

Page 1

FormNo.3421-305RevA
LogSplitter
ModelNo.22618—SerialNo.402000000andUp
ModelNo.22618HD—SerialNo.402000000andUp
Registeratwww.T oro.com.
OriginalInstructions(EN)
*3421-305*A
Page 2
WARNING
registeryourproduct.
accessoryinformation,helpndingadealer,orto
CALIFORNIA
Proposition65Warning
Thisproductcontainsachemical
orchemicalsknowntotheStateof
Californiatocausecancer,birthdefects,
orreproductiveharm.
Theengineexhaustfromthisproduct
containschemicalsknowntotheStateof
Californiatocausecancer,birthdefects,
orotherreproductiveharm.
Useofthisproductmaycauseexposure
tochemicalsknowntotheStateof
Californiatocausecancer,birthdefects,
orotherreproductiveharm.
ItisaviolationofCaliforniaPublicResourceCode
Section4442or4443touseoroperatetheengineon
anyforest-covered,brush-covered,orgrass-covered
landunlesstheengineisequippedwithaspark
arrester,asdenedinSection4442,maintainedin
effectiveworkingorderortheengineisconstructed,
equipped,andmaintainedforthepreventionofre.
Wheneveryouneedservice,genuineToroparts,or
additionalinformation,contactanAuthorizedService
DealerorToroCustomerServiceandhavethemodel
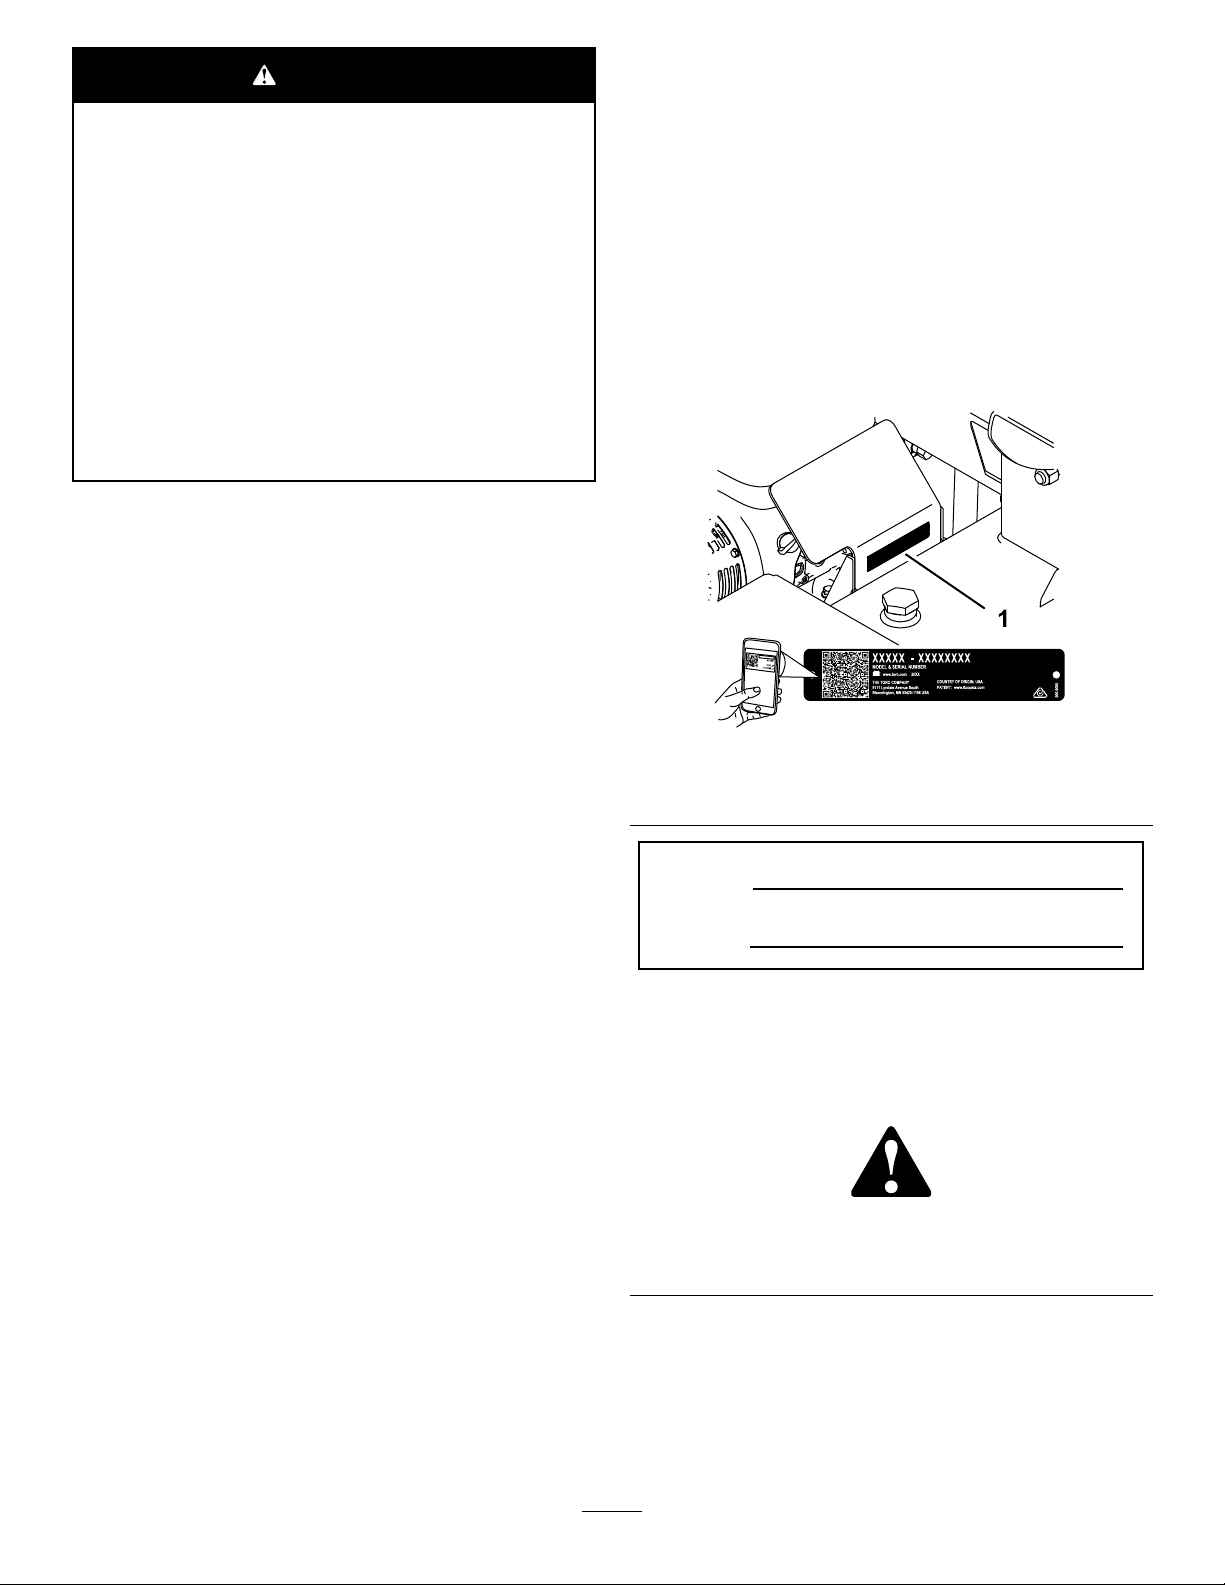
andserialnumbersofyourproductready.Figure1
identiesthelocationofthemodelandserialnumbers
ontheproduct.Writethenumbersinthespace
provided.
Important:Withyourmobiledevice,youcan
scantheQRcodeontheserialnumberdecal(if
equipped)toaccesswarranty,parts,andother
productinformation.
Theenclosedengineowner'smanualissupplied
forinformationregardingtheUSEnvironmental
ProtectionAgency(EPA)andtheCaliforniaEmission
ControlRegulationofemissionsystems,maintenance,
andwarranty.Replacementsmaybeorderedthrough
theenginemanufacturer.
TheDOTtireinformationislocatedonthesideof
eachtire.Thisinformationgivesloadandspeed
ratings.Replacementtiresshouldhavethesame
orbetterratings;refertoSpecications(page7)to
ensurethatthetiresonyourmachinemeetorexceed
theweightrequirementsofyourmachine.
Introduction
Thismachineisdesignedtosplitwoodlogscuttoa
sizetotwithinthemachinesplittingwedgeopening.
Itcanoperateinthehorizontalorverticalposition.It
isnotintendedtosplitrock,metal,oranymaterials
otherthanwood.Thelogsplittercanbetowedbehind
avehicleequippedwithanappropriateballhitch.
g243187
Figure1
1.Modelandserialnumberlocation
ModelNo.
SerialNo.
Thismanualidentiespotentialhazardsandhas
safetymessagesidentiedbythesafety-alertsymbol
(Figure2),whichsignalsahazardthatmaycause
seriousinjuryordeathifyoudonotfollowthe
recommendedprecautions.
g000502
Figure2
1.Safety-alertsymbol
Readthisinformationcarefullytolearnhowtooperate
andmaintainyourproductproperlyandtoavoid
injuryandproductdamage.Youareresponsiblefor
operatingtheproductproperlyandsafely .
YoumaycontactTorodirectlyatwww.Toro.com
forproductsafetyandoperationtrainingmaterials,
©2018—TheToro®Company
8111LyndaleAvenueSouth
Bloomington,MN55420
Thismanualuses2wordstohighlightinformation.
Importantcallsattentiontospecialmechanical
informationandNoteemphasizesgeneralinformation
worthyofspecialattention.
2
Contactusatwww.Toro.com.
PrintedintheUSA
AllRightsReserved
Page 3

Contents
Safety
Safety.......................................................................3
GeneralSafety...................................................3
SafetyandInstructionalDecals..........................4
ProductOverview.....................................................6
Controls.............................................................6
EngineControls..............................................6
Specications....................................................7
BeforeOperation...................................................8
BeforeOperationSafety.....................................8
AddingFuel........................................................8
PreparingtoUsetheMachine.............................9
DuringOperation.................................................10
DuringOperationSafety...................................10
StartingtheEngine............................................11
ShuttingofftheEngine.......................................11
ChangingtheRailPosition.................................11
SplittingaLog...................................................12
AfterOperation....................................................13
AfterOperationSafety......................................13
TowingSafety...................................................13
TowingtheMachine..........................................14
Maintenance...........................................................17
RecommendedMaintenanceSchedule(s)...........17
Pre-MaintenanceProcedures..............................18
MaintenanceSafety..........................................18
DisconnectingtheSpark-plugWire...................18
Lubrication..........................................................19
GreasingtheRail..............................................19
GreasingtheWheelBearings...........................19
EngineMaintenance...........................................20
EngineSafety...................................................20
ServicingtheAirCleaner..................................20
ServicingtheEngineOil....................................21
ServicingtheSparkPlug...................................23
FuelSystemMaintenance...................................24
CleaningtheFuel-SedimentCup......................24
DriveSystemMaintenance..................................25
CheckingtheTirePressure...............................25
CheckingtheWheelLugNuts...........................25
HydraulicSystemMaintenance...........................26
HydraulicSystemSafety...................................26
HydraulicFluidSpecications...........................26
CheckingtheHydraulic-FluidLevel...................26
ReplacingtheHydraulicFilter...........................27
ReplacingtheHydraulicFluid...........................27
Storage...................................................................28
StorageSafety..................................................28
Storage.............................................................28
Troubleshooting......................................................29
Improperuseormaintenancebytheoperatoror
ownercanresultininjury.T oreducethepotential
forinjury,complywiththesesafetyinstructions
andalwayspayattentiontothesafety-alert
symbol
Danger—personalsafetyinstruction.Failureto
complywiththeinstructionmayresultinpersonal
injuryordeath.
,whichmeans:Caution,Warning,or
GeneralSafety
Thisproductiscapableofamputatinghandsand
feetandofthrowingobjects.Alwaysfollowallsafety
instructionstoavoidseriouspersonalinjury.
Usingthisproductforpurposesotherthanitsintended
usecouldprovedangeroustoyouandbystanders.
•Readandunderstandthecontentsofthis
Operator’sManualbeforestartingtheengine.
•Useyourfullattentionwhileoperatingthe
machine.Donotengageinanyactivitythat
causesdistractions;otherwise,injuryorproperty
damagemayoccur.
•Donotputyourhandsorfeetnearmoving
componentsofthemachine.
•Donotoperatethemachinewithoutallguards
andothersafetyprotectivedevicesinplaceand
workingonthemachine.
•Keepclearofanydischargeopening.Keep
bystandersandpetsasafedistanceawayfrom
themachine.
•Keepchildrenoutoftheoperatingarea.Never
allowchildrentooperatethemachine.
•Stopthemachineandshutofftheenginebefore
servicing,fueling,oruncloggingthemachine.
Improperlyusingormaintainingthismachinecan
resultininjury.Toreducethepotentialforinjury,
complywiththesesafetyinstructionsandalwayspay
attentiontothesafety-alertsymbol,whichmeans
Caution,Warning,orDanger—personalsafety
instruction.Failuretocomplywiththeseinstructions
mayresultinpersonalinjuryordeath.
Youcanndadditionalsafetyinformationwhere
neededthroughoutthisOperator’sManual.
3
Page 4
SafetyandInstructionalDecals
Safetydecalsandinstructionsareeasilyvisibletotheoperatorandarelocatednearanyarea
ofpotentialdanger.Replaceanydecalthatisdamagedormissing.
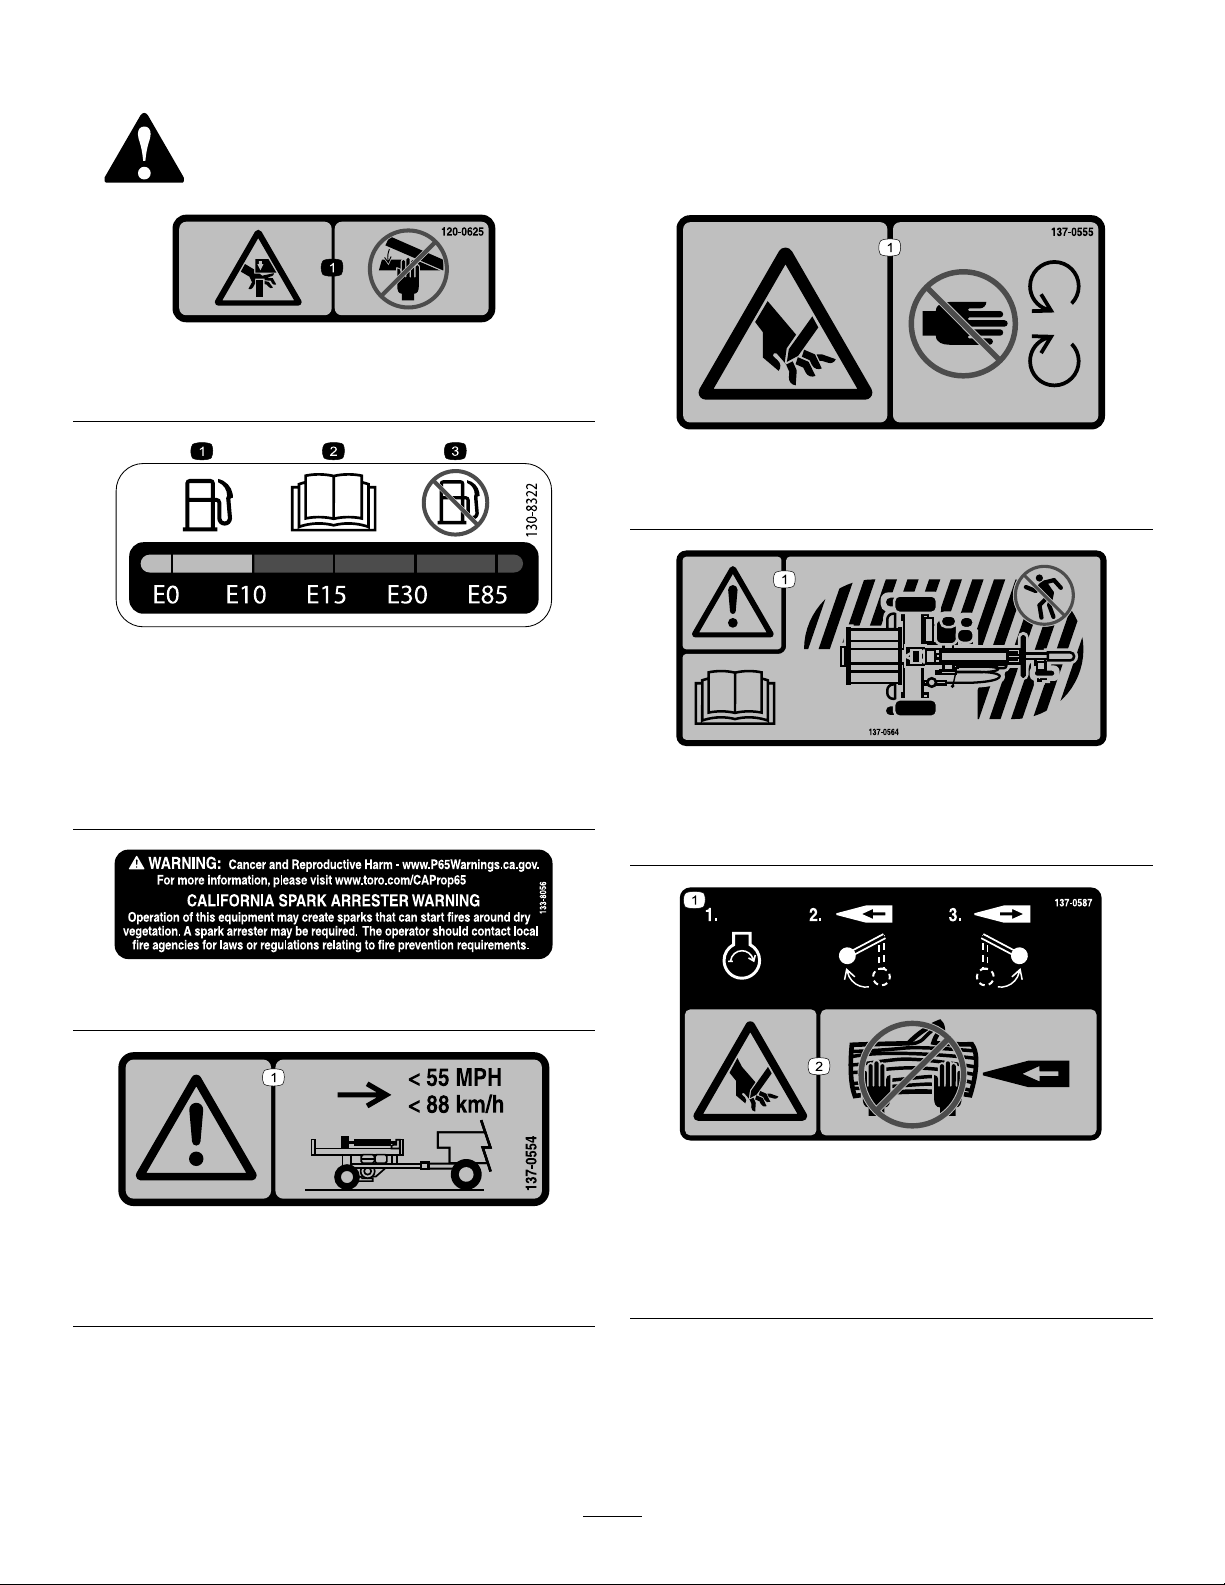
120-0625
1.Pinchpoint,hand—keephandsaway.
130-8322
decal120-0625
decal137-0555
137-0555
1.Cuttinghazard—keepawayfrommovingparts.
decal130-8322
1.Useonlyfuelwithan
alcoholcontentbyvolume
under10%.
3.Donotusefuelwithan
alcoholcontentbyvolume
greaterthan10%.
2.ReadtheOperator's
Manualformore
informationonfuel.
133-8056
137-0554
1.Warning—donotexceed88km/h(55mph)when
transportingthemachine.
decal137-0564
137-0564
1.Warning—readtheOperator’sManual;keepawayfromthe
machinewhileinoperation.
decal133-8056
decal137-0587
137-0587
decal137-0554
1.1)Starttheengine;2)
Movetheleverforwardto
splitthelog;3)Movethe
leverbackwardtoreturn
thesplittingwedge.
2.Cuttinghazard—keep
handsoffofthelog.
4
Page 5
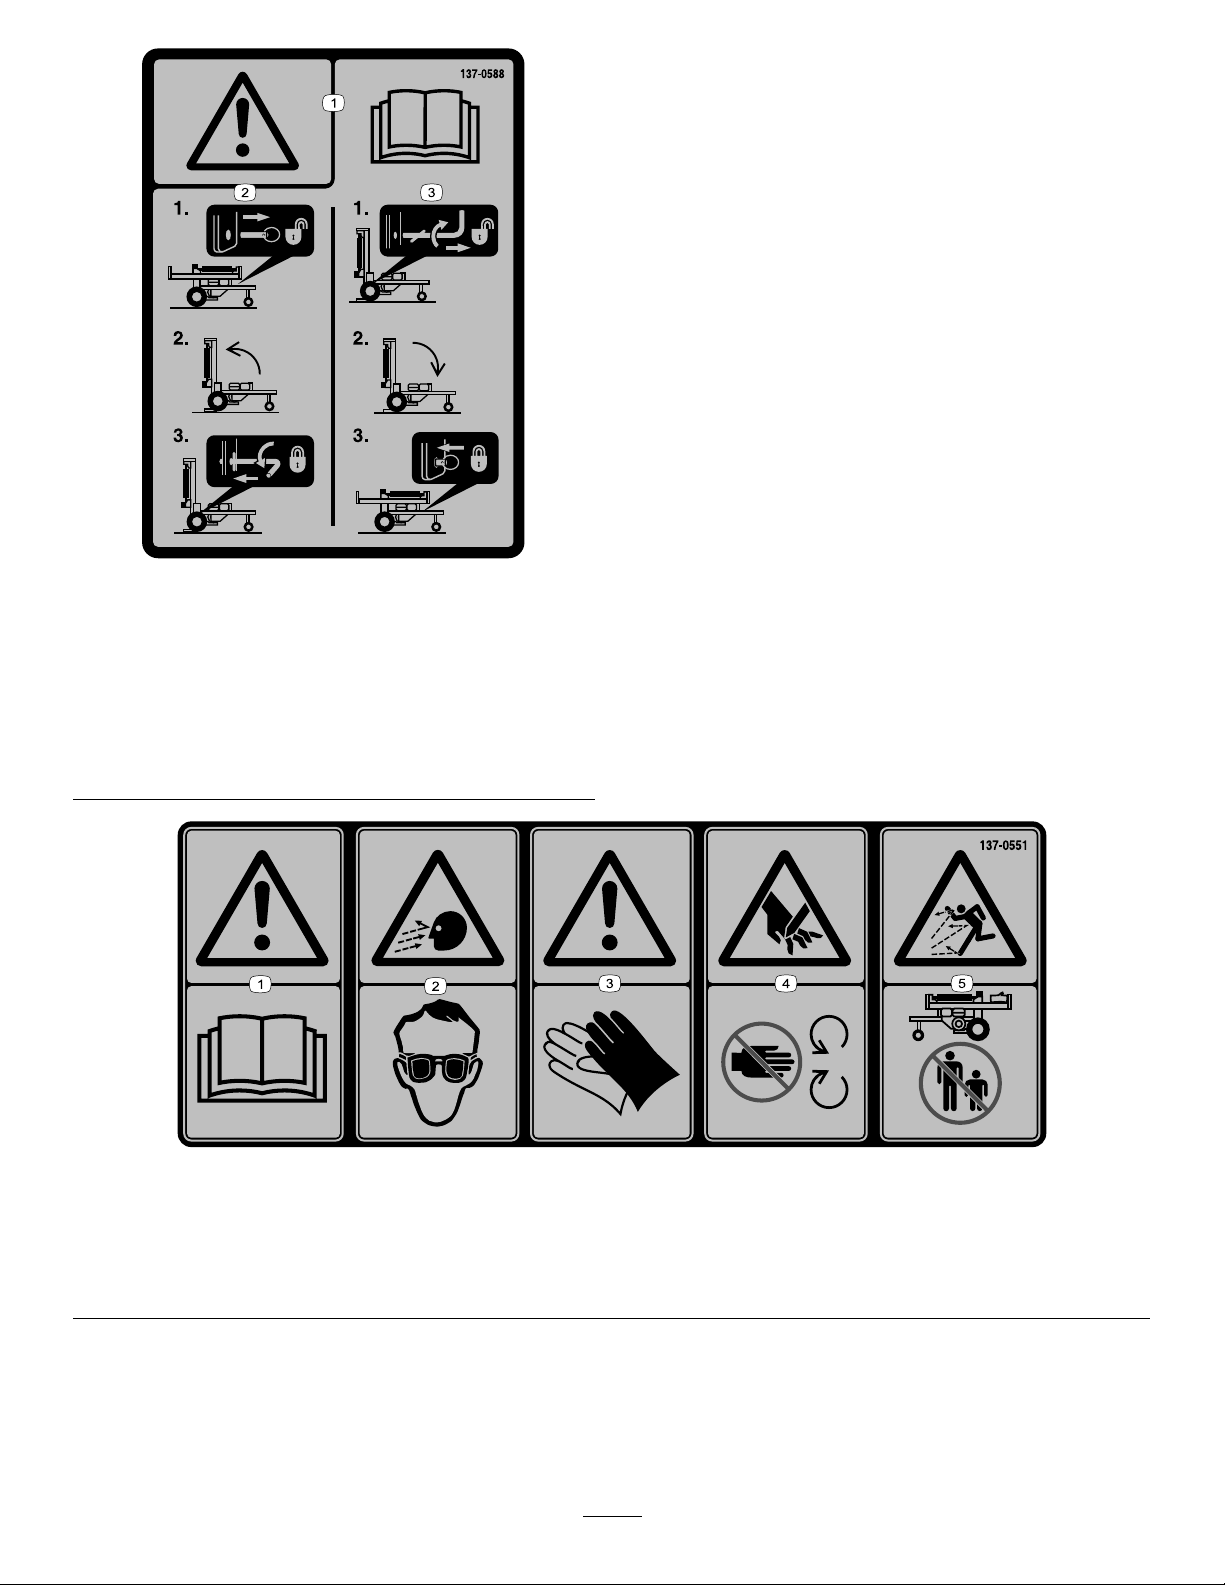
decal137-0588
137-0588
1.Warning—readthe
Operator’sManual.
2.Toraisetherail,1)
Removethelockpin;2)
Raisetherail;3)Turnthe
locklever.
3.Tolowertherail,1)Turn
thelocklever;2)Lower
therail;3)Insertthelock
pin.
decal137-0551
137-0551
1.Warning—readtheOperator’sManual.4.Cuttinghazard—keepawayfrommovingparts.
2.Thrownoryingobjectshazard—weareyeprotection.5.Thrownobjecthazard—keepbystandersawayfromthe
machine.
3.Warning—wearprotectivegloves.
5
Page 6
ProductOverview
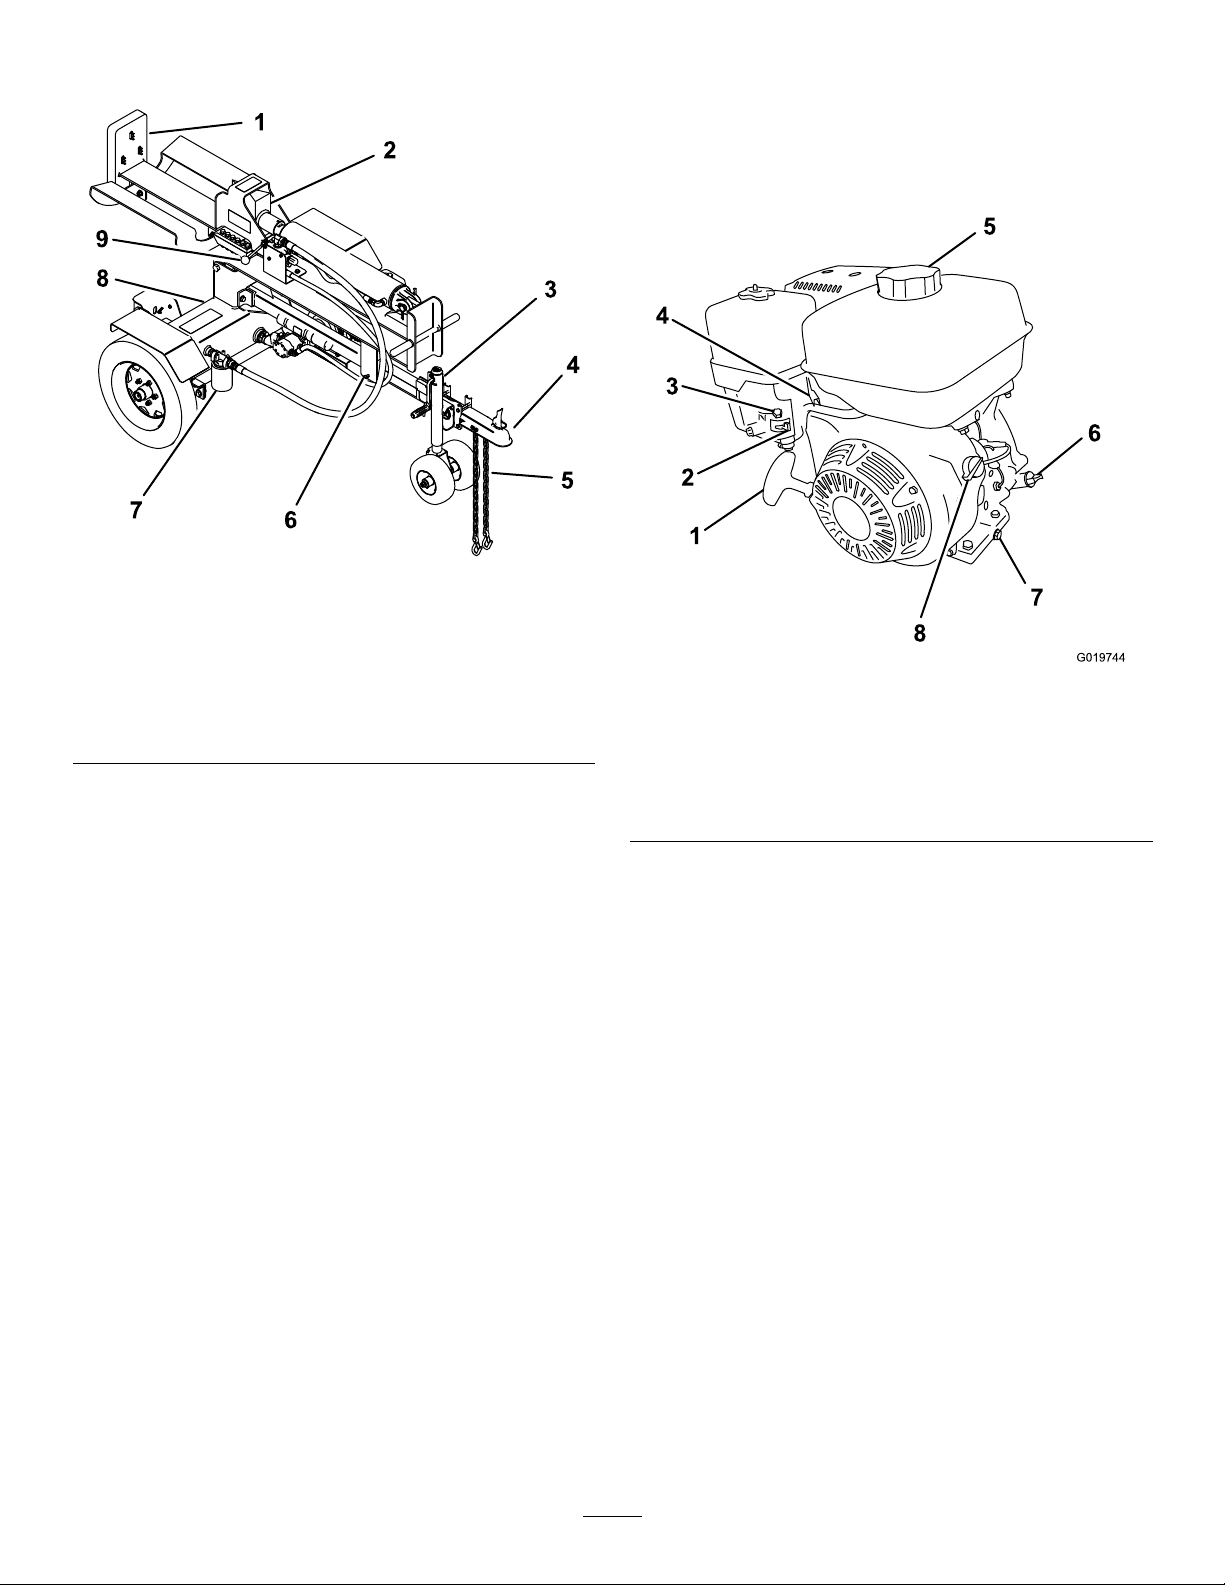
Figure3
1.Endplate6.Raillockingpin
2.Spittingwedge7.Hydrauliclter
3.Jacklift
4.Hitchreceiver
5.Safetychains
8.Hydraulicreservoir
9.Controllever
Controls
Becomefamiliarwithallthecontrolsbeforeyoustart
theengineandoperatethemachine.
EngineControls
g205930
g019744
Figure4
1.Recoil-starthandle5.Fuelcap
2.Fuelvalve
3.Chokelever7.Oil-drainplug
4.Throttlelever
6.Oildipstick
8.ON/OFFswitch
FuelValve
Thefuelvalve(Figure4)islocatedunderneaththe
chokelever.Movetheleverforthefuelvalvetothe
ONpositionbeforeattemptingtostarttheengine.
Whenyouhavenishedusingthemachine,shutoff
theengineandmovethefuel-valvelevertotheOFF
position.
ChokeLever
Usethechokelever(Figure4)tostartacoldengine.
Beforepullingtherecoil-starthandle,movethechoke
levertotheCLOSEDposition.Oncetheengineis
running,movethechokelevertotheOPENposition.
Donotusethechokeiftheengineisalreadywarmed
uporiftheairtemperatureishigh.
ThrottleLever
Thethrottlelever(Figure4)controlsthespeed(rpm)
oftheengine.Itislocatednexttothechokelever.
EngineON/OFFSwitch
TheON/OFFswitchislocatedonthefrontofthe
engine.
6
Page 7
•RotateittotheONpositiontostartandrunthe
engine.
•RotateittotheOFFpositiontoshutofftheengine.
Figure5
1.Offposition2.Onposition
Recoil-StartHandle
Tostarttheengine,pulltherecoil-starthandle(Figure
4)quicklytoturntheengineover.Theenginecontrols
describedabovemustallbesetcorrectlyforthe
enginetostart.
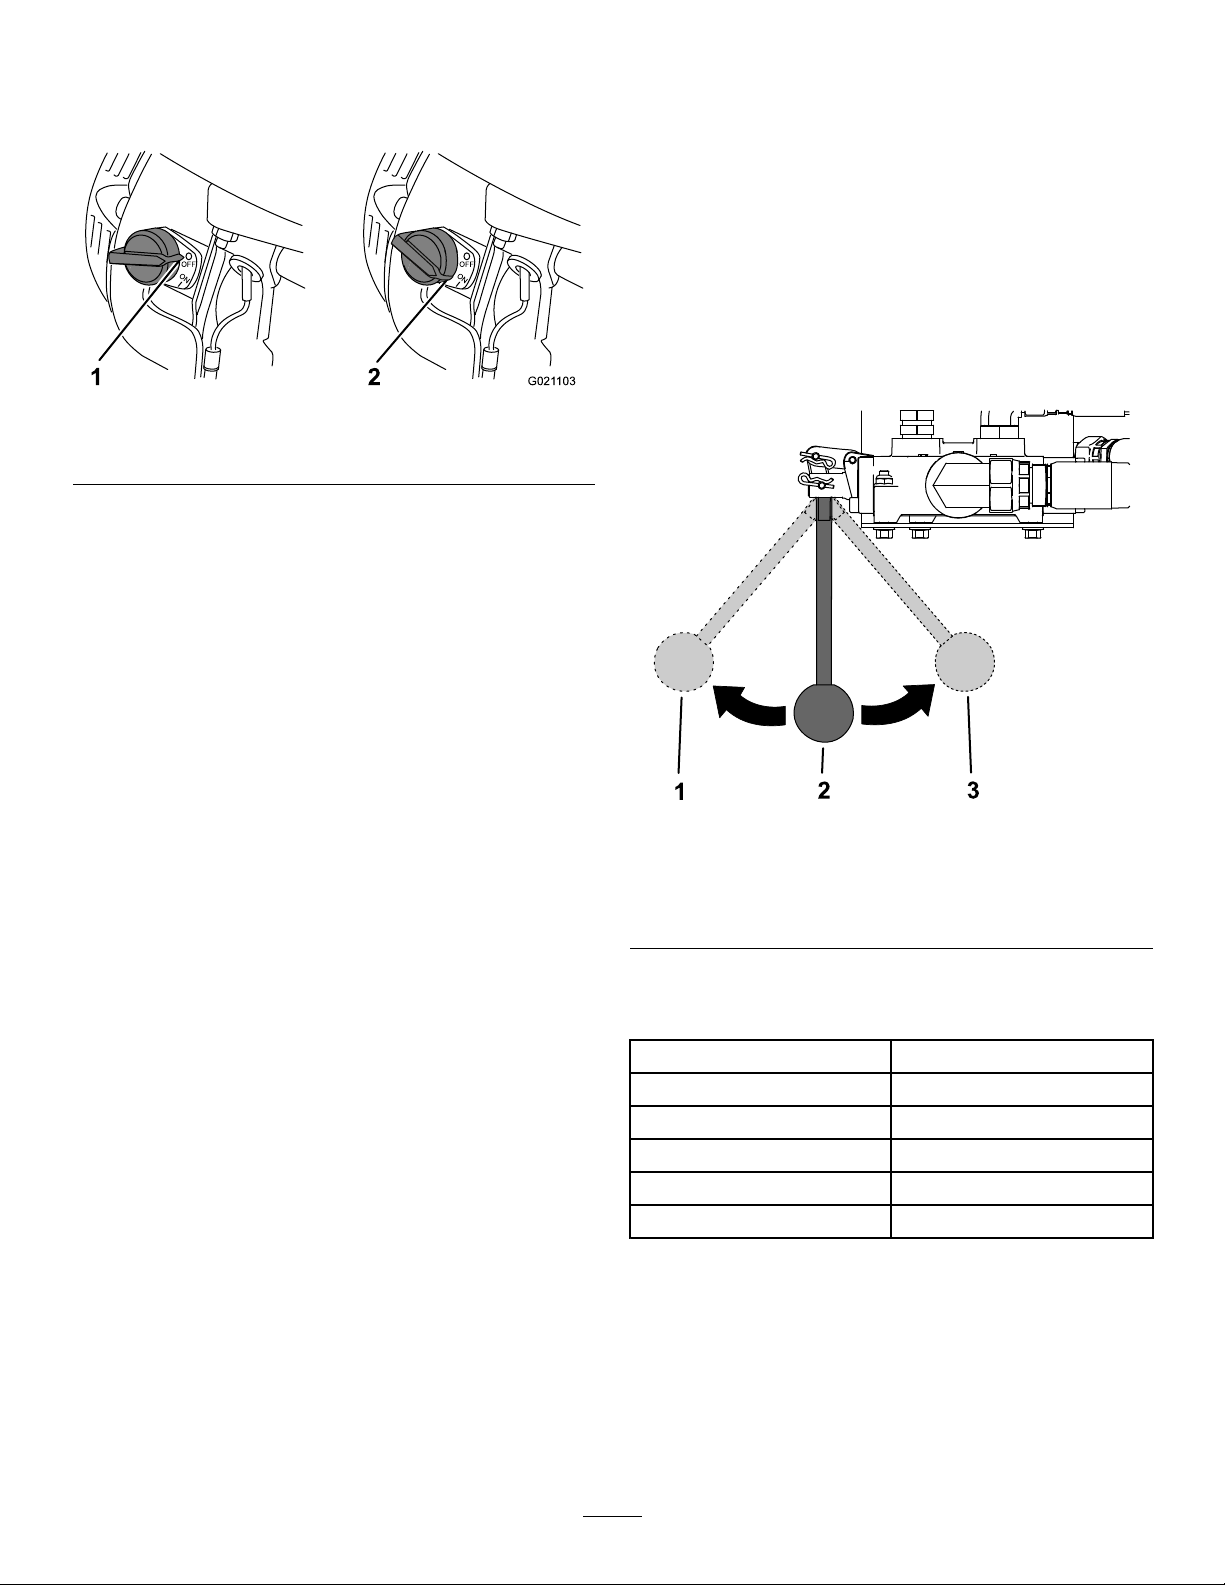
WedgeControlLever
Thewedgecontrolleveractuatesthehydraulicvalve
thatmovesthesplittingwedgeforwardandreverse
duringthelogsplittingprocess.
•Holdthecontrollevertowardtheendplateto
movethesplittingwedgeforward.
•Releasethecontrollevertostopthesplitting
wedgemovement.
•Movethecontrollevertothereversepositionto
retractthesplittingwedge.Movingtheleverto
thefullreversepositionautomaticallyretractsthe
g021103
splittingwedgealltheway.
1.Movethewedgeforward.
2.Controllever(neutral
position)
Specications
Length
Width
Height
Weight
Maximumlogopening
Hitchreceiver
g206049
Figure6
3.Movethewedgerearward.
246cm(97inches)
130cm(51inches)
115cm(46inches)
412kg(909lb)
63cm(25inches)
5cm(2inches)
7
Page 8

Operation
BeforeOperation
BeforeOperationSafety
GeneralSafety
•Neverallowchildrenoruntrainedpeopleto
operateorservicethemachine.Localregulations
mayrestricttheageoftheoperator.Theowner
isresponsiblefortrainingalloperatorsand
mechanics.
•Becomefamiliarwiththesafeoperationofthe
equipment,operatorcontrols,andsafetysigns.
•Knowhowtostopthemachineandenginequickly.
•Checkthatoperator-presencecontrols,safety
switches,andshieldsareattachedandfunctioning
properly.Donotoperatethemachineunlessthey
arefunctioningproperly.
FuelSafety
•Toavoidpersonalinjuryorpropertydamage,use
extremecareinhandlingfuel.Fuelvaporsare
ammableandexplosive.
•Extinguishallcigarettes,cigars,pipes,andother
sourcesofignition.
•Useonlyanapprovedfuelcontainer.
•Donotremovethefuelcaporaddfueltothefuel
tankwhiletheengineisrunningorwhilehot.
•Donotrefuelthemachineindoors.
•Donotstorethemachineorfuelcontainerwhere
thereisanopename,spark,orpilotlight,such
asonawaterheateroronotherappliances.
•Donotllcontainersinsideavehicleoronatruck
ortrailerbedwithaplasticliner.Alwaysplace
containersontheground,awayfromyourvehicle
beforelling.
•Ifyouspillfuelonyourclothing,changeyour
clothingimmediately.Wipeupanyspilledfuel.
•Neveroverllthefueltank.Replacethefuelcap
andtightenitsecurely.
•Storefuelinanapprovedcontainerandkeepit
outofthereachofchildren.Neverbuymorethan
a30-daysupplyoffuel.
•Donotllthefueltankcompletelyfull.Addfuelto
thefueltankuntilthelevelisatthebottomofthe
llernecktube..
–Avoidprolongedbreathingofvapors.
–Keepyourfaceawayfromthenozzleandfuel
tankopening.
–Avoidcontactwithskin;washoffspillswith
soapandwater.
AddingFuel
FuelRecommendations
•Forbestresults,useonlyclean,fresh(lessthan
30daysold),unleadedgasolinewithanoctane
ratingof87orhigher((R+M)/2ratingmethod).
•Ethanol:Gasolinewithupto10%ethanol
(gasohol)or15%MTBE(methyltertiarybutyl
ether)byvolumeisacceptable.Ethanoland
MTBEarenotthesame.Gasolinewith15%
ethanol(E15)byvolumeisnotapprovedforuse.
Neverusegasolinethatcontainsmorethan
10%ethanolbyvolume,suchasE15(contains
15%ethanol),E20(contains20%ethanol),orE85
(containsupto85%ethanol).Usingunapproved
gasolinemaycauseperformanceproblemsand/or
enginedamagewhichmaynotbecoveredunder
warranty.
•Donotusegasolinecontainingmethanol.
•Donotstorefueleitherinthefueltankorinfuel
containersoverthewinterunlessyouuseafuel
stabilizer.
•Donotaddoiltogasoline.
•Removetheequipmentfromthetruckortrailer
andrefuelitwhileitisontheground.Ifthisisnot
possible,thenrefuelfromaportablecontainer
ratherthanafuel-dispensernozzle.
•Donotoperatethemachinewithouttheentire
exhaustsysteminplaceandinproperworking
condition.
•Keepthefuel-dispensernozzleincontactwith
therimofthefueltankorcontaineropeningat
alltimesuntilfuelingiscomplete.Donotusea
nozzlelock-opendevice.
Important:T oreducestartingproblems,addfuel
stabilizertothefuelallseason,mixingitwithfuel
lessthan30daysold;runthemachinedrybefore
storingitformorethan30days.
Donotusefueladditivesotherthanafuel
stabilizer/conditioner.Donotusefuelstabilizers
withanalcoholbasesuchasethanol,methanol,
orisopropanol.
8
Page 9
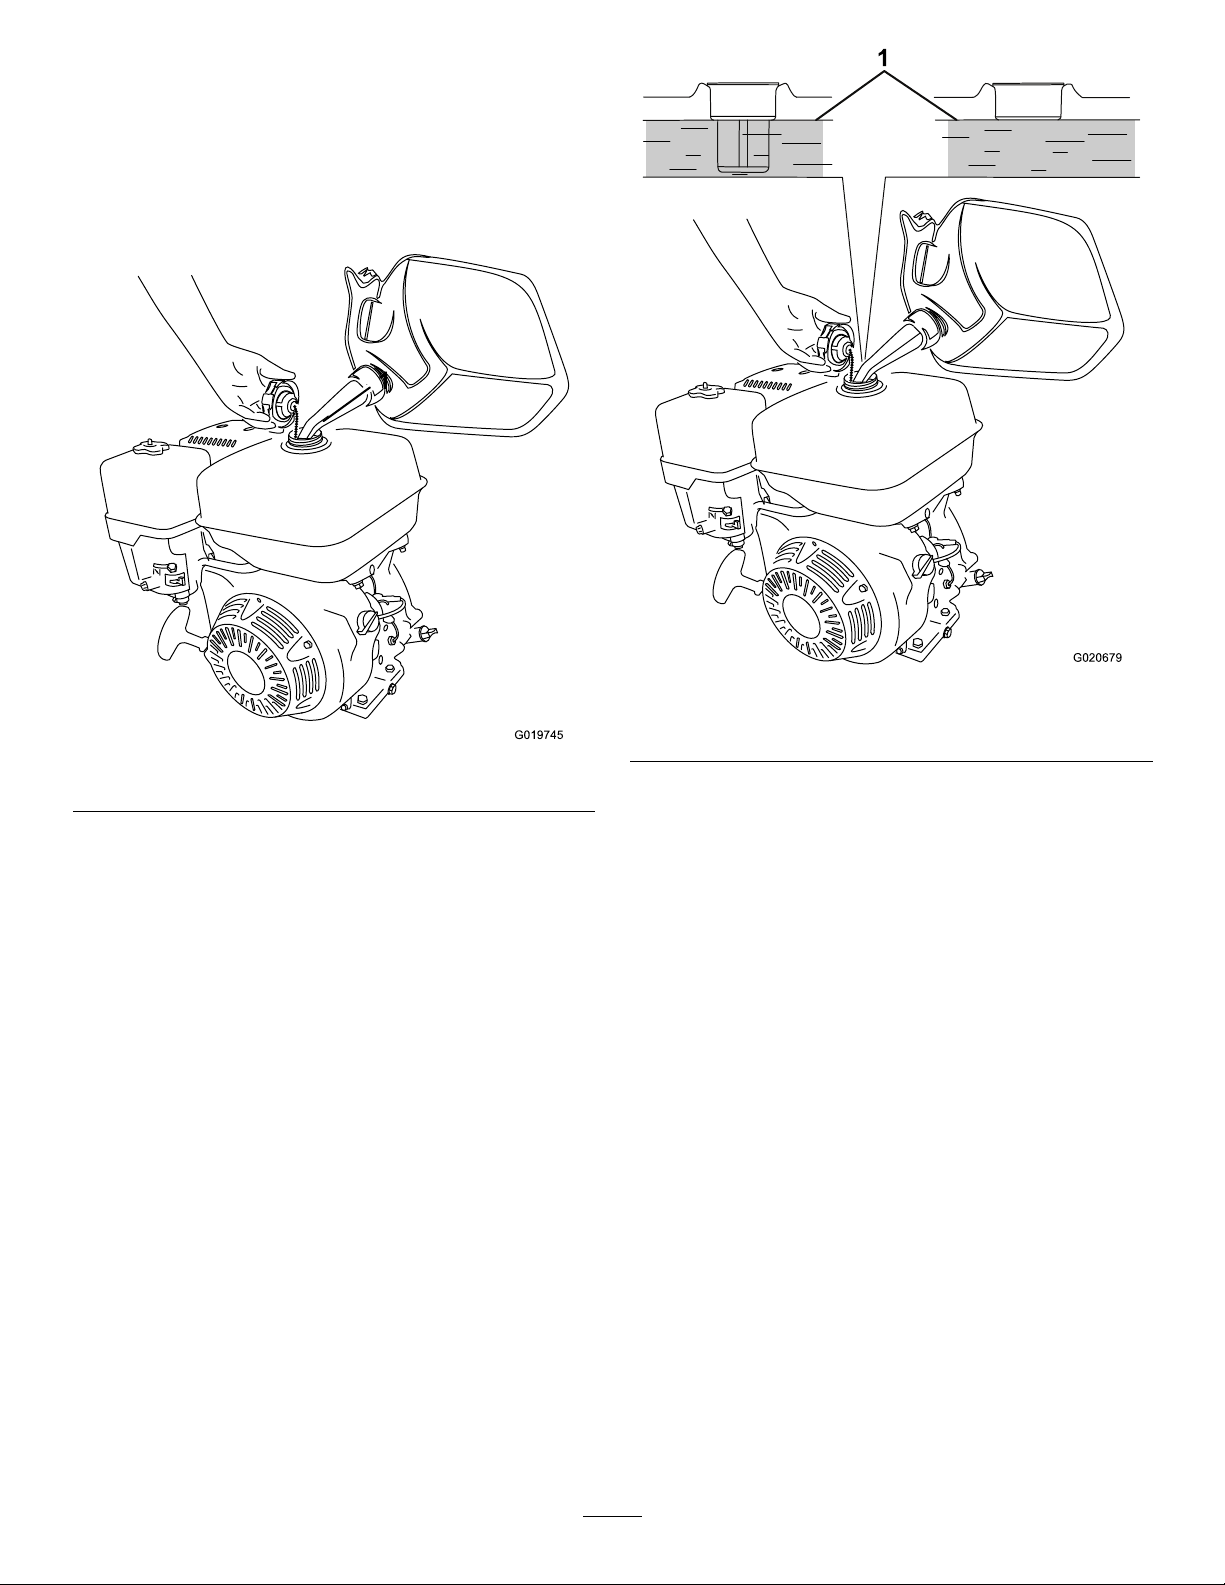
FillingtheFuelTank
FuelTankCapacity:1.1L(1.2USqt)
1.Parkthemachineonalevelsurface,shutoffthe
engine,andallowtheenginetocool.
2.Cleanaroundthefuelcapandremoveit(Figure
7).
Figure7
3.Addfueltothefueltankuntilthelevelisatthe
maximumfuellevel(Figure8).
Important:Thisspaceinthetankallows
fueltoexpand.Donotllthefueltank
completelyfull.
g020679
Figure8
g019745
1.Maximumfuellevel
4.Installthefuelcapsecurely(Figure7).
5.Wipeupanyspilledfuel.
PreparingtoUsethe Machine
1.Parkthemachineonalevelsurfaceand
disconnectthemachinefromthetowvehicle.
2.Chockthefrontandbackofthetirestoprevent
themachinefrommoving.
3.Ensurethatallguardsareinplaceandingood
condition.
4.Ensurethattheworkareaisfreeofwoodand
debris.
5.Performalldailymaintenanceprocedures
describedinMaintenance(page17).
9
Page 10

DuringOperation
DuringOperationSafety
GeneralSafety
•Theowner/operatorcanpreventandisresponsible
foraccidentsthatmaycausepersonalinjuryor
propertydamage.
•Wearappropriateclothing,includingeye
protection;handprotection;longpants;
slip-resistant,substantialfootwear;andhearing
protection.Tiebacklonghairanddonotwear
looseclothingorloosejewelry.
•Donotoperatethemachinewhileill,tired,or
undertheinuenceofalcoholordrugs.
•Nevercarrypassengersonthemachineandkeep
bystandersandpetsawayfromthemachine
duringoperation.
•Beforeyoustarttheengine,ensurethatthe
machineissecurefrommovement,therailis
lockedinthehorizontalorverticalposition,and
youareintheoperatingposition.
•Alwaysoperatethemachinefromtheoperator
zonespeciedinSplittingaLog(page12).Keep
theoperator’sareaandadjacentareasclearfor
safe,securefooting.
SplittingSafety
•Placeyourhandsonthesidesofthelog,notonthe
ends.Neverplaceyourhandsoranypartofyour
bodybetweenalogandanypartofthemachine.
•Donotstraddleorreachacrossthelog-splitting
areawhenoperatingthemachine.
•Useyouronlyhandtopushthecontrollever
forward(towardthelog).Ifthelogmovesbefore
thesplittingwedgecontactsit,donottouchthe
splittingwedgewhileinmotion.Releasethe
controllever,thenpositionthelog.
•Operatethemachineonlyfromtheoperating
positionbythecontrollever.
•Only1adultshouldstabilizethelogandoperate
thecontrolhandletoensurefullcontroloverthe
logandsplittingwedge.
•Neverattempttosplitmorethan1logatatime.
•Keeptheworkareaclean;removesplitlogsfrom
aroundthemachinesothatyoudonotslipon
them.
•Logsshouldbecutwithendsassquareas
possiblepriortosplitting.Forlogsthatarenotcut
square,theleast-squareendandlongestportion
ofthelogshouldbeplacedtowardthesplitting
wedgeandthesquareendplacedtowardtheend
plate.
•Keepyourhandsandfeetawayfrommovingparts.
Keepclearofthesplittingwedgeatalltimes.
•Ifahelperisassistinginloadinglogs,never
activatethecontrolsuntilthehelperisatleast3m
(10ft)awayfromthemachine.
•Stopthemachine,shutofftheengine,waitfor
allmovingpartstostop,andinspectthesplitting
wedgeafterstrikinganobjectorifthereisan
abnormalvibrationinthemachine.Makeall
necessaryrepairsbeforeresumingoperation.
•Neverrunanengineinanareawhereexhaust
gassesareenclosed.
•Neverleavearunningmachineunattended.
•Beforeleavingtheoperatingposition,dothe
following:
–Fullyretractthesplittingwedge.
–Shutofftheengine.
–Waitforallmovingpartstostop.
•Donotoperatethemachinewhenthereistherisk
oflightning.
•Useaccessories,attachments,andreplacement
partsapprovedbyTheT oro®Companyonly.
10
Page 11

StartingtheEngine
1.TurntheengineOn/OffswitchtotheONposition
(Figure5).
2.MovethefuelvalvetotheOPENposition(Figure
7).
ChangingtheRailPosition
WARNING
Therailisheavyandcansuddenlyfallonto
themachineframeifyoureleasethehandle
whenraisingorloweringtherail.
Controltherailbythehandle,andkeepyour
handsawayfromthemachineframeand
pinchpointswhenraisingorloweringtherail.
RaisingtheRailtotheVertical Position
Youcanrotatetherailanduseitinthehorizontalor
verticalposition.
1.Parkthemachineonalevelsurfaceandshut
offtheengine.
2.Chockthefrontandbackofthetirestoprevent
themachinefrommoving.
3.Removethelockpin(Figure10).
Figure9
1.Chokelever
2.Fuelvalve4.Recoil-starthandle
3.MovethechokelevertotheCLOSEDposition
(Figure7).
3.Throttlelever
Note:Awarmorhotenginemaynotrequire
choking.
4.MovethethrottlelevertotheFASTposition
(Figure7).
5.Pullthestarterhandlelightlyuntilyoufeel
resistance,thenpullthehandlebriskly(Figure
7).Returnthestarterhandlegently .
6.Aftertheenginestarts,graduallymovethe
chokeleverbacktotheOFFposition.Ifthe
enginestallsorhesitates,movethechokeback
totheONpositionagainuntiltheenginewarms
up.ThenmoveittotheOFFposition.
4.Rotatetherailsothatitisvertical,againstthe
baseofthemachine(Figure10).
g205921
5.Rotatetheverticallocklevertotheclosed
positiontosecurethelowerrailinplace(Figure
10).
ShuttingofftheEngine
1.MovethethrottlelevertoSLOWposition.
2.TurntheengineOn/OffswitchtotheOFF
position.
3.MovethefuelvalvetotheCLOSEDposition.
g206125
Figure10
11
Page 12

LoweringtheRailtotheHorizontal Position
SplittingaLog
1.Rotatetheverticallocklevertotheopenposition
(Figure11).
2.Carefullyrotatetherailintothehorizontal
position(Figure11).
3.Installthelockpintosecuretherail(Figure11).
WARNING
Thismachineiscapableofamputatinghands
andfeet.
Alwaysstandintheoperatingareashownin
Figure12.
g206500
Figure12
1.Operatingarea
Figure11
g206124
1.Parkthemachineonalevelsurface.
2.Chockthefrontandbackofthetirestoprevent
themachinefrommoving.
3.Changetherailposition,ifdesired,andlockit
intoposition;refertoChangingtheRailPosition
(page11).
4.Starttheengine.
5.Ensurethatthelogsyouaresplittingareless
than60cm(24inches)longandthatbothends
arecutasataspossible.
Note:Thispreventsthelogfromslidingoutof
positionwhileunderpressure.
6.Placethelogagainsttheendplatesothatthe
directionofthegrainmatchesthedirectionof
movementforthesplittingwedge.
12
Page 13

Figure13
1.Log3.Endplate—Railvertical
position
2.Endplate—Railhorizontal
position
AfterOperation
AfterOperationSafety
•Cleandebrisfromthemuferandenginetohelp
preventres.Cleanupoilorfuelspills.
•Allowtheenginetocoolbeforestoringthemachine
inanyenclosure.
•Shutoffthefuelbeforestoringortransportingthe
machine.
•Neverstorethemachineorfuelcontainerwhere
thereisanopename,spark,orpilotlight,such
g206746
asonawaterheateroronotherappliances.
•Keepallpartsofthemachineingoodworking
conditionandallhardwaretightened.
•Replaceallwornordamageddecals.
TowingSafety
Important:Neverattempttosplitlogs
acrossthegrain.
Figure14
7.MovethecontrollevertotheFORWARDposition
tosplitthelog.
8.MovethecontrollevertotheREVERSEposition
toreturnthesplittingwedge.
9.Shutofftheenginewhenyouarenished
splittinglogs.
Checkwithyourlocalcountyorstatetowingsafety
regulationsbeforetowingthemachine.
•Inordertoreducethepossibilityofanaccident
whiletransportingthemachineonpublicroads,
ensurethatthetowingvehicleismechanically
soundandingoodoperatingcondition.
•Shutofftheenginebeforetransportingthe
machine.
•Ensurethattheballhitchyouareusingisthe
propersizeforthehitchreceiveronthemachine.
•Inspectthehitchandcouplingforwear.Nevertow
themachinewithdamagedordefectivehitches,
couplings,chains,orothercomponents.
•Checkthetireairpressureonthetowingvehicle
g206160
andthemachine.
•Checkthetiretreadandsidewallfordamageand
wear.
•Properlyattachthesafetychainstothetowing
vehicle.
•Ensurethatthedirectionalandbrakelightsare
workingproperly.
•Ensurethatthedirectional,backup,andbrake
lightsofthetowvehicleareworkingproperly(if
equipped).
•Beforetowing,ensurethatyourmachineis
correctlyandsecurelyattachedtothetowing
vehicle.
•Ensurethatthesafetychainsareproperlysecured
tothevehicle,andleaveenoughslackforturning.
•Donotcarryanymaterialinthemachinewhen
towing.
•Avoidsuddenstopsandstarts.Thiscancause
skidding,orjackkning.Smooth,gradualstarts
andstopswillimprovetowing.
13
Page 14

•Avoidsharpturnstopreventrolling.T owonlywith
avehiclethathasahitchdesignedfortowing.Do
notattachtowedequipmentexceptatthehitch
point.
•Donottowthemachinefasterthan88km/h(55
mph).
•Usecautionwhenbackingup;useaspotter
outsidethevehicletoguideyou.
•Donotallowanyonetositorrideonthemachine.
•Disconnectthemachinefromthetowvehicle
beforeusingit.
•Securethemachinefrommovementbeforeyou
towit.
TowingtheMachine
Beforetowingthemachine,readalloftheinformation
andperformalloftheapplicableproceduresinthis
sectiontoensuresafeandpropertowing.
WARNING
Towingthemachineathighspeedincreases
theriskofahitchmalfunctionandtirefailure.
Higherspeedsalsoincreasethemomentum
ofthemachineandbrakingdistance.Ifthe
machinedetachesfromthetowvehicleathigh
speed,itcouldcausedamagetoproperty,or
injuryordeathtobystanders.
•Placechockblocksunderneaththetirestoprevent
themfromrollingwhilethemachineisparked.
Donotexceed88km/h(55mph)whentowing
themachine.Forpoorroadconditionsor
inclementweather,reducespeedaccordingly.
•ReviewandunderstandtheTowingSafety(page
13).
•Testthebrakesofthetowvehiclebeforetowing.
•Avoidsuddenstartsandstopswhiletowingthe
machine.
TowVehicleRequirements
Beforeconnectingthemachinetoyourtowvehicle,
ensurethatyourvehicleispreparedasfollows:
•Ensurethatyourtowvehiclehastowing
capacityfortheweightofthemachine;referto
Specications(page7).
•UseaClass2orlargerreceiver.
•Ensurethatyourtowvehiclehastheappropriate
hitchtotowthemachine;optionsincludea50mm
(2inch)ballhitchorapintlehitch.
•Ensurethattheelectricalconnectorofthetow
vehicleiscompatiblewiththeelectricalconnector
ofthemachine.Themachineusesastandard
4-pin,atplug.Ifyourtowvehiclehasadifferent
typeofplug,obtainanadapterfromanautomotive
partsstore.
14
Page 15

HitchingtheMachinetoaTow
ConnectingtheSafetyChainsto
Vehicle
1.Shut-offtheengineandfuelvalve.
2.Lowertherailtothehorizontalpositionand
secureitwiththelockpin;refertoLoweringthe
RailtotheHorizontalPosition(page12).
3.Inspectthetires;refertoCheckingtheTire
Pressure(page25).
4.Applychassisgreasetothesocketofthehitch
receiverandtheareaoftheclampthatcontacts
theball.
5.Oilthepivotpointsandslidingsurfacesofthe
hitchreceiverwithSAE30motoroil.
6.Crankthehandleofthejacklifttoalignthehitch
receiverwiththeballofthetowvehicle.
7.HitchthemachineasshowninFigure15.
theTowVehicle
1.Pullthesafetychainthroughtheslotsinthe
keyholes,sothatthelengthsoneachsideare
equal.
2.Crossbothlengthsofchainunderthehitch
receiver.
Note:Crossingthechainsdecreasesthe
chancesofthefrontofthemachinedropping
tothegroundifthehitchdoesnotholdthe
connection.
Figure16
1.Connectinglinks2.Chainscrossedunder
hitchreceiver
3.Connecteachlengthofchaintothesafety
chainmountingpointonthetowvehiclewiththe
connectinglinks(Figure16).
Important:Ensurethatthechainhas
enoughslackforturningaroundcorners
whentowingthemachine.
g206325
Figure15
8.Crankthehandleonthejacklifttoraisethe
casterwheelsofftheground.
g035113
15
Page 16

ConnectingandCheckingthe Lights
1.Connecttheelectricalplugofthemachinewith
theelectricalplugofthetowvehicle(Figure17).
Figure17
Note:Themachineusesastandard4-pin,at
plug.Ifyourtowvehiclehasadifferenttype
ofplug,obtainanadapterfromanautomotive
partsstore.
2.EnsurethatthetowvehicleisinNEUTRAL,
engagetheparkingbrake,andstarttheengine.
3.Testthelightsasfollows:
A.Turnontheheadlightsofthetowvehicle.
g020828
Note:Thetaillightsofthemachineshould
illuminate.
B.Pressthebrakepedalofthetowvehicle.
Note:Thebrakelightsofthemachine
shouldilluminate.
C.Operateeachturnsignalofthetowvehicle
inturn.
Note:Thecorrespondingturn-signallights
ofthemachineshouldilluminate.
16
Page 17

Maintenance
Determinetheleftandrightsidesofthemachinefromthenormaloperatingposition.
RecommendedMaintenanceSchedule(s)
MaintenanceService
Interval
Afterthersthour
Aftertherst10hours
Aftertherst20hours
Beforeeachuseordaily
Every50hours
Every100hours
Every300hours
Every500hours
Yearly
MaintenanceProcedure
•Checkthewheellugnuts.
•Checkthewheellugnuts.
•Changetheengineoil.
•Inspecttheair-cleanerelements.
•Checktheengine-oillevel.
•Checkthetirepressure.
•Checkthehydraulic-uidlevel.
•Cleantheair-cleanerelements.Cleanthemmorefrequentlyindustyoperating
conditions.
•Changetheengineoil(moreofteninextremelydustyorsandyconditions).
•Checkthesparkplug.
•Cleanthefuel-sedimentcup.
•Replacethehydrauliclter.
•Replacethehydraulicuid.
•Replacethepaperair-cleanerelement.Replaceitmorefrequentlyindusty
operatingconditions.
•Replacethesparkplug.
•Greasethewheelbearings.
•Checkthewheellugnuts.
Yearlyorbeforestorage
•Changetheengineoil.
•Cleanthefuel-sedimentcup.
Note:Refertoyourengineowner’smanualforadditionalmaintenanceprocedures.
17
Page 18

Pre-Maintenance
Disconnectingthe
Procedures
MaintenanceSafety
•Beforerepairingthemachinedothefollowing:
–Parkthemachineonalevelsurface.
–Fullyretractthesplittingwedge.
–Shutofftheengine.
–Disconnectthespark-plugwire.
•Cleangrassanddebrisfromthemuferand
enginetohelppreventres.
•Cleanupoilorfuelspills.
•Donotallowuntrainedpersonneltoservicethe
machine.
•Usejackstandstosupportthemachineand/or
componentswhenrequired.
•Carefullyreleasepressurefromcomponentswith
storedenergy.
•Removethespark-plugwirebeforemakingany
repairs.
Spark-plugWire
Pullthespark-plugwireofftheterminalofthespark
plug(Figure18).
g019281
Figure18
1.Sparkplug
•Keepyourhandsandfeetawayfrommoving
parts.Ifpossible,donotmakeadjustmentswith
theenginerunning.
•Keepallpartsingoodworkingconditionandall
hardwaretightened.Replaceallwornordamaged
decals.
•Neverinterferewiththeintendedfunctionofa
safetydeviceorreducetheprotectionprovided
byasafetydevice.Checktheirproperoperation
regularly.
•Toensureoptimumperformanceandcontinued
safetycerticationofthemachine,useonly
genuineT ororeplacementpartsandaccessories.
Replacementpartsandaccessoriesmadeby
othermanufacturerscouldbedangerous,and
suchusecouldvoidtheproductwarranty.
18
Page 19

Lubrication
GreasingtheRail
Greasetype:General-purposegrease
Ifthesplittingwedgegetsstuckontherail,ensurethat
thebeamisnotbentandthereisnothingobstructing
thepathofthewedge,thengreasetherail.Lubricate
bothsidesofthebeamface.
g206422
Figure20
1.Rubberplug
2.Connectagreaseguntothegreasettings
andpumpgreaseintothettingsontheaxle
(Figure20)andthecasterwheels(Figure21)
untilgreasebeginstooozeoutofthebearings.
Figure19
1.Rail
GreasingtheWheel Bearings
ServiceInterval:Every500hours
Greasetype:General-purposegrease
1.Removetherubberplugsfromtheaxle(Figure
20).
g206411
g206425
Figure21
1.Greasetting
3.Installtherubberplugs(Figure20).
19
Page 20

EngineMaintenance
EngineSafety
•Shutofftheenginebeforecheckingtheoilor
addingoiltothecrankcase.
•Donotchangethegovernorspeedoroverspeed
theengine.
ServicingtheAirCleaner
ServiceInterval:Beforeeachuseordaily—Inspect
theair-cleanerelements.
Every50hours—Cleantheair-cleaner
elements.Cleanthemmorefrequentlyindusty
operatingconditions.
Every300hours/Y early(whichevercomes
rst)—Replacethepaperair-cleanerelement.
Replaceitmorefrequentlyindustyoperating
conditions.
Important:Donotoperatetheenginewithout
theair-lterassembly;extremeenginedamage
willoccur.
1.Shutofftheengineandwaitforallmovingparts
tostop.
2.Disconnectthewirefromthesparkplug;referto
DisconnectingtheSpark-plugWire(page18).
3.Removethenutthatsecuresthecover(Figure
22).
Figure22
1.Covernut
2.Cover
3.Wingnut6.Base
4.Removethecover.
4.Foamelement
5.Paperelement
Note:Becarefultopreventdirtanddebrisfrom
fallingintothebase.
5.Removethefoamandpaperelementsfromthe
base(Figure22).
6.Removethefoamelementfromthepaper
element(Figure22).
7.Inspectthefoamandpaperelementsand
replacethemiftheyaredamagedorexcessively
dirty.
g019728
Note:Nevertrytobrushdirtoffthepaper
element;brushingforcesthedirtintothebers.
8.Cleanthefoamelementinwarm,soapywater
orinanonammablesolvent.
Note:Donotusefueltocleanthefoamelement
becauseitcouldcreateariskofreorexplosion.
20
Page 21

9.Rinseanddrythefoamelementthoroughly .
10.Dipthefoamelementincleanengineoil,then
squeezeouttheexcessoil.
Note:Excessoilinthefoamelementrestricts
theairowthroughtheelementandmayreach
thepaperlterandclogit.
11.Wipedirtfromthebaseandthecoverwitha
moistrag.
ServicingtheEngineOil
Note:Changetheoilmorefrequentlywhenthe
operatingconditionsareextremelydustyorsandy .
Engine-OilSpecications
ToroPremiumEngineOilisavailablefromyour
AuthorizedT oroDealer.
Note:Becarefultopreventdirtanddebrisfrom
enteringtheairductleadingtothecarburetor.
12.Installtheair-cleanerelementsandensurethat
theyareproperlypositioned.
13.Securelyinstallthecoverwiththenut.
OilType:DetergentoilwithanAPIserviceofSJor
higher.
CrankcaseCapacity:1.1L(1.2USqt)
Viscosity:Refertothetablebelow.
g013375
Figure23
CheckingtheEngine-OilLevel
ServiceInterval:Beforeeachuseordaily
1.Parkthemachineonalevelsurfaceandshut
offtheengine.
2.Allowtheenginetocool.
3.Disconnectthewirefromthesparkplug;referto
DisconnectingtheSpark-plugWire(page18).
4.Cleanaroundthedipstick.
5.ChecktheoillevelasshowninFigure24.
21
Page 22

Figure25
5.Slowlypourapproximately80%ofthespecied
oilintothellertubeandslowlyaddthe
additionaloiltobringittotheFullmark(Figure
26).
g206641
g031623
Figure24
ChangingtheEngineOil
ServiceInterval:Aftertherst20hours—Change
theengineoil.
Every100hours—Changetheengineoil(more
ofteninextremelydustyorsandyconditions).
Yearlyorbeforestorage—Changetheengine
oil.
Note:Disposeoftheusedoilatarecyclingcenter.
1.Starttheengineandletitrunfor5minutes.
Note:Thiswarmstheoilsothatitdrainsbetter.
2.Parkthemachineonalevelsurfaceandshut
offtheengine.
3.Disconnectthewirefromthesparkplug;referto
DisconnectingtheSpark-plugWire(page18).
4.ChangetheoilasshowninFigure25.
g035136
g206640
Figure26
22
Page 23

ServicingtheSparkPlug
SparkPlugSpecications
Type:NGKBPR6ESorequivalent
Gap:0.7to0.8mm(0.028to0.031inch)
Note:Usea21mm(13/16inch)spark-plugwrench
forremovingandinstallingthesparkplug.
RemovingtheSparkPlug
1.Parkthemachineonalevelsurfaceandshut
offtheengine.
2.Locateandremovethesparkplugs(Figure27).
CheckingtheSparkPlug
ServiceInterval:Every100hours/Every6months
(whichevercomesrst)
Every300hours/Yearly(whichevercomesrst)
Important:Donotcleanthesparkplug(s).
Alwaysreplacethesparkplug(s)whenithas:a
blackcoating,wornelectrodes,anoilylm,or
cracks.
Ifyouseelightbrownorgrayontheinsulator,the
engineisoperatingproperly.Ablackcoatingonthe
insulatorusuallymeanstheaircleanerisdirty .
Setthegapto0.70to0.80mm(0.28to0.031inch).
g206628
Figure28
Figure27
InstallingtheSparkPlug
Tightenthesparkplug(s)to27N∙m(20ft-lb).
g019749
g027478
g027735
Figure29
23
Page 24

FuelSystem
Maintenance
CleaningtheFuel-Sediment Cup
ServiceInterval:Every100hours/Every6months
(whichevercomesrst)—Cleanthe
fuel-sedimentcup.
Yearlyorbeforestorage—Cleanthe
fuel-sedimentcup.
Underneaththefuelvalveisasedimentcuptocatch
dirtinthefuel.
1.Parkthemachineonalevelsurfaceandshut
offtheengine.
2.Allowtheenginetocool.
3.Disconnectthewirefromthesparkplug;referto
DisconnectingtheSpark-plugWire(page18).
4.MovetheleverofthefuelvalvetotheOFF
position,allthewaytotheleft(Figure30).
5.Unscrewthefuel-sedimentcup(Figure30).
6.RemoveandretainthefuellterandO-ring
(Figure30).
10.AligntheO-ringintothegrooveinthesediment
cupandinstallthesedimentcuptothefuel-valve
housing.
11.MovetheleverofthefuelvalvetotheON
position(allthewaytotheright)andcheckfor
leaks.Ifitleaks,replacetheO-ring.
Note:DonotcleantheO-ringinsolvent.
Figure30
1.Fuelvalve—OFFposition3.Fuellter
2.O-ring
4.Fuel-sedimentcup
g019333
7.Cleanthefuellterandsedimentcupusinga
nonammablesolvent,anddryitcarefully.
8.WipetheO-ringwithaclean,drycloth.
9.Installthefuellterinthebottomofthe
carburetor(Figure30).
24
Page 25

DriveSystem
Maintenance
CheckingtheTirePressure
ServiceInterval:Beforeeachuseordaily
2.Ensurethatthetiresareinatedto410kPa(60
psi).
CheckingtheWheelLug Nuts
ServiceInterval:Afterthersthour
WARNING
Failuretomaintaincorrecttirepressure
mayresultintirefailureandlossofcontrol,
resultinginpropertydamageandserious
injuryordeath.
•Checkthetirepressurefrequentlyto
ensureproperination.Ifthetiresarenot
inatedtothecorrectpressure,theywill
wearprematurely .
•Inspectthetireconditionbeforetowing
andafteranyoperatingaccident.
TheDOTtireinformationislocatedonthesideof
eachtire.Thisinformationgivesloadandspeed
ratings.Replacementtiresshouldhavethesame
orbetterratings.Formoreinformationgoto
http://www.nhtsa.gov/Vehicle+Safety/Tires.
1.Visuallyinspectthetiresfordamageandwear
(Figure31andFigure32).
Aftertherst10hours
Yearly
Checkandtorquethewheellugnutsto108to122
N∙m(80to90ft-lb).
1.Exampleoftirewearcausedbyunderination
1.Exampleoftirewearcausedbyoverination
g020836
Figure31
g010293
Figure32
25
Page 26

HydraulicSystem
Maintenance
HydraulicSystemSafety
•Seekimmediatemedicalattentionifuidisinjected
intoskin.Injecteduidmustbesurgicallyremoved
withinafewhoursbyadoctor.
•Ensurethatallhydraulic-uidhosesandlinesare
ingoodconditionandallhydraulicconnections
andttingsaretightbeforeapplyingpressureto
thehydraulicsystem.
•Keepyourbodyandhandsawayfrompinhole
leaksornozzlesthatejecthigh-pressurehydraulic
uid.
•Usecardboardorpapertondhydraulicleaks.
•Safelyrelieveallpressureinthehydraulicsystem
beforeperforminganyworkonthehydraulic
system.
HydraulicFluid
Specications
Hydraulictankcapacity:30L(8USgallons)
Hydraulicuidtype:T oroAllSeasonHydraulicFluid
Note:Manyhydraulicuidsarealmostcolorless,
makingitdifculttospotleaks.Areddyeadditivefor
thehydraulicsystemuidisavailablein20ml(0.67
oz)bottles.Onebottleissufcientfor15to22L
(4to6USgallons)ofhydraulicuid.OrderPartNo.
44-2500fromyourAuthorizedT oroDealer.
g206553
Figure33
1.Uppernotch2.Breathercap
5.Removethebreathercap(Figure33).
6.Wipethedipstickoffandthreadthebreather
capintothereservoir.
7.Removethedipstickandverifythattheuidisat
theuppernotch(Figure33).Installthebreather
cap.
8.Iftheuidlevelislow,removethellerplugand
slowlyaddhydraulicuidintothereservoirto
raisetheleveltotheuppernotchonthedipstick
(Figure34).
Checkingthe Hydraulic-FluidLevel
ServiceInterval:Beforeeachuseordaily
Note:Thebesttimetocheckthehydraulic-uidlevel
iswhenthemachineiscool,beforeyoustartitfor
theday.
1.Parkthemachineonalevelsurfaceandfully
retractthesplittingwedge.
2.Shutofftheengine.Allowthemachinetocool
completely.
3.Lowertherailtothehorizontalposition;refer
toLoweringtheRailtotheHorizontalPosition
(page12)
4.Cleanaroundthebreathercap(Figure33).
g207827
Figure34
1.Fillerplug
9.Installthellerplug.
26
Page 27

ReplacingtheHydraulic
ReplacingtheHydraulic
Filter
ServiceInterval:Every100hours
1.Parkthemachineonalevelsurface,fullyretract
thesplittingwedge,andshutofftheengine.
2.Placeadrainpanunderthelterandreplace
thelter(Figure35).
Fluid
ServiceInterval:Every100hours
1.Parkthemachineonalevelsurface,fullyretract
thesplittingwedge,andshutofftheengine.
Allowthemachinetocoolcompletely .
2.Placeadrainpanunderthesuctionhose
connectedtothereservoirtank(Figure36).
g206497
Figure36
3.Cleanupanyspilleduid.
Figure35
1.Hydrauliclter
2.Hoseclamp
3.Crankthehandleofthejacklifttolowerthefront
ofthemachine.
4.Disconnectthesuctionhoseandallowuidto
drainintothedrainpan.
g206495
5.Installthesuctionhoseandsecureitwiththe
hoseclamp.
6.Crankthehandleofthejacklifttoraisethe
machinesothatitislevel.
7.Removethellerplugandllthereservoirwith
hydraulicuidasspeciedinHydraulicFluid
Specications(page26).
3.Hose
Note:Theuidlevelshouldbeattheupper
notchonthedipstickonthebreathercap(Figure
33)
27
Page 28

Storage
StorageSafety
•Allowthemachinetocoolbeforestoring.
•Donotstorethemachineorfuelnearames.
Storage
Forstorageover30days,preparethemachineas
follows:
1.Removedirtandgrimefromtheexternalparts
oftheentireunit,especiallytheengine.Clean
dirtandsawdustchipsfromtheoutsideofthe
enginecylinderheadnsandblowerhousing.
Important:Youcanwashtheunitwithmild
detergentandwater.
2.Addapetroleum-basedstabilizer/conditionerto
fuelinthetank.Followmixinginstructionsfrom
stabilizermanufacturer.(7.8mlperLor1oz
perUSgallon).
15.Checkandtightenallbolts,nuts,andscrews.
Repairorreplaceanypartthatisdamaged.
16.Paintallscratchedorbaremetalsurfaces.Paint
isavailablefromyourAuthorizedServiceDealer.
17.Storethemachineinaclean,drygarageor
storagearea.
18.Coverthemachinetoprotectitandkeepitclean.
Note:Fuelstabilizer/conditionerismost
effectivewhenmixedwithfreshfuelandused
atalltimes.
Important:Donotuseanalcohol-based
stabilizer(ethanolormethanol).Donotstore
stabilizer/conditionedfuelover90days.
3.Runtheenginetodistributeconditionedfuel
throughthefuelsystem(5minutes).
4.Shutofftheengine,allowittocool,anddrain
thefueltankusingapumptypesiphon.Dispose
offuelproperly;recycleasperlocalcodes.
5.Starttheengineandrunituntilitshutsoff.
6.Engagethechokelever.
7.Startandruntheengineuntilitdoesnotstart.
8.Cleanthesedimentcup;refertoCleaningthe
Fuel-SedimentCup(page24).
9.Servicetheaircleaner;refertoServicingtheAir
Cleaner(page20).
10.Changetheengineoil;refertoChangingthe
EngineOil(page22).
11.Removethesparkplugandcheckthecondition;
refertoServicingtheSparkPlug(page23).
12.Withthesparkplugremovedfromtheengine,
pour2tablespoonsofengineoilintothespark
plughole.
13.Pullthestarterslowlytocranktheengineand
distributetheoilinsidethecylinder.
14.Installthesparkplug,butdonotinstallthewire
onthesparkplug.
28
Page 29

Troubleshooting
Problem
Theenginedoesnotstart.
Theenginerunsrough.
Thesplittingwedgedoesnotmove.
Thesplittingwedgemovesslowly .
PossibleCauseCorrectiveAction
1.TheengineOn/OffswitchisintheOFF
position.
2.Thefuel-shutoffvalveisclosed.2.Openthefuel-shutoffvalve.
3.Thechokeisopen.
4.Thefueltankisempty.4.Fillthetankwithfreshfuel.
5.ThethrottleisnotintheFASTposition.5.MovethethrottletotheFASTposition.
6.Thesparkplugwireislooseor
disconnected.
1.Thechokeisclosed.
2.Theairlterisclogged.2.Cleanorreplacetheairlter.
3.Thefuellineisclogged.3.Cleanthesedimentcup.
4.Thereiswaterorcontaminantsinthe
fuel.
5.Thesparkplugsarewornorhave
buildupontheelectrodes.
1.Thehydraulic-uidlevelmaybelow.1.Addhydraulicuid.
2.Thecontrolvalveorpumpisblocked
ordamaged.
1.Theenginespeedissetonidle.1.MovethethrottletotheFASTposition.
2.Thehydraulicuidiscontaminated.2.Changethehydraulicuidandlter.
3.Thehydraulicpump,cylinder ,or
directionalvalveisdamaged.
1.MovetheswitchtotheONposition.
3.Closethechokewhenstartingacold
engine.
6.Checktheelectrodegapandcleanor
replacethesparkplug.
1.Openthechoke.
4.Drainthefueltankandllitwithfresh
fuel.
5.Checktheelectrodegapandcleanor
replacethesparkplug.
2.ContactyourAuthorizedService
Dealer.
3.ContactyourAuthorizedService
Dealer.
29
Page 30

Notes:
Page 31

Notes:
Page 32

CaliforniaProposition65WarningInformation
Whatisthiswarning?
Youmayseeaproductforsalethathasawarninglabellikethefollowing:
WARNING:CancerandReproductiveHarm—www.p65Warnings.ca.gov.
WhatisProp65?
Prop65appliestoanycompanyoperatinginCalifornia,sellingproductsinCalifornia,ormanufacturingproductsthatmaybesoldinorbroughtinto
California.ItmandatesthattheGovernorofCaliforniamaintainandpublishalistofchemicalsknowntocausecancer,birthdefects,and/orother
reproductiveharm.Thelist,whichisupdatedannually,includeshundredsofchemicalsfoundinmanyeverydayitems.ThepurposeofProp65isto
informthepublicaboutexposuretothesechemicals.
Prop65doesnotbanthesaleofproductscontainingthesechemicalsbutinsteadrequireswarningsonanyproduct,productpackaging,orliteraturewith
theproduct.Moreover,aProp65warningdoesnotmeanthataproductisinviolationofanyproductsafetystandardsorrequirements.Infact,the
CaliforniagovernmenthasclariedthataProp65warning“isnotthesameasaregulatorydecisionthataproductis‘safe’or‘unsafe.’”Manyofthese
chemicalshavebeenusedineverydayproductsforyearswithoutdocumentedharm.Formoreinformation,gotohttps://oag.ca.gov/prop65/faqs-view-all
AProp65warningmeansthatacompanyhaseither(1)evaluatedtheexposureandhasconcludedthatitexceedsthe“nosignicantrisklevel”;or(2)
haschosentoprovideawarningbasedonitsunderstandingaboutthepresenceofalistedchemicalwithoutattemptingtoevaluatetheexposure.
Doesthislawapplyeverywhere?
Prop65warningsarerequiredunderCalifornialawonly .ThesewarningsareseenthroughoutCaliforniainawiderangeofsettings,includingbutnot
limitedtorestaurants,grocerystores,hotels,schools,andhospitals,andonawidevarietyofproducts.Additionally,someonlineandmailorder
retailersprovideProp65warningsontheirwebsitesorincatalogs.
.
HowdotheCaliforniawarningscomparetofederallimits?
Prop65standardsareoftenmorestringentthanfederalandinternationalstandards.TherearevarioussubstancesthatrequireaProp65warning
atlevelsthatarefarlowerthanfederalactionlimits.Forexample,theProp65standardforwarningsforleadis0.5μg/day,whichiswellbelow
thefederalandinternationalstandards.
Whydon’tallsimilarproductscarrythewarning?
•ProductssoldinCaliforniarequireProp65labellingwhilesimilarproductssoldelsewheredonot.
•AcompanyinvolvedinaProp65lawsuitreachingasettlementmayberequiredtouseProp65warningsforitsproducts,butothercompanies
makingsimilarproductsmayhavenosuchrequirement.
•TheenforcementofProp65isinconsistent.
•CompaniesmayelectnottoprovidewarningsbecausetheyconcludethattheyarenotrequiredtodosounderProp65;alackofwarningsfora
productdoesnotmeanthattheproductisfreeoflistedchemicalsatsimilarlevels.
WhydoesToroincludethiswarning?
Torohaschosentoprovideconsumerswithasmuchinformationaspossiblesothattheycanmakeinformeddecisionsabouttheproductstheybuyand
use.T oroprovideswarningsincertaincasesbasedonitsknowledgeofthepresenceofoneormorelistedchemicalswithoutevaluatingthelevelof
exposure,asnotallthelistedchemicalsprovideexposurelimitrequirements.WhiletheexposurefromToroproductsmaybenegligibleorwellwithinthe
“nosignicantrisk”range,outofanabundanceofcaution,T orohaselectedtoprovidetheProp65warnings.Moreover ,ifT orodoesnotprovidethese
warnings,itcouldbesuedbytheStateofCaliforniaorbyprivatepartiesseekingtoenforceProp65andsubjecttosubstantialpenalties.
RevA
 Loading...