


FormNo.3430-923RevA
StumpGrinder
CompactToolCarrier
ModelNo.22429—SerialNo.404320000andUp
Registeratwww.T oro.com.
OriginalInstructions(EN)
*3430-923*A

ThisproductcomplieswithallrelevantEuropean
directives.Fordetails,pleaseseetheDeclarationof
Incorporation(DOI)atthebackofthispublication.
WARNING
CALIFORNIA
Proposition65Warning
Useofthisproductmaycauseexposure
tochemicalsknowntotheStateof
Californiatocausecancer,birthdefects,
orotherreproductiveharm.
Introduction
ThismachineisdesignedforuseonTorocompact
toolcarrierstogrindandremovetreestumpsand
surfaceroots.Itisnotintendedtocutrockoranyother
materialotherthanwoodandthesoilaroundastump.
Usingthisproductforpurposesotherthanitsintended
usecouldprovedangeroustoyouandbystanders.
Important:Withyourmobiledevice,youcan
scantheQRcodeontheserialnumberdecal(if
equipped)toaccesswarranty,parts,andother
productinformation.
g245347
Figure1
1.Modelandserialnumberlocation
Readthisinformationcarefullytolearnhowtooperate
andmaintainyourproductproperlyandtoavoid
injuryandproductdamage.Y ouareresponsiblefor
operatingtheproductproperlyandsafely .
YoumaycontactT orodirectlyatwww.Toro.com
forproductsafetyandoperationtrainingmaterials,
accessoryinformation,helpndingadealer,orto
registeryourproduct.
Wheneveryouneedservice,genuineToroparts,or
additionalinformation,contactanAuthorizedService
DealerorToroCustomerServiceandhavethemodel
andserialnumbersofyourproductready.Figure1
identiesthelocationofthemodelandserialnumbers
ontheproduct.Writethenumbersinthespace
provided.
ModelNo.
SerialNo.
Thismanualidentiespotentialhazardsandhas
safetymessagesidentiedbythesafety-alertsymbol
(Figure2),whichsignalsahazardthatmaycause
seriousinjuryordeathifyoudonotfollowthe
recommendedprecautions.
g000502
Figure2
1.Safety-alertsymbol
Thismanualuses2wordstohighlightinformation.
Importantcallsattentiontospecialmechanical
informationandNoteemphasizesgeneralinformation
worthyofspecialattention.
©2019—TheToro®Company
8111LyndaleAvenueSouth
Bloomington,MN55420
Contactusatwww.Toro.com.
2
PrintedintheUSA
AllRightsReserved

Contents
Safety
Safety.......................................................................3
GeneralSafety...................................................3
SlopeSafety.......................................................3
StumpGrinderSafety.........................................4
MaintenanceandStorageSafety........................4
SafetyandInstructionalDecals..........................5
Setup........................................................................6
1PreparingtheTractionUnit..............................6
2InstallingtheShieldBrackets...........................6
3AssemblingtheOperatorShield.......................9
4InstallingtheChipGuard................................10
ProductOverview....................................................11
Specications...................................................11
Operation.................................................................11
InstallingandRemovingtheAttachment............11
GrindingStumps...............................................12
GrindingRoots.................................................13
TransportPosition............................................13
TransportingtheStumpGrinderona
Trailer............................................................13
OperatingTips.................................................13
Maintenance...........................................................14
RecommendedMaintenanceSchedule(s)...........14
GreasingtheMachine.......................................14
ReplacingtheTeeth..........................................15
Storage...................................................................16
Troubleshooting......................................................17
DANGER
Theremaybeburiedutilitylinesinthework
area.Diggingintothemmaycauseashock
oranexplosion.
Havethepropertyorworkareamarkedfor
buriedlinesanddonotdiginmarkedareas.
Contactyourlocalmarkingserviceorutility
companytohavethepropertymarked(for
example,intheUS,call811orinAustralia,
call1100forthenationwidemarkingservice).
GeneralSafety
Alwaysfollowallsafetyinstructionstoavoidserious
injuryordeath.
•Donottransportanattachmentwiththearms
raised.Alwaystransporttheattachmentcloseto
theground;refertoTransportPosition(page13).
•Havethepropertyorworkareamarkedforburied
linesandotherobjects,anddonotdiginmarked
areas.
•ReadandunderstandthecontentofthisOperator’s
Manualbeforestartingtheengine.
•Useyourfullattentionwhileoperatingthe
machine.Donotengageinanyactivitythat
causesdistractions;otherwise,injuryorproperty
damagemayoccur.
•Neverallowchildrenoruntrainedpeopleto
operatethemachine.
•Keepyourhandsandfeetawayfromthemoving
componentsandattachments.
•Donotoperatethemachinewithouttheguards
andothersafetyprotectivedevicesinplaceand
workingonthemachine.
•Keepbystandersandpetsawayfromthemachine.
•Stopthemachine,shutofftheengine,andremove
thekeybeforeservicing,fueling,orunclogging
themachine.
Improperlyusingormaintainingthismachinecan
resultininjury.T oreducethepotentialforinjury,
complywiththesesafetyinstructionsandalways
payattentiontothesafety-alertsymbol
meansCaution,Warning,orDanger—personalsafety
instruction.Failuretocomplywiththeseinstructions
mayresultinpersonalinjuryordeath.
SlopeSafety
•Operatethemachineupanddownslopeswith
theheavyendofthemachineuphill.Weight
distributionchangeswithattachments.This
3
,which

attachmentmakesthefrontofmachinetheheavy
end.
•Keeptheattachmentintheloweredposition
whenonslopes.Raisingtheattachmentona
slopeaffectsthestabilityofthemachine.
•Slopesareamajorfactorrelatedtolossofcontrol
andtip-overaccidents,whichcanresultinsevere
injuryordeath.Operatingthemachineonany
slopeoruneventerrainrequiresextracaution.
•Establishyourownproceduresandrulesfor
operatingonslopes.Theseproceduresmust
includesurveyingthesitetodeterminewhich
slopesaresafeformachineoperation.Always
usecommonsenseandgoodjudgmentwhen
performingthissurvey.
StumpGrinderSafety
•Forwheeledmachines,donotusethe
counterweightonthetractionunitwhenusingthe
stumpgrinder.
•Neveroperatethestumpgrinderwithouttheshield
installedonthetractionunitandthechipguard
onthegrinder.
•Keepallbystandersatleast9m(30ft)awayfrom
theworkarea.
•Onlyusethestumpgrinderforgrindingstumps
lessthan91cm(36inch)tall.
MaintenanceandStorage
•Slowdownanduseextracareonhillsides.Ground
conditionscanaffectthestabilityofthemachine.
•Avoidstartingorstoppingonaslope.Ifthe
machinelosestraction,proceedslowly,straight
downtheslope.
•Avoidturningonslopes.Ifyoumustturn,turn
slowlyandkeeptheheavyendofthemachine
uphill.
•Keepallmovementsonslopesslowandgradual.
Donotmakesuddenchangesinspeedor
direction.
•Ifyoufeeluneasyoperatingthemachineona
slope,donotdoit.
•Watchforholes,ruts,orbumps,asuneventerrain
couldoverturnthemachine.T allgrasscanhide
obstacles.
•Usecautionwhenoperatingonwetsurfaces.
Reducedtractioncouldcausesliding.
•Evaluatetheareatoensurethatthegroundis
stableenoughtosupportthemachine.
•Usecautionwhenoperatingthemachinenearthe
following:
Safety
•Checkfastenersatfrequentintervalsforproper
tightnesstoensurethattheequipmentisinsafe
operatingcondition.
•RefertotheOperator’sManualforimportant
detailsifyoustoretheattachmentforanextended
periodoftime
•Maintainorreplacesafetyandinstructionlabels,
asnecessary.
–Drop-offs
–Ditches
–Embankments
–Bodiesofwater
Themachinecouldsuddenlyrolloverifatrack
goesovertheedgeortheedgecavesin.Maintain
asafedistancebetweenthemachineandany
hazard.
•Donotremoveoraddattachmentsonaslope.
•Donotparkthemachineonahillsideorslope.
4

SafetyandInstructional
Decals
Safetydecalsandinstructionsare
easilyvisibletotheoperatorandare
locatednearanyareaofpotential
danger.Replaceanydecalthatis
damagedormissing.
decal133-8061
133-8061
decal136-5814
136-5814
1.Warning—readthe
Operator'sManual.
2.Cutting/dismemberment
hazardofhands
andfeet,rotating
knives/blades—waitforall
movingpartstostop;keep
allguardsandshieldsin
place.
3.Thrownobject
hazard—keepallguards
andshieldsinplace;keep
bystandersawayfromthe
machine.
136-5817
1.Cutting/dismembermenthazardoffoot,rotating
knives/blades—waitforallmovingpartstostop;keephands
andfeetawayfrommovingparts.
decal136-5817
136-5818
1.Thrownobjecthazard—keepallguardsandshieldsin
place;keepbystandersawayfromthemachine.
decal136-5818
5

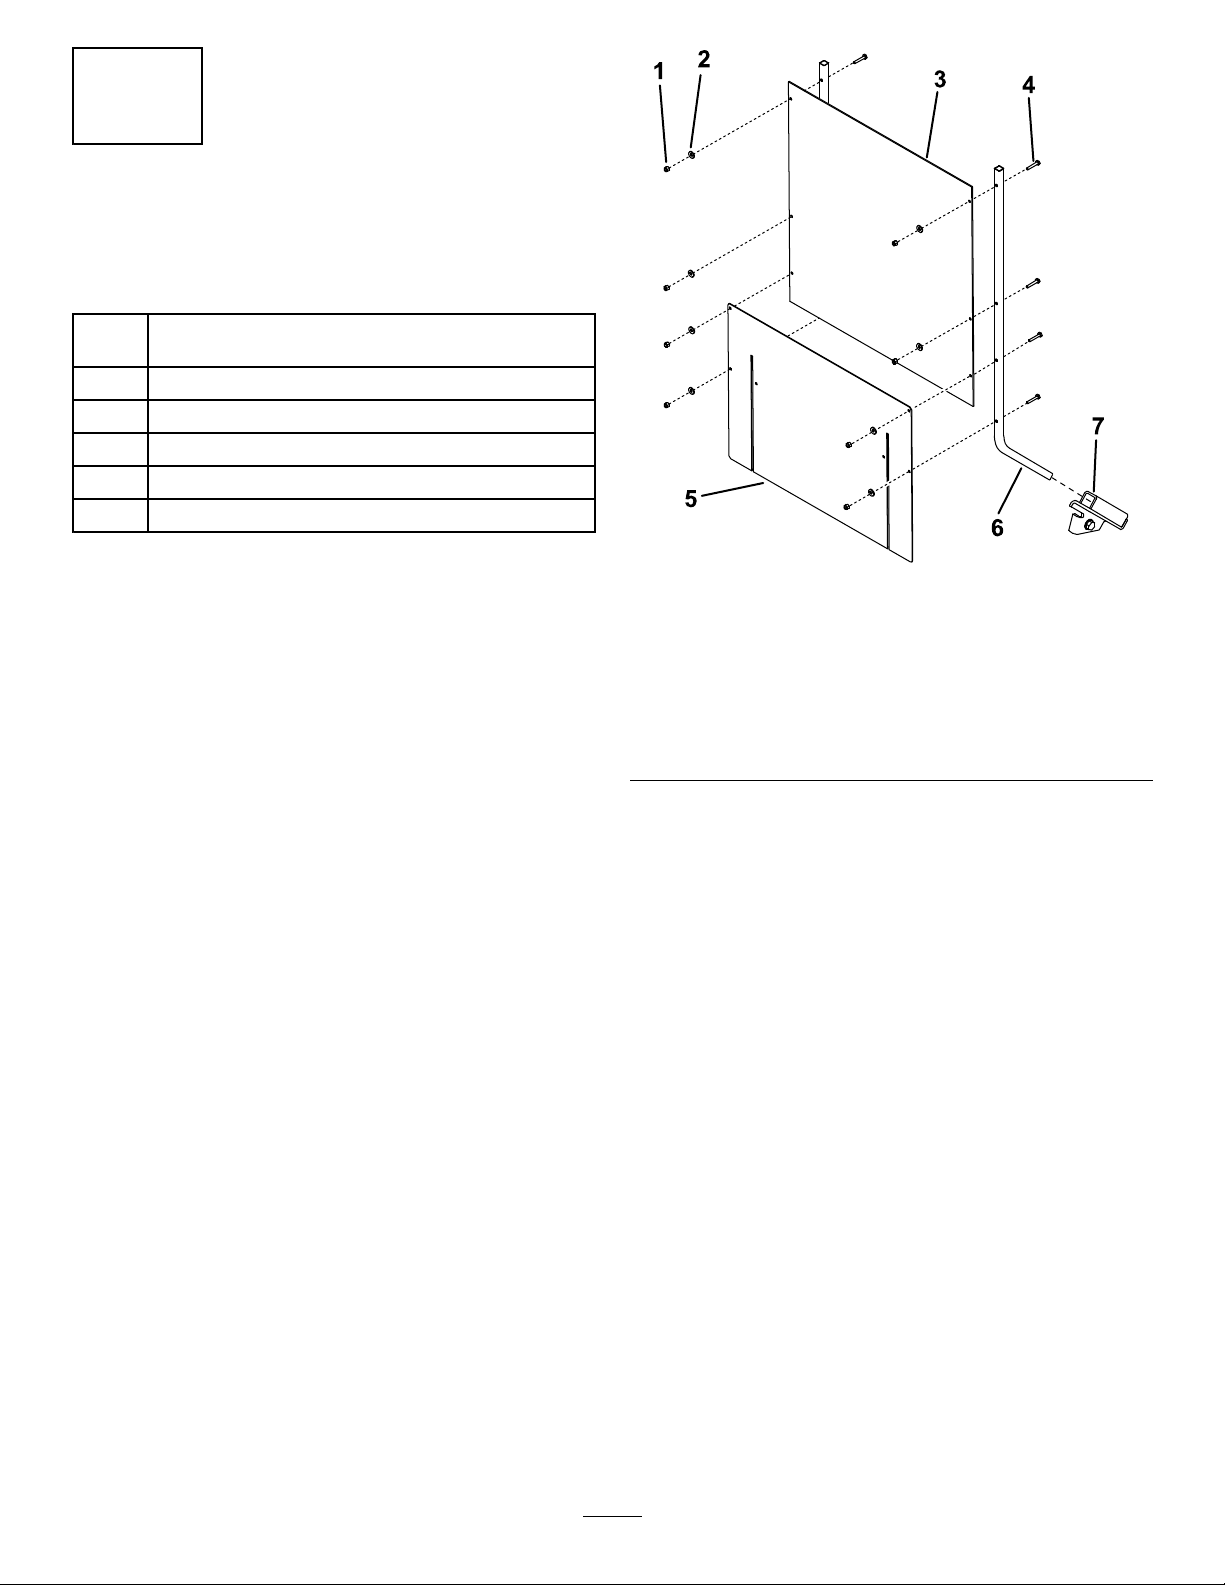
Setup
LooseParts
Usethechartbelowtoverifythatallpartshavebeenshipped.
ProcedureDescription
1
2
3
4
Nopartsrequired
Rightshieldbracket(3holes)—200/300
SeriesorTX400/500Seriesonly
Leftshieldbracket(3holes)—200/300
SeriesorTX400/500Seriesonly
Self-tappingscrew(5/16x3/4inch)
Rightshieldbracket(2holes)—TX1000
only
Leftshieldbracket(2holes)—TX1000
only
Bolt(1/4x3/4inch)—TX1000only
Locknut(1/4inch)—TX1000only
Shieldsupport(1bend)—200/300
SeriesorTX400/500Series
Shieldsupport(2bends)—TX1000only
Shield
Bolt(1/4x1-1/2inch)
Washer8
Locknut(1/4inch)
Chipguard
Guardpin
Hairpincotter1
Qty.
Use
–
1
1
4
1
1
4
4
2
2
1
8
8
1
1
Preparethetractionunit.
Installtheshieldbrackets.
Assembletheoperatorshield.
Installthechipguard.
1
PreparingtheTractionUnit
NoPartsRequired
Procedure
1.Parkthemachineonalevelsurface.
2.Lowertheloaderarms.
3.Engagetheparkingbrake(ifapplicable).
4.Shutofftheengineandremovethekey.
6

2
InstallingtheShield
3.Repeatsteps1and2fortheothersideofthe
tractionunit.
TX400or500SeriesTractionUnit
Only
Brackets
Partsneededforthisprocedure:
Rightshieldbracket(3holes)—200/300SeriesorTX
1
400/500Seriesonly
Leftshieldbracket(3holes)—200/300SeriesorTX
1
400/500Seriesonly
4
Self-tappingscrew(5/16x3/4inch)
1
Rightshieldbracket(2holes)—TX1000only
1
Leftshieldbracket(2holes)—TX1000only
4
Bolt(1/4x3/4inch)—TX1000only
4
Locknut(1/4inch)—TX1000only
200or300SeriesTractionUnit
Only
Important:Usetheshieldbracketswith3holes.
1.Insertthetabontheshieldbracketintothe
lift-pointholeonthetractionunit,withthehole
inthebracketaligningwiththesmallholeinthe
tractionunitframe(Figure3).
Important:Usetheshieldbracketswith3holes.
1.Measureinfromtheedgesoftheframeas
illustratedinFigure4andmarkthelocationsof
theholesformountingtheshieldbracket.
Note:Iftheholesexist,skiptostep3.
Note:Thereisarightandleftbracket.Ensure
thatyouinstallthecorrectbracketoneachside.
Thetabshouldbeinthelift-pointholeandthe
bracketshouldbeontheoutsideoftheframe
(Figure3).
Figure3
1.Shieldbracket
2.Lift-pointhole4.Self-tappingscrew
3.Tab
g203568
Figure4
1.4.6cm(1.8inch)3.4.6cm(1.8inch)
2.1.4cm(0.6inch)
2.Drillahole(5/16inch)throughtheframeateach
markedlocation.
3.Alignthetabontheshieldbracketwiththefront
edgeoftheframewiththebracketinsideofthe
loader-armpocket(Figure5).
g013653
Note:Thereisarightandleftbracket.Ensure
thatyouinstallthecorrectbracketoneachside.
Thetabshouldbeovertheframeedgeandthe
bracketshouldbeinsidetheloader-armpocket
withthe2smallerholesinthebracketlinedup
withtheholesyoudrilledintheframe(Figure5).
4.Mountingholes
2.Securethebrackettotheframewitha
self-tappingscrew(Figure3).
7

Figure5
1.Self-tappingscrew2.Shieldbracket
4.Securethebrackettotheframewith2
self-tappingscrewsasillustratedinFigure5.
5.Repeatsteps1through4fortheothersideof
thetractionunit.
TX1000TractionUnitOnly
Important:Usetheshieldbracketswith2holes.
3.Installtheleftshieldbracketontheleftframe
using2bolts(1/4x3/4inch)and2Locknuts(1/4
inch)asshowninFigure7.
g013655
g202825
Figure7
1.Bolts(1/4x3/4inch)3.Locknut(1/4inch)
2.Leftshieldbracket
4.Installtherightshieldbracketontherightframe
2bolts(1/4x3/4inch)and2locknuts(1/4inch),
similartoFigure7.
1.Measureinfromtheedgesoftheframeas
illustratedinFigure6andmarkthelocationsof
theholesformountingtheshieldbracket.
Note:Iftheholesexist,skiptostep3.
Figure6
g245655
1.7.0cm(2-3/4inch)
2.5.7cm(2-1/4inch)5.Referencebar
3.1.3cm(1/2inch)
4.Hole
2.Drillahole(9/32inch)throughtheframeateach
markedlocation.
8
3
AssemblingtheOperator
Shield
Partsneededforthisprocedure:
Shieldsupport(1bend)—200/300SeriesorTX
2
400/500Series
2
Shieldsupport(2bends)—TX1000only
1
Shield
8
Bolt(1/4x1-1/2inch)
8Washer
8
Locknut(1/4inch)
AssemblingtheShield
Note:Usetheshieldsupportswith1bendfor
200/300seriesorTX400/500seriestractionunits.
Usetheshieldsupportswith2bendsforTX1000
tractionunits.
1.Slidetheshieldsupportsintothepocketsinthe
shieldbracketsonthetractionunit(Figure8or
Figure9).
Figure8
200/300SeriesorTX400/500SeriesTractionUnits
1.Locknut(8)
2.Washer(8)6.Shieldsupport(2)
3.Shield7.Shieldbracket(2)
4.Bolt(8)
5.Skirt
g202610
9

Figure9
TX1000TractionUnitsOnly
1.Locknut(8)
2.Washer(8)6.Shieldsupport(2)
3.Shield7.Shieldbracket(2)
4.Bolt(8)
5.Skirt
4
InstallingtheChipGuard
Partsneededforthisprocedure:
1
Chipguard
1
Guardpin
1Hairpincotter
Procedure
Thestumpgrinderhas4setsofmountingholesfor
positioningthechipguard(Figure10).Movethe
guardup(upperholes)whenyouaregrindingclose
tothegroundanddown(lowerholes)whenyouare
g202842
chippingtallstumps.Installthechipguardasfollows:
1.Positionthemountingtubeontheguard
between2holesonthegrinder(Figure10).
2.Assembletheshieldandexibleskirttothe
shieldsupportsasillustratedinFigure8or
Figure9,using8bolts(1/4x1-1/2inch),8
washers,and8locknuts(1/4inch).
Note:Theskirtshoulddrapeovertheengine
orhood.
Figure10
1.Guardpin
2.Mountingholes5.Hairpincotter
3.Chipguard
2.Slidetheguardpinthroughtheholesinthe
grinderandthemountingtube(Figure10).
3.Securethepinwithahairpincotter(Figure10).
4.Mountingtube
g202609
10

ProductOverview
Figure11
1.Chipguard4.Stumpgrindinghead
2.Mountingplate
3.Pivotbolt
5.Teeth
Operation
InstallingandRemoving
theAttachment
RefertotheOperator’sManualforthetractionunitfor
theinstallationandremovalprocedure.
Important:Beforeinstallingtheattachment,
positionthemachineonalevelsurface,ensure
thatthemountplatesarefreeofanydirtordebris,
andensurethatthepinsrotatefreely .Ifthepins
donotrotatefreely,greasethem.
Note:Alwaysusethetractionunittoliftandmove
theattachment.
WARNING
Ifyoudonotfullyseatthequick-attach
g013651
pinsthroughtheattachmentmountplate,
theattachmentcouldfalloffthemachine,
crushingyouorbystanders.
Ensurethatthequick-attachpinsarefully
seatedintheattachmentmountplate.
Specications
Note:Specicationsanddesignaresubjectto
changewithoutnotice.
Width(withchipguard)112cm(44inches)
Width(withoutchipguard)66cm(26inches)
Length
Height
Weight
Toensureoptimumperformanceandcontinuedsafety
certicationofthemachine,useonlygenuineToro
replacementpartsandaccessories.Replacement
partsandaccessoriesmadebyothermanufacturers
couldbedangerous,andsuchusecouldvoidthe
productwarranty.
51cm(20inches)
79cm(31inches)
120kg(265lb)
WARNING
Hydraulicuidescapingunderpressurecan
penetrateskinandcauseinjury.Fluidinjected
intotheskinmustbesurgicallyremoved
withinafewhoursbyadoctorfamiliarwith
thisformofinjury;otherwise,gangrenemay
result.
•Ensurethatallhydraulic-uidhoses
andlinesareingoodconditionandall
hydraulicconnectionsandttingsaretight
beforeapplyingpressuretothehydraulic
system.
•Keepyourbodyandhandsawayfrom
pinholeleaksornozzlesthateject
high-pressurehydraulicuid.
•Usecardboardorpapertondhydraulic
leaks;neveruseyourhands.
11

CAUTION
Hydrauliccouplers,hydrauliclines/valves,
andhydraulicuidmaybehot.Ifyoucontact
hotcomponents,youmaybeburned.
•Weargloveswhenoperatingthehydraulic
couplers.
•Allowthemachinetocoolbeforetouching
hydrauliccomponents.
•Donottouchhydraulicuidspills.
GrindingStumps
WARNING
Duringoperation,debrisyinalldirections
andcancauseinjurytoeyesandother
exposedbodyparts.
•Neveroperatethestumpgrinderwithout
theshieldinstalledonthetractionunitand
thechipguardonthegrinder.
•Duringoperation,weareyeprotection,
hearingprotection,substantial,
slip-resistantfootwear,andlong
pants.
•Keepallbystandersatleast9m(30ft)
awayfromtheworkarea.
1.Ifyourtractionunithasaspeedselector,move
ittotheSLOWposition.
2.Starttheengine.
3.Pulltheauxiliaryhydraulicslevertotheoperator
griptoengagethestumpgrinder.
4.Positionthegrinderontheleftsideandbehind
thestump(Figure12).
g013658
Figure12
5.Swingthegrindertowardyouusingthe
attachment-tiltlever,grindingatadepthof0.5
to5cm(1/4to2inches),dependingonthe
hardnessofthewood(Figure12).
Note:Ifyoucuttoodeep,thegrinderstalls.Ifit
stalls,raiseitslightlyandtryagain.
6.Swingthegrinderbackout(Figure12),lowerit
0.5to5cm(1/4to2inches),andrepeatsteps
4through6untilyouhavegrounddownafew
inches.
7.Raisetheloaderarmstotheoriginalheight.
8.Movethegrindertotheright(Figure12).
9.Repeatsteps4through8untilyoureachthe
rightsideofthestump.
10.Returnthegrindertotheleftsideofthestump,
lowerit,andrepeatsteps3through10untilyou
havegroundthestumpintotheground.
Note:T ocontainthechips,youmayneedto
stopthegrinderandmovethechipguardupas
youmovethegrinderdown.
11.Whennished,stopthegrinderbymoving
theauxiliaryhydraulicslevertotheNEUTRAL
position.
12

GrindingRoots
1.Stopthegrinderandhangitverticallyfromthe
loaderarmsafewcentimeters(inches)offthe
ground.
2.Shutofftheengineandremovethekey.
3.Loosenthelargeboltonthetopofthegrinder
(Figure13).
15.Swingthegrinder30degreescounter-clockwise
(Figure13).
16.T orquethelargeboltontopofthegrinderto406
N∙m(300ft-lb)asshowninFigure13.
17.Installtheboltandnutinthefrontholeand
torquethemto101N∙m(75ft-lb)asshownin
Figure13.
TransportPosition
Whentransportingtheattachment,keepitasclose
tothegroundaspossible,nomorethan15cm(6
inches)abovetheground.Tiltitrearward.
Figure13
1.Largebolt—loosen2.Frontbolt—remove
4.Removethefrontboltandnutsecuringthe
grinder(Figure13).
5.Swingthegrinder30degreesclockwise(Figure
13).
6.T orquethelargeboltontopofthegrinderto406
N∙m(300ft-lb)asshowninFigure13.
7.Installtheboltandnutinthefrontholeand
torquethemto101N∙m(75ft-lb)asshownin
Figure13.
8.Startthetractionunitandstartthegrinder.
9.Lowerthegrinderintotheroot.
10.Movethegrinderalongthelengthoftherootby
movingthetractionunitovertheroot.
11.Whennished,stopthegrinderbymoving
theauxiliaryhydraulicslevertotheNEUTRAL
position.
12.Shutofftheengineandremovethekey.
13.Loosenthelargeboltonthetopofthegrinder
(Figure13).
14.Removethefrontboltandnutsecuringthe
grinder(Figure13).
g245446
Figure14
g013659
1.Nomorethan15cm(6
inches)abovetheground
2.Tilttheattachment
rearward.
TransportingtheStump
GrinderonaTrailer
Placetheattachmentonatrailerortruckcapableof
carryingit.Securelytieittothetrailerortruckusing
tiestrapsappropriatefortheweightoftheattachment
andforhighwayuse.
Important:Removetheoperator'sshieldbefore
transportingthetractionunittoavoiddamageto
theshieldofthetractionunit.
OperatingTips
•Alwaysusefullthrottle(maximumenginespeed).
•Nevertransporttheattachmentwiththeloader
armsraised.Keepthearmsloweredandthe
attachmenttiltedup.
•Ifyourtractionunithasaspeedselector(present
onsomewheeledtractionunits),setittotheSLOW
(turtle)position.
•Ifyourtractionunithasaowdivider(present
onsomewheeledtractionunits),adjustitto
approximatelythe10o’clockposition.
13

Maintenance
RecommendedMaintenanceSchedule(s)
MaintenanceService
Interval
Beforeeachuseordaily
Beforestorage
MaintenanceProcedure
•Greasethemachine.
•Checktheconditionoftheteethandrotateorreplaceanythatarewornordamaged.
•Greasethemachine.
•Paintchippedsurfaces.
GreasingtheMachine
ServiceInterval:Beforeeachuseordaily
Beforestorage
GreasethettinginFigure15.
GreaseType:General-purposegrease
1.Parkthemachineonalevelsurface,lowerthe
loaderarms,andengagetheparkingbrake(if
applicable).
2.Shutofftheengineandremovethekey.
3.Cleanthegreasettingwitharag.
4.Connectagreaseguntothetting.
5.Pumpgreaseintothettinguntilgreasebegins
tooozeoutofthebearings.
6.Wipeupanyexcessgrease.
Figure15
g203602
14

ReplacingtheTeeth
ServiceInterval:Beforeeachuseordaily—Check
theconditionoftheteethandrotate
orreplaceanythatarewornor
damaged.
Duetothehighamountofwearplacedontheteeth,
youwillneedtorotateandreplacethemperiodically .
Eachtoothisindexedwith3positionssothatyoucan
rotateittwice,exposinganewsharpedgebefore
replacingthetooth.
g246708
Figure17
(Yourgrinder'sappearancemayvaryfromthatshownin
theillustration)
Figure16
1.Sharptooth
2.Worntooth
Torotateatooth,loosenthenutsecuringthetooth
(Figure17).Pushthetoothforwardandrotateitone
thirdofaturn,bringinganunusededgetotheoutside.
Torquethenutsecuringthetoothto37to45N∙m(27
to33ft-lb).
g034325
1.Nut3.Toothholder
2.Spacer
4.Tooth
Toreplaceatooth,removethenutsecuringthetooth
toremoveit,theninstallanewtoothandnutinthe
sameposition(Figure17).T orquethenutsecuring
thetoothto37to45N∙m(27to33ft-lb).
15

Storage
1.Beforelong-termstorage,washtheattachment
withmilddetergentandwatertoremovedirtand
grime.
2.Checktheconditionoftheteeth.Turnorreplace
anywornordamagedteeth.
3.Checkandtightenallbolts,nuts,andscrews.
Repairorreplaceanydamagedorwornpart.
4.Ensurethatallhydrauliccouplersareconnected
togethertopreventcontaminationofthe
hydraulicsystem.
5.Paintallscratchedorbaremetalsurfaces.Paint
isavailablefromyourAuthorizedServiceDealer.
6.Storetheattachmentinaclean,drygarageor
storagearea.Coverittoprotectitandkeepit
clean.
16

Troubleshooting
Problem
Thecuttingdiskstopsduringcutting.
Thecuttingdiskdoesnotturnorturns
slowly.
Thegrinderdoesnotcutfastenough.
PossibleCauseCorrectiveAction
1.Y ouarecuttingtoodeep.
2.T eethareworn,damaged,orbroken.2.Rotateorreplaceanyworn,damaged,
1.Ahydrauliccouplerisnotcompletely
connected.
2.Ahydrauliccouplerisdamaged.
3.Thereisanobstructioninahydraulic
hose.
4.Anauxiliaryvalveonthetractionunit
isnotopening.
5.Thehydraulicmotorordrivehasfailed.5.ContactyourAuthorizedService
6.Thecheckvalvebrakeisreversed.6.Reversethecheckvalvedirection;
1.T eethareworn.1.Rotateorreplaceanywornteeth.
2.Thesettingiswrongontheowdivider
andspeedlever(applicablewheeled
unitsonly).
3.Thereisarestrictioninaquickcoupler
orhose.
4.Thehydraulicsystemistoohot.
5.Thereliefvalveissetbelow
specications.
1.Raisetheloaderarms13mm(1/2
inch).
orbrokenteeth.
1.Checkandtightenallcouplers.
2.Check/replacecouplers.
3.Findandremovetheobstruction.
4.Repairthevalve.
Dealer.
contactyourAuthorizedService
Dealer.
2.Settheowdividertothe10o’clock
positionandthespeedlevertothe
turtleposition.
3.Checkthehosesandcouplersand
repairanyproblemsfound.
4.Shutthesystemdownandallowitto
cool.
5.ContactyourAuthorizedService
Dealer.
Thecuttingdiskturnsinthewrong
direction.
1.Theauxiliary-valveleverisinthe
wrongposition.
2.Thehydraulichosesarereversed.2.Disconnectthehosesandswitch
1.Movetheauxiliary-valvelevertothe
rearwardposition.
positions.
17

DeclarationofIncorporation
TheT oroCompany,8111LyndaleAvenueSouth,Bloomington,MN,USAdeclaresthatthefollowingunit(s)
conform(s)tothedirectiveslisted,wheninstalledinaccordancewiththeaccompanyinginstructionsontocertain
ToromodelsasindicatedontherelevantDeclarationsofConformity.
ModelNo.
22429404320000andUp
SerialNo.
ProductDescriptionInvoiceDescription
StumpGrinder
STUMPGRINDER
ATT ACHMENTCE
GeneralDescription
StumpGrinder2006/42/EC
Directive
RelevanttechnicaldocumentationhasbeencompiledasrequiredperPartBofAnnexVIIof2006/42/EC.
Wewillundertaketotransmit,inresponsetorequestsbynationalauthorities,relevantinformationonthispartly
completedmachinery.Themethodoftransmissionshallbeelectronictransmittal.
ThismachineryshallnotbeputintoserviceuntilincorporatedintoapprovedToromodelsasindicatedonthe
associatedDeclarationofConformityandinaccordancewithallinstructions,wherebyitcanbedeclaredin
conformitywithallrelevantDirectives.
Certied:
JoeHager
Sr.EngineeringManager
811 1LyndaleAve.South
Bloomington,MN55420,USA
February18,2019
AuthorizedRepresentative:
MarcelDutrieux
ManagerEuropeanProductIntegrity
ToroEuropeNV
Nijverheidsstraat5
2260Oevel
Belgium

EuropeanPrivacyNotice
TheInformationToroCollects
ToroWarrantyCompany(T oro)respectsyourprivacy.Inordertoprocessyourwarrantyclaimandcontactyouintheeventofaproductrecall,weaskyou
tosharecertainpersonalinformationwithus,eitherdirectlyorthroughyourlocalT orocompanyordealer.
TheT orowarrantysystemishostedonserverslocatedwithintheUnitedStateswhereprivacylawmaynotprovidethesameprotectionasapplies
inyourcountry.
BYSHARINGYOURPERSONALINFORMATIONWITHUS,YOUARECONSENTINGTOTHEPROCESSINGOFYOURPERSONALINFORMATION
ASDESCRIBEDINTHISPRIV ACYNOTICE.
TheWayT oroUsesInformation
Toromayuseyourpersonalinformationtoprocesswarrantyclaims,tocontactyouintheeventofaproductrecallandforanyotherpurposewhichwetell
youabout.ToromayshareyourinformationwithT oro'safliates,dealersorotherbusinesspartnersinconnectionwithanyoftheseactivities.Wewillnot
sellyourpersonalinformationtoanyothercompany.Wereservetherighttodisclosepersonalinformationinordertocomplywithapplicablelawsand
withrequestsbytheappropriateauthorities,tooperateoursystemsproperlyorforourownprotectionorthatofotherusers.
RetentionofyourPersonalInformation
Wewillkeepyourpersonalinformationaslongasweneeditforthepurposesforwhichitwasoriginallycollectedorforotherlegitimatepurposes
(suchasregulatorycompliance),orasrequiredbyapplicablelaw .
Toro'sCommitmenttoSecurityofYourPersonalInformation
Wetakereasonableprecautionsinordertoprotectthesecurityofyourpersonalinformation.Wealsotakestepstomaintaintheaccuracyandcurrent
statusofpersonalinformation.
AccessandCorrectionofyourPersonalInformation
Ifyouwouldliketorevieworcorrectyourpersonalinformation,pleasecontactusbyemailatlegal@toro.com.
AustralianConsumerLaw
AustraliancustomerswillnddetailsrelatingtotheAustralianConsumerLaweitherinsidetheboxoratyourlocalToroDealer.
374-0282RevC

CaliforniaProposition65WarningInformation
Whatisthiswarning?
Youmayseeaproductforsalethathasawarninglabellikethefollowing:
WARNING:CancerandReproductiveHarm—www.p65Warnings.ca.gov.
WhatisProp65?
Prop65appliestoanycompanyoperatinginCalifornia,sellingproductsinCalifornia,ormanufacturingproductsthatmaybesoldinorbroughtinto
California.ItmandatesthattheGovernorofCaliforniamaintainandpublishalistofchemicalsknowntocausecancer,birthdefects,and/orother
reproductiveharm.Thelist,whichisupdatedannually,includeshundredsofchemicalsfoundinmanyeverydayitems.ThepurposeofProp65isto
informthepublicaboutexposuretothesechemicals.
Prop65doesnotbanthesaleofproductscontainingthesechemicalsbutinsteadrequireswarningsonanyproduct,productpackaging,orliteraturewith
theproduct.Moreover,aProp65warningdoesnotmeanthataproductisinviolationofanyproductsafetystandardsorrequirements.Infact,the
CaliforniagovernmenthasclariedthataProp65warning“isnotthesameasaregulatorydecisionthataproductis‘safe’or‘unsafe.’”Manyofthese
chemicalshavebeenusedineverydayproductsforyearswithoutdocumentedharm.Formoreinformation,gotohttps://oag.ca.gov/prop65/faqs-view-all
AProp65warningmeansthatacompanyhaseither(1)evaluatedtheexposureandhasconcludedthatitexceedsthe“nosignicantrisklevel”;or(2)
haschosentoprovideawarningbasedonitsunderstandingaboutthepresenceofalistedchemicalwithoutattemptingtoevaluatetheexposure.
Doesthislawapplyeverywhere?
Prop65warningsarerequiredunderCalifornialawonly.ThesewarningsareseenthroughoutCaliforniainawiderangeofsettings,includingbutnot
limitedtorestaurants,grocerystores,hotels,schools,andhospitals,andonawidevarietyofproducts.Additionally ,someonlineandmailorder
retailersprovideProp65warningsontheirwebsitesorincatalogs.
.
HowdotheCaliforniawarningscomparetofederallimits?
Prop65standardsareoftenmorestringentthanfederalandinternationalstandards.TherearevarioussubstancesthatrequireaProp65warning
atlevelsthatarefarlowerthanfederalactionlimits.Forexample,theProp65standardforwarningsforleadis0.5μg/day,whichiswellbelow
thefederalandinternationalstandards.
Whydon’tallsimilarproductscarrythewarning?
•ProductssoldinCaliforniarequireProp65labellingwhilesimilarproductssoldelsewheredonot.
•AcompanyinvolvedinaProp65lawsuitreachingasettlementmayberequiredtouseProp65warningsforitsproducts,butothercompanies
makingsimilarproductsmayhavenosuchrequirement.
•TheenforcementofProp65isinconsistent.
•CompaniesmayelectnottoprovidewarningsbecausetheyconcludethattheyarenotrequiredtodosounderProp65;alackofwarningsfora
productdoesnotmeanthattheproductisfreeoflistedchemicalsatsimilarlevels.
WhydoesToroincludethiswarning?
Torohaschosentoprovideconsumerswithasmuchinformationaspossiblesothattheycanmakeinformeddecisionsabouttheproductstheybuyand
use.T oroprovideswarningsincertaincasesbasedonitsknowledgeofthepresenceofoneormorelistedchemicalswithoutevaluatingthelevelof
exposure,asnotallthelistedchemicalsprovideexposurelimitrequirements.WhiletheexposurefromT oroproductsmaybenegligibleorwellwithinthe
“nosignicantrisk”range,outofanabundanceofcaution,T orohaselectedtoprovidetheProp65warnings.Moreover ,ifTorodoesnotprovidethese
warnings,itcouldbesuedbytheStateofCaliforniaorbyprivatepartiesseekingtoenforceProp65andsubjecttosubstantialpenalties.
RevA
 Loading...