

Page 1
FormNo.3368-850RevB
Commercial53cmLawnMower
ModelNo.22186TE—SerialNo.311000001andUp
ToregisteryourproductordownloadanOperator'sManualorPartsCatalogatnocharge,gotowww.T oro.com.OriginalInstructions(EN)
Page 2
ThisproductcomplieswithallrelevantEuropean
directives.Fordetails,seetheseparateproductspecic
DeclarationofConformity(DOC)sheet.
Introduction
Thisrotary-blade,walk-behindlawnmoweris
intendedtobeusedbyresidentialhomeowners
orprofessional,hiredoperators.Itisdesigned
primarilyforcuttinggrassonwell-maintainedlawns
onresidentialorcommercialproperties.Itisnot
designedforcuttingbrushorforagriculturaluses.
Readthisinformationcarefullytolearnhowtooperate
andmaintainyourmachineproperlyandtoavoidinjury
anddamagetothemachine.Youareresponsiblefor
operatingthemachineproperlyandsafely.
YoumaycontactTorodirectlyatwww.Toro.comfor
machineandaccessoryinformation,helpndinga
dealer,ortoregisteryourmachine.
Wheneveryouneedservice,genuineT oroparts,
oradditionalinformation,contactanAuthorized
ServiceDealerorToroCustomerServiceandhave
themodelandserialnumbersofyourmachineready.
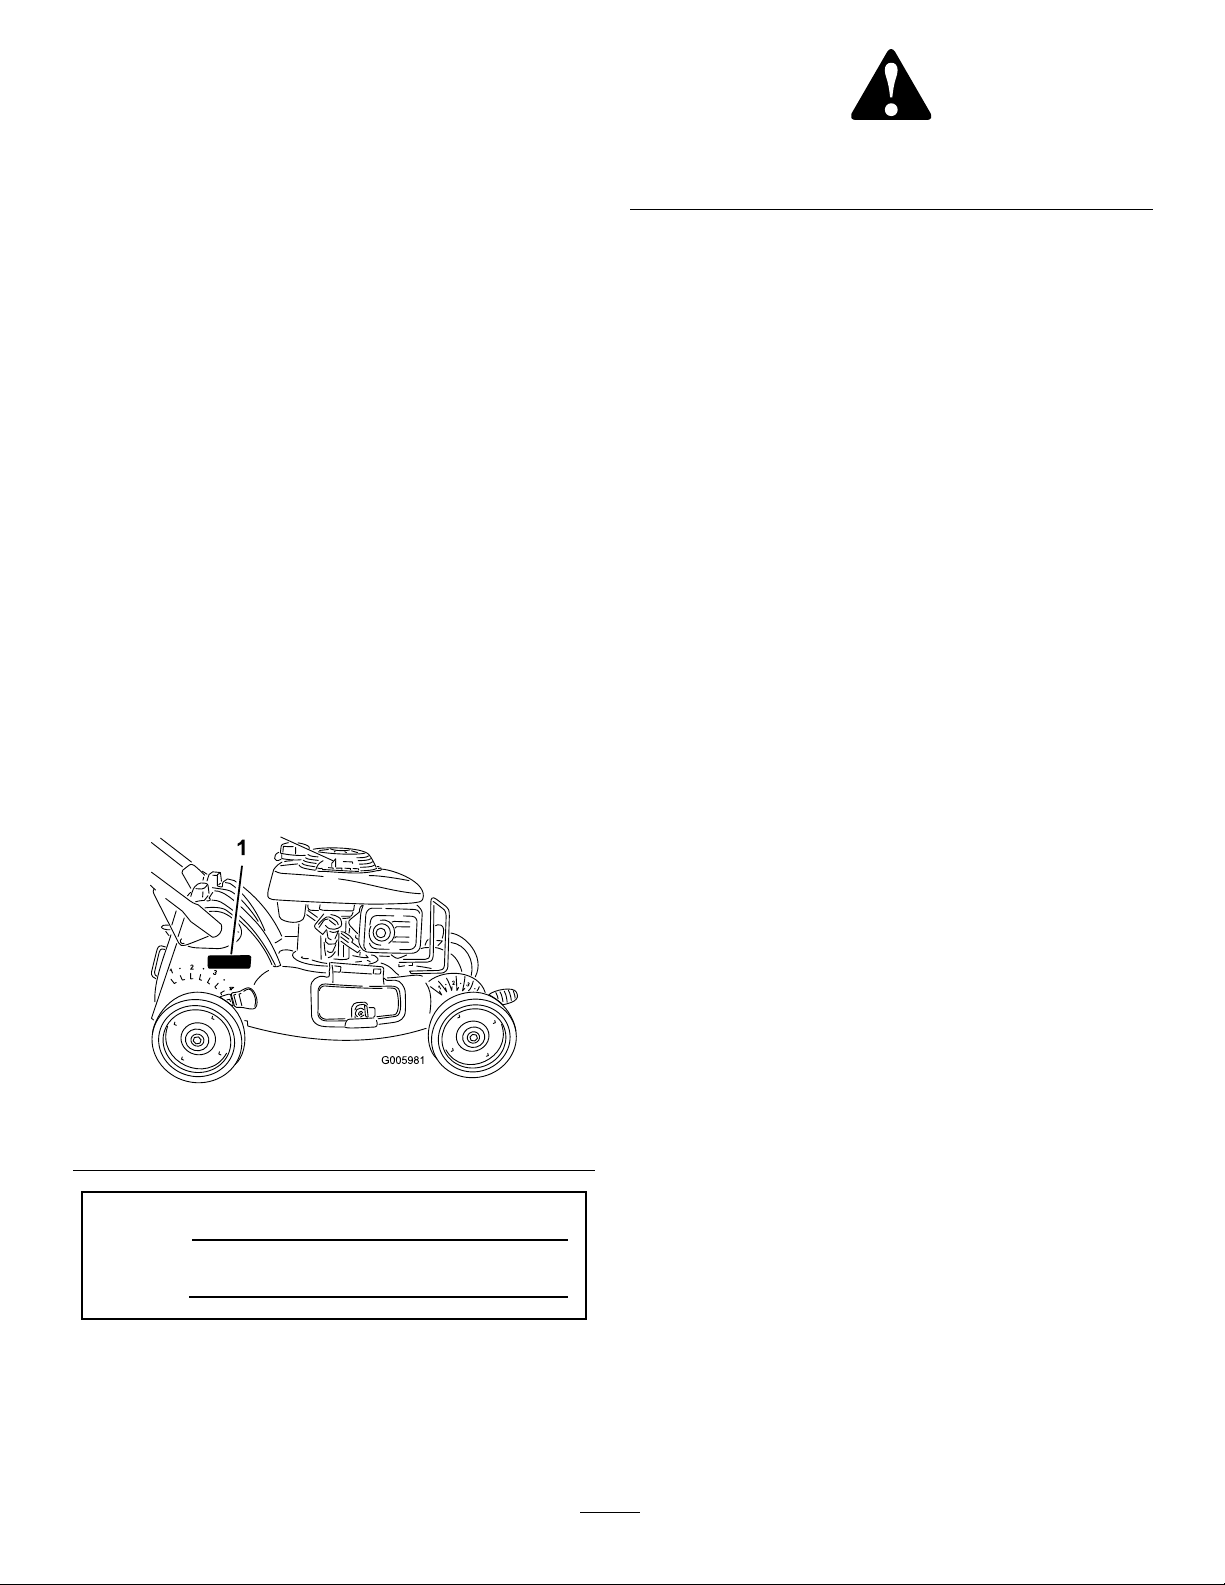
Figure1identiesthelocationofthemodelandserial
numbersonthemachine.Writethenumbersinthe
spaceprovided.
Figure1
1.Modelandserialnumberlocation
ModelNo.
SerialNo.
Thismanualidentiespotentialhazardsandhassafety
messagesidentiedbythesafetyalertsymbol(Figure2),
whichsignalsahazardthatmaycauseseriousinjury
ordeathifyoudonotfollowtherecommended
precautions.
Figure2
1.Safetyalertsymbol
Thismanualusestwowordstohighlightinformation.
Importantcallsattentiontospecialmechanical
informationandNoteemphasizesgeneralinformation
worthyofspecialattention.
Contents
Introduction.................................................................2
Safety...........................................................................3
GeneralSafety......................................................3
SoundPressure.....................................................5
SoundPower........................................................5
Hand-ArmVibration............................................5
SafetyandInstructionalDecals.............................6
Setup...........................................................................8
1InstallingtheHandle..........................................8
2FillingtheEnginewithOil.................................9
3InstalltheRecyclePlugorGrassBag.................10
ProductOverview......................................................11
Controls.............................................................12
Operation...................................................................12
CheckingtheEngineOilLevel............................12
FillingtheFuelTankwithGasoline.....................13
StartingtheEngine.............................................13
StoppingtheEngine...........................................14
OperatingtheSelf-propelDrive..........................14
AdjustingtheCuttingHeight..............................15
RecyclingtheClippings.......................................15
BaggingtheClippings.........................................16
Side-dischargingtheClippings............................17
OperatingTips...................................................18
Maintenance...............................................................19
RecommendedMaintenanceSchedule(s)................19
PremaintenanceProcedures....................................19
PreparingforMaintenance.................................19
EngineMaintenance...............................................20
ServicingtheAirCleaner....................................20
ChangingtheEngineOil....................................20
ServicingtheSparkPlug.....................................20
DriveSystemMaintenance.....................................21
AdjustingtheSelf-propelDriveCable.................21
BladeMaintenance.................................................22
MaintainingtheCuttingBlade.............................22
Cleaning.................................................................23
CleaningundertheMachine................................23
Storage.......................................................................23
©2013—TheT oro®Company
8111LyndaleAvenueSouth
Bloomington,MN55420
Contactusatwww.Toro.com.
2
PrintedintheUSA
AllRightsReserved
Page 3

PreparingtheFuelSystem...................................23
PreparingtheEngine..........................................23
GeneralInformation..........................................24
RemovingtheMachinefromStorage..................24
Troubleshooting.........................................................25
Safety
Improperlyusingormaintainingthismachinecan
resultininjury.Toreducethepotentialforinjury,
complywiththesesafetyinstructions.
Torodesignedandtestedthismachineforreasonably
safeservice;however,failuretocomplywiththe
followinginstructionsmayresultinpersonalinjury.
Toensuremaximumsafety,bestperformance,and
togainknowledgeofthemachine,itisessential
thatyouandanyotheroperatorofthemachineread
andunderstandthecontentsofthismanualbefore
theengineiseverstarted.Payparticularattention
tothesafetyalertsymbol(
Caution,Warning,orDanger—“personalsafety
instruction.”Readandunderstandtheinstruction
becauseithastodowithsafety .Failuretocomply
withtheinstructionmayresultinpersonalinjury.
GeneralSafety
Figure2)whichmeans
Thefollowinginstructionshavebeenadaptedfromthe
ISOstandard5395.
Thiscuttingmachineiscapableofamputatinghands
andfeetandthrowingobjects.Failuretoobservethe
followingsafetyinstructionscouldresultinserious
injuryordeath.
Training
•Readtheinstructionscarefully.Befamiliarwiththe
controlsandtheproperuseofthemachine.
•Neverallowchildrenorpeopleunfamiliarwiththese
instructionstousethemachine.Localregulations
canrestricttheageoftheoperator.
•Keepinmindthattheoperatororuserisresponsible
foraccidentsorhazardsoccurringtootherpeopleor
theirproperty.
•Understandexplanationsforallpictogramsusedon
themachineorintheinstructions.
Gasoline
WARNING-Gasolineishighlyammable.Takethe
followingprecautions.
•Storefuelincontainersspecicallydesignedforthis
purpose.
•Refueloutdoorsonlyanddonotsmokewhile
refueling.
•Addfuelbeforestartingtheengine.Neverremove
thecapofthefueltankoraddgasolinewhilethe
engineisrunningorwhentheengineishot.
3
Page 4

•Ifgasolineisspilled,donotattempttostartthe
enginebutmovethemachineawayfromthearea
ofspillageandavoidcreatinganysourceofignition
untilgasolinevaporshavedissipated.
•Replaceallfueltankandcontainercapssecurely .
Preparation
•Whilemowing,alwayswearsubstantialfootwearand
longtrousers.Donotoperatethemachinewhen
barefootorwearingopensandals.
•Thoroughlyinspecttheareawherethemachineisto
beusedandremoveallstones,sticks,wires,bones
andotherforeignobjects.
•Beforeusing,alwaysvisuallyinspecttoseethat
guards,andsafetydevices,suchasdeectorsand/or
grasscatchers,areinplaceandworkingcorrectly.
•Beforeusing,alwaysvisuallyinspecttoseethatthe
blades,bladeboltsandcutterassemblyarenotworn
ordamaged.Replacewornordamagedbladesand
boltsinsetstopreservebalance.
Starting
•Disengageallbladeanddriveclutchesandshiftinto
neutralbeforestartingtheengine.
•Donottiltthemachinewhenstartingtheengine
orswitchingonthemotor,unlessthemachinehas
tobetiltedforstarting.Inthiscase,donottiltit
morethanabsolutelynecessaryandliftonlythepart,
whichisawayfromtheoperator.
•Starttheengineorswitchonthemotorcarefully
accordingtoinstructionsandwithfeetwellaway
fromtheblade(s)andnotinfrontofthedischarge
chute.
Operation
•Nevermowwhilepeople,especiallychildren,orpets
arenearby .
•Mowonlyindaylightoringoodarticiallight.
•Avoidoperatingthemachineinwetgrass,where
feasible.
•Stayalertforholesintheterrainandotherhidden
hazards.
•Donotputhandsorfeetnearorunderrotatingparts.
Keepclearofthedischargeopeningatalltimes.
•Neverpickuporcarryamachinewhiletheengine
isrunning.
•Useextremecautionwhenreversingorpullinga
pedestriancontrolledmachinetowardsyou.
•Walk,neverrun.
•Slopes:
–Donotmowexcessivelysteepslopes.
–Exerciseextremecautionwhenonslopes.
–Mowacrossthefaceofslopes,neverupand
downandexerciseextremecautionwhen
changingdirectiononslopes.
–Alwaysbesureofyourfootingonslopes.
•Uselowthrottlesettingswhenengagingthe
traction-clutch,especiallyinhighgears.Reduce
speedonslopesandinsharpturnstoprevent
overturningorlossofcontrol.
•Stopthebladeifthemachinehastobetiltedfor
transportationwhencrossingsurfacesotherthan
grassandwhentransportingthemachinetoand
fromtheareatobemowed.
•Donotoperatetheengineinaconnedspacewhere
dangerouscarbonmonoxidefumescancollect.
•Stoptheengine
–wheneveryouleavethemachine.
–beforerefueling.
–beforeremovingthegrasscatcher.
–beforemakingheightadjustmentunless
adjustmentcanbemadefromtheoperator's
position.
•Stoptheengineanddisconnectthespark-plugwire.
–beforeclearingblockagesoruncloggingchute.
–beforechecking,cleaningorworkingonthe
machine.
–afterstrikingaforeignobject,inspectthe
machinefordamageandmakerepairsbefore
restartingandoperatingthemachine.
–ifthemachinestartstovibrateabnormally(check
immediately).
•Reducethethrottlesettingduringengineshutdown,
andclosethefuelvalveattheconclusionofmowing.
•Lightningcancausesevereinjuryordeath.Ifyousee
lightningorhearthunderinthearea,donotoperate
themachine;seekshelter.
•Watchoutfortrafcwhencrossingornearroadways.
MaintenanceandStorage
•Keepallnuts,boltsandscrewstighttobesurethe
machineisinsafeworkingcondition.
•Donotusepressurecleaningmachineonmachine.
•Neverstorethemachinewithgasolineinthetank
andinsideabuildingwherefumescanreachanopen
ameorspark.
•Allowtheenginetocoolbeforestoringinany
enclosure.
4
Page 5

•Toreducetherehazard,keeptheengine,silencer,
batterycompartmentandgasolinestoragefreeof
grass,leaves,orexcessivegrease.
•Checkgrasscatchercomponentsandthedischarge
guardfrequentlyandreplacewithmanufacturer's
recommendedparts,whennecessary.
•Replacewornordamagedpartsforsafety .
•Replacefaultysilencers.
•Ifthefueltankhastobedrained,dothisoutdoors.
•Donotchangetheenginegovernorsettingsor
overspeedtheengine.Operatinganengineat
excessivespeedcanincreasethehazardofpersonal
injury.
•Becarefulduringadjustmentofthemachineto
prevententrapmentofthengersbetweenmoving
bladesandxedpartsofthemachine.
•Toensurethebestperformanceandsafety,
purchaseonlygenuineT ororeplacementparts
andaccessories.Donotuse
accessories;theymaycauseasafetyhazard.
will t
partsand
SoundPressure
Thisunithasasoundpressurelevelattheoperator’s
earof90dBA,whichincludesanUncertaintyValue(K)
of1dBA.Thesoundpressurelevelwasdetermined
accordingtotheproceduresoutlinedinEN836.
SoundPower
Thisunithasaguaranteedsoundpowerlevelof98dBA,
whichincludesanUncertaintyValue(K)of1dBA.The
soundpowerlevelwasdeterminedaccordingtothe
proceduresoutlinedinISO11094.
Hand-ArmVibration
Measuredvibrationlevelforthelefthand=4.0m/s
Measuredvibrationlevelfortherighthand=5.8m/s
UncertaintyValue(K)=2.3m/s
Themeasuredvaluesweredeterminedaccordingtothe
proceduresoutlinedinEN836.
2
2
2
5
Page 6
SafetyandInstructionalDecals
Safetydecalsandinstructionsareeasilyvisibletotheoperatorandarelocatednearanyareaof
potentialdanger.Replaceanydecalthatisdamagedorlost.
Manufacturer'sMark
1.Indicatesthebladeisidentiedasapartfromtheoriginal
machinemanufacturer.
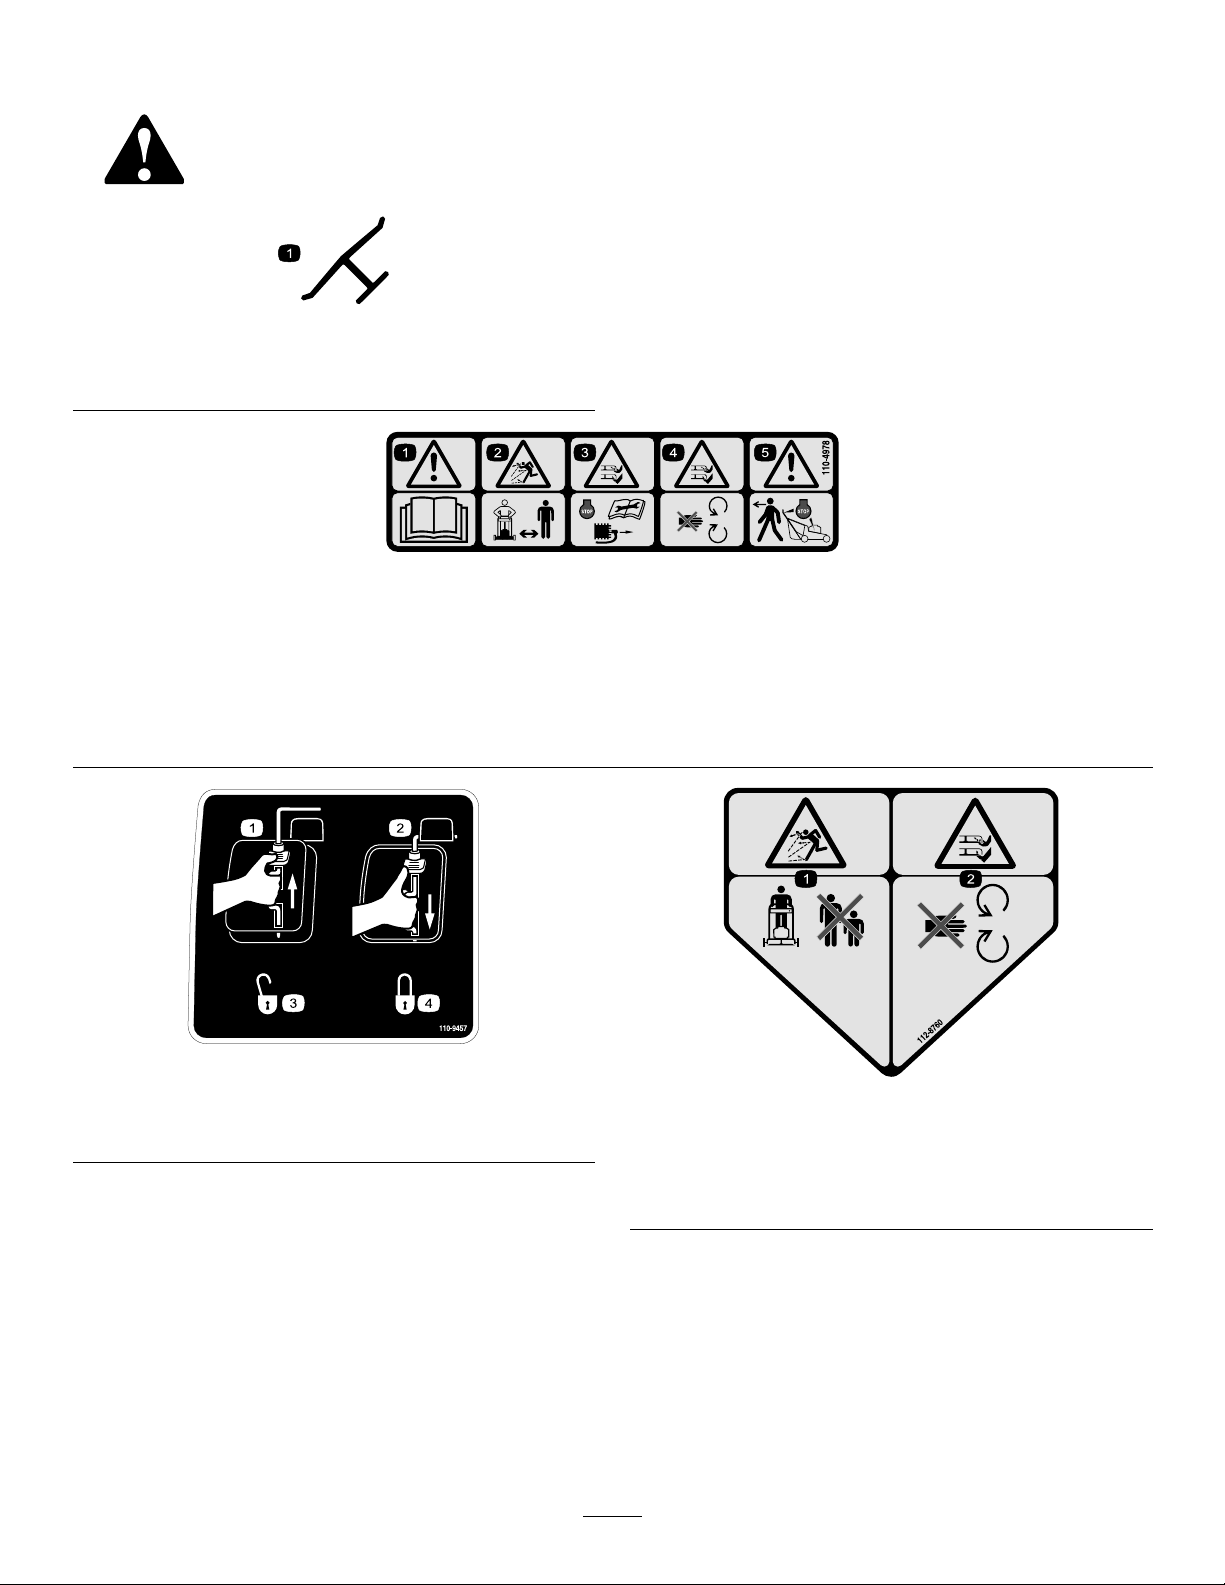
110-4978
1.Warning—readtheOperator'sManual.
2.Thrownobjecthazard—keepbystandersasafedistancefromthemachine.
3.Cutting,dismembermenthazardofhandorfoot—stoptheengineandremovethesparkplugwirebeforeperformingany
maintenanceonthemachine.
4.Cutting,dismembermenthazardofhandorfoot—stayawayfrommovingparts.
5.Warning—stoptheenginebeforeleavingthemachine.
1.EngineswitchOff
2.EngineswitchOn
110-9457
3.Unlocked
4.Locked
1.Thrownobjecthazard—keepbystandersasafedistance
fromthemachine.
2.Cutting/dismembermentofhandorfoot—stayawayfrom
movingparts.
112-8760
6
Page 7

114-2820
1.Warning—readthe
Operator'sManual.
2.Thrownobject
hazard—keepbystanders
asafedistancefromthe
machine.
3.Thrownobjecthazard—do
notoperatethemower
withoutthereardischarge
plugorbaginplace;do
notoperatethemower
withoutthesidedischarge
coverordeectorinplace.
4.Cutting/dismemberment
hazardofhandorfoot,
mowerblade—stayaway
frommovingparts.
5.Cutting/dismemberment
hazardofhandorfoot,
mowerblade—remove
theignitionkeyandread
theinstructionsbefore
servicingorperforming
maintenance.
6.Cutting/dismemberment
hazardofhandorfoot,
mowerblade—donot
operateupanddown
slopes;operatesideto
sideonslopes;stopthe
enginebeforeleavingthe
operatingposition;and
lookbehindyouwhen
backingup.
7
Page 8
LooseParts
Usethechartbelowtoverifythatallpartshavebeenshipped.
ProcedureDescription
1
2
3
1
InstallingtheHandle
Partsneededforthisprocedure:
2
Oval-headbolt(5/16x1-1/2inches)
2
Bolt(5/16x1-1/2inches)
2
Spacer
4
Locknut(5/16inch)
1
Cabletie
Oval-headbolt(5/16x1-1/2inches)
Bolt(5/16x1-1/2inches)
Spacer
Locknut(5/16inch)
Cabletie
SAE30WdetergentoilwithanAPI
serviceclassicationofSH,SJ,SL,or
higher(notsuppliedwiththemower)
Nopartsrequired
Qty.
20oz.
(0.55l)
Use
2
2
2
4
1
–
Installthehandle.
Filltheenginewithoil.
Installtherecycleplugorgrassbag.
Procedure
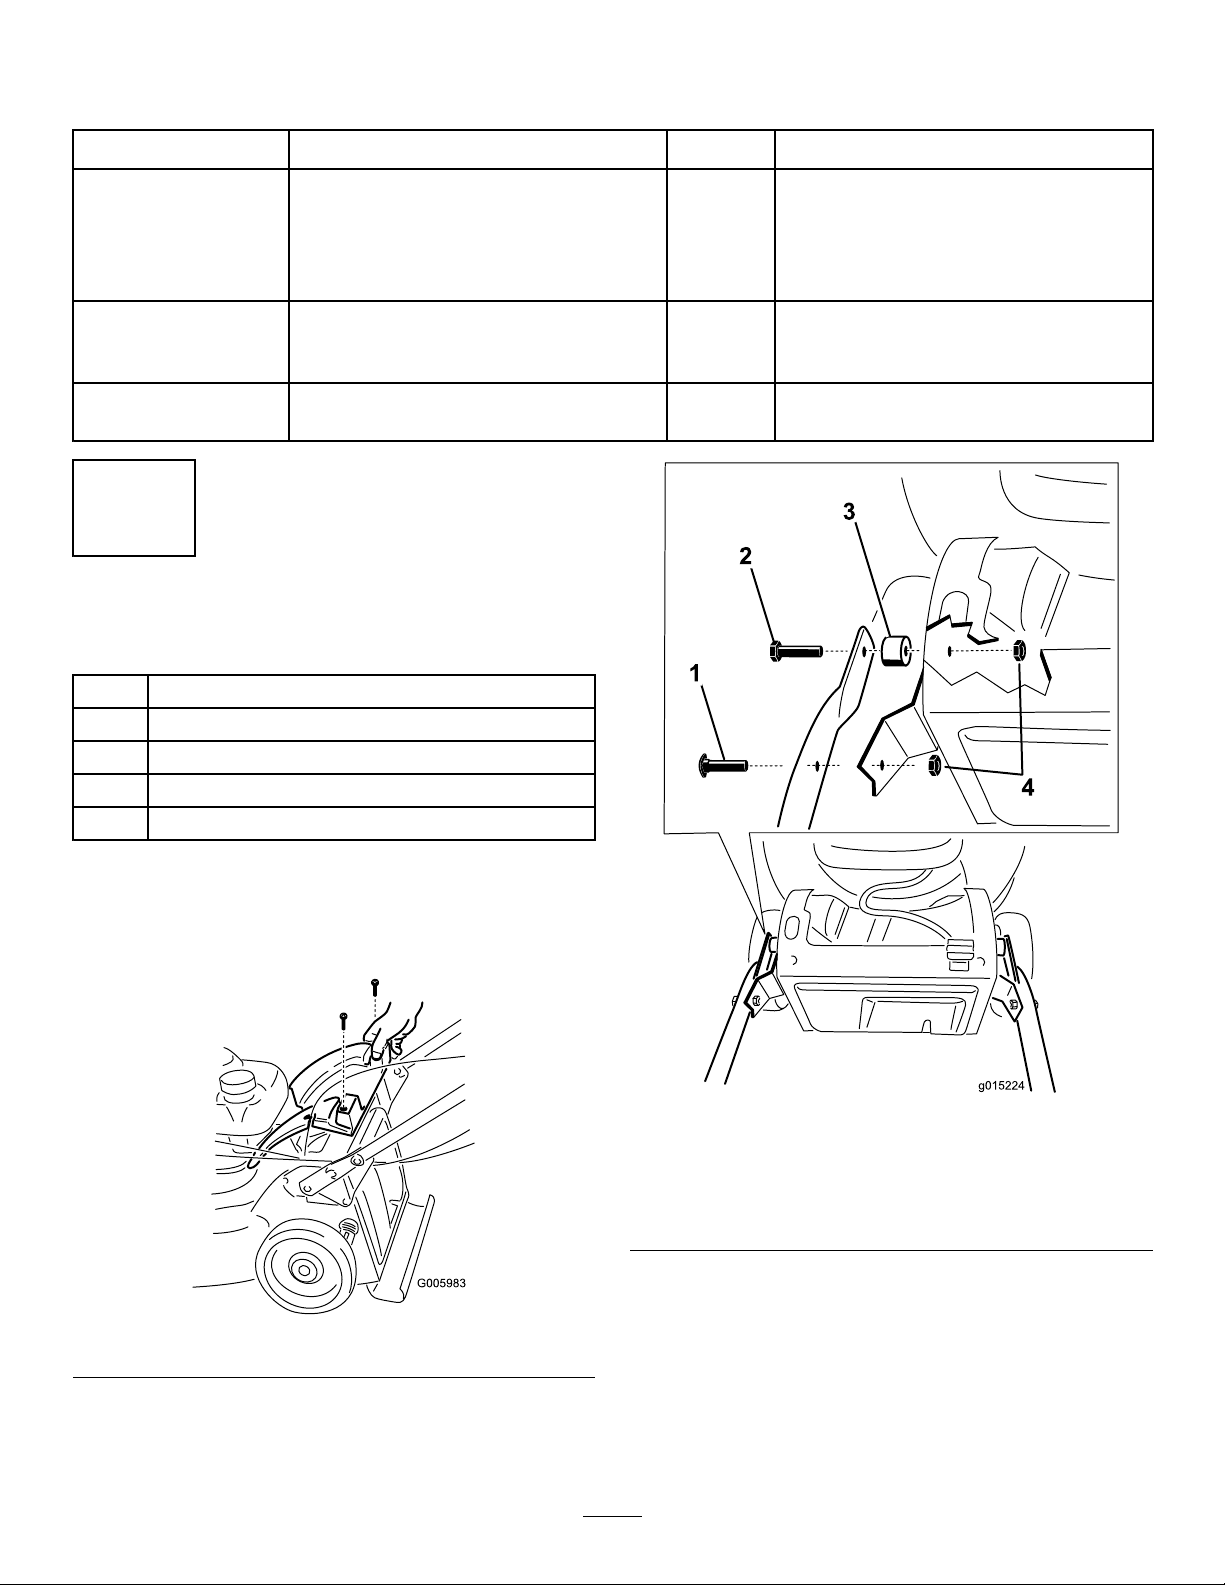
1.Removethe2screwsthatholdthebackcoverin
placeandremovethebackcover(Figure3).
Figure3
2.Attachthehandletothedeckofthemachine
(Figure4)usingthe4bolts,4locknuts,and2spacers
intheloosepartsbag.
Figure4
1.Oval-headbolt(5/16x
1-1/2inches)(2)
2.Bolt(5/16x1-1/2inches)
(2)
3.Spacer(2)
4.Locknut(5/16inch)(4)
Note:Youcansetthehandleheightinoneoftwo
positions(Figure5).Setthehandletoaheightthatis
comfortableforyou.
8
Page 9
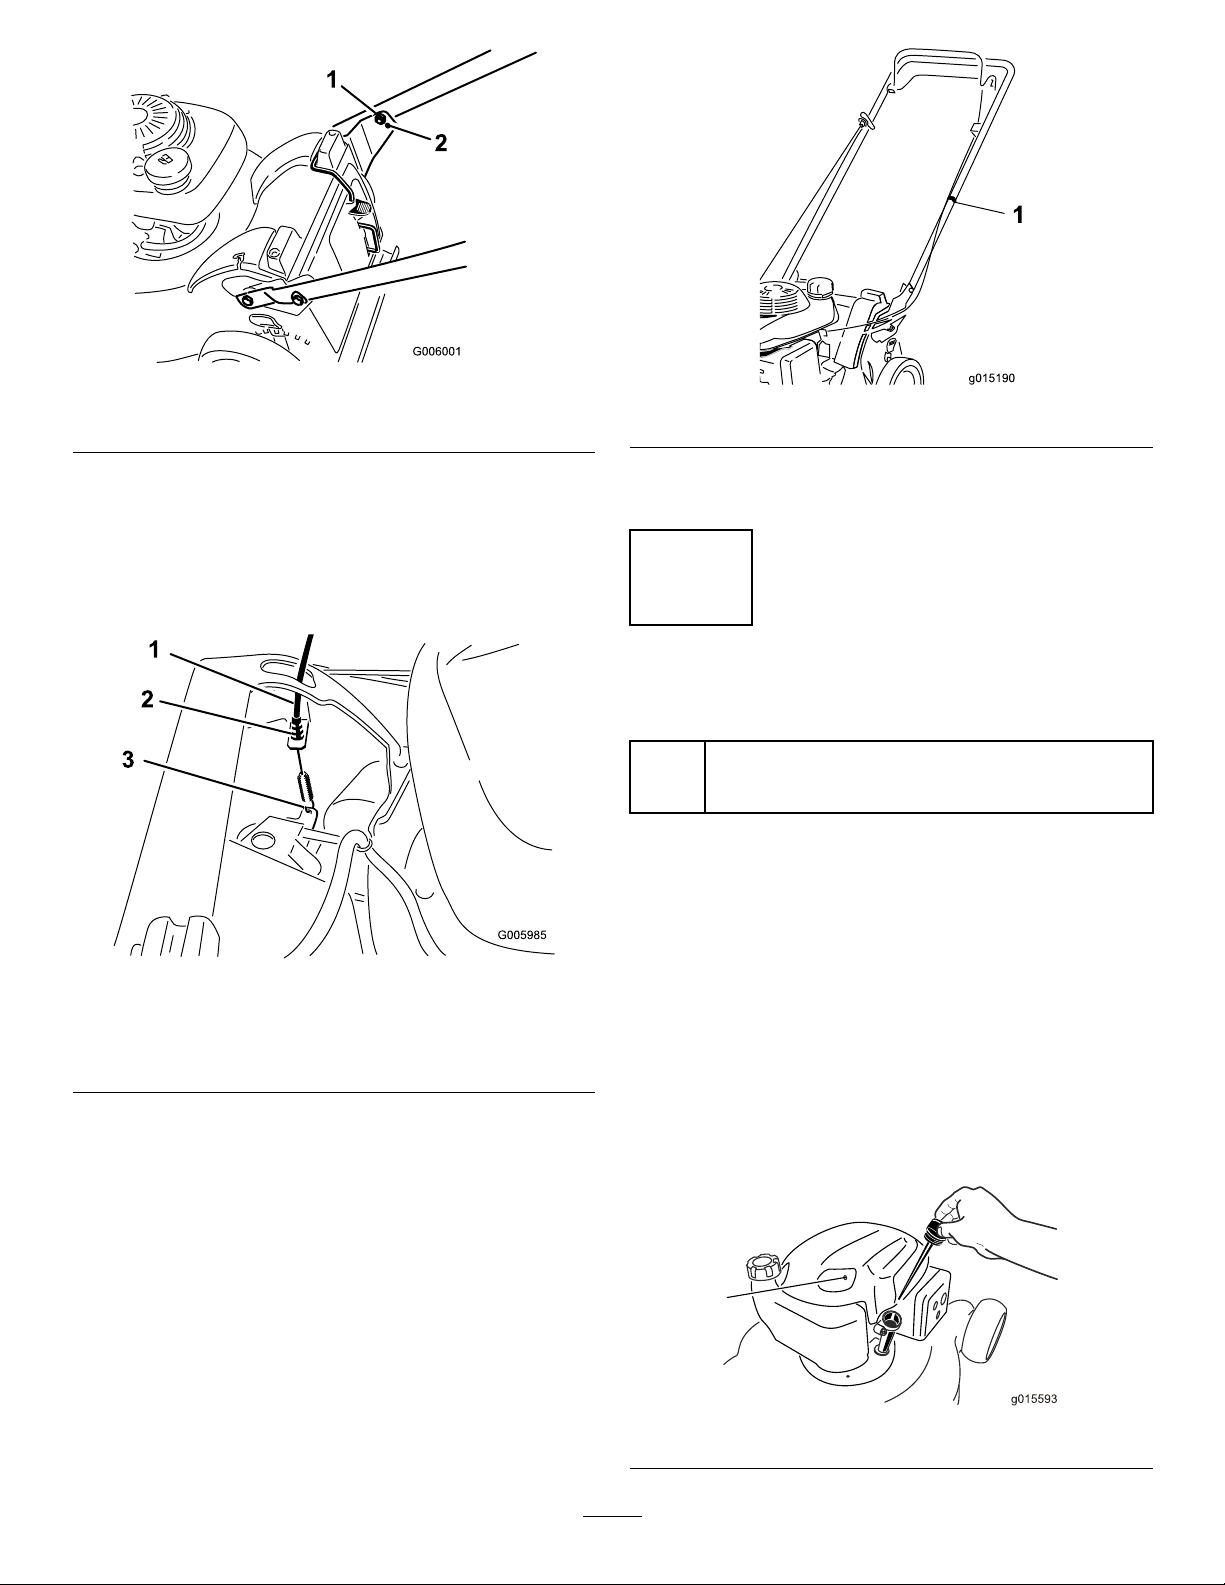
Figure5
1.Higherhandleposition2.Lowerhandleposition
Figure7
Note:Torqueallboltsto120in-lb(13.6N-m).
3.Routetheself-propeldrivecabledowntheinside
ofthehandle,threadthecablethroughtheopening
onthelefthandsideofthehousing,andattachthe
cableend(Figure6).
Figure6
1.Self-propeldrivecable
2.Insertcablejacketend
here
4.Ensurethattheself-propeldrive
isproperlyadjusted;referto
AdjustingtheSelf-propelDriveCable(page21).
3.Attachcableendhere
6.Installthebackcoverwiththe2screwsyouremoved
instep1.
2
FillingtheEnginewithOil
Partsneededforthisprocedure:
20oz.
(0.55l)
Procedure
Important:Thismachine
intheengine.
Important:T oreadthedipstickinthismachine
correctly,do
thedipstickuntilthethreadsonthecapjusttouch
thethreadsintheoillltube.
1.Movethemachinetoalevelsurface.
2.Removethedipstick,wipeitclean,andinsertitback
SAE30WdetergentoilwithanAPIservice
classicationofSH,SJ,SL,orhigher(notsupplied
withthemower)
does not
not
screwitintotheoillltube.Insert
intotheoilllertubejustuntilitstopsbutdonot
screwitin(
Figure8).
comewithoil
5.Tietheloosecablestothehandle(Figure7)using
thecabletiefromtheloosepartsbag.
Figure8
9
Page 10

3.Removethedipstickandchecktheoillevel.
Figure9showshowtoreadthedipstick.
Figure9
1.Oillevelistoolow3.Oillevelisgood
2.Oillevelistoohigh
•Ifthedipstickshowsthattheoilistoolow,add
oiltotheengine.
Important:Useonlythekindofoillistedat
thestartofthisprocedure.
Note:Whentheenginehasnooilinit,youcan
rstpourabout3/4oftheamountofoillistedat
thestartofthisprocedureintothelltube.
Slowlypoursmallamountsofoilintotheoil
lltube,waitafewminutesandcheckthelevel
withthedipstick.Repeatthisuntilthedipstick
indicatesthattheoillevelisgood.Donot
overll.
preventsthemowerfromoperatingwithoutarecycle
plugorgrassbag.Thispreventsthemachinefrom
throwingdebrisattheoperatorthroughtherearchute.
Fortheswitchtodetectthepresenceoftherecycleplug,
thetopoftherecyclepluglevermustliefullyinthe
bottomofthechannel(Figure10).
Figure10
1.Topofrecycleplugleverinswitchchannel
1.Inserttherecycleplugintothemower,ifitisnot
alreadyinstalled(Figure11).
•Ifthedipstickshowsthattheoilis
toohigh,drainoutalittleoil;referto
ChangingtheEngineOil(page20).
•Ifthetopoftheoilfallswithinthemarked
sectiononthedipstick,theoillevelisgood.
4.Installthedipstickandhandtightenitsecurely.
Important:
5 operating hour s
refertoChangingtheEngineOil(page20).
Change the engine oil after the r st
;changeityearlythereafter;
3
InstalltheRecyclePlugor
GrassBag
NoPartsRequired
Procedure
Youmustcorrectlyinstalltherecycleplug(forrecycling
orside-discharging)orgrassbag(forbagging)orthe
enginewillnotstart.
Themachinehasasafetyswitch,locatedatthebottom
ofachannelonthetop,rightrearofthemower,that
Figure11
10
Page 11

2.Squeezethebuttonontheleverwithyourthumb
andfullyinserttherecycleplugintotheopening
(Figure11).
3.Releasethebuttonontheleverandensurethatthe
topoftheleverisliesfullyintheswitchchannel.If
thetopoftheleverisnotintheswitchchannel,
yourmachinewillnotstart!
Note:Iftheleverdoesnotlatchproperly,
disconnectthewirefromthesparkplugandcheck
forandremoveanydebrisbuildupinthetunnel.
ProductOverview
Figure12
1.Bladecontrolbar
2.Self-propeldrivebar7.Sparkplug
3.Handle
4.Fueltank
5.Cuttingheightlever(4)
1.Grassbag3.recycleplug(installed)
2.Sidedischargechute
6.Airlter
8.Oilll/dipstick(notshown)
9.Starterhandle
Figure13
11
Page 12

Controls
Operation
Note:Determinetheleftandrightsidesofthe
machinefromthenormaloperatingposition.
CheckingtheEngineOilLevel
ServiceInterval:Beforeeachuseordaily
Important:Toreadthedipstickinthismachine
correctly,do
Insertthedipstickuntilthethreadsonthecapjust
touchthethreadsintheoillltube.
not
screwitintotheoillltube.
1.Recoilstarthandle
2.Bladecontrolbar
Figure14
3.Self-propeldrivebar
1.Movethemachinetoalevelsurface.
2.Removethedipstick,wipeitclean,andinsertit
intotheoilllertubejustuntilitstopsbutdonot
screwitin(
3.Removethedipstickandchecktheoillevel.
Figure16showshowtoreadthedipstick.
Figure15).
Figure15
Figure16
1.Oillevelistoolow3.Oillevelisgood
2.Oillevelistoohigh
•Ifthedipstickshowsthattheoilistoolow ,
addoiltotheengine;refertoSetup,step
2FillingtheEnginewithOil(page9).
•Ifthedipstickshowsthattheoilis
toohigh,drainoutalittleoil;referto
ChangingtheEngineOil(page20).
•Ifthetopoftheoilfallswithinthemarked
sectiononthedipstick,theoillevelisgood.
4.Installthedipstickandhandtightenitsecurely.
12
Page 13

FillingtheFuelTankwith
Gasoline
DANGER
Gasolineisextremelyammableandexplosive.A
reorexplosionfromgasolinecanburnyouand
others.
•Topreventastaticchargefromignitingthe
gasoline,placethecontainerand/ormower
directlyonthegroundbeforelling,notina
vehicleoronanobject.
•Fillthetankoutdoorswhentheengineiscold.
Wipeupspills.
•Donothandlegasolinewhensmokingor
aroundanopenameorsparks.
•Storegasolineinanapprovedfuelcontainer,
outofthereachofchildren.
Fillthefueltankwithfreshunleadedregulargasoline
fromamajorname-brandservicestation(
Important:Toreducestartingproblems,add
fuelstabilizertothefuelallseason,mixingitwith
gasolinelessthan30daysold.
Figure17).
Figure18
1.Topofrecycleplugleverinswitchchannel
Figure19
Figure17
StartingtheEngine
Important:Asafetyswitchpreventsthemachine
fromstartingunlesstherecycleplugorthegrass
bagissecurelyinstalled.
1.Installtherecycleplug(Figure18)orthegrassbag
(Figure19)onthemachine.
2.TurnthefuelvalvelevertotheOnposition
(Figure20).
13
Page 14

Figure20
3.Whentheengineiscold,movethechokeleverto
theChokeposition(
chokewhentheengineiswarm.
Figure21).Donotusethe
Figure22
1.Recoilstarthandle
5.Ifthemachinedoesnotstartin1or2pulls,repeat
steps3and4.
Note:Ifthemachinestilldoesnotstart,contactan
AuthorizedServiceDealer.
StoppingtheEngine
ServiceInterval:Beforeeachuseordaily
Tostoptheengine,releasethebladecontrolbar
(Figure23).
Important:Whenyoureleasethebladecontrol
bar,boththeengineandbladeshouldstopwithin
3seconds.Iftheydonotstopproperly,stop
usingthemachineimmediatelyandcontactan
AuthorizedServiceDealer.
Figure21
4.Holdthebladecontrolbaragainstthehandleand
pulltherecoilstarter(Figure22).
Note:Ifthechokeisengaged,itwillautomatically
turnoffabout3secondsafterthebladecontrolbar
isheldagainstthehandle.
Note:Pulltherecoilstarthandlelightlyuntilyou
feelresistance,thenpullitbriskly.
Figure23
1.Bladecontrolbar
OperatingtheSelf-propel
Drive
1.Tooperatetheself-propeldrive,squeezethe
self-propeldrivebaragainstthehandleandhold
Figure24).
it(
14
Page 15

Figure24
1.Self-propeldrivebar
Note:Themaximumself-propeldrivespeedis
xed.Toreducethespeed,increasethespace
betweentheself-propeldrivebarandthehandle.
2.Todisengagetheself-propeldrive,releasethe
self-propeldrivebar.
Note:Themachinecomeswithfreewheeling
clutcheswhichmakeiteasiertopullthemachine
rearward.Todisengagetheclutches,youmayneed
topushthemachineforward1inch(2.5cm)or
moreafteryoureleasetheself-propeldrivebar.
AdjustingtheCuttingHeight
Cuttingheightsarefrom1inch(25mm)to4-1/2
inches(114mm)in1/2-inch(13mm)increments.
WARNING
Adjustingthecuttingheightmaybringyouinto
contactwiththemovingblade,causingserious
injury.
•Stoptheengineandwaitforallmovingparts
tostop.
•Donotputyourngersunderthehousing
whenadjustingthecuttingheight.
Adjustthecuttingheightasdesired(Figure25).Setall
fourwheelstothesameheight.
Figure25
1.Highestheight-of-cut
position(leversforward)
2.Lowestheight-of-cut
position(leversrearward)
Note:T oraisethemower,moveall4cuttingheight
leversforward;tolowerthemower,movethem
rearward.
RecyclingtheClippings
Yourmachinecomesfromthefactoryreadytorecycle
thegrassandleafclippingsbackintothelawn.
Ifthegrassbagisonthemachine,removeit(referto
RemovingtheGrassBag(page16))beforerecyclingthe
clippings.Ifthesidedischargechuteisonthemachine,
removeitandlockthesidedischargedoor(referto
RemovingtheSideDischargeChute(page17))before
recyclingtheclippings.
Important:Asafetyswitchpreventsthemachine
fromstartingunlesstherecycleplugissecurely
installed(
Figure26).
InstalltherecycleplugasillustratedinFigure26.
15
Page 16

Figure26
1.Topofrecycleplugleverinswitchchannel
BaggingtheClippings
Usethegrassbagwhenyouwanttocollectgrassand
leafclippingsfromthelawn.
Ifthesidedischargechuteisonthemachine,
removeitandlockthesidedischargedoor(referto
RemovingtheSideDischargeChute(page17))before
baggingtheclippings.
WARNING
Aworngrassbagcouldallowsmallstones
andothersimilardebristobethrowninthe
operator'sorbystander'sdirectionandresultin
seriouspersonalinjuryordeathtotheoperatoror
bystanders.
Checkthegrassbagfrequently.Ifitisdamaged,
installanewT ororeplacementbag.
WARNING
Thebladeissharp;contactingthebladecanresult
inseriouspersonalinjury.
Figure27
2.Insertthegrassbaghandleintothegroovesatthe
topofthemachine.
Important:Asafetyswitchpreventsthe
machinefromstartingunlesstherecycleplug
issecurelyinstalled.
RemovingtheGrassBag
1.Liftthegrassbaghandleoutfromthegroovesatthe
topofthemachineandremovethebag(Figure28).
Stoptheengineandwaitforallmovingpartsto
stopbeforeleavingtheoperatingposition.
InstallingtheGrassBag
1.Removetherecycleplug(Figure27).
Figure28
2.Inserttherecycleplug(Figure29).
16
Page 17

2.Liftopenthesidedischargedoor(Figure31).
Figure31
3.Installthesidedischargechuteandclosethedoor
ontothechute(
Figure32).
Figure29
Side-dischargingthe
Clippings
Usethesidedischargeforcuttingverytallgrass.
Ifthebagisonthemachine,removeitandinsertthe
recycleplugbeforeside-dischargingtheclippings;refer
toRecyclingtheClippings(page15).
Important:Asafetyswitchpreventsthemachine
fromstartingunlesstherecycleplugissecurely
installed.
InstallingtheSideDischargeChute
1.Unlockthesidedischargedoor(Figure30).
Figure32
RemovingtheSideDischargeChute
Toremovethesidedischargechute,reversethesteps
above.
Important:Lockthesidedischargedoorafteryou
closeit(Figure33).
Figure30
17
Page 18

atthe2-inch(51mm),2-1/2inch(64mm),or
3-inch(76mm)cuttingheightsettings.Cutonly
aboutathirdofthegrassbladeatatime.Donot
cutbelowthe2-1/2inch(64mm)settingunlessthe
grassissparseoritislatefallwhengrassgrowth
beginstoslowdown.
Figure33
OperatingTips
GeneralTips
•Maintainasharpbladethroughoutthecutting
season.Periodicallyledownnicksontheblade.
•Replacethebladewhennecessarywithanoriginal
Tororeplacementblade.
•Mowonlydrygrassorleaveswherefeasible.W et
grassandleavestendtoclumpontheyardandcan
causethemowertoplugortheenginetostall.
WARNING
Wetgrassorleavescancauseseriousinjuryif
youslipandcontacttheblade.
Mowonlyindryconditionswherefeasible.
•Cleanunderthemowerhousingaftereachmowing.
SeeCleaningundertheMowerHousing.
•Keeptheengineingoodrunningcondition.
•Settheenginespeedtothefastestpositionforthe
bestcuttingresults.
•Whencuttinggrassover6inches(15cm)tall,rst
mowatthehighestcuttingheightsettingandwalk
slower;thenmowagainatalowersettingforthe
bestlawnappearance.Ifthegrassistoolongand
theleavesclumpontopofthelawn,themowermay
plugandcausetheenginetostall.
•Alternatethemowingdirection.Thishelpsdisperse
theclippingsoverthelawnforevenfertilization.
Ifthenishedlawnappearanceisunsatisfactory,try
oneormoreofthefollowing:
•Sharpentheblade.
•Walkataslowerpacewhilemowing.
•Raisethecuttingheightonyourmower.
•Cutthegrassmorefrequently.
•Overlapcuttingswathsinsteadofcuttingafull
swathwitheachpass.
•Setthecuttingheightonthefrontwheelsonenotch
lowerthantherearwheels.
CuttingLeaves
•Aftercuttingthelawn,ensurethathalfofthelawn
showsthroughthecutleafcover.Youmayneedto
makemorethanonepassovertheleaves.
WARNING
Operatingamowerwithitsenginerunningat
aspeedgreaterthanthefactorysettingcan
causethemowertothrowapartofthebladeor
engineintotheoperator'sorbystander'sarea
andresultinseriouspersonalinjuryordeath.
–Donotchangetheenginespeedsetting.
–Ifyoususpecttheenginespeedisfaster
thannormal,contactanAuthorizedService
Dealer.
•Cleantheairlterfrequently.recyclingstirsup
moreclippingsanddustwhichclogstheairlter
andreducesengineperformance.
CuttingGrass
•Grassgrowsatdifferentratesatdifferenttimesof
theyear.Inthesummerheat,itisbesttocutgrass
•Forlightleafcoverage,setallthewheelsatthesame
cuttingheightsetting.
•Iftherearemorethan5inches(12.7cm)ofleaves
onthelawn,setthefrontcuttingheight1or2
notcheshigherthantherearcuttingheight.This
makesiteasiertofeedtheleavesunderthemower
housing.
•Slowdownyourmowingspeedifthemowerdoes
notcuttheleavesnelyenough.
•Ifyoumowoveroakleaves,youcanaddlimeto
thegrassinthespringtoreducetheacidityofthe
oakleaves.
18
Page 19

Maintenance
RecommendedMaintenanceSchedule(s)
MaintenanceService
Interval
Aftertherst5hours
Beforeeachuseordaily
Every100hours
Every200hours
Beforestorage
Yearly
MaintenanceProcedure
•Changetheengineoil.
•Checktheengineoillevel.
•Ensurethattheenginestopswithin3secondsafterreleasingthebladecontrolbar.
•Checktheaircleanerfordirtand/ordamageandcleanorreplaceitifnecessary .
•Cleangrassclippingsanddirtfromunderthemachine.
•Checkthesparkplug.
•Replacethesparkplug.
•Emptythefueltankbeforerepairsasdirectedandbeforeannualstorage.
•Cleantheairlter(morefrequentlyindustyoperatingconditions).
•Changetheengineoil.
•Replacethebladeorhaveitsharpened(morefrequentlyiftheedgedullsquickly).
Premaintenance
Procedures
PreparingforMaintenance
1.Stoptheengineandwaitforallmovingpartstostop.
2.Disconnectthesparkplugwirefromthesparkplug
(Figure34)beforeperforminganymaintenance
procedure.
handfuelpumptoremovethefuel.Alwaystip
themowerontoitssidewiththeairlterup.
WARNING
Tippingthemowermaycausethefueltoleak.
Gasolineisammable,explosiveandcancause
personalinjury.
Runtheenginedryorremovethegasolinewith
ahandpump;neversiphon.
Figure34
3.Afterperformingthemaintenanceprocedure(s),
connectthesparkplugwiretothesparkplug.
Important:Beforetippingthemowertochange
theoilorreplacetheblade,allowthefueltank
torundrythroughnormalusage.Ifyoumust
tipthemowerpriortorunningoutoffuel,usea
19
Page 20

EngineMaintenance
ServicingtheAirCleaner
ServiceInterval:Beforeeachuseordaily
Yearly
1.Pressdownonthelatchtabsontopoftheaircleaner
coverandremovethecover(
Figure35
1.Aircleanercover
2.Latchtab(2)
3.Airlter
Figure35).
Figure36
3.Tipthemachineontoitsside,withoillltubedown,
todraintheusedoiloutthroughtheoillltubeinto
apan(Figure37).
2.Removetheairlter(Figure35).
3.Iftheairlterisdamagedoriswetwithoilorfuel,
replaceit.
4.Iftheairlterisdirty,tapitonahardsurfaceseveral
timesorblowcompressedairlessthan30psi(207
kPa)throughthesideofthelterthatfacesthe
engine.
Note:Donotbrushthedirtoffthelter;brushing
forcesdirtintothebers.
5.Removedirtfromtheaircleanerbodyandcover
usingamoistrag.Donotwipedirtintotheair
duct.
6.Installthelterintotheaircleaner.
7.Closethecover.
ChangingtheEngineOil
ServiceInterval:Aftertherst5hours
Yearly
Note:Runtheengineafewminutesbeforechanging
theoiltowarmit.Warmoilowsbetterandcarries
morecontaminantsoutoftheengine.
1.Performthepre-maintenanceprocedures;referto
PreparingforMaintenance(page19).
2.Removethedipstick(Figure36).
Figure37
4.Filltheenginewithoil;refertoSetup,step
2FillingtheEnginewithOil(page9).
5.Installthedipstickandhandtightenitsecurely.
6.Disposeoftheusedoilatalocalrecyclingcenter.
ServicingtheSparkPlug
ServiceInterval:Every100hours
Every200hours
UseanNGKBPR6ESsparkplugorequivalent.
1.Stoptheengineandwaitforallmovingpartstostop.
2.Disconnectthewirefromthesparkplug(Figure34).
3.Cleanaroundthesparkplug.
4.Removethesparkplugfromthecylinderhead.
Important:Replaceacracked,fouled,or
dirtysparkplug.Donotcleantheelectrodes
becausegritenteringthecylindercandamage
theengine.
5.Setthegapontheplugto0.030in.(0.76mm)
(Figure38).
20
Page 21

Figure38
1.Centerelectrodeinsulator
2.Sideelectrode
3.Airgap(nottoscale)
6.Installthesparkplugandthegasketsealbyhand.
7.Tightentheplug1/2turnafterthesparkplugseats
tocompressthewasher.
Note:Wheninstallingtheoriginalsparkplugagain,
tighten1/8to1/4turnafterthesparkplugseatsto
compressthewasher.
DriveSystem
Maintenance
AdjustingtheSelf-propelDrive
Cable
Wheneveryouinstallanewself-propelcableorif
theself-propeldriveisoutofadjustment,adjustthe
self-propeldrivecable.
1.Loosenthecablesupportnut(
Figure39).
Note:Under-tighteningthesparkplugcancause
theplugtobecomeveryhotandcandamagethe
engine.Overtighteningthesparkplugcandamage
thethreadsintheenginecylinderhead.
8.Connectthewiretothesparkplug.
Figure39
1.1to1-1/2inches(25to38
mm)
2.Self-propeldrivebar5.Cablesupport
3.Cablejacket
2.Holdtheself-propelbail1to1-1/2inches(25to38
mm)fromthehandle(Figure39).
3.Pulldownthecablejacket(towardthemower)until
thereisnoslackinthecable(
4.Tightenthenutonthecablesupport.
5.Releasetheself-propeldrivebarandensurethatthe
cableisloose.
Note:Thecablemustbeloosewiththeself-propel
drivebarinthereleasedposition;otherwise,the
machinemaycreepwhenyoudisengagethebar.
4.Cablesupportnut
Figure39).
21
Page 22

BladeMaintenance
MaintainingtheCuttingBlade
ServiceInterval:Yearly
Examinethebladewheneveryourunoutofgasoline.If
thebladeisdamagedorcracked,replaceitimmediately.
Ifthebladeedgeisdullornicked,haveitsharpenedor
replaceit.
WARNING
Thebladeissharp;contactingthebladecanresult
inseriouspersonalinjury.
Weargloveswhenservicingtheblade.
1.Disconnectthesparkplugwirefromthesparkplug;
refertoPreparingforMaintenance.
2.Tipthemachineontoitsside,withtheairlterup.
3.Useablockofwoodtoholdthebladesteady
Figure40).
(
Figure41
Figure40
4.Removetheblade,savingallmountinghardware
(Figure40).
5.Installthenewbladeandallmountinghardware
(
Figure41).
Important:Positionthecurvedendsofthe
bladetopointtowardthemachinehousing.
6.Useatorquewrenchtotightenthebladeboltto
40to50ft-lb(54to68N⋅ ⋅⋅m).
22
Page 23

Cleaning
CleaningundertheMachine
ServiceInterval:Beforeeachuseordaily
WARNING
Themowermaydislodgematerialfromunderthe
mowerhousing.
•Weareyeprotection.
•Stayintheoperatingposition(behindthe
handle).
•Donotallowbystandersinthearea.
Storage
Topreparethemachineforoff-seasonstorage,perform
therecommendedmaintenanceprocedures;referto
Maintenance.
Storethemachineinacool,clean,dryplace.Coverthe
machinetokeepitcleanandprotected.
PreparingtheFuelSystem
WARNING
Gasolinecanvaporizeifyoustoreitoverlong
periodsoftimeandexplodeifitcomesintocontact
withanopename.
1.Withtheenginerunningonaatpavedsurface,
sprayastreamofwaterinfrontoftherightrear
wheel(Figure42).
Thewaterwillsplashintothepathoftheblade,
cleaningouttheclippings.
Figure42
2.Whennomoreclippingscomeout,stopthewater
andmovethemachinetoadryarea.
3.Runtheengineforafewminutestodrythehousing
topreventitfromrusting.
•Donotstoregasolineoverlongperiodsoftime.
•Donotstorethemowerwithgasolineinthefuel
tankorthecarburetorinanenclosurewithan
opename.(Forexample,afurnaceorawater
heaterpilotlight.)
•Allowtheenginetocoolbeforestoringitinany
enclosure.
Emptythefueltankwhenmowingthelasttimebefore
storingthemower.
1.Runthemachineuntiltheenginestopsfromrunning
outoffuel.
2.Primetheengineandstartitagain.
3.Allowtheenginetorununtilitstops.Whenyoucan
nolongerstarttheengine,itissufcientlydry.
PreparingtheEngine
1.Whiletheengineisstillwarm,changetheoilfrom
thecrankcase.RefertoChangingtheEngineOil.
2.Removethesparkplug.
3.Usinganoilcan,addaboutonetablespoonofoilto
thecrankcasethroughthesparkplughole.
4.Slowlyrotatetheengineseveraltimes,usingthe
starterrope,todistributetheoil.
5.Installthesparkplugbutdonotconnectthewireto
thesparkplug.
23
Page 24

GeneralInformation
1.Cleanunderthemachine;referto
CleaningundertheMachine(page23).
2.Cleananydirtandchafffromthecylinder,cylinder
headns,andblowerhousing.
3.Removegrassclippings,dirt,andgrimefromthe
externalpartsoftheengine,theshrouding,andthe
topofthemachine.
4.Checktheconditionoftheblade;referto
MaintainingtheCuttingBlade(page22).
5.Servicetheairlter;referto
ServicingtheAirCleaner(page20).
6.Tightenallnuts,bolts,andscrews.
7.Touchupallrustedorchippedpaintsurfaceswith
paintavailablefromanAuthorizedServiceDealer.
RemovingtheMachinefrom
Storage
1.Checkandtightenallfasteners.
2.Removethesparkplugandspintheenginerapidly
usingthestartertoblowexcessoilfromthecylinder.
3.Cleanthesparkplugorreplaceitifitiscracked,
broken,oriftheelectrodesareworn.
4.Installthesparkplugandtighten1/8to1/4turn
afterthesparkplugseatstocompressthewasher.
5.Performanyneededmaintenanceprocedures;refer
Maintenance(page19).
to
6.Fillthefuelinthefueltankwithfreshgasoline.
7.Checktheengineoillevel.
8.Connectthewiretothesparkplug.
24
Page 25

Troubleshooting
Problem
Enginedoesnotstart
Theenginestartshardorlosespower
PossibleCauseCorrectiveAction
1.Thefueltankisemptyorthefuel
systemcontainsstalefuel.
2.Theengineiscoldandthechokewas
notused.
3.Thewireisnotconnectedtothespark
plug.
4.Thesparkplugispitted,fouled,orthe
gapisincorrect.
1.Theprimerhasnotbeenpressed.1.Presstheprimer3times.
2.Thefuelcapventholeisplugged.2.Cleanthefuelcapventholeorreplace
3.Theairlterelementisdirtyandis
restrictingtheairow.
4.Theundersideofthemachinecontains
clippingsanddebris.
5.Thesparkplugispitted,fouled,orthe
gapisincorrect.
6.Theengineoillevelistoolow,toohigh,
orexcessivelydirty.
7.Thefueltankcontainsstalefuel.7.Drainandllthefueltankwithfresh
1.Drainand/orllthefueltankwith
freshgasoline.Iftheproblempersists,
contactanAuthorizedServiceDealer.
2.MovethechokelevertotheChoke
position.
3.Connectthewiretothesparkplug.
4.Checkthesparkplugandadjustthe
gapifnecessary .Replacethespark
plugifitispitted,fouled,orcracked.
thefuelcap.
3.Cleantheairlterpre-cleanerand/or
replacethepaperairlter.
4.Cleanunderthemachine.
5.Checkthesparkplugandadjustthe
gapifnecessary .Replacethespark
plugifitispitted,fouled,orcracked.
6.Checktheengineoil.Changetheoilif
itisdirty;addordraintheoiltoadjust
theoilleveltotheFullmarkonthe
dipstick.
gasoline.
Enginerunsrough
Themachineortheenginevibrates
excessively
Unevencuttingpattern
Dischargechuteplugs
1.Thewireisnotconnectedtothespark
plug.
2.Thesparkplugispitted,fouled,orthe
gapisincorrect.
3.Theairlterelementisdirtyandis
restrictingtheairow.
1.Thebladeisbentorisoutofbalance.1.Balancetheblade.Ifthebladeisbent,
2.Theblademountingnutsareloose.2.Tightentheblademountingnuts.
3.Theundersideofthemachinecontains
clippingsanddebris.
4.Theenginemountingboltsareloose.4.Tightentheenginemountingbolts.
1.All4wheelsarenotatthesameheight.1.Placeall4wheelsatthesameheight.
2.Thebladeisdull.
3.Youaremowinginthesamepattern
repeatedly.
4.Theundersideofthemachinecontains
clippingsanddebris.
1.Thecuttingheightistoolow.1.Raisethecuttingheight.
2.Youaremowingtoofast.2.Slowdown.
3.Thegrassiswet.
4.Theundersideofthemachinecontains
clippingsanddebris.
1.Connectthewiretothesparkplug.
2.Checkthesparkplugandadjustthe
gapifnecessary .Replacethespark
plugifitispitted,fouled,orcracked.
3.Cleantheairlterpre-cleanerand/or
replacethepaperairlter.
replaceit.
3.Cleanunderthemachine.
2.Sharpenandbalancetheblade.
3.Changethemowingpattern.
4.Cleanunderthemachine.
3.Allowthegrasstodrybeforemowing.
4.Cleantheundersideofthemachine.
25
Page 26

Problem
PossibleCauseCorrectiveAction
Mowerdoesnotself-propel
1.Theself-propeldrivecableisoutof
adjustmentorisdamaged.
2.Thereisdebrisunderthebeltcover.
1.Adjusttheself-propeldrivecable.
Replacethecableifnecessary.
2.Cleanthedebrisfromunderthebelt
cover.
26
Page 27

InternationalDistributorList
Distributor:
AtlantisSuveSulamaSisstemleriLt
BalamaPrimaEngineeringEquip.HongKong85221552163
B-RayCorporation
CascoSalesCompany
CeresS.A.CostaRica
CSSCTurfEquipment(pvt)Ltd.SriLanka
CyrilJohnston&Co.
EquiverMexico525553995444
FemcoS.A.Guatemala
G.Y .K.CompanyLtd.
GeomechanikiofAthensGreece
GuandongGoldenStarChina
HakoGroundandGardenSweden
HakoGroundandGarden
HayterLimited(U.K.)
HydroturfInt.CoDubai
HydroturfEgyptLLC
IbeaS.P .A.
IrriamcPortugal351212388260
IrrigationProductsInt'lPvtLtd.India862283960789
JeanHeybroekb.v .Netherlands3130639461 1
Lely(U.K.)Limited
MaquiverS.A.Colombia
MaruyamaMfg.Co.Inc.
MetraKft
Mountelda.s.CzechRepublic
MunditolS.A.
OslingerTurfEquipmentSA
OyHakoGroundandGardenAb
ParklandProductsLtd.NewZealand6433493760
Prochaska&Cie
RTCohen2004Ltd.
Riversa
ScSvendCarlsenA/S
SolvertS.A.S.
SpyprosStavrinidesLimitedCyprus
SurgeSystemsIndiaLimited
T-MarktLogisticsLtd.Hungary3626525500
ToroAustraliaAustralia61395807355
ToroEuropeBVBABelgium3214562960
Country:
Turkey902163448674
Korea82325512076
PuertoRico7877888383
NorthernIreland442890813121
Japan81726325861
Norway4722907760
UnitedKingdom441279723444
UnitedArabEmirates97143479479
Egypt2025194308
Italy390331853611
UnitedKingdom441480226800
Japan81332522285
Hungary3613263880
Argentina541148219999
Ecuador59342396970
Finland35898700733
Austria4312785100
Israel97298617979
Spain
Denmark4566109200
France33130817700
India911292299901
PhoneNumber:
5062391 138
94112746100
5024423277
30109350054
862087651338
4635100000
5712364079
420255704220
34952837500
35722434131
374-0269RevB
Page 28

TheT oroWarranty
ConditionsandProductsCovered
TheT oro®Companyanditsafliate,T oroWarrantyCompany ,pursuantto
anagreementbetweenthem,jointlypromisetorepairtheT oroProduct
listedbelowifusedforresidentialpurposes*ifdefectiveinmaterialsor
workmanship.
Thefollowingtimeperiodsapplyfromthedateofpurchase:
ProductsWarrantyPeriod
WalkPowerMowers2yearlimitedwarranty
RearEngineRiders2yearlimitedwarranty
Lawn&GardenTractors
ElectricHandHeldProducts2yearlimitedwarranty
Snowthrowers
ConsumerZeroTurn
*OriginalPurchasermeansthepersonwhooriginallypurchasedtheT oro
Product
*Residentialpurposesmeansuseoftheproductonthesamelotasyour
home.Useatmorethanonelocation,orinstitutionalorrentaluse,is
consideredcommercialuse,andthecommercialusewarrantywouldapply .
2yearlimitedwarranty
2yearlimitedwarranty
2yearlimitedwarranty
LimitedWarrantyforCommercialUse
ToroConsumerProductsandattachmentsusedforcommercial,
institutional,orrentaluse,arewarrantedagainstdefectsinmaterials
orworkmanshipforthefollowingtimeperiodsfromthedateoforiginal
purchase:
ProductsWarrantyPeriod
WalkPowerMowers90daywarranty
RearEngineRiders90daywarranty
Lawn&GardenTractors
ElectricHandHeldProducts90daywarranty
Snowthrowers
ConsumerZeroTurn
90daywarranty
90daywarranty
45daywarranty
InstructionsforObtainingWarrantyService
IfyouthinkthatyourT oroProductcontainsadefectinmaterialsor
workmanship,followthisprocedure:
1.Contactyoursellertoarrangeserviceoftheproduct.Ifforanyreason
itisimpossibleforyoutocontactyourseller,youmaycontactany
ToroAuthorizedDistributortoarrangeservice.
2.Bringtheproductandyourproofofpurchase(salesreceipt)tothe
ServiceDealer.IfforanyreasonyouaredissatisedwiththeService
Dealer’sanalysisorwiththeassistanceprovided,contactusat:
CustomerCareDepartment,ConsumerDivision
TheT oroCompany
811 1LyndaleAvenueSouth
Bloomington,MN55420-1196
Manager:T echnicalProductSupport:001–952–887–8248
SeeattachedDistributorList
OwnerResponsibilities
YoumustmaintainyourT oroProductbyfollowingthemaintenance
proceduresdescribedintheOperator'sManual.Suchroutine
maintenance,whetherperformedbyadealerorbyyou,isatyourexpense.
ItemsandConditionsNotCovered
Thisexpresswarrantydoesnotcoverthefollowing:
•Costofregularmaintenanceserviceorwearparts,suchasrotor
blades(paddles),scraperblades,belts,fuel,lubricants,oilchanges,
sparkplugs,cable/linkageorbrakeadjustments
•Anyproductorpartwhichhasbeenalteredormisusedandrequires
replacementorrepairduetoaccidentsorlackofpropermaintenance
•Repairsnecessaryduetofailuretousefreshfuel(lessthanone
monthold),orfailuretoproperlypreparetheunitpriortoanyperiod
ofnon-useoveronemonth
•Engineandtransmission.Thesearecoveredbytheappropriate
manufacturer’sguaranteeswithseparatetermsandconditions
Allrepairscoveredbythesewarrantiesmustbeperformedbyan
AuthorizedT oroServiceDealerusingT oroapprovedreplacementparts.
GeneralConditions
Thepurchaseriscoveredbythenationallawsofeachcountry.Therights
towhichthepurchaserisentitledwiththesupportoftheselawsarenot
restrictedbythiswarranty .
374-0268RevA
 Loading...