

Page 1
FormNo.3360-501RevA
53cmHeavy-DutyRearBagger
LawnMower
ModelNo.22179TE—SerialNo.270004001andUp
Registeratwww.T oro.com.OriginalInstructions(EN)
Page 2
informationandNoteemphasizesgeneralinformation
worthyofspecialattention.
Introduction
Readthisinformationcarefullytolearnhowtooperate
andmaintainyourproductproperlyandtoavoidinjury
andproductdamage.Youareresponsibleforoperating
theproductproperlyandsafely.
YoumaycontactTorodirectlyatwww .Toro.comfor
productandaccessoryinformation,helpndinga
dealer,ortoregisteryourproduct.
Wheneveryouneedservice,genuineToroparts,or
additionalinformation,contactanAuthorizedService
DealerorToroCustomerServiceandhavethemodel
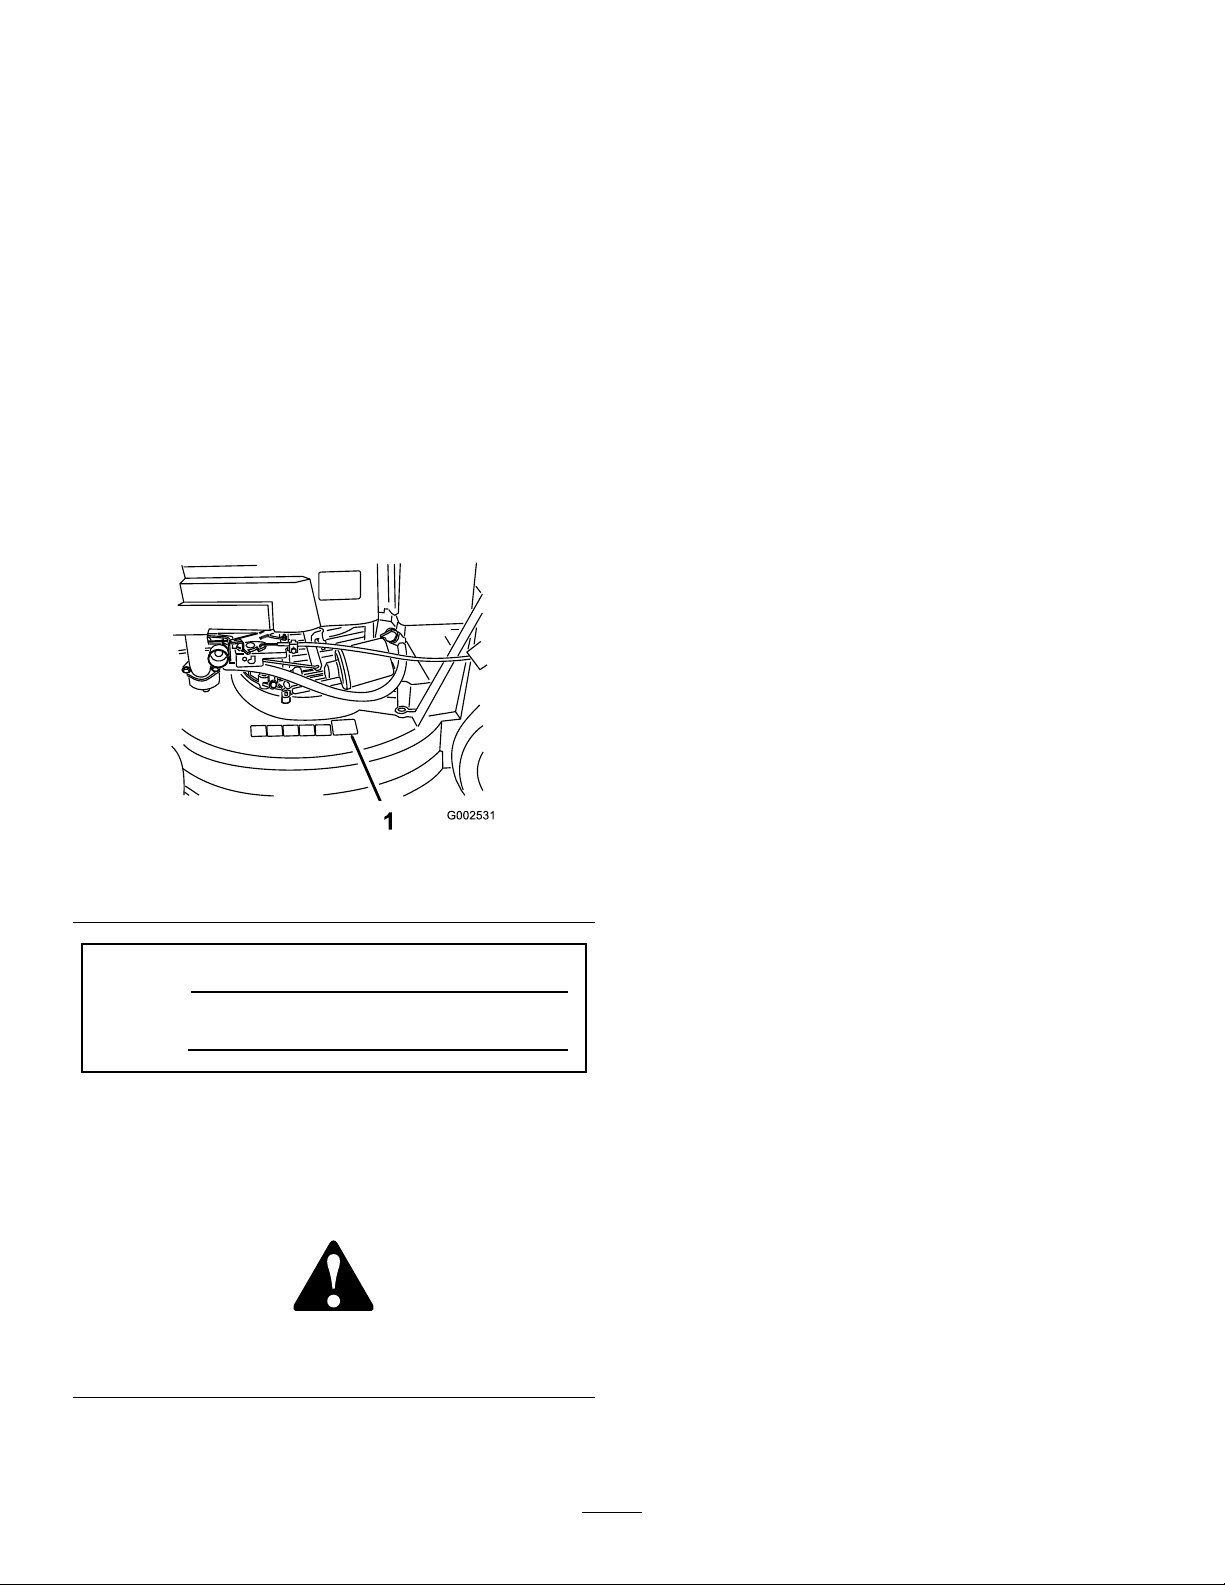
andserialnumbersofyourproductready .Figure1
identiesthelocationofthemodelandserialnumbers
ontheproduct.Writethenumbersinthespace
provided.
Figure1
1.Modelandserialnumberlocation
ModelNo.
SerialNo.
Thismanualidentiespotentialhazardsandhas
safetymessagesidentiedbythesafetyalertsymbol
(Figure2),whichsignalsahazardthatmaycauseserious
injuryordeathifyoudonotfollowtherecommended
precautions.
Figure2
1.Safetyalertsymbol
Thismanualuses2wordstohighlightinformation.
Importantcallsattentiontospecialmechanical
Contents
Introduction.................................................................2
Safety...........................................................................3
GeneralLawnMowerSafety.................................3
SoundPressure.....................................................5
SoundPower........................................................5
Vibration,Hand/arm...........................................5
SafetyandInstructionalDecals.............................6
Setup............................................................................7
1InstallingtheHandle..........................................7
2InstallingtheFuelTankandtheFuel
Line..................................................................8
3FillingtheCrankcasewithOil.............................8
ProductOverview........................................................9
Controls.............................................................10
Operation...................................................................10
CheckingtheEngineOilLevel............................10
FillingtheFuelTankwithGasoline.....................11
StartingtheEngine.............................................12
StoppingtheEngine...........................................13
OperatingtheBlade............................................13
OperatingtheTractionDrive..............................13
CheckingtheBladeBrakeClutch........................14
AdjustingtheCuttingHeight..............................14
UsingtheGrassBag...........................................14
OperatingTips...................................................15
Maintenance...............................................................17
RecommendedMaintenanceSchedule(s)................17
Lubrication.............................................................17
LubricatingthePivotArms.................................17
LubricatingtheGearCase...................................18
EngineMaintenance...............................................18
ServicingtheAirFilter........................................18
ChangingtheEngineOil....................................19
ChangingtheOilFilter.......................................19
ServicingtheSparkPlug.....................................20
FuelSystemMaintenance.......................................21
EmptyingtheFuelTankandCleaningthe
FuelFilter.......................................................21
DriveSystemMaintenance.....................................21
ServicingtheWheels..........................................21
ControlsSystemMaintenance.................................22
AdjustingtheBladeBrakeCable.........................22
BladeMaintenance.................................................23
MaintainingtheCuttingBlade.............................23
Cleaning.................................................................25
CleaningundertheMowerHousing....................25
CleaningtheBladeBrakeClutchShield...............25
©2007—TheToro®Company
8111LyndaleAvenueSouth
Bloomington,MN55420
Contactusatwww.Toro.com.
2
PrintedintheUSA
AllRightsReserved
Page 3

Storage.......................................................................26
PreparingtheFuelSystem...................................26
PreparingtheEngine..........................................26
GeneralInformation..........................................26
RemovingtheLawnMowerfromStorage............27
Troubleshooting.........................................................28
Safety
Improperlyusingormaintainingthismowercan
resultininjury.Toreducethepotentialforinjury,
complywiththesesafetyinstructions.
Torodesignedandtestedthismowerforreasonablysafe
service;however,failuretocomplywiththefollowing
instructionsmayresultinpersonalinjury.
Toensuremaximumsafety,bestperformance,and
togainknowledgeoftheproduct,itisessential
thatyouandanyotheroperatorofthemowerread
andunderstandthecontentsofthismanualbefore
theengineiseverstarted.Payparticularattention
tothesafetyalertsymbol(Figure2)whichmeans
Caution,Warning,orDanger—“personalsafety
instruction.”Readandunderstandtheinstruction
becauseithastodowithsafety.Failuretocomply
withtheinstructionmayresultinpersonalinjury.
GeneralLawnMowerSafety
Thefollowinginstructionshavebeenadaptedfromthe
ISOstandard5395.
Thiscuttingmachineiscapableofamputatinghands
andfeetandthrowingobjects.Failuretoobservethe
followingsafetyinstructionscouldresultinserious
injuryordeath.
Training
•Readtheinstructionscarefully.Befamiliarwiththe
controlsandtheproperuseoftheequipment.
•Neverallowchildrenorpeopleunfamiliarwiththese
instructionstousethemower.Localregulationscan
restricttheageoftheoperator.
•Keepinmindthattheoperatororuserisresponsible
foraccidentsorhazardsoccurringtootherpeopleor
theirproperty.
•Understandexplanationsforallpictogramsusedon
themowerorintheinstructions.
Gasoline
WARNING-Gasolineishighlyammable.Takethe
followingprecautions.
•Storefuelincontainersspecicallydesignedforthis
purpose.
•Refueloutdoorsonlyanddonotsmokewhile
refueling.
•Addfuelbeforestartingtheengine.Neverremove
thecapofthefueltankoradgasolinewhilethe
engineisrunningorwhentheengineishot.
3
Page 4

•Ifgasolineisspilled,donotattempttostartthe
enginebutmovethemowerawayfromtheareaof
spillageandavoidcreatinganysourceofignition
untilgasolinevaporshavedissipated.
•Replaceallfueltankandcontainercapssecurely.
Preparation
•Whilemowing,alwayswearsubstantialfootwearand
longtrousers.Donotoperatetheequipmentwhen
barefootorwearingopensandals.
•Thoroughlyinspecttheareawheretheequipmentis
tobeusedandremoveallstones,sticks,wires,bones
andotherforeignobjects.
•Beforeusing,alwaysvisuallyinspecttoseethat
guards,andsafetydevices,suchasdeectorsand/or
grasscatchers,areinplaceandworkingcorrectly.
•Beforeusing,alwaysvisuallyinspecttoseethatthe
blades,bladeboltsandcutterassemblyarenotworn
ordamaged.Replacewornordamagedbladesand
boltsinsetstopreservebalance.
Starting
•Disengageallbladeanddriveclutchesandshiftinto
neutralbeforestartingtheengine.
•Donottiltmowerwhenstartingtheengineor
switchingonthemotor,unlessthemowerhastobe
tiltedforstarting.Inthiscase,donottiltitmorethan
absolutelynecessaryandliftonlythepart,whichis
awayfromtheoperator.
•Starttheengineorswitchonthemotorcarefully
accordingtoinstructionsandwithfeetwellaway
fromtheblade(s)andnotinfrontofthedischarge
chute.
Operation
•Nevermowwhilepeople,especiallychildren,orpets
arenearby .
•Mowonlyindaylightoringoodarticiallight.
•Avoidoperatingthelawnmowerinwetgrass,where
feasible.
•Stayalertforholesintheterrainandotherhidden
hazards.
•Donotputhandsorfeetnearorunderrotatingparts.
Keepclearofthedischargeopeningatalltimes.
•Neverpickuporcarryalawnmowerwhilethe
engineisrunning.
•Useextremecautionwhenreversingorpullinga
pedestriancontrolledlawnmowertowardsyou.
•Walk,neverrun.
•Slopes:
–Donotmowexcessivelysteepslopes.
–Exerciseextremecautionwhenonslopes.
–Mowacrossthefaceofslopes,neverupand
downandexerciseextremecautionwhen
changingdirectiononslopes.
–Alwaysbesureofyourfootingonslopes.
•Uselowthrottlesettingswhenengagingthe
traction-clutch,especiallyinhighgears.Reduce
speedonslopesandinsharpturnstoprevent
overturningorlossofcontrol.
•Stopthebladeifthelawnmowerhastobetiltedfor
transportationwhencrossingsurfacesotherthan
grassandwhentransportingthelawnmowertoand
fromtheareatobemowed.
•Donotoperatetheengineinaconnedspacewhere
dangerouscarbonmonoxidefumescancollect.
•Stoptheengine
–wheneveryouleavethelawnmower.
–beforerefueling.
–beforeremovingthegrasscatcher.
–beforemakingheightadjustmentunless
adjustmentcanbemadefromtheoperator’s
position.
•Stoptheengineanddisconnectthespark-plugwire.
–beforeclearingblockagesoruncloggingchute.
–beforechecking,cleaningorworkingonthelawn
mower.
–afterstrikingaforeignobject,inspectthelawn
mowerfordamageandmakerepairsbefore
restartingandoperatingthelawnmower.
–iflawnmowerstartstovibrateabnormally(check
immediately).
•Reducethethrottlesettingduringengineshutdown,
andclosethefuelvalveattheconclusionofmowing.
•Watchoutfortrafcwhencrossingornearroadways.
MaintenanceandStorage
•Keepallnuts,boltsandscrewstighttobesurethe
equipmentisinsafeworkingcondition.
•Donotusepressurecleaningequipmentonmachine.
•Neverstoretheequipmentwithgasolineinthetank
andinsideabuildingwherefumescanreachanopen
ameorspark.
•Allowtheenginetocoolbeforestoringinany
enclosure.
•Toreducetherehazard,keeptheengine,silencer,
batterycompartmentandgasolinestoragearefreeof
grass,leaves,orexcessivegrease.
4
Page 5

•Checkgrasscatchercomponentsandthedischarge
guardfrequentlyandreplacewithmanufacturer’s
recommendedparts,whennecessary.
•Replacewornordamagedpartsforsafety.
•Replacefaultysilencers.
•Ifthefueltankhastobedrained,dothisout-doors.
•Donotchangetheenginegovernorsettingsor
overspeedtheengine.Operatinganengineat
excessivespeedcanincreasethehazardofpersonal
injury.
•Onmultibladedlawnmowers,takecareasrotating
oneblademaycauseotherstorotate.
•Becarefulduringadjustmentofthelawnmowerto
prevententrapmentofthengersbetweenmoving
bladesandxedpartsofthelawnmower.
•Toensurethebestperformanceandsafety,
purchaseonlygenuineTororeplacementparts
andaccessories.Donotuse
accessories;theymaycauseasafetyhazard.
will t
partsand
SoundPressure
ThisunithasanequivalentcontinuousA-weighted
soundpressurelevelattheoperatorearof88dBA,
basedonmeasurementsofidenticalmachinesperEN
11094andEN836.
SoundPower
ThisunithasanequivalentcontinuousA-weighted
soundpowerlevelof98dBA,basedonmeasurements
ofidenticalmachinesperEN11094.
Vibration,Hand/arm
Thisunitdoesnotexceedahand/armvibrationlevelof
5.5m/s
perEN1033.
2
,basedonmeasurementsofidenticalmachines
5
Page 6
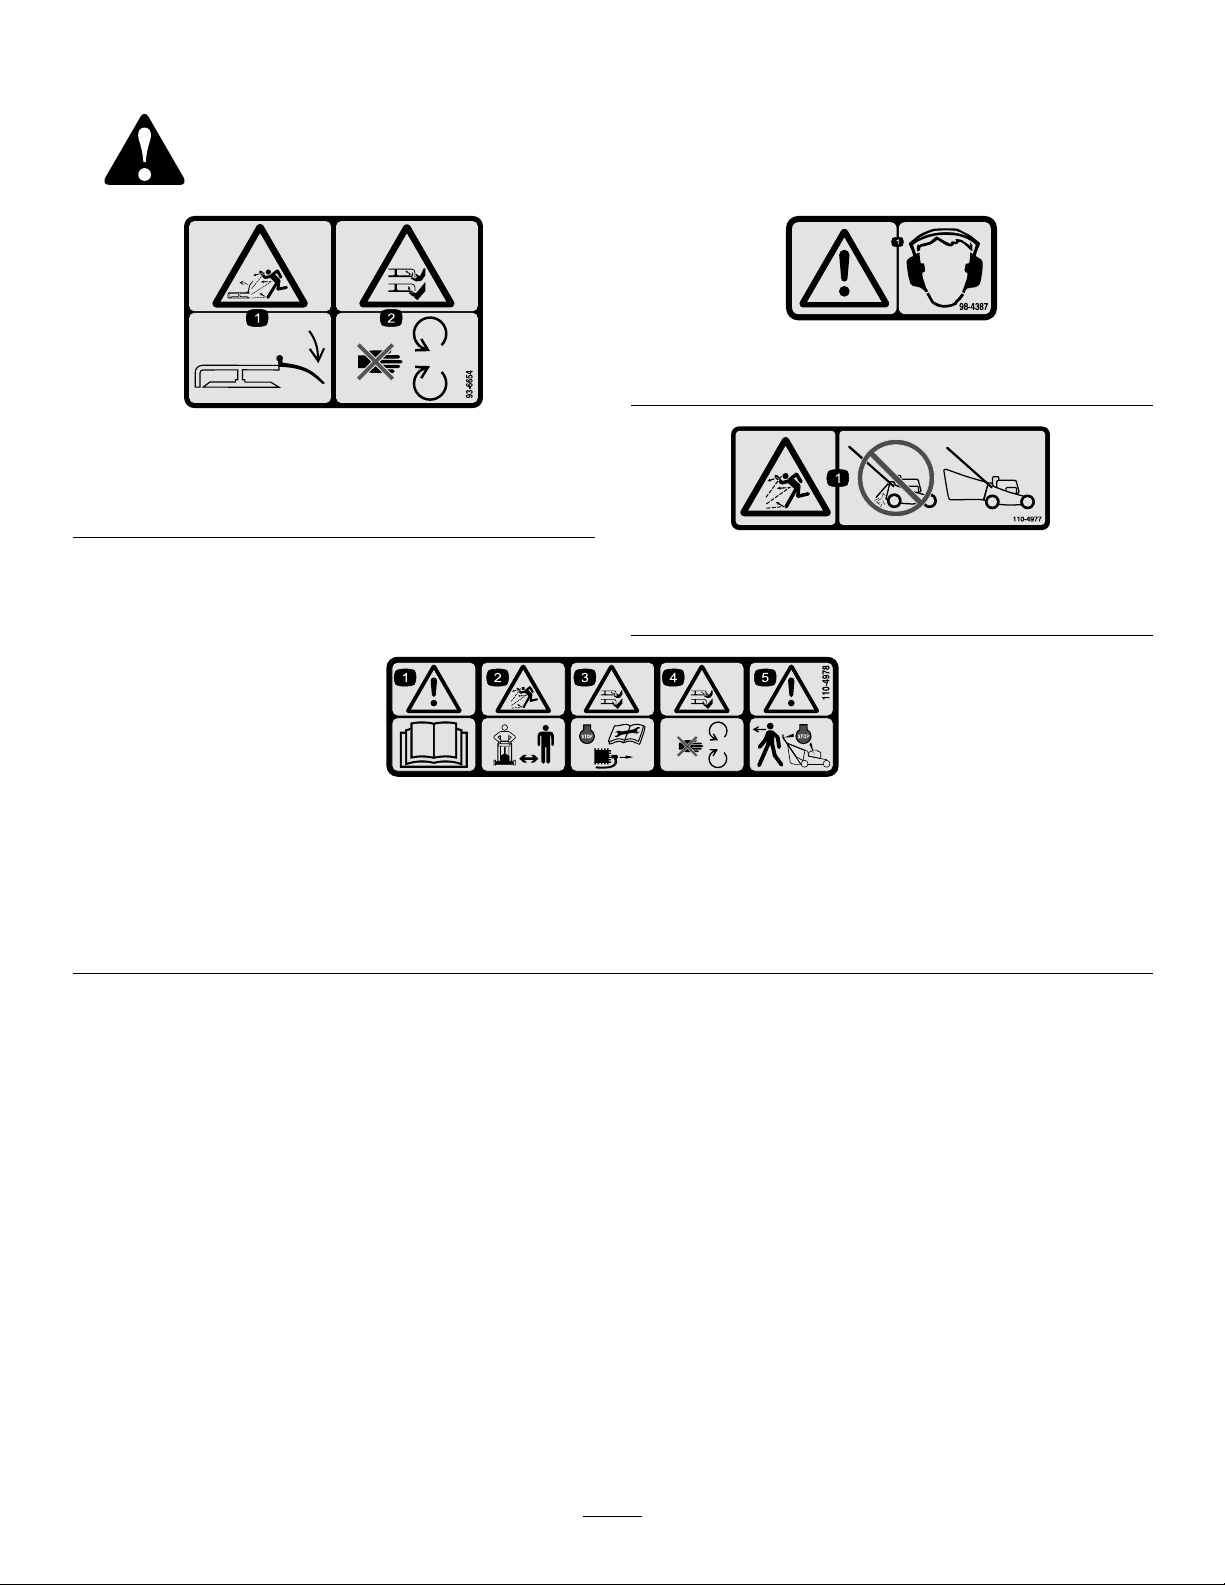
SafetyandInstructionalDecals
Safetydecalsandinstructionsareeasilyvisibletotheoperatorandarelocatednearanyareaof
potentialdanger.Replaceanydecalthatisdamagedorlost.
93-6654
1.Thrownobject—hazard,mower-keepthedeectorinplace.
2.Cutting/dismembermenthazardofhandorfoot,mower
blade—stayawayfrommovingparts.
98-4387
1.Warning—wearhearingprotection.
110-4977
1.Thrownobjecthazard—donotoperatethemowerwithout
abaginplace.
110-4978
1.Warning—readtheOperator’sManual.
2.Thrownobjecthazard—keepbystandersasafedistancefromthemachine.
3.Cutting,dismembermenthazardofhandorfoot—stoptheengineandremovethesparkplugwirebeforeperformingany
maintenanceonthemachine.
4.Cutting,dismembermenthazardofhandorfoot—stayawayfrommovingparts.
5.Warning—stoptheenginebeforeleavingthemachine.
6
Page 7
Setup
LooseParts
Usethechartbelowtoverifythatallpartshavebeenshipped.
ProcedureDescription
Handle1
Oval-headbolt
Bolt(5/16x7/8inch)
1
Bolt(5/16x1-1/2inches)
Washer4
Locknut(5/16inch)
Cabletie
Self-tappingscrew
2
3
Note:Determinetheleftandrightsidesofthemachine
fromthenormaloperatingposition.
Nopartsrequired
1
InstallingtheHandle
Qty.
Use
4
2
2
8
3
2
1
–
Installthehandle.
Installthefueltankandfuelline.
Fillthecrankcasewithoil.
Partsneededforthisprocedure:
1Handle
4
Oval-headbolt
2
Bolt(5/16x7/8inch)
2
Bolt(5/16x1-1/2inches)
4Washer
8
Locknut(5/16inch)
3
Cabletie
Procedure
1.Mountthelowerhandletothemowerhousingwith
2bolts(5/16x7/8inch),2bolts(5/16x1-1/2
inches),4washers,and4locknuts(Figure3).
Figure3
1.Housing4.Locknut
2.LowerHandle
3.Washer
5.Bolt(5/16x1-1/2inches)
6.Bolt(5/16x7/8inch)
Note:Installthewasherswiththecupsidefacing
thehandle.
Note:Youcanadjustthehandleheightformore
comfortableoperation.Securingthelowerhandle
endintheupperholelowersthehandle;securingthe
lowerhandleendinthelowerholeraisesthehandle.
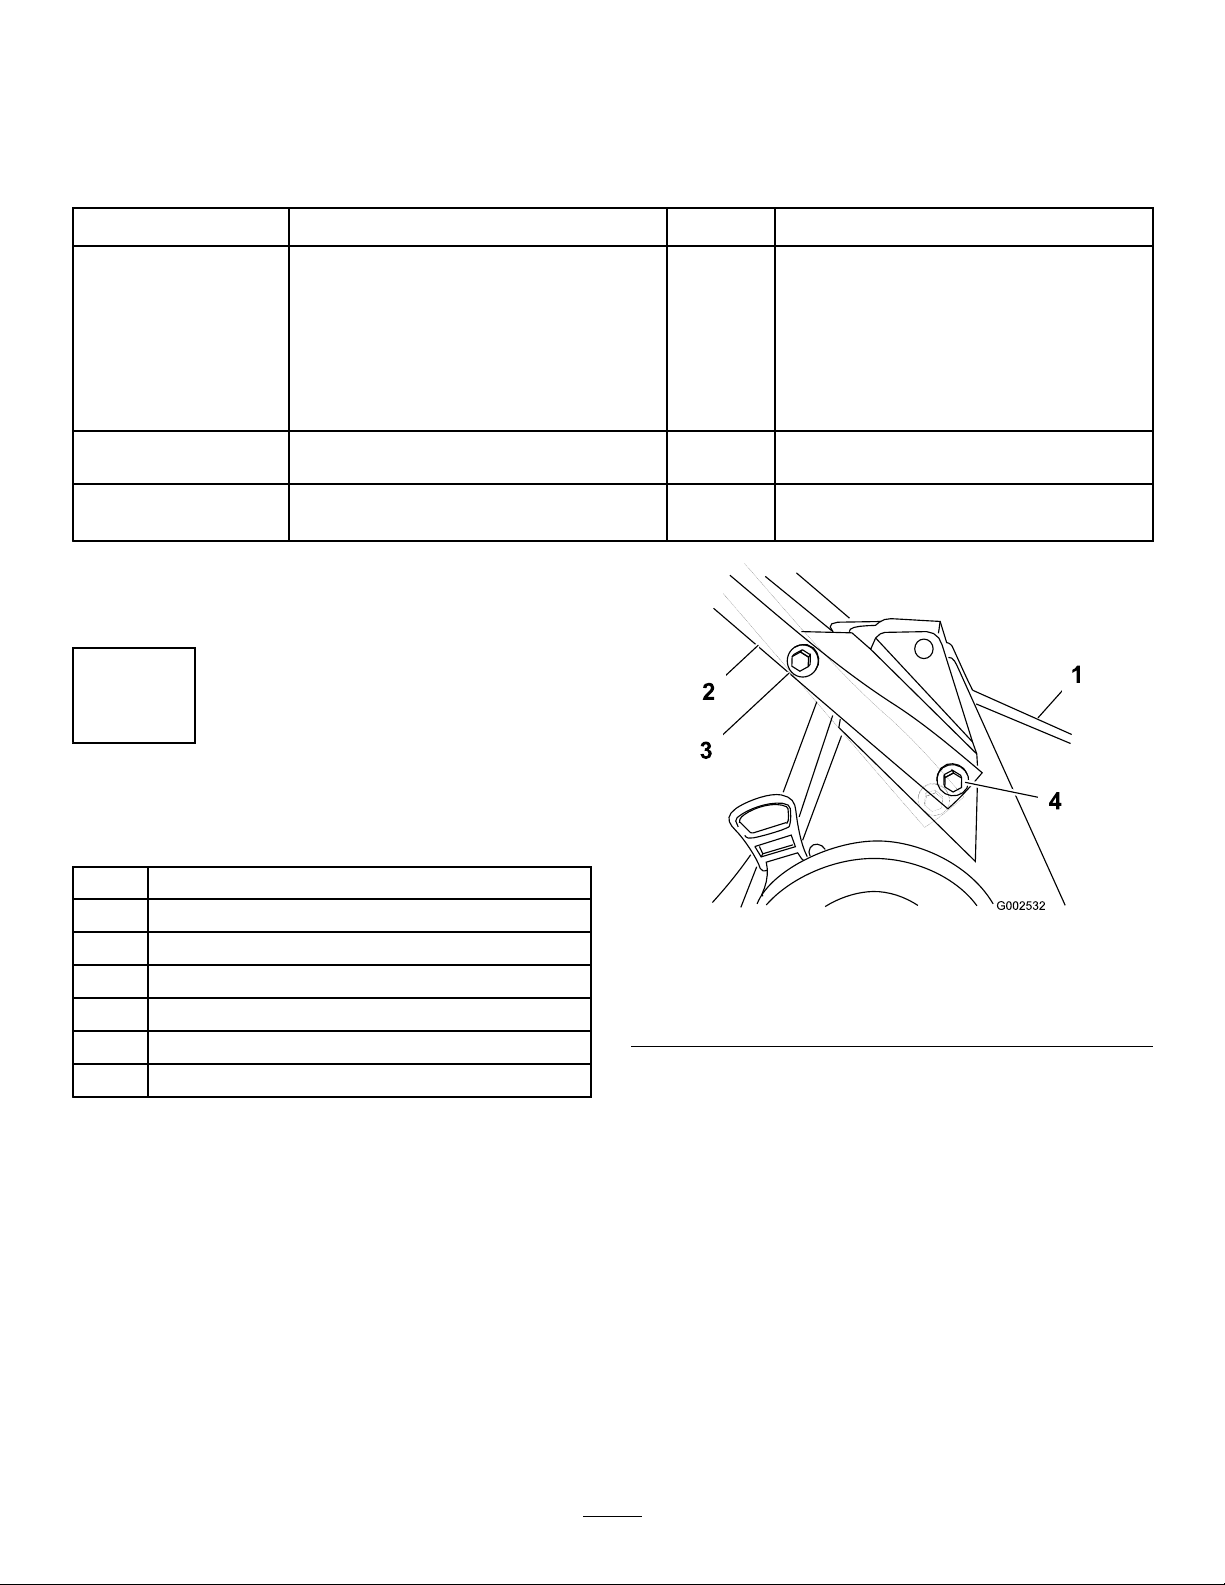
2.Installtheupperhandleontothelowerhandleand
securetheupperhandlewith4oval-headbolts,4
washers,and4locknuts(Figure4).
Note:Inserttheoval-headboltsthroughtheupper
andlowerhandlesectionssothatthelocknutsareon
theoutsideofthehandle.
7
Page 8
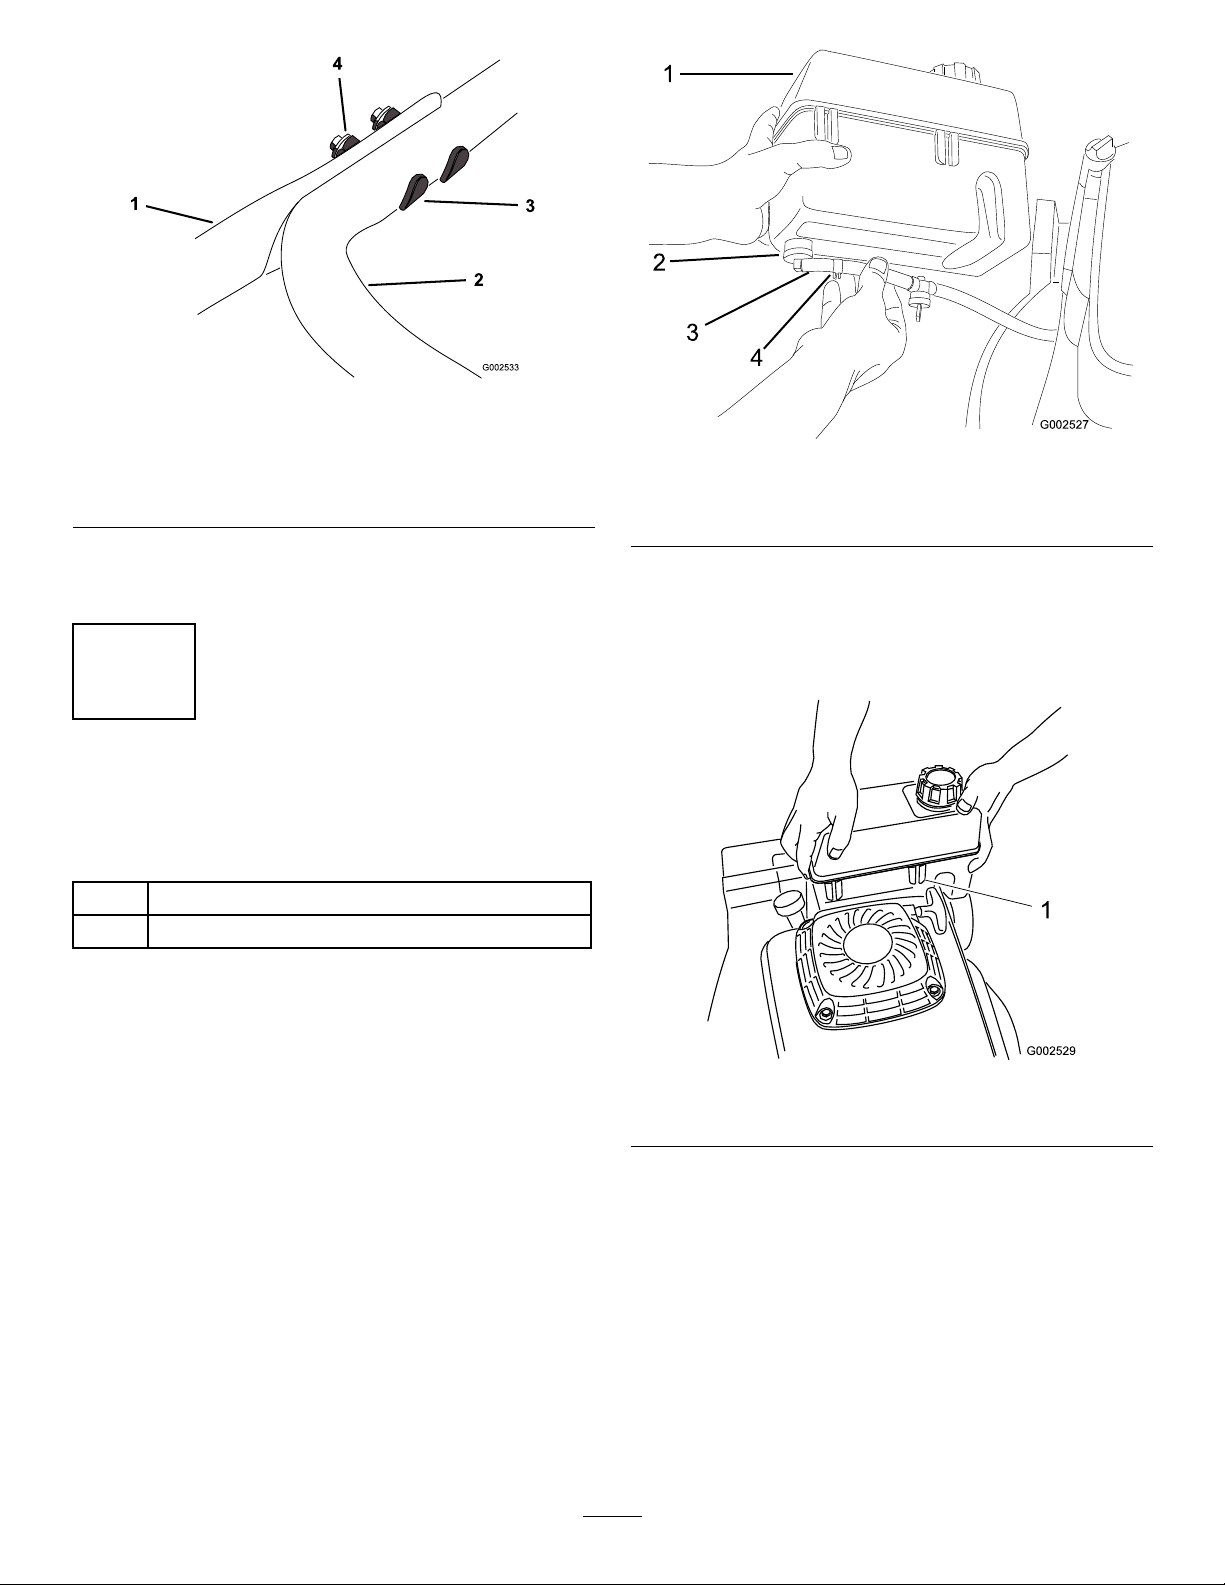
1.Upperhandle
G002527
1
2
3
4
2.Lowerhandle
3.Oval-headbolt(4)
4.Locknut
Figure4
Figure5
1.Fueltank3.Fuelline
2.Elbowtting
4.Fuellineclamp
3.Usethecabletiesprovidedtosecurethecontrol
cablestothehandle.
2
InstallingtheFuelTankand
theFuelLine
Partsneededforthisprocedure:
2
Self-tappingscrew
1
Procedure
1.Slidetheendofthefuellineontotheelbowtting
(Figure5).
2.Securethefuellineinplacewiththefuellineclamp
(Figure5).
3.Hooktheplasticclipsonthefrontofthefueltank
ontothefueltankbracket(Figure6).
Figure6
1.Plasticclip(2)
4.Securethebottomofthefueltanktothefueltank
bracketbyinstallingtheself-tappingscrewsfromthe
bottom.Donotovertightenthescrews.
8
Page 9
3
FillingtheCrankcasewithOil
NoPartsRequired
Procedure
Theenginecrankcaseisshippedwithoutoil.Youmust
llitwithapproximately29oz.(0.85l)ofoilbefore
startingtheengine.RefertoCheckingtheEngineOil
LevelinOperation,page10foroilspecicationsand
instructions.
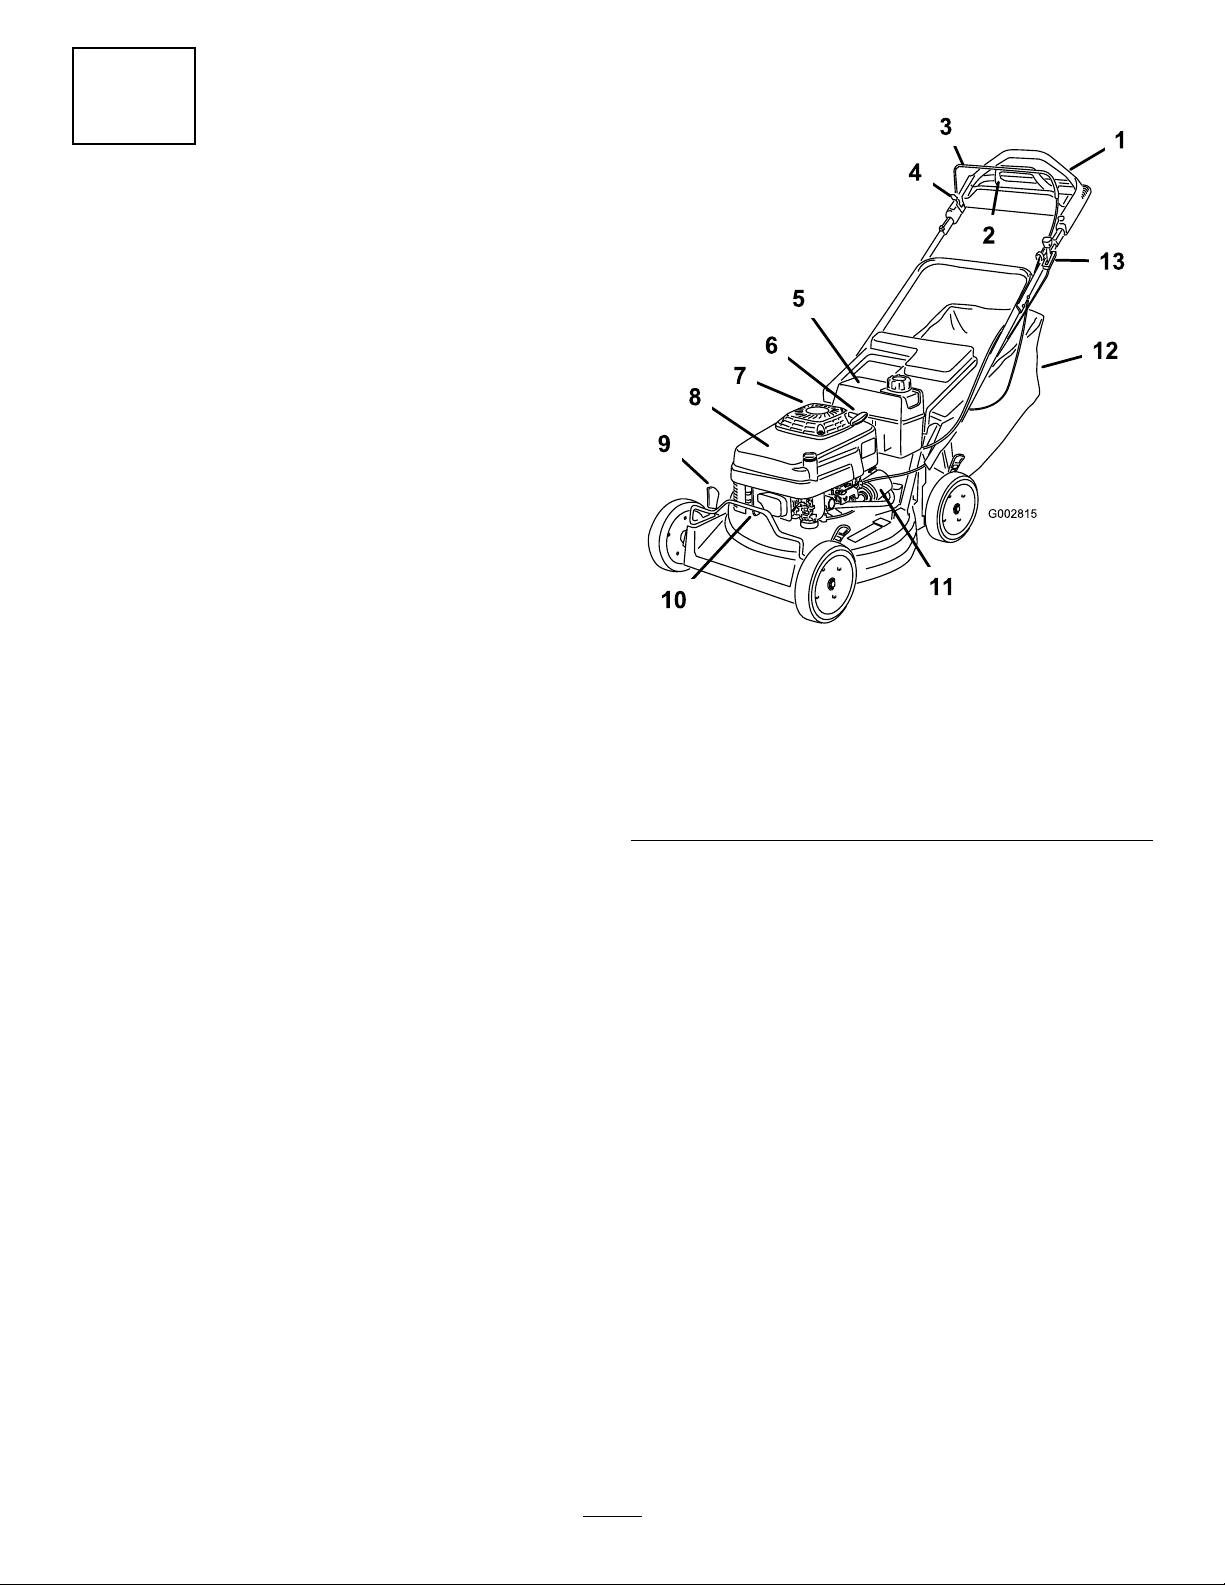
ProductOverview
Figure7
1.Handle
2.Tractionassisthandle
3.Bladecontrolbar
4.Controlbarlock11.Oillter
5.Fueltank
6.Starterhandle
7.Oilll/dipstick(notshown)
8.Airlter
9.Cuttingheightlever
10.Sparkplug
12.Grassbag
13.Throttlecontrollever
9
Page 10

Controls
G002816
1
2
4
3
Thetractionassisthandle,bladecontrolbar,controlbar
lock,andthrottlecontrolleverareontheupperhandle
asshownin(Figure8).
Figure8
1.Tractionassisthandle3.Bladecontrolbar
2.Controlbarlock
4.Throttlecontrollever
Operation
Note:Determinetheleftandrightsidesofthe
machinefromthenormaloperatingposition.
Eachtimebeforeyoumow ,makesurethatthe
self-propeldriveandthebladecontrolbailoperate
properly.Whenyoureleasethebladecontrolbail,the
bladeshouldstop.Ifitdoesnot,contactanAuthorized
ServiceDealer.
Thismachineproducessoundlevelsinexcess
of85dBAattheoperator’searandcancause
hearinglossthroughextendedperiodsof
exposure.
Wearhearingprotectionwhenoperatingthis
machine.
Thethrottlesettingsareshownin(Figure9).
Figure9
1.Choke3.Slow
2.Fast
4.Stop
Figure10
1.Warning—wearhearingprotection.
CheckingtheEngineOilLevel
ServiceInterval:Beforeeachuseordaily
Initially,llthecrankcasewith29ounces(0.85liters)
ofoil.Useonlyhigh-qualitySAE30orSAE10W30
weightdetergentoilthathastheAmericanPetroleum
Institute(API)serviceclassicationSF ,SG,SH,orSJ.
OilCapacity
Withoillter29ounces(0.85liters)
Withoutoillter22ounces(0.65liters)
Beforeeachuse,ensurethattheoillevelisbetweenthe
AddandFullmarksonthedipstick(Figure11).
10
Page 11

Figure11
1.Dipstick3.Add
2.Full
Note:Whenthecrankcaseisempty,pourabout3/4
ofthecrankcasecapacityofoilinthecrankcase,then
followtheprocedureinthissection.
1.Movethelawnmowertoalevelsurface.
2.Cleanaroundthedipstick(Figure11).
3.Removethedipstickbyrotatingthecap
counterclockwiseandpullingitout.
4.Wipethedipstickcleanwithacleancloth.
5.Insertthedipstickintothellerneck,butdonot
screwitin.
6.Removethedipstickandreadtheoillevel
(Figure11).
7.IftheoillevelreadingisbelowtheAddmarkon
thedipstick,slowlypouronlyenoughoilintothe
llerholetoraisetheoilleveltotheFullmarkon
thedipstick.
than10%ethanol,premiumgasoline,orwhitegas.
Usingthesefuelscandamagetheengine’sfuel
system.
Important:Donotusegasolinethathasbeen
storedsincethelastmowingseasonorlonger.
Incertainconditions,gasolineisextremely
ammableandhighlyexplosive.Areor
explosionfromgasolinecanburnyouand
othersandcandamageproperty.
•Fillthefueltankoutdoors,inanopenarea,
andwhentheengineiscold.Wipeupany
gasolinethatspills.
•Donotllthefueltankcompletelyfull.Add
gasolinetothefueltankuntilthelevelis1/4
to1/2in.(6to13mm)belowthebottomof
thellerneck.Thisemptyspaceinthetank
allowsthegasolinetoexpand.
•Neversmokewhenhandlinggasoline,and
stayawayfromanopenameorwherea
sparkmayignitethegasolinefumes.
•Storegasolineinanapprovedfuelcontainer
andkeepitoutofthereachofchildren.
•Neverbuymorethana30-daysupplyof
gasoline.
Important:Donotoverllthecrankcasewith
oilandruntheengine;enginedamagewill
result.Draintheexcessoiluntiltheoillevelon
thedipstickreadsFull.
8.Insertthedipstickintothellerneckandrotatethe
capclockwiseuntilitistight.
FillingtheFuelTankwith
Gasoline
Forbestresults,useclean,fresh,lead-freegasolinewith
anoctaneratingof87orhigher.T oensurefreshness,
purchaseonlythequantityofgasolinethatyouexpectto
usein30days.Usingunleadedgasolineresultsinfewer
combustiondepositsandlongerenginelife.Youmay
useleadedgasolineifunleadedgasolineisnotavailable.
Important:Donotaddoiltothegasoline.
Important:Donotusemethanol,gasoline
containingmethanol,gasoholcontainingmore
11
Page 12

Whenfueling,undercertaincircumstances,a
staticchargecandevelop,ignitingthegasoline.
Areorexplosionfromgasolinecanburnyou
andothersanddamageproperty.
•Alwaysplacegasolinecontainersonthe
groundandawayfromyourvehiclebefore
lling.
•Donotllgasolinecontainersinsidea
vehicleoronatruckortrailerbedbecause
interiorcarpetsorplastictruckbedliners
mayinsulatethecontainerandslowtheloss
ofanystaticcharge.
•Whenpractical,removegasoline-powered
equipmentfromthetruckortrailerand
refueltheequipmentwithitswheelsonthe
round.
•Ifthisisnotpossible,thenrefuelsuch
equipmentonatruckortrailerfroma
portablecontainer,notfromagasoline
dispensernozzle.
•Ifyoumustuseagasolinedispensernozzle,
keepthenozzleincontactwiththerimof
thefueltankorcontaineropeningatall
timesuntilfuelingiscomplete.
Figure12
1.Oilll/dipstick
2.Fueltankcap
3.Aircleaner
2.Removethecapfromthetank.
3.Fillthefueltankwithunleadedgasolinetowithin
1/4to1/2inch(6to13mm)fromthetopofthe
tank.Donotllintothellerneck.
Useafuelstabilizer/conditionerregularlyduring
operationandstorage.Astabilizer/conditionercleans
theengineduringoperationandpreventsgum-like
varnishdepositsfromformingintheengineduring
periodsofstorage.
Important:Donotusefueladditivesotherthan
afuelstabilizer/conditioner.Donotusefuel
stabilizerswithanalcoholbasesuchasethanol,
methanol,orisopropanol.
1.Cleanaroundthefueltankcap(Figure12).
Important:Donotllthetankmorethan1/4
inch(6mm)fromthetopofthetankbecause
thegasolinemusthaveroomtoexpand.
4.Installthefueltankcapandwipeupanyspilled
gasoline.
StartingtheEngine
1.Connectthewiretothesparkplug(Figure13).
Figure13
1.Spark-plugwire
2.Openthefuelvalve(Figure14)
12
Page 13

Figure14
1.Fuelvalve
3.MovethethrottlecontrollevertotheChoke
position(Figure9).
4.Pullthestarterhandlelightlyuntilyoufeel
resistance,thenpullitsharply.
5.Regulatethethrottleasdesiredwhentheengine
starts.
Note:Iftheenginefailstostartafter3pulls,repeat
steps3through5.
StoppingtheEngine
1.MovethethrottlecontroltotheStopposition.
2.Disconnectthewirefromthesparkplugifyoudo
notusethelawnmowerorleaveitunattended.
Figure15
2.Pullthebladecontrolbartothehandleandhold
it(Figure16).
OperatingtheBlade
EngagingtheBlade
Whenyoustartyourengine,thebladedoesnotturn.
Youmustengagethebladetomow .
1.Pushthecontrolbarlockforward(Figure15).
Figure16
DisengagingtheBlade
Releasethebladecontrolbar.
Important:Whenyoureleasethebladecontrol
bar,thebladeshouldstopwithin3seconds.Ifit
doesnotstopproperly,stopusingyourmower
immediatelyandcontactanAuthorizedService
Dealer.
OperatingtheTractionDrive
1.Tooperatetheself-propeldrive,simplywalkwith
yourhandsontheupperhandle(Figure17)and
yourelbowsatyoursides,andthemowerwill
automaticallykeeppacewithyou.
13
Page 14

Note:Youcanself-propelthemowerwiththe
bladeengagedordisengaged.
2.
Figure17
AdjustingtheCuttingHeight
Eachwheelisadjustedindividuallywithawheelheight
adjustmentlever.Cuttingheightsare1-1/4inches(32
mm),1-3/4inches(44mm),2-1/4inches(57mm),
2-3/4inches(70mm),3-1/4inches(83mm),and
3-3/4inches(95mm).
Adjustingthecuttingheightleverscouldbring
yourhandsintocontactwithamovingblade
andresultinseriousinjury.
•Stoptheengineandwaitforallmovement
tostopbeforeadjustingthecuttingheight.
•Donotputyourngersunderthehousing
whenadjustingthecuttingheight.
CheckingtheBladeBrake
Clutch
Checkthebladecontrolbarbeforeeachusetoensure
thatthebladebrakeclutchsystemisoperatingproperly.
1.Installtheemptygrassbagonthedischargetunnel.
2.Starttheengine.
3.Pullthebladecontrolbartothenormalblade
engagedposition.Thebagshouldbegintoinate,
indicatingthatthebladeisengagedandrotating.
4.Releasethebladecontrolbail.Ifthebagdoesnot
immediatelydeate,itindicatesthatthebladeisstill
rotating.Thebladebrakeclutchmechanismmay
bedeteriorating,and,ifignored,couldresultinan
unsafeoperatingcondition.Havethelawnmower
inspectedandservicedbyanAuthorizedService
Dealer.
Ifthebladebrakeclutchsystemisinoperative,
thebladewillcontinuetorotatewhenyou
releasethebladecontrolbail.Contactwith
bladecouldoccur,causingseriousinjury.
•Checkthebladebrakeclutchoperation
beforeeachuse.
•Neveruseamowerequippedwithablade
brakeclutchthathasaninoperativesafety
system.
•TakeyourmowertoanAuthorizedService
Dealerforrepairifthesafetysystemfailsto
operateproperly.
1.Pullthewheelheightadjustmentlevertowardthe
wheel(Figure18)andmoveittothedesiredsetting.
Figure18
1.Wheelheightadjustmentlever
2.Releasethewheelheightadjustmentleverandseat
itsecurelyinthenotch.
3.Adjustallthewheelstothesamecuttingheight
setting.
UsingtheGrassBag
InstallingtheGrassBag
1.Waitforallmovingpartstostop.
2.Raiseandholdupthereardoor(Figure19).
14
Page 15

MowingwiththeGrassBag
Aworngrassbagcouldallowsmallstones
andothersimilardebristobethrowninthe
operator’sorbystander’sdirectionandresultin
seriouspersonalinjuryordeathtotheoperator
orbystanders.
Checkthegrassbagfrequently.Ifitis
damaged,installanewTororeplacementbag.
Figure19
1.Reardoor
3.Installthebagonthebagmountingposts
(Figure20).
Figure20
1.Bagmountingposts
OperatingTips
GeneralTips
•Maintainasharpbladethroughoutthecutting
season.Periodicallyledownnicksontheblade.
•Replacethebladewhennecessarywithanoriginal
Tororeplacementblade.
•Mowonlydrygrassorleaves.Wetgrassandleaves
tendtoclumpontheyardandcancausethemower
toplugortheenginetostall.
Wetgrassorleavescancauseseriousinjuryif
youslipandcontacttheblade.
Mowonlyindryconditions.
•Cleanunderthemowerhousingaftereachmowing.
SeeCleaningundertheMowerHousing.
4.Lowerthereardoor.
RemovingtheGrassBag
Toremovethebag,reversethestepsabove.
Themowercanthrowgrassclippingsandother
objectsthroughanopendischargetunnel.
Objectsthrownwithenoughforcecouldcause
seriouspersonalinjuryordeathtotheoperator
orbystander.
Neveropenthedooronthedischargetunnel
whentheengineisrunning.
•Keeptheengineingoodrunningcondition.
•Settheenginespeedtothefastestpositionforthe
bestcuttingresults.
15
Page 16

•Forlightleafcoverage,setallthewheelsatthesame
cuttingheightsetting.
Operatingamowerwithitsenginerunningat
aspeedgreaterthanthefactorysettingcan
causethemowertothrowapartofthebladeor
engineintotheoperator’sorbystander’sarea
andresultinseriouspersonalinjuryordeath.
–Donotchangetheenginespeedsetting.
–Ifyoususpecttheenginespeedisfaster
thannormal,contactanAuthorizedService
Dealer.
•Cleantheairlterfrequently.Mulchingstirsup
moreclippingsanddustwhichclogstheairlter
andreducesengineperformance.
CuttingGrass
•Grassgrowsatdifferentratesatdifferenttimesof
theyear.Inthesummerheat,itisbesttocutgrass
atthe2-1/4inch(57mm),2-3/4inch(70mm),or
3-1/4inch(83mm)cuttingheightsettings.Cut
onlyaboutathirdofthegrassbladeatatime.Do
notcutbelowthe2-1/4inch(57mm)settingunless
thegrassissparseoritislatefallwhengrassgrowth
beginstoslowdown.
•Whencuttinggrassover6inches(15cm)tall,rst
mowatthehighestcuttingheightsettingandwalk
slower;thenmowagainatalowersettingforthe
bestlawnappearance.Ifthegrassistoolongand
theleavesclumpontopofthelawn,themowermay
plugandcausetheenginetostall.
•Alternatethemowingdirection.Thishelpsdisperse
theclippingsoverthelawnforevenfertilization.
•Iftherearemorethan5inches(12.7cm)ofleaves
onthelawn,setthefrontcuttingheight1or2
notcheshigherthantherearcuttingheight.This
makesiteasiertofeedtheleavesunderthemower
housing.
•Slowdownyourmowingspeedifthemowerdoes
notcuttheleavesnelyenough.
•Ifyoumowoveroakleaves,youcanaddlimeto
thegrassinthespringtoreducetheacidityofthe
oakleaves.
Ifthenishedlawnappearanceisunsatisfactory,try
oneormoreofthefollowing:
•Sharpentheblade.
•Walkataslowerpacewhilemowing.
•Raisethecuttingheightonyourmower.
•Cutthegrassmorefrequently .
•Overlapcuttingswathsinsteadofcuttingafull
swathwitheachpass.
•Setthecuttingheightonthefrontwheelsonenotch
lowerthantherearwheels.Forexample,setthe
frontwheelsat2-1/4inches(57mm)andtherear
wheelsat2-3/4inches(70mm).
CuttingLeaves
•Aftercuttingthelawn,ensurethathalfofthelawn
showsthroughthecutleafcover.Youmayneedto
makemorethanonepassovertheleaves.
16
Page 17

Maintenance
Note:Determinetheleftandrightsidesofthemachinefromthenormaloperatingposition.
RecommendedMaintenanceSchedule(s)
MaintenanceService
Interval
Aftertherst8hours
Beforeeachuseordaily
Every25hours
Every50hours
Every100hours
Every300hours
Yearly
Important:Refertoyour
MaintenanceProcedure
•Changetheengineoil.
•Checktheengineoillevel.
•Inspectthemowerbladesforwearordamage.
•Cleanunderthemowerhousing.
•Cleanthefoampre-cleaner(morefrequentlyindustyconditions).
•Changetheengineoil(moreoftenindustyconditions).
•Cleanthebladebrakeclutchshield.
•Lubricatethegearcase.
•Cleanthepaperairlter(morefrequentlyindustyconditions).
•Changetheoillter.
•Checkthesparkplug.
•Replacethepaperairlter(morefrequentlyindustyconditions).
•Cleanthefuellter.
Engine Operator’ s Man ual
foradditionalmaintenanceprocedures.
Ifyouleavethewireonthesparkplug,someonecouldaccidentlystarttheengineandseriouslyinjure
youorotherbystanders.
Disconnectthewirefromthesparkplugbeforeyoudoanymaintenance.Setthewireasidesothatit
doesnotaccidentlycontactthesparkplug .
Lubrication
LubricatingthePivotArms
Afterevery50operatinghoursorwhentheseasonends,
lubricatethepivotarms.
1.Movetherearwheelcuttingheightleverstothe
centersetting.
2.Wipethegreasettingswithacleanrag(Figure21).
3.Installagreasegunontothettingandgentlyapply2
or3pumpsof#2multi-purposelithiumbasegrease.
Important:Excessivegreasepressuremay
damagetheseals.
Figure21
17
Page 18

LubricatingtheGearCase
ServiceInterval:Every100hours
Afterevery100operatinghours,greasethegearcase.
1.Removethegrassbag.
2.Installagreasegunontothettingthroughthebelt
coveropening(Figure22).
Figure22
EngineMaintenance
ServicingtheAirFilter
ServiceInterval:Every25hours
Every100hours
Every300hours
Cleanthefoampre-cleanerevery25operatinghours.
Cleanthepaperairlterevery100operatinghours.
Replacethepaperairlteronceeveryseasonorevery
300operatinghours;replaceitmorefrequentlyindusty
conditions.
Important:Donotoperatetheenginewithoutthe
airlterassembly;extremeenginedamagewill
occur.
1.Stoptheengineandwaitforallmovingpartstostop.
2.Disconnectthewirefromthesparkplug(Figure13).
3.Removethescrewthatsecurestheaircleanercover
(Figure23).
3.Gentlyapplyoneto2pumpsof#2multi-purpose
lithium-basegrease.
4.Installthegrassbag.
Figure23
1.Screw3.Paperairlter
2.Cover
4.Removethecoverandcleanitthoroughly(Figure23).
5.Removethepaperairlteranddiscardit(Figure24).
18
1.Paperairlter
Figure24
2.Foampre-cleaner
Page 19

Important:Donottrytocleanapaperlter.
6.Removethefoampre-cleanerandwashitwitha
milddetergentandwater,thenblotitdry.
7.Saturatethepre-cleanerwithoil,thensqueezeit(do
nottwist)toremovetheexcessoil.
8.Installthefoampre-cleaner.
9.Installthenewpaperairlter.
10.Installthecoverandsecureitwiththescrew.
ChangingtheEngineOil
ServiceInterval:Aftertherst8hours
ChangingtheOilFilter
ServiceInterval:Every100hours
Replacetheoillter(Figure25)afterevery100operating
hoursoryearly,whichevercomesrst.
Every50hours
Changetheoilaftertherst8operatinghoursandthan
afterevery50operatinghoursoreveryseason(more
frequentlyindustyordirtyconditions).
1.Runtheenginetowarmtheengineoil.
Note:Warmoilowsbetterandcarriesmore
contaminants.
Oilmaybehotafterenginehasbeenrun,and
contactwithhotoilcancauseseverepersonal
injury.
Avoidcontactingthehotengineoilwhenyou
drainit.
2.Stoptheengineandwaitforallmovingpartstostop.
3.Disconnectthewirefromthesparkplug(Figure13).
4.Placeasuitabledrainpanundertherightsideof
themower.
5.Removethedipstickbyrotatingthecap
counterclockwiseandpullingitout.
6.Tipthemowerontoitsrightsidetodraintheoil
intothedrainpan.
Figure25
1.Oillter
1.Runtheenginetowarmtheoil.
Oilmaybehotaftertheenginehasbeen
run,andcontactwithhotoilcancausesever
personalinjury.
Avoidcontactingthehotengineoilwhenyou
drainit.
2.Stoptheengineandwaitforallmovingpartstostop.
3.Disconnectthewirefromthesparkplug.
4.Draintheengineoil;refertoChangingtheEngine
Oil.
5.Placearagundertheoilltertocatchanyoilthat
mayleakoutasyouremovethelter.
6.Removetheoillter.
7.Useyourngertocoatthegasketonthenewlter
withoil(Figure26).
2.Fuelline
Note:Youcanalsoremovetheoilfromthe
crankcaseusinganoilextractor.
7.Returnthemowertoitsoperatingposition.
8.Insertthedipstickintothellerneckandrotatethe
capclockwiseuntilitistight.
9.Recycletheusedoilaccordingtolocalcodes.
10.FillthecrankcasetotheFulllineonthedipstickwith
freshoil.RefertotheFillingtheCrankcasewithOil.
11.Wipeupanyspilledoil.
19
Page 20

Figure27
Figure26
1.Gasket
1.Centerelectrodeinsulator
2.Sideelectrode
3.Airgap(nottoscale)
8.Installthenewlterandhandtightenit2/3turn
only.
9.FillthecrankcasetotheFulllineonthedipstickwith
freshoilRefertoFillingtheCrankcasewithOil.
10.Connectthewiretothesparkplug.
11.Runtheengineforabout3minutes.
12.Stoptheengine,waitforallmovingpartstostop,
andcheckforoilleakagearoundthelter.
13.Addoiltocompensatefortheoilintheoillter.
RefertoCheckingtheEngineOilLevel.
14.Recycletheusedoillteraccordingtolocalcodes.
ServicingtheSparkPlug
ServiceInterval:Every100hours
Checkthesparkplugafterevery100operatinghours.
UseanNGKBPR5ESsparkplugorequivalent.
1.Stoptheengineandwaitforallmovingpartstostop.
6.Installthesparkplugandthegasketseal.
7.Torquetheplugto17ft-lb(23N-m).
8.Connectthewiretothesparkplug.
2.Disconnectthewirefromthesparkplug(Figure13).
3.Cleanaroundthesparkplug.
4.Removethesparkplugfromthecylinderhead.
Important:Replaceacracked,fouled,or
dirtysparkplug.Donotcleantheelectrodes
becausegritenteringthecylindercandamage
theengine.
5.Setthegapontheplugto0.030in.(0.76mm)
(Figure27).
20
Page 21

FuelSystem
DriveSystem
Maintenance
EmptyingtheFuelTankand
CleaningtheFuelFilter
ServiceInterval:Yearly
Thefuellter(screen)elementislocatedinsidethefuel
tank.Cleanthefuellterelementyearly.
1.Stoptheengineandwaitforittocooldown.
Note:Draingasolinefromacoldengineonly.
2.Disconnectthewirefromthesparkplug.
3.Disconnectthefuellinebylooseningthetubeclamp
atthecarburetor.
4.Openthefuelvalve.
5.Drainthegasolinecompletelyfromthetankandfuel
lineintoanapprovedfuelcontainer.
6.Removethefueltankfromthemower.
7.Pourasmallamountoffuelinthefueltank,move
thefuelaroundinthetank,andpouritoutintoan
approvedfuelcontainer.
8.Installthefueltankandfuelline;refertoInstalling
theFuelTankandtheFuelLine.
Maintenance
ServicingtheWheels
RemovingtheWheels
1.Stoptheengineandwaitforallmovingpartstostop.
2.Disconnectthewirefromthesparkplug(Figure13).
3.Removethebolt,thewheelspacer,andthelocknut
mountingthewheeltothepivotarm(Figure28).
Figure28
1.Locknuts
2.Wheelspacer7.Lug
3.Bearing/hubassembly8.Bearing(2)
4.Bearingspacer9.Bolt
5.Wheelhalf
4.Separatethewheelhalvesfromthetirebyremoving
4capscrewsand4locknuts(Figure28).
6.Plasticcover(rearwheels
only)
Note:Ifyouremovethebearingsfromthe
bearing/hubassembly,removethembypressingon
thebearingspacer(Figure28).
AssemblingtheWheels
1.Positionthetireontoonewheelhalf,aligningthe
lugsoneach(Figure28).
2.Placethebearing/hubassemblyintothecenterhole
ofthewheelhalf.Ensurethatthelegsofthehubare
positionedovertheangeofthehole(Figure28).
3.Placetheotherwheelhalfontothebearing/hub
assembly,aligningthewheelandthetirelugsandthe
mountingholes(Figure28).
4.Using2fullythreadedscrewsorbolts(1/4-20x1.50
inch)andnon-lockingnuts,looselysecurethewheel
halvestogether.Mountthescrewsorboltsinthe
opposingholes(Figure28).
5.Checkthealignmentofallpartsandtightenthe
screws,alternatingfromsidetosideforauniformt,
untilthewheelhalvesaredrawntogether(Figure28).
21
Page 22

6.Installthe2boltsand2locknutspreviouslyremoved
intheremainingholesinthewheelhalvesand
tighten.Removethe2longscrewsorboltsand
replacethemwith2boltsand2locknuts(Figure28).
ControlsSystem
Maintenance
7.Installthewheeltothepivotarmwiththebolts,
aspacer,andalocknut.Ensurethatthespaceris
positionedbetweenthewheelhubandthepivotarm
(Figure28).
AdjustingtheBladeBrake
Cable
Wheneveryouinstallanewbladebrakecableassembly
orreplacethebelt,adjustthebladebrakecable.
1.Stoptheengineandwaitforallmovingpartstostop.
2.Disconnectthewirefromthesparkplug(Figure13).
3.Removethefueltankfromthetankbracket.
Note:Youdonotneedtodisconnectthefuelline
fromthefueltank.
4.Loosenthecableclampscrewuntilthebrakecable
conduitslides(Figure29).
Figure29
1.Spring3.Cableclampscrew
2.Cableconduit
5.Drawthecabletothereartoremovetheslackin
thecable.
6.Pushthecableconduitforward5/8inch(1.6cm)
(Figure29).
7.Torquethecableclampscrewto100to120in-lb(11
to14N-m)tolocktheadjustmentinplace.
22
Page 23

Donotovertightenthebladebrakecable.
Overtighteningthebladebrakecablecould
preventthebladebrakefromcontactingthe
brakedrumwhenyoureleasethecontrolbar.
Ifthebladebrakedoesnotcontactthebrake
drum,thebladewillnotstoprotating,which
couldcauseseriouspersonalinjury.
•Eachtimeyouadjustthebrakecable,ensure
thatthebrakestopsthebladein3seconds
orless.
•Ifthebladedoesnotstoprotatingin3
secondsorless,bringthemowertoan
AuthorizedServiceDealerforinspection
andrepair.
BladeMaintenance
MaintainingtheCuttingBlade
Alwaysmowwithasharpblade.Asharpbladecuts
cleanlyandwithouttearingorshreddingthegrassblades.
1.Stoptheengineandwaitforallmovingpartstostop.
2.Disconnectthewirefromthesparkplug(Figure13).
3.Drainthegasolinefromthefueltank;referto
EmptyingtheFuelTankandCleaningtheFuelFilter.
4.Tipthemowerontoitsrightside(Figure30).
Figure30
1.Blade3.Anti-scalpcup
2.Bladenuts
InspectingtheBlade
ServiceInterval:Beforeeachuseordaily
Carefullyexaminethebladeforsharpnessandwear,
especiallywheretheatandthecurvedpartsmeet
(Figure31A).Becausesandandabrasivematerialcan
wearawaythemetalthatconnectstheatandcurved
partsoftheblade,checkthebladebeforeusingthe
mower.Ifyounoticeaslotorwear(Figure31Band
Figure31C),replacetheblade;refertoRemovingthe
Blade.
23
Page 24

Figure31
1.Sail
2.Flatpartoftheblade4.Slotformed
3.Wear
BalancingtheBlade
1.Checkthebalanceofthebladebyplacingthecenter
holeofthebladeoveranailorscrewdrivershank
clampedhorizontallyinavise(Figure33).
Figure33
Note:Forthebestperformance,installanewblade
beforethecuttingseasonbegins.Duringtheyear,le
downanysmallnickstomaintainthecuttingedge.
Awornordamagedbladecanbreak,anda
pieceofthebladecouldbethrownintothe
operator’sorbystander’sarea,resultingin
seriouspersonalinjuryordeath.
•Inspectthebladeperiodicallyforwearor
damage.
•Replaceawornordamagedblade.
RemovingtheBlade
Grasptheendofthebladeusingaragorathickly
paddedglove.Removethebladenuts,theanti-scalpcup,
andtheblade(Figure30).
Note:Youcanalsocheckthebalanceusinga
commerciallymanufacturedbladebalancer.
2.Ifeitherendofthebladerotatesdownward,lethat
end(notthecuttingedgeortheendnearthecutting
edge).Thebladeisproperlybalancedwhenneither
enddrops.
InstallingtheBlade
1.Installasharp,balancedToroblade,theanti-scalp
cup,andthebladenuts.Thesailoftheblademust
pointtowardthetopofthemowerhousingfor
properinstallation.Torquethebladenutsto23to
27ft-lb(32to37N-m).
2.Returnthemowertoitsoperatingposition.
3.Connectthewiretothesparkplug.
SharpeningtheBlade
Filethetopsideofthebladetomaintainitsoriginal
cuttingangle(Figure32A)andinnercuttingedgeradius
(Figure32B).Thebladewillremainbalancedifyou
removethesameamountofmaterialfrombothcutting
edges.
Figure32
1.Sharpenatthisangleonly .
2.Maintaintheoriginalradius
here.
24
Page 25

Cleaning
CleaningundertheMower
Housing
Toensurethebestperformance,keeptheundersideof
themowerhousingclean.
WashingMethod
ServiceInterval:Beforeeachuseordaily
1.Positionthemoweronaatconcreteorasphalt
surfacenearagardenhose.
2.Starttheengine.
3.Holdtherunninggardenhoseathandleleveland
directthewatertoowonthegroundjustinfront
oftherightreartire(Figure34).
Tippingthemowermaycausethefueltoleak
fromthecarburetororthefueltank.Gasoline
isextremelyammable,highlyexplosive,and,
undercertainconditions,cancausepersonal
injuryorpropertydamage.
Avoidfuelspillsbyrunningtheenginedryor
byremovingthegasolinewithahandpump;
neversiphon.
3.Tipthemowerontoitsrightside.
4.Removethedirtandgrassclippingswithahardwood
scraper.Avoidburrsandsharpedges.
5.Returnthemowertoitsoperatingposition.
6.Fillthefueltank.
7.Connectthewiretothesparkplug.
CleaningtheBladeBrake
Figure34
1.Rightrearwheel
Note:Thebladewilldrawinwaterandwashout
clippings.Letthewaterrununtilyounolongersee
clippingsbeingwashedoutfromunderthehousing.
4.Stoptheengineandwaitforallmovingpartstostop.
5.Turnoffthegardenhose.
6.Startthemowerandletitrunforafewminutes
todryoutthemoistureonthemowerandits
components.
ScrapingMethod
Ifwashingdoesnotremovealldebrisfromunderthe
mower,scrapeitclean.
1.Disconnectthewirefromthesparkplug(Figure13).
2.Drainthefuelfromthefueltank.RefertoEmptying
theFuelTankandCleaningtheFuelFilter.
ClutchShield
ServiceInterval:Every50hours
Cleaninsidethebladebrakeclutchshieldwhenyou
changetheengineoiltoensurethebestperformance
andtopreventpartsfromdegradingorwhenyou
sharpenthebladebecauseyouneedtoremovetheblade
inordertoremovetheshield.
1.Stoptheengineandwaitforallmovingpartstostop.
2.Disconnectthewirefromthesparkplug(Figure13).
3.Drainthegasolinefromthefueltank;referto
EmptyingtheFuelTankandCleaningtheFuelFilter.
4.Tipthemoweronitsrightside.
Tippingthemowermaycausethefueltoleak
fromthecarburetororthefueltank.Gasoline
isextremelyammable,highlyexplosive,and,
undercertainconditions,cancausepersonal
injuryorpropertydamage.
Avoidfuelspillsbyemptyingthefueltankas
directed;neversiphon.
5.Remove2bladenuts,theanti-scalpcup,andthe
blade(Figure30).
6.Removethe4screwsthatholdtheshieldinplace
(Figure35).
25
Page 26

Figure35
1.Screws(4)
7.Removetheshieldandbrushorblowallthedebris
fromundertheshieldandaroundthebladebrake
clutchsystem.
8.Installtheshieldusingthe4screwsthatyou
previouslyremoved.
9.Installtheblade,theanti-scalpcup,andthe2blade
nuts.
2.Bladebrakeclutchshield
Storage
Topreparethemowerforoff-seasonstorage,perform
therecommendedmaintenanceprocedures.Referto
Maintenance.
Storethemowerinacool,clean,dryplace.Coverthe
mowertokeepitcleanandprotected.
PreparingtheFuelSystem
Gasolinecanvaporizeifyoustoreitoverlong
periodsoftimeandexplodeifitcomesinto
contactwithanopename.
•Donotstoregasolineoverlongperiodsof
time.
•Donotstorethemowerwithgasolineinthe
fueltankorthecarburetorinanenclosure
withanopename.(Forexample,afurnace
orawaterheaterpilotlight.)
•Allowtheenginetocoolbeforestoringitin
anyenclosure.
10.Returnthemowertoitsoperatingposition.
11.Connectthewiretothesparkplug.
Emptythefueltankwhenmowingthelasttimebefore
storingthemower.
1.Runthemoweruntiltheenginestopsfromrunning
outoffuel.
2.Primetheengineandstartitagain.
3.Allowtheenginetorununtilitstops.Whenyoucan
nolongerstarttheengine,itissufcientlydry.
PreparingtheEngine
1.Whiletheengineisstillwarm,changetheoilfrom
thecrankcase.RefertoChangingtheEngineOil.
2.Removethesparkplug.
3.Usinganoilcan,addaboutonetablespoonofoilto
thecrankcasethroughthesparkplughole.
4.Slowlyrotatetheengineseveraltimes,usingthe
starterrope,todistributetheoil.
5.Installthesparkplugbutdonotconnectthewireto
thesparkplug.
GeneralInformation
1.Cleanthemowerhousing.RefertoCleaningunder
theMowerHousing.
2.Cleananydirtandchafffromthecylinder,cylinder
headns,andblowerhousing.
26
Page 27

3.Removegrassclippings,dirt,andgrimefromthe
externalpartsoftheengine,theshrouding,andthe
topofthemowerhousing.
4.Checktheconditionoftheblade.Referto
MaintainingtheCuttingBlade.
5.CleantheBBCshield;refertoCleaningtheBlade
BrakeClutchShield.
6.Servicetheairlter;refertoServicingtheAirFilter.
7.Lubricatethepivotarms;refertoLubricatingthe
PivotArms.
8.Tightenallnuts,bolts,andscrews.
9.Touchupallrustedorchippedpaintsurfaceswith
paintavailablefromanAuthorizedServiceDealer.
RemovingtheLawnMower
fromStorage
1.Checkandtightenallfasteners.
2.Removethesparkplugandspintheenginerapidly
usingthestartertoblowexcessoilfromthecylinder.
3.Cleanthesparkplugorreplaceitifitiscracked,
broken,oriftheelectrodesareworn.
4.Installthesparkplugandtorqueitto17ft-lb(23
N-m).
5.Performanyneededmaintenanceprocedures;refer
toMaintenance.
6.Fillthefuelinthefueltankwithfreshgasoline.
7.Checktheengineoillevel.
8.Connectthewiretothesparkplug.
27
Page 28

Troubleshooting
Problem
Enginedoesnotstart
Enginestartshardorlosespower
Enginerunsrough
PossibleCauseCorrectiveAction
1.Thefueltankisemptyorthefuel
systemcontainsstalefuel.
2.ThethrottleleverisnotintheChoke
position.
3.Thewireisnotconnectedtothespark
plug.
4.Thesparkplugispitted,fouled,orthe
gapisincorrect.
1.Thefueltankcontainsstalefuel.1.Drainandllthefueltankwithfresh
2.Thefuelcapventholeisplugged.2.Cleanthefuelcapventholeorreplace
3.Theairlterelementisdirtyandis
restrictingtheairow.
4.Theundersideofthemowerhousing
containsclippingsanddebris.
5.Thesparkplugispitted,fouled,orthe
gapisincorrect.
6.Theengineoillevelislowortheoilis
dirty.
1.Thewireisnotconnectedtothespark
plug.
2.Thesparkplugispitted,fouled,orthe
gapisincorrect.
3.ThethrottleleverisnotintheFast
position.
4.Theairlterelementisdirtyandis
restrictingtheairow.
1.Drainand/orllthefueltankwith
freshgasoline.Iftheproblempersists,
contactanAuthorizedServiceDealer.
2.MovethethrottlelevertotheChoke
position.
3.Connectthewiretothesparkplug.
4.Checkthesparkplugandadjustthe
gapifnecessary.Replacethespark
plugifitispitted,fouled,orcracked.
gasoline.
thefuelcap.
3.Cleantheairlterpre-cleanerand/or
replacethepaperairlter.
4.Cleanunderthemowerhousing.
5.Checkthesparkplugandadjustthe
gapifnecessary.Replacethespark
plugifitispitted,fouled,orcracked.
6.Checktheengineoil.Changetheoilif
itisdirtyoraddoilifitislow
1.Connectthewiretothesparkplug.
2.Checkthesparkplugandadjustthe
gapifnecessary.Replacethespark
plugifitispitted,fouled,orcracked.
3.MovethethrottlelevertotheFast
position.
4.Cleantheairlterpre-cleanerand/or
replacethepaperairlter.
Lawnmowerorenginevibrates
excessively
Unevencuttingpattern
Mowerdoesnotself-propel
1.Thebladeisbentorisoutofbalance.1.Balancetheblade.Ifthebladeisbent,
2.Theblademountingnutsareloose.2.Tightentheblademountingnuts.
3.Theundersideofthemowerhousing
containsclippingsanddebris.
4.Theenginemountingboltsareloose.4.Tightentheenginemountingbolts.
1.All4wheelsarenotatthesameheight.1.Placeall4wheelsatthesameheight.
2.Thebladeisdull.
3.Youaremowinginthesamepattern
repeatedly.
4.Theundersideofthemowerhousing
containsclippingsanddebris.
1.Theself-propeldrivecableisoutof
adjustmentorisdamaged.
2.Thereisdebrisunderthebeltcover.
replaceit.
3.Cleanunderthemowerhousing.
2.Sharpenandbalancetheblade.
3.Changethemowingpattern.
4.Cleanunderthemowerhousing.
1.Adjusttheself-propeldrivecable.
Replacethecableifnecessary .
2.Cleanthedebrisfromunderthebelt
cover.
28
Page 29

Notes:
29
Page 30

Notes:
30
Page 31

International Distributor List
Distributor: Country: Phone Number:
Atlantis Su ve Sulama Sisstemleri Lt Turkey 90 216 344 86 74
Balama Prima Engineering Equip Hong Kong 852 2155 2163
B-Ray Corporation Korea 82 32 551 2076
Casco Sales Company Puerto Rico 787 788 8383
Ceres S.A Costa Rica 506 239 1138
CSSC Turf Equipment (pvt) Ltd Sri Lanka 94 11 2746100
Cyril Johnston & Co Northern Ireland 44 2890 813 121
Equiver Mexico 52 55 539 95444
Femco S.A. Guatemala 502 442 3277
G.Y.K. Company ltd. Japan 81 726 325 861
Geomechaniki of Athens Greece 30 10 935 0054
Guandong Golden Star China 86 20 876 51338
Hako Gorund and Garden Sweden 46 35 10 0000
Hayter Limited (U.K.) United Kingdom 44 1279 723 444
Hydroturf Int. Co Dubai United Arab Emirates 97 14 347 9479
Hydroturf Egypt LLC Egypt 202 519 4308
Ibea S.p.A. Italy 39 0331 853611
Irriamc Portugal 351 21 238 8260
Jean Heybroek b.v. Netherlands 31 30 639 4611
Lely (U.K.) Limited United Kingdom 44 1480 226 800
Maquiver S.A. Colombia 57 1 236 4079
Maruyama Mfg. Co. Inc. Japan 81 3 3252 2285
Metra Kft Hungary 36 1 326 3880
Mountfield a.s. Czech Republic 420 255 704 220
Munditol S.A. Argentina 54 11 4 821 9999
Oslinger Turf Equipment SA Ecuador 593 4 239 6970
Oy Hako Ground and Garden Ab Finland 358 987 00733
Parkland Products Ltd New Zealand 64 3 34 93760
Prochaska & Cie Austria 43 1 278 5100
RT Cohen 2004 Ltd Israel 972 986 17979
Riversa Spain 34 9 52 83 7500
Roth Motorgerate GmBh & Co Germany 49 7144 2050
Sc Svend Carlsen A/S Denmark 45 66 109 200
Solvert S.A.S France 33 1 30 81 77 00
Spypros Stavrinides Limited Cyprus 357 22 434131
Surge Systems India Limited India 91 1 292299901
T-Markt Logistics Ltd Hungary 36 26 525 500
Toro Australia Australia 61 3 9580 7355
Toro Europe BVBA Belgium 32 14 562 960
374-0102 Rev B
Page 32

The Toro Warranty
Conditions and Products Covered
The Toro® Company and its afliate, Toro Warranty Company, pursuant to
an agreement between them, jointly promises to the original purchaser* to
repair any Toro Product used for normal residential purposes* if defective in
materials or workmanship. The following time periods apply from the date
of original purchase:
Products
Walk Power Mowers
Rear Engine Riders 2-year limited warranty
Lawn & Garden Tractors
Electric Hand Held Products
Snowthrowers
Consumer Zero Turn
* “Original purchaser” means use the person who originally purchased Toro
products.
* “Normal residential purposes” means use of the product on the same lot as
your home. Use at more than one location is considered commercial use, and
the commercial use warranty would apply.
Warranty Period
2-year limited warranty
2-year limited warranty
2-year limited warranty
2-year limited warranty
2-year limited warranty
Limited Warranty for Commercial Use
Toro Consumer Products and attachments used for commercial, institutional,
or rental use are warranted against defects in materials or workmanship for the
following time periods from the date of original purchase:
Products
Walk Power Mowers
Rear Engine Riders 90 day warranty
Lawn & Garden Tractors
Electric Hand Held Products
Snowthrowers
Consumer Zero Turn
Warranty Period
90 day warranty
90 day warranty
90 day warranty
90 day warranty
45 day warranty
Instructions for Obtaining Warranty Service
If you think that your Toro Product contains a defect in materials or
workmanship, follow this procedure:
1. Contact your seller to arrange service of the product. If for any reason
it is impossible for you to contact your seller, you may contact any Toro
Authorized Distributor to arrange service.
2. Bring the product and your proof of purchase (sales receipt) to your seller
or the Service Dealer.
If for any reason you are dissatised with the Service Dealer’s analysis or with the
assistance provided, contact the Toro importer or contact us at:
Customer Care Department, Consumer Division
Toro Warranty Company
8111 Lyndale Avenue South
Bloomington, MN 55420-1196
Manager: Technical Product Support: 001-952-887-8248
See attached Distributor List
Owner Responsibilities
You must maintain your Toro Product by following the maintenance procedures
described in the operator’s manual. Such routine maintenance, whether
performed by a dealer or by you, is at your expense.
Items and Conditions Not Covered
This express warranty does not cover:
• Cost of regular maintenance service or parts, such as lters, fuel, lubricants,
tune-up parts, blade sharpening, brake and clutch adjustments.
• Any product or part which has been altered or misused or required
replacement or repair due to normal wear, accidents, or lack of proper
maintenance.
• Repairs necessary due to improper fuel, contaminants in the fuel system, or
failure to properly prepare the fuel system prior to any period of non-use
over three months.
• Engine and transmission. These are covered by the appropriate
manufacturer’s guarantees with separate terms and conditions.
All repairs covered by this warranty must be performed by an Authorized Toro
Service Dealer using Toro approved replacement parts.
General Conditions
The purchaser is covered by the national laws of each country. The rights to
which the purchaser is entitled with the support of these laws are not restricted
by this warranty.
374-0101 Rev A
 Loading...