

Page 1
FormNo.3375-280RevA
Commercial21inLawnMower
ModelNo.22155—SerialNo.313000001andUp
ModelNo.22156—SerialNo.313000001andUp
Registeratwww.T oro.com.
OriginalInstructions(EN)
*3375-280*A
Page 2
WARNING
CALIFORNIA
Proposition65Warning
Thisproductcontainsachemicalorchemicals
knowntotheStateofCaliforniatocausecancer,
birthdefects,orotherreproductiveharm.
Theengineexhaustfromthisproduct
containschemicalsknowntotheStateof
Californiatocausecancer,birthdefects,
orotherreproductiveharm.
Important:Thisengineisnotequippedwithaspark
arrestermufer.ItisaviolationofCaliforniaPublic
ResourceCodeSection4442touseoroperatetheengine
onanyforest-covered,brush-covered,orgrass-covered
land.Otherstatesorfederalareasmayhavesimilarlaws.
ThissparkignitionsystemcomplieswithCanadianICES-002.
Theenclosed
informationregardingtheUSEnvironmentalProtection
Agency(EPA)andtheCaliforniaEmissionControl
Regulationofemissionsystems,maintenance,and
warranty.Replacementsmaybeorderedthroughthe
enginemanufacturer.
Engine Owner's Man ual
issuppliedfor
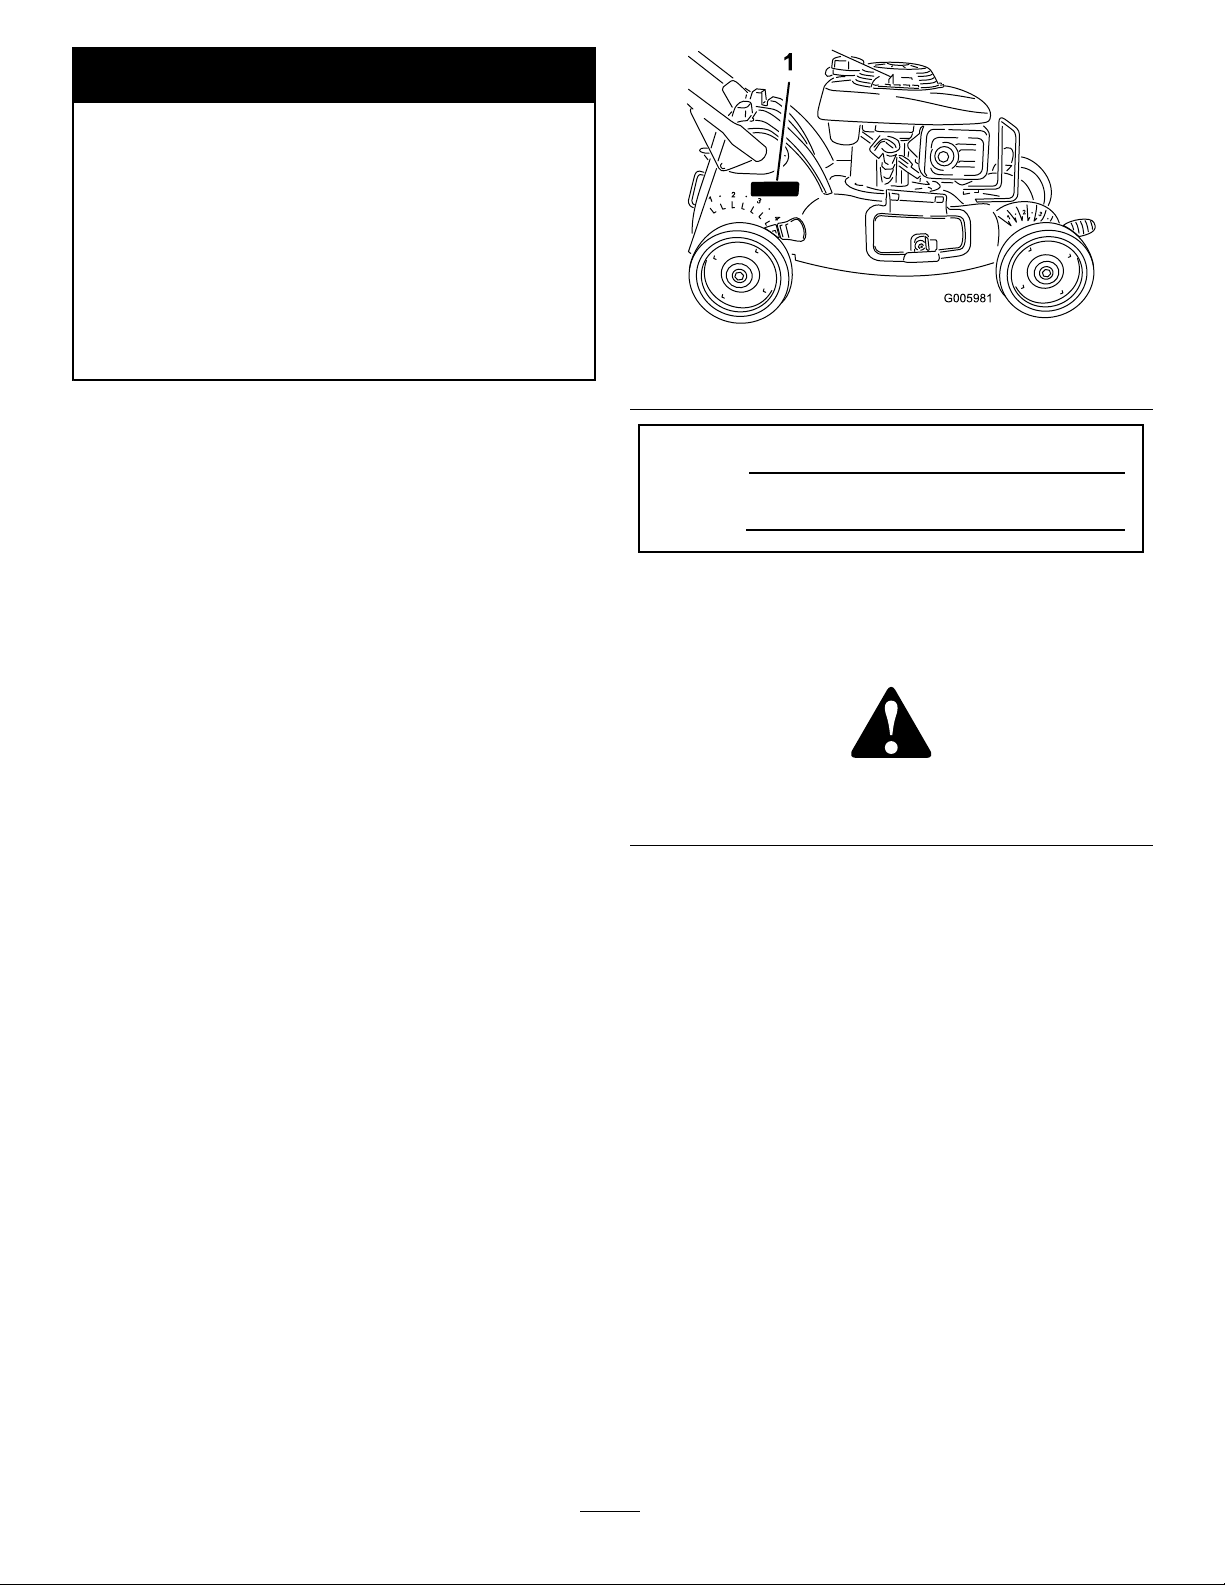
Figure1
1.Modelandserialnumberlocation
ModelNo.
SerialNo.
Thismanualidentiespotentialhazardsandhassafety
messagesidentiedbythesafetyalertsymbol(Figure2),
whichsignalsahazardthatmaycauseseriousinjuryordeath
ifyoudonotfollowtherecommendedprecautions.
Introduction
Readthisinformationcarefullytolearnhowtooperateand
maintainyourproductproperlyandtoavoidinjuryand
productdamage.Youareresponsibleforoperatingthe
productproperlyandsafely .
YoumaycontactTorodirectlyatwww .Toro.comforproduct
andaccessoryinformation,helpndingadealer,ortoregister
yourproduct.
Wheneveryouneedservice,genuineToroparts,oradditional
information,contactanAuthorizedServiceDealerorToro
CustomerServiceandhavethemodelandserialnumbersof
yourproductready .Figure1identiesthelocationofthe
modelandserialnumbersontheproduct.Writethenumbers
inthespaceprovided.
Figure2
1.Safetyalertsymbol
Thismanualuses2wordstohighlightinformation.
Importantcallsattentiontospecialmechanicalinformation
andNoteemphasizesgeneralinformationworthyofspecial
attention.
©2012—TheToro®Company
8111LyndaleAvenueSouth
Bloomington,MN55420
Contactusatwww.T oro.com.
2
PrintedintheUSA
AllRightsReserved
Page 3

Contents
Safety
Introduction..................................................................2
Safety...........................................................................3
GeneralOperation..................................................3
SlopeOperation......................................................4
Children.................................................................4
Service...................................................................4
SafetyandInstructionalDecals.................................5
Setup............................................................................6
1InstallingtheHandle.............................................6
2FillingtheEnginewithOil......................................7
3InstalltheRear-dischargePlugorGrass
Bag....................................................................8
ProductOverview..........................................................9
Controls...............................................................10
Operation....................................................................10
CheckingtheEngineOilLevel.................................10
FillingtheFuelTankwithGasoline...........................11
StartingtheEngine.................................................11
StoppingtheEngine...............................................12
OperatingtheSelf-propelDrive................................12
AdjustingtheCuttingHeight....................................13
RecyclingtheClippings...........................................13
BaggingtheClippings.............................................14
Side-dischargingtheClippings..................................15
OperatingTips......................................................16
Maintenance.................................................................17
RecommendedMaintenanceSchedule(s)......................17
PremaintenanceProcedures........................................17
PreparingforMaintenance.......................................17
EngineMaintenance..................................................18
ServicingtheAirCleaner.........................................18
ChangingtheEngineOil.........................................18
ServicingtheSparkPlug..........................................18
DriveSystemMaintenance.........................................19
AdjustingtheSelf-propelDriveCable........................19
BladeMaintenance.....................................................20
MaintainingtheCuttingBlade..................................20
Cleaning...................................................................21
CleaningundertheMachineHousing........................21
Storage........................................................................21
PreparingtheFuelSystem.......................................21
PreparingtheEngine..............................................21
GeneralInformation...............................................22
RemovingtheMachinefromStorage.........................22
Troubleshooting...........................................................23
ThislawnmowermeetsorexceedstheCPSCbladesafety
requirementsforwalk-behindrotarylawnmowersandthe
B71.1specicationsoftheAmericanNationalStandards
Instituteineffectatthetimeofproduction.
Readandunderstandthecontentsofthismanualbefore
youstarttheengine.
Thesafetyalertsymbol(Figure2)isusedtoalertyouto
potentialpersonalinjuryhazards.Obeyallsafetymessages
thatfollowthissymboltoavoidpossibleinjuryordeath.
Improperlyusingormaintainingthismowercouldresultin
injuryordeath.Toreducethispotential,complywiththe
followingsafetyinstructions.
Thefollowinginstructionshavebeenadaptedfromthe
ANSI/OPEIstandardB71.1-2003.
Thiscuttingmachineiscapableofamputatinghands
andfeetandofthrowingobjects.Failuretoobserve
thefollowingsafetyinstructionscouldresultinserious
injuryordeath.
GeneralOperation
•Read,understand,andfollowallinstructionsonthe
machineandinthemanual(s)beforestarting.
•Donotputhandsorfeetnearorunderthemachine.
Keepclearofthedischargeopeningatalltimes.
•Onlyallowresponsibleadultswhoarefamiliarwiththe
instructionstooperatethismachine.
•Cleartheareaofobjectssuchasrocks,wire,toys,etc.,
whichcouldbethrownbytheblade.Staybehindthe
handlewhentheengineisrunning.
•Besuretheareaisclearofbystandersbeforeoperating.
Stopthemachineifanyoneentersthearea.
•Donotoperatethemachinebarefootedorwhilewearing
sandals.Alwayswearsubstantialfootwear.
•Donotpullthemachinebackwardunlessabsolutely
necessary.Alwayslookdownandbehindbeforeand
whilemovingbackward.
•Neverdirectdischargedmaterialtowardanyone.Avoid
dischargingmaterialagainstawallorobstruction.
Materialmayricochetbacktowardtheoperator.Stopthe
bladewhencrossinggravelsurfaces.
•Donotoperatemachinewithouttheentiregrasscatcher,
dischargeguard,rearguard,orothersafetyprotective
devicesinplaceandworking.
•Neverleavearunningmachineunattended.
•Stoptheengineandwaituntilthebladecomestoa
completestopbeforecleaningthemachine,removing
grasscatcher,oruncloggingthedischargeguard.
•Operatethemachineonlyindaylightorgoodarticial
light.
3
Page 4

•Donotoperatethemachinewhileundertheinuence
ofalcoholordrugs.
•Neveroperatethemowerinwetgrass.Alwaysbesureof
yourfooting;walk;neverrun.
•Disengagethedrivesystem,ifsoequipped,before
startingtheengine.
•Ifthemachineshouldstarttovibrateabnormally,stop
theengineandcheckforthecauseimmediately.Vibration
isgenerallyawarningoftrouble.
•Alwaysweareyeprotectionwhenoperatingthemachine.
•Seethemanufacturer'sinstructionsforproperoperation
andinstallationofaccessories.Onlyuseaccessories
approvedbythemanufacturer.
SlopeOperation
Slopesareamajorfactorrelatedtoslipandfallaccidents,
whichcanresultinsevereinjury.Operationonallslopes
requireextracaution.Ifyoufeeluneasyonaslope,donot
mowit.
•Mowacrossthefaceofslopes;neverupanddown.
Exerciseextremecautionwhenchangingdirectionon
slopes.
•Watchforholes,ruts,bumps,rocks,orotherhidden
objects.Uneventerraincouldcauseaslipandfall
accident.Tallgrasscanhideobstacles.
•Donotmowonwetgrassorexcessivelysteepslopes.
Poorfootingcouldcauseaslipandfallaccident.
•Donotmowneardrop-offs,ditches,orembankments.
Youcouldloseyourfootingorbalance.
Children
Tragicaccidentscanoccuriftheoperatorisnotalerttothe
presenceofchildren.Childrenareoftenattractedtothe
machineandthemowingactivity.Neverassumethatchildren
willremainwhereyoulastsawthem.
•Keepchildrenoutofthemowingareaandunderthe
watchfulcareofaresponsibleadultotherthanthe
operator.
•Bealertandturnmoweroffifachildentersthearea.
•Neverallowchildrentooperatethemachine.
•Useextracarewhenapproachingblindcorners,shrubs,
trees,orotherobjectsthatmayblockyourviewofachild.
Service
SafeHandlingofGasoline
Toavoidpersonalinjuryorpropertydamage,use
extremecareinhandlinggasoline.Gasolineisextremely
ammableandthevaporsareexplosive.
•Extinguishallcigarettes,cigars,pipes,andothersources
ofignition.
•Useonlyanapprovedgasolinecontainer.
•Neverremovegascaporaddfuelwiththeengine
running.Allowenginetocoolbeforerefueling.
•Neverrefuelthemachineindoors.
•Neverstorethemachineorfuelcontainerwherethereis
anopename,spark,orpilotlight,suchasonawater
heateroronotherappliances.
•Neverllcontainersinsideavehicleoronatruckor
trailerbedwithaplasticliner.Alwaysplacecontainerson
thegroundawayfromyourvehiclebeforelling.
•Removegas-poweredequipmentfromthetruckortrailer
andrefuelitontheground.Ifthisisnotpossible,then
refuelsuchequipmentwithaportablecontainerrather
thanfromagasolinedispensernozzle.
•Keepthenozzleincontactwiththerimofthefueltank
orcontaineropeningatalltimesuntilfuelingiscomplete.
Donotuseanozzlelock-opendevice.
•Iffuelisspilledonclothing,changeclothingimmediately.
•Neveroverllfueltank.Replacegascapandtighten
securely.
WARNING
Exhaustcontainscarbonmonoxide,anodorless,
deadlypoisonthatcankillyou.
Donotruntheengineindoorsorinanenclosed
area.
GeneralService
•Neveroperatemachineinaclosedarea.
•Keepallnutsandboltstighttobesuretheequipmentis
insafeworkingcondition.
•Nevertamperwithsafetydevices.Checktheirproper
operationregularly.
•Keepmachinefreeofgrass,leaves,orotherdebris
build-up.Cleanupoilorfuelspillsandremoveany
fuel-soakeddebris.Allowthemachinetocoolbefore
storingit.
•Ifyoustrikeaforeignobject,stopandinspectthe
machine.Repairit,ifnecessary,beforestartingit.
•Nevermakeanyadjustmentsorrepairswiththeengine
running.Disconnectthespark-plugwireandgroundit
againsttheenginetopreventunintendedstarting.
•Checkgrasscatchercomponentsandthedischarge
guardfrequently,andreplacethemwithmanufacturer's
recommendedparts,whennecessary.
•Mowerbladesaresharp.Wrapthebladeorweargloves,
anduseextracautionwhenservicingthem.
•Donotchangetheenginegovernorsettingoroverspeed
theengine.
•Maintainorreplacesafetyandinstructionlabels,as
necessary.
4
Page 5
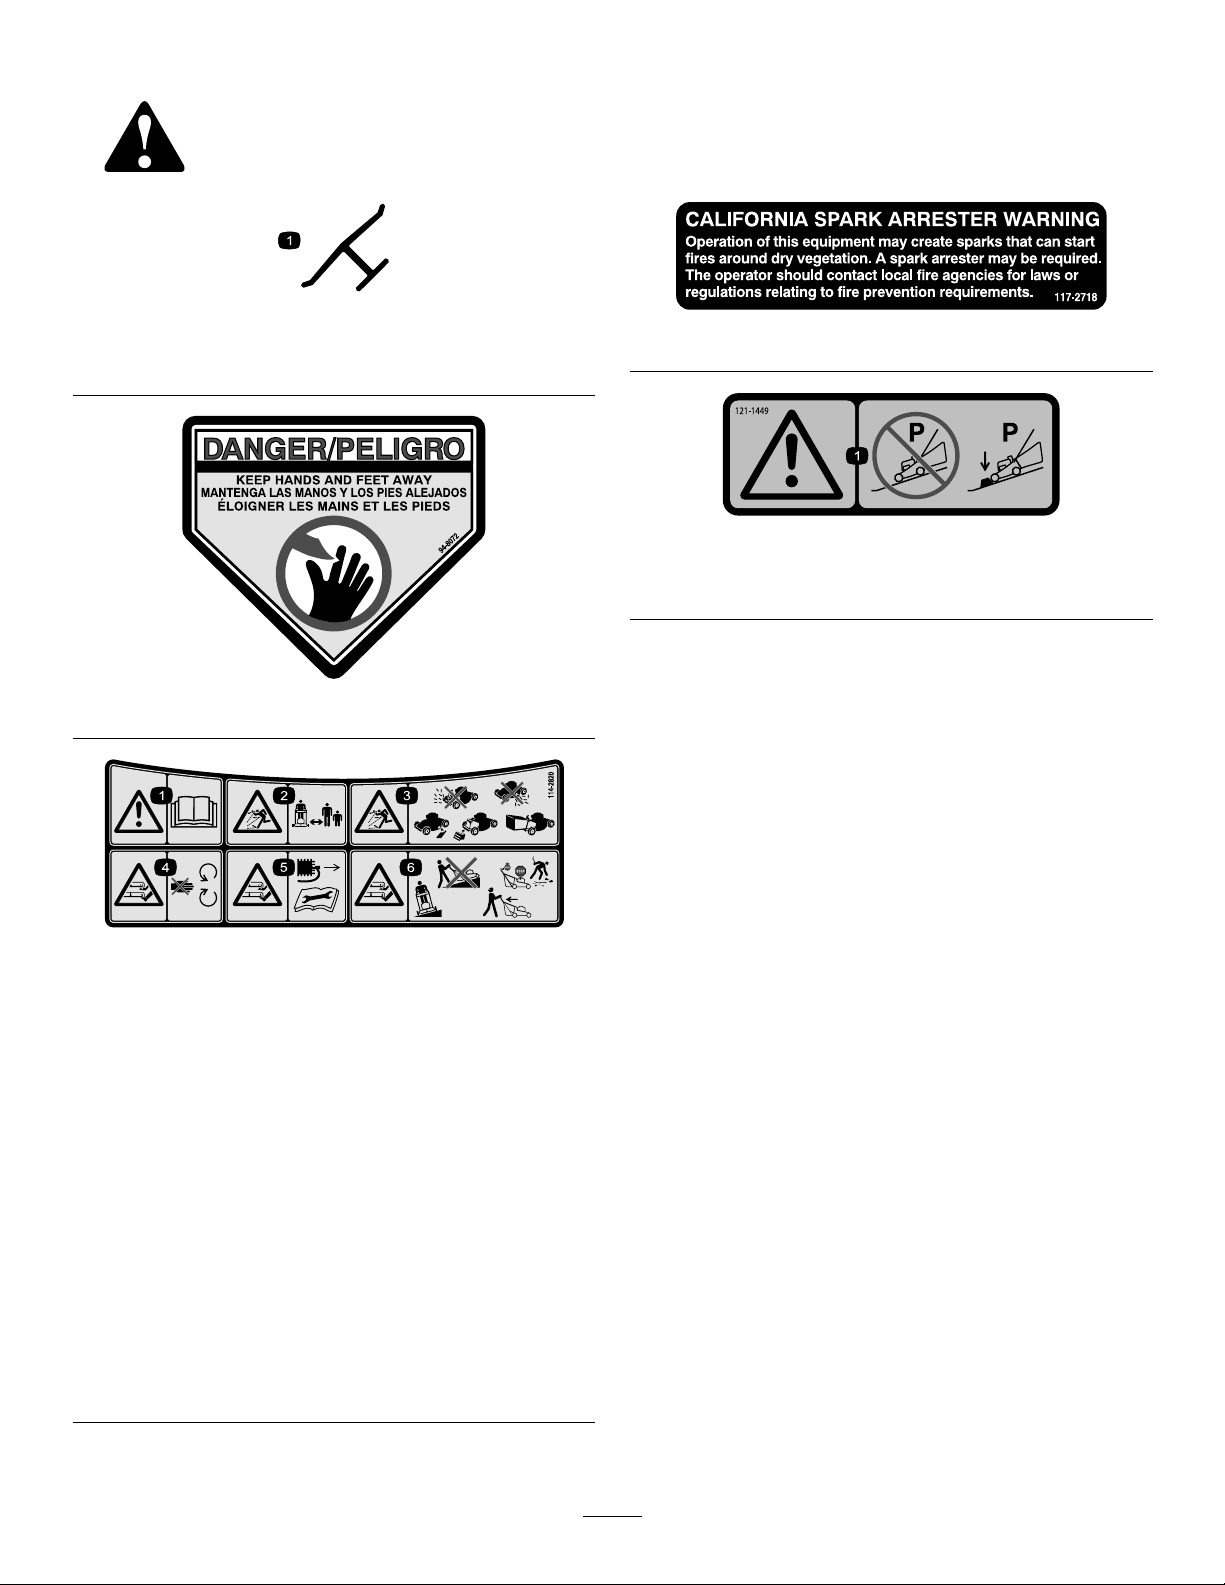
SafetyandInstructionalDecals
Safetydecalsandinstructionsareeasilyvisibletotheoperatorandarelocatednearanyareaofpotential
danger.Replaceanydecalthatisdamagedorlost.
Manufacturer'sMark
1.Indicatesthebladeisidentiedasapartfromtheoriginal
machinemanufacturer.
94-8072
117–2718
121-1449
1.Warning—donotparkonslopesunlesswheelsarechocked
orblocked.
1.Warning—readthe
Operator'sManual.
2.Thrownobject
hazard—keepbystanders
asafedistancefromthe
machine.
3.Thrownobjecthazard—do
notoperatethemower
withoutthereardischarge
plugorbaginplace;do
notoperatethemower
withoutthesidedischarge
coverordeectorinplace.
114-2820
4.Cutting/dismemberment
hazardofhandorfoot,
mowerblade—stayaway
frommovingparts.
5.Cutting/dismemberment
hazardofhandorfoot,
mowerblade—remove
theignitionkeyandread
theinstructionsbefore
servicingorperforming
maintenance.
6.Cutting/dismemberment
hazardofhandorfoot,
mowerblade—donot
operateupanddown
slopes;operatesideto
sideonslopes;stopthe
enginebeforeleavingthe
operatingposition;and
lookbehindyouwhen
backingup.
5
Page 6
Setup
LooseParts
Usethechartbelowtoverifythatallpartshavebeenshipped.
ProcedureDescription
1
2
3
1
InstallingtheHandle
Partsneededforthisprocedure:
2
Oval-headbolt(5/16x1-1/2inches)
2
Bolt(5/16x1-1/2inches)
2
Spacer
4
Locknut(5/16inch)
1
Cabletie
Oval-headbolt(5/16x1-1/2inches)
Bolt(5/16x1-1/2inches)
Spacer
Locknut(5/16inch)
Cabletie
SAE30WdetergentoilwithanAPI
serviceclassicationofSH,SJ,SL,or
higher(notsuppliedwiththemachine).
Nopartsrequired
Qty.
2
2
2
4
1
20oz.
(0.55l)
–
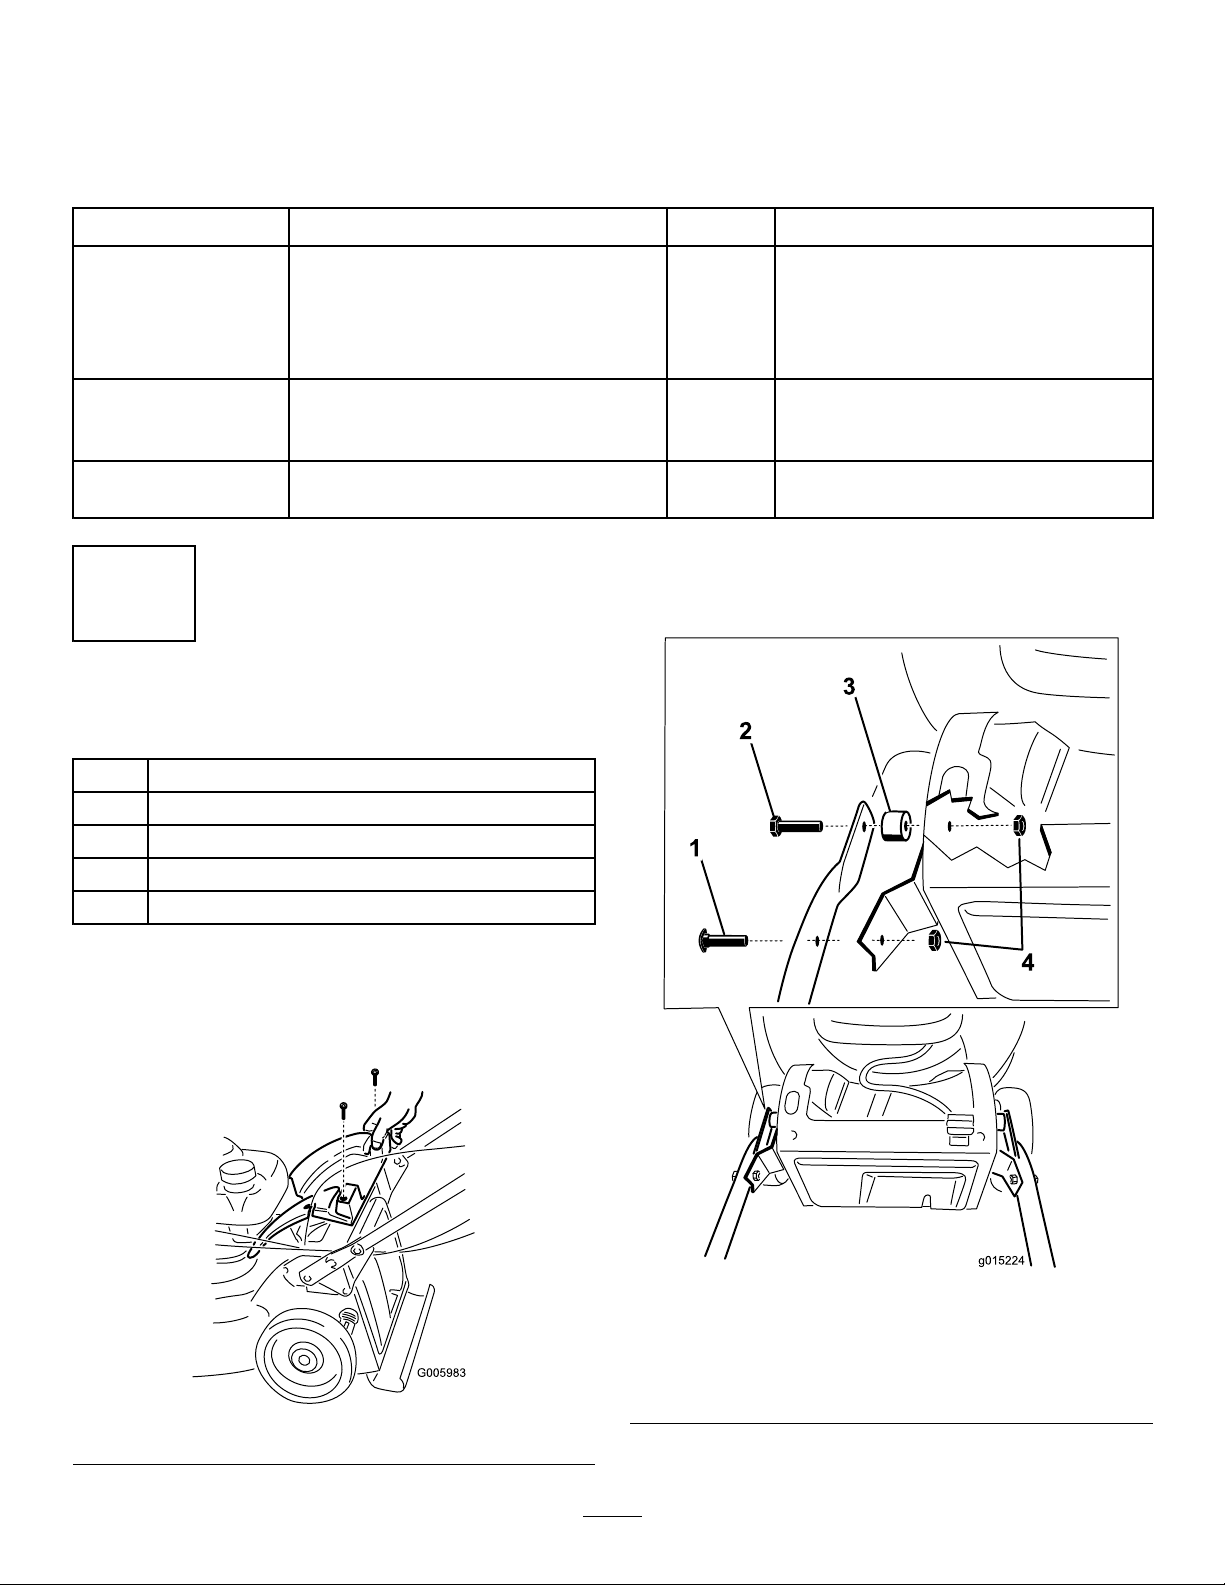
2.Attachthehandletothemachinehousing(Figure4)
usingthe4bolts,4locknuts,and2spacersintheloose
partsbag.
Installthehandle.
Filltheenginewithoil.
Installtherecycleplugorgrassbag.
Use
Procedure
1.Removethe2screwsthatholdthebackcoverinplace
andremovethebackcover(Figure3).
Figure3
1.Oval-headbolt(5/16x
1-1/2inches)(2)
2.Bolt(5/16x1-1/2inches)
(2)
6
Figure4
3.Spacer(2)
4.Locknut(5/16inch)(4)
Page 7
Note:Youcansetthehandleheightin1of2
positions(Figure5).Setthehandletoaheightthatis
comfortableforyou.
Figure7
Figure5
1.Higherhandleposition2.Lowerhandleposition
Note:T orqueallboltsto120in-lb(13.6N-m).
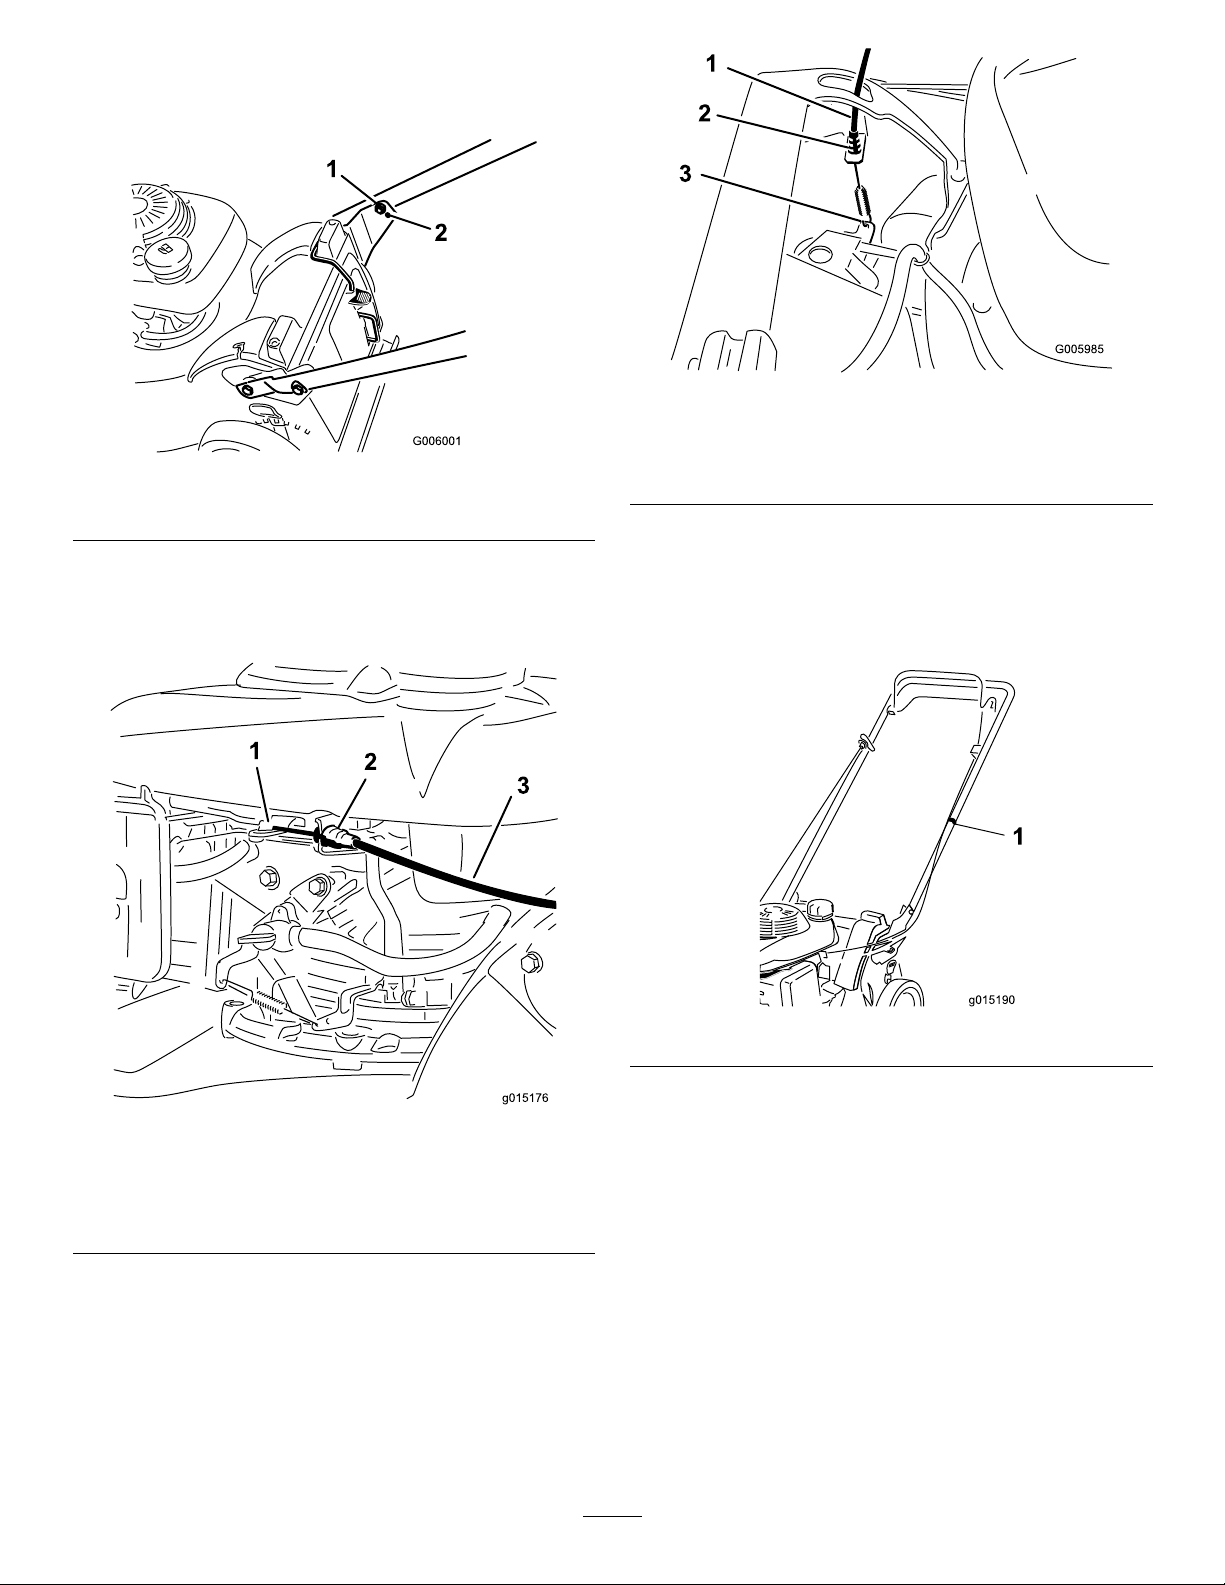
3.Routetheblade-brakecabledowntheinsideofthe
handleandattachthecableend(
Figure6).
1.Self-propel-drivecable
2.Insertcablejacketend
here
3.Attachcableendhere
5.Ensurethattheself-propeldrive
isproperlyadjusted.Referto
AdjustingtheSelf-propelDriveCable(page19).
6.Tiethecabletothehandle(Figure8)usingthecable
tiefromtheloosepartsbag.
Figure6
1.AttachcableZ-ttingend
here
2.Insertcablejacketend
here
3.Blade-brakecable
4.Routetheself-propeldrivecabledowntheinsideofthe
handle,threadthecablethroughtheopeningonthe
lefthandsideofthehousing,andattachthecableend
(
Figure7)(Self-propelmodelonly).
Figure8
7.Installthebackcoverwiththe2screwsthatyou
removedinstep1.
7
Page 8
2
3
FillingtheEnginewithOil
Partsneededforthisprocedure:
20oz.
(0.55l)
Procedure
Important:Yourmachine
theengine.
1.Removethedipstick(Figure9).
SAE30WdetergentoilwithanAPIservice
classicationofSH,SJ,SL,orhigher(notsupplied
withthemachine).
does not
comewithoilin
InstalltheRear-dischargePlug orGrassBag
NoPartsRequired
Procedure
Youmustcorrectlyinstalltherear-dischargeplug(for
recyclingorside-dischargingtheclippings)orgrassbag(for
baggingtheclippings)ortheenginewillnotstart.
Themachinehasasafetyswitch,locatedatthebottomofa
channelonthetop,rightrearofthemachine,thatprevents
themachinefromoperatingwithoutarear-dischargeplugor
grassbag.Thispreventsthemachinefromthrowingdebris
attheoperatorthroughtherearchute.
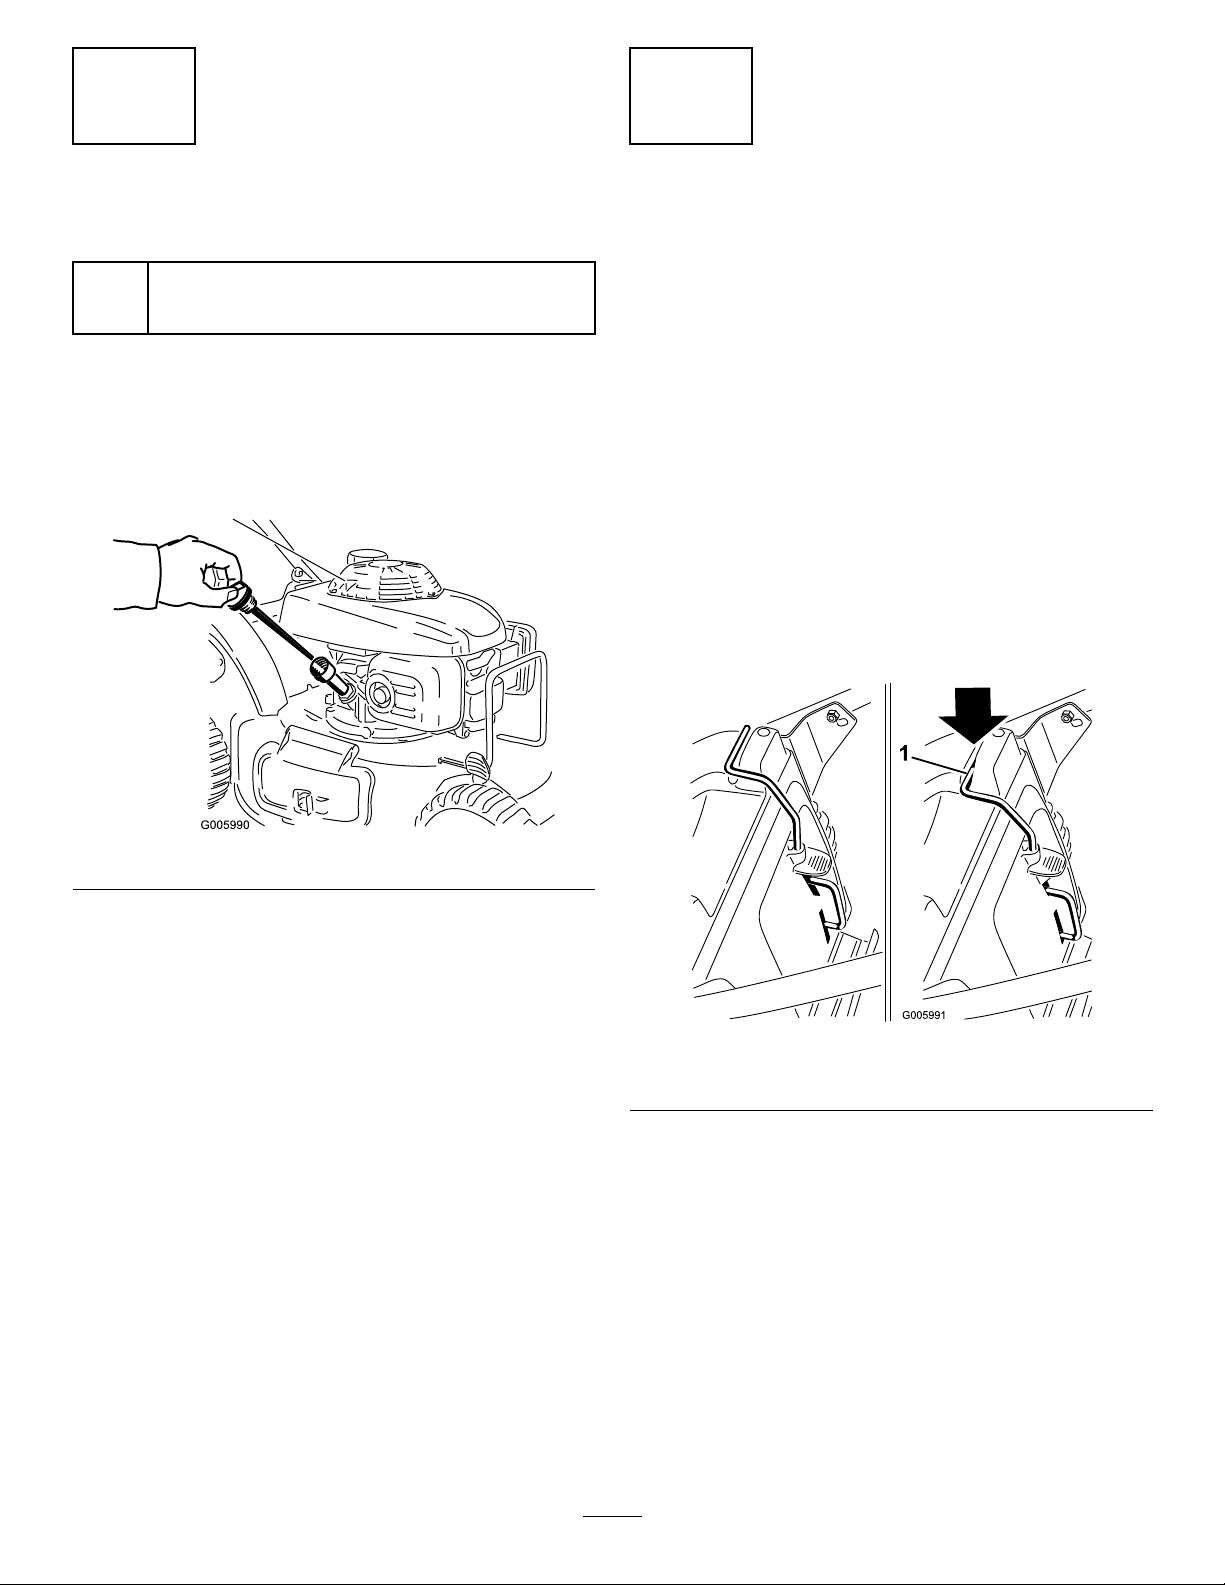
Fortheswitchtodetectthepresenceoftherear-discharge
plug,thetopoftherear-dischargepluglevermustliefullyin
thebottomofthechannel(Figure10).
Figure9
2.Slowlypouroilintotheoillltube,periodically
checkingthelevelwiththedipstick,untilthedipstick
indicatesthattheengineisfullasillustratedin
Donotoverll.
Note:Max.ll:20oz.(0.55l),type:SAE30W
detergentoilwithanAPIserviceclassicationofSH,
SJ,SL,orhigher.
Note:Ifyouoverlltheengine,poursomeoiloutof
itasdirectedin
3.Installthedipsticksecurely.
Important:
operating hour s
toChangingtheEngineOil(page18).
ChangingtheEngineOil(page18).
Change the engine oil after the r st 5
;changeityearlythereafter.Refer
Figure9.
Figure10
1.Topofrear-dischargeplugleverinswitchchannel
1.Inserttherear-dischargeplugintothemachine,ifit
isn'talreadyinstalled(Figure11).
8
Page 9

ProductOverview
Figure12
Figure11
2.Squeezethebuttonontheleverwithyourthumband
fullyinserttherear-dischargeplugintotheopening
(Figure11).
3.Releasethebuttonontheleverandensurethatthetop
oftheleverisliesfullyintheswitchchannel.Ifthe
topoftheleverisnotintheswitchchannel,your
machinewillnotstart!
Note:Iftheleverdoesnotlatchproperly ,disconnect
thewirefromthesparkplugandcheckforandremove
anydebrisbuildupinthetunnel.
1.Blade-controlbar
2.Self-propel-drivebar7.Sparkplug
3.Handle
4.Fueltank
5.Cutting-heightlever(4)
1.Grassbag
2.Side-dischargechute
6.Airlter
8.Oilll/dipstick(notshown)
9.Starterhandle
Figure13
3.Rear-dischargeplug
(installed)
9
Page 10

Controls
Operation
Note:Determinetheleftandrightsidesofthemachine
fromthenormaloperatingposition.
CheckingtheEngineOilLevel
ServiceInterval:Beforeeachuseordaily
1.Removethedipstick,wipeitclean,andinsertitintothe
oilllerneck,butdonotscrewitin(Figure15).
Figure14
1.Recoil-starthandle
2.Blade-controlbar
3.Self-propel-drivebar
Figure15
2.Removethedipstickandchecktheoillevel(Figure15).
Ifthereisnooilonthedipstick,slowlypouroilinto
theoillltube,periodicallycheckingthelevelwiththe
dipstick,untilthedipstickindicatesthattheengineis
fullasillustratedin
ll:20oz.(0.55l),type:SAE30Wdetergentoilwith
anAPIserviceclassicationofSH,SJ,SL,orhigher.)
Note:Max.ll:20oz.(0.55l),type:SAE30W
detergentoilwithanAPIserviceclassicationofSH,
SJ,SL,orhigher.
Note:Ifyouoverlltheengine,poursomeoiloutof
it;referto
3.Installthedipsticksecurely.
ChangingtheEngineOil(page18).
Figure15.Donotoverll.(Max.
10
Page 11

FillingtheFuelTankwith Gasoline
DANGER
Gasolineisextremelyammableandexplosive.A
reorexplosionfromgasolinecanburnyouand
others.
•Topreventastaticchargefromignitingthe
gasoline,placethecontainerand/ormachine
directlyonthegroundbeforelling,notina
vehicleoronanobject.
•Fillthetankoutdoorswhentheengineiscold.
Wipeupspills.
•Donothandlegasolinewhensmokingoraround
anopenameorsparks.
•Storegasolineinanapprovedfuelcontainer,out
ofthereachofchildren.
Fillthefueltankwithfreshunleadedregulargasolinefroma
majorname-brandservicestation(Figure16).
Important:T oreducestartingproblems,addfuel
stabilizertothefuelallseason,mixingitwithgasoline
lessthan30daysold.
Figure17
1.Topofrear-dischargeplugleverinswitchchannel
Figure18
Figure16
StartingtheEngine
Important:Themachinehasasafetyswitchthat
preventsyoufromstartingthemachineunlessyourst
installtherear-dischargeplugorthegrassbagsecurely
onthemachine.
1.Installtherear-dischargeplug(
bag(Figure18)onthemachine.
Figure17)orthegrass
2.TurnthefuelvalvelevertotheOnposition(Figure19).
11
Page 12

Figure19
3.Whentheengineiscold,movethechokelevertothe
Chokeposition(Figure20).
Note:Donotusethechokewhentheengineiswarm.
Figure21
1.Recoil-starthandle
5.Ifthemachinedoesnotstartafter1or2pulls,repeat
steps3and4.
Note:Ifthemachinestilldoesnotstart,contactan
AuthorizedServiceDealer.
StoppingtheEngine
ServiceInterval:Beforeeachuseordaily
Tostoptheengine,releasetheblade-controlbar(Figure22).
Important:Whenyoureleasetheblade-controlbar,
boththeengineandbladeshouldstopwithin3seconds.
Iftheydonotstopproperly,stopusingyourmachine
immediatelyandcontactanAuthorizedServiceDealer.
Figure20
4.Holdtheblade-controlbaragainstthehandleandpull
therecoilstarter(Figure21).
Note:Pulltherecoilstarthandlelightlyuntilyoufeel
resistance,thenpullitbriskly.
Note:Ifthechokeisengaged,itwillautomaticallyturn
offabout3secondsafteryouholdtheblade-control
baragainstthehandle.
Figure22
1.Blade-controlbar
OperatingtheSelf-propel Drive
Self-propelmodelonly
1.Tooperatetheself-propeldrive,squeezetheself-propel
drivebaragainstthehandleandholdit(Figure23).
12
Page 13

Figure23
1.Self-propel-drivebar
Note:Themaximumself-propel-drivespeedisxed.
Toreducethespeed,increasethespacebetweenthe
self-propel-drivebarandthehandle.
2.Todisengagetheself-propeldrive,releasethe
self-propeldrivebar.
Note:Themachinecomeswithfreewheelingclutches
thatmakeiteasiertopullthemachinerearward.T o
disengagetheclutches,youmayneedtopushthe
machineforward1inch(2.5cm)ormoreafteryou
releasetheself-propel-drivebar.
1.Highestcutting-height
position(leversforward)
Figure24
2.Lowestcutting-height
position(leversrearward)
AdjustingtheCuttingHeight
Cuttingheightsrangefrom1inch(25mm)to4-1/2inches
(114mm)in1/2-inch(13mm)increments.
WARNING
Adjustingthecuttingheightmaybringyouinto
contactwiththemovingblade,causingserious
injury.
•Stoptheengineandwaitforallmovingparts
tostop.
•Donotputyourngersunderthehousingwhen
adjustingthecuttingheight.
Adjustthecuttingheightasdesired(Figure24).Setall4
wheelstothesameheight.
Note:T oraisethemachine,moveall4cuttingheightlevers
forward;tolowerthemachine,movethemrearward.
RecyclingtheClippings
Yourmachinecomesfromthefactoryreadytorecyclethe
grassandleafclippingsbackintothelawn.
Ifthegrassbagisonthemachine,removeit;referto
RemovingtheGrassBag(page14)beforerecycling
theclippings.Ifthesidedischargechuteisonthe
machine,removeitandlockthesidedischargedoor;refer
toRemovingtheSide-dischargeChute(page15)before
recyclingtheclippings.
Important:Themachinehasasafetyswitchthat
preventsyoufromstartingthemachineunlessyourst
installtherear-dischargeplugsecurelyonthemachine
(Figure25).
Installtherear-dischargeplugasillustratedinFigure25.
13
Page 14

Figure25
1.Topofrear-dischargeplugleverinswitchchannel
BaggingtheClippings
Usethegrassbagwhenyouwanttocollectgrassandleaf
clippingsfromthelawn.
Iftheside-dischargechuteisonthemachine,
removeitandlocktheside-dischargedoor;referto
RemovingtheSide-dischargeChute(page15)beforebagging
theclippings.
WARNING
Aworngrassbagcouldallowsmallstonesand
othersimilardebristobethrownintheoperator'sor
bystander'sdirectionandresultinseriouspersonal
injuryordeathtotheoperatororbystanders.
Checkthegrassbagfrequently.Ifitisdamaged,
installanewTororeplacementbag.
WARNING
Thebladeissharp;contactingthebladecanresult
inseriouspersonalinjury.
Figure26
2.Insertthegrassbaghandleintothegroovesatthetop
ofthemachine.
Important:Themachinehasasafetyswitchthat
preventsyoufromstartingthemachineunlessyou
rstinstallthegrassbagsecurelyonthemachine.
RemovingtheGrassBag
1.Liftthegrassbaghandleoutfromthegroovesatthe
topofthemachineandremovethebagfromthe
machine(Figure27).
Stoptheengineandwaitforallmovingpartstostop
beforeleavingtheoperatingposition.
InstallingtheGrassBag
1.Removetherear-dischargeplug(Figure26).
Figure27
2.Inserttherear-dischargeplug(Figure28).
14
Page 15

Figure28
Side-dischargingtheClippings
Usetheside-dischargechuteforcuttingverytallgrass.
Ifthebagisonthemachine,removeit
andinserttherear-dischargeplug;referto
RemovingtheGrassBag(page14)beforeside-discharging
theclippings.
Figure30
3.Installtheside-dischargechuteandclosethedooronto
thechute(Figure31).
Important:Themachinehasasafetyswitchthat
preventsyoufromstartingthemachineunlessyourst
installtherear-dischargeplugsecurelyonthemachine;
refertoRecyclingtheClippings(page13).
InstallingtheSide-dischargeChute
1.Unlocktheside-dischargedoor(Figure29).
Figure29
2.Liftopentheside-dischargedoor(Figure30).
Figure31
RemovingtheSide-dischargeChute
Toremovetheside-dischargechute,reversethestepsabove.
Important:Locktheside-dischargedoorafteryouclose
it(Figure32).
Figure32
15
Page 16

OperatingTips
Ifthenishedlawnappearanceisunsatisfactory,tryoneor
moreofthefollowing:
GeneralTips
•Maintainasharpbladethroughoutthecuttingseason.
Periodicallyledownnicksontheblade.
•ReplacethebladewhennecessarywithanoriginalToro
replacementblade.
•Mowonlydrygrassorleaves.W etgrassandleavestend
toclumpontheyardandcancausethemachinetoplug
ortheenginetostall.
WARNING
Wetgrassorleavescancauseseriousinjuryif
youslipandcontacttheblade.
Mowonlyindryconditions.
•Cleanunderthemachinehousingaftereachmowing.
RefertoCleaningundertheMachineHousing(page21).
•Keeptheengineingoodrunningcondition.
•Settheenginespeedtothefastestpositionforthebest
cuttingresults.
WARNING
Operatingamachinewithitsenginerunning
ataspeedgreaterthanthefactorysettingcan
causethemachinetothrowapartoftheblade
orengineintotheoperator'sorbystander'sarea
andresultinseriouspersonalinjuryordeath.
•Sharpentheblade.
•Walkataslowerpacewhilemowing.
•Raisethecuttingheightonyourmachine.
•Cutthegrassmorefrequently.
•Overlapcuttingswathsinsteadofcuttingafullswath
witheachpass.
•Setthecuttingheightonthefrontwheelsanotchlower
thantherearwheels.
CuttingLeaves
•Aftercuttingthelawn,ensurethathalfofthelawnshows
throughthecutleafcover.Youmayneedtomakemore
thanonepassovertheleaves.
•Forlightleafcoverage,setallthewheelsatthesame
cuttingheightsetting.
•Iftherearemorethan5inches(12.7cm)ofleavesonthe
lawn,setthefrontcuttingheight1or2notcheshigher
thantherearcuttingheight.Thismakesiteasiertofeed
theleavesunderthemachinehousing.
•Slowdownyourmowingspeedifthemachinedoesnot
cuttheleavesnelyenough.
•Ifyoumowoveroakleaves,youcanaddlimetothegrass
inthespringtoreducetheacidityoftheoakleaves.
–Donotchangetheenginespeedsetting.
–Ifyoususpecttheenginespeedisfaster
thannormal,contactanAuthorizedService
Dealer.
•Cleantheairlterfrequently.Recyclingstirsupmore
clippingsanddust,whichclogstheairlterandreduces
engineperformance.
CuttingGrass
•Grassgrowsatdifferentratesatdifferenttimesofthe
year.Inthesummerheat,itisbesttocutgrassatthe
2-inch(51mm),2-1/2inch(64mm),or3-inch(76mm)
cuttingheightsettings.Cutonlyaboutathirdofthegrass
bladeatatime.Donotcutbelowthe2-1/2inch(64mm)
settingunlessthegrassissparseoritislatefallwhen
grassgrowthbeginstoslowdown.
•Whencuttinggrassover6inches(15cm)tall,rstmow
atthehighestcuttingheightsettingandwalkslower;then
mowagainatalowersettingforthebestlawnappearance.
Ifthegrassistoolongandtheleavesclumpontopofthe
lawn,themachinemayplugandcausetheenginetostall.
•Alternatethemowingdirection.Thishelpsdispersethe
clippingsoverthelawnforevenfertilization.
16
Page 17

Maintenance
RecommendedMaintenanceSchedule(s)
MaintenanceService
Interval
Aftertherst5hours
Beforeeachuseordaily
Every100hours
Every200hours
Beforestorage
Yearly
MaintenanceProcedure
•Changetheengineoil.
•Checktheengineoillevel.
•Ensurethattheenginestopswithin3secondsafterreleasingtheblade-controlbar.
•Checktheaircleanerfordirtand/ordamageandcleanorreplaceitifnecessary.
•Cleangrassclippingsanddirtfromunderthemachinehousing.
•Checkthesparkplug.
•Replacethesparkplug.
•Emptythefueltankbeforerepairsasdirectedandbeforeannualstorage.
•Cleantheairlter(morefrequentlyindustyoperatingconditions).
•Changetheengineoil.
•Replacethebladeorhaveitsharpened(morefrequentlyiftheedgedullsquickly).
Premaintenance
Procedures
PreparingforMaintenance
1.Stoptheengineandwaitforallmovingpartstostop.
WARNING
Tippingthemachinemaycausethefuelto
leak.Gasolineisammable,explosiveand
cancausepersonalinjury.
Runtheenginedryorremovethegasoline
withahandpump;neversiphon.
2.Disconnectthespark-plugwirefromthesparkplug
(Figure33)beforeperforminganymaintenance
procedure.
Figure33
3.Afterperformingthemaintenanceprocedure(s),
connectthespark-plugwiretothesparkplug.
Important:Beforetippingthemachinetochange
theoilorreplacetheblade,allowthefueltankto
rundrythroughnormalusage.Ifyoumusttip
themachinepriortorunningoutoffuel,usea
handfuelpumptoremovethefuel.Alwaystipthe
machineontoitssidewiththeairlterup.
17
Page 18

EngineMaintenance
ServicingtheAirCleaner
ServiceInterval:Beforeeachuseordaily
Yearly
1.Pressdownonthelatchtabsontopoftheaircleaner
coverandremovethecover(Figure34).
Figure34
Figure35
3.Tipthemachineontoitsside,withtheairlterup,
todraintheusedoiloutthroughtheoillltube
(Figure36).
1.Aircleanercover
2.Latchtab(2)
3.Airlter
2.Removetheairlter(Figure34).
3.Iftheairlterisdamagedoriswetwithoilorfuel,
replaceit.
4.Iftheairlterisdirty,tapitonahardsurfaceseveral
timesorblowcompressedairlessthan30psi(207kPa)
throughthesideofthelterthatfacestheengine.
Note:Donotbrushthedirtoffthelter;brushing
forcesdirtintothebers.
5.Removedirtfromtheaircleanerbodyandcoverusing
amoistrag.Donotwipedirtintotheairduct.
6.Installthelterintotheaircleaner.
7.Closethecover.
ChangingtheEngineOil
ServiceInterval:Aftertherst5hours
Yearly
Runtheengineafewminutesbeforechangingtheoiltowarm
it.Warmoilowsbetterandcarriesmorecontaminants.
1.Performthepre-maintenanceprocedures;referto
PreparingforMaintenance.
2.Removethedipstick(
Figure35).
Figure36
4.Slowlypouroilintotheoil-lltube,periodically
checkingthelevelwiththedipstick,untilthedipstick
indicatesthattheengineisfullasillustratedin
Figure35.Donotoverll.
Note:Max.ll:20oz.(0.55l),type:SAE30W
detergentoilwithanAPIserviceclassicationofSH,
SJ,SL,orhigher.
Note:Ifyouoverlltheengine,poursomeoilout
ofit.
5.Installthedipsticksecurely.
6.Disposeoftheusedoilproperlyatalocalrecycling
center.
ServicingtheSparkPlug
ServiceInterval:Every100hours
Every200hours
UseanNGKBPR6ESsparkplugorequivalent.
1.Stoptheengineandwaitforallmovingpartstostop.
2.Disconnectthewirefromthesparkplug(Figure33).
3.Cleanaroundthesparkplug.
4.Removethesparkplugfromthecylinderhead.
18
Page 19

Important:Replaceacracked,fouled,ordirty
sparkplug.Donotcleantheelectrodesbecause
gritenteringthecylindercandamagetheengine.
5.Setthegapontheplugto0.030in.(0.76mm)
(Figure37).
Figure37
1.Center-electrodeinsulator
2.Sideelectrode
3.Airgap(nottoscale)
6.Installthesparkplugandthegasketsealbyhand.
7.Tightentheplug1/2turnafterthesparkplugseats
tocompressthewasher.
DriveSystem
Maintenance
AdjustingtheSelf-propelDrive Cable
Self-propelmodelonly
Wheneveryouinstallanewself-propelcableorifthe
self-propeldriveisoutofadjustment,adjusttheself-propel
drivecable.
1.Loosenthecablesupportnut(Figure38).
Note:Wheninstallingtheoriginalsparkplugagain,
tighten1/8to1/4turnafterthesparkplugseatsto
compressthewasher.
Note:Under-tighteningthesparkplugcancausethe
plugtobecomeveryhotandcandamagetheengine.
Overtighteningthesparkplugcandamagethethreads
intheenginecylinderhead.
8.Connectthewiretothesparkplug.
Figure38
1.1to1-1/2inches(25to38
mm)
2.Self-propel-drivebar5.Cablesupport
3.Cablejacket
2.Holdtheself-propelbail1to1-1/2inches(25to38
mm)fromthehandle(
3.Pulldownthecablejacket(towardthemachine)until
thereisnoslackinthecable(Figure38).
4.Tightenthenutonthecablesupport.
5.Releasetheself-propel-drivebarandensurethatthe
cableisloose.
Note:Thecablemustbeloosewiththeself-propel
drivebarinthereleasedposition;otherwise,the
machinemaycreepwhenyoudisengagethebar.
4.Cable-supportnut
Figure38).
19
Page 20

BladeMaintenance
MaintainingtheCuttingBlade
ServiceInterval:Yearly
Examinethebladewheneveryourunoutofgasoline.Ifthe
bladeisdamagedorcracked,replaceitimmediately.Ifthe
bladeedgeisdullornicked,haveitsharpenedorreplaceit.
WARNING
Thebladeissharp;contactingthebladecanresult
inseriouspersonalinjury.
Weargloveswhenservicingtheblade.
1.Disconnectthespark-plugwirefromthesparkplug.
RefertoPreparingforMaintenance.
2.Tipthemachineontoitsside,withtheairlterup.
3.Useablockofwoodtoholdthebladesteady
(Figure39).
Figure40
Figure39
4.Removetheblade,savingallmountinghardware
(Figure39).
5.Installthenewbladeandallmountinghardware
(Figure40).
Important:Positionthecurvedendsoftheblade
topointtowardthemachinehousing .
6.Useatorquewrenchtotightenthebladeboltto40
to50ft-lb(54to68N-m).
20
Page 21

Cleaning
CleaningundertheMachine Housing
ServiceInterval:Beforeeachuseordaily
WARNING
Themachinemaydislodgematerialfromunderthe
machinehousing.
•Weareyeprotection.
•Stayintheoperatingposition(behindthe
handle).
•Donotallowbystandersinthearea.
Storage
Topreparethemachineforoff-seasonstorage,perform
therecommendedmaintenanceprocedures.Referto
Maintenance.
Storethemachineinacool,clean,dryplace.Coverthe
machinetokeepitcleanandprotected.
PreparingtheFuelSystem
WARNING
Gasolinecanvaporizeifyoustoreitoverlong
periodsoftimeandexplodeifitcomesintocontact
withanopename.
•Donotstoregasolineoverlongperiodsoftime.
1.Withtheenginerunningonaatpavedsurface,spray
astreamofwaterinfrontoftherightrearwheel
(Figure41).
Thewaterwillsplashintothepathoftheblade,
cleaningouttheclippings.
Figure41
2.Whennomoreclippingscomeout,stopthewaterand
movethemachinetoadryarea.
3.Runtheengineforafewminutestodrythehousing
topreventitfromrusting.
•Donotstorethemachinewithgasolineinthe
fueltankorthecarburetorinanenclosurewith
anopename.(Forexample,afurnaceora
waterheaterpilotlight.)
•Allowtheenginetocoolbeforestoringitinany
enclosure.
Emptythefueltankwhenmowingthelasttimebeforestoring
themachine.
1.Runthemachineuntiltheenginestopsfromrunning
outoffuel.
2.Primetheengineandstartitagain.
3.Allowtheenginetorununtilitstops.Whenyoucan
nolongerstarttheengine,itissufcientlydry.
PreparingtheEngine
1.Whiletheengineisstillwarm,changetheoilfromthe
crankcase.RefertoChangingtheEngineOil(page18).
2.Removethesparkplug.
3.Usinganoilcan,addaboutonetablespoonofoilto
thecrankcasethroughthesparkplughole.
4.Slowlyrotatetheengineseveraltimes,usingthestarter
rope,todistributetheoil.
5.Installthesparkplugbutdonotconnectthewireto
thesparkplug.
21
Page 22

GeneralInformation
1.Cleanthemachinehousing.Referto
CleaningundertheMachineHousing(page21).
2.Cleananydirtandchafffromthecylinder,cylinder
headns,andblowerhousing.
3.Removegrassclippings,dirt,andgrimefromthe
externalpartsoftheengine,theshrouding,andthetop
ofthemachinehousing.
4.Checktheconditionoftheblade.Referto
MaintainingtheCuttingBlade(page20).
5.Servicetheaircleaner;referto
ServicingtheAirCleaner(page18).
6.Tightenallnuts,bolts,andscrews.
7.Touchupallrustedorchippedpaintsurfaceswith
paintavailablefromanAuthorizedServiceDealer.
RemovingtheMachinefrom Storage
1.Checkandtightenallfasteners.
2.Removethesparkplugandspintheenginerapidly
usingthestartertoblowexcessoilfromthecylinder.
3.Cleanthesparkplugorreplaceitifitiscracked,
broken,oriftheelectrodesareworn.
4.Installthesparkplugandtighten1/8to1/4turnafter
thesparkplugseatstocompressthewasher.
5.Performanyneededmaintenanceprocedures;referto
Maintenance.
6.Fillthefuelinthefueltankwithfreshgasoline.
7.Checktheengineoillevel.
8.Connectthewiretothesparkplug.
22
Page 23

Troubleshooting
Problem
Theenginedoesnotstart.
Theenginestartshardorlosespower.
Theenginerunsrough.
PossibleCauseCorrectiveAction
1.Thefueltankisemptyorthefuel
systemcontainsstalefuel.
2.Theengineiscoldandthechokewas
notused.
3.Thewireisnotconnectedtothespark
plug.
4.Thesparkplugispitted,fouled,orthe
gapisincorrect.
1.Thefueltankcontainsstalefuel.1.Drainandllthefueltankwithfresh
2.Thefuelcapventholeisplugged.2.Cleanthefuelcapventholeorreplace
3.Theairlterelementisdirtyandis
restrictingtheairow.
4.Theundersideofthemachinehousing
containsclippingsanddebris.
5.Thesparkplugispitted,fouled,orthe
gapisincorrect.
6.Theengineoillevelislowortheoilis
dirty.
1.Thewireisnotconnectedtothespark
plug.
2.Thesparkplugispitted,fouled,orthe
gapisincorrect.
3.Theairlterelementisdirtyandis
restrictingtheairow.
1.Drainand/orllthefueltankwith
freshgasoline.Iftheproblempersists,
contactanAuthorizedServiceDealer .
2.MovethechokelevertotheChoke
position.
3.Connectthewiretothesparkplug.
4.Checkthesparkplugandadjustthe
gapifnecessary.Replacethespark
plugifitispitted,fouled,orcracked.
gasoline.
thefuelcap.
3.Cleantheairlterpre-cleanerand/or
replacethepaperairlter.
4.Cleanunderthemachinehousing.
5.Checkthesparkplugandadjustthe
gapifnecessary.Replacethespark
plugifitispitted,fouled,orcracked.
6.Checktheengineoil.Changetheoilif
itisdirtyoraddoilifitislow
1.Connectthewiretothesparkplug.
2.Checkthesparkplugandadjustthe
gapifnecessary.Replacethespark
plugifitispitted,fouled,orcracked.
3.Cleantheairlterpre-cleanerand/or
replacethepaperairlter.
Themachineorenginevibrates
excessively.
Thecuttingpatternisuneven.
Thedischargechuteplugsup.
Themachinedoesnotself-propel.
1.Thebladeisbentorisoutofbalance.1.Balancetheblade.Ifthebladeisbent,
2.Theblademountingnutsareloose.2.Tightentheblademountingnuts.
3.Theundersideofthemachinehousing
containsclippingsanddebris.
4.Theenginemountingboltsareloose.4.Tightentheenginemountingbolts.
1.All4wheelsarenotatthesameheight.1.Placeall4wheelsatthesameheight.
2.Thebladeisdull.
3.Youaremowinginthesamepattern
repeatedly.
4.Theundersideofthemachinehousing
containsclippingsanddebris.
1.Thecuttingheightistoolow.1.Raisethecuttingheight.
2.Youaremowingtoofast.2.Slowdown.
3.Thegrassiswet.
4.Theundersideofthemachinehousing
containsclippingsanddebris.
1.Theself-propeldrivecableisoutof
adjustmentorisdamaged.
2.Thereisdebrisunderthebeltcover.
replaceit.
3.Cleanunderthemachinehousing.
2.Sharpenandbalancetheblade.
3.Changethemowingpattern.
4.Cleanunderthemachinehousing.
3.Allowthegrasstodrybeforemowing.
4.Cleantheundersideofthemachine
housing.
1.Adjusttheself-propeldrivecable.
Replacethecableifnecessary.
2.Cleanthedebrisfromunderthebelt
cover.
23
Page 24

TheToroTotalCoverageWarranty
ALimitedWarranty(seewarrantyperiodsbelow)Contractor
Landscape
Equipment
(LCE)
ConditionsandProductsCovered
TheT oroCompanyanditsafliate,T oroWarrantyCompany,pursuantto
anagreementbetweenthem,jointlypromisetotheoriginalpurchaser
torepairtheT oroProductslistedbelowifdefectiveinmaterialsor
workmanship.
Thefollowingtimeperiodsapplyfromthedateofpurchasebytheoriginal
owner:
ProductsWarrantyPeriod
AllMowers
•Engine
Seeenginemanufacturer'swarranty
•Battery90daysPartsandLabor
1yearPartsonly
•BeltsandTires90days
•Attachments1year
21in.HeavyDutyMowers1yearcommercialUse
2yearsResidentialUse
Mid-SizeWalk-BehindMowers
GrandStand
TM
Mowers
•Frame
ZMaster
®
Z400,Z500Mowers4yearsor1,200hours
•Frame
ZMaster
®
G3Mowers
•Frame
1
SomeenginesusedonT oroLCEProductsarewarrantedbytheenginemanufacturer.
2
Residentialusemeansuseoftheproductonthesamelotasyourhome.Useatmorethanone
locationisconsideredcommercialuseandthecommercialwarrantywouldapply .
3
Whicheveroccursrst.
4
LifetimeFrameW arranty-Ifthemainframe,consistingofthepartsweldedtogethertoformthe
tractorstructurethatothercomponentssuchastheenginearesecuredto,cracksorbreaksin
normaluse,itwillberepairedorreplaced,atToro'soption,underwarrantyatnocostforparts
andlabor .Framefailureduetomisuseorabuseandfailureorrepairrequiredduetorustor
corrosionarenotcovered.
2years
5yearsor1,200hours
Lifetime(originalowneronly)
Lifetime(originalowneronly)
5yearsor1,200hours
Lifetime(originalowneronly)
2
3
4
3
4
3
4
Thiswarrantyincludesthecostofpartsandlabor,butyoumustpay
transportationcosts.
InstructionsforObtainingWarrantyService
IfyouthinkthatyourT oroProductcontainsadefectinmaterialsor
workmanship,followthisprocedure:
1.ContactanyAuthorizedT oroServiceDealertoarrangeservice
attheirdealership.T olocateadealerconvenienttoyou,referto
theYellowPagesofyourtelephonedirectory(lookunder“Lawn
Mowers”)oraccessourwebsiteatwww .Toro.com.Y oumayalso
callthenumberslistedinitem#3tousethe24-hourT oroDealer
locatorsystem.
2.Bringtheproductandyourproofofpurchase(salesreceipt)tothe
ServiceDealer.Thedealerwilldiagnosetheproblemanddetermine
ifitiscoveredunderwarranty .
3.IfforanyreasonyouaredissatisedwiththeServiceDealer’s
analysisorwiththeassistanceprovided,contactusat:
RLCCustomerCareDepartment
ToroWarrantyCompany
811 1LyndaleAvenueSouth
Bloomington,MN55420-1 196
888-865-5676(U.S.Customers)
888-865-5691(Canadacustomers)
1
OwnerResponsibilities
YoumustmaintainyourT oroProductbyfollowingthemaintenance
proceduresdescribedintheOperator'sManual.Suchroutine
maintenance,whetherperformedbyadealerorbyyou,isatyourexpense.
ItemsandConditionsNotCovered
Thereisnootherexpresswarrantyexceptforspecialemission
systemandenginewarrantycoverageonsomeproducts.
Thisexpresswarrantydoesnotcoverthefollowing:
•Costofregularmaintenanceserviceorwearparts,suchaslters,
fuel,lubricants,tune-upparts,bladesharpening,brakeandclutch
adjustments.
•Anyproductorpartwhichhasbeenalteredormisusedandrequires
replacementorrepairduetonormalwear,accidents,orlackof
propermaintenance.
•Repairsnecessaryduetoimproperfuel,contaminantsinthefuel
system,orfailuretoproperlypreparethefuelsystempriortoany
periodofnon-useoverthreemonths.
•Pickupanddeliverycharges.
GeneralConditions
Allrepairscoveredbythesewarrantiesmustbeperformedbyan
AuthorizedT oroServiceDealerusingToroapprovedreplacementparts.
NeitherTheToroCompanynorToroWarrantyCompanyisliablefor
indirect,incidentalorconsequentialdamagesinconnectionwiththe
useoftheToroProductscoveredbythiswarranty ,includingany
costorexpenseofprovidingsubstituteequipmentorserviceduring
reasonableperiodsofmalfunctionornon-usependingcompletion
ofrepairsunderthiswarranty.
Allimpliedwarrantiesofmerchantability(thattheproductistfor
ordinaryuse)andtnessforuse(thattheproductistforaparticular
purpose)arelimitedtothedurationoftheexpresswarranty
Somestatesdonotallowexclusionsofincidentalorconsequential
damages,orlimitationsonhowlonganimpliedwarrantylasts,so
theaboveexclusionsandlimitationsmaynotapplytoyou.
Thiswarrantygivesyouspeciclegalrights,andyoumayalsohaveother
rightswhichvaryfromstatetostate.
CountriesOtherthantheUnitedStatesorCanada
CustomerswhohavepurchasedT oroproductsoutsidetheUnitedStatesorCanadashouldcontacttheirToroDistributor(Dealer)toobtainguarantee
policiesforyourcountry,province,orstate.IfforanyreasonyouaredissatisedwithyourDistributor'sserviceorhavedifcultyobtainingguarantee
information,contacttheT oroimporter.Ifallotherremediesfail,youmaycontactusatT oroWarrantyCompany .
374-0252RevC
 Loading...