

FormNo.3442-580RevA
Flex-ForcePowerSystem60VMAX55cm
RecyclerLawnMower
Flex-ForcePowerSystem™60VMAX55cm
Recycler®Rasenmäher
CortacéspedRecycler®60VMAXde55cm
conFlex-ForcePowerSystem™
TondeuseRecycler®60VMAX55cmavec
FlexForcePowerSystem™
TosaerbaRecycler®da55cmFlex-Force
PowerSystem™60VMAX
Flex-ForcePowerSystem™60VMAX55cm
Recycler®gazonmaaier
Flex-ForcePowerSystem™60VMAX55cm
Recycler®-gressklipper
KosiarkazseriiFlex-ForcePowerSystem™
60VMAXoszerokości55cmzsystemem
rozdrabniającymRecycler®
Flex-ForcePowerSystem™60VMAX55cm
Recycler®gräsklippare
www.T oro.com.
*3442-580*


FormNo.3442-559RevA
Flex-ForcePowerSystem
MAX55cmRecycler
®
Mower
ModelNo.21864—SerialNo.400000000andUp
ModelNo.21864T—SerialNo.400000000andUp
™
60V
Lawn
Registeratwww.T oro.com.
OriginalInstructions(EN)
*3442-559*

ThisproductcomplieswithallrelevantEuropean
directives;fordetails,pleaseseetheseparateproduct
specicDeclarationofConformity(DOC)sheet.
Introduction
Thisrotary-blade,walk-behindlawnmowerisintended
tobeusedbyresidentialhomeowners.Itisdesigned
primarilyforcuttinggrassonwell-maintainedlawns
onresidentialproperties.Itisnotdesignedforcutting
brushorforagriculturaluses.Itisdesignedtouse
lithium-ionbatterypackModels81860(providedwith
Model21864)orModel81875;itcanalsousebattery
packModel81825orModel81860.Thesebattery
packsaredesignedtobechargedonlybybattery
chargerModels81802(providedwithModel21864)
orModel81805.Usingtheseproductsforpurposes
otherthantheirintendedusecouldprovedangerous
toyouandbystanders.
Model21864Tdoesnotincludeabatteryora
charger.
Readthisinformationcarefullytolearnhowtooperate
andmaintainyourproductproperlyandtoavoid
injuryandproductdamage.Youareresponsiblefor
operatingtheproductproperlyandsafely .
Visitwww.Toro.comformoreinformation,including
safetytips,trainingmaterials,accessoryinformation,
helpndingadealer,ortoregisteryourproduct.
Wheneveryouneedservice,genuinethe
manufacturerparts,oradditionalinformation,contact
anAuthorizedServiceDealerorthemanufacturer
CustomerServiceandhavethemodelandserial
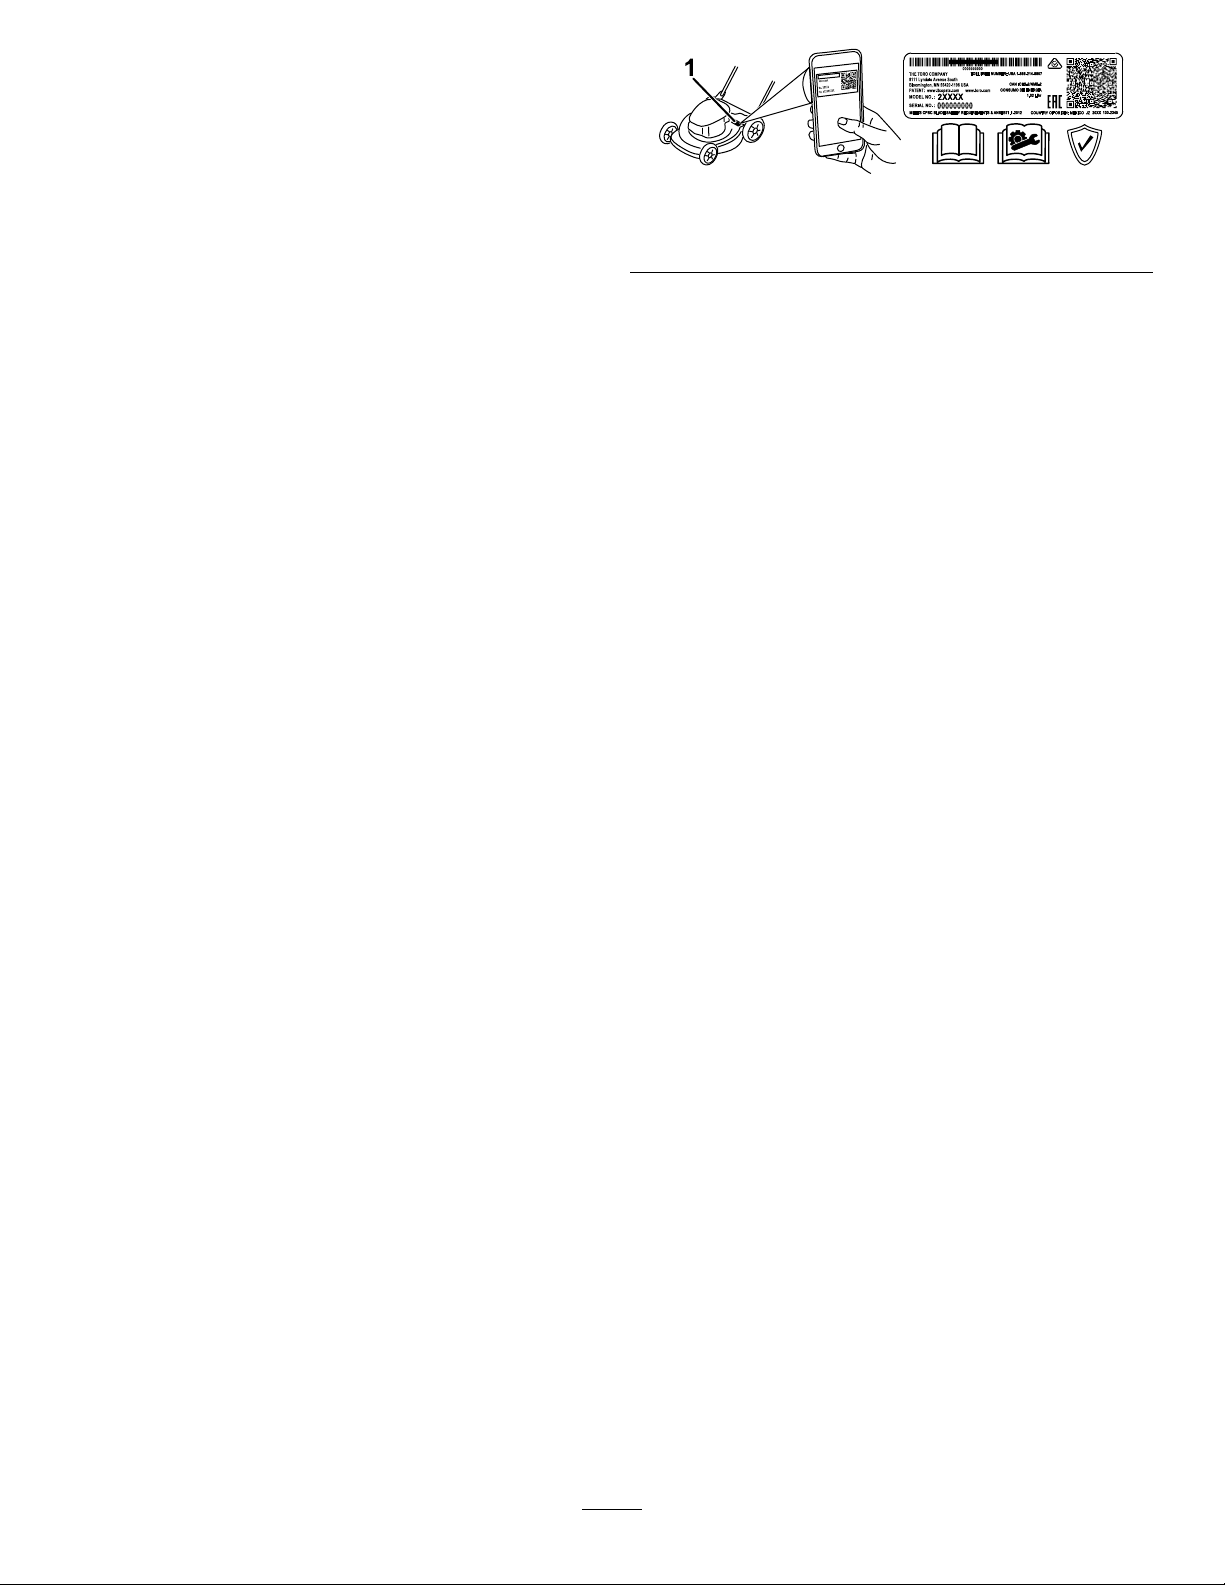
numbersofyourproductready.Figure1identies
thelocationofthemodelandserialnumbersonthe
product.Writethenumbersinthespaceprovided.
Important:Withyourmobiledevice,youcan
scantheQRcodeontheserialnumberdecal(if
equipped)toaccesswarranty,parts,andother
productinformation.
Figure1
1.Modelandserialnumberlocation
Safety
IMPORTANTSAFETY
INSTRUCTIONS
WARNING—Whenusinganelectricmachine,always
readandfollowbasicsafetywarningsandinstructions
toreducetheriskofre,electricshock,orinjury,
includingthefollowing:
I.Training
1.Theoperatorofthemachineisresponsiblefor
anyaccidentsorhazardsoccurringtoothersor
theirproperty.
2.Donotallowchildrentouseorplaywiththe
machine,batterypack,orthebatterycharger;
localregulationsmayrestricttheageofthe
operator.
3.Donotallowpeoplewithreducedphysical,
sensory,ormentalcapabilitiesorwithout
experienceandknowledgetousethemachine,
batterypack,orbatterychargerunlessthey
receiveinstructionorsupervisiononusingit
safelyandunderstandthehazardsinvolved
whileusingit.
4.Beforeusingthemachine,batterypack,and
batterycharger,readalltheinstructionsand
cautionarymarkingsontheseproducts.
5.Becomefamiliarwiththecontrolsandproper
useofthemachine,batterypack,andbattery
charger.
II.Preparation
1.Keepbystanders,especiallychildren,andpets
outoftheoperatingarea.
2.Donotoperatethemachinewithoutallguards
andsafetydevices,suchasdeectorsandgrass
catchers,inplaceandfunctioningproperlyon
themachine.
3.Inspecttheareawhereyouwillusethemachine
andremoveallobjectsthatcouldinterferewith
theoperationofthemachineorthatthemachine
couldthrow.
4.Beforeusingthemachine,ensurethattheblade,
bladebolt,andbladeassemblyarenotwornor
damaged.Replaceanydamagedorunreadable
labels.
g275230
5.UseonlythebatterypackspeciedbyT oro.
Usingotheraccessoriesandattachmentsmay
increasetheriskofinjuryandre.
6.Pluggingthebatterychargerintoanoutletthat
isnot100to240Vcancauseareorelectric
shock.Donotplugthebatterychargerintoan
outletotherthan100to240V .Foradifferent
©2020—TheToro®Company
8111LyndaleAvenueSouth
Bloomington,MN55420
Contactusatwww.Toro.com.
2
PrintedinChina
AllRightsReserved

styleofconnection,useanattachmentplug
adapterofthepropercongurationforthepower
outletifneeded.
7.Donotuseadamagedormodiedbattery
packorbatterycharger,whichmayexhibit
unpredictablebehaviorthatresultsinre,
explosion,orriskofinjury .
8.Ifthesupplycordtothebatterychargeris
damaged,contactanAuthorizedServiceDealer
toreplaceit.
9.Donotusenon-rechargeablebatteries.
10.Chargethebatterypackwithonlythebattery
chargerspeciedbyT oro.Achargersuitablefor
1typeofbatterypackmaycreateariskofre
whenusedwithanotherbatterypack.
11.Chargethebatterypackinawell-ventilatedarea
only.
12.Donotexposeabatterypackorbatterycharger
toreortotemperatureshigherthan68°C
(154°F).
13.Followallcharginginstructionsanddo
notchargethebatterypackoutsideofthe
temperaturerangespeciedintheinstructions.
Otherwise,youmaydamagethebatterypack
andincreasetheriskofre.
14.Dressproperly—Wearappropriateclothing,
includingeyeprotection;longpants;substantial,
slip-resistantfootwear(notbarefootorwearing
sandals);andhearingprotection.Tiebacklong
hairanddonotwearloosejewelrythatcanget
caughtinmovingparts.Wearadustmaskin
dustyoperatingconditions.Useofrubbergloves
isrecommended.
III.Operation
1.Contactwiththemovingbladewillcauseserious
injury.Keepyourhandsorfeetawayfromthe
cuttingareaandallmovingpartsofthemachine.
Keepclearofanydischargeopening.
2.Usingthismachineforpurposesotheranits
intendedusecouldprovedangeroustoyouand
bystanders.
3.Disengagetheself-propeldrive(ifequipped)
beforestartingthemachine.
4.Preventunintentionalstarting—Ensurethatthe
electric-startbuttonisremovedfromtheignition
beforeconnectingthebatterypackandhandling
themachine.
5.Useyourfullattentionwhileoperatingthe
machine.Donotengageinanyactivitythat
causesdistractions;otherwise,injuryorproperty
damagemayoccur.
6.Stopthemachine,removetheelectric-start
button,removethebatterypackfromthe
machine,andwaitforallmovementtostop
beforeadjusting,servicing,cleaning,orstoring
themachine.
7.Removethebatterypackandelectric-start
buttonfromthemachinewheneveryouleaveit
unattendedorbeforechangingaccessories.
8.Donotforcethemachine—Allowthemachineto
dothejobbetterandsaferattherateforwhichit
wasdesigned.
9.Stayalert—Watchwhatyouaredoinganduse
commonsensewhenoperatingthemachine.
Donotusethemachinewhileill,tired,orunder
theinuenceofalcoholordrugs.
10.Operatethemachineonlyingoodvisibilityand
appropriateweatherconditions.Donotoperate
themachinewhenthereistheriskoflightning.
11.Useextremecautionwhenreversingorpulling
themachinetowardyou.
12.Keepproperfootingandbalanceatalltimes,
especiallyonslopes.Mowacrosstheface
ofslopes,neverupanddown.Useextreme
cautionwhenchangingdirectionsonslopes.Do
notmowexceedinglysteepslopes.Walk,never
runwiththemachine.
13.Donotdirectthedischargematerialtoward
anyone.Avoiddischargingmaterialagainsta
wallorobstruction;materialmayricochettoward
you.Stoptheblade(s)whencrossinggravel
surfaces.
14.Watchforholes,ruts,bumps,rocks,orother
hiddenobjects.Uneventerraincouldcauseyou
toloseyourbalanceorfooting.
15.Wetgrassorleavescancauseseriousinjuryif
youslipandcontacttheblade.Avoidmowingin
wetconditionsorwhenitisraining.
16.Ifthemachinestrikesanobjectorstartsto
vibrate,immediatelyshutoffthemachine,
removetheelectric-startbutton,removethe
batterypack,andwaitforallmovementtostop
beforeexaminingthemachinefordamage.
Makeallnecessaryrepairsbeforeresuming
operation.
17.Stopthemachineandremovetheelectric-start
buttonbeforeloadingthemachineforhauling.
18.Underabusiveconditions,thebatterypackmay
ejectliquid;avoidcontact.Ifyouaccidently
comeintocontactwiththeliquid,ushwith
water.Iftheliquidcontactsyoureyes,seek
medicalhelp.Liquidejectedfromthebattery
packmaycauseirritationorburns.
IV.MaintenanceandStorage
1.Stopthemachine,removetheelectric-start
button,removethebatterypackfromthe
3

machine,andwaitforallmovementtostop
beforeadjusting,servicing,cleaning,orstoring
themachine.
2.Donotattempttorepairthemachineexceptas
indicatedintheinstructions.HaveanAuthorized
ServiceDealerperformserviceonthemachine
usingidenticalreplacementparts.
3.Wearglovesandeyeprotectionwhenservicing
themachine.
4.Sharpenadullbladeonbothsidestomaintain
balance.Cleanthebladeandensurethatitis
balanced.
5.Replacethebladeifitisbent,worn,orcracked.
Anunbalancedbladecausesvibration,which
coulddamagethemotororcausepersonal
injury.
6.Whenservicingtheblade,beawarethatthe
bladecanstillmoveeventhoughthepower
sourceisoff.
7.Checkthegrasscollectionbagfrequentlyfor
deteriorationorwear,andreplaceawornbag
withaT oro[replacement]bag.
8.Forbestperformance,useonlygenuineT oro
replacementpartsandaccessories.Other
replacementpartsandaccessoriescouldbe
dangerous,andsuchusecouldvoidtheproduct
warranty.
9.Maintainthemachine—Keepcuttingedges
sharpandcleanforthebestandsafest
performance.Keephandlesdry,clean,andfree
fromoilandgrease.Keepguardsinplaceandin
workingorder.Keepbladessharp.Useidentical
replacementbladesonly.
10.Checkthemachinefordamagedparts—Ifthere
aredamagedguardsorotherparts,determine
whetherthemachinewilloperateproperly .
Checkformisalignedandbindingmovingparts,
brokenparts,mounting,andanyothercondition
thatmayaffectitsoperation.Unlessindicated
intheinstructions,haveanAuthorizedService
Dealerrepairorreplaceadamagedguardor
part.
11.Whenthebatterypackisnotinuse,keepit
awayfrommetalobjectssuchaspaperclips,
coins,keys,nails,andscrewsthatcanmakea
connectionfrom1terminaltoanother.Shorting
thebatteryterminalsmaycauseburnsorare.
12.Checkthebladeandmotormountingbolts
frequentlyfortightness.
13.Whenyouarenotusingthemachine,storeit
indoorsinadry,secureplaceoutofthereach
ofchildren.
14.CAUTION—Amistreatedbatterypackmay
presentariskofreorchemicalburn.Donot
disassemblethebatterypack.Donotheatthe
batterypackabove68°C(154°F)orincinerate
it.ReplacethebatterypackwithagenuineToro
batterypackonly;usinganothertypeofbattery
packmaycauseareorexplosion.Keep
batterypacksoutofthereachofchildrenand
intheoriginalpackaginguntilyouarereadyto
usethem.
15.Donotdisposeofthebatteryinare.The
cellmayexplode.Checkwithlocalcodesfor
possiblespecialdisposalinstructions.
SAVETHESE
INSTRUCTIONS
4

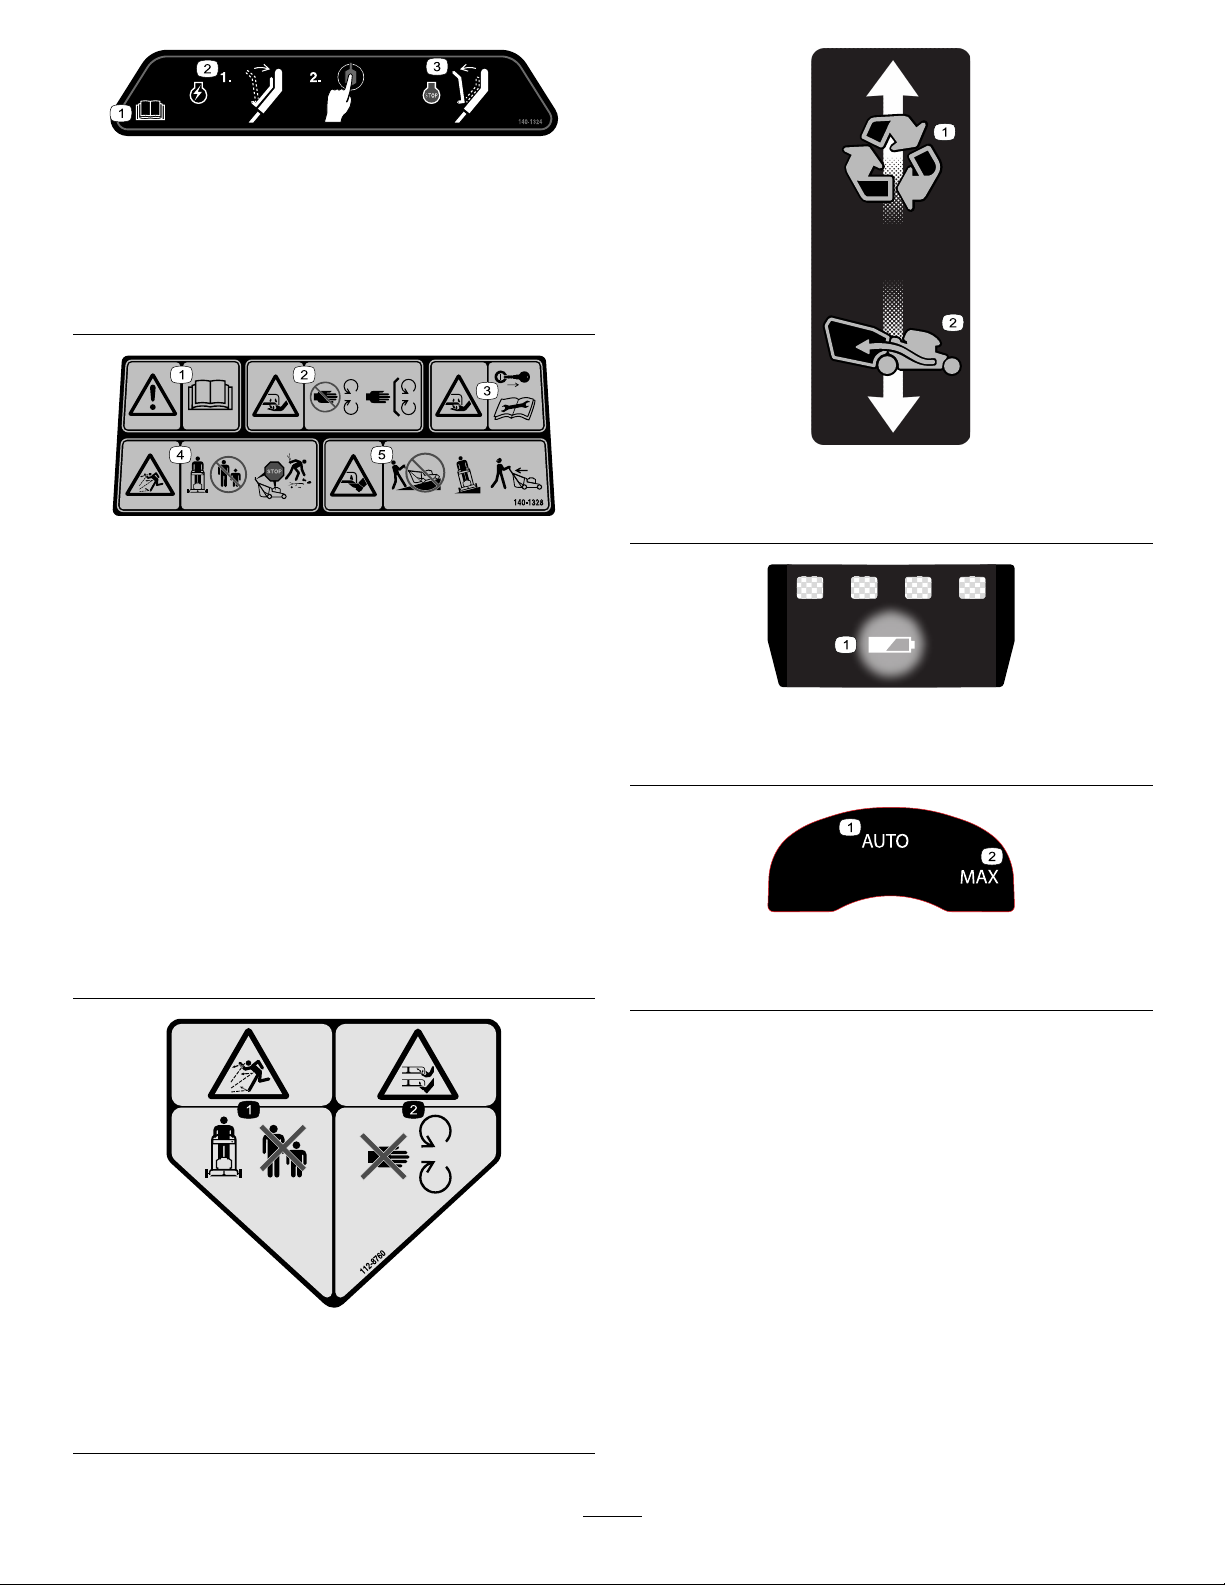
SafetyandInstructionalDecals
Safetydecalsandinstructionsareeasilyvisibletotheoperatorandarelocatednearanyarea
ofpotentialdanger.Replaceanydecalthatisdamagedormissing.
Model81860
decal137-9489
137-9489
1.ReadtheOperator’s
Manual.
2.Recycle5.Donotexposetorain.
3.Containslithiumions;do
notdiscard.
4.Keepawayfromopen
ames.
137-9495
1.ReadtheOperator’sManual.
2.Donotdiscard.4.Doubleinsulated
3.Forindooruse.
decal137-9495
137-9496
1.Thebatterypackischarging.3.Thebatterypackisoverorundertheappropriatetemperature
range.
2.Thebatterypackisfullycharged.4.Batterypackchargingfault
5
decal137-9496
decal140-1324
140-1324
1.ReadtheOperator’s
Manual.
2.Tostartthemachine,
squeezethebartothe
handleandpressthe
button.
1.Warning—readthe
Operator’sManual.
2.Cutting/dismemberment
hazardofthehand,mower
blade—stayawayfrom
movingparts;keepall
guardsandshieldsin
place.
3.Cutting/dismemberment
hazardofthehand,mower
blade—removethekey
andreadtheOperator’s
Manualbeforeperforming
maintenance.
140-1328
3.Toshutoffthemachine,
releasethebar.
4.Thrownobject
hazard—keepbystanders
away;shutofftheengine
andwaitforallmoving
partstostopbefore
leavingthemachine;pick
updebrisbeforemowing.
5.Cutting/dismemberment
hazardofthefoot,mower
blade—donotmowup
ordownslopes;only
mowacrossslopes;look
behindyouwhenmowing
inreverse.
decal139-6557
139-6557
decal140-1328
1.Recyclingmode2.Baggingmode
decal137-9461
137-9461
1.Batterychargestatus
decal134-4691
134-4691
1.Autospeed2.Maxspeed
112-8760
1.Thrownobjecthazard—keepbystandersaway .
2.Cutting/dismembermenthazardofhandorfoot,mower
blade—stayawayfrommovingparts.
decal112-8760
6

Setup
Note:Thebatterypackisnotfullychargedwhenit
ispurchased.Beforeusingthemachinefortherst
time,refertoChargingtheBatteryPack(page17).
1
MountingtheBattery
Charger(Optional)
NoPartsRequired
Procedure
Ifdesired,mountthebatterychargersecurelyona
wallusingthewall-mountkeyholesonthebackof
thecharger.
Mountitindoors(suchasagarageorotherdryplace),
nearapoweroutlet,andoutofthereachofchildren.
RefertoFigure2forassistanceinmountingthe
charger.
Slidethechargerovertheappropriatelypositioned
hardwaretosecurethechargerinplace(hardware
notincluded).
Figure2
g247359
7
2
UnfoldingtheHandle
NoPartsRequired
Procedure
WARNING
Unfoldingthehandleimproperlycandamagethecables,causinganunsafeoperating
condition.
•Donotdamagethecable(s)whenfoldingorunfoldingthehandle.
•Ensurethatthecable(s)areroutedtotheoutsideofthehandle.
•Ifacableisdamaged,contactanAuthorizedServiceDealer.
Note:Ensurethatthecablesareroutedontheoutsideofthehandleandarenotpinched(DofFigure3).
Figure3
8
g335466
3
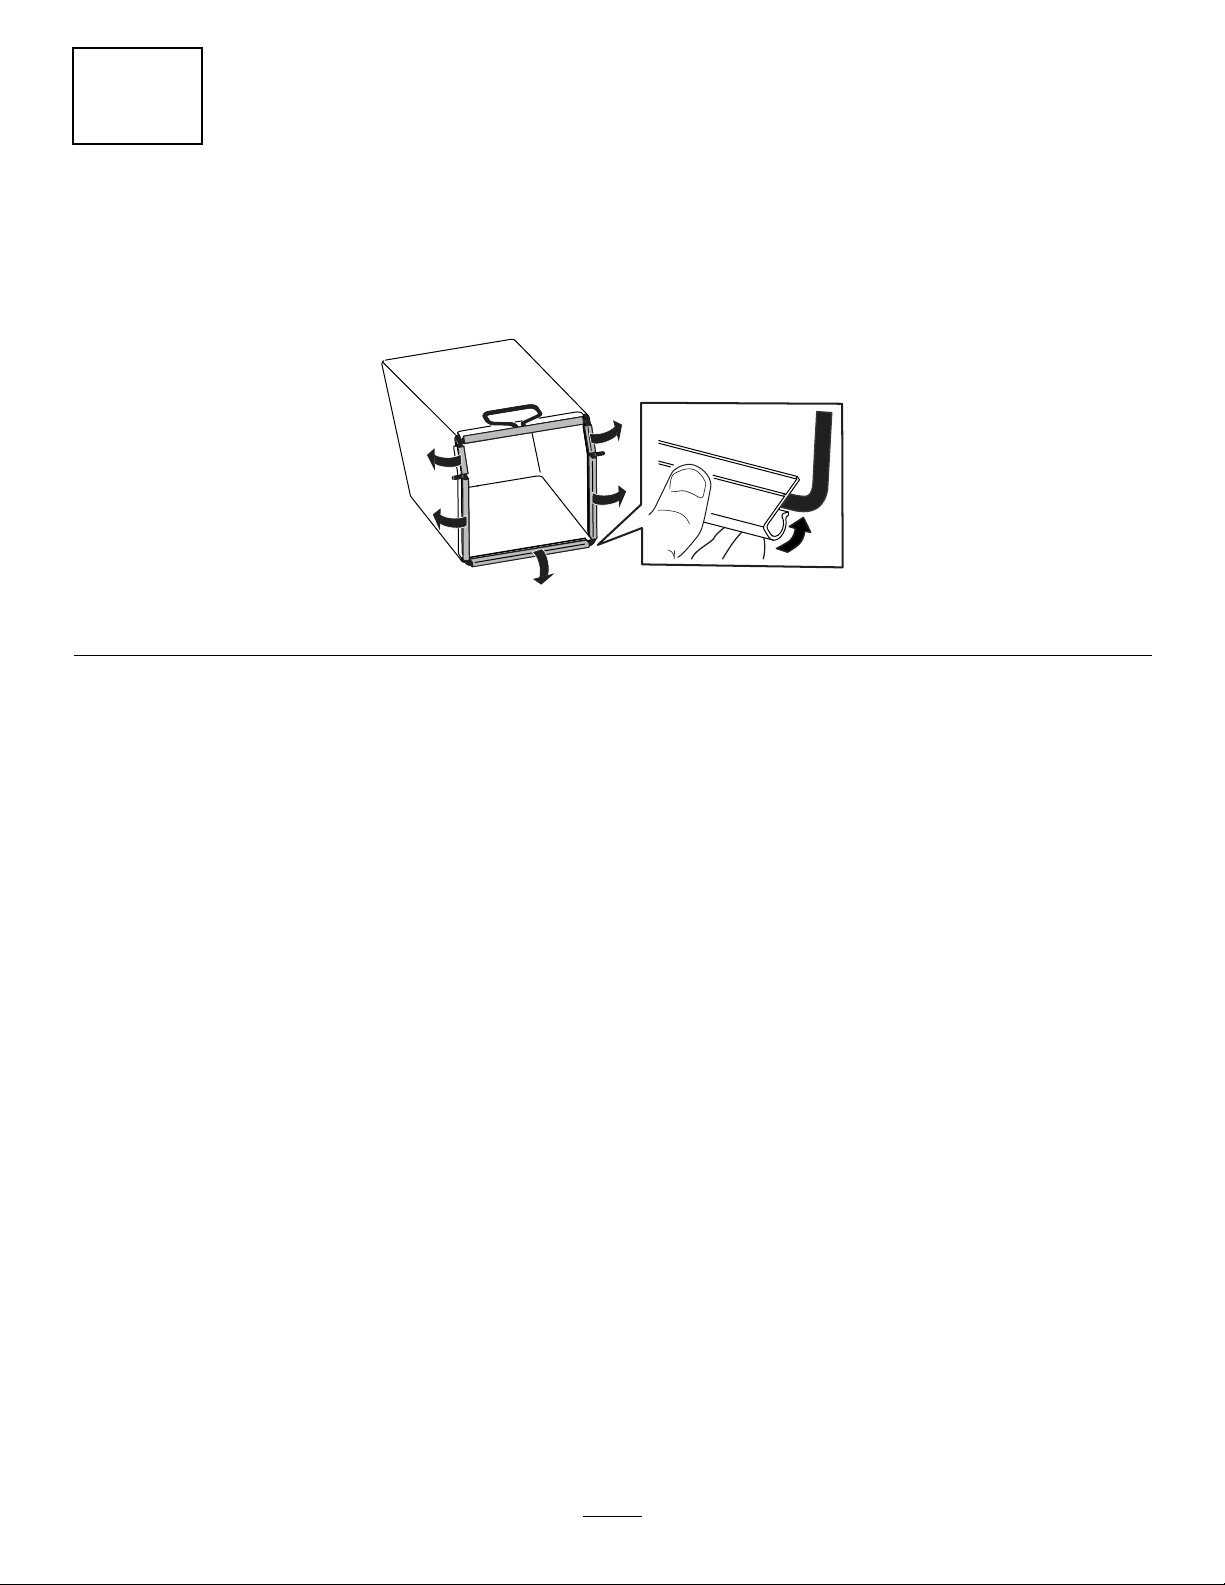
AssemblingtheGrassBag
NoPartsRequired
Procedure
g334351
Figure4
9

ProductOverview
Specications
BatteryPack
Model81860
Batterypackcapacity
Batterymanufacturerrating=60Vmaximumand54Vnominal.
Actualvoltagevarieswithload.
6.0Ah
324Wh
BatteryCharger
Model81802
Type
Input
Output60VMAXDC2.0A
60VMAXLithium-IonBatteryCharger
100to240VAC50/60HzMax2.0A
AppropriateTemperatureRanges
1.Handle
2.Self-propeldrivebar
3.Blade-controlbar
4.Electric-startbutton
5.Electric-starterswitch
6.Batterycompartment
Figure5
7.Cutting-heightlever(4)
8.Bag-on-demandlever
9.Handlelever(2)
10.Grassbag
11.Reardeector
Charge/storethebatterypack
at
Usethebatterypackat
Usethemachineat
5°C(41°F)to40°C(104°F)*
-30°C(-22°F)to49°C(120°F)*
0°C(32°F)to49°C(120°F)*
*Chargingtimewillincreaseifyoudonotchargethe
batterypackwithinthisrange.
Storethemachine,batterypack,andbatterycharger
g335468
inanenclosedclean,dryarea.
1.BatterychargerModel
81802(includedwith
Model21864)
g292995
Figure6
2.BatterypackModel81860
(includedwithModel
21864)
10

Operation
BeforeOperation
InstallingtheBatteryPack
Important:Operatethebatterypackonlyintemperaturesthatarewithintheappropriaterange;refer
toSpecications(page10).
1.Makesurethattheventsonthebatteryareclearofanydustanddebris.
2.Liftupthebattery-compartmentlid(AofFigure7).
3.Lineupthecavityinthebatterypackwiththetongueonthemachineandslidethebatterypackintothe
compartmentuntilitlocksintoplace(BofFigure7).
4.Closethebattery-compartmentlid(CofFigure7).
Note:Ifthebattery-compartmentliddoesnotclosecompletely,thebatteryisnotfullyinstalled.
Figure7
g251221
11

AdjustingtheCuttingHeight
DANGER
Adjustingthecutting-heightleverscouldbringyourhandsintocontactwithamovingblade
andresultinseriousinjury.
•Shutoffthemotor,removetheelectric-startbutton(ifequipped),andwaitforallmoving
partstostopbeforeadjustingthecuttingheight.
•Donotputyourngersunderthehousingwhenadjustingthecuttingheight.
Adjustthecuttingheightasdesired.Setallwheelstothesamecuttingheight(Figure8).
Figure8
g254131
12

DuringOperation
StartingtheMachine
1.Ensurethatthebatterypackisinstalledinthemachine;refertoInstallingtheBatteryPack(page11).
2.Inserttheelectric-startbuttonintotheelectric-starterswitch(AofFigure9).
3.Squeezetheblade-controlbarandholdittothehandle(BofFigure9).
4.Presstheelectric-startbuttonandkeepitpresseduntilthemotorstarts(CofFigure9).
Figure9
g335467
UsingtheSelf-PropelDrive
Simplywalkwithyourhandsontheupperhandleandyourelbowsatyoursides,andthemachinewill
automaticallykeeppacewithyou(Figure10).
Figure10
Note:Ifthemachinedoesnotfreelyrollbackwardafterself-propelling,stopwalking,holdyourhandsinplace,
andallowthemachinetorollacoupleofcentimeters(inches)forwardtodisengagethewheeldrive.Y oucan
alsotryreachingjustundertheupperhandletothemetalhandleandpushingthemachineforwardacoupleof
centimeters(inches).Ifthemachinestilldoesnotrollbackwardeasily,contactanAuthorizedServiceDealer.
g334136
13

BaggingtheClippings
Usethegrassbagwhenyouwanttocollectgrassandleafclippingsfromthelawn.
Ifthebag-on-demandleverisintherecyclingposition,moveittothebaggingposition;refertoOperatingthe
Bag-on-DemandLever(page15).
InstallingtheGrassBag
1.Raiseandholdupthereardeector(AofFigure1 1).
2.Installthegrassbag,ensuringthatthepinsonthebagrestinthenotchesonthehandle(BofFigure1 1).
3.Lowerthereardeector.
Figure11
g334207
RemovingtheGrassBag
Toremovethebag,reversethestepsinInstallingtheGrassBag(page14).
RecyclingtheClippings
Yourmachinecomesfromthefactoryreadytorecyclethegrassandleafclippingsbackintothelawn.
Ifthegrassbagisonthemachineandthebag-on-demandleverisinthebaggingposition,movethelevertothe
recyclingposition;refertoOperatingtheBag-on-DemandLever(page15).
14

Operatingthe
AdjustingtheBladeSpeed
Bag-on-DemandLever
Thebag-on-demandfeatureallowsyoutoeither
collectorrecyclegrassandleafclippingswhilethe
grassbagisattachedtothemachine.
•Tobagthegrassandleafclippings,pressthe
buttononthebag-on-demandleverandmovethe
leverforwarduntilthebuttonontheleverpopsup
(Figure12).
Figure12
1.Bag-on-demandlever(in
therecyclingposition)
2.Bag-on-demandlever(in
thebaggingposition)
Thismachinehas2blade-speedsettings:AUTOand
MAX.
•WhensettotheAUTOposition,thebladespeed
isadjustedautomaticallyforgreaterefciency;
changesincuttingconditionsaredetectedand
thebladespeedincreaseswhennecessaryto
maintainqualityofcut.
•WhensettotheMAXposition,thebladespeed
remainsatthehighestspeedatalltimes.
Turnthekeyinthekeyswitchtoeitherpositionto
adjustthebladespeedsetting(Figure14).
g251583
•Torecyclethegrassandleafclippings,press
thebuttonontheleverandmovethelever
rearwarduntilthebuttonontheleverpopsup.
Important:Forproperoperation,remove
anygrassclippingsanddebrisfromthe
bag-on-demanddoorandthesurrounding
opening(Figure13)beforeyoumovethe
bag-on-demandleverfrom1positionto
another.
Figure13
1.Cleanhere
g337279
Figure14
1.AUTOposition2.MAXposition
g251584
15

ShuttingOfftheMachine
1.Releasetheblade-controlbar(AofFigure15).
2.Removetheelectric-startbuttonfromthe
electric-starterswitch(BofFigure15).
3.Removethebatterypack;refertoRemovingthe
BatteryPackfromtheMachine(page16).
Note:Wheneveryouarenotusingthemachine,
removethebatterypack.
Figure15
OperatingTips
GeneralMowingTips
•Avoidstrikingsolidobjectswiththeblade.Never
deliberatelymowoveranyobject.
•Forbestperformance,installanewT oroblade
beforethecuttingseasonbeginsorwhen
necessary.
CuttingGrass
•Cutonlyaboutathirdofthegrassbladeatatime.
Forimprovedruntime,cutgrassatahigherheight
ofcut.
•Donotcutbelow51mm(2inches)unlessthe
grassissparseoritislatefallwhengrassgrowth
beginstoslowdown.
•Whencuttinggrassover15cm(6inches)tall,
g335480
mowatthehighestcuttingheightsettingandwalk
slower;thenmowagainatalowersettingforthe
bestlawnappearance.Ifthegrassistoolong,the
machinemayplugandcausethemotortostall.
RemovingtheBatteryPack
fromtheMachine
1.Liftupthebattery-compartmentlid.
2.Pressthebattery-packlatchtoreleasethe
batterypackandremovethebatterypack.
3.Closethebattery-compartmentlid.
•Wetgrassandleavestendtoclumpontheyard
andcancausethemachinetoplugorthemotorto
stall.Avoidmowinginwetconditions.
•Beawareofapotentialrehazardinverydry
conditions,followalllocalrewarnings,andkeep
themachinefreeofdrygrassandleafdebris.
•Alternatethemowingdirection.Thishelps
dispersetheclippingsoverthelawnforeven
fertilization.
•Ifthenishedlawnappearanceisunsatisfactory,
try1ormoreofthefollowing:
–Replacethebladeorhaveitsharpened.
–Walkataslowerpacewhilemowing.
–Raisethecuttingheightonyourmachine.
–Cutthegrassmorefrequently .
–Overlapcuttingswathsinsteadofcuttingafull
swathwitheachpass.
CuttingLeaves
•Aftercuttingthelawn,ensurethathalfofthelawn
showsthroughthecutleafcover.Y oumayneed
tomakemorethanasinglepassovertheleaves.
•Iftherearemorethan13cm(5inches)ofleaves
onthelawn,mowatahighercuttingheightand
thenagainatthedesiredcuttingheight.
•Slowdownyourmowingspeedifthemachine
doesnotcuttheleavesnelyenough.
16

AfterOperation
ChargingtheBatteryPack
Important:Thebatterypackisnotfullycharged
whenyoupurchaseit.Beforeusingthetoolfor
thersttime,placethebatterypackinthecharger
andchargeituntiltheLEDdisplayindicatesthe
batterypackisfullycharged.Readallsafety
precautions.
Important:Chargethebatterypackonlyin
temperaturesthatarewithintheappropriate
range;refertoSpecications(page10).
Note:Atanytime,pressthebattery-charge-indicator
buttononthebatterypacktodisplaythecurrent
charge(LEDindicators).
1.Ensurethattheventsonthebatteryandcharger
areclearofanydustanddebris.
Green
blinking
Green
Red
Red
blinking
Batterypackischarging
Batterypackischarged
Batterypackand/orbatterychargerisoverorunder
theappropriatetemperaturerange
Batterypackchargingfault*
*RefertoTroubleshooting(page23)formore
information.
Important:Thebatterycanbeleftonthecharger
forshortperiodsbetweenuses.
Ifthebatterywillnotbeusedforlongerperiods,
removethebatteryfromthecharger;referto
Storage(page22).
g290533
Figure16
1.Batterypackcavity
2.Batterypackventingareas6.Handle
3.Batterypackterminals
4.Battery-charge-indicator
button
5.LEDindicators(current
charge)
7.ChargerLEDindicator
light
8.Chargerventingareas
2.Lineupthecavityinthebatterypack(Figure16)
withthetongueonthecharger.
3.Slidethebatterypackintothechargeruntilitis
fullyseated(Figure16).
4.T oremovethebatterypack,slidethebattery
backwardoutofthecharger.
5.RefertothefollowingtabletointerprettheLED
indicatorlightonthebatterycharger.
Indicator
light
Off
Indicates
Nobatterypackinserted
17

CleaningUnderthe
Machine
ServiceInterval:Aftereachuse
Forbestresults,cleanthemachinesoonafteryou
havecompletedmowing.
4.Starttheengineandrunitforafewminutesto
drytheundersideofthemachinetopreventit
fromrusting.
5.Shutofftheengine,removetheelectric-start
button(ifequipped),andallowthemachineto
coolbeforestoringitinanenclosedarea.
1.Movethemachineontoaatpavedsurface.
2.Shutofftheengineandwaitforallmovingparts
tostopbeforeleavingtheoperatingposition.
3.Washouttheareaunderthereardoorwherethe
clippingsgofromtheundersideofthemachine
tothegrassbag.
CleaningUndertheMachineinthe
Vertical-StowPosition
1.Setthemachineinthevertical-stowposition;
refertoStoringtheMachineintheVertical-Stow
Position(page19).
2.Washouttheclippingsfromunderthemachine.
Note:Washouttheareawiththe
bag-on-demand(ifequipped)inboththefully
forwardandfullyrearwardpositions.
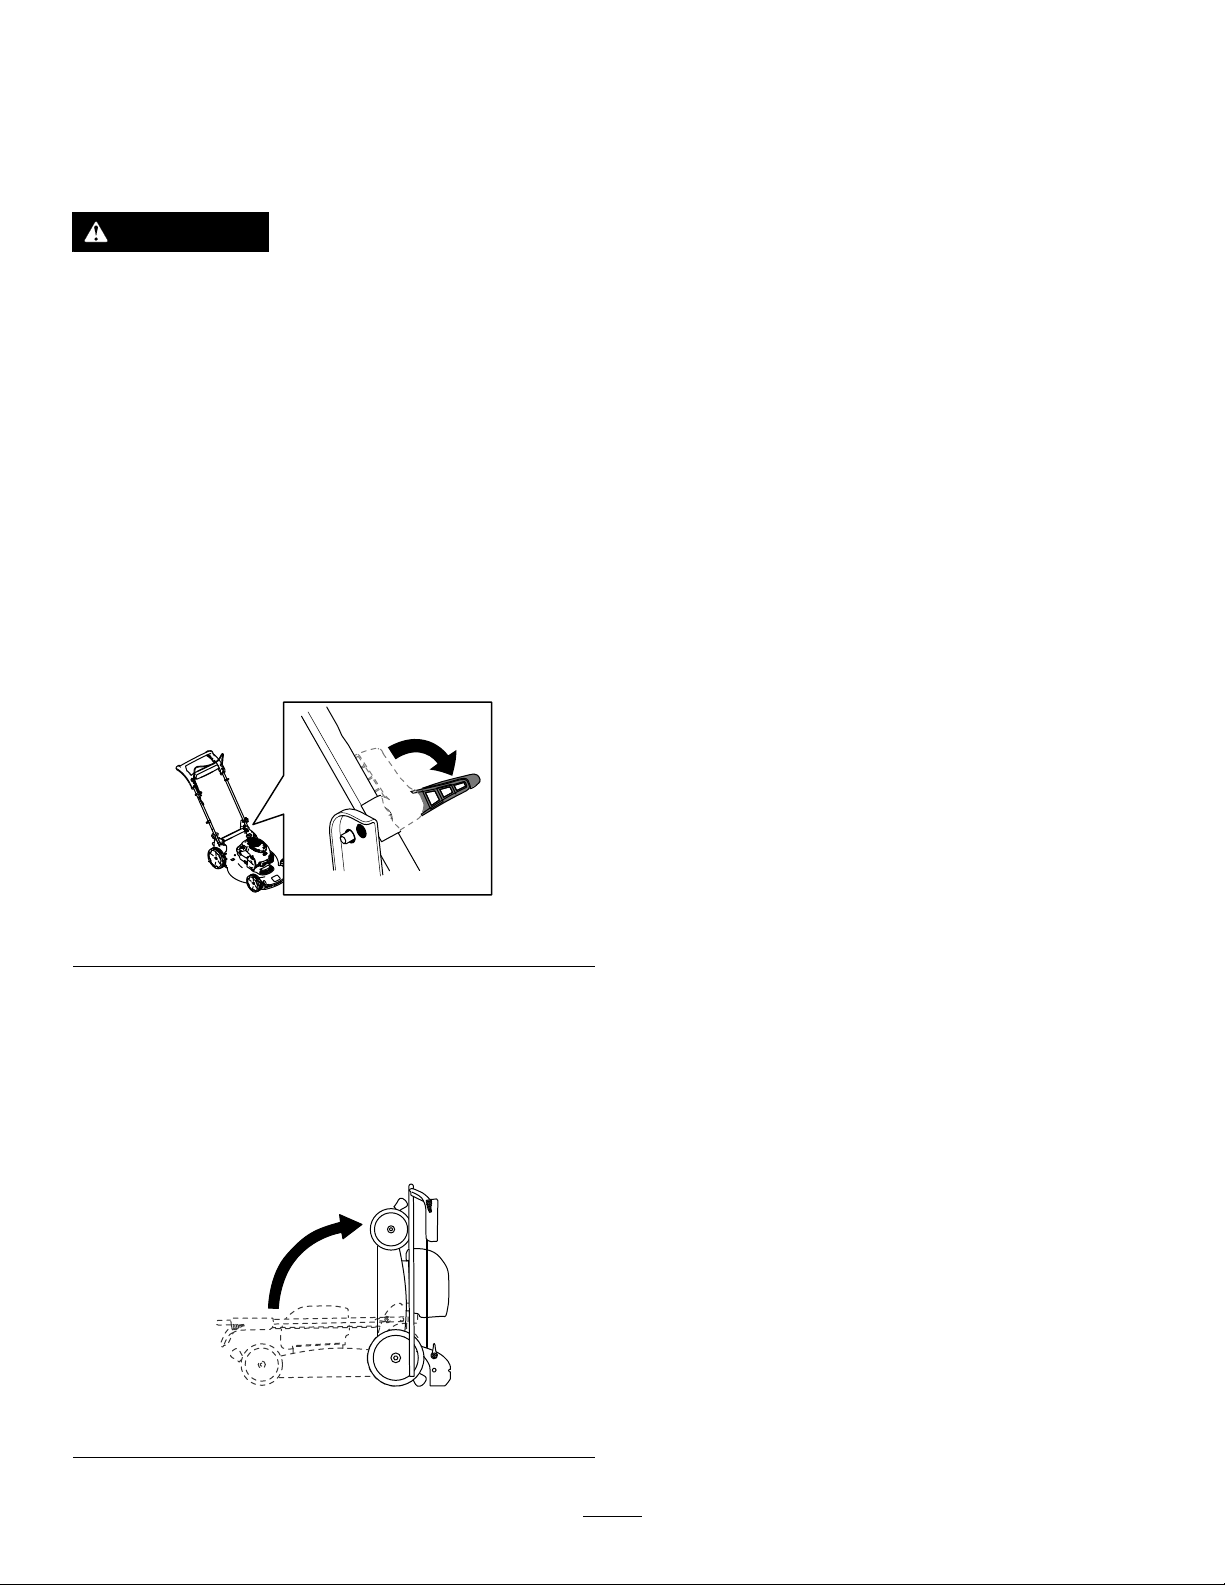
FoldingtheHandle
WARNING
Foldingorunfoldingthehandleimproperlycandamagethecables,causinganunsafe
operatingcondition.
•Donotdamagethecableswhenfoldingorunfoldingthehandle.
•Ifacableisdamaged,contactanAuthorizedServiceDealer.
1.Holdthehandlewhiledisengagingthehandlelockstoavoidpinchingyourhands.
2.Disengagethehandlelocksuntilyoucanmovetheupperhandlefreely(AofFigure17)
3.Foldthehandleforwardtothefullyforwardposition(BofFigure17).
Important:Routethecablestotheoutsideofthehandlelocksasyoufoldthehandle.
Figure17
4.T ounfoldthehandle,referto2UnfoldingtheHandle(page8).
g334367
18
StoringtheMachineinthe
Vertical-StowPosition
Youcanstoreyourmachineintheverticalpositionto
minimizestoragespace.
WARNING
Foldingorunfoldingthehandleimproperly
candamagethecables,causinganunsafe
operatingcondition.
•Donotdamagethecableswhenfoldingor
unfoldingthehandle.
•Ifacableisdamaged,contactan
AuthorizedServiceDealer.
1.Removetheelectric-startbuttonandbattery
fromthemachine.
2.Ensurethatthecutting-heightsettingonthe
machineis92mm(3-5/8inches)orlower;ifitis
not,lowerit;refertoAdjustingtheCuttingHeight
(page12).
3.Disengagethehandlelocks(Figure18).
Figure18
4.Foldthehandlefullyforward.
Important:Routethecablestotheoutside
ofthehandleknobsasyoufoldthehandle.
5.Engagethehandlelocks.
6.Liftthefrontofthemachinebythehandleand
moveitintoastoragespace(Figure19).
g335482
Figure19
g251586
19

Maintenance
Removetheelectric-startbuttonandbatterypack
fromthemachinebeforemaintainingorcleaningthe
machine.
Useonlythemanufacturer’srecommended
replacementpartsandaccessories.
Inspectandmaintainthemachineregularly.Have
themachinerepairedonlybyanAuthorizedService
Dealer.
LubricatingtheMachine
Youdonotneedtolubricatethemachine;allthe
bearingshavebeenlubricatedatthefactoryforthe
lifeofthemachine.
ReplacingtheBlade
ServiceInterval:Y early
Important:Youwillneedatorquewrenchto
installthebladeproperly.Ifyoudonothavea
torquewrenchorareuncomfortableperforming
thisprocedure,contactanAuthorizedService
Dealer.
Ifthebladeisdamagedorcracked,replaceit
immediately.Ifthebladeedgeisdullornicked,have
itsharpenedandbalanced,orreplaceit.
WARNING
Whenservicingtheblade,beawarethatthe
bladecanstillmoveeventhoughthepower
sourceisoff.Thebladeissharp;contacting
thebladecanresultinseriouspersonalinjury.
g231389
Figure20
4.Installthenewbladeandallmountinghardware
(Figure21).
Weargloveswhenservicingtheblade.
1.Removetheelectric-startbuttonandbattery
packfromthemachine.
2.Useablockofwoodtoholdthebladesteady
(Figure20).
3.Removetheblade,savingallmountinghardware
(Figure20).
g231390
Figure21
Important:Positionthecurvedendsofthe
bladefacinguptowardthemachinehousing.
5.Useatorquewrenchtotightenthebladebolt
to68N∙m(50ft-lb).
20

AdjustingtheSelf-Propel
PreparingtheBatteryPack
Drive
ForSelf-Propel-DriveModelsOnly
Wheneveryouinstallanewself-propelcableorif
theself-propeldriveisoutofadjustment,adjustthe
self-propeldrive.
1.Turntheadjustmentnutcounterclockwiseto
loosenthecableadjustment(Figure22).
Figure22
forRecycling
Important:Uponremoval,covertheterminalsof
thebatterypackwithheavy-dutyadhesivetape.
Donotattempttodestroyordisassemblethe
batterypackorremoveanyofitscomponents.
ContactyourlocalmunicipalityoryourauthorizedT oro
distributorformoreinformationonhowtoresponsibly
recyclethebattery.
g269307
1.Handle(leftside)
2.Adjustmentnut5.Turnthenut
3.Self-propel-drivecable
2.Adjustthetensiononthecable(Figure22)by
pullingitbackorpushingitforwardandholding
thatposition.
4.Turnthenutclockwiseto
tightentheadjustment.
counterclockwiseto
loosentheadjustment.
Note:Pushthecabletowardthemotorto
increasethetraction;pullthecableawayfrom
themotortodecreasethetraction.
3.Turntheadjustmentnutclockwisetotightenthe
cableadjustment.
Note:Tightenthenutrmlywithasocketor
wrench.
21

Storage
Important:Storethemachine,batterypack,and
chargeronlyintemperaturesthatarewithinthe
appropriaterange;refertoSpecications(page
10).
Important:Ifyouarestoringthebatterypack
fortheoff-season,chargeituntil2or3LED
indicatorsturngreenonthebattery.Donotstore
afullychargedorfullydepletedbattery .When
youarereadytousethemachineagain,charge
thebatterypackuntiltheleftindicatorlightturns
greenonthechargerorall4LEDindicatorsturn
greenonthebattery.
•Disconnecttheproductfromthepowersupply(i.e.,
removethebatterypack)andcheckfordamage
afteruse.
•Donotstorethemachinewiththebatterypack
installed.
•Cleanallforeignmaterialfromtheproduct.
•Whennotinuse,storethemachine,electric-start
button,batterypack,andbatterychargeroutofthe
reachofchildren.
•Keepthemachine,batterypack,andbattery
chargerawayfromcorrosiveagents,suchas
gardenchemicalsandde-icingsalts.
•T oreducetheriskofseriouspersonalinjury ,do
notstorethebatterypackoutsideorinvehicles.
•Storethemachine,batterypack,andbattery
chargerinanenclosedclean,dryarea.
22

Troubleshooting
Performonlythestepsdescribedintheseinstructions.Allfurtherinspection,maintenance,andrepairwork
mustbeperformedbyanauthorizedservicecenterorasimilarlyqualiedspecialistifyoucannotsolvethe
problemyourself.
Problem
Themachinedoesnotstart.
Themachinedoesnotruncontinuously.
Themachinedoesnotreachfullpower .
Thebatterypackloseschargequickly .1.Thebatterypackisoverorunderthe
Thebatterychargerisnotworking.
1.Thebatteryisnotfullyinstalledinthe
machine.
2.Thebatterypackisnotcharged.
3.Thebatterypackisdamaged.3.Replacethebatterypack.
4.Thereisanotherelectricalproblem
withthemachine.
1.Thereismoistureontheleadsofthe
batterypack.
2.Thebatteryisnotfullyinstalledintothe
tool.
1.Thebatterypackchargecapacityis
toolow .
2.Theairventsareblocked.
appropriatetemperaturerange.
1.Thebatterychargerisoverorunder
theappropriatetemperaturerange.
2.Theoutletthatthebatterychargeris
pluggedintodoesnothavepower .
PossibleCauseCorrectiveAction
1.Removeandthenreplacethebattery
intothemachine,makingsurethatitis
fullyinstalledandlatched.
2.Removethebatterypackfromthe
machineandchargeit.
4.ContactanAuthorizedServiceDealer.
1.Allowthebatterypacktodryorwipeit
dry.
2.Removeandthenreplacethebattery
intothetoolmakingsurethatitisfully
installedandlatched.
1.Removethebatterypackfromthe
machineandfullychargethebattery
pack.
2.Cleantheairvents.
1.Movethebatterypacktoaplace
whereitisdryandthetemperatureis
between5°C(41°F)and40°C(104°F).
1.Unplugthebatterychargerandmove
ittoaplacewhereitisdryandthe
temperatureisbetween5°C(41°F)
and40°C(104°F).
2.Contactyourlicensedelectricianto
repairtheoutlet.
TheLEDindicatorlightonthebattery
chargerisred.
TheLEDindicatorlightonthebattery
chargerisblinkingred.
1.Thebatterychargerand/orbattery
packisoverorundertheappropriate
temperaturerange.
1.Thereisanerrorinthecommunication
betweenthebatterypackandthe
charger.
2.Thebatterypackisweak.
1.Unplugthebatterychargerandmove
thebatterychargerandbatterypack
toaplacewhereitisdryandthe
temperatureisbetween5°C(41°F)
and40°C(104°F).
1.Removethebatterypackfromthe
batterycharger,unplugthebattery
chargerfromtheoutlet,andwait10
seconds.Plugthebatterychargerinto
theoutletagainandplacethebattery
packonthebatterycharger.IftheLED
indicatorlightonthebatterychargeris
stillblinkingred,repeatthisprocedure
again.IftheLEDindicatorlighton
thebatterychargerisstillblinkingred
after2attempts,properlydisposeof
thebatterypackatabatteryrecycling
facility.
2.Properlydisposeofthebatterypackat
abatteryrecyclingfacility .
23

Problem
PossibleCauseCorrectiveAction
Themachineisproducingabeeping
sound.
Thequalityofcutisdecreasedor
unsatisfactory.
Themachineisvibrating.1.Thebladeisbentordamaged.
1.Thebatterypackisnotcharged.
2.Themachineisinanunsafeposition
foroperation.
3.Themachineisoverloaded.
4.Thereisanotherelectricalproblem
withthemachine.
1.Thebladeisdull.1.Havethebladesharpenedorreplaced.
2.Thecuttingdeckhasdebrisbuildup.
1.Thebladeisdull.1.Havethebladesharpenedorreplaced. Themachineiscuttingunevenly .
2.Thecuttingdeckisdamaged.
1.Removethebatterypackfromthe
machineandchargeit.
2.Ensurethatthemachineisnotatan
extremeanglewhileoperating.
3.Cutthegrassatahigherheightofcut
orwalkataslowerpacewhilemowing.
4.Attempttheothertroubleshooting
actions,ifthealarmstillsounds,
contactanAuthorizedServiceDealer.
2.Cleanunderthemachine.
2.ContactanAuthorizedServiceDealer.
1.Inspectthebladeandreplaceif
necessary.
24

EEA/UKPrivacyNotice
Toro’sUseofY ourPersonalInformation
TheT oroCompany(“Toro”)respectsyourprivacy.Whenyoupurchaseourproducts,wemaycollectcertainpersonalinformationaboutyou,eitherdirectly
fromyouorthroughyourlocalT orocompanyordealer.T orousesthisinformationtofullcontractualobligations-suchastoregisteryourwarranty ,
processyourwarrantyclaimortocontactyouintheeventofaproductrecall-andforlegitimatebusinesspurposes-suchastogaugecustomer
satisfaction,improveourproductsorprovideyouwithproductinformationwhichmaybeofinterest.Toromayshareyourinformationwithoursubsidiaries,
afliates,dealersorotherbusinesspartnersinconnectiontheseactivities.Wemayalsodisclosepersonalinformationwhenrequiredbylaworin
connectionwiththesale,purchaseormergerofabusiness.Wewillneversellyourpersonalinformationtoanyothercompanyformarketingpurposes.
RetentionofyourPersonalInformation
Torowillkeepyourpersonalinformationaslongasitisrelevantfortheabovepurposesandinaccordancewithlegalrequirements.Formoreinformation
aboutapplicableretentionperiodspleasecontactlegal@toro.com.
Toro’sCommitmenttoSecurity
YourpersonalinformationmaybeprocessedintheUSoranothercountrywhichmayhavelessstrictdataprotectionlawsthanyourcountryofresidence.
Wheneverwetransferyourinformationoutsideofyourcountryofresidence,wewilltakelegallyrequiredstepstoensurethatappropriatesafeguardsare
inplacetoprotectyourinformationandtomakesureitistreatedsecurely.
AccessandCorrection
Youmayhavetherighttocorrectorreviewyourpersonaldata,orobjecttoorrestricttheprocessingofyourdata.Todoso,pleasecontactusbyemail
atlegal@toro.com.IfyouhaveconcernsaboutthewayinwhichT orohashandledyourinformation,weencourageyoutoraisethisdirectlywithus.
PleasenotethatEuropeanresidentshavetherighttocomplaintoyourDataProtectionAuthority.
374-0282RevC


FormNo.3442-563RevA
Flex-ForcePowerSystem
60VMAX55cmRecycler
Rasenmäher
Modellnr.21864—Seriennr.400000000undhöher
Modellnr.21864T—Seriennr.400000000undhöher
™
®
RegistrierenSieIhrProduktunterwww.T oro.com.
Originaldokuments(DE)
*3442-563*
DiesesProdukterfülltallerelevanteneuropäischen
Richtlinien;weitereDetailsndenSieinder
produktspezischenKonformitätserklärung(DOC).
g275230
Bild1
Einführung
DieserhandgeführteRasenmähermitSichelmessern
solltevonPrivatleutenverwendetwerden.Erist
hauptsächlichfürdasMähenvonGrasaufgepegten
GrünächeninPrivatanlagengedacht.Eristnicht
fürdasSchneidenvonBüschenoderfüreinen
landwirtschaftlichenEinsatzgedacht.Eristfürdie
VerwendungmitdenLithium-Ionen-Akkumodellen
81860(imLieferumfangvonModell21864enthalten)
oderModel81875vorgesehen;ebenfallskannder
AkkupackinModellnr.81825oder81860verwendet
werden.DieseAkkupackssindsoausgelegt,dasssie
nurmitdenAkkuladegerätemodell81802(mitModell
21864geliefert)oderModel81805geladenwerden
können.DerzweckfremdeEinsatzdieserProdukte
kannfürSieundUnbeteiligtegefährlichsein.
Modell21864TenthältkeinenAkkuundkein
Ladegerät.
LesenSiedieseInformationensorgfältigdurch,
umsichmitdemordnungsgemäßenEinsatzund
derWartungdesGerätsvertrautzumachenund
VerletzungenundeineBeschädigungdesGerätszu
vermeiden.SietragendieVerantwortungfüreinen
ordnungsgemäßenundsicherenEinsatzdesGeräts.
1.TypenschildmitModell-undSeriennummer
BesuchenSiewww.toro.comhinsichtlich
Sicherheitstipps,Schulungsunterlagen,
Zubehörinformationen,StandorteinesHändlersoder
RegistrierungdesProdukts.
WendenSiesichandenVertragshändleroder
KundendienstdesHerstellers,wennSieeine
Serviceleistung,OriginalersatzteiledesHerstellers
oderweitereInformationenbenötigen.HabenSie
dafürdieModell-undSeriennummernderMaschine
griffbereit.Bild1zeigtdiePositionderModell-und
SeriennummernamProdukt.TragenSiehierbittedie
Modell-undSeriennummerndesGerätsein.
Wichtig:ScannenSiemitIhremMobilgerätden
QR-CodeaufdemSeriennummernaufkleber(falls
vorhanden),umaufGarantie-,Ersatzteil-oder
andereProduktinformationenzuzugreifen.
©2020—TheToro®Company
8111LyndaleAvenueSouth
Bloomington,MN55420
KontaktierenSieunsunterwww.Toro.com.
2
AlleRechtevorbehalten
Druck:China

Sicherheit
WICHTIGE
SICHERHEITSANWEISUN-
GEN
WARNUNG:BeiderVerwendungeinerelektrischen
MaschinesinddiegrundlegendenSicherheitshinweise
undAnweisungenimmerzulesenundeinzuhalten,
umdieGefahreinesBrands,einesStromschlagsund
vonVerletzungenzuverringern,u.a.:
I.Schulung
1.DerBedienerderMaschineistfüralleUnfälle
oderGefahrenfürDritteundderenEigentum
verantwortlich.
2.LassenSieKindernichtmitderMaschine,dem
AkkupackoderdemAkkuladegerätspielen;das
MindestaltervonBenutzernistmöglicherweise
vonörtlichenVorschriftenvorgegeben.
3.LassenSiekeinePersonenmiteingeschränkten
physischen,sensorischenodermentalen
FähigkeitenoderPersonenohneErfahrung
undKenntnissedieMaschine,denAkkupack
oderdasAkkuladegerätverwenden,außersie
wurdenausreichendinBezugaufdiesichere
VerwendungunddiemitderVerwendung
zusammenhängendenGefahrenunterwiesen
undarbeitenunterAufsicht.
4.VorderVerwendungderMaschine,des
AkkupacksunddesAkkuladegerätsalle
AnweisungenundWarnaufkleberaufdiesen
Produktenlesen.
5.MachenSiesichmitdenBedienelementen
undderordnungsgemäßenBedienung
derMaschine,desAkkupacksunddes
Akkuladegerätsvertraut.
II.Vorbereitung
1.HaltenSieUnbeteiligte,besonderskleineKinder
undHaustiere,ausdemArbeitsbereichfern.
2.BedienenSiedieMaschineniemals,
wennnichtalleSchutzvorrichtungen
undSicherheitsvorrichtungenwiez.B.
AblenkblecheundGrasfangkörbeangebracht
undfunktionstüchtigsind.
3.PrüfenSiedenArbeitsbereichderMaschine
undentfernenSiealleObjektediesichaufden
EinsatzderMaschineauswirkenodervonihr
aufgeschleudertwerdenkönnten.
4.StellenSievorjederVerwendungderMaschine
sicher,dassdasMesser,dieMesserschraube
unddieMessereinheitnichtabgenutztoder
beschädigtsind.ErsetzenSieallebeschädigten
oderunleserlichenAufkleber.
5.VerwendenSienureinenvonToroangegebenen
Akkupack.DieVerwendungvonanderem
ZubehöroderAnbaugerätenkannein
Verletzungs-oderBrandrisikobergen.
6.DasEinsteckendesAkkuladegerätsineine
SteckdosemiteineranderenSpannungals
100bis240V,kannzueinemBrandoder
Stromschlagführen.SteckenSiedasLadegerät
nichtineineSteckdosemiteineranderen
Spannungals100bis240V .Beieinem
anderenAnschlussdesignkannbeiBedarfein
SteckeradaptermitderrichtigenKonguration
fürdieSteckdoseverwendetwerden.
7.VerwendenSiekeinebeschädigtenoder
verändertenAkkupacksoderAkkuladegeräte,
dasiesichunerwartetverhaltenundBrand,
ExplosionoderVerletzungenverursachen
können.
8.WenndasStromkabeldesAkkuladegeräts
beschädigtist,tretenSiefürErsatzmiteinem
VertragshändlerinKontakt.
9.VerwendenSiekeinenichtauadbarenAkkus.
10.LadenSiedenAkkupacknurmiteinemvonT oro
angegebenenAkkuladegerät.EinLadegerät,
dasfürdeneinenAkkupacktypgeeignetist,
kannbeieinemanderenAkkupackzueiner
Brandgefahrführen.
11.LadenSiedenAkkupacknurineinemgut
belüftetenBereichauf.
12.SetzenSieeinemAkkupackoderein
AkkuladegerätkeinemFeueroderT emperaturen
vonüber68°Caus.
13.BefolgenSiealleAnweisungenzum
AuadenundladenSiedenAkkupacknicht
außerhalbdesinderAnweisungangegeben
Temperaturbereichs.Andernfallskann
derAkkupackbeschädigtwerdenunddie
Brandgefahrsteigen.
14.GeeigneteKleidung:TragenSiegeeignete
Kleidung,u.a.eineSchutzbrille,langeHosen,
rutschfesteArbeitsschuhe(keineSandalenund
nichtbarfuß)undeinenGehörschutz.BindenSie
langesHaarzusammenundtragenSiekeinen
losenSchmuck,derinbeweglichenTeilen
hängenbleibenkann.TragenSieinstaubigen
BetriebsbedingungeneineStaubmaske.Die
VerwendungvonGummihandschuhenwird
empfohlen.
III.Betrieb
1.DerKontaktmiteinemsichdrehenden
MesserskanneszuschwerenVerletzungen
führen.HaltenSieIhreHändeundFüßevom
Schnittbereichundallenanderenbeweglichen
TeilenderMaschinefern.BleibenSieimmer
vonderAuswurföffnungfern.
3

2.WenndieseMaschinefüreinenanderenZweck
alsvorgeseheneingesetztwird,kanndasfür
BedienerundanderePersonengefährlichsein.
3.KuppelnSiedenSelbstantriebaus(falls
vorhanden),bevorSiedieMaschine
einschalten.
4.VerhindernSieunbeabsichtigtesStarten:Stellen
Siesicher,dassderElektrostarttasterausder
Zündungentferntist,bevorSiedenAkkupack
einsetzenunddieMaschinebenutzen.
5.KonzentrierenSiesichimmerbeider
VerwendungderMaschine.TunSienichts,
wasSieablenkenkönnte,sonstkönnen
VerletzungenoderSachschädenauftreten.
6.HaltenSiedieMaschinean,entfernenSieden
Elektrostarttaster,entfernenSiedenAkkupack
ausderMaschineundwartenSie,bisalle
beweglichenTeilezumStillstandgekommen
sind,bevorSiesieeinstellen,warten,reinigen
oderlagern.
7.EntfernenSiedenAkkupackundden
ElektrostarttasterausderMaschine,wenn
SiesieunbeaufsichtigtlassenoderbevorSie
Zubehörwechseln.
8.BelastenSiedieMaschinenichtübermäßig:Sie
holendasMeisteausderMaschineheraus,
wennSiesiemitdervorgesehenenLeistung
laufenlassen.
9.SeienSiewachsam:AchtenSieaufdas,was
SietunundlassenSiebeiderBenutzungder
MaschinegesundenMenschenverstandwalten.
VerwendenSiedieMaschinenicht,wennSie
müdeoderkranksindoderunterAlkohol-oder
Drogeneinussstehen.
10.SetzenSiedieMaschinenurbeiguten
Sichtverhältnissenundgeeigneten
Witterungsbedingungenein.FahrenSie
dieMaschineniebeiGewitter,bzw.wenn
GefahrdurchBlitzschlagbesteht.
11.SeienSieäußerstvorsichtig,wennSiedas
GerätzurücksetzenoderinIhreRichtung
ziehen.
12.AchtenSieimmerauffestenStandundBalance,
besondersanAbhängen.MähenSieimmer
querzumHang,nichthangaufwärtsoder
-abwärts.GehenSiebeimRichtungswechselan
Hanglagenäußerstvorsichtigvor.Versuchen
Sienicht,steileHängezumähen.GehenSie
mitderMaschine.Niemalsrennen.
13.WerfenSiedasSchnittgutnichtgegenPersonen
aus.VermeidenSie,MaterialgegeneineWand
odereinHindernisauszuwerfen,dadasMaterial
aufSiezurückprallenkann.StellenSiedas/die
Messerab,wennSieeineKiesoberächen
überqueren.
14.AchtenSieaufLöcher,Rillen,Bodenwellen,
SteineoderandereverborgeneObjekte.
UnebenesGeländekanndazuführen,dassSie
dasGleichgewichtoderdenHaltverlieren.
15.NassesGrasund/odernasseBlätterkönnen
zuschwerenVerletzungenführen,solltenSie
daraufausrutschenundmitdemMesserin
Berührungkommen.VermeidenSieeinMähen
innassenBedingungenoderimRegen.
16.WenndieMaschineeinenGegenstand
trifftoderanfängtzuvibrieren,stellenSie
sofortdieMaschineab,entfernenSieden
Elektrostarttaster,entfernenSiedenAkkupack
undwartenSie,bisallebeweglichenTeile
zumStillstandgekommensind,bevorSiedie
MaschineaufSchädenuntersuchen.Führen
SiealleerforderlichenReparaturendurch,ehe
SiedieMaschinewiederinGebrauchnehmen.
17.HaltenSiedieMaschineanundentfernenSie
denElektrostarttaster,bevorSiedieMaschine
zumTransportauaden.
18.UntermissbräuchlichenBedingungenkann
FlüssigkeitausdemAkkupackaustreten.
VermeidenSieKontakt.WennSiedie
Flüssigkeitversehentlichberühren,mitWasser
spülen.WenndieFlüssigkeitinIhreAugen
gelangt,suchenSieeinenArztauf.Vom
AkkupackausgestoßeneFlüssigkeitkannzu
HautreizungenoderVerbrennungenführen.
IV.WartungundLagerung
1.HaltenSiedieMaschinean,entfernenSieden
Elektrostarttaster,entfernenSiedenAkkupack
ausderMaschineundwartenSie,bisalle
beweglichenTeilezumStillstandgekommen
sind,bevorSiesieeinstellen,warten,reinigen
oderlagern.
2.VersuchenSienicht,dieMaschinezureparieren,
außerindemindenAnweisungenangegebenen
Maße.LassenSiedieMaschinedurcheinen
VertragshändlermitidentischenErsatzteilen
instandsetzen.
3.TragenSiebeimDurchführenvon
WartungsarbeitenHandschuheundeine
Schutzbrille.
4.SchärfenSieeinstumpfesMesservonbeiden
Seiten,umdasGleichgewichtzuerhalten.
ReinigenSiedasMesserundstellenSiesicher,
dassesinBalanceist.
5.ErsetzenSieeinMesser,wennesverbogen,
verschlissenoderangebrochenist.EinMesser,
dasnichtimGleichgewichtist,kannVibrationen
erzeugen,diedenMotorbeschädigenoderzu
Verletzungenführenkönnen.
4

6.BeimWartendesMessersdaraufachten,
dasssichdasMesserauchbeigetrennter
Stromversorgungnochbewegenkann.
7.PrüfenSiedenGrasfangkorbregelmäßigauf
VerschlechterungoderVerschleißundersetzen
SieeinenverschlissenenKorbmiteinem
ErsatzkorbvonToro.
8.UmeinebestmöglicheLeistungsicherzustellen,
verwendenSienurOriginalersatzteileund
-zubehörteilevonT oro.AndereErsatz-und
Zubehörteilekönnengefährlichseinundeine
VerwendungkönntedieGarantieungültig
machen.
9.WartenSiedieMaschine:HaltenSiedie
Schnittkantenscharfundsauber,umeine
bestmöglicheundsichereLeistungzu
gewährleisten.HaltenSiedieHolmetrocken,
sauberundöl-undfettfrei.LassenSiedie
Schutzvorrichtungeninfunktionierendem
Zustanddort,wosiehingehören.HaltenSiedie
Messerscharf.VerwendenSienuridentische
Messer.
10.PrüfenSiedieMaschineaufbeschädigte
Teile:WennSchutzvorrichtungenoderandere
Teilebeschädigtsind,stellenSiefest,obdie
Maschinenochbenutzbarist.AchtenSieauf
schlechtausgerichteteundsichberührende
beweglicheTeile,defekteTeilebzw.Befestigung
undalleanderenZustände,diedenBetrieb
beeinträchtigenkönnten.Solangeinden
Anweisungennichtandersangegeben,lassen
SiebeschädigteSchutzvorrichtungenundTeile
nurvoneinemautorisiertenVertragshändler
reparierenbzw.austauschen.
BrandodereinerExplosionführen.HaltenSie
AkkupacksvonKindernfernundbewahren
sieinderOriginalverpackungauf,bisSiesie
verwenden.
15.EntsorgenSiedenAkkunichtdurchVerbrennen.
DieZellenkönnenexplodieren.PrüfenSievor
OrtgeltendeGesetzeinBezugaufmögliche
spezielleAnweisungenzurEntsorgung.
BEWAHRENSIEDIESE
SICHERHEITSANWEISUN-
GENAUF
11.HaltenSieeinnichtverwendetesAkkupack
vonMetallobjektenfern,u.a.Briefklammern,
Münzen,Schlüssel,Nägel,Schrauben,dieeine
VerbindungvoneinemPolzueinemanderen
herstellenkönnen.EinKurzschließender
AkkupolekannzuVerbrennungenodereinem
Brandführen.
12.PrüfenSiedasMesserunddieMotorbefestigungsschraubenregelmäßigaufFestigkeit.
13.WennSiedieMaschinenichtverwenden,
lagernSiesiedrinnen,aneinemtrockenen
undsicherenOrtaußerhalbderReichweitevon
Kindern.
14.ACHTUNG:einfalschgehandhabtes
AkkupackkanneinBrandrisikodarstellenoder
Verätzungenverursachen.DemontierenSieden
Akkupacknicht.ErwärmenSiedenAkkupack
nichtüber68°CundverbrennenSieihnnicht.
ErsetzenSiedenAkkupacknurdurchein
OriginalakkupackvonToro.DieVerwendung
einesanderenAkkupacktypskannzueinem
5

Sicherheits-undBedienungsschilder
DieSicherheits-undAnweisungsaufklebersindgutsichtbar;siebendensichinderNähe
dermöglichenGefahrenbereiche.TauschenSiebeschädigteoderverlorengegangene
Aufkleberaus.
134-4691
1.Autospeed2.Maxspeed
Modell81860
decal134-4691
decal137-9489
137-9489
1.LesenSiedie
Bedienungsanleitung.
2.Recyceln5.NichtRegenaussetzen.
3.EnthältLithium-Ionen,
nichtwegwerfen.
137-9495
1.LesenSiedieBedienungsanleitung.3.FürdenGebrauchimInnenbereich.
2.Nichtwegwerfen.
4.Doppeltisoliert
4.VonoffenerFlamme
freihalten.
decal137-9495
137-9496
1.DerAkkupacklädt.3.DerAkkupackistnichtimgeeignetenT emperaturbereich.
2.DerAkkupackistvollständigaufgeladen.4.AkkupackLadefehler
6
decal137-9496

decal140-1324
140-1324
1.LesenSiedie
Bedienungsanleitung.
2.DrückenSiezumAnlassen
derMaschinedenBügel
zumHolmunddrücken
SiedieT aste.
1.Warnung:LesenSiedie
Bedienungsanleitung.
2.Schnitt-bzw.
Amputationsgefahr
fürHändeam
Mähwerkmesser:
BerührenSiekeine
beweglichenT eileund
nehmenSiekeine
Schutzblecheund
Schutzvorrichtungen
ab.
3.Schnitt-/AmputationsgefahrfürdieHändeam
Mähwerkmesser:ziehen
SiedenSchlüsselab
undlesenSiedieBedie-
nungsanleitung,bevorSie
Wartungsarbeitendurchführen.
140-1328
3.LassenSiedenBügel
los,umdieMaschine
abzustellen.
4.Gefahrdurch
aufgeschleuderte
Gegenstände:Halten
SieUnbeteiligtefern;
schaltenSiedenMotor
abundwartenSiebisalle
beweglichenT eilezum
Stillstandgekommensind,
bevorSiedieMaschine
verlassen;hebenSie
verstreuteTeileauf,bevor
SiemitdemMähen
beginnen.
5.Schnitt-/AmputationsgefahrfürFüße,Mähwerksmesser:MähenSieHänge
nichthochundruntersondernnurparallel;schauen
Sienachhinten,wennSie
rückwärtsmähen.
decal112-8760
112-8760
1.GefahrdurchherausgeschleuderteObjekte:Unbeteiligte
müsseneinenAbstandzurMaschinehalten.
2.GefahrvonSchnittverletzungen/einerAmputationvon
HändenoderFüßendurchMähwerkmesser:HaltenSie
sichvonbeweglichenT eilenfern.
decal140-1328
decal139-6557
139-6557
1.Recycler-Stellung2.Fangkorb-Stellung
decal137-9461
137-9461
1.Akkuladestatus
7

Einrichtung
Hinweis:DerAkkupackistbeimKaufnicht
vollständigaufgeladen.BevorSiedieMaschinezum
erstenMalverwenden,sieheAuadendesAkkupacks
(Seite17).
1
Befestigungdes
Akkuladegeräts(optional)
KeineTeilewerdenbenötigt
Verfahren
SiekönnenbeiBedarfdasLadegerätmitden
AussparungenzurWandmontageaufderRückseite
desLadegerätsanderWandbefestigen.
BefestigenSieesimInnenbereich(wiez.B.ineiner
GarageoderaneinemanderentrockenenOrt)inder
NäheeinerSteckdoseundaußerhalbderReichweite
vonKindern.
InBild2ndenSieHinweisezumBefestigendes
Ladegeräts.
SchiebenSiedasLadegerätüberdierichtig
angebrachtenBefestigungen,umdasLadegerätzu
befestigen(Befestigungenliegennichtbei).
g247359
Bild2
8

2
AufklappendesHolms
KeineTeilewerdenbenötigt
Verfahren
WARNUNG:
WennSiedenHolmfalschaufklappen,könnenSiedieKabelbeschädigenunddensicheren
Geräteeinsatzgefährden.
•BeschädigenSiebeimAuf-oderZusammenklappendesHolmsnichtdieKabel.
•StellenSiesicher,dassdieKabelzurAußenseitedesHolmsverlegtsind.
•WendenSiesichbeieinembeschädigtenKabelaneinenofziellenVertragshändler.
Hinweis:StellenSiesicher,dassdieKabelzurAußenseitedesHolmsverlegtsindundnichteingeklemmt
werden(DinBild3).
Bild3
g335466
9

3
MontierendesFangkorbs
KeineTeilewerdenbenötigt
Verfahren
g334351
Bild4
10

Produktübersicht
TechnischeDaten
Akkupack
Modell81860
Akkupackleistung
Akkuherstellerangabe=Max.60Voltund54Voltnominal.
TatsächlicheSpannunghängtvonderLastab.
6,0Ah
324Wh
Akkuladegerät
Modell81802
Typ60VoltMAX,Lithium-Ionen-
Eingabe
Ausgabe
Akkuladegerät
100bis240VAC50/60HzMax2,0A
60VMAXDC2,0A
GeeigneteTemperaturbereiche
Bild5
1.Bügel
2.Selbstantriebsbügel
3.Schaltbügel9.Holmhebel(2)
4.Elektrostarttaster10.Fangkorb
5.Elektrostartschalter11.Heckablenkblech
6.Akkukasten
7.Schnitthöheneinstellhebel
(4)
8.Zuschaltbarer
Fangkorb-Hebel
Auaden/Lagerndes
Akkupacksbei
VerwendungdesAkkupacks
bei
VerwendungderMaschinebei
5°Cbis40°C*
-30°Cbis49°C
0°Cbis49°C*
*DieLadezeitwirdverlängert,wennSiedenAkkupack
nichtindiesemBereichauaden.
g335468
LagernSiedieMaschine,denAkkupackunddas
AkkuladegerätaneinemsauberenundtrockenenOrt.
1.Akkuladegerätmodell
81802(mitModell21864
mitgeliefert)
g292995
Bild6
2.Akkupackmodell81860
(mitModell21864
mitgeliefert)
11

Betrieb
VordemEinsatz
EinsetzendesAkkupacks
Wichtig:VerwendenSiedenAkkupacknurbeiTemperaturenimangemessenenBereich,siehe
TechnischeDaten(Seite11).
1.StellenSiesicher,dassdieEntlüftungenamAkkukeinenStaubundkeineRückständeenthalten.
2.ÖffnenSiedenDeckeldesAkkukastens(AinBild7).
3.RichtenSiedieVertiefungimAkkupackmitderNaseanderMaschineausundschiebenSieden
AkkupackindenKasten,biserinseinerPositioneinrastet(BinBild7).
4.SchließenSiedenDeckeldesAkkukastens(CinBild7).
Hinweis:WennsichderAkkufachdeckelnichtvollständigschließt,istderAkkupacknichtvollständig
eingesetzt.
Bild7
g251221
12

EinstellenderSchnitthöhe
GEFAHR
BeimEinstellenderSchnitthöhenhebelkönnenIhreHändeeinbeweglichesMesserberühren
undSiekönnenschwereVerletzungenerleiden.
•SchaltenSievordemEinstellenderSchnitthöhedenMotorab,entfernenSiedieelektrische
Starttaste(sofernvorhanden)undwartenSie,bisallebeweglichenTeilezumStillstand
gekommensind.
•FührenSieIhreFingerbeimEinstellenderSchnitthöhenieunterdasMähwerk.
StellenSiedieSchnitthöheein.StellenSiealleRäderaufdiegleicheSchnitthöheein(Bild8).
Bild8
g254131
13

WährenddesEinsatzes
AnlassenderMaschine
1.VergewissernSiesich,dassderAkkupackinderMaschineist;sieheEinsetzendesAkkupacks(Seite12).
2.FührenSiedenElektrostarttasterindenElektrostartschalter(AinBild9).
3.DrückenSiedenSchaltbügelundhaltenSieihngegendenHolm(BinBild9).
4.HaltenSiedenElektrostarttastergedrückt,bisderMotorstartet(CinBild9).
Bild9
g335467
VerwendendesSelbstantriebs
GehenSieeinfachvorwärtsundhaltenSiedabeiIhreHändeamoberenHolmundIhreEllbogenanIhren
Seiten;dieMaschinehältautomatischmitIhnenSchritt(Bild10).
Bild10
Hinweis:WenndieMaschinenichtungehindertnachdemSelbstantriebrückwärtsrollt,gehenSienicht
weiter,lassenSiedieHändeamBügelundlassenSiedieMaschineeinpaarZentimetervorwärtsrollen,
umdenRadantriebeinzukuppeln.SiekönnenauchunterdemoberenHolmdenMetallbügelanfassenund
dieMaschineeinpaarZentimeternachvorneschieben.WenndieMaschineimmernochnichtungehindert
rückwärtsrollt,wendenSiesichandenofziellenVertragshändler.
g334136
14

SammelndesSchnittguts
VerwendenSiedenFangkorb,wennSieSchnittgutundLaubimFangkorbsammelnmöchten.
WennderHebelfürdenzuschaltbarenFangkorbinderRecycler-Stellungist,schiebenSieihnindie
Fangkorb-Stellung,sieheVerwendendesHebelsfürdenzuschaltbarenFangkorb(Seite16).
MontierendesFangkorbs
1.HebenSiedashintereAblenkblechanundhaltenSieeshoch(AinBild11).
2.SetzenSiedenGrasfangkorbein,stellenSiesicher,dassdieStifteamFangkorbindenKerbenam
Holmsind(BinBild11).
3.SenkenSiedashintereAblenkblechab.
Bild11
g334207
EntfernendesFangkorbs
WennSiedenFangkorbabnehmenmöchten,gehenSieumgekehrtvoralsinMontierendesFangkorbs
(Seite15).
Schnittgutrecyclen
DerRasenmäheristwerksseitigaufdasRecycelnvonSchnittgutundLaubeingestellt.
WennderGrasfangkorbanderMaschineangebrachtist,undderHebelfürdenzuschaltbarenFangkorbaufder
Fangkorb-Stellungsteht,schiebenSiedenHebelindieRecycler-Stellung,sieheVerwendendesHebelsfür
denzuschaltbarenFangkorb(Seite16).
15

VerwendendesHebels
Einstellender
fürdenzuschaltbaren
Fangkorb
MitdemzuschaltbarenFangkorbkönnenSie
SchnittgutundLaubentwedersammelnoder
recyceln,wennderGrasfangkorbanderMaschine
angebrachtist.
•ZumSammelndesSchnittgutsundLaubs
drückenSiedieTasteamHebelfürden
zuschaltbarenFangkorbundbewegendenHebel
nachvorne,bisdieT asteamHebelherausspringt
(Bild12).
Bild12
Messerdrehzahl
DieseMaschineverfügtüber2Messerdrehzahlein-
stellungen:AUTOundMAX.
•InderAUTO-StellungwirddieMesserdrehzahl
automatischfüreinehöhereEfzienzangepasst;
ÄnderungenderSchnittbedingungenwerden
erkanntunddieMesserdrehzahlerhöhtsich,wenn
dieszurAufrechterhaltungderSchnittqualität
notwendigist.
•IndieMAX-StellungbleibtdieMesserdrehzahl
immeraufderhöchstenDrehzahl.
DrehenSiedenSchlüsselimSchlüsselschalterauf
einederbeidenStellungen,umdieEinstellungder
Messerdrehzahlanzupassen(Bild14).
g251583
1.Hebelfürden
zuschaltbarenFangkorb
(inRecycling-Stellung)
2.Hebelfürden
zuschaltbarenFangkorb
(inFangkorb-Stellung)
•ZumRecyclendesSchnittgutsundLaubs
drückenSiedieTasteamHebelundbewegen
denHebelnachhinten,bisdieT asteamHebel
herausspringt.
Wichtig:FüreineneinwandfreienBetrieb
solltenSieSchnittgutundRückständevon
derKlappedeszuschaltbarenFangkorbsund
denumgebendenÖffnungenentfernen(Bild
13),bevorSiedieStellungdesHebelsfürden
zuschaltbarenFangkorbändern.
g337279
Bild14
1.AUTO-Stellung2.MAX-Stellung
1.AndieserStellereinigen
g251584
Bild13
16

AbstellenderMaschine
1.LassenSiedenSchaltbügellos(AinBild15).
2.EntfernenSiedenElektrostarttasterausdem
Elektrostartschalter(BinBild15).
3.EntfernenSiedenAkkupack,sieheEntfernen
desAkkupacksausderMaschine(Seite17).
Hinweis:EntnehmenSiedenAkkupackjedes
Mal,wennSiedieMaschinenichtverwenden.
Bild15
EntfernendesAkkupacks
ausderMaschine
1.ÖffnenSiedenDeckeldesAkkukastens.
2.DrückenSiedenAkkuriegel,umdenAkkupack
zulösenundziehenSiedenAkkupackheraus.
3.SchließenSiedenDeckeldesAkkukastens.
Betriebshinweise
AllgemeineMähtipps
•VermeidenSie,dassdasMesseraufFremdkörper
aufprallt.MähenSienieabsichtlichüber
irgendwelchenGegenständen.
•UmdiebesteLeistungzuerzielen,installierenSie
einneuesToroMesservorBeginnderMähsaison
oderbeiBedarf.
wennSieGrasmähen,daslängerals15cmist.
MähenSiedannnocheinmalmiteinerniedrigeren
Einstellung,umdemRasendasgewünschte
Schnittbildzugeben.WenndasGraszulangist,
kanndieMaschineverstopfenundderMotorkann
abdrosseln.
•NassesGrasundLaubneigenzumVerklumpen
imGartenundkönneneinVerstopfender
MaschineundeinAbdrosselndesMotors
verursachen.VermeidenSieMäharbeitenbei
nassenUmgebungsbedingungen.
•InsehrtrockenenBedingungenbesteht
eineBrandgefahr.HaltenSieallelokalen
BrandgefahrwarnungeneinundentfernenSie
trockenesGrasundLaubvonderMaschine.
•WechselnSiehäugdieMährichtung.Dadurch
verteiltsichdasSchnittgutbesseraufder
RasenächeundbewirkteineffektiveresDüngen.
•ProbierenSiebeieinemunbefriedigenden
g335480
SchnittbilddesRasenseinederfolgenden
Abhilfenaus:
–WechselnSiedasMesserausoderlassenSie
esschärfen.
–GehenSiebeimMähenlangsamer.
–HebenSiedieSchnitthöhederMaschinean.
–MähenSiehäuger.
–LassenSiedieBahnenüberlappen,anstelle
beijedemGangeineneueBahnzumähen.
SchnetzelnvonLaub
•StellenSienachdemMähensicher,dassdie
HälftedesRasensdurchdieSchnittgutdecke
sichtbarist.DabeimüssenSieunterUmständen
mehrmalsüberdasLaubmähen.
•WenneineLaubdeckevonmehrals13cmauf
demRasenliegt,mähenSiemiteinerhöheren
Schnitthöheunddannmitdergewünschten
Schnitthöhe.
•MähenSielangsamer,wenndieMaschinedas
Laubnichtfeingenughäckselt.
Mähen
•MähenSieimmernureinDritteldesGrashalmsin
einemDurchgang.DieLaufzeitwirdverbessert,
wennSiedasGrasmiteinergrößerenSchnitthöhe
mähen.
•MähenSienichtuntereinerEinstellungvon
51mm,wenndasGrassehrfeinwächst,oderim
Spätherbst,wenndasGraswachstumnachlässt.
•StellenSiebeimerstenDurchgangdieSchnitthöhe
aufdiehöchsteEinstellungundgehenlangsamer,
NachdemEinsatz
AuadendesAkkupacks
Wichtig:DerAkkupackistbeimKaufnicht
vollständigaufgeladen.BevorSiedieMaschine
zumerstenMalverwenden,setzenSieden
AkkupackindasLadegeräteinundladenes
auf,bisdieLED-Anzeigeangibt,dassder
Akkupackganzaufgeladenist.LesenSiealle
Sicherheitsanweisungen.
17

Wichtig:LadenSiedenAkkupacknurbei
TemperaturenimangemessenenBereich,siehe
TechnischeDaten(Seite11).
Hinweis:DrückenSiebeiBedarfdieT astefür
dieAkkuladeanzeigeaufdemAkkupack,umden
aktuellenLadestandanzuzeigen(LED-Anzeigen).
1.StellenSiesicher,dasssichindenEntlüftungen
amAkkuundLadegerätkeinStauboder
Schmutzbendet.
Bild16
1.Akkupackfach
2.Akkupack-
Entlüftungsbereiche
3.Akkupack-
Anschlussklemmen
4.TastefürAkkuladeanzeige8.Entlüftungsbereicheam
5.LED-Anzeigeleuchten
(aktuellerLadezustand)
6.Bügel
7.LED-Anzeigeleuchte
Ladegerät
Ladegerät
*WeitereInformationenndenSieunterFehlersuche
und-behebung(Seite24).
Wichtig:DerAkkukannzwischendenEinsätzen
fürkurzeZeiträumeaufdemLadegerätbelassen
werden.
WennderAkkufürlängereZeitnichtbenutztwird,
nehmenSiedenAkkuausdemLadegerät;siehe
Einlagerung(Seite23).
ReinigenunterdemGerät
Wartungsintervall:NachjederVerwendung
UmdiebestenErgebnissezuerzielen,reinigenSie
dieMaschinesobaldSiemitdemMähenfertigsind.
1.FahrenSiedieMaschineaufeineebene,
befestigteFläche.
2.StellenSiedenMotorabundwartenSie,bis
allebeweglichenT eilezumStillstandgekommen
sind,bevorSiedieBedienungsposition
verlassen.
3.ReinigenSiedenBereichunterderHeckklappe,
g290533
anderStelle,anderdasSchnittgutvonder
UnterseitederMaschineindenFangkorb
befördertwird.
Hinweis:ReinigenSiedenBereichmitdem
zuschaltbarenFangkorb(fallsvorhanden)inder
Vorwärts-undRückwärtsstellung.
4.StartenSiedenMotorundlassenSieihnfür
einpaarMinutenlaufen,umdieUnterseiteder
Maschineauszutrocknen,damitsienichtrostet.
2.FluchtenSiedasLochimAkkupack(Bild16)mit
derZungeamLadegerätaus.
3.SchiebenSiedenAkkupackindasLadegerät,
biseseinrastet(Bild16).
4.SchiebenSiezumHerausnehmendes
AkkupacksdenAkkupacknachhintenausdem
Ladegerät.
5.InderfolgendenTabellendenSieeine
BeschreibungderLED-Anzeigeleuchtenauf
demAkkuladegerät.
Anzeigeleuchte
Aus
Grün
blinkend
GrünAkkupackistaufgeladen
Rot
Rot
blinkend
Anzeige
KeinAkkupackeingeführt
Akkupackwirdaufgeladen
DerAkkupackund/oderAkkuladegerätistnichtim
geeignetenTemperaturbereich
AkkupackLadefehler*
5.StellenSiedieMaschineab,ziehenSieden
Elektrostarttaste(fallsvorhanden)abundlassen
SiedieMaschineabkühlen,bevorSiediesein
einemgeschlossenenRaumabstellen.
ReinigenderMaschinenunterseite
inderaufrechtenLagerstellung
1.StellenSiedieMaschineindieaufrechte
Lagerstellung,sieheLagernderMaschineinder
aufrechtenLagerstellung(Seite20).
2.SpülenSiedasSchnittgutvonder
Maschinenunterseiteheraus.
18

ZusammenklappendesHolms
WARNUNG:
WennSiedenHolmfalschauf-oderzusammenklappen,könnenSiedieKabelbeschädigen
unddensicherenGeräteeinsatzgefährden.
•BeschädigenSiebeimAuf-oderZusammenklappendesHolmsnichtdieKabel.
•WendenSiesichbeieinembeschädigtenKabelaneinenofziellenVertragshändler.
1.HaltenSiedenHolmfest,währendSiedieHolmarretierungeinrasten,umeineQuetschungderHändezu
vermeiden.
2.LösenSiedieHolmarretierungen,bisSiedenoberenHolmungehindertbewegenkönnen(AinBild17)
3.KlappenSiedenHolmnachvorneindieganznachvornegeklappteStellung(BinBild17).
Wichtig:VerlegenSiedieKabelanderAußenseitederHolmarretierungen,währendSieden
Holmzusammenklappen.
Bild17
4.ZumAufklappendesHolmssiehe2AufklappendesHolms(Seite9).
g334367
19

LagernderMaschineinder
aufrechtenLagerstellung
SiekönnendieMaschineauchvertikallagern,um
Platzzusparen.
WARNUNG:
WennSiedenHolmfalschauf-oder
zusammenklappen,könnenSiedieKabel
beschädigenunddensicherenGeräteeinsatz
gefährden.
•BeschädigenSiebeimAuf-oder
ZusammenklappendesHolmsnichtdie
Kabel.
•WendenSiesichbeieinembeschädigten
KabelaneinenofziellenVertragshändler.
1.EntfernenSiedenElektrostarttasterundden
AkkuausderMaschine.
2.StellenSiesicher,dassdieSchnitthöheneinstellunganderMaschine92mmoderniedriger
ist,sieheEinstellenderSchnitthöhe(Seite13),
wenndiesnichtderFallist.
3.LösenSiedieHolmarretierung(Bild18).
g251586
Bild19
Bild18
4.KlappenSiedenHolmganznachvorne.
Wichtig:VerlegenSiebeimZusammenklap-
pendesHolmsdieKabelanderAußenseite
derHolmhandräder.
5.AktivierenSiedieHolmarretierungen.
6.HebenSiedieVorderseitederMaschineam
HolmanundstellensieindenLagerplatz(Bild
19).
g335482
20

Wartung
EntfernenSiedenElektrostarttasterundden
AkkupackausderMaschine,bevorSiedieMaschine
wartenoderreinigen.
VerwendenSienurdievomHerstellerempfohlenen
Ersatz-undZubehörteile.
PrüfenundwartenSiedieMaschineregelmäßig.
LassenSiedieMaschinevoneinemofziellen
Vertragshändlerreparieren.
SchmierenderMaschine
SiebrauchendieMaschinenichtschmieren;alle
LagerwurdenabWerkfürdieLebenszeitder
Maschinedauergeschmiert.
AuswechselndesMessers
Wartungsintervall:Jährlich
Wichtig:SiebenötigenfürdenrichtigenEinbau
desMesserseinenDrehmomentschlüssel.Wenn
SiekeinenDrehmomentschlüsselhabenoder
dieseArbeitnichtausführenmöchten,wenden
SiesichaneinenofziellenVertragshändler.
WechselnSiedasMessersofortaus,wennes
beschädigtodergerissenist.SchärfenSiedie
Messerkante,wennsiestumpfistoderEinkerbungen
aufweist.WechselnSieggf.dasMesseraus.
WARNUNG:
BeimWartendesMessersdaraufachten,
dasssichdasMesserauchbeigetrennter
Stromversorgungnochbewegenkann.
DasMesseristscharf;einKontaktkannzu
schwerenVerletzungenführen.
g231389
Bild20
4.SetzenSiedasneueMesserundalleSchrauben
auf(Bild21).
TragenSieHandschuhe,wennSiedasMesser
warten.
1.EntfernenSiedenElektrostarttasterundden
AkkupackausderMaschine.
2.StabilisierenSiedasMessermiteinem
Holzblock(Bild20).
3.NehmenSiedasMesserabundbewahrenSie
alleBefestigungsschraubenauf(Bild20).
g231390
Bild21
Wichtig:DasgebogeneEndedesMessers
solltenachobenzumMähwerkgehäuse
zeigen.
5.ZiehenSiedieMesserschraubemiteinem
Drehmomentschlüsselauf68Nman.
21

Einstellendes
VorbereitendesAkkupacks
Selbstantriebs
NurfürModellemitSelbstantrieb
BeimEinbaueinesSelbstantriebsseilsoderbeieiner
falschenEinstellungdesSelbstantriebsmüssenSie
denSelbstantriebeinstellen.
1.DrehenSiedieEinstellmutternachlinks,umdie
Seileinstellungzulösen(Bild22).
Bild22
fürRecycling
Wichtig:DeckenSiediePoledesAkkupacks
nachdemAusbaumitextrastarkemKlebeband
ab.VersuchenSienicht,denAkkupackzu
zerstörenoderauseinanderzubauenoderTeilezu
entfernen.
InformationenzumverantwortungsvollenRecyceln
desAkkuserhaltenSiebeiIhrerörtlichenVerwaltung
oderIhremT oro-Vertragshändler.
g269307
1.Holm(linkeSeite)4.DrehenSiedieMutter
2.Einstellmutter
3.Selbstantriebsseil
2.StellenSiedieSpannungdesSeils(Bild22)ein,
indemSieihnzurückziehenodernachvorne
drückenunddannindieserStellungarretieren.
nachrechts,umdie
Einstellunganzuziehen.
5.DrehenSiedieMutter
nachlinks,umdie
Einstellungzulösen.
Hinweis:DrückenSiedasSeilzumMotor,um
denAntriebzuerhöhen;ziehenSiedasSeil
vomMotorweg,umdenAntriebzuverringern.
3.DrehenSiedieMutternachrechts,umdie
Seileinstellunganzuziehen.
Hinweis:ZiehenSiedieMuttermiteinem
SteckschlüsseloderSchraubenschlüsselfest
an.
22

Einlagerung
Wichtig:LagernSiedieMaschine,denAkkupack
unddasLadegerätnurbeiTemperaturenim
angemessenenBereich,sieheTechnischeDaten
(Seite11).
Wichtig:WennSiedenAkkupackfürdie
Nebensaisonaufbewahren,ladenSieihnauf,bis
2oder3LED-AnzeigenamAkkugrünaueuchten.
LagernSieeinganzaufgeladenesoderganzleeres
Akkunichtein.WennSiedieMaschinewieder
verwendenmöchten,ladenSiedenAkkupackauf,
bisdielinkeAnzeigeleuchteamLadegerätgrün
leuchtetoderallevierLED-AnzeigenamAkku
grünleuchten.
•TrennenSiedasGerätvonderStromversorgung
(d.h.entfernenSiedenAkkupack)undprüfenSie
esnachderVerwendungaufSchäden.
•BewahrenSiedieMaschinenichtmiteingebautem
Akkupackauf.
•EntfernenSiealleFremdkörpervomProdukt.
•LagernSiedieMaschine,denElektrostarttaster,
denAkkupackunddasLadegerätaußerhalbder
ReichweitevonKindern.
•BewahrenSiedieMaschine,denAkkupack
unddasAkkuladegerätnichtzusammenmit
Ätzmittelnauf,wiez.B.Gartenchemikalienund
Enteisungssalzen.
•UmdieGefahrschwererVerletzungenzu
minimieren,lagernSiedenAkkupacknicht
außerhalboderinnerhalbvonFahrzeugen.
•LagernSiedieMaschine,denAkkupackunddas
Akkuladegerätaneinemsauberenundtrockenen
Ort.
23

Fehlersucheund-behebung
FührenSienurdieindieserAnleitungbeschriebenenSchrittedurch.AlleweiterenInspektions-,Wartungs-und
ReparaturarbeitenmüssenvoneinemVertrags-KundendienstodereinemähnlichqualiziertenFachbetrieb
durchgeführtwerden,wennSiedasProblemnichtselberlösenkönnen.
Problem
DieMaschinestartetnicht.
DieMaschineläuftnichtrund.
DieMaschineerreichtseine
Höchstleistungnicht.
DerAkkupackentlädtsehrschnell.1.DerAkkupackistnichtimgeeigneten
1.DerAkkuistnichtvollständig
eingerastet.
2.DerAkkupackistnichtaufgeladen.2.EntfernenSiedenAkkupackausder
3.DerAkkupackistbeschädigt.
4.Esgibteinandereselektrisches
ProblemmitderMaschine.
1.DieLeitungendesAkkupackssind
feucht.
2.DerAkkuistnichtvollständig
eingerastet.
1.DieAkkupackladungistzuniedrig.
2.DieEntlüftungensindverstopft.2.ReinigenSiedieEntlüftungen.
Temperaturbereich.
MöglicheUrsacheBehebungsmaßnahme
1.NehmenSiedenAkkuherausund
steckenSieihnwiedereinundstellen
Siedabeisicher,dasservollständig
eingebautundverriegeltist.
MaschineundladenSieihnauf.
3.ErsetzenSiedenAkkupack.
4.SetzenSiesichdannmiteinem
VertragshändlerinVerbindung.
1.LassenSiedenAkkupacktrocknen
bzw.wischenSieihntrocken.
2.NehmenSiedenAkkuherausund
steckenSieihnwiedereinundstellen
Siedabeisicher,dasservollständig
eingebautundverriegeltist.
1.EntfernenSiedenAkkupackausder
MaschineundladenSieihnvollständig
auf.
1.BringenSiedenAkkupackaneinen
Ort,dertrockenistundandemdie
Temperaturzwischen5°Cund40°C
liegt.
DasLadegerätfunktioniertnicht.
DieLED-AnzeigeleuchteamLadegerät
leuchtetrot.
1.DasLadegerätistüberoderunterdem
geeigneteTemperaturbereich.
2.DieSteckdose,inwelcherdas
Ladegerätsteckt,istnichtmitdem
Stromnetzverbunden.
1.DasAkkuladegerätund/oder
Akkupackistnichtimgeeigneten
Temperaturbereich.
1.TrennenSiedasAkkuladegerätvom
StromundbringenSieesaneinen
Ort,dertrockenistundandemdie
Temperaturzwischen5°Cund40°C
liegt.
2.LassenSiedieSteckdosevoneinem
Fachelektrikerreparieren.
1.TrennenSiedasAkkuladegerätvom
StromundbringenSieAkkuladegerät
undAkkupackaneinenOrt,der
trockenistundandemdieTemperatur
zwischen5°Cund40°Cliegt.
24

Problem
MöglicheUrsacheBehebungsmaßnahme
DieLED-AnzeigeleuchteamLadegerät
blinktrot.
DieMaschinegibteinenPieptonaus.
1.DieKommunikationzwischen
AkkupackundLadegerätistdefekt.
2.DerAkkupackistschwach.
1.DerAkkupackistnichtaufgeladen.1.EntfernenSiedenAkkupackausder
2.DieMaschineistineinerunsicheren
PositionfürdenBetrieb.
3.DieMaschineistüberlastet.
4.Esgibteinandereselektrisches
ProblemmitderMaschine.
1.NehmenSiedenAkkupackaus
demAkkuladegerät,ziehenSiedas
LadegerätausderSteckdoseund
wartenSie10Sekunden.Stecken
SiedasAkkuladegerätwieder
indieSteckdoseundlegenSie
denAkkupackindasLadegerät.
WenndieLED-Anzeigeleuchte
amAkkuladegerätimmernochrot
blinkt,wiederholenSiedenVorgang.
WenndieLED-Anzeigeleuchte
nach2Versuchenimmernoch
rotblinkt,entsorgenSieden
Akkupackordnungsgemäßaneiner
Akkusammelstelle.
2.EntsorgenSiedenAkkupack
ordnungsgemäßaneiner
Akkusammelstelle.
MaschineundladenSieihnauf.
2.StellenSiesicher,dasssichdie
MaschinewährenddesBetriebsnicht
ineinemextremenWinkelbendet.
3.MähenSiedasGrasmiteinergrößeren
SchnitthöheodergehenSiebeim
Mähenlangsamer.
4.ProbierenSiedieMaßnahmenzur
Fehlerbehebung.WennderAlarmton
weiterausgegebenwird,wenden
Siesichaneinenautorisierten
Vertragshändler.
DieSchnittqualitätistschlechterbzw.
nichtzufriedenstellend.
DieMaschineschneidetungleichmäßig.
DieMaschineweistVibrationenauf.
1.DasMesseriststumpf.
2.ImMähwerkhabensich
Mährückständeangesammelt.
1.DasMesseriststumpf.
2.DasMähwerkistbeschädigt.
1.DasMesseristverbogenoder
beschädigt.
1.LassenSiedasMesserschärfenoder
austauschen.
2.ReinigenSiedieUnterseitedes
Geräts.
1.LassenSiedasMesserschärfenoder
austauschen.
2.SetzenSiesichdannmiteinem
VertragshändlerinVerbindung.
1.PrüfenSiedasMesserundwechseln
SieesbeiBedarfaus.
25

EEA/UKDatenschutzerklärung
TorosVerwendungIhrerpersönlichenInformationen
TheToroCompany(„T oro“)respektiertIhrePrivatsphäre.WennSieunsereProduktekaufen,könnenwirbestimmtepersönlicheInformationenüber
Siesammeln,entwederdirektvonIhnenoderüberIhrelokaleToro-NiederlassungoderIhrenHändler.ToroverwendetdieseInformationen,um
vertraglicheVerpichtungenzuerfüllen–z.B.umIhreGarantiezuregistrieren,IhrenGarantieanspruchzubearbeitenoderSieimFalleeinesRückrufs
zukontaktieren–undfürlegitimeGeschäftszwecke–z.B.umdieKundenzufriedenheitzumessen,unsereProduktezuverbessernoderIhnen
ProduktinformationenzurVerfügungzustellen,diefürSievonInteresseseinkönnten.T orokanndieInformationenimRahmendieserAktivitätenan
ToroTochtergesellschaften,HändleroderGeschäftspartnerweitergeben.WirkönnenauchpersönlicheDatenoffenlegen,wenndiesgesetzlich
vorgeschriebenistoderimZusammenhangmitdemVerkauf,KaufoderderFusioneinesUnternehmens.T oroverkauftIhrepersönlichenInformationen
niemalsananderenUnternehmen.
SpeicherungIhrerpersönlichenDaten
TorowirdIhrepersönlichenDatensolangeaufbewahren,wieesfürdieobengenanntenZweckerelevantistundinÜbereinstimmungmitden
gesetzlichenBestimmungen.FürweitereInformationenüberdiegeltendenAufbewahrungsfristenwendenSiesichbitteanlegal@toro.com.
TorosEngagementfürSicherheit
IhrepersönlichenDatenkönnenindenUSAodereinemanderenLandverarbeitetwerden,indemmöglicherweisewenigerstrengeDatenschutzgesetze
geltenalsinIhremWohnsitzland.WannimmerwirIhreDatenaußerhalbIhresWohnsitzlandesübermitteln,werdenwirdiegesetzlichvorgeschriebenen
Schritteunternehmen,umsicherzustellen,dassangemesseneSicherheitsvorkehrungenzumSchutzIhrerDatengetroffenwerdenundum
sicherzustellen,dassdiesesicherbehandeltwerden.
ZugangundKorrektur
SiehabendasRecht,IhrepersönlichenDatenzukorrigierenundzuüberprüfenoderderVerarbeitungIhrerDatenzuwidersprechenbzw.diese
einzuschränken.BittekontaktierenSieunsdazuperE-Mailunterlegal@toro.com.WennSieBedenkenhaben,wieToromitIhrenDatenumgegangenist,
bittenwirSie,diesdirektmitunszubesprechen.BittebeachtenSie,dasseuropäischeBürgerdasRechthaben,sichbeiIhrerDatenschutzbehörde
zubeschweren.
374-0282RevC

FormNo.3442-565RevA
CortacéspedRecycler
de55cmconFlex-ForcePower
System
Nºdemodelo21864—Nºdeserie400000000ysuperiores
Nºdemodelo21864T—Nºdeserie400000000ysuperiores
™
®
60VMAX
Registresuproductoenwww.Toro.com.
Traduccióndeloriginal(ES)
*3442-565*

Esteproductocumpletodaslasdirectivaseuropeas
aplicables;sideseamásdetalles,consultela
DeclaracióndeConformidad(Declarationof
Conformity–DOC)decadaproducto.
Introducción
Estecortacéspedmanualdecuchillasrotativasestá
diseñadoparaserusadoporusuariosdomésticos.
Estádiseñadoprincipalmenteparasegarcésped
bienmantenidoenzonasverdesresidenciales.No
estádiseñadoparacortarmalezaoparaaplicaciones
agrícolas.Estádiseñadoparausarlabateríadeiones
delitioModelo81860(suministradaconelModelo
21864)oelModelo81875;tambiénpuedeutilizarla
bateríaModelo81825oModelo81860.Estasbaterías
estándiseñadasparasercargadasúnicamenteconel
cargadordebateríasModelo81802(suministradocon
elModelo21864)oelModelo81805.Elusodeestos
productosparapropósitosdiferentesalosprevistos
puedeserpeligrosoparaustedyparaotraspersonas.
g275230
Figura1
1.Ubicacióndelosnúmerosdemodeloydeserie
ElModelo21864Tnoincluyebateríanicargador.
Leaestemanualdetenidamenteparaaprendera
utilizarymantenercorrectamentesuproducto,y
paraevitarlesionesydañosalproducto.Ustedesel
responsabledeoperarelproductodeformacorrecta
ysegura.
Visitewww.Toro.comparaobtenermásinformación,
incluidosconsejosdeseguridad,materialesde
formación,informaciónsobreaccesorios,ayuda
paraencontraraundistribuidoropararegistrarsu
producto.
Sinecesitaasistenciatécnica,piezasgenuinas
delfabricanteoinformaciónadicional,póngaseen
contactoconunServicioTécnicoAutorizadooconel
Serviciodeatenciónalclientedelfabricanteytengaa
manoelnúmerodeserieydemodelodelproducto.
Figura1identicalaubicaciónenelproductodelos
númerosdemodeloydeserie.Escribalosnúmeros
enelespacioprovisto.
Importante:Consudispositivomóvil,puede
escanearelcódigoQRdelapegatinadelnúmero
deserie(ensucaso)paraaccederainformación
sobrelagarantía,laspiezas,yotrainformación
sobreelproducto.
©2020—TheToro®Company
8111LyndaleAvenueSouth
Bloomington,MN55420
Póngaseencontactoconnosotrosenwww.Toro.com.
2
Reservadostodoslosderechos
ImpresoenChina

Seguridad
INSTRUCCIONESDE
SEGURIDAD
IMPORTANTES
ADVERTENCIA–alutilizarunamáquinaeléctrica,
leayobservesiemprelasnormaseinstrucciones
deseguridadbásica,andereducirelriesgode
incendio,descargaeléctricaolesiones,incluyendo
lassiguientes:
I.Formación
1.Eloperadordelamáquinaesresponsablede
cualquieraccidenteopeligroqueafecteaotras
personasoasupropiedad.
2.Nodejequelosniñosutilicenojueguenconla
máquina,labateríaoelcargadordelabatería;
lanormativalocalpuederestringirlaedaddel
operador.
3.Nopermitaquepersonasconcapacidadfísica,
sensorialomentalreducida,osinexperienciay
conocimientos,utilicenlamáquina,labateríao
elcargadordelabateríaamenosquereciban
instruccionesosupervisiónsobresuusoseguro
ycomprendanlospeligrosqueconllevasuuso.
4.Antesdeutilizarlamáquina,labateríay
elcargadordelabatería,leatodaslas
instruccionesysímbolosdeadvertenciade
estosproductos.
5.Familiaríceseconloscontrolesyconeluso
correctodelamáquina,labateríayelcargador
delabatería.
II.Preparación
1.Nopermitaqueentrenotraspersonas,
especialmenteniñosoanimalesdomésticos,en
lazonadetrabajo.
2.Noutilicelamáquinasinquetodoslos
protectoresydispositivosdeseguridad,
talescomodeectoresyrecogedores,estén
colocadosyfuncionencorrectamenteenla
máquina.
3.Inspeccioneeláreadondesevaautilizarla
máquinayretirecualquierobjetoquepudiera
interferirconelfuncionamientodelamáquinao
quepudieraserarrojadoporlamáquina.
4.Antesdeutilizarlamáquina,asegúresedeque
lacuchilla,elpernodelacuchillayelconjunto
delacuchillanoestándesgastadosodañados.
Sustituyacualquierpegatinaqueestédañada
oilegible.
5.Utiliceúnicamentelabateríaespecicada
porToro.Elusodeotrosaccesoriospuede
aumentarelriesgodeincendioylesiones.
6.Siseenchufaelcargadordebateríaenuna
tomaquenoseade100a240V,puede
producirseunincendioounadescargaeléctrica.
Noenchufeelcargadordelabateríaenuna
tomadecorrientequenoseade100Va240
V.Paraotrostiposdeconexión,utiliceun
adaptadordeenchufedeltipocorrectoparala
tomadecorriente,siesnecesario.
7.Noutilicelabateríaoelcargadordelabatería
siestándañadosomodicados,porquepodrían
mostraruncomportamientoimpredeciblecon
resultadodeincendio,explosiónoriesgode
lesiones.
8.Sielcabledealimentacióndelcargadordela
bateríaestádañado,póngaseencontactocon
unServicioTécnicoAutorizadoparacambiarlo.
9.Noutilicebateríasnorecargables.
10.Carguelabateríaúnicamenteconelcargador
debateríaespecicadoporToro.Uncargador
diseñadoparauntipodeterminadodebatería
puedecrearunriesgodeincendiosiseutiliza
conotrabatería.
11.Carguelabateríaúnicamenteenunazonabien
ventilada.
12.Noexpongalabateríaoelcargadoralfuegooa
temperaturassuperioresa68°C.
13.Sigatodaslasinstruccionesdecargayno
carguelabateríasilatemperaturaestáfueradel
intervaloespecicadoenlasinstrucciones.De
locontrario,podríadañarlabateríayaumentar
elriesgodeincendio.
14.Vestimentaadecuada–lleveropaadecuada,
incluyendoprotecciónocular;pantalónlargo;
calzadoresistenteyantideslizante(novaya
descalzoniconsandalias);yprotecciónauditiva.
Sitieneelpelolargo,recójaselo,ynolleve
joyassueltasquepuedanquedaratrapadas
enlaspiezasmóviles.Lleveunamascarilla
encondicionesdetrabajodemuchopolvo.Se
recomiendaelusodeguantesdegoma.
III.Operación
1.Elcontactoconlacuchillaenmovimiento
causarálesionesgraves.Mantengalasmanos
ylospiesalejadosdelazonadecorteyde
todaslaspiezasmóvilesdelamáquina.Nose
acerquealosoriciosdedescarga.
2.Elusodeestamáquinaparaotrospropósitos
quelosprevistospodríaserpeligrosopara
ustedyparaotraspersonas.
3.Desengranelatransmisiónautopropulsada(si
estáinstalada)antesdearrancarlamáquina.
4.Eviteelarranqueaccidental–asegúresede
queelbotóndearranqueeléctricoseretira
3

delencendidoantesdeconectarlabateríay
manejarlamáquina.
5.Prestetodasuatenciónalutilizarlamáquina.
Norealiceningunaactividadquecause
distracciones;delocontrario,podrían
producirselesionesodañosmateriales.
6.Parelamáquina,retireelbotóndearranque
eléctrico,retirelabateríadelamáquinayespere
aquesedetengatodomovimientoantesde
ajustar,revisar,limpiaroalmacenarlamáquina.
7.Retirelabateríayelbotóndearranqueeléctrico
delamáquinaantesdedejarladesatendidao
antesdecambiardeaccesorio.
8.Nofuercelamáquina–dejequelamáquina
hagaeltrabajomejoryconmásseguridadala
velocidadparalaquefuediseñada.
9.Manténgasealerta–estéatentoaloqueestá
haciendoyutiliceelsentidocomúnmientras
trabajeconlamáquina.Noutilicelamáquinasi
estáenfermo,cansado,obajolainuenciade
alcoholodrogas.
10.Utilicelamáquinaúnicamenteconbuena
visibilidadyencondicionesmeteorológicas
apropiadas.Nouselamáquinasihayriesgo
derayos.
11.Extremelasprecaucionesalirhaciaatrásoal
tirardelamáquinahaciausted.
12.Pisermeymantengaelequilibrioentodo
momento,sobretodoenpendientes.Siegue
detravésencuestasypendientes,nunca
haciaarribaohaciaabajo.Extremelas
precaucionesalcambiardedirecciónencuestas
opendientes.Nosieguependientesocuestas
extremadamenteempinadas.Camine,nocorra
nuncaconlamáquina.
13.Nodirijaelmaterialdedescargahaciauna
persona.Eviteladescargadematerialcontra
unapareduobstrucción,yaqueelmaterial
podríarebotarhaciausted.Parelacuchillaolas
cuchillasalcruzarsuperciesdegrava.
14.Estéalertaaagujeros,surcos,montículos,
rocasuotrosobjetosocultos.Elterrenoirregular
podríahacerquepierdaelequilibrio.
15.Lahierbamojadaolashojasmojadaspueden
causarlegraveslesionessiustedresbalaytoca
lacuchilla.Evitesegarencondicioneshúmedas
ocuandollueve.
16.Silamáquinagolpeaunobjetooempiezaa
vibrar,apagueinmediatamentelamáquina,
retireelbotóndearranqueeléctrico,retire
labateríayespereaquesedetengatodo
movimientoantesdeexaminarlamáquinaen
buscadedaños.Hagatodaslasreparaciones
necesariasantesdevolverautilizarlamáquina.
17.Parelamáquinayretireelbotóndearranque
eléctricoantesdecargarlamáquinaparael
transporte.
18.Encondicionesabusivas,labateríapuede
expulsarlíquido;eviteelcontacto.Encasode
uncontactoaccidentalconellíquido,enjuague
conagua.Siellíquidoentraencontactocon
susojos,busqueayudamédica.Ellíquido
expulsadodelabateríapuedecausarirritación
oquemaduras.
IV.Mantenimientoyalmacenamiento
1.Parelamáquina,retireelbotóndearranque
eléctrico,retirelabateríadelamáquinayespere
aquesedetengatodomovimientoantesde
ajustar,revisar,limpiaroalmacenarlamáquina.
2.Nointenterepararlamáquina,salvocon
arregloaloindicadoenlasinstrucciones.Haga
queunServicioTécnicoAutorizadorealiceel
mantenimientodelamáquinausandopiezasde
repuestoidénticas.
3.Lleveguantesyprotecciónocularalrealizarel
mantenimientodelamáquina.
4.Aleunacuchillaromaenambosladospara
mantenerelequilibrio.Limpielacuchillay
asegúresedequeestáequilibrada.
5.Cambielacuchillasiestádoblada,desgastadao
agrietada.Unacuchilladesequilibradaproduce
vibraciones,quepodríandañarelmotoro
causarlesionespersonales.
6.Alrealizarelmantenimientodelacuchilla,sepa
quelacuchillapuedemoverseinclusosila
fuentedealimentaciónestáapagada.
7.Compruebefrecuentementelabolsaderecogida
derecortesenbuscadedeteriorosodesgaste,
ysustituyacualquierbolsadesgastadaporuna
bolsa[derecambio]T oro.
8.Paraobtenerelmejorrendimiento,utilice
solamentepiezasyaccesoriosgenuinosde
Toro.Otrosaccesoriosypiezasderepuesto
podríanserpeligrosos,ydichousopodría
invalidarlagarantíadelproducto.
9.Mantengalamáquinacorrectamente–
mantengaloslosdecortealadosylimpios
paraobtenerelmejorrendimientoylamayor
seguridad.Mantengalosmanillaressecos,
limpiosylibresdeaceiteygrasa.Mantenga
losprotectorescolocadosyenbuenestado
defuncionamiento.Mantengalascuchillas
aladas.Utiliceúnicamentecuchillasde
repuestoidénticas.
10.Inspeccionelamáquinaenbuscadepiezas
dañadas–sihaydañosenlosprotectoresoen
otraspiezas,determinesilamáquinafunciona
correctamente.Compruebequelaspiezas
4

móvilesestáncorrectamentealineadasyquese
muevenlibrementesinagarrotarse,queestán
correctamentemontadas,quenohaypiezas
rotas,yquenohayotrascircunstanciasque
pudieranafectarasuuso.Amenosquese
indiquelocontrarioenlasinstrucciones,haga
queunServicioTécnicoAutorizadorepareo
sustituyacualquierprotectorocomponente
dañado.
14.CUIDADO–unabateríamaltratadapuede
representarunriesgodeincendiooquemadura
química.Nodesmontelabatería.Nocaliente
labateríaamásde68°Cnilaincinere.
Sustituyalabateríaúnicamenteconunabatería
Torogenuina;elusodeotrotipodebatería
podríaprovocarunincendioounaexplosión.
Mantengalasbateríasfueradelalcancedelos
niñosyenelembalajeoriginalhastasuuso.
11.Cuandolabateríanoestáenuso,debe
mantenersealejadadeobjetosmetálicoscomo
clips,monedas,llaves,clavosytornillosque
pudieranhacerunaconexiónentreunterminal
yotro.Uncortocircuitoentrelosterminales
delabateríapuedecausarquemadurasoun
incendio.
12.Compruebefrecuentementequelospernosde
montajedelacuchillaydelmotorestánbien
apretados.
13.Cuandonoestéutilizandolamáquina,guárdela
enunlugarcerrado,secoyseguro,fueradel
alcancedelosniños.
Pegatinasdeseguridadeinstrucciones
Laspegatinaseinstruccionesdeseguridadestánalavistadeloperadoryestánubicadas
cercadecualquierzonadepeligropotencial.Sustituyacualquierpegatinaqueestédañadao
quefalte.
Modelo81860
15.Notirelabateríausadaalfuego.Lacelda
puedeexplosionar.Compruebesilanormativa
localcontienealgunainstrucciónespecialsobre
laeliminacióndelasbaterías.
GUARDEESTAS
INSTRUCCIONES
137-9489
1.Leaelmanualdel
operador.
2.Reciclar5.Noexponeralalluvia.
3.Contieneionesdelitio;no
desechar.
4.Manteneralejadade
llamasdesnudas.
decal137-9489
5

137-9495
1.Leaelmanualdeloperador.3.Parausoeninteriores.
2.Nolosdeseche.4.Dobleaislamiento
137-9496
decal137-9495
decal137-9496
1.Labateríaseestácargando.3.Latemperaturadelabateríaestáporencimaopordebajo
delintervalodetemperaturaadecuado.
2.Labateríaestácompletamentecargada.4.Fallodecargadelabatería
decal140-1324
140-1324
1.Leaelmanualdel
operador.
2.Paraarrancarlamáquina,
aprietelabarracontrael
manillarypulseelbotón.
3.Paraapagarlamáquina,
sueltelabarra.
1.Advertencia–leael
Manualdeloperador.
2.Peligrode
corte/desmembramiento
delamano,cuchilladel
cortacésped–nose
acerquealaspiezasen
movimiento;mantenga
colocadostodoslos
protectoresydefensas.
3.Peligrode
corte/desmembramiento
delamano,cuchilladel
cortacésped–retirela
llaveyleaelManualdel
operadorantesderealizar
tareasdemantenimiento.
140-1328
4.Peligrodeobjetos
arrojados–mantenga
alejadasaotraspersonas;
apagueelmotoryespere
aquesedetengantodas
laspiezasenmovimiento
antesdeabandonarla
máquina;recojacualquier
residuoantesdesegar.
5.Peligrode
corte/desmembramiento
delpie,cuchilladel
cortacésped–nosiegue
cuestaarribaocuesta
abajoenpendientes;
siegueúnicamentede
ladoaladoenpendientes;
mirehaciaatrásmientras
siegaenmarchaatrás.
decal140-1328
6

112-8760
1.Peligrodeobjetosarrojados–mantengaalejadasaotras
personas.
2.Peligrodecorte/desmembramientodemanoopieporla
cuchilladelcortacésped–noseacerquealaspiezasen
movimiento.
decal134-4691
134-4691
1.Velocidadautomática2.Velocidadmáxima
decal112-8760
139-6557
1.Mododereciclado2.Mododeensacado
137-9461
1.Estadodecargadelabatería
decal139-6557
decal137-9461
7

Montaje
Nota:Enelmomentodelacompralabateríanoestá
totalmentecargada.Antesdeutilizarlamáquinapor
primeravez,consulteCargadelabatería(página17).
1
Cómomontarelcargador
delabatería(opcional)
Nosenecesitanpiezas
Procedimiento
Silodesea,monteelcargadordelabatería
rmementeenlaparedutilizandolosoriciosde
montajeenparedenlapartetraseradelcargador.
Mónteloenunespaciointerior(talcomoungarajeu
otrolugarseco),cercadeunatomadecorrientey
fueradelalcancedelosniños.
ConsultelaFigura2paraobtenerasistenciasobre
elmontajedelcargador.
Coloqueelcargadorsobrelasjaciones
correctamenteposicionadasparajarloensulugar
(jacionesnoincluidas).
Figura2
g247359
8

2
Desplegadodelmanillar
Nosenecesitanpiezas
Procedimiento
ADVERTENCIA
Sipliegaodespliegaelmanillardeformaincorrecta,puedendañarseloscables,creando
unascondicionesdeoperacióninseguras.
•Nodañeel/loscable(s)alplegarodesplegarelmanillar.
•Asegúresedecolocarel/loscable(s)enelexteriordelmanillar.
•Siuncableestádañado,póngaseencontactoconelServicioTécnicoAutorizado.
Nota:Asegúresedequeloscablesquedanporfueradelmanillaryquenoestánaprisionados(Figura3,D).
Figura3
9
g335466

3
Ensamblajedelabolsaderecogida
Nosenecesitanpiezas
Procedimiento
g334351
Figura4
10

Elproducto
g292995
Figura6
Figura5
1.Manillar7.Palancadealturadecorte
2.Barradecontrol
delatransmisión
autopropulsada
3.Barradecontroldelas
cuchillas
4.Botóndearranque
eléctrico
5.Interruptordearranque
eléctrico
6.Compartimientodela
batería
(4)
8.Palancadeensacadoa
demanda
9.Palancadelmanillar(2)
10.Bolsaderecogida
11.Deectortrasero
1.Cargadordebaterías
Modelo81802(incluido
conelModelo21864)
2.Bateríamodelo81860
(incluidaconelModelo
21864)
Especicaciones
Batería
Modelo81860
Capacidaddelabatería
Voltajesegúnelfabricantedelabatería=60Vmáximoy54V
nominal.Elvoltajerealdependedelacarga.
Cargadordelabatería
Modelo81802
g335468
Tipo
Entrada
Salida
Cargadordebateríasdeionesdelitio
60VMAX
100a240Vca50/60HzMáx.2,0A
60VMÁXCC2,0A
Intervalosdetemperaturaadecuados
Cargue/guardelabateríaa5°Ca40°C*
Utilicelabateríaa
Utilicelamáquinaa
*Eltiempodecargaserámayorsilatemperaturano
estádentrodeesteintervalodurantelacarga.
Guardelamáquina,labateríayelcargadorenun
lugarcerrado,limpioyseco.
6,0Ah
324Wh
-30°Ca49°C*
0°Ca49°C*
11

Operación
Antesdel
funcionamiento
Instalacióndelabatería
Importante:Utilicelabateríasoloatemperaturasqueesténdentrodelintervaloapropiado;consulte
Especicaciones(página11).
1.Compruebequelosoriciosdeventilacióndelabateríaestánlibresdepolvoyresiduos.
2.Levantelatapadelcompartimentodelabatería(Figura7,A).
3.Alineeelhuecodelabateríaconlalengüetadelamáquina,eintroduzcalabateríaenelcompartimento
hastaqueseengancheensusitio(Figura7,B).
4.Cierrelatapadelcompartimentodelabatería(Figura7,C).
Nota:Silatapadelcompartimentodelabateríanosecierraporcompleto,labateríanoestá
correctamenteinstalada.
Figura7
g251221
12

Ajustedelaalturadecorte
PELIGRO
Alajustarlaspalancasdealturadecorte,podríatocarunacuchillaenmovimientoconlas
manos,loquepodríacausarlegraveslesiones.
•Apagueelmotor,retireelbotóndearranqueeléctrico(ensucaso),yespereaquese
detengantodaslaspiezasenmovimientoantesdeajustarlaalturadecorte.
•Nopongalosdedosdebajodelacarcasaalajustarlaalturadecorte.
Ajustelaalturadecortesegúndesee.Ajustetodaslasruedasalamismaalturadecorte(Figura8).
Figura8
g254131
13

Duranteel
funcionamiento
Arranquedelamáquina
1.Asegúresedequelabateríaestáinstaladaenlamáquina;consulteInstalacióndelabatería(página12).
2.Introduzcaelbotóndearranqueeléctricoenelinterruptordearranqueeléctrico(Figura9,A).
3.Aprietelabarradecontroldelacuchillacontraelmanillar(Figura9,B).
4.Pulseelbotóndearranqueeléctricoymanténgalopulsadohastaqueelmotorarranque(Figura9,C).
Figura9
g335467
Usodelatransmisiónautopropulsada
Simplementecamineconlasmanossobreelmanillarsuperioryloscodosjuntoalcuerpo,ylamáquina
mantendráautomáticamentesumismavelocidad(Figura10).
Figura10
Nota:Silamáquinanoruedalibrementehaciaatrásdespuésdeusarlaautopropulsión,deténgase,deje
lasmanosensusitio,ydejequelamáquinaruedeunoscentímetroshaciaadelanteparadesengranarla
transmisióndelasruedas.Tambiénpuedeintentarponerlamanosobreelmanillarmetálicosituadojusto
debajodelmanillarsuperioryempujarlamáquinahaciaadelanteunoscentímetros/pulgadas.Silamáquinano
ruedafácilmentehaciaatrás,póngaseencontactoconelServicioTécnicoAutorizado.
g334136
14

Ensacadodelosrecortes
Utilicelabolsaderecogidasidesearecogerlosrecortesdehierbaylashojasdelcésped.
Silapalancadeensacadoademandaestáenlaposicióndereciclado,muévalaalaposicióndeensacado;
consulteFuncionamientodelapalancadeensacadoademanda(página16).
Instalacióndelabolsaderecogida
1.Levanteysujeteeldeectortrasero(Figura11,A).
2.Instalelabolsaderecogida,asegurándosedequelospasadoresdelabolsadescansanenlasmuescas
delmanillar(Figura11,B).
3.Bajeeldeectortrasero.
Figura11
g334207
Retiradadelabolsaderecogida
Pararetirarlabolsa,sigalospasosdeInstalacióndelabolsaderecogida(página15)ensentidoinverso.
Recicladodelosrecortes
Sumáquinavienepreparadadefábricaparareciclar,esdecir,parapicarlosrecortesdehierbayhojasy
devolverlosalcésped.
Silabolsaderecogidaestáinstaladaenlamáquina,ylapalancadeensacadoademandaestáenla
posicióndeensacado,muevalapalancaalaposicióndereciclado;consulteFuncionamientodelapalanca
deensacadoademanda(página16).
15

Funcionamientodela
Ajustedelavelocidaddela
palancadeensacadoa
demanda
Lafuncióndeensacadoademandalepermite
recogeroreciclarlosrecortesdehierbayhojasconla
bolsaderecortesinstaladaenlamáquina.
•Paraensacarlosrecortesdehierbayhojas,
presioneelbotóndelapalancadeensacadoa
demandaymuevalapalancahaciadelantehasta
quesalteelbotóndelapalanca(Figura12).
Figura12
1.Palancadeensacadoa
demanda(enlaposición
dereciclado)
2.Palancadeensacadoa
demanda(enlaposición
deensacado)
cuchilla
Estamáquinatienedosajustesdevelocidaddela
cuchilla:AUTOyMAX.
•CuandoseajustaalaposiciónAUTO,lavelocidad
delacuchillaseajustaautomáticamentepara
mejorarlaecacia;sedetectacualquiercambio
enlascondicionesdecorteyseaumentala
velocidaddelacuchillaencasodenecesidad
paramantenerlacalidaddecorte.
•EnlaposiciónMAX,semantienelavelocidad
máximadelacuchillaentodomomento.
Girelallavedelinterruptordeencendidoacualquier
posiciónparaajustarlavelocidaddelacuchilla
(Figura14).
g251583
•Parareciclarlosrecortesdehierbayhojas,
presioneelbotóndelapalancaymuevalapalanca
haciaatráshastaquesalteelbotóndelapalanca.
Importante:Paraasegurarunfuncionamiento
correcto,retirecualquierrecortedehierba
yotrosresiduosdelatapadeensacadoa
demandaydelhuecoadyacente(Figura13)
antesdemoverlapalancadeensacadoa
demandadeunaposiciónalaotra.
Figura13
1.Limpiaraquí
g337279
Figura14
1.PosiciónAUTO2.PosiciónMÁX
g251584
16

Apagadodelamáquina
1.Sueltelabarradecontroldelacuchilla(Figura
15,A).
2.Retireelbotóndearranqueeléctricodel
interruptordearranqueeléctrico(Figura15,B).
3.Retirelabatería;consulteCómoretirarla
bateríadelamáquina(página17).
Nota:Cuandonovayaausarlamáquina,retire
labatería.
Figura15
ycaminedespacio,luegosieguedenuevoauna
alturamenorparaobtenerelmejoraspectodel
césped.Silahierbaesdemasiadolarga,puede
atascarlamáquinayhacerquesecaleelmotor.
•Lahierbamojadaylashojasmojadastiendena
pegarsealsuelo,ypuedenatascarlamáquina
ohacerquesecaleelmotor.Evitesegaren
condicioneshúmedas.
•Estéatentoalposibleriesgodeincendio
encondicionesmuysecas,sigatodaslas
advertenciaslocalesparacasosdeincendio
ymantengalamáquinalibredehierbasecay
residuosdehojas.
•Alterneladireccióndecorte.Estoayudaa
dispersarlosrecortesentodoelcésped,dando
unafertilizaciónmáshomogénea.
•Sielaspectonaldelcéspednoessatisfactorio,
pruebeconunaomásdelastécnicassiguientes:
–Cambiarlacuchillaomandarlaaalar.
–Caminarmásdespaciomientrassiega.
g335480
–Elevarlaalturadecortedelamáquina.
–Cortarelcéspedconmásfrecuencia.
–Solaparlospasillosdecorteenlugardecortar
unpasillocompletoencadapasada.
Cómoretirarlabateríade
lamáquina
1.Levantelatapadelcompartimentodelabatería.
2.Presioneelcierredelabateríaparaliberarla
batería,yretirelabatería.
3.Cierrelatapadelcompartimentodelabatería.
Consejosdeoperación
Consejosgeneralesdesiega
•Evitegolpearobjetossólidosconlacuchilla.No
sieguenuncaporencimadeobjetoalguno.
•Paraobtenerelmejorrendimiento,instaleuna
cuchillanuevaT oroantesdequeempiecela
temporadadesiega,ocuandoseanecesario.
Siegadelahierba
•Cortesolamenteunterciodelahojadehierba
cadavez.Paramejorarlaautonomía,sieguea
unaalturadecortemayor.
•Nocorteconunajusteinferiora51mmamenos
quelahierbaseaescasa,oanalesdelotoño
cuandoelritmodecrecimientodelahierba
empiezaadecaer.
•Cuandocortehierbademásde15cmdealto,
siegueprimerousandolaalturadecortemásalta
Cortedehojas
•Despuésdesegarelcésped,asegúresedequela
mitaddelcéspedseveatravésdelacoberturade
hojascortadas.Esposiblequetengaquehacer
másdeunapasadaporencimadelashojas.
•Sihaymásde13cmdehojasenelcésped,
siegueaunaalturadecortemásaltaydespués
vuelvaasegaralaalturadecortequedesee.
•Sieguemásdespaciosilamáquinanocortalas
hojassucientementenas.
Despuésdel
funcionamiento
Cargadelabatería
Importante:Enelmomentodelacomprala
bateríanoestátotalmentecargada.Antesdeusar
laherramientaporprimeravez,coloquelabatería
enelcargadorycárguelahastaqueelindicador
LEDindiquequelabateríaestácompletamente
cargada.Leatodaslasprecaucionesde
seguridad.
Importante:Carguelabateríasoloatemperaturas
queesténdentrodelintervaloapropiado;consulte
Especicaciones(página11).
17

Nota:Encualquiermomento,presioneelbotóndel
indicadordecargadelabateríadelabateríapara
mostrarlacargaactual(indicadoresLED).
1.Compruebequelosoriciosdeventilaciónde
labateríaydelcargadorestánlibresdepolvo
yresiduos.
Importante:Labateríapuededejarseconectada
alcargadorduranteperiodoscortosentreusos.
Silabateríanosevaautilizarduranteperiodos
máslargos,retirelabateríadelcargador;consulte
Almacenamiento(página23).
Limpiezadelosbajosdela
máquina
Intervalodemantenimiento:Despuésdecadauso
Paraobtenerresultadosóptimos,limpielamáquina
inmediatamentedespuésdeterminarlasiega.
1.Llevelamáquinaaunasupercieplana
pavimentada.
2.Pareelmotoryespereaquesedetengantodas
laspiezasenmovimientoantesdeabandonar
elpuestodeloperador.
Figura16
1.Huecodelabatería
2.Zonasdeventilacióndela
batería
3.Terminalesdelabatería7.IndicadorLEDdel
4.Botóndelindicadorde
cargadelabatería
5.IndicadoresLED(carga
actual)
6.Manillar
cargador
8.Zonasdeventilacióndel
cargador
2.Alineeelhuecodelabatería(Figura16)conla
lengüetadelcargador.
3.Introduzcalabateríaenelcargadorhastaque
estécompletamenteasentada(Figura16).
4.Pararetirarlabatería,deslicelabateríahacia
atrásparasacarladelcargador.
5.Consultelatablasiguienteparainterpretarel
indicadorLEDdelcargadordelabatería.
Indicador
Desconectado
Verde
intermitente
VerdeLabateríaestácargada
Roja
Rojointermitente
Indica
Nohaybateríainsertada
Labateríaseestácargando
Labateríay/oelcargadordelabateríaestá(n)por
encimaopordebajodelintervalodetemperatura
adecuado
Fallodecargadelabatería*
g290533
3.Lavelazonaqueestádebajodelapuerta
trasera,pordondepasanlosrecortesensu
caminodesdelaparteinferiordelamáquina
hastalabolsaderecogida.
Nota:Lavelazonaconlapalancadeensacado
ademanda(ensucaso)totalmentehacia
adelanteytotalmentehaciaatrás.
4.Arranqueelmotorydéjeloenmarchadurante
unosminutosparaquesesequelaparteinferior
delamáquinayevitarqueseoxide.
5.Apagueelmotor,retireelbotóndearranque
eléctrico(sidisponedeél)ydejequelamáquina
seenfríeantesdealmacenarlaenunlugar
cerrado.
Limpiezadelaparteinferiorde
lamáquinaenlaposiciónde
almacenamientovertical
1.Pongalamáquinaenlaposiciónde
almacenamientovertical;consulte
Almacenamientodelamáquinaenla
posiciónvertical(página20).
2.Eliminelosrecortesdehierbadedebajodela
máquinaconagua.
*ConsulteSolucióndeproblemas(página24)si
deseamásinformación.
18

Plegadodelmanillar
ADVERTENCIA
Sipliegaodespliegaelmanillardeformaincorrecta,puedendañarseloscables,creando
unascondicionesdeoperacióninseguras.
•Nodañeloscablesalplegarodesplegarelmanillar.
•Siuncableestádañado,póngaseencontactoconelServicioTécnicoAutorizado.
1.Sostengaelmanillaraldesengranarlosbloqueosdelmanillarparaevitaratraparselasmanos.
2.Abralaspalancasdebloqueodelmanillarhastaquepuedamoverlibrementelasecciónsuperiordel
manillar(Figura17,A).
3.Pliegueelmanillarhaciaadelantedeltodo(Figura17,B).
Importante:Asegúresedequeloscablesquedanporfueradelaspalancasdebloqueodel
manillaralplegarlasecciónsuperior.
Figura17
4.Paradesplegarelmanillar,consulte2Desplegadodelmanillar(página9).
g334367
19

Almacenamientodela
máquinaenlaposición
vertical
Puedealmacenarlamáquinaenposiciónverticalpara
aprovecharalmáximoelespaciodealmacenamiento.
ADVERTENCIA
Sipliegaodespliegaelmanillardeforma
incorrecta,puedendañarseloscables,
creandounascondicionesdeoperación
inseguras.
•Nodañeloscablesalplegarodesplegarel
manillar.
•Siuncableestádañado,póngase
encontactoconelServicioTécnico
Autorizado.
1.Retireelbotóndearranqueeléctricoylabatería
delamáquina.
g251586
Figura19
2.Asegúresedequelaalturadecortedela
máquinaesde92mmomenos;sino,bájela;
consulteAjustedelaalturadecorte(página13).
3.Abralaspalancasdebloqueodelmanillar
(Figura18).
Figura18
4.Pliegueelmanillarcompletamentehacia
adelante.
Importante:Asegúresedequeloscables
quedanporfueradelospomosdelmanillar
alplegarlasecciónsuperior.
5.Cierrelaspalancasdebloqueodelmanillar.
g335482
6.Levantelapartedelanteradelamáquinaconel
manillaryllévelaallugardealmacenamiento
(Figura19).
20

Mantenimiento
Retireelbotóndearranqueeléctricoylabateríadela
máquinaantesderealizartareasdemantenimientoo
limpiezaenlamáquina.
Utiliceúnicamentepiezasderepuestoyaccesorios
recomendadosporelfabricante.
Inspeccioneyreviselamáquinadeformaregular.
Lamáquinadebeserreparadaúnicamenteporun
ServicioTécnicoAutorizado.
Lubricacióndelamáquina
Noesnecesariolubricarlamáquina;todoslos
cojinetesvienendefábricalubricadosparatodala
vidadelamáquina.
Cambiodelacuchilla
Intervalodemantenimiento:Cadaaño
Importante:Ustednecesitaráunallave
dinamométricaparainstalarlacuchilla
correctamente.Sinodisponedeunallave
dinamométricaopreerenorealizareste
procedimiento,póngaseencontactoconel
ServicioTécnicoAutorizado.
Silacuchillaestádañadaoagrietada,sustitúyala
inmediatamente.Siellodelacuchillaestáromoo
mellado,mandeaalarlacuchillaocámbiela.
ADVERTENCIA
Alrealizarelmantenimientodelacuchilla,
sepaquelacuchillapuedemoverseincluso
silafuentedealimentaciónestáapagada.La
cuchillaestámuyalada;cualquiercontacto
conlacuchillapuedecausarlesiones
personalesgraves.
g231389
Figura20
4.Instalelacuchillanuevaytodoslosherrajesde
montaje(Figura21).
Lleveguantesalrealizarelmantenimientode
lacuchilla.
1.Retireelbotóndearranqueeléctricoylabatería
delamáquina.
2.Utiliceunbloquedemaderaparainmovilizarla
cuchilla(Figura20).
3.Retirelacuchilla,conservandotodoslos
herrajesdemontaje(Figura20).
g231390
Figura21
Importante:Coloquelacuchillaconlos
extremoscurvoshaciaarriba,haciala
carcasadelamáquina.
5.Utiliceunallavedinamométricaparaapretar
elpernodelacuchillaa68N·m.
21

Ajustedelatransmisión
Preparacióndelabatería
autopropulsada
Soloparamodelosdetransmisión
autopropulsada
Cadavezqueinstaleuncabledelatransmisión
autopropulsadanuevo,osilatransmisión
autopropulsadaestámalajustada,ajustela
transmisiónautopropulsada.
1.Girelatuercadeajusteensentidoantihorario
paraaojarelcable(Figura22).
paraelreciclado
Importante:Despuésderetirarla,cubralos
terminalesdelabateríaconcintaadhesivade
serviciopesado.Nointentedestruirodesmontar
labateríaniintenteretirarcualquieradelos
componentesdelamisma.
Póngaseencontactoconlasautoridadesmunicipales
oconsudistribuidorautorizadoTorosideseamás
informaciónsobrecómoreciclarlabateríadeforma
responsable.
Figura22
1.Manillar(ladoizquierdo)4.Girelatuercaensentido
2.Tuercadeajuste
3.Cabledelatransmisión
autopropulsada
2.Ajustelatensióndelcable(Figura22)tirando
delmismohaciaatrásoempujándolohacia
adelante,ymanténgaloenesaposición.
horarioparaapretarel
ajuste.
5.Girelatuercaensentido
antihorarioparaaojarel
ajuste.
Nota:Empujeelcablehaciaelmotorpara
aumentarlatracción;tiredelcable,alejándolo
delmotor,parareducirlatracción.
3.Girelatuercadeajusteensentidohorariopara
apretarelajustedeloscables.
Nota:Aprieteconrmezalatuercaconun
conectorhembraounallave.
g269307
22

Almacenamiento
Importante:Almacenelamáquina,labateríayel
cargadorsoloatemperaturasqueesténdentrodel
intervaloapropiado;consulteEspecicaciones
(página11).
Importante:Sivaaalmacenarlabateríahasta
latemporadasiguiente,cárguelahastaque2o
3delosindicadoresLEDdelabateríacambien
averde.Noalmacenelabateríacompletamente
cargadanicompletamentedescargada.Antesde
volverausarlamáquina,carguelabateríahasta
quesevuelvaverdeelindicadorizquierdodel
cargador,ohastaquelos4indicadoresLEDdela
bateríasevuelvanverdes.
•Desconecteelproductodelsuministrodeenergía
(esdecir,retirelabatería)ycompruebesihay
dañosdespuésdeluso.
•Noalmacenelamáquinaconlabateríainstalada.
•Limpiecualquiermaterialextrañodelproducto.
•Cuandonoseesténutilizando,almacenela
máquina,elbotóndearranqueeléctrico,labatería
yelcargadordelabateríafueradelalcancede
losniños.
•Mantengalamáquina,labateríayelcargadorde
labateríaalejadosdeagentescorrosivoscomo
productosquímicosdejardínosalparadeshielo.
•Parareducirelriesgodelesionespersonales
graves,noalmacenelabateríaenelexterioroen
unvehículo.
•Guardelamáquina,labateríayelcargadorenun
lugarcerrado,limpioyseco.
23

Solucióndeproblemas
Realicesololospasosdescritosenestasinstrucciones.Cualquierotrotrabajodeinspección,mantenimientoo
reparacióndebeserrealizadoporunServicioTécnicoAutorizadooporunespecialistaautorizadosino
puedesolucionarelproblemaustedmismo.
ProblemaPosiblecausa
Lamáquinanoarranca.
Lamáquinanofuncionadeforma
continua.
Lamáquinanoalcanzalamáxima
potencia.
Labateríasedescargarápidamente.1.Latemperaturadelabateríaestápor
1.Labateríanoestácorrectamente
instaladaenlamáquina.
2.Labateríanoestácargada.2.Retirelabateríadelamáquinay
3.Labateríaestádañada.
4.Hayotroproblemaeléctricoconla
máquina.
1.Hayhumedadenloscablesdela
batería.
2.Labateríanoestáinstaladapor
completoenlaherramienta.
1.Lacapacidaddecargadelabatería
esdemasiadobaja.
2.Losoriciosdeventilaciónestán
obstruidos.
encimaopordebajodelintervalode
temperaturaadecuado.
Accióncorrectora
1.Retireyluegovuelvaacolocarla
bateríaenlamáquina,asegurándose
dequeestácompletamenteinstalada
ybloqueada.
cárguela.
3.Sustituyalabatería.
4.PóngaseencontactoconelServicio
TécnicoAutorizado.
1.Dejequelabateríasesequeoséquela
conunpaño.
2.Retireyluegovuelvaacolocar
labateríaenlaherramienta,
asegurándosedequeestá
completamenteinstaladaybloqueada.
1.Retirelabateríadelamáquinay
carguecompletamentelabatería.
2.Limpielosoriciosdeventilación.
1.Trasladelabateríaaunlugarseco
cuyatemperaturaseadeentre5°Cy
40°C.
Elcargadordelabateríanofunciona.
ElindicadorLEDdelcargadordela
bateríaestárojo.
ElindicadorLEDdelcargadordela
bateríaparpadeaenrojo.
1.Latemperaturadelcargadordela
bateríaestáporencimaopordebajo
delintervalodetemperaturaadecuado.
2.Latomadecorrienteenlaqueestá
enchufadoelcargadordelabateríano
tienecorriente.
1.Elcargadordelabateríay/olabatería
estáporencimaopordebajodel
intervalodetemperaturaadecuado.
1.Hayunerrordecomunicacionesentre
labateríayelcargador.
2.Labateríaestácasiagotada.2.Eliminecorrectamentelabatería
1.Desenchufeelcargadordelabatería
ytrasládeloaunlugarsecocuya
temperaturaseadeentre5°Cy40°C.
2.Póngaseencontactoconun
electricistaautorizadoparaquerepare
latomadecorriente.
1.Desenchufeelcargadordelabatería
ymuevaelcargadordelabatería
ylabateríaaunlugarsecocuya
temperaturaseadeentre5°Cy40°C.
1.Retirelabateríadelcargador,
desconecteelcargadordelatoma
decorrienteyespere10segundos.
Vuelvaaenchufarelcargadorenla
tomadecorrienteycoloquelabatería
enelcargador.SielindicadorLED
delcargadorsigueparpadeandoen
rojo,repitaesteprocedimiento.Si
elindicadorLEDdelcargadorsigue
parpadeandodespuésde2intentos,
eliminelabateríacorrectamente
enunainstalaciónderecicladode
baterías.
enunainstalaciónderecicladode
baterías.
24

ProblemaPosiblecausa
Accióncorrectora
Lamáquinaproduceunpitido.
Lacalidaddecorteesreducidao
insatisfactoria.
Lamáquinacortadeformadesigual.
Lamáquinavibra.1.Lacuchillaestádobladaodañada.1.Inspeccionelacuchillaycámbielasi
1.Labateríanoestácargada.1.Retirelabateríadelamáquinay
2.Lamáquinaestáenunaposición
inseguraparaeluso.
3.Lamáquinaestásobrecargada.
4.Hayotroproblemaeléctricoconla
máquina.
1.Lacuchillanoestáalada.1.Hagaquelacuchillasealeose
2.Lacarcasadecortetieneuna
acumulaciónderesiduos.
1.Lacuchillanoestáalada.1.Hagaquelacuchillasealeose
2.Lacarcasadecorteestádañada.
cárguela.
2.Asegúresedequelamáquinanotiene
unainclinaciónextremaduranteeluso.
3.Siegueaunaalturadecortemásalta
ocamineaunritmomáslentodurante
lasiega.
4.Pruebelasdemásaccionesde
solucióndeproblemas,ysilaalarma
siguesonando,póngaseencontacto
conunServicioTécnicoAutorizado.
cambie.
2.Limpiedebajodelamáquina.
cambie.
2.PóngaseencontactoconelServicio
TécnicoAutorizado.
esnecesario.
25

AvisosobreprivacidadenelEEE/ReinoUnido
UsodesusdatospersonalesporpartedeT oro
TheToroCompany(“Toro”)respetasuprivacidad.Aladquirirnuestrosproductos,podemosrecopilarciertosdatospersonalessobreusted,yasea
deformadirectaatravésdeustedodenuestraempresaonuestrorepresentantelocaldeToro.Toroutilizaestosdatosparacumplirobligaciones
contractuales,comoregistrarsugarantía,procesarunareclamacióndegarantíaoponerseencontactoconustedencasodelaretiradadeunproducto,
asícomoparanescomercialeslegítimos,comovalorarlasatisfaccióndelosclientes,mejorarnuestrosproductosuofrecerleinformacióndeproductos
quepuedanserdesuinterés.T oropuedecompartirsusdatosconliales,concesionariosuotrossocioscomercialesdeT oroenrelaciónconcualquiera
delasactividadesantesmencionadas.Tambiénpodemosrevelarsusdatospersonalescuandoserequieraporleyoenrelaciónconlaventa,la
adquisiciónolafusióndeunaempresa.Novenderemossusdatospersonalesaningunaotraempresaconnesdemarketing.
Retencióndesuinformaciónpersonal
Toroconservarásusdatospersonaleshastaqueseanrelevantesparalasnalidadesindicadasanteriormenteysegúnlosrequisitoslegales.Para
obtenermásinformaciónsobrelosperiodosderetenciónaplicables,póngaseencontactoconlegal@toro.com.
CompromisodeToroconlaseguridad
SusdatospersonalessepuedenprocesarenEstadosUnidosoenotropaísqueapliqueleyesdeproteccióndedatosmenosestrictasquelasdesupaís
deresidencia.Cuandotransramossusdatospersonalesfueradesupaísderesidencia,daremoslospasoslegalmentepertinentesparagarantizarque
seaplicanlasmedidasadecuadasparaprotegersuinformaciónyparagarantizarquesetrataconseguridad.
Accesoycorrección
Puedetenerderechoacorregirorevisarsusdatospersonales,obienanegarsealprocesamientodesusdatosorestringirlo.Paraello,póngase
encontactoconnosotrosenladirecciónlegal@toro.com.SitienealgunapreocupaciónacercadecómohagestionadoTorosuinformación,le
instamosaquesepongaencontactoconnosotrosdirectamente.Recuerdequelosresidenteseuropeostienenderechoapresentarquejasantela
autoridadresponsabledelaproteccióndedatos.
374-0282RevC

FormNo.3442-567RevA
TondeuseRecycler
55cmavecFlexForcePower
System
N°demodèle21864—N°desérie400000000etsuivants
N°demodèle21864T—N°desérie400000000etsuivants
™
®
60VMAX
Enregistrezvotreproduitàwww.Toro.com.
Traductiondutexted'origine(FR)
*3442-567*

Ceproduitestconformeàtouteslesdirectives
européennespertinentes.Pourplusde
renseignements,reportez-vousàlaDéclarationde
conformitéspéciqueduproduitfournieséparément.
Introduction
Cettetondeuseautotractéeàlamerotativeest
destinéeaugrandpublic.Elleestprincipalement
conçuepourtondrelespelousesentretenues
régulièrementdanslesterrainsprivés.Ellen'estpas
conçuepourcouperlesbroussaillesnipourunusage
agricole.Elleestconçuepourfonctionneravecla
batterieion-lithiummodèle81860(fournieavecle
modèle21864)ou81875;ellepeutaussiutiliser
labatteriemodèle81825ou81860.Cesbatteries
sontconçuespourêtrechargéesuniquementavecle
chargeurmodèle81802(fourniaveclemodèle21864)
ou81805.L'utilisationdecesproduitsàd'autres
nsquecellesprévuespeutêtredangereusepour
vous-mêmeettoutepersonneàproximité.
g275230
Figure1
1.Emplacementdesnumérosdemodèleetdesérie
Lemodèle21864Tnecomprendpasdebatterie
nidechargeur.
Lisezattentivementcettenoticepourapprendre
commentutiliseretentretenircorrectementvotre
produit,etéviterainsidel'endommageroudevous
blesser.Vousêtesresponsabledel'utilisationsûreet
correcteduproduit.
Pourplusd’informations,ycomprisdesconseils
desécurité,desdocumentsdeformation,des
renseignementsconcernantunaccessoire,
pourobtenirl'adressed'unconcessionnaireou
pourenregistrervotreproduit,rendez-voussur
www.T oro.com.
Pourobtenirdesprestationsdeservice,despièces
d'origineoudesrenseignementscomplémentaires,
contactezunconcessionnaire-réparateuragrééou
leserviceclientenayantlesnumérosdemodèleet
desérieduproduitàportéedelamain.LaFigure1
indiquel'emplacementdesnumérosdemodèleetde
sérieduproduit.Inscrivezlesnumérosdansl'espace
réservéàceteffet.
Important:Avecvotreappareilmobile,vous
pouvezscannerlecodeQRsurl'autocollantdu
numérodesérie(lecaséchéant)and'accéder
auxinformationssurlagarantie,lespièces
détachéesetautresrenseignementssurle
produit.
©2020—TheToro®Company
8111LyndaleAvenueSouth
Bloomington,MN55420
Contactez-noussurwww.Toro.com.
2
ImpriméenChine
Tousdroitsréservés

Sécurité
IMPORTANTES
CONSIGNES
DESÉCURITÉ
ATTENTION–quandvousutilisezunemachine
électrique,lisezetrespecteztoujourslesmisesen
gardeetconsignesdesécuritéélémentairespour
réduirelesrisquesd'incendie,dechocélectriqueou
deblessure,notamment:
I.Formationàl'utilisation
1.L'utilisateurdelamachineestresponsabledes
accidentsetdommagescausésauxautres
personnesetàleurspossessions.
2.N'autorisezpaslesenfantsàjoueravecla
machine,labatterieoulechargeurdebatterie;
laréglementationlocalepeutimposerunâge
minimumpourlesutilisateurs.
3.N'autorisezaucunepersonneprésentantdes
aptitudesphysiques,sensoriellesoumentales
réduites,ouencoremanquantd'expérience
oudeconnaissances,àutiliserlamachine,la
batterieoulechargeurdebatterie,àmoins
qu'ellessoientsuperviséesetforméesà
l'utilisationsécuritairedelamachineetqu'elles
comprennentlesrisquesassociésàson
utilisation.
4.Avantd'utiliserlamachine,labatterieetle
chargeurdebatterie,liseztouteslesinstructions
etmisesengardequigurentsurcesproduits.
5.Familiarisez-vousaveclescommandesetle
maniementcorrectdelamachine,delabatterie
etduchargeurdebatterie.
II.Avantd'utiliserlamachine
1.Teneztoutlemonde,enparticulierlesenfants,
etlesanimaux,àl'écartdelazonedetravail.
2.N'utilisezpaslamachinesidescapotsoudes
dispositifsdeprotection,telsquelesdéecteurs
etbacsàherbe,manquentousontdéfectueux.
3.Examinezlazonedetravailetdébarrassez-lade
toutobjetpouvantgênerlefonctionnementdela
machineouêtreprojetépendantsonutilisation.
4.Avantd'utiliserlamachine,vériezquelalame,
leboulondelalameetl'ensemblenesontpas
usésniendommagés.Remplacezlesétiquettes
endommagéesouillisibles.
5.Utilisezuniquementlabatteriespéciéepar
Toro.L'utilisationd'autresaccessoireset
outilspeutaccroîtrelerisquedeblessureet
d'incendie.
6.Vouspouvezcauserunincendieouunchoc
électriquesivousbranchezlechargeurde
batterieàuneprisequin'estpasde100à240
V.Nebranchezlechargeurdebatteriequ'à
uneprisede100à240V.Pouruntypede
branchementdifférent,utilisezunadaptateur
correctementcongurépourlaprise,lecas
échéant.
7.N'utilisezpaslabatterieoulechargeurs'ils
sontendommagésoumodiés,carleur
comportementpourraitêtreimprévisibleet
causerunincendie,uneexplosionoudes
blessures.
8.Silecordond'alimentationduchargeur
estendommagé,adressez-vousàun
concessionnaire-réparateuragréépourlefaire
remplacer.
9.N’utilisezpasdebatteriesnonrechargeables.
10.Chargezlabatterieuniquementaveclechargeur
spéciéparT oro.Unchargeurconvenantàun
certaintypedebatteriepeutcréerunrisque
d'incendies'ilestutiliséavecuneautrebatterie.
11.Nechargezlabatteriequedansunendroitbien
aéré.
12.N'exposezpaslabatterieoulechargeuraufeu
ouàdestempératuressupérieuresà68ºC.
13.Respecteztouteslesinstructionsdecharge
etnechargezpaslabatteriehorsdelaplage
detempératurespéciéedanslesinstructions.
Vousrisquezsinond'endommagerlabatterieet
d'accroîtrelerisqued'incendie.
14.Portezunetenueadéquate–portezdes
vêtementsappropriés,ycomprisuneprotection
oculaire,unpantalon,deschaussuressolidesà
semelleantidérapante(netravaillezpaspieds
nusouchaussédesandales),desgantsde
caoutchoucetdesprotecteursd'oreilles.Si
voscheveuxsontlongs,attachez-lesetne
portezpasdebijouxpendantsquipourraient
seprendredanslespiècesmobiles.Portez
unmasqueantipoussièresil'atmosphèreest
poussiéreuse.Ilestrecommandédeporterdes
gantsdecaoutchouc.
III.Utilisation
1.Lecontactaveclalameenrotationpeutcauser
desblessuresgraves.Gardezlesmainsetles
piedsàl'écartdelazonedecoupeetdetoutes
lespiècesmobilesdelamachine.Nevous
tenezpasdevantl'ouvertured'éjection.
2.L'utilisationdecettemachineàd'autresns
quecelleprévuepeutêtredangereusepour
vous-mêmeettoutepersonneàproximité.
3.Désengagezl'autopropulsion(selon
l'équipement)avantdedémarrerlamachine.
3

4.Évitezlesdémarragesaccidentels–
assurez-vousqueleboutondedémarrage
électriqueestretirédudémarreurélectrique
avantdebrancherlabatterieetdemanipuler
lamachine.
5.Accordeztoutevotreattentionàl'utilisationdela
machine.Nefaitesriend’autrequipuissevous
distraire,aurisquedecauserdesdommages
corporelsoumatériels.
6.Arrêtezlamachine,enlevezleboutonde
démarrageélectrique,enlevezlabatteriedela
machineetattendezl'arrêtdetoutmouvement
avantderégler,réviser,nettoyerouremiserla
machine.
7.Enlevezlabatterieetleboutondedémarrage
électriquedelamachinechaquefoisquevous
lalaissezsanssurveillanceouavantdechanger
d'accessoires.
8.Nefaitespasforcerlamachine–elledonnera
debienmeilleursrésultatsetseraplussûresi
vousl'utilisezàlavitessepourlaquelleelleest
prévue.
9.Restezalerte–Concentrez-voussurvotre
tâcheetfaitespreuvedebonsenslorsquevous
utilisezlamachine.N'utilisezpaslamachinesi
vousêtesmaladeoufatigué(e),nisousl'emprise
del'alcool,dedroguesoudemédicaments.
10.N'utilisezlamachinequesilavisibilitéest
sufsanteetlesconditionsmétéorologiques
favorables.N'utilisezpaslamachinesilafoudre
menace.
11.Redoublezdeprudenceenmarchearrièreou
quandvoustirezlamachineversvous.
12.Gardeztoujourslespiedsbienposésàterreet
maintenezvotreéquilibre,enparticuliersurles
pentes.Travailleztransversalementàlapente,
jamaisenmontantoudescendant.Changezde
directionaveclaplusgrandeprudencesurles
terrainsenpente.Netondezpasdepentestrop
raides.Avanceztoujoursàuneallurenormale
aveclamachine,necourezpas.
13.Nedirigezpasl'éjectionversquiquecesoit.
N'éjectezpasl'herbecoupéecontreunmurou
unobstacle,carellepourraitricocherdansvotre
direction.Arrêtezlaouleslamesquandvous
passezsurdugravier.
14.Méez-vousdestrous,ornières,bosses,
rochersouautresobstaclescachés.Vous
pouvezglisserouperdrel'équilibresileterrain
estirrégulier.
15.Entravaillantsurl'herbeoulesfeuilleshumides,
vousrisquezdeglisseretdevousblesser
gravementsivoustouchezlalameentombant.
Netondezpassil'herbeesthumideousousla
pluie.
16.Silamachineheurteunobjetousemetàvibrer,
arrêtez-laimmédiatement,enlevezlebouton
dedémarrageélectrique,enlevezlabatterieet
attendezl'arrêtcomplettoutmouvementavant
devérierl'étatdelamachine.Effectueztoutes
lesréparationsnécessairesavantderéutiliser
lamachine.
17.Arrêtezlamachineetenlevezleboutonde
démarrageélectriqueavantdechargerla
machinepourletransport.
18.Dansdesconditionsd'utilisationabusive,du
liquidepeutjaillirhorsdelabatterie;éviteztout
contact.Encasdecontactaccidentelavecle
liquide,rincezàl'eau.Encasdecontactdu
liquideaveclesyeux,consultezunmédecin.Le
liquideéjectéhorsdelabatteriepeutcauserdes
irritationsoudesbrûlures.
IV.Entretienetremisage
1.Arrêtezlamachine,enlevezleboutonde
démarrageélectrique,enlevezlabatteriedela
machineetattendezl'arrêtdetoutmouvement
avantderégler,réviser,nettoyerouremiserla
machine.
2.N'essayezpasderéparerlamachinesauf
commeexpliquédanslesinstructions.
Conezl'entretiendelamachineàun
concessionnaire-réparateuragrééquiutilisedes
piècesderechangeidentiques.
3.Portezdesgantsetuneprotectionoculairepour
fairel'entretiendelamachine.
4.Aiguisezleslamesémousséesdesdeuxcôtés
pourlesmainteniréquilibrées.Nettoyezlalame
etvériezqu'elleestéquilibrée.
5.Remplacezlalamesielleestfaussée,uséeou
ssurée.Unelamemaléquilibréeprovoquedes
vibrationsquipeuventendommagerlemoteur
oucauserdesblessures.
6.Quandvousfaitesl'entretiendelalame,
n'oubliezpasqu'ellepeutencorebougermême
sil'alimentationélectriqueestcoupée.
7.Vériezfréquemmentquelebacderamassage
n'estpasdétérioréouusé,etremplacezunbac
uséparunbacT oro.
8.Pourobtenirdesrésultatsoptimaux,utilisez
uniquementdespiècesderechangeetdes
accessoiresTorod'origine.T ousautres
accessoiresoupiècesderechangepeuventêtre
dangereux,etleurutilisationrisqued'annuler
lagarantieproduit.
9.Maintenezlamachineenbonétat–Pour
obtenirdesperformancesoptimalesetsûres,
conservezletranchantdeslamespropreetbien
affûté.Gardezlespoignéespropresetsèches,
etexemptesd'huileetdegraisse.Gardez
4

toujourslesprotectionsenplaceetenbonétat.
Maintenezleslamesbienaiguisées.Utilisez
uniquementdeslamesderechangeidentiques.
10.Vériezqu'aucunepiècedelamachine
n'estendommagée–Sivousconstatez
quedesprotectionsoud'autrespiècessont
endommagées,déterminezsilamachinepeut
fonctionnercorrectement.Vériezqu'aucune
despiècesmobilesn'estmalalignéeougrippée,
etqu'aucunepiècen'estcassée,malxéeou
présentetoutautredéfautquipourraitaffecter
sonfonctionnement.Saufindicationcontraire
danslesinstructions,faitesréparerouremplacer
lesprotectionsoulespiècesendommagéespar
unconcessionnaire-réparateuragréé.
11.Lorsquelabatterienesertpas,rangez-laà
l'écartd'objetsmétalliquestelsquetrombones,
piècesdemonnaie,clés,clousouvisqui
pourraientrelierlesbornesentreelles.Un
court-circuitauxbornesdelabatteriepeut
causerdesbrûluresouunincendie.
12.Vériezfréquemmentleserragedesboulonsde
montagedelalameetdumoteur.
13.Lorsquevousn'utilisezpaslamachine,
remisez-ladansunlocalsecetsécurisé,ethors
deportéedesenfants.
14.PRUDENCE–Labatteriepeutprésenterun
risqued'incendieoudebrûlurechimiqueen
casdemauvaistraitement.Nedémontezpas
labatterie.N'exposezpaslabatterieàune
températuresupérieureà68ºCetnel'incinérez
pas.Remplaceztoujourslabatterieparune
batterieT orod'origine;l'utilisationdetoutautre
typedebatteriepeutentraînerunincendieou
uneexplosion.Conservezlesbatterieshorsde
laportéedesenfantsetdansleuremballage
d'originejusqu'aumomentdelesutiliser.
15.Nejetezpaslabatterieaufeu.L'élément
pourraitexploser.Vériezsilaréglementation
localestipuledesprocéduresdemiseaurebut
spéciales.
CONSERVEZCES
INSTRUCTIONS
Autocollantsdesécuritéetd'instruction
Desautocollantsdesécuritéetdesinstructionsbienvisiblesparl'opérateursontplacésprès
detouslesendroitspotentiellementdangereux.Remplaceztoutautocollantendommagé
oumanquant.
Modèle81860
137-9489
1.Lisezlemanuelde
l'utilisateur.
2.Recyclage5.Nepasexposeràlapluie.
3.Contientdesionslithium;
nepasmettreaurebut.
4.Teniràl'écartdes
ammes.
decal137-9489
5

137-9495
1.Lisezlemanueldel'utilisateur.3.Pourusageintérieur.
2.Nepasmettreaurebut.4.Doubleisolation
137-9496
decal137-9495
decal137-9496
1.Labatterieestencharge.
3.Latempératuredelabatterieestsupérieureouinférieureàla
plagedetempératureappropriée.
2.Labatterieestcomplètementchargée.4.Anomaliedechargedelabatterie
decal140-1324
140-1324
1.Lisezlemanuelde
l'utilisateur.
2.Pourdémarrerlamachine,
serrezlabarrecontrele
guidonetappuyezsurle
bouton.
3.Pourarrêterlamachine,
relâchezlabarre.
1.Attention–lisezleManuel
del'utilisateur.
2.Risquede
coupure/mutilationdes
mainsparlalamede
latondeuse–nevous
approchezpasdespièces
mobiles;gardeztoutes
lesprotectionsettousles
capotsenplace.
3.Risquede
coupure/mutilationdes
mainsparlalamede
latondeuse–enlevez
lacléetlisezleManuel
del'utilisateuravant
d'effectuertoutentretien.
decal140-1328
140-1328
4.Risquedeprojection
d'objets–n'autorisez
personneàs'approcher;
coupezlemoteuret
attendezl'arrêtcomplet
detouteslespièces
mobilesavantdequitter
lamachine;ramassezles
débrisavantdetondre.
5.Risquede
coupure/mutilationdes
piedsparlalamedela
tondeuse–netondez
pasdanslesensdela
pente,maistoujours
transversalement;
regardezderrièrevous
quandvoustondezen
marchearrière.
6

112-8760
1.Risquedeprojectiond'objets–n'autorisezpersonneà
s'approcher.
2.Risquedecoupure/mutilationdesmainsoudespieds
parlalamedelatondeuse–nevousapprochezpasdes
piècesmobiles.
decal134-4691
134-4691
1.Vitesseauto2.Vitessemax.
decal112-8760
139-6557
1.Moderecyclage2.Moderamassage
137-9461
1.Étatdechargedelabatterie
decal139-6557
decal137-9461
7

Miseenservice
Remarque:Labatterien'estpascomplètement
chargéeàl'achat.Avantd'utiliserlamachinepourla
premièrefois,voirChargedelabatterie(page18).
1
Montageduchargeurde
batterie(option)
Aucunepiècerequise
Procédure
Sivouslesouhaitez,vouspouvezxerlechargeur
debatteriesurunmuràl'aidedesfentesentroude
serruresituéesaudos.
Montez-leàl'intérieur(parexempledansungarage
outoutautreendroitàl'abridel'humidité),àproximité
d'uneprisedecourantethorsdelaportéedes
enfants.
g247359
Figure2
VoirlaFigure2poursavoircommentmonterle
chargeur.
Pourxerlechargeurenplace,glissez-lesurles
xationsplacéesaubonendroit(xationsnon
incluses).
8

2
Dépliageduguidon
Aucunepiècerequise
Procédure
ATTENTION
Vousrisquezd'endommagerlescâblesetderendrel'utilisationdelamachinedangereusesi
vousnedépliezpasleguidoncorrectement.
•Veillezànepasendommagerle(s)câble(s)enpliantoudépliantleguidon.
•Vériezquele(s)câble(s)passe(nt)bienàl'extérieurduguidon.
•Siuncâbleestendommagé,contactezunconcessionnaire-réparateuragréé.
Remarque:Vériezquelescâblespassentbienàl'extérieurduguidonetnesontpaspincés(DdeFigure3).
Figure3
9
g335466

3
Montagedubacàherbe
Aucunepiècerequise
Procédure
g334351
Figure4
10

Vued'ensembledu
produit
g292995
Figure6
Figure5
1.Chargeurdebatterie
modèle81802(inclus
aveclemodèle21864)
g335468
2.Batteriemodèle81860
(incluseavecle
modèle21864)
1.Guidon
2.Barred'autopropulsion8.Levierdecommandede
3.Barredecommandedes
lames
4.Boutondedémarrage
électrique
5.Interrupteurdedémarrage
électrique
6.Compartimentdela
batterie
7.Levierdehauteurde
coupe(4)
ramassagesurdemande
9.Levierduguidon(2)
10.Bacàherbe
11.Déecteurarrière
11

Caractéristiques
techniques
Batterie
Modèle
Capacitédelabatterie
Tensionbatterienominaleselonlefabricant=60Vmax.,54V
nominale.Latensionréellevariesuivantlacharge.
81860
6Ah
324Wh
Chargeurdebatterie
Modèle
Type
Entrée100à240Vc.a.,50/60Hz,2Amax.
Sortie
81802
Chargeurdebatterieion-lithium60V
MAX
60Vc.c.max.,2A
Plagesdetempératuresadéquates
Charger/rangerlabatterie
entre
Utiliserlabatterieentre
Utiliserlamachineentre
*Letempsdechargeaugmenteendehorsdecette
plagedetempérature.
5ºCet40ºC*
-30ºCet49ºC*
0ºCet49ºC*
Rangezlamachine,labatterieetlechargeurde
batteriedansunlocalfermé,propreetsec.
12

Utilisation
Avantl'utilisation
Installationdelabatterie
Important:Utilisezlabatterieuniquementdanslaplagedetempératuresindiquée;voir
Caractéristiquestechniques(page12).
1.Vériezqueleséventssurlabatteriesontexemptsdepoussièreetdedébris.
2.Soulevezlecouvercleducompartimentdelabatterie(AdelaFigure7).
3.Placezlecreuxdanslabatterieenfacedelalanguettesurlamachine,etglissezlabatteriedansle
compartimentjusqu'àcequ'elles'enclencheenposition(BdelaFigure7).
4.Refermezlecouvercleducompartimentdelabatterie(CdelaFigure7).
Remarque:Silecouvercleducompartimentdelabatterienesefermepascomplètement,celasignie
quelabatterien'estpasparfaitementinstallée.
Figure7
g251221
13

Réglagedelahauteurdecoupe
DANGER
Lorsduréglagedesleviersdehauteurdecoupe,vousrisquezdevousblessergravementsi
vosmainstouchentlalameenmouvement.
•Coupezlemoteur,enlevezleboutondedémarrageélectrique(selonl'équipement)et
attendezl'arrêtcompletdetouteslespiècesmobilesavantderéglerlahauteurdecoupe.
•Nemettezpaslesdoigtssouslecarterduplateaudecoupequandvousréglezlahauteur
decoupe.
Choisissezlahauteurdecoupevoulue.Régleztouteslesrouesàlamêmehauteur(Figure8).
Figure8
g254131
14

Pendantl'utilisation
Démarragedelamachine
1.Vériezquelabatterieestinstalléedanslamachine;voirInstallationdelabatterie(page13).
2.Insérezleboutondedémarrageélectriquedansl'interrupteurdedémarrageélectrique(AdelaFigure9).
3.Serrezlabarredecommandedelalamecontreleguidon(BdelaFigure9).
4.Appuyezsurleboutondedémarrageélectriquejusqu'àcequelemoteurdémarre(CdelaFigure9).
Figure9
g335467
Utilisationdelacommanded'autopropulsion
Ilsuftd'avanceraveclesmainsposéessurlabarresupérieureduguidonetlescoudesserrés;lamachine
avanceautomatiquementàvotrerythme(Figure10).
Figure10
Remarque:Sivousavezdesdifcultésàfairereculerlamachineaprèsavoirutilisél'autopropulsion,
immobilisez-vous,laissezvosmainsenplaceetlaissezlamachineavancerdequelquescentimètrespour
désengagerlatransmissionauxroues.Vouspouvezaussiessayerd'atteindrelapoignéeenmétal,situéejuste
souslapartiesupérieureduguidon,etdepousserlamachineenavantsurquelquescentimètres.Sivousavez
desdifcultésàfairereculerlamachine,contactezunconcessionnaire-réparateuragréé.
g334136
15

Ramassagedel'herbecoupée
Utilisezlebacàherbepourrecueillirlesdébrisd'herbeetdefeuillesdéposéssurlapelouse.
Silelevierderamassagesurdemandeestenpositionderecyclage,placez-leenpositionderamassage;voir
Utilisationdulevierderamassagesurdemande(page17).
Montagedubacàherbe
1.Soulevezledéecteurarrièreetgardez-ledanscetteposition(AdelaFigure11).
2.Montezlebacàherbeenveillantàplacerlesergotsdanslescransduguidon(BdelaFigure11).
3.Abaissezledéecteurarrière.
Figure11
g334207
Retraitdubacàherbe
Pourretirerlebacàherbe,inversezlaprocéduredemontagedécritedansMontagedubacàherbe(page16).
Recyclagedel'herbecoupée
Àlalivraison,votremachineestprêteàrecyclerl'herbeetlesfeuillescoupéespournourrirvotrepelouse.
Silebacàherbeestmontésurlamachineetsilelevierderamassagesurdemandeestenpositionde
ramassage,placezlelevierenpositionderecyclage;voirUtilisationdulevierderamassagesurdemande
(page17).
16

Utilisationdulevierde
Réglagedelavitessedela
ramassagesurdemande
Lafonctionderamassagesurdemandevouspermet
deramasserouderecyclerlesdéchetsd'herbeet
defeuillesquandlebacàherbeestmontésurla
machine.
•Pourramasserlesdéchetsd'herbeetde
feuilles,appuyezsurleboutondulevierde
ramassagesurdemandeetdéplacezlelevieren
avantjusqu'àcequeleboutonressorte(Figure
12).
Figure12
1.Levierderamassagesur
demande(enpositionde
recyclage)
2.Levierderamassagesur
demande(enpositionde
ramassage)
lame
Cettemachinedisposede2réglagesdevitessedela
lame:AUTOetMAX.
•ÀlapositionAUTO,lavitessedelalameest
automatiquementrégléepourassurerunmeilleur
rendement;lesmodicationsdesconditionsde
coupesontdétectéesetlavitessedelalame
augmentelorsquecelaestnécessairepour
maintenirqualitédecoupe.
•ÀlapositionMAX,lalametourneàlavitesse
maximaleenpermanence.
Tournezlaclédanslecommutateuràl'uneoul'autre
positionpourmodierleréglagedevitessedelalame
(Figure14).
g251583
•Pourrecyclerlesdéchetsd'herbeetdefeuilles,
appuyezsurleboutondulevieretdéplacezle
levierenarrièrejusqu'àcequeleboutonressorte.
Important:Pourqueleramassages'effectue
correctement,enlevezlesdéchetsd'herbe
etautresquisetrouventsurlevoletde
ramassagesurdemandeetl'ouverture(Figure
13)avantdechangerlapositiondulevierde
ramassagesurdemande.
g251584
Figure13
1.Nettoyerici
g337279
Figure14
1.PositionAUTO2.PositionMAX
17

Arrêtdelamachine
1.Relâchezlabarredecommandedelalame(A
delaFigure15).
2.Retirezleboutondedémarrageélectriquede
l'interrupteurdudémarreurélectrique(Bdela
Figure15).
3.Enlevezlabatterie;voirRetraitdelabatteriede
lamachine(page18).
Remarque:Enlevezlabatteriechaquefois
quevousn'utilisezpaslamachine.
•N'utilisezpasunehauteurdecoupeinférieureà
51mm,saufsil'herbeestclairseméeouàlande
l'automnequandlapoussecommenceàralentir.
•Sil'herbefaitplusde15cm,effectuezunpremier
passageàvitesseréduiteàlahauteurdecoupe
laplushaute.Effectuezensuiteundeuxième
passageàunehauteurdecoupeinférieurepour
obtenirunecoupeplusesthétique.L'herbetrop
hauterisqued'obstruerlamachineetdefairecaler
lemoteur.
•L'herbeetlesfeuilleshumidesonttendanceà
s'agglomérersurlapelouseetpeuventobstruerla
machineetfairecalerlemoteur.Évitezdetondre
quandl'herbeesthumide.
•Soyezconscientdesrisquesd'incendiepartemps
trèssec,respecteztouslesavertissementslocaux
relatifsauxincendies,etnelaissezpasl'herbeet
lesfeuillessèchess'accumulersurlamachine.
•Alternezladirectiondelatonte.Celapermet
dedisperserlesdéchetsplusuniformémentet
d'obtenirunefertilisationplushomogène.
Figure15
Retraitdelabatteriedela
machine
1.Soulevezlecouvercleducompartimentdela
batterie.
2.Appuyezsurleverroudelabatteriepourla
débloqueretl'enlever.
3.Refermezlecouvercleducompartimentdela
batterie.
Conseilsd'utilisation
Conseilsdetontegénéraux
•Évitezdeheurterdesobstaclesaveclalame.Ne
passezjamaisintentionnellementsurunobjetquel
qu'ilsoit.
•Pourobtenirdesrésultatsoptimaux,installezune
lameT oroneuveaudébutdelasaisondetonteou
quandcelaestnécessaire.
g335480
•Sil'aspectdelapelousetonduen'estpas
satisfaisant,essayezuneouplusieursdes
solutionssuivantes:
–Remplacezlalameoufaites-laaiguiser.
–Tondezenavançantpluslentement.
–Augmentezlahauteurdecoupe.
–Tondezplussouvent.
–Empiétezsurlespassagesprécédentspour
tondreunelargeurdebanderéduite.
Hachagedesfeuilles
•Aprèslatonte,50%delapelousedoitêtrevisible
souslacouchedefeuilleshachées.Vousdevrez
peut-êtrerepasserplusieursfoissurlesfeuilles.
•Silacouchedefeuillessurlapelousefaitplusde
13cmd'épaisseur,utilisezunehauteurdecoupe
plusélevée,puisfaitesunsecondpassageàla
hauteurdecoupedésirée.
•Ralentissezlavitessedetontesilesfeuillesne
sontpashachéesassezmenues.
Aprèsl'utilisation
Latonte
•Netondezl'herbequesuruntiersdesahauteur
àchaquefois.Pouraméliorerladuréede
fonctionnement,utilisezunehauteurdecoupe
plusélevée.
Chargedelabatterie
Important:Labatterien'estpascomplètement
chargéeàl'achat.Avantd'utiliserl'outilpourla
premièrefois,placezlabatteriedanslechargeur
etchargez-lajusqu'àcequelesdiodesindiquent
18

qu'elleestcomplètementchargée.Liseztoutes
lesconsignesdesécurité.
*VoirDépistagedesdéfauts(page25)pourplus
d'informations.
Important:Chargezlabatterieuniquementàune
températurecomprisedanslaplageadéquate;
voirCaractéristiquestechniques(page12).
Remarque:Àtoutmoment,appuyezsurlebouton
indicateurdechargedelabatteriepourafcherla
chargeactuelle(diodes).
1.Vériezqueleséventsdelabatterieetdu
chargeursontexemptsdepoussièreetde
débris.
Figure16
1.Logementdelabatterie
2.Éventsdelabatterie
3.Bornesdelabatterie7.Voyantduchargeur
4.Boutonindicateurde
charge
2.Placezlecreuxdelabatterie(Figure16)devant
lalanguetteduchargeur.
3.Insérezlabatteriedanslechargeurjusqu'àce
qu'ellesoitcomplètementenclenchée(Figure
16).
4.Pourretirerlabatterieduchargeur,faites-la
glisserversl'arrière.
5.Reportez-vousautableauci-dessouspour
interpréterlesindicationsduvoyantsurle
chargeurdebatterie.
VoyantIndication
Éteint
Clignotementvert
VertBatteriechargée
Rouge
Clignotement
rouge
Pasdebatterieprésente
Batterieencharge
Latempératuredelabatterieet/ouduchargeurest
supérieureouinférieureàlaplageappropriée.
Anomaliedechargedelabatterie*
5.Diodes(chargeactuelle)
6.Guidon
8.Éventsduchargeur
Important:Vouspouvezlaisserlabatteriedans
lechargeurpendantunecourtepériodeentre
deuxutilisations.
Silabatterienedoitpasservirpendantune
périodeprolongée,retirez-laduchargeur;voir
Remisage(page24).
Nettoyagedudessousde
lamachine
Périodicitédesentretiens:Aprèschaqueutilisation
Pourobtenirdesrésultatsoptimaux,nettoyez
rapidementlamachineaprèslatonte.
1.Placezlamachinesurunesurfaceplateet
revêtue.
2.Coupezlemoteuretattendezl'arrêtcomplet
detouteslespiècesmobilesavantdequitterla
positiond'utilisation.
3.Lavezlasurfacesouslevoletarrièreaupointoù
l'herbecoupéepassedelafaceinférieuredela
machineaubacderamassage.
g290533
Remarque:Lavezlecôtéramassagesur
demande(selonl'équipement)auxpositions
avantetarrièremaximales.
4.Mettezlemoteurenmarcheetlaissez-letourner
quelquesminutespoursécherledessousdela
machineetl'empêcherderouiller.
5.Coupezlemoteur,retirezleboutonde
démarrageélectrique(selonl'équipement)et
laissezrefroidirlamachineavantdelaremiser
dansunlocalfermé.
Nettoyagedudessousdela
machineenpositionverticale
1.Placezlamachineàlapositionverticale;voir
Rangementdelamachineàlaverticale(page
20).
2.Lavezlesdéchetsd'herbeaggloméréssousla
machine.
19

Pliageduguidon
ATTENTION
Vousrisquezd'endommagerlescâblesetderendrel'utilisationdelamachinedangereusesi
vouspliezoudépliezmalleguidon.
•Veillezànepasendommagerlescâblesenpliantoudépliantleguidon.
•Siuncâbleestendommagé,contactezunconcessionnaire-réparateuragréé.
1.Tenezleguidonpendantquevousdésengagezlesverrousduguidonpouréviterdevouspincerlesmains.
2.Déverrouillezleguidonjusqu'àcequelamoitiésupérieurebougelibrement(AdelaFigure17).
3.Rabattezleguidoncomplètementenavant(BdelaFigure17).
Important:Faitespasserlescâblesàl'extérieurdesverrousquandvousrepliezleguidon.
Figure17
4.Pourdéplierleguidon,voir2Dépliageduguidon(page9).
Rangementdelamachine
àlaverticale
Vouspouvezrangerlamachineàlaverticalepour
minimiserl'encombrement.
ATTENTION
Vousrisquezd'endommagerlescâblesetde
rendrel'utilisationdelamachinedangereuse
sivouspliezoudépliezmalleguidon.
•Veillezànepasendommagerlescâblesen
pliantoudépliantleguidon.
•Siuncâbleestendommagé,contactezun
concessionnaire-réparateuragréé.
4.Pliezleguidoncomplètementenavant.
5.Engagezlesverrousduguidon.
g334367
g335482
Figure18
Important:Faitespasserlescâblesà
l'extérieurdesboutonsquandvouspliezle
guidon.
1.Retirezleboutondedémarrageélectriqueetla
batteriedelamachine.
2.Vériezquelahauteurdecoupedelamachine
estrégléeà92mmoumoins;sicen'estpasle
cas,réduisez-la;voirRéglagedelahauteurde
coupe(page14).
3.Ouvrezlesverrousduguidon(Figure18).
6.Soulevezl'avantdelamachineparleguidonet
amenez-lajusqu'aulieuderangement(Figure
19).
20
 Loading...