


FormNo.3442-704RevC
Flex-ForcePowerSystem™60VMAX36cmand43cmLawnMower
21836/T,21843/T ,21844/T
Flex-ForcePowerSystem™60VMAX36cmund43cmRasenmäher
21836/T,21843/T ,21844/T
CortacéspedFlex-ForcePowerSystem™60VMAXde36cmy43cm
21836/T,21843/T ,21844/T
TondeuseFlex-ForcePowerSystem™60VMAXde36cmet43cm
21836/T,21843/T ,21844/T
TosaerbaFlex-ForcePowerSystem™da36cme43cm,60VMAX
21836/T,21843/T ,21844/T
Flex-ForcePowerSystem™60VMAX36cmen43cmgazonmaaier
21836/T,21843/T ,21844/T
Flex-ForcePowerSystem™60VMAKS36cmog43cmgressklipper
21836/T,21843/T ,21844/T
KosiarkaFlex-ForcePowerSystem™zakumulatoremo
maksymalnymnapięciuładowania60V,oszerokości36cmi43cm
21836/T,21843/T ,21844/T
Flex-ForcePowerSystem™60VMAX36cmoch43cmgräsklippare
21836/T,21843/T ,21844/T
www.T oro.com.
*3442-704*


FormNo.3442-672RevC
Flex-ForcePowerSystem
MAX36cmand43cmLawn
Mower
ModelNo.21836—SerialNo.321000001andUp
ModelNo.21836T—SerialNo.321000001andUp
ModelNo.21843—SerialNo.321000001andUp
ModelNo.21843T—SerialNo.321000001andUp
ModelNo.21844—SerialNo.321000001andUp
ModelNo.21844T—SerialNo.321000001andUp
™
60V
Registeratwww.T oro.com.
OriginalInstructions(EN)
*3442-672*

Forassistance,pleasesee
www.Toro.com/supportor
contactyourAuthorized
ServiceDealerbefore
returningthisproduct.
Wheneveryouneedservice,genuinethe
manufacturerparts,oradditionalinformation,contact
anAuthorizedServiceDealerorthemanufacturer
CustomerServiceandhavethemodelandserial
numbersofyourproductready .Figure1identies
thelocationofthemodelandserialnumbersonthe
product.Writethenumbersinthespaceprovided.
ThisproductcomplieswithallrelevantEuropean
directives;fordetails,pleaseseetheseparateproduct
specicDeclarationofConformity(DOC)sheet.
Introduction
Thisrotary-blade,walk-behindlawnmowerisintended
tobeusedbyresidentialhomeowners.Itisdesigned
primarilyforcuttinggrassonwell-maintainedlawns
onresidentialproperties.Itisnotdesignedforcutting
brushorforagriculturaluses.Itisdesignedto
useToroFlex-Forcelithium-ionbatterypackModel
81825(providedwithModel21836),Model81850
(providedwithModel21843andModel21844)and
81860or81875.Thesebatterypacksaredesigned
tobechargedonlybybatterychargerModel81802
(providedwithModels21836,21843,and21844),or
81805.Usingtheseproductsforpurposesotherthan
theirintendedusecouldprovedangeroustoyouand
bystanders.
Models21836T ,21843T ,and21844Tdonotinclude
abatteryoracharger.
Important:Withyourmobiledevice,youcan
scantheQRcodeontheserialnumberdecal(if
equipped)toaccesswarranty,parts,andother
productinformation.
g275230
Figure1
1.Modelandserialnumberlocation
ModelNo.
SerialNo.
Thismanualidentiespotentialhazardsandhas
safetymessagesidentiedbythesafety-alertsymbol
(Figure2),whichsignalsahazardthatmaycause
seriousinjuryordeathifyoudonotfollowthe
recommendedprecautions.
Readthisinformationcarefullytolearnhowtooperate
andmaintainyourproductproperlyandtoavoid
injuryandproductdamage.Y ouareresponsiblefor
operatingtheproductproperlyandsafely.
Visitwww.T oro.comformoreinformation,including
safetytips,trainingmaterials,accessoryinformation,
helpndingadealer,ortoregisteryourproduct.
g000502
Figure2
Safety-alertsymbol
Thismanualuses2wordstohighlightinformation.
Importantcallsattentiontospecialmechanical
informationandNoteemphasizesgeneralinformation
worthyofspecialattention.
©2021—TheToro®Company
8111LyndaleAvenueSouth
Bloomington,MN55420
Contactusatwww.T oro.com.
2
PrintedinChina
AllRightsReserved

Contents
Safety
Safety.......................................................................3
SafetyandInstructionalDecals..........................5
Setup........................................................................8
1MountingtheBatteryCharger
(Optional)........................................................8
2AssemblingtheHandle....................................9
ProductOverview...................................................10
Specications..................................................10
BeforeOperation..................................................11
InstallingtheBatteryPack.................................11
AdjustingtheCuttingHeight.............................12
DuringOperation.................................................13
StartingtheMachine.........................................13
UsingtheSelf-PropelDrive...............................13
AdjustingtheBladeSpeed................................13
RecyclingtheClippings....................................14
BaggingtheClippings.......................................15
ShuttingOfftheMachine..................................17
RemovingtheBatteryPackfromthe
Machine........................................................17
OperatingTips.................................................18
AfterOperation....................................................18
ChargingtheBatteryPack................................18
CleaningtheMachine.......................................19
FoldingtheHandle...........................................19
StoringtheMachineintheVertical-Stow
Position.........................................................20
Maintenance...........................................................21
LubricatingtheMachine....................................21
ReplacingtheBlade..........................................21
PreparingtheBatteryPackfor
Recycling......................................................22
Storage...................................................................22
Service.............................................................22
Troubleshooting......................................................23
IMPORTANTSAFETY
INSTRUCTIONS
WARNING—Whenusinganelectricmachine,always
readandfollowbasicsafetywarningsandinstructions
toreducetheriskofre,electricshock,orinjury ,
includingthefollowing:
I.Training
1.Theoperatorofthemachineisresponsiblefor
anyaccidentsorhazardsoccurringtoothersor
theirproperty.
2.Donotallowchildrentouseorplaywiththe
machine,batterypack,orthebatterycharger;
localregulationsmayrestricttheageofthe
operator.
3.Donotallowchildrenoruntrainedpeopleto
operateorservicethemachine.Allowonly
peoplewhoareresponsible,trained,familiar
withtheinstructions,andphysicallycapableto
operateorservicethemachine.
4.Beforeusingthemachine,batterypack,and
batterycharger,readalltheinstructionsand
cautionarymarkingsontheseproducts.
5.Becomefamiliarwiththecontrolsandproper
useofthemachine,batterypack,andbattery
charger.
II.Preparation
1.Keepbystanders,especiallychildrenandpets,
outoftheoperatingarea.
2.Donotoperatethemachinewithoutallguards
andsafetydevices,suchasdeectorsandgrass
catchers,inplaceandfunctioningproperlyon
themachine.
3.Inspecttheareawhereyouwillusethemachine
andremoveallobjectsthatcouldinterferewith
theoperationofthemachineorthatthemachine
couldthrow.
4.Beforeusingthemachine,ensurethattheblade,
bladebolt,andbladeassemblyarenotwornor
damaged.Replaceanydamagedorunreadable
labels.
5.UseonlythebatterypackspeciedbyToro.
Usingotheraccessoriesandattachmentsmay
increasetheriskofinjuryandre.
6.Pluggingthebatterychargerintoanoutletthat
isnot100to240Vcancauseareorelectric
shock.Donotplugthebatterychargerintoan
outletotherthan100to240V .Foradifferent
styleofconnection,useanattachmentplug
3

adapterofthepropercongurationforthepower
outletifneeded.
waitforallmovementtostopbeforeadjusting,
servicing,cleaning,orstoringthemachine.
7.Donotuseadamagedormodiedbattery
packorbatterycharger,whichmayexhibit
unpredictablebehaviorthatresultsinre,
explosion,orriskofinjury.
8.Ifthesupplycordtothebatterychargeris
damaged,contactanAuthorizedServiceDealer
toreplaceit.
9.Donotusenon-rechargeablebatteries.
10.Chargethebatterypackwithonlythebattery
chargerspeciedbyT oro.Achargersuitablefor
1typeofbatterypackmaycreateariskofre
whenusedwithanotherbatterypack.
11.Chargethebatterypackinawell-ventilatedarea
only.
12.Donotexposeabatterypackorbatterycharger
toreortotemperatureshigherthan68°C
(154°F).
13.Followallcharginginstructionsanddo
notchargethebatterypackoutsideofthe
temperaturerangespeciedintheinstructions.
Otherwise,youmaydamagethebatterypack
andincreasetheriskofre.
14.Dressproperly—Wearappropriateclothing,
includingeyeprotection;longpants;substantial,
slip-resistantfootwear(notbarefootorwearing
sandals);andhearingprotection.Tiebacklong
hairanddonotwearlooseclothingorloose
jewelrythatcangetcaughtinmovingparts.
Wearadustmaskindustyoperatingconditions.
III.Operation
1.Contactwiththemovingbladewillcauseserious
injury.Keepyourhandsorfeetawayfromthe
cuttingareaandallmovingpartsofthemachine.
Keepclearofanydischargeopening.
2.Usingthismachineforpurposesotheranits
intendedusecouldprovedangeroustoyouand
bystanders.
3.Disengagetheself-propeldrive(ifequipped)
beforestartingthemachine.
4.Donottilttheappliancewhenstartingthemotor.
5.Preventunintentionalstarting—Ensurethatthe
safetykeyisremovedfromthemachinebefore
connectingthebatterypackandhandlingthe
machine.
6.Useyourfullattentionwhileoperatingthe
machine.Donotengageinanyactivitythat
causesdistractions;otherwise,injuryorproperty
damagemayoccur.
7.Stopthemachine,removethesafetykey,
removethebatterypackfromthemachine,and
8.Removethebatterypackandsafetykeyfrom
themachinewheneveryouleaveitunattended
orbeforechangingaccessories.
9.Donotforcethemachine—Allowthemachineto
dothejobbetterandsaferattherateforwhichit
wasdesigned.
10.Stayalert—Watchwhatyouaredoinganduse
commonsensewhenoperatingthemachine.
Donotusethemachinewhileill,tired,orunder
theinuenceofalcoholordrugs.
11.Operatethemachineonlyingoodvisibilityand
appropriateweatherconditions.Donotoperate
themachinewhenthereistheriskoflightning.
12.Useextremecautionwhenreversingorpulling
themachinetowardyou.
13.Keepproperfootingandbalanceatalltimes,
especiallyonslopes.Mowacrosstheface
ofslopes,neverupanddown.Useextreme
cautionwhenchangingdirectionsonslopes.Do
notmowexceedinglysteepslopes.Walk,never
runwiththemachine.
14.Donotdirectthedischargematerialtoward
anyone.Avoiddischargingmaterialagainsta
wallorobstruction;materialmayricochettoward
you.Stoptheblade(s)whencrossingsurfaces
otherthangrass.
15.Watchforholes,ruts,bumps,rocks,orother
hiddenobjects.Uneventerraincouldcauseyou
toloseyourbalanceorfooting.
16.Wetgrassorleavescancauseseriousinjuryif
youslipandcontacttheblade.Avoidmowingin
wetconditionsorwhenitisraining.
17.Ifthemachinestrikesanobjectorstartsto
vibrate,immediatelyshutoffthemachine,
removethesafetykey,removethebattery
pack,andwaitforallmovementtostopbefore
examiningthemachinefordamage.Makeall
necessaryrepairsbeforeresumingoperation.
18.Stopthemachineandremovethesafetykey
beforeloadingthemachineforhauling.
19.Underabusiveconditions,thebatterypackmay
ejectliquid;avoidcontact.Ifyouaccidently
comeintocontactwiththeliquid,ushwith
water.Iftheliquidcontactsyoureyes,seek
medicalhelp.Liquidejectedfromthebattery
packmaycauseirritationorburns.
IV.MaintenanceandStorage
1.Stopthemachine,removethesafetykey,
removethebatterypackfromthemachine,and
waitforallmovementtostopbeforeadjusting,
servicing,cleaning,orstoringthemachine.
4

2.Donotattempttorepairthemachineexceptas
indicatedintheinstructions.HaveanAuthorized
ServiceDealerperformserviceonthemachine
usingidenticalreplacementparts.
3.Wearglovesandeyeprotectionwhenservicing
themachine.
4.Replacethebladeifitisbent,worn,orcracked.
Anunbalancedbladecausesvibration,which
coulddamagethemotororcausepersonal
injury.
5.Whenservicingtheblade,beawarethatthe
bladecanstillmoveeventhoughthepower
sourceisoff.
6.Checkthegrasscollectionbagfrequentlyfor
deteriorationorwear,andreplaceawornbag
withaToro[replacement]bag.
7.Forbestperformance,useonlygenuineToro
replacementpartsandaccessories.Other
replacementpartsandaccessoriescouldbe
dangerous,andsuchusecouldvoidtheproduct
warranty.
8.Maintainthemachine—Keepcuttingedges
sharpandcleanforthebestandsafest
performance.Keephandlesdry ,clean,andfree
fromoilandgrease.Keepguardsinplaceandin
workingorder.Keepbladessharp.Useidentical
replacementbladesonly.
9.Checkthemachinefordamagedparts—Ifthere
aredamagedguardsorotherparts,determine
whetherthemachinewilloperateproperly.
Checkformisalignedandbindingmovingparts,
brokenparts,mounting,andanyothercondition
thatmayaffectitsoperation.Unlessindicated
intheinstructions,haveanAuthorizedService
Dealerrepairorreplaceadamagedguardor
part.
10.Whenthebatterypackisnotinuse,keepit
awayfrommetalobjectssuchaspaperclips,
coins,keys,nails,andscrewsthatcanmakea
connectionfrom1terminaltoanother.Shorting
thebatteryterminalsmaycauseburnsorare.
11.Checkthebladeandmotormountingbolts
frequentlyfortightness.
12.Whenyouarenotusingthemachine,storeit
indoorsinadry,secureplaceoutofthereach
ofchildren.
13.CAUTION—Amistreatedbatterypackmay
presentariskofreorchemicalburn.Donot
disassemblethebatterypack.Donotheatthe
batterypackabove68°C(154°F)orincinerate
it.ReplacethebatterypackwithagenuineToro
batterypackonly;usinganothertypeofbattery
packmaycauseareorexplosion.Keep
batterypacksoutofthereachofchildrenand
intheoriginalpackaginguntilyouarereadyto
usethem.
14.Donotdisposeofthebatteryinare.The
cellmayexplode.Checkwithlocalcodesfor
possiblespecialdisposalinstructions.
SAVETHESE
INSTRUCTIONS
SafetyandInstructionalDecals
Safetydecalsandinstructionsareeasilyvisibletotheoperatorandarelocatednearanyarea
ofpotentialdanger.Replaceanydecalthatisdamagedormissing.
134-6016
1.Enginespeed—slow
1.Warning—keephandsandfeetawayfromthemowerblade.
2.Enginespeed—fast
134-5099
decal134-6016
decal134-5297
134-5297
1.MaxPowerMode
decal134-5099
5

Model81825
decal134-4550
134-4550
1.Warning—readthe
Operator'sManual.
2.Cutting/dismemberment
hazardofhand,mower
blade—stayawayfrom
movingparts;keepall
guardsandshieldsin
place.
3.Cutting/dismemberment
hazardofhandorfoot,
mowerblade—remove
thekeyandreadthe
Operator’sManualbefore
performingmaintenance.
4.Thrownobject
hazard—keepbystanders
away;shutoffthe
enginebeforeleaving
theoperatingposition;
pickupanydebrisbefore
mowing.
5.Cutting/dismemberment
hazardofhandorfoot,
mowerblade—donot
operateupanddown
slopes;operateside
tosideonslopes;look
behindyouwhenmoving
inreverse.
1.ReadtheOperator’s
Manual.
2.Recyclethebattery
properly.
3.Donotdiscard.
decal137-9487
137-9487
4.Donotexposetoame.
5.Donotexposetorain.
1.Batterychargestatus
decal137-9461
137-9461
6

Model81850
decal140-2158
140-2158
1.ReadtheOperator’s
4.Donotexposetoame.
Manual.
2.Recyclethebattery
5.Donotexposetorain.
properly.
3.Donotdiscard.
137-9495
1.ReadtheOperator’sManual.
2.Donotdiscard.4.Doubleinsulated
3.Forindooruse.
decal137-9495
1.Thebatterypackischarging.
2.Thebatterypackisfullycharged.
3.Thebatterypackisoverorundertheappropriatetemperaturerange.
4.Batterypackchargingfault
decal137-9463
137-9463
7

Setup
Important:Thebatterypackisnotfullychargedwhenitispurchased.Beforeusingthemachinefor
thersttime,refertoChargingtheBatteryPack(page18).
Note:Thesafetykeyandallotherloosepartshavebeenplacedinthebatterycompartmentforsafedelivery;
ensurethatyouremovethemfromthecompartmentandstoretheminasafeplacepriortoassembly.
1
MountingtheBattery
Charger(Optional)
Partsneededforthisprocedure:
2
Mountinghardware(notincluded)
Procedure
Ifdesired,mountthebatterychargersecurelyona
wallusingthewall-mountkeyholesonthebackof
thecharger.
Mountitindoors(suchasagarageorotherdryplace),
nearapoweroutlet,andoutofthereachofchildren.
RefertoFigure3forassistanceinmountingthe
charger.
Slidethechargerovertheappropriatelypositioned
hardwaretosecurethechargerinplace(hardware
notincluded).
Figure3
g290534
8

2
AssemblingtheHandle
2.Pullthehandlebarreleasebracetowardthe
upperhandletoreleasethehandlelock(Figure
5).
3.Movethehandlerearwardtotheoperating
positionandletgoofthehandlebarrelease
brace(Figure5).
Partsneededforthisprocedure:
1Upperhandleassembly
2Bolt
2Locknut
Procedure
Important:Removeanddiscardtheprotective
plasticsheetthatcoversthemowerandanyother
plasticorwrappingonthemachine.
Note:Removetherubberend-capfromthehandle
assemblypriortoinsertingtheupperhandlebar
intothelowerhandlebar.Theseareaddedduring
manufacturingtopreventdamagetothecables.
WARNING
Foldingorunfoldingthehandleimproperly
candamagethecables,causinganunsafe
operatingcondition.
•Donotdamagethecableswhenfoldingor
unfoldingthehandle.
•Ifacableisdamaged,contactan
AuthorizedServiceDealer.
Note:Ensurethatthehandleclicksintoplace.
g341335
Figure5
1.Installtheupperhandleassemblytothelower
handleandsecureitusing2boltsand2locknuts
asshowninFigure4.
Figure4
g342173
9

ProductOverview
Specications
ModelWeight
21836/T
21843/T
21844/T
LengthWidthHeight
(withouta
battery)
20.2kg130.6cm41.7cm107.3cm
(44.5lb)(51.4
inches)
22.1kg136.2cm48.5cm108.5cm
(48.7lb)(53.6
inches)
24.0kg136.2cm48.5cm108.5cm
(52.9lb)(53.6
inches)
(16.4
inches)
(19.1
inches)
(19.1
inches)
(42.2
inches)
(42.7
inches)
(42.7
inches)
SmartStowDimensions
ModelLengthWidthHeight
113.5cm
(44.7inches)
114.0cm
(44.9inches)
114.0cm
(44.9inches)
Figure6
21836/T41.2cm(16.2
21843/T41.0cm(16.1
g364064
21844/T
inches)
inches)
41.0cm
(16.1inches)
41.7cm(16.4
inches)
48.5cm(19.1
inches)
48.5cm(19.1
inches)
1.Batterycompartment
2.Reardeector7.Grassboxfullindicator
3.Handlebarreleasebrace
4.Blade-controlhandles
5.Handlebar
6.Self-propeldrivehandles
(Model21844only)
8.Grassbox
9.Height-of-cutbutton
10.Height-of-cutindicator
window
Figure7
1.BatterychargerModel
81802(includedwith
Models21836,21843,and
21844)
2.BatterypackModel81850
(includedwithModels
21843and21844)
3.BatterypackModel81825
(includedwithModel
21836)
BatteryPack
Model8182581850
Batterypackcapacity
Batterymanufacturerrating=60Vmaximumand54Vnominal.
Actualvoltagevarieswithload.
2.5Ah4.0Ah
135Wh216Wh
BatteryCharger
Model81802
Type
Input
Output60VMAXDC2.0A
g342171
AppropriateTemperatureRanges
Charge/storethebatterypack
at
Usethebatterypackat
Usethemachineat
*Chargingtimewillincreaseifyoudonotchargethe
batterypackwithinthisrange.
60VMAXLithium-IonBatteryCharger
100to240VAC50/60HzMax2.0A
5°C(41°F)to40°C(104°F)*
-30°C(-22°F)to49°C(120°F)*
0°C(32°F)to49°C(120°F)*
Storethemachine,batterypack,andbatterycharger
inanenclosedclean,dryarea.
10

Operation
Note:Determinetheleftandrightsidesofthemachinefromthenormaloperatingposition.
BeforeOperation
InstallingtheBatteryPack
Important:Operatethebatterypackonlyintemperaturesthatarewithintheappropriaterange;refer
toSpecications(page10).
1.Ensurethatthesafetykeyisnotinstalledtothemachine.
2.Ensurethattheventsonthebatteryareclearofanydustanddebris.
3.Liftupthebattery-compartmentlid(AofFigure8).
4.Lineupthecavityinthebatterypackwiththetongueonthemachineandslidethebatterypackintothe
compartmentuntilitlocksintoplace(BofFigure8).
5.Closethebattery-compartmentlid(CofFigure8).
Note:Ifthebattery-compartmentliddoesnotclosecompletely,thebatteryisnotfullyinstalled.
Figure8
g341293
11

AdjustingtheCutting
Height
WARNING
Adjustingtheheight-of-cutcouldbringyour
handsintocontactwithamovingbladeand
resultinseriousinjury.
Theheightofcutisadjustablein6increments
between19mm(3/4inch)and70mm(2-3/4inches).
Indicator
HeightofCutPosition
1(lowest)
2
•Shutoffthemotor,removethebattery,and
waitforallmovingpartstostopbefore
adjustingthecuttingheight.
•Donotputyourngersunderthehousing
whenadjustingthecuttingheight.
Toadjustthecuttingheight,pressdownonthe
height-of-cutbuttonandraiseorlowerthedeckuntil
thedesiredheight-of-cutsettingisshowninthe
height-of-cutwindow(Figure9).
3
4
5
6(highest)
Figure9
1.Height-of-cutbutton2.Height-of-cutviewwindow
g364065
12

DuringOperation
StartingtheMachine
1.Ensurethatthebatterypackischargedand
installedinthemachine;refertoInstallingthe
BatteryPack(page11).
2.Installthesafetykeytothemachine(Figure10).
UsingtheSelf-PropelDrive
Model21844/TOnly
•Toadjusttheself-propelmovementspeed,
adjustthespeedcontrol(Figure12).
•Toengagetheself-propeldrive,pullthe
self-propeldrivehandlesuptothehandleand
holdthem(Figure12).
•Todisengagetheself-propel-drive,releasethe
self-propeldrivehandles.
Note:Toreducethegroundspeed,movethe
speedcontroltotheleft;toincrease,moveitto
theright.
Figure10
3.PressthePowerbuttonatthecenterofthe
upperhandletoturnonthemachine.
4.Squeezetheblade-controlhandlestostartthe
machine.
Figure11
g344530
g342174
Figure12
1.Self-propelspeedcontrol
2.MAXbutton
3.Self-propeldrivehandles
AdjustingtheBladeSpeed
Thismachinehas2blade-speedsettings:RUNSMART
andMAX.
•WhensettoRUNSMART,thebladespeedis
adjustedautomaticallyforgreaterefciency;
changesincuttingconditionsaredetectedand
thebladespeedincreaseswhennecessaryto
maintainqualityofcut.
•WhensettotheMAX,thebladespeedremainsat
thehighestspeedatalltimes.
g341398
PresstheMAXbuttonbelowtheOnbuttontosetthe
machinetoMAXspeed(Figure12).
13

RecyclingtheClippings
Yourmachinecomesfromthefactoryreadytorecycle
thegrassandleafclippingsbackintothelawn.
Ifthegrassboxisonthemachine,removeitbefore
recyclingtheclippings.RefertoRemovingtheGrass
Box(page16).
InstallingtheMulchPlug
1.Shutoffthemachineandremovethebattery
packandsafetykey;refertoShuttingOffthe
Machine(page17).
2.Placethemachineintheverticalstowposition;
refertoStoringtheMachineintheVertical-Stow
Position(page20).
3.Cleanthebottomofthedecktoensuretheplug
installsproperly;refertoCleaningunderthe
Machine(page19).
4.Alignthemulchplugandpushthebottomofthe
pluguntilitsnapsintoplaceontothe2retaining
pinsasshowninFigure13.
Important:Thebottomofthemulchplug
shouldbeushwiththebottomofthedeck
whenproperlyinstalled;ifthemulchplug
doesnotinstallcorrectly,donotuseit;
contactyourAuthorizedServiceDealer.
Figure13
g342177
RemovingtheMulchPlug
Toremovethemulchplug,removethebatterypack
andthenreversethestepsinInstallingtheMulch
Plug(page14).
14

BaggingtheClippings
Usethegrassboxwhenyouwanttocollectgrassandleafclippingsfromthelawn.
Ifthemulchplugisonthemachine,removeitbeforebaggingtheclippings.RefertoRemovingtheMulchPlug
(page14).
InstallingtheGrassBox
1.Movethehandleintotheuprightpositionandliftupthereardeector(AofFigure14).
2.Installthehooksofthegrassboxintothenotchesontherearofthemachine(BofFigure14).
3.Allowthereardeectortorestonthebox(CofFigure14).
4.Returnthehandlebacktotheoperatingposition;refertoFoldingtheHandle(page19).
Figure14
GrassBoxFullIndicator
Thegrassboxisttedwithafullindicatorattherearofthehardtop.Whilegrassisbeingcollected,airows
throughthegrassbox,raisingtheindicatorapintotheopenposition.Whenthegrassboxisfull,theairowis
blocked,andtheindicatorapcloses.
g341400
Figure15
g363501
15

RemovingtheGrassBox
Toremovethebox,reversethestepsinInstallingtheGrassBox(page15).
Donotoperatethemachinewiththegrassboxremovedunlessthemulchplugisinstalled.Removethegrass
boxonlywhenmulching,transportingthemachine,storingthemachine,oremptyingthegrassbox(Figure16).
Figure16
g356991
16

ShuttingOfftheMachine
RemovingtheBatteryPack
1.Releasetheblade-controlbar(Figure10).
Figure17
2.Removethesafetykeyfromthemachine(Figure
10).
fromtheMachine
1.Liftupthebattery-compartmentlid.
2.Pressthebattery-packlatchtoreleasethe
batterypackandremovethebatterypack.
3.Closethebattery-compartmentlid.
g341360
g341392
Figure19
Figure18
3.Removethebatterypack;refertoRemovingthe
BatteryPackfromtheMachine(page17).
Note:Wheneveryouarenotusingthemachine,
removethebatterypack.
g344533
17

OperatingTips
AfterOperation
GeneralMowingTips
•Avoidstrikingsolidobjectswiththeblade.Never
deliberatelymowoveranyobject.
•Forbestperformance,installanewToroblade
beforethecuttingseasonbeginsorwhen
necessary.
CuttingGrass
•Cutonlyaboutathirdofthegrassbladeatatime.
Forimprovedqualityofcut,runtime,andbagging,
cutgrassatahigherheightofcut.
•Donotcutatthelowestheight-of-cutsetting
unlessthegrassissparseoritislatefallwhen
grassgrowthbeginstoslowdown.
•Whencuttingtallgrass,mowatthehighestcutting
heightsettingandwalkslower;thenmowagainat
alowersettingforthebestlawnappearance.If
thegrassistoolong,themachinemayplugand
causethemotortostall.
•Wetgrassandleavestendtoclumpontheyard
andcancausethemachinetoplugorthemotorto
stall.Avoidmowinginwetconditions.
ChargingtheBatteryPack
Important:Thebatterypackisnotfullycharged
whenyoupurchaseit.Beforeusingthetoolfor
thersttime,placethebatterypackinthecharger
andchargeituntiltheLEDdisplayindicatesthe
batterypackisfullycharged.Readallsafety
precautions.
Important:Chargethebatterypackonlyin
temperaturesthatarewithintheappropriate
range;refertoSpecications(page10).
Note:Atanytime,pressthebattery-charge-indicator
buttononthebatterypacktodisplaythecurrent
charge(LEDindicators).
1.Ensurethattheventsonthebatteryandcharger
areclearofanydustanddebris.
•Beawareofapotentialrehazardinverydry
conditions,followalllocalrewarnings,andkeep
themachinefreeofdrygrassandleafdebris.
•Alternatethemowingdirection.Thishelps
dispersetheclippingsoverthelawnforeven
fertilization.
•Ifthenishedlawnappearanceisunsatisfactory,
try1ormoreofthefollowing:
–Replacethebladeorhaveitsharpened.
–Walkataslowerpacewhilemowing.
–Raisethecuttingheightonyourmachine.
–Cutthegrassmorefrequently.
–Overlapcuttingswathsinsteadofcuttingafull
swathwitheachpass.
CuttingLeaves
•Aftercuttingthelawn,ensurethathalfofthelawn
showsthroughthecutleafcover.Y oumayneed
tomakemorethanasinglepassovertheleaves.
•Removeexcessivequantitiesofleavesfromthe
groundbeforecuttingtheleaves.Ifthemachineis
notcuttingleavesnelyenough,slowdownyour
mowingspeed,ormowatahighercuttingheight
andthenagainatthedesiredcuttingheight.
g290533
Figure20
1.Batterypackcavity
2.Batterypackventingareas6.Handle
3.Batterypackterminals
4.Battery-charge-indicator
button
2.Lineupthecavityinthebatterypack(Figure20)
withthetongueonthecharger.
3.Slidethebatterypackintothechargeruntilitis
fullyseated(Figure20).
4.T oremovethebatterypack,slidethebattery
backwardoutofthecharger.
5.LEDindicators(current
charge)
7.ChargerLEDindicator
light
8.Chargerventingareas
18

5.RefertothefollowingtabletointerprettheLED
indicatorlightonthebatterycharger.
FoldingtheHandle
Indicator
light
Off
Green
blinking
Green
Red
Red
blinking
*RefertoTroubleshooting(page23)formore
information.
Indicates
Nobatterypackinserted
Batterypackischarging
Batterypackischarged
Batterypackand/orbatterychargerisoverorunder
theappropriatetemperaturerange
Batterypackchargingfault*
Important:Thebatterycanbeleftonthecharger
forshortperiodsbetweenuses.
Ifthebatterywillnotbeusedforlongerperiods,
removethebatteryfromthecharger;referto
Service(page22).
CleaningtheMachine
CleaningundertheMachine
ServiceInterval:Aftereachuse
Forbestresults,cleanunderthemachinesoonafter
youhavecompletedmowing.
WARNING
Foldingorunfoldingthehandleimproperly
candamagethecables,causinganunsafe
operatingcondition.
•Donotdamagethecableswhenfoldingor
unfoldingthehandle.
•Ifacableisdamaged,contactan
AuthorizedServiceDealer.
WARNING
Ensurethatthehandleisintheoperating
positionpriortostartingthemachineto
preventthrownobjectrelatedinjuries.
1.Shutoffthemachine,removethesafetykey ,
andremovethebatterypack;refertoShutting
OfftheMachine(page17).
2.Pullthehandlebarreleasebracetowardthe
upperhandletoreleasethehandlelock(Figure
21).
3.Foldthehandlehalfwayforwardtotheupright
position,orfullyforwardtothevertical-stow
positionasshowninFigure21.
1.Shutoffthemachineandremovethebattery
packandthesafetykey.
2.Lowerthemachinetoitslowestcutting-height
setting.
3.Setthemachineinthevertical-stowposition;
refertoStoringtheMachineintheVertical-Stow
Position(page20).
4.Usingabrushorbroom,cleananydebrisaway
fromtheundersideofthemachine.
Important:Donotusewatertocleanthe
machine;watermaydamageelectrical
components.
5.Cleanthegrassbox.
CleaningtheGrassBox
ServiceInterval:Aftereachuse
Frequentlycleanthegrassboxtoensuremaximum
collectioncapability.Brushawayanydebris.
Figure21
1.Vertical-stowposition
2.Uprightposition
4.T ounfoldthehandle,referto2Assemblingthe
Handle(page9).
3.Operatingposition
g342175
19

StoringtheMachineinthe
Vertical-StowPosition
Youcanstoreyourmachineintheverticalpositionto
minimizestoragespace.
WARNING
Foldingorunfoldingthehandleimproperly
candamagethecables,causinganunsafe
operatingcondition.
•Donotdamagethecableswhenfoldingor
unfoldingthehandle.
•Ifacableisdamaged,contactan
AuthorizedServiceDealer.
Note:Youcanhookthegrassboxontothe
handlebarreleasebraceinthisposition(Figure
23).
1.Shutoffthemachine,removethesafetykey ,
andremovethebatterypack;refertoShutting
OfftheMachine(page17).
2.Foldthehandleallthewayforwarduntilitclicks
intoposition;refertoFoldingtheHandle(page
19).
3.Ensurethatthegrassboxisnotinstalledtothe
machine;ifitis,removeit.RefertoRemoving
theGrassBox(page16).
4.Ensurethatthecutting-heightonthemachineis
settothehighestsetting(setting6);ifitisnot,
raiseit.RefertoAdjustingtheCuttingHeight
(page12).
5.Tiltthemachinebackandrollitbythehandle
intoastoragespace(Figure22).
WARNING
Pullingthehandlebarreleasebrace
unlocksthehandlebar,whichmaycause
themowertosuddenlydroptothe
ground.
g356985
Figure23
Donotpullthehandlebarreleasebrace
tomovethemachine.
Figure22
g342176
20

Maintenance
Removethesafetykeyandbatterypackfromthe
machinebeforemaintainingorcleaningthemachine.
Useonlythemanufacturer’srecommended
replacementpartsandaccessories.
Inspectandmaintainthemachineregularly.Have
themachinerepairedonlybyanAuthorizedService
Dealer.
LubricatingtheMachine
Youdonotneedtolubricatethemachine;allthe
bearingshavebeenlubricatedatthefactoryforthe
lifeofthemachine.
ReplacingtheBlade
ServiceInterval:Yearly
Important:Youwillneedatorquewrenchto
installthebladeproperly.Ifyoudonothavea
torquewrenchorareuncomfortableperforming
thisprocedure,contactanAuthorizedService
Dealer.
g357349
Figure24
Ifthebladeisdamagedorcracked,replaceit
immediately.Ifthebladeedgeisdullornicked,have
itsharpenedandbalanced,orreplaceit.
WARNING
Whenservicingtheblade,beawarethatthe
bladecanstillmoveeventhoughthepower
sourceisoff.Thebladeissharp;contacting
thebladecanresultinseriouspersonalinjury.
Weargloveswhenservicingtheblade.
1.Removethesafetykeyandbatterypackfrom
themachine.
2.Useablockofwoodtoholdthebladesteady
(Figure24).
3.Removethebladebolt,washer,andblade;save
thewasherandbladebolt(Figure24).
4.Installthenewblade,washer,andbladebolt
(Figure25).
Important:Positionthecurvedendsofthe
bladefacinguptowardthemachinehousing.
g357350
Figure25
5.Useatorquewrenchtotightenthebladebolt
to35N∙m(26ft-lb).
21

PreparingtheBatteryPack
Storage
forRecycling
Important:Uponremoval,covertheterminalsof
thebatterypackwithheavy-dutyadhesivetape.
Donotattempttodestroyordisassemblethe
batterypackorremoveanyofitscomponents.
ContactyourlocalmunicipalityoryourauthorizedT oro
distributorformoreinformationonhowtoresponsibly
recyclethebattery.
Important:Storethemachine,batterypack,and
chargeronlyintemperaturesthatarewithinthe
appropriaterange;refertoSpecications(page
10).
Important:Ifyouarestoringthebatterypack
fortheoff-season,chargeituntil2or3LED
indicatorsturngreenonthebattery .Donotstore
afullychargedorfullydepletedbattery.When
youarereadytousethemachineagain,charge
thebatterypackuntiltheleftindicatorlightturns
greenonthechargerorall4LEDindicatorsturn
greenonthebattery .
•Disconnecttheproductfromthepowersupply
(i.e.,removethebatterypackandthesafetykey)
andcheckfordamageafteruse.
•Donotstorethemachineorchargerwiththe
batterypackinstalled.
•Cleanallforeignmaterialfromtheproduct.
•Whennotinuse,storethemachine,safetykey,
batterypack,andbatterychargeroutofthereach
ofchildren.
•Keepthemachine,batterypack,andbattery
chargerawayfromcorrosiveagents,suchas
gardenchemicalsandde-icingsalts.
•Toreducetheriskofseriouspersonalinjury,do
notstorethebatterypackoutsideorinvehicles.
•Tightenallfasteners.
•Storethemachine,batterypack,andbattery
chargerinanenclosedclean,dryarea.
Service
ServiceInterval:Yearly
Shouldthismachineneedservice,contactyour
AuthorizedServiceDealer.
22

Troubleshooting
Performonlythestepsdescribedintheseinstructions.Allfurtherinspection,maintenance,andrepairwork
mustbeperformedbyanauthorizedservicecenterorasimilarlyqualiedspecialistifyoucannotsolvethe
problemyourself.
Problem
Themachinedoesnotstart.
Themachinedoesnotrunordoesnotrun
continuously.
Themachinedoesnotreachfullpower.
Thebatterypackloseschargequickly.
PossibleCauseCorrectiveAction
1.Thebatteryisnotfullyinstalledinthe
machine.
2.Thebatterypackisnotcharged.
3.Thebatterypackisdamaged.3.Replacethebatterypack.
4.Thereisanotherelectricalproblem
withthemachine.
1.Thereismoistureontheleadsofthe
batterypack.
2.Thebatteryisnotfullyinstalledintothe
tool.
1.Thebatterypackchargecapacityis
toolow.
2.Theairventsareblocked.
1.Thebatterypackisoverorunderthe
appropriatetemperaturerange.
2.Themachineisoverloaded
1.Removeandthenreplacethebattery
intothemachine,makingsurethatitis
fullyinstalledandlatched.
2.Removethebatterypackfromthe
machineandchargeit.
4.ContactanAuthorizedServiceDealer.
1.Allowthebatterypacktodryorwipeit
dry.
2.Removeandthenreplacethebattery
intothetoolmakingsurethatitisfully
installedandlatched.
1.Removethebatterypackfromthe
machineandfullychargethebattery
pack.
2.Cleantheairvents.
1.Movethebatterypacktoaplace
whereitisdryandthetemperatureis
between5°C(41°F)and40°C(104°F).
2.Cutthegrassatahigherheightofcut
orwalkataslowerpacewhilemowing.
Thebatterychargerisnotworking.
Themachinedoesnotself-propel.
TheLEDindicatorlightonthebattery
chargerisred.
1.Thebatterychargerisoverorunder
theappropriatetemperaturerange.
2.Theoutletthatthebatterychargeris
pluggedintodoesnothavepower.
1.Theselfpropeldrivesystemorpower
cableisdamaged.
1.Thebatterychargerand/orbattery
packisoverorundertheappropriate
temperaturerange.
1.Unplugthebatterychargerandmove
ittoaplacewhereitisdryandthe
temperatureisbetween5°C(41°F)
and40°C(104°F).
2.Contactyourlicensedelectricianto
repairtheoutlet.
1.ContactanAuthorizedServiceDealer.
1.Unplugthebatterychargerandmove
thebatterychargerandbatterypack
toaplacewhereitisdryandthe
temperatureisbetween5°C(41°F)
and40°C(104°F).
23

Problem
PossibleCauseCorrectiveAction
TheLEDindicatorlightonthebattery
chargerisblinkingred.
Themachineisproducingabeeping
sound.
1.Thereisanerrorinthecommunication
betweenthebatterypackandthe
charger.
2.Thebatterypackisweak.
1.Thebatterypackisnotcharged.
2.Themachineisinanunsafeposition
foroperation.
3.Themachineisoverloaded.
4.Thereisanotherelectricalproblem
withthemachine.
1.Removethebatterypackfromthe
batterycharger,unplugthebattery
chargerfromtheoutlet,andwait10
seconds.Plugthebatterychargerinto
theoutletagainandplacethebattery
packonthebatterycharger.IftheLED
indicatorlightonthebatterychargeris
stillblinkingred,repeatthisprocedure
again.IftheLEDindicatorlighton
thebatterychargerisstillblinkingred
after2attempts,properlydisposeof
thebatterypackatabatteryrecycling
facility.
2.Contactyourauthorizedservicedealer
ifthebatteryisinwarranty,orproperly
disposeofthebatterypackatabattery
recyclingfacility .
1.Removethebatterypackfromthe
machineandchargeit.
2.Ensurethatthemachineisnotatan
extremeanglewhileoperating.
3.Cutthegrassatahigherheightofcut
orwalkataslowerpacewhilemowing.
4.Attempttheothertroubleshooting
actions,ifthealarmstillsounds,
contactanAuthorizedServiceDealer .
Thequalityofcutisdecreasedor
unsatisfactory.
Thebaggingisdecreasedor
unsatisfactory.
Themachineisvibrating.1.Thebladeisbentordamaged.
1.Thebladeisdull.1.Havethebladesharpenedorreplaced.
2.Thecuttingdeckhasdebrisbuildup.
1.Themachineisoverloaded.
2.Thegrassboxventsareblocked.
1.Thebladeisdull.1.Havethebladesharpenedorreplaced. Themachineiscuttingunevenly.
2.Thecuttingdeckisdamaged.
2.Cleanunderthemachine.
1.Cutthegrassatahigherheightofcut.
2.Cleanthegrassboxwithwateranda
softbrush.
2.ContactanAuthorizedServiceDealer.
1.Inspectthebladeandreplaceif
necessary.
24

EEA/UKPrivacyNotice
Toro’sUseofYourPersonalInformation
TheT oroCompany(“T oro”)respectsyourprivacy.Whenyoupurchaseourproducts,wemaycollectcertainpersonalinformationaboutyou,eitherdirectly
fromyouorthroughyourlocalT orocompanyordealer.T orousesthisinformationtofullcontractualobligations-suchastoregisteryourwarranty,
processyourwarrantyclaimortocontactyouintheeventofaproductrecall-andforlegitimatebusinesspurposes-suchastogaugecustomer
satisfaction,improveourproductsorprovideyouwithproductinformationwhichmaybeofinterest.T oromayshareyourinformationwithoursubsidiaries,
afliates,dealersorotherbusinesspartnersinconnectiontheseactivities.Wemayalsodisclosepersonalinformationwhenrequiredbylaworin
connectionwiththesale,purchaseormergerofabusiness.Wewillneversellyourpersonalinformationtoanyothercompanyformarketingpurposes.
RetentionofyourPersonalInformation
Torowillkeepyourpersonalinformationaslongasitisrelevantfortheabovepurposesandinaccordancewithlegalrequirements.Formoreinformation
aboutapplicableretentionperiodspleasecontactlegal@toro.com.
Toro’sCommitmenttoSecurity
YourpersonalinformationmaybeprocessedintheUSoranothercountrywhichmayhavelessstrictdataprotectionlawsthanyourcountryofresidence.
Wheneverwetransferyourinformationoutsideofyourcountryofresidence,wewilltakelegallyrequiredstepstoensurethatappropriatesafeguardsare
inplacetoprotectyourinformationandtomakesureitistreatedsecurely .
AccessandCorrection
Youmayhavetherighttocorrectorreviewyourpersonaldata,orobjecttoorrestricttheprocessingofyourdata.Todoso,pleasecontactusbyemail
atlegal@toro.com.IfyouhaveconcernsaboutthewayinwhichT orohashandledyourinformation,weencourageyoutoraisethisdirectlywithus.
PleasenotethatEuropeanresidentshavetherighttocomplaintoyourDataProtectionAuthority .
374-0282RevC


FormNo.3442-676RevC
Flex-ForcePowerSystem
60VMAX36cmund43cm
Rasenmäher
Modellnr.21836—Seriennr.321000001undhöher
Modellnr.21836T—Seriennr.321000001undhöher
Modellnr.21843—Seriennr.321000001undhöher
Modellnr.21843T—Seriennr.321000001undhöher
Modellnr.21844—Seriennr.321000001undhöher
Modellnr.21844T—Seriennr.321000001undhöher
™
RegistrierenSieIhrProduktunterwww.T oro.com.
Originaldokuments(DE)
*3442-676*

WennSieUnterstützung
benötigen,gehenSieauf
www.Toro.com/support
oderwendenSiesich
anIhrenautorisierten
Service-Händler,bevor
SiediesesProdukt
zurückgeben.
DiesesProdukterfülltallerelevanteneuropäischen
Richtlinien;weitereDetailsndenSieinder
produktspezischenKonformitätserklärung(DOC).
Einführung
WendenSiesichandenToro-Vertragshändler
oderKundendienst,wennSieeineServiceleistung,
OriginalersatzteilevonTorooderweitere
Informationenbenötigen.HabenSiedafürdieModellundSeriennummernderMaschinegriffbereit.Bild1
zeigtdiePositionderModell-undSeriennummern
amProdukt.TragenSiehierbittedieModell-und
SeriennummerndesGerätsein.
Wichtig:ScannenSiemitIhremMobilgerätden
QR-CodeaufdemSeriennummernaufkleber(falls
vorhanden),umaufGarantie-,Ersatzteil-oder
andereProduktinformationenzuzugreifen.
g275230
Bild1
DieserhandgeführteRasenmähermitSichelmessern
solltevonPrivatleutenverwendetwerden.Er
isthauptsächlichfürdasMähenvonGrasauf
gepegtenGrünächeninPrivatanlagengedacht.
EristnichtfürdasSchneidenvonBüschenoder
füreinenlandwirtschaftlichenEinsatzgedacht.Er
istfürdieVerwendungmitdenToroFlex-Force
Lithium-Ionen-Akkumodellen81825(imLieferumfang
vonModell21836enthalten),Modelle81850(im
LieferumfangvonModell21843undModell21844)
enthalten)undModell81860oderModell81875
vorgesehen.DieseAkkupackssindsoausgelegt,
dasssienurmitdenAkkuladegerätemodellen81802
(imLieferumfangderModelle21836,21843und
21844enthalten)oder81805geladenwerdenkönnen.
DerzweckfremdeEinsatzdieserProduktekannfür
SieundUnbeteiligtegefährlichsein.
DieModelle21836T ,21843Tund21844Tenthalten
wedereinenAkkunocheinLadegerät
LesenSiedieseInformationensorgfältigdurch,
umsichmitdemordnungsgemäßenEinsatzund
derWartungdesGerätsvertrautzumachenund
VerletzungenundeineBeschädigungdesGerätszu
vermeiden.SietragendieVerantwortungfüreinen
ordnungsgemäßenundsicherenEinsatzdesGeräts.
BesuchenSiewww.toro.comhinsichtlich
Sicherheitstipps,Schulungsunterlagen,
Zubehörinformationen,StandorteinesHändlersoder
RegistrierungdesProdukts.
1.TypenschildmitModell-undSeriennummer
Modellnr.
Seriennr.
IndieserAnleitungwerdenpotenzielleGefahren
angeführt,undSicherheitshinweisewerdenvom
Sicherheitswarnsymbol(Bild2)gekennzeichnet.
DiesesWarnsymbolweistaufeineGefahrhin,diezu
schwerenodertödlichenVerletzungenführenkann,
wennSiedieempfohlenenSicherheitsvorkehrungen
nichteinhalten.
g000502
Bild2
Sicherheitswarnsymbol
IndieserAnleitungwerdenzweiBegriffezur
HervorhebungvonInformationenverwendet.Wichtig
weistaufspezielletechnischeInformationenhin,und
HinweishebtallgemeineInformationenhervor,die
IhrebesondereBeachtungverdienen.
©2021—TheToro®Company
8111LyndaleAvenueSouth
Bloomington,MN55420
KontaktierenSieunsunterwww.T oro.com.
2
AlleRechtevorbehalten
Druck:China

Inhalt
Sicherheit
Sicherheit..................................................................3
Sicherheits-undBedienungsschilder.................6
Einrichtung................................................................8
1BefestigungdesAkkuladegeräts
(optional).........................................................8
2ZusammenbauendesHolms...........................9
Produktübersicht.....................................................10
TechnischeDaten............................................10
VordemEinsatz...................................................11
EinsetzendesAkkupacks..................................11
EinstellenderSchnitthöhe................................12
WährenddesEinsatzes.......................................13
AnlassenderMaschine....................................13
VerwendendesSelbstantriebs.........................13
EinstellenderMesserdrehzahl.........................13
Schnittgutrecyclen............................................14
SammelndesSchnittguts.................................15
AbstellenderMaschine....................................17
EntfernendesAkkupacksausder
Maschine......................................................17
Betriebshinweise.............................................18
NachdemEinsatz...............................................19
AuadendesAkkupacks..................................19
ReinigenderMaschine.....................................19
ZusammenklappendesHolms.........................20
LagernderMaschineinderaufrechten
Lagerstellung................................................21
Wartung..................................................................22
SchmierenderMaschine..................................22
AuswechselndesMessers...............................22
VorbereitendesAkkupacksfür
Recycling......................................................23
Einlagerung............................................................23
Service.............................................................23
Fehlersucheund-behebung...................................24
WICHTIGE
SICHERHEITSANWEISUN-
GEN
WARNUNG:BeiderVerwendungeinerelektrischen
MaschinesinddiegrundlegendenSicherheitshinweise
undAnweisungenimmerzulesenundeinzuhalten,
umdieGefahreinesBrands,einesStromschlagsund
vonVerletzungenzuverringern,u.a.:
I.Schulung
1.DerBedienerderMaschineistfüralleUnfälle
oderGefahrenfürDritteundderenEigentum
verantwortlich.
2.LassenSieKindernichtmitderMaschine,dem
AkkupackoderdemAkkuladegerätspielen;das
MindestaltervonBenutzernistmöglicherweise
vonörtlichenVorschriftenvorgegeben.
3.KinderodernichtgeschultePersonen
dürfendieMaschinewederverwendennoch
warten.LassenSienurPersonenzu,die
verantwortungsbewusst,geschult,mitden
Anweisungenvertraut,undkörperlichinder
Lagesind,dieMaschinezubedienenundzu
warten.
4.VorderVerwendungderMaschine,des
AkkupacksunddesAkkuladegerätsalle
AnweisungenundWarnaufkleberaufdiesen
Produktenlesen.
5.MachenSiesichmitdenBedienelementen
undderordnungsgemäßenBedienung
derMaschine,desAkkupacksunddes
Akkuladegerätsvertraut.
II.V orbereitung
1.HaltenSieUnbeteiligte,besonderskleineKinder
undHaustiere,ausdemArbeitsbereichfern.
2.BedienenSiedieMaschineniemals,
wennnichtalleSchutzvorrichtungen
undSicherheitsvorrichtungenwiez.B.
AblenkblecheundGrasfangkörbeangebracht
undfunktionstüchtigsind.
3.PrüfenSiedenArbeitsbereichderMaschine
undentfernenSiealleObjektediesichaufden
EinsatzderMaschineauswirkenodervonihr
aufgeschleudertwerdenkönnten.
4.StellenSievorjederVerwendungderMaschine
sicher,dassdasMesser,dieMesserschraube
unddieMessereinheitnichtabgenutztoder
beschädigtsind.ErsetzenSieallebeschädigten
oderunleserlichenAufkleber.
5.VerwendenSienureinenvonToroangegebenen
Akkupack.DieVerwendungvonanderem
3

ZubehöroderAnbaugerätenkannein
Verletzungs-oderBrandrisikobergen.
6.DasEinsteckendesAkkuladegerätsineine
SteckdosemiteineranderenSpannungals
100bis240V,kannzueinemBrandoder
Stromschlagführen.SteckenSiedasLadegerät
nichtineineSteckdosemiteineranderen
Spannungals100bis240V.Beieinem
anderenAnschlussdesignkannbeiBedarfein
SteckeradaptermitderrichtigenKonguration
fürdieSteckdoseverwendetwerden.
7.VerwendenSiekeinebeschädigtenoder
verändertenAkkupacksoderAkkuladegeräte,
dasiesichunerwartetverhaltenundBrand,
ExplosionoderVerletzungenverursachen
können.
8.WenndasStromkabeldesAkkuladegeräts
beschädigtist,tretenSiefürErsatzmiteinem
VertragshändlerinKontakt.
9.VerwendenSiekeinenichtauadbarenAkkus.
10.LadenSiedenAkkupacknurmiteinemvonToro
angegebenenAkkuladegerät.EinLadegerät,
dasfürdeneinenAkkupacktypgeeignetist,
kannbeieinemanderenAkkupackzueiner
Brandgefahrführen.
11.LadenSiedenAkkupacknurineinemgut
belüftetenBereichauf.
12.SetzenSieeinemAkkupackoderein
AkkuladegerätkeinemFeueroderTemperaturen
vonüber68°Caus.
13.BefolgenSiealleAnweisungenzum
AuadenundladenSiedenAkkupacknicht
außerhalbdesinderAnweisungangegeben
Temperaturbereichs.Andernfallskann
derAkkupackbeschädigtwerdenunddie
Brandgefahrsteigen.
14.GeeigneteKleidung:TragenSiegeeignete
Kleidung,u.a.eineSchutzbrille,langeHosen,
rutschfesteArbeitsschuhe(keineSandalen
undnichtbarfuß)undeinenGehörschutz.
BindenSielangesHaarzusammenund
tragenSiekeineloseKleidungoderlosen
Schmuck,derinbeweglichenTeilenhängen
bleibenodereingezogenwerdenkann.Tragen
SieinstaubigenBetriebsbedingungeneine
Staubmaske.
III.Betrieb
1.DerKontaktmiteinemsichdrehenden
MesserskanneszuschwerenVerletzungen
führen.HaltenSieIhreHändeundFüßevom
Schnittbereichundallenanderenbeweglichen
TeilenderMaschinefern.BleibenSieimmer
vonderAuswurföffnungfern.
2.WenndieseMaschinefüreinenanderenZweck
alsvorgeseheneingesetztwird,kanndasfür
BedienerundanderePersonengefährlichsein.
3.KuppelnSiedenSelbstantriebaus(falls
vorhanden),bevorSiedieMaschine
einschalten.
4.NeigenSiedasGerätbeimStartdesMotors
nicht.
5.VerhindernSieunbeabsichtigtesStarten:Stellen
Siesicher,dassSicherheitsschlüsselausder
Maschineentferntist,bevorSiedenAkkupack
einsetzenunddieMaschinebenutzen.
6.KonzentrierenSiesichimmerbeider
VerwendungderMaschine.TunSienichts,
wasSieablenkenkönnte,sonstkönnen
VerletzungenoderSachschädenauftreten.
7.HaltenSiedieMaschinean,entfernenSieden
Sicherheitsschlüssel,nehmenSiedenAkku
ausderMaschineundwartenSie,bisalle
BewegungenzumStillstandgekommensind,
bevorSiedieMaschineeinstellen,warten,
reinigenoderaufbewahren.
8.EntfernenSiedenAkkupackundden
SicherheitsschlüsselvonderMaschine,wenn
SiesieunbeaufsichtigtlassenoderbevorSie
Zubehörteilewechseln.
9.BelastenSiedieMaschinenichtübermäßig:Sie
holendasMeisteausderMaschineheraus,
wennSiesiemitdervorgesehenenLeistung
laufenlassen.
10.SeienSiewachsam:AchtenSieaufdas,was
SietunundlassenSiebeiderBenutzungder
MaschinegesundenMenschenverstandwalten.
VerwendenSiedieMaschinenicht,wennSie
müdeoderkranksindoderunterAlkohol-oder
Drogeneinussstehen.
11.SetzenSiedieMaschinenurbeiguten
Sichtverhältnissenundgeeigneten
Witterungsbedingungenein.FahrenSie
dieMaschineniebeiGewitter,bzw.wenn
GefahrdurchBlitzschlagbesteht.
12.SeienSieäußerstvorsichtig,wennSiedas
GerätzurücksetzenoderinIhreRichtung
ziehen.
13.AchtenSieimmerauffestenStandundBalance,
besondersanAbhängen.MähenSieimmer
querzumHang,nichthangaufwärtsoder
-abwärts.GehenSiebeimRichtungswechselan
Hanglagenäußerstvorsichtigvor.Versuchen
Sienicht,steileHängezumähen.GehenSie
mitderMaschine.Niemalsrennen.
14.WerfenSiedasSchnittgutnichtgegenPersonen
aus.VermeidenSie,Materialgegeneine
WandodereinHindernisauszuwerfen,dadas
4

MaterialaufSiezurückprallenkann.StellenSie
das/dieMähmesserab,wennSieeinegrasfreie
Oberächenüberqueren.
15.AchtenSieaufLöcher,Rillen,Bodenwellen,
SteineoderandereverborgeneObjekte.
UnebenesGeländekanndazuführen,dassSie
dasGleichgewichtoderdenHaltverlieren.
16.NassesGrasund/odernasseBlätterkönnen
zuschwerenVerletzungenführen,solltenSie
daraufausrutschenundmitdemMesserin
Berührungkommen.VermeidenSieeinMähen
innassenBedingungenoderimRegen.
17.StellenSiedieMaschinesofortab,wennsie
aufeinenGegenstandaufpralltoderanfängtzu
vibrieren,ziehendenSicherheitsschlüsselab,
entfernenSiedenAkkupackundwartenSie,bis
allebeweglichenTeilezumStillstandgekommen
sind,bevorSiedieMaschineaufeventuelle
Beschädigungenuntersuchen.FührenSiealle
erforderlichenReparaturendurch,eheSiedie
MaschinewiederinGebrauchnehmen.
18.HaltenSiedieMaschineanundentfernen
SiedenSicherheitsschlüssel,bevorSiedie
MaschinefürdenTransportauaden.
19.UntermissbräuchlichenBedingungenkann
FlüssigkeitausdemAkkupackaustreten.
VermeidenSieKontakt.WennSiedie
Flüssigkeitversehentlichberühren,mitWasser
spülen.WenndieFlüssigkeitinIhreAugen
gelangt,suchenSieeinenArztauf.Vom
AkkupackausgestoßeneFlüssigkeitkannzu
HautreizungenoderVerbrennungenführen.
IV.WartungundLagerung
1.HaltenSiedieMaschinean,entfernenSieden
Sicherheitsschlüssel,nehmenSiedenAkku
ausderMaschineundwartenSie,bisalle
BewegungenzumStillstandgekommensind,
bevorSiedieMaschineeinstellen,warten,
reinigenoderaufbewahren.
2.VersuchenSienicht,dieMaschinezureparieren,
außerindemindenAnweisungenangegebenen
Maße.LassenSiedieMaschinedurcheinen
VertragshändlermitidentischenErsatzteilen
instandsetzen.
3.TragenSiebeimDurchführenvon
WartungsarbeitenHandschuheundeine
Schutzbrille.
4.ErsetzenSieeinMesser,wennesverbogen,
verschlissenoderangebrochenist.EinMesser,
dasnichtimGleichgewichtist,kannVibrationen
erzeugen,diedenMotorbeschädigenoderzu
Verletzungenführenkönnen.
5.BeimWartendesMessersdaraufachten,
dasssichdasMesserauchbeigetrennter
Stromversorgungnochbewegenkann.
6.PrüfenSiedenGrasfangkorbregelmäßigauf
VerschlechterungoderVerschleißundersetzen
SieeinenverschlissenenKorbmiteinem
ErsatzkorbvonToro.
7.UmeinebestmöglicheLeistungsicherzustellen,
verwendenSienurOriginalersatzteileund
-zubehörteilevonT oro.AndereErsatz-und
Zubehörteilekönnengefährlichseinundeine
VerwendungkönntedieGarantieungültig
machen.
8.WartenSiedieMaschine:HaltenSiedie
Schnittkantenscharfundsauber,umeine
bestmöglicheundsichereLeistungzu
gewährleisten.HaltenSiedieHolmetrocken,
sauberundöl-undfettfrei.LassenSiedie
Schutzvorrichtungeninfunktionierendem
Zustanddort,wosiehingehören.HaltenSiedie
Messerscharf.VerwendenSienuridentische
Messer.
9.PrüfenSiedieMaschineaufbeschädigte
Teile:WennSchutzvorrichtungenoderandere
Teilebeschädigtsind,stellenSiefest,obdie
Maschinenochbenutzbarist.AchtenSieauf
schlechtausgerichteteundsichberührende
beweglicheT eile,defekteT eilebzw.Befestigung
undalleanderenZustände,diedenBetrieb
beeinträchtigenkönnten.Solangeinden
Anweisungennichtandersangegeben,lassen
SiebeschädigteSchutzvorrichtungenundT eile
nurvoneinemautorisiertenVertragshändler
reparierenbzw.austauschen.
10.HaltenSieeinnichtverwendetesAkkupack
vonMetallobjektenfern,u.a.Briefklammern,
Münzen,Schlüssel,Nägel,Schrauben,dieeine
VerbindungvoneinemPolzueinemanderen
herstellenkönnen.EinKurzschließender
AkkupolekannzuVerbrennungenodereinem
Brandführen.
11.PrüfenSiedasMesserunddieMotorbefestigungsschraubenregelmäßigaufFestigkeit.
12.WennSiedieMaschinenichtverwenden,
lagernSiesiedrinnen,aneinemtrockenen
undsicherenOrtaußerhalbderReichweitevon
Kindern.
13.ACHTUNG:einfalschgehandhabtes
AkkupackkanneinBrandrisikodarstellenoder
Verätzungenverursachen.DemontierenSieden
Akkupacknicht.ErwärmenSiedenAkkupack
nichtüber68°CundverbrennenSieihnnicht.
ErsetzenSiedenAkkupacknurdurchein
OriginalakkupackvonToro.DieVerwendung
einesanderenAkkupacktypskannzueinem
BrandodereinerExplosionführen.HaltenSie
AkkupacksvonKindernfernundbewahren
sieinderOriginalverpackungauf,bisSiesie
verwenden.
5

14.EntsorgenSiedenAkkunichtdurchVerbrennen.
DieZellenkönnenexplodieren.PrüfenSievor
OrtgeltendeGesetzeinBezugaufmögliche
spezielleAnweisungenzurEntsorgung.
BEWAHRENSIEDIESE
Sicherheits-undBedienungsschilder
DieSicherheits-undAnweisungsaufklebersindgutsichtbar;siebendensichinderNähe
dermöglichenGefahrenbereiche.T auschenSiebeschädigteoderverlorengegangene
Aufkleberaus.
134-6016
SICHERHEITSANWEISUNGENAUF
decal134-6016
1.Motordrehzahl:Langsam
2.Motordrehzahl:Schnell
134-5099
1.Warnung:BerührenSiedieMähmessernichtmitden
HändenoderFüßen.
134-5297
1.MaxPowerModus
decal134-5099
decal134-5297
1.Warnung:LesenSiedie
Bedienungsanleitung.
2.Schnitt-bzw.
Amputationsgefahr
fürHändeam
Mähwerkmesser:
BerührenSiekeine
beweglichenTeileund
nehmenSiekeine
Schutzblecheund
Schutzvorrichtungen
ab.
3.Schnitt-/AmputationsgefahrderHändeoderFüße
amMähmesser:ziehen
SiedenSchlüsselab
undlesenSiedieBedie-
nungsanleitung,bevorSie
Wartungsarbeitendurchführen.
decal134-4550
134-4550
4.Gefahrdurch
aufgeschleuderte
Gegenstände:HaltenSie
Unbeteiligtefern;schalten
SiedenMotorab,bevor
SiedieBedienposition
verlassen;hebenSie
verstreuteTeileauf,bevor
SiemitdemMähen
beginnen.
5.Schnitt-/AmputationsgefahrderHändeoderFüße
amMähmesser:Mähen
Sieniehangaufwärtsoder
-abwärts,mähenSieimmerwaagrechtzumHang.
SchauenSienachhinten,
wennSierückwärtsfahren.
decal137-9461
137-9461
1.Akkuladestatus
6

Modell81825
decal137-9487
Modell81850
137-9487
1.LesenSiedie
4.NichtFeueraussetzen.
Bedienungsanleitung.
2.RecycelnSiedieAkkus
ordnungsgemäß.
3.Nichtwegwerfen.
5.NichtRegenaussetzen.
1.LesenSiedie
Bedienungsanleitung.
2.RecycelnSiedieAkkus
ordnungsgemäß.
3.Nichtwegwerfen.
137-9495
1.LesenSiedieBedienungsanleitung.3.FürdenGebrauchimInnenbereich.
2.Nichtwegwerfen.
4.Doppeltisoliert
decal140-2158
140-2158
4.NichtFeueraussetzen.
5.NichtRegenaussetzen.
decal137-9495
1.DerAkkupacklädt.
2.DerAkkupackistvollständigaufgeladen.
3.DerAkkupackistnichtimgeeignetenT emperaturbereich.
4.AkkupackLadefehler
decal137-9463
137-9463
7

Einrichtung
Wichtig:DerAkkupackistbeimKaufnichtvollständigaufgeladen.BevorSiedieMaschinezumersten
Malverwenden,sieheAuadendesAkkupacks(Seite19).
Hinweis:DerSicherheitsschlüsselundalleanderenlosenTeilesindfüreinesichereAuslieferungimAkkufach
untergebracht.StellenSiesicher,dassSiesievorderMontageausdemFachentfernenundaneinemsicheren
Ortaufbewahren.
1
Befestigungdes
Akkuladegeräts(optional)
FürdiesenArbeitsschritterforderlicheT eile:
2
Befestigungsmaterial(nichtenthalten)
Verfahren
SiekönnenbeiBedarfdasLadegerätmitden
AussparungenzurWandmontageaufderRückseite
desLadegerätsanderWandbefestigen.
BefestigenSieesimInnenbereich(wiez.B.ineiner
GarageoderaneinemanderentrockenenOrt)inder
NäheeinerSteckdoseundaußerhalbderReichweite
vonKindern.
InBild3ndenSieHinweisezumBefestigendes
Ladegeräts.
SchiebenSiedasLadegerätüberdierichtig
angebrachtenBefestigungen,umdasLadegerätzu
befestigen(Befestigungenliegennichtbei).
Bild3
g290534
8

2
Zusammenbauendes
Holms
FürdiesenArbeitsschritterforderlicheT eile:
1
ObereHolmbaugruppe
2
Schraube
2
Sicherungsmutter
Verfahren
Wichtig:EntfernenundentsorgenSiedie
Kunststoffschutzfolie,indiederRasenmäher
eingepacktist,sowiealleanderenKunststoffe
oderVerpackungenanderMaschine.
Hinweis:EntfernenSiedieGummistopfenvom
Holm,bevorSiedieobereHolmstangeindie
untereHolmstangeeinführen.Diesewerdenbeider
Herstellunghinzugefügt,umeineBeschädigungder
Kabelzuverhindern.
WARNUNG:
WennSiedenHolmfalschauf-oder
zusammenklappen,könnenSiedieKabel
beschädigenunddensicherenGeräteeinsatz
gefährden.
•BeschädigenSiebeimAuf-oder
ZusammenklappendesHolmsnichtdie
Kabel.
•WendenSiesichbeieinembeschädigten
KabelaneinenofziellenVertragshändler.
1.BringenSiedieobereHolmbaugruppeam
unterenHolmanundsichernSieihnmitzwei
SchraubenundzweiSicherungsmuttern,wiein
Bild4dargestellt.
g342173
Bild4
2.ZiehenSiedieHolmarretierungsstrebe
inRichtungdesoberenHolms,umdie
Holmarretierungzulösen(Bild5).
3.BringenSiedenHolmnachhintenin
dieBetriebspositionundlassenSiedie
Holmarretierungsstrebelos(Bild5).
Hinweis:AchtenSiedarauf,dassderHolm
einrastet.
g341335
Bild5
9

Produktübersicht
TechnischeDaten
Modell
21836/T
Gewicht
(ohne
Akku)
20,2kg130,6cm41,7cm107,3cm
Länge
Breite
Höhe
Bild6
1.Akkukasten
2.Heckablenkblech7.Füllstandanzeigedes
3.Holmarretierungsstrebe8.Fangkorb
4.Schaltbügel
5.Führungsholm
6.Selbstantriebsbügel(nur
Modell21844)
Grasfangkorbs
9.Schnitthöhen-Taste
10.Anzeigefensterder
Schnitthöhe
21843/T
21844/T
22,1kg136,2cm48,5cm108,5cm
24,0kg136,2cm48,5cm108,5cm
SmartStowAbmessungen
Modell
21836/T
21843/T
21844/T
Länge
41,2cm41,7cm113,5cm
41,0cm48,5cm114,0cm
41,0cm48,5cm114,0cm
Breite
Höhe
Akkupack
Modell8182581850
g364064
Akkupackleistung
Akkuherstellerangabe=Max.60Voltund54Voltnominal.
TatsächlicheSpannunghängtvonderLastab.
2,5Ah4,0Ah
135Wh216Wh
Akkuladegerät
Modell81802
Typ60VoltMAX,Lithium-Ionen-
Eingabe
Ausgabe
Akkuladegerät
100bis240VAC50/60HzMax2,0A
60VMAXDC2,0A
1.Akkuladegerät,Modell
81802(imLieferumfang
vonModell21836,21843
und21844enthalten)
2.Akkupack,Modell81850
(imLieferumfangvon
Modell21843und21844
enthalten)
Bild7
3.Akkupackmodell81825
(mitModell21836
mitgeliefert)
GeeigneteTemperaturbereiche
Auaden/Lagerndes
Akkupacksbei
VerwendungdesAkkupacks
bei
g342171
VerwendungderMaschinebei
*DieLadezeitwirdverlängert,wennSiedenAkkupack
nichtindiesemBereichauaden.
LagernSiedieMaschine,denAkkupackunddas
AkkuladegerätaneinemsauberenundtrockenenOrt.
10
5°Cbis40°C*
-30°Cbis49°C
0°Cbis49°C*

Betrieb
Hinweis:BestimmenSiedielinkeundrechteSeitederMaschineanhandderüblichenBetriebsposition.
VordemEinsatz
EinsetzendesAkkupacks
Wichtig:VerwendenSiedenAkkupacknurbeiT emperaturenimangemessenenBereich,siehe
TechnischeDaten(Seite10).
1.StellenSiesicher,dassderSicherheitsschlüsselnichtanderMaschineeingesetztist.
2.StellenSiesicher,dasssichindenBelüftungsöffnungendesAkkuskeinStauboderSchmutzbendet.
3.ÖffnenSiedenDeckeldesAkkukastens(AinBild8).
4.RichtenSiedieVertiefungimAkkupackmitderNaseanderMaschineausundschiebenSieden
AkkupackindenKasten,biserinseinerPositioneinrastet(BinBild8).
5.SchließenSiedenDeckeldesAkkukastens(CinBild8).
Hinweis:WennsichderAkkufachdeckelnichtvollständigschließt,istderAkkupacknichtvollständig
eingesetzt.
Bild8
g341293
11

EinstellenderSchnitthöhe
DieSchnitthöheistin6Stufenzwischen19mmund
70mmeinstellbar.
WARNUNG:
BeimEinstellenderSchnitthöhekönnenIhre
HändemiteinemsichdrehendenMähmesser
inKontaktgeraten,wasschwereVerletzungen
zurFolgehabenkann.
•SchaltenSievordemEinstellender
SchnitthöhedenMotorab,entfernen
SiedieAkkuundwartenSie,bis
allebeweglichenTeilezumStillstand
gekommensind.
•FührenSieIhreFingerbeimEinstellender
SchnitthöhenieunterdasMähwerk.
UmdieSchnitthöheeinzustellen,drückenSiedie
Schnitthöhen-TasteundhebenodersenkenSiedas
Mähwerk,bisdiegewünschteSchnitthöheneinstellung
imSchnitthöhenfensterangezeigtwird(Bild9).
Anzeige
Schnitthöheneinstellung
1(niedrigste)
2
3
4
5
6(höchste)
Bild9
1.Schnitthöhen-Taste2.Sichtfensterfürdie
Schnitthöhe
g364065
12

WährenddesEinsatzes
Verwendendes
Selbstantriebs
AnlassenderMaschine
1.VergewissernSiesich,dassderAkkupack
aufgeladenundinderMaschineeingesetztist;
sieheEinsetzendesAkkupacks(Seite11).
2.SetzenSiedenSicherheitsschlüsselindie
Maschineein(Bild10).
NurModell21844/T
•UmdieGeschwindigkeitdesSelbstantriebs
einzustellen,verstellenSieden
Geschwindigkeitsregler(Bild12).
•EinkuppelndesSelbstantriebs:ZiehenSiedie
SelbstantriebsbügelzumHolmundhaltenSie
dieseindieserStellungfest(Bild12).
•AuskuppelndesSelbstantriebs:LassenSie
dieSelbstantriebsbügellos.
Hinweis:UmdieFahrgeschwindigkeitzuverrin-
gern,bewegenSiedenGeschwindigkeitsregler
nachlinks.ZumErhöhenderFahrgeschwindigkeit,
bewegenSiedenGeschwindigkeitsreglernach
rechts.
Bild10
3.DrückenSiediePower-TasteinderMittedes
oberenHolms,umdieMaschineeinzuschalten.
4.DrückenSiedieSchaltbügel,umdieMaschine
zustarten.
Bild11
g344530
g342174
Bild12
1.GeschwindigkeitsreglerSelbstantrieb
2.MAX-Taste
3.Selbstantriebsbügel
Einstellender
Messerdrehzahl
DieseMaschineverfügtüberzweiMesserdrehzahleinstellungen:RUNSMARTundMAX.
•ImModusRUNSMARTwirddieMesserdrehzahl
automatischfüreinehöhereEfzienzangepasst.
g341398
ÄnderungenderSchnittbedingungenwerden
erkanntunddieMesserdrehzahlerhöhtsich,wenn
dieszurAufrechterhaltungderSchnittqualität
notwendigist.
•ImModusMAXbleibtdieMesserdrehzahlimmer
aufderhöchstenDrehzahl.
13

DrückenSiedieTasteMAXunterhalbderEin-Taste,
umdieMaschineaufdieMAXDrehzahleinzustellen
(Bild12).
Schnittgutrecyclen
DerRasenmäheristwerksseitigaufdasRecycelnvon
SchnittgutundLaubeingestellt.
NehmenSieggf.denGrasfangkorbvonderMaschine
ab,bevorSiedasSchnittgutrecyclen.Siehe
EntfernendesGrasfangkorbs(Seite16).
EinsetzendesMulchstopfens
1.SchaltenSiedieMaschineabundentfernenSie
denAkkupackunddenSicherheitsschlüssel;
sieheAbstellenderMaschine(Seite17).
2.StellenSiedieMaschineindieaufrechte
Aufbewahrungsstellung,sieheLagernder
MaschineinderaufrechtenLagerstellung(Seite
21).
3.ReinigenSiedieUnterseitedesMähwerks,um
sicherzustellen,dassderMulchstopfenrichtig
installiertwird;sieheReinigenunterdemGerät
(Seite19).
EntfernendesMulchstopfens
UmdenMulchstopfenzuentfernen,nehmenSie
denAkkuherausundführenSiedieSchritte
unterEinsetzendesMulchstopfens(Seite14)in
umgekehrterReihenfolgeaus.
4.RichtenSiedenMulchstopfenausunddrücken
SiedieUnterseitedesSteckersein,biserauf
denbeidenHaltestifteneinrastet,wieinBild13
dargestellt.
Wichtig:DieUnterseitedesMulchstopfens
solltebeiordnungsgemäßerInstallation
bündigmitderUnterseitedesMähwerks
abschließen;wennderMulchstopfennicht
korrektinstalliertist,verwendenSieihn
nicht;wendenSiesichanIhrenautorisierten
Servicehändler.
Bild13
g342177
14

SammelndesSchnittguts
VerwendenSiedenGrasfangkorb,wennSieSchnittgutundLaubvomRasenaufsammelnmöchten.
BendetsichderMulchstopfennochanderMaschine,entfernenSiediesen,bevorSiedasSchnittgutüberden
Grasfangkorbaufsammeln.SieheEntfernendesMulchstopfens(Seite14).
AnbringendesGrasfangkorbs
1.BringenSiedenHolmindieaufrechteStellungundhebenSiedashintereAblenkblech(AinBild14)an.
2.SetzenSiedieHakendesGrasfangkorbsindieAussparungenanderRückseitederMaschineein
(BvonBild14).
3.LassenSiedashintereAblenkblechaufdemGrasfangkorbauiegen(CinBild14).
4.BringenSiedenHolmwiederindieBetriebsstellung,sieheZusammenklappendesHolms(Seite20).
Bild14
FüllstandanzeigedesGrasfangkorbs
DerGrasfangkorbistmiteinerVoll-AnzeigeanderRückseitedesHardtopsausgestattet.Währendder
GrasaufnahmeströmtLuftdurchdenGrasfangkorbundhebtdieAnzeigeklappeindieoffeneStellung.Wenn
derGrasfangkorbvollist,wirdderLuftstromunterbrochen,unddieAnzeigeklappeschließtsich.
g341400
Bild15
g363501
15

EntfernendesGrasfangkorbs
WennSiedenGrasfangkorbabnehmenmöchten,gehenSieinumgekehrterReihenfolgevoralsinAnbringen
desGrasfangkorbs(Seite15).
BetreibenSiedieMaschinenichtmitabgenommenemGrasfangkorb,wennderMulchsteckernichtinstalliert
ist.NehmenSiedenGrasfangkorbnurab,wennSiemulchen,dieMaschinetransportieren,dieMaschine
einlagernoderdenGrasfangkorbentleeren(Bild16).
Bild16
g356991
16

AbstellenderMaschine
EntfernendesAkkupacks
1.LassenSiedenSchaltbügellos(Bild10).
Bild17
2.EntfernenSiedenSicherheitsschlüsselvonder
Maschine(Bild10).
ausderMaschine
1.ÖffnenSiedenDeckeldesAkkukastens.
2.DrückenSiedenAkkuriegel,umdenAkkupack
zulösenundziehenSiedenAkkupackheraus.
3.SchließenSiedenDeckeldesAkkukastens.
g341360
Bild19
g341392
Bild18
3.EntfernenSiedenAkkupack,sieheEntfernen
desAkkupacksausderMaschine(Seite17).
Hinweis:EntnehmenSiedenAkkupackjedes
Mal,wennSiedieMaschinenichtverwenden.
g344533
17

Betriebshinweise
sichtbarist.DabeimüssenSieunterUmständen
mehrmalsüberdasLaubmähen.
AllgemeineMähtipps
•VermeidenSie,dassdasMesseraufFremdkörper
aufprallt.MähenSienieabsichtlichüber
irgendwelchenGegenständen.
•UmdiebesteLeistungzuerzielen,installierenSie
einneuesT oroMesservorBeginnderMähsaison
oderbeiBedarf.
Mähen
•MähenSieimmernureinDritteldesGrashalms
ineinemDurchgang.ZurVerbesserungder
Schnittqualität,derLaufzeitunddemAuffangen
desSchnittguts,schneidenSiedasGrasineiner
höherenSchnitthöhe.
•MähenSienichtunterder64mm
Schnitthöheneinstellung,esseidenn,das
Graswächstsehrfein,oderesistSpätherbstund
dasGraswachstumlässtnach.
•StellenSie,wennSiehohesGrasmähen,beim
erstenDurchgangdieSchnitthöheaufdiehöchste
EinstellungundmähenSiedannnocheinmal
miteinerniedrigerenEinstellung,umdemRasen
dasgewünschteErscheinungsbildzuverleihen.
WenndasGraszulangist,kanndieMaschine
verstopfenundderMotorkannabdrosseln.
•NassesGrasundLaubneigenzumVerklumpen
imGartenundkönneneinVerstopfender
MaschineundeinAbdrosselndesMotors
verursachen.VermeidenSieMäharbeitenbei
nassenUmgebungsbedingungen.
•InsehrtrockenenBedingungenbesteht
eineBrandgefahr.HaltenSieallelokalen
BrandgefahrwarnungeneinundentfernenSie
trockenesGrasundLaubvonderMaschine.
•WechselnSiehäugdieMährichtung.Dadurch
verteiltsichdasSchnittgutbesseraufder
RasenächeundbewirkteineffektiveresDüngen.
•ProbierenSiebeieinemunbefriedigenden
SchnittbilddesRasenseinederfolgenden
Abhilfenaus:
–WechselnSiedasMesserausoderlassenSie
esschärfen.
–GehenSiebeimMähenlangsamer.
–HebenSiedieSchnitthöhederMaschinean.
–MähenSiehäuger.
–LassenSiedieBahnenüberlappen,anstelle
beijedemGangeineneueBahnzumähen.
•EntfernenSieübermäßigeLaubansammlungen
vomBoden,bevorSieüberLaubmähen.Wenn
dieMaschinedasLaubnichtfeingenugschneidet,
verlangsamenSieIhreMähgeschwindigkeitoder
mähenSiemiteinerhöherenSchnitthöheund
dannwiedermitdergewünschtenSchnitthöhe.
SchnetzelnvonLaub
•StellenSienachdemMähensicher,dassdie
HälftedesRasensdurchdieSchnittgutdecke
18

NachdemEinsatz
5.InderfolgendenTabellendenSieeine
BeschreibungderLED-Anzeigeleuchtenauf
demAkkuladegerät.
AuadendesAkkupacks
Wichtig:DerAkkupackistbeimKaufnicht
vollständigaufgeladen.BevorSiedieMaschine
zumerstenMalverwenden,setzenSieden
AkkupackindasLadegeräteinundladenes
auf,bisdieLED-Anzeigeangibt,dassder
Akkupackganzaufgeladenist.LesenSiealle
Sicherheitsanweisungen.
Wichtig:LadenSiedenAkkupacknurbei
TemperaturenimangemessenenBereich,siehe
TechnischeDaten(Seite10).
Hinweis:DrückenSiebeiBedarfdieTastefür
dieAkkuladeanzeigeaufdemAkkupack,umden
aktuellenLadestandanzuzeigen(LED-Anzeigen).
1.StellenSiesicher,dasssichindenEntlüftungen
amAkkuundLadegerätkeinStauboder
Schmutzbendet.
Anzeigeleuchte
Aus
Grün
blinkend
GrünAkkupackistaufgeladen
Rot
Rot
blinkend
Anzeige
KeinAkkupackeingeführt
Akkupackwirdaufgeladen
DerAkkupackund/oderAkkuladegerätistnichtim
geeignetenT emperaturbereich
AkkupackLadefehler*
*WeitereInformationenndenSieunterFehlersuche
und-behebung(Seite24).
Wichtig:DerAkkukannzwischendenEinsätzen
fürkurzeZeiträumeaufdemLadegerätbelassen
werden.
WennderAkkufürlängereZeitnichtbenutztwird,
nehmenSiedenAkkuausdemLadegerät;siehe
Service(Seite23).
ReinigenderMaschine
Bild20
1.Akkupackfach
2.Akkupack-
Entlüftungsbereiche
3.Akkupack-
Anschlussklemmen
4.TastefürAkkuladeanzeige8.Entlüftungsbereicheam
5.LED-Anzeigeleuchten
(aktuellerLadezustand)
6.Bügel
7.LED-Anzeigeleuchte
Ladegerät
Ladegerät
2.FluchtenSiedasLochimAkkupack(Bild20)mit
derZungeamLadegerätaus.
3.SchiebenSiedenAkkupackindasLadegerät,
biseseinrastet(Bild20).
4.SchiebenSiezumHerausnehmendes
AkkupacksdenAkkupacknachhintenausdem
Ladegerät.
ReinigenunterdemGerät
Wartungsintervall:NachjederVerwendung
UmdiebestenErgebnissezuerzielen,reinigenSie
dieUnterseitederMaschinesobaldSiemitdem
Mähenfertigsind.
1.SchaltenSiedieMaschineabundentfernenSie
denAkkupackunddenSicherheitsschlüssel.
g290533
2.SenkenSiedieMaschineaufdieniedrigste
Schnitthöheab.
3.StellenSiedieMaschineindieaufrechte
Lagerstellung,sieheLagernderMaschineinder
aufrechtenLagerstellung(Seite21).
4.ReinigenSieVerschmutzungenander
UnterseitederMaschinemiteinerBürsteoder
einemBesen.
Wichtig:VerwendenSiekeinWasser
zumReinigenderMaschine.Wasserkann
elektrischeBauteilebeschädigen.
5.ReinigenSiedenGrasfangkorb.
ReinigendesGrasfangkorbs
Wartungsintervall:NachjederVerwendung
ReinigenSiedenGrasfangkorbhäug,umeine
maximaleAuffangleistungzugewährleisten.Bürsten
SieeventuelleVerschmutzungenab.
19

Zusammenklappendes
Holms
WARNUNG:
WennSiedenHolmfalschauf-oder
zusammenklappen,könnenSiedieKabel
beschädigenunddensicherenGeräteeinsatz
gefährden.
•BeschädigenSiebeimAuf-oder
ZusammenklappendesHolmsnichtdie
Kabel.
•WendenSiesichbeieinembeschädigten
KabelaneinenofziellenVertragshändler.
WARNUNG:
StellenSiesicher,dasssichderHolm
vordemStartenderMaschineinder
Betriebsstellungbendet,umVerletzungen
durchherausgeschleuderteGegenständezu
vermeiden.
4.ZumAufklappendesHolmssiehe2
ZusammenbauendesHolms(Seite9).
1.SchaltenSiedieMaschineaus,ziehenSieden
SicherheitsschlüsselabundentfernenSieden
Akku,sieheAbstellenderMaschine(Seite17).
2.ZiehenSiedieHolmarretierungsstrebe
inRichtungdesoberenHolms,umdie
Holmarretierungzulösen(Bild21).
3.KlappenSiedenHolmhalbnachvorneindie
aufrechteStellungoderganznachvorneindie
senkrechteAufbewahrungsstellung,wieinBild
21dargestellt.
1.Senkrechte
Aufbewahrungsstellung
2.HochgeklappteStellung
g342175
Bild21
3.Betriebsstellung
20

LagernderMaschineinder
aufrechtenLagerstellung
SiekönnendieMaschineauchvertikallagern,um
Platzzusparen.
WARNUNG:
WennSiedenHolmfalschauf-oder
zusammenklappen,könnenSiedieKabel
beschädigenunddensicherenGeräteeinsatz
gefährden.
•BeschädigenSiebeimAuf-oder
ZusammenklappendesHolmsnichtdie
Kabel.
•WendenSiesichbeieinembeschädigten
KabelaneinenofziellenVertragshändler.
1.SchaltenSiedieMaschineaus,ziehenSieden
SicherheitsschlüsselabundentfernenSieden
Akku,sieheAbstellenderMaschine(Seite17).
2.KlappenSiedenHolmganznachvorne,biser
einrastet,sieheZusammenklappendesHolms
(Seite20).
g342176
Bild22
Hinweis:IndieserStellungkönnenSieden
GrasfangkorbindieHolmarretierungsstrebe
einhängen(Bild23).
3.VergewissernSiesich,dassderGrasfangkorb
nichtanderMaschineangebautist,entfernen
Sieihnggf.SieheEntfernendesGrasfangkorbs
(Seite16).
4.VergewissernSiesich,dassdieSchnitthöhe
anderMaschineaufdiehöchsteEinstellung
(Einstellung6)eingestelltist;istdiesnicht
derFall,erhöhenSiedieSchnitthöhe.Siehe
EinstellenderSchnitthöhe(Seite12).
5.KippenSiedieMaschinezurückundrollenSie
sieamHolmandenAufbewahrungsort(Bild22).
WARNUNG:
DurchZiehenander
HolmarretierungsstrebewirdderHolm
entriegelt,wasdazuführenkann,dass
derRasenmäherplötzlichaufdenBoden
kippt.
ZiehenSienichtander
Holmarretierungsstrebe,umdie
Maschinezubewegen.
g356985
Bild23
21

Wartung
EntfernenSiedenSicherheitsschlüsselunddenAkku
ausderMaschine,bevorSiedieMaschinewarten
oderreinigen.
VerwendenSienurdievomHerstellerempfohlenen
Ersatz-undZubehörteile.
PrüfenundwartenSiedieMaschineregelmäßig.
LassenSiedieMaschinevoneinemofziellen
Vertragshändlerreparieren.
SchmierenderMaschine
SiebrauchendieMaschinenichtschmieren;alle
LagerwurdenabWerkfürdieLebenszeitder
Maschinedauergeschmiert.
AuswechselndesMessers
Wartungsintervall:Jährlich
Wichtig:SiebenötigenfürdenrichtigenEinbau
desMesserseinenDrehmomentschlüssel.Wenn
SiekeinenDrehmomentschlüsselhabenoder
dieseArbeitnichtausführenmöchten,wenden
SiesichaneinenofziellenVertragshändler.
5.ZiehenSiedieMesserschraubemiteinem
DrehmomentschlüsselaufeinDrehmoment
von35N∙man.
g357349
Bild24
WechselnSiedasMessersofortaus,wennes
beschädigtodergerissenist.SchärfenSiedie
Messerkante,wennsiestumpfistoderEinkerbungen
aufweist.WechselnSieggf.dasMesseraus.
WARNUNG:
BeimWartendesMessersdaraufachten,
dasssichdasMesserauchbeigetrennter
Stromversorgungnochbewegenkann.
DasMesseristscharf;einKontaktkannzu
schwerenVerletzungenführen.
TragenSieHandschuhe,wennSiedasMesser
warten.
1.NehmenSiedenSicherheitsschlüsselundden
AkkuausderMaschine.
2.StabilisierenSiedasMessermiteinem
Holzblock(Bild24).
3.EntfernenSiedieMesserschraube,die
UnterlegscheibeunddasMesser,bewahrenSie
dieUnterlegscheibeunddieMesserschraube
auf(Bild24).
4.InstallierenSiedasneueMesser,die
UnterlegscheibeunddieMesserschraube(Bild
25).
Wichtig:DasgebogeneEndedesMessers
solltenachobenzumMähwerkgehäuse
zeigen.
g357350
Bild25
22

VorbereitendesAkkupacks
Einlagerung
fürRecycling
Wichtig:DeckenSiediePoledesAkkupacks
nachdemAusbaumitextrastarkemKlebeband
ab.VersuchenSienicht,denAkkupackzu
zerstörenoderauseinanderzubauenoderT eilezu
entfernen.
InformationenzumverantwortungsvollenRecyceln
desAkkuserhaltenSiebeiIhrerörtlichenVerwaltung
oderIhremToro-Vertragshändler.
Wichtig:LagernSiedieMaschine,denAkkupack
unddasLadegerätnurbeiTemperaturenim
angemessenenBereich,sieheTechnischeDaten
(Seite10).
Wichtig:WennSiedenAkkupackfürdie
Nebensaisonaufbewahren,ladenSieihnauf,bis
2oder3LED-AnzeigenamAkkugrünaueuchten.
LagernSieeinganzaufgeladenesoderganzleeres
Akkunichtein.WennSiedieMaschinewieder
verwendenmöchten,ladenSiedenAkkupackauf,
bisdielinkeAnzeigeleuchteamLadegerätgrün
leuchtetoderallevierLED-AnzeigenamAkku
grünleuchten.
•TrennenSiedieMaschinevonder
Stromversorgung(d.h.entfernenSieden
AkkuunddenSicherheitsschlüssel)undprüfenSie
dieMaschinenachderVerwendungaufSchäden.
•BewahrenSiedieMaschineoderdasLadegerät
miteingebautemAkkupackauf.
•EntfernenSiealleFremdkörpervomProdukt.
•LagernSiedieMaschine,denSicherheitsschlüs-
sel,denAkkuunddasAkkuladegerätaußerhalb
derReichweitevonKindern,wennSiediesenicht
verwenden.
•BewahrenSiedieMaschine,denAkkupack
unddasAkkuladegerätnichtzusammenmit
Ätzmittelnauf,wiez.B.Gartenchemikalienund
Enteisungssalzen.
•UmdieGefahrschwererVerletzungenzu
minimieren,lagernSiedenAkkupacknicht
außerhalboderinnerhalbvonFahrzeugen.
•ZiehenSiedieBefestigungenan.
•LagernSiedieMaschine,denAkkupackunddas
Akkuladegerätaneinemsauberenundtrockenen
Ort.
Service
Wartungsintervall:Jährlich
SolltedasGerätgewartetwerdenmüssen,wenden
SiesichanIhrenautorisiertenVertragshändler.
23

Fehlersucheund-behebung
FührenSienurdieindieserAnleitungbeschriebenenSchrittedurch.AlleweiterenInspektions-,Wartungs-und
ReparaturarbeitenmüssenvoneinemVertrags-KundendienstodereinemähnlichqualiziertenFachbetrieb
durchgeführtwerden,wennSiedasProblemnichtselberlösenkönnen.
Problem
DieMaschinestartetnicht.
DieMaschineläuftnichtodernicht
durchgehend.
DieMaschineerreichtseine
Höchstleistungnicht.
DerAkkupackentlädtsehrschnell.
MöglicheUrsacheBehebungsmaßnahme
1.DerAkkuistnichtvollständig
eingerastet.
2.DerAkkupackistnichtaufgeladen.2.EntfernenSiedenAkkupackausder
3.DerAkkupackistbeschädigt.
4.Esgibteinandereselektrisches
ProblemmitderMaschine.
1.DieLeitungendesAkkupackssind
feucht.
2.DerAkkuistnichtvollständig
eingerastet.
1.DieAkkupackladungistzuniedrig.
2.DieEntlüftungensindverstopft.2.ReinigenSiedieEntlüftungen.
1.DerAkkupackistnichtimgeeigneten
Temperaturbereich.
2.DieMaschineistüberlastet
1.NehmenSiedenAkkuherausund
steckenSieihnwiedereinundstellen
Siedabeisicher,dasservollständig
eingebautundverriegeltist.
MaschineundladenSieihnauf.
3.ErsetzenSiedenAkkupack.
4.SetzenSiesichdannmiteinem
VertragshändlerinVerbindung.
1.LassenSiedenAkkupacktrocknen
bzw.wischenSieihntrocken.
2.NehmenSiedenAkkuherausund
steckenSieihnwiedereinundstellen
Siedabeisicher,dasservollständig
eingebautundverriegeltist.
1.EntfernenSiedenAkkupackausder
MaschineundladenSieihnvollständig
auf.
1.BringenSiedenAkkupackaneinen
Ort,dertrockenistundandemdie
Temperaturzwischen5°Cund40°C
liegt.
2.MähenSiedasGrasmiteinergrößeren
SchnitthöheodergehenSiebeim
Mähenlangsamer.
DasLadegerätfunktioniertnicht.
DerSelbstantriebderMaschine
funktioniertnicht.
DieLED-AnzeigeleuchteamLadegerät
leuchtetrot.
1.DasLadegerätistüberoderunterdem
geeigneteT emperaturbereich.
2.DieSteckdose,inwelcherdas
Ladegerätsteckt,istnichtmitdem
Stromnetzverbunden.
1.DasSelbstantriebssystemoderdas
Stromkabelistbeschädigt.
1.DasAkkuladegerätund/oder
Akkupackistnichtimgeeigneten
Temperaturbereich.
1.TrennenSiedasAkkuladegerätvom
StromundbringenSieesaneinen
Ort,dertrockenistundandemdie
Temperaturzwischen5°Cund40°C
liegt.
2.LassenSiedieSteckdosevoneinem
Fachelektrikerreparieren.
1.SetzenSiesichdannmiteinem
VertragshändlerinVerbindung.
1.TrennenSiedasAkkuladegerätvom
StromundbringenSieAkkuladegerät
undAkkupackaneinenOrt,der
trockenistundandemdieT emperatur
zwischen5°Cund40°Cliegt.
24

Problem
MöglicheUrsacheBehebungsmaßnahme
DieLED-AnzeigeleuchteamLadegerät
blinktrot.
DieMaschinegibteinenPieptonaus.
1.DieKommunikationzwischen
AkkupackundLadegerätistdefekt.
2.DerAkkupackistschwach.
1.DerAkkupackistnichtaufgeladen.1.EntfernenSiedenAkkupackausder
2.DieMaschineistineinerunsicheren
PositionfürdenBetrieb.
3.DieMaschineistüberlastet.
4.Esgibteinandereselektrisches
ProblemmitderMaschine.
1.NehmenSiedenAkkupackaus
demAkkuladegerät,ziehenSiedas
LadegerätausderSteckdoseund
wartenSie10Sekunden.Stecken
SiedasAkkuladegerätwieder
indieSteckdoseundlegenSie
denAkkupackindasLadegerät.
WenndieLED-Anzeigeleuchte
amAkkuladegerätimmernochrot
blinkt,wiederholenSiedenVorgang.
WenndieLED-Anzeigeleuchte
nach2Versuchenimmernoch
rotblinkt,entsorgenSieden
Akkupackordnungsgemäßaneiner
Akkusammelstelle.
2.WendenSiesichanIhren
Vertragshändler,wennderAkku
unterGarantiesteht,oderentsorgen
SiedenAkkupackordnungsgemäßbei
einerAkkusammelstelle.
MaschineundladenSieihnauf.
2.StellenSiesicher,dasssichdie
MaschinewährenddesBetriebsnicht
ineinemextremenWinkelbendet.
3.MähenSiedasGrasmiteinergrößeren
SchnitthöheodergehenSiebeim
Mähenlangsamer.
4.ProbierenSiedieMaßnahmenzur
Fehlerbehebung.WennderAlarmton
weiterausgegebenwird,wenden
Siesichaneinenautorisierten
Vertragshändler.
DieSchnittqualitätistschlechterbzw.
nichtzufriedenstellend.
DasGrassammelvermögenhat
sichverschlechtertbzw.istnicht
zufriedenstellend.
DieMaschineschneidetungleichmäßig.
DieMaschineweistVibrationenauf.
1.DasMesseriststumpf.
2.ImMähwerkhabensich
Mährückständeangesammelt.
1.DieMaschineistüberlastet.
2.DieLüftungsöffnungendes
Grasfangkorbssindblockiert.
1.DasMesseriststumpf.
2.DasMähwerkistbeschädigt.
1.DasMesseristverbogenoder
beschädigt.
1.LassenSiedasMesserschärfenoder
austauschen.
2.ReinigenSiedieUnterseitedes
Geräts.
1.MähenSiedasGrasineinerhöheren
Schnitthöhe.
2.ReinigenSiedenGrasfangkorbmit
WasserundeinerweichenBürste.
1.LassenSiedasMesserschärfenoder
austauschen.
2.SetzenSiesichdannmiteinem
VertragshändlerinVerbindung.
1.PrüfenSiedasMesserundwechseln
SieesbeiBedarfaus.
25

EEA/UKDatenschutzerklärung
TorosV erwendungIhrerpersönlichenInformationen
TheToroCompany(„T oro“)respektiertIhrePrivatsphäre.WennSieunsereProduktekaufen,könnenwirbestimmtepersönlicheInformationenüber
Siesammeln,entwederdirektvonIhnenoderüberIhrelokaleT oro-NiederlassungoderIhrenHändler.ToroverwendetdieseInformationen,um
vertraglicheVerpichtungenzuerfüllen–z.B.umIhreGarantiezuregistrieren,IhrenGarantieanspruchzubearbeitenoderSieimFalleeinesRückrufs
zukontaktieren–undfürlegitimeGeschäftszwecke–z.B.umdieKundenzufriedenheitzumessen,unsereProduktezuverbessernoderIhnen
ProduktinformationenzurVerfügungzustellen,diefürSievonInteresseseinkönnten.T orokanndieInformationenimRahmendieserAktivitätenan
ToroT ochtergesellschaften,HändleroderGeschäftspartnerweitergeben.WirkönnenauchpersönlicheDatenoffenlegen,wenndiesgesetzlich
vorgeschriebenistoderimZusammenhangmitdemVerkauf,KaufoderderFusioneinesUnternehmens.ToroverkauftIhrepersönlichenInformationen
niemalsananderenUnternehmen.
SpeicherungIhrerpersönlichenDaten
TorowirdIhrepersönlichenDatensolangeaufbewahren,wieesfürdieobengenanntenZweckerelevantistundinÜbereinstimmungmitden
gesetzlichenBestimmungen.FürweitereInformationenüberdiegeltendenAufbewahrungsfristenwendenSiesichbitteanlegal@toro.com.
TorosEngagementfürSicherheit
IhrepersönlichenDatenkönnenindenUSAodereinemanderenLandverarbeitetwerden,indemmöglicherweisewenigerstrengeDatenschutzgesetze
geltenalsinIhremWohnsitzland.WannimmerwirIhreDatenaußerhalbIhresWohnsitzlandesübermitteln,werdenwirdiegesetzlichvorgeschriebenen
Schritteunternehmen,umsicherzustellen,dassangemesseneSicherheitsvorkehrungenzumSchutzIhrerDatengetroffenwerdenundum
sicherzustellen,dassdiesesicherbehandeltwerden.
ZugangundKorrektur
SiehabendasRecht,IhrepersönlichenDatenzukorrigierenundzuüberprüfenoderderVerarbeitungIhrerDatenzuwidersprechenbzw.diese
einzuschränken.BittekontaktierenSieunsdazuperE-Mailunterlegal@toro.com.WennSieBedenkenhaben,wieT oromitIhrenDatenumgegangenist,
bittenwirSie,diesdirektmitunszubesprechen.BittebeachtenSie,dasseuropäischeBürgerdasRechthaben,sichbeiIhrerDatenschutzbehörde
zubeschweren.
374-0282RevC

FormNo.3442-678RevC
CortacéspedFlex-ForcePower
System
™
60VMAXde36cmy43
cm
Nºdemodelo21836—Nºdeserie321000001ysuperiores
Nºdemodelo21836T—Nºdeserie321000001ysuperiores
Nºdemodelo21843—Nºdeserie321000001ysuperiores
Nºdemodelo21843T—Nºdeserie321000001ysuperiores
Nºdemodelo21844—Nºdeserie321000001ysuperiores
Nºdemodelo21844T—Nºdeserie321000001ysuperiores
Registresuproductoenwww.Toro.com.
Traduccióndeloriginal(ES)
*3442-678*

Sinecesitaayuda,visite
www.Toro.com/support
opóngaseencontacto
consuServicioTécnico
Autorizadoantesde
devolveresteproducto.
Sinecesitaasistenciatécnica,piezasgenuinas
delfabricanteoinformaciónadicional,póngaseen
contactoconunServicioTécnicoAutorizadooconel
Serviciodeatenciónalclientedelfabricanteytengaa
manoelnúmerodeserieydemodelodelproducto.
Figura1identicalaubicaciónenelproductodelos
númerosdemodeloydeserie.Escribalosnúmeros
enelespacioprovisto.
Esteproductocumpletodaslasdirectivaseuropeas
aplicables;sideseamásdetalles,consultela
DeclaracióndeConformidad(Declarationof
Conformity–DOC)decadaproducto.
Introducción
Estecortacéspedmanualdecuchillasrotativasestá
diseñadoparaserusadoporusuariosdomésticos.
Estádiseñadoprincipalmenteparasegarcésped
bienmantenidoenzonasverdesresidenciales.No
estádiseñadoparacortarmalezaoparaaplicaciones
agrícolas.Estádiseñadoparausarlabateríade
ionesdelitioFlex-ForcedeT oro,Modelo81825
(suministradaconelModelo21836),Modelo81850
(suministradaconlosmodelos21843yModelo
21844)y81860o81875.Estasbateríasestán
diseñadasparasercargadasúnicamenteconel
cargadordebateríasmodelo81802(suministrado
conlosmodelos21836,21843y21844),o81805.El
usodeestosproductosparapropósitosdiferentesa
losprevistospuedeserpeligrosoparaustedypara
otraspersonas.
Importante:Consudispositivomóvil,puede
escanearelcódigoQRdelapegatinadelnúmero
deserie(ensucaso)paraaccederainformación
sobrelagarantía,laspiezas,yotrainformación
sobreelproducto.
g275230
Figura1
1.Ubicacióndelosnúmerosdemodeloydeserie
Nºdemodelo
Nºdeserie
Estemanualidenticapeligrospotencialesycontiene
mensajesdeseguridadidenticadosporelsímbolo
dealertadeseguridad(Figura2),queseñalaun
peligroquepuedecausarlesionesgravesolamuerte
siustednosiguelasprecaucionesrecomendadas.
Losmodelos21836T ,21843Ty21844Tnoincluyen
nibateríanicargador.
Leaestemanualdetenidamenteparaaprendera
utilizarymantenercorrectamentesuproducto,y
paraevitarlesionesydañosalproducto.Ustedesel
responsabledeoperarelproductodeformacorrecta
ysegura.
Visitewww.Toro.comparaobtenermásinformación,
incluidosconsejosdeseguridad,materialesde
formación,informaciónsobreaccesorios,ayuda
paraencontraraundistribuidoropararegistrarsu
producto.
©2021—TheToro®Company
8111LyndaleAvenueSouth
Bloomington,MN55420
Figura2
Símbolodealertadeseguridad
Estemanualutiliza2palabraspararesaltar
información.Importantellamalaatenciónsobre
informaciónmecánicaespecial,yNotaresalta
informacióngeneralquemereceunaatención
especial.
Póngaseencontactoconnosotrosenwww.Toro.com.
2
Reservadostodoslosderechos
g000502
ImpresoenChina

Contenido
Seguridad
Seguridad.................................................................3
Pegatinasdeseguridadeinstrucciones.............6
Montaje.....................................................................8
1Cómomontarelcargadordelabatería
(opcional)........................................................8
2Montajedelmanillar.........................................9
Elproducto..............................................................10
Especicaciones..............................................10
Antesdelfuncionamiento.....................................11
Instalacióndelabatería.....................................11
Ajustedelaalturadecorte................................12
Duranteelfuncionamiento...................................13
Arranquedelamáquina....................................13
Usodelatransmisiónautopropulsada..............13
Ajustedelavelocidaddelacuchilla..................13
Recicladodelosrecortes..................................14
Ensacadodelosrecortes.................................15
Apagadodelamáquina....................................17
Cómoretirarlabateríadelamáquina................17
Consejosdeoperación....................................18
Despuésdelfuncionamiento...............................19
Cargadelabatería...........................................19
Limpiezadelamáquina....................................19
Plegadodelmanillar.........................................20
Almacenamientodelamáquinaenla
posiciónvertical............................................20
Mantenimiento........................................................22
Lubricacióndelamáquina................................22
Cambiodelacuchilla........................................22
Preparacióndelabateríaparael
reciclado.......................................................23
Almacenamiento.....................................................23
Mantenimiento..................................................23
Solucióndeproblemas...........................................24
INSTRUCCIONESDE
SEGURIDAD
IMPORTANTES
ADVERTENCIA–alutilizarunamáquinaeléctrica,
leayobservesiemprelasnormaseinstrucciones
deseguridadbásica,andereducirelriesgode
incendio,descargaeléctricaolesiones,incluyendo
lassiguientes:
I.Formación
1.Eloperadordelamáquinaesresponsablede
cualquieraccidenteopeligroqueafecteaotras
personasoasupropiedad.
2.Nodejequelosniñosutilicenojueguenconla
máquina,labateríaoelcargadordelabatería;
lanormativalocalpuederestringirlaedaddel
operador.
3.Nodejequelamáquinalautilicenomantengan
niñosopersonasquenohayanrecibidola
formaciónadecuadaalrespecto.Sólopermita
quemanejenomantenganlamáquinapersonas
responsables,formadas,familiarizadasconlas
instruccionesyfísicamentecapacesdeutilizar
lamáquina.
4.Antesdeutilizarlamáquina,labateríay
elcargadordelabatería,leatodaslas
instruccionesysímbolosdeadvertenciade
estosproductos.
5.Familiaríceseconloscontrolesyconeluso
correctodelamáquina,labateríayelcargador
delabatería.
II.Preparación
1.Nopermitaqueentrenotraspersonas,
especialmenteniñosoanimalesdomésticos,en
lazonadetrabajo.
2.Noutilicelamáquinasinquetodoslos
protectoresydispositivosdeseguridad,
talescomodeectoresyrecogedores,estén
colocadosyfuncionencorrectamenteenla
máquina.
3.Inspeccioneeláreadondesevaautilizarla
máquinayretirecualquierobjetoquepudiera
interferirconelfuncionamientodelamáquinao
quepudieraserarrojadoporlamáquina.
4.Antesdeutilizarlamáquina,asegúresedeque
lacuchilla,elpernodelacuchillayelconjunto
delacuchillanoestándesgastadosodañados.
Sustituyacualquierpegatinaqueestédañada
oilegible.
3

5.Utiliceúnicamentelabateríaespecicada
porToro.Elusodeotrosaccesoriospuede
aumentarelriesgodeincendioylesiones.
6.Siseenchufaelcargadordebateríaenuna
tomaquenoseade100a240V,puede
producirseunincendioounadescargaeléctrica.
Noenchufeelcargadordelabateríaenuna
tomadecorrientequenoseade100Va240
V.Paraotrostiposdeconexión,utiliceun
adaptadordeenchufedeltipocorrectoparala
tomadecorriente,siesnecesario.
7.Noutilicelabateríaoelcargadordelabatería
siestándañadosomodicados,porquepodrían
mostraruncomportamientoimpredeciblecon
resultadodeincendio,explosiónoriesgode
lesiones.
8.Sielcabledealimentacióndelcargadordela
bateríaestádañado,póngaseencontactocon
unServicioTécnicoAutorizadoparacambiarlo.
9.Noutilicebateríasnorecargables.
10.Carguelabateríaúnicamenteconelcargador
debateríaespecicadoporToro.Uncargador
diseñadoparauntipodeterminadodebatería
puedecrearunriesgodeincendiosiseutiliza
conotrabatería.
11.Carguelabateríaúnicamenteenunazonabien
ventilada.
12.Noexpongalabateríaoelcargadoralfuegooa
temperaturassuperioresa68°C.
13.Sigatodaslasinstruccionesdecargayno
carguelabateríasilatemperaturaestáfueradel
intervaloespecicadoenlasinstrucciones.De
locontrario,podríadañarlabateríayaumentar
elriesgodeincendio.
14.Vestimentaadecuada–lleveropaadecuada,
incluyendoprotecciónocular;pantalónlargo;
calzadoresistenteyantideslizante(novaya
descalzoniconsandalias);yprotecciónauditiva.
Sitieneelpelolargo,recójaselo,ynolleve
prendasholgadasojoyassueltasquepuedan
quedaratrapadasenlaspiezasmóviles.Lleve
unamascarillaencondicionesdemuchopolvo.
III.Operación
1.Elcontactoconlacuchillaenmovimiento
causarálesionesgraves.Mantengalasmanos
ylospiesalejadosdelazonadecorteyde
todaslaspiezasmóvilesdelamáquina.Nose
acerquealosoriciosdedescarga.
2.Elusodeestamáquinaparaotrospropósitos
quelosprevistospodríaserpeligrosopara
ustedyparaotraspersonas.
3.Desengranelatransmisiónautopropulsada(si
estáinstalada)antesdearrancarlamáquina.
4.Noinclineelaparatoalarrancarelmotor.
5.Eviteelarranqueaccidental–Asegúresede
retirarlallavedeseguridaddelamáquinaantes
deconectarlabateríaymanipularlamáquina.
6.Prestetodasuatenciónalutilizarlamáquina.
Norealiceningunaactividadquecause
distracciones;delocontrario,podrían
producirselesionesodañosmateriales.
7.Parelamáquina,retirelallavedeseguridad,
retirelabateríadelamáquinayespereaque
sedetengatodomovimientoantesdeajustar,
revisar,limpiaroalmacenarlamáquina.
8.Retirelabateríaylallavedeseguridaddela
máquinaantesdedejarladesatendidaoantes
decambiardeaccesorio.
9.Nofuercelamáquina–dejequelamáquina
hagaeltrabajomejoryconmásseguridadala
velocidadparalaquefuediseñada.
10.Manténgasealerta–estéatentoaloqueestá
haciendoyutiliceelsentidocomúnmientras
trabajeconlamáquina.Noutilicelamáquinasi
estáenfermo,cansado,obajolainuenciade
alcoholodrogas.
11.Utilicelamáquinaúnicamenteconbuena
visibilidadyencondicionesmeteorológicas
apropiadas.Nouselamáquinasihayriesgo
derayos.
12.Extremelasprecaucionesalirhaciaatrásoal
tirardelamáquinahaciausted.
13.Pisermeymantengaelequilibrioentodo
momento,sobretodoenpendientes.Siegue
detravésencuestasypendientes,nunca
haciaarribaohaciaabajo.Extremelas
precaucionesalcambiardedirecciónencuestas
opendientes.Nosieguependientesocuestas
extremadamenteempinadas.Camine,nocorra
nuncaconlamáquina.
14.Nodirijaelmaterialdedescargahaciauna
persona.Eviteladescargadematerialcontra
unapareduobstrucción,yaqueelmaterial
podríarebotarhaciausted.Detengalas
cuchillasantesdecruzarsuperciesqueno
esténcubiertasdehierba.
15.Estéalertaaagujeros,surcos,montículos,
rocasuotrosobjetosocultos.Elterrenoirregular
podríahacerquepierdaelequilibrio.
16.Lahierbamojadaolashojasmojadaspueden
causarlegraveslesionessiustedresbalaytoca
lacuchilla.Evitesegarencondicioneshúmedas
ocuandollueve.
17.Silamáquinagolpeaunobjetooempiezaa
vibrar,apagueinmediatamentelamáquina,
retirelallavedeseguridad,retirelabateríay
espereaquesedetengatodomovimientoantes
deexaminarlamáquinaenbuscadedaños.
4

Hagatodaslasreparacionesnecesariasantes
devolverautilizarlamáquina.
18.Parelamáquinayretirelallavedeseguridad
antesdecargarlamáquinaparaeltransporte.
19.Encondicionesabusivas,labateríapuede
expulsarlíquido;eviteelcontacto.Encasode
uncontactoaccidentalconellíquido,enjuague
conagua.Siellíquidoentraencontactocon
susojos,busqueayudamédica.Ellíquido
expulsadodelabateríapuedecausarirritación
oquemaduras.
IV.Mantenimientoyalmacenamiento
1.Parelamáquina,retirelallavedeseguridad,
retirelabateríadelamáquinayespereaque
sedetengatodomovimientoantesdeajustar,
revisar,limpiaroalmacenarlamáquina.
2.Nointenterepararlamáquina,salvocon
arregloaloindicadoenlasinstrucciones.Haga
queunServicioTécnicoAutorizadorealiceel
mantenimientodelamáquinausandopiezasde
repuestoidénticas.
3.Lleveguantesyprotecciónocularalrealizarel
mantenimientodelamáquina.
4.Cambielacuchillasiestádoblada,desgastadao
agrietada.Unacuchilladesequilibradaproduce
vibraciones,quepodríandañarelmotoro
causarlesionespersonales.
5.Alrealizarelmantenimientodelacuchilla,sepa
quelacuchillapuedemoverseinclusosila
fuentedealimentaciónestáapagada.
6.Compruebefrecuentementelabolsaderecogida
derecortesenbuscadedeteriorosodesgaste,
ysustituyacualquierbolsadesgastadaporuna
bolsa[derecambio]Toro.
muevenlibrementesinagarrotarse,queestán
correctamentemontadas,quenohaypiezas
rotas,yquenohayotrascircunstanciasque
pudieranafectarasuuso.Amenosquese
indiquelocontrarioenlasinstrucciones,haga
queunServicioTécnicoAutorizadorepareo
sustituyacualquierprotectorocomponente
dañado.
10.Cuandolabateríanoestáenuso,debe
mantenersealejadadeobjetosmetálicoscomo
clips,monedas,llaves,clavosytornillosque
pudieranhacerunaconexiónentreunterminal
yotro.Uncortocircuitoentrelosterminales
delabateríapuedecausarquemadurasoun
incendio.
11.Compruebefrecuentementequelospernosde
montajedelacuchillaydelmotorestánbien
apretados.
12.Cuandonoestéutilizandolamáquina,guárdela
enunlugarcerrado,secoyseguro,fueradel
alcancedelosniños.
13.CUIDADO–unabateríamaltratadapuede
representarunriesgodeincendiooquemadura
química.Nodesmontelabatería.Nocaliente
labateríaamásde68°Cnilaincinere.
Sustituyalabateríaúnicamenteconunabatería
Torogenuina;elusodeotrotipodebatería
podríaprovocarunincendioounaexplosión.
Mantengalasbateríasfueradelalcancedelos
niñosyenelembalajeoriginalhastasuuso.
14.Notirelabateríausadaalfuego.Lacelda
puedeexplosionar.Compruebesilanormativa
localcontienealgunainstrucciónespecialsobre
laeliminacióndelasbaterías.
GUARDEESTAS
7.Paraobtenerelmejorrendimiento,utilice
solamentepiezasyaccesoriosgenuinosde
Toro.Otrosaccesoriosypiezasderepuesto
podríanserpeligrosos,ydichousopodría
invalidarlagarantíadelproducto.
8.Mantengalamáquinacorrectamente–
mantengaloslosdecortealadosylimpios
paraobtenerelmejorrendimientoylamayor
seguridad.Mantengalosmanillaressecos,
limpiosylibresdeaceiteygrasa.Mantenga
losprotectorescolocadosyenbuenestado
defuncionamiento.Mantengalascuchillas
aladas.Utiliceúnicamentecuchillasde
repuestoidénticas.
9.Inspeccionelamáquinaenbuscadepiezas
dañadas–sihaydañosenlosprotectoresoen
otraspiezas,determinesilamáquinafunciona
correctamente.Compruebequelaspiezas
móvilesestáncorrectamentealineadasyquese
INSTRUCCIONES
5

Pegatinasdeseguridadeinstrucciones
Laspegatinaseinstruccionesdeseguridadestánalavistadeloperadoryestánubicadas
cercadecualquierzonadepeligropotencial.Sustituyacualquierpegatinaqueestédañadao
quefalte.
134-6016
decal134-6016
1.Velocidaddelmotor–
lento
2.Velocidaddelmotor–
rápido
134-5099
1.Advertencia–mantengalasmanosylospiesalejadosde
lacuchilladelcortacésped.
134-5297
1.Mododepotenciamáxima
decal134-5099
decal134-5297
1.Advertencia–leael
Manualdeloperador.
2.Peligrode
corte/desmembramiento
delamano,cuchillade
siega–noseacerquea
laspiezasenmovimiento;
mantengacolocados
todoslosprotectoresy
defensas.
3.Peligrode
corte/desmembramiento
demanoopie,cuchilla
delcortacésped–retirela
llaveyleaelManualdel
operadorantesderealizar
tareasdemantenimiento.
decal134-4550
134-4550
4.Peligrodeobjetos
arrojados–mantenga
alejadasaotraspersonas;
apagueelmotorantes
dedejarlaposicióndel
operador;retirecualquier
residuoantesdesegar.
5.Peligrode
corte/desmembramiento
demanoopie,cuchilla
delcortacésped–no
subanibajependientes;
desplácesedeladoalado
enpendientes;mirehacia
atrásmientrassiegueen
marchaatrás.
1.Estadodecargadelabatería
6
decal137-9461
137-9461

Modelo81825
Modelo81850
decal137-9487
137-9487
1.Leaelmanualdel
4.Noexponeralasllamas.
operador.
2.Reciclelabatería
correctamente.
3.Notiraralabasura.
5.Noexponeralalluvia.
1.LeaelManualdel
2.Reciclelabatería
3.Notiraralabasura.
137-9495
1.Leaelmanualdeloperador.3.Parausoeninteriores.
2.Notiraralabasura.4.Dobleaislamiento
decal140-2158
140-2158
4.Noexponeralasllamas.
operador.
5.Noexponeralalluvia.
correctamente.
decal137-9495
137-9463
1.Labateríaseestácargando.
2.Labateríaestácompletamentecargada.
3.Latemperaturadelabateríaestáporencimaopordebajodelintervalodetemperaturaadecuado.
4.Fallodecargadelabatería
7
decal137-9463

Montaje
Importante:Enelmomentodelacompralabateríanoestátotalmentecargada.Antesdeutilizarla
máquinaporprimeravez,consulteCargadelabatería(página19).
Nota:Lallavedeseguridadytodaslasdemáspiezassueltashansidocolocadasenelcompartimentode
labateríaparaasegurarunaentregasegura;retírelasdelcompartimentoyguárdelasenunlugarseguro
antesdelmontaje.
1
Cómomontarelcargador
delabatería(opcional)
Piezasnecesariasenestepaso:
2
Fijacionesdemontaje(noincluidas)
Procedimiento
Silodesea,monteelcargadordelabatería
rmementeenlaparedutilizandolosoriciosde
montajeenparedenlapartetraseradelcargador.
Mónteloenunespaciointerior(talcomoungarajeu
otrolugarseco),cercadeunatomadecorrientey
fueradelalcancedelosniños.
ConsultelaFigura3paraobtenerasistenciasobre
elmontajedelcargador.
Coloqueelcargadorsobrelasjaciones
correctamenteposicionadasparajarloensulugar
(jacionesnoincluidas).
Figura3
g290534
8

2
Montajedelmanillar
Piezasnecesariasenestepaso:
1
Conjuntodemanillarsuperior
2Perno
2
Contratuerca
Procedimiento
Importante:Retireydesechelahojaprotectora
deplásticoquecubreelcortacésped,yretire
cualquierotroplásticooenvolturadelamáquina.
Nota:Retirelostaponesdegomadelmanillarantes
deinsertarelmanillarsuperiorenelmanillarinferior.
Estosseañadendurantelafabricaciónparaevitar
dañosaloscables.
ADVERTENCIA
Sipliegaodespliegaelmanillardeforma
incorrecta,puedendañarseloscables,
creandounascondicionesdeoperación
inseguras.
•Nodañeloscablesalplegarodesplegarel
manillar.
•Siuncableestádañado,póngase
encontactoconelServicioTécnico
Autorizado.
1.Conecteelmanillarsuperioralmanillarinferiory
sujételocon2pernosy2contratuercas,como
semuestraenlaFigura4.
g342173
Figura4
2.Muevalabarradeliberacióndelmanillarhacia
elmanillarsuperiorparaliberarelbloqueodel
manillar(Figura5).
3.Muevaelmanillarhaciaatrásalaposiciónde
usoysueltelabarradeliberacióndelmanillar
(Figura5).
Nota:Asegúresedequeelmanillarencajeen
susitioconun'clic'.
g341335
Figura5
9

Elproducto
Especicaciones
ModeloPeso
21836/T
LongitudAnchuraAltura
(sin
batería)
20,2kg130,6cm41,7cm107,3cm
Figura6
1.Compartimentodela
batería
2.Deectortrasero
3.Barradeliberacióndel
manillar
4.Palancasdecontroldelas
cuchillas
5.Manillar10.Mirillaindicadoradela
6.Palancasde
autopropulsión(Modelo
21844solamente)
7.Indicadorderecogedorde
hierballeno
8.Recogedordehierba
9.Botóndealturadecorte
alturadecorte
21843/T
21844/T
22,1kg136,2cm48,5cm108,5cm
24,0kg136,2cm48,5cm108,5cm
DimensionesdelSmartStow
ModeloLongitudAnchuraAltura
21836/T
21843/T
21844/T
41,2cm41,7cm113,5cm
41cm48,5cm114cm
41cm48,5cm114cm
Batería
Modelo8182581850
g364064
Capacidaddelabatería
Voltajesegúnelfabricantedelabatería=60Vmáximoy54V
nominal.Elvoltajerealdependedelacarga.
2,5Ah4,0Ah
135Wh216Wh
Cargadordelabatería
Modelo81802
Tipo
Entrada
Salida
Cargadordebateríasdeionesdelitio
60VMAX
100a240VAC50/60HzMáx.2A
60VMÁXCC2A
1.Cargadordebaterías
Modelo81802(incluido
conlosModelos21836,
21843y21844)
2.BateríaModelo81850
(incluidaconlosModelos
21843y21844)
Figura7
3.BateríaModelo81825
(incluidaconelModelo
21836)
Intervalosdetemperaturaadecuados
Cargue/guardelabateríaa5°Ca40°C*
Utilicelabateríaa
Utilicelamáquinaa
*Eltiempodecargaserámayorsilatemperaturano
g342171
estádentrodeesteintervalodurantelacarga.
Guardelamáquina,labateríayelcargadorenun
lugarcerrado,limpioyseco.
10
-30°Ca49°C*
0°Ca49°C*

Operación
Nota:Losladosderechoeizquierdodelamáquinasedeterminandesdelaposiciónnormaldeloperador.
Antesdelfuncionamiento
Instalacióndelabatería
Importante:Utilicelabateríasoloatemperaturasqueesténdentrodelintervaloapropiado;consulte
Especicaciones(página10).
1.Asegúresedequelallavedeseguridadnoestáinstaladaenlamáquina.
2.Compruebequelosoriciosdeventilacióndelabateríaestánlibresdepolvoyresiduos.
3.Levantelatapadelcompartimentodelabatería(Figura8,A).
4.Alineeelhuecodelabateríaconlalengüetadelamáquina,eintroduzcalabateríaenelcompartimento
hastaqueseengancheensusitio(Figura8,B).
5.Cierrelatapadelcompartimentodelabatería(Figura8,C).
Nota:Silatapadelcompartimentodelabateríanosecierraporcompleto,labateríanoestá
correctamenteinstalada.
Figura8
g341293
11
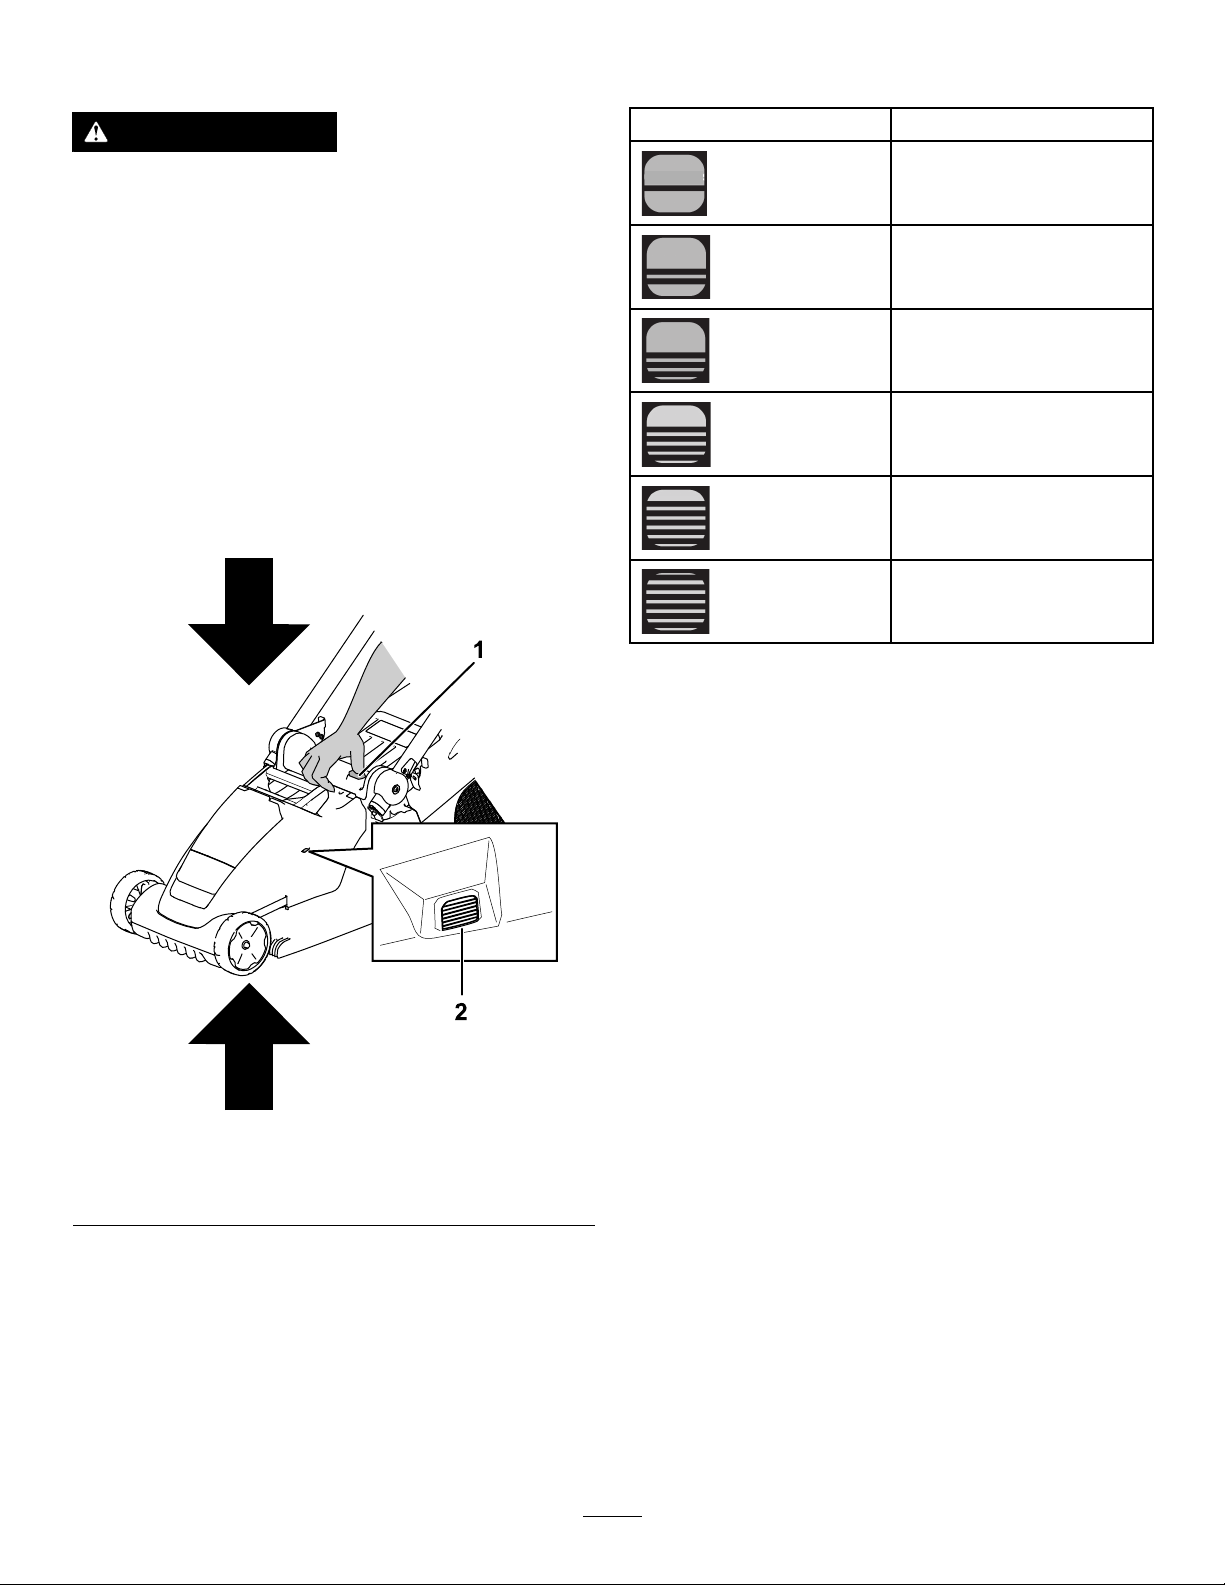
Ajustedelaalturadecorte
Laalturadecorteesajustableen6incrementos,
entre19mmy70mm.
ADVERTENCIA
Alajustarlaalturadecorte,podríatocaruna
cuchillaenmovimientoconlasmanos,loque
podríacausarlegraveslesiones.
•Apagueelmotor,retirelabatería,yespere
aquesedetengantodaslaspiezasen
movimientoantesdeajustarlaalturade
corte.
•Nopongalosdedosdebajodelacarcasa
alajustarlaalturadecorte.
Paraajustarlaalturadecorte,presioneelbotónde
alturadecorteyeleveobajelacarcasahastaquese
vealaalturadecortedeseadaenlamirilladelajuste
delaalturadecorte(Figura9).
Indicador
Posicióndealturadecorte
1(lamásbaja)
2
3
4
5
6(lamásalta)
Figura9
1.Botóndealturadecorte2.Mirilladelajustedela
alturadecorte
g364065
12

Duranteel
Usodelatransmisión
funcionamiento
Arranquedelamáquina
1.Asegúresedequelabateríaestácargadae
instaladaenlamáquina;consulteInstalaciónde
labatería(página11).
2.Instalelallavedeseguridadenlamáquina
(Figura10).
autopropulsada
Modelo21844/Tsolamente
•Paraajustarlavelocidaddelatransmisión
autopropulsada,ajusteelcontroldevelocidad
(Figura12).
•Paraactivarlatransmisiónautopropulsada,
acerquelaspalancasdeautopropulsiónal
manillarymanténgalasallí(Figura12).
•Paradesactivarlatransmisiónautopropulsada,
sueltelaspalancasdeautopropulsión.
Nota:Parareducirlavelocidaddeavance,
muevaelcontroldevelocidadalaizquierda;para
aumentarlavelocidad,muévalaaladerecha.
Figura10
3.Pulseelbotóndeencendidosituadoenelcentro
delmanillarsuperiorparaencenderlamáquina.
4.Aprietelaspalancasdecontroldelascuchillas
paraarrancarlamáquina.
Figura11
g344530
g342174
Figura12
1.Controldelavelocidaddeautopropulsión
2.BotónMAX
3.Palancasdeautopropulsión
Ajustedelavelocidaddela
cuchilla
Estamáquinatienedosajustesdevelocidaddela
cuchilla:RUNSMART(Controlinteligente),yMAX.
•CuandoseajustaalaposiciónRUNSMART,la
velocidaddelacuchillaseajustaautomáticamente
paramejorarlaecacia;sedetectacualquier
cambioenlascondicionesdecorteyseaumenta
lavelocidaddelacuchillaencasodenecesidad
paramantenerlacalidaddecorte.
g341398
•EnlaposiciónMAX,semantienelavelocidad
máximadelacuchillaentodomomento.
PulseelbotónMAXsituadodebajodelbotónde
Encendidoparaajustarlamáquinaalavelocidad
MÁXIMA(Figura12).
13

Recicladodelosrecortes
Sumáquinavienepreparadadefábricaparareciclar,
esdecir,parapicarlosrecortesdehierbayhojasy
devolverlosalcésped.
Silabolsaderecogidaestáinstaladaenlamáquina,
retírelaantesdecambiaralmododerecicladodelos
recortes.ConsulteRetiradadelrecogedor(página
16).
Instalacióndeltapóndemulching
1.Apaguelamáquinayretirelabateríaylallave
deseguridad;consulteApagadodelamáquina
(página17).
2.Coloquelamáquinaenlaposiciónverticalde
almacenamiento;consulteAlmacenamientode
lamáquinaenlaposiciónvertical(página20).
3.Limpielaparteinferiordelacarcasapara
asegurarsedequeeltapónseinstala
correctamente;consulteLimpiezadelosbajos
delamáquina(página19).
4.Alineeeltapóndemulchingeintroduzcala
parteinferiordeltapónhastaqueencajeenlos
2pasadoresderetención,comosemuestraen
laFigura13.
Importante:Laparteinferiordeltapón
demulchingdebeestarenrasadaconla
parteinferiordelacarcasacuandoestá
instaladocorrectamente;sieltapónde
mulchingnoseinstalacorrectamente,nolo
utilice;póngaseencontactoconsuServicio
TécnicoAutorizado.
Figura13
g342177
Retiradadeltapóndemulching
Pararetirareltapóndemulching,retirelabateríay
luegoinviertalospasosdeInstalacióndeltapónde
mulching(página14).
14

Ensacadodelosrecortes
Utiliceelrecogedorsidesearecogerlosrecortesdehierbayhojasdelcésped.
Sieltapóndemulchingestáinstaladoenlamáquina,retíreloantesdecambiaralmododeensacadodelos
recortes.ConsulteRetiradadeltapóndemulching(página14).
Instalacióndelrecogedor
1.Muevaelmanillaralaposiciónverticalylevanteeldeectortrasero(Figura14,A).
2.Instalelosganchosdelrecogedorenlasmuescasdelapartetraseradelamáquina(Figura14,B).
3.Dejequeeldeectortraserodescansesobreelrecogedor(Figura14,C).
4.Vuelvaacolocarelmanillarenlaposicióndeoperación;consultePlegadodelmanillar(página20).
Figura14
Indicadorderecogedordehierballeno
Elrecogedorincluyeunindicadordellenadoenlapartetraseradelacubiertadura.Mientrasseestá
recogiendohierba,elaireuyeatravésdelrecogedor,conloqueseelevalaaletadelindicadorhastala
posiciónabierta.Cuandoelrecogedorestálleno,sebloqueaelujodeaireysecierralaaletadelindicador.
g341400
Figura15
g363501
15

Retiradadelrecogedor
Pararetirarelrecogedor,sigalospasosdeInstalacióndelrecogedor(página15)ensentidoinverso.
Noutilicelamáquinaconelrecogedorquitado,amenosqueestéinstaladoeltapóndemulching.Retireel
recogedorúnicamenteduranteelmulching,altransportarlamáquina,alguardarlamáquinaoalvaciarel
recogedor(Figura16).
Figura16
g356991
16

Apagadodelamáquina
Cómoretirarlabateríade
1.Sueltelabarradecontroldelacuchilla(Figura
10).
Figura17
2.Retirelallavedeseguridaddelamáquina
(Figura10).
lamáquina
1.Levantelatapadelcompartimentodelabatería.
2.Presioneelcierredelabateríaparaliberarla
batería,yretirelabatería.
3.Cierrelatapadelcompartimentodelabatería.
g341360
Figura19
g341392
Figura18
3.Retirelabatería;consulteCómoretirarla
bateríadelamáquina(página17).
Nota:Cuandonovayaausarlamáquina,retire
labatería.
g344533
17

Consejosdeoperación
Consejosgeneralesdesiega
•Evitegolpearobjetossólidosconlacuchilla.No
sieguenuncaporencimadeobjetoalguno.
•Paraobtenerelmejorrendimiento,instaleuna
cuchillanuevaT oroantesdequeempiecela
temporadadesiega,ocuandoseanecesario.
Siegadelahierba
•Cortesolamenteunterciodelahojadehierba
cadavez.Paramejorarlacalidaddecorte,la
autonomíayelensacado,siegueaunaalturade
cortemayor.
•Nocorteconelajustedealturadecortemásbajo
amenosquelahierbaseaescasa,oanalesdel
otoñocuandoelritmodecrecimientodelahierba
empiezaadecaer.
•Cuandocortehierbaalta,siegueprimerousando
laalturadecortemásaltaycaminedespacio;
luegosieguedenuevoaunaalturamenor
paraobtenerelmejoraspecto.Silahierbaes
demasiadolarga,puedeatascarlamáquinay
hacerquesecaleelmotor.
•Lahierbamojadaylashojasmojadastiendena
pegarsealsuelo,ypuedenatascarlamáquina
ohacerquesecaleelmotor.Evitesegaren
condicioneshúmedas.
•Estéatentoalposibleriesgodeincendio
encondicionesmuysecas,sigatodaslas
advertenciaslocalesparacasosdeincendio
ymantengalamáquinalibredehierbasecay
residuosdehojas.
•Alterneladireccióndecorte.Estoayudaa
dispersarlosrecortesentodoelcésped,dando
unafertilizaciónmáshomogénea.
•Sielaspectonaldelcéspednoessatisfactorio,
pruebeconunaomásdelastécnicassiguientes:
–Cambiarlacuchillaomandarlaaalar.
–Caminarmásdespaciomientrassiega.
–Elevarlaalturadecortedelamáquina.
–Cortarelcéspedconmásfrecuencia.
–Solaparlospasillosdecorteenlugardecortar
unpasillocompletoencadapasada.
nocortalashojassucientementenas,reduzca
lavelocidaddesiegaosiegueaunaalturade
cortemásaltayluegosieguedenuevoalaaltura
decortedeseada.
Cortedehojas
•Despuésdesegarelcésped,asegúresedequela
mitaddelcéspedseveatravésdelacoberturade
hojascortadas.Esposiblequetengaquehacer
másdeunapasadaporencimadelashojas.
•Sihayunacantidadexcesivadehojas,retirehojas
delsueloantesdepicarlashojas.Silamáquina
18

Despuésdel
funcionamiento
Cargadelabatería
Importante:Enelmomentodelacomprala
bateríanoestátotalmentecargada.Antesdeusar
laherramientaporprimeravez,coloquelabatería
enelcargadorycárguelahastaqueelindicador
LEDindiquequelabateríaestácompletamente
cargada.Leatodaslasprecaucionesde
seguridad.
Importante:Carguelabateríasoloatemperaturas
queesténdentrodelintervaloapropiado;consulte
Especicaciones(página10).
Indicador
Desconectado
Verde
intermitente
VerdeLabateríaestácargada
Roja
Rojointermitente
Indica
Nohaybateríainsertada
Labateríaseestácargando
Labateríay/oelcargadordelabateríaestá(n)por
encimaopordebajodelintervalodetemperatura
adecuado
Fallodecargadelabatería*
*ConsulteSolucióndeproblemas(página24)si
deseamásinformación.
Nota:Encualquiermomento,presioneelbotóndel
indicadordecargadelabateríadelabateríapara
mostrarlacargaactual(indicadoresLED).
1.Compruebequelosoriciosdeventilaciónde
labateríaydelcargadorestánlibresdepolvo
yresiduos.
Figura20
1.Huecodelabatería
2.Zonasdeventilacióndela
batería
3.Terminalesdelabatería
4.Botóndelindicadorde
cargadelabatería
2.Alineeelhuecodelabatería(Figura20)conla
lengüetadelcargador.
3.Introduzcalabateríaenelcargadorhastaque
estécompletamenteasentada(Figura20).
4.Pararetirarlabatería,deslicelabateríahacia
atrásparasacarladelcargador.
5.Consultelatablasiguienteparainterpretarel
indicadorLEDdelcargadordelabatería.
5.IndicadoresLED(carga
actual)
6.Manillar
7.IndicadorLEDdel
cargador
8.Zonasdeventilacióndel
cargador
Importante:Labateríapuededejarseconectada
alcargadorduranteperiodoscortosentreusos.
Silabateríanosevaautilizarduranteperiodos
máslargos,retirelabateríadelcargador;consulte
Mantenimiento(página23).
Limpiezadelamáquina
Limpiezadelosbajosdela
máquina
Intervalodemantenimiento:Despuésdecadauso
Paraobtenerresultadosóptimos,limpiedebajo
delamáquinainmediatamentedespuésdehaber
terminadolasiega.
1.Apaguelamáquinayretirelabateríaylallave
deseguridad.
2.Bajelamáquinaalaalturadecortemásbaja.
g290533
3.Pongalamáquinaenlaposiciónde
almacenamientovertical;consulte
Almacenamientodelamáquinaenla
posiciónvertical(página20).
4.Usandouncepilloounaescoba,limpiecualquier
residuodelaparteinferiordelamáquina.
Importante:Noutiliceaguaparalimpiar
lamáquina;elaguapodríadañarlos
componenteseléctricos.
5.Limpieelrecogedordehierba.
Limpiezadelrecogedordehierba
Intervalodemantenimiento:Despuésdecadauso
Limpieelrecogedorconfrecuenciaparaasegurarla
máximacapacidadderecogida.Eliminecualquier
residuoconuncepillo.
19

Plegadodelmanillar
Almacenamientodela
ADVERTENCIA
Sipliegaodespliegaelmanillardeforma
incorrecta,puedendañarseloscables,
creandounascondicionesdeoperación
inseguras.
•Nodañeloscablesalplegarodesplegarel
manillar.
•Siuncableestádañado,póngase
encontactoconelServicioTécnico
Autorizado.
ADVERTENCIA
Antesdearrancarlamáquina,asegúrese
dequeelmanillarestáenlaposiciónde
operaciónparaevitarlesionescausadaspor
objetosarrojados.
1.Apaguelamáquina,retirelallavedeseguridad
yretirelabatería;consulteApagadodela
máquina(página17).
2.Muevalabarradeliberacióndelmanillarhacia
elmanillarsuperiorparaliberarelbloqueodel
manillar(Figura21).
3.Pliegueelmanillarparcialmentehacia
adelantehastaqueestéenposiciónvertical,
ohaciaadelantedeltodo,alaposiciónde
almacenamientovertical,comosemuestraen
laFigura21.
máquinaenlaposición
vertical
Puedealmacenarlamáquinaenposiciónverticalpara
aprovecharalmáximoelespaciodealmacenamiento.
ADVERTENCIA
Sipliegaodespliegaelmanillardeforma
incorrecta,puedendañarseloscables,
creandounascondicionesdeoperación
inseguras.
•Nodañeloscablesalplegarodesplegarel
manillar.
•Siuncableestádañado,póngase
encontactoconelServicioTécnico
Autorizado.
1.Apaguelamáquina,retirelallavedeseguridad
yretirelabatería;consulteApagadodela
máquina(página17).
2.Pliegueelmanillarhaciaadelantedeltodohasta
queencajeensuposiciónconun'clic';consulte
Plegadodelmanillar(página20).
3.Asegúresedequeelrecogedordehierbano
estáinstaladoenlamáquina;siestáinstalado,
retírelo.ConsulteRetiradadelrecogedor
(página16).
4.Asegúresedequelaalturadecortedela
máquinaestáenlaposiciónmásalta(ajuste
6);sino,aumentelaalturadecorte.Consulte
Ajustedelaalturadecorte(página12).
Figura21
1.Posiciónde
almacenamientovertical
2.Posiciónverticaldel
manillar
4.Paradesplegarelmanillar,consulte2Montaje
delmanillar(página9).
3.Posicióndetrabajo
5.Inclinelamáquinahaciaatrásyconlaayuda
delmanillar,llévelarodandohastaunlugarde
almacenamiento(Figura22).
ADVERTENCIA
Altirardelabarradeliberación
sedesbloqueaelmanillar,loque
puedehacerqueelcortacéspedbaje
repentinamentealsuelo.
g342175
20
Notiredelabarradeliberaciónpara
desplazarlamáquina.

Figura22
Nota:Elrecogedordehierbapuede
engancharseenlabarradeliberaciónenesta
posición(Figura23).
Figura23
g342176
g356985
21

Mantenimiento
Retirelallavedeseguridadylabateríadelamáquina
antesderealizartareasdemantenimientoolimpieza
enlamáquina.
Utiliceúnicamentepiezasderepuestoyaccesorios
recomendadosporelfabricante.
Inspeccioneyreviselamáquinadeformaregular.
Lamáquinadebeserreparadaúnicamenteporun
ServicioTécnicoAutorizado.
Lubricacióndelamáquina
Noesnecesariolubricarlamáquina;todoslos
cojinetesvienendefábricalubricadosparatodala
vidadelamáquina.
Cambiodelacuchilla
Intervalodemantenimiento:Cadaaño
Importante:Ustednecesitaráunallave
dinamométricaparainstalarlacuchilla
correctamente.Sinodisponedeunallave
dinamométricaopreerenorealizareste
procedimiento,póngaseencontactoconel
ServicioTécnicoAutorizado.
5.Utiliceunallavedinamométricaparaapretar
elpernodelacuchillaa35N·m.
g357349
Figura24
Silacuchillaestádañadaoagrietada,sustitúyala
inmediatamente.Siellodelacuchillaestáromoo
mellado,mandeaalarlacuchillaocámbiela.
ADVERTENCIA
Alrealizarelmantenimientodelacuchilla,
sepaquelacuchillapuedemoverseincluso
silafuentedealimentaciónestáapagada.La
cuchillaestámuyalada;cualquiercontacto
conlacuchillapuedecausarlesiones
personalesgraves.
Lleveguantesalrealizarelmantenimientode
lacuchilla.
1.Retirelallavedeseguridadylabateríadela
máquina.
2.Utiliceunbloquedemaderaparainmovilizarla
cuchilla(Figura24).
3.Retireelpernodelacuchilla,laarandelayla
cuchilla;guardelaarandelayelperno(Figura
24).
4.Instalelacuchillanueva,laarandelayelperno
(Figura25).
g357350
Figura25
Importante:Coloquelacuchillaconlos
extremoscurvoshaciaarriba,haciala
carcasadelamáquina.
22

Preparacióndelabatería
Almacenamiento
paraelreciclado
Importante:Despuésderetirarla,cubralos
terminalesdelabateríaconcintaadhesivade
serviciopesado.Nointentedestruirodesmontar
labateríaniintenteretirarcualquieradelos
componentesdelamisma.
Póngaseencontactoconlasautoridadesmunicipales
oconsudistribuidorautorizadoT orosideseamás
informaciónsobrecómoreciclarlabateríadeforma
responsable.
Importante:Almacenelamáquina,labateríayel
cargadorsoloatemperaturasqueesténdentrodel
intervaloapropiado;consulteEspecicaciones
(página10).
Importante:Sivaaalmacenarlabateríahasta
latemporadasiguiente,cárguelahastaque2o
3delosindicadoresLEDdelabateríacambien
averde.Noalmacenelabateríacompletamente
cargadanicompletamentedescargada.Antesde
volverausarlamáquina,carguelabateríahasta
quesevuelvaverdeelindicadorizquierdodel
cargador,ohastaquelos4indicadoresLEDdela
bateríasevuelvanverdes.
•Desconecteelproductodelsuministrodeenergía
(esdecir,retirelabateríaylallavedeseguridad)y
compruebesihaydañosdespuésdeluso.
•Noalmacenelamáquinaoelcargadorconla
bateríainstalada.
•Limpiecualquiermaterialextrañodelproducto.
•Cuandonoseesténutilizando,almacenela
máquina,lallavedeseguridad,labateríayel
cargadordelabateríafueradelalcancedelos
niños.
•Mantengalamáquina,labateríayelcargadorde
labateríaalejadosdeagentescorrosivoscomo
productosquímicosdejardínosalparadeshielo.
•Parareducirelriesgodelesionespersonales
graves,noalmacenelabateríaenelexterioroen
unvehículo.
•Aprietetodaslasjaciones.
•Guardelamáquina,labateríayelcargadorenun
lugarcerrado,limpioyseco.
Mantenimiento
Intervalodemantenimiento:Cadaaño
Encasodequelamáquinanecesitealguna
reparación,póngaseencontactoconsuservicio
técnicoautorizado.
23

Solucióndeproblemas
Realicesololospasosdescritosenestasinstrucciones.Cualquierotrotrabajodeinspección,mantenimientoo
reparacióndebeserrealizadoporunServicioTécnicoAutorizadooporunespecialistaautorizadosino
puedesolucionarelproblemaustedmismo.
ProblemaPosiblecausa
Lamáquinanoarranca.
Lamáquinanofuncionaonofuncionade
formacontinua.
Lamáquinanoalcanzalamáxima
potencia.
Labateríasedescargarápidamente.
Accióncorrectora
1.Labateríanoestácorrectamente
instaladaenlamáquina.
2.Labateríanoestácargada.2.Retirelabateríadelamáquinay
3.Labateríaestádañada.
4.Hayotroproblemaeléctricoconla
máquina.
1.Hayhumedadenloscablesdela
batería.
2.Labateríanoestáinstaladapor
completoenlaherramienta.
1.Lacapacidaddecargadelabatería
esdemasiadobaja.
2.Losoriciosdeventilaciónestán
obstruidos.
1.Latemperaturadelabateríaestápor
encimaopordebajodelintervalode
temperaturaadecuado.
2.Lamáquinaestásobrecargada
1.Retireyluegovuelvaacolocarla
bateríaenlamáquina,asegurándose
dequeestácompletamenteinstalada
ybloqueada.
cárguela.
3.Sustituyalabatería.
4.PóngaseencontactoconelServicio
TécnicoAutorizado.
1.Dejequelabateríasesequeoséquela
conunpaño.
2.Retireyluegovuelvaacolocar
labateríaenlaherramienta,
asegurándosedequeestá
completamenteinstaladaybloqueada.
1.Retirelabateríadelamáquinay
carguecompletamentelabatería.
2.Limpielosoriciosdeventilación.
1.Trasladelabateríaaunlugarseco
cuyatemperaturaseadeentre5°Cy
40°C.
2.Siegueaunaalturadecortemásalta
ocamineaunritmomáslentodurante
lasiega.
Elcargadordelabateríanofunciona.
Lamáquinanoavanzaconelsistemade
autopropulsión.
ElindicadorLEDdelcargadordela
bateríaestárojo.
1.Latemperaturadelcargadordela
bateríaestáporencimaopordebajo
delintervalodetemperaturaadecuado.
2.Latomadecorrienteenlaqueestá
enchufadoelcargadordelabateríano
tienecorriente.
1.Elsistemadetransmisión
autopropulsadaoelcablede
alimentaciónestádañado.
1.Elcargadordelabateríay/olabatería
estáporencimaopordebajodel
intervalodetemperaturaadecuado.
1.Desenchufeelcargadordelabatería
ytrasládeloaunlugarsecocuya
temperaturaseadeentre5°Cy40°C.
2.Póngaseencontactoconun
electricistaautorizadoparaquerepare
latomadecorriente.
1.PóngaseencontactoconelServicio
TécnicoAutorizado.
1.Desenchufeelcargadordelabatería
ymuevaelcargadordelabatería
ylabateríaaunlugarsecocuya
temperaturaseadeentre5°Cy40°C.
24

ProblemaPosiblecausa
Accióncorrectora
ElindicadorLEDdelcargadordela
bateríaparpadeaenrojo.
Lamáquinaproduceunpitido.
1.Hayunerrordecomunicacionesentre
labateríayelcargador.
2.Labateríaestácasiagotada.2.Póngaseencontactoconunservicio
1.Labateríanoestácargada.1.Retirelabateríadelamáquinay
2.Lamáquinaestáenunaposición
inseguraparaeluso.
3.Lamáquinaestásobrecargada.
4.Hayotroproblemaeléctricoconla
máquina.
1.Retirelabateríadelcargador,
desconecteelcargadordelatoma
decorrienteyespere10segundos.
Vuelvaaenchufarelcargadorenla
tomadecorrienteycoloquelabatería
enelcargador.SielindicadorLED
delcargadorsigueparpadeandoen
rojo,repitaesteprocedimiento.Si
elindicadorLEDdelcargadorsigue
parpadeandodespuésde2intentos,
eliminelabateríacorrectamente
enunainstalaciónderecicladode
baterías.
técnicoautorizadosilabateríaestáen
garantía,oeliminecorrectamentela
bateríaenunainstalacióndereciclado
debaterías.
cárguela.
2.Asegúresedequelamáquinanotiene
unainclinaciónextremaduranteeluso.
3.Siegueaunaalturadecortemásalta
ocamineaunritmomáslentodurante
lasiega.
4.Pruebelasdemásaccionesde
solucióndeproblemas,ysilaalarma
siguesonando,póngaseencontacto
conunServicioTécnicoAutorizado.
Lacalidaddecorteesreducidao
insatisfactoria.
Elensacadoesdecienteoinsatisfactorio.
Lamáquinacortadeformadesigual.
Lamáquinavibra.1.Lacuchillaestádobladaodañada.1.Inspeccionelacuchillaycámbielasi
1.Lacuchillanoestáalada.
2.Lacarcasadecortetieneuna
acumulaciónderesiduos.
1.Lamáquinaestásobrecargada.
2.Losoriciosdeventilacióndel
recogedordehierbaestánobstruidos.
1.Lacuchillanoestáalada.
2.Lacarcasadecorteestádañada.
1.Hagaquelacuchillasealeose
cambie.
2.Limpiedebajodelamáquina.
1.Siegueaunaalturadecortemásalta.
2.Limpieelrecogedordehierbacon
aguayuncepillosuave.
1.Hagaquelacuchillasealeose
cambie.
2.PóngaseencontactoconelServicio
TécnicoAutorizado.
esnecesario.
25

AvisosobreprivacidadenelEEE/ReinoUnido
UsodesusdatospersonalesporpartedeToro
TheToroCompany(“T oro”)respetasuprivacidad.Aladquirirnuestrosproductos,podemosrecopilarciertosdatospersonalessobreusted,yasea
deformadirectaatravésdeustedodenuestraempresaonuestrorepresentantelocaldeT oro.Toroutilizaestosdatosparacumplirobligaciones
contractuales,comoregistrarsugarantía,procesarunareclamacióndegarantíaoponerseencontactoconustedencasodelaretiradadeunproducto,
asícomoparanescomercialeslegítimos,comovalorarlasatisfaccióndelosclientes,mejorarnuestrosproductosuofrecerleinformacióndeproductos
quepuedanserdesuinterés.Toropuedecompartirsusdatosconliales,concesionariosuotrossocioscomercialesdeToroenrelaciónconcualquiera
delasactividadesantesmencionadas.Tambiénpodemosrevelarsusdatospersonalescuandoserequieraporleyoenrelaciónconlaventa,la
adquisiciónolafusióndeunaempresa.Novenderemossusdatospersonalesaningunaotraempresaconnesdemarketing.
Retencióndesuinformaciónpersonal
Toroconservarásusdatospersonaleshastaqueseanrelevantesparalasnalidadesindicadasanteriormenteysegúnlosrequisitoslegales.Para
obtenermásinformaciónsobrelosperiodosderetenciónaplicables,póngaseencontactoconlegal@toro.com.
CompromisodeT oroconlaseguridad
SusdatospersonalessepuedenprocesarenEstadosUnidosoenotropaísqueapliqueleyesdeproteccióndedatosmenosestrictasquelasdesupaís
deresidencia.Cuandotransramossusdatospersonalesfueradesupaísderesidencia,daremoslospasoslegalmentepertinentesparagarantizarque
seaplicanlasmedidasadecuadasparaprotegersuinformaciónyparagarantizarquesetrataconseguridad.
Accesoycorrección
Puedetenerderechoacorregirorevisarsusdatospersonales,obienanegarsealprocesamientodesusdatosorestringirlo.Paraello,póngase
encontactoconnosotrosenladirecciónlegal@toro.com.SitienealgunapreocupaciónacercadecómohagestionadoTorosuinformación,le
instamosaquesepongaencontactoconnosotrosdirectamente.Recuerdequelosresidenteseuropeostienenderechoapresentarquejasantela
autoridadresponsabledelaproteccióndedatos.
374-0282RevC

TondeuseFlex-ForcePower
FormNo.3442-680RevC
System
™
60VMAXde36cmet
43cm
N°demodèle21836—N°desérie321000001etsuivants
N°demodèle21836T—N°desérie321000001etsuivants
N°demodèle21843—N°desérie321000001etsuivants
N°demodèle21843T—N°desérie321000001etsuivants
N°demodèle21844—N°desérie321000001etsuivants
N°demodèle21844T—N°desérie321000001etsuivants
Enregistrezvotreproduitàwww.Toro.com.
Traductiondutexted'origine(FR)
*3442-680*
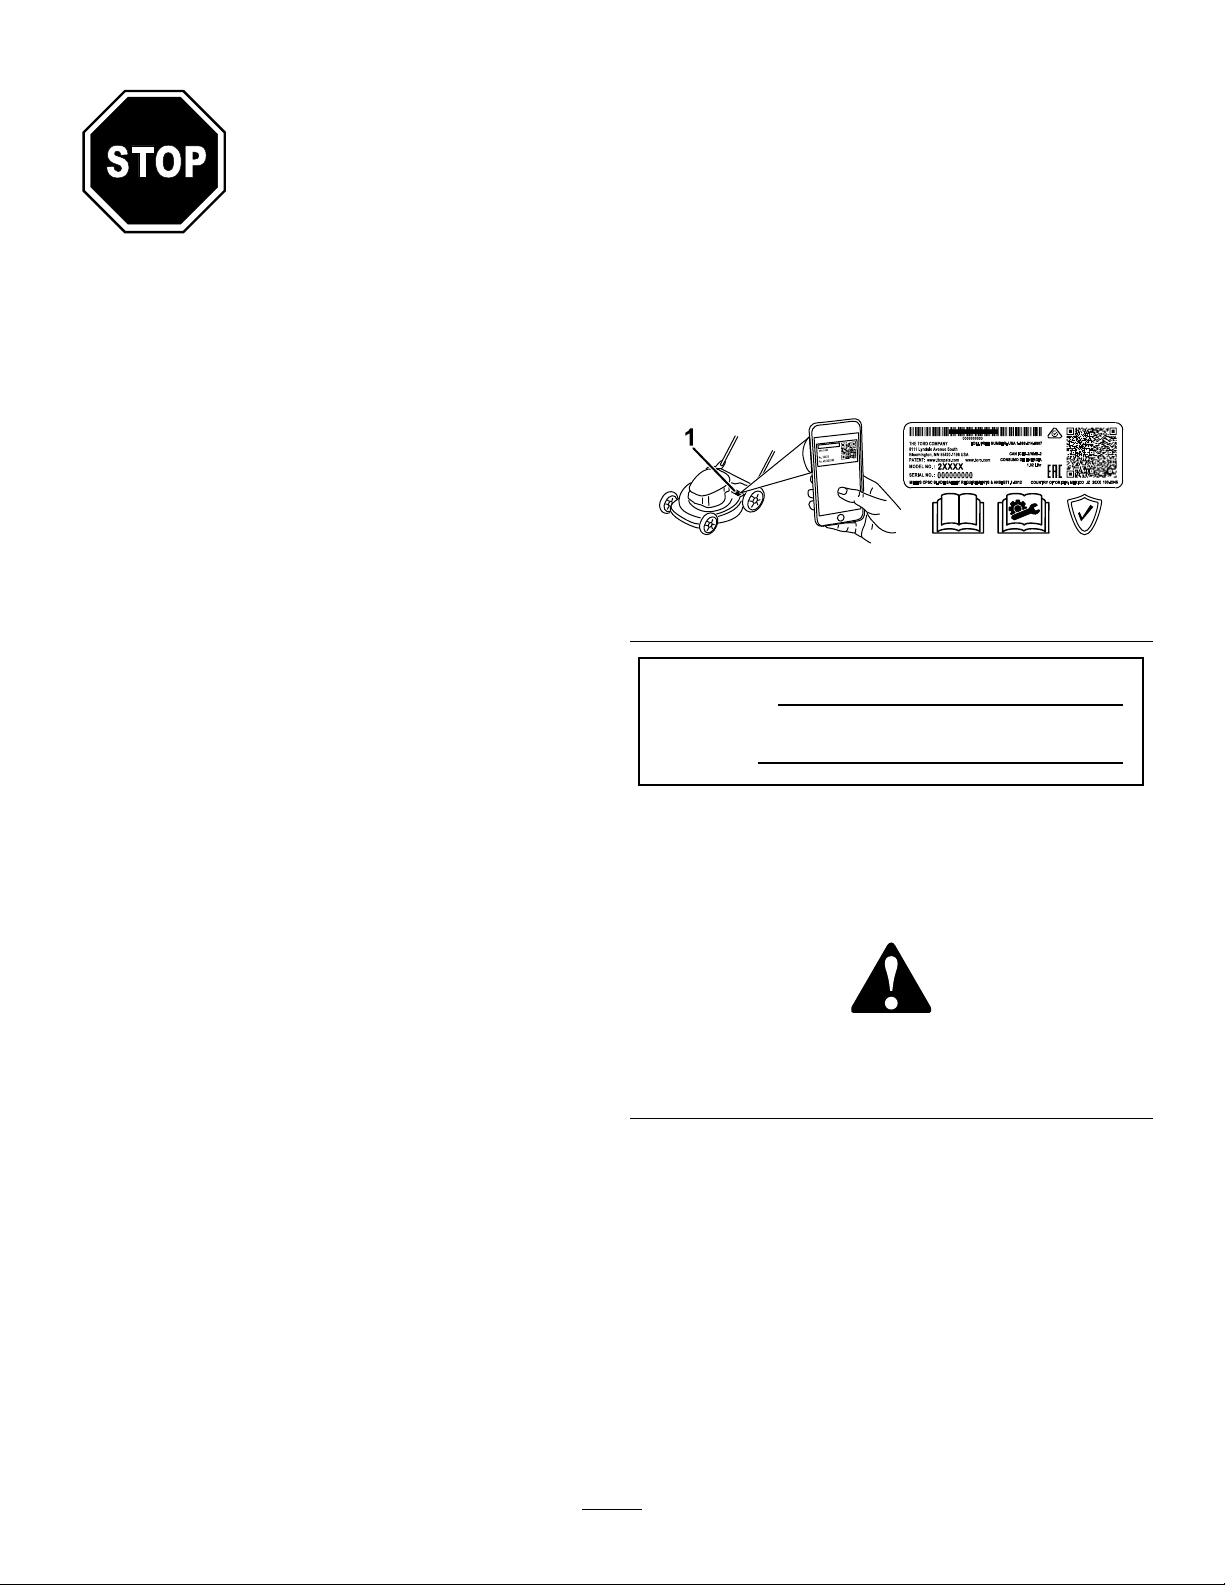
Sivousavezbesoin
d'aide,rendez-voussur
www.Toro.com/support
oucontactezvotre
concessionnaireréparateuragrééavant
derenvoyerceproduit.
Ceproduitestconformeàtouteslesdirectives
européennespertinentes.Pourplusde
renseignements,reportez-vousàlaDéclarationde
conformitéspéciqueduproduitfournieséparément.
Introduction
Cettetondeuseautotractéeàlamerotativeest
destinéeaugrandpublic.Elleestprincipalement
conçuepourtondrelespelousesentretenues
régulièrementdanslesterrainsprivés.Ellen'estpas
conçuepourcouperlesbroussaillesnipourunusage
agricole.Elleestconçuepourfonctionneravecla
batterieion-lithiumToroFlexForcemodèle81825
(fournieaveclemodèle21836),modèle81850(fournie
aveclemodèle21843etlemodèle21844)etle
modèle81860ou81875.Cesbatteriessontconçues
pourêtrechargéesuniquementaveclechargeur
modèle81802(fourniaveclesmodèles21836,21843
et21844)ou81805.L'utilisationdecesproduitsà
d'autresnsquecellesprévuespeutêtredangereuse
pourvous-mêmeettoutepersonneàproximité.
Lesmodèles21836T,21843Tet21844Tne
comprennentpasdebatterieoudechargeur.
Pourobtenirdesprestationsdeservice,des
piècesT orod'origineoudesrenseignements
complémentaires,munissez-vousdesnuméros
demodèleetdesérieduproduitetcontactezun
concessionnaire-réparateuragrééouleserviceclient
Toro.LaFigure1indiquel'emplacementdesnuméros
demodèleetdesérieduproduit.Inscrivezles
numérosdansl'espaceréservéàceteffet.
Important:Avecvotreappareilmobile,vous
pouvezscannerlecodeQRsurl'autocollantdu
numérodesérie(lecaséchéant)and'accéder
auxinformationssurlagarantie,lespièces
détachéesetautresrenseignementssurle
produit.
g275230
Figure1
1.Emplacementdesnumérosdemodèleetdesérie
N°demodèle
N°desérie
Lesmisesengardedecemanuelsoulignentdes
dangerspotentielsetsontsignaléesparlesymbole
desécurité(Figure2),quiindiqueundangerpouvant
entraînerdesblessuresgravesoumortellessiles
précautionsrecommandéesnesontpasrespectées.
Lisezattentivementcettenoticepourapprendre
commentutiliseretentretenircorrectementvotre
produit,etéviterainsidel'endommageroudevous
blesser.Vousêtesresponsabledel'utilisationsûreet
correcteduproduit.
Pourplusd’informations,ycomprisdesconseils
desécurité,desdocumentsdeformation,des
renseignementsconcernantunaccessoire,
pourobtenirl'adressed'unconcessionnaireou
pourenregistrervotreproduit,rendez-voussur
www.T oro.com.
©2021—TheToro®Company
8111LyndaleAvenueSouth
Bloomington,MN55420
Figure2
Symboledesécurité
Cemanuelutilisedeuxtermespourfairepasser
desrenseignementsessentiels.Important,pour
attirerl'attentionsurdesrenseignementsmécaniques
spéciquesetRemarque,pourinsistersurdes
renseignementsd'ordregénéralméritantuneattention
particulière.
Contactez-noussurwww.Toro.com.
2
g000502
ImpriméenChine
Tousdroitsréservés

Tabledesmatières
Sécurité
Sécurité....................................................................3
Autocollantsdesécuritéetd'instruction..............6
Miseenservice.........................................................8
1Montageduchargeurdebatterie
(option)............................................................8
2Montageduguidon..........................................9
Vued'ensembleduproduit......................................10
Caractéristiquestechniques.............................11
Avantl'utilisation..................................................12
Installationdelabatterie...................................12
Réglagedelahauteurdecoupe.......................13
Pendantl'utilisation.............................................14
Démarragedelamachine.................................14
Utilisationdelacommanded'autopropul-
sion...............................................................14
Réglagedelavitessedelalame.......................14
Recyclagedel'herbecoupée............................15
Ramassagedel'herbecoupée.........................16
Arrêtdelamachine...........................................18
Retraitdelabatteriedelamachine...................18
Conseilsd'utilisation........................................19
Aprèsl'utilisation.................................................20
Chargedelabatterie........................................20
Nettoyagedelamachine..................................20
Pliageduguidon...............................................21
Rangementdelamachineàlaverticale............21
Entretien.................................................................23
Graissagedelamachine..................................23
Remplacementdelalame................................23
Préparationdelabatteriepourle
recyclage......................................................24
Remisage...............................................................24
Entretien...........................................................24
Dépistagedesdéfauts............................................25
IMPORTANTES
CONSIGNES
DESÉCURITÉ
ATTENTION–quandvousutilisezunemachine
électrique,lisezetrespecteztoujourslesmisesen
gardeetconsignesdesécuritéélémentairespour
réduirelesrisquesd'incendie,dechocélectriqueou
deblessure,notamment:
I.Formationàl'utilisation
1.L'utilisateurdelamachineestresponsabledes
accidentsetdommagescausésauxautres
personnesetàleurspossessions.
2.N'autorisezpaslesenfantsàjoueravecla
machine,labatterieoulechargeurdebatterie;
laréglementationlocalepeutimposerunâge
minimumpourlesutilisateurs.
3.Neconezpasl'utilisationoul'entretiendela
machineàdesenfantsouàdespersonnesnon
qualiées.Seuleslespersonnesresponsables,
forméesàl'utilisationetl'entretiendela
machine,ayantluetcomprislesinstructionset
physiquementaptessontautoriséesàutiliserou
entretenirlamachine.
4.Avantd'utiliserlamachine,labatterieetle
chargeurdebatterie,liseztouteslesinstructions
etmisesengardequigurentsurcesproduits.
5.Familiarisez-vousaveclescommandesetle
maniementcorrectdelamachine,delabatterie
etduchargeurdebatterie.
II.Avantd'utiliserlamachine
1.T eneztoutlemonde,enparticulierlesenfants
etlesanimaux,àl'écartdelazonedetravail.
2.N'utilisezpaslamachinesidescapotsoudes
dispositifsdeprotection,telsquelesdéecteurs
etbacsàherbe,manquentousontdéfectueux.
3.Examinezlazonedetravailetdébarrassez-lade
toutobjetpouvantgênerlefonctionnementdela
machineouêtreprojetépendantsonutilisation.
4.Avantd'utiliserlamachine,vériezquelalame,
leboulondelalameetl'ensemblenesontpas
usésniendommagés.Remplacezlesétiquettes
endommagéesouillisibles.
5.Utilisezuniquementlabatteriespéciéepar
Toro.L'utilisationd'autresaccessoireset
outilspeutaccroîtrelerisquedeblessureet
d'incendie.
6.Vouspouvezcauserunincendieouunchoc
électriquesivousbranchezlechargeurde
batterieàuneprisequin'estpasde100à240
3

V.Nebranchezlechargeurdebatteriequ'à
uneprisede100à240V.Pouruntypede
branchementdifférent,utilisezunadaptateur
correctementcongurépourlaprise,lecas
échéant.
7.N'utilisezpaslabatterieoulechargeurs'ils
sontendommagésoumodiés,carleur
comportementpourraitêtreimprévisibleet
causerunincendie,uneexplosionoudes
blessures.
8.Silecordond'alimentationduchargeur
estendommagé,adressez-vousàun
concessionnaire-réparateuragréépourlefaire
remplacer.
9.N’utilisezpasdebatteriesnonrechargeables.
10.Chargezlabatterieuniquementaveclechargeur
spéciéparToro.Unchargeurconvenantàun
certaintypedebatteriepeutcréerunrisque
d'incendies'ilestutiliséavecuneautrebatterie.
11.Nechargezlabatteriequedansunendroitbien
aéré.
12.N'exposezpaslabatterieoulechargeuraufeu
ouàdestempératuressupérieuresà68°C.
13.Respecteztouteslesinstructionsdecharge
etnechargezpaslabatteriehorsdelaplage
detempératurespéciéedanslesinstructions.
Vousrisquezsinond'endommagerlabatterieet
d'accroîtrelerisqued'incendie.
14.Portezunetenueadéquate–portezdes
vêtementsappropriés,ycomprisuneprotection
oculaire,unpantalon,deschaussuressolidesà
semelleantidérapante(netravaillezpaspieds
nusouchaussédesandales),desgantsde
caoutchoucetdesprotecteursd'oreilles.Sivos
cheveuxsontlongs,attachez-lesetneportez
pasdevêtementsamplesoudebijouxpendants
quipourraientseprendredanslespièces
mobiles.Portezunmasqueantipoussièresi
l'atmosphèreestpoussiéreuse.
III.Utilisation
1.Lecontactaveclalameenrotationpeutcauser
desblessuresgraves.Gardezlesmainsetles
piedsàl'écartdelazonedecoupeetdetoutes
lespiècesmobilesdelamachine.Nevous
tenezpasdevantl'ouvertured'éjection.
2.L'utilisationdecettemachineàd'autresns
quecelleprévuepeutêtredangereusepour
vous-mêmeettoutepersonneàproximité.
3.Désengagezl'autopropulsion(selon
l'équipement)avantdedémarrerlamachine.
4.Nebasculezpaslamachinequandvous
démarrezlemoteur.
5.Évitezlesdémarragesaccidentels–
assurez-vousquelaclédesécuritéestretirée
dudémarreurélectriqueavantdebrancherla
batterieetdemanipulerlamachine.
6.Accordeztoutevotreattentionàl'utilisationdela
machine.Nefaitesriend’autrequipuissevous
distraire,aurisquedecauserdesdommages
corporelsoumatériels.
7.Arrêtezlamachine,retirezlaclédesécurité,
enlevezlabatteriedelamachineetattendez
l'arrêtdetoutmouvementavantderégler,
réviser,nettoyerouremiserlamachine.
8.Enlevezlabatterieetlaclédesécuritédela
machinechaquefoisquevouslalaissezsans
surveillanceouavantdechangerd'accessoires.
9.Nefaitespasforcerlamachine–elledonnera
debienmeilleursrésultatsetseraplussûresi
vousl'utilisezàlavitessepourlaquelleelleest
prévue.
10.Restezalerte–Concentrez-voussurvotre
tâcheetfaitespreuvedebonsenslorsquevous
utilisezlamachine.N'utilisezpaslamachinesi
vousêtesmaladeoufatigué(e),nisousl'emprise
del'alcool,dedroguesoudemédicaments.
11.N'utilisezlamachinequesilavisibilitéest
sufsanteetlesconditionsmétéorologiques
favorables.N'utilisezpaslamachinesilafoudre
menace.
12.Redoublezdeprudenceenmarchearrièreou
quandvoustirezlamachineversvous.
13.Gardeztoujourslespiedsbienposésàterreet
maintenezvotreéquilibre,enparticuliersurles
pentes.Travailleztransversalementàlapente,
jamaisenmontantoudescendant.Changezde
directionaveclaplusgrandeprudencesurles
terrainsenpente.Netondezpasdepentestrop
raides.Avanceztoujoursàuneallurenormale
aveclamachine,necourezpas.
14.Nedirigezpasl'éjectionversquiquecesoit.
N'éjectezpasl'herbecoupéecontreunmurou
unobstacle,carellepourraitricocherdansvotre
direction.Arrêtezlarotationdelaoudeslames
avantdetraverserunesurfacenonherbeuse.
15.Méez-vousdestrous,ornières,bosses,
rochersouautresobstaclescachés.Vous
pouvezglisserouperdrel'équilibresileterrain
estirrégulier.
16.Entravaillantsurl'herbeoulesfeuilleshumides,
vousrisquezdeglisseretdevousblesser
gravementsivoustouchezlalameentombant.
Netondezpassil'herbeesthumideousousla
pluie.
17.Silamachineheurteunobjetousemetàvibrer,
arrêtez-laimmédiatement,retirezlacléde
sécurité,enlevezlabatterieetattendezl'arrêt
complettoutmouvementavantdevérierl'état
4

delamachine.Effectueztouteslesréparations
nécessairesavantderéutiliserlamachine.
18.Arrêtezlamachineetretirezlaclédesécurité
avantdechargerlamachinepourletransport.
19.Dansdesconditionsd'utilisationabusive,du
liquidepeutjaillirhorsdelabatterie;éviteztout
contact.Encasdecontactaccidentelavecle
liquide,rincezàl'eau.Encasdecontactdu
liquideaveclesyeux,consultezunmédecin.Le
liquideéjectéhorsdelabatteriepeutcauserdes
irritationsoudesbrûlures.
IV.Entretienetremisage
1.Arrêtezlamachine,retirezlaclédesécurité,
enlevezlabatteriedelamachineetattendez
l'arrêtdetoutmouvementavantderégler,
réviser,nettoyerouremiserlamachine.
2.N'essayezpasderéparerlamachinesauf
commeexpliquédanslesinstructions.
Conezl'entretiendelamachineàun
concessionnaire-réparateuragrééquiutilisedes
piècesderechangeidentiques.
3.Portezdesgantsetuneprotectionoculairepour
fairel'entretiendelamachine.
4.Remplacezlalamesielleestfaussée,uséeou
ssurée.Unelamemaléquilibréeprovoquedes
vibrationsquipeuventendommagerlemoteur
oucauserdesblessures.
5.Quandvousfaitesl'entretiendelalame,
n'oubliezpasqu'ellepeutencorebougermême
sil'alimentationélectriqueestcoupée.
6.Vériezfréquemmentquelebacderamassage
n'estpasdétérioréouusé,etremplacezunbac
uséparunbacT oro.
7.Pourobtenirdesrésultatsoptimaux,utilisez
uniquementdespiècesderechangeetdes
accessoiresT orod'origine.Tousautres
accessoiresoupiècesderechangepeuventêtre
dangereux,etleurutilisationrisqued'annuler
lagarantieproduit.
etqu'aucunepiècen'estcassée,malxéeou
présentetoutautredéfautquipourraitaffecter
sonfonctionnement.Saufindicationcontraire
danslesinstructions,faitesréparerouremplacer
lesprotectionsoulespiècesendommagéespar
unconcessionnaire-réparateuragréé.
10.Lorsquelabatterienesertpas,rangez-laà
l'écartd'objetsmétalliquestelsquetrombones,
piècesdemonnaie,clés,clousouvisqui
pourraientrelierlesbornesentreelles.Un
court-circuitauxbornesdelabatteriepeut
causerdesbrûluresouunincendie.
11.Vériezfréquemmentleserragedesboulonsde
montagedelalameetdumoteur.
12.Lorsquevousn'utilisezpaslamachine,
remisez-ladansunlocalsecetsécurisé,ethors
deportéedesenfants.
13.PRUDENCE–Labatteriepeutprésenterun
risqued'incendieoudebrûlurechimiqueen
casdemauvaistraitement.Nedémontezpas
labatterie.N'exposezpaslabatterieàune
températuresupérieureà68°Cetnel'incinérez
pas.Remplaceztoujourslabatterieparune
batterieTorod'origine;l'utilisationdetoutautre
typedebatteriepeutentraînerunincendieou
uneexplosion.Conservezlesbatterieshorsde
laportéedesenfantsetdansleuremballage
d'originejusqu'aumomentdelesutiliser.
14.Nejetezpaslabatterieaufeu.L'élément
pourraitexploser.Vériezsilaréglementation
localestipuledesprocéduresdemiseaurebut
spéciales.
CONSERVEZCES
INSTRUCTIONS
8.Maintenezlamachineenbonétat–Pour
obtenirdesperformancesoptimalesetsûres,
conservezletranchantdeslamespropreetbien
affûté.Gardezlespoignéespropresetsèches,
etexemptesd'huileetdegraisse.Gardez
toujourslesprotectionsenplaceetenbonétat.
Maintenezleslamesbienaiguisées.Utilisez
uniquementdeslamesderechangeidentiques.
9.Vériezqu'aucunepiècedelamachine
n'estendommagée–Sivousconstatez
quedesprotectionsoud'autrespiècessont
endommagées,déterminezsilamachinepeut
fonctionnercorrectement.Vériezqu'aucune
despiècesmobilesn'estmalalignéeougrippée,
5

Autocollantsdesécuritéetd'instruction
Desautocollantsdesécuritéetdesinstructionsbienvisiblesparl'opérateursontplacésprès
detouslesendroitspotentiellementdangereux.Remplaceztoutautocollantendommagé
oumanquant.
134-6016
1.Régimemoteur–bas2.Régimemoteur–haut
decal134-6016
decal134-4550
134-4550
134-5099
1.Attention–n'approchezpaslesmainsetlespiedsdela
lame.
134-5297
1.ModeMaxPower
decal134-5099
decal134-5297
1.Attention–lisezleManuel
del'utilisateur.
2.Risquede
coupure/mutilationdes
mainsparlalamede
latondeuse–nevous
approchezpasdespièces
mobilesetgardeztoutes
lesprotections.
3.Risquede
coupure/mutilationdes
mainsoudespiedspar
lalamedelatondeuse
–retirezlacléetlisez
leManueldel'utilisateur
avantd'entreprendreun
entretien.
4.Risquedeprojection
d'objets–n'autorisez
personneàs'approcher;
coupezlemoteuravant
dequitterlaposition
d'utilisation;ramassezles
débrisavantdetondre.
5.Risquede
coupure/mutilationdes
mainsoudespiedspar
lalamedelatondeuse
–netravaillezpasdans
lesensdelapente,
maistransversalement;
regardezderrièrevous
avantdefairemarche
arrière.
1.Étatdechargedelabatterie
6
decal137-9461
137-9461

Modèle81825
Modèle81850
decal137-9487
137-9487
1.Lisezlemanuelde
l'utilisateur.
2.Recyclezlabatterieselon
laréglementationen
vigueur.
3.Nepasmettreaurebut.
4.Nepasexposeraux
ammes.
5.Nepasexposeràlapluie.
1.LisezleManuelde
l'utilisateur.
2.Recyclezlabatterieselon
laréglementationen
vigueur.
3.Nepasmettreaurebut.
137-9495
1.Lisezlemanueldel'utilisateur.3.Pourusageintérieur.
2.Nepasmettreaurebut.4.Doubleisolation
decal140-2158
140-2158
4.Nepasexposeraux
ammes.
5.Nepasexposeràlapluie.
decal137-9495
137-9463
1.Labatterieestencharge.
2.Labatterieestcomplètementchargée.
3.Latempératuredelabatterieestsupérieureouinférieureàlaplagedetempératureappropriée.
4.Anomaliedechargedelabatterie
7
decal137-9463

Miseenservice
Important:Labatterien'estpascomplètementchargéeàl'achat.Avantd'utiliserlamachinepourla
premièrefois,voirChargedelabatterie(page20).
Remarque:Laclédesécuritéettouteslesautrespiècesdétachéesontétéplacéesdanslecompartiment
delabatteriepouréviterd'êtreperdues;veillezàlessortirducompartimentetàlesrangerenlieusûravant
lemontage.
1
Montageduchargeurde
batterie(option)
Piècesnécessairespourcetteopération:
2
Fixationsdemontage(nonincluses)
Procédure
Sivouslesouhaitez,vouspouvezxerlechargeur
debatteriesurunmuràl'aidedesfentesentroude
serruresituéesaudos.
Montez-leàl'intérieur(parexempledansungarage
outoutautreendroitàl'abridel'humidité),àproximité
d'uneprisedecourantethorsdelaportéedes
enfants.
VoirlaFigure3poursavoircommentmonterle
chargeur.
Pourxerlechargeurenplace,glissez-lesurles
xationsplacéesaubonendroit(xationsnon
incluses).
Figure3
g290534
8

2
Montageduguidon
Piècesnécessairespourcetteopération:
1Partiesupérieureduguidon
2Boulon
2
Contre-écrou
Procédure
Important:Retirezetmettezaurebutlapellicule
deplastiquequiprotègelatondeuse,ainsique
toutautreemballageouélémentenplastique
utilisésurlamachine.
Remarque:Retirezlecapuchonencaoutchoucà
l'extrémitéduguidondechaquecôtéavantd'insérer
labarresupérieuredanslabarreinférieure.Ces
capuchonssontajoutésaucoursdelafabrication
pourprotégerlescâbles.
ATTENTION
Vousrisquezd'endommagerlescâblesetde
rendrel'utilisationdelamachinedangereuse
sivouspliezoudépliezmalleguidon.
•Veillezànepasendommagerlescâblesen
pliantoudépliantleguidon.
•Siuncâbleestendommagé,contactezun
concessionnaire-réparateuragréé.
1.Insérezlabarresupérieuredanslabarre
inférieureduguidonetxezletoutenplace
avec2boulonset2contre-écrous,comme
montréàlaFigure4.
g342173
Figure4
2.Tirezlabarrededéblocageduverslapartie
supérieureduguidonpourdébloquerleverrou
duguidon(Figure5).
3.Relevezleguidonversl'arrière,enposition
d'utilisation,etrelâchezlabarrededéblocage
(Figure5).
Remarque:Assurez-vousqueleguidon
s'enclencheenplace.
g341335
Figure5
9

Vued'ensembledu
produit
g342171
Figure7
1.Compartimentdela
batterie
2.Déecteurarrière
3.Barrededéblocagedu
guidon
4.Poignéesdecommande
deslames
5.Guidon
Figure6
6.Manettesd'autopropulsion
(modèle21844seulement)
7.Indicateurdebacàherbe
plein
8.Bacàherbe
9.Boutondehauteurde
coupe
10.Regarddehauteurde
coupe
1.Chargeurdebatterie
modèle81802(inclus
aveclesmodèles21836,
21843et21844)
2.Batteriemodèle81850
(incluseaveclesmodèles
21843et21844)
g364064
3.Batteriemodèle81825
(incluseavecle
modèle21836)
10

Caractéristiques
techniques
Modèle
21836/T
21843/T
21844/T
Poids
(sans
batterie)
20,2kg130,6cm41,7cm107,3cm
22,1kg136,2cm48,5cm108,5cm
24,0kg136,2cm48,5cm108,5cm
LongueurLargeur
Hauteur
DimensionsSmartStow
Modèle
21836/T
21843/T
21844/T
LongueurLargeur
41,2cm41,7cm113,5cm
41cm48,5cm114,cm
41,cm48,5cm114,cm
Hauteur
Batterie
Modèle
Capacitédelabatterie
Tensionbatterienominaleselonlefabricant=60Vmax.,54V
nominale.Latensionréellevariesuivantlacharge.
8182581850
2,5Ah4Ah
135Wh216Wh
Chargeurdebatterie
Modèle
Type
Entrée100à240Vc.a.,50/60Hz,2Amax.
Sortie
81802
Chargeurdebatterieion-lithium60V
MAX
60Vc.c.max.,2A
Plagesdetempératuresadéquates
Charger/rangerlabatterie
entre
Utiliserlabatterieentre
Utiliserlamachineentre
*Letempsdechargeaugmenteendehorsdecette
plagedetempérature.
Rangezlamachine,labatterieetlechargeurde
batteriedansunlocalfermé,propreetsec.
5°Cet40°C*
-30°Cet49°C*
0°Cet49°C*
11

Utilisation
Remarque:Lescôtésgaucheetdroitdelamachinesontdéterminésd'aprèslapositiond'utilisationnormale.
Avantl'utilisation
Installationdelabatterie
Important:Utilisezlabatterieuniquementdanslaplagedetempératuresindiquée;voir
Caractéristiquestechniques(page11).
1.Vériezquelaclédesécuritén'estpasinstalléesurlamachine.
2.Vériezqueleséventsdelabatteriesontexemptsdepoussièreetdedébris.
3.Soulevezlecouvercleducompartimentdelabatterie(AdelaFigure8).
4.Placezlecreuxdanslabatterieenfacedelalanguettesurlamachine,etglissezlabatteriedansle
compartimentjusqu'àcequ'elles'enclencheenposition(BdelaFigure8).
5.Refermezlecouvercleducompartimentdelabatterie(CdelaFigure8).
Remarque:Silecouvercleducompartimentdelabatterienesefermepascomplètement,celasignie
quelabatterien'estpasparfaitementinstallée.
Figure8
g341293
12

Réglagedelahauteurde
coupe
ATTENTION
Lorsduréglagedelahauteurdecoupe,vous
pouvezvousblessergravementsivosmains
touchentunelameenmouvement.
•Coupezlemoteur,retirezlabatterieet
attendezl'arrêtcompletdetoutesles
piècesmobilesavantderéglerlahauteur
decoupe.
Lahauteurdecoupedisposede6réglagesde
hauteurdecoupeentre19mmet70mm.
IndicateurPositiondehauteurde
coupe
1(laplusbasse)
2
3
•Nemettezpaslesdoigtssouslecarterde
latondeusequandvousréglezlahauteur
decoupe.
Pourréglerlahauteurdecoupe,appuyezsurle
boutondehauteurdecoupeetmontezoudescendez
leplateauàlahauteurdecoupevoulue,indiquée
dansleregarddehauteurdecoupe(Figure9).
4
5
6(laplusélevée)
1.Boutondehauteurde
coupe
g364065
Figure9
2.Regarddehauteurde
coupe
13

Pendantl'utilisation
Utilisationdelacommande
d'autopropulsion
Démarragedelamachine
1.Vériezquelabatterieestchargéeetinstallée
danslamachine;voirInstallationdelabatterie
(page12).
2.Installezlaclédesécuritésurlamachine(Figure
10).
Modèle21844/Tseulement.
•Pourréglerlavitessed'autopropulsion,réglez
lacommandedevitesseàlapositionvoulue
(Figure12).
•Pourengagerl'autopropulsion,serrezet
maintenezlesmanettesdecommande
d'autopropulsioncontreleguidon(Figure12).
•Pourdésengagerl'autopropulsion,relâchez
lesmanettesdecommanded'autopropulsion.
Remarque:Pourréduirelavitessede
déplacement,poussezlacommandedevitesse
verslagauche;poussez-lacommandeversla
droitepouraugmenterlavitesse.
Figure10
3.Appuyezsurleboutondemarcheaucentrede
lapartiesupérieureduguidonpourdémarrer
lamachine.
4.Serrezlespoignéesdecommandedeslames
pourcommenceràtondre.
Figure11
g344530
g342174
Figure12
1.Commandedevitessed'autopropulsion
2.BoutonMAX
3.Manettesdecommanded'autopropulsion
Réglagedelavitessedela
lame
Cettemachinedisposede2réglagesdevitessedela
lame:RUNSMARTetMAX.
•ÀlapositionRUNSMART,lavitessedelalameest
automatiquementrégléepourassurerunmeilleur
rendement;lesmodicationsdesconditionsde
coupesontdétectéesetlavitessedelalame
augmentelorsquecelaestnécessairepour
g341398
maintenirqualitédecoupe.
•ÀlapositionMAX,lalametourneàlavitesse
maximaleenpermanence.
AppuyezsurleboutonMAXsousleboutonde
démarragepourréglerlavitessedelamachinesur
MAX(Figure12).
14

Recyclagedel'herbe
coupée
Àlalivraison,votremachineestprêteàrecycler
l'herbeetlesfeuillescoupéespournourrirvotre
pelouse.
Silebacàherbeestmontésurlamachine,enlevez-le
avantdeprocéderaurecyclagedel'herbecoupée.
VoirRetraitdubacàherbe(page17).
Installationdel'obturateurde
mulching
1.Coupezlemoteurdelamachine,puisretirez
labatterieetlaclédesécurité;voirArrêtdela
machine(page18).
2.Placezlamachineàlaverticaleenpositionde
rangement;voirRangementdelamachineà
laverticale(page21).
3.Nettoyezledessousduplateaudecoupeande
pouvoirinstallerl'obturateurcorrectement;voir
Nettoyagedudessousdelamachine(page20).
Déposedel'obturateurde
mulching
Pourdéposerl'obturateurdemulching,retirezla
batterieetinversezlesopérationsdelaprocédure
décritesousInstallationdel'obturateurdemulching
(page15).
4.Installezl'obturateuretpoussezsurlebas
jusqu'àcequ'ils'enclencheenplacesurles2
goupillesdexation,commemontréàlaFigure
13.
Important:Lebasdel'obturateurde
mulchingdoitêtreparfaitementalignésurle
plateauquandilestinstallécorrectement;
nel'utilisezpasdanslecascontraire;
contactezvotreconcessionnaire-réparateur
agréé.
Figure13
g342177
15

Ramassagedel'herbecoupée
Utilisezlebacàherbepourrecueillirlesdébrisd'herbeetdefeuillesdéposéssurlapelouse.
Sil'obturateurdemulchingestinstallésurlamachine,enlevez-leavantderamasserl'herbecoupée.Voir
Déposedel'obturateurdemulching(page15).
Installationdubacàherbe
1.Levezleguidonàlaverticaleetsoulevezledéecteurarrière(AdeFigure14).
2.Engagezlescrochetsdubacàherbedanslescransàl'arrièredelamachine(BdeFigure14).
3.Appuyezledéecteurarrièresurlebac(CdeFigure14).
4.Ramenezleguidonenpositiond'utilisation;voirPliageduguidon(page21).
Figure14
Indicateurdebacàherbeplein
Unindicateurdebacàherbepleinestsituésurlecouverclerigidedubac.Pendantleramassagedel'herbe,
l'airquicirculedanslebacàherbesoulèvelevoletindicateurenpositionouverte.Lorsquelebacàherbeest
plein,lacirculationdel'airestbloquéeetlevoletindicateurseferme.
g341400
Figure15
g363501
16

Retraitdubacàherbe
Pourretirerlebacàherbe,inversezlesopérationsdécritessousInstallationdubacàherbe(page16).
N'utilisezpaslamachinesanslebacàherbe,àmoinsquel'obturateurdemulchingnesoitenplace.Ne
retirezlebacàherbequepourlemulching,letransportouleremisagedelamachine,ouencorepourle
vider(Figure16).
Figure16
g356991
17

Arrêtdelamachine
Retraitdelabatteriedela
1.Relâchezlabarredecommandedelalame
(Figure10).
Figure17
2.Retirezlaclédesécuritédelamachine(Figure
10).
machine
1.Soulevezlecouvercleducompartimentdela
batterie.
2.Appuyezsurleverroudelabatteriepourla
débloqueretl'enlever.
3.Refermezlecouvercleducompartimentdela
batterie.
g341392
Figure19
g341360
Figure18
3.Enlevezlabatterie;voirRetraitdelabatteriede
lamachine(page18).
Remarque:Enlevezlabatteriechaquefois
quevousn'utilisezpaslamachine.
g344533
18

Conseilsd'utilisation
Conseilsdetontegénéraux
•Évitezdeheurterdesobstaclesaveclalame.Ne
passezjamaisintentionnellementsurunobjetquel
qu'ilsoit.
•Pourobtenirdesrésultatsoptimaux,installezune
lameT oroneuveaudébutdelasaisondetonteou
quandcelaestnécessaire.
Latonte
•Netondezl'herbequesuruntiersdesahauteur
àchaquefois.Pourunemeilleurequalitéde
coupe,uneplusgrandeautonomieetunmeilleur
ramassage,tondezl'herbeàunehauteurde
coupeplusélevée.
•N'utilisezpaslaplusbassehauteurdecoupe,sauf
sil'herbeestclairseméeouàlandel'automne
quandlapoussecommenceàralentir.
•Sil'herbeesthaute,effectuezunpremierpassage
àvitesseréduiteàlahauteurdecoupelaplus
haute;repassezensuiteàunehauteurdecoupe
inférieurepourobtenirunecoupeplusesthétique.
L'herbetrophauterisqued'obstruerlamachineet
defairecalerlemoteur.
Hachagedesfeuilles
•Aprèslatonte,50%delapelousedoitêtrevisible
souslacouchedefeuilleshachées.Vousdevrez
peut-êtrerepasserplusieursfoissurlesfeuilles.
•Débarrassezlesoldesquantitésexcessivesde
feuillesavantdeleshacher.Silamachinene
hachepaslesfeuillesassezn,réduisezlavitesse
detonteouutilisezunehauteurdecoupeplus
élevée,avantderepasseràlahauteurdecoupe
voulue.
•L'herbeetlesfeuilleshumidesonttendanceà
s'agglomérersurlapelouseetpeuventobstruerla
machineetfairecalerlemoteur.Évitezdetondre
quandl'herbeesthumide.
•Soyezconscientdesrisquesd'incendiepartemps
trèssec,respecteztouslesavertissementslocaux
relatifsauxincendies,etnelaissezpasl'herbeet
lesfeuillessèchess'accumulersurlamachine.
•Alternezladirectiondelatonte.Celapermet
dedisperserlesdéchetsplusuniformémentet
d'obtenirunefertilisationplushomogène.
•Sil'aspectdelapelousetonduen'estpas
satisfaisant,essayezuneouplusieursdes
solutionssuivantes:
–Remplacezlalameoufaites-laaiguiser.
–Tondezenavançantpluslentement.
–Augmentezlahauteurdecoupe.
–Tondezplussouvent.
–Empiétezsurlespassagesprécédentspour
tondreunelargeurdebanderéduite.
19

Aprèsl'utilisation
5.Reportez-vousautableauci-dessouspour
interpréterlesindicationsduvoyantsurle
chargeurdebatterie.
Chargedelabatterie
Important:Labatterien'estpascomplètement
chargéeàl'achat.Avantd'utiliserl'outilpourla
premièrefois,placezlabatteriedanslechargeur
etchargez-lajusqu'àcequelesdiodesindiquent
qu'elleestcomplètementchargée.Liseztoutes
lesconsignesdesécurité.
Important:Chargezlabatterieuniquementàune
températurecomprisedanslaplageadéquate;
voirCaractéristiquestechniques(page11).
Remarque:Àtoutmoment,appuyezsurlebouton
indicateurdechargedelabatteriepourafcherla
chargeactuelle(diodes).
1.Vériezqueleséventsdelabatterieetdu
chargeursontexemptsdepoussièreetde
débris.
VoyantIndication
Éteint
Clignotementvert
VertBatteriechargée
Rouge
Clignotement
rouge
Pasdebatterieprésente
Batterieencharge
Latempératuredelabatterieet/ouduchargeurest
supérieureouinférieureàlaplageappropriée.
Anomaliedechargedelabatterie*
*VoirDépistagedesdéfauts(page25)pourplus
d'informations.
Important:Vouspouvezlaisserlabatteriedans
lechargeurpendantunecourtepériodeentre
deuxutilisations.
Silabatterienedoitpasservirpendantune
périodeprolongée,retirez-laduchargeur;voir
Entretien(page24).
Nettoyagedelamachine
Figure20
1.Logementdelabatterie
2.Éventsdelabatterie
3.Bornesdelabatterie7.Voyantduchargeur
4.Boutonindicateurde
charge
5.Diodes(chargeactuelle)
6.Guidon
8.Éventsduchargeur
2.Placezlecreuxdelabatterie(Figure20)devant
lalanguetteduchargeur.
3.Insérezlabatteriedanslechargeurjusqu'àce
qu'ellesoitcomplètementenclenchée(Figure
20).
4.Pourretirerlabatterieduchargeur,faites-la
glisserversl'arrière.
Nettoyagedudessousdela
machine
Périodicitédesentretiens:Aprèschaqueutilisation
Pourobtenirdesrésultatsoptimaux,nettoyez
rapidementlafaceinférieuredelamachineaprèsla
tonte.
g290533
1.Coupezlemoteurdelamachine,puisretirezla
batterieetlaclédesécurité
2.Abaissezlamachineàlahauteurdecoupela
plusbasse.
3.Placezlamachineàlaverticaleenpositionde
rangement;voirRangementdelamachineà
laverticale(page21).
4.Avecunebrosseouunbalai,enlevezlesdébris
aggloméréssurlafaceinférieuredelamachine.
Important:Nenettoyezpaslamachine
àl'eauaurisqued'endommagerles
composantsélectriques.
5.Nettoyezlebacàherbe.
Nettoyagedubacàherbe
Périodicitédesentretiens:Aprèschaqueutilisation
Nettoyezsouventlebacàherbepourassurerun
ramassageoptimal.Enlevezlesdébrisàlabrosse.
20
 Loading...