


22inRecycler
ModelNo.21467—SerialNo.400000000andUp
®
Introduction
Thisrotary-blade,walk-behindlawnmowerisintended
tobeusedbyresidentialhomeowners.Itisdesigned
primarilyforcuttinggrassonwell-maintainedlawnson
residentialproperties.Usingthisproductforpurposes
otherthanitsintendedusecouldprovedangerousto
youandbystanders.
Readthisinformationcarefullytolearnhowtooperate
andmaintainyourproductproperlyandtoavoid
injuryandproductdamage.Youareresponsiblefor
operatingtheproductproperlyandsafely.
Visitwww.T oro.comformoreinformation,including
safetytips,trainingmaterials,accessoryinformation,
helpndingadealer,ortoregisteryourproduct.
Wheneveryouneedservice,genuineToroparts,or
additionalinformation,contactanAuthorizedService
DealerorToroCustomerServiceandhavethemodel
andserialnumbersofyourproductready .Figure1
identiesthelocationofthemodelandserialnumbers
ontheproduct.Writethenumbersinthespace
provided.
Important:Withyourmobiledevice,youcan
scantheQRcodeontheserialnumberdecal(if
equipped)toaccesswarranty,parts,andother
productinformation.
Figure1
1.Modelandserialnumberlocation
ModelNo.
SerialNo.
Thismanualidentiespotentialhazardsandhas
safetymessagesidentiedbythesafety-alertsymbol
(Figure2),whichsignalsahazardthatmaycause
seriousinjuryordeathifyoudonotfollowthe
recommendedprecautions.
FormNo.3441-860RevA
LawnMower
Operator'sManual
g000502
Figure2
Safety-alertsymbol
Thismanualuses2wordstohighlightinformation.
Importantcallsattentiontospecialmechanical
informationandNoteemphasizesgeneralinformation
worthyofspecialattention.
ItisaviolationofCaliforniaPublicResourceCode
Section4442or4443touseoroperatetheengineon
anyforest-covered,brush-covered,orgrass-covered
landunlesstheengineisequippedwithaspark
arrester,asdenedinSection4442,maintainedin
effectiveworkingorderortheengineisconstructed,
equipped,andmaintainedforthepreventionofre.
Theenclosedengineowner'smanualissupplied
forinformationregardingtheUSEnvironmental
ProtectionAgency(EPA)andtheCaliforniaEmission
ControlRegulationofemissionsystems,maintenance,
andwarranty.Replacementsmaybeorderedthrough
theenginemanufacturer.
GrossorNetTorque:Thegrossornettorque
ofthisenginewaslaboratoryratedbytheengine
manufacturerinaccordancewiththeSocietyof
AutomotiveEngineers(SAE)J1940orJ2723.As
conguredtomeetsafety,emission,andoperating
requirements,theactualenginetorqueonthisclass
ofmowerwillbesignicantlylower.Pleasereferto
theenginemanufacturer’sinformationincludedwith
themachine.
g282707
WARNING
CALIFORNIA
Proposition65Warning
Theengineexhaustfromthisproduct
containschemicalsknowntotheStateof
Californiatocausecancer,birthdefects,
orotherreproductiveharm.
Useofthisproductmaycauseexposure
tochemicalsknowntotheStateof
Californiatocausecancer,birthdefects,
orotherreproductiveharm.
©2020—TheT oro®Company
8111LyndaleAvenueSouth
Bloomington,MN55420
Registeratwww.Toro.com.
OriginalInstructions(EN)
PrintedinMexico
AllRightsReserved
*3441-860*

Contents
Safety
Introduction...............................................................1
Safety.......................................................................2
GeneralSafety...................................................2
SafetyandInstructionalDecals..........................3
Setup........................................................................4
1AssemblingandUnfoldingtheHandle..............4
2InstallingtheRecoil-StarterRopeinthe
RopeGuide.....................................................4
3AddingOiltotheEngine...................................6
4AssemblingtheGrassBag...............................6
ProductOverview.....................................................8
Specications....................................................8
Attachments/Accessories...................................8
Operation..................................................................9
BeforeOperation...................................................9
BeforeOperationSafety.....................................9
FillingtheFuelTank............................................9
CheckingtheEngine-OilLevel..........................10
AdjustingtheHandleHeight..............................11
AdjustingtheCuttingHeight..............................11
DuringOperation.................................................13
DuringOperationSafety...................................13
StartingtheEngine...........................................13
UsingtheSelf-PropelDrive...............................14
ShuttingOfftheEngine.....................................14
RecyclingtheClippings....................................14
BaggingtheClippings.......................................14
OperatingtheBag-on-DemandLever...............15
OperatingTips.................................................15
AfterOperation....................................................16
AfterOperationSafety......................................16
CleaningUndertheMachine............................16
FoldingtheHandle...........................................17
Maintenance...........................................................18
RecommendedMaintenanceSchedule(s)...........18
MaintenanceSafety..........................................18
PreparingforMaintenance...............................18
ServicingtheAirFilter.......................................19
ChangingtheEngineOil...................................19
ReplacingtheBlade..........................................20
AdjustingtheSelf-PropelDrive.........................21
Storage...................................................................22
StorageSafety..................................................22
PreparingtheMachineforStorage...................22
RemovingtheMachinefromStorage................22
Thismachinehasbeendesignedinaccordancewith
ANSIB71.1-2017.
GeneralSafety
Thisproductiscapableofamputatinghandsand
feetandofthrowingobjects.Alwaysfollowallsafety
instructionstoavoidseriouspersonalinjuryordeath.
•Read,understand,andfollowtheinstructions
andwarningsinthisOperator’sManualandon
themachineandattachmentsbeforestartingthe
engine.
•Donotputyourhandsorfeetnearmovingpartsor
underthemachine.Keepclearofanydischarge
opening.
•Donotoperatethemachinewithoutallguards
andothersafetyprotectivedevicesinplaceand
functioningproperlyonthemachine.
•Keepbystandersandchildrenoutoftheoperating
area.Donotallowchildrentooperatethemachine.
Allowonlypeoplewhoareresponsible,trained,
familiarwiththeinstructions,andphysically
capabletooperatethemachine.
•Stopthemachine,shutofftheengine,andwaitfor
allmovingpartstostopbeforeservicing,fueling,
oruncloggingthemachine.
Improperlyusingormaintainingthismachinecan
resultininjury.Toreducethepotentialforinjury,
complywiththesesafetyinstructionsandalways
payattentiontothesafety-alertsymbol
meansCaution,Warning,orDanger—personalsafety
instruction.Failuretocomplywiththeseinstructions
mayresultinpersonalinjuryordeath.
,which
2

SafetyandInstructionalDecals
Safetydecalsandinstructionsareeasilyvisibletotheoperatorandarelocatednearanyarea
ofpotentialdanger.Replaceanydecalthatisdamagedormissing.
Manufacturer'sMark
1.Thismarkindicatesthatthebladeisidentiedasapart
fromtheoriginalmachinemanufacturer .
decaloemmarkt
decal94-8072
94-8072
decal125-5026
125-5026
1.Recyclingmode2.Baggingmode
decal133-8062
133-8062
decal131-4514
131-4514
1.Warning—readtheOperator'sManual.
2.Cutting/dismembermenthazardofhand,mower
blade—stayawayfrommovingparts;keepallguardsand
shieldsinplace.
3.Cutting/dismembermenthazardofhand,mower
blade—disconnectthespark-plugwirebeforeperforming
maintenance.
4.Thrownobjecthazard—keepbystandersaway;shutoffthe
enginebeforeleavingtheoperatingposition;pickupany
debrisbeforemowing.
5.Cutting/dismembermenthazardoffoot,mowerblade—do
notoperateupanddownslopes;operatesidetosideon
slopes;lookbehindyouwhenmovinginreverse.
3

Setup
Important:Removeanddiscardtheprotectiveplasticsheetthatcoverstheengineandanyother
plasticorwrappingonthemachine.
1
AssemblingandUnfoldingtheHandle
NoPartsRequired
Procedure
Note:Ensurethatthecablesareroutedontheoutsideofthehandleandarenotpinched(DofFigure3).
Figure3
4
g334082

2
InstallingtheRecoil-StarterRopeintheRopeGuide
NoPartsRequired
Procedure
Important:Tostarttheenginesafelyandeasilywheneveryouusethemachine,installtherecoil-starter
ropeintheropeguide.
Figure4
g334093
5

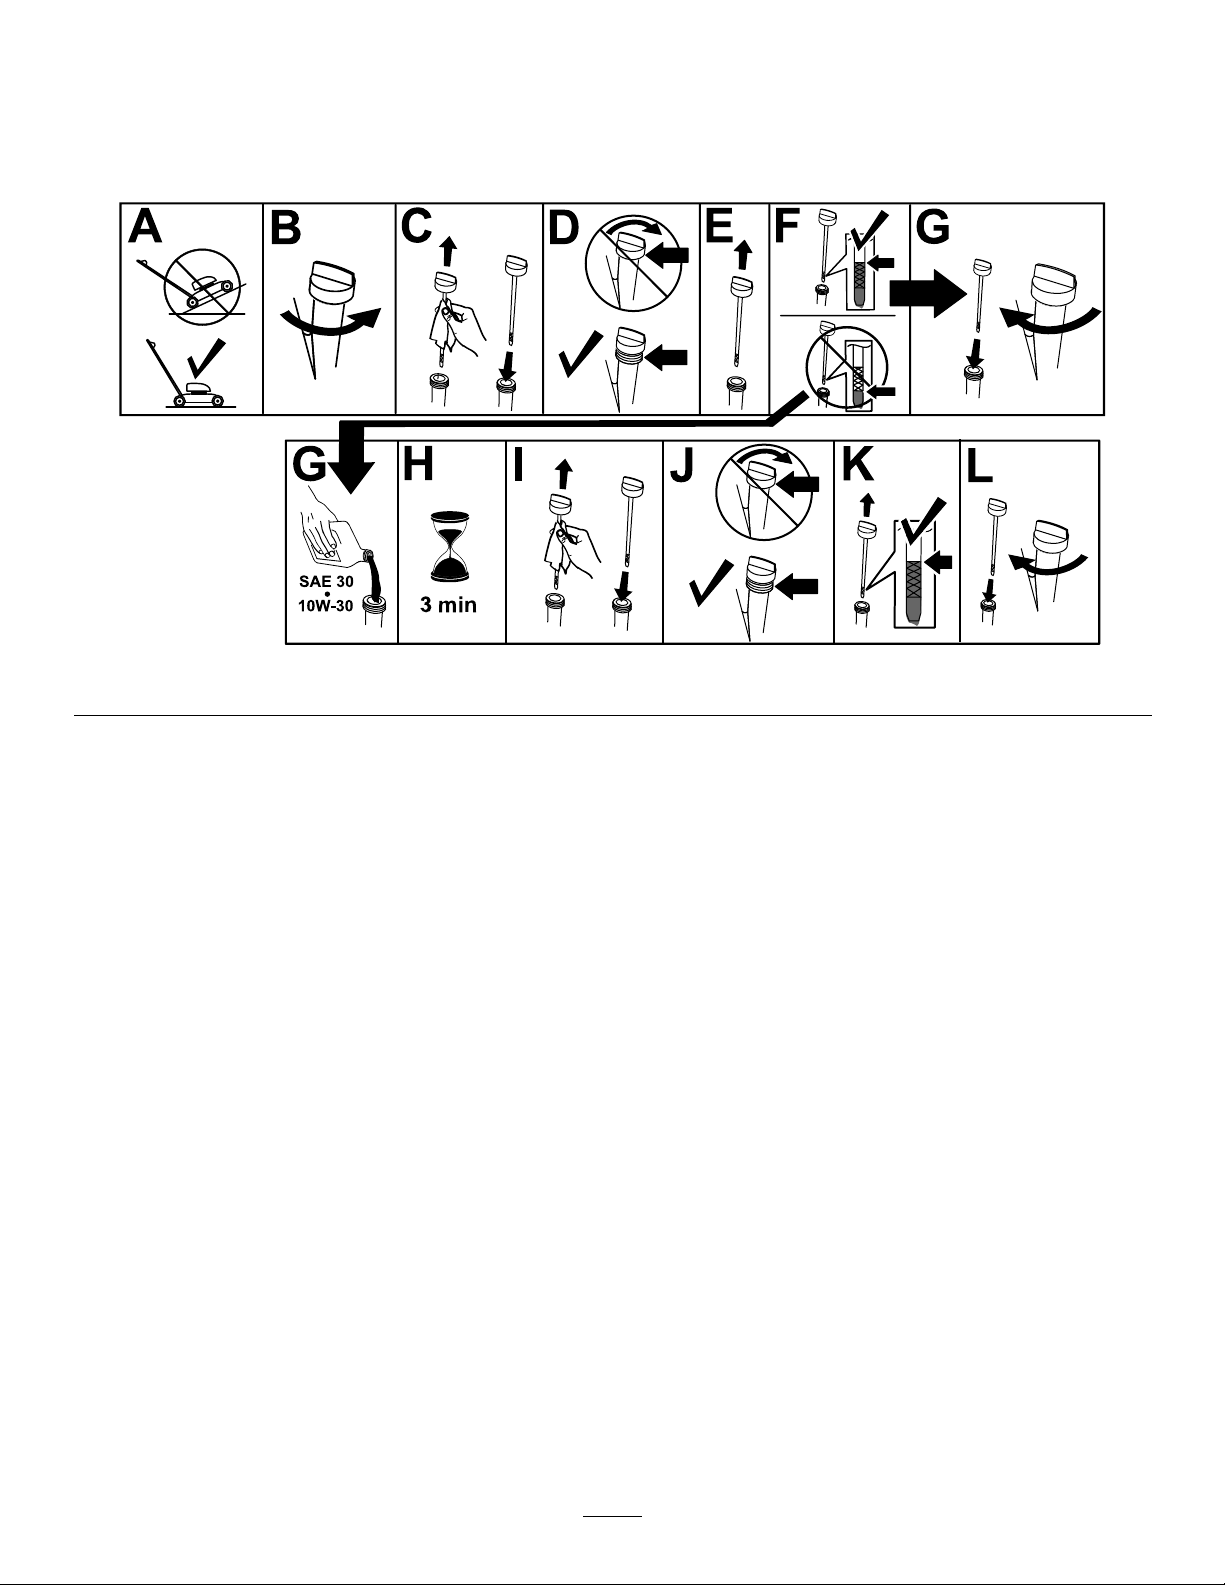
3
AddingOiltotheEngine
NoPartsRequired
Procedure
Important:Iftheoillevelintheengineistoolowortoohighandyouruntheengine,youmaydamage
theengine.
Figure5
g235721
6

4
AssemblingtheGrassBag
NoPartsRequired
Procedure
g334351
Figure6
7

ProductOverview
productwarranty.
couldbedangerous,andsuchusecouldvoidthe
Figure7
1.Handle
2.Blade-controlbar
3.Reardeector
4.Fuel-tankcap
5.Aircleaner
6.Cutting-heightlever(4)
7.Sparkplug
8.Oilll/dipstick
9.Bag-on-demandlever
10.Handleknob(2)
11.Grassbag
12.Recoil-starthandle
Specications
ModelWeightLengthWidthHeight
21467
Attachments/Accessories
AselectionofToroapprovedattachmentsand
accessoriesisavailableforusewiththemachine
toenhanceandexpanditscapabilities.Contact
yourAuthorizedServiceDealerorauthorizedT oro
distributororgotowww.T oro.comforalistofall
approvedattachmentsandaccessories.
35.4kg150cm59cm109cm
(78lb)(59inches)(23inches)(43inches)
g334209
Toensureoptimumperformanceandcontinuedsafety
certicationofthemachine,useonlygenuineToro
replacementpartsandaccessories.Replacement
partsandaccessoriesmadebyothermanufacturers
8
Operation
Note:Determinetheleftandrightsidesofthe
machinefromthenormaloperatingposition.
–Avoidprolongedbreathingofvapors.
–Keepyourhandsandfaceawayfromthe
nozzleandthefuel-tankopening.
–Keepfuelawayfromyoureyesandskin.
BeforeOperation
BeforeOperationSafety
GeneralSafety
•Alwaysshutoffthemachine,waitforallmoving
partstostop,andallowthemachinetocoolbefore
adjusting,servicing,cleaning,orstoringit.
•Becomefamiliarwiththesafeoperationofthe
equipment,operatorcontrols,andsafetysigns.
•Checkthatallguardsandsafetydevices,suchas
deectorsand/orgrasscatcher,areinplaceand
functioningproperly.
•Alwaysinspectthemachinetoensurethatthe
bladesandbladeboltsarenotwornordamaged.
•Inspecttheareawhereyouwillusethemachine,
andremoveallobjectsthatcouldinterferewith
theoperationofthemachineorthatthemachine
couldthrow.
•Contactwiththemovingbladewillcauseserious
injury.Donotputyourngersunderthehousing.
FillingtheFuelTank
TypeUnleadedgasoline
Minimumoctanerating
Ethanol
MethanolNone
MTBE(methyltertiarybutyl
ether)
OilDonotaddtothefuel
Useonlyclean,fresh(nomorethan30daysold),fuel
fromareputablesource.
Important:Toreducestartingproblems,addfuel
stabilizer/conditionertofreshfuelasdirectedby
thefuel-stabilizer/conditionermanufacturer.
Refertoyourengineowner’smanualforadditional
information.
FillthefueltankasshowninFigure8.
87(US)or91(research
octane;outsidetheUS)
Nomorethan10%byvolume
Lessthan15%byvolume
FuelSafety
•Fuelisextremelyammableandhighlyexplosive.
Areorexplosionfromfuelcanburnyouand
othersandcandamageproperty.
–Topreventastaticchargefromignitingthefuel,
placethecontainerand/ormachinedirectlyon
thegroundbeforelling,notinavehicleoron
anobject.
–Fillthefueltankoutdoors,inanopenarea,
whentheengineiscold.Wipeupanyfuelthat
spills.
–Donothandlefuelwhensmokingoraroundan
openameorsparks.
–Donotremovethefuelcaporaddfueltothe
tankwhiletheengineisrunningorhot.
–Ifyouspillfuel,donotattempttostartthe
engine.Avoidcreatingasourceofignitionuntil
thefuelvaporshavedissipated.
–Storefuelinanapprovedcontainerandkeep
itoutofthereachofchildren.
•Fuelisharmfulorfatalifswallowed.Long-term
exposuretovaporscancauseseriousinjuryand
illness.
g230458
Figure8
9
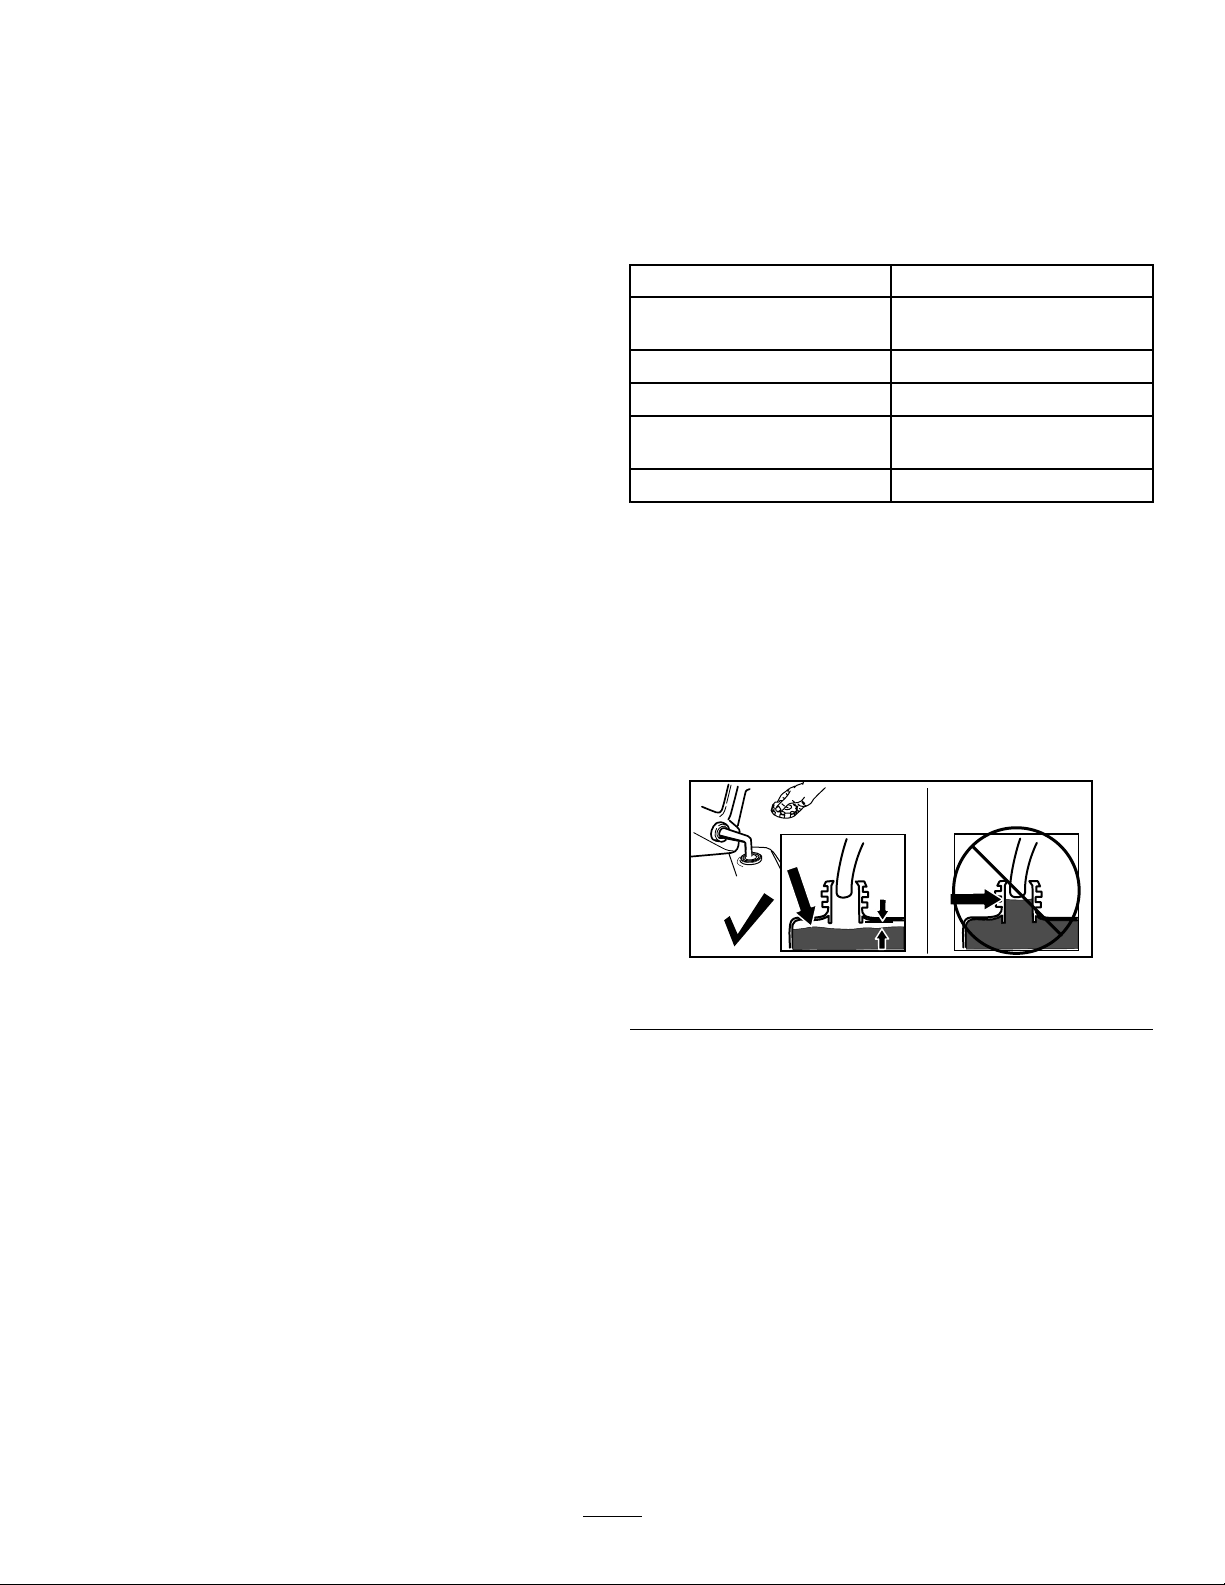
CheckingtheEngine-OilLevel
ServiceInterval:Beforeeachuseordaily
Important:Iftheoillevelinthecrankcaseistoolowortoohighandyouruntheengine,youmay
damagetheengine.
Figure9
g235721
10

AdjustingtheHandleHeight
Youcanraiseorlowerthehandlein1of2positionsthatismorecomfortableforyou(Figure10).
Figure10
1.Removebothhandleknobs.
2.Movethehandletothedesiredheightposition.
3.Securethehandlewiththepreviouslyremovedhandleknobs.
AdjustingtheCuttingHeight
g334096
DANGER
Adjustingthecutting-heightleverscouldbringyourhandsintocontactwithamovingblade
andresultinseriousinjury.
•Shutofftheengineandwaitforallmovingpartstostopbeforeadjustingthecuttingheight.
•Donotputyourngersunderthehousingwhenadjustingthecuttingheight.
CAUTION
Iftheenginehasbeenrunning,themuferwillbehotandcanburnyou.
Keepawayfromthehotmufer.
Adjustthecuttingheightasdesired.Setallwheelstothesamecuttingheight(Figure11).
11
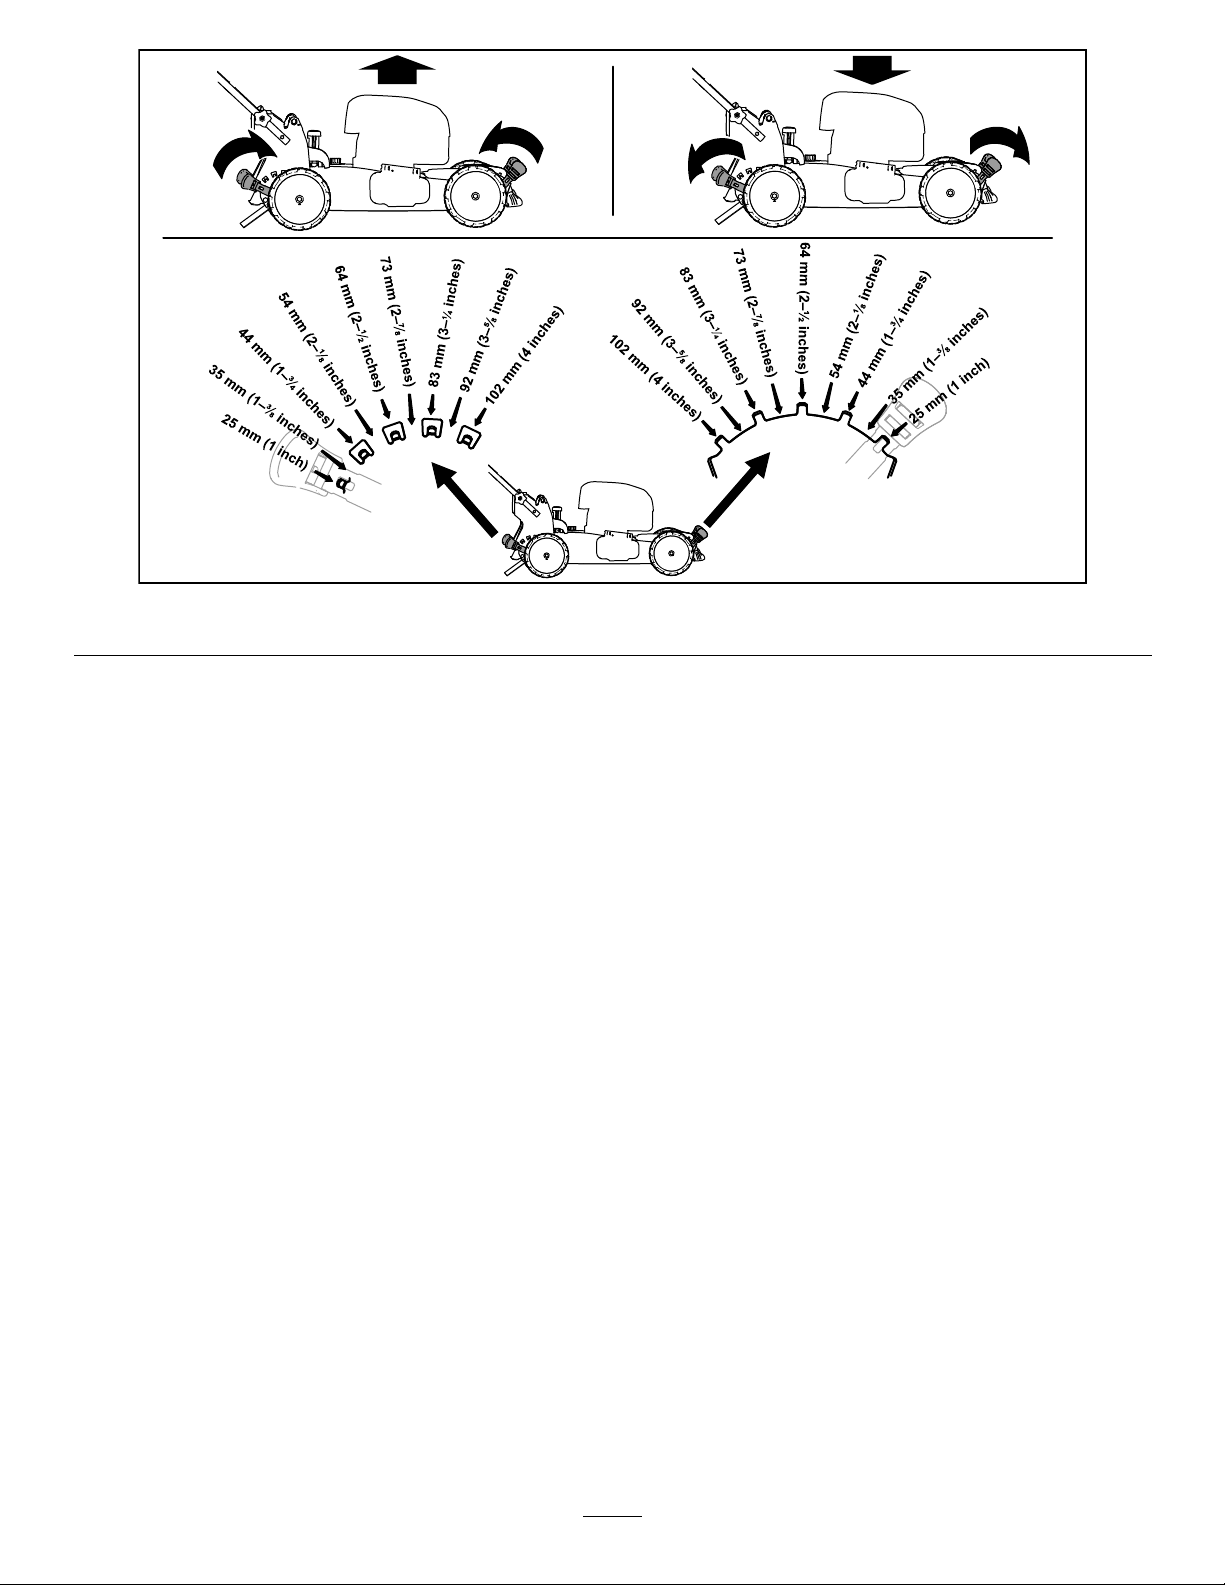
Figure11
g254131
12

DuringOperation
DuringOperationSafety
GeneralSafety
•Wearappropriateclothing,includingeye
protection;longpants;substantial,slip-resistant
footwear;andhearingprotection.Tiebacklong
hairanddonotwearlooseclothingorloose
jewelry.
•Useyourfullattentionwhileoperatingthe
machine.Donotengageinanyactivitythat
causesdistractions;otherwise,injuryorproperty
damagemayoccur.
•Donotoperatethemachinewhileill,tired,or
undertheinuenceofalcoholordrugs.
•Thebladeissharp;contactingthebladecanresult
inseriouspersonalinjury.Shutofftheengineand
waitforallmovingpartstostopbeforeleavingthe
operatingposition.
allmovingpartstostop,anddisconnectthewire
fromthesparkplugbeforeexaminingthemachine
fordamage.Makeallnecessaryrepairsbefore
resumingoperation.
•Beforeleavingtheoperatingposition,shutoffthe
engineandwaitforallmovingpartstostop.
•Iftheenginehasbeenrunning,itwillbehotand
canseverelyburnyou.Keepawayfromthehot
engine.
•Operatetheengineonlyinwell-ventilatedareas.
Exhaustgasescontaincarbonmonoxide,whichis
anodorless,deadlypoison.
•Checkthegrasscatchercomponentsandthe
dischargechutefrequentlyforanywearor
deteriorationandreplacethemwithgenuineT oro
partswhennecessary.
SlopeSafety
•Mowacrossthefaceofslopes;neverupand
down.Useextremecautionwhenchanging
directiononslopes.
•Whenyoureleasetheblade-controlbar,the
engineshouldshutoffandthebladeshouldstop
within3seconds.Ifnot,stopusingyourmachine
immediatelyandcontactanAuthorizedService
Dealer.
•Keepbystandersoutoftheoperatingarea.Keep
smallchildrenoutoftheoperatingareaandunder
thewatchfulcareofaresponsibleadultwhois
notoperatingthemachine.Stopthemachineif
anyoneentersthearea.
•Alwayslookdownandbehindyoubeforemoving
themachineinreverse.
•Operatethemachineonlyingoodvisibilityand
appropriateweatherconditions.Donotoperate
themachinewhenthereistheriskoflightning.
•Wetgrassorleavescancauseseriousinjuryif
youslipandcontacttheblade.Avoidmowingin
wetconditions.
•Useextremecarewhenapproachingblind
corners,shrubs,trees,orotherobjectsthatmay
blockyourview.
•Donotdirectthedischargematerialtoward
anyone.Avoiddischargingmaterialagainstawall
orobstruction;materialmayricochettowardyou.
Stoptheblade(s)whencrossinggravelsurfaces.
•Watchforholes,ruts,bumps,rocks,orother
hiddenobjects.Uneventerraincouldcauseyou
toloseyourbalanceorfooting.
•Donotmowonexcessivelysteepslopes.Poor
footingcouldcauseaslip-and-fallaccident.
•Mowwithcautionneardrop-offs,ditches,or
embankments.
StartingtheEngine
1.Holdtheblade-controlbaragainstthehandle
(AofFigure12).
2.Pulltherecoil-starthandlelightlyuntilyoufeel
resistance,thenpullitsharply,andallowitto
returntotheropeguideonthehandleslowly(B
ofFigure12).
g334135
Figure12
Note:Ifthemachinedoesnotstartafterseveral
attempts,contactanAuthorizedServiceDealer.
•Ifthemachinestrikesanobjectorstartsto
vibrate,immediatelyshutofftheengine,waitfor
13
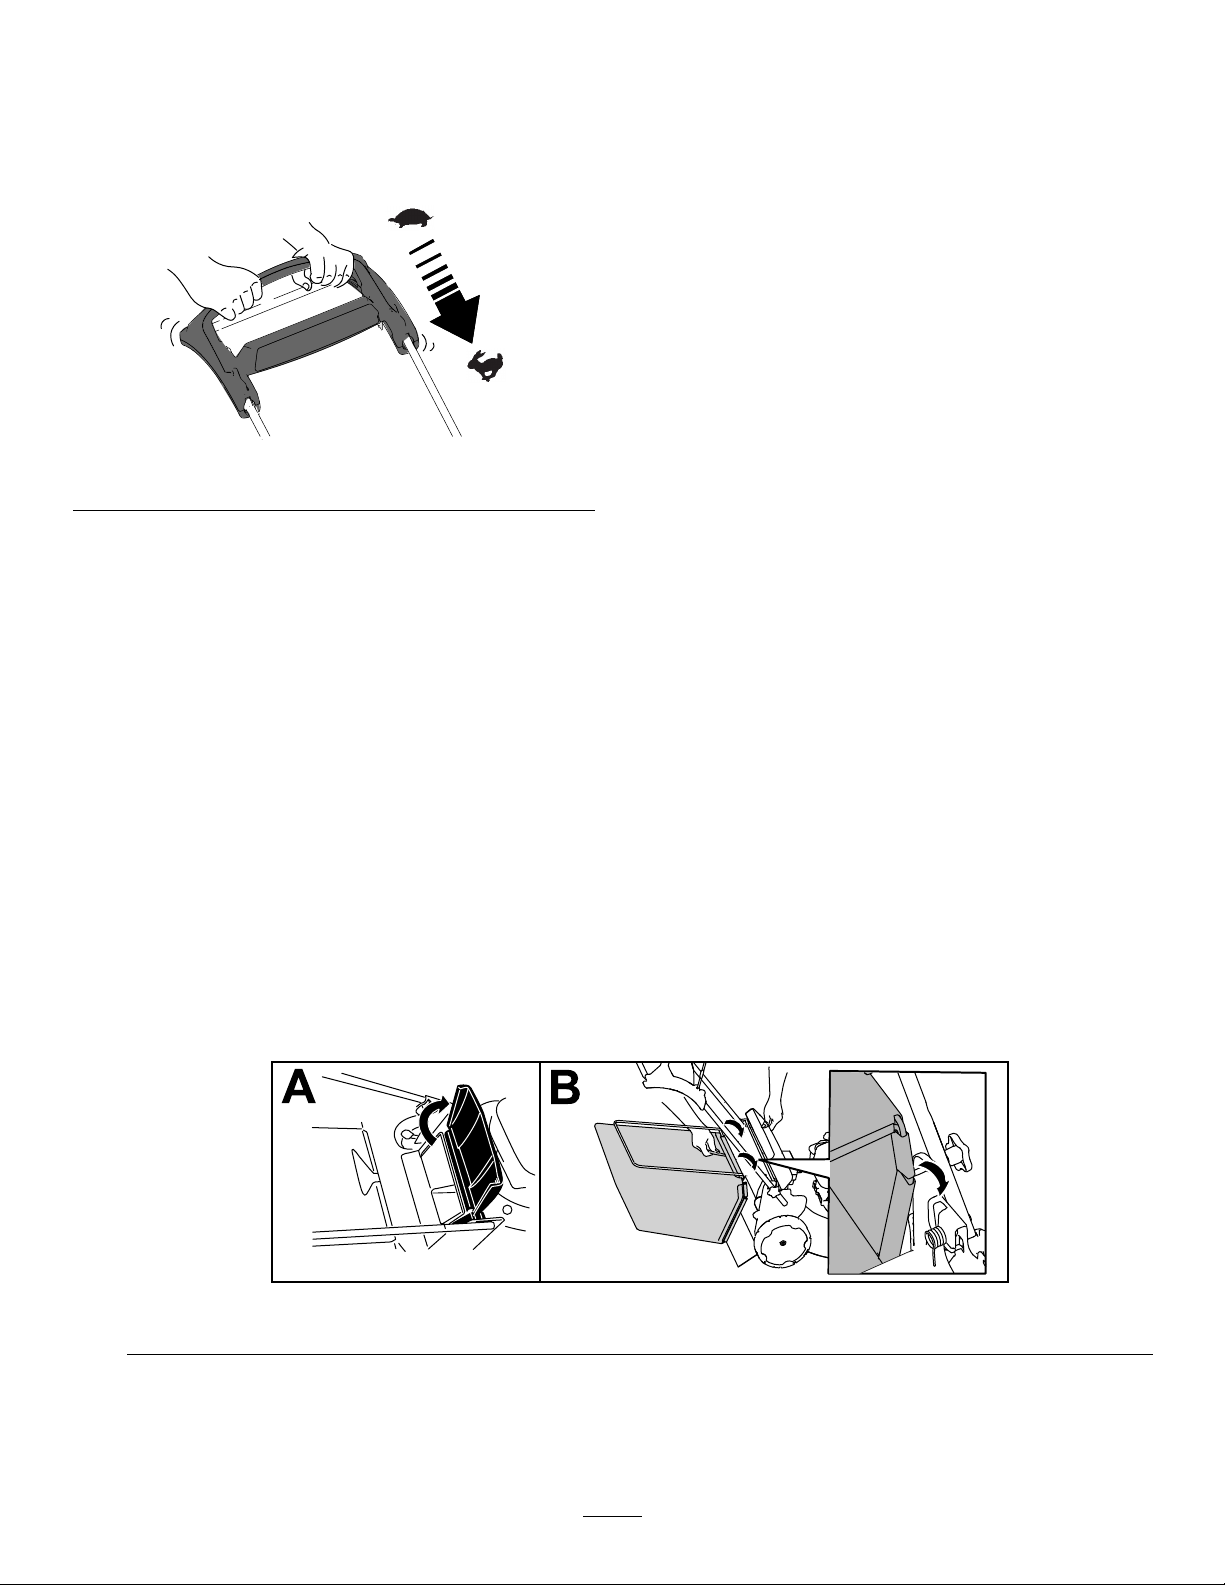
UsingtheSelf-PropelDrive
Tooperatetheself-propeldrive,simplywalkwithyour
handsontheupperhandleandyourelbowsatyour
sides,andthemachinewillautomaticallykeeppace
withyou(Figure13).
Figure13
Note:Ifthemachinedoesnotfreelyrollbackward
afterself-propelling,stopwalking,holdyourhands
inplace,andallowthemachinetorollacoupleof
centimeters(inches)forwardtodisengagethewheel
drive.Youcanalsotryreachingjustundertheupper
handletothemetalhandleandpushingthemachine
forwardacoupleofcentimeters(inches).Ifthe
machinestilldoesnotrollbackwardeasily,contactan
AuthorizedServiceDealer.
ShuttingOfftheEngine
ServiceInterval:Beforeeachuseordaily—Ensure
thattheengineshutsoffwithin
3secondsafterreleasingthe
blade-controlbar.
Toshutofftheengine,releasetheblade-controlbar.
Important:Whenyoureleasetheblade-control
bar,boththeengineandbladeshouldstopwithin
3seconds.Iftheydonotstopproperly,stop
usingyourmachineimmediatelyandcontactan
g334136
AuthorizedServiceDealer.
RecyclingtheClippings
Yourmachinecomesfromthefactoryreadytorecycle
thegrassandleafclippingsbackintothelawn.
Ifthegrassbagisonthemachineandthe
bag-on-demandleverisinthebaggingposition,move
thelevertotherecyclingposition;refertoOperating
theBag-on-DemandLever(page15).
BaggingtheClippings
Usethegrassbagwhenyouwanttocollectgrassandleafclippingsfromthelawn.
Ifthebag-on-demandleverisintherecyclingposition,moveittothebaggingposition;refertoOperatingthe
Bag-on-DemandLever(page15).
InstallingtheGrassBag
1.Raiseandholdupthereardeector(AofFigure14).
2.Installthegrassbag,ensuringthatthepinsonthebagrestintheslotsonthehandlebracket(Bof
Figure14).
3.Lowerthereardeector.
Figure14
g334207
RemovingtheGrassBag
Toremovethebag,reversethestepsinInstallingtheGrassBag(page14).
14

Operatingthe
Bag-on-DemandLever
Thebag-on-demandfeatureallowsyoutoeither
collectorrecyclegrassandleafclippingswhilethe
grassbagisattachedtothemachine.
•Tobagthegrassandleafclippings,pressthe
buttononthebag-on-demandleverandmovethe
leverforwarduntilthebuttonontheleverpopsup
(Figure15).
Figure15
OperatingTips
GeneralMowingTips
•Inspecttheareawhereyouwillusethemachine
andremoveallobjectsthatthemachinecould
throw.
•Avoidstrikingsolidobjectswiththeblade.Never
deliberatelymowoveranyobject.
•Ifthemachinestrikesanobjectorstartstovibrate,
immediatelyshutofftheengine,waitforallmoving
partstostop,disconnectthewirefromthespark
plug,andexaminethemachinefordamage.
•Forbestperformance,installanewToroblade
beforethecuttingseasonbeginsorwhen
necessary.
CuttingGrass
•Cutonlyaboutathirdofthegrassbladeatatime.
Donotcutbelow51mm(2inches)unlessthe
g334148
grassissparseoritislatefallwhengrassgrowth
beginstoslowdown.
1.Bag-on-demandlever(inthebaggingposition)
•Torecyclethegrassandleafclippings,press
thebuttonontheleverandmovethelever
rearwarduntilthebuttonontheleverpopsup.
Important:Forproperoperation,shutoff
theengine,waitforallmovingpartstostop,
andthenremoveanygrassclippingsand
debrisfromthebag-on-demanddoorandthe
surroundingopening(Figure16)beforeyou
movethebag-on-demandleverfrom1position
toanother.
Figure16
1.Cleanhere
•Whencuttinggrassover15cm(6inches)tall,
mowatthehighestcuttingheightsettingandwalk
slower;thenmowagainatalowersettingforthe
bestlawnappearance.Ifthegrassistoolong,the
machinemayplugandcausetheenginetostall.
•Wetgrassandleavestendtoclumpontheyard
andcancausethemachinetoplugortheengine
tostall.Avoidmowinginwetconditions.
•Beawareofapotentialrehazardinverydry
conditions,followalllocalrewarnings,andkeep
themachinefreeofdrygrassandleafdebris.
•Alternatethemowingdirection.Thishelps
dispersetheclippingsoverthelawnforeven
fertilization.
•Ifthenishedlawnappearanceisunsatisfactory,
try1ormoreofthefollowing:
–Replacethebladeorhaveitsharpened.
–Walkataslowerpacewhilemowing.
–Raisethecuttingheightonyourmachine.
g024438
–Cutthegrassmorefrequently.
–Overlapcuttingswathsinsteadofcuttingafull
swathwitheachpass.
CuttingLeaves
•Aftercuttingthelawn,ensurethathalfofthelawn
showsthroughthecutleafcover.Y oumayneed
tomakemorethanasinglepassovertheleaves.
15

•Iftherearemorethan13cm(5inches)ofleaves
onthelawn,mowatahighercuttingheightand
thenagainatthedesiredcuttingheight.
AfterOperation
•Slowdownyourmowingspeedifthemachine
doesnotcuttheleavesnelyenough.
AfterOperationSafety
GeneralSafety
•Alwaysshutoffthemachine,waitforallmoving
partstostop,andallowthemachinetocoolbefore
adjusting,servicing,cleaning,orstoringit.
•Cleangrassanddebrisfromthemachinetohelp
preventres.Cleanupoilorfuelspills.
•Neverstorethemachineorfuelcontainerwhere
thereisanopename,spark,orpilotlight,such
asonawaterheateroronotherappliances.
HaulingSafety
•Usecarewhenloadingorunloadingthemachine.
•Securethemachinefromrolling.
CleaningUnderthe
Machine
ServiceInterval:Aftereachuse
Forbestresults,cleanunderthemachineshortlyafter
youhavecompletedmowing.
1.Lowerthemachinetoitslowestcutting-height
setting.
2.Movethemachineontoapavedlevelsurface.
3.Withtheenginerunningandthebladeengaged,
sprayastreamofwaterinfrontoftheright,rear
wheel(Figure17).
Note:Thewaterwillsplashintothepathofthe
blade,cleaningouttheclippings.
Figure17
4.Whennomoreclippingscomeout,stopthe
waterandmovethemachinetoadryarea.
5.Starttheengineandrunitforafewminutesto
drytheundersideofthemachinetopreventit
fromrusting.
6.Shutofftheengine,removetheelectric-start
button(ifequipped),andallowthemachineto
coolbeforestoringitinanenclosedarea.
g002600
16

FoldingtheHandle
WARNING
Foldingorunfoldingthehandleimproperlycandamagethecables,causinganunsafe
operatingcondition.
•Donotdamagethecableswhenfoldingorunfoldingthehandle.
•Ifacableisdamaged,contactanAuthorizedServiceDealer.
1.Removeandsavethe2handleknobsand2carriageboltsfromthehandlebrackets(AofFigure18).
Important:Routethecablestotheoutsideofthehandleknobsasyoufoldthehandle.
2.Foldthehandlebyrotatingitforward(BofFigure18).
3.Looselyinstallthehandleknobsandcarriageboltsonthehandlebrackets(CofFigure18).
4.Tounfoldthehandle,referto1AssemblingandUnfoldingtheHandle(page4).
Figure18
g334460
17

Maintenance
RecommendedMaintenanceSchedule(s)
MaintenanceService
Interval
Beforeeachuseordaily
Aftereachuse
Yearly
Yearlyorbeforestorage
MaintenanceProcedure
•Checktheengine-oillevelandaddoilasneeded.
•Ensurethattheengineshutsoffwithin3secondsafterreleasingtheblade-control
bar.
•Cleangrassclippingsanddirtfromunderthemachine.
•Servicetheairlter.
•Changetheengineoil.
•Replacethebladeorhaveitsharpened(morefrequentlyiftheedgedullsquickly).
•Cleantheenginebyremovingdirtanddebrisfromitstopandsides;cleanitmore
frequentlyindustyoperatingconditions.
•Emptythefueltankbeforerepairsasdirectedandbeforeyearlystorage.
Important:Refertoyourengineowner’smanualforadditionalmaintenanceprocedures.
MaintenanceSafety
•Alwaysshutoffthemachine,waitforallmoving
partstostop,andallowthemachinetocoolbefore
adjusting,servicing,cleaning,orstoringit.
•Disconnectthespark-plugwirefromthesparkplug
beforeperforminganymaintenanceprocedure.
PreparingforMaintenance
1.Shutofftheengineandwaitforallmovingparts
tostop.
2.Disconnectthespark-plugwirefromthespark
plug(Figure19).
•Wearglovesandeyeprotectionwhenservicing
themachine.
•Thebladeissharp;contactingthebladecanresult
inseriouspersonalinjury .Weargloveswhen
servicingtheblade.Donotrepairoralterthe
blade(s).
•Nevertamperwithsafetydevices.Checktheir
properoperationregularly .
•Tippingthemachinemaycausethefueltoleak.
Fuelisammableandexplosive,andcancause
personalinjury.Runtheenginedryorremovethe
fuelwithahandpump;neversiphonthefuel.
•Toensureoptimumperformanceofthemachine,
useonlygenuineTororeplacementpartsand
accessories.Replacementpartsandaccessories
madebyothermanufacturerscouldbedangerous,
andsuchusecouldvoidtheproductwarranty.
g024440
Figure19
1.Spark-plugwire
3.Afterperformingthemaintenanceprocedure(s),
connectthespark-plugwiretothesparkplug.
Important:Beforetippingthemachineto
changetheoilorreplacetheblade,allowthe
fueltanktorundrythroughnormalusage.If
youmusttipthemachinepriortorunning
outoffuel,useahandfuelpumptoremove
thefuel.Alwaystipthemachineontoits
side,withthedipstickdown.
18

ServicingtheAirFilter
ServiceInterval:Yearly
1.Pressdownonthelatchtabsontopofthe
air-ltercover(Figure20).
8.Installthecover.
ChangingtheEngineOil
ServiceInterval:Yearly
Note:Runtheengineafewminutesbeforechanging
theoiltowarmit.Warmoilowsbetterandcarries
morecontaminants.
EngineOilSpecications
1.Latchtabs
2.Paperairlter
2.Openthecover.
Figure20
3.Foampre-lter
Engineoilcapacity
OilviscositySAE30orSAE10W-30
APIserviceclassicationSJorhigher
0.55L(18.6oz)*
detergentoil
*Thereisresidualoilinthecrankcaseafteryoudrain
theoil.Donotpourtheentirecapacityofoilintothe
crankcase.Fillthecrankcasewithoilasdirectedin
thefollowingsteps.
1.Movethemachinetoalevelsurface.
2.RefertoPreparingforMaintenance(page18).
3.Removethedipstickbyrotatingthecap
counterclockwiseandpullingitout(Figure21).
g027782
3.Removethepaperairlterandthefoam
pre-lter(Figure20).
4.Inspectthefoampre-lter,andreplaceitifitis
damagedorexcessivelydirty.
5.Inspectthepaperairlter.
•Iftheairlterisdamagedoriswetwithoil
orfuel,replaceit.
•Iftheairlterisdirty,tapitonahardsurface
severaltimesorblowcompressedairless
than207kPa(30psi)throughthesideofthe
lterthatfacestheengine.
Note:Donotbrushthedirtoffthelter;
brushingforcesdirtintothebers.
6.Removethedirtfromtheair-lterbodyandthe
coverusingamoistrag.
Important:Donotwipedirtintotheairduct.
7.Installthefoampre-lterandthepaperairlter
intotheairlter.
g024432
Figure21
1.Full3.Low
2.High
4.Tipthemachineontoitsside(sothattheair
lterisup)todraintheusedoilfromtheoil-ll
tube(Figure21).
19

Figure22
5.Afterdrainingtheusedoil,returnthemachineto
theoperatingposition.
6.Carefullypourabout3/4oftheenginecapacity
ofoilintotheoil-lltube.
ReplacingtheBlade
ServiceInterval:Yearly
Important:Youwillneedatorquewrenchto
installthebladeproperly.Ifyoudonothavea
torquewrenchorareuncomfortableperforming
thisprocedure,contactanAuthorizedService
Dealer.
Examinethebladewheneveryourunoutoffuel.Ifthe
bladeisdamagedorcracked,replaceitimmediately.
g024441
Ifthebladeedgeisdullornicked,haveitsharpened
andbalanced,orreplaceit.
WARNING
Thebladeissharp;contactingthebladecan
resultinseriouspersonalinjury.
Weargloveswhenservicingtheblade.
7.Wait3minutesfortheoiltosettleintheengine.
8.Wipethedipstickcleanwithacleancloth.
9.Insertthedipstickintotheoil-lltube,butdonot
screwitin,thenremovethedipstick.
10.Readtheoillevelonthedipstick(Figure21).
•Iftheoillevelonthedipstickistoolow,
carefullypourasmallamountofoilintothe
oil-lltube,wait3minutes,andrepeatsteps
8through10untiltheoillevelonthedipstick
iscorrect.
•Iftheoillevelonthedipstickistoohigh,
draintheexcessoiluntiltheoillevelonthe
dipstickiscorrect.
Important:Iftheoillevelintheengineistoo
lowortoohighandyouruntheengine,you
maydamagetheengine.
11.Installthedipstickintotheoil-lltubesecurely.
12.Recycletheusedoilproperly.
1.RefertoPreparingforMaintenance(page18).
2.Tipthemachineontoitssidewiththeairlterup.
3.Useablockofwoodtoholdthebladesteady
(Figure23).
g231389
Figure23
4.Removetheblade,savingallmountinghardware
(Figure23).
5.Installthenewbladeandallmountinghardware
(Figure24).
20

Figure24
AdjustingtheSelf-Propel
Drive
ForSelf-Propel-DriveModelsOnly
Wheneveryouinstallanewself-propelcableorif
theself-propeldriveisoutofadjustment,adjustthe
self-propeldrive.
1.Turntheadjustmentnutcounterclockwiseto
loosenthecableadjustment(Figure25).
g231390
Important:Positionthecurvedendsofthe
bladetopointtowardthemachinehousing.
6.Useatorquewrenchtotightenthebladebolt
to82N∙m(60ft-lb).
Figure25
1.Handle(leftside)
2.Adjustmentnut5.Turnthenut
3.Self-propel-drivecable
4.Turnthenutclockwiseto
tightentheadjustment.
counterclockwiseto
loosentheadjustment.
2.Adjustthetensiononthecable(Figure25)by
pullingitbackorpushingitforwardandholding
thatposition.
Note:Pushthecabletowardtheengineto
increasethetraction;pullthecableawayfrom
theenginetodecreasethetraction.
3.Turntheadjustmentnutclockwisetotightenthe
cableadjustment.
Note:Tightenthenutrmlywithasocketor
wrench.
g334884
21

Storage
4.Performanymaintenanceprocedures;referto
Maintenance(page18).
Storethemachineinacool,clean,dryplace.
StorageSafety
Alwaysshutoffthemachine,waitforallmoving
partstostop,andallowthemachinetocoolbefore
adjusting,servicing,cleaning,orstoringit.
PreparingtheMachinefor
Storage
1.Onthelastrefuelingoftheyear,addfuel
stabilizer(suchasToroPremiumFuel
Treatment)tothefuelasdirectedonthelabel.
2.Disposeofanyunusedfuelproperly .Recycle
itaccordingtolocalcodesoruseitinyour
automobile.
Important:Oldfuelinthefueltankisthe
leadingcauseofhardstarting.Donotstore
thefuelwithoutfuelstabilizermorethan
30days,anddonotstorestabilizedfuel
beyondthedurationrecommendedbythe
fuel-stabilizermanufacturer.
5.Checktheengine-oillevel;refertoCheckingthe
Engine-OilLevel(page10).
6.Fillthefueltankwithfreshfuel;refertoFilling
theFuelT ank(page9).
7.Connectthewiretothesparkplug.
3.Runthemachineuntiltheengineshutsofffrom
runningoutoffuel.
4.Starttheengineagainandallowittorununtil
itshutsoff.Whenyoucannolongerstartthe
engine,itissufcientlydry.
5.Disconnectthewirefromthesparkplugand
connectthewiretotheretainingpost(if
equipped).
6.Removethesparkplug,add30ml(1oz)of
engineoilthroughthespark-plughole,andpull
thestarterropeslowlyseveraltimestodistribute
oilthroughoutthecylindertopreventcylinder
corrosionduringtheoff-season.
7.Looselyinstallthesparkplug.
8.Tightenallnuts,bolts,andscrews.
RemovingtheMachine
fromStorage
1.Checkandtightenallfasteners.
2.Removethesparkplugandspintheengine
rapidlybypullingtherecoil-starthandletoblow
theexcessoilfromthecylinder.
3.Installthesparkplugandtightenitwithatorque
wrenchto20N∙m(15ft-lb).
22

CaliforniaProposition65WarningInformation
Whatisthiswarning?
Youmayseeaproductforsalethathasawarninglabellikethefollowing:
WARNING:CancerandReproductiveHarm—www.p65Warnings.ca.gov.
WhatisProp65?
Prop65appliestoanycompanyoperatinginCalifornia,sellingproductsinCalifornia,ormanufacturingproductsthatmaybesoldinorbroughtinto
California.ItmandatesthattheGovernorofCaliforniamaintainandpublishalistofchemicalsknowntocausecancer,birthdefects,and/orother
reproductiveharm.Thelist,whichisupdatedannually,includeshundredsofchemicalsfoundinmanyeverydayitems.ThepurposeofProp65isto
informthepublicaboutexposuretothesechemicals.
Prop65doesnotbanthesaleofproductscontainingthesechemicalsbutinsteadrequireswarningsonanyproduct,productpackaging,orliteraturewith
theproduct.Moreover,aProp65warningdoesnotmeanthataproductisinviolationofanyproductsafetystandardsorrequirements.Infact,the
CaliforniagovernmenthasclariedthataProp65warning“isnotthesameasaregulatorydecisionthataproductis‘safe’or‘unsafe.’”Manyofthese
chemicalshavebeenusedineverydayproductsforyearswithoutdocumentedharm.Formoreinformation,gotohttps://oag.ca.gov/prop65/faqs-view-all
AProp65warningmeansthatacompanyhaseither(1)evaluatedtheexposureandhasconcludedthatitexceedsthe“nosignicantrisklevel”;or(2)
haschosentoprovideawarningbasedonitsunderstandingaboutthepresenceofalistedchemicalwithoutattemptingtoevaluatetheexposure.
Doesthislawapplyeverywhere?
Prop65warningsarerequiredunderCalifornialawonly.ThesewarningsareseenthroughoutCaliforniainawiderangeofsettings,includingbutnot
limitedtorestaurants,grocerystores,hotels,schools,andhospitals,andonawidevarietyofproducts.Additionally,someonlineandmailorder
retailersprovideProp65warningsontheirwebsitesorincatalogs.
.
HowdotheCaliforniawarningscomparetofederallimits?
Prop65standardsareoftenmorestringentthanfederalandinternationalstandards.TherearevarioussubstancesthatrequireaProp65warning
atlevelsthatarefarlowerthanfederalactionlimits.Forexample,theProp65standardforwarningsforleadis0.5μg/day,whichiswellbelow
thefederalandinternationalstandards.
Whydon’tallsimilarproductscarrythewarning?
•ProductssoldinCaliforniarequireProp65labellingwhilesimilarproductssoldelsewheredonot.
•AcompanyinvolvedinaProp65lawsuitreachingasettlementmayberequiredtouseProp65warningsforitsproducts,butothercompanies
makingsimilarproductsmayhavenosuchrequirement.
•TheenforcementofProp65isinconsistent.
•CompaniesmayelectnottoprovidewarningsbecausetheyconcludethattheyarenotrequiredtodosounderProp65;alackofwarningsfora
productdoesnotmeanthattheproductisfreeoflistedchemicalsatsimilarlevels.
WhydoesExmarkincludethiswarning?
Exmarkhaschosentoprovideconsumerswithasmuchinformationaspossiblesothattheycanmakeinformeddecisionsabouttheproductstheybuy
anduse.Exmarkprovideswarningsincertaincasesbasedonitsknowledgeofthepresenceofoneormorelistedchemicalswithoutevaluatingthelevel
ofexposure,asnotallthelistedchemicalsprovideexposurelimitrequirements.WhiletheexposurefromExmarkproductsmaybenegligibleorwell
withinthe“nosignicantrisk”range,outofanabundanceofcaution,ExmarkhaselectedtoprovidetheProp65warnings.Moreover,ifExmarkdoesnot
providethesewarnings,itcouldbesuedbytheStateofCaliforniaorbyprivatepartiesseekingtoenforceProp65andsubjecttosubstantialpenalties.
RevA

 Loading...