

Page 1
22inRecycler
ModelNo.21462—SerialNo.400000000andUp
ModelNo.21464—SerialNo.400000000andUp
®
LawnMower
FormNo.3441-821RevA
Operator'sManual
Introduction
Thisrotary-blade,walk-behindlawnmowerisintended
tobeusedbyresidentialhomeowners.Itisdesigned
primarilyforcuttinggrassonwell-maintainedlawnson
residentialproperties.Usingthisproductforpurposes
otherthanitsintendedusecouldprovedangerousto
youandbystanders.
Readthisinformationcarefullytolearnhowtooperate
andmaintainyourproductproperlyandtoavoid
injuryandproductdamage.Youareresponsiblefor
operatingtheproductproperlyandsafely.
Visitwww.T oro.comformoreinformation,including
safetytips,trainingmaterials,accessoryinformation,
helpndingadealer,ortoregisteryourproduct.
Wheneveryouneedservice,genuineToroparts,or
additionalinformation,contactanAuthorizedService
DealerorToroCustomerServiceandhavethemodel
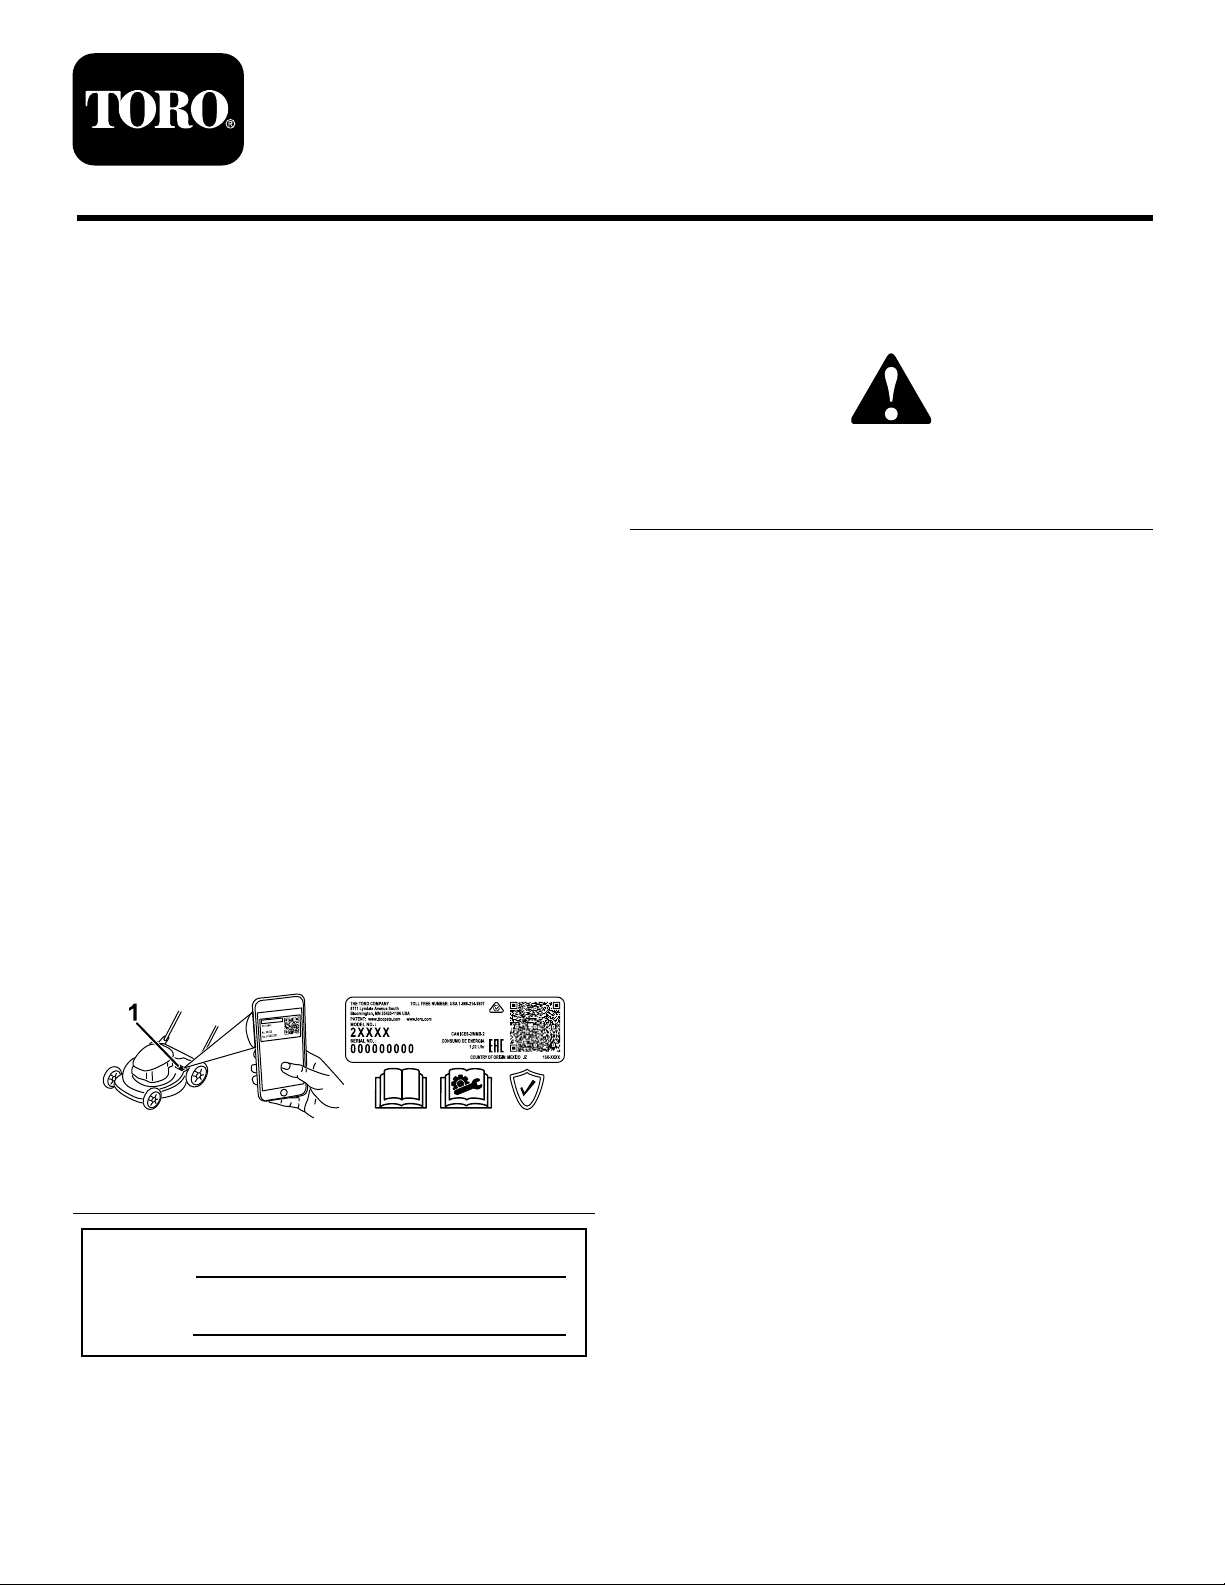
andserialnumbersofyourproductready .Figure1
identiesthelocationofthemodelandserialnumbers
ontheproduct.Writethenumbersinthespace
provided.
Important:Withyourmobiledevice,youcan
scantheQRcodeontheserialnumberdecal(if
equipped)toaccesswarranty,parts,andother
productinformation
seriousinjuryordeathifyoudonotfollowthe
recommendedprecautions.
g000502
Figure2
Safety-alertsymbol
Thismanualuses2wordstohighlightinformation.
Importantcallsattentiontospecialmechanical
informationandNoteemphasizesgeneralinformation
worthyofspecialattention.
ItisaviolationofCaliforniaPublicResourceCode
Section4442or4443touseoroperatetheengineon
anyforest-covered,brush-covered,orgrass-covered
landunlesstheengineisequippedwithaspark
arrester,asdenedinSection4442,maintainedin
effectiveworkingorderortheengineisconstructed,
equipped,andmaintainedforthepreventionofre.
Theenclosedengineowner'smanualissupplied
forinformationregardingtheUSEnvironmental
ProtectionAgency(EPA)andtheCaliforniaEmission
ControlRegulationofemissionsystems,maintenance,
andwarranty.Replacementsmaybeorderedthrough
theenginemanufacturer.
Figure1
1.Modelandserialnumberlocation
ModelNo.
SerialNo.
Thismanualidentiespotentialhazardsandhas
safetymessagesidentiedbythesafety-alertsymbol
(Figure2),whichsignalsahazardthatmaycause
©2020—TheT oro®Company
8111LyndaleAvenueSouth
Bloomington,MN55420
Registeratwww.Toro.com.
GrossorNetTorque:Thegrossornettorque
ofthisenginewaslaboratoryratedbytheengine
manufacturerinaccordancewiththeSocietyof
AutomotiveEngineers(SAE)J1940orJ2723.As
g282707
conguredtomeetsafety,emission,andoperating
requirements,theactualenginetorqueonthisclass
ofmowerwillbesignicantlylower.Pleasereferto
theenginemanufacturer’sinformationincludedwith
themachine.
OriginalInstructions(EN)
PrintedinMexico
AllRightsReserved
*3441-821*
Page 2

WARNING
Contents
CALIFORNIA
Proposition65Warning
Theengineexhaustfromthisproduct
containschemicalsknowntotheStateof
Californiatocausecancer,birthdefects,
orotherreproductiveharm.
Batteryposts,terminals,andrelated
accessoriescontainleadandlead
compounds,chemicalsknownto
theStateofCaliforniatocause
cancerandreproductiveharm.Wash
handsafterhandling.
Useofthisproductmaycauseexposure
tochemicalsknowntotheStateof
Californiatocausecancer,birthdefects,
orotherreproductiveharm.
Introduction...............................................................1
Safety.......................................................................3
GeneralSafety...................................................3
SafetyandInstructionalDecals..........................4
Setup........................................................................6
1AssemblingandUnfoldingtheHandle..............6
2InstallingtheRecoil-StarterRopeinthe
RopeGuide.....................................................7
3AddingOiltotheEngine...................................8
4AssemblingtheGrassBag...............................8
5ChargingtheBattery........................................9
ProductOverview...................................................10
Specications..................................................10
Attachments/Accessories.................................10
Operation................................................................10
BeforeOperation.................................................10
BeforeOperationSafety...................................10
FillingtheFuelTank...........................................11
CheckingtheEngine-OilLevel..........................12
AdjustingtheHandleHeight.............................12
AdjustingtheCuttingHeight.............................13
DuringOperation.................................................14
DuringOperationSafety...................................14
StartingtheEngine...........................................15
UsingtheSelf-PropelDrive...............................16
ShuttingOfftheEngine.....................................16
RecyclingtheClippings....................................16
BaggingtheClippings.......................................17
OperatingtheBag-on-DemandLever...............18
OperatingTips.................................................18
AfterOperation....................................................19
AfterOperationSafety......................................19
CleaningUndertheMachine............................19
FoldingtheHandle...........................................20
Maintenance...........................................................21
RecommendedMaintenanceSchedule(s)...........21
MaintenanceSafety..........................................21
PreparingforMaintenance...............................21
ServicingtheAirFilter.......................................22
ChangingtheEngineOil...................................22
ChargingtheBattery.........................................23
ReplacingtheFuse...........................................23
ReplacingtheBlade..........................................24
AdjustingtheSelf-PropelDrive.........................25
Storage...................................................................25
StorageSafety..................................................25
PreparingtheMachineforStorage...................25
RemovingtheMachinefromStorage................26
2
Page 3

Safety
Thismachinehasbeendesignedinaccordancewith
ANSIB71.1-2017.
GeneralSafety
Thisproductiscapableofamputatinghandsand
feetandofthrowingobjects.Alwaysfollowallsafety
instructionstoavoidseriouspersonalinjuryordeath.
•Read,understand,andfollowtheinstructions
andwarningsinthisOperator’sManualandon
themachineandattachmentsbeforestartingthe
engine.
•Donotputyourhandsorfeetnearmovingpartsor
underthemachine.Keepclearofanydischarge
opening.
•Donotoperatethemachinewithoutallguards
andothersafetyprotectivedevicesinplaceand
functioningproperlyonthemachine.
•Keepbystandersandchildrenoutoftheoperating
area.Donotallowchildrentooperatethemachine.
Allowonlypeoplewhoareresponsible,trained,
familiarwiththeinstructions,andphysically
capabletooperatethemachine.
•Stopthemachine,shutofftheengine,removethe
electric-startbutton(ifequipped),andwaitforall
movingpartstostopbeforeservicing,fueling,or
uncloggingthemachine.
Improperlyusingormaintainingthismachinecan
resultininjury.Toreducethepotentialforinjury,
complywiththesesafetyinstructionsandalways
payattentiontothesafety-alertsymbol
meansCaution,Warning,orDanger—personalsafety
instruction.Failuretocomplywiththeseinstructions
mayresultinpersonalinjuryordeath.
,which
3
Page 4
SafetyandInstructionalDecals
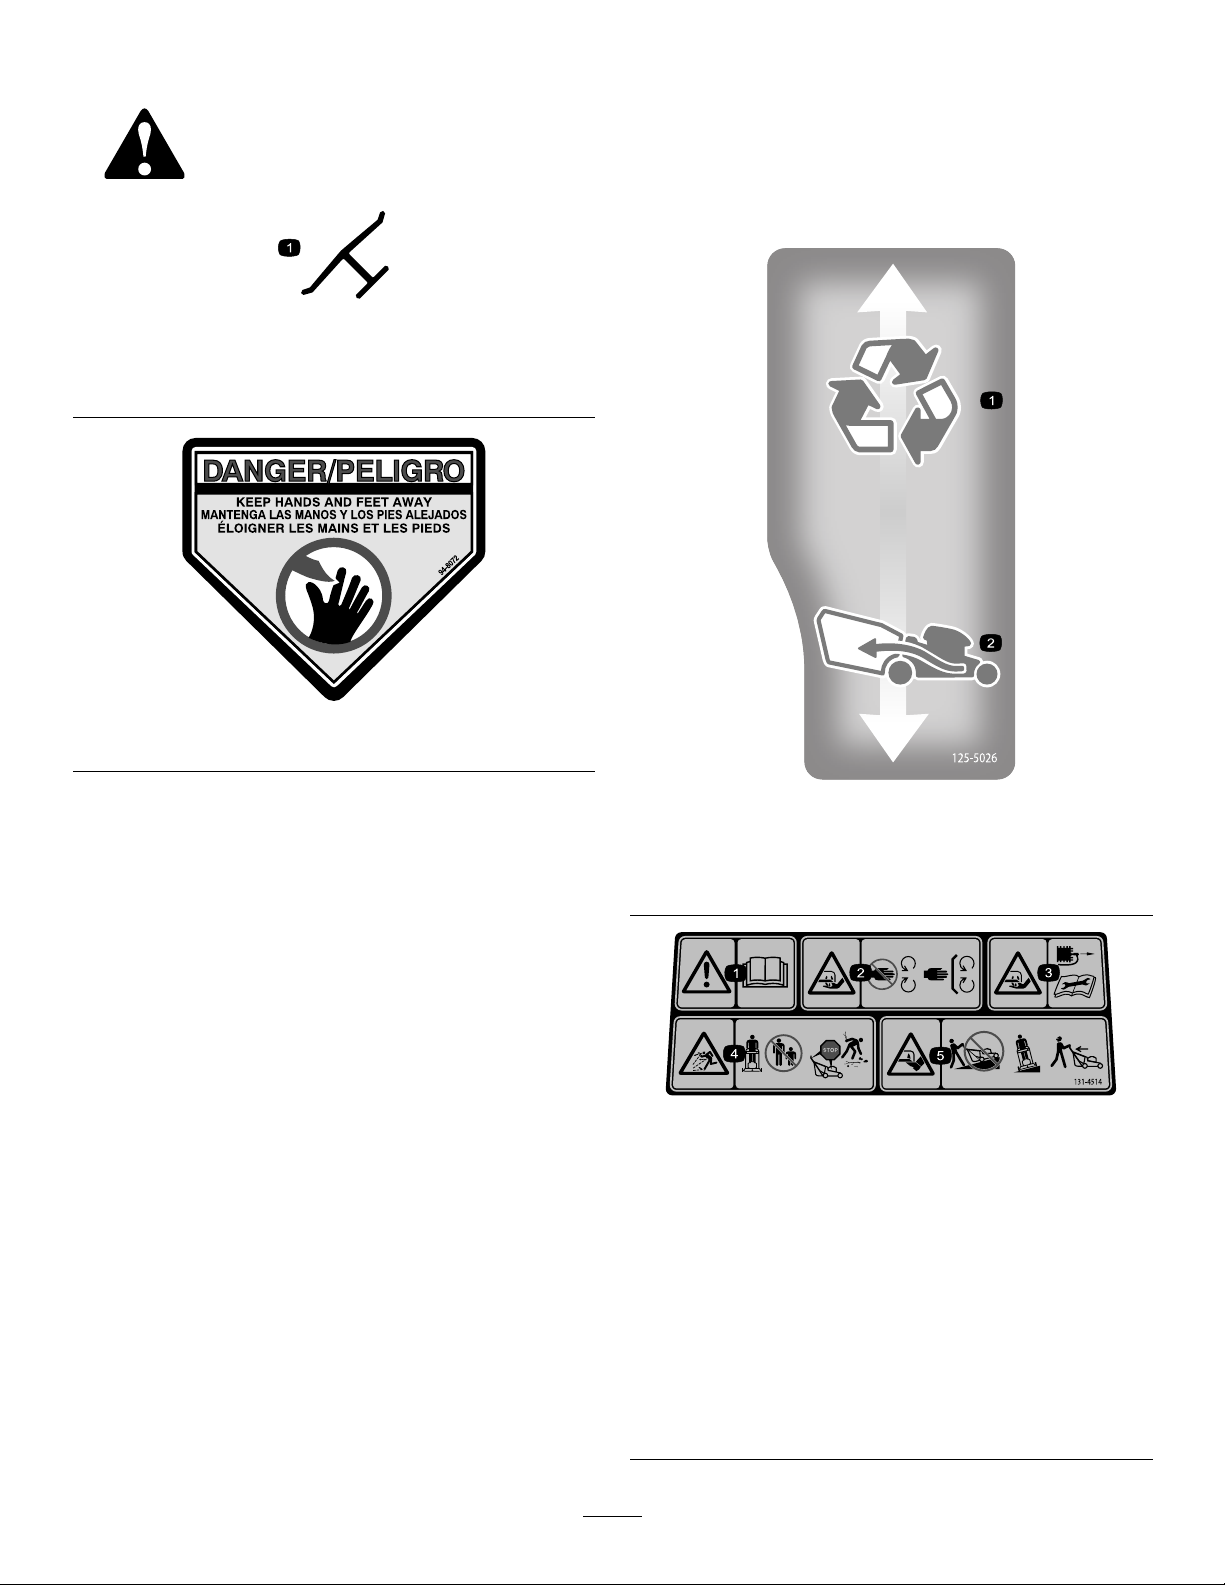
Safetydecalsandinstructionsareeasilyvisibletotheoperatorandarelocatednearanyarea
ofpotentialdanger.Replaceanydecalthatisdamagedormissing.
Manufacturer'sMark
1.Thismarkindicatesthatthebladeisidentiedasapart
fromtheoriginalmachinemanufacturer .
decaloemmarkt
decal94-8072
94-8072
decal125-5026
125-5026
1.Recyclingmode2.Baggingmode
decal131-4514
131-4514
1.Warning—readtheOperator'sManual.
2.Cutting/dismembermenthazardofhand,mower
blade—stayawayfrommovingparts;keepallguardsand
shieldsinplace.
3.Cutting/dismembermenthazardofhand,mower
blade—disconnectthespark-plugwirebeforeperforming
maintenance.
4.Thrownobjecthazard—keepbystandersaway;shutoffthe
enginebeforeleavingtheoperatingposition;pickupany
debrisbeforemowing.
5.Cutting/dismembermenthazardoffoot,mowerblade—do
notoperateupanddownslopes;operatesidetosideon
slopes;lookbehindyouwhenmovinginreverse.
4
Page 5
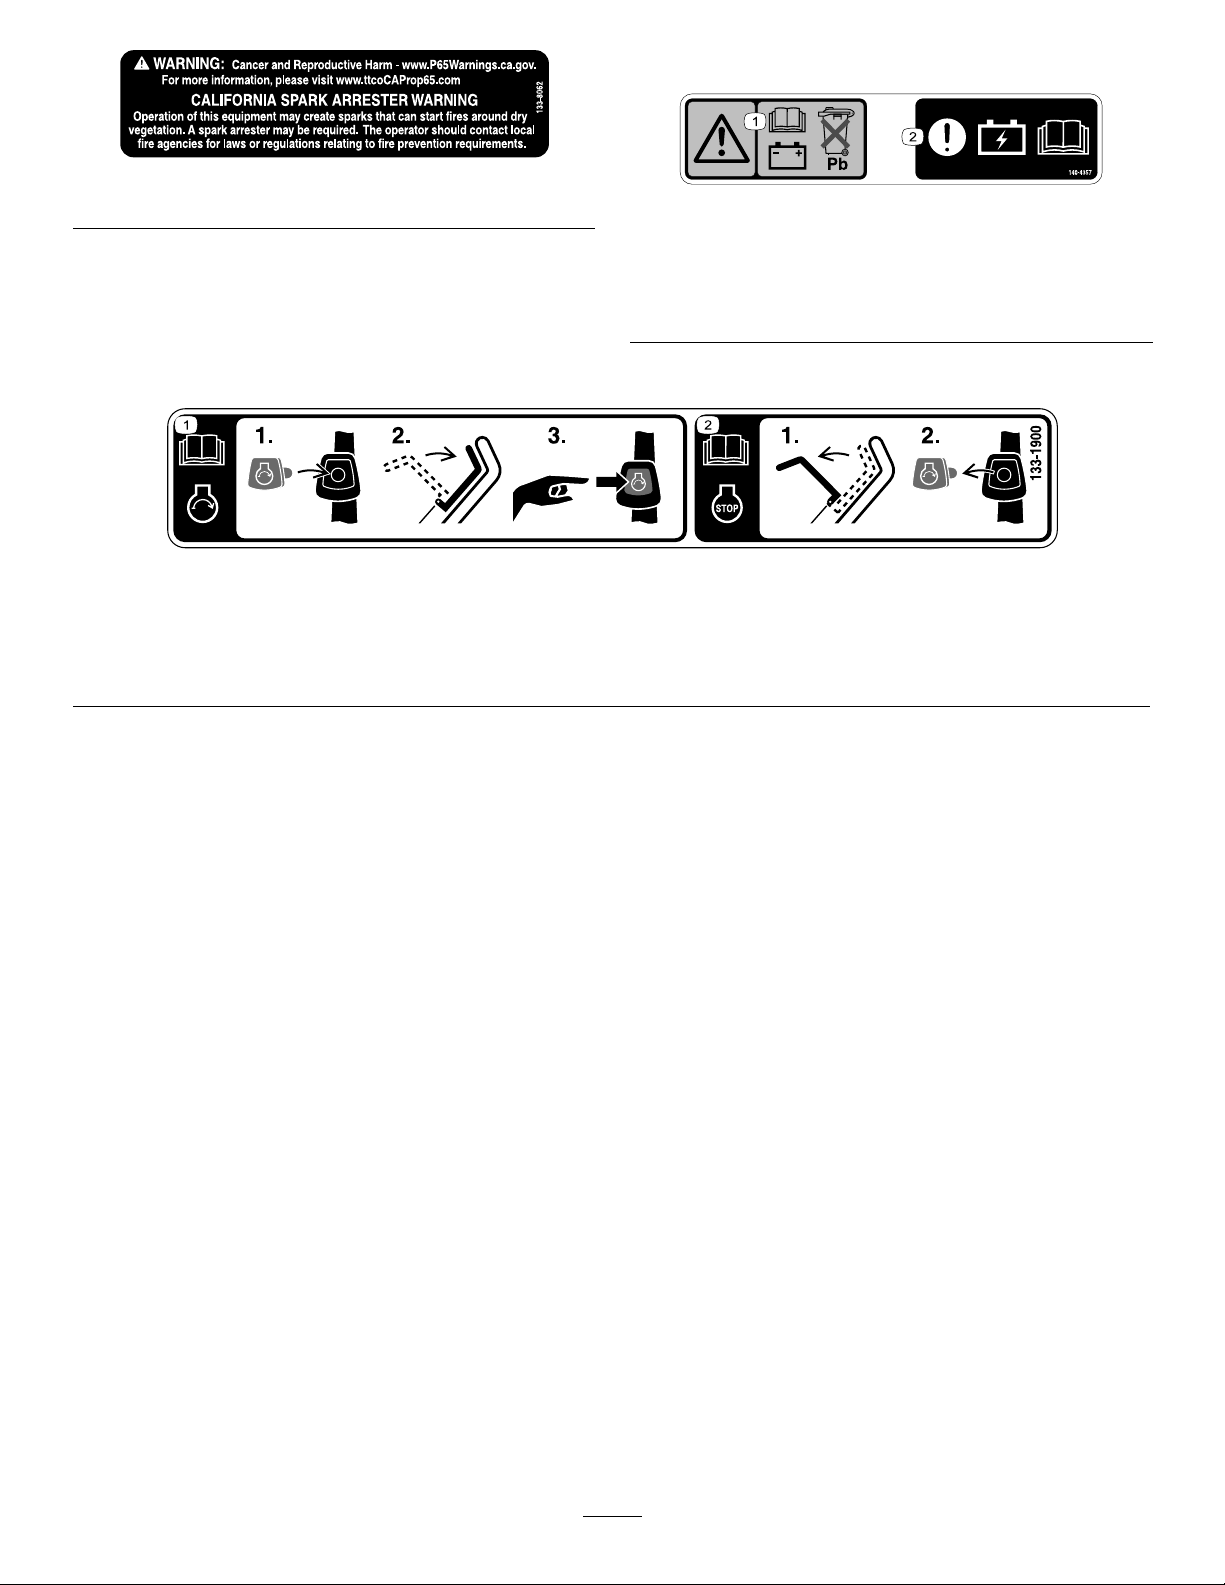
Electric-startmodelonly
decal133-8062
133-8062
140-4357
decal140-4357
Electric-startmodelonly
1.ReadtheOperator’sManualformoreinformationonstarting
theengine—1)Inserttheelectric-startbuttonintothe
electricstarter;2)Engagetheblade-controlbar;3)Pushthe
electric-startbuttontostarttheengine.
1.Warning—readthe
Operator’sManualfor
batteryinformation;donot
discardtheleadbattery .
133-1900
2.ReadtheOperator’sManualformoreinformationonstopping
theengine—1)Releasetheblade-controlbar;2)Removethe
electric-startbuttonfromtheelectricstarter.
2.Attention—readthe
Operator’sManual
forbatterycharging
information.
decal133-1900
5
Page 6
Setup
Important:Removeanddiscardtheprotectiveplasticsheetthatcoverstheengineandanyother
plasticorwrappingonthemachine.
Important:Topreventaccidentalstarting,donotinserttheelectric-startbuttonintotheelectric-start
ignition(ifequipped)untilyouarereadytostarttheengine.
1
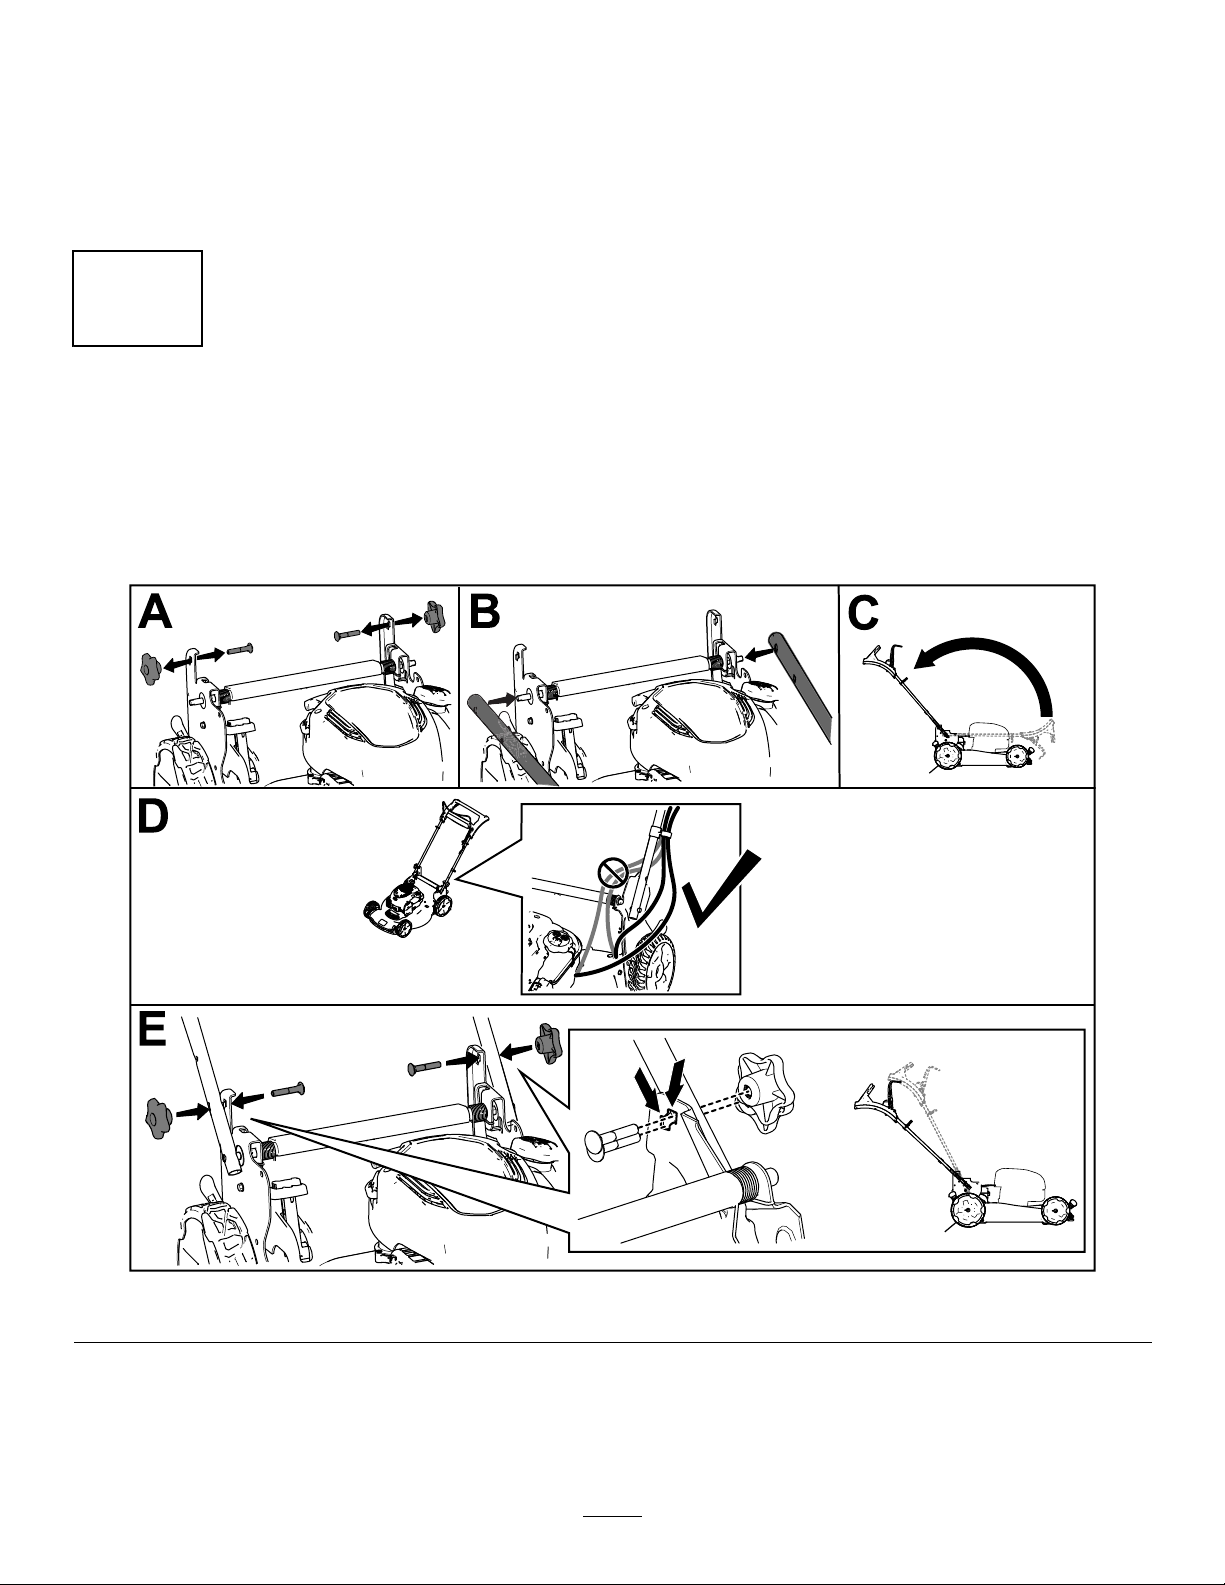
AssemblingandUnfoldingtheHandle
NoPartsRequired
Procedure
Note:Ensurethatthecablesareroutedontheoutsideofthehandleandarenotpinched(DofFigure3).
Figure3
6
g334082
Page 7
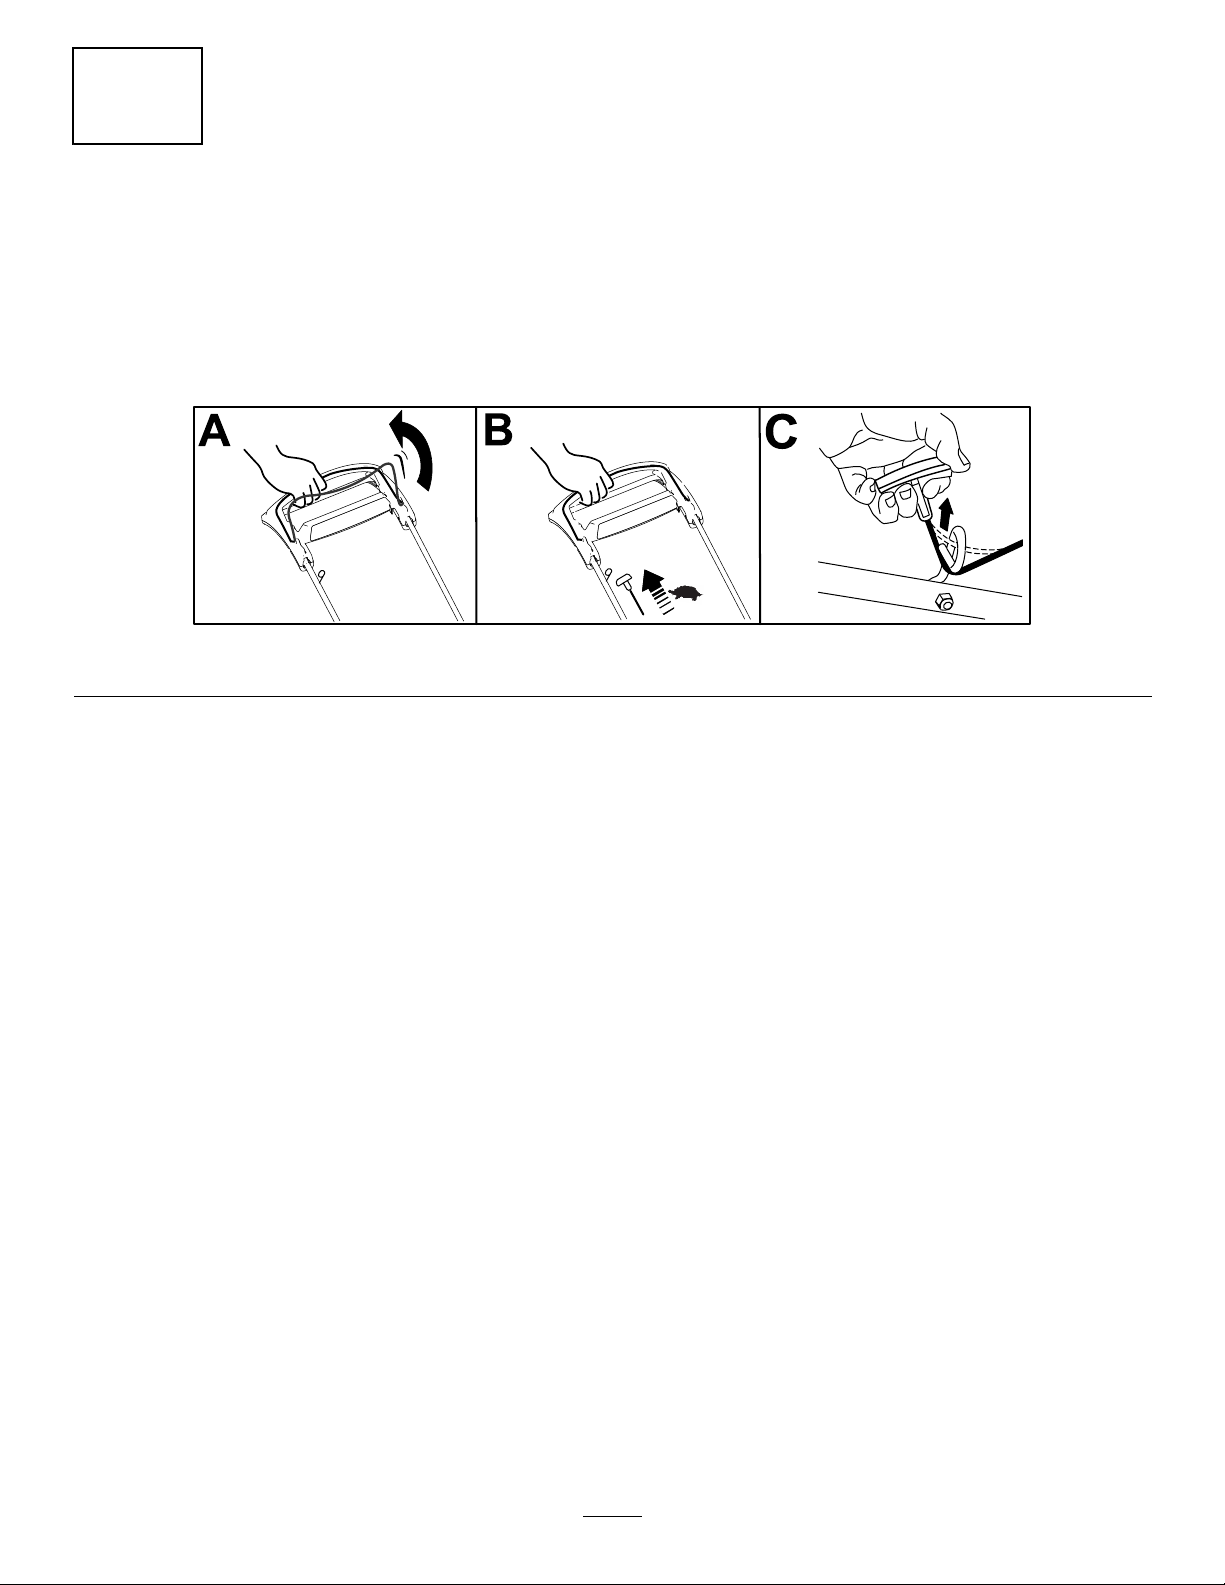
2
InstallingtheRecoil-StarterRopeintheRopeGuide
NoPartsRequired
Procedure
Important:Tostarttheenginesafelyandeasilywheneveryouusethemachine,installtherecoil-starter
ropeintheropeguide.
Figure4
g334093
7
Page 8
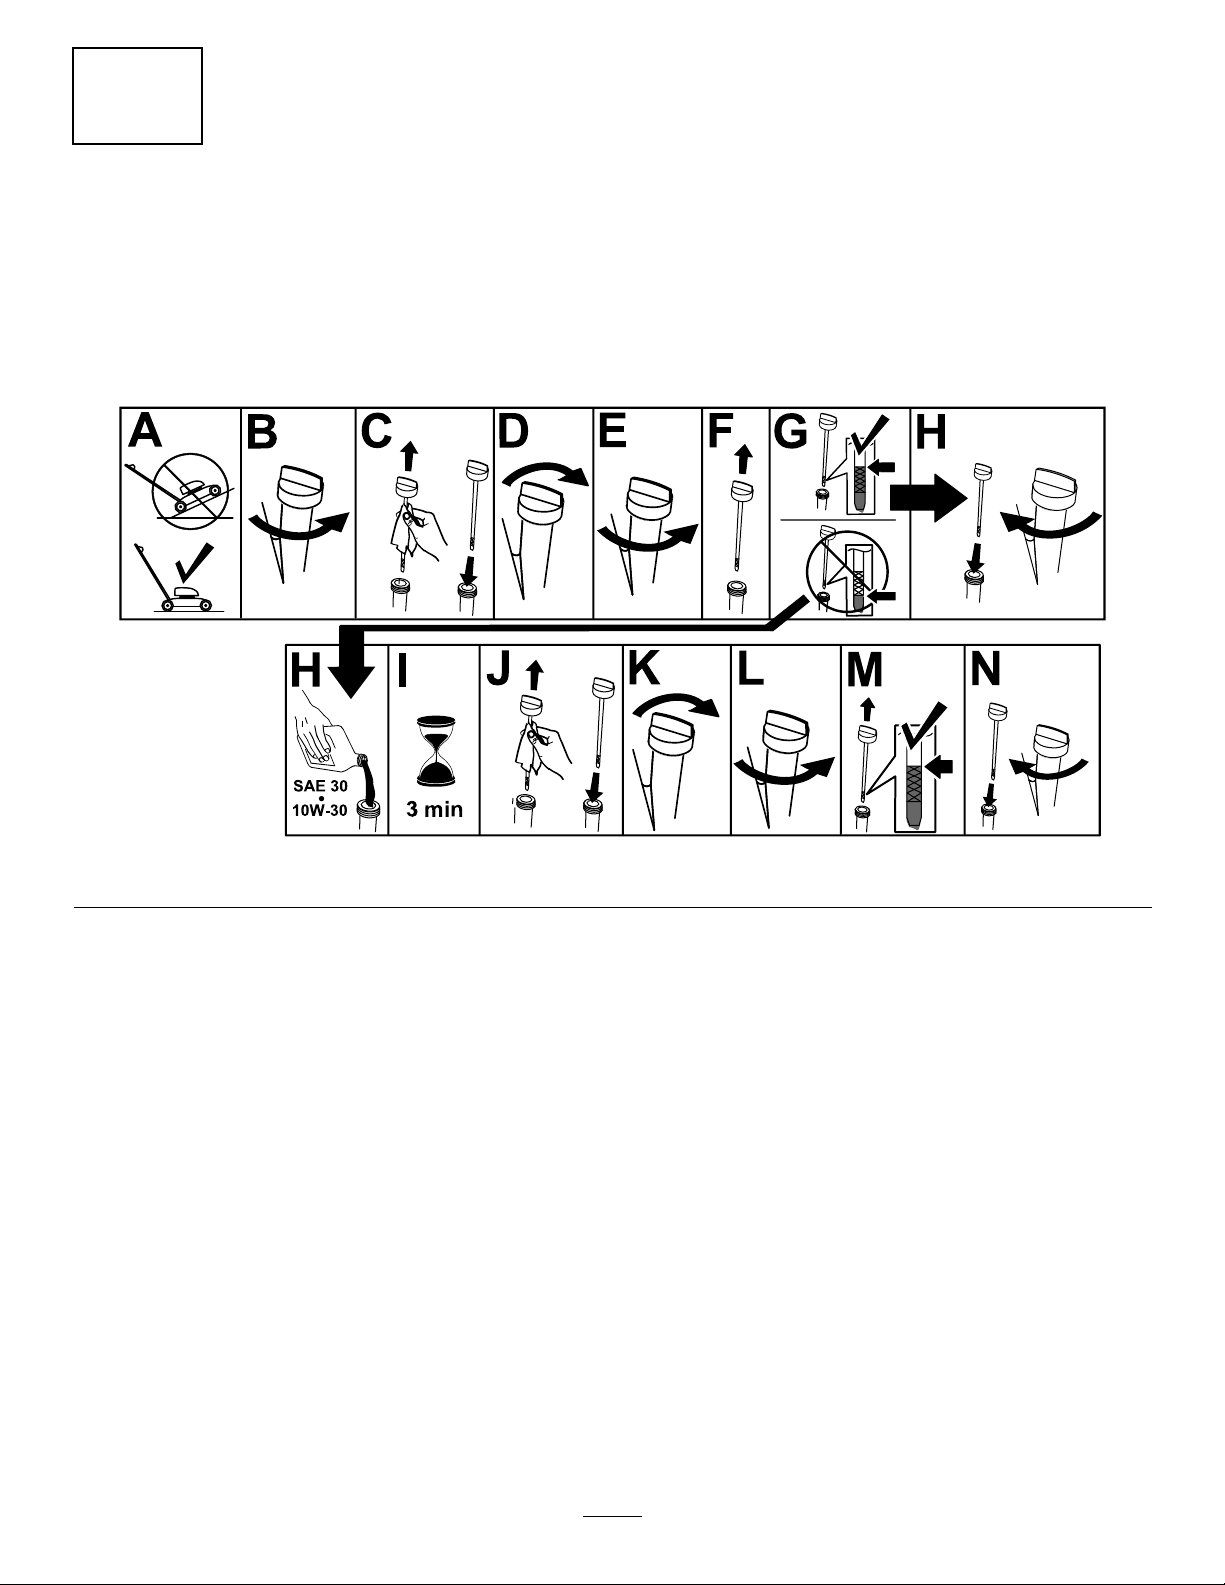
3
AddingOiltotheEngine
NoPartsRequired
Procedure
Important:Iftheoillevelintheengineistoolowortoohighandyouruntheengine,youmaydamage
theengine.
Figure5
g222533
8
Page 9
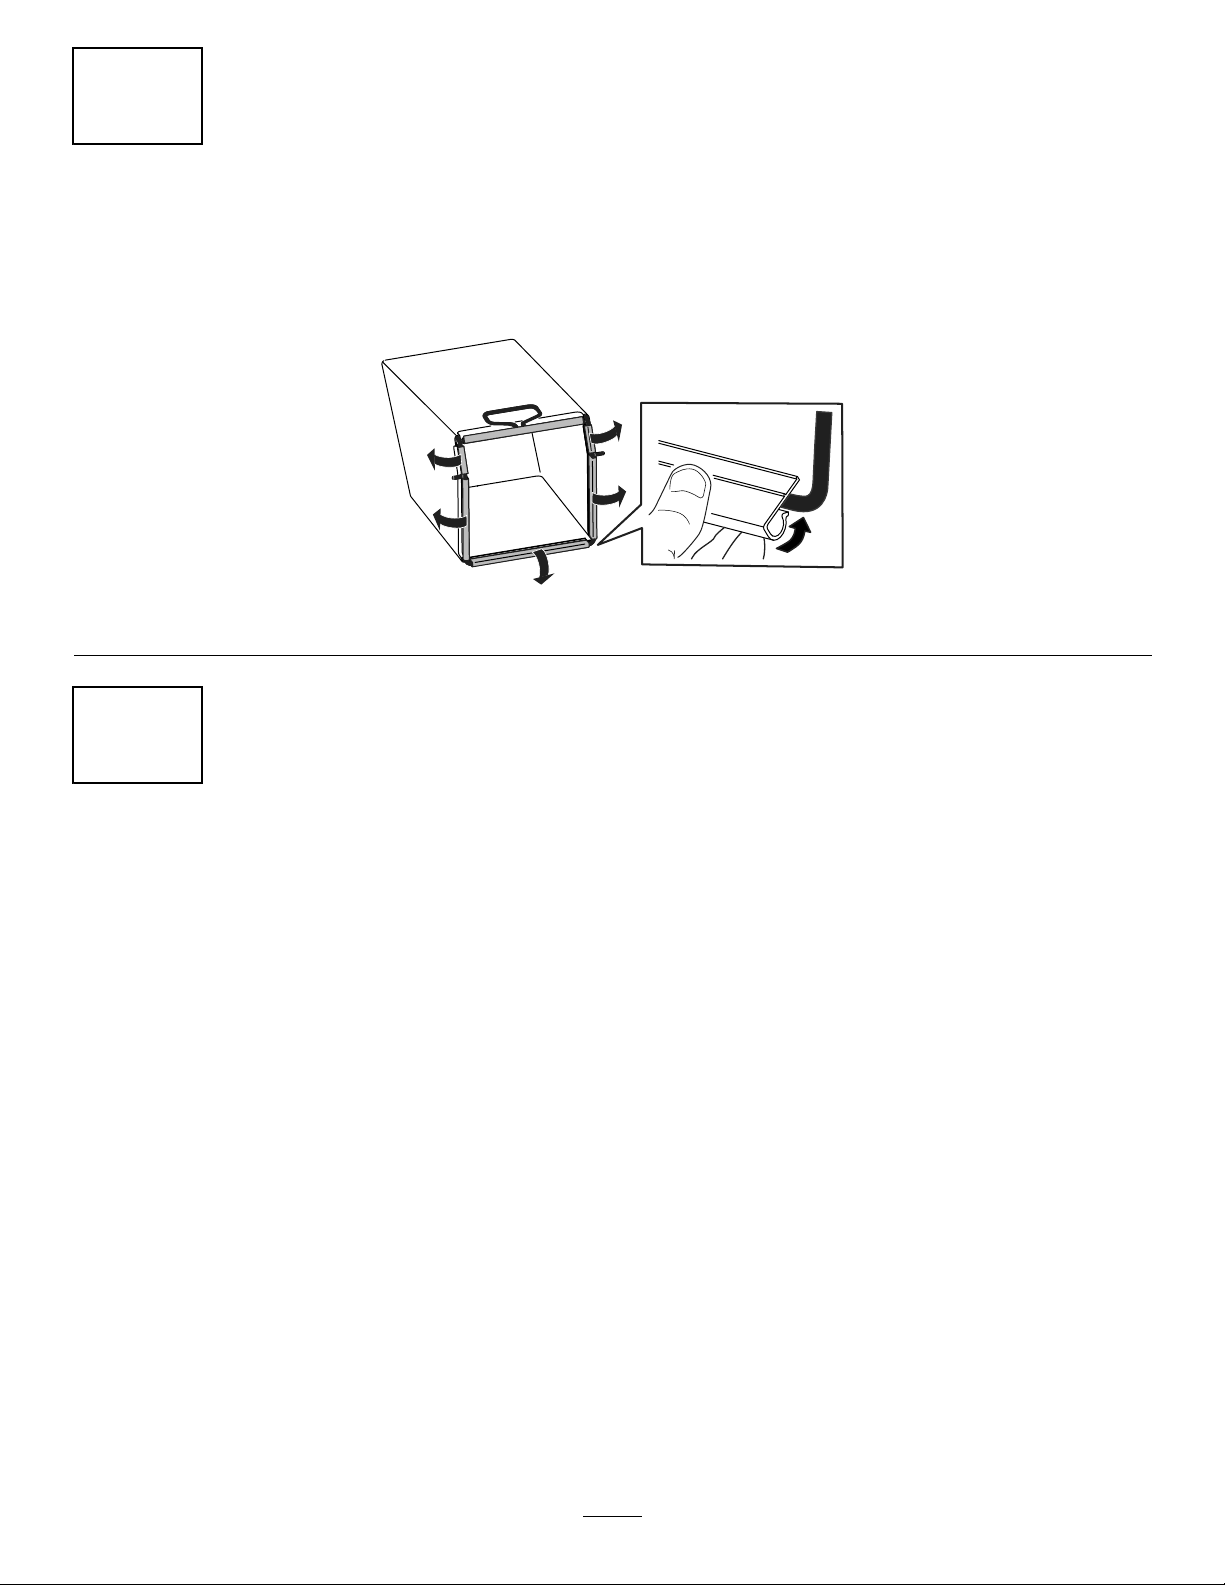
4
AssemblingtheGrassBag
NoPartsRequired
Procedure
g334351
Figure6
5
ChargingtheBattery
NoPartsRequired
Procedure
Electric-StartModelOnly
RefertoChargingtheBattery(page23).
9
Page 10
ProductOverview
Specications
ModelWeightLengthWidthHeight
21462
21464
35kg
(78lb)151cm59cm109cm
39kg
(87lb)
(59inches)(23
inches)
(43inches)
Attachments/Accessories
AselectionofToroapprovedattachmentsand
accessoriesisavailableforusewiththemachine
toenhanceandexpanditscapabilities.Contact
yourAuthorizedServiceDealerorauthorizedT oro
distributororgotowww.T oro.comforalistofall
approvedattachmentsandaccessories.
Toensureoptimumperformanceandcontinuedsafety
certicationofthemachine,useonlygenuineToro
replacementpartsandaccessories.Replacement
partsandaccessoriesmadebyothermanufacturers
couldbedangerous,andsuchusecouldvoidthe
g334160
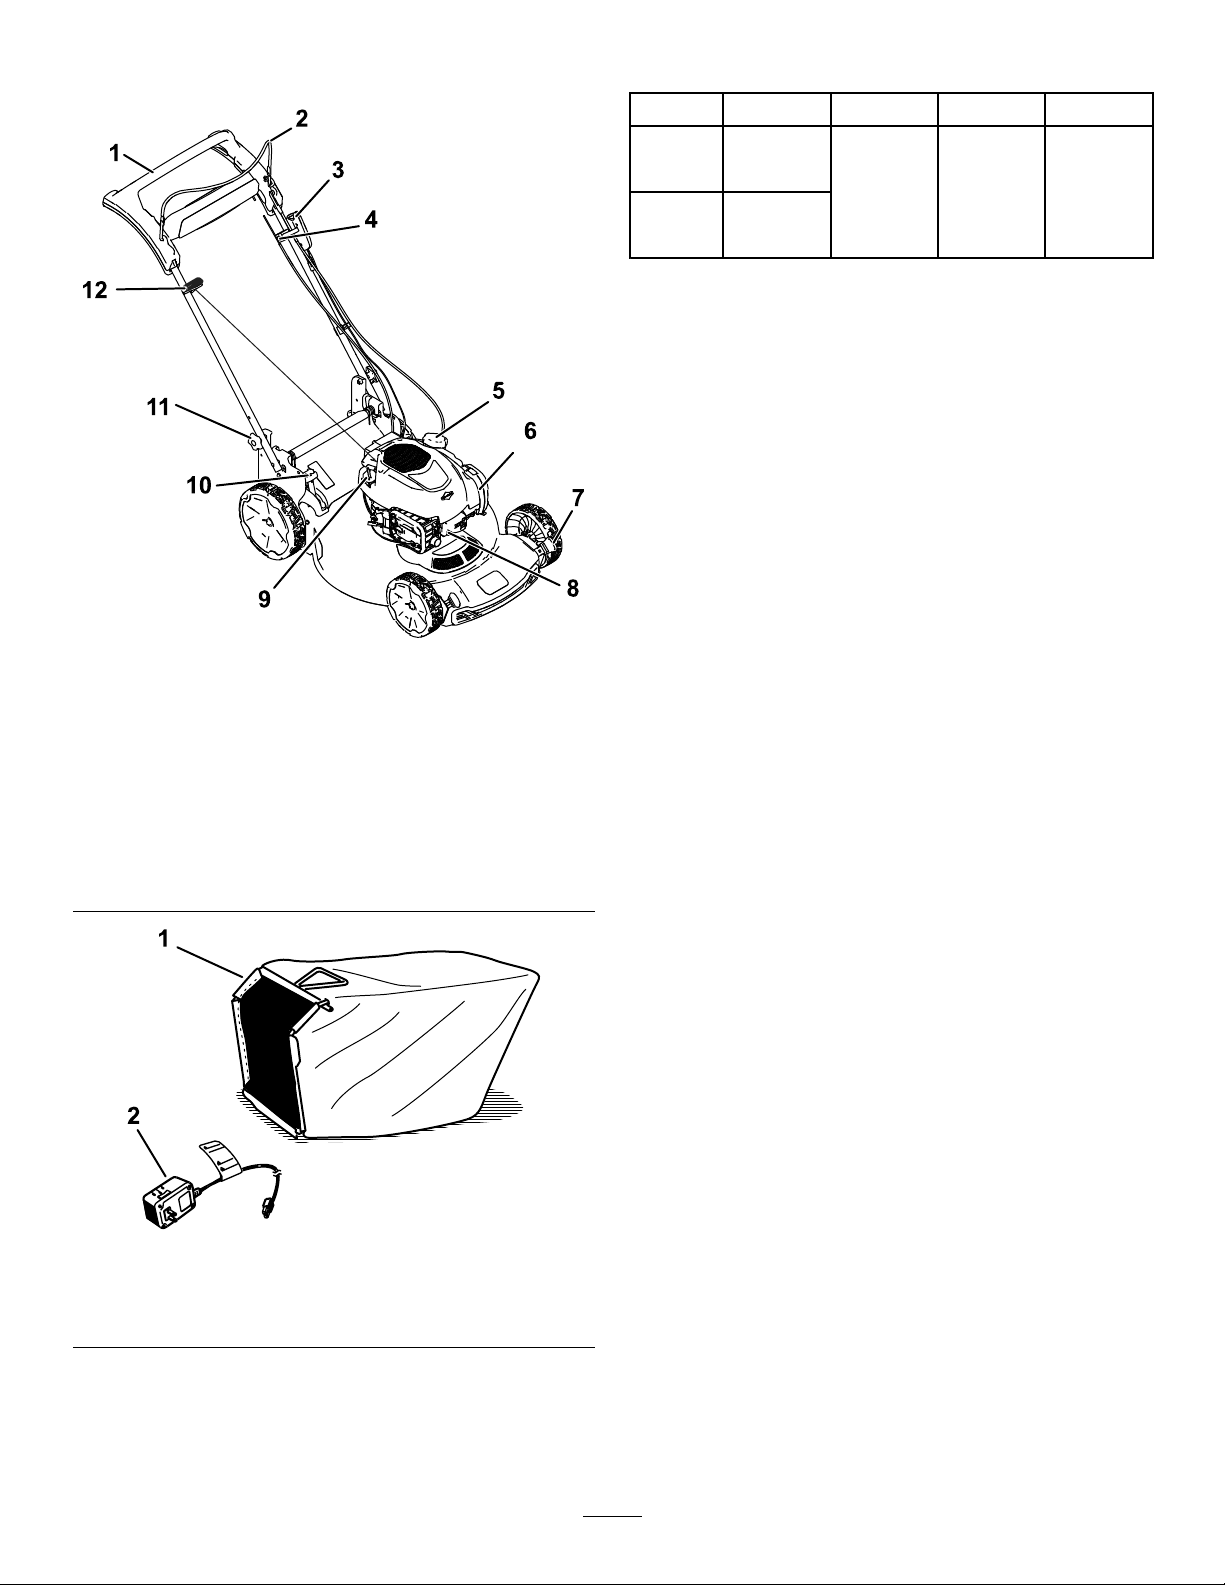
Figure7
productwarranty.
1.Handle
2.Blade-controlbar
3.Electric-startbutton
(electric-startmodelonly)
4.Adjustmentforthe
self-propeldrive
5.Fuel-tankcap
6.Airlter
1.Grassbag
7.Cutting-heightlever(4)
8.Sparkplug
9.Oilll/dipstick
10.Bag-on-demandlever
11.Handleknob(2)
12.Recoil-starthandle
Figure8
2.Batterycharger
(electric-startmodelonly)
Operation
Note:Determinetheleftandrightsidesofthe
machinefromthenormaloperatingposition.
BeforeOperation
BeforeOperationSafety
GeneralSafety
•Alwaysshutoffthemachine,removethe
electric-startbutton(ifequipped),waitforall
movingpartstostop,andallowthemachinetocool
beforeadjusting,servicing,cleaning,orstoringit.
•Becomefamiliarwiththesafeoperationofthe
equipment,operatorcontrols,andsafetysigns.
•Checkthatallguardsandsafetydevices,suchas
deectorsand/orgrasscatcher,areinplaceand
g334095
functioningproperly.
•Alwaysinspectthemachinetoensurethatthe
bladesandbladeboltsarenotwornordamaged.
•Inspecttheareawhereyouwillusethemachine,
andremoveallobjectsthatcouldinterferewith
theoperationofthemachineorthatthemachine
couldthrow.
•Contactwiththemovingbladewillcauseserious
injury.Donotputyourngersunderthehousing.
10
Page 11
FuelSafety
•Fuelisextremelyammableandhighlyexplosive.
Areorexplosionfromfuelcanburnyouand
othersandcandamageproperty.
–Topreventastaticchargefromignitingthefuel,
placethecontainerand/ormachinedirectlyon
thegroundbeforelling,notinavehicleoron
anobject.
–Fillthefueltankoutdoors,inanopenarea,
whentheengineiscold.Wipeupanyfuelthat
spills.
–Donothandlefuelwhensmokingoraroundan
openameorsparks.
–Donotremovethefuelcaporaddfueltothe
tankwhiletheengineisrunningorhot.
–Ifyouspillfuel,donotattempttostartthe
engine.Avoidcreatingasourceofignitionuntil
thefuelvaporshavedissipated.
FillingtheFuelTank
TypeUnleadedgasoline
Minimumoctanerating
Ethanol
MethanolNone
MTBE(methyltertiarybutyl
ether)
OilDonotaddtothefuel
Useonlyclean,fresh(nomorethan30daysold),fuel
fromareputablesource.
Important:Toreducestartingproblems,addfuel
stabilizer/conditionertofreshfuelasdirectedby
thefuel-stabilizer/conditionermanufacturer.
Refertoyourengineowner’smanualforadditional
information.
87(US)or91(research
octane;outsidetheUS)
Nomorethan10%byvolume
Lessthan15%byvolume
–Storefuelinanapprovedcontainerandkeep
itoutofthereachofchildren.
•Fuelisharmfulorfatalifswallowed.Long-term
exposuretovaporscancauseseriousinjuryand
illness.
–Avoidprolongedbreathingofvapors.
–Keepyourhandsandfaceawayfromthe
nozzleandthefuel-tankopening.
–Keepfuelawayfromyoureyesandskin.
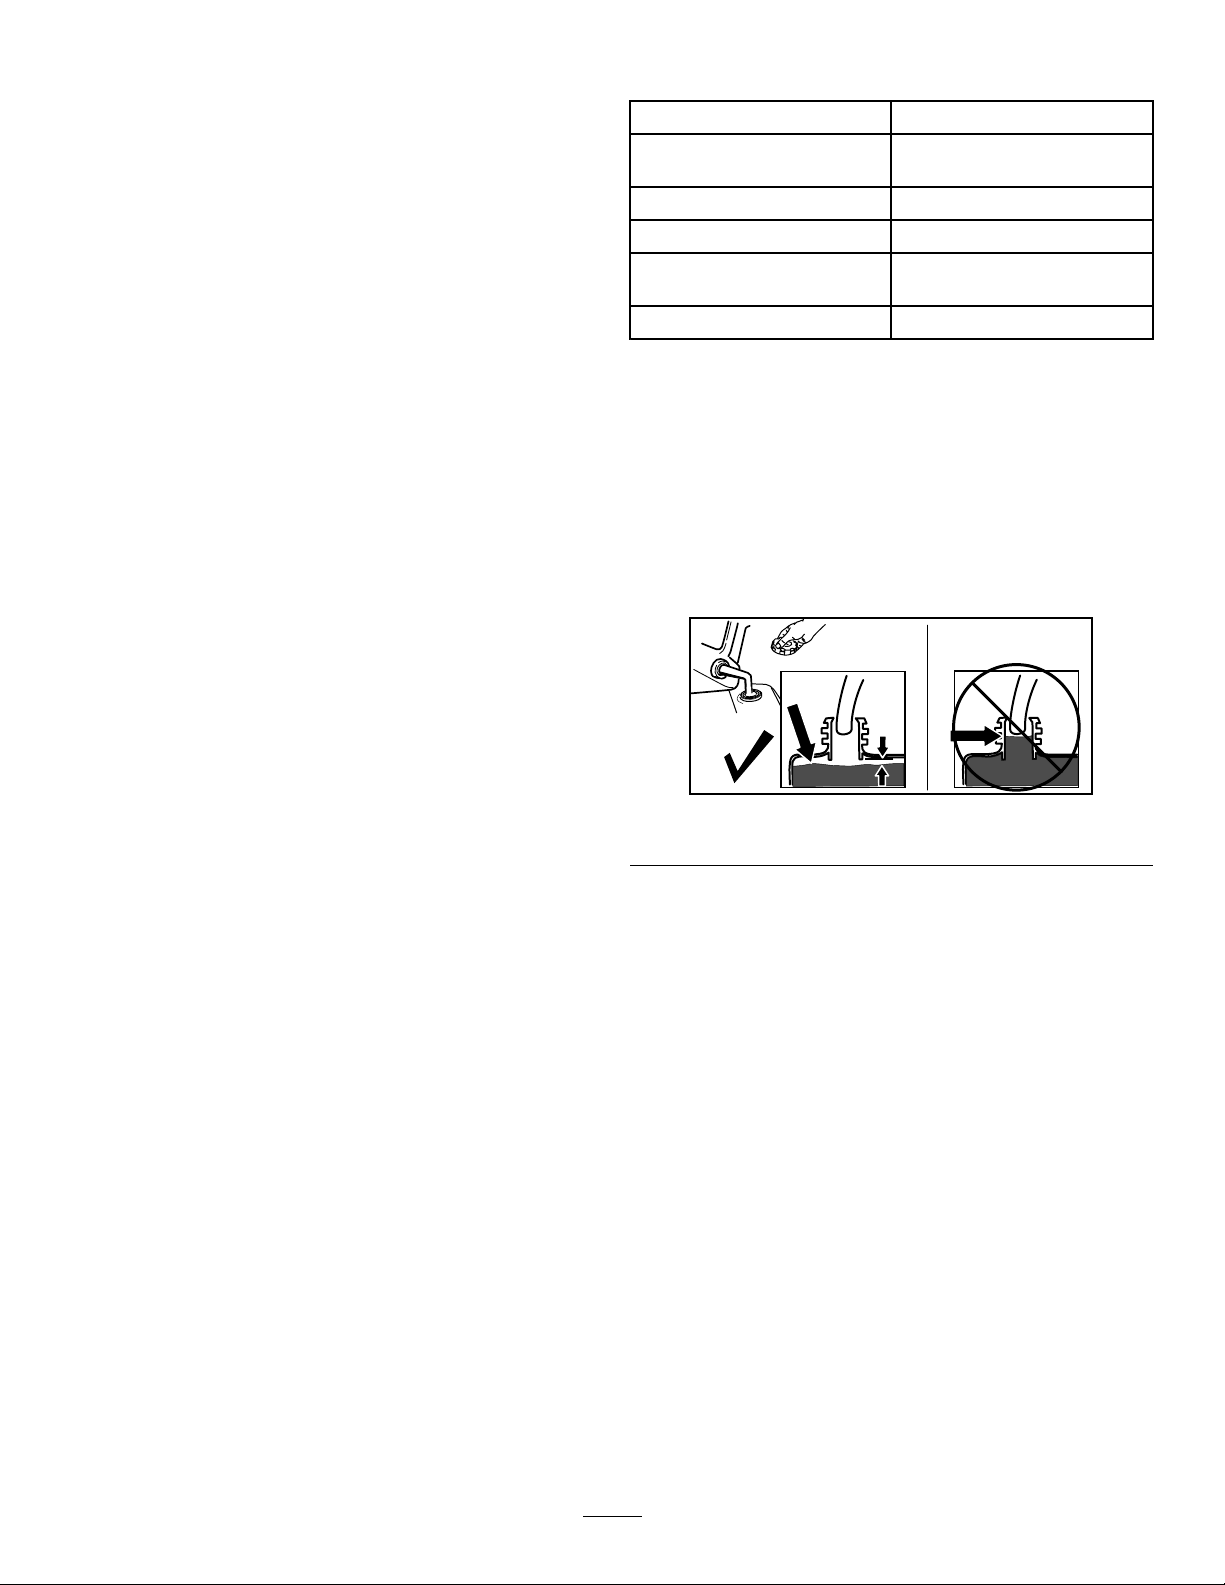
FillthefueltankasshowninFigure9.
g230458
Figure9
11
Page 12
CheckingtheEngine-OilLevel
ServiceInterval:Beforeeachuseordaily
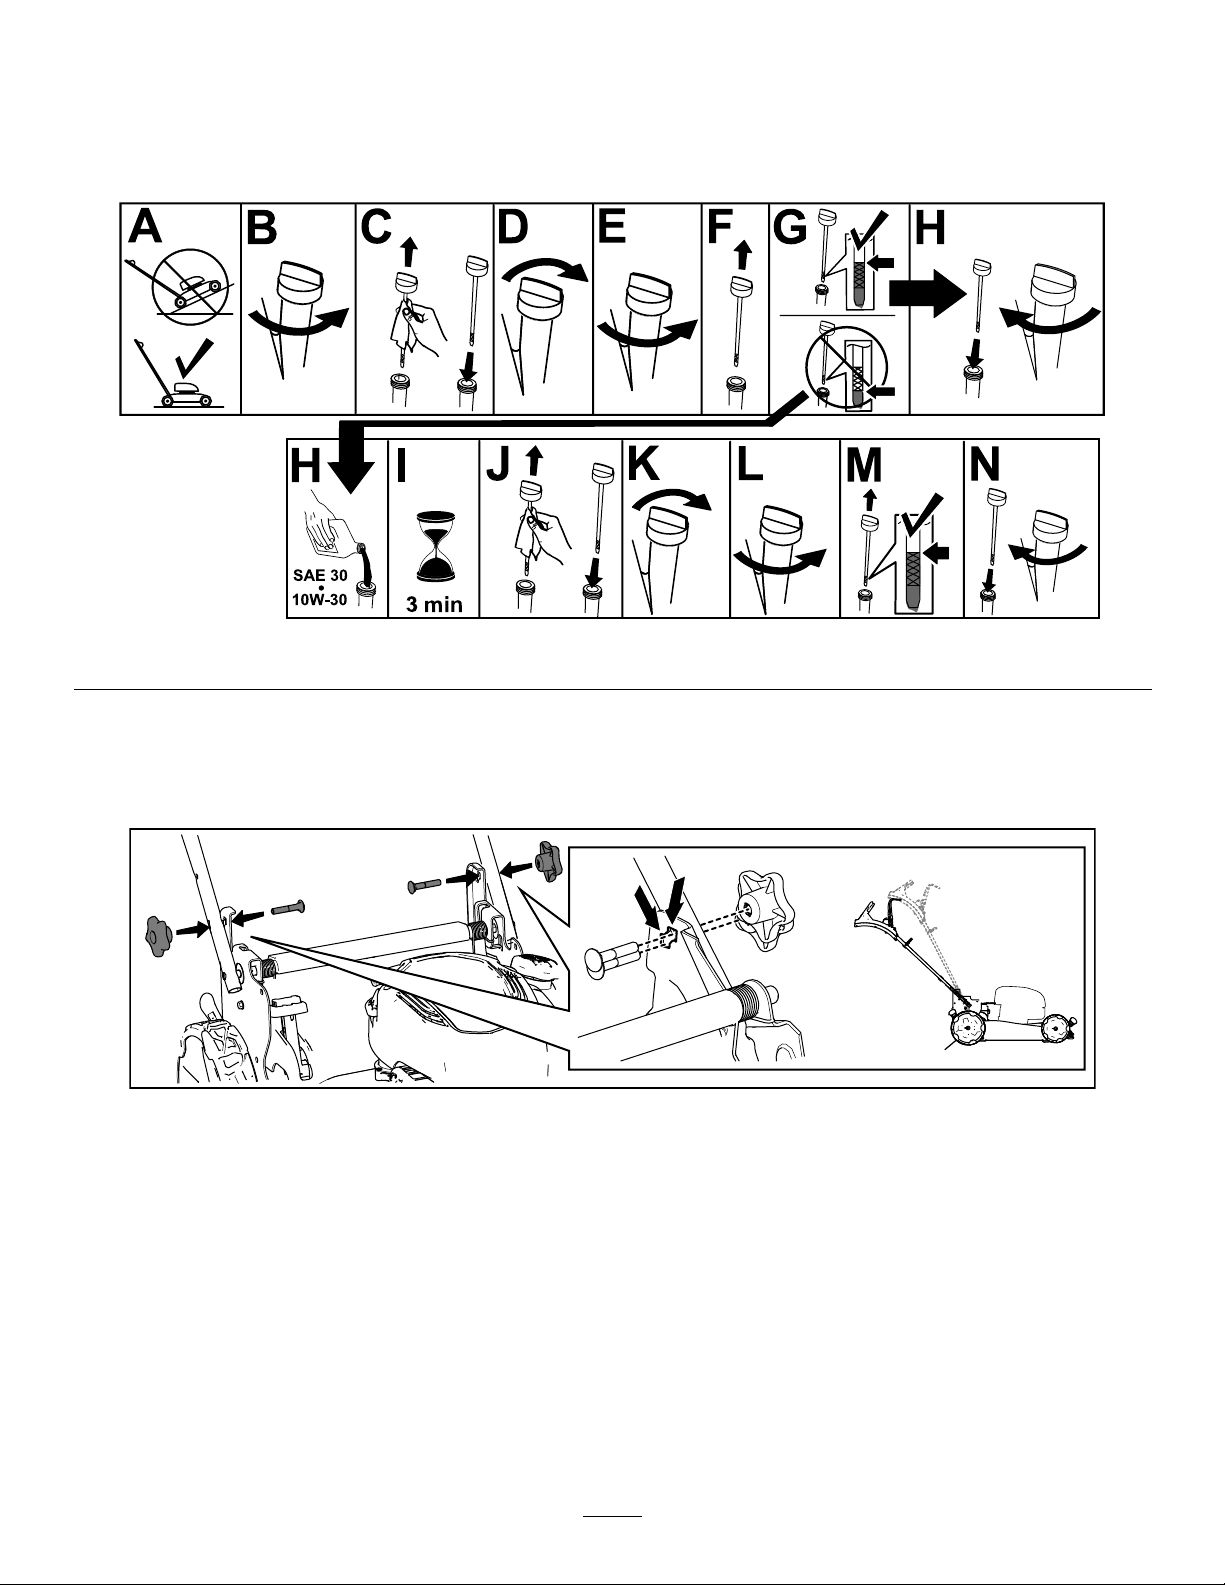
Important:Iftheoillevelinthecrankcaseistoolowortoohighandyouruntheengine,youmay
damagetheengine.
Figure10
g231765
AdjustingtheHandleHeight
Youcanraiseorlowerthehandlein1of2positionsthatismorecomfortableforyou(Figure11).
Figure11
1.Removebothhandleknobs.
2.Movethehandletothedesiredheightposition.
3.Securethehandlewiththepreviouslyremovedhandleknobs.
g334096
12
Page 13
AdjustingtheCuttingHeight
DANGER
Adjustingthecutting-heightleverscouldbringyourhandsintocontactwithamovingblade
andresultinseriousinjury.
•Shutofftheengine,removetheelectric-startbutton(ifequipped),andwaitforallmoving
partstostopbeforeadjustingthecuttingheight.
•Donotputyourngersunderthehousingwhenadjustingthecuttingheight.
CAUTION
Iftheenginehasbeenrunning,themuferwillbehotandcanburnyou.
Keepawayfromthehotmufer.
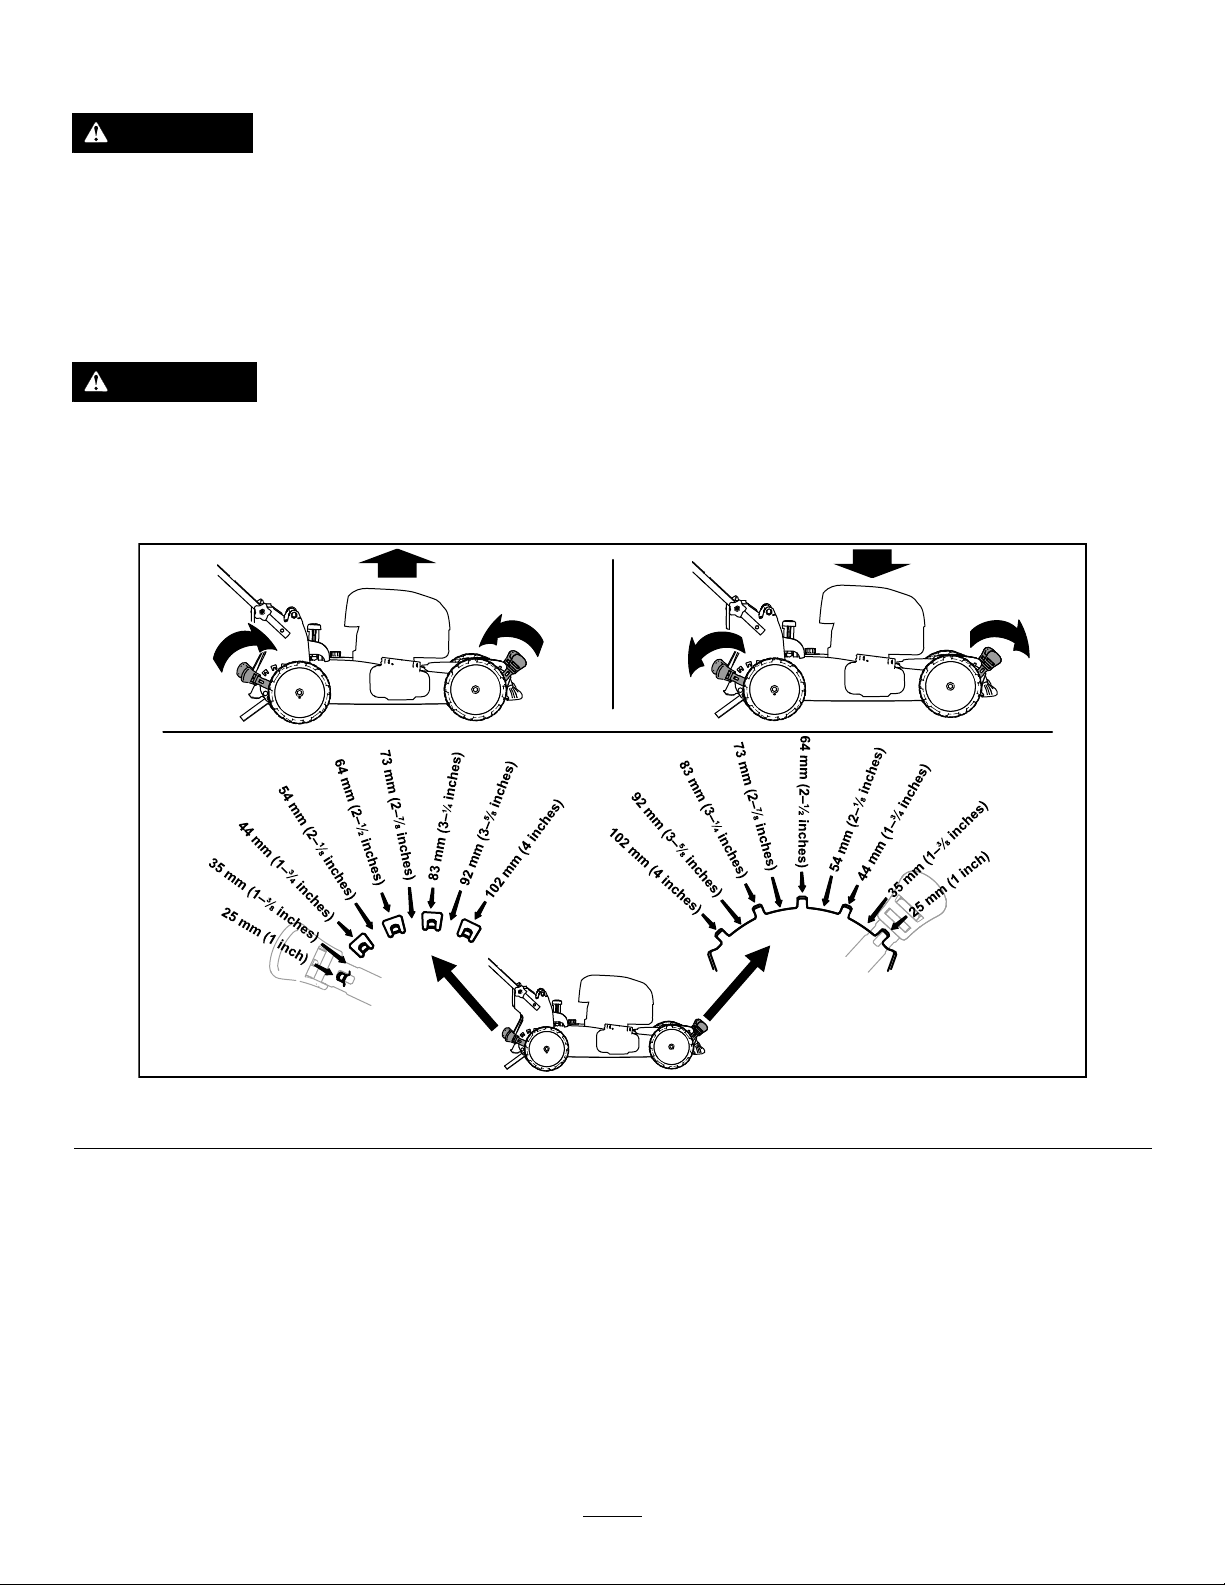
Adjustthecuttingheightasdesired.Setallwheelstothesamecuttingheight(Figure12).
Figure12
g254131
13
Page 14

DuringOperation
DuringOperationSafety
theelectric-startbutton(ifequipped),waitforall
movingpartstostop,anddisconnectthewire
fromthesparkplugbeforeexaminingthemachine
fordamage.Makeallnecessaryrepairsbefore
resumingoperation.
GeneralSafety
•Wearappropriateclothing,includingeye
protection;longpants;substantial,slip-resistant
footwear;andhearingprotection.Tiebacklong
hairanddonotwearlooseclothingorloose
jewelry.
•Useyourfullattentionwhileoperatingthe
machine.Donotengageinanyactivitythat
causesdistractions;otherwise,injuryorproperty
damagemayoccur.
•Donotoperatethemachinewhileill,tired,or
undertheinuenceofalcoholordrugs.
•Thebladeissharp;contactingthebladecanresult
inseriouspersonalinjury.Shutofftheengine,
removetheelectric-startbutton(ifequipped),and
waitforallmovingpartstostopbeforeleavingthe
operatingposition.
•Whenyoureleasetheblade-controlbar,the
engineshouldshutoffandthebladeshouldstop
within3seconds.Ifnot,stopusingyourmachine
immediatelyandcontactanAuthorizedService
Dealer.
•Keepbystandersoutoftheoperatingarea.Keep
smallchildrenoutoftheoperatingareaandunder
thewatchfulcareofaresponsibleadultwhois
notoperatingthemachine.Stopthemachineif
anyoneentersthearea.
•Alwayslookdownandbehindyoubeforemoving
themachineinreverse.
•Operatethemachineonlyingoodvisibilityand
appropriateweatherconditions.Donotoperate
themachinewhenthereistheriskoflightning.
•Wetgrassorleavescancauseseriousinjuryif
youslipandcontacttheblade.Avoidmowingin
wetconditions.
•Useextremecarewhenapproachingblind
corners,shrubs,trees,orotherobjectsthatmay
blockyourview.
•Donotdirectthedischargematerialtoward
anyone.Avoiddischargingmaterialagainstawall
orobstruction;materialmayricochettowardyou.
Stoptheblade(s)whencrossinggravelsurfaces.
•Watchforholes,ruts,bumps,rocks,orother
hiddenobjects.Uneventerraincouldcauseyou
toloseyourbalanceorfooting.
•Ifthemachinestrikesanobjectorstartsto
vibrate,immediatelyshutofftheengine,remove
•Beforeleavingtheoperatingposition,shutoff
theengine,removetheelectric-startbutton(if
equipped),andwaitforallmovingpartstostop.
•Iftheenginehasbeenrunning,itwillbehotand
canseverelyburnyou.Keepawayfromthehot
engine.
•Operatetheengineonlyinwell-ventilatedareas.
Exhaustgasescontaincarbonmonoxide,whichis
anodorless,deadlypoison.
•Checkthegrasscatchercomponentsandthe
dischargechutefrequentlyforanywearor
deteriorationandreplacethemwithgenuineT oro
partswhennecessary.
SlopeSafety
•Mowacrossthefaceofslopes;neverupand
down.Useextremecautionwhenchanging
directiononslopes.
•Donotmowonexcessivelysteepslopes.Poor
footingcouldcauseaslip-and-fallaccident.
•Mowwithcautionneardrop-offs,ditches,or
embankments.
14
Page 15
StartingtheEngine
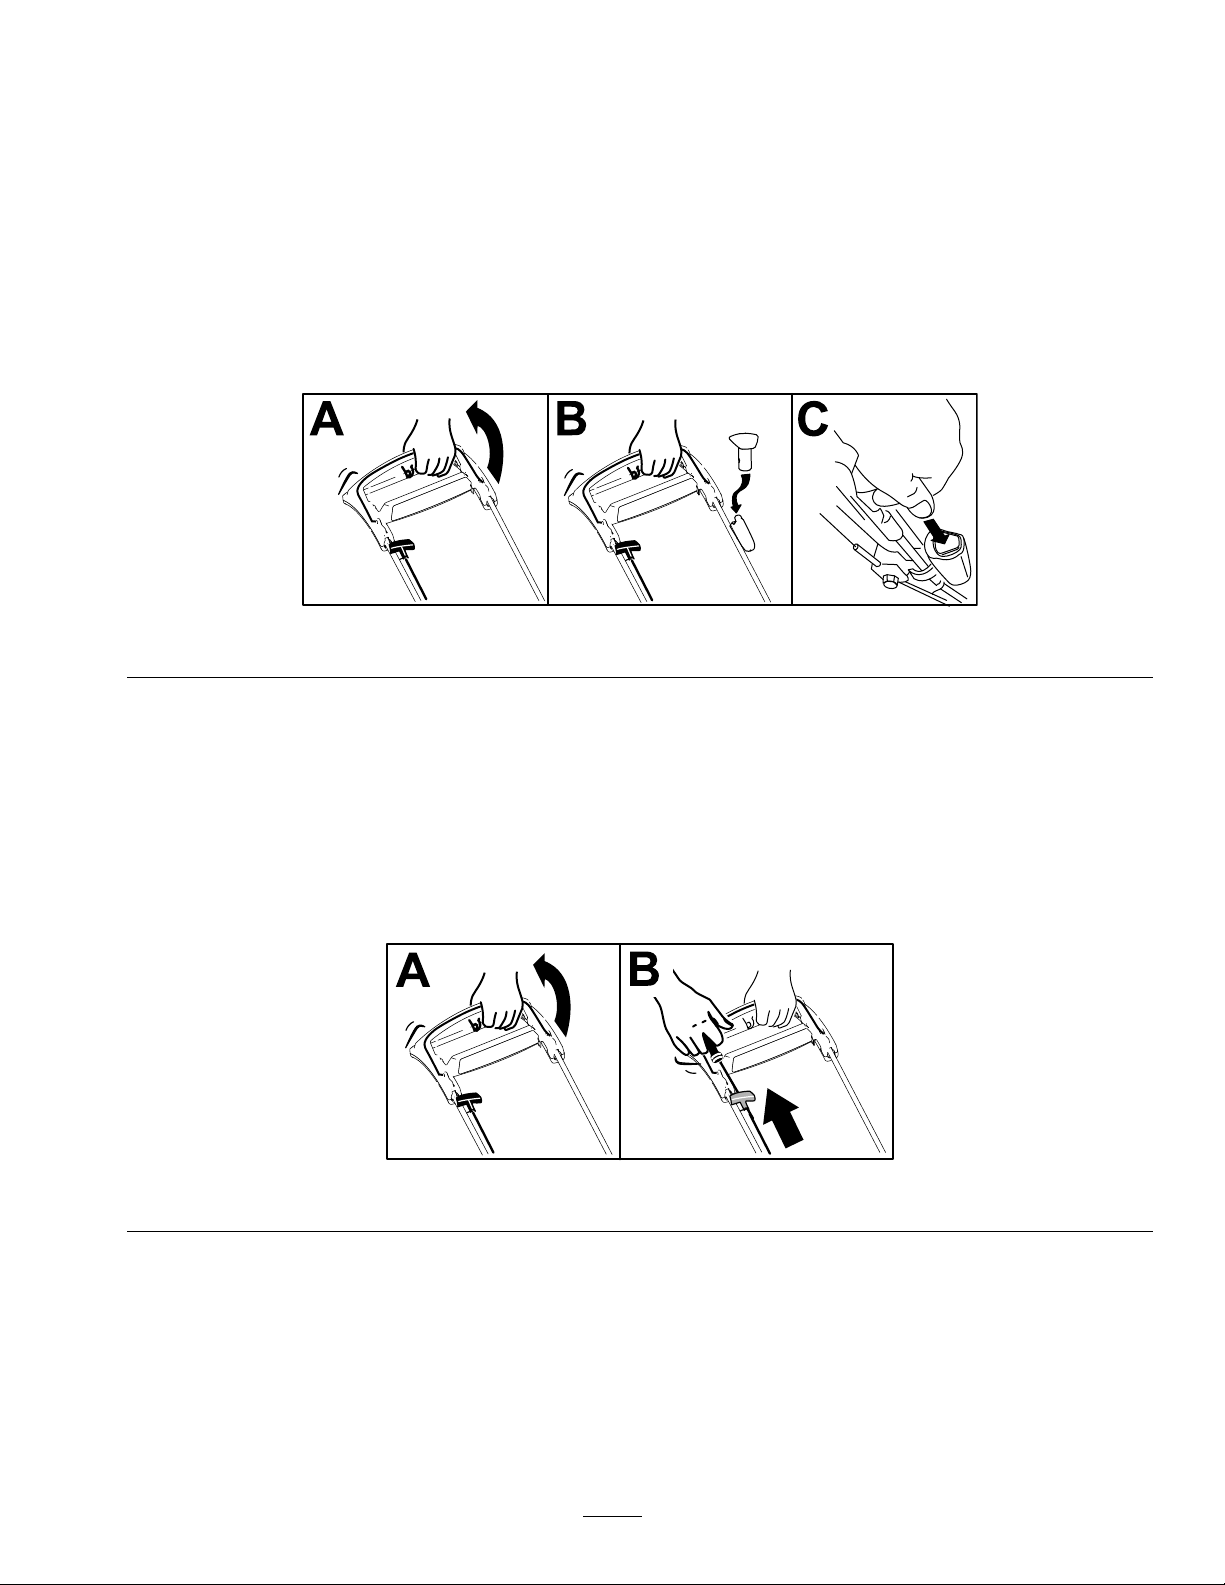
Youcanstarttheengineusingeithertheelectric-startbutton(ifequipped)ortherecoil-starthandle.
StartingtheEngineUsingtheElectric-StartButton
ForElectric-StartModels
1.Holdtheblade-controlbaragainstthehandle(AofFigure13).
2.Iftheelectric-startbuttonhasbeenremoved,insertitintheelectricstarter(BofFigure13).
3.Pushtheelectric-startbuttonuntiltheenginestarts(CofFigure13).
Note:Ifthemachinedoesnotstartafterseveralattempts,contactanAuthorizedServiceDealer.
Figure13
g334134
StartingtheEngineUsingtheRecoil-StartHandle
1.Holdtheblade-controlbaragainstthehandle(AofFigure14).
2.Pulltherecoil-starthandle(BofFigure14).
Note:Whenyoupulltherecoil-starthandle,pullitlightlyuntilyoufeelresistance,thenpullitsharply .
Allowtheropetoreturntothehandleslowly.
Note:Ifthemachinedoesnotstartafterseveralattempts,contactanAuthorizedServiceDealer.
Figure14
g334135
15
Page 16
UsingtheSelf-PropelDrive
RecyclingtheClippings
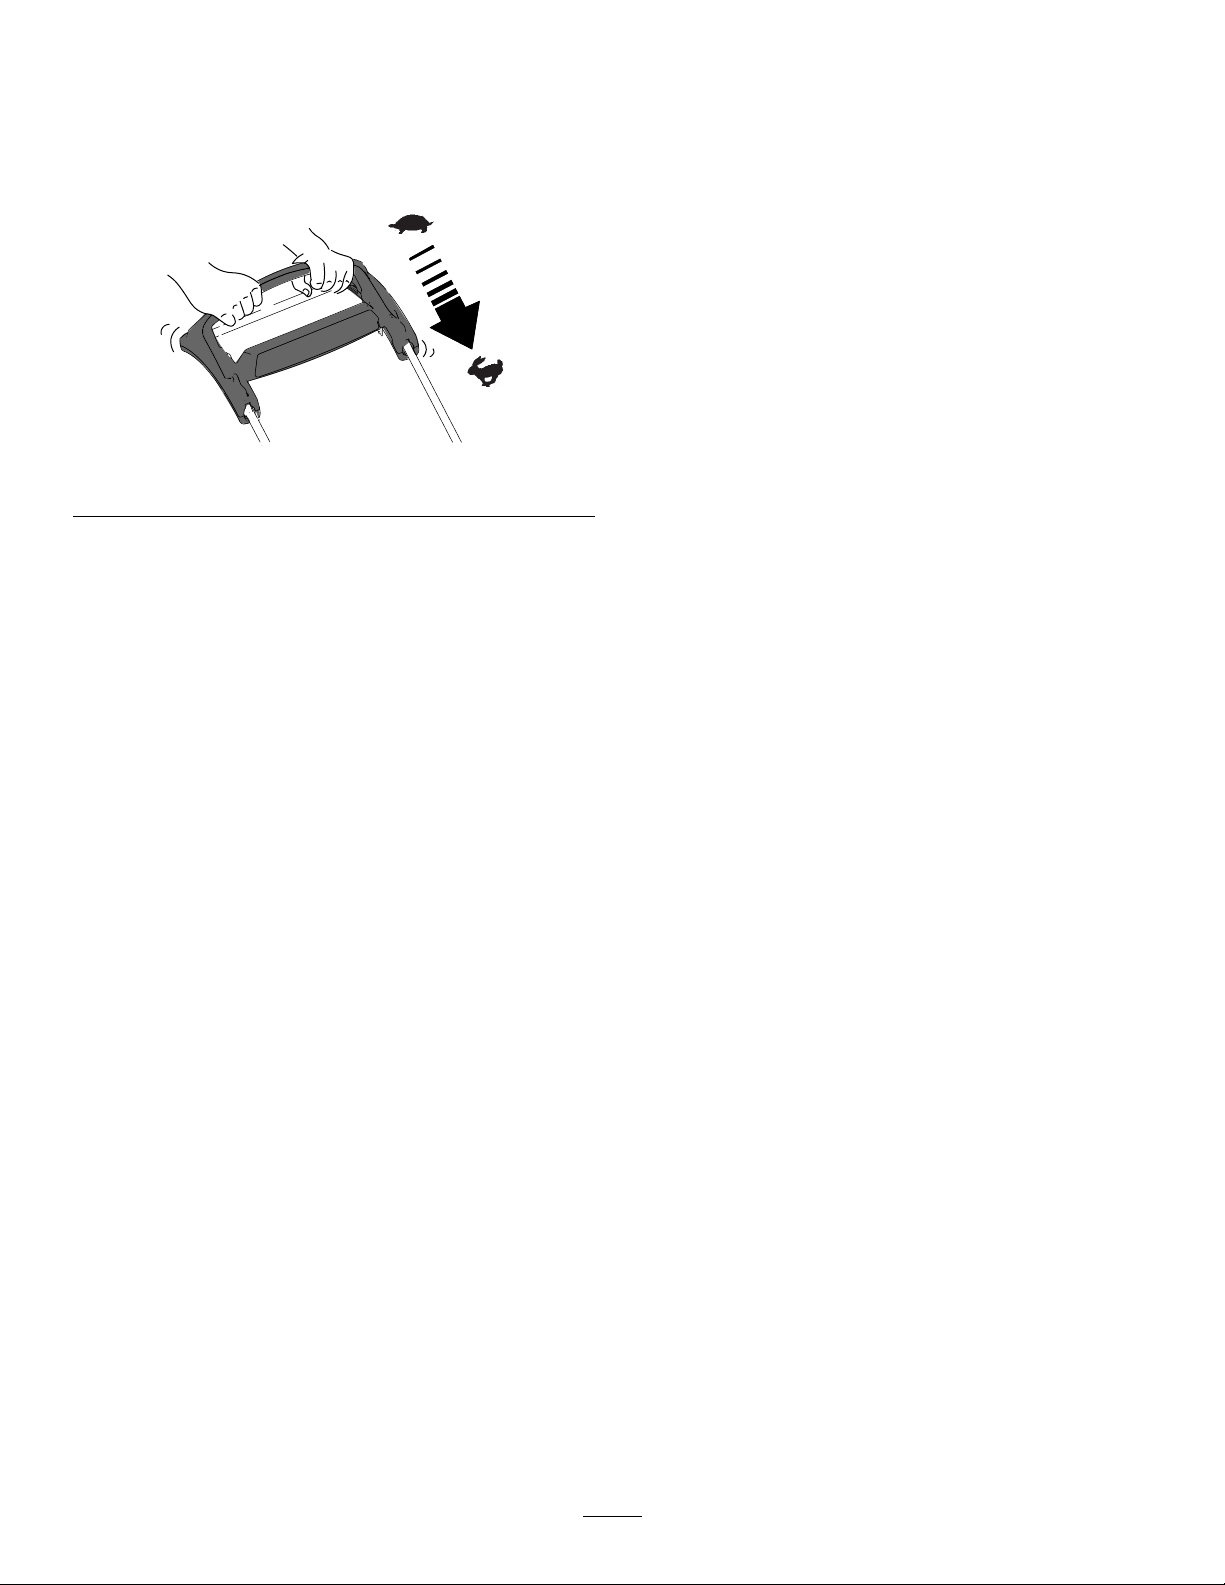
Tooperatetheself-propeldrive,simplywalkwithyour
handsontheupperhandleandyourelbowsatyour
sides,andthemachinewillautomaticallykeeppace
withyou(Figure15).
Figure15
Note:Ifthemachinedoesnotfreelyrollbackward
afterself-propelling,stopwalking,holdyourhands
inplace,andallowthemachinetorollacoupleof
centimeters(inches)forwardtodisengagethewheel
drive.Youcanalsotryreachingjustundertheupper
handletothemetalhandleandpushingthemachine
forwardacoupleofcentimeters(inches).Ifthe
machinestilldoesnotrollbackwardeasily,contactan
AuthorizedServiceDealer.
Yourmachinecomesfromthefactoryreadytorecycle
thegrassandleafclippingsbackintothelawn.
Ifthegrassbagisonthemachineandthe
bag-on-demandleverisinthebaggingposition,move
thelevertotherecyclingposition;refertoOperating
theBag-on-DemandLever(page18).
g334136
ShuttingOfftheEngine
ServiceInterval:Beforeeachuseordaily—Ensure
thattheengineshutsoffwithin
3secondsafterreleasingthe
blade-controlbar.
Toshutofftheengine,releasetheblade-controlbar.
Note:Removetheelectric-startbutton(ifequipped)
wheneveryouleavethemachine.
Important:Whenyoureleasetheblade-control
bar,theengineshouldshutoffandtheblade
shouldstopwithin3seconds.Iftheydonot,stop
usingyourmachineimmediatelyandcontactan
AuthorizedServiceDealer.
16
Page 17
BaggingtheClippings
Usethegrassbagwhenyouwanttocollectgrassandleafclippingsfromthelawn.
Ifthebag-on-demandleverisintherecyclingposition,moveittothebaggingposition;refertoOperatingthe
Bag-on-DemandLever(page18).
InstallingtheGrassBag
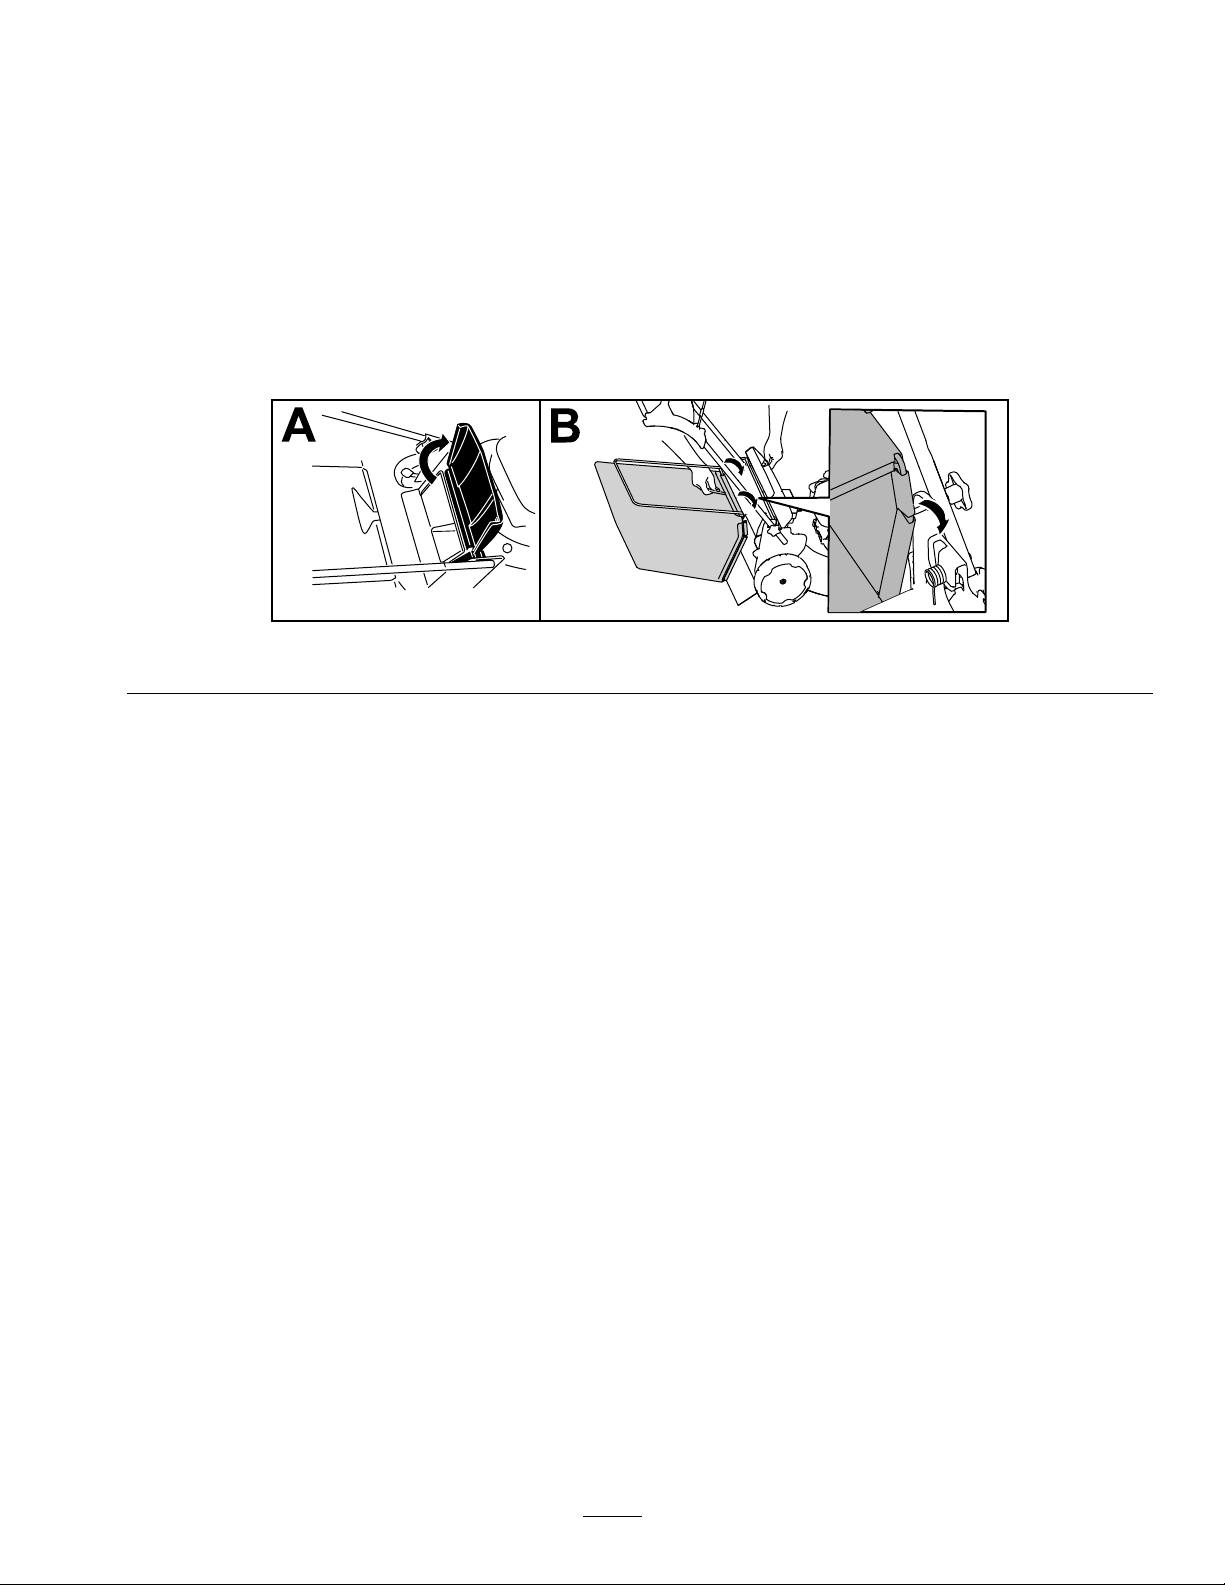
1.Raiseandholdupthereardeector(AofFigure16).
2.Installthegrassbag,ensuringthatthepinsonthebagrestintheslotsonthehandlebracket(Bof
Figure16).
3.Lowerthereardeector.
Figure16
g334207
RemovingtheGrassBag
Toremovethebag,reversethestepsinInstallingtheGrassBag(page17).
17
Page 18
Operatingthe
Bag-on-DemandLever
Thebag-on-demandfeatureallowsyoutoeither
collectorrecyclegrassandleafclippingswhilethe
grassbagisattachedtothemachine.
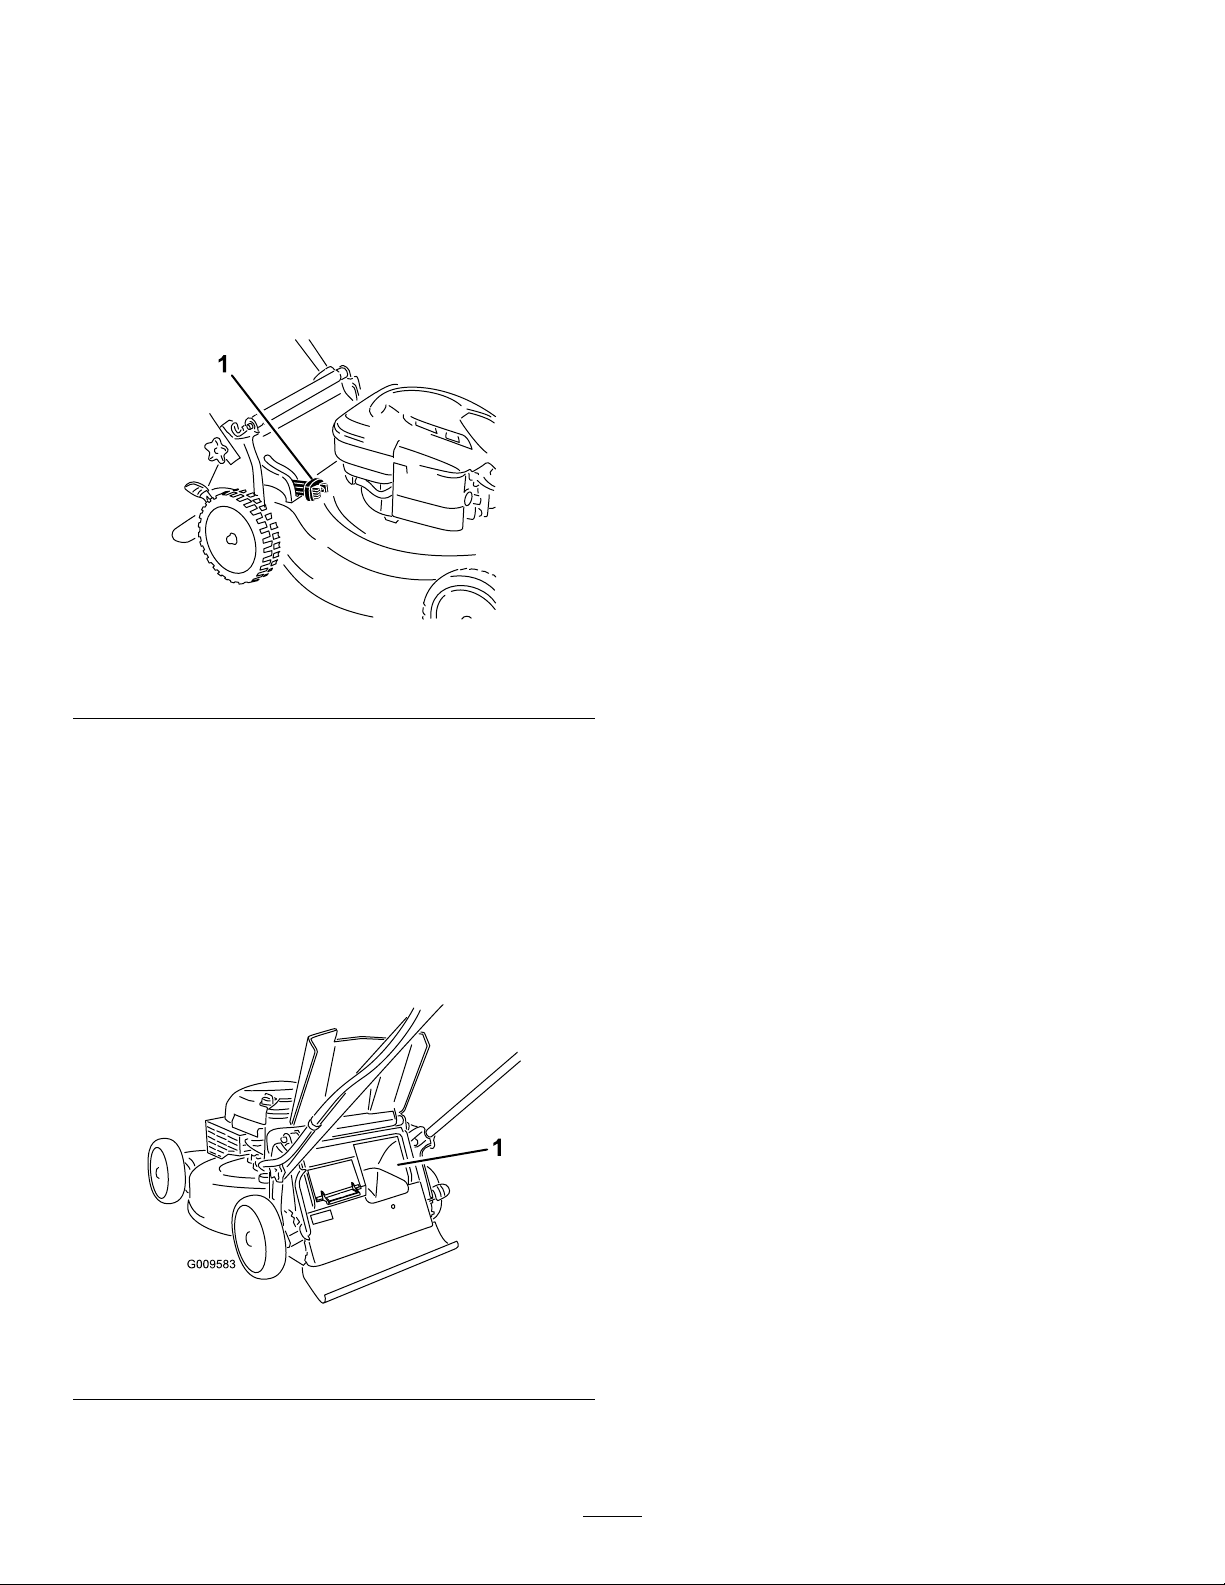
•Tobagthegrassandleafclippings,pressthe
buttononthebag-on-demandleverandmovethe
leverforwarduntilthebuttonontheleverpopsup
(Figure17).
Figure17
1.Bag-on-demandlever(inthebaggingposition)
•Torecyclethegrassandleafclippings,press
thebuttonontheleverandmovethelever
rearwarduntilthebuttonontheleverpopsup.
Important:Forproperoperation,shutoff
theengine,waitforallmovingpartstostop,
andthenremoveanygrassclippingsand
debrisfromthebag-on-demanddoorandthe
surroundingopening(Figure18)beforeyou
movethebag-on-demandleverfrom1position
toanother.
OperatingTips
GeneralMowingTips
•Inspecttheareawhereyouwillusethemachine
andremoveallobjectsthatthemachinecould
throw.
•Avoidstrikingsolidobjectswiththeblade.Never
deliberatelymowoveranyobject.
•Ifthemachinestrikesanobjectorstartstovibrate,
immediatelyshutofftheengine,waitforallmoving
partstostop,removetheelectric-startbutton(if
equipped),disconnectthewirefromthespark
plug,andexaminethemachinefordamage.
•Forbestperformance,installanewToroblade
beforethecuttingseasonbeginsorwhen
necessary.
CuttingGrass
•Cutonlyaboutathirdofthegrassbladeatatime.
g334148
Donotcutbelow51mm(2inches)unlessthe
grassissparseoritislatefallwhengrassgrowth
beginstoslowdown.
•Whencuttinggrassover15cm(6inches)tall,
mowatthehighestcuttingheightsettingandwalk
slower;thenmowagainatalowersettingforthe
bestlawnappearance.Ifthegrassistoolong,the
machinemayplugandcausetheenginetostall.
•Wetgrassandleavestendtoclumpontheyard
andcancausethemachinetoplugortheengine
tostall.Avoidmowinginwetconditions.
•Beawareofapotentialrehazardinverydry
conditions,followalllocalrewarnings,andkeep
themachinefreeofdrygrassandleafdebris.
•Alternatethemowingdirection.Thishelps
dispersetheclippingsoverthelawnforeven
fertilization.
1.Cleanhere
Figure18
•Ifthenishedlawnappearanceisunsatisfactory,
try1ormoreofthefollowing:
–Replacethebladeorhaveitsharpened.
–Walkataslowerpacewhilemowing.
–Raisethecuttingheightonyourmachine.
–Cutthegrassmorefrequently.
–Overlapcuttingswathsinsteadofcuttingafull
g009583
swathwitheachpass.
CuttingLeaves
•Aftercuttingthelawn,ensurethathalfofthelawn
showsthroughthecutleafcover.Y oumayneed
tomakemorethanasinglepassovertheleaves.
18
Page 19

•Iftherearemorethan13cm(5inches)ofleaves
onthelawn,mowatahighercuttingheightand
thenagainatthedesiredcuttingheight.
•Slowdownyourmowingspeedifthemachine
doesnotcuttheleavesnelyenough.
AfterOperation
AfterOperationSafety
GeneralSafety
•Alwaysshutoffthemachine,removethe
electric-startbutton(ifequipped),waitforall
movingpartstostop,andallowthemachinetocool
beforeadjusting,servicing,cleaning,orstoringit.
•Cleangrassanddebrisfromthemachinetohelp
preventres.Cleanupoilorfuelspills.
•Neverstorethemachineorfuelcontainerwhere
thereisanopename,spark,orpilotlight,such
asonawaterheateroronotherappliances.
4.Whennomoreclippingscomeout,stopthe
waterandmovethemachinetoadryarea.
5.Starttheengineandrunitforafewminutesto
drytheundersideofthemachinetopreventit
fromrusting.
6.Shutofftheengine,removetheelectric-start
button(ifequipped),andallowthemachineto
coolbeforestoringitinanenclosedarea.
HaulingSafety
•Removetheelectric-startbutton(ifequipped)
beforeloadingthemachineforhauling.
•Usecarewhenloadingorunloadingthemachine.
•Securethemachinefromrolling.
CleaningUnderthe
Machine
ServiceInterval:Aftereachuse
Forbestresults,cleanunderthemachineshortlyafter
youhavecompletedmowing.
1.Lowerthemachinetoitslowestcutting-height
setting.
2.Movethemachineontoapavedlevelsurface.
3.Withtheenginerunningandthebladeengaged,
sprayastreamofwaterinfrontoftheright,rear
wheel(Figure19).
Note:Thewaterwillsplashintothepathofthe
blade,cleaningouttheclippings.
Figure19
g002600
19
Page 20
FoldingtheHandle
WARNING
Foldingorunfoldingthehandleimproperlycandamagethecables,causinganunsafe
operatingcondition.
•Donotdamagethecableswhenfoldingorunfoldingthehandle.
•Ifacableisdamaged,contactanAuthorizedServiceDealer.
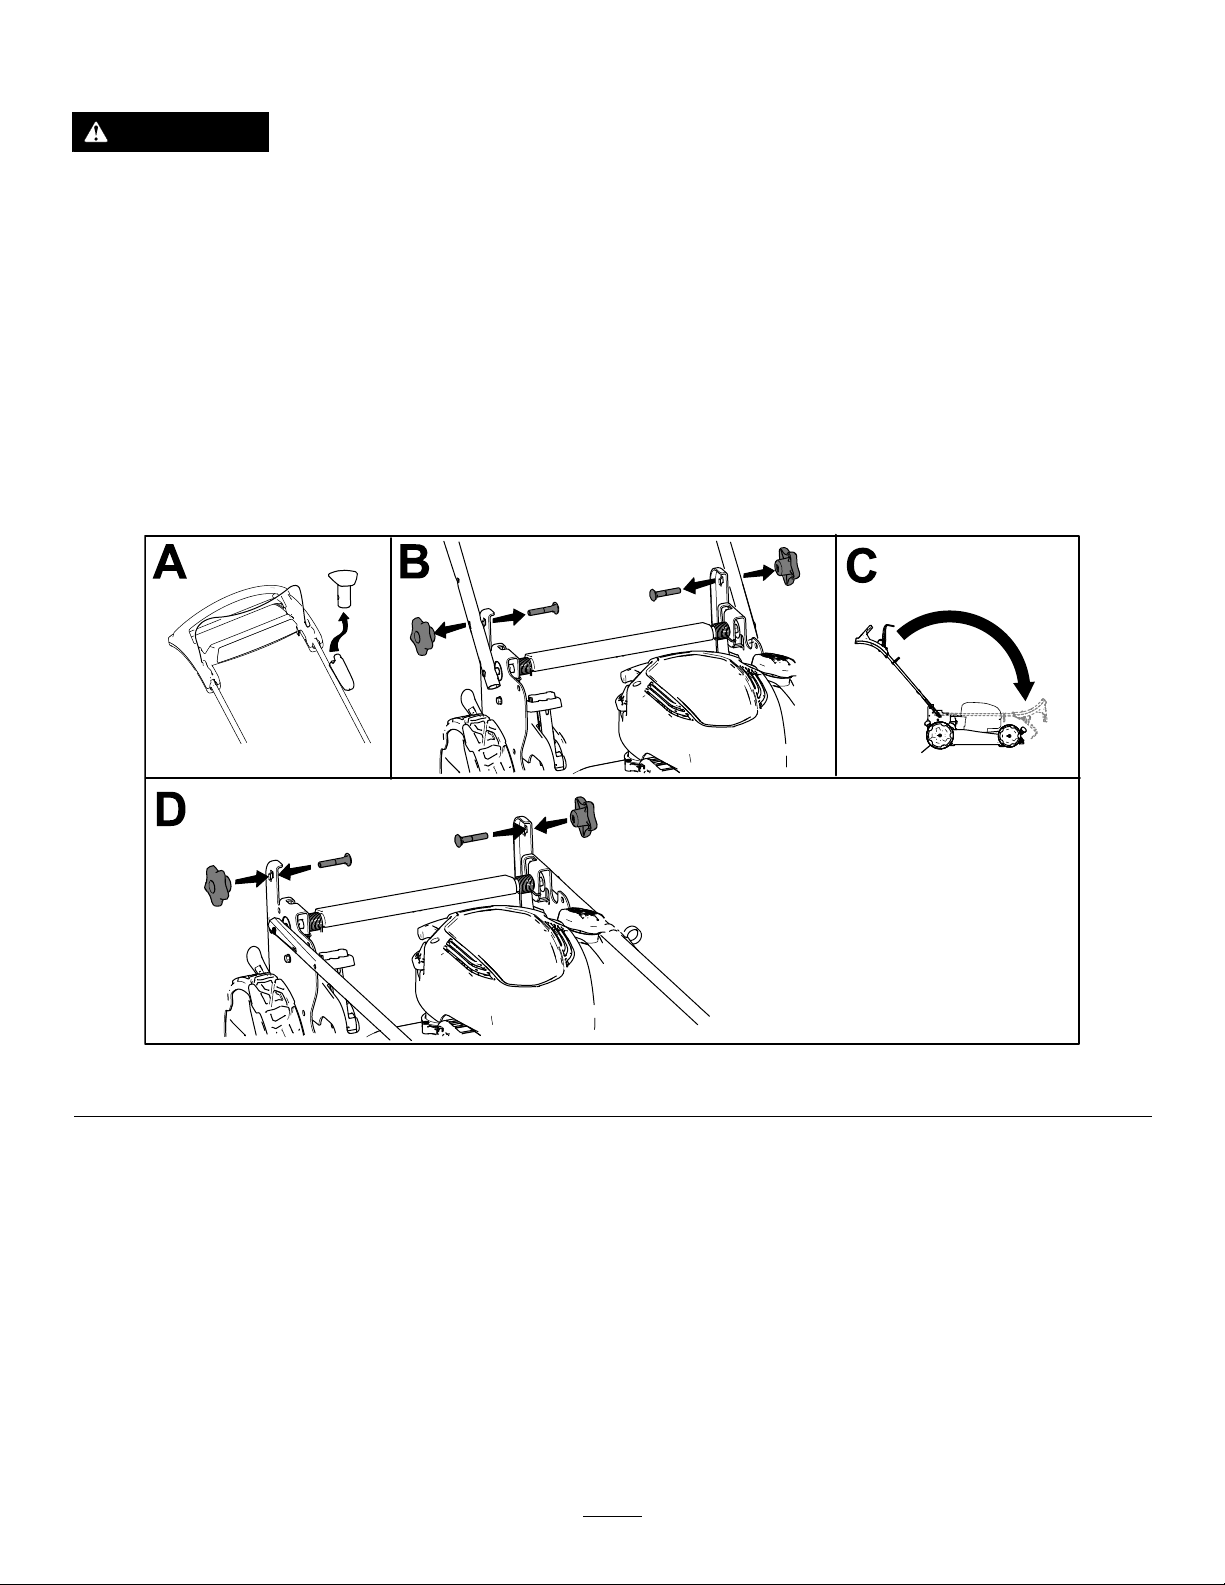
1.Removetheelectric-startbutton(ifequipped)asshowninAofFigure20.
2.Removeandsavethe2handleknobsand2carriageboltsfromthehandlebrackets(BofFigure20).
Important:Routethecablestotheoutsideofthehandleknobsasyoufoldthehandle.
3.Foldthehandlebyrotatingitforward(CofFigure20).
4.Looselyinstallthehandleknobsandcarriageboltsonthehandlebrackets(DofFigure20).
5.Tounfoldthehandle,referto1AssemblingandUnfoldingtheHandle(page6).
Figure20
g334159
20
Page 21
Maintenance
RecommendedMaintenanceSchedule(s)
MaintenanceService
Interval
Beforeeachuseordaily
Aftereachuse
Every25hours
Yearly
Yearlyorbeforestorage
MaintenanceProcedure
•Checktheengine-oillevelandaddoilasneeded.
•Ensurethattheengineshutsoffwithin3secondsafterreleasingtheblade-control
bar.
•Cleangrassclippingsanddirtfromunderthemachine.
•Servicetheairlter;serviceitmorefrequentlyindustyoperatingconditions.
•Chargethebattery(ifequipped)for24hours.
•Replacetheairlter;replaceitmorefrequentlyindustyoperatingconditions.
•Changetheengineoil(ifdesired).
•Replacethebladeorhaveitsharpened(morefrequentlyiftheedgedullsquickly).
•Cleantheenginebyremovingdirtanddebrisfromitstopandsides;cleanitmore
frequentlyindustyoperatingconditions.
•Emptythefueltankbeforerepairsasdirectedandbeforeyearlystorage.
Important:Refertoyourengineowner’smanualforadditionalmaintenanceprocedures.
MaintenanceSafety
•Alwaysshutoffthemachine,waitforallmoving
partstostop,andallowthemachinetocoolbefore
adjusting,servicing,cleaning,orstoringit.
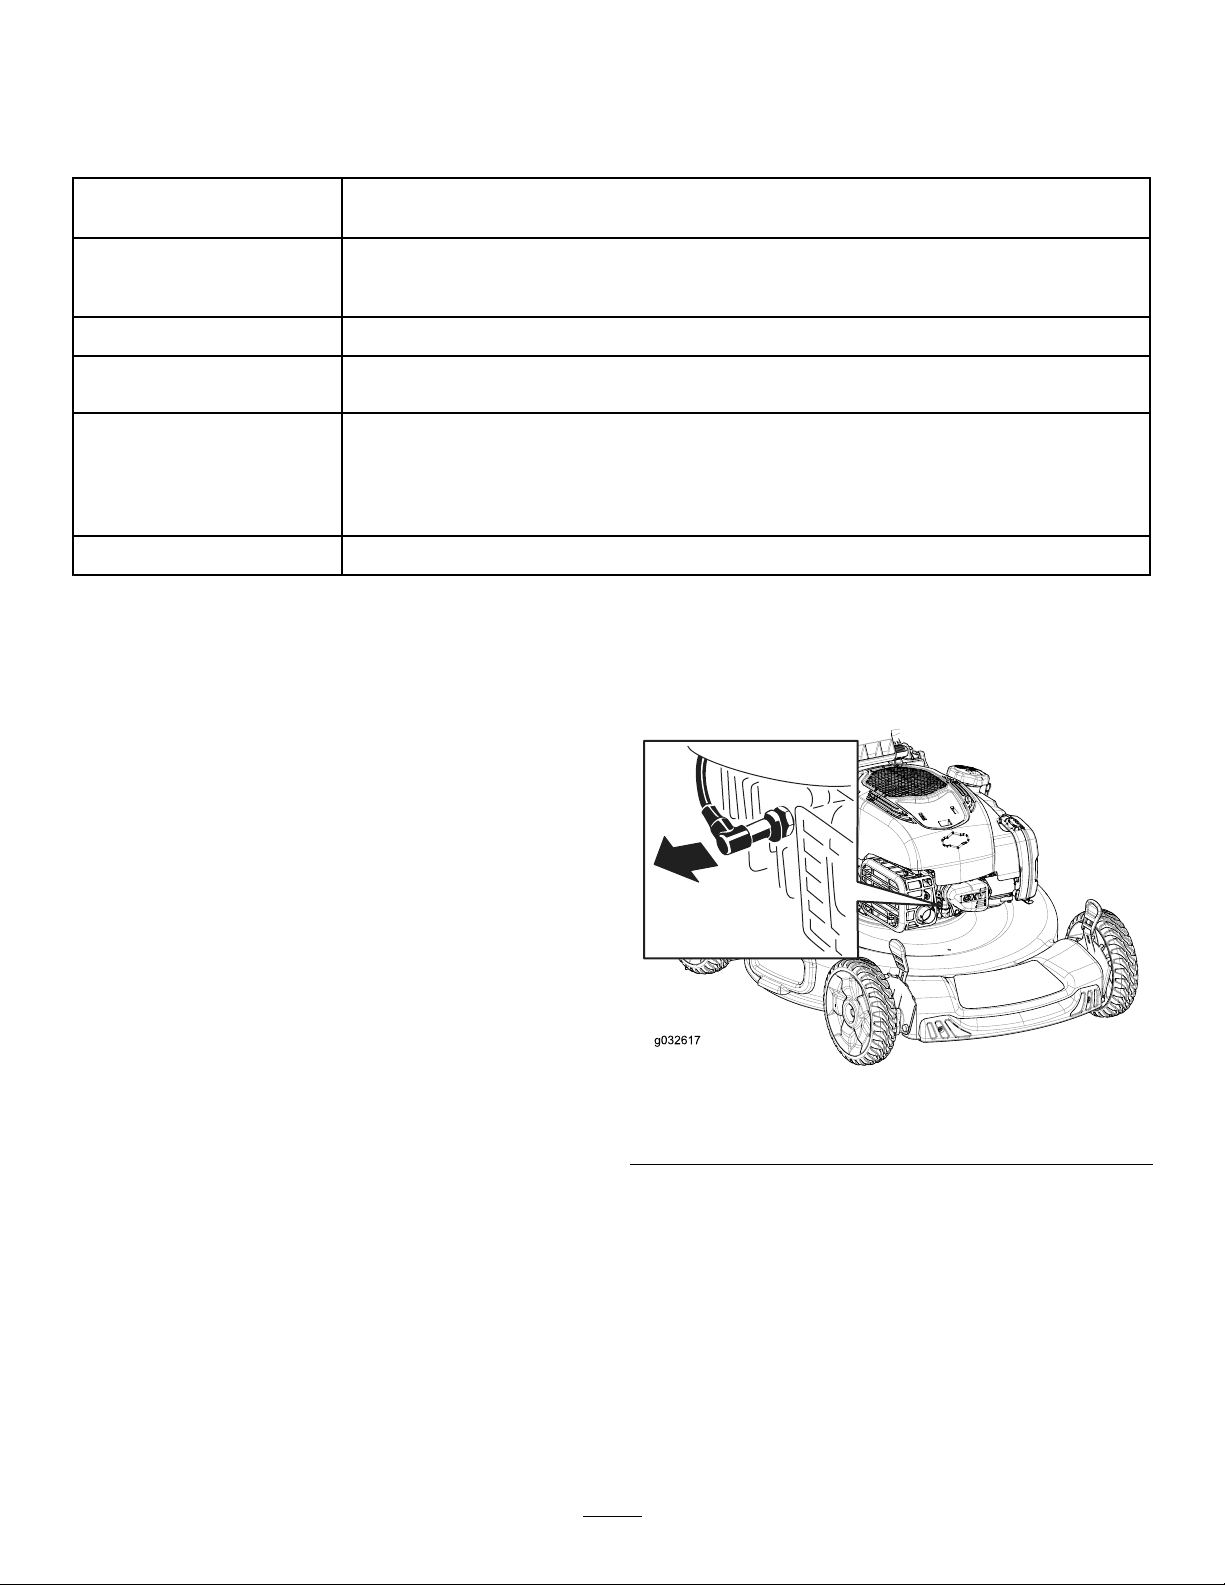
2.Disconnectthespark-plugwirefromthespark
plug(Figure21).
•Disconnectthespark-plugwirefromthesparkplug
andremovetheelectric-startbutton(ifequipped)
beforeperforminganymaintenanceprocedure.
•Wearglovesandeyeprotectionwhenservicing
themachine.
•Thebladeissharp;contactingthebladecanresult
inseriouspersonalinjury .Weargloveswhen
servicingtheblade.Donotrepairoralterthe
blade(s).
•Nevertamperwithsafetydevices.Checktheir
properoperationregularly .
•Tippingthemachinemaycausethefueltoleak.
Fuelisammableandexplosive,andcancause
personalinjury.Runtheenginedryorremovethe
fuelwithahandpump;neversiphonthefuel.
•Toensureoptimumperformanceofthemachine,
useonlygenuineTororeplacementpartsand
accessories.Replacementpartsandaccessories
madebyothermanufacturerscouldbedangerous,
andsuchusecouldvoidtheproductwarranty.
PreparingforMaintenance
1.Shutofftheengine,removetheelectric-start
button(ifequipped),andwaitforallmoving
partstostop.
1.Spark-plugwire
3.Afterperformingthemaintenanceprocedure(s),
connectthespark-plugwiretothesparkplug.
Important:Beforetippingthemachineto
changetheoilorreplacetheblade,allowthe
fueltanktorundrythroughnormalusage.If
youmusttipthemachinepriortorunning
outoffuel,useahandfuelpumptoremove
thefuel.Alwaystipthemachineontoits
side,withthedipstickdown.
g032617
Figure21
21
Page 22
ServicingtheAirFilter
ServiceInterval:Every25hours
Yearly
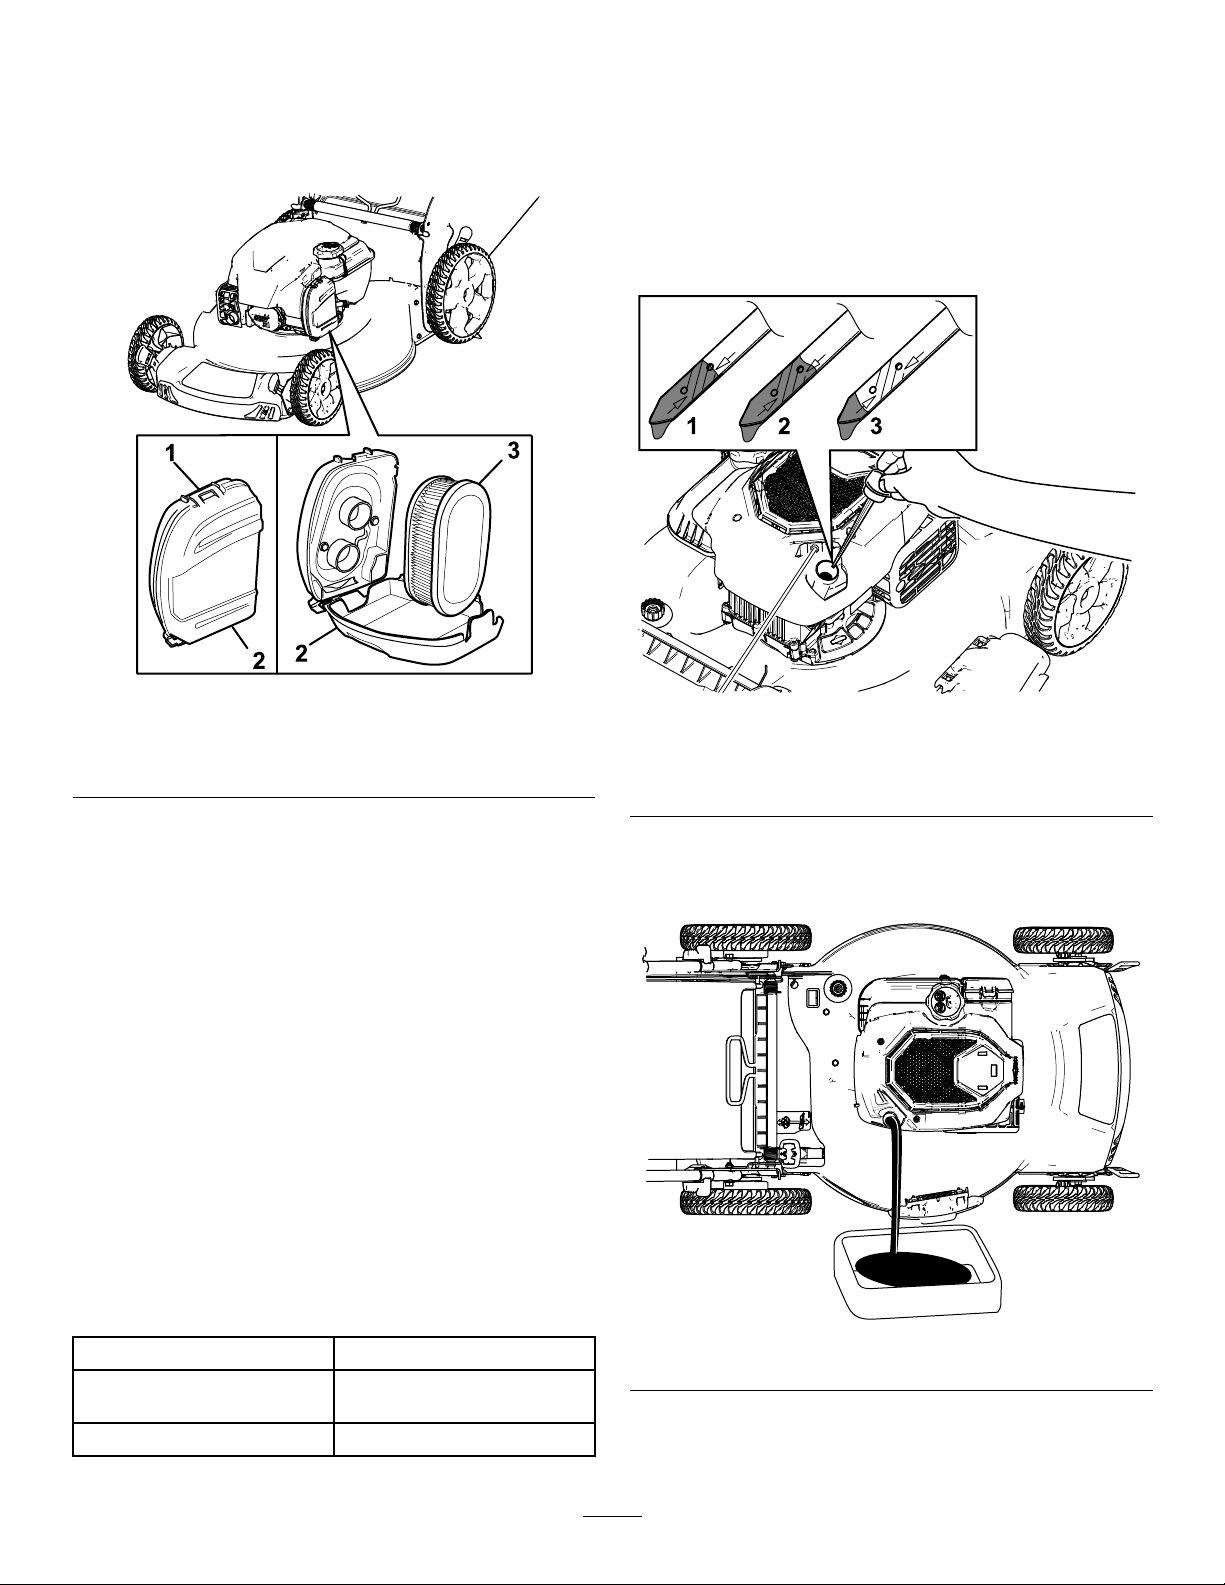
1.Unclipthetopoftheair-ltercover(Figure22).
*Thereisresidualoilinthecrankcaseafteryoudrain
theoil.Donotpourtheentirecapacityofoilintothe
crankcase.Fillthecrankcasewithoilasdirectedin
thefollowingsteps.
1.Movethemachinetoalevelsurface.
2.RefertoPreparingforMaintenance(page21).
3.Removethedipstickbyrotatingthecap
counterclockwiseandpullingitout(Figure23).
Figure22
1.Clip3.Airlter
2.Air-ltercover
2.Removetheairlter(Figure22).
3.Inspecttheairlter.
Note:Iftheairlterisexcessivelydirty,replace
itwithanewlter.Otherwise,gentlytaptheair
lteronahardsurfacetoloosendebris.
4.Installtheairlter.
5.Usethecliptoinstalltheair-ltercover.
ChangingtheEngineOil
ServiceInterval:Yearly
Changingtheengineoilisnotrequired,butif
youwanttochangetheoil,usethefollowing
procedure.
Note:Runtheengineafewminutesbeforechanging
theoiltowarmit.Warmoilowsbetterandcarries
morecontaminants.
g334162
g201460
Figure23
1.Full3.Low
2.High
4.Tipthemachineontoitsside(sothattheair
lterisup)todraintheusedoilfromtheoil-ll
tube(Figure24).
EngineOilSpecications
Engineoilcapacity
OilviscositySAE30orSAE10W-30
APIserviceclassicationSJorhigher
0.44L(15oz)*
detergentoil
g186039
Figure24
5.Afterdrainingtheusedoil,returnthemachineto
theoperatingposition.
22
Page 23
6.Carefullypourabout3/4oftheenginecapacity
ofoilintotheoil-lltube.
7.Wait3minutesfortheoiltosettleintheengine.
8.Wipethedipstickcleanwithacleancloth.
9.Insertthedipstickintotheoil-lltube,screwitin,
thenremovethedipstick.
10.Readtheoillevelonthedipstick(Figure23).
•Iftheoillevelonthedipstickistoolow,
carefullypourasmallamountofoilintothe
oil-lltube,wait3minutes,andrepeatsteps
8through10untiltheoillevelonthedipstick
iscorrect.
•Iftheoillevelonthedipstickistoohigh,
draintheexcessoiluntiltheoillevelonthe
dipstickiscorrect.
Important:Iftheoillevelintheengineistoo
lowortoohighandyouruntheengine,you
maydamagetheengine.
11.Installthedipstickintotheoil-lltubesecurely.
12.Recycletheusedoilproperly.
ChargingtheBattery
Note:Yourbatterychargermayhavea2-colorLED
displaythatindicatesthefollowingstatesofcharging:
•Aredlightindicatesthatthechargerischarging
thebattery .
•Agreenlightindicatesthatthechargerisfully
chargedorthechargerisdisconnectedfromthe
battery.
•Aashinglightthatalternatesbetweenredand
greenindicatesthatthebatteryisnearlyfully
charged.Thisstatelastsonlyafewminutesuntil
thebatteryisfullycharged.
ReplacingtheFuse
Electric-StartModelOnly
Ifthebatterydoesnotchargeortheenginedoesnot
runwiththeelectricstarter,thefusemaybeblown.
Replaceitwitha40Aplug-intypefuse.
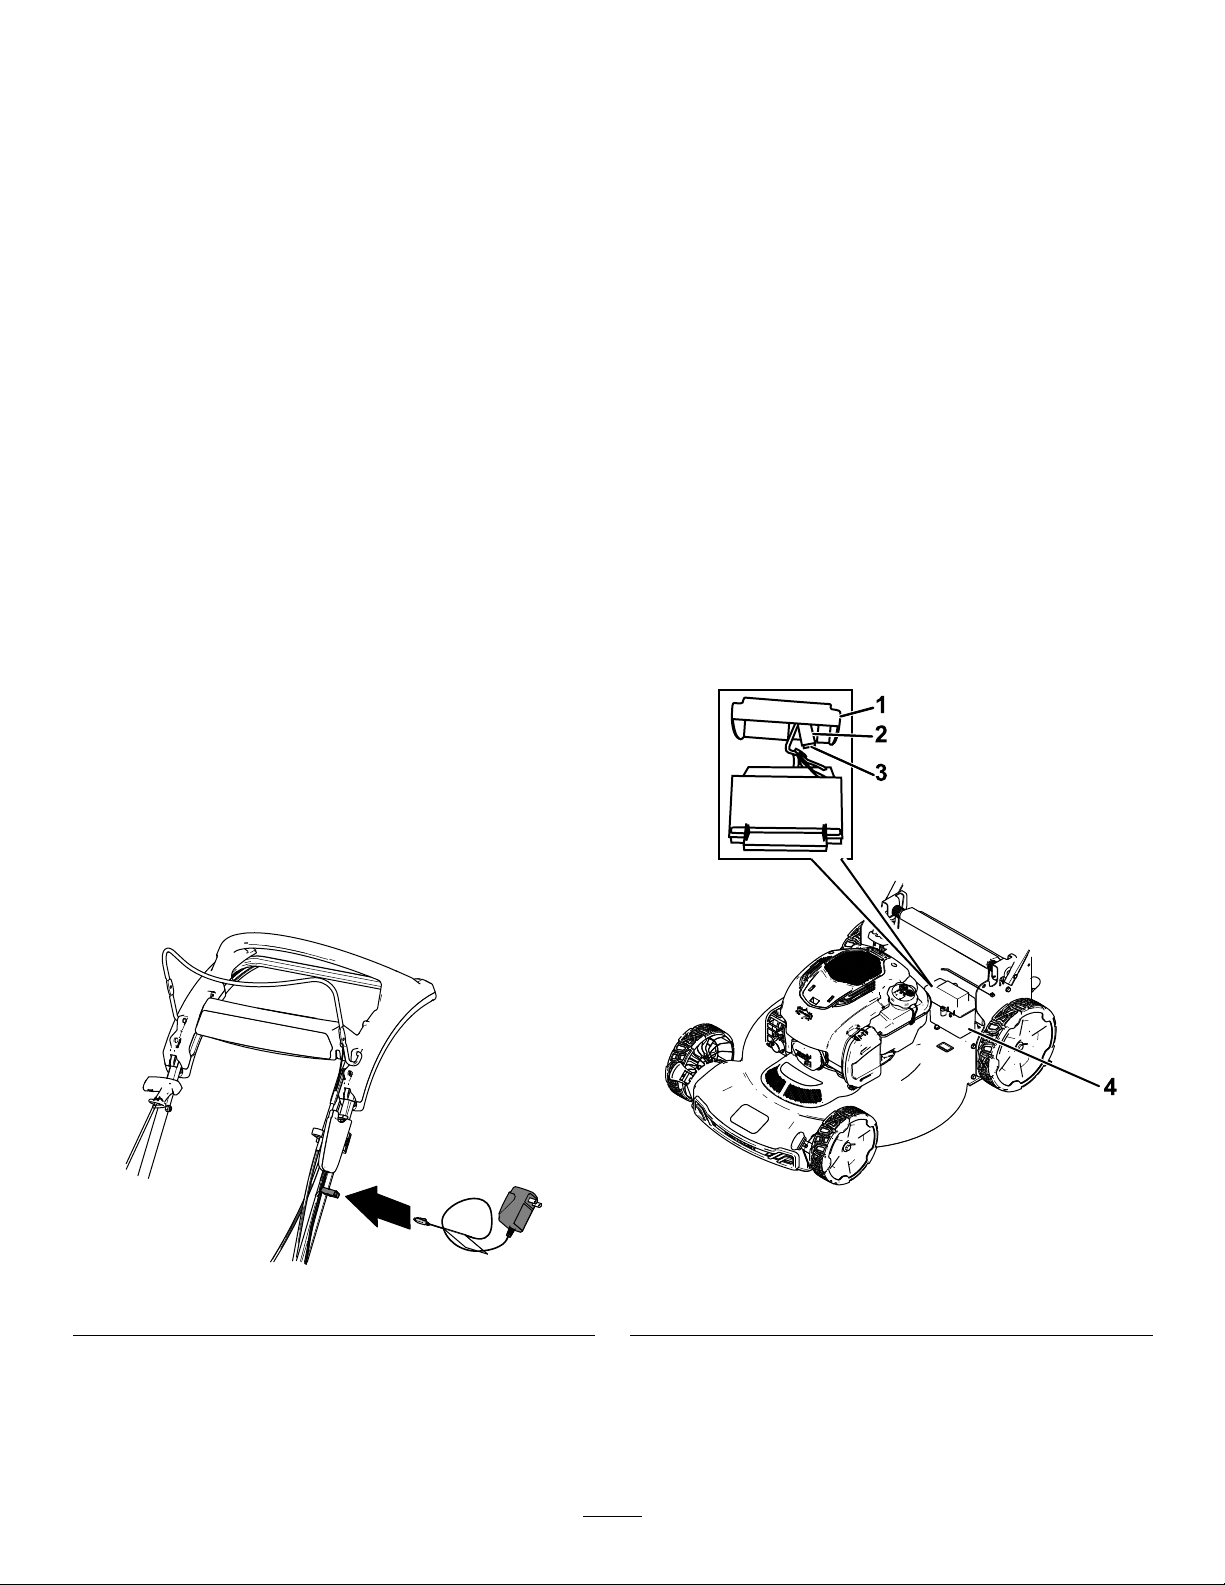
1.Removethecoverfromthebatterycompartment
(Figure26).
2.Pulloutthebatteryandlocatethefuse(Figure
26).
3.Replacethefuseinthefuseholder(Figure26).
ForElectric-StartModels
ServiceInterval:Every25hours
Chargethebatteryfor24hoursinitially ,thenmonthly
(every25starts)orasneeded.Alwaysusethe
chargerinashelteredareaandchargethebatteryat
roomtemperature(22°Cor70°F)wheneverpossible.
1.Connectthechargertothewireharnesslocated
belowtheelectric-startbutton(Figure25).
Figure25
g334206
Figure26
1.Cover
g334165
2.Fuseholder5.Fuse
3.Sparefuse
4.Batterycompartment
2.Plugthechargerintoawalloutlet.
Note:Whenthebatterynolongerholdsa
charge,recycleordisposeofthelead-acid
batteryaccordingtolocalcodes.
Note:Yourmachinecomeswithasparefusein
thebatterycompartment.
4.Installthecoveroverthebatterycompartment
(Figure26).
23
Page 24
ReplacingtheBlade
ServiceInterval:Yearly
Important:Youwillneedatorquewrenchto
installthebladeproperly.Ifyoudonothavea
torquewrenchorareuncomfortableperforming
thisprocedure,contactanAuthorizedService
Dealer.
Examinethebladewheneveryourunoutoffuel.Ifthe
bladeisdamagedorcracked,replaceitimmediately.
Ifthebladeedgeisdullornicked,haveitsharpened
andbalanced,orreplaceit.
WARNING
Thebladeissharp;contactingthebladecan
resultinseriouspersonalinjury.
Weargloveswhenservicingtheblade.
1.RefertoPreparingforMaintenance(page21).
2.Tipthemachineontoitssidewiththeairlterup.
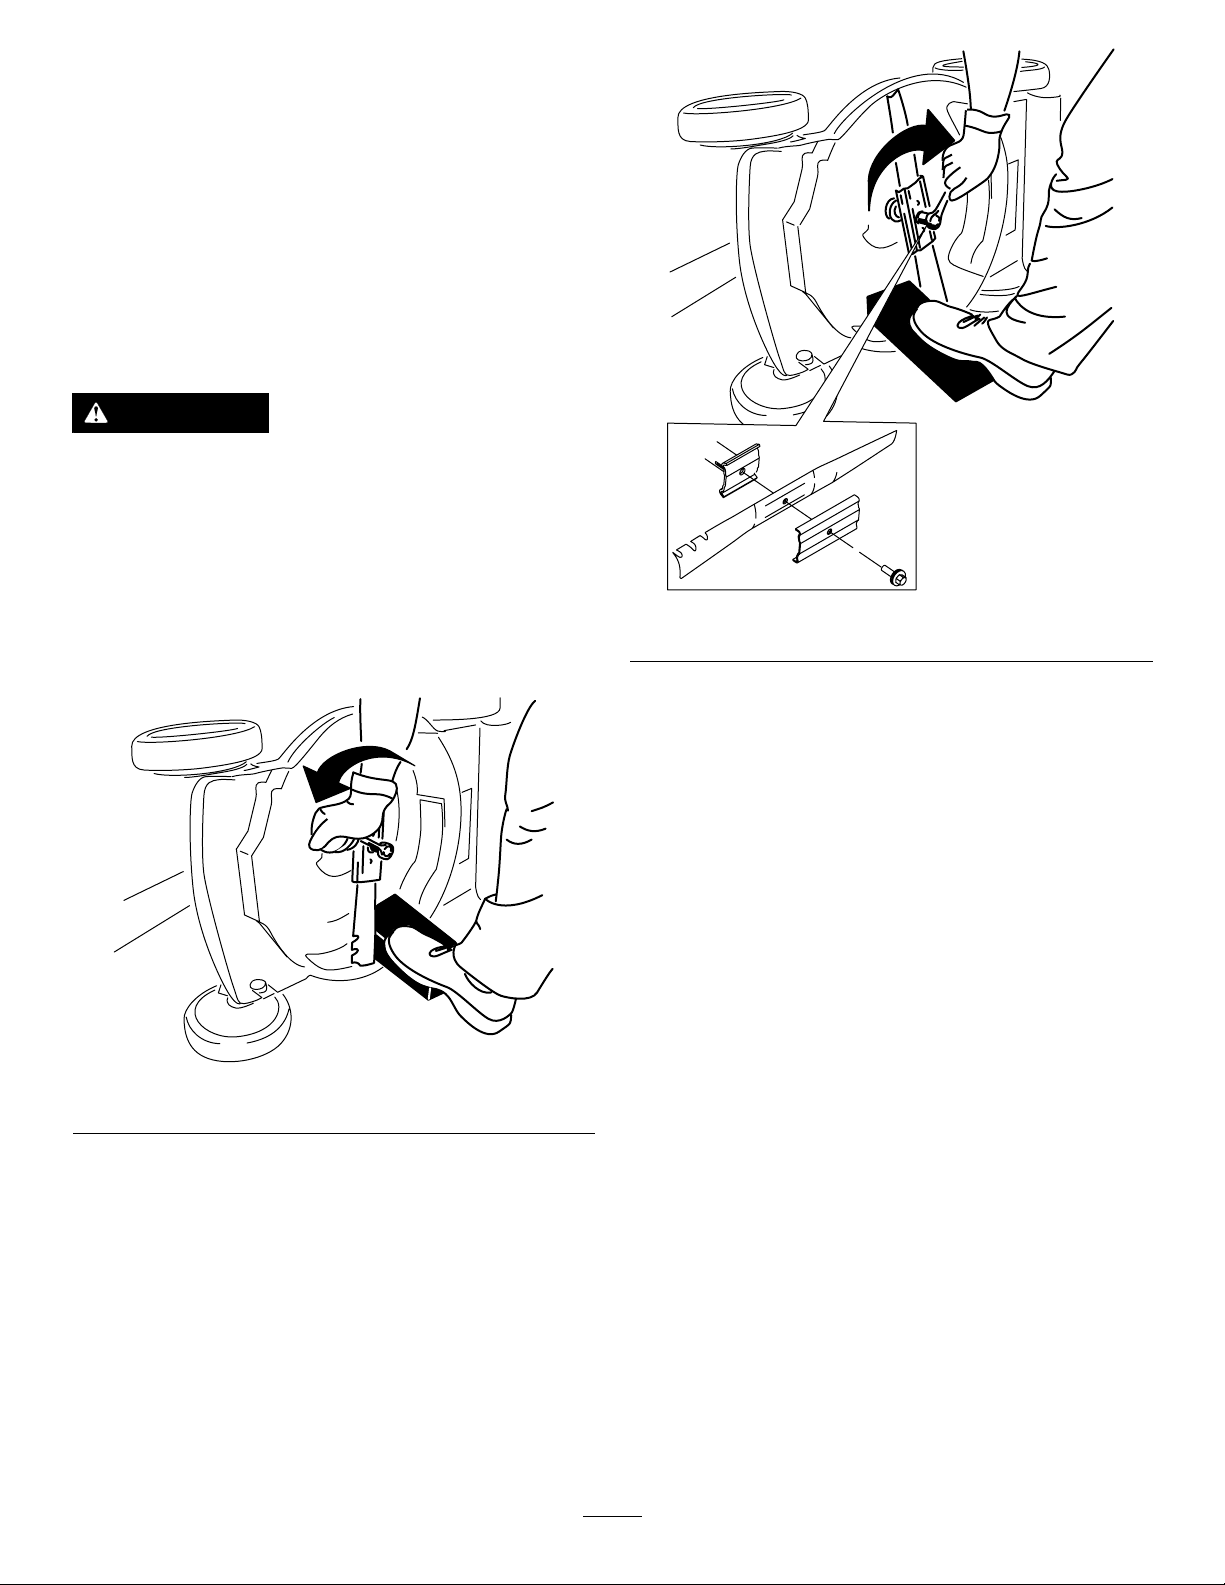
3.Useablockofwoodtoholdthebladesteady
(Figure27).
g231390
Figure28
Important:Positionthecurvedendsofthe
bladetopointtowardthemachinehousing.
Figure27
4.Removetheblade,savingallmountinghardware
(Figure27).
5.Installthenewbladeandallmountinghardware
(Figure28).
6.Useatorquewrenchtotightenthebladebolt
to82N∙m(60ft-lb).
g231389
24
Page 25
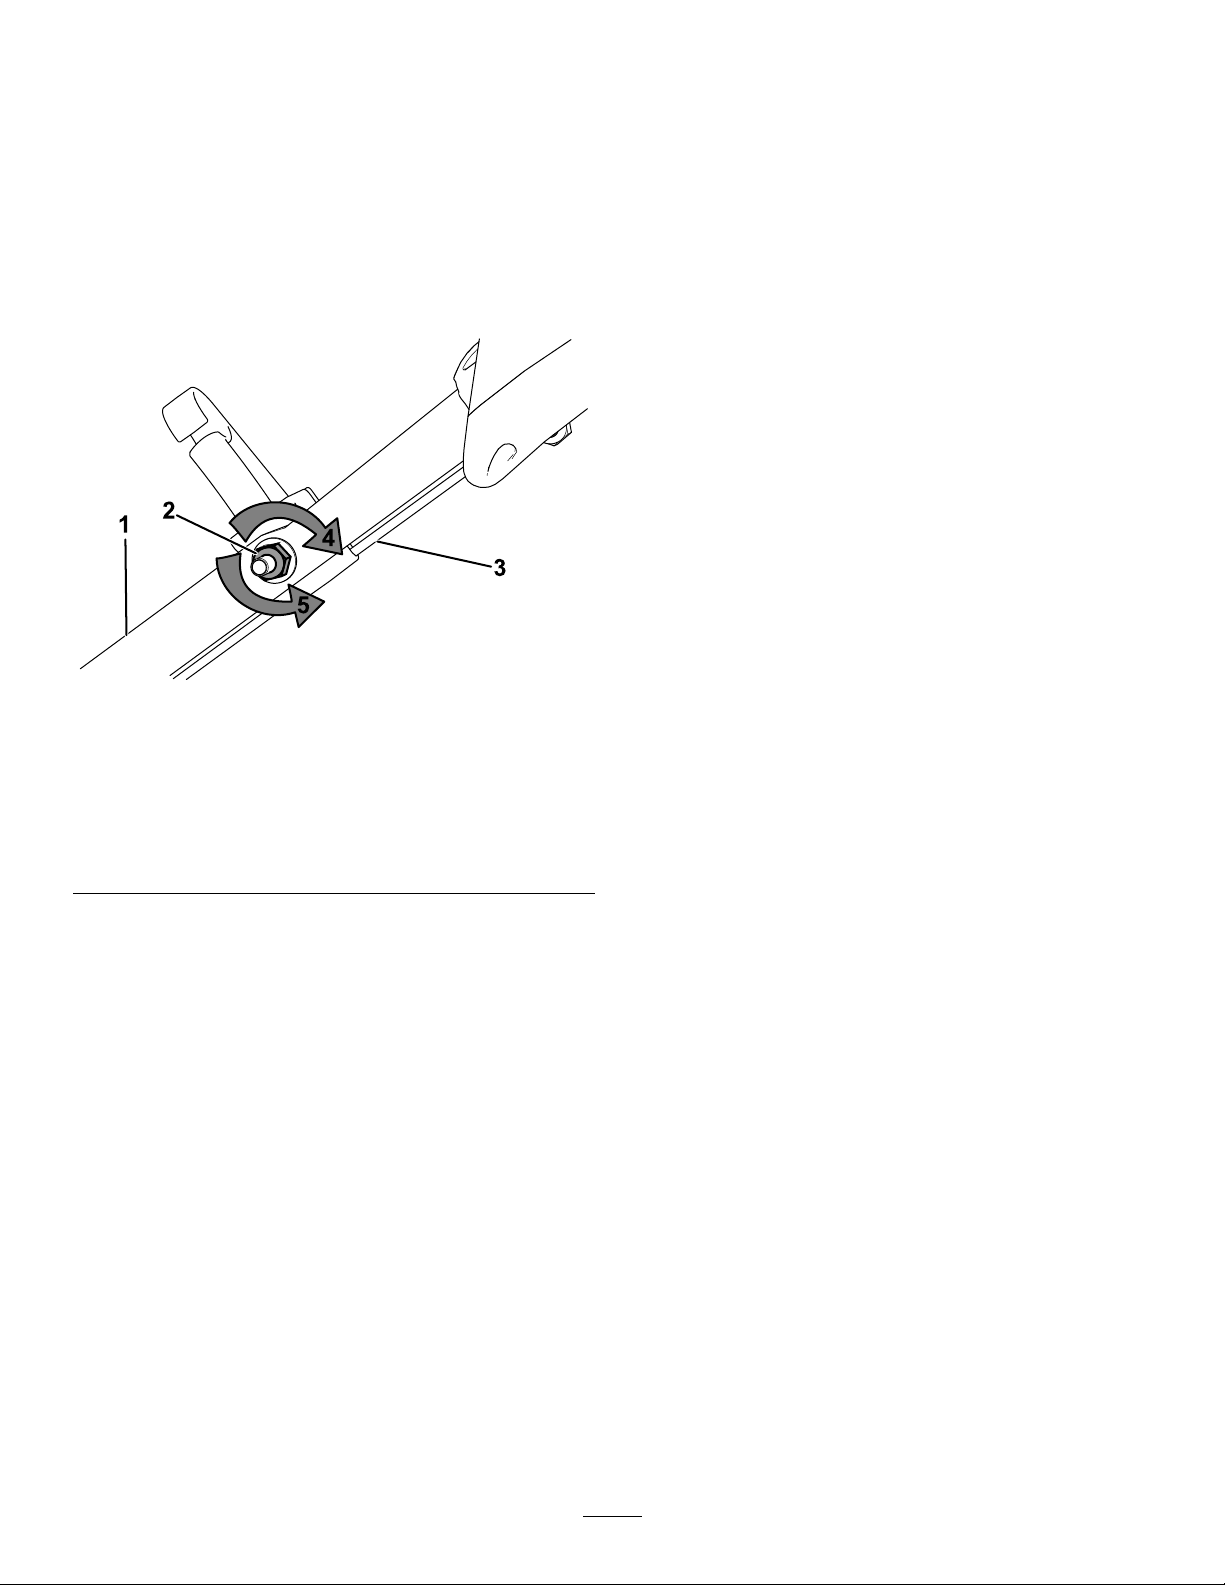
AdjustingtheSelf-Propel
Storage
Drive
ForSelf-Propel-DriveModelsOnly
Wheneveryouinstallanewself-propelcableorif
theself-propeldriveisoutofadjustment,adjustthe
self-propeldrive.
1.Turntheadjustmentnutcounterclockwiseto
loosenthecableadjustment(Figure29).
Figure29
1.Handle(leftside)
2.Adjustmentnut5.Turnthenut
3.Self-propel-drivecable
2.Adjustthetensiononthecable(Figure29)by
pullingitbackorpushingitforwardandholding
thatposition.
Note:Pushthecabletowardtheengineto
increasethetraction;pullthecableawayfrom
theenginetodecreasethetraction.
3.Turntheadjustmentnutclockwisetotightenthe
cableadjustment.
Note:Tightenthenutrmlywithasocketor
wrench.
4.Turnthenutclockwiseto
tightentheadjustment.
counterclockwiseto
loosentheadjustment.
Storethemachineinacool,clean,dryplace.
StorageSafety
Alwaysshutoffthemachine,removetheelectric-start
button(ifequipped),waitforallmovingpartstostop,
andallowthemachinetocoolbeforeadjusting,
servicing,cleaning,orstoringit.
PreparingtheMachinefor
Storage
1.Onthelastrefuelingoftheyear,addfuel
stabilizer(suchasToroPremiumFuel
Treatment)tothefuelasdirectedonthelabel.
2.Disposeofanyunusedfuelproperly .Recycle
itaccordingtolocalcodesoruseitinyour
automobile.
Important:Oldfuelinthefueltankisthe
g334884
leadingcauseofhardstarting.Donotstore
thefuelwithoutfuelstabilizermorethan
30days,anddonotstorestabilizedfuel
beyondthedurationrecommendedbythe
fuel-stabilizermanufacturer.
3.Runthemachineuntiltheengineshutsofffrom
runningoutoffuel.
4.Starttheengineagainandallowittorununtil
itshutsoff.Whenyoucannolongerstartthe
engine,itissufcientlydry.
5.Disconnectthewirefromthesparkplugand
connectthewiretotheretainingpost(if
equipped)andremovetheelectric-startbutton
(ifequipped).
6.Removethesparkplug,add30ml(1oz)of
engineoilthroughthespark-plughole,andpull
therecoil-starterropeslowlyseveraltimesto
distributeoilthroughoutthecylindertoprevent
cylindercorrosionduringtheoff-season.
7.Looselyinstallthesparkplug.
8.Tightenallnuts,bolts,andscrews.
9.Electric-startmodelsonly:Chargethebattery
for24hours,thenunplugthebatterycharger
andstorethemachineinanunheatedarea.If
youmuststorethemachineinaheatedarea,
youmustchargethebatteryevery90days.
RefertoChargingtheBattery(page23).
25
Page 26

RemovingtheMachine
fromStorage
1.Electric-startmodelsonly:Chargethebattery
for24hours;referto5ChargingtheBattery
(page9).
2.Checkandtightenallfasteners.
3.Removethesparkplugandspintheengine
rapidlybypullingtherecoil-starthandletoblow
theexcessoilfromthecylinder.
4.Installthesparkplugandtightenitwithatorque
wrenchto20N∙m(15ft-lb).
5.Performanymaintenanceprocedures;referto
Maintenance(page21).
6.Checktheengine-oillevel;refertoCheckingthe
Engine-OilLevel(page12).
7.Fillthefueltankwithfreshfuel;refertoFilling
theFuelT ank(page1 1).
8.Connectthewiretothesparkplug.
26
Page 27

CaliforniaProposition65WarningInformation
Whatisthiswarning?
Youmayseeaproductforsalethathasawarninglabellikethefollowing:
WARNING:CancerandReproductiveHarm—www.p65Warnings.ca.gov.
WhatisProp65?
Prop65appliestoanycompanyoperatinginCalifornia,sellingproductsinCalifornia,ormanufacturingproductsthatmaybesoldinorbroughtinto
California.ItmandatesthattheGovernorofCaliforniamaintainandpublishalistofchemicalsknowntocausecancer,birthdefects,and/orother
reproductiveharm.Thelist,whichisupdatedannually,includeshundredsofchemicalsfoundinmanyeverydayitems.ThepurposeofProp65isto
informthepublicaboutexposuretothesechemicals.
Prop65doesnotbanthesaleofproductscontainingthesechemicalsbutinsteadrequireswarningsonanyproduct,productpackaging,orliteraturewith
theproduct.Moreover,aProp65warningdoesnotmeanthataproductisinviolationofanyproductsafetystandardsorrequirements.Infact,the
CaliforniagovernmenthasclariedthataProp65warning“isnotthesameasaregulatorydecisionthataproductis‘safe’or‘unsafe.’”Manyofthese
chemicalshavebeenusedineverydayproductsforyearswithoutdocumentedharm.Formoreinformation,gotohttps://oag.ca.gov/prop65/faqs-view-all
AProp65warningmeansthatacompanyhaseither(1)evaluatedtheexposureandhasconcludedthatitexceedsthe“nosignicantrisklevel”;or(2)
haschosentoprovideawarningbasedonitsunderstandingaboutthepresenceofalistedchemicalwithoutattemptingtoevaluatetheexposure.
Doesthislawapplyeverywhere?
Prop65warningsarerequiredunderCalifornialawonly.ThesewarningsareseenthroughoutCaliforniainawiderangeofsettings,includingbutnot
limitedtorestaurants,grocerystores,hotels,schools,andhospitals,andonawidevarietyofproducts.Additionally,someonlineandmailorder
retailersprovideProp65warningsontheirwebsitesorincatalogs.
.
HowdotheCaliforniawarningscomparetofederallimits?
Prop65standardsareoftenmorestringentthanfederalandinternationalstandards.TherearevarioussubstancesthatrequireaProp65warning
atlevelsthatarefarlowerthanfederalactionlimits.Forexample,theProp65standardforwarningsforleadis0.5μg/day,whichiswellbelow
thefederalandinternationalstandards.
Whydon’tallsimilarproductscarrythewarning?
•ProductssoldinCaliforniarequireProp65labellingwhilesimilarproductssoldelsewheredonot.
•AcompanyinvolvedinaProp65lawsuitreachingasettlementmayberequiredtouseProp65warningsforitsproducts,butothercompanies
makingsimilarproductsmayhavenosuchrequirement.
•TheenforcementofProp65isinconsistent.
•CompaniesmayelectnottoprovidewarningsbecausetheyconcludethattheyarenotrequiredtodosounderProp65;alackofwarningsfora
productdoesnotmeanthattheproductisfreeoflistedchemicalsatsimilarlevels.
WhydoesExmarkincludethiswarning?
Exmarkhaschosentoprovideconsumerswithasmuchinformationaspossiblesothattheycanmakeinformeddecisionsabouttheproductstheybuy
anduse.Exmarkprovideswarningsincertaincasesbasedonitsknowledgeofthepresenceofoneormorelistedchemicalswithoutevaluatingthelevel
ofexposure,asnotallthelistedchemicalsprovideexposurelimitrequirements.WhiletheexposurefromExmarkproductsmaybenegligibleorwell
withinthe“nosignicantrisk”range,outofanabundanceofcaution,ExmarkhaselectedtoprovidetheProp65warnings.Moreover,ifExmarkdoesnot
providethesewarnings,itcouldbesuedbytheStateofCaliforniaorbyprivatepartiesseekingtoenforceProp65andsubjecttosubstantialpenalties.
RevA
Page 28

 Loading...