

Toro 21462 Operator's Manual

22inRecycler
ModelNo.21462—SerialNo.408930000andUp
ModelNo.21464—SerialNo.408000000andUp
®
LawnMower
FormNo.3444-703RevA
Operator'sManual
Introduction
Thisrotary-blade,walk-behindlawnmowerisintended
tobeusedbyresidentialhomeowners.Itisdesigned
primarilyforcuttinggrassonwell-maintainedlawnson
residentialproperties.Usingthisproductforpurposes
otherthanitsintendedusecouldprovedangerousto
youandbystanders.
Readthisinformationcarefullytolearnhowtooperate
andmaintainyourproductproperlyandtoavoid
injuryandproductdamage.Youareresponsiblefor
operatingtheproductproperlyandsafely.
Visitwww.T oro.comformoreinformation,including
safetytips,trainingmaterials,accessoryinformation,
helpndingadealer,ortoregisteryourproduct.
Wheneveryouneedservice,genuineToroparts,or
additionalinformation,contactanAuthorizedService
DealerorToroCustomerServiceandhavethemodel
andserialnumbersofyourproductready .Figure1
identiesthelocationofthemodelandserialnumbers
ontheproduct.Writethenumbersinthespace
provided.
Important:Withyourmobiledevice,youcan
scantheQRcodeontheserialnumberdecal(if
equipped)toaccesswarranty,parts,andother
productinformation
Figure1
1.Modelandserialnumberlocation
ModelNo.
seriousinjuryordeathifyoudonotfollowthe
recommendedprecautions.
g000502
Figure2
Safety-alertsymbol
Thismanualuses2wordstohighlightinformation.
Importantcallsattentiontospecialmechanical
informationandNoteemphasizesgeneralinformation
worthyofspecialattention.
Besuretoregisteryourmachineat
www.T oro.com/register.Registrationensures
thatyouarenotiedshouldtherebeaproductrecall.
Yourregistrationinformationisneversoldorshared
withthirdpartycompanies.Toavoidwasteand
helptheenvironment,adischargechutedoesnot
comewithyourpurchase(mostcustomerspreferto
recycleorbagtheirgrassclippings).Youcanrequest
adischargechutewhenyouregisteryourproduct
atwww.T oro.com/register.Simplychecktheboxin
theonlineregistrationformandT orowillsendyoua
dischargechuteatnoadditionalcharge.Pleaseallow
1to2weeksfordelivery .
ItisaviolationofCaliforniaPublicResourceCode
Section4442or4443touseoroperatetheengineon
anyforest-covered,brush-covered,orgrass-covered
landunlesstheengineisequippedwithaspark
arrester,asdenedinSection4442,maintainedin
g282707
effectiveworkingorderortheengineisconstructed,
equipped,andmaintainedforthepreventionofre.
Theenclosedengineowner'smanualissupplied
forinformationregardingtheUSEnvironmental
ProtectionAgency(EPA)andtheCaliforniaEmission
ControlRegulationofemissionsystems,maintenance,
andwarranty.Replacementsmaybeorderedthrough
theenginemanufacturer.
SerialNo.
Thismanualidentiespotentialhazardsandhas
safetymessagesidentiedbythesafety-alertsymbol
(Figure2),whichsignalsahazardthatmaycause
©2021—TheT oro®Company
8111LyndaleAvenueSouth
Bloomington,MN55420Registeratwww.Toro.com.
GrossorNetTorque:Thegrossornettorque
ofthisenginewaslaboratoryratedbytheengine
manufacturerinaccordancewiththeSocietyof
AutomotiveEngineers(SAE)J1940orJ2723.As
conguredtomeetsafety,emission,andoperating
requirements,theactualenginetorqueonthisclass
OriginalInstructions(EN)
PrintedinMexico
AllRightsReserved
*3444-703*

ofmowerwillbesignicantlylower.Pleasereferto
theenginemanufacturer’sinformationincludedwith
themachine.
WARNING
CALIFORNIA
Proposition65Warning
Theengineexhaustfromthisproduct
containschemicalsknowntotheStateof
Californiatocausecancer,birthdefects,
orotherreproductiveharm.
Batteryposts,terminals,andrelated
accessoriescontainleadandlead
compounds,chemicalsknownto
theStateofCaliforniatocause
cancerandreproductiveharm.Wash
handsafterhandling.
Useofthisproductmaycauseexposure
tochemicalsknowntotheStateof
Californiatocausecancer,birthdefects,
orotherreproductiveharm.
Contents
Introduction...............................................................1
Safety.......................................................................3
GeneralSafety...................................................3
SafetyandInstructionalDecals..........................4
Setup........................................................................6
1AssemblingandUnfoldingtheHandle..............6
2InstallingtheBlade-ControlBar........................7
3InstallingtheRecoil-StarterRopeinthe
RopeGuide.....................................................7
4AddingOiltotheEngine...................................8
5AssemblingtheGrassBag...............................8
6ChargingtheBattery........................................9
ProductOverview...................................................10
Specications..................................................10
Attachments/Accessories.................................10
Operation................................................................10
BeforeOperation.................................................10
BeforeOperationSafety...................................10
FillingtheFuelTank...........................................11
CheckingtheEngine-OilLevel..........................12
AdjustingtheHandleHeight.............................12
AdjustingtheCuttingHeight.............................13
DuringOperation.................................................14
DuringOperationSafety...................................14
StartingtheEngine...........................................15
UsingtheSelf-PropelDrive...............................16
ShuttingOfftheEngine.....................................16
RecyclingtheClippings....................................16
BaggingtheClippings.......................................17
OperatingtheBag-on-DemandLever...............18
OperatingTips.................................................18
AfterOperation....................................................19
AfterOperationSafety......................................19
CleaningUndertheMachine............................19
FoldingtheHandle...........................................20
Maintenance...........................................................21
RecommendedMaintenanceSchedule(s)...........21
MaintenanceSafety..........................................21
PreparingforMaintenance...............................21
ServicingtheAirFilter.......................................22
ChangingtheEngineOil...................................22
ChargingtheBattery.........................................23
ReplacingtheFuse...........................................23
ReplacingtheBlade..........................................24
AdjustingtheSelf-PropelDrive.........................25
Storage...................................................................25
StorageSafety..................................................25
PreparingtheMachineforStorage...................25
RemovingtheMachinefromStorage................26
2

Safety
Thismachinehasbeendesignedinaccordancewith
ANSIB71.1-2017.
GeneralSafety
Thisproductiscapableofamputatinghandsand
feetandofthrowingobjects.Alwaysfollowallsafety
instructionstoavoidseriouspersonalinjuryordeath.
•Read,understand,andfollowtheinstructions
andwarningsinthisOperator’sManualandon
themachineandattachmentsbeforestartingthe
engine.
•Donotputyourhandsorfeetnearmovingpartsor
underthemachine.Keepclearofanydischarge
opening.
•Donotoperatethemachinewithoutallguards
andothersafetyprotectivedevicesinplaceand
functioningproperlyonthemachine.
•Keepbystandersandchildrenoutoftheoperating
area.Donotallowchildrentooperatethemachine.
Allowonlypeoplewhoareresponsible,trained,
familiarwiththeinstructions,andphysically
capabletooperatethemachine.
•Stopthemachine,shutofftheengine,removethe
electric-startbutton(ifequipped),andwaitforall
movingpartstostopbeforeservicing,fueling,or
uncloggingthemachine.
Improperlyusingormaintainingthismachinecan
resultininjury.Toreducethepotentialforinjury,
complywiththesesafetyinstructionsandalways
payattentiontothesafety-alertsymbol
meansCaution,Warning,orDanger—personalsafety
instruction.Failuretocomplywiththeseinstructions
mayresultinpersonalinjuryordeath.
,which
3

SafetyandInstructionalDecals
Safetydecalsandinstructionsareeasilyvisibletotheoperatorandarelocatednearanyarea
ofpotentialdanger.Replaceanydecalthatisdamagedormissing.
Manufacturer'sMark
1.Thismarkindicatesthatthebladeisidentiedasapart
fromtheoriginalmachinemanufacturer .
decaloemmarkt
decal94-8072
94-8072
decal125-5026
125-5026
1.Recyclingmode2.Baggingmode
decal131-4514
131-4514
1.Warning—readtheOperator'sManual.
2.Cutting/dismembermenthazardofhand,mower
blade—stayawayfrommovingparts;keepallguardsand
shieldsinplace.
3.Cutting/dismembermenthazardofhand,mower
blade—disconnectthespark-plugwirebeforeperforming
maintenance.
4.Thrownobjecthazard—keepbystandersaway;shutoffthe
enginebeforeleavingtheoperatingposition;pickupany
debrisbeforemowing.
5.Cutting/dismembermenthazardoffoot,mowerblade—do
notoperateupanddownslopes;operatesidetosideon
slopes;lookbehindyouwhenmovinginreverse.
4

Electric-startmodelonly
decal133-8062
133-8062
140-4357
decal140-4357
Electric-startmodelonly
1.ReadtheOperator’sManualformoreinformationonstarting
theengine—1)Inserttheelectric-startbuttonintothe
electricstarter;2)Engagetheblade-controlbar;3)Pushthe
electric-startbuttontostarttheengine.
1.Warning—readthe
Operator’sManualfor
batteryinformation;donot
discardtheleadbattery .
133-1900
2.ReadtheOperator’sManualformoreinformationonstopping
theengine—1)Releasetheblade-controlbar;2)Removethe
electric-startbuttonfromtheelectricstarter.
2.Attention—readthe
Operator’sManual
forbatterycharging
information.
decal133-1900
5

Setup
Important:Removeanddiscardtheprotectiveplasticsheetthatcoverstheengineandanyother
plasticorwrappingonthemachine.
Important:Topreventaccidentalstarting,donotinserttheelectric-startbuttonintotheelectric-start
ignition(ifequipped)untilyouarereadytostarttheengine.
1
AssemblingandUnfoldingtheHandle
NoPartsRequired
Procedure
Note:Ensurethatthecablesareroutedontheoutsideofthehandleandarenotpinched(DofFigure3).
Figure3
6
g334082

2
InstallingtheBlade-ControlBar
NoPartsRequired
Procedure
g344378
Figure4
3
InstallingtheRecoil-StarterRopeintheRopeGuide
NoPartsRequired
Procedure
Important:Tostarttheenginesafelyandeasilywheneveryouusethemachine,installtherecoil-starter
ropeintheropeguide.
Figure5
g334093
7
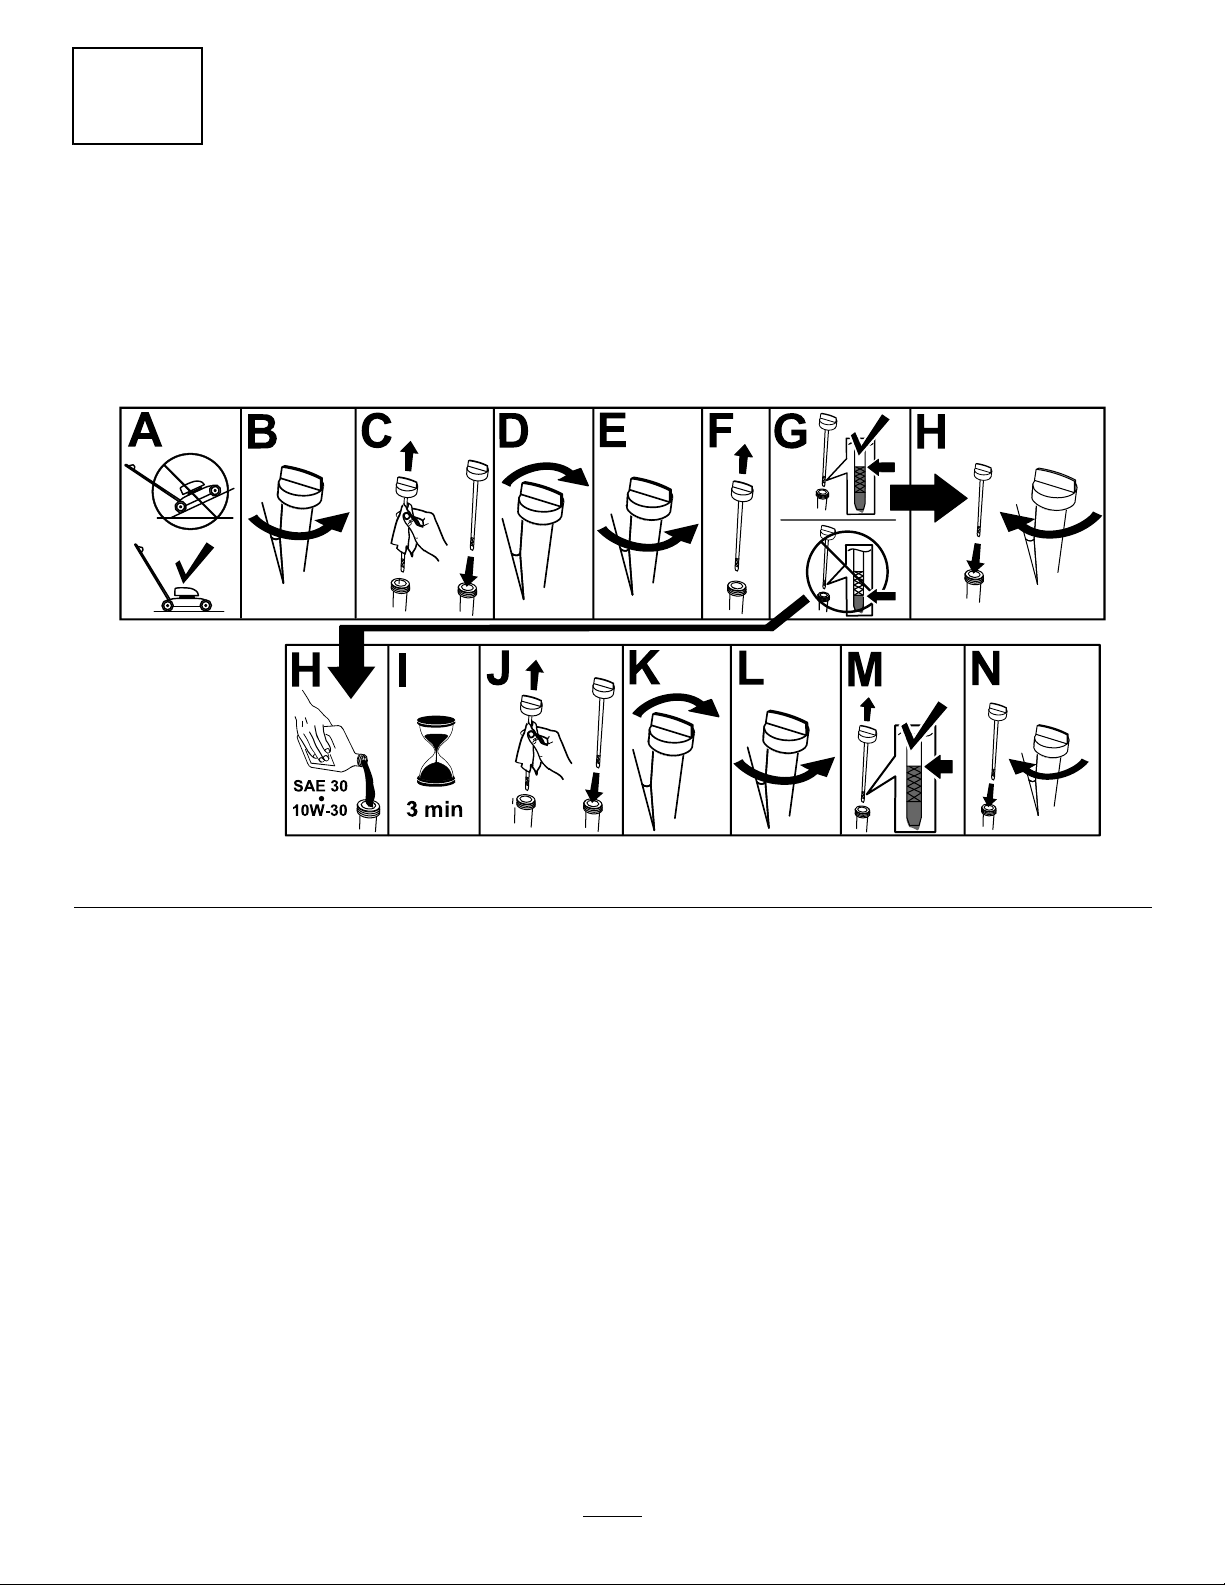
4
AddingOiltotheEngine
NoPartsRequired
Procedure
Important:Iftheoillevelintheengineistoolowortoohighandyouruntheengine,youmaydamage
theengine.
Figure6
g222533
8

5
AssemblingtheGrassBag
NoPartsRequired
Procedure
g334351
Figure7
6
ChargingtheBattery
NoPartsRequired
Procedure
Electric-StartModelOnly
RefertoChargingtheBattery(page23).
9
 Loading...