

Page 1

48in,54in,or60inRecycler
ProlineCommercialWalk-BehindMowerwithFloatingCuttingUnit
ModelNo.140-1914
ModelNo.140-1915
ModelNo.140-1916
Installation
LooseParts
Usethechartbelowtoverifythatallpartshavebeenshipped.
FormNo.3436-332RevA
®
Kit
InstallationInstructions
ProcedureDescription
3
4
5
6
7
Rightbafe
Carriagebolt(5/16x3/4inch)—48-inch
decksonly
Carriagebolt(5/16x3/4inch)—54-inch
decksonly
Nut(5/16inch)—48-inchand60-inch
decksonly
Nut(5/16inch)—54-inchdecksonly
Dischargechutecover1
Bolt(3/8x1inch)—48-inchdecksonly
Bolt(3/8x1inch)—54-inchand60-inch
decksonly
Nut(3/8inch)—48-inchand54-inch
decksonly
Nut(3/8inch)—60-inchdecksonly
Nut(5/16inch)—60-indecksonly
Bolt(3/8x1-1/4inches)—54-inchdecks
only
Bolt(5/16x1-1/4inches)—60-inch
decksonly
Kickerbafe
Hex-washer-headbolt(5/16x3/4inch)
Leftbafe
Carriagebolt(5/16x3/4inch)—48-inch,
54-inch,and60-inchdecks
Nut(5/16inch)—48-inchdecksonly
Nut(5/16inch)—54-inchand60-inch
decksonly
Decal1
Mulchingblades3
Qty.
Use
1
1
2
3
4
3
2
3
2
1
1
1
2
4
1
1
3
4
Installtherightbafe.
Installthedischargechutecover.
Installthekickerbafes(48-inchdecks
only).
Installtheleftbafe.
Installthedecalandmulchingblades.
©2019—TheT oro®Company
8111LyndaleAvenueSouth
Bloomington,MN55420
Registeratwww.Toro.com.
OriginalInstructions(EN)
PrintedintheUSA
AllRightsReserved
*3436-332*A
Page 2

1
PreparingtheMachine
NoPartsRequired
Procedure
1.Parkthemachineonalevelsurface.
2.DisengagethePTO,engagetheparkingbrake.
3.Shutofftheengineandremovethekey.
4.Foreasieraccess,raisethefrontofthemachine
andsupportitusingjackstandsratedforyour
machines.
WARNING
Mechanicalorhydraulicjacksmayfailto
supportthemachineandcauseserious
injury.
Usejackstandswhensupportingthe
machine.
g209902
Figure1
54-inchdeckshown
1.Nut3.Bolt
2.Cutoffbafe
3.Installthefastenersinthesameholesthatthey
wereoriginallyremovedfrom(Figure1).
3
2
PreparingtheMowerDeck
NoPartsRequired
Procedure
1.Removetheexistingmowerblades;refertothe
Operator’sManualforthemachine.
2.Removethe2boltsand2nutssecuringthe
cutoffbafetothedeckandremovethecutoff
bafe(Figure1).
Note:Retainthebafeforconvertingbackto
sidedischarge.
InstallingtheRightBafe
Partsneededforthisprocedure:
1
Rightbafe
1
Carriagebolt(5/16x3/4inch)—48-inchdecksonly
2
Carriagebolt(5/16x3/4inch)—54-inchdecksonly
3
Nut(5/16inch)—48-inchand60-inchdecksonly
4
Nut(5/16inch)—54-inchdecksonly
2
Page 3

48-InchDecks
54-InchDecks
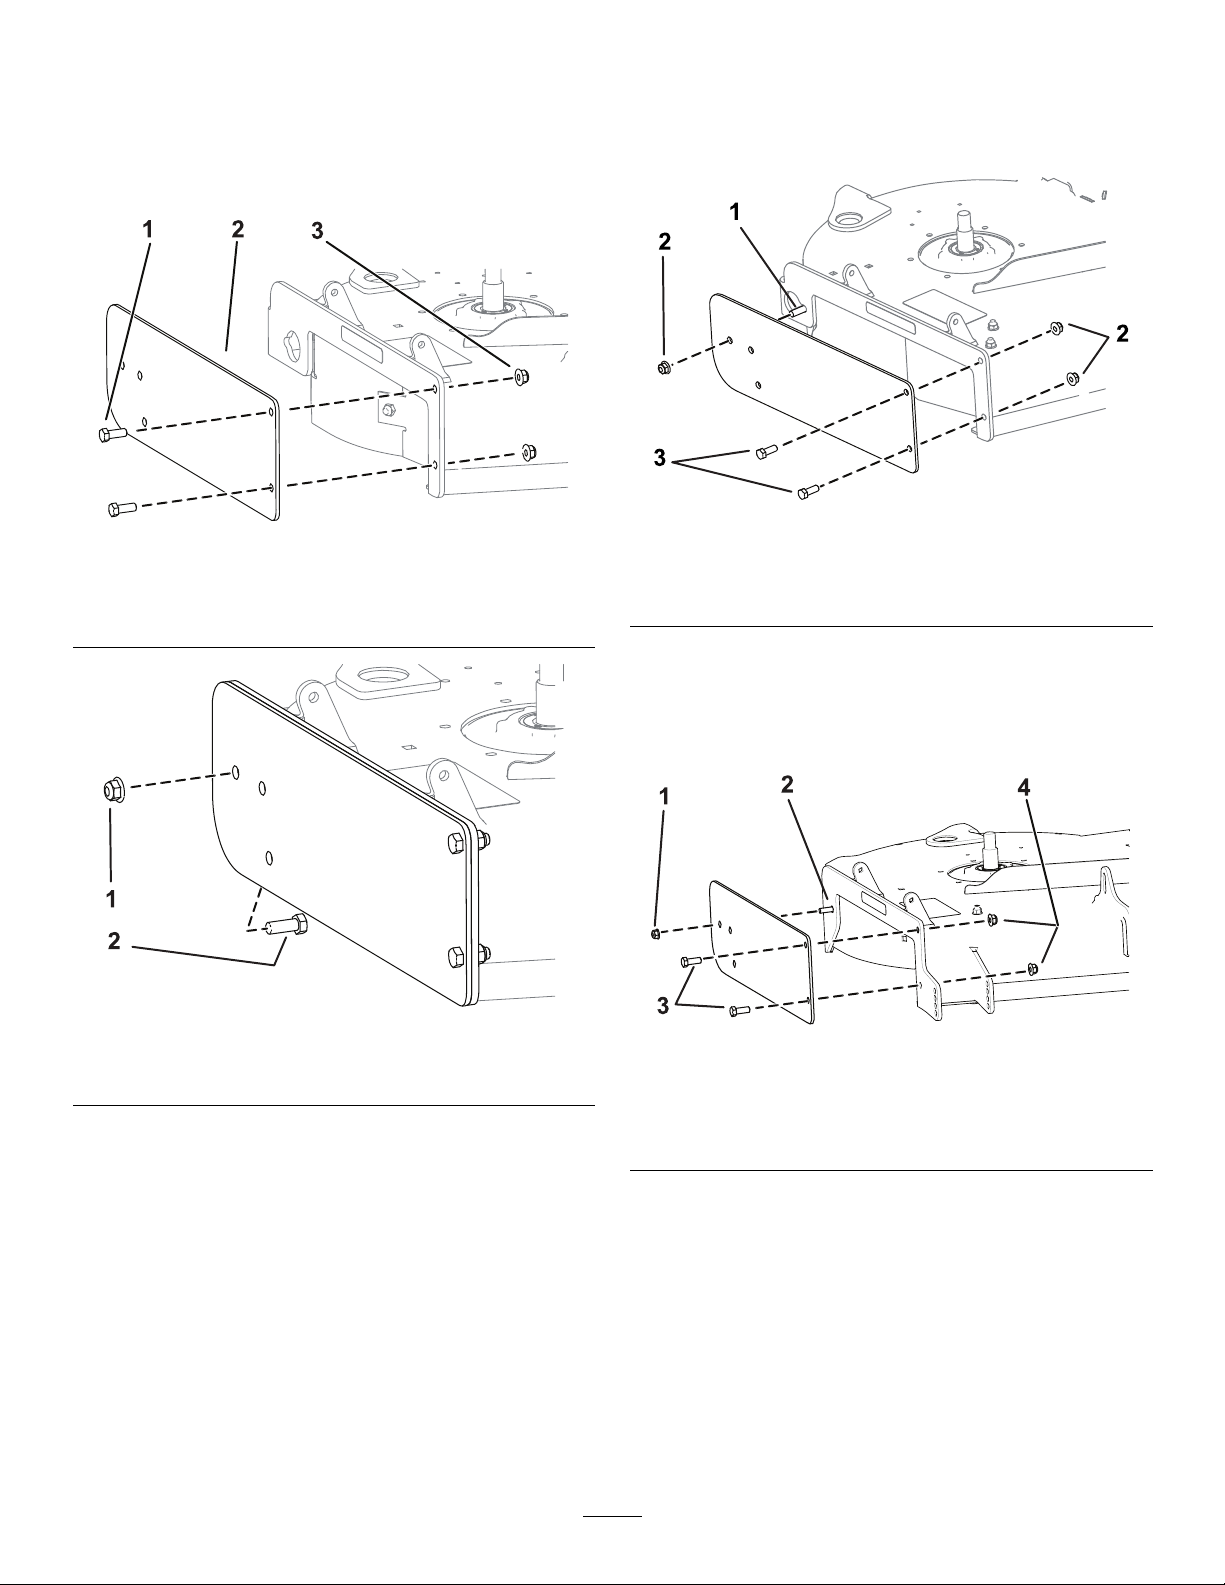
1.Installtherightbafeusing2nuts(5/16inch)
asshowninFigure2.Tightenthefastenersby
hand.
Figure2
1.Nut(5/16inch)
2.Rightbafe
3.Weldedposts
1.Removethenutsandboltsfromthelocation
showninFigure4.
g308772
Figure4
1.Nutsandbolts
g012805
2.Installtherightbafeusing1carriagebolt(5/16
x3/4inch)and3nuts(5/16inch)asshownin
Figure5.Tightenthefastenersbyhand.
2.Securetherightsideoftherightbafewith1
carriagebolt(5/16x3/4inch)and1nut(5/16)
inchasshowninFigure3.
Figure3
1.Nut(5/16inch)2.Carriagebolt(5/16x3/4
inch)
3.Tightenallfasteners.
g308756
g209901
Figure5
1.Nut(5/16inch)
2.Rightbafe4.Carriagebolt(5/16x3/4
3.Weldedposts
inch)
3.Securetherearwalloftherightbafetothe
mowerdeckusing1carriagebolt(5/16x3/4
inch)andnut(5/16inch)asshowninFigure6.
3
Page 4

Figure6
g308757
1.Nut(5/16inch)2.Carriagebolt(5/16x3/4
inch)
4.Tightenallfasteners.
60-InchDecks
1.Removethenutandboltfromthelocation
showninFigure7orFigure8.
Figure7
1.Nutandbolt
2.Installtherightbafeusing3nuts(5/16inch)
asshowninFigure8.Tightenthefastenersby
hand.
g219326
Figure8
1.Nut—5/16inch(3)3.Weldedpost(3)
2.Rightbafe
3.Tightenthefastenersbyhand.
4
InstallingtheDischarge
ChuteCover
Partsneededforthisprocedure:
g219304
1Dischargechutecover
3
Bolt(3/8x1inch)—48-inchdecksonly
2
Bolt(3/8x1inch)—54-inchand60-inchdecksonly
3
Nut(3/8inch)—48-inchand54-inchdecksonly
2
Nut(3/8inch)—60-inchdecksonly
1
Nut(5/16inch)—60-indecksonly
1
Bolt(3/8x1-1/4inches)—54-inchdecksonly
1
Bolt(5/16x1-1/4inches)—60-inchdecksonly
4
Page 5
Procedure
54-inchDecks
48-inchDecks
Installthedischargechutecoverusing3bolts(3/8
x1inch)and3nuts(3/8inch)asshowninFigure9
andFigure10.
Figure9
1.Bolts(3/8x1inch)3.Nuts(3/8inch)
2.Dischargechutecover
Installthedischargechutecoverusing1bolt(3/8x
1-1/4inches),2bolts(3/8x1inch)and3nuts(3/8
inch)asshowninFigure11.
g307460
g308754
1.Bolt(3/8x1-1/4inches)3.Bolts(3/8x1inch)
2.Nuts(3/8inch)
Figure11
60-inchDecks
Figure10
1.Nuts(3/8inch)2.Bolts(3/8x1inch)
Installthedischargechutecoverusing1carriagebolt
(5/16x1-1/4inches),1nut(5/16inch),2bolts(3/8x1
inch),and2nuts(3/8inch)asshowninFigure12.
g308755
Figure12
1.Nut(5/16inch)3.Bolt(3/8x1inch)
2.Carriagebolt(5/16x1-1/4
inches)
4.Nut(3/8inch)
g308758
5
Page 6

5
6
InstallingtheKickerBafes
48-InchDecksOnly
Partsneededforthisprocedure:
2
Kickerbafe
4
Hex-washer-headbolt(5/16x3/4inch)
Procedure
Installthekickerbafestotheundersideofthedeck
using4bolts(5/16x3/4inch)atthelocationsshown
inFigure13.
InstallingtheLeftBafe
Partsneededforthisprocedure:
1
Leftbafe
Carriagebolt(5/16x3/4inch)—48-inch,54-inch,and
1
60-inchdecks
3
Nut(5/16inch)—48-inchdecksonly
4
Nut(5/16inch)—54-inchand60-inchdecksonly
Procedure
1.Installtheleftbafeasfollows:
•For48-inchdecks,installtheleftbafe
using3nuts(5/16inch)and1carriagebolt
(5/16x3/4inch)asshowninFigure14.
Figure13
1.Kickerbafe2.Bolt(5/16x3/4inch)
g012843
Figure14
1.Nut(5/16inch)3.Leftbafe
2.Carriagebolt(5/16x3/4
inch)
•For54-inchand60-inchdecks,removethe
existingfastenersfromtheholesshownin
Figure15,andinstalltheleftbafeusing4
nuts(5/16inch)and1carriagebolt(5/16x
3/4inch).
g012841
6
Page 7

Figure15
1.Nut(5/16inch)3.Leftbafe
2.Carriagebolt(5/16x3/4
inch)
4.Removetheexisting
hardwarefromtheseholes
(54-inchdecksonly)
g219327
g209974
Figure16
1.30mm(1.19inches)2.17mm(0.65inches)
2.Tightenallfasteners.
7
InstallingtheDecaland
MulchingBlades
Partsneededforthisprocedure:
1Decal
3Mulchingblades
Procedure
1.Installthedecaltothemowerdeckinthe
locationshowninFigure16.
2.Installthemulchingbladesonmachine;referto
theOperator’sManualforthemachine.
7
Page 8

Operation
OperatingTips
UsingtheFastThrottleSetting
StoppingtheMachine
Ifyoumuststoptheforwardmotionofthemachine
whilemowing,aclumpofgrassclippingsmay
dropontoyourlawn.T oavoidthis,moveontoa
previouslycutareawiththebladesengagedoryou
candisengagethemowerdeckwhilemovingforward.
Forbestmowingandmaximumaircirculation,operate
theengineattheFASTposition.Airisrequiredto
thoroughlycutgrassclippings,sodonotsettheheight
ofcutsolowastototallysurroundthemowerinuncut
grass.Alwaystrytohave1sideofthemowerfree
fromuncutgrass,whichallowsairtobedrawninto
themower.
CuttingaLawnfortheFirstTime
Cutgrassslightlylongerthannormaltoensurethat
thecuttingheightofthemowerdoesnotscalpany
unevenground.However,thecuttingheightused
inthepastisgenerallythebestonetouse.When
cuttinggrasslongerthan15cm(6inches)tall,cutthe
lawntwicetoensureanacceptablequalityofcut.
CuttingaThirdoftheGrassBlade
Cutonlyaboutathirdofthegrassblade.Cuttingmore
thanthatisnotrecommendedunlessgrassissparse,
oritislatefallwhengrassgrowsmoreslowly.
KeepingtheUndersideofthe
MowerClean
Cleanclippingsanddirtfromtheundersideofthe
moweraftereachuse.Ifgrassanddirtbuildupinside
themower,cuttingqualitywilleventuallybecome
unsatisfactory.
MaintainingtheBlade(s)
Maintainasharpbladethroughoutthecuttingseason
becauseasharpbladecutscleanlywithouttearingor
shreddingthegrassblades.Tearingandshredding
turnsgrassbrownattheedges,whichslowsgrowth
andincreasesthechanceofdisease.Checkthe
mowerbladesaftereachuseforsharpness,and
foranywearordamage.Filedownanynicksand
sharpenthebladesasnecessary.Ifabladeis
damagedorworn,replaceitimmediatelywitha
genuineTororeplacementblade.
AlternatingtheMowingDirection
Alternatethemowingdirectiontokeepthegrass
standingstraight.Thisalsohelpsdisperseclippings
whichenhancesdecompositionandfertilization.
MowingatCorrectIntervals
Grassgrowsatdifferentratesatdifferenttimesof
theyear.Tomaintainthesamecuttingheight,mow
moreofteninearlyspring.Asthegrassgrowthrate
slowsinmidsummer,mowlessfrequently.Ifyou
cannotmowforanextendedperiod,rstmowata
highcuttingheight,thenmowagain2dayslaterata
lowerheightsetting.
UsingaSlowerCuttingSpeed
Toimprovecutquality,useaslowergroundspeed
incertainconditions.
AvoidingCuttingTooLow
Whenmowinguneventurf,raisethecuttingheight
toavoidscalpingtheturf.
8
 Loading...