

Page 1
Form No. 3353-635 Rev A
Left- and Right-Hand Gearcase Assemblies
For Power Max®, Power Shift® and 824XL Power Throw
Snowthrowers
Model No. 108-7325
Model No. 108-7327
Installation Instructions
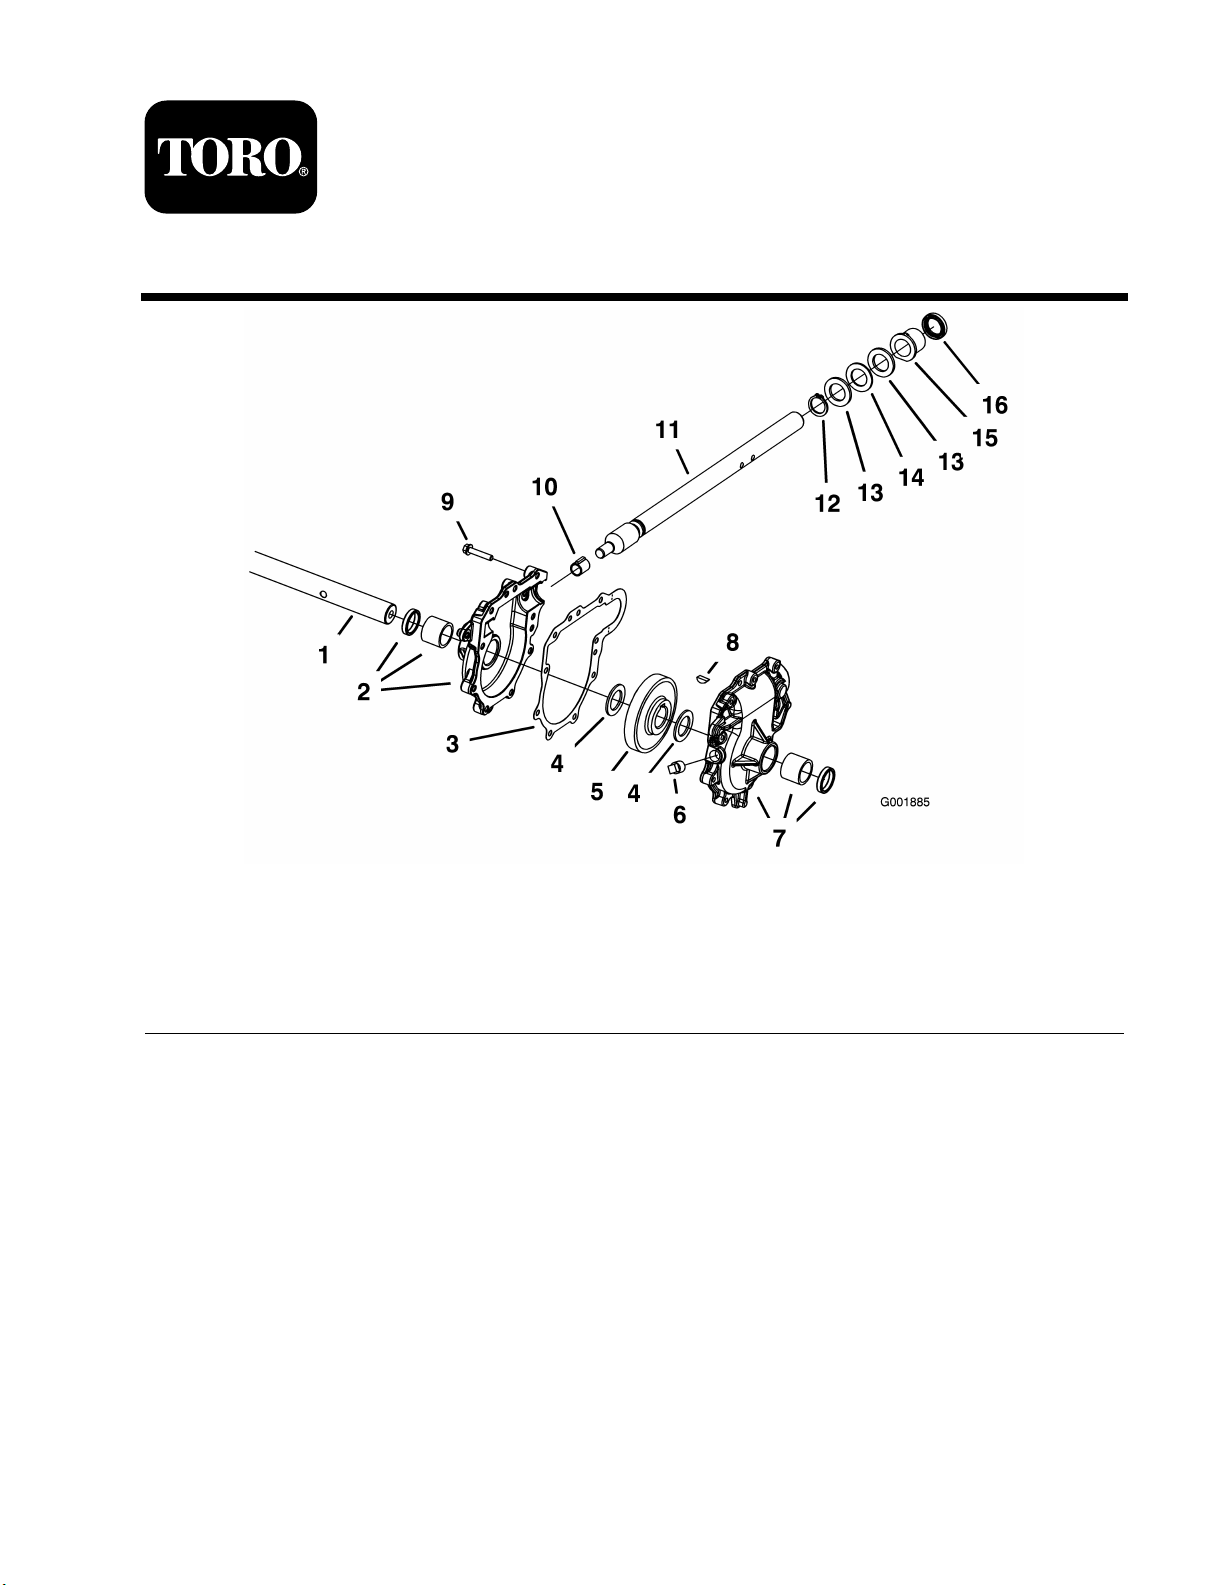
Figure 1
1. Auger shaft 5. Helical gear
2. Right-hand gearcase
assembly
3. Gasket 7. Left-hand gearcase assembly 11. Impeller shaft 15. Input bushing
4. Thrust washer 8. Woodruff key
6. Pipe plug 10. Worm bushing
9. Screw
12. Retaining ring
Disassembling the Gearcase
1. R emo v e the g earcase assembly from the
sno wthro w er .
Note: R efer to ser vice man ual 492-9138 or
492-0354.
2. Disassemble the g earcase assembly .
3. R emo v e and discard the old g ask et (if
applicable).
13. Thrust bearing (0.078 inch
thick)
14. Thrust bearing (0.125 inch
thick)
16. Oil seal
© 2005—The Toro® Company
8111 Lyndale Avenue South
Bloomington, MN 55420
Register at www.Toro.com. Original Instructions (EN)
Printed in the USA.
All Rights Reserved
Page 2

Inspecting the Gearcase
1. Inspect the g earcase castings for fla ws or
scratc hes in the g ask et surface area, and re place
the castings if necessar y .
2. If the g earcase has a g ask et and y ou plan to
reuse the castings , clean the mac hined surfaces
with a liquid g ask et remo v er .
6. Star t the 9 screws b y hand to a v oid cross
threading, and tor que them in sequence to 135
to 165 in-lb (17.0 N·m).
7. R emo v e the exter nal loop of the g ask et b y
cutting along the perforations .
8. Assemble the aug ers to the g earcase .
Note: Do not clean the oil from the
pressed-in output bushings .
3. If the g earcase does not ha v e a g ask et but
has a sealant, re place the g earcase halv es with
the new g earcase half assemblies (par t nos .
108-7324 and 108-7326).
Note: T he new g ask et will not fit on the old
g earcase castings .
4. Inspect the 2 g ears , 4 bronze bushings , 2
shafts , and 3 oil seals for w ear or damag e , and
re place them if necessar y .
Installing the Gasket and
Assembling the Gearcase
1. Assemble the g ears and shafts into the
left-hand g earcase half .
2. Apply a dab of silicone sealant to the mac hined
surface of the left-hand g earcase half at the top
and bottom of the oil seal.
Note: Use Loctite 598 or an equi v alent
automoti v e R TV silicone sealant. Do not use
silicone sealant anywhere else on the mac hined
surface .
3. Carefully align the new g ask et onto the
left-hand g earcase half . T he exter nal loop in
the g ask et can be bent up on the perforated
fold lines .
Press the g ask et do wn into the 2 dabs of
sealant so that the sealant flo ws around the
g ask et edg es .
Installing and Filling the
Gearcase
1. Install the aug er assembly in the sno wthro w er;
refer to the ser vice man ual.
2. Mo v e the sno wthro w er to a lev el surface .
3. R emo v e the pipe plug from the g earcase .
4. Add g ear oil 80W -90 until it begins to flo w out
of the fill hole .
5. Apply a thin coating of thread sealant to the
pipe plug threads before installing the pipe
plug .
6. T or que the pipe plug to 80 to 90 in-lb (9.6
N·m).
7. Coat the impeller shaft with an anti-seize
compound before installing the impeller pulley .
8. Install the pulley .
Note: Before tightening the square head
set screws on the impeller pulley , remo v e all
end pla y from the impeller shaft b y pulling
it to the rear while tur ning the shaft slo wly
in a cloc kwise direction (from the operating
position) and push the pulley forw ard ag ainst
the thr ust w asher; refer to the ser vice man ual.
9. Tighten the set screws .
Note: Chec k the g earcase fluid lev el during
setup , after ev er y ten operating hours , and after
ann ual storag e .
4. Carefully align the right-hand g earcase half .
Note: Do not disr upt the g ask et.
5. If y ou reuse the left-hand casting, thoroughly
clean the screws and apply a thread loc k er
(Loctite 242 or an equi v alent) before
assembling them.
Note: Y ou do not need to do this ste p if y ou
are using a new left-hand casting .
2
Page 3

Form No. 3353-582 Rev A
Demi-boîtiers d'engrenages gauche et
droit
Déneigeuses Power Max®, Power Shift® et
824XL Power Throw
N° de modèle 108-7325
N° de modèle 108-7327
Installation Instructions
Figure 1
1. Arbre de fraise à neige 5. Roue à denture hélicoïdale
2. Demi-boîtier d'engrenages
droit
3. Joint
4. Rondelle de butée 8. Clavette Woodruff 12. Bague de retenue 16. Arrêt d'huile
6. Bouchon de tuyau 10. Bague de vis sans n
7. Demi-boîtier d'engrenages
gauche
9. Vis
11. Arbre de turbine 15. Bague d'entrée
Démontage du boîtier
d'engrenages
1. Déposez l'ensemble boîtier d'eng renag es de la
déneig euse .
Note: R e por tez-v ous au man uel d'entretien
492-9138 ou 492-0354.
2. Démontez l'ensemble boîtier d'eng renag es .
3. Déposez et jetez le joint usagé (le cas éc héant).
13. Butée (0,078 pouce
d'épaisseur)
14. Butée (0,125 pouce
d'épaisseur)
© 2005—The Toro® Company
8111 Lyndale Avenue South
Bloomington, MN 55420
Register at www.Toro.com. Original Instructions (EN)
Imprimé aux États-Unis.
All Rights Reserved
Page 4

Contrôle du boîtier
d'engrenages
1. Examinez les deux moitiés du boîtier et
remplacez-les si la surface du joint est
endommagée ou ra yée .
2. Si le boîtier d'eng renag es est équipé d'un joint
et que v ous souhaitez réutiliser les deux par ties ,
netto yez les surfaces usinées a v ec un produit
d'enlèv ement de joint liquide .
Note: V ous pouv ez omettre cette étape si
v ous montez un demi-boîtier g auc he neuf .
6. Commencez à ser rer les 9 vis à la main en
prenant soin de ne pas fausser le filetag e , puis
ser rez-les l'une après l'autre à 17,0 Nm.
7. Enlev ez la boucle exter ne du joint en le
coupant le long des perforations .
8. Montez les fraises dans le boîtier d'eng renag es .
Note: N'enlev ez pas l'huile qui se trouv e dans
les bagues de sor tie emmanc hées à la presse .
3. Si le boîtier d'eng renag es n'est pas m uni d'un
joint mais de mastic d'étanc héité, remplacez
les deux moitiés par le nouv eau modèle de
demi-boîtiers (Réf . 108-7324 et 108-7326).
Note: Le nouv eau joint ne s'adapte pas sur
les anciens demi-boîtiers .
4. Vérifiez l'état des 2 eng renag es , des 4 bagues
en bronze , des 2 arbres et des 3 ar rêts d'huile ;
remplacez-les s'ils sont usés ou endommagés .
Pose du joint et montage du
boîtier d'engrenages
1. Montez les eng renag es et les arbres dans le
demi-boîtier g auc he .
2. Appliquez un peu de mastic au silicone sur la
surface usinée du demi-boîtier g auc he , en haut
et en bas de l'ar rêt d'huile .
Pose et remplissage du
boîtier d'engrenages
1. P osez l'ensemble fraises dans la déneig euse
(re por tez-v ous au man uel d'entretien).
2. Garez la déneig euse sur un sol plat et
horizontal.
3. R etirez le bouc hon de tuyau du boîtier
d'eng renag es .
4. V ersez de l'huile pour eng renag es 80W -90
jusqu'à ce qu'elle commence à déborder par
l'orifice de remplissag e .
5. Appliquez une fine couc he de produit
d'étanc héité sur les filetag es du bouc hon a v ant
de le re placer sur le tuyau.
6. Ser rez le bouc hon à 9,6 Nm.
7. Appliquez du produit anti-g rippag e sur l'arbre
de la turbine a v ant de monter la poulie de la
turbine .
Note: Utilisez du Loctite 598 ou un mastic au
silicone R TV automobile équi v alent. N'utilisez
pas de mastic au silicone ailleurs que sur la
surface usinée .
3. Alignez soigneusement le nouv eau joint sur
le demi-boîtier g auc he . La boucle exter ne du
joint peut être re pliée sur les lignes de pliag e
perforées .
Appuyez le joint sur les 2 points de mastic
jusqu'à ce que ce der nier déborde autour du
joint.
4. Alignez soigneusement le demi-boîtier droit.
Note: Ne déplacez pas le joint.
5. Si v ous réutilisez le demi-boîtier g auc he ,
netto yez soigneusement les vis et enduisez-les
de frein-filet (Loctite 242 ou produit équi v alent)
a v ant de les mettre en place .
8. P osez la poulie .
Note: A v ant de ser rer les vis à tête car rée sur
la poulie de la turbine , supprimez le jeu axial de
l'arbre de la turbine en tirant l'arbre en ar rière
et en le faisant tour ner lentement dans le sens
horaire (vu de la position d'utilisation), puis
poussez la poulie en a v ant contre la rondelle de
butée (re por tez-v ous au man uel d'entretien).
9. Ser rez les vis de fixation.
Note: Contrôlez le ni v eau de liquide dans le
boîtier d'eng renag es pendant la préparation
de la mac hine , puis toutes les 10 heures de
fonctionnement et après c haque remisag e
ann uel.
2
 Loading...