

Page 1
44 Discharge Chute Retrofit Kit
100 Series Z Master Mowers
Part No. 106–5452
Loose Parts
Description Qty. Use
Form No. 3328–104
Installation Instructions
Discharge bracket
Bolt, 5/16 x 3/4 inch
Flange nut, 5/16 inch
Grass deflector
Spacer
Spring
Bolt, 5/16 x 7–1/2 inch
Locknut, 5/16 inch
Warning
An uncovered discharge opening could allow the
lawn mower to throw objects in the operator’s or
bystander’s direction and result in serious injury.
Also, contact with the blade could occur.
Never operate the lawn mower unless you install a
cover plate, a mulch plate, grass deflector, or a
grass chute and catcher.
Removing the Existing Grass
Deflector
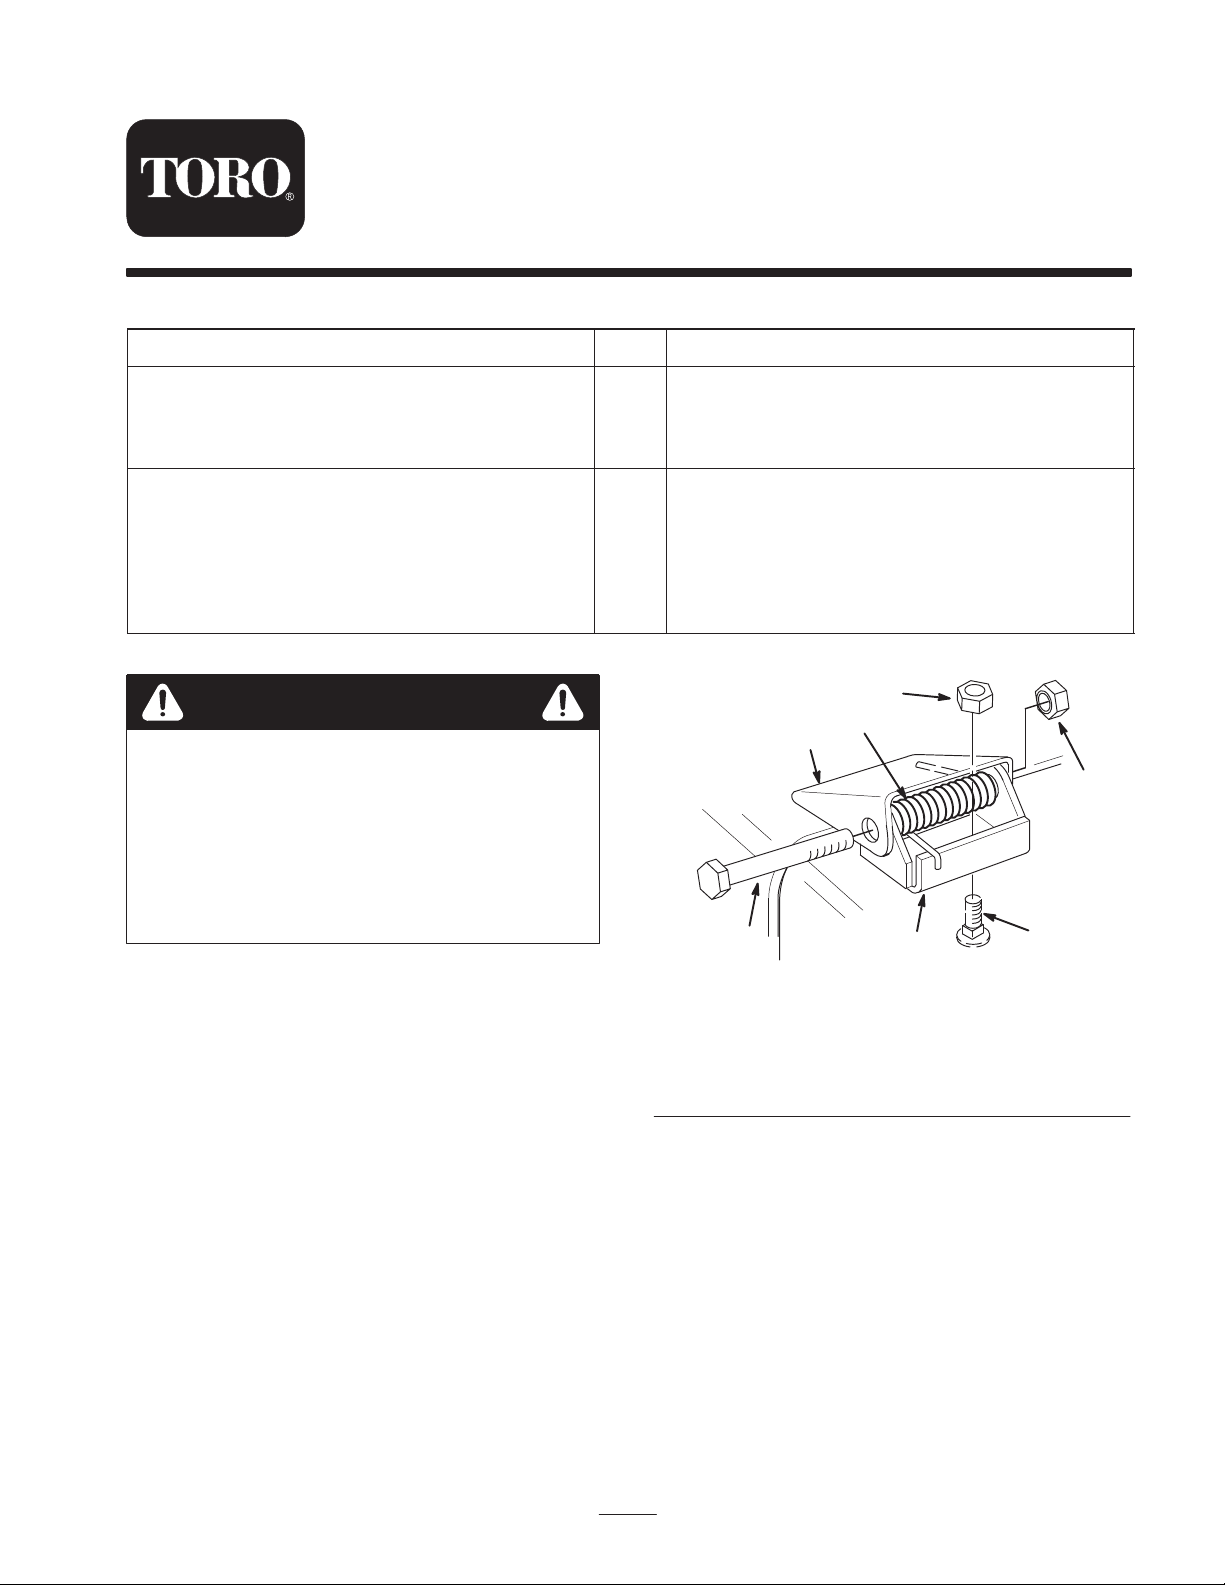
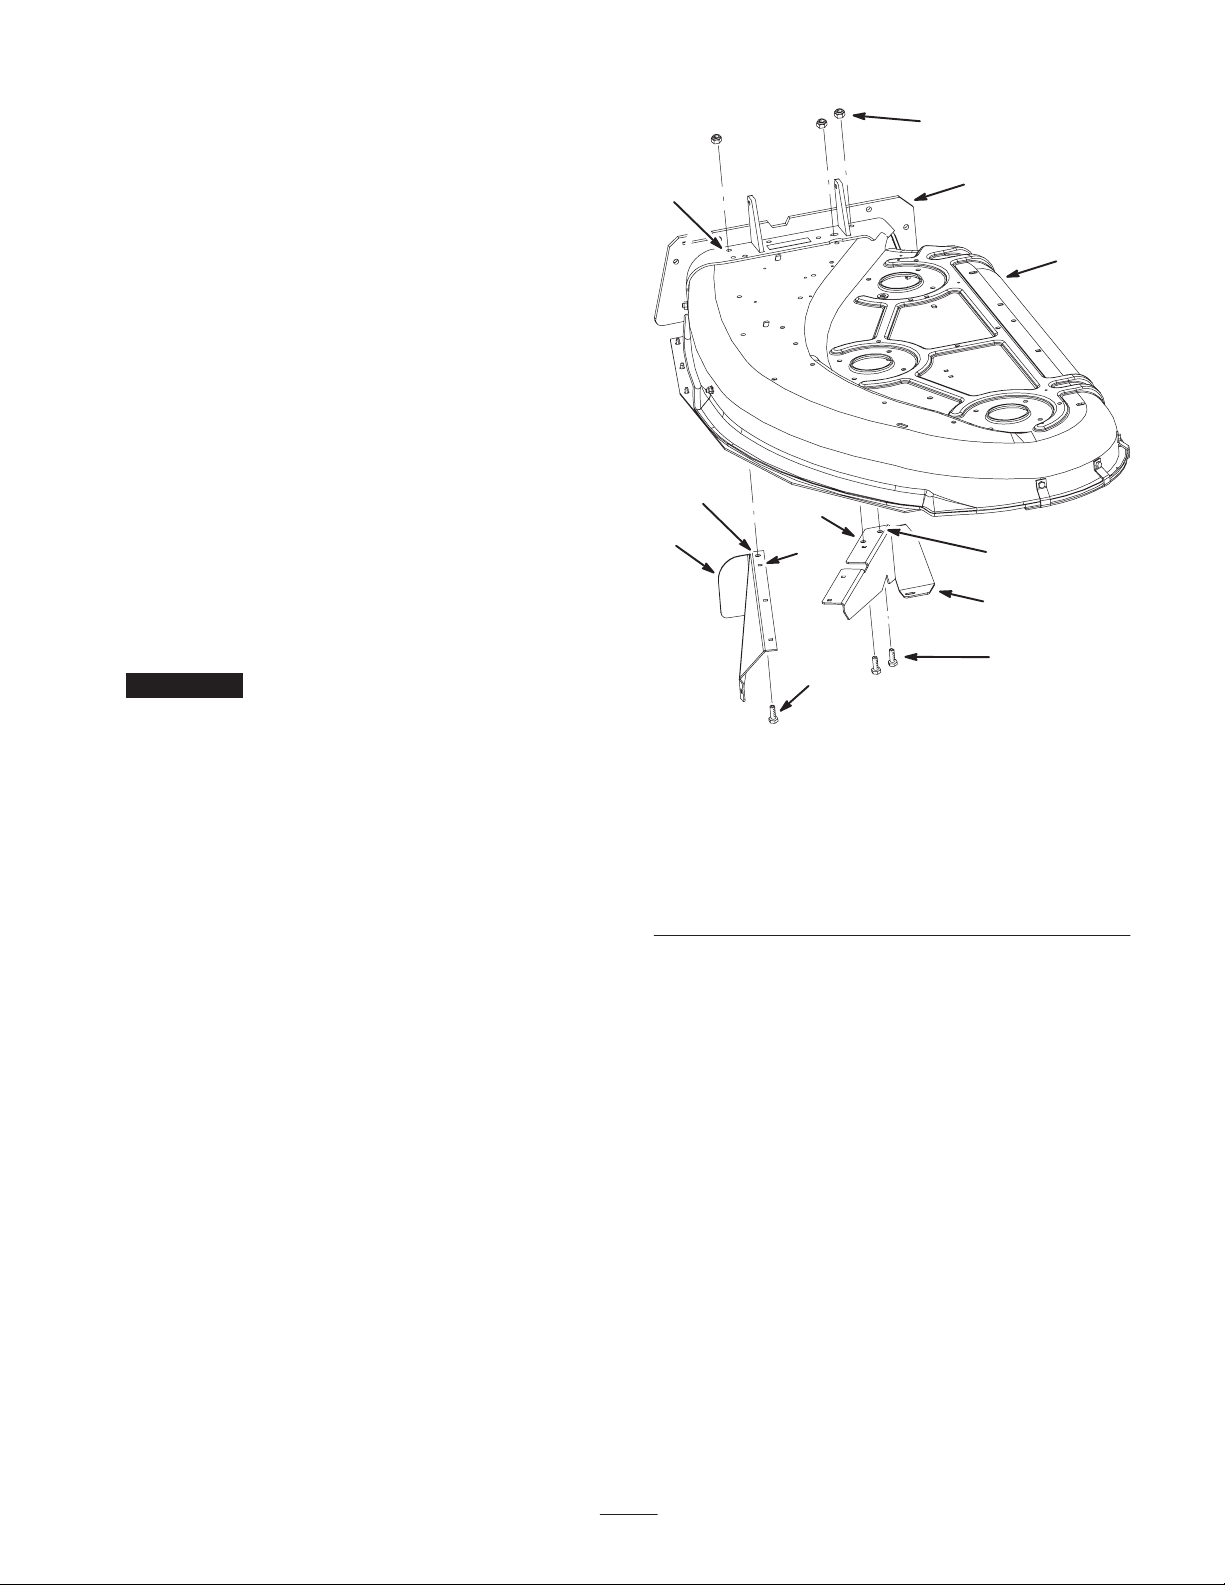
1. Remove the existing grass deflector and defector
mounts (Fig. 1). Discard the grass deflector and mounts.
1
8
8
1
1
1
1
1
Installing the discharge bracket
Installing the grass deflector
1. Bolt
2. Deflector mount
3. Spring
4. Cone Locknut
4
3
2
7
1
5
Figure 1
5. Pivot Bracket
6. Carriage Bolt
7. Locknut
6
m–2549
2002 by The Toro Company
8111 Lyndale Avenue South
Bloomington, MN 55420-1196
2. Thoroughly clean the mower discharge opening. All
debris must be removed to ensure the discharge bracket
will fit properly against the mower.
3. Repair all bent or damaged areas of mower and replace
any missing parts.
All Rights Reserved
Printed in the USA
1
Page 2
Installing the Deflector Bracket
Note: Remove any bolts from the bagger tunnel baffles that
interfere with the installation of the discharge bracket.
Note: There is one existing hole in the mower to use for
installing the deflector bracket (Fig. 3).
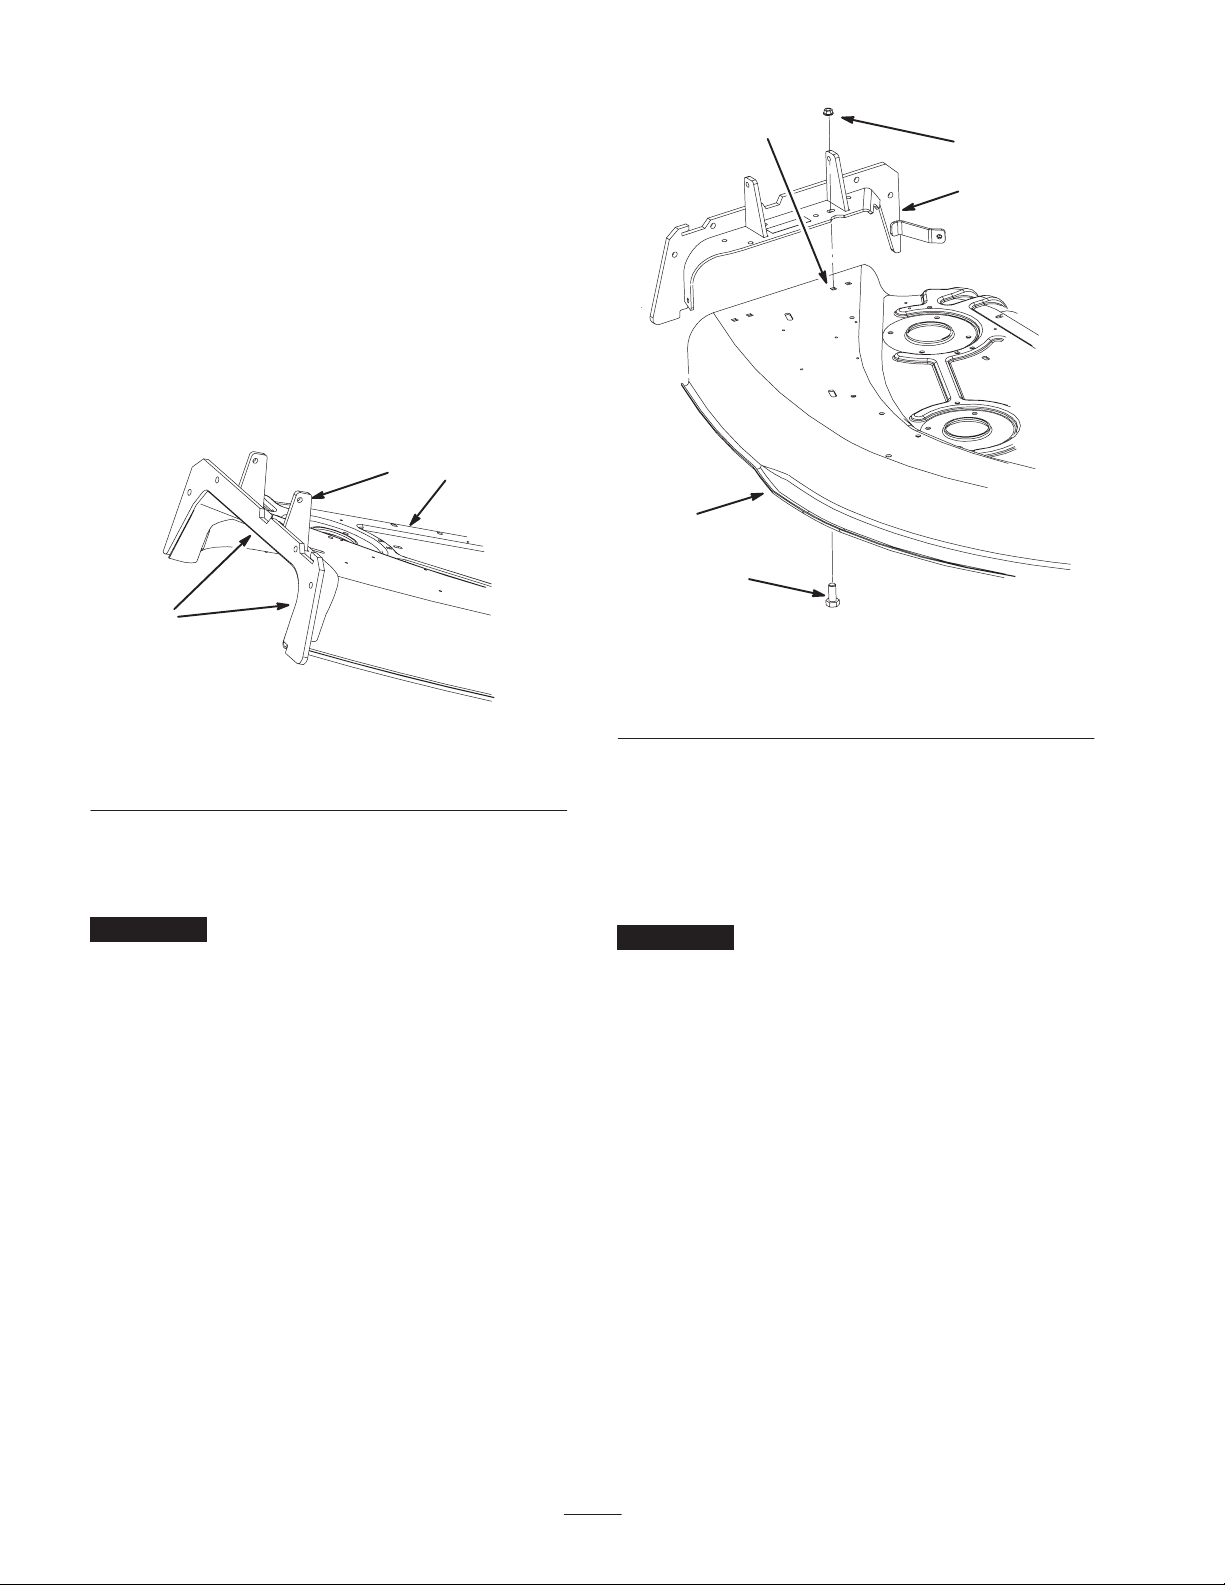
1. Place the discharge bracket on top of the discharge
tunnel (Fig. 2).
2. Align the discharge bracket flush with the outside of the
discharge tunnel (Fig. 2).
Note: Make sure the discharge bracket is flush with the
outside of the discharge opening.
2
3
1
m–6149
Figure 2
1. Flush to mower edge
2. Mower
3. Install the discharge bracket to the mower with 1 bolt
(5/16 x 3/4 inch) and 1 flange nuts (5/16 inch) using the
existing hole (Fig. 3).
Important Make sure the bolt heads are installed on the
inside of the cutting chamber. See Figure 3.
3. Deflector bracket
1
4
3
2
5
m–6147
Figure 3
1. Existing hole
2. Mower
3. Deflector bracket
4. Flange nut, 5/16 inch
5. Bolt, 5/16 x 3/4 inch
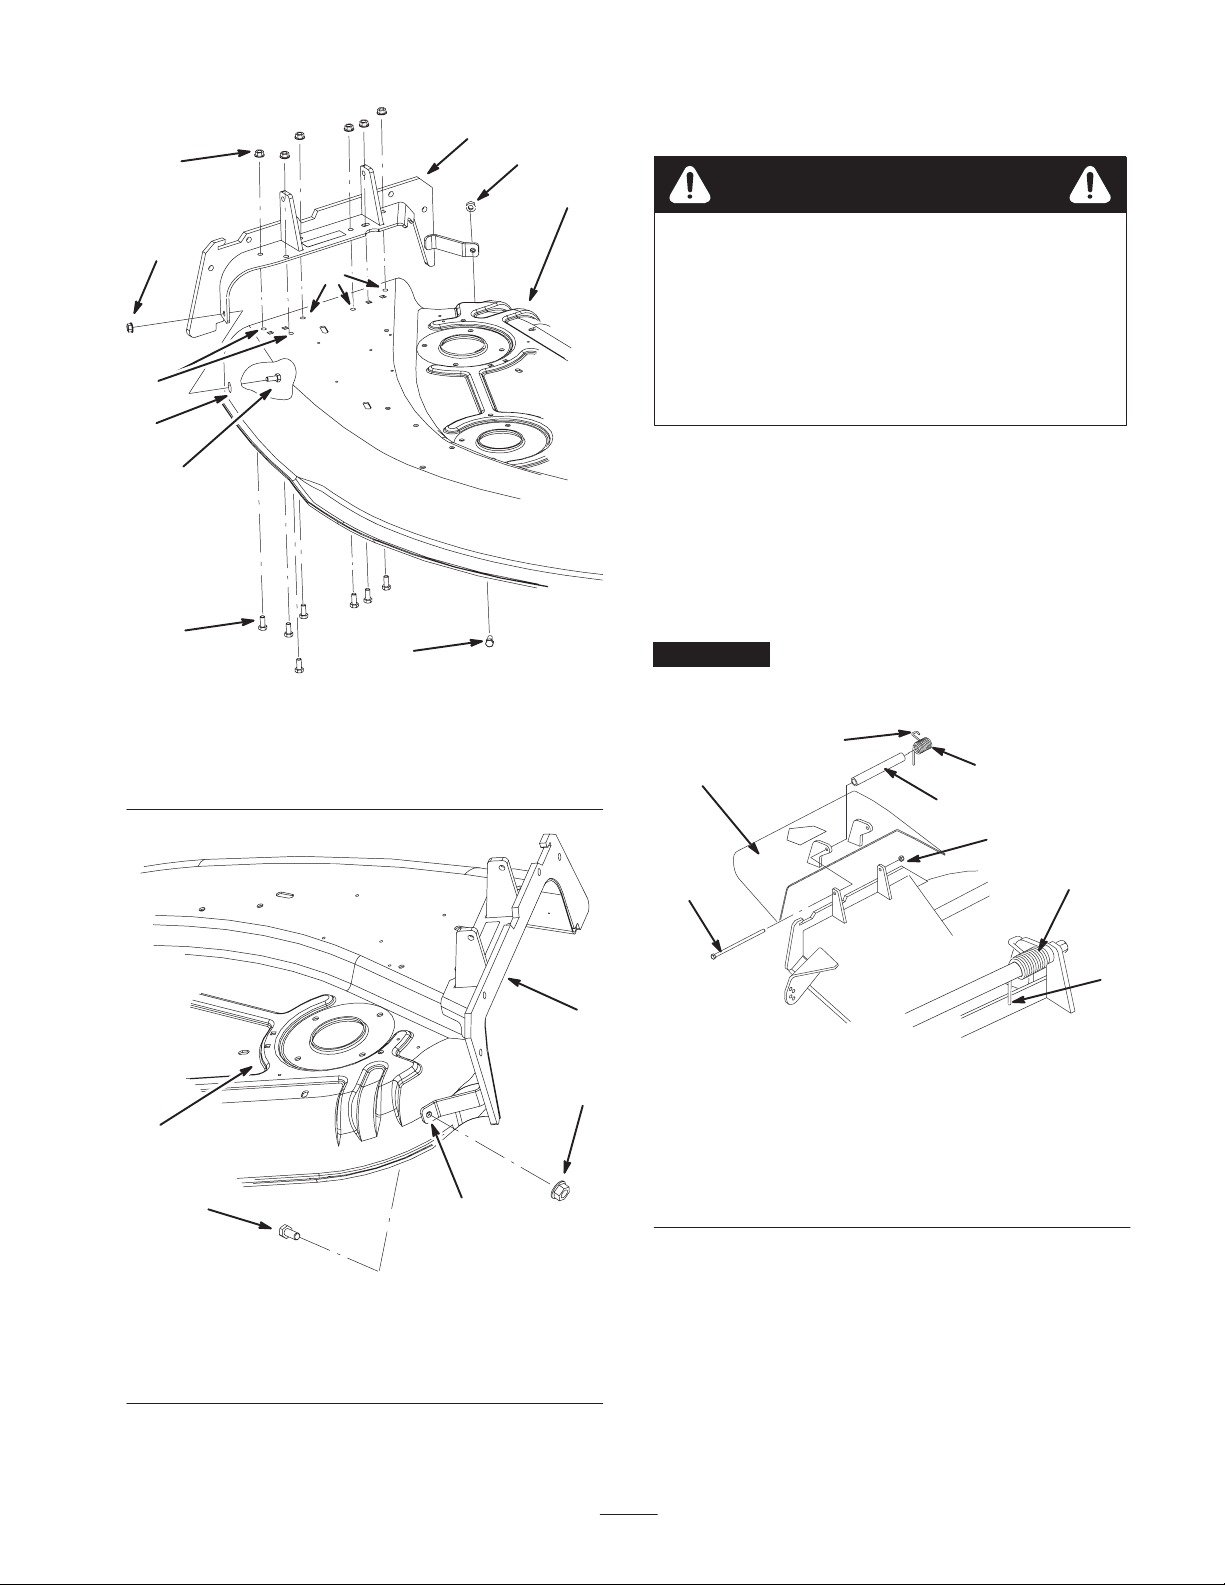
4. Using the discharge bracket as a template, drill 7 holes
(11/32 inch dia.) into the top and sides of the mower
(Figures 4 and 5).
5. Install the discharge bracket to the mower with 7 bolts
(5/16 x 3/4 inch) and 7 flange nuts (5/16 inch)
(Figures 4 and 5).
Important Make sure the bolt heads are installed on the
inside of the cutting chamber. See Figures 4 and 5.
2
Page 3
4
2
2
3
Installing the Grass Deflector
Warning
2
5
5
1
1
1. Bolt, 5/16 x 3/4 inch
2. Flange nut, 5/16 inch
3. Mower
5
Figure 4
1
4. Deflector bracket
5. Hole to drill
m–6148
An uncovered discharge opening could allow the
lawn mower to throw objects in the operator’s or
bystander’s direction and result in serious injury.
Also, contact with the blade could occur.
Never operate the lawn mower unless you install a
cover plate, a mulch plate, or a grass chute and
catcher.
1. Place spacer and spring onto grass deflector. Place the
straight end of spring behind deck edge.
Note: Make sure the straight end of spring is installed
behind deck edge before installing the bolt as shown in
Figure 6.
2. Install bolt and nut. Place hook end of spring around
grass deflector (Fig. 6).
Important The grass deflector must be able to lower
down into position. Lift the deflector up to test that it
lowers into the full down position.
8
6
4
2
3
3
1
1. Bolt, 5/16 x 3/4 inch
2. Flange nut, 5/16 inch
3. Mower
Figure 5
5
4. Deflector bracket
5. Hole to drill
m–6140
1
5
7
4
m–5037
2
1. Bolt
2. Spacer
3. Locknut
4. Spring
5. Spring installed
Figure 6
6. Grass Deflector
7. Place behind deck edge
before installing bolt
8. Hook end of spring
3
Page 4
Installing the Baffles for the
Z Master DFS Bagger Only
3
5
Note: This section is only needed when installing the front
baffle for the Z Master DFS Bagger.
Installing the Front Tunnel Baffle
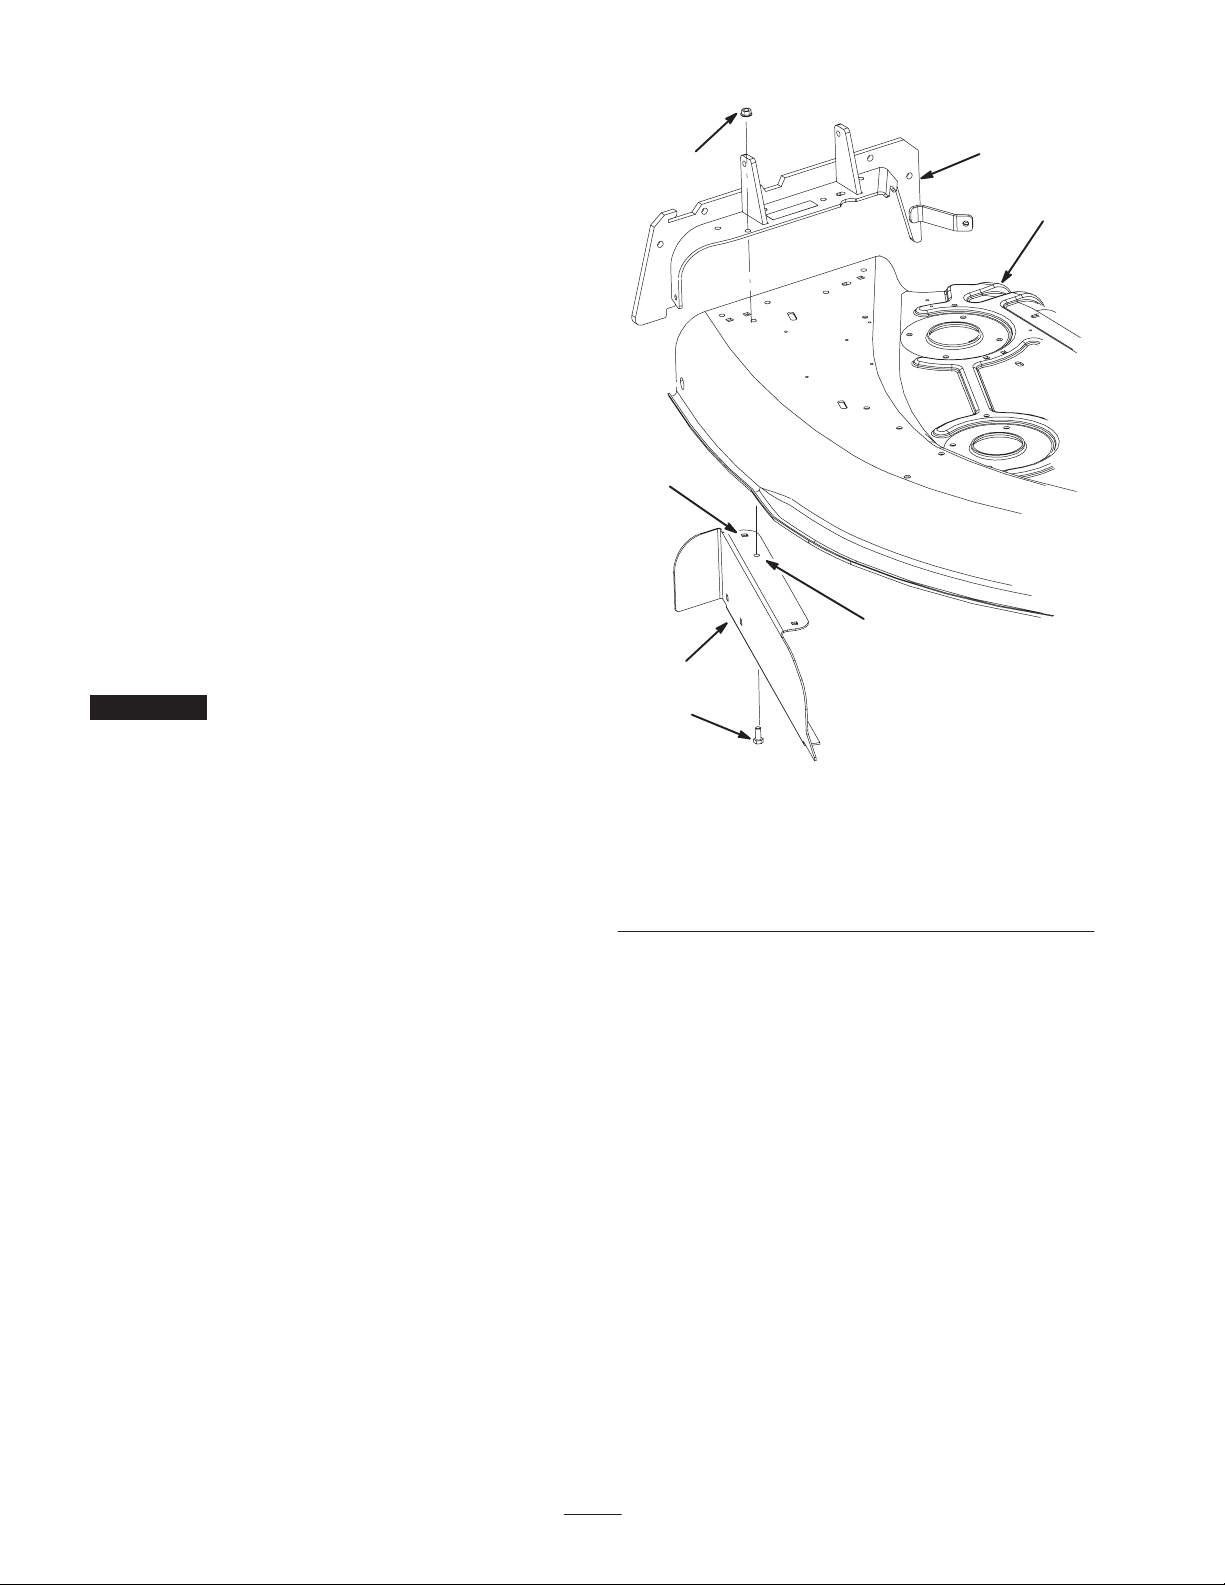
When using the deflector bracket, one new hole will need
to be drilled into the front tunnel baffle. See Figure 7.
1. If the deflector bracket is installed before the front
tunnel baffle, remove the one bolt (5/16 x 3/4 inch) and
flange nut (5/16 inch) shown in Figure 7.
2. Install the front baffle as instructed in the Boot and
Tube Kit. Do not use the existing hole shown in
Figure 7.
3. With the discharge bracket and the front tunnel baffle
installed, drill a hole (11/32 inch dia.) into the front
tunnel baffle shown in Figure 7.
4. Install the front tunnel baffle to the mower and the
deflector bracket using one bolt (5/16 x 3/4 inch) and a
flange nut (5/16 inch).
Important Make sure the bolt head is installed on the
inside of the cutting chamber. See Figure 7.
7
2
1
1. Bolt, 5/16 x 3/4 inch
2. Front tunnel baffle—for
Z Master DFS bagger
3. Flange nut
4. Mower
4
6
m–6139
Figure 7
5. Deflector bracket
6. Drill new hole
7. Do not use this existing
hole
Installing the Rear Tunnel Baffle
There are no holes to drill in the rear tunnel baffle.
4
Page 5
Installing the Baffles for the
Z Master Soft Bagger Only
Note: This section is only needed when installing the front
and rear baffles for the Z Master Soft Bagger.
Installing the Front Tunnel Baffle
When using the deflector bracket, one new hole will need
to be drilled into the front tunnel baffle. See Figure 8.
1. If the discharge bracket is installed, remove the one
front baffle bolt (5/16 x 3/4 inch) from the existing hole
shown in Figure 8.
2. Install the front baffle as instructed in the Finishing Kit.
Do not use the existing hole shown in Figure 7.
3. With the discharge bracket and the front tunnel baffle
installed, drill a hole (11/32 inch dia.) into the front
tunnel baffle shown in Figure 8.
4
7
6
5
7
9
2
8
9
4. Install the front tunnel baffle to the mower and the
deflector bracket using one bolt (5/16 x 3/4 inch) and a
flange nut (5/16 inch).
Important Make sure the bolt head is installed on the
inside of the cutting chamber. See Figure 8.
3
1
1
m–6166
Figure 8
1. Bolt, 5/16 x 3/4 inch
2. Front tunnel baffle—for
Z Master Soft bagger
3. Rear tunnel baffle—for
Z Master Soft bagger
4. Flange nut
5. Mower
6. Deflector bracket
7. Drill new hole in front
tunnel baffle
8. Do not use this existing
hole
9. Drill new hole in rear
tunnel baffle
Installing the Rear Tunnel Baffle
When using the deflector bracket, two new holes will
need to be drilled into the front tunnel baffle. See Figure 8.
1. Install the rear baffle as instructed in the Finishing Kit.
2. With the discharge bracket and the rear tunnel baffle
installed, drill two holes (11/32 inch dia.) into the rear
tunnel baffle shown in Figure 8.
3. Install the rear tunnel baffle to the mower and the
deflector bracket using 2 bolts (5/16 x 3/4 inch) and
2 flange nuts (5/16 inch).
5
Page 6

678
Page 7

Page 8

 Loading...