

Page 1

Bagger Dump Kit
for Out Front Z
FORM NO. 3323-106
Part No. 100–2441
Loose
Note: Use the chart below to identify parts for assembly.
DESCRIPTION QTY. USE
Dump Plate
Hopper Floor Plate
Screw
Flat W
Locknut
Emitter Bracket
Parts
asher
1
1
2
2
2
1
Install Dump Plate
Install Hopper Floor
Install Emitter Bracket
INSTALLATION
INSTRUCTIONS
Printed in USA
The T
oro Company – 1999
All Rights Reserved
Page 2
Installation Instructions
Installing
Dump Plate
1. Disengage the power take off (PTO), set the
parking brake, and turn the ignition key to
“OFF” to stop the engine. Remove the key.
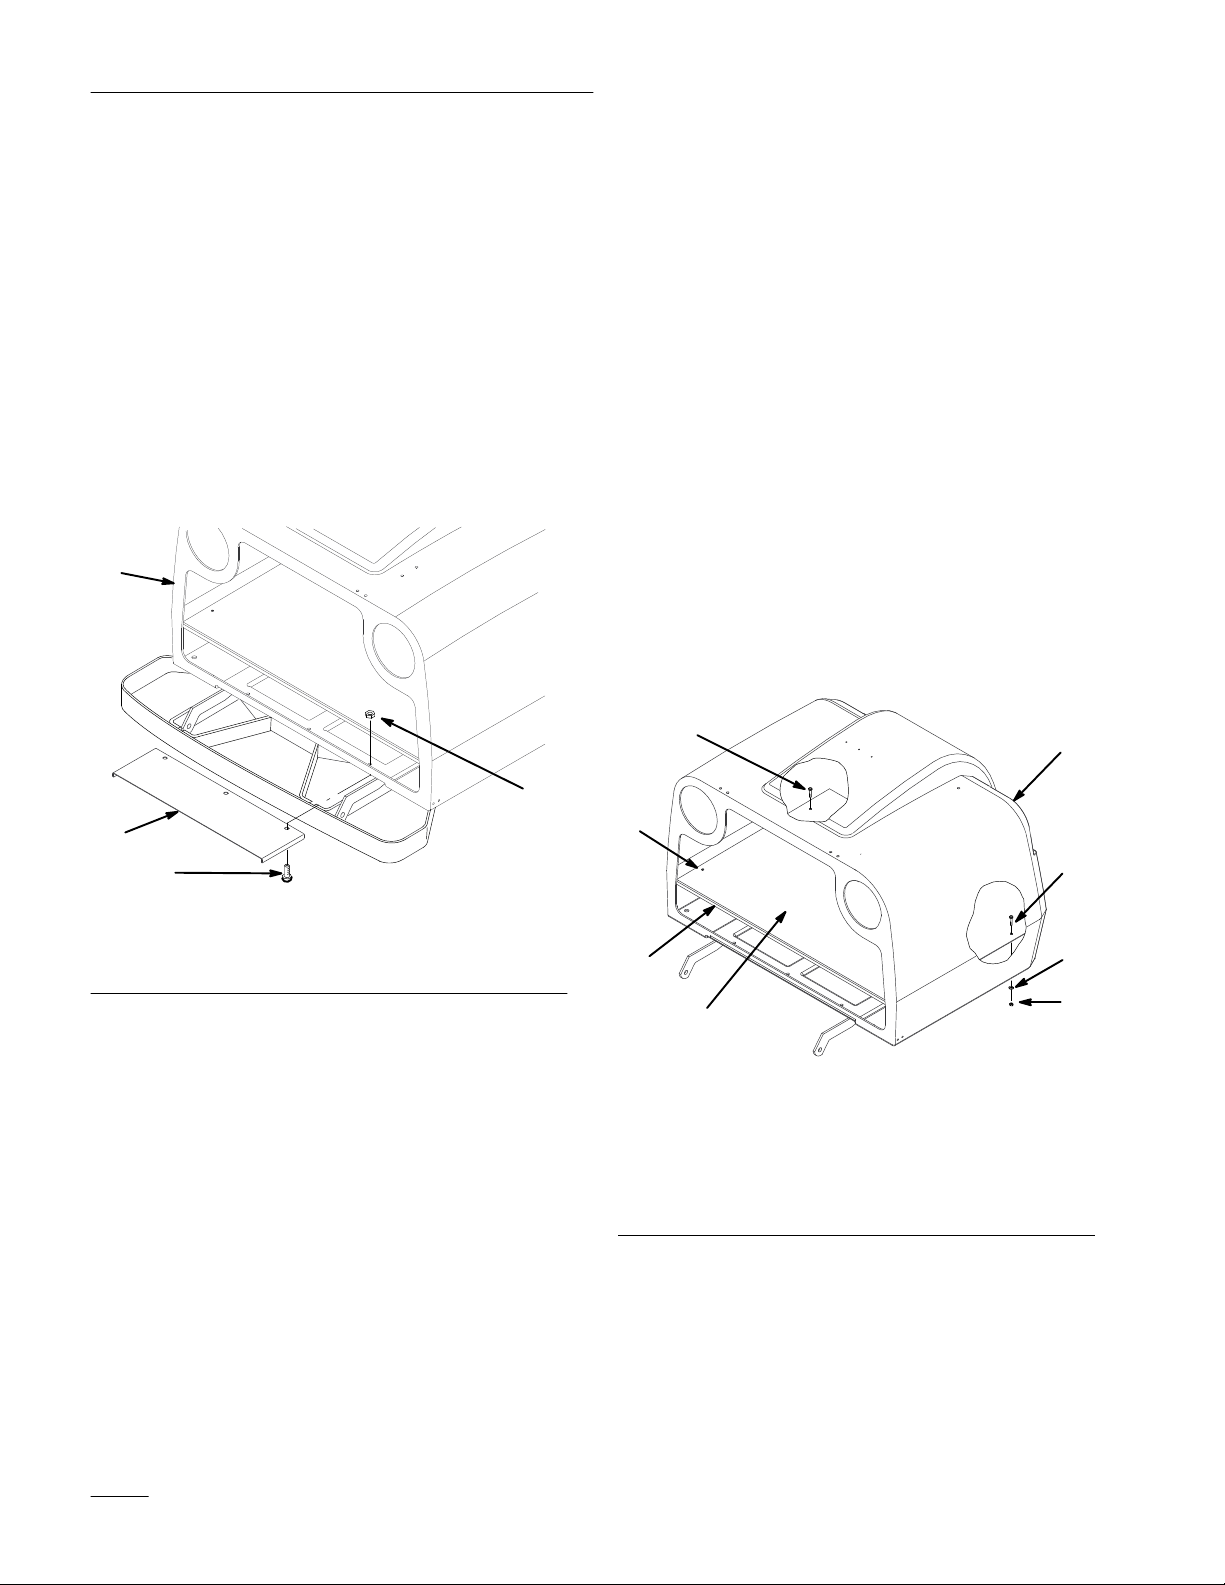
2. Remove the existing three bolts that hold hopper
to the frame (Fig. 1). Save existing hardware.
3. Slide the dump plate under the hopper. Align
holes with the existing holes in hopper and
frame (Fig. 1).
4. Install nuts and bolts (Fig. 1).
1
Installing
Hopper Floor Plate
1. Lift rear hopper door. Clean out any loose grass
and debris.
2. Tilt hopper floor plate at an angle to place it into
the hopper.
Note: The bent tabs must face down. Short
tab must be towards back of hopper
(Fig. 2).
3. Using the two front holes in floor as a template,
drill two 9/32 holes into the floor of the hopper
(Fig. 2).
4. Install a screw, flat washer and nut to fasten the
floor plate to hopper floor (Fig. 2).
Note: No hardware is needed in the two back
holes in hopper floor (Fig. 2).
3
1
4
1. Hopper
2. Nut
2
7
3
3
Figure 1
3. Bolt
4. Dump
Plate
6
4
5
2
Figure 2
1. Hopper
2. Hopper
3. Screw
4.
Flat W
5.
Lock Nut
Floor Plate
asher
6.
Bent T
ab (Short tab and
facing down)
7.
Rear holes in hopper floor
(No hardware required for
them)
2
Page 3

Installation Instructions
Installing
New Emitter Bracket
The new emitter bracket can be installed to allow an
earlier signal when hopper is full. The receiver
bracket must be moved also when an earlier signal is
desired.
Installing Emitter
1. Lift rear hopper door. Clean out any loose grass
and debris around emitter and receiver.
2. Remove the emitter from existing bracket
(Fig. 3). Save existing hardware.
3. Remove the existing emitter bracket and rear
wire clip (Fig. 3). Save existing hardware.
Note: The rear wire clip will need to be
reinstalled on the front hole in new
emitter bracket (Fig. 3).
4. Install emitter to new bracket. Install into lower
holes to receive an earlier signal when the
hopper is full.(Fig. 3). Use existing hardware.
5. Install new emitter bracket with wire clip in front
hole (Fig. 3). Use existing hardware.
Moving Receiver
1. Remove the receiver bracket from the front of
hopper. Keep the receiver attached to bracket
(Fig. 3). Save existing hardware.
2. Install a bolt through the bottom hole in the
hopper and into the top hole of bracket (Fig. 3).
The top hole in hopper is not used.
3. Using the bottom hole in the bracket as a
template, drill a 9/32” hole into the hopper.
Make sure the holes are in line vertically before
drilling (Fig. 3).
4. Install a bolt into the bottom hole of bracket and
drilled hole in hopper (Fig. 3).
Note: Make sure the wire between receiver,
wire clips and emitter is tight. It will
collect grass clippings if it is not.
(Fig. 3).
5
1
7
3
6
2
1. Emitter
2. New
3.
4.
Emitter Bracket
Receiver and Bracket
Hole to drill
4
Figure 3
5.
Rear Wire Clip
6.
Front of Hopper
7.
Emitter Wire
3
Page 4

Installation Instructions
4
 Loading...