

Page 1
FormNo.3382-400RevB
G015454
Workman
ModelNo.07299—SerialNo.314000001andUp
ModelNo.07299TC—SerialNo.314000001andUp
®
MDEUtilityMachine
Registeratwww.T oro.com.
OriginalInstructions(EN)
*3382-400*B
Page 2
WARNING
CALIFORNIA
Proposition65Warning
Thisproductcontainsachemicalorchemicals
knowntotheStateofCaliforniatocausecancer,
birthdefects,orreproductiveharm.
Thismachineisautilitymachineintendedtobeusedby
professional,hiredoperatorsincommercialapplications.It
isprimarilydesignedforthetransportofimplementsusedin
suchapplications.Thismachineallowsforthesafetransport
ofanoperatorandonepassengerintheidentiedseats.The
bedofthismachineisnotsuitableforanyriders.
ThisproductcomplieswithallrelevantEuropeandirectives;
fordetails,pleaseseetheseparateproductspecicDeclaration
ofConformity(DOC)sheet.
Introduction
ModelNo.
SerialNo.
Thismanualidentiespotentialhazardsandhassafety
messagesidentiedbythesafetyalertsymbol(Figure2),
whichsignalsahazardthatmaycauseseriousinjuryordeath
ifyoudonotfollowtherecommendedprecautions.
Figure2
1.Safetyalertsymbol
Thismanualuses2wordstohighlightinformation.
Importantcallsattentiontospecialmechanicalinformation
andNoteemphasizesgeneralinformationworthyofspecial
attention.
Readthisinformationcarefullytolearnhowtooperateand
maintainyourproductproperlyandtoavoidinjuryand
productdamage.Youareresponsibleforoperatingthe
productproperlyandsafely.
YoumaycontactTorodirectlyatwww .Toro.comforproduct
andaccessoryinformation,helpndingadealer,ortoregister
yourproduct.
Wheneveryouneedservice,genuineT oroparts,oradditional
information,contactanAuthorizedServiceDealerorToro
CustomerServiceandhavethemodelandserialnumbersof
yourproductready.Figure1identiesthelocationofthe
modelandserialnumbersontheproduct.Writethenumbers
inthespaceprovided.
1.Modelandserialnumberlocation
©2014—TheToro®Company
8111LyndaleAvenueSouth
Bloomington,MN55420
Figure1
Contactusatwww.Toro.com.
2
PrintedintheUSA.
AllRightsReserved
Page 3

Contents
Introduction..................................................................2
Safety...........................................................................4
SafeOperatingPractices...........................................4
BeforeOperating....................................................4
Operation...............................................................4
HandlingandServicingBatteries...............................6
Maintenance...........................................................7
SoundPressure.......................................................7
Hand-armVibration................................................7
Whole-bodyVibration.............................................7
SafetyandInstructionalDecals.................................8
Setup...........................................................................11
1InstallingtheSteeringWheel..................................11
2InstallingtheBatteries..........................................11
3CheckingtheTirePressure....................................13
4SettingtheChargerVoltage(model07299TC
only).................................................................14
5ReadingtheManualandViewingtheSafety
Video................................................................14
ProductOverview.........................................................15
Controls...............................................................15
Specications........................................................17
Attachments/Accessories........................................17
Operation....................................................................18
ThinkSafetyFirst...................................................18
PreformingPre-startingChecks................................18
CheckingtheTirePressure......................................18
OperatingtheMachine............................................18
StoppingtheMachine.............................................18
ParkingtheMachine...............................................18
UnderstandingandUsingtheBatterySystem..............18
OperatingtheCargoBox.........................................20
BreakinginaNewMachine......................................22
TransportingtheMachine........................................22
TowingtheMachine...............................................22
TowingaMachine..................................................23
Maintenance.................................................................24
RecommendedMaintenanceSchedule(s)......................24
DailyMaintenanceChecklist....................................24
PremaintenanceProcedures........................................25
MaintainingtheMachineunderSpecialOperating
Conditions.........................................................25
LiftingtheMachine................................................25
AccessingtheHood................................................26
Lubrication...............................................................26
AddingGrease.......................................................26
ElectricalSystemMaintenance....................................27
MaintainingtheBatteries.........................................27
ReplacingtheFuses................................................29
ReplacingtheHeadlights.........................................29
DriveSystemMaintenance.........................................30
InspectingtheTires................................................30
AdjustingtheFrontWheelToe-inand
Camber.............................................................30
CheckingtheTransaxle-oilLevel..............................32
ChangingtheTransaxleOil......................................32
BrakeMaintenance....................................................33
CheckingtheBrake-uidLevel.................................33
InspectingtheBrakes..............................................33
AdjustingtheParkingBrake.....................................33
Cleaning...................................................................34
WashingtheMachine..............................................34
Storage........................................................................34
Troubleshooting...........................................................35
3
Page 4

Safety
Improperuseormaintenancebytheoperatororownercan
resultininjury.Toreducepotentialinjury,complywith
thesesafetyinstructionsandalwayspayattentiontothe
safetyalertsymbol,whichmeansCaution,Warning,or
Danger—“personalsafetyinstruction.”Failuretocomply
withtheinstructionmayresultinpersonalinjuryordeath.
Supervisors,operators,andservicepersonsshouldbefamiliar
withthefollowingstandardsandpublications(thematerial
maybeobtainedfromtheaddressshown):
SAEJ2258LightUtilitymachine
SAEInternational,400CommonwealthDrive,Warrendale,
PA15096-0001U .S.A.
SafeOperatingPractices
WARNING
Themachineisanoff-highwayvehicleonly,andis
notdesigned,equipped,ormanufacturedforuseon
publicroads.Usingitonapublicroadmayresult
inanaccident,whichcouldseriouslyinjureorkill
youorothers.
Donotusethismachineonpublicroads.
Supervisor'sResponsibilities
•Makesurethatoperatorsarethoroughlytrainedand
familiarwiththeOperator'sManualandalllabelsonthe
machine.
•Besuretoestablishyourownspecialproceduresand
workrulesforunusualoperatingconditions(e.g.slopes
toosteepformachineoperation).
Note:Thismachinehasasupervisorspeedlimitswitchto
allowyoutolimitthemaximumspeedthattheoperatorcan
drivethemachine.
BeforeOperating
•Operatethemachineonlyafterreadingandunderstanding
thecontentsofthismanual.
•Neverallowchildrentooperatethemachine.Anyone
whooperatesthemachineshouldhaveamotorvehicle
license.
•Neverallowotheradultstooperatethemachinewithout
rstreadingandunderstandingtheOperator'sManual.
Onlytrainedandauthorizedpersonsshouldoperatethis
machine.Makesurethatalloperatorsarephysicallyand
mentallycapableofoperatingthemachine.
•Thismachineisdesignedtocarryonlyyou,the
operator,andonepassengerintheseatprovidedbythe
manufacturer.Nevercarryanyotherpassengersonthe
machine.
•Neveroperatethemachinewhenundertheinuence
ofdrugsoralcohol.Evenprescriptiondrugsandcold
medicinescancausedrowsiness.
•Donotdrivethemachinewhenyouaretired.Besureto
takeoccasionalbreaks.Itisveryimportantthatyoustay
alertatalltimes.
•Becomefamiliarwiththecontrolsandknowhowtostop
themachinequickly.
•Keepallshields,safetydevices,anddecalsinplace.Ifa
shield,safetydevice,ordecalismalfunctioning,illegible,
ordamaged,repairorreplaceitbeforeoperatingthe
machine.
•Alwayswearsubstantialshoes.Donotoperatethe
machinewhilewearingsandals,tennisshoesorsneakers.
Donotwearloosettingclothingorjewelrywhichcould
getcaughtinmovingpartsandcausepersonalinjury.
•Wearingsafetyglasses,safetyshoes,longpants,anda
helmetisadvisableandrequiredbysomelocalsafetyand
insuranceregulations.
•Avoiddrivingwhenitisdark,especiallyinunfamiliar
areas.Ifyoumustdrivewhenitisdark,besuretodrive
cautiously,usetheheadlights,andevenconsideradding
additionallights.
•Beextremelycarefulwhenoperatingaroundpeople.
Alwaysbeawareofwherebystandersmightbe.
•Beforeoperatingthemachine,alwayscheckthedesignated
areasofthemachinethatarestatedinthepre-starting
sectionofthismanual.Ifsomethingiswrong,donotuse
themachine.Makesurethattheproblemiscorrected
beforethemachineorattachmentisoperated.
Operation
•Theoperatorandpassengershouldremainseated
wheneverthemachineisinmotion.Theoperatorshould
keepbothhandsonthesteeringwheelwheneverpossible,
andthepassengershouldusethehandholdsprovided.
Keepyourarmsandlegswithinthemachinebodyatall
times.
•Driveslowerandturnlesssharplywhenyouarecarrying
apassenger.Rememberyourpassengermaynotbe
expectingyoutobrakeorturnandmaynotbeready.
•Alwayswatchoutforandavoidlowoverhangssuchas
treelimbs,doorjambs,andoverheadwalkways.Make
surethereisenoughroomoverheadtoeasilyclearthe
machineandyourhead.
•Failuretooperatethemachinesafelymayresultinan
accident,tipoverofthemachine,andseriousinjuryor
death.Drivecarefully.Topreventtippingorlossof
control:
–Useextremecaution,reducespeed,andmaintain
asafedistancearoundsandtraps,ditches,creeks,
ramps,unfamiliarareas,oranyareasthathaveabrupt
changesingroundconditionsorelevation.
4
Page 5

–Watchforholesorotherhiddenhazards.
–Useextracautionwhenoperatingthemachineon
wetsurfaces,inadverseweatherconditions,athigher
speeds,orwithafullload.Stoppingtimeanddistance
willincreasewithafullload.
–Avoidsuddenstopsandstarts.Donotgofrom
reversetoforwardorforwardtoreversewithoutrst
comingtoacompletestop.
–Slowdownbeforeturning.Donotattemptsharp
turnsorabruptmaneuversorotherunsafedriving
actionsthatmaycausealossofmachinecontrol.
–Whendumping,donotletanyonestandbehindthe
machineanddonotdumptheloadonanyone'sfeet.
Releasethetailgatelatchesfromthesideofthebox,
notfrombehind.
–Onlyoperatethemachinewhenthecargoboxis
downandlatched.
–Beforebackingup,looktotherearandensurethat
nooneisbehindyou.Backupslowly.
–Watchoutfortrafcwhenyouarenearorcrossing
roads.Alwaysyieldtherightofwaytopedestrians
andothermachines.Thismachineisnotdesignedfor
useonstreetsorhighways.Alwayssignalyourturns
orstopearlyenoughsothatotherpeopleknowwhat
youplantodo.Obeyalltrafcrulesandregulations.
–Theelectricalsystemofthemachinecanproduce
sparkscapableofignitingexplosivematerials.Never
operatethemachineinornearanareawherethereis
dustorfumesintheairwhichareexplosive.
–Ifyouareeverunsureaboutsafeoperation,stopwork
andaskyoursupervisor.
•Ifthemachineevervibratesabnormally,stopimmediately,
waitforallmotiontostop,andinspectthemachinefor
damage.Repairalldamagebeforecommencingoperation.
•Beforegettingofftheseat:
1.Stopthemovementofthemachine.
2.Settheparkingbrake.
3.TurnthekeytotheOffposition.
4.Removethekey.
Note:Ifthemachineisonanincline,blockthe
wheelsaftergettingoffofthemachine.
5.Lightningcancausesevereinjuryordeath.If
lightningisseenorthunderisheardinthearea,do
notoperatethemachine;seekshelter.
Braking
•Slowdownbeforeyouapproachanobstacle.This
givesyouextratimetostoporturnaway.Hittingan
obstaclecandamagethemachineanditscontents.More
important,itcaninjureyouandyourpassenger.
•Grossmachineweight(GVW)hasamajorimpactonyour
abilitytostopand/orturn.Heavyloadsandattachments
makeamachinehardertostoporturn.Theheavierthe
load,thelongerittakestostop.RefertoLoadingthe
CargoBox(page21)formoreinformation.
•Decreasethemachinespeedifthecargoboxhasbeen
removedandthereisnoattachmentonthemachine.The
brakingcharacteristicschangeandfaststopsmaycause
therearwheelstolockup,whichmayaffectthecontrol
ofthemachine.
•Turfandpavementaremuchmoreslipperywhenthey
arewet.Itcantake2to4timesaslongtostoponwet
surfacesasondrysurfaces.Ifyoudrivethroughstanding
waterdeepenoughtogetthebrakeswet,theywillnot
workwelluntiltheyaredry.Afterdrivingthroughwater,
youshouldtestthebrakestomakesuretheywork
properly.Iftheydonot,driveslowlywhileputtinglight
pressureonthebrakepedal.Thiswilldrythebrakesout.
OperatingonHills
WARNING
Operatingthemachineonahillmaycausetipping
orrollingofthemachine,orthebatteriesmayrun
lowandyoucouldloseheadwayonthehill.This
couldresultinpersonalinjury.
•Donotoperatethemachineonexcessivelysteep
slopes.
•Donotacceleratequicklyorslamonthebrakes
whenbackingdownahill,especiallywithaload.
•Ifthebatteriesrunloworyoubegintolose
headwaywhileclimbingahill,graduallyapply
thebrakesandslowlybackstraightdownthe
hill.
•Operatethemachineslowlyonahillanduse
caution.
•Avoidturningonahill.
•Reduceyourloadandthespeedofthemachine.
•Avoidstoppingonhills,especiallywithaload.
Theseextracautionsneedtobetakenwhenoperatingthe
machineonahillbyperformingthefollowing:
•Slowdownbeforestartingupordownahill.
•Ifthebatteriesrunloworyoubegintoloseheadway
whileclimbingahill,graduallyapplythebrakesandslowly
backstraightdownthehill.
•Turningwhiletravelingupordownhillscanbedangerous.
Ifyouhavetoturnwhileonahill,doitslowlyand
cautiously.Nevermakesharporfastturns.
•Heavyloadsaffectstability.Reducetheweightoftheload
andyourspeedwhenoperatingonhillsoriftheloadhas
ahighcenterofgravity.Securetheloadtopreventitfrom
shiftingandtakeextracarewhenhaulingloadsthatshift
easily(liquid,rock,sand,etc.).
•Avoidstoppingonhills,especiallywithaload.Stopping
whilegoingdownahillwilltakelongerthanstopping
5
Page 6

onlevelground.Ifthemachinemustbestopped,avoid
suddenspeedchanges,whichmayinitiatetippingor
rollingofthemachine.Donotslamonthebrakes
whenrollingbackward,asthismaycausethemachine
tooverturn.
•YoucaninstallanoptionalROPSkitforoperationon
hillyterrain.
OperatingonRoughTerrain
Reduceyourspeedandloadwhenoperatingonroughterrain,
unevenground,nearcurbs,holes,andothersuddenchanges
interrain.Loadsmayshift,causingthemachinetobecome
unstable.
YoucaninstallaoptionalROPSkitforoperationinrough
terrain.
WARNING
Suddenchangesinterrainmaycauseabrupt
steeringwheelmovement,possiblyresultingin
handandarminjuries.
•Reduceyourspeedwhenoperatingonrough
terrainandnearcurbs.
•Gripthesteeringwheellooselyaroundthe
perimeterkeepingthumbsupandoutoftheway
ofthesteering-wheelspokes.
LoadingandDumping
Theweightandpositionofthecargoandpassengercan
changethemachinecenterofgravityandmachinehandling.
Toavoidlossofcontrolandpersonalinjury,followthese
guidelines:
•Donotcarryloadswhichexceedtheloadlimitsdescribed
onthemachineweightlabel;refertoLoadingtheCargo
Box(page21)forthemachineweightlimits.Theload
ratingisforlevelsurfacesonly .
•Reducetheweightoftheloadwhenoperatingonhills
androughterraintoavoidtippingoroverturningofthe
machine.
•Reducetheweightoftheloadifthecenterofgravityis
high.Itemssuchasbricks,fertilizer,orlandscapetimbers
stackhigherinthebox.Thehigheraloadisstacked,the
morelikelythemachineistotipover.Distributetheload
aslowaspossible,makingsurethattheloaddoesnot
affectrearvisibility.
•Positiontheweightoftheloadevenlyfromsidetoside.
Ifyoupositiontheloadtowardoneofthesides,the
machineismorelikelytotipoverwhileturning.
•Positiontheweightofaloadevenlyfromfronttoback.
Ifyoupositiontheloadbehindtherearaxle,itwillreduce
theweightonthefrontwheels.Thismayresultinaloss
ofsteeringcontrolorcausethemachinetotipoveron
hillsorbumpyterrain.
•Useextracautioniftheloadexceedsthedimensionsof
theboxandwhenhandlingoff-centerloadsthatcannot
becentered.Keeploadsbalancedandsecuretoprevent
themfromshifting.
•Alwayssecureloadssothattheydonotshift.Ifaloadis
notsecured,oryouaretransportingaliquidinalarge
containersuchasasprayer,theloadcanshift.This
shiftinghappensmostoftenwhileturning,goingupor
downhills,suddenlychangingspeeds,orwhiledriving
overroughsurfaces.Shiftingloadscancausethemachine
totipover.
WARNING
Theweightoftheboxmaybeheavy.Handsor
otherbodypartscouldbecrushed.
–Keephandsandotherbodypartsclearwhen
loweringthebox.
–Donotdumpmaterialsonbystanders.
•Neverdumpaloadedcargoboxwhilethemachineis
sidewaysonahill.Thechangeinweightdistributionmay
causethemachinetooverturn.
•Whenoperatingwithaheavyloadinthecargobox,
reduceyourspeedandallowforsufcientbraking
distance.Donotsuddenlyapplythebrakes.Useextra
cautiononslopes.
•Beawarethatheavyloadsincreaseyourstoppingdistance
andreduceyourabilitytoturnquicklywithouttipping
over.
•Therearcargospaceisintendedforloadcarrying
purposesonly,notforpassengers.
•Neveroverloadyourmachine.Thedecal(locatedonthe
rearframe)showsloadlimitsforthemachine.Never
overloadtheattachmentsorexceedthegrossmachine
weight(GVW).
HandlingandServicing Batteries
•Toreducethepotentialforre,keepthebatteriesand
motorareafreeofexcessivegrease,grass,leaves,and
accumulationofdirt.
•Alwaysdisconnectandremoveabatterycablebefore
servicinganyelectricalcomponents.
•Disconnectinganybatterycablewillinhibitoperationof
theelectricalsystem.
•Batteryelectrolytecontainssulfuricacid.Sulfuricacid
produceshydrogengaswhich,intherightproportions,
isexplosive.
–Alwaysservice,store,andchargethemachineina
well-ventilatedarea.
–Keepsparksandopenamesawayfromthebatteries.
6
Page 7

–Donotsmokenearthebatteries.
–Neveruseanopenametocheckthelevelorleakage
ofbatteryelectrolyte.
•Usecautionwhenhandlingandworkingaround
electrolyte.Thesulfuricacidinelectrolytecanburnskin
anddamageclothing.Furthermore,itcanbeemittedasa
gasthatcandamageyourlungs.
–Wearpropereye,hand,andfaceprotection.
–Donotleanoverthebatteriesatanytime.
–Avoidbreathinginbatteryfumes.
–Fillthebatterieswherecleanwaterisalwaysavailable
forushingtheskin.
–Ifyougetelectrolyteonyourskinoreyes,ush
theaffectedareafor20minuteswithcleanwater.
Removeacid-soakedclothing.Seekmedicalattention
immediately.
–Keepchildrenandpetsawayfromthebatteriesand
electrolyte.
•Electrolyteisverypoisonous.
–Donotdrinkelectrolyte.
–Ifelectrolyteisswallowed,donotinducevomiting;
instead,drinklargeamountsofwaterormilkfollowed
bymilkofmagnesia,beatenraweggs,orvegetable
oil.Getmedicalattentionimmediately.
–Keepchildrenandpetsawayfromthebatteriesand
electrolyte.
•Whennotllingthebatteries,keepthebatteryventcaps
tightonthebatteries.Neveroperatethemachineifany
oftheventcapsaremissingordamaged.
•Whenremovingorinstallingthebatteries,donotallow
thebatteryterminalstotouchanymetalpartsofthe
machine.
•Donotallowmetaltoolstoshortbetweenthebattery
terminalsandmetalpartsofthemachine.Removeall
jewelryandwatchesbeforeservicingthebatteries.
•Donotcheckabatterychargebyplacingametalobject
acrosstheposts.Thiswillcausesparkswhichcancause
anexplosion.
•Alwayskeepthebatteryretainersinplacetoprotectand
securethebatteries.
•Readandunderstandthecharginginstructionsbefore
chargingthebatteries;refertoChargingtheBatteries
(page27).Also,takethefollowingprecautionsand
actionswhenchargingthebatteries:
–TurnthemachineOn/OffswitchtoOffbefore
connectingthechargertoapowersource.
–Useonlythebatterychargersuppliedwiththe
machinetochargethebatteries.
–Donotchargeadamagedorfrozenbattery.
–AlwaysunplugtheACpowercordfromthepower
outletbeforeunpluggingitfromthemachinecharging
receptacletoavoidsparks.
–Ifduringchargingabatterygetshot,beginsemitting
largeamountsofgasses,orspewselectrolyte,
immediatelydisconnectthechargerpowercordfrom
thepoweroutlet.Havethemachineservicedbyan
AuthorizedServiceDealerbeforeusingitagain.
Maintenance
•Onlyqualiedandauthorizedpersonnelshallbe
permittedtomaintain,repair,adjust,orinspectthe
machine.
•Beforeservicingormakingadjustmentstothemachine,
stopthemachine,settheparkingbrake,andremovethe
keytopreventsomeonefromaccidentallystartingthe
motor.
•Tomakesurethattheentiremachineisingoodcondition,
keepallnuts,bolts,andscrewsproperlytightened.
•Donotuseopenpansoffuelorammablecleaning
uidsforcleaningparts.
•Ifmajorrepairsareeverneededorassistanceisrequired,
contactanAuthorizedToroDistributor.
•Tobesureofoptimumperformanceandsafety,always
purchasegenuineTororeplacementpartsandaccessories.
Replacementpartsandaccessoriesmadebyother
manufacturerscouldbedangerous.Alteringthismachine
inanymannerthatmayaffectmachineoperation,
performance,durability ,oritsuse,mayresultininjuryor
death.Suchusecouldvoidtheproductwarranty.
SoundPressure
Thisunithasasoundpressurelevelattheoperator’searof68
dBA,whichincludestheUncertaintyValue(K)of1dBA.
Hand-armVibration
Measuredvibrationlevelforrighthand=0.43m/s²
Measuredvibrationlevelforlefthand=0.38m/s²
UncertaintyValue(K)=0.5m/s²
Measuredvaluesweredeterminedaccordingtotheprocedures
outlinedinEN1032.
Whole-bodyVibration
Measuredvibrationlevel=0.2m/s²
UncertaintyValue(K)=0.5m/s²
Measuredvaluesweredeterminedaccordingtotheprocedures
outlinedinEN1032.
7
Page 8
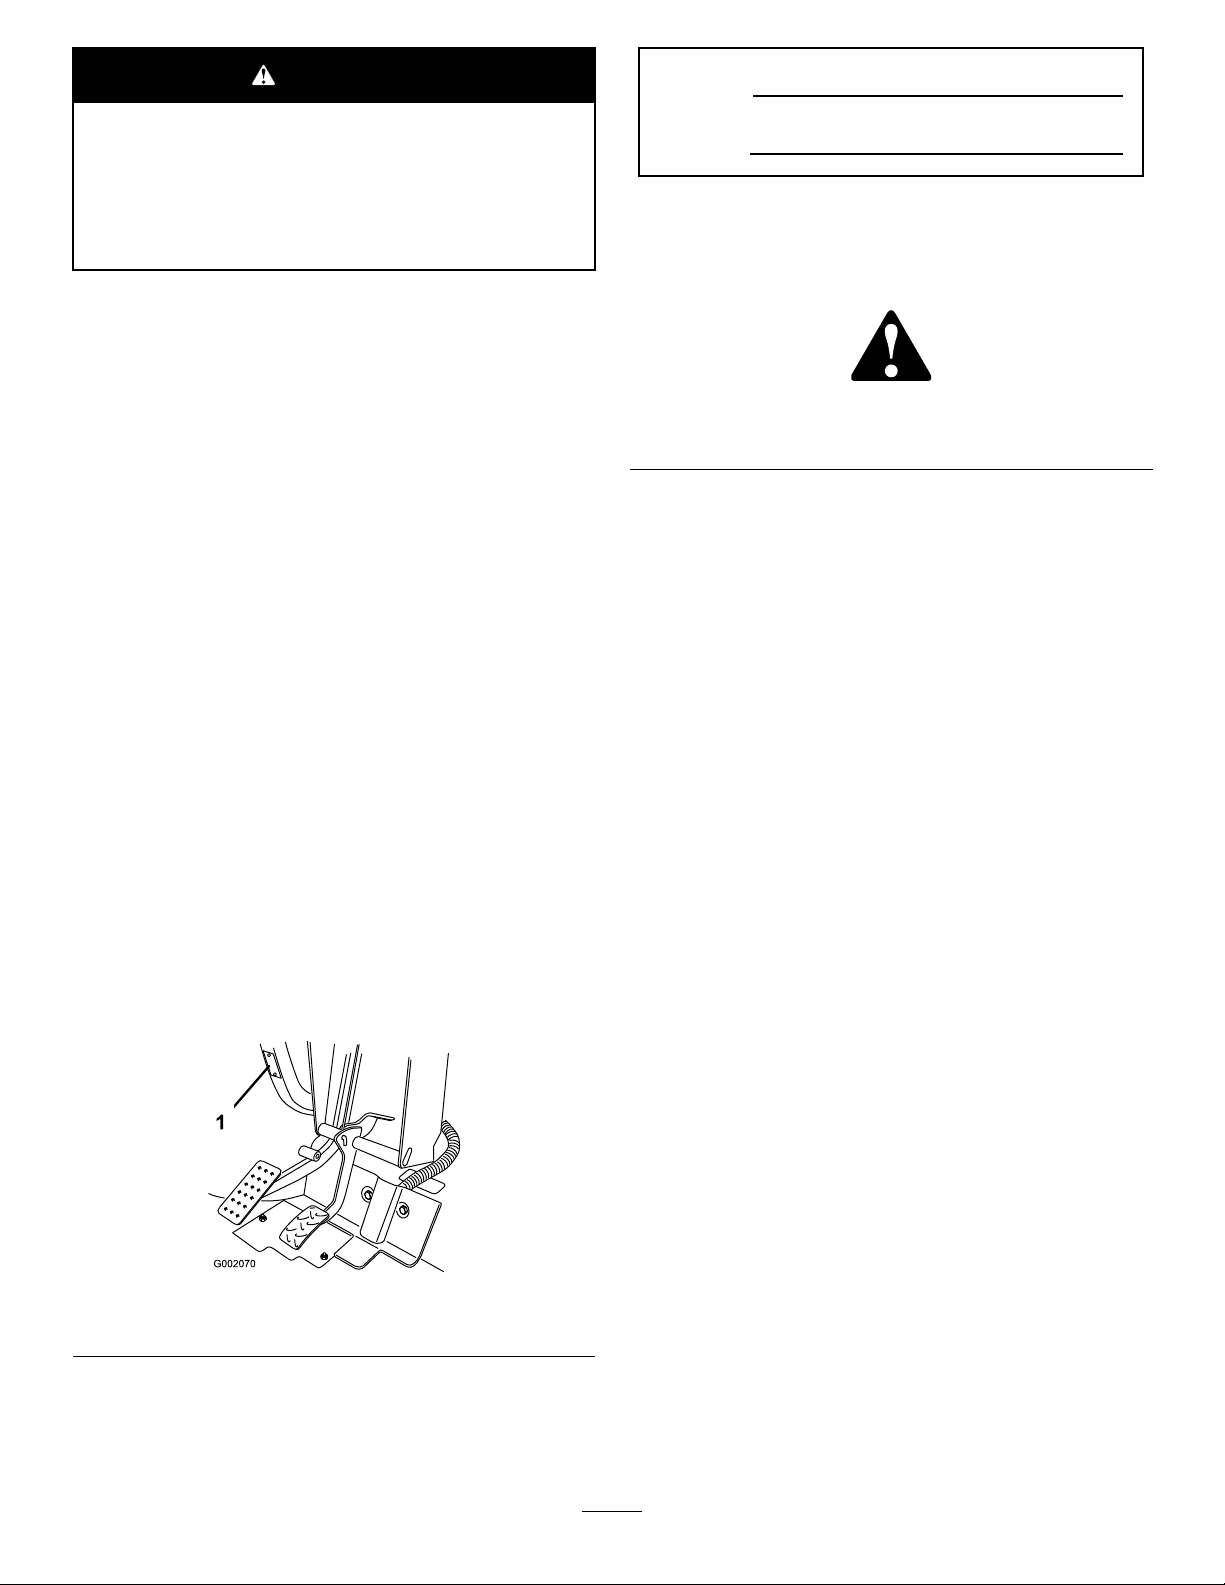
SafetyandInstructionalDecals
Safetydecalsandinstructionsareeasilyvisibletotheoperatorandarelocatednearanyareaofpotential
danger.Replaceanydecalthatisdamagedorlost.
112-3310
1.Warning—readtheOperator'sManual.10.Lighton,OK
2.Collisionhazard—donotoperatethevehicleonpublicstreets,
roads,orhighways.
3.Fallinghazard—donotcarrypassengersinthecargobed.
4.Fallinghazard—donotallowchildrentooperatethevehicle.
5.Tostartthemotor,sitontheoperator'sseat,releasethe
parkingbrake,turnthepowerkeyon,pullthechokeleverout
(ifneeded),andpresstheacceleratorpedal.
6.Tostopthemotor,releasetheacceleratorpedal,setthe
parkingbrake,turnthepowerkeyoff,andremovethepower
key.
7.Horn
8.Headlights
9.Battery/hourmeter
11.Lightblinking,readtheOperator'sManual.
12.Cargobedlift
13.Rearlift
14.Forward
15.Reverse
16.Power—Off
17.Power—On
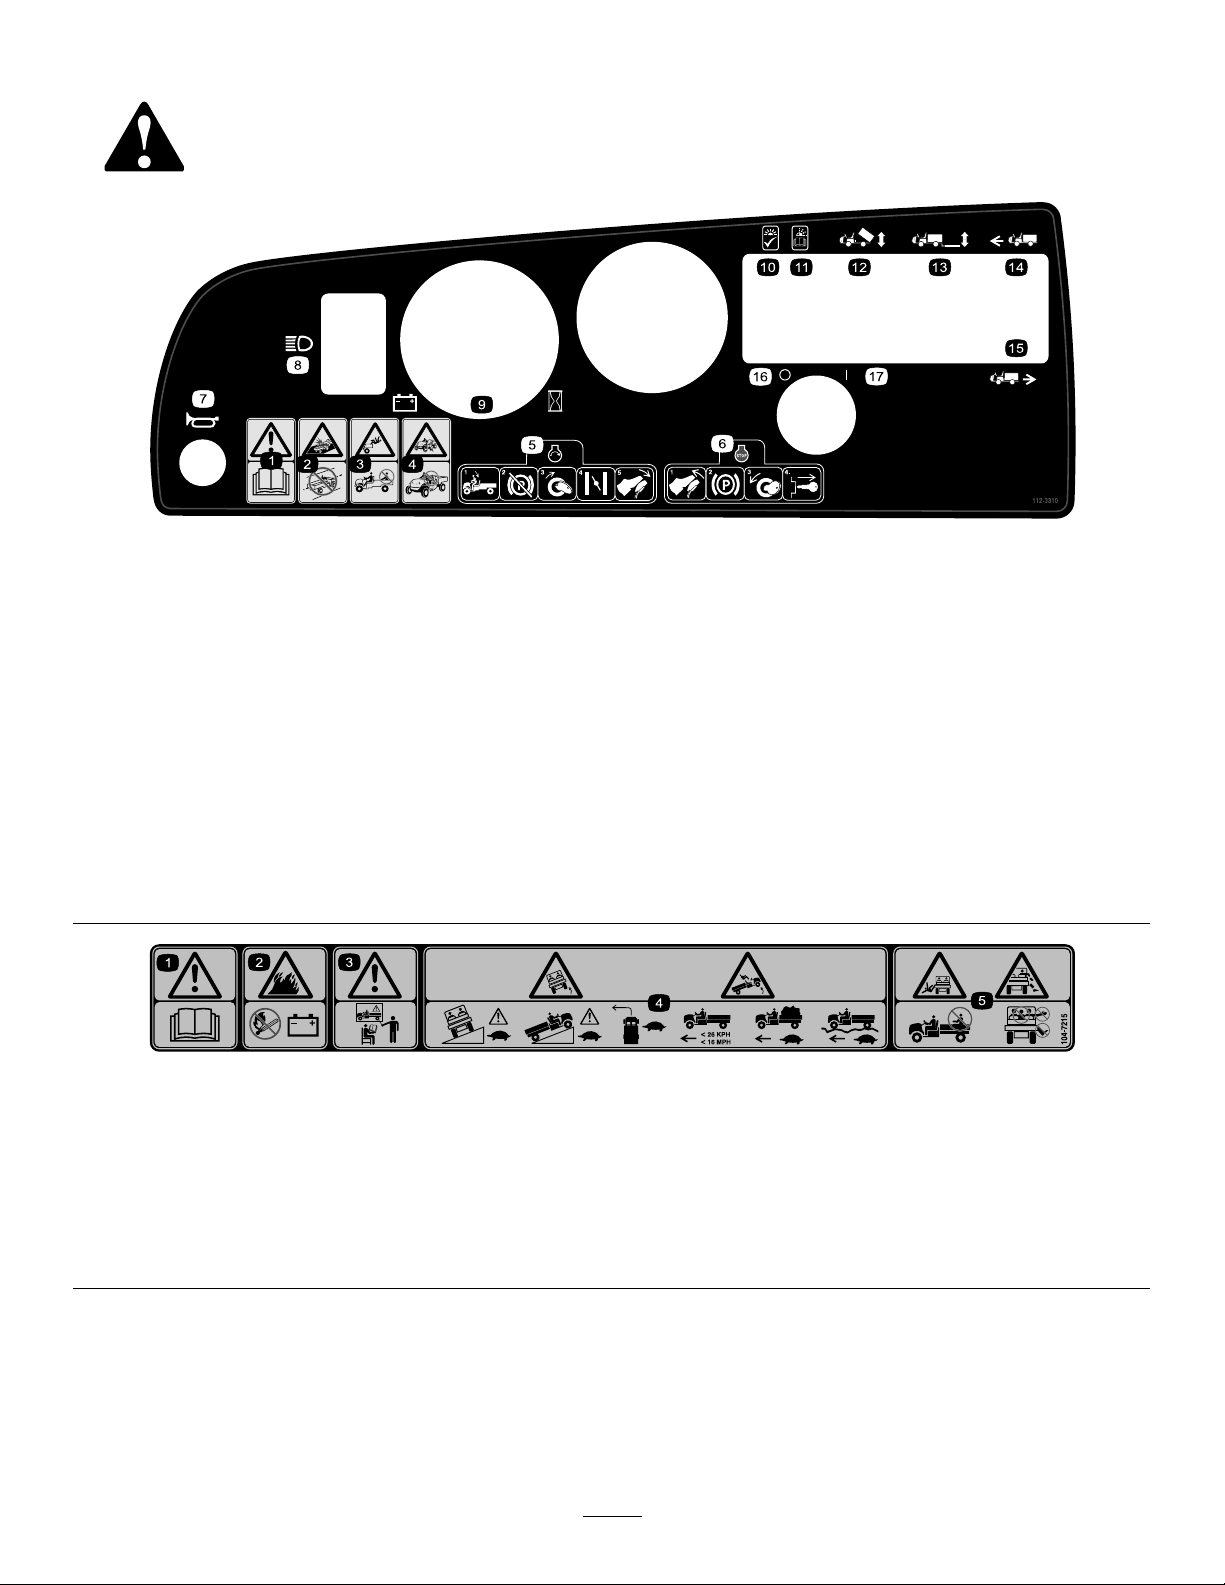
104-7215
1.Warning—readtheOperator'sManual.
2.Explosionhazard—nore,openames,orsmokingaroundbatteries.
3.Warning—donotoperatethismachineunlessyouaretrained.
4.Tippinghazard—usecautionanddriveslowlywhileonslopes;driveslowlywhenturning,keepthevehiclespeedunder16mph
(26km/h)whencarryingafullorheavyloadandwhendrivingonroughterrain.
5.Fallingandarm/leginjuryhazards—donotcarrypassengersinthecargobedandkeeparmsandlegsinsideofthevehicleatall
times.
8
Page 9
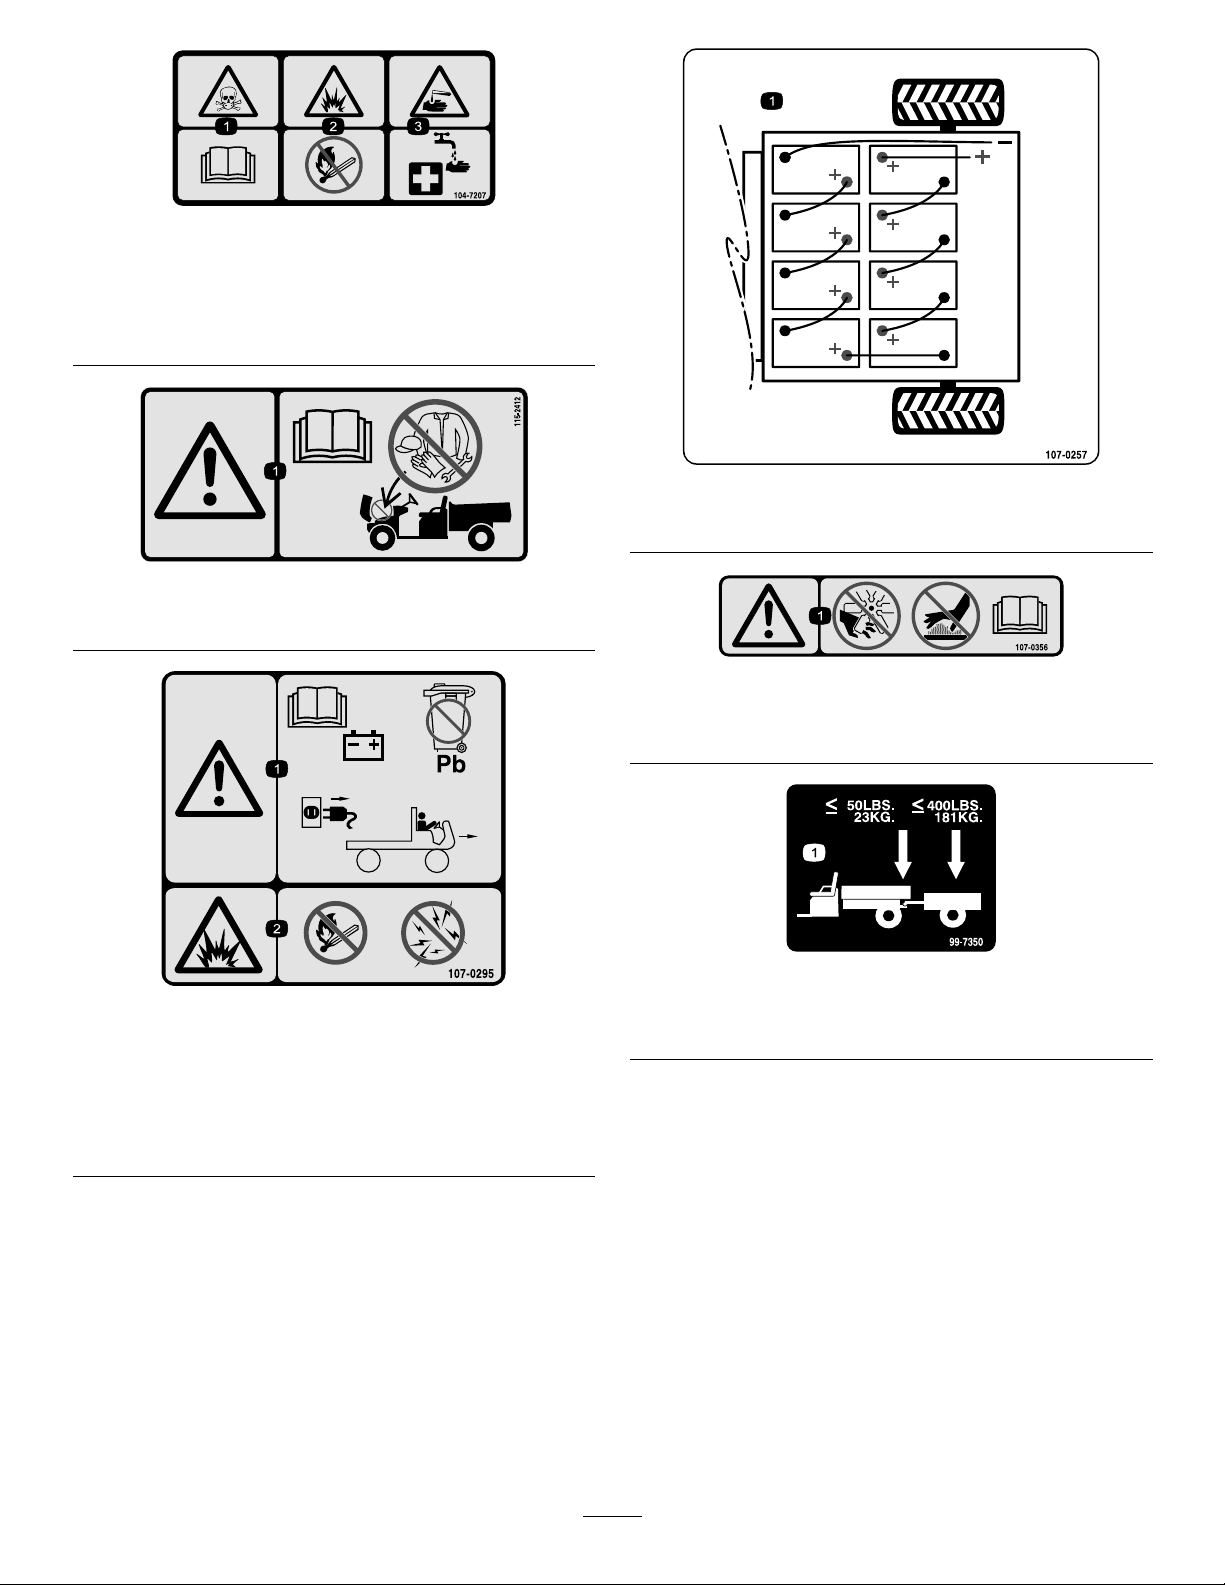
104-7207
1.Poisonhazard—readtheOperator'sManual.
2.Explosionhazard—nore,openames,orsmoking.
3.Causticliquid/chemicalburnhazard—toperformrstaid,
ushwithwater.
115-2412
1.Warning—readtheOperator'sManual;nostorage.
107-0257
1.Batteryschematic
107-0356
1.Warning—donottouchmovingobjects,fan;donottouch
thehotsurfaces;readtheOperator'sManual.
107-0295
1.Warning—readtheOperator'sManualformoreinformation
onbatteries;batteriescontainlead,donotdiscard;
disconnectthepowercordfrompowersourcebeforedriving
vehicle.
2.Explosionhazard—nore,openames,orsmoking;avoid
sparks.
99-7350
1.Maximumtongueweightis50lb(23kg);maximumtrailer
weightis400lb(181kg).
9
Page 10
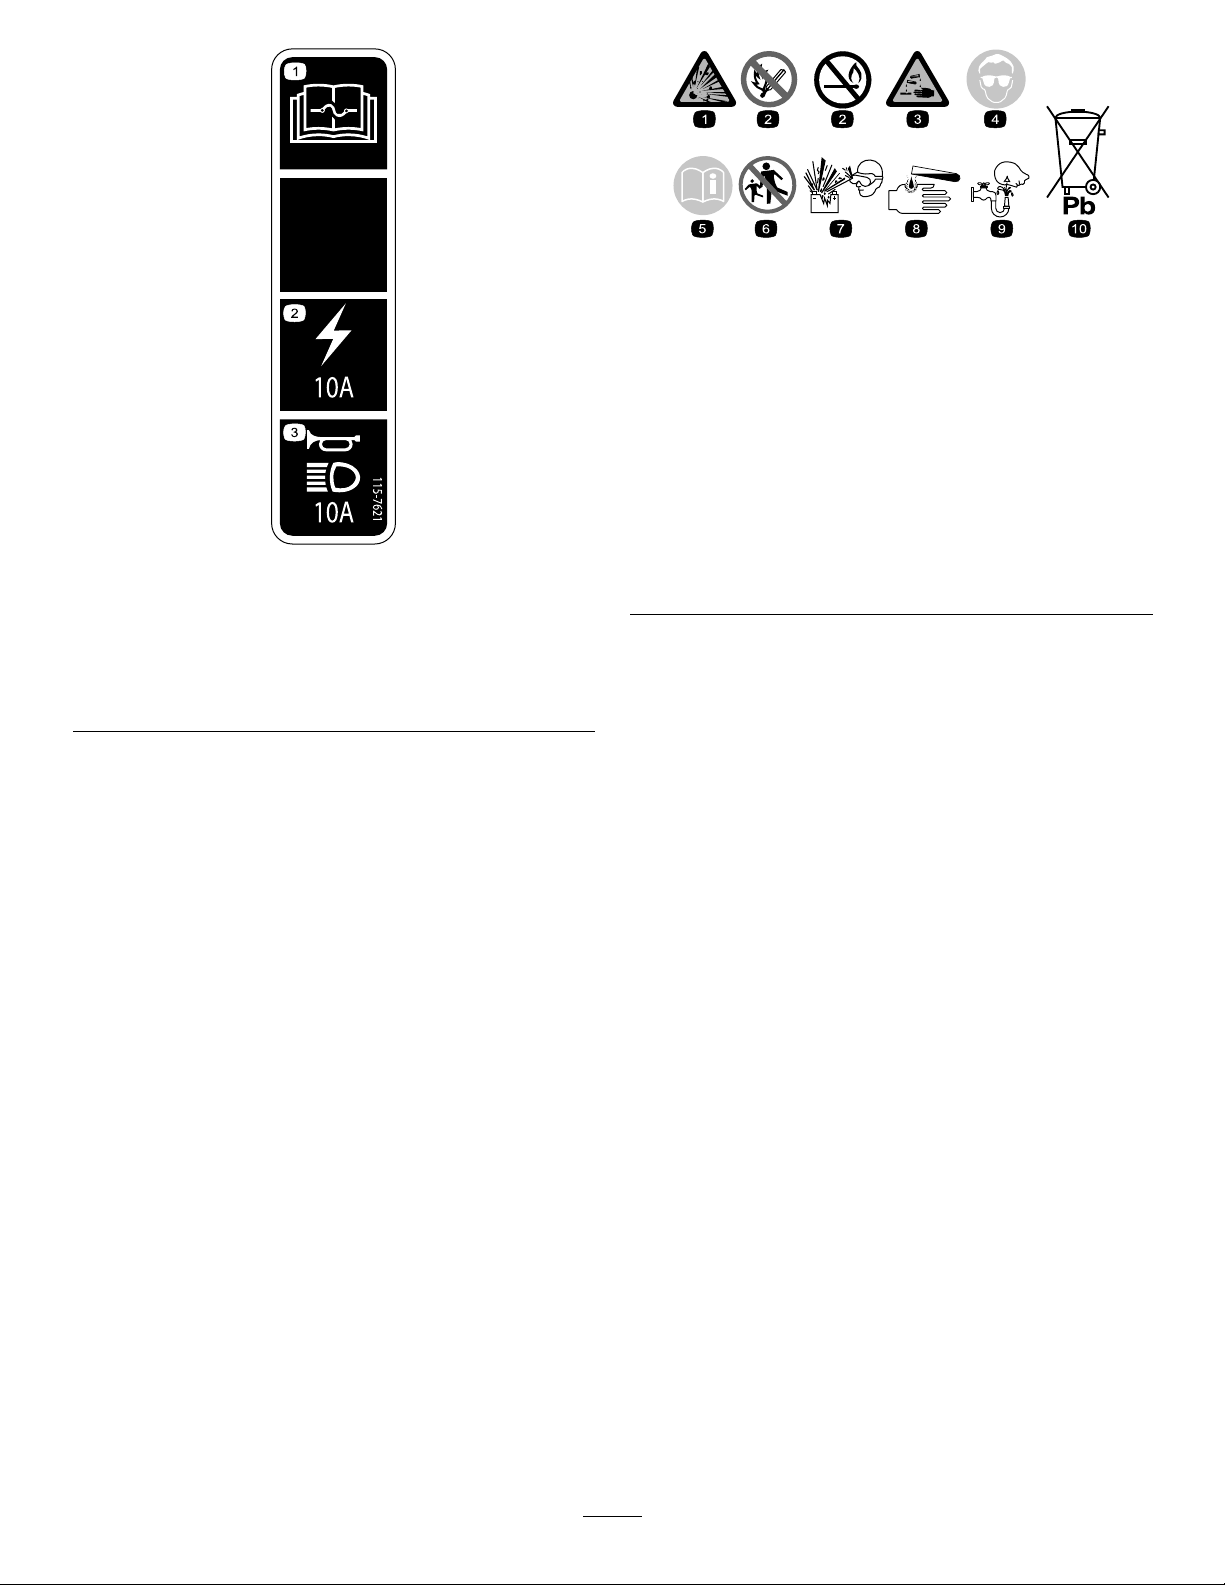
BatterySymbols
Someorallofthesesymbolsareonyourbattery
1.ReadtheOperator’s
Manualforinformationon
fuses.
2.Electrical
power/accessories—
10A
115–7621
3.Hornandlights—10A
1.Explosionhazard
2.Nore,opename,or
smoking.
3.Causticliquid/chemical
burnhazard
4.Weareyeprotection9.Flusheyesimmediately
5.ReadtheOperator's
Manual.
6.Keepbystandersasafe
7.Weareyeprotection;
8.Batteryacidcancause
10.Containslead;donot
distancefromthebattery.
explosivegasescan
causeblindnessandother
injuries
blindnessorsevereburns.
withwaterandgetmedical
helpfast.
discard.
10
Page 11
Setup
LooseParts
Usethechartbelowtoverifythatallpartshavebeenshipped.
ProcedureDescription
1
2
3
4
5
Steeringwheel
Batteryholddown2
Batteryhold-downrod2
Batterycables
Battery-traypads4
Batterypad1
Flangenut(3/8inch)
Battery-terminal-protectorspray1
Nopartsrequired
Nopartsrequired
Operator'sManual
PartsCatalog
Safetytrainingmaterial
Registrationcard1
PredeliveryInspectionForm1
CerticateofQuality
Key2
Qty.
Use
1
7
2
–
–
1
1
1
1
Installthesteeringwheel(model
07299TConly).
Installthebatteries(model07299TC
only).
Checkthetirepressure.
Setthechargervoltage(model07299TC
only).
ReadtheOperator'sManualandview
thetrainingmaterialbeforeoperating
themachine.
Note:Determinetheleftandrightsidesofthemachine
fromthenormaloperatingposition.
1
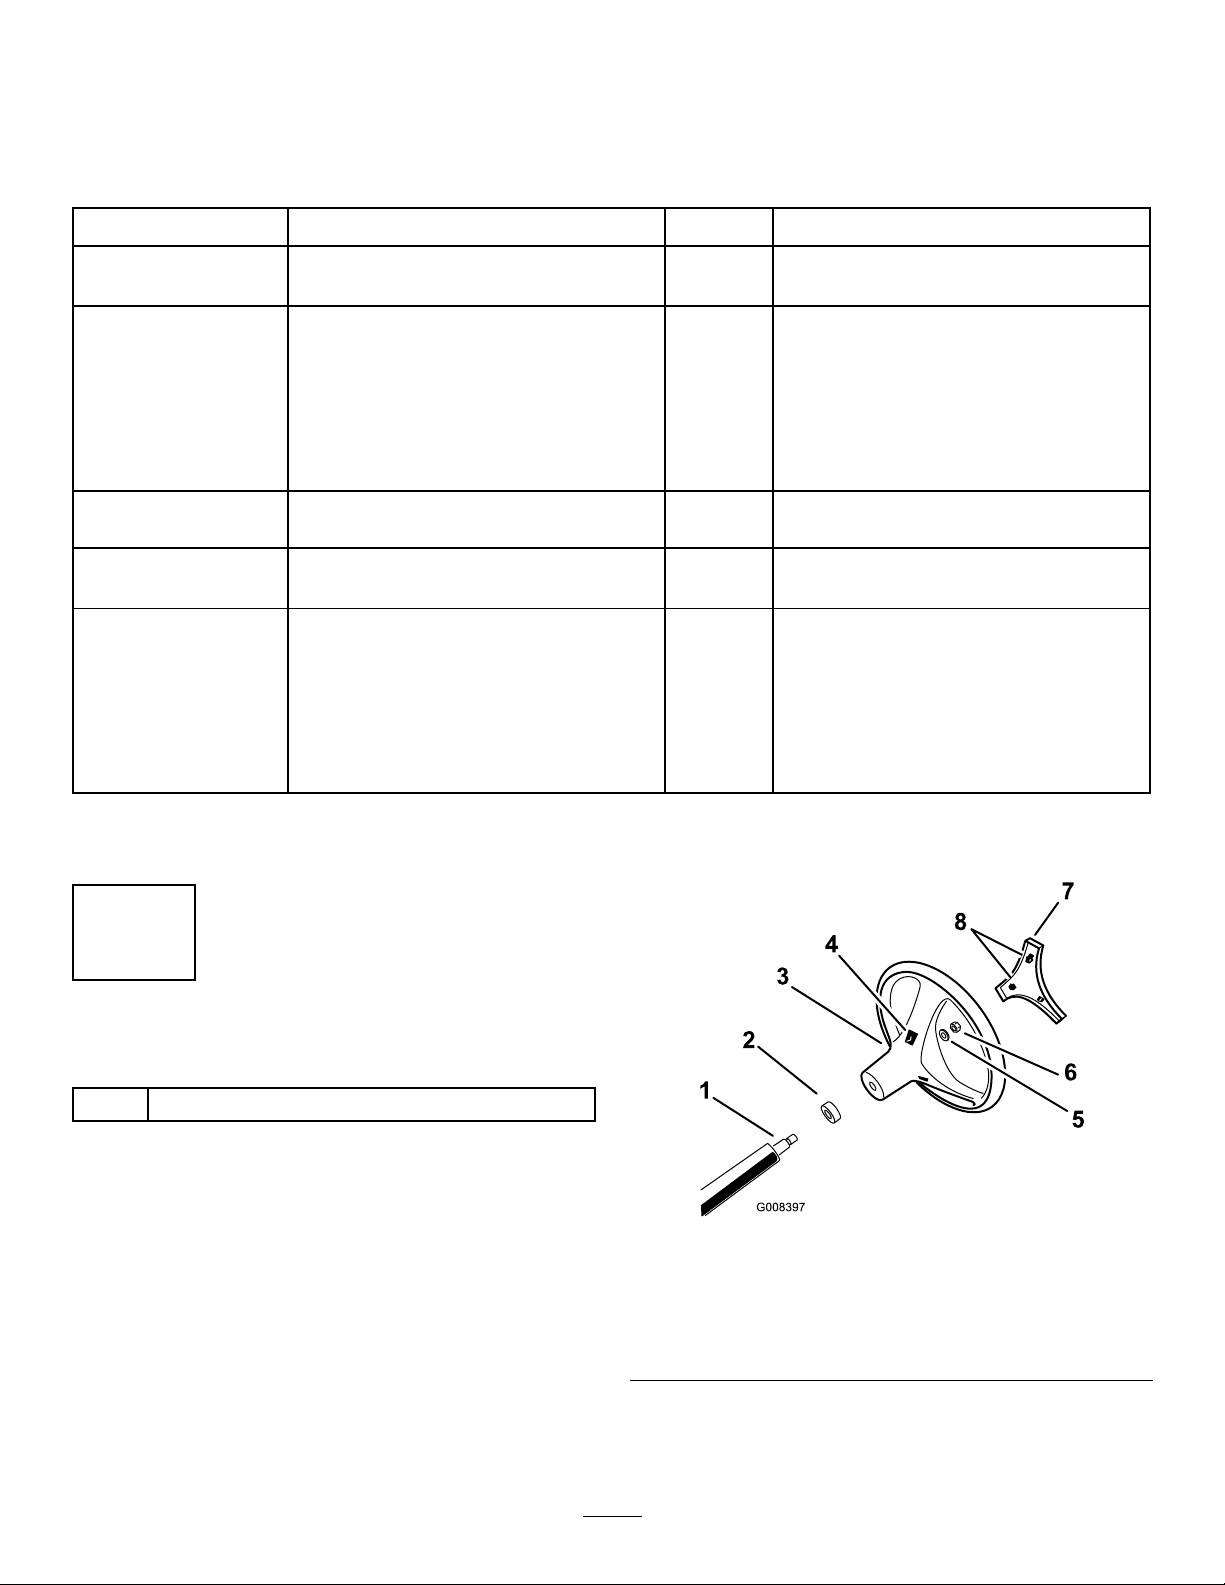
InstallingtheSteeringWheel
Partsneededforthisprocedure:
1
Steeringwheel
Procedure
Note:ThisprocedureisonlyneededforModelNo.
07299TC.
1.Releasethetabsonthebackofthesteeringwheelthat
holdthecentercoverinplace,andremovethecover.
2.Removethenutandwasherfromthesteeringshaft.
3.Slidethesteeringwheelandwasherontotheshaft.
4.Positionthesteeringwheelontheshaft,sothatthe
crossbeamishorizontalwhenthetiresarepointed
straightaheadandthethickerspokeofthesteering
wheelisdownward.
5.Securethesteeringwheeltotheshaftwiththenut
(Figure3).
Figure3
1.Steeringshaft
2.Dustcover6.Nut
3.Steeringwheel7.Cover
4.Tabslotsinthewheel8.Tabsinthecover
6.Torquethenutto24to29N-m(18to22ft-lbs).
7.Snapthecentercoverintoplace.
5.Washer
11
Page 12
2
InstallingtheBatteries
Partsneededforthisprocedure:
2Batteryholddown
2Batteryhold-downrod
7
Batterycables
4Battery-traypads
1Batterypad
2
Flangenut(3/8inch)
1Battery-terminal-protectorspray
Procedure
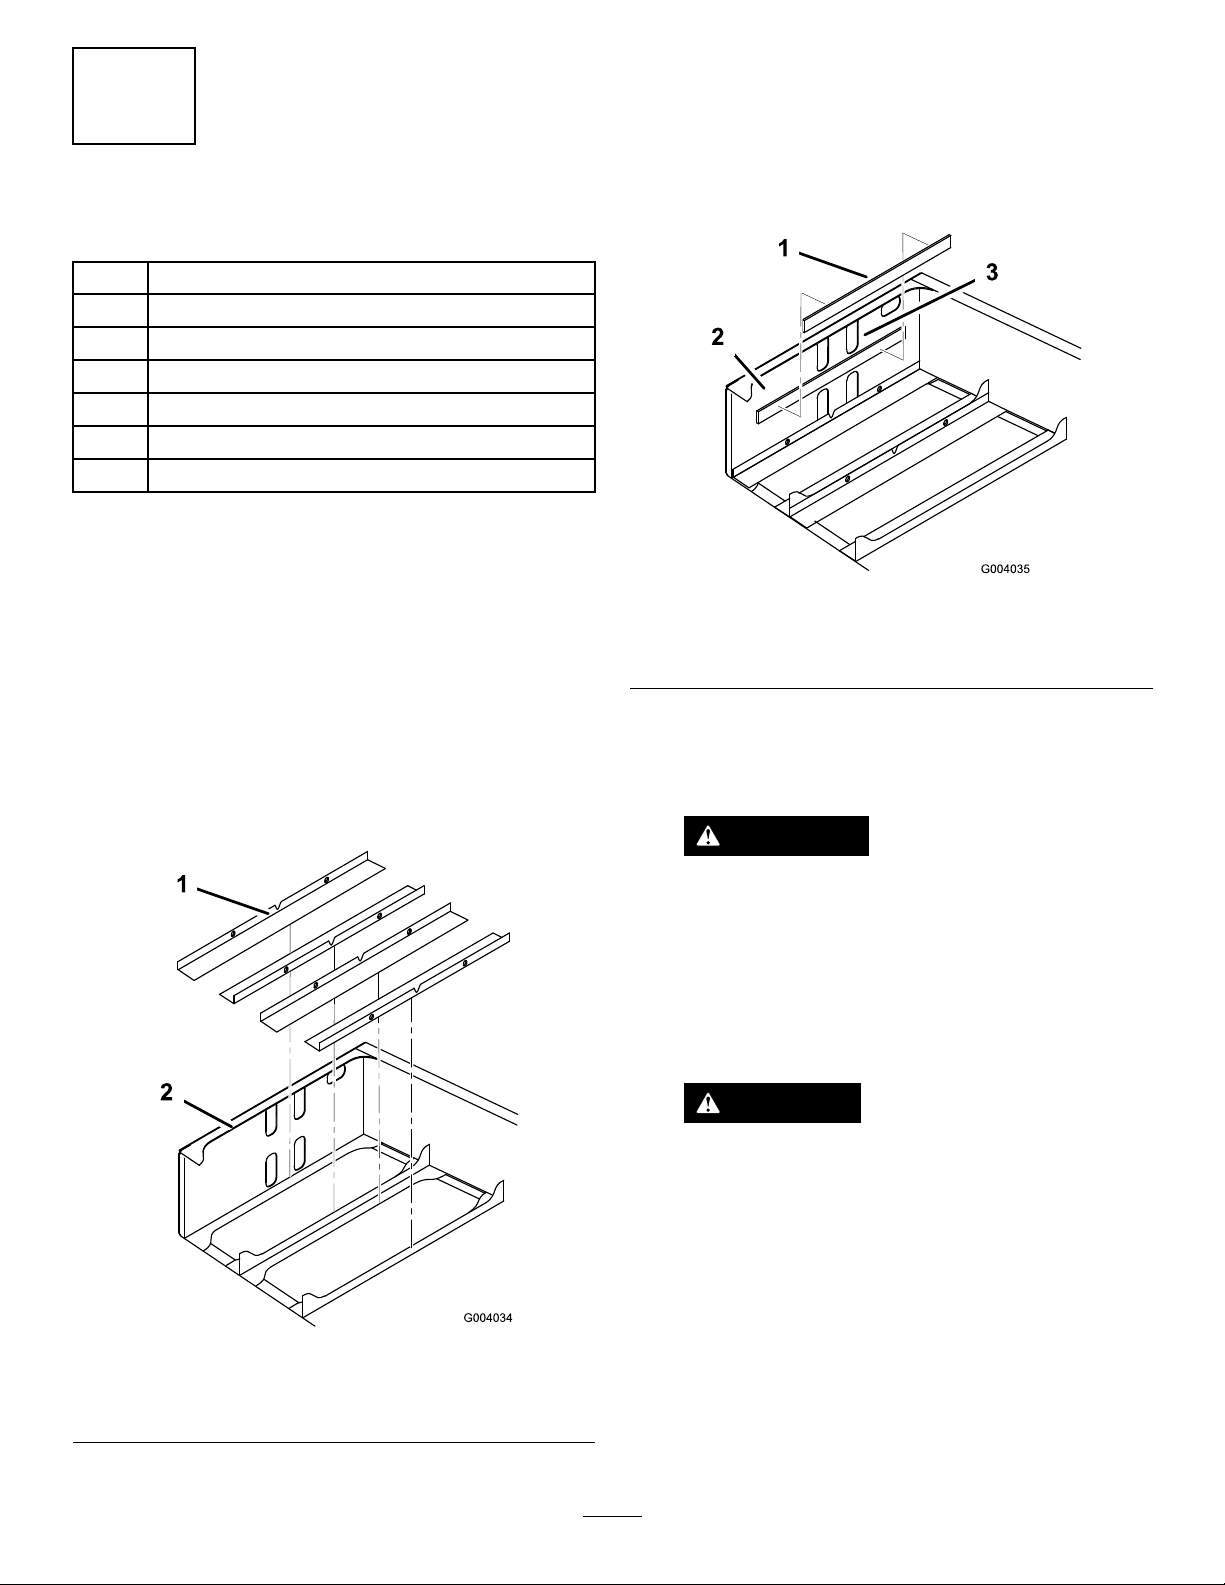
3.Removetheadhesivestripfromthebackofthebattery
padandinstallitontothefrontinsidefaceoftherear
frame(Figure5).
Note:Thepadshouldbeapproximately6mm(1/4
inch)belowthebottomedgeoftheuppersetofcutout
holes(Figure5).
UseeitherTrojanT105orT145,orUSBatteryUS2200or
US145.
BatterySpecication:6V225AH@20hrrate
Dimensions:(LxWxH)26.4x18.1x26.5cm(10-3/8x
7-1/8x10-7/16inches)
1.TurnthekeyswitchtotheOffpositionandremove
thekey.
2.Installthebattery-traypadsintotherear-frame
assembly(Figure4).
Figure5
1.Batterypad3.Uppercutoutholes
2.Frontinsideface
4.Installthebatteries(Figure6).
Note:Payattentiontothebatterypolaritywhen
installingthenewbatteries(Figure6).
WARNING
Incorrectbatterycableroutingcoulddamage
themachineandcables,causingsparks.
Sparkscancausethebatterygassesto
explode,resultinginpersonalinjury.
Alwaysensurethebatterypolaritywhen
makingconnections.
CAUTION
Batteriescangiveyouapowerfulelectrical
shock.
1.Battery-traypads
2.Rear-frameassembly
•Usetoolswithplastichandlesorwrapthe
handlesofmetaltoolswithelectricaltape.
•Becarefulnottocontactbothapositive
terminalandanegativeterminalatthe
sametime.
Figure4
12
Page 13

3
CheckingtheTirePressure
NoPartsRequired
Procedure
Checkthetirepressureevery8hoursordailytoensure
properlevels.
Theairpressurerangeinthefrontandreartiresis55to152
kPa(8to22psi).
Figure6
5.Installthebatteryretainersandtorquethenutsto17to
22N-m(150to200in-lbs).
6.Connectthebatteriestogetherwiththebatterycables
includedinlooseparts(Figure6).
Important:Checkallhigh-currentbattery
connectionstoensurethattheyhavebeenproperly
secured.
Note:Ensurethatthecableroutingdoesnotallow
cablestocontactanysharpedges.
7.Tightentheboltandsecuretheothersideoftheclip
withanewbolt(5/16x3/4inch)andaangenut
(5/16inch)(Figure6).
8.Connectthelong,red,mainpositiveleadbetweenthe
bankofbatteriesandthemachine(Figure6).
9.Connectthelong,black,mainnegativeleadbetween
thebankofbatteriesandthemachine(Figure6).
Theairpressureneededisdeterminedbythepayloadcarried.
Lowerairpressurewillprovidelesscompaction,asmoother
ride,andfewertiremarks.Lowerpressureshouldnotbeused
forheavypayloadsathighspeeds.
Higherpressuresshouldbeusedforheavierpayloadsandat
higherspeeds.Donotexceedthemaximumpressure.
WARNING
Looseorimproperlysecuredbattery
connectionscoulddamagethemachineand
cables,causingsparks.Sparkscancause
thebatterygassestoexplode,resultingin
personalinjury.
Alwaysensurethebatterypolaritywhen
makingconnections.
10.Torquethenutssecuringallbatterycablesto13.5to21
N-m(120to180in-lbs).
11.CoatthebatteryterminalswithTorobattery-terminal
protector.
12.Ensurethattherubbercoversoneachbatterycableare
securelyseatedoverthebatteryterminals.
13
Page 14

4
220
200
100
120
G005241
5
SettingtheChargerVoltage (model07299TConly)
NoPartsRequired
Procedure
Important:Theincorrectvoltagesettingonthebattery
chargercanimpairfunctionanddamagethecharger.
Alwaysmakesurethatthechargervoltagesettingmatchesthe
voltageusedtopowerthecharger.
1.Locatethevoltageselectorontherearofthecharger
(Figure7).
2.Adjustthevoltagesettingbymovingtheswitchonthe
voltageselectorupwardordownwardtochangethe
voltagesetting(Figure7).
ReadingtheManualand ViewingtheSafetyVideo
Partsneededforthisprocedure:
1
Operator'sManual
1
PartsCatalog
1
Safetytrainingmaterial
1Registrationcard
1PredeliveryInspectionForm
1
CerticateofQuality
2Key
Procedure
•ReadtheOperator'sManual.
•Viewthesafetytrainingmaterial.
•Fillouttheregistrationcard.
•CompletethePre-deliveryInspectionForm.
Figure7
1.Voltageselector
2.Voltage-settingwindow4.Voltagesbyswitchposition
Note:Alwaysusetheappropriatepowercordforthepower
outletofthecountryorregionwherechargingwilloccur.
ContactyourAuthorizedToroDealertoobtainthecorrect
powercordifnecessary.
3.Switch
14
Page 15

ProductOverview
G015455
1
2
3
4
5
6
Figure8
1.Hoodstrap
2.Parkingbrake
Controls
Figure9
1.Brakepedal5.Passengerhandhold
2.Parkingbrake/center
console
3.Steeringwheel
4.Cupholder
6.Operator'sManualtube
7.Acceleratorpedal
3.Cargobox5.Chargingreceptacle
4.Cargoboxreleaselever
enginerpmandgroundspeed.Releasingthepedaldecreases
theenginespeedandgroundspeedofthemachine.
6.Towingtongue
BrakePedal
Thebrakepedalisusedtoapplyservicebrakestostopor
slowthemachine(Figure9).
CAUTION
Brakescanbecomewornorcanbeincorrectly
adjustedresultinginpersonalinjury.
Ifthebrakepedaltravelstowithin25mm(1inch)
ofthemachineoorboard,thebrakesmustbe
adjustedorrepaired.
ParkingBrake
Theparkingbrakeisbetweentheseats(Figure9).Whenever
youshutoffthemachine,settheparkingbraketoprevent
themachinefromaccidentalmovement.Tosettheparking
brake,pullbackthelever.Toreleasetheparkingbrake,push
theleverforward.Ifthemachineisparkedonasteepgrade,
makesurethatyousettheparkingbrake.
AcceleratorPedal
Theacceleratorpedal(Figure9)givestheoperatortheability
tovarytheengineandgroundspeedofthemachinewhen
thetransmissionisingear.Pressingthepedalincreasesthe
On/OffSwitch
TheOn/Offswitch(Figure10),usedtoactivatetheelectrical
systemsofthemachine,has2positions:OnandOff.Rotate
15
Page 16

thekeyclockwisetotheOnpositiontooperatethemachine
G009236
1
andaccessories.Afterstoppingthemachine,rotatethekey
counterclockwisetotheOffposition.Removethekeywhen
leavingthemachine.
Figure10
1.On/Offswitch
2.Hornbutton(TCModels
only)
3.Lightswitch
4.Battery/hourmeter
5.Machine-statuslight
6.Power-cargo-bedswitch
(optional)
7.Rearliftswitch(optional)
8.Machine-directionswitch
Machine-statusLight
Themachinecontainsacomputerthatmonitorsthestateof
themachineelectricalsystems.Thiscomputercommunicates
thestatusofthemachinetoyouthroughthemachine-status
light.AlwayscheckthislightwhenyouturntheOn/Off
switchtotheOnposition(Figure14)Whenthereareno
problemsandthemachineisoperational,thelightison.
Whenthereisaproblem,thelightashes.Thelightashes
atvariousintervalsfordifferentproblemsandevents.Ifthe
lightblinks,refertoUnderstandingandUsingtheBattery
System(page18)foradescriptionoftheashcodes.
LightSwitch
Usethisswitchtoturntheheadlightsonandoff(Figure10).
CargoBedLiftSwitch(Optional)
Usethisswitchtoraiseandlowerthecargobed(Figure10).
RearLiftSwitch(Optional)
HornButton(TCModelsonly)
Pressthehornbuttontosoundthehorn(Figure10).
Battery-dischargeIndicator
Thebattery/hourmeterprovidesyouwithanindicationof
howmuchchargeiscontainedinthebatteries(Figure10
andFigure14)andthenumberofoperatinghoursonthe
machine.ThebatterymeterislocatedatthetopoftheLCD
screen.Whenthemachinebatteriesarefullycharged,ten
barsextendfromthe0tothe1position.Asthechargeis
used,barsdisappearstartingontherightside.Fordetailed
informationonthebatterymeter,refertoUnderstandingand
UsingtheBatterySystem(page18).
ThehourmeterislocatedatthebottomoftheLCDscreen.
ItlogsoperatinghourswheneverthekeyisintheOnposition
andthemachineisinmotion.
Machine-directionSwitch
Usethisswitch(Figure10)totogglebetweenforwardand
reverseoperation.
Usethisswitchtoraiseandlowertherearlift(Figure10).
SupervisorSpeed-limitSwitch
Thesupervisorspeed-limitswitch,locatedunderthecup
holder(Figure11)has2positions:OnandOff.Rotatethe
keyclockwisetotheOnpositiontolimitthemaximum
machinespeedtoafactorysettingof19kph(12mph).Rotate
thekeycounterclockwisetotheOffpositiontorestorethe
maximumspeedofthemachine.
Figure11
Note:Ifthemachine-directionalswitchismovedtothe
ReversepositionwhentheOn/OffswitchisintheOn
position,abuzzerwillsoundtowarntheoperatorthatthe
machineissettomoveinthereversedirection.
1.Supervisorspeed-limitswitch
16
Page 17

PassengerHandHolds
G009193
1
2
Thepassengerhandholdsarelocatedontherightsideofthe
dashpanelandattheoutsideofeachseat(Figure12).
1.Hiprestraint2.Passengerhandhold
Specications
Note:Specicationsanddesignaresubjecttochangewithoutnotice.
Figure12
Baseweight
BaseweightwithoutBatteries
Ratedcapacity
(onlevelground)
Maximumgrossmachine
weight(GMW)(onlevelground)
Maximumcargocapacity(on
levelground)
Towcapacity:
StandardhitchTongueweight23kg(50lbs),Maximumtrailerweight182kg(400lbs)
Heavy-dutyhitch
Overallwidth150cm(59inches)
Overalllength304cm(120inches)
Groundclearance
Wheelbase
Wheeltread
(centerlinetocenterline)
Cargoboxlength117cm(46inches)inside,133cm(52inches)outside
Cargoboxwidth125cm(49inches)inside,150cm(59inches)attheoutsideofthemoldedfenders
Cargoboxheight
726kg(1600lbs)
765kg(1025lbs)
545kg(1200lbs)total—includinga90.7kg(200lbs)operatoranda90.7kg(200lbs)passenger ,
load,trailertongueweight,grosstrailerweight,accessories,andattachments
1270kg(2800lbs)total—includingalloftheweightslistedabove
362kg(800lbs)*total—includingtrailertongueweightandgrosstrailerweight
Tongueweight45kg(100lbs),Maximumtrailerweight363kg(800lbs)
25cm(10inches)atthefrontwithnoloadoroperator,18cm(7inches)attherearwithno
loadoroperator
211cm(83inches)
125cm(49inches)inthefront,1 18cm(46inches)intherear
25cm(10inches)inside
*SpecicationslistedarewithTrojanT145batteries.
Attachments/Accessories
AselectionofToroapprovedattachmentsandaccessoriesisavailableforusewiththemachinetoenhanceandexpand
itscapabilities.ContactyourAuthorizedServiceDealerorDistributororgotowww.Toro.comforalistofallapproved
attachmentsandaccessories.
17
Page 18

Operation
Note:Determinetheleftandrightsidesofthemachine
fromthenormaloperatingposition.
ThinkSafetyFirst
Pleasecarefullyreadallofthesafetyinstructionsanddecals
inthesafetysection.Knowingthisinformationcouldhelp
youorbystandersavoidinjury.
PreformingPre-starting Checks
OperatingtheMachine
1.Disconnectthebatterycharger.
2.Sitintheoperator'sseat,insertthekeyintotheOn/Off
switch,androtatethekeyclockwisetotheOnposition.
3.Movethemachine-directionswitchtothedesired
position.
Note:Ifyoumovethedirectionalswitchtothe
ReversepositionwhiletheOn/OffswitchisintheOn
position,abuzzersoundstowarnyouthatthemachine
issettomoveinthereversedirection.
4.Releasetheparkingbrake.
5.Slowlystepontheacceleratorpedaltodrivethe
machine.
Checkthefollowingitemseachtimeyoubeginusingthe
machinefortheday:
•Checkthetirepressure.
•Checkthebrakepedaloperation.
•Checktoseethatthelightsareworking.
•Turnthesteeringwheeltotheleftandrighttocheck
steeringresponse.
•Checkforloosepartsandanyothernoticeable
malfunctions.Makesurethatthemachineisoffandall
movingpartshavestoppedbeforecheckingforloose
partsandothermalfunctions.
Ifanyoftheaboveitemsarenotcorrect,notifyyourmechanic
orcheckwithyoursupervisorbeforetakingthemachineout
fortheday.Yoursupervisormaywantyoutocheckother
itemsonadailybasis,soaskwhatyourresponsibilitiesare.
CheckingtheTirePressure
ServiceInterval:Beforeeachuseordaily
Checkthetirepressureevery8hoursordailytoensure
properlevels.
Theair-pressurerangeinthefrontandreartiresis55to
103kPa(8to22psi).
Note:Inatingthetiresatalowerpressurereduces
compaction,createsasmootherride,andminimizestire
marks.Donotinatethetiresatalowerpressurewhen
operatingthemachinewithheavypayloadsathighspeeds.
Inatethetiresathigherpressureswhenoperatingthe
machinewithheavierpayloadsathighspeeds.
StoppingtheMachine
Important:Whenstoppingthemachineonanincline,
usethebraketostopthemachine,andtheparking
braketoholditinplace.Usingtheacceleratortostall
themachinecandamagethemachine.
Tostopthemachine,removeyourfootfromtheaccelerator
pedalandslowlypressthebrakepedal.
Note:Thestoppingdistancemayvarydependingonthe
machineloadandspeed.
ParkingtheMachine
1.SettheparkingbrakeandrotatetheOn/Offkeyto
theOffpositon.
2.Removethekeyfromtheswitchtopreventaccidental
starting.
UnderstandingandUsingthe BatterySystem
UnderstandingDeep-cycleBatteries
Themachinecontains8deepcycle,lead-acidbatterieswhich
supplypowertothemotorandaccessories.Adeep-cycle
batteryisnotthesameasanautomobilebattery.An
automobilebatteryisdesignedtoprovideasurgeofpowerto
startthemachineandmoderatepowertorunthelightsand
accessorieswhenthemotorifofforidling.Thealternator
thencontinuouslychargesastheautomobileruns.Assuch,
anautomobilebatteryseldomdropsbelow90%ofthe
maximumchargelevel.
Adeep-cyclebatteryisdesignedtobeaprimarypower
sourcetoprovideasustainedoutput.Deep-cyclebatteriesare
typicallydischargedaslowas20to30%ofthemaximum
chargelevel.Adischargethislowisconsideredadeep
discharge.
Lead-acidbatteriesproduceelectricitythroughachemical
reactionbetweencoatedleadplatesandsulfuricacid.
18
Page 19

Chargingabatteryreversesthechemicalreaction,allowing
thebatterytoonceagainproduceelectricity.
Abatteryisaperishableitemthathasalimitedlifetime
(Figure13).Whenabatteryisnew ,itrequiresabreak-in
periodtoestablishefcientelectricalproduction.Thisbreak
inperiodusuallyrequires20to50discharge/chargecycles.
UsingtheBatterySystem
Whenyourbatteriesarefullycharged,thebatterymeterwill
have10barsshowingfromlefttoright(Figure14).
Figure13
Battery-lifetimetable
1.Batterycapacity
2.Discharge/chargecycles5.Endofthebatterylife
3.Break-inperiod(20to50
cycles)
4.Primebatterylife
Afterthebreak-inperiod,thebatterywillmaintainahigh
capacityformanycycles.Thenumberofcyclesabatterywill
performisdependantonthefollowing:
•Batterymaintenance—impropermaintenancewill
severelyreducethelifeofthebatteries.
•Depthofdischargebetweenchargecycles—thedeeper
thebatteriesaredischargedonaregularbasis
betweencharges,thelesslifetheywillhave.
•Chargefrequency—chargethebatterieswheneverthey
arenotinuse.Fullydischargingthebatterieswill
damagethemandreducetheirlife.
Attheendofthebatterylife,thecoatingontheleadplates
beginstodeteriorate,causingthebatteriestorapidlylose
electriccapacity.
Figure14
1.Battery/hourmeter2.Charge-indicatorbars
Asyouusethemachine,thebarswilldisappearasthe
electricalcapacityofthebatteriesisused.
Whenonly2barsareleft,theredwarninglightonthemeter
willilluminate,andthebatteryiconwillbeginashingonthe
screen(Figure15).Thisindicatesthatthebatterycapacityis
nearlydrainedandyoushouldchargethebatteriesassoonas
possibletopreventbatterydamage.
Figure15
1.Batteryicon
2.Warninglight—On
Whenonlyonebarisleft,thewarninglightwillash,andthe
machinewillgointoanenergy-savingmode(Figure16).In
thismode,themachinewillonlydriveat3mph.Chargethe
batteriesimmediatelytopreventseriousdamagetothem.
Ifthebatteriesbecomefullydischarged,themachinewill
shutdown.Donotallowthebatteriestobecomefully
discharged.
Important:Toobtainmaximumbatterylife,always
chargethebatterieswhenthereare2ormorebarsvisible
onthescreen.Depletingthebatteriestolowerthan2
19
Page 20

bars,especiallyonaregularbasis,willreducethelife
g014860
1
2
3
ofthebatteries.
Figure16
1.Batteryicon
2.Warninglight—ashing
Figure17
1.Latchlever3.Detentslot
2.Proprod
OperatingtheCargoBox
RaisingtheCargoBox
WARNING
Drivingthemachinewiththecargoboxraisedmay
causethemachinetotiporrolleasier.Thebox
structuremaybecomedamagedifyouoperatethe
machinewiththeboxraised.
•Onlyoperatethemachinewhenthecargobox
isdown.
•Afteremptyingthecargobox,lowerit.
CAUTION
Ifaloadisconcentratednearthebackofthecargo
boxwhenyoureleasethelatches,theboxmay
unexpectedlytipopeninjuringyouorbystanders.
•Centerloadsinthecargoboxifpossible.
•Holdthecargoboxdownandensurethatno
oneisleaningovertheboxorstandingbehindit
whenreleasingthelatches.
LoweringtheCargoBox
WARNING
Theweightoftheboxmaybeheavy.Handsor
otherbodypartscouldbecrushed.
Keephandsandotherbodypartsclearwhen
loweringthebox.
1.Raisethecargoboxslightlybyliftinguponthelatch
lever(Figure17).
2.Pulltheproprodoutofthedetentslot(Figure17).
3.Lowertheboxuntilitlatchesintosecurely(Figure17).
•Removeallcargofromtheboxbeforeliftingthe
boxuptoservicethemachine.
1.Liftthelatchleverthatisattheeithersidenearthe
forwardcornerofthecargobox,andlifttheboxup
(Figure17).
2.Securethecargoboxbypullingtheproprodintothe
reardetentatendoftheslotthatisintheleftframeof
themachine(Figure17).
20
Page 21

OpeningtheTailgate
1.Ensurethatthecargoboxisdownandlatched.
2.Liftuponthengerpullsatthebackpanelofthetail
gate(Figure18).
Figure18
1.Tailgateange(cargobox)3.Liftup(ngerpull)
2.Lockange(tailgate)
4.Rotaterearwardanddown
Figure19
3.Usingashort,shakingmotiontorotatethetailgate
backandforthseveraltimes(Figure19).
Note:Thisactionwillhelpmovematerialawayfrom
thehingearea
4.Lowerthetailgateandcheckthehingeareasfor
remainingmaterialthatisinthehingearea.
5.Repeatsteps1through4untilthematerialisremoved
fromthehingearea.
6.Rotatethetailgateupandforwarduntilthelockanges
ofthetailgateareushwiththetailgatepocketinthe
cargobox(Figure18).
Note:Raiseorlowerthetailgateinordertoalignthe
lockangesofthetailgatewiththeverticalopenings
betweenthetailgateangesofthecargobox.
3.Alignthelockangesofthetailgatewiththeopenings
betweenthetailgateangesofthecargobox(Figure
18).
4.Rotatethetailgaterearwardanddown(Figure18).
ClosingtheTailgate
Ifyouunloadedloosematerialsuchassand,landscapingrock,
orwoodchipsfromthecargoboxofthemachine,somethe
materialthatyouunloadedmayhavelodgedinthehinge
areaofthetailgate.Performthefollowingbeforeclosingthe
tailgate.
1.Useyourhandstoremoveasmuchofthematerial
fromthehingeareaaspossible.
2.Rotatethetailgatetoapproximately45°position
(Figure19).
7.Lowerthetailgateuntilitisseatedinthebackofthe
cargobox(Figure18).
Note:Thelockangesofthetailgatewillbefully
securedbythetailgateangesofthecargobox.
LoadingtheCargoBox
Maximumcargobox
capacity(onlevel
3
3
3
3
3
(13ft3).The
ground)
1/2Full
1/3Full
1/2Full
1/3Full
Thecapacityofthecargoboxis0.37m
amount(volume)ofmaterialthatcanbeplacedinthebox
withoutexceedingthemachine-loadratingscanvarygreatly
dependingonthedensityofthematerial.Forexample,a
levelboxofwetsandweighs680kg(1500lbs),whichgreatly
exceedstheloadrating.
Seethetablebelowforloadvolumelimitswithvarious
materials:
MaterialDensity
Gravel,dry1522kg/m
Gravel,wet1922kg/m
Sand,dry1442kg/m
Sand,wet1922kg/m
3
(95lb/ft
(120lb/ft
(90lb/ft
(120lb/ft
)
3
)
3
)
3
)
21
Page 22

Wood
Bark
Earth,packed
721kg/m
(45lb/ft
721kg/m
(45lb/ft
1602kg/m
(100lb/ft
3
3
)
3
3
)
3
3
)
Full
Full
1/2Full
AdjustingtheBoxLatches
Iftheboxlatchdoesnotlatchtightly,vibratingupanddown
asyoudrivethemachine,youcanadjustthelatchpoststo
makethelatchestsnugly.
1.Loosenthenutontheendofthelatchpost(Figure20).
CAUTION
Looseseatsmayfalloffofthevehicleandtrailer
whentransportingthemachine,andtheseatsmay
landonanothervehicleorobstructtheroadway.
Removetheseatsormakesurethattheseatsare
securelyfastenedtothecouplingintheseatshroud.
Figure21
1.Tie-downpoints
TowingtheMachine
Incaseofanemergency ,themachinecanbetowedfora
shortdistance.However,wedonotrecommendthisasa
standardprocedure.
Figure20
1.Latch3.Latchpost
2.Nut
2.Turnthelatchpostclockwiseuntilitissnugagainstthe
latchandthentightenthenut(Figure20).
3.Repeatthisprocedureforthelatchontheotherside
ofthemachine.
BreakinginaNewMachine
ServiceInterval:Aftertherst100hours
•Avoidhard-brakingsituationsfortherstseveralhoursof
newmachinebreak-inoperation.Newbrakeliningsmay
notbeatoptimumperformanceuntilseveralhoursofuse
hascausedthebrakestobecomeburnished(broken-in).
•RefertoMaintenance(page24)foranyspeciallow-hour
checks.
•Checkthefrontsuspensionpositioningandadjustitif
necessary.
WARNING
Towingatexcessivespeedscouldcausealossof
steeringcontrol,resultinginpersonalinjury.
Nevertowthemachineatfasterthan8km/h
(5mph).
Towingthemachineisa2-personjob.Ifthemachinemust
bemovedaconsiderabledistance,transportitonatruckor
trailer;refertoTransportingtheMachine(page22).
1.TurnofftheOn/Offswitchandremovethekey.
Important:Ifyoutowthemachinewiththekey
intheOnposition,theelectricalsystemmaybe
damaged.
2.Afxatowlinetothetongueonthefrontoftheframe
(Figure22).
3.Releasetheparkingbrake.
TransportingtheMachine
Formovingthemachinelongdistances,atrailershouldbe
used.Makesurethatthemachineissecuredtothetrailer.
RefertoFigure21andFigure22forthelocationofthe
tie-downpoints.
Figure22
1.Towingtongueandtie-downpoint
22
Page 23

TowingaMachine
Themachineiscapableofpullingtrailers.2typesoftow
hitchesareavailableforthemachine,dependingonyour
application.ContactyourAuthorizedToroDistributorfor
details.
Whenhaulingcargoortowingatrailer,donotoverloadyour
machineortrailer.Overloadingcancausepoorperformance
ordamagetothebrakes,axle,motor,transaxle,steering,
suspension,bodystructure,ortires.Alwaysloadatrailerwith
60%ofthecargoweightinthefrontofthetrailer.Thisplaces
approximately10%oftheGrossTrailerWeight(GTW)on
thetowhitchofthemachine.
Themaximumcargoloadshallnotexceed362kg(800lb),
includingtheGTW .Forexample,iftheGTWis90kg(200
lb)thenthemaximumcargoloadis272kg(600lb).
Toprovideadequatebrakingandtraction,alwaysloadthe
cargoboxwhentrailering.DonotexceedtheGTWorGVW
limits.
Avoidparkingamachinewithatraileronahill.Ifyoumust
parkonahill,settheparkingbrakeandblockthetrailertires.
23
Page 24

Maintenance
Note:Determinetheleftandrightsidesofthemachinefromthenormaloperatingposition.
RecommendedMaintenanceSchedule(s)
MaintenanceService
Interval
Aftertherst100hours
Beforeeachuseordaily
Every25hours
Every100hours
Every200hours
Every800hours
DailyMaintenanceChecklist
Duplicatethispageforroutineuse.
Fortheweekof: MaintenanceCheckItem
MondayTuesdayWednesdayThursdayFriday
Checkthebrakeand
parkingbrakeandadjust
asneeded.
Checkunusualoperating
noises.
Checkthetirepressure.
Checkforuidleaks.
Checktheinstrument
operation.
Checktheaccelerator
operation.
Lubricateallgrease
ttings.
Touchupanydamaged
paint.
MaintenanceProcedure
•Performtheguidelinesforbreakinginanewmachineguidelines.
•Checkthetirepressure.
•Chargethebatteries.
•Checkthebrake-uidlevel.
•Cleanthebatteries.
•Checkthebatteryelectrolytelevel.
•Greasethebearingsandbushings.
•Inspecttheconditionandwearofthetires.
•T orquethewheellugnuts.
•Checkthefrontwheeltoe-inandcamber.
•Checkthetransaxle-oillevel.
•Inspectthebrakes.
•Adjusttheparkingbrakeifneeded.
•Changethetransaxleoil.
SaturdaySunday
WARNING
Thebedmustberaisedtoperformsomeroutinemaintenance.
Araisedbedcanfallandinjurepersonsthatareunderneathit.
•Alwaysusetheproprodtoholdthebedupbeforeworkingunderit.
•Removeanyloadmaterialfromthebedbeforeworkingunderit.
24
Page 25

CAUTION
IfyouleavethekeyintheOn/Offswitch,someonecouldaccidentlystartthemachineandseriously
injureyouorotherbystanders.
RemovethekeyfromtheOn/Offswitchanddisconnectabatterycablebeforeyoudoanymaintenance.
Premaintenance
Procedures
MaintainingtheMachineunder SpecialOperatingConditions
Ifthemachineissubjectedtoanyoftheconditionslisted
below,maintenanceshouldbeperformedtwiceasfrequently.
•Desertoperation
•Coldclimateoperation—below10°C(50°F)
•Trailertowing
•Afterextendedoperationinmud,sand,water,orsimilar
dirtyconditions,haveyourbrakesinspectedandcleaned
assoonaspossible.Thiswillpreventanyabrasive
materialfromcausingexcessivewear.
1.Frontjackingpoint
Figure23
Figure24
LiftingtheMachine
Wheneverthemachineisrunforroutinemaintenanceand/or
motordiagnostics,therearwheelsofthemachineshouldbe
25mm(1inch)offthegroundwiththerearaxlesupported
onjackstands.
DANGER
Themachinemaybeunstablewhenusingajack.It
couldslipoffthejack,injuringanyonebeneathit.
•Donotstartthemachinewhilethemachineis
onajack.
•AlwaysremovethekeyfromtheOn/Offswitch
beforegettingoffofthemachine.
•Blockthetireswhenthemachineisonajack.
Thejackingpointatthefrontofthemachineisonthefront
oftheframebehindthetowingtongue(Figure23).
Thejackingpointattherearofthemachineisundertheaxle
tubes(Figure24).
1.Rearjackingpoints
25
Page 26

AccessingtheHood
1.Releasetherubberstrapsonbothsidesofthehood
(Figure25).
Figure25
Lubrication
Lubricateallofthebearingsandbushingsevery100hours
oronceayear,whicheveroccursrst.Greasethemmore
frequentlywhenusingthemachineforheavy-dutyoperations.
GreaseType:Number2GeneralPurposeLithium-Base
Grease
AddingGrease
ServiceInterval:Every100hours
1.Wipethegreasettingcleansoforeignmattercannot
beforcedintothebearingorthebushing.
2.Pumpgreaseintothebearingorbushing.
3.Wipeoffanyexcessgrease.
Thegreasettingsarelocatedatthe4tie-rodends(Figure
26)andthe2kingpins(Figure27).
2.Raisethehood.
3.Lowerthehoodtocloseanduserubberretaining
strapstosecurethehood.
1.Greasetting
Figure26
Leftsideshown
2.Tierod
Figure27
26
Page 27

ElectricalSystem
Maintenance
MaintainingtheBatteries
WARNING
CALIFORNIA
Proposition65Warning
Batteryposts,terminals,andrelated
accessoriescontainleadandleadcompounds,
chemicalsknowntotheStateofCalifornia
tocausecancerandreproductiveharm.
Washhandsafterhandling.
ChargingtheBatteries
ServiceInterval:Beforeeachuseordaily
Achargerissuppliedwiththemachine.Alwayskeepthe
chargerinadrylocation.Formaximumbatterylife,charge
thebatterieswheneveryouarenotusingthemachine.
Dependingonhowdischargedthebatteriesare,itmaytake
upto16hourstochargethebatteriestofullcapacity .
Important:Lead-acidbatteriesdonotdevelopa
chargememoryanddonotneedtobefullydischarged
beforechargingthem.
may dama ge them.
machineisnotinuse.
Full y discharging the batteries
Chargethebatteriesanytimethe
WARNING
Chargingthebatteryproducesgassesthatcan
explode.
WARNING
Batteryterminalsormetaltoolscouldshortagainst
metalcomponentscausingsparks.Sparkscan
causethebatterygassestoexplode,resultingin
personalinjury.
•Whenremovingorinstallingthebattery,donot
allowthebatteryterminalstotouchanymetal
partsofthemachine.
•Donotallowmetaltoolstoshortbetween
thebatteryterminalsandmetalpartsofthe
machine.
•Alwayskeepthebatteryretainersinplaceto
protectandsecurethebatteries.
CleaningtheBatteries
ServiceInterval:Every25hours
1.Ensurethatallofthebatterycapsaretight.
2.Useapapertoweltocleanthebatteries.
3.Ifthebatteryterminalsarecorroded,cleanthemwith
asolutionof4partswaterandonepartbakingsoda.
Also,cleanthepostsandcableclampswithapostand
clampcleaner.
Note:Thepostsandclampsshouldhaveabright
metallicshine.
4.ApplyalightcoatingofTorobattery-terminal
protector.
Neversmokenearthebatteriesandkeepsparks
andamesawayfromthem.
1.Positionthemachineinawell-ventilatedareaneara
suitablepoweroutlet.
2.Connectthechargercordtothechargingreceptacleon
themachine(locatedonthepanelbetweentheseats).
Note:Ensurethatthechargervoltagesettingmatches
thevoltageatthepoweroutletbeingused.
3.Plugthechargerpowercordintothepoweroutlet.
Note:Whilethebatteriesarecharging,thegreenlight
onthechargerwillblinkonandoff.Whenthebatteries
arefullycharged,thegreenlightstopsblinkingand
stayson.
4.Disconnectthecordfromthepoweroutlet.
5.Disconnectthechargerfromthemachine.
Important:Donotcarrythechargeronthemachine.
Excessiveorprolongedjarringmaydamageit.
AddingWatertotheBatteries
ServiceInterval:Every25hours/Monthly(whichever
comesrst)
Useonlyclean,distilledwatertollthebatteries.
1.Raisethecargobed,turnthekeyoff,andremoveit.
2.Removethellercapsfromeachbattery.
3.Iftheelectrolyteisnotoverthetopoftheplatesin
eachbatterycell,addjustenoughdistilledwaterto
covertheplates.
4.Replacethellercapsonallbatteries.
5.Chargethebatteriesuntilafullchargeisachieved;refer
toChargingtheBatteries(page27).
6.Oncethebatteriesarefullycharged,removetheller
capsfromeachbattery.
27
Page 28

7.Addjustenoughdistilledwatertobringtheelectrolyte
levelto3mm(1/8inch)belowthebottomofeach
llwell(Figure28).
Figure28
Figure29
1.Batteryplates3.Electrolytelevel
2.Fillercap4.Batteryterminal
Important:Donotoverllthebattery.Electrolyte
willoverowontootherpartsofthemachineand
severecorrosionanddeteriorationmayresult.
Also,overllingthebatterywillreducethelifeof
thebattery.
8.Replacethellercapsonallbatteries.
ReplacingUsedBatteries
Whenthemachinebeginstoshowalossofrangeorwhenthe
lengthofthedischarge/chargecycleissignicantlyreduced,
thebatteriesareprobablygettingoldandlosingtheirability
toholdacharge.TakethemachinetoanAuthorizedService
Dealerandhavethemtestthebatteriestodeterminewhether
thebatteriesneedtobereplaced.Thedealercanthenreplace
thebatteriesforyou.Ifyouwishtoreplacethebatteries
yourself,usethefollowingprocedure:
1.Raisethecargobed,turnthekeyoff,andremoveit.
2.Disconnectthelong,black,mainnegativeleadrunning
fromthebankofbatteriestothemachinefromthe
batterypost(Figure29).
3.Removethelong,red,mainpositiveleadrunningfrom
thebankofbatteriestothemachinefromthebattery
post(Figure29).
4.Disconnectallofthebatteryleadsfromthebatteries.
5.Removethebatteryretainerslocatedbetweenthe
batteries.
6.Removeallofthebatteriesandrecyclethemaccording
toyourlocalcodes.
7.Installnewbatteriesintheplacesvacatedbytheold
batteries
Note:Payattentiontothebatterypolaritywhen
installingthenewbatteries(Figure29).
8.Installthebatteryretainersandtorquethenutsto17to
22N-m(150to200in-lb).
9.Connectthebatteriestogetherwiththebatterycables
removedpreviously,asshowninFigure29.
10.Connectthelong,red,mainpositiveleadbetweenthe
bankofbatteriesandthemachine(Figure29).
11.Connectthelong,black,mainnegativeleadbetween
thebankofbatteriesandthemachine(Figure29).
12.Torquethenutssecuringallofthebatterycablesto
13.5to21N-m(120to180in-lb).
13.CoatthebatteryterminalswithTorobattery-terminal
protector.
14.Ensurethattherubberbootsoneachbatterycableare
securelyseatedoverthebatteryterminals.
28
Page 29

StoringtheBatteries
G021810
1
2
Chargethebatteriesfullybeforeplacingthemachineinto
storage.Plugthechargerintoawalloutletwhilethemachine
andbatteriesareinstorage.Leavethechargerpluggedintoa
walloutletandchargingreceptacleduringstoragetoensure
thatthebatteriesstaychargedanddonotfreeze;otherwise,
chargethebatteriesatleastonceevery3months.
CAUTION
Anysurfacecontaminationcandamagethe
headlightbulbandleadingtoitsfailureorexplosion
creatingaserioussafetyhazard.
Headlightlampsshouldbehandledwithout
touchingtheclearquartz,eitherbyusingaclean
papertowelorcarefullyholdingthebase.
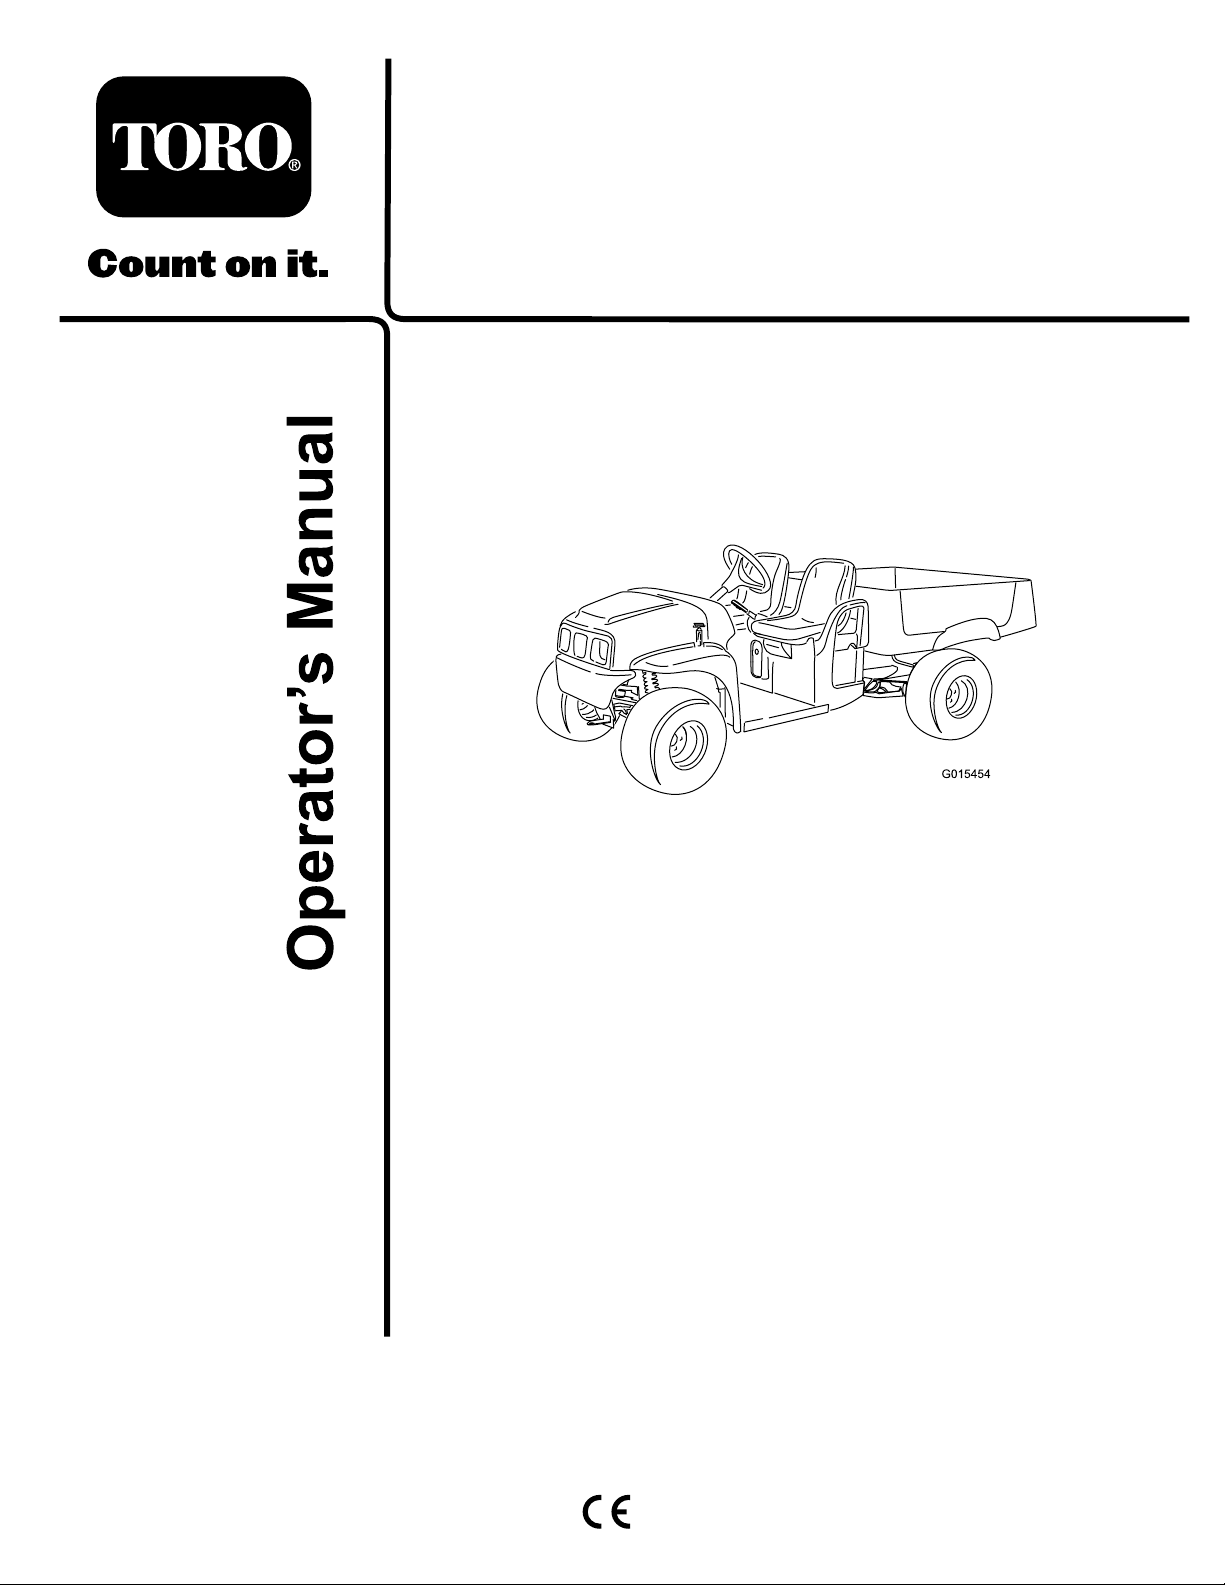
ReplacingtheFuses
Thereare2fusesintheelectricalsystem.Theyarelocated
beneaththedashonthedriver'sside(Figure30).
Open
PowerPoint10A
LightsandHorn10A
Figure30
1.Machinefuseholder
2.Relay
10A
Specication:SeeyourPartsCatalog.
1.Disconnecttheelectricalharnessfromthebulb
housingonthebackofthelamp.
2.Removetheprotectiverubberboot(Figure31).
Figure31
1.Headlight4.Retainingring
2.Speedclipandatwasher
3.Headlightbulb6.Headlightbulbharness
3.Releasetheplasticretainingringbyturningit1/4turn
counterclockwise.
4.Removethering.
5.Rubberboot
connection
ReplacingtheHeadlights
Beforeperforminganymaintenancesettheparkingbrake,
turntheOn/OffswitchtoOff,andremovethekey.
Releasetheretainingstrapsonthehoodandraisethehoodto
accesstheheadlights.
ReplacingtheBulbs
CAUTION
Thehalogenbulbsbecomeextremelyhotwhenin
operation.Handlingahotbulbcancausesevere
burnsandpersonalinjury.
Alwaysallowenoughtimetoforthebulbstocool
beforereplacingthem.Usecarewheneverhandling
thebulb.
5.Removethebulbassemblybymovingitrearward,out
ofthelamphousing.
6.Installanewbulbintothelamphousing.
Note:Useapapertoweltograspthenewbulbwith
handlingittoavoidcontaminatingthesurface.
7.Securethebulbinplacebyinstallingtheretainingring.
Note:Turnthering1/4turnclockwisetolockitin
place.
8.Installtherubberbootovertheringandbulb.
9.Connectthebulbtotheelectricalharness.
29
Page 30

ReplacingtheHeadlight
Whenremovingorreplacingtheheadlightassembly,
disconnectthewiringharnesstothebulbassemblyifthebulb
istoberemovedwiththelamp.
DriveSystem
Maintenance
1.Removethespeedclipsandwasherssecuringthe
headlightinplace.
Note:Retainalloftheparts.
2.Removetheheadlightassemblybymovingitforward
throughtheopeninginthefrontbumper(Figure31).
3.Installthenewheadlightthroughtheopeninginthe
bumper(Figure31).
4.Ensurethattheadjustmentpostsarelinedupwiththe
holesinthemountingbracketinthebumper.
5.Securetheheadlightassemblywiththewashersand
speedclipsremovedpreviously.
6.Attachtheheadlighttothewireharnessremoved
previously.
7.Adjusttheheadlightstodirectthebeamstothedesired
position.
AdjustingtheHeadlights
Usethefollowingproceduretoadjusttheheadlightbeam
positionwheneveraheadlightassemblyisreplacedor
removed.
1.TurnthekeytotheOnpositionandturnonthe
headlights.
2.Attheheadlightassembly,usethefastenerstopivotthe
headlightassemblyandaffectthecast-beamposition.
InspectingtheTires
ServiceInterval:Every100hours
Every100hours
Checkthetireconditionatleastevery100hoursofoperation.
Operatingaccidents,suchashittingcurbs,candamagea
tireorrimandalsodisruptwheelalignment,soinspecttire
conditionafteranaccident.
Checkthewheelstoensurethattheyaremountedsecurely.
Torquethelugnutsto61to88N-m(45to65ft-lb).
AdjustingtheFrontWheel Toe-inandCamber
ServiceInterval:Every100hours/Yearly(whichevercomes
rst)—Checkthefrontwheeltoe-inand
camber.
Important:Youwillneedtoobtaintoolnumber
TORO6010fromyourToroDistributortoperformthis
procedure.
Thetoe-inshouldbe0to6mm(0to1/4inch)andthe
cambershouldbe0+1/2degree,i.e.,thebottomofthewheel
rimsangledin2.3mm(0.09inch)morethanthetop,withthe
followingparameters:
•Checkthetirepressuretoensurethatthefronttiresare
inatedto82kPa(12psi).
•Either,addweighttothedriver'sseatequaltotheaverage
operatorwhowillrunthemachine,orhaveanoperator
sitontheseat.Theweightoroperatormustremainon
theseatforthedurationoftheprocedure.
•Onalevelsurface,rollthemachinestraightback2to3
m(6to10ft)andthenstraightforwardtotheoriginal
startingposition.Thiswillallowthesuspensiontosettle
intotheoperatingposition.
•Measurethetoe-inwiththewheelsfacingstraightahead.
1.Tocheckthecamber,placea90degreesquareonthe
groundwiththeverticaledgetouchingthefaceofthe
tire(Figure32).
30
Page 31

g014968
1
2
Figure32
G014994
1
2
3
G009235
1
2
3
Left,frontwheelshownfromthefront;theangleis
exaggeratedforillustrativepurposes
1.Measurehere
2.Measurehere—shouldbe2.3mm(0.09inch)largerthan
themeasurementat1
2.Measurefromthesamepartoftherimonthetopand
bottomofthetiretothesquare(Figure32).
Note:Thedistanceofthebottommeasurement
shouldbe2.3mm(0.09inch)largerthanthetop
measurement.Completethemeasurementonboth
fronttiresbeforeadjusting.
Completethefollowingprocedureforeachtirethat
needsadjusting:
3.UsingtoolTORO6010,rotatethecollarontheshock
absorbertochangethelengthofthespring(Figure33).
Figure33
1.Shock-absorberspring3.Springlength
2.Collar
4.Onalevelsurface,rollthemachinestraightback2to3
m(6to10ft)andthenstraightforwardtotheoriginal
startingposition.
5.Repeatthisprocedure,startingwithstep1untilthe
camberissetcorrectlyforbothfrontwheels.
6.Measurethedistancebetweenbothofthefronttiresat
theaxleheightatboththefrontandrearofthefront
tires(Figure34).
•Ifthebottommeasurementwastooshort,reduce
thelengthofthespring.
•Ifthebottommeasurementwastoolong,increase
thelengthofthespring.
1.Tirecenterline—back3.Axlecenterline
2.Tirecenterline—front
7.Ifthemeasurementdoesnotfallwithin0to6mm(0
to1/4inch),loosenthejamnutsatbothendsofthe
tierods(Figure35).
Figure34
31
Page 32

ChangingtheTransaxleOil
ServiceInterval:Every800hours
Oiltype:10W30(SAESJorhigher)
Oilcapacity:1.9L(2USqt)
1.Alignadrainpanunderthedrainplug(Figure36).
Figure35
1.Jamnut2.Tierod
8.Rotatebothtierodstomovethefrontofthetire
inwardoroutward.
9.Tightenthetierodjamnutswhentheadjustmentis
correct.
10.Ensurethatthereisfulltravelofthesteeringwheelin
bothdirections.
CheckingtheTransaxle-oil Level
ServiceInterval:Every100hours
Oiltype:10W30(SAESJorhigher)
1.Parkthemachineonalevelsurface,settheparking
brake,andturnoffandremovethekey .
2.Removethellplugonthetransaxle(Figure36).
2.Removethellplugandtheseal(Figure36).
Note:Retainthellplugandsealforinstallationin
step6.
3.Removethedrainplugandtheseal,andallowtheoilto
draincompletely(Figure36).
Note:Retainthedrainplugandsealforinstallation
instep4.
4.Installthedrainplugandseal,andtorqueitto20to27
N-m(15to20ft-lb).
5.Fillthetransaxlewiththespeciedoiluntilitrunsout
ofthellhole.
6.Installthellplugandseal,andtorqueitto20to27
N-m(15to20ft-lb).
Note:Theoillevelshouldbeevenwiththebottom
ofthellplug.
Figure36
1.Fillplug2.Drainplug
3.Iftheoillevelislow,removethellplugandaddthe
speciedoiluntilitrunsoutofthehole(Figure36).
4.Replacethellplugandtorqueitto20to27N-m(15
to20ft-lb).
32
Page 33

BrakeMaintenance
AdjustingtheParkingBrake
ServiceInterval:Every200hours
CheckingtheBrake-uidLevel
ServiceInterval:Beforeeachuseordaily
Thebrake-uidreservoirislledandshippedfromthe
factorywithDOT3brakeuid.Checkthelevelbeforethe
machineisrststartedandevery8hoursordaily,thereafter.
1.Parkthemachineonalevelsurface,settheparking
brake,turntheOn/OffswitchtoOff,andremovethe
key.
2.Removetherubberpluginthecenterandontopof
thedashtogainaccesstothemasterbrakecylinder
andreservoir.
3.Lookatthesideofthereservoir,andensurethatthe
uidlevelisabovetheMinimumline(Figure37).
4.Iftheuidlevelislow,cleantheareaaroundthecap,
removethecap,andllthereservoirtoabovethe
Minimumline.Donotoverll.
1.Prytherubbercoverofftheparkingbrake.
2.Loosenthesetscrewsecuringtheknobtothe
parking-brakelever(Figure38).
Figure38
1.Parking-brakelever
2.Knob
3.Rotatetheknobuntilaforceof133to156N-m(30to
35ft-lb)isrequiredtoactuatethelever.
4.Tightenthesetscrewandinstalltherubbercover.
3.Setscrew
Figure37
1.Brake-uidreservoir
2.Minimumline
InspectingtheBrakes
ServiceInterval:Every100hours
Brakesareacriticalsafetycomponentofthemachine.As
withallsafetycomponents,theyshouldbecloselyinspectedat
regularintervalstoensureoptimumperformanceandsafety.
Thefollowinginspectionsshouldbedoneevery100hours:
•Inspectthebrakeshoesforwearordamage.Ifthelining
(brakepad)thicknessislessthan1.6mm(1/16inch),the
brakeshoesshouldbereplaced.
•Inspectthebackingplateandothercomponentsforsigns
ofexcessivewearordeformation.Ifanydeformationis
found,theappropriatecomponentsmustbereplaced.
•Checkthebrakeuidlevel;refertoCheckingthe
Brake-uidLevel(page33).
33
Page 34

Cleaning
WashingtheMachine
Storage
1.Positionthemachineonalevelsurface,settheparking
brake,stopthemachine,andremovethekey.
Washthemachineasneeded.Usewateraloneorwithamild
detergent.Aragmaybeused,howeverthehoodwillloose
someofitsluster.
Important:Pressurizedwaterisnotrecommended
whenwashingthemachine.Itmaydamagetheelectrical
system,loosenimportantdecals,orwashawaynecessary
greaseatfrictionpoints.Avoidexcessiveuseofwater,
especiallynearthecontrolpanel,motor,andbatteries.
2.Cleandirtandgrimefromtheentiremachine,including
theoutsideofthemotorhousing.
Important:Youcanwashthemachinewithmild
detergentandwater.Donotusehighpressure
watertowashthemachine.Pressurewashing
maydamagetheelectricalsystemorwashaway
necessarygreaseatfrictionpoints.Avoidexcessive
useofwater,especiallynearthecontrolpanel,
lights,motor,andthebattery.
3.Inspectthebrakes;refertoInspectingtheBrakes(page
33).
4.Greasethemachine;refertoAddingGrease(page26).
5.Checkthetirepressure;referto.
6.Chargethebatteriesfullybeforeplacingthemachine
intostorage;refertoChargingtheBatteries(page27).
Plugthechargerintoawalloutletwhilethemachine
andbatteriesareinstorage.Leavethechargerplugged
intoawalloutletandchargingreceptacleduringstorage
toensurethatthebatteriesstaychargedanddonot
freeze;otherwise,chargethebatteriesatleastonce
every3months.
7.Checkandtightenallbolts,nuts,andscrews.Repairor
replaceanypartthatisdamaged.
8.Paintallscratchedorbaremetalsurfaces.
PaintisavailablefromyourAuthorizedServiceDealer.
9.Storethemachineinaclean,drygarageorstoragearea.
10.Removethekeyandputitinasafeplaceoutofthe
reachofchildren.
11.Coverthemachinetoprotectitandkeepitclean.
34
Page 35

Troubleshooting
MachineStatusLightFlashPattern
Alwayson
1ash
2ashes
3ashes
4ashes
Problem
1.Thesystemisfunctioningproperly.
1.Thecomputerprogrammingpersonality
isoutofrange.
1.Theacceleratorpedalwaspressed
whentheOn/Offkeywasturned.
1.Thepowerblockhasashortcircuit
(MOSFETS/C).
2.Thereisapoorbatterorpowercable
connection.
1.Thelinecontactorisnotrespondingto
commands.
PossibleCauseCorrectiveAction
1.None
1.TurntheOn/OffkeytotheOffposition,
waitafewseconds,andturntheOn/Off
keytotheOnposition.Ifthecondition
continues,refertoyourAuthorized
ServiceDealer.
1.TurntheOn/OffkeytotheOffposition,
releasetheacceleratorpedal,andturn
theOn/OffkeytotheOnposition.
1.TurntheOn/OffkeytotheOffposition,
waitafewseconds,andturnthe
On/OffkeytotheOnposition.Check
allbatteriesandhighcurrentcontroller
connectionsIftheconditioncontinues,
refertoyourAuthorizedService
Dealer.
2.TurntheOn/OffkeytotheOffposition,
waitafewseconds,andturnthe
On/OffkeytotheOnposition.Check
allbatteriesandhighcurrentcontroller
connectionsIftheconditioncontinues,
refertoyourAuthorizedService
Dealer.
1.TurntheOn/OffkeytotheOffposition,
waitafewseconds,andturntheOn/Off
keytotheOnposition.Ifthecondition
continues,refertoyourAuthorized
ServiceDealer.
5ashes
6ashes1.Acceleratorpotentiometerisoutof
7ashes
8ashes
9ashes
Off
1.Thechargerinterlockswitchisactive.
adjustment.
1.Thebatteryvoltageisoutofrange.1.RefertoyourAuthorizedService
2.Thereisanovervoltageerrorcode
causedbyoverspeedingwhen
travelingdownasteephill.
1.Thecontrollerisoverheated.1.Themachinewillcontinuetorun,but
1.Themotorisoverheatedorthebattery
isnearlydischarged(themachinewill
gointotheenergy-savingmode).
1.Thereiseithernopowertothe
controllerorthecontrollerhasfailed.
1.TurntheOn/OffkeytotheOffposition,
disconnectthecharger,andturnthe
On/OffkeytotheOnposition.
1.RefertoyourAuthorizedService
Dealer.
Dealer.
2.Cyclethepedaltoclearfault,ifit
doesnotclearthefault,refertoyour
AuthorizedServiceDealertohave
thebatteriestestedandreplacedif
necessary.
atareducedpoweruntilthecontroller
coolsdown.
1.Ifthebattermeterdisplaysmorethan
onebar,stopthemachine,andallow
themotortocoolbeforeoperatingit
again.Ifthebatterymeterdisplays
onlyonebar,chargethemachine
immediately.
1.RefertoyourAuthorizedService
Dealer.
35
Page 36

Notes:
36
Page 37

Notes:
37
Page 38

Notes:
38
Page 39

InternationalDistributorList
Distributor:
AgrolancKft
BalamaPrimaEngineeringEquip.HongKong85221552163
B-RayCorporation
CascoSalesCompany
CeresS.A.CostaRica
CSSCTurfEquipment(pvt)Ltd.SriLanka
CyrilJohnston&Co.
CyrilJohnston&Co.RepublicofIreland
EquiverMexico525553995444ParklandProductsLtd.NewZealand6433493760
FemcoS.A.Guatemala
ForGarderOU
G.Y .K.CompanyLtd.
GeomechanikiofAthensGreece
GolfinternationalTurizm
GuandongGoldenStarChina
HakoGroundandGardenSweden
HakoGroundandGarden
HayterLimited(U.K.)
HydroturfInt.CoDubai
HydroturfEgyptLLC
IrrimacPortugal351212388260T oroEuropeNVBelgium3214562960
IrrigationProductsInt'lPvtLtd.India0091442449
JeanHeybroekb.v.Netherlands3130639461 1VictusEmakPoland48618238369
Country:
Hungary3627539640
Korea82325512076
PuertoRico7877888383
NorthernIreland442890813121
Estonia3723846060
Japan81726325861
Turkey902163365993Riversa
Norway4722907760
UnitedKingdom441279723444
UnitedArabEmirates97143479479T-MarktLogisticsLtd.Hungary3626525500
Egypt2025194308ToroAustraliaAustralia61395807355
PhoneNumber:Distributor:
5062391138
94112746100
442890813121
5024423277
30109350054
862087651338
4635100000
4387
Country:
MaquiverS.A.Colombia
MaruyamaMfg.Co.Inc.
Mountelda.s.CzechRepublic
Mountelda.s.Slovakia
MunditolS.A.
NormaGarden
OslingerTurfEquipmentSA
OyHakoGroundandGarden
Ab
Perfetto
PratoverdeSRL.
Prochaska&Cie
RTCohen2004Ltd.
LelyTurfcare
SolvertS.A.S.
SpyprosStavrinidesLimitedCyprus
SurgeSystemsIndiaLimited
ValtechMorocco21253766
Japan81332522285
Argentina54114821
Russia749541 16120
Ecuador59342396970
Finland35898700733
Poland48618208416
Italy390499128
Austria4312785100
Israel97298617979
Spain
Denmark4566109200
France331308177
India911292299901
Phone
Number:
5712364079
420255704
220
420255704
220
9999
128
34952837500
00
35722434131
3636
EuropeanPrivacyNotice
TheInformationToroCollects
ToroWarrantyCompany(T oro)respectsyourprivacy.Inordertoprocessyourwarrantyclaimandcontactyouintheeventofaproductrecall,weaskyou
tosharecertainpersonalinformationwithus,eitherdirectlyorthroughyourlocalT orocompanyordealer.
TheT orowarrantysystemishostedonserverslocatedwithintheUnitedStateswhereprivacylawmaynotprovidethesameprotectionasapplies
inyourcountry.
BYSHARINGYOURPERSONALINFORMATIONWITHUS,YOUARECONSENTINGTOTHEPROCESSINGOFYOURPERSONALINFORMATION
ASDESCRIBEDINTHISPRIV ACYNOTICE.
TheWayT oroUsesInformation
Toromayuseyourpersonalinformationtoprocesswarrantyclaims,tocontactyouintheeventofaproductrecallandforanyotherpurposewhichwetell
youabout.ToromayshareyourinformationwithT oro'safliates,dealersorotherbusinesspartnersinconnectionwithanyoftheseactivities.Wewillnot
sellyourpersonalinformationtoanyothercompany.Wereservetherighttodisclosepersonalinformationinordertocomplywithapplicablelawsand
withrequestsbytheappropriateauthorities,tooperateoursystemsproperlyorforourownprotectionorthatofotherusers.
RetentionofyourPersonalInformation
Wewillkeepyourpersonalinformationaslongasweneeditforthepurposesforwhichitwasoriginallycollectedorforotherlegitimatepurposes
(suchasregulatorycompliance),orasrequiredbyapplicablelaw .
Toro'sCommitmenttoSecurityofYourPersonalInformation
Wetakereasonableprecautionsinordertoprotectthesecurityofyourpersonalinformation.Wealsotakestepstomaintaintheaccuracyandcurrent
statusofpersonalinformation.
AccessandCorrectionofyourPersonalInformation
Ifyouwouldliketorevieworcorrectyourpersonalinformation,pleasecontactusbyemailatlegal@toro.com.
AustralianConsumerLaw
AustraliancustomerswillnddetailsrelatingtotheAustralianConsumerLaweitherinsidetheboxoratyourlocalT oroDealer.
374-0269RevH
Page 40

TheToroGeneralCommercialproductsGuarantee
ALimitedWarranty
Electric
Workman
ConditionsandProductsCovered
TheToroCompanyanditsafliate,T oroWarrantyCompany,pursuant
toanagreementbetweenthem,jointlywarrantyourT oroCommercial
product(“Product”)tobefreefromdefectsinmaterialsorworkmanship
fortwoyearsor1500operationalhours*,whicheveroccursrst.Where
awarrantableconditionexists,wewillrepairtheProductatnocostto
youincludingdiagnostics,labor,parts,andtransportation.Thiswarranty
beginsonthedatetheProductisdeliveredtotheoriginalretailpurchaser.
*Productequippedwithanhourmeter.
InstructionsforObtainingWarrantyService
YouareresponsiblefornotifyingtheCommercialProductsDistributoror
AuthorizedCommercialProductsDealerfromwhomyoupurchasedthe
Productassoonasyoubelieveawarrantableconditionexists.Ifyouneed
helplocatingaCommercialProductsDistributororAuthorizedDealer,or
ifyouhavequestionsregardingyourwarrantyrightsorresponsibilities,
youmaycontactusat:
CommercialProductsServiceDepartment
ToroWarrantyCompany
811 1LyndaleAvenueSouth
Bloomington,MN55420-1196
E-mail:commercial.warranty@toro.com
OwnerResponsibilities
AstheProductowner,youareresponsibleforrequiredmaintenanceand
adjustmentsstatedinyourOperator’sManual.Failuretoperformrequired
maintenanceandadjustmentscanbegroundsfordisallowingawarranty
claim.
ItemsandConditionsNotCovered
Notallproductfailuresormalfunctionsthatoccurduringthewarranty
periodaredefectsinmaterialsorworkmanship.Thiswarrantydoesnot
coverthefollowing:
•Productfailureswhichresultfromtheuseofnon-T ororeplacement
parts,orfrominstallationanduseofadd-on,ormodiednon-Toro
brandedaccessoriesandproducts.Aseparatewarrantymaybe
providedbythemanufactureroftheseitems.
•Productfailureswhichresultfromfailuretoperformrecommended
maintenanceand/oradjustments.Failuretoproperlymaintainyour
ToroproductpertheRecommendedMaintenancelistedinthe
Operator’sManualcanresultinclaimsforwarrantybeingdenied.
•ProductfailureswhichresultfromoperatingtheProductinanabusive,
negligentorrecklessmanner.
•Partssubjecttoconsumptionthroughuseunlessfoundtobedefective.
Examplesofpartswhichareconsumed,orusedup,duringnormal
Productoperationinclude,butarenotlimitedto,batteries,carbon
brushes,brakecomponents,tires,lters,belts,etc.
•Failurescausedbyoutsideinuence.Itemsconsideredtobeoutside
inuenceinclude,butarenotlimitedto,weather,storagepractices,
contamination,useofunapprovedlubricants,additives,chemicals,etc.
•Normal“wearandtear”items.Normal“wearandtear”includes,butis
notlimitedto,damagetoseatsduetowearorabrasion,wornpainted
surfaces,scratcheddecalsorwindows,etc.
Parts
Partsscheduledforreplacementasrequiredmaintenancearewarranted
fortheperiodoftimeuptothescheduledreplacementtimeforthatpart.
Partsreplacedunderthiswarrantyarecoveredforthedurationofthe
originalproductwarrantyandbecomethepropertyofT oro.T orowillmake
thenaldecisionwhethertorepairanyexistingpartorassemblyorreplace
it.T oromayuseremanufacturedpartsforwarrantyrepairs.
NoteRegardingDeepCycleBatteryWarranty:
Deepcyclebatterieshaveaspeciedtotalnumberofkilowatt-hoursthey
candeliverduringtheirlifetime.Operating,recharging,andmaintenance
techniquescanextendorreducetotalbatterylife.Asthebatteriesin
thisproductareconsumed,theamountofusefulworkbetweencharging
intervalswillslowlydecreaseuntilthebatteryiscompletelywornout.
Replacementofwornoutbatteries,duetonormalconsumption,isthe
responsibilityoftheproductowner.Batteryreplacementmayberequired
duringthenormalproductwarrantyperiodatowner’sexpense.
GeneralConditions
RepairbyanAuthorizedToroDistributororDealerisyoursoleremedy
underthiswarranty.
NeitherTheToroCompanynorToroWarrantyCompanyisliablefor
indirect,incidentalorconsequentialdamagesinconnectionwiththe
useoftheToroProductscoveredbythiswarranty,includingany
costorexpenseofprovidingsubstituteequipmentorserviceduring
reasonableperiodsofmalfunctionornon-usependingcompletionof
repairsunderthiswarranty.
Allimpliedwarrantiesofmerchantabilityandtnessforusearelimitedtothe
durationofthisexpresswarranty .Somestatesdonotallowexclusionsof
incidentalorconsequentialdamages,orlimitationsonhowlonganimplied
warrantylasts,sotheaboveexclusionsandlimitationsmaynotapplytoyou.
Thiswarrantygivesyouspeciclegalrights,andyoumayalsohaveother
rightswhichvaryfromstatetostate.
CountriesOtherthantheUnitedStatesorCanada
CustomerswhohavepurchasedT oroproductsexportedfromtheUnitedStatesorCanadashouldcontacttheirT oroDistributor(Dealer)toobtain
guaranteepoliciesforyourcountry ,province,orstate.IfforanyreasonyouaredissatisedwithyourDistributor'sserviceorhavedifcultyobtaining
guaranteeinformation,contacttheT oroimporter.Ifallotherremediesfail,youmaycontactusatT oroWarrantyCompany .
374-0274RevA
 Loading...