

Toro 03780, Reelmaster 7000-D Operator's Manual

FormNo.3398-993RevA
Reelmaster
®
7000-D4-Wheel
DriveTractionUnit
ModelNo.03780—SerialNo.316000001andUp
Registeratwww.T oro.com.
OriginalInstructions(EN)
*3398-993*A
ThisproductcomplieswithallrelevantEuropeandirectives.
Fordetails,pleaseseetheseparateproductspecic
DeclarationofConformity(DOC)sheet.
WARNING
CALIFORNIA
Proposition65Warning
Thisproductcontainsachemicalorchemicals
knowntotheStateofCaliforniatocausecancer,
birthdefects,orreproductiveharm.
Dieselengineexhaustandsomeofits
constituentsareknowntotheStateof
Californiatocausecancer,birthdefects,
andotherreproductiveharm.
Figure1
ItisaviolationofCaliforniaPublicResourceCode
Section4442or4443touseoroperatetheengineonany
forest-covered,brush-covered,orgrass-coveredlandunless
theengineisequippedwithasparkarrester,asdenedin
Section4442,maintainedineffectiveworkingorderorthe
engineisconstructed,equipped,andmaintainedforthe
preventionofre.
Theenclosedengineowner’smanualissuppliedfor
informationregardingtheUSEnvironmentalProtection
Agency(EPA)andtheCaliforniaEmissionControl
Regulationofemissionsystems,maintenance,and
warranty.Replacementsmaybeorderedthroughtheengine
manufacturer.
Introduction
Thismachineisaride-on,reel-bladelawnmowerintended
tobeusedbyprofessional,hiredoperatorsincommercial
applications.Itisprimarilydesignedforcuttinggrasson
well-maintainedlawnsingolfcourses,parks,sportselds,
andoncommercialgrounds.Itisnotdesignedforcutting
brush,mowinggrassandothergrowthalongsidehighways,
orforagriculturaluses.
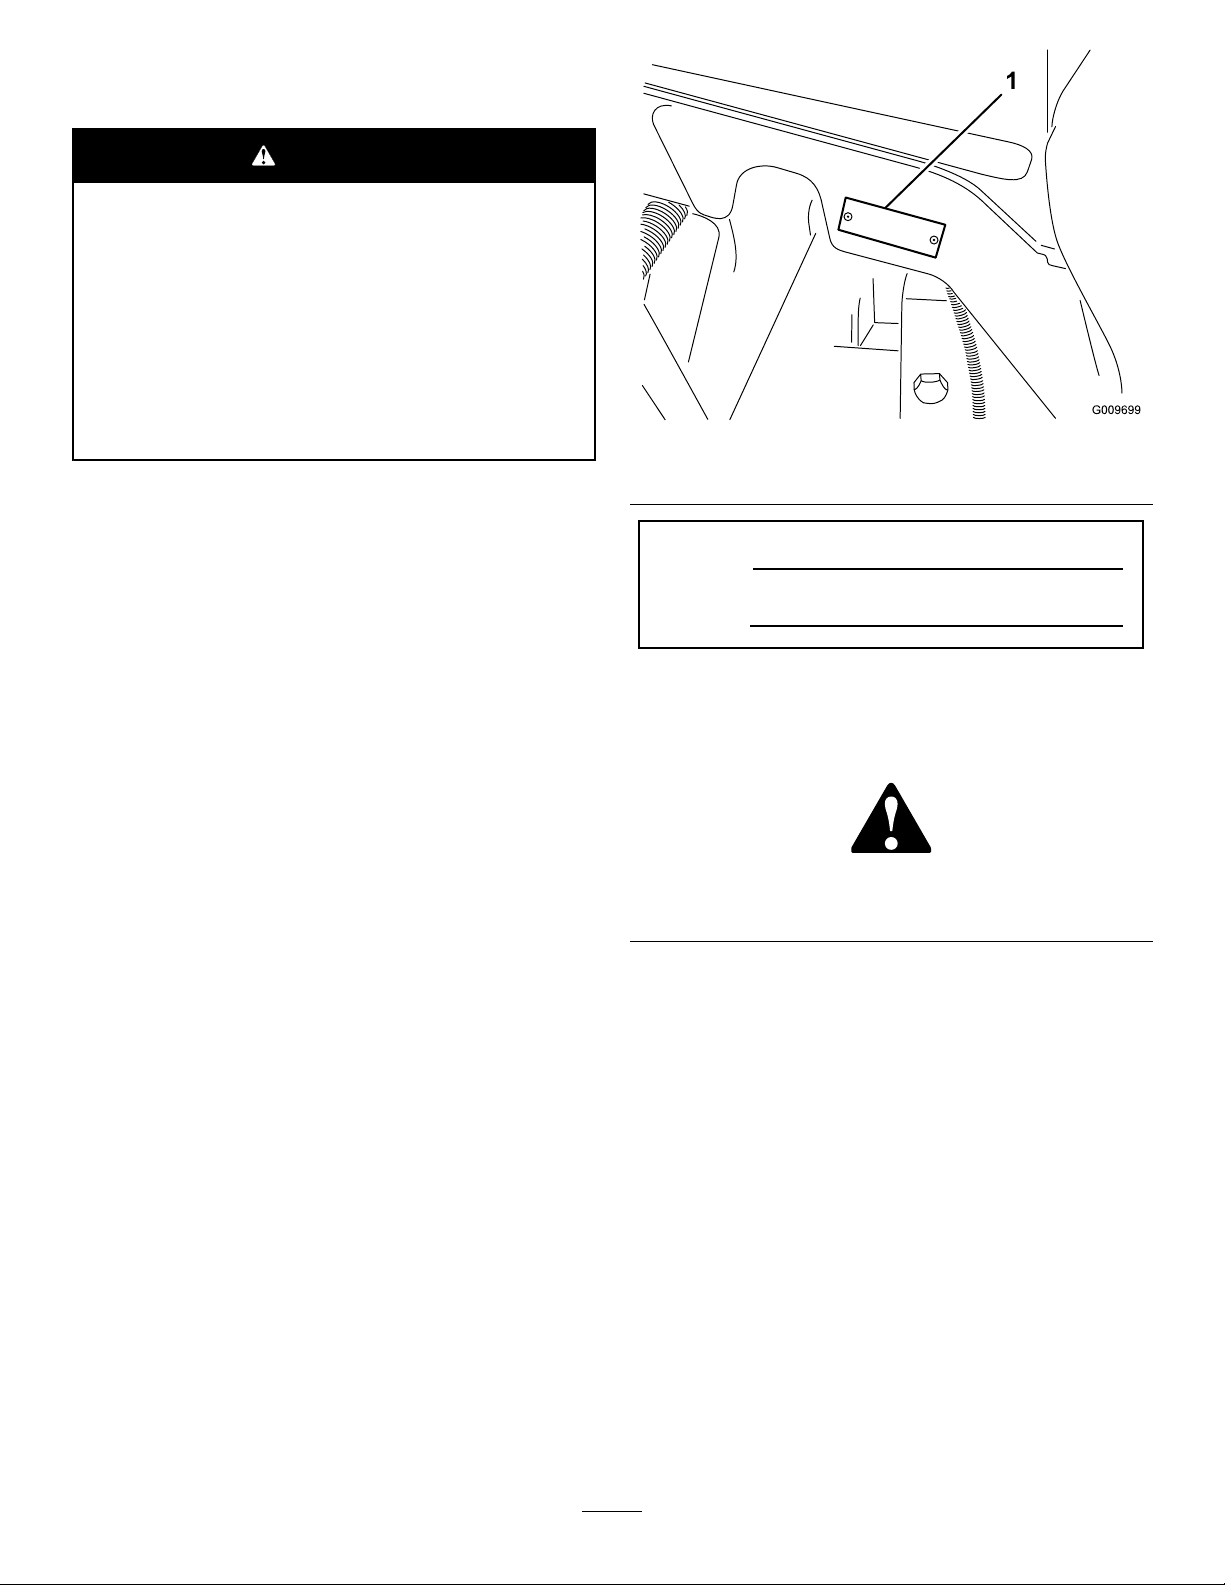
1.Modelandserialnumberlocation
ModelNo.
SerialNo.
Thismanualidentiespotentialhazardsandhassafety
messagesidentiedbythesafety-alertsymbol(Figure2),
whichsignalsahazardthatmaycauseseriousinjuryordeath
ifyoudonotfollowtherecommendedprecautions.
Figure2
1.Safety-alertsymbol.
Thismanualuses2wordstohighlightinformation.
Importantcallsattentiontospecialmechanicalinformation
andNoteemphasizesgeneralinformationworthyofspecial
attention.
Readthisinformationcarefullytolearnhowtooperateand
maintainyourproductproperlyandtoavoidinjuryand
productdamage.Youareresponsibleforoperatingthe
productproperlyandsafely.
YoumaycontactTorodirectlyatwww .Toro.comforproduct
safetyandoperationtrainingmaterials,accessoryinformation,
helpndingadealer,ortoregisteryourproduct.
Wheneveryouneedservice,genuineT oroparts,oradditional
information,contactanAuthorizedServiceDealerorToro
CustomerServiceandhavethemodelandserialnumbersof
yourproductready.Figure1identiesthelocationofthe
modelandserialnumbersontherightfrontframemember
oftheproduct.Writethenumbersinthespaceprovided.
©2015—TheToro®Company
8111LyndaleAvenueSouth
Bloomington,MN55420
Contactusatwww.Toro.com.
2
PrintedintheUSA
AllRightsReserved

Contents
Safety...........................................................................4
SafeOperatingPractices...........................................4
ToroRidingMowerSafety........................................6
SoundPowerLevel..................................................7
SoundPressureLevel...............................................7
VibrationLevel......................................................7
Engine-EmissionCertication..................................7
SafetyandInstructionalDecals.................................7
Setup...........................................................................13
1AdjustingtheSupportRollers................................14
2ReplacingtheWarningDecalforCE
Compliance........................................................14
3InstallingtheHoodLockforCE
Compliance........................................................14
4InstallingtheCuttingUnits....................................15
5AdjustingtheTurf-CompensationSpring................19
6UsingtheCutting-UnitKickstand...........................19
7GreasingtheMachine...........................................20
8CheckingtheFluidLevels.....................................21
9UsingtheGaugeBar............................................21
ProductOverview.........................................................22
Controls...............................................................22
Specications........................................................28
TractionUnitSpecications.....................................28
Attachments/Accessories........................................28
Operation....................................................................29
ThinkSafetyFirst...................................................29
CheckingtheLeveloftheEngineOil.........................29
CheckingtheCoolingSystem...................................30
FillingtheFuelTank...............................................30
CheckingtheLeveloftheHydraulicFluid..................31
CheckingtheTirePressure......................................32
StartingandStoppingtheEngine..............................32
EngineSpeedSwitch...............................................33
CheckingtheInterlockSwitches...............................33
AdjustingtheLift-ArmCounterbalance.....................34
AdjustingtheLift-ArmTurnaroundPosition..............34
PushingorTowingtheMachine...............................34
HaulingtheMachine...............................................36
IdentifyingtheJackingPoints...................................36
IdentifyingtheTie-DownPoints..............................36
OperatingCharacteristics........................................36
OperatingTips......................................................37
Maintenance.................................................................38
RecommendedMaintenanceSchedule(s)......................38
DailyMaintenanceChecklist....................................39
ServiceIntervalChart.............................................40
PremaintenanceProcedures........................................41
RemovingtheHood...............................................41
Lubrication...............................................................41
GreasingtheBearingsandBushings..........................41
EngineMaintenance..................................................43
ServicingtheAirCleaner.........................................43
ServicingtheEngineOilandFilter............................44
ServicingtheDieselParticulateFilter(DPF)...............44
ServicingtheDieselOxidationCatalyst
(DOC)..............................................................44
FuelSystemMaintenance...........................................45
DrainingtheFuelTank...........................................45
CheckingtheFuelLinesandConnections..................45
ServicingtheWaterSeparator..................................45
ServicingtheFuelFilter...........................................45
CleaningtheFuel-IntakeScreen...............................46
ElectricalSystemMaintenance....................................46
ChargingandConnectingtheBattery........................46
ServicingtheBattery...............................................47
LocatingtheFuses..................................................48
DriveSystemMaintenance.........................................49
CheckingtheTorqueoftheWheelNuts.....................49
CheckingthePlanetaryGearDriveOil......................49
ChangingthePlanetaryGearDriveOil......................49
CheckingtheOilLeveloftheRearAxle.....................50
ChangingtheOilintheRearAxle.............................50
CheckingtheLubricantintheGearBoxofthe
RearAxle...........................................................50
AdjustingtheTractionDriveforNeutral....................51
CheckingtheRear-WheelToe-In..............................51
CoolingSystemMaintenance......................................52
ServicingtheEngineCoolingSystem........................52
BrakeMaintenance....................................................53
AdjustingtheServiceBrakes....................................53
BeltMaintenance......................................................54
ServicingtheAlternatorBelt....................................54
HydraulicSystemMaintenance....................................54
ChangingtheHydraulicFluid...................................54
ReplacingtheHydraulicFilters.................................54
CheckingtheHydraulicLinesandHoses....................55
CuttingUnitMaintenance...........................................56
BacklappingtheCuttingUnits..................................56
Storage........................................................................57
PreparingtheEngine..............................................57
PreparingtheTractionUnit.....................................57
3

Safety
ThismachinemeetsorexceedsENISO5395:2013(when
appropriatedecalsapplied),andANSIB71.4-2012.
Improperlyusingormaintainingthemachinecanresult
ininjury.T oreducethepotentialforinjury,complywith
thesesafetyinstructionsandalwayspayattentiontothe
safety-alertsymbol,whichmeansCaution,Warning,or
Danger—personalsafetyinstruction.Failuretocomplywith
theinstructionmayresultinpersonalinjuryordeath.
SafeOperatingPractices
ThefollowinginstructionsarefromtheENISO5395:2013
andANSIB71.4-2012.
Training
•Readtheoperator'smanualandothertrainingmaterial
carefully.Befamiliarwiththecontrols,safetysigns,and
theproperuseoftheequipment.
•Neverallowchildrenorpeopleunfamiliarwiththese
instructionstouseorservicethemower.Local
regulationsmayrestricttheageoftheoperator.
•Nevermowwhilepeople,especiallychildren,orpetsare
nearby.
•Keepinmindthattheoperatororuserisresponsiblefor
accidentsorhazardsoccurringtootherpeopleortheir
property.
•Donotcarrypassengers.
•Alldriversandmechanicsshouldseekandobtain
professionalandpracticalinstruction.Theowneris
responsiblefortrainingtheusers.Suchinstructionshould
emphasize:
–theneedforcareandconcentrationwhenworking
withride-onmachines;
–controlofaride-onmachineslidingonaslopewill
notberegainedbytheapplicationofthebrake.The
mainreasonsforlossofcontrolare:
◊insufcientwheelgrip;
◊beingdriventoofast;
◊inadequatebraking;
◊thetypeofmachineisunsuitableforitstask;
◊lackofawarenessoftheeffectofground
conditions,especiallyslopes;
◊incorrecthitchingandloaddistribution.
•Theowner/usercanpreventandisresponsiblefor
accidentsorinjuriesoccurringtopeopleordamageto
property.
Preparation
•Whilemowing,alwayswearappropriateclothing,
includingeyeprotection,substantial,slip-resistant
footwear,longtrousers,andearprotection.
•Tiebacklonghair.Donotwearjewelry.
•Thoroughlyinspecttheareawheretheequipmentisto
beusedandremoveallobjectswhichmaybethrownby
themachine.
•Replacefaultysilencers/mufers.
•Evaluatetheterraintodeterminewhataccessoriesand
attachmentsareneededtoproperlyandsafelyperform
thejob.Onlyuseaccessoriesandattachmentsapproved
bythemanufacturer.
•Checkthattheoperator'spresencecontrols,safety
switchesandshieldsareattachedandfunctioning
properly.Donotoperateunlesstheyarefunctioning
properly.
SafeHandlingofFuels
•Toavoidpersonalinjuryorpropertydamage,useextreme
careinhandlingfuel.Fuelisextremelyammableandthe
vaporsareexplosive.
•Extinguishallcigarettes,cigars,pipes,andothersources
ofignition.
•Useonlyanapprovedfuelcontainer.
•Neverremovefuelcaporaddfuelwiththeengine
running.
•Allowenginetocoolbeforerefueling.
•Neverrefuelthemachineindoors.
•Neverstorethemachineorfuelcontainerwherethereis
anopename,spark,orpilotlightsuchasonawater
heateroronotherappliances.
•Neverllcontainersinsideavehicleoronatruckor
trailerbedwithaplasticliner.Alwaysplacecontainerson
thegroundawayfromyourvehiclebeforelling.
•Removeequipmentfromthetruckortrailerandrefuelit
ontheground.Ifthisisnotpossible,thenrefuelsuch
equipmentwithaportablecontainer,ratherthanfroma
fueldispensernozzle.
•Keepthenozzleincontactwiththerimofthefueltank
orcontaineropeningatalltimesuntilfuelingiscomplete.
Donotuseanozzlelockopendevice.
•Iffuelisspilledonclothing,changeclothingimmediately.
•Neveroverllfueltank.Replacefuelcapandtighten
securely.
Operation
•Donotoperatetheengineinaconnedspacewhere
dangerouscarbonmonoxidefumescancollect.
•Mowonlyindaylightoringoodarticiallight.
•Beforeattemptingtostarttheengine,disengageallblade
attachmentclutches,shiftintoneutral,andengagethe
parkingbrake.
•Rememberthereisnosuchthingasasafeslope.Travel
ongrassslopesrequiresparticularcare.T oguardagainst
overturning:
4

–donotstoporstartsuddenlywhengoingupor
downhill;
–machinespeedsshouldbekeptlowonslopesand
duringtightturns;
–stayalertforhumpsandhollowsandotherhidden
hazards;
–Donotturnsharply.Usecarewhenreversing.
–Usecounterweight(s)orwheelweightswhen
suggestedintheoperator'smanual.
•Stayalertforholesintheterrainandotherhiddenhazards.
•Watchoutfortrafcwhencrossingornearroadways.
•Stopthebladesrotatingbeforecrossingsurfacesother
thangrass.
•Whenusinganyattachments,neverdirectdischargeof
materialtowardbystandersnorallowanyonenearthe
machinewhileinoperation.
•Neveroperatethemachinewithdamagedguards,shields,
orwithoutsafetyprotectivedevicesinplace.Besureall
interlocksareattached,adjustedproperly ,andfunctioning
properly.
•Donotchangetheenginegovernorsettingsorover-speed
theengine.Operatingtheengineatexcessivespeedmay
increasethehazardofpersonalinjury.
•Beforeleavingtheoperator'sposition:
–stoponlevelground;
–disengagethepowertake-offandlowerthe
attachments;
–changeintoneutralandsettheparkingbrake;
–stoptheengineandremovethekey.
•Disengagedrivetoattachmentswhentransportingornot
inuse.
•Stoptheengineanddisengagedrivetoattachment:
–beforerefuelling;
–beforemakingheightadjustmentunlessadjustment
canbemadefromtheoperator'sposition.
–beforeclearingblockages;
–beforechecking,cleaningorworkingonthemower;
–afterstrikingaforeignobjectorifanabnormal
vibrationoccurs.Inspectthemowerfordamage
andmakerepairsbeforerestartingandoperatingthe
equipment.
•Reducethethrottlesettingduringenginerun-outand,if
theengineisprovidedwithashut-offvalve,turnthefuel
offattheconclusionofmowing.
•Keephandsandfeetawayfromthecuttingunits.
•Lookbehindanddownbeforebackinguptobesureof
aclearpath.
•Slowdownandusecautionwhenmakingturnsand
crossingroadsandsidewalks.Stopcylinders/reelsifnot
mowing.
•Donotoperatethemachinewhenill,tired,orunderthe
inuenceofalcoholordrugs.
•Lightningcancausesevereinjuryordeath.Iflightning
isseenorthunderisheardinthearea,donotoperate
themachine;seekshelter.
•Usecarewhenloadingorunloadingthemachineintoa
trailerortruck.
•Usecarewhenapproachingblindcorners,shrubs,trees,
orotherobjectsthatmayobscurevision.
MaintenanceandStorage
•Keepallfastenerstighttobesurethattheequipmentis
insafeworkingcondition.
•Neverstoretheequipmentwithfuelinthetankinsidea
buildingwherefumesmayreachanopenameorspark.
•Allowtheenginetocoolbeforestoringinanyenclosure.
•Toreducetheriskofre,keeptheengine,
silencer/mufer,batterycompartmentandfuelstorage
areafreeofgrass,leaves,orexcessivegrease.Cleanupoil
orfuelspillage.
•Keepallpartsingoodworkingconditionandallhardware
andhydraulicttingstightened.Replaceallwornor
damagedpartsanddecals.
•Ifthefueltankhastobedrained,dothisoutdoors.
•Becarefulduringadjustmentofthemachinetoprevent
entrapmentofthengersbetweenmovingbladesand
xedpartsofthemachine.
•Onmulti-cylinder/multi-reelmachines,takecareas
rotatingonecylinder/reelcancauseothercylinders/reels
torotate.
•Disengagedrives,lowerthecuttingunits,setparking
brake,stopengineandremovekeyfromignition.Wait
forallmovementtostopbeforeadjusting,cleaningor
repairing.
•Usejackstandstosupportcomponentswhenrequired.
•Carefullyreleasepressurefromcomponentswithstored
energy.
•Disconnectbatterybeforemakinganyrepairs.Disconnect
thenegativeterminalrstandthepositivelast.Reconnect
positiverstandnegativelast.
•Usecarewhencheckingthecylinders/reels.Weargloves
andusecautionwhenservicingthem.
•Keephandsandfeetawayfrommovingparts.Ifpossible,
donotmakeadjustmentswiththeenginerunning.
•Chargebatteriesinanopenwellventilatedarea,away
fromsparkandames.Unplugchargerbeforeconnecting
ordisconnectingfrombattery.W earprotectiveclothing
anduseinsulatedtools.
5

Hauling
•Usecarewhenloadingorunloadingthemachineintoa
trailerortruck.
•Usefullwidthrampsforloadingmachineintotraileror
truck.
•Tiethemachinedownsecurelyusingstraps,chains,cable,
orropes.Bothfrontandrearstrapsshouldbedirected
downandoutwardfromthemachine
•Donottouchtheengine,silencer/mufer,orexhaust
pipewhiletheengineisrunningorsoonafterithas
stoppedbecausetheseareascouldbehotenoughtocause
burns.
•Onanyhill,thereisthepossibilityoftippingorrolling
over,buttheriskincreasesastheslopeangleincreases.
Steephillsshouldbeavoided.
Cuttingunitsmustbeloweredwhengoingdownslopes
tomaintainsteeringcontrol
ToroRidingMowerSafety
ThefollowinglistcontainssafetyinformationspecictoToro
productsorothersafetyinformationthatyoumustknowthat
isnotincludedintheCEN,ISO,orANSIstandard.
Thisproductiscapableofamputatinghandsandfeetand
throwingobjects.Alwaysfollowallsafetyinstructionsto
avoidseriousinjuryordeath.
Useofthisproductforpurposesotherthanitsintendeduse
couldprovedangeroustouserandbystanders.
WARNING
Engineexhaustcontainscarbonmonoxide,which
isanodorless,deadlypoisonthatcankillyou.
Donotrunengineindoorsorinanenclosedarea.
•Knowhowtostoptheenginequickly.
•Wearingsafetyshoesandlongpantsisadvisableand
requiredbysomelocalordinancesandinsurance
regulations.
•Handlefuelcarefully.Wipeupanyspills.
•Checkthesafetyinterlockswitchesdailyforproper
operation.Ifaswitchshouldfail,replacetheswitch
beforeoperatingthemachine.
•Beforestartingtheengine,sitontheseat.
•Usingthemachinedemandsattention.Topreventloss
ofcontrol:
–Donotdriveclosetosandtraps,ditches,creeks,
embankments,orotherhazards.
–Reducespeedwhenmakingsharpturns.Avoid
suddenstopsandstarts.
–Whennearorcrossingroads,alwaysyieldthe
right-of-way.
–Applytheservicebrakeswhengoingdownhillto
keepforwardspeedslowandtomaintaincontrolof
themachine.
•WhenoperatingamachinewithROPS(roll-over
protectionsystem)neverremovetheROPSandalways
usetheseatbelt.
•Raisethecuttingunitswhendrivingfromoneworkarea
toanother.
•Engagetractiondriveslowly,alwayskeepfootontraction
pedal,especiallywhentravelingdownhill.
Usereverseontractionpedalforbraking.
•Ifthemachinestallswhenclimbingaslope,donotturn
themachinearound.Alwaysbackslowly,straightdown
theslope.
•Whenapersonorpetappearsunexpectedlyinornearthe
mowingarea,stopmowing.Carelessoperation,combined
withterrainangles,ricochets,orimproperlypositioned
guardscanleadtothrownobjectinjuries.Donotresume
mowinguntiltheareaiscleared.
MaintenanceandStorage
•Makesureallhydrauliclineconnectorsaretightandall
hydraulichosesandlinesareingoodconditionbefore
applyingpressuretothesystem.
•Keepyourbodyandhandsawayfrompinholeleaksor
nozzlesthatejecthydraulicuidunderhighpressure.
Usepaperorcardboard,notyourhands,tosearchfor
leaks.Hydraulicuidescapingunderpressurecanhave
sufcientforcetopenetratetheskinandcauseserious
injury.Seekimmediatemedicalattentionifuidis
injectedintoskin.
•Beforedisconnectingorperforminganyworkonthe
hydraulicsystem,allpressureinthesystemmustbe
relievedbystoppingtheengineandloweringthecutting
unitsandattachmentstotheground.
•Checkallfuellinesfortightnessandwearonaregular
basis.Tightenorrepairthemasneeded.
•Iftheenginemustberunningtoperformamaintenance
adjustment,keephands,feet,clothing,andanypartsof
thebodyawayfromthecuttingunits,attachments,and
anymovingparts.
•Toensuresafetyandaccuracy,haveanAuthorizedToro
Distributorcheckthemaximumenginespeedwitha
tachometer.
•Ifmajorrepairsareeverneededorifassistanceisdesired,
contactanAuthorizedToroDistributor.
•UseonlyToro-approvedattachmentsandreplacement
parts.Thewarrantymaybevoidedifusedwith
unapprovedattachments.
6
SoundPowerLevel
VibrationLevel
Thisunithasaguaranteedsoundpowerlevelof100dBA,
whichincludesanUncertaintyValue(K)of1dBA.
Soundpowerlevelwasdeterminedaccordingtothe
proceduresoutlinedinISO11094.
SoundPressureLevel
Thisunithasasoundpressurelevelattheoperator’searof83
dBA,whichincludesanUncertaintyValue(K)of1dBA.
Soundpressurelevelwasdeterminedaccordingtothe
proceduresoutlinedinENISO5395:2013.
SafetyandInstructionalDecals
Safetydecalsandinstructionsareeasilyvisibletotheoperatorandarelocatednearanyareaofpotential
danger.Replaceanydecalthatisdamagedorlost.
Hand-Arm
Measuredvibrationlevelforrighthand=0.3m/s
Measuredvibrationlevelforlefthand=0.3m/s
UncertaintyValue(K)=0.16m/s
2
2
2
Measuredvaluesweredeterminedaccordingtotheprocedures
outlinedinENISO5395:2013.
WholeBody
Measuredvibrationlevel=0.2m/s
UncertaintyValue(K)=0.1m/s
2
2
Measuredvaluesweredeterminedaccordingtotheprocedures
outlinedinENISO5395:2013.
Engine-EmissionCertication
TheengineinthismachineisEPATier4FinalandEUStage
3bcompliant.
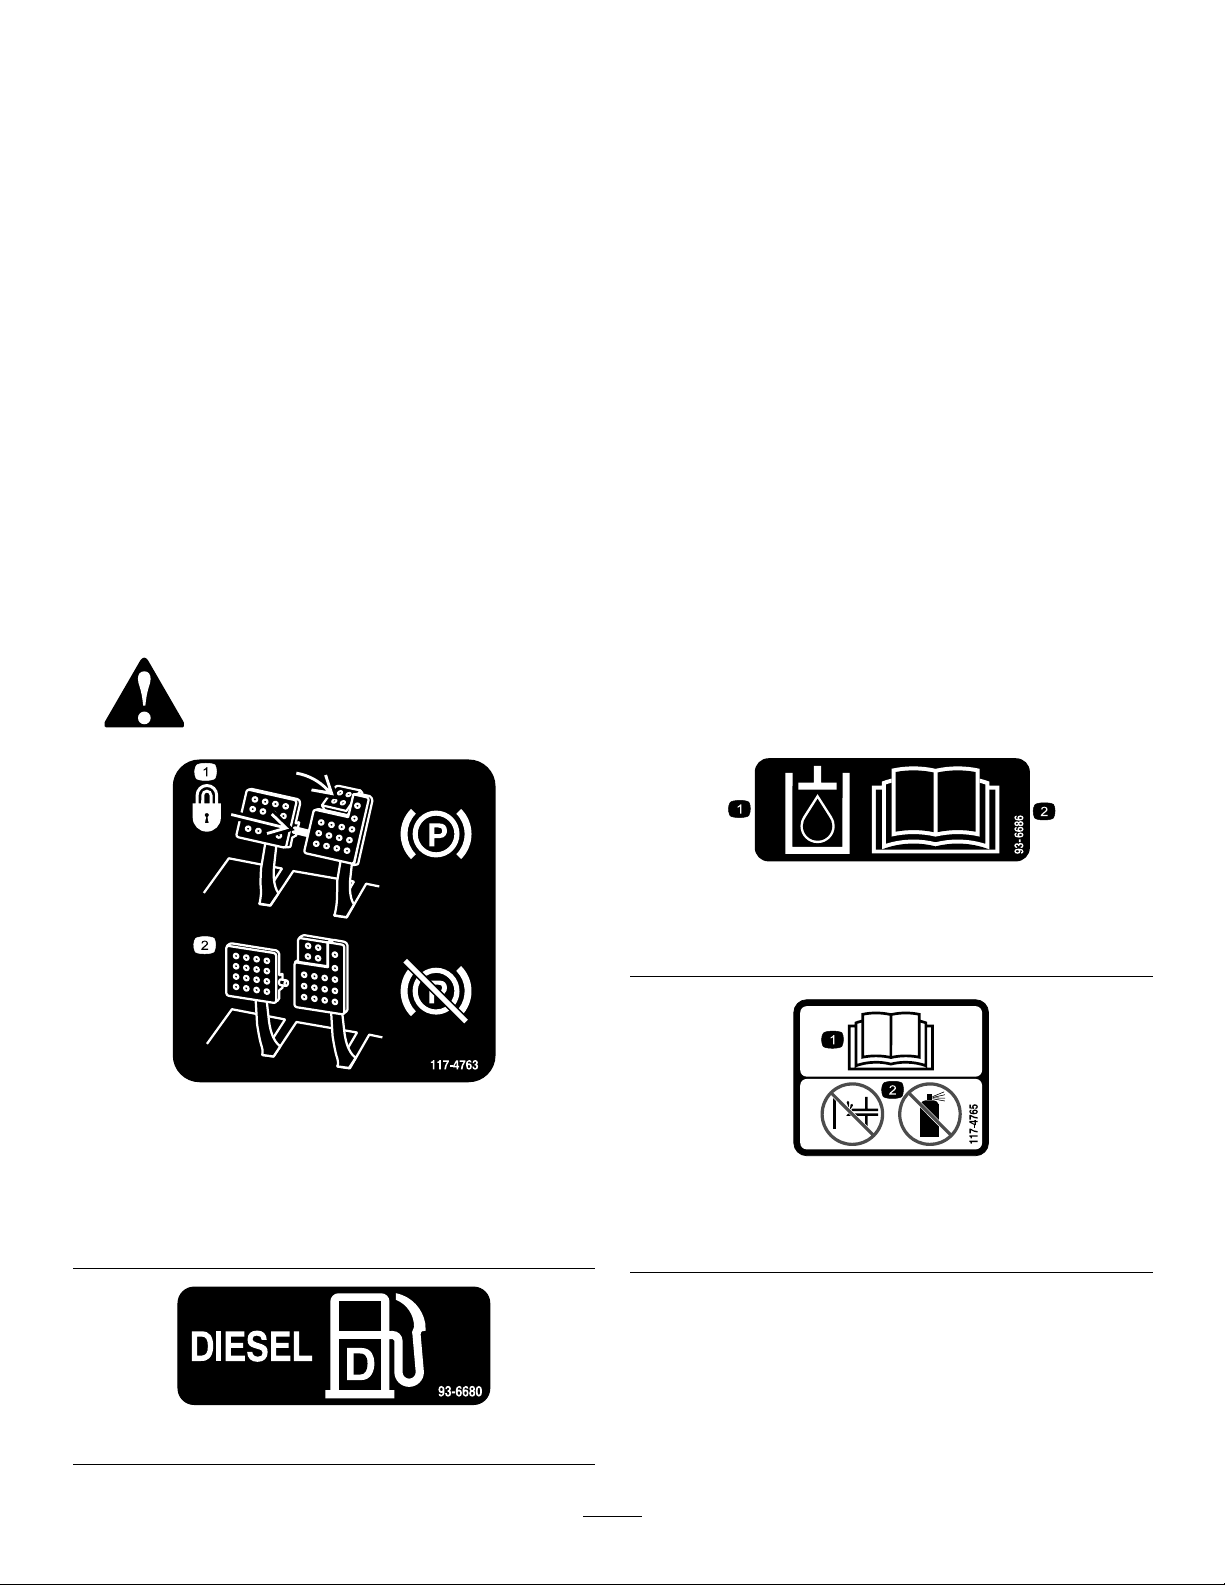
1.Toengagetheparking
brake,securethebrake
pedalswiththelockingpin,
presstheparkingbrake
pedalsandengagethetoe
pedal.
117-4763
93-6680
2.Todisengagetheparking
brake,disengagethe
lockingpinandreleasethe
pedals.
93-6686
1.Hydraulicoil
2.ReadtheOperator'sManual.
117-4765
1.ReadtheOperator'sManual.
2.Donotusestartingaids.
7
117-4766
1.Cutting/dismembermenthazard;fan—stayawayfrom
movingparts.
117–2718
106-6755
110-9642
1.Storedenergyhazard—readtheOperator'sManual.
2.Movethecotterpintotheholeclosesttotherodbracket
andthenremovetheliftarmandpivotyoke.
1.Enginecoolantunder
pressure.
2.Explosionhazard—read
theOperator'sManual.
1.Warning—wearhearingprotection.
1.Warning—readthe
instructionsbefore
servicingorperforming
maintenance.
3.Warning—donottouchthe
hotsurface.
4.Warning—readthe
Operator'sManual.
98-4387
93-6688
2.Cuttinghazardofhandor
foot—stoptheengineand
waitformovingpartsto
stop.
125–8754
1.Headlights
2.Engage7.Lowerthecuttingunits
3.Powertake-off(PTO)
4.Disengage
5.Fast
6.Slow
8.Raisethecuttingunits
9.ReadtheOperator’s
Manual.
1.ReadtheOperator’sManual.
8
121–3887
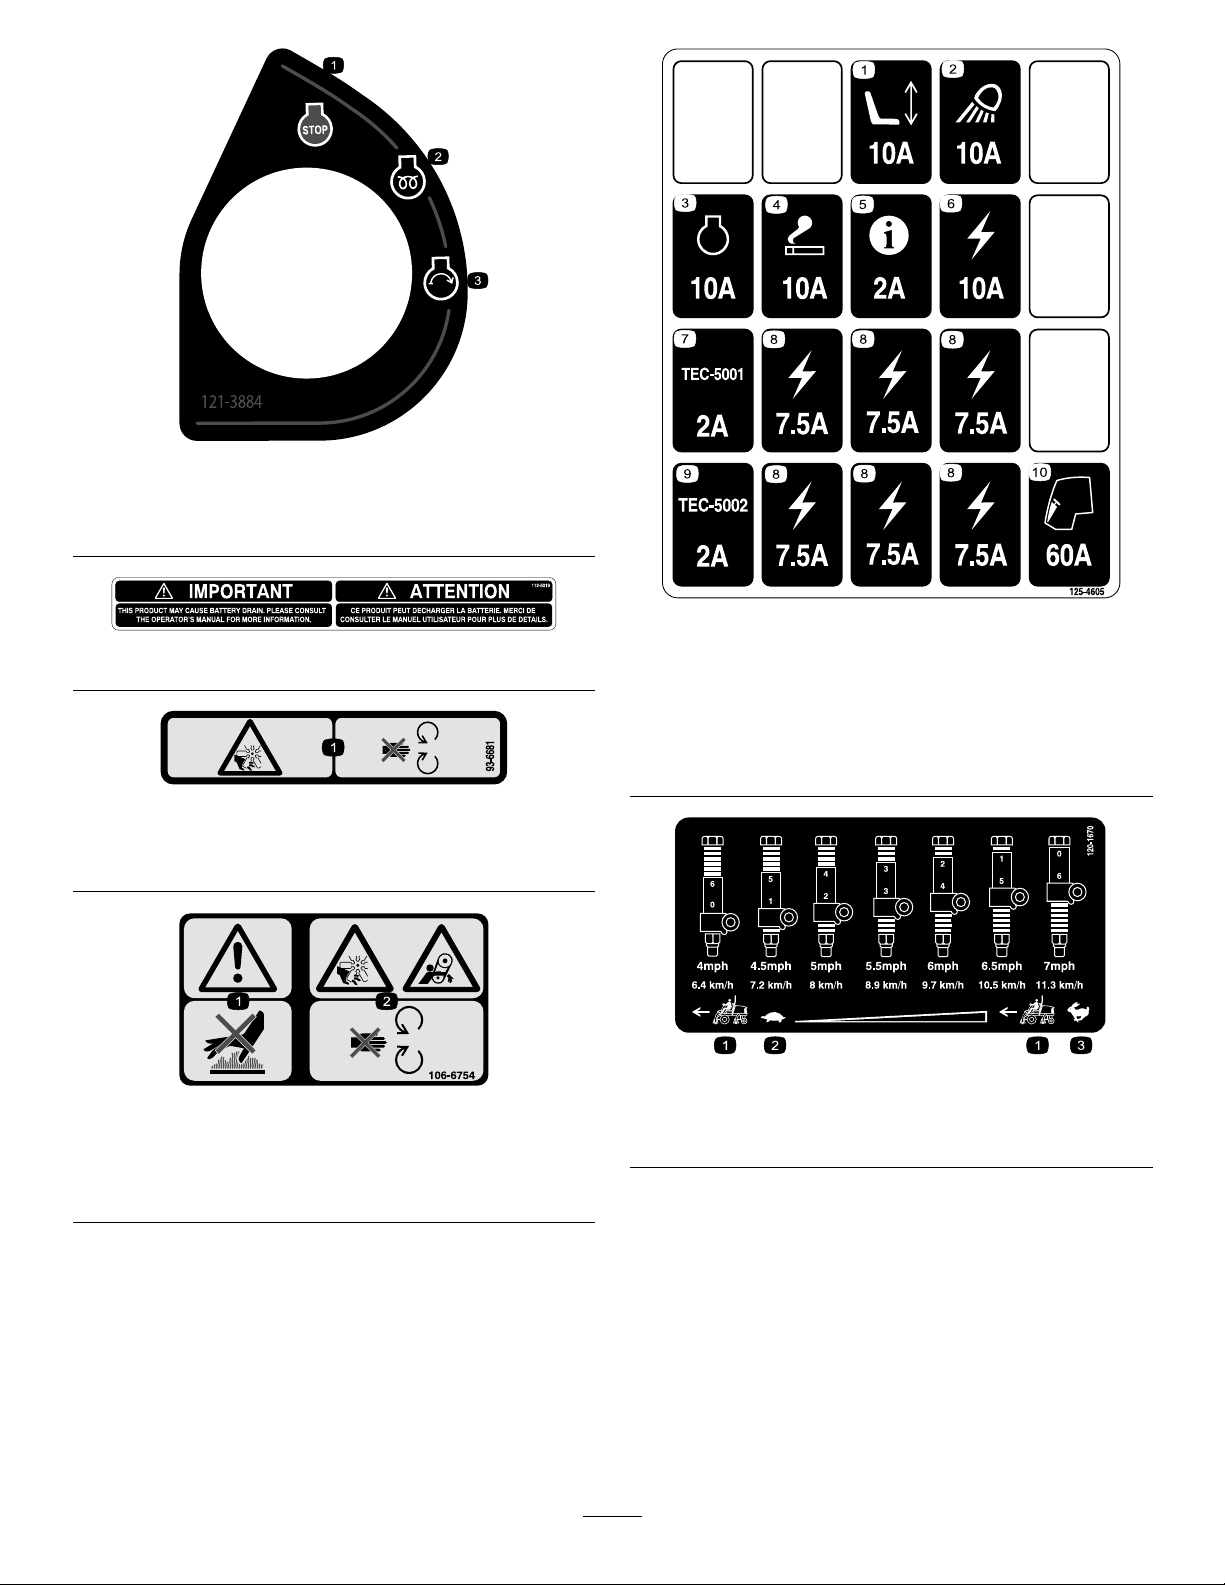
121–3884
1.Engine—stop3.Engine—start
2.Engine—preheat
112-5019
93–6681
1.Cutting/dismembermenthazard—stayawayfrommoving
parts.
125–4605
1.Powerseat,10A6.Powersupplied,10A
2.Worklight,10A
3.Engine,10A8.Powersupplied,7.5A
4.Cigarettelighter,10A9.Controller,2A
5.Infocenter,2A
7.Controller,2A
10.Enginepreheat,60A
106-6754
1.Warning—donottouchthehotsurface.
2.Cutting/dismembermenthazard,fanandentanglement
hazard,belt—stayawayfrommovingparts.
120-1670
1.Tractionunitspeed3.Fast
2.Slow
9
BatterySymbols
Someorallofthesesymbolsareonyourbattery
130-1651
1.ReadtheOperator'sManualformoreinformationof
servicingthemachine.
1.Explosionhazard
2.Nore,opename,or
smoking.
3.Causticliquid/chemical
burnhazard
4.Weareyeprotection9.Flusheyesimmediately
5.ReadtheOperator's
Manual.
6.Keepbystandersasafe
7.Weareyeprotection;
8.Batteryacidcancause
10.Containslead;donot
distancefromthebattery.
explosivegasescan
causeblindnessandother
injuries
blindnessorsevereburns.
withwaterandgetmedical
helpfast.
discard.
10
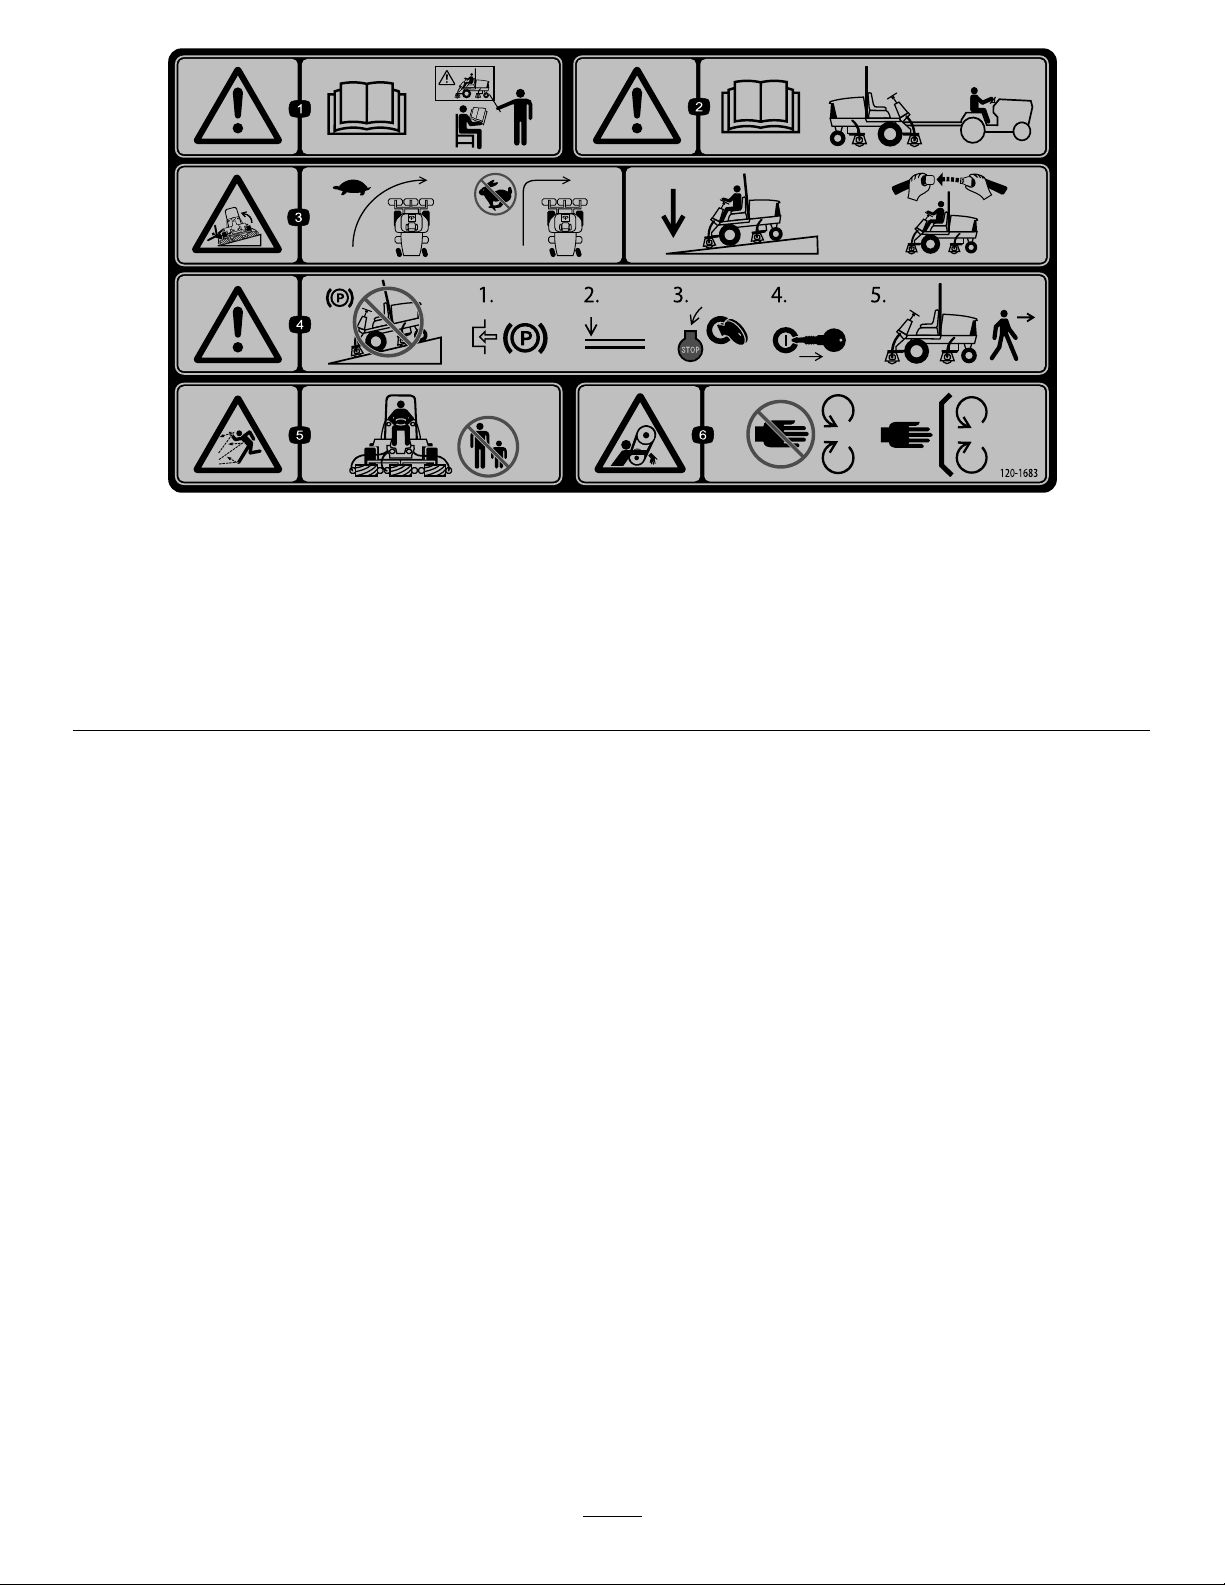
120-1683
1.Warning—readtheOperator'sManual,donotoperatethis
machineunlessyouaretrained.
2.Warning—readtheOperator'sManualbeforetowingthe
machine.
3.Tippinghazard—slowmachinebeforeturning,donotturnat
highspeeds;lowerthecuttingunitwhendrivingdownslopes;
usearolloverprotectionsystemandweartheseatbelt
4.Warning—donotparkthemachineonslopes;engagethe
parkingbrake,lowerthecuttingunits,stoptheengineand
removetheignitionkeybeforeleavingthemachine.
5.Thrownobjecthazard—keepbystandersasafedistancefrom
themachine.
6.Entanglementhazard,belt—stayawayfrommovingparts,
keepallguardsandshieldsinplace.
11
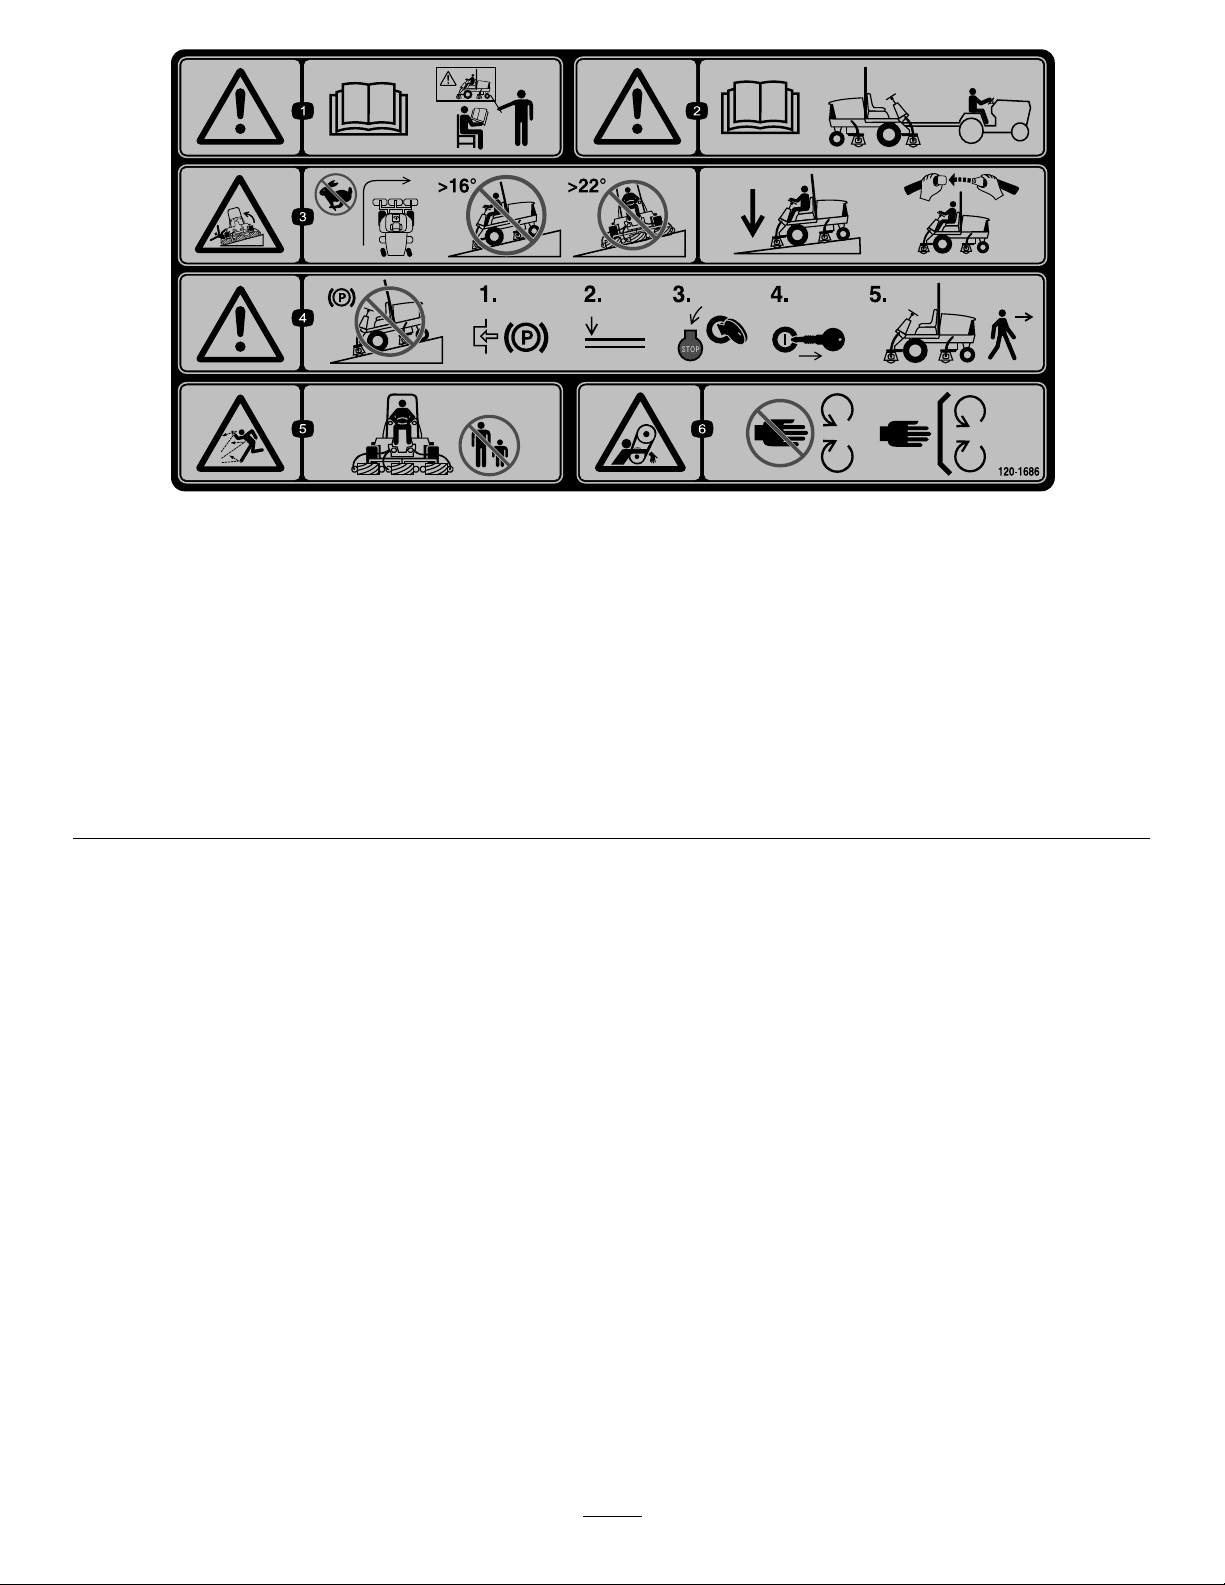
120-1686
Afxoverpartno.120–1683forCE*
*ThissafetydecalincludesaslopewarningrequiredonthemachinefrocompliancetotheEuropeanLawnMowerStandardENISO5395:2013.Theconservativemaximumslope
anglesindicatedforoperationofthismachineareprescribedbyandrequiredbythisstandard.
1.Warning—readtheOperator'sManual,donotoperatethis
machineunlessyouaretrained.
2.Warning—readtheOperator'sManualbeforetowingthe
machine.
3.Tippinghazard—donotturnathighspeeds,donotupand
downslopesgreaterthan16degrees,donotmowacross
slopesgreaterthan22degrees;lowerthecuttingunitwhen
drivingdownslopes;usearolloverprotectionsystemand
weartheseatbelt
4.Warning—donotparkthemachineonslopes;engagethe
parkingbrake,lowerthecuttingunits,stoptheengineand
removetheignitionkeybeforeleavingthemachine.
5.Thrownobjecthazard—keepbystandersasafedistancefrom
themachine.
6.Entanglementhazard,belt—stayawayfrommovingparts,
keepallguardsandshieldsinplace.
12

Setup
LooseParts
Usethechartbelowtoverifythatallpartshavebeenshipped.
ProcedureDescription
1
2
3
4
5
6
7
8
9
Nopartsrequired
Warningdecal1
Hood-lockbracket1
Rivet2
Screw,1/4x2inch
Flatwasher,1/4inch
Locknut,1/4inch
Fronthoseguide,right1
Fronthoseguide,left
Nopartsrequired
Cutting-unitkickstand
Nopartsrequired
Nopartsrequired
Gaugebar
Qty.
–
1
2
1
1
–
1Usethecutting-unitkickstand.
–
–
1
Adjustthesupportrollers.
ReplacethedecalforCECompliance.
InstallthehoodlockforEuropeanCE
Compliance.
Installthecuttingunits.
Adjusttheturf-compensationspring.
Greasethemachine.
Checkthelevelsoftherearaxle
lubricant,hydraulicuid,andengineoil.
Usethegaugebartoadjustthecutting
unit.
Use
MediaandAdditionalParts
Description
Operator'sManual
Engineoperator'smanual1
PartsCatalog
Operatortrainingmaterial
DeclarationofConformity
Note:Determinetheleftandrightsidesofthemachinefromthenormaloperatingposition.
Qty.
1
1
1
1
Readthemanualbeforeoperatingthemachine.
Readthemanualbeforeoperatingtheengine.
Usethecatalogtoreferencepartnumbers.
Viewthetrainingmaterialbeforeoperatingthemachine.
ThisdocumentindicatesCEcompliance.
Use
13

1
g019541
1
2
3
2
AdjustingtheSupportRollers
NoPartsRequired
Procedure
Dependingonwhatwidthcuttingunitsaretobeinstalledon
thetraction,adjustthesupportrollersasfollows:
•Ifusing27inchcuttingunits,therollersaretobeinstalled
intheuppermountingholesofsupportassembly
channels(Figure3).
•Ifusing32inchcuttingunits,therollersaretobe
installedinthelowermountingholesofsupportassembly
channels(Figure3).
ReplacingtheWarningDecal forCECompliance
Partsneededforthisprocedure:
1Warningdecal
Procedure
OnmachinesrequiringCECompliance,afxtheCEwarning
decal,PartNo.120-1683overthestandardwarningdecal,
PartNo.120-1686.
3
InstallingtheHoodLockfor CECompliance
Partsneededforthisprocedure:
Figure3
1.Supportassemblychannel3.Usethisholefor32inch
cuttingunits.
2.Usethisholefor27inch
cuttingunits.
1Hood-lockbracket
2Rivet
1
Screw,1/4x2inch
2
Flatwasher,1/4inch
1
Locknut,1/4inch
Procedure
1.Unhookthehoodlatchfromthehood-latchbracket
(Figure4).
14
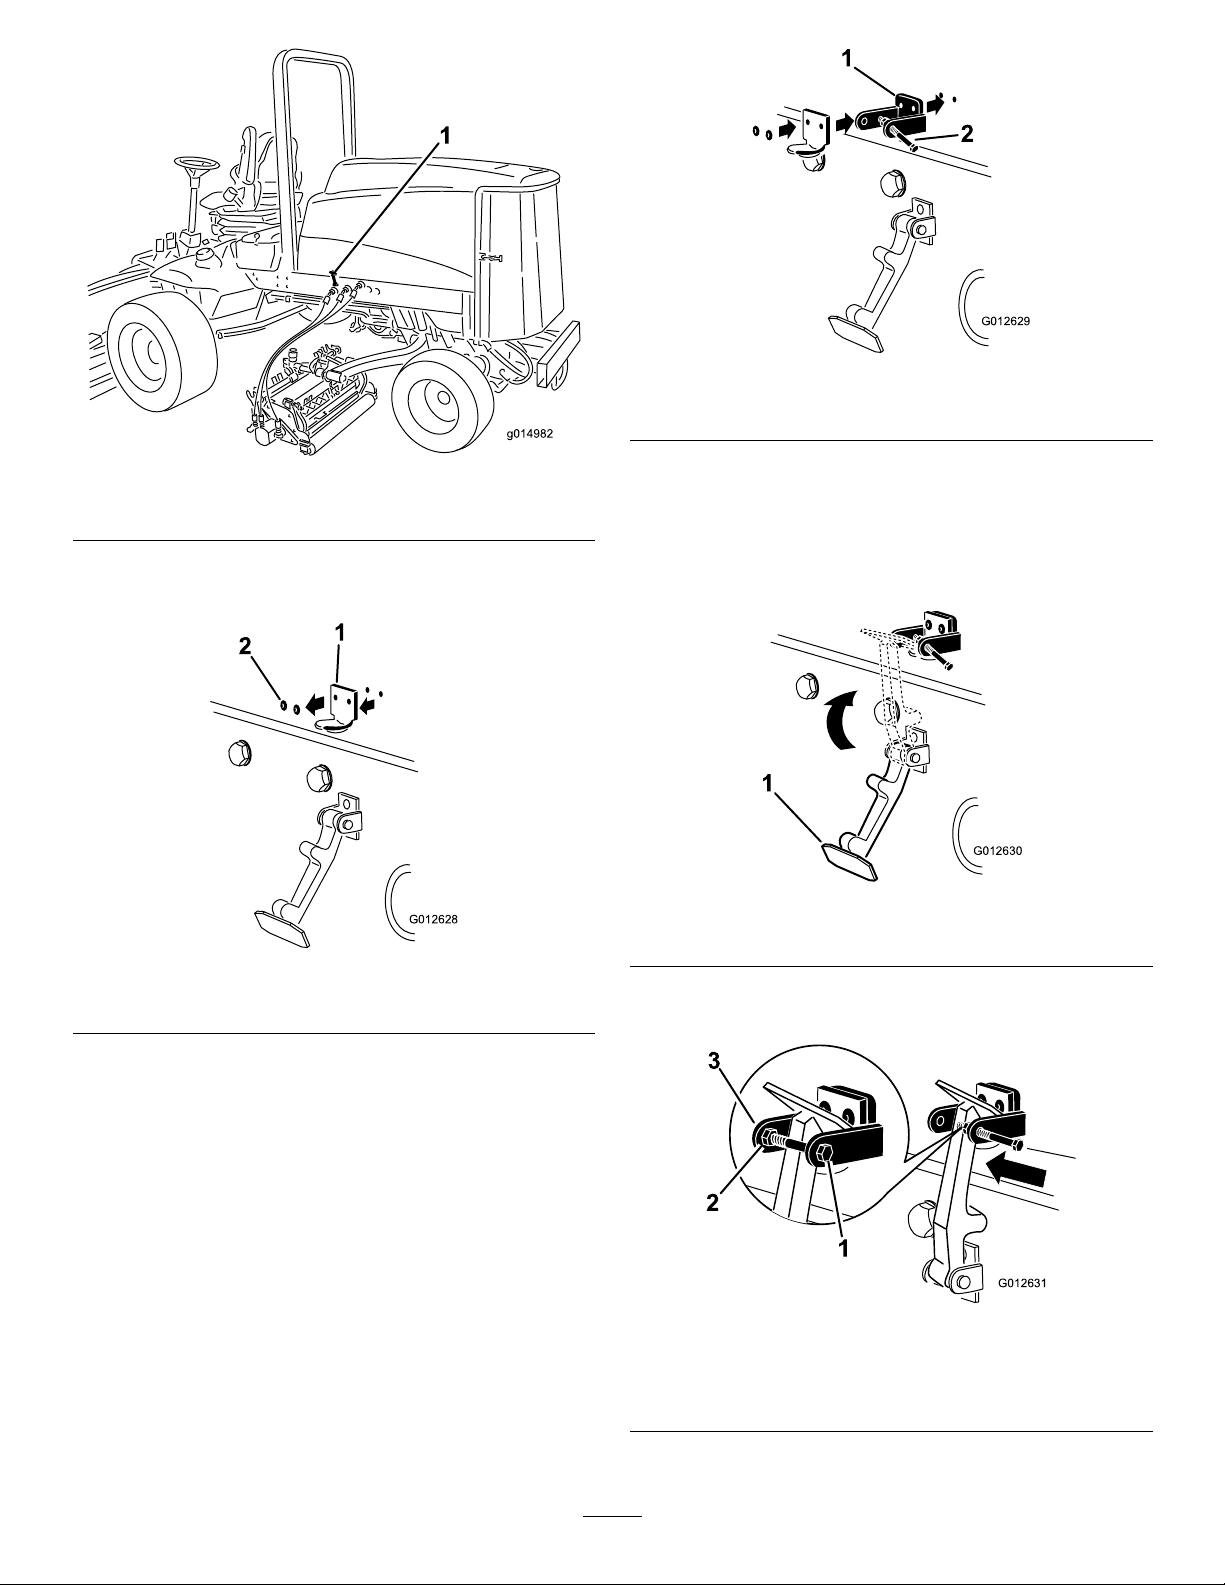
G012628
1
2
G012629
1
2
Figure6
G012630
1
G012631
1
2
3
Figure4
1.Hoodlatch
2.Removethe2rivetssecuringthehood-latchbracketto
thehood(Figure5).
Figure5
1.Hood-latchbracket2.Rivets
1.CElockbracket
2.Boltandnutassembly
5.Alignthewasherswiththeholesontheinsideofthe
hood.
6.Rivetthebracketsandthewasherstothehood(Figure
6).
7.Hookthelatchontothehood-latchbracket(Figure7).
Figure7
1.Hoodlatch
8.Screwtheboltintotheotherarmofhood-lockbracket
tolockthelatchinposition(Figure8).
3.Removethehood-latchbracketfromthehood.
4.Whilealigningthemountingholes,positiontheCE
lockbracketandthehood-latchbracketontothehood.
Note:Thelockbracketmustbeagainstthehood
(Figure5).
Donotremoveboltandnutassemblyfromthe
lock-bracketarm.
Figure8
1.Bolt
2.Nut
3.Armofthehood-lock
bracket
9.Tightentheboltsecurelybutdonottightenthenut.
15

4
InstallingtheCuttingUnits
Partsneededforthisprocedure:
1Fronthoseguide,right
1
Fronthoseguide,left
Procedure
1.Removethereelmotorsfromtheshippingbrackets.
2.Removetheshippingbracketsanddiscard.
3.Removethecuttingunitsfromthecartons.
4.Assembleandadjustasdescribedinthecuttingunit
Operator'sManual.
5.Makesurethatthecounterweight(Figure9)isinstalled
totheproperendofthecuttingunitasdescribedinthe
cuttingunitOperator'sManual.
Figure10
1.Turfcompensationspring3.Springtube
2.Rodbracket
B.Removetheangenutsecuringthespring-tube
bolttothecarrier-frametab(Figure10)
C.Removetheassembly.
D.Mountthespring-tubebolttotheoppositetabon
thecarrierframeandsecurewiththeangenut.
Note:Theboltheadistobepositionedtothe
outersideofthetabasshowninFigure11.
Figure11
1.Oppositecarrierframetab
2.Rodbracket
Figure9
1.Counterweight
6.Allofthecuttingunitsareshippedwiththeturf
compensationspringmountedtotherightsideofthe
cuttingunit.Theturfcompensationspringmustbe
mountedtothesamesideofthecuttingunitasthe
reeldrivemotor.Repositiontheturfcompensation
asfollows:
A.Removethe2carriageboltsandnutssecuringthe
rodbrackettothecutting-unittabs(Figure10).
E.Mounttherodbrackettothecuttingunittabs
withthecarriageboltsandnuts(Figure11).On
thecuttingunit,mountthelefthoseguidetothe
frontofthecuttingunittabswhenreinstallingthe
rodbracket(Figure13).
Important:OnCuttingUnit4(leftfront)
andCuttingUnit5(rightfront),usethe
rod-bracketmountingnutstoinstallthehose
guidestothefrontofthecutting-unittabs.
Thehoseguidesshouldleantowardthecenter
cuttingunit(Figure12throughFigure14).
16
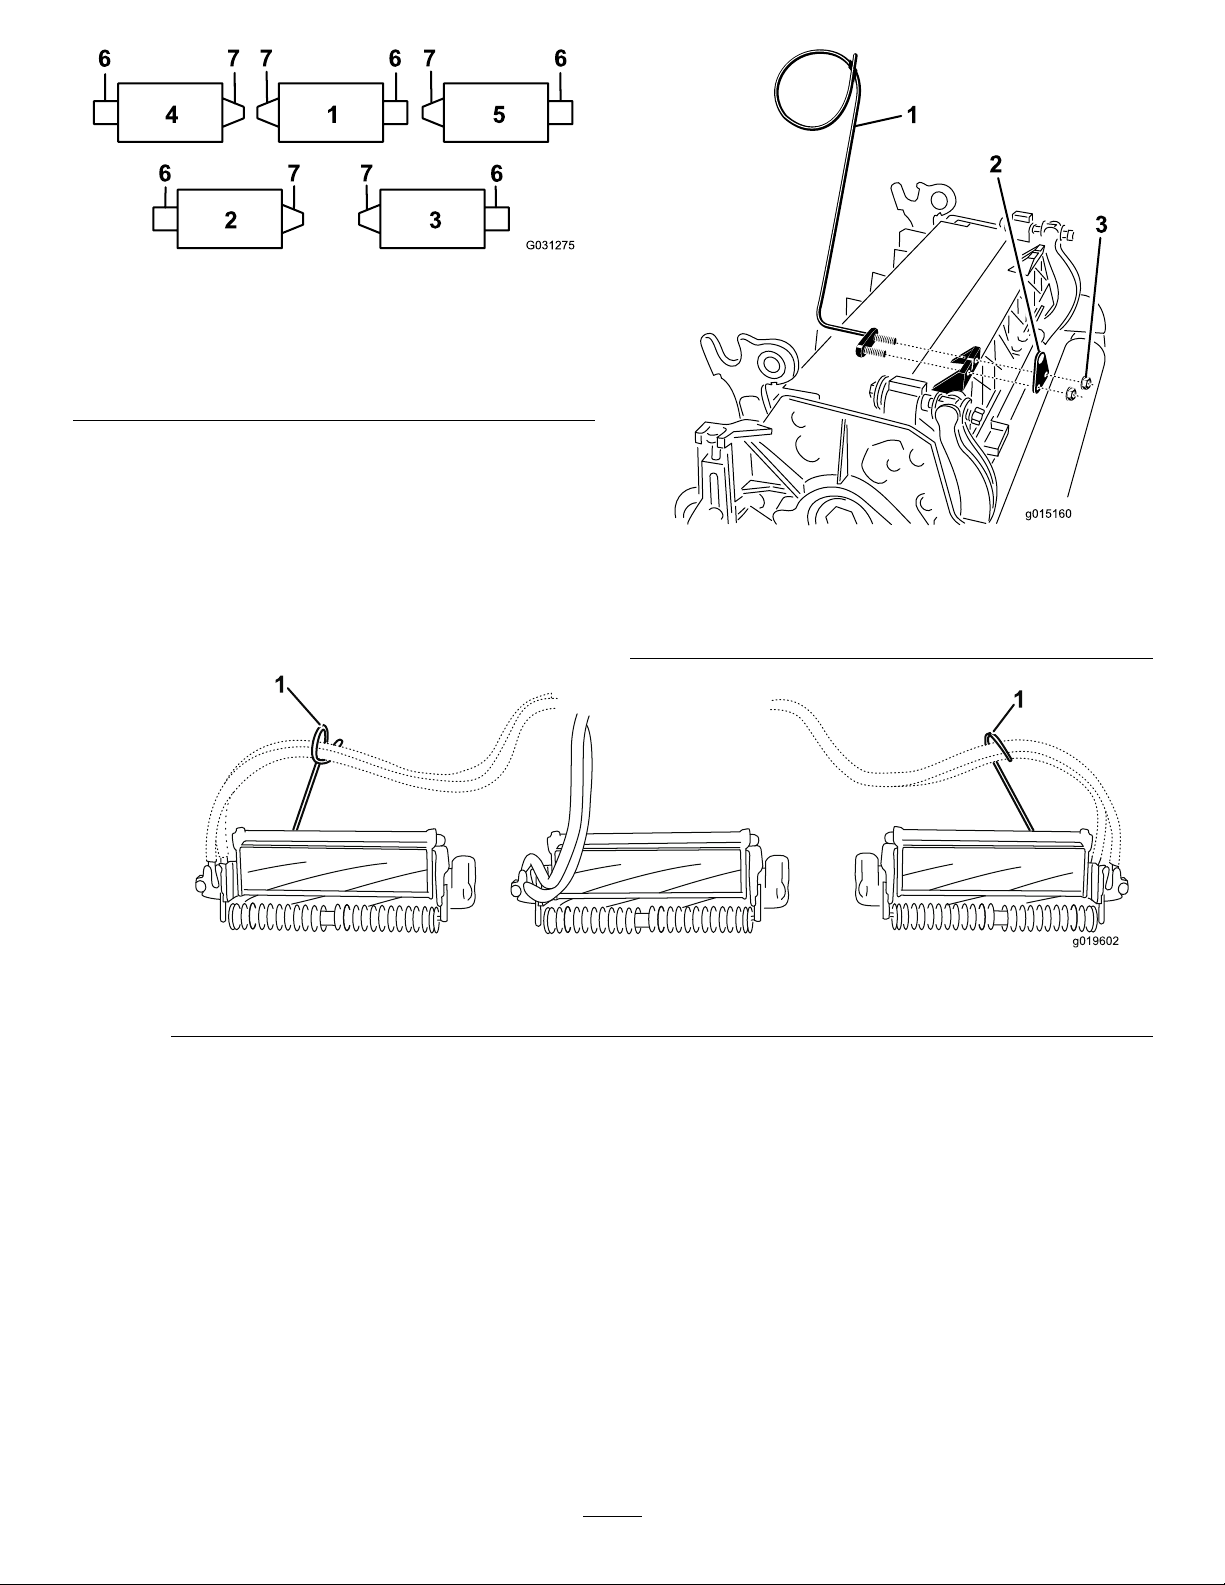
Figure12
g019602
1
1
1.Cuttingunit15.Cuttingunit5
2.Cuttingunit2
3.Cuttingunit3
4.Cuttingunit4
6.Reelmotor
7.Weight
Figure13
1.Hoseguides(eachmustleantowardthecentercuttingunit)
Note:Wheninstallingorremovingthecutting
units,makesurethatthehairpincotterisinstalled
inthespring-rodholenexttotherodbracket.
Otherwise,thehairpincottermustbeinstalledin
theholeintheendoftherod.
1.Hoseguide(leftside
shown)
2.Rodbracket
Figure14
3.Nuts
7.Increasethesteeringontherearcuttingunitsby
removingthe2pivotspacers,hex-socketscrews,and
angelocknuts(Figure15)fromthecarrierframesof
therearcuttingunits(CuttingUnits2and3);referto
Figure12.
17

Figure15
G015976
1
2
3
4
5
1
G015977
10.Forthefrontcuttingunits,slideacuttingunitunder
theliftarmwhileinsertingtheshaftofthecarrier
frameupintothelift-armpivotyoke(Figure16).Make
surethatthethrustwasherisinpositiononthecarrier
frameshaft.
11.Securethecarrier-frameshafttothelift-armyokewith
theklikpin(Figure16).
12.Tolock(x)thesteeringonthecuttingunits,secure
thepivotyoketothecarrierframewiththesnapper
pin(Figure17).
1.Hex-socketscrew
2.Pivotspacer4.Flangelocknut
3.Carrierframe
8.Loweralloftheliftarmscompletely.
9.Coatthecarrier-frameshaftwithcleangrease(Figure
16).
Figure17
1.Snapperpin
Note:Fixedsteeringisrecommendedwhen
cuttingonsidehills.
13.Usethefollowingprocedureontherearcuttingunits
whentheheightofcutisabove19mm(3/4inch).
A.Removethelynchpinandwashersecuringthe
lift-armpivotshafttotheliftarmandslidethe
lift-armpivotshaftoutoftheliftarm(Figure18).
1.Lift-armpivot-shaftlynchpinandwasher
Figure18
B.Insertthelift-armyokeontothecarrierframe
shaft(Figure16).
1.Lift-armpivotyoke4.Carrier-frameshaft
2.Liftarm
3.Klikpin
Figure16
5.Thrustwasher
C.Insertthelift-armshaftintotheliftarmand
secureitwiththewasherandthelynchpin(Figure
18).
14.Securethelift-armchaintothechainbracketwiththe
snapperpin(Figure19).
Note:Usethenumberofchainlinksdescribedinthe
cuttingunitOperator'sManual.
18
 Loading...