

Page 1
HoverPro550Machine
g017365
1
ModelNo.02611—SerialNo.315000001andUp
Introduction
WARNING
CALIFORNIA
Proposition65Warning
Thisproductcontainsachemicalorchemicals
knowntotheStateofCaliforniatocausecancer,
birthdefects,orreproductiveharm.
Theengineexhaustfromthisproduct
containschemicalsknowntotheStateof
Californiatocausecancer,birthdefects,
orotherreproductiveharm.
FormNo.3392-576RevA
Operator'sManual
Important:Thisengineisnotequippedwithaspark
arrestermufer.ItisaviolationofCaliforniaPublic
ResourceCodeSection4442touseoroperatetheengine
onanyforest-covered,brush-covered,orgrass-covered
land.Otherstatesorfederalareasmayhavesimilarlaws.
ThissparkignitionsystemcomplieswithCanadianICES-002.
Theenclosed
Engine Owner's Man ual
issuppliedfor
informationregardingtheUSEnvironmentalProtection
Agency(EPA)andtheCaliforniaEmissionControl
Regulationofemissionsystems,maintenance,and
warranty.Replacementsmaybeorderedthroughthe
enginemanufacturer.
Readthisinformationcarefullytolearnhowtooperateand
maintainyourproductproperlyandtoavoidinjuryand
productdamage.Youareresponsibleforoperatingthe
productproperlyandsafely.Keepforfuturereference.
YoumaycontactTorodirectlyatwww .Toro.comforproduct
safetyandoperationtrainingmaterials,accessoryinformation,
helpndingadealer,ortoregisteryourproduct.
Wheneveryouneedservice,genuineToroparts,oradditional
information,contactanAuthorizedServiceDealerorToro
CustomerServiceandhavethemodelandserialnumbersof
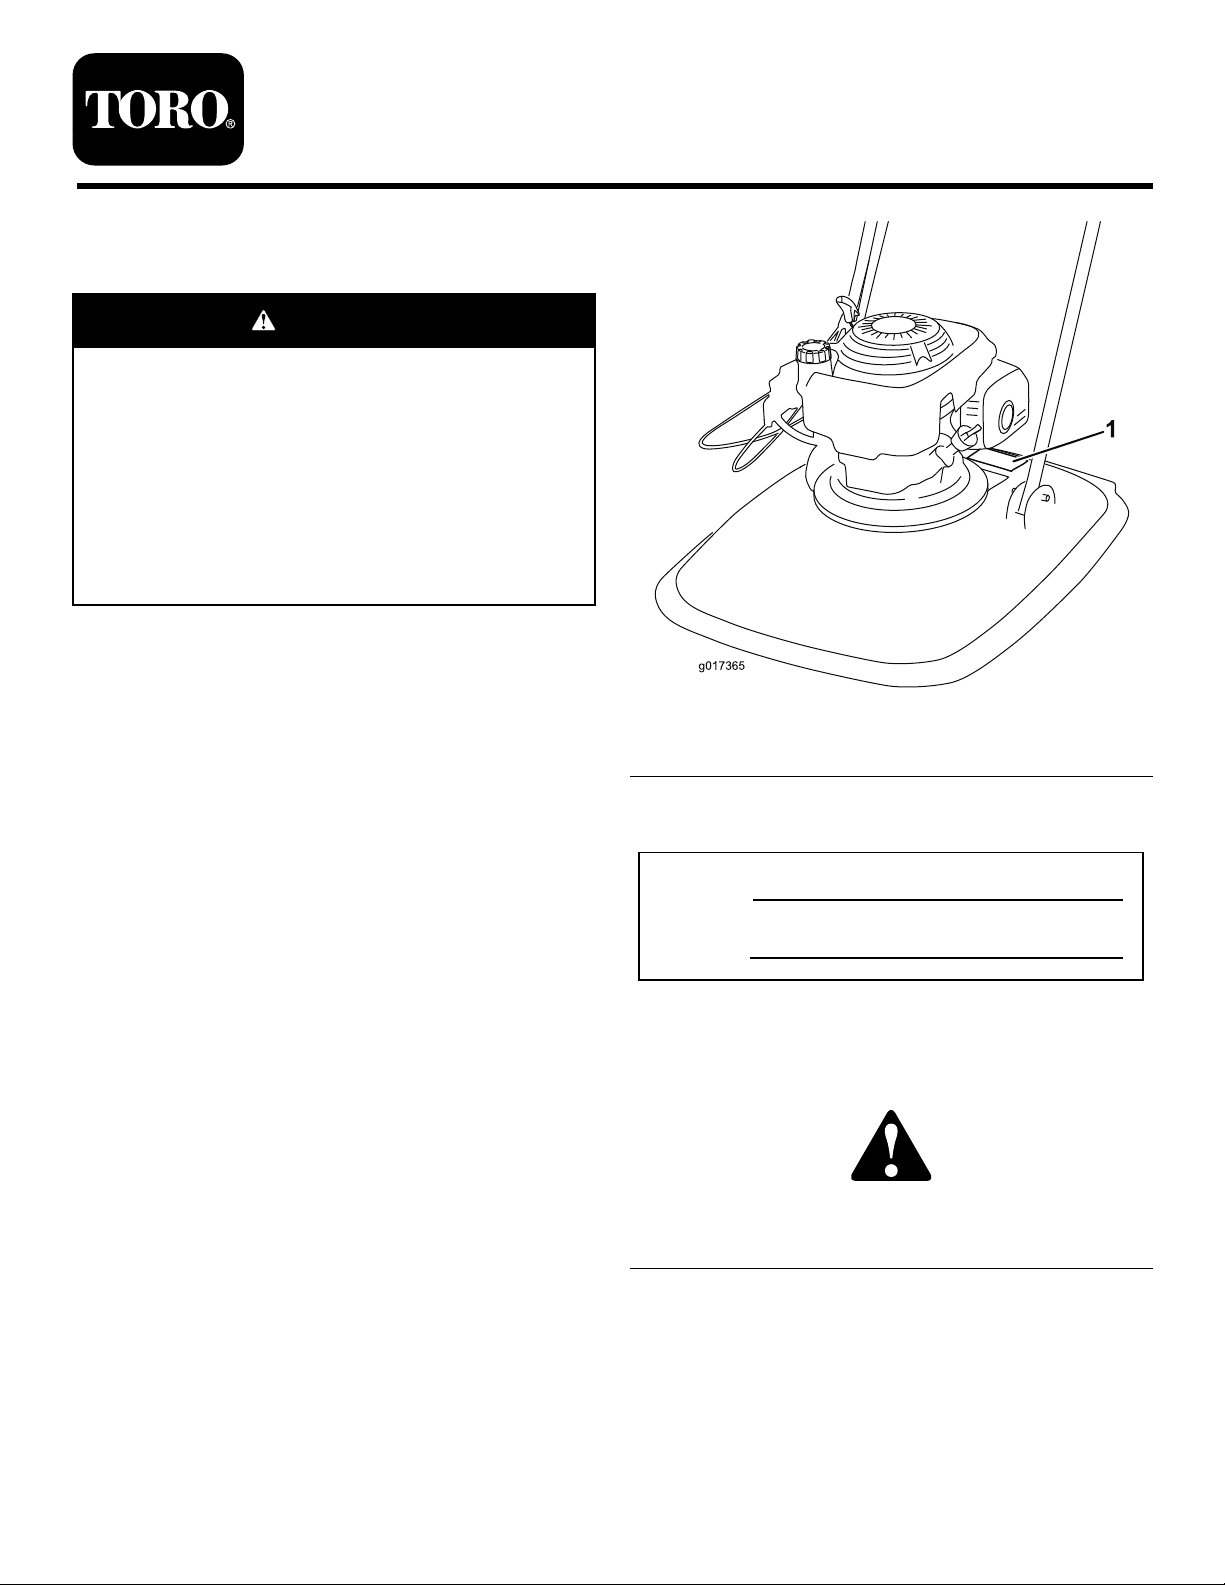
yourproductready.Figure1identiesthelocationofthe
modelandserialnumbersontheproduct.
Figure1
1.Modelandserialnumberplate
Writetheproductmodelandserialnumbersinthespace
below:
ModelNo.
SerialNo.
Thismanualidentiespotentialhazardsandhassafety
messagesidentiedbythesafetyalertsymbol(Figure2),
whichsignalsahazardthatmaycauseseriousinjuryordeath
ifyoudonotfollowtherecommendedprecautions.
Figure2
1.Safetyalertsymbol
Thismanualuses2wordstohighlightinformation.
Importantcallsattentiontospecialmechanicalinformation
andNoteemphasizesgeneralinformationworthyofspecial
attention.
©2015—TheT oro®Company
8111LyndaleAvenueSouth
Bloomington,MN55420
Registeratwww.T oro.com.
Formodelswithstatedenginehorsepower,thegross
horsepoweroftheenginewaslaboratoryratedbytheengine
manufacturerinaccordancewithSAEJ1349.Ascongured
OriginalInstructions(EN)
PrintedintheUK
AllRightsReserved
*3392-576*A
Page 2

tomeetsafety,emission,andoperatingrequirements,the
actualenginehorsepoweronthisclassmachinewillbe
signicantlylower.
Contents
Introduction..................................................................1
Safety...........................................................................2
GeneralOperation..................................................2
SlopeOperation......................................................2
Children.................................................................3
Service...................................................................3
Hauling..................................................................4
SafetyandInstructionalDecals.................................5
Setup............................................................................6
1AssemblingtheHandle..........................................6
2InstallingtheFootstop...........................................6
3FillingtheEnginewithOil......................................7
ProductOverview..........................................................8
Operation.....................................................................8
FillingtheFuelTank................................................8
CheckingtheEngine-OilLevel..................................9
AdjustingtheCuttingHeight....................................10
StartingtheEngine.................................................11
AdjustingtheChoke...............................................12
StoppingtheEngine...............................................12
OperatingTips......................................................13
Maintenance.................................................................14
RecommendedMaintenanceSchedule(s)......................14
PreparingforMaintenance.......................................15
ReplacingtheAirCleaner........................................15
ChangingtheEngineOil.........................................15
ServicingtheSparkPlug..........................................16
ReplacingtheBlade................................................16
CleaningtheMachine..............................................17
Storage........................................................................17
PreparingtheMachineforStorage............................17
Troubleshooting...........................................................18
Safety
ThismachinehasbeendesignedinaccordancewithENISO
5395:2013andANSIB71.4–2012.
Thiscuttingmachinecanamputatehandsandfeetand
throwobjects.Failuretoobservethefollowingsafety
instructionscouldresultinseriousinjuryordeath.
GeneralOperation
•Alloperatorsandmechanicsshouldbetrained.The
ownerisresponsiblefortrainingtheusers.
•Neverletchildrenoruntrainedpeopleoperateorservice
theequipment.Localregulationsmayrestricttheageof
theoperator.
•Theowner/usercanpreventandisresponsiblefor
accidentsorinjuriesoccurringtothemselves,other
people,orproperty.
•Donotputhandsorfeetnearorunderthemachine.
•Evaluatetheterraintodeterminewhataccessoriesand
attachmentsareneededtoproperlyandsafelyperform
thejob.Onlyuseaccessoriesandattachmentsapproved
bythemanufacturer.
•Cleartheareaofobjectssuchasrocks,wire,toys,etc.,
whichcouldbethrownbytheblade.Staybehindthe
handlewhentheengineisrunning.
•Besuretheareaisclearofbystandersbeforeoperating.
Stopmachineifanyoneentersthearea.
•Wearappropriateclothingincludinghardhat,safety
glasses,andhearingprotection.Longhair,looseclothing,
orjewelrymaygettangledinmovingparts.
•Donotpullmachinebackwardunlessabsolutely
necessary.Alwayslookdownandbehindbeforeand
whilemovingbackward.
•Slowdownandusecautionwhenmakingturnsand
crossingroadsandsidewalks.
•Materialmayricochetbacktowardtheoperator.Donot
operateovergravelsurfaces.
•Checkthattheoperator’spresencecontrols,safety
switches,andshieldsareattachedandfunctioning
properly.Donotoperateunlesstheyarefunctioning
properly.
•Neverleavearunningmachineunattended.
•Stoptheengineandwaituntilthebladecomestoa
completestop,andremovethesparkplugwirebefore
cleaningoruncloggingthemachine.
•Operatemachineonlyindaylightorgoodarticiallight.
•Donotoperatemachinewhileundertheinuenceof
alcoholordrugs.
•Neveroperatemachineinwetgrass.Alwaysbesureof
yourfooting;walk;neverrun.
•Neverraisethedeckwiththeenginerunning.
•Ifthemachineshouldstarttovibrateabnormally,stop
theengineandcheckforthecauseimmediately.Vibration
isgenerallyawarningoftrouble.
•Usecarewhenloadingorunloadingthemachineintoa
trailerortruck.
•ReadtheOperator’sManualandothertrainingmaterial.If
theoperator(s)ormechanic(s)cannotreadEnglishitis
theownersresponsibilitytoexplainthismaterialtothem.
•Becomefamiliarwiththesafeoperationoftheequipment,
operatorcontrols,andthesafetysigns.
SlopeOperation
Slopesareamajorfactorrelatedtoslipandfallaccidents,
whichcanresultinsevereinjury.Operationonallslopes
requireextracaution.Ifyoufeeluneasyonaslope,donot
mowit.
2
Page 3

•Mowacrossthefaceofslopes;neverupanddown.
Exerciseextremecautionwhenchangingdirectionon
slopes.
•Watchforholes,ruts,bumps,rocks,orotherhidden
objects.Uneventerraincouldcauseaslipandfall
accident.Tallgrasscanhideobstacles.
•Donotmowonwetgrassorexcessivelysteepslopes.
Poorfootingcouldcauseaslipandfallaccident.
•Donotmowneardrop-offs,ditches,orembankments.
Youcouldloseyourfootingorbalance.
•Whenusingthemachine,alwayskeepbothhandsonthe
handlebar.
•Whencuttingsteepslopesfromthetopoftheslopeand
alongerreachisneeded,nevertiethemachinetoarope,
usetheextendedhandlebarkitoption.
Children
Tragicaccidentscanoccuriftheoperatorisnotalerttothe
presenceofchildren.Childrenareoftenattractedtothe
machineandthemowingactivity .Neverassumethatchildren
willremainwhereyoulastsawthem.
•Keepchildrenoutofthemowingareaandunderthe
watchfulcareofaresponsibleadultotherthanthe
operator.
•Bealertandturnmachineoffifachildentersthearea.
•Neverallowchildrentooperatethemachine.
•Useextracarewhenapproachingblindcorners,shrubs,
trees,orotherobjectsthatmayblockyourviewofachild.
Service
SafeHandlingofGasoline
Toavoidpersonalinjuryorpropertydamage,use
extremecareinhandlinggasoline.Gasolineisextremely
ammableandthevaporsareexplosive.
•Extinguishallcigarettes,cigars,pipes,andothersources
ofignition.
•Useonlyanapprovedgasolinecontainer.
•Neverremovegascaporaddfuelwiththeengine
running.Allowenginetocoolbeforerefueling.
•Neverrefuelordrainthemachineindoors.
•Neverstorethemachineorfuelcontainerwherethereis
anopename,spark,orpilotlightsuchasonawater
heateroronotherappliances.
•Neverllcontainersinsideavehicleoronatruckor
trailerbedwithaplasticliner.Alwaysplacecontainerson
thegroundawayfromyourvehiclebeforelling.
•Removegas-poweredequipmentfromthetruckortrailer
andrefuelitontheground.Ifthisisnotpossible,then
refuelsuchequipmentwithaportablecontainer,rather
thanfromagasolinedispensernozzle.
•Keepthenozzleincontactwiththerimofthefueltank
orcontaineropeningatalltimesuntilfuelingiscomplete.
Donotuseanozzlelock-opendevice.
•Iffuelisspilledonclothing,changeclothingimmediately.
•Neveroverllfueltank.Replacegascapandtighten
securely.
WARNING
Exhaustcontainscarbonmonoxide,anodorless,
deadlypoisonthatcankillyou.
Donotruntheengineindoorsorinanenclosed
area.
GeneralService
•Neveroperatemachineinaclosedarea.
•Keepallnutsandboltstighttobesuretheequipmentis
insafeworkingcondition.
•Nevertamperwithsafetydevices.Checktheirproper
operationregularly.
•Keepmachinefreeofgrass,leaves,orotherdebris
build-up.Cleanupoilorfuelspillageandremoveany
fuel-soakeddebris.Allowmachinetocoolbeforestoring
inanenclosedspace.
•Nevermakeanyadjustmentsorrepairswiththeengine
running.Disconnectthesparkplugwireandground
againstenginetopreventunintendedstarting.
•Donotchangetheenginegovernorsettingoroverspeed
theengine.
•Maintainorreplacesafetyandinstructionlabels,as
necessary.
•Ifgasolineisspilled,donotattempttostarttheengine
butmovethemachineawayfromtheareaofspillageand
avoidcreatinganysourceofignitionuntilthegasoline
vaporhasdissipated.
•Replacefaultysilencers.
•Beforeusing,alwaysvisuallyinspecttoseethattheblade,
boltsandspacersarenotwornordamaged.Replacea
wornordamagedblade.
•Stopthebladeifthemachinehastobetiltedfor
transportationwhencrossingsurfacesotherthangrass,
andwhentransportingthemachinetoandfromthearea
tobemowed.
•Neverpickuporcarryamachinewhiletheengineis
running.
•Stoptheengineanddisconnectthesparkplugwire,make
surethatallmovingpartshavecometoacompletestop:
–Beforeclearingblockages.
–Beforechecking,cleaning,orworkingonthemachine.
–Afterstrikingaforeignobject.Inspectthemachine
fordamageandmakerepairsbeforerestartingand
operatingthemachine.
3
Page 4

–Ifthemachinestartstovibrateabnormally.
–Wheneveryouleavethemachine.
–Beforerefueling.
•Ensuretheengineandthefueltankareemptyoffuel
beforerotatingthemachinebeyonda45degreeangle.
•Usecarewhencheckingtheblades.Wrapthebladeor
weargloves,andusecautionwhenservicingthem.
•Keephandsandfeetawayfrommovingparts.Ifpossible,
donotmakeadjustmentswiththeenginerunning.
•Shutoffthefuelwhilestoringortransportingthe
machine.Donotfuelnearopenames,anddonotdrain
fuelindoors.
•Parkthemachineonlevelground.Neverallowuntrained
personneltoservicethemachine.
•Allowtheenginetocoolbeforestoringinanyenclosure.
•Replacewornordamagedpartsforsafety.
•Ifthefueltankhastobedrained,thisshouldbedone
outdoors.Thedrainedfuelshouldbestoredinacontainer
specicallydesignedforfuelstorageoritshouldbe
disposedofcarefully.
•StarttheenginecarefullyaccordingtotheOperator’ s
Manualandwithfeetawayfromthecuttingelements.
•Alwayswearearprotection.
•Whentiltingthemachinetostarttheengine,donottilt
itmorethanabsolutelynecessaryandliftonlythepart
whichisawayfromtheoperator.
•Examinethemachineregularlyandreplacewornor
damagedpartsforsafety.UseonlyTorogenuinespare
parts.
Hauling
•Usecarewhenloadingorunloadingthemachineintoa
traileroratruck.
•Usefull-widthrampsforloadingthemachineintoa
traileroratruck.
•Tiethemachinedownsecurelyusingstraps,chains,
cables,orropes.Boththefrontandtherearstrapsshould
bedirecteddownandoutwardfromthemachine.
4
Page 5
SafetyandInstructionalDecals
Important:Safetyandinstructiondecalsarelocatednearareasofpotentialdanger.Replacedamageddecals.
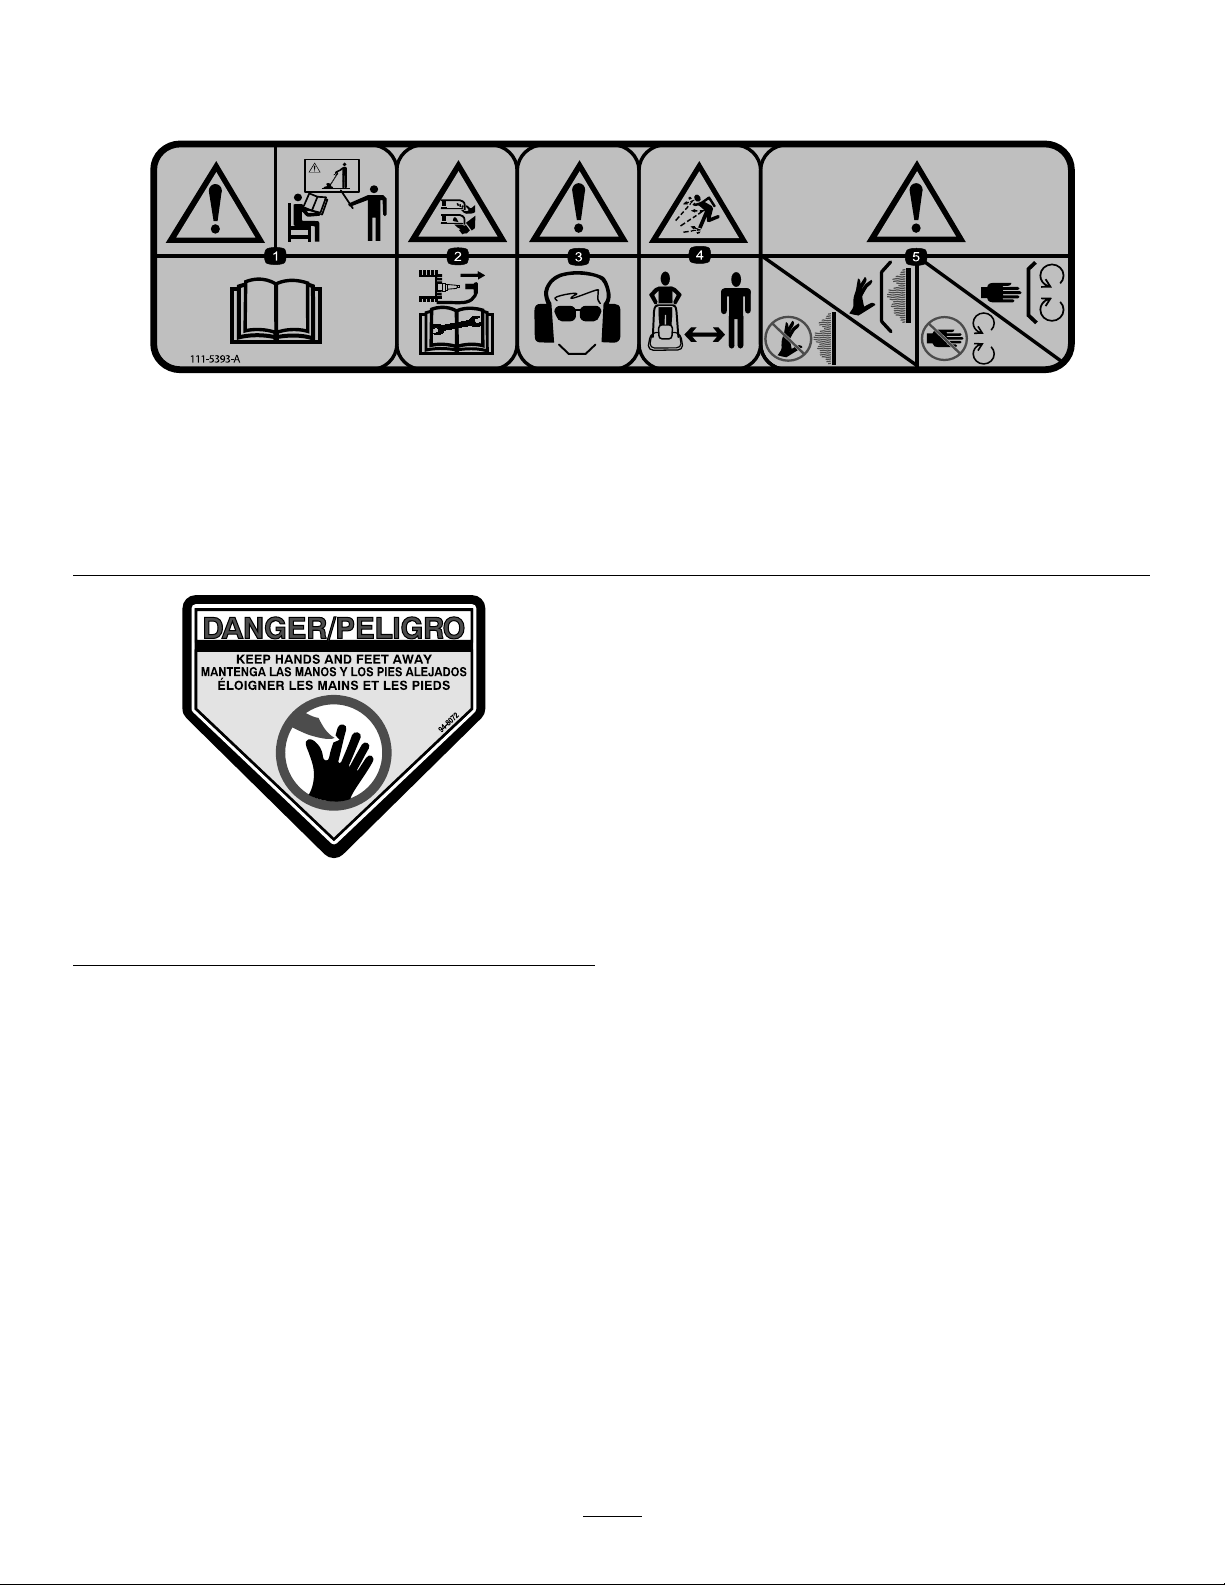
111-5393
1.Warning—Receivetrainingontheproduct;readthe
Operator’sManual.
2.Cutting/dismembermenthazardofhandorfoot,mowerblade;
disconnectthewirefromthesparkplugbeforeworkingonthe
machine;nevertmetalcuttingparts.
3.Warning—weareyeandhearingprotection.
94-8072
1.Warning—cutting/dismembermenthazardofhandorfoot,
cuttingmechanism.
4.Thrownobjecthazard;keepbystandersawayfromthe
machine.
5.Warning—donottouchhotsurfaces;keepguardsinplace;
Stayawayfrommovingparts;keepguardsinplace.
5
Page 6
Setup
g017333
1
2
3
4
5
6
g017328
1
2
3
4
5
1
AssemblingtheHandle
NoPartsRequired
Procedure
1.Slide2bushesintotheframe.
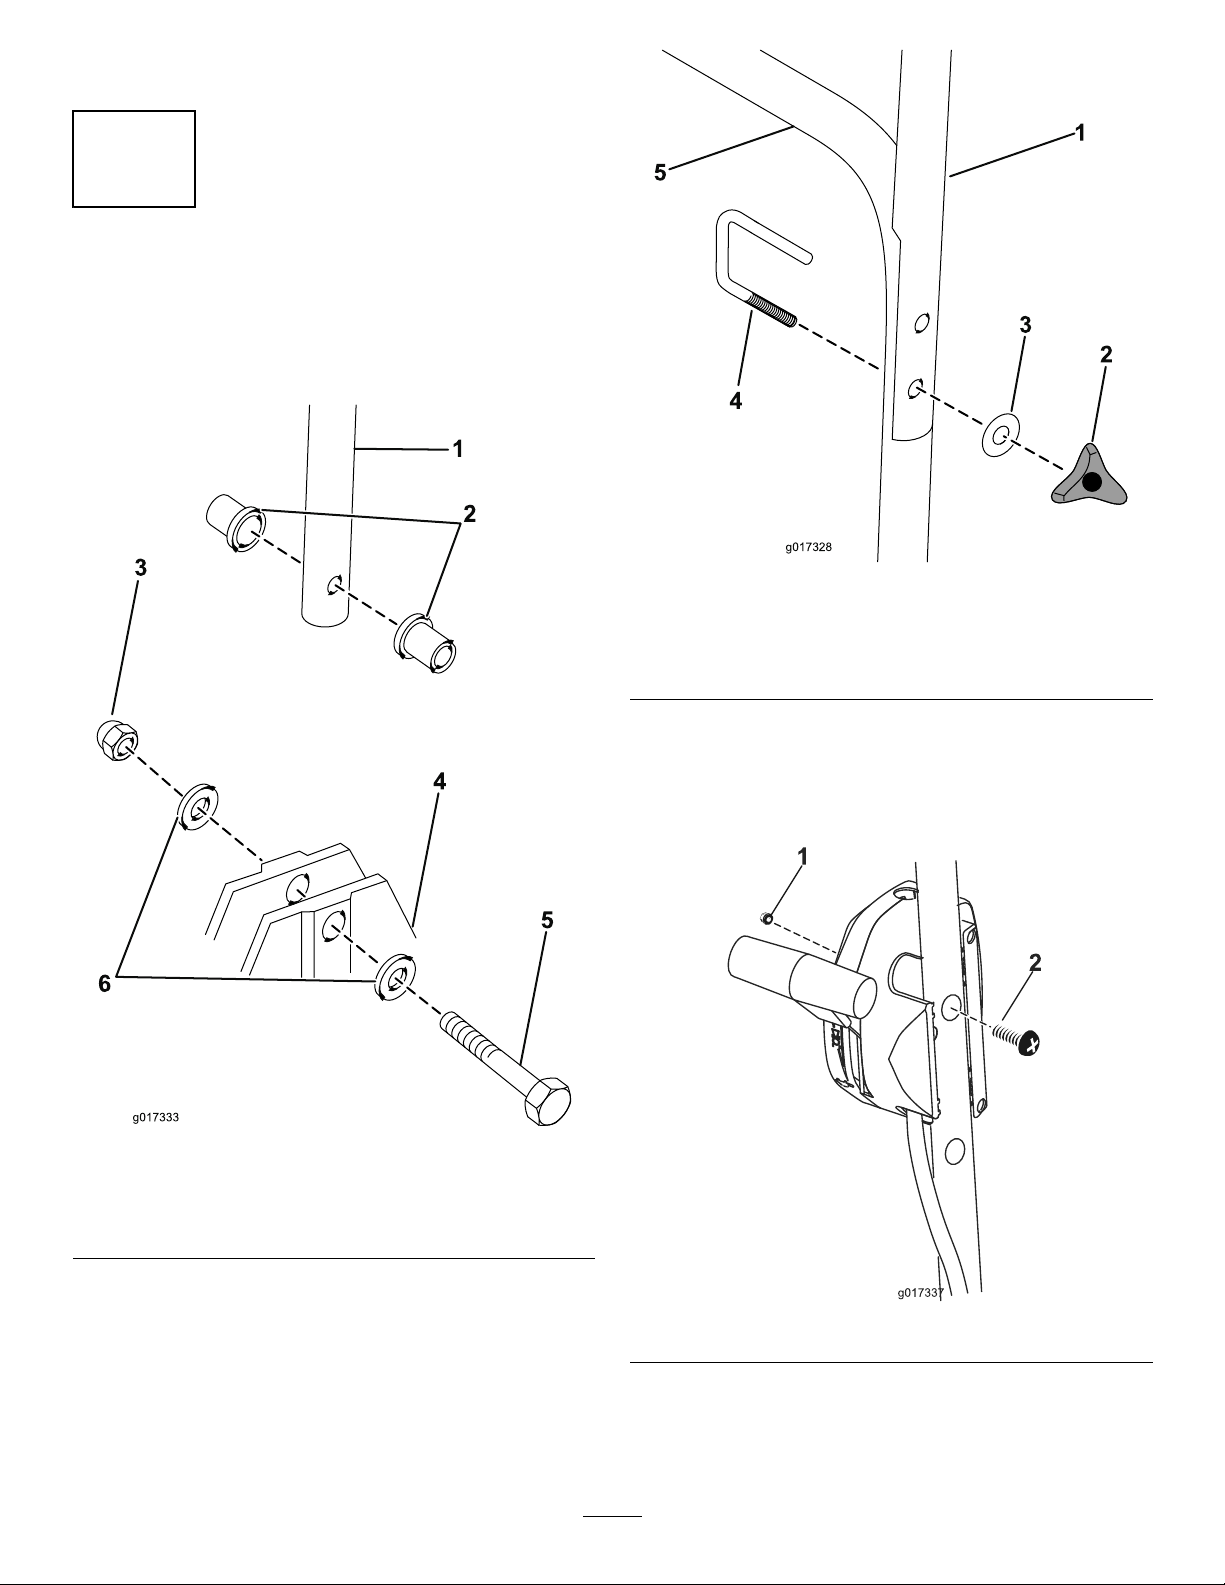
Figure4
1.Upperhandle4.Ubolt
2.Handwheel5.Lowerhandle
3.Washer
5.FittheUboltthroughtheupperandlowerhandleand
secureitwithawasherandahandwheel.
6.Attachthethrottleassemblytotheoutsideofthe
handlebarandsecureitwithanutandapanscrew.
Figure3
1.Lowerhandle4.Frame
2.Bushes5.Bolt
3.Nut6.Washers
2.Placethelowerhandlebetweenthebushesandsecure
itwith1handlebarbolt,2washers,and1nut.
Note:Placethelowerhandlebetweenthebusheswith
thekickstopassemblyontherighthandside.
3.Repeatfortheoppositeside.
4.Aligntheholesontheupperhandlewiththelower
handle.
Figure5
6
Page 7

2
1
2
3
g017332
g017338
InstallingtheFootstop
NoPartsRequired
Procedure
Securethefootstoptotheboltontherightsideofthelower
handleusinganutand2washers(Figure6).
Note:Installthefootstopusingthelowerholeinthe
footstopasshowninFigure6.
Max.ll:0.59L(20oz),type:SAE30orSAE10W-30
detergentoilwithanAPIserviceclassicationofSF,SG,SH,
SJ,SL,orhigher.
1.Movethemachinetoalevelsurface.
2.Removethedipstick(Figure7).
Figure7
Figure6
1.Footstop4.Bolt
2.Nut5.Lowerhandle
3.Washer
1.Theoillevelisatits
maximum.
2.Theoillevelistoo
high—removeoilfrom
thecrankcase.
3.Slowlypouroilintotheoilllhole,wait3minutes,
andchecktheoillevelonthedipstickbywipingthe
dipstickcleanandtheninserting,butnotscrewingin,
theoilllcapintothehole(Figure8).
3.Theoillevelistoo
low—addoiltothe
crankcase.
Figure8
3
FillingtheEnginewithOil
NoPartsRequired
Procedure
Important:Yourmachinedoesnotcomewithoilin
theengine.Beforestartingtheengine,lltheengine
withoil.
Note:Filltheenginecrankcasewithoiluntilthe
dipstickindicatesthattheengineoilleveliscorrect
asshowninFigure7.Ifyouoverlltheenginewith
oil,removetheexcessoilasdirectedinChangingthe
EngineOil(page15).
4.Installthedipstickandhandtightenitsecurely.
Important:
operating hour s
toChangingtheEngineOil(page15).
7
Change the engine oil after the r st 5
;changeityearlythereafter.Refer
Page 8

ProductOverview
g017341
1
2
3
4
5
6
7
8
9
1
2
3
7
8
9
g017335
4
5
6
Operation
FillingtheFuelTank
DANGER
Gasolineisextremelyammableandexplosive.A
reorexplosionfromgasolinecanburnyouand
others.
•Topreventastaticchargefromignitingthe
gasoline,placethecontainerand/ormachine
directlyonthegroundbeforelling,notina
vehicleoronanobject.
•Fillthetankoutdoorswhentheengineiscold.
Wipeupspills.
•Donothandlegasolinewhensmokingoraround
anopenameorsparks.
•Storegasolineinanapprovedfuelcontainer,out
ofthereachofchildren.
RecommendedFuel:
Figure9
1.Fuelcap6.Handlebarsecuringknob
2.Enginestart7.Exhaustguard
3.Throttlecontrol8.Enginecover
4.Enginestophandle9.Dipstick
5.Handlebar
Figure10
•Forbestresults,useonlyclean,fresh(lessthan30days
old),unleadedgasolinewithanoctaneratingof87or
higher((R+M)/2ratingmethod).
•Ethanol:Gasolinewithupto10%ethanol(gasohol)
or15%MTBE(methyltertiarybutylether)byvolume
isacceptable.EthanolandMTBEarenotthesame.
Gasolinewith15%ethanol(E15)byvolumeisnot
approvedforuse.Neverusegasolinethatcontainsmore
than10%ethanolbyvolume,suchasE15(contains15%
ethanol),E20(contains20%ethanol),orE85(contains
85%ethanol).Usingunapprovedgasolinemaycause
performanceproblemsand/orenginedamagewhichmay
notbecoveredunderwarranty.
•Donotusegasolinecontainingmethanol.
•Donotstorefueleitherinthefueltankorfuelcontainers
overthewinterunlessafuelstabilizerisused.
•Donotaddoiltogasoline.
6.Fuelcap
9.Carburetor
1.Sparkplug
2.Exhaustguard7.Fingerguard
3.Exhaust8.Aircleaner
4.Dipstick
5.Startergrip
8
Page 9

g017340
Figure11
1
2
3
g017332
CheckingtheEngine-OilLevel
ServiceInterval:Beforeeachuseordaily
1.Movethemachinetoalevelsurface.
2.Removethedipstickandwipeitwithacleancloth.
3.Insert,butdonotscrewin,thedipstickintotheoil
llhole.
4.Removethedipstickandcheckit.
5.Todeterminetheproperoillevelonthedipstick,refer
toFigure12).
Figure12
1.Theoillevelisatits
maximum.
2.Theoillevelistoo
high—removeoilfrom
thecrankcase.
3.Theoillevelistoo
low—addoiltothe
crankcase.
6.Iftheoillevelislow,slowlypouroilintotheoilll
hole,wait3minutes,andchecktheoillevelonthe
dipstickbywipingthedipstickcleanandtheninserting,
butnotscrewingin,theoilllcapintothehole.
Note:Max.ll:0.59l(20oz.)SAE10W -30detergent
oilwithanAPIserviceclassicationofSF,SG,SH,
SJ,SL,orhigher.
Note:Filltheenginecrankcasewithoiluntilthe
dipstickindicatesthattheengineoilleveliscorrectas
showninFigure12.Ifyouoverlltheenginewith
oil,removetheexcessoilasdirectedinChangingthe
EngineOil(page15).
7.Installthedipstickandhandtightenitsecurely.
Important:
operating hour s
toChangingtheEngineOil(page15).
Change the engine oil after the r st 5
;changeityearlythereafter.Refer
9
Page 10

AdjustingtheCuttingHeight
WARNING
Adjustingthecuttingheightmaybringyouinto
contactwiththeblade,causingseriousinjury.
•Stoptheengineandwaitforallmovingparts
tostop.
•Weargloveswhilehandlingtheblade.
CAUTION
Iftheenginehasbeenrunning,themuferwillbe
hotandcanseverelyburnyou.Keepawayfromthe
hotmufer.
Adjustthecuttingheightasdesired.
1.Turnthefuelswitchtotheoffposition.
2.Disconnectthewirefromthesparkplug.
3.Tiltthemachineonitsleftside.
4.Wearingprotectivegloves,removethebladebolt
andspacers.
5.Repositionthespacerstothedesiredheight,reinstall
thebladeretainerandspacers(Figure13,),andtighten
theboltto25N-m(18ft-lbs).
Figure13
1.Cutterbar
2.Spacers
3.Bladeretainer
Note:Thelargespacermustbepositioneddirectly
belowtheimpelleratalltimes.
4.Bolt
5.Largespacer
10
Page 11

StartingtheEngine
OFF
ON
g017346
g017334
1
2
g017329
1.Placethethrottlecontroltothechokeposition,ensure
thatthefuelswitchisinthe‘On’position.
Figure14
2.Holdtheenginestophandleagainstthehandle.
Figure15
1.Handle2.Enginestophandle
Figure16
4.Pulltherecoilstarthandle.
Note:Ifthemachinedoesnotstartafterseveralattempts,
contactanAuthorizedServiceDealer.
3.Placeyourfootonthedeckandtiltthemachine
towardsyou(Figure16).
11
Page 12

AdjustingtheChoke
g017367
1
2
g017366
StoppingtheEngine
Usethethrottleassemblytoadjustthechoke(Figure17).
ServiceInterval:Beforeeachuseordaily
Tostoptheengine,releasethebladecontrolbar(Figure18).
Important:Whenyoureleasetheenginestophandle,
boththeengineandbladeshouldstopwithin3seconds.
Iftheydonotstopproperly,stopusingyourmachine
immediatelyandcontactanAuthorizedServiceDealer.
Figure18
Figure17
1.Chokeon2.Chokeoff
12
Page 13

OperatingTips
GeneralMowingTips
•Cleartheareaofsticks,stones,wire,branches,andother
debristhatthebladecouldhit.
•Avoidstrikingsolidobjectswiththeblade.Never
deliberatelymowoveranyobject.
•Ifthemachinestrikesanobjectorstartstovibrate,
immediatelystoptheengine,disconnectthewirefrom
thesparkplug,andexaminethemachinefordamage.
•Forbestperformance,installanewbladebeforethe
cuttingseasonbegins.
•ReplacethebladewhennecessarywithaToro
replacementblade.
CuttingGrass
•Cutonlyaboutathirdofthegrassbladeatatime.Donot
cutbelowthe32mm(1.25inch)settingunlessthegrass
issparseoritislatefallwhengrassgrowthbeginstoslow
down.RefertoAdjustingtheCuttingHeight.
•Mowinggrassover15cm(6inches)inlengthisnot
recommended.Ifthegrassistoolong,themachinemay
plugandcausetheenginetostall.
•Mowonlydrygrassorleaves.W etgrassandleavestend
toclumpontheyardandcancausethemachinetoplug
ortheenginetostall.
WARNING
Wetgrassorleavescancauseseriousinjuryif
youslipandcontacttheblade.Mowonlyindry
conditions.
•Alternatethemowingdirection.Thishelpsdispersethe
clippingsoverthelawnforevenfertilization.
•Ifthenishedlawnappearanceisunsatisfactory,tryone
ormoreofthefollowing:
–Replacethebladeorhavethebladesharpened.
–Walkataslowerpacewhilemowing.
–Raisethecuttingheightonyourmachine.
–Cutthegrassmorefrequently.
–Overlapcuttingswathsinsteadofcuttingafullswath
witheachpass.
CuttingLeaves
•Aftercuttingthelawn,ensurethathalfofthelawnshows
throughthecutleafcover.Y oumayneedtomakemore
thanonepassovertheleaves.
•Slowdownyourmowingspeedifthemachinedoesnot
cuttheleavesnelyenough.
13
Page 14

Maintenance
Note:Determinetheleftandrightsidesofthemachinefromthenormaloperatingposition.
RecommendedMaintenanceSchedule(s)
MaintenanceService
Interval
Aftertherst5hours
Beforeeachuseordaily
Aftereachuse
Every100hours
Beforestorage
Yearly
MaintenanceProcedure
•Changetheengineoil.
•Checktheengine-oillevel.
•Ensurethattheenginestopswithin3secondsafterreleasingthebladecontrolbar.
•Cleangrassclippingsanddirtfromtheentiremachine.
•Cleangrassclippingsanddirtfromtheentiremachine.
•Checkthesparkplugandreplaceitifnecessary.
•Emptythefueltankbeforerepairsasdirectedandbeforeannualstorage.
•Cleanthecoolingsystem;removegrassclippings,debris,ordirtfromtheengine
aircoolingnsandstarter.Cleanthesystemmorefrequentlyindirtyorhigh-chaff
conditions.
•Replacetheairlter;replaceitmorefrequentlyindustyoperatingconditions.
•Changetheengineoil.
•Replacethebladeorhaveitsharpened(morefrequentlyiftheedgedullsquickly).
14
Page 15

PreparingforMaintenance
g017342
1
2
3
g017339
1.Stoptheengineandwaitforallmovingpartstostop.
2.Disconnectthesparkplugwirefromthesparkplug
(Figure19)beforeperforminganymaintenance
procedure.
Figure20
Figure19
1.Sparkplugwire
3.Afterperformingthemaintenanceprocedure(s),
connectthesparkplugwiretothesparkplug.
WARNING
Tippingthemachinemaycausethefuelto
leak.Gasolineisammable,explosiveand
cancausepersonalinjury.
Runtheenginedryorremovethegasoline
withahandpump;neversiphon.
1.Cover
2.Latchtabs
2.Openthecover.
3.Removethelter(Figure20).
4.Inspectthelter,andreplaceitifitisdamagedor
excessivelydirty.
5.Inspectthepaperairlter.
A.Ifthelterisdamagedoriswetwithoilorfuel,
replaceit.
B.Ifthelterisdirty,tapitonahardsurfaceseveral
timesorblowcompressedairlessthan207kPa
(30psi)throughthesideofthelterthatfaces
theengine.
Note:Donotbrushthedirtoffthelter;
brushingforcesdirtintothebers.
6.Removedirtfromtheaircleanerbodyandcoverusing
amoistrag.Donotwipedirtintotheairduct.
7.Insertthelterintotheaircleaner.
8.Installthecover.
3.Filter
ChangingtheEngineOil
Important:Alwaystipthemachineontoitsside
withthedipstickdown.
ReplacingtheAirCleaner
ServiceInterval:Yearly
1.Pressdownonthelatchtabsontopoftheaircleaner
cover(Figure20).
ServiceInterval:Aftertherst5hours
Yearly
1.Ensurethatthefueltankcontainslittleornofuelso
thatfueldoesnotleakoutwhenyoutipthemachine
ontoitsside.
2.Runtheengineafewminutesbeforechangingtheoil
towarmit.
Note:Warmoilowsbetterandcarriesmore
contaminants.
3.Disconnectthewirefromthesparkplug.Referto
PreparingforMaintenance.
4.Removethedipstick.
5.Tipthemachineontoitsside,withthedipstickdown,
todraintheusedoiloutthroughtheoillltube.
15
Page 16

6.Returnthemachinetotheoperatingposition.
1
2
3
g017332
7.Slowlypouroilintotheoilllhole,wait3minutes,
andchecktheoillevelonthedipstickbywipingthe
dipstickcleanandtheninserting,butnotscrewingin,
theoilllcapintothehole.
Note:Max.ll:0.59l(20oz.),type:SAE30orSAE
10W-30detergentoilwithanAPIserviceclassication
ofSF,SG,SH,SJ,SL,orhigher.
Note:Filltheenginecrankcasewithoiluntilthe
dipstickindicatesthattheengineoilleveliscorrectas
shownin(Figure21).Ifyouoverlltheenginewithoil,
removetheexcessoilasdirectedinstep5.
Figure21
1.Theoillevelisatits
maximum.
2.Theoillevelistoo
high—removeoilfrom
thecrankcase.
3.Theoillevelistoo
low—addoiltothe
crankcase.
Figure22
1.Centerelectrodeinsulator
2.Sideelectrode
3.Airgap(nottoscale)
6.Installthesparkplugandthegasketseal.
7.Torquetheplugto20N-m(15ft-lb).
8.Connectthewiretothesparkplug.
ReplacingtheBlade
ServiceInterval:Yearly
Important:
blades pr oper l y
areuncomfortableperformingthisprocedure,contact
anAuthorizedServiceDealer.
Examinethebladeswheneveryourunoutofgasoline.If
thebladeisdamagedorcracked,replaceitimmediately.If
thebladesedgesaredullornicked,havethemsharpenedor
replaced.
WARNING
Y ou will need a torque wr ench to install the
.Ifyoudonothaveatorquewrenchor
8.Installthedipstickandhandtightenitsecurely.
9.Disposeoftheusedoilproperlyatalocalrecycling
center.
ServicingtheSparkPlug
ServiceInterval:Every100hours
Checkthesparkplugafterevery100operatinghours.Usean
ChampionRN9YCsparkplugorequivalent.
1.Stoptheengineandwaitforallmovingpartstostop.
2.Disconnectthewirefromthesparkplug.
3.Cleanaroundthesparkplug.
4.Removethesparkplugfromthecylinderhead.
Important:Replaceacracked,fouled,ordirty
sparkplug.Donotcleantheelectrodesbecause
gritenteringthecylindercandamagetheengine.
5.Setthegapontheplugto0.76mm(0.030inch)(Figure
22).
Thebladeissharp;contactingthebladecanresult
inseriouspersonalinjury.
•Disconnectthewirefromthesparkplug .
•Weargloveswhenservicingtheblade.
1.Disconnectthesparkplugwirefromthesparkplug.
RefertoPreparingforMaintenance.
2.Tipthemachineontoitsside,withtheairlterup.
3.Useablockofwoodtoholdthebladesteady.
4.Removetheblade(turnthebladebolt
counterclockwise),savingallthemounting
hardware.
5.Installthenewblade(turnthebladeboltclockwise)
andallmountinghardware.
Important:Positionthecurvedendsoftheblade
topointtowardthemachinehousing.
6.Useatorquewrenchtotightenthebladeboltto
25N-m(18ft-lb).
16
Page 17

Important:Abolttorquedto25N-m(18ft-lb)is
verytight.Whileholdingthebladewithablock
ofwood,putyourweightbehindtheratchetor
wrenchandtightentheboltsecurely.Thisboltis
verydifculttoovertighten.
Storage
Storethemachineinacool,clean,dryplace.
PreparingtheMachinefor
CleaningtheMachine
ServiceInterval:Beforeeachuseordaily
Aftereachuse
WARNING
Themachinemaydislodgematerialfromunderthe
machinehousing.
•Weareyeprotection.
•Stayintheoperatingposition(behindthe
handle).
•Donotallowbystandersinthearea.
1.Tipthemachineonitsside.
2.Useabrushorcompressedairtoremovegrassand
debrisfromtheexhaustguard,thetopcowl,andthe
surroundingdeckareas.
Storage
WARNING
Gasolinevaporscanexplode.
•Donotstoregasolinemorethan30days.
•Donotstorethemachineinanenclosurenear
anopename.
•Allowtheenginetocoolbeforestoringit.
1.Onthelastrefuelingoftheyear,addfuelstabilizerto
thefuelasdirectedbytheenginemanufacturer.
2.Runthemachineuntiltheenginestopsfromrunning
outoffuel.
3.Primetheengineandstartitagain.
4.Allowtheenginetorununtilitstops.Whenyoucan
nolongerstarttheengine,itissufcientlydry.
5.Disconnectthewirefromthesparkplug.
6.Removethesparkplug,add30ml(1oz.)ofoilthrough
thesparkplughole,andpullthestarterropeslowly
severaltimestodistributeoilthroughoutthecylinder
topreventcylindercorrosionduringtheoff-season.
7.Installthesparkplugandtightenitwithatorque
wrenchto20N-m(15ft-lb).
8.Tightenallnuts,bolts,andscrews.
17
Page 18

Troubleshooting
Problem
Theenginedoesnotstart
Theenginestartshardorlosespower
PossibleCauseCorrectiveAction
1.Thewireisnotconnectedtothespark
plug.
2.Thefuelcapventholeisplugged.2.Cleanthefuelcapventholeorreplace
3.Thesparkplugispitted,fouled,orthe
gapisincorrect.
4.Thefueltankisemptyorthefuel
systemcontainsstalefuel.
1.Thefuelcapventholeisplugged.1.Cleanthefuelcapventholeorreplace
2.Theairlterelementisdirtyandis
restrictingtheairow.
3.Theundersideofthemachinehousing
containsclippingsanddebris.
4.Thesparkplugispitted,fouled,orthe
gapisincorrect.
5.Theengineoillevelistoolow,toohigh,
orexcessivelydirty .
6.Thefueltankcontainsstalefuel.6.Drainandllthefueltankwithfresh
1.Connectthewiretothesparkplug.
thefuelcap.
3.Checkthesparkplugandadjustthe
gapifnecessary .Replacethespark
plugifitispitted,fouled,orcracked.
4.Drainand/orllthefueltankwith
freshgasoline.Iftheproblempersists,
contactanAuthorizedServiceDealer.
thefuelcap.
2.Cleantheairlterpre-cleanerand/or
replacethepaperairlter.
3.Cleanunderthemachinehousing.
4.Checkthesparkplugandadjustthe
gapifnecessary .Replacethespark
plugifitispitted,fouled,orcracked.
5.Checktheengineoil.Changetheoilif
itisdirty;addordraintheoiltoadjust
theoilleveltotheFullmarkonthe
dipstick.
gasoline.
Theenginerunsrough
Themachineorenginevibrates
excessively
Thereisanunevencuttingpattern
1.Thewireisnotconnectedtothespark
plug.
2.Thesparkplugispitted,fouled,orthe
gapisincorrect.
3.Theairlterelementisdirtyandis
restrictingtheairow.
1.Theundersideofthemachinehousing
containsclippingsanddebris.
2.Theenginemountingboltsareloose.2.Tightentheenginemountingbolts.
3.Theblademountingboltloose.3.Tightentheblademountingbolt.
4.Thebladeisbentorisoutofbalance.4.Balancetheblade.Ifthebladeisbent,
1.Youaremowinginthesamepattern
repeatedly.
2.Theundersideofthemachinehousing
containsclippingsanddebris.
3.Thebladeisdull.
1.Connectthewiretothesparkplug.
2.Checkthesparkplugandadjustthe
gapifnecessary .Replacethespark
plugifitispitted,fouled,orcracked.
3.Cleantheairlterpre-cleanerand/or
replacethepaperairlter.
1.Cleanunderthemachinehousing.
replaceit.
1.Changethemowingpattern.
2.Cleanunderthemachinehousing.
3.Sharpenandbalancetheblade.
18
Page 19

Notes:
19
Page 20

ToroGeneralCommercialProductWarranty
ATwo-YearLimitedWarranty
ConditionsandProductsCovered
TheT oroCompanyanditsafliate,T oroWarrantyCompany ,pursuant
toanagreementbetweenthem,jointlywarrantyourToroCommercial
product(“Product”)tobefreefromdefectsinmaterialsorworkmanship
fortwoyearsor1500operationalhours*,whicheveroccursrst.This
warrantyisapplicabletoallproductswiththeexceptionofAerators
(refertoseparatewarrantystatementsfortheseproducts).Wherea
warrantableconditionexists,wewillrepairtheProductatnocosttoyou
includingdiagnostics,labor,parts,andtransportation.Thiswarranty
beginsonthedatetheProductisdeliveredtotheoriginalretailpurchaser .
*Productequippedwithanhourmeter.
InstructionsforObtainingWarrantyService
YouareresponsiblefornotifyingtheCommercialProductsDistributoror
AuthorizedCommercialProductsDealerfromwhomyoupurchasedthe
Productassoonasyoubelieveawarrantableconditionexists.Ifyouneed
helplocatingaCommercialProductsDistributororAuthorizedDealer,or
ifyouhavequestionsregardingyourwarrantyrightsorresponsibilities,
youmaycontactusat:
ToroCommercialProductsServiceDepartment
ToroW arrantyCompany
811 1LyndaleAvenueSouth
Bloomington,MN55420-1196
952–888–8801or800–952–2740
E-mail:commercial.warranty@toro.com
OwnerResponsibilities
AstheProductowner,youareresponsibleforrequiredmaintenanceand
adjustmentsstatedinyourOperator'sManual.Failuretoperformrequired
maintenanceandadjustmentscanbegroundsfordisallowingawarranty
claim.
ItemsandConditionsNotCovered
Notallproductfailuresormalfunctionsthatoccurduringthewarranty
periodaredefectsinmaterialsorworkmanship.Thiswarrantydoesnot
coverthefollowing:
•Productfailureswhichresultfromtheuseofnon-Tororeplacement
parts,orfrominstallationanduseofadd-on,ormodiednon-T oro
brandedaccessoriesandproducts.Aseparatewarrantymaybe
providedbythemanufactureroftheseitems.
•Productfailureswhichresultfromfailuretoperformrecommended
maintenanceand/oradjustments.Failuretoproperlymaintainyour
ToroproductpertheRecommendedMaintenancelistedinthe
Operator’sManualcanresultinclaimsforwarrantybeingdenied.
•ProductfailureswhichresultfromoperatingtheProductinanabusive,
negligent,orrecklessmanner .
•Partssubjecttoconsumptionthroughuseunlessfoundtobedefective.
Examplesofpartswhichareconsumed,orusedup,duringnormal
Productoperationinclude,butarenotlimitedto,brakepadsand
linings,clutchlinings,blades,reels,rollersandbearings(sealedor
greasable),bedknives,sparkplugs,castorwheelsandbearings,tires,
lters,belts,andcertainsprayercomponentssuchasdiaphragms,
nozzles,andcheckvalves,etc.
•Failurescausedbyoutsideinuence.Conditionsconsideredtobe
outsideinuenceinclude,butarenotlimitedto,weather,storage
practices,contamination,useofunapprovedfuels,coolants,lubricants,
additives,fertilizers,water,orchemicals,etc.
•Failureorperformanceissuesduetotheuseoffuels(e.g.gasoline,
diesel,orbiodiesel)thatdonotconformtotheirrespectiveindustry
standards.
•Normalnoise,vibration,wearandtear,anddeterioration.
•Normal“wearandtear”includes,butisnotlimitedto,damagetoseats
duetowearorabrasion,wornpaintedsurfaces,scratcheddecalsor
windows,etc.
Parts
Partsscheduledforreplacementasrequiredmaintenancearewarranted
fortheperiodoftimeuptothescheduledreplacementtimeforthatpart.
Partsreplacedunderthiswarrantyarecoveredforthedurationofthe
originalproductwarrantyandbecomethepropertyofToro.T orowillmake
thenaldecisionwhethertorepairanyexistingpartorassemblyorreplace
it.Toromayuseremanufacturedpartsforwarrantyrepairs.
DeepCycleandLithium-IonBatteryWarranty:
DeepcycleandLithium-Ionbatterieshaveaspeciedtotalnumberof
kilowatt-hourstheycandeliverduringtheirlifetime.Operating,recharging,
andmaintenancetechniquescanextendorreducetotalbatterylife.Asthe
batteriesinthisproductareconsumed,theamountofusefulworkbetween
chargingintervalswillslowlydecreaseuntilthebatteryiscompletelyworn
out.Replacementofwornoutbatteries,duetonormalconsumption,
istheresponsibilityoftheproductowner.Batteryreplacementmaybe
requiredduringthenormalproductwarrantyperiodatowner’sexpense.
Note:(Lithium-Ionbatteryonly):ALithium-Ionbatteryhasapartonly
proratedwarrantybeginningyear3throughyear5basedonthetime
inserviceandkilowatthoursused.RefertotheOperator'sManualfor
additionalinformation.
MaintenanceisatOwner’sExpense
Enginetune-up,lubrication,cleaningandpolishing,replacementoflters,
coolant,andcompletingrecommendedmaintenancearesomeofthe
normalservicesT oroproductsrequirethatareattheowner’sexpense.
GeneralConditions
RepairbyanAuthorizedT oroDistributororDealerisyoursoleremedy
underthiswarranty.
NeitherTheToroCompanynorToroW arrantyCompanyisliablefor
indirect,incidentalorconsequentialdamagesinconnectionwiththe
useoftheT oroProductscoveredbythiswarranty,includingany
costorexpenseofprovidingsubstituteequipmentorserviceduring
reasonableperiodsofmalfunctionornon-usependingcompletion
ofrepairsunderthiswarranty.ExceptfortheEmissionswarranty
referencedbelow,ifapplicable,thereisnootherexpresswarranty.All
impliedwarrantiesofmerchantabilityandtnessforusearelimitedto
thedurationofthisexpresswarranty.
Somestatesdonotallowexclusionsofincidentalorconsequential
damages,orlimitationsonhowlonganimpliedwarrantylasts,sotheabove
exclusionsandlimitationsmaynotapplytoyou.Thiswarrantygivesyou
speciclegalrights,andyoumayalsohaveotherrightswhichvaryfrom
statetostate.
Noteregardingenginewarranty:
TheEmissionsControlSystemonyourProductmaybecoveredby
aseparatewarrantymeetingrequirementsestablishedbytheU.S.
EnvironmentalProtectionAgency(EPA)and/ortheCaliforniaAirResources
Board(CARB).Thehourlimitationssetforthabovedonotapplytothe
EmissionsControlSystemWarranty .RefertotheEngineEmissionControl
WarrantyStatementsuppliedwithyourproductorcontainedintheengine
manufacturer’sdocumentationfordetails
CountriesOtherthantheUnitedStatesorCanada
CustomerswhohavepurchasedT oroproductsexportedfromtheUnitedStatesorCanadashouldcontacttheirT oroDistributor(Dealer)toobtain
guaranteepoliciesforyourcountry,province,orstate.IfforanyreasonyouaredissatisedwithyourDistributor'sserviceorhavedifcultyobtaining
guaranteeinformation,contacttheToroimporter.
374-0253RevC
 Loading...