

Page 1

INSTRUCTION MANUAL
16 INCH DIGITAL WALL FAN WITH REMOTE
ITEM NO.: HI-FAN-W16DIGIT-1P/
HI-FAN-W16DIGIT-2P
PLEASE READ AND SAVE THIS INSTRUCTION.
Attention: Pictures in the IM are for reference only.
Page 2

CAUTION
WARNING
RULES FOR SAFE OPERATION
PART FIGURE
READ AND FOLLOW ALL INSTRUCTION BEFORE OPERATING FAN
Read rules for safe operation and instructions carefully.
1.
This appliance has a polarized plug (one blade is wider than the other). To reduce the risk of
electric shock, this plug is intended to fit in a polarized outlet only one way. If plug does not fit fully
in the outlet, reverse the plug. If it still does not fit, contact a qualified electrician. Do not attempt to
defeat this safety feature.
2.
To reduce the risk of fire or electric shock, DO NOT use this fan with any solid-state speed control
device.
1.
Never insert fingers, pencils, or any other object through the guard when fan is running.
2.
Disconnect the fan when moving from one location to another.
3.
Disconnect the fan when removing grills for cleaning.
4.
Be sure fan is on a stable surface when operating to avoid overturning.
5.
DO NOT use fan in window. Rain may create electrical hazard.
6.
Ensure that the fan is switched off from the supply mains before removing the grille.
7.
Do not operate any fan with a damaged cord or plug. Discard fan or return to an authorized service facility
for examination and/or repair.
8.
Do not run cord under carpeting. Do not cover cord with throw rugs, runners, or similar coverings. Do not
route cord under furniture or appliances. Arrange cord away from traffic area and where it will not be
tripped over.
Page 3

ASSEMBLY COMPONENTS
BATTERY WARNING
1. Unscrew the secure ring clockwise from the fan motor. Fix the rear grill to the motor then tighten
the secure ring again (see fig.1);
2. Insert the blades into the motor shaft pin, and turn the fan blade securing cap counterclockwise
to tighten the blade (see fig.2).
3. Fix the front grill and the rear grill with circlip clip and then use the fasten clip to tighten the fan grill
(see fig.3).
ING THE TEMOTE CONTROL
1. Do not dispose of batteries in fire, batteries may explode or leak;
2. Do not mix old and new batteries;
3. Do not mix alkaline, standard(carbon-zinc) or rechargeable (nickel-cadmium) batteries.
1. Drill 3 holes on the wall where the fan intended to be mounted, and insert the 3 drywall plugs into the hole;
2. Fix the fan bracket on the wall with inserting and tightening the screws provided into the drywall plugs;
3. Hang the fan upward onto the wall bracket and tighten the white screw nut provided to secure the fan.
MOUNTING ON THE WALL
Page 4
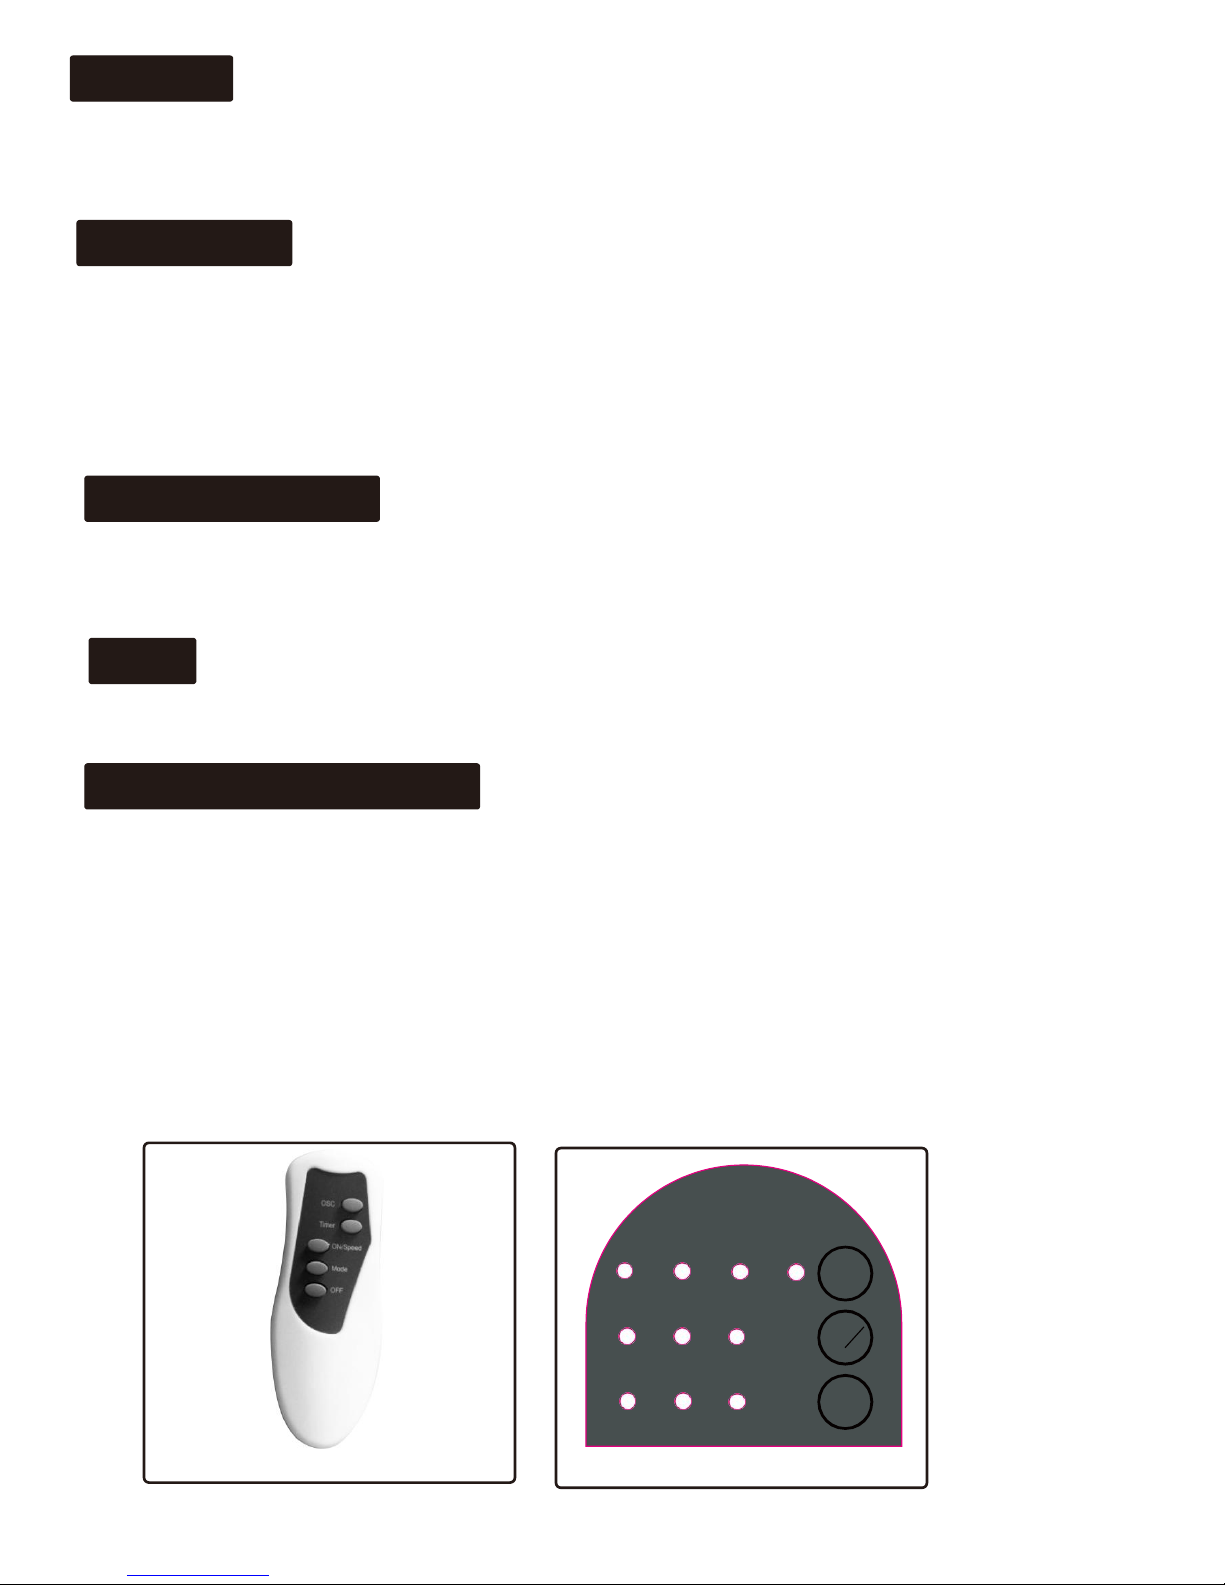
TIMER
ON/SPEED
OSCILLATION
OFF
FUNCTION MODES
Press the Timer button repeatedly to change the timer setting. The time increases by every 0.5h and
maximum timer setting is 7.5h.
Press the ON button on the remote. The fan will start to operate at a low speed if it is the first time
you have plugged it in. If the fan was plugged in before, it will operate at the speed as last turned off.
After starting the fan, this ON button is for setting the speed. Press this button repeatedly to switch the
speed from from “LO-ME-HI” .
Press the OSC button on the remote to control the oscillation of the fan. Press the button again
when the fan head turns to your desired angle and the fan will stop oscillating.
Press the OFF button to turn the fan off.
This fan has three different modes: NORMAL, NATURAL BREEZE and SLEEP. Each
mode functions differently.
NORMAL WIND-The fan will deliver constant airflow on high, medium or low speed settings;
NAT URAL WIND -The fan delivers airflow consistent with natural wind. The airflow cycles from high
speed to low speed, repeating the cycle to create a natural breeze in the environment;
SLEEP WIND -The fan will reduce airflow step by step until the fan shuts off.
OFF-The fan will completely turn off.
0.5
1
2
4
TIMER
SWING
LOW MIDDLE
HIGH
SPEED
SPEED
ON
NORMAL NATURE SLEEP
MODE
OFF
Page 5

USER SERVICING INSTRUCTIONS
1. Grasp plug and remove from the receptacle or other outlet device. Do not unplug by
pulling on cord
2. Open fuse cover. Slide open fuse access cover on top of attachment plug towards
blades. (see fig.1)
3. Remove fuse carefully. Remove the fuse by prying it out carefully. (see fig.2)
4. Risk of fire. Replace fuse only with 2.5 Amp, 125 Volt fuse.
5. Close fuse cover. Slide closed the fuse access cover on top of attachment plug. (see fig.3).
6. Risk of fire. Do not replace attachment plug. Contains a safety device (fuse) that
should not be removed. Discard product if the attachment plug is damaged.
Fig.1
Fig.2Fig.2 Fig.3
Tips: Do not overexert when replacing the fuse or damage may occur. If it’s hard to close
the access cover, make sure the fuse is fully inserted.
CLEANING:
1. Be sure to unplug from the electrical supply source before cleaning.
2. Plastic parts should be cleaned with mild soap and damp cloth or sponge. Thoroughly
remove soap film with clean water.
3.
Be sure not to
get water or other liquid into the motor.
LIMITED ONE-YEAR WARRANTY
Hexago LLC warrants this product to be free of defects in material and workmanship for
the applications specified in the Owner's Manual for a period of one year from date of
purchase. This warranty only applies to the original purchaser of this product.
This warranty excludes damage, accidental or otherwise, to the unit not caused by a defect
in material or workmanship.
The warranty also excludes damage caused by misuse, tampering, modification, misassembly,
repairs or alterations, or failure to adequately maintain and care for the unit. Operating this
product under any conditions other than those recommended or at voltages other than indicated
will also void this warranty. For warranty issues, contact the place of purchase for repair/
replacement opportunities. The original dated receipt or proof of purchase must accompany
all returns.
All warranties, expressed or implied, are limited for one year from the date of purchase.
Tornado is a registered trademark of Hexago LLC.
Some states do not allow for the limitation or exclusion of incidental or consequential damages,
or do not allow limitation on implied warranties. The above limitations and exclusions may not
apply to you. This warranty gives you specific legal rights, and may also include other rights
that vary state by state.
Customer service email: tornadofans.info@gmail.com
Website: www.tornado-fans.com
 Loading...