

Page 1

TORNADO INDUSTRIES, LLC
3101 WICHITA COURT
FORT WORTH, TX 76140
PHONE: 800-VACUUMS
FAX: 817-551-0719
WWW.TORNADOVAC.COM
Form No. L7300AA 1/17 ©Tornado Industries, LLC. All rights reserved
1
Page 2

Long Term Buyer Protection Limited Warranty
Tornado Industries, LLC. (Tornado) warrants to the end/user customer that the Tornado product(s) will
be free from defects in material and workmanship for the duration(s) described below. This limited
warranty DOES NOT cover machines and/or components subject to normal wear and tear, damage
that occurs in shipping, failures resulting from modication, accident, unsuitable operating environment, misuse, abuse, neglect, or improper maintenance by you. For full details, contact your Authorized Tornado Distributor, Service Center, or the Tornado Technical Service Department. Tornado
sales and service representatives are not authorized to waive or alter the terms of this warranty, or to
increase the obligations of Tornado under the warranty.
10 Years*
Plastic water tanks and Rotationally-molded bodies
2 Years*
Parts on all Tornado cleaning equipment
1 Year*
Labor on all Tornado cleaning equipment
1 Year*
Warranty on batteries, one year prorated
All battery warranties are handled directly by the battery manufacturer, on a one year prorated basis
Terms subject to change without notice
1. Except all Windshears™ Blowers, Storm, TV2SS, Side and Downdraft, Insulation Blowers, CV 30,
CV 38, CK14/1 PRO, CK 14/2 PRO, SWM 31/9, CK LW13/1, CK LW 13/1 ROAM, CV 38/48 Dual,
PV6, PV10, PV6 ROAM, Wall Mount Vacuum and all chargers are warranted for 1 (one) year for both
parts and labor.
2. All non-wear item parts purchased after warranty expiration are warranted for 90 days.
3. Warranty starts from the date of sale to the consumer or, at Tornado’s discretion, 6 months after
the dealer purchased the unit from Tornado, whichever comes rst.
4. The EB 30 is warranted for a period of 90 days for both parts and labor.
5. The warranty on engines used on propane powered equipment is limited to motor manufacturer’s
warranty.
6. Ride-on Scrubbers are warranted for 24 months, parts, 6 months labor or 1,000 hours, whichever
occurs rst.
Note: Tornado, The Latest Dirt, Floorkeeper,
Carpetkeeper, Carpetrinser, Carpetrinser/Dryer,
Headmaster, Taskforce, PAC-VAC, T-Lite, Glazer,
Windshear, Max-Vac and Trot-Mop are trademarks
of Tornado Industries
Website: www.tornadovac.com
Phone 1-800-VACUUMS
Fax 817-551-0719
Address 3101 Wichita Court
Fort Worth, TX 76140
1-800-VACUUMS 90 Years of Cleaning Innovation A Tacony Company
Form F2662.©2017. All rights reserved
Page 3

IMPORTANT SAFETY INSTRUCTIONS
When using an electrical appliance, basic precautions should always be followed, including the following:
READ AND UNDERSTAND ALL INSTRUCTIONS BEFORE USING THIS UNIT
Read and understand this owner’s manual and all labels on the unit before operating. Safety is a combination of
common sense, staying alert and knowing how your unit works. Use this unit only as described in this manual.
Use only manufacturer’s recommended attachments. To reduce the risk of personal injury or damage to your
unit use only Tornado recommended accessories.
IMPORANT: The manufacturer cannot accept responsibility for damage caused when the appliance is
not used according to the instructions, or for uses other than those for which it was intended.
WARNING: To reduce the risk of re, electric shock, damage or injury:
• Fully assemble vacuum before operating.
• Use and store in a dry location.
• Do not use outdoors or on wet surfaces.
• Do not allow to be used as a toy. Close attention is necessary when used by or near children.
• Use only as described in this manual.
• Do not use charger with damaged cord or plug. If appliance or charger is not working as it should, has been
dropped, damaged, left outdoors, or dropped into water, contact an Authorized Tornado service center for
service.
• Do not pull or carry charger by cord, use cord as a handle, close a door on the cord, or pull cord around
sharp edges or corners.
• Do not run appliance over cord.
• Keep cord away from heated surfaces.
• Do not unplug charger by pulling on cord. To unplug charger, grasp the plug, not the cord.
• Do not handle charger, including charger plug, and charger terminals with wet hands.
• Do not put any object into openings.
• Do not use with any opening blocked; keep free of dust, lint, hair and anything that may reduce air ow.
• Keep hair, loose clothing, ngers and all parts of the body away from openings and moving parts.
• Do not pick up anything that is burning or smoking, such as cigarettes, matches or hot ashes.
• Do not use without vacuum bag in place.
• Use extra care when cleaning on stairs.
• Do not use to pick up ammable or combustible liquids such as gasoline or use in areas where they may be
present.
• Do not attempt to service the unit while charger is plugged in.
• Do not charge the unit outdoors.
• Only charge in temperatures between 0-45ºC (32-113ºF).
• Do not open, crush, expose to heat above 100ºC (212ºF) or incinerate the battery even if it is severely damaged. The battery can explode in a re.
• Use only with the Cordless Battery Vacuum Charger supplied - P/N 99131
• The battery and charger have no user serviceable parts.
• Batteries must be disposed of responsibly.
• Remove the battery before removing the bottom plate.
SAVE THESE INSTRUCTIONS.
3
Page 4

Your new Tornado unit is a high quality, precision-made product. All parts used in the manufacturing of this unit
have passed rigid quality control standards prior to assembly. Please safeguard the original receipt / invoice. If
you experience any problems with your unit during the warranty period, the original receipt / invoice will act as
proof of purchase. Contact Tornado for any warranty inquiries.
The model and serial number of this product may be found on the back side of the unit. Y
note the model and serial number of your unit in the spaces provided below, and retain this book as
a permanent record of your purchase.
Date of purchase
Serial number
Model number
ou should
POLARIZATION INSTRUCTIONS
Power Cord, 2-Wire Polarized Cord
This product is equipped with a polarized alternating current line plug (a plug having one blade wider than the
other). This plug ts into the power outlet only one way. This is a safety feature. If you are unable to insert the
plug fully into the outlet, try reversing the plug. If the plug should still fail to t, contact an electrician to replace
the obsolete outlet. Do not defeat the safety purpose of the polarized plug.
State of California
Proposition 65 Warnings:
WARNING: This product contains one or more chemicals known to the State of California to
cause cancer.
WARNING: This product contains one or more chemicals known to the State of California to
cause birth defects or other reproductive harm.
For Best Performance
• Keep your vacuum clean and in good operating condition.
• Change vacuum bags when the bags are 2/3 full to maximize cleaning performance.
• Always use genuine vacuum bags and replacement parts. Use of other products may result in poor cleaning performance, potential vacuum cleaner damage and may void vacuum warranty. Genuine products are
designed for maximum cleaning performance.
• Store your machine carefully in a dry area.
• For optimum cleaning performance and safety, follow your owner’s manual instructions.
4
Page 5

DESCRIPTION OF THE VACUUM
DESCRIPTION OF CHANGE
REV
PART NUMBER
SHEET
1 OF 4
BYECN NODATEREV
DESCRIPTION OF CHANGE
REV
PART NUMBER
SHEET
1 OF 1
BYECN NODATEREV
C223-2000
NOTES:
1. OUTPUT 50.4V DC, 1.5A
2. DC POWER CONNECTOR PLUG 2.5MM AND CABLE 47" LONG.
3 INPUT = AC 100-240V, 50/60Hz, 100VA.
4. AC CABLE 71" LONG W/ 2 PIN POLARIZED AMERICAN PLUG
5. PLUGS AND CABLES UL CERTIFIED.
6. CHARGER - UL1310 CERTIFIED
1
2
12
11
10
4
1 Ergonomic Handle
2 On/Off Power Switch
3 Bag Compartment
4 Vacuum Nozzle
5 Headlight
6 Furniture Guard
7 Handle Release Pedal
8 Battery Pack
9 Charge Point
10 Battery Life Display
11 Battery Release Button
12 Carry Handle
13 Charger
9
8
3
5
6
7
13
Key Replacement Parts
• Cleanbreeze disposable collection bags: 90039
• Belt: B014-0814B
• Battery: 98311
• Battery Charger: 99131
5
Page 6

ASSEMBLING THE VACUUM
MATERIAL
DRAWN
ISSUED
SCALE
FINISH
DATE
DATE
DO NOT SCALE
UNLESS OTHERWISE SPECIFIED
DESCRIPTION
DRAWING SIZE:C
PART NUMBER
SHEET 1 OF 1
TACONY CORPORATION CLAIMS PROPRIETARY
RIGHTS IN THE MATERIAL DISCLOSED HERE IN.
THIS DRAWING IS ISSUED FOR ENGINEERING
INFORMATION ONLY. IT MAY NOT BE REPRO-
DUCED, NOR MAY THE INFORMATION HERE IN
BE USED FOR MANUFACTURING PURPOSES
WITHOUT WRITTEN PERMISSION FROM TACONY
CORPORATION.
1.000
TACONY CORPORATION
1760 Gilsinn Lane, Fenton, MO 63026
X.X .5 mm RADII X.X .5mm
X.XX .25mm X.XX .25mm
X.XXX .12mm MACHINE SURFACE
X.XXXX .012mm BREAK SHARP CORNERS TO .25mm MAX
0 30" COMMON TO BE CONCETRIC TO .05mm
AS 20MAY15
SEE NOTES
SEE NOTES
C223-2000
BATTERY CHARGER 50.4V DC
NOTES:
1. OUTPUT 50.4V DC, 1.5A
2. DC POWER CONNECTOR PLUG 2.5MM AND CABLE 47" LONG.
3 INPUT = AC 100-240V, 50/60Hz, 100VA.
4. AC CABLE 71" LONG W/ 2 PIN POLARIZED AMERICAN PLUG
5. PLUGS AND CABLES UL CERTIFIED.
6. CHARGER - UL1310 CERTIFIED
Attaching the Handle to the Vacuum
• NOTE: Do not turn on the vacuum until it is com-
pletely assembled.
• The vacuum cleaner and the handle are packed
separately and require assembly.
• Remove the handle bracket by removing the two
screws (Fig. 1).
• Place handle onto the back of the vacuum, aligning
holes with pegs (Fig. 2).
• Place the handle bracket back into position (Fig. 3).
• Secure with two screws removed in Fig. 1. Tuck the
cord into the space to the left of the handle.
• Open the bag compartment to ensure a vacuum bag
is in place.
• Your vacuum is now ready for use.
Fig. 1 Fig. 2
Charging Battery
• When you receieve your unit the battery is partially charged and will run for a short time. To fully
charge the battery see Battery Charging section.
• The battery is located on the back of the vacuum.
It can be charged while installed on the vacuum, or
the battery can be removed from the vacuum and
charged independently (see removing and reinstalling the battery (page 14).
• Plug the AC cable into the charger and into a wall
socket (Fig. 1).
• Plug the charger DC cable into the Charge Point on
the battery. (Fig. 2).
• The Charger LED light will be red during charging
and will turn green when the battery pack is fully
charged.
Fig. 3
Fig. 1
Fig. 2
6
Page 7

Battery Life Display
MATERIAL
DRAWN
ISSUED
FINISH
DATE
DATE
UNLESS OTHERWISE SPECIFIED
TACONY CORPORATION
1760 Gilsinn Lane, Fenton, MO 63026
SHEET
2 OF 8
SEE DETAIL A
• Press the button on the battery to illuminate the
LED lights.
• When the battery is fully charged there will be four
(4) green lights and one (1) red light showing (Fig.
3).
• As the battery is discharged, during use, the number
of green lights showing will reduce from four (4) to
none (0).
• When all of the green lights are off and only the red
light is showing, there is a small amount of time remaining before the battery will be fully discharged
and will require recharging.
Reclining the Handle
Fig. 3
• Press the Handle Release Pedal located on the back
of the vacuum with your foot to recline the handle
(Fig. 4).
OPERATION
On/Off Switch
• Turn the switch On to use the vacuum. If the vacuum doesn’t turn on, check that the battery is charged
(see page 10).
• Always unplug the charger from the Charge Point
before use.
Edge Cleaning
The edge cleaning feature provides improved cleaning near walls and stationary furniture. For maximum
edge cleaning, place the left side of the nozzle, from the
user’s perspective, against the wall or stationary furniture (Fig. 2).
Fig. 4
Fig. 1
Automatic Carpet Height Adjustment
Your vacuum is designed with an automatic selfadjusting nozzle. No manual adjustments are required.
The height of the nozzle automatically adjusts to the
ooring surface. This self-adjusting feature allows the
nozzle to oat evenly over all ooring surfaces.
Fig. 2
7
Page 8

OPERATION
MATERIAL
FINISH
DESCRIPTION
DESCRIPTION OF CHANGE
REV
PART NUMBER
SHEET
4 OF 8
BYECN NODATEREV
MATERIAL
DRAWN
ISSUED
FINISH
DATE
DATE
UNLESS OTHERWISE SPECIFIED
TACONY CORPORATION
1760 Gilsinn Lane, Fenton, MO 63026
Bare Floor Cleaning
Your vacuum is equipped with a squeegee to improve
its effectiveness in cleaning bare oors (Fig. 1).
Vacuuming Under Furniture
Your vacuum will lay at on the oor for effective
cleaning under beds and tables.
• Press the Handle Release Pedal once for routine
vacuuming cleaning (Fig. 2).
• Continue to lower the handle to enable the vacuum
to lay at on the oor for cleaning under furniture
(Fig. 3).
Fig. 1
Fig. 2
Fig. 3
8
Page 9

MAINTENANCE AND CARE
Replacing the Vacuum Bag
NOTE: Turn the vacuum off and remove the battery.
• Unzip the bag compartment.
• Remove the used vacuum bag by pulling the green
bag collar tab away from the vacuum (Fig. 1). Slide
the used bag out of the bag holder which automatically seals the bag opening (Fig. 2). Discard the
used bag.
• To install a new bag, slide the bottom of the green
bag collar into the bag holder until it “snaps” into
place (Fig. 3).
• Push the top of the bag collar upward until the collar “snaps” into place on the vacuum (Fig. 4).
Fig. 1
• Tuck the bag corners into the bag compartment,
then zip the bag compartment closed.
Fig. 2
Fig. 3
Fig. 4
9
Page 10

MAINTENANCE AND CARE
Removing and Reinstalling the Battery
NOTE: Turn the vacuum off. If the battery charger is
plugged into the charge point on the vacuum,
remove the charger from the charge point before removing the battery.
The battery can be removed and charged independently
from the vacuum.
• To remove the battery push up on the release button
and lift the battery off (Fig. 1).
• To replace the battery, line up the bottom of the battery with the posts at the base of the coupling. Push
the battery in until it clicks (Fig. 2).
Fig. 1
Fig. 2
10
Page 11
MAINTENANCE AND CARE
DESCRIPTION OF CHANGE
REV
PART NUMBER
SHEET
6 OF 8
BYECN NODATEREV
Removing and Reinstalling the Bottom Plate
WARNING! To Reduce the Risk of Electrical Shock
or Injury from Moving Parts, Turn the Vacuum Off and
Remove the Battery Before Servicing or Cleaning the
Vacuum.
To Remove the Bottom Plate:
• Make sure the vacuum is turned Off.
• Remove the battery (see Removing and Reinstalling
the Battery, page 10).
• Press the handle release pedal to place the vacuum
cleaner in the at position.
• Turn the vacuum cleaner over, exposing the bottom
plate.
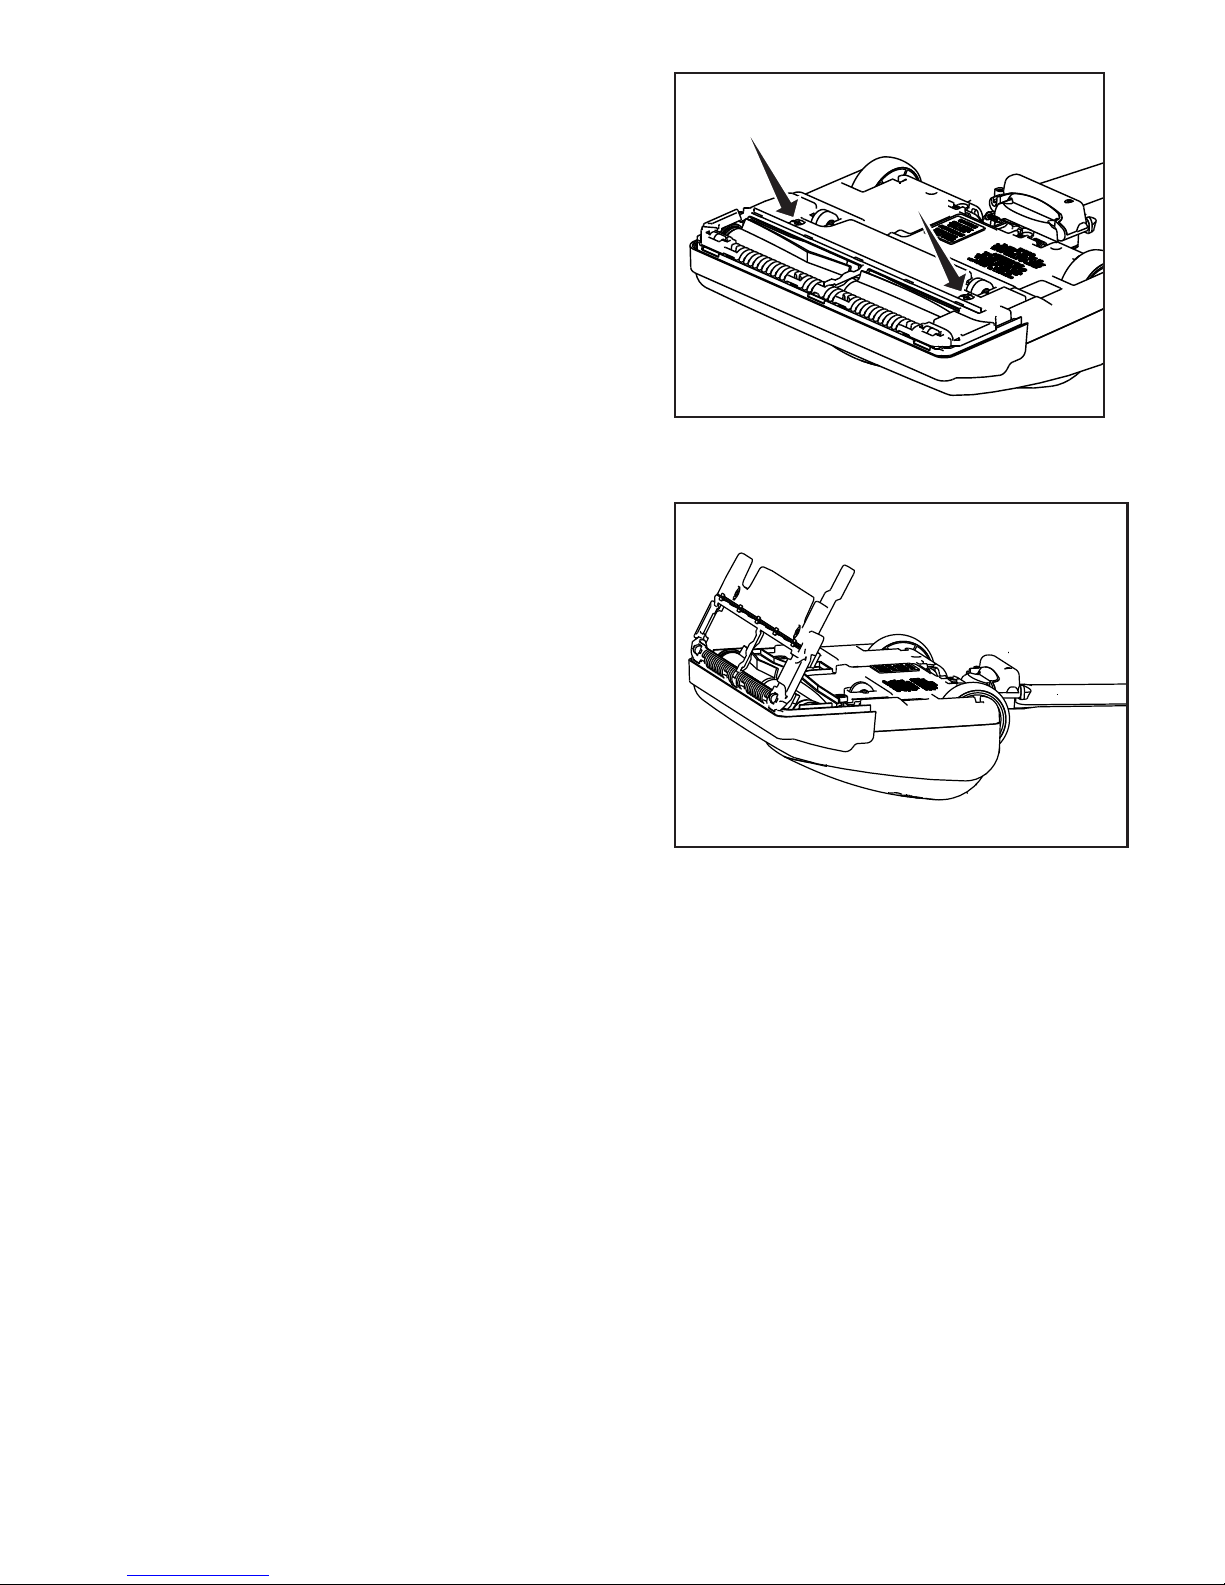
• Turn the two screws a quarter turn to release the
bottom plate (Fig. 1). Remove the bottom plate.
• To reinstall the bottom plate: Align the front edge of
the bottom plate into the notches inside the nozzle
(Fig. 2).
• Press the bottom plate into position until the plate
“clicks” on both sides. Tighten the two screws a
quarter turn to secure the bottom plate.
• Replace the Battery (see see Removing and Reinstalling the Battery, page 10).
Fig. 1
Fig. 2
11
Page 12

MAINTENANCE AND CARE
DESCRIPTION OF CHANGE
PART NUMBER
SHEET
8 OF 8
MATERIAL
FINISH
DESCRIPTION
TACONY CORPORATION
DESCRIPTION OF CHANGE
REV
PART NUMBER
SHEET
8 OF 8
BYECN NODATEREV
SCALE 0.400
DESCRIPTION OF CHANGE
REV
PART NUMBER
SHEET
4 OF 8
BYECN NODATEREV
Replacing the Vacuum Belt
WARNING! To Reduce the Risk of Electrical Shock
or Injury from Moving Parts, Turn the Vacuum Off and
Remove the Battery Before Servicing or Cleaning the
Vacuum.
NOTE: To ensure maximum cleaning efciency, the
belt should be checked regularly to be sure it is in good
condition. Check to see if the belt is stretched, cracked,
or if excessive slipping is occurring. Replace if needed.
• Turn the vacuum off and unplug the charger from
the Charge Point.
• Remove the battery (see see Removing and Reinstalling the Battery, page 10).
• Remove the bottom plate (see Removing and Reinstalling the Bottom Plate, page 11).
Fig. 1
• Remove the brushroll and the worn or broken belt
from the brushroll pulley and the motor drive shaft.
• Loop the new belt around the motor drive shaft and
the brushroll (Fig. 1).
• Reinstall the brushroll into the nozzle. Turn the
brushroll by hand, making sure the belt is not twisted and all rotating parts move smoothly (Fig. 2).
• Reinstall the bottom plate (see Removing and Reinstalling the Bottom Plate, page 11).
• Replace the battery (see see Removing and Reinstalling the Battery, page 10).
Replacing the Squeegee
WARNING! To Reduce the Risk of Electrical Shock
or Injury from Moving Parts, Turn the Vacuum Off and
Remove the Battery Before Servicing or Cleaning the
Vacuum.
Fig. 2
If your squeegee splits or begins to look worn, simply
slide the worn squeegee from its track and slide a new
one into the track. If you have trouble installing the new
squeegee, please contact an Authorized Tornado Service
Center.
12
Page 13

Please provide additional information on
Warranty
Registration
Form
Tornado equipment: (Check choices below)
__ Automatic Scrubbers __Sweepers
__Propane Floor Machines __Rotary Floor Machine
__High Speed Burnishers __Carpet Vacuums
__Carpet Extractors & Spotters __Wet/Dry Vacs
__ Steam Cleaners __Jumbo Vacs
__Ride-On Equipment __Pressure Washers
See complete product info at www.tornadovac.com
Selling Dealer:(Required)__________________________
Please Print Clearly
_____________________________________________________________________________
Company/Institution
_____________________________________ ____________________________________
Contact Name Title
_____________________________________ ____________________________________
Address City/State/Zip Code
_____________________________________ ____________________________________
Phone Fax
_____________________________________ ____________________________________
Date of Purchase Email
See white metal plate or sticker on unit for this information.
MACHINE TYPE/MODEL NUMBER: MACHINE SERIAL NUMBER:
1. 1.
2. 2.
3. 3.
4. 4.
Facility Description (please circle all that apply)
1. School 9. Hospital 17. U.S. Govt.
2. Retail Store 10. Nursing Home 18. Other Govt.
3. Restaurant 11. Religious Institution 19. Auto Service
4. Ofce Building 12. Airport 20. Airport
5. Contract Cleaning 13. Warehouse 21. Non-Prot
6. Light Manufacturing 14. Apartment/Condo 22. Other (specify)
7. Heavy Manufacturing 15. Warehouse
8. College/University 16. Supermarket
How did you rst learn about
Tornado cleaning and
maintenance equipment?
o Contacted by local dealer
o Previous experience with
Tornado products
o Reputation/
Recommendation
o Advertising
o Direct mail
o Internet
o Other
Total Hard Floor Area
o 0-10,000 (0-930)
o 10-50,000 (930-4,650)
o 50-250,000 (4,650-23,250)
o Over 250,000 (over
23,260)
In square feet (meters)
Total Carpeted Area
Square feet (square meters)
o 0-10,000 (0-930)
o 10-50,000 (930-4,650)
o 50-250,000 (4,650-23,250)
o Over 250,000 (over
23,260)
Damage or defect arising from abuse, neglect or other misuse is excluded from this warranty. Other items
may or may not apply based on your specic machine. If any defect occurs, the warranty is voided if service is
attempted by non-Authorized Tornado Service Centers.
©2017 Tornado Industries. All rights reserved.
X8449-TOR 1/2017
Return to :
Tornado Industries
3101 Wichita Court
Fort Worth, TX 76140
Fax: 817-551-0719
or online at
www.tornadovac.com
 Loading...