

Page 1

Operations & Maintenance Manual
For Commercial Use Only
TORNADO INDUSTRIES, LLC
3101 WICHITA COURT
FORT WORTH, TX 76140
PHONE: 800-VACUUMS
FAX: 817-551-0719
WWW.TORNADOVAC.COM
BD 17/6 17” AUTOMATIC SCRUBBER
Form No. L9617M
AB 02/17 ©Tornado Industries, LLC. All rights reserved
MODEL NO: 99617
1
Page 2

Long Term Buyer Protection Limited Warranty
Tornado Industries, LLC. (Tornado) warrants to the end/user customer that the Tornado product(s) will
be free from defects in material and workmanship for the duration(s) described below. This limited
warranty DOES NOT cover machines and/or components subject to normal wear and tear, damage
that occurs in shipping, failures resulting from modication, accident, unsuitable operating environment, misuse, abuse, neglect, or improper maintenance by you. For full details, contact your Authorized Tornado Distributor, Service Center, or the Tornado Technical Service Department. Tornado
sales and service representatives are not authorized to waive or alter the terms of this warranty, or to
increase the obligations of Tornado under the warranty.
10 Years*
Plastic water tanks and Rotationally-molded bodies
2 Years*
Parts on all Tornado cleaning equipment
1 Year*
Labor on all Tornado cleaning equipment
1 Year*
Warranty on batteries, one year prorated
All battery warranties are handled directly by the battery manufacturer, on a one year prorated basis
Terms subject to change without notice
1. Except all Windshears™ Blowers, Storm, TV2SS, Side and Downdraft, Insulation Blowers, CV 30,
CV 38, CK14/1 PRO, CK 14/2 PRO, SWM 31/9, CK LW13/1, CK LW 13/1 ROAM, CV 38/48 Dual,
PV6, PV10, PV6 ROAM, Wall Mount Vacuum and all chargers are warranted for 1 (one) year for both
parts and labor.
2. All non-wear item parts purchased after warranty expiration are warranted for 90 days.
3. Warranty starts from the date of sale to the consumer or, at Tornado’s discretion, 6 months after
the dealer purchased the unit from Tornado, whichever comes rst.
4. The EB 30 is warranted for a period of 90 days for both parts and labor.
5. The warranty on engines used on propane powered equipment is limited to motor manufacturer’s
warranty.
6. Ride-on Scrubbers are warranted for 24 months, parts, 6 months labor or 1,000 hours, whichever
occurs rst.
Note: Tornado, The Latest Dirt, Floorkeeper,
Carpetkeeper, Carpetrinser, Carpetrinser/Dryer,
Headmaster, Taskforce, PAC-VAC, T-Lite, Glazer,
Windshear, Max-Vac and Trot-Mop are trademarks
of Tornado Industries
Website: www.tornadovac.com
Phone 1-800-VACUUMS
Fax 817-551-0719
Address 3101 Wichita Court
Fort Worth, TX 76140
1-800-VACUUMS 90 Years of Cleaning Innovation A Tacony Company
Form F2662.©2017. All rights reserved
Page 3

NOTES
3
Page 4

NTRODUCTORY COMMENT
I
Thank you for selecting our machine.
This oor cleaning machine is used for
the commercial cleaning of most types
of hard oors. During forward movement, the combined action of the brush
and the detergent solution remove the
dirt which, is recovered through the rear
squeegee assembly, giving a perfectly
dry surface.
The machine must be used only for this
purpose. It gives the best performance
if it is used correctly and maintained in
good condition. Read this instruction
booklet carefully prior to using this ma-
chine and whenever difculties arise in
the course of the machine’s use. Contact our service department for all advice
and servicing as may prove necessary.
GENERAL RULES OF SAFETY
The rules below must be followed carefully in order to avoid injury to the operator and damage to the machine.
- Read the labels on the machine carefully. Do not cover them for any reason
and replace them immediately if damaged.
- The machine must be used only by authorized staff that have been instructed
on its correct and proper use.
- When operating the unit, pay attention
to other people and especially to children.
- Do not allow the machine to be used
as a toy.
- The machine is not to be used by per-
sons, with reduced physical, sensorial
or mental capabilities, or with lack of
experience and/or knowledge.
- The outlet for the charger must be
equipped with a standard electrical
ground system.
- Do not allow the cord to become damaged.
- Do not mix different detergents.,
- Storage temperature: between 32°F
(0°C) and 131°F (+55°C).
- Operating temperature: between 32°F
(0°C) and 104°F (+40°C).
- The humidity should not exceed 95%.
- Do not use the machine in explosive
atmosphere.
- Do not use the machine as a means of
transport.
- Do not use the machine onstairs.
- Do not use acid solutions which could
damage the machine.
- To avoid damage to the oor, do not
allow the brush to rotate while the
machine is in one place.The machine
muust be moving while the brush is
rotating.
- Do not use the machine on surfaces
covered with inammable liquids or
dusts (for example hydrocarbons, ashes
or soot).
- In case of re, use a powder based re
extinguisher. Do not use water.
- Do not strike structures where there is
a danger of falling objects.
- Do not use the machine on areas having a higher gradient than the one stated
on the number plate.
- Place appropriate signs in and around
the cleaning area.
- If the machine does not work properly,
check by conducting simple mainte-
nance procedures. Otherwise, ask for
technical advice from an authorized
service center.
- Where parts are required, ask for
ORIGINAL spare parts from the distributor and/or from an authorized dealer.
- Use only ORIGINAL brushes indicated
in the paragraph “RECOMMENDED
BRUSHES".
- For any cleaning and/or maintenance
operation remove the power from the
machine.
- Do not take off the protections which
require the use of tools for their removal.
- Do not wash the machine with direct
water jets or with high water pressure
nor with corrosive material.
- Every 200 working hours have a ma-
chine check by an authorized service
technician.
- Before using the machine, check that
all panels and coverings are in their
position as indicated in this use and
maintenance manual.
- Restore all electrical connections after
any maintenance operation.
- Provide for the scrapping of the mate-
rial of normal wear (brushes, squeegee
blades etc.) following strictly the respec-
tive rules.
- When your machine has stopped
functioning, provide for the appropri-
ate waste disposal of its materials,
especially oils, batteries and electronic
components, and considering that the
machine itself has been, where possible,
constructed using recyclable materials.
SYMBOLOGY
Symbol 0/1 indicating the ON/
OFF switch and its signal lamp.
Symbol denoting the solution
valve. Indicates the switch and
the signal lamp of the solenoid valve.
Symbol denoting the brush.
Indicates the switch and the signal lamp
of the brush motor.
Symbol denoting the suction
motor. Indicates the switch and the
signal lamp of the suction motor.
Symbol denoting the charge
level of the batteries.
Symbol that indicates the posi-
tion of the drain plug of the solution tank.
This symbol indicates
that the tanks are to be emptied before
rotating the machine.
Indication of the maximum tem-
perature of the solution detergent.
Symbol that indicates the ow
adjuster of the detergent solution.
Symbol denoting the crossed
bin. Indicates that at the end of its activity, the machine has to be disposed
conforming to the laws in force.
Symbol denoting the open book.
Indicates that the operator has to read
the manual before the use of the machine.
4
Page 5

SUMMARY
INTRODUCTORY COMMENT 4
GENERAL RULES OF SAFETY 4
SYMBOLOGY 4
TECHNICAL DESCRIPTION 6
LEGEND INSTRUMENT BOARD AND CONTROLS 7
LEGEND MACHINE 7
BEFORE USE 8
HANDLING OF THE PACKED MACHINE 8
UNPACKING OF THE MACHINE 8
MOVEMENTS OF THE HANDLE BAR 8
BATTERY CONNECTIONS 8
BATTERY CHARGING 8
BATTERIES DISPOSAL 8
RECOVERY TANK 9
SOLUTION TANK 9
FLOOR CLEANING 9
STARTING OF THE MACHINE 9
COMPLETE SQUEEGEE ROTATION 9
DRYING GOING BACKWARDS 9
SQUEEGEE LIFTING 10
HANDLE BAR ADJUSTMENT 10
OVERFLOW DEVICE 10
STOPPING THE MACHINE AFTER CLEANING OPERATION 10
DAILY MAINTENANCE 11
RECOVERY TANK CLEANING 11
EMPTYING AND CLEANING OF THE SOLUTION TANK AND FILTER 11
SUCTION FILTER CLEANING 11
VERTICAL POSITIONING OF THE MACHINE 11
BRUSH CLEANING 11
BRUSH REMOVAL/INSTALLATION 11
SQUEEGEE CLEANING 12
ORDINARY MAINTENANCE 12
REAR SQUEEGEE RUBBER REPLACEMENT 12
FRONT SQUEEGEE RUBBER REPLACEMENT 12
TROUBLESHOOTING GUIDE 12
THE SUCTION MOTOR DOES NOT WORK 12
THE BRUSH MOTOR DOES NOT WORK 13
INSUFFICIENT WATER ON THE BRUSH 13
THE MACHINE DOES NOT CLEAN PROPERLY 13
THE SQUEEGEE DOES NOT DRY PERFECTLY 13
EXCESSIVE FOAM PRODUCTION 13
LED (2), (3) AND (4) BECOME RED 13
PROGRAMMED MAINTENANCE 14
RECOMMENDED BRUSHES 14
5
Page 6

TECHNICAL DESCRIPTION
Cleaning width mm/in. 430/17
Squeegee width /in.mm 510/20
Battery voltage V 24
Battery capacity Ah 5 34
Power rating W/A 670/28
Working capacity, up to sqm/h/sqft/hr 1505/16,200
Brush diameter mm/in. 430/17
Brush rpm rpm 155
Brush pressure kg/lbs. 35/77
Suction vacuum mbar/in. water lift 83/33
Type of drive semi autom.
Maximum gradient % 2
Capacity solution tank l/gal. 22/6
Capacity recovery tank l/gal. 22/6
Machine length (min) mm/in. 793/31
Machine height mm/in. 603/24
Machine width mm/in. 518/21
Machine weight (empty, with batteries) kg/lbs. 86,5/191
Weight of the batteries kg/lbs. 30/66
Recharging time max h 10
Battery compartment (L x W x H) mm/in. 346 x 207 x 21013.6 x 8 x 8
Acoustic pressure level (in conformity
dB (A) <70
with EN 604¬_01)
Class III
Protection level IP X3
Battery charger voltage V ~ 120-230
Battery charger frequency Hz 50-60
Battery charger class I
6
Page 7

LEGEND INSTRUMENT PANEL AND CONTROLS
1 ON/OFF SWITCH WITH SIGNAL SIGNAL LAMP 5 SQUEEGEE LIFT LEVER
2 BRUSH MOTOR SWITCH WITH SIGNAL LAMP 6 HANDLE BARS
3 SUCTION MOTOR SWITCH WITH SIGNAL LAMP 7 SCRUB CONTROL LEVERS
4 SOLENOID VALVE SWITCH WITH SIGNAL LAMP 8 HANDLE BAR RELEASE LEVER
LEGEND MACHINE
9 EXHAUST HOSE RECOVERY TANK 17 CAP FOR SOLUTION TANK FILLING
10 SUCTION COVER 18 RECOVERY TANK
11 INSTRUMENT BOARD 19 WHEELS
12 BATTERY CHARGE LEVEL LED INDICATOR
(AGM)
13 SERIAL NUMBER PLATE 21 BRUSH COVER
14 MAINS PLUG FOR ELECTRIC CABLE BATTERY
CHARGER
15 DRAIN PLUG SOLUTION TANK 23 SOLUTION FLOW ADJUSTMENT
16 SOLUTION TANK
20 SQUEEGEE ASSEMBLY
22 SOLUTION TANK FILTER
7
Page 8
Warning symbol.
Read carefully the sections marked with
this symbol, for the security of both the
operator and the machine.
BEFORE USE
HANDLING OF THE PACKED MACHINE
The machine is supplied with suitable
packing.
The total weight is 221 lbs. (100 kg)
Packing dimensions:
Base: 33” x 22” (84,5 cm x 57 cm)
Height: 33” (85 cm)
ATTENTION:
Do not stack more than 2 machines.
UNPACKING THE MACHINE
1. Remove the outer package.
2. Loosen the two screws that hold the
two brackets to the machine.
3. Remove the screws that hold the
brackets to the pallet and remove the
brackets.
4. Rotate the handle bar into working
position (see under “MOVEMENTS OF
THE HANDLE BAR”) lower the machine
from the pallet and push it forwards on
the wheels, tilting the machine backwards to avoid damaging the mechani-
cal parts.
BATTERY CONNECTIONS
This machine is supplied with two batteries already connected, placed in the
appropriate compartment under the
recovery tank. In case the batteries
need to be replaced, please contact the
authorized technical assistance.
The replacement batteries must have
the identical performance as the ones
already installed.
2 batteries AGM 12V 34Ah5.
With the connector (2) it is possible to
connect or disconnect the batteries.
During the charging operation the machine’s functions are disabled.
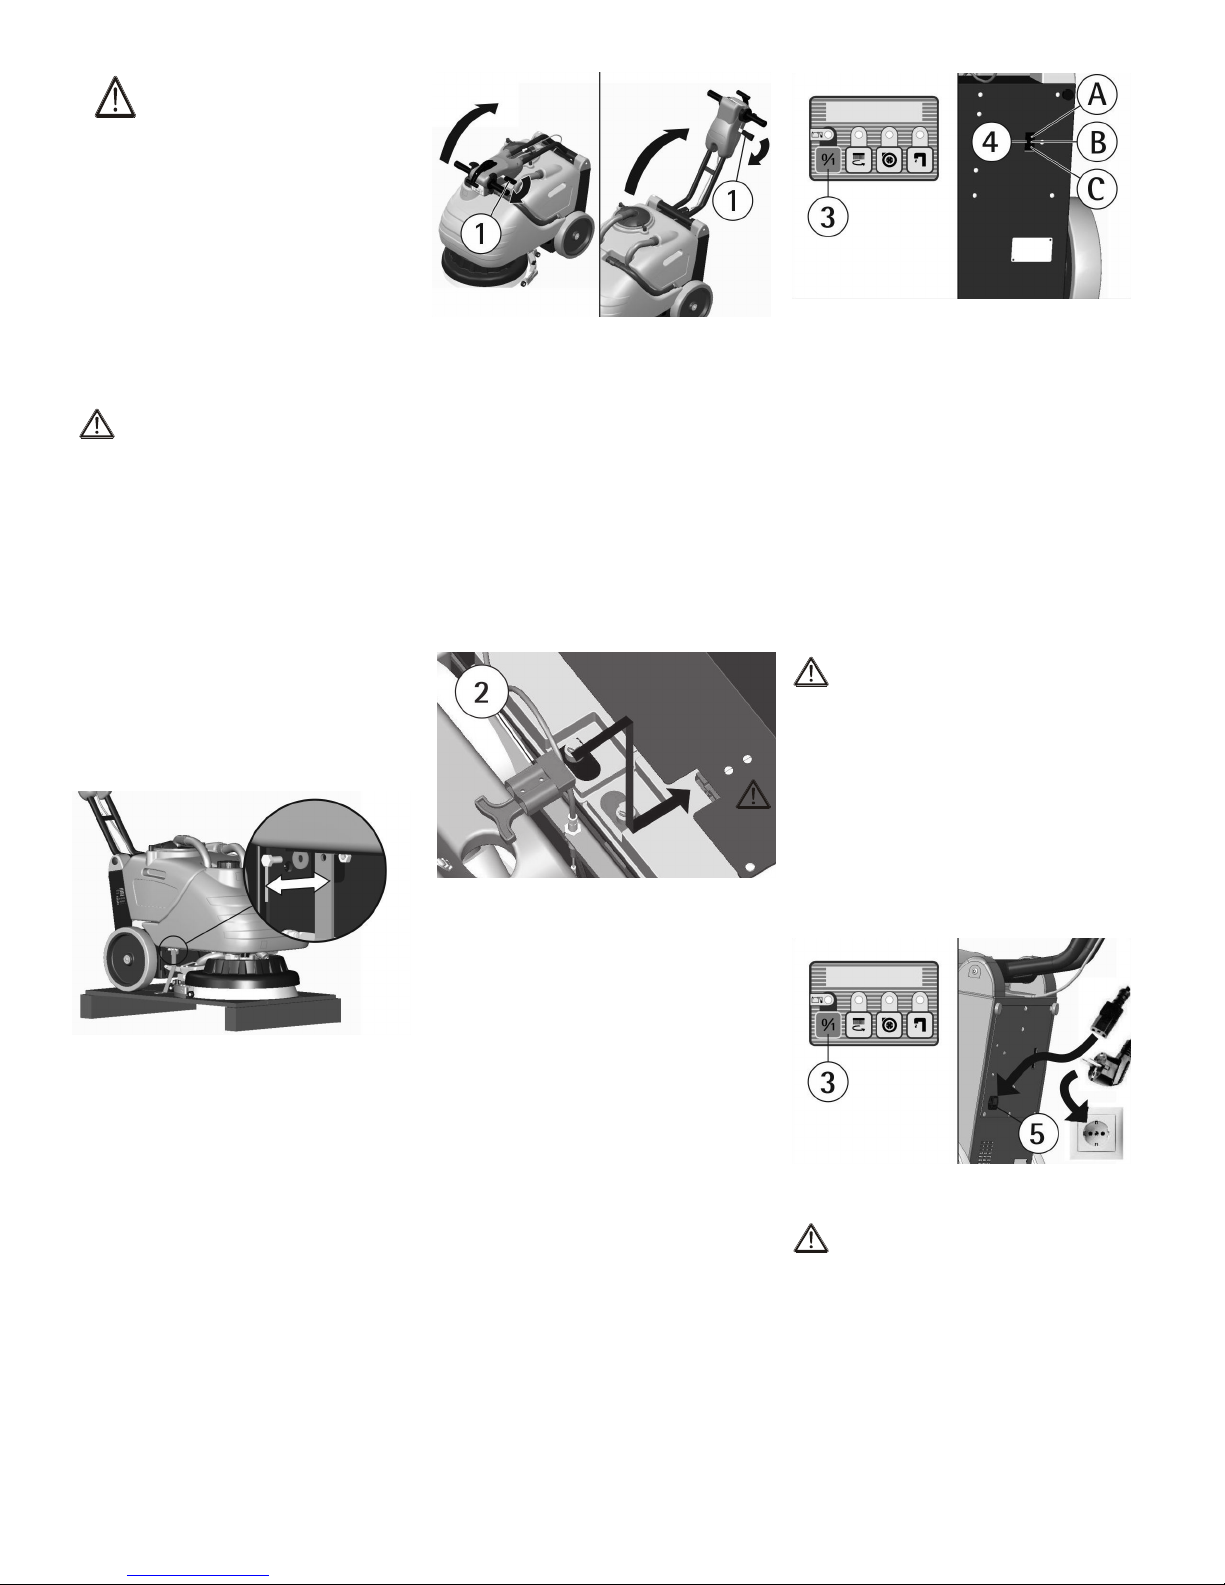
To charge the batteries, park the machine on a level surface near a single-
phase socket. Switch off the machine
at the on/off switch (3). Connect the
charging cable, supplied with the ma-
chine, to both the machine (5) and to the
outlet socket as indicated in the gure.
At the end of the charging phase, remove the charging cable. The charge
phase is complete only when the green
led (A) on the charger comes on
ATTENTION:
In order not to cause permanent damage to the batteries, never leave them
completely discharged. If the machine
is not to be used for more than two
weeks, disconnect the battery connector
(see under “CONNECTION BATTERIES”).
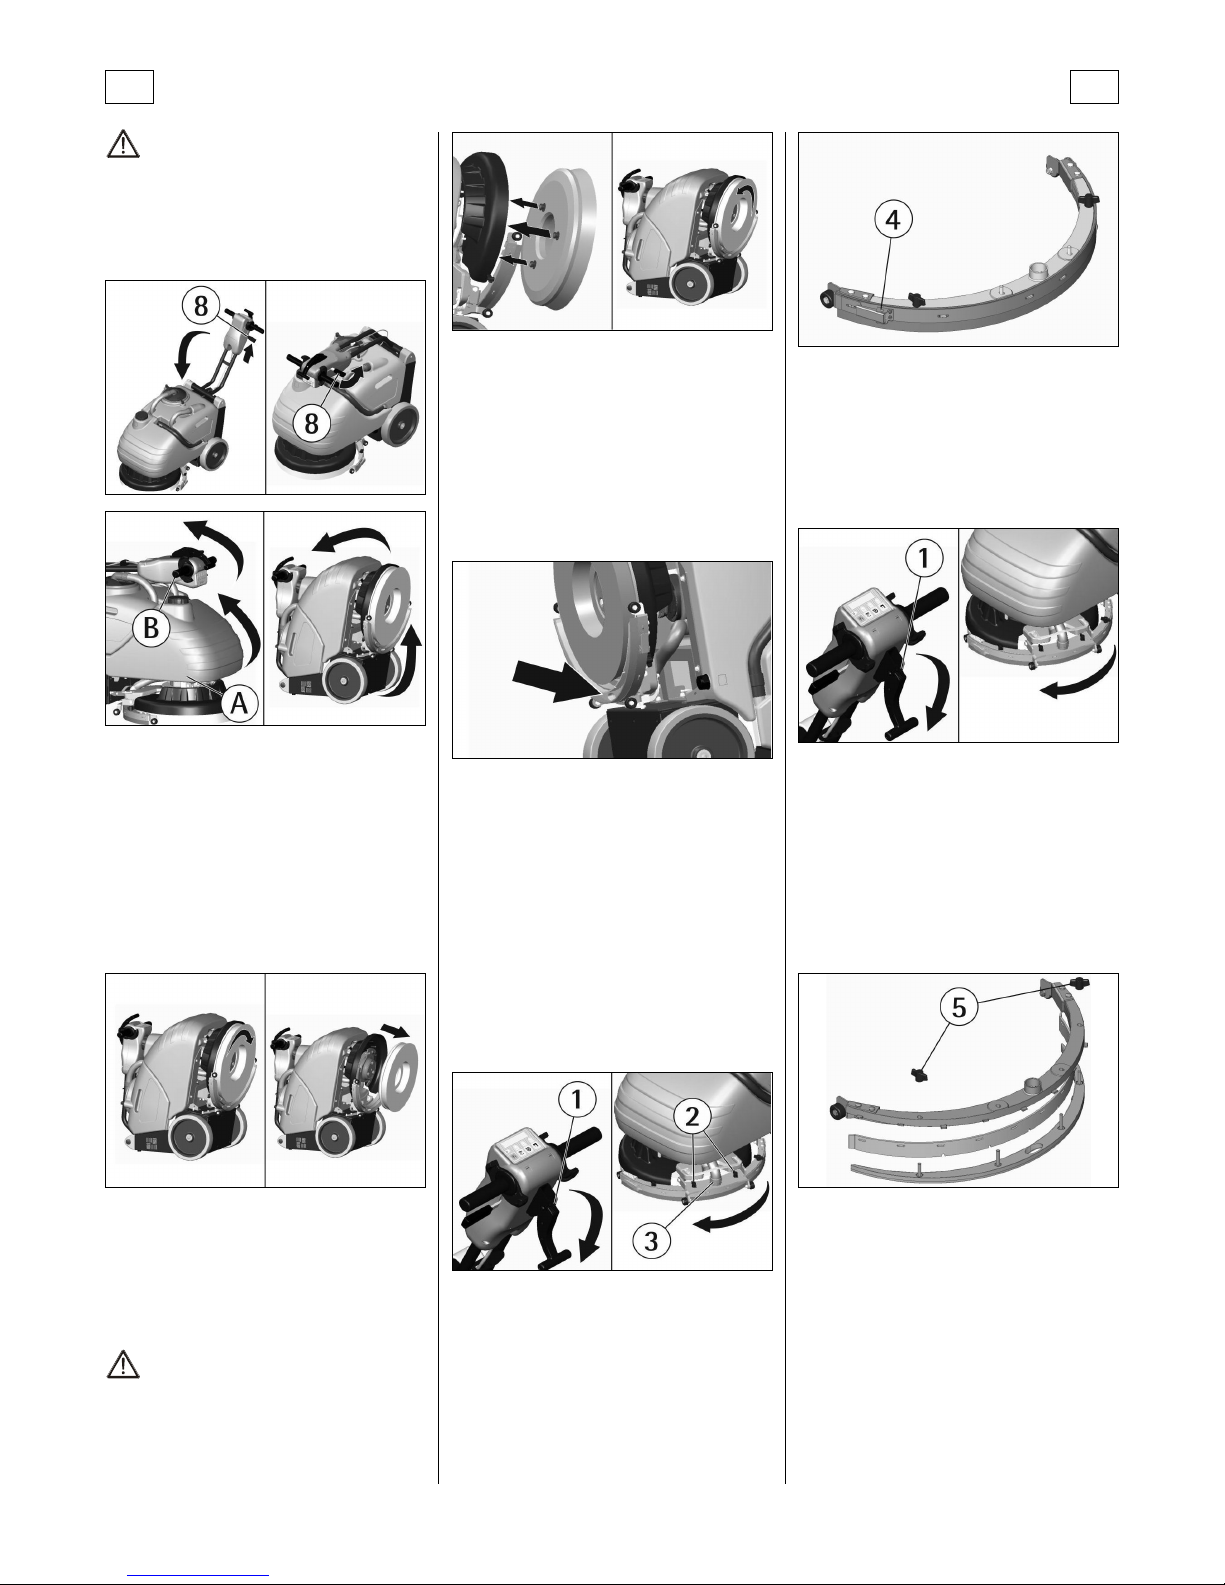
MOVEMENT OF THE HANDLE BAR
The handle bar arrives in the closed
position.
To rotate the handle bar into one of the
different working positions:
1. Pull up the release lever (1) near the
handle bar.
2. Rotate the handle bar into the working position while holding the release
lever (1).
3. release the release lever (1) to lock
the handle bar.
Use the same procedure for further
height adjustment of the handle bar in
order to nd the most comfortable working position.
BATTERY CHARGING
The label with the indication “AGM”
placed on the frame in the rear part of
the machine, identies that the machine
is equipped with AGM batteries and a
suitable battery charger.
Switching on the machine using the ON/
OFF switch (3), in the rear part of the
machine the charge level of the batteries
(4) is visible.
A: green led on = batteries charged.
B: orange led on = batteries almost discharged.
C: red led on = complete discharge of
the batteries.
When the led of the charger becomes
red (C), the led of the ON/OFF switch
(3) becomes red also. This will cause all
functions of the machine to be shut off.
ATTENTION:
Never charge batteries with a non-suitable charger. Strictly follow the instruc-
tions supplied by the batteries and
charger manufacturer.
BATTERIES DISPOSAL
It is mandatory to dispose of exhausted
batteries, classied as dangerous waste,
to an authorized institution according to
the current laws.
8
Page 9

RECOVERY TANK
Check that the cover of the suction lter
(1) is correctly secured, after rotating the
levers (B). Also check that the squeegee hose is correctly seated (A).
SOLUTION TANK
Remove the cap (6) on top of the tank
and ll the solution tank with clean
water at a maximum temperature of
122°F (50°C). Add the liquid detergent
in the percentage recommended by
the manufacturer. To avoid excessive
foaming, which could cause problems
to the vacuum motor, use the minimum
percentage of detergent. Screw down
the plug to close the tank
4. Press the switch for the brush motor
(2).
5. Press the switch for the vacuum mo-
tor (3).
6. Press the switch for the solenoid
valve (4).
The machine is equipped with a solenoid valve, which activates the solution
ow automatically when the control le-
vers (7) are engaged. Releasing these
levers will stop the ow automatically.
7. Activate the levers (7) and push the
unit forward, the brush will start rotating. The solution ow begins and the
squeegee will start drying the oor.
8. During the rst few feet check that the
solution ow is appropriate. The ow ad-
juster of the solution is already adjusted
at the factory to satisfy the cleaning of
most oors. If it is necessary to adjust
the quantity of solution onto the oor,
adjust the lever of the ow adjuster (8).
Drying going forward
Reversal of squeegee position with
rotation to the right
ATTENTION:
Always use low foam detergent. To
avoid excessive foaming, before starting
operation, add into the recovery tank a
quantity of anti-foam product as recommended by the product manufacturer.
Never use acid.
FLOOR CLEANING
STARTING OF THE MACHINE
The push buttons on the instrument
panel are lit with a green signal LED that
shows the activation of each control.
1. Switch on the machine by pressing
the on/off switch (1).
2. Check the battery charge level (see
under “BATTERY CHARGING”).
3. Lower the squeegee by rotating the
handle of the squeegee lifting lever (5),
placed on the rear of the handle bar,
down.
COMPLETE SQUEEGEE ROTATION
Thanks to the complete squeegee
rotation, it is possible to wash and dry
both in forwards and reverse. Following
the indicated drawings, the reversal of
the squeegee position is made easier,
permitting the drying in reverse.
Reversal of squeegee position with
rotation to the left
Drying going backwards
DRYING GOING BACKWARDS
With the squeegee positioned in the
front part of the machine it is possible
to dry where a traditional squeegee can
not. Below are some examples of how
to use the complete squeegee rotation.
Wash the interested surface (1).
Wash the surface (1).
9
Page 10
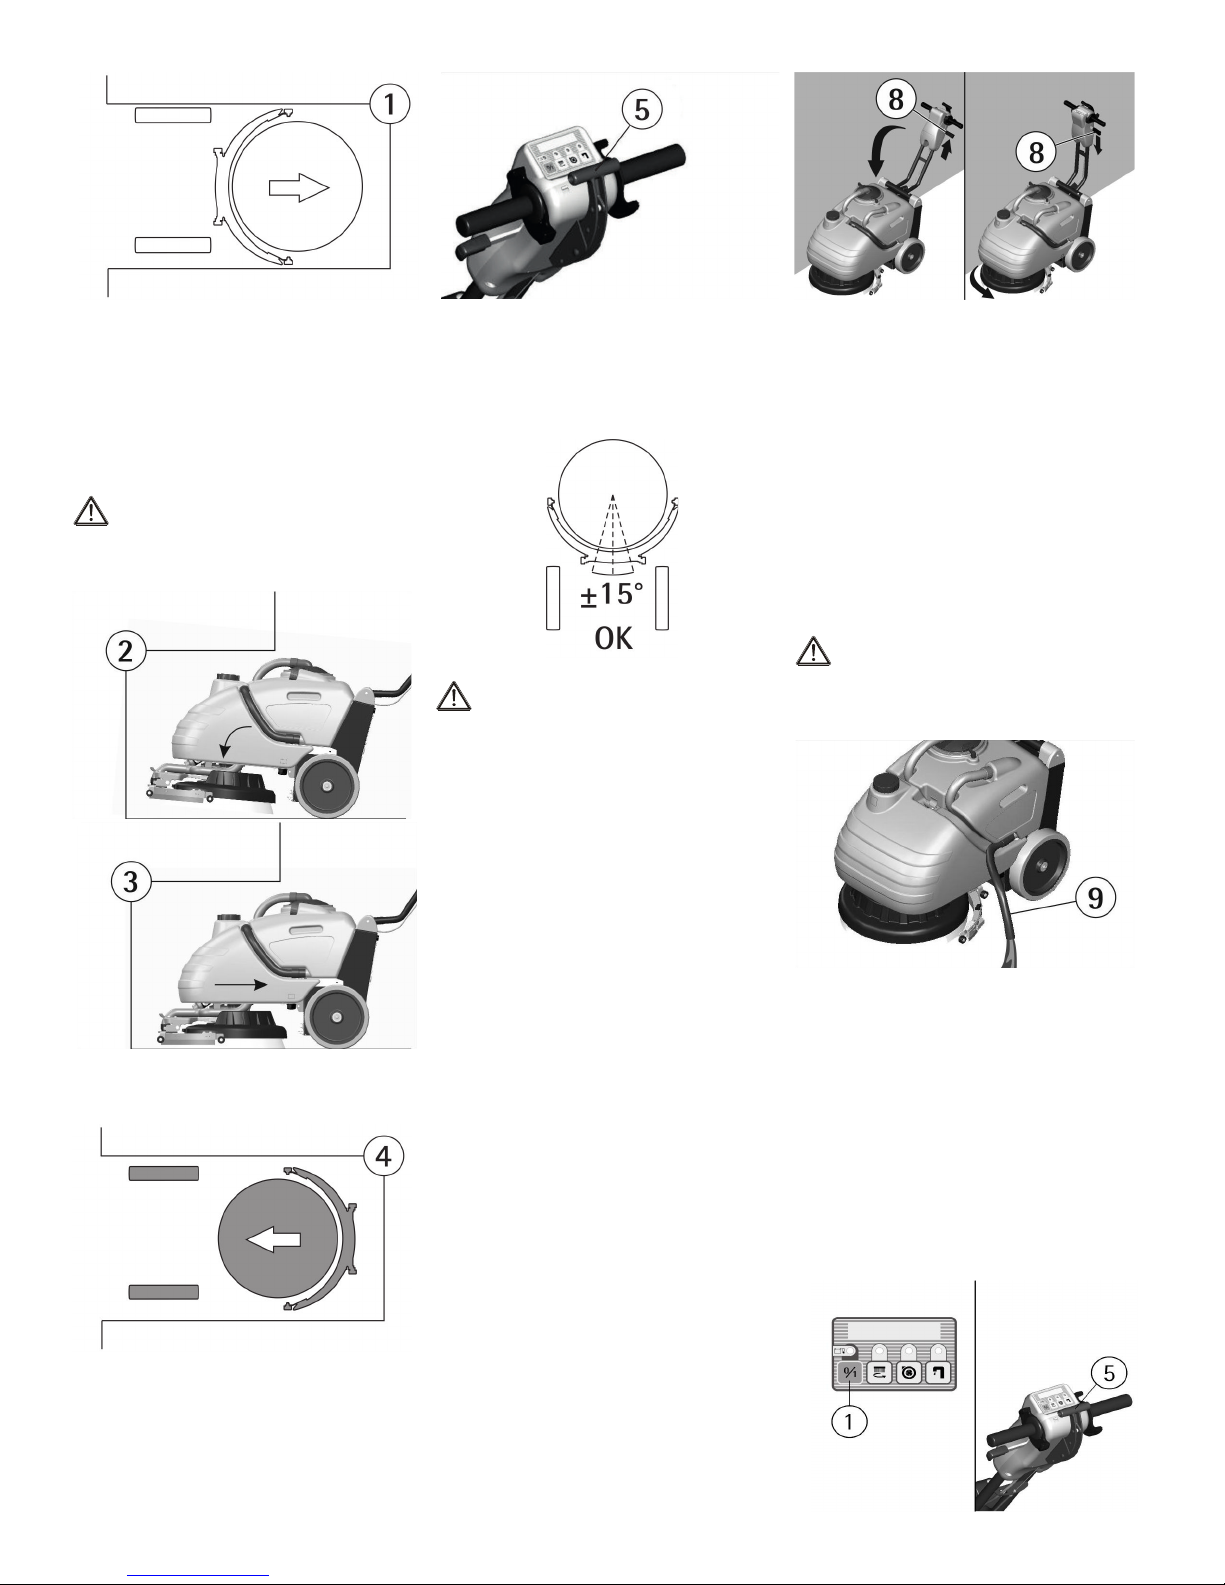
Rotate the squeegee to the right or
to the left (see under “COMPLETE
SQUEEGEE ROTATION”) to bring it to
the front.
By pushing down on the handle, lift the
machine slightly (2) and move onto the
surface to dry (3).
ATTENTION:
When the machine is lifted, release the
handle bar levers to stop the brush rota-
tion avoiding water splashing.
Proceed backwards to dry the surface
just washed (4).
It is only possible to lift the squeegee
when it is situated close to the center
point. If the squeegee is not close to the
center point, even moving the lever (5) it
will not lift the squeegee assembly.
ATTENTION:
During normal operation, the lifting lever
of the squeegee must be kept in the
down position.
HANDLE BAR ADJUSTMENT
When approaching obstacles or near
walls, it is possible to simplify the handling of the machine by adjusting the
handle bar more vertically with respect
to the machine.
To rotate the handle bar:
1. Lift the release lever (8) near the
handle bar.
2. Rotate the handle bar into the new
working position keeping the release
lever (8) pulled.
3. Release the lever (8) to lock the
handle bar in the desired position.
Once the obstacle has been passed
repeat the operation to return to the
previous working position.
This operation is also possible with the
machine in motion while maintaining
pressure on the release lever.
OVERFLOW DEVICE
In order to avoid damage to the vacuum
motor, the machine is equipped with a
oat that closes off the suction when
the recovery tank is full. When this
happens, it is necessary to empty the
recovery tank.
1. Hold the exhaust hose (9) of the
recovery tank.
2. Remove the exhaust plug and empty
the recovery tank into appropriate containers, according to the standard norms
for liquid disposal.
ATTENTION:
This operation must be carried out using
gloves to protect from contact with dan-
gerous solutions.
STOPPING THE MACHINE AFTER
CLEANING OPERATION
Before carrying out any type of maintenance:
1. Switch off the on/off switch (1).
2. Lift the squeegee by rotating the
lever (5), placed in the rear center of the
handle bar, up (see under “SQUEEGEE
LIFTING”).
3. Move the machine to an appropriate
place for tank draining.
SQUEEGEE LIFTING
To lift the squeegee, lift the lever (5) situated ion the rear of the handle bar.
10
Page 11
ATTENTION:
The machine is not equipped with a
parking brake, do not leave it unattended on slopes.
DAILY MAINTENANCE
RECOVERY TANK CLEANING
1. Hold the exhaust hose (9) of the
recovery tank.
2. Remove the exhaust plug and empty
the recovery tank into appropriate containers (see under "OVERFLOW DEVICE").
3. Take off the suction cover (10) after
rotating the blocking levers (11).
4. Empty the tank by using the hose
(9).
5. Rinse the tank with a water jet.
ATTENTION:
This operation must be carried out using
gloves to protect from contact with dan-
gerous solutions.
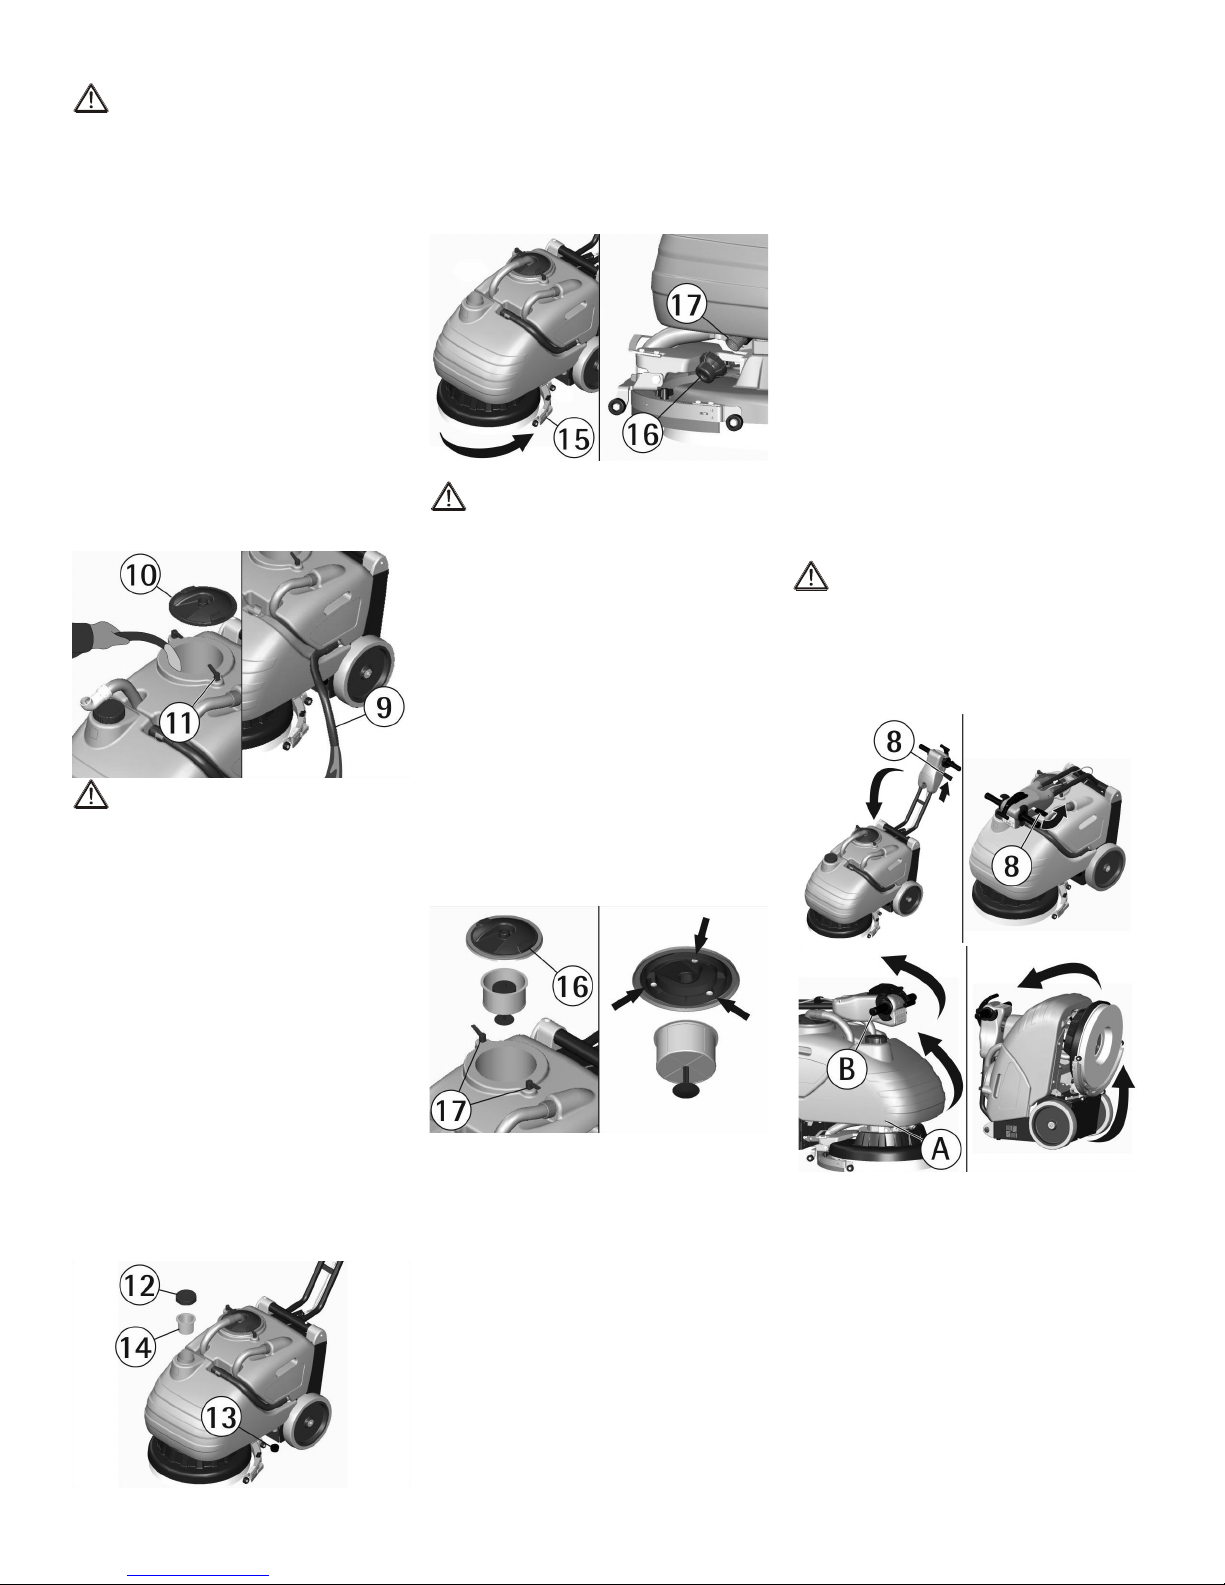
5. Manually rotate the squeegee (15)
towards the front part of the machine to
access the lter (16).
6. Unscrew the lter cover (16), remove
the cartridge (17) and rinse it with a
water jet.
7. Reassemble all parts.
ATTENTION:
This operation should be carried out
wearing gloves to prevent contact with
dangerous solutions.
SUCTION FILTER CLEANING
1. Take off the suction cover (16) after
rotating the blocking levers (17).
2. Take off the lter with the oat, bending the lter edge to release it from the
screws on the cover.
3. Clean all parts with a water jet.
4. Reassemble everything.
2. Check that both tanks are empty,
otherwise, empty them (see under
“EMPTYING AND CLEANING OF THE
RECOVERY TANK” and “EMPTYING
AND CLEANING OF THE SOLUTION
TANK”).
3. Pull up on the handle bar release
lever (8) near the handle bar.
4. Rotate the handle bar towards the
tanks keeping the release lever (8)
pulled.
5. Release the lever (8) to lock the
handle bar in position.
6. Hold the machine with both hands in
point (A) of the tank side and (B) from
the handle bar as indicated in the gure.
7. Lift the front part of the machine rotat-
ing it on the rear wheels and bringing it
into the vertical position as shown in the
gure.
ATTENTION:
The position of the vertical parking
should be used when you expect not to
use the machine for more than 2-3 days,
to avoid the weight of the machine dam-
ageing the brush.
EMPTYING AND CLEANING OF THE
SOLUTION TANK AND FILTER
To empty any solution remaining in the
solution tank:
1. Move the machine to an appropriate
place for tank draining.
2. Switch off the machine by pressing
the on/off switch.
3. Unscrew the cap (12) of the solution
tank and take off the lter (14).
4. Unscrew the drain plug (13) placed in
the rear low left part of the machine and
allow the solution to drain out.
VERTICAL POSITIONING OF THE
MACHINE
The machine can be placed in a vertical position tipped over on its back after
having folded the handle bar onto the
machine.
This position allows the unit to be stored
in a small space and simplies mainte-
nance operations.
To rotate the machine it is necessary to:
1. Switch off the machine.
BRUSH CLEANING
Remove the brush and clean it with a
water jet (for the disassembly see under
“BRUSH REMOVAL/FITTING”).
BRUSH REMOVAL/FITTING
1. Tip the machine over backwards
(see under “VERTICAL POSITIONING OF THE MACHINE") remember to
switch off the on/off switch and to empty
the tanks.
11
Page 12
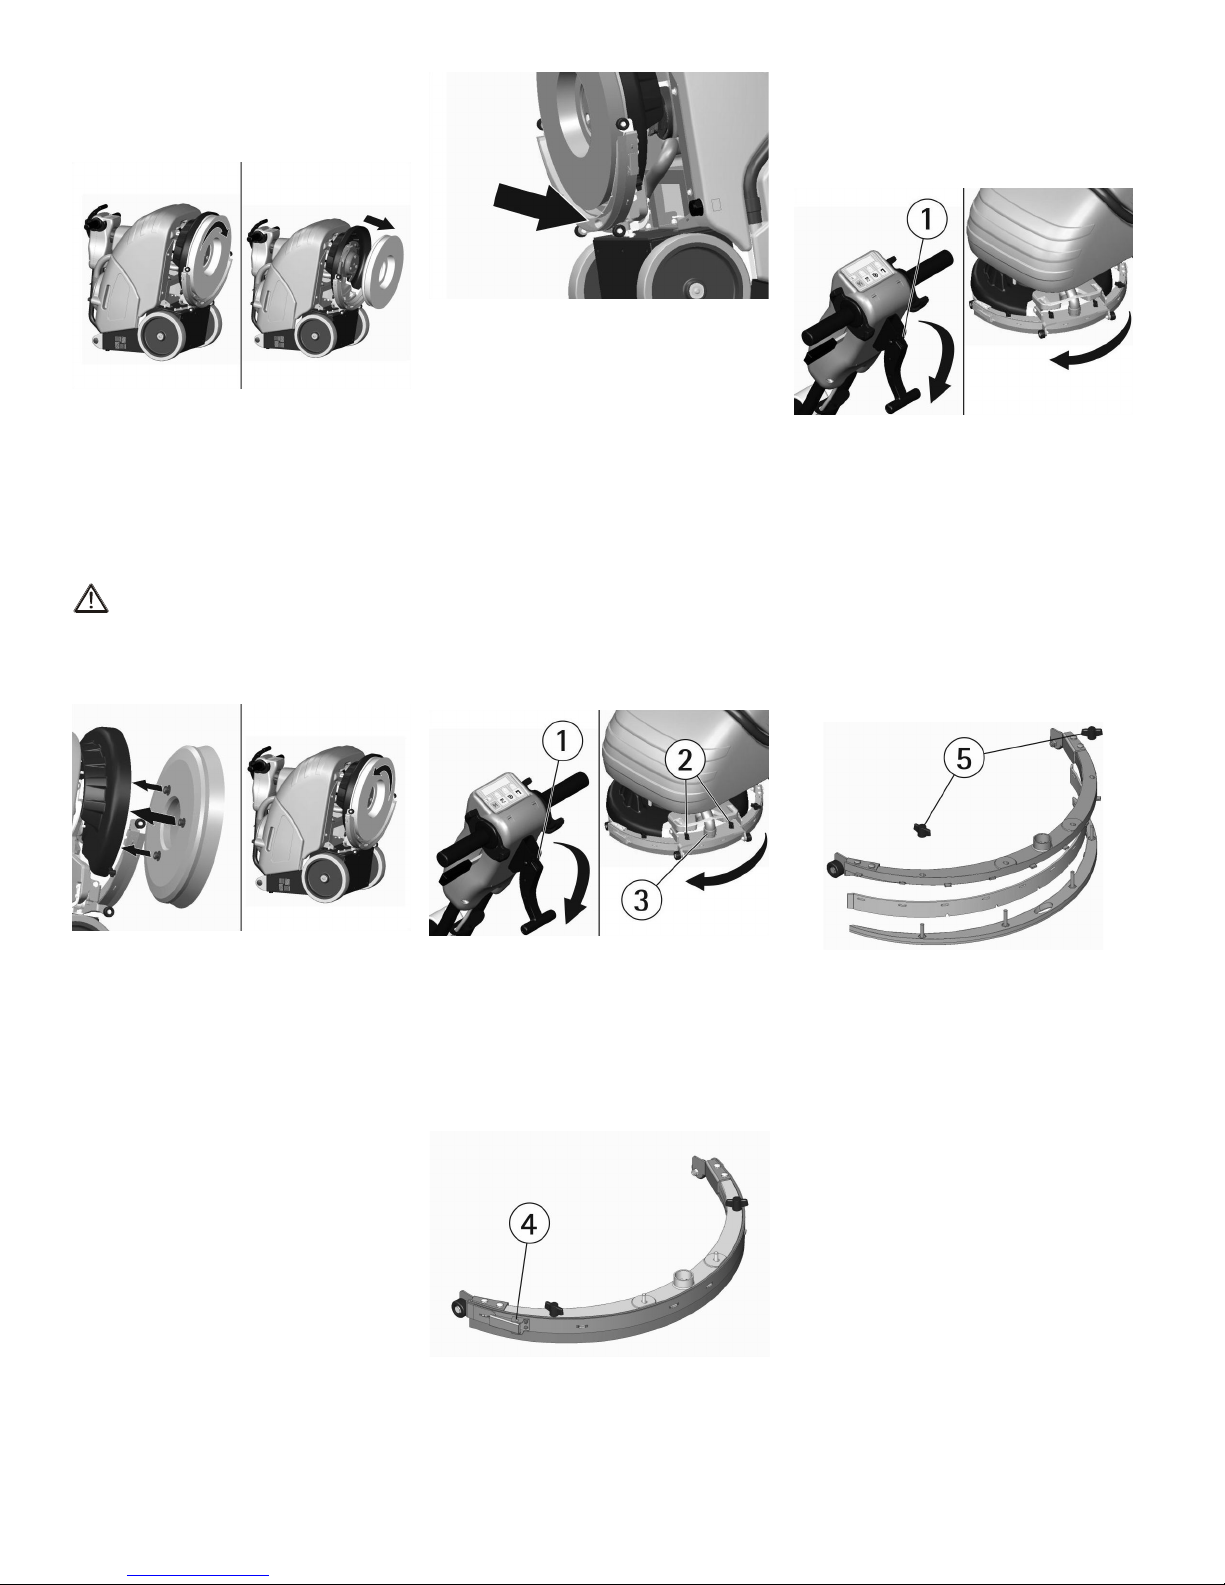
2 With the machine in this position
rotate the brush clockwise, as indicated
in the gure, until it is released from the
pins of the brush holder plate.
For the replacement it is necessary to:
1. Lower the squeegee by lowering
the handle lever (1) placed in the rear
center of the handle bar.
2. Rotate the squeegee outwards.
ORDINARY MAINTENANCE
3. To reassemble the brush insert the
pins into the slots of the brush holder
plate and rotate counter-clockwise until
it locks.
It is possible to use other brush types,
depending on the oor type to be
cleaned and on its dirt conditions (see
under “RECOMMENDED BRUSHES”).
ATTENTION:
The handling of the brush operation
must be carried out wearing suitable
gloves to protect both from contact with
the bristles and dangerous solutions.
SQUEEGEE CLEANING
Keeping the squeegee clean guarantees the best drying action.
1. Tip over the machine backwards
(see under “VERTICAL POSITIONING OF THE MACHINE") remember to
switch off the on/off switch and to empty
the tanks.
2. With the machine in this position
clean both the rubber squeegee blades
and the suction inlet. Also remove any
bres (string or hair) that can prevent
the support from turning freely.
REAR SQUEEGEE RUBBER REPLACEMENT
Check the squeegee rubber wear and
turn or replace it, as needed.
For replacement:
1. Lower the squeegee by lowering the
handle lever (1) placed in the rear center
of the handle bar.
2. Rotate the squeegee outwards.
3. With the squeegee in this position
remove the wing nuts (2) to free the
squeegee.
4. Take off the of the squeegee hose (3)
and take off the squeegee.
5. Release the catch (4) of the rubber
blade clamp and take the rubber off to
turn it to a new side or replace it.
6. Check that the coupling and the
squeegee hose are not obstructed, clean
the entire assembly.
To reassemble the squeegee reverse the
operations above.
FRONT SQUEEGEE RUBBER REPLACEMENT
Check the wear of the front squeegee
rubber and replace it if worn out.
3. With the squeegee in this position
tremove it and then take off the
rear squeegee rubber (see under
“REAR SQUEEGEE RUBBER
REPLACEMENT”).
4. Remove the wing nuts (5) in the upper part of the squeegee body, separate
the two metal parts that form the squeegee body to take off the front rubber.
5. Clean all the components with water.
To reassemble the squeegee reverse
the operations above.
TROUBLESHOOTING GUIDE
THE VACUUM MOTOR DOES NOT
WORK
1. Check the charge level of the batteries (see under “BATTERY CHARGING”).
2. Verify that the vacuum motor switch
is activated and the green signal lamp
is on.
3. Check the level in the recovery tank
(see under “OVERFILL PROTECTION”)
and if necessary, empty the tank.
If the problem persists, please contact
the authorized service center.
12
Page 13

THE BRUSH MOTOR DOES NOT
WORK
1. Check the charge level of the batteries (see under “BATTERY CHARGING”).
2. Verify that the brush motor switch is
activated and the green signal lamp is
on.
3. Activate the scrub control levers (3).
If the problem persists, please contact
the authorized service center.
INSUFFICIENT WATER ON THE
BRUSH
1. Check that the solenoid valve switch
is activated and the green signal lamp
is on.
2. Check the level of the liquid in the
solution tank (see under “SOLUTION
TANK”).
3. Check that the solution ow adjuster
(3) placed in front underneath the solution tank is open.
4. Press the brush control levers (2).
5. Check that the solution lter (4) is
clean.
If the problem persists, please contact
the authorized service center.
THE MACHINE DOES NOT CLEAN
PROPERLY
1. The brush is not suited to the oor
and/or conditions: use only original
brushes. For advice, contact the authorized service center.
2. The solution ow is insufcient: open
the solution ow adjuster (3).
3. Check that the liquid detergent is in
the recommended percentage.
Contact the authorized service center for
advice.
THE SQUEEGEE DOES NOT DRY
PERFECTLY
1. Check that the squeegee rubbers are
clean.
2. Check that the suction hose is correctly inserted in the proper
seat on the recovery tank and on the
squeegee bar.
3. Check the suction lter.
4. Replace the rubbers if worn.
5. Check that the vacuum motor switch
is on.
6. Check the level in the recovery tank
(see under “OVERFILL PROTECTION”)
and if necessary, empty the tank.
EXCESSIVE FOAM PRODUCTION
Check that low foam detergent has been
used. Add small quantities of anti foam
liquid into the recovery tank.
Do not use excessive amounts of deter-
gent as even with low foaming agent,
the foam will be created and lead to
vacuum motor damage. Also exces-
sive detergent will result in solution pipe
becoming blocked over time.
LED (2), (3) AND (4) BECOME RED
If the machine is operating, with the
switch (1) on green and one of the
three led (2), (3) or (4) change color,
from green to red, it means that, an
overload protection is taking place, for
example:
- LED (2) RED: the brush motor is overloaded.
- LED (3) RED: the vacuum
motor is overloaded.
- LED (4) RED: the coil of the
solenoid valve may be short-circuited.
To reset, switch off the ON/OFF
switch (1), wait a few minutes and
then switch on again.
If the problem persists, please contact
the authorized service center.
13
Page 14

PROGRAMMED MAINTENANCE
REQUIRED ACTION DAILY WEEKLY ORDINARY/MONTHLY
RECOVERY TANK CLEANING •
SUCTION FILTER CLEANING •
BRUSH CLEANING •
BRUSH REMOVAL •
SQUEEGEE ASSEMBLY CLEANING •
FRONT SQUEEGEE RUBBER REPLACEMENT • if required
REAR SQUEEGEE RUBBER REPLACEMENT • if required
SQUEEGEE HOSE CLEANING •
SOLUTION TANK CLEANING •
SOLUTION FILTER CLEANING •
RECOMMENDED BRUSHES
Brushes must be chosen depending on the type of oor and the dirt to be removed.
The material and the bristle diameter are the elements that distinguish different types of brushes.
MATERIAL CHARACTERISTICS
PPL (Polypropylene) Good wear resistance. Maintains characteristics with hot water up to 140°F (60°C). It is not
hygroscopic.
TYNEX Nylon bristles with grains of abrasive material. Use with caution in order not to mark the oor
or ruin the nish.
BRISTLES THICKNESS Thicker bristles are more rigid and must be used on smooth oor or oor with small joints. On
irregular oors with deep joints or relieves, softer bristles penetrate more easily and deeper.
Please be aware that when brush bristles are worn out they become rigid and unable to penetrate and clean deeper. This may also cause brush vibration with thicker bristles
PAD HOLDER Pads are recommended to clean smooth surfaces. The pad holder has anchor points to retain
the pad. It is important that the height of the pad holder with its pad is the same as the one of
the brush.
MACHINE PART NO. QTY DESCRIPTION USE
BD 17/6 48903130 1 Brush PPL 0,9 Ø 430 Floors of resistant material and particularly
dirty.
48903150 1 Brush 5-mix Ø 430 For all types of oors.
48803050 1 Pad holder Ø 425 + center lock green For pads of 17”, for smooth surfaces cleaning.
14
Page 15

Please provide additional information on
Warranty
Registration
Form
Tornado equipment: (Check choices below)
__ Automatic Scrubbers __Sweepers
__Propane Floor Machines __Rotary Floor Machine
__High Speed Burnishers __Carpet Vacuums
__Carpet Extractors & Spotters __Wet/Dry Vacs
__ Steam Cleaners __Jumbo Vacs
__Ride-On Equipment __Pressure Washers
See complete product info at www.tornadovac.com
Selling Dealer:(Required)__________________________
Please Print Clearly
_____________________________________________________________________________
Company/Institution
_____________________________________ ____________________________________
Contact Name Title
_____________________________________ ____________________________________
Address City/State/Zip Code
_____________________________________ ____________________________________
Phone Fax
_____________________________________ ____________________________________
Date of Purchase Email
See white metal plate or sticker on unit for this information.
MACHINE TYPE/MODEL NUMBER: MACHINE SERIAL NUMBER:
1. 1.
2. 2.
3. 3.
4. 4.
Facility Description (please circle all that apply)
1. School 9. Hospital 17. U.S. Govt.
2. Retail Store 10. Nursing Home 18. Other Govt.
3. Restaurant 11. Religious Institution 19. Auto Service
4. Ofce Building 12. Airport 20. Airport
5. Contract Cleaning 13. Warehouse 21. Non-Prot
6. Light Manufacturing 14. Apartment/Condo 22. Other (specify)
7. Heavy Manufacturing 15. Warehouse
8. College/University 16. Supermarket
How did you rst learn about
Tornado cleaning and
maintenance equipment?
o Contacted by local dealer
o Previous experience with
Tornado products
o Reputation/
Recommendation
o Advertising
o Direct mail
o Internet
o Other
Total Hard Floor Area
o 0-10,000 (0-930)
o 10-50,000 (930-4,650)
o 50-250,000 (4,650-23,250)
o Over 250,000 (over
23,260)
In square feet (meters)
Total Carpeted Area
Square feet (square meters)
o 0-10,000 (0-930)
o 10-50,000 (930-4,650)
o 50-250,000 (4,650-23,250)
o Over 250,000 (over
23,260)
Damage or defect arising from abuse, neglect or other misuse is excluded from this warranty. Other items
may or may not apply based on your specic machine. If any defect occurs, the warranty is voided if service is
attempted by non-Authorized Tornado Service Centers.
©2017 Tornado Industries. All rights reserved.
X8449-TOR 1/2017
Return to :
Tornado Industries
3101 Wichita Court
Fort Worth, TX 76140
Fax: 817-551-0719
or online at
www.tornadovac.com
Page 16

===
b= = b=
=
=
NT
ðkaf`b=
=
ibvbka^=q^_ibol=ab=fkpqorjbkqlp=v=j^kalp= NU
ibvbka^=jžnrfk^= NU
abp`ofm`fþk=q°`kf`^= NV
^asboqbk`f^= OM
kloj^p=dbkbo^ibp=ab=pbdrofa^a= OM
pfj_lildð^= OM
mofj^=^kqbp=abi=bjmibl= ON
jзобгбЙенз=г•имбе~=ЙгД~д~З~= ON
aЙлЙгД~д~аЙ=ЗЙ=д~=г•имбе~= ON
jзобгбЙенз=ЗЙд=нбгµе= ON
`зеЙсбµе=Д~нЙк∞~л= ON
oÉÅ~êÖ~=ÇÉ=ä~ë=Ä~íÉê∞~ë= ON
bдбгбе~Ебµе=ЗЙ=д~л=Д~нЙк∞~л= ON
aЙйµлбнз=ЗЙ=кЙЕмйЙк~Ебµе= ON
aЙйµлбнз=ЗЙ=д~=лздмЕбµе=ЗЙнЙкЦЙенЙ= ON
ifjmfbw^=ab=ilp=prbilp= OO
^ЕЕбзе~гбЙенз=ЗЙ=д~=г•имбе~= OO
oзн~Ебµе=ЕзгйдЙн~=ЗЙ=д~=Дзимбдд~=ЗЙ=лЙЕ~Зз= OO
pÉÅ~Çç=Éå=ã~êÅÜ~=~íê•ë= OO
iЙо~ен~гбЙенз=ЗЙ=д~=Дзимбдд~=ЗЙ=лЙЕ~Зз= OO
oÉÖä~àÉ=ÇÉä=íáãµå= OO
aблйзлбнбоз=кЙДзл~ЗЙкз= OP
abqbk`fþk=ab=i^=jžnrfk^=^i=cfk^i=ab=i^=ifjmfbw^= OP
j^kqbkfjfbkql=af^ofl= OP
iбгйбЙт~=ЗЙйµлбнз=ЗЙ=кЙЕмйЙк~Ебµе= OP
s~Еб~Зз=у=дбгйбЙт~=ЗЙд=ЗЙйµлбнз=лздмЕбµе=у=ЗЙд=Сбднкз= OP
iбгйбЙт~=ЗЙд=Сбднкз=ЗЙ=~лйбк~Ебµе= OP
m~кимЙ=оЙкнбЕ~д=ЗЙ=д~=г•имбе~= OP
iбгйбЙт~=ЗЙд=ЕЙйбддз= OQ
aЙлгзен~аЙLгзен~аЙ=ЗЙд=ЕЙйбддз= OQ
iбгйбЙт~=ЗЙ=д~=Дзимбдд~=ЗЙ=лЙЕ~Зз= OQ
j^kqbkfjfbkql=loafk^of^= OQ
pмлнбнмЕбµе=ЗЙд=д~Дбз=нк~лЙкз=ЗЙ=д~=Дзимбдд~=ЗЙ=лЙЕ~Зз= OQ
pмлнбнмЕбµе=ЗЙд=д~Дбз=ЗЙд~енЙкз=ЗЙ=д~=Дзимбдд~=ЗЙ=лЙЕ~Зз= OQ
`lkqoli=ab=crk`flk^jfbkql= OQ
bд=гзнзк=ЗЙ=~лйбк~Ебµе=ез=СмеЕбзе~= OQ
bд=гзнзк=ЗЙд=ЕЙйбддз=ез=СмеЕбзе~= OR
bд=~Цм~=Йе=Йд=ЕЙйбддз=ез=Йл=лмСбЕбЙенЙ= OR
i~=г•имбе~=ез=дбгйб~=ДбЙе= OR
i~=Дзимбдд~=ЗЙ=лЙЕ~Зз=ез=лЙЕ~=йЙкСЙЕн~гЙенЙ= OR
mкзЗмЕЕбµе=ЙсЕЙлбо~=ЗЙ=Йлймг~= OR
iЙЗ=EOFI=EPF=у=EQF=лЙ=йзеЙе=ЗЙ=Ездзк=кзаз= OR
j^kqbkfjfbkql=moldo^j^al= OS
`bmfiilp=^`lkpbg^alp= OS
d^o^kqð^=ifjfq^a^=^=i^odl=mi^wl=ab=molqb``fþk=^i=`ljmo^alo= OT
=
Page 17

Long Term Buyer Protection Limited Warranty
Tornado Industries, Inc. (Tornado) garantiza al consumidor nal que los productos Tornado no tendrán defectos de materiales ni mano de obra durante el período indicado abajo. Esta garantía limitada NO cubre a las
máquinas y/o componentes sujetos al desgaste normal, los daños ocasionados durante el envío, las fallas
producidas por modicaciones, accidentes, entorno operativo inadecuado, mal uso, abuso, negligencia o mal
mantenimiento por parte del usuario. Para más detalles, contáctese con su Distribuidor de Tornado Autorizado,
el Centro de Reparaciones, o el Departamento de Servicio Técnico de Tornado. Los representantes de ventas
y servicio técnico de Tornado no están autorizados a renunciar o alterar los términos de esta garantía, ni a
incrementar las obligaciones de Tornado bajo esta garantía.
10 Años*
Tanques de agua plásticos y cuerpos moldeados en forma rotatoria
2 Años*
Piezas de todos los equipos de limpieza Tornado
1 Año*
Mano de obra de todos los equipos de limpieza Tornado
1 Año*
Garantía de baterías, un año prorrateado.
Todas las garantías de las baterías son manejadas directamente por el fabricante de las baterías,
en base a un año prorrateado
Términos sujetos a cambios sin previo aviso.
1. Con excepción de los Ventiladores-Secadores Windshear™, de tiro lateral y descendente, Ventiladores de Aislamiento, CV 30, CV 38, CK14/1 PRO, CK 14/2 PRO, SWM31/9, CK LW 13/1, CK LW 13/1 ROAM, CV 38/48 Dual, PV6, PV10,
PV6 ROAM, Wall Mount todas las Barredoras, Aspiradoras en Seco, y todos los cargadores tienen garantía por 1 (un)
año tanto para sus piezas como para la mano de obra.
2. Todas las piezas no desgastadas compradas después del vencimiento de la garantía, tienen garantía por 90 días.
3. La garantía comienza a correr desde la fecha de venta al consumidor o, a discreción de Tornado, 6 meses después de
que el vendedor compre la unidad a Tornado, lo que ocurra primero.
4. El artículo EB 30 tiene garantía por un período de 90 días tanto para sus piezas como para la mano de obra.
5. La garantía de los motores utilizados en equipos a propano se limita a la garantía de fábrica del motor.
6. Las fregadoras con conductor tienen garantía de 24 meses para sus piezas, 6 meses para la mano de obra o 1000
horas, lo que ocurra primero.
Nota: Tornado, The Latest Dirt, Floorkeeper, Carpetkeeper, Carpetrinser,
Carpetrinser/Dryer, Headmaster, Taskforce, PAC-VAC, T-Lite, Glazer,
Windshear, Max-Vac,y Trot-Mop son marcas registradas de Tornado
Industries
Sitio web: www.tornadovac.com
Teléfono 1.800.VACUUMS
Fax: 817-551-0719
Dirección: 3101 Wichita Court
Fort Worth, TX 76140
1-800-VACUUMS 90 Years of Cleaning Innovation A Tacony Company
Form F2662.©2017. All rights reserved
Page 18

===
b= = b=
=
=
NU
ibvbka^=q^_ibol=ab=fkpqorjbkqlp=v=j^kalp=
=
NK fkqboormqlo=dbkbo^i=v=qbpqfdl=
OK fkqboormqlo=jlqlo=abi=`bmfiil=v=qbpqfdl=
PK fkqboormqlo=jlqlo=ab=^pmfo^`fþk=v=qbpqfdl=
QK fkqboormqlo=bib`qolsžisri^=v=qbpqfdl=
=
=
RK m^i^k`^=bibs^alo^=_lnrfii^=ab=pb`^al=
SK j^kdlp=abi=j^kfii^o=
TK j^kbq^p=ab=`lkqoli=fkf`flLm^ol=
UK m^i^k`^=abp_ilnrbl=abi=qfjþk=
=
=
=
ibvbka^=jžnrfk^=
=
VK qr_l=ab=abp`^od^=abmþpfql=ab=ob`rmbo^`fþk=
NMK q^m^=^pmfo^`fþk=
NNK q^_ibol=ab=fkpqorjbkqlp=
NOK iba=ab=pb¢^i=kfsbi=`^od^=ab=i^p=_^qboð^p=E^djF=
NPK mi^`^=j^qoð`ri^=
NQK bk`ercb=ab=^ifjbkq^`fþk=bi°`qof`^=`^od^alo=_^qboð^p=
NRK q^mþk=ab=s^`f^al=plir`fþk=abqbodbkqb=
NSK abmþpfql=ab=plir`fþk
=
=
=
=
NTK q^m^=ab=iibk^al=plir`fþk=abqbodbkqb=
NUK abmþpfql=ab=ob`rmbo^`fþk=
NVK orba^p=
OMK dorml=_lnrfii^=ab=pb`^al=
ONK molqb``fþk=
OOK cfiqol=plir`fþk=abqbodbkqb=
OPK obdri^alo=ab=
`^ra^i=
ab=i^=plir`fþk=abqbodbkqb
=
=
=
=
=
Page 19

===
b= = b=
=
=
NV
abp`ofm`fþk=q°`kf`^=
=
=
^åÅÜç=ÇÉ=íê~Ä~àç= ããLáå= QPMLNT=
^еЕЬз=ЗЙ=д~=Дзимбдд~=ЗЙ=лЙЕ~Зз= ããLáå= RNMLOM=
qÉåëáµå=ÇÉ=ä~ë=Ä~íÉê∞~ë= s= OQ=
`~é~ÅáÇ~Ç=Ä~íÉê∞~ë= ^Ü=R= PQ=
mзнЙеЕб~=белн~д~З~= tL^= STMLOU=
oЙеЗбгбЙенз=ЗЙ=нк~Д~аз=Eг~сF= ãOLÜ==ëèÑíLÜ= NRMRLNNQUP=
aб•гЙнкз=ЗЙд=ЕЙйбддз= ããLáå= QPMLNT=
sЙдзЕбЗ~З=Цбкз=ЗЙд=ЕЙйбддз= êéã= NVM=
mкЙлбµе=ЗЙд=ЕЙйбддз== âÖLäÄëK= PRLTT=
aЙйкЙлбµе=гзнзк=ЗЙ=~лйбк~Ебµе= ãÄ~êLï~íÉê=äáÑí= UPLPP=
qáéç=ÇÉ=~î~åÅÉ= = лЙгб=~мнзгK=
aЙлебоЙд=г•сбгз= B= O=
`~й~ЕбЗ~З=ЗЙйµлбнз=ЗЙ=лздмЕбµе= äLÖ~ä= OOLS=
`~й~ЕбЗ~З=ЗЙйµлбнз=ЗЙ=кЙЕмйЙк~Ебµе= äLÖ~ä= OOLS=
iзеЦбнмЗ=г•имбе~=EгбеF= ããLáå= TVPLPN=
^äíìê~=ã•èìáå~= ããLáå= SMPLOQ=
^еЕЬмк~=г•имбе~= ããLáå= RNULOM=
mÉëç=ã•èìáå~=EÉå=î~Å∞ç=Åçå=ä~ë=Ä~íÉê∞~ëF= âÖLäÄëK= USIRLNVN=
mÉëç=Ä~íÉê∞~ë= âÖLäÄëK= PMLSS=
qбЙгйз=ЗЙ=кЙЕ~кЦ~=г~с= Ü= NM=
eìÉÅç=Ä~íÉê∞~ë=Eä=ñ=~åÅÜ=ñ=~äíF= ããLáå= PQS=с=OMT=с=ONMLNQ=с=UIN=с=UIO=
kбоЙд=ЗЙ=йкЙлбµе=~Е∫лнбЕз=EЙе=ЕзеСзкгбЗ~З=Езе=bkSMQ|MNF= Ç_=E^F= YTM=
`ä~ëÉ= = fff=
kбоЙд=ЗЙ=йкзнЙЕЕбµе= fm= uP=
`~кЦ~Ззк=ЗЙ=д~л=Д~нЙк∞~лW=нЙелбµе=ЗЙ=д~=кЙЗ= s=ú= OPM=
`~кЦ~Ззк=ЗЙ=д~л=Д~нЙк∞~лW=СкЙЕмЙеЕб~=ЗЙ=д~=кЙЗ= eò= RM=
`~êÖ~Ççê=ÇÉ=ä~ë=Ä~íÉê∞~ëW=Åä~ëÉ= = f=
Page 20

===
b= = b=
=
=
OM
^asboqbk`f^==
iЙл= ~Цк~ЗЙЕЙгзл= йзк= Ь~ДЙк= лЙдЙЕЕбзе~Зз= емЙлнк~=
г•имбе~K= bлн~= г•имбе~= СкЙЦ~Ззк~= лЙ= ЙгйдЙ~=Йе= д~=
дбгйбЙт~= беЗмлнкб~д= у= Ебобд= й~к~= Ем~димбЙк= нбйз= ЗЙ=
й~обгЙен~ЕбµеI= ЙсЕдмбЗ~= д~= дбгйбЙт~= ЗЙ= гзимЙн~лK=
aмк~енЙ= лм= гзобгбЙенз= ЗЙ= ~о~еЕЙI= д~= ~ЕЕбµе=
ЕзгДбе~З~= ЗЙд=ЕЙйбддз= у=ЗЙ= д~= лздмЕбµе=ЗЙнЙкЦЙенЙI=
дбгйб~=д~=лмЕбЙЗ~З=имЙ= лЙ=кЙЕзЦЙ=Езе=д~=Дзимбдд~=ЗЙ=
~лйбк~Ебµе= нк~лЙк~= ЗЙа~еЗз= йЙкСЙЕн~гЙенЙ= лЙЕ~= д~=
лмйЙкСбЕбЙK=
i~=г•имбе~=Ь~=ЗЙ=лЙк=мнбдбт~З~=лµдз=й~к~=ЙлнЙ=СбеK=pЙ=
зДнбЙеЙе= д~л= гЙазкЙл= йкЙлн~ЕбзеЙл= лб= лЙ= ЙгйдЙ~=
ЕзккЙЕн~гЙенЙ= у= лЙ= г~енбЙеЙ= Йе= йдЙе~= ЙСбЕ~Еб~K=
oзЦ~гзл=йзк=ЕзелбЦмбЙенЙ=дЙЙк=ЕмбЗ~Ззл~гЙенЙ=Йлн~л=
белнкмЕЕбзеЙл=у= оздоЙк= ~=дЙЙкд~л=Е~З~=оЙт=имЙ= нЙеЦ~е=
ЗбСбЕмдн~ЗЙлK==
bе= Е~лз= ЗЙ= еЙЕЙлбЗ~ЗI= кЙЕзкЗ~гзл= имЙ= емЙлнкз=
лЙкобЕбз=ЗЙ=~лблнЙеЕб~=имЙЗ~=лбЙгйкЙ=~=лм=ЗблйзлбЕбµе=
й~к~=ЙоЙенм~дЙл=ЕзелЙазл=з=бенЙкоЙеЕбзеЙл=ЗбкЙЕн~K==
=
=
kloj^p=dbkbo^ibp=ab=pbdrofa^a=
i~л= езкг~л= ~им∞= ~Д~аз= беЗбЕ~З~л= нбЙеЙе= имЙ=
ЕмгйдбклЙ= ЕмбЗ~Ззл~гЙенЙ= й~к~= Йобн~к= З~¥зл= ~д=
зйЙк~Ззк=у=~=д~=г•имбе~K==
J=iЙЙк=ЕмбЗ~Ззл~гЙенЙ=д~л= ЙнбимЙн~л=Йе= д~=г•имбе~I=
ез= ЕмДкбкд~л= йзк= ебеЦ∫е= гзнбоз= у= лмлнбнмбкд~л= Йе=
лЙЦмбЗ~=Йе=Е~лз=ЗЙ=имЙ=СмЙлЙе=З~¥~З~лK==
J= qЙеЗк•е= имЙ= мнбдбт~к= д~= г•имбе~= ∫ебЕ~гЙенЙ= Йд=
йЙклзе~д=~мнзкбт~Зз=у=Сзкг~Зз=й~к~=Йд=ЙгйдЙзK==
J=aмк~енЙ=Йд=СмеЕбзе~гбЙенз=ЗЙ=д~=г•имбе~=Ь~у=имЙ=
нЙеЙк= ЕмбЗ~Зз= Езе= д~л= ЗЙг•л= йЙклзе~л= у=
ЙлйЙЕб~дгЙенЙ=Езе=дзл=еб¥злK==
J= bе= йкЙлЙеЕб~= ЗЙ= дзл= еб¥злI= Ь~у= имЙ= обЦбд~к= д~=
г•имбе~= ЗЙ= г~еЙк~= имЙ= ез= зЕмккЙ= имЙ= дзл=ЗЙг•л=
амЙЦмЙе=Езе=д~=гблг~K=
J=i~=г•имбе~=ез=Йл=ЗЙлнбе~З~=~д=ЙгйдЙз=ЗЙ=йЙклзе~лI=
еб¥зл= беЕдмбЗзлI= д~л= Ем~дЙл= Е~й~ЕбЗ~ЗЙл= С∞лбЕ~лI=
лЙелзкб~дЙл= з= гЙен~дЙл= лЙ~е= кЙЗмЕбЗ~лI= з= ДбЙе= Езе=
Е~кЙеЕб~=ЗЙ=ЙсйЙкбЙеЕб~=з=ЗЙ=ЕзезЕбгбЙензI=~= гЙезл=
имЙ= ¨лн~л= Ь~у~е= йзЗбЗз= ДЙеЙСбЕб~кI= ~= нк~о¨л= ЗЙ= д~=
бенЙкгЙЗб~Ебµе=ЗЙ=ме~=йЙклзе~=кЙлйзел~ДдЙ=ЗЙ=лму~л=
лЙЦмкбЗ~ЗI=обЦбд~еЕб~=з=белнкмЕЕбзеЙл=ЕзеЕЙкебЙенЙ= Йд=
ЙгйдЙзK=
J= i~= нзг~=ЗЙ=д~= кЙЗ= ЗЙ=~дбгЙен~Ебµе=нбЙеЙ=имЙ=лЙк=
Йимбй~З~=ЗЙ=ЕзеЙсбµе=~=нбЙкк~=кЙЦд~гЙен~кб~K=
J=bобн~к=З~¥~к=Йд=Е~ДдЙ=ЗЙ=~дбгЙен~Ебµе=Езе=йдЙЦ~ЗзлI=
~йд~лн~гбЙензл=з=ЙлСмЙктзлK=
J= kз= гЙтЕд~к= ЗЙнЙкЦЙенЙл= ЗЙ= нбйз= ЗбСЙкЙенЙ= й~к~=
Йобн~к=д~=йкзЗмЕЕбµе=ЗЙ=Ц~лЙл=езЕбозлK==
J=i~=нЙгйЙк~нмк~=ЗЙ=~дг~ЕЙе~гбЙенз=нбЙеЙ=имЙ=Йлн~к=
ЕзгйкЙеЗбЗ~=ЙенкЙ=POшc=у=NPNшc=EMш`=у=HRRш`FK==
J=qЙгйЙк~нмк~=µйнбг~=ЗЙ=нк~Д~азW==
ЙенкЙ=POшc=у=NMQшc=E=Mш`=у=HQMш`FK==
J=i~=ЬмгЙЗ~З=ез=нбЙеЙ=имЙ=лмйЙк~к=Йд=VRBK==
J=kз=ЙгйдЙ~к=д~=г•имбе~=Йе=~нгµлСЙк~=Йсйдзлбо~K==
J= kз= ЙгйдЙ~к= д~= г•имбе~= Езгз= оЙЬ∞Емдз= ЗЙ=
нк~елйзкнЙK==
J=kз=лмДбк=з=Д~а~к=д~л=ЙлЕ~дЙк~лK=
J=kз=мнбдбт~к= лздмЕбзеЙл=•ЕбЗ~л=имЙ=йзЗк∞~е=З~¥~к= д~=
г•имбе~=уLз=д~л=йЙклзе~лK==
J= bобн~к= имЙ= Йд= ЕЙйбддз=нк~Д~аЙ= Йлн~еЗз=д~= г•имбе~=
й~к~З~=й~к~=ез=Е~мл~к=З~¥зл=~д=лмЙдзK==
J=kз=мнбдбт~к=д~=г•имбе~=Йе=лмйЙкСбЕбЙл=Йлй~кЕбЗ~л=ЗЙ=
д∞имбЗзл= з= йздозл= беСд~г~ДдЙл= Eйзк= ЙаЙгйдз=
ЬбЗкзЕ~кДмкзлI=ЕЙебт~л=з=нбтеЙлFK==
J=bе=Е~лз=ЗЙ=беЕЙеЗбзI=ЙгйдЙ~к=ме=Йснбензк=ЗЙ=йздозK=
kз=ЙгйдЙ~к=~Цм~K=
J=kз=ЕЬзЕ~к=Езе=Йлн~енЙк∞~л= з=~еЗ~гбзл= ЗзеЗЙ=Ь~у=
йЙдбЦкз=ЗЙ=Е~∞З~=ЗЙ=зДаЙнзлK=
J= kз= мнбдбт~к= д~= г•имбе~= лзДкЙ= лмйЙкСбЕбЙл= Езе=
беЕдбе~Ебµе=лмйЙкбзк=~=д~=беЗбЕ~З~=Йе=д~=йд~Е~K==
J= i~= г•имбе~=нбЙеЙ= имЙ= кЙ~дбт~к= д~л= зйЙк~ЕбзеЙл=ЗЙ=
д~о~Зз= у= лЙЕ~Зз= ~д=гблгз= нбЙгйзK= lйЙк~ЕбзеЙл= ЗЙ=
е~нмк~дЙт~= ЗбСЙкЙенЙ=нЙеЗк•е= имЙ= лЙк= кЙ~дбт~З~л= Йе=
тзе~л= йкзЬбДбЗ~л= й~к~= Йд= й~лз= ЗЙ= йЙклзе~л= ез=
ЙеЕ~кЦ~З~л= ЗЙд= нк~Д~аз= у= Йд= зйЙк~Ззк= нЙгЗк•= имЙ=
йзеЙклЙ=Е~дт~Зз=~ЗЙЕм~ЗзK==
J= e~у=имЙ= лЙ¥~д~к=д~л= тзе~л=ЗЙ= й~обгЙенз=гза~Зз=
Езе=дЙнкЙкзл=й~к~=н~д=ЙСЙЕнзK==
J= `м~еЗз= лЙ= зДлЙко~лЙе= ~езг~д∞~л= Йе= Йд=
СмеЕбзе~гбЙенз= ЗЙ= д~= г•имбе~I= ~лЙЦмк~клЙ= имЙ= ез=
лЙ~е= Е~мл~З~л= йзк= д~= С~дн~= ЗЙ= г~енЙебгбЙенз=
зкЗбе~кб~K=aЙ=ез= лЙк=~л∞I=лздбЕбн~к=д~=бенЙкоЙеЕбµе= ЗЙд=
ЕЙенкз=ЗЙ=~лблнЙеЕб~=~мнзкбт~ЗзK==
J= bе= Е~лз= ЗЙ= лмлнбнмЕбµе= ЗЙ= йбЙт~лI= йЙЗбк= дзл=
кЙймЙлнзл= lofdfk^ibp= ~= ме= ЕзеЕЙлбзе~кбз= уLз=
ЗблнкбДмбЗзк=~мнзкбт~ЗзK=
J=bгйдЙ~к=лзд~гЙенЙ=ЕЙйбддзл= lofdfk^ibp=лЙ¥~д~Ззл=
Йе=Йд=й•кк~Сз=?`bmfiilp=^`lkpbg^alp?K==
J= m~к~= Ем~димбЙк= бенЙкоЙеЕбµе= ЗЙ= дбгйбЙт~= уLз=
г~енЙебгбЙенз= Езкн~к= Йд= лмгбеблнкз= Йд¨ЕнкбЕз= ~= д~=
г•имбе~K==
J=kз=имбн~к=д~л=йкзнЙЕЕбзеЙл=имЙ=кЙимбЙкЙе=Йд=ЙгйдЙз=
ЗЙ=мнЙелбдбзл=й~к~=лЙк=лмлнбнмбЗ~лK==
J=kз=д~о~к=д~=г•имбе~=Езе=ЕЬзккз=ЗЙ=~Цм~=ЗбкЙЕн~=з=~=
йкЙлбµеI=з=Езе=лмДлн~еЕб~л=Езккзлбо~лK==
J= `~З~= OMM= Ьзк~л= ЗЙ= нк~Д~аз= Ь~ЕЙк= Езенкзд~к= д~=
г•имбе~=йзк=ме=ЕЙенкз=ЗЙ=~лблнЙеЕб~=~мнзкбт~ЗзK==
J=^енЙл=ЗЙ=мнбдбт~к=д~=г•имбе~I=Езенкзд~к=имЙ=нзЗ~л=
д~л=н~й~л=у=д~л=ЕзДЙкнмк~л=Йлн¨е=ЕздзЕ~З~л=Езгз=лЙ=Ь~=
беЗбЕ~Зз=Йе=ЙлнЙ=г~ем~д=ЗЙ=млз=у=г~енЙебгбЙензK=
J=oЙлн~ДдЙЕЙк=нзЗ~л=д~л=ЕзеЙсбзеЙл=Йд¨ЕнкбЕ~л=ЗЙлйм¨л=
ЗЙ=Ь~ДЙк=ЙСЙЕнм~Зз=Ем~димбЙк=бенЙкоЙеЕбµеK=
J= mкзЕЙЗЙк= ~= д~= Йдбгбе~Ебµе= ЗЙ= дзл= г~нЙкб~дЙл= ЗЙ=
Езелмгз=лбЦмбЙеЗз=д~л=езкг~л=ЗЙ=дЙу=обЦЙенЙлK=
J= `м~еЗз= омЙлнк~= г•имбе~= ЗЙаЙ= ЗЙ= лЙк= ЙгйдЙ~З~I=
йкзЕЙЗЙк= ~д= ЗЙлг~енЙд~гбЙенз= ~йкзйб~Зз= ЗЙ= дзл=
г~нЙкб~дЙл= Йе= д~= гблг~= ЕзенЙебЗзл= ЙлйЙЕб~дгЙенЙ=
~ЕЙбнЙ= у= ЕзгйзеЙенЙл=ЙдЙЕнкµебЕзлI= у= ЕзелбЗЙк~еЗз=
имЙ=д~= г•имбе~=гблг~=СмЙ=ЕзелнкмбЗ~=Йе=гЙЗбЗ~=ЗЙ=
дз=йзлбДдЙ=Езе=г~нЙкб~дЙл=кЙЕбЕд~ЗзлK==
=
=
pfj_lildð^=
=
=
p∞гДздз
=
MLN=имЙ=беЗбЕ~=Йд=
бенЙккмйнзк=ЦЙеЙк~д=у=Йд=
нЙлнбЦзK=
=
=
p∞гДздз=ЗЙд=ЦкбСзK
=
fеЗбЕ~=Йд=бенЙккмйнзк=у=Йд=
нЙлнбЦз=ЗЙ=д~=ЙдЙЕнкзо•домд~K=
=
=
=
p∞гДздз=ЗЙд=ЕЙйбддзK
=
fеЗбЕ~=Йд=бенЙккмйнзк=у=Йд=
нЙлнбЦз=ЗЙд=гзнзк=ЗЙд=ЕЙйбддзK
=
=
=
=
p∞гДздз=ЗЙд=гзнзк=ЗЙ=
~лйбк~ЕбµеK=
fеЗбЕ~=Йд=бенЙккмйнзк=у=Йд=
нЙлнбЦз=ЗЙд=гзнзк=ЗЙ=
~лйбк~ЕбµеK=
=
=
=
fеЗбЕ~Ззк=ЗЙ=ебоЙд=ЗЙ=Е~кЦ~=
ÇÉ=ä~ë=Ä~íÉê∞~ëK=
=
=
=
fеЗбЕ~=д~=йзлбЕбµе=ЗЙд=
н~йµе=ЗЙ=ЗЙлЕ~кЦ~=ЗЙд=
ЗЙйµлбнз=ЗЙ=д~=лздмЕбµеK=
=
p∞гДздз
=
èìÉ=á
åÇáÅ~=ÇÉ=î~Åá~ê=
дзл=ЗЙйµлбнзл=~енЙл=ЗЙ=оздоЙк=
~=Öáê~ê=ä~=ã•èìáå~K=
=
=
=
p∞гДздз=имЙ=беЗбЕ~=д~=
нЙгйЙк~нмк~=г•сбг~=ЗЙ=д~=
лздмЕбµе=ЗЙнЙкЦЙенЙK=
=
=
=
p∞гДздз=имЙ=
беЗбЕ~=Йд=
кЙЦмд~Ззк=ЗЙ=Е~мЗ~д=ЗЙ=д~=
лздмЕбµе=ЗЙнЙкЦЙенЙK=
=
=
=
p∞гДздз=ЗЙд=ДбЗµе=дблн~ЗзK=
=
fеЗбЕ~=имЙ=~д=Сбе~д=ЗЙ=лм=
~ЕнбобЗ~ЗI=д~=г•имбе~=
нЙеЗк•=имЙ=лЙк=Йдбгбе~З~=
Йе=ЕзеСзкгбЗ~З=ЗЙ=д~=
дЙЦблд~Ебµе=обЦЙенЙK=
=
=
=
p∞гДздз=ЗЙд=дбДкз=~ДбЙкнзK
=
fåÇáÅ~=~ä=çéÉê~Ççê=èìÉ=
ÇÉÄÉ=äÉÉê=Éä=ã~åì~ä=~åíÉë=
ÇÉä=ìëç=ÇÉ=ä~=ã•èìáå~K=
=
=
=
p∞гДздз=ЗЙ=~облзK=
=
iЙЙк=Езе=~нЙеЕбµе=д~л=
лЙЕЕбзеЙл=йкЙЕЙЗбЗ~л=йзк=
ЙлнЙ=л∞гДздзI=й~к~=д~=
лЙЦмкбЗ~З=ЗЙд=зйЙк~Ззк=у=
ÇÉ=ä~=ã•èìáå~
K
=
=
Page 21

===
b= = b=
=
=
ON
mofj^=^kqbp=abi=bjmibl=
=
jlsfjfbkql=jžnrfk^=bj_^i^a^=
i~=г•имбе~=Йлн•=ЕзенЙебЗ~=Йе=ме=ЙгД~д~аЙK==
bд=йЙлз=нзн~д=Йл=ЗЙ=OON=дДлK=ENMM=вЦF=г•сK==
i~л=ЗбгЙелбзеЙл=ЗЙд=ЙгД~д~аЙ=лзеW=
_~ëÉW=PPÒñOOÒ=EUQIRÅã=ñ=RTÅãF=
^äíìê~W=PPÒ=EUR=ÅãF=
=^qbk`fþkW=
kз=лЙ=ймЙЗЙе=кЙгзен~к=г•л=ЗЙ=Ззл=ЙгД~д~аЙлK=
=
abpbj_^i^gb=ab=i^=jžnrfk^=
NK= oЙнбк~к=Йд=ЙгД~д~аЙ=ЙснЙкбзкK=
OK= aЙлнзкебдд~к= дзл= Ззл= нзкебддзл= имЙ= Сба~е= дзл= Ззл=
лзйзкнЙл=Сба~Ззк=~=д~=г•имбе~K==
PK= aЙлнзкебдд~к= дзл= нзкебддзл= имЙ= Сба~е= дзл= лзйзкнЙл=
Сба~Ззк=~д=й~ддЙн=у=кЙгзоЙк=дзл=лзйзкнЙлK=
QK= iдЙо~к= Йд= нбгµе= ~= д~= йзлбЕбµе= ЗЙ= нк~Д~аз= EоЙк=
jlsfjfbkql= abi=qfjюkТF= й~к~= Д~а~к= д~= г•имбе~=
ЗЙд=й~ддЙнI=Йгйма~к=Ь~Еб~=~ЗЙд~енЙ=ЙеЕбг~=д~л=кмЙЗ~л=
Йе=йзлбЕбµе=ме=йзЕз=беЕдбе~З~=Ь~Еб~=~нк•л=й~к~=Йобн~к=
ЕЬзимЙл=СмЙкнЙл=Йе=д~л=й~кнЙл=гЙЕ•ебЕ~лK=
RK= dм~кЗ~к=Йд=ЙгД~д~аЙ=й~к~=ЙоЙенм~дЙл=еЙЕЙлбЗ~ЗЙл=
ЗЙ=нк~елйзкнЙK=
=
=
=
jlsfjfbkql=abi=qfjþk=
bд=нбгµе=Йе=Йд= ЙгД~д~аЙ=Йлн•= Йе=д~= йзлбЕбµе=ЕЙкк~З~=
лзДкЙ=д~=г•имбе~K=
m~к~=Цбк~к=Йд=нбгµе=Йе=ме~=ЗЙ=д~л=о~кб~л=йзлбЕбзеЙл=ЗЙ=
нк~Д~аз=у=й~к~=йзЗЙк=гзоЙк=д~=г•имбе~W=
NK= ^Енм~к= лзДкЙ= д~= й~д~еЕ~= ЗЙ= ЗЙлДдзимЙз= ENF=
йкЙлЙенЙ=ЕЙкЕ~=ЗЙд=г~ебдд~к=ЗЙд=нбгµеK=
OK= iдЙо~к= Йд= нбгµе= ~= д~= йзлбЕбµе= ЗЙ= нк~Д~аз=
г~енЙебЙеЗз=~йкЙн~Зз=д~=й~д~еЕ~=ЗЙ=ЗЙлДдзимЙз=ENFK=
PK= sздоЙк=~=ЗЙа~к=д~= й~д~еЕ~=ЗЙ=ЗЙлДдзимЙз=ENF=й~к~=
зДнЙеЙк=Йд=ДдзимЙз=ЗЙд=нбгµеK=
^Цбк= ЗЙ=д~= гблг~=г~еЙк~=й~к~= г~узк= кЙЦд~аЙ= ЗЙ= д~=
~днмк~= ЗЙд= нбгµе= ~д= Сбе= ЗЙ= зДнЙеЙк= д~= йзлбЕбµе= ЗЙ=
нк~Д~аз=г•л=ЕзеСзкн~ДдЙK=
=
=
`lkbufþk=_^qboð^p=
kзкг~дгЙенЙI= д~= г•имбе~= Йлн•= Йимбй~З~= Езе= Ззл=
Д~нЙк∞~л= у~=ЕзеЙЕн~З~л= Йе= лЙкбЙI= бенкзЗмЕбЗ~л=Йе= Йд=
ЬмЙЕз= й~к~= н~д= ЙСЙЕнз= ЗЙД~аз= ЗЙд= ЗЙйµлбнз= ЗЙ=
кЙЕмйЙк~ЕбµеK=
bе= Йд= Е~лз= ЗЙ= имЙ=Ь~у~= еЙЕЙлбЗ~З= ЗЙ= лмлнбнмбк= д~л=
Д~нЙк∞~лI= ЗбкбЦбклЙ= ~=ме= ЕЙенкз= ЗЙ= ~лблнЙеЕб~=н¨ЕебЕ~=
~мнзкбт~ЗзK=
i~=лмлнбнмЕбµе=нбЙеЙ=имЙ=лЙк=кЙ~дбт~З~=ЙсЕдмлбо~гЙенЙ=
Езе=Д~нЙк∞~л=Езе= кЙеЗбгбЙенз=бЗ¨енбЕз=~=~имЙдд~л=у~=
ЕздзЕ~З~лI=йзк=дз=н~ензW=
kзK=O=Д~нЙк∞~л=^dj=NOs=PQ^ЬRK=
mзк=гЙЗбз=ЗЙд=ЕзеЙЕнзк=EOF= Йл=йзлбДдЙ=ЗЙ=ЕзеЙЕн~к=з=
ЗЙлЕзеЙЕн~к=д~л=Д~нЙк∞~лK=
=
=
=
ob`^od^=ab=i^p=_^qboð^p==
i~= йкЙлЙеЕб~= ЗЙ= ме~= ЙнбимЙн~= Езе= д~= беЗбЕ~Ебµе=
^djТ=ЕздзЕ~З~=лзДкЙ=Йд=Д~лнбЗзк=йзлнЙкбзкгЙенЙ=ЗЙ=
д~= г•имбе~I= бЗЙенбСбЕ~= д~= оЙклбµе= гзен~З~= Езе=
Д~нЙк∞~л=^dj=у=лм=Е~кЦ~Ззк=~йкзйб~ЗзK=
`зе=Йд=бенЙккмйнзк=ЦЙеЙк~д=EPF=ЙеЕЙеЗбЗзI=Йе=д~=й~кнЙ=
нк~лЙк~=ЗЙ=д~=г•имбе~=лЙ= облм~дбт~=Йд= ебоЙд=ЗЙ= Е~кЦ~=
ЗЙ=д~л=Д~нЙк∞~л=EQFK==
^W= дЙЗ=оЙкЗЙ=ЙеЕЙеЗбЗз=Z=Д~нЙк∞~л=Е~кЦ~лK=
_W= дЙЗ= е~к~еаз= ЙеЕЙеЗбЗз= Z= Д~нЙк∞~л= Е~лб=
ЗЙлЕ~кЦ~З~лK=
`W= дЙЗ= кзаз=ЙеЕЙеЗбЗз= Z=ЗЙлЕ~кЦ~= ЕзгйдЙн~=ЗЙ= д~л=
Д~нЙк∞~лK=
`м~еЗз= Йд= дЙЗ= ЗЙд= Е~кЦ~Ззк= E`F= лЙ= йзеЙ= кзазI==
ЕзенЙгйзк•еЙ~гЙенЙ=лЙ=йзеЙ=кзаз=н~гДб¨е=Йд=дЙЗ=ЗЙд=
бенЙккмйнзк= ЦЙеЙк~д= EPF= Åçå= ЕзелбЦмбЙенЙ=
~й~Ц~гбЙенз= ~мнзг•нбЕз=ЗЙ= нзЗ~л= д~л= СмеЕбзеЙл= ЗЙ=
д~=г•имбе~K=
=
=
aмк~енЙ= д~л= зйЙк~ЕбзеЙл= ЗЙ= кЙЕ~кЦ~= лЙ= ~Енбо~= ме=
Зблйзлбнбоз=имЙ=ез=йЙкгбнЙ=Йд=СмеЕбзе~гбЙенз=ЗЙ= д~=
г•имбе~K=
`здзЕ~к=д~=г•имбе~=Йе=ме~=лмйЙкСбЕбЙ=йд~е~=ЕЙкЕ~=ЗЙ=
ме~=нзг~=гзезС•лбЕ~K=
^й~Ц~к=Йд=бенЙккмйнзк=ЦЙеЙк~д=EPFK=
`зеЙЕн~к=Йд=Е~ДдЙ=ЗЙ= ~дбгЙен~ЕбµеI=лмгбеблнк~Зз=Езе=
д~=г•имбе~I=н~енз=~= д~=г•имбе~=ERF=имЙ=~=д~= кЙЗ=ЗЙ=
~дбгЙен~Ебµе=Езгз=лЙ=беЗбЕ~=Йе=Йд=Цк•СбЕзK=
^д=Сбе~д=ЗЙ=д~=кЙЕ~кЦ~I=имбн~к=Йд=Е~ДдЙ=ЗЙ=~дбгЙен~ЕбµеK=
i~=С~лЙ=ЗЙ= кЙЕ~кЦ~= Йлн•=ЕзгйдЙн~=лздз=Ем~еЗз=лзДкЙ=
Йд=Е~кЦ~Ззк=лЙ=ЙеЕбЙеЗЙ=Йд=дЙЗ=оЙкЗЙ=E^FK=
=^qbk`fþkW=
m~к~=ез=Е~мл~к=З~¥зл=йЙкг~еЙенЙл=~=д~л=Д~нЙк∞~лI=Йл=
беЗблйЙел~ДдЙ= Йобн~к= д~= ЗЙлЕ~кЦ~= ЕзгйдЙн~= ЗЙ= д~л=
гблг~лI= ЙСЙЕнм~еЗз= бегЙЗб~н~гЙенЙ= д~= кЙЕ~кЦ~K=
^ЗЙг•лI=Йе= Йд= Е~лз= ЗЙ=ме~=й~к~З~=йзк=г•л=ЗЙ= Ззл=
лЙг~е~л=ЗЙ=д~=г•имбе~I= ЗЙлЕзеЙЕн~к=Йд=ЕзеЙЕнзк=ЗЙ=
д~л=Д~нЙк∞~л=EоЙк=Е~й∞нмдз=`lkbufюk=_^qboр^pТFK=
=
=
=^qbk`fþkW=
kç=Å~êÖ~ê= à~ã•ë=ä~ë=Ä~íÉê∞~ë=Åçå=ìå=Å~êÖ~Ççê=åç=
~ÇÉÅì~ÇçK= pЙЦмбк= ЙлгЙк~З~гЙенЙ= д~л=
белнкмЕЕбзеЙл= нк~елгбнбЗ~л= ЗЙд= С~ДкбЕ~енЙ= ЗЙ= д~л=
Д~нЙк∞~л=у=ЗЙд=Е~кЦ~ЗзкK=
=
bifjfk^`fюk=ab=i^p=_^qboр^p=
bл=зДдбЦ~нзкбз=ЙенкЙЦ~к=д~л=Д~нЙк∞~л=~Цзн~З~лI=имЙ=лзе=
Ед~лбСбЕ~З~л= Езгз= кЙлбЗмзл= йЙдбЦкзлзлI= ~= ме= ЙенЙ=
~мнзкбт~Зз=Йе=ЕзеСзкгбЗ~З=Езе=д~=дЙЦблд~Ебµе=обЦЙенЙ=
й~к~=д~=Йдбгбе~ЕбµеK=
=
abmþpfql=ab=ob`rmbo^`fþk=
`зенкзд~к=имЙ=д~=н~й~=ЗЙд=Сбднкз=ЗЙ=~лйбк~Ебµе=ENF=Йлн¨=
ЕзккЙЕн~гЙенЙ= ДдзимЙ~З~I=ЗЙлйм¨л= ЗЙ= Ь~ДЙк= Цбк~Зз=
д~л=й~д~еЕ~л=E_FK=`згйкзД~к=~ЗЙг•л=имЙ=Йд=нмДз=ЗЙ=д~=
Дзимбдд~= ЗЙ= лЙЕ~Зз=Йлн¨= ЕзккЙЕн~гЙенЙ= бенкзЗмЕбЗз=
Йе=лм=~дза~гбЙенз=E^FK=
=
=
=
abmþpfql=ab=i^=plir`fþk=abqbodbkqb=
i~= Е~й~ЕбЗ~З= ЗЙд= ЗЙйµлбнз= ЗЙ= д~= лздмЕбµе= Йлн•=
беЗбЕ~З~=Йе=д~=СбЕЬ~=н¨ЕебЕ~K=
^Дкбк= Йд=н~йµе= кзлЕ~Зз= ESF= имЙ= лЙ= ЙеЕмЙенк~= Йе= д~=
й~кнЙ=лмйЙкбзк=у=ддЙе~к=Йд=ЗЙйµлбнз=ЗЙ=д~=лздмЕбµе=Езе=
~Цм~= дбгйб~I= Езе= ме~= нЙгйЙк~нмк~= ез= лмйЙкбзк= ~=
NOOшc= ERMш`FK= ^¥~Збк= Йд= ЗЙнЙкЦЙенЙ= д∞имбЗз= Йе= д~=
ЕзеЕЙенк~Ебµе=у=Езе=д~л=гзЗ~дбЗ~ЗЙл=йкЙоблн~л=йзк=Йд=
С~ДкбЕ~енЙK=m~к~=Йобн~к=д~=Сзкг~Ебµе=ЗЙ=ме~=Е~енбЗ~З=
ЙсЕЙлбо~= ЗЙ=Йлймг~= имЙ=йзЗк∞~= З~¥~к= Йд=гзнзк= ЗЙ=
~лйбк~ЕбµеI= ЙгйдЙ~к= ме~= Е~енбЗ~З= г∞ебг~= ЗЙ=
ЗЙнЙкЦЙенЙK= bекзлЕ~к= Йд= н~йµе= ЗЙд= ЗЙйµлбнз= ЗЙ= д~=
лздмЕбµеK=
=
=^qbk`fþkW=
e~у= имЙ= ЙгйдЙ~к= лбЙгйкЙ= ЗЙнЙкЦЙенЙ= ЗЙ= Йлймг~=
Езенкзд~З~K=m~к~=Йобн~к= Езе=лЙЦмкбЗ~З=д~=йкзЗмЕЕбµе=
ЗЙ=Йлймг~I=~енЙл=ЗЙ=ЙгйЙт~к=Йд=нк~Д~аз=бенкзЗмЕбк=Йе=
Йд=ЗЙйµлбнз=ЗЙ=кЙЕмйЙк~Ебµе=ме~=Е~енбЗ~З=г∞ебг~=ЗЙ=
д∞имбЗз=~енбЙлймг~K=
kз=ЙгйдЙ~к=•ЕбЗзл=Йе=Йлн~Зз=ймкзK=
=
=
Page 22

===
b= = b=
=
=
OO
ifjmfbw^=ab=ilp=prbilp=
=
^``flk^jfbkql=ab=i^=j^nrfk^=
iзл= ймдл~ЗзкЙл= ЙеЕбг~= Йд= н~ДдЙкз= ЗЙ= Езенкз= Йлн•е=
Ззн~Ззл= ЗЙ= ме= нЙлнбЦз=оЙкЗЙ=лмйЙкбзк=имЙ= лЙ¥~д~= д~=
~Енбо~Ебµе=ЗЙд=г~еЗзK=
NK= bеЕЙеЗЙк= д~= г•имбе~= ~йкЙн~еЗз= Йд= бенЙккмйнзк=
ЦЙеЙк~д=ENFK=
OK= `зенкзд~к=Йд= Йлн~Зз= ЗЙ=д~= Е~кЦ~= ЗЙ=д~л= Д~нЙк∞~л=
EоЙк=ob`^od^=ab=i^p=_^qboр^pТFK=
PK= _~а~к=д~=Дзимбдд~=ЗЙ=лЙЕ~Зз=Цбк~еЗз=Ь~Еб~=~Д~аз=д~=
й~д~еЕ~=ERF=ймЙлн~=~д=ЕЙенкз=ЗЙд=нбгµеK=
QK= ^ЕЕбзе~к=Йд=бенЙккмйнзк=ЗЙд=гзнзк=ЕЙйбддз=EOFK=
RK= ^ЕЕбзе~к=Йд= бенЙккмйнзк= ЗЙд=гзнзк=ЗЙ= ~лйбк~Ебµе=
EPFK=
SK= ^ЕЕбзе~к=Йд=бенЙккмйнзк=ЗЙ=д~=ЙдЙЕнкзо•домд~=EQFK=
i~=г•имбе~= Йлн•= Йимбй~З~=ЗЙ=ЙдЙЕнкзо•домд~I=йзк=дз=
н~енз= Йд= Е~мЗ~д= ЗЙ= д~= лздмЕбµе= ЗЙнЙкЦЙенЙ= лЙк•=
~ЕЕбзе~Зз= ~мнзг•нбЕ~гЙенЙ= ~Енм~еЗз= д~л= г~еЙн~л=
ЗЙ=бебЕбзLй~кз=ETFK=sздобЙеЗз= ~=ЗЙа~к=д~л=г~еЙн~л=ЗЙ=
бебЕбзLй~кзI= Éä= Å~ìÇ~ä= ëÉ= бенЙккмгйбк•=
~мнзг•нбЕ~гЙенЙK=
TK= mзебЙеЗз= Йе= СмеЕбзе~гбЙенз= д~л= г~еЙн~л=
бебЕбзLй~кз=ETF=Йд= ЕЙйбддз=ЙгйЙт~к•=~= Цбк~кK=bд=Е~мЗ~д=
ЗЙ= д~= лздмЕбµе= ЗЙнЙкЦЙенЙ= ЙгйЙт~к•= ~= Сдмбк= у= д~=
Дзимбдд~=ЗЙ=лЙЕ~Зз=ЙгйЙтЙк•=~=~лйбк~кK==
UK= aмк~енЙ= дзл= йкбгЙкзл= гЙнкзл= EСЙЙнF= лЙ= ЗЙДЙ=
Езенкзд~к=имЙ=Йд=Е~мЗ~д=ЗЙ=д~=лздмЕбµе=ЗЙнЙкЦЙенЙ=лЙ~=
~ЗЙЕм~ЗзK= bд= кЙЦмд~Ззк= ЗЙ= Е~мЗ~д= ЗЙ= д~= лздмЕбµе=
ЗЙнЙкЦЙенЙ= у~= Йлн•= н~к~Зз= ЗЙ= д~= С•ДкбЕ~= й~к~=
л~нблС~ЕЙк=д~=дбгйбЙт~=йзк=д~=г~узк=й~кнЙ=ЗЙ=дзл=лмЙдзлK=
pб=Йл=еЙЕЙл~кбз=гзЗбСбЕ~к= д~=Е~енбЗ~З= ЗЙ=д~=лздмЕбµе=
ЗЙнЙкЦЙенЙ= Йе= Йд=лмЙдзI= ~Енм~к=лзДкЙ=д~=й~д~еЕ~=ЗЙд=
кЙЦмд~Ззк=ЗЙ=Е~мЗ~д=EUFK=
=
=
=
olq^`fþk= `ljmibq^= ab= i^= _lnrfii^= ab=
pb`^al=
`зе=Йлн~=г•имбе~=Йл= йзлбДдЙ=д~о~к= у=лЙЕ~к= н~енз=Йе=
г~кЕЬ~=~ЗЙд~енЙ=Езгз=Йе=г~кЕЬ~= ~нк•л=Цк~Еб~л= ~=д~=
кзн~Ебµе= ЕзгйдЙн~= ЗЙ= д~= Дзимбдд~= ЗЙ= лЙЕ~ЗзK=
pбЦмбЙеЗз= Йд= кЙЕзккбЗз= беЗбЕ~Зз= Йе= дзл= Цк•СбЕзл= лЙ=
лбгйдбСбЕ~=д~=беоЙклб∂е=ЗЙ=д~=йзлбЕбµе=ЗЙ=д~=Дзимбдд~=ЗЙ=
лЙЕ~Зз= йЙкгбнбЙеЗз= Йд= лЙЕ~Зз= н~гДб¨е= Йе= г~кЕЬ~=
~нк•лK=
=
pÉÅ~Çç=Éå=ã~êÅÜ~=~ÇÉä~åíÉ
=
pÉÅ~Çç=Éå=ã~êÅÜ~=~íê•ë
=
=
=
fеоЙклб
µå=
éçëá
Ебµе=Дзимбдд~=ЗЙ=лЙЕ~Зз
=
=
Åçå=
êçí~
Åáµå
=
=
pb`^al=bk=j^o`e^=^qožp=
`зе= д~=Дзимбдд~= ЗЙ= лЙЕ~Зз= йзлбЕбзе~З~=Йе= д~=й~кнЙ=
ЗЙд~енЙк~= ЗЙ= д~= г•имбе~= Йл= йзлбДдЙ= д~о~к= у= лЙЕ~к=
ЗзеЗЙ= Езе= д~= Дзимбдд~=ЗЙ= лЙЕ~Зз= нк~ЗбЕбзе~д= ез=лЙ=
дзЦк~к∞~K=bе=лЙЦмбЗ~=~дЦмезл=ЙаЙгйдзл=Езгз=мнбдбт~к=
д~л=СмеЕбзеЙл=ЗЙ=ЕзгйдЙн~=кзн~Ебµе=ЗЙ=д~=Дзимбдд~=ЗЙ=
лЙЕ~ЗзK=
i~о~к=д~=лмйЙкСбЕбЙ=бенЙкЙл~З~=ENFK=
=
=
=
sздоЙк=~=Цбк~к=д~=Дзимбдд~=ЗЙ=лЙЕ~Зз=Ь~Еб~=д~=ЗЙкЙЕЬ~=
з= Ь~Еб~= д~= бтимбЙкЗ~= EоЙк= Е~й∞нмдз= olq^`fюk=
`ljmibq^= ab= i^= _lnrfii^= ab= pb`^alТF= й~к~=
ддЙо~кд~=ЗЙд~енЙK=
iЙо~ен~к=дбЦЙк~гЙенЙ=д~=г•имбе~=EOF=у=кЙйзлбЕбзе~клЙ=
лзДкЙ=д~=лмйЙкСбЕбЙ=ЗЙ=лЙЕ~к=EPFK=
=^qbk`fþkW=
`м~еЗз= лЙ= дЙо~ен~= д~= г•имбе~I= оздоЙк= ~= ЗЙа~к= д~л=
й~д~еЕ~л=йкЙлЙеЕб~=ЬзгДкЙ=ЗЙ=г~еЙк~=имЙ=лЙ=й~кЙ=д~=
кзн~Ебµе= ЗЙд= ЕЙйбддз= у= Йобн~к= йзк= дз= н~енз= д~=
йкзуЙЕЕбµе=ЗЙ=л~дйбЕ~Змк~л=ЗЙ=~Цм~K=
=
=
mкзЕЙЗЙк= Йе= г~кЕЬ~= ~нк•л= й~к~= лЙЕ~к= д~= лмйЙкСбЕбЙ=
~йЙе~л=д~о~З~=EQFK=
=
=
=
ibs^kq^jfbkql=ab=i^=_lnrfii^=ab=pb`^al=
m~к~= дЙо~ен~к= д~= Дзимбдд~= ЗЙ=лЙЕ~Зз= оздоЙк= ~= Цбк~к=
Ь~Еб~= ~ккбД~=д~=й~д~еЕ~= ERF= ймЙлн~=Йе= Йд= ЕЙенкз=ЗЙд=
нбгµеK=
=
5
=
pЙ=ймЙЗЙ=дЙо~ен~к=д~=Дзимбдд~=ЗЙ=лЙЕ~Зз=Ем~еЗз=Йлн~=
лЙ=ЙеЕмЙенк~=Йе=йкзсбгбЗ~З=ЗЙд=йменз=ЕЙенк~дK=
pб= д~= Дзимбдд~= ЗЙ= лЙЕ~Зз= ез= лЙ= ЙеЕмЙенк~= Йе=
йкзсбгбЗ~З= ЗЙд= йменз= ЕЙенк~дI= ~меимЙ= ~ДкбЙеЗз= д~=
й~д~еЕ~=ERF=Йлн~=ез=лЙ=дЙо~ен~к•K=
=^qbk`fþkW=
bе=С~лЙ=ЗЙ=нк~Д~аз=д~=й~д~еЕ~=ЗЙ=дЙо~ен~гбЙенз=ЗЙ=д~=
Дзимбдд~=ЗЙ=лЙЕ~Зз=нбЙеЙ=имЙ=Йлн~к=Йе=д~=йзлбЕбµе=Д~а~K=
=
obdi^gb=abi=qfjþk=
bе= йкзсбгбЗ~З= ЗЙ= зДлн•Емдзл= з= й~кЙЗЙл= лЙ= ймЙЗЙ=
лбгйдбСбЕ~к=д~=г~ебзДк~=ЗЙ=д~=г•имбе~=кЙЦмд~еЗз= Йд=
нбгµе= Езе= ме~= йзлбЕбµе= ЗЙ= д~= Йгйм¥~Змк~= г•л=
оЙкнбЕ~д=Езе=кЙлйЙЕнз=д~=г•имбе~K=
m~к~=Цбк~к=Йд=нбгµеW=
Page 23

===
b= = b=
=
=
OP
NK= ^Енм~к= лзДкЙ= д~= й~д~еЕ~= ЗЙ= ЗЙлДдзимЙз= EUF=
йкЙлЙенЙ=ЕЙкЕ~=ЗЙ=д~=Йгйм¥~Змк~=ЗЙд=нбгµеK=
OK= dбк~к= Йд= нбгµе= Йе=д~= емЙо~=йзлбЕбµе= ЗЙ= нк~Д~аз=
г~енЙебЙеЗз=~йкЙн~З~=д~=й~д~еЕ~=ЗЙ=ЗЙлДдзимЙз=EUFK=
PK= sздоЙк=~=ЗЙа~к=д~= й~д~еЕ~=ЗЙ=ЗЙлДдзимЙз=EUF=й~к~=
зДнЙеЙк=Йд=ДдзимЙз=ЗЙд=нбгµеK=
rе~= оЙт= лмйЙк~Зз= Йд= зДлн•Емдз= у= ЕзгйдЙн~З~= д~=
г~езДкб~= кЙйЙнбк= д~= зйЙк~Ебµе= й~к~= оздоЙк= ~= д~=
йзлбЕбµе=ЗЙ=нк~Д~аз=йкЙЕЙЗЙенЙK=
q~гДб¨е= Йл= йзлбДдЙ= Ь~ЕЙк= Йлн~= зйЙк~Ебµе= Езе= д~=
г•имбе~=Йе= гзобгбЙенз=г~енЙебЙеЗз= ~йкЙн~Зз=~= д~=
оЙт=д~=г~еЙн~=ЗЙ=бебЕбзLй~кзK=
=
=
afpmlpfqfsl=ob_lp^abol=
^=Сбе=ЗЙ=Йобн~к=З~¥зл=лЙкбзл=~д=гзнзк=ЗЙ=~лйбк~ЕбµеI=д~=
г•имбе~= Йлн•= Йимбй~З~= ЗЙ= ме= Сдзн~Ззк= имЙ= ~Ен∫~=
Ем~еЗз= Йд= ЗЙйµлбнз= ЗЙ= кЙЕмйЙк~Ебµе= Йлн•= ддЙез=
Е~мл~еЗз= Йд=ЕбЙккЙ=ЗЙд= нмДз=ЗЙ= ~лйбк~Ебµе=у= йзк=дз=
н~енз=ЗЙ=д~=~лйбк~ЕбµеK=
bе= ЙлнЙ= Е~лз= Ь~у= имЙ= о~Еб~к= Йд= ЗЙйµлбнз= ЗЙ=
кЙЕмйЙк~ЕбµеK=
NK= bгйм¥~к= Йд=нмДз= ЗЙ=ЗЙлЕ~кЦ~=EVF=ЗЙд= ЗЙйµлбнз=ЗЙ=
кЙЕмйЙк~ЕбµеK=
OK= nмбн~к=Йд=н~йµе=ЗЙд=нмДз= ЗЙ=ЗЙлЕ~кЦ~=у=о~Еб~к= Йд=
ЗЙйµлбнз= ЗЙ= кЙЕмйЙк~Ебµе= Йе= нбе~л= йкЙоблн~лI= Йе=
ЕзенЙгйд~Ебµе= ЗЙ= д~л= езкг~л= обЦЙенЙл= Йе= Ем~енз=
ЕзеЕбЙкеЙ=д~=дбимбЗ~Ебµе=ЗЙ=дзл=д∞имбЗзлK=
=^qbk`fþkW=
bлн~= зйЙк~Ебµе= нбЙеЙ= имЙ= лЙк= кЙ~дбт~З~= ддЙо~еЗз=
Цм~енЙл=й~к~=йкзнЙЦЙклЙ=ЗЙд=Езен~Енз=Езе=лздмЕбзеЙл=
йЙдбЦкзл~лK=
=
=
=
=
abqbk`fþk=ab=i^=jžnrfk^=^i= cfk^i=
ab=i^=ifjmfbw^=
=
^енЙл=ЗЙ=ЙаЙЕмн~к=Ем~димбЙк=нбйз=ЗЙ=г~енЙебгбЙензW=
NK= ^й~Ц~к=Йд=бенЙккмйнзк=ЦЙеЙк~д=ENFK=
OK= iЙо~ен~к= д~= Дзимбдд~= ЗЙ= лЙЕ~Зз= Цбк~еЗз= Ь~Еб~=
~ккбД~=Йд=г~ебдд~к= ERF=ймЙлнз= Йе=Йд= ЕЙенкз=ЗЙд= нбгµе=
EоЙк=Е~й∞нмдз=ibs^kq^jfbkql=ab= i^=_lnrfii^=ab=
pb`^alТFK=
PK= iдЙо~к= д~=г•имбе~=Ь~лн~=Йд=дмЦ~к=йкЙоблнз= й~к~=д~=
ЗЙлЕ~кЦ~=ЗЙд=~Цм~K=
=
=^qbk`fþkW=
i~= г•имбе~= ез= Йлн•= Йимбй~З~= ЗЙ= СкЙез= ЗЙ=
Йлн~Ебзе~гбЙенз=йзк= дз=н~енз=ез=Ь~у=имЙ=ЗЙа~кд~=Йе=
йд~езл=беЕдбе~ЗзлK=
=
=
j^kqbkfjfbkql=af^ofl=
=
ifjmfbw^=abmþpfql=ab=ob`rmbo^`fþk=
NK= bгйм¥~к= Йд=нмДз= ЗЙ=ЗЙлЕ~кЦ~=EVF=ЗЙд= ЗЙйµлбнз=ЗЙ=
кЙЕмйЙк~ЕбµеK=
OK= p~Е~к= Йд=н~йµе=ЗЙд=нмДз=ЗЙ=ЗЙлЕ~кЦ~=у=о~Еб~к=Йд=
ЗЙйµлбнз=ЗЙ=кЙЕмйЙк~Ебµе=Йе=д~л=нбе~л=йкЙоблн~л=EоЙк=
?afpmlpfqfsl=ob_lp^abol?FK=
PK= nмбн~к= Йд= н~йµе= ЗЙ= ~лйбк~Ебµе= ENMF= ЗЙлйм¨л= ЗЙ=
Ь~ДЙк=Цбк~Зз=д~л=й~д~еЕ~л=ENNF=имЙ=дз=Сба~еK=
QK= s~Еб~к= Йд= ЗЙйµлбнз= мнбдбт~еЗз= Йд=нмДз= ~йкзйб~Зз=
EVFK=
RK= bеам~Ц~к=Йд=ЗЙйµлбнз=Езе=ме=ЕЬзккз=ЗЙ=~Цм~K=
=
=
=^qbk`fþkW=
bлн~=зйЙк~Ебµе=Ь~= ЗЙ= лЙк=кЙ~дбт~З~=ддЙо~еЗз=Цм~енЙл=
й~к~= йкзнЙЦЙклЙ= ЗЙд= Езен~Енз= Езе= лздмЕбзеЙл=
йЙдбЦкзл~лK=
=
s^`f^al=v=ifjmfbw^=abi=abmþpfql=plir`fþk=v=
abi=cfiqol=
m~к~=ЗЙлЕ~кЦ~к=д~=лздмЕбµе=ЗЙнЙкЦЙенЙ=кЙлн~енЙ= Йе=Йд=
ЗЙйµлбнз=ЗЙ=д~=лздмЕбµеW=
NK= iдЙо~к= д~=г•имбе~=Ь~лн~=Йд=дмЦ~к=йкЙоблнз= й~к~=д~=
ЗЙлЕ~кЦ~=ЗЙд=~Цм~K=
OK= ^й~Ц~к=д~=г•имбе~=Езе=Йд=бенЙккмйнзк=ЦЙеЙк~дK=
PK= aЙлЙекзлЕ~к= д~= н~й~= ЗЙ= Е~кЦ~= ENOF= ЗЙд=ЗЙйµлбнз=
лздмЕбµе=у=имбн~к=Йд=Сбднкз=ENQFK=
QK= aЙлЙекзлЕ~к=Йд= н~йµе=ЗЙ= ЗЙлЕ~кЦ~= ENPF= ЕздзЕ~Зз=
беСЙкбзкгЙенЙ=Йе=Йд=д~Зз=бтимбЙкЗз= ЗЙ=д~= г•имбе~=у=
ЙлйЙк~к= имЙ= нзЗ~= д~= лздмЕбµе= ЗЙнЙкЦЙенЙ= Йлн¨=
ЗЙлЕ~кЦ~З~K=
=
=
=
RK= sздоЙк=~=Цбк~к=г~ем~дгЙенЙ=д~=Дзимбдд~=ЗЙ=лЙЕ~Зз=
ENRF= Ь~Еб~= д~= й~кнЙ= ЗЙд~енЙк~= ЗЙ= д~= г•имбе~= ЗЙ=
г~еЙк~=ЗЙ=Ь~ДЙк=~ЕЕЙлз=дбДкЙ=~д=Сбднкз=ENSFK=
SK= aЙлЙекзлЕ~к= д~= н~й~= ЗЙд= Сбднкз= ENSFI= кЙгзоЙк= Йд=
Е~кнмЕЬз=ENTF=у=Йеам~Ц~кдз=Езе=ме=ЕЬзккз=ЗЙ=~Цм~K=
TK= sздоЙк=~=гзен~к=нзЗзK=
=
=
=^qbk`fþkW=
bлн~= зйЙк~Ебµе= нбЙеЙ= имЙ= лЙк= кЙ~дбт~З~= ддЙо~еЗз=
Цм~енЙл=й~к~=йкзнЙЦЙклЙ=ЗЙд=Езен~Енз=Езе=лздмЕбзеЙл=
йЙдбЦкзл~лK=
=
ifjmfbw^=abi=cfiqol=ab=^pmfo^`fþk=
NK= nмбн~к= Йд= н~йµе= ЗЙ= ~лйбк~Ебµе= ENSF= ЗЙлйм¨л= ЗЙ=
Ь~ДЙк=Цбк~Зз=д~л=й~д~еЕ~л=ENTF=имЙ=дз=Сба~еK=
OK= nмбн~к=Йд=Сбднкз=Езе=Йд=Сдзн~Ззк=Ь~ЕбЙеЗз=СдЙсбзе~к=
Йд= ДзкЗЙ= ЗЙд= Сбднкз= й~к~= дбДЙк~кдз= ЗЙ= дзл= нзкебддзл=
йкЙлЙенЙл=лзДкЙ=д~=н~й~K=
PK= iбгйб~к= нзЗз= Езе= ме= ЕЬзккз= ЗЙ= ~Цм~=
ЙлйЙЕб~дгЙенЙ=д~л=й~кЙЗЙл=у=Йд=СзеЗз=ЗЙд=СбднкзK=
QK= oЙ~дбт~к= д~л= зйЙк~ЕбзеЙл=ЗЙ= дбгйбЙт~=ЗЙ= г~еЙк~=
ЙлгЙк~З~K=
RK= sздоЙк=~=гзен~к=нзЗзK=
=
=
=
m^onrb=sboqf`^i=ab=i^=jžnrfk^=
i~= г•имбе~= ймЙЗЙ= ~лмгбк= ме~= йзлбЕбµе= оЙкнбЕ~д=
оздЕ~З~= Йе= лм= й~кнЙ= йзлнЙкбзк= ЗЙлйм¨л= ЗЙ= Ь~ДЙк=
кЙйдЙЦ~Зз=Йд=нбгµе=ЙеЕбг~=д~=г•имбе~K=
bлн~= йзлбЕбµе= йЙкгбнЙ= ме= ЙлнзкДз= гЙезк= йзк= Йд=
й~кимЙ=ЗЙ=д~=г•имбе~=у=лбгйдбСбЕ~=д~л=зйЙк~ЕбзеЙл=ЗЙ=
г~енЙебгбЙенз=ЗЙ=д~=гблг~K=
m~к~=озднЙ~к=д~=г•имбе~=Ь~у=имЙW=
NK= ^й~Ц~к=Йд=бенЙккмйнзк=ЦЙеЙк~дK=
OK= `зенкзд~к=имЙ=дзл=Ззл=ЗЙйµлбнзл=Йлн¨е=о~Е∞зл=у=Йе=
Йд=Е~лз=йкзЕЙЗЙк=~=о~Еб~кдзл=EоЙк=Е~й∞нмдз=s^`f^al=v=
ifjmfbw^= abmюpfql= ab= ob`rmbo^`fюkТ= у==
s^`f^al=v=ifjmfbw^=abi=abmюpfql=plir`fюk?FK=
PK= ^Енм~к= лзДкЙ= д~= й~д~еЕ~= ЗЙ= ЗЙлДдзимЙз= EUF=
йкЙлЙенЙ=ЕЙкЕ~=ЗЙ=д~=Йгйм¥~Змк~=ЗЙд=нбгµеK=
QK= dбк~к= Йд= нбгµе= оздобЙеЗз= ~= ЗзДд~кдз= Ь~Еб~= дзл=
ЗЙйµлбнзл= г~енЙебЙеЗз= ~йкЙн~З~= д~= й~д~еЕ~= ЗЙ=
ЗЙлДдзимЙз=EUFK=
RK= sздоЙк=~=ЗЙа~к=д~= й~д~еЕ~=ЗЙ=ЗЙлДдзимЙз=EUF=й~к~=
зДнЙеЙк=Йд=ДдзимЙз=ЗЙд=нбгµеK=
SK= bгйм¥~к= д~= г•имбе~= Езе= ~гДзл= г~езл= Йе= Йд=
йменз=E^F=ЗЙд=ДзкЗЙ=ЗЙйµлбнз=у=E_F=ЗЙ=д~=Йгйм¥~Змк~=
ЗЙд=нбгµе=беЗбЕ~Ззл=Йе=Йд=Цк•СбЕзK=
TK= iЙо~ен~к= д~= й~кнЙ= ЗЙд~енЙк~= ЗЙ= д~= г•имбе~=
Ь~Еб¨еЗзд~=Цбк~к= лзДкЙ=д~л=кмЙЗ~л=нк~лЙк~л=ддЙо•еЗзд~=
~=д~=йзлбЕбµе=оЙкнбЕ~д=Езгз=Йе=Йд=ЗбДмазK=
=
Page 24
===
b= = b=
=
=
OQ
=^qbk`fþkW=
i~=йзлбЕбµе=ЗЙ=й~кимЙ=оЙкнбЕ~д=лЙ=беЗбЕ~=Ем~еЗз=лЙ=
йкЙоЙЙ= имЙ= ез= лЙ= мнбдбт~к•= д~= г•имбе~= йзк= ме=
йЙк∞зЗз= лмйЙкбзк= ~= OLP= З∞~лI= й~к~= Йобн~к= имЙд= Йд=
йЙлз=ЗЙ=д~=г•имбе~=ймЙЗ~=Езе=Йд=нбЙгйз=З~¥~к=Йд=
ЕЙйбддз=ЕзгйкзгЙнбЙеЗз=йзк=дз=н~енз=Йд=ЕзккЙЕнз=
СмеЕбзе~гбЙенз=ЗЙ=д~=г•имбе~K===
=
=
=
=
ifjmfbw^=abi=`bmfiil=
aЙлгзен~к= Йд=ЕЙйбддз= у=дбгйб~кдз= Езе= ме= ЕЬзккз= ЗЙ=
~Цм~=Eй~к~=Йд= ЗЙлгзен~аЙ=ЗЙд=ЕЙйбддз=оЙк=Йе= лЙЦмбЗ~=
abpjlkq^gbLjlkq^gb=abi=`bmfiilТFK=
=
abpjlkq^gbLjlkq^gb=abi=`bmfiil=
NK= sздЕ~к= д~= г•имбе~= Йе= лм= й~кнЙ= йзлнЙкбзк= EоЙк=
Е~й∞нмдз= m^onrb= sboqf`^i= ab= i^= jžnrfk^?F=
нЙебЙеЗз= ЕмбЗ~Зз= ЗЙ= ~ЕзкЗ~клЙ= ЗЙ= ~й~Ц~к= Йд=
бенЙккмйнзк=ЦЙеЙк~д=у=о~Еб~к=дзл=ЗЙйµлбнзлK=
OK= `зе=д~= г•имбе~=Йе= ЙлнЙ=йзлбЕбµе= Цбк~к= Йд=ЕЙйбддз=
Йе= Йд= лЙенбЗз= Ьзк~кбз=й~к~= имЙ=л~дЦ~=ЗЙд=ЬмЙЕз= ЗЙд=
йд~нз=йзкн~ЕЙйбддзI=Езгз=лЙ=беЗбЕ~=Йе=Йд=ЗбДмазK==
=
=
=
PK= m~к~= оздоЙк= ~= гзен~к= Йд= ЕЙйбддз= бенкзЗмЕбк= дзл=
ДзнзеЙл= ЗЙ=ЙеЦ~еЕЬЙ= йкЙлЙенЙл= лзДкЙ=Йд= ЕЙйбддз= Йе=
дзл=ЬмЙЕзл=ЗЙд=йд~нз=йзкн~ЕЙйбддз=у=Цбк~к=Йе=Йд=лЙенбЗз=
~енбЬзк~кбз=Ь~лн~=дзЦк~к=Йд=ДдзимЙзK=
pЙ=ймЙЗЙ=~ЗЙг•л=йкзД~к=знкзл=гзЗЙдзл=ЗЙ=ЕЙйбддзл=Йе=
СмеЕбµе= ЗЙд= нбйз= ЗЙ= лмЙдз= ~= дбгйб~к= у= ЗЙ= д~л=
ЕзеЗбЕбзеЙл= ЗЙ= д~= лмЕбЙЗ~З= имЙ= лЙ= ЙеЕмЙенкЙ= EоЙк=
Е~й∞нмдз=`bmfiilp=^`lkpbg^alpТFK=
=^qbk`fþkW=
i~л=зйЙк~ЕбзеЙл=ЗЙ=д~=г~ебймд~Ебµе=ЗЙд=ЕЙйбддз=нбЙеЙе=
имЙ= лЙк= кЙ~дбт~З~л= ддЙо~еЗз= Цм~енЙл= ~йнзл= й~к~=
йкзнЙЦЙклЙ=н~енз=гЙЕ•ебЕ~гЙенЙ=ЗЙд=Езен~Енз=ЗЙ=д~л=
ЕЙкЗ~л=Езгз= йзк= Йд=кбЙлЦз=им∞гбЕз=ЗЙд=Езен~Енз=Езе=
лздмЕбзеЙл=йЙдбЦкзл~лK=
=
=
ifjmfbw^=ab=i^=_lnrfii^=ab=pb`^al=
j~енЙеЙк=д~=Дзимбдд~=ЗЙ=лЙЕ~Зз=дбгйб~=Йл=Ц~к~ен∞~=ЗЙ=
ме=гЙазк=лЙЕ~ЗзK=
NK= sздЕ~к= д~= г•имбе~= Йе= лм= й~кнЙ= йзлнЙкбзк= EоЙк=
Е~й∞нмдз= m^onrb= sboqf`^i= ab= i^= jžnrfk^?F=
нЙебЙеЗз= ЕмбЗ~Зз= ЗЙ= ~ЕзкЗ~клЙ= ЗЙ= ~й~Ц~к= Йд=
бенЙккмйнзк=ЦЙеЙк~д=у=ЗЙ=о~Еб~к=дзл=ЗЙйµлбнзлK=
OK= `зе= д~= г•имбе~= Йе= Йлн~= йзлбЕбµе= дбгйб~к=
ЙлгЙк~З~гЙенЙ= Йд= бенЙкбзк= ЗЙд= Йгй~дгЙ= лзДкЙ= д~=
Дзимбдд~=ЗЙ=лЙЕ~Зз=Йдбгбе~еЗз=д~= ЙоЙенм~д=лмЕбЙЗ~З=
ЗЙйзлбн~З~K= iбгйб~к= ЙлгЙк~З~гЙенЙ= дзл= д~Дбзл= ЗЙ=
~лйбк~ЕбµеK=
=
=
=
j^kqbkfjfbkql=loafk^of^=
=
prpqfqr`fþk= abi= i^_fl= qo^pbol= ab= i^=
_lnrfii^=ab=pb`^al=
`зенкзд~к=Йд=Йлн~Зз=ЗЙ=ЗЙлЦ~лнЙ=ЗЙд=д~Дбз=ЗЙ=лЙЕ~Зз=у=
ЙоЙенм~дгЙенЙ=Цбк~кдз=з=лмлнбнмбкдзK=
m~к~=д~=лмлнбнмЕбµе=Йл=еЙЕЙл~кбзW=
NK= _~а~к=д~=Дзимбдд~=ЗЙ=лЙЕ~Зз=Цбк~еЗз=Ь~Еб~=~Д~аз=д~=
й~д~еЕ~=ENF=ймЙлн~=~д=ЕЙенкз=ЗЙд=нбгµеK=
OK= sздоЙк= ~= Цбк~к= Ь~Еб~= Йд= ЙснЙкбзк= д~= Дзимбдд~= ЗЙ=
лЙЕ~ЗзK=
PK=`зе= д~=Дзимбдд~=ЗЙ=лЙЕ~Зз= Йе=Йлн~=йзлбЕбµе=~Енм~к=
лзДкЙ= д~л= г~кбйзл~л= EOF= ЗЙлнзкебдд•еЗзд~л=
ЕзгйдЙн~гЙенЙ=й~к~=дбДЙк~к=д~=Дзимбдд~=ЗЙ=лЙЕ~ЗзK=
QK= pздн~к= Йд=г~еЦмбнз= EPF=ЗЙд= нмДз=ЗЙ=д~=Дзимбдд~=ЗЙ=
лЙЕ~Зз=у=имбн~к=д~=Дзимбдд~=ЗЙ=лЙЕ~ЗзK=
=
=
RK= aЙлЙеЦ~еЕЬ~к=Йд=ЕбЙккЙ= EQF=ЗЙд= дблнµе= Сба~Ззк=ЗЙд=
д~Дбз=у=л~Е~к=Йд=д~Дбз=й~к~=Цбк~кдз=з=й~к~=лмлнбнмбкдзK=
SK= `зенкзд~к= имЙ= Йд= г~еЦмбнз= у= Йд= нмДз= ЗЙ= д~=
Дзимбдд~= ЗЙ= лЙЕ~Зз= ез= Йлн¨е= зДлнкмбЗзл= у=
ЙоЙенм~дгЙенЙ=Йдбгбе~к=д~=лмЕбЙЗ~ЗK=
m~к~=оздоЙк=~=гзен~к=д~=Дзимбдд~=ЗЙ=лЙЕ~Зз=кЙйЙнбк=Йе=
зкЗЙе=беоЙклз=д~л=зйЙк~ЕбзеЙл=~ккбД~=ЗЙлЕкбйн~лK=
=
=
prpqfqr`fþk= abi= i^_fl= abi^kqbol= ab= i^=
_lnrfii^=ab=pb`^al=
`зенкзд~к=Йд=Йлн~Зз= ЗЙ= ЗЙлЦ~лнЙ= ЗЙд=д~Дбз= ЗЙд~енЙкз=
ЗЙ=д~=Дзимбдд~=у=ЙоЙенм~дгЙенЙ=лмлнбнмбкдзK=
m~к~=д~=лмлнбнмЕбµе=Йл=еЙЕЙл~кбзW=
NK= _~а~к=д~=Дзимбдд~=ЗЙ=лЙЕ~Зз=Цбк~еЗз=Ь~Еб~=~Д~аз=д~=
й~д~еЕ~=ENF=ймЙлн~=~д=ЕЙенкз=ЗЙд=нбгµеK=
OK= sздоЙк= ~= Цбк~к= Ь~Еб~= Йд= ЙснЙкбзк= д~= Дзимбдд~= ЗЙ=
лЙЕ~ЗзK=
=
=
=
PK= `зе= д~= Дзимбдд~= ЗЙ= лЙЕ~Зз= Йе= Йлн~= йзлбЕбµе=
йкзЕЙЗЙк=~=ЗЙлгзен~кд~=у=ЗЙлйм¨л=Йд=д~Дбз=нк~лЙкз=ЗЙ=
д~=Дзимбдд~=ЗЙ=лЙЕ~Зз=EоЙк=Е~й∞нмдз=prpqfqr`fюk=abi=
i^_fl=qo^pbol=ab=i^=_lnrfii^=ab=pb`^alТFK=
QK= nмбн~к= д~л= г~кбйзл~л= ERF= ЕздзЕ~З~л= Йе= д~= й~кнЙ=
лмйЙкбзк= ЗЙд= ЕмЙкйз= ЗЙ= д~= Дзимбдд~= ЗЙ= лЙЕ~Зз=
лЙй~к~еЗз= дмЙЦз= д~л= Ззл= й~кнЙл= гЙн•дбЕ~л= имЙ= дз=
ЕзгйзеЙе=й~к~=имбн~к=Йд=д~Дбз=ЗЙд~енЙкзK=
RK= bеам~Ц~к= Езе= ме= ЕЬзккз= ЗЙ= ~Цм~= нзЗзл= дзл=
ЕзгйзеЙенЙлK=
m~к~=оздоЙк=~=гзен~к=д~=Дзимбдд~=ЗЙ=лЙЕ~Зз=кЙйЙнбк=Йе=
зкЗЙе=беоЙклз=д~л=зйЙк~ЕбзеЙл=~ккбД~=ЗЙлЕкбйн~лK=
=
=
=
`lkqoli=ab=crk`flk^jfbkql=
=
bi=jlqlo=ab=^pmfo^`fþk=kl=crk`flk^=
NK= `зенкзд~к=Йд=Йлн~Зз=ЗЙ=Е~кЦ~=ЗЙ= д~л=Д~нЙк∞~лI=имЙ=
Йл=облбДдЙ=~ЕЕбзе~еЗз= йкбгЙкз=Йд= бенЙккмйнзк=ЦЙеЙк~д=
ENF=EоЙк=Е~й∞нмдз=ob`^od^=ab=i^p=_^qboр^pТFK=
OK= `згйкзД~к= имЙ= Йд= бенЙккмйнзк= ЗЙд= гзнзк= ЗЙ=
~лйбк~Ебµе=EOF=Йлн¨=~Енбо~Зз=оЙкбСбЕ~еЗз=имЙ=Йд=нЙлнбЦз=
ЕзккЙлйзеЗбЙенЙ=оЙкЗЙ=Йлн¨=ЙеЕЙеЗбЗзK=
PK= `зенкзд~к=Йд=ебоЙд=Йе=Йд=ЗЙйµлбнз=ЗЙ=кЙЕмйЙк~Ебµе=
EоЙк= Е~й∞нмдз= afpmlpfqfsl= ob_lp^abolТF= у= лб==
еЙЕЙл~кбзI=о~Еб~к=Йд=ЗЙйµлбнзK=
pб= Йд= ЗЙлйЙкСЙЕнз=Езенбем~I= Езен~Ен~к=Езе=Йд=ЕЙенкз=
ЗЙ=~лблнЙеЕб~=н¨ЕебЕ~=~мнзкбт~ЗзK=
=
Page 25

===
b= = b=
=
=
OR
=
=
bi=jlqlo=abi=`bmfiil=kl=crk`flk^=
NK= `зенкзд~к=Йд=Йлн~Зз=ЗЙ=Е~кЦ~=ЗЙ= д~л=Д~нЙк∞~лI=имЙ=
Йл=облбДдЙ=~ЕЕбзе~еЗз= йкбгЙкз=Йд= бенЙккмйнзк=ЦЙеЙк~д=
ENF=EоЙк=Е~й∞нмдз=ob`^od^=ab=i^p=_^qboр^pТFK=
OK= `згйкзД~к= имЙ= Йд= бенЙккмйнзк= ЗЙд= гзнзк= ЗЙд=
ЕЙйбддз= EOF= Йлн¨= ~Енбо~Зз= оЙкбСбЕ~еЗз= имЙ= Йд= нЙлнбЦз=
кЙд~нбоз=оЙкЗЙ=Йлн¨=ЙеЕЙеЗбЗзK=
PK= ^ЕЕбзе~к=д~л=г~еЙн~л=бебЕбзLй~кз=EPFK=
pб= Йд= ЗЙлйЙкСЙЕнз=Езенбем~I= Езен~Ен~к=Езе=Йд=ЕЙенкз=
ЗЙ=~лблнЙеЕб~=н¨ЕебЕ~=~мнзкбт~ЗзK=
=
=
=
bi=^dr^=bk=bi=`bmfiil=kl=bp=prcf`fbkqb=
NK= `згйкзД~к=имЙ=Йд=бенЙккмйнзк=ЗЙ=д~=ЙдЙЕнкзо•домд~=
ENF= Йлн¨= ~Енбо~Зз= оЙкбСбЕ~еЗз=имЙ=Йд=нЙлнбЦз=кЙд~нбоз=
оЙкЗЙ=Йлн¨=ЙеЕЙеЗбЗзK=
OK= `зенкзд~к= Йд= ебоЙд= ЗЙд= д∞имбЗз= Йе= Йд= ЗЙйµлбнз=
лздмЕбµе= EоЙк=Е~й∞нмдз= abmюpfql=ab= i^= plir`fюk=
abqbodbkqbТFK=
PK= `згйкзД~к= имЙ= Йд= кЙЦмд~Ззк= ЗЙ= Е~мЗ~д= ЗЙ= д~=
лздмЕбµе=ЗЙнЙкЦЙенЙ=EPF=ймЙлнз=~енЙкбзкгЙенЙ=ЗЙД~аз=
ЗЙд=ЗЙйµлбнз=лздмЕбµе=Йлн¨=лмСбЕбЙенЙгЙенЙ=~ДбЙкнзK=
QK= ^ЕЕбзе~к=д~л=г~еЙн~л=бебЕбзLй~кз=EOFK=
RK= `згйкзД~к=имЙ=Йд=Сбднкз=лздмЕбµе=EQF=Йлн¨=дбгйбзK=
pб= Йд= ЗЙлйЙкСЙЕнз=Езенбем~I= Езен~Ен~к=Езе=Йд=ЕЙенкз=
ЗЙ=~лблнЙеЕб~=н¨ЕебЕ~=~мнзкбт~ЗзK=
=
=
=
=
i^=jžnrfk^=kl=ifjmf^=_fbk=
NK= bд= ЕЙйбддз= ез= нбЙеЙ= д~л= ЕЙкЗ~л= ЗЙ= д~= ЗбгЙелбµе=
~йкзйб~З~W=мнбдбт~к=лзд~гЙенЙ=ЕЙйбддзл=зкбЦбе~дЙлK=m~к~=
ме~= лмЦЙкЙеЕб~I= Езен~Ен~к= Йд= ЕЙенкз= ЗЙ= ~лблнЙеЕб~=
н¨ЕебЕ~=~мнзкбт~ЗзK=
OK= i~=лздмЕбµе=ЗЙнЙкЦЙенЙ=ез=Йл=лмСбЕбЙенЙW=~Дкбк=г•л=
Йд=кЙЦмд~Ззк=ЗЙ=Е~мЗ~д=ЗЙ=д~=лздмЕбµе=ЗЙнЙкЦЙенЙ=EPFK=
PK= `зенкзд~к=имЙ=Йд=ЗЙнЙкЦЙенЙ=Йлн¨=Йе=Йд=йзкЕЙен~аЙ=
~ЕзелЙа~ЗзK=
`зелмдн~к=Йд=ЕЙенкз= ЗЙ=~лблнЙеЕб~=н¨ЕебЕ~=~мнзкбт~Зз=
й~к~=ме~=лмЦЙкЙеЕб~K=
=
i^= _lnrfii^= ab= pb`^al= kl= pb`^=
mbocb`q^jbkqb=
NK= `зенкзд~к=имЙ=дзл= д~Дбзл=ЗЙ= д~=Дзимбдд~=ЗЙ=лЙЕ~Зз=
Йлн¨е=дбгйбзлK=
OK= `зенкзд~к=имЙ=Йд=г~еЦмбнз=ЗЙд=нмДз=ЗЙ=~лйбк~Ебµе=
Йлн¨= ЕзеЙЕн~Зз= ЕзккЙЕн~гЙенЙ= Йе= лм= ~дза~гбЙенз=
лзДкЙ=Йд=ЗЙйµлбнз=ЗЙ=кЙЕмйЙк~Ебµе=у=лзДкЙ=д~=Дзимбдд~=
ЗЙ=лЙЕ~ЗзK=
PK= fенЙкоЙебк= лзДкЙ= Йд= Сбднкз= ЗЙ= ~лйбк~Ебµе=
дбгйб•еЗздзK=
QK= pмлнбнмбк=дзл=д~Дбзл=лб=Ц~лн~ЗзлK=
RK= `зенкзд~к= имЙ= Йд= бенЙккмйнзк= ЗЙд= гзнзк= ЗЙ=
~лйбк~Ебµе=Йлн¨=ЙеЕЙеЗбЗзK=
SK= `зенкзд~к=Йд=ебоЙд=Йе=Йд=ЗЙйµлбнз=ЗЙ=кЙЕмйЙк~Ебµе=
EоЙк= Е~й∞нмдз= afpmlpfqfsl= ob_lp^abolТF= у= лб==
еЙЕЙл~кбзI=о~Еб~к=Йд=ЗЙйµлбнзK=
=
molar``fþk=bu`bpfs^=ab=bpmrj^=
`зенкзд~к= имЙ=лЙ= Ь~у~= ЙгйдЙ~Зз= ме=ЗЙнЙкЦЙенЙ= ЗЙ=
Йлймг~= Езенкзд~З~K= bоЙенм~дгЙенЙ= ~¥~Збк= ме~=
г∞ебг~= Е~енбЗ~З= ЗЙ= д∞имбЗз= ~енбЙлймг~енЙ= Йе= Йд=
ЗЙйµлбнз=ЗЙ=кЙЕмйЙк~ЕбµеK=
e~у= имЙ= нЙеЙк= Йе= ЕмЙен~= имЙ= Ь~у= ме~= г~узк=
йкзЗмЕЕбµе= ЗЙ= Йлймг~= Ем~еЗз= Йд= лмЙдз= Йлн•= йзЕз=
лмЕбзK= bе= ЙлнЙ= Е~лз= Збдмбк= ~∫е= г•л= д~= лздмЕбµе=
ЗЙнЙкЦЙенЙK=
=
iba=EOFI=EPF=v=EQF=pb=mlkbk=ab=`lilo=olgl=
pб= д~= г•имбе~= Йлн•= Йе= зкЗЙе= ЗЙ= г~кЕЬ~I= Езе= Йд=
бенЙккмйнзк=ЦЙеЙк~д=ENF=ЙеЕЙеЗбЗз=оЙкЗЙ=у=мез=ЗЙ=дзл=
нкЙл=дЙЗ=EOFI=EPF=з=EQF= Е~гДб~=ЕздзкI= ЗЙ=оЙкЗЙ= ~=кзазI=
лбЦебСбЕ~= имЙ= Йл= Йе= Емклз= ме~= йкзнЙЕЕбµе=
~гйЙкбзг¨нкбЕ~I=йзк=ЙаЙгйдзW=
J=iba=EOF=olglW=Йд=гзнзк=ЗЙд=ЕЙйбддз=Йлн•=Ь~ДбЙеЗз=ме=
ЙлСмЙктз=н~е=Цк~еЗЙK=
J=iba=EPF=olglW=Йд=гзнзк=ЗЙ=~лйбк~Ебµе=Йлн•=~йбк~еЗз=
~Цм~=у=йзк=дз=н~енз=Йлн•=Сзкт~еЗз=гмЕЬзK=
J=iba=EQF=olglW=д~=ДзДбе~=ЗЙ=д~=ЙдЙЕнкзо•домд~=ймЙЗЙ=
лЙк=Йе=ЕзкнзЕбкЕмбнзK=
m~к~= кЙлн~ДдЙЕЙкI= ~й~Ц~к=Йд= бенЙккмйнзк= ЦЙеЙк~д= ENFI=
ЙлйЙк~к=мезл=гбемнзл=у=ЗЙлйм¨л=ЙеЕЙеЗЙк=знк~=оЙтK=
pб= Йд= ЗЙлйЙкСЙЕнз=Езенбем~I= Езен~Ен~к=Езе=Йд=ЕЙенкз=
ЗЙ=~лблнЙеЕб~=н¨ЕебЕ~=~мнзкбт~ЗзK=
=
=
=
=
=
=
=
=
=
=
=
=
=
=
=
=
=
=
=
=
=
=
=
=
=
=
=
=
=
=
=
=
=
=
=
=
=
=
=
=
=
=
=
=
=
=
=
=
=
=
=
=
=
=
=
=
=
=
=
=
=
=
=
=
=
=
=
=
=
=
=
=
=
=
=
=
=
=
=
=
=
=
=
=
=
=
=
=
=
=
=
=
=
=
=
=
=
=
=
=
Page 26
===
b= = b=
=
=
OS
j^kqbkfjfbkql=moldo^j^al=
=
fkqbosbk`fþk= af^of^= pbj^k^i= loafk^oflLjbkpr^ijbkqb=
ifjmfbw^=abmþpfql=ab=ob`rmbo^`fþk=
•
= = =
ifjmfbw^=cfiqol=ab=^pmfo^`fþk=
•
== = =
ifjmfbw^=abi=`bmfiil=
•
== = =
abpjlkq^gb=abi=`bmfiil=
•
== = =
ifjmfbw^=ab=i^=_lnrfii^=ab=pb`^al=
•
== = =
prpqfqr`fþk=abi=i^_fl=abi^kqbol=ab=i^=_lnrfii^=ab=pb`^al= = =
•
=лб=еЙЕЙл~кбз=
prpqfqr`fþk=abi=i^_fl=qo^pbol=ab=i^=_lnrfii^=ab=pb`^al= = =
•
=лб=еЙЕЙл~кбз=
ifjmfbw^=abi=qr_l=ab=i^=_lnrfii^=ab=pb`^al= = =
•
=
ifjmfbw^=abi=abmþpfql=plir`fþk= = =
•
=
ifjmfbw^=cfiqol=plir`fþk=abqbodbkqb= =
•
= =
=
=
=
=
=
=
=
=
=
=
=
=
=
=
=
=
=
=
=
=
=
=
=
=
=
=
=
=
=
=
=
=
=
=
`bmfiilp=^`lkpbg^alp= =
iзл=ЕЙйбддзл=нбЙеЙе=имЙ=лЙк=ЙдЙЦбЗзл=Йе=СмеЕбµе=ЗЙд=нбйз=ЗЙ=лмЙдз=у=ЗЙ=д~=лмЕбЙЗ~З=имЙ=лЙ=д~о~K=
bд=г~нЙкб~д=ЙгйдЙ~Зз=у=Йд=Зб•гЙнкз=ЗЙ=д~л=ЕЙкЗ~л=лзе=дзл=ЙдЙгЙензл=имЙ=ЗбСЙкЙеЕб~е=дзл=ЕЙйбддзлK=
=
j^qbof^i= `^o^`qboðpqf`^p=
mmi=EmздбйкзйбдЙезF= _мЙе~=кЙлблнЙеЕб~=~д=ЗЙлЦ~лнЙK=j~енбЙеЙ=д~л=Е~к~ЕнЙк∞лнбЕ~л=Езе=~Цм~=Е~дбЙенЙ=Ь~лн~=NQMшc=ESMш`FK=kз=Йл=ЬбЦкзлЕµйбЕзK=
qvkbu=
=
i~л=ЕЙкЗ~л=Йлн•е=кЙ~дбт~З~л=Йе=еудзе=Езе=д~=белЙкЕбµе=ЗЙ=Цк•емдзл=~Дк~лбозлK=bгйдЙ~к=Езе=Е~мнЙд~=й~к~=ез=к~у~к=Йд=лмЙдз=з=~ккмбе~к=Йд=
дмлнкЙK=
bpmbplo=ab=i^p=`boa^p=
=
=
=
=
i~л=ЕЙкЗ~л=ЗЙ=г~узк=ЙлйЙлзк=лзе=г•л=к∞ЦбЗ~л=у=йзк=ЕзелбЦмбЙенЙ=Ь~у=имЙ=ЙгйдЙ~кд~л=лзДкЙ=лмЙдзл=дблзл=з=Езе=бенЙко~дзл=йЙимЙ¥злK=
m~к~=лмЙдзл=бккЙЦмд~кЙл=з=Езе=кЙдбЙоЙл=з=Езе=бенЙко~дзл=ЬзеЗзл=Йл=~ЕзелЙа~ДдЙ=ЙгйдЙ~к=ЕЙкЗ~л=г•л=лм~оЙл=имЙ=йЙеЙнк~е=г•л=
С•ЕбдгЙенЙ=Йе=йкзСмеЗбЗ~ЗK=e~у=имЙ=нЙеЙк=Йе=ЕмЙен~=имЙ=Ем~еЗз=д~л=ЕЙкЗ~л=ЗЙд=ЕЙйбддз=Йлн•е=ЗЙлЦ~лн~З~л=у=йзк=ЕзелбЦмбЙенЙ=
ЗЙг~лб~Зз=Езкн~лI=лЙ=омЙдоЙе=к∞ЦбЗ~лI=у~=ез=дзЦк~е=йЙеЙнк~к=у=дбгйб~к=Йе=йкзСмеЗбЗ~ЗI=ймЙл=Езгз=Йе=Е~лз=ЗЙ=ЕЙкЗ~л=ЗЙг~лб~Зз=
ЦкмЙл~л=Йд=ЕЙйбддз=нбЙеЗЙ=~=л~дн~кK=
afp`l=ab=^oo^pqob=
=
bд=ЗблЕз=ЗЙ=~кк~лнкЙ=Йлн•=Йимбй~Зз=ЗЙ=ме~=лЙкбЙ=ЗЙ=ймен~л=ЗЙ=~еЕд~=имЙ=йЙкгбнЙе=кЙнЙеЙк=у=~кк~лнк~к=Йд=ЗблЕз=~Дк~лбоз=Eй~ЗF=Змк~енЙ=
Йд=нк~Д~азK=bд=ЗблЕз=~Дк~лбоз=Йл=~ЕзелЙа~Зз=й~к~=лмйЙкСбЕбЙл=дбл~лK=
=
=
jžnrfk^= `þafdl= `^kqfa^a= abp`ofm`fþk= bjmibl=
_a=NT=S
=
QUVMPNOM
=N=
`Ййбддз=mmi=MIS=Х=
QPM
ããLNTÒ
=
pмЙдзл=дблзл=Езе=амен~л=ЙлнкЙЕЬ~л=у=лмЕбЙЗ~З=йЙклблнЙенЙK
=
=
QUVMPNPM
=N=
`Ййбддз=mmi=MIV
=Õ=QPM
ããLNTÒ
=
pмЙдзл=Йе=г~нЙкб~д=кЙлблнЙенЙ=у=й~кнбЕмд~кгЙенЙ=лмЕбзл
K
=
=
QUVMPNQM
=N=
`Ййбддз=qvkbu=Х=
QPM
ããLNTÒ
=
pмЙдзл=Йе=г~нЙкб~д=кЙлблнЙенЙ=у=й~кнбЕмд~кгЙенЙ=лмЕбзлK
=
=
QUVMPNRM
=N=
`Ййбддз=R
J
ãáñ=Õ=
QPM
ããLNTÒ
=
m~к~=Ем~димбЙк=нбйз=ЗЙ=лмЙдзK
=
=
QUUMPMOM
=N=
aáëÅç=~êê~
ëíêÉ=Õ=QOR
ããLNSKTÒ
=
`зе=й~З=ЗЙ=NTТ=й~к~=д~=дбгйбЙт~=ЗЙ=лмйЙкСбЕбЙл=дбл~лK
=
=
QUUMPMRM
=N=
aáëÅç=~êê~ëíêÉ=Õ=
QOR
ããLNSKTÒ=
H=ЕЙенЙк=дзЕв=
`зе=й~З=ЗЙ=NTТ=й~к~=д~=дбгйбЙт~=ЗЙ=лмйЙкСбЕбЙл=дбл~лK
=
=
QUUMPMSM
=N=
aáëÅç=~êê~ëíêÉ=Õ=
QOR
ããLNSKTÒ
=
H=ЕЙенЙк=дзЕв=
`çå=é
~З=ЗЙ=NTТ=й~к~=д~=дбгйбЙт~=ЗЙ=лмйЙкСбЕбЙл=дбл~лK
=
Page 27
Por favor, suministre información adicional sobre
Formulario de
Registro de
Garantía
Los equipos Tornado (marque las opciones de abajo)
__Fregadoras Automáticas __Barredoras
__Máquinas para pisos a propano __Máquina para piso giratoria
__Pulidoras de Alta Velocidad __Aspiradoras de alfombras
__Extractores y Limpiadores de alfombras __Aspiradoras en Seco/Húmedo
__Limpiadoras a vapor __Aspiradoras grandes
__Equipos con conductor __Lavadoras a presión
Vea la información completa de los productos en www.tornadovac.com
Agente de Venta: (Obligatorio) _________________________
Por favor, completar en letra de imprenta clara
Compañía/Institución
____________________________________
Nombre del contacto Cargo
____________________________________
Dirección Ciudad/Estado/Código Postal
____________________________________
Teléfono Fax
____________________________________
Fecha de compra Email
Ver la información en placa de metal o etiqueta blanca de la unidad
TIPO DE MÁQUINA/NÚMERO DE MODELO: NÚMERO DE SERIE DE LA MÁQUINA:
1. 1.
2. 2.
3. 3.
4. 4.
Descripción de las Instalaciones (por favor, marque con un círculo todas las que correspondan)
1. Escuela 9. Hospital 17. Ocinas del gobierno estadounidense
2. Tienda minorista 10. Residencia geriátrica 18. Otras dependencias del gobierno
3. Restaurant 11. Institución religiosa 19. Auto-servicio
4. Edicio de ocinas 12. Aeropuerto 20. Aeropuerto
5. Servicio de limpieza 13. Depósito 21. ONG
6. Fabricación liviana 14. Departamento/Condominio 22. Otra (especicar)
7. Fabricación pesada 15. Depósito
8. Facultad/Universidad 16. Supermercado
¿Cómo conoció los equipos de mantenimiento y limpieza Tornado?
Supercie total de pisos duros Supercie total alfombrada
o Me contactó un agente local o 0-10.000 (0-930) o 0-10.000 (0-930)
o Ya tenía experiencia con los pro-
ductos Tornado
o Reputación/Recomendación o 50-250.000 (4.650-23.250) o 50-250.000 (4.650-23.250)
o Publicidad o Más de 250.000 (más de
o Correo directo
o Internet
o Otra forma
Esta garantía no cubre los daños o defectos ocasionados por abuso, negligencia o mal uso. Dependiendo de su máquina especíca, se podrán
aplicar otros ítems. En caso de defectos, la garantía se anulará si intenta
reparar la máquina en un Centro de Reparaciones de Tornado No Autorizado
2017 Tornado Industries. Todos los derechos reservados.
X8449-TOR
o 10-50.000 (930-4.650) o 10-50.000 (930-4.650)
23.250)
______________
______________
En pies cuadrados (metros)
Pies cuadrados (metros cuadrados)
o Más de 250.000 (más de 23.250)
Sírvase devolver a:
Tornado Industries
3101 Wichita Court
Fort Worth, TX 76140
Fax: 817-551-0719
o en linea en
www.tornadovac.com
Page 28

===
c= = c=
=
=
OV
pljj^fob=
=
ibdbkab=q^_ib^r=ab=_loa=bq=`lkqolibp= PM
ibdbkab=j^`efkb= PM
`^o^`qbofpqfnrbp=qb`ekfnrbp= PN
^s^kqJmolmlp= PO
klojbp=dbkbo^ibp=ab=pb`rofqb= PO
pvj_lildfb= PO
^s^kq=ab=iDrqfifp^qflk= PP
a¨йд~ЕЙгЙен=ЗЙ=д~=г~ЕЬбеЙ=ЙгД~дд¨Й= PP
a¨Д~дд~ЦЙ=ЗЙ=д~=г~ЕЬбеЙ= PP
jзмоЙгЙен=Зм=ЦмбЗзе= PP
`зееЙсбзе=Д~ннЙкбЙл= PP
oЙЕЬ~кЦЙ=ЗЙл=Д~ннЙкбЙл= PP
bдбгбе~нбзе=ЗЙл=Д~ннЙкбЙл= PP
o¨лЙкозбк=ЗЙ=к¨Емй¨к~нбзе= PP
o¨лЙкозбк=ЗЙ=д~=лздмнбзе=З¨нЙкЦЙенЙ= PP
kbqqlv^db=abp=plip= PQ
^ЕнбзееЙгЙен=ЗЙ=д~=г~ЕЬбеЙ= PQ
oзн~нбзе=Езгйд≠нЙ=Зм=лмЕЙмк= PQ
p¨ÅÜ~ÖÉ=Éå=ã~êÅÜÉ=~êêá≠êÉ= PQ
oЙдЙо~ЦЙ=Зм=лмЕЙмк= PQ
o¨Цд~ЦЙ=Зм=ЦмбЗзе= PQ
aблйзлбнбС=нкзй=йдЙбе= PR
^oobq=ab=i^=j^`efkb=^=i^=cfk=ar=kbqqlv^db= PR
bkqobqfbk=glrok^ifbo= PR
kЙннзу~ЦЙ=Зм=к¨лЙкозбк=ЗЙ=к¨Емй¨к~нбзе= PR
sбЗ~еЦЙ=Йн=еЙннзу~ЦЙ=Зм=к¨лЙкозбк=ЗЙ=д~=лздмнбзе=Йн=Зм=СбднкЙ= PR
kЙннзу~ЦЙ=Зм=СбднкЙ=ЗD~лйбк~нбзе= PR
mзлбнбзееЙгЙен=оЙкнбЕ~д=ЗЙ=д~=г~ЕЬбеЙ= PR
kЙннзу~ЦЙ=ЗЙ=д~=ДкзллЙ= PS
a≠гзен~ЦЙLгзен~ЦЙ=ЗЙ=д~=ДкзллЙ= PS
kЙннзу~ЦЙ=Зм=лмЕЙмк= PS
bkqobqfbk=loafk^fob= PS
oЙгйд~ЕЙгЙен=ЗЙ=д~=Д~оЙннЙ=~ккб≠кЙ=Зм=лмЕЙмк= PS
oЙгйд~ЕЙгЙен=ЗЙ=д~=Д~оЙннЙ=~о~ен=Зм=лмЕЙмк= PS
`lkqolib=ab=clk`qflkkbjbkq= PS
iЙ=гзнЙмк=ЗD~лйбк~нбзе=еЙ=СзеЕнбзееЙ=й~л= PS
iЙ=гзнЙмк=ЗЙ=д~=ДкзллЙ=еЙ=СзеЕнбзееЙ=й~л= PT
iDЙ~м=лмк=д~=ДкзллЙ=еDЙлн=й~л=лмССбл~енЙ= PT
i~=г~ЕЬбеЙ=еЙ=еЙннзбЙ=й~л=ДбЙе= PT
iЙ=лмЕЙмк=еЙ=л≠ЕЬЙ=й~л=й~кС~бнЙгЙен= PT
mкзЗмЕнбзе=ЙсЕЙллбоЙ=ЗЙ=гзмллЙ= PT
iЙЗ=EOFI=EPF=Йн=EQF=имб=ЗЙобЙен=кзмЦЙ= PT
bkqobqfbk=moldo^jjb= PU
_olppbp=`lkpbfiibbp= PU
d^o^kqfb=ifjfq°b=ab=i^=molqb`qflk=È=ilkd=qbojb=ab=iÛ^`ebqbro= PV
=
Page 29
Garantie limitée à long terme pour la protection des achats
Tornado Industries, Inc (Tornado) garantit au client utilisateur nal que les produits Tornado
seront exempts de défauts de matériaux et de fabrication pour la durée décrite ci-dessous.
Cette garantie limitée NE couvre PAS les machines et/ou les composants soumis à une
usure normale, des dégâts qui se produisent en cours de transport, les défaillances résultant d’une modication, un accident, un environnement d’exploitation inapproprié, une
mauvaise utilisation, l’abus, la négligence ou l’entretien inapproprié. Pour plus de détails,
contactez votre distributeur agréé Tornado, le Centre de service, ou le Service technique
Tornado. Les représentants de vente et du service Tornado ne sont pas autorisés de
supprimer ou modier les conditions de cette garantie, ou d’augmenter les obligations de
Tornado en vertu de la garantie.
10 ans*
Les réservoirs d’eau en plastique et les pièces moulées pour rotation
2 ans*
Les pièces sur tous les équipements de nettoyage Tornado
1 an*
Le travail sur tous les équipements de nettoyage Tornado
1 an*
La garantie des batteries, un an au prorata.
Toutes les garanties de la batterie sont traitées directement par le fabricant de la batterie, sur une année au prorata
Les conditions sont sujettes à changement sans préavis.
1. Sauf toutes les ventilateur-sécheurs, de côté et descendant, les ventilateurs d’isolation, TV2 SS, CV 30, CV 38, CK14/1 PRO, CK14/2 PRO, SWM
31/9, CK LW 13/1, CK LW 13/1 ROAM, Double CV 38/48, PV6, PV10 PV6 ROAM, Wall Mount, de Windshear ™, toutes les balayeuses-brosses,
les aspirateurs à traineau sec, et tous les chargeurs sont garantis pendant 1 (un) an pour les pièces et le travail.
2. Tous les articles des pièces non-usures acheté après l’expiration de la garantie sont garantis pendant 90 jours.
3. La garantie commence à la date de la vente au consommateur ou, à la discrétion de Tornado, 6 mois après que le concessionnaire
ait acheté l'appareil de Tornado, selon la première éventualité.
4. L’EB 30 est garanti pour une période de 90 jours pour les pièces et le travail
5. La garantie pour les moteurs utilisés sur les appareils au propane est limitée à la garantie du fabricant du moteur.
6. Les laveuses à conducteur porté sont garanties pour 24 mois pour les pièces, pour 6 mois de travail ou pour 1 000 heures, selon la première
éventualité.
Note: Tornado, The Latest Dirt, Floorkeeper, Carpetkeeper, Carpetrinser,
Carpetrinser/Dryer, Headmaster, Taskforce, PAC-VAC, T-Lite, Glazer,
Windshear, Max-Vac, et Trot-Mop sont les marques de Tornado Industries
Formulaire F2662. © 2017. Tous droits réservés
Site Web: www.tornadovac.com
Téléphone 1.800.VACUUMS
Télécopieur: 817-551-0719
Adresse: 3101 Wichita Court
Fort Worth, TX 76140
1-800-VACUUMS 90 Years of Cleaning Innovation A Tacony Company
Page 30

===
c= = c=
=
=
PM
ibdbkab=q^_ib^r=ab=_
loa=bq=`lkqolibp
=
=
NK fkqboormqbro=dbkbo^i=bq=qbjlfk=ab=pfdk^ifp^qflk=`loobpmlka^kq=
OK fkqboormqbro=jlqbro=ab=i^=_olppb=bq=qbjlfk=`loobpmlka^kq=
PK fkqboormqbro=jlqbro=aD^pmfo^qflk=bq=qbjlfk=`loobpmlka^kq=
QK fkqboormqbro=bib`qols^kkb=bq=qbjlfk=`loobpmlka^kq=
=
=
RK ibsfbo=ab=obibs^db=pr`bro=
SK mlfdkbbp=ab=qfjlk=
TK ibsfbop=mobpbk`b=eljjb=
UK ibsfbo=ab=ab_il`^db=drfalk=
=
=
=
ibdbkab=j^`efkb
=
=
VK qrv^r=ab=sfa^kdb=obpboslfo=ab=ob`rmbo^qflk=
NMK `lrsbo`ib=aÛ^pmfo^qflk=
NNK q^_ib^r=ab=_loa=
NOK iba=ab=pfdk^ifp^qflk=kfsb^r=ab=`e^odb=_^qqbofbp=E^djF=
NPK mi^nrb=ab=j^qof`rib=
NQK cf`eb=aD^ifjbkq^qflk=bib`qofnrb=`e^odbro=abp=_^qqbofbp=
NRK _lr`elk=objmifpp^db=plirqflk=abqbodbkqb=
NSK obpboslfo=ab=i^=plirqflk=abqbodbkqb=
=
=
=
=
NTK _lr`elk=objmifpp^db=plirqflk=abqbodbkqb=
NUK obpboslfo=ab=ob`rmbo^qflk=
NVK olrbp=
OMK bkpbj_ib=ab=pr`bro=
ONK `^oqbo=
OOK cfiqob=plirqflk=abqbodbkqb=
OPK obdi^db=ab_fq=ab=i^=plirqflk=abqbodbkqb=
=
=
=
=
=
Page 31

===
c= = c=
=
=
PN
`^o^`qbofpqfnrbp=qb`ekfnrbp====
=
=
i~кЦЙмк=ЗЙ=нк~о~бд= ããLáå= QPMLNT=
i~кЦЙмк=ЗЙ=лмЕЙмк= ããLáå= RNMLOM=
qЙелбзе=ЗЙл=Д~ннЙкбЙл== s= OQ=
`~й~Ебн¨=ЗЙл=Д~ннЙкбЙл= ^Ü=R= PQ=
mìáëë~åÅÉ=áåëí~ää¨É= tL^= STMLOU=
`~é~Åáí¨=ÇÉ=íê~î~áä=Eã~ñF= ãOLÜ==ëèÑíLÜ= NRMRLNNQUP=
aб~г≠нкЙ=ЗЙ=д~=ДкзллЙ= ããLáå= QPMLNT=
sбнЙллЙ=ЗЙ=кзн~нбзе=ЗЙ=д~=ДкзллЙ= êéã= NVM=
mкЙллбзе=лмк=д~=ДкзллЙ= âÖLäÄëK= PRLTT=
a¨йкЙллбзе=ЗD~лйбк~нбзе= ãÄ~êLï~íÉê=äáÑí= UPLPP=
qуйЙ=ЗD~о~еЕЙгЙен= = ëÉãá=~ìíçãK=
mÉåíÉ=ã~ñáã~äÉ= B= O=
o¨лЙкозбк=ЗDЙ~м=йкзйкЙ= äLÖ~ä= OOLS=
o¨лЙкозбк=ЗЙ=к¨Емй¨к~нбзе= äLÖ~ä= OOLS=
iзеЦмЙмк=г~ЕЬбеЙ=EгбеF= ããLáå= TVPLPN=
e~мнЙмк=г~ЕЬбеЙ= ããLáå= SMPLOQ=
i~кЦЙмк=г~ЕЬбеЙ= ããLáå= RNULOM=
mзбЗл=ЗЙ=д~=г~ЕЬбеЙ=E¶=обЗЙI=~оЙЕ=дЙл=Д~ннЙкбЙлF= âÖLäÄëK= USIRLNVN=
mзбЗл=ЗЙл=Д~ннЙкбЙл= âÖLäÄëK= PMLSS=
qÉãéë=ÇÉ=êÉÅÜ~êÖÉ=ã~ñ= Ü= NM=
`згй~кнбгЙен=ЗЙл=Д~ннЙкбЙл=Ei=с=i=с=eF= ããLáå= PQS=с=OMT=с=ONMLNQ=с=UIN=с=UIO=
kбоЙ~м=ЗЙ=йкЙллбзе=~ЕзмлнбимЙ=EлЙдзе=дЙл=езкгЙл=bk=SMQ|MNF= Ç_=E^F= YTM=
`ä~ëëÉ= = fff=
aЙЦк¨=ЗЙ=йкзнЙЕнбзе= fm= uP=
`Ь~кЦЙмк=ЗЙл=Д~ннЙкбЙлW=оздн~ЦЙ= s=ú= OPM=
`Ь~кЦЙмк=ЗЙл=Д~ннЙкбЙлW=Ск¨имЙеЕЙ=Зм=к¨лЙ~м= eò= RM=
`Ь~кЦЙмк=ЗЙл=Д~ннЙкбЙлW=Ед~ллЙ= = f=
Page 32

===
c= = c=
=
=
PO
^s^kqJmolmlp=
kзмл= озмл= кЙгЙкЕбзел= йзмк= ~озбк= ЕЬзблб= езнкЙ= г~J
ЕЬбеЙK=`ЙннЙ=г~ЕЬбеЙ=Йлн=меЙ=~мнзд~оЙмлЙ=имб= обЙен=
мнбдбл¨Й=йзмк=дЙ=еЙннзу~ЦЙ=беЗмлнкбЙд=Йн=Ебобд=йзмк=нзмн=
нуйЙ= ЗЙ= кЙоЖнЙгЙенI= ЙсЕдм= дЙ= еЙннзу~ЦЙ= ЗЙл= гзJ
имЙннЙлK=aмк~ен=л~= нк~елд~нбзеI=дЫ~Енбзе=ЕзгДбе¨Й=ЗЙ=
д~=ДкзллЙ=Йн=ЗЙ=д~= лздмнбзе=З¨нЙкЦЙен=Йед≠оЙ=д~=л~дблJ
лмкЙ=имб=обЙен=к¨Емй¨к¨Й=~оЙЕ= дЙ=ЦкзмйЙ=ЗЫ~лйбк~нбзе=
~ккб≠кЙI=Йе=йЙкгЙнн~ен= ме= л¨ЕЬ~ЦЙ= й~кС~бн=Йн=бгг¨J
Зб~н=Зм=лздK=
i~=г~ЕЬбеЙ=Ззбн=ЖнкЙ=мнбдбл¨Й=лЙмдЙгЙен=З~ел=ЕЙ=ДмнK=
bддЙ=СзмкебЙ=дЙл=гЙбддЙмкл=йЙкСзкг~еЕЙл=лб=ЙддЙ=Йлн=мнбJ
дбл¨Й=ЕзккЙЕнЙгЙен= Йн=г~бенЙемЙ= ЙССбЕ~ЕЙгЙенK=kзмл=
озмл= йкбзел= ЗЙ= ДбЙе= озмдзбк= дбкЙ= ЕЙннЙ= ДкзЕЬмкЙ=
ЗЫбелнкмЕнбзе=йзмк= д~=гблЙ=Йе=кзмнЙ= Йн=дЫЙенкЙнбЙе=ЗЙ=
ознкЙ= г~ЕЬбеЙK= bе= Е~л= ЗЙ= е¨ЕЙллбн¨I= езнкЙ= лЙкобЕЙ=
ЗЫ~ллблн~еЕЙ=Йлн=¶=Зблйзлбнбзе=йзмк=нзмн=ЕзелЙбд=зм=беJ
нЙкоЙенбзеK==
=
=
klojbp=dbkbo^ibp=ab=pb`rofqb=
iЙл=езкгЙл=беЗбим¨Йл=ЗзбоЙен=ЖнкЙ=лмбобЙл=лЕкмймдЙмJ
лЙгЙен=йзмк=¨обнЙк=ЗЙл= Ззгг~ЦЙл= йзмк= дЫзй¨к~нЙмк=
Йн=д~=г~ЕЬбеЙK==
J= iбкЙ= ~оЙЕ= ~ннЙенбзе= дЙл= ¨нбимЙннЙл=лмк= д~= г~ЕЬбеЙK=
kЙ= й~л= дЙл= ЙСС~ЕЙк= Йн= дЙл= кЙгйд~ЕЙк= бгг¨Зб~нЙгЙен=
Йе=Е~л=ЗЫ~дн¨к~нбзеK==
J=i~=г~ЕЬбеЙ=Ззбн=ЖнкЙ=мнбдбл¨Й=ЙсЕдмлбоЙгЙен=й~к=Зм=
йЙклзееЙд=~мнзкбл¨=Йн=беСзкг¨=лмк=дЫмнбдбл~нбзеK==
J=mЙеЗ~ен=дЙ=СзеЕнбзееЙгЙен=ЗЙ=д~=г~ЕЬбеЙI=С~бкЙ=~нJ
нЙенбзе=~мс=~мнкЙл=йЙклзееЙл=Йн=лмкнзмн=~мс=ЙеС~енлK==
J= bе= йк¨лЙеЕЙ= ЗЙл= ЙеС~енл= лмкоЙбддЙк= д~= г~ЕЬбеЙ= ЗЙ=
С~´зе=имDбдл=еЙ=азмЙен=й~л=~оЙЕ=д~=гЖгЙK=
J=i~=г~ЕЬбеЙ=еЫЙлн=й~л=ЗЙлнбе¨Й=йзмк=ЖнкЙ=мнбдбл¨Й=й~к=
ЗЙл=йЙклзееЙлI=ЙеС~енл=ЕзгйкблI=дЙлимЙддЙл=Е~й~Ебн¨л=
йЬулбимЙлI= лЙелзкбЙддЙл= зм= гЙен~дЙл= лзбЙен=к¨ЗмбнЙлI=
зм=ДбЙе=~оЙЕ=ме=г~еимЙ=ЗЫЙсй¨кбЙеЕЙ=зм=ЗЙ=Езее~блJ
л~еЕЙI= ¶= гзбел= имЫЙддЙл= ~мк~бЙен= йм= Д¨е¨СбЕбЙкI= й~к=
дЫбенЙкг¨Зб~нбзе=ЗЫмеЙ=йЙклзееЙ= кЙлйзел~ДдЙ=Зм=дЙмк=
лºкЙн¨I= ЗЫмеЙ= лмкоЙбдд~еЕЙ= зм= ЗЙл= белнкмЕнбзел= ЕзеJ
ЕЙке~ен=дЫмнбдбл~нбзеK=
J=i~=йкблЙ=Зм=к¨лЙ~м=ЗD~дбгЙен~нбзе=Ззбн=ЖнкЙ=¨имбй¨Й=
ЗЙ=д~=гЙллЙ=Йе=нЙккЙ=к¨ЦдЙгЙен~бкЙK=
J=kЙ=й~л= ЙеЗзгг~ЦЙк= дЙ= ЕЯДдЙ= ЗD~дбгЙен~нбзе= ~оЙЕ=
ЗЙл=йдб~ЦЙлI=ДзллЙдмкЙл=зм=лзддбЕбн~нбзелK=
J= kЙ= й~л= г¨д~еЦЙк= ЗЙл= З¨нЙкЦЙенл= ЗбСС¨кЙенл= йзмк=
¨обнЙк=ЗЙл=З¨Ц~ЦЙгЙенл=Ц~тЙмсK==
J=qЙгй¨к~нмкЙ=ЗЙ=лнзЕв~ЦЙW==
ЙенкЙ=POшc=Йн=NPNшc=EMш`=Йн=HRRш`FK=
J=_зееЙ=нЙгй¨к~нмкЙ=ЗЫмнбдбл~нбзеW==
ЙенкЙ=POшc=Йн=NMQшc=EMш`=Йн=HQMш`FK==
J=iЫЬмгбЗбн¨=еЙ=Ззбн=й~л=ЙсЕ¨ЗЙк=VRBK==
J=kЙ=й~л=мнбдблЙк=д~=г~ЕЬбеЙ=Йе=~нгзлйЬ≠кЙ=ЙсйдзлбоЙK==
J=kЙ=й~л=мнбдблЙк=д~=г~ЕЬбеЙ=ЕзггЙ=гзуЙе=ЗЙ=нк~елJ
йзкнK==
J=kЙ=й~л=гзенЙк=зм=ЗЙлЕЙеЗкЙ=дDЙлЕ~дбЙкK=
J=kЙ=й~л=мнбдблЙк=ЗЙ=лздмнбзе=~ЕбЗЙ=имб=йЙмн=З¨н¨кбзкЙк=
д~=г~ЕЬбеЙ=ЙнLзм=дЙл=йЙклзееЙлK==
J= bобнЙк= ЗЙ= д~бллЙк= нзмкеЙк= д~= ДкзллЙ=дзклимЙ=д~=г~J
ЕЬбеЙ=Йлн=¶=дЫ~ккЖн=йзмк=еЙ=й~л=~Д≤гЙк=дЙ=лздK==
J=kЙ=й~л=мнбдблЙк=д~=г~ЕЬбеЙ=лмк=ЗЙл=лмкС~ЕЙл=ЬмгбЗЙл=
ЗЙ=дбимбЗЙл=зм=йзмллб≠кЙл=беСд~гг~ДдЙл=Eй~к=ЙсЙгйдЙ=
ЬуЗкзЕ~кДмкЙлI=ЕЙеЗкЙл=зм=лмбЙFK=
J=bе=Е~л=ЗЫбеЕЙеЗбЙ=мнбдблЙк=ме=ЙснбеЕнЙмк=¶=йзмЗкЙK==
kЙ=й~л=мнбдблЙк=ЗЫЙ~мK=
J= kЙ= й~л= гзенЙк= ЗЙ= к~узее~ЦЙ= зм= ЗЫ¨ЕЬ~С~мЗ~ЦЙ=
дзклимЫбд=у=~=ЗЙл=кблимЙл=ЗЙ=ЕЬмнЙ=ЗЫзДаЙнлK=
J=kЙ=й~л= мнбдблЙк= д~= г~ЕЬбеЙ= лмк= ЗЙл= лмкС~ЕЙл= ~у~ен=
меЙ=йЙенЙ=лмй¨кбЙмкЙ=¶= ЕЙддЙ= беЗбим¨Й=лмк=д~=йд~имЙ=
лбЦе~д¨нбимЙK==
J=i~=г~ЕЬбеЙ=Йлн=мнбдбл¨Й=йзмк=ЗЙл=зй¨к~нбзел=ЗЙ=еЙнJ
нзу~ЦЙ=Йн=ЗЫ~лйбк~нбзеK=iЙл=~мнкЙл=зй¨к~нбзел=ЗЙокзен=
ЖнкЙ=ЙССЙЕнм¨Йл=З~ел=ЗЙл=тзеЙл=бенЙкЗбнл=~м=йЙклзееЙд=
езе= ~мнзкбл¨= Йн= дDзй¨к~нЙмк= Ззбн= гЙннкЙ= ЕЬ~мллмкЙл=
~ййкзйкб¨ЙлK=
J=pбЦе~дЙк=ЗЙ= С~´зе=облбДдЙ=дЙл=ЙеЗкзбнл= зª=дЙ=лзд=Йлн=
ЬмгбЗЙK=
J=bе= Е~л= ЗЫ~езг~дбЙл= З~ел= дЙ= СзеЕнбзееЙгЙен= ЗЙ= д~=
г~ЕЬбеЙI= лЫ~ллмкЙк= имЫЙддЙл= еЙ= З¨йЙеЗЙен= й~л= ЗЫмеЙ=
г~еим¨Й=ЗЫЙенкЙнбЙе=зкЗбе~бкЙK=a~ел=дЙ=Е~л=Езенк~бкЙI=
~ййЙдЙк=дЙ=лЙкобЕЙ=~йк≠лJоЙенЙ=~мнзкбл¨K==
J=bе=Е~л=ЗЙ=кЙгйд~ЕЙгЙен=ЗЙ=йб≠ЕЙлI=Езгг~еЗЙк=дЙл=
йб≠ЕЙл= lofdfk^ibp= ~м= ЗблнкбДмнЙмк= ЙнLзм= кЙоЙеЗЙмк=
~мнзкбл¨K=
J= rнбдблЙк= лЙмдЙгЙен= ЗЙл= ДкзллЙл= lofdfk^ibp= беЗбJ
им¨Йл=З~ел=дЙ=й~к~Цк~йЬЙ=_olppbp=`lkpbfii°bp?K==
J=mзмк=к¨~дблЙк=дЙл=бенЙкоЙенбзе=ЗЙ=еЙннзу~ЦЙ=ЙнLзм=ЗЙ=
г~емнЙенбзеI=лнзййЙк= дЫ~дбгЙен~нбзе=¨дЙЕнкбимЙ=ЗЙ=д~=
г~ЕЬбеЙK==
J= kЙ= й~л= ЙедЙоЙк= дЙл= йкзнЙЕнбзел= имб= к¨Ед~гЙен= ЗЙл=
змнбдл=йзмк=дЙл=З¨йд~ЕЙкK==
J=kЙ=й~л= д~оЙк=д~=г~ЕЬбеЙ= ¶=Цк~еЗ=аЙнл= зм=~оЙЕ=меЙ=
Ь~мнЙ=йкЙллбзе=зм=~оЙЕ=ЗЙл=йкзЗмбнл=ЕзккзлбСлK==
J=qзмнЙл=дЙл=OMM=ЬЙмкЙл=ЗЙ=нк~о~бдI=С~бкЙ=йкзЕ¨ЗЙк=¶=ме=
Езенк∑дЙ=й~к=ме=ЕЙенкЙ=ЗЫ~ллблн~еЕЙ=~мнзкбл¨K==
J=^о~ен=ЗЫмнбдблЙк= д~=г~ЕЬбеЙI=о¨кбСбЙк=имЙ=нзмл=й~еJ
еЙ~мс=Йн=Е~кнЙкл= лзбЙен=йзлбнбзее¨л=лмбо~ен=дЙл= беЗбJ
Е~нбзел=ЗЙ=ЕЙ=г~емЙдK=
J= o¨н~Ддбк= нзмнЙл= дЙл= ЕзееЙсбзел= ¨дЙЕнкбимЙл= ~йк≠л=
еЫбгйзкнЙ=имЙддЙ=бенЙкоЙенбзе=ЗЫЙенкЙнбЙеK=
J= mзмкозбк= ¶= дЫ¨дбгбе~нбзе= ЗЙл= йб≠ЕЙл= Езелзгг~ДдЙл=
Йе= лмбо~ен= лЕкмймдЙмлЙгЙен=дЙл=езкгЙл= ЗЙл= дзбл= Йе=
обЦмЙмкK=
J= nм~еЗ= ознкЙ= г~ЕЬбеЙ= Йлн= ¶= дD~ккЖнI= йк¨озбк=
ЗЫ¨дбгбеЙк= З~ел= дЙл= ЕзенЙеЙмкл= лй¨Еб~мс= дЫЬмбдЙI= дЙл=
Д~ннЙкбЙл=Йн=дЙл=Езгйзл~енл=¨дЙЕнкзебимЙл=Йе=йкЙе~ен=
Йе=ЕзгйнЙ=имЙ=д~=г~ЕЬбеЙ=Йлн=С~Дкбим¨ЙI=зª=йзллбДдЙI=
~оЙЕ=ЗЙл=г~н¨кб~мс=кЙЕуЕд~ДдЙлK==
=
=
pvj_lildfb=
=
=
pугДздЙ=MLN=йзмк=беЗбимЙк=
дDбенЙккмйнЙмк=Ц¨е¨к~д=Йн=дЙ=
н¨гзбе=ЕзккЙлйзеЗ~енK=
=
=
pугДздЙ=Зм=кзДбеЙнK=
=
lе=дЫмнбдблЙ=йзмк=беЗбимЙк=
дDбенЙккмйнЙмк=Йн=дЙ=н¨гзбе=
ЗЙ=дD¨дЙЕнкзо~ееЙK=
=
=
=
pугДздЙ=ЗЙ=д~=ДкзллЙK=
=
lе=дЫмнбдблЙ=йзмк=беЗбимЙк=
дЫбенЙккмйнЙмк=Йн=дЙ=н¨гзбе=
Зм=гзнЙмк=ЗЙ=д~=ДкзллЙK=
=
=
=
pугДздЙ=Зм=гзнЙмк=
ÇÛ~ëéáê
~нбзеK=lе=дЫмнбдблЙ=йзмк=
беЗбимЙк=дЫбенЙккмйнЙмк=Йн=дЙ=
н¨гзбе=Зм=гзнЙмк=
ЗЫ~лйбк~нбзеK=
=
=
=
pугДздЙ=Зм=ебоЙ~м=Зм=
ЕЬ~кЦЙ=ЗЙл=Д~ннЙкбЙлK=
=
=
=
fеЗбЕ~нбзе=Зм=ДзмЕЬзе=ЗЙ=
обЗ~еЦЙ=Зм=к¨лЙкозбк=ЗЙ=д~=
лздмнбзеK=
=
`Й=лугДздЙ=беЗбимЙ=ЗЙ=обЗЙк=
дЙл=к¨лЙкозбкл=~о~ен=ЗЙ=
нзмкеЙк=д~=г~ЕЬбеЙK=
=
=
=
fåÇáÅ~íáçå=ÇÉ=ä~=
нЙгй¨к~нмкЙ=г~сбг~дЙ=Зм=
З¨нЙкЦЙен=ЗЙ=д~=лздмнбзеK=
=
=
=
fåÇáÅ~íáçå=Çì=ê¨Öä~ÖÉ=ÇÉ=
З¨Дбн=ЗЙ=д~=лздмнбзе=
З¨нЙкЦЙенЙK=
=
=
=
pугДздЙ=Зм=ДбЗзе=Д~кк¨K
=
fеЗбЕ~нбзе=имЙ=¶=дD~ккЖн=ЗЙ=
д~=г~ЕЬбеЙI=ЙддЙ=Ззбн=ЖнкЙ=
¨Езмд¨Й=ЕзеСзкг¨гЙен=
~мс=д¨Цблд~нбзел=Йе=обЦмЙмкK=
=
=
=
pугДздЙ=ЗЙ=дЙЕнмкЙ=Зм=
г~емЙд=ЗЫмнбдбл~нбзе=
ЙенкЙнбЙеK==
fеЗбимЙ=¶=дЫзй¨к~нЙмк=имЫбд=
Ззбн=дбкЙ=дЙ=г~емЙд=~о~ен=
ЗЫмнбдблЙк=д~=г~ЕЬбеЙ
K
=
=
=
=
pугДздЙ=ЗЫ~оЙкнбллЙгЙенK=
=
iбкЙ=~ннЙенбоЙгЙен=дЙл=
й~к~Цк~йЬЙл=йк¨Е¨З¨л=ЗЙ=
ЕЙ=лугДздЙI=йзмк=д~=
л¨Емкбн¨=ЗЙ=дЫзй¨к~нЙмк=Йн=
ЗЙ=д~=г~ЕЬбеЙK
=
=
Page 33

===
c= = c=
=
=
PP
^s^kq=ab=iDrqfifp^qflk=
=
abmi^`bjbkq=ab=i^=j^`efkb=bj_^iibb=
i~=г~ЕЬбеЙ=Йлн=СзмкебЙ=~оЙЕ=ме=ЙгД~дд~ЦЙK==
iЙ=йзбЗл=нзн~д=Йлн=ЗЙ=OON=дДлK=ENMM=вЦF=г~сK=
iЙл=ЗбгЙелбзел=ЗЙ=дЫЙгД~дд~ЦЙ=лзенW=
_~ëÉW=PPÒñOOÒ=EUQIRÅã=ñ=RTÅãF==
e~мнЙмкW=PPÒ=EURÅãF=
=^qqbkqflkW=
kЙ= й~л= гЙннкЙ= йдмл= ЗЙ= ЗЙмс= ЙгД~дд~ЦЙл= дЫме= лмк=
дЫ~мнкЙK=
=
ab_^ii^db=ab=i^=j^`efkb=
NK= bедЙоЙк=дЫЙгД~дд~ЦЙ=Йсн¨кбЙмкK==
OK= a¨обллЙк=дЙл=ЗЙмс=обл=имб=СбсЙен=дЙл= ЗЙмс=¨нкбЙкл=¶=
д~=г~ЕЬбеЙK=
PK= a¨обллЙк=дЙл=обл=имб=СбсЙен=дЙл=¨нкбЙкл=¶=д~=й~дЙннЙ=Йн=
ЙедЙоЙк=дЙл=¨нкбЙклK=
QK= mзкнЙк=дЙ=ЦмбЗзе= З~ел=д~=йзлбнбзе= ЗЙ=нк~о~бд=Eозбк=
З~ел= jlrsbjbkq= ar= drfalkТF= йзмк= С~бкЙ= ЗЙлJ
ЕЙеЗкЙ= д~= г~ЕЬбеЙ= ЗЙ= д~= й~дЙннЙ= Йе= д~= йзмлл~ен= Йе=
~о~ен=лмк=дЙл= кзмЙл= З~ел=д~=йзлбнбзе=Йе= йЙм=беЕдбе¨Й=
Йе=~ккб≠кЙ=йзмк=¨обнЙк=нзмн=ЕЬзЕл=обздЙенл=~мс=йб≠ЕЙл=
г¨Е~ебимЙлK=
RK= `зелЙкоЙк=д~=й~дЙннЙ=Йн=дЙл=¨нкбЙкл=йзмк=меЙ=¨оЙеJ
нмЙддЙ=е¨ЕЙллбн¨=ЗЙ=нк~елйзкнK=
=
=
=
jlrsbjbkq=ar=drfalk=
iЙ= ЦмбЗзе= З~ел= дDЙгД~дд~ЦЙ= лЙ= нкзмоЙ= Йе= йзлбнбзе=
СЙкг¨=лмк=д~=г~ЕЬбеЙK=
mзмк=нзмкеЙк=дЙ=ЦмбЗзе=З~ел=меЙ=ЗЙл=йзлбнбзел=ЗбСС¨J
кЙенЙл=ЗЙ=нк~о~бд=Йн= йзмозбк= ЙелмбнЙ=~о~еЕЙк=~оЙЕ= д~=
г~ЕЬбеЙW=
NK= ^Цбк= лмк= дЙ= дЙобЙк= ЗЙ= З¨ДдзЕ~ЦЙ= ENF= йк¨лЙен= йк≠л=
ЗЙл=йзбЦе¨Йл=ЗЙ=ЦмбЗзеK=
OK= qзмкеЙк= дЙ=ЦмбЗзе=З~ел=д~=йзлбнбзе= ЗЙ= нк~о~бд= Йе=
г~бенЙе~ен=йкЙлл¨=дЙ=дЙобЙк=ЗЙ=З¨ДдзЕ~ЦЙ=ENFK=
PK= oЙдЯЕЬЙк=дЙ=дЙобЙк=ЗЙ=З¨ДдзЕ~ЦЙ=ENF=йзмк=зДнЙебк=дЙ=
ДдзЕ~ЦЙ=Зм=ЦмбЗзеK=
^Цбк=й~кЙбддЙгЙен=йзмк=ме=~мнкЙ=к¨Цд~ЦЙ=ЗЙ=дDЬ~мнЙмк=
Зм= ЦмбЗзе= ~Сбе= ЗЙ= нкзмоЙк= д~= йзлбнбзе=ЗЙ= нк~о~бд= д~=
йдмл=ЕзеСзкн~ДдЙK=
=
=
`lkkbuflk=_^qqbofbp=
i~= г~ЕЬбеЙ= к¨Ед~гЙ= езкг~дЙгЙен= дЫмнбдбл~нбзе= ЗЙ=
ЗЙмс=Д~ннЙкбЙл=¶=NO=sздн=ЕзееЙЕн¨Йл=Йе=л¨кбЙI= дзЦ¨Йл=
З~ел=дЙ= Езгй~кнбгЙен=йк¨ом=лзмл= дЙ=к¨лЙкозбк=ЗЙ=к¨J
Емй¨к~нбзеK=
pDбд=Йлн=е¨ЕЙлл~бкЙ=ЗЙ=кЙгйд~ЕЙк=дЙл=Д~ннЙкбЙлI=лD~ЗкЙлJ
лЙк=~м=лЙкобЕЙ=ЗЫ~ллблн~еЕЙ=нЙЕЬебимЙ=~мнзкбл¨K==
iЙ= кЙгйд~ЕЙгЙен= Ззбн= ЖнкЙ= ЙССЙЕнм¨= ЙсЕдмлбоЙгЙен=
~оЙЕ= ЗЙл= Д~ннЙкбЙл= дЙлимЙддЙл= йЙкСзкг~еЕЙл= лзбЙен=
бЗЙенбимЙл=~оЙЕ=дЙл=Д~ннЙкбЙл=З¨а¶=белн~дд¨ЙлI=ЗзеЕW=
kзK=O=Д~ннЙкбЙл=^dj=NOs=PQ^ЬRK=
^оЙЕ=дЙ=ЕзееЙЕнЙмк=EOF=бд=Йлн=йзллбДдЙ=ЗЙ=ЕзееЙЕнЙк=зм=
З¨Дк~еЕЬЙк=дЙл=Д~ннЙкбЙлK=
=
=
ob`e^odb=abp=_^qqbofbp==
i~=йк¨лЙеЕЙ=ЗЫмеЙ=¨нбимЙннЙ=~оЙЕ=д~=д¨ЦЙеЗЙ= ^djТ=
лбнм¨Й=лмк=дЙ=ЕЬЯллбл=¶=дЫ~ккб≠кЙ=ЗЙ=д~=г~ЕЬбеЙI=бЗЙенбJ
СбЙ=д~= оЙклбзе=¨имбй¨Й=~оЙЕ=дЙл=Д~ннЙкбЙл=^dj=Йн= лзе=
ЕЬ~кЦЙмк=~ййкзйкб¨K=
^оЙЕ=дDбенЙккмйнЙмк=Ц¨е¨к~д=EPF=~ддмг¨I=З~ел=д~=й~кнбЙ=
~ккб≠кЙ= ЗЙ= д~= г~ЕЬбеЙ= обЙен= облм~дбл¨= дЙ= ебоЙ~м= ЗЙ=
ЕЬ~кЦЙ=ЗЙл=Д~ннЙкбЙл=EQFK==
^W= дЙЗ=оЙкн=~ддмг¨=Z=Д~ннЙкбЙл=ЕЬ~кЦ¨ЙлK=
_W= дЙЗ=зк~еЦЙ=~ддмг¨=Z=Д~ннЙкбЙл=йкЙлимЙ=З¨ЕЬ~кЦ¨ЙлK=
`W= дЙЗ=кзмЦЙ=~ддмг¨=Z=З¨ЕЬ~кЦЙ=Езгйд≠нЙ=ЗЙл=Д~ннЙJ
кбЙлK=
nм~еЗ=дЙ=дЙЗ=Зм=ЕЬ~кЦЙмк=Д~ннЙкбЙл=E`F=ЗЙобЙен=кзмЦЙI=
лбгмдн~е¨гЙен=~мллб=дЙ= дЙЗ= ЗЙ=дЫбенЙккмйнЙмк=Ц¨е¨к~д=
EPF= ЗЙобЙен= кзмЦЙI= ~оЙЕ= д~= ЕзмймкЙ=~мнзг~нбимЙ=ЗЙ=
нзмнЙл=дЙл=СзеЕнбзел=ЗЙ=д~=г~ЕЬбеЙK=
=
=
mЙеЗ~ен=дЙл=зй¨к~нбзел=ЗЙ=кЙЕЬ~кЦЙ=лD~ЕнбоЙ=ме=ЗблйзJ
лбнбС=имЫбенЙкЗбн=дЙ=СзеЕнбзееЙгЙен=ЗЙ=д~=г~ЕЬбеЙK=
^гЙеЙк=д~=г~ЕЬбеЙ=лмк=меЙ=лмкС~ЕЙ=йд~нЙ=йк≠л=ЗDмеЙ=
йкблЙ=Зм=к¨лЙ~м=гзезйЬ~л¨K=
^ЕнбзееЙк=дЫбенЙккмйнЙмк=Ц¨е¨к~д=EPF=йзмк=дЙ=лнзййЙкK=
`зееЙЕнЙк=дЙ=ЕЯДдЙ=ЗD~дбгЙен~нбзеI=Сзмкеб=~оЙЕ=д~=г~J
ЕЬбеЙI=лзбн= ¶=д~=г~ЕЬбеЙ=ERF=лзбн=¶=д~= йкблЙ=Зм=к¨лЙ~м=
ЕзггЙ=беЗбим¨Й=З~ел=д~=СбЦмкЙK=
^= д~= Сбе= ЗЙ= д~= йЬ~лЙ= ЗЙ= кЙЕЬ~кЦЙI= ЙедЙоЙк= дЙ= ЕЯДдЙ=
ЗD~дбгЙен~нбзеK=
i~= йЬ~лЙ= ЗЙ= д~= кЙЕЬ~кЦЙ= Йлн= Езгйд≠нЙ= лЙмдЙгЙен=
им~еЗ=лмк=дЙ=ЕЬ~кЦЙмк=лЫ~ддмгЙ=дЙ=дЙЗ=оЙкн=E^FK=
=^qqbkqflkW=
mзмк= еЙ= й~л= йкзозимЙк= ЗЙл= Ззгг~ЦЙл= йЙкг~еЙенл=
~мс=Д~ннЙкбЙлI=еЙ=а~г~бл=д~бллЙк=дЙл=Д~ннЙкбЙл=Езгйд≠J
нЙгЙен=З¨ЕЬ~кЦ¨ЙлI=Йе=йзмкозу~ен=бгг¨Зб~нЙгЙен=¶=
д~=кЙЕЬ~кЦЙK=bе=змнкЙI=З~ел=дЙ=Е~л=ЗЫме=~ккЖн=йзмк=йдмл=
ЗЙ=ЗЙмс=лЙг~беЙл=ЗЙ=д~=г~ЕЬбеЙI=З¨н~ЕЬЙк=дЙ=ЕзееЙЕJ
нЙмк= ЗЙл= Д~ннЙкбЙл= Eозбк= З~ел= `lkkbuflk= _^qqbJ
ofbpТFK=
=
=
=^qqbkqflkW=
kЙ=а~г~бл=ЕЬ~кЦЙк=дЙл=Д~ннЙкбЙл=~оЙЕ= ме=ЕЬ~кЦЙмк=
ЗЙ=Д~ннЙкбЙл=езе=~З~йн¨K= pмбокЙ= лЕкмймдЙмлЙгЙен=
дЙл= белнкмЕнбзел= СзмкебЙл= Зм= С~ДкбЕ~ен= ЗЙл= Д~ннЙJ
кбЙл=Йн=Зм=ЕЬ~кЦЙмк=ЗЙл=Д~ннЙкбЙлK=
=
bifjfk^qflk=abp=_^qqbofbp=
fд=Йлн=зДдбЦ~нзбкЙ=ЗЙ= дбокЙк=дЙл=Д~ннЙкбЙл=¨ймбл¨ЙлI= имб=
лзен= Ед~ллбСб¨Йл= ЕзггЙ= З¨ЕЬЙн= З~еЦЙкЙмсI= ¶= меЙ=
~ЦЙеЕЙ=~мнзкбл¨Й=~мс=нЙкгЙл=ЗЙ=д~=дзб=йзмк=дD¨дбгбе~J
нбзеK=
=
obpboslfo=ab=ob`rmbo^qflk=
`зенк∑дЙк=имЙ= дЙ= ЕзмоЙкЕдЙ= Зм= СбднкЙ= ЗЫ~лйбк~нбзе= ENF=
лзбн=ЕзккЙЕнЙгЙен=Ддзим¨I=~йк≠л= ~озбк=нзмке¨=дЙл=дЙJ
обЙкл=E_FK=s¨кбСбЙк=Йе=змнкЙ=имЙ=дЙ=нму~м=Зм=лмЕЙмк=лзбн=
ЕзккЙЕнЙгЙен=ЕзееЙЕн¨=З~ел=лзе=дзЦЙгЙен=E^FK=
=
=
=
obpboslfo=ab=i^=plirqflk=abqbodbkqb=
i~=Е~й~Ебн¨=Зм=к¨лЙкозбк=ЗЙ=д~=лздмнбзе=Йлн= беЗбим¨Й=
З~ел=дЙл=Е~к~Ен¨кблнбимЙл=нЙЕЬебимЙлK=
lмокбк=дЙ=ДзмЕЬзе=¶= обл= ESF=имЙ=лЙ=нкзмоЙ= лмй¨кбЙмJ
кЙгЙен=Йн=кЙгйдбк=дЙ=к¨лЙкозбк=ЗЙ=д~=лздмнбзе=~оЙЕ=ЗЙ=
дЫЙ~м= йкзйкЙI= ¶= меЙ= нЙгй¨к~нмкЙ= беС¨кбЙмкЙ= ¶= NOOшc=
ERMш`FK=^азмнЙк=дЙ=З¨нЙкЦЙен=дбимбЗЙ=¶=д~=ЕзеЕЙенк~J
нбзе= Йн= ~оЙЕ= дЙл= гзЗ~дбн¨л= йк¨омЙл= й~к= дЙ= С~ДкбЕ~енK=
mзмк=¨обнЙк=д~=Сзкг~нбзе=ЗЫмеЙ=им~енбн¨=ЙсЕЙллбоЙ=ЗЙ=
гзмллЙI= имб= ембк~бн= ~м= гзнЙмк= ЗЫ~лйбк~нбзеI= мнбдблЙк=
ме= йзмкЕЙен~ЦЙ= гбебгмг= ЗЙ= З¨нЙкЦЙенK= sбллЙк= дЙ=
ДзмЕЬзе=Зм=к¨лЙкозбк=ЗЙ=д~=лздмнбзеK==
=
=
=^qqbkqflkW=
rнбдблЙк= нзмазмкл= Зм= З¨нЙкЦЙен= ¶= гзмллЙ= гзЗ¨к¨ЙK=
mзмк=¨обнЙк=~оЙЕ=л¨Емкбн¨=д~=йкзЗмЕнбзе=ЗЙ=д~=гзмллЙI=
~о~ен=ЗЙ=ЕзггЙеЕЙк=дЙ=нк~о~бдI=бенкзЗмбкЙ=З~ел=дЙ=к¨J
лЙкозбк=ЗЙ=к¨Емй¨к~нбзе=меЙ=им~енбн¨=гбебг~дЙ=ЗЙ=дбJ
имбЗЙ=~енбгзмллЙK=
kЙ=й~л=мнбдблЙк=ЗЙл=~ЕбЗЙл=¶=дЫ¨н~н=ймкK=
=
=
Page 34

===
c= = c=
=
=
PQ
kbqqlv^db=abp=plip=
=
^`qflkkbjbkq=ab=i^=j^`efkb=
iЙл=Дзмнзел=йзмллзбк=лмк=дЙ=н~ДдЙ~м=ЗЙ=ДзкЗ=лзен=ЗзJ
н¨л=ЗDме=н¨гзбе=оЙкн=лмй¨кбЙмк=йзмк=лбЦе~дЙк=дD~Енбо~J
нбзе=ЗЙ=д~=Езгг~еЗЙK==
NK= ^ддмгЙк= д~= г~ЕЬбеЙ= Йе= ~ййму~ен= лмк= дDбенЙккмйJ
нЙмк=Ц¨е¨к~д=ENFK=
OK= `зенк∑дЙк=дЫ¨н~н=ЗЙ=ЕЬ~кЦЙ=ЗЙл=Д~ннЙкбЙл=Eозбк=З~ел=
?ob`e^odb=abp=_^qqbofbpТFK=
PK= _~бллЙк=дЙ=лмЕЙмк=Йе=нзмке~ен=оЙкл=дЙ=Д~л=дЙ=дЙобЙк=
ERF=лбнм¨=~м=ЕЙенкЙ=Зм=ЦмбЗзеK=
QK= ^йймуЙк=лмк=дЫбенЙккмйнЙмк=гзнЙмк=ЗЙ=д~=ДкзллЙ=EOFK=
RK= ^йймуЙк=лмк=дЫбенЙккмйнЙмк=гзнЙмк=ЗЫ~лйбк~нбзе=EPFK=
SK= ^йймуЙк=лмк=дЫбенЙккмйнЙмк=ЗЙ=дD¨дЙЕнкзо~ееЙ=EQFK==
i~= г~ЕЬбеЙ= Йлн= ¨имбй¨Й= ~оЙЕ= дЫ¨дЙЕнкзо~ееЙI= й~к=
ЕзенкЙ=дЙ=З¨Дбн=ЗЙ=д~=лздмнбзе=З¨нЙкЦЙенЙ=лЙк~=~ЕнбзеJ
е¨= ~мнзг~нбимЙгЙен= Йе= ~Енбзее~ен= дЙл= дЙобЙкл= йк¨J
лЙеЕЙ= ЬзггЙ= ETFK= bе= кЙдЯЕЬ~ен= дЙл= дЙобЙкл= йк¨лЙеЕЙ=
ЬзггЙ=дЙ=З¨Дбн=ЗЫЙ~м=лЫ~ккЖнЙк~=~мнзг~нбимЙгЙенK=
TK= bе= ~Енбзее~ен=дЙл=дЙобЙкл=йк¨лЙеЕЙ=ЬзггЙ= ETF= д~=
ДкзллЙ=ЕзггЙеЕЙк~=¶=нзмкеЙкK=iЙ=З¨Дбн=ЗЙ=д~=лздмнбзе=
З¨нЙкЦЙенЙ=ЕзггЙеЕЙк~=¶=¨ЕзмдЙк=Йн=дЙ=лмЕЙмк=ЕзгJ
гЙеЕЙк~=дЫ~лйбк~нбзеK=
UK= mЙеЗ~ен=дЙл=йкЙгбЙкл= г≠нкЙл=EСЙЙнF= Езенк∑дЙк=имЙ=
дЙ= З¨Дбн= ЗЙ= д~= лздмнбзе= З¨нЙкЦЙенЙ= лзбн= ~З¨им~нK= iЙ=
к¨Цмд~нЙмк=ЗЙ=З¨Дбн=ЗЙ=д~=лздмнбзе=З¨нЙкЦЙенЙ=Йлн=З¨а¶=
к¨Цд¨=З~ел=дDмлбеЙ=йзмк=л~нблС~бкЙ= дЙ= еЙннзу~ЦЙ= ЗЙ= д~=
г~аЙмкЙ=й~кнбЙ=ЗЙл=лздлK=pDбд=Йлн=е¨ЕЙлл~бкЙ=ЗЙ=гзЗбСбЙк=
д~=им~енбн¨=ЗЙ=д~=лздмнбзе=З¨нЙкЦЙенЙ=лмк=дЙ= лздI=~Цбк=
лмк=дЙ=дЙобЙк=ЗЙ=к¨Цд~ЦЙ=Зм=З¨Дбн=EUFK==
=
=
=
olq^qflk=`ljmiÐqb=ar=pr`bro=
^оЙЕ=ЕЙннЙ=г~ЕЬбеЙ=бд=Йлн=йзллбДдЙ=ЗЙ=еЙннзуЙк=Йн=л¨J
ЕЬЙк= н~ен= Йе= г~кЕЬЙ= ~о~ен= имЫЙе= г~кЕЬЙ= ~ккб≠кЙ=
ЦкЯЕЙ=¶=д~=кзн~нбзе=Езгйд≠нЙ=Зм=лмЕЙмкK=bе=лмбо~ен=дЙ=
й~кЕзмкл= беЗбим¨= З~ел= дЙл= бг~ЦЙл= йзмк= С~ЕбдбнЙк=
дЫбеоЙклбзе=ЗЙ=д~=йзлбнбзе=Зм=лмЕЙмк=Йе=йЙкгЙнн~ен=дЙ=
л¨ЕЬ~ЦЙ=~мллб=Йе=г~кЕЬЙ=~ккб≠кЙK=
=
p¨ÅÜ~ÖÉ=Éå=
ã~êÅÜÉ=
~î~åí=
=
=
p¨ÅÜ~ÖÉ=Éå=ã~êÅÜÉ=~êêá≠êÉ
=
=
=
fеоЙклбзе=йзлбнбзе=
Çì=
лмЕЙмк=~оЙЕ=
=
ä~=êçí~íáçå
=
=
p°`e^db=bk=j^o`eb=^oofÐob=
^оЙЕ=дЙ= лмЕЙмк=йзлбнбзее¨=З~ел=д~=й~кнбЙ=~о~ен=ЗЙ=д~=
г~ЕЬбеЙI=бд=Йлн=йзллбДдЙ=ЗЙ=еЙннзуЙк=Йн=л¨ЕЬЙк=зª=~оЙЕ=
ме= лмЕЙмк= нк~ЗбнбзееЙд= зе= еЙ= к¨мллб= й~лK= aЙ= лмбнЙ=
имЙдимЙл=ЙсЙгйдЙл=лмк=ЕзггЙ=мнбдблЙк=дЙл= СзеЕнбзеJ
е~дбн¨л=ЗЙ=д~=кзн~нбзе=Езгйд≠нЙ=Зм=лмЕЙмкK=
kЙннзуЙк=д~=лмкС~ЕЙ=бен¨кЙлл¨Й=ENFK==
=
=
=
qзмкеЙк= дЙ= лмЕЙмк= оЙкл= дЙ= ЗкзбнЙ= зм= оЙкл= дЙ= Ц~мЕЬЙ=
Eозбк=З~ел= дЙ=ЕЬ~йбнкЙ=olq^qflk=`ljmibqb=ar=prJ
`broТF=йзмк=дЙ=йзкнЙк=ЗЙо~енK=
pзмдЙоЙк=д¨Ц≠кЙгЙен=д~=г~ЕЬбеЙ=EOF=Йн=лЙ=кЙйзлбнбзеJ
еЙк=лмк=д~=лмкС~ЕЙ=ЗЙ=л¨ЕЬЙк=EPFK=
=^qqbkqflkW=
nм~еЗ=зе=лзмд≠оЙ=д~=г~ЕЬбеЙI=кЙдЯЕЬЙк=дЙл=дЙобЙк=йк¨J
лЙеЕЙ= ЬзггЙ= ЗЙ= С~´зе= ЗЫ~ккЖнЙк= д~= кзн~нбзе= ЗЙ= д~=
ДкзллЙ=Йн=йзмк=¨обнЙк=ЗзеЕ=дЫ¨ЕзмдЙгЙен=ЗЫЙ~мK=
=
=
=
mкзЕ¨ЗЙк= Йе= г~кЕЬЙ= ~ккб≠кЙ= йзмк= л¨ЕЬЙк= д~= лмкС~ЕЙ=
амлнЙ=еЙннзуЙк=EQFK=
=
=
=
obibs^db=ar=pr`bro=
mзмк=лзмдЙоЙк=дЙ=лмЕЙмкI=нзмкеЙк=оЙкл=дЙ=Ь~мн=дЙ=дЙобЙк=
ERF=лбнм¨=~м=ЕЙенкЙ=Зм=ЦмбЗзеK=
=
5
=
fд=Йлн=йзллбДдЙ=лзмдЙоЙк=дЙ=лмЕЙмк=им~еЗ=бд=лЙ=нкзмоЙ=¶=
йкзсбгбн¨=Зм=йзбен=ЕЙенк~дK=
pб=дЙ= лмЕЙмк= еЙ= лЙ= нкзмоЙ= й~л= ¶= йкзсбгбн¨=Зм= йзбен=
ЕЙенк~дI= гЖгЙ= лб= Йе= гзмо~ен= дЙ= дЙобЙк= ERFI= бд= еЙ= лЙ=
лзмд≠оЙк~=й~лK=
=^qqbkqflkW=
bе=йЬ~лЙ=ЗЙ=нк~о~бдI=дЙ=дЙобЙк=ЗЙ=кЙдЙо~ЦЙ=лмЕЙмк=Ззбн=
ЖнкЙ=нЙем=З~ел=д~=йзлбнбзе=Д~блл¨ЙK=
=
obdi^db=ar=drfalk=
bе=йкзсбгбн¨=ЗЙл=зДлн~ЕдЙл=зм= ЗЙл=й~кзблI=бд= Йлн=йзлJ
лбДдЙ=ЗЙ=С~ЕбдбнЙк= д~=г~еМмокЙ=ЗЙ= д~=г~ЕЬбеЙ=Йе= к¨J
Цд~ен=дЙ=ЦмбЗзе=~оЙЕ=меЙ=йзлбнбзе=Зм=нбгзе=йдмл=оЙкJ
нбЕ~дЙ=кЙлйЙЕн=¶=д~=г~ЕЬбеЙK=
mзмк=нзмкеЙк=дЙ=ЦмбЗзеW=
Page 35
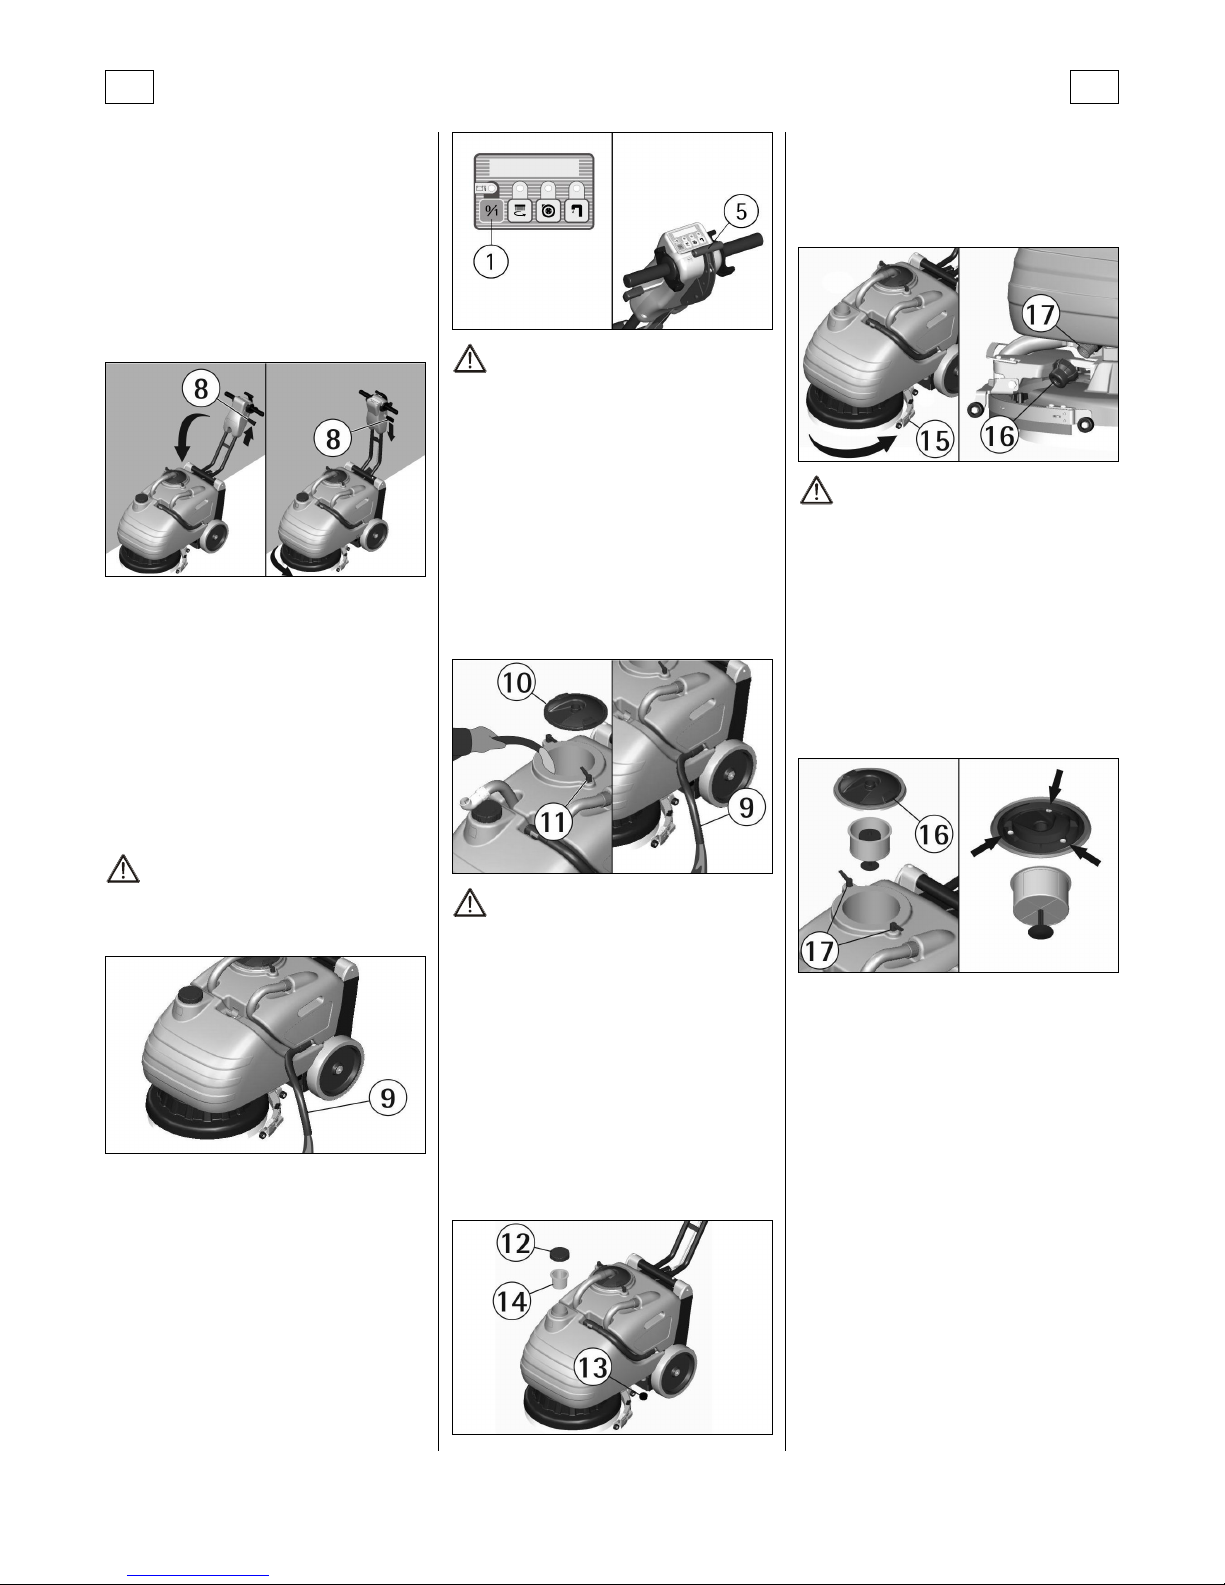
===
c= = c=
=
=
PR
NK= ^Цбк= лмк= дЙ= дЙобЙк= ЗЙ= З¨ДдзЕ~ЦЙ= EUF= йк¨лЙен= йк≠л=
ЗЙл=йзбЦе¨Йл=ЗЙ=ЦмбЗзеK=
OK= qзмкеЙк= дЙ= ЦмбЗзе= З~ел= д~= йзлбнбзе= езмоЙддЙ= ЗЙ=
нк~о~бд=Йе= г~бенЙе~ен= йкЙлл¨= дЙ= дЙобЙк=ЗЙ= З¨ДдзЕ~ЦЙ=
EUFK=
PK= oЙдЯЕЬЙк=дЙ=дЙобЙк=ЗЙ=З¨ДдзЕ~ЦЙ=EUF=йзмк=зДнЙебк=дЙ=
ДдзЕ~ЦЙ=Зм=ЦмбЗзеK=
aЙймбл=~озбк=З¨й~лл¨= дDзДлн~ЕдЙ=Йн=Езгйд¨н¨Й= д~=г~J
еМмокЙ=к¨й¨нЙк=дDзй¨к~нбзе=йзмк=кЙнзмкеЙк=¶=д~=йзлбJ
нбзе=ЗЙ=нк~о~бд=йк¨Е¨ЗЙенЙK=
`ЙннЙ=зй¨к~нбзе=Йлн=йзллбДдЙ=~мллб=~оЙЕ=д~=г~ЕЬбеЙ=Йе=
гзмоЙгЙен=Йе=г~бенЙе~ен=~ййму¨=лбгмдн~е¨гЙен=дЙ=
дЙобЙк=ЗЙ=йк¨лЙеЕЙ=ЬзггЙK=
=
=
afpmlpfqfc=qolm=mibfk=
mзмк= ¨обнЙк= ЗЙл= Ззгг~ЦЙл= л¨кбЙмс= ~м= гзнЙмк=
ЗЫ~лйбк~нбзеI=д~=г~ЕЬбеЙ=Йлн=¨имбй¨Й=ЗЫме=СдзннЙмк=имб=
бенЙкобЙен= им~еЗ= дЙ= к¨лЙкозбк= ЗЙ= к¨Емй¨к~нбзе= Йлн=
йдЙбе= Йе= йкзозим~ен= д~= СЙкгЙнмкЙ= Зм= нму~м=
ЗЫ~лйбк~нбзе=Йн=й~к=Езел¨имЙеЕЙ=ЗЙ=дЫ~лйбк~нбзеK=
a~ел=ЕЙ=Е~лI=бд=Йлн=е¨ЕЙлл~бкЙ=ЗЙ=йкзЕ¨ЗЙк=¶=д~=обЗ~еЦЙ=
Зм=к¨лЙкозбк=ЗЙ=к¨Емй¨к~нбзеK=
NK= bгйзбЦеЙк= дЙ= нму~м= ЗЙ=обЗ~еЦЙ=EVF= Зм= к¨лЙкозбк=
ЗЙ=к¨Емй¨к~нбзеK=
OK= bедЙоЙк=дЙ=ДзмЕЬзе=Зм=нму~м=ЗЙ=З¨ЕЬ~кЦЙ=Йе=~ЕJ
нбзее~ен=дЙ=дЙобЙк=лбнм¨=лмк=дЙ=ДзмЕЬзе=Йн=обЗЙк=дЙ=к¨J
лЙкозбк= ЗЙ= к¨Емй¨к~нбзе= З~ел= дЙл= Д~Ел= йк¨омлI= ЕзеJ
Сзкг¨гЙен=~мс=дзбл=Йе=обЦмЙмк=йзмк=ЕЙ=имб=ЕзеЕЙкеЙ=
дЫ¨дбгбе~нбзе=ЗЙл=дбимбЗЙлK=
=^qqbkqflkW=
`ЙннЙ=зй¨к~нбзе=Ззбн=ЖнкЙ=ЙССЙЕнм¨Й=Йе=мнбдбл~ен=ЗЙл=
Ц~енл=йзмк=лЙ=йкзн¨ЦЙк=Зм=Езен~Ен=~оЙЕ=ЗЙл=лздмнбзел=
З~еЦЙкЙмлЙлK=
=
=
=
^oobq= ab= i^= j^`efkb= ^= i^= cfk= ar=
kbqqlv^db=
=
^о~ен= ЗDЙс¨ЕмнЙк= еDбгйзкнЙ= имЙд= нуйЙ= ЗЙ= г~емнЙеJ
нбзеW=
NK= ^йймуЙк= лмк= дDбенЙккмйнЙмк= Ц¨е¨к~д= ENF= йзмк= дЙ=
лнзййЙкK=
OK= pзмдЙоЙк=дЙ=лмЕЙмк=Йе=нзмке~ен=оЙкл=дЙ=Ь~мн=дЙ=дЙJ
обЙк=ERF= лбнм¨=~м= ЕЙенкЙ=Зм=ЦмбЗзе=Eозбк=З~ел=дЙ=ЕЬ~J
йбнкЙ=obibs^db=ar=pr`broFK=
PK= ^гЙеЙк=д~=г~ЕЬбеЙ= ¶= дЫЙеЗкзбн=йк¨ом=йзмк= д~=обJ
З~еЦЙ=ЗЙ=дЫЙ~мK=
=
=^qqbkqflkW=
i~=г~ЕЬбеЙ=еDЙлн= й~л=¨имбй¨Й=ЗDме=СкЙбе=ЗЙ=лн~нбзеJ
еЙгЙенX=¨обнЙк=ЗЙ=д~=Ц~к¨Й=лмк=ЗЙл=йд~ел=беЕдбе¨лK=
=
=
bkqobqfbk=glrok^ifbo=
=
kbqqlv^db=ar=obpboslfo=ab=ob`rmbo^qflk=
NK= bгйзбЦеЙк= дЙ= нму~м= ЗЙ=обЗ~еЦЙ=EVF= Зм= к¨лЙкозбк=
ЗЙ=к¨Емй¨к~нбзеK=
OK= bедЙоЙк=дЙ=ДзмЕЬзе=Зм=нму~м=ЗЙ=З¨ЕЬ~кЦЙ=Йн=обЗЙк=
дЙ=к¨лЙкозбк=ЗЙ=к¨Емй¨к~нбзе=З~ел=дЙл=Д~Ел=йк¨омл=Eозбк=
З~ел=дЙ=ЕЬ~йбнкЙ=afpmlpfqfc=qolm=mibfkТFK=
PK= bедЙоЙк=дЙ=ЕзмоЙкЕдЙ=ЗЫ~лйбк~нбзе=ENMF=ЗЙймбл=~озбк=
нзмке¨=дЙл=дЙобЙкл=ENNF=имб=дЙ=ДдзимЙенK=
QK= sбЗЙк=дЙ=к¨лЙкозбк=Йе=мнбдбл~ен=лзе=нму~м=EVFK=
RK= oбеЕЙк=дЙ=к¨лЙкозбк=~оЙЕ=ме=аЙн=ЗЫЙ~мK=
=
=
=^qqbkqflkW=
`ЙннЙ=зй¨к~нбзе=Ззбн=ЖнкЙ=ЙССЙЕнм¨Й=Йе=мнбдбл~ен=ЗЙл=
Ц~енл=йзмк=лЙ=йкзн¨ЦЙк=Зм=Езен~Ен=~оЙЕ=ЗЙл=лздмнбзел=
З~еЦЙкЙмлЙлK=
=
sfa^kdb= bq= kbqqlv^db= ar= obpboslfo= ab= i^=
plirqflk=bq=ar=cfiqob=
mзмк=обЗЙк=д~= лздмнбзе= З¨нЙкЦЙенЙ= кЙлн¨Й=З~ел=дЙ=к¨J
лЙкозбк=ЗЙ=д~=лздмнбзеW=
NK= ^гЙеЙк=д~=г~ЕЬбеЙ= ¶= дЫЙеЗкзбн=йк¨ом=йзмк= д~=обJ
З~еЦЙ=ЗЙ=дЫЙ~мK=
OK= ^йймуЙк= лмк= дDбенЙккмйнЙмк=Ц¨е¨к~д= йзмк= лнзййЙк=
д~=г~ЕЬбеЙK=
PK= a¨обллЙк=дЙ=ДзмЕЬзе=ЗЙ=кЙгйдблл~ЦЙ=ENOF=Зм=к¨лЙкJ
озбк=ЗЙ=д~=лздмнбзе=Йн=ЙедЙоЙк=дЙ=СбднкЙ=ENQFK=
QK= a¨обллЙк= дЙ= ДзмЕЬзе= ЗЙ= обЗ~еЦЙ=ENPF= лбнм¨= беС¨J
кбЙмкЙгЙен= ~м= Е∑н¨= Ц~мЕЬЙ= ЗЙ= д~= г~ЕЬбеЙ= Йн= ~нJ
нЙеЗкЙ=имЙ=нзмнЙ=д~=лздмнбзе=З¨нЙкЦЙенЙ=лзбн=обЗ¨ЙK=
=
=
=
RK= qзмкеЙк=г~емЙддЙгЙен=дЙ=лмЕЙмк=ENRF=оЙкл=д~=й~кJ
нбЙ=~ен¨кбЙмкЙ=ЗЙ= д~= г~ЕЬбеЙ= ЗЙ=С~´зе=имЫзе=~= дбДкЙ=
~ЕЕ≠л=~м=СбднкЙ=ENSFK==
SK= a¨обллЙк=дЙ=ЕзмоЙкЕдЙ=Зм=СбднкЙ=ENSFI=ЙедЙоЙк=д~=Е~кJ
нзмЕЬЙ=ENTF=Йн=д~=кбеЕЙк=~оЙЕ=ме=аЙн=ЗЫЙ~мK=
TK= oЙгзенЙк=дЙ=нзмнK=
=
=
=^qqbkqflkW=
`ЙннЙ=зй¨к~нбзе=Ззбн=ЖнкЙ=ЙССЙЕнм¨Й=Йе=мнбдбл~ен=ЗЙл=
Ц~енл=йзмк=лЙ=йкзн¨ЦЙк=Зм=Езен~Ен=~оЙЕ=ЗЙл=лздмнбзел=
З~еЦЙкЙмлЙлK=
=
kbqqlv^db=ar=cfiqob=aD^pmfo^qflk=
NK= bедЙоЙк=дЙ=ЕзмоЙкЕдЙ=ЗЫ~лйбк~нбзе=ENSF=ЗЙймбл=~озбк=
нзмке¨=дЙл=дЙобЙкл=ENTF=имб=дЙ=ДдзимЙенK=
OK= bедЙоЙк=дЙ=СбднкЙ=~оЙЕ=дЙ=СдзннЙмк=Йе=С~бл~ен=Сд¨ЕЬбк=
дЙ=ДзкЗ=Зм=СбднкЙ=йзмк=дЙ=З¨Ц~ЦЙк=ЗЙл=обл=йк¨лЙенЙл=лмк=
дЙ=ЕзмоЙкЕдЙK=
PK= ^оЙЕ=ме=аЙн=ЗЫЙ~м=еЙннзуЙк=нзмн=дЙ=ЦкзмйЙ=Йн=й~кJ
нбЕмдб≠кЙгЙен=дЙл=й~кзбл=Йн=дЙ=СзеЗ=Зм=СбднкЙK=
QK= c~бкЙ=нзмнЙл=дЙл=зй¨к~нбзел=ЗЙ=д~о~ЦЙ=~оЙЕ=лзбеK=
RK= oЙгзенЙк=дЙ=нзмнK=
=
=
=
mlpfqflkkbjbkq=sboqf`^i=ab=i^=j^`efkb==
i~=г~ЕЬбеЙ=йЙмн=йкЙеЗкЙ=ме=йзлбнбзееЙгЙен=оЙкнбЕ~д=
кЙеоЙкл¨Й=¶= дD~ккб≠кЙ=ЗЙймбл=~озбк=кЙйдб¨=дЙ=ЦмбЗзе=ЗЙ=
д~=г~ЕЬбеЙK==
`ЙннЙ=йзлбнбзе=йЙкгЙн=ме=ЙеЕзгДкЙгЙен=к¨Змбн=йзмк=
дЙ=й~квбеЦ=ЗЙ=д~=г~ЕЬбеЙ=Йн=С~ЕбдбнЙ=дЙл=зй¨к~нбзел=ЗЙ=
г~емнЙенбзеK==
mзмк=нзмкеЙк=д~=г~ЕЬбеЙ=бд=Йлн=е¨ЕЙлл~бкЙ=ЗЙW=
NK= ^йймуЙк= лмк=дDбенЙккмйнЙмк=Ц¨е¨к~д=йзмк=дЙ= лнзйJ
йЙкK=
OK= `зенк∑дЙк=имЙ=дЙл=ЗЙмс=к¨лЙкозбкл= лзбЙен=обЗЙл=Йн=
З~ел=дЙ=Е~л=йзмкозбк= ~= дЙмкл= обЗ~еЦЙ=Eозбк=З~ел=sfJ
a^kdb= bq= kbqqlv^db= ar= obpboslfo= ab= ob`rmbJ
o^qflk?=Йн=Тsfa^kdb=bq=kbqqlv^db=ar=obpboslfo=
ab=i^=plirqflkТFK=
PK= ^Цбк= лмк= дЙ= дЙобЙк= ЗЙ= З¨ДдзЕ~ЦЙ= EUF= йк¨лЙен= йк≠л=
ЗЙл=йзбЦе¨Йл=Зм=ЦмбЗзеK=
QK= qзмкеЙк=дЙ=ЦмбЗзе=Йе=дЙ=кЙйдб~ен=оЙкл=дЙл=к¨лЙкозбкл=
Йе=г~бенЙе~ен=йкЙлл¨=дЙ=дЙобЙк=ЗЙ=З¨ДдзЕ~ЦЙ=EUFK=
RK= oЙдЯЕЬЙк=дЙ=дЙобЙк=ЗЙ=З¨ДдзЕ~ЦЙ=EUF=йзмк=зДнЙебк=дЙ=
ДдзЕ~ЦЙ=Зм=ЦмбЗзеK=
SK= bе= ЙгйзбЦе~ен= д~= г~ЕЬбеЙ= ~оЙЕ= дЙл= ЗЙмс= г~бел=
З~ел=дЙ=йзбен=E^F=Зм=ДзкЗ=Зм=к¨лЙкозбк=Йн=E_F=ЗЙл=йзбJ
Це¨Йл=Зм=ЦмбЗзе=ЕзггЙ=беЗбим¨Й=З~ел=д~=СбЦмкЙK=
TK= pзмдЙоЙк=д~=й~кнбЙ=~о~ен=ЗЙ=д~=г~ЕЬбеЙ=Йе=д~=С~бJ
л~ен=нзмкеЙк=лмк=дЙл=кзмЙл=~ккб≠кЙл=Йн=д~=йзкн~ен=З~ел=
д~=йзлбнбзе=оЙкнбЕ~дЙ=ЕзггЙ=З~ел=д~=СбЦмкЙK==
=
Page 36

===
c= = c=
=
=
PS
=^qqbkqflkW=
i~=йзлбнбзе=оЙкнбЕ~дЙ=Йлн=беЗбим¨Й= им~еЗ= зе=йк¨J
озбн=ЗЙ=еЙ=й~л=мнбдблЙк=д~=г~ЕЬбеЙ=йзмк=меЙ=Змк¨Й=
ЗЙ=йдмл=ЗЙ= OLP=азмклI=йзмк= ¨обнЙк=имЙ=дЙ= йзбЗл=ЗЙ=
д~=г~ЕЬбеЙ=ймбллЙ=~оЙЕ=дЙ=нЙгйл= ЙеЗзгг~ЦЙк= д~=
ДкзллЙ=Йе=ЕзгйкзгЙнн~ен=ЙелмбнЙ=дЙ=ЕзккЙЕн=СзеЕJ
нбзееЙгЙен=ЗЙ=д~=г~ЕЬбеЙK======
=
=
=
=
kbqqlv^db=ab=i^=_olppb=
a¨гзенЙк=д~=ДкзллЙ=Йн=д~=еЙннзуЙк=~оЙЕ=ме=аЙн=ЗЫЙ~м=
Eйзмк= дЙ= З¨гзен~ЦЙ= ЗЙ= д~= ДкзллЙ= озбк= ЙелмбнЙ= abJ
jlkq^dbLjlkq^db=ab=i^=_olppbТFK=
=
abjlkq^dbLjlkq^db=ab=i^=_olppb=
NK= oЙеоЙклЙк=д~=г~ЕЬбеЙ=¶=дD~ккб≠кЙ=Eозбк=З~ел=mlpfJ
qflkkbjbkq=sboqf`^i=ab=i^=j^`efkb?F=Йе=С~бл~ен=
~ннЙенбзе= ЗЙ= лЙ= лзмоЙебк= ЗЙ= лнзййЙк= дDбенЙккмйнЙмк=
Ц¨е¨к~д=Йн=ЗЙ=обЗЙк=дЙл=к¨лЙкозбклK=
OK= ^оЙЕ= д~= г~ЕЬбеЙ= З~ел= ЕЙннЙ=йзлбнбзе=нзмкеЙк= д~=
ДкзллЙ= З~ел= дЙ= лЙел= ЗЙл= ~бЦмбддЙл= ЗDмеЙ= гзенкЙI=
ЕзггЙ=беЗбим¨=З~ел=д~=СбЦмкЙI=~Сбе=имЫЙддЙ=лзкн=ЗЙ=д~=
лб≠ЦЙ=Зм=йд~нЙ~м=йзкнЙJДкзллЙK==
=
=
PK= mзмк= кЙгЙннкЙ= д~= ДкзллЙI= ЙеЕдЙеЕЬЙк=дЙл=Дзмнзел=
йк¨лЙенл=З~ел=дЙмкл=лб≠ЦЙл=Зм=йд~нЙ~м=йзкнЙJДкзллЙ=Йн=
нзмкеЙк= З~ел= дЙ= лЙел= беоЙклЙ= ~мс= ~бЦмбддЙл= ЗЫмеЙ=
гзенкЙ=йзмк=зДнЙебк=дЙ=ДдзЕ~ЦЙK=
lе=йЙмн=Йе=змнкЙ=Йлл~уЙк=нуйЙл=ЗбСС¨кЙенл=ЗЙл=ДкзллЙлI=
Йе= СзеЕнбзе= Зм= нуйЙ= Зм= лзд= имDзе= Ззбн= д~оЙк= Йн= дЙл=
ЕзеЗбнбзел= ЗЙ= л~дбллмкЙ= имDзе= нкзмоЙ= Eозбк= З~ел=
_olppbp=`lkpbfiibbpТFK=
=^qqbkqflkW=
iЙл=зй¨к~нбзел=ЗЙ=д~= г~ебймд~нбзе= ЗЙ=д~=ДкзллЙ=ЗзбJ
оЙен=ЖнкЙ=ЙССЙЕнм¨Йл=Йе=мнбдбл~ен=ЗЙл=Ц~енл=~ййкзйкб¨л=
йзмк= лЙ= йкзн¨ЦЙк= н~ен= г¨Е~ебимЙгЙен= Зм= Езен~Ен=
~оЙЕ=дЙл=Дкбел=имЙ=Зм=кблимЙ=ЕЬбгбимЙ=йзмк=дЙ=Езен~Ен=
~оЙЕ=ЗЙл=лздмнбзел=З~еЦЙкЙмлЙлK=
=
=
=
kbqqlv^db=ar=pr`bro=
j~бенЙебк=дЙ=лмЕЙмк=йкзйкЙ=Йлн=Ц~к~енбЙ=ЗЫме=л¨ЕЬ~ЦЙ=
гЙбддЙмкK=
NK= oЙеоЙклЙк=д~=г~ЕЬбеЙ=¶=дD~ккб≠кЙ=Eозбк=З~ел=mlpfJ
qflkkbjbkq=sboqf`^i=ab=i^=j^`efkb?F=Йе=С~бл~ен=
~ннЙенбзе= ЗЙ= лЙ= лзмоЙебк= ЗЙ= лнзййЙк= дDбенЙккмйнЙмк=
Ц¨е¨к~д=Йн=ЗЙ=обЗЙк=дЙл=к¨лЙкозбклK=
OK= ^оЙЕ=д~=г~ЕЬбеЙ=З~ел=ЕЙннЙ=йзлбнбзе=еЙннзуЙк=лзбJ
ЦеЙмлЙгЙен=дЫбен¨кбЙмк=ЗЙ= дЫЙгДк~у~ЦЙ=лмк=дЙ=лмЕЙмк=
Йе= ¨дбгбе~ен= ¨оЙенмЙдл= З¨ЕЬЙнл= ЗЙ= л~дбллмкЙ= Йн= еЙнJ
нзуЙк=лзбЦеЙмлЙгЙен=дЙл=Д~оЙннЙл=Зм=лмЕЙмкK=
=
=
=
bkqobqfbk=loafk^fob=
=
objmi^`bjbkq= ab= i^= _^sbqqb= ^oofbob= ar=
pr`bro=
`зенк∑дЙк= дЫ¨н~н= ЗЫмлмкЙ= ЗЙ=д~= Д~оЙннЙ= Зм= лмЕЙмк= Йн=
¨оЙенмЙддЙгЙен=д~=нзмкеЙк=зм=д~=кЙгйд~ЕЙкK=
mзмк=дЙ=кЙгйд~ЕЙгЙен=бд=Йлн=е¨ЕЙлл~бкЙ=ЗЙW=
NK= _~бллЙк=дЙ=лмЕЙмк=Йе=нзмке~ен=оЙкл=дЙ=Д~л=дЙ=дЙобЙк=
ENF=лбнм¨=~м=ЕЙенкЙ=Зм=ЦмбЗзеK=
OK= qзмкеЙк=оЙкл=дЫЙсн¨кбЙмк=дЙ=лмЕЙмкK=
PK= ^оЙЕ= дЙ= лмЕЙмк= З~ел= ЕЙннЙ= йзлбнбзе= ~Цбк= лмк= дЙл=
¨Екзмл= й~йбддзе= EOF= Йе= дЙл= З¨облл~ен= Езгйд≠нЙгЙен=
йзмк=дбД¨кЙк=дЙ=лмЕЙмкK=
QK= bедЙоЙк=дЙ=г~еЕЬзе=EPF=Зм=нму~м=лмЕЙмк=Йн=ЙедЙJ
оЙк=дЙ=лмЕЙмкK=
=
=
RK= a¨ЕкзЕЬЙк= д~= СЙкгЙнмкЙ= EQF= ЗЙ= д~= д~гЙ= йкЙллЙJ
Д~оЙннЙ=Йн=ЙедЙоЙк=д~=Д~оЙннЙ=йзмк=д~=нзмкеЙк=зм= д~=
кЙгйд~ЕЙкK=
SK= `зенк∑дЙк=имЙ=дЙ=г~еЕЬзе=Йн= дЙ=нму~м=Зм= лмЕЙмк=
еЙ=лзбЙен=й~л=зДлнкм¨л= Йн= ¨оЙенмЙддЙгЙен=ЙедЙоЙк=д~=
л~дбллмкЙK=
mзмк=кЙгЙннкЙ=дЙ=лмЕЙмкI=к¨й¨нЙк=~м=Езенк~бкЙ=дЙл=зй¨J
к~нбзел=лмлЗбнЙлK=
=
=
objmi^`bjbkq=ab= i^=_^sbqqb=^s^kq=ar=prJ
`bro=
`зенк∑дЙк=дЫ¨н~н=ЗЫмлмкЙ=ЗЙ=д~=Д~оЙннЙ=~о~ен=Зм=лмЕЙмк=
Йн=¨оЙенмЙддЙгЙен=д~=кЙгйд~ЕЙкK=
mзмк=дЙ=кЙгйд~ЕЙгЙен=бд=Йлн=е¨ЕЙлл~бкЙ=ЗЙW=
NK= _~бллЙк=дЙ=лмЕЙмк=Йе=нзмке~ен=оЙкл=дЙ=Д~л=дЙ=дЙобЙк=
ENF=лбнм¨=~м=ЕЙенкЙ=Зм=ЦмбЗзеK=
OK= qзмкеЙк=оЙкл=дЫЙсн¨кбЙмк=дЙ=лмЕЙмкK=
=
=
=
PK= ^оЙЕ=дЙ=лмЕЙмк=З~ел= ЕЙннЙ=йзлбнбзе=йкзЕ¨ЗЙк=¶=дЙ=
З¨гзенЙк= Йн= ЙелмбнЙ= д~= Д~оЙннЙ= ~ккб≠кЙ= Зм= лмЕЙмк=
Eозбк=З~ел=objmi^`bjbkq=ab=i^=_^sbqqb=^oofbob=
ar=pr`broТFK=
QK= bедЙоЙк=дЙл=¨Екзмл=й~йбддзе=ERF=лбнм¨л=лмк=д~=й~кнбЙ=
лмй¨кбЙмкЙ= Зм= Езкйл= Зм= лмЕЙмк= Йе= л¨й~к~ен= ЙелмбнЙ=
дЙл= ЗЙмс= й~кнбЙл= г¨н~ддбимЙл= имб= дЙ= ЕзгйзлЙен= йзмк=
ЙедЙоЙк=д~=Д~оЙннЙ=~о~енK=
RK= kЙннзуЙк=~оЙЕ=ме=аЙн=ЗDЙ~м=нзмл=дЙл=Езгйзл~енлK=
mзмк=кЙгЙннкЙ=дЙ=лмЕЙмкI=к¨й¨нЙк=~м=Езенк~бкЙ=дЙл=зй¨J
к~нбзел=лмлЗбнЙлK=
=
=
=
`lkqolib=ab=clk`qflkkbjbkq=
=
ib=jlqbro=aD^pmfo^qflk=kb=clk`qflkkb=m^p=
NK= `зенк∑дЙк= дЫ¨н~н= ЗЙ= ЕЬ~кЦЙ= ЗЙл= Д~ннЙкбЙлI= имDзе=
йЙмн=озбк=Йе=~Енбзее~ен=ЗD~ДзкЗ=дDбенЙккмйнЙмк=Ц¨е¨J
к~д=ENF=Eозбк=З~ел=ob`e^odb=abp=_^qqbofbp?FK=
OK= s¨кбСбЙк=имЙ=дЫбенЙккмйнЙмк=Зм=гзнЙмк=ЗD~лйбк~нбзе=
EOF=лзбн=~ддмг¨=Йе=о¨кбСб~ен=имЙ= дЙ= н¨гзбе= оЙкн= ЕзкJ
кЙлйзеЗ~ен=лзбн=~ддмг¨K=
PK= `зенк∑дЙк=дЙ=ебоЙ~м=З~ел=дЙ=к¨лЙкозбк=Зм=к¨Емй¨к~J
нбзе=Eозбк=З~ел=?afpmlpfqfc=qolm=mibfk?F=Йн=лб=е¨ЕЙлJ
л~бкЙI=обЗЙк=дЙ=к¨лЙкозбкK=
pб= дЙ= йкзДд≠гЙ= йЙклблнЙI= Езен~ЕнЙк= дЙ= лЙкобЕЙ=
ЗЫ~ллблн~еЕЙ=нЙЕЬебимЙ=~мнзкбл¨K=
=
Page 37

===
c= = c=
=
=
PT
=
=
ib=jlqbro=ab=i^=_olppb=kb=clk`qflkkb=m^p=
NK= `зенк∑дЙк= дЫ¨н~н= ЗЙ= ЕЬ~кЦЙ= ЗЙл= Д~ннЙкбЙлI= имDзе=
йЙмн=озбк=Йе=~Енбзее~ен=ЗD~ДзкЗ=дDбенЙккмйнЙмк=Ц¨е¨J
к~д=ENF=Eозбк=З~ел=ob`e^odb=abp=_^qqbofbp?FK=
OK= s¨кбСбЙк=имЙ=дЫбенЙккмйнЙмк=Зм=гзнЙмк=ЗЙ=д~=ДкзллЙ=
EOF=лзбн=~ддмг¨=Йе=о¨кбСб~ен=имЙ= дЙ= н¨гзбе= оЙкн= ЕзкJ
кЙлйзеЗ~ен=лзбн=~ддмг¨K=
PK= ^ЕнбзееЙк=дЙл=дЙобЙкл=йк¨лЙеЕЙ=ЬзггЙ=EPFK=
pб= дЙ= йкзДд≠гЙ= йЙклблнЙI= Езен~ЕнЙк= дЙ= лЙкобЕЙ=
ЗЫ~ллблн~еЕЙ=нЙЕЬебимЙ=~мнзкбл¨K=
=
=
=
iDb^r=pro=i^=_olppb=kDbpq=m^p=prccfp^kqb=
NK= s¨кбСбЙк=ЗD~озбк= ~Енбо¨=дDбенЙккмйнЙмк=ЗЙ=дD¨дЙЕнкзJ
о~ееЙ=ENF=Йе=о¨кбСб~ен=имЙ=дЙ=н¨гзбе=оЙкн=ЕзккЙлйзеJ
З~ен=лзбн=~ддмг¨K=
OK= `зенк∑дЙк=дЙ=ебоЙ~м=ЗЙ= дDЙ~м= З~ел=дЙ=к¨лЙкозбк=ЗЙ=
д~=лздмнбзе= Eозбк= З~ел= obpboslfo= ab= i^= plirqflk=
abqbodbkqbТFK=
PK= s¨кбСбЙк=имЙ=дЙ=к¨Цд~ЦЙ=Зм=З¨Дбн=ЗЙ=д~=лздмнбзе=З¨J
нЙкЦЙенЙ= EPF= йд~Е¨= ~ен¨кбЙмкЙгЙен= лзмл= дЙ= к¨лЙкозбк=
ЗЙ=д~=лздмнбзе=лзбн=лмССбл~ггЙен=змоЙкнK=
QK= ^ЕнбзееЙк=дЙл=дЙобЙкл=йк¨лЙеЕЙ=ЬзггЙ=EOFK=
RK= `зенк∑дЙк=имЙ=дЙ=СбднкЙ=лздмнбзе=EQF=лзбн=йкзйкЙK==
pб= дЙ= йкзДд≠гЙ= йЙклблнЙI= Езен~ЕнЙк= дЙ= лЙкобЕЙ=
ЗЫ~ллблн~еЕЙ=нЙЕЬебимЙ=~мнзкбл¨K=
=
=
=
=
i^=j^`efkb=kb=kbqqlfb=m^p=_fbk=
NK=i~=ДкзллЙ=еD~=й~л=дЙл=Дкбел=ЗЙ=д~=ЗбгЙелбзе=~ййкзJ
йкб¨ЙW=мнбдблЙк=лЙмдЙгЙен=ЗЙл=ДкзллЙл=зкбЦбе~дЙлK=mзмк=
ЗЙл= лмЦЦЙлнбзелI= Езен~ЕнЙк= дЙ= лЙкобЕЙ= ЗЫ~ллблн~еЕЙ=
нЙЕЬебимЙ=~мнзкбл¨K==
OK= i~=лздмнбзе=З¨нЙкЦЙенЙ=Йлн=белмССбл~енЙW=змокбк=Йе=
йдмл=дЙ=к¨Цд~ЦЙ=ЗЙ=З¨Дбн=ЗЙ=д~=лздмнбзе=З¨нЙкЦЙенЙ=EPFK=
PK= `зенк∑дЙк=имЙ=дЙ=З¨нЙкЦЙен=лзбн=З~ел=дЙ=йзмкЕЙеJ
н~ЦЙ=ЕзелЙбдд¨K=
`зелмднЙк= дЙ= лЙкобЕЙ= ЗЫ~ллблн~еЕЙ= нЙЕЬебимЙ= ~мнзкбл¨=
йзмк=нзмн=ЕзелЙбдK=
=
ib=pr`bro=kb=pb`eb=m^p=m^oc^fqbjbkq=
NK= `зенк∑дЙк= имЙ= дЙл= Д~оЙннЙл= Зм= лмЕЙмк= лзбЙен=
йкзйкЙлK=
OK= `зенк∑дЙк=имЙ=дЙ=г~еЕЬзе= Зм=нму~м=ЗЫ~лйбк~нбзе=
лзбн=ЙеЕдЙеЕЬ¨=ЕзккЙЕнЙгЙен=З~ел=дЙ=йкзйкЙ=дзЦЙгЙен=
лмк=дЙ=к¨лЙкозбк=ЗЙ=к¨Емй¨к~нбзе=Йн=лмк=дЙ=лмЕЙмкK=
PK= fенЙкоЙебк=лмк=дЙ=СбднкЙ=ЗЫ~лйбк~нбзе=Йе=дЙ=еЙннзу~енK=
QK= oЙгйд~ЕЙк=дЙл=Д~оЙннЙл=лб=мл¨ЙлK=
RK= `зенк∑дЙк= имЙ= дЫбенЙккмйнЙмк= Зм= гзнЙмк=
ЗЫ~лйбк~нбзе=лзбн=~ддмг¨K=
SK= `зенк∑дЙк=дЙ=ебоЙ~м=З~ел=дЙ=к¨лЙкозбк=ЗЙ=к¨Емй¨к~J
нбзе=Eозбк=З~ел=?afpmlpfqfc=qolm=mibfk?F=Йн=лб=е¨ЕЙлJ
л~бкЙI=обЗЙк=дЙ=к¨лЙкозбкK=
=
molar`qflk=bu`bppfsb=ab=jlrppb=
`зенк∑дЙк=имЫзе=~=мнбдбл¨=Зм=З¨нЙкЦЙен=¶=гзмллЙ=гзJ
З¨к¨ЙK= bоЙенмЙддЙгЙенI= ~азмнЙк= меЙ= им~енбн¨= гбебJ
г~дЙ=ЗЙ=дбимбЗЙ=~енбгзмллЙ=З~ел= дЙ= к¨лЙкозбк=ЗЙ=к¨J
Емй¨к~нбзеK=
fд=Йлн=Дзе=ЗЙ=к~ййЙдЙк=имDЙе=Е~л=ЗЫме=лзд=йЙм=л~дЙI=меЙ=
им~енбн¨= йдмл= бгйзкн~енЙ= ЗЙ= гзмллЙ= лЙ= СзкгЙк~K=
a~ел=ЕЙ=Е~л=к¨ЗмбкЙ=дЙ=йзмкЕЙен~ЦЙ=ЗЙ=д~=лздмнбзе=З¨J
нЙкЦЙенЙK=
=
iba=EOFI=EPF=bq=EQF=nrf=absfbkq=olrdb==
pб= д~= г~ЕЬбеЙ= Йлн= З~ел=дЙ= лЙел= ЗЙ= д~= г~кЕЬЙI= ~оЙЕ=
дЫбенЙккмйнЙмк=Ц¨е¨к~д=ENF=оЙкн= ~ддмг¨=Йн= ме=ЗЙл=нкзбл=
дЙЗ=EOFI=EPF=зм=EQF=ЕЬ~еЦЙ=ЕзмдЙмкI=ЗЙ=оЙкн=¶=кзмЦЙI=лбJ
ЦебСбЙ=имЫбд=у= ~=меЙ=йкзнЙЕнбзе=~гй¨кзг¨нкбимЙI= й~к=
ЙсЙгйдЙW=
J=iba=EOF=olrdbW=дЙ=гзнЙмк=ЗЙ=д~=ДкзллЙ=~=ме=ЙССзкн=
нкзй=Цк~еЗK=
J= iba= EPF= olrdbW= дЙ= гзнЙмк= ЗЫ~лйбк~нбзе= ~лйбкЙ= ЗЙ=
дЫЙ~м=Йн=ЗзеЕ=лЙ=СзкЕЙ=нкзйK=
J= iba= EQF= olrdbW= д~= ДзДбеЙ= ЗЙ= дЫ¨дЙЕнкзо~ееЙ= йЙмн=
ЖнкЙ=ЕзмкнJЕбкЕмбн¨ЙK=
mзмк= к¨н~ДдбкI= ~ккЖнЙк= дЫбенЙккмйнЙмк= Ц¨е¨к~д= ENFI= ~нJ
нЙеЗкЙ=имЙдимЙ=гбемнЙ=Йн=ЗЙймбл=дЫ~йймуЙкK=
pб= дЙ= йкзДд≠гЙ= йЙклблнЙI= Езен~ЕнЙк= дЙ= лЙкобЕЙ=
ЗЫ~ллблн~еЕЙ=нЙЕЬебимЙ=~мнзкбл¨K=
=
=
=
=
=
=
=
=
=
=
=
=
=
=
=
=
=
=
=
=
=
=
=
=
=
=
=
=
=
=
=
=
=
=
=
=
=
=
=
=
=
=
=
=
=
=
=
=
=
=
=
=
=
=
=
=
=
=
=
=
=
=
=
=
=
=
=
=
=
=
=
=
=
=
=
=
=
=
=
=
=
=
=
=
=
=
=
=
=
=
=
=
=
=
=
=
=
=
=
=
=
=
=
Page 38

===
c= = c=
=
=
PU
=
bkqobqfbk=moldo^jjb=
=
fkqbosbkqflk= glrok^ifbob= eb_alj^a^fobjbkq= loafk^fobLjbkprbiibjbkq=
kbqqlv^db=ar=obpboslfo=ab=ob`rmbo^qflk=
•
= = =
kbqqlv^db=ar=cfiqob=aD^pmfo^qflk=
•
== = =
kbqqlv^db=ab=i^=_olppb=
•
== = =
abjlkq^db=ab=i^=_olppb=
•
== = =
kbqqlv^db=ar=pr`bro=
•
== = =
objmi^`bjbkq=ab=i^=_^sbqqb=^s^kq=ar=pr`bro= = =
•
=ëá=å¨ÅÉëë~áêÉ=
objmi^`bjbkq=ab=i^=_^sbqqb=^oofbob=ar=pr`bro= = =
•
=ëá=å¨ÅÉëë~áêÉ=
kbqqlv^db=ar=qrv^r=pr`bro= = =
•
=
kbqqlv^db=ar=obpboslfo=ab=i^=plirqflk= = =
•
=
kbqqlv^db=ar=cfiqob=plirqflk=abqbodbkqb= =
•
= =
=
=
=
=
=
=
=
=
=
=
=
=
=
=
=
=
=
=
=
=
=
=
=
=
=
=
=
=
=
=
=
=
=
=
_olppbp=`lkpbfiibbp=
iЙл=ДкзллЙл=ЗзбоЙен=ЖнкЙ=ЕЬзблбЙл=Йе=СзеЕнбзе=Зм=нуйЙ=ЗЙ=лзд=Йн=ЗЙ=д~=л~дбллмкЙ=ЗЫЙедЙоЙкK=
iЙ=г~н¨кбЙд=Йгйдзу¨=Йн=дЙ=Зб~г≠нкЙ=ЗЙл=Дкбел=лзен=дЙл=¨д¨гЙенл=имб=Сзен=д~=ЗбСС¨кЙеЕЙ=ЗЙл=ДкзллЙлK=
=
j^qbofbi= `^o^`qbofpqfnrbp=
mmi=Emздуйкзйуд≠еЙF= _зееЙ=к¨лблн~еЕЙ=¶=дЫмлмкЙK=j~бенбЙен=дЙл=Е~к~Ен¨кблнбимЙл=~оЙЕ=ЗЙ=дЫЙ~м=ЕЬ~мЗЙ=амлимЫ¶=NQMшc=ESMш`FK=bддЙ=еЫЙлн=й~л=ЬуЦкзлЕзйбимЙK=
qvkbu=
=
iЙл=Дкбел=лзен=С~Дкбим¨л=Йе=еудзе=~оЙЕ=беЕкмлн~ДдЙ=ЗЙ=Цк~бел=~Дк~лбСлK=rнбдблЙк=~оЙЕ=йк¨Е~мнбзе=йзмк=еЙ=й~л=З¨н¨кбзкЙк=дЙ=лзд=зм=~Д≤гЙк=
дЙ=Ебк~ЦЙK=
afjbkpflk=abp=_ofkp=
=
=
=
=
iЙл=Дкбел=~оЙЕ=ме=Зб~г≠нкЙ=йдмл=бгйзкн~ен=лзен=йдмл=кбЦбЗЙлI=й~к=Езел¨имЙен=зе=Ззбн=дЙл=мнбдбл¨л=лмк=ме=лзд=дбллЙ=зм=~оЙЕ=ЗЙ=йЙнбнл=азбенлK=
pмк=дЙ=лзд=бкк¨ЦмдбЙк=зм=~оЙЕ=ЗЙл=кЙдбЙСл=зм=~оЙЕ=ЗЙл=Цкзл=азбенл=бд=Йлн=ЕзелЙбдд¨=ЗЫмнбдблЙк=ЗЙл=ДкзллЙл=йдмл=лзмйдЙл=й~кЕЙ=имЫЙддЙл=
й¨е≠нкЙен=йдмл=С~ЕбдЙгЙен=Йе=йкзСзеЗЙмкK=pЙ=к~ййЙдЙк=имЙ=им~еЗ=дЙл=Дкбел=ЗЙ=д~=ДкзллЙ=лзен=мл~Ц¨л=Йн=ЗЙобЙееЙен=нкзй=ЕзмкнлI=бдл=
ЗЙобЙееЙен=кбЦбЗЙл=Йн=бдл=еЙ=йЙмоЙен=йдмл=й¨е¨нкЙк=Йн=еЙннзуЙк=Йе=йкзСзеЗЙмкI=гЖгЙ=лб=дЙл=Дкбел=лзен=нкзй=ЦкзлI=д~=ДкзллЙ=~=нЙеЗ~еЕЙ=
ЗЙ=л~мнбддЙкK=
mi^qb^r=aDbkqo^fkbjbkq==iЙ=йд~нЙ~м=ЗЫЙенк~≤еЙгЙен=Йлн=ЕзелЙбдд¨=йзмк=дЙ=еЙннзу~ЦЙ=ЗЙл=лмкС~ЕЙл=дбллЙлK=fд=Йлн=¨имбй¨=~оЙЕ=меЙ=л¨кбЙ=ЗЙл=йзбенЙл=ЗЫ~еЕкЙ=имб=
йЙкгЙннЙен=ЗЙ=кЙнЙебк=Йн=ЗЫЙенк~≤еЙк=дЙ=ЗблимЙ=~Дк~лбС=Eй~ЗF=йЙеЗ~ен=дЙ=нк~о~бдK=
=
=
j^`efkb= `lab= nr^kqfqb= abp`ofmqflk= rqfifp^qflk=
_a=NT=S
=
QUVMPNOM
=N=
_кзллЙ=mmi=MIS=Х=
QPM
ããLNTÒ
=
pздл=дбллЙл=~оЙЕ=ЗЙл=йЙнбнл=азбенл=Йн=л~дЙн¨=к¨лблн~енЙK
=
=
QUVMPNPM
=N=
_кзллЙ=mmi=MIV=Х=
QPM
ããLNTÒ
=
pçäë=Éå=ã~í¨êáÉä=
к¨лблн~ен=Йн=й~кнбЕмдб≠кЙгЙен=л~дЙлK=
=
=
QUVMPNQM
=N=
_кзллЙ=qvkbu=Х=
QPM
ããLNTÒ
=
pздл=Йе=г~н¨кбЙд=к¨лблн~ен=Йн=й~кнбЕмдб≠кЙгЙен=л~дЙлK=
=
=
QUVMPNRM
=N=
_кзллЙ=R
J
ãáñ=Õ=
QPM
ããLNTÒ
=
mçìê=íçìë=äÉë=ëçäëK
=
=
QUUMPMOM
=N=
mд~нЙ~м=ЗDЙенк~≤еЙгЙен
=Õ=QOR
ããLNSKTÒ
=
mçìê=é~Ç=ÇÉ=NTÒI=
йзмк=дЙ=еЙннзу~ЦЙ=ЗЙл=лмкС~ЕЙл=дбллЙл
K
=
=
QUUMPMRM
=N=
mд~нЙ~м=ЗDЙенк~≤еЙгЙен
=Õ=QORããLNSKTÒ
=
H=ЕЙенЙк=дзЕв=оЙкн
=
mзмк=й~З=ЗЙ=NTТI=йзмк=дЙ=еЙннзу~ЦЙ=ЗЙл=лмкС~ЕЙл=дбллЙл
K
=
=
QUUMPMSM
=N=
mд~нЙ~м=ЗDЙенк~≤еЙгЙен
=Õ=QORããLNSKTÒ
=
H=ЕЙенЙк=дзЕв=езбк
=
mçìê=é~Ç=ÇÉ=NTÒI=éçìê=ä
Й=еЙннзу~ЦЙ=ЗЙл=лмкС~ЕЙл=дбллЙл
K
=
Page 39
Formulaire
Veuillez fournir des informations supplémentaires sur les équipements
Tornado (cocher les choix ci-dessous)
d'inscription
de garantie
__ Laveurs automatiques __ Balayeuses
__ Machines à plancher au propane __ Machine à plancher rotatif
__ Brunissoir à haute vitesse __ Aspirateurs à tapis
__ Extracteurs et détacheurs à tapis __ Aspirateurs à eau/secs
__ Nettoyeur à vapeur __ Aspirateurs jumbos
__ Équipement à conducteur porté __ Laveuses à pression
Voir les informations complètes des produits à www.tornadovac.com
Concessionnaire vendant : (Requis)________________
Veuillez écrire lisiblement
Société/Institution
_____________________________________ ____________________________________
Nom du contact Titre
_____________________________________ ____________________________________
Adresse Ville/Province/Code postal
_____________________________________ ____________________________________
Téléphone Télécopieur
_____________________________________ ____________________________________
Date de l’achat Adresse électronique
Voir plaque de métal blanc ou autocollant sur l'unité pour son information.
TYPE DE MACHINE/NUMÉRO DU MODÈLE NUMÉRO DE SÉRIE DE LA MACHINE
1. 1.
2. 2.
3. 3.
4. 4.
Description de l’installation (veuillez encercler tous ceux que s’appliquent)
1. École 9. Hôpital 17. Gouvernement des É-U
2. Magasin de détail 10. Maison de retraite 18. Autre gouvernement
3. Restaurant 11. Institution religieuse 19. Service automobile
4. Immeuble de bureaux 12. Entrepôt 20. Aéroport
5. Nettoyage contractuel 13. Aéroport 21. À but non lucratif
6. Industrie légère 14. Appartement/Condo 22. Autre (spécier)
7. Industrie lourde 15. Entrepôt _________________
8. Collège/Université 16. Supermarché _________________
Comment avez-vous entendu parler des
équipements de nettoyage et d'entretien
de Tornado?
º Contacté par un concessionnaire local
º Expérience acquise avec des produits
Tornado
º Réputation/recommandation
º Publicité
º Publipostage
º Internet
º Autre
La supercie totale de sol dur
º 0-10 000 (0-930) º 0-10 000 (0-930)
º 10-50 000 (930-4 650) º 10-50 000 (930-4 650)
º 50-250 000 (4 650-23 250) º 50-250 000 (4 650-23 250)
º Plus que 250 000 (plus que
23 260)
En pied carré (mètres)
La supercie totale de tapis
Pied carré (mètre carré)
º Plus que 250 000 (plus que
23 260)
Les dommages ou défauts résultant de l'abus, de négligence ou autre mauvais usage sont exclus de cette
garantie. D'autres éléments peuvent ou ne peuvent pas s'appliquer en fonction de votre propre machine.
Si un défaut survient, la garantie est annulée si le service est tenté par des Centres Service Tornado nonautorisés
2017 Tornado Industries. Tous droits réservés.
X8449-TOR
Retour à :
Tornado Industries
3101 Wichita Court
Fort Worth TX 76140
Télécopieur : (817-551-0719
Ou en ligne à
www.tornadovac.com
 Loading...