

Page 1
Operations & Maintenance Manual
For Commercial Use Only
TORNADO INDUSTRIES, LLC
3101 WICHITA COURT
FORT WORTH, TX 76140
(800)-822-8867 FAX
(817)-551-6507
WWW.TORNADOVAC.COM
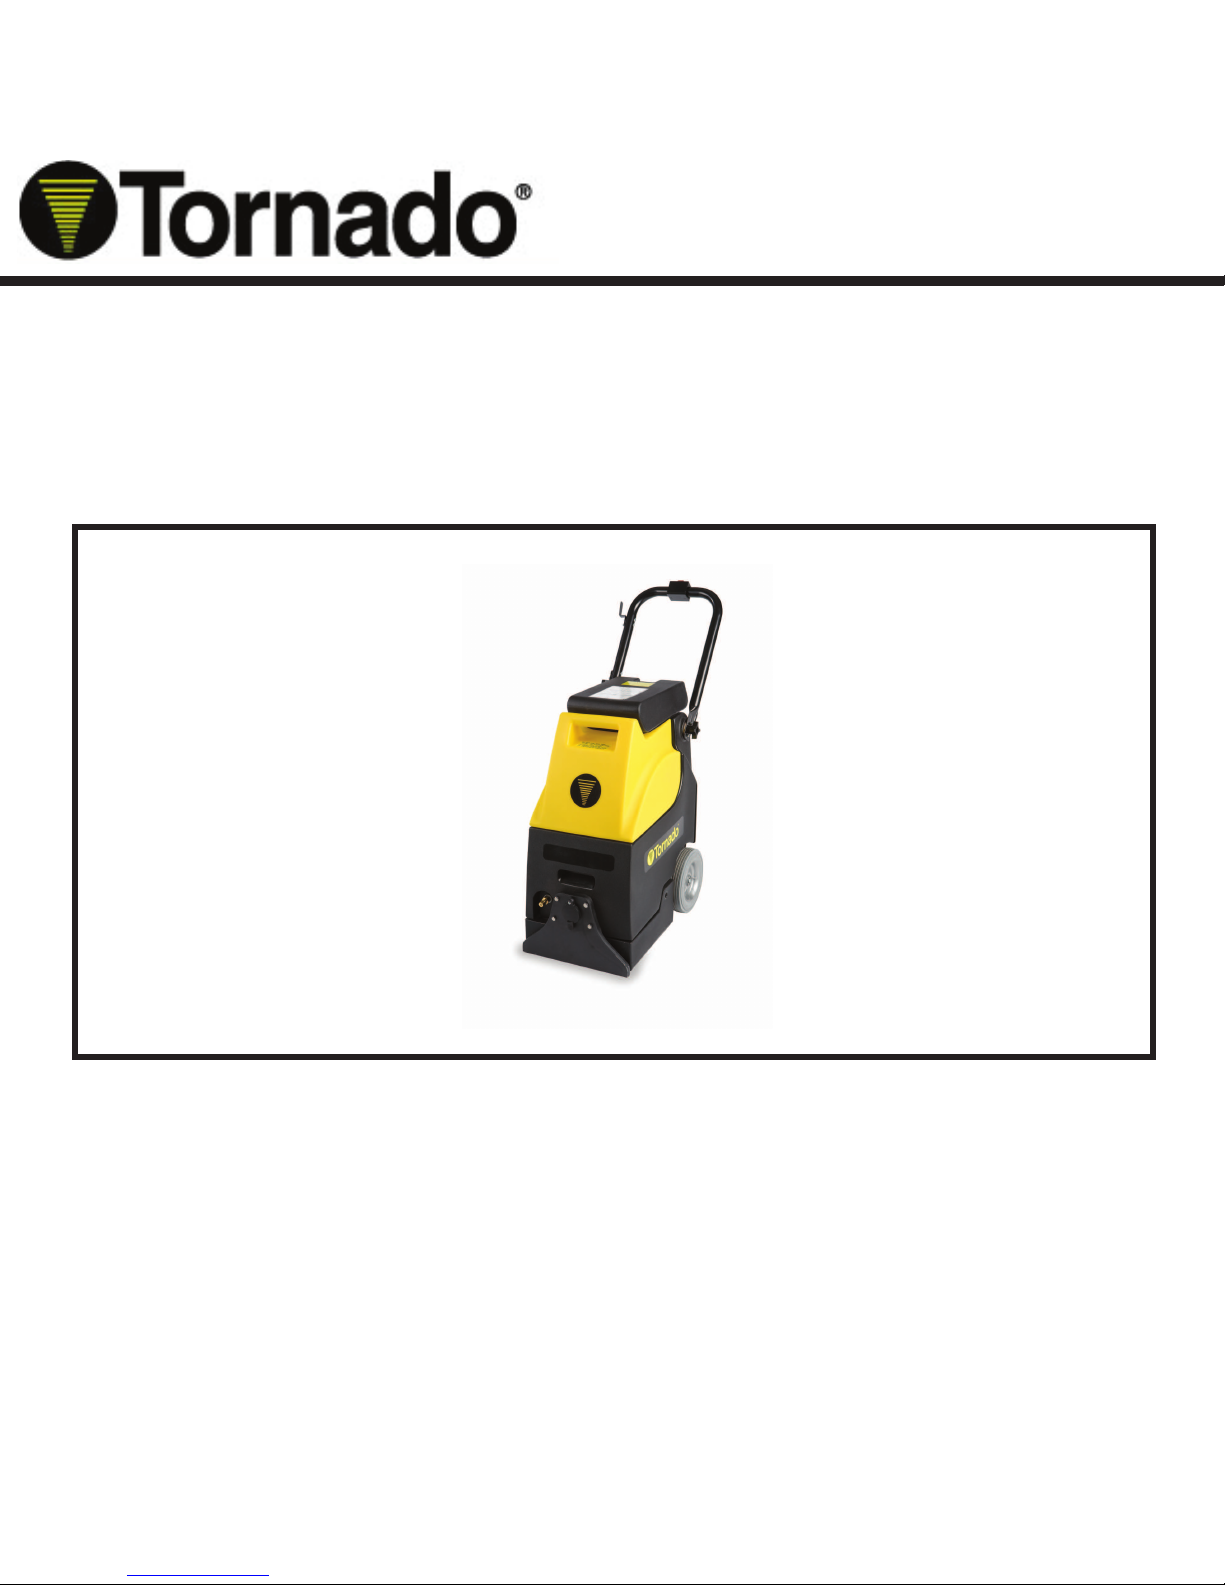
MINI-MARATHON 425
MODEL NO: 98150
Form No. L9724BA 05/12 ©Tornado Industries, LLC. All rights reserved
1
Page 2

10 Years
Plastic water tanks and Rotationally-molded bodies 1)2)4)
2 Years
Parts on all Tornado cleaning equipment 1) 3) 4)
1 Year
Labor on all Tornado cleaning equipment
1 Year
Warranty on batteries and chargers, one year prorated.
All battery warranties are handled by the battery manufacturer, on a one year prorated basis
Long-Term Buyer Protection Limited Warranty
Note: Tornado, The Latest Dirt, Floorkeeper, Carpetkeeper, Carpetrinser,
Carpetrinser/Dryer, Headmaster, Taskforce, PAC-VAC, T-Lite, Glazer,
Windshear, Max-Vac,and Trot-Mop are trademarks of Tornado Industries
Form F2662.© 2011. All rights reserved
*Effective January 1
st
, 2012. Terms subject to change without notice.
1. Except all Windshear™ Blower-Dryers, Side and Downdraft, Insulation Blowers, CV 30, CV 38, CW 50, CW 100, CK14/1, CK LW 13/1,
CV 38/48 Dual, PV6, PV10, all Push Sweepers, Dry Canister Vacuums, and all chargers are warranted for 1 (one) year for both parts
and labor.
2. All-non wear item parts purchased after warranty expiration are warranted for 90 days.
3. Warranty starts from the date of sale to the consumer or, at Tornado’s discretion, 6 months after the dealer
purchased the unit from Tornado, whichever comes first.
4. The EB 30 is warranted for a period of 90 days for both parts and labor
5. The warranty on engines used on propane po
wered equipment is limited to motor manufacturer’s warranty.
6. Ride on scrubbers are warranted for 24 months parts, 6 months labor or 1,000 hours, whichever occurs first.
Tornado Industries, Inc. (Tornado) warrants to the end user customer that the Tornado products will be free
from defects in material and workmanship for the duration(s) described below. is limited warranty DOES
NOT cover machines and/or components subject to normal wear and tear, damage that occurs in shipping,
failures resulting from modication, accident, unsuitable operating environment, misuse, abuse, neglect or improper maintenance by you. For full details, contact your Authorized Tornado Distributor, Service Center, or the
Tornado Technical Service Department. Tornado sales and service representatives are not authorized to waive or
alter the terms of this warranty, or to increase the obligations of Tornado under the warranty
Website: www.tornadovac.com
Phone 1.800.VACUUMS
Fax: (817)-551-6507
Address: 3101 WICHITA COURT
2
FORT WORTH, TX 76140
Page 3

NOTES
3
Page 4

This manual is furnished with each new model. It
provides necessary operation and maintenance
instructions.
MACHINE DATA
Model No.___________________
Read this manual completely and understand the
machine before operating or servicing.
TABLE OF CONTENTS:
Safety Precautions 4
Grounding Instructions 5
Safety Labels 6
Machine Components 7
Machine Setup 8
Machine Operation 9
Pre-Operation 9
Cleaning Carpets 10
While Operating 10
Cleaning with Accessory Tools 10
Draining Recovery Tank 11
Draining Solution Tank 11
Filter Maintenance 11
Daily Maintenance 12
Serial No.___________________
Install Date__________________
SAFETY PRECAUTIONS
This machine is intended for commercial use. It
is designed to clean carpet and upholstery in an
indoor environment and is not constructed for
any other use. Use only recommended cleaning
solutions and accessory tools.
The following safety alert symbols are used
throughout their manual as indicated in their
description.
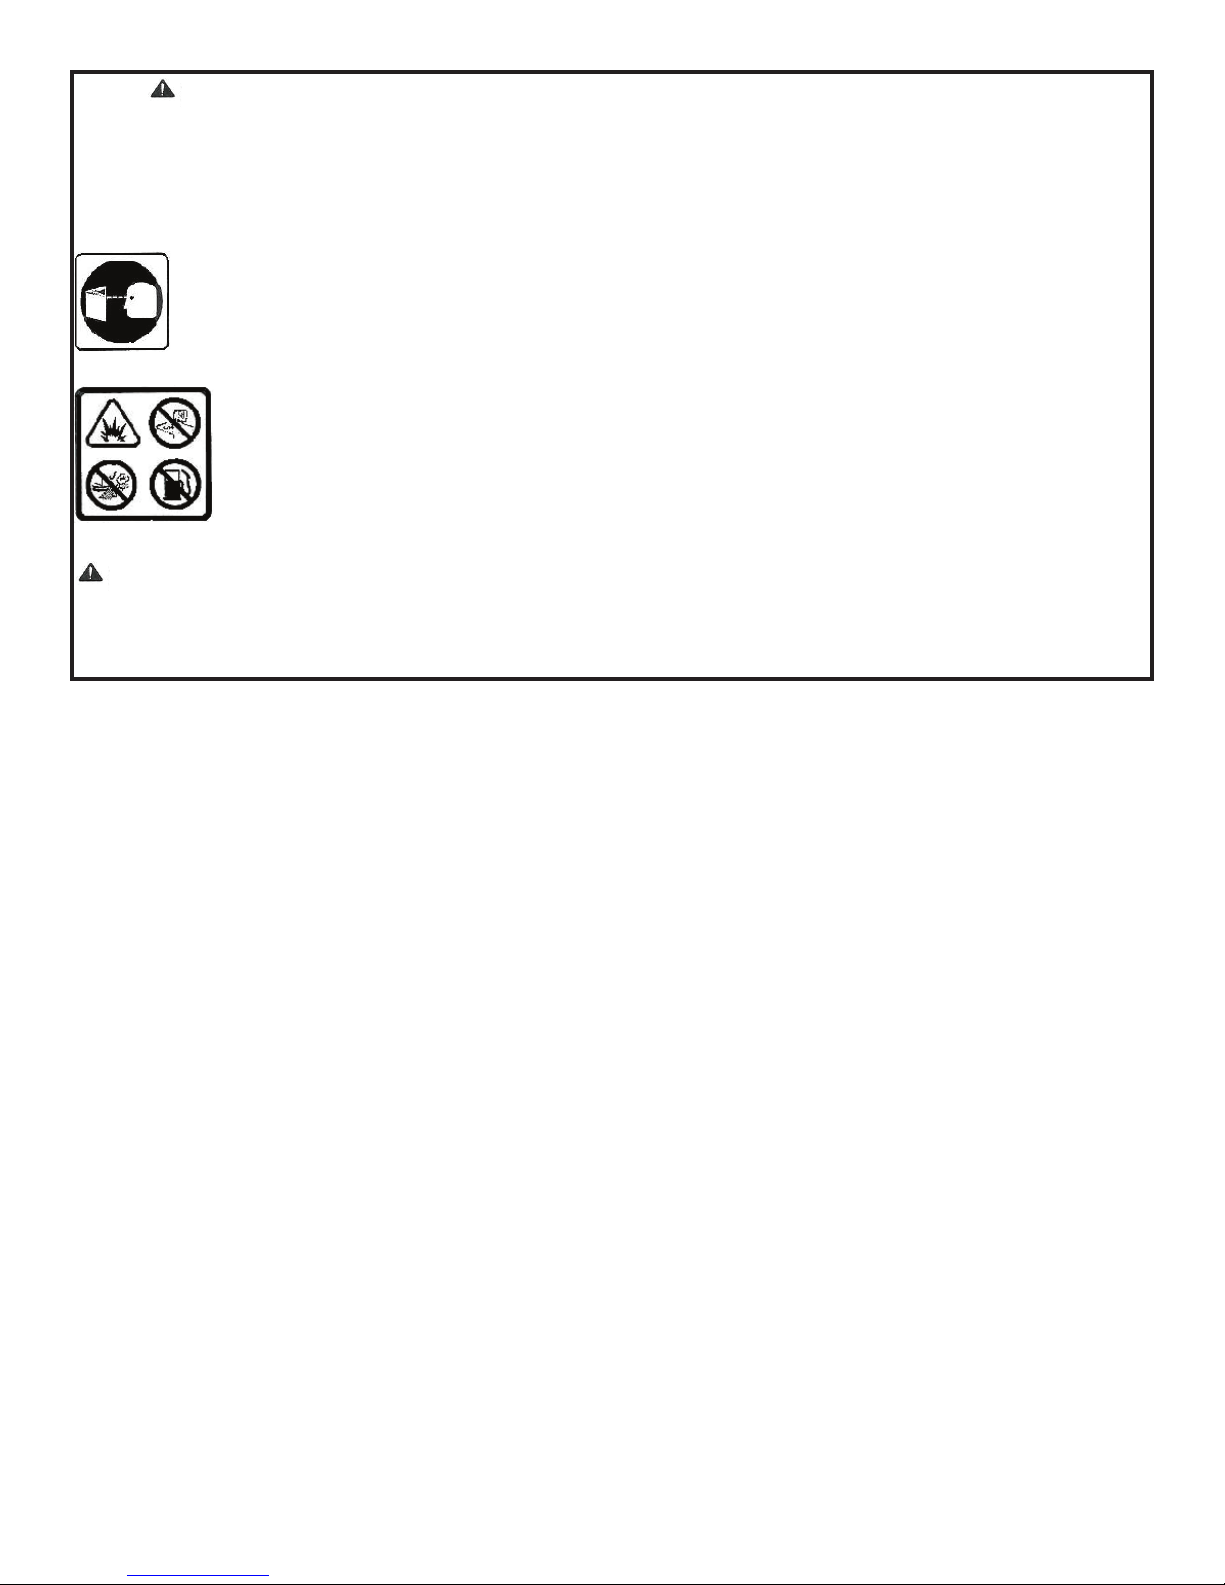
WARNING: To warn of hazards or unsafe
practices which could result in server personal
injury or death.
WARNING: Hazardous Voltage. Shock or
electrocution can result. Always unplug machine
before servicing.
WARNING: Flammable materials can cause
an explosion or re. Do not use ammable
materials in tank(s).
Weekly Maintenance 13
Monthly Maintenance 13
Quarterly Maintenance 13
Storing Machine 13
Troubleshooting 14
WARNING: Flammable materials or reactive
metals can cause an explosion or re. Do not pick
up any of these items or materials.
4
Page 5

All operators must read, understand, and practice
the following safety precautions.
• Report machine damage or faulty
operation immediately
FOR SAFETY:
1. Do not operate machine :
• Unless trained and authorized
• Unless operator manual is read and
understood
• In ammable or explosive area.
• Unless cord is properly grounded
• With damaged cord or plug
• If not in proper operating condition
• In outdoor area
• In standing water
• With the use of an extension cord
2. Before operating Machine
• Follow mixing and handling instructions
on chemical containers.
1. Before leaving or servicing machine.
• Turn off machine
• Unplug cord from wall outlet.
2. When servicing machine
• Unplug cord from wall outlet
• Avoid moving parts.
• Do not wear loose jackets, shirts or
sleeves.
• Use manufacture supplied approved
replacement parts.
GROUNDING INSTRUCTIONS:
• Make sure all safety devices are in place
and operate properly
3. When using machine
• Do not run over cord
• Do not pull machine by plug or cord
• Do not pull cord around sharp edges or
corners
• Do not unplug by pulling on cord
• Do not stretch cord
• Do not handle plug with wet hands
• Keep cord away from heated surfaces
Machine must be grounded. If it should
malfunction or breakdown, grounding
provides a path of least resistance for
electrical shock. This machine is equipped
with a cord having an equipment grounding
conductor and grounding plug. The plug
must be plugged into an appropriate outlet
that is properly installed in accordance
with all local code as ordinances. Do not
remove ground pin; if missing. Replace plug
before use.
SAFETY LABELS:
The safety labels appear on the machine
in the locations indicated. Replace labels if
they become damaged or illegible.
5
Page 6
WARNING LABEL-Located on cover. Label warns operator of safe practices of
equipment.
FOR SAFETY LABEL-located on rear panel.
FOR SAFETY Read manual before operating machine.
FLAMMABLE MATERIALS/SPILLS LABEL- located near solution tank ll port and on
recovery tank lid.
WARNING: Flammable materials can cause an explosion or re. Do not use ammable materials
in tank(s). Flammable materials or reactive metals can cause explosion or re. Do not pick up these
types of products.
6
Page 7

MACHINE COMPONENTS
1. Main Power ON/OFF Switch
2. Pump Reset Button
3. Brush Reset Button
4. Solution Switch
5. Folding Handles
6. Recovery Tank Cover
7. Recovery Tank
8. Solution Tank
9. Accessory Tool Solution Hose
Coupler
10. Accessory Tool Vacuum Hose Port
11. Pick-Up Head
12. Folding Handle Lock Knob
13. Solution Tank Drain Hose
14. Power Cord Holder
1
2
3
Figure 1
4
5
6
13
14
12
7
8
9
10
11
Figure 3Figure 2
7
Page 8
MACHINE SETUP
1. Carefully check carton for signs of
damage. Report damage at once to
carrier. The machine is shipped fully
assembled and is ready for use.
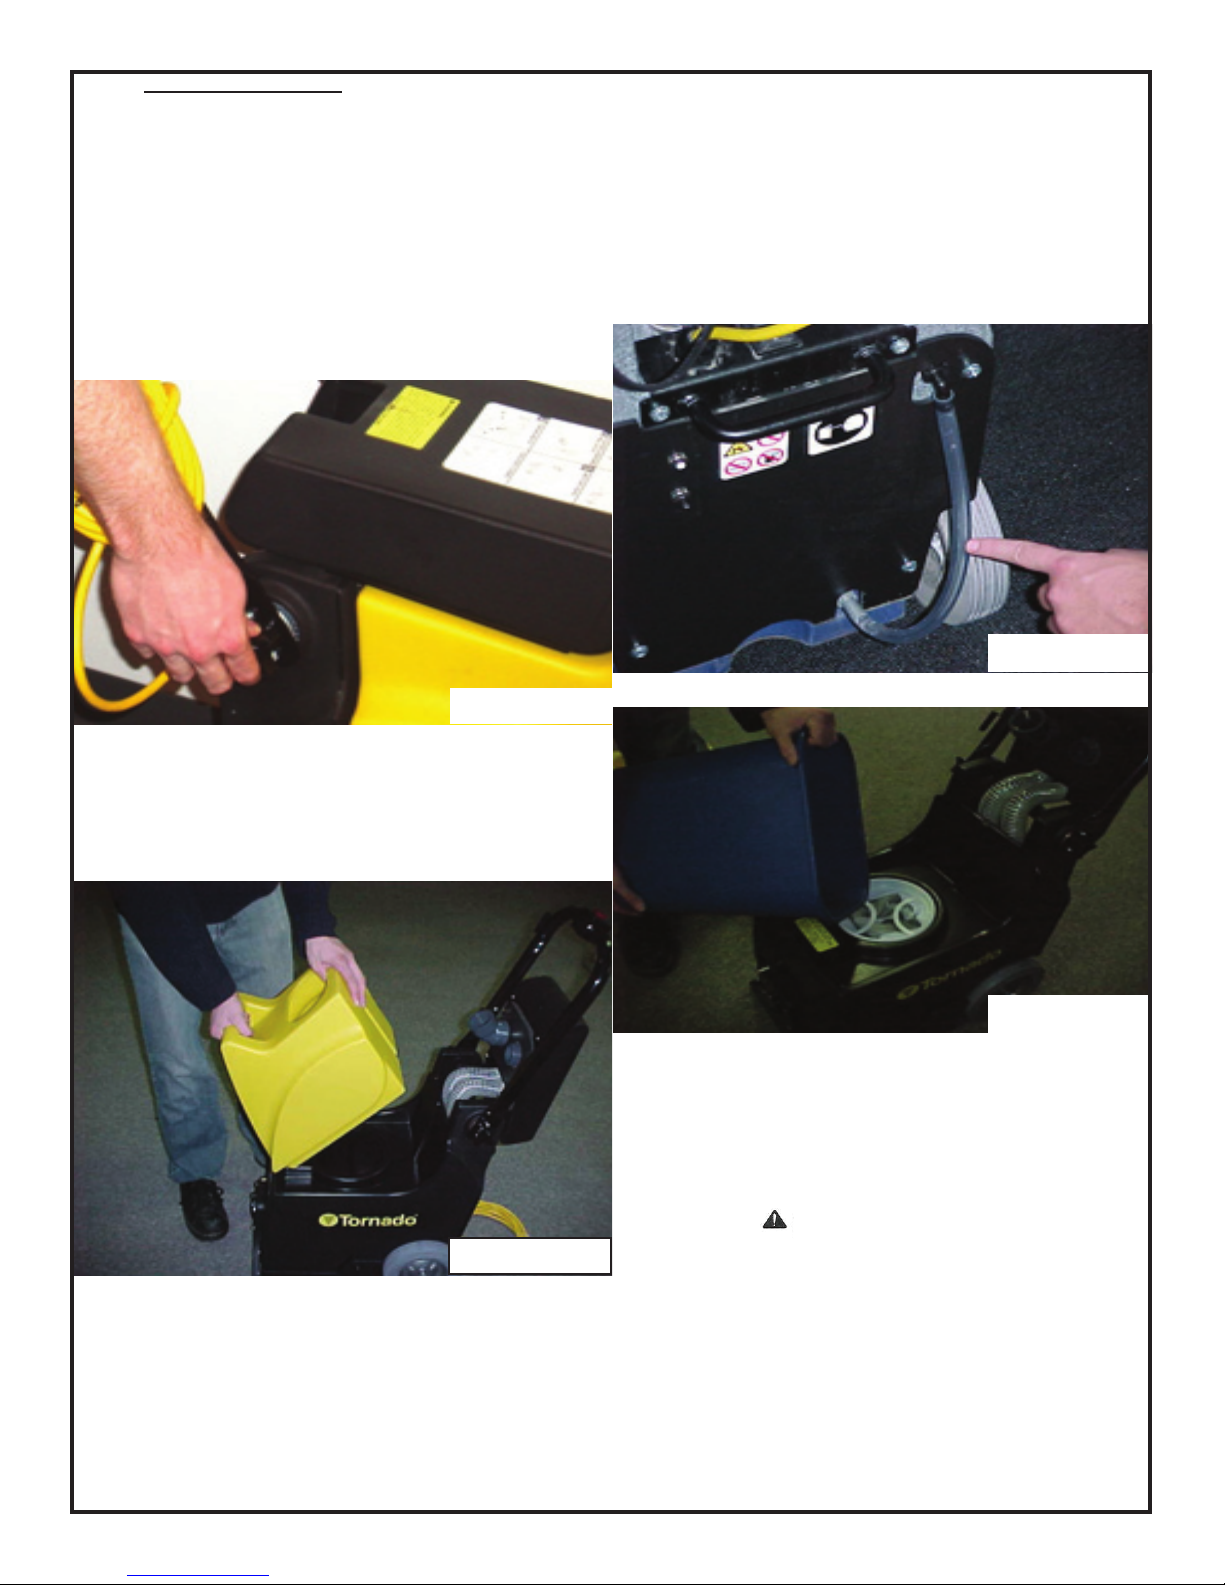
2. Adjust handle from transport position.
To adjust, loosen handle knobs, lift
handle to desired operating height,
tighten handle knobs to lock handle
(gure 4).
Figure 4
4. Using a clean bucket or hose, ll solution
tank with 4 gallons (15 L) of hot water, 140°F
(60°C) maximum. Observe solution tank hose at
rear of machine when lling (gure 6). The hose
indicates the amount of water in solution tank. Do
not use recovery tank to ll machine. Use a clean
bucket. (Figure 7).
Figure 6
3. Lift recovery tank cover and remove
recovery tank. Make sure the oat shut-
off screen and solution tank strainer are in
place before use (gure 5).
Figure 5
Figure 7
ATTENTION: Do not use recovery
tank to ll solution tank. Residual dirt
or debris could cause damage to the
solution pump.
WARNING: Flammable materials
can cause an explosion or re. Do not
use ammable materials in tank(s). Add
a recommended cleaning uid.
5. Replace recovery tank and close
cover after lling.
6. Plug power cord in a grounded
wall outlet. (Figure 8).
8
Page 9
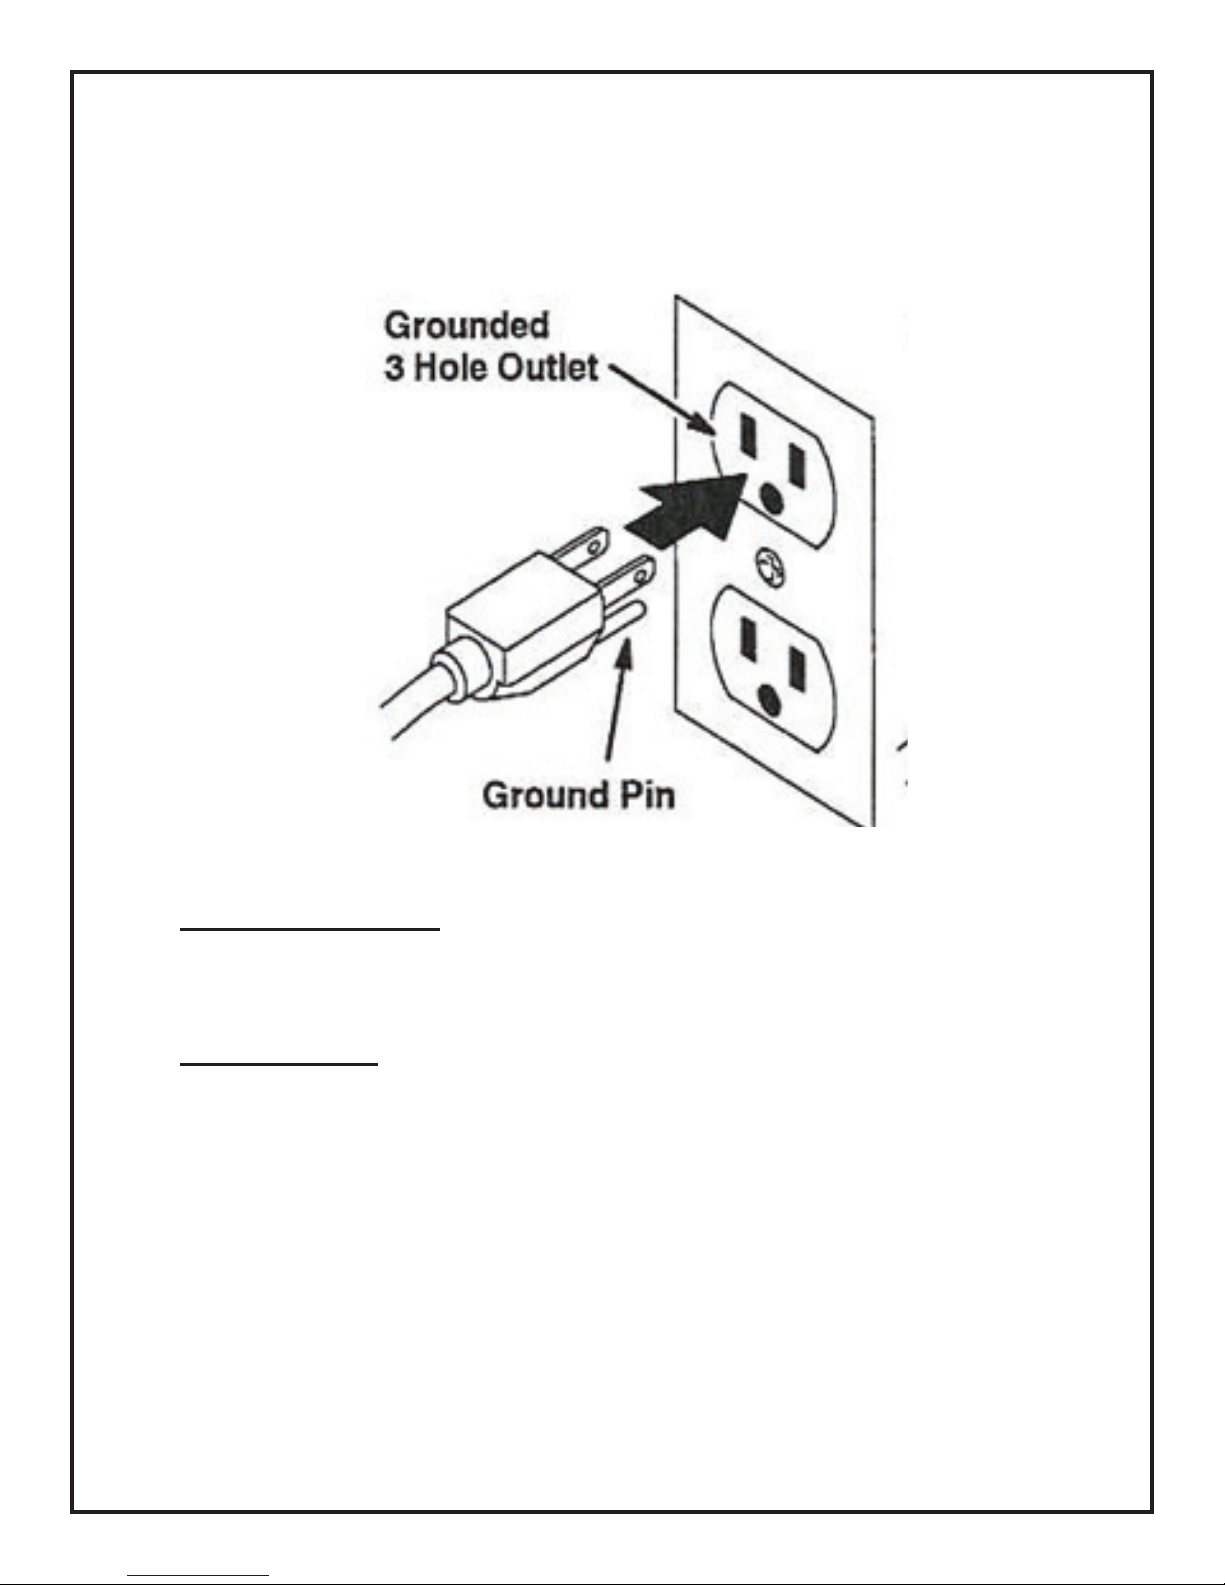
FOR SAFETY: Do not operate machine unless cord is
properly grounded.
FOR SAFETY: Do not operate machine with an extension
cord
Figure 8
MACHINE OPERATION
FOR SAFETY: Do not operate machine unless operator manual is read and understood.
PRE-OPERATION:
1. Vacuum carpet to remove debris.
2. Perform MACHINE SETUP procedures.
3. Inspect power cord for damage.
9
Page 10

CLEANING CARPETS
1. Turn main power switch on (gure 9).
Figure 9
2. To begin cleaning carpets push solution
switch and slowly pull machine backwards
(gure 10).
WARNING: Flammable materials or
reactive metals can cause explosion or re.
Do not pick up these types of products.
1. Work away from the outlet and power cord
to prevent cord damage.
2. Periodically check for excessive foam build
up in recovery tank. Use Defoamer foam
control solution to prevent vacuum motor
damage.
ATTENTION: Excessive foam buildup will not
activate the oat shut off.
3. If brush stops, the circuit breaker may have
been tripped. Unplug the power cord and
check brush for obstruction. Push brush
reset button to resume (gure 11).
Figure 10
3. Release solution switch near the end of the
path and continue to pull machine to pick up
solution.
4. Tip machine back on the wheels and push
machine forward to begin next path.
WHILE OPERATING
1. Overlap each path by 2 inches (50mm).
Figure 11
CLEANING WITH ACCESSORY TOOLS
1. Connect accessory tool hoses to solution
hose couplet and vacuum hose port located
the front of the unit (gure 12).
Figure 12
10
Page 11

2. Turn main power switch on (gure 9).
3. Operate accessory tools as normal (gure
13).
NOTE: When cleaning upholstery, always check
cleaning instruction attached to the furniture by
manufacturer.
Figure 13
4. After cleaning, relieve water pressure from
tool before disconnecting hose. Push the
switch on the hand tool after turning main
power switch off.
NOTE: Make sure to rinse out recovery tank
after each use. Do not use this tank to ll
machine with cleaning solution.
SOLUTION TANK
1. Pull solution tank drain hose off of hose
barb at rear of machine and empty
remaining solution (gure 15).
Figure 15
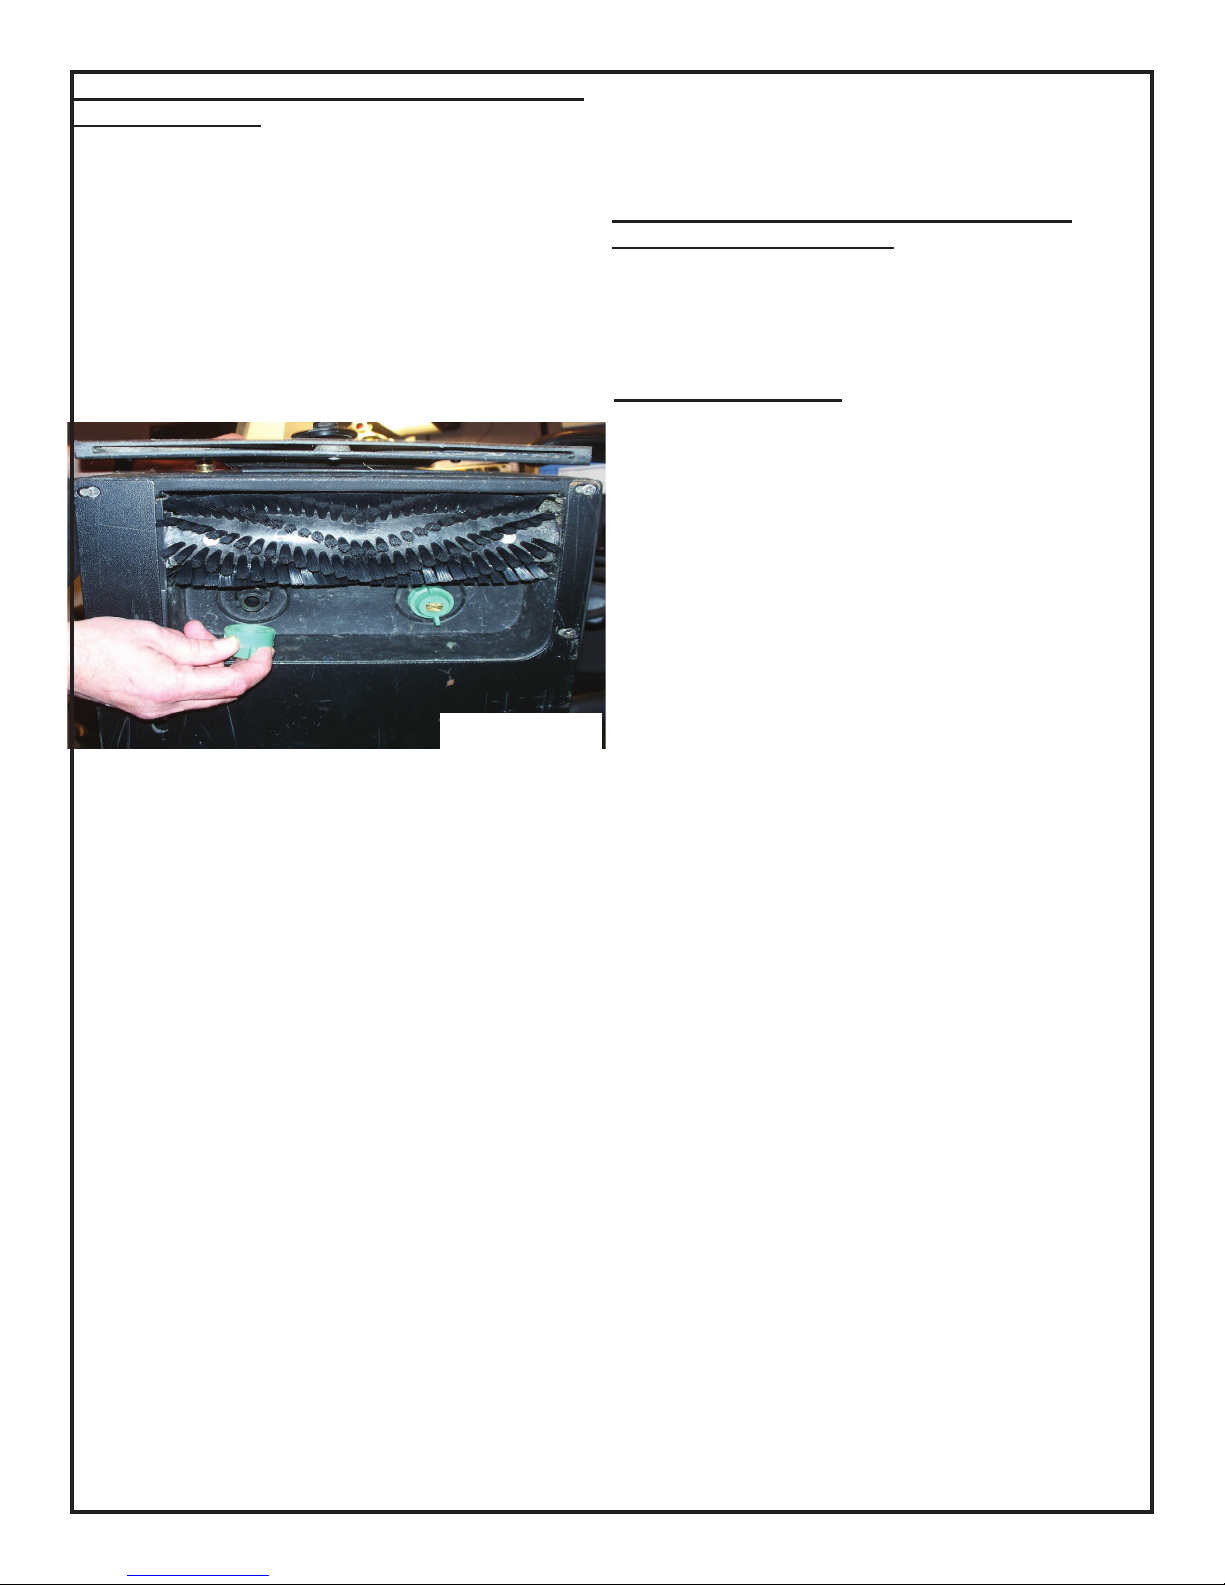
FILTER MAINTENANCE
To clean the external lter, remove the recovery
tank and locate the lter, grasp the inner handle
and pull out the lter. Rinse the lter bag inside
and out. You can then replace the lter by
snapping the lter back into place gure 16).
DRAINING TANKS
FOR SAFETY: When servicing machine, unplug
cord from wall outlet.
RECOVERY TANK
1. Turn machine off and unplug power cord.
2. Lift recovery tank cover, remove recovery
tank, and empty (gure 14).
Figure 14
Figure 16
To clean the internal lter, remove the back
cover by removing the 4 screws, locate the lter
next to the vacuum motor and unscrew the cap.
Remove the lter screen from the cap and rinse it
thoroughly. Once nished, reassemble the screen
and cap and replace the back cover (gure 17).
Figure 17
11
Page 12
To keep the machine in food working condition,
simply follow the daily, weekly, and monthly
maintenance procedures.
FOR SAFETY: When servicing machine, unplug
cord from wall outlet
DAILY MAINTENANCE (EVERY 4 HOURS OF
OPERATION)
1. Empty and rinse out recovery tank
thoroughly (gure 18).
2. Drain remaining solution from solution tank.
3. Clean solution tank ll port strainer.
4. Remove any entangled carpet ber and
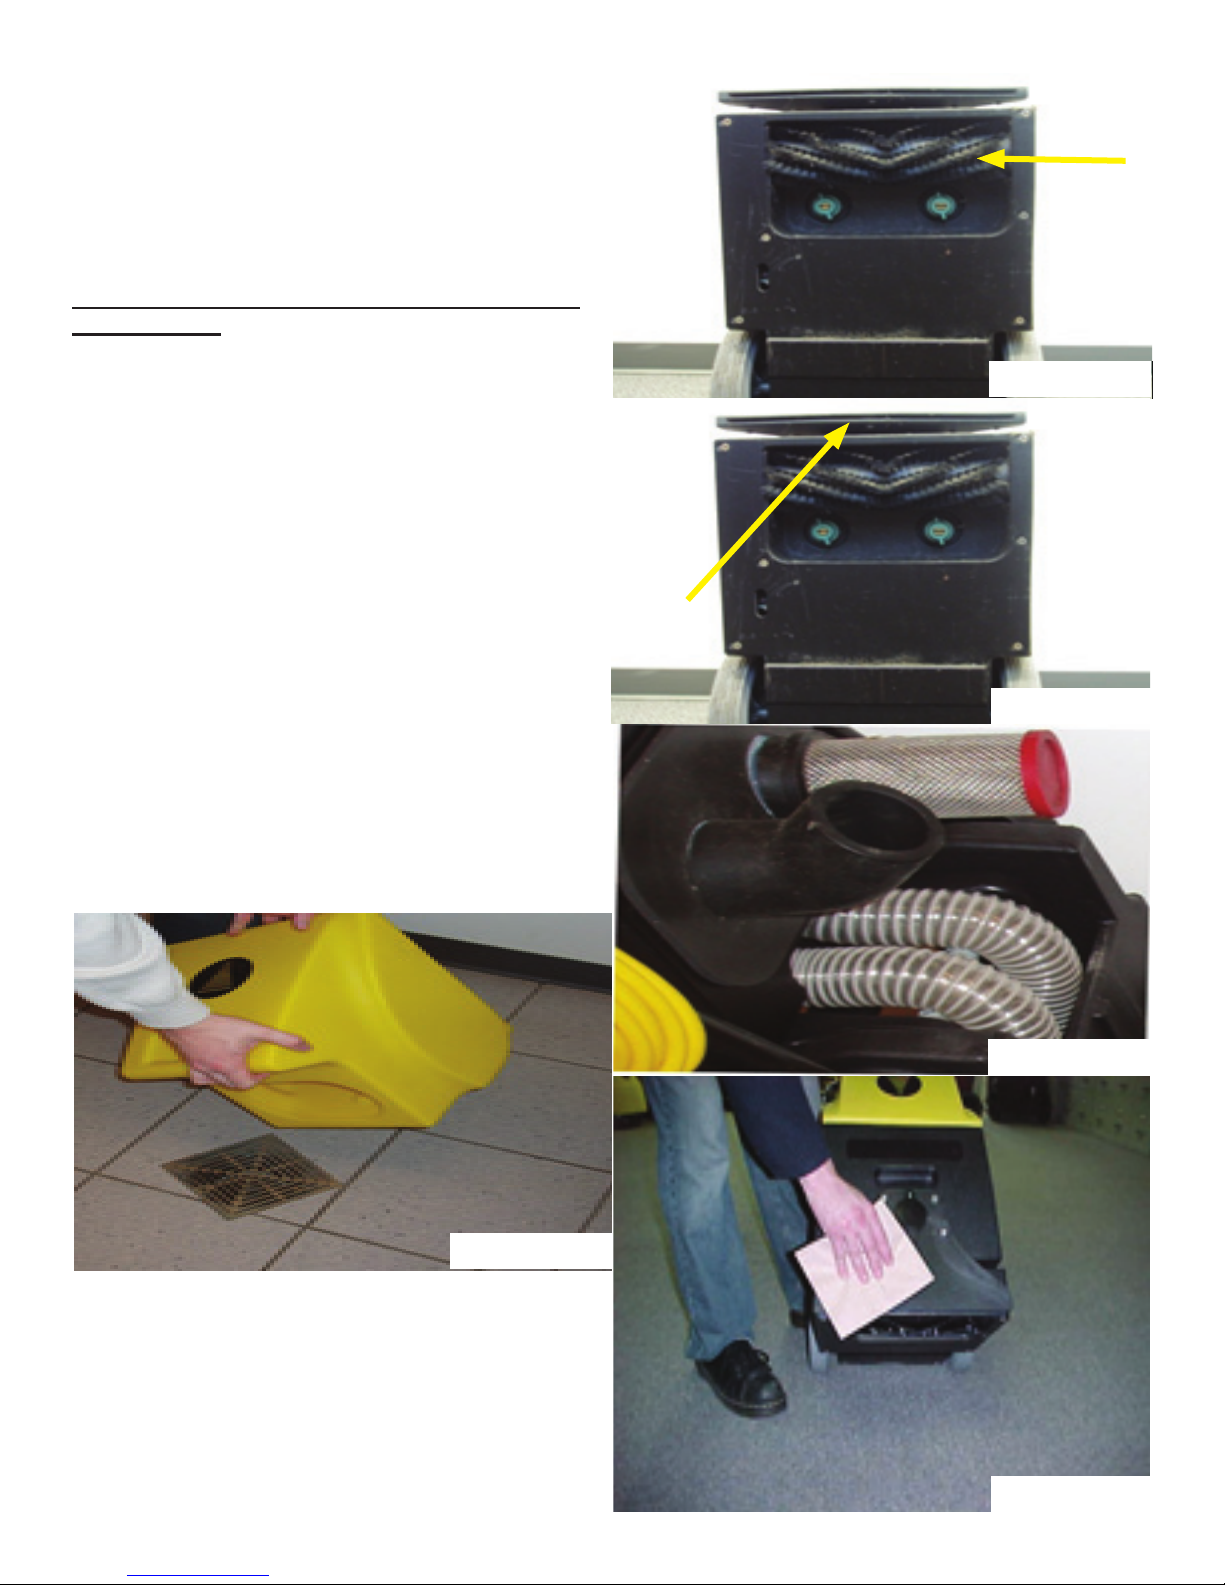
debris from brush (gure 19).
5. Remover any debris lodged in pick up head
(gure 20).
6. Remove oat shut-off screen form recovery
tank cover and clean (gure 21).
7. Wipe off power cord and check for damage,
replace if necessary. Coil cord neatly after
use
Clean machine with All Purpose cleaner and damp
cloth (gure 22).
Figure 19
Figure 18
Figure 20
Figure 18
Figure 17
Figure 21
Figure 22
12
Page 13
WEEKLY MAINTENANCE (EVERY 20 HOURS
OF OPERATION)
1. Inspect vacuum hoses for holes and loose
cuffs.
2. Inspect spray pattern for plugging. If
plugged, remove spray tips by twisting
spray tip body counter-clockwise and clean
orices (gure 23).
3. Inspect cord and cord grip for damage.
Replace immediately if damaged.
2. Lubricate wheels with water resistant oil.
3. Inspect machine for water leaks and loose
hardware.
QUATERLY MAINTENANCE (EVERY 250
HOURS OF OPERATION)
1. Check vacuum motor for carbon brush
wear. Replace brushes if worn to a length
of 38/” (10mm) or less
STORING MACHINE
1. Before storing machine, be certain to rinse
and drain tanks of all water
2. Store machine in a dry area in the upright
position
3. Open recovery tank cover to promote air
circulation.
Figure 23
MONTHLY MAINTENANCE EVERY 80 HOURS
OF OPERATION)
1. Flush solution system with recommended
liquid neutralizer to dissolve normal
chemical build up.
• Pour 2 gallons (7.5L) of hot water 140°F
(60°C) into solution tank. Add a liquid
neutralizer according to mixing instructions
on bottle.
FOR SAFETY: When using machine,
following mixing and handling instructions
on chemical containers.
• Position brush over oor drain and operate
machine for one minute.
• Connect hand tool solution hose to machine
and also over a oor drain operate tool for
one minute.
ATTENTION: Do not expose to rain. Store
indoors.
ATTENTION: Do not store in freezing
temperatures of 32°F (0°C) or below.
• Shut off machine and allow remaining
solution to break down chemical buildup
overnight.
• Next day, spray out remaining solution and
ush system with 3 gallons (11L) of clean
water.
13
Page 14

Machine does not
operate.
Faulty switches or wiring.
Faulty power cord.
Building circuit breaker
tripped
PROBLEM CAUSE SOLUTION
Brush motor does not
operate.
Brush motor circuit
breaker tripped.
Switch not pushed.
Loose or broken brush
belt.
Faulty switch or wiring.
Faulty brush motor.
Solution pump does not
operate.
Solution pump circuit
breaker tripped.
Switch not pushed.
Faulty switch or wiring.
Faulty solution pump
motor.
Vacuum motor does not
operate
Loose or broken wiring.
Faulty main power
switch.
Defective vacuum motor.
Worn carbon brushes.
Poor solution pick-up. Defective recovery tank
cover gasket.
Clogged oat shut-off
screen.
Accessory tool vacuum
hose port cover is loose
or missing.
Loose vacuum hose
cuffs.
Pulling machine too fast.
Uneven or no spray. Plugged spray tips.
Improper spray tip size or
spray angle.
Clogged solenoid valve.
Worn spray tips.
Solution tank low or
empty.
Faulty solution pump.
Pump needs priming.
Contact Tornado.
Contact Tornado.
Reset breaker.
Let motor cool and reset
brush motor breaker
button at rear of machine,
Push solution switch.
Contact Tornado
.
Contact Tornado.
Contact Tornado.
Let pump cool and reset
pump breaker button at
rear of machine.
Push solution switch.
Contact Tornado.
Contact Tornado.
Contact Tornado.
Contact Tornado.
Contact Tornado.
Contact Tornado.
Replace gasket.
Open recovery tank
cover and clean lint off
screen.
Check vacuum hose port
cover.
Secure connections
under cover.
Slow down cleaning
process.
Clean or replace tips.
Replace with proper tips
.
Contact Tornado.
Replace spray tips.
Rell solution tank.
Contact Tornado.
Prime pump by pressing
solution hose coupler
tip located at front of
machine.
14
Page 15

Warranty
Registration
Form
Please provide additional information on
Tornado equiptment: (Check choices below)
__ Automatic Scrubbers __Sweepers
__Propane Floor Machines __Rotary Floor Machine
__High Speed Burnishers __Carpet Vacuums
__Carpet Extractors & Spotters __Wet/Dry Vacs
__ Steam Cleaners __Jumbo Vacs
__Ride-On Equiptment __Pressure Washers
See complete product info at www.tornadovac@.com
Please Print Cleary
Selling Dealer:(Required)__________________________
__________________________________________________________________________
Company/Institution
_____________________________________ _______________________________
Contact Name Title
_____________________________________ _______________________________
Address City/State/Zip Code
_____________________________________ _______________________________
Phone Fax
_____________________________________ _______________________________
Date of Purchase Ema
See white metal plate or sticker on unit for his information.
MACHINE TYPE/MODEL NUMBER: MACHINE SERIAL NUMBER:
1. 1.
2. 2.
3. 3.
4. 4.
Facility Description (please circle all that apply)
1. School 9. Hospital 17. U.S. Govt.
2. Retail Store 10. Nursing Home 18. Other Govt.
3. Restaurant 11. Religious Institution 19. Auto Service
4. Ofce Building 12. Airport 20. Airport
5. Contract Cleaning 13. Warehouse 21. Non-Prot
6. Light Manufacturing 14. Apartment/Condo 22. Other (specify)
7. Heavy Manufacturing 15. Warehouse
8. College/University 16. Supermarket
How did you rst lean about
Tornado cleaning and
maintenance equipment?
o Contacted by local dealer
o Previous experience with
Tornado products
o Reputation/Recommendation
o Advertising
o Direct mail
o Internet
o Other
Damage or defect arising from abuse, neglect or other misuse is excluded from this warranty. Other
items may or may not apply based on your specic machine. If any defect occurs, the warranty is voided
if service is attempted by non-Authorized Tornado Service Centers.
©2012 Tornado Industries. All rights reserved.
X8449-TOR 3/2012
In square feet (meters)
Total Hard Floor Area
o 0-10,000 (0-930)
o 10-50,000 (930-4,650)
o 50-250,000 (4,650-23,250)
o Over 250,000 (over
23,260)
15
Total Carpeted Area
Square feet (square meters)
o 0-10,000 (0-930)
o 10-50,000 (930-4,650)
o 50-250,000 (4,650-23,250)
o Over 250,000 (over
23,260)
Return to:
Tornado Industries 3101
WICHITA COURT
FORT WORTH, TX 76140
Fax: (817)-551-6507
 Loading...