

1
IMPORTANT OWNER-OPERATOR INSTALLATION INSTRUCTIONS
C3205
REAR TIE DOWNS W/ FACTORY INSTALLED RECEIVER
REVISED vers5 BY: JL 8/5/15
TECH SUPPORT (800) 246-8132
AFTER INSTALL, PLEASE GIVE
THIS BOOKLET TO YOUR CUSTOMER

2
Warnings
Truck Bed and Camper Protection
Torklift does not recommend installing your camper on top of a plastic bed liner (or other
compressible material such as foam). These materials can act as a spring, causing increased
vertical truck camper movement independent of the vehicle. Plastic bed liners can slide on the
truck bed surface, and the truck camper can slide on top of the bed liner. Using a plastic bed
liner or similar compressible material will void your warranty and may additionally cause truck
bed and/or camper damage.
Minor movement or settling can occur in some incidental harsh driving conditions (on or offroad). A rubber bed mat is recommended to protect the truck bed and camper, but is not a
requirement to maintain the Torklift legendary lifetime warranty.
Suspension
To significantly reduce body roll, sag and sway Torklift strongly recommends the StableLoad.
Torklift International StableLoads improve safety, handling, and to help level your truck. More
information can be found at (www.Torklift.com/stableload).
If your truck is additionally equipped with suspension air bags Torklift cautions against over
pressurization as this may lead to unsafe vehicle handling characteristics. We have found that
airbags used in conjunction with StableLoads have allowed operators to lower air bag pressure
by 50% or more. Only pressurize suspension air bags enough to level the truck.

3
C3205 PARTS INVENTORY
2 - TIE DOWN RECEIVERS
2 - BENT TIE DOWN INSERTS
2 - 1/4” PINS
THIS KIT USES FACTORY
FASTENERS FOR INSTALLATION
INSTALLATION INSTRUCTIONS
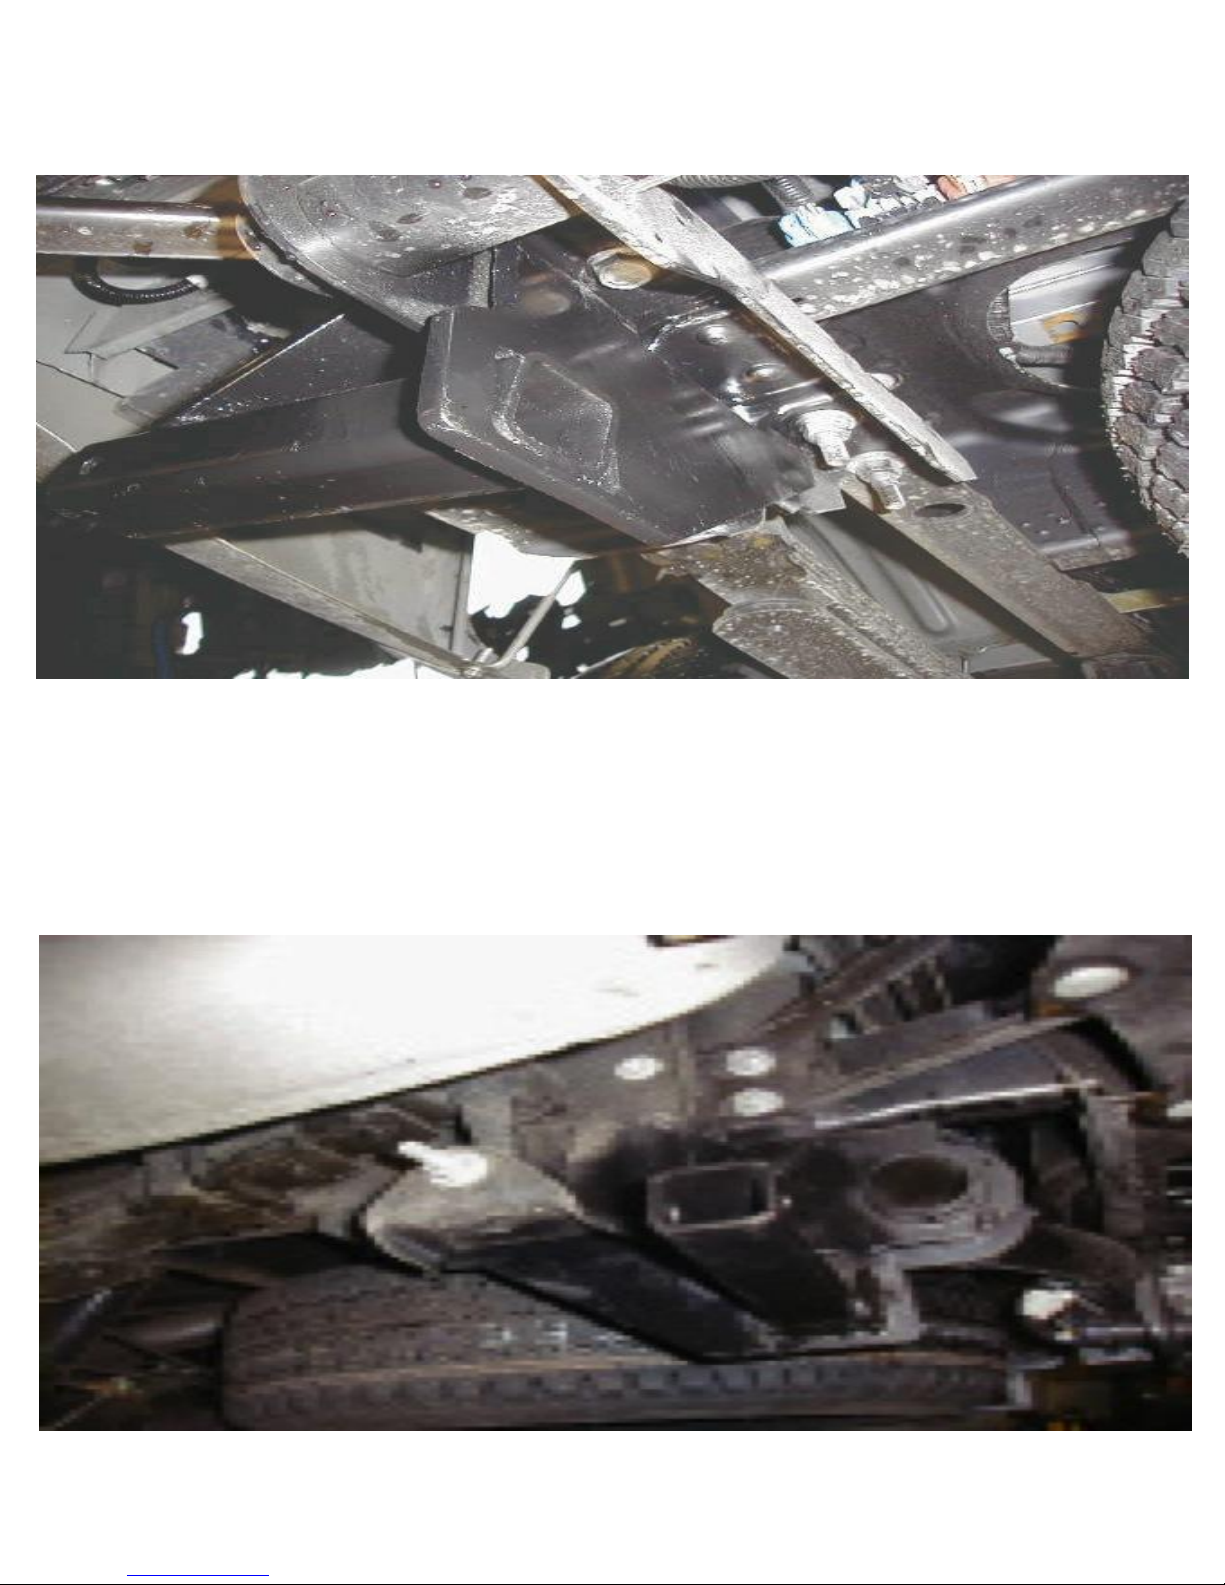
1. Locate and inventory all parts to become familiar with all brackets.
2. Hold the tie down receiver into place to locate the proper pre-existing holes
in the frame at the end of frame rails near the bumper and bottom of frame (
photos page A
in the bottom of the frame. These bolts will be re-used in the installation of the
tie down.
). Remove the bolt in the side of the frame and remove the bolts
see
3. Now place the upper support bracket between the bumper bracket and the
frame and reinstall the two bolts in the bottom of the frame and the one bolt in
the side of the frame. (
See page 3
).
4. Find one insert and 1/4” pin and put the bent insert into the receiver using
the hole in the insert. Install 1/4” pin.
5. You should have at least 1” clearance between the insert and the lip of the
box or after market accessory. Tighten all fasteners. 1/2” bolts to 60 ft.
lbs.(81nm)
***Note: Use locktite on the factory bolts when you reinstall.
4
INSTALLATION DIAGRAM
Photo A
DRIVERS SIDE LOOKING FROM UNDERNEATH BUMPER
NOTE: Short bed trucks will use the two factory bolts that currently attach the corner bumper
brackets to the frame (see photo below). Loosen the corner bumper support bracket at the
bumper (both the upper and lower fastener), as this will allow the corner bracket to hinge out
from the frame after removing the two nuts, which attach the corner bracket to the frame.
DRIVERS SIDE LOOKING FROM REAR CORNER
USE THESE FACTORY FASTENERS

5
INSTALLATION DIAGRAM
Incorrect insert installation
Correct insert installation C3205 ONLY

6
INSTRUCTIONS FOR MAINTENANCE OF
POLISHED STAINLESS STEEL PRODUCTS
Torklift utilizes quality grade 304 stainless steel in this product.
304 stainless steel is well known for its anti corrosive properties, however
in some environments such as coastal regions or when in contact with some
road chemicals, corrosion may occur.
We recommend occasional polishing of our product to maintain its
attractive finish. Use an approved stainless steel cleaning/polishing
product, which can be purchased from any automotive supplier.

7
TORKLIFT’S BOLT FISHING GUIDE
Your guide to understanding the installation of our frame mounted tie downs.
-Coiled End of Bolt Fisher-
what is being fished along with the
Note: The hardware may vary as to
bolt. In this instance a 1” X 2” plate
washer is being fished along with the
hex bolt. Different applications may
require fishing through various star
washers and flat washers for example.
Desired Hole on Vehicle (Place the coiled
end of the bolt fisher through this hole).
This side of the Bolt Fisher should come
out of a hole where the required hardware
(for example 1” X 2” plate washer) can pass
through.
This bottom example shows the bolt when it’s completely fished through the
vehicle. You may find it easier to keep the bolt fisher attached until you get the tie
down receiver in place so that the bolt doesn’t fall into the vehicle frame.
WARNING: PULLING TOO HARD ON THE BOLT FISHER CAN RESULT IN
LOST FASTENERS, OR BROKEN BOLT FISHER.

8
TIEDOWN INSERT INSTALLATION
INSTRUCTIONS
On one end of each of your tie down inserts is a triangular plate referred to
by Torklift as a bullet plate. Your tie down inserts should be installed with the
shorter side of the bullet plate facing away from each other, i.e.. The shorter
side of the front insert should point to the front of the truck and the shorter
side of the rear insert should point towards the rear of the truck.
Once installed, attach the TorkLift directional stickers to the face of the
bullet plate on the insert as a reminder.
DRIVERS SIDE FRONT DRIVERS SIDE REAR
IMPORTANT NOTE: Your tie down inserts are designed to have clearance inside of the
receiver. This is to account for road debris, as well as aid in installation and removal. Some
rattle may be expected if the inserts are left installed while not under load from the camper.

9
RECOMMENDED TRUCK CAMPER
INSTALLATION INSTRUCTIONS
When securing any heavy load (especially a camper) in your truck bed, your front tie down points should pull the load
forward as much as possible. Some camper anchor points may differ with different manufacturers, as well as the camper
jack mounting locations. Your Torklift tie down inserts has offset triangular brackets to increase the angle of pull. These
are designed to be used in the front facing forward, and the rear facing rearward but can be used in either front or rear.
These recommendations are to be considered and followed as a basic rule of thumb. Obviously there will be some
applications where this may not be possible. At a minimum, if opposite pull of both front and rear tie downs cannot be
achieved for whatever reason, you should have at least a forward pull at the front or rear location.
If your camper does not come with Rubber Bumpers on the front lower portion of the camper, installing Rubber Bumpers
(Torklift has Rubber Bumpers available Part A7001) or using a block of wood such as a 2 x 4 in the bed, will prevent the
camper from damaging the front bulk head of the truck bed.
Minor movement (or settling) can occur in some incidental harsh driving conditions (on or off road). A rubber bed mat is
not a requirement to maintain the lifetime warranty on a Torklift system, but a strong recommendation simply as a safety
precaution to protect the truck bed, the bottom of the camper and to give the camper additional support.
TORKLIFT DOES NOT RECOMMEND: Installing your truck camper in your truck on top of a drop in plastic bed
liner!!! The drop in plastic bed liners can slide on top of the truck bed surface, and the camper can slide on top of the slick
surface of the bed liner. The liner can also act as a spring causing a trampoline effect increasing vertical truck camper
movement, independent of the vehicle, possibly resulting in truck bed, and camper damage!
INSTRUCTIONS FOR FINISH MAINTENANCE
OF TORKLIFT PRODUCTS
POWDER COATED STEEL:
To keep your Torklift products looking good follow these guidelines. All steel powder coated Torklift products are
sandblasted for maximum adhesion and use a high quality industrial urethane based powder coat. Due to the extreme,
harsh, undercar environment that your Torklift products live in, (consistently sprayed with corrosive road chemicals such
as salt, and road debris), Torklift does not warranty the power coated finish.
To minimize corrosion from these factors on powder coated steel products, Torklift recommends regularly cleaning and
inspecting the powder-coated surface and touching up any affected areas with enamel or urethane based aerosol paint
product. If there are any areas of surface rust, there are also aerosol spray rust converters available on the market that
can be used as a preparation to touch-up paint application. These finish maintenance products are available at any
automotive parts supplier.
POLISHED STAINLESS STEEL:
Torklift utilizes quality grade 304 stainless steel in our stainless steel polished products. 304 stainless steel is well known
for its anti-corrosive properties. However, in some environments such as coastal regions or when coming in contact with
some road chemicals, corrosion may occur.
For a quick clean simply use WD40 and a cloth rag. We also recommend occasional polishing of our polished stainless
products to maintain their attractive finish. Use an approved stainless steel chrome or aluminum mag wheel polish
cleaning product, which can be purchased from any automotive parts supplier.

10
Torklift International Limited Lifetime
Warranty Information
322 Railroad Ave North, Kent, WA 98032
Torklift will require proof of purchase to register, with pictures of any defective product
before issuing a replacement. Torklift will not register any product without proof of
purchase, which can be faxed, scanned, emailed, or mailed to the information provided
below. Torklift warrants it’s hitches, custom hitch receivers, frame mounted tie downs,
turnbuckles, and accessories (excluding wire harnesses which carry a 90 day warranty)
from date of purchase against defects in material and workmanship under normal use and
service for the ownership life of the original consumer purchaser. ALL COMMERCIAL
APPLICATIONS ARE WARRANTED FOR A PERIOD OF 90 DAYS FROM THE
DATE OF INSTALLATION/SERVICE. Torklift will replace FREE OF CHARGE any
part, which proves defective in material or workmanship when presented to Torklift,
TRANSPORTATION CHARGES PREPAID by purchaser, at the address above. THIS
WARRANTY IS LIMITED TO DEFECTIVE PARTS REPLACEMENT ONLY.
LABOR CHARGES AND/OR DAMAGE INCURRED IN INSTALLATION OR
REPLACEMENT, AS WELL AS INCIDENTAL AND CONSEQUENTIAL
DAMAGES CONNECTED THEREWITH ARE EXCLUDED. This warranty does not
include the finish or paint on our products. Rusting, cracking or peeling of the finish is
also excluded. Some states do not allow the exclusion or limitation of incidental or
consequential damages, so the above limitation or exclusion may not apply to you. Any
damage to Torklift products as a result of misuse, abuse, neglect, accident, improper
installation or any use violation of instructions furnished by Torklift or WHEN USED IN
ANY COMMERCIAL APPLICATION WILL VOID THE WARRANTY. This warranty
gives you specific legal rights, and you may also have rights, which vary from state to
state. With warranty service, you may be able to go to a small claims court, a state court
or a federal district court.

11
322 Railroad Ave North, Kent, WA 98032
Phone (800) 246-8132 Fax (253) 854-8003
or visit our website: www.TorkLift.com
Dear Valued Customer,
Thank you for making TorkLift your choice for truck, camper packages and accessories
for your vehicle. By choosing TorkLift products, you have chosen a company that has
been serving the RV industry for nearly 40 years and whose name has become
synonymous with strength, quality and advanced design and installation.
Please take a few moments of your time to complete the Product Registration
Warranty Card on the next page. When registering your newly purchased TorkLift
products, you can be assured that your contact information is secure and that you and
your product are getting the attention and respect that you deserve.
Thank you again for choosing TorkLift quality products.
Register for your lifetime warranty and receive a free Torklift
International gift.
To Fax: Send copies of the questionnaire, warranty card and receipt to
253-854-8003
To E-mail: Send copies of the questionnaire, warranty card and receipt to
To Mail: Send to Torklift International 322 Railroad Ave North, Kent, WA 98032
warranty@torklift.com

12
Frame Mounted Tie Downs
Leading the camper tie down industry in strength,
quality, advanced design and installation. TorkLift
TRUE frame mounted tie downs are far superior
to all tie down systems available.
The TorkLift system is unique in its design and is
patented. Four independent tie down points (with
no belly or crossbar) working much like your
receiver type trailer hitch as the inserts are
removable allowing the system to be virtually
undetectable when not in use.
They are designed for each make and model to fit tight to the frame so as not to compromise
ground clearance. TorkLift tie downs are not universal ‘one size fits all’ therefore all the
problems with correct fit for each particular application have been eliminated.
Original SuperHitch & SuperHitch Magnum
High strength extended hitch system engineered for safely towing all types of trailers
behind your truck and camper. With a max towing capacity of 14,000 lbs.(6350kg) with
an extension*, (17,000 lbs.(7711kg) to 20,000 lbs.(9071kg) without*) the Original
SuperHitch and SuperHitch Magnum are rated the strongest in the industry.
CONTACT YOUR LOCAL DEALER FOR MORE DETAILS
*Weight capacity varies depending on the SuperHitch and SuperTruss extension setup.

13
PLEASE FILL OUT THIS FORM COMPLETELY AND RETURN TO TORKLIFT WITHIN
30 DAYS OF PURCHASE ACCOMPANIED BY A COPY OF YOUR ORIGINAL RECEIPT
1. PART(S) PURCHASED
2. PURCHASER INFORMATION
3. TRUCK INFORMATION
YEAR: ______________ MAKE: _________________
4. CAMPER INFORMATION
YEAR: ___________ MAKE: _______________ MODEL: ________________
5. DEALER INFORMATION
PURCHASED FROM: ______________________________________________
CITY: _________________ STATE: _____ ZIP / POSTAL: ______________
INSTALLED BY: OWNER ABOVE DEALER ANOTHER DEALER
IF ANOTHER DEALER, WHO: _______________________________________
PART#: ___________________ PART#: _______________________
OFFICIAL WARRANTY REGISTRATION CARD
PART#: ___________________ PART#: _______________________
NAME: _____________________________________________________________
EMAIL: ______________________________
ADDRESS: __________________________________________________________
CITY: _________________ STATE: _____ ZIP / POSTAL CODE: ______________
PHONE: ( ) -_________
MODEL:_____________ BED LENGTH: ___________
ADDRESS:______________________________________________________
TODAY’S DATE: _________________________
 Loading...