

IMPORTANT OWNER-OPERATOR INSTALLATION
INSTRUCTIONS
A7710R / A7710RS
Warning!!
This battery box is made of aluminum and is
Conductive! Do not allow the battery terminals to touch the aluminum
Battery Box. Be careful not to touch the battery box with a wrench while
tightening the battery terminals, as this could cause a short!
REVISED version 6 BY: DK 11/24/2015
TECH SUPPORT (800) 246-8132

1
Warning!! Improper installation of
Solar Equipped Power Armors may
result in battery over-charging!
Single Solar Panel Option 1:
If you plan to use two or more batteries with a single 10Watt Solar Panel, you will NOT need to purchase any
additional parts.
Single Solar Panel Option 2:
If you plan to use one battery with a single 10-Watt Solar
Panel, it is required that you use a 6 Amp Regulator (PN
A7715) to prevent your battery from gassing and over
charging.
Double Solar Panel Option 1:
If you plan to use 4 or more batteries with two 10-Watt
Solar Panels, you will need to purchase a second solar
panel (A7713) and either the Y-Harness adapter (A7714) or
optionally a 6-amp regulator (A7715)
Double Solar Panel Option 2:
If you plan to use less than 4 batteries with two 10-Watt
Solar Panels, you will need to purchase a second solar
panel (A7713) and a 6-amp regulator (A7715)

2
Optional Solar Parts
PN - A7713
- Additional 10-Watt Solar Panel (Requires the
use of
A7714
or
A7715
when installed as a second solar
panel)
PN - A7714
- Y-Harness Adapter (Connects Two 10-Watt
solar panels, not needed if using
A7715
)
PN - A7715
- 6-amp regulator
required when using less
than two batteries per solar panel
(Regulates amperage to
prevent gassing and over charging, will work with
one
or
two
10-Watt Solar Panels,
A7714
not required)
Replacement Battery Mats
The battery mat included with the Power Armor Battery
Box is acid neutralizing, and will help reduce any corrosion
from spilled battery acid. It is a “wear” item and may
eventually need to be replaced. New battery mats are
available through Torklift International. Part numbers
below.
PN: A7717- A7710RS/A7710RS Battery Mat

3
Inventory List
A7710R / A7710RS
Item:
Quantity:
Power Armor Max Battery Box
1
Power Armor Max Lid
1
Two Piece Divider Half
2
Drop In Stiffener
1
Battery Mat 58”
1
Battery Strap
5
1/4" x 1” SS Self-Drilling Screw
8
7/16” Square Profile O-ring
8
1/4"-20 x 1” SS Hex Bolt
6
1/4" SS SAE Flat Washer
12
1/4"-20 SS Hex Nut
6
1/4" Lock Washer
6
1/4"-20 SS Wing Nut
2
1/4"-20 x SS 3/4" Carriage Bolt
2
10 Watt Solar Panel (A7710RS Only)
1
15A Fuse Holder (A7710RS Only)
1
Positive Wire Female to Male Extension
(A7710RS Only)
1

4
Step 1:
Remove the Power Armor Max Lid by sliding the lid away from the side
of the box with the lock; then lifting the front edge and unhooking the lid
from the tabs on the rear of the box.
Step 2:
Test fit your batteries in the Power Armor Max Battery Box. If you plan
on using the Two Piece Divider, all of the batteries will need to be on the
same side of the box. The battery terminals should face the side of the box
with the 2” holes. For solar models, the batteries should be closest to the
side of the box with the lock. There are a series of slots cut into the bottom
of the Power Armor Battery Box for the included Battery Straps. Make
an incision in the Battery Mat over each of the slots you will need for the
Battery Straps. Install the non-buckled end of the Battery Straps down
through one of the slots and back up through the bottom of the Power
Armor Max Battery Box. Use the straps to secure the batteries and ensure
that they are situated correctly for your application. Once the battery box is
installed, the straps will be difficult to adjust. Remove the batteries and
Battery Mat before proceeding.
5
Step 3:
The two 2” holes in the front/back panel of the Power Armor Max Battery
Box are used to allow the battery cables to enter the battery box. They can
be mounted to either the front or rear of the trailer as long as there is
sufficient room to open and remove the Power Armor Max Lid.
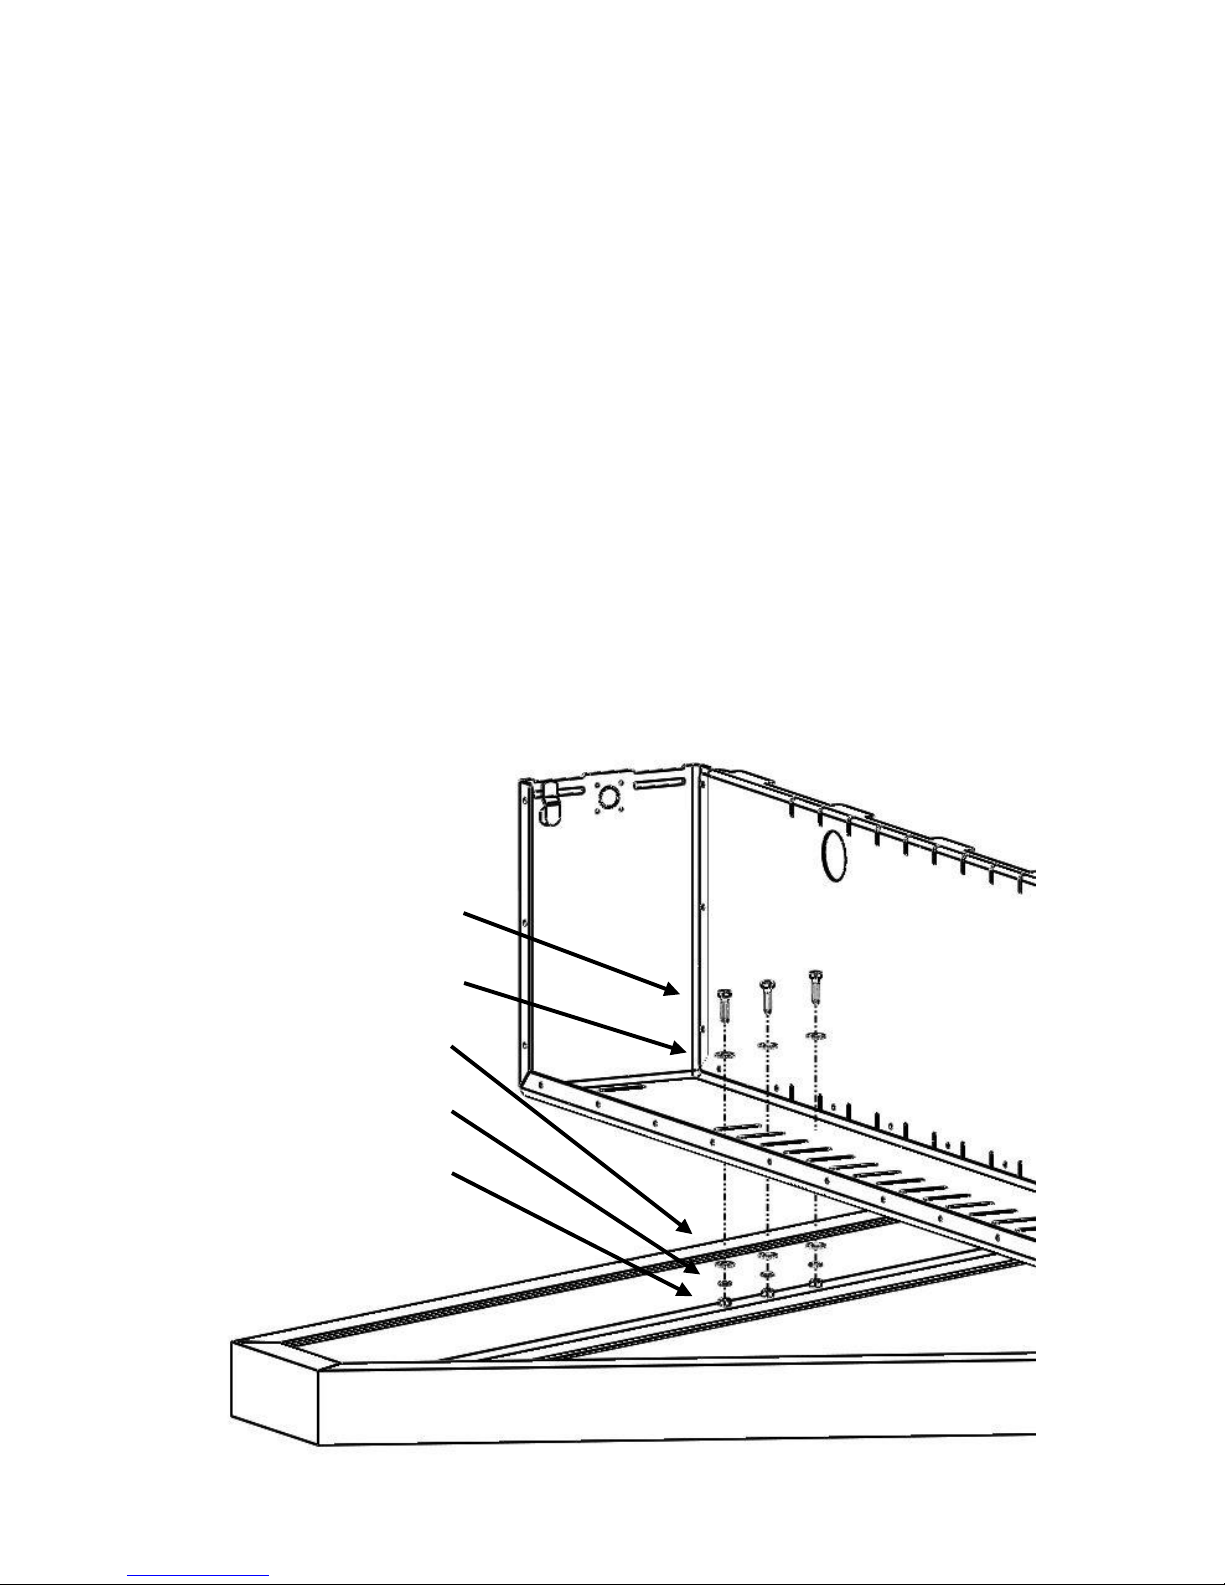
Place the Power Armor Max Battery Box where it is to be mounted. If the
battery box is being installed on an open frame trailer, drill three ¼” holes
per side through the bottom of the battery box and into the trailer. Secure
the battery box as seen in figure 3.1
1/4"-20 x 1” SS Hex Bolt
1/4" SS SAE Flat Washer
1/4" SS SAE Flat Washer
1/4" Lock Washer
1/4"-20 SS Hex Nut
Figure 3.1

6
If the battery box is being installed on a boxed frame trailer, install three
1/4" x 1” SS Self-Drilling Screws per side through the bottom of the
battery box and into the trailer frame. Place a 7/16” square profile O-ring
around the head of each screw/bolt to protect the battery mat from abrasion.
See figure 3.2
Figure 3.2
Step 4
Reinstall the Battery Mat and Batteries. To prevent any possible contact
between the battery terminals and lock, the battery terminals should be
oriented towards the side of the box with the 2” holes. Tightly secure the
batteries with the battery straps.
1/4" x 1” SS
Self Drill Screw
1/4" SS Flat
Washer

7
Step 5:
If desired, a Two Piece Divider can be installed into the battery box. To
install the Two Piece Divider, place the tabbed end of one of the Two Piece
Divider Halves into the slots in the side of the battery box. Use the other
Two Piece Divider Half to tab into the opposite side of the box. Bolt the
two divider halves together using the supplied 1/4"-20 x 3/4" SS Carriage
Bolts and 1/4"-20 SS Wing Nuts. The wing nuts should be on the opposite
side of the divider from the batteries to avoid abrasion. See figure 5.1
Figure 5.1
1/4"-20 x 3/4" SS Carriage
Bolts
1/4"-20 Wing Nuts

8
Step 6:
While flexing the front and back side of the battery box slightly apart, install
the Drop in Stiffener into one of the four middle upper slots in the battery
box as shown in figure 6.1. If the Two Piece Divider is already installed in
one of these slots, the battery box stiffener will not be needed.
Figure 6.1

9
Step 7:
The Power Armor Max and Power Armor Max Solar battery boxes are
capable of supporting multiple battery configurations. Depending on the
configuration, additional battery cables may be required but are not
included.
------------------------------ 12-VOLT BATTERIES ------------------------------
Wiring for ONE 12v battery: Figure 7.1
Wiring for TWO 12v batteries: Figure 7.2
Wiring for THREE 12v batteries: Figure 7.3
Wiring for FOUR 12v batteries: Figure 7.4
Wiring for FIVE 12v batteries: Figure 7.5
------------------------------ 6-VOLT BATTERIES -------------------------------
Wiring for TWO 6v batteries: Figure 7.6
Wiring for FOUR 6v batteries: Figure 7.7
ONE 12v Battery Wiring Diagram (Figure 7.1)
Solar Only

10
TWO 12v Batteries Wiring Diagram (Figure 7.2)
THREE 12v Batteries Wiring Diagram (Figure 7.3)
FOUR 12v Batteries Wiring Diagram (Figure 7.4)
Solar Only
Solar Only
Solar Only

11
FIVE 12v Batteries Wiring Diagram (Figure 7.5)
TWO 6v Batteries Wiring Diagram (Figure 7.6)
FOUR 6v Batteries Wiring Diagram (Figure 7.7)
Solar Only
Solar Only
Solar Only

12
Step 8
To attach the
Power Armor Max Lid
to the
Power Armor Max Battery
Box
, place it over the
Power Armor Max Battery Box
, and align it so the
tabs on the
Power Armor Max Battery Box
fit through the slotted holes in
the
Power Armor Max Lid
as seen in Figure 8.1
Figure 8.1
Step 9
Slide the Power Armor Max Lid away from the lock and lower it down
over the front of the Power Armor Max Battery Box. Once the Power
Armor Max Lid is sitting flat, slide it towards the lock so the Locking tabs
on the lid slide into the Power Armor Max Battery Box as seen in figure
9.1

13
Figure 9.1
After the Power Armor Max Lid has slid into place, lock the key cylinder
as seen in figure 9.2.
Solar Models Only: Connect the SAE connector from the Solar Panel into
the SAE connector on the side of the Power Armor Solar Battery Box.
Figure 9.2

14
Torklift International Limited Lifetime
Warranty Information
322 N Railroad Ave. Kent, WA 98032
Torklift will require proof of purchase to register, with pictures of any
defective product before issuing a replacement. Torklift will not register
any product without proof of purchase, which can be faxed, scanned,
emailed, or mailed to the information provided below. Torklift warrants
its hitches, custom hitch receivers, frame mounted tie downs,
turnbuckles, and accessories (excluding wire harnesses which carry a 90
day warranty) from date of purchase against defects in material and
workmanship under normal use and service for the ownership life of the
original consumer purchaser. All plastic, rubber, and/ or electrical
components maintain a warranty of up to one year from the date of the
purchase. ALL COMMERCIAL APPLICATIONS ARE WARRANTED
FOR A PERIOD OF 90 DAYS FROM THE DATE OF
INSTALLATION/SERVICE. Torklift will replace FREE OF CHARGE
any part which proves defective in material or workmanship when
presented to Torklift, TRANSPORTATION CHARGES PREPAID by
purchaser, at the address above. THIS WARRANTY IS LIMITED TO
DEFECTIVE PARTS REPLACEMENT ONLY. LABOR CHARGES
AND/OR DAMAGE INCURRED IN INSTALLATION OR
REPLACEMENT, AS WELL AS INCIDENTAL AND
CONSEQUENTIAL DAMAGES CONNECTED THEREWITH ARE
EXCLUDED. This warranty does not include the finish or paint on our
products. Rusting, cracking or peeling of the finish is also excluded.
Some states do not allow the exclusion or limitation of incidental or
consequential damages, so the above limitation or exclusion may not
apply to you. Any damage to Torklift products as a result of misuse,
abuse, neglect, accident, improper installation or any use violative of
instructions furnished by Torklift or WHEN USED IN ANY
COMMERCIAL APPLICATION WILL VOID THE WARRANTY.
This warranty gives you specific legal rights, and you may also have
rights which vary from state to state. With warranty service, you may be
able to go to a small claims court, a state court or a federal district court.

15
322 N Railroad Ave. Kent, WA 98032
Phone (800) 246-8132
Fax (253) 854-8003
Or visit our website: www.TorkLift.com
Dear Valued Customer,
Thank you for making TorkLift your choice for truck, camper packages and
accessories for your vehicle. By choosing TorkLift products, you have
chosen a company that has been serving the RV industry for nearly 40
years and whose name has become synonymous with strength, quality and
advanced design and installation.
Please take a few moments of your time to complete the Product
Registration Warranty Card on the next page. When registering your newly
purchased TorkLift products, you can be assured that your contact
information is secure and that you and your product are getting the
attention and respect that you deserve.
Thank you again for choosing TorkLift quality products.
Register for your lifetime warranty and receive a free Torklift
International gift.
To Fax: Send copies of the questionnaire, warranty card and receipt to
253-854-8003
To E-mail: Send copies of the questionnaire, warranty card and receipt to
warranty@torklift.com
To Mail: Send to Torklift International 322 N Railroad Ave. Kent, WA 98032

16
OFFICIAL WARRANTY REGISTRATION CARD
PLEASE FILL OUT THIS FORM COMPLETELY AND RETURN TO TORKLIFT WITHIN
30 DAYS OF PURCHASE ACCOMPANIED BY A COPY OF YOUR ORIGINAL RECEIPT
 Loading...