

TORID SL-6576-BK, SL-6576-BK-01, SL-6576-BK-02, SL-6576-GN, SL-6576-GN-01 Quick Install Manual
...
QUICK INSTALL GUIDE
VER. 1.1
SL-6576-BK
SL-6576-BK-01
SL-6576-BK-02
SL-6576-GN
SL-6576-GN-01
SL-6576-WE
SL-6576-WE-01
EN
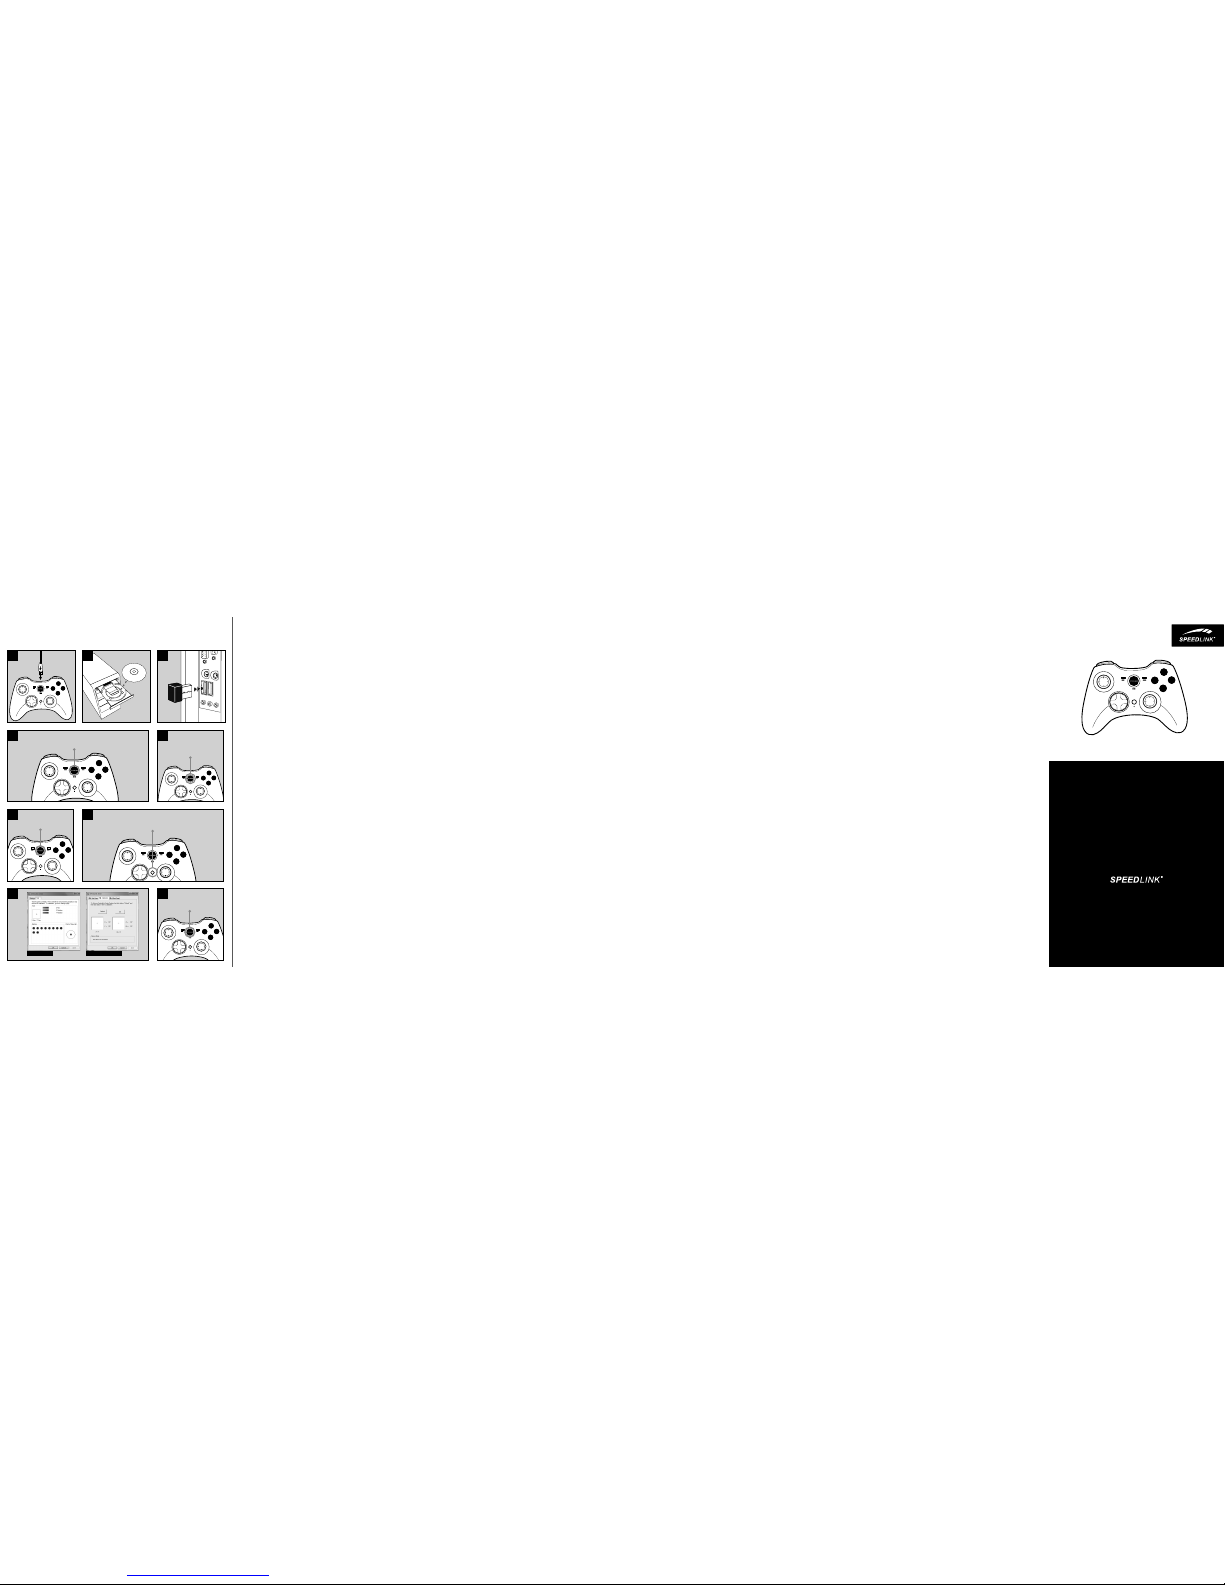
1. CHARGING
First, charge the gamepad. Using the mini-USB cable, connect it to any free USB port on your PC, console or
other USB power source (min. 500mA). The gamepad’s LED ring will flash during charging which takes up
to 3 hours. Please be aware that the initial charge may take a little longer. As soon as the LED ring stays lit,
charging is complete and you can disconnect the cable.
2. DRIVER INSTALLATION
To use the gamepad on the PC, insert the supplied driver CD into the CD drive to install the driver software. If
the installation process does not start automatically, use Windows* Explorer to navigate to your CD drive and
start the program ‘Setup.exe’. You need to install the driver software to use the vibration function with some
games.
For the best possible performance, always use the latest driver version which you can download from the
SPEEDLINK website at www.speedlink.com.
You do not need to install the driver if using the gamepad on the PS3*.
3. CONNECTING
Plug the USB receiver into any free USB port on your PC or PS3*. The device will be detected automatically
and ready to use in just a few seconds.
4. WIRELESS CONNECTION
If the gamepad is switched o, keep the SPEEDLINK button held depressed for three seconds to switch it on.
The gamepad’s LED ring will then start to flash.
If using the gamepad for the first time, press the button again briefly to establish the connection to the PC or
console – when doing so, make sure the gamepad is close to the receiver. The connection process takes a
few seconds, but once done the connection is established automatically when you switch on the gamepad in
future. Once the connection has been established, one segment of the LED ring will stay lit depending on the
gamepad assignment.
5. XINPUT AND DIRECTINPUT
To switch between the gamepad’s two operating modes, keep the SPEEDLINK button held depressed for 3
seconds. In DirectInput mode (for all older and some newer games), the LED under the Turbo button will be
lit; in XInput mode (for the majority of the latest games), the LED under the Turbo button will not be lit.
Be sure to set the gamepad to the correct mode before starting the game. Switching during gameplay may
stop the game identifying the controller correctly – if this happens, restart the game. Please consult the
manual that accompanied the game, ask the publisher or try both modes to establish which mode works the
best.
6. D-PAD MODE
If using with a PC, press the SPEEDLINK briefly in DirectInput mode to switch between the two D-pad modes.
If the upper left LED (LED ring) is lit, coolie hat mode is active; if the LED is not lit, the D-pad will control the
axes of the left analog stick and the right analog stick will take over button functions 1 to 4.
7. RAPID-FIRE FUNCTION
The rapid-fire function allows a button to fire multiple times in rapid succession when pressed. To activate
this function, press and hold the Turbo button and press the button you want to assign this function to. In
rapid-fire mode, the LED below the Turbo button will flash.
8. SETTINGS
On the PC, you can check the gamepad functions in the Windows* Control Panel under ‘Devices and Printers’
(Windows* 10/8/7/Vista*) or ‘Game Controllers’ (Windows XP*).
You will also find the options here for the vibration function in DirectInput mode; for XInput games, configure
the vibration functions in the game’s settings. Please note, vibration functions only work if supported by the
game and the relevant option is enabled in the game’s settings.
9. STAND-BY MODE
After five minutes of inactivity (or after 30 seconds if a wireless connection has not been established), the
gamepad will switch to standby mode to save power; press the SPEEDLINK button to reactivate it. If the
gamepad’s upper right LED starts to flash while in use, recharge the gamepad. You can charge and game at
the same time.
Notes: Press the “SPEEDLINK” button to access the Home Menu on the PS3*. Be aware, you can’t switch the
console on using this button.
Some PS3* games oer optional motion sensor control functionality for which you need a special gamepad.
To ensure you maintain maximum control when using the TORID, deactivate the relevant option in the game’s
options menu.
DE
1. AUFLADEN
Laden Sie das Gamepads bitte zunächst auf: Verbinden Sie es über das Mini-USB-Kabel mit einer freien
USB-Schnittstelle des PCs, der Konsole oder einer anderen USB-Stromquelle (mindestens 500 mA). Der LEDRing am Gamepad blinkt während des Ladevorgangs, der bis zu 3 Stunden benötigt. Beachten Sie bitte, dass
der erste Ladevorgang etwas mehr Zeit beanspruchen kann. Sobald der LED-Ring konstant leuchtet, ist das
Aufladen beendet und Sie können die Kabelverbindung trennen.
2. TREIBERINSTALLATION
Um das Gamepad am PC zu verwenden, legen Sie die mitgelieferte Treiber-CD in das CD-Laufwerk ein,
um die Treibersoftware zu installieren. Sollte die Installation nicht automatisch beginnen, wählen Sie
im Windows* Explorer Ihr CD-Laufwerk und starten Sie das Programm „Setup.exe“. Die Installation ist
notwendig für die Nutzung der Vibrationsfunktion in einigen Spielen.
Für optimale Leistung verwenden Sie bitte stets die neueste Treiberversion, die Sie auf der SPEEDLINKWebsite unter www.speedlink.com finden.
Sollten Sie das Gamepad an der PS3* verwenden, entfällt die Installation des Treibers.
3. ANSCHLUSS
Verbinden Sie den USB-Empfänger mit einem freien USB-Anschluss Ihres PCs oder Ihrer PS3*. Das Gerät
wird automatisch erkannt und ist nach wenigen Sekunden einsatzbereit.
4. FUNKVERBINDUNG
Sollte das Gamepad abgeschaltet sein, halten Sie die „SPEEDLINK“-Taste drei Sekunden lang gedrückt, um
es einzuschalten. Daraufhin beginnt der LED-Ring des Gamepads zu blinken.
Betätigen Sie die Taste bei der ersten Verwendung kurz erneut, um die Verbindung zum PC oder zur Konsole
herzustellen; bitte stellen Sie sicher, dass sich das Gamepad dabei in der Nähe des Empfängers befindet.
Der Verbindungsvorgang benötigt einige Sekunden und geschieht künftig nach Einschalten des Gamepads
automatisch. Nach erfolgreicher Verbindung leuchtet, je nach Zuordnung des Gamepads, ein Segment des
LED-Rings konstant.
5. XINPUT UND DIRECTINPUT
Um am PC zwischen den beiden Betriebsmodi des Gamepads zu wechseln, halten Sie die „SPEEDLINK“Taste 3 Sekunden lang gedrückt: Im DirectInput-Modus (für alle älteren und einige neuere Spiele) leuchtet
die LED unter der Turbo-Taste; im XInput-Modus (für die meisten aktuellen Spiele) erlischt die LED unter der
Turbo-Taste.
Bitte versetzen Sie das Gamepad in den gewünschten Modus, bevor Sie ein Spiel starten. Das Umschalten
im laufenden Spiel kann dazu führen, dass der Controller von diesem nicht mehr korrekt erkannt wird; in
diesem Fall starten Sie bitte das Spiel neu. Mit welchem Modus ein Spiel am besten funktioniert, erfahren
Sie im zugehörigen Handbuch, beim Hersteller oder durch Ausprobieren.
6. STEUERKREUZ-MODUS
Bei der Verwendung am PC betätigen Sie die „SPEEDLINK“-Taste im DirectInput-Modus nur kurz, um
zwischen zwei Modi für das digitale Steuerkreuz (D-Pad) zu wechseln: Leuchtet die linke obere LED (LEDRing), ist der Rundblickschalter-Modus aktiv. Leuchtet diese LED nicht, steuert das Steuerkreuz die Achsen
des linken Analogsticks; überdies übernimmt der rechte Analogstick dann die Funktion der Tasten 1 bis 4.
7. SCHNELLFEUERFUNKTION
Die Schnellfeuerfunktion führt eine Taste mehrfach in schneller Folge aus, solange diese gedrückt wird.
Halten Sie dafür die „Turbo“-Taste gedrückt und betätigen Sie gleichzeitig die Taste, für welche die Funktion
aktiviert werden soll. Im Schnellfeuermodus blinkt die LED unter der Turbo-Taste.
8. EINSTELLUNGEN
Am PC können Sie die Funktion des Gamepads in der Windows*-Systemsteuerung im Abschnitt „Geräte und
Drucker“ (Windows* 10/8/7/Vista*) beziehungsweise „Gamecontroller“ (Windows XP*) prüfen.
Im DirectInput-Modus finden Sie dort auch die Optionen für die Vibrationsfunktion; Vibrationen für XInputTitel konfigurieren Sie in den jeweiligen Spieloptionen. Bitte beachten Sie, dass Vibrationen nur dann
wiedergegeben werden, wenn ein Spiel diese nutzt und die entsprechende Funktion in den Spieloptionen
aktiviert ist.
9. STAND-BY-MODUS
Das Gamepad wechselt nach fünf Minuten Inaktivität in den Stand-by-Modus (nach 30 Sekunden ohne
hergestellte Funkverbindung), um Energie zu sparen. Drücken Sie dann die „SPEEDLINK“-Taste, um es zu
reaktivieren. Beginnt die obere rechte LED am Gamepad im Betrieb zu blinken, sollte es erneut aufgeladen
werden. Auch gleichzeitiges Aufladen und Spielen ist möglich.
Hinweise: Mit der „SPEEDLINK“-Taste rufen Sie das Hauptmenü der PS3* auf. Bitte beachten Sie, dass sich die
Konsole mit dieser Taste nicht einschalten lässt.
Einige PS3*-Spiele bieten eine optionale Steuerung über Bewegungssensoren an, für die Sie ein spezielles
Gamepad benötigen. Deaktivieren Sie die entsprechende Funktion in den Spieloptionen, um eine optimale
Steuerung mit dem TORID zu gewährleisten.
IT
1. CARICA
Innanzitutto caricare gli accumulatori integrati del gamepad collegandolo tramite il mini cavo USB a una
porta USB libera del PC, della console o di un‘altra sorgente di energia USB (minimo 500 mA). L‘anello LED
sul gamepad lampeggia durante la ricarica, che dura fino a 3 ore. Si precisa che la prima ricarica può durare
leggermente più del solito. Appena l‘anello LED è acceso costantemente la ricarica è terminata e il cavo può
essere staccato.
2. INSTALLAZIONE DEL DRIVER
Per utilizzare il gamepad con il PC, inserire nel drive CD il CD con i driver in dotazione, per installare il
software del driver. In caso di mancato avvio automatico dell‘installazione, selezionare l‘unità CD nel
Windows* Explorer ed avviare il programma «Setup.exe». L‘installazione è necessaria per utilizzare la
funzione di vibrazione in alcuni giochi.
Per la migliore prestazione utilizzare sempre la versione più recente del driver, che è disponibile sul sito web
SPEEDLINK all‘indirizzo www.speedlink.com.
Se si usa il gamepad su una PS3*, non occorre installare il driver.
3. COLLEGAMENTO
Collegare il ricevitore USB a una porta USB libera del PC o della PS3*. Il dispositivo viene riconosciuto
automaticamente ed è pronto per l‘uso in pochi secondi.
4. CONNESSIONE WIRELESS
Se il gamepad è spento, premere il tasto «SPEEDLINK» per tre secondi per accenderlo. Quindi l‘anello LED
del gamepad inizia a lampeggiare.
Quando si usa il gamepad per la prima volta, premere nuovamente il tasto per creare una connessione
con il PC o con la console. Accertarsi che il gamepad si trovi in prossimità del ricevitore. La procedura
di connessione richiede alcuni secondi e in seguito sarà creata automaticamente dopo l‘accensione del
gamepad. A connessione avvenuta un segmento dell‘anello LED rimane costantemente acceso, in base
all‘assegnazione del gamepad.
5. XINPUT E DIRECTINPUT
Per commutare le due modalità operative del gamepad sul PC, tenere premuto il tasto «SPEEDLINK» per 3
secondi. In modalità DirectInput (per tutti i giochi più vecchi e alcuni giochi nuovi) si accende il LED sotto il
tasto turbo; in modalità XInput (per la maggior parte dei giochi attuali) si spegne il LED sotto il tasto turbo.
Impostare la modalità desiderata sul gamepad prima di avviare il gioco. Se la commutazione avviene
durante il gioco in corso, il controller potrebbe non essere più riconosciuto correttamente. In tal caso
riavviare il gioco. Per trovare la modalità più adatta a un gioco, consultare il manuale relativo, chiedere
informazioni al produttore o fare delle prove.
6. MODALITÀ CROCE DIREZIONALE
Durante l‘utilizzo con il PC, per commutare tra due modalità per la croce direzionale digitale (D-Pad),
azionare il tasto «SPEEDLINK» nella modalità DirectInput: quando è acceso il LED (anello LED) in alto a
sinistra è attivata la modalità comando Hat. Se il LED non è acceso, la croce direzionale controlla gli assi
dello stick analogico sinistro; inoltre lo stick analogico destro assume la funzione dei tasti da 1 a 4.
7. FUNZIONE DI FUOCO RAPIDO
La funzione di fuoco rapido esegue più volte in rapida successione un tasto a piacere, finché viene premuto.
Tenere premuto il tasto «Turbo» e azionare contemporaneamente il tasto al quale si vuole assegnare la
funzione. In modalità fuoco rapido lampeggia il LED sotto il tasto turbo.
8. IMPOSTAZIONI
Sul PC la funzione del gamepad può essere verificata nel Pannello di controllo di Windows*, nella sezione
«Dispositivi e stampanti» (Windows* 10/8/7/Vista*) ossia «Gamecontroller» (Windows XP*).
In modalità DirectInput vi troverete anche le opzioni per la funzione di vibrazione. Le vibrazioni per titoli
XInput possono essere configurate nelle opzioni del gioco stesso. Vi ricordiamo che le vibrazioni saranno
riprodotte solo se supportate dal gioco e dopo aver attivato questa funzione nelle opzioni del gioco.
9. MODALITÀ STAND BY
Dopo cinque minuti di inattività il gamepad va in modalità stand-by (dopo 30 secondi senza connessione
wireless) per risparmiare energia. Premere il tasto «SPEELINK» per riattivarlo. Quando il LED in alto a destra
sul gamepad inizia a lampeggiare durante l‘uso, deve essere ricaricato. È anche possibile giocare mentre si
carica il gamepad.
Avvertenze: Premere il tasto «SPEEDLINK» per avviare il menu principale della PS3*. Tenere presente che non
si può accendere la console con questo tasto.
Alcuni giochi PS3* hanno un controllo opzionale attraverso sensori di movimento, per i quali occorre un
gamepad specifico. Per garantire un controllo perfetto con il TORID disattivare questa funzione nelle opzioni del
gioco.
FR
1. RECHARGE
Commencez par recharger la manette en la reliant à l’aide du câble mini-USB à une prise USB libre sur votre
ordinateur, votre console ou une autre source de courant USB (500 mA au moins). Le cercle de voyants sur
la manette clignote durant la recharge qui peut prendre jusqu’à 3 heures. À noter que la première recharge
peut être un peu plus longue. Dès que les voyants sont allumés de manière continue, cela signifie que la
recharge est achevée et vous pouvez débrancher le câble.
2. INSTALLATION DU PILOTE
Pour utiliser la manette avec un ordinateur, insérez le CD fourni dans le lecteur de CD-ROM afin d‘installer
le logiciel du pilote. Si l’installation ne démarre pas automatiquement, cliquez sur votre lecteur de CD-ROM
dans l’Explorateur de Windows* et lancez le programme « Setup.exe ». Il est nécessaire d’installer le pilote
pour bénéficier de la fonction vibration dans certains jeux.
Pour un fonctionnement optimal, veuillez utiliser toujours la dernière version du pilote que vous trouverez
sur le site SPEEDLINK à l’adresse www.speedlink.com.
En cas d’utilisation de la manette avec la PS3*, il n’est pas nécessaire d’installer le pilote.
3. BRANCHEMENT
Reliez le récepteur USB à une prise USB libre de votre ordinateur ou de votre PS3*. L’appareil est détecté
automatiquement et prêt à l’emploi en quelques secondes seulement.
4. LIAISON RADIO
Si la manette est éteinte, maintenez la touche « SPEEDLINK » enfoncée trois secondes pour l’allumer. Le cercle de
voyants situé sur la manette se met à clignoter.
Lors de la première utilisation, appuyez à nouveau brièvement sur la touche pour établir la liaison avec le PC ou la
console (assurez-vous que la manette est à proximité du récepteur). L’établissement de la liaison prend quelques
secondes. Elle s’établira ensuite automatiquement dès que vous mettrez en marche la manette. Une fois la liaison
établie, un segment du cercle de voyants reste allumé en continu selon l’aectation de la manette.
5. XINPUT ET DIRECTINPUT
Pour basculer sur PC entre les deux modes d’utilisation de la manette, maintenez la touche « SPEEDLINK
» enfoncée 3 secondes : en mode DirectInput (pour les jeux plus anciens et pour certains jeux récents), le
voyant situé sous la touche turbo est allumé ; en mode XInput (convient pour la plupart des jeux actuels), ce
voyant est éteint.
Réglez la manette sur le mode souhaité avant de lancer un jeu. Si vous changez de mode en cours de jeu,
il est possible que la manette ne soit plus reconnue correctement ; dans ce cas, redémarrez le jeu. Pour
connaître le mode le mieux adapté au jeu, consultez la notice du jeu, demandez conseil au fabricant ou bien
essayez alternativement les deux modes.
6. MODE DU PAVÉ DIRECTIONNEL
Sur PC, appuyez brièvement sur la touche « SPEEDLINK » en mode DirectInput pour basculer entre les deux
modes du pavé directionnel numérique (D-pad) : lorsque le voyant (cercle de voyants) situé en haut à gauche
est allumé, le mode vue panoramique est activé. Si ce voyant n’est pas allumé, le pavé directionnel contrôle
les axes du stick analogique de gauche ; le stick analogique de droite assure alors la fonction des touches 1
à 4.
7. FONCTION DE TIR RAPIDE
La fonction de tir rapide répète en rafale la fonction d’une touche donnée tant que vous maintenez cette
touche enfoncée. Pour cela, maintenez la touche « Turbo » enfoncée et actionnez simultanément la touche
pour laquelle vous souhaitez activer cette fonction. Le voyant situé en dessous de la touche « Turbo »
clignote en mode de tir rapide.
8. PARAMÈTRES
Sur PC, vous pouvez vérifier le bon fonctionnement de la manette en allant dans le Panneau de configuration
Windows* dans la section « Périphériques et imprimantes » (Windows* 10/8/7/Vista*) ou « Contrôleurs de jeu
» (Windows XP*).
En mode DirectInput, vous y trouverez également les options de réglage de la fonction vibration ; les
vibrations pour les jeux XInput doivent être configurées dans les options du jeu en question. Les vibrations
ne sont restituées que si le jeu les prend en charge et si la fonction correspondante a été activée dans les
options du jeu.
9. MODE VEILLE
Afin d’éviter tout gaspillage, la manette passe automatiquement en mode veille quand vous ne vous en
servez pas durant cinq minutes (30 secondes sans liaison radio). Appuyez dans ce cas sur la touche «
SPEEDLINK » pour la réactiver. Quand le voyant situé en haut à droite sur la manette se met à clignoter en
cours de jeu, cela signifie que la manette doit être rechargée. Il est possible de recharger la manette en
jouant.
Remarques : la touche « SPEEDLINK » vous donne accès au menu principal de la PS3*. Cette touche ne permet
pas d‘allumer la console.
Certains jeux PS3* comprennent un mode de contrôle nécessitant une manette spéciale avec capteurs de
mouvement. Désactivez la fonction en question dans les options du jeu afin de garantir un contrôle optimal
avec votre manette TORID.
X B
Y
A
TURBO
EN, DE, FR, ES, RU, IT, NL, PL
TORID
GAMEPAD WIRELESS
TURBO
X B
Y
A
1
X B
Y
A
TURBO
4
X B
Y
A
TURBO
6
8
X B
Y
A
TURBO
7
X B
Y
A
TURBO
5
X B
Y
A
TURBO
9
2 3
QUICK INSTALL GUIDE
TORID – GAMEPAD WIRELESS
PRESS
PRESS (HOLD 3 sec)
PRESS
PRESS (+ FIRE BUTTON)
XInput mode DirectInput mode
PRESS
ES
1. CARGAR
Primero carga el Gamepad: Con el minicable USB lo conectas a un puerto libre USB del ordenador, en la
consola o cualquier otro puerto USB con corriente (mínimo 500 mA). El aro LED del Gamepad parpadea
durante el proceso de carga que dura aproximadamente 3 horas en total. Ten en cuenta que la primera carga
podría tardar más tiempo de lo normal. En cuanto el LED se mantenga fijo, la carga está completa y puedes
desenchufar el cable.
2. INSTALAR EL CONTROLADOR
Para utilizar el pad en el ordenador, inserta el CD ROM adjunto en el lector de CDs del ordenador para
instalar el software de controlador. Si no se instala automáticamente, en Windows* Explorer, selecciona
tu unidad de CD-ROM e inicia el programa «setup.exe». Esta instalación es imprescindible para utilizar la
función vibración en algunos juegos.
Para obtener el máximo rendimiento, utiliza siempre la versión más reciente del controlador que puedas
encontrar y descargarlo de la página web de SPEEDLINK:www.speedlink.com.
Si vas a utilizar el pad en la PS3*, no necesitas instalar el controlador.
3. CONEXIÓN
Conecta el receptor USB a un puerto USB que esté libre en tu ordenador o en PS3*. El dispositivo se detecta
automáticamente y puedes utilizarlo sin más a los pocos segundos.
4. CONEXIÓN RF
Si el pad está desconectado, mantén pulsado el botón «SPEEDLINK» durante tres segundos para activarla. El
aro LED del pad empieza a parpadear.
Vuelve a pulsar brevemente el botón si es la primera vez que lo utilizas con el fin de establecer la conexión
con el PC o la consola; asegúrate de que durante el proceso el pad está cerca del receptor. El proceso
de emparejamiento precisa unos segundos, pero en futuras actuaciones se realiza automáticamente
al encender el pad. Después de la correcta conexión, un segmento del aro LED se enciende de forma
permanente, dependiendo del modo del pad.
5. XINPUT Y DIRECTINPUT
Para alternar entre los dos modos de funcionamiento del pad mantén pulsado el botón «SPEEDLINK» durante
3 segundos: En el modo Directinput (para los antiguos y algunos de los juegos nuevos) se enciende el LED
bajo el botón Turbo; en el modo Xinput (para la mayor parte de los juegos actuales) el LED bajo el botón
Turbo se apaga.
Antes de iniciar cualquier juego activa el pad en el modo que vas a utilizar. La conmutación de un modo a
otro mientras estás jugando podría tener como consecuencia que no se detectase y funcionase bien el pad,
en tal caso reinicia el juego. Cuál es el modo con el que mejor funciona el pad lo averiguarás en el manual
correspondiente, informándote en el fabricante o simplemente probando.
6. MODO CRUCETA
Si utilizas el ordenador Pulsa brevemente el botón «SPEEDLINK» en modo DirectInput, para alternar entre
dos modos para la cruceta digital (D-Pad): Si se enciende el LED (El aro LED) superior de la izquierda, se
encuentra activado el modo panorámico. Si este LED no se enciende, la cruceta controla los ejes del stick
analógico izquierdo; de este modo el stick analógico derecho asume la función de los botones 1 a 4.
7. FUNCIÓN RÁFAGAS
La función de fuego rápido, ráfagas, la ejecuta un botón de manera constante mientras lo tengas pulsado.
Mantén pulsado el botón «Turbo» y pulsa al mismo tiempo el botón en el que quieras activar esta función. En
modo ráfagas parpadea el LED bajo el botón Turbo.
8. CONFIGURACIONES
En el ordenador la función del pad podrás controlarla desde el panel de control de Windows* «Ver
dispositivos e impresoras» (Windows* 10/7/8/Vista*), o bien «Dispositivos de juegos» (Windows XP*).
En modo DirectInput encontrarás también las opciones para la función de vibración; las vibraciones
para títulos XInput habrá que configurarlas en las respectivas opciones del juego. Ten en cuenta que las
vibraciones sólo se reproducen, si vienen con un juego y están activadas las opciones correspondientes del
juego.
9. MODO STAND-BY
El pad cambia a modo stand by tras cinco minutos de inactividad, (a los 30 segundos si no se ha establecido
la vinculación RF) para que ahorres energía. Para volverlo a activar pulsa «SPEEDLINK» una vez más. Si
el LED superior derecho del pad parpadea con intermitencia, es el momento de volver a cargarlo. Jugar y
cargar todo al mismo tiempo son posibles.
Avisos: Pulsando «SPEEDLINK» entras en el menú principal de la PS3*. Ten en cuenta que con este botón no
activas la consola ni la apagas.
Algunos juegos PS3* permiten un control opcional a través de los sensores de movimiento para los cuales
necesitarías un pad especial. Desactiva la función correspondiente en opciones de juego para que tu control
con «TORID» sea el mejor posible.
RU
1. ЗАРЯДКА
Сначала зарядите встроенные аккумуляторы геймпада: Соедините его с помощью кабеля Mini-USB
со свободным USB-портом компьютера, приставки или другого источника тока USB (минимум 500мА).
Светодиодное кольцо на геймпаде во время процесса зарядки мигает, сам процесс продолжается
до 3 часов. Помните о том, что для первой зарядки нужно несколько больше времени. Как только
светодиодное кольцо начнет гореть не мигая, зарядка завершена и можно отсоединить кабель.
2. ИНСТАЛЛЯЦИЯ ДРАЙВЕРОВ
Вставьте компакт-диск с драйверами из комплекта поставки в дисковод, чтобы инсталлировать
драйвера для использования геймпада на компьютере. Если инсталляция не начнется автоматически,
выберите в Проводнике Windows* дисковод и запустите программу «Setup.exe». Инсталляция нужна,
чтобы пользоваться виброэффектами в некоторых играх.
Для достижения оптимального эффекта всегда используйте самую новую версию драйверов, которую
нужно взять на веб-сайте SPEEDLINK по адресу www.speedlink.com.
Если геймпад будет использоваться на PS3*, драйвера инсталлировать не нужно.
3. ПОДКЛЮЧЕНИЕ
Соедините USB-приемник со свободным USB-портом компьютера или PS3*. Система автоматически
распознает устройство и оно готово к работе через несколько секунд.
4. РАДИОСВЯЗЬ
Если геймпад отключен, для его включения нужно нажать кнопку «SPEEDLINK» и удерживать ее
нажатой в течение трех секунд. После этого начнет мигать светодиодное кольцо геймпада.
При первом использовании снова кратко нажмите кнопку, чтобы установить связь с ПК или
приставкой; обеспечьте, чтобы геймпад при этом находился вблизи приемника. Для соединения
нужно несколько секунд, этот процесс в будущем будет выполняться автоматически. После
успешного установления соединения определенный сегмент светодиодного кольца, в зависимости от
соответствия геймпада, будет гореть не мигая.
5. XINPUT И DIRECTINPUT
Чтобы на компьютере переключаться между обеими рабочими режимами, нажмите кнопку
«SPEEDLINK» и удерживайте ее нажатой на протяжении 3 секунд: В режиме DirectInput (для всех
старых и некоторых новых игр) горит светодиод под кнопкой Турбо; в режиме XInput (для большинства
новых игр) светодиод под кнопкой Турбо гаснет.
Переключите геймпад в нужный режим до запуска игры. Переключение во время игры может
привести к тому, что она больше не будет правильно распознавать контроллер, в этом случае игру
нужно перезапустить. В каком игра работает лучше всего, можно узнать из соответствующего
руководства, у производителя или опытным путем.
6. РЕЖИМ КРЕСТОВИНЫ УПРАВЛЕНИЯ
При использовании на ПК коротко нажмите кнопку «SPEEDLINK» в режиме DirectInput, чтобы
переключиться между двумя режимами для цифровой крестовины управления (D-Pad): Если горит
левый верхний светодиод (Светодиодное кольцо), активен режим переключателя кругового обзора.
Если этот светодиод не горит, крестовина управления управляет осями левого аналогового стика; в
этом случае правый аналоговый стик берет на себя функции кнопок от 1 до 4.
7. ФУНКЦИЯ БЫСТРОГО ОГНЯ
Функция быстрого огня многократно в быстрой последовательности выполняет одну кнопку,
пока удерживается нажатой. Для этого кнопку «Turbo» нужно удерживать нажатой и при этом
одновременно нажать кнопку, для которой должна быть активизирована функция. В режиме быстрого
огня мигает светодиод под кнопкой Турбо.
8. НАСТРОЙКИ
На ПК функционирование геймпада под Windows* можно проверить в разделе управления системой
«Устройства и принтеры» (Windows* 8/7/Vista*) или «Игровые контроллеры» (Windows* XP).
В режиме DirectInput там также имеются опции для виброфункции; вибрация для XInput
конфигурируется в опциях соответствующей игры. Помните о том, что вибрация воспроизводится
только в том случае, если она используется в игре, а в настройках игры активирована
соответствующая функция.
9. РЕЖИМ ОЖИДАНИЯ
Геймпад через пять минут его неиспользования переключается в режим ожидания (через 30 секунд
без установленного радиосоединения), чтобы экономить энергию. Для его активизации нажмите
кнопку «SPEEDLINK». Если верхний правый светодиод на геймпаде во время его работы начинает
мигать, его нужно снова зарядить. Можно одновременно заряжать его и играть.
Указания: Клавишей «SPEEDLINK» вызывается главное меню PS3*. Помните о том, что приставка этой
клавишей не включается.
Некоторые игры PS3* имеют дополнительное управление через датчики движения, для чего нужен
специальный геймпад. Отключите соответствующую функцию в опциях игры, чтобы обеспечить
оптимальнео управление с помощью TORID.
NL
1. OPLADEN
Laad om te beginnen de ingebouwde batterij van de gamepad op: Sluit de gamepad met behulp van de
mini-USB-kabel aan op een vrije USB-poort van de pc, de console of een andere USB-stroombron (minimaal
500mA). De LED-ring van de gamepad knippert tijdens het opladen, wat maximaal drie uur in beslag neemt.
De eerste keer kan het opladen iets langer duren. Zodra de LED-ring continu brandt, is het opladen voltooid
en kunt u de kabel weer loskoppelen.
2. STUURPROGRAMMA-INSTALLATIE
Plaats de meegeleverde cd-rom in het cd-romstation om de stuurprogrammatuur te installeren als u de
gamepad bij de pc wilt gebruiken. Als de installatie niet automatisch wordt gestart, selecteert u in de
Windows*-Verkenner uw cd-romstation en start u het programma „Setup.exe“. De installatie is noodzakelijk
om gebruik te maken van de trilfunctie in sommige games.
Gebruik de nieuwste versie van het stuurprogramma voor optimale prestaties; die versie staat op de website
van SPEEDLINK: www.speedlink.com.
Als u de gamepad bij de PS3* wilt gebruiken, hoeft u het stuurprogramma niet te installeren.
3. AANSLUITEN
Sluit de USB-ontvanger aan op een vrije USB-poort van de pc of de PS3*. Het apparaat wordt automatisch
herkend en is na een paar seconden gereed voor gebruik.
4. RADIOVERBINDING
Als de gamepad uitgeschakeld is, houdt u de „SPEEDLINK“-knop drie seconden ingedrukt om de gamepad in
te schakelen. Dan begint de LED-ring te knipperen.
Druk bij het eerste gebruik nogmaals kort op de knop om de verbinding met de pc of de console tot stand te
brengen; zorg ervoor dat de gamepad zich daarbij in de directe nabijheid van de ontvanger bevindt. Het tot
stand brengen van de verbinding vergt enige seconden en vindt in de toekomst automatisch plaats na het
inschakelen van de gamepad. Als de verbinding tot stand is gebracht, gaat een segment van de LED-ring,
afhankelijk van waaraan de gamepad is toegewezen, continu branden.
5. XINPUT EN DIRECTINPUT
Houd de „SPEEDLINK“-knop 3 seconden ingedrukt om tussen de beide werkstanden van de gamepad te
wisselen: In de DirectInput-modus (voor alle oudere en sommige nieuwere games) brandt de LED onder de
turboknop; In de XInput-modus (voor de meeste tegenwoordige games) dooft de LED onder de turboknop.
Zet de gamepad in de gewenste modus, voordat u de game start. Als u tijdens een game overschakelt op
een andere modus, kan het gebeuren dat de game de controller niet meer correct herkent; in dit geval dient
u de game opnieuw op te starten. In welke modus een game het beste werkt, staat in het bijbehorende
handboek; u kunt het ook navragen bij de fabrikant of het uitproberen.
6. STUURKRUISMODUS
Als u de gamepad bij de pc gebruikt, drukt u kort op de „SPEEDLINK“-knop in de DirectInput-modus om
tussen de twee modi van het digitale stuurkruis (D-Pad) te schakelen: Gaat de LED linksboven branden (LEDring), dan is de rondkijkmodus actief. Als deze LED niet brandt, stuurt het stuurkruis de assen aan van de
linker analoge stick; bovendien worden dan de functies van de knoppen 1 tot en met 4 toegewezen aan de
rechter analoge stick.
7. SNELVUURFUNCTIE
Met behulp van de snelvuurfunctie kunt u de functie van een knop meerdere keren achter elkaar uitvoeren
zolang u de knop ingedrukt houdt. Houd daartoe de „Turbo“-knop ingedrukt en druk tegelijkertijd op de knop
waaraan u de functie wilt toewijzen. In de snelvuurmodus brandt de LED onder de turboknop.
8. INSTELLINGEN
Op de pc kunt u controleren of de gamepad werkt in het Configuratiescherm van Windows* bij „Apparaten
en printers“ (Windows* 7/Vista*), resp. „Spelbesturingen“ (Windows* XP).
In de DirectInput-modus staan daar ook de opties voor de trilfunctie; Trilfuncties voor XInput-games
configureert u steeds bij de opties van de game. Opties voor de trilfunctie worden echter alleen
weergegeven als ze relevant zijn voor een game en als in die game de desbetreende functie bij de
instellingen is ingeschakeld.
9. STAND-BYMODUS
Als de gamepad vijf minuten niet wordt gebruikt, wordt de stand-bymodus ingeschakeld om energie te
besparen (na dertig seconden als er geen radioverbinding tot stand is gebracht). Druk in dat geval op de
„SPEEDLINK“-knop om de gamepad weer te activeren. Als de LED rechtsboven op de gamepad tijdens
gebruik begint te knipperen, dient de gamepad opnieuw te worden opgeladen. Gelijktijdig opladen en gamen
is mogelijk.
Tip: Als u op de knop „SPEEDLINK“ drukt, roept u het hoofdmenu op van de PS3*. Let op: u kunt met deze knop
de console niet inschakelen.
Een aantal PS3*-games kan worden bestuurd met behulp van bewegingssensoren, waarvoor u een speciale
gamepad nodig hebt. Schakel die functie uit in de spelopties voor een optimale besturing met de TORID.
PL
1. ŁADOWANIE
Najpierw naładuj wbudowane akumulatory gamepada: podłącz go przewodem USB do wolnego złącza USB
włączonego komputera, konsoli lub do innego źródła zasilania USB (co najmniej 500mA). Podczas ładowania
wskaźnik LED na gamepadzie miga. Ładowanie trwa ok. 3 godziny. Należy pamiętać, że pierwsze ładowanie
może trwać nieco dłużej. Gdy dioda LED świeci światłem ciągłym, ładowanie jest zakończone i można
odłączyć kabel USB.
2. INSTALACJA STEROWNIKÓW
Włóż załączoną płytę CD ze sterownikami do napędu CD-ROM, aby zainstalować sterowniki. Jeżeli instalacja
nie rozpocznie się automatycznie, w Eksploratorze Windows* wybierz napęd CD-ROM i uruchom program
„Setup.exe”. Instalacja jest konieczna do korzystania z funkcji wibracji w niektórych grach.
Dla optymalnych wyników używaj zawsze najnowszych wersji sterowników, które można znaleźć na stronie
internetowej SPEEDLINK pod adresem www.speedlink.com.
Jeżeli chcesz używać gamepada z konsolą PS3*, instalacja sterowników jest zbędna.
3. PODŁĄCZENIE
Podłącz odbiornik USB do wolnego portu USB komputera lub konsoli PS3*. Urządzenie zostanie
automatycznie rozpoznane i po kilku sekundach będzie gotowe do pracy.
4. POŁĄCZENIE RADIOWE
Jeżeli gamepad jest wyłączony, naciśnij przycisk „SPEEDLINK” i przytrzymaj przez ok. 3 sekundy, aby go
włączyć. Pierścień LED gamepada zaczyna wówczas migać.
Przy pierwszym użyciu ponownie krótko naciśnij przycisk, aby nawiązać połączenie z komputerem; upewnij
się, że gamepad znajduje się w tym czasie w pobliżu odbiornika. Proces nawiązania połączenia trwa kilka
sekund, a później odbywa się automatycznie przy każdym włączeniu gamepada. Po pomyślnym nawiązaniu
połączenia, zależnie od konfiguracji gamepada, jeden segment pierścienia LED świeci światłem ciągłym.
5. XINPUT I DIRECTINPUT
Aby przełączyć się między obydwoma trybami pracy gamepada, naciśnij przycisk „SPEEDLINK” i przytrzymaj
go przez 3 sekundy: W trybie DirectInput (dotyczy wszystkich starszych i niektórych nowych gier) świeci się
dioda LED pod przyciskiem Turbo; w trybie XInput (większość nowych gier) dioda LED pod przyciskiem Turbo
gaśnie.
Zanim rozpoczniesz grę, przełącz gamepad do odpowiedniego trybu. Przełączanie w trakcie gry może
spowodować, że kontroler nie zostanie poprawnie rozpoznany. W takim przypadku należy ponownie
rozpocząć grę. Odpowiedni tryb ustalisz na podstawie instrukcji do gry, u producenta lub metodą prób i
błędów.
6. TRYB KRZYŻA STERUJĄCEGO
Przy podłączeniu do komputera PC naciśnij krótko przycisk „SPEEDLINK” w trybie DirectInput, by wybrać
jeden z dwóch trybów pracy cyfrowego krzyża sterującego: jeśli lewa górna dioda LED świeci się (pierścienia
LED), aktywny jest tryb rozglądania się dookoła. Jeżeli ta dioda LED nie świeci, krzyż sterujący steruje osiami
lewego drążka analogowego; ponadto prawy drążek analogowy przejmuje wówczas funkcje przycisków 1 do
4.
7. FUNKCJA SZYBKIEGO OGNIA
Funkcja szybkiego ognia jest odpowiednikiem wielokrotnego, szybkiego naciskania przycisku tak długo, jak
długo jest on naciśnięty. Naciśnij i przytrzymaj przycisk „Turbo” i jednocześnie naciśnij przycisk, dla którego
chcesz aktywować tę funkcję. W trybie szybkiego ognia miga dioda LED pod przyciskiem turbo.
8. USTAWIENIA
Funkcje dżojstika można sprawdzić w Panelu sterowania Windows* w części „Urządzenia i drukarki”
(Windows* 8/7/Vista*) lub „Kontrolery gier” (Windows* XP).
W trybie DirectInput znajdziesz tam także opcje funkcji wibracji; wibracje w trybie XInput konfiguruje się
bezpośrednio w odpowiednich opcjach gier. Należy pamiętać, że wibracje działają tylko wtedy, gdy są
obsługiwane przez grę, a odpowiednie opcje gry są aktywowane.
9. TRYB OCZEKIWANIA
W celu oszczędzania energii, po 7 minutach bezczynności gamepad przechodzi do trybu oczekiwania (po 30
sekundach bez nawiązanego połączenia radiowego). Naciśnij przycisk „SPEEDLINK”, aby go reaktywować.
Gdy prawa górna dioda LED na gamepadzie zaczyna migać, gamepad wymaga ponownego naładowania.
Możliwe jest jednoczesne ładowanie i granie.
Wskazówki: Za pomocą przycisku „SPEEDLINK” wywołasz menu główne konsoli PS3*. Należy jednak pamiętać,
że za pomocą tego przycisku nie można włączyć konsoli.
Niektóre gry na PS3* oferują opcjonalne sterowanie za pomocą czujników ruchu, do czego jest potrzebny
specjalny gamepad. Wyłącz odpowiednie funkcje w opcjach gry, by zapewnić sobie optymalne sterowanie za
pomocą gamepada TORID.
GET TO KNOW IT:
TECHNICAL SUPPORT
EN
Having technical problems with this product? Get in touch with our Support team – the
quickest way is via our website: www.speedlink.com
DE
Bei technischen Schwierigkeiten mit diesem Produkt wenden Sie sich bitte an unseren
Support, den Sie am schnellsten über unsere Webseite www.speedlink.com erreichen.
IT
In caso di dicoltà tecniche con questo prodotto rivolgetevi al nostro supporto che è
facilmente reperibile attraverso il nostro sito www.speedlink.com.
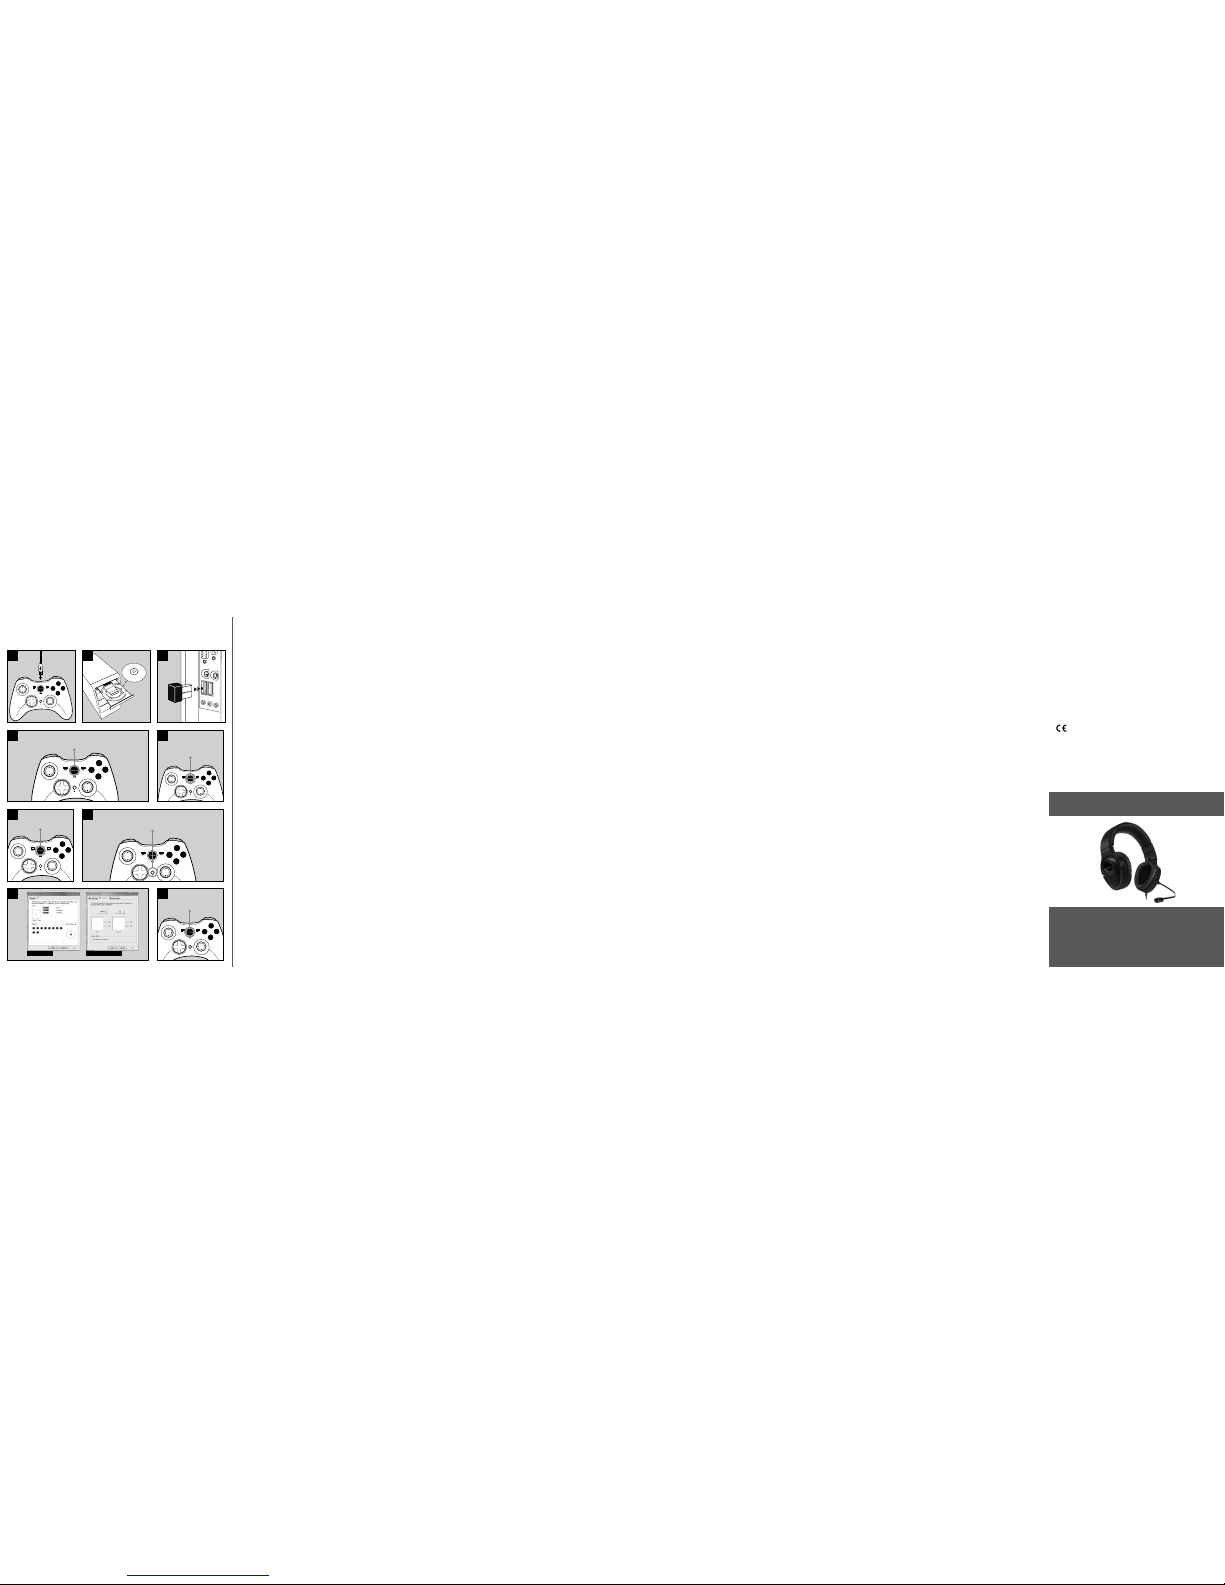
MEDUSA XE Stereo Headset - for PS4*
Enjoy outstanding sound with detailed trebles and intensive bass: the MEDUSA XE Stereo
Gaming Headset delivers first-class stereo sound for action-packed PS4* games, while
the flexible noise-cancelling microphone makes it easier to communicate with your
teammates. The adjustable headband allows you to achieve the perfect fit, while the
practical in-line remote oers convenient control of the volume and sound levels. What’s
more, the MEDUSA XE Stereo’s low weight and comfortable padding oers maximum
comfort – making it the first choice for long gaming sessions.
© 2016 Jöllenbeck GmbH. All rights reserved. SPEEDLINK, the SPEEDLINK word mark and
the SPEEDLINK swoosh are registered trademarks of Jöllenbeck GmbH.
* Microsoft, Windows, Windows XP and Windows Vista are registered trademarks of
Microsoft Corporation in the United States and other countries. PS3 is a registered
trademark of Sony Computer Entertainment Inc.
All trademarks are the property of their respective owner. Jöllenbeck GmbH shall not be
made liable for any errors that may appear in this manual. Information contained herein is
subject to change without prior notice. Please keep this information for later reference.
JÖLLENBECK GmbH, Kreuzberg 2, 27404 Weertzen, GERMANY
TURBO
X B
Y
A
1
X B
Y
A
TURBO
4
X B
Y
A
TURBO
6
8
X B
Y
A
TURBO
7
X B
Y
A
TURBO
5
X B
Y
A
TURBO
9
2 3
QUICK INSTALL GUIDE
TORID – GAMEPAD WIRELESS
PRESS
PRESS (HOLD 3 sec)
PRESS
PRESS (+ FIRE BUTTON)
XInput mode DirectInput mode
PRESS
 Loading...