

Page 1

FCC ID: US8-SA-04 Report No. M060926_Cert_ Infusion_BGW200EG
EMC Technologies Pty Ltd – 57 Assembly Drive, Tullamarine VIC 3043 Australia
www.emctech.com.au
EMC Technologies Report Number: M060926_Cert_Infusion_BGW200EG
APPENDIX H
USER MANUAL
Page 2

I
Table of Contents
Disclaimers and Trademarks II
Trademark acknowledgements II
Software License Agreement II
Important Product Information III
Note: Radiated Radio Energy: FCC Statement III
Safety and Compliance Information III
Torian One-Year Limited Warranty V
Where to Obtain Warranty Service IX
Getting started – Unpacking and charging. X
Inserting the MMC card X
External connections X
First time charge XI
USB Charging XI
Attaching the wrist strap XI
User Interface Overview 1
On/Off, Mode Change and Volume 2
Turning the InFusion
™
On 2
Mode Change 2
Turning the InFusion
™
Off 2
Volume 3
How to Enter Text 4
MP3 Mode 5
MP3 Mode - No Memory Card 6
MP3 Mode - No Tracks Found 6
MP3 Setup 6
Playlist 6
Playlist Folder 7
Delete Function 7
What is internet radio? 8
iRadio Mode 11
Available Networks 12
Preset Abbreviation 12
iRadio Setup – when not connected 12
iRadio Setup – when connected 12
New Connection 13
Disconnect 14
Record: (Start; Stop) 14
Listening to recorded audio 14
Station Search 14
Custom Address 14
Previous Search 15
InFusion
™
Search 15
Live365 Search 16
Station Selection 17
FM Mode 18
FM Radio Setup 18
InFusion™ Setup 19
General Setup 19
Alarm Setup 20
Information 21
WiFi Setup 21
Profi le Confi guration 22
Network Profi les 22
Glossary 25
1. Wireless Local Area Network 26
2. Wireless confi guration 26
3. Scanning for Available Networks 26
4. Profi le Confi guration 26
Connecting 26
Troubleshooting 27
Page 3

II
Disclaimers and Trademarks
While every effort has been made to ensure that
the information contained in this guide is accurate
and complete, no liability can be accepted for
any errors or omissions. Torian Wireless Limited
reserve the right to change the specifi cations of
the hardware and software described herein at any
time without prior notice. Except for the warranties
expressly set out in this document, Torian Wireless
Limited makes no warranties regarding the
fi tness and or merchantability of the hardware
and software, and does not warrant for damages
resulting from corrupted or lost data due to
operational errors or malfunction of the radio, the
software, the memory cards, personal computers,
or any device connected to the radio.
Trademark acknowledgements
Torian
™
iRoamer™ and InFusion™ are trademarks of
Torian Wireless Limited, which have recognized
goodwill worldwide. InFusion™ is an Australian
registered trademark. Torian Wireless Limited
claims and exercises its common law trademark
rights in relation to these trademarks.
Microsoft and Windows are either registered
trademarks or trademarks of Microsoft Corporation.
Other names and products mentioned or used in
this manual are the trademarks of their respective
companies.
Software License Agreement
Use of the InFusion
™
is subject to the InFusion
™
Software License Agreement found at
www.torianwireless.com
Disclaimers and Trademarks
Page 4
III
Important Product Information
Warning: Any changes or modifi cations not
expressively approved by Torian could void the
user’s authority to operate this equipment.
Note: Radiated Radio Energy: FCC Statement
This equipment has been tested and found to
comply with the limits for a Class B digital device,
pursuant to Part 15 of the FCC Rules. These limits
are designed to provide reasonable protection
against harmful interference in a residential
installation. This equipment generates, uses
and can radiate radio frequency energy and, if
not installed and used in accordance with the
instructions, may cause harmful interference
to radio communications. However, there is no
guarantee that interference will not occur in a
particular installation. If this equipment does
cause harmful interference to radio or television
reception, which can be determined by turning the
equipment off and on, you are encouraged to try
to correct the interference by one or more of the
following measures:
• Reorient or relocate the receiving antenna
• Increase the separation between the equipment
and receiver
• Connect the equipment into an outlet on a
circuit different from that to which the receiver
is connected
• Consult the dealer or an experienced radio/TV
technician for help
Safety and Compliance Information
Please listen responsibility. To avoid injury, read
all the information and safety instructions before
using the InFusion
™
• Store this equipment out of reach of children
and infants. Accidental damage to the radio or
batteries by a child could result in serious injury.
In addition, placement of the strap around a
child’s neck could result in asphyxiation.
• Do not attempt to disassemble or alter any
part of the equipment that is not expressly
described in this guide. Disassembly or
alteration may result in high-voltage electrical
shock. Internal inspections, alterations and
repairs should be conducted by qualifi ed
service personnel authorised by Torian Wireless
Limited.
• To avoid the risk of high-voltage electrical shock,
do not touch the inside components exposed
as a result of damage. There is risk of high-
voltage electrical shock. Please take the fi rst
opportunity to consult your radio distributor or
Support Help Desk.
Important Product Information
This device complies with Part 15 of the FCC
Rules. Operation is subject to the following two
conditions: (1) this device may not cause harmful
interference, and (2) this device must accept any
interference received, including interference that
may cause undesired operation
Important Product Information
Warning: Any changes or modifi cations not
expressively approved by Torian could void the
user’s authority to operate this equipment.
Note: Radiated Radio Energy: FCC Statement
This equipment has been tested and found to
comply with the limits for a Class B digital device,
pursuant to Part 15 of the FCC Rules. These limits
are designed to provide reasonable protection
against harmful interference in a residential
installation. This equipment generates, uses
and can radiate radio frequency energy and, if
not installed and used in accordance with the
instructions, may cause harmful interference
to radio communications. However, there is no
guarantee that interference will not occur in a
particular installation. If this equipment does
cause harmful interference to radio or television
reception, which can be determined by turning the
equipment off and on, you are encouraged to try
to correct the interference by one or more of the
following measures:
• Reorient or relocate the receiving antenna
• Increase the separation between the equipment
and receiver
Safety and Compliance Information
Please listen responsibility. To avoid injury, read
all the information and safety instructions before
using the InFusion
™
• Store this equipment out of reach of children
and infants. Accidental damage to the radio or
batteries by a child could result in serious injury.
In addition, placement of the strap around a
child’s neck could result in asphyxiation.
• Do not attempt to disassemble or alter any
part of the equipment that is not expressly
described in this guide. Disassembly or
alteration may result in high-voltage electrical
shock. Internal inspections, alterations and
repairs should be conducted by qualifi ed
service personnel authorised by Torian Wireless
Limited.
• To avoid the risk of high-voltage electrical shock,
do not touch the inside components exposed
as a result of damage. There is risk of high-
voltage electrical shock. Please take the fi rst
opportunity to consult your radio distributor or
Important Product Information
Important Product Information
Warning: Any changes or modifi cations not
expressively approved by Torian could void the
user’s authority to operate this equipment.
Note: Radiated Radio Energy: FCC Statement
This equipment has been tested and found to
comply with the limits for a Class B digital device,
pursuant to Part 15 of the FCC Rules. These limits
are designed to provide reasonable protection
against harmful interference in a residential
installation. This equipment generates, uses
and can radiate radio frequency energy and, if
not installed and used in accordance with the
instructions, may cause harmful interference
to radio communications. However, there is no
guarantee that interference will not occur in a
particular installation. If this equipment does
cause harmful interference to radio or television
reception, which can be determined by turning the
equipment off and on, you are encouraged to try
to correct the interference by one or more of the
following measures:
• Reorient or relocate the receiving antenna
• Increase the separation between the equipment
and receiver
• Connect the equipment into an outlet on a
circuit different from that to which the receiver
is connected
• Consult the dealer or an experienced radio/TV
technician for help
Safety and Compliance Information
Please listen responsibility. To avoid injury, read
all the information and safety instructions before
using the InFusion
™
• Store this equipment out of reach of children
and infants. Accidental damage to the radio or
batteries by a child could result in serious injury.
In addition, placement of the strap around a
child’s neck could result in asphyxiation.
• Do not attempt to disassemble or alter any
part of the equipment that is not expressly
described in this guide. Disassembly or
alteration may result in high-voltage electrical
shock. Internal inspections, alterations and
repairs should be conducted by qualifi ed
service personnel authorised by Torian Wireless
Limited.
• To avoid the risk of high-voltage electrical shock,
do not touch the inside components exposed
as a result of damage. There is risk of high-
voltage electrical shock. Please take the fi rst
opportunity to consult your radio distributor or
Support Help Desk.
Important Product Information
Safety and Compliance Information
Please listen responsibility. To avoid injury, read
all the information and safety instructions before
using the InFusion
™
• Store this equipment out of reach of children
and infants. Accidental damage to the radio or
batteries by a child could result in serious injury.
In addition, placement of the strap around a
child’s neck could result in asphyxiation.
• Do not attempt to disassemble or alter any
part of the equipment that is not expressly
described in this guide. Disassembly or
alteration may result in high-voltage electrical
shock. Internal inspections, alterations and
repairs should be conducted by qualifi ed
service personnel authorised by Torian Wireless
Limited.
• To avoid the risk of high-voltage electrical shock,
do not touch the inside components exposed
as a result of damage. There is risk of highvoltage electrical shock. Please take the fi rst
opportunity to consult your radio distributor or
Support Help Desk.
Infusion Manual Touch Up.indd 3 29/11/06 2:06:15 PM
Page 5

IV
• Stop operating the equipment immediately
if it emits smoke or noxious fumes. Failure
to do so may result in fi re or electrical shock.
Immediately turn the radio power off, unplug
the power cord from the power outlet. Confi rm
that smoke or fume emissions have ceased.
Please consult your radio distributor or the
closest radio Support Help Desk.
• Stop operating the equipment if it is dropped
or the casing is damaged. Failure to do so may
result in fi re or electrical shock. Immediately
turn the power off, unplug the power cord from
the power outlet. Please consult your radio
distributor or the closest Support Help Desk.
• Do not allow the equipment to come into
contact with, or become immersed in, water or
other liquids. Do not allow liquids to enter the
interior. The radio has not been waterproofed.
If the exterior comes into contact with liquids
or salt air, wipe it dry with a soft, absorbent
cloth. In the event that water or other foreign
substances enter the interior, immediately turn
the radio’s power off and unplug the power cord
from the power outlet. Continued use of the
equipment may result in fi re or electrical shock.
Please consult your radio distributor or the
closest Support Help Desk.
• Do not use substances containing alcohol,
benzene, thinners, or other fl ammable
substances to clean or maintain the equipment.
The use of these substances may lead to fi re.
• Remove the power cord on a regular periodic
basis and wipe away the dust and dirt that
collects on the plug, the exterior of the power
outlet and the surrounding area. In dusty, humid
or greasy environments, the dust that collects
around the plug over long periods of time may
become saturated with humidity and shortcircuit, leading to fi re.
• Do not cut, damage, alter or place heavy items
on the power adapter cord. Any of these actions
may cause an electrical short circuit, which may
lead to fi re or electrical shock.
• Do not handle the power cord if your hands
are wet. Handling it with wet hands may lead
to electrical shock. When unplugging the cord,
ensure that you hold the solid portion of the
plug. Pulling on the fl exible portion of the cord
may damage or expose the wire and insulation,
creating the potential for fi res or electrical
shocks.
• Use of power sources not expressly
recommended for this equipment may lead to
overheating, distortion of the equipment, fi re,
electrical shock or other hazards. Use only the
recommended power accessories.
Important Product Information Continued
Page 6

V
Torian One-Year Limited Warranty
Torian’s warranty obligations for the hardware
product are limited to the terms set forth below.
Torian, as defi ned below, warrants this hardware
product against defects in materials and
workmanship under normal use for a period of
ONE (1) YEAR from the date of retail purchase
by the original end-user purchaser (“Warranty
Period”). If a hardware defect arises and a valid
claim is received by Torian within the Warranty
Period, at its option and to the extent permitted
by law. Torian will, at Torian’s election, either
(1) repair the product at no charge using new
refurbished replacement parts, (2) exchange the
product with a product that is new or which has
been manufactured from new or serviceable used
parts and is at least functionally equivalent to the
original product or (3) refund the purchase price of
the product. Torian may request that you replace
defective parts with new or refurbished user
installable parts that Torian provides in fulfi lment of
its warranty obligation. A replacement product or
part, including a user-installable part that has been
Installed In accordance with instructions provided
by Torian, assumes the remaining warranty of
the original product or ninety (90) days from the
date of replacement or repair, whichever provides
longer coverage for you. When a product or part is
exchanged, any replacement item becomes your
property and the replaced item becomes Torian’s
property. Parts provided by Torian in fulfi lment of
its warranty obligation must be used in products
for which warranty service is claimed. When a
refund is given, the product for which the refund is
provided must be returned to Torian and becomes
Torian’s property.
If a defect arises and a valid claim is received
by Torian after the fi rst one hundred and eighty
(180) days of the Warranty Period, a shipping
and handling charge may apply to any repair or
exchange of the product undertaken by Torian.
EXCLUSIONS AND LIMITATIONS
This Limited Warranty applies only to the hardware
product manufactured by or for Torian that can be
identifi ed by the “Torian” trademark, trade name,
or logo affi xed to it. The Limited Warranty does
not apply to any non-Torian hardware product or
any software, even if packaged or sold with the
Torian hardware. Manufacturers, suppliers or
publishers other than Torian, may provide their
own warranties to the end user purchaser, but
Torian, insofar as permitted by law, provides their
products “as is”. Software distributed by Torian
with or without the Torian brand name (including,
but not limited to system software) is not covered
under this Limited Warranty. Refer to the licencing
agreement accompanying the software for details
of your rights with respect to its use and any
warranties given by Torian in relation to the same.
Torian does not warrant that the operation of the
product will be uninterrupted or error free. Torian is
not responsible for damage arising from failure to
follow instructions relating to the product’s use.
This warranty does not apply: (a) to damage
caused by use with non-Torian products; (b) to
damage caused by accident, abuse, misuse, fl ood,
fi re, earthquake or other external causes; (c) to
damage caused by operating the product outside
the permitted or intended uses described by
Torian; (d) to damage caused by service (including
Torian One-Year Limited Warranty
Page 7

VI
upgrades and expansions) performed by anyone
who is not a representative of Torian or a Torian
Authorized Service Provider; (e) To a product or
part that has been modifi ed to alter functionality or
capability without the written permission of Torian;
or (f) if any Torian serial number has been removed
or defaced.
TO THE EXTENT PERMITTED BY LAW, THIS WARRANTY
AND THE REMEDIES SET FORTH ABOVE ARE EXCLUSIVE
AND IN LIEU OF All OTHER WARRANTIES, REMEDIES
AND CONDlTlONS, WHETHER ORAL OR WRITTEN,
STATUTORY, EXPRESS OR IMPLIED. AS PERMITTED BY
APPLICABLE LAW, TORIAN SPECIFlCALLY DISCLAIMS
ANY AND ALL STATUTORY OR IMPLIED WARRANTIES,
INCLUDING, WITHOUT LIMITATION, WARRANTIES OF
MERCHANTABILITY AND FITNESS FOR A PARTICULAR
PURPOSE AND WARRANTIES AGAINST HIDDEN OR
LATENT DEFECTS. IF TORIAN CANNOT LAWFULLY
DISCLAIM STATUTORY OR IMPLIED WARRANTIES
THEN TO THE EXTENT PERMITTED BY LAW, ALL SUCH
WARRANTIES SHALL BE LIMITED IN DURATION TO
THE DURATION OF THE EXPRESS WARRANTY AND
TO THE REPAIR OR REPLACEMENT SERVICE AS
DETERMINED BY TORIAN IN ITS SOLE DISCRETION.
No
Torian reseller, agent or employee is authorized
to make any modifi cation, extension, or addition
to this warranty. If any term is held to be illegal or
unenforceable, the legality or enforceability of the
remaining terms shall not be affected or impaired.
EXCEPT AS PROVIDED IN THIS WARRANTY AND TO THE
MAXIMUM EXTENT PERMITTED BY LAW, TORIAN IS NOT
RESPONSIBLE FOR DIRECT, SPECIAL, INCIDENTAL OR
CONSEQUENTIAL DAMAGES RESULTING FROM ANY
BREACH OF WARRANTY OR CONDITION, OR UNDER ANY
OTHER LEGAL THEORY, INCLUDING BUT NOT LIMITED TO
LOSS OF USE; LOSS OF REVENUE; LOSS OF ACTUAL OR
ANTICIPATED PROFITS (INCLUDING LOSS OF PROFITS
ON CONTRACTS); LOSS OF THE USE OF MONEY; LOSS
OF ANTICIPATED SAVINGS; LOSS OF BUSINESS; LOSS
OF OPPORTUNITY; LOSS OF GOODWlLL, LOSS OF
REPUTATlON; LOSS OF, DAMAGE TO OR CORRUPTION
OF DATA; OR ANY INDIRECT OR CONSEQUENTIAL
LOSS OR DAMAGE HOWSOEVER CAUSED INCLUDING
THE REPLACEMENT OF EQUIPMENT AND PROPERTY,
ANY COSTS OF RECOVERING, PROGRAMMING OR
REPRODUCING ANY PROGRAM OR DATA STORED IN OR
USED WITH THE TORIAN PRODUCT, AND ANY FAILURE
TO MAINTAIN THE CONFIDENTIALITY OF DATA STORED
ON THE PRODUCT. THE FOREGOING LIMITATION SHALL
NOT APPLY TO DEATH OR PERSONAL INJURY CLAIMS,
OR ANY STATUTORY LIABILlTY FOR INTENTIONAL AND
GROSS NEGLIGENT ACTS AND/OR OMISSIONS. TORIAN
DISCLAIMS ANY REPRESENTATION THAT IT WILL BE
ABLE TO REPAIR ANY PRODUCT UNDER THIS WARRANTY
OR MAKE A PRODUCT EXCHANGE WITHOUT RISK TO OR
LOSS OF PROGRAMS OR DATA.
YOU AGREE THAT TORIAN’S MAXIMUM LIABILITY, IF ANY,
IS CALCULATED AT THE VALUE OF THE RETAIL PRICE
OF THE PRODUCT YOU HAVE PURCHASED, AND YOU
AGREE TO INDEMNIFY TORIAN FOR ANY ADDITIONAL
COSTS AND OR DAMAGES THAT MAY RESULT AS A
CONSEQUENCE OF YOUR USE OF THE PRODUCT.
CONSUMER PROTECTION LAWS
FOR CONSUMERS WHO ARE COVERED BY CONSUMER
PROTECTION LAWS OR REGULATIONS IN THEIR
COUNTRY OF PURCHASE OR, IF DIFFERENT, THEIR
COUNTRY OF RESIDENCE. THE BENEFITS CONFERRED
BY THIS WARRANTY ARE IN ADDITION TO ALL RIGHTS
AND REMEDIES CONVEYED BY SUCH CONSUMER
Torian One-Year Limited Warranty
Page 8

VII
PROTECTION LAWS AND REGULATIONS. Some
countries, states and provinces do not allow the
exclusion or limitation of incidental or
consequential damages or allow limitations on
how long an implied warranty or condition may
last, so the above limitations or exclusions may not
apply to you. This warranty gives you specifi c legal
rights, and you may also have other rights that vary
by country. state or province. This Limited Warranty
is governed by and construed under the laws of
the country in which the product purchase took
place. Torian, the warrantor under this Limited
Warranty, is identifi ed at the end of this document
according to the country or region in which the
product purchase look place.
OBTAINING WARRANTY SERVICE
Please access and review the online help
resources referred to in the documentation
accompanying this hardware product before
seeking warranty service. If the product is still not
functioning properly after making use of these
resources, access the online website, “www.
torianwireless.com” for instructions on how to
obtain warranty service. You must follow Torian’s
warranty processes.
Torian may provide warranty service (i) at a
Torian owned retail store or on location of the a
certifi ed retail outlet or the retail outlet may send
the product to a Torian repair service location
for service (ii) by sending you prepaid way bills
(and if you no longer have the original packaging,
Torian may send you packaging material) to enable
you to Ship the product to Torian’s repair service
location for service, or (iii) by sending you new
or, refurbished customer-installable replacement
product or parts to enable you to service or
exchange your own product (”DIY Service”). Upon
receipt of the replacement product or part, the
original product or part becomes the property
of Torian and you agree to follow instructions,
including, if required, arranging the return of
original product or part to Torian in a timely
manner. When providing DIY Service requiring
the return of the original product or part, Torian
may require a credit card authorization as security
for the retaiI price of the replacement product or
part and applicable shipping costs. If you follow
instructions, Torian will cancel the credit card
authorisation, so you will not be charged for the
product or part and shipping costs. If you fail to
return the replaced product or part as instructed,
Torian will charge the credit card for the authorized
amount.
Service options, parts availability and response
times may vary according to the country in
which service is requested. Service options
are subject to change at any time. You may be
responsible for shipping and handling charges if
the product cannot be serviced in the country in
which service is requested. If you seek service
in a country that is not the country of purchase,
you will comply with all applicable export laws
and regulations and be responsible for all custom
duties, V.A.T. and other associated taxes and
charges. For international service, Torian may repair
or exchange defective products and parts with
comparable products and parts that comply with
local standards. In accordance with applicable
law. Torian may require that you furnish proof of
Torian One-Year Limited Warranty
Page 9

VIII
purchase details and/or comply with registration
requirements before receiving warranty service.
Please refer to the accompanying documentation
for more details on this and other matters on
obtaining warranty service.
Torian will maintain and use customer information
in accordance with the Torian Customer Privacy
Policy accessible at www.torianwireless.com.
If your product is capable of storing software
programs, data and other information, you should
make periodic backup copies of the information
contained on the produces hard drive or other
storage media to protect the contents and as a
precaution against possible operationaI failures.
Before you deliver your product for warranty
service it is your responsibility to keep a separate
backup copy of the contents, and disable any
security passwords.
IT IS POSSIBLE THAT THE
CONTENTS OF YOUR HARD DRIVE WILL BE LOST OR
REFORMATTED IN THE COURSE OF WARRANTY SERVICE,
AND TORIAN AND ITS AGENTS ARE NOT RESPONSIBLE
FOR ANY DAMAGE TO OR LOSS OF PROGRAMS, DATA
OR OTHER INFORMATION CONTAINED ON THE MEDIA
OR ANY PART OF THE PRODUCT SERVICED.
Your
product will be returned to you confi gured as
originally purchased, subject to applicable updates.
You will be responsible for reinstalling all other
software programs, data and passwords. Recovery
and reinstallation of software programs and user
data are not covered under this Limited Warranty.
GOVERNING LAW
For the avoidance of doubt, your purchase of
an InFusion™ product from Torian or any third
party will be regulated by the laws of the state
of Victoria, Australia. Any disputes in relation to
your purchase of an InFusion
™
product or these
terms and conditions will be governed exclusively
by the laws of the state of Victoria, Australia and
the courts of the state of Victoria, Australia and
the federal courts of Australia. You waive your
right to claim that any matter brought before
such courts is brought in an inconvenient and or
incorrect jurisdiction. You agree that your use of
the InFusion
™
product constitutes acceptance of
this clauses and the other terms and conditions
set out herein.
Torian One-Year Limited Warranty
Page 10

IX
Region/Country of Purchase Warrantor Contact/Address
Australia/New Zealand Torian Wireless Ltd 1300 TORIAN (1300 867 426)
International +61 3 8415 1994
Fax + 61 3 8415 1982
United States and other Americas
Countries
Refer to the website at www.torianwireless.com
Europe
Refer to the website at www.torianwireless.com
Other
Refer to the website at www.torianwireless.com
Where to Obtain Warranty Service
Page 11

X
Getting started – Unpacking and charging.
Getting started – Unpacking and charging.
Unpack the box and make sure all the items are
present:
1. InFusion
™
Internet radio
2. SD MMC card
3. AC/DC mains power supply/charger
4. USB cable
5. Wrist strap
6. Earphones
Inserting the MMC card
(Note: The InFusion
™
will not function in MP3 mode
or recording mode without the MMC card).
Ensure the InFusion™ is off
Slide the MMC card into the slot as shown below
and press into place.
Figure 1: Sliding the MMC
Card into the MMC slot
NB: The Torian logo
faces down
when
inserting
the MMC
Card
External connections
Please take note of the external connections as
indicated below.
Figure 2: External Connections
Earphone Jack
USB Port
Power Connection
Page 12

XI
First time charge
The internal battery will need charging for the
InFusion
™
to work. To charge the battery, connect
the power supply lead to the radio at the power
connection port (see Figure 2, left)
The InFusion
™
will auto-start when connected to
the charger. This may take up to 30 seconds.
Wait approximately 2 to 3 hours for the battery to
charge.
You can use the full functionality of your InFusion
™
while charging is taking place. You can also
connect your InFusion™ to a PC via the USB cord,
while charging is taking place, to load music, adjust
settings etc.
USB Charging
The InFusion
™
can also be charged by connecting
via the USB cable to a PC. The charge time will be
signifi cantly longer. The exact length of time will
depend on what functions the InFusion™ is carrying
out while USB charging is taking place
Note:
The very fi rst time the InFusion™ is started up you
will be asked to select the country you are in from
a list. Use the scroll button to scroll up or down
until your country is highlighted, and then press
the select button. The InFusion™ will continue
starting up.
Attaching the wrist strap
The wrist strap should be attached to the device
as follows:
Slide the narrow end of the strap through the loop;
Then, take the broad end of the strap and pull it
through the loop created by the narrow end.
Pull gently to close.
Figure 3: Attaching the wrist strap
Getting started – Unpacking and charging.
Page 13

Page 14
1
User Interface Overview
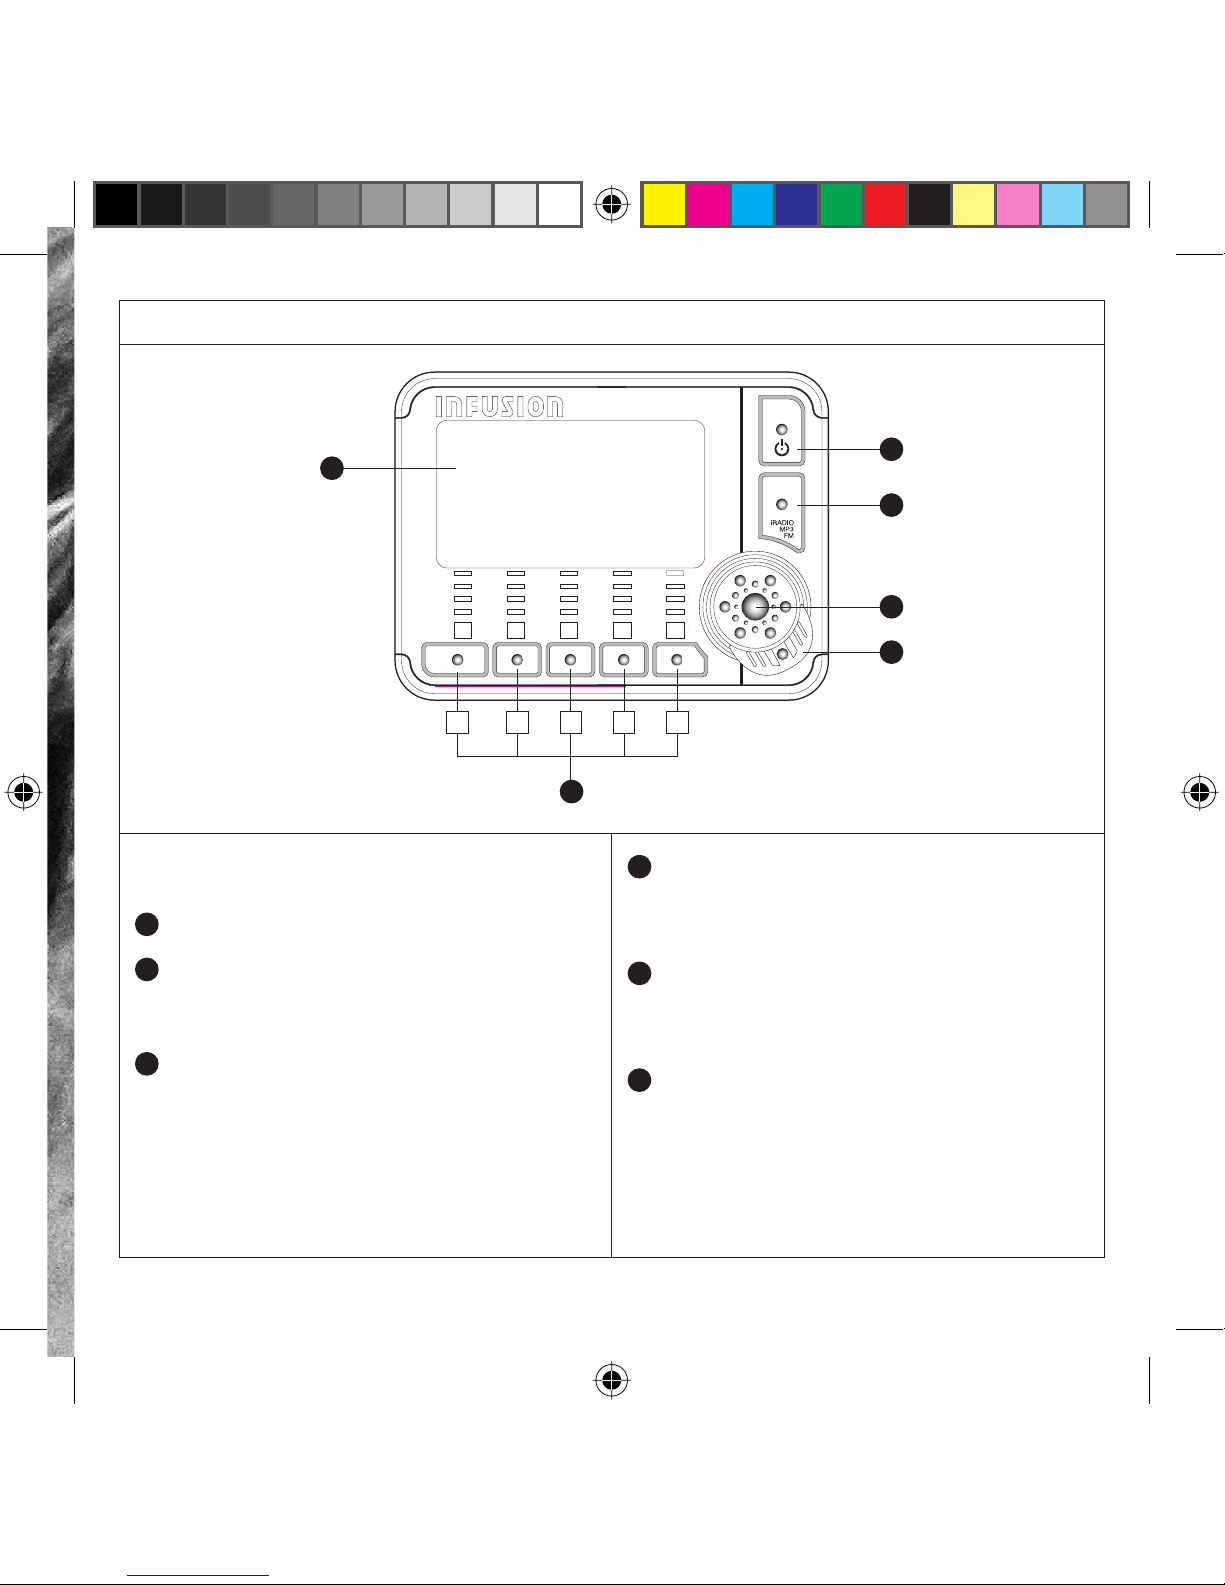
The InFusion™ has the following hardware
interfaces:
1
LCD Display
2
Soft Keys 1-5 - Allows you to quickly access
various pre-sets which may have been created
on the system.
3
Toggle - Adjusts volume when in play screens
Scrolls through the menu options when in a
menu system.
Cycles through the alphanumeric characters
when text editing.
4
Select Button - Acts as a selection button
when in menus and text applications.
Enters menu system when in play screens.
5
IMF Button - Switches between iRadio, MP3
and FM Radio modes.
Enters InFusion™ Setup screen if held.
6
Power/Cancel Button - Turns the InFusion
™
on
and off when held for more than 2 seconds.
Acts as a cancel button when in a menu
system if held for less than 2 seconds.
LCD Display
1
2
4
3
5
6
Power/Cancel
IMF Button
Select Button
Toggle
Soft Keys 1-5
Figure 4: User Interface Overview
1 2 3 4 5
Page 15
2
On/Off, Mode Change and Volume
Figure 5: Start up menu Figure 7: IMF Button – Mode Change
On/Off, Mode Change and Volume
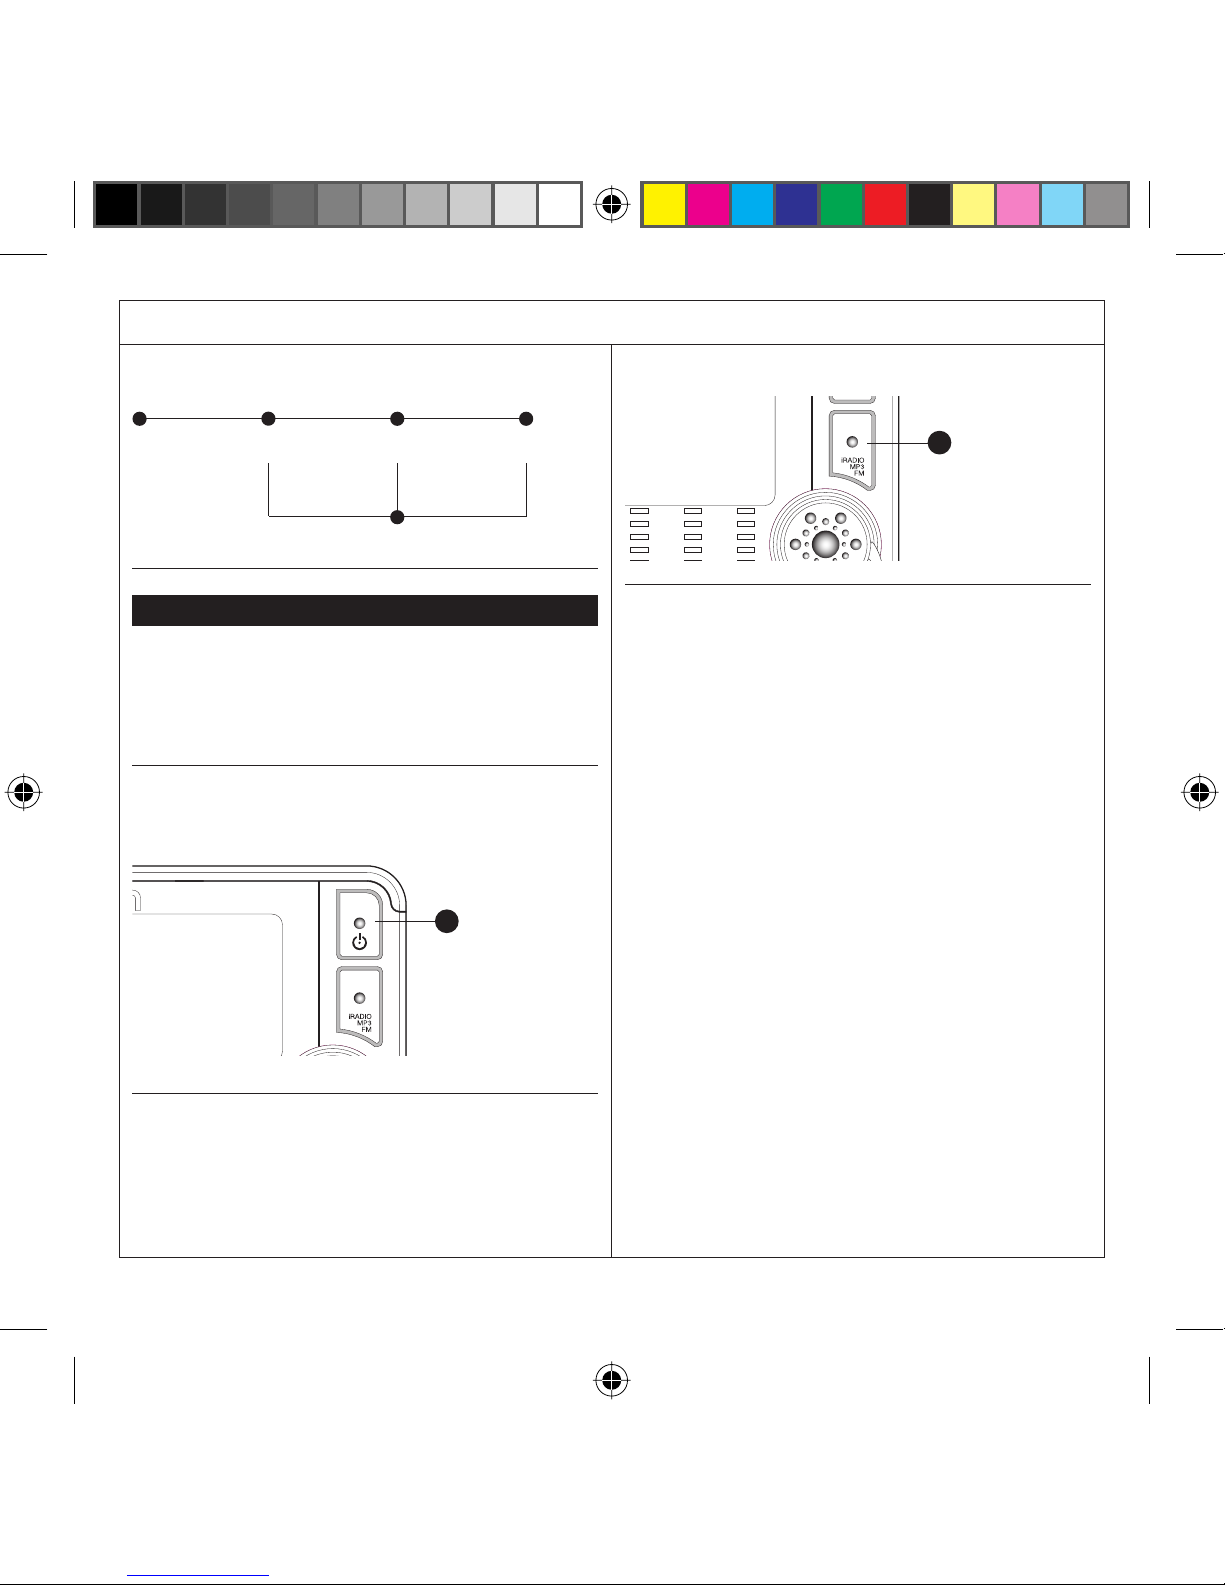
Turning the InFusion™ On
The InFusion™ is turned on using the Power/Cancel
Button. The button need to be held for at least 10
seconds for the device to turn on.
Figure 6: Turning the InFusion™ On.
Hold for at least 10 seconds
When the InFusion™ is turned on for the fi rst time it
will start in MP3 mode. If you turned the InFusion™
off in either iRadio or FM Radio mode it will
resume in that mode the next time you start up.
Figure 7: IMF Button – Mode Change
Mode Change
The InFusion
™
has 3 distinct modes: MP3, iRadio
and FM Radio.
To change between these modes, press the IMF
Button for less than 2 seconds. The InFusion™ will
move between MP3, iRadio and FM Radio modes
if in one of the three play screens.
The InFusion
™
enters the InFusion™ Setup screen by
holding the IMF Button for more than 2 seconds.
Turning the InFusion™ Off
The InFusion™ is turned off by holding the Power
Button for more than 2 seconds in any screen.
InFusion™ Setup
FM Radio
iRadioMP3
Startup
5
IMF Button
6
Power/Cancel
Page 16
3
Volume
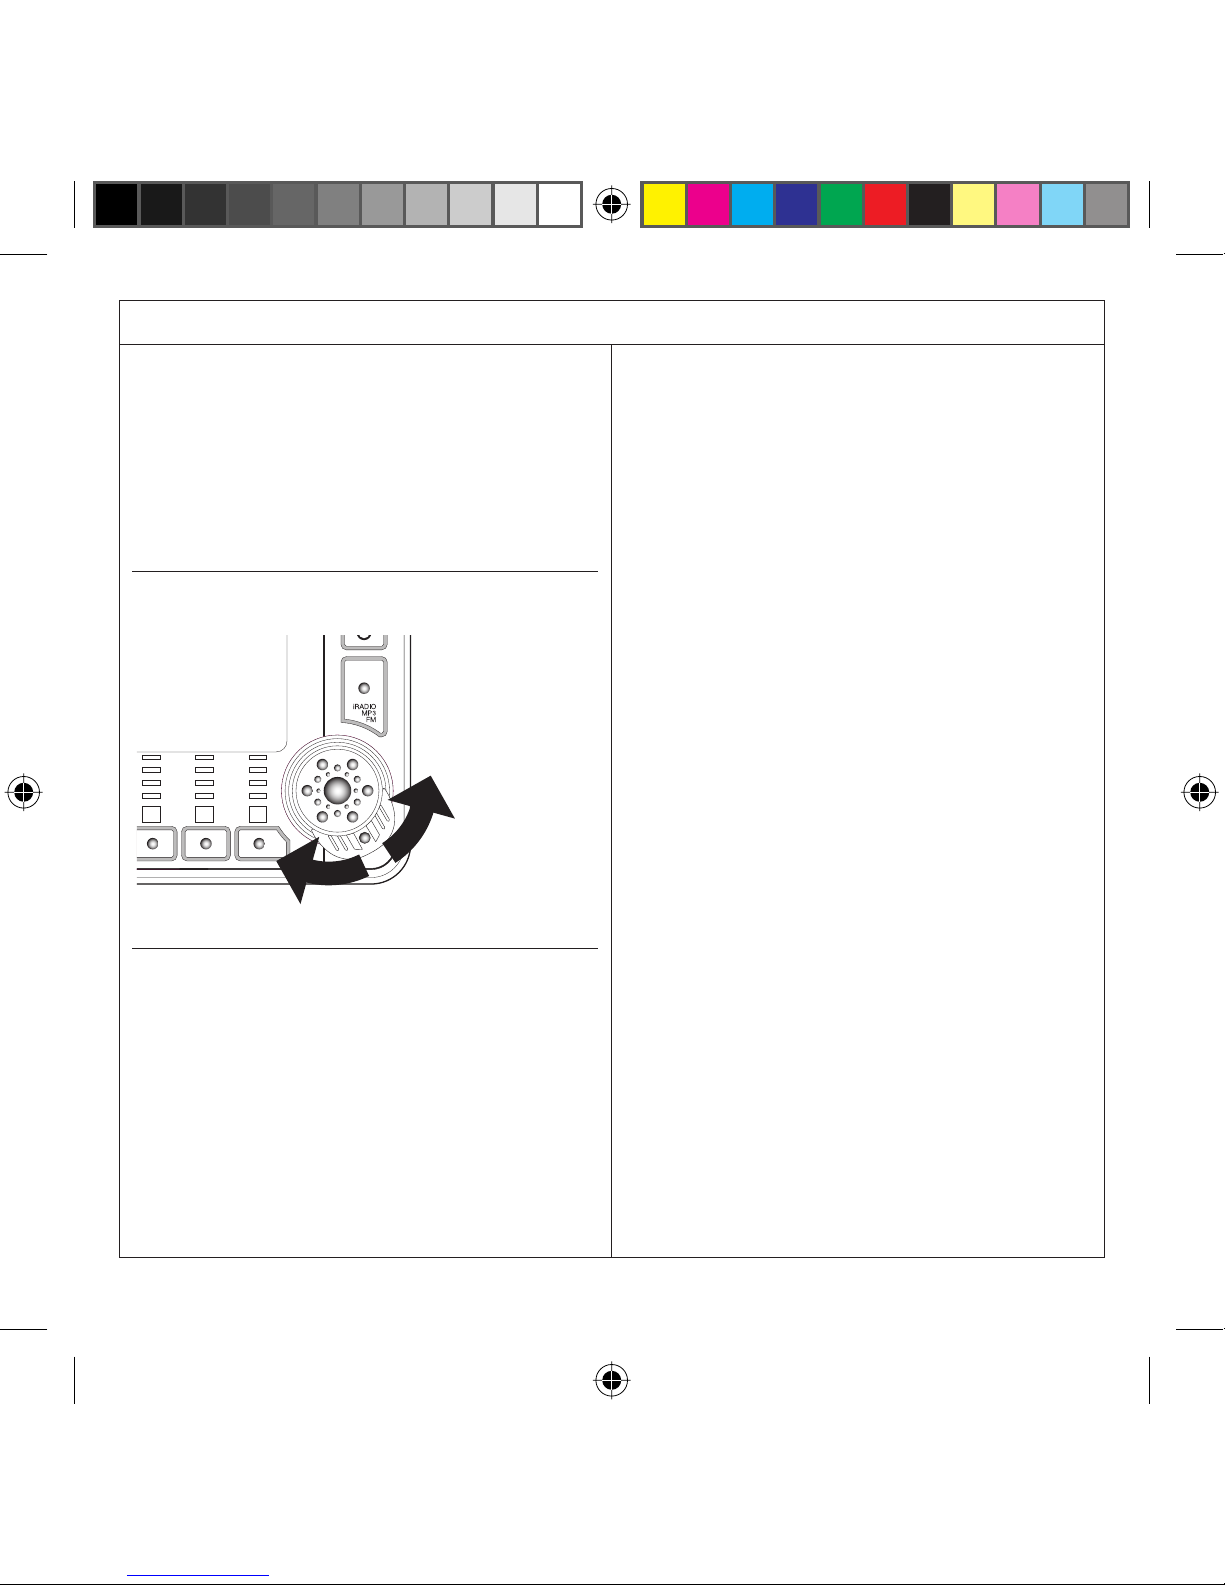
Adjust the volume by moving the Toggle whilst
playing any audio content (MP3, iRadio or FM
Radio).
• Move down and to the left to decrease volume
• Move up and to the right to increase volume
Figure 8: Volume Control
Note: The toggle will not affect the volume when
in the menus – only when in the play screens.
Note: All menus on the InFusion
™
will wraparound
when traversed through.
Increase Volume
Decrease Volume
On/Off, Mode Change and Volume
Page 17

4
How to Enter Text
When fi rst entering a text entry screen a character
will be displayed on the far left of the screen.
This character can be changed by using the Toggle;
the character will cycle through the available
alphanumeric symbols. Pressing the Select Button
will set this character and move the cursor one
position to the right; a new character will appear
and can be changed with the Toggle again.
Continue these steps until the text is entered. If
necessary the cursor can be moved back through
using soft keys 1 and 5.
• Soft key 1 relates to a back arrow
• Soft key 5 relates to a forward arrow
A character can be corrected by placing the cursor
at the position of the character and using the
Toggle. A character can also be deleted by pressing
soft key 4.
You do not need to press the Select Button for the
last character, simply leave the cursor at the last
characters position.
Once the text entry is complete you can press Soft
Key 3 to enter the text in the InFusion
™
and go to
the next screen.
Figure 9: Typical Text Entry Screen
Text Entry
2
Soft Keys 1-5
1 2 3 4 5
Page 18

5
Figure 10: MP3 Player menu map
MP3 Mode
When pressing the IMF Button to enter MP3
mode, or when the MP3 mode is entered after a
power off, the MP3 player will immediately start
playing from the exact position it was playing
last time the device was in MP3 mode (only if a
MMC/SD card is detected).
If the exact position cannot be found, (the fi le may
have been changed, deleted, or if it is the fi rst time
playing in MP3 mode) then the device will play the
fi rst MP3 available in the list.
The LCD shows the total track time, the current
track time, the name of the track (scrolling if
necessary) and the name of the album (scrolling
if necessary).
Figure 11: InFusion™ in MP3 Mode
When fast forward is selected the device will
move through the current track until it reaches
the start of the next track. The device will then
start to play the next track and not continue to fast
forward through it.
The Play or Pause icon above the LCD will be lit
accordingly, as will the icon mapping to Soft Key 3.
InFusion™ Setup
FM Radio
iRadio
MP3
Play Mode Playlist
Normal
Delete
Shuffl e Repeat Song
Delete All Songs
Repeat All
Confi rm
Delete Song Folder
MP3 Mode
MP3 Mode
The LCD shows the total track time, the current
track time, the name of the track and the name of
the album.
When fast forward is selected the device will
move through the current track until it reaches the
start of the next track. The device will then start to
play the next track and not continue to fast forward
through it.
The Play or Pause icon above the LCD will be lit
accordingly, as will the icon mapping to Soft Key 3
fi rst MP3 available in the list.
The LCD shows the total track time, the current
track time, the name of the track (scrolling if
necessary) and the name of the album (scrolling
if necessary).
Figure 11: InFusion™ in MP3 Mode
MP3 Mode
Infusion Manual Touch Up.indd 1 28/11/06 1:11:24 PM
Page 19
6
MP3 Mode - No Memory Card
If there is no memory card inserted in the device
you can still enter the MP3 Setup menu system.
You will only be given the option to change the Play
Mode or to enter the InFusion
™
Setup.
MP3 Mode - No Tracks Found
When the InFusion
™
is in MP3 mode and there are
no MP3 tracks on the memory card, you will only
be given the option to change the Play Mode or to
enter the InFusion
™
Setup.
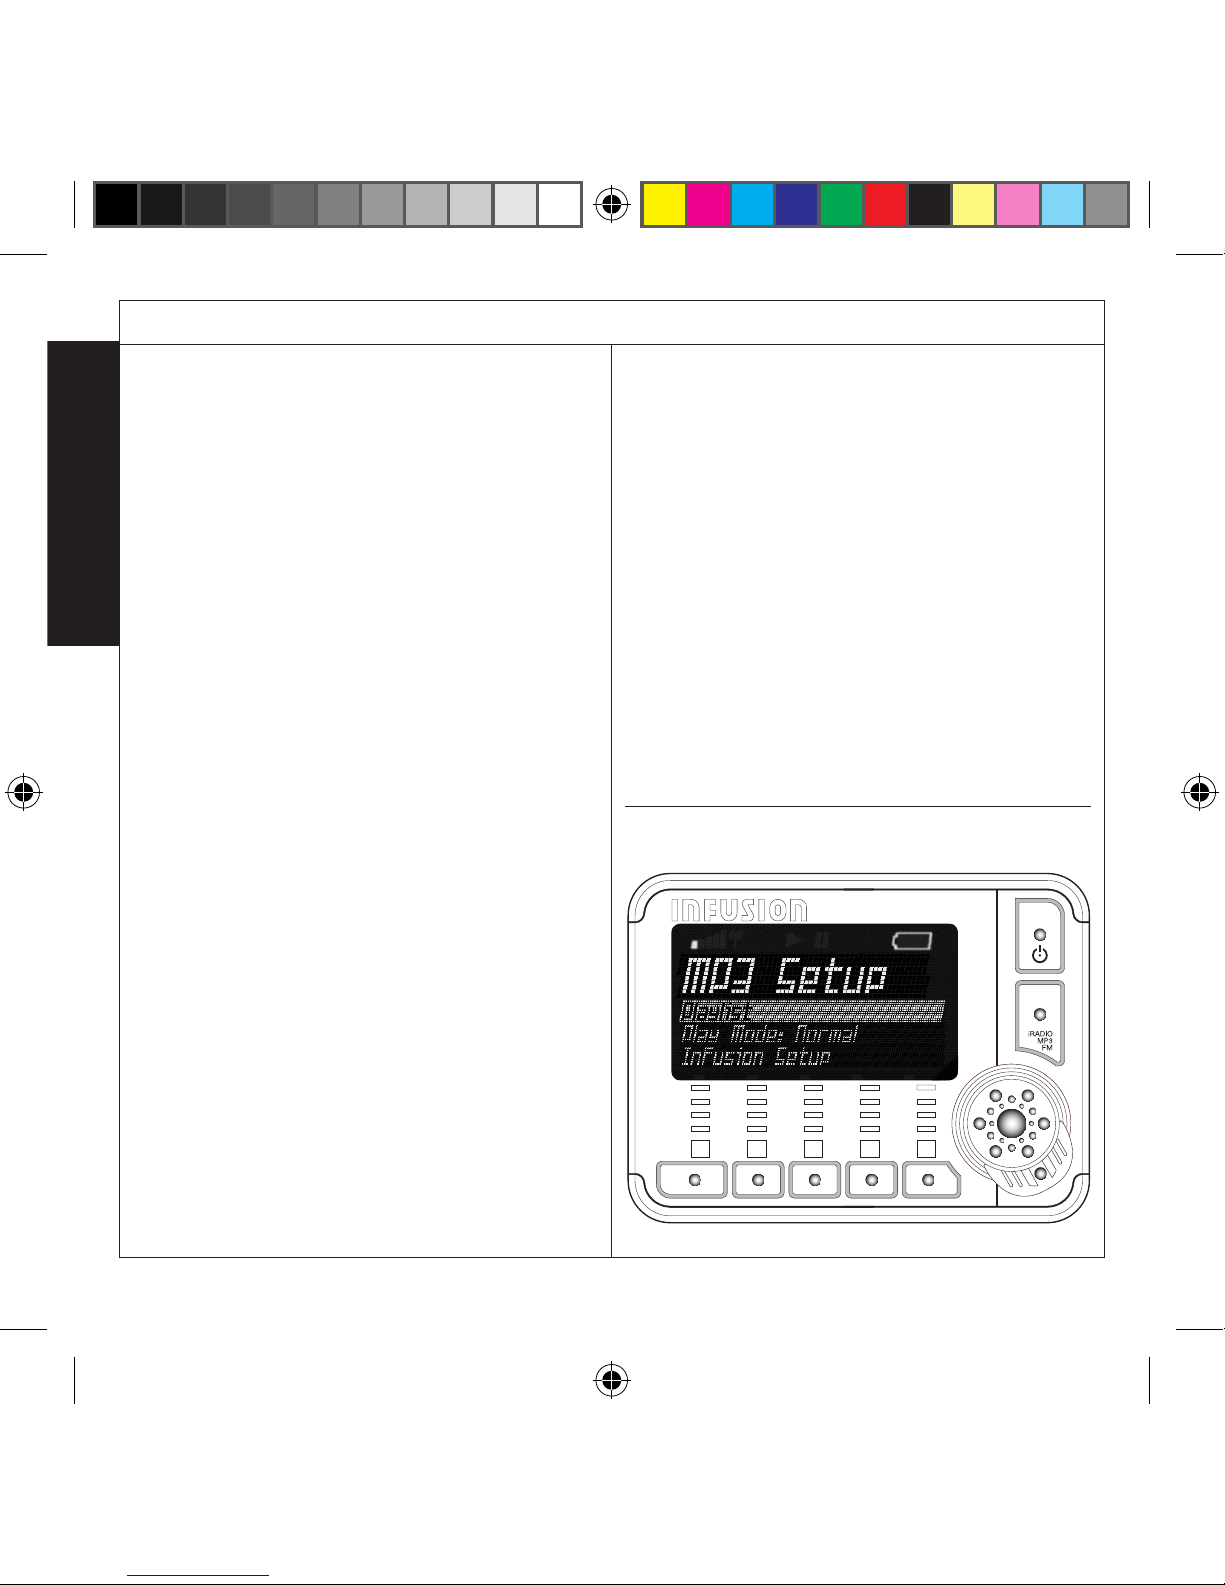
MP3 Setup
When you enter MP3 Setup any music playing will
continue to play. You can:
• exit the mode at any time (press Cancel Button).
• choose to view the Playlist
• change the Play Mode by pressing the
Select Button while the Play Mode option is
highlighted. The mode displayed will change
with each Select Button push; or
• enter the InFusion
™
Setup.
Playlist
The device will display the folders and tracks found
on the memory card. Any folders found will be
listed fi rst (in alphabetical order) and then any
tracks not in a folder (also in alphabetical order).
An icon will be displayed next to each item found,
designating if the item is a folder or a track. An
icon of a folder will designate a folder and an icon
of a musical note will designate a track.
You can scroll through the list of items. If a folder
is highlighted, you can play the folder by pressing
Soft Key 2. The device will return to the play screen
and begin playing the folder.
You can open a folder by pressing the Select
Button. The device will then display a list of folders
and tracks in the newly open folder. You can also
delete the highlighted folder by pressing Soft Key
4 in the Playlist screen. The device will then go to
the delete screen.
If a track is highlighted, you can play the track by
pressing Soft Key 2. The device will then return to
the MP3 play screen and play the track. You can
also delete the highlighted song by pressing Soft
Key 4 in the Playlist screen. The device will then go
to the delete screen.
Figure 12: MP3 Setup
MP3 Mode
MP3 Mode
MP3 Mode - No Memory Card
If there is no memory card inserted in the device
you can still enter the MP3 Setup menu system.
MP3 Mode - No Tracks Found
When the InFusion™ is in MP3 mode and there
are no MP3 tracks on the memory card, you can
still enter the MP3 Setup menu system.
MP3 Setup
When you enter MP3 Setup any music playing will
continue to play. You can:
• exit the mode at any time (press Cancel Button).
• choose to view the Playlist
• change the Play Mode by pressing the
Select Button while the Play Mode option is
highlighted. The mode displayed will change
with each Select Button push; or
• enter the InFusion™ Setup.
Playlist
The device will display the folders and tracks found
on the memory card. Any folders found will be
listed fi rst (in alphabetical order) and then any
tracks not in a folder (also in alphabetical order).
An icon will be displayed next to each item found,
designating if the item is a folder or a track. An
icon of a folder will designate a folder and an icon
of a musical note will designate a track.
You can scroll through the list of items. If a folder
is highlighted, you can play the folder by pressing
Soft Key 2. The device will return to the play screen
and begin playing the folder.
You can open a folder by pressing the Select But-
ton. The device will then display a list of folders
and tracks in the newly open folder. You can also
delete the highlighted folder by pressing Soft Key
4 in the Playlist screen. The device will then go to
the delete screen.
If a track is highlighted, you can play the track by
pressing Soft Key 2. The device will then return to
the MP3 play screen and play the track. You can
also delete the highlighted song by pressing Soft
Key 4 in the Playlist screen. The device will then go
to the delete screen.
Infusion Manual Touch Up.indd 2 28/11/06 1:11:26 PM
Page 20

7
Playlist Folder
The InFusion
™
does not have the ability to create
and save play lists as such, but you can create
groups of MP3 tracks by saving your music in
folders when you copy MP3 fi les to your MMC.
In this way you can select and open a folder and
just play the tracks in that folder.
The LCD will display the name of the folder that
has been opened. You will be given the same
options as in the Playlist menu.
You can delete a highlighted folder or track by
pressing Soft Key 4, this will take you to the delete
confi rmation screen.
You can go further into the folder sequence by
pressing the Select Button on each new folder.
You can also return out of each folder by pressing
the Cancel Button.
Delete Function
The delete function allows you to delete a folder,
a track or all items on the memory card.
Once you have chosen an option the device will go
to a confi rmation screen.
• You can confi rm the deletion of the track, folder
or all contents by pressing Soft Key 1 for “Yes”.
The selection will be deleted and the device will
return to the Playlist or folder it was in.
If you choose to delete all items on the memory
card the items will be deleted and the device
will return to the “No Tracks Found” screen.
• Should you wish not to delete the selection,
simply press the cancel button and device will
return to the Playlist or folder it was in.
Figure 13: Delete Screen
MP3 Mode
MP3 Mode
Page 21

8
What is internet radio?
Internet radio refers to audio services that stream
over the internet. Nearly every modern free to
air “terrestrial” station has an online presence
and there are many more that only broadcast their
content via the internet.
Normally, you would require a PC to connect to
the internet to listen to any of these services, and
whilst you may be able to access the internet
wirelessly either at home or in a WiFi zone, one
could hardly describe a PC or a notebook truly
portable and convenient.
Your InFusion™ changes all that. The InFusion™
uses iRoamer™ Technology which gives access to
the internet without the need for a PC.
It is the world’s fi rst truly portable internet radio,
giving you ease of use, choice of streaming radio
stations and a host of features beside.
However, there are a few things you need to know
in order to fully enjoy your InFusion™
Connecting to the internet
Unlike the MP3 mode which can be used wherever
you are (as long as you have the MMC card
installed) and the FM mode which can be used
wherever normal FM radio signals are received,
a pre-requisite of using your device to listen to
radio over the internet is that you have to have a
wireless connection to the internet (or connect via
USB to a PC). Wireless connections can be via a
wireless network at home, or via a WiFi Hotspot.
Wireless home network
Many home networks are now wireless. If you
have a wireless network you can connect your
InFusion™ to it and access the internet. You may
have to provide a password if the wireless network
has security – just as you would when using any
other wireless device on your network.
WiFi Hotspots
WiFi Hotspots are venues that offer wireless
access to the internet.
Hotspots are often found at restaurants, train
stations, airports, libraries, coffee shops,
bookstores, and other public places.
Many universities and schools have wireless
networks in their campus.
What’s more, the number of Hotspots is set to
grow exponentially around the globe over the next
few years.
More and more Hotspots are free, but some
require a subscription.
Services such as iPass give you access to
participating Hotspots on a fee basis, and your
InFusion™ is setup to take advantage of this.
Remember that connecting the InFusion™ to a
wireless network is very much like connecting
any other network device. If you have any
problems, please consult your InFusion™ dealer
for assistance.
What is internet radio?
Page 22

9
What is internet radio?
How do I locate my internet radio stations on the
InFusion?
The InFusion™ interface is designed to allow you
to locate your stations with ease by:
• The Custom Address option allows you to
enter a web address (URL) for a station.
• Previous Search redisplays the last search.
• Content services for example:
InFusion™ Search searches a database of
stations provided by Torian.
Live365 Search searches a database of stations
provided by Live365 network.
There are various options for searching these
available networks which are explained more
fully in the section that follows.
Will I be able to save network connection
settings?
Yes. Just as you may need different settings to
connect a PC or notebook to different networks,
you may need different settings to access different
wireless networks.
The InFusion™ allows you to save these settings
for rapid access when you return to a particular
WiFi zone or wireless home network. Please see
page 22, Profi le Confi guration for more details.
Will I be able to save my favourite radio station
settings?
Yes again. The InFusion™ allows you to save your
station presets for ease of access.
Please see page 17, Station Selection for more
details.
Can I record audio for “Time Shift” listening?
Yes. The InFusion™ can record MP3 format
streams. It allows you to set recording times and
to record audio for subsequent listening (The MMC
card must be inserted. Audio recording is limited
to the available space on the MMC card).
For more information, see page 14, Record (Start/
Stop and page 20, Alarm Setup.
Please note that recording can be set while you
are listening to an MP3 format stream or can be
set to begin and end at prescribed times. This time
based recording is managed through the “Alarm”
interface.
Page 23
10
iRadio Mode
iRadio Mode
InFusion™ Setup
MP3
FM radio
iRadio
Save Preset iRadio Setup
New Connection
Station SelectionDisconnect
Record Start/Stop
InFusion™ iPass Enable
Available Networks
Connect with iPass
Custom Address Live 365 Search
InFusion™ Search
Name
Abbreviation
By Country/City By Text Search
Previous Search
Options
By Text SearchBy Genre
User Name
Max SpeedPassword
Min Speed Row Number Match
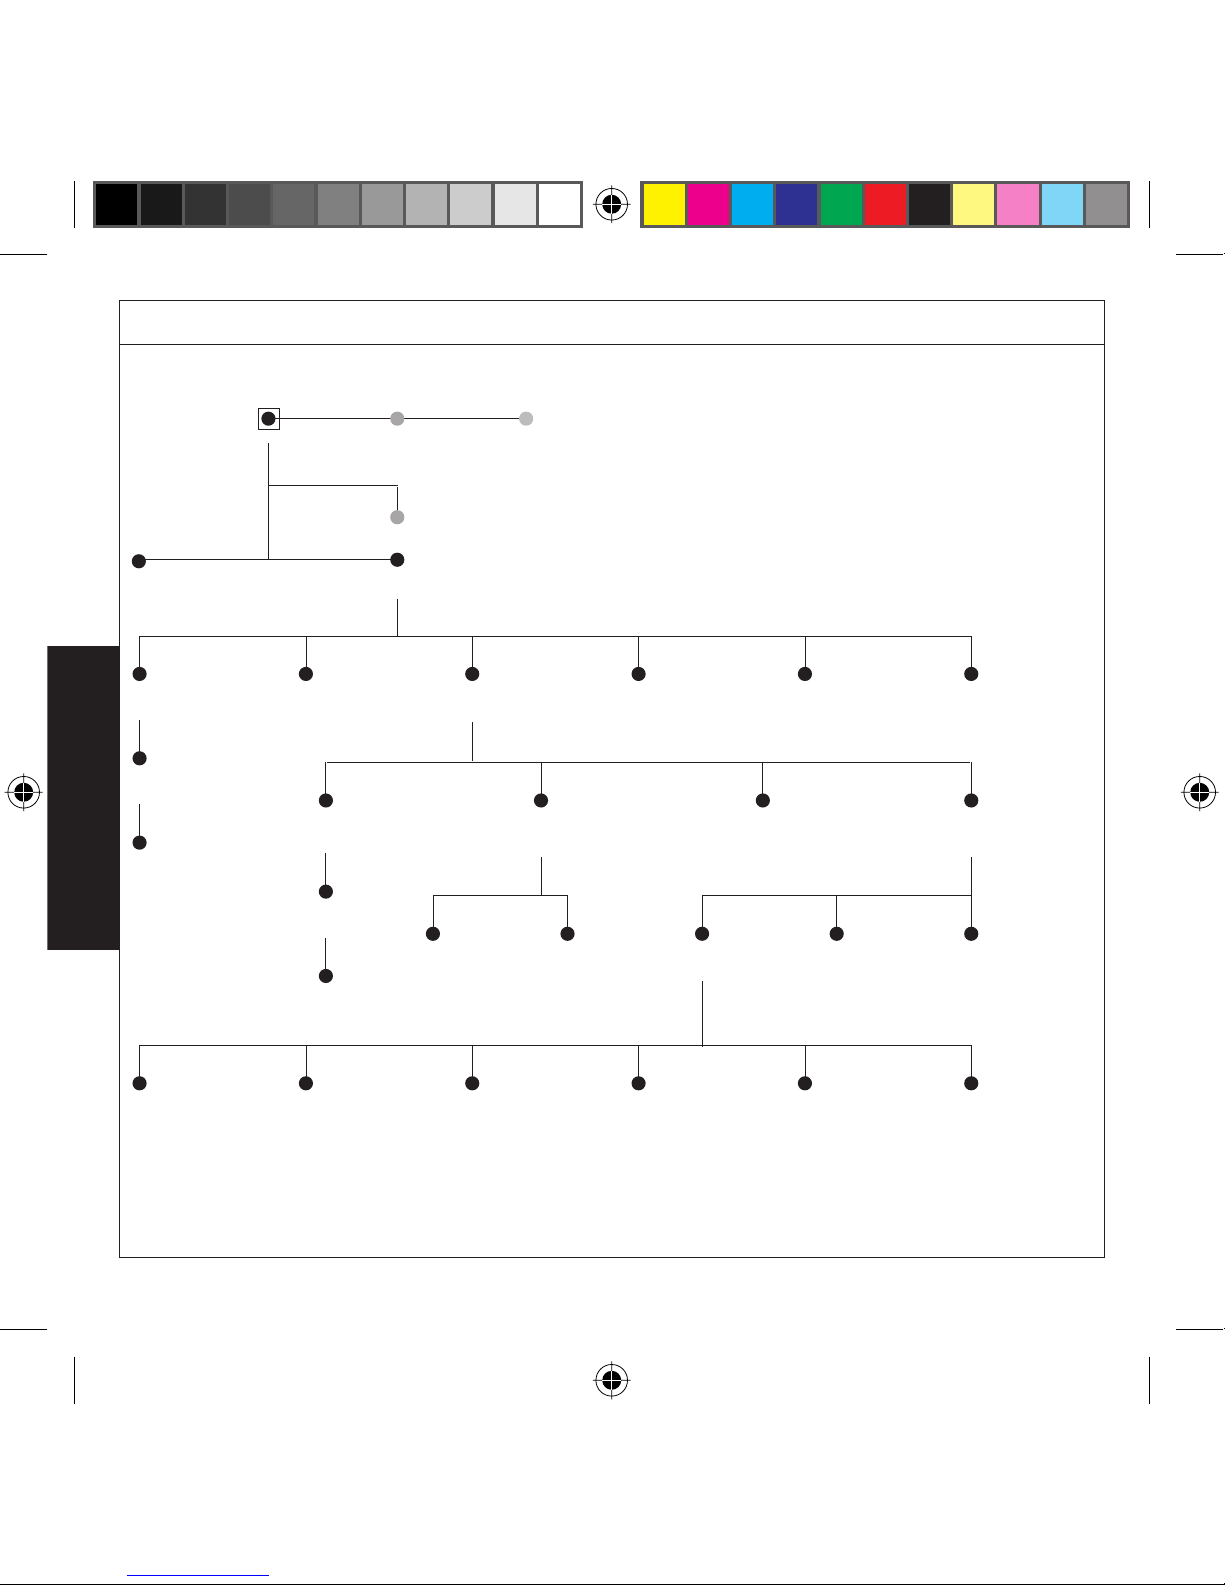
Figure 14: iRadio Menu Map
Page 24
11
iRadio Mode
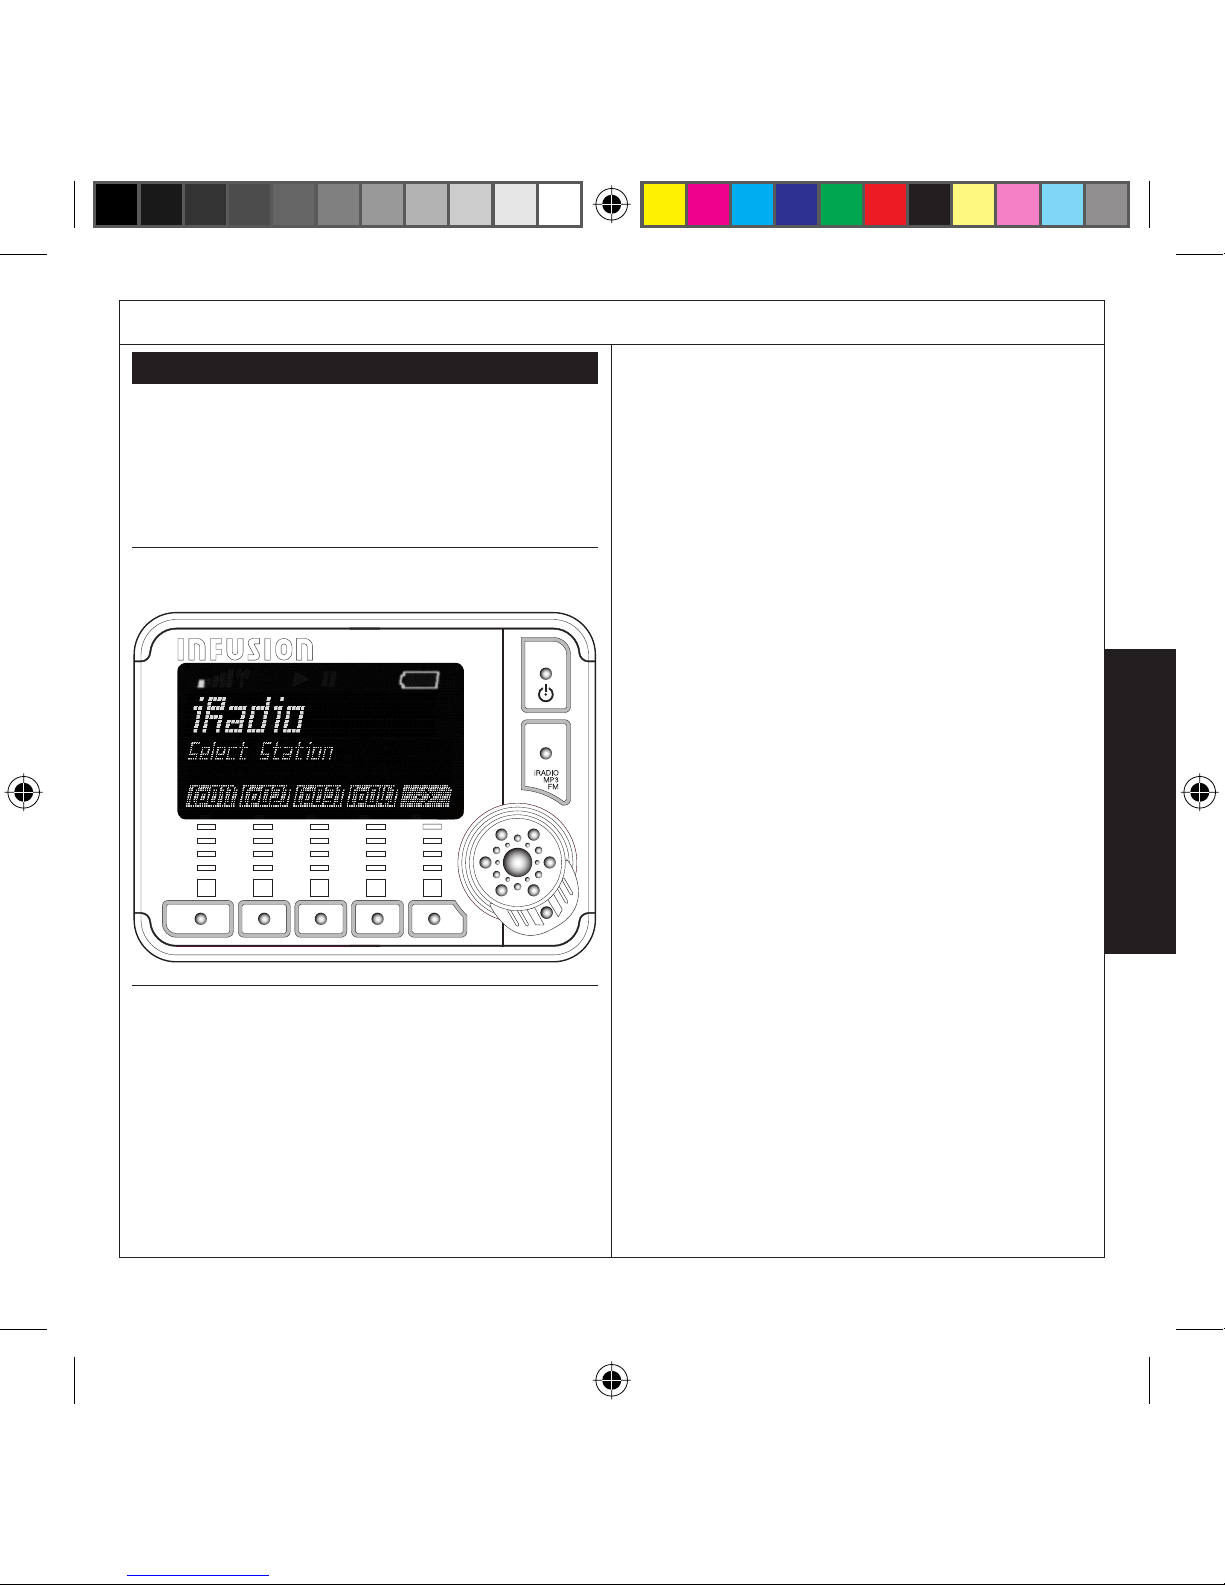
When you fi rst enter the iRadio Mode the device
will not attempt to connect to a network. You can
connect to a network by either pressing one of the
preset Soft Keys or via the iRadio Setup menu and
selecting New Connection.
Figure 15: InFusion™ in iRadio Mode
If you press a preset Soft Key (either with or
without a preset station designated to it) the
device will attempt to connect to a network. The
LCD will display that the device is attempting to
connect.
If the connection is successful, the device will
return to the iRadio play screen and will begin
streaming the selected station. If you have
selected an empty preset the device will connect
to a network but no station will stream.
If the connection is not successful the device will
display any available networks on the Available
Networks screen. If no networks are available
the device will display “No Networks Found” and
return to the iRadio play screen.
You can preset a station by holding a Soft Key for
the desired location. The device will go to a text
entry and ask you to enter an abbreviation for the
station. The text entry screen will be pre-populated
with the stations name.
If an existing preset is already in the location, the
new preset will override it.
Stations are labelled by their radio abbreviation on
the Soft Key tab and their name is displayed when
they are playing.
If a stream is being recorded the “Record” icon
will be lit.
iRadio Mode
iRadio Mode
Page 25
12
Available Networks
You can select the network you wish to connect to
by pressing the Select Button. If the connection is
successful the device will return to the iRadio play
screen (if a Soft Key had been pressed) or return
to the iRadio Setup screen (if the connection had
been attempted from there).
If connection cannot be made you will be advised
and the device will return to the “Available
Network” screen.
You can edit a network by pressing Soft key 3,
the device will go to the “Confi guration Profi le”
screen for the network. Once you have updated
the profi le you can select “Save Settings” and the
device will attempt to connect to that network.
If the connection is successful the device will
return to the iRadio play screen (if a Soft Key had
been pressed) or return to the iRadio Setup screen
(if connection had been attempted from there).
If the connection is not successful the device will
advise you and return to the “Available Network”
screen. From here you can try to connect again
to any of the available networks, or exit out of
the screen using the Cancel Button to the iRadio
Setup screen.
Preset Abbreviation
You can enter the preset stations abbreviation
which will appear in the preset tab on the play
screen. The screen will be pre-populated with the
stations name.
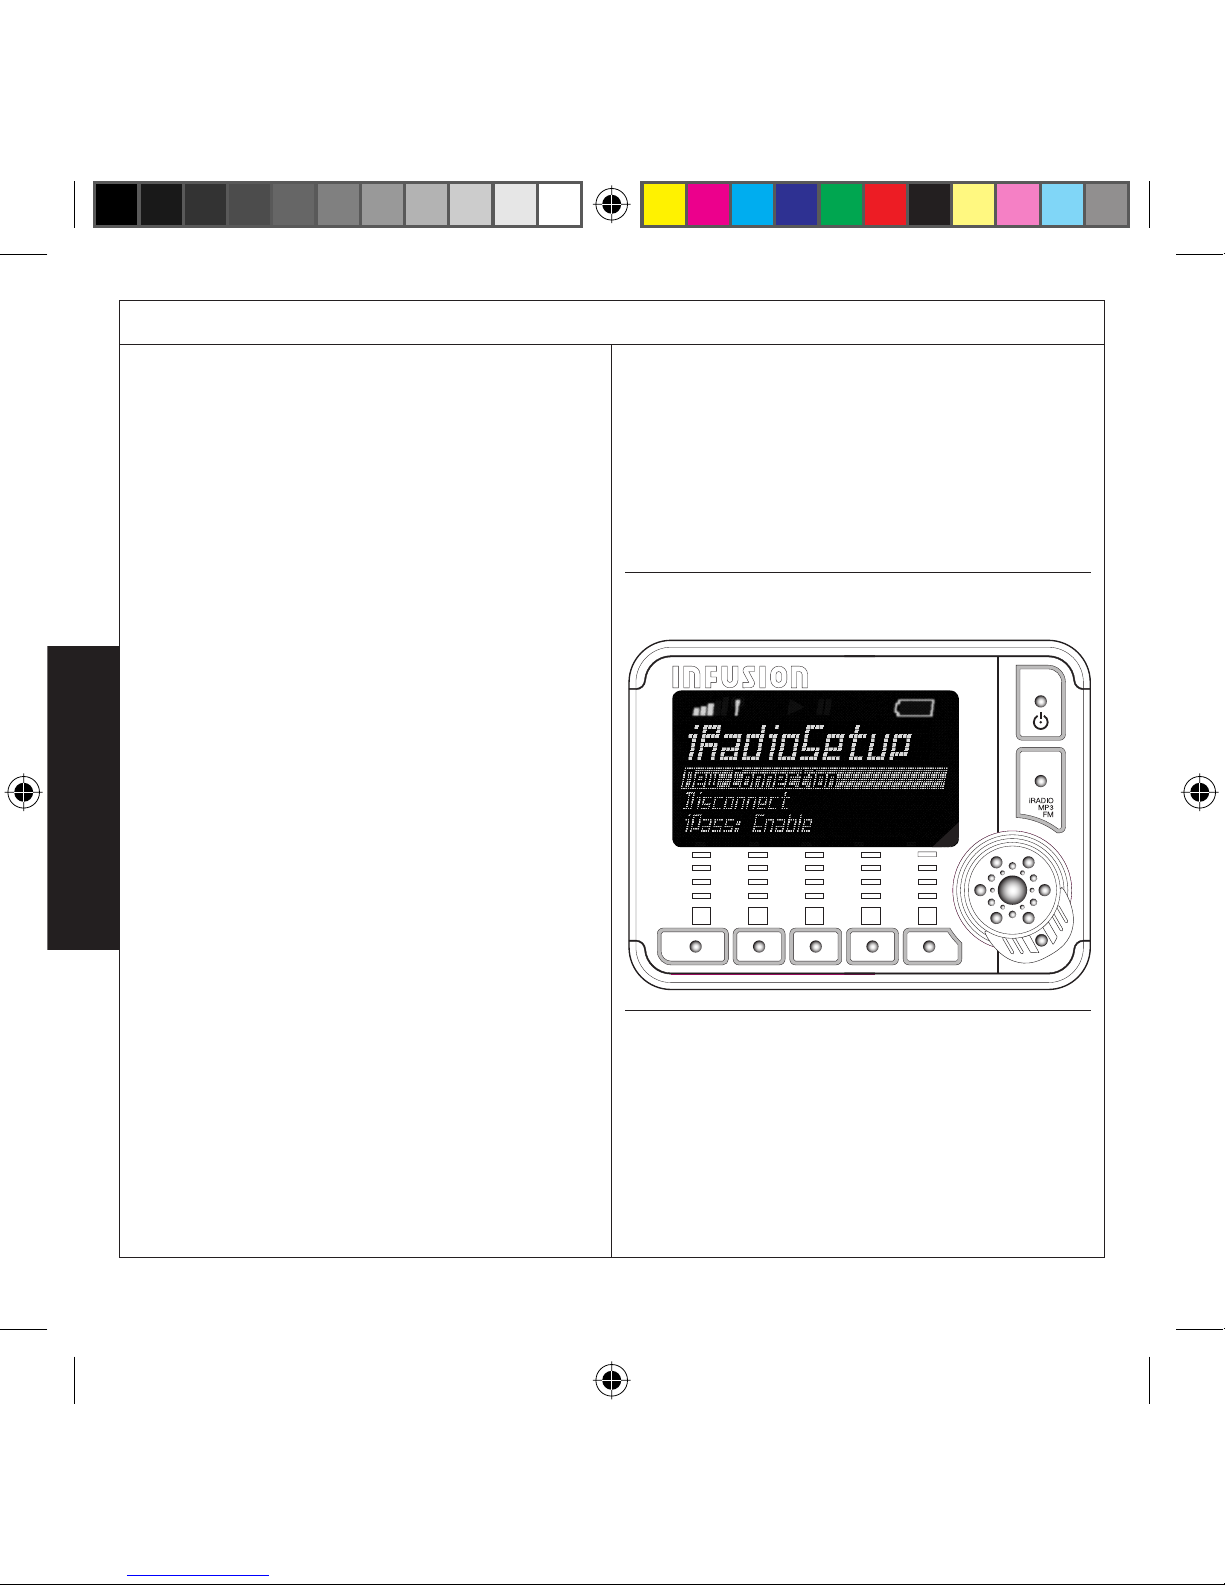
iRadio Setup – when not connected
If the device is not connected you will only be
given the two options of either
• New Connection: Make a new connection
• InFusion
™
Setup: Enter the InFusion™ setup
(see page 19).
Figure 16: iRadio Setup Mode
iRadio Setup – when connected
When the device is in iRadio Setup mode if the
device is connected you will be given the options:
• New Connection: Make a new connection or
change to a new connection
• Disconnect
iRadio Mode
iRadio Mode
Page 26

13
• Station Search: Go to Station Search
• Record: The Record option will be displayed
as “Record: Start” when not recording, and
“Record: Stop” when recording.
The Record status can be changed by pressing
the Select Button when Record is highlighted.
“Record” will only be available when the MMC
card is inserted and a station is streaming in
MP3 format.
• iPass: Enable or Disable iPass. The iPass option
will be displayed as “iPass: Enabled” when
enabled, and “iPass: Disabled” when disabled.
The iPass status can be changed by pressing
the Select Button when iPass is highlighted
• InFusion
™
Setup: Enter the InFusion™ setup
(see page 19).
New Connection
If you choose New Connection, the device will
search for available networks. The LCD will display
that a search is being done. If the search is
successful the device will display a list of available
networks. You can attempt to connect to a network
by pressing the Select Button when the network
is highlighted. If the connection is successful the
device will return to the iRadio Setup.
New Connection is still provided so you can
change your current connection to another
network. If you select New Connection when
already connected the device will display the
Available Network screen.
If the connection is unsuccessful the device will
display that the connection was unsuccessful. The
device will again display a list of available networks
on the “Available Network” screen.
You can choose to edit the highlighted network
by pressing Soft Key 3. The device will enter the
“Profi le Confi guration” screen for the network. You
can edit the network confi gurations, save settings
and attempt to connect again.
If no available networks are found the device will
display “No Networks Found” and return to the
iRadio setup screen.
iRadio Mode
iRadio Mode
Page 27

14
Disconnect
If you choose to Disconnect, the device will
disconnect from the server. The LCD will display
that the device is disconnecting. The device will
then return to the iRadio Setup screen and you will
be given the reduced options of “New Connection”
and “InFusion
™
Setup”.
Record: (Start; Stop)
When the device has a memory card inserted
and it is streaming a station you will be given the
option to record that station. When you select
this option the device will move to the iRadio play
screen and the Record icon above the LCD will be
lit. If you now enter the iRadio Setup screen you
will be given the “Record: Stop” option.
Once the memory card is full the device will
stop recording and you will be informed that the
memory card is full.
If you choose to stop recording the device will
remain in the iRadio Setup screen, the record icon
will no longer be lit and the Record: Start option
will be displayed.
Listening to recorded audio
Recorded audio is saved as an MP3 on the
memory card. It can then be listened to the same
as any other MP3 on the memory card in MP3
mode.
Station Search
You can choose how you would like to search for
an iRadio station to stream.
• The Custom Address option allows you to
enter a web address for a station.
• Previous Search re-displays the last search (if
no previous search has been made this option
will not be available).
• Content services will be listed, for example:
InFusion™ Search searches a database of
stations provided by the Torian.
Live365 Search searches a database of stations
provided by the Live365 network.
Note: These services may not always be available.
The availability of a particular service will depend
on connection type and service purchase. If it is
not available the service will not be listed as an
option.
Custom Address
If you select “Custom Address” you can enter the
exact URL of the station you wish to listen to. You
do not need to enter a “http” prefi x.
Custom Name
You can enter in a custom station name for the
station being set. Pressing “OK” moves you to
“Custom Abbreviation”.
iRadio Mode
iRadio Mode
Page 28

15
Custom Abbreviation
You can enter in a custom station abbreviation
for the station being set; this is restricted to 3
characters. Pressing “OK” moves back to the
iRadio play screen and begins playing the entered
station. You can hold a Soft Key to preset the
station. If the device cannot stream from the web
address an error message will be displayed.
Previous Search
Previous search will only be displayed when a
previous search has been made. You may select a
station from the list and will then be taken back to
the iRadio play screen, where the station is played
(you can then preset the station by holding a Soft
Key for the desired location).
InFusion
™
Search
You can choose how you would to search
InFusion
™
.
“By Country/City” will allow you to browse through
a menu list of countries, followed be states, and
then cities.
“By Text” allows you to search for a station by
name.
By Country
This menu allows you to select from a list of
countries available in InFusion
™
search. By
selecting a country you are taken to the state
screen.
Soft Key 1 – Jumps menu to the fi rst country
starting with “A”.
Soft Key 2 – Jumps menu to the fi rst country
starting with “F”.
Soft Key 3 – Jumps menu to the fi rst country
starting with “L”.
Soft Key 4 – Jumps menu to the fi rst country
starting with “Q”.
Soft Key 5 – Jumps menu to the fi rst country
starting with “W”.
The Toggle moves between menu items.
The Select Button selects the menu item.
iRadio Mode
iRadio Mode
Page 29

16
By State
This menu allows you to select from a list of states
available in InFusion
™
Search from the chosen
country. By selecting a state you are taken to the
City Screen.
By City
This menu allows you to select from a list of cities
available in InFusion
™
Search from the chosen
state. By selecting city you are taken to the Station
Selection Screen.
By Text Search
You can enter in a search term. By selecting “OK”
the InFusion™ will search for a station name/s that
match the term and put those stations into a list
for viewing in the “Station Selection” screen.
If no results are found, the message “No results”
is displayed, and the InFusion
™
will return to the
“By Text Search” screen.
For details on text entry, please refer to page 4
Live365 Search
You can select the way you want to search Live365.
“By Genre” allows you to search based on Genre.
“By Text Search” allows you to type in a text string
that is used to search Live365. “Live365 Options”
allows you to set the specifi c parameters to clarify
the search or to view the results of the search.
The Toggle moves between menu items.
The Select Button selects the menu item.
Live365 Search By Genre
You can select a genre in which to search for
stations. If sub-genres exist for the selected genre,
then a list of sub-genres is displayed including
the genre at the top. If no sub-genres exist the
InFusion
™
will go directly to the Station Selection
Screen, displaying stations from that genre.
You now have the choice to search the entire genre
or just one of its sub-genres. If you select the
genre again, the InFusion
™
will display the stations
under all the sub-genres. If you selects a subgenre the InFusion™ will display only the stations
under that sub-genre. The InFusion™ will display the
results on the Station Selection Screen
iRadio Mode
iRadio Mode
Page 30

17
Live365 Search By Text Search
You can enter in a search term. By Selecting “OK”
the InFusion
™
will search Live365 system for a set
of results that match the search term and puts
the results into a list for viewing in the Station
Selection Screen.
If no results are found, the message “No results”
is displayed, and waits for key press (“OK”).
For details on text entry, please refer to page 4.
Live365 Options
You can select the required option from the menu
and can alter the value of that setting.
• Username is the name to use in connecting
with the Live365 network.
• Password is the password to use in the
connecting process with the user name.
• Maximum Speed is the maximum connection
speed that a search result can have.
• Minimum Speed is the minimum connection
speed that a search result can have.
• Row Number the number of results to be
found and displayed once received from
Live365.
• Match the strictness of the search. You can
choose whether to match all search parameters
or match any or some of the search parameters.
Station Selection
You can reach the Station Selection screen in
a number of ways in each database (InFusion
™
,
Live365 etc). From within each database the
method of searching performed will return results
that are displayed here. Once you have selected
a station the InFusion™ will return to iRadio play
screen and being playing the station. You can then
preset the station by holding the Soft Key for the
desired location.
iRadio Mode
iRadio Mode
Page 31

18
Figure 17: FM Radio Menu Map
FM Mode
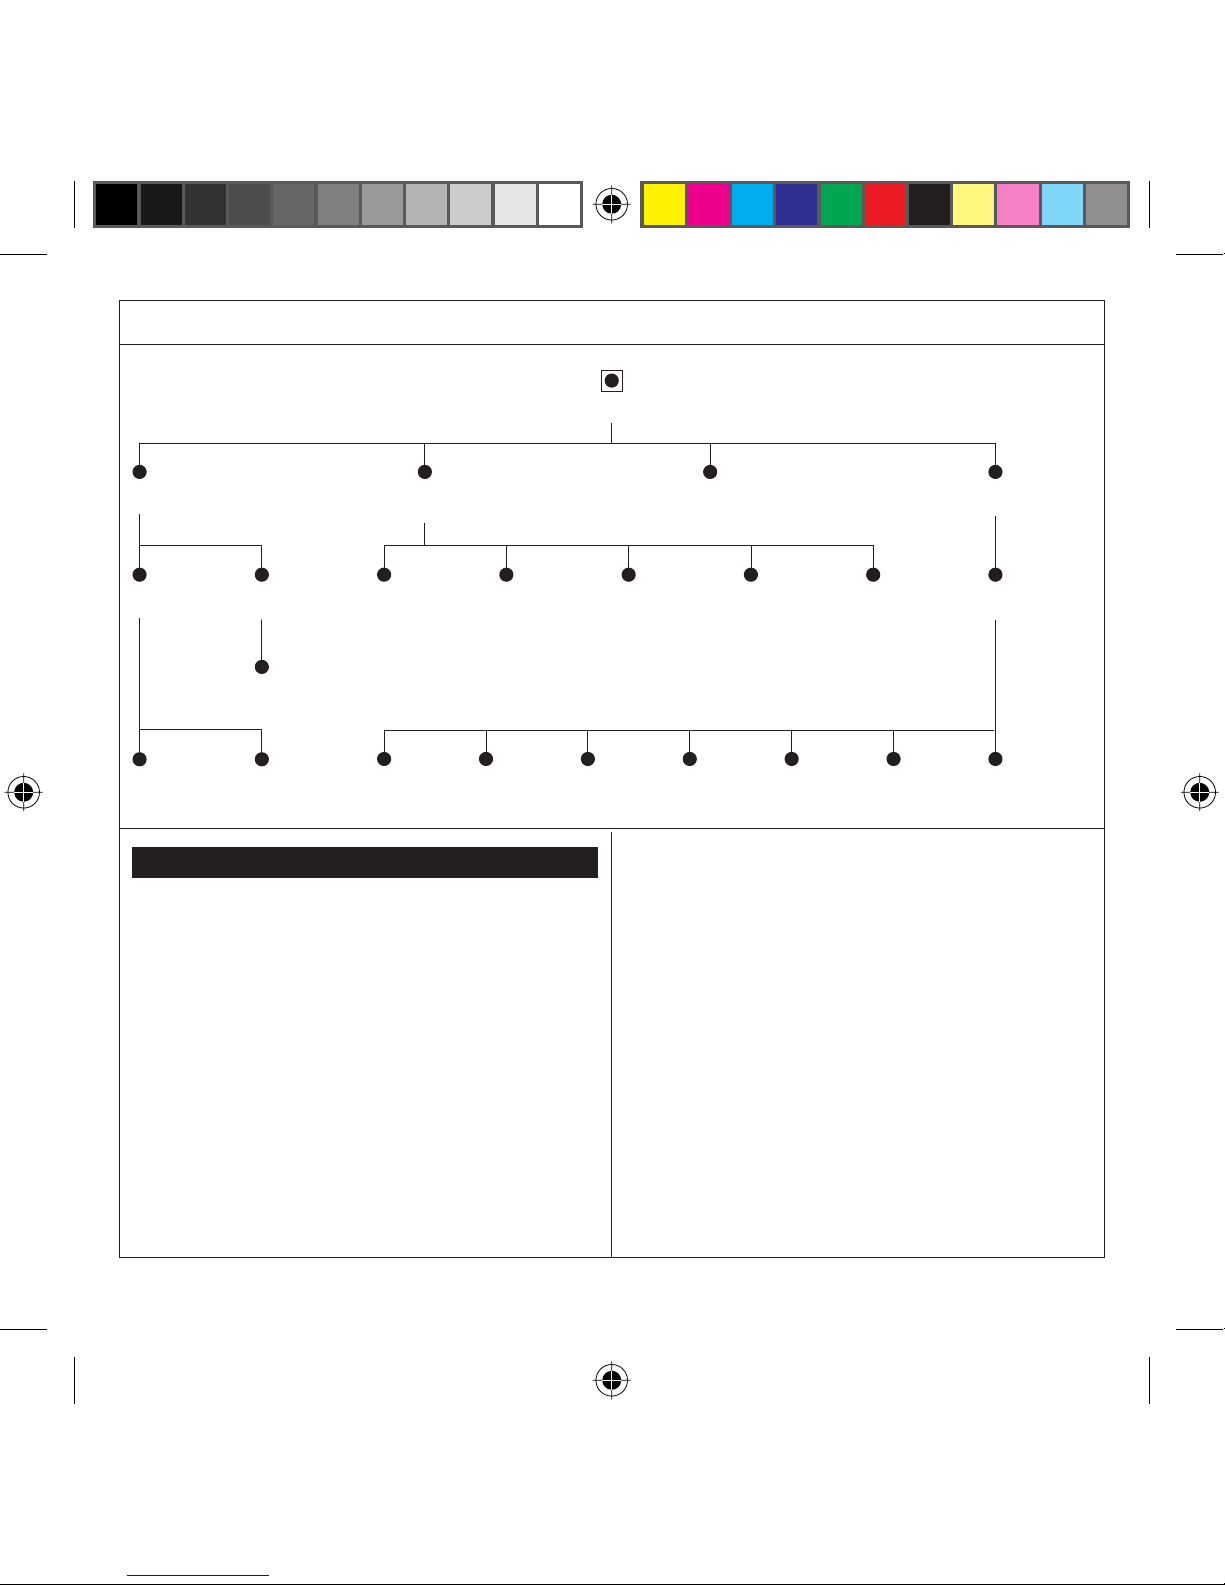
When you select the FM mode the device will play
the last designated station. If no past selection has
been made the device will be tuned to the lowest
frequency station.
When in FM Radio Mode, you will have the
following options:
• Save Preset Abbreviation
• FM Radio Setup
Save Preset Abbreviation
Pressing an empty preset Soft Key will take you
into “Station Tune” screen where you can tune to
a station. Once a station has been selected the
device will return to the FM Radio play screen. You
can then hold the preset position for where you
want to place the station. The device will then go
to the enter “Station Abbreviation” screen. The
new station abbreviation is saved in the selected
preset position, and display above the frequency
when the station is playing.
FM Radio Setup
Select enters the FM Radio Setup screen.
From here you can choose “Station Tune” or
“InFusion™ Setup”.
Station Tune
There are two ways you can tune your InFusion
™
to
your desired station:
• You can allow the device to fi nd a station by
pressing Soft Keys 1 and 5, or
• you can fi nd the frequency for a station by
pressing Soft keys 2 and 4.
Once you fi nd a desired station you can select it by
either pressing Soft Key 3 or pressing the Select
Button. The device will then return to the FM Radio
play screen where you can choose to preset the
station by holding a Soft Key.
Note: It is advisable not to have the USB cable
plugged in when listening to the FM radio.
Figure 18: FM Radio Mode
FM Mode
FM Mode
InFusion™ Setup
iRadio
MP3
FM Radio
Save Preset Abbreviation FM Radio Setup
Station TuneInFusion™ Setup
Page 32
19
InFusion™ Setup
The InFusion™ Setup screen allows you to select
from the following options:
• General Setup
• Alarm Setup
• Information
• WiFi Setup
General Setup
You can choose which general setup you wish to
confi gure
• Current Time: (00:00)
• Current Date: (01/02)
• Country: (User’s country)
• Backlight Dimming: (Enable; Disable)
• Online Settings: (Enable; Disable)
Pressing the Select button when Online Settings is
highlighted will change the Online Settings status.
When Online Settings is enabled your data will be
shared, when disabled your data will not be shared.
Current Time
You can set the time for the InFusion
™
. The time is
in 24 hour format. Once set, the device will return
to the General Setup screen.
InFusion™ Setup
InFusion™ Setup
InformationGeneral Setup Alarm SetupWiFi Setup
iPass Setup WiFi Setup
Backlight
Dimming
Time Date
Country
Online
Settings
Alarm (1; 2; 3)
User Name Password
Profi le Confi guration
Active
Time Action Duration Profi le Preset/PlaylistDate
Figure 19: InFusion™ Menu
Page 33

20
Current Date
You can set the date for the InFusion
™
. Once set
the device will return the General Setup screen.
Country
You can set the country for the InFusion
™
. Once set
the device will return the General Setup screen.
Alarm Setup
You can select up to 3 alarm actions (from Alarm 1
to Alarm 3) to confi gure.
Alarm 1: (Active, Not Active)
Alarm 2: (Active, Not Active)
Alarm 3: (Active, Not Active)
Alarm Profi le
You can select which menu item you wish to
confi gure.
• Active: (On; Off)
• Occurring: (Once Off; Daily)
• Time: (00:00)
• Date: (dd/mm – only available when Occurring
is set to Once Off)
• Action: (MP3; iRadio; FM Radio; Record iRadio)
• Profi le: (cycle through networks – only available
when Action is set to iRadio or Record iRadio)
• Duration: 00:00 (only available when Action is
set to Record iRadio)
• Preset: (cycle through presets – only available
when Action is set to FM, iRadio or Record iRadio)
• Playlist: (Track – only available when Action is
set to MP3)
Pressing the Select Button on Active, Occurring,
Action, Profi le and Preset will change the options
status.
Pressing the Select Button on Time, Date,
Duration and Playlist will take you to another
screen to enter the setting.
Alarm Time
You can set what time the alarm is to go off. The
time is in 24 hour format. Once a time has been
set the device will return to the Alarm Profi le
screen.
Alarm Date
You can set what date the alarm is to go off.
The time is in dd/mm format. Once a date has
been set the device will return to the Alarm Profi le
screen. If Occurring has been set to daily it will not
be given as an option.
Record Duration
You can set how long you want the device to
record for once the alarm has gone off. Once the
duration has been set the device will return to the
Alarm Profi le screen.
Playlist – MP3
You can select which Track you wish to hear when
the alarm goes off. You can navigate the folders the
same way as when in the normal Playlist. Once a
track has been selected the device will return to
the Alarm Profi le screen.
InFusion™ Setup
Page 34

21
Information
Selecting the “Information” screen will allow you
to view the MAC address for the device and the
fi rmware version.
WiFi Setup
You can select to view the stored Network Profi les
or view the iPass Setup.
iPass Setup
You select the option you wish to modify:
• iPass username
• iPass password
iPass Username
You enter the username for the iPass Setup.
When you select “OK” the device will store the
username and return to the previous menu. Next
time you select this screen the username fi eld will
be pre-populated with the username.
iPass Password
You enter the password for the iPass Setup.
When you select “OK” the device will store the
password and return to the previous menu. Next
time you select this screen the password fi eld will
be pre-populated with the password.
InFusion™ Setup
Page 35

22
Profi le Confi guration
Network Profi les
You will be given a list of existing profi les. You can:
• add a profi le by pressing Soft Key 1,
• edit a profi le by highlighting and pressing Soft
Key 3, or
• delete a profi le by pressing Soft Key 5.
Once you select a profi le, the details from that
profi le are loaded on the Profi le Confi guration
screen so you can edit the settings.
The device will store a maximum of 16 profi les
(you will be advised if you attempt to enter more
than 16 profi les).
You can select to confi gure the following profi le
settings:
• Profi le Name
• SSID:
• WEP: (Enable, Disable)
• WEP Key: (only available when WEP is enabled)
• Network Settings
• iPass: (Enable; Disable)
• Save Settings
Profi le Name
You can enter in a profi le name. When you select
“OK” the device will store the name and return
to the previous menu. Next time you select this
screen the name fi eld will be pre-populated with
the profi le name.
For details on text entry, please refer to page 4.
Profi le Confi guration
Profi le Confi guration
Network SettingsWEP Save SettingsProfi le Name
IP Allocation IP Address Subnet Address Gateway Address DNS Address
Figure 20: Profi le Confi guration Menu Map
SSID WEP Key iPass
Page 36

23
SSID
You can enter in an SSID. When you select “OK”
the device will store the SSID and return to the
previous menu. Next time you select this screen
the SSID fi eld will be pre-populated with the SSID.
For details on text entry, please refer to page 4.
WEP
Enable or disable
WEP Key
Selecting this option allows you to enter the WEP
key. When you select “OK” the device will store
the WEP key and returns to the previous menu.
Next time you select this screen the WEP key fi eld
will be pre-populated with the WEP key.
Network Settings
You can select which option you want to update:
• IP Allocation: (Auto; Manual)
• IP Address
• Subnet Address
• Gateway Address
• DNS Address
Note: IP Address, Subnet Address, Gateway
Address and DNS Address are only displayed on
the menu when IP Allocation is set to manual..
IP Address
In this selection you enter the IP address. When
you select “OK” the device will store the IP
address and return to the previous menu. Next
time you select this screen the IP fi eld will be prepopulated with the IP address.
Subnet Address
Selecting this option allows you to enter the
Subnet address. When you select “OK” the device
will store the Subnet address and return to the
previous menu. Next time you select this screen
the Subnet fi eld will be pre-populated with the
Subnet address.
Gateway Address
Selecting this option allows you to enter the
Gateway address. When you select “OK” the
device will store the Gateway address and return
to the previous menu. Next time you selects this
screen the Gateway fi eld will be pre-populated
with the Gateway address.
DNS Address
Selecting this option allows you to enter the DNS
address. When you select “OK” the device will
store the DNS address and return to the previous
menu. Next time you select this screen the DNS
fi eld will be pre-populated with the DNS address
iPass
iPass is enabled when the network you are
connected to needs iPass
Profi le Confi guration
Page 37

24
Save Settings
You can select to save the profi le confi guration. The
device will then return to the screen you were in
before confi guring the profi le:
If you entered the Profi le Confi guration screen
via the WiFi Setup, the device will return to the
Network Profi le screen.
If you entered the Profi le Confi guration screen by
attempting to connect to a network, the device
will return to either the iRadio play screen, or the
iRadio Setup screen, depending on which screen
you had been in.
Profi le Confi guration
Page 38

25
Glossary
DHCP Dynamic Host Confi guration
Protocol, a way to automatically
assign IP address to internet
Devices connected to a network.
DNS Domain Name Server, an IP address
for a machine which can convert
URLs to IP addresses which the
InFusion
™
can then contact for data
such as internet radio.
Gateway An IP address of a router which
connects a Network to the Internet.
Hotspot WiFi Hotspots are venues that offer
wireless access to the internet.
iPass Third party network service allowing
access to many commercial
Hotspots throughout the world,
for more information visit
‘www.ipass.com.’
IP Address Internet Protocol address, similar
to a telephone number which is
assigned to internet devices such
as the InFusion
™
.
MAC Media Access Control, a hardware
address unique to computer
network cards, InFusion and other
network devices.
Network Two or more computers or internet
devices (such as the InFusion
™
)
connected together, either
physically with wires, or by radio
waves (WiFi.)
Server A computer or device which
provides services such as DHCP
to computers on a Network
Switch A device which can connect
multiple computers or network
devices together to form a network.
SSID Service Set Identifi er, the name of
a particular WLAN
URL Uniform Resource Locator, typically
the Internet address format ending
in ‘.com’ such as
www.torianwireless.com.
WEP Wired Equivalent Privacy, an
encryption Policy
WiFi Wireless Fidelity, networking using
radio waves rather than wires.
WLAN Wireless Local Area Network
Wireless A Switch that uses WiFi
Access Point
Page 39

26
1. Wireless Local Area Network
The InFusion
™
uses 802.11b WiFi to access the
internet, which means that a WiFi network is
necessary for streaming internet radio.
Hotspots consist of at least one wireless access
point. This can be simply a wireless switch
connected to an existing network, or an all-in-one
wireless-router-hub, as long 802.11b wireless
networking is enabled.
2. Wireless confi guration
There are many different brands of wireless
access points, all of which will have some way
to confi gure settings such as WiFi encryption,
channel, network ID and so on.
For home networks where the Wireless access
point confi guration is accessible, ensure only WEP
encryption is used (if any,) and that if MAC fi ltering
is used, that the InFusion
™
’ MAC is registered (see
‘Information’ screen under ‘InFusion™ Setup’ for the
MAC address.)
3. Scanning for Available Networks
To have the InFusion
™
scan for available networks,
follow the steps in the ‘iRadio Mode’ section. A list
of available networks will appear, including those
with hidden SSIDs which may not be available.
4. Profi le Confi guration
From the ‘Available Networks’ screen (in
‘iRadio Mode’) choose ‘edit’ with the desired
network SSID highlighted to display the profi le
confi guration. Most of the fi elds will be prepopulated with the current networks settings.
• Encryption
At the time of this publication, the InFusion
™
supported WEP encryption only. If the current
Network uses WEP, it will be shown as enabled,
with a WEP key fi eld displayed. Enter the WEP
key here.
• iPass
If the Hotspot uses iPass to allow users
internet access, it will need to be enabled in the
Profi le confi guration. If iPass has not yet been
confi gured, the unit will ask for a user name
and Password.
• IP allocation
There are two ways the InFusion
™
can have its
IP address assigned; automatically by a DHCP
server or manually by the user. Use automatic
allocation unless otherwise preferred (for the
more tech savvy users.)
• DNS allocation
As with IP allocation, the DNS can either be
assigned by a server automatically or manually
by the user. Only set manually if necessary.
Connecting
Page 40

27
Problem Possible Causes
InFusion™ can’t see any networks. Check that the wireless access point is confi gured properly. SSID
broadcasting may be disabled, in which case a manual network profi le
will need to be entered through InFusion™ settings.
InFusion™ can detect the right
SSID, but can’t connect.
This could be due to many things, the fi rst is a security measure used
in some networks known as MAC fi ltering. This is where the wireless
access point has a list of known devices which are allowed to connect,
and all others are denied access. To resolve this, either MAC fi ltering
needs to be disabled on the wireless access point, or the InFusion™
MAC address needs to be added to the list. To locate the MAC address,
see the ‘Information’ screen under ‘InFusion™ Setup’.
Another possible problem is encryption. The InFusion™ may not have
the correct WEP key stored for the given network, or the network may
use a different encryption protocol, one unsupported by the InFusion™.
Finally, wireless access points have a maximum number of
simultaneous connections; ensure there is a spare connection available.
InFusion™ connects to the
network, but can’t stream or
search for stations.
Check that the wireless router has an active internet connection, and
that any gateway fi rewalls allow the InFusion™ access to Port 80.
If it is a commercial Hotspot which uses iPass, ensure that the username and password are correct, and that iPass is enabled.
Custom URL won’t stream. There could be many reasons for this. Perhaps the streaming audio
format is not supported by the InFusion™, or the station server is busy,
or the URL is incorrect.
For a more detailed version of the
user manual, please download a
copy at www.torianwireless.com
Troubleshooting
Page 41

28
Figure 1: Sliding the MMC Card into the MMC slot X
Figure 2: External Connections X
Figure 3: Attaching the wrist strap XI
Figure 4: User Interface Overview 1
Figure 5: Start up menu 2
Figure 6: Turning the InFusion™ On. 2
Figure 7: IMF Button – Mode Change 2
Figure 8: Volume Control 3
Figure 9: Typical Text Entry Screen 4
Figure 10: MP3 Player menu map 5
Figure 11: InFusion™ in MP3 Mode 5
Figure 12: MP3 Setup 6
Figure 13: Delete Screen 7
Figure 14: iRadio Menu Map 10
Figure 15: InFusion™ in iRadioMode 11
Figure 16: iRadio Setup Mode 12
Figure 17: FM Radio Menu Map 18
Figure 18: FM Radio Mode 18
Figure 20: Profi le Confi guration Menu Map 22
Table of Charts and Illustrations
 Loading...