


XC9516 Series
ETR0707-008
Triple Output Power Supply for TFT-LCD
■GENERAL DESCRIPTION
The XC9516 series can offer three different power supplies to TFT-LCD panels. These power supplies consist of a step-up
DC/DC converter for a source driver, positive and negative charge pumps for a gate driver.
This IC has power-on sequences
be used as power-on sequences with adding a P-channel FET as external component. Also, the FET can shut down a path
to the power input line when CE pin is low.
■APPLICATIONS
●TFT-LCD panels
●LCD monitors
■
TYPICAL APPLICATION CIRCUITS
VIN
VOUT
VGL
CLcp1
CIN
CE
R3
R4
CDD
CVL
CD
D2D3C1
L1
VIN
CE
CVL
CD
VOUT
FB1
DRV1
AGND
e.g) Components List
V
= 9.2V, VGL = -5.3V, VGH= 12V
OUT
C
= 4.7μF
IN
C
=4.7μF
L1,CL2
, C2 = 0.01μF
C
1
C
= 0.1μF
VL,CD
= 1μF
C
DD
C
Lcp1,CLcp2
C
FB
C
5
= 1μF
= 22pF
= 0.01μF
to keep inrush current as small when output voltage rises. The step-up DC/DC output can
■FEATURES
A Step-up DC/DC Converter and 2 of Charge Pumps (Positive/Negative)
Input Voltage Range : 2.5V ~ 5.5V
Maximum Output Voltage : 19V (DC/DC output)
Output Voltage Accuracy : ±1.5%
Oscillation Frequency : 300kHz ~ 1.2MHz (Adjustable)
External MOSFET Gate Signal Output
: N-Channel Open Drain
Switch Over-Current Protection : 1.3A
Soft-Start Time : Internally fixed
Protection :
Over Voltage Protection (Step-up DC/DC 21V)
Short-Circuit Protection (
Short-Circuit Protection (Positive and Negative Charge Pump)
Thermal Shutdown (150℃)
UVLO (1.87V)
Operating Ambient Temperature : -40℃~+85℃
Package : QFN-20
Environmentally Friendly : EU RoHS Compliant, Pb Free
■TYPICAL PERFORMANCE
LX
PGND
ROSC
SWB
CP2SWB
DRV2
FB2
D1(SD)
CFB
FB
R1
R2
ROSC
(R9)
C5(R7)
R8
R10
Tr2
C2
D4
D5
R5
R6
= 820 kΩ
R
1
= 100 kΩ
R
2
R
= 390 kΩ
3
= 300 kΩ
R
4
R
= 820 kΩ
5
= 75 kΩ
R
6
R
= 300 kΩ
8
(R9)= 130 kΩ
R
OSC
= 51 kΩ
R
10
CHARACTERISTICS
VOUT
CL1
●Efficiency vs. Output Current
100
90
80
VSRC
CLcp2
CL2
Tr1
VGH
70
60
50
40
Efficiency:EFFI(%)
30
20
10
0
1 10 100 1000
XC9516 Efficiency
VIN=5.5V
☆GreenOperation Compatible
VIN=2.5V
VIN=2.5V
Iout[mA]
VIN=3.3V
VIN=3.3V
VIN=4.0V
Step-up DC/DC)
VIN=VCE, VOUT=9.0V
FOSC=1MHz
Icp1=-1mA, Icp2=1mA
VIN=4.0V
VIN=5.5V
2.5V
3.3V
4.0V
5.5V
1/25

XC9516 Series
■PIN CONFIGURATION
*1 The dissipation pad:AGND Level
(If the pad needs to be connected to other pins, it should be considered about the level of pad voltage.)
■PIN ASSIGNMENT
PIN NUMBER
QFN-20
1 DRV1 Negative Charge Pump Driver Output
2 CP2SWB Positive Charge Pump for Output Control
3 FB1 FB Pin for Negative Charge Pump
4 CE Chip Enable Pin
5 FB FB Pin for Step-Up DC/DC Converter
6 ROSC Frequency Setting
7 NC No Connection
8 VIN Power
9 CD Short Protection Delay Capacitor Connection
10 AGND Analog Ground
11 FB2 FB Input for Positive Charge Pump
12 CVL Internal Power Capacitor Connection
13 SWB Step-Up DC/DC Converter Output Control
14 V
15 DRV2 Positive Charge Pump Driver Output
16 LX Driver Output Pin for Step-Up DC/DC Converter
17 LX Driver Output Pin for Step-Up DC/DC Converter
18 NC No Connection
19 PGND Power Ground Pin for Driver
20 PGND Power Ground Pin for Driver
■LOGIC CONDITION
PIN NAME LOGIC CONDITION
CE PIN
Voltage is based on VSS(GND=AGND=PGND)
■FUNCTION CHART
CONDITIONS IC OPERATION
L OFF(Stand-by)
H ON
IC operation is unstable when CE opens so that these pins shall not be left open outside.
NC
LX
LX
PGND
PGND
17
18
19
20
6
ROSC
16
9
8
7
10
IN
NC
CD
V
AGND
LXLXNC
17
16
9
10
CD
AGND
<TOP VIEW> <BOTTOM VIEW>
PIN NAME FUNCTIONS
Step-Up DC/DC Converter Output Voltage
OUT
H
L
GND≦V
1.2V≦V
≦0.4V
CE
CE≦VIN
PGND
PGND
20
19
18
6
7
8
IN
NC
V
ROSC
2/25

■PRODUCT CLASSIFICATION
●Ordering Information
XC9516①②③④⑤⑥-⑦
DESIGNATOR ITEM SYMBOL DESCRIPTON
① UVLO Detect Voltage A Detect Voltage: 1.87V, Hysteresis Width 0.44V
②③ Over Voltage Limit 21 Over Voltage Detect Voltage: 21V
④ Over Current Limit A Over Current Detect Voltage: 1.3A
⑤⑥-⑦
(*1) The “-G” suffix denotes Halogen and Antimony free as well as being fully RoHS compliant.
(*2) The XC9516 reels are shipped in a moisture-proof packing.
■BLOCK DIAGRAM
PGND and AGND are externally connected to the same potential.
(*1)
Package (Order Unit) ZR-G QFN-20 (1,000/Reel)
(*1)
⇒ XC9516A21AZR-G
(*2)
XC9516
Series
3/25

XC9516 Series
■ABSOLUTE MAXIMUM RATINGS
Operating Ambient Temperature Topr -40 ~ +85
PAR AMETER SYMBOL RATINGS UNITS
VIN Voltage VIN
CE Pin Voltage VCE
FB
Pin Voltage
FB1
Pin Voltage
FB2
Pin Voltage
ROSC Pin Voltage V
CD Pin Voltage VCD
CVL Pin Voltage VVL
SWB Pin Voltage V
CP2SWB Pin Voltage V
V
Pin Voltage V
OUT
LX Pin Voltage VLX
DR1 Pin Voltage V
DR2 Pin Voltage V
LX Pin Current ILX
Power Dissipation Pd
Storage Temperature Tstg -55 ~ +125
VFB
V
FB1
V
FB2
ROSC
SWB
CP2SWB
OUT
DRV1
DRV2
-0.3~6.0
-0.3~VIN+0.3 or 6.0
-0.3~V
-0.3~V
-0.3~V
-0.3~V
-0.3~V
+0.3 or 6.0
CVL
+0.3 or 6.0
CVL
+0.3 or 6.0
CVL
+0.3 or 6.0
CVL
+0.3 or 6.0
CVL
(*1)
(*2)
(*2)
(*2)
(*2)
(*2)
-0.3~6.0
-0.3~22
-0.3~22
-0.3~22
-0.3~22
-0.3~V
-0.3~V
+0.3 or 22
OUT
+0.3 or 22
OUT
(*3)
(*3)
1650
300
V
V
V
V
V
V
V
V
V
V
V
V
V
V
mA
mW
o
C
o
C
* All voltages are described based on GND. (GND=AGND=PGND)
(*1) The maximum value should be either V
(*2) The maximum value should be either V
(*3) The maximum value should be either V
+0.3 or +6.0 in the lowest.
IN
+0.3 or +6.0 in the lowest.
CVL
+0.3 or +22.0 in the lowest.
OUT
4/25

■ELECTRICAL CHARACTERISTICS
Unless otherwise stated, V
IN=VCE
=3.3V, V
OUT
=9.0V, f
=300kHz, Ta=25℃
OSC
XC9516
Series
PAR AMETER SYMBOL CONDITIONS MIN. TYP. MAX. UNITS
Power Input Voltage Range VIN 2.5 - 5.5 V
Input Voltage Rise Time t
Supply Current I
Stand-by Current I
Oscillation Frequency f
UVLO Detect Voltage
(VIN falls down)
UVLO Feedback Voltage
(VIN rises)
CE "High" Voltage V
CE "Low" Voltage V
VIN=VCE=0.2V→2.5V
VIN
VFB=V
DD1
VCE=0V - 0.1 8.0 μA
STB
VFB=V
VIN=VCE, VFB=V
VIN=VCE, VFB=V
VFB=V
VFB=V
V
UVLO1
V
UVLO2
OSC
CEH
CEL
FB2
=0.8V, V
FB2
FB2
FB2
=0.8V, V
FB2
FB2
=0.8V, V
=0.8V, V
(*1)
- - 15 ms
=1.2V, VCD=0V 0.8 2.0 4.0 μA
FB1
=1.2V, VCD=0V, R
FB1
=0.8V, V
=0.8V, V
=1.2V, VCD=0V
FB1
=1.2V, VCD=0V
FB1
=1.2V, VCD=0V 1.2 - VIN V
FB1
=1.2V, VCD=0V AGND - 0.4 V
FB1
OSC
Open
255 300 345 kHz
1.77 1.87 1.97 V
2.22 2.31 2.40 V
CE Input Current ICE VIN=5.5V, VCE=0V or 5.5V -0.1 - 0.1 μA
CD Pin Charge Current I
CD Pin Discharge Current I
CD Pin Detect Voltage VCD VFB= V
CP2SWB ”L” Output Voltage
SWB ”L” Output Voltage V
CP2SWB Pull up Resistance
SWB Pull up Resistance R
Thermal Shutdown Temperature
Hysteresis Width T
VFB=0.9V→0.4V, V
CD1
VFB=V
CD2
V
SWB2
SWB
R
VCE=0V,V
CP2
VCE=0V,V
SWB
T
- 150 - oC
TSD
- 20 - oC
HYS
FB1=VFB2
= V
FB1
FB2
Input Current=1mA
Input Current=1mA
=5.5V,CP2SWB=1.0V 350 800 2500 kΩ
OUT
=5.5V,SWB=1.0V 350 800 2500 kΩ
OUT
= V
FB1
=0.9V 2.6 5.5 8.4 μA
FB2
=0.9V, VCD=0.1V 0.20 0.38 0.56 mA
=0V 0.95 1.0 1.05 V
0.55 0.65 0.80 V
0.26 0.33 0.40 V
CIRCUIT
-
⑳
①
②
③
④
④
⑤
⑤
⑥
⑦
⑧
⑨
⑩
⑩
⑪
⑪
-
-
●Step-Up DC/DC Converter Block
FB Voltage VFB V
Setting Output Voltage Range
Maximum Duty Cycle D
V
OUTSET
MAX
Soft-Start Time tSS
LX “N-ch” ON Resistance R
LX Current Limit I
V
Over Voltage Limit V
OUT
Short Protection Voltage V
LXN
LIM
19.5 21 22
OVP
V
SHORT
FB Input Current IFB VIN=5.5V, VCE=0V, VFB=0V, 5.5V -0.1 - 0.1
=1.2V, V
FB1
5.5 - 19 V
V
FB=VFB1=VFB2
R
Open
OSC
2.0 4.0 5.0
=0.8V, VCD=0V 0.985 1 1.015 V
FB2
=0V, VCD=0V,
92 95 98
%
ms
⑫
-
⑬
⑲
100 190 400 mΩ -
=1.0MHz 1.1 1.3 1.5
f
OSC
FB1=VFB2
=0.9V, CD=0.1μF 0.40 0.48 0.55 V ⑮
A
V
μA
⑱
⑰
⑭
●Negative Charge Pump Block
FB1 Voltage V
Output Impedance 1 R
Short Protection Voltage 1 V
FB1 Input Current I
VFB=V
FB1
V
OUT1
VFB=V
SHORT1
VIN=5.5V, VCE=0V , V
FB1
=0.8V, VCD=0V 0.985 1 1.015 V
FB2
=1.2V, I
FB1
DRV1
=0.9V, CD=0.1μF 1.2 2.4 2.8 V ⑮
FB2
=20mA -
=0V, 5.5V -0.1 - 0.1 μA ⑭
FB1
15 45
Ω
⑫
⑯
●Positive Charge Pump Block
FB2 Voltage V
Output Impedance 2 R
Short Protection Voltage 2 V
FB2 Input Current I
(*1)Test Condition for input voltage rise time
When used at V
Please also note input voltage before rise should be less than 0.2V. Please see test circuit 20 for test condition, and for the detail of recommended
input wave form, please see NOTES ON USE.
, input voltage should rise from 0.2V to 2.5V within 15ms.
IN=VCE
VFB=0.8V, V
FB2
V
OUT2
SHORT2
VIN=5.5V, VCE=0V , V
FB2
=0.8V, I
FB2
VFB=V
FB1
DRV2
=0.9V, CD=0.1μF 0.40 0.48 0.55 V ⑮
FB1
=1.2V, VCD=0V
=20mA -
=0V, 5.5V -0.1 - 0.1
FB2
0.985 1.0 1.015
15 45
V
Ω
μA
⑫
⑯
⑭
5/25

XC9516 Series
■TEST CIRCUITS
<Circuit1 Supply Current>
<Circuit2 Stand-by Current>
PGND LX
DRV1
CP2SWB
FB1
CE
FB
V
IN
A
VIN=3.3V
ROSC
AGND
DRV2
V
SWB
CVL
FB2
CD
OUT
A
V
=9.0V
OUT
①VFB=0.8V→1.2V→0.8V LX oscillation is checked
=1.2V→0.8V→1.2V DRV1 Oscillation is checked.
②V
FB1
③V
=0.8V→1.2V
FB2
→0.8V DRV2 Oscillation is checked.
After ①~③, supply current is measured at both V
<Circuit3 Oscillation Frequency>
LX Oscillation period is measured.
and V
IN
OUT
VCE=0V, supply current is measured at both VIN and V
.
OUT
.
<Circuit4 UVLO Detect/Release Voltage>
UVLO Detect Voltage Measurement: VIN is decreased (2.5V→1.5V), VIN is
measured when L
UVLO Release Voltage Measurement: V
oscillation started,
L
X
oscillation stopped.
X
is increased (1.5V→2.5V) when
IN
<Circuit6 CE H/L Input Current> <Circuit5 CE H/L Voltage>
CE H Voltage Measurement: VCE is increased(0.4V→1.2V), VCE is measured
when LX oscillation started.
CE L Voltage Measurement: V
when L
oscillation stopped.
X
is decreased(1.2V→0.4V), VCE is measured
CE
6/25
CE H Input Current: Current is measured when CE pin Voltage is 5.5V.
CE L Input Current: Current is measured when CE pin Voltage is 0V.

■TEST CIRCUITS (Continued)
< Circuit7 CD pin Charge Current>
<測定回路7 CD端子充電電流>
< Circuit8 CDpin Discharge Current>
<測定回路8 CD端子放電電流>
XC9516
Series
After VFB=0.9V→0.4V, CD pin output current is measured.
VFB=0.9V→0.4V後にCD端子出力電流を測定
<測定回路9 CD端子検出電圧>
<Circuit9 CD pin Detect Voltage>
VCD=0.1V→0.2 VCD is measured when LX oscillation stopped.
VCD=0V→1.2V、LX端子が発振停止するVCD電圧を測定
<Circuit10 CP2SWB/SWB L Output Voltage> <Circuit11 CP2SWB/SWB pins Pull-up Resistance>
<測定回路10 CP2SWB/SWB L出力電圧>
Input current is measured when CD pin Voltage is 0.1V.
CD端子に0.1V入力時の入力電流を測定
<測定回路11 CP2SWB/SWB プルアップ抵抗>
CP2SWB L Output Voltage: Voltage is measured when 1.0mA is flow in
CP2SWB“L”出力電圧:CP2SWB端子に1.0mA入力し電圧を測定
CP2SWB pin.
SWB“L”出力電圧 :SWB端子に1.0mA入力し電圧を測定
SWB L Output Voltage Voltage is measured when 1.0mA is flow in SWB
pin.
CP2SWB Pull-up Resistance Measurement: Output current is measured when
CP2SWB pin is 1.0V.R=(5.5-1.0)/I
CP2SWB and SWB pins are internally pulled-up to V
SWB Pull-up Resistance Measurement: Output Current is measured when SWB pin
voltage is 1.0V.R=(5.5-1.0)/I
*CP2SWB and SWB pins are internally pulled-up to V
OUT
OUT
7/25

XC9516 Series
■TEST CIRCUITS (Continued)
< Circuit12 FB/FB1/FB2 Voltage Test>
< Circuit13 Maximum Duty Cycle>
FB Voltage Measurement: VFB=1.1V→0.9V, VFB is measured when LX oscillation started.
FB1 Voltage Measurement: V
FB2 Voltage Measurement: V
=0.9V→1.1V, V
FB1
=1.1V→0.9V, V
FB2
is measured when DRV1 oscillation started.
FB1
is measured when DRV2 oscillation started.
FB2
< Circuit14 FB/FB1/FB2 H/L Input Current>
FB Input Current Measurement: Input Current is measured when FB Voltage is 5.5V/0V.
FB1 Input Current Measurement: Input Current is measured when FB1 Voltage is 5.5V/0V.
FB2 Input Current Measurement: Input Current is measured when FB2 Voltage is 5.5V/0V.
< Circuit16 Output Impedance 1/2>
Duty cycle of LX oscillation is measured.
< Circuit15 FB/FB1/FB2 Short Circuit Protection>
FB Short Protection Measurement: VFB=0.9V→0.4V, VFB is measured when VFB oscillation stopped.
FB1 Short Protection Measurement: V
FB2 Short Protection Measurement: V
< Circuit17 V
Over Voltage Limit Measurement>
OUT
=1.2V→2.8V, V
FB1
=0.9V→0.4V, V
FB2
is measured when DRV1 oscillation stopped.
FB1
is measured when DRV2 oscillation stopped.
FB2
Output Impedance1: A load current of 20mA is applied to DRV1,
Output Impedance2: A load current of 20mA is applied to DRV2,
DRV1 voltage is measured when a load is applied or not applied R=V/0.02.
DRV2 voltage is measured when a load is applied or not applied R=V/0.02.
8/25
V
=18V→22V, V
OUT
is measured when Lx oscillation stopped.
OUT

■TEST CIRCUITS (Continued)
< Circuit18 LX Current Limit>
<測定回路18 LX電流制限>
V
に負荷電流(可変抵抗)を接続
SRC
・A load current (Variable Resistor) is connected to
電流プローブを使用しVIN-L1間のコイルピークを確認
V
.
SRC
過電流制限がかかるまで負荷電流を増加
Coil peak current at VIN-L1 is monitored by the
過電流制限時のコイルピークを測定する。
current probe. A coil peak current is measured.
XC9516
Series
< Circuit18 LX External Components List>
・測定回路図18 外付け部品使用例
NAME MODEL NAME CHARACTERISTIC MANUFACTURER
名称 型番 特性 メーカ
L
L
SD XBS204S17 Schottky diode, 2A/40V TOREX
SD XBS204S17 ショットキーダイオード, 2A/40V TOREX
D2-5 XBS104S13 Schottky diode, 1A/40V TOREX
D2-5 XBS104S13 ショットキーダイオード, 1A/40V TOREX
Tr1 XP152A11E5MR Pch MOSFET TOREX
Tr1 XP152A11E5MR Pch MOSFET TOREX
Tr2 CPH3109 PNP transistor SANYO
Tr2 CPH3109 PNP トランジスタ 三洋
C
C
CD,C
C
C
C
CL1,C
C
C
C
C
C
C
C
R
R
R
R
R
R
R
R
R
R
R
R
C
C
R
R
R
R
R
R
< Setting values when the above parts are used>
LTF5022T-4R7N2R0 Coil, 4.7μH TDK
1
LTF5022T-4R7N2R0 コイル, 4.7uH TDK
1
LMK212BJ475KG ceramic condenser, 4.7μF/10V TAIYO YUDEN
IN
LMK212BJ475KG セラミックコンデンサ, 4.7μF/10V 太陽誘電
IN
TMK107BJ104KA ceramic condenser, 0.1μF/25V TAIYO YUDEN
VL
TMK107BJ104KA セラミックコンデンサ, 0.1μF/25V 太陽誘電
D,CVL
TMK107BJ105KA ceramic condenser, 1μF/25V TAIYO YUDEN
DD
TMK107BJ105KA セラミックコンデンサ, 1μF/25V 太陽誘電
DD
C3216X5R1E475M ceramic condenser, 4.7μF/25V TDK
L2
C3216X5R1E475M セラミックコンデンサ, 4.7μF/25V TDK
L1,CL2
TMK107BJ105KA ceramic condenser, 1μF/25V TAIYO YUDEN
Lcp1,CLcp2
TMK107BJ105KA セラミックコンデンサ, 1μF/25V 太陽誘電
Lcp1,CLcp2
C1608JB1H220J ceramic condenser, 22pF/50V TDK
C1608JB1H220J セラミックコンデンサ, 22pF/50V TDK
FB
FB
C1608JB1H103K ceramic condenser, 0.01μF/50V TDK
C1608JB1H103K セラミックコンデンサ, 0.01μF/50V TDK
1,C2
1,C2
RMC1/16K824FTP チップ抵抗, 820kΩ 釜屋電機
RMC1/16K824FTP chip resistance, 820kΩ KAMAYA
1
1
RMC1/16K104FTP チップ抵抗, 100kΩ 釜屋電機
RMC1/16K104FTP chip resistance, 100kΩ KAMAYA
2
2
RMC1/16K394FTP チップ抵抗, 390kΩ 釜屋電機
3
RMC1/16K394FTP chip resistance, 390kΩ KAMAYA
3
RMC1/16K304FTP チップ抵抗, 300kΩ 釜屋電機
4
RMC1/16K304FTP chip resistance, 300kΩ KAMAYA
4
RMC1/16K824FTP チップ抵抗, 820kΩ 釜屋電機
5
RMC1/16K824FTP chip resistance, 820kΩ KAMAYA
5
RMC1/16K753FTP チップ抵抗, 75kΩ 釜屋電機
6
RMC1/16K753FTP chip resistance, 75kΩ KAMAYA
6
C1608JB1H103K セラミックコンデンサ, 0.01μF/50V TDK
5
C1608JB1H103K ceramic condenser, 0.01μF/50V TDK
5
RMC1/16K304FTP チップ抵抗, 300kΩ 釜屋電機
8
RMC1/16K304FTP chip resistance, 300kΩ KAMAYA
8
RMC1/16K134FTP チップ抵抗, 130kΩ 釜屋電機
9
RMC1/16K134FTP chip resistance, 130kΩ KAMAYA
9
RMC1/16K513FTP チップ抵抗, 51kΩ 釜屋電機
10
RMC1/16K513FTP chip resistance, 51kΩ KAMAYA
10
各設定電圧(上記部品使用時)
OUT=VSRC
=-5.3V
GL
=12.0V
GH
=1.0MHz
=9.2V
V
V
V
f
OSC
9/25

tti
XC9516 Series
■TEST CIRCUITS (Continued)
< Circuit19 Soft start/Start-up Sequence>
<測定回路19 ソフトスタート/立ち上がりシーケンス>
・Soft start Measurement
・ソフトスタート測定
CE voltage is triggered on rising edge (0V→VIN).
CE端子に0V→VIN入力でCEをトリガにして測定
LX oscillation start from 1.0V≦VCE.
1.0V≦VCEからLXの発振開始時間、V
V
rising time is measured.
OUT
起動完了時間を測定する。
・Start-up Sequence Measurement
・立ち上がりシーケンス測定
Trigger on CE start-up. Sequence is checked in
CE起動をトリガにして測定
the order of V
V
出力完了、VGL出力完了、VGH出力完了、
OUT
V
出力完了を確認する。
SRC
, VCL, VGH and V
OUT
SRC
の
OUT
.
10/25
< Circuit19 LX External Components List>
・測定回路図19 外付け部品使用例
NAME MODEL NAME CHARACTERISTIC MANUFACTURER
名称 型番 特性 メーカ
L
1
SD XBS204S17 Schottky diode, 2A/40V TOREX
D2-5 XBS104S13 Schottky diode, 1A/40V TOREX
Tr1 XP152A11E5MR Pch MOSFET TOREX
Tr2 CPH3109 PNP transistor SANYO
C
C
C
C
C
C
C
R
R
R
R
R
R
C
R
R
R
LTF5022T-4R7N2R0 Coil, 4.7μH TDK
L
SD XBS204S17 ショットキーダイオード, 2A/40V TOREX
D2-5 XBS104S13 ショットキーダイオード, 1A/40V TOREX
Tr1 XP152A11E5MR Pch MOSFET TOREX
Tr2 CPH3109 PNP トランジスタ 三洋
IN
C
D,CVL
C
DD
C
L1,CL2
C
Lcp1,CLcp2
C
C
FB
C
1,C2
R
1
R
2
R
3
R
4
R
5
R
6
C
5
R
8
R
9
R
10
< Se
LTF5022T-4R7N2R0 コイル, 4.7uH TDK
1
LMK212BJ475KG ceramic condenser, 4.7μF/10V TAIYO YUDEN
LMK212BJ475KG セラミックコンデンサ, 4.7μF/10V 太陽誘電
IN
TMK107BJ104KA ceramic condenser, 0.1μF/25V TAIYO YUDEN
TMK107BJ104KA セラミックコンデンサ, 0.1μF/25V 太陽誘電
D,CVL
TMK107BJ105KA ceramic condenser, 1μF/25V TAIYO YUDEN
TMK107BJ105KA セラミックコンデンサ, 1μF/25V 太陽誘電
DD
C3216X5R1E475M ceramic condenser, 4.7μF/25V TDK
C3216X5R1E475M セラミックコンデンサ, 4.7μF/25V TDK
L1,CL2
TMK107BJ105KA ceramic condenser, 1μF/25V TAIYO YUDEN
TMK107BJ105KA セラミックコンデンサ, 1μF/25V 太陽誘電
Lcp1,CLcp2
C1608JB1H220J ceramic condenser, 22pF/50V TDK
C1608JB1H220J セラミックコンデンサ, 22pF/50V TDK
FB
C1608JB1H103K ceramic condenser, 0.01μF/50V TDK
C1608JB1H103K セラミックコンデンサ, 0.01μF/50V TDK
1,C2
RMC1/16K824FTP chip resistance, 820kΩ KAMAYA
RMC1/16K824FTP チップ抵抗, 820kΩ 釜屋電機
1
RMC1/16K104FTP チップ抵抗, 100kΩ 釜屋電機
RMC1/16K104FTP chip resistance, 100kΩ KAMAYA
2
RMC1/16K394FTP チップ抵抗, 390kΩ 釜屋電機
3
RMC1/16K394FTP chip resistance, 390kΩ KAMAYA
RMC1/16K304FTP チップ抵抗, 300kΩ 釜屋電機
4
RMC1/16K304FTP chip resistance, 300kΩ KAMAYA
RMC1/16K824FTP チップ抵抗, 820kΩ 釜屋電機
5
RMC1/16K824FTP chip resistance, 820kΩ KAMAYA
RMC1/16K753FTP チップ抵抗, 75kΩ 釜屋電機
6
RMC1/16K753FTP chip resistance, 75kΩ KAMAYA
C1608JB1H103K セラミックコンデンサ, 0.01μF/50V TDK
5
C1608JB1H103K ceramic condenser, 0.01μF/50V TDK
RMC1/16K304FTP チップ抵抗, 300kΩ 釜屋電機
8
RMC1/16K304FTP chip resistance, 300kΩ KAMAYA
RMC1/16K134FTP チップ抵抗, 130kΩ 釜屋電機
9
RMC1/16K134FTP chip resistance, 130kΩ KAMAYA
RMC1/16K513FTP チップ抵抗, 51kΩ 釜屋電機
10
RMC1/16K513FTP chip resistance, 51kΩ KAMAYA
ng values when the above parts are used>
各設定電圧(上記部品使用時)
V
V
V
f
OSC
OUT=VSRC
=-5.3V
GL
=12.0V
GH
=1.0MHz
=9.2V

■TEST CIRCUITS (Continued)
< Circuit20 Input Voltage Start-up Time>
<測定回路20 入力電圧立ち上げ時間>
・Input Voltage Start-up Time
・入力電圧立ち上げ時間
V
is measured after rising VIN and VCE within
SRC
VIN=VCEを15ms以下で起動しV
less than 15ms.
VIN=VCE=0.2V→2.5V、t
VIN=VCE=0.2V→2.5V, t
・推奨入力波形
・Recommended Input Waveform
VIN=VCE≦0.2Vで起動
Start-up with VIN=VCE≦0.2V
立ち上げ時間 t
Start-up time t
入力電圧立ち上げ時間波形
≦15ms
≦15ms
VIN
VIN
Input Waveform
VIN
≦15ms
≦15ms
VIN
の出力を確認。
SRC
XC9516
Series
< Circuit20 LX External Components List>
・測定回路図20 外付け部品使用例
NAME MODEL NAME CHARACTERISTIC MANUFACTURER
L
1
SD XBS204S17 Schottky diode, 2A/40V TOREX
L
D2-5 XBS104S13 Schottky diode, 1A/40V TOREX
SD XBS204S17 ショットキーダイオード, 2A/40V TOREX
D2-5 XBS104S13 ショットキーダイオード, 1A/40V TOREX
Tr1 XP152A11E5MR Pch MOSFET TOREX
Tr1 XP152A11E5MR Pch MOSFET TOREX
Tr2 CPH3109 PNP transistor SANYO
Tr2 CPH3109 PNP トランジスタ 三洋
C
IN
C
C
D,CVL
C
C
DD
C
C
L1,CL2
C
C
Lcp1,CLcp2
C
C
FB
C
C
1,C2
C
R
1
R
R
2
R
R
3
R
R
4
R
R
R
5
R
R
6
C
C
5
R
R
8
R
R
9
R
R
10
< Setting values when the above parts are used>
LTF5022T-4R7N2R0 Coil, 4.7μH TDK
名称 型番 特性 メーカ
1
LTF5022T-4R7N2R0 コイル, 4.7uH TDK
LMK212BJ475KG ceramic condenser, 4.7μF/10V TAIYO YUDEN
LMK212BJ475KG セラミックコンデンサ, 4.7μF/10V 太陽誘電
IN
TMK107BJ104KA ceramic condenser, 0.1μF/25V TAIYO YUDEN
TMK107BJ104KA セラミックコンデンサ, 0.1μF/25V 太陽誘電
D,CVL
TMK107BJ105KA ceramic condenser, 1μF/25V TAIYO YUDEN
TMK107BJ105KA セラミックコンデンサ, 1μF/25V 太陽誘電
DD
C3216X5R1E475M ceramic condenser, 4.7μF/25V TDK
C3216X5R1E475M セラミックコンデンサ, 4.7μF/25V TDK
L1,CL2
TMK107BJ105KA ceramic condenser, 1μF/25V TAIYO YUDEN
TMK107BJ105KA セラミックコンデンサ, 1μF/25V 太陽誘電
Lcp1,CLcp2
C1608JB1H220J ceramic condenser, 22pF/50V TDK
C1608JB1H220J セラミックコンデンサ, 22pF/50V TDK
FB
C1608JB1H103K ceramic condenser, 0.01μF/50V TDK
C1608JB1H103K セラミックコンデンサ, 0.01μF/50V TDK
1,C2
RMC1/16K824FTP chip resistance, 820kΩ KAMAYA
RMC1/16K824FTP チップ抵抗, 820kΩ 釜屋電機
1
RMC1/16K104FTP chip resistance, 100kΩ KAMAYA
RMC1/16K104FTP チップ抵抗, 100kΩ 釜屋電機
2
RMC1/16K394FTP chip resistance, 390kΩ KAMAYA
RMC1/16K394FTP チップ抵抗, 390kΩ 釜屋電機
3
RMC1/16K304FTP chip resistance, 300kΩ KAMAYA
RMC1/16K304FTP チップ抵抗, 300kΩ 釜屋電機
4
RMC1/16K824FTP chip resistance, 820kΩ KAMAYA
RMC1/16K824FTP チップ抵抗, 820kΩ 釜屋電機
5
RMC1/16K753FTP チップ抵抗, 75kΩ 釜屋電機
RMC1/16K753FTP chip resistance, 75kΩ KAMAYA
6
C1608JB1H103K セラミックコンデンサ, 0.01μF/50V TDK
5
C1608JB1H103K ceramic condenser, 0.01μF/50V TDK
RMC1/16K304FTP チップ抵抗, 300kΩ 釜屋電機
8
RMC1/16K304FTP chip resistance, 300kΩ KAMAYA
RMC1/16K134FTP チップ抵抗, 130kΩ 釜屋電機
9
RMC1/16K134FTP chip resistance, 130kΩ KAMAYA
RMC1/16K513FTP チップ抵抗, 51kΩ 釜屋電機
10
RMC1/16K513FTP chip resistance, 51kΩ KAMAYA
各設定電圧(上記部品使用時)
V
V
V
f
OSC
OUT=VSRC
=-5.3V
GL
=12.0V
GH
=1.0MHz
=9.2V
11/25

XC9516 Series
■OPERATIONAL EXPLANATION
XC9516 series includes following blocks which are a reference voltage source, an oscillation circuit connecting to an external
R
register, a UVLO circuit to prevent malfunction in low voltage operation, internal power supply regulator connecting external
OSC
capacitor, a step-up DC/DC converter, step-up charge pump and inverting charge pump, a short circuit protection circuit, an
C
VL
over current sensing circuit, an over voltage sensing circuit and a thermal shutdown circuit.
VIN
VOUT
CIN
CDD
CE
CVL
CD
VGL
CLcp1
R3
R4
D2D3C1
The step-up DC/DC converter consists of a ramp wave circuit created from the above mentioned oscillation circuit, an error
amplifier to compare feedback voltage through external resistor network from V
a PWM comparator to decide duty cycle by comparing ramp wave form created by the above mentioned ramp wave circuit and
error amplifier output, a phase compensation circuit and current feedback circuit for output voltage stabilization, a N-channel
MOS driver transistor to provide duty cycle on-time from L
MOS driver transistor, a over-voltage protection circuit operated at 1.3 typical to protect the devices connecting to the V
voltage pin.
A multi-loop feedback control by feedback voltage and N-channel MOS driver transistor provides stable output voltage
operation so that low ESR ceramic capacitor can be used.
The inverting voltage charge pump consists of an error amplifier to compare internal voltage reference and the feedback
voltage thorough external resistor network from V
by output level of the error amplifier, driver circuit for charge pump operation.
The step-up charge pump consists of an error amplifier to compare internal voltage reference and the feedback voltage
thorough external resistor network from V
OUT
output level of the error amplifier, driver circuit for charge pump operation.
<Reference Voltage Source>
The reference voltage source provides the reference voltage to ensure stable output voltage of the IC.
<Oscillation Circuit >
The oscillation circuit determines switching frequency. The frequency can be changed by external resistance R
of 300 kHz to 1.2MHz.
When R
pin is left open, the frequency is fixed at 300kHz.
OSC
When the frequency is low, efficiency is high at light load. When the frequency is high, “L” value of coil will be low and makes
space saving.
The oscillation frequency is calculated by the following formula (Equation 1).
R
where f
denotes a setting frequency.
OSC
= 95 x 109 / (f
OSC
- 300 x 103)・・・(Equation 1)
OCS
< Ramp Wave Circuit >
This circuit is used to produce ramp waveforms needed for PWM operation.
< Error Amplifier for DC/DC>
The error amplifier is designed to monitor output voltage. The error amplifier compares the reference voltage with the feedback
voltage through the external divider resistors. When a feedback voltage is lower than the reference voltage, the output voltage
of the error amplifier is increased.
12/25
L1
VIN
CE
CVL
CD
VOUT
FB1
DRV1
AGND
output voltage, output impedance control circuit to adjust output impedance
OUT
D1(SD)
CFB
LX
FB
PGND
R8
R10
ROSC
(R9)
C2
ROSC
SWB
CP2SWB
DRV2
FB2
pin, a current limit circuit to limit the current to flow the N-channel
X
VOUT
CL1
R1
R2
C5(R7)
CL2
Tr1
Tr2
VSRC
D4
D5
R5
R6
VGH
CLcp2
output voltage and internal reference voltage,
OUT
OUT
output
output voltage, output impedance control circuit to adjust output impedance by
in a range
OSC

XC9516
Series
■OPERATIONAL EXPLANATION (Continued)
<External Resistors for setting Output Voltages>
A setting output voltage V
V
OUT
V
A setting output voltage V
V
GL
V
A setting output voltage VGH for the step-up charge pump is calculated by the following formula (Equation 4).
V
GH
V
<Regulator for Internal Power Circuit >
The XC9516 series includes a regulator for internal power circuit in order to stabilize operation. Its power source is taken from
VIN and V
. An external capacitor CVL=0.1μF is required to stabilize this internal power supply.
OUT
<UVLO Circuit >
When the input voltage VIN falls below a threshold voltage 1.87V (TYP.), all driver transistors will be forced off to prevent
malfunction. When the V
soft-start function to initiate startup operation.
< Current Limit >
The current limiter monitors the current flowing through the N-channel MOS driver transistor connected to the Lx pin, and
features a combination of the current limit and latch function.
①When the driver current is greater than a specific level (a peak current of inductor), the constant-current type current limit
function operates to turn off the pulses from the Lx pin at any given timing.
②When the driver transistor is turned off, the limiter circuit is then released from the current limit detection state.
③At the next pulse, the driver transistor is turned on. However, the transistor is immediately turned off in the case of an
over-current state.
④When the over-current state is eliminated, the IC resumes its normal operation.
The IC waits for the over-current state to end by repeating the steps ①~③. During a latch delay time which was set by an
external capacitor with CD pin, if the ①~③ over-current sate is repeated, all driver transistors in the step-up DC/DC converter,
the step-up charge pump and the voltage inverting charge pump will be maintained to turn off. Once the IC is in suspension mode,
operations can be resumed by either turning the IC off via the CE pin, or by restoring power to the V
Depending on the state of a substrate, it may result in the case where the latch delay time may become longer or the operation
may not be latched. Please locate an input capacitor to the C
I
LX
V
OUT
L
X
V
CE
V
IN
for the step-up DC/DC is calculated by the following formula (Equation 2).
OUT
= VFB×( R1 + R2 ) / R2・・・(Equation 2)
=1.0V, R1 + R2 < 1000kΩ
FB
for the negative charge pump is calculated by the following formula (Equation 3).
GL
= V
-( V
- V
FB1
OUT
=1.0V, R3 + R4 < 1000kΩ
FB1
= V
×( R5 + R6 ) / R6・・・(Equation 4)
FB2
=1.0V, R5 + R6 < 1000kΩ
FB2
voltage becomes 2.31V (TYP.) or higher, the UVLO function is released and the IC performs the
IN
) x R4 / R3・・・(Equation 3)
FB1
Limit < td
pin as close as possible.
D
Limit > td
pin.
IN
I
LIM
0mA
0V
VCE Restart
Current Limit Timing Chart
Level
13/25

XC9516 Series
■OPERATIONAL EXPLANATION (Continued)
<Short-circuit Detection Circuit >
When either output voltage falls below the set voltage while monitoring each feedback voltage of a step-up DC/DC converter,
step-up charge pump and inverting charge pump it is allowed as short-circuit so that latch delay circuit starts operation. If the
output voltage goes back in the range of the set voltage within the latch delay time, the start of the latch delay circuit will be
released. When output voltage is not recovered, all of the driver transistors will be turned off and latched after the latch delay
time.
<Latch Delay
Where each short-circuit detection circuit detects output voltage short-circuit or when the over-current detection circuit detects
over-current of the L
will be tuned off and latched after the delay time which was set by an external capacitor to the C
latch, either turning the IC off and on via the CE pin or restoring power supply (V
t
is calculated by the following formula (Equation 5).
D
<Thermal Shutdown>
For protection against heat damage of the ICs, thermal shutdown function monitors chip temperature. The thermal shutdown
circuit starts operating and all of the driver transistors will be turned off when the chip’s temperature reaches 150
temperature drops to 130
startup operation.
<Over-voltage Protection>
The over-voltage limit monitors the voltage of V
elevates and beyond 21V (TYP.). In order to release the latch, either turning the IC off and on via the CE pin or restoring power
supply (VIN pin) should be selected.
Circuit >
pin, All driver transistors in a step-up DC/DC converter, step-up charge pump and inverting charge pump.
X
C
= td x 5.5 x 10⁻⁶/ 1.0・・・(Equation 5)
D
5.5 x 10
1.0 (C
-6
(CD Pin Charge Current, Typical)
Pin Detect Voltage, TYP.)
D
O
C or less after shutting of the current flow, the IC performs the soft start function to initiate output
pin. In order to release the
pin) should be selected. A setting delay time
IN
pin. All of the driver transistors will be turned off when the voltage of V
OUT
D
O
C. When the
OUT
pin
14/25

XC9516
Series
■OPERATIONAL EXPLANATION (Continued)
<Start-up Sequence>
After V
inverting charge pump starts to operate to see VGL voltage. After the negative charge pump, CP2SWB low signal output turns
Tr2 on to make a positive charge pump starts to operate to see V
for V
come out. When falling, V
when the Tr2 goes off.
When Rising
①VIN=VCE input
②V
OUT
③V
GL
④CP2SWB Low output, V
⑤SWB Low output, V
When Falling
⑥V
IN=VCE
input with CE same time, the DC/DC starts to operate to set V
IN
voltage. After VGH output, SWB low signal output turn Tr1 on
GH
output. The CP2SWB and SWB pins are internally pulled up to V
SRC
, VGL, and VGH outputs go off after VIN and V
OUT
Rising completed
Operation started
rising started
GH
output
SRC
=0V, V
, VGL, VGH, V
OUT
output is OFF
SRC
Rising/Falling Sequence
①
TSS
VIN=CE
0V
VOUT Level
②
VOUT
VGL
0V
0V
VIN Level
③
VOUT Level
VGH
0V
VOUT Level
CP2SWB
0V
VOUT Level
④
VGL Level
VGH Level
⑤
voltage. After the DC/DC start-up, a negative
OUT
, therefore, this V
OUT
goes to ground. The V
CE
level is kept until a low signal
OUT
output will be turned off
SRC
⑥
0V
0V
0V
0V
VOUT Level
Low Level
VOUT Level
0V
SWB
VSRC
0V
0V
Low Level
VOUT Level
0V
0V
15/25

XC9516 Series
■NOTES ON USE
1. For temporary, transitional voltage drop or voltage rising phenomenon, the IC is liable to malfunction should the ratings be
exceeded.
2. Switching regulators like step-up DC/DC converters may cause spike noise and/or ripple voltage. These amounts are greatly
affected by peripheral components (coil inductance values, capacitor value and substrate layout of peripheral circuit). Test and
inspect the actual circuits thoroughly before use.
3. An input capacitor should be placed near the IC VIN pin as much as possible.
4. As for power-on, when CE pin is used with connecting to VIN pin, VIN-VCE voltage should begin rising from below 2.0V. Rise
time should be less than 15ms. (Please refer to Figure 1.)
On the other hand, when CE pin is used independently from V
voltage rising. (Please refer to Figure 2.)
5. GND pattern should be layouted to get a same level of voltage for AGND pin, PGND pin, and package heatsink.
6. When current over limited value (peak current) flows for a specified period, current limit circuit will turn off a built-in driver
transistor (integral latch circuit). Until the circuit detects the latch delay time and turns off the build-in driver transistor, current of
limited level continues to flow, so please take full care of rating of coils.
7. In case of VGL voltage, VGH voltage may overshoots or undershoots when power supply rise, please put speed-up capacitor
(CFB1, CFB2) between FB1 pin and V
, FB2 pin and VGH. (Please refer to figure 3 and 4.)
GL
8. When load of inverting charge pump and step-up charge pump are with no load and load current of step-up DC/DC converter
is large, the output of the each charge pump may become unstable by switch of step-up DC/DC converter. In case of that,
please put a ferrite bead (L2) into a driver output (DRV1 pin and DRV2 pin) of the each charge pump. (Please refer to figure 4.)
9. Torex places an importance on improving our products and its reliability.
However, by any possibility, we would request user fail-safe design and post-aging treatment on system or equipment.
pin, CE pin voltage should be started to rise after VIN pin
IN
Figure 1. (Recommended for input wave form for V
Rising is recommended from less than 0.2V.
Rise time should be within 15ms.
V
OUT
R3
CFB1
VGL
CLcp1
Figure 3.
Connection diagram for speed-up capacitor (CFB1)
CFB1 is connected to between FB1 pin and V
R4
D2
C1
D3
FB1
DRV1
GL
IN=VCE
V
IN
V
CE
)
Figure 2. (Recommended for input wave form for V
CE should be rising after V
DRV2
FB2
Figure 4.
Connection diagram for a ferrite bead / speed-up capacitor (CFB2)
L2 (ferrite bead) is connected to between DRV2 pin and C2.
CFB2 is connected to between FB2 pin and V
rising.
IN
L2
CFB2
C2
R5
R6
0V
0V
pin and CE pin are input separately.)
IN
D4
D5
VGH
CLcp2
.
GH
16/25
(
)
■NOTES ON USE (Continued)
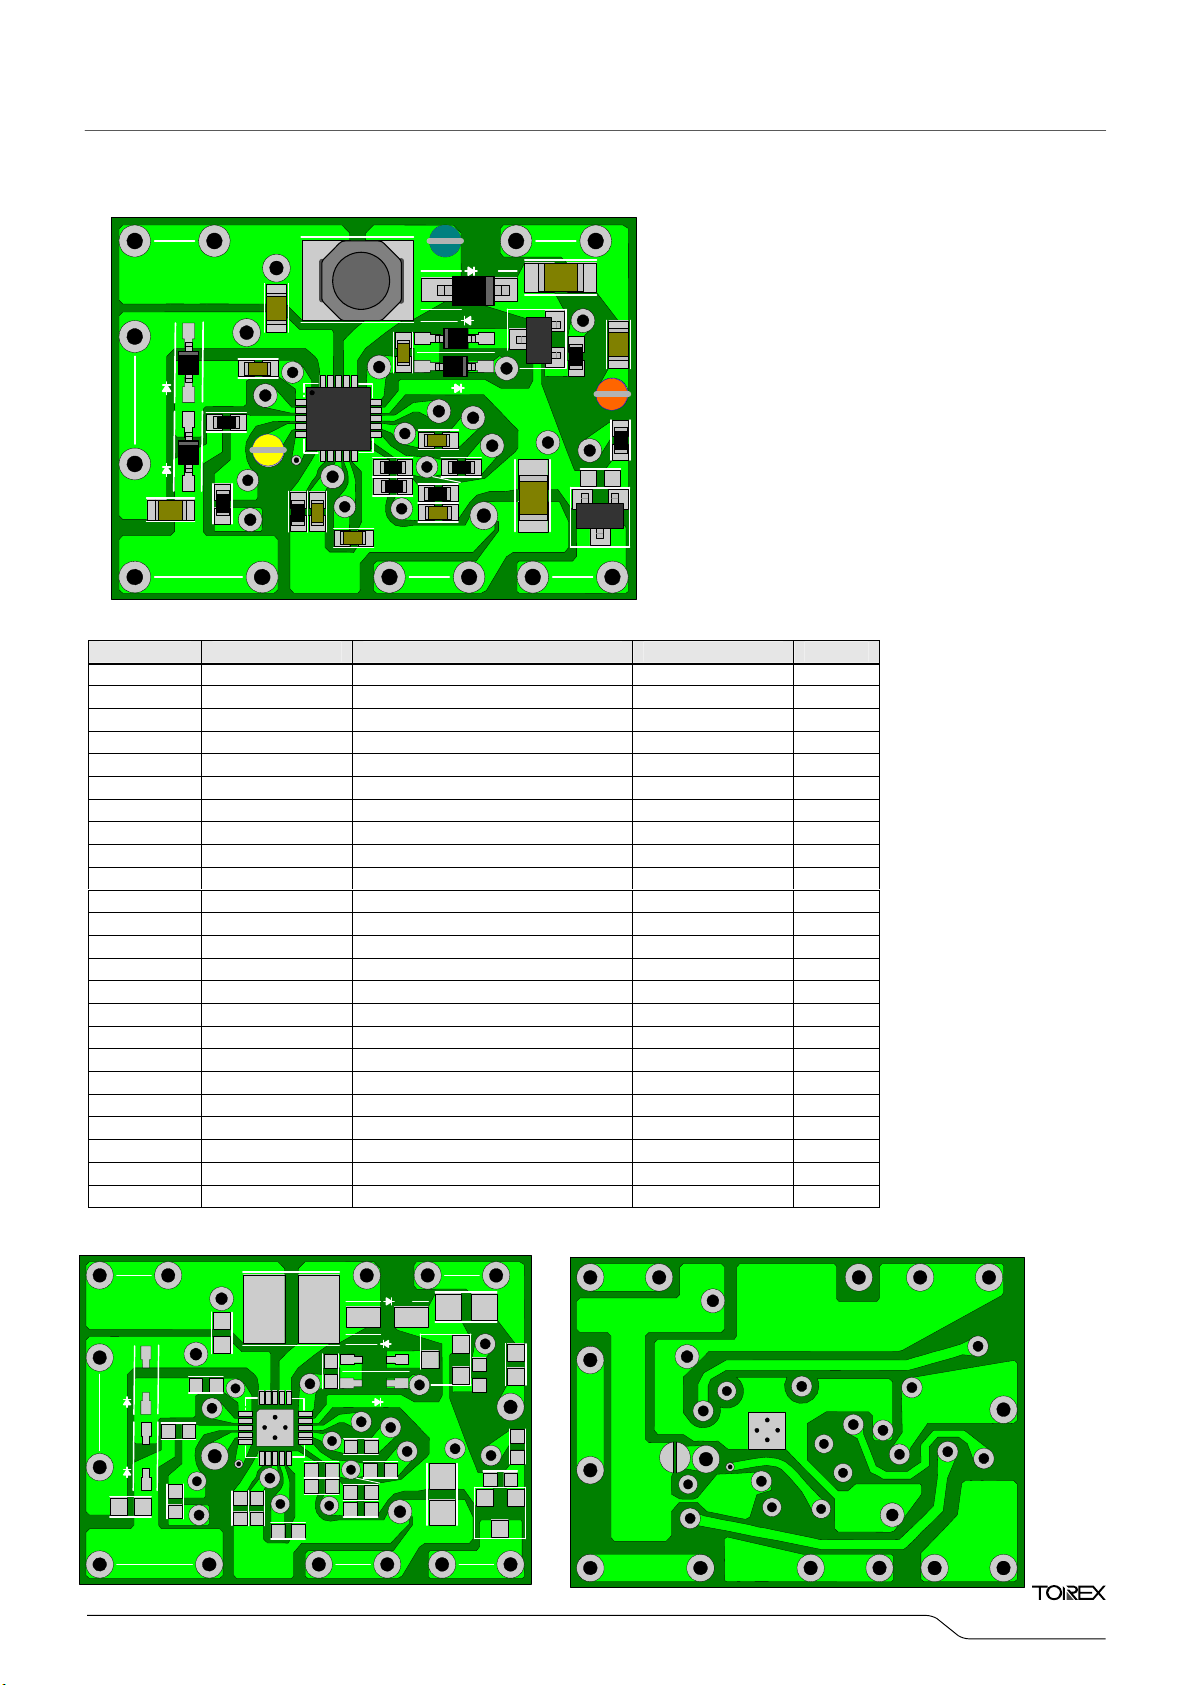
TOP VIEW (Layout example)
VIN
SD
L
CIN
NC
PGND
PGND
ROSCNCVINCDAGND
CD
CDD
C2
LX
LX
DR_CP2
DR-CP2
VOUT
SWB
CVL
CVL
FB_CP2
R6
R2
FB
D2D3
PGND
R4
CLcp1
VOUT
CP1
Components List
DESIGNATOR PRODUCT NOTE MAKER QTY
IC XC9516A21AZR-G TOREX 1
L LTF5022T-4R7N2R0 Coil, 4.7μH TDK 1
SD XBS204S17 Schottky Barrie Diodes, 2A/40V TOREX 1
D2, D3, D4,
Tr1 XP152A11E5MR P-ch MOS FET TOREX 1
Tr2 CPH3109 PNP Transistor SANYO 1
CIN LMK212BJ475KG Ceramic Capacitor, 4.7μF/10V TAIYO UDEN 1
CD, CVL TMK107BJ104KA Ceramic Capacitor, 0.1μF/25V TAIYO UDEN 2
CDD TMK107BJ105KA Ceramic Capacitor, 1μF/25V TAIYO UDEN 1
CL1, CL2 C3216X5R1E475M Ceramic Capacitor, 4.7μF/25V TDK 2
DR_CP1
C1
DR-CP1
RDYB
FB_CP1
CE
FB
CE
FB
CP1
R3
R9
XBS104S13 Schottky Barrie Diodes, 1A/40V TOREX 4
CLcp1, CLcp2 TMK107BJ105KA Ceramic Capacitor, 1μF/25V TAIYO UDEN 2
CFB C1608JB1H220J Ceramic Capacitor, 22pF/50V TDK 1
C1, C2 C1608JB1H103K Ceramic Capacitor, 0.01μF/50V TDK 2
R1 RMC1/16K824FTP Chip Resistor, 820kΩ KAMAYA ELECTRIC 1
R2 RMC1/16K104FTP Chip Resistor, 100kΩ KAMAYA ELECTRIC 1
R3 RMC1/16K394FTP Chip Resistor, 390kΩ KAMAYA ELECTRIC 1
R4 RMC1/16K304FTP Chip Resistor, 300kΩ KAMAYA ELECTRIC 1
R5 RMC1/16K824FTP Chip Resistor, 820kΩ KAMAYA ELECTRIC 1
R6 RMC1/16K753FTP Chip Resistor, 75kΩ KAMAYA ELECTRIC 1
R7 C1608JB1H103K Ceramic Capacitor, 0.01μF/50V TDK 1
R8 RMC1/16K304FTP Chip Resistor, 300kΩ KAMAYA ELECTRIC 1
R9 RMC1/16K134FTP Chip Resistor, 130kΩ KAMAYA ELECTRIC 1
R10 RMC1/16K513FTP Chip Resistor, 51kΩ KAMAYA ELECTRIC 1
L2 MMZ1608S400A Ferrite bead, 40Ω@100MHz TDK 1
R1
CFB
LX
SD
D4
D5
FB
R1
CP2
CFB
R5
CL1
TR2
GND
CL2
Tr
CLcp2
R10
CP2
VOUT
R8
R7
Tr
TR1
VOUTGND
*Notes for Board
VOUTCP1=V
VOUTCP2=V
GL
GH
XC9516
Series
TOP VIEW
PGND
CLcp1
VIN
D2D3
VOUT
CP1
L
CIN
DR_CP1
C1
R4
CE
FB
CP1
R3
C2
DR_CP2
R6
R2
R9
CD
CDD
CVL
FB
R1
CFB
LX
D5
FB
CP2
SD
D4
GND
CL2
TR2
R5
CL1
R10
CP2
VOUT
R8
R7
TR1
VOUTGND
BOTTOM VIEW
CLcp2
Flip horizontal
17/25

XC9516 Series
■TYPICAL PERFORMANCE CHARACTERISTICS
(1) Efficiency vs. Output Current
100
90
80
70
60
50
40
Efficiency:EFFI(%)
30
20
10
0
1 10 100 1000
XC9516 Efficiency
VIN=5.5V
(2) Output Voltage vs. Output Current
9.6
LOAD REG DC/DC VOUT
9.4
9.2
VOUT(V)
9.0
8.8
Iout[mA]
VIN=2.5V
VIN=2.5V
VIN=VCE, VOUT=9.0V
FOSC=1MHz
Icp1=-1mA, Icp2=1mA
VIN=3.3V
VIN=3.3V
VIN=4.0V
VIN=VCE=2.5V, V
Icp1=-10mA, Icp2=10mA
VIN=4.0V
VIN=5.5V
2.5V
3.3V
4.0V
5.5V
=9V
OUT
DC/DC VOUT
100
90
80
70
60
50
40
Efficiency:EFFI(%)
30
20
10
0
1 10 100 1000
LOAD REG CP1 VGL
-5.10
-5.20
-5.30
VGL(V)
-5.40
-5.50
XC9516 Efficiency
VIN=5.5V
Iout[mA]
VIN=VCE, VOUT=9.0V
FOSC=1MHz
Icp1=-10mA, Icp2=10mA
VIN=3.3V
VIN=2.5V
VIN=VCE=2.5 V, VGL=-5 .3V
IOUT=100mA, Icp2=10mA
VIN=4.0V
VGL
2.5V
3.3V
4.0V
5.5V
8.6
0 20 40 60 80 100 120 140 160 180 200 220 240
LOAD REG CP2 VGH
12.3
12.2
12.1
VGH(V)
12.0
11.9
11.8
0 5 10 15 20 25 30
IOUT(mA)
VIN=VCE=2.5V, VGH=12V
IOUT=100mA, Icp1=-10mA
ICP2(mA)
-5.60
0 5 10 15 20 25
ICP1(mA)
VGH
18/25

■TYPICAL PERFORMANCE CHARACTERISTICS (Continued)
(3) Frequency vs. Ambient Temperature
400
XC9516 FOSC
, V
V
IN=VCE
FOSC=OPEN
OUT
=9.0V
350
300
FOSC (kHz)
250
200
-50 -25 0 25 50 75 100 125
VIN=2.5V
VIN=5.5V
VIN=4.0V
Temperature (℃)
VIN=2.5V
VIN=4.0V
VIN=5.5V
(4) Supply Current vs. Ambient Temperature
4000.0
3500.0
3000.0
2500.0
2000.0
IDD1(μA)
1500.0
1000.0
500.0
0.0
-50 -25 0 25 50 75 100 125
VIN=5.5V
VIN=2.5V
IDD1
VIN=4.0V
Temperature(℃)
VIN=VCE, V
=9.0V
OUT
VIN=2.5V
VIN=4.0V
VIN=5.5V
(5) Stand-by Current vs. Ambient Temperature
XC9516 ISTB
4.00
3.50
3.00
2.50
2.00
1.50
ISTB(μA)
1.00
0.50
0.00
-0.50
-50 -25 0 25 50 75 100 125
Temperature(℃)
VCE=0V, V
(6) FB Voltage vs. Ambient Temperature
(7) FB1 Voltage vs. Ambient Temperature
XC9516 FB-V
1.030
1.025
1.020
1.015
1.010
1.005
1.000
FB (V)
0.995
0.990
0.985
0.980
0.975
0.970
VIN=5.5V
VIN=4.0V
-50 -20 10 40 70 100
VIN=2.5V
Temperature (℃)
, V
V
IN=VCE
OUT
FOSC=OPEN
VIN=2.5V
VIN=4.0V
VIN=5.5V
=9.0V
XC9516 FB1-V
1.030
1.025
1.020
1.015
1.010
1.005
1.000
FB1 (V)
0.995
0.990
0.985
0.980
0.975
0.970
-50 -20 10 40 70 100
VIN=2.5V
VIN=4.0V
VIN=5.5V
Temperature (℃)
=9.0V
OUT
VIN=2.5V
VIN=4.0V
VIN=5.5V
VIN=5.5V
VIN=4.0V
VIN=2.5V
, V
V
IN=VCE
FOSC=OPEN
VIN=2.5V
VIN=4.0V
VIN=5.5V
XC9516
Series
=9.0V
OUT
19/25

XC9516 Series
■TYPICAL PERFORMANCE CHARACTERISTICS (Continued)
(8) FB2 Voltage vs. Ambient Temperature
1.030
1.025
1.020
1.015
1.010
1.005
1.000
FB2 (V)
0.995
0.990
0.985
0.980
0.975
0.970
-50 -20 10 40 70 100
XC9516 FB2-V
Temperature (℃)
(9) CE ”H” Voltage vs. Ambient Temperature (10) CE ”L” Voltage vs. Ambient Temperature
1.40
1.30
1.20
1.10
1.00
CE-H (V)
0.90
0.80
0.70
0.60
-50 -25 0 25 50 75 100 125
XC9516 CE-H
Temperature (℃)
V
(11) LX Pin N-ch Driver ON Resistance vs. Ambient Temperature
LX Nch ON-R (mΩ)
400
350
300
250
200
150
100
XC9516 LX Nch On resistance
CVL=4.0V, FOSC=OPEN
, V
V
IN=VCE
FOSC=OPEN
VIN=2.5V
VIN=4.0V
VIN=5.5V
VIN=2.5V
VIN=4.0V
VIN=5.5V
=9.0V, FOSC=OPEN
OUT
VIN=2.5V
VIN=4.0V
VIN=5.5V
VIN=2.5V
VIN=4.0V
VIN=5.5V
OUT
=9.0V
XC9516 CE-L
1.40
1.30
1.20
1.10
1.00
CE-L (V)
0.90
0.80
0.70
0.60
-50 -25 0 25 50 75 100 125
Temperature (℃)
V
OUT
=9.0V, FOSC=OPEN
VIN=2.5V
VIN=4.0V
VIN=5.5V
VIN=2.5V
VIN=4.0V
VIN=5.5V
20/25
50
0
-50 -25 0 25 50 75 100 125
Temperature (℃)

■TYPICAL PERFORMANCE CHARACTERISTICS (Continued)
(12) Load Transient Response 1 vs. DC/DC Output (V
OUT
)
V
OUT
200mV/div
I
OUT
2.0V/div
SW
I
=0mA→100mA
OUT
I
=0mA
OUT
VIN=VCE=2.5V, V
Ta= 2 5℃
I
=100mA
OUT
OUT
=9.0V
V
OUT
200mV/div
I
OUT
50mA/div
I
=100mA→0mA
OUT
I
=100mA
OUT
VIN=VCE=2.5V, V
Ta= 2 5℃
I
=0mA
OUT
XC9516
Series
=9.0V
OUT
100μs/div
(13) Load Transient Response 2 vs. CP1 Output (VGL)
VIN=VCE=2.5V, VGL=-5.0V
Ta= 2 5℃
ICP1 SW ON
=-10mA
VGL
200mV/div
ICP1 SW
2.0V/div
ICP1=-1mA→-10mA
ICP1 SW OFF
=-1mA
100μs/div
(14) Load Transient Response 3 vs. CP2 Output (VGH)
ICP1=-10mA→-1mA
VGL
200mV/div
ICP1 SW
2.0V/div
ICP1 SW ON
=-10mA
100μs/div
VIN=VCE=2.5V, VGL=-5.0V
Ta= 2 5℃
ICP1 SW OFF
=-1mA
100μs/div
VGH
200mV/div
ICP2 SW
2.0V/div
ICP2=1mA→10mA
ICP1 SW OFF
=1mA
100μs/div
V
IN=VCE
Ta= 2 5℃
ICP1 SW ON
=10mA
=2.5V, VGH=12V
VGH
200mV/div
ICP2 SW
2.0V/div
ICP2=10mA→1mA
ICP2 SW ON
=10mA
VIN=VCE=2.5V, VGH=12V
Ta= 2 5℃
ICP1 SW OFF
=1mA
100μs/div
21/25
r
XC9516 Series
■TYPICAL PERFORMANCE CHARACTERISTICS (Continued)
(15) Ripple Rejection Rat vs. Output Current
VIN=VCE=2.5V, V
Ta= 2 5℃, I
V
OUT
20mV/div
VGL
20mV/div
VGH
20mV/div
VIN=VCE=2.5V, V
Ta= 2 5℃, I
V
OUT
20mV/div
VGL
20mV/div
VGH
20mV/div
(16) Start-up Sequence
V
OUT
VIN=VCE=2.5V, V
Ta= 2 5℃, I
Monitor
=9V, VGL=-5V, VGH=12V
OUT
=0mA, ICP1=0mA, ICP2=0mA
OUT
1μs/div
=9V, VGL=-5V, VGH=12V
OUT
=100mA, ICP1=-10mA, ICP2=10mA
OUT
1μs/div
=9V, VGL=-5V, VGH=12V
OUT
=1mA, ICP1=-1mA, ICP2=1mA
OUT
VGH 3.0V/div
V
3.0V/div
OUT
V
3.0V/div
IN
VGL 3.0V/div
V
OUT
20mV/div
VGL
20mV/div
VGH
20mV/div
VSRC Monito
V
Ta= 2 5℃, I
VIN=VCE=2.5V, V
Ta= 2 5℃, I
=2.5V, V
IN=VCE
=9V, VGL=-5V, VGH=12V
OUT
=50mA, ICP1=-5mA, ICP2=5mA
OUT
1μs/div
=9V, VGL=-5V, VGH=12V
OUT
=1mA, ICP1=-1mA, ICP2=1mA
OUT
VGH 3.0V/div
VGL 3.0V/div
VSRC 3.0V/div
V
IN
3.0V/div
22/25
2.0ms/div
2.0ms/div

■PACKAGING INFORMATION
●QFN-20 (Unit: mm)
1 PIN INDENT
(0.2)
4.00±0.10
+0.03
0.02
4.00±0.10
2.70±0.05
0.40±0.05
106789
-0.02
0.75±0.05
XC9516
Series
0.20±0.05
5
4
3
2
2.70±0.05
1
11
12
13
14
15
*The side of pins are not gilded, but nickel is used.
(0.5)
20
19
161718
●QFN-20 Reference Pattern Layout (Unit: mm) ●QFN-20 Reference Metal Mask Design (Unit: mm)
4.6
3.2
0.3
3.2
4.6
2.7
4.5
3.3
4.5
3.3
0.3 1.1
0.5
2.7
0.3
Solder Thickness:120μm (reference)
0.5
1.10.3
23/25

XC9516 Series
■MARKING RULE
QFN20
① represents product series
1pin
①②③④⑤⑥
01~09, 0A~0Z, 11・・・9Z, A1~A9, AA~Z9, ZA~ZZ repeated
(G, I, J, O, Q, W excluded)
*No character inversion used.
MARK PRODUCT SERIES
0 XC9516******-G
② represents UVLO setting voltage and LX detect over current
MARK UVLO VOLTAGE
A
③④ represents V
③ ④
2 1 21V XC9516*21*** -G
⑤⑥ represents production lot number
Detect:1.87V, Hysteresis Width:0.44V
detect over voltage
OUT
MARK
V
DETECT OVER VOLTAGE (e.g.) PRODUCT SERIES
OUT
LX DETECT
OVER CURRENT
1.3A XC9516A**A**-G
PRODUCT
SERIES
24/25

XC9516
Series
1. The products and product specifications contained herein are subject to change without
notice to improve performance characteristics. Consult us, or our representatives
before use, to confirm that the information in this datasheet is up to date.
2. We assume no responsibility for any infringement of patents, patent rights, or other
rights arising from the use of any information and circuitry in this datasheet.
3. Please ensure suitable shipping controls (including fail-safe designs and aging
protection) are in force for equipment employing products listed in this datasheet.
4. The products in this datasheet are not developed, designed, or approved for use with
such equipment whose failure of malfunction can be reasonably expected to directly
endanger the life of, or cause significant injury to, the user.
(e.g. Atomic energy; aerospace; transport; combustion and associated safety
equipment thereof.)
5. Please use the products listed in this datasheet within the specified ranges.
Should you wish to use the products under conditions exceeding the specifications,
please consult us or our representatives.
6. We assume no responsibility for damage or loss due to abnormal use.
7. All rights reserved. No part of this datasheet may be copied or reproduced without the
prior permission of TOREX SEMICONDUCTOR LTD.
25/25
 Loading...