

XC9135/XC9136 Series
1A Driver Transistor Built-In, Multi Functional Step-Up DC/DC Converters
■GENERAL DESCRIPTION
XC9135/XC9136 series are synchronous step-up DC/DC converters with a 0.2Ω(TYP.) N-channel driver transistor and a 0.2
Ω(TYP.) synchronous P-channel switching transistor built-in. A highly efficient and stable current can be supplied up to 1.0A by
reducing ON resistance of the built-in transistors.
The series are able to start operation under the condition which has 0.9V input voltage to generate 3.3V output voltage with a 33
Ωload resistor, suitable for mobile equipment using only one Alkaline battery or one Nickel metal hydride battery.
During the operation of a shutdown, the load disconnection function enables to cut the current conduction path from the input to
the output.
The output voltage is selectable in 0.1V increments within 1.8~5.0V (±2.0% accuracy).
The UVLO function of the XC9135 series is capable to reduce leaking potassium hydroxide by stopping IC operation while
battery voltage is declining. The release voltages of UVLO are 0.85V (±6.0% accuracy) and 1.6V (±3.0% accuracy), and
selectable voltages range of 0.9V~3.0V.
■APPLICATIONS
●Digital audios
●Digital cameras, Video equipments
●Wireless mice
●Various standard power supplies using batteries
such as alkaline (1 to 3 cells), nickel metal
hydride, or lithium ion (1 cell)
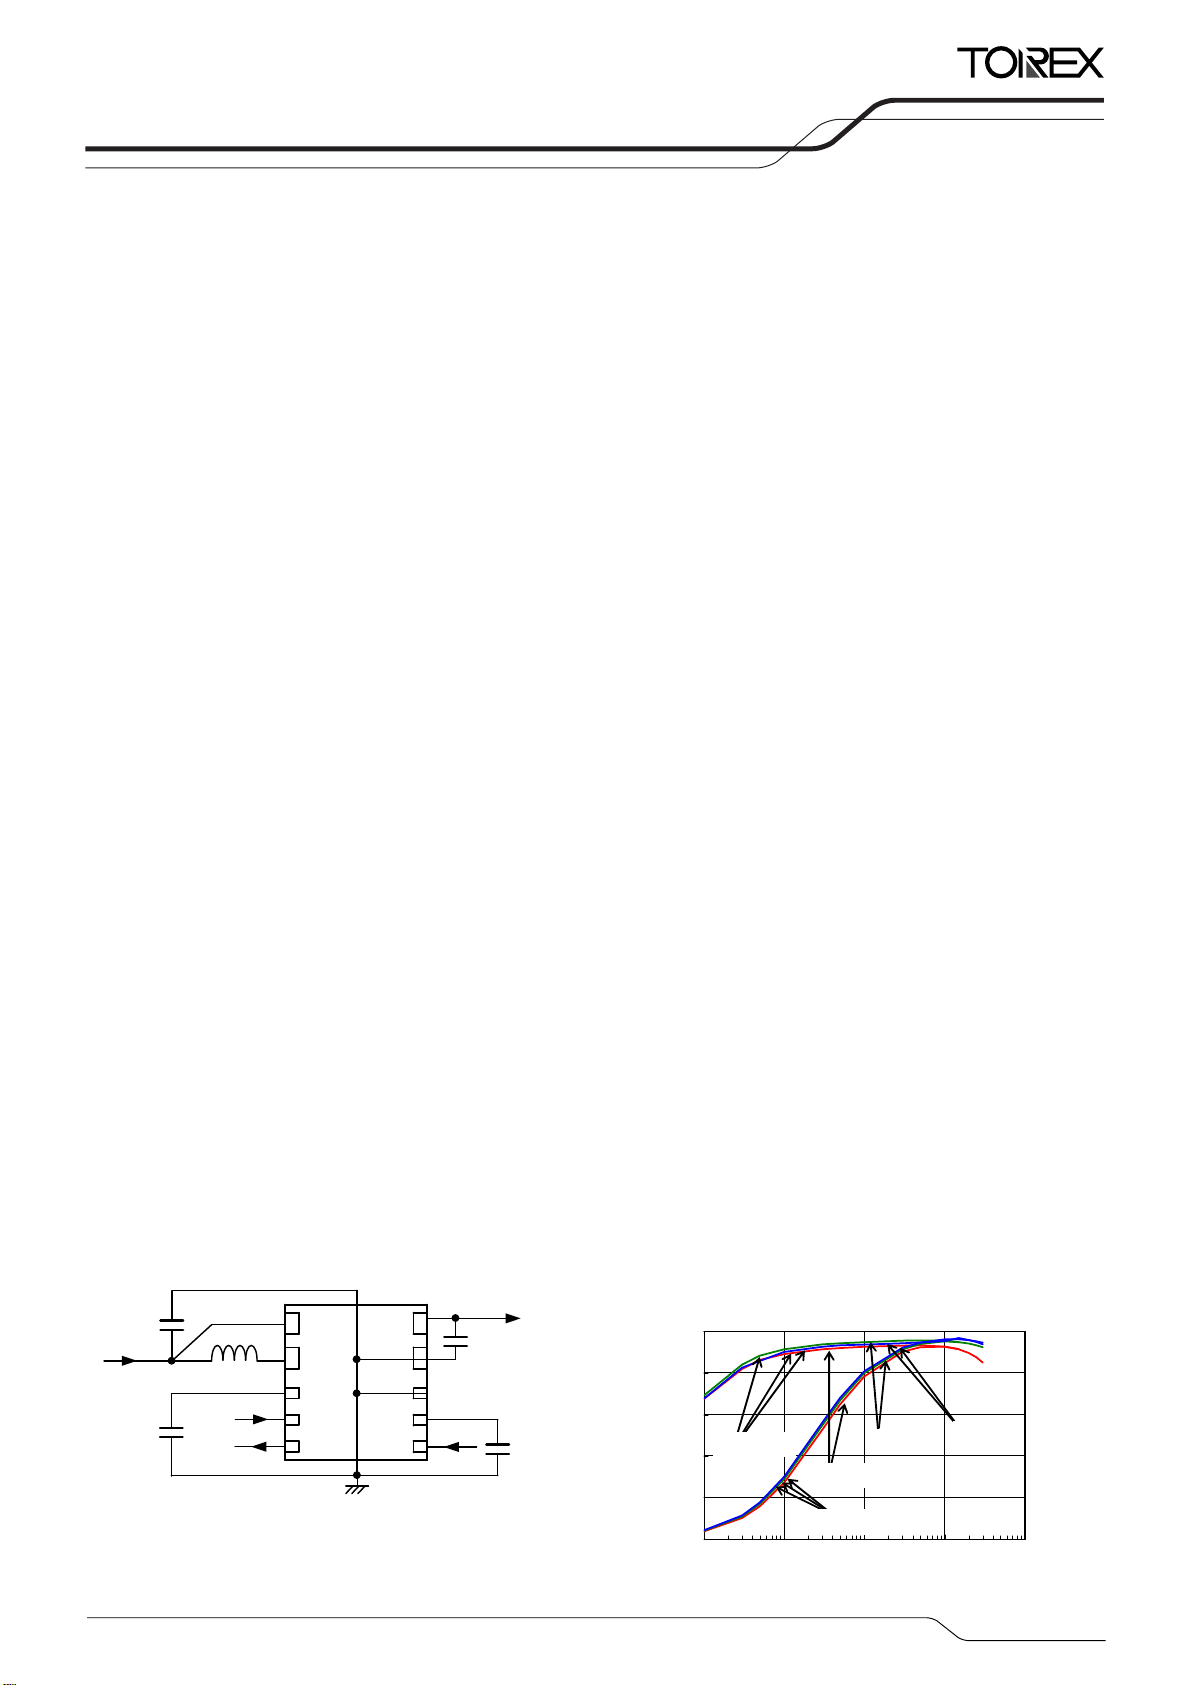
■TYPICAL APPLICATION CIRCUIT
●XC9135 Series
C
IN
V
IN
C
DD
L
MODE
V
BAT
Lx
CDD
MODE
FO
FO
V
OUT
PGND
AGND
CDF
EN
OUT
C
L
EN
Cdf
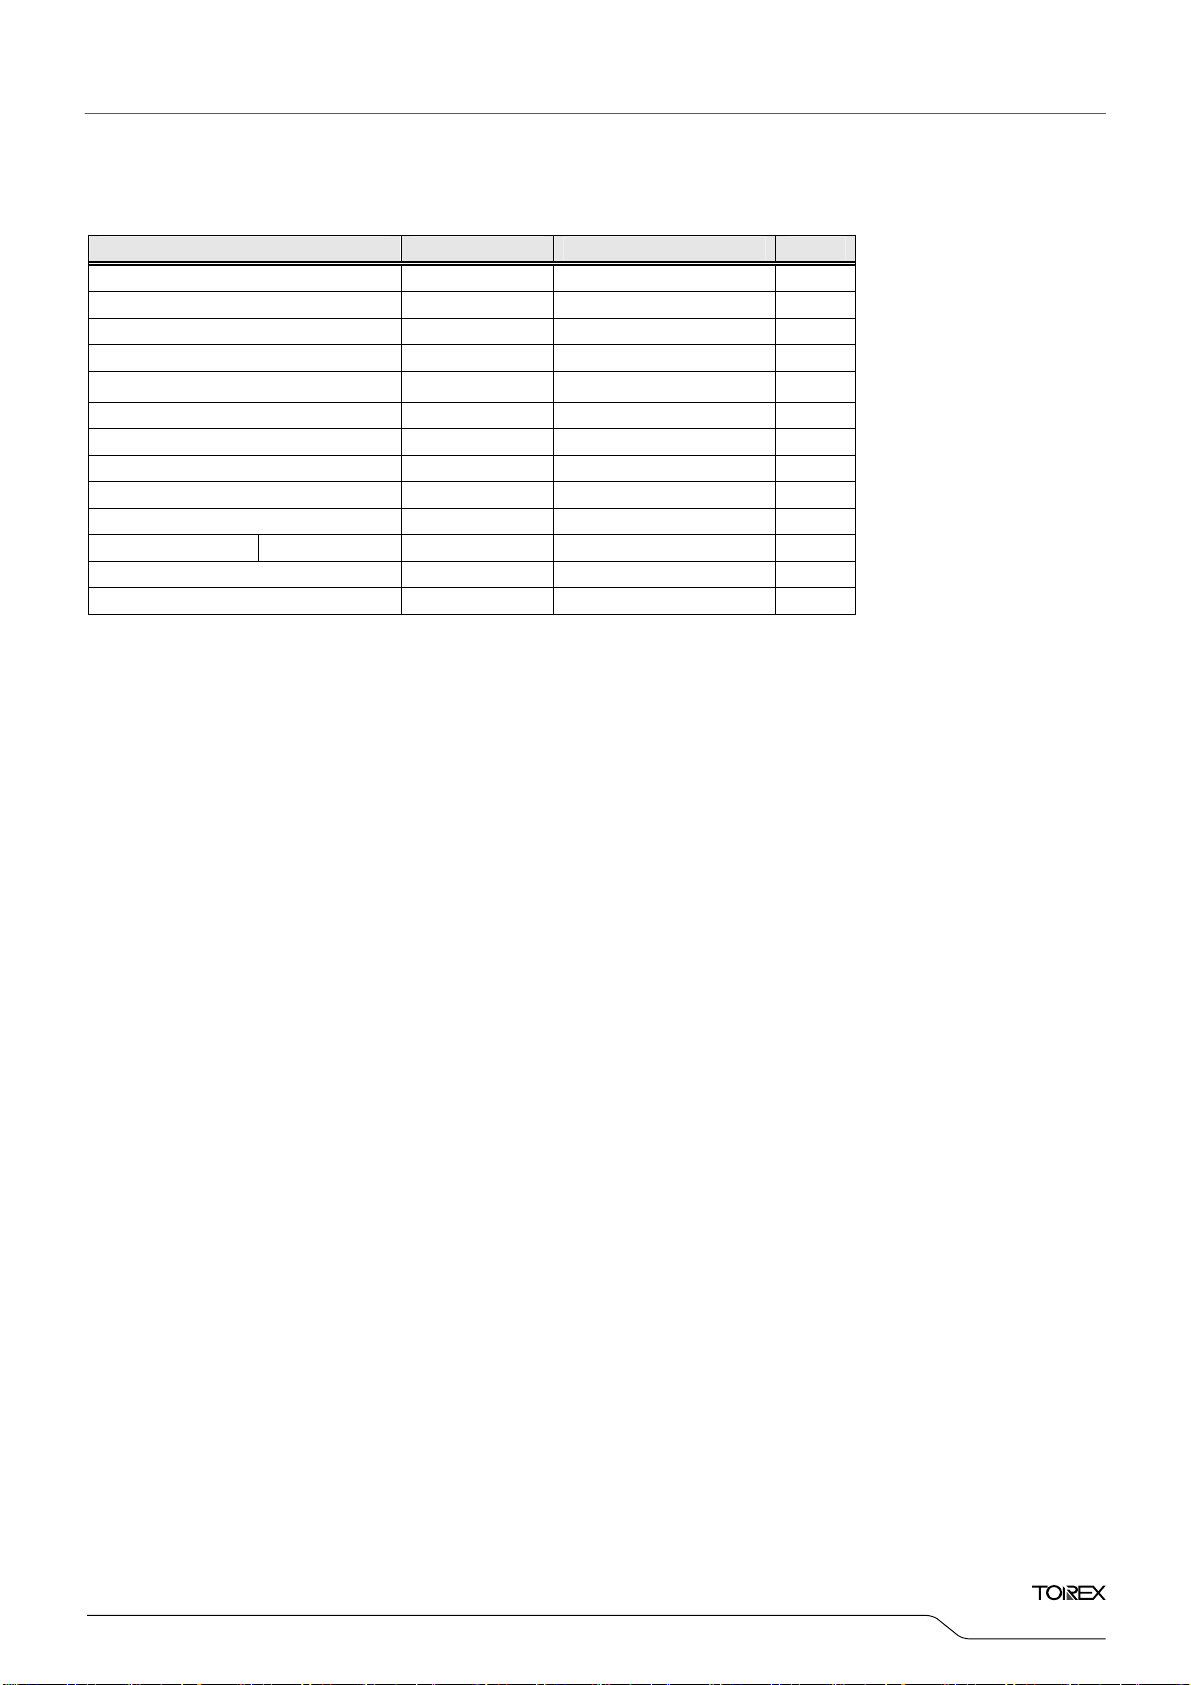
■FEATURES
Input Voltage Range
Fixed Output Voltages
Oscillation Frequency
Input Current
Output Current
Control Mode Selection
Load Transient Response
Protection Circuits
Over-current limit
Integral latch method
Functions
Load Disconnection Function
UVLO
Output Capacitor
Operating Ambient Temperature : -40℃ ~ +85℃
Package
Environmentally Friendly
■TYPICAL PERFORMANCE
CHARACTERISTICS
●Efficiency vs. Output Current
XC9135C32CDR-G (V
L=4.7μH (VLF3014ST-4R7M1R1), CL=22μF (LMK316ABJ226ML)
C
=10μF (JMK212ABJ106KG), CDD=0.47μF (TMK107BJ474KA)
IN
100
80
60
PWM/PFM
40
Efficiency : EFFI (%)
20
0
0.1 1 10 100 1000
Output Current : IOUT (mA)
☆GreenOperation Compatible
: 0.65V~5.5V
: 1.8V~5.0V(0.1V increments)
: 1.2MHz(±15%)
: 1.0A
: 500mA @ V
: PWM or Auto PWM/PFM
:
100mV V
OUT
: Thermal shutdown
: Soft-start
CL Auto Discharge Function
Flag-out Function
: Ceramic Capacitor
: USP-10B
: EU RoHS Compliant, Pb Free
=3.2V)
OUT
2.5V
VIN=1.8V
PWM
ETR0416-001a
=3.3V, VIN=1.8V(TYP.)
OUT
=3.3V,VIN=1.8V,I
3.0V
f
OSC
OUT
=1.2MHz
=1mA→200mA
1/35
XC9135/9136 Series
■PIN CONFIGURATION
FO
MODE
CDD
BAT
5
3
2
Lx
1
USP-10B
(BOTTOMVIEW)
XC9135シリーズ
XC9135 Series XC9136 Series
■PIN ASSIGNMENT
PIN NUMBER
XC9135 series XC9136 series
6
74
8
9
10
EN
CDF
AGND
PGND
VOUT
FO
CDD
BAT
3
2
Lx
1
USP-10B
(BOTTOMVIEW)
XC9136シリーズ
65
74
8
9
10
EN
NCMODE
AGND
PGND
VOUT
PIN NAME FUNCTIONS
1 1 BAT
2 2 Lx
3 3 CDD
Bypass Capacitor Connection
4 4 MODE
5 5 FO
6 6 EN
7 - CDF
UVLO Detect Delay Capacitor Connection
- 7 NC
8 8 AGND
9 9 PGND
10 10 VOUT
* The dissipation pad for the USP-10B package should be solder-plated in recommended mount pattern and metal masking so as to enhance
mounting strength and heat release.
If the pad needs to be connected to other pins, it should be
*Please short the GND pins (pins 8 and 9).
connected to the AGND (No.8) or PGND (No.9) pin.
Power Input
Switching
Mode Switching
Flag Output
Enable
No Connection
Analog Ground
Power Ground
Output Voltage
■FUNCTION CHART
1. EN Pin Function
XC9135/XC9136 series
EN PIN FUNCTIONS
H Operation
L Stop
* Do not leave the EN pin open.
2. MODE Pin Function
XC9135/XC9136 series
MODE PIN FUNCTIONS
H PWM
L PWM/PFM automatic control
* Do not leave the MODE pin open.
2/35
■PRODUCT CLASSIFICATION
●Ordering Information
XC9135①②③④⑤⑥-⑦
XC9136①②③④⑤⑥-⑦
DESIGNATOR
(*1)
・・・・・・・・・・・・・・V
(*1)
・・・・・・・・・・・・・・V
ITEM
product with UVLO integral latch protection
OUT
product
OUT
SYMBOL
UVLO
0.85V
DESCRIPTION
UVLO
UVLO≦1.2V
1.6V
XC9135/XC9136
(*2)
(○・・・With the functions ×・・・Without the functions)
UVLO
DETECT
DELAY
Outside
Standard
UVLO>1.2V
Outside
Standard
LATCH
PROTECTION
Series
CL
AUTO
DISCHARGE
(*3)
①
②③
④
⑤⑥-⑦
XC9135 series
Output voltage
internally fixed(V
OUT
)
A
C
B
K
L
XC9135 series
Semi custom
(*5)
M
R
T
XC9136 series
Output voltage
internally fixed(V
Output Voltage (V
OUT
OUT
)
)
(XC9135A,C Series)
Output Voltage (V
OUT
)
(XC9135B,K/XC9136 Series)
Output Voltage (V
OUT
)
(XC9135L,M,R,T Series)
E
N
28~50
18~50
01~99
Oscillation Frequency C 1.2MHz
(*1)
Package (Order Unit) DR-G
× ○ × × ○ ○ ○
× ○ × × ○ ○ ×
○ × × × ○ ○ ○
○ × × × ○ ○ ×
× × × ○ ○ ○ ○
× × × ○ ○ ○ ×
× × ○ × ○ ○ ○
× × ○ × ○ ○ ×
× × × × × × ○
× × × × × × ×
Output Voltage
e.g. V
OUT
Output Voltage
e.g. V
OUT
Semi custom serial numbers starting from 01
USP-10B (3,000/Reel)
(*4)
=5.0V⇒②=5, ③=0
(*4)
=1.8V⇒②=1, ③=8
(*6)
(*5)
(*1)
The ”-G” suffix indicates that the products are Halogen and Antimony free as well as being fully RoHS compliant.
(*2)
The SYMBOL of DESIGNATOR① is decided by the combination of with or without “UVLO”, “UVLO DETECT DELAY”, “FO”,
“LATCH PROTECTION”, and “C
Example: ○・・・With the functions ×・・・Without the functions
(*3)
Example: ○・・・V
(*4)
The XC9135A, XC9135C, XC9135L, XC9135M limit their selection rang in 2.8V to 5V. The other products have the range from 1.8V to 5V.
(*5)
The XC9135L, XC9135M, XC9135R, XC9135T are semi-custom products. Please consult with your Torex sales contact.
(*6)
The XC9135/XC9136 reels are shipped in a moisture-proof packing.
×・・・V
pin can not be connected to the different output pin such as another supply (AC adaptor).
OUT
pin can be connected to the different output pin such as another supply (AC adaptor).
OUT
DISCHARGE”.
L
The package should only be opened immediately before use. When storage time after the open is long, or receiving the device without the
moisture-proof packing in some reason, please bake the device in 60℃/24h(1 time) for removing moisture before use.
3/35
XC9135/9136 Series
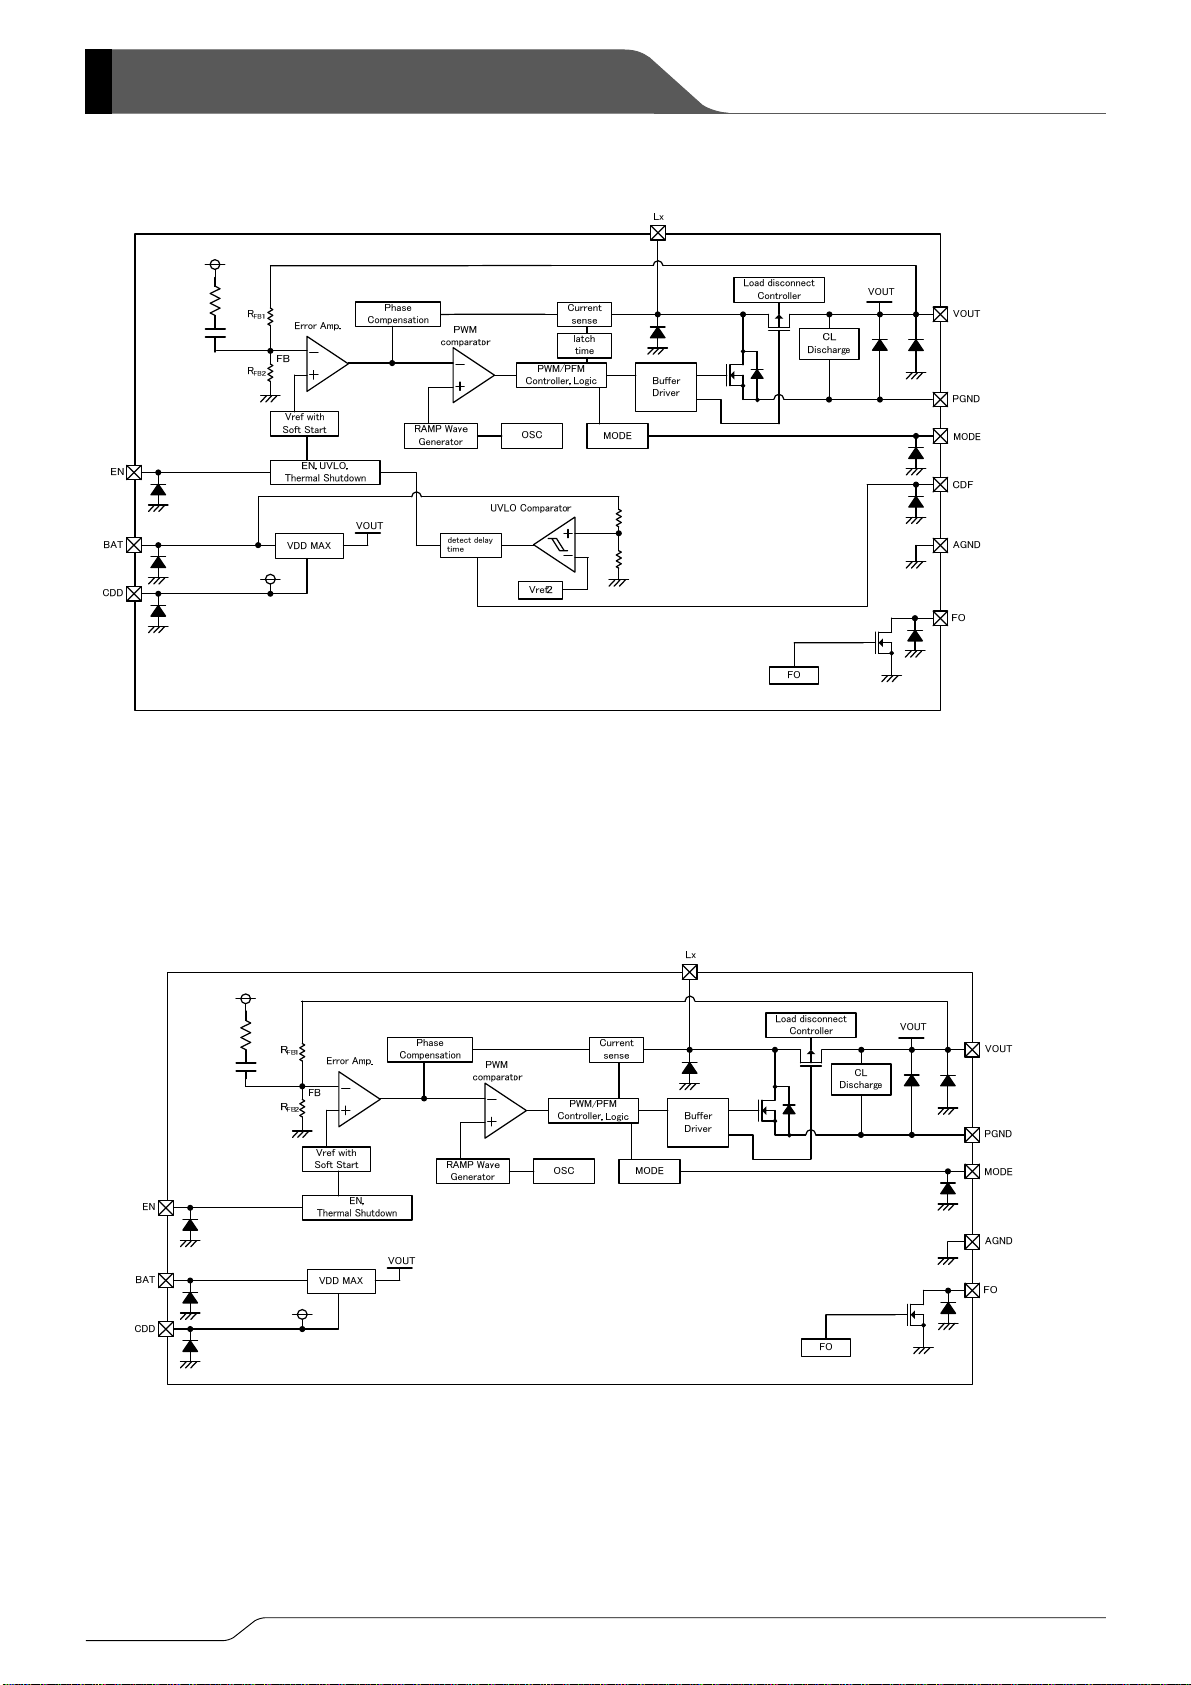
■BLOCK DIAGRAMS
●XC9135A/XC9135B/XC9135L/XC9135R Series
* Diodes inside the circuit are an ESD protection diode and a parasitic diode.
●XC9135C/XC9135K/XC9135M/XC9135T Series
XC9135C/XC9135K/XC9135M/XC9135T series does not have C
●XC9136E Series
*Diodes inside the circuit are an ESD protection diode and a parasitic diode.
●XC9136N Series
XC9136N series does not have C
discharge function.
L
4/35
discharge function.
L
■ABSOLUTE MAXIMUM RATINGS
Ta= 2 5 ℃
PAR AMETER SYMBOL RATINGS UNITS
V
Pin Voltage V
OUT
CDD Pin Voltage V
FO Pin Voltage VFO
OUT
CDD
-0.3~7.0
-0.3~7.0
-0.3~7.0
V
V
V
FO Pin Current IFO 10 mA
CDF Pin Voltage
BAT Pin Voltage V
MODE Pin Voltage V
EN Pin Voltage VEN
Lx Pin Voltage VLx
Lx Pin Current ILx
(*1)
V
CDF
BAT
MODE
-0.3~7.0
-0.3~7.0
-0.3~7.0
-0.3~7.0
-0.3~V
±2000
OUT
+0.3
V
V
V
V
V
mA
Power Dissipation USP-10B Pd 150 mW
Operating Ambient Temperature
Storage Temperature
* AGND and PGND are standard voltage for all of the voltage.
(*1)
For only the XC9135 series. The XC9136 series does not have the CDF pin.
Topr
Tstg
-40 ~ +85 ℃
-55 ~ +125 ℃
XC9135/XC9136
Series
5/35
XC9135/9136 Series
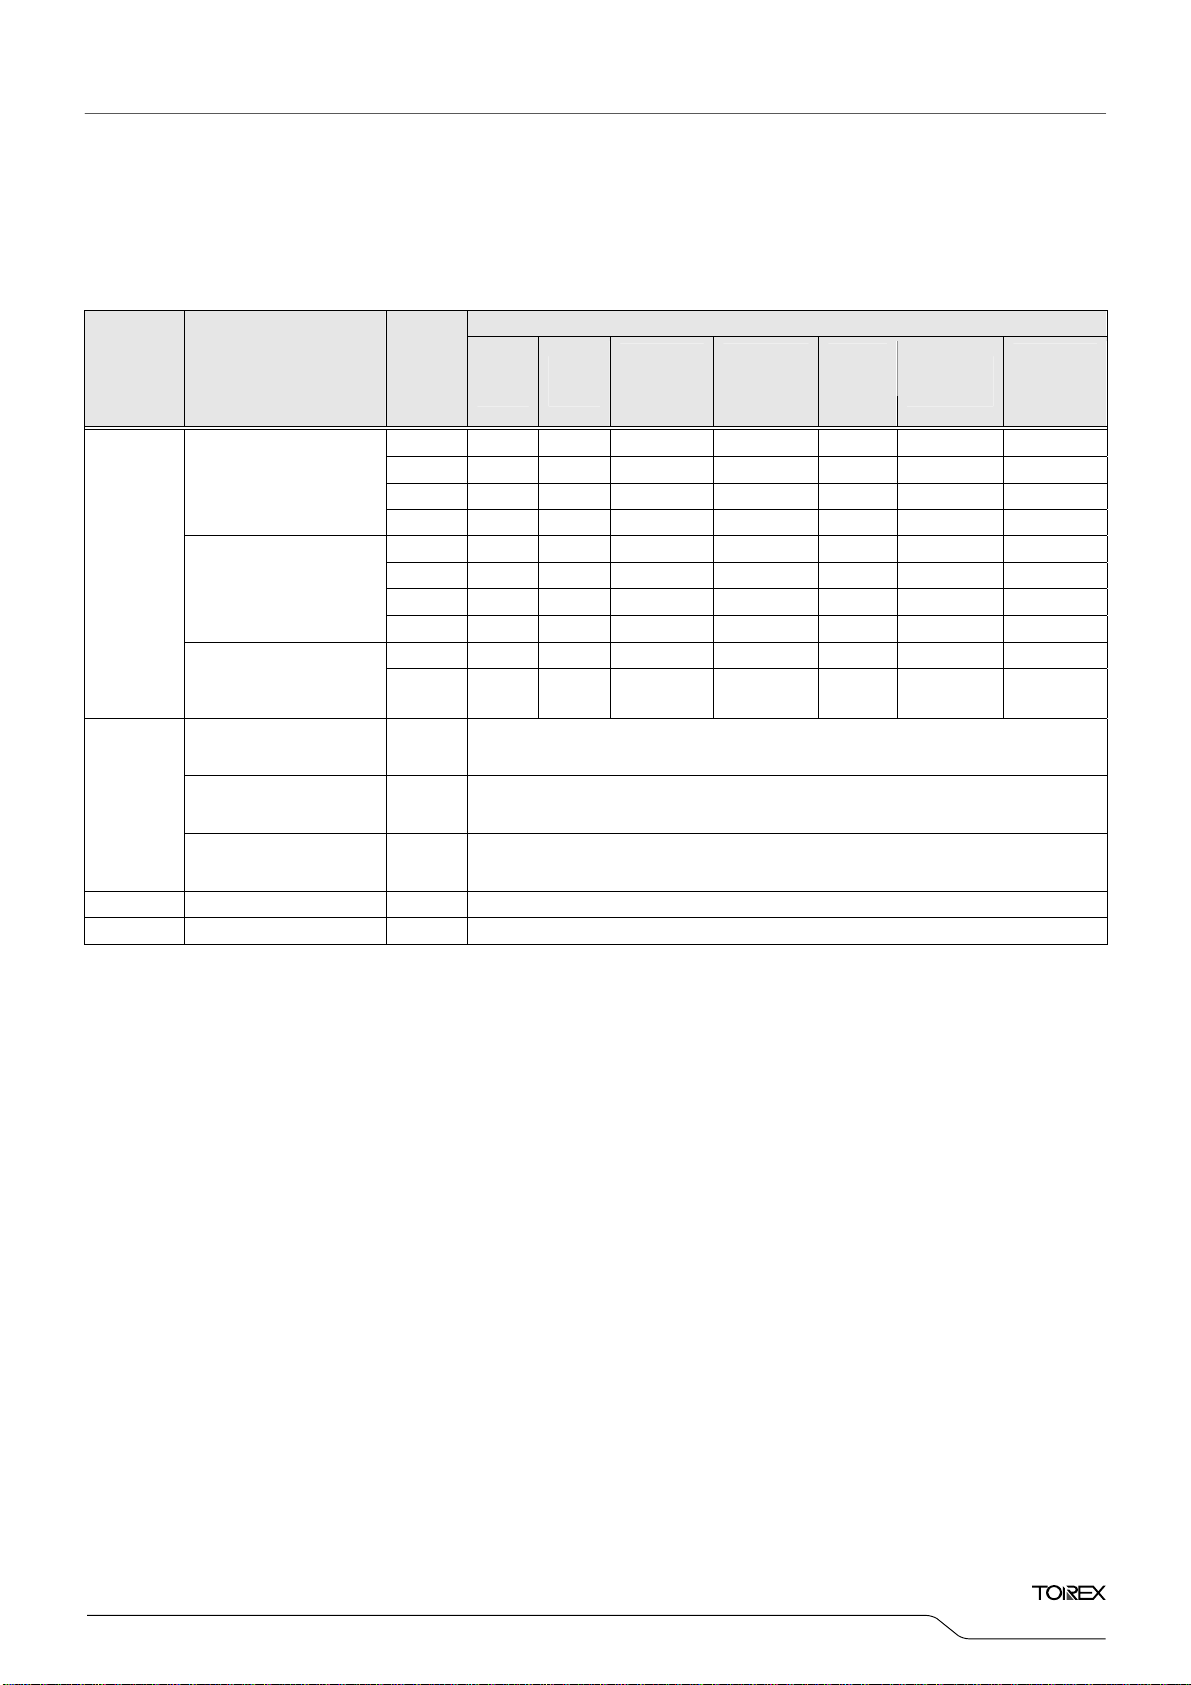
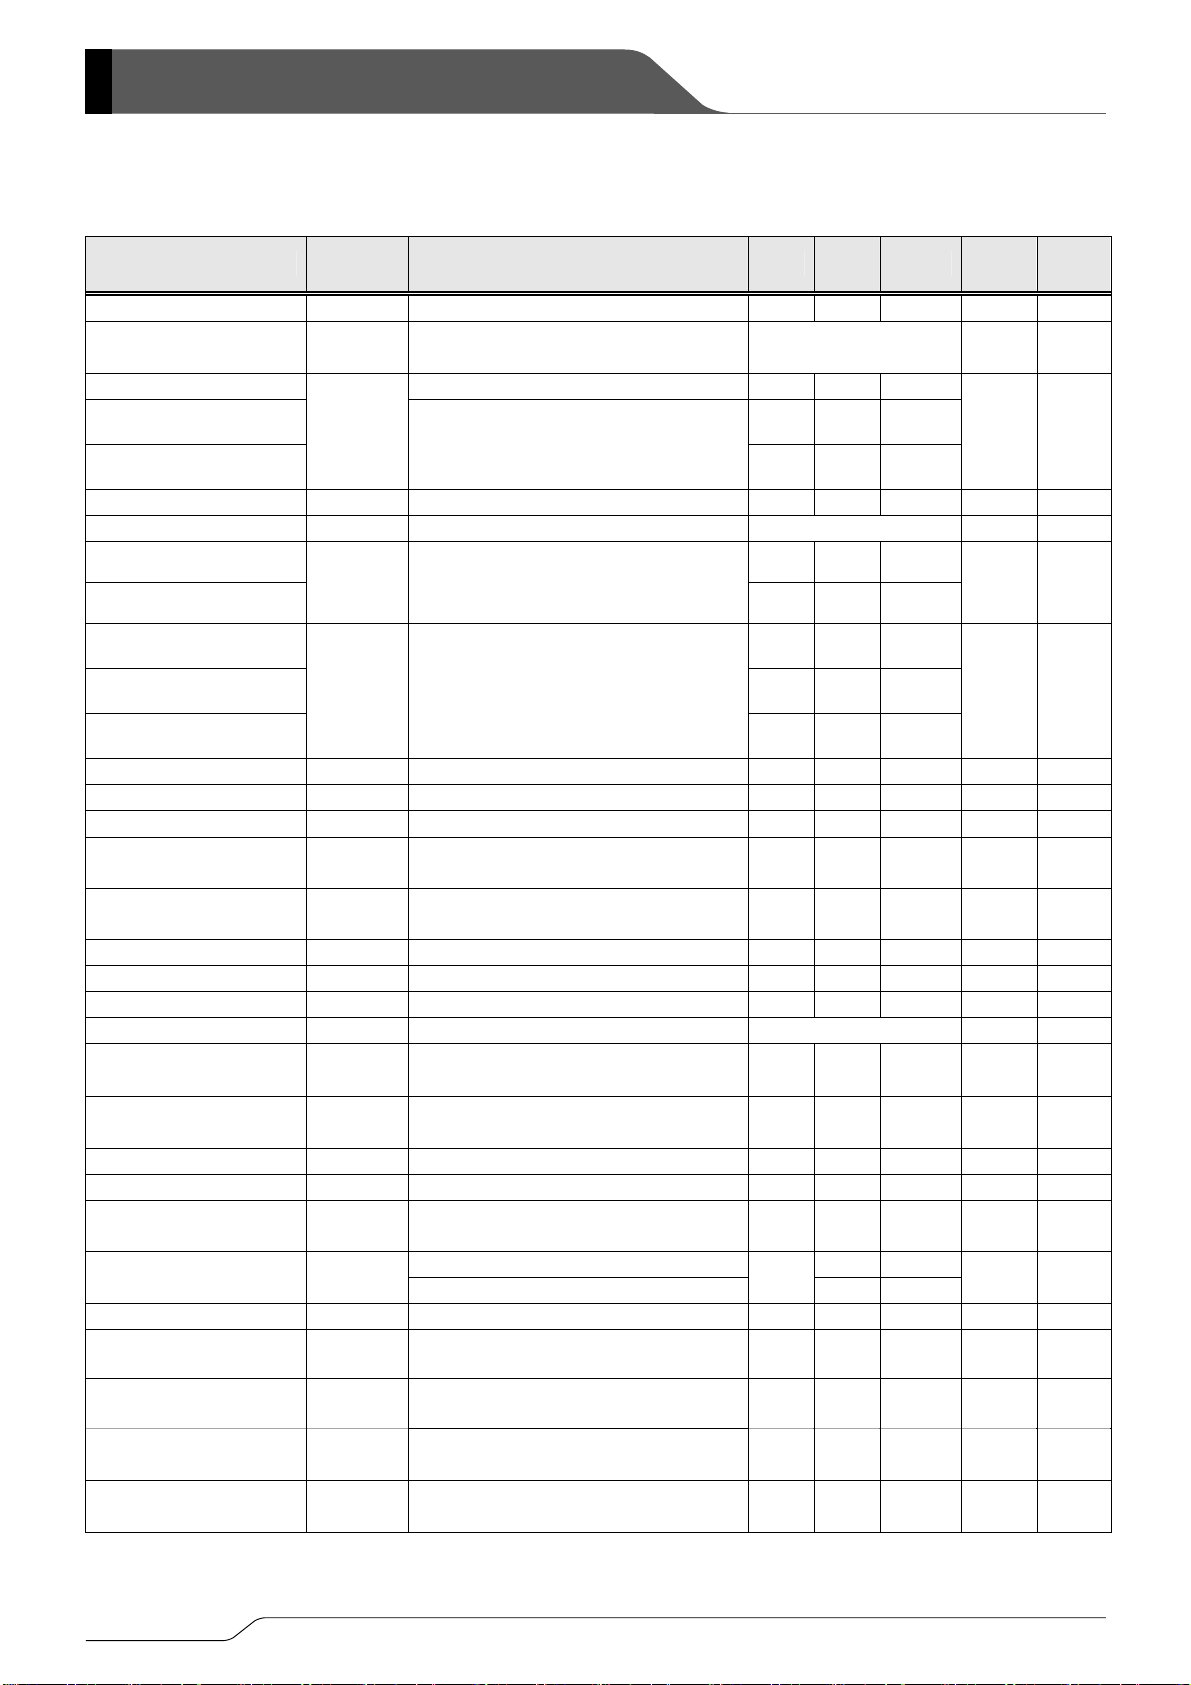
■ELECTRICAL CHARACTERISTICS
● XC9135A/XC9135C/XC9135B/XC9135K
Ta = 25 ℃
PARAMETER SYMBOL CONDITIONS MIN TYP MAX
Input Voltage VIN
Output Voltage V
OUT
V
IN=VUVLO_R(E)
R
is selected with V
L
Operation Start Voltage RL=1kΩ, V
Operation Start Voltage
XC9135A/C
Operation Start Voltage
XC9135B/K
Operation Hold Voltage V
V
ST1
HLD
V
=0V,
MODE
V
≦3.3V,I
OUT(E)
V
>3.3V,I
OUT(E)
RL=1kΩ, V
+0.1V
, Refer to F1 Table
OUT(E)
=0V
MODE
=100mA
OUT
=50mA
OUT
=0V
MODE
5.5 V
E1 V
Supply Current Iq E2
Input Pin Current
XC9135A/C
Input Pin Current
XC9135B/K
Stand-by Current
XC9135A
Stand-by Current
XC9135B
Stand-by Current
XC9135C/K
Lx Leakage Current I
Oscillation Frequency f
Maximum Duty Cycle D
Minimum Duty Cycle D
PFM Switching Current I
Efficiency
(*2)
EFFI I
Lx SW "Pch" ON Resistance R
Lx SW "Nch" ON Resistance
Maximum Current Limit I
Integral Latch Time t
Soft-Start Time tSS
Thermal Shut Temperature T
Hysteresis Width T
CL Discharge Resistance
XC9135A/B
(*8)
R
FO ON Resistance RFO
FO Leakage Current I
FO_LEAK
EN "H" Voltage V
EN "L" Voltage V
MODE "H" Voltage V
MODE "L" Voltage V
I
VIN=V
BAT
I
VIN=V
STB
VIN=VLx=V
LxL
OSC
MAX
MIN
PFM
LxP
R
LxN
LIM
LAT
V
IN=Vpull
V
IN=Vpull
V
IN=VOUT(E)
R
L
V
MODE
R
L
OUT
I
OUT
(*4)
E3 A
V
IN
from becoming FO=”H”
VIN=V
After V
TSD
HYS
DCHG
VIN=V
VEN=3.3V, VFO=0.5V,V
V
EN
-0.2V, VEN=3.3V
OUT(E)
OUT(E)
0.1 2.0
OUT(E)
=(V
OUT(E)+VUVLO_R(E)
=(V
OUT(E)+VUVLO_R(E)
)/2
)/2
+0.5V,
is selected with V
, Refer to F1 Table
OUT(E)
=0V,
is selected with V
=100mA,V
=200mA
MODE
(*3)
0.20
, Refer to F1 Table
OUT(E)
=0V,VFO:OPEN 93 %
=(V
)/2, time to stop Lx oscillation
OUT(E)
=(V
pull
OUT(E)+VUVLO_R(E)
=0V→3.3V, time to FO=L
EN
(*5)
=2.0V
OUT
=3.3V, VFO=0.5V,V
)/2, V
OUT=VOUT(E)
100 200 400 Ω
<3.3V
OUT(E)
≧3.3V
OUT(E)
(*6)
(*6)
×0.95
VFO=5.5V 0 1
ENH
ENL
MODEH
MODEL
=(V
V
IN=Vpull
While VEN=0.20V→0.75V, Voltage to start oscillation
V
IN=Vpull
While VEN=0.75V→0.20V, Voltage to stop oscillation
Voltage for PWM Control
R
is selected with V
L
Voltage for PFM Control
is selected with V
R
L
OUT(E)+VUVLO_R(E)
=(V
OUT(E)+VUVLO_R(E)
)/2,
)/2,
, Refer to F1 Table
OUT(E)
, Refer to F1 Table
OUT(E)
1.1 4.0
1.5 6.0
0.2 3.5
0.2 4.5
1.0 6.0
1.02 1.20 1.38 MHz
86.5 93.0 98.0 %
0 %
250 350 mA
0.5 2.0 4.0 ms
2.6 5.0 8.5 ms
150
20
100
0.75 5.5 V
AGND 0.2 V
0.75 5.5 V
AGND 0.2 V
6/35
V
V
UVLO_R
0.9
V
UVLO_F
0.35
(*1)
0.20
0.35
200 250
150 200
UNITS CIRCUIT
UVLO_R
(*1)
V
(*1)
V
μA ②
μA ⑥
μA ③
μA ④
(*1)
Ω ⑧
(*1)
Ω ⑨
℃
℃
Ω
μA ⑦
①
①
①
⑤
⑤
①
①
①
①
①
⑤
⑥
⑦
⑤
⑤
①
①
XC9135/XC9136
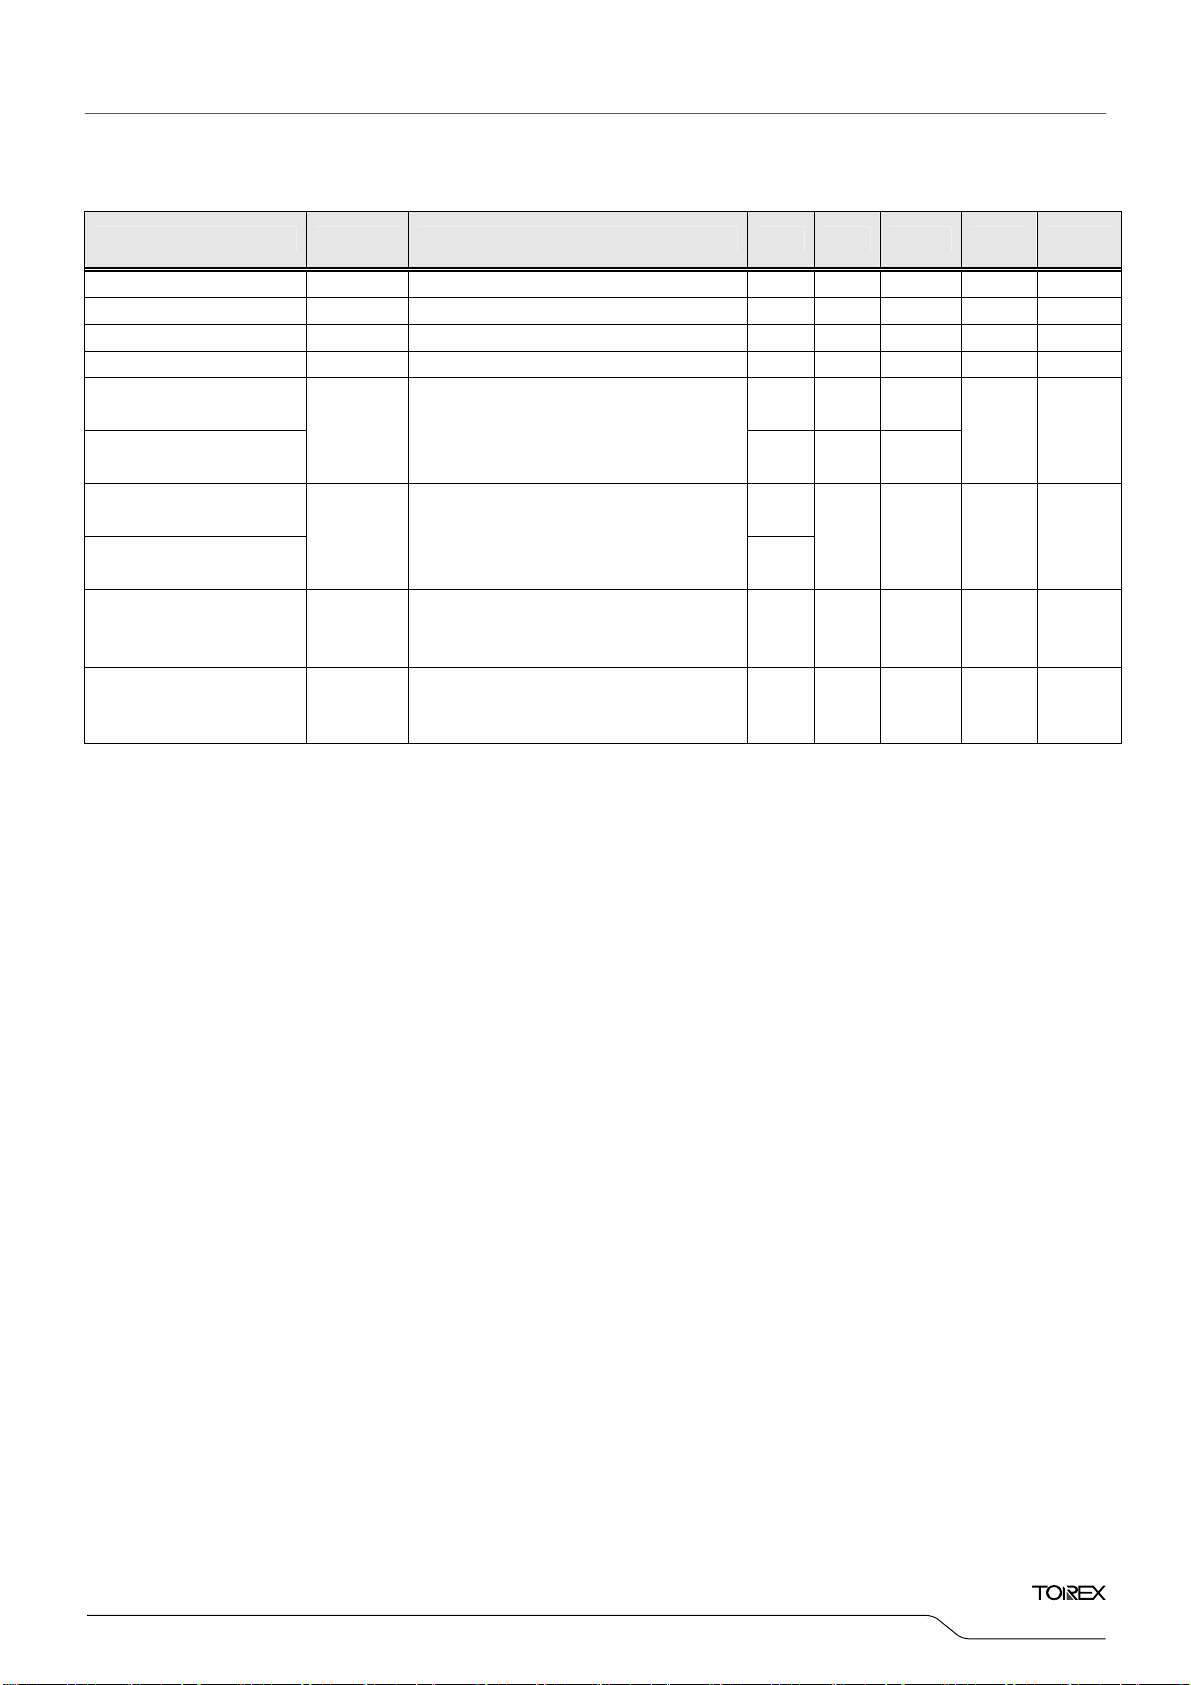
■ELECTRICAL CHARACTERISTICS (Continued)
● XC9135A/XC9135C/XC9135B/XC9135K
PARAMETER SYMBOL CONDITIONS MIN TYP MAX UNITS CIRCUIT
Series
Ta = 25 ℃
EN "H" Current I
EN "L" Current I
MODE "H" Current I
MODE "L" Current I
UVLO Release Voltage
XC9135A/C
UVLO Release Voltage
XC9135B/K
UVLO Hysteresis Width
XC9135A/C
UVLO Hysteresis Width
XC9135B/K
Output Voltage Drop
Protection
XC9135B/K
(*9)
UVLO
Detect Delay
VIN=VEN=5.5V 0.1
ENH
VIN=5.5V,VEN=0V -0.1
ENL
VIN=VEN=V
MODEH
VIN=VEN=5.5V,V
MODEL
V
UVLO_R
RL=1kΩ,While VIN=0.2V→3.3V,
Voltage to start oscillation
=5.5V 0.1
MODE
=0V -0.1
MODE
1.552 1.600 1.648
0.799 0.850 0.901
0.10
(*7)
V
UVLO_HYS
0.05
V
LVP
tDF
While V
oscillation
After V
0.65V,
=1.7V → 1.3V, Voltage to stop
OUT
IN=VPULL
=(V
OUT(E)+VUVLO_R(E)
)/2→
1.4 1.5 1.6
0.5 1.0 1.5
time to stop oscillation
0.14 0.20
External Components: C
=10μF(ceramic), L=2.2μH(VLCF4020 TDK), CDD=0.47μF(ceramic),CL=22μF(ceramic), CDF=1000pF(ceramic)
IN
Test Conditions
For the Circuit No.1, unless otherwise stated, V
For the Circuit No.2, unless otherwise stated, V
For the Circuit No.3, unless otherwise stated, V
For the Circuit No.4, unless otherwise stated, V
For the Circuit No.5, unless otherwise stated, V
For the Circuit No.6, unless otherwise stated, V
For the Circuit No.7, unless otherwise stated, V
For the Circuit No.8, unless otherwise stated, V
For the Circuit No.9, unless otherwise stated, V
=(V
IN
OUT(E)+VUVLO_R(E)
IN=VEN=VOUT(E)
OUT=VEN=VMODE
OUT=VEN=VMODE
=1.5V, V
IN=Vpull
OUT=VOUT(E)
IN=VOUT(E)
IN=VLX=VOUT(E)
=1.1V,V
IN
+0.5V, VEN=V
+0.5V, VEN=V
OUT
)2,VEN=V
+0.5V, V
MODE=VFO
=0V(GND connected),CDF:OPEN
MODE
=0V(GND connected),CDF:OPEN
=0V(GND connected),CDF:OPEN
OUT=VEN=VMODE=VFO=VOUT(E)-
=0V(GND connected),CDF:OPEN
MODE
=0V(GND connected),CDF:OPEN
MODE
+0.5,VEN=V
=1.6V,VEN=3.3V,V
=3.3V,CDF:OPEN
MODE
MODE=VFB(CDF
= Output Voltage Setting V
V
OUT(E)
V
UVLO_F=VUVLO_R-VUVLO_HYS
=UVLO Voltage Setting
UVLO_R(E)
(*1) Designed value
(*2) Efficiency =[{(output voltage) X (output current)} ÷ {(input voltage) X (input current)} ] X 100
SW "P-ch" ON resistance=(VLx-V
(*3) L
X
(*4) Testing method of L
(*5) C
Discharge resistance
L
(*6) FO ON resistance = V
SW "N-ch" ON resistance is stated at test circuits.
X
= V
÷ V
OUT
÷ FO pin measure current
FO
(*7) The Voltage is a difference between V
(*8) The XC9135C,XC9135K series does not have C
pin test voltage)÷200mA
OUT
pin measure current
OUT
and the voltage to stop oscillation for Lxpin while VIN=V
UVLO_R
discharge function. For XC9135A, XC9135B.
L
(*9) The XC9135A,XC9135C series does not have output voltage drop protection. For XC9135B, XC9135K.
=3.3V
→0.2V.RL=1kΩ
UVLO_R
μA ②
μA ②
μA ②
μA ②
V ①
V ①
V ⑤
ms ⑤
0.1V,
)=0V(GND connected)
7/35
XC9135/9136 Series
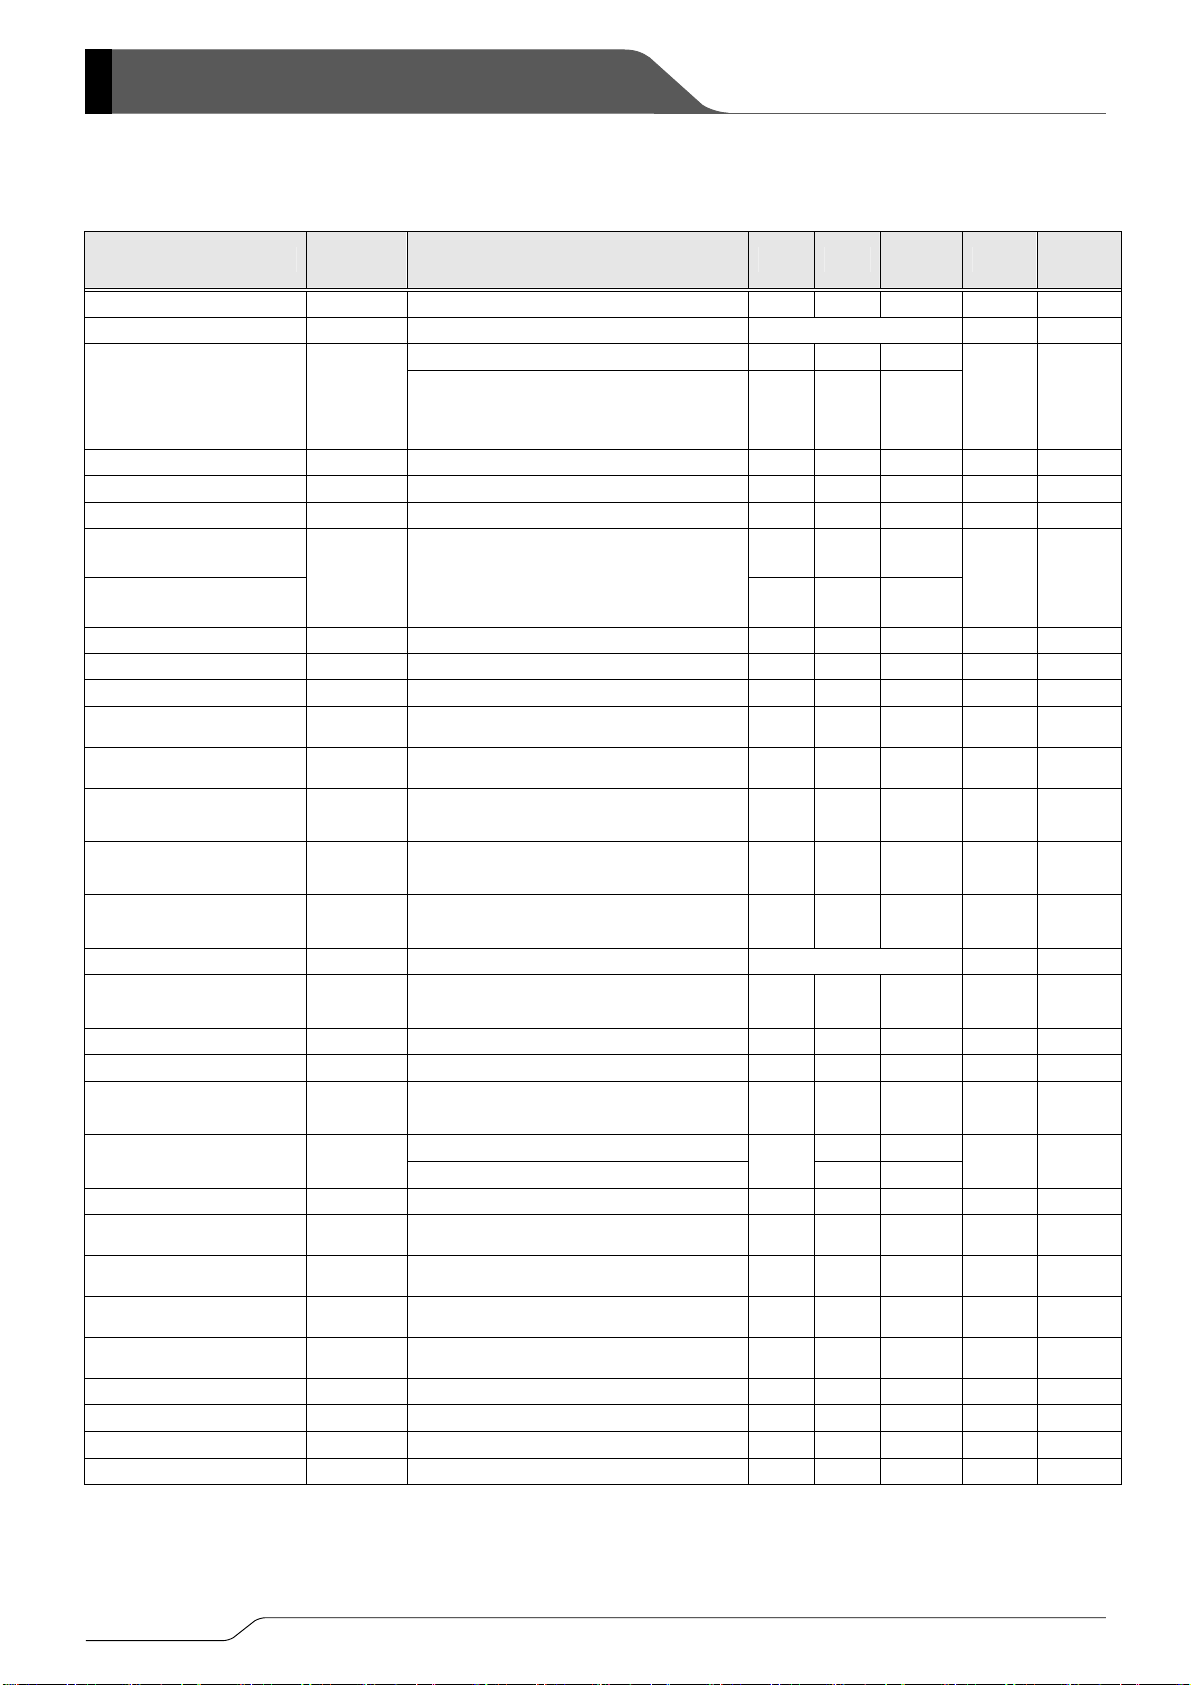
■ELECTRICAL CHARACTERISTICS (Continued)
●XC9136E/XC9136N
PARAMETER SYMBOL CONDITIONS MIN TYP MAX UNITS CIRCUIT
Ta =2 5 ℃
Input Voltage VIN
Output Voltage V
Operation Start Voltage V
Operation Hold Voltage V
RL is selected with V
OUT
RL=1kΩ, V
V
MODE
ST1
HLD
V
OUT(E)
V
OUT(E)
RL=1kΩ, V
MODE
=0V,
≦3.3V,I
>3.3V,I
MODE
, Refer to F1 Table E1 V
OUT(E)
=0V 0.85
=100mA
OUT
=50mA
OUT
=0V 0.65 V
5.5 V
Supply Current Iq 36 52
Input Pin Current I
Stand-by Current
XC9136E
Stand-by Current
XC9136N
Lx Leakage Current I
Oscillation Frequency f
Maximum Duty Cycle D
Minimum Duty Cycle D
PFM Switching Current I
Efficiency
(*2)
EFFI
Lx SW "Pch" ON Resistance R
VIN=V
BAT
-0.2V, VEN=3.3V 0.65 2.15
OUT(E)
0.1 2.0
I
VIN=V
STB
OUT(E)
0.9 5.0
VIN=VLx=V
LxL
VIN=V
OSC
86.5 93.0 98.0 %
MAX
MIN
PFM
I
LxP
pull=VOUT(E)
V
IN=VOUT(E)
R
is selected with V
L
=0V,
V
MODE
R
is selected with V
L
=(V
V
IN
I
=100mA,V
OUT
=200mA
OUT
0.1 2.0
OUT(E)
/2 1.02 1.20 1.38 MHz
+0.5V,
OUT(E)
, Refer to F1 Table
OUT(E)
, Refer to F1 Table
OUT(E)
+0.85V)/2,
=0V,VFO:OPEN
MODE
(*3)
0.20
0 %
250 350 mA
93 %
0.9
0.35
(*1)
(*1)
①
V
①
①
μA ②
μA ⑥
μA ③
μA ④
⑤
⑤
①
①
①
Ω
⑧
Lx SW "Nch" ON Resistance R
Maximum Current Limit I
Soft-Start Time tSS
Thermal Shut Temperature T
Hysteresis Width T
CL Discharge Resistance
XC9136E
(*7)
FO ON Resistance RFO
FO Leakage Current I
EN "H" Voltage V
EN "L" Voltage V
MODE "H" Voltage V
MODE "L" Voltage V
EN "H" Current I
EN "L" Current I
MODE "H" Current I
MODE "L" Current I
(*4)
LxN
LIM
TSD
HYS
R
DCHG
FO_LEAK
ENH
ENL
MODEH
MODEL
VIN=VEN=5.5V 0.1
ENH
VIN=5.5V,VEN=0V -0.1
ENL
MODEH
MODEL
V
IN
V
IN=Vpull
V
EN
=(V
+0.85V)/2
OUT(E)
=1.6V, V
OUT=VOUT(E)
×0.95
=0V→3.3V, voltage to start oscillation
2.6 5.0 8.5 ms
VIN=V
OUT
VEN=3.3V, VFO=0.5V,V
=3.3V, VFO=0.5V,V
V
EN
=2.0V
(*5)
100 200 400 Ω
(*6)
OUT(E)
OUT(E)
<3.3V
≧3.3V
(*6)
100
VFO=5.5V 0 1
V
=1.6V,
IN=Vpull
While VEN=0.20V→0.75V, Voltage to start oscillation
V
=1.6V,
IN=Vpull
While VEN=0.75V→0.20V, Voltage to stop oscillation
Voltage for PFM Control
R
is selected with V
L
Voltage for PWM Control
R
is selected with V
L
VIN=VEN=V
MODE
VIN=VEN=5.5V,V
=5.5V 0.1
MODE
, Refer to F1 Table
OUT(E)
, Refer to F1 Table
OUT(E)
=0V -0.1
0.75 5.5 V ⑤
AGND 0.2 V ⑤
0.75 5.5 V ①
AGND 0.2 V ①
0.20
(*1)
E3 A
150
20
200 250
150 200
(*1)
0.35
Ω
⑨
①
⑤
℃
℃
⑥
Ω
⑦
μA ⑦
μA ②
μA ②
μA ②
μA ②
8/35

■ELECTRICAL CHARACTERISTICS (Continued)
●XC9136E/XC9136N
External Components: CIN=10μF(ceramic), L=2.2μH(VLCF4020 TDK), CDD=0.47μF(ceramic),CL=22μF(ceramic)
Test Conditions
For the Circuit No.1, unless otherwise stated, Circuit No.1 V
For the Circuit No.3, unless otherwise stated, V
For the Circuit No.4, unless otherwise stated, V
For the Circuit No.5, unless otherwise stated, V
For the Circuit No.6, unless otherwise stated, V
For the Circuit No.7, unless otherwise stated, V
For the Circuit No.8, unless otherwise stated, V
For the Circuit No.9, unless otherwise stated, V
For the Circuit No.2, unless otherwise stated, Circuit No.2 VIN=VEN=V
OUT=VEN=VMODE
OUT=VEN=VMODE
IN=Vpull
OUT=VOUT(E)
IN=VOUT(E)
IN=VLX=VOUT(E)
=1.1V,V
IN
=1.6V,VEN=V
IN
OUT(E)
=0V(GND connected)
=0V(GND connected)
=1.5V, V
OUT=VEN=VMODE=VFO=VOUT(E)-
+0.5V, VEN=V
+0.5V, VEN=V
+0.5,VEN=V
=1.6V,VEN=3.3V,V
OUT
+
0.5V, V
= Output Voltage Setting
V
OUT(E)
(*1) Designed value
(*2) Efficiency =[{(output voltage) X (output current)} ÷ {(input voltage) X (input current)}] X 100
SW "P-ch" ON resistance=(VLx-V
(*3) L
X
(*4) Testing method of L
(*5) C
Discharge resistance
L
(*6) FO ON resistance = V
SW "N-ch" ON resistance is stated at test circuits.
X
= V
÷ V
OUT
÷ FO pin measure current
FO
(*7) The XC9136NSeries does not have C
pin test voltage)÷200mA
OUT
pin measure current
OUT
discharge function. For XC9136E.
L
=3.3V
MODE
=0V(GND connected)
MODE
=0V(GND connected)
MODE
=0V
MODE
=3.3V
MODE
=0V(GND connected)
MODE
XC9135/XC9136
Series
0.1V
9/35
XC9135/9136 Series
■ELECTRICAL CHARACTERISTICS (Continued)
●XC9135L/XC9135M/XC9135R/XC9135T
PARAMETER SYMBOL CONDITIONS MIN TYP MAX UNITS CIRCUIT
Ta =2 5 ℃
Input Voltage VIN 5.5 V
Output Voltage Accuracy
(*10)
V
Operation Start Voltage V
Operation Hold Voltage V
OUT
R
is selected with V
L
V
IN=VUVLO_R(E)
RL=1kΩ, V
V
MODE
V
OUT(E)
V
ST1
HLD
OUT(E)
V
MODE
V
OUT(E)
V
OUT(E)
RL=1kΩ, V
MODE
=0V,V
≦3.3V,I
>3.3V,I
=0V,V
≦3.3V,I
>3.3V,I
MODE
+0.1V
, Refer to F1 Table
OUT(E)
-2 2 %
=0V V
≧1.0,
UVLO_R(E)
=100mA
OUT
=50mA
OUT
<1.0,
UVLO_R(E)
=100mA
OUT
=50mA
OUT
=0V V
V
UVLO_F
V
Current Limit Iq E2
Input Pin Current I
Stand-by Current
XC9135L
Stand-by Current
XC9135R
Stand-by Current
XC9135M/T
Lx Leakage Current I
Oscillation Frequency f
Maximum Duty Cycle D
Minimum Duty Cycle D
PFM Switching Current I
Efficiency
(*2)
EFFI I
Lx SW "Pch" ON Resistance R
VIN=V
BAT
I
VIN=V
STB
VIN=VLx=V
LxL
I
V
V
V
R
V
R
OUT
OUT
OSC
MAX
MIN
PFM
LxP
-0.2V, VEN=3.3V 1.1 6.0
OUT(E)
OUT(E)
0.1 2.0
OUT(E)
=(V
IN=Vpull
IN=Vpull
IN=VOUT(E)
is selected with V
L
MODE
is selected with V
L
OUT(E)+VUVLO_R(E)
=(V
OUT(E)+VUVLO_R(E)
+0.5V
=0V,
=100mA,V
=200mA
MODE
(*3)
0.20
0.2 3.5
0.2 4.5
1.0 6.0
)/2
)/2
, Refer to F1 Table
OUT(E)
, Refer to F1 Table
OUT(E)
1.02 1.20 1.38 MHz
86.5 93.0 98.0 %
0 %
250 350 mA
=0V,VFO:OPEN 93 %
UVLO_R
UVLO_R
0.9
0.35
(*1)
(*1)
(*1)
V
μA ②
μA ⑥
μA ③
μA ④
Ω
①
①
①
⑤
⑤
①
①
①
⑧
Lx SW "Nch" ON Resistance R
Maximum Current Limit I
Integral Latch Time t
Soft-Start Time tSS
Thermal Shut Temperature T
Hysteresis Width T
CL Discharge Resistance
XC9135L/R
(*8)
FO ON Resistance RFO
FO Leakage Current I
10/35
(*4)
LxN
E3 A
LIM
LAT
150
TSD
20
HYS
R
DCHG
FO_LEAK
V
=(V
IN
becoming FO=”H”.
V
IN=Vpull
V
OUT=VOUT(E)
After V
VIN=V
VEN=3.3V, VFO=0.5V,V
V
EN
)/2, time to stop Lx oscillation from
OUT(E)
=(V
OUT(E)+VUVLO_R(E)
)/2,
×0.95
=0V→3.3V, time to start FO=L.
EN
(*5)
=2.0V
OUT
=3.3V, VFO=0.5V,V
100 200 400 Ω
<3.3V
OUT(E)
≧3.3V
OUT(E)
(*6)
(*6)
0.5 2.0 4.0 ms
2.6 5.0 8.5 ms
100
VFO=5.5V 0 1
0.20
(*1)
0.35
200 250
150 200
(*1)
Ω
℃
℃
Ω
μA ⑦
⑨
①
①
⑤
⑥
⑦

XC9135/XC9136
■ELECTRICAL CHARACTERISTICS (Continued)
●XC9135L/XC9135M/XC9135R/XC9135T
PARAMETER SYMBOL CONDITIONS MIN TYP MAX UNITS CIRCUIT
Series
Ta =2 5 ℃
EN "H" Voltage V
EN "L" Voltage V
MODE "H" Voltage V
MODE "L" Voltage V
EN "H" Current I
EN "L" Current I
MODE "H" Current I
MODE "L" Current I
UVLO Release Voltage V
Hysteresis Width
V
Output Voltage Drop
Protection
XC9135R/T
(*9)
UVLO Detect Delay tDF
=(V
V
ENH
ENL
MODEH
MODEL
ENH
ENL
MODEH
MODEL
UVLO_R
UVLO_HYS
V
LVP
While VEN=0.20V→0.75V, Voltage to start oscillation
V
IN=Vpull
While VEN=0.75V→0.20V, Voltage to stop oscillation
Voltage for PFM Control
R
is selected with V
L
Voltage for PWM Control
R
is selected with V
L
VIN=VEN=5.5V 0.1
VIN=5.5V,VEN=0V -0.1
VIN=VEN=V
VIN=VEN=5.5V,V
R
=1kΩ,While VIN=0.2V→3.3V,
L
Voltage to start oscillation
(*7)
(*7)
While V
oscillation
IN=Vpull
After V
OUT(E)+VUVLO_R(E)
=(V
OUT(E)+VUVLO_R(E)
=5.5V 0.1
MODE
MODE
0.9≦V
2.0<V
OUT
IN
UVLO_R(E
=(V
≦2.0
UVLO_R(E
)
≦3.0
)
=1.7V→1.3V, Voltage to stop
OUT(E)+VUVLO_R(E)
time to stop oscillation
)/2,
)/2,
, Refer to F1 Table
OUT(E)
, Refer to F1 Table
OUT(E)
0.75 5.5 V
AGND 0.2 V
0.75 5.5 V
AGND 0.2 V
=0V -0.1
0.10 UVLO
0.05
1.4 1.5 1.6
)/2→0.65V,
0.5 1.0 1.5
External Components
Test Conditions
For the Circuit No.3, unless otherwise stated, V
For the Circuit No.4, unless otherwise stated, V
For the Circuit No.5, unless otherwise stated, V
For the Circuit No.6, unless otherwise stated, V
For the Circuit No.7, unless otherwise stated, V
For the Circuit No.8, unless otherwise stated, V
For the Circuit No.9, unless otherwise stated, V
= Output Voltage Setting V
V
OUT(E)
V
UVLO_F=VUVLO_R-VUVLO_HYS
(*1) Designed value
(*2) Efficiency =[ {(output voltage) X (output current)} ÷ {(input voltage) X (input current)} ] X 100
SW "P-ch" ON resistance=(VLx-V
(*3) L
X
(*4) Testing method of L
(*5) C
Discharge resistance
L
(*6) FO ON resistance = V
(*7) The Voltage is a difference between V
(*8) The XC9135M,XC9135T series does not have C
(*9) The XC9135L,XC9135M series does not have output voltage drop protection. For XC9135R, XC9135T.
CIN=10μF(ceramic), L=2.2μH(VLCF4020 TDK), CDD=0.47μF(ceramic),CL=22μF(ceramic), CDF=1000pF(ceramic)
:
For the Circuit No.1, unless otherwise stated, V
For the Circuit No.2, unless otherwise stated, V
=UVLO Voltage Setting
UVLO_R(E)
=(V
IN
OUT(E)+VUVLO_R(E)
IN=VEN=VOUT(E)
OUT=VEN=VMODE
OUT=VEN=VMODE
=1.5V, V
IN=Vpull
OUT=VOUT(E)
IN=VOUT(E)
IN=VLX=VOUT(E)
=1.1V,V
IN
+0.5V, VEN=V
+0.5V, VEN=V
OUT
)2,VEN=V
+0.5V, V
MODE=VFO
=0V(GND connected),CDF:OPEN
MODE
=0V(GND connected),CDF:OPEN
=0V(GND connected),CDF:OPEN
OUT=VEN=VMODE=VFO=VOUT(E)-
=0V(GND connected),CDF:OPEN
MODE
=0V(GND connected),CDF:OPEN
MODE
+0.5,VEN=V
=1.6V,VEN=3.3V,V
=3.3V,CDF:OPEN
MODE
MODE=VFB(CDF
pin test voltage)÷200mA
OUT
SW "N-ch" ON resistance is stated at test circuits.
X
= V
÷ V
OUT
÷ FO pin measure current
FO
pin measure current
OUT
and the voltage to stop oscillation for Lxpin while VIN=V
UVLO_R
discharge function. For XC9135L, XC9135R.
L
E4
0.14 0.20
=3.3V
0.1V,
)=0V(GND connected)
→0.2V.RL=1kΩ
UVLO_R
⑤
⑤
①
①
μA ②
μA ②
μA ②
μA ②
V ①
V ①
V ⑤
ms ⑤
11/35

XC9135/9136 Series
■XC9135/XC9136 Series Voltage Chart
SYMBOL
PARAMETER
V V
E1 E2 E3
Output Voltage
Error margin
Supply Current Maximum Current Limit
μA
A
Output voltage MIN MAX TYP MAX MIN TYP MAX
1.8* 1.764 1.836 35 50 0.98 1.85
1.9* 1.862 1.938 36 50 1.03 1.85
2.0* 1.960 2.040 36 50 1.09 1.85
2.1* 2.058 2.142 36 50 1.14 1.85
2.2* 2.156 2.244 36 50 1.18 1.85
2.3* 2.254 2.346 36 50 1.23 1.85
2.4* 2.352 2.448 36 50 1.27 1.85
2.5* 2.450 2.550 36 50 1.31 1.85
2.6* 2.548 2.652 36 50 1.34 1.85
2.7* 2.646 2.754 36 50 1.37 1.85
2.8 2.744 2.856 37 50 1.40 1.85
2.9 2.842 2.958 37 50 1.42 1.85
3.0 2.940 3.060 37 50 1.15 1.45 1.85
3.1 3.038 3.162 37 51 1.17 1.47 1.85
3.2 3.136 3.264 37 51 1.18 1.49 1.87
3.3 3.234 3.366 37 52 1.19 1.50 1.89
3.4 3.332 3.468 37 52 1.21 1.52 1.91
3.5 3.430 3.570 37 52 1.22 1.53 1.92
3.6 3.528 3.672 37 53 1.22 1.54 1.94
3.7 3.626 3.774 38 53 1.23 1.55 1.95
3.8 3.724 3.876 38 54 1.24 1.56 1.96
3.9 3.822 3.978 38 54 1.25 1.57 1.97
4.0 3.920 4.080 38 54 1.25 1.57 1.97
4.1 4.018 4.182 38 55 1.26 1.58 1.99
4.2 4.116 4.284 38 55 1.26 1.58 1.99
4.3 4.214 4.386 38 56 1.26 1.58 1.99
4.4 4.312 4.488 38 56 1.26 1.58 1.99
4.5 4.410 4.590 39 56 1.26 1.59 2.00
4.6 4.508 4.692 39 57 1.26 1.59 2.00
4.7 4.606 4.794 39 57 1.26 1.59 2.00
4.8 4.704 4.896 39 58 1.26 1.59 2.00
4.9 4.802 4.998 39 58 1.26 1.59 2.00
5.0 4.900 5.100 39 58 1.26 1.59 2.00
*
XC9135A/XC9135C/XC9135L/XC9135M series are excluded.
When output voltage is lower than 2.9V, maximum current limit may happen to decrease.
Please refer to the typical performance characteristics
graph #10 of Maximum Current Limit vs. Ambient Temperature
Table F1
V
RL PARAMETER
OUT(E)
V Ω
1.8≦V
2.1≦V
3.1≦V
4.3≦V
OUT(E)
OUT(E)
OUT(E)
OUT(E)
<2.1
<3.1
<4.3
≦5
150
220
330
470
SYMBOL
V %
UVLO MIN MAX
0.9≦V
1.0≦V
1.7≦V
2.3≦V
3.0=V
UVLO_R
UVLO_R
UVLO_R
UVLO_R
UVLO_R
<1.0
<1.7
<2.3
<3.0
E4
UVLO Release Voltage
Accuracy
-4.5 4.5
-3.0 3.0
-3.5 3.5
-4.5 4.5
-5.5 5.5
12/35

XC9135/XC9136
Series
■TYPICAL APPLICATION CIRCUIT
C
IN
V
IN
L
MODE
C
DD
FO
BAT
Lx
CDD
MODE
FO
V
OUT
PGND
AGND
CDF
EN
V
OUT
C
L
EN
Cdf
<CDF pin settings, XC9135 series>
A capacitor can be connected to the CDF pin to set the delay time for stopping operation after UVLO is detected. The length of
the delay time depends on the capacitance of the Cdf capacitor. Use a capacitor with a capacitance of 1000pF or higher for the
Cdf capacitor.
The relationship between the capacitance of the Cdf capacitor and the delay time is 1 ms of delay for each 1000pF (3000pF
gives a delay of 3ms).
[External Components]
f
=1.2MHz
OSC
●XC9136 Series ●XC9135 Series
L:
2.2μH~4.7μH
VLCF4020 series, LTF5022-LC series
CL:
Should be selected in 20μF or higher
Capacitor JMK212BJ106KG×2、LMK212BJ106KG×2、LMK316BJ226ML is recommended.
Ceramic capacitor: B (JIS standard) or X7R, X5R (EIA standard)
CIN:
10μF
Capacitor JMK212BJ106KG or LMK212BJ106KG is recommended.
Ceramic capacitor: B (JIS standard) or X7R, X5R (EIA standard)
CDD:
0.47μF (Ceramic capacitor)
CDF: 1000pF
* UVLO detect delay capacitor C
and CDD is constantly applied in the same voltage to VDD. While selecting a part, please concern about
DF
capacitance reduction and voltage durability.
* For the coil L, please use 2.2μH to 4.7μH. However, when the input voltage V
* Capacitance C
is recommended 20μF or higher. (Ceramic capacitor compatible)
L
is lower than 1.5V, please use 2.2μH.
IN
When you select the external components, please consider capacitance loss and voltage durability.
* If using tantalum or low ESR electrolytic capacitors please be aware that ripple voltage will be higher due to the larger ESR (Equivalent
Series Resistance) values of those types of capacitors. Please also note that the IC’s operation may become unstable with such capacitors
so that we recommend to test on the board before usage.
* If using electrolytic capacitor for the C
, please connect a ceramic capacitor in parallel.
L
13/35

XC9135/9136 Series
■OPERATIONAL EXPLANATION (Continued)
The XC9135/XC9136 series consists of a reference voltage source, ramp wave circuit, error amplifier, PWM comparator,
phase compensation circuit, N-channel driver transistor, P-channel synchronous rectification switching transistor and current
limiter circuit.
The error amplifier compares the internal reference voltage with the resistors RFB1 and RFB2. Phase compensation is
performed on the resulting error amplifier output, to input a signal to the PWM comparator to determine the turn-on time of the
N-channel driver transistor during PWM operation. The PWM comparator compares, in terms of voltage level, the signal from
the error amplifier with the ramp wave from the ramp wave circuit, and delivers the resulting output to the buffer driver circuit to
cause the Lx pin to output a switching duty cycle. This process is continuously performed to ensure stable output voltage.
The current feedback circuit monitors the N-channel driver transistor’s turn-on current for each switching operation, and
modulates the error amplifier output signal to provide multiple feedback signals. This enables a stable feedback loop even
when a low ESR capacitor, such as a ceramic capacitor, is used, ensuring stable output voltage.
<Reference Voltage Source>
The source provides the reference voltage to ensure stable output of the DC/DC converter.
<Ramp Wave Circuit>
The ramp wave circuit determines switching frequency. The frequency is fixed internally at 1.2MHz. The Clock
generated is used to produce ramp waveforms needed for PWM operation, and to synchronize all the internal circuits.
<Error Amplifier>
The error amplifier is designed to monitor output voltage. The amplifier compares the reference voltage with the feedback
voltage divided by the internal resistors (R
of the error amplifier increases. The gain and frequency characteristics of the error amplifier are optimized internally.
FB1 and RFB2). When the FB pin is lower than the reference voltage, output voltage
14/35

XC9135/XC9136
Series
■OPERATIONAL EXPLANATION (Continued)
< Maximum Current Limit>
The current limiter circuit monitors the maximum current flowing through the N-channel driver transistor connected to the Lx
pin, and features a combination of the current limit and latch function.
① When the driver current is greater than a specific level (equivalent to peak coil current), the maximum current limit
function starts to operate and the pulses from the Lx pin turn off the N-channel driver transistor at any given time.
When the driver transistor is turned off, the limiter circuit is then released from the maximum current limit detection state.
②
③ At the next pulse, the driver transistor is turned on. However, the transistor is immediately turned off in the case of
an over current state.
④ When the over current state is eliminated, the IC resumes its normal operation.
The XC9135 series waits for the over current state to end by repeating the steps ① through ③.
If an over current state continues for several milliseconds and the above three steps are repeatedly performed, the IC performs
the function of latching the OFF state of the N-channel driver transistor and P-channel synchronous transistor, and goes into
operation suspension mode. After being put into suspension mode, the IC can resume operation by turning itself off once and
then re-starting via the EN pin, or by restoring power to the V
IN pin.
The XC9136 series does not have this latch function, so operation steps ① through ③ repeat until the over current state
ends. Integral latch time may be released from an over current detection state because of the noise. Depending on the state of
a substrate, it may result in the case where the latch time may become longer or the operation may not be latched. Please
locate an input capacitor as close as possible.
Please note that the current flow into the N-channel driver transistor is different from output current I
<Thermal Shutdown>
For protection against heat damage, the thermal shutdown function monitors chip temperature. When the chip’s
temperature reaches 150
O
C (TYP.), the thermal shutdown circuit starts operating and the driver transistor will be turned off.
At the same time, the output voltage decreases. When the temperature drops to 130
flow, the IC performs the soft start function to initiate output startup operation.
<MODE>
The MODE pin operates in PWM mode by applying a high level voltage and in PFM/PWM automatic switching mode by
applying a low level voltage.
<Shut-Down, Load Disconnection Function>
The IC enters chip disable state by applying low level voltage to the EN pin. At this time, the N-channel and P-channel
synchronous switching transistors are turned OFF. Please also note that a parasitic diode of the P-channel synchronous
switch is controlled, thus, the current conduction path is disconnected.
<Flag Out>
The FO pin becomes high impedance during over current state, over temperature state, soft-start period, and shut-down
period. In normal state, the FO pin is low impedance. The FO pin is N-channel open drain output.
.
OUT
O
C (TYP.) after shutting off the current
15/35

XC9135/9136 Series
■OPERATIONAL EXPLANATION (Continued)
<CL Discharge >
The XC9135A/XC9135B/XC9135L/XC9135R/XC9136E series can discharge the electric charge at the output capacitor
(CL) when a low signal to the EN pin which enables a whole IC circuit put into OFF state, is inputted via the N-channel
transistor located between the V
) is quickly discharged so that it may avoid application malfunction. Discharge time of the output capacitor (CL) is set by the
(C
L
C
auto-discharge resistance (R) and the output capacitor (CL). By setting time constant of a CL auto-discharge resistance
L
value [R
] and an output capacitor value (CL) as τ(τ=C x R), discharge time of the output voltage after discharge via the
DCHG
N channel transistor is calculated by the following formulas. However, the C
V
or V
BAT
V = V
, so it is difficult to make sure the discharge time. We recommend that you fully check actual performance.
OUT
×e
-t /τ
OUT
or t = τln (V
V : Output voltage after discharge
V
: Output voltage
OUT
t : Discharge time
τ : C×R
C : Capacitance of Output capacitor (C
R : C
●Output Voltage Discharge Characteristics
(V)
OUT
Output Voltage: V
Discharge resistance, it depends on supply voltage
L
5.5
5.0
4.5
4.0
3.5
3.0
2.5
2.0
1.5
1.0
0.5
0.0
0.000 0.005 0.010 0.015
V
OUTSET
The XC9135C/XC9135K/XC9135M/XC9135T/XC9136N series do not have CL discharge function. If the MODE pin is set
low to select auto PWM/PFM mode, the output of XC9135C/XC9135K/XC9135M/XC9135T/XC9136N series can be
connected to another power supply.
However, it should be noted that when the output of XC9135A/XC9135B/XC9135L/XC9135R/XC9136E series is connected to
another power supply, the IC may be damaged.
< CDD, V
V
DD MAX
>
DDMAX
circuit compares the input voltage and the output voltage then it will select the higher one as the power supply for
the IC. The higher voltage will be supplied to the C
<UVLO>
The XC9135 Series has a UVLO function. When the voltage of the BAT pin falls below V
the voltage of the BAT pin rises above V
<UVLO Detect Delay Time>
On the XC9135 Series, a capacitor Cdf can be connected to the CDF pin to set the delay time for stopping operation after
UVLO is detected.
This will prevent malfunctioning of the UVLO function due to temporary drops in the BAT voltage caused by load transients
and other conditions.
If the BAT voltage falls below the UVLO detection voltage and then returns to the UVLO release voltage or higher within the
detection delay time, the IC will continue operating.
If the BAT voltage does not return to the UVLO release voltage or higher within the detection delay time, the IC will stop
oscillating after the detection delay time has elapsed.
<Output Voltage Drop Protection>
The XC9135B/ XC9135K/ XC9135R/ XC9135T Series has a built-in output voltage drop protection function.
If the output voltage V
falls below the output voltage drop protection voltage V
OUT
16/35
pin and the PGND pin. When the IC is disabled, electric charge at the output capacitor
OUT
/V)
OUT
=1.8V, VIN=1.0V
V
=3.3V, VIN=2.0V
OUTSET
V
Discharge Time: t(s)
UVLO_R
)
L
CL=20μF
=5.0V, VIN=2.0V
OUTSET
pin and the IC operates in stable when a capacitor is connected.
DD
, output restarts by soft-start.
discharge resistance [R
L
, the IC stops oscillating. When
UVLO_F
due to an overload or other condition, the
LVP
] is depends on the
DCHG

XC9135/XC9136
Series
function will latch the Nch driver Tr and the Pch synchronous rectification switch Tr in the off state. Once in the latched state,
operation is restarted by turning the IC off and then on with the EN pin, or by restarting the power.
■NOTE ON USE
1. Please do not exceed the stated absolute maximum ratings values.
2. The DC/DC converter performance is greatly influenced by not only the ICs' characteristics, but also by those of the external
components. Care must be taken when selecting the external components. Especially for CL load capacitor, it is
recommended to use type B capacitors (JIS regulation) or X7R, X5R capacitors (EIA regulation).
3. Make sure that the PCB GND traces are as thick and wide as possible. The ground voltage fluctuation caused by high ground
current at the time of switching may result in instability of the IC. Therefore, the GND traces close to PGND pin and AGND pin
are important.
4. Please mount each external component as close to the IC as possible. Also, please make traces thick and short to reduce the
circuit impedance.
5. When the device is used in high step-up ratio, the current limit function may not work during excessive load current. In this
case, the maximum duty cycle limits maximum current. For the XC9135 series, while the current is controlled with maximum
duty cycle, over current latch function will not work.
6. In case of connecting to another power supply as shown in below circuit diagram, please use the
XC9135C/XC9135K/XC9135M/XC9135T/XC9136N series. Please also note that the MODE pin is fixed in low level for
selecting PWM/PFM auto mode. If the MODE pin is in high to maintain fixed PWM control mode, the backflow current may
happen. If the output of XC9135A/XC9135B/XC9135L/XC9135R/XC9136E series is connected to another power supply, the
IC may be damaged.
7. The maximum current limiter controls the limit of the N-channel driver transistor by monitoring current flow. This function does
not limit the current flow of the P-channel synchronous transistor. When over current flows to the P-channel synchronous
transistor in case of load, the IC may be damaged.
8. The integral latch time of the XC9135 series could be released from the maximum current detection state as a result of board
mounting conditions. This may extend integral latch time or the level required for latch operation to function may not be
reached. Please connect the output capacitor as close to the IC as possible.
9. The MODE pin and EN pin are not pulled-down internally. Please make sure that the voltage applied to the MODE pin and
the EN pin.
10. When used in small step-up ratios, the device may skip pulses during PWM control mode.
11. In the PWM/PFM auto, transition from PFM to PWM mode, or PWM to PFM mode, the output voltage may be fluctuated.
(Please refer below)
V
OUT
I
Lx
V
=4.2V, V
IN
V
:50mV/div, ILx:200mA/div, Time:20μs/div
OUT
L=4.7μH(LTF5022-LC), C
C
=10μF(LMK212BJ106KG), CDD=0.47μF(EMK107BJ474KA-T)
IN
R
=270kΩ, R
FB1
=5.0V, MODE: Auto PWM/PFM
OUT
=20μF(LMK212BJ106KG*2)
L
=30kΩ, CFB=10pF
FB2
17/35

XC9135/9136 Series
■NOTE ON USE (Continued)
12. When used in large step-up ratios and small load current, the output voltage may change when PWM/PFM auto is changed
to PWM control mode by using the MODE pin. (Please refer below)
13. After the soft-start period, when used in VIN>V
14. During start-up, when output setting voltage is lower than 2V, the PWM/PFM auto mode should be selected. In case of the
15. For temporary, transitional voltage drop or voltage rising phenomenon, the IC is liable to malfunction should the ratings be
16. Torex places an importance on improving our products and its reliability.
18/35
V
OUT
V
V
I
V
Lx
Lx
MODE
=0.9V, V
IN
V
:100mV/div, ILx:500mA/div, VLx:10V/div, V
OUT
L=2.2μH(VLCF4020), CL=20μF(LMK212BJ106KG*2)
C
=10μF(LMK212BJ106KG), CDD=0.47μF(EMK107BJ474KA-T)
IN
R
=270kΩ, R
FB1
(the input voltage is higher than the output voltage), In the
OUTSET
=5.0V, MODE:PWM/PFM→PWM, I
OUT
MODE
=30kΩ, CFB=0pF
FB2
=3mA
OUT
:5V/div, Time:200μs/div
XC9135C/ XC9135K/ XC9135M/XC9135T/XC9136N series , the P-channel synchronous transistor is turned on when
MODE pin is tied to high. When the MODE pin is tied to low, the current flows into the parasitic diode of the P-channel
synchronous transistor so that results in generating excessive heat in the IC. Please test in the board before usage with
considering heat dissipation. For the XC9135A /XC9135B/XC9135L/XC9135R/XC9136E, series (under development) the
P-channel synchronous transistor is always turned on which is no matter of MODE pin control.
fixed PWM control mode, the output voltage may become smaller than the setting voltage. When the setting output
voltage is higher than 2V, the IC can be started to operate in the both modes of PWM/PFM auto and fixed PWM control.
exceeded.
However, by any possibility, we would request user fail-safe design and post-aging treatment on system or equipment.

XC9135/XC9136
Series
■NOTE ON USE (Continued)
●Instructions for pattern layouts
1. In order to stabilize VIN voltage level, we recommend that a by-pass capacitor CIN is connected as close as possible to the
and VSS pins.
V
IN
2. Please mount each external component as close to the IC as possible.
3. Place external components as close to the IC as possible and use thick and short traces to reduce the circuit impedance.
4. Make sure that the PCB GND traces are thick and wide as possible. Ground voltage level fluctuation created by high
ground current at the time of switching may cause instability of the IC.
5. The internal driver transistors bring on heat because of the I
6. Please place a capacitor between CDF pin and GND.
●Example of pattern layout
FRONT BACK
current and ON resistance of the driver transistors.
IN
19/35

XC9135/9136 Series
■TEST CIRCUITS
<Circuit No.1>
XC9135A/C/L/M/B/K/R/T
XC9136E/N
Wave Form Measure Point
L
A
V
IN
V
C
IN
V
MODE
V
FO
< Circuit No.2 > < Circuit No.3 >
BAT
A
V
IN
V
MODE
Lx
A
FO
AGND PGND
※ External Components
C
DD
< Circuit No.4 >
BAT
A
V
IN
V
Lx
V
MODE
Lx
FO
AGND PGND
※ External Components
: 0.47μF (ceramic)
C
DD
BAT
Lx
R
FO
FO
AGND PGND
VOUT
(CDF)
CDD
: 0.47 μ F( ceramic)
VOUT
(CDF)
CDD
VOUT
CDF
ENMODE
V
CDD
FB
ENMODE
FB
ENMODE
A
V
C
DD
V
C
DD
EN
C
DD
A
V
FB
EN
V
FB
EN
A
C
L
C
DF
V
OU
T
V
OUT
V
RL
V
※
External Components
L
: 2.2 μH ( VLCF 4020- 2R 2 :TDK)
:
C
10μ F ( ceramic)
IN
C
: 0.47 μF (ceramic)
DD
: 22μ F ( ceramic)
C
L
:
1000
C
pF
DF
:
10
Ω
R
k
FB2
BAT
Lx
A
IN
V
MODE
FO
AGND PGND
※ External Components
C
DD
VOUT
(CDF)
CDD
:0.47μF(ceramic)
FB
ENMODE
V
EN
C
DD
V
OUT
V
FB
20/35

XC9135/XC9136
Series
■TEST CIRCUITS(Continued)
<Circuit No.5>
< Circuit No.6>
A
V
IN
V
MODE
BAT
Lx
FO
AGND PGND
* External Components
: 0.47μF (ceramic)
C
DD
VOUT
(CDF)
CDD
FB
ENMODE
V
C
DD
A
V
OUT
V
FB
EN
<Circuit No.8 >
V
IN
V
Lx
V
MODE
BAT
Lx
FO
AGND PGND
* External Components
: 0.47μF (ceramic)
C
DD
Circuit No.1~9
XC9136E/XC9136N series does not have FB(C
VOUT
(CDF)
CDD
FB
ENMODE
V
C
DD
) pin.
DF
V
V
FB
EN
<Measurement method for ON resistance of the Lx switch>
Using the layout of circuit No.9 above, set the L
pin voltage to 50mV by adjusting the Vpull voltage whilst the N-channel driver
X
transistor is turned on. Then, measure the voltage difference between both ends of Rpull. ON Resistance is calculated by using
the following formula: (However, when the XC9135 series is measured, CDF
operation under V
R
=0.05 ÷ ((V1 – 0.05) ÷ 0.5)
LXN
UVLO_R<VIN
where V1 is a node voltage between SBD and Rpull. L
)
X
<Circuit No.7 >
BAT
Lx
V
IN
V
MODE
V
FO
A
FO
AGND PGND
* External Components
C
DD
: 0.47μF (ceramic)
VOUT
(CDF)
CDD
FB
ENMODE
V
EN
C
DD
<Circuit No.9 >
Wave Form Measure Point
SBD
V
I
V
OUT
V
OUT
IN
Vpull
1
V
pin is grounded, please start measurement on
BAT
Rpull
Lx
FO
MODE
AGND PGND
* External Components
C
DD
SBD : XBS304S17(TOREX)
Rpull : 0.5Ω
VOUT
FB
(CDF)
ENMODE
CDD
: 0.47μF (ceramic)
C
DD
pin voltage and V1 are measured by an oscilloscope.
V
FB
V
OUT
V
FB
(CDF)
V
EN
21/35

z
z
XC9135/9136 Series
■TYPICAL PERFORMANCE CHARACTERISTICS
(1)効率-出力電流特性例
(1) Efficiency vs. Output Current
Efficiency : EFFI (%)
Efficiency : EFFI (%)
(2) Output Voltage vs. Output Current
(2)出力電圧-出力電流特性例
Output Voltage : VOUT (V)
XC9135C32CDR-G (V
L=4.7μH (VLF3014ST-4R7M1R1), CL=22
=10μF (JMK212ABJ106KG), CDD=0.47μF (TMK107BJ474KA)
C
IN
100
80
60
PWM/PFM
40
20
0
0.1 1 10 100 1000
VIN=1.8V
PWM
Output Current : IOUT (mA)
XC9136E50CDR-G (V
L=4.7μH (VLF5010S-4R7), CL=22
=10μF (LMK212ABJ106KG), CDD=0.47μF (TMK107BJ474KA)
C
IN
100
80
60
40
20
0
0.1 1 10 100 1000
Output Current : IOUT (mA)
XC9135C32CDR-G (V
L=4.7μH (VLF3014ST-4R7M1R1), CL=22
=10μF (JMK212ABJ106KG), CDD=0.47μF (TMK107BJ474KA)
C
IN
4.2
VIN=1.8, 2.5, 3.0V
3.7
3.2
2.7
2.2
0.1 1 10 100 1000
Output Current : IOUT (mA)
=3.2V)
OUT
LMK316ABJ226ML
μF (
2.5V
=5V)
OUT
μF (LMK316ABJ226ML)
VIN=4.2V
PWM/PFM
PWM
=3.2V)
OUT
LMK316ABJ226ML
μF (
3.0V
f
f
f
OSC
OSC
OSC
=1.2MH
=1.2MH
=1.2MHz
)
L=2.2μH (LTF5022-2R2-LC), CL=22μF (LMK316ABJ226ML)
=10μF (LMK212ABJ106KG), CDD=0.47μF (EMK107BJ474KA)
C
IN
100
PWM/PFM
80
60
40
Efficiency : EFFI (%)
20
0
0.01 0.1 1 10 100 1000
XC9136E32CDR-G (V
XC9136E32CDR-G (V
)
L=2.2μH (LTF5022-2R2-LC), CL=22
=10μF (LMK212ABJ106KG), CDD=0.47μF (EMK107BJ474KA)
C
IN
3.4
VIN=0.8, 1.0, 1.5V
3.3
3.2
3.1
Output Voltage : VOUT (V)
3.0
0.01 0.1 1 10 100 1000
=3.2V)
OUT
1.5V
VIN=0.8V
PWM
Output Current : IOUT (mA)
=3.2V)
OUT
μF (LMK316ABJ226ML)
Output Current : IOUT (mA)
f
OSC
1.2V
f
OSC
=1.2MHz
=1.2MHz
22/35

■TYPICAL PERFORMANCE CHARACTERISTICS
(2) Output Voltage vs. Output Current (Continued)
(2)出力電圧-出力電流特性例
Output Voltage : VOUT (V)
(3) Ripple Voltage vs. Output Current
(3)出力リップル電圧-出力電流特性例
100
Ripple Voltage : Vr (mV)
Ripple Voltage : Vr (mV)
XC9136E50CDR-G (V
L=4.7μH (VLF5010S-4R7), CL=22
C
=10μF (LMK212ABJ106KG), CDD=0.47μF (TMK107BJ474KA)
IN
6.0
VIN=4.2V
5.5
5.0
4.5
4.0
0.1 1 10 100 1000
Output Current : IOUT (mA)
XC9135C32CDR-G (V
L=4.7μH (VLF3014ST-4R7M1R1), CL=22
C
=10μF (JMK212ABJ106KG), CDD=0.47μF (TMK107BJ474KA)
IN
80
PWM/PFM
60
VIN=1.8V
40
20
0
0.1 1 10 100 1000
Output Current : IOUT (mA)
XC9136E50CDR-G (V
L=4.7μH (VLF5010S-4R7), CL=22
C
=10μF (LMK212ABJ106KG), CDD=0.47μF (TMK107BJ474KA)
IN
100
VIN=4.2V
80
PWM PWM/PFM
60
40
20
0
0.1 1 10 100 1000
Output Current : IOUT (mA)
=5V)
OUT
μF (LMK316ABJ226ML)
f
=3.2V)
OUT
LMK316ABJ226ML
μF (
2.5V 3.0V
=5V)
OUT
μF (LMK316ABJ226ML)
f
OSC
f
OSC
PWM
OSC
=1.2MHz
=1.2MHz
=1.2MHz
XC9136E32CDR-G (V
)
Ripple Voltage : Vr (mV)
L=2.2μH (LTF5022-2R2-LC), CL=22
C
=10μF (LMK212ABJ106KG), CDD=0.47μF (EMK107BJ474KA)
IN
100
PWM
80
60
40
20
0
0.01 0.1 1 10 100 1000
PWM/PFM
VIN=0.8V
Output Current : IOUT (m A)
XC9135/XC9136
=3.2V)
OUT
μF (LMK316ABJ226ML)
f
=1.2MHz
OSC
1.5V
1.2V
Series
23/35

(5)
XC9135/9136 Series
■TYPICAL PERFORMANCE CHARACTERISTICS (Continued)
(4)出力電圧-周囲温度特性
(4) Output Voltage vs. Ambient Temperature
(V)
Output Voltage: V
CIN=10μF(LMK212BJ106KG), CDD=0.4 7μF(EMK107BJ474KA)
1.90
1.88
1.86
1.84
OUT
1.82
1.80
1.78
1.76
1.74
1.72
1.70
-50 -25 0 25 50 75 100
XC9136x18C
L=2.2μH(VLCF4020), CL=20μF(LMK212BJ106KG*2)
Ambient Temperature: Ta (℃)
(5)消費電流-周囲温度特性例
Supply Current vs. Ambient Temperature
XC9135A
60
50
40
30
20
10
Quiescent Current: Iq (μA)
0
-50 -25 0 25 50 75 100
Ambient Temperature: Ta (℃)
V
OUT
(6) Stand-by Current vs. Ambient Temperature
(6)スタンバイ電流-周囲温度特性例
XC9135A
5
4
(μA)
STB
3
VIN=5.0V
2
1
Standby Current: I
0
-50 -25 0 25 50 75 100
3.3V
1.8V
Ambient Temperature: Ta (℃)
f
OSC
=5.0V
3.3V
f
OSC
FO=OPEN
=1.2MHz
=1.2MHz
CIN=10μF(LMK212BJ106KG), CDD=0.4 7μF(EMK107BJ474KA)
3.40
3.38
3.36
(V)
3.34
OUT
3.32
3.30
3.28
3.26
3.24
Output Voltage: V
3.22
3.20
-50 -25 0 25 50 75 100
5
4
(μA)
STB
3
VIN=5.0V
2
1
Standby Current: I
0
-50 -25 0 25 50 75 100
XC9136x33C
L=4.7μH(LTF5022-LC), CL=20μF(LMK212BJ106KG*2)
Ambient Temperature: Ta (℃)
XC9135C
3.3V
1.8V
Ambient Temperature: Ta (℃)
FO=OPEN
f
=1.2MHz
OSC
24/35

XC9135/XC9136
■TYPICAL PERFORMANCE CHARACTERISTICS (Continued)
(7) Oscillation Frequency vs. Ambient Temperature
(7)発振周波数-周囲温度特性例 (8)最大デューティー比-周囲温度特性例
XC9135/XC9136
1.40
1.35
(MHz)
1.30
OSC
1.25
1.20
1.15
1.10
1.05
Oscillation Freqency: f
1.00
-50 -25 0 25 50 75 100
Ambient Temperature: Ta (℃)
V
=1.8V
OUT
3.3V
5.0V
(9) Lx SW “N-ch” ON Resistance vs. Output Voltage
(9)LxSW"Nch"ON抵抗-出力電圧特性例 (10)LxSW"Pch"ON抵抗-周囲温度特性例
XC9135/XC9136
1.0
0.9
(Ω)
LxN
0.8
0.7
0.6
0.5
0.4
0.3
0.2
0.1
Lx SW Nch ON Resistance: R
0.0
012345
25℃
Output Voltage: V
OUT
Ta=85℃
-40℃
(V)
(11) Lx Leakage Current vs. Ambient Temperature
(11)Lxリーク電流-周囲温度特性例 (12)ソフトスタート時間-周囲温度特性例
XC9135/XC9136
5.0
V
BAT=VLx
, V
OUT=VEN
=0V
4.0
(μA)
LxL
3.0
Lx Leak Current: I
2.0
1.0
0.0
VLx=5.0V
3.3V
1.8V
-50 -25 0 25 50 75 100
Ambient Temperature : Ta (℃)
(8) Maximum Duty Cycle vs. Ambient Temperature
XC9135/XC9136
f
100
(%)
MAX
95
90
85
Maximum Duty Cycle: D
80
-50 -25 0 25 50 75 100
Ambient Temperature: Ta (℃)
OSC
V
=1.8V
OUT
3.3V
5.0V
(10) Lx SW “P-ch” ON Resistance vs. Ambient Temperature
XC9135/XC9136
V
1.0
0.9
(Ω)
LxP
0.8
0.7
0.6
0.5
0.4
0.3
0.2
0.1
Lx SW Pch ON Resistance: R
0.0
-50 -25 0 25 50 75 100
Ambient Temperature: Ta (℃)
OUT
(12) Soft-Start Time vs. Ambient Temperature
XC9135/XC9136
f
10.0
9.0
8.0
(ms)
SS
7.0
6.0
5.0
4.0
Soft-Start Time: t
3.0
2.0
V
=5.0V
OUT
3.3V
1.8V
-50 -25 0 25 50 75 100
Ambient Temperature: Ta (℃)
OSC
Series
=1.2MHz
=3.3V
=1.2MHz
25/35

XC9135/9136 Series
■TYPICAL PERFORMANCE CHARACTERISTICS (Continued)
(13)PFMスイッチ電流-入力電圧特性例 (14)MODE"H""L"電圧-出力電圧特性例
(13) PFM Switch Current vs. Input Voltage Voltage
350
(mA)
PFM
325
300
275
250
225
PFM SW Current: I
200
0.01.02.03.04.05.06.0
(15) EN "H" Voltage vs. Output Voltage
(15)EN"H"電圧-出力電圧特性例 (16)EN"L"電圧-出力電圧特性例
0.8
0.7
(V)
ENH
0.6
0.5
0.4
EN"H" Voltage: V
0.3
0.2
0123456
(17) Operation Start Voltage vs. Ambient Temperature
(17)動作開始電圧-周囲温度特性例
1.0
(V)
0.9
ST1
0.8
0.7
0.6
0.5
Operation Start Voltage: V
0.4
-50 -25 0 25 50 75 100
XC9135A50C
V
L=4.7μH (LTF5022-LC), C
C
=10μF(ceramic), CDD=0.47μF (ceramic)
IN
Input Voltage: V
OUT
IN
XC9135/XC9136
Ta=-40℃
25℃
Output Voltage: V
OUT
XC9136
MODE:PWM/PFM, RL=1kΩ, f
L=2.2μH (VLCF4020), C
=10μF(cerami c), CDD=0.47μF (ceramic)
C
IN
V
=1.8V
OUT
3.3V
5.0V
Ambient Temperature: Ta (℃)
=5V, f
=1.2MHz
OSC
=22μF (ceramic)
L
(V)
85℃
(V)
OSC
=22μF (ceramic)
L
=1.2MHz
(14) MODE "H", "L" Voltage vs. Output Voltage
XC9135/XC9136
(V)
0.8
MODEL
0.7
,V
0.6
MODEH
0.5
V
=5.0V
0.4
OUT
3.3V
1.8V
0.3
0.2
MODE "H" "L" Voltage: V
-50 -25 0 25 50 75 100
Ambient Temperature: Ta (℃)
(16) EN "L" Voltage vs. Output Voltage
XC9135/XC9136
0.8
0.7
(V)
ENL
0.6
Ta=-40℃
0.5
85℃
0.4
EN "L" Voltage: V
0.3
25℃
0.2
0123456
Output Voltage: V
OUT
(V)
XC9136E33C
MODE:PWM/PFM, RL=33Ω, f
L=2.2μH (VLCF4020), C
=10μF(ceramic), CDD=0.47μF (ceramic)
C
1.0
(V)
0.9
ST1
IN
0.8
0.7
0.6
0.5
Operation Start Voltage: V
0.4
-50 -25 0 25 50 75 100
Ambient Temperature: Ta (℃)
=22μF (ceramic)
L
V
OUT
=1.2MHz
OSC
=3.3V
26/35

XC9135/XC9136
■TYPICAL PERFORMANCE CHARACTERISTICS (Continued)
(18)動作保持電圧-周囲温度特性例 (19)無負荷時入力電流-入力電圧特性例
(18) Operation Hold Voltage vs. Ambient Temperature
1.0
(V)
0.9
HLD
Operation Hold Voltage: V
V
=1.8V
0.8
OUT
3.3V
5.0V
0.7
0.6
0.5
0.4
-50 -25 0 25 50 75 100
XC9136
MODE:PWM/PFM, RL=1kΩ, f
L=2.2μH (VLCF4020), C
=10μF(ceramic), CDD=0.47μF (ceramic)
C
IN
Ambient Temperature: Ta (℃)
=22μF (ceramic)
L
OSC
=1.2MHz
(20) Current Limit vs. Ambient Temperature
(20)最大電流制限-周囲温度特性例 (21)最大電流制限-周囲温度特性例
2.5
2.3
2.1
(A)
1.9
LIM
1.7
1.5
1.3
1.1
Current Limit :I
0.9
0.7
0.5
-50 -25 0 25 50 75 100
XC9135xxx/XC9136xxx
L=2.2μH(VLCF4020), CL=20μF(LMK212BJ106KG*2)
CIN=10μF(LMK212BJ106KG), CDD=0.4 7μF(EMK107BJ474KA)
Ambient Temperature: Ta (℃)
f
OSC
=1.2MHz
(22) UVLO Release Voltage vs. Ambient Temperature
(22)UVLO解除電圧-周囲温度特性例
XC9135A
1.70
1.68
(V)
1.66
UVLO_R
1.64
1.62
1.60
1.58
1.56
1.54
1.52
UVLO Release Voltage: V
1.50
-50 -25 0 25 50 75 100
VOUT=3.3V
5.0V
Ambient Temperature: Ta (℃)
MODE:PWM, f
OSC
=1.2MHz
(19) No Load Input Current vs. Input Voltage
XC9135C30C
MODE:PWM/PFM, RL:OPEN, f
L=4.7μH (VLCF4020), C
C
=10μF(ceramic), CDD=0.47μF (ceramic), Ta=25℃
100.0
IN
90.0
80.0
(μA)
IN
70.0
60.0
50.0
40.0
30.0
20.0
10.0
No Load Input Current: I
0.0
0.0 0.5 1.0 1.5 2.0 2.5 3.0
Input Voltage: V
IN
=22μF (ceramic)
L
(V)
OSC
(21) Latch Time vs. Ambient Temperature
XC9135xxxC
L=4.7μH(LTF5022-LC), C
4
=10μF(ceramic), CDD=0.47μF (ceramic)
C
IN
MODE:PWM, f
=20μF(LMK212BJ106KG*2)
L
3
(ms)
LAT
2
V
=5.0V
1
Latch Time: t
OUT
3.3V
1.8V
0
-50 -25 0 25 50 75 100
Ambient Temperature: Ta (℃)
OSC
XC9135B
0.95
MODE:PWM, f
0.93
(V)
0.91
UVLO_R
0.89
0.87
0.85
0.83
V
=1.8V
OUT
3.3V
5.0V
UVLO Release Voltage: V
0.81
0.79
0.77
0.75
-50 -25 0 25 50 75 100
Ambient Temperature: Ta (℃)
OSC
Series
=1.2MHz
=1.2MHz
=1.2MHz
27/35

XC9135/9136 Series
■TYPICAL PERFORMANCE CHARACTERISTICS (Continued)
(23) UVLO Release Voltage vs. Ambient Temperature
(23)UVLO検出電圧-周囲温度特性例
1.54
1.52
(V)
1.50
UVLO_F
1.48
1.46
1.44
1.42
1.40
1.38
UVLO Detect Voltage: V
1.36
-50 -25 0 25 50 75 100
(24) UVLO Hysteresis Voltage vs. Ambient Temperature (25) UVLO Detect Delay Time vs. Ambient Temperature
(24)UVLOヒステリシス-周囲温度特性例 (25)UVLO検出遅延時間-周囲温度特性例
XC9135BxxC/XC9135KxxC
0.20
(V)
0.18
UVLO_HYS
0.16
0.14
0.12
V
OUT
UVLO Hysteresis Voltage: V
0.10
-50 -25 0 25 50 75 100
(26) Quiescent Current vs. UVLO Voltage (27) Low Voltage Protection Voltage vs. Ambient Temperature
(26)UVLO検出、解除動作時の消費電流遷移状態特性例 (27)出力電圧低下保護電圧-周囲温度特性例
50
40
30
20
V
OUT
10
Quiescent Current: Iq (μA)
0
1.0 1.2 1.4 1.6 1.8 2.0
XC9135A
MODE:PWM, f
V
OUT
Ambient Temperature: Ta (℃)
MODE:PWM, f
=1.8V
3.3V
5.0V
Ambient Temperature: Ta (℃)
XC9135C
=5.0V
3.3V
Input Voltage: V
(V)
IN
OSC
=3.3V
5.0V
OSC
f
OSC
=1.2MHz
=1.2MHz
=1.2MHz
XC9135B
0.80
(V)
0.75
UVLO_F
0.70
V
0.65
OUT
=1.8V
3.3V
UVLO Detect Voltage: V
5.0V
0.60
-50 -25 0 25 50 75 100
Ambient Temperature: Ta (℃)
MODE:PWM, f
XC9135AxxC/XC9135CxxC
MODE:PWM, f
2000
1800
(μs)
1600
DF
1400
1200
1000
800
600
400
200
UVLO Detect Delay Time: t
V
=3.3V
OUT
5.0V
0
-50 -25 0 25 50 75 100
Ambient Temperature: Ta (℃)
XC9135K
1.60
(V)
LVP
1.55
1.50
1.45
1.40
Low Voltage Protection Voltage: V
-50 -25 0 25 50 75 100
Ambient Temperature: Ta (℃)
MODE:PWM, f
=1.2MHz
OSC
CDF=1000pF
=1.2MHz
OSC
=1.2MHz
OSC
28/35

XC9135/XC9136
■TYPICAL PERFORMANCE CHARACTERISTICS (Continued)
(28)FO ON抵抗-周囲温度特性例 (29)CL放電抵抗-周囲温度特性例
(28) FO ON Resistance vs. Ambient Temperature (29) CL Discharge Resistance vs. Ambient Temperature
400
350
(Ω)
300
FO
250
200
150
100
FO ON Resistance: R
50
0
-50 -25 0 25 50 75 100
(30)ソフトスタート特性例
(30) Soft-start
V
=3.3V, VIN=1.8V, RL=33Ω,MODE:PWM/PFM V
OUT
V
OUT
I
Lx
V
=2.0V, VIN=0.9V, RL=20Ω, MODE:PWM/PFM
OUT
V
OUT
I
Lx
V
IN
XC9135/XC9136
V
1.8V
V
BAT=VOUT=VEN
=5.0V
OUT
, VFO=0.5V
3.3V
400
(Ω)
350
DCHG
300
250
200
150
100
50
CL Discharge Resistance: R
0
XC9135B
3.3V
1.8V
V
OUT
V
BAT=VOUT
=5.0V
, VEN=0V
-50 -25 0 25 50 75 100
Ambient Temperature: Ta (℃)
=5.0V, VIN=5.5V, RL=50Ω
OUT
V
OUT
I
V
V
FO
V
:1V/div, ILx:200mA/div, VEN:5/div, VFO:5V/div Time:2ms/div V
OUT
L=4.7μH(LTF5022-LC), C
C
=10μF(LMK212BJ106KG),CDD=0.47μF(EMK107BJ474KA) CIN=10μF(LMK212BJ106KG),CDD=0.47μF(EMK107BJ474KA)
IN
V
:1V/div, I
OUT
L=2.2μH(VLS252012), C
C
=10μF(LMK212BJ106KG), CDD=0.47μF(EMK107BJ474KA)
IN
200mA/div, VIN:1V/div, Time:2ms/div
Lx:
EN
XC9135A33C (1.2MHz) XC9135A50C (1.2MHz)
=20μF(LMK212BJ106KG*2) L=4.7μH(LTF5022-LC), CL=20μF(LMK212BJ106KG*2)
L
XC9135B20C(1.2MHz)
=22μF(LMK212BJ226MG)
L
Lx
V
EN
Ambient Temperature: Ta (℃)
:2V/div, ILx:500mA/div, VEN:5/div, Time:100us/div
OUT
Series
29/35

XC9135/9136 Series
■TYPICAL PERFORMANCE CHARACTERISTICS (Continued)
●負荷過渡応答特性例
●Load Transient Response
V
OUT
I
Lx
V
OUT
V
OUT
30/35
=1.8V, VIN=0.9V, I
V
OUT
=3.3V, VIN=1.8V, I
V
OUT
I
Lx
=3.3V, VIN=1.8V, I
V
OUT
I
Lx
I
OUT
=1mA→50mA V
OUT
I
OUT
:100mV/div, ILx:200mA/div, I
V
OUT
L=2.2μH(LTF5022-LC), C
=10μF(LMK212BJ106KG), CDD=0.47μF(EMK107BJ474KA) CIN=10μF(LMK212BJ106KG), CDD=0.47μF(EMK107BJ474KA)
C
IN
=1mA→200mA V
OUT
I
OUT
:100mV/div, ILx:200mA/div, I
V
OUT
L=4.7μH(LTF5022-LC), C
=10μF(LMK212BJ106KG), CDD=0.47μF(EMK107BJ474KA) CIN=10μF(LMK212BJ106KG), CDD=0.47μF(EMK107BJ474KA)
C
IN
=1mA→200mA V
OUT
:100mV/div, ILx:200mA/div, I
V
OUT
L=4.7μH(LTF5022-LC), C
C
=10μF(LMK212BJ106KG), CDD=0.47μF(EMK107BJ474KA) CIN=10μF(LMK212BJ106KG), CDD=0.47μF(EMK107BJ474KA)
IN
XC9136E18C (1.2MHz, PWM/PFM) XC9136E18C (1.2MHz, PWM/PFM)
:50mA/div, Time:50μs/div V
OUT
=20μF(LMK212BJ106KG*2) L=2.2μH(LTF5022-LC), CL=20μF(LMK212BJ106KG*2)
L
XC9136E33C (1.2MHz, PWM/PFM) XC9136E33C (1.2MHz, PWM/PFM)
:200mA/div, Time:50μs/div V
OUT
=20μF(LMK212BJ106KG*2) L=4.7μH(LTF5022-LC), CL=20μF(LMK212BJ106KG*2)
L
XC9136E33C (1.2MHz, PWM) XC9136E33C (1.2MHz, PWM)
:200mA/div, Time:50μs/div V
OUT
=20μF(LMK212BJ106KG*2) L=4.7μH(LTF5022-LC), CL=20μF(LMK212BJ106KG*2)
L
=1.8V, VIN=0.9V, I
OUT
V
OUT
I
Lx
I
OUT
=3.3V, VIN=1.8V, I
OUT
V
OUT
I
OUT
=3.3V, VIN=1.8V, I
OUT
V
OUT
I
I
OUT
OUT
:100mV/div, ILx:200mA/div, I
OUT
OUT
:100mV/div, ILx:200mA/div, I
OUT
OUT
Lx
:100mV/div, ILx:200mA/div, I
OUT
=50mA→1mA
=200mA→1mA
I
Lx
=200mA→1mA
OUT
:200mA/div, Time:1ms/div
OUT
:200mA/div, Time:50μs/div
OUT
:50mA/div, Time:1ms/div

XC9135/XC9136
■TYPICAL PERFORMANCE CHARACTERISTICS (Continued)
●負荷過渡応答特性例
●Load Transient Response (Continued)
V
=5.0V, VIN=3.7V, I
OUT
V
OUT
I
Lx
I
OUT
=1mA→250mA V
OUT
V
:100mV/div,ILx:200mA/div,I
OUT
L=4.7μH(LTF5022-LC), C
=10μF(LMK212BJ106KG), CDD=0.47μF(EMK107BJ474KA) CIN=10μF(LMK212BJ106KG), CDD=0.47μF(EMK107BJ474KA)
C
IN
XC9136E50C(1.2MHz,PWM/PFM) XC9136E50C(1.2MHz,PWM/PFM)
:250mA/div,Time:50μs/div V
OUT
=20μF(LMK212BJ106KG*2) L=4.7μH(LTF5022-LC), CL=20μF(LMK212BJ106KG*2)
L
=5.0V, VIN=3.7V, I
OUT
V
OUT
I
Lx
I
OUT
=250mA→1mA
OUT
:100mV/div, ILx:200mA/div, I
OUT
:250mA/div, Time:1ms/div
OUT
Series
31/35

XC9135/9136 Series
■PACKAGING INFORMATION
●USP-10B
32/35

XC9135/XC9136
■PACKAGING INFORMATION (Continued)
●USP-10B Reference Pattern Layout ●USP-10B Reference Metal Mask Design
0.0250.025
0.25
0.025
0.4750.475
0.025
0.20 0.40 0.20
1.50 1.50
0.45
1.05 1.05
0.80 0.80
0.20 0.20
0.45
0.125
0.125
0.125
0.225
0.25
0.125
0.125
0.125
0.25
0.225
1.25
1.25
1.45 1.45
0.35 1.10 1.10 0.35
0.70 0.70
1.35
0.25
0.55 0.55
1.35
0.0750.300.10
0.075 0.30 0.10
0.15 0.15
Series
1.051.05
33/35

XC9135/9136 Series
■MARKING RULE
●USP-10B
① represents product series
MARK PRODUCT SERIES
5 XC9135******-G
6 XC9136******-G
② represents a type of DC/DC converters
DESCRIPTION
MARK ITEM
UVLO
0.85V
A
C
B
K
E
N
Output voltage
internally set-up(V
Output voltage
internally set-up(V
Output voltage
internally set-up(V
Output voltage
internally set-up(V
Output voltage
internally set-up(V
Output voltage
internally set-up(V
OUT
OUT
OUT
OUT
OUT
OUT
× ○ ○ ○ ○
)
× ○ ○ ○ ×
)
○ × ○ ○ ○
)
○ × ○ ○ ×
)
× × × × ○
)
× × × × ×
)
③④ represents reference voltage and oscillation frequency
When mark ① is 5 or 6.
(XC9135A/C/B/K, XC9136E/N):Output Voltage
MARK
③ ④
OUTPUT VOLTAGE(V) PEODUCT SERIES
1 8 1.8 XC9135*18***-G XC9136*18***-G
3 3 3.3 XC9135*33***-G XC9136*33***-G
⑤⑥ represents production lot number
01~09, 0A~0Z, 11~9Z, A1~A9, AA~Z9, ZA~ZZ in order.
(G, I, J, O, Q, W excluded)
*No character inversion used.
34/35
(*2)
(○…With the functions)
UVLO
1.6V
DETECT DELAY
UVLO
1
2
3
4
5
USP-10B
(TOP VIEW)
×…
Without the functions)
LATCH
PROTECTION
⑤ ⑥④
② ③①
DISCHARGE
CL AUTO
10
9
8
7
6
(*3)
XC9135A*****-G
XC9135C*****-G
XC9135B*****-G
XC9135K*****-G
XC9136E*****-G
XC9136N*****-G
PRODUCT
SERIES

XC9135/XC9136
Series
1. The products and product specifications contained herein are subject to change without
notice to improve performance characteristics. Consult us, or our representatives
before use, to confirm that the information in this datasheet is up to date.
2. We assume no responsibility for any infringement of patents, patent rights, or other
rights arising from the use of any information and circuitry in this datasheet.
3. Please ensure suitable shipping controls (including fail-safe designs and aging
protection) are in force for equipment employing products listed in this datasheet.
4. The products in this datasheet are not developed, designed, or approved for use with
such equipment whose failure of malfunction can be reasonably expected to directly
endanger the life of, or cause significant injury to, the user.
(e.g. Atomic energy; aerospace; transport; combustion and associated safety
equipment thereof.)
5. Please use the products listed in this datasheet within the specified ranges.
Should you wish to use the products under conditions exceeding the specifications,
please consult us or our representatives.
6. We assume no responsibility for damage or loss due to abnormal use.
7. All rights reserved. No part of this datasheet may be copied or reproduced without the
prior permission of TOREX SEMICONDUCTOR LTD.
35/35
 Loading...