

Page 1

50 South Street, Comberton, Cambridge CB3 7DZ
Telephone 01223 263818 Fax 01223 264118
Email: sales@torchcomputers.co.uk; Website: http://www.torchcomputers.co.uk
User Instructions for EN063K003
46 inch LCD screen
with built-in computer
Contents
Declaration of Conformity page 2
Unpacking and Repacking page 3
Voltage Selection page 4
UK, Singapore, Hong Kong
Europe
USA, Canada, Taiwan
Voltage Selection page 5
Other Countries
Extension Cables page 6
Fitting the cable to the screen page 7
Powering on the screen page 9
Powering off the screen page 9
Uninterruptible Power Supply (UPS) page 10
Removing Mains Power from the Screen page 10
Computer Interfaces page 10
Speaker Audio Orientation Switch (Option) page 11
Wall Mounting page 12
UPS and Computer Access page 12
P:\WINWORD\user instructions for EN069K003 46 inch LCD July 08 screen.doc 30/06/2008
Page 2

Declaration of Conformity
This equipment has been supplied in accordance with the CE rules for compliance with
BS-EN 500081-1:1992, 500081-2:1992, and 500082-1:1992 and Amendment
93/68/ECC LVD, RoHS material supply and WEEE Disposal Directives.
A Declaration of Conformity can be obtained from Torch, Please email:
sales@torchcomputers.co.uk
Torch specialises in producing individual computers to each customer's exact
requirements. In order to comply with our duties under these CE rules it is Torch policy
to use components that have been proven as part of a test in an authorised test house,
or components that are generically similar.
Please note that this compliance will be invalidated if the equipment is modified in any
way.
Safety Information
When adding or removing devices to or from the system, ensure that all power cables
are unplugged from the system.
Before adding or removing signal cables, adapters from the system disconnect all
power cables.
Make sure the power supply is set to the correct voltage for your area.
If foreign bodies or fluids enter the screen, immediately pull out the mains plug from
the socket. Ask a qualified person to check the equipment before operating it once
again. Or else, there is a risk of electric shock.
Never open the casing. Or else, there is a risk of electric shock.
Always ask qualified personnel to carry out maintenance jobs. Otherwise you are
putting yourself as well as others at risk.
If the power supply is broken, do not try to fix it yourself, contact a qualified service
technician.
There are no user serviceable parts inside.
For Technical or Support Advice please email:
support@torchcomputers.co.uk
P:\WINWORD\user instructions for EN069K003 46 inch LCD July 08 screen.doc 30/06/2008 Page 2
Page 3
UNPACKING
Remove the 2 black straps by releasing the buckles or sliding them off (do NOT cut them)
Remove the 4 white handgrips by unlatching the clip on the right hand side and hinging them
outwards.
Slit the packaging tape at the top of the box and open up the flaps, and lift out the white foam
blocks.
Lift off the entire outer sleeve leaving the screen sitting on the two lower foam blocks. Remove
the screen protection ply wood sheet. Use 2 people to lift out the screen
RE-PACKING
Insert the two lower foam blocks on the bottom tray, pack screen in plastic bag. Use 2 people
to lift the screen, place the outer sleeve over the bottom tray.
Fit the 4 white handgrips by inserting them through both parts of the cardboard. Insert the
screen protection ply wood sheet between the cardboard and foam inserts.
Put in the top white foam blocks. Close the flaps at the top of box and seal with packaging
tape. Re-fit the 2 black straps and secure the buckles
Unpacking and Repacking
P:\WINWORD\user instructions for EN069K003 46 inch LCD July 08 screen.doc 30/06/2008 Page 3
Page 4

Voltage Selection
The Torch Computers 46” LCD screen, model EN063K003, is designed to work on both
110-120 VAC (60Hz) and 220-240 VAC (50Hz) mains electricity supplies.
Normally, the screen will be delivered to the end user with the correct voltage for the local
supply already set.
2-metre long (6 feet) cables are supplied with plugs for three types of wall socket
Type UK – (5amp fuse fitted) used in United Kingdom, Singapore, Hong Kong,
and some other countries
The other end of the cable is an IEC socket, type C13.
This cable is for use on 220-240 VAC, 50 Hz
Type Schuco – used in many European countries
The other end of the cable is an IEC socket, type C13.
This cable is for use on 220-240 VAC, 50 Hz
Type USA – used in USA, Canada, Taiwan and some other countries
The other end of the cable is an IEC socket, type C19.
This cable is for use on 110-120 VAC, 60 Hz
P:\WINWORD\user instructions for EN069K003 46 inch LCD July 08 screen.doc 30/06/2008 Page 4
Page 5
Other Countries
This product is not suitable for Japan which has 98-100VAC mains supply. Please contact Torch
Computers Ltd at sales@torchcomputers.co.uk. Most other countries have either 220-240 VAC
supplies or 110-120 VAC supplies.
For countries with 220-240 VAC supplies, but which use neither the UK plug nor the European
(Schuco) plug, the user should obtain a professionally-made power cable with the local plug at
one end and the IEC type C13 socket at the other, which can then be used in place of the 220-240
cables supplied.
Countries with 110-120 VAC supplies often use the USA type plug, in which case the type USA
cable supplied can be used. (See above)
However, if the local plug is not the USA type, then a cable must be made with the local plug at
one end and an IEC type C19 socket at the other end.
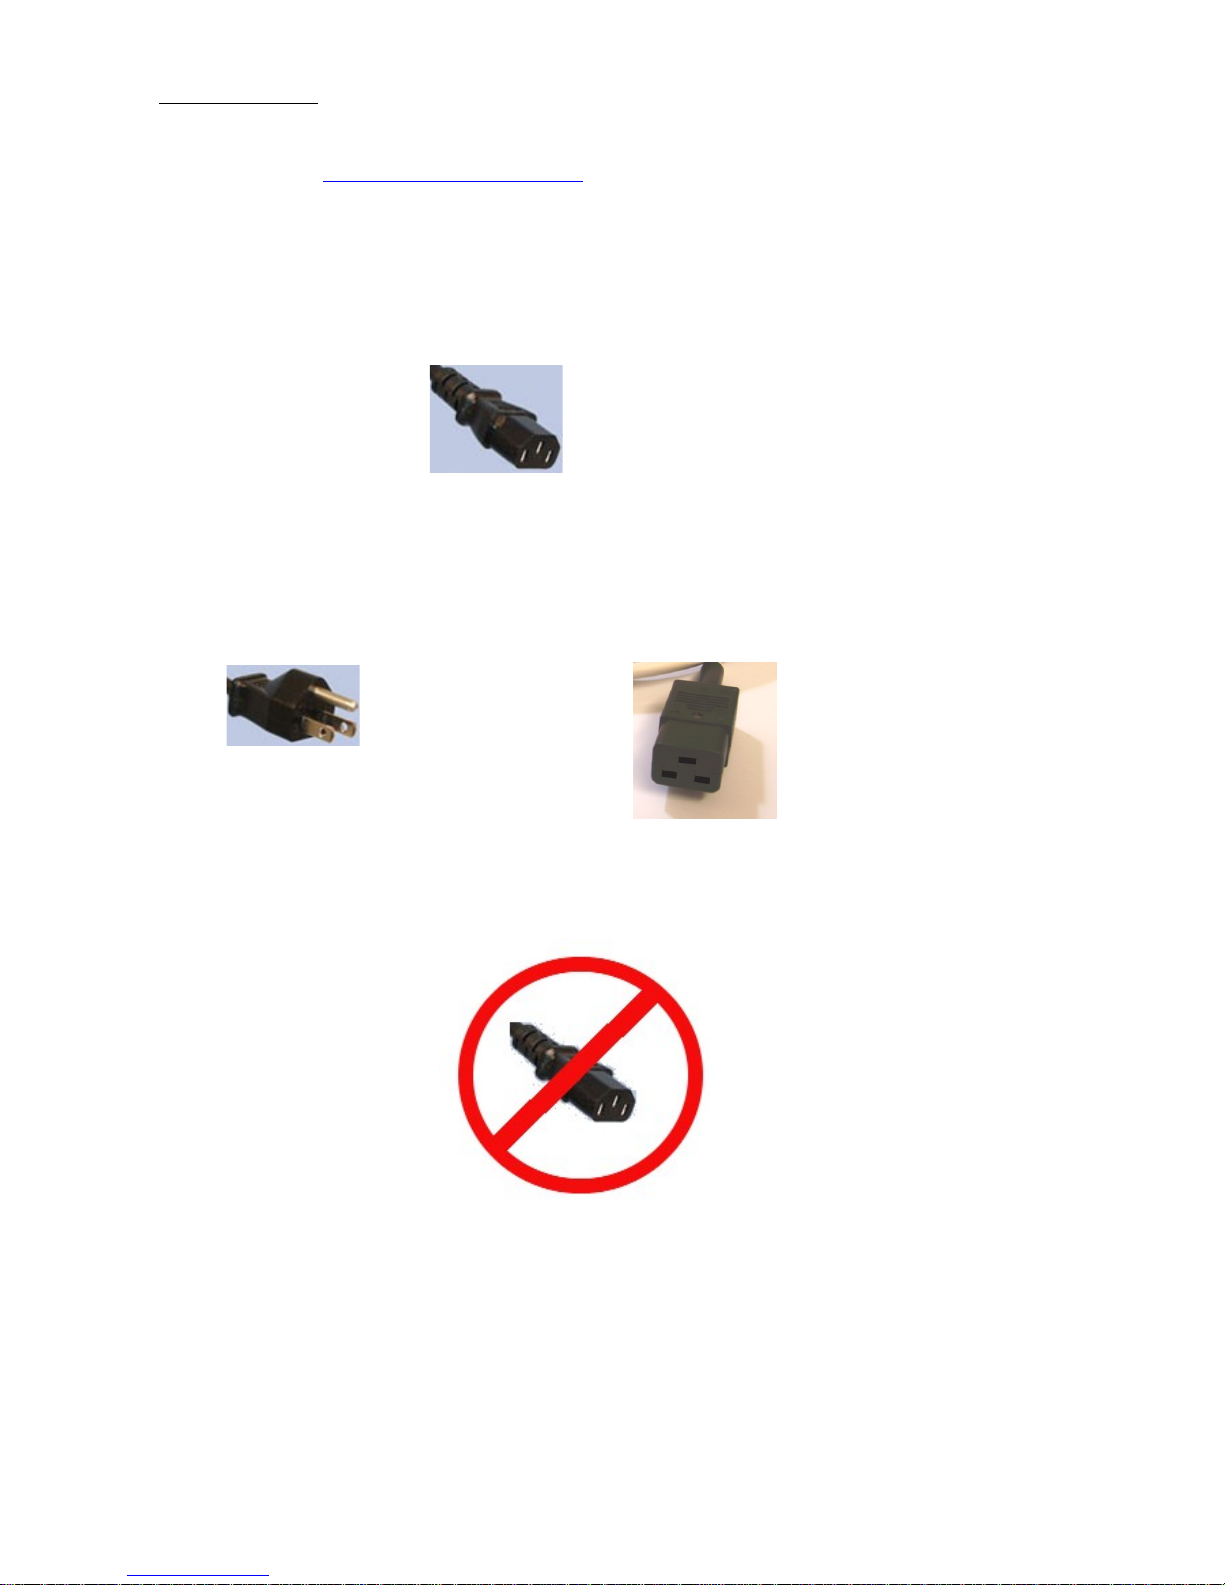
The IEC type C13 socket MUST NOT BE USED WITH THE TORCH COMPUTERS 46”
SCREEN WHEN THE MAINS SUPPLY VOLTAGE IS 110-120 VAC
NOT ON 110-120 VAC
P:\WINWORD\user instructions for EN069K003 46 inch LCD July 08 screen.doc 30/06/2008 Page 5
IEC type C13 socket
USA type plug
IEC type C19 socket
Page 6

Extension Cables
In addition, two extension cables are provided
Type 220-240 VAC
This has an IEC type C13 socket at one end and an IEC type C14 plug at the other
Type 110-120 VAC
This has an IEC type C19 socket at one end and an IEC type C20 plug at the other
The two metre cables can be used plugged directly from the screen to the wall socket, or can be
used with the appropriate extension cable.
P:\WINWORD\user instructions for EN069K003 46 inch LCD July 08 screen.doc 30/06/2008 Page 6
Page 7

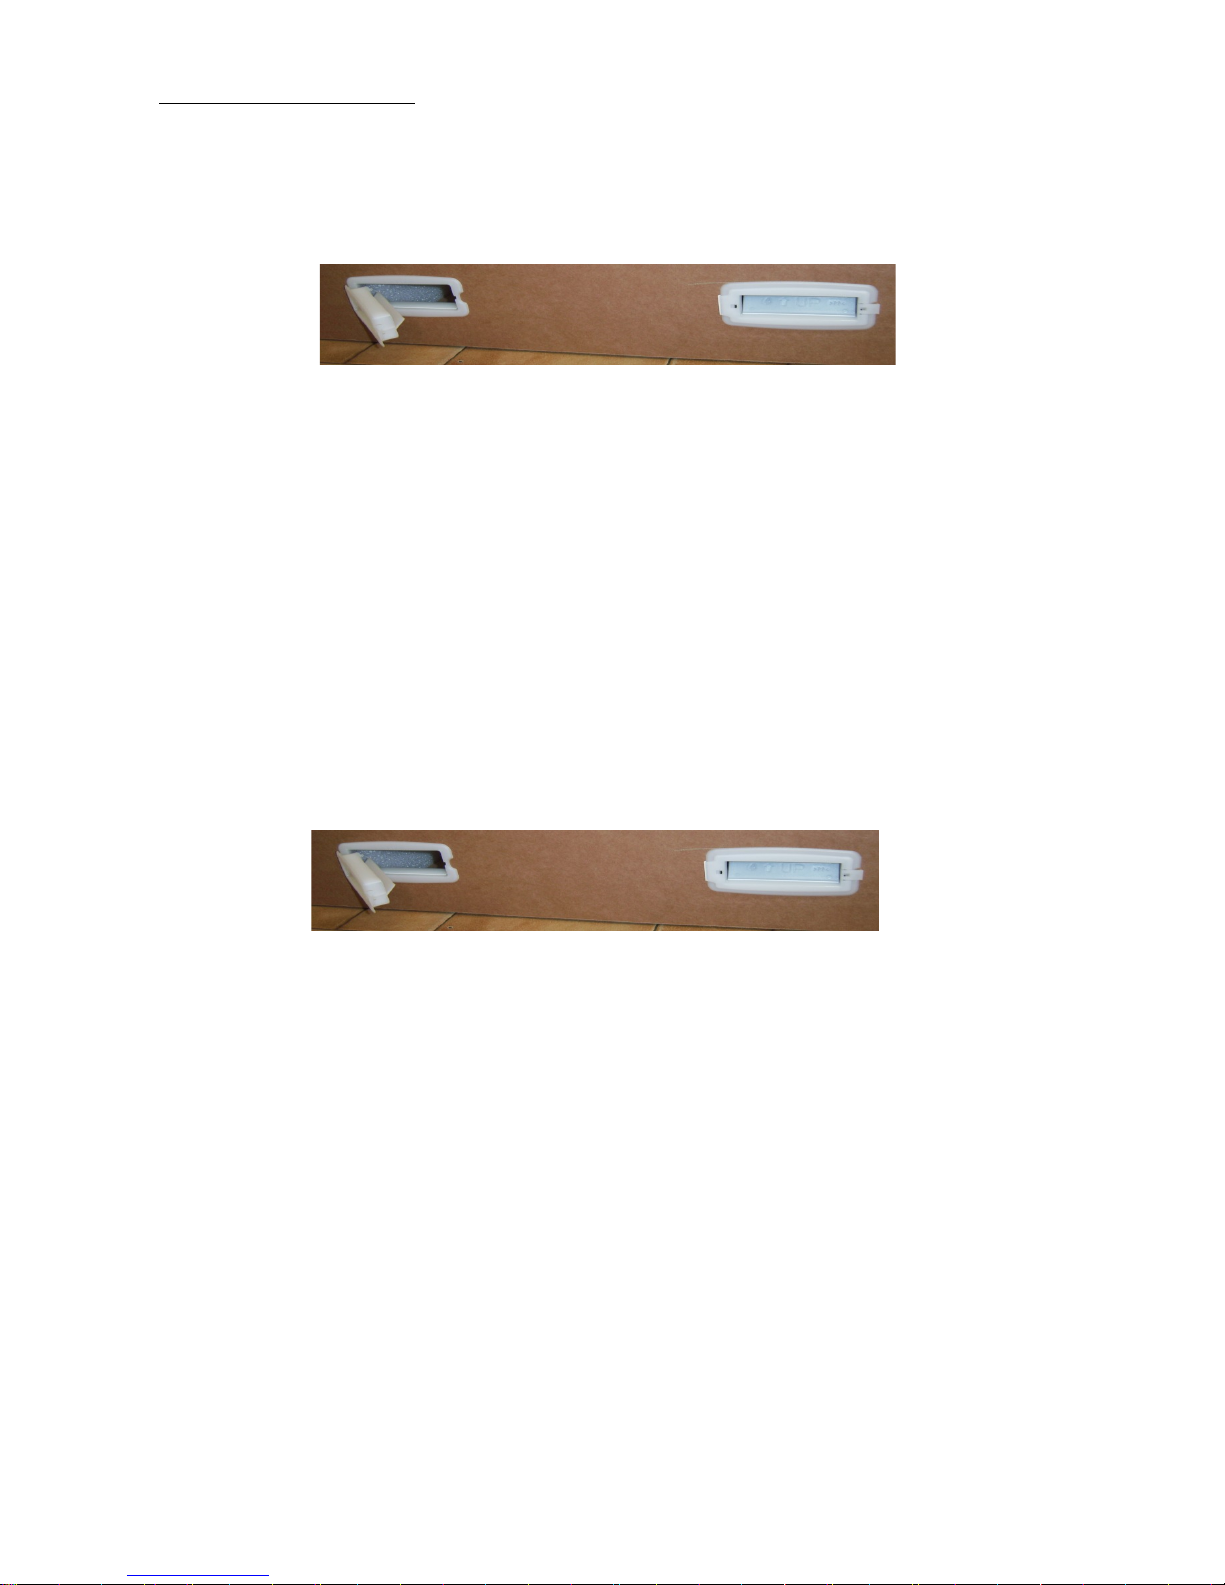
Fitting the cable to the screen
The picture above, left, is of the rear of the screen with the access panels closed.
To fit the cable, undo the knurled silver thumbscrew and remove the side access hatch. It is not
really necessary to remove the rear access hatch, but you may it convenient to do if you wish.
The cable can be led out from the screen in a number of different ways according the needs of
the installation.
P:\WINWORD\user instructions for EN069K003 46 inch LCD July 08 screen.doc 30/06/2008 Page 7
Side access panel
with knurled
thumbscrew
Rear access panel
with 4 countersunk
screws M4 x 6 mm
Page 8

Plug the cable into the appropriate inlet connector on the screen
Unscrew knurled knob and move to left for 220-240 VAC use. Plug cable into IEC type C14
inlet connector and fuse holder.
Unscrew knurled knob and move to right for 110-120 VAC use. Plug cable into IEC type C20
inlet connector and fuse holder.
P:\WINWORD\user instructions for EN069K003 46 inch LCD July 08 screen.doc 30/06/2008 Page 8
Page 9

Powering on the screen
When mains power is applied to the Torch Computers 46” LCD screen, a bleep will be heard.
This is the UPS (uninterruptible power supply) initialising.
As delivered, the computer will not power up when the mains power is applied, and screen is set
up so that the LCD panel turns on as soon as power is applied, but will shortly go into sleep
mode. The red light comes on and after a short pause it flashes. In the unlikely event that the red
light is not flashing but shows a steady light, press the power button once (shown with a green
arrow). The light should then start flashing.
To start the unit, press the red button once, briefly. The computer will start and the LCD panel
will come on. A series of bleeps will be heard as the equipment starts up. The red light will go
out.
No further user intervention should be necessary, as the screen is shipped in a configuration such
that the artwork animation will start operating automatically as soon as the computer has
completed its initialisation.
Powering off the screen
When the artwork is running, press the red button briefly and the computer will shut down,
putting the screen into sleep mode.
If the computer is still initialising, wait until the artwork is running before switching off.
P:\WINWORD\user instructions for EN069K003 46 inch LCD July 08 screen.doc 30/06/2008 Page 9
Press once to
switch
computer on,
press once more
to turn off
Remote PC Power Screen Power Left Right Up Down Menu Source
Infra-red indicator indicator Button (Not intended for use by end-user)
Sensor (Blue) (Red) (Don’t touch)
Screen control buttons From July 2008
To operate, press with the blunt end of pencil, or something similar
Page 10

Uninterruptible Power Supply (UPS)
The Torch Computers 46” screen is fitted with a UPS whose purpose is to protect the unit against
mains fluctuations. If the power is lost, the LCD panel will go off immediately, but the UPS will
keep the computer running. During this time, the UPS bleeps continually.
If the power is restored within one minute, the LCD panel will come back on and normal
operation will resume.
If the power remains off after one minute, the computer will start to shut down, which will take
up to one minute more.
Removing Mains Power from the Screen
Do not remove Mains Power from the Screen except when the computer is shut down.
Once the computer is shut down the mains can be switched off and/or unplugged. When this is
done, the UPS will bleep.
Computer Interfaces
The computer interfaces are not intended for the use of the end-user, and any problems caused by
so doing will be outside the warranty.
For authorised personnel only, the interfaces available are as shown:
PS-2 / USB keyboard PS-2 /USB mouse 10/100 LAN USB
(Red) (Green)
P:\WINWORD\user instructions for EN069K003 46 inch LCD July 08 screen.doc 30/06/2008 Page 10
Page 11

Speaker Orientation Option
This feature enables the sound to be switched between the Portrait & Landscape Orientation
before the mounting of the monitor
Make Sure the Mains input plug is disconnected, with the monitor placed face down on a
suitable protected soft surface. Locate the switch, which is through the rear right hand landscape
wall mounting opening in the rear panel.
Set the switch to Portrait or Landscape as required.
P:\WINWORD\user instructions for EN069K003 46 inch LCD July 08 screen.doc 30/06/2008 Page 11
Page 12

Wall Mounting
Two wall mounting brackets are provided, one each for portrait (“vertical”) and for landscape
(“horizontal”) mounting.
In the rear of the screen are three holes, each 30 mm (13/
16
th
inch) square, of which two are used
for each of the two orientations.
UPS Access Computer Access
Remove 4 screws to release Remove inner six screws, or all twelve to release
For landscape mounting refer to the landscape holes and guide slots in the picture above and
use the bracket illustrated on the next page. Screw the bracket firmly to the wall with the screws
pointing upwards. Ensure that the bracket is level. It is the responsibility of the installer to
ensure that the screws used and the wall to which the screen is attached are capable of
holding the screen safely. The screen weighs about 50kg – the fixings should be rated at
least three times that value, i.e. the wall and the screws should be able to withstand 150 kg
load.
(See page 13 for portrait mounting)
P:\WINWORD\user instructions for EN069K003 46 inch LCD July 08 screen.doc 30/06/2008 Page 12
Landscape fixing holes Portrait fixing holes
Landscape guide slots Portrait guide slot
Page 13

When the bracket is securely fixed to the wall, the screen can be hung upon it, using at least two
people to lift it. Locate the guide fins into the guide slots and slide the screen upwards until the
screws drop into the square holes. Lower the screen slightly and ensure that the screws have
located correctly in the holes within the screen.
If the screen is not exactly level, the adjustment nuts can be used for fine adjustment. The screen
must be removed again, and then the top nut on the screws can be wound up or down, or
removed entirely. The nut that holds the screws into the bracket must not be removed or
loosened; only the second nuts on each screw that is provided for the purpose of adjustment.
For portrait mounting use the bracket illustrated below. Screw the bracket firmly to the wall
with the screws pointing upwards. Note that the fixing holes are off-centre by 46mm (1.8”).
Ensure that the bracket is level. It is the responsibility of the installer to ensure that the
screws used and the wall to which the screen is attached are capable of holding the screen
safely. The screen weighs about 50kg – the fixings should be rated at least three times that
value, i.e. the wall and the screws should be able to withstand 150 kg load.
P:\WINWORD\user instructions for EN069K003 46 inch LCD July 08 screen.doc 30/06/2008 Page 13
Guide fins
Adjustment nuts
Guide slot
Portrait fixing holes
Page 14

When the bracket is securely fixed to the wall, the screen can be hung upon it, using at least two
people to lift it. Locate the guide fin into the guide slots and slide the screen upwards until the
screws drop into the square holes. Lower the screen slightly and ensure that the screws have
located correctly in the holes within the screen.
If the screen is not exactly level, the adjustment nuts can be used for fine adjustment. The screen
must be removed again, and then the top nut on the screws can be wound up or down, or
removed entirely. The nut that holds the screws into the bracket must not be removed or
loosened; only the second nuts on each screw that is provided for the purpose of adjustment.
P:\WINWORD\user instructions for EN069K003 46 inch LCD July 08 screen.doc 30/06/2008 Page 14
Guide fin
Adjustment nuts
 Loading...