

Page 1

Table of Contents
…
…
…
…
…
…
…
…
.
…
…
…
…
…
…
…
…
…
…
.
…
…
…
…
…
…
…
…
…
…
.
…
…
.
…
…
1. Cautionary Notes and Precautions…………………………………………………………………………….……
Important Handling Cautions and Warnings………………………………………………………….……
1.1
2. Specifications………………………………………………………………………………………………….……
3. Keys, Display Indicators and Abbreviations………………………………………………………………….……
2
3
5
6
4. Parts Descriptions…………………………………………………………………………………………………… 7
5. Unpacking Balance and Getting Started…………………………………………………………………….………
6. Basic Principles of Weighing……………………………………………………………………………….………
7. Battery Installation and Replacement……………………………………………………………………….………
8. Functions, Descriptions and Definitions……………………………………………………………………………
9. Weighing…………………………………………………………………………………………………….………
Weighing…………………………………………………………………………………………….……… 14
9.1.
Taring……………………………………………………………………………………………….………. 14
9.2.
Extending the Resolution………………………………………………………………………….………
9.3.
Zeroing the Scale………………………………………………………………………………….………
9.4.
9
11
12
13
14
16
16
10. Auto-Zero……………………………………………………………………………………………….…………. 17
11. Parts Counting…………………………………………………………………………………………….………
Using the Default Sample Setting………………………………………………………………….………
11.1.
Using a Custom Sample Size……………………………………………………………………….………
11.2.
Counting Based on a Known Individual Piece Weight…………………………………………….………
11.3.
12. Units of Measure………………………………………………………………………………………….………
13. Percent Weighing………………………………………………………………………………………….………
14. Recipe Weighing………………………………………………………………………………………….………
18
18
19
21
23
26
26
15. Calibration……………………………………………………………………………………………….………… 29
Quick Calibration………………………………………………………………………………….………
15.1.
Stepped Calibration……………………………………………………………………………….………… 31
15.2.
16. Port 1 - RS232 Communication Port Configuration…………………………………………………….…………
Data Transmission and Exchange Protocol……………………………………………………….………
16.1.
Baud Rate………………………………………………………………………………………….………
16.2.
Bites……………………………………………………………………………………………….………
16.3.
Parity…………………………………………………………………………………………….………….. 36
16.4.
17. Port 2 –USB Configuration…………………………………………………………………………….…………
29
33
33
35
35
37
18. Receipt Printout………………………………………………………………………………………….………… 39
Enabling and Disabling Receipt Fields…………………………………………..……………….………… 40
18.1.
Assigning Operator and Product ID Numbers…………………………………………………….………
18.2.
19. Dynamic and Animal Weighing LOC…………………………………………………………………….………
20. Storing Tare Values……………………………………………………………………………………….………
Storing a Tare Value Manually…………………………………………………………………….……….. 42
20.1.
Storing a Tare Value Automatically………………………………………………………………………
20.2.
Recalling a Previously Stored Tare Value……………………………………………………….…………. 44
20.3.
21. Min Max Weighing……………………………………………………………………………………….………
22. Newton – Force Measurement…………………………………………………………………………….………
23. Filtering…………………………………………………………………………………………………….………
24. Date and Time…………………………………………………………………………………………….….……
Enabling and Disabling Date and Time Stamping………………………………………………….….…… 48
24.1.
Setting the Current Date and Time…………………………………………………………………..……
24.2.
Enabling PIN access to the Date Configuration Function………………………………………….….……
24.3.
40
41
42
43
45
46
47
48
48
50
25. Threshold Check Weighing and Opto-Isolator……………………………………………………………..……… 51
Enabling Check Weighing and Setting Threshold Limits…………………………………………..………
25.1.
51
26. Totalizing ………..………………………………………………………………………………………..………. 53
27. Battery ……….………………………………………………………………………………………….………… 55
28. LCD Backlight ………………………..………………………………………………………………….……….. 56
29. Automatic Shutoff ……………….……………………………………………………………………….……….. 57
30. Menu Customization …………………………………………………………………………………….……….. 58
31. Restoring Default Settings…………………………..………………………………………………….…………. 58
32. Common Errors and Troubleshooting ………………………………………………………………….…………. 59
33. Maintenance …………………………………………………………………………………………………….… 59
34. Limited Warranty………………………………………………………………………………………….………
60
Page 2

Precision General Purpose
Chapter 1: Cautionary Notes
Remember choose a proper location for you scale. Always handle the unit with care.
The correct location and proper environment make an important contribution to the accuracy of the weighing
results of TORBAL industrial scales.
The optimum location for your scale:
• Stable, vibration-free base as horizontal as possible
• Away from direct sunlight
• Not exposed to high temperature variations
• Away from direct drafts
• The best location is a stable surface away from direct drafts, doors, windows, radiators and air
conditioner vents.
- 2 -
Page 3

CAUTION:
WARNING:
• The scale is designed for indoor use only.
• Do not operate the scale in hazardous areas or conditions.
• Do not use the scale in locations subject to high humidity.
• Do not connect cables in ways other than those mentioned in this manual.
• Be sure to set the scale on a firm, stable, horizontal surface.
• Never stand on or lean upon this product. Equipment may fall or collapse, causing breakage
and possible injury.
• Before moving the product, unplug it and unplug all cables connected to it.
• When storing, transporting or returning the scale for service, always use the original
packaging.
• Never attempt to repair, disassemble or modify the scale yourself. Tampering with the scale
may result in injury and cause more damage to the equipment.
• Be sure to use the specified power source.
• Do not allow foreign matter to fall into the scale.
• If water or other liquid spills into the scale, do not continue to use it. Unplug the power cord
immediately and contact technical support.
1.1. Important handling Cautions and Warnings
Follow all safety guidelines in order to avoid electrical shock, or damage to
connected peripheral devices.
• All necessary repairs or internal adjustments should be made by authorized personnel only.
• To avoid the risk of fire use an outlet of the proper type that provides the specified voltage. The
required voltage for the power supply is 115vAC @ 60Hz and requires a minimum of 1.2 amperes
of current.
• Do not use the scale when the cover is open.
• Do not use the scale in explosive atmospheres.
• Do not use the scale in very high humidity.
• If the scale does not operate properly, unplug the power supply and do not use it until checked by
authorized personnel.
Disposal of electronic equipment in waste containers is
forbidden by law.
• Please dispose of electronic equipment in appropriate recycling centers or by
returning to the original point of purchase.
- 3 -
Page 4

Always handle your scale with care. Damage caused by improper handling is not covered
under the scale’s warranty.
Never drop or throw any articles onto the
scale’s pan or onto any other parts of the unit!
DO NOT let the scale fall or drop from its
tabletop surface!
When moving the scale do not press or apply
force onto the scales pan!
DO NOT pass or handle liquids directly over
the scale to avoid spillage and liquid damage!
- 4 -
Page 5

Chapter 2: Specifications
Capacity
Readability (d)
Linearity
Stabilization time (typical)
Tare Range
Pan Dimension
Scale Dimension
Scale Weight
Model
BTA210 BTA2100
210 g 2000 g
0.01g 0.1g
0.02 g 0.2 g
< 3s
-210 g (Max) -2000 g (Max)
115mm 145mm
185 x 290 x 90 mm
1 kg
Power Supply
Operating Temperature
RS232 Port
USB Port
Warranty
12VDC@850ma
-18C to +33C
Bidirectional
B Type
One Year
- 5 -
Page 6

Chapter 3: Keys, Display Indicators and Abbreviations
Key Primary Function
Power On and Power Off
ÆTÅ
Æ0Å
MENU
B/G
HR
Display Indicator
AUT
NET
Tare – used to tare the weighing pan
Zero – used to zero the scale (Legal for Trade models only)
Menu – used to access the main menu
Data Transfer – used to print data or transfer data to a PC via the RS232 communication port
Gross Weight – used to change display from Net Weight to Gross Weight
High Resolution – temporarily (5 sec) increases the display resolution
Description
Stability Indicator - The weighing result has stabilized and an accurate reading may be taken.
Zero - The scale is maintaining a “center of zero” condition. (Legal for Trade models only)
AZSM (Automatic Zero Setting Mechanism) is enabled. Always enabled in Legal for Trade models.
Net Weight – indicates that the container weight has been removed by tare
- 6 -
Page 7

Chapter 4: Parts Description
BTA Models: Front and Side View
1 Pan
2 Pan Support
3 Draft Ring
4 LCD Display
5 Keypad
6 Leveling Feet
7 Level Indicator
8 Draft Shield (Optional)
9 Draft Shield Top Cover (Optional)
1 Pan
2 Pan Base
4 LCD Display
5 Keypad
6 Leveling Feet
7 Level Indicator
- 7 -
Page 8
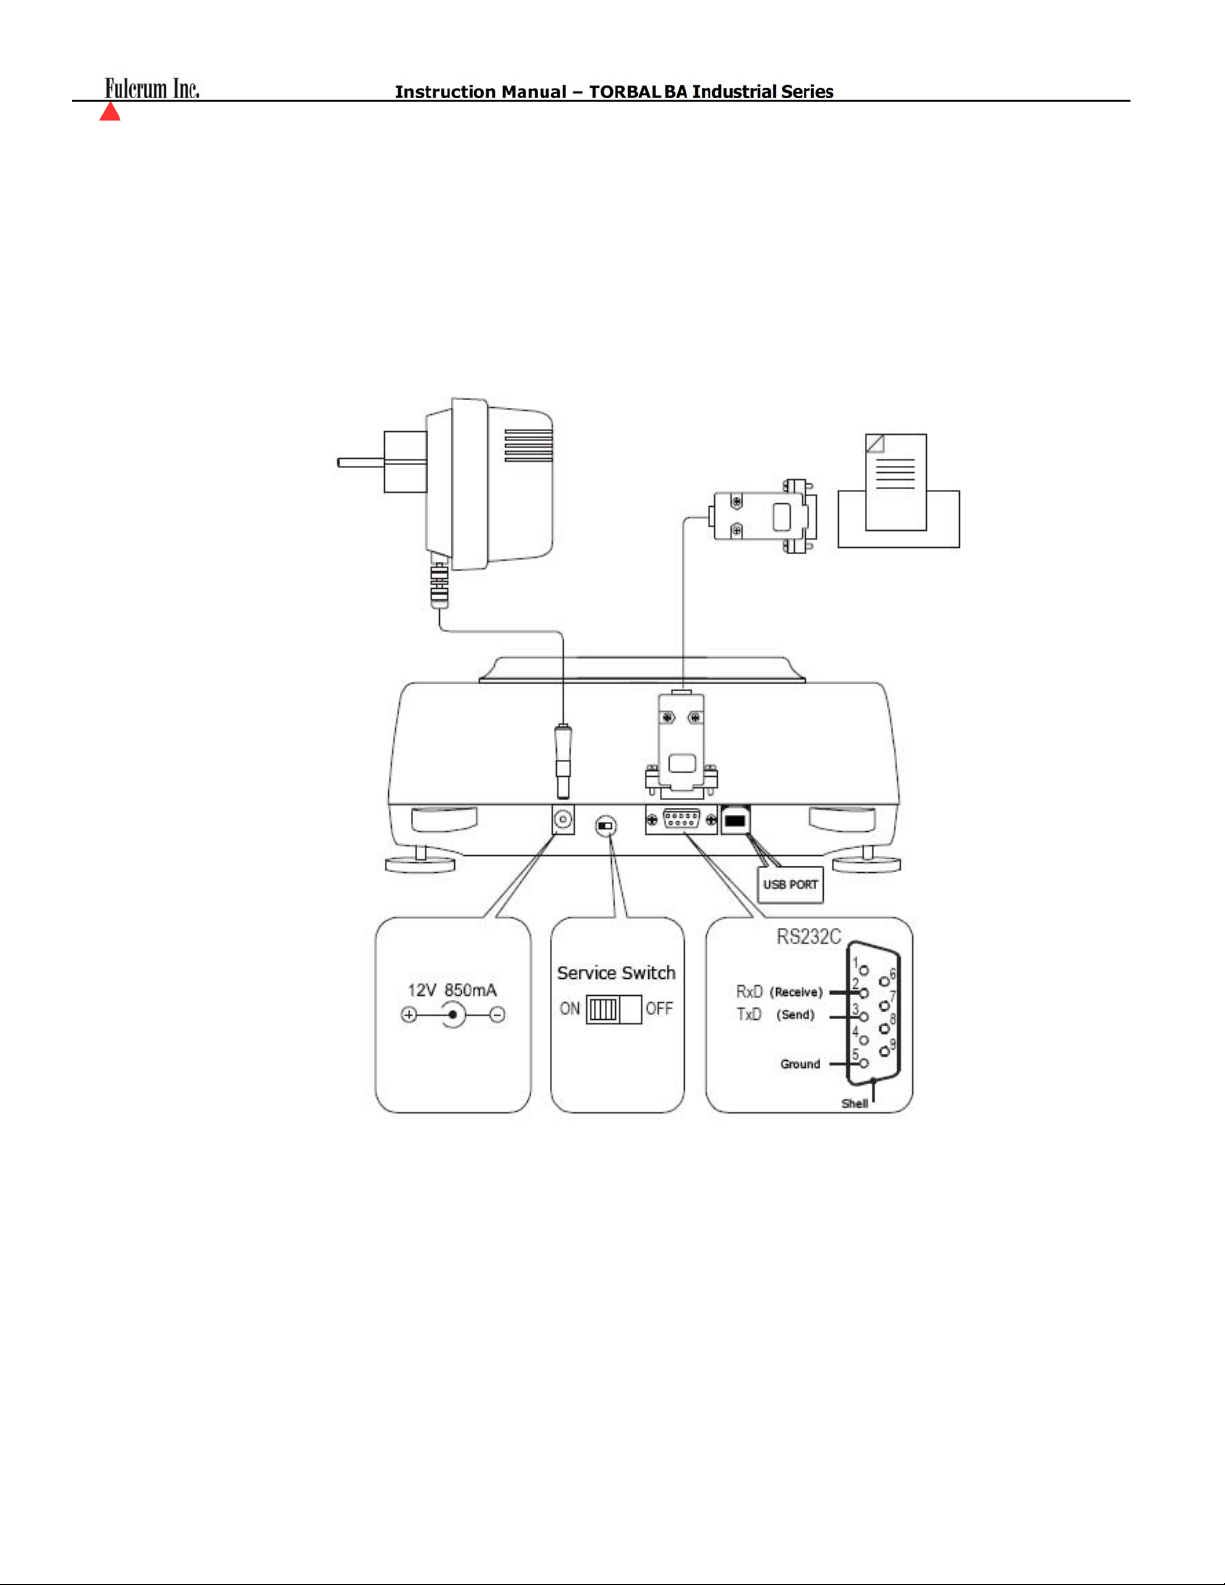
BTA Models: Rear View
- 8 -
Page 9
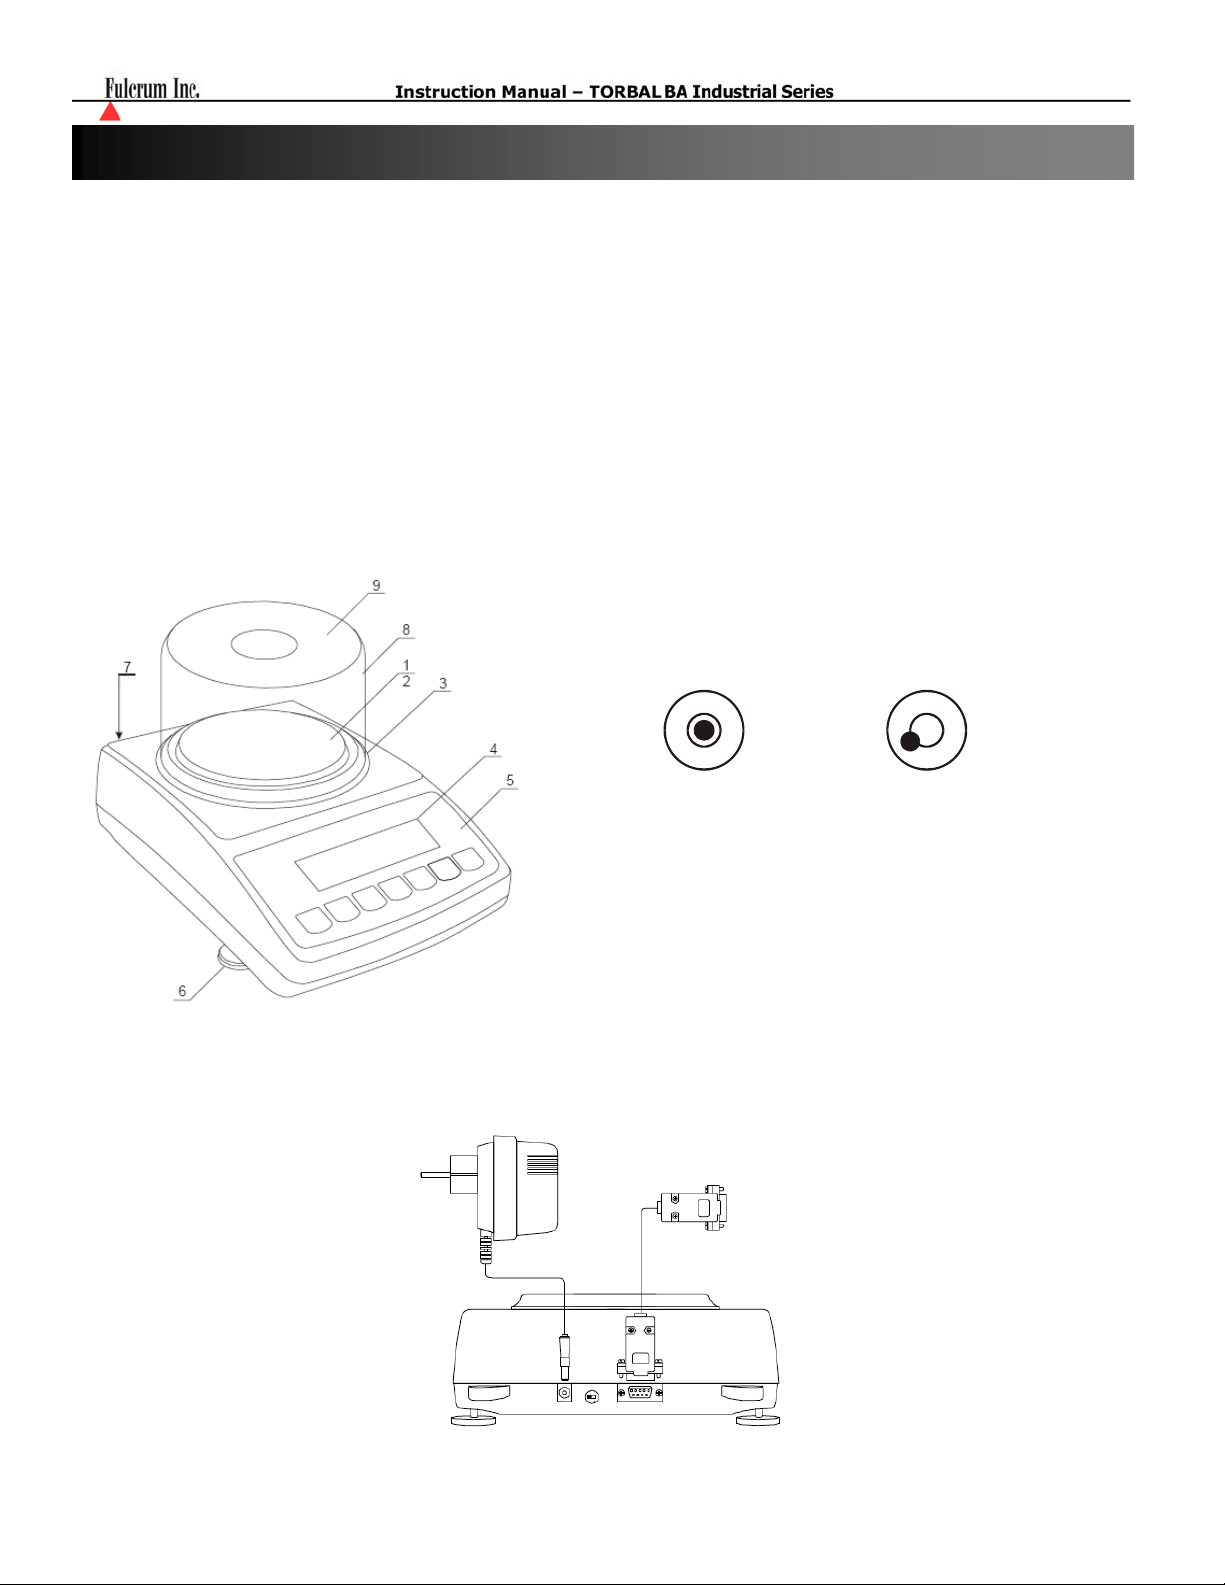
Chapter 5: Unpacking the Balance and Getting Started
1. Carefully remove the scale, pan, and all of its components out of the packaging. Place them on a stable
surface where the scale will not be affected by any mechanical vibrations or high air movements.
2. After removing the pan base and the pan from their packaging, carefully install the pan base (2) onto
the scale by seating it on the pan support located in the middle of the scale. Once the pan base has
been installed, carefully place the pan (1) on the base
3. Once the pan has been installed, level the scale by adjusting the front feet (6) until the level indicator
(7) shows the “air bubble” is in the center position of the sight glass. The level indicator is located on
the rear left side of the scale.
Correct Incorrect
4. After leveling the scale, you may plug the AC adaptor to the AC adaptor socket located in the rear of
the scale.
- 9 -
Page 10

5. When the AC adapter is plugged into the wall outlet, the scale will turn “ON” automatically, initialize
itself, and enter weighing mode.
C-1 0
6. To turn the scale OFF press the Power “OFF” button ( ).
00
- 10 -
Page 11
Chapter 6: Basic Principles of Weighing
1. The scale should be properly zeroed before weighing. Proper zeroing is indicated by the Zero
→0←
Indicator (
(
→0←
) key to Zero an empty pan.
2. Weighing allows taring over the entire weight range. This is accomplished by pressing the Tare
key, (
→T←
capacity is not overloaded.
3. An accurate weighing result should not be taken until the stability indicator, ( ) , indicates that
the result is stable.
4. For best results place the unknown weight in the center of the pan.
5. Always protect the scale from dirt, dust, and corrosive liquids. When Cleaning use of a clean cloth
with soap and water, and then dry with a clean wiper.
6. Use the “Active” function to customize the scale’s main menu and disable functions that are not used.
This makes use the main menu fast and easy.
) on the display. If the display signals an out of zero condition (----), press the
). Care should be exercised when tare is in use to be sure that the scale’s maximum
Never overload the scale in excess of 20% of the scale’s rated maximum
capacity.
- 11 -
Page 12

Chapter 7: Battery Installation, Replacement, and Operation
Never enable the “Batter” (battery) function when operating the scale on conventional
disposable AA Batteries. The “Battery” function may be enabled only when using rechargeable
multi-use batteries.
Useful Tips for Operating the Scale with a Battery
• In order to increase the battery’s operating life, it is recommended to set the scale’s back light mode to
(“back light battery” – B_LBAT). Refer to Chapter 28 (LCD back light).
• When operating the unit on batteries it is recommended to enable the scale’s “Auto-Off” function by
setting it to AUT BAT. This will turn the scale off automatically after 5 minutes of inactivity. Refer to
Chapter 29 (Auto Off).
To install or replace the scale’s batteries, follow the steps below:
1. Remove the scale’s pan, pan base, as
well as the draft ring (BTA210
Models) and carefully place the scale
up-side down.
2. Remove the security screws (11) and
lift the battery compartment cover
(12).
3. Remove the battery nest from the
compartment (13).
4. Install four AA batteries. Be sure
position the batteries with correct
polarity.
- 12 -
Page 13

Chapter 8: Functions, Descriptions and Definitions
• Parts Counting is used to count parts based on their established average piece weight.
• Percent weighing is used to establish the relative weight of an unknown, compared to that of a stored
reference weight and expressed as a percent.
• Recipe Making is used for weighing and summing individual ingredients such as powers or liquids
during recipe making or mixing compounds.
• Check weighing is used to check whether a weight of an object falls within specified threshold limits.
• Animal and dynamic weighing is used to weigh animals or objects which are in motion while on the
pan.
• Tare Storing is used to store the values of various containers used for weighing.
• Filtering is used to minimize or eliminate the effects of vibrations in the weighing surface.
• Min / Max Indication is used in conjunction with Check Weighing to control external indication or
sorting equipment.
• Totalizing is used for summation of sequential weighing results of items or articles.
- 13 -
Page 14
Chapter 9: Weighing
9.1 Weighing
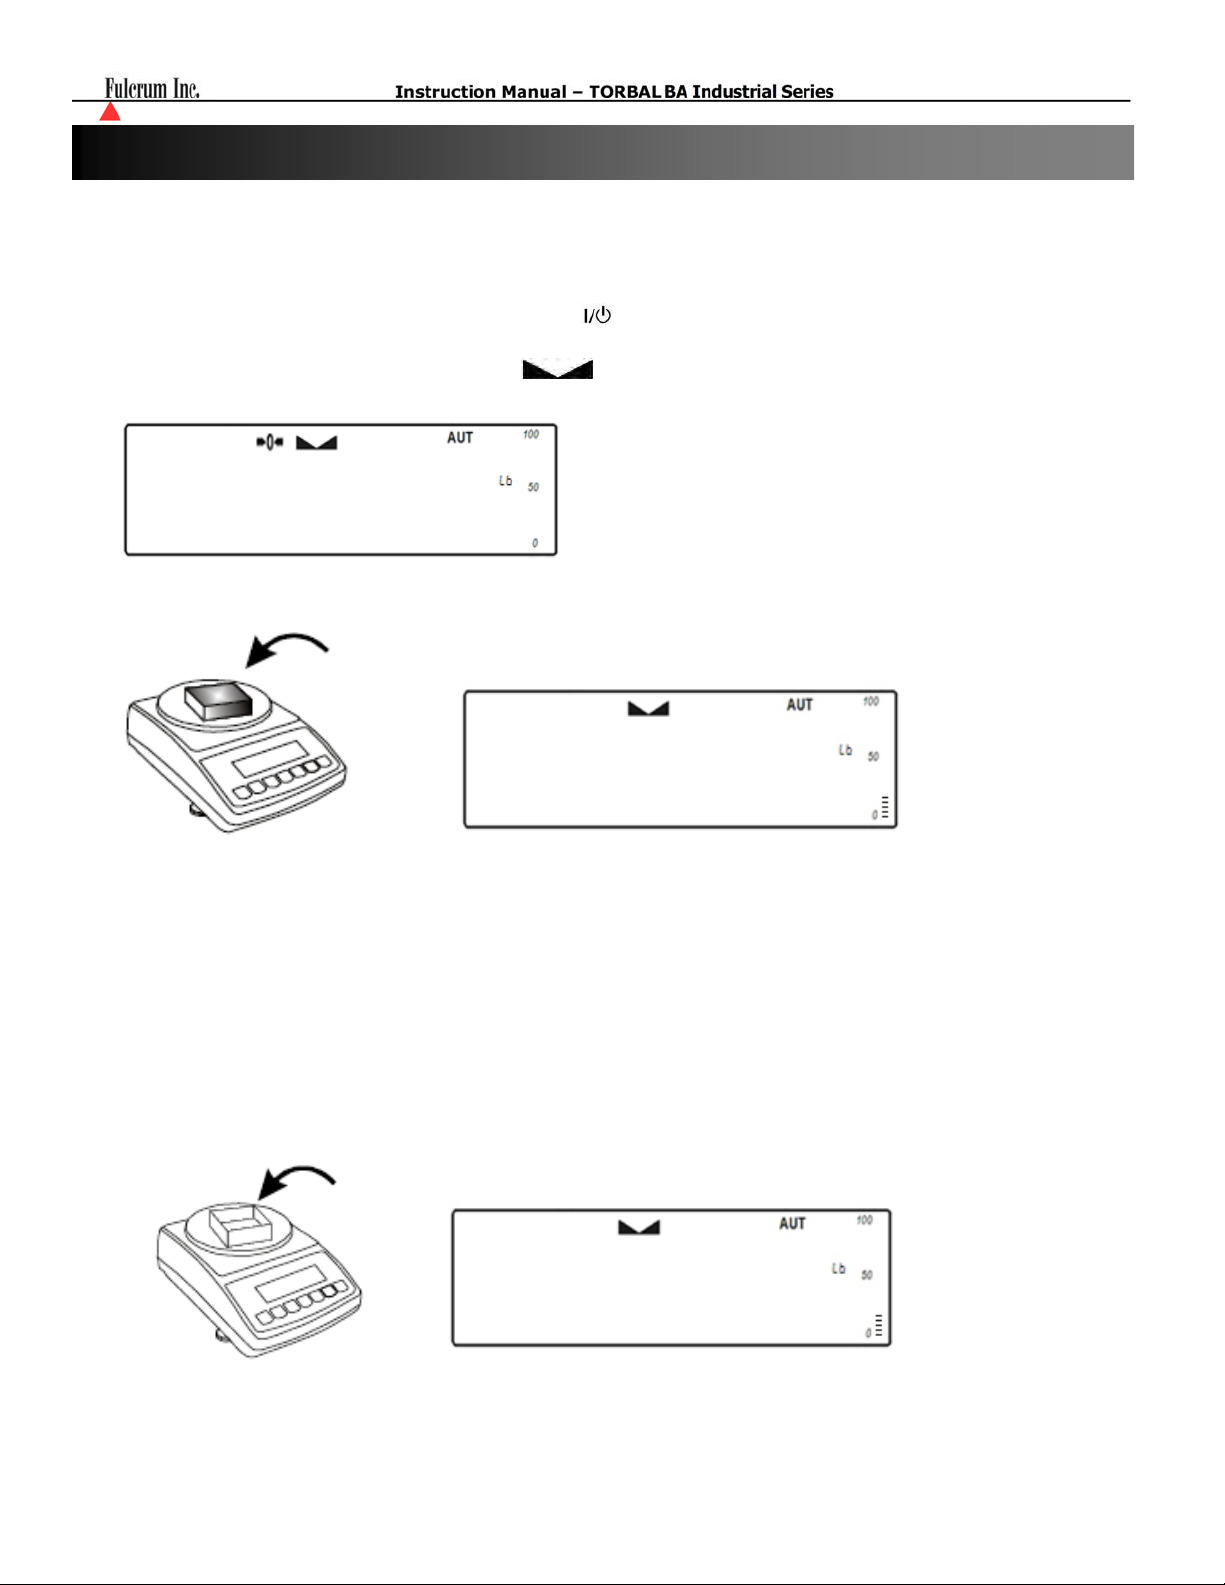
1. To begin weighing, press the power button ( ) to turn the scale ON. The scale will go through its
initialization procedure and automatically enter “Weighing Mode”. The scale is ready to begin
weighing as soon as the stabilization ( ) and zero (Æ0Å) indicators appears on the display.
0
00
2. When weighing, always place the mass in the middle of the pan. The weighed result may be taken
when the stabilization indicator appears on the display.
12
9.2 Taring
1. If a container is used for weighing, it may be tared. In taring the container, the scale subtracts the
weight of the container from the gross weight to obtain the net weight.
2. To tare the weighing container, place it in the middle of the pan. The container’s weight will be shown
on the display.
2
00
04
- 14 -
Page 15

3. Once the stabilization indicator appears on the display, the container is ready to be tared. To tare the
container, press the “T” button. The display will show a dotted line which indicates the scale has
begun the taring process.
-------
4. When finished taring, the balance will return to weighing and the NET indicator will be lit. The
display will indicate 0.00g.
0
00
5. Place the unknown weight in the tared container. The NET weight will be displayed.
20.00
6. To obtain the gross weight (Tared container + unknown weight) press the B/G key.
22
04
- 15 -
Page 16

9.3 Extending the resolution
1. The resolution of the scale can be temporarily increased by pressing the HR key. This temporary
increase in resolution can be very useful in scales where d=e. The display resolution is increased for 5
seconds and then reverts automatically.
22
Note: These results are not legal for trade and cannot be sent to a printer or an external computer.
9.4 Zeroing the scale
If the display signals are out of zero condition “—“, the scale must be zeroed before weighing.
036
- -
1. To zero the scales press the Æ0Å key.
-------
00
0
- 16 -
Page 17

(
)
Chapter 10: Auto-zero
All BA Scales are equipped with AZSM, the “Auto Zero Setting Mechanism.” AZSM automatically
maintains a center of zero and 5.0d.
1. Enter the main Menu by pressing the MENU key
0
2. Select “AutotA” by pressing the T key.
AutotA
00
Autota
3. To enable Auto-zero press the T key when “Aut on” is displayed, to disable press the T key when
“AutoFF” is displayed or select “out” to exit.
Aut on
Autoff
- 17 -
Page 18
(
)
Chapter 11: Parts Counting
Functions Options:
PCS Off
PCS On
PCS ..
PC Set
PC UM
PCS RS
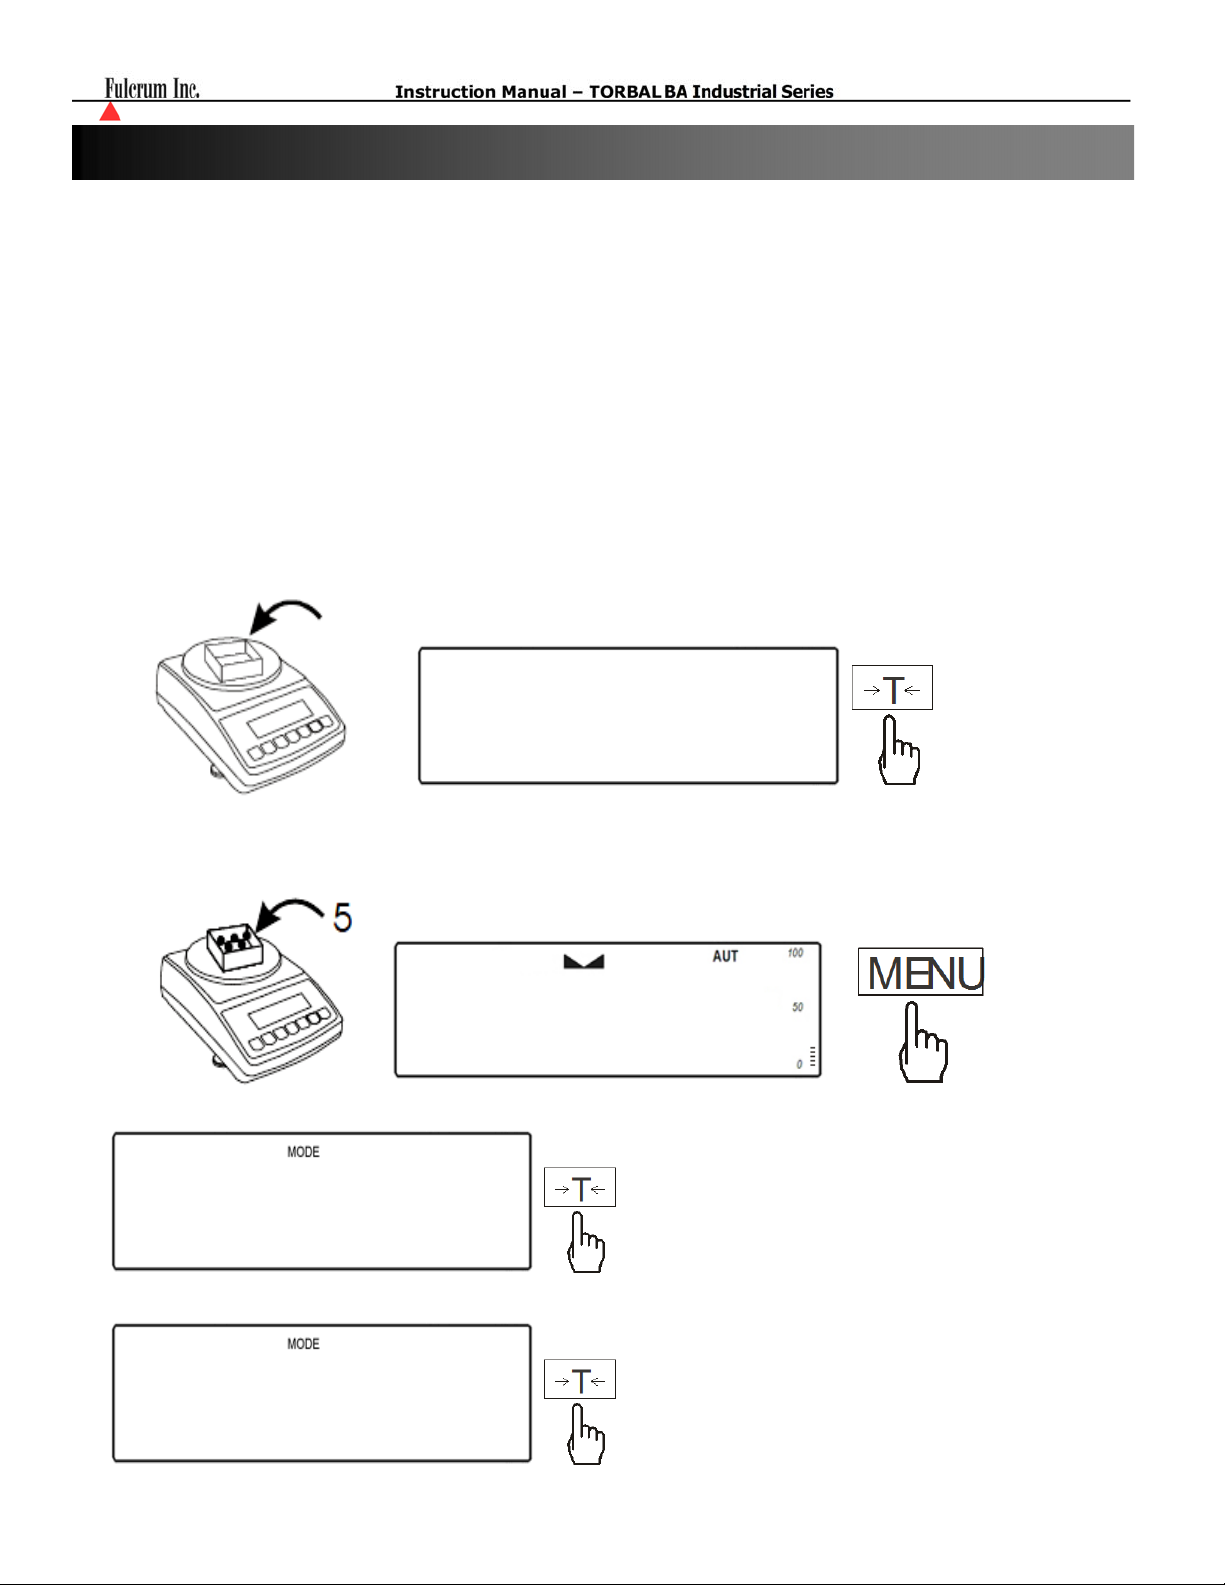
11.1. Using a default sample size setting
( PCsoff)
(pcs on)
(PCS . .)
(PC SET)
(PC UMM)
(PCs rS)
1. Place the counting container on the pan while in the weighing and press the T key to tare the
container.
Disables Parts Counting
Enables Parts Counting
Recalls the last Average Pieces Weigh used in for counting
Setting a custom sample size
Setting a custom known Individual Piece Weight
obtaining the average piece weight from secondary higher accuracy scale via RS232
PCS
-------
2. Place a sample in the container. The sample size must equal to one of the pre-set options:
5,10,20,50,100, 200,500, and press the MENU key
PCS
25
3. Wait for PCS to appear on the display and press the T key
00
pCS
4. Select “PCS on” by pressing the T key.
pCS on
- 18 -
Page 19
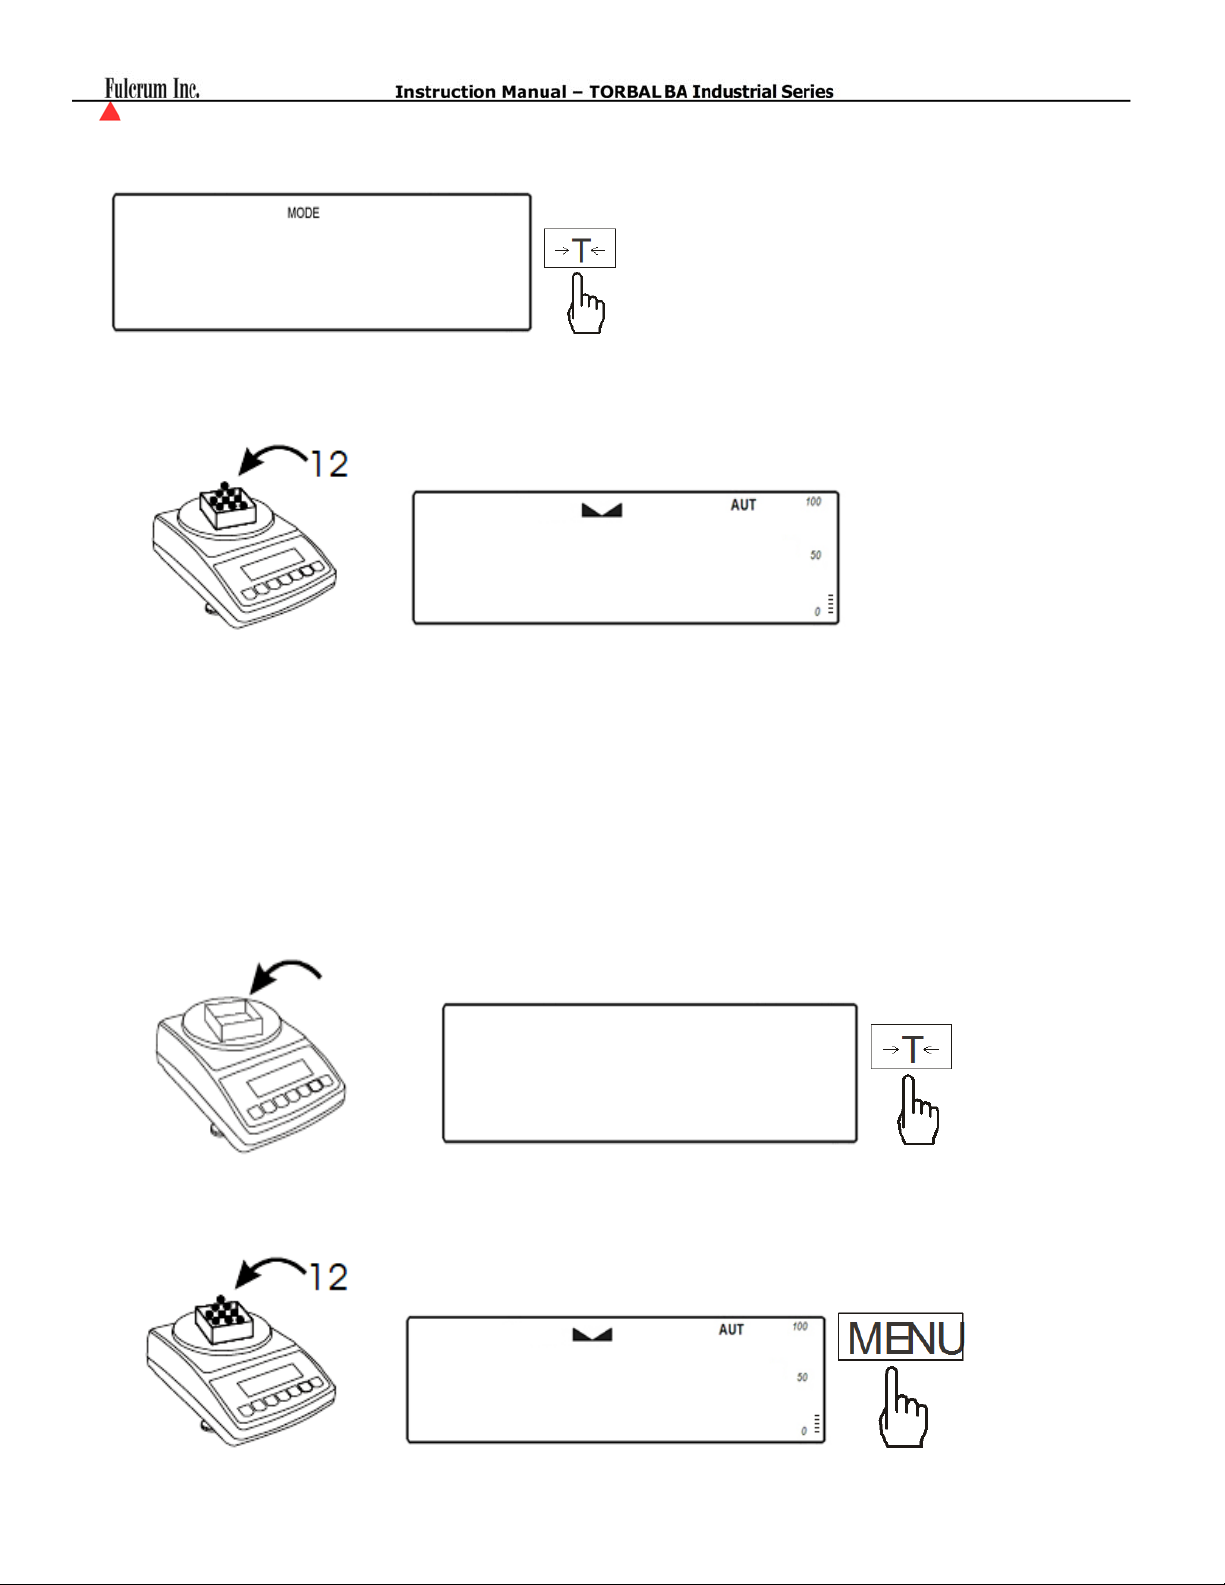
5. Available sample size options will alternate on the display. Press the T key to select a size value
equal to the number of the sample placed in the container.
pCS 5
6. After the sample size has been selected, the scale will display the count of the sample. At any time
you can proceed with the count.
PCS
17
7. To turn parts counting off, select PCS from the main menu and press the T key when “PCSoFF” is
displayed.
11.2 Using a custom sample size
1. Place the counting container on the pan while in the weighing mode and press the T key to tare the
container.
2. Place a desired sample size in the container and press the MENU key. (i.e. 12 as illustrated)
-------
PCS
25
- 19 -
00
Page 20
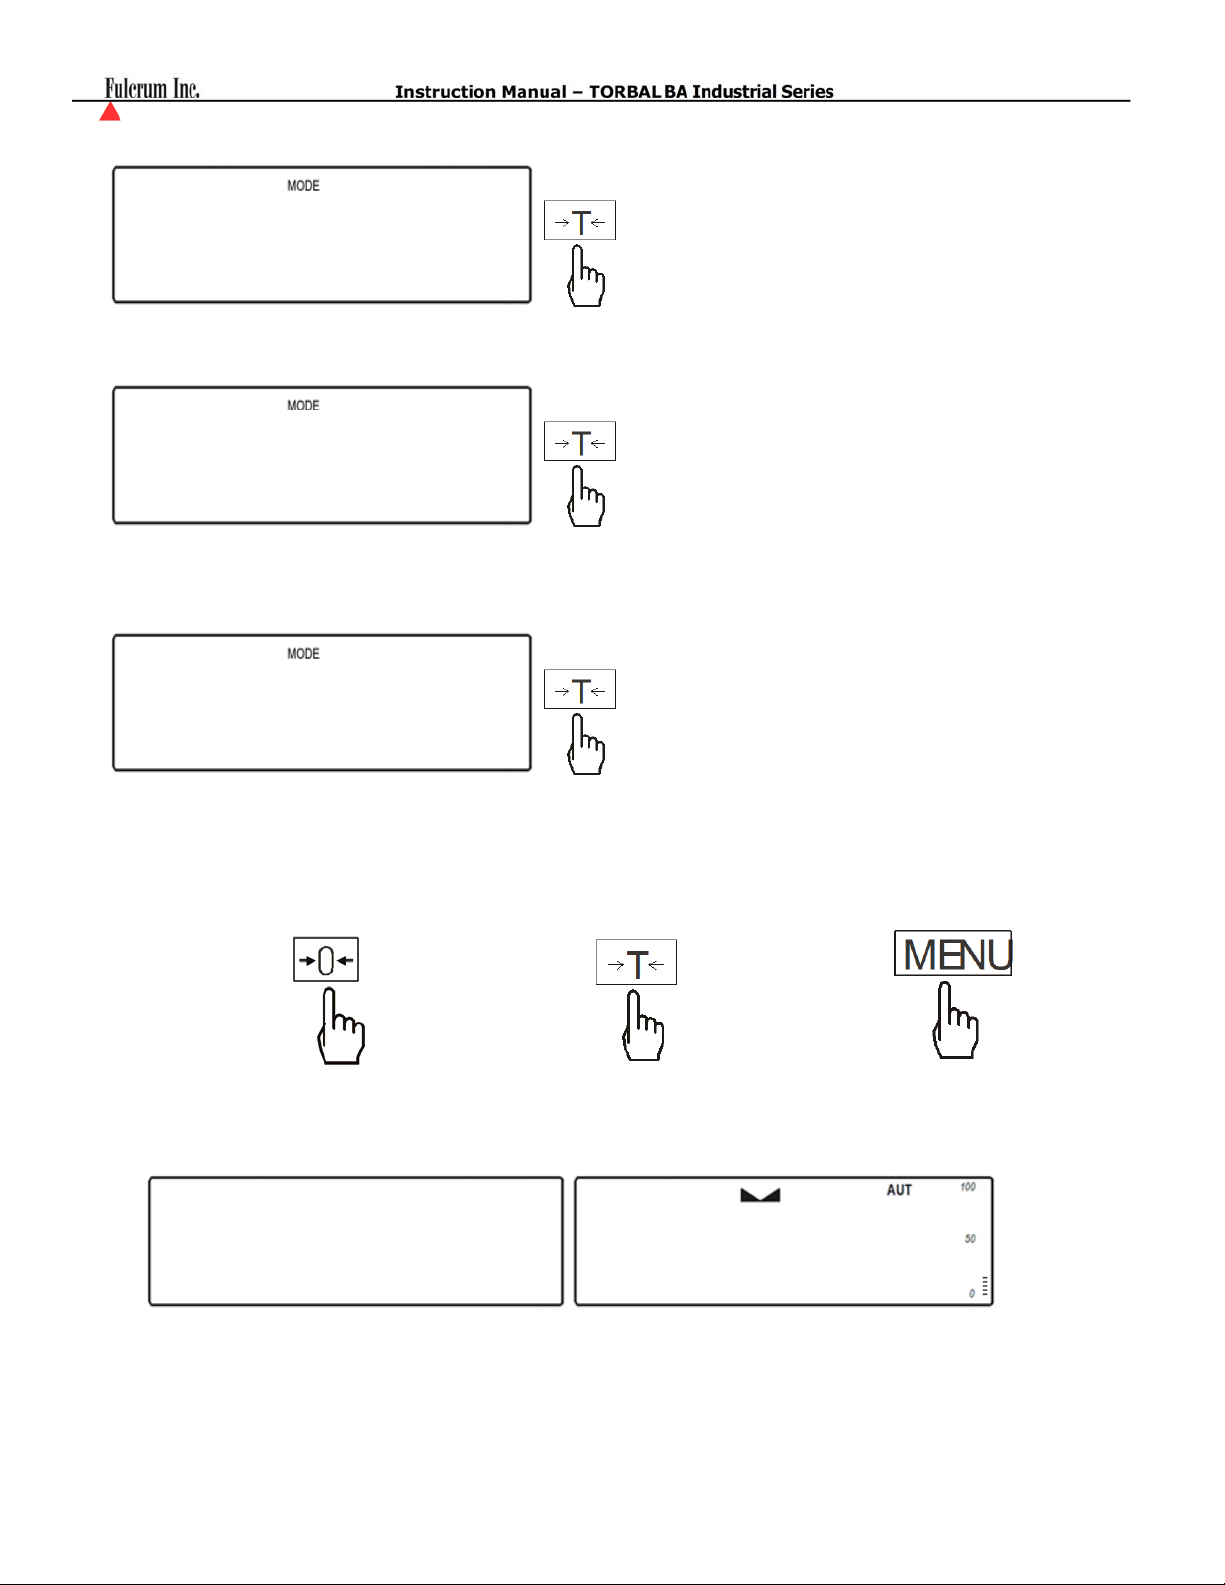
3. Wait for PCS to appear on the display and press the T key
pCS
4. Select “PCS on” by pressing the T key.
pCS on
5. Available sample size options will alternate on the display. Press the T key when “PC Set” is
displayed.
pC set
6. A dashed line will be displayed indicating to manually enter the value for your sample size in the
container. To do so, use the following keys: the Æ0Å key to increment a digit, the T key to accept
and go to the next digit, and MENU to accept the entire setting.
To increment a digit To accept and go to next digit To accept entered value
.
PCS
12
- 20 -
Page 21
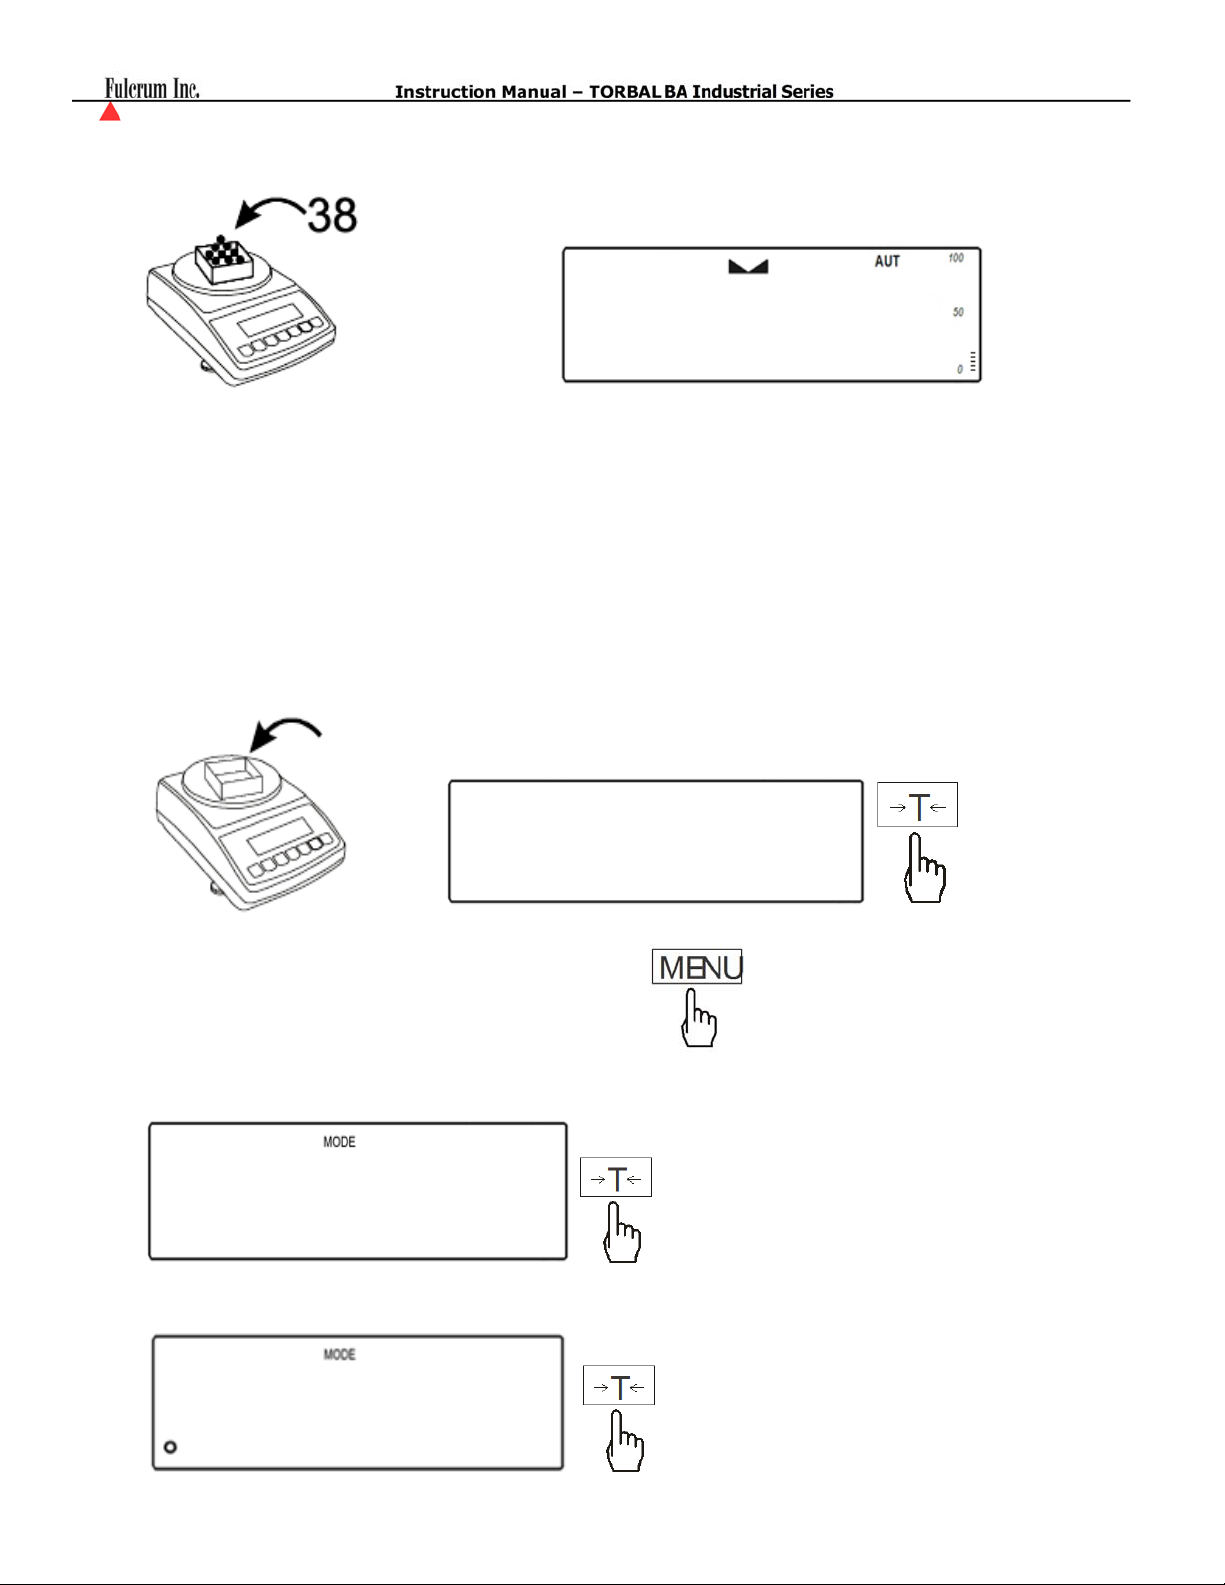
7. Once your custom sample size value has been entered and the MENU key pressed, the scale will
display the count of the sample. At any time you can proceed with the count.
PCS
50
8. Once an accurate count has been taken, the container and its contents may be removed from the
scale. To Turn parts counting off, select PCS from the main menu and press the T key when
PCSoFF is displayed.
11.3 Counting based on a known Individual Piece Weight (No Sample Size Required)
1. Place the counting container on the pan and press the T key to tare the container.
-------
2. Press the MENU key to enter the main menu.
3. Wait for “PCS” to appear on the display and press the T key
pCS
4. Select “PCS on” by pressing the T key.
pCS on
- 21 -
Page 22
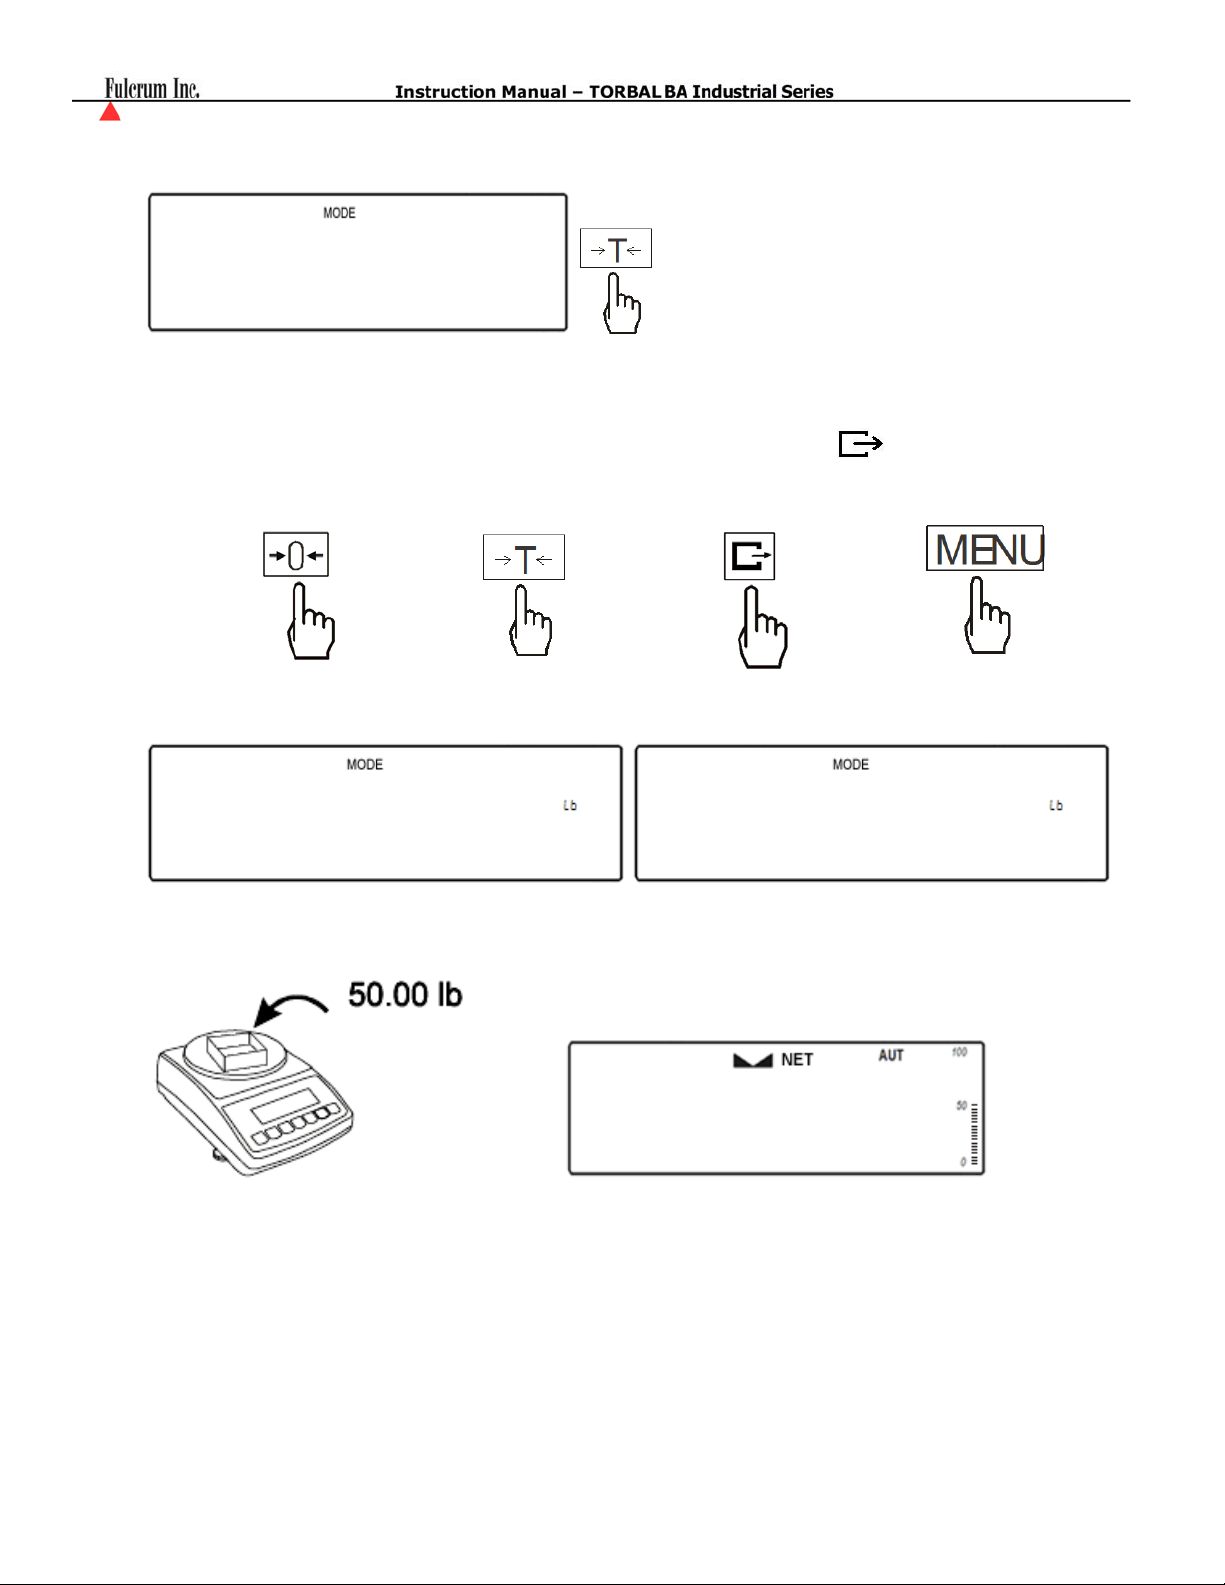
5. Available sample size options will alternate on the display. Press the T key when “PC uM” is
displayed.
pC UMM
6. A dashed line will be displayed indicating to manually enter the exact individual piece weight of
the counted parts. To manually enter the individual piece weight, use the following keys: the C key
to increment a digit, the T key to accept and go to the next digit, the
and the MENU key to accept the entire setting.
To increment a digit To accept and go to
next digit
To insert a decimal To accept entered
key to insert a decimal,
value
.
10.00
7. Once the individual piece weight is entered and the MENU key pressed, the scale will display
“0pcs”. At any time proceed with the count.
PCS
5
8. Once an accurate count has been taken, the container and its contents may be removed from the
scale. To exit parts counting and return to basic weighing, select “PCS OFF” from the parts
counting menu.
- 22 -
Page 23
(
)
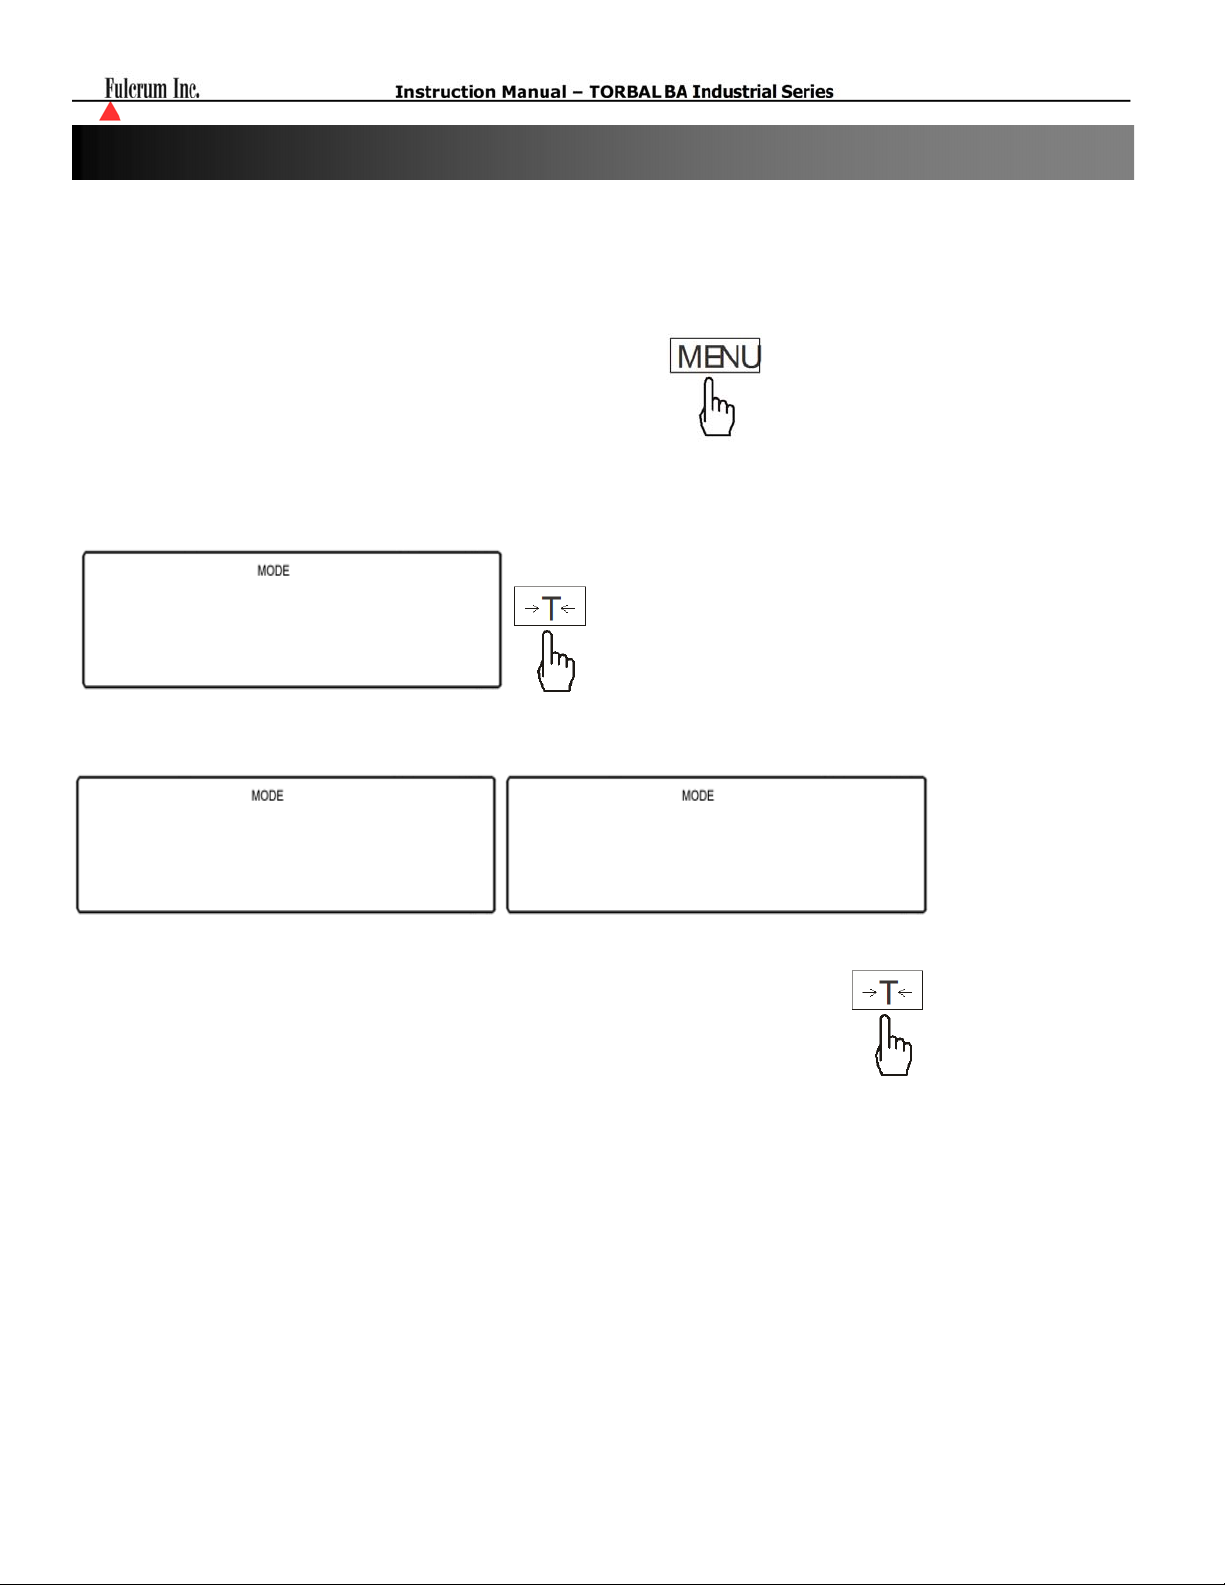
Chapter 12: Units of measure
The BA Scales can operate in nine different units of measure: Grams (g), Kilograms (kg), Carats (ct), Pounds
(lb), Newton, Grains, Ounces, Ounces Troy, Pennyweight. By factory default, the scale is set to weigh in
grams (lb). To select a different unit of measure,
follow the steps below.
1. Enter the main menu by pressing the MENU key.
2. When command “UNITS” is displayed, press the T key.
Unit
Unit
3. The scale will display available units of measure sequentially.
ct
Carat penny
4. When the desired unit is displayed, press the T key to make the selection.
5. Once the selection is made, the scale will automatically return to the weighing mode
- 23 -
Page 24
(
)
Chapter 13: Percent Weighing
Function Options:
PER Off
PER On
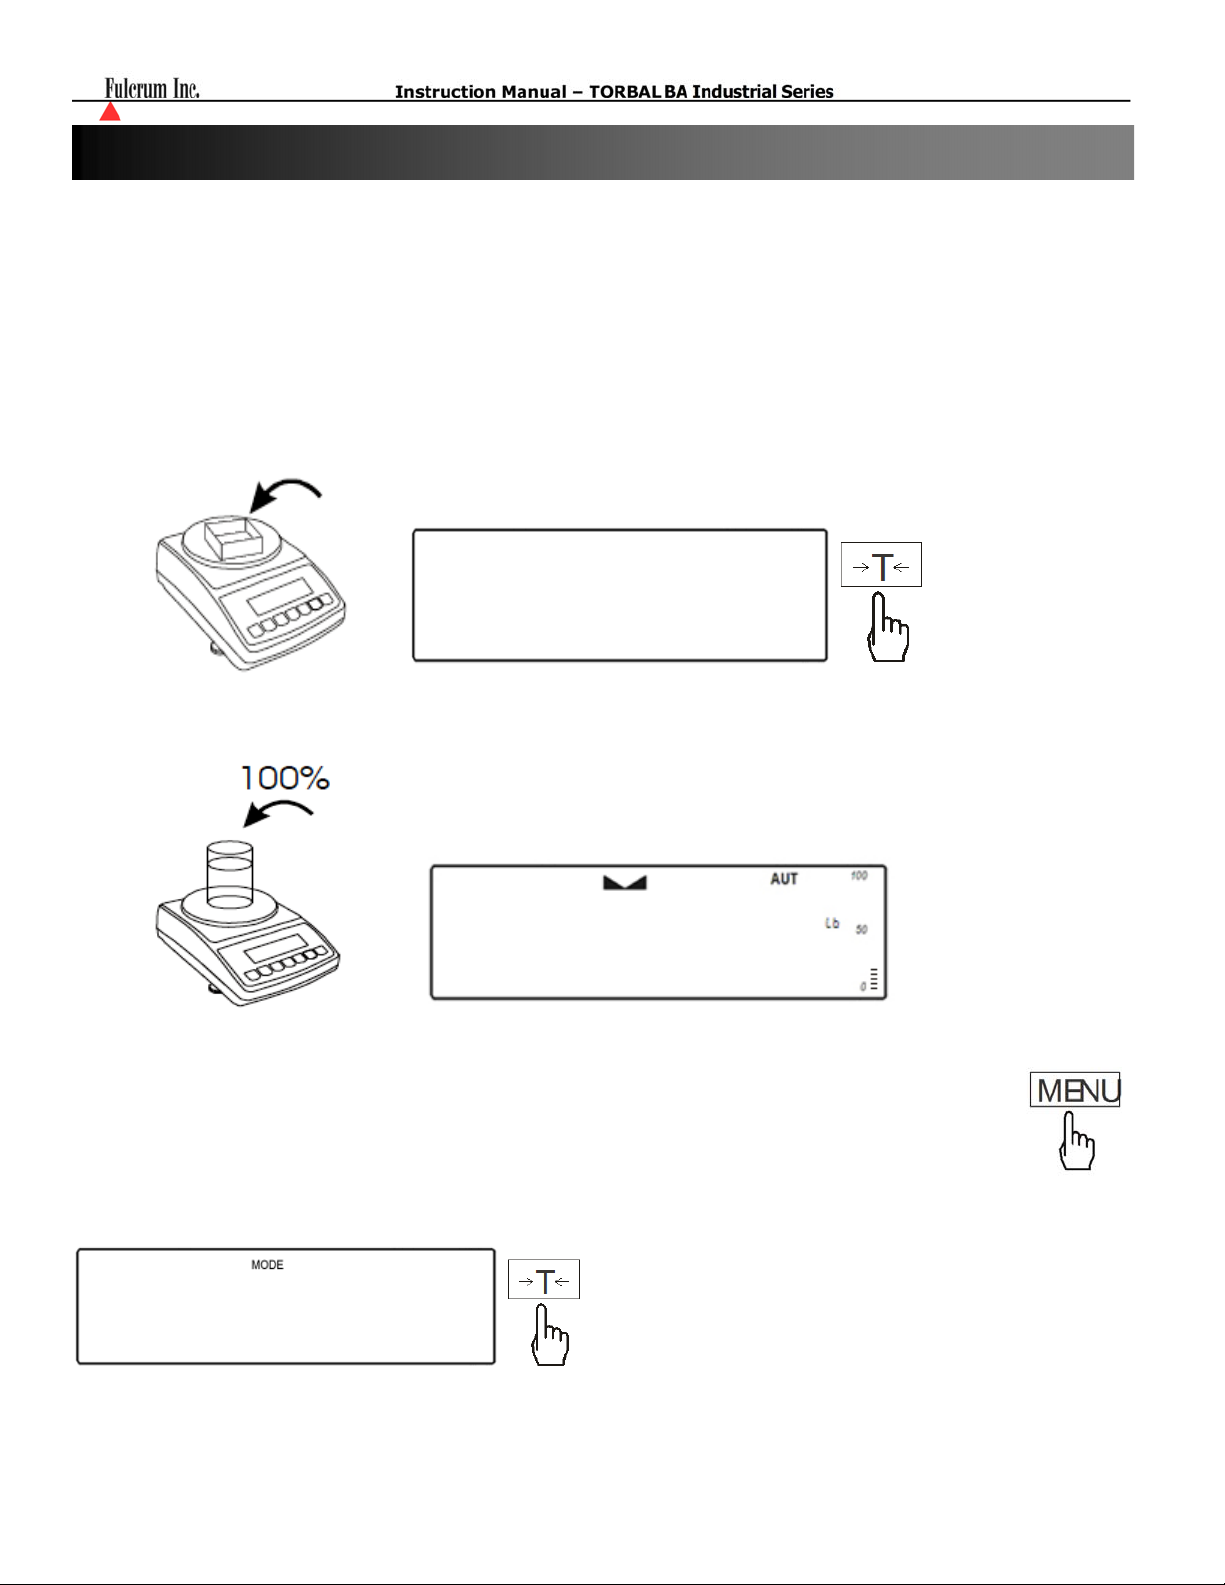
Percent weighing is used to express the weight of an object as a percentage of a stored sample weight. To use
percent weighing, follow these steps:
1. Place container on the pan and press the T key to tare.
( Peroff)
(per on)
Disables Percent Weighing
Enables Percent Weighing
PerC
-------
2. Once the scale has been tared, place the sample reference weight on the pan.
15
3. The weight of the sample will be displayed as it is placed on the pan. Once the weight of the
sample stabilizes and the stability indicator appears on the display, press the MENU key to
enter the main menu.
4. When “PERCENT” is displayed, press the T key.
23
PerC
- 24 -
Page 25
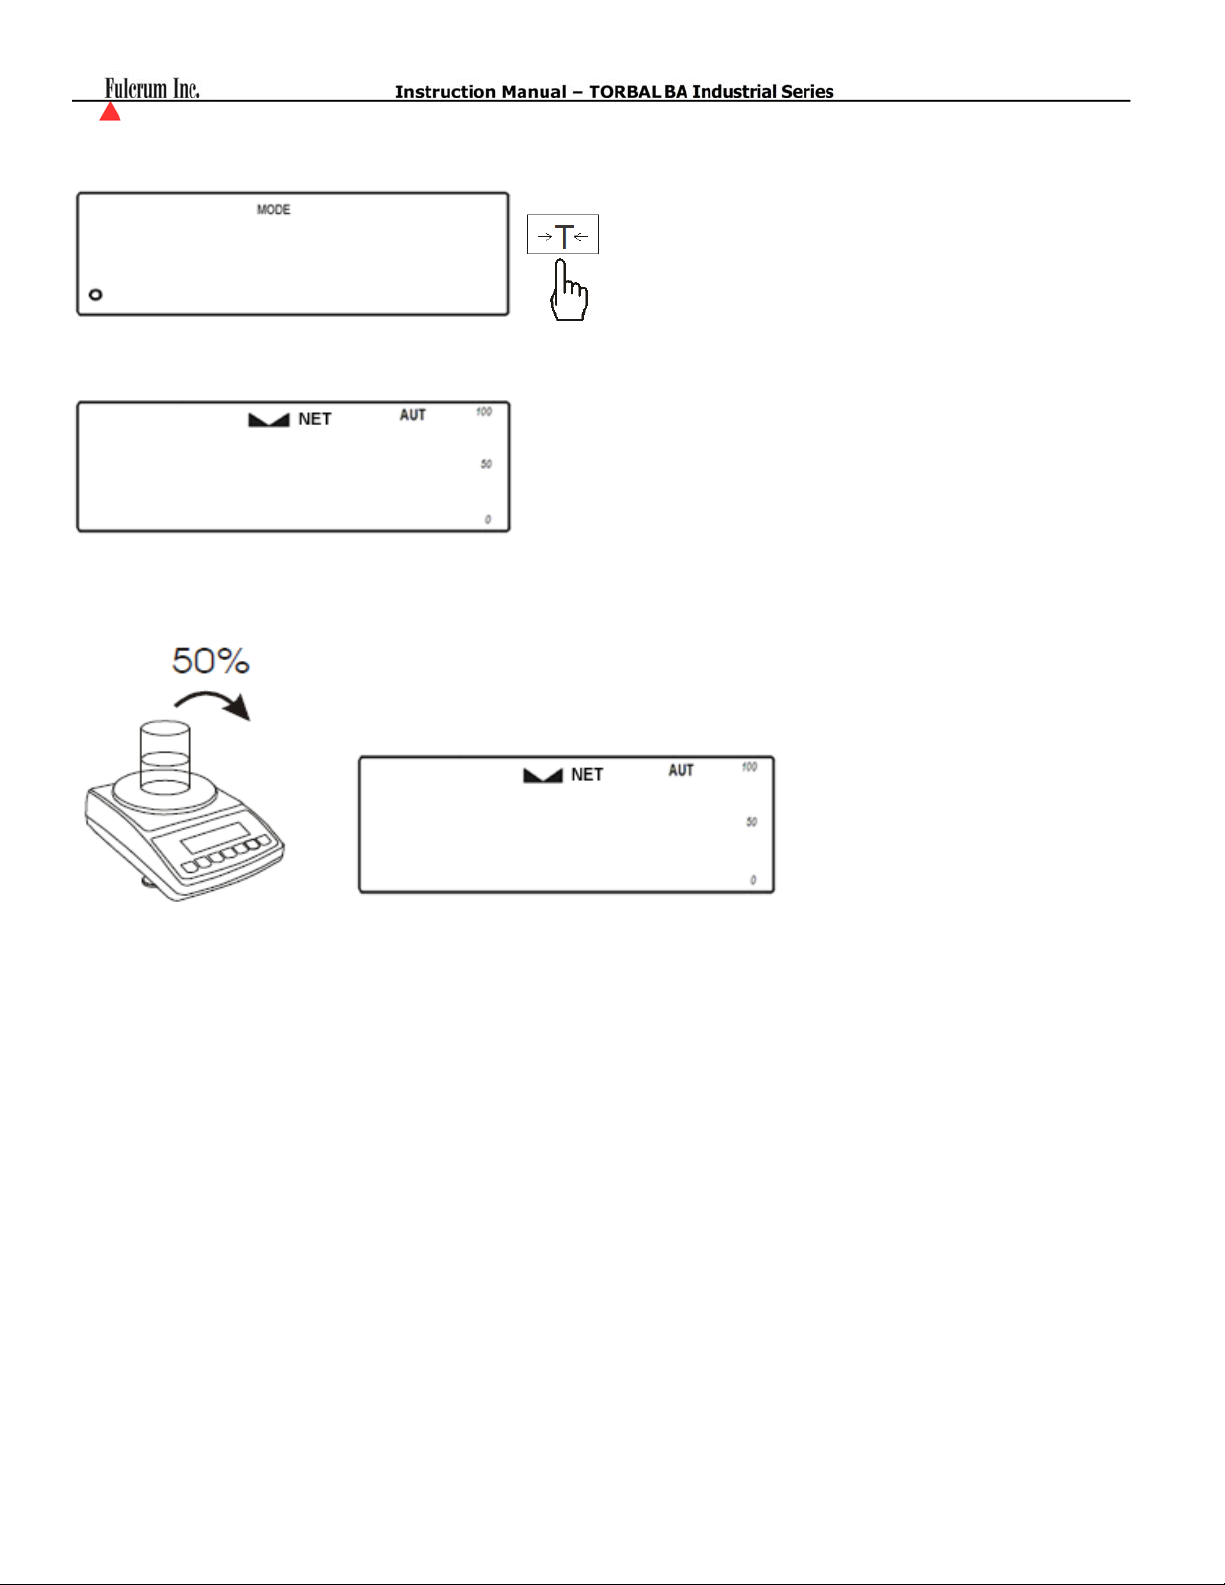
5. Commands “PER OFF” and “PER ON” will be displayed sequentially. To proceed with percent weighing
and set the reference sample weight, press the T key when command “PER ON” is displayed.
Per on
6. Once the reference sample weight is set, the scale will express the weight as a percentage.
%
100
7. Remove the sample and place an object in the container. The scale will express the weight of that object as
a percentage of the stored sample.
%
50
8. To exit percent weighing and return to basic weighing, select “PER OFF” from the percent menu.
- 25 -
Page 26
(
)
Chapter 14: Recipe Weighing
reCIpe
Function Options:
Rec Off
Rec On
Rec Con
( rECoff)
(reC on)
(reCCon)
Disables Recipe Weighing
Enables Recipe Weighing
allows to continue recipe making after obtaining a total
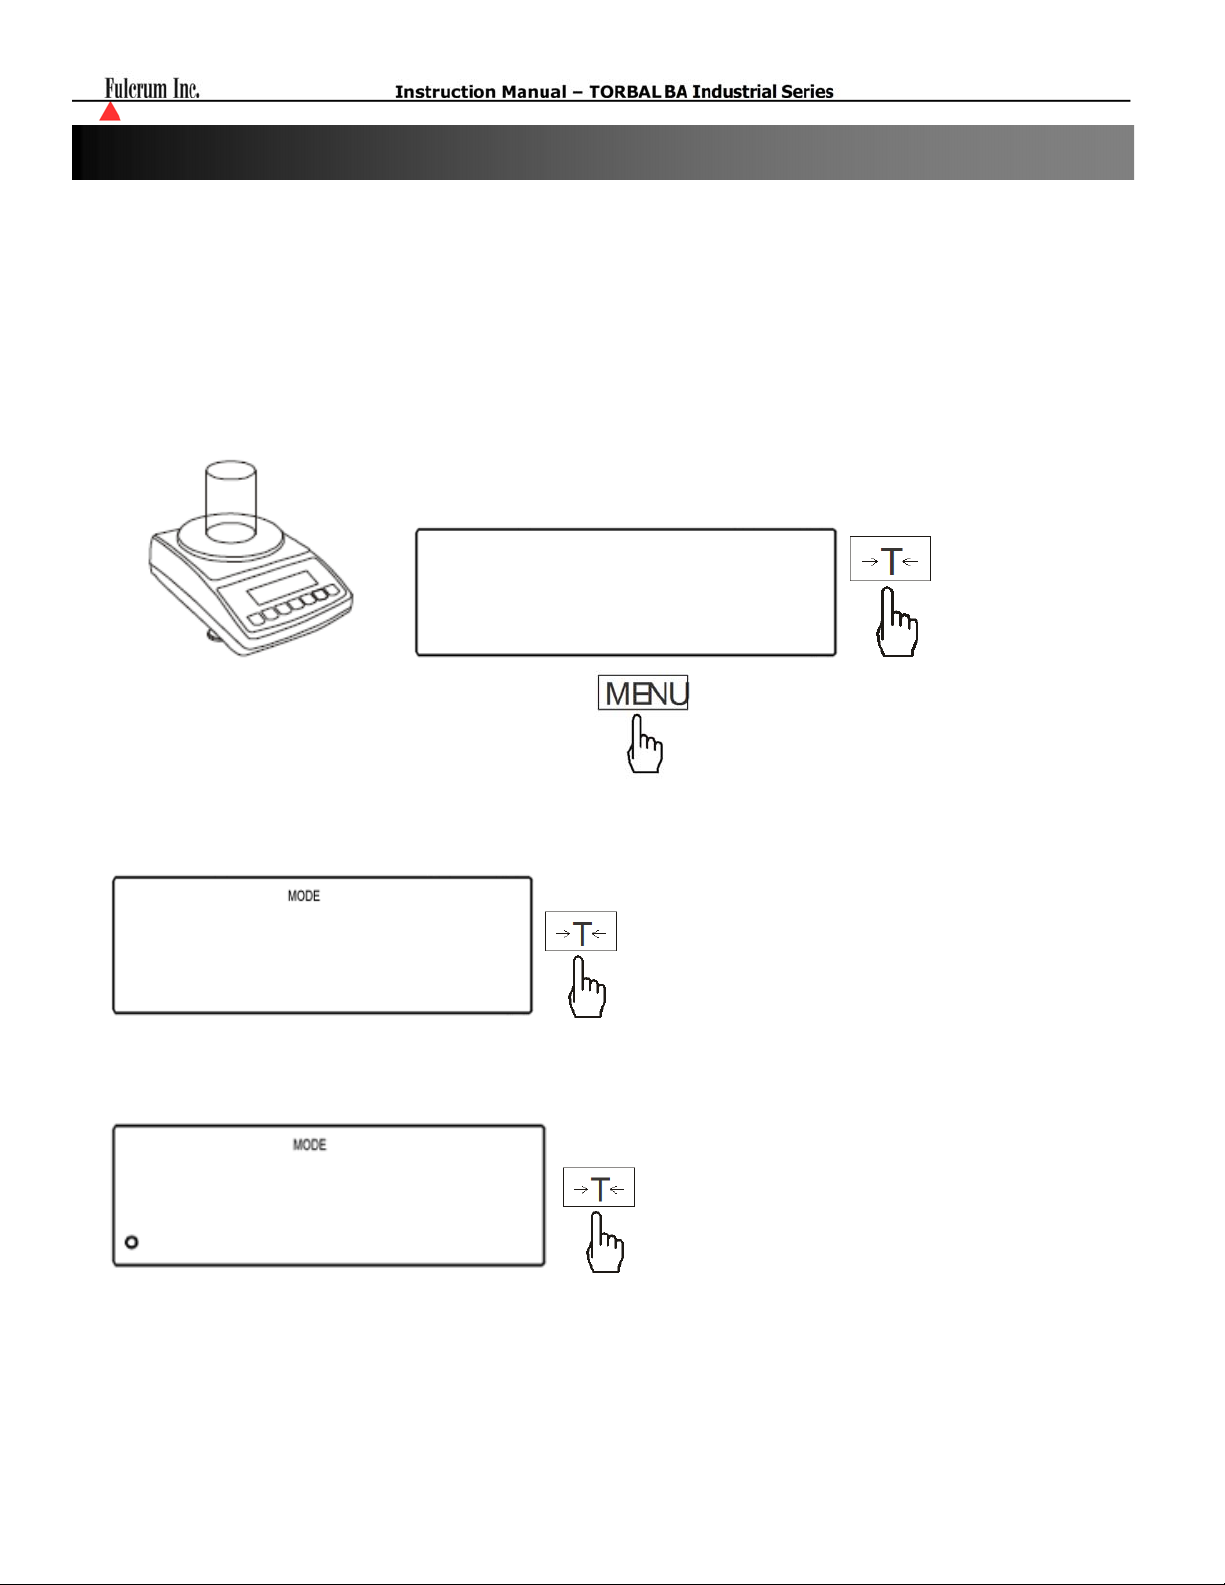
1. Place the counting container on the pan and press the T key to tare the container.
-------
2. Press the MENU key to enter the main menu.
3. Wait for “RECIPE” to appear on the display and press the T key
reCIpe
4. Select “Rec on” by pressing the T key.
REC on
- 26 -
Page 27
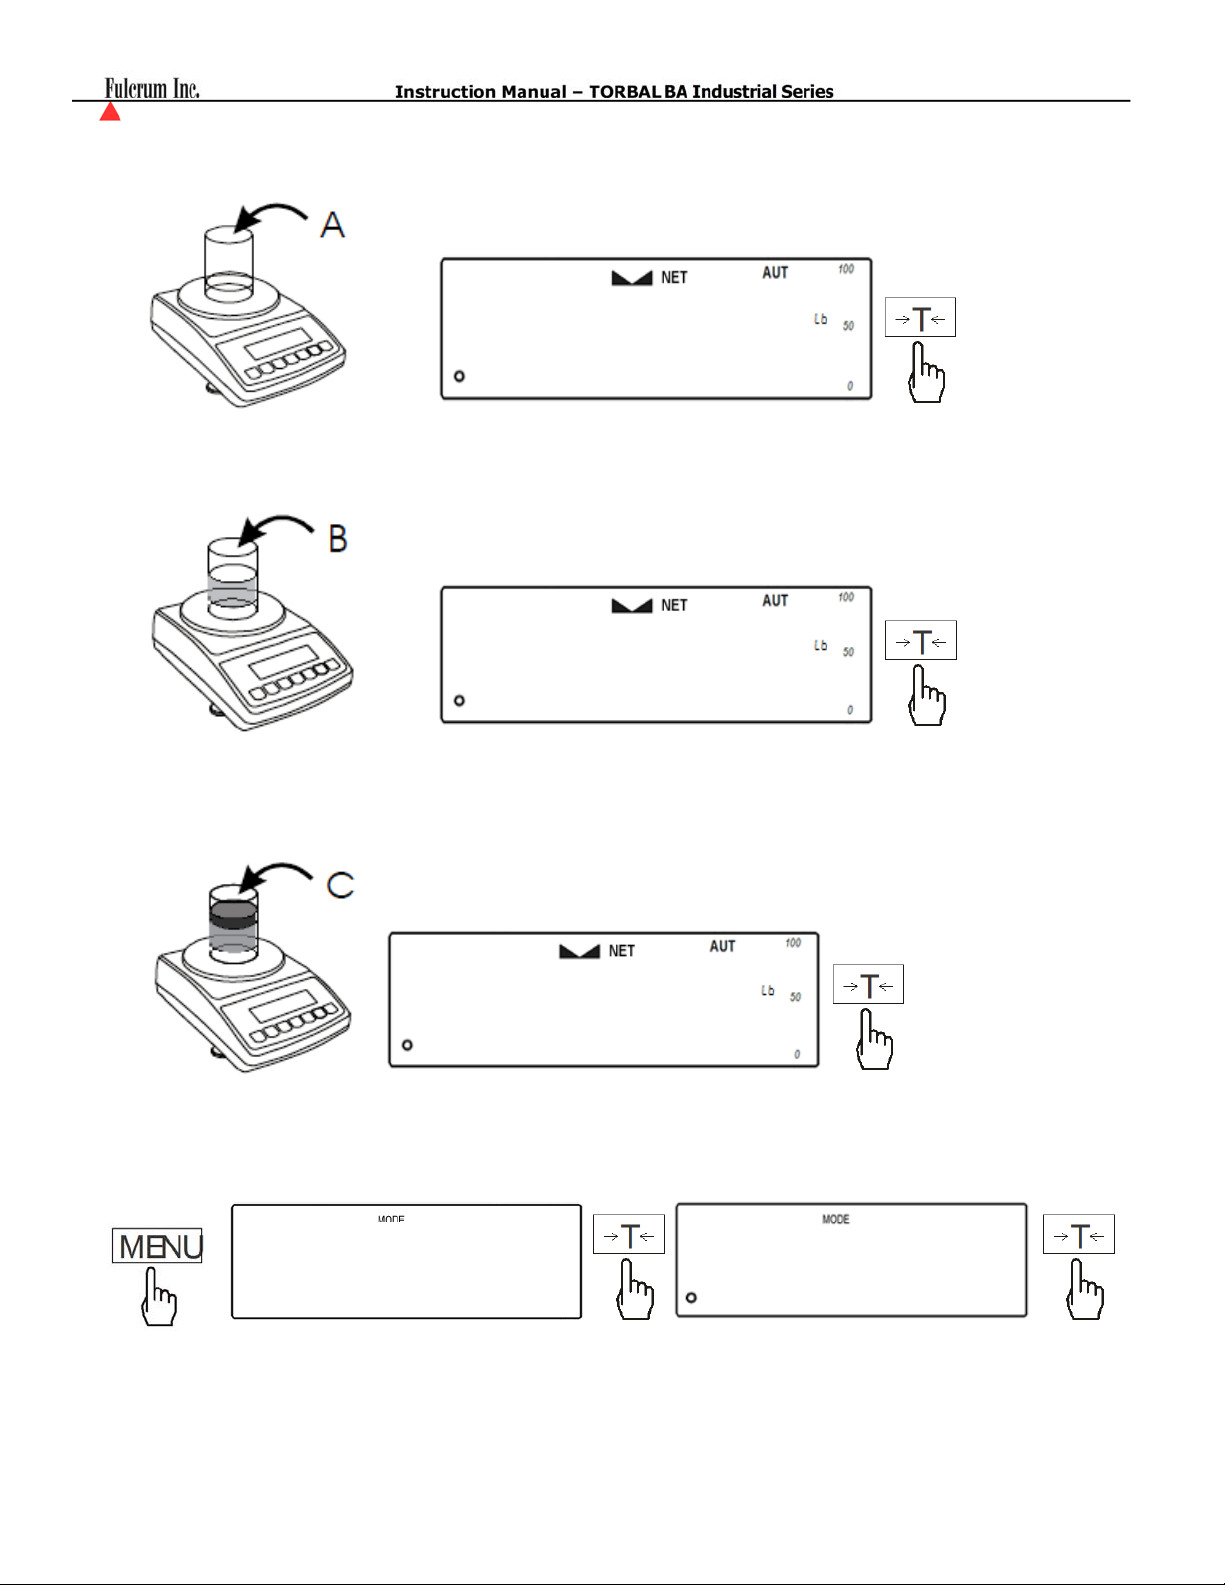
5. The display will read 0 indicating that you may place the first ingredient into the container. Once the
Weight of the ingredient stabilized press the T key to accept the ingredient weight.
0
22
6. Once the weight has been accepted place the second ingredient into the container. Once the weight of the
second ingredient stabilizes press the T key to accept the ingredient weight.
0
37
7. Steps 1 and 2 can be repeated until all ingredients are in the container. Before obtaining a Total make sure
that the last ingredient weight was accepted and the display reads 0.
0
44
8. To obtain the Total for the recipe press the MENU key, select the “Recipe” function, and then select “Rec
Off”
reCIpe
reCoff
- 27 -
Page 28
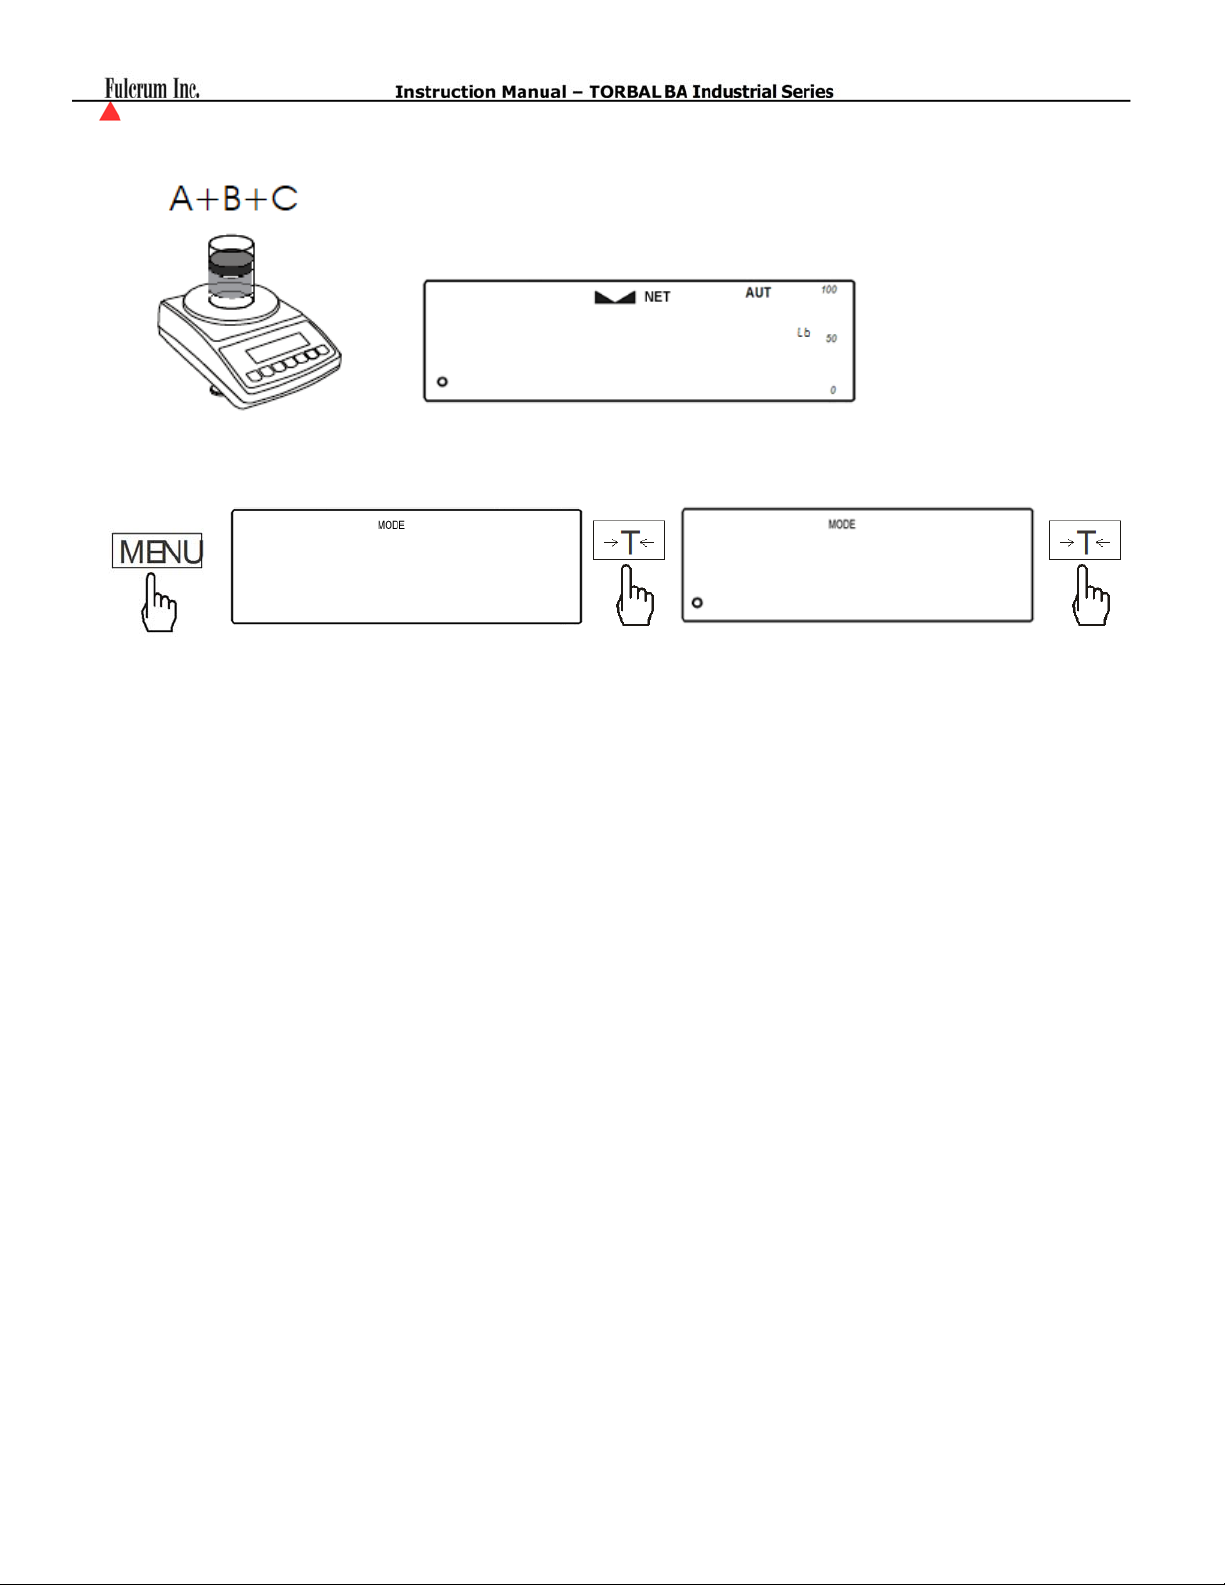
9. The total of all ingredients will be displayed.
1
04
10. To continue Recipe making press the Menu select the “Recipe” function, and then select “Rec Con”
reCIpe
11. Press the T key to accept the current Total and repeat steps 5 through 7 to add more ingredients.
12. To clear and start a new recipe, remove the container and all ingredients from the pan and press the zero
key Æ0Å. Once the result is cleared, repeat steps 1 through 9.
reCCon
- 28 -
Page 29
(
)
Chapter 15: Calibration
Function Options:
CAL On
CAL Stp
Other
Calibration with an external Calibration Weight should be performed if the scale exhibits erroneous readings
or periodically to assure accuracy of all weighing results. The scale should be calibrated with a high accuracy
weight equal to its maximum capacity. Before starting calibration, have the appropriate calibration weight
available.
( CaL oN)
(CALSTP)
(other)
Starts Quick Calibration. Recommended when calibrating with a single calibration
weight.
Starts Stepped Calibration. Recommended when calibrating with multiple
calibration weights.
Calibration with calibration mass not equal to the scale’ capacity.
CaLIb
15.1. Quick Calibration (calibrating with a single calibration weight).
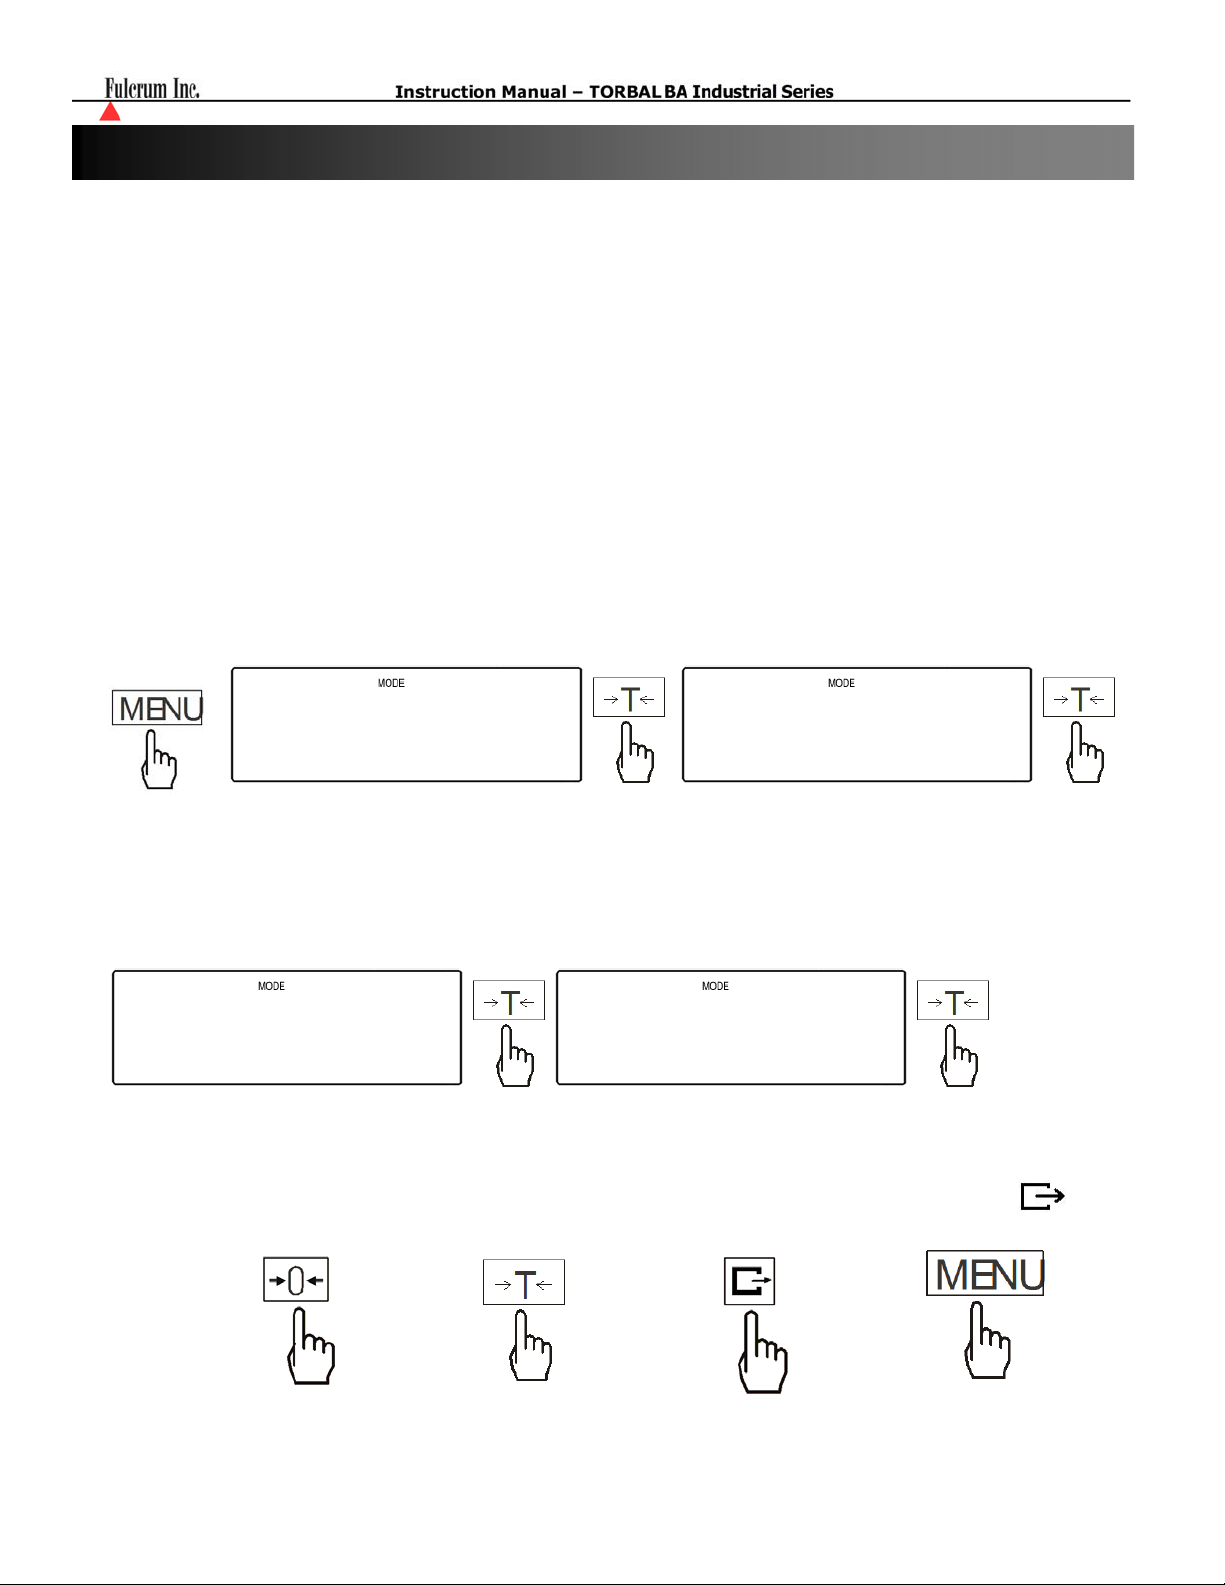
1. Press the MENU key, when the option “Calib” is displayed press the T key, and then select the option
“CAL On” by press the T key once again.
CaLIb
CAL oN
2. The scale will display a full a calibration mass equal to the scales capacity i.e.”30”, and an option to select
a different calibration mass”other“. To calibrate the scale with a mass value equal to the scales capacity
press the T key when the calibration mass value is displayed (proceed to step 4). To calibrate the scale
with a mass lower than the scale’s maximum capacity, press the T when “other” is displayed (proceed to
step 3).
30 other
3. If option “other” has been selected a dashed line will be displayed indicating to manually enter the exact
value of the calibration mass used to calibrate the scale. To manually enter the calibration value, use the
following keys: the C key to increment a digit, the T key to accept and go to the next digit, the key to
insert a decimal, and the MENU key to accept the entire setting.
To increment a digit To accept and go to
next digit
To insert a decimal To accept entered
- 29 -
value
Page 30
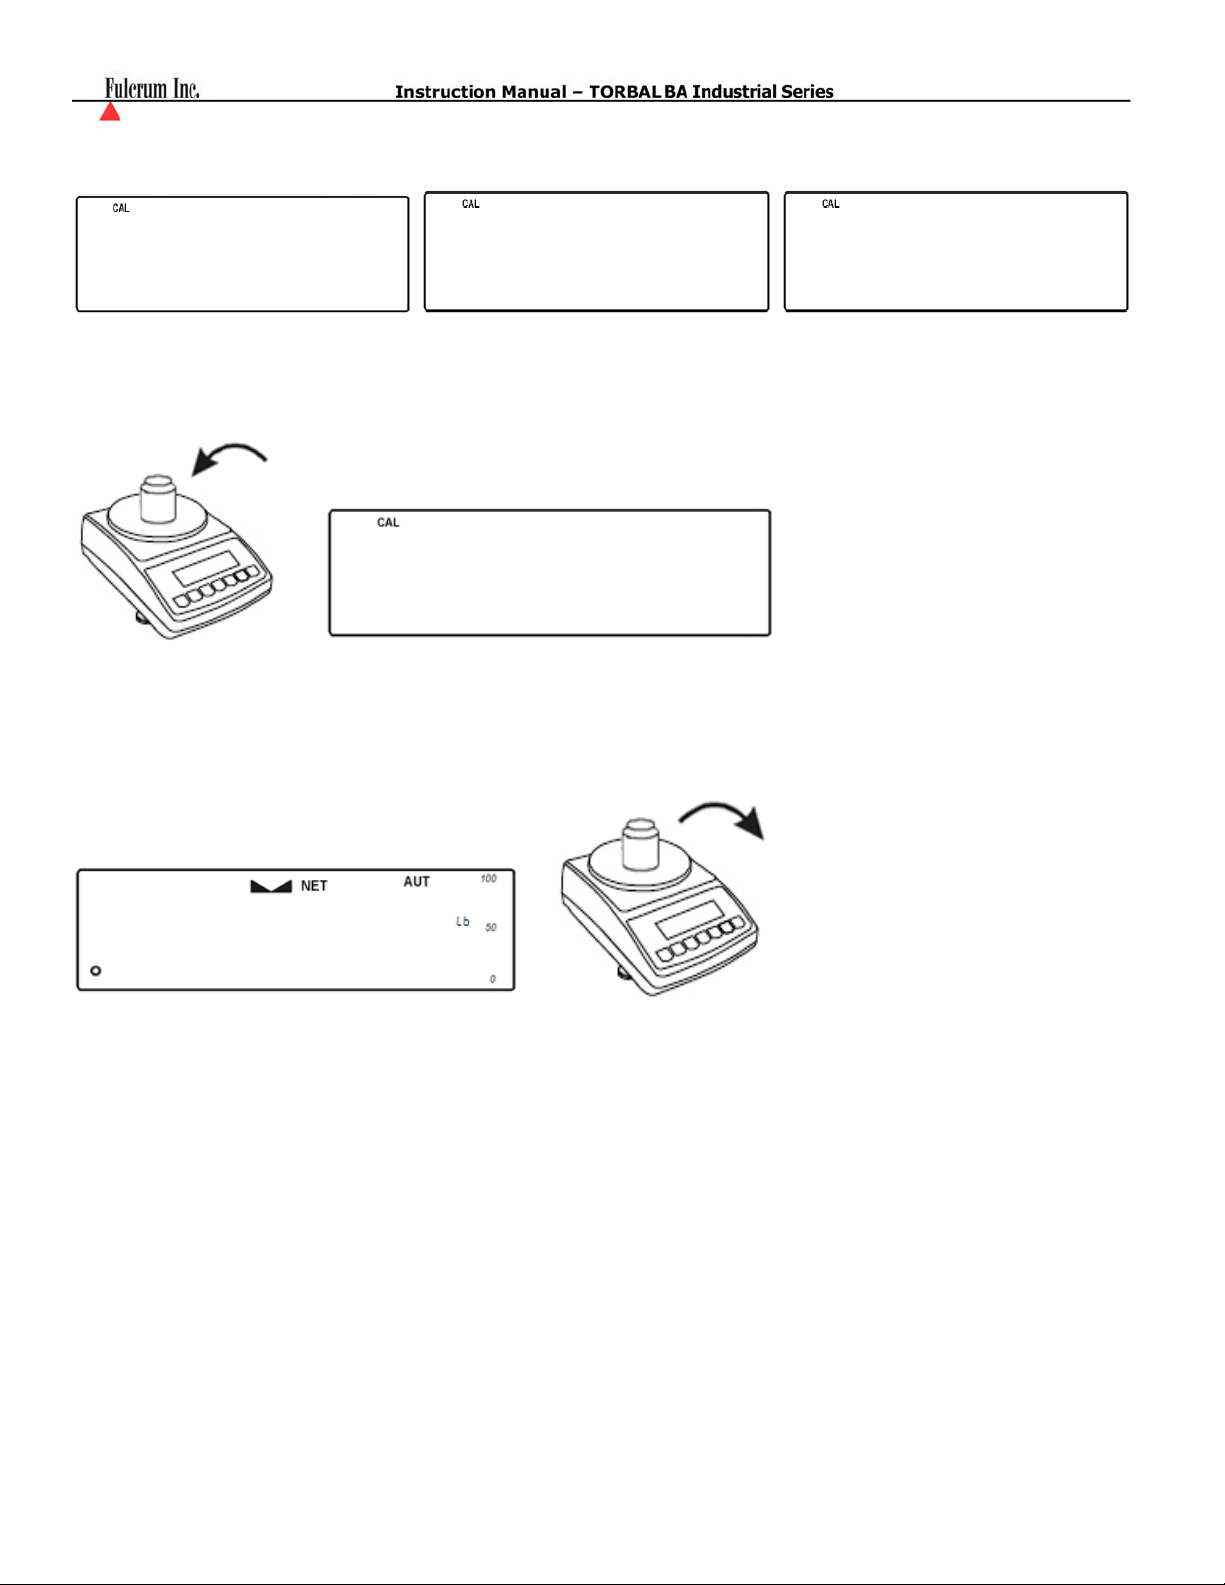
4. The scale will perform a tare and the message “LOAD” will be displayed.
-CAL-
5. When the message “LOAD” is displayed, place the calibration weight on the scale’s hanging pan.
Calibration will begin automatically and “WAIT” will be displayed indicating that calibration is in
progress.
------
LOAD
wwAIT
6. When finished the scale will automatically return to the weighing mode, and the calibration weight can be
removed from the pan.
30
00
- 30 -
Page 31
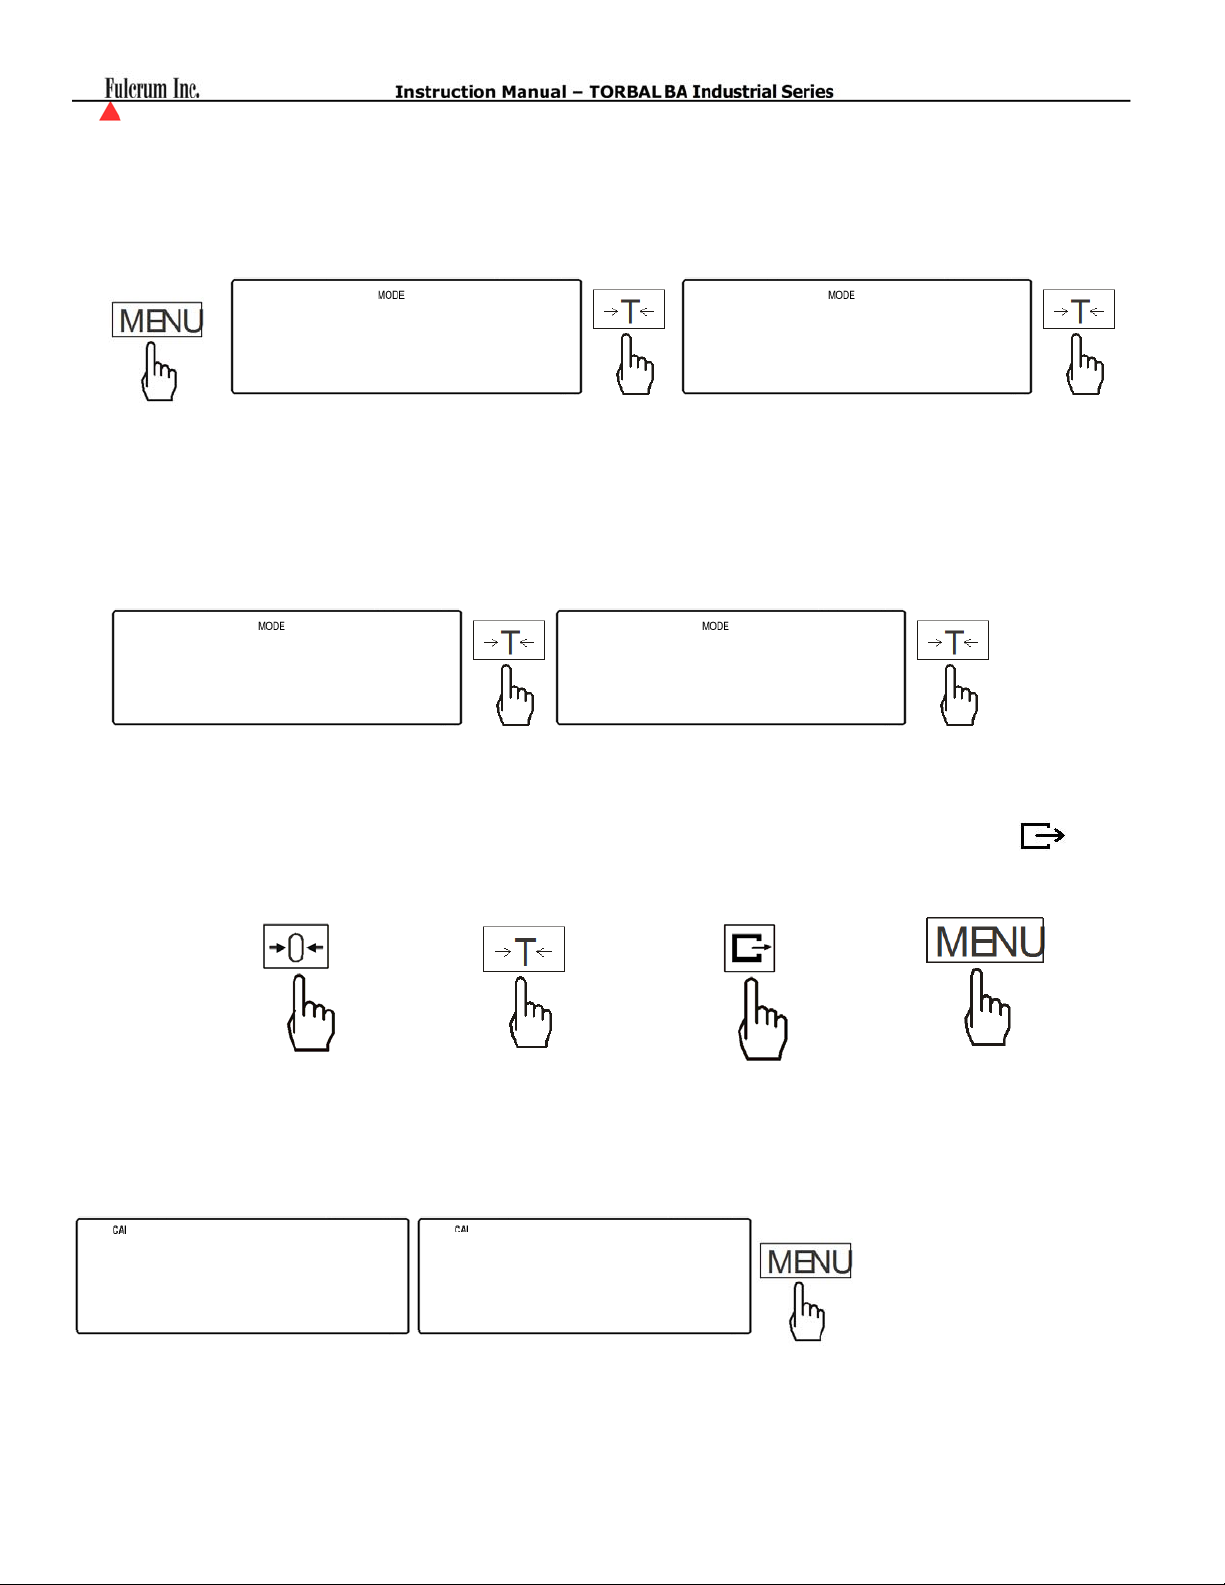
15.2. Stepped Calibration (calibrating with multiple calibration weights.)
1. Press the MENU key, when the option “Calib” is displayed press the T key, and then select the option
“CAL Stp” by press the T key once again.
CaLIb
2. The scale will display a full a calibration mass equal to the scales capacity i.e.”30”, and an option to select
a different calibration mass”other“. To calibrate the scale with a mass value equal to the scales capacity
press the T key when the calibration mass value is displayed (proceed to step 4). To calibrate the scale
with a mass lower than the scale’s maximum capacity, press the T when “other” is displayed (proceed to
step 3).
CAL STP
30 other
3. If option “other” has been selected a dashed line will be displayed indicating to manually enter the exact
value of the calibration mass used to calibrate the scale. To manually enter the calibration value, use the
following keys: the C key to increment a digit, the T key to accept and go to the next digit, the key to
insert a decimal, and the MENU key to accept the entire setting.
To increment a digit To accept and go to
next digit
4. The scale will display the message “Press Menu”. When you are ready to Tare the scale Press the MENU
key.
-CAL-
press
To insert a decimal To accept entered
mmenu
- 31 -
value
Page 32
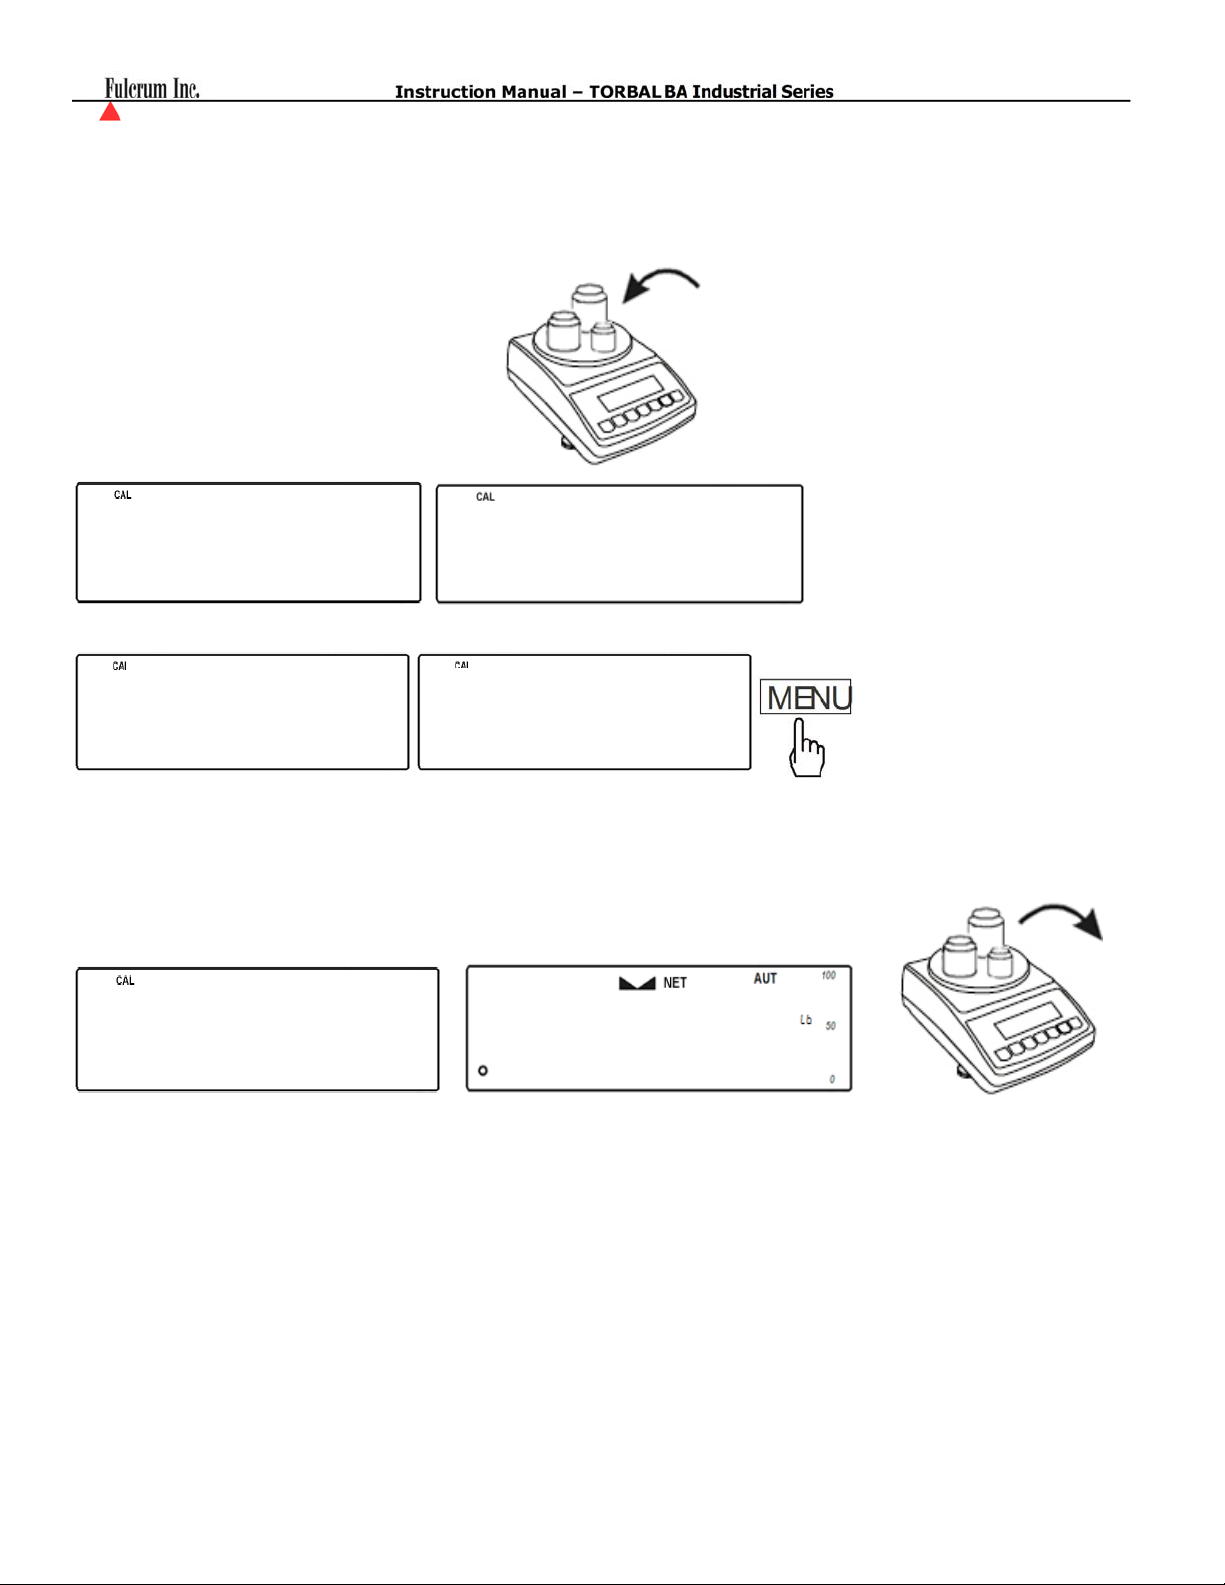
5. The scale will perform a tare and the message “LOAD” will be displayed indicating to place all
calibration weights on the pan. After placing all weights on the pan, press the Menu key to initiate the
calibrations process.
Caution: Do not press Menu until all calibration weights are on the scale’s pan
------
LOAD
-CAL-
press
6. Message “CCCCCC” will be displayed indicating that calibration is in progress. When finished the scale
will automatically return to the weighing mode and the calibration weights can be removed from the pan.
CCCCCC
mmenu
30.00
- 32 -
Page 33
(
)
Chapter 16: Port 1 - RS232 Communication Port Configuration
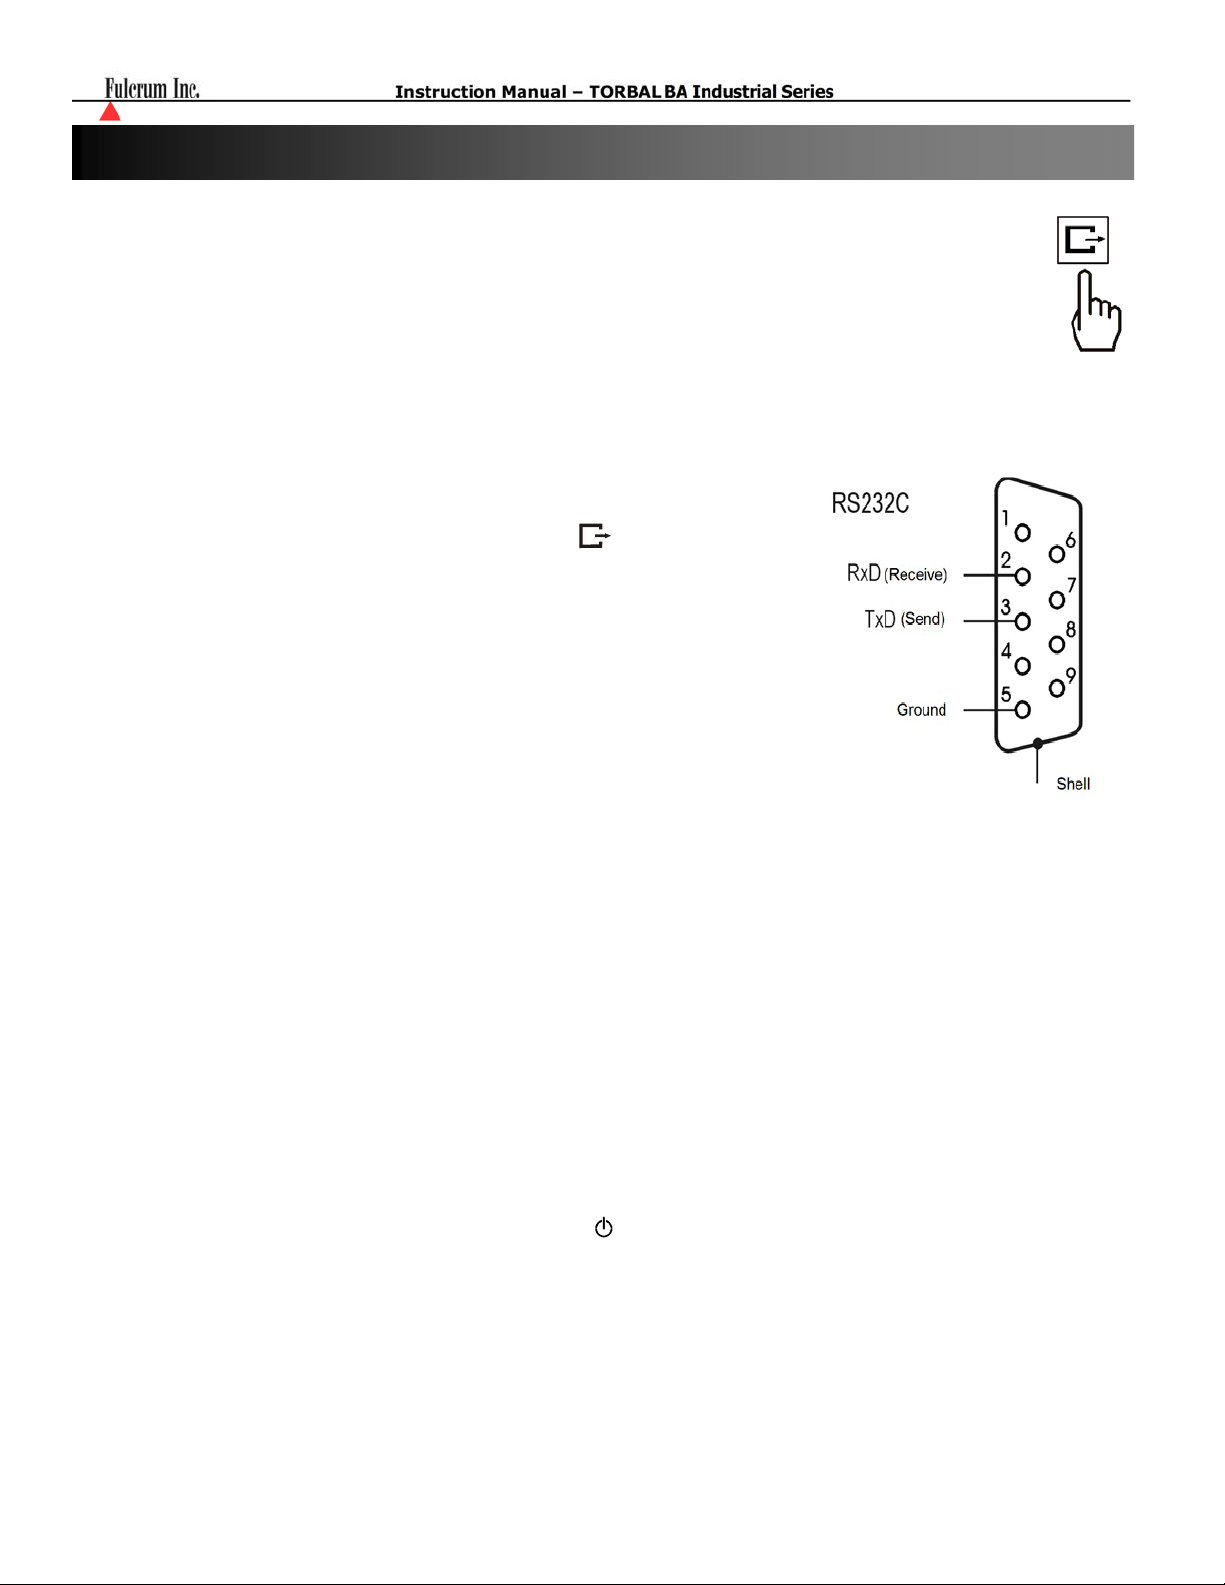
After a weighing transaction is completed, a result data receipt can be printed. To initiate printing,
press the data transfer key. Data may be sent to a printer or a PC via the Torbal Communication
Software.
16.1. Data Transmission and Exchange Protocol
Data Transmission (LONG):
Transmission Parameters: 8 bits, 1 stop bit, no parity, baud rate 4800bps,
Exchange data:
Transmit the weight (equivalent to the Print Key, , in weighing:
Computer→Scale: S I CR LF (53h 49h 0Dh 0Ah) – initiating signal,
Scale→Computer: scale sends 16 Bytes of data as follows:
Byte 1 - The charater ‘-‘ or space
Byte 2 - space
Bytes 3,4 - digit or space
Bytes 5-9 - digit, comma, or space
Byte 10 - digit
Byte 11 - space
Byte 12 - k, l, c, p or space (for kg,lb,ct,pc, or%)
Byte 13 - g, b, t, c or %
Byte 14 - space
Byte 15 - CR
Byte 16 - LF
Port 1
‘Tare the weight’ (corresponds to the →T← key in weighing):
Computer→Scale: S T CR LF (53h 54h 0Dh 0Ah),
Scale→Computer: no response.
‘Zero the scale’ (corresponds to the key →0← in weighing):
Computer→Scale: S Z CR LF (53h 5Ah 0Dh 0Ah),
Scale→Computer: no reponse.
‘Turn On / Off the Scale (corresponds to the key I/ in weighing):
Computer→Scale: S S CR LF (53h 53h 0Dh 0Ah),
Scale→Computer: no response.
‘Display the MENU’ (corresponds to the key MENU in weighing):
Computer→Scale: S F CR LF (53h 46h 0Dh 0Ah),
Scale→Computer: no response.
- 33 -
Page 34
Setting the threshold 1 (optional):
Computer→Scale: S L D1...DN CR LF (53h 4Ch D1...DN 0Dh 0Ah)
where: D1...DN – Threshold value, up to 8 characters,
Scale→Computer: no response,
Example:
To set 1000g in weight B1.5 (d=0.5g) type:
S L 1 0 0 0 . 0 CR LF (53h 4Ch 31h 30h 30h 30h 2Eh 30h 0Dh 0Ah).
To set 100kg in weight B150 (d=50g) type:
S L 1 0 0 . 0 0 CR LF (53h 4Ch 31h 30h 30h 2Eh 30h 30h 0Dh 0Ah),
Setting the threshold 2 (optional):
Computer→Scale: S H D1...DN CR LF (53h 48h D1...DN 0Dh 0Ah),
where: D1...DN – threshold value, up to 8 characters,
Scale→Computer: no response
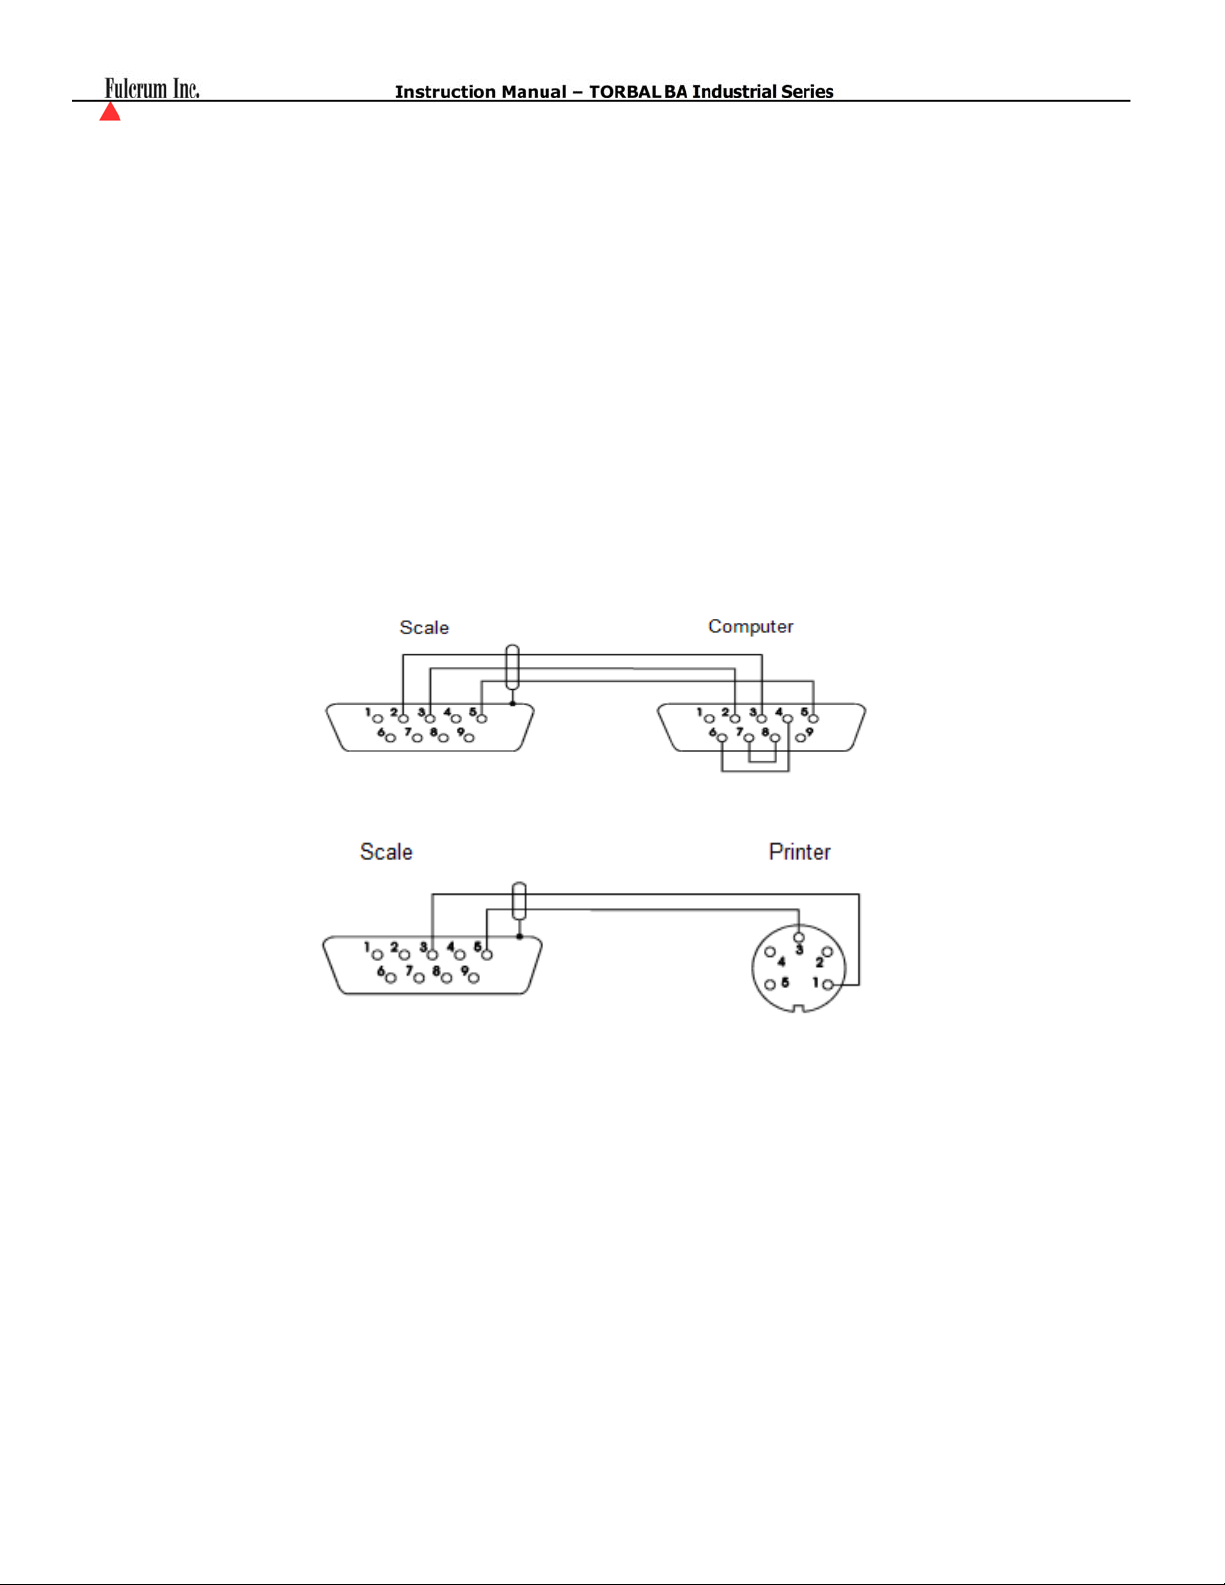
Cable WK-1 Configuration
Cable WD-1 Configuration
- 34 -
Page 35
16.2. Baud Rate
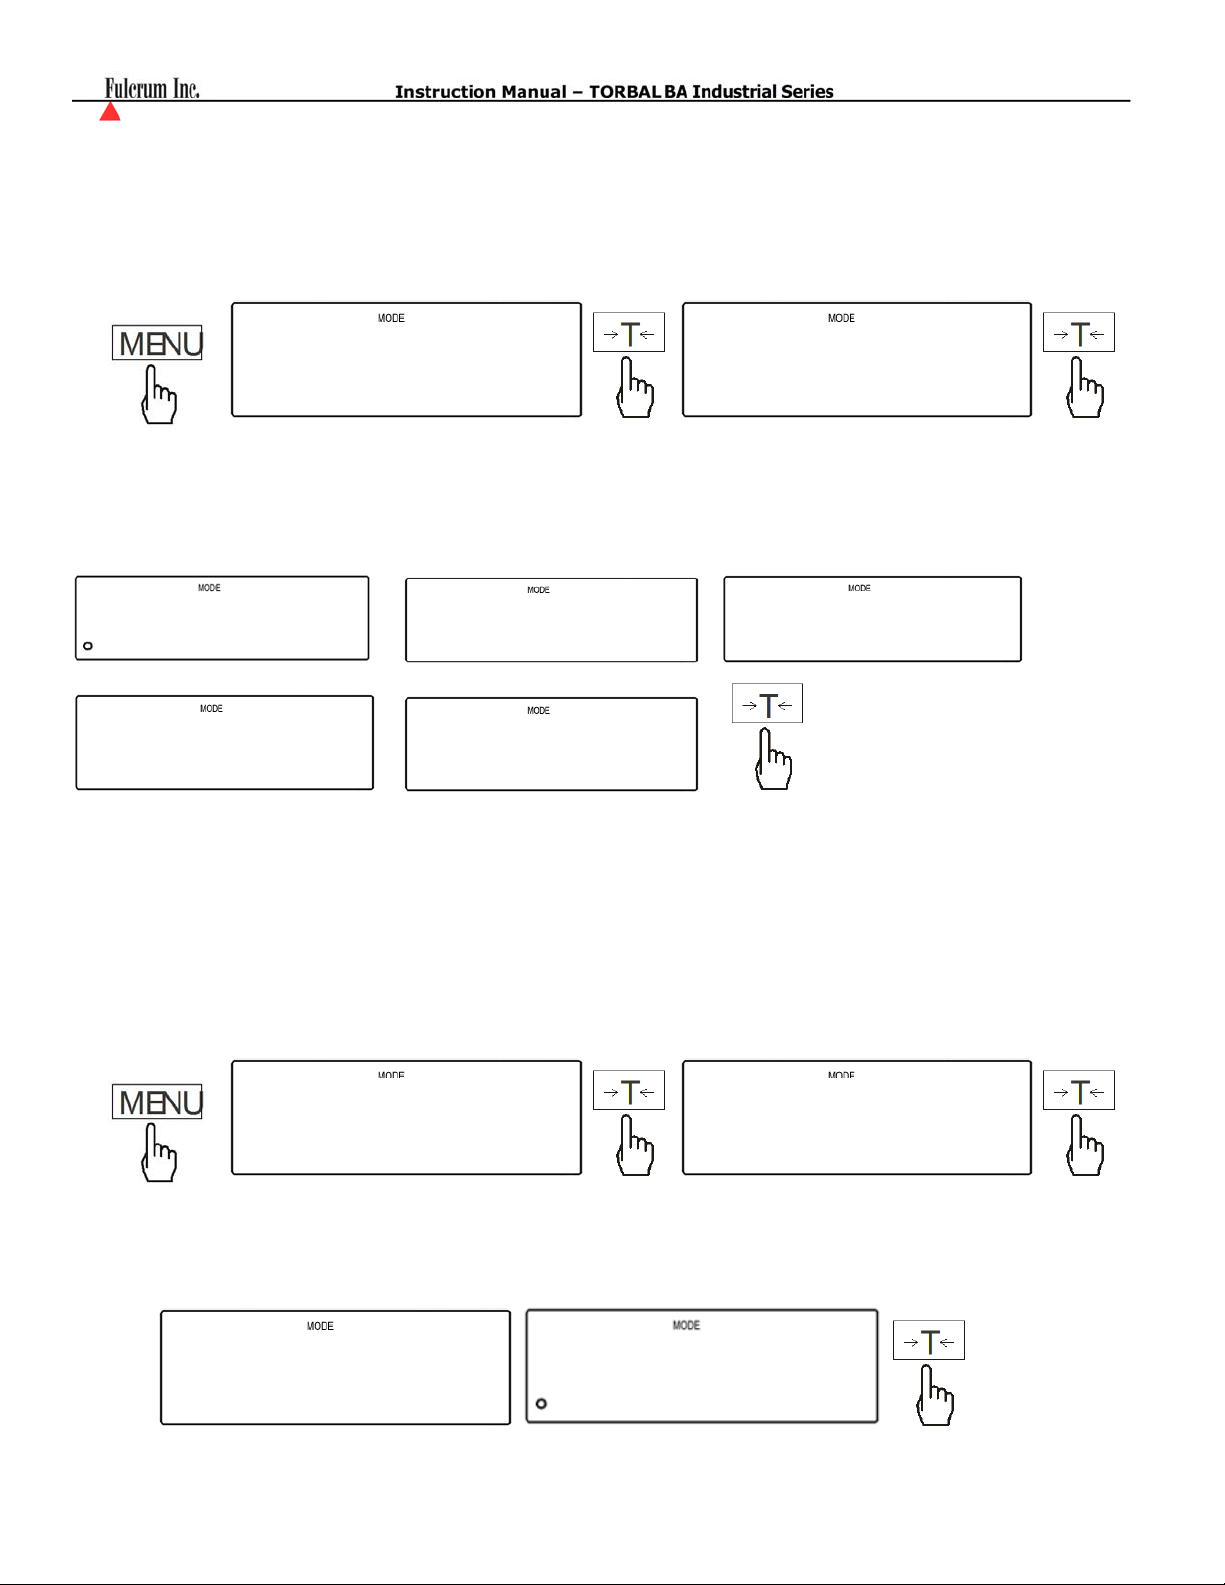
1. Press the MENU key, when the option “Port - 1” is displayed press the T key, and then select the option
“Baud” by press the T key once again.
Port -1
2. The scale will begin to display available baud rates: “4800”, “9600”, “19200”, “38400”, and “57600”. To
make a selection, press the T key when the desired setting is displayed.
4800 9600 19200
38400 57600
16.3. Bites
1. Press the MENU key, when the option “Port - 1” is displayed press the T key, and then select the option
“Bites” by press the T key once again.
bAUd
Port -1
2. The scale will display available Bits settings: “7-bit”,”8-bit”. To make a selection press the T key when
the desired setting is displayed.
7 - bIt
8 - bIt
- 35 -
bItES
Page 36
16.4. Parity
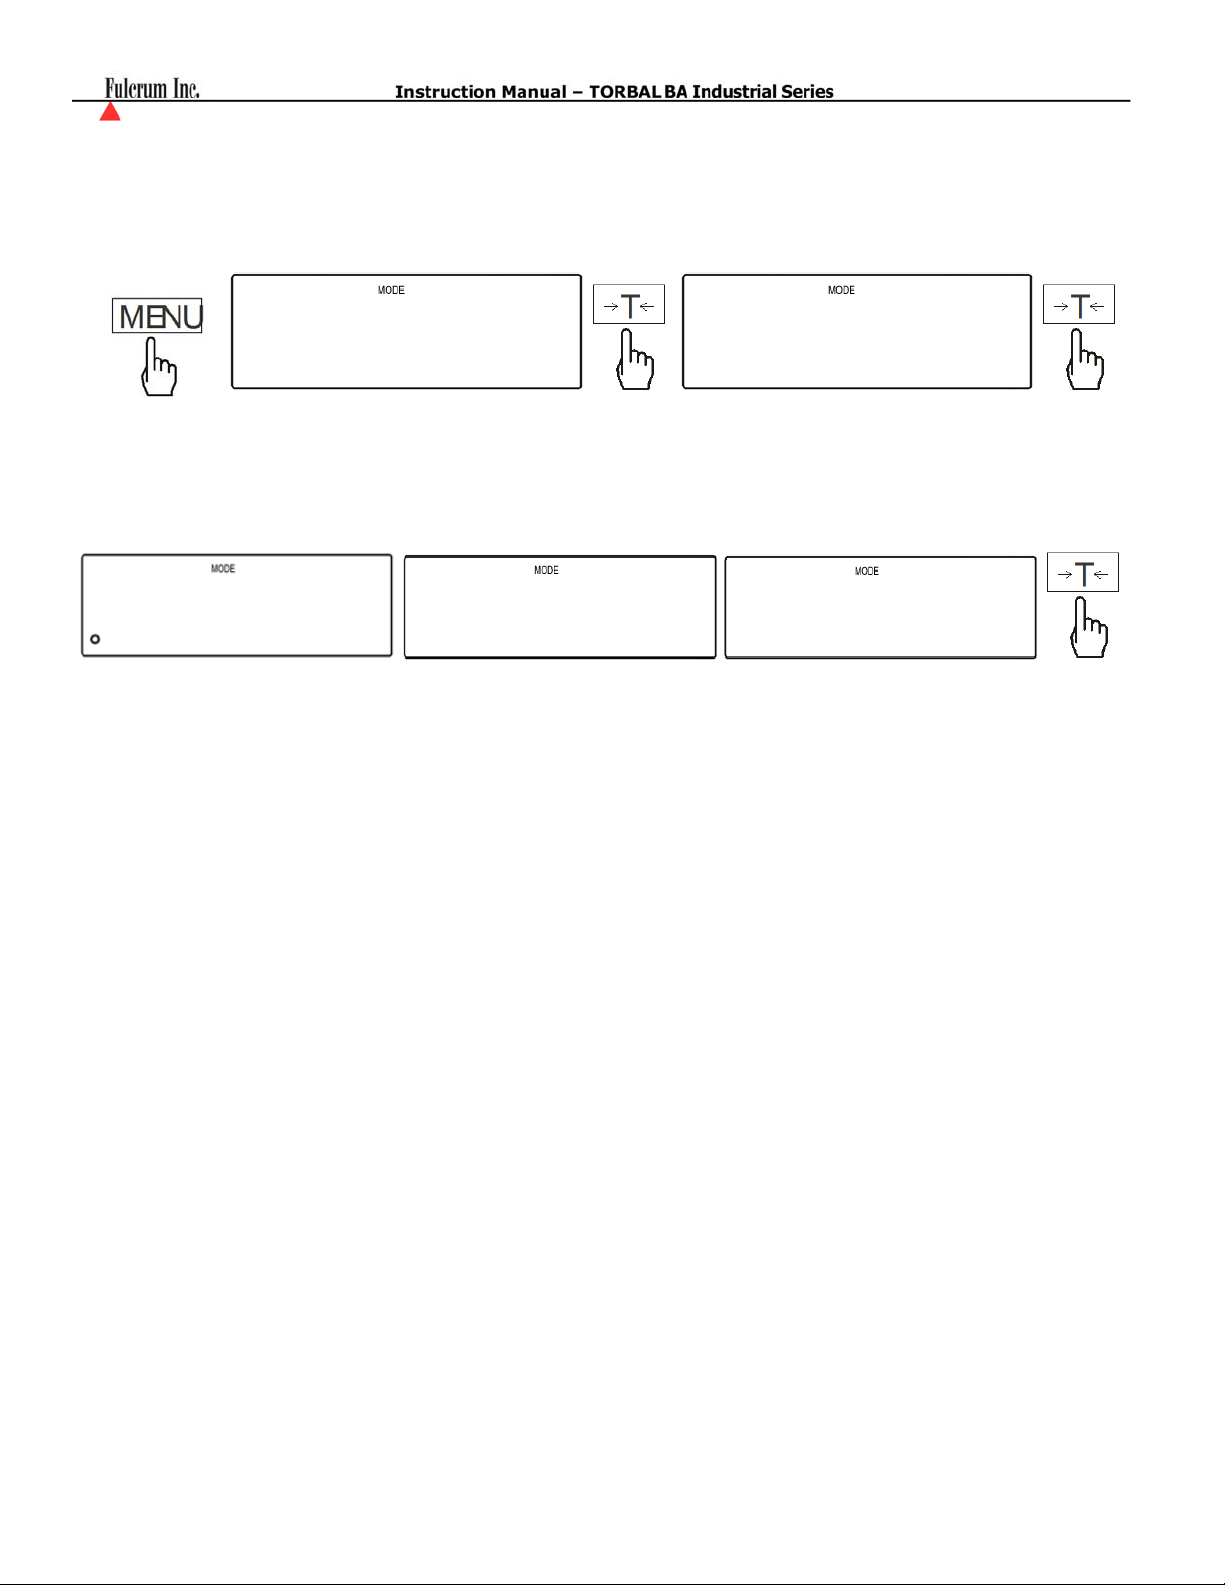
1. Press the MENU key, when the option “Port - 1” is displayed press the T key, and then select the option
“Parity” by press the T key once again.
Port -1
2. The scale will display available Parity settings: “none”,”odd”, “even”. To make a selection press the T key
when the desired setting is displayed.
none odd
PARITY
evEN
- 36 -
Page 37
(
)
Chapter 17: Port 2 – USB Configuration
Port 2
Before connecting the scale to a computer the USB Port must be configured with the appropriate baud rate
and other necessary parameters. To configure the USB Port follow configuration steps from Chapter 15 and
apply them to menu option “Port-2.”
PC Connection via USB
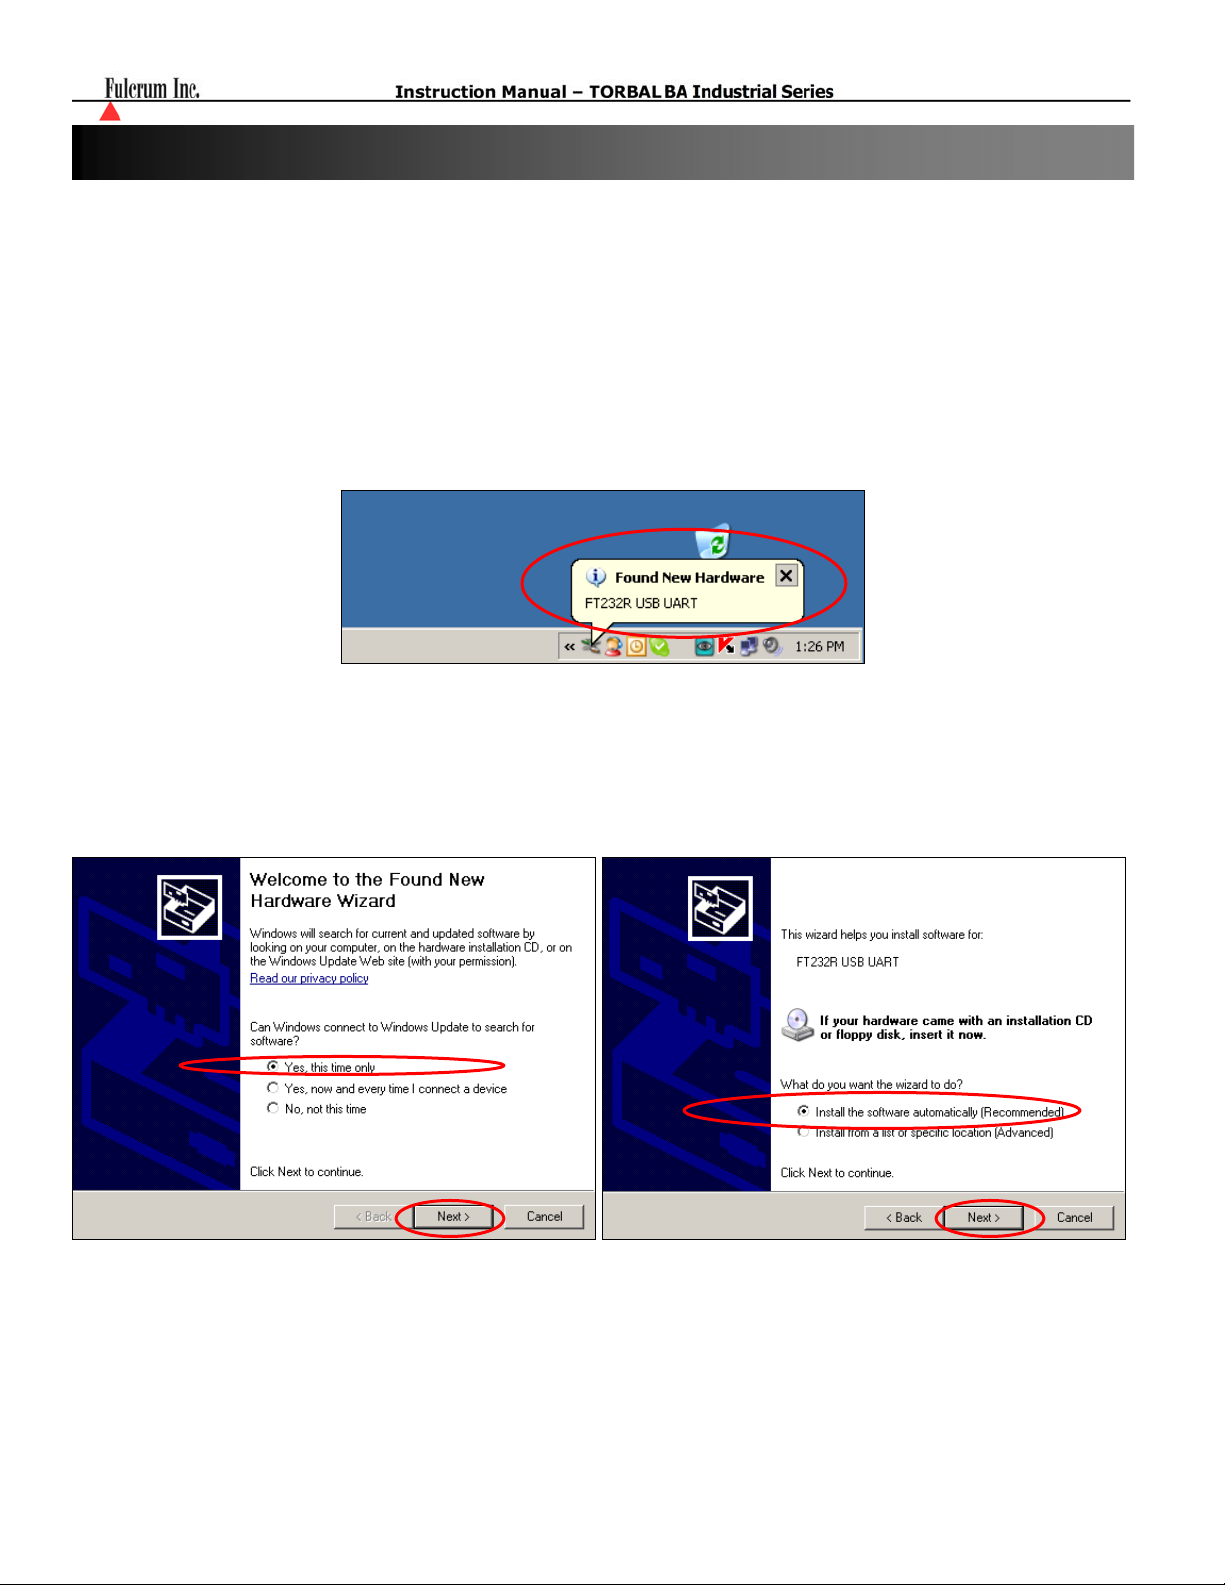
Once the USB port has been configured, connect the scale to the PC with a Standard A/B USB cable
and follow the “Found New Hardware” configuration wizard as described below.
1. Allow Windows to connect to Windows Update in order to search for software. Select “Yes, this time
only” and click “Next”. Once driver “FT232R USB UART” has been found, select “Install the
software automatically (Recommended)” and click “Next.
- 37 -
Page 38
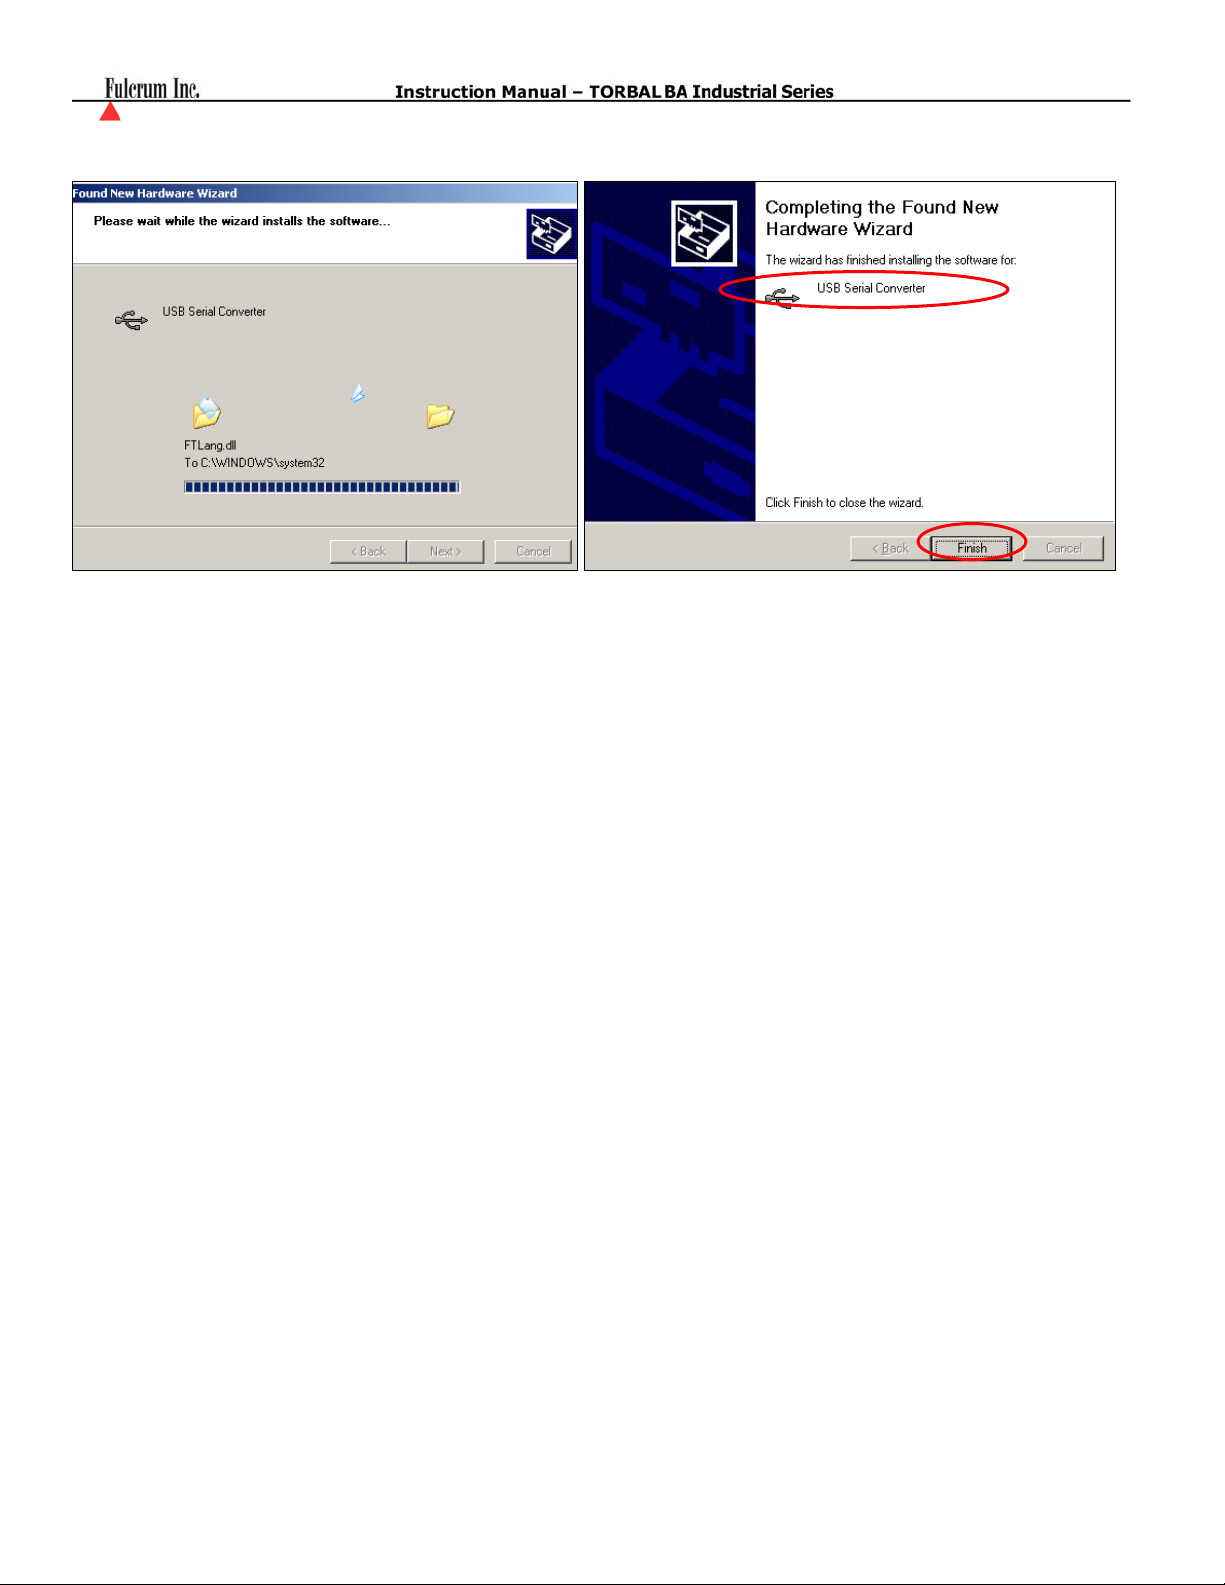
2. Windows will begin installation of the driver, when completed click “Finish”.
3. Once installation of the driver has been completed the scale is ready to communicate with the PC via
the USB port.
- 38 -
Page 39
(
)
Chapter 18: Receipt Printout
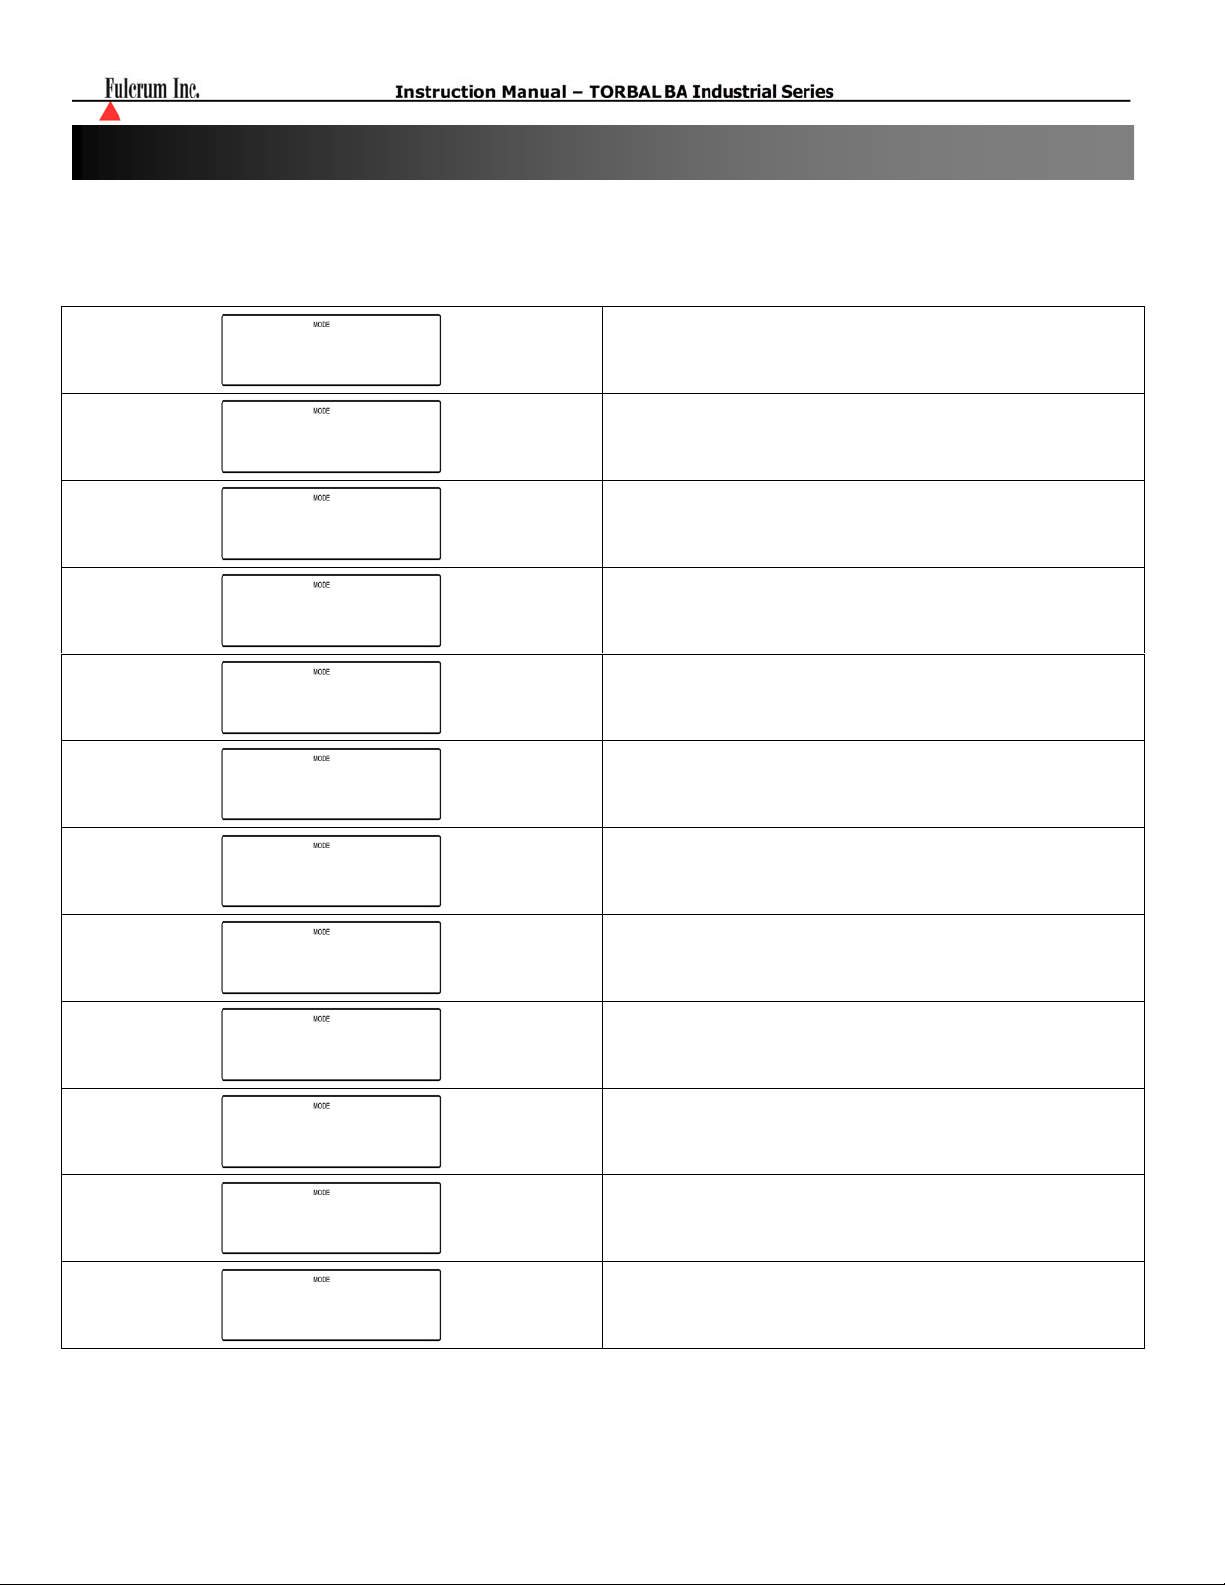
A detailed transaction receipt can be printed after weighing has been completed. The receipt can be
customized to include the following information:
Header
idOPER
pRINT
Header – includes unit information such as: Mode
number, Max Capacity, resolution and Unit Serial
number.
Operator Id – shows the ID number of the user
which performed the weighing transaction
DATE
Date – Date of the performed transaction
TIME
Time – Time at which the transaction was performed
prn no
Printout number – Number of the receipt prenticed
in a given day
ID Prod
Product Id – ID number of the product or item
weighed
Count
Count – Result obtained in Parts Counting
APW – Average Piece weight of the counted parts in
ApWW
the Parts Counting Functions
NETTo
Net – Net result of the weighing transaction
tare
Tare – tared weight in the weighing transaction
brUTTo
Gross – gross weight of the weighing transaction
total
Total – grand total obtained in the totalizing function
- 39 -
Page 40
18.1. Enabling and Disabling Receipt Fields
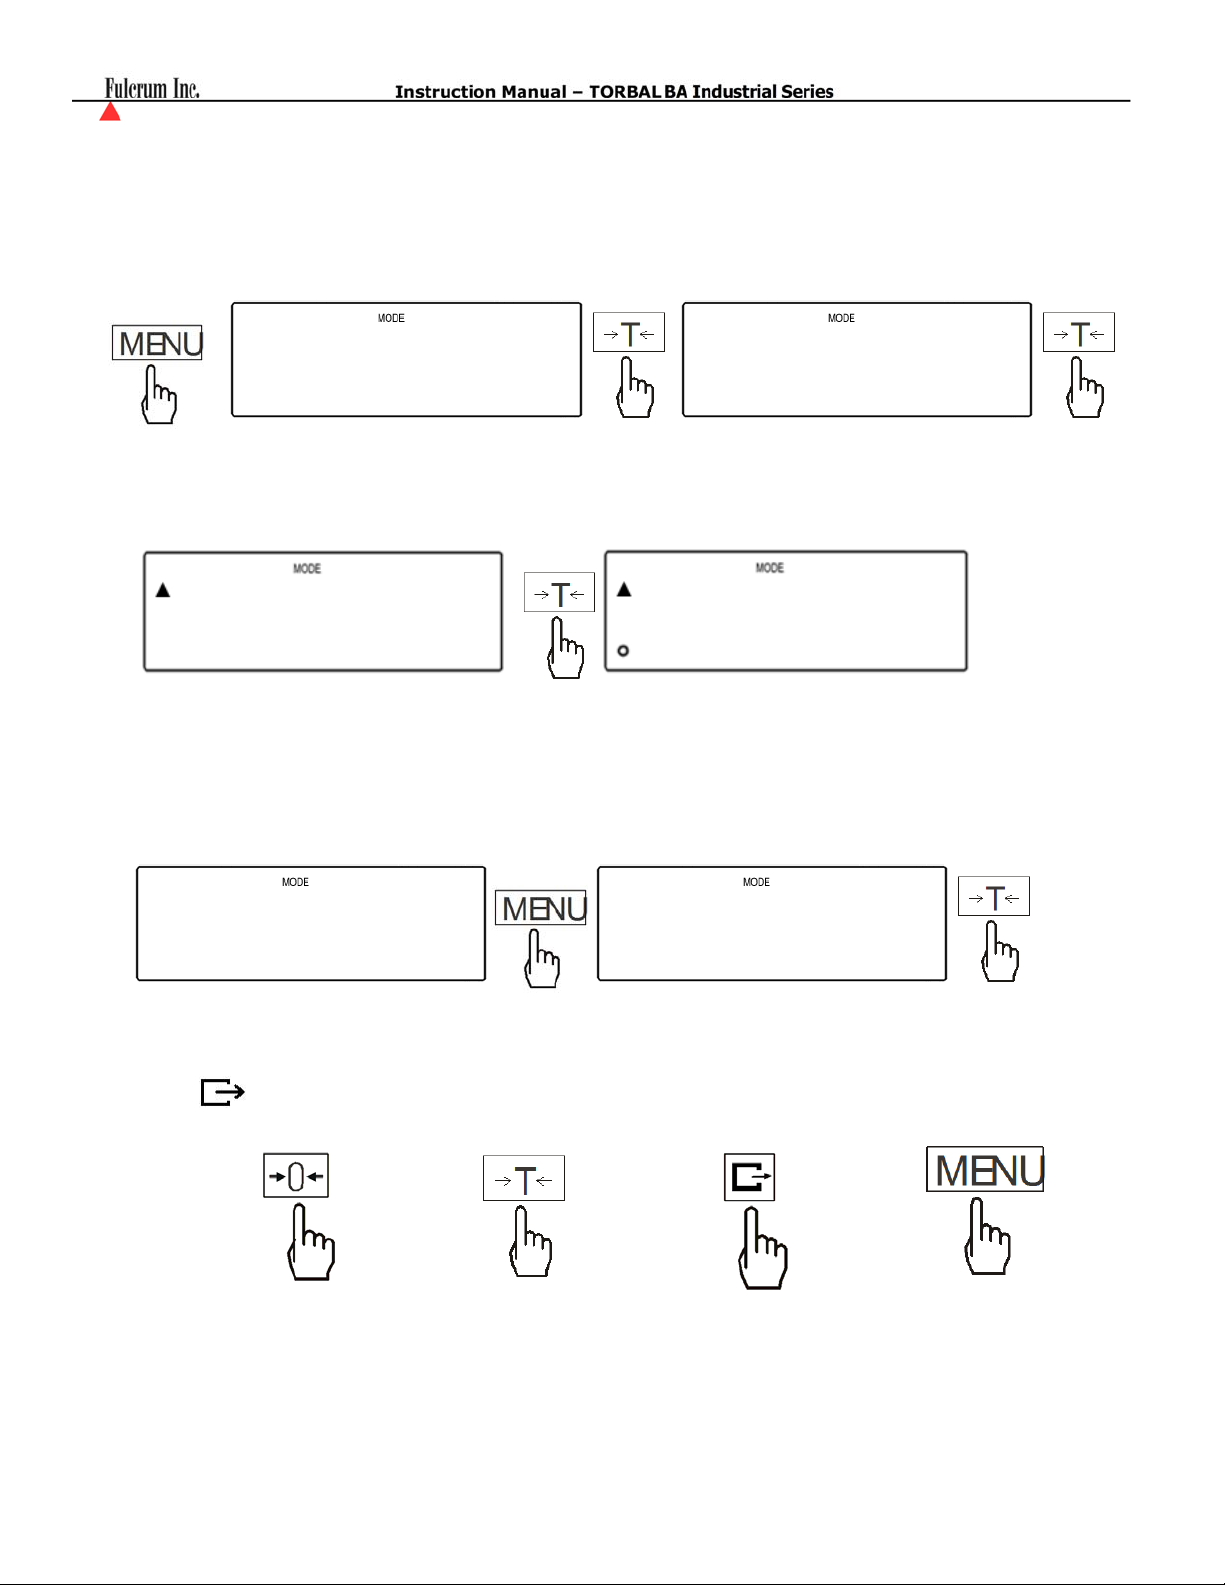
1. Press the MENU key, when the option “Print” is displayed press the T key, and then select a desired field
by press the T key once again when the name is displayed.
PrINT
2. The scale will display options “ON” and” Off”. To enable the field press the T key when “On” displayed,
to disable the field press the T key when “Off” is displayed.
ON
18.2. Assigning Operator and Product ID numbers.
1. From the weighing mode press and hold the Menu key for 3 seconds or until the scales displays
“IDPROD” and “IOPER”. Select the desired option by pressing the T key.
OFF
HEADER
0.00 IDPRoD
2. A dashed line will be displayed indicating to manually enter ID number. To manually enter the ID
number, use the following keys: the C key to increment a digit, the T key to accept and go to the next
digit, the
key to insert a decimal, and the MENU key to accept the entire setting.
To increment a digit To accept and go to
next digit
To insert a decimal To accept entered
value
- 40 -
Page 41
(
)
Chapter 19: Dynamic and Animal Weighing
Function Options:
LOC Off
LOC On
LOC Prn
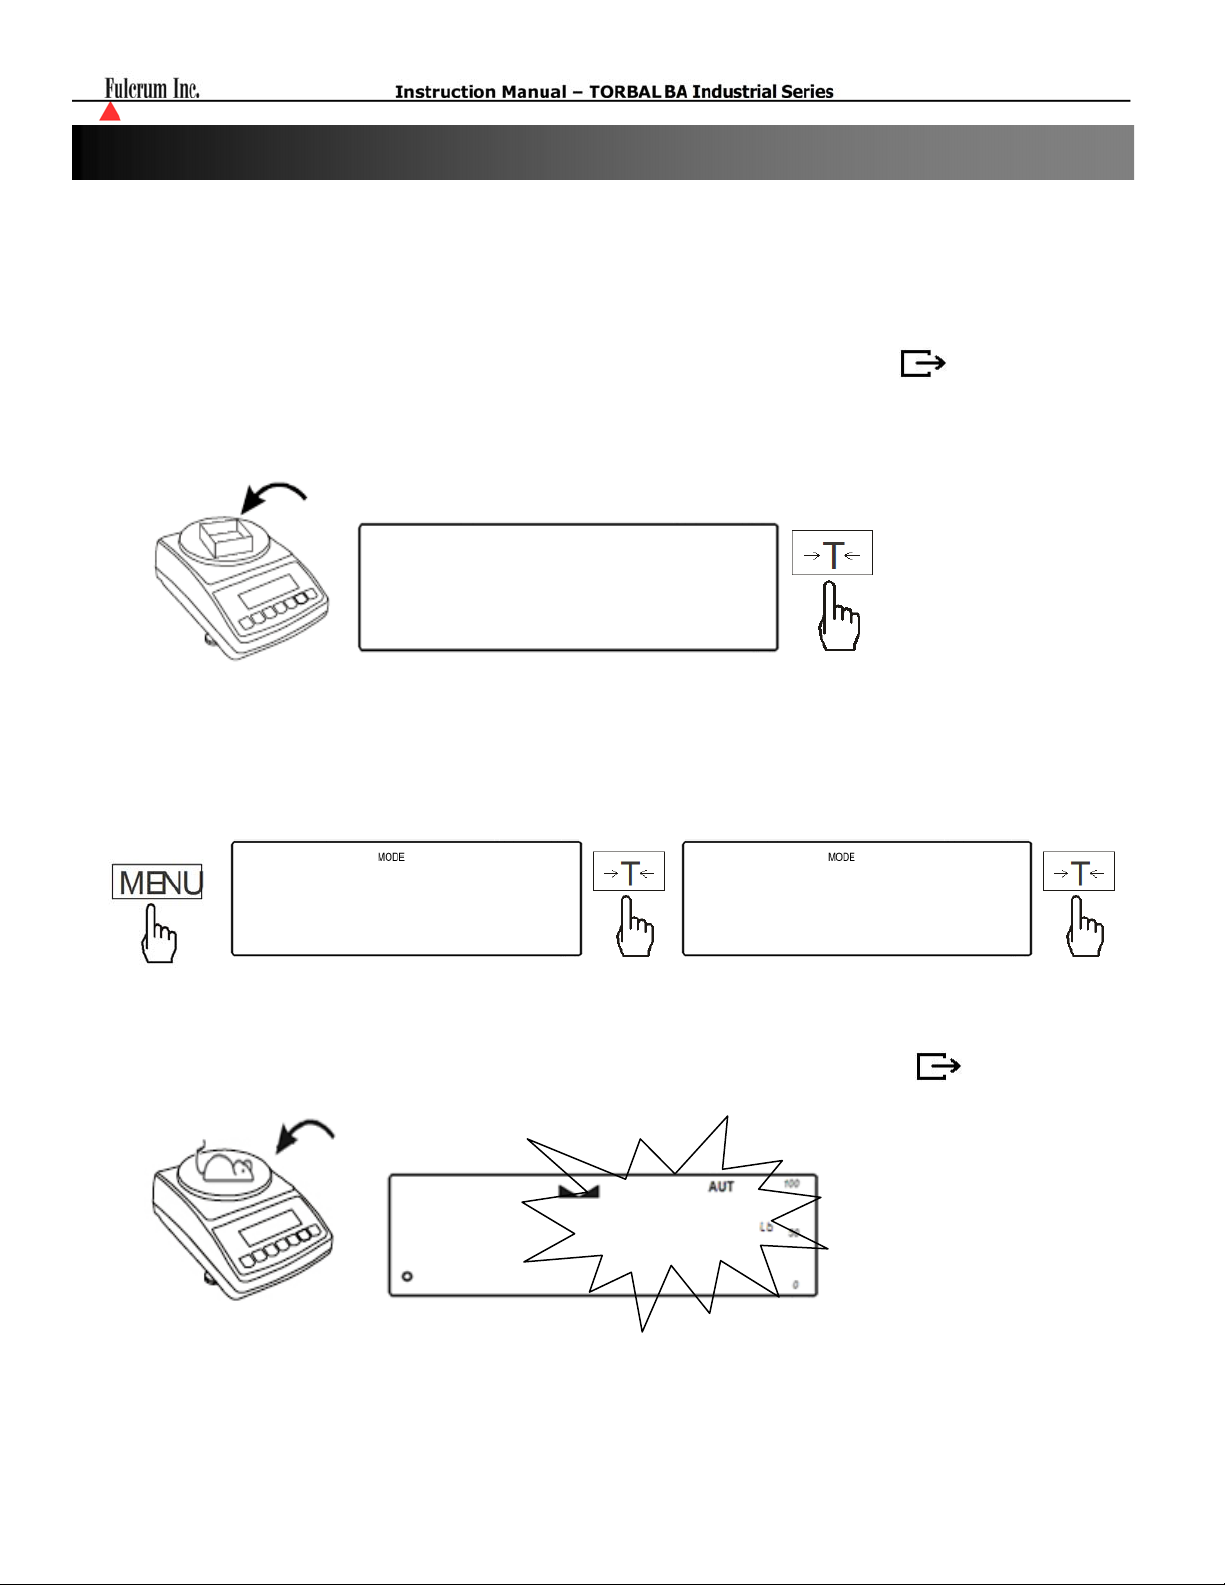
1. Place a container on the pan and press the T key to tare.
( LOC oFF)
(LOC on)
(LOC Prn)
Disables the LOC Dynamic Weighing Function
Enables and Starts the LOC Dynamic Weighing Function (Weight integration
initiates automatically)
- Enables and Starts the LOC Dynamic Weighing Function (Weight integration is
initiated manually with the press of the Data Transfer Key )
LOC
-------
2. Press the Menu key, when the option “LOC” is displayed press the T key, and then select the option “LOC
On” or “LOC Prn” by press the T key once again.
LOC
3. Place the animal or the moving object on the pan. Weight integration will begin automatically. If “LOC
Prn” was selected press the data transfer key to initiate weight integration manually
is integrating the weighing result the display flashes.
0
28
4. Final result will be automatically sent to a printer or a PC via the RS232 port. During data transmission
the word print will be displayed. The final result remains displayed for 30 seconds. To perform the next
weighing remove the animal, wait for the scale to display 0 and place the next animal on the pan.
LOC oN
. While the scale
- 41 -
Page 42
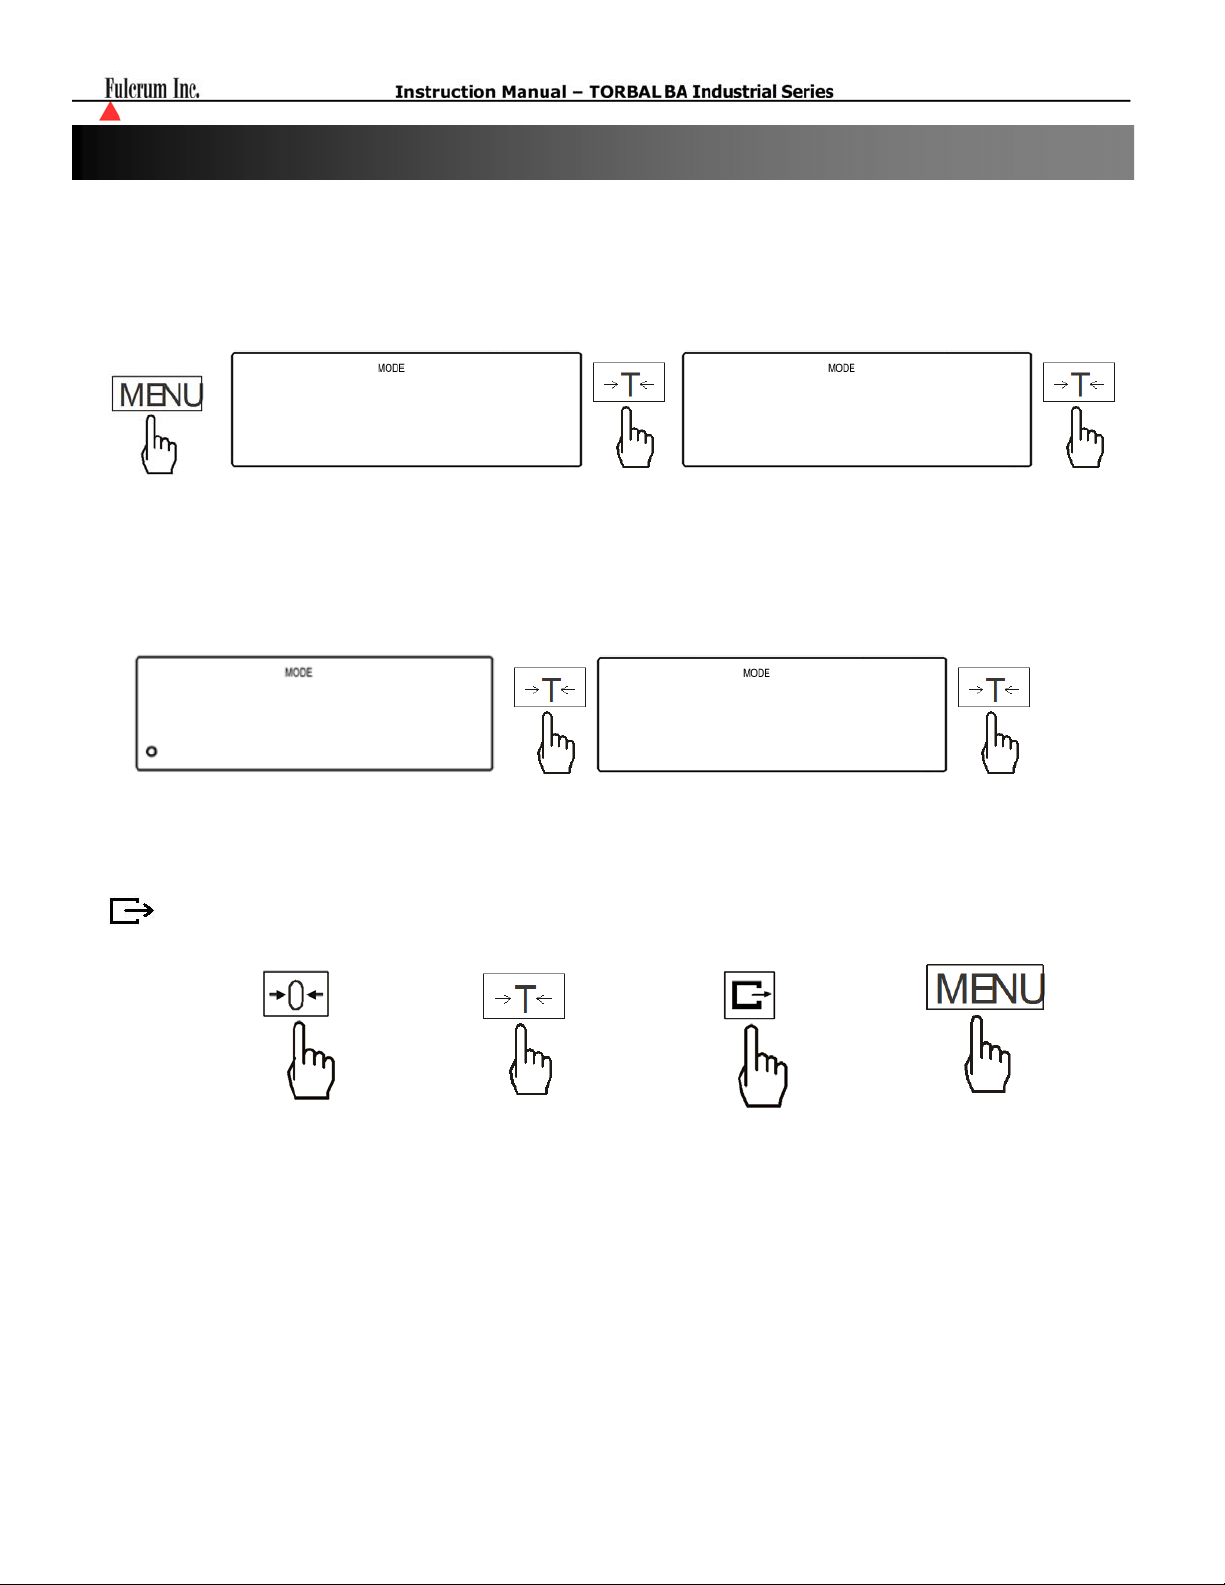
Chapter 20: Storing Tare Values
20.1. Storing a Tare Value Manually
1. Press the MENU key, when the option “Tare” is displayed press the T key, and then select the option “Tar
Set ” by press the T key once again.
tare tarset
2. The scale will begin to Display tare locations. Locations marked with a dot in the upper left corner of the
LED have a stored tare value assigned. To select a tare location or overwrite a current location press the T
key when a desired location is displayed, and then select the option “Manual ” by press the T key once
again.
tare 1
3. A dashed line will be displayed indicating to manually enter the Tare value. To manually enter tare value,
use the following keys: the C key to increment a digit, the T key to accept and go to the next digit, the
key to insert a decimal, and the MENU key to accept the entire setting.
To increment a digit To accept and go to
4. Once a tare value has been assigned, the scale will automatically store the value in the selected memory
location and return to the weighing mode with the tare value in use.
next digit
mmanual
To insert a decimal To accept entered
value
- 42 -
Page 43
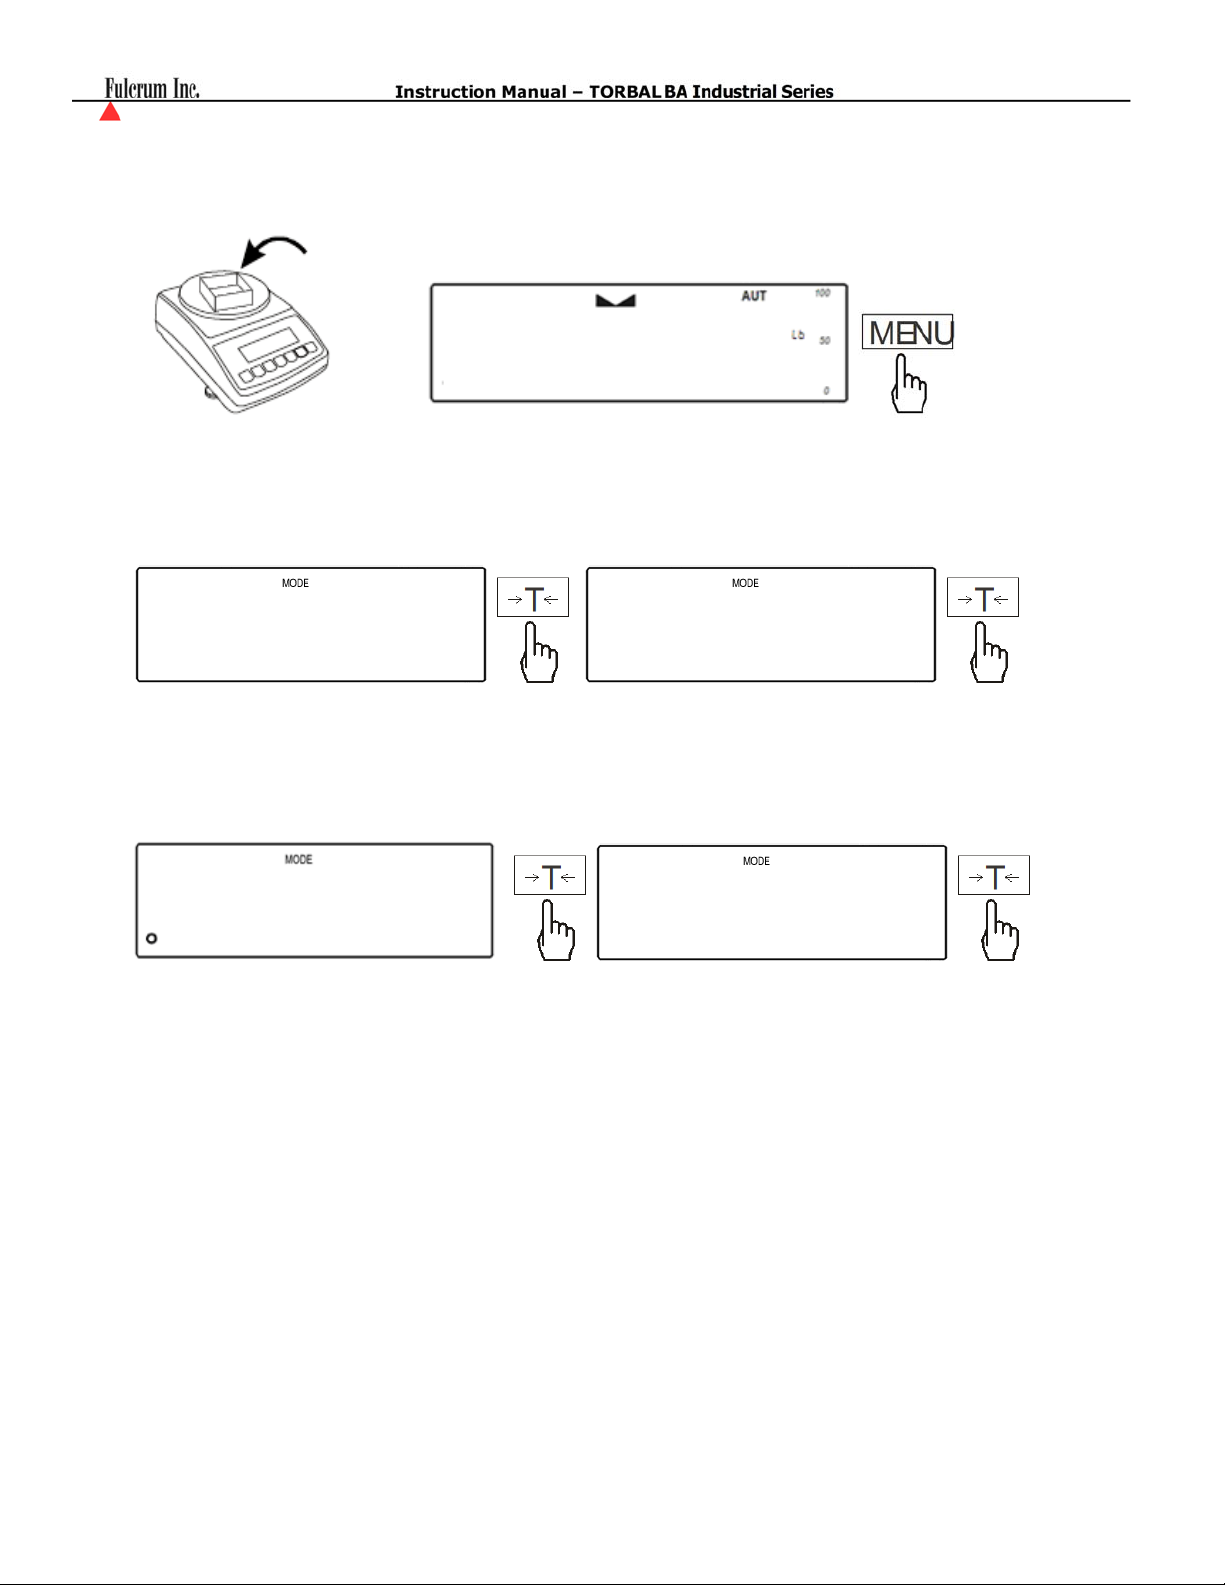
20.2. Storing a Tare Value Automatically
1. Place a container on the pan and press the MENU key to enter the main menu.
0
60
2. When the option “Tare” is displayed press the T key, and then select the option “Tar Set ” by pressing the
T key once again.
tare
3. The scale will begin to Display tare locations. Locations marked with a dot in the upper left corner of the
LED have a stored tare value assigned. To select a tare location or overwrite a current location press the T
key when a desired location is displayed, and then select the option “Pan ” by press the T key once again.
tare 1
4. The scale will automatically store the value of the container on the in the selected memory location and
return to the weighing mode with the tare value in use.
tar set
PAn
- 43 -
Page 44
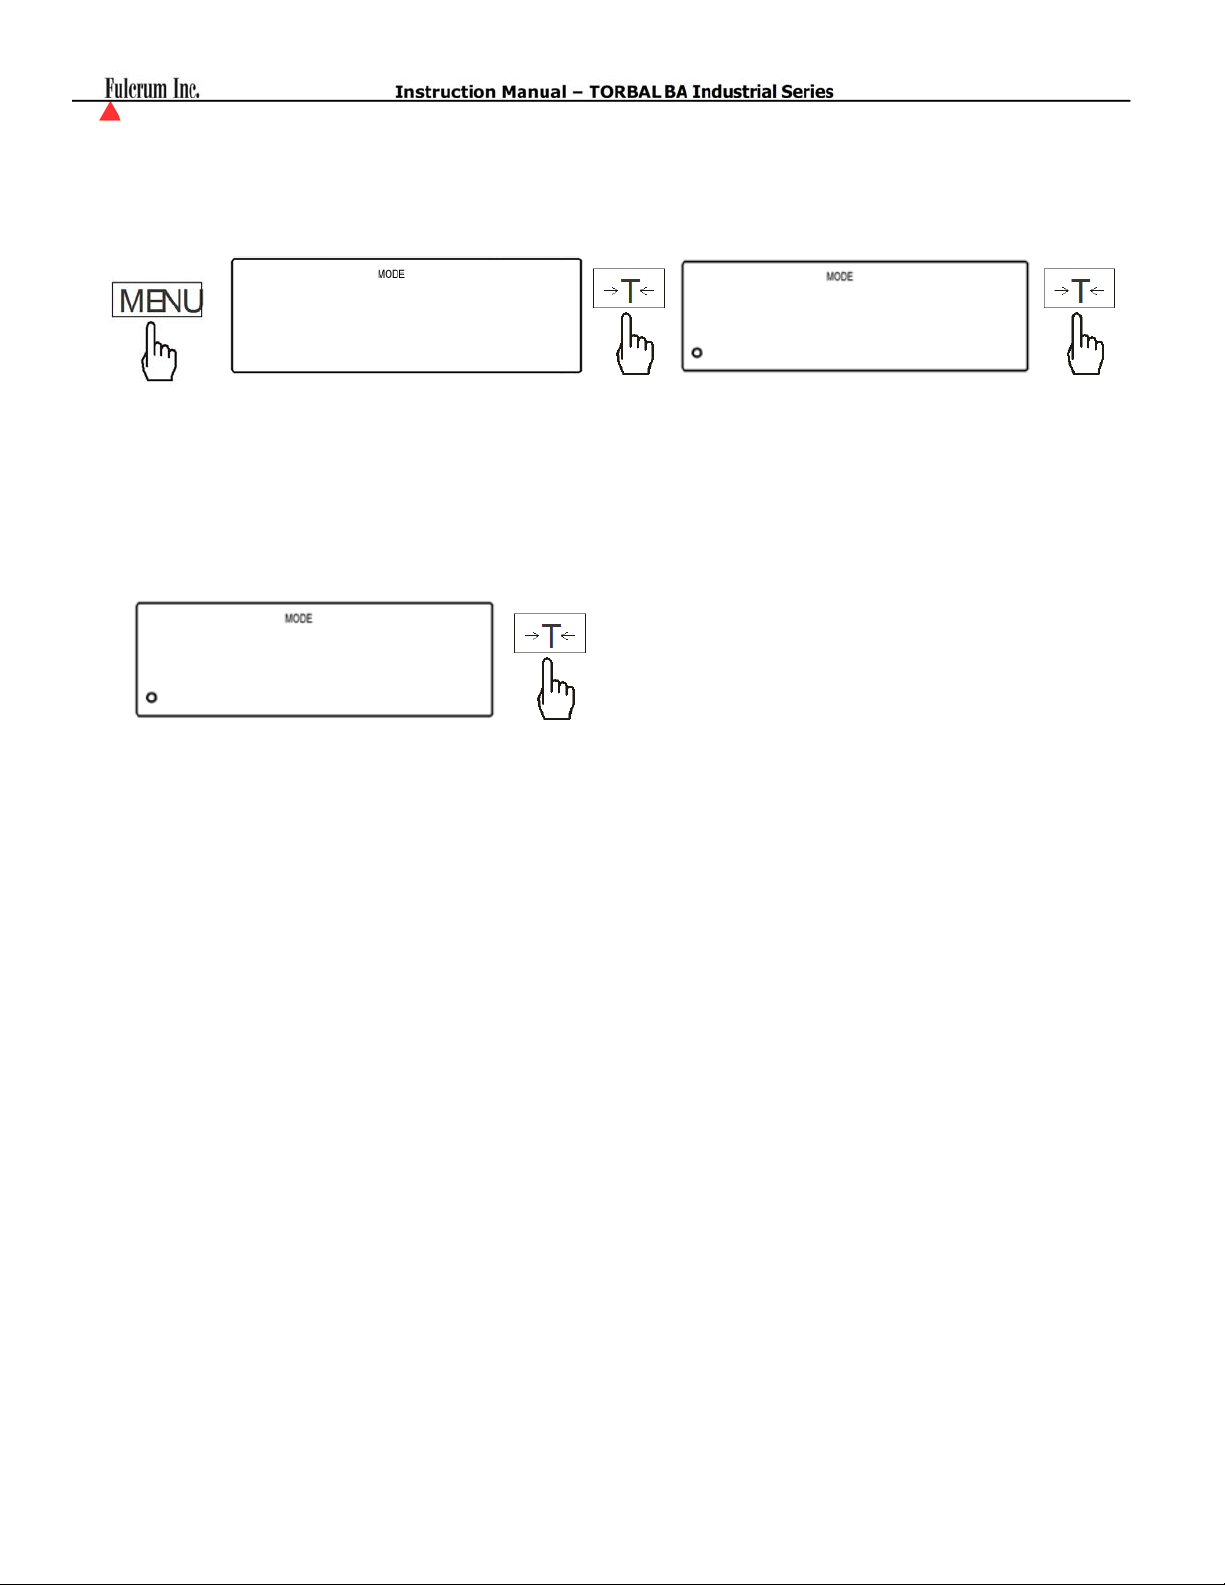
20.3. Recalling a previously stored tare value.
1. Press the Menu key, when the option “Tare” is displayed press the T key, and then select the option “Tar
On ” by press the T key once again.
tare
2. The scale will begin to Display tare locations. Locations marked with a dot in the upper left corner of the
LED have a stored tare value assigned. To select a tare location press the T key when a desired location is
displayed.
tar on
tare 1
3. The scale will return to the weighing mode with the selected tare value in use.
- 44 -
Page 45
(
)
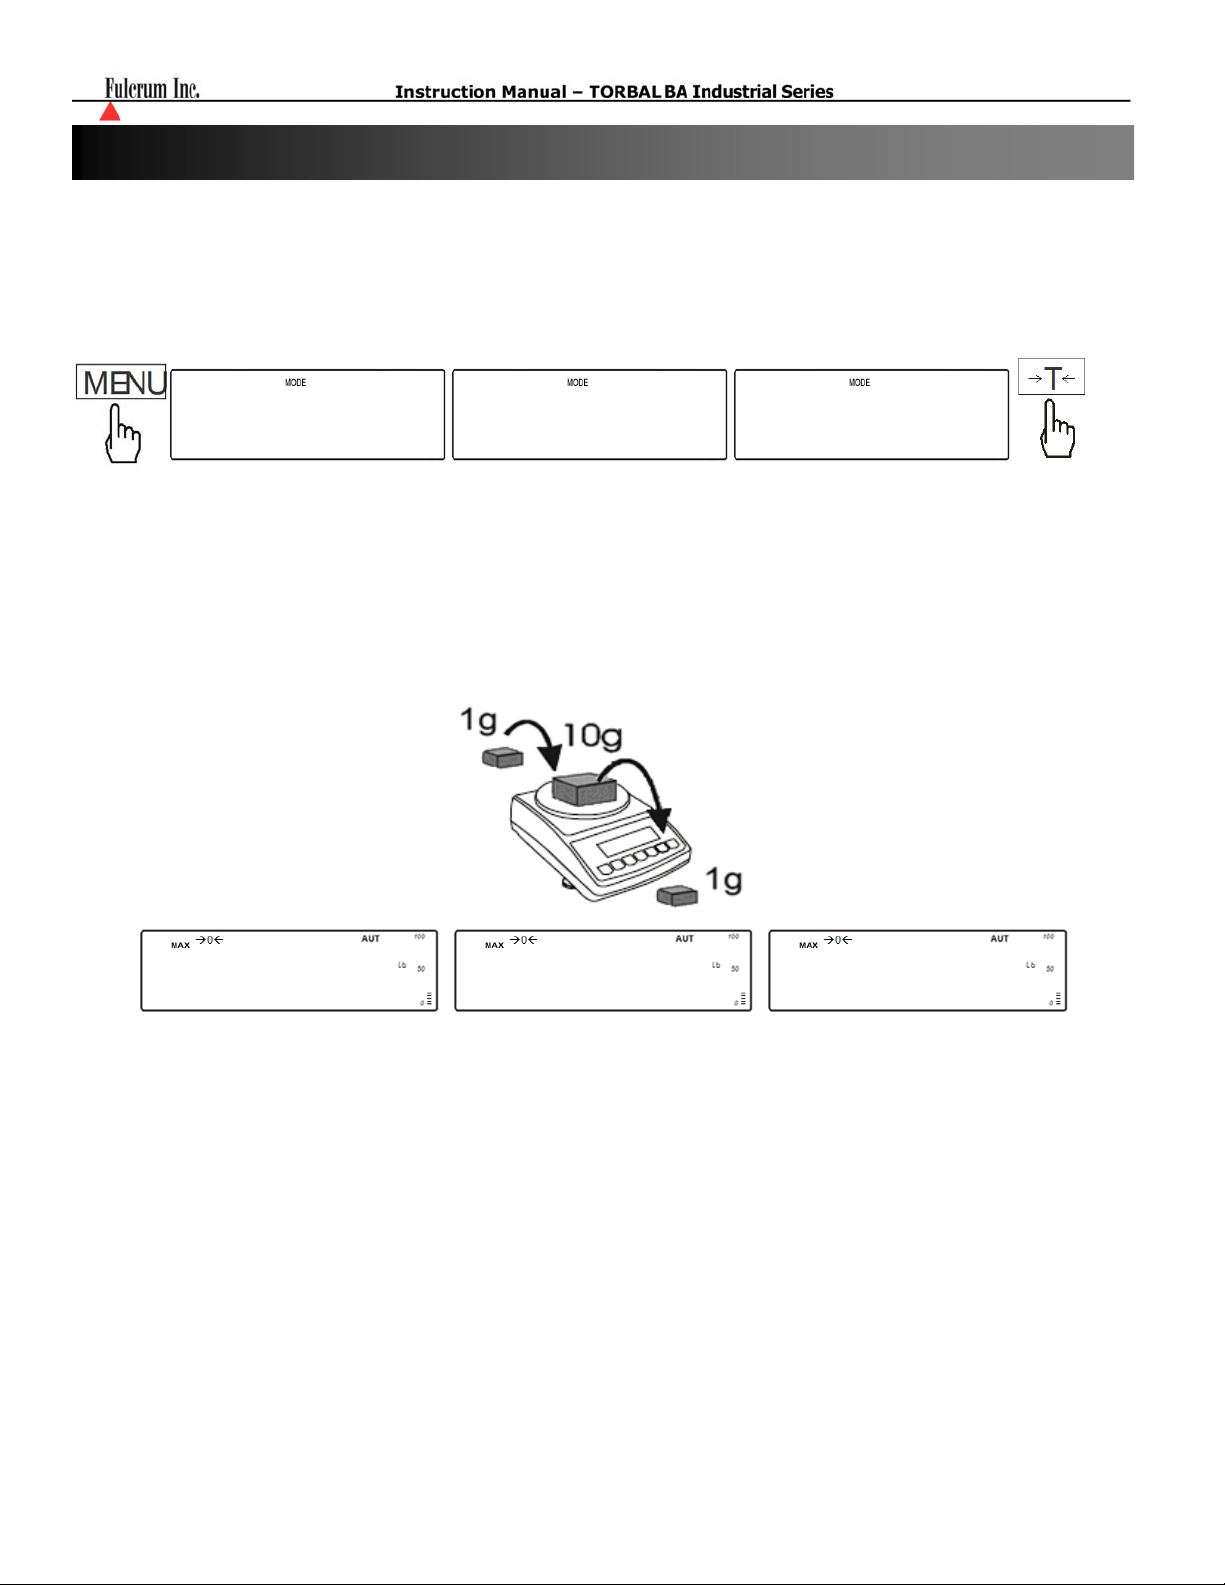
Chapter 21: Min – Max Weighing
This function allows you to find the maximum (highest) or minimum (lowest) weight in a series of weights.
1. Press the MENU key, when the option “Up” is displayed press the T key, and then select the option
“High” or “Low” by press the T key once again.
up
2. The scale will return to weighing and it will begin to hold on the display the highest or the lowest weight.
When seeking the highest weight in a series make sure to remove the previous weight from the pan before
adding the new weight. When seeking the lowest value weight be sure to add the new weight before
removing the previous weight.
Note: Add and remove weights with care in order not to increase the weight unintentionally.
UP
LOWW HIGH
1.00
Note: Stability indicator and Auto-Zero is disabled during Min/Max weighing.
10.00
10.00
- 45 -
Page 46
(
)
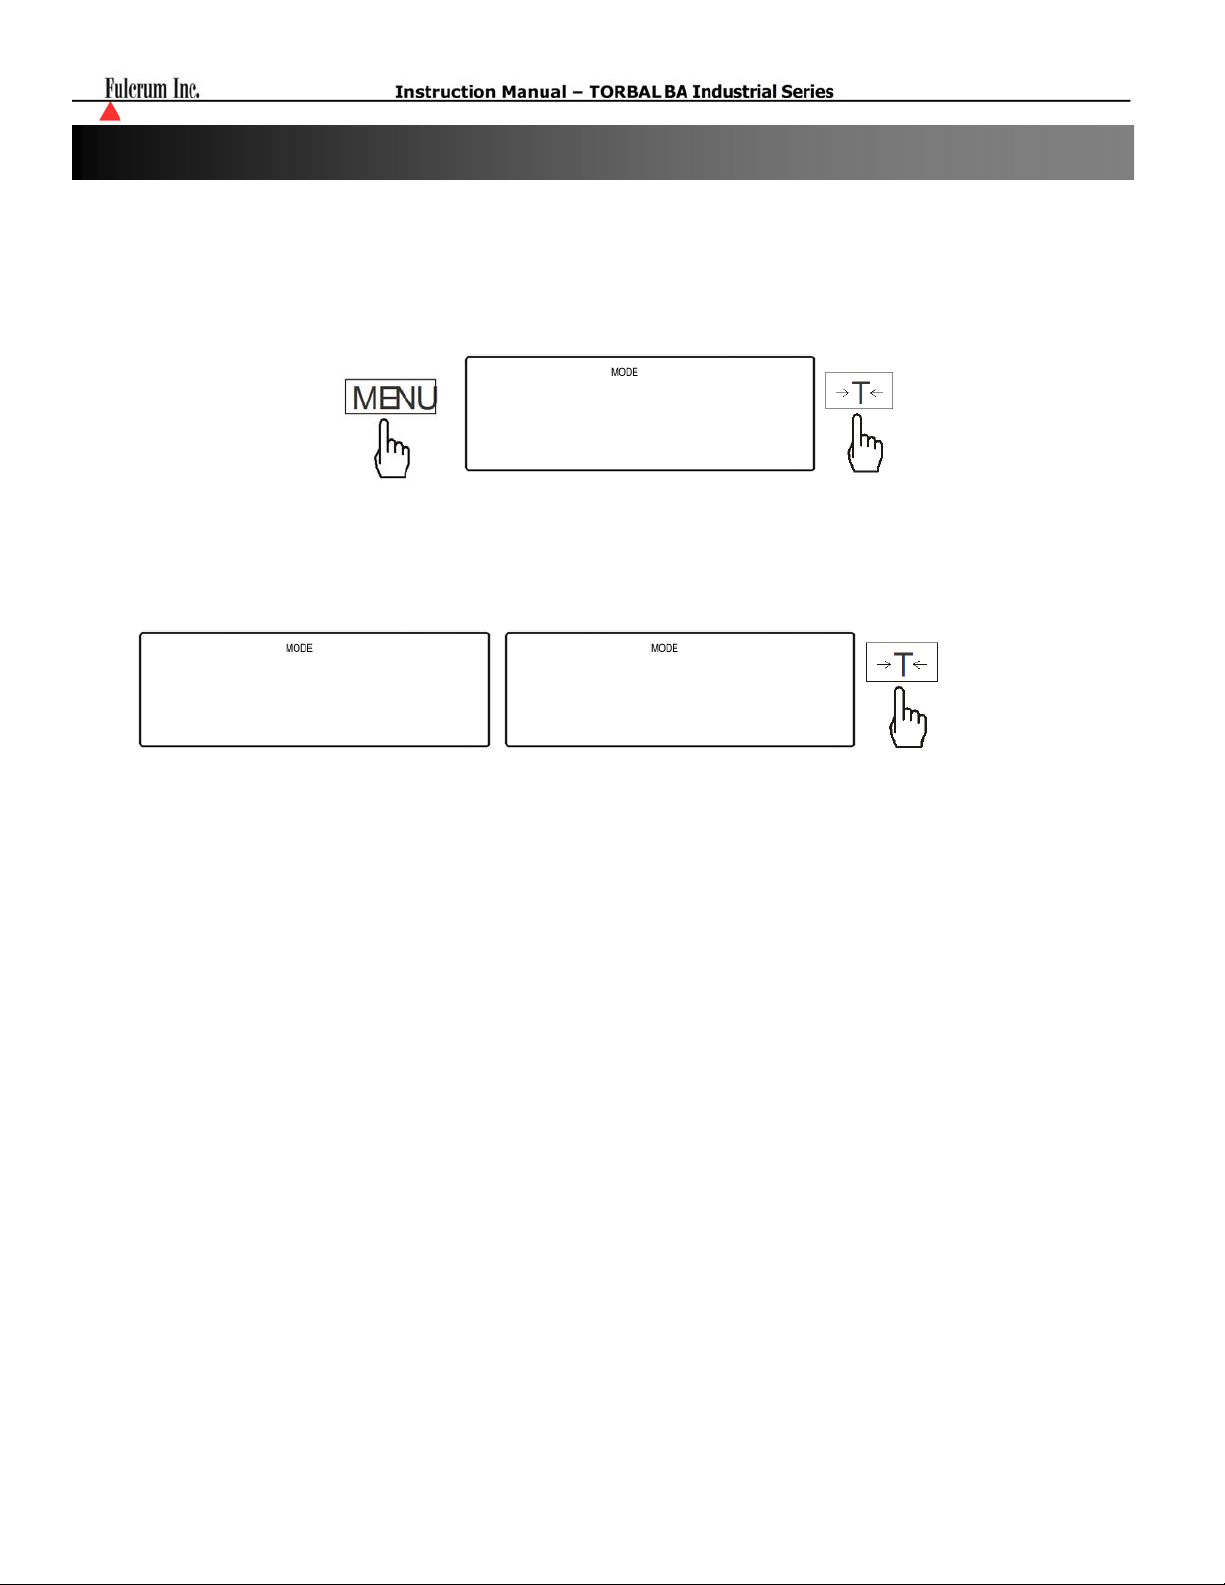
Chapter 22: Newton – Force Measurement
This function changes the unit of weight to Newton (N) - 1N ≈0.101971 kg
1. Press the Menu key, when the option “Newton” is displayed press the T key.
NEWWTO
newwtO
2. The scale will display options “ON” and” Off”. To enable Newton force measuring press the T key when
“New On” displayed, to disable Newton force measuring press the T key when “New Off” is displayed.
neww ON
nww oFF
- 46 -
Page 47
(
)
Chapter 23: Filtering
This function is used when vibration is encountered during weighing. This may be the result of ground
vibration, or a vibrating live load on the pan. Increasing the filter setting will increase the time required for a
measurement. The integration time of the measurement is increased thereby eliminating higher frequency
vibration.
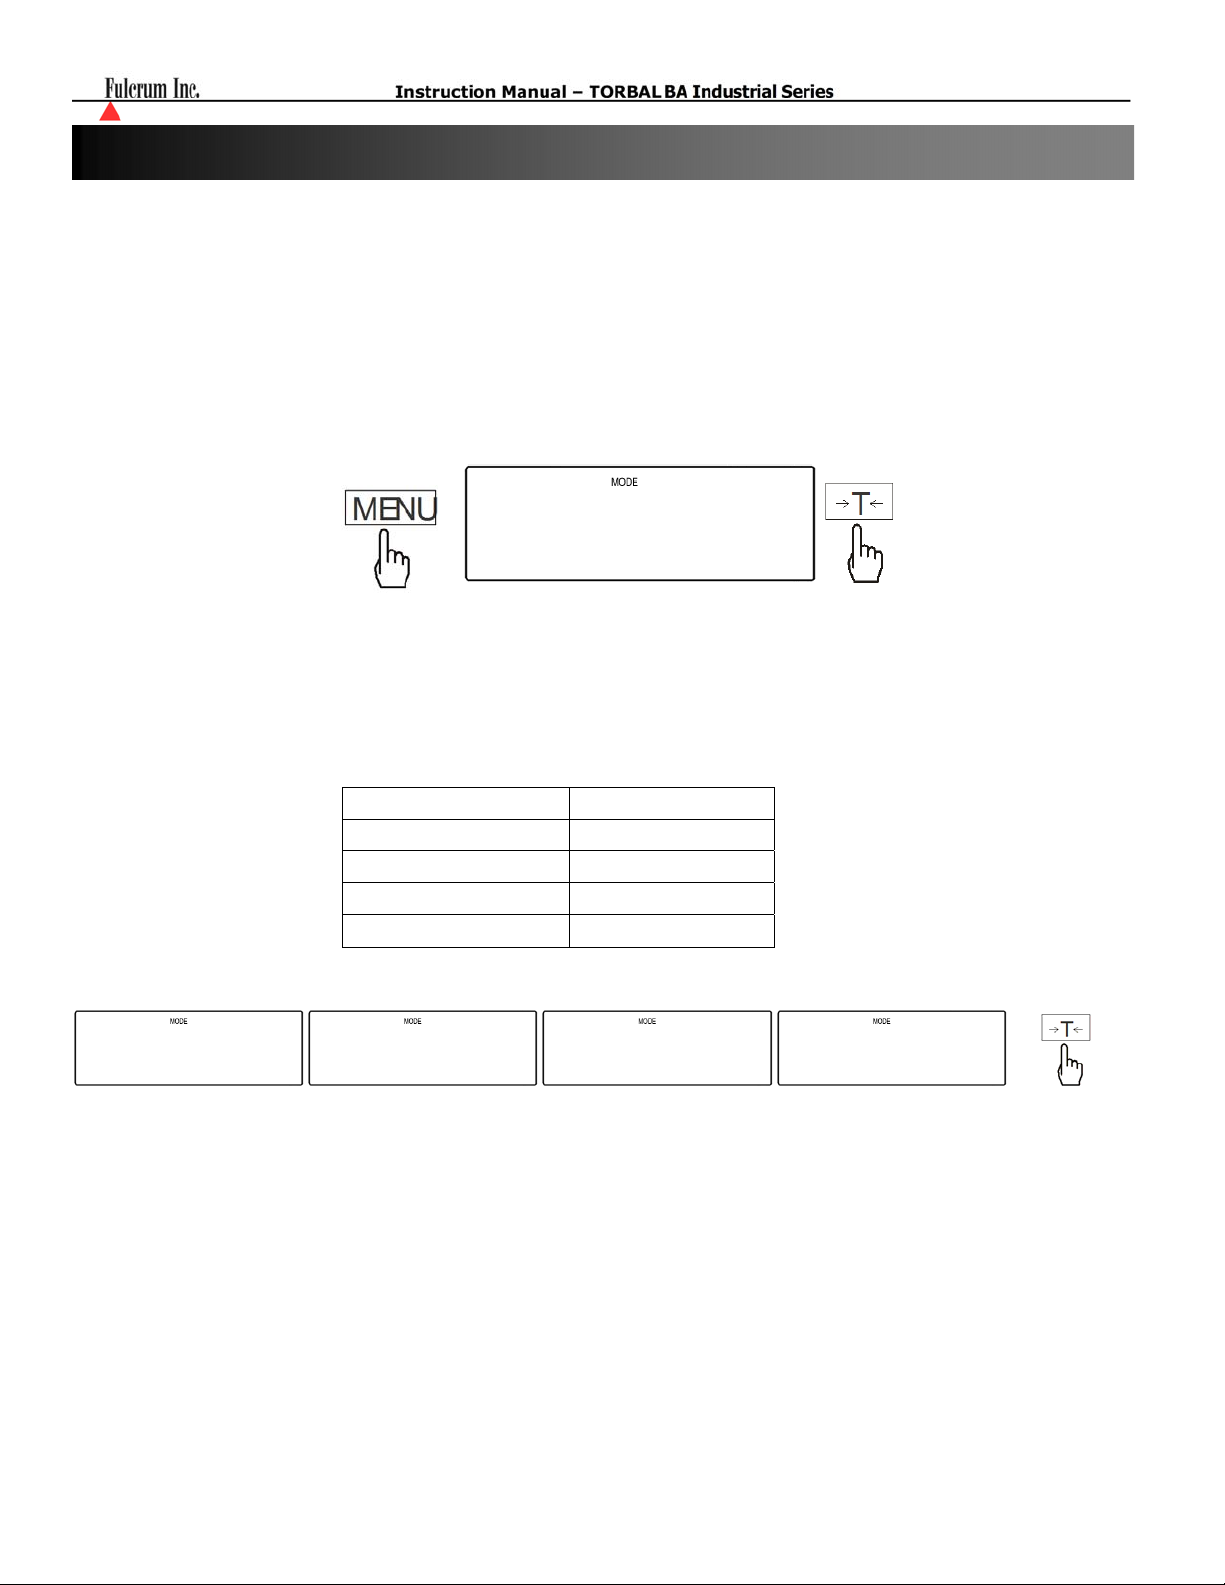
1. Press the MENU key, when the option “Filter” is displayed press the T key.
FILTER
fILTER
2. The scale will display options “Off” and available filter sensitivity levels “Fil 10, Fil 20, Fil 30 and Fil
40”. To select and enable Filtering press the T key when a desired filter level is displayed.
Filter Sensitivity
Fil 10 Low
Fil 20 Medium
Fil 30 High
Fil 40 Severe
FIL 10 FIL 20 FIL 30 FIL 40
3. To disable filtering select “Fil Off” from the filter menu.
- 47 -
Page 48
Chapter 24: Date and Time
Function Options:
Dat On
Dat Off
Dat Set
Dat Pin
Dat For
24.1. Enabling and Disabling Date and Time stamping
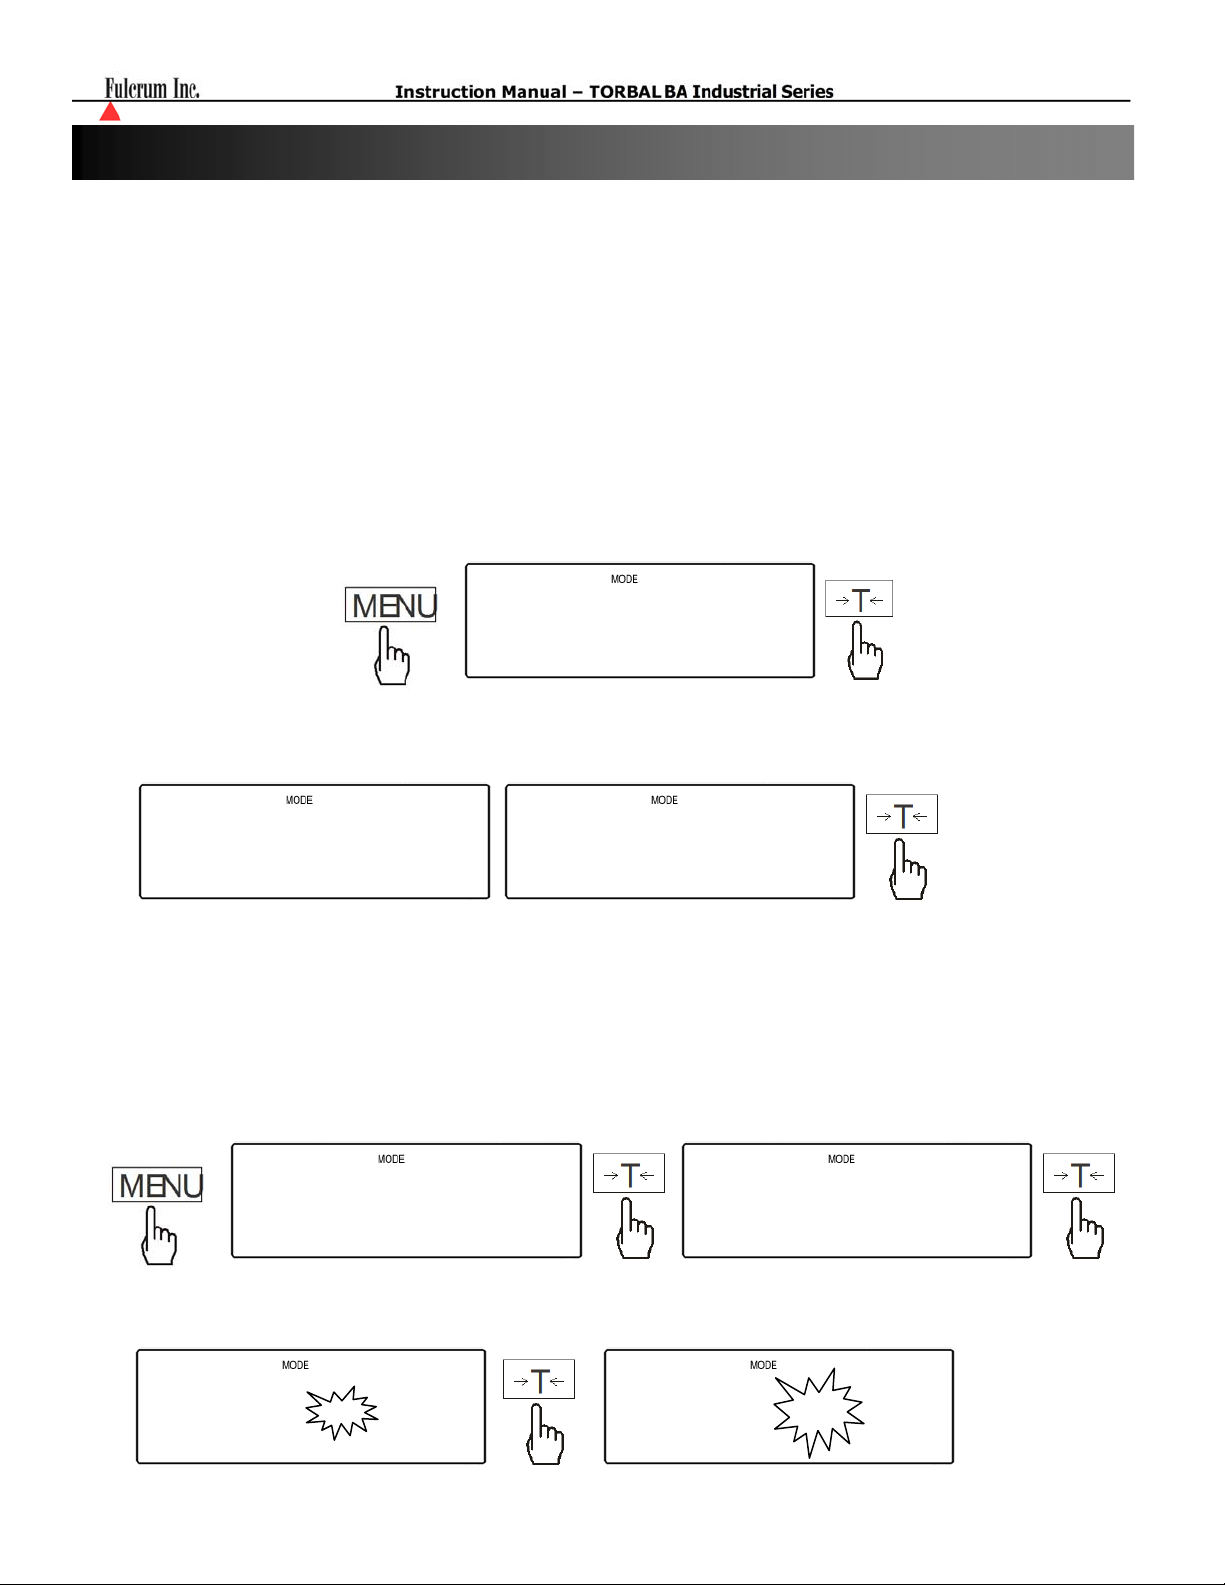
1. Press the MENU key, when the option “Date” is displayed press the T key.
(DAT oN)
(DAToff)
(datset)
(datpIn)
(datfor)
Enables date and time printing with every weighing result.
Disables date and time printing.
Date configuration” allows to set the current date and time.
Enables PIN access to the Date Configuration.
Format selection (United States / Europe).
date
2. The scale will display options “Dat On, Dat Off, Dat Set, Dat Pin, Dat For” . To enable Date stamping
press the T key when “Dat On” is displayed, to disable press the T key when “Dat Off” is displayed.
dat ON dat oFF
24.2. Setting the current date and time
1. Press the MENU key, when the option “Date” is displayed press the T key, and then select the option “Dat
Set ” by press the T key once again.
Date DATSET
2. The current time will be displayed. To change or to set a new time press the T key
h03-25
h03-25
- 48 -
Page 49
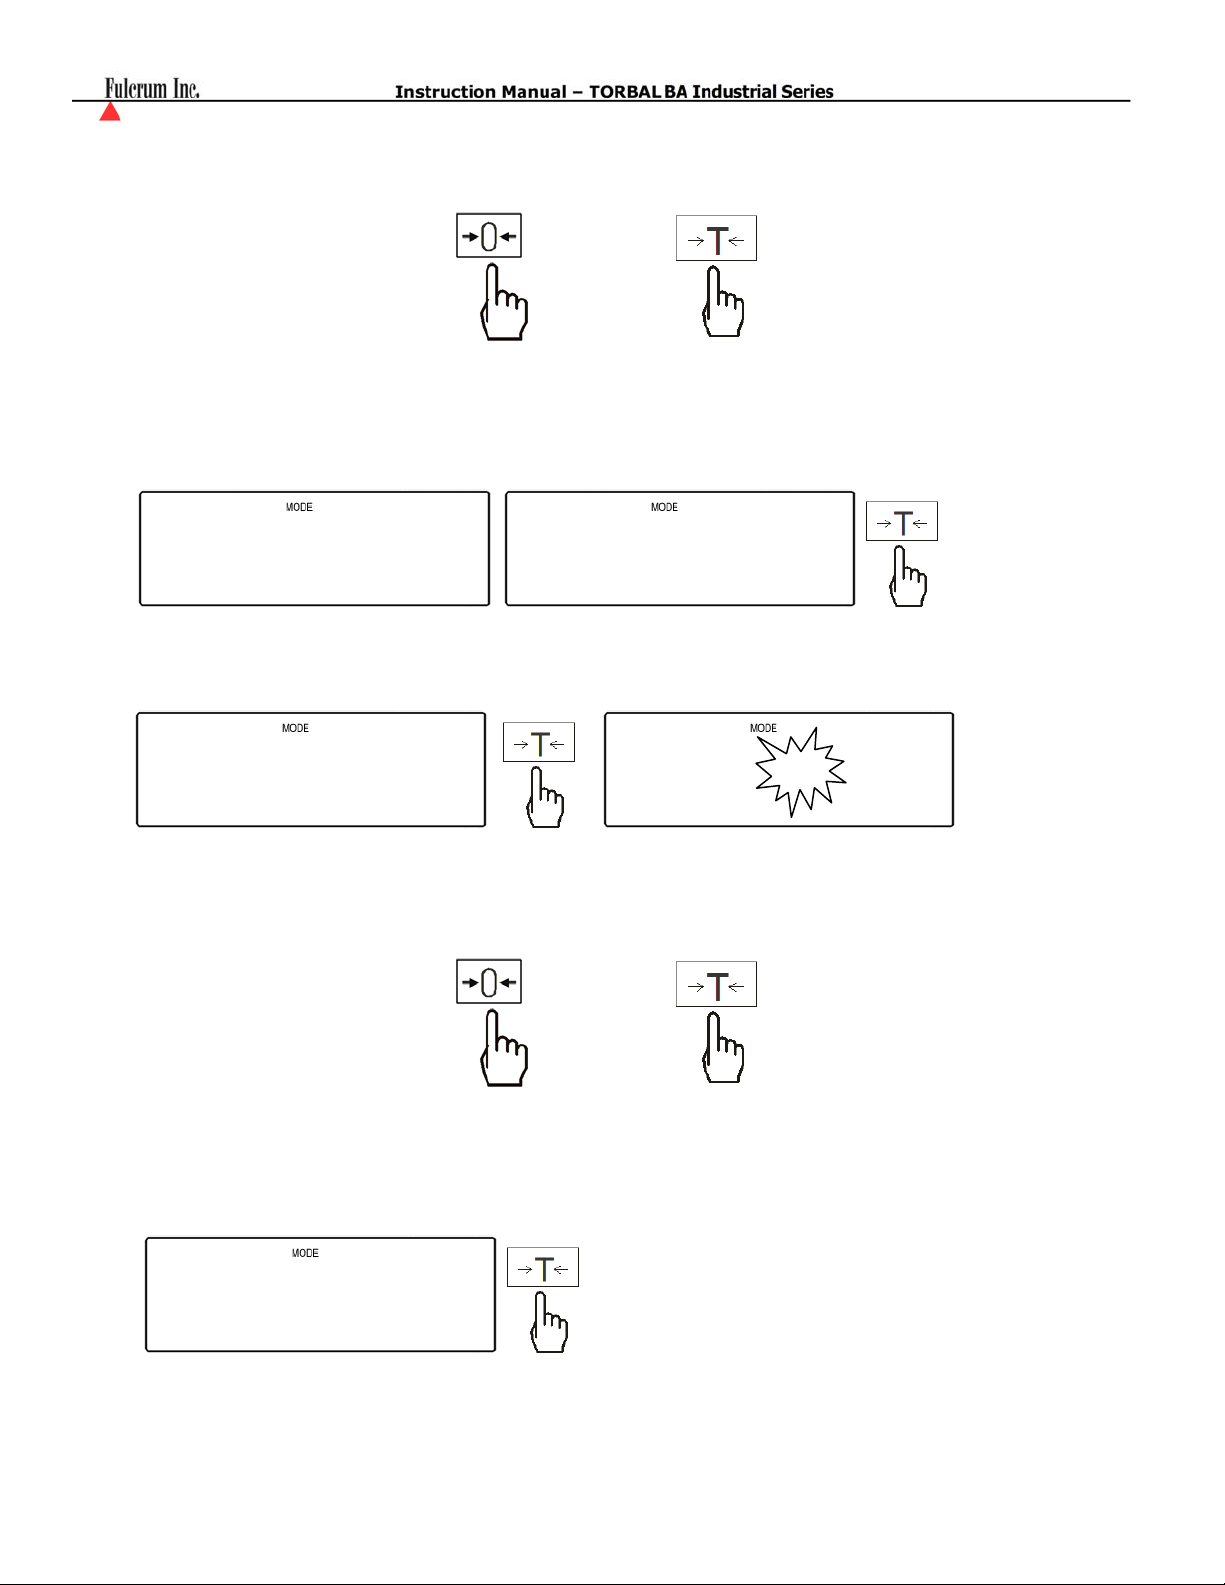
3. Use the following keys to change the current time
4. Once the time has been set the scale will display “PM” or “AM”. Press the T key when the desired setting
is displayed.
To increment a digit To accept and go to
next digit
5. Once the Time has been set, the scale will display the current date. To change or to set a new date press
the T key
d06-12
6. Use the following keys to change the date
7. Once the time has been set the scale will display the current year. To change the years press the T key.
To increment a digit To accept and go to
d06-12
next digit
y - 2010
- 49 -
Page 50
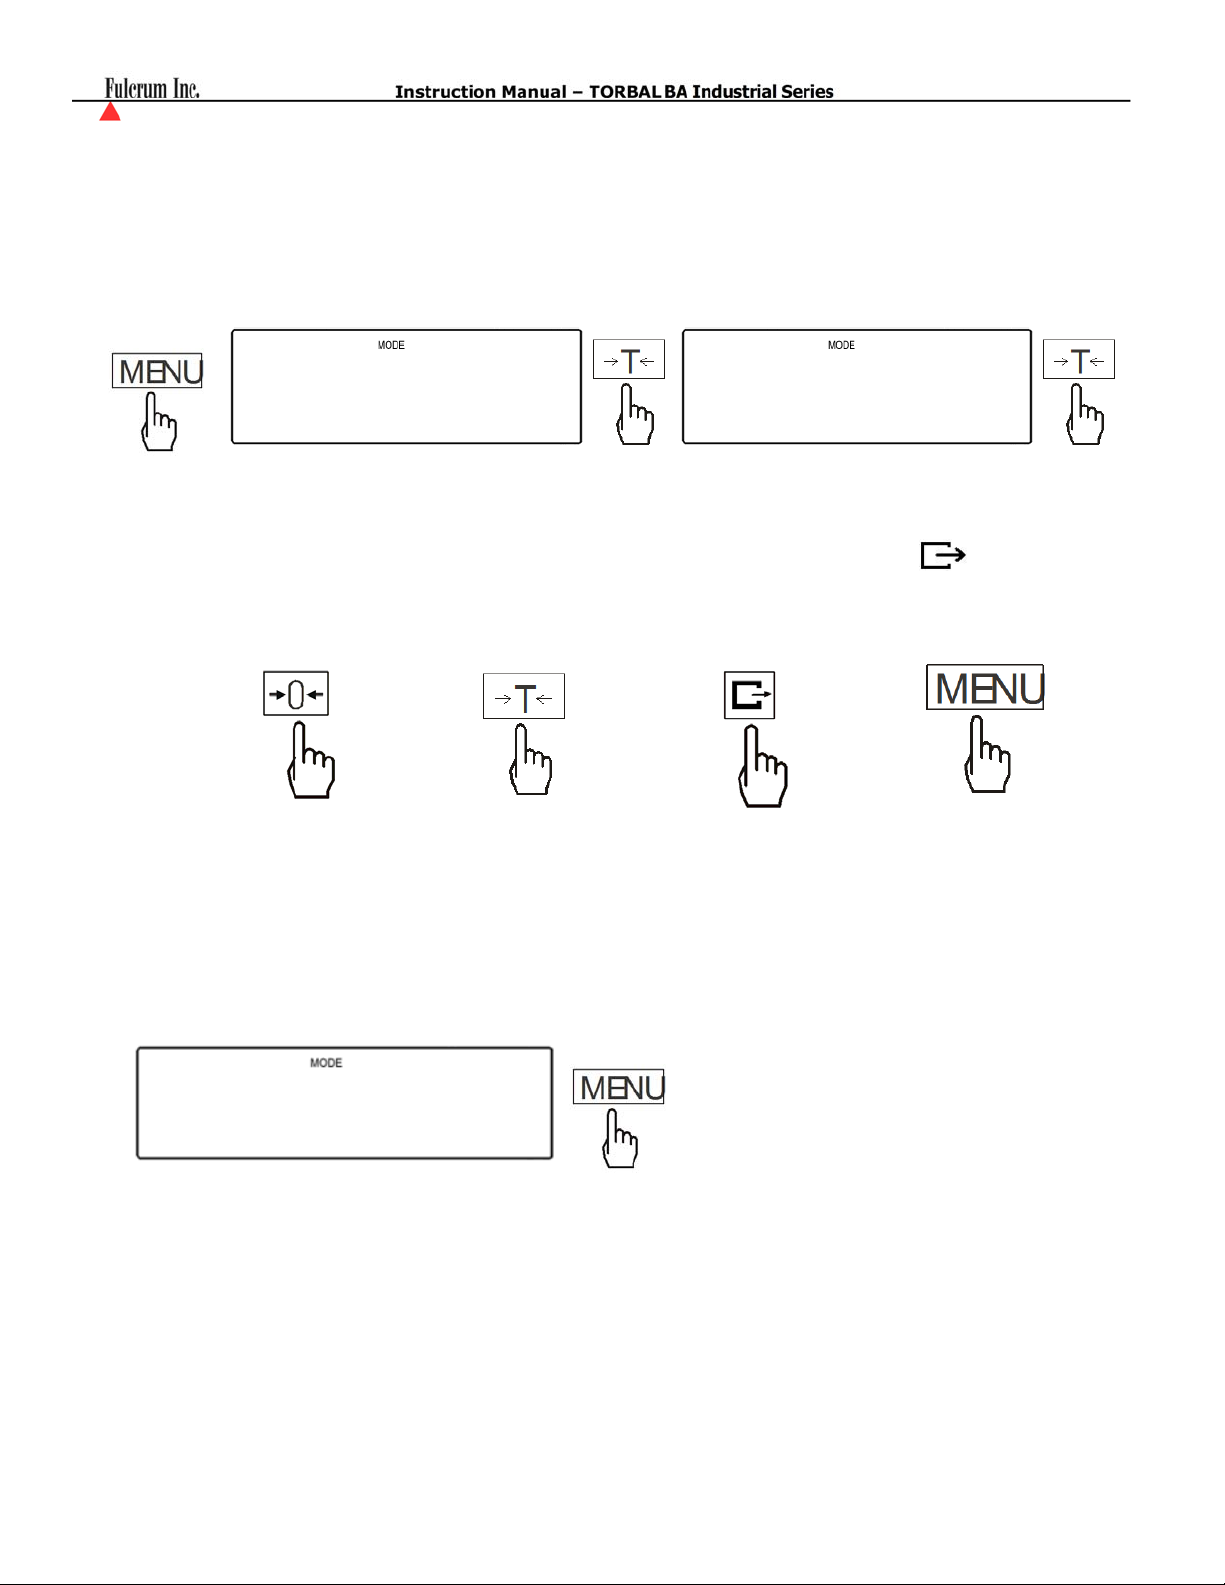
24.3. Enabling PIN access to the Date Configuration Function.
Configuration of the current date and time can be protected with a PIN. Once set the user is prompted to enter
a pin number before time and date change is allowed.
1. To Set PIN for date configuration press the MENU key. When the option “Date” is displayed press the T
key, and then select the option “Dat PIN ” by press the T key once again.
Date
2. The scale will display a dashed line indicating to enter a desired PIN. To enter the PIN, use the following
keys: the C key to increment a digit, the T key to accept and go to the next digit, the key to insert a
decimal, and the MENU key to accept the entire setting.
To increment a digit To accept and go to
next digit
3. After setting the PIN, you will be asked to key in the pin in order to access the “Date and Time” feature.
To remove or disable PIN access, enter the “Date” function and key-in the current PIN. After accessing
the “Date” menu, select option “DatPin” and do not enter a new PIN number. Simply press the MENU
key with the dashed line displayed.
To insert a decimal To accept entered
DATPIN
PIN
_
- 50 -
Page 51
(
)
Chapter 25: Threshold Check Weighing
Threshold check weighing is used to check whether a weight of an object falls within specified threshold
limits.
Function Options:
Thr Off
Thr On
Thr Prn
Dat Cfg
25.1. Enabling check weighing and setting threshold limits.
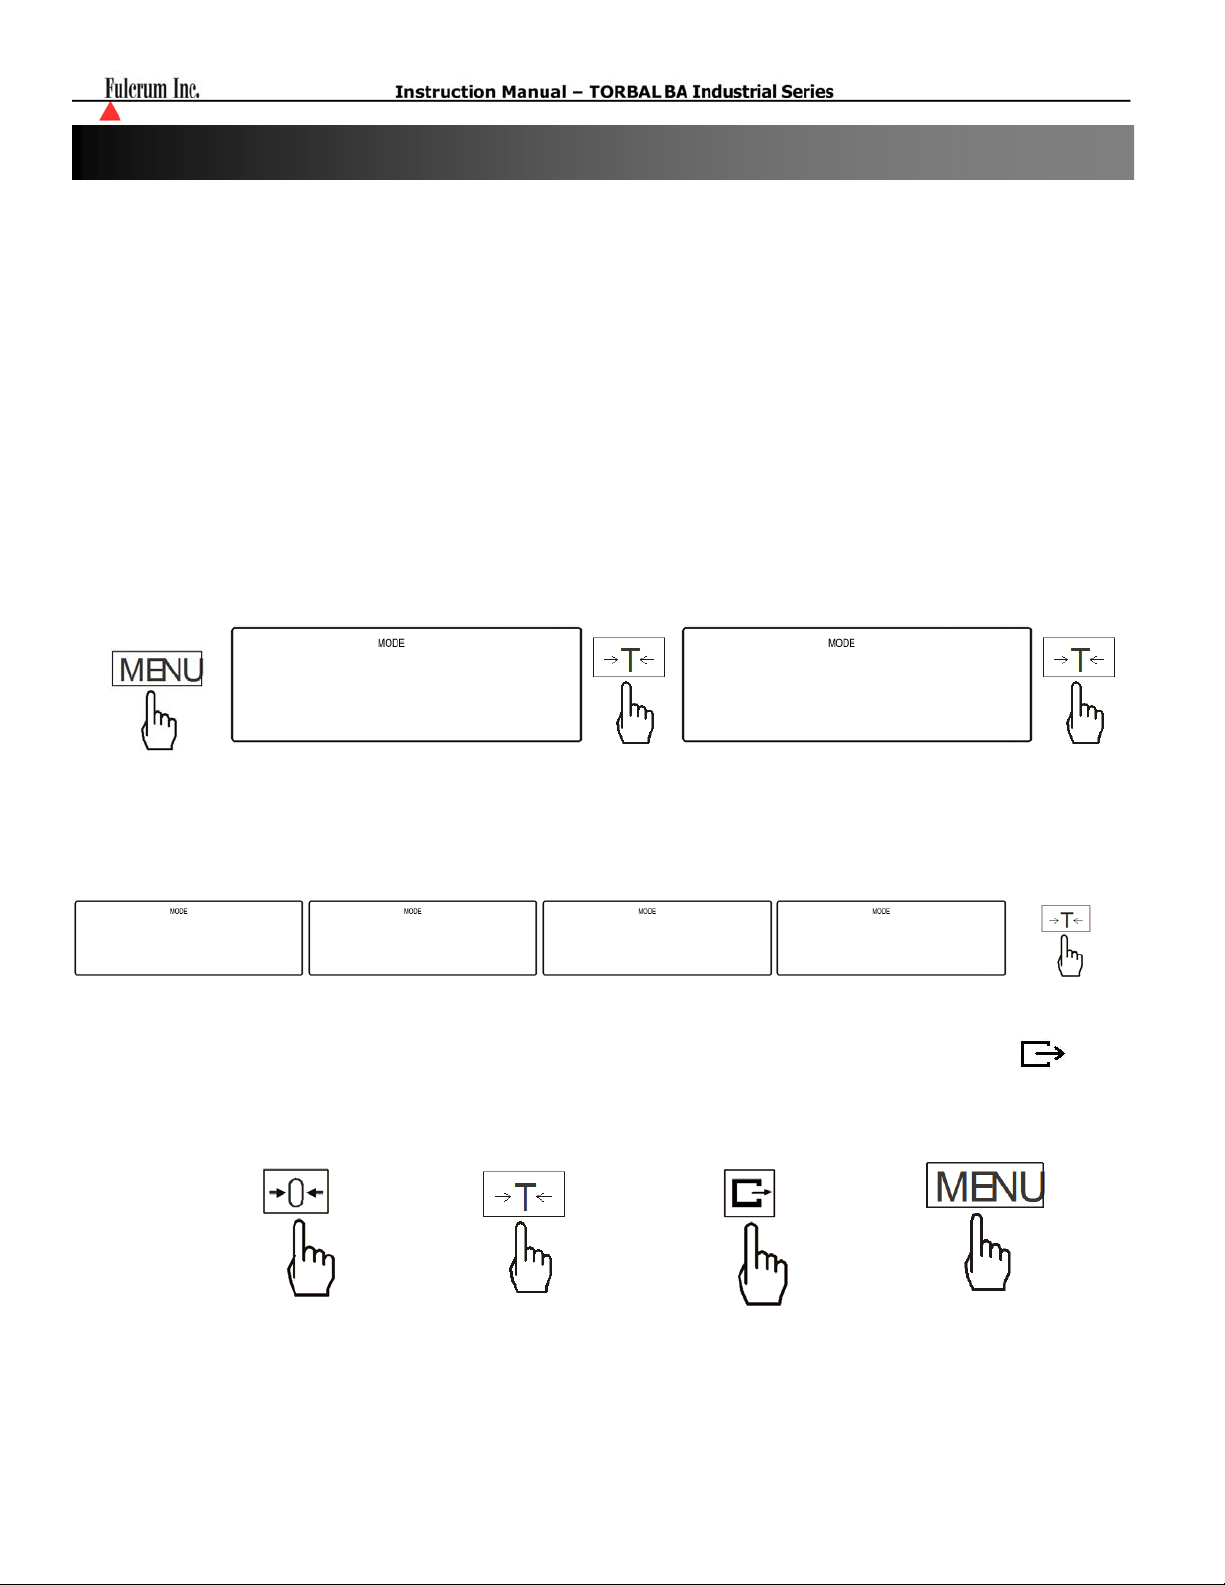
1. Press the MENU key, when the option “thr” is displayed press the T key, and then select the option
“thr On” by press the T key once again.
(throFF)
(thr on)
(thrPrn)
(thrCFG)
Disables threshold and check weighing.
Enables threshold weighing and sets function parameters.
Prints currently set parameters.
Sets output mode for the opto-isolator (Pulse Mode / Level Mode).
ThR
thr thr on
2. The scale will begin to display threshold limits. To set the Lower Limit waits for “Set-1” to display and
press the T key. To set the Upper Limit waits for “Set-2” to display and press the T key. To set the
minimum weight value that should be used in check weighing select “Set-3”.
set 0 set 1 set 2 set 3
3. The scale will display a dashed line indicating to enter the limit value. To enter the value, use the
following keys: the C key to increment a digit, the T key to accept and go to the next digit, the
insert a decimal, and the MENU key to accept the entire setting.
To increment a digit To accept and go to
next digit
To insert a decimal To accept entered
value
key to
- 51 -
Page 52
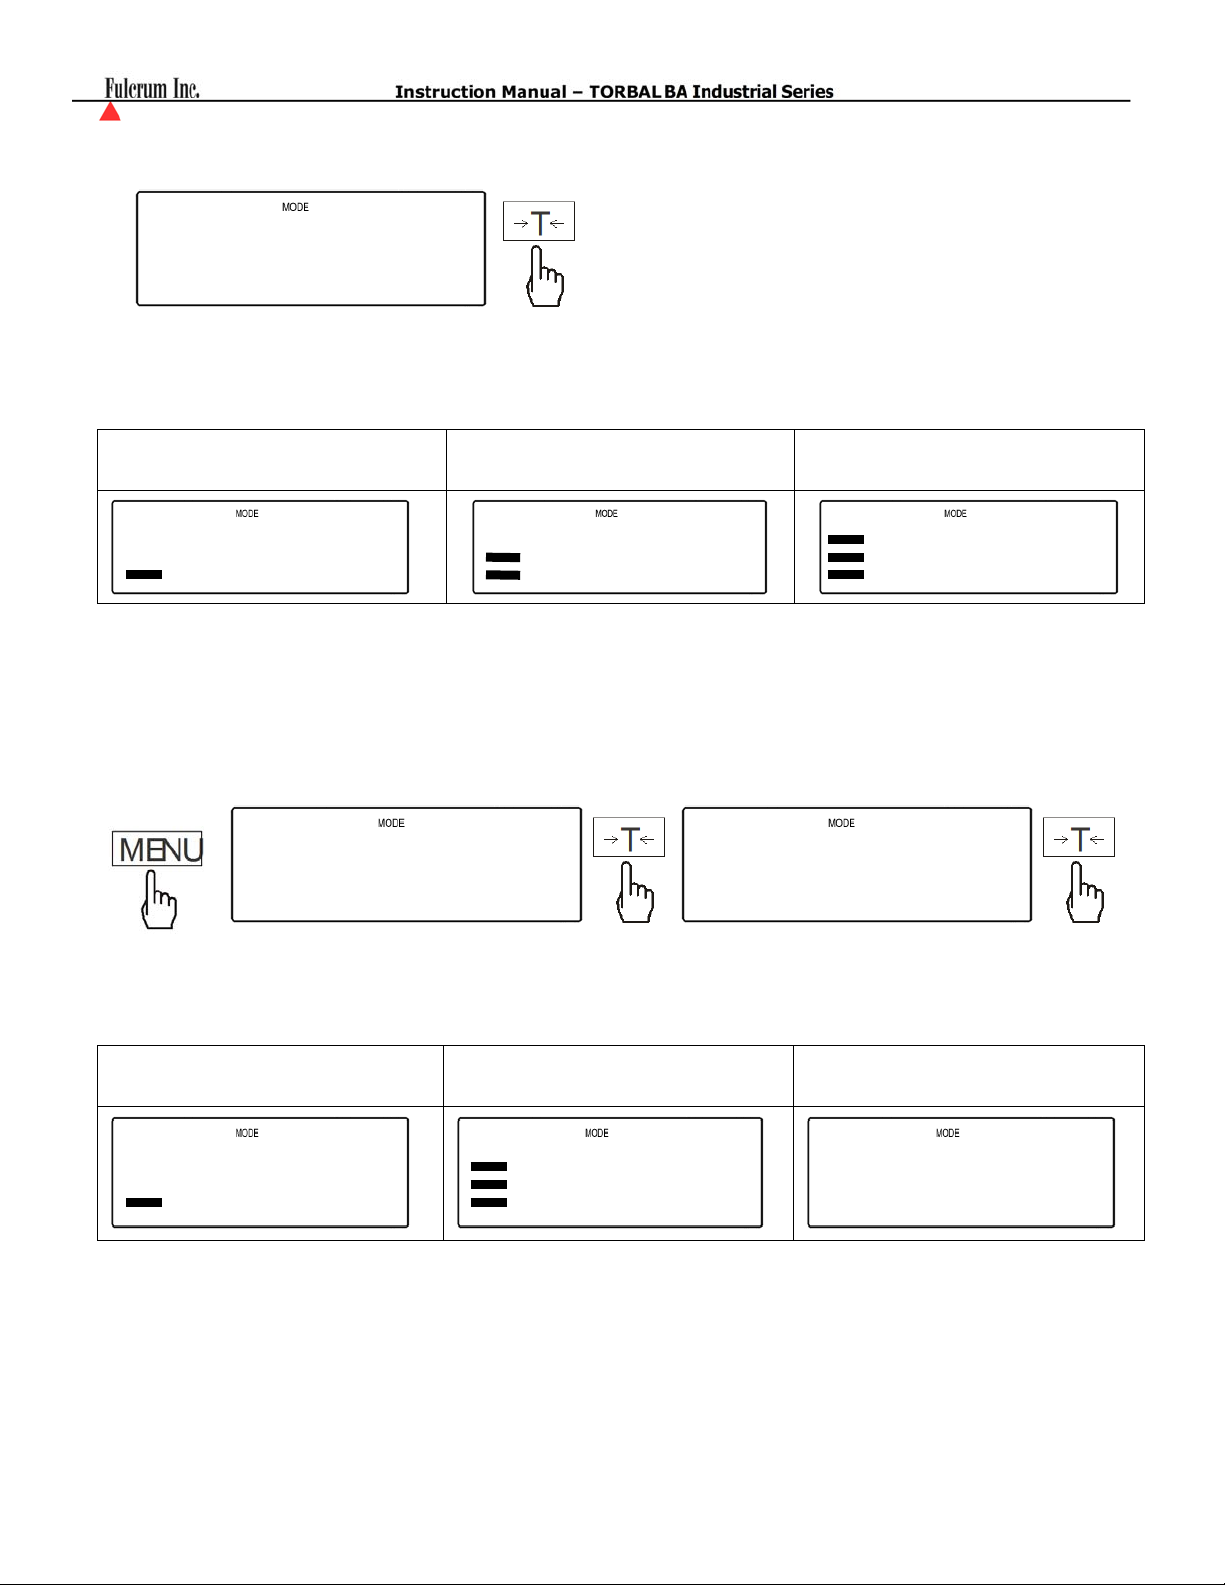
4. After setting all limit sets, select “Set-0” in order to return to weighing with the limits enabled.
set - O
5. To perform check weighing places the weigh on the Pan. The result is indicated by a dashed line located
on the left side of the display.
LOW OK HIGH
0.50
6. To disable check weighing enter the “thr” menu and select “thr Off”
7. To view the threshold limits Press the Menu key, when the option “thr” is displayed press the T key, and
then select the option “thrPrn ” by press the T key once again.
1.10
3.20
thr thrprn
8. Current limit sets will be displayed and transmitted via the RS-232 port. To view all limits use the T key.
LOW HIGH Min
1.00
- 52 -
3.00
0.20
Page 53
(
)
Chapter 26: Totalizing
Function Options:
Tot Prn
Tot Off
Tot o
Tot -
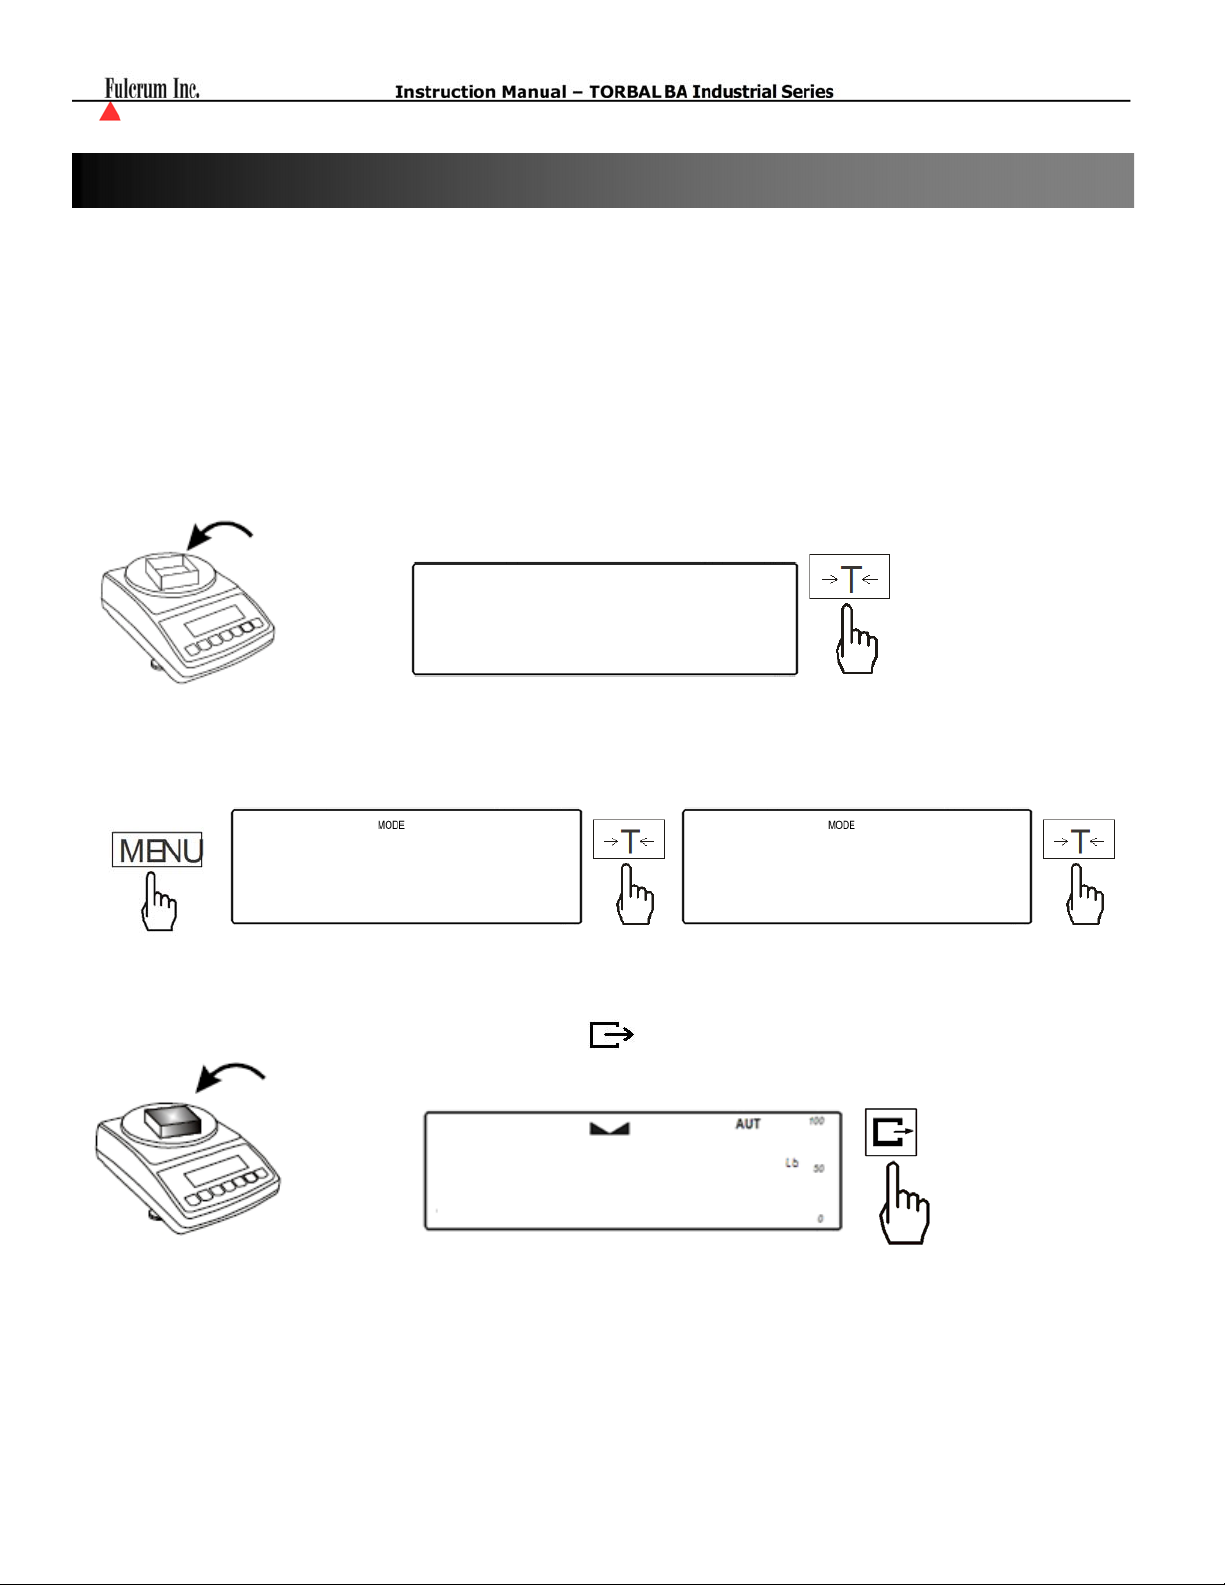
1. Place a container on the pan and press the T key to tare.
2. Press the MENU key, when the option “Total” is displayed press the T key, and then select the option
“Tot o ” or “Tot –“ by press the T key once again.
(totPRN)
(totoff)
(tot o)
(tot -)
Displays and prints transaction total. (Does not reset the sum value)
Displays and disables the transaction total. (Resets the sum Value)
Prints measurement weigh before adding.
Adds measurement weigh to the total without printing
ToTAl
-------
total tot -
3. The display will read 0 indicating that you may place the first object into the container. Once the Weight
of the object stabilized press the data transfer key
to accept and add the object weight to the total.
0
22
- 53 -
Page 54
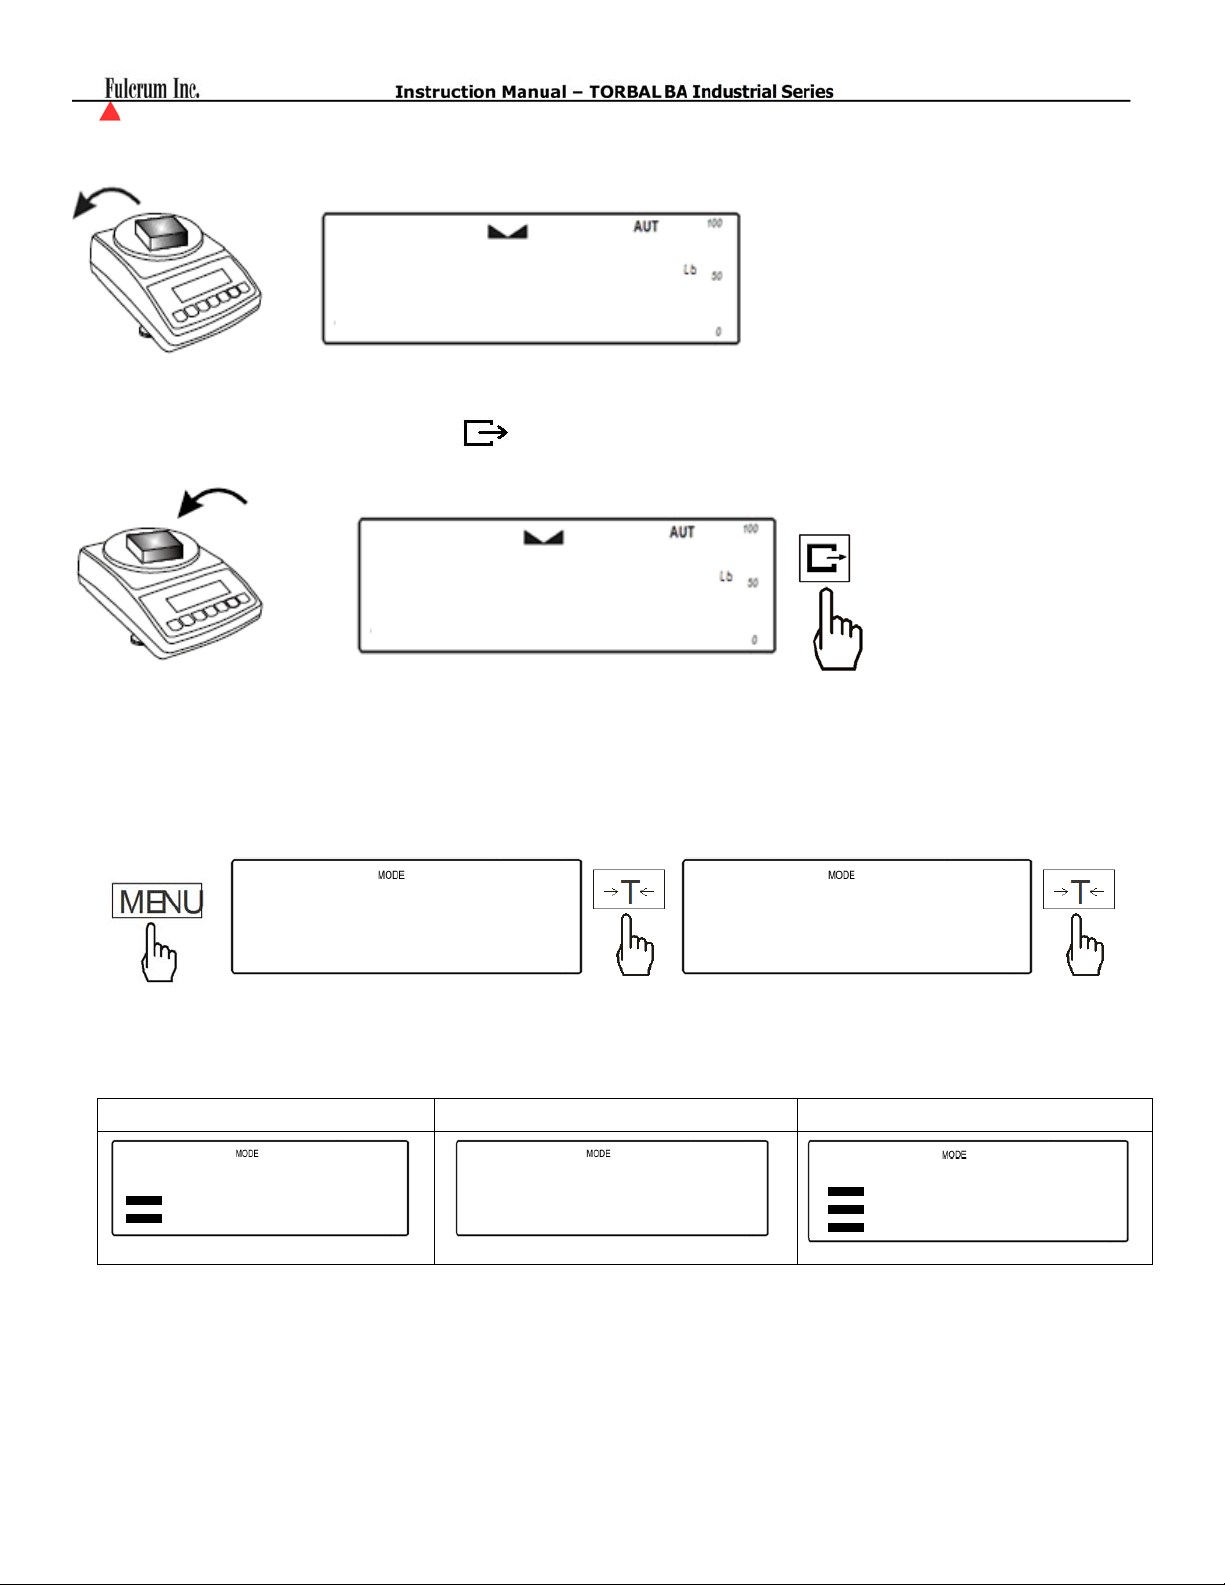
4. Once the weight has been added, remove the object from the weighing pan.
0
00
5. Wait for the scale to return to 0 and place the second object on the pan. . Once the Weight of the object
stabilized press the data transfer key to accept and add the second object weight to the total.
0
55
6. Follow steps 3 through 6 until all object have been added. To view the total of the transaction press the
Menu key, when the option “Total” is displayed press the T key, and then select the option “Tot Off ” or
“Tot Prn“ by press the T key once again.
total
7. The total will be displayed. To view the number of measurements added and the average press the Menu
key.
Total Number of measurements
totoff
Transaction Average
0.77 0.39
- 54 -
Page 55
(
)
Chapter 27:
The battery function allows enabling or disabling charging of the internal rechargeable battery pack through
the external power supply connected to the scale.
Never enable the “Batter” (battery) function when operating the scale on conventional
disposable AA Batteries. The “Battery” function may be enabled only when using rechargeable
multi-use batteries.
Warning !
Enabling the “Battery” function and attempting to charge disposable, single-use, nonrechargeable AA
batteries such as disposable carbon-zinc, alkaline or lithium cells, may be extreamley hazardous.
Batteries my overhet, spill, and/or explode.
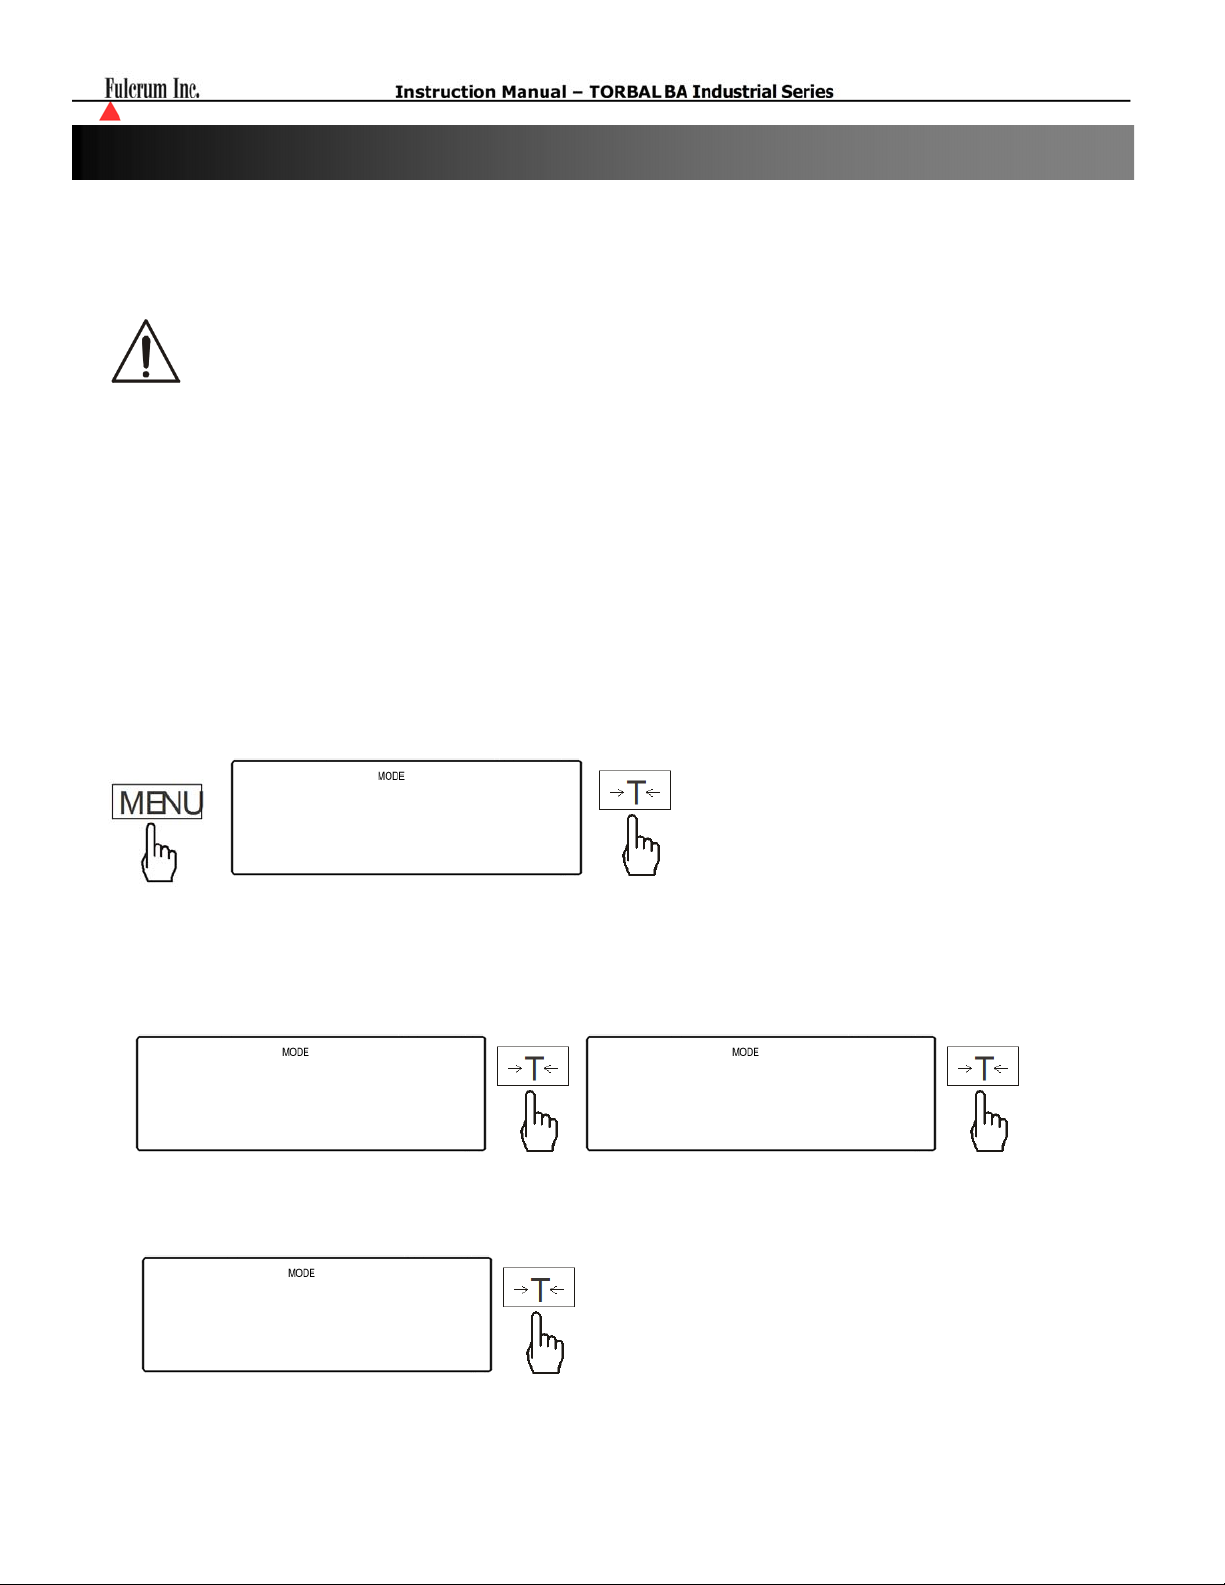
1. To disable or enable battery charging press the MENU key, when the option “Battery is displayed
press the T key.
battery
Battery
2. The scale will display options “BAT OFF”, “BAT ON”, “BAT VOL”. To disable battery charging
press the T key “BAT OFF” is displayed, to enable battery charging press the T key when “BAT ON”
is displayed.
bat off
3. To check the batteries charging status press the T key when “BAT VOL” is displayed.
bat on
bat UoL
- 55 -
Page 56
(
)
Chapter 28: LCD Back Light
LCD Back Light (b_light):
B_L OFF
B_L On
B_L ECO
B_L BAT
To configure or disable the LCD back light follow the steps below:
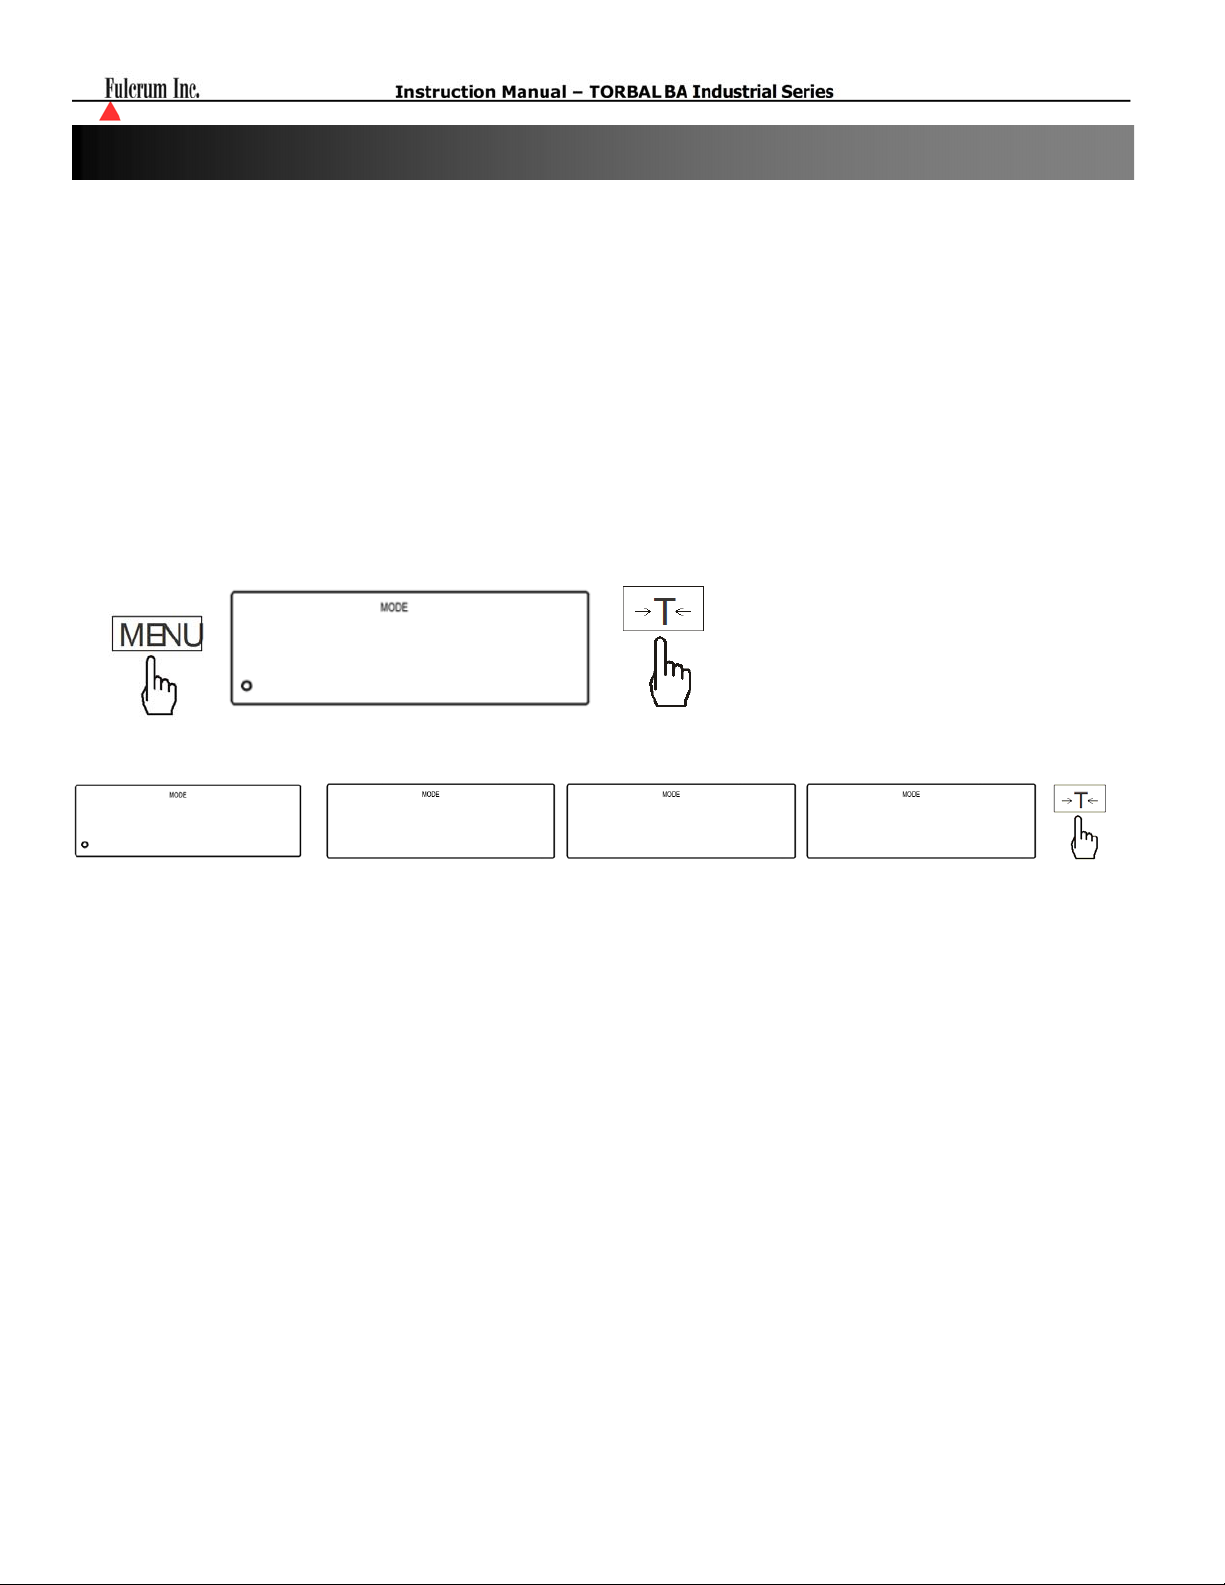
1. Press the MENU key, when the option “B_Light” is displayed, press the T Key.
(B_L OFF)
(B_L On)
(B_L ECO)
(B_L BAT)
Disables LCD back light.
Enables LCD back light.
Disables the LCD back light after 30 second inactivity “no weight applied to the
pan or the pressed keys.”
Disables back light only when operating the unit on batteries “no weight applied to
the pan or the pressed keys.”
b_LIGHT
b_LIgHT
2. The scale will display available back light settings: “B_L On”, B_L Off, “B_L ECO” and “B_L BAT”.
b_L on B_L oFF b_L ECO
3. To make a selection press the T key when desired back light setting is displayed.
b_L BAt
- 56 -
Page 57
(
)
Chapter 29: Automatic Shutoff
Automatic shutoff (AUToff):
Aut OFF
Aut On
Aut BAT
To configure or disable the LCD back light follow the steps below:
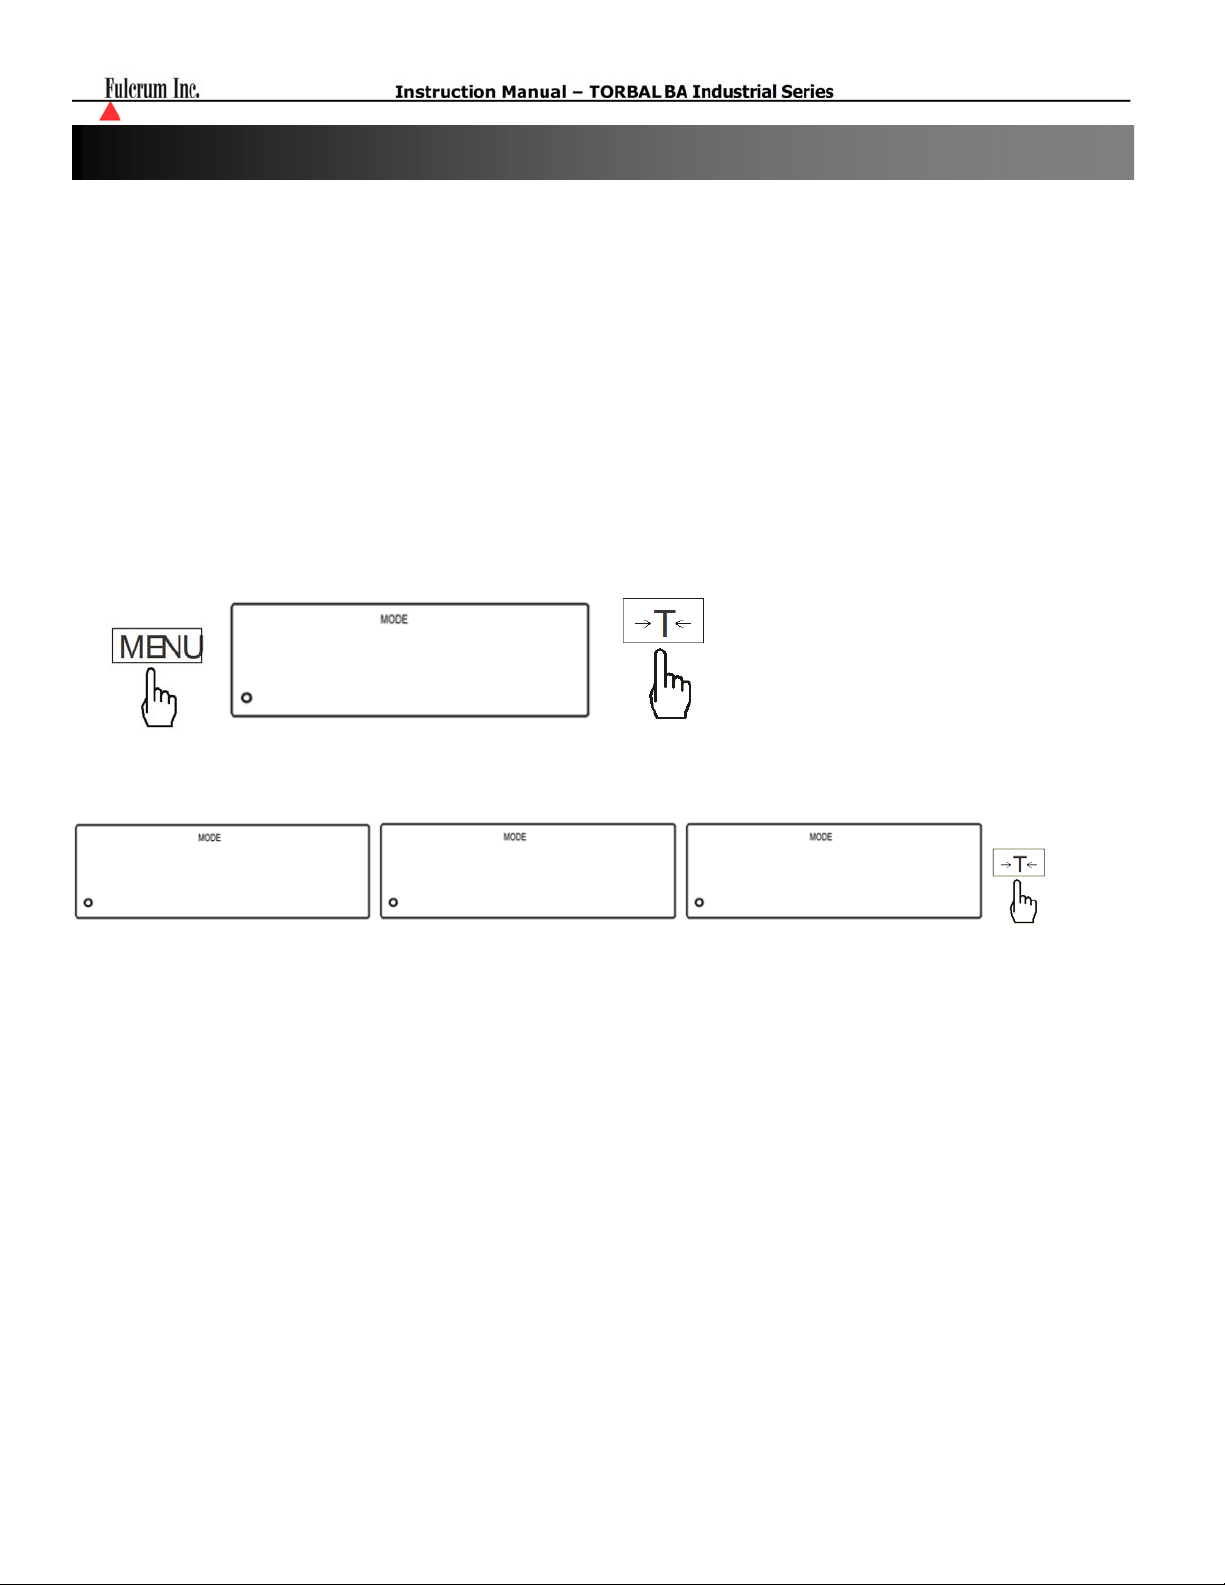
4. Press the MENU key, when the option “AutoOff” is displayed, press the T Key.
(AUT OFF)
(AUT On)
(AUT BAT)
Disables automatic shutoff – scale is always on.
Enables automatic shutoff – scale turns automatically off after 5min of inactivity,
“no weight applied to the pan or the pressed keys.”
Enables automatic shutoff only when the unit is operating on batteries – scale turns
automatically off after 5min of inactivity, “no weight applied to the pan or the
pressed keys.”
Autoff
autoOff
5. The scale will display available auto shutoff settings: “Aut Off”, “Aut On, and “Aut_BAT”.
AOF oFF AOF on AOF bat
6. To make a selection press the T key when desired back light setting is displayed.
- 57 -
Page 58
(
)
(
)
Chapter 30: Menu Customization
The Active function is used to customize the scale’s Main Menu. This feature should be used to deactivate
functions or features that are not used. Deactivated functions will not appear in the Main Menu which will
simplify its use. To activate or deactivate features or function follow the steps below.
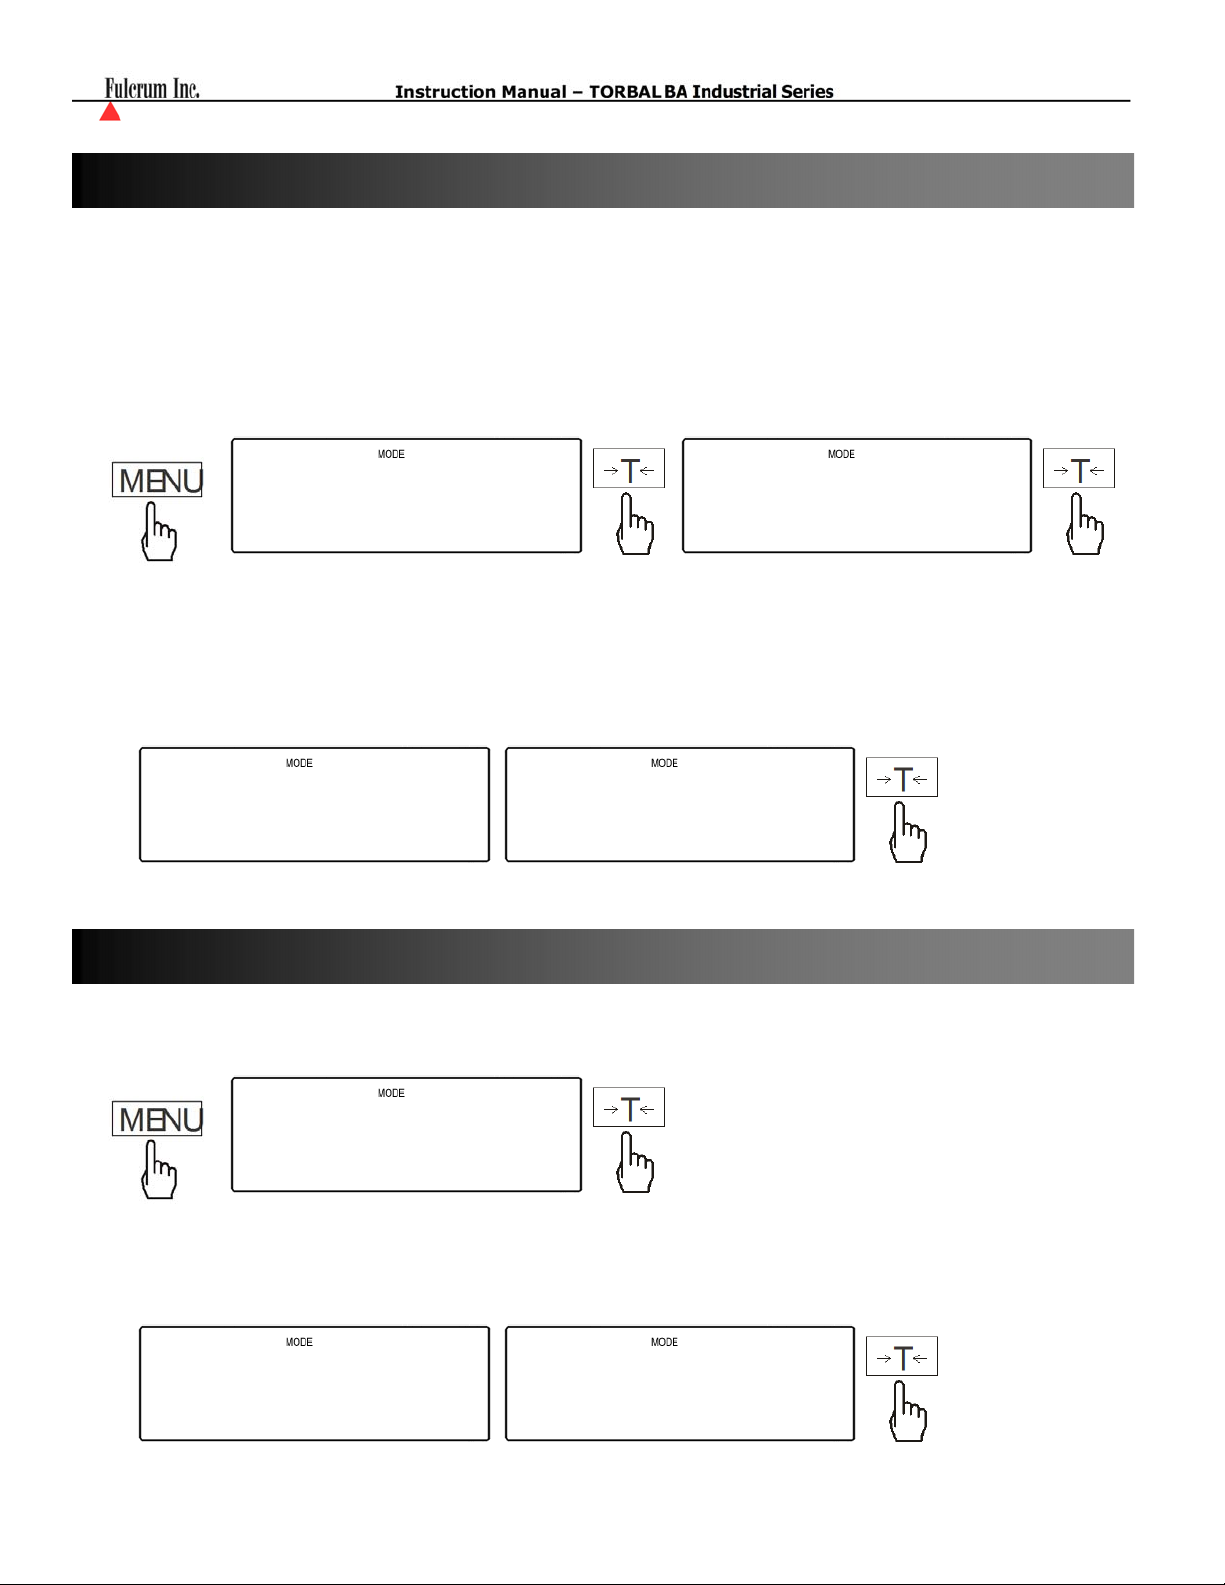
1. Press the MENU key, when the option “Active” is displayed press the T key, and then select a desired
function or feature by press the T key once again when the name is displayed.
ACTIU
ACTIu Avtota
2. The scale will display options “ON” and” Off”. To disable a function from appearing in the Main Menu
press the T key when “Off” is displayed, to enable a function to have it appear in the Main Menu press the
T key when “On” is displayed.
ON OFF
Chapter 31: Resorting Default Settings
To restore the scale’s factory settings follow the steps below
1. Press the MENU key, when the option “Default” is displayed press the T key.
DEFAUL
DefauL
2. The scale will display options “Yes” and” No”. To restore the scale’s factory setting press the T key when
“Yes” is displayed. To cancel press the T key when “No” is displayed.
YES NO
- 58 -
Page 59
Chapter 32: Common Errors and Troubleshooting
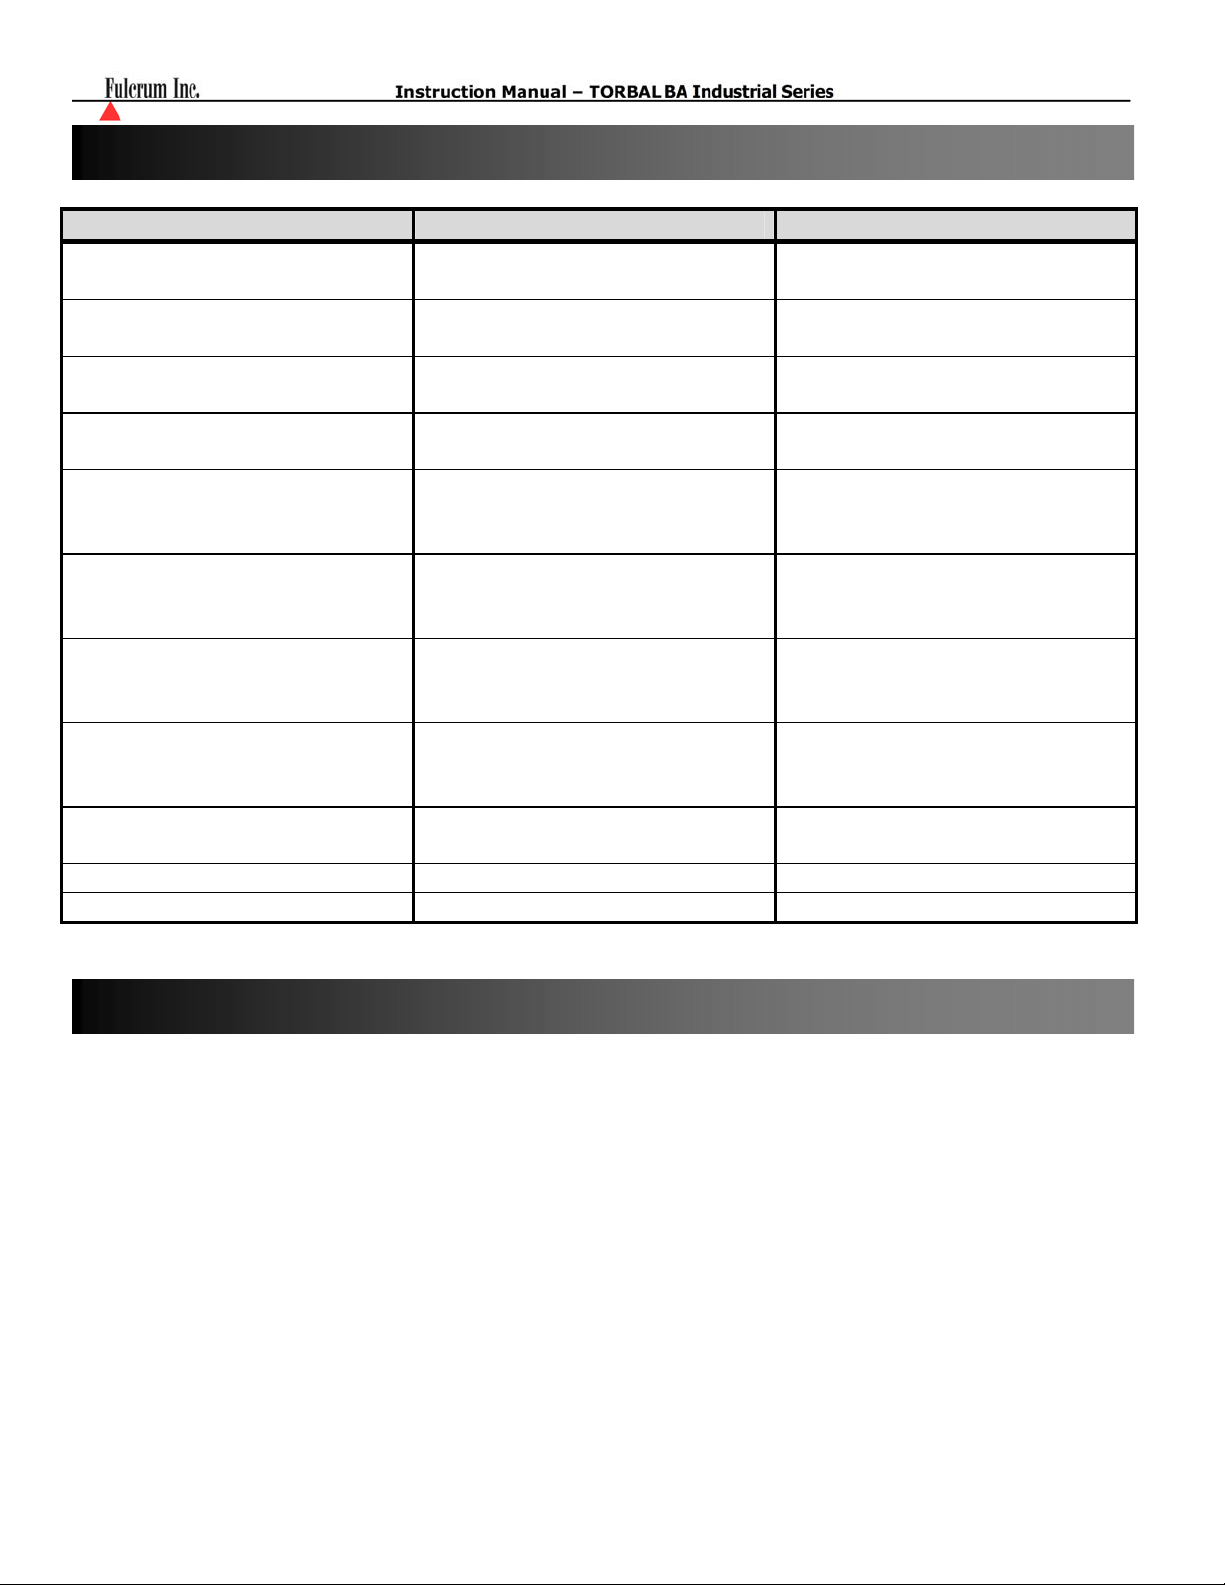
Error or Indicator Cause Explanation / Solution
- - - - Below zero Re-zero the scale by pressing the
Æ0Å key.
- - Taring is not allowed Place a weight on the pan before
taking a tare.
- - Re-zeroing is not allowed Remove weight from pan and clear
stored tare values.
L Pan error Make sure that pan is properly
seated on the pan support.
H Exceeded capacity The scale has exceeded its
weighing capacity. Reduce the
weight.
Err - b Pan not cleared on power-up The pan was not empty while the
scale was initiating at startup.
Clear the pan and restart the scale.
Sapl LO (Parts Counting) Average piece weight is too low The average piece weight is lower
than 3e. Be sure that individual
piece weight is greater than 3e.
Sapl LO (Percent Weighing) Sample reference weight is too low The sample reference weight is
lower than 100d. Increase the
sample weight.
The scale will not turn on Possible power failure Check the power AC adapter
connection.
Weighing results are not accurate Inaccurate calibration Calibrate the scale.
Weighing result will not stabilize Irregular environment Eliminate drafts or vibrations.
Chapter 33: Maintenance
Cleaning and maintaining your Scale:
• Before cleaning the scale always unplug the A/C adapter from the electrical outlet.
• Use a soft, slightly damp cloth to clean the exterior housing of your scale,.
• Wipe the scale gently. Do not allow any liquid to enter into the scale.
• Do not apply extensive pressure to the LCD or the LED display.
• Do not use chemicals or benzene when cleaning the surface. Corrosive chemicals may damage the
finish.
• Alcohol may be used only to clean the scale’s stainless steel pan or the draft ring.
- 59 -
Page 60

Chapter 34: Limited Warranty
PURCHASER’S 12-MONTH WARRANTY
Warranty is valid only if the attached warranty registration card is completed and returned within 30 days.
This product is a precision device made to exacting standards of scientific accuracy. It is guaranteed to have
been adjusted and inspected for proper workmanship and performance, and certified for its currently
advertised specifications before shipment.
Fulcrum Products are warranted against defects in material and workmanship under normal use and service.
This warranty is extended only to the first purchaser. This limited warranty will not apply if, upon inspection,
it is found that the product was tampered with, misused, overloaded, or abused, mishandled, placed in an
improper environment, improperly installed or adjusted, used for a purpose other than that for which it was
designed, or repaired by unauthorized personnel.
Fulcrum’s liability under this warranty is limited to furnishing labor and parts necessary to remedy the defect
covered by this warranty and restore the product to normal operating condition. Purchasers may be charged a
minimum repair fee for in-warranty products returned for repair if those products are determined to be
problem-free.
To make a claim under this limited warranty, obtain an RMA number from Fulcrum and return the
product, carefully packed in its original packaging, shipping prepaid, with the RMA number written on the
return package.
- 60 -
 Loading...