

Page 1

TABLE OF CONTENTS
1. Cautionary Notes and Precautions
1.1. Important Safety Warnings
1.2. HOT Parts and Surfaces
1.3. More Cautionary Notes and Precautions
2. Specifications
3. Introduction
3.1. Function of the Moisture Analyzer
3.2. Good Practices and General Rules
4. Keys, Display Indicators, Commands, and Abbreviations
5. Parts Description
6. Unpacking the Moisture Analyzer and Getting Started
7. Understanding the Functions, Parameters, and Modes
7.1. Methods of Terminating the Moisture Analysis
7.2. Understating Configuration Parameters
8. Configuration and Parameter Setting for Moisture Analysis
8.1. Mode
8.2. Calculation Formula
8.3. Drying Temperature
8.4. Sample Quantity
8.5. Sampling Interval
8.6. Drying Time
8.7. Saving the Configuration and Parameters
9. RAP Configuration
10. Preparing the Sample
10.1. Using a Glass Fibre Filter
11. Making a Moisture Analysis
12. Setting Drying Parameters for Unknown Samples
13. Loading Saved Parameters and Configuration
14. Report Printing
15. Testing the Analyzer with Sodium Tartrate Dihydrate
16. Weighing
16.1. Taring
16.2. Clearing the Tare
17. Parts Counting
17.1. Using a Custom Sample Size
17.2. Counting Based on a Known Individual Piece Weight
18. Calibration
19. Main Menu
19.1. Autotaring
19.2. RS232 Serial Port Configuration
19.3. Print Adjustment
19.4. Time and Date
19.5. Language
19.6. LCD Setting
20. Halogen Replacement and Maintenance of the Moisture Analyzer
21. Technical Information
22. Common Errors and Troubleshooting
23. Replacement Parts
24. Limited Warranty
Page 2
Chapter 1: Cautionary Notes
The TORBAL Moisture Analyzer is a sensitive and a delicate instrument that generates heat up to 160°C. Many
parts and surfaces of the moisture analyzer get extremely HOT. Always handle the analyzer with care and use
EXCESSIVE CAUTION when operating the moisture analyzer.
1.1. Important Safety Warnings
WARNING:
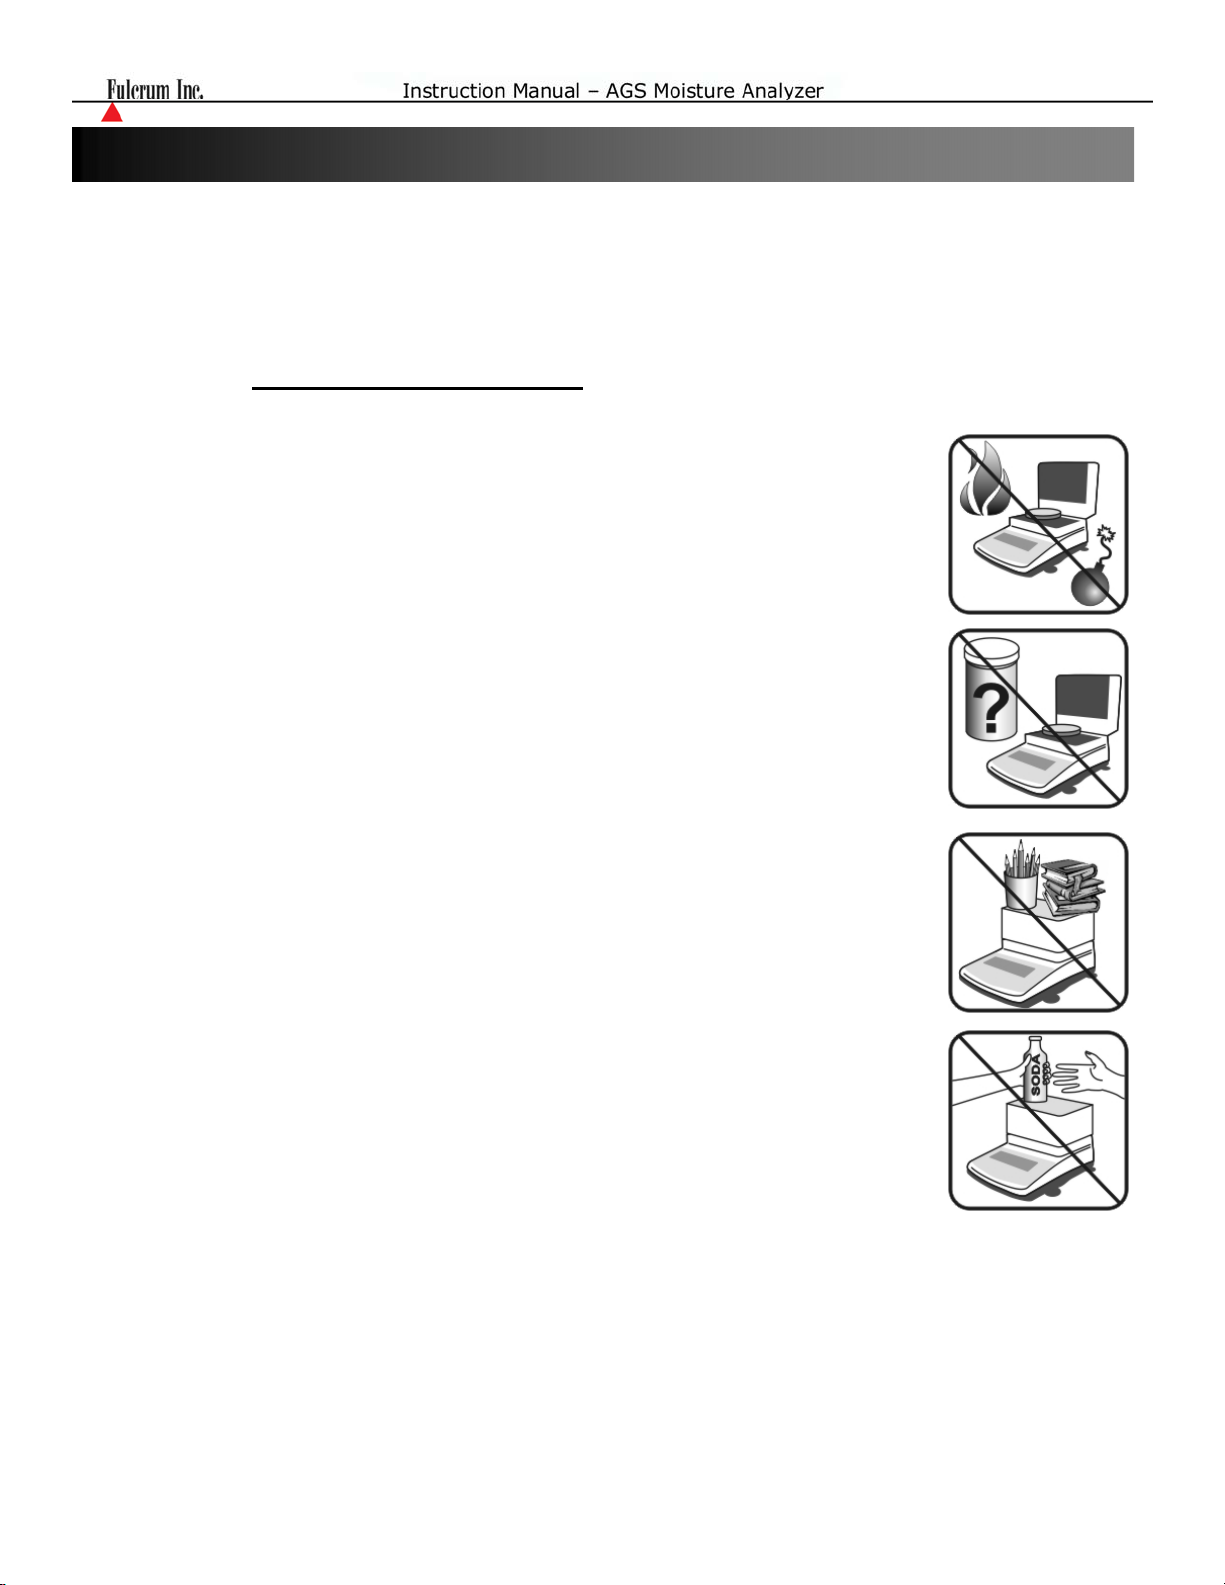
• Do not test flammables, explosives, or things that produce dangerous or
noxious vapors.
• Do not test unknown substances.
• Do not put anything on the perforated top cover of the unit.
• Do not pass anything over the top of the unit when drying is in progress.
Never pass fluids over the perforated cover (a spill can be disastrous).
• If a sample flames, first pull the power plug from the power outlet, then
extinguish the flame.
• Always assume the Drying Chamber is hot when you open the cover. As the
internal parts can retain heat, allow adequate time for cooling before
touching any of the internal surfaces.
• Never touch a halogen lamp unless you are about to replace it, and you are
sure it is both off and cool.
2
Page 3
WARNING:
• If a mistake creates a dangerous situation, hit the STOP key and it will terminate the heating
immediately.
• Use caution when touching any of the parts that rise to high temperatures during testing. Wear
protective gloves when removing hot samples, even when using the pan handle (it can get very
hot).
• Use the cover handle to open and close the Drying Chamber.
• Always use forceps or needle-nose pliers to remove the hot disposable sample pan from the larger
permanent pan.
• When loading a new sample into the Drying Chamber using the pan handle, make sure the
disposable sample pan and sample are centered and that the sample has been leveled. The
maximum sample height must be less than 10 mm.
• Be sure the Analyzer is in an area with good air circulation (to diffuse the heat generated by the
Drying Chamber), relatively low (less than 85%) or controlled humidity (for accurate
measurements), and an ambient temperature between 18ºC and 30ºC.
Legal regulations forbid disposal of electronic
equipment in waste containers.
• Please return this device to the point of purchase or another company that
specializes in recycling of waste electronic components.
3
Page 4
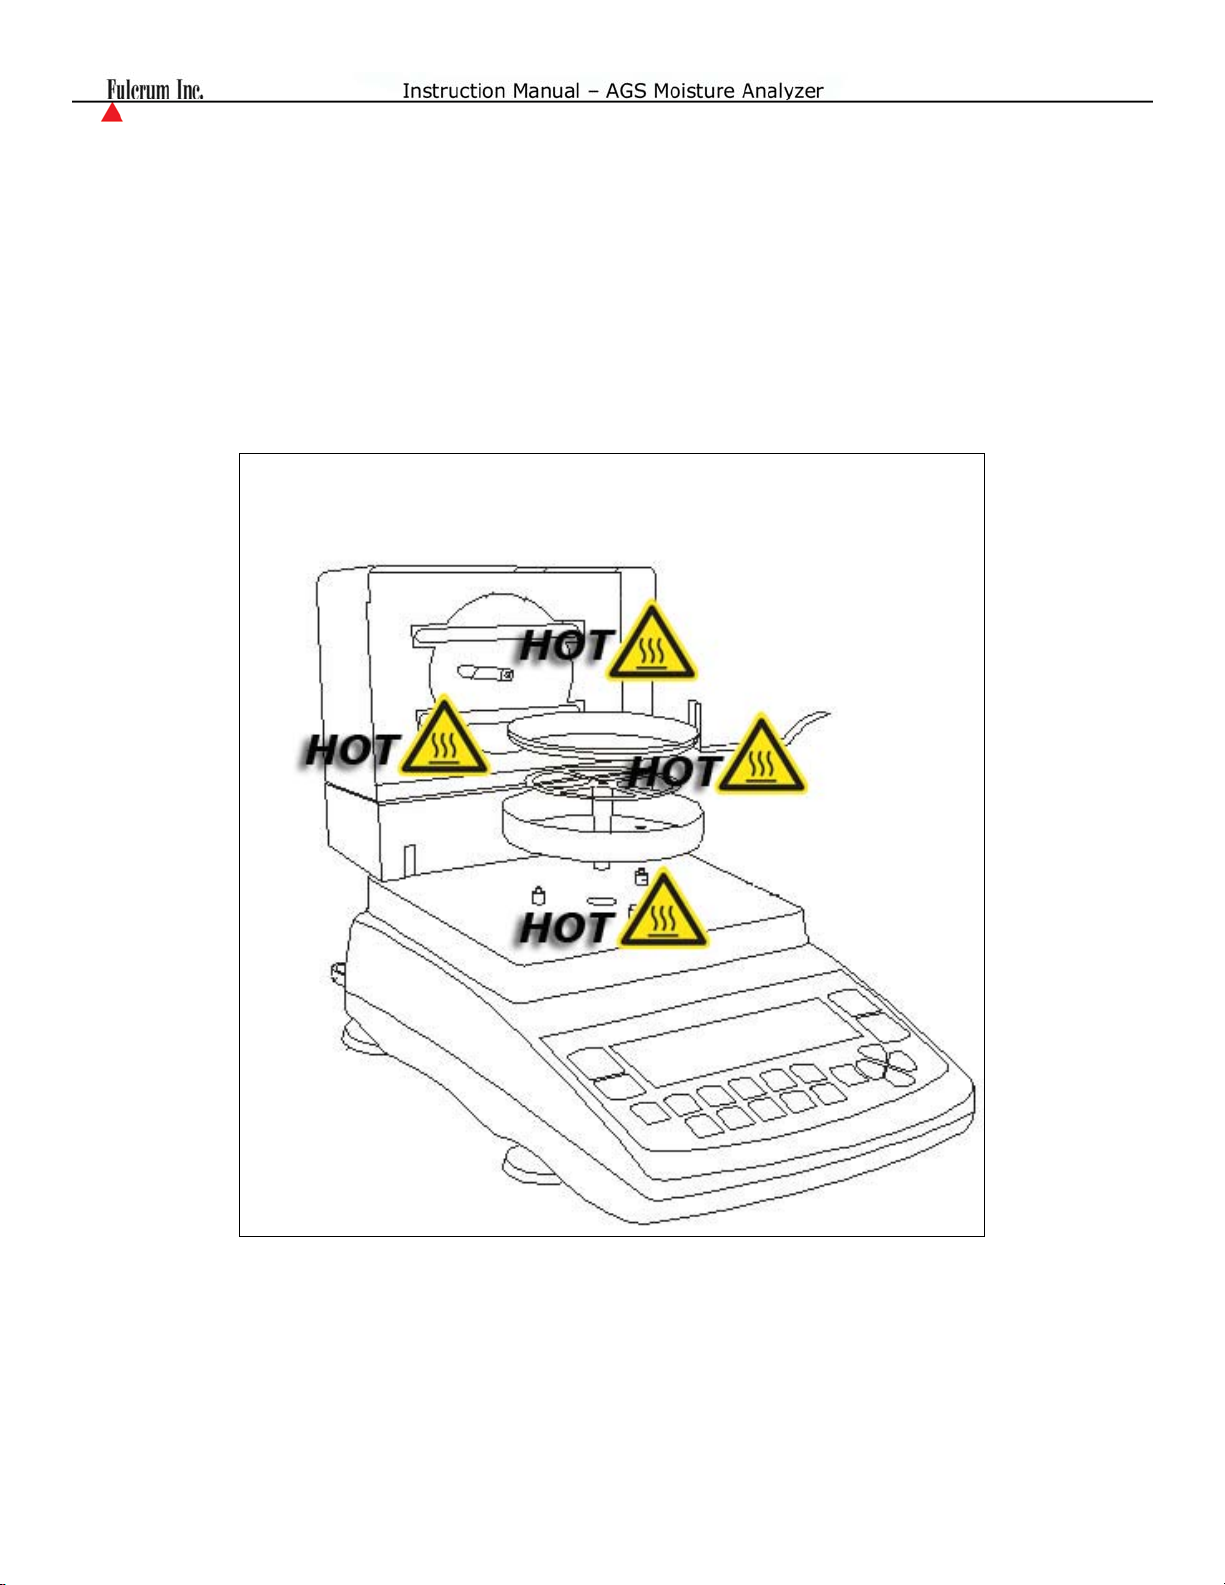
1.2. HOT Parts and Surfaces
Many parts of the Moisture Analyzer get very HOT during use. Familiarize yourself with these internal parts
and always allow adequate time for cooling before touching or handling.
4
Page 5
1.3. More Cautionary Notes and Precautions
Correct location and proper environment has a significant impact on the accuracy of the weighing results of the
TORBAL Moisture Analyzer.
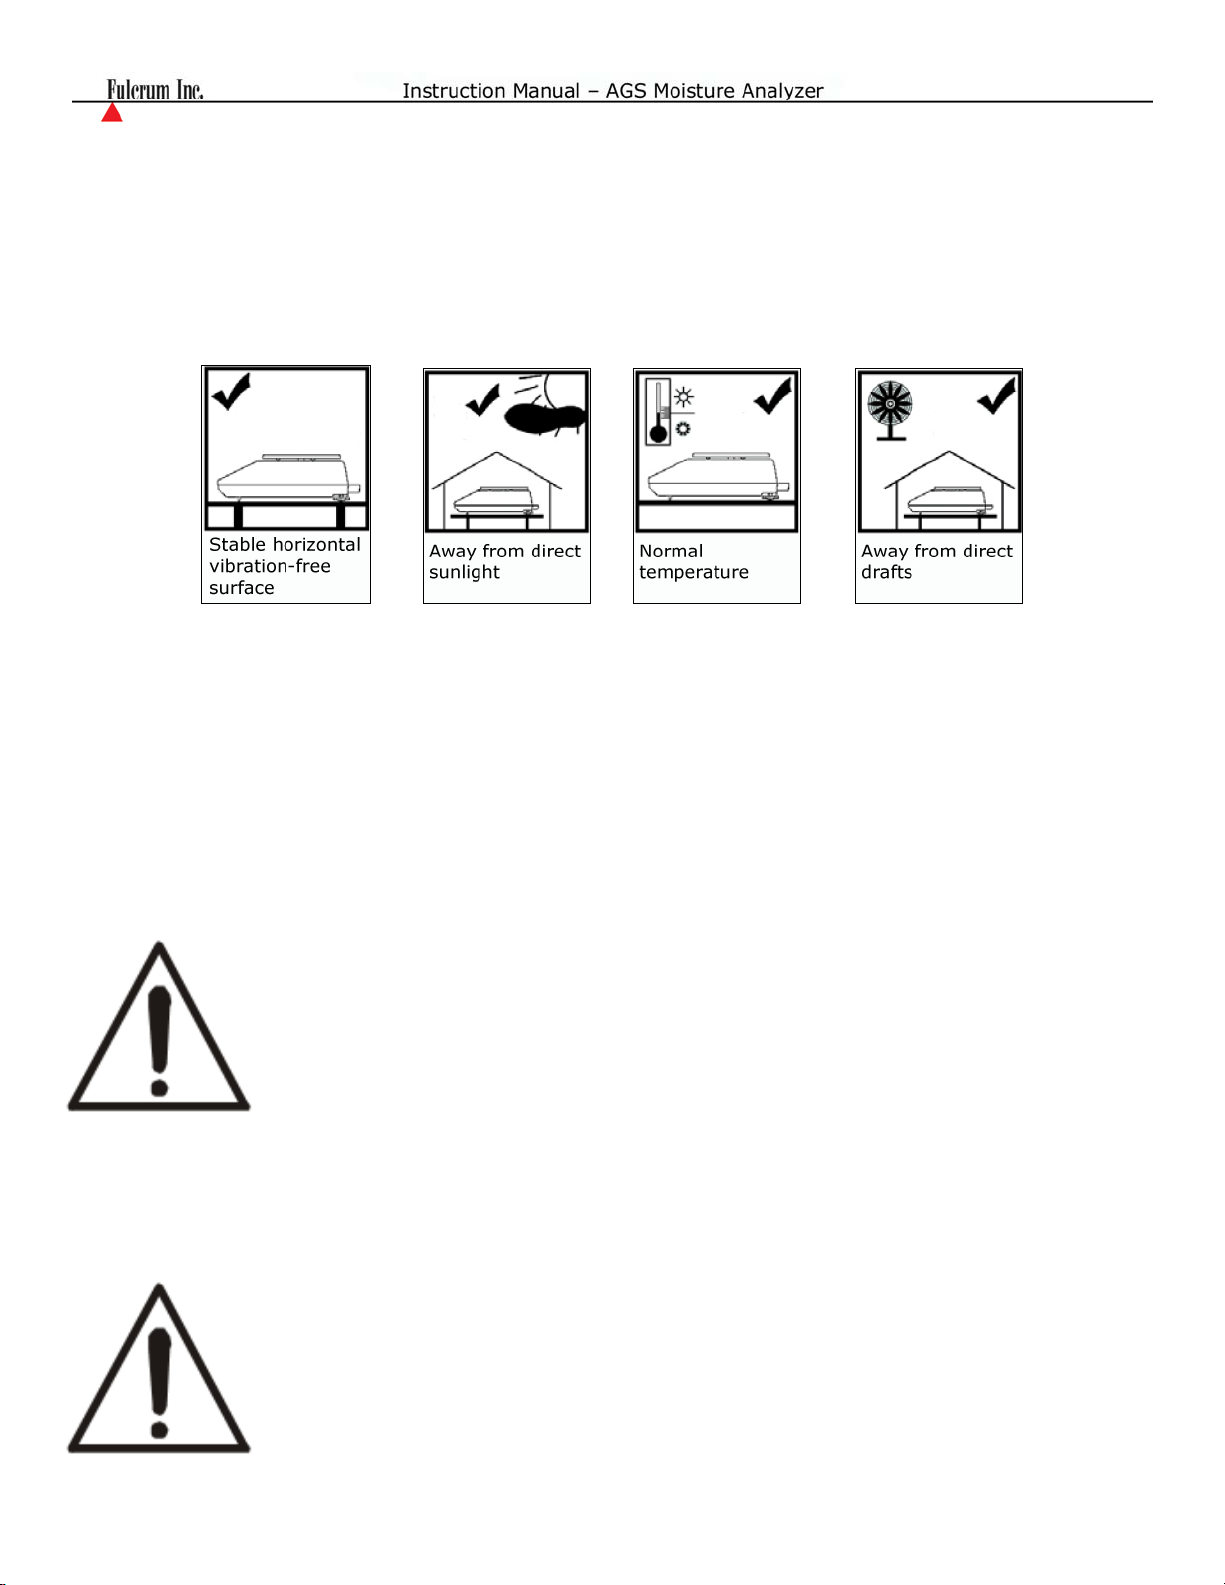
The optimal location for your unit:
• Stable, vibration-free base as horizontal as possible
• Away from direct sunlight
• Not exposed to high temperature variations
• Away from direct drafts
• Best location: stable bench away from direct drafts, doors, windows, radiators, and air conditioner vents.
CAUTION:
WARNING:
• The Analyzer is designed for indoor use only.
• Do not operate the unit in hazardous areas or conditions.
• Do not use the Analyzer in locations subject to high humidity or dust levels.
• Do not connect cables in ways other than those designated in this manual.
• Be sure to set the Analyzer on a firm, stable horizontal surface.
• Never stand on or lean on this product. Equipment may fall or collapse, causing
breakage and possible injury.
• Before moving the product, unplug it and unplug all cables connected to it.
• When storing, transporting, or returning the unit for service, always use the original
packaging.
• Never attempt to repair, disassemble, or modify the Analyzer yourself. Tampering
with the unit may result in injury and cause more damage to the equipment.
• Be sure to use the specified power source.
• Do not allow foreign matter to fall into the unit.
• If water or other liquid spills into the Analyzer, do not continue to use it. Unplug the
power cord immediately and contact technical support.
5
Page 6
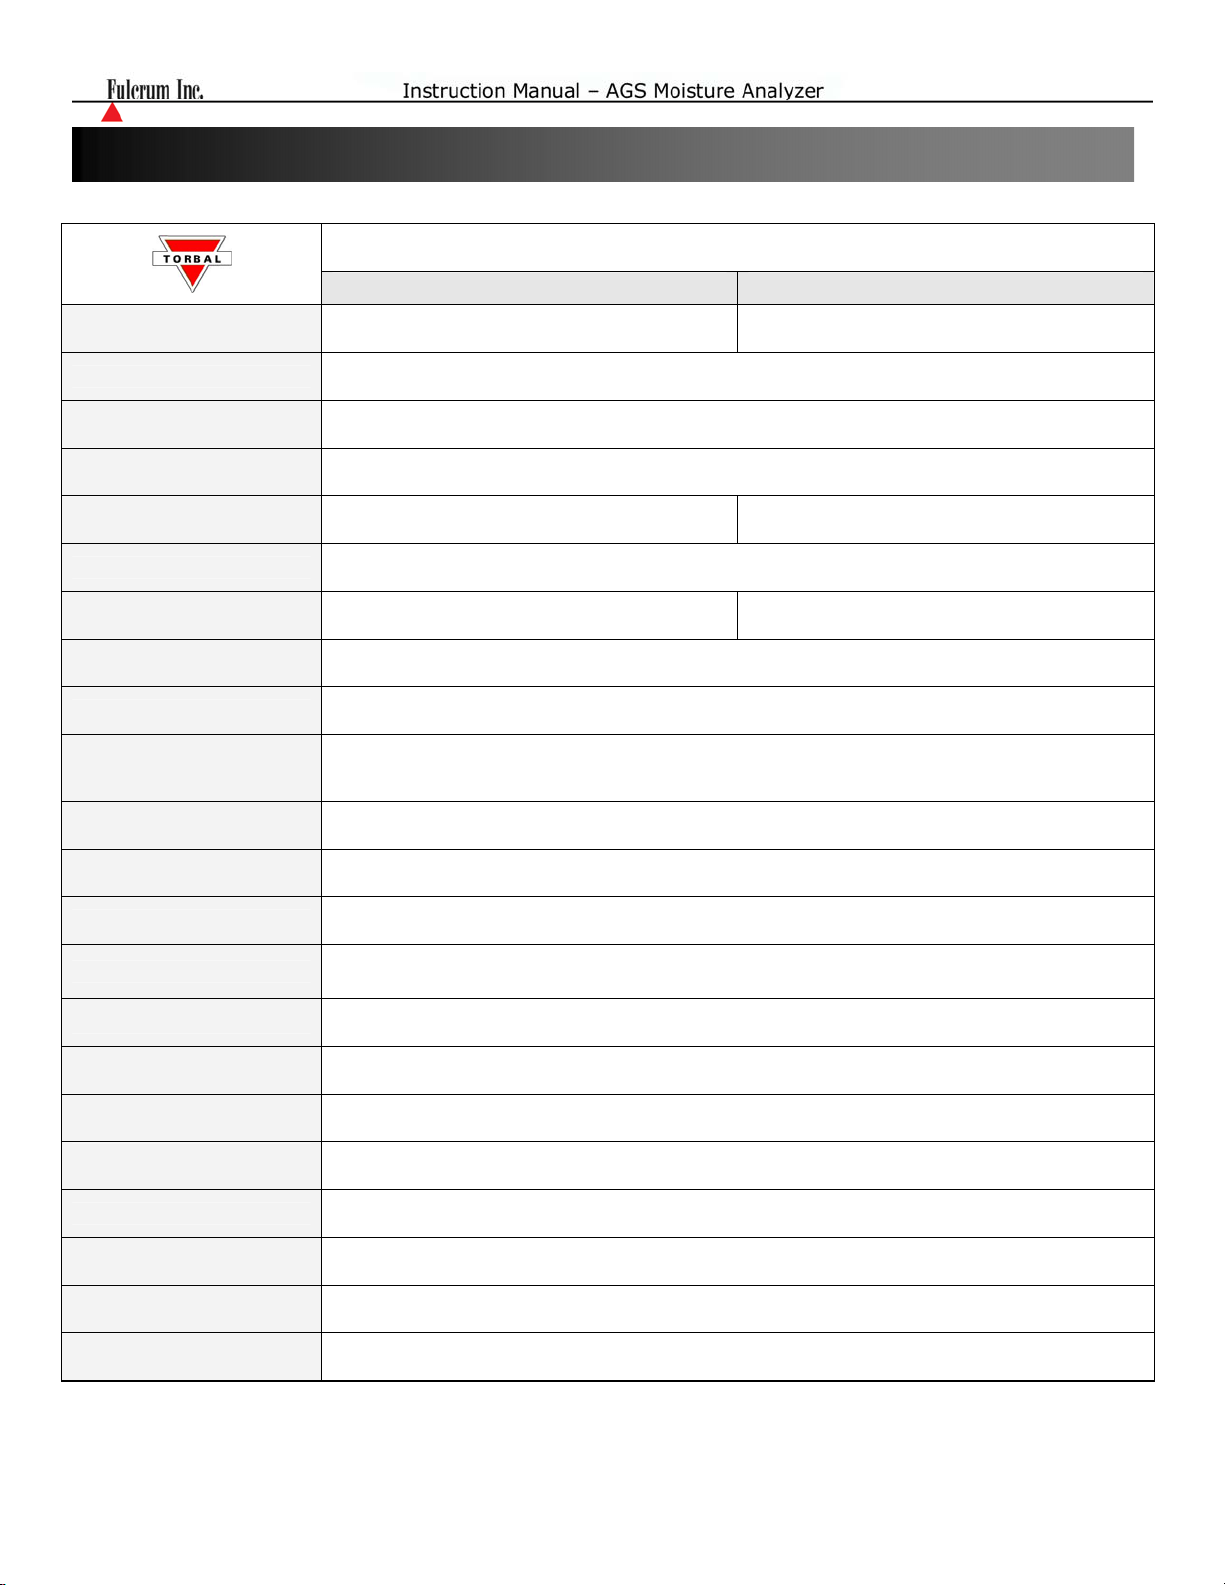
Chapter 2: Specifications
Model
Maximum Capacity 50g 100g
Readability (d) 0.001g
Repeatability (Standard
Deviation)
Linearity +/- 0.002g
Tare Range -50g -100g
Accuracy Class II
Calibration Weight 50g 100g
Operating Temperature +18C to +33C
Analyzer Resolution 0.01%
AGCN100 AGCN200
0.001g
Moisture Measurement
Accuracy
Maximum Drying
Temperature
Sampling Time 1 sec. to 180 sec.
Maximum Drying Time 10 hours
Drying Power 250W
Halogen Size 118mm
Warm-up time Approximately 30 sec.
Pan Size 90mm
Drying Chamber
Dimensions
Scale Dimensions 215mm x 345mm x 200mm
Unit Weight 7kg
Power 110VAC, 60Hz
0.1g to 5g = +/-0.3%
5g to 15g = +/-0.06%
> 15g = < +/-0.04%
160°C
108mm x 20mm
Warranty 12 months
6
Page 7

Chapter 3: Introduction
3.1. Function of the Moisture Analyzer
• The primary function of the device is to make precise measurements that allow the user to determine the
moisture content of various materials using the principle of thermo-gravimetric analysis.
• The secondary functions is to use the device as a precision scale to make weight determinations, as well
as to use the combination of computer software and the weighing function to count parts.
3.2. Good Practices and General Rules
• Larger samples take longer to dry, but produce more accurate results. When accurate results are
required, try to stay in the 5 to 15 gram range. Use the Drying Chart feature to help in optimizing the
Sample Size, Drying Time, and Temperature.
• For uniformity of results, it is better to set the Drying Time for a little longer rather than shorter.
• Lower temperatures take longer, but produce more uniform results in many materials. This is especially
true if thermal decomposition is encountered in which added moisture is driven off as drying continues
because of decomposition.
• Prepare the sample properly. This includes: obtaining uniformity of initial weight, leveling the sample,
using a glass fiber disc with fluid samples or samples that produce fluids when heated, and avoiding
carbonization of the sample when possible (lower heat helps).
• Prepare the sample quickly and get it into analysis before its moisture content is altered by its
surroundings.
• The more samples tested, the better the statistical reliability of the results.
• If solvents are required, be very careful of the vapors produced—they can be flammable or even
explosive. Safety first!
• Keep the Analyzer clean, keep the area around the Analyzer clear, calibrate the weighing unit
periodically, and test the unit for moisture accuracy using the Sodium Tartrate Dihydrate chemical
standard whenever problems are suspected (or periodically).
• Above all, remember the Drying Chamber can run at high temperatures, so use caution whenever
opening the cover or handling sample pans. The internal surfaces retain heat for some time.
7
Page 8
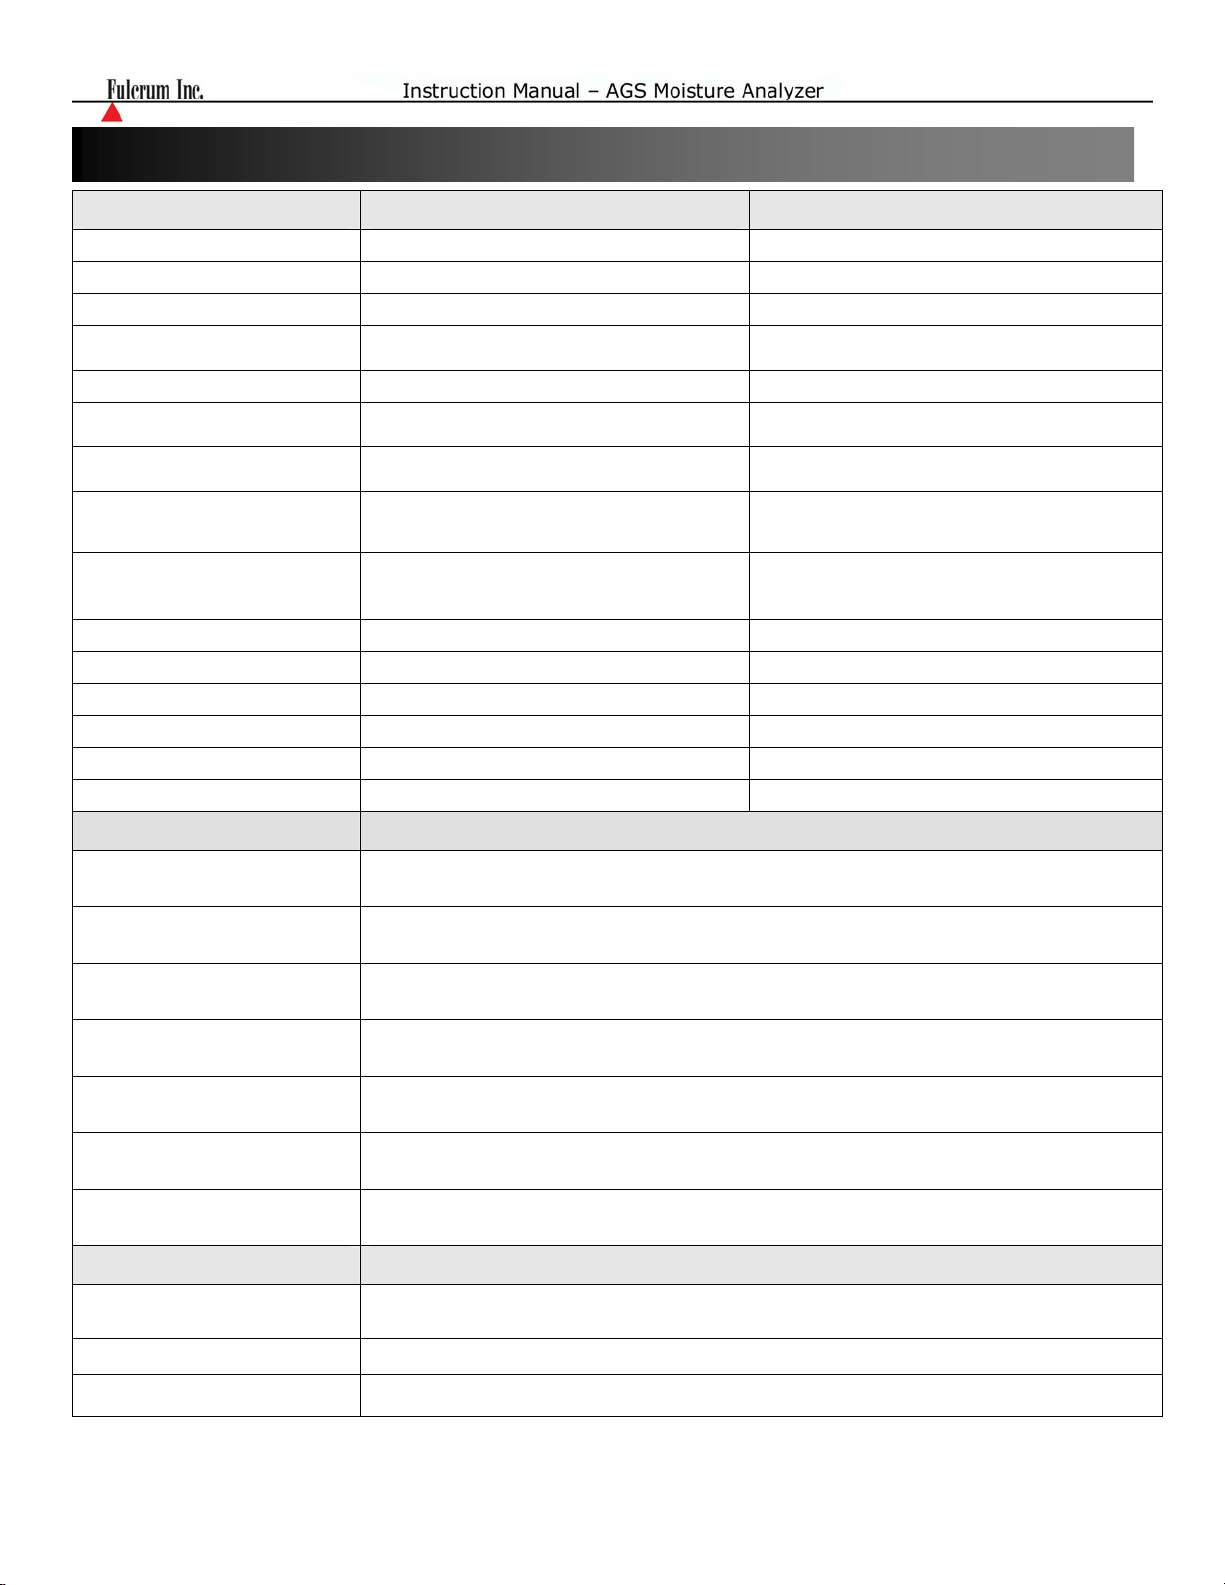
Chapter 4: Keys, Display Indicators, Commands, and Abbreviations
Key Primary Function Secondary Function
I/Ø
ÅÆT
Æ0Å
ENTER Æ
MENU
CLR
< > ^
Å
Æ
[Æ
▼
F1
F2
F3
F4
F5
Menu – used to access the main menu Number “9” key
Mode Return – used to switch between moisture
Data Transfer – used to print data to a
printer or transfer data to a PC via the
Display Indicator Description
Power On and Power Off -
Tare – used to tare the weighing pan N/A
N/A N/A
Enter – used to accept and confirm
commands
Clear – used to clear and cancel
operation
Navigation Keys – used to navigate
through the menus
analysis and weighing modes
RS232 communication port
N/A Number “8” key
START Number “1” key
SET Number “2” key
STAT Number “3” key
MEM Number “4” key
STOP Number “5” key
N/A
N/A
N/A
Number “0” key
Number “7” key
T The current temperature in the drying chamber
m Current weight
t Current drying time
m0 Initial weight
Ts Defined drying temperature
ts Defined drying time
AUT Autotaring
Command or Abbreviation Description
Drying temp.
Sampling Interv.
Meas Number
Drying Temperature
Sampling Interval
Measurement Number
8
Page 9
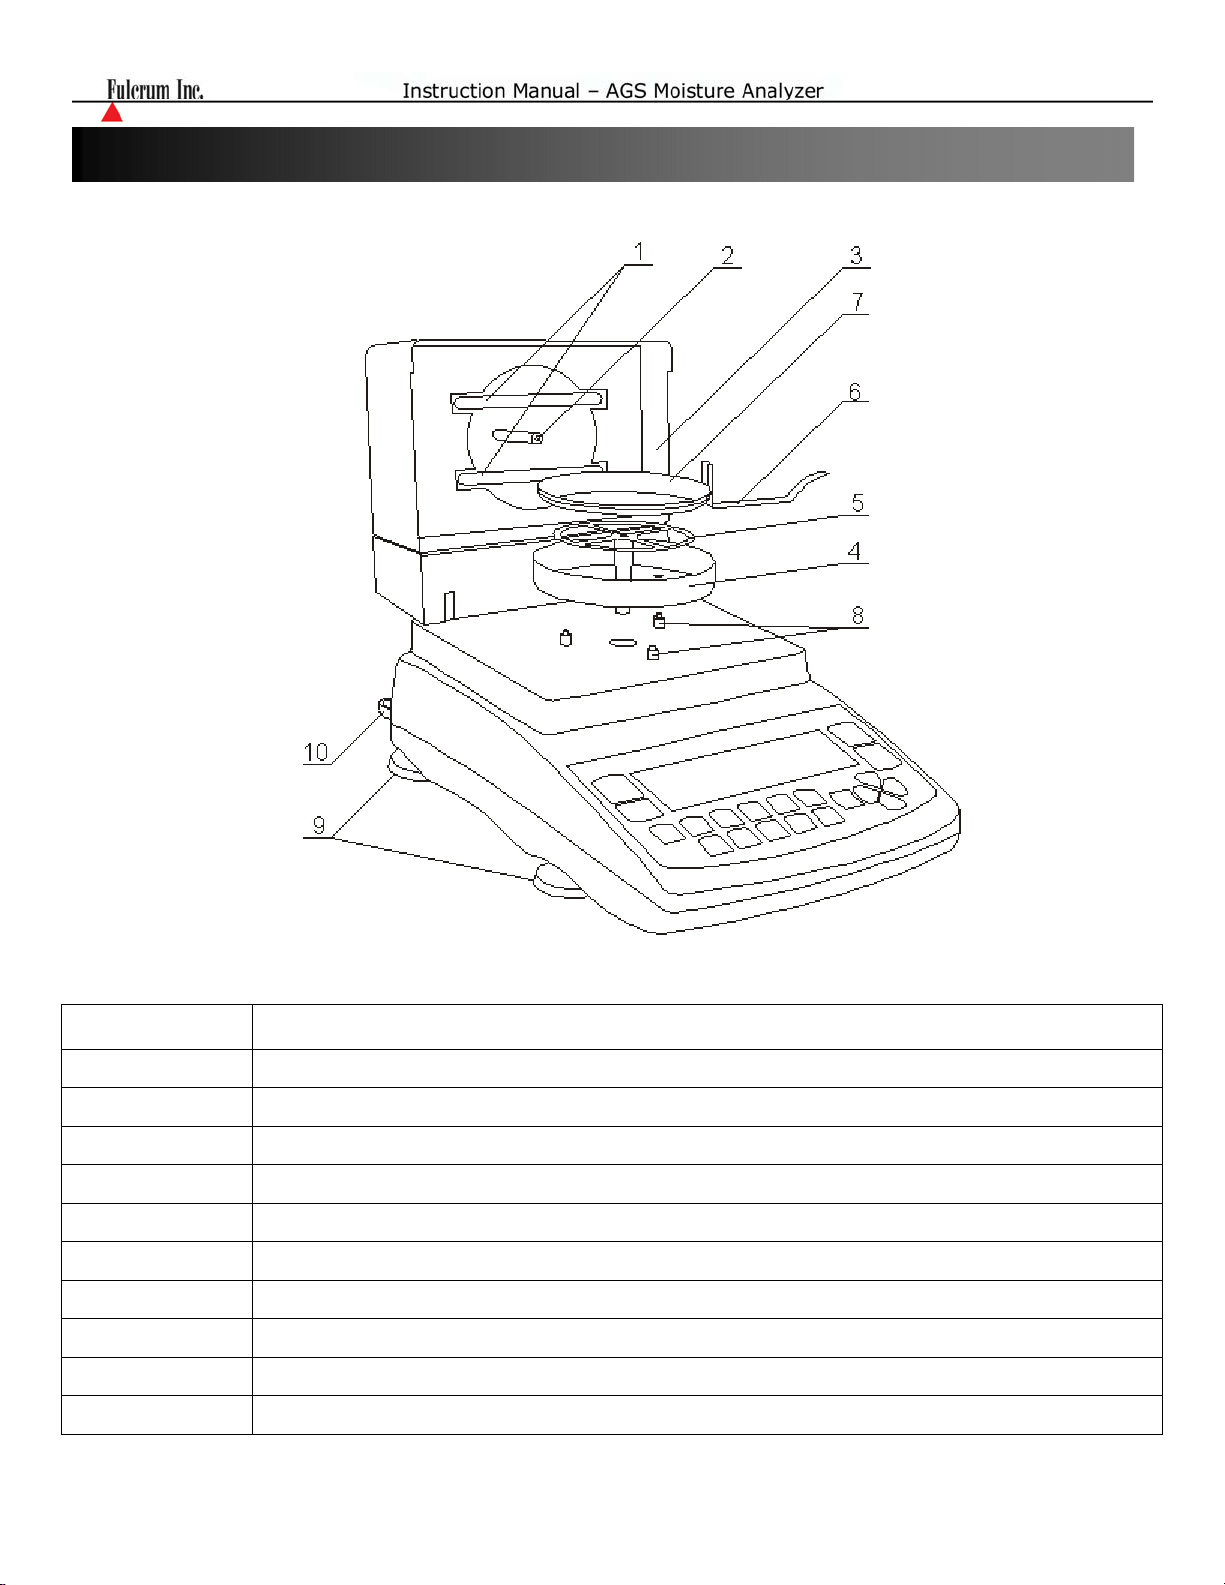
Chapter 5: Parts Description
Part No. Description:
1
2
3
4
5
6
7
8
9
10
Halogen Lamps
Temperature Sensor
Drying Chamber
Pan Shield
Pan Support
Pan Handle
Disposable Pan
Pan Shield Posts
Adjustable Legs
Level Indicator
9
Page 10
Chapter 6: Unpacking the Moisture Analyzer and Getting Started
1. Carefully remove the Moisture Analyzer and all its components from the packaging and place
them on a stable base where the unit will not be affected by any mechanical vibrations or air
movements.
2. After removing the Pan Shield (4), Pan Support (5), and Pan Handle (6) from their packaging,
open the Drying Chamber (3) and carefully install the Pan Shield (4) on the three Pan Shield Posts
(8).
3. Once the Pan Shield is installed on the shield posts, gently insert the Pan Support (5) into the
opening of the Analyzer’s mechanism.
4. After installing the Pan Support, place a Disposable Pan (7) on the Pan Handle (6), then place it on
the Pan Support so that the handle rests on the Pan Shield without touching the Pan Support.
5. After installing all pan components, close the Drying Chamber and level the Analyzer by adjusting
the leveling feet until the level indicator shows the “air bubble” is in the center position of the
sight glass. The level indicator is located on the rear left side of the unit.
6. After leveling the scale, plug the power supply cable into the power supply socket (Marked 110V)
located in the rear of the Analyzer.
7. Make sure the drying chamber is closed, and then plug the power cable into the wall outlet.
8. When the cable is plugged into the wall outlet, the Analyzer will turn “ON” automatically,
initialize itself, and perform Initial Heating. The Initial Heating is designed to drive any residual
moisture from the heating chamber. The internal temperature is raised to 105°C and held there for
a preset time period
9. Upon completion of the power-up sequence, the unit comes up in the Moisture Analyzer Mode and
is then ready to be used.
WARNING: Please be careful and remember the drying chamber has been heated and will
retain heat for some time.
10
Page 11
Chapter 7: Understanding the Functions, Parameters, and Modes
7.1. Methods of Terminating the Moisture Analysis
There are 3 methods for terminating a moisture analysis:
1. Time Mode - drying is terminated when a set “Drying Time” is reached.
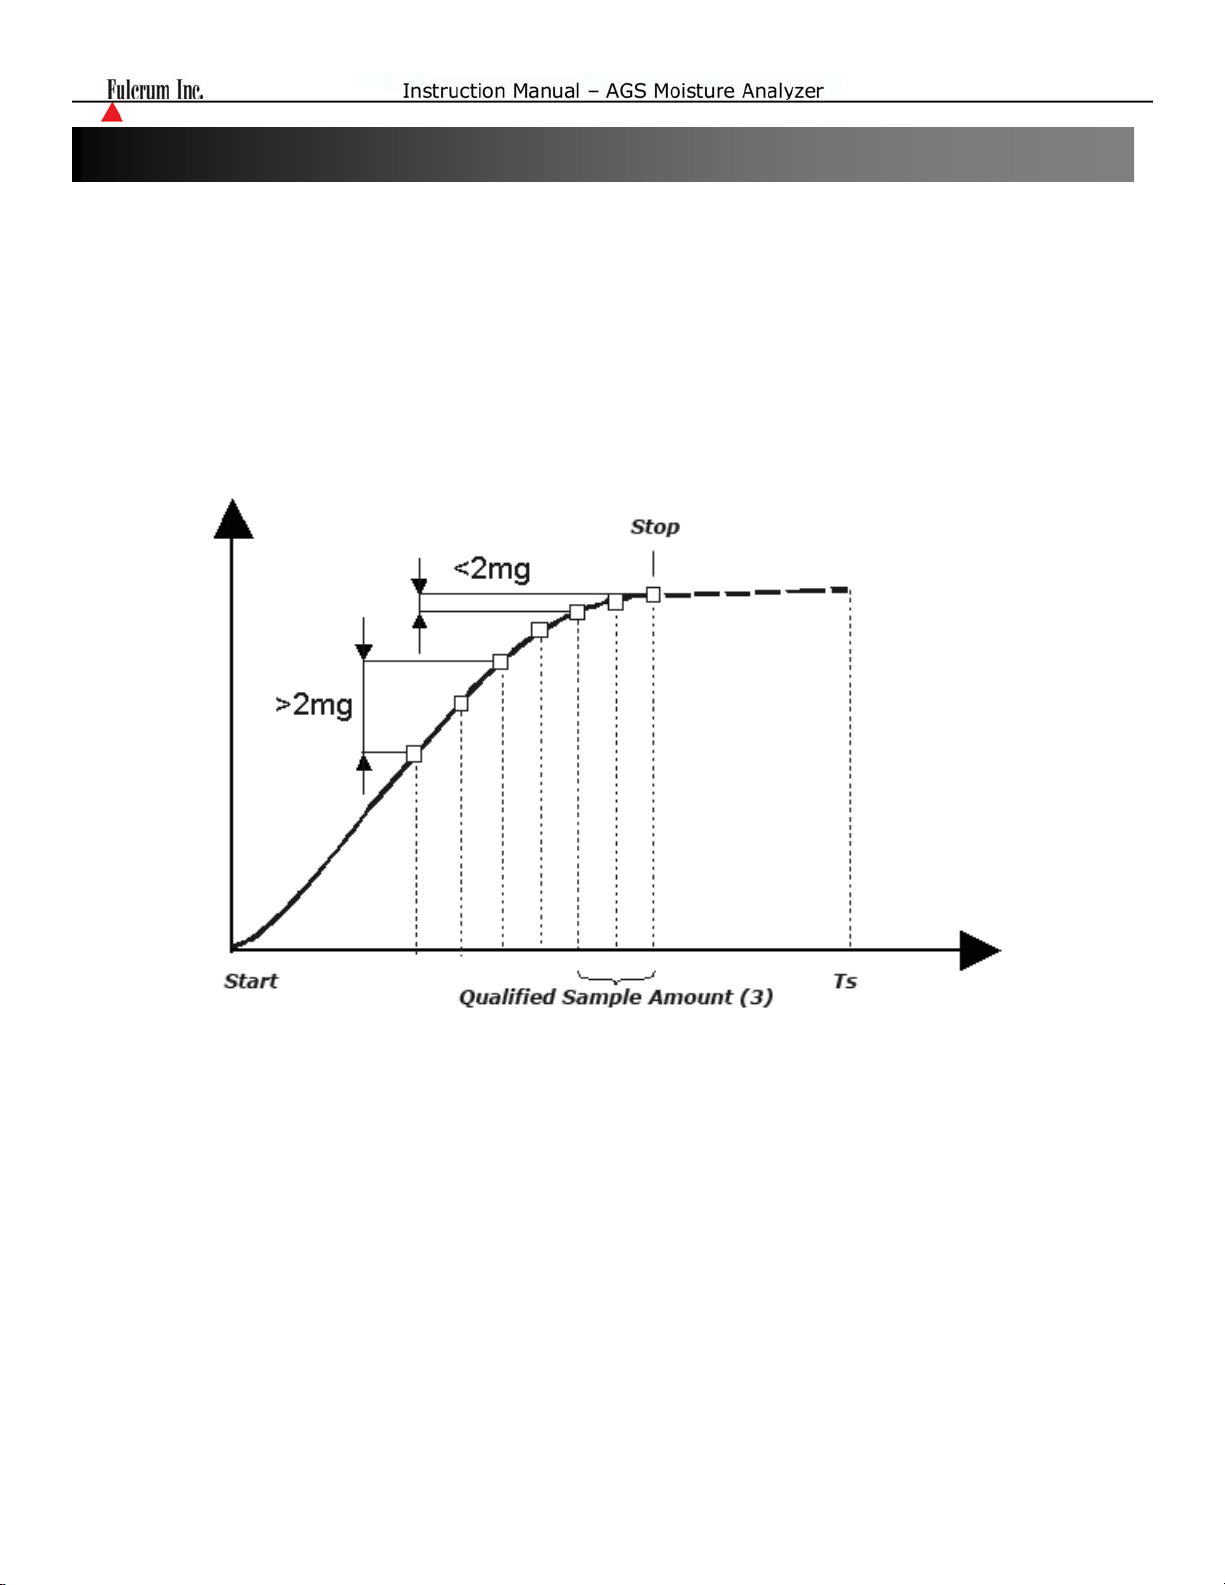
2. Short Mode (See graph below) – drying is terminated when the mass loss between
successive samples (Sample Quantity) is smaller than the threshold value of 2mg.
3. Manual – drying is terminated when F5 STOP is pressed.
11
Page 12
7.2. Understanding Configuration Parameters
Mode (Default Setting: m
Three formulas are available for performing moisture analysis:
1. W [%] = m
2. W [%] = m – m/m * 100%, where moisture is determined in relation to current weight
3. W [%] = m/m0 * 100%, where current weight is determined as a percentage of sample weight
Where: m0 = initial (wet) weight, m = current weight, and W [%] = moisture as a %
– m/m0 * 100%, where moisture is determined in relation to initial weight
0
– m/m0 * 100%)
0
Drying Temperature:
Once the temperature is defined, it will be held constant for the duration of the drying time.
This parameter is used to define the maximum drying temperature for a sample.
Sample Quantity:
parameter to have the analysis terminated when the successive weight measurements (samples) do not differ by
more than 2mg. When setting this parameter, the Analyzer will begin to take the set number of samples
(sample quantity) and compare the weight result of each. When the weight of the samples does not differ by
more than 2mg, the analysis will stop. This configuration method is particularly helpful when an adequate
Drying Time of the sample is uncertain. If the change between samples is less than 2mg, we can assume the
sample has been dried and the analysis can be stopped.
In the Short Mode this parameter is used in conjunction with the Sampling Interval
Sampling Interval:
parameter. It defines the time interval between sampling. The maximum Sampling Interval is 180 seconds. This
parameter can also be also used in the Time Mode for monitoring the moisture loss as well as for statistical
functions such as the Drying Chart, or to print and record the sample weights. (See Chapter 10. STAT
Configuration).
In the Short Mode this parameter is used in conjunction with the Sample Quantity
Rule of Thumb for the Short Mode: Higher number of samples and longer time intervals result in a more
accurate estimate for the total drying time of the sample, as well as the end result.
Drying Time:
Time Mode. When the Drying Time is reached, the analysis will stop.
This parameter is used to set the length of the drying in order to complete the analysis in the
12
Page 13
Chapter 8: Configuration and Parameter Setting for Moisture Analysis
1. If the Analyzer is in weighing mode, press the MODE RETURN key and enter the Moisture Analysis
Mode.
2. Press the SET (2) key to enter the Moisture Analyzer main menu. Configuration parameters will be
displayed: Mode, Drying Temp, Samples Quantity, Sampling Interval, Drying Time, and Save
Parameters.
8.1. Mode
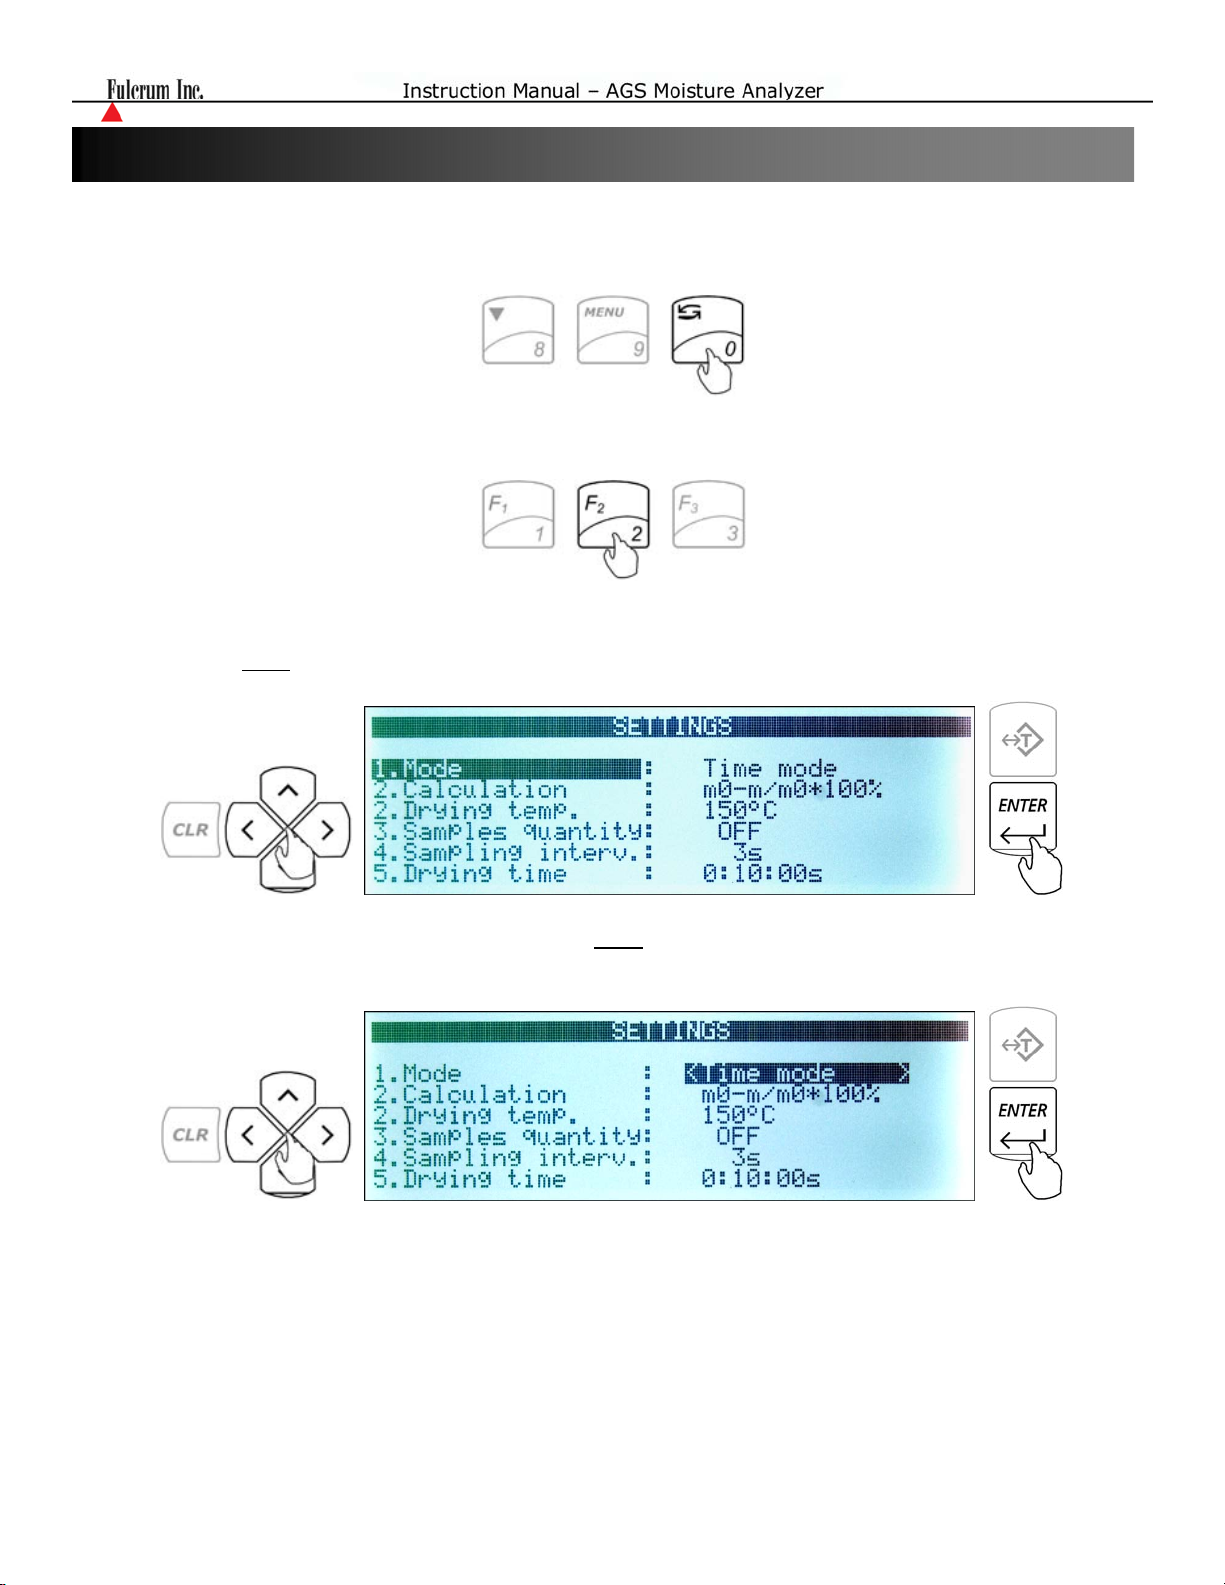
1. Use the “<>” navigation key to select Mode and press the ENTER key.
2. The current mode will be displayed. Use the “<>” navigation key to alternate between the Time Mode
and the Short Mode. Once a desired mode is displayed, press the ENTER key to confirm the selection.
Short Mode – the analysis will be terminated automatically when the loss in moisture between the
samples taken during the analysis is less than 2mg. This mode requires that the Sample Quantity
(Section 8.4) and the Sampling Interval (Section 8.5) are defined.
Time Mode – the analysis is terminated when the defined Drying Time (Section 8.6) is reached.
13
Page 14
8.2. Calculation Formula
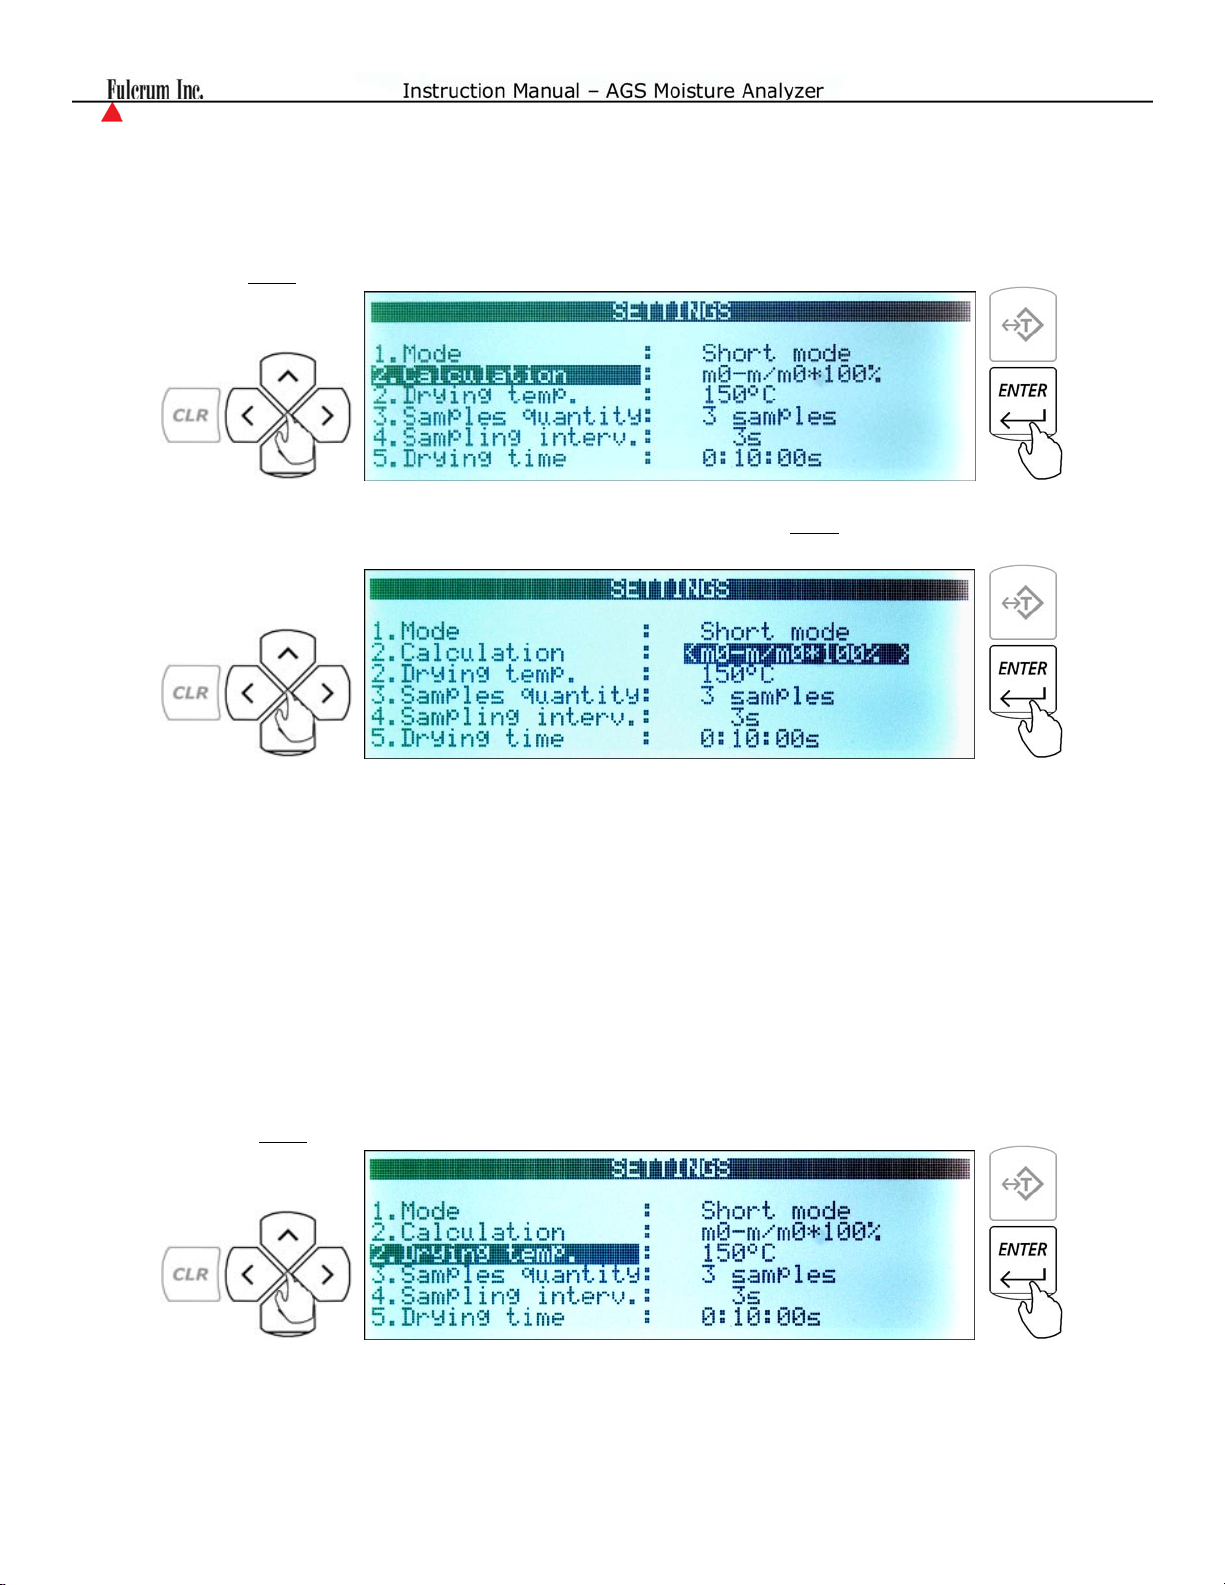
1. Use the “<>” navigation key to select Calculation and press the ENTER key.
2. The current moisture analysis formula will be displayed. Use the “<>” navigation key to alternate
between formulas. Once a desired formula is displayed, press the ENTER key to confirm the selection.
Where m0 = initial (wet) weight, m = current weight, and W [%] = moisture as a %:
1. W [%] = m0 – m/m0 * 100%, where moisture is determined in relation to initial weight
2. W {%} = m – m/m * 100%, where moisture is determined in relation to current weight
3. W [%] = m/m0 * 100%, where current weight is determined as a percentage of sample weight
8.3. Drying Temperature
1. Use the “<>” navigation keys to select Drying Temp and press the ENTER key.
2. Use the Numeric keys to enter the desired Drying Temperature in degrees Celsius. The maximum
temperature is 160°C.
14
Page 15
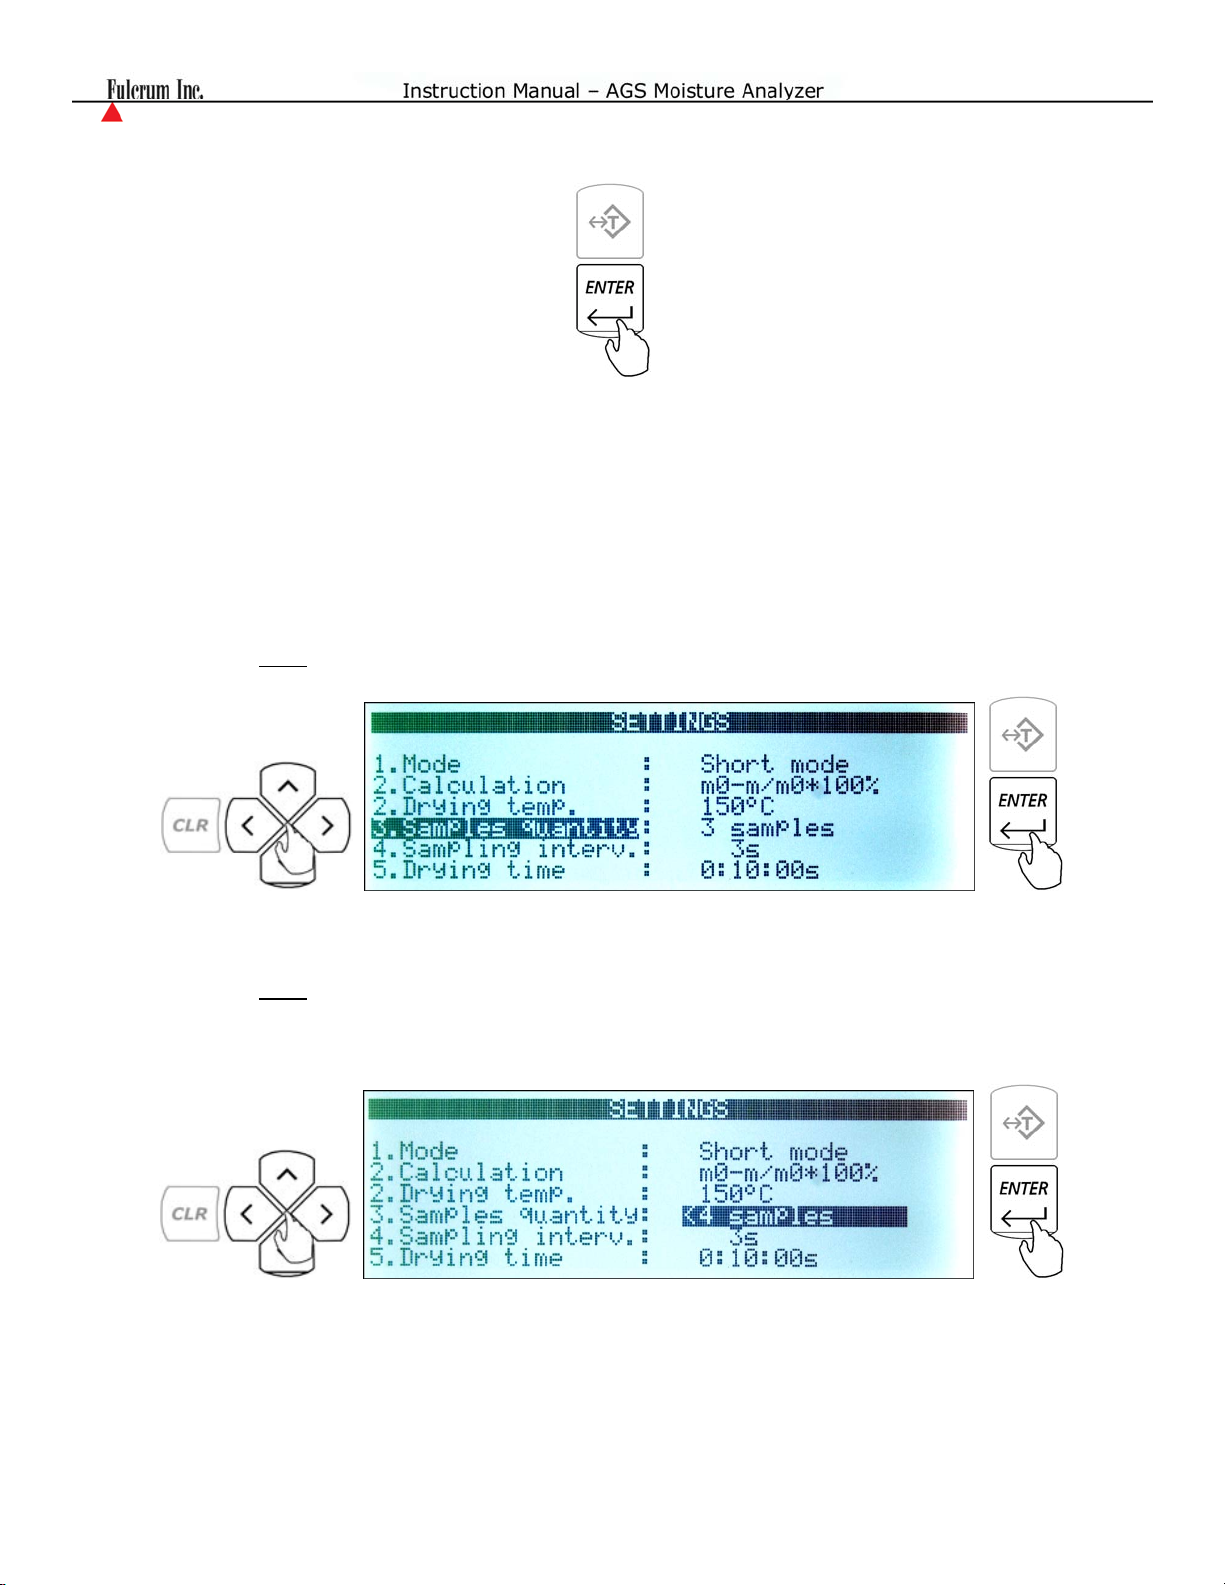
3. Once the temperature has been entered, press the ENTER key to confirm the selection.
Note: A table of materials with their recommended Drying Time and sample weight is included in this
manual.
8.4. Sample Quantity
Note
: This parameter must be set when using the analyzer in the Short Mode. See the Notes and
Parameter descriptions in Section 7.2.
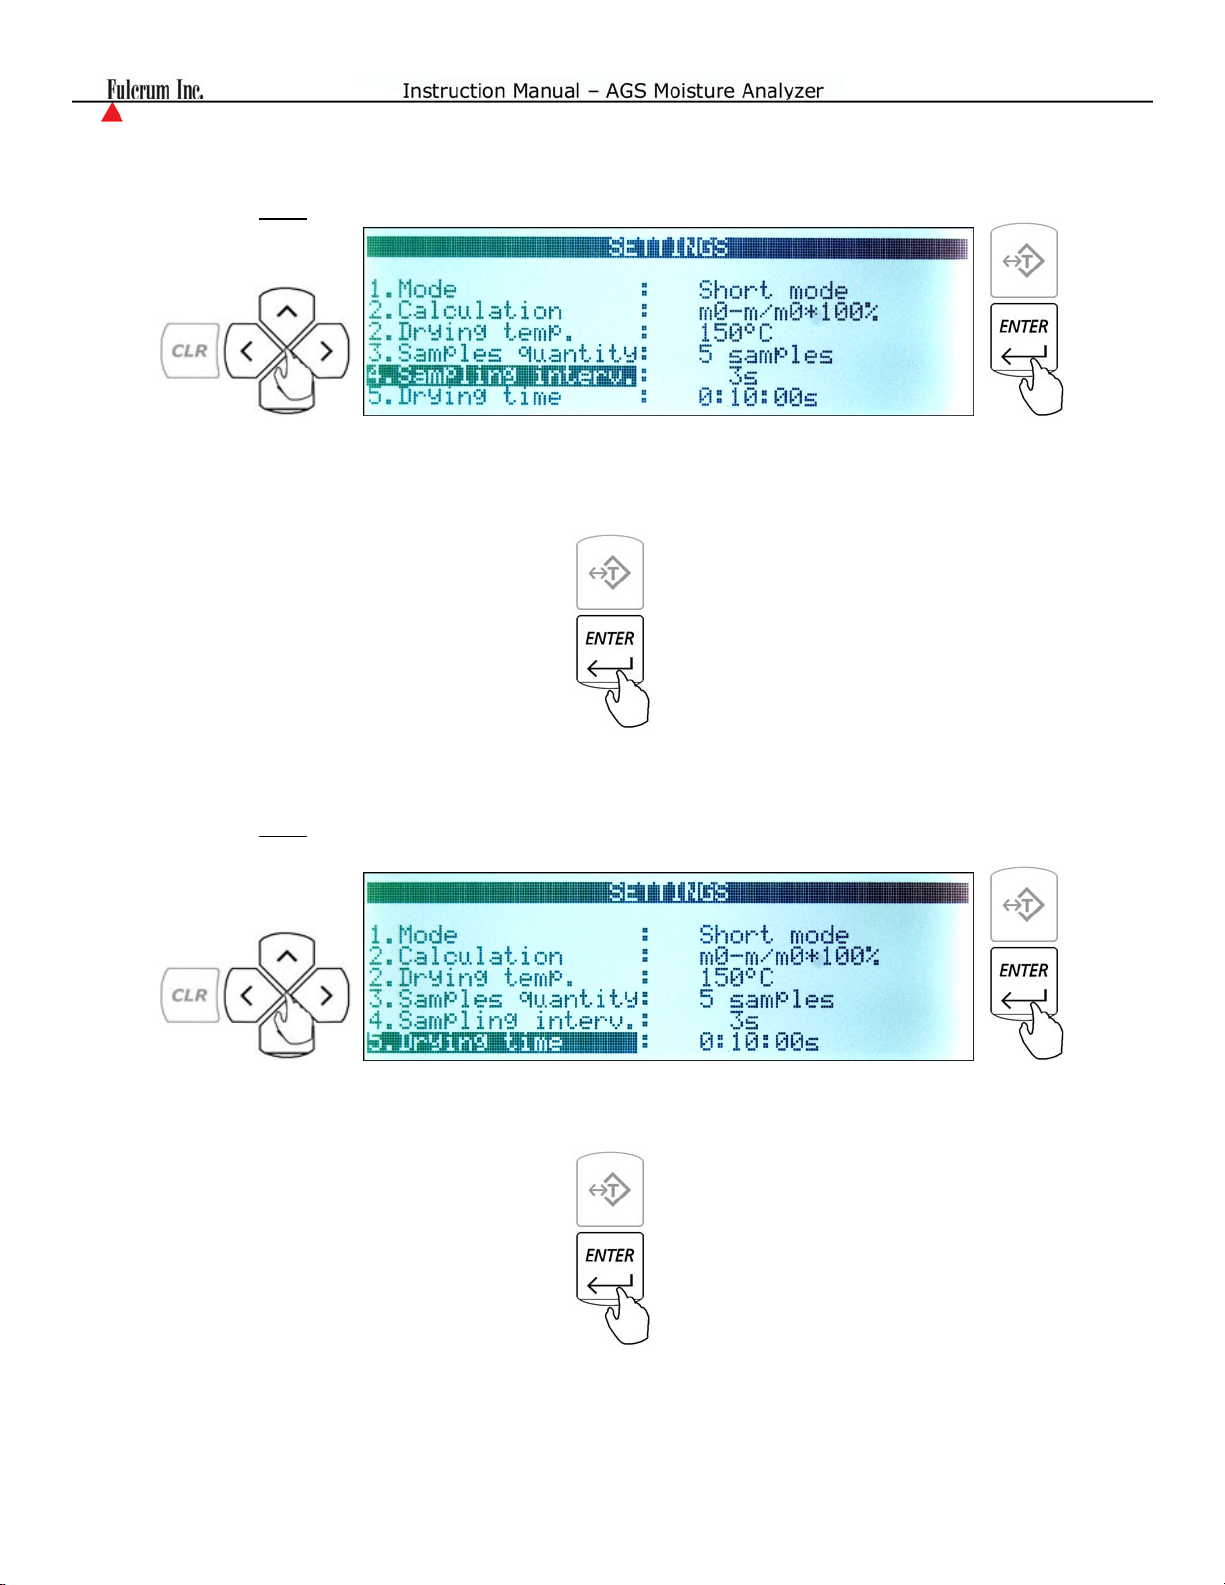
1. Use the “<>” navigation key to select Samples Quantity and press the ENTER key.
2. Use the “<>”
are: OFF, 2 samples, 3 samples, 4 samples, and 5 samples. Once the desired selection has been
made, press the ENTER key confirm the selection.
navigation keys again to select the desired number of samples to be taken. The choices
15
Page 16
8.5. Sampling Interval
1. Use the “<>” navigation key to select Sampling Interval and press ENTER.
2. Use the numeric keys to enter the desired Sampling Interval in seconds. The maximum time is 180
seconds. Once the desired Time Interval has been entered, press the ENTER key to confirm the
entry.
8.6. Drying Time
1. Use the “<>” navigation key to select Drying Time and press the ENTER key. Drying Time is
specified in the following format: hh/mm/ss.
2. Use the numeric keys to enter the desired drying time. Press the ENTER key to advance between
fields.
3. Once the desired time has been entered, press the ENTER key to confirm the entry.
16
Page 17
8.7. Saving the Configuration and Parameters
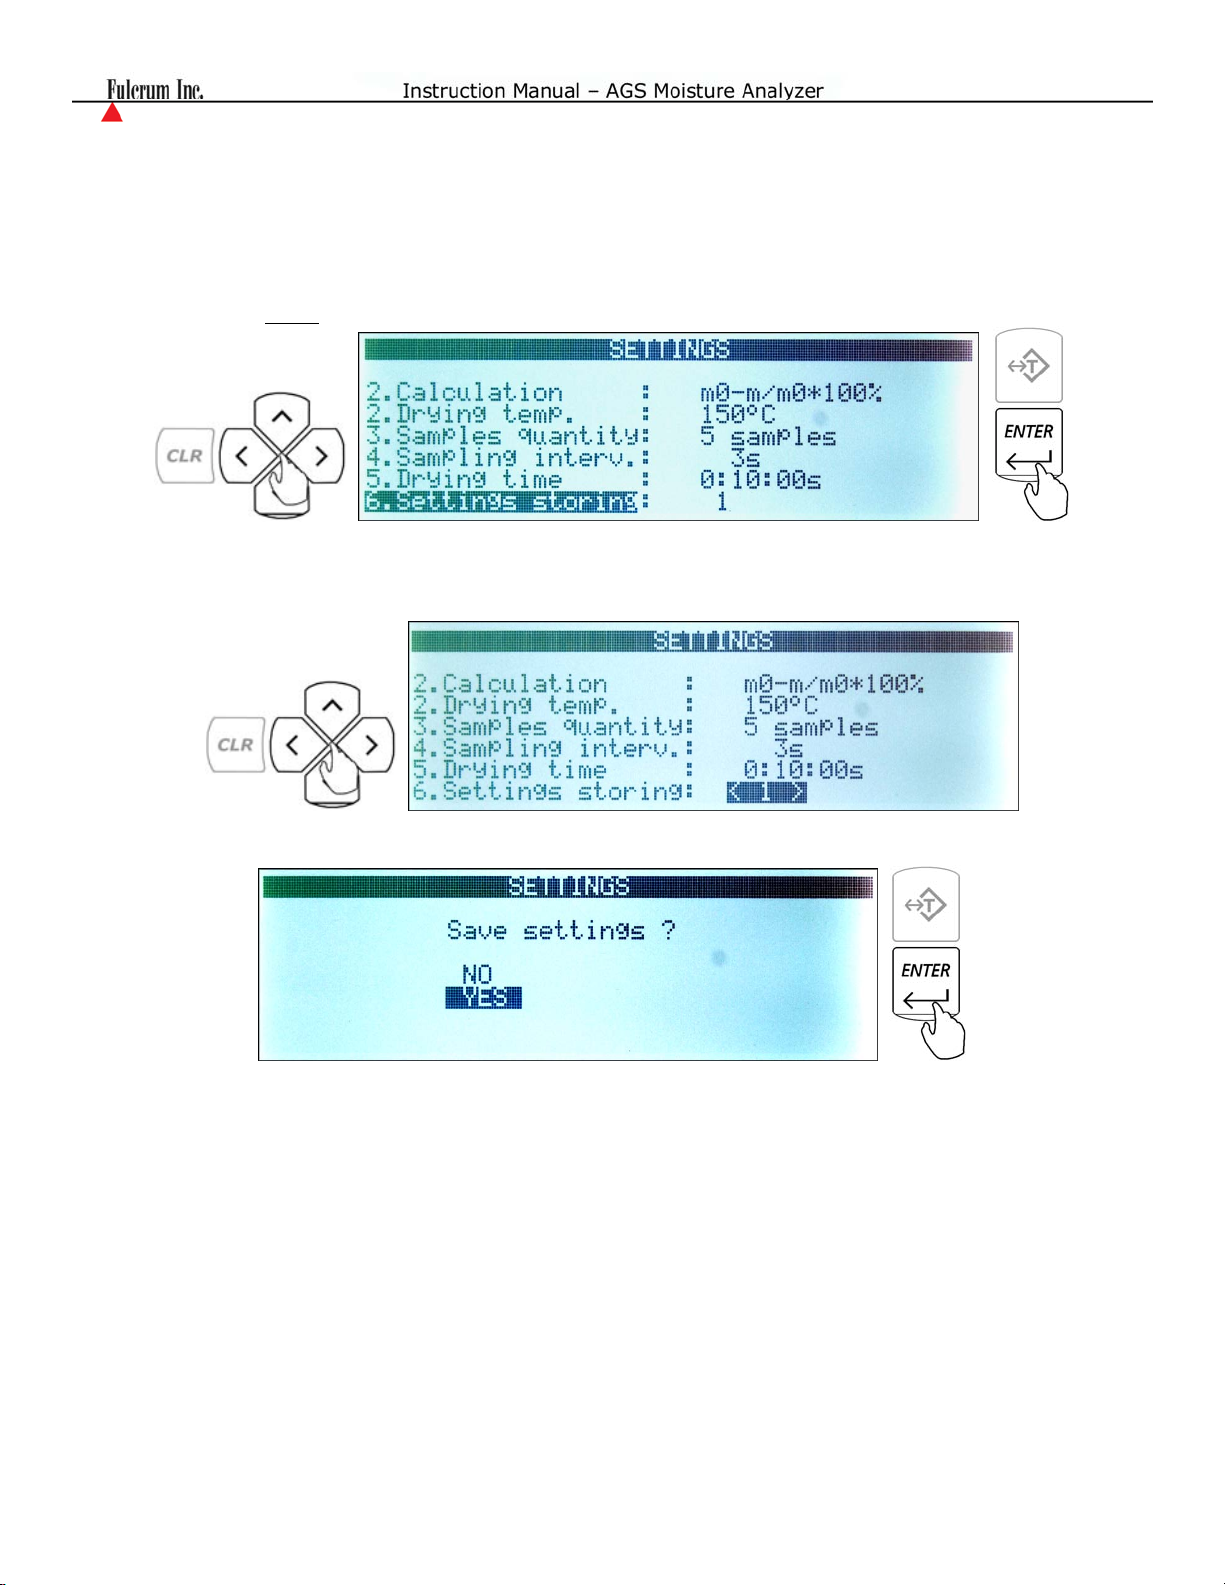
A configuration of parameters can be saved in the analyzer’s internal memory. Up to 10 different
configurations can be saved. To save a configuration for future use, follow the step below:
1. Use the “<>”
navigation key to select Save Parameters and press the ENTER key.
2. Use the navigation keys to select the memory location in which you want to store the present set of
parameters
3. Press ENTER to store the parameters in the selected location.
17
Page 18
Chapter 9: RAP Configuration
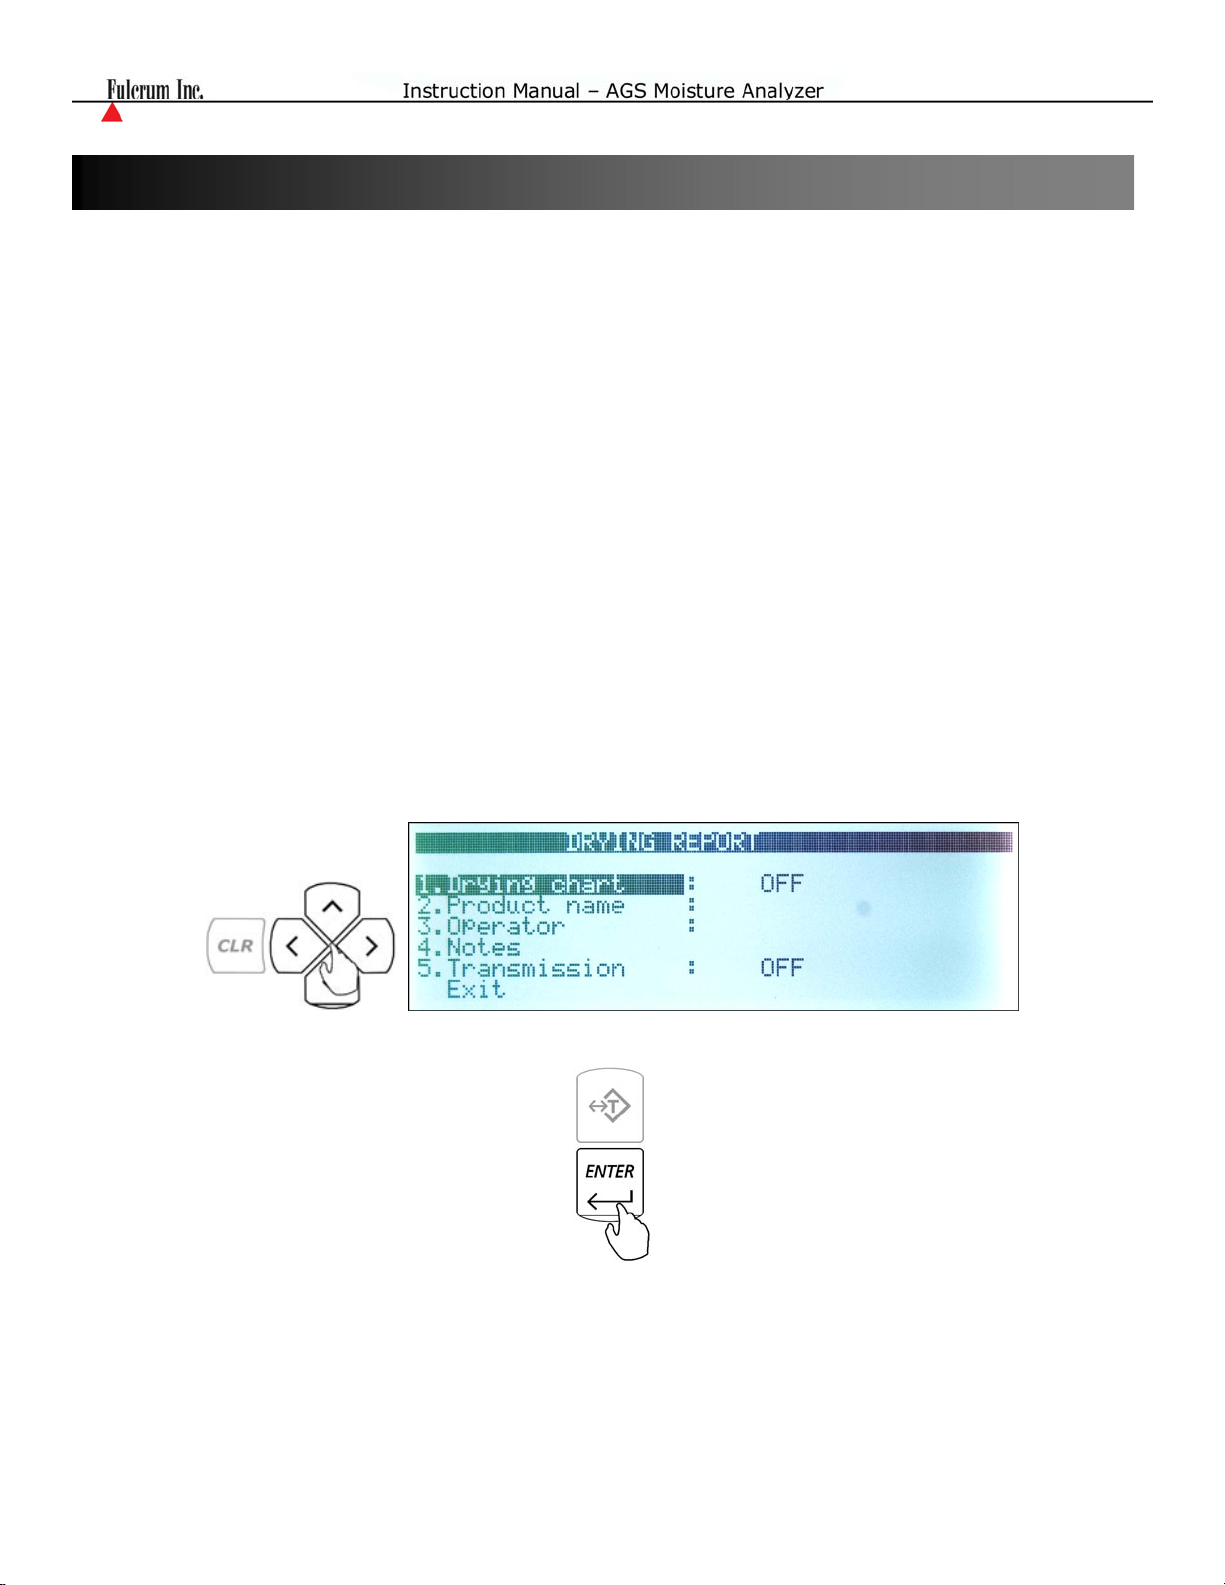
To enter Statistical Configuration, press the F2 key (STAT). The following STAT options will be
displayed:
• Drying chart – the Drying Chart is especially useful during initial testing of new materials; however, it
should be turned OFF during routine analysis. It is very helpful in defining parameters such as drying
temperature, sampling interval, and drying time, as the shape of the drying cycle is clearly displayed.
• Product name – this setting allows the User to assign a name of the product or sample being analyzed.
The name will be printed on the Drying Report printout (maximum 20 characters total).
• Executive – this setting allows the User to assign a name of the person performing the analysis. The
name will appear on the Drying Report printout (maximum 20 characters total).
• Notes – this setting allows the User to enter important notes that may be required for the analysis. The
notes will appear on the Drying Report printout (maximum 240 characters total).
• Transmission – when turned ON, this function sends the sample weight to the printer port at the end of
each sampling interval. This function can be very useful during initial sample evaluations or for sending
data to an external computer for more detailed analysis.
To set and configure the Functions, follow the steps below:
1. Use the Navigation keys to select a STAT function you would like to configure.
2. Once the function is selected, press the ENTER key.
18
Page 19
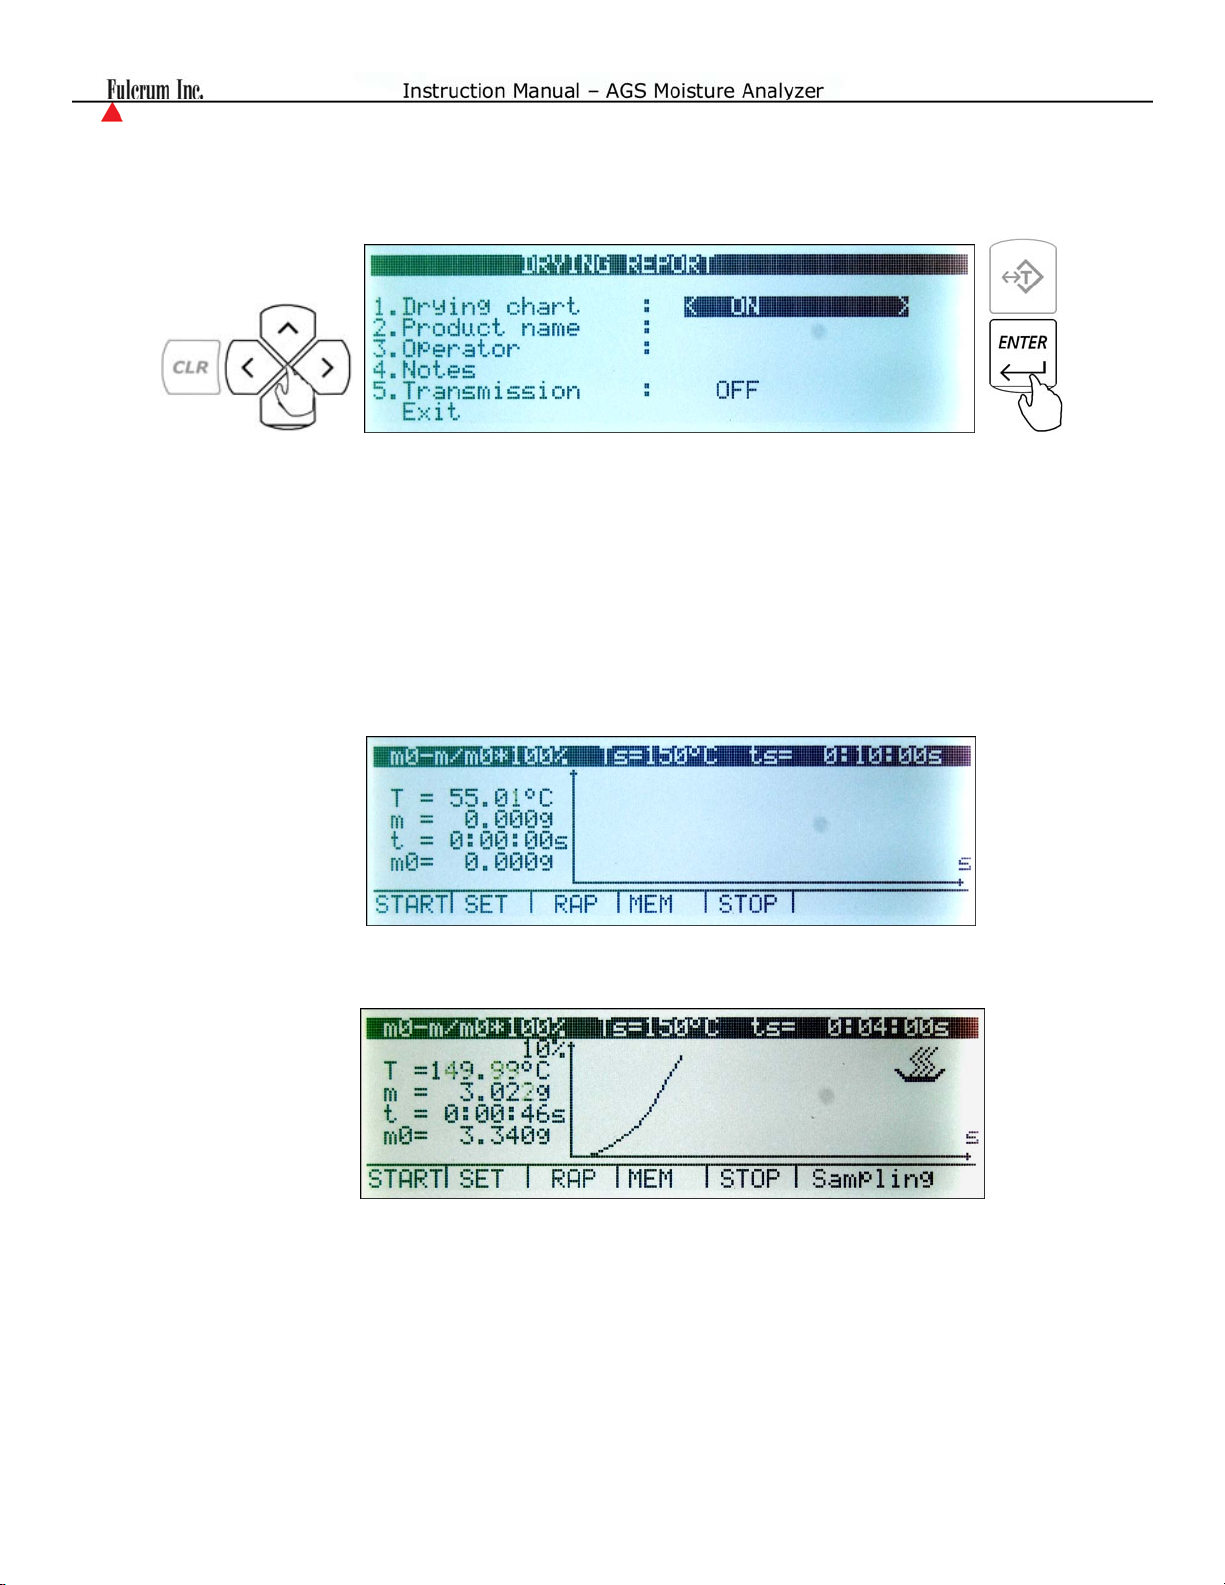
3. For the Drying Chart and Statistics parameters, use the navigation keys to toggle between ON and
OFF. Once the function has been enabled or disabled, press the ENTER key to save and confirm the
selection.
4. For Product Name, Executive, and Notes parameters, it is recommended you use an external
keyboard which can be connected to the PS2 keyboard port located in the rear of the Analyzer.
Once the data has been entered, select Exit and press the Enter key to save the data and return to the
analysis mode.
19
Page 20
Chapter 10: Preparing the Sample
1. A sample of a given substance must be representative. Drawing and preparing a sample is a very
important process as it may affect the repeatability of measurements. The most common method of
homogenizing a sample is mixing. Another method is to draw a few samples from different but
specific points in a substance and calculate an average value, or to draw a few samples from
different points in a substance, mix them, and draw a sample from the mixture.
Note: The sampling method depends on the type of research being performed. In quality control,
usually many representative samples are analyzed. In production control, it is enough to confirm
sampling repeatability.
2. When preparing a sample, it is important the sample does not absorb moisture from the surrounding
environment – thus preparation time should be as short as possible.
Note: If it is necessary to analyze more than one sample at the same time, the samples should be
placed in separate hermetically sealed plastic bags or containers. Make sure the sample does not lose
moisture while it is inside the container (the container or plastic bag should not have much air in it).
3. Tools and instruments used in the preparation process may affect measurement accuracy. Do not
use tools that transmit heat as this can cause the sample to lose moisture before the actual analysis.
Use only special grinders and mixing instruments. When drawing a sample from a liquid consisting
of solid materials, use a glass mixer, spoon, or magnetic mixer.
4. To analyze moisture content, place the sample on the disposable pan provided with the unit and
place it in the dryer chamber. Using disposable pans helps to avoid the false results that may be
caused by the residue left from previous samples.
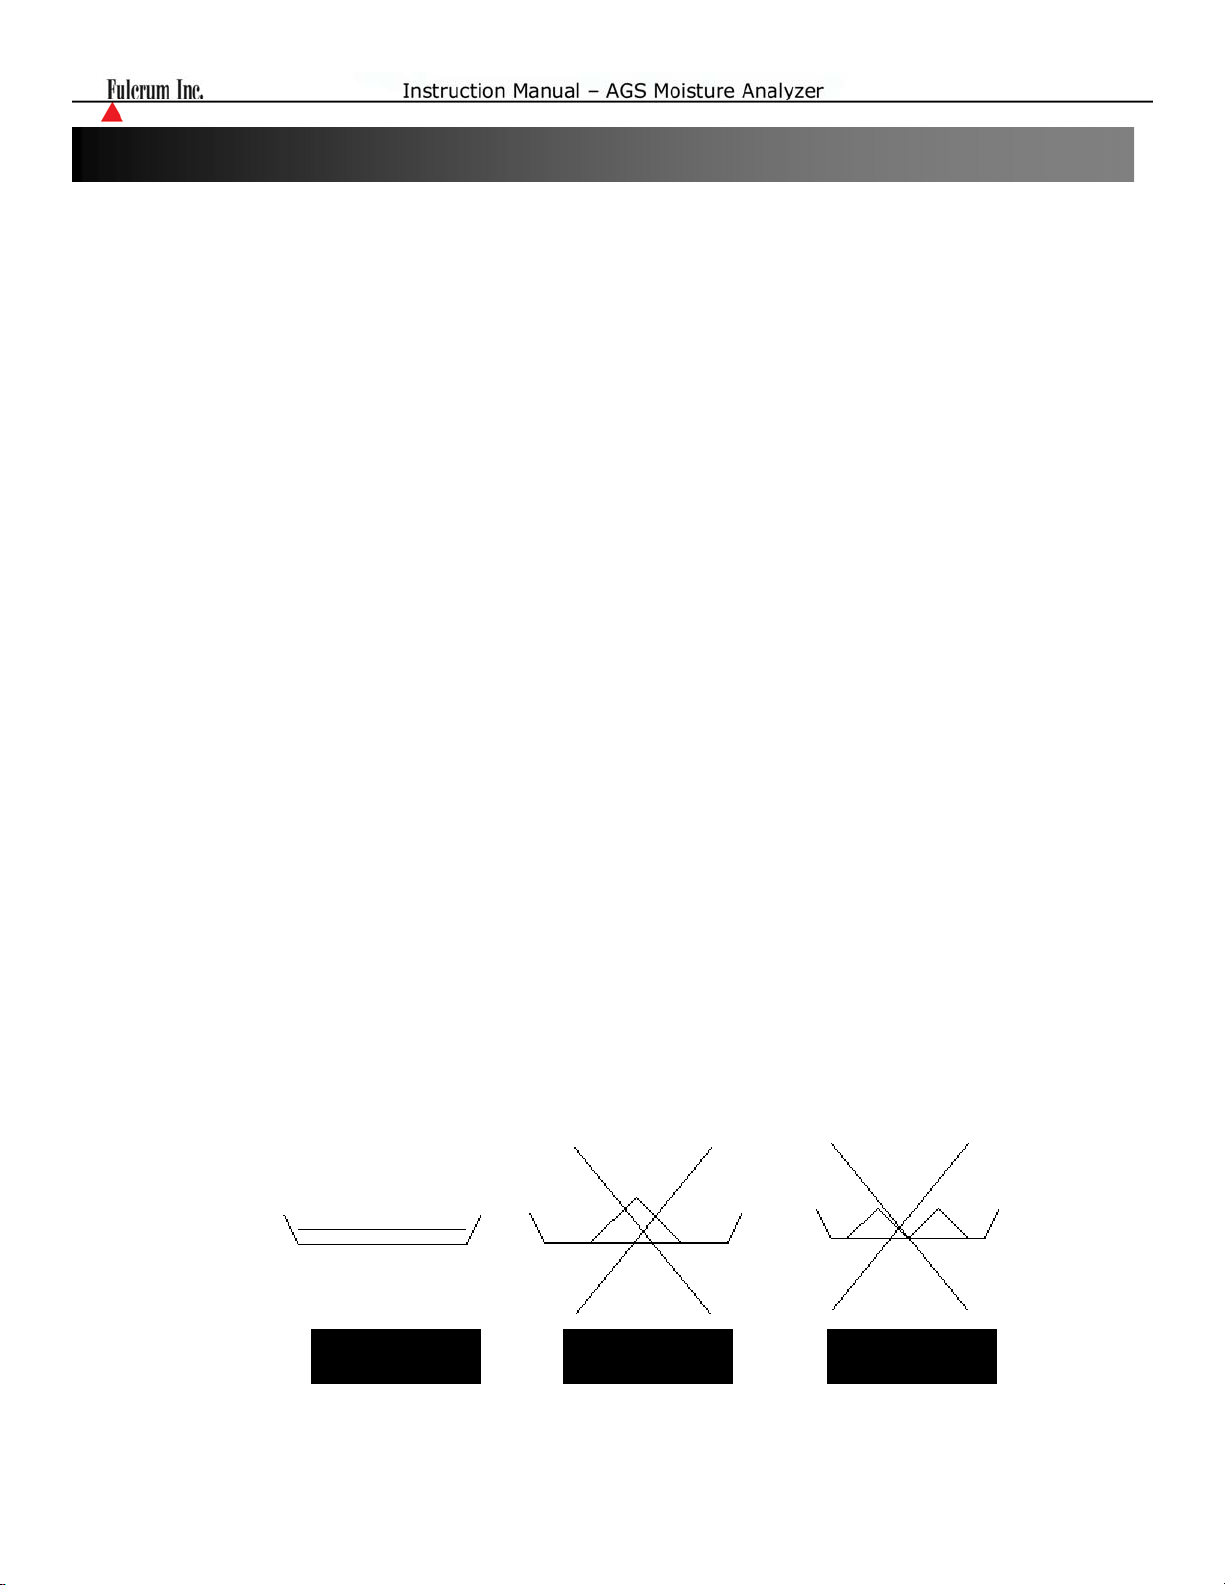
5. A sample should be always thin and distributed uniformly throughout the pan so that the heat
penetrates equally all over the sample and dries the entire sample effectively.
`
Correct Incorrect Incorrect
20
Page 21
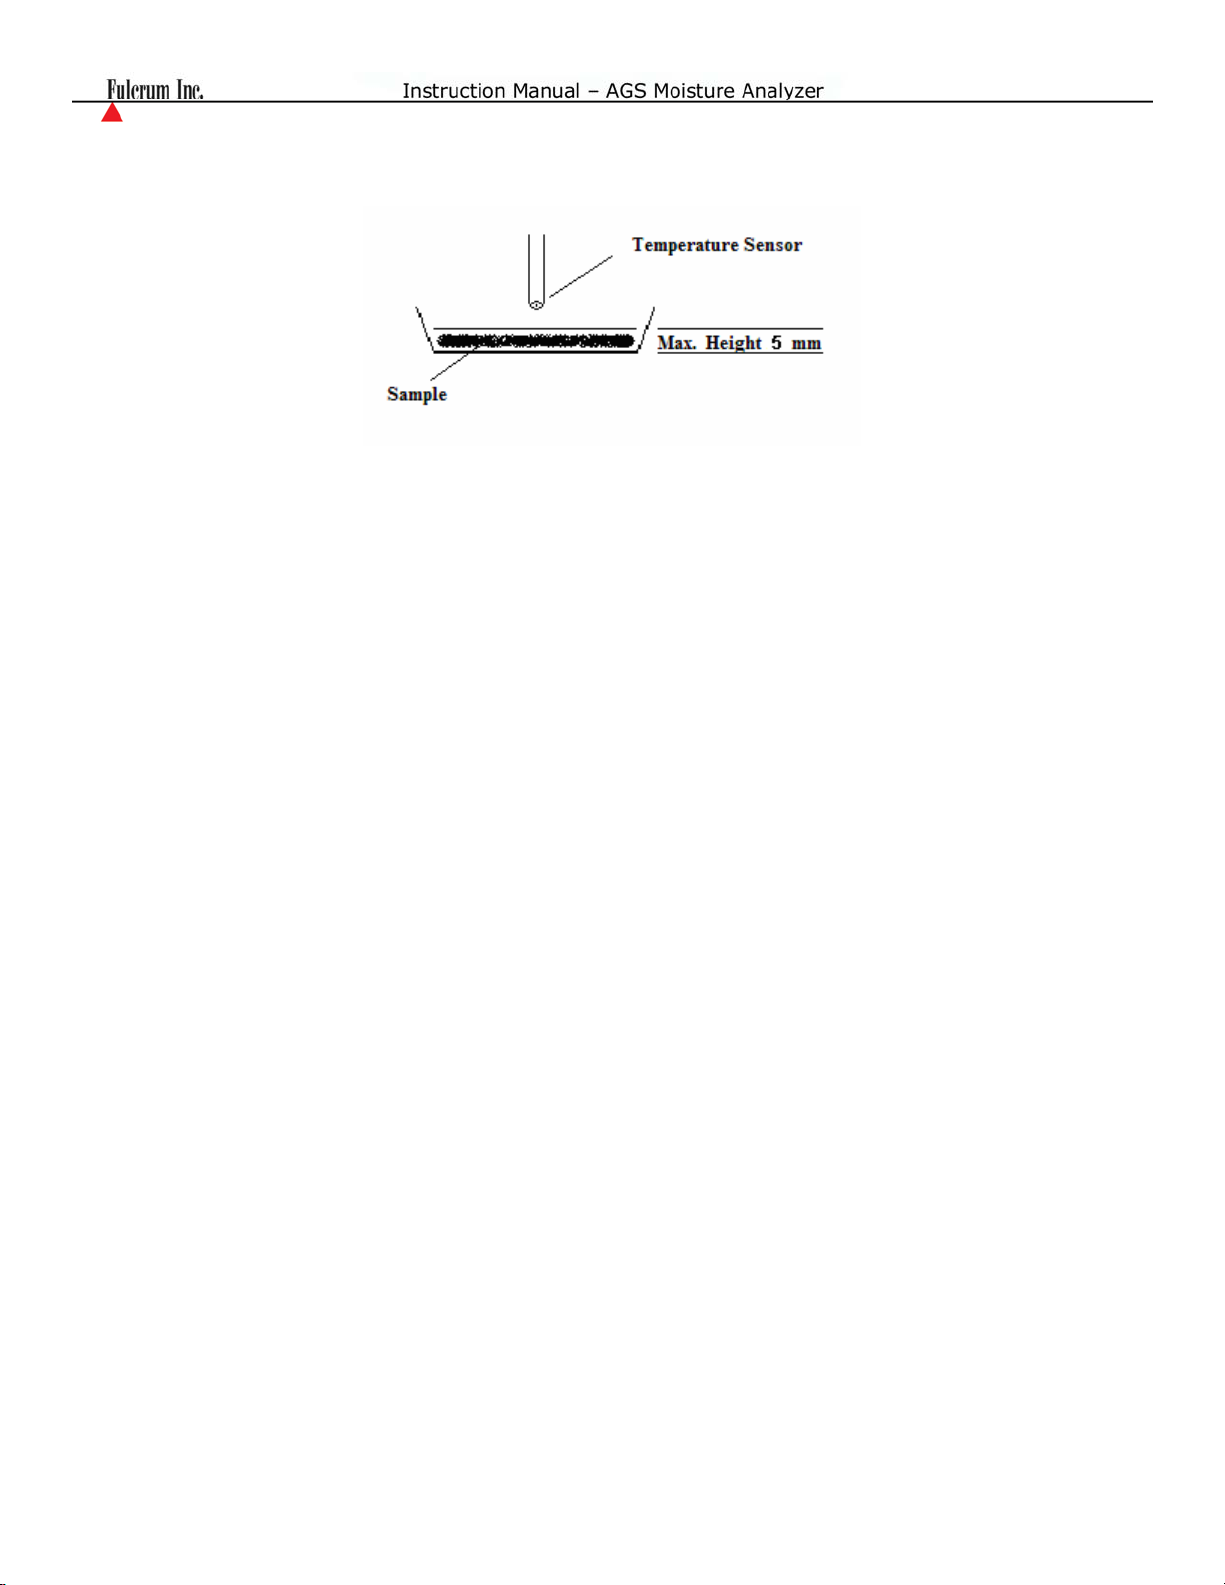
Important NOTE:
Due to the location of the temperature sensor, the sample height may NOT exceed 10mm.
A sample that is thick or unevenly distributed will cause the top surface of the sample to be overly dried
and possibly burned while the sample underneath the top surface remains wet. This may result in the
sample being burned or the top surface hardening which will make the analysis more difficult as well as
inaccurate.
A sample should always be placed in uniform layers measuring 2 to 5mm in thickness and weighing 5 to
15g, depending on the substance.
Using a Glass Fibre Filter
When drying liquids, pastes, or substances that may melt or lose liquid during the drying process, the
use of glass fibre filters is recommended as filters ensure equal liquid distribution. When solid materials
are being dried, a glass fibre filter will prevent the sample from burning.
.
21
Page 22
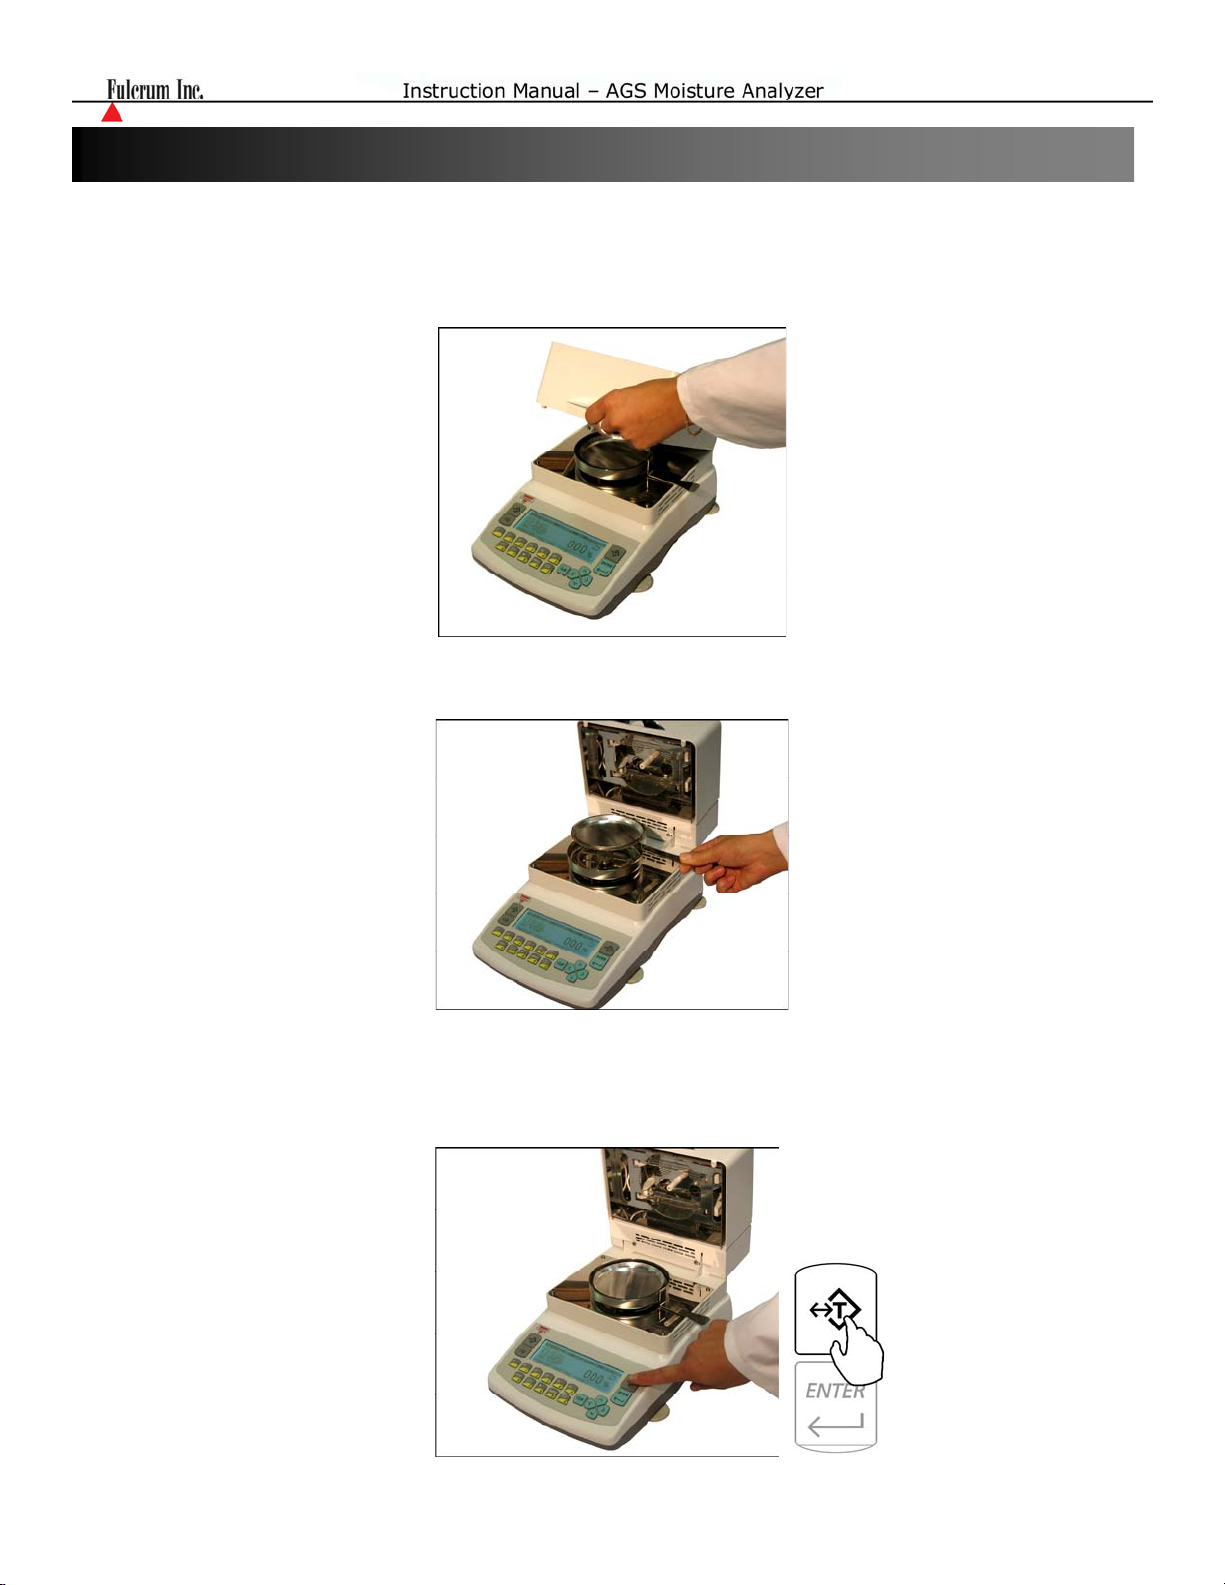
Chapter 11: Making a Moisture Analysis
After configuring all of the necessary parameter and preparing the sample, you may begin your moisture
analysis by following the steps below:
1. Open the Drying Chamber.
2. Using the Pan Handle, place the Disposable Pan on the Pan Support.
Note: Be sure the Pan Handle is not touching the Pan Shield.
3. Press the T key to Tare the Disposable Pan.
22
Page 23
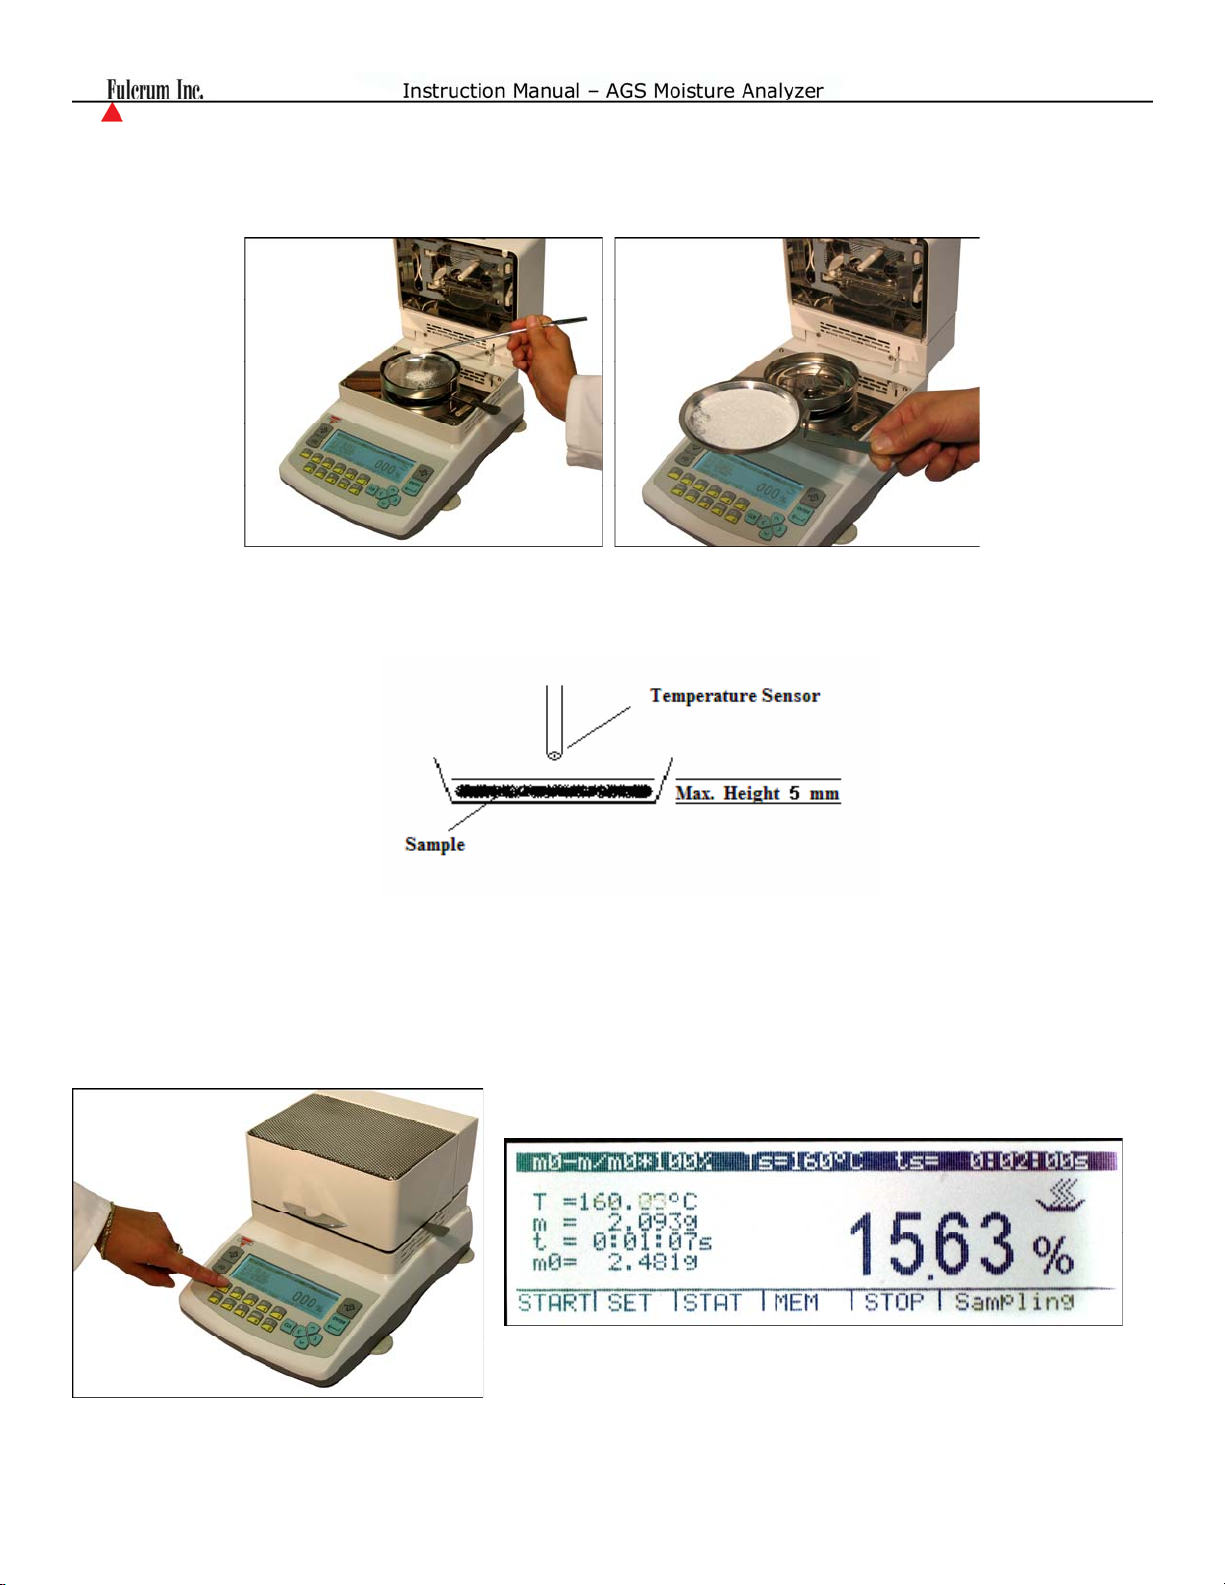
4. Place the sample on the Disposable Pan. After the Tare has been performed, the Disposable Pan can be
removed from the Pan Support by using the Pan Handle to evenly distribute the sample.
Note: Make sure the sample is evenly distributed on the Disposable Pan as per the instructions
listed in Chapter 11.
5. Close the Drying Chamber.
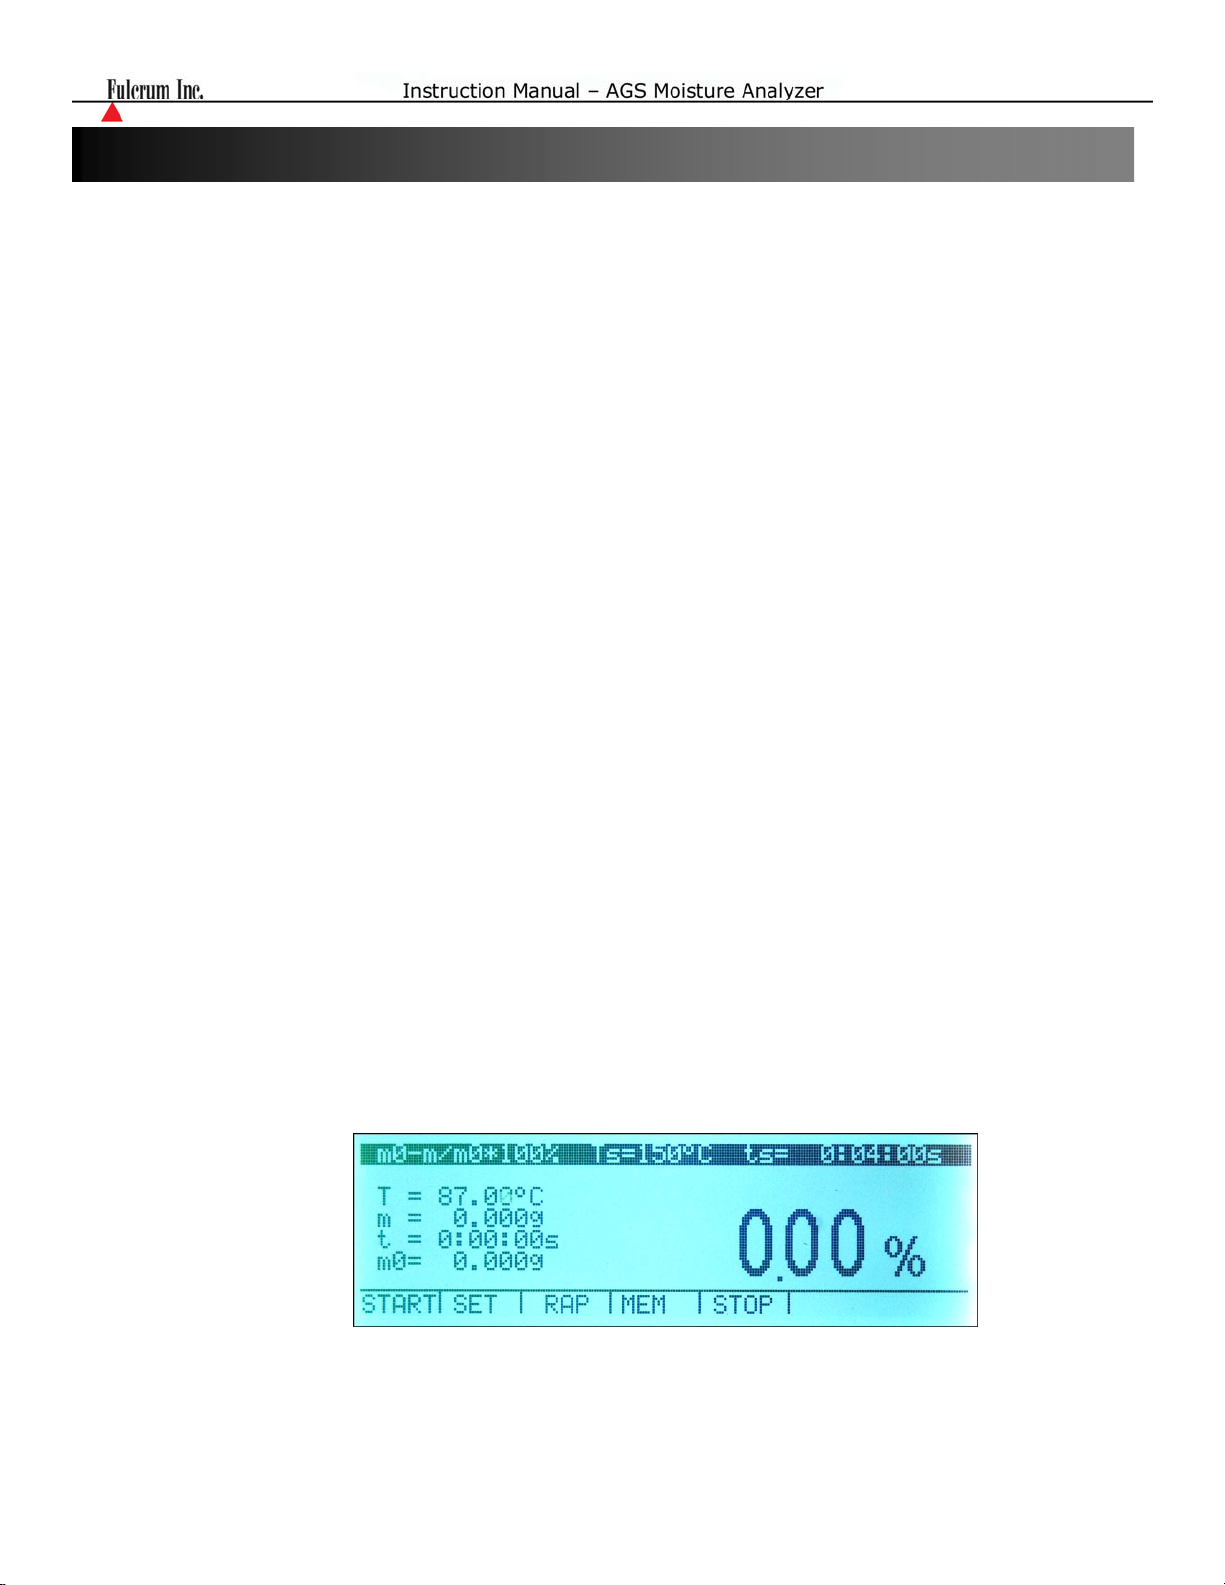
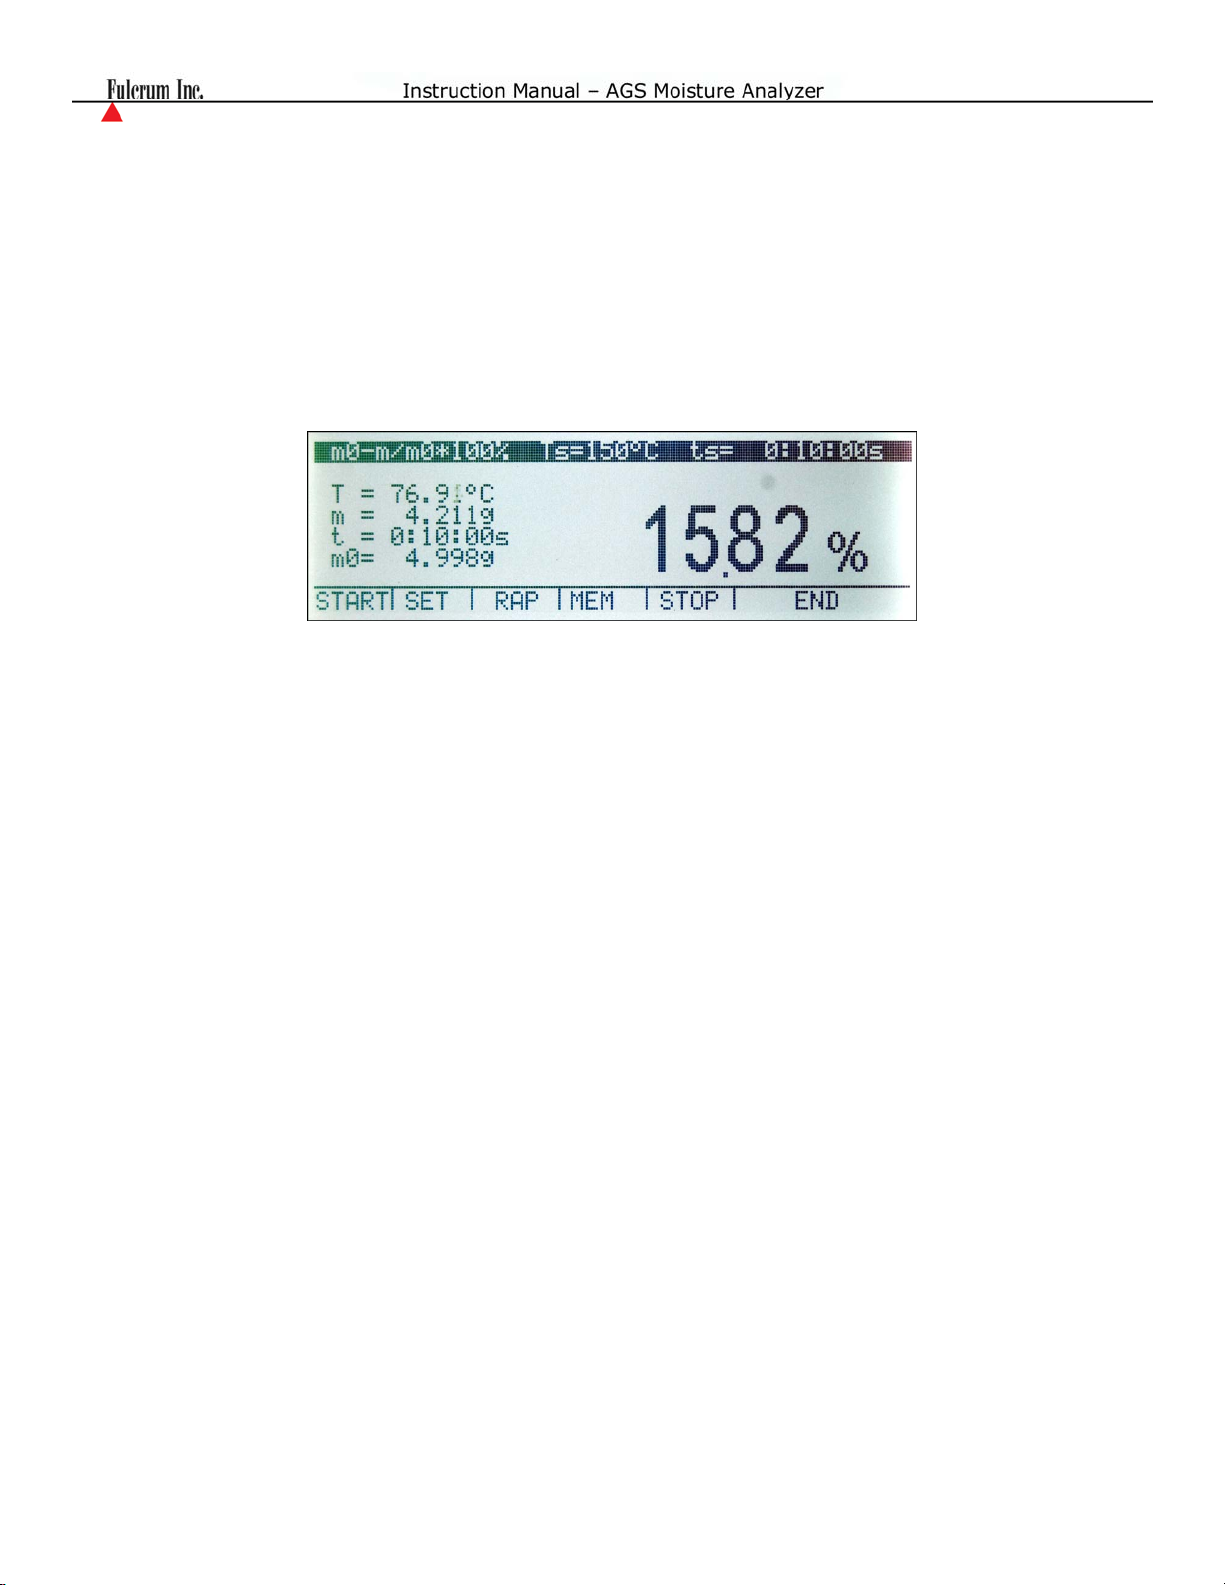
6. Press the F1 (START) key. The unit will indicate on the display that Heating is in progress. The
moisture content of the sample will be displayed as a percentage (%). During the analysis, in addition to
the result, the display will indicate the Drying Chamber Temperature, the present weight of the sample,
the elapsed time, and the initial weight of the sample.
23
Page 24
Important Caution Note: Do not touch the top surfaces of the Moisture Analyzer’s Drying
Chamber or any internal parts either during or soon after use. As the parts and surfaces will be very
HOT, allow adequate time for the unit to cool. Be sure to read and follow all Caution Procedures
listed in Chapter 1.
7. When the analysis is finished, “END” will be displayed in the lower right corner of the LCD. The Final
result will remain displayed. To clear the result and prepare the unit for the next analysis, press the F5
key STOP.
Caution: Always use the forceps supplied with the unit when handling a used Disposable Pan.
Important Note: Before starting a new analysis press F5 (STOP), replace the disposable pan and
perform a TARE to make sure parameters m, t and m0 are cleared (set to 0).
24
Page 25
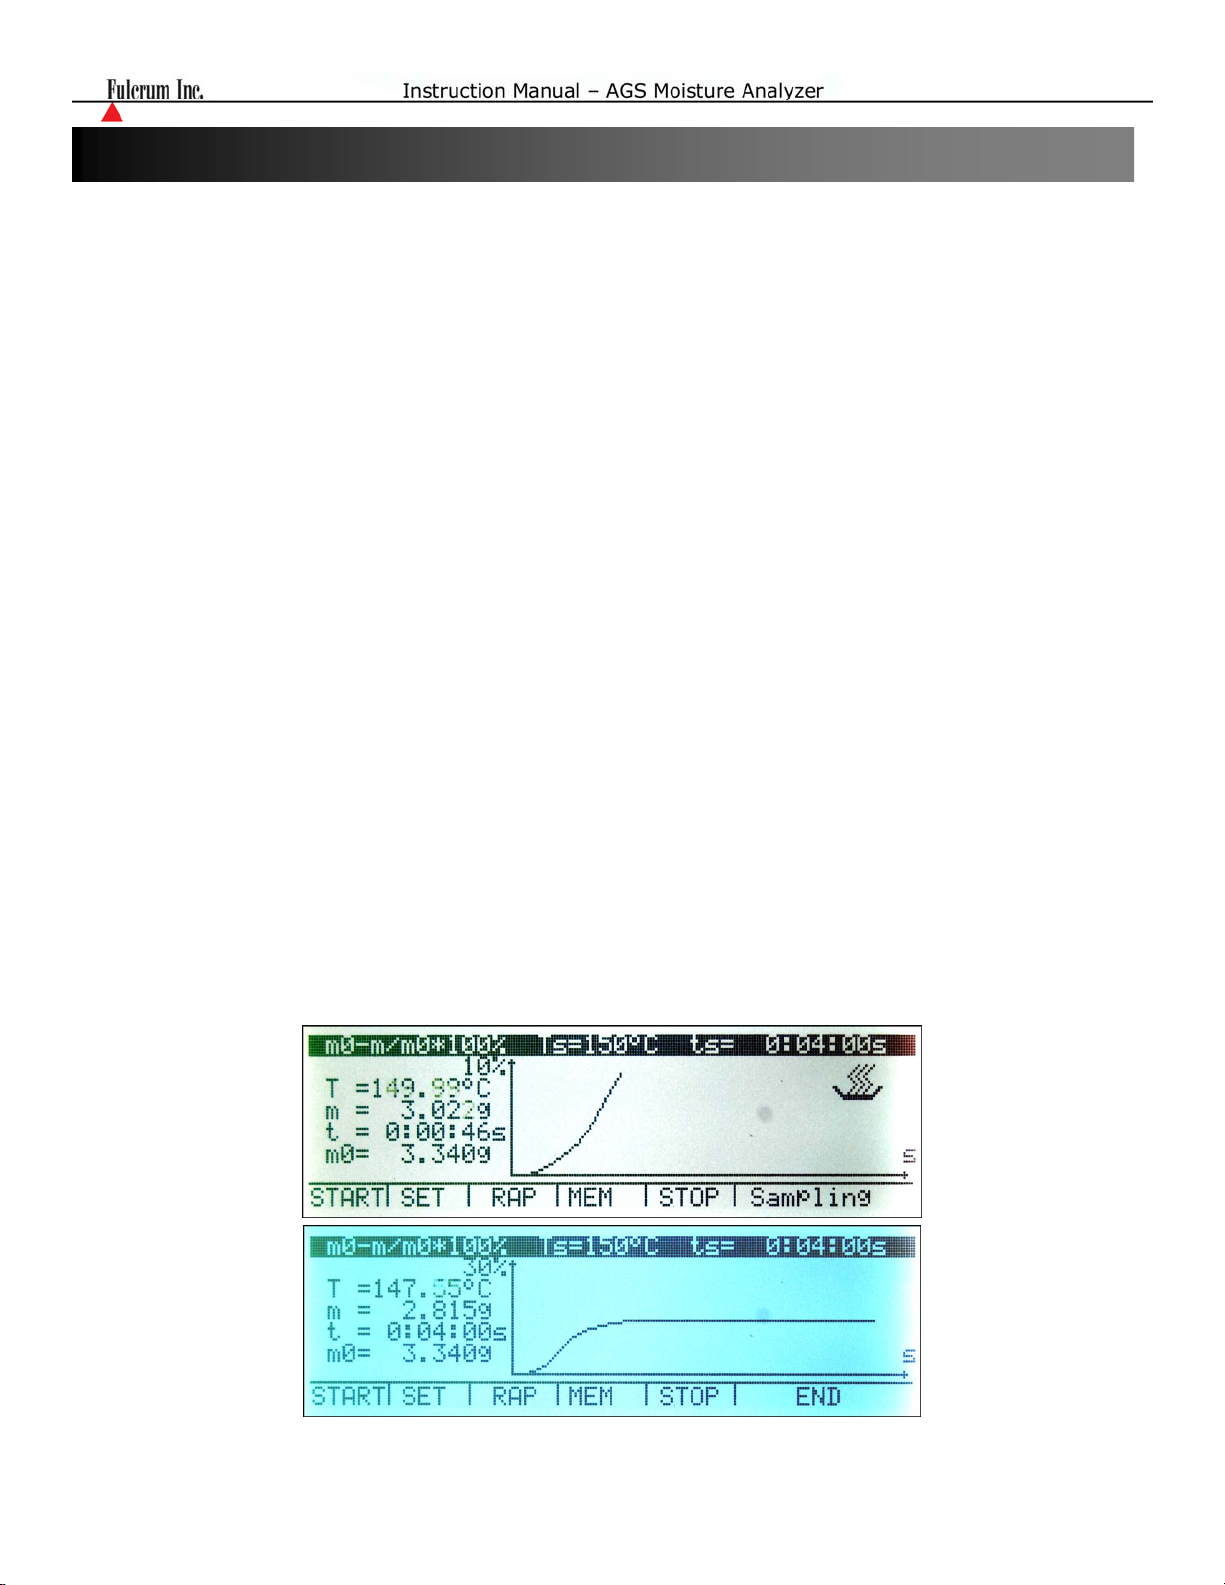
Chapter 12: Setting Drying Parameters for Unknown Samples
To estimate the optimum drying parameters for an unknown sample, it is recommended you activate the Drying
Chart for the initial analysis. To enable the Drying Chart, follow the steps listed in Chapter 10.
After enabling the Drying Chart, set the following parameter values for the initial analysis:
Temperature: organic matters: 80 – 100°C, mineral matters: 140 – 160°C
Qualifying quantity: None (drying process is stopped after defined drying time)
Sampling interval: 1 second
Drying time: Set the time value long enough to dry the entire sample
By observing the progress of the drying chart, it is possible to estimate its course and determine the time needed
to dry the sample as well as analyze its moisture content.
The X axis of the chart represents 160 time intervals (for longer time intervals, the axis changes to 360, 720,
etc.).
The Y axis of the chart represents moisture values according to the chosen formula. It starts at 10% and shifts
automatically to 30%, 50%, etc.
NOTE: Remember to disable the Drying Chart before regular analysis.
The sample is dried when the slope of the drying chart begins to curve. The actual drying time should be
defined with a reserve, taking into consideration differences in the weight of successive samples. If the drying
time is too short, the results of moisture analysis will be inaccurate.
25
Page 26
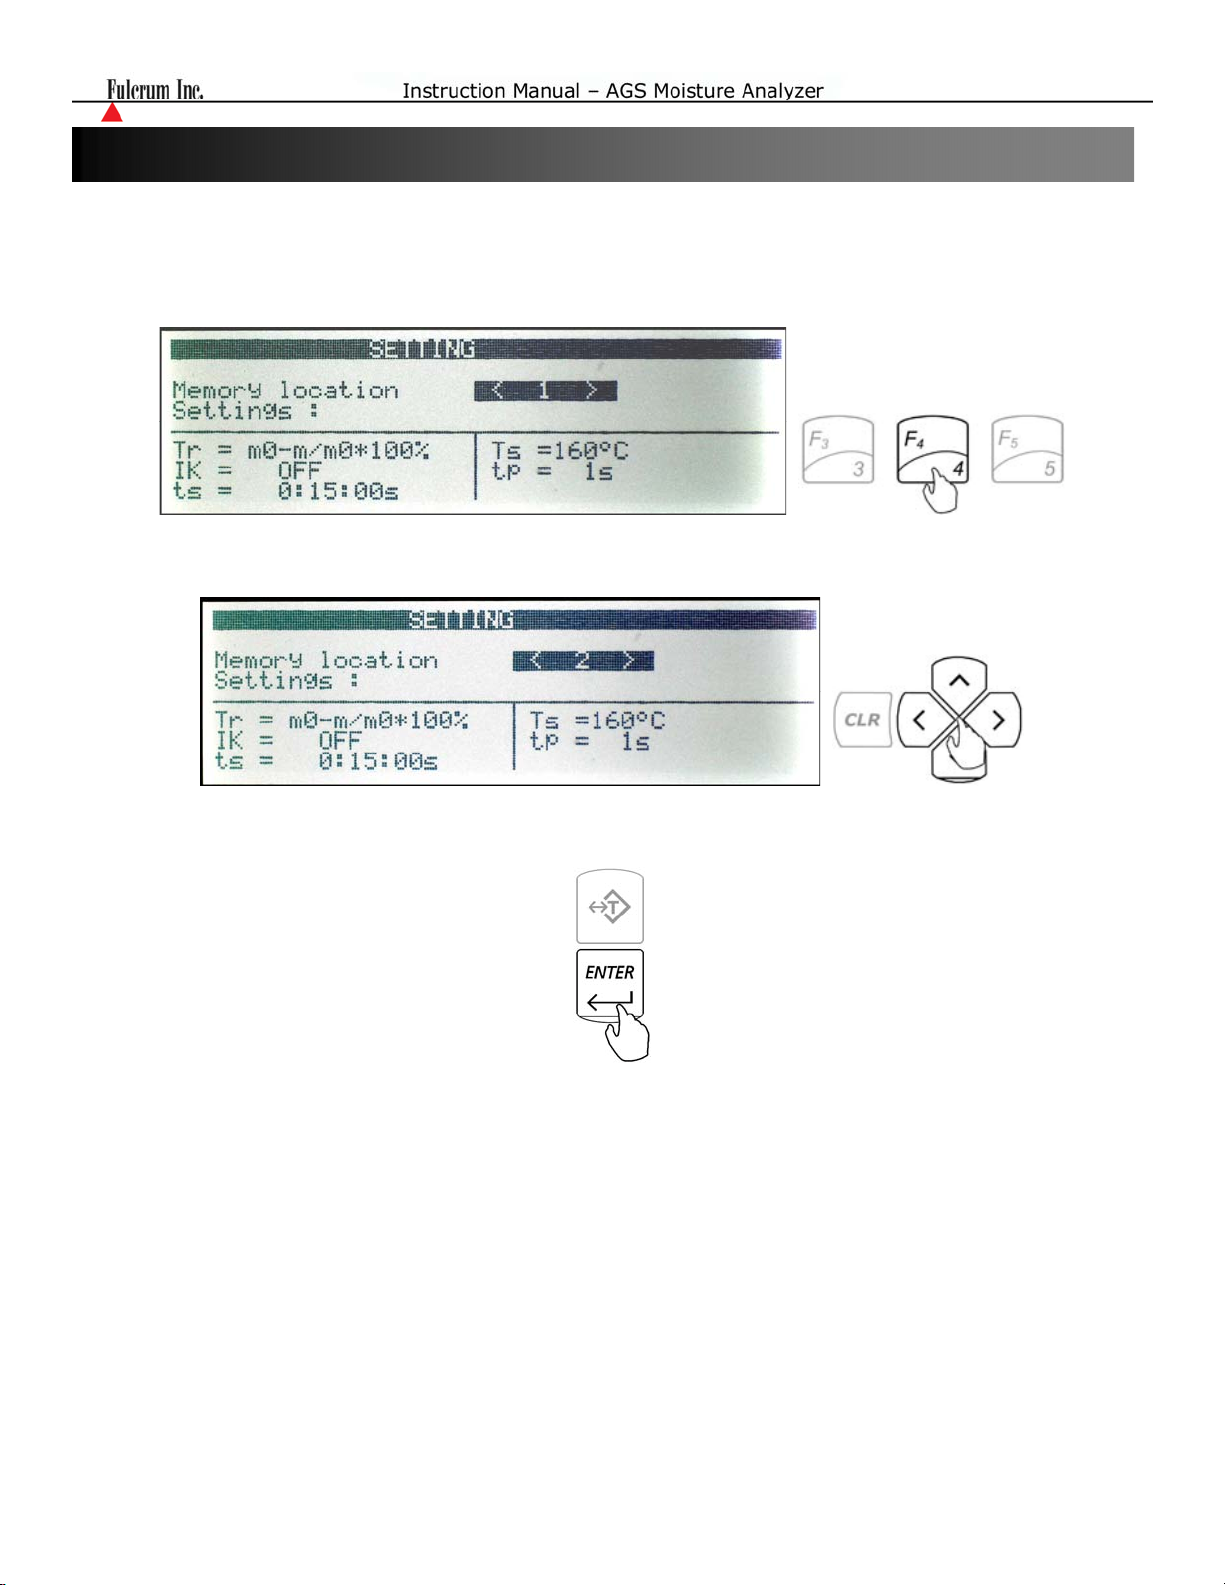
Chapter 13: Loading Saved Parameters and Configuration
To load saved parameters that have been stored in the memory, follow the steps below:
1. Press the F4 (MEM) key to access the unit’s Memory Bank.
2. Use the navigation keys to select a desired set of stored parameters.
3. Once the set has been selected, press the ENTER key.
4. Stored parameters will be uploaded into the Analyzer’s Configuration Menu.
26
Page 27
Chapter 14: Report Printing
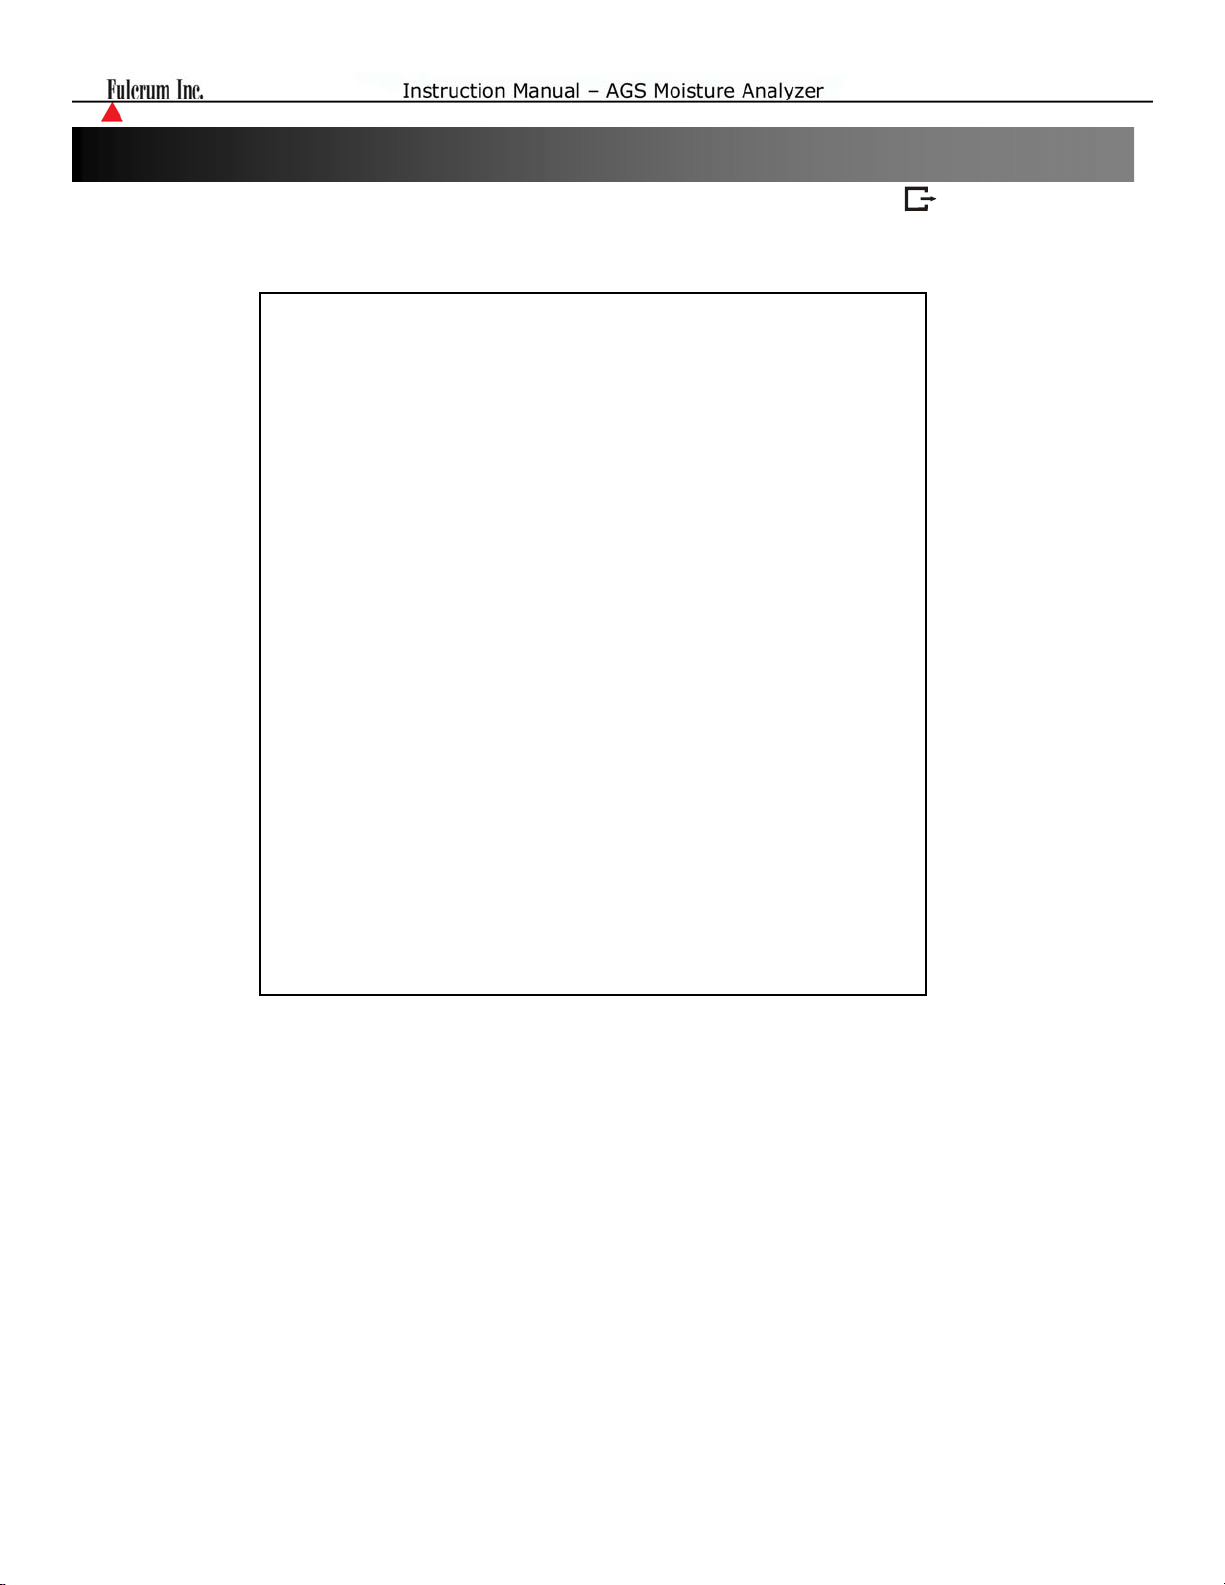
To print a Drying Report of a performed analysis, press the data transfer (PRINT) key.
- - - - - - - - - - - - - - - - - - -- - - - -
Date: 2006-10-17
Time.: 13:03:24
Drying parameters
- - - - - - - - - - - - - - - - - - -- - - - -
Product
Drying temperature : 119°C
Mode : m0-m/m0*100%
Finished time over
Initial weight : 0.000 g
Final weight : 0.000 g
Drying time : 0:00:00s.
Sampling interval: : 10s
Moisture : 0.00%
NOTE:
The analysis proceeded by:
Signature ....................................
Drying started:
27
Page 28
Chapter 15: Testing the Analyzer with Sodium Tartrate Dihydrate
Important: Always wear protective goggles over your eyes and rubber gloves
when handling Sodium Tartrate Dihydrate.
Warning:
If inhaled, Sodium Tartrate Dihydrate may cause mild irritation to the respiratory tract. If the
chemical comes in contact with skin or eyes, it may also cause mild irritation. If swallowed, a
large dose may cause gastrointestinal disturbances.
First Aid:
• If inhaled, immediately move to an area with sufficient fresh air. Get medical attention for any
breathing difficulty.
• If ingested, drink several glasses of water or milk. If a large amount was swallowed, get medical advice.
• If skin contact occurs, wash exposed area with soap and water. Get medical advice if irritation
develops.
• If eye contact occurs, wash eyes thoroughly with water. Get medical advice if irritation develops.
Sodium Tartrate Dihydrate is a chemical compound that can be used as a standard to check the accuracy of the
Moisture Analyzer. When the chemical is heated to 150°C, it undergoes a change that releases moisture
(theoretically 15.66%) so the chemical should lose 15.51% to 15.81% of its weight. The “m0 – m/ m0 * 100%”
formula will show the results directly. With a sample weight of 5 grams, set the drying time to 10 minutes to be
sure the chemical action is complete. If the chemical has been stored at elevated temperatures or subjected to
mechanical abuse, the results may vary. Be sure to spread the sample evenly throughout the disposable pan.
Recommended Parameters
Mode: Time Mode
Calculation: m
Drying Temperature: 150
Sample Quantity: OFF
Sampling Interval: 3sec
Drying Time: 10:00 minutes
– m/ m0 * 100%
0
Note: Make sure the disposable pan is cool before placing the sample.
28
Page 29
Chapter 16: Weighing
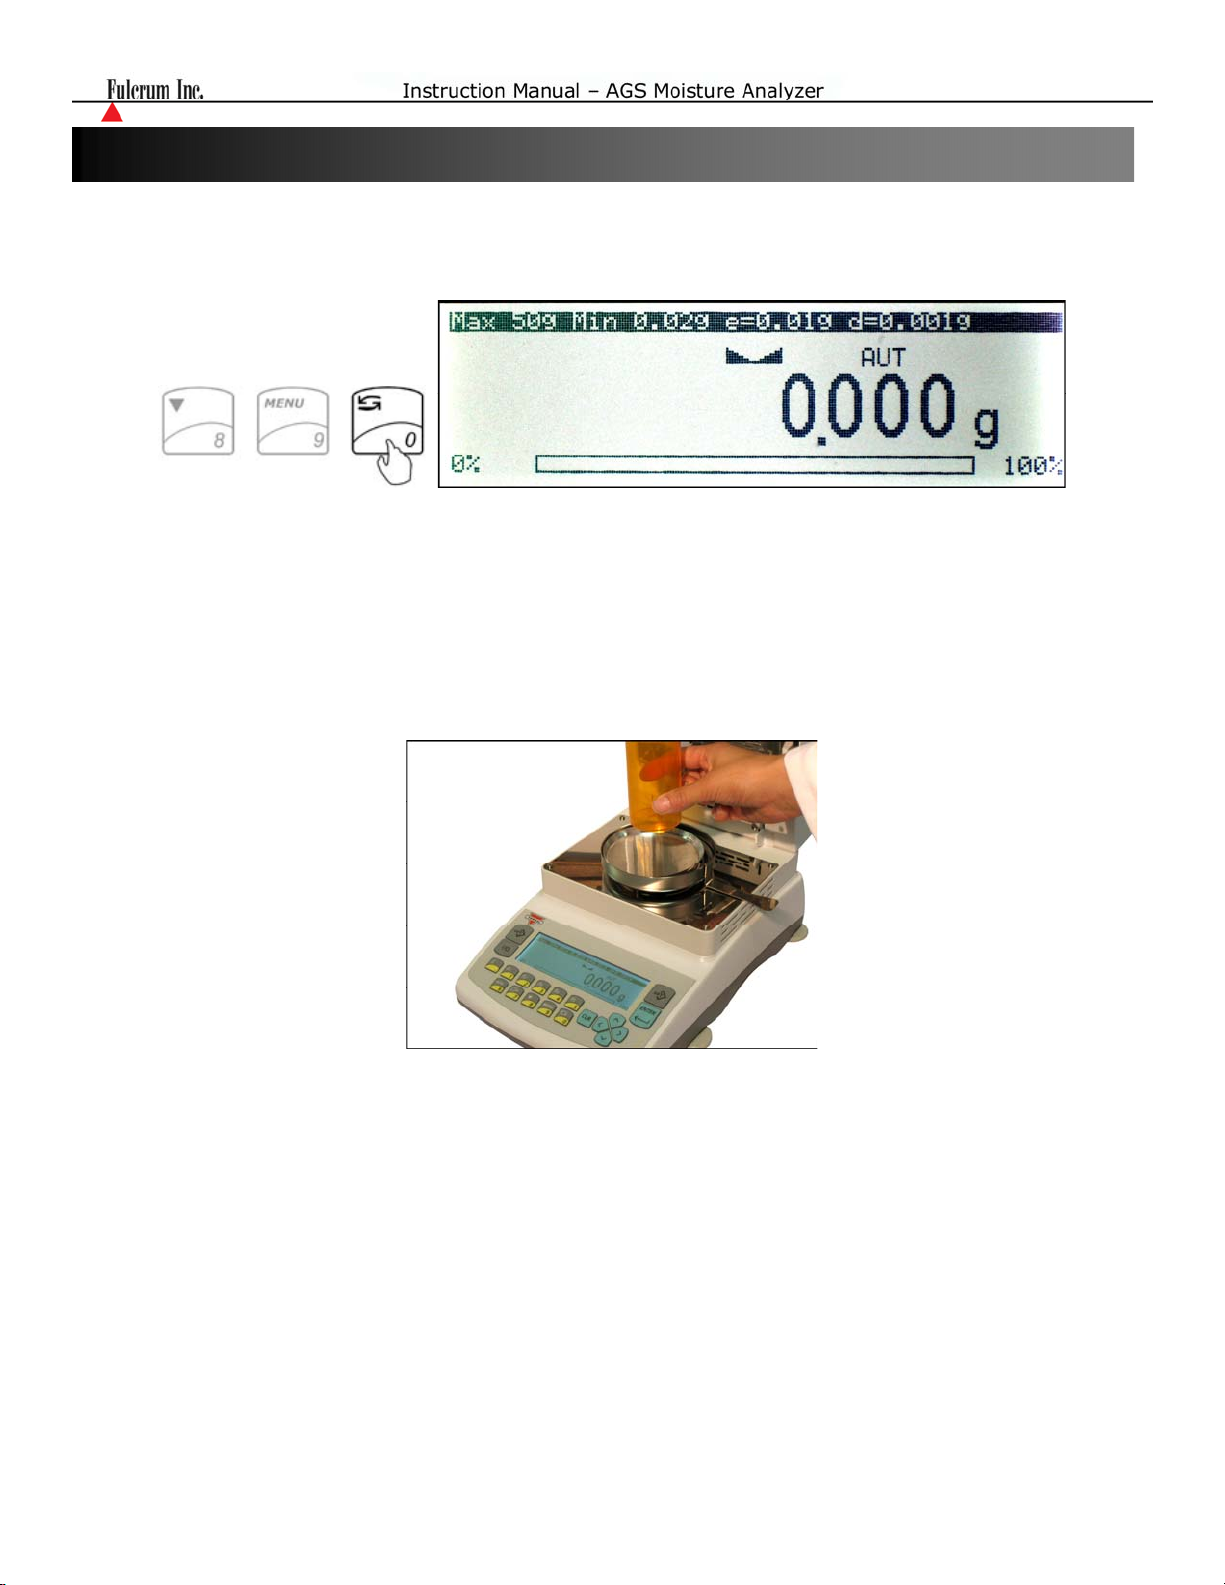
1. To begin weighing, press the Mode Return key (Æ Æ) to switch from a Moisture Analyzing Mode to a
Weighing Mode or vice versa. The scale is ready to begin weighing as soon as the stabilization indicator
( ) appears on the display.
2. When weighing, always place the mass in the middle of the pan. The weighed result may be taken when
the stabilization indicator appears on the display.
16.1. Taring
1. If a container is used for weighing, it may be tared. In taring the container, the scale subtracts the
weight of the container from the gross weight to obtain the net weight.
2. To tare the weighing container, place it in the middle of the pan. The container’s weight will be
shown on the display.
29
Page 30
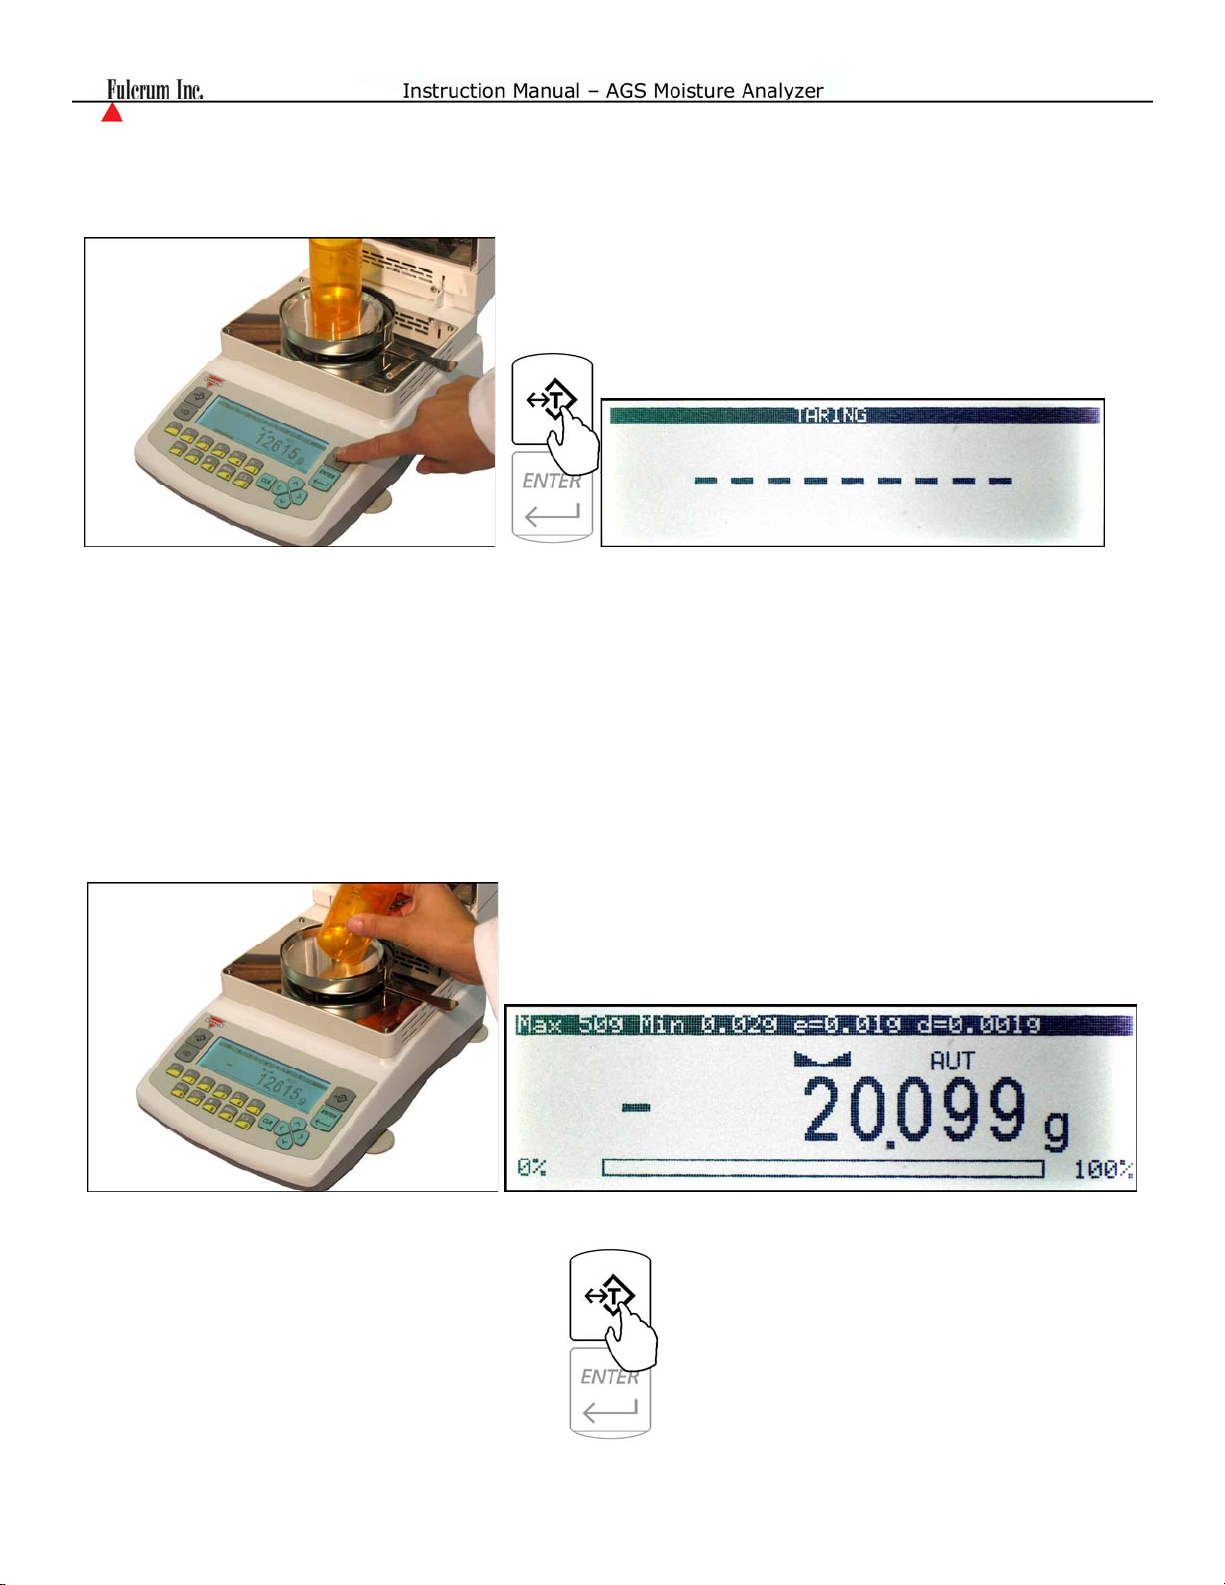
3. Once the stabilization indicator appears on the display, the container is ready to be tared. To tare the
container, press the T button. The display will show a dotted line which indicates the scale has
begun the taring process.
4. When finished taring, the balance will return to Weighing Mode. The display will indicate 0, and the
NET indicator will be shown on the display signaling the next weight taken is a NET result.
Note: Do not touch or move the scale during the taring process.
16.2. Clearing a Tare
1. To clear the tare, remove the tared object along with the NET weight from the pan. The scale will
then display a negative NET tare result.
2. To clear the tare, press the T button.
30
Page 31
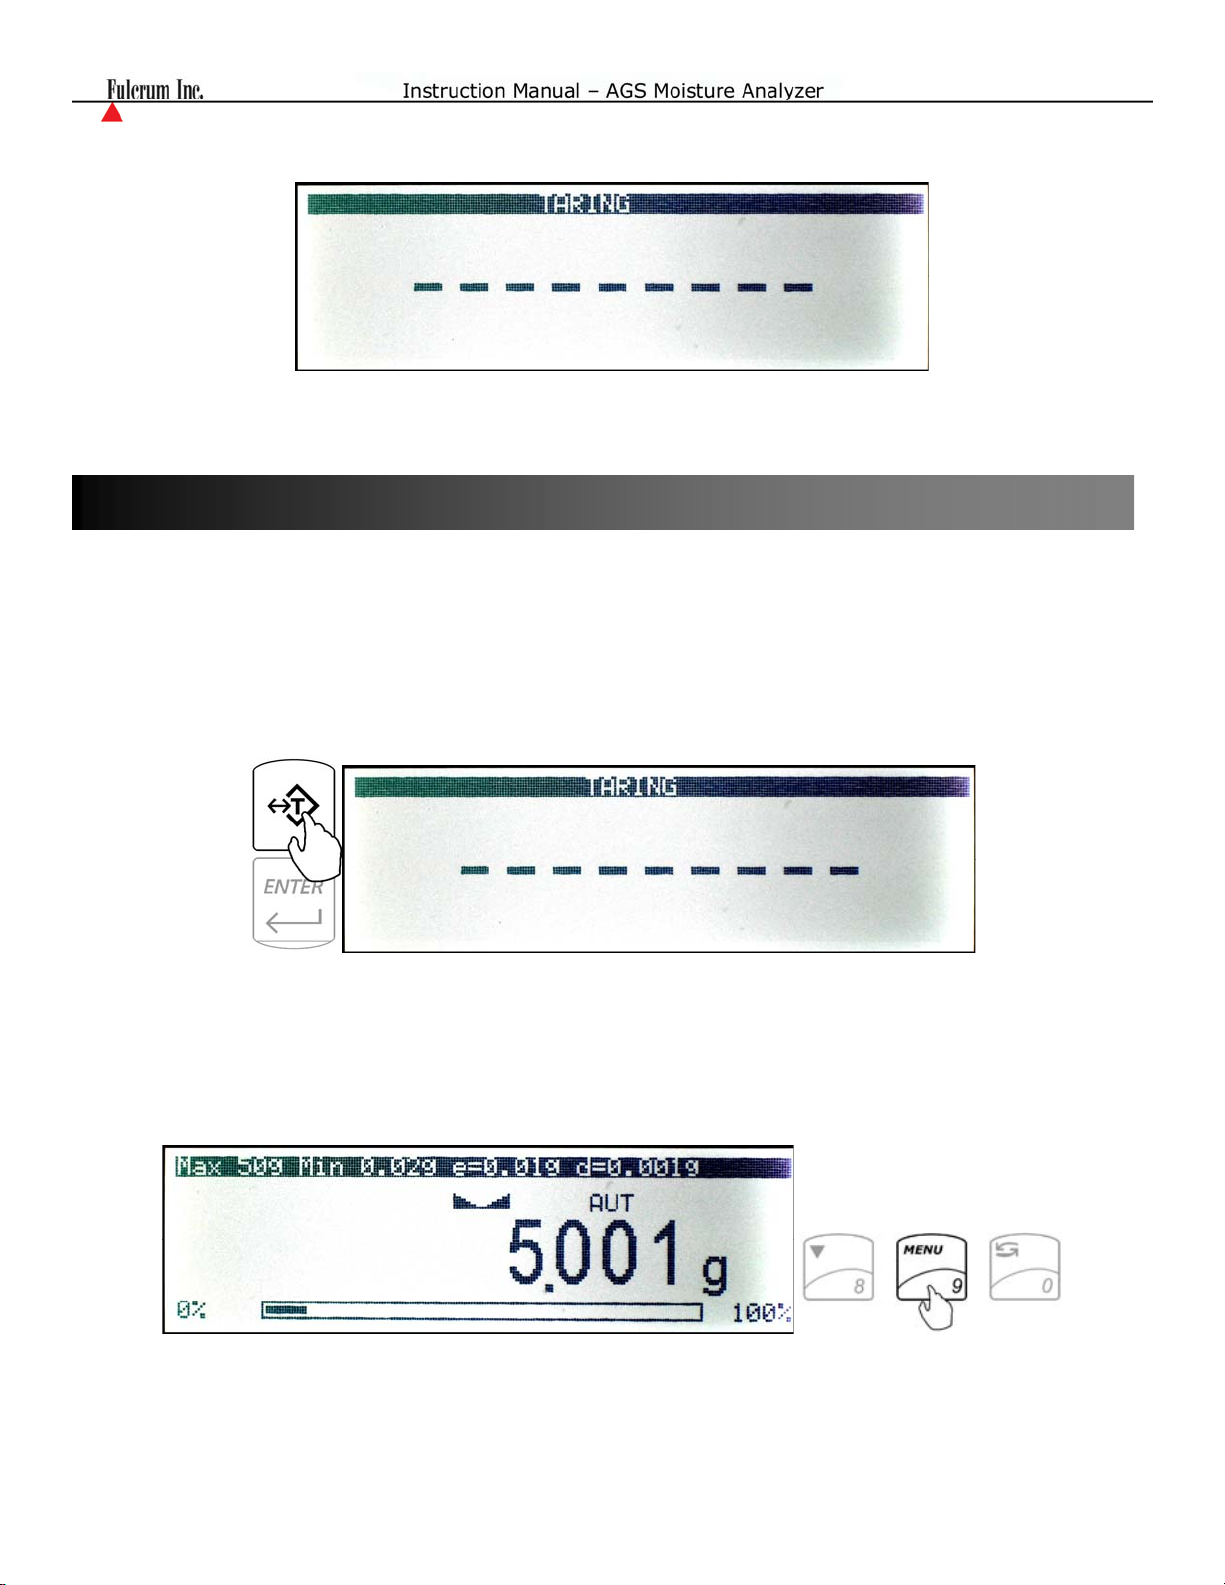
3. The display will show dashed lines indicating the tare is clearing.
4. When finished clearing the tare, the scale will return to Weighing Mode.
Chapter 17: Parts Counting
Note: In order to perform Parts Counting, the analyzer must be in the Weighing Mode.
17.1. Using a Custom Sample Size
1. Place a container on the Analyzer’s pan and press the T key to tare. After taring the container manually,
count out the sample you want to be used for calculating the average piece weight of your counting
transaction.
2. Place the sample in the container.
3. The weight of the sample will be displayed as it is placed on the pan. Once the weight of the sample
stabilizes and the stability indicator appears on the display, press the MENU key to enter the main menu.
31
Page 32
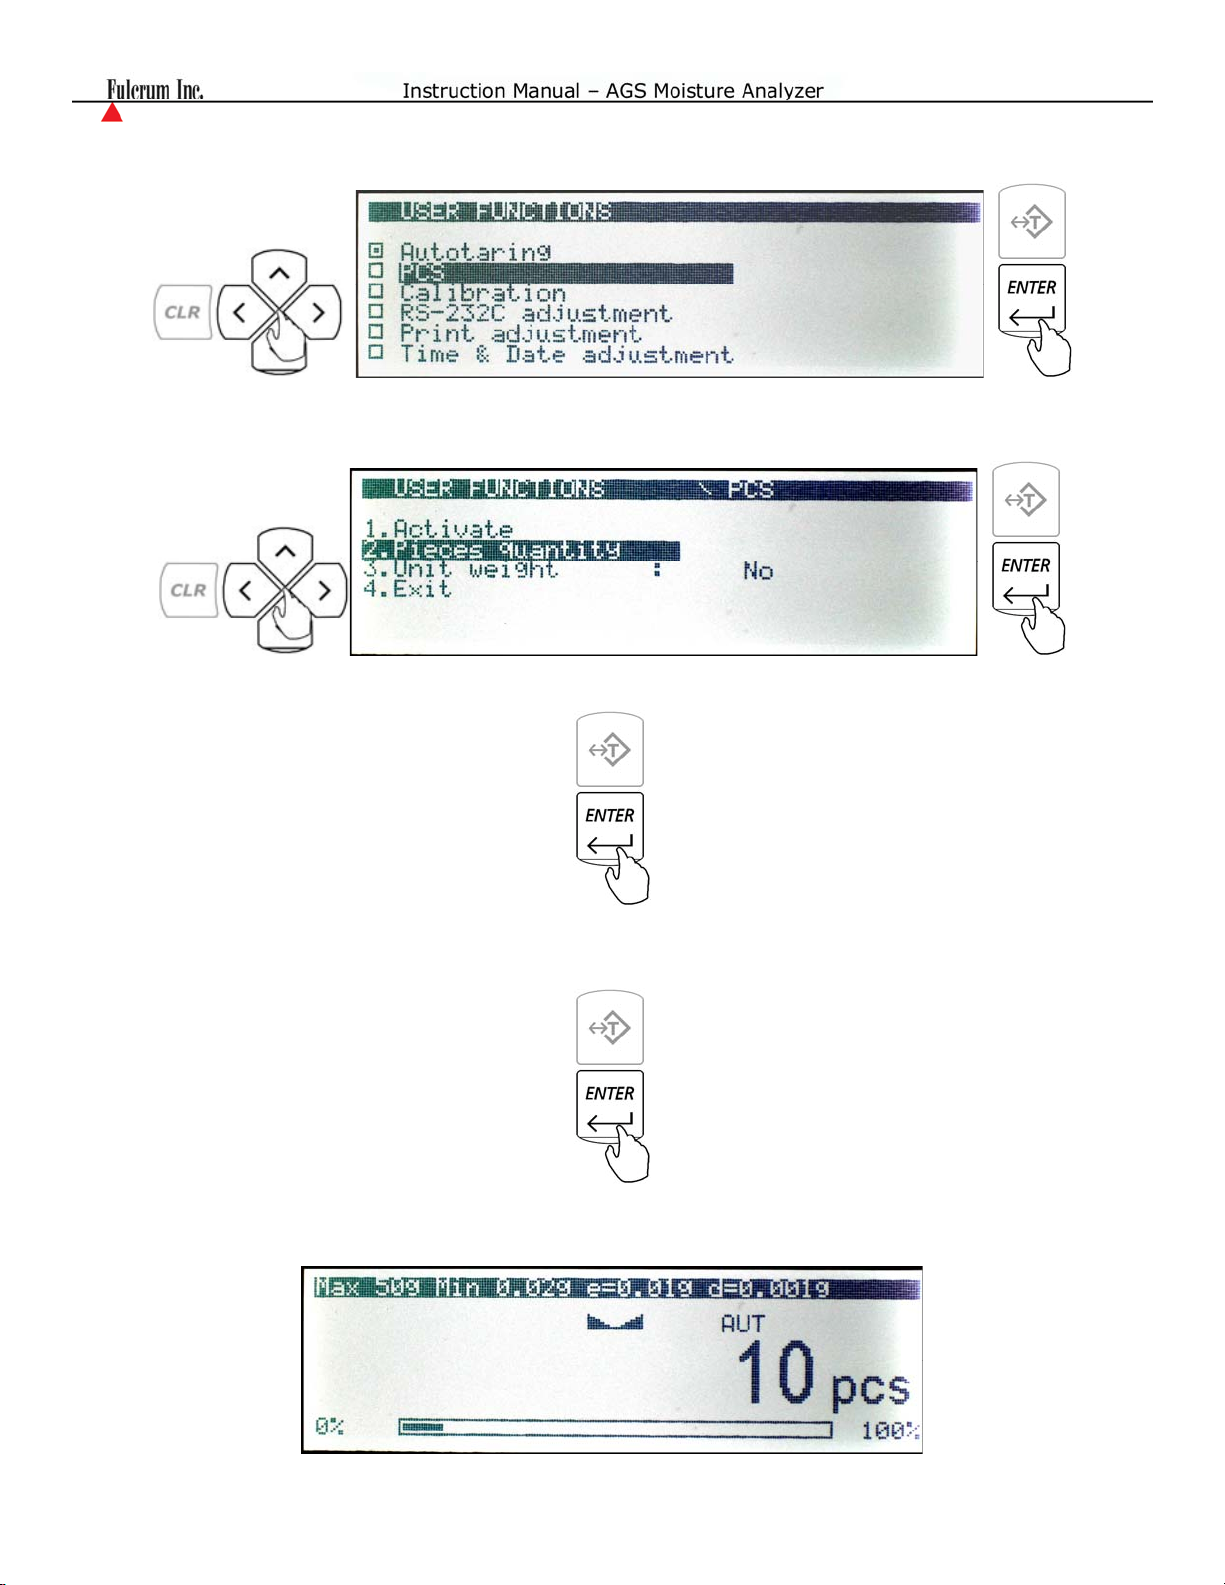
4. Use the navigation keys to select PCS and press the Enter key
5. Use the navigation keys once again to select Pieces Quantity and press the ENTER key.
6. Using the numeric keys, enter the value of your sample size placed in the container and press the
ENTER key.
7. Once your custom sample size value has been entered, use the navigation keys to select option number
“1” Activate and press the ENTER key.
8. The scale will display the count of the sample. At any time you can proceed with the count.
32
Page 33
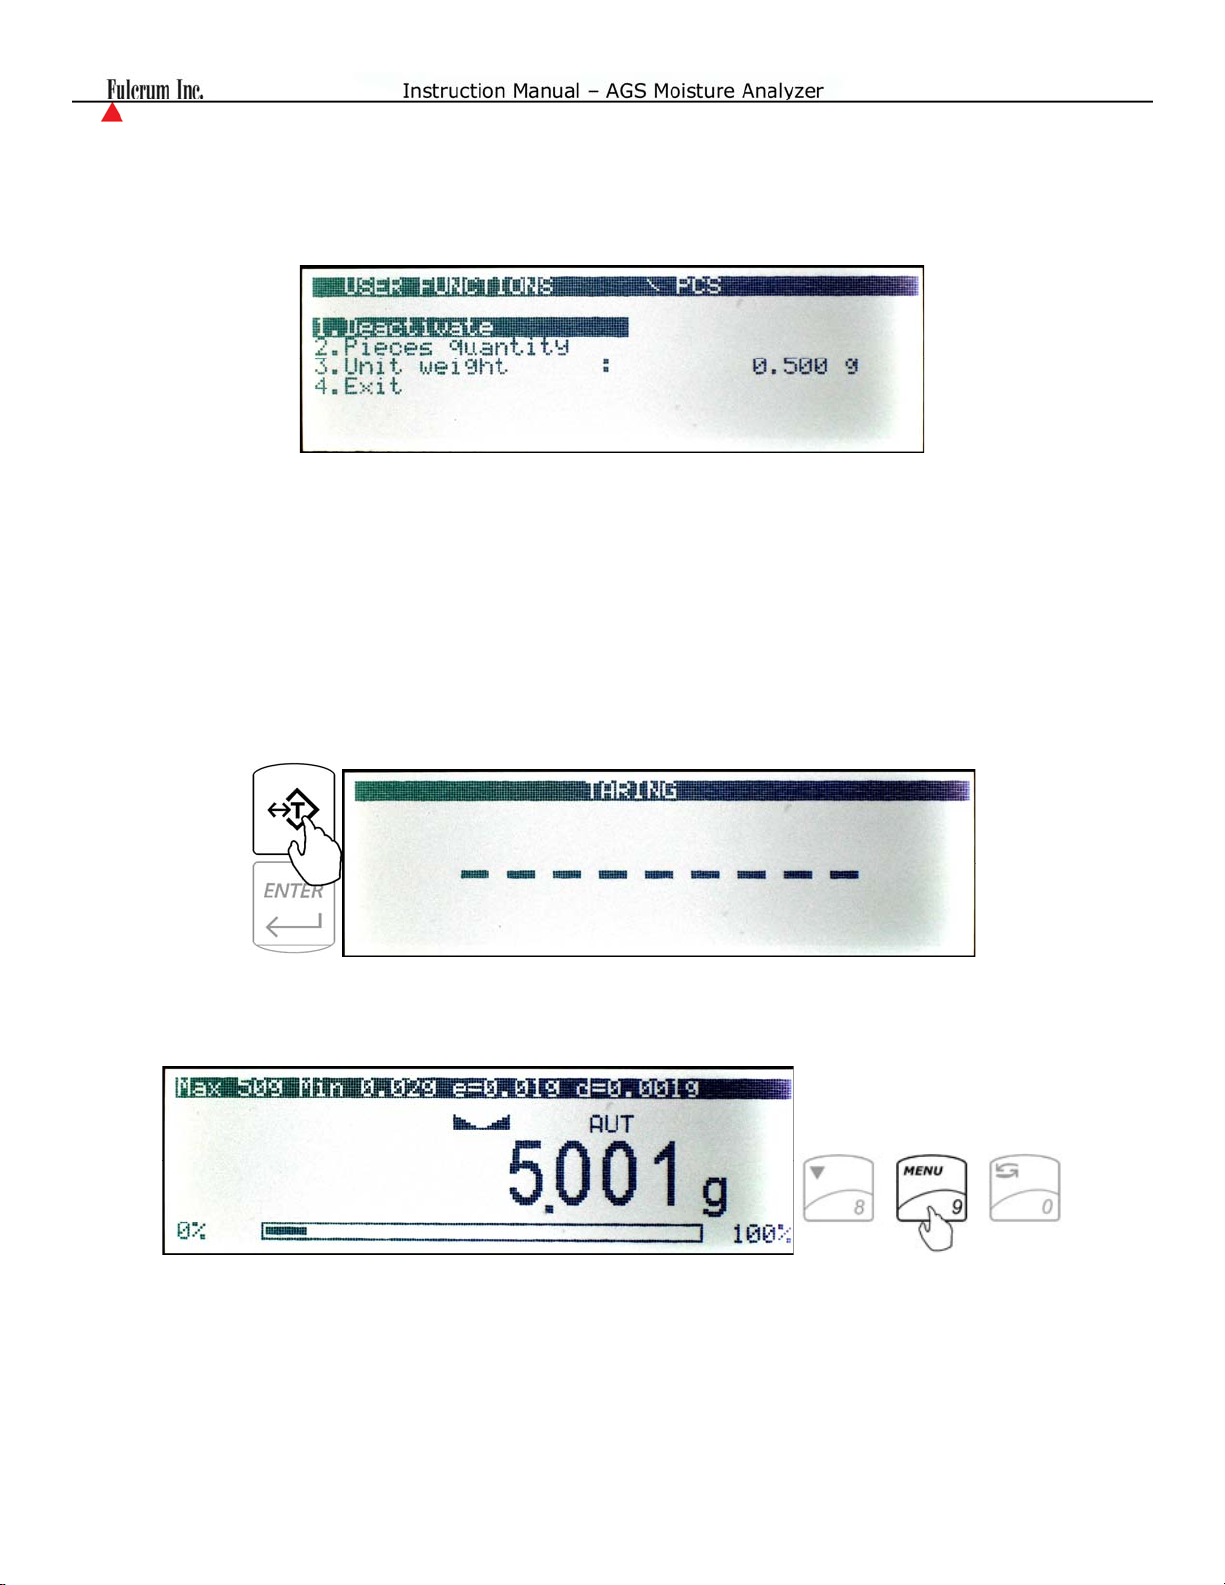
9. Once an accurate count has been taken, the container and its contents may be removed from the scale.
To exit parts counting and return to basic weighing, select Deactivate from the parts counting menu.
17.2. Counting Based on a Known Individual Piece Weight
1. Place a container on the scale’s pan and press the T key to tare.
2. Press the MENU key to enter the main menu.
33
Page 34
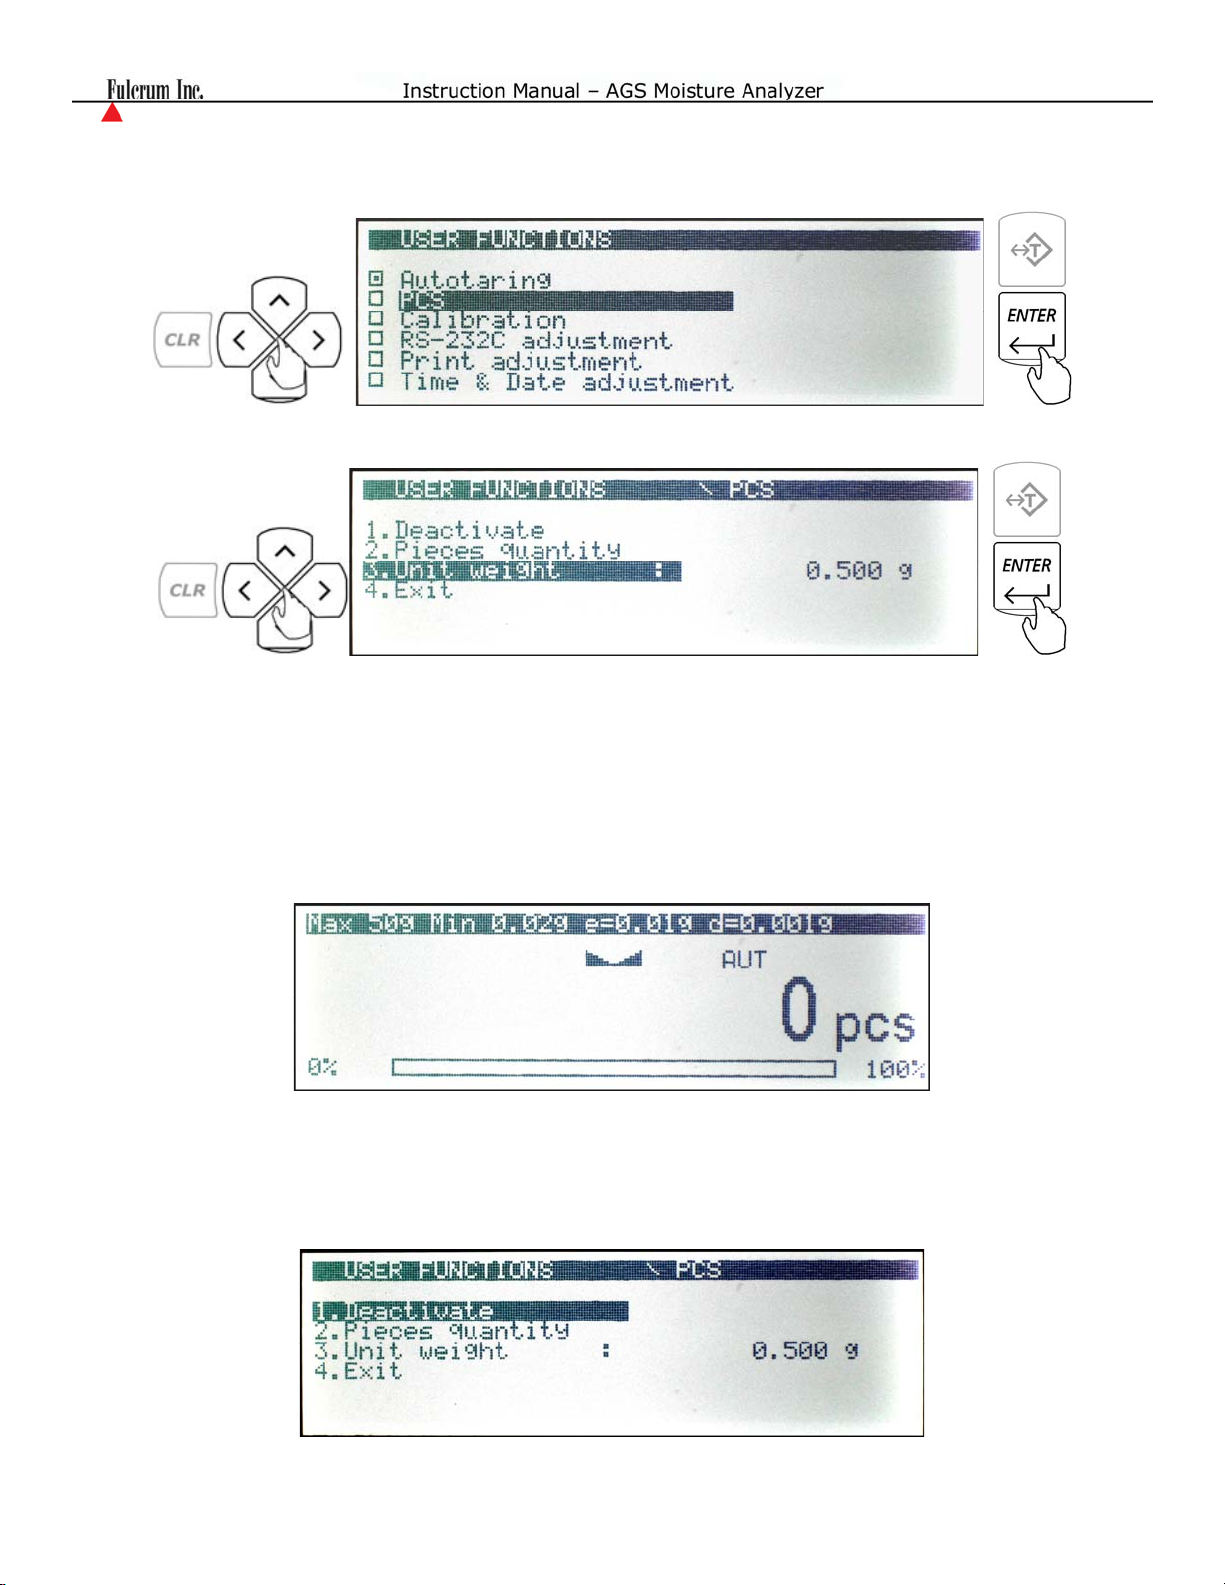
3. Use the navigation keys to select PCS and press the ENTER key.
4. Use the navigation keys once again to select Unit Weight and press the ENTER key.
5. Using the numeric keys, enter the exact individual piece weight of the counted parts.
6. Once the exact individual piece weight has been entered, use the navigation keys to select option
number 1 Activate and press the ENTER key.
7. The scale will display “0pcs”. At any time, proceed with the count.
8. Once an accurate count has been taken, the container and its contents may be removed from the scale.
To exit parts counting and return to basic weighing, select “Deactivate” from the parts counting menu.
34
Page 35
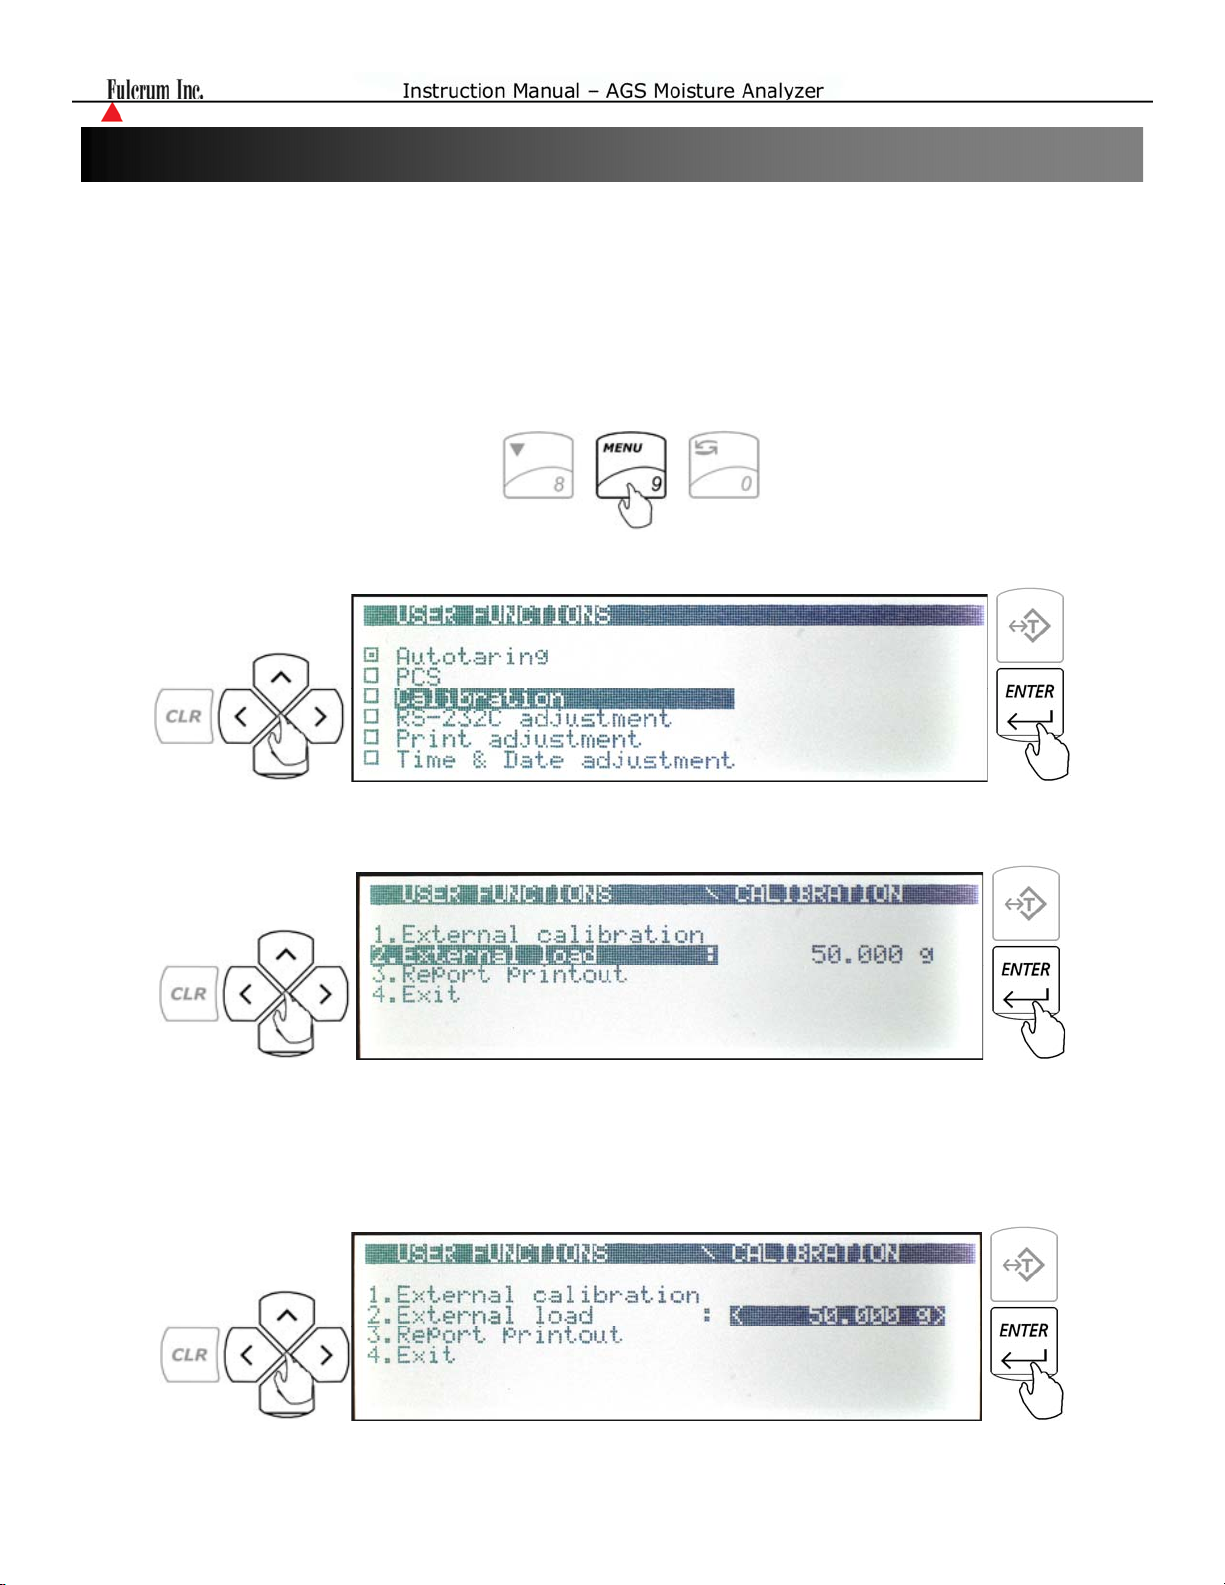
Chapter 18: Calibration
When the Analyzer is initially installed, it must be calibrated to ensure accurate weighing results.
Calibration should be performed periodically or whenever the unit is moved to a different location. Before
calibrating the Analyzer, have the appropriate calibration weight available.
Note: In order to perform Calibration, the Analyzer must be in the Weighing Mode.
1. Press the Menu key to enter the Main Menu of the weighing mode.
2. Use the navigation keys to select CALIBRATION and press the ENTER key
3. To change the calibration mass, use the navigation keys to select EXTERNAL LOAD and press ENTER.
4. Use the navigation keys to select the allowed external loads for calibration. The load equal to full scale
range is recommended. Be sure the weight used for the External Load is of sufficient accuracy for your
purpose. Once the Calibration mass has been selected press the ENTER key to accept the External Load
selection.
35
Page 36
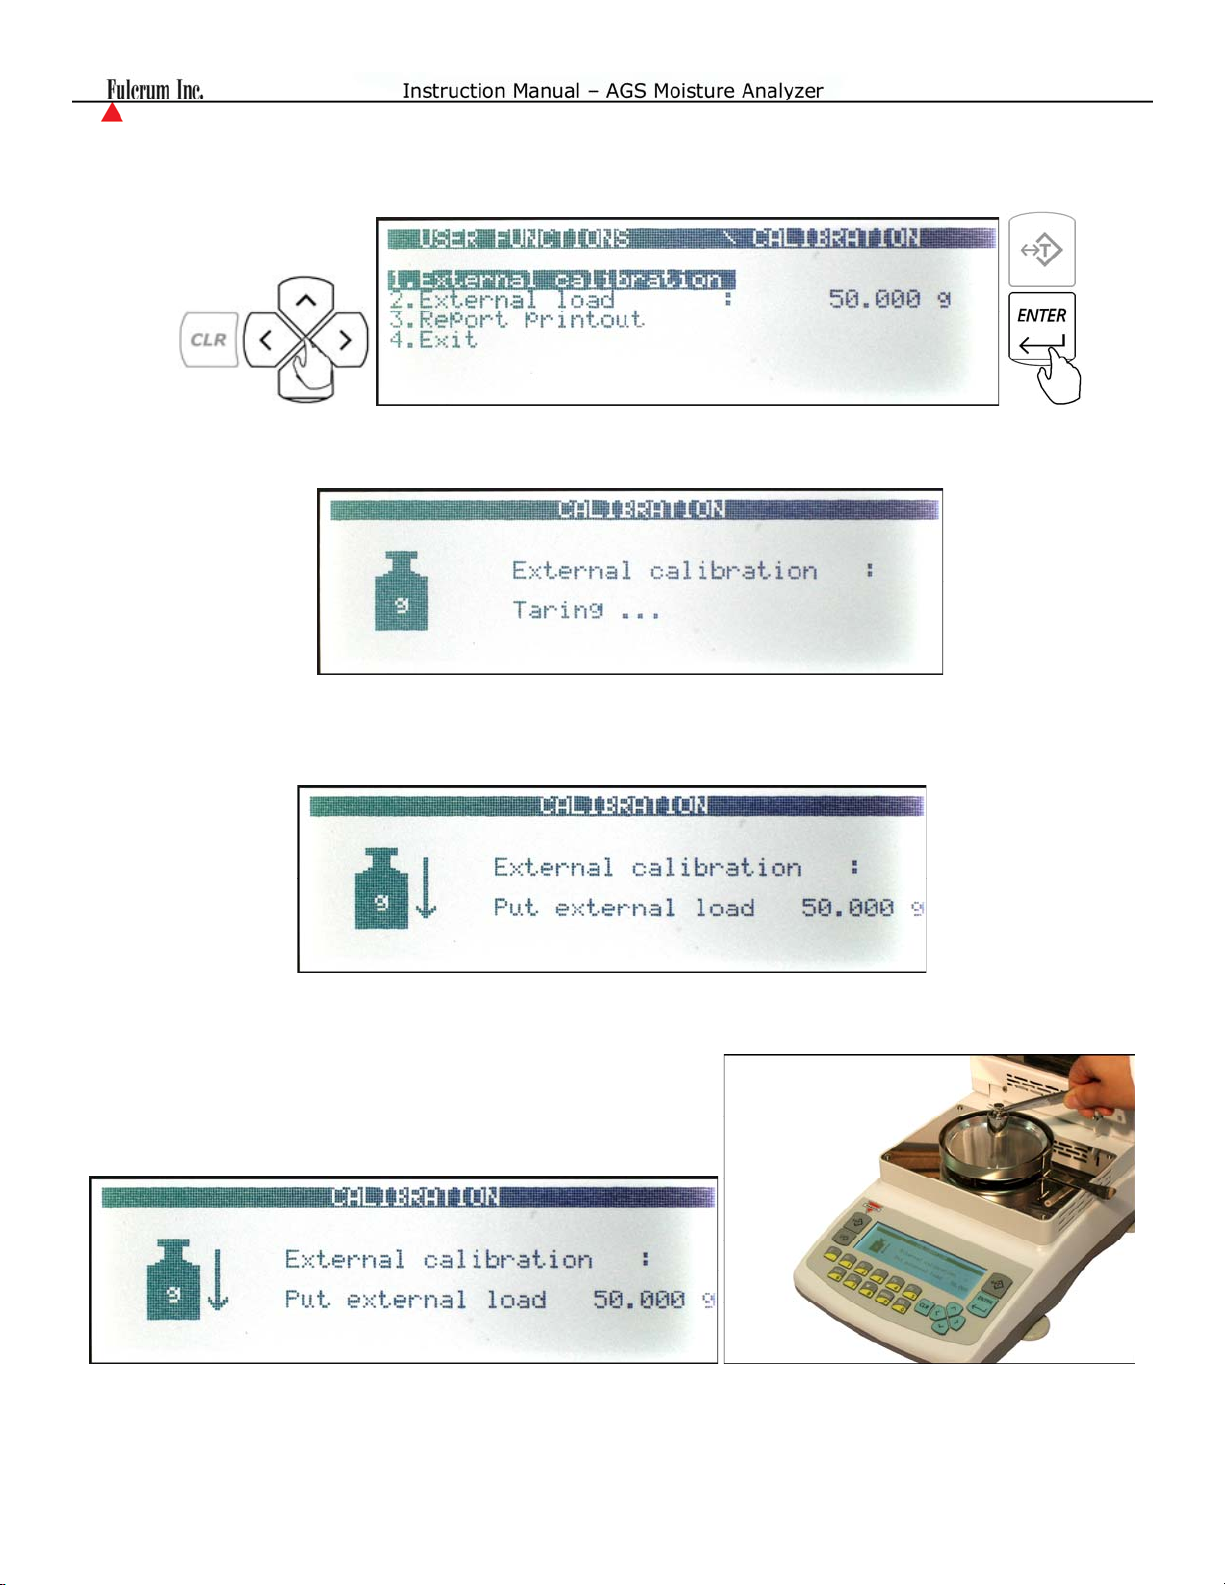
5. To begin Calibration, select option 1. EXTERNAL CALIBRATION and press the ENTER key to start the
calibration process.
6. Before calibration begins, the scale will perform an automatic tare.
7. After the tare is complete, the screen requests that the External Load, whose value is shown on the
screen, be placed on the pan.
8. Place the External Load on the pan.
36
Page 37
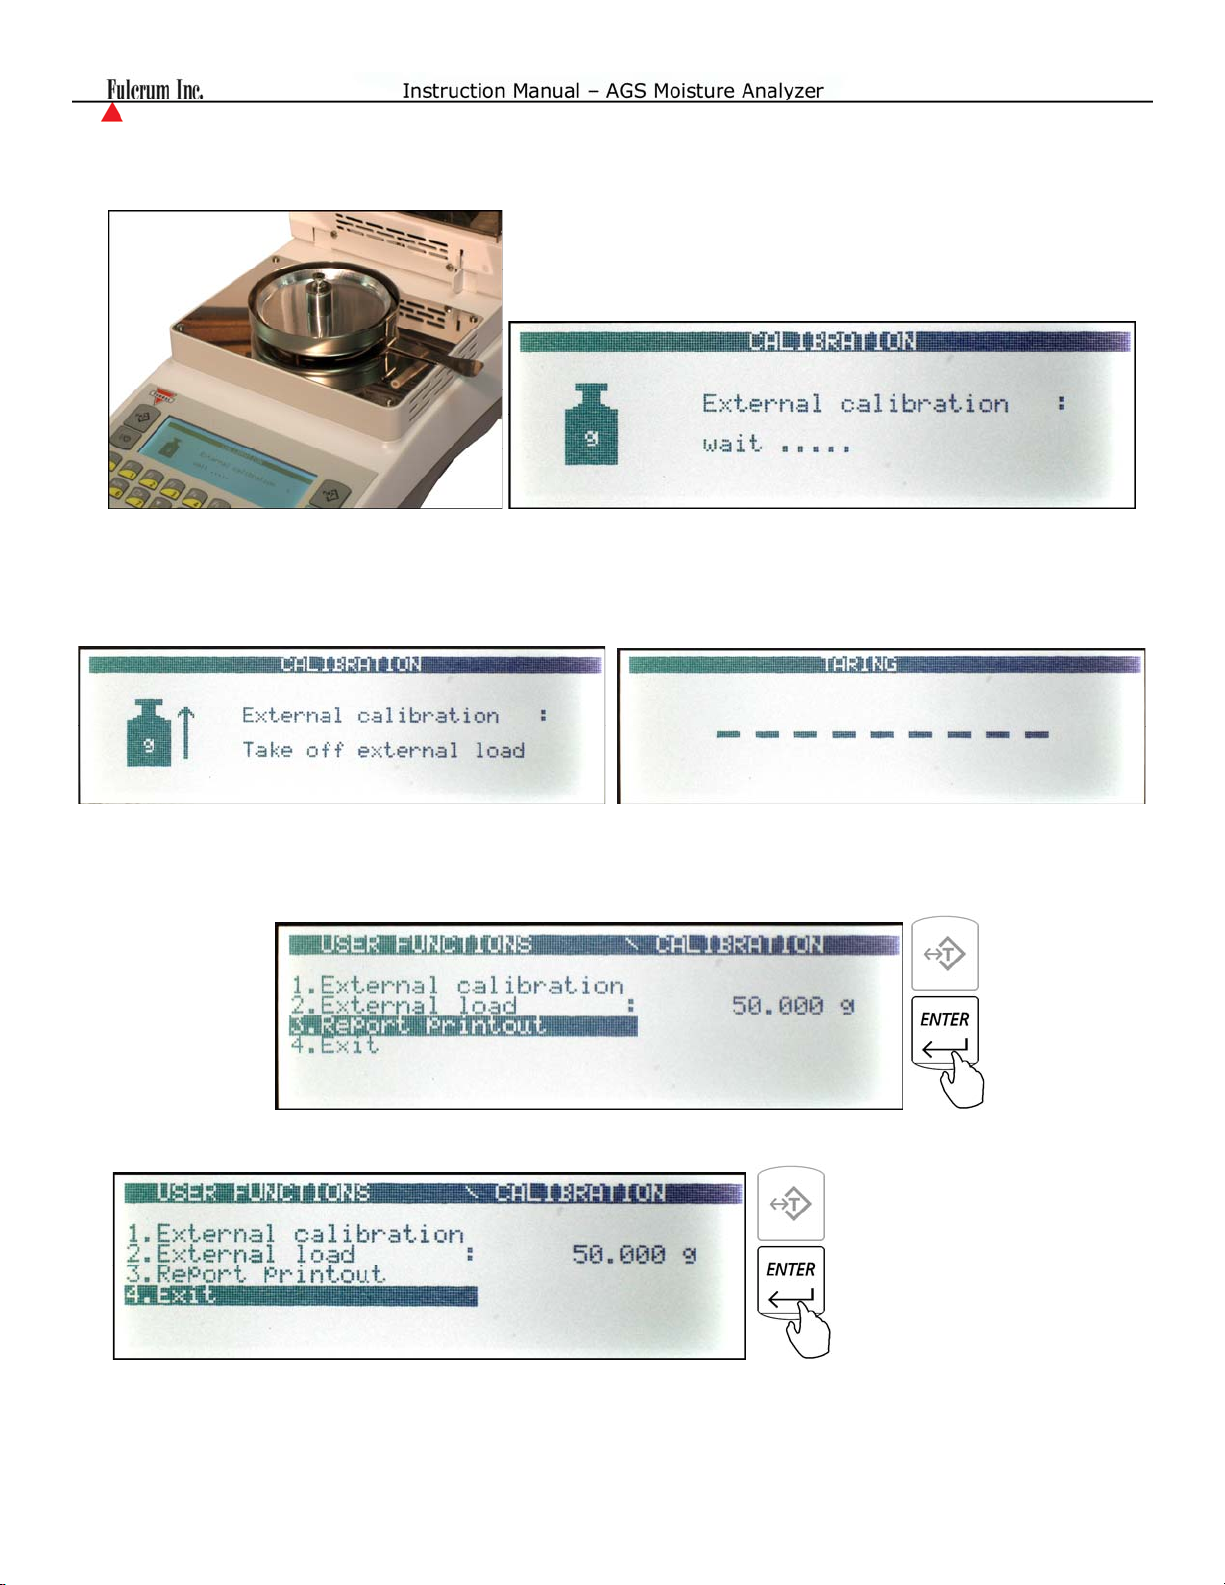
9. When the calibration weight is placed on the pan, the scale will automatically begin the calibration
process.
10. When calibration is complete, the unit requests that the External Load be removed. When the Load is
removed from the unit, the screen requests a waiting period, which is followed by a screen showing
dashes (- - - - - -). After completing the calibration process, the unit will return to the Calibration Menu.
11. To get a Report Printout of the calibration results, use the navigation keys to select 3. REPORT
PRINTOUT and press the ENTER key. Calibration Data will be sent to the external printer.
12. To exit the Calibration menu, select EXIT and press the ENTER key.
37
Page 38
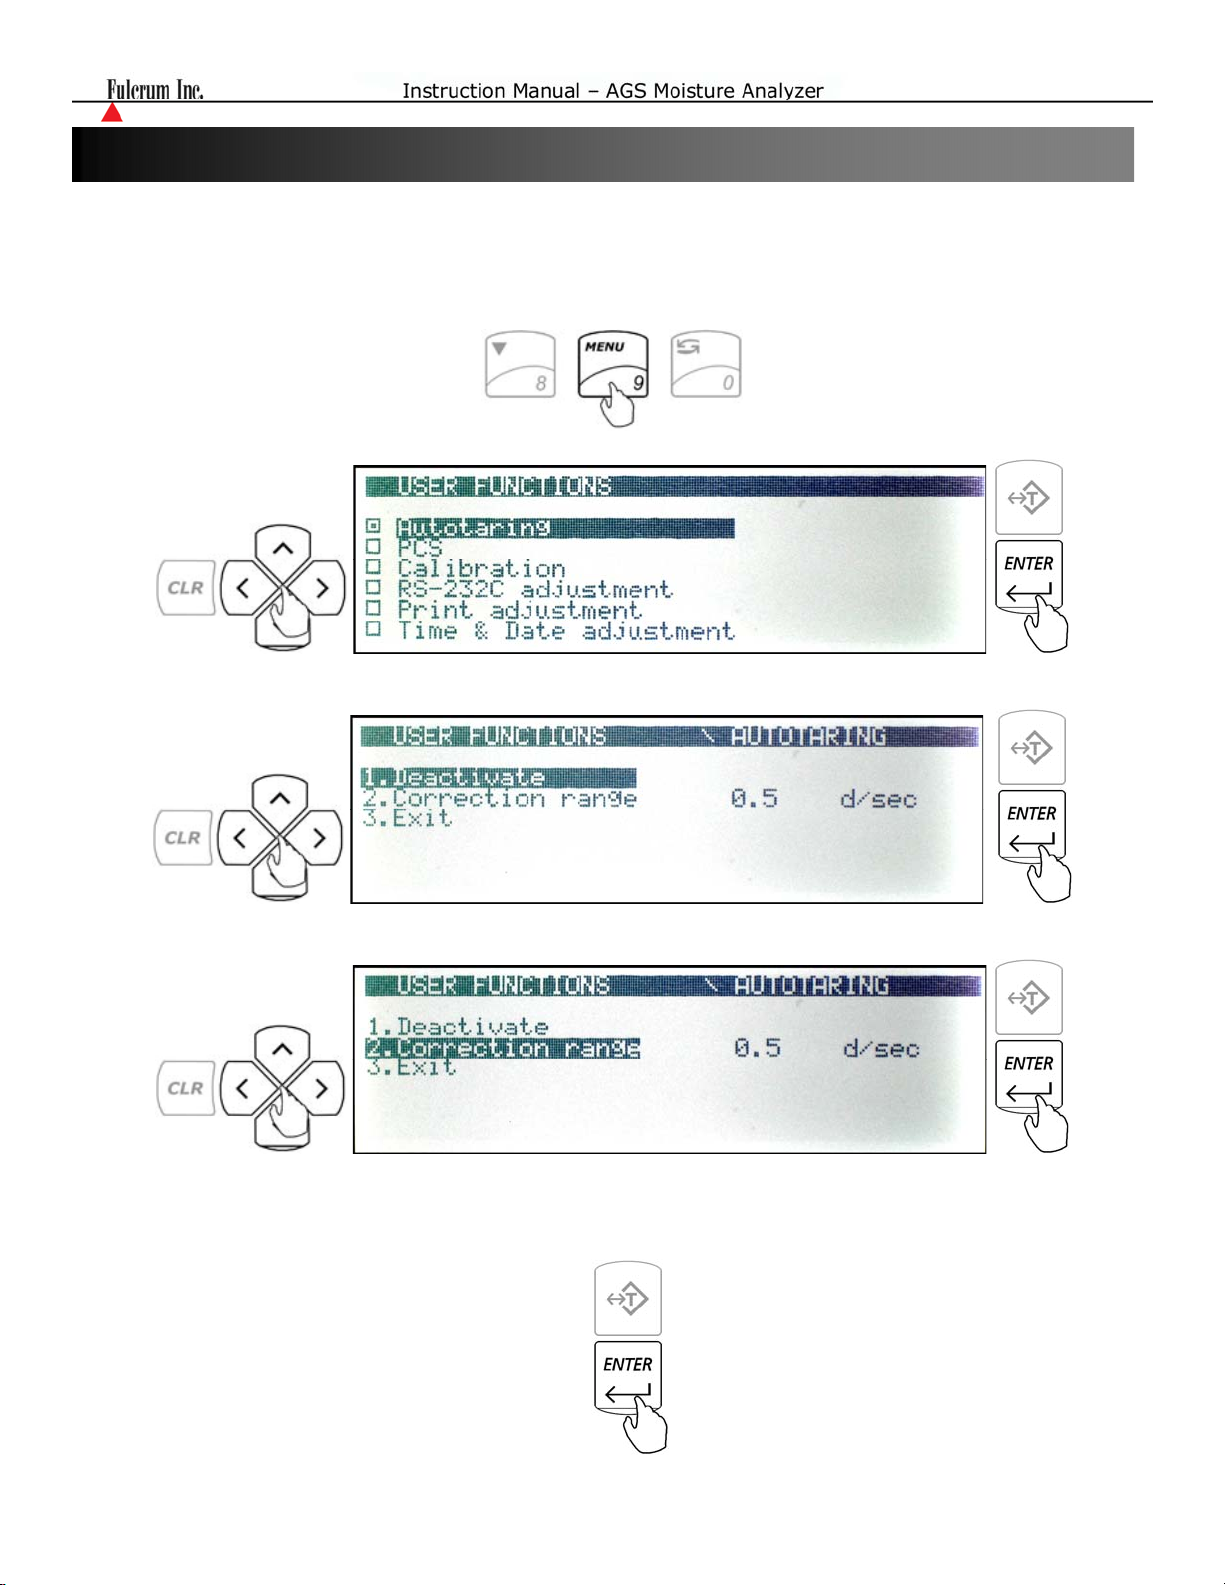
Chapter 19: Main Menu
19.1. Autotaring
1. Enter the main menu by pressing the MENU key.
2. Use the navigation keys to select “Autotaring” and press ENTER.
3. To deactivate or activate the Autotaring function, select option (1) and press the ENTER key.
4. To change the auto zeroing range, use the navigation keys to select option (2) Correction Range
and press the ENTER key.
5. Using the numeric keys to enter the desired Autotaring range between 0.5d and 5.0d.
6. Once the new range has been entered, press the ENTER key to save the setting.
38
Page 39
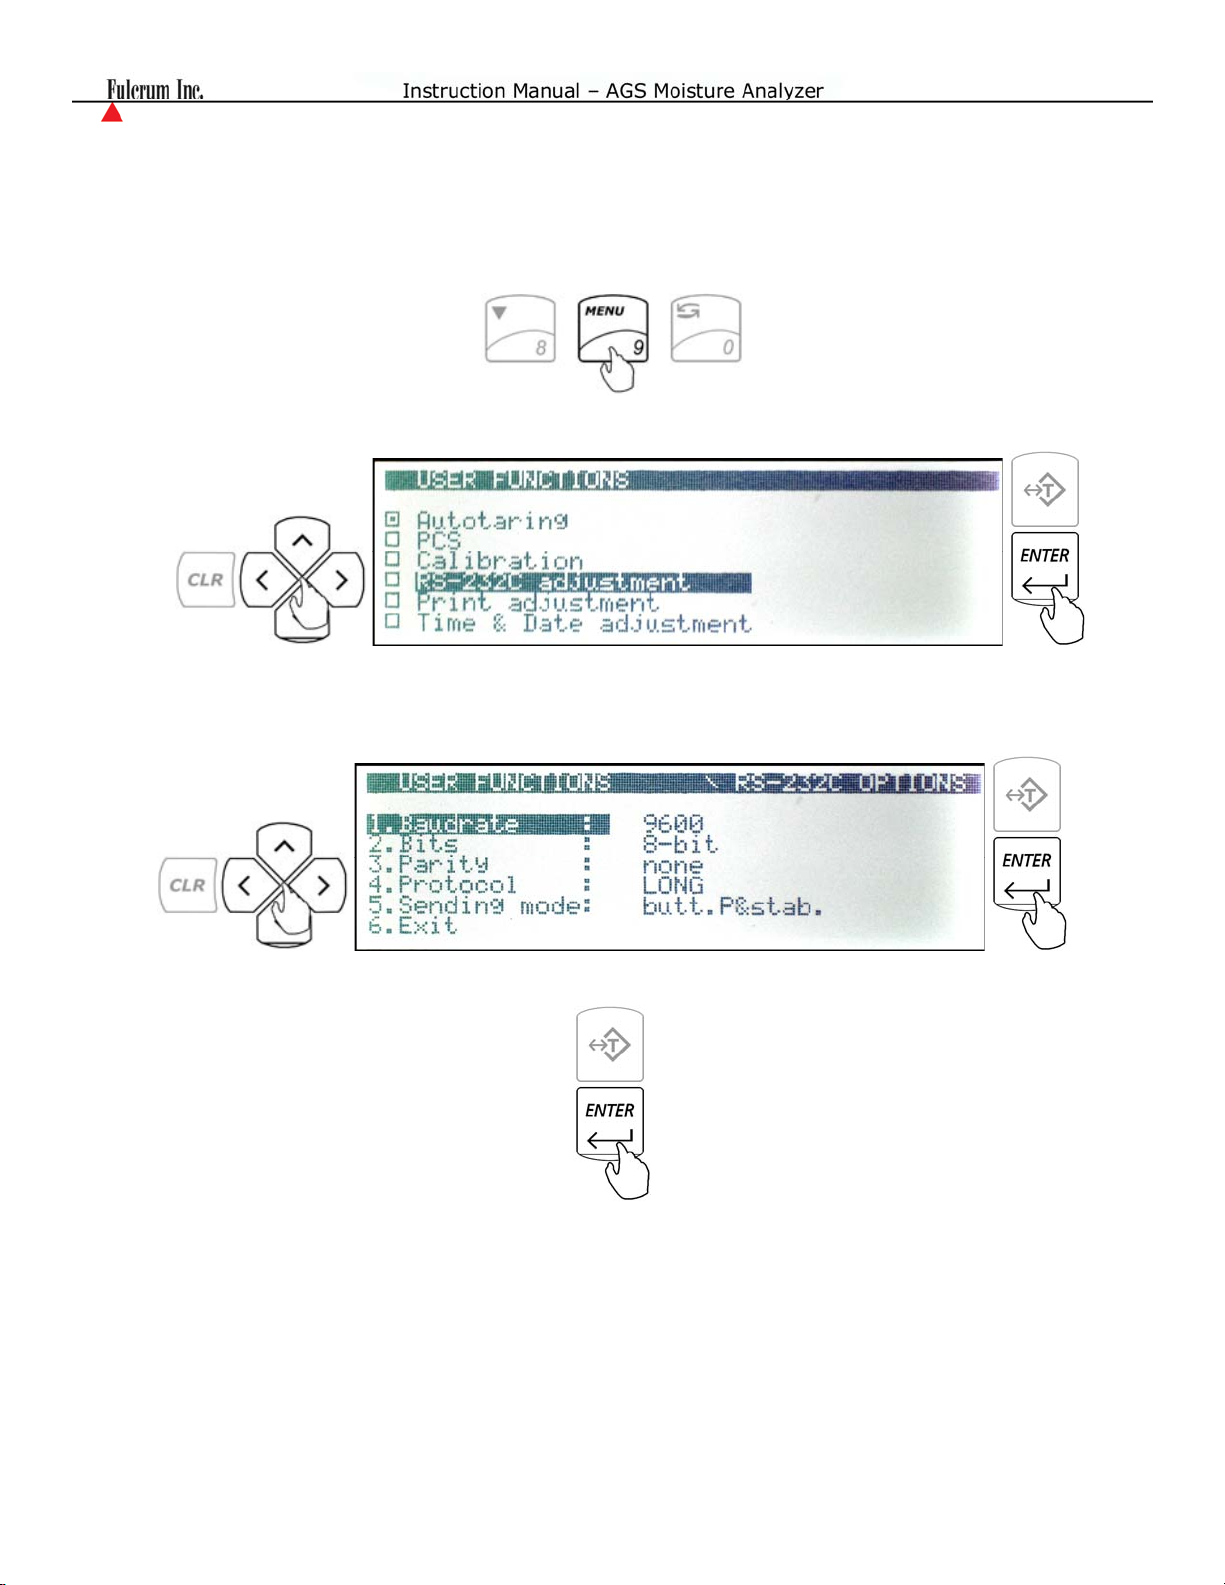
19.2. RS232 Serial Port Configuration
1. Enter the main menu by pressing the MENU key.
2. Use the navigation keys to select RS232 and press ENTER.
3. To configure the “RS232 Port”, use the navigation keys to select the desired parameter, press the
ENTER key, and then once again use the navigation keys to make the desired selection.
4. Once the selection is made, press the ENTER key to save the setting.
39
Page 40
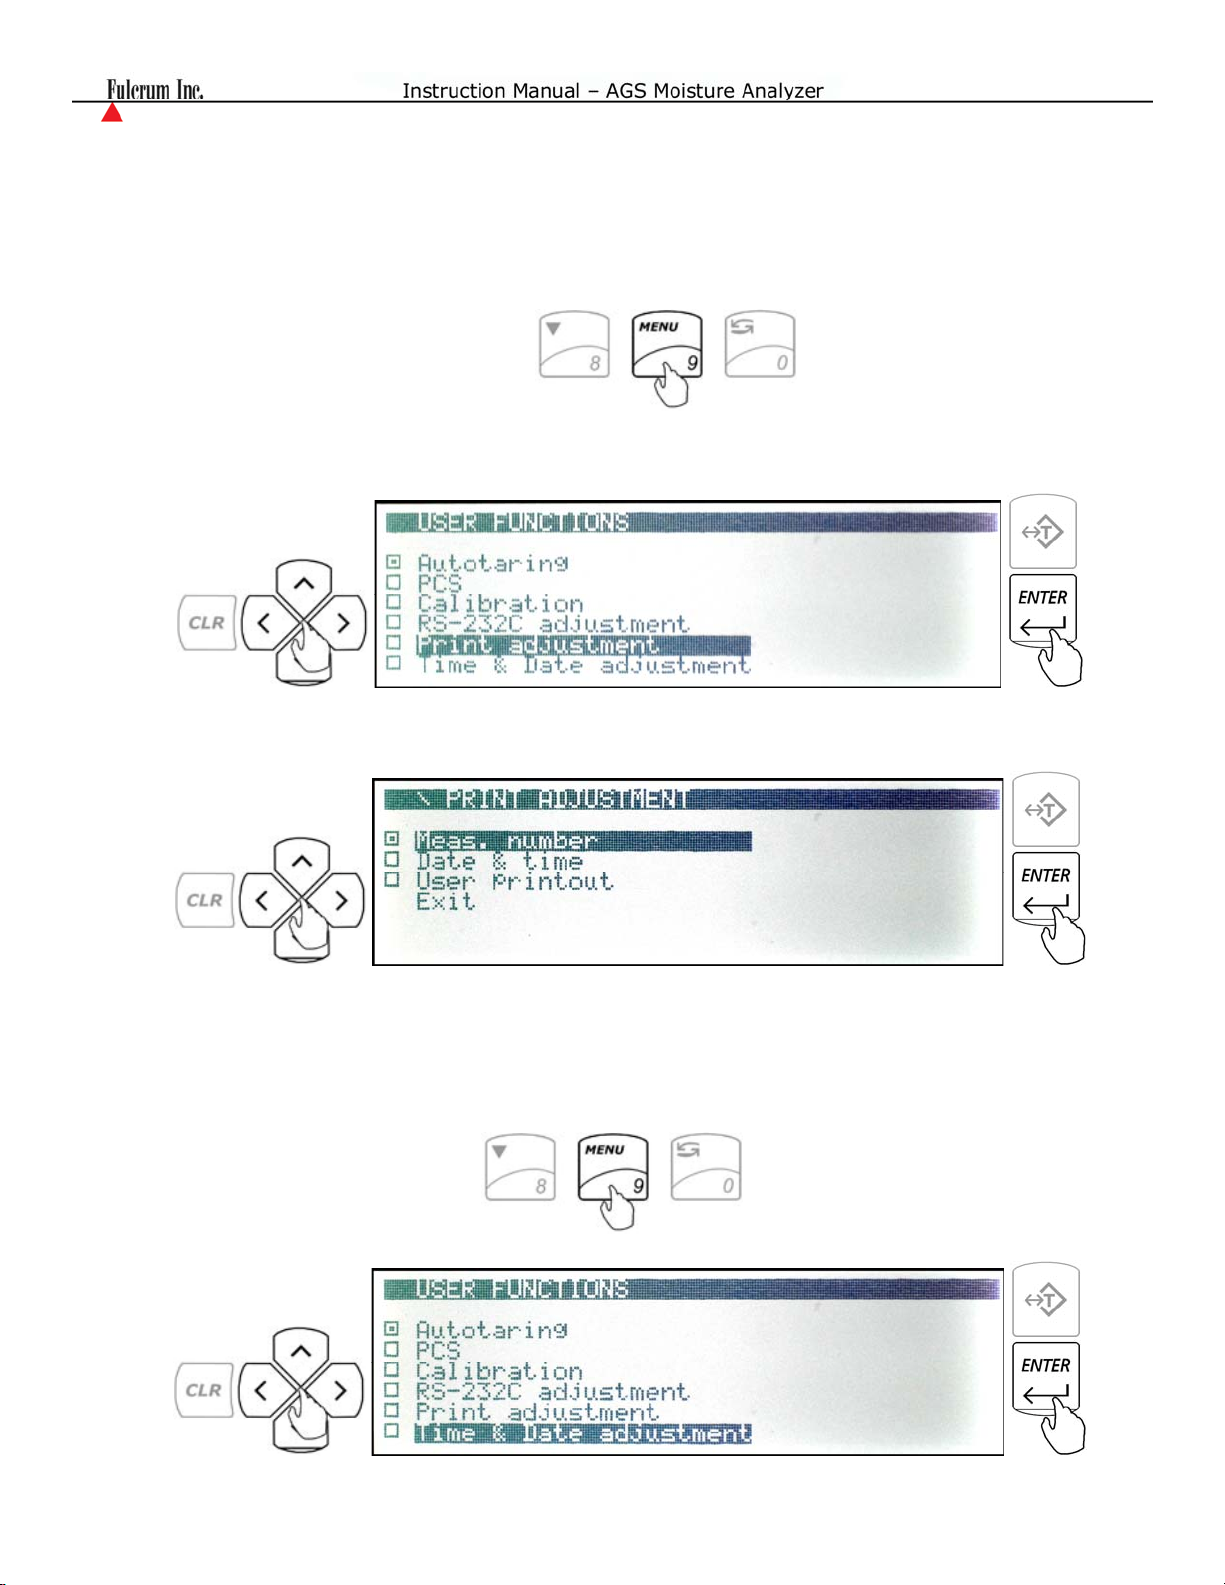
19.3. Print Adjustment
1. Enter the main menu by pressing the MENU key.
2. Use the navigation keys to select “Print Adjustment” and press ENTER.
3. In order to have the Measurement Number or the Date and Time printed on the weighing report,
use the navigation keys to make a selection and press the ENTER key.
19.4. Time and Date
1. Enter the main menu by pressing the MENU key.
2. Use the navigation keys to select “Time and Date” and press ENTER.
40
Page 41
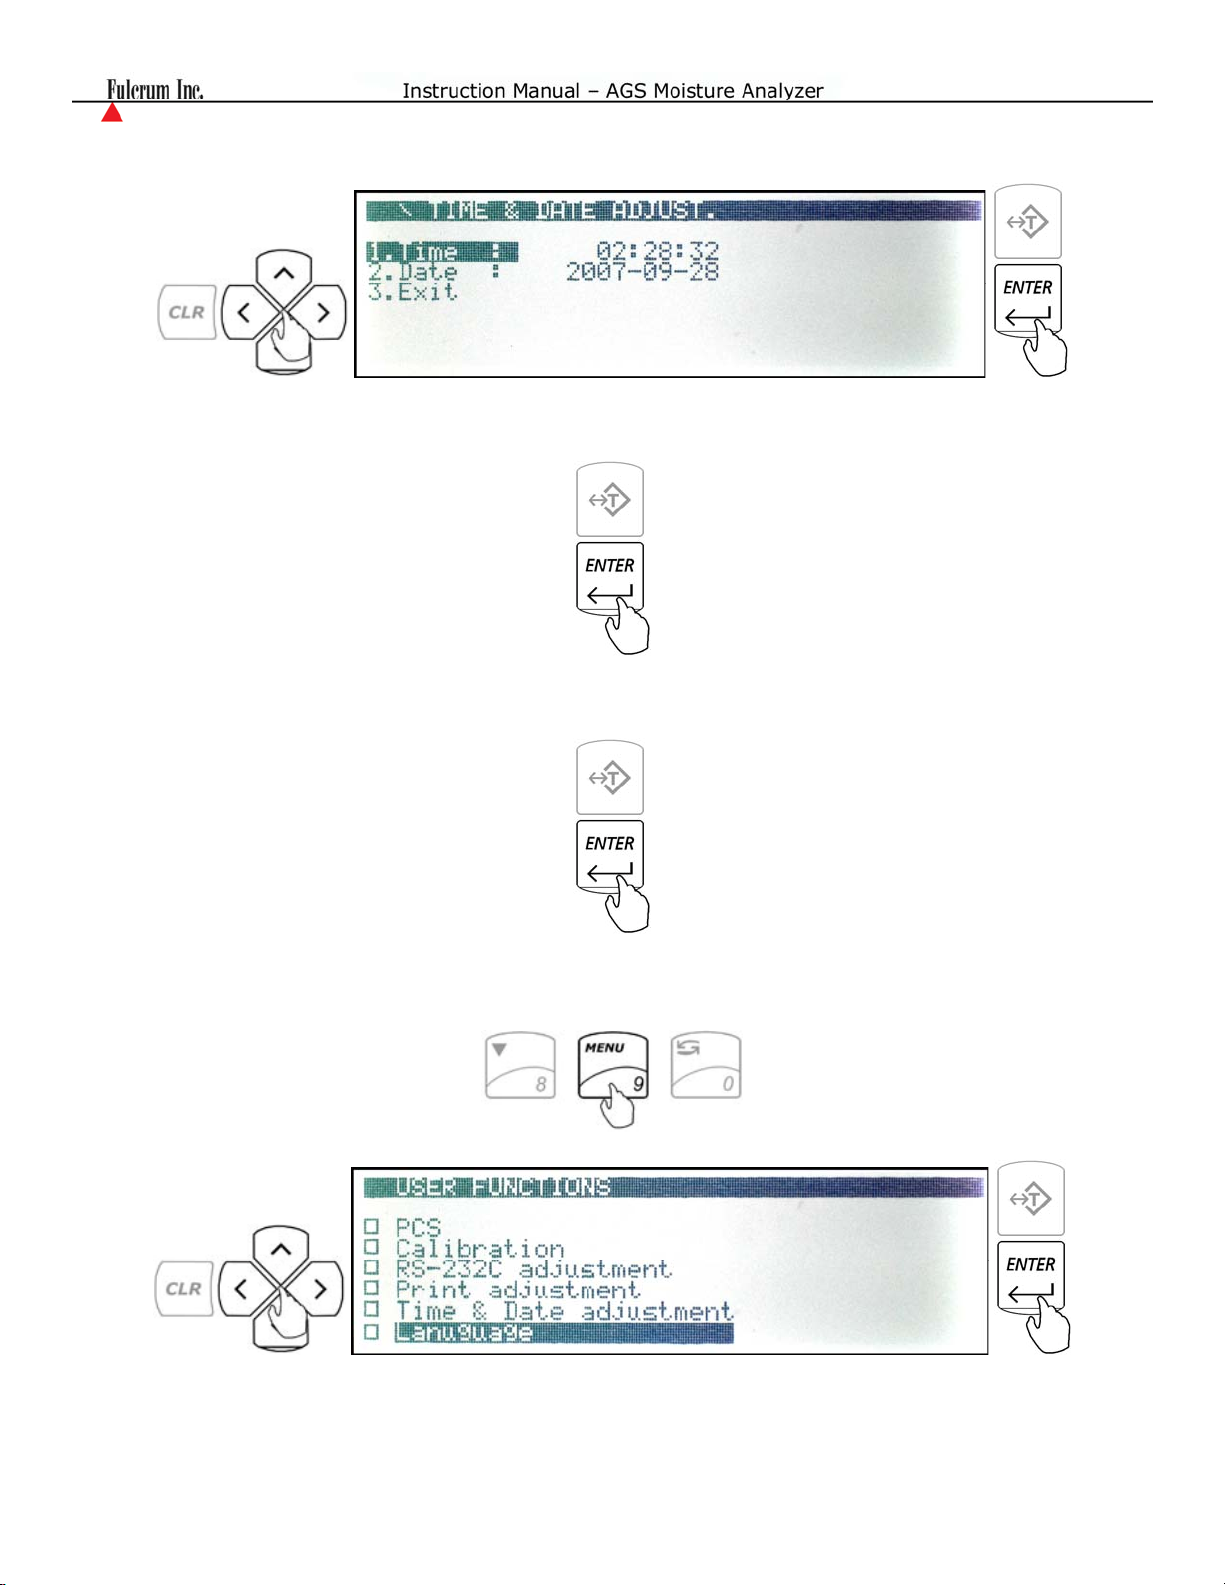
3. To adjust the time, use the navigation keys to select Time and press ENTER.
4. Using the numeric keys to enter the current time. The time is entered in segments: hours,
minutes, and seconds. After entering a segment, press the ENTER key to move to the next
segment.
5. To change the date, select Date with the navigation keys and press ENTER. Using the numeric
keys to enter the current date. The date is entered in segments: day, month, and year
00/00/0000. After entering a segment, press the ENTER key to move to the next segment.
19.5. Language
1. Enter the Main Menu by pressing the MENU key.
2. Use the Navigation keys to select LANGUAGE and press the ENTER key
41
Page 42
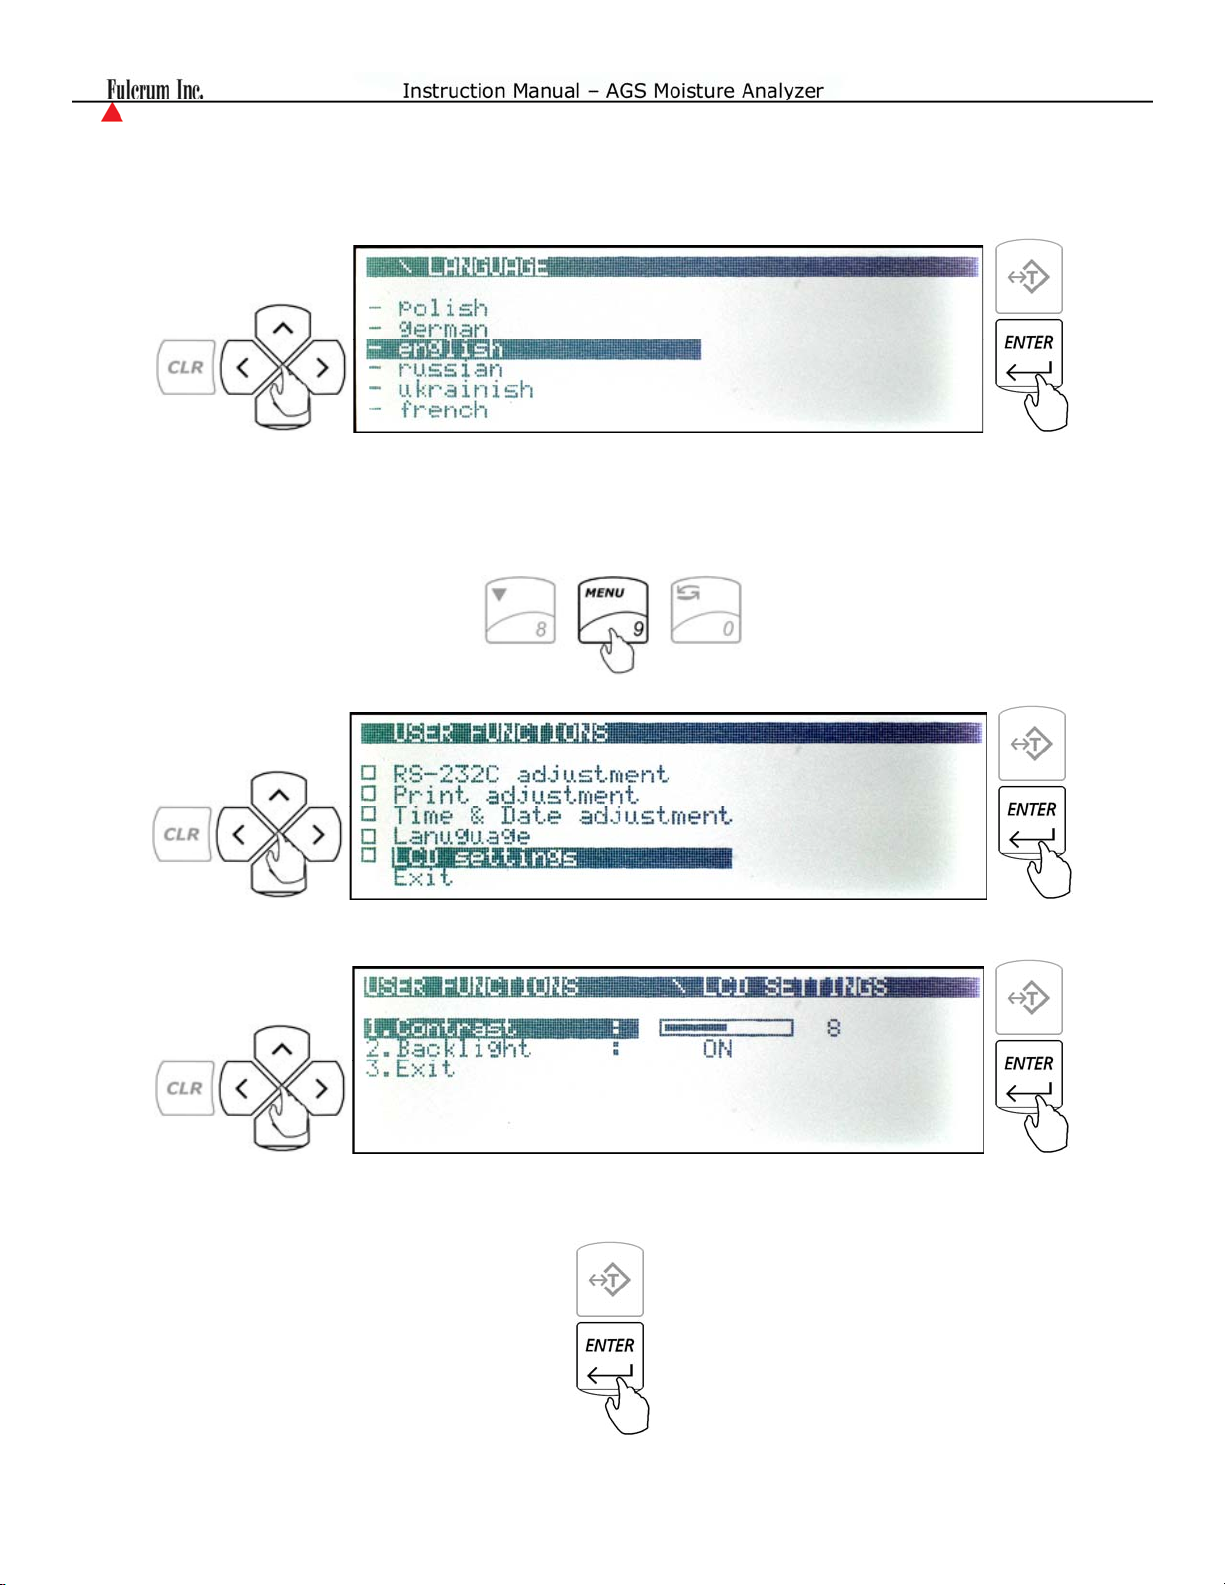
3. Available languages will be displayed: Polish, German, English, Russian, Ukrainian, French,
and Spanish. Use the navigation keys to choose the language you wish to select and press the
ENTER key.
19.6. LCD Setting
1. Enter the main menu by pressing the MENU key.
2. Use the navigation keys to select LCD SETTINGS and press ENTER.
3. To change the contrast of your LCD display, select Contrast and press the ENTER key.
4. Use the left and right arrow navigation keys to adjust the contrast of your display. Once the
contrast is at the desired level, press the ENTER key to save the setting.
42
Page 43
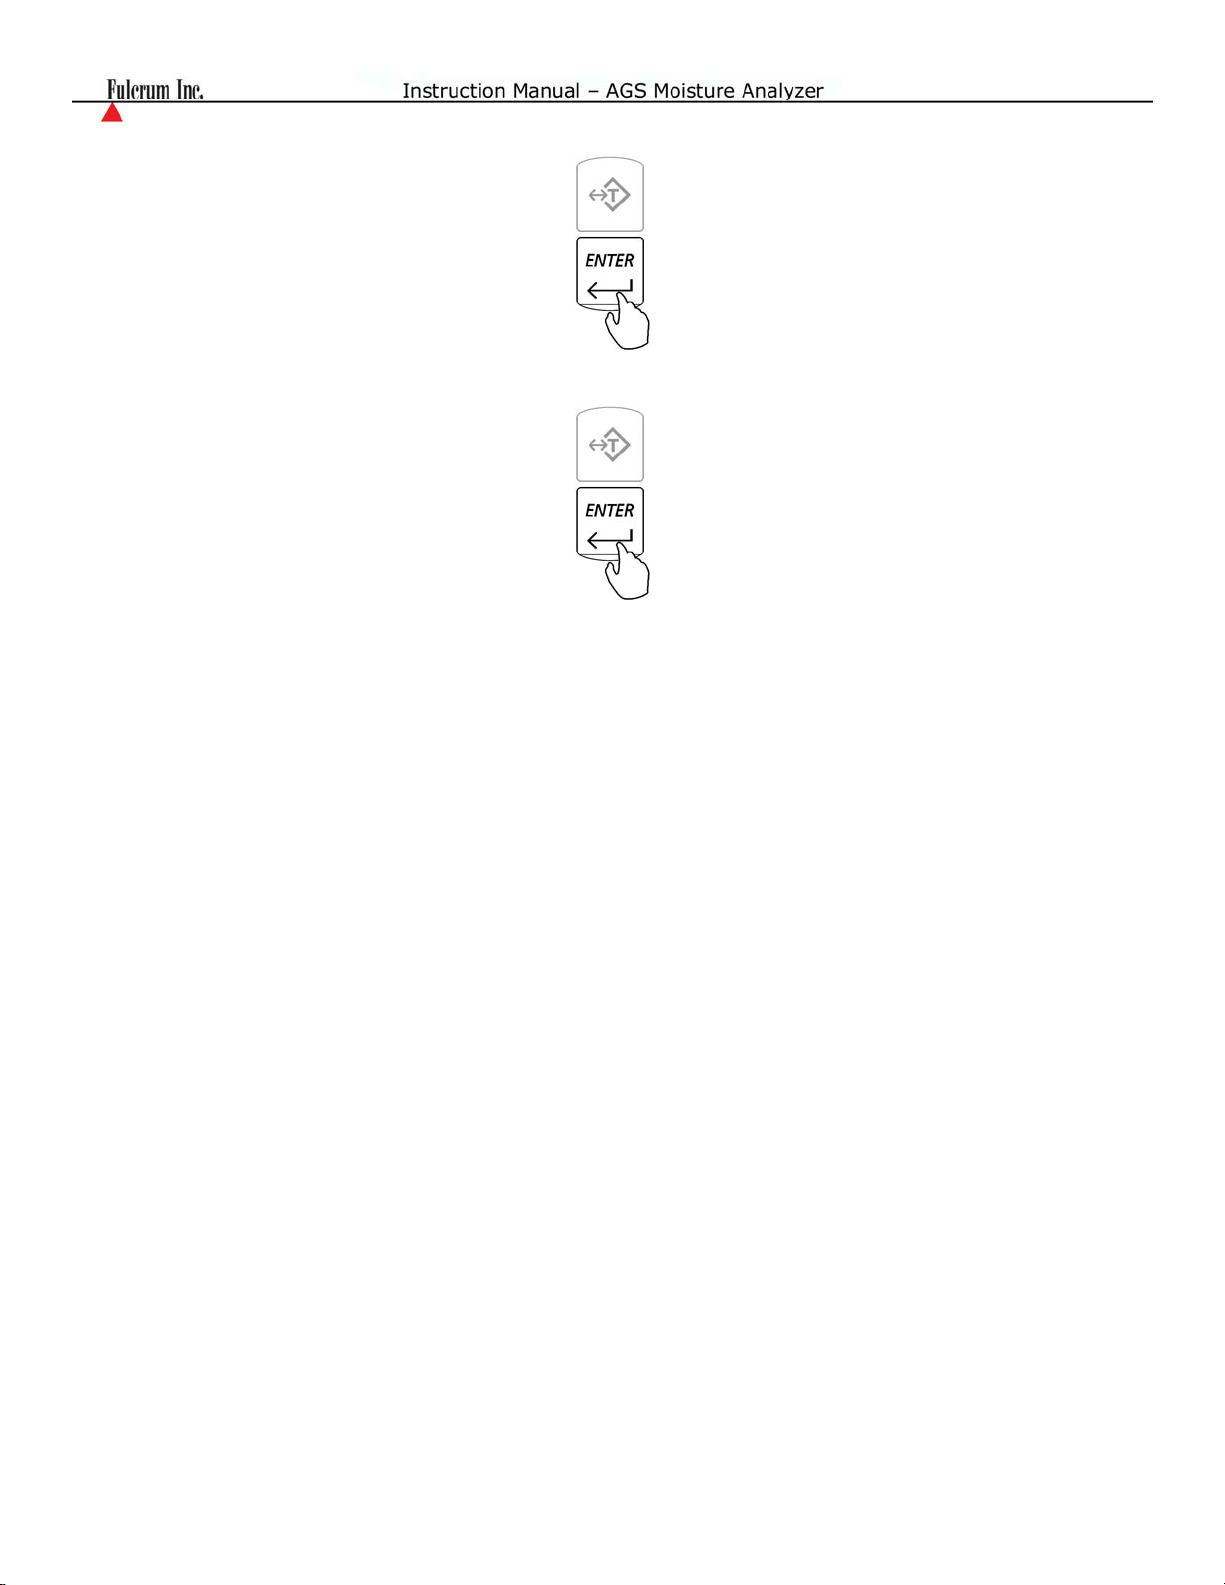
5. To completely turn off the back light of the LCD display, select Back Light and press ENTER.
6. Using the left and right arrow navigation keys, select OFF. Once the back light is turned off,
press the ENTER key to save the setting.
43
Page 44

Chapter 20: Halogen Bulb Replacement and Analyzer Maintenance
Cleaning the Analyzer
• Before cleaning the unit or replacing halogen bulbs, always unplug the power cord from the electrical
outlet.
• Before performing any maintenance on the unit, make sure all parts and surfaces of the Analyzer have
cooled.
• Use a soft, lint-free, slightly damp cloth to clean the Analyzer.
• Wipe the unit gently. Do not allow any liquid to enter into the Analyzer’s weighing or drying
mechanisms.
• Do not touch the temperature sensor (see parts description).
• Do not apply extensive pressure to the LCD display.
• Do not use chemicals especially benzene when cleaning the surface. Corrosive chemicals may damage
the finish.
• Alcohol may be used only to clean the scale’s stainless steel pan support or the pan handle.
• To prolong the life of the halogen bulbs, be sure the bulbs are clean and free from fingerprints. Even a
small amount of oil from your fingers can cause the bulb to break when it is turned on.
Replacing the Halogen Bulb
Replace the halogen bulbs when they are defective or when you sense that drying is taking more
time than usual.
Warning:
• Before replacing the halogen bulb, avoid electrical shocks by unplugging the power cord from the
electrical outlet.
• Make sure the rated voltage of the new halogen bulbs is correct for the voltage of the power supply,
• Handle the old bulb with care to avoid cracking. Broken glass may cause injury.
• Never touch a halogen bulb with your bare fingers.
• Always wear gloves when handling a new bulb. Even a small amount of oil from your fingers can
cause the bulb to break (or shorten its life) when it is turned on.
• If a bulb is touched, before being used it may be cleaned with a lint-free cloth.
• When replacing the bulbs in the Analyzer, make sure to avoid touching the temperature sensor.
44
Page 45
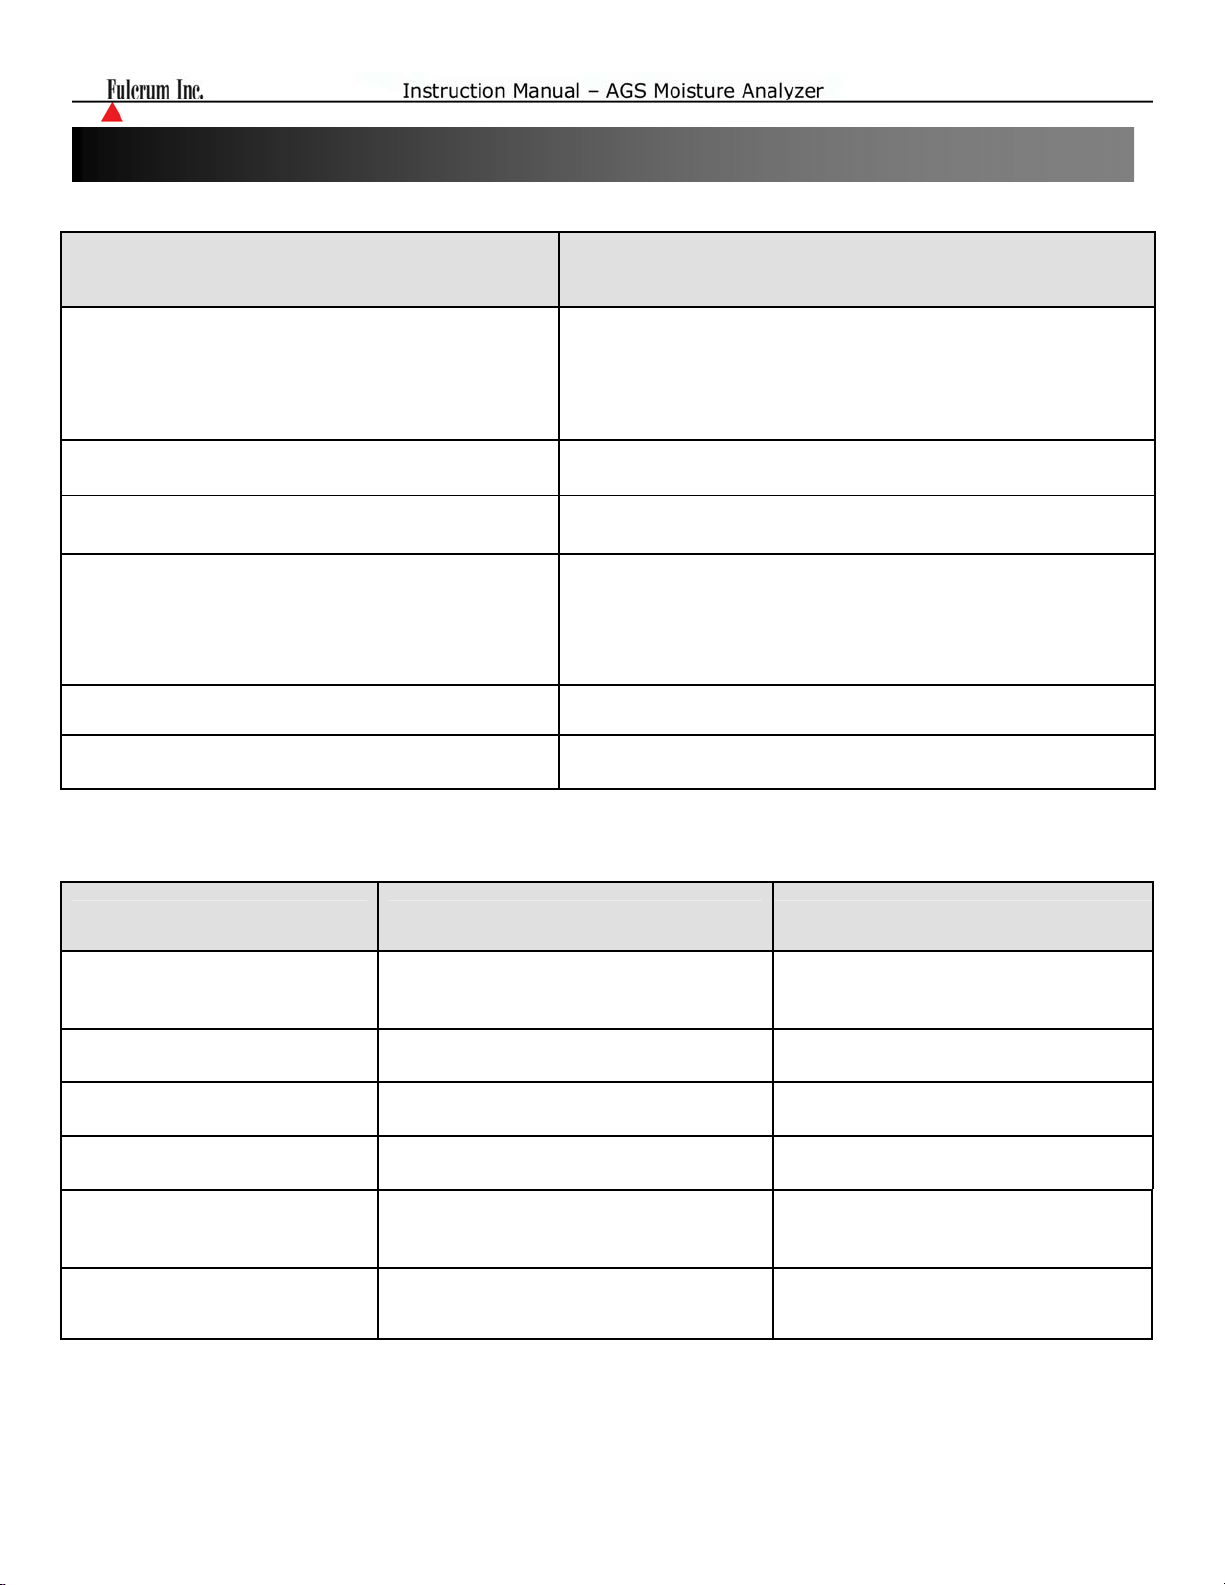
Chapter 22: Common Errors and Troubleshooting
Problem Explanation / Solution
• Reduce the drying temperature.
The sample burns during analysis
The drying process takes a very long time
Drying takes longer than usual
A sample loses weight before the analysis begins
The sample turns into a liquid
• Reduce the size of the sample and make sure it is
uniformly distributed on the pan.
• If necessary, place a glass fiber filter on top of the
sample.
• Increase the drying temperature.
• Reduce the mass of the sample.
• Halogen Bulbs may need to be replaced.
• Do not place the sample on the disposable pan
inside of the drying chamber.
• Remove the disposable pan, place the sample
outside of the chamber, then quickly place it back in
the chamber for analysis.
• Use glass fiber filters to analyze the sample.
The sample doesn’t contain enough volatile matter
Error Cause Explanation / Solution
Load error!
Capacity exceeded!
Tare range exceeded!
Tare value not cleared!
Load error! (C01)
Load error! (C02)
Scale load at start up exceeds 10% of the
scale MAX capacity
Scale range exceeded
Attempt to tare the scale that is beyond
the Tare range
Attempt to zero the scale without clearing
a prior tare
Load error while initializing. The pan
mass is below 10% of the stored value.
Load error while initializing. The pan
mass is over 10% of the stored value.
• Increase the size of the sample.
The pan was not empty while the
scale was initiating at start-up. Clear
the pan and restart the scale.
The scale has exceeded its weighing
capacity. Reduce the weight.
Place a weight on the pan before
taking a tare.
Remove weight from pan and clear
store tare values.
Do not touch or move the scale while
calibration is in progress. The pan MUST
be empty and properly installed.
Do not touch or move the scale while
calibration is in progress. The pan MUST
be empty and properly installed.
45
Page 46
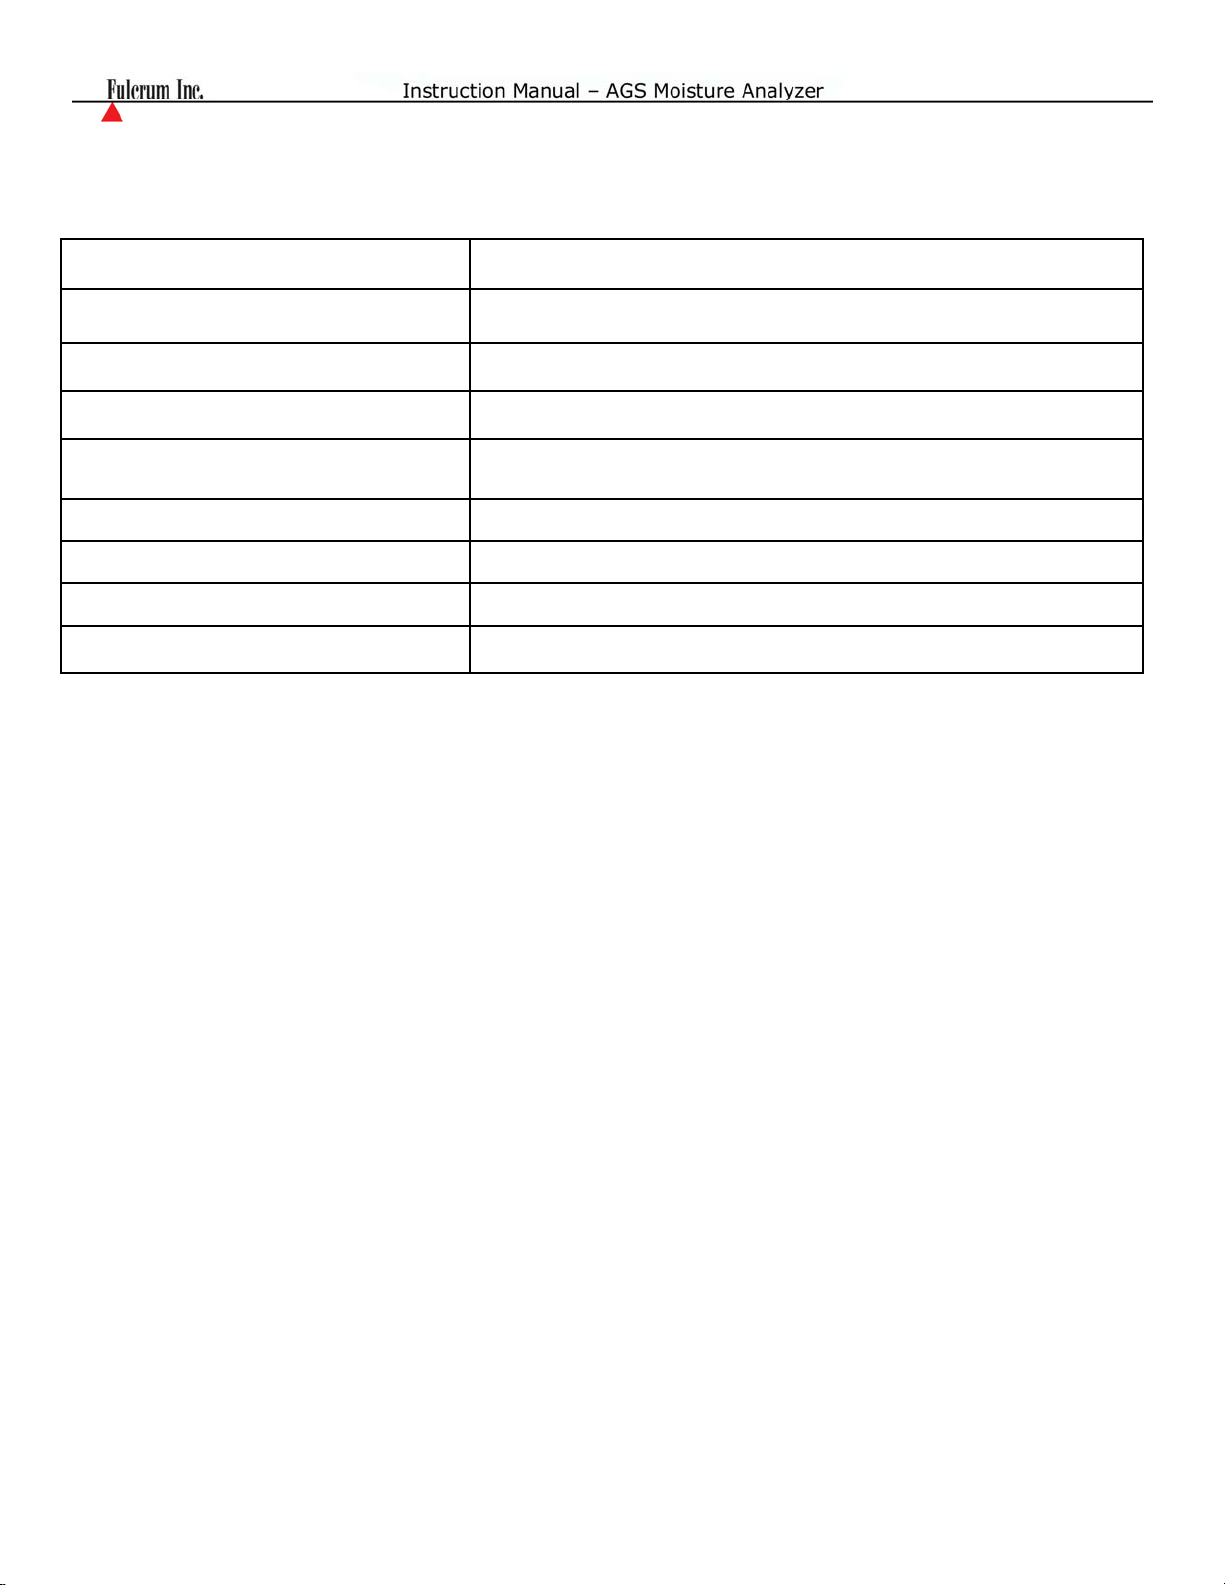
If any of the following errors are displayed, please contact technical support at (973)-473-6900:
EEPROM1 Error
EEPROM2 Error
EEPROM Error!
CRC Error xx
Service switch OFF!
EEPROM1 memory error (shortage of memory, memory is damaged, or
check sum error)
EEPROM2 memory error (shortage of memory, memory is damaged, or
check sum error)
EEPROM1 or EEPROM2 memory error
Check sum error number xx in EEPROM memory
Attempt to access the Service mode with the Service Switch in the OFF
position
A/D range exceeded!
A/D converter read error!
Temperature sensor error!
Service switch ON!
A/D converter range exceeded
No response from A/D converter
No response from the temperature sensor
Attempt to access the Service Mode without a service command
46
Page 47
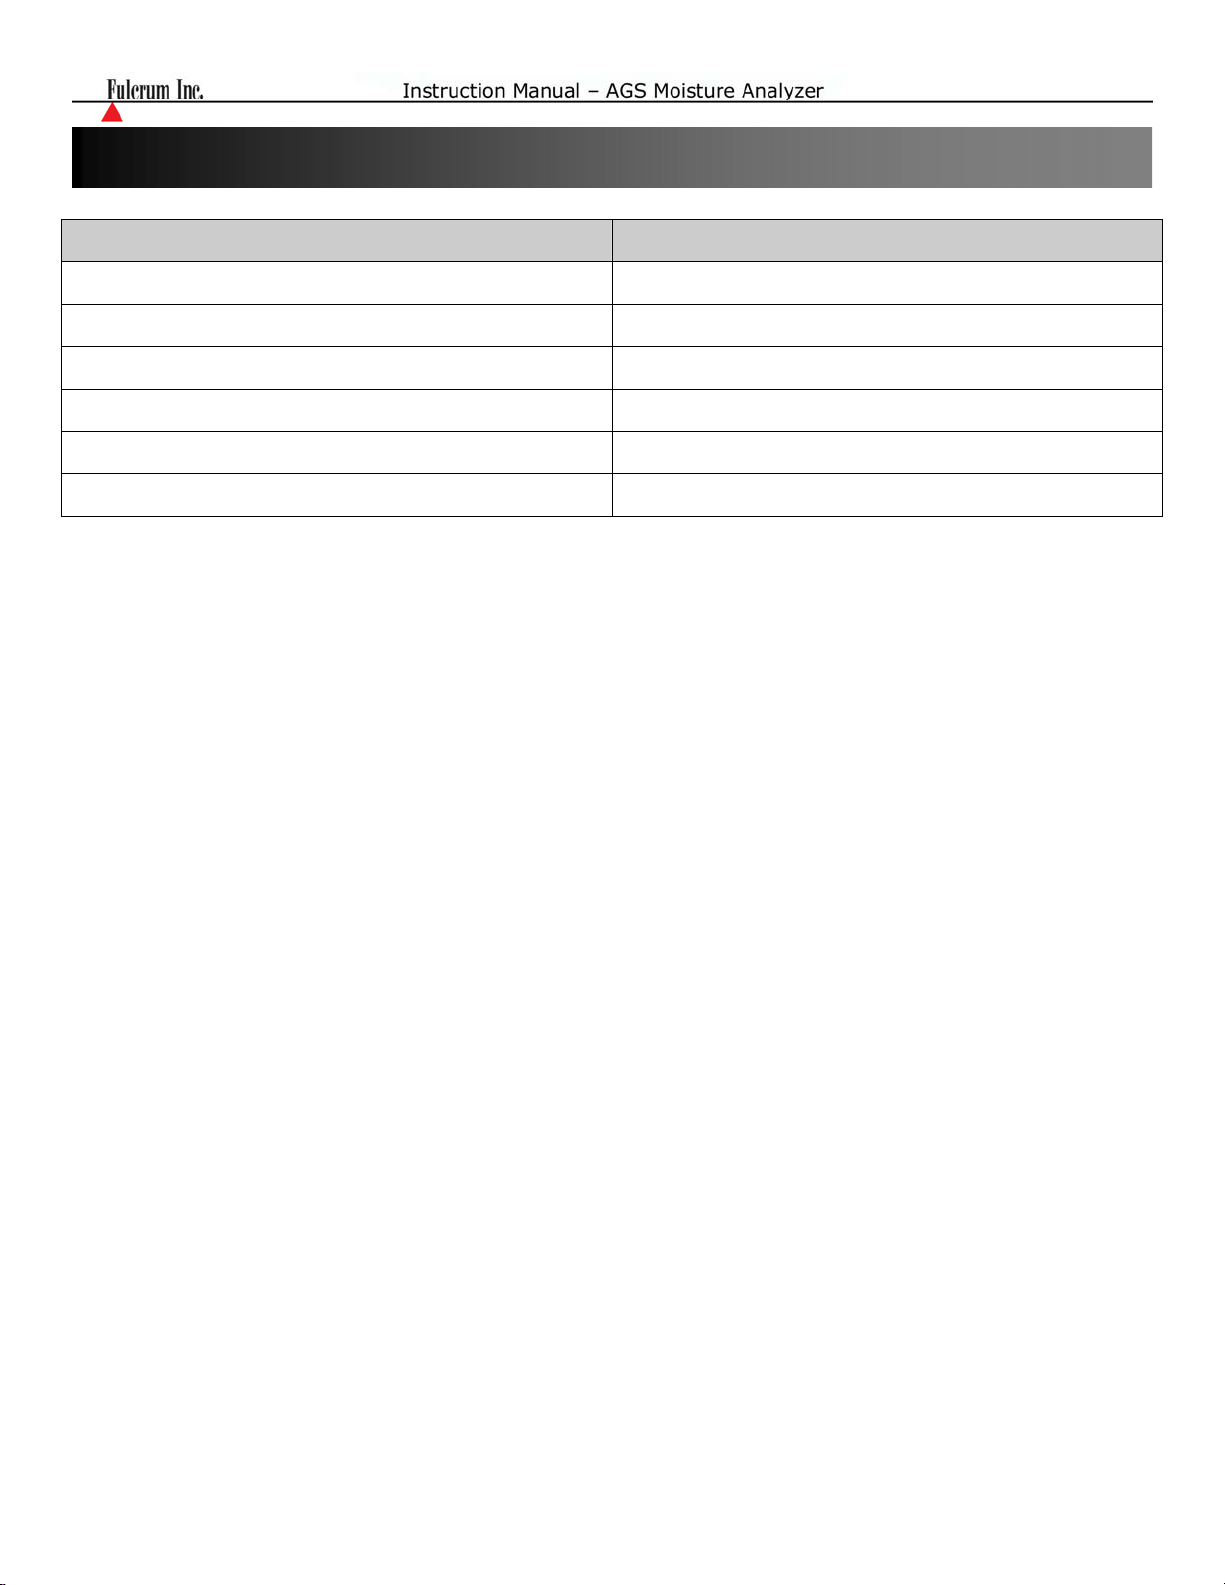
Chapter 23: Replacement Parts
Description Part No.
Power Cord AGS9250
Pan Assembly AGS9260
RS232 Printer Cable AGS9270
Disposable Pans AGS9280
Halogen Bulbs AGS9290
Sodium Tartrate Dihydrate AGS9291
47
Page 48

Chapter 24: Limited Warranty
PURCHASER’S 12-MONTH WARRANTY
Warranty is valid only if the attached warranty registration card is completed and returned within 30 days.
This product is a precision device made to exacting standards of scientific accuracy. It is guaranteed to have
been adjusted and inspected for proper workmanship and performance and to be certified for its currently
advertised specifications before shipment.
Fulcrum Products are warranted against defects in material and workmanship under normal use and service.
This warranty is extended only to the first purchaser. This limited warranty will not apply if, upon inspection, it
is found that the product was tampered with, misused, overloaded, abused, mishandled, placed in an
improper environment, improperly installed or adjusted, used for a purpose other than that for which it was
designed, or repaired by unauthorized personnel.
Fulcrum’s liability under this warranty is limited to furnishing the labor and parts necessary to remedy the
defect covered by this warranty and restore the product to normal operating condition. Purchasers may be
charged a minimum repair fee for in-warranty products returned for repair if those products are determined to
be problem-free.
To make a claim under this limited warranty, obtain an RMA number from Fulcrum and return the
product (carefully packed in its original packaging and shipping prepaid) with the RMA number written on the
return package.
48
 Loading...