

Toraiz Squid User Manual
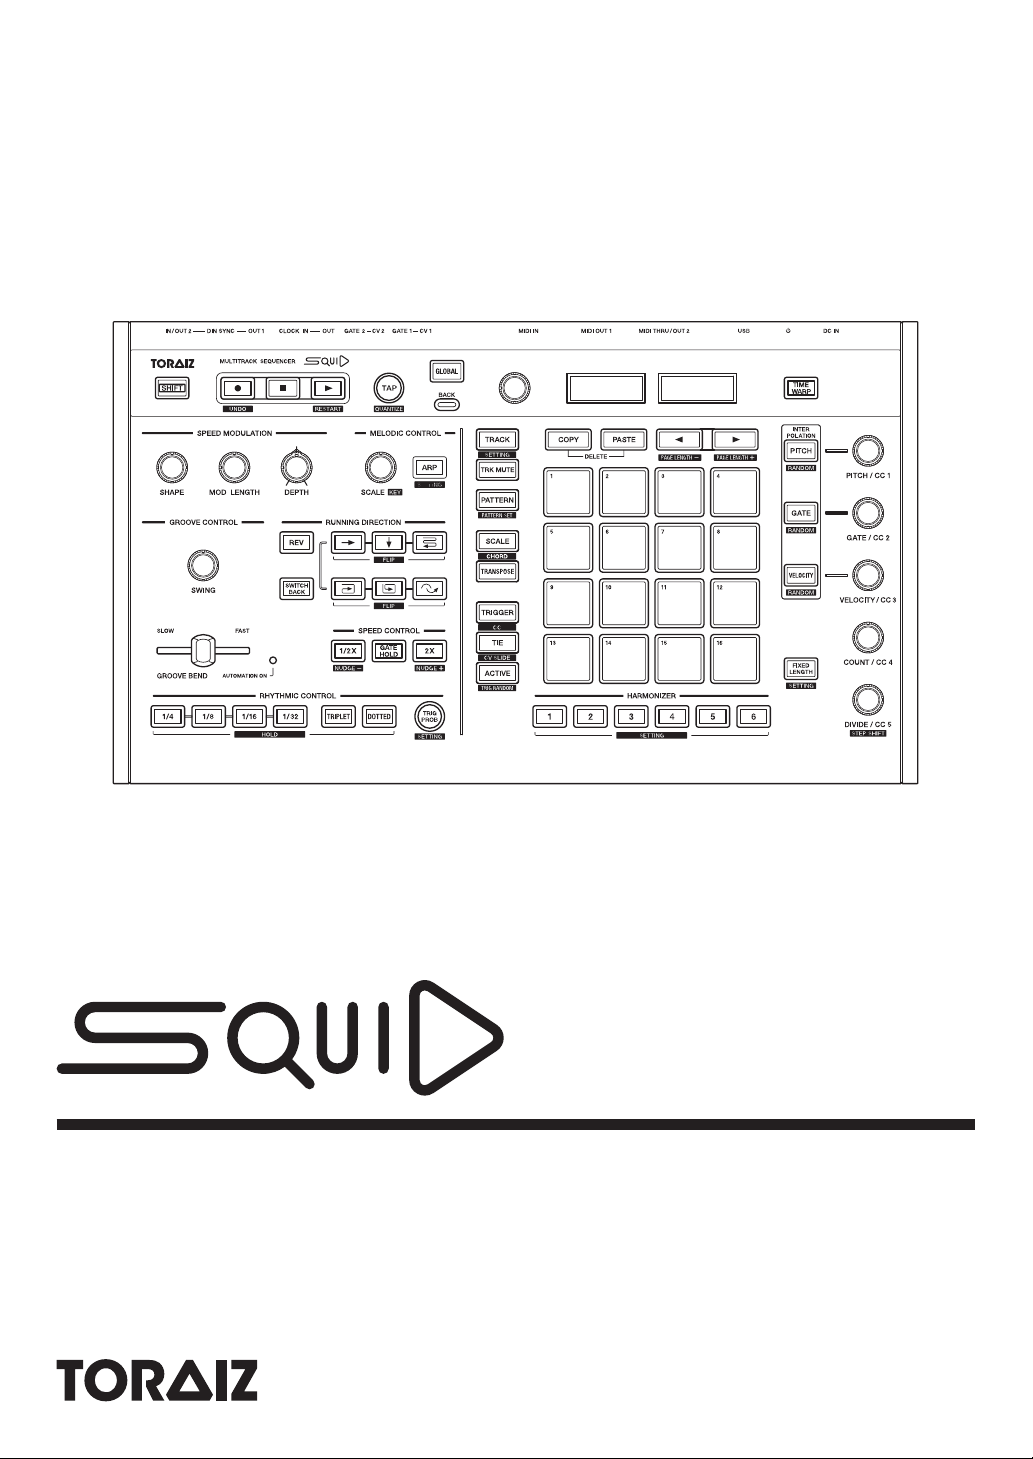
Multitrack Sequencer
Operating Instructions
pioneerdj.com/support/
For FAQs and other support information for this product, visit the above site.

How to read this manual
Thank you for purchasing this Pioneer DJ product.
Be sure to read this manual and the “Operating Instructions (Quick
Start Guide)” included with this unit. Both documents include important
information that you should understand before using this product.
In particular, be sure to read “IMPORTANT SAFETY
INSTRUCTIONS.”
• In this manual, the names of buttons, knobs and terminals indicated
on the product, and names of menus, etc. on the unit displays, are
indicated within square brackets ([ ]). (e.g. [GLOBAL] button,
[CLOCK OUT] terminal, [Save As])
• Please note that the unit displays and their specifications described
in this manual as well as the external appearance and specifications
of the hardware are currently under development and may differ from
the final specifications.
• Please note that depending on the operating system version, web
browser settings, etc., operation may differ from the procedures
described in this manual.
2
En

Contents
How to read this manual............................................................... 2
Before starting...........................................................................6
Features........................................................................................ 6
Auto power off function ................................................................. 7
Part names and functions ........................................................8
Control panel ................................................................................ 8
Rear panel .................................................................................. 16
Connections............................................................................. 18
Connecting inputs and outputs ................................................... 19
The data structure of the unit.................................................21
Basic Operation....................................................................... 22
Project management................................................................... 22
Transport .................................................................................... 26
Step edit section...................................................................... 29
Switching the 16-pad mode ........................................................ 29
TRACK mode.............................................................................. 31
TRACK MUTE mode .................................................................. 33
PATTERN mode ......................................................................... 34
PATTERN SET mode ................................................................. 37
SCALE mode .............................................................................. 39
CHORD mode............................................................................. 44
TRANSPOSE mode.................................................................... 46
TRIGGER mode ......................................................................... 47
CC (Control Change) mode........................................................ 61
TIE mode .................................................................................... 64
3
En

Contents
CV SLIDE mode ......................................................................... 65
ACTIVE mode............................................................................. 66
INTERPOLATION....................................................................... 67
RANDOMIZER............................................................................ 70
HARMONIZER............................................................................ 71
COPY/PASTE............................................................................. 73
DELETE...................................................................................... 75
STEP SHIFT ............................................................................... 78
STEP JUMP................................................................................ 78
FIXED LENGTH.......................................................................... 79
Phrase arrangement section..................................................80
SPEED MODULATION function ................................................. 80
MELODIC CONTROL function ................................................... 86
GROOVE CONTROL function.................................................... 92
RUNNING DIRECTION function................................................. 95
SPEED CONTROL function ....................................................... 99
RHYTHMIC CONTROL function............................................... 101
Global section........................................................................ 104
UNDO ....................................................................................... 104
TIME WARP ............................................................................. 106
Changing the settings...........................................................108
GLOBAL settings ...................................................................... 108
QUANTIZE settings .................................................................. 140
ARPEGGIATOR settings .......................................................... 142
TRIG PROB (Trigger Probability) settings................................ 144
TRACK settings ........................................................................ 145
HARMONIZER settings ............................................................ 148
FIXED LENGTH setting ............................................................ 151
En
4

Contents
Connecting to external equipment ......................................152
Connecting the unit to an external MIDI device or a PC/Mac to
play ........................................................................................... 152
Synchronizing the unit to external MIDI devices or a PC/Mac
.................................................................................................. 156
Connecting the unit to an external CV/GATE compatible
device to play............................................................................ 158
Synchronizing the unit and an external DIN SYNC compatible
device to play............................................................................ 160
Synchronizing the unit with an external CLOCK compatible
device to play............................................................................ 165
Signal conversion function........................................................ 169
Additional information.......................................................... 171
Troubleshooting........................................................................ 171
About trademarks and registered trademarks .......................... 175
Specifications............................................................................ 176
5
En

Before starting
Features
The SQUID is a standalone multitrack sequencer that can connect
various music production equipment and produce phrases
successively. Phrases can be sequenced quickly using the step
parameter knobs which work independently for each parameter and
the sequence functions such as HARMONIZER and
INTERPOLATION.
Constantly get inspired by phrases created by the unit. You can add
different arrangements to the sequence and experiment with the user
interface using numerous arrangement functions such as RUNNING
DIRECTION, GROOVE BEND and SPEED MODULATION.
This inspiring and expressive musical tool is compatible with many
types of music production systems. It features terminals for USB and
MIDI as well as CV/GATE OUT and DIN SYNC-which can control not
only modular synthesizers but also vintage electronic musical
instruments.
6
En

Before starting
Auto power off function
This unit comes with an auto power off function, which is enabled as
the default setting. The power turns off automatically when there is no
signal input, output or operation for approximately 4 hours.
To turn on the power once the unit has turned off automatically, press
the [] button on the rear panel to release it to the off position (), and
then press in the [] button again ().
To disable the auto power off function, press the [GLOBAL] button to
display the GLOBAL menu. Then, turn the rotary selector to switch the
[Auto Power Off] setting to [Disable].
Notes
• Unsaved data will be lost if the unit is powered off automatically. Be
sure to save important data such as edited project data.
• The auto power off function may not turn off the unit in certain modes
of operation. Therefore, always be sure to turn off the power
manually after use.
7
En
Part names and functions
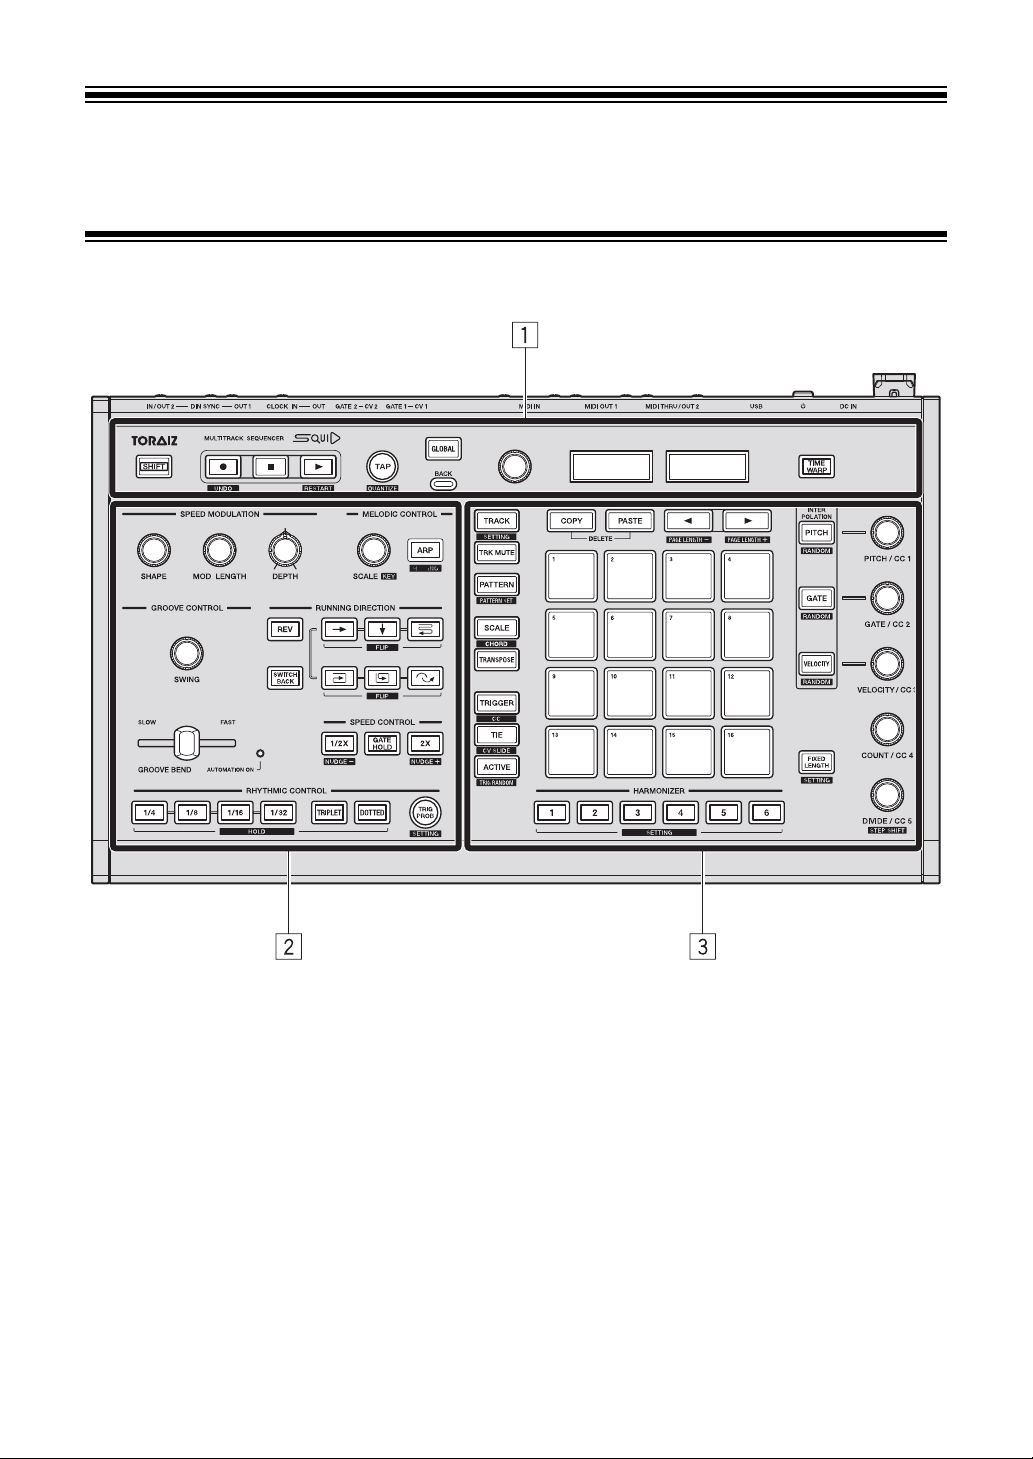
Control panel
1 Global section
2 Phrase arrangement section
3 Step edit section
8
En
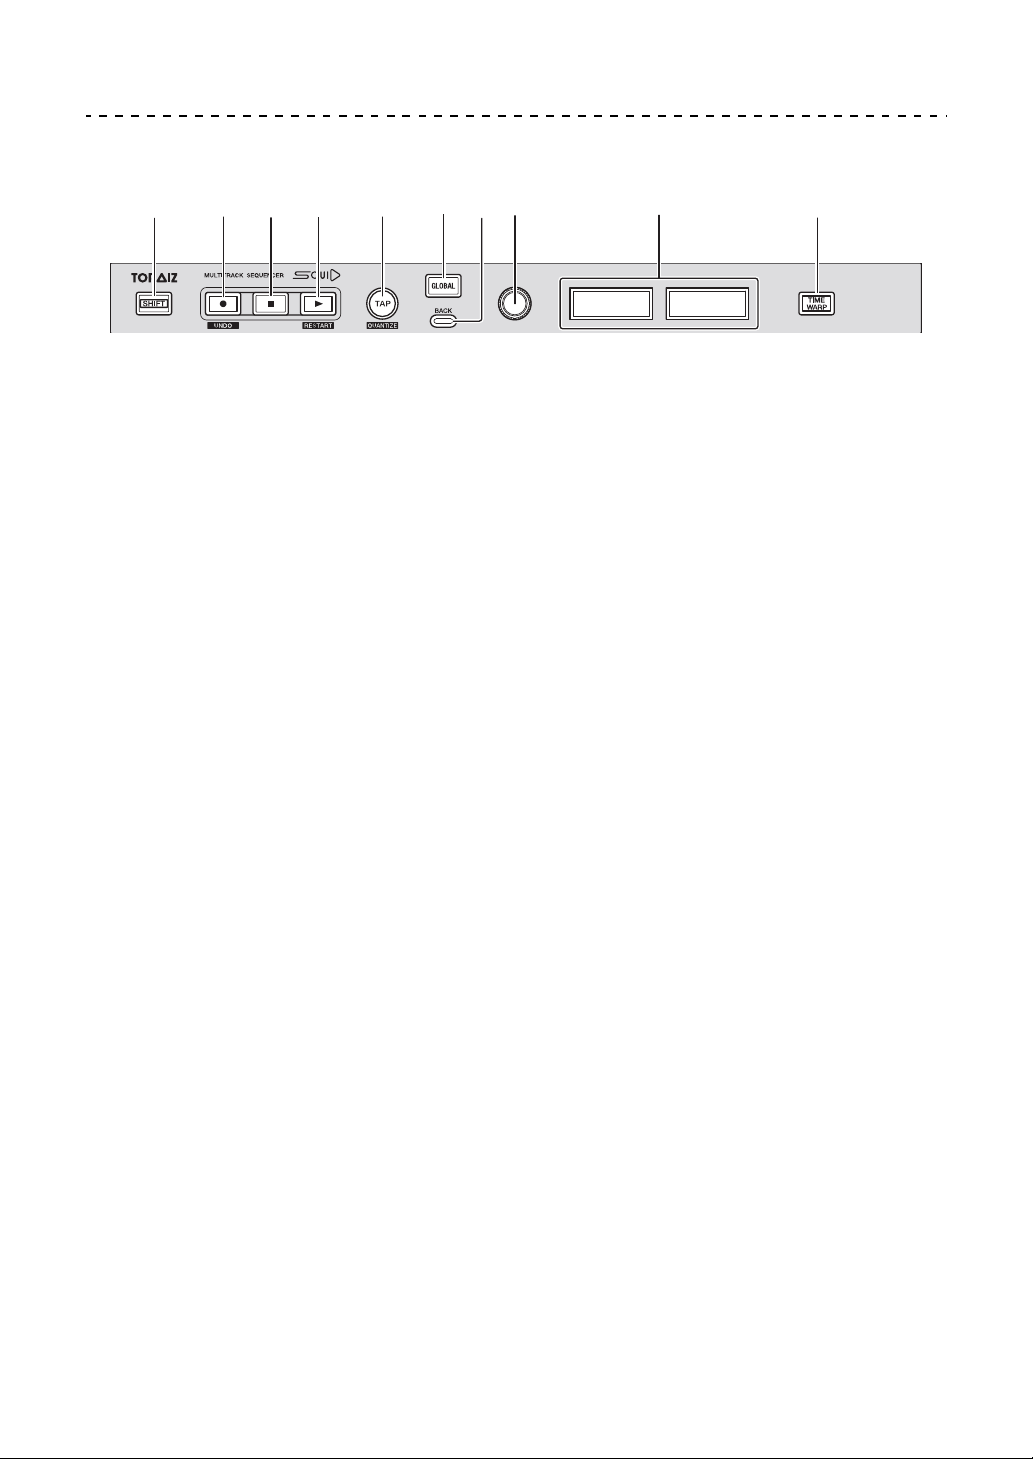
Global section
Part names and functions
1
2
43
5
67
8 9 a
1 SHIFT button
When operating a button or knob while holding down the [SHIFT] button, you
can access an alternative function.
2 (record) button
Toggles the pad performance, Harmonizer performance, and Real-time
recording state of the automation information. For details, refer to “Real-time
recording” (page 43).
[SHIFT] + press:
Switches the display to indications of the history. For details, refer to “UNDO”
(page 104).
3 (stop) button
Stops the pattern playback.
4 (play) button
Plays or pauses the pattern.
[SHIFT] + press:
Resumes the sequence playback from the first step.
En
9

Part names and functions
5 TAP button
Sets the BPM of a sequence. Flashes to BPM during the sequence playback.
For details, refer to “Setting the BPM (Beats Per Minute) of a sequence”
(page 28).
[SHIFT] + press:
Switches the display to QUANTIZE setting. For details, refer to “QUANTIZE
settings” (page 140).
6 GLOBAL button
Switches the display to the GLOBAL menu.
7 BACK button
Returns the display to a higher layer in the GLOBAL menu.
8 Rotary selector
Selects an item on the display and changes the setting.
9 Display
Shows various menus, BPM, beat indicator, track number, pattern number,
page, etc.
a TIME WARP button
Turns the Time Warp function to on or off. For details, refer to “TIME WARP”
(page 106).
10
En
Part names and functions
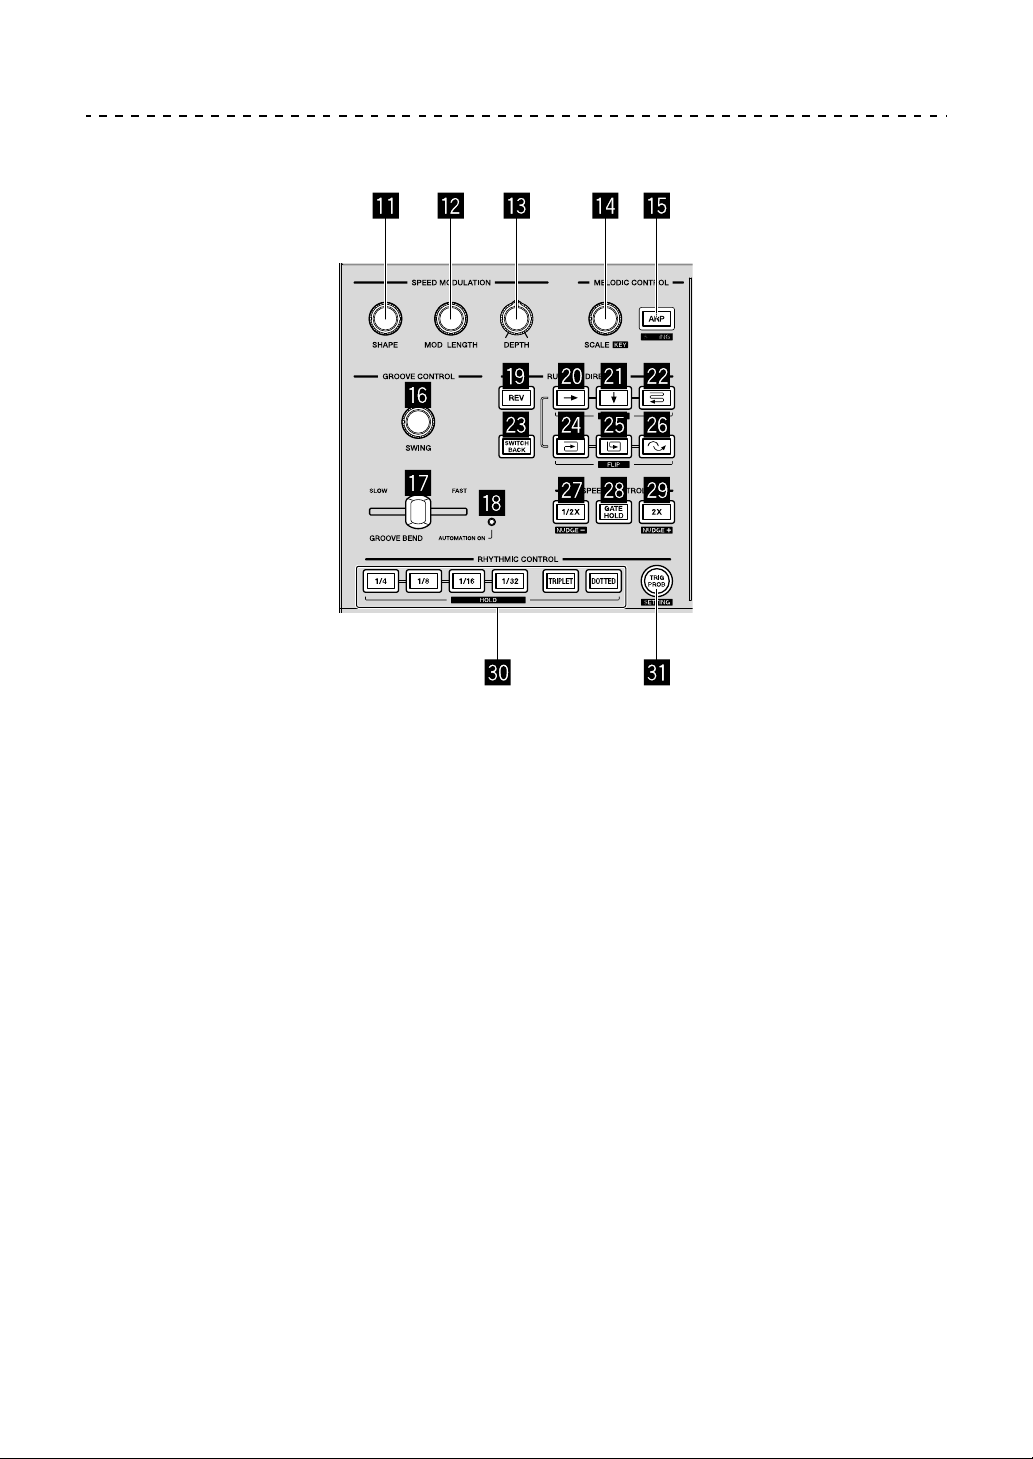
Phrase arrangement section
b SHAPE knob
c MOD LENGTH knob
d DEPTH knob
b to d: Performs various operations for the Speed Modulation function. For
details, refer to “SPEED MODULATION function” (page 80).
e SCALE knob
f ARP button
e & f: Performs various operations for the Melodic Control function. For
details, refer to “MELODIC CONTROL function” (page 86).
11
En
Part names and functions
g SWING knob
h GROOVE BEND slider
i AUTOMATION ON indicator
g to i: Used to perform various operations for the Groove Control function.
For details, refer to “GROOVE CONTROL function” (page 92).
j REV button
k (right) button
l (down) button
m (zigzag) button
n SWITCH BACK button
o (clockwise) button
p (counterclockwise) button
q (skip back) button
j to q: Used to perform various operations for the Running Direction function.
For details, refer to “RUNNING DIRECTION function” (page 95).
r 1/2X (half) button
s GATE HOLD button
t 2X (double) button
r to t: Used to perform various operations for the Speed Control function. For
details, refer to “SPEED CONTROL function” (page 99).
u RHYTHM buttons
v TRIG PROB button
u & v: Used to perform various operations for the Rhythmic Control function.
For details, refer to “RHYTHMIC CONTROL function” (page 101).
En
12
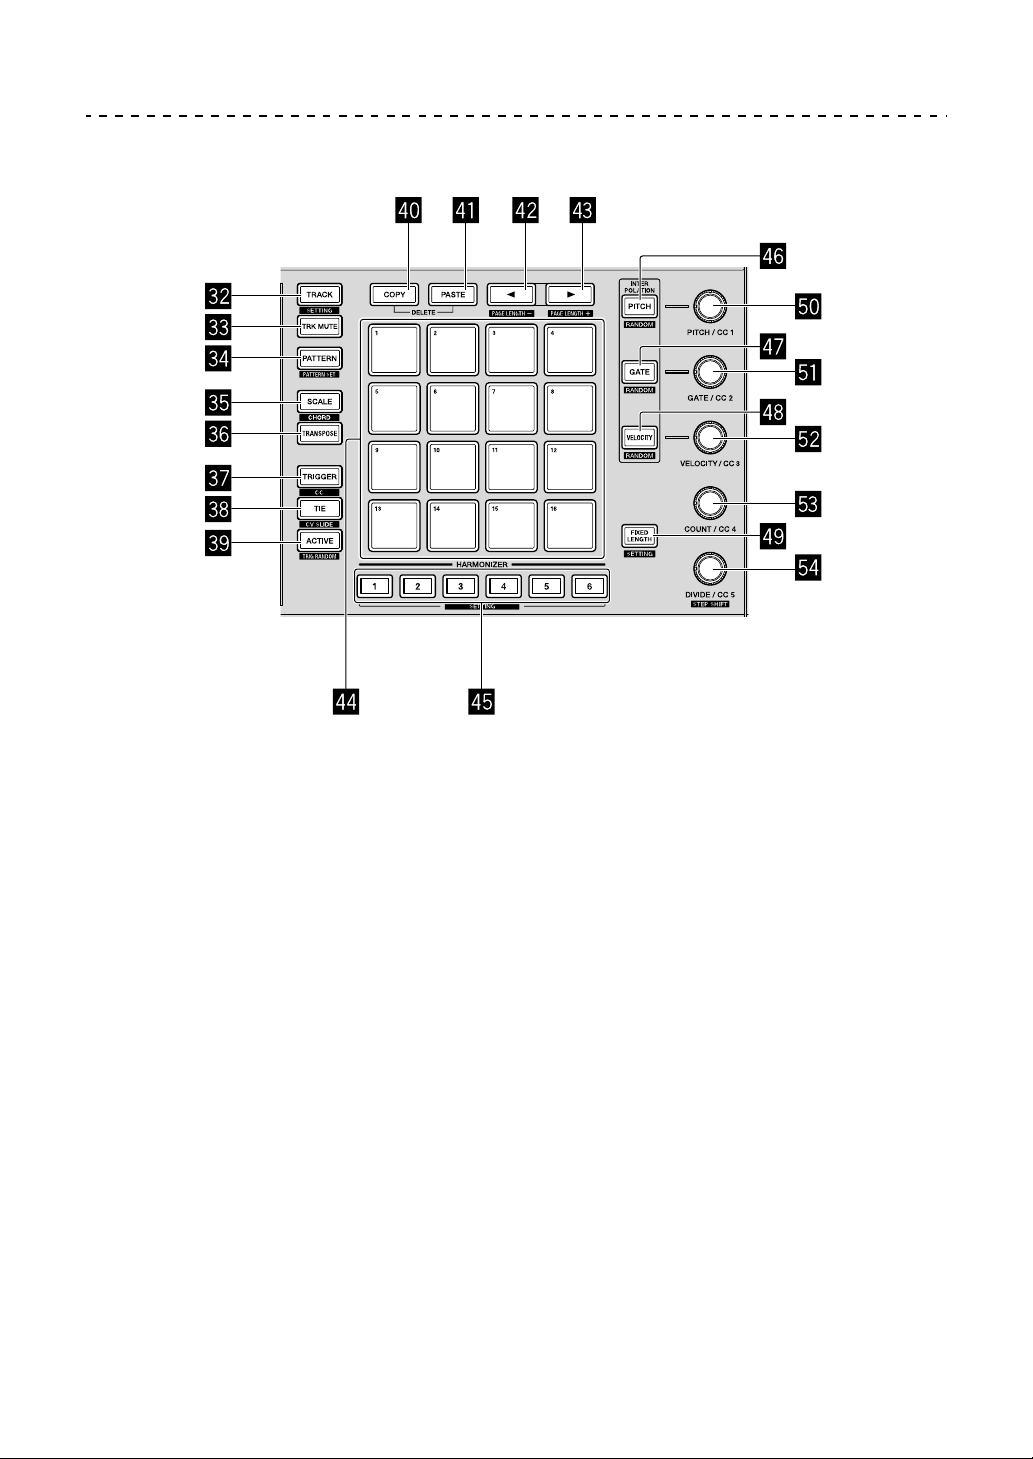
Step edit section
Part names and functions
w TRACK button
x TRK MUTE button
y PATTERN button
z SCALE button
A TRANSPOSE button
B TRIGGER button
C TIE button
D ACTIVE button
w to D: Switches the 16-pad function when each button is pressed. For details,
refer to “Switching the 16-pad mode” (page 29).
13
En

Part names and functions
E COPY button
F PASTE button
E & F: Used to copy and paste specific information such as steps, patterns,
pattern sets, and notes. Pressing both buttons at the same time enables
deleting mode. For details, refer to “COPY/PASTE” (page 73) and “DELETE”
(page 75).
G button
H button
G & H: Used to change the length of a pattern and a page shown on the 16-
pads. For details, refer to “Changing the pattern length” (page 55).
I 16-pads
Performs various operations depending on the pad mode.
J HARMONIZER buttons
Changes a note to a chord while holding down the button. For details, refer to
“HARMONIZER” (page 71).
K PITCH button
L GATE button
M VELOCITY button
K to M: Used to perform various operations for Interpolation and Randomizer.
For details, refer to “INTERPOLATION” (page 67) and “RANDOMIZER”
(page 70).
N FIXED LENGTH button
Sets a pattern length to a specific length. For details, refer to “FIXED LENGTH”
(page 79).
14
En

Part names and functions
O PITCH/CC 1 knob
P GATE/CC 2 knob
Q VELOCITY/CC 3 knob
R COUNT/CC 4 knob
S DIVIDE/CC 5 knob
O to S: Used to change parameters of a note and step. For details, refer to
“TRIGGER mode” (page 47) and “CC (Control Change) mode” (page 61).
15
En
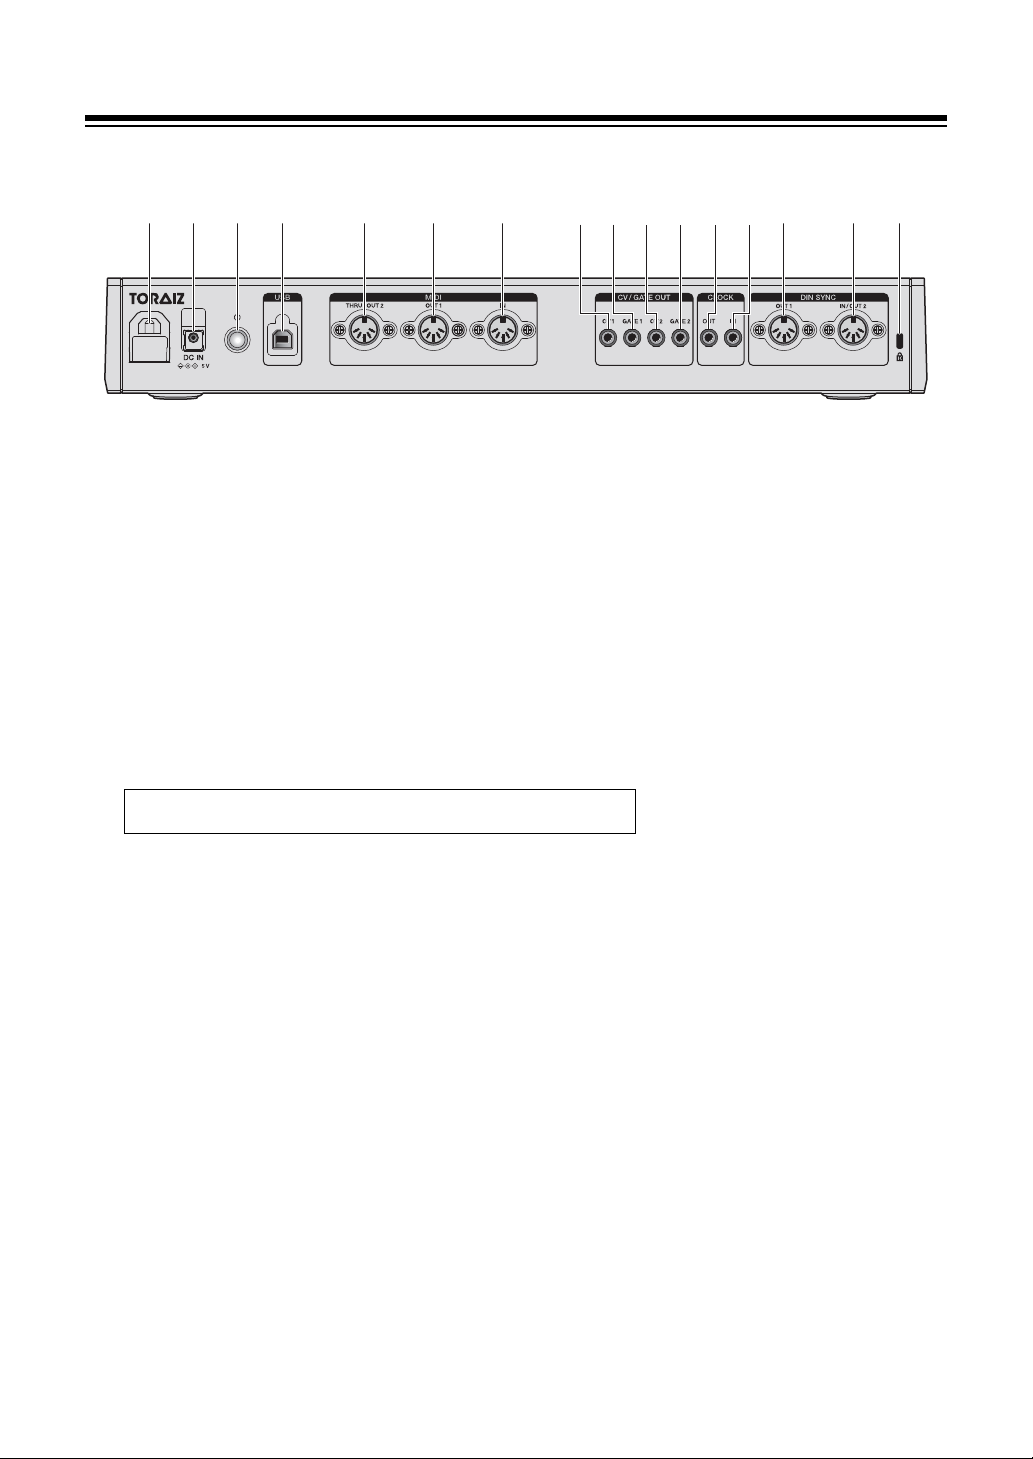
Part names and functions
1 2 3 4 5 6 7
f gedcb
a98
Rear panel
1 Cable hook
Hook the AC adapter cable when using this unit.
Refer to “How to use the cable hook” (page 20).
2 DC IN terminal
Connect the AC adapter cable.
3 power button
Turns the power of this unit On/Off.
On/ Off
This switch is between off and on for this unit.
4 USB-B terminal
Connect to your PC/Mac.
• A USB hub cannot be used.
• To optimize performance, connect this unit and a PC/Mac directly using a
USB 2.0 compliant USB cable.
5 MIDI THRU/OUT2 terminal
Connect to a device that receives MIDI signals from this unit.
6 MIDI OUT1 terminal
Connect to a device that receives MIDI signals from this unit.
7 MIDI IN terminal
Connect to a device that sends MIDI signals to this unit.
16
En

Part names and functions
8 CV OUT1 terminal
Connect to a device that receives CV signals from this unit.
9 GATE OUT1 terminal
Connect to a device that receives GATE signals from this unit.
a CV OUT2 terminal
Connect to a device that receives CV signals from this unit.
b GATE OUT2 terminal
Connect to a device that receives GATE signals from this unit.
c CLOCK OUT terminal
Connect to a device that receives CLOCK signals from this unit.
d CLOCK IN terminal
Connect to a device that sends CLOCK signals to this unit.
e DIN SYNC OUT1 terminal
Connect to a device that receives DIN SYNC signals from this unit.
f DIN SYNC IN/OUT2 terminal
Connect to a device that sends or receives DIN SYNC signals to or from this
unit.
g Kensington lock slot
17
En

Connections
• Be sure to turn off the power, disconnect the USB cable from this unit,
and unplug the power cord from the power outlet whenever making
or changing connections.
• Connect the power cord and a USB cable once all the connections
between devices have been completed.
• Be sure to use the included power cord and AC adaptor.
• Refer to the operating instructions for components to be connected.
• Use a USB cable which complies with USB 2.0.
• The unit is powered by either the AC adapter or USB-bus power.
The unit can be powered by just connecting the unit and your PC/
Mac via a USB cable without connecting the AC adaptor.
If the AC adapter is connected at the same time, the USB-bus power
can be used as a backup power source. If the AC adapter is
disconnected while using the unit, the unit automatically switches the
power source to the USB-bus power.
• To stabilize the power supply, be sure to connect the AC adapter
connecting cord and a USB cable to the [DC IN] terminal and [USB-
B] terminal tightly. If the connection is not secured, the unit may not
operate stably.
Special notes when using USB-bus power
• There are some restrictions in functions such as dimming on buttons,
LEDs for pads, and display.
• Be sure to connect the unit directly to a USB 2.0/3.0 port on your PC/
Mac using a USB cable.
• We recommend using a USB certified USB cable that is 2 meters
(6.56 feet) or shorter to prevent stability issues.
18
En
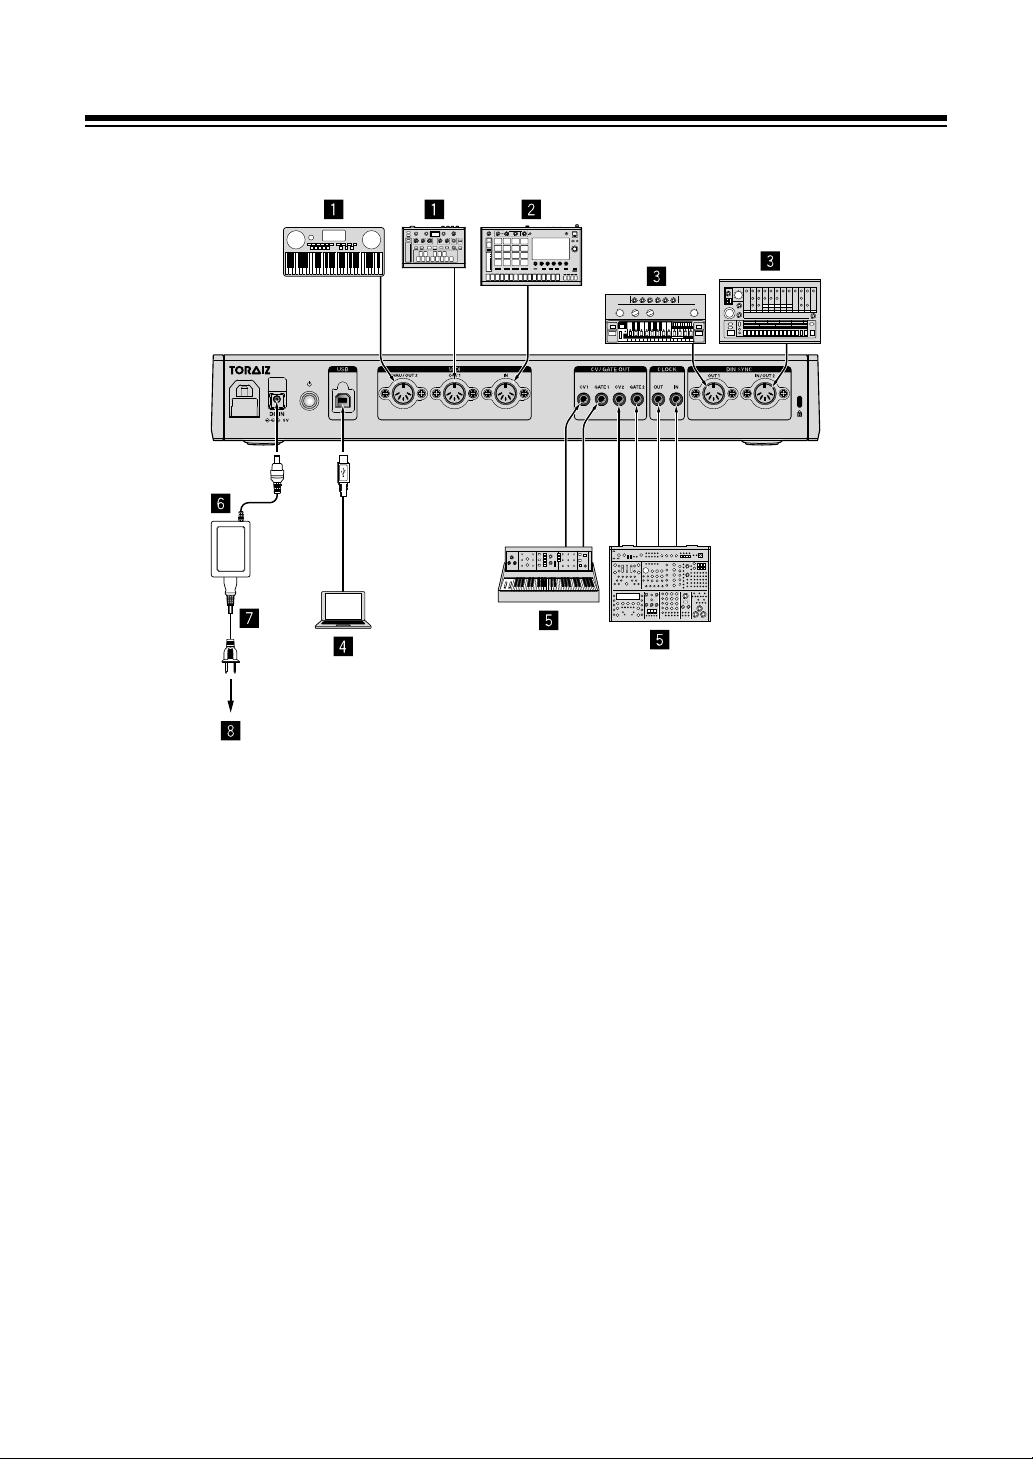
Connecting inputs and outputs
Connections
1 MIDI-compatible Synthesizer, Drum machine, Sound module,
etc.
2 MIDI-compatible Synthesizer, Drum machine, Sound module,
MIDI keyboard, etc.
3 DIN SYNC-compatible Synthesizer, Drum machine, Sound
module, etc.
4 PC/Mac
5 CV/GATE/CLOCK-compatible Synthesizer, Drum machine,
Sound module, etc.
6 AC adaptor (included)
7 Power cord (included)
8 To power outlet
19
En
Connections
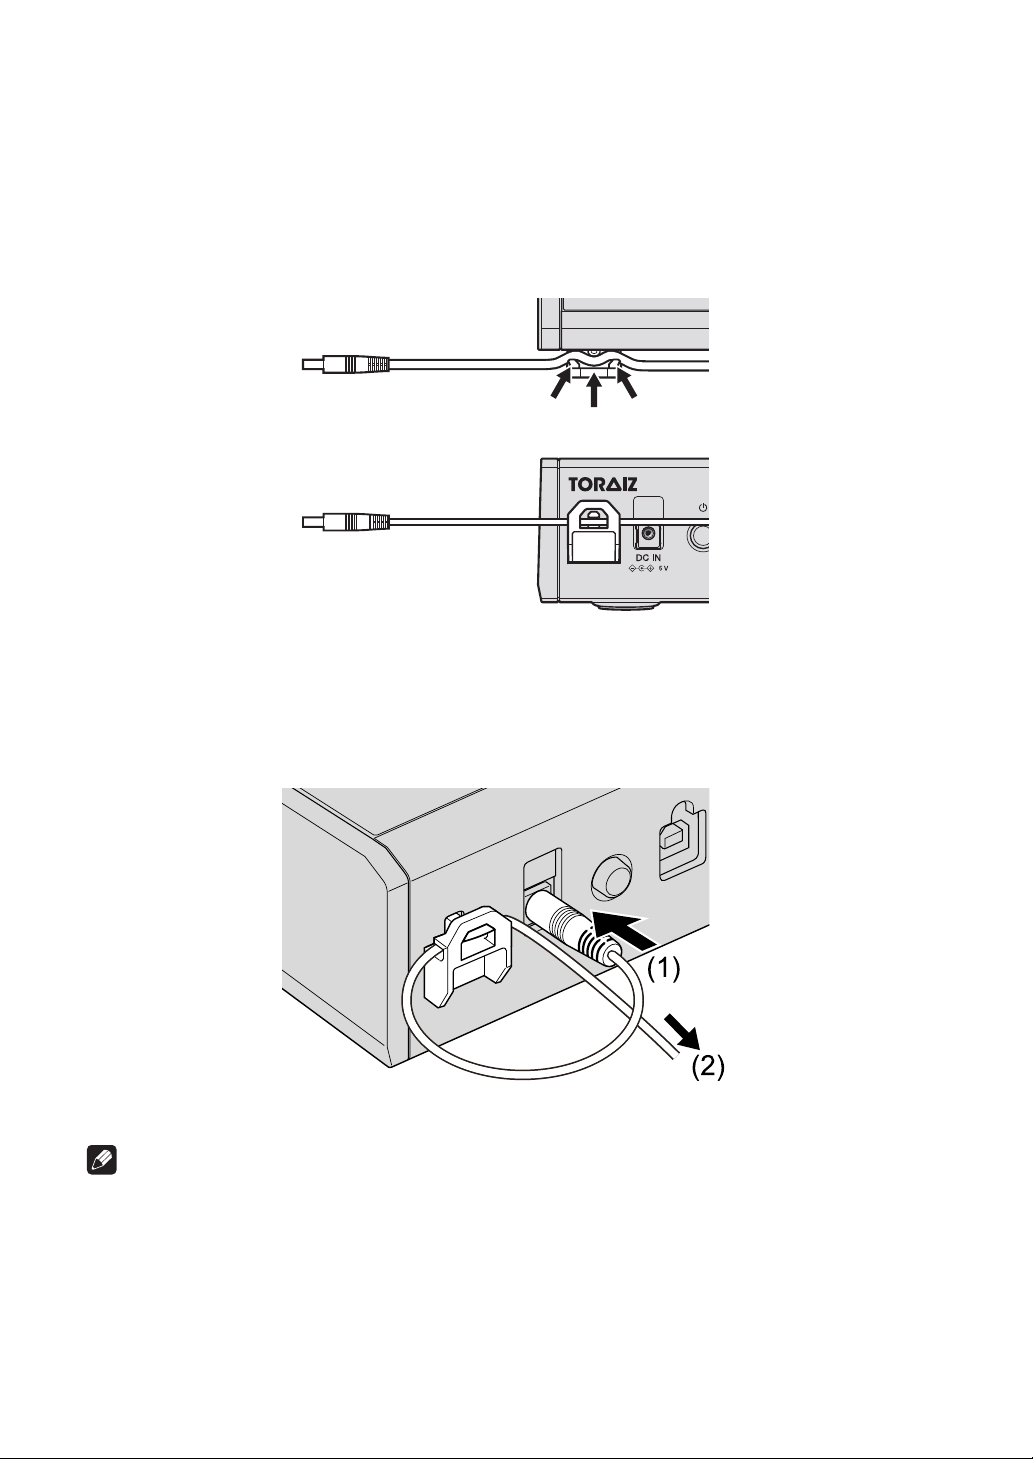
How to use the cable hook
Hook the connection cable of the AC adaptor to avoid accidentally
disconnecting it from the unit.
1 Fit the connection cable of the AC adaptor into the cable hook.
2 Connect the plug of the connection cable to the [DC IN] terminal (1).
If the cable on the left side of the cable hook is too long, tighten it
moderately (2).
Note
Be sure to connect the AC adapter connecting cord to the [DC IN]
terminal tightly. If the connection is not secured, the unit may not
operate stably.
20
En
The data structure of the unit
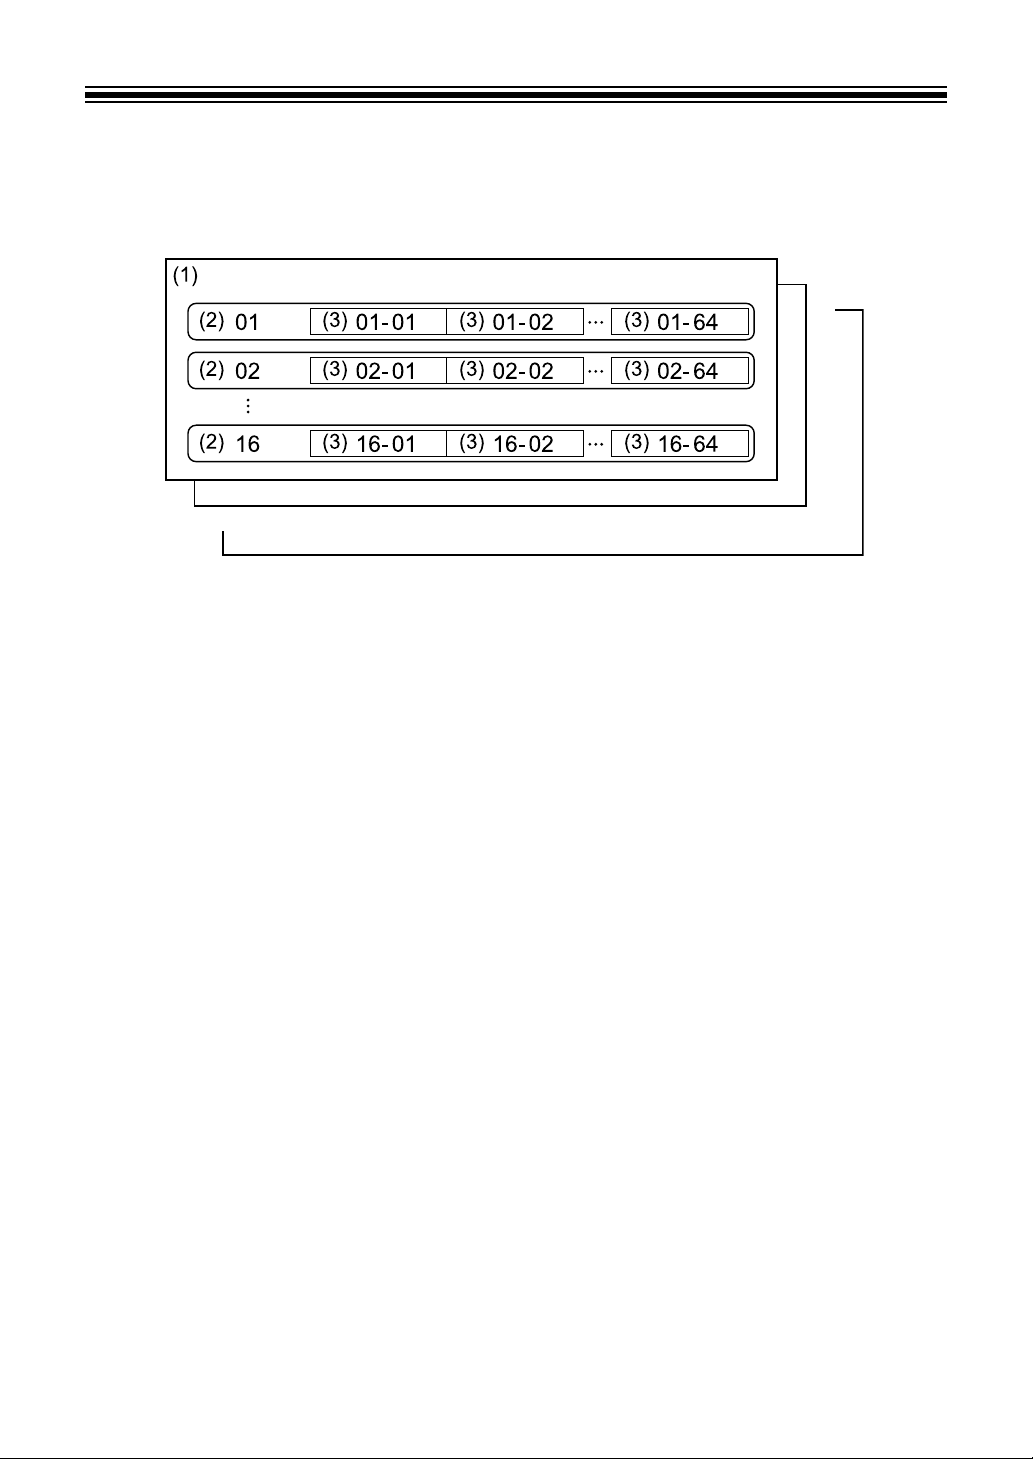
The data structure of the unit is as shown below.
(1) Project:
A project is a unit of work created by the user containing various
information.
One project consists of 16 tracks.
(2) Track:
Each track can create up to 64 patterns.
You can assign a track to a sound source such as track 1 to the
drums, track 2 to the bass, track 3 to the synthesizer, etc.
(3) Pattern:
A pattern is a sequence of performance information played by
using various functions of the unit.
You can set the length of a pattern from 1 to 64 steps in step
increments.
The maximum number of each element which can be created in this
unit is as follows.
• The number of projects: 128
• The number of tracks for one project: 16
• The number of patterns for one track: 64
• The number of pattern sets for one project:16
• The total number of patterns: 1600
En
21
Basic Operation
Project management
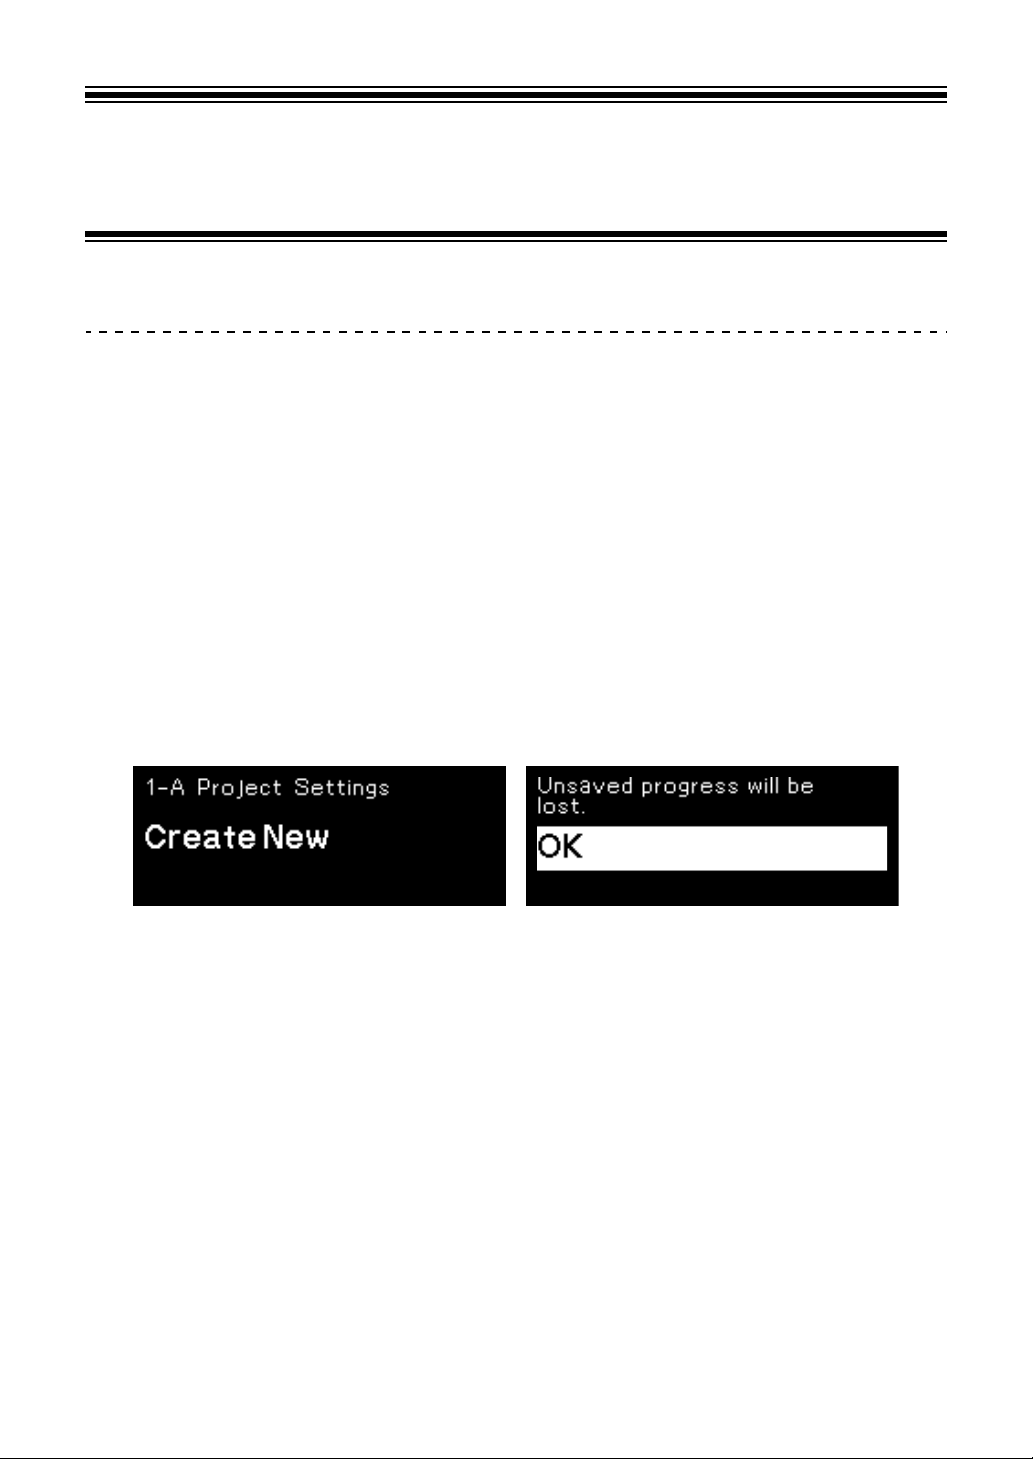
Creating a new project
1 Press the [GLOBAL] button.
The button lights up and you enter the GLOBAL menu.
2 Turn the rotary selector to select [Create New] and press it.
3 Turn the rotary selector to select [OK] and press it.
A new project is created.
• If a new project is created without saving the current project, any changes
will be lost. Be sure to save the current project if you want to maintain the
changes.
22
En
Basic Operation
Loading a project
1 Press the [GLOBAL] button.
The button lights up and you enter the GLOBAL menu.
2 Turn the rotary selector to select [Open(recent)], [Open(by
creation)] or [Open(by name)] and press it.
• Select [Open(recent)] to scroll though the projects in the order they were
opened.
• Select [Open(by creation)] to scroll though the projects in the order they
were created.
• Select [Open(by name)] to scroll though the projects in alphabetical order.
3 Turn the rotary selector to select a project and press it.
The project is loaded.
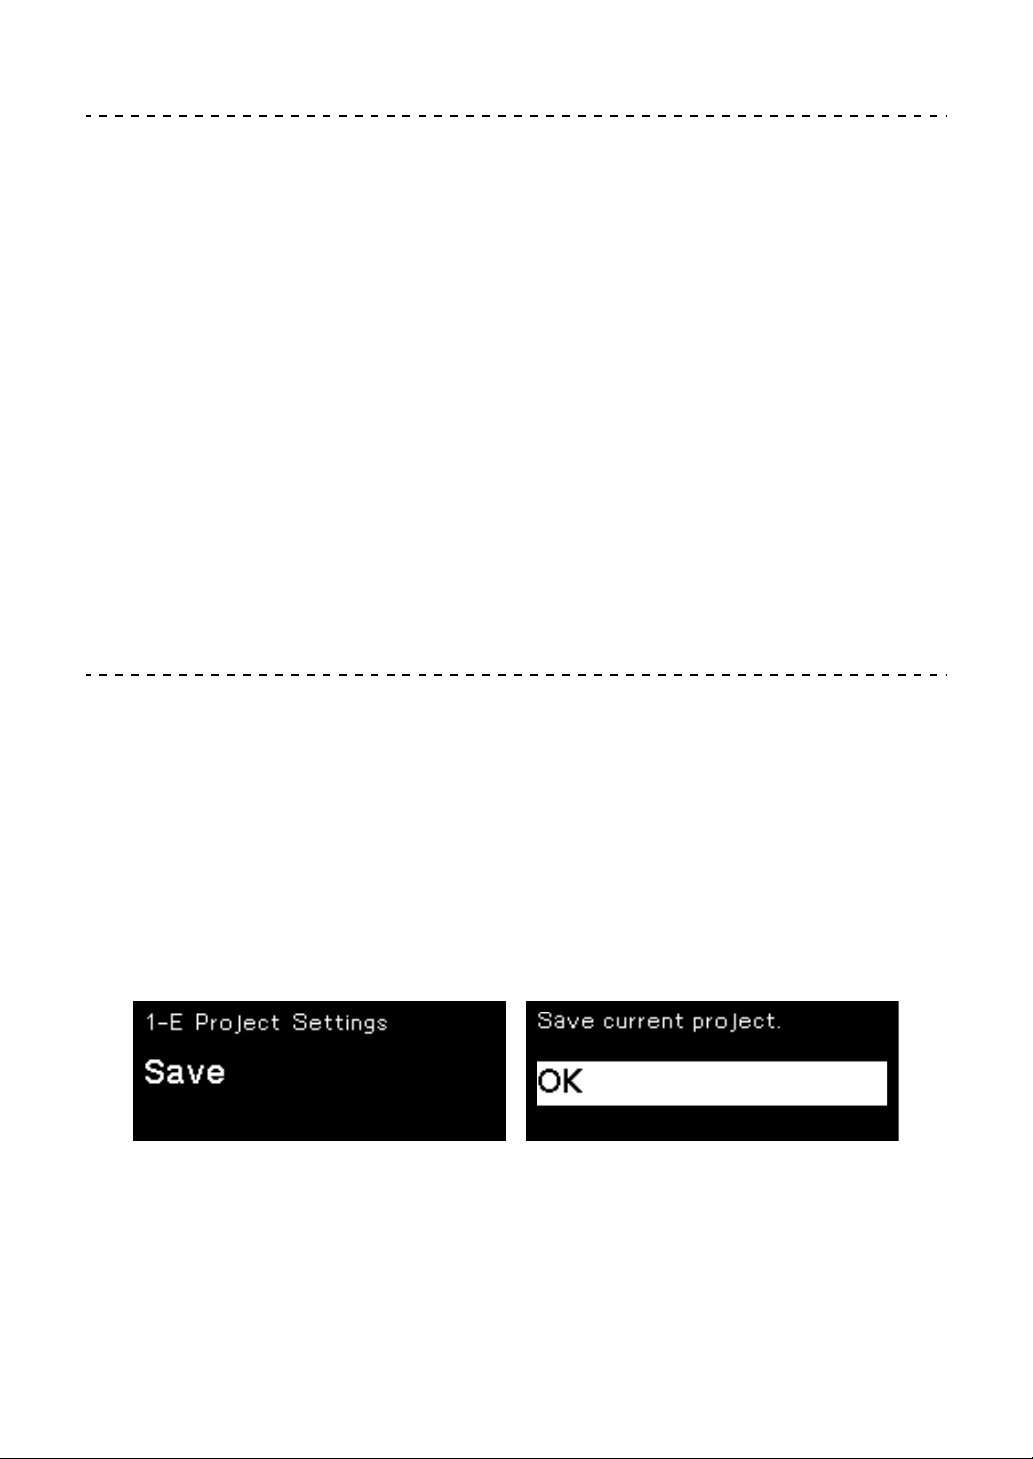
Overwriting a project
1 Press the [GLOBAL] button.
The button lights up and you enter the GLOBAL menu.
2 Turn the rotary selector to select [Save] and press it.
3 Turn the rotary selector to select [OK] and press it.
The project is overwritten.
23
En

Basic Operation
Naming and saving a project
1 Press the [GLOBAL] button.
The button lights up and you enter the GLOBAL menu.
2 Turn the rotary selector to select [Save As] and press it.
• Select [Save] to overwrite a project.
3 Press the []/[] button to move the cursor and turn the rotary
selector to change the character.
Name the project by repeating this step.
• Alphanumeric characters, symbols, or a blank space can be used.
• To delete a character at the cursor, hold down the [SHIFT] button and press
the [BACK] button.
• To insert a blank space in front of the cursor, hold down the [SHIFT] button
and press the rotary selector.
• When an existing project is loaded, its name is shown on the display.
4 Press the rotary selector.
The project is saved.
24
En
Basic Operation
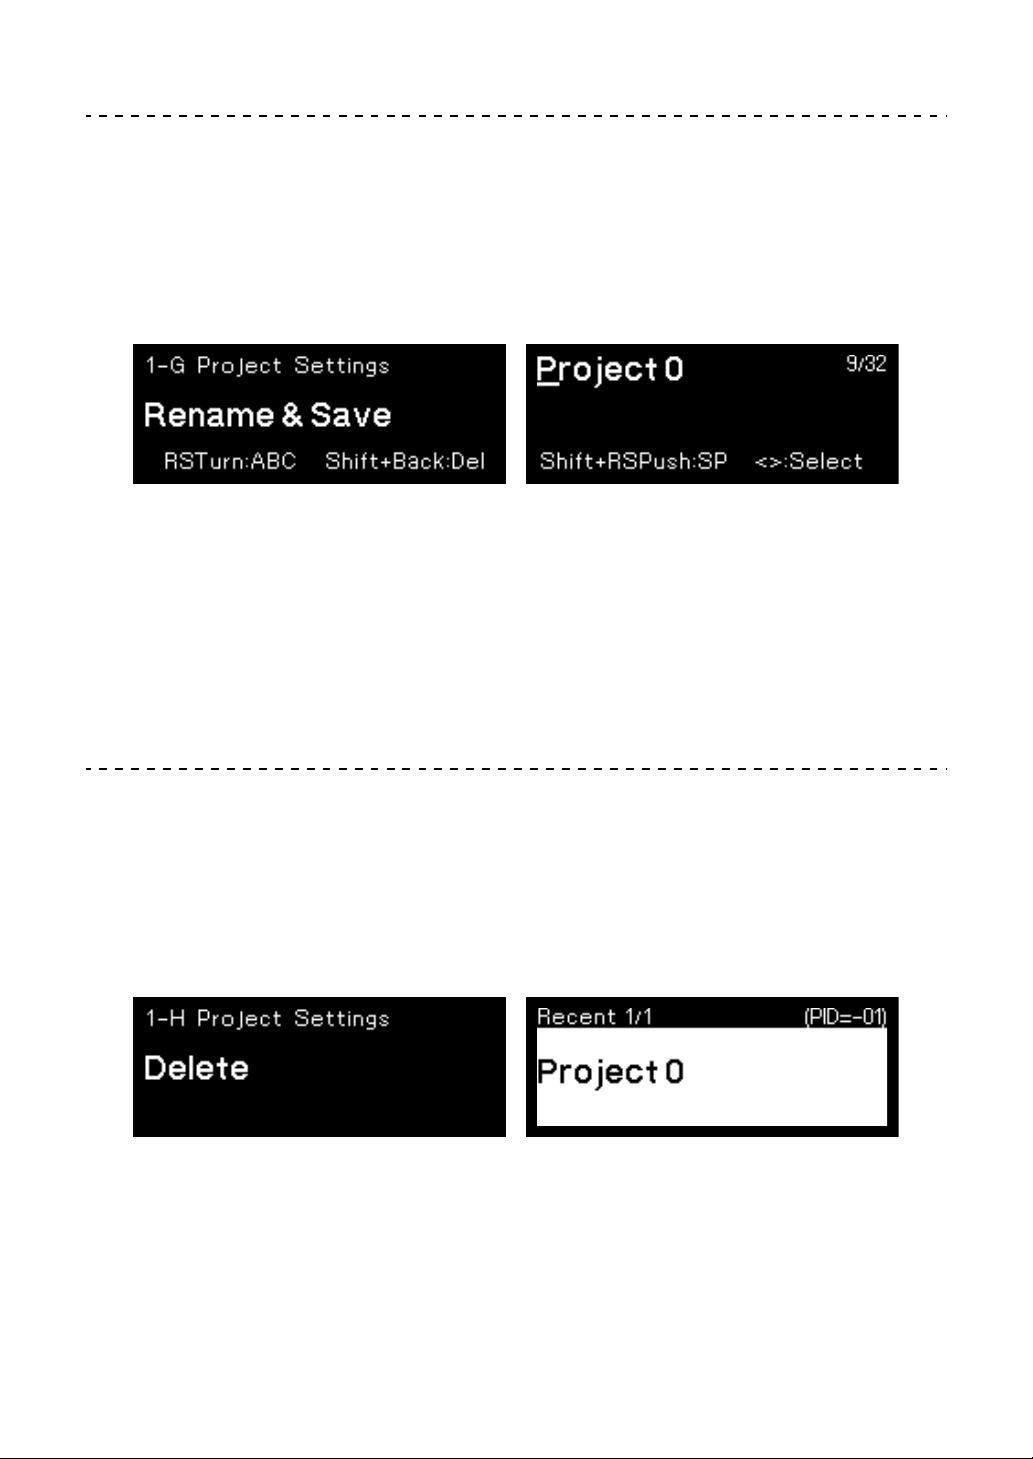
Changing and overwriting a project name
1 Press the [GLOBAL] button.
The button lights up and you enter the GLOBAL menu.
2 Turn the rotary selector to select [Rename & Save] and press it.
3 Press the []/[] button to move the cursor and turn the rotary
selector to change the character.
• For details, refer to step 3 in “Naming and saving a project” (page 24).
4 Press the rotary selector.
The project name is changed and overwritten.
Deleting a project
1 Press the [GLOBAL] button.
The button lights up and you enter the GLOBAL menu.
2 Turn the rotary selector to select [Delete] and press it.
3 Turn the rotary selector to select a project and press it.
The selected project is deleted.
25
En

Basic Operation
Transport
This chapter explains the functions using buttons and knobs in the
Global section (page 9).
Playing a sequence
1 Press the [] (play) button.
The button lights up in green and a sequence is played.
The 16-pads light up depending on the direction of the step movement and the
step state which is set through various pad modes.
• Up to 8 notes can be unmuted at the same time for each track.
• To pause the sequence playback, press the [] (play) button.
The button flashes when paused.
• To stop the sequence playback, press the [] (stop) button.
The light of the [] (play) button turns off.
26
En

Basic Operation
Recording the performance information into a sequence in real time (Real-time recording)
The information of the pad performance, the Harmonizer performance,
and the automation can be recorded into a sequence.
1 Press the [] (record) button.
The button lights up in red and recording standby mode is enabled.
2 Press the [] (play) button.
The button lights up in green. When the sequence starts playing, recordable
mode is enabled.
• The following performance information can be recorded into a sequence;
– Performance information using the 16-pads in Scale mode (page 39)
– Performance information using the 16-pads in Chord mode (page 44)
– Performance information made in combination with the [HARMONIZER]
buttons (page 71)
– Performance information using the 16-pads in Transpose mode (page 46)
– Performance information of the [GROOVE BEND] slider (page 93)
– Performance information of the [SPEED CONTROL] buttons (page 99)
– Performance information of the [RHYTHMIC CONTROL] buttons
(page 101)
Restarting a sequence
You can restart a sequence from the first step without stopping the
playback.
1 Hold down the [SHIFT] button and press the [] (play) button.
The sequence restarts regardless of whether it is being played, paused, or
stopped.
En
27
Basic Operation
Setting the BPM (Beats Per Minute) of a sequence
The BPM can be set in the following method:
• Setting the BPM with a numerical value
• Setting the BPM by tapping the [TAP] button
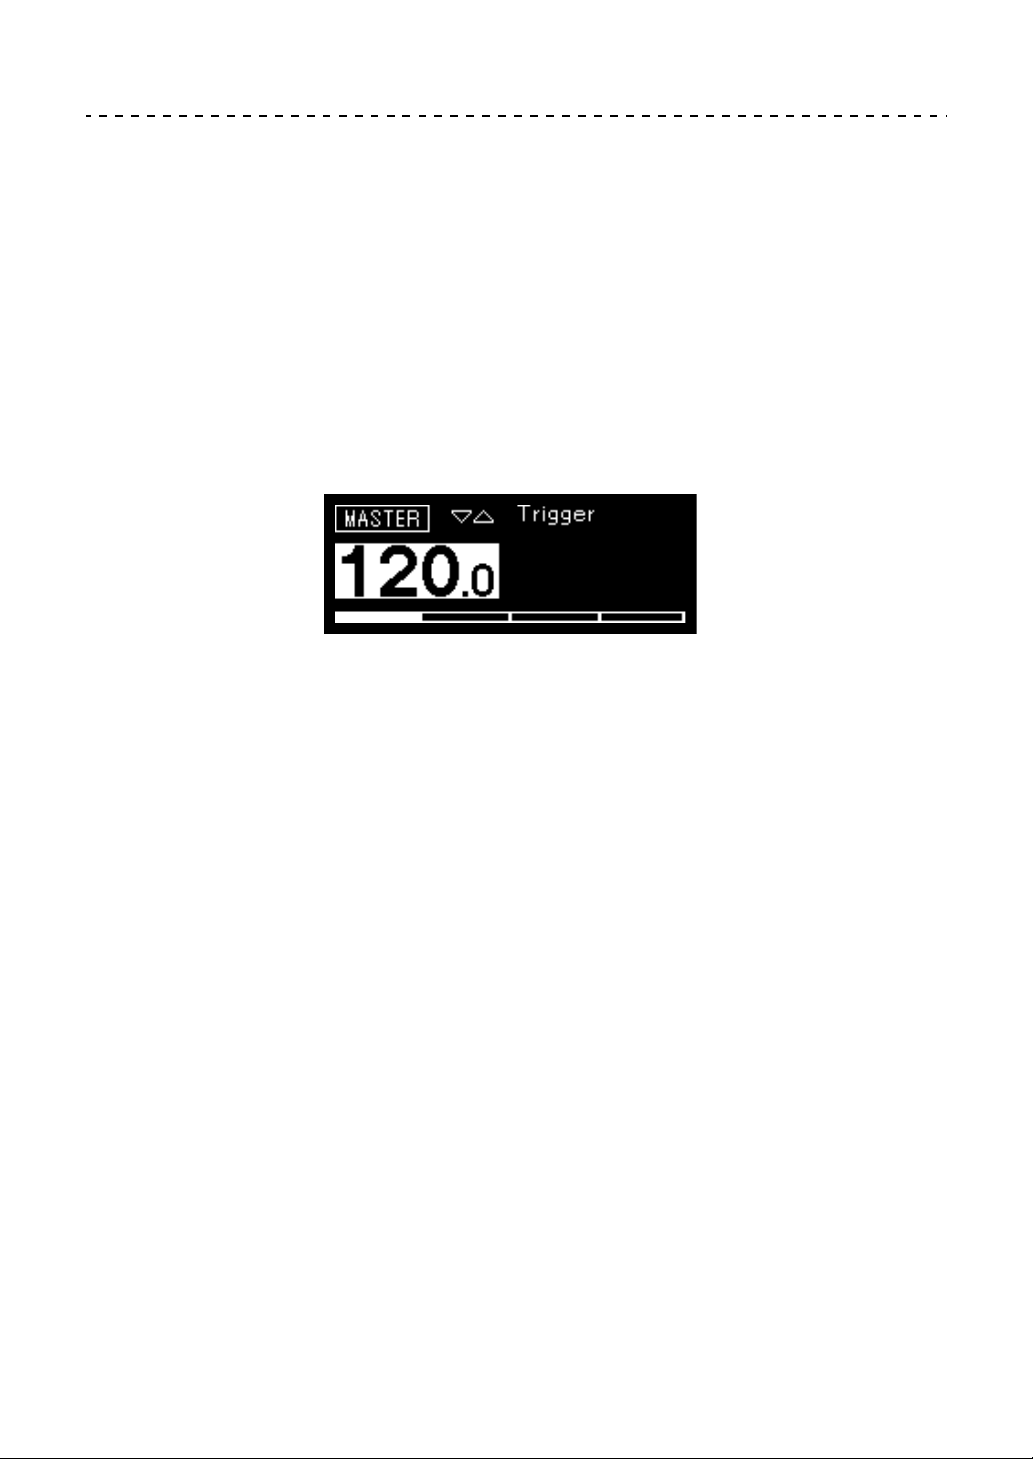
Setting the BPM with a numerical value
1 Press the [TAP] button.
The BPM indicator is highlighted on the display.
2 Turn the rotary selector to change the BPM.
The changed BPM is applied immediately.
• The value can be set from [30 BPM] to [300 BPM].
• To change a value after the decimal point, hold down the [SHIFT] button and
turn the rotary selector.
• Shortly after changing the BPM, the display returns to the former state.
Setting the BPM by tapping the [TAP] button
1 Tap the [TAP] button twice or more.
The BPM is calculated based on the interval of tapping and applied
immediately.
• The calculated BPM is shown for each tap.
• Shortly after tapping, the display returns to the former state.
28
En

Step edit section
Switching the 16-pad mode
You can switch the functions (the modes) of the 16-pads as needed.
• Track mode (page 31):
Selects a track (current track) to operate or edit from the 16 tracks.
• Track Mute mode (page 33):
You can toggle muting and solo of the 16 tracks.
• Pattern mode (page 34):
You can select a pattern (current pattern) to operate or edit from up
to 64 patterns included in the current track.
• Pattern Set mode (page 37):
You can save a combination of patterns selected for each track or
load them at once.
• Scale mode (page 39):
You can play scales using the 16-pads.
• Chord mode (page 44):
You can play chords using the 16-pads.
• Transpose mode (page 46):
You can transpose the current pattern in real time.
• Trigger mode (page 47):
You can set the note of each step (pad) to mute/unmute and changes
various parameters of a note and a step (pad).
• CC mode (page 61):
You can assign up to 5 MIDI controller numbers to each track and set
the MIDI control value to each step (pad).
• Tie mode (page 64):
You can set the Tie of each step (pad) connecting the sound of the
previous step (pad).
29
En

Step edit section
• CV Slide mode (page 65):
You can set CV Slide for each step where the pitch is changed
forward to the next step (pad) smoothly for each step.
This function is enabled only when the output terminal of the track is
set to [CV/GATE1] or [CV/GATE2].
• Active mode (page 66):
You can set each step to Active or Inactive. Inactive steps are
removed from the sequence and skipped during the pattern
playback.
30
En
 Loading...