

TOPWAY EM ENTERPRISE ONA008 User Manual
Tra
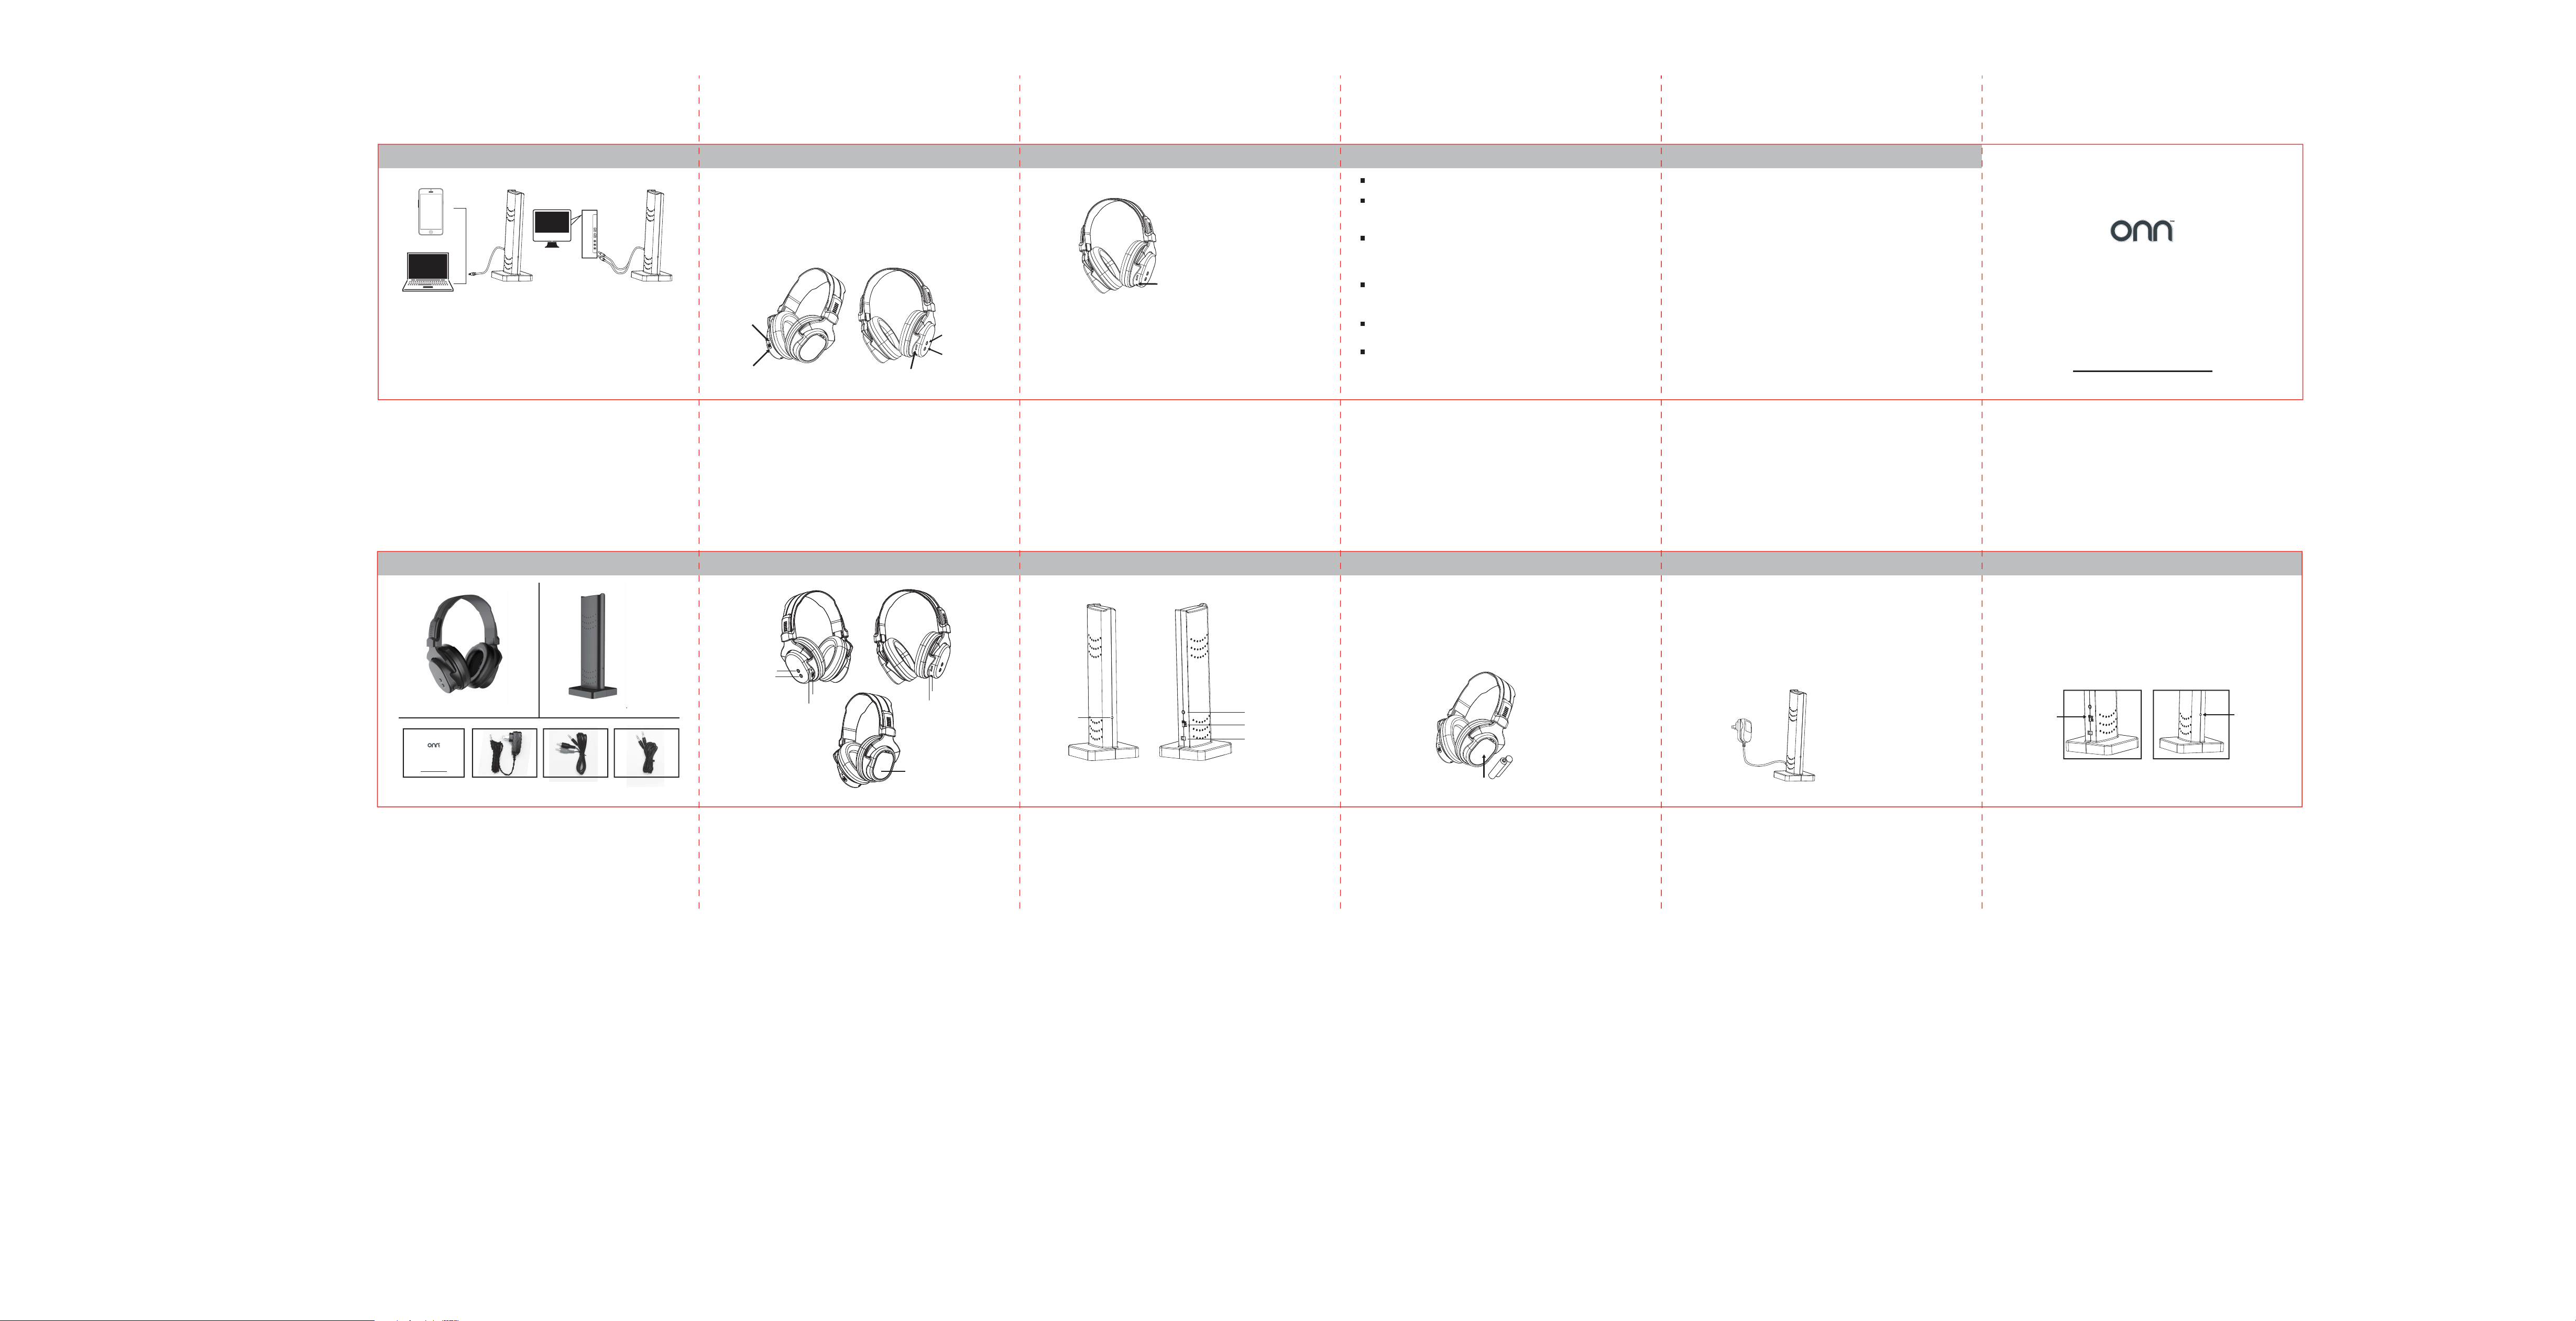
Front
Cover
Transmitter using
Smartphone
PC
NOTE: one Transmitter can be connected 3 headphones, each headphone only
need press “RESET” press ”SCAN”, all can listen the sound from 1 audio device.
If using 2 or 3 Transmitters at the same time, each Transmitter need pull its
channel, for example: the first Transmitter pulls CH1, the second one need pull
CH2, the third one need pull CH3, then can listen your music from your own
headphone, no interference.)
audio cable
TV
yellow
white
red
TV adapter
P7 P8 P9 P10 P11
Wireless Headphone using Wired Headphone using
1. Turn the Headphone on by pulling the switch to “ON” located on the side of the headphone.
the Red LED indicator light turns on located on side of the headphone. Pressing “RESET”
located on front of headphone , press “SCAN” located on front of headphone ,
listen the sound from your audio device. (NOTE: if the channel is changed from Transmitter,
need re-press “RESET” then press “SCAN”, listen the music again.)
2. When the Transmitter turns off, pressing “RESET” located on front of headphone then press
“SCAN” located on front of headphone, can listen the radio.
3. Adjust the listening volume to a comfortable level using the headphone’s volume control
located on headphone.
Red LED
indicator
light turns on
press "SCAN"
press "RESET"
pulls the switch to "ON"
adjust the comfortable sound
When the headphone turns off, using the audio cable to plug in the "Audio", and your audio
device, listen the music as the wired headphone.
when you don’t use the Transmitter or Headphone, pls turn them off and take out
NOTE:
the batteries and don’t plug the Power Adaptor into the electrical outlet.
audio cable plugged
in "AUDIO"
Troubleshooting tips
I cannot turn the Headphone on
Replace the batteries in the headphone, and make sure the switch is in “ON”
I cannot turn the Transmitter on
Replace the batteries in the headphone
Make sure the Power adaptor is plugged well
Make sure the switch is on CH1, CH2 or CH3
I cannot listen the music
Make sure turn the Transmitter and Headphone on
Make sure the audio cable is connected well
Press “RESET” then press “SCAN”, make sure connect the right channel
Ensure that you are within approximately 30 feet of the Transmitter
I cannot listen the music when 2 or 3 headphones are working with
one Transmitter
Make sure the switch in on “ON” of the headphone
Press “RESET” then press “SCAN”, make sure connect the right channel
Interfere with signal when 2 or 3 Transmitter is are working
Make sure the Transmitters are in different channel
Press “RESET” then press “SCAN”, make sure connect its’ own channel
Has noise or interfere when listening
Make sure the transmit distance is within 30feet(9.1M)
Make sure the transmitter and receiver are in the visible range, no obstacles
Make sure no strong interference signals
Make sure the audio cable is in straighten, non winding
NOTE
This equipment has been tested and found to comply with the limits for a Class B digital device,
pursuant to part 15 of the FCC Rules. These limits are designed to provide reasonable protection
against harmful interference in a residential installation. This equipment generates uses and can
radiate radio frequency energy and, if not installed and used in accordance with the instructions,
may cause harmful interference to radio communications. However, there is no guarantee that
interference will not occur in a particular installation. If this equipment does cause harmful
interference to radio or television reception, which can be determined by turning the equipment
off and on, the user is encouraged to try to correct the interference by one or more of the
following measures:
- Reorient or relocate the receiving antenna.
- Increase the separation between the equipment and receiver.
-Connect the equipment into an outlet on a circuit different from that to which the
receiver is connected.
-Consult the dealer or an experienced radio/TV technician for help
Changes or modifications not expressly approved by the party responsible for compliance
could void the user's authority to operate the equipment.
This device complies with Part
15 of the FCC Rules. Operation is subject to the following two conditions:
(1) this device may not cause harmful interference, and
(2) this device must accept any interference received, including interference that may
cause undesired operation.
A general, cautionary and warning marking intended to inform the user of a potential risk of
fire, electrical shock, or injury to persons shall be provided.
Wireless Headphones With Transmitter
FCC ID:2AKI8-ONA008
Model: ONA17AA008
PRODUCT GUIDE
In the box
Wireless Headphones With Transmitter
Model: ONA17AA008
PRODUCT GUIDE
Using the 5V Power Adapter:
To use the Power Adapter:
1.Place the Transmitter in the supplied cradle.
2.Connect the Power Adaptor to the transmitter’s Cradle.
3.Plug the Power Adaptor into a nearby electrical outlet.
NOTE: Make sure the Power Adaptor is the correct voltage. Failure to do so
may cause damage to the transmitter.
Headphone
AC adapter TV adapter Audio cableProduct Guide
Transmitter
Headphone controls Transmitter controls
Reset Key
Scan Key
ON/OFF
LED light
Audio
Volume control
LED light
Battery
Compartment
Battery Installation:
Headphone:
1. Open the battery compartment by sliding the latch downward located on left
side of the headphone.
2. Put in 2*AAA batteries. Made sure they are placed in compartment with the
polarity in the correct position(+/-).
3. Close the compartment by sliding the cover back on & closing the latch.
Note: Do not mix old and new batteries
Audio
OFF/channel switch
AC socket
P1 P2 P3 P4 P5
Transmitter using
1. Connect the Transmitter to the “Audio”jacks of your audio device for
example: Smartphone, PC, TV, using the supplied cables and adapters.
(NOTE: when connecting the Transmitter to the Television, the RCA “Audio-Out”
jacks are located on the back of your TV Set, not the front.)
2. Make sure that your audio device is turned on and set to a reasonable
listening volume.
3. Turn the Transmitter on by pulling the switch to any place of CH1/CH2/CH3
located on back of the Transmitter, The Red LED indicator light turns on located
on front of the Transmitter.
Pulls the switch
to any place of
CH1/CH2/CH3
Red LED
indicator
light turns on
Note: Transmit distance is approximately 30 feet(9.1m). maximum line-of-sight,
Nil Interference
P6
 Loading...