

Page 1

Table of Contents
Major Functions……………………………………………………………………02
Description of Button/Interfaces……………………………………………………..03
Description of Display Screen………………………………………………………04
Basic Operation………………………………………………………………………07
Master Interface………………………………………………………………………09
Music Mode…………………………………………………………………………10
Video Playing………………………………………………………………………12
FM Radio……………………………………………………………………………14
Picture Browse………………………………………………………………………17
E-book………………………………………………………………………………19
Recording……………………………………………………………………………22
Resource Manager……………………………………………………………………23
Games………………………………………………………………………………...24
System Setup…………………………………………………………………………25
Video Conversion……………………………………………………………………34
Firmware Upgrade…………………………………………………………………36
Common Troubles……………………………………………………………………38
1
Page 2

Major Functions
·Brand new contact screen operation system, with even more visual and convenient
operation
·320x240 dot matrix 260K-color full color high speed TFT display screen
·It supports the music format of MP3, WMA and WAV
·It supports MPEG-4 (AVI) video format
·FM radio and capable of saving 20 radio channels
·It supports picture browse in the formats of JPEG, gif and BMP
·Built-in microphone and extra long time recording
·Energy efficiency setup, with brightness capable of free modulation and automatic
power off
·Multiple EQ and cycle for your option
·It supports multiple foreign written languages
·It supports WIN98S/ME, WIN2000 and WINXP systems
·USB2.0 high-speed transmission
·It supports e-book reading
·It supports game functions
·Moving hard disk functions
·It supports firmware upgrade
2
Page 3

3
Page 4

01: Play mode
02: Loop mode
03: Play/pause state
04: Power display
05: Current music/total music
06: EQ
0: Bit rate
08: Music name
09: Lyric
10: Progress bar
11: Time already playing the current music
12: Volume
13: Current remaining time
4
Page 5

01: Power display
02: Manual search mode
03: Preset radio channel mode
04: Save radio channels
05: Delete radio channels
06: Automatic search mode
07: Radio frequency
08: Receiving area
09: Frequency progress bar
10: Receiving area frequency range
11: Volume
5
Page 6

01: Power display
02: Recorded file name
03: Recording time
04: Recording progress bar
05: Recording quality
06: Remaining time for recording
6
Page 7

Basic Operation
Power on
Push the power switch of the player towards the direction of for 3 seconds for
power on.
Power off
In the power off state, push the power switch of the player towards the direction of
for 3 seconds for power off.
Lock button on/off
In the states of video, music and radio, you can set the lock button as ON to prevent
unintended button error operation.
Button lock: Push the switch button of the player towards the direction of , and the
button of the player will be locked up without any response to any operation.
Button lock: Push the switch button of the player to the original position to unlock
and to restore to the button operation.
Volume Control
In the states of music, FM radio and video, etc, you can perform volume control using
+ or – button at the lower part of the screen. + button is for increased volume and –
button is for reduced volume. Hold Button + or Button – to continuously increase or
reduce volume.
Switching the earphone/built-in speaker output
In the button menu, short press button to switch the sound output from the
earphone/built-in speaker.
Power reset
If there is shutdown to the player in the process of operation, you can turn off and
restart the player by pressing RESET button.
Connecting the computer and data file transmission
Start the computer and then connect the unit with the USB port of the computer using
the connection line. In this way you can perform USB power supply or USB data
transmission. This unit and the computer can be connected using the USB interface,
and can be used as a moving disk. All you do is put your favorite music in the player
without the procedures of any third party
7
Page 8

Battery
High capacity lithium battery is used for this unit.
The duration available of the battery power depends on volume, types of playing files
and operation of batteries. The player can be set up by the user as [user define power
off time] or [display setup] to save batteries.
Charging
In the time of charging, connect the player with the USB port of the USB or the
charger. If the charger attached to the unit is used, the indicator of the charger during
charging is red. When the indicator of the charger turns green, it indicates that the
battery is full.
Using the MINI SD card
After this unit is connected with the computer, you will find two moving disks. The
first one is the built-in memory disk for this unit and the other is the disk for the MINI
SD card. If no card is inserted, the second disk cannot be opened. This unit supports
the extension of the MINI SD card from 128MB to 4GB.
Inserting and Pulling out the MINI SD card
Inserting: Put the MINI SD card face up (side with words) (with the direction of the
display screen as the face), and slightly force the card into the socket of the card, i.e.
connecting the unit. Under this state, you can play the content in the MINI card.
Pulling: Slightly push the MINI SD, and it will bounce by a section, and then you can
take it out.
Caution: Please perform inserting and pulling operation when power is off! Otherwise,
it will lead to the loss or damage to the files within the unit! If no card is inserted, the
computer will be unable to perform read and write operation for the disk notes of the
later moving disk (MINI SD card).
8
Page 9

Main Interface
MP4 provides a contact screen operation system, which allows you to perform even
more visually. In the main menu interface, click on the corresponding function icons
on the screen to access the selected function mode.
After accessing the corresponding function mode, gently touch the contact screen.
You can see a menu window.
After some time or after at the upper part of the screen on the screen is
contacted, the menu window will disappear.
Press M button at the lower part of the screen or contact at the bottom of the
contact screen to directly return to the main menu interface.
Long press M button at the lower part of the screen or in the control menu at the
upper part of the screen to return to the main menu to select he interface.
9
Page 10

Music mode
In the main menu interface, click on “Music” function icon on the contact screen to
access the “Music” function interface.
1. Description of playing interface
After accessing the “Music” function mode, gently touch the screen to be able to see
the “Menu Window”.
Touch the “ ” at the upper part of the “screen menu”, and the “Menu Window” will
disappear.
Press “M” button at the upper part of the screen or “ ” button at the bottom of the
contact screen to be able to directly return to the “Main Menu” interface.
Built-in speaker on/off control button
Use the music mode setup shortcut button to be able to perform the music
playing mode, the loop mode and the EQ mode.
Directly return to the “Main Menu” interface.
Close the button menu display.
Short press the button to enter the previous music and long press for the fast
rewind of the current music
Access the music list to select the music files
Play/pause the current music
Short press the button to access the next music and long press for the fast
10
Page 11

2. Description of the music list interface
Directly touch the “name of music” on the screen to be able to play the selected
music.
Built-in speaker on/off control button
Directly return to the main menu interface
Close the button menu display
File browse up
Delete the selected music
Return to the folder at the upper level
File browse down
3. Lyric display
The player supports “*LRC” lyric files (The user can download via “www.lrc.com”
website, or acquire lyric files via “LRC”) to perform synchronous playing of lyrics
and music. Names of lyrics and files of music must be identical.
When there is any lyric file bearing the same name under the directory of playing
music, the playing will directly access the lyric display interface.
11
Page 12

Movies playing
In the main menu interface, click on “Movies” function icon on the screen to be able
to access the “Movie” function interface.
After accessing the “Movie” function mode, gently touch the contact screen to be able
to see the menu window.
Touch the “ ” at the upper part of the “screen menu”, and the “Menu Window” will
disappear.
Press “M” button at the upper part of the screen or “ ” button at the bottom of the
contact screen to be able to directly return to the “Main Menu” interface.
1. Description of movie file list interface
Directly click on the name of video file on the screen to be able to start playing the
selected video.
Built-in speaker on/off control button
Directly return to the main menu interface
Close the button menu display
File browse up
Delete the selected music
Return to the folder at the upper level
File browse down
12
Page 13
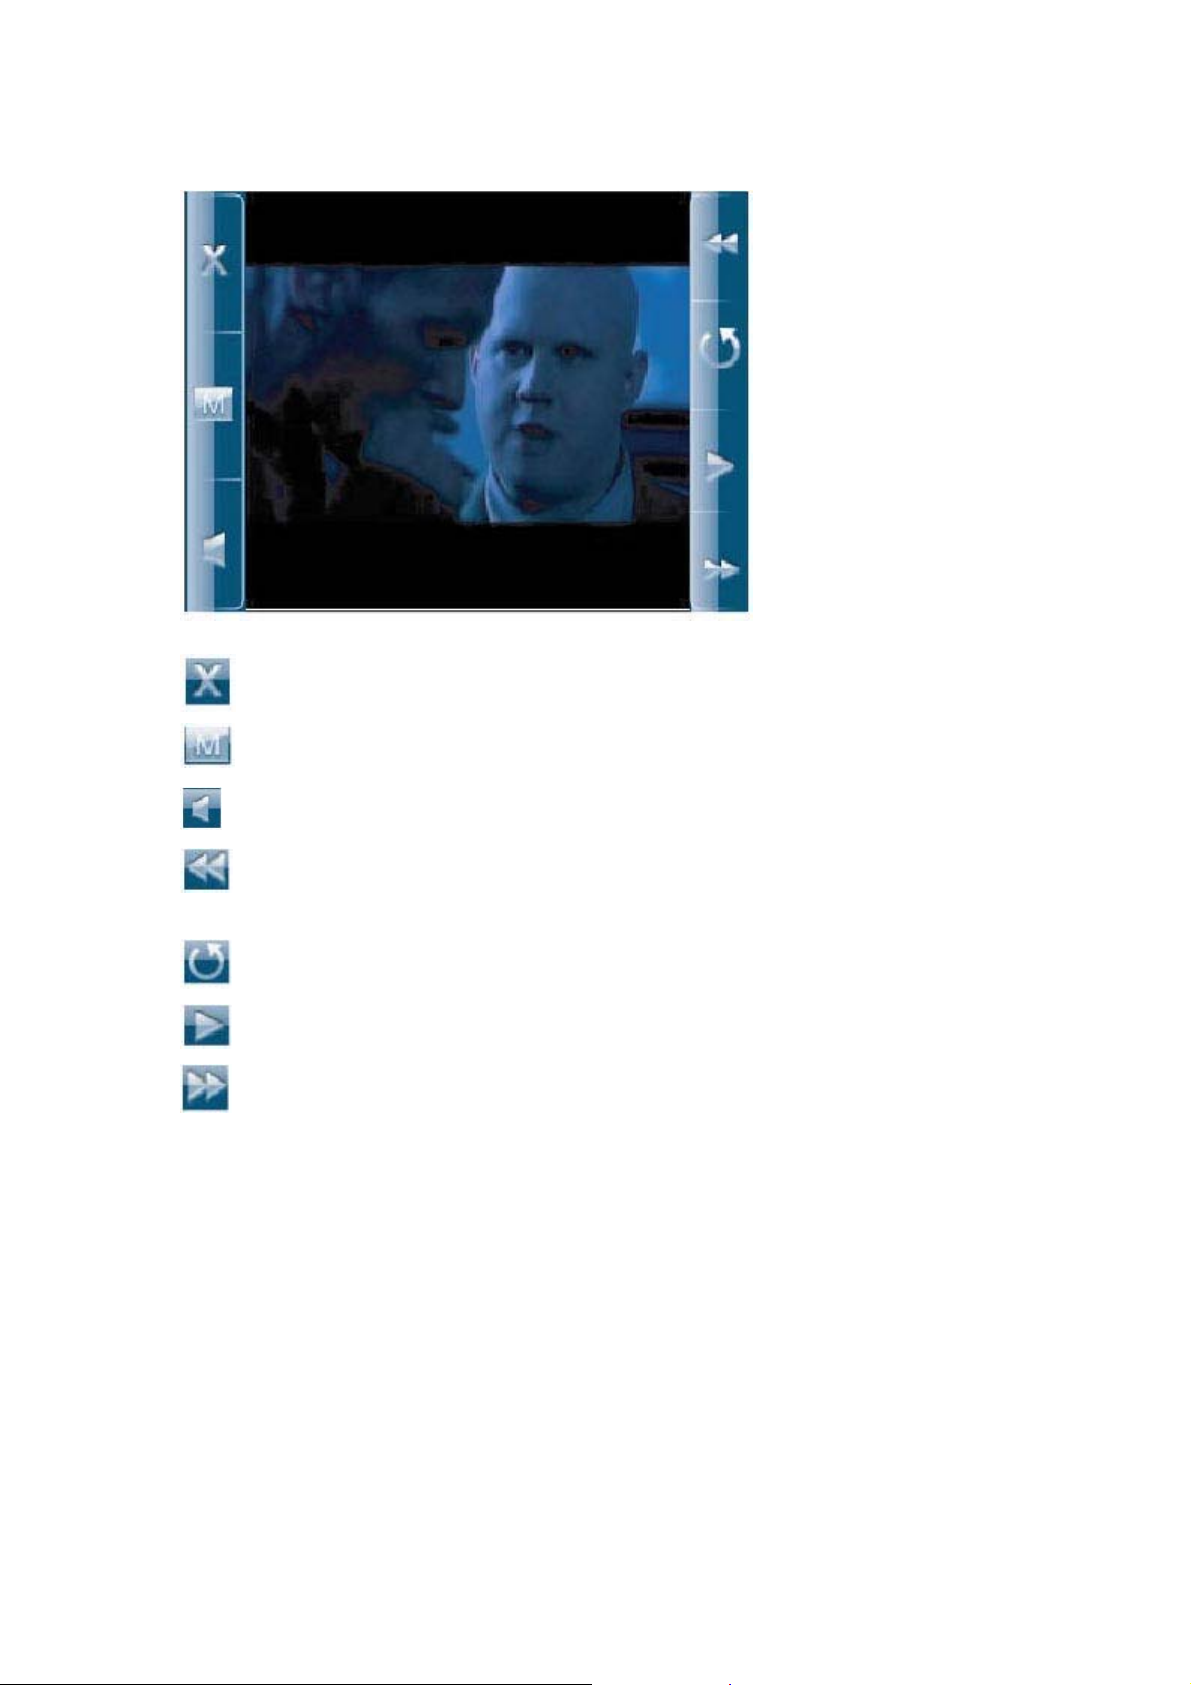
2. Description of movies playing
Close button menu display
Directly return to the main menu interface
Built-in speaker on/off control button
Short press the button to access the previous video and long press for fast rewind
of the current video
Access the video list and select the video files
Play/pause the current video
Short press the button to access the next video and long press for the fast
forward of the current video
13
Page 14
FM radio
In the main menu, click on “Radio” function icon on the screen to be able to access
the “Radio” function interface.
After accessing the “Radio” function mode, gently touch the screen to be able to see
the menu window.
Touch the “ ” at the upper part of the “screen menu”, and the “Menu Window” will
disappear.
Press “M” button at the upper part of the screen or “ ” button at the bottom of the
contact screen to be able to directly return to the “Main Menu” interface.
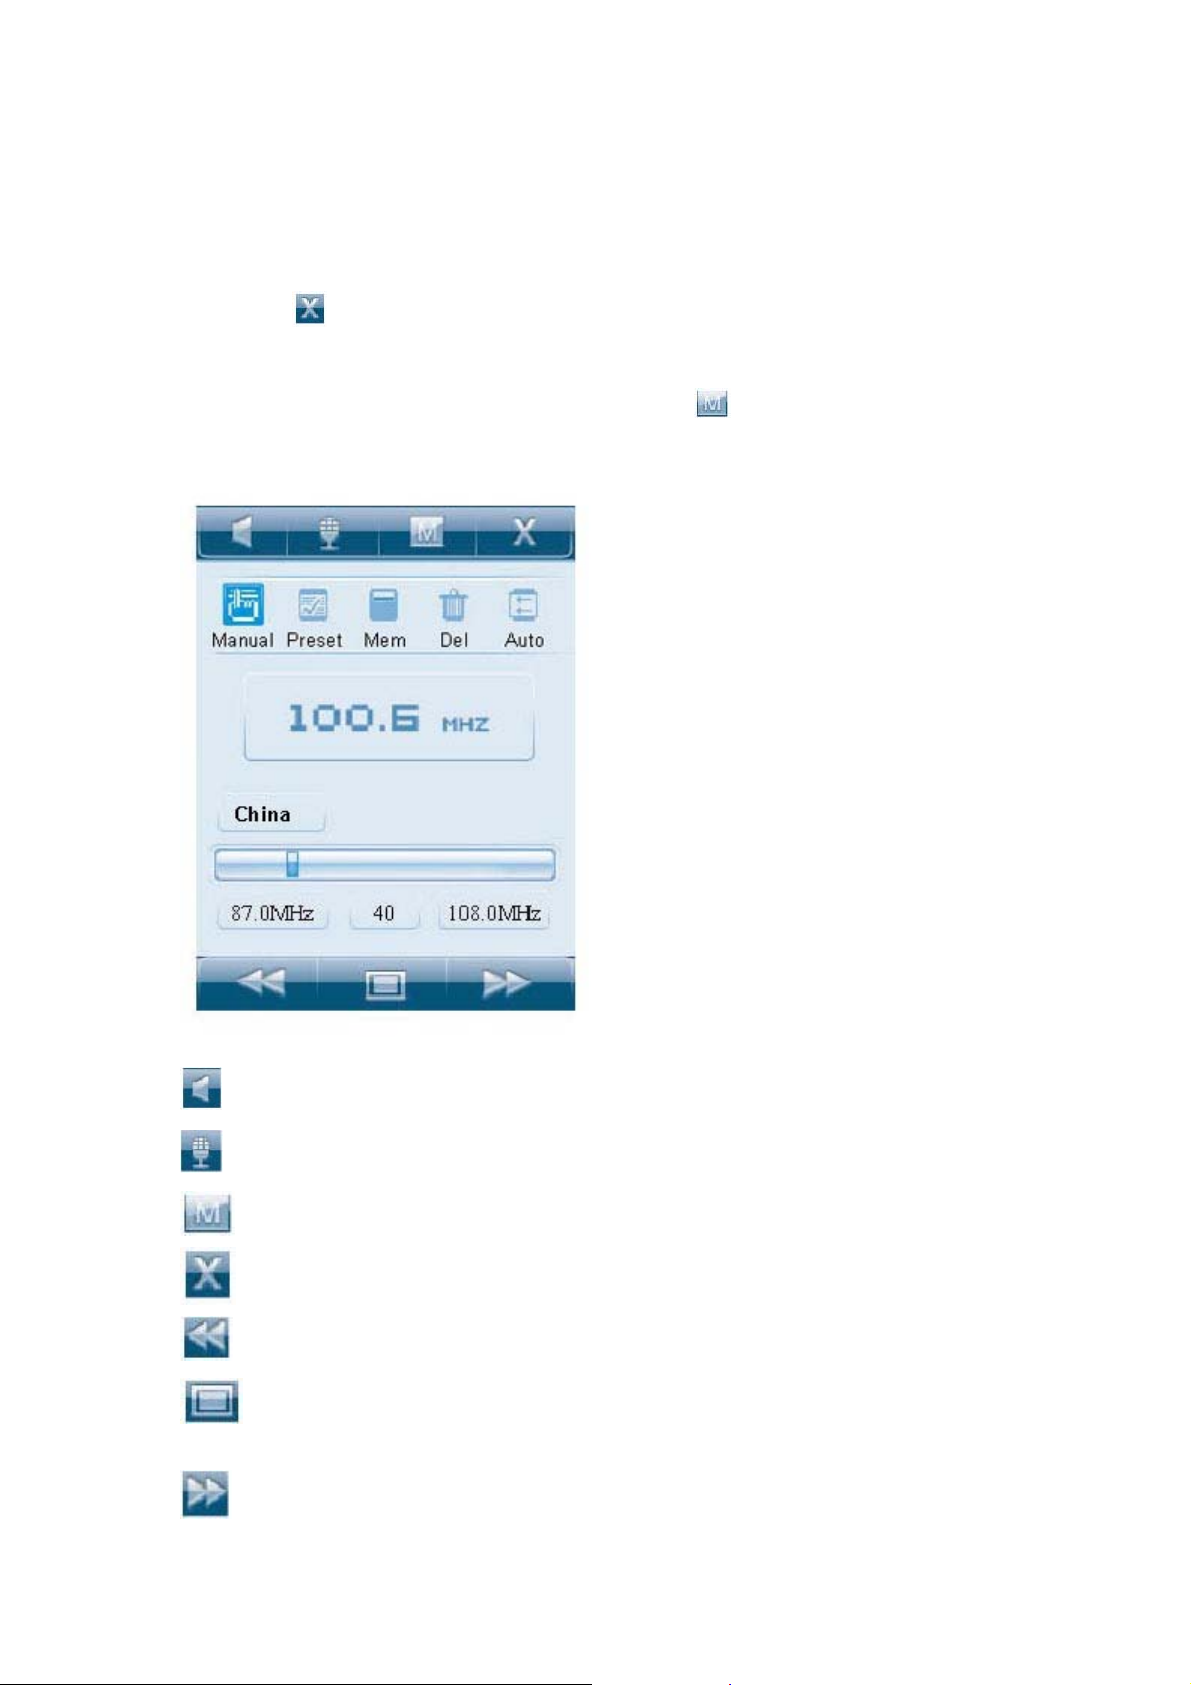
Built-in speaker on/off control button
FM interior record shortcut button
Directly return to the main menu interface
Close the button menu display
Switch radio channels to the low frequency direction
Use the “Switch” button in the FM mode to switch over to the states of
“Manual Search, Preset, Delete, Save, Automatic Search”, etc
Switch radio channels to the high frequency direction
14
Page 15
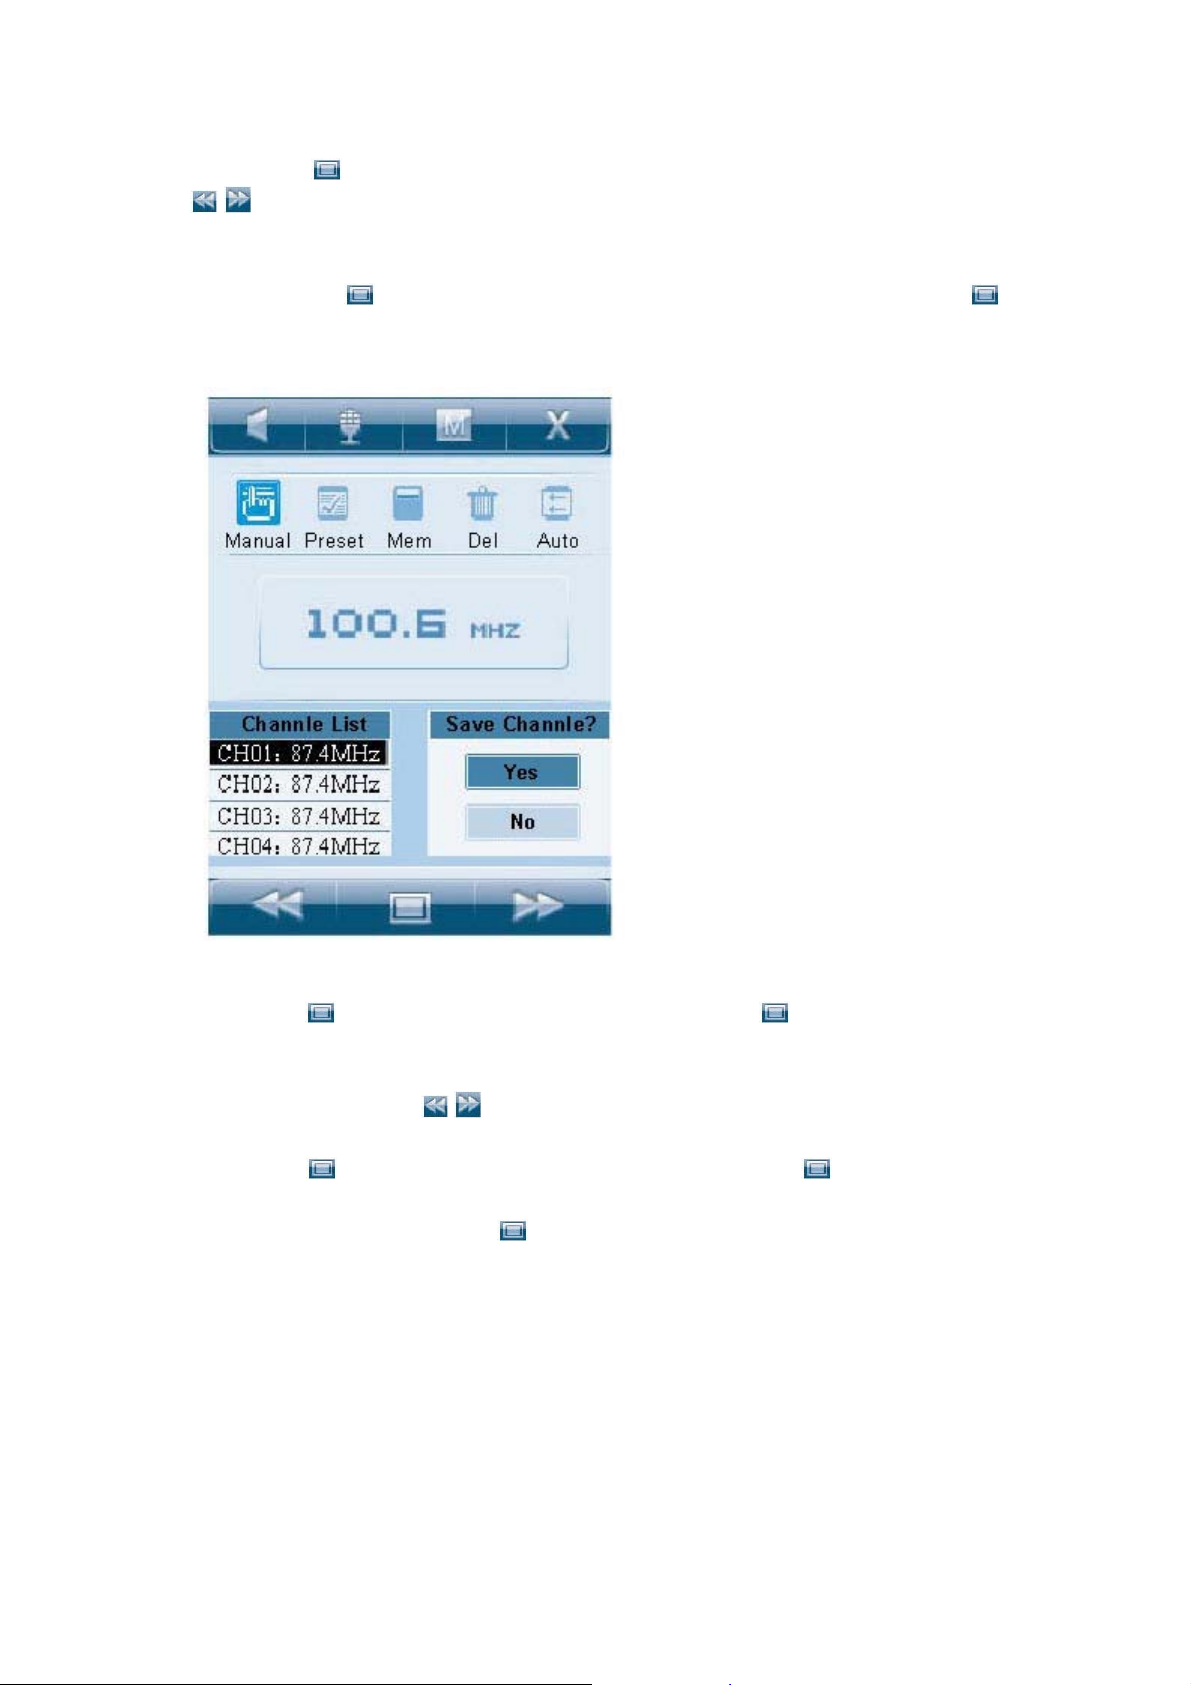
1. Searching radio channels
Short press “ ” button in the FM mode. Select “Manual” option and short press
“ / ” button to search radio channels up and down. You can perform silencing
treatment for this operation.
2. Saving radio channels
Short press the “ ” button in the FM state. Select “Save” option. Short press “ ”
button to save the current radio channels. After selecting the radio channel selection
positions CH1 and CH2, short press again the “YES” button for saving the same.
3. Fully automatic search and memory of radio channels
Short press “
” button to select the “Auto” option. Press “ ” to be able to perform
fully automatic search of radio channels and saving. After the search is over, it will
switch to the first radio channel for the frequency modulation. In the process of radio
frequency search, press “
/ ” button to be able to stop automatic search.
4. Deleting radio channels
Short press “
” button to select “Delete” option. Short press “ ” button to pop up
the radio channel preset list. Select the preset radio channel position CH1 or CH2 to
be deleted, and then short press “
” button for “YES” and deletion.
15
Page 16
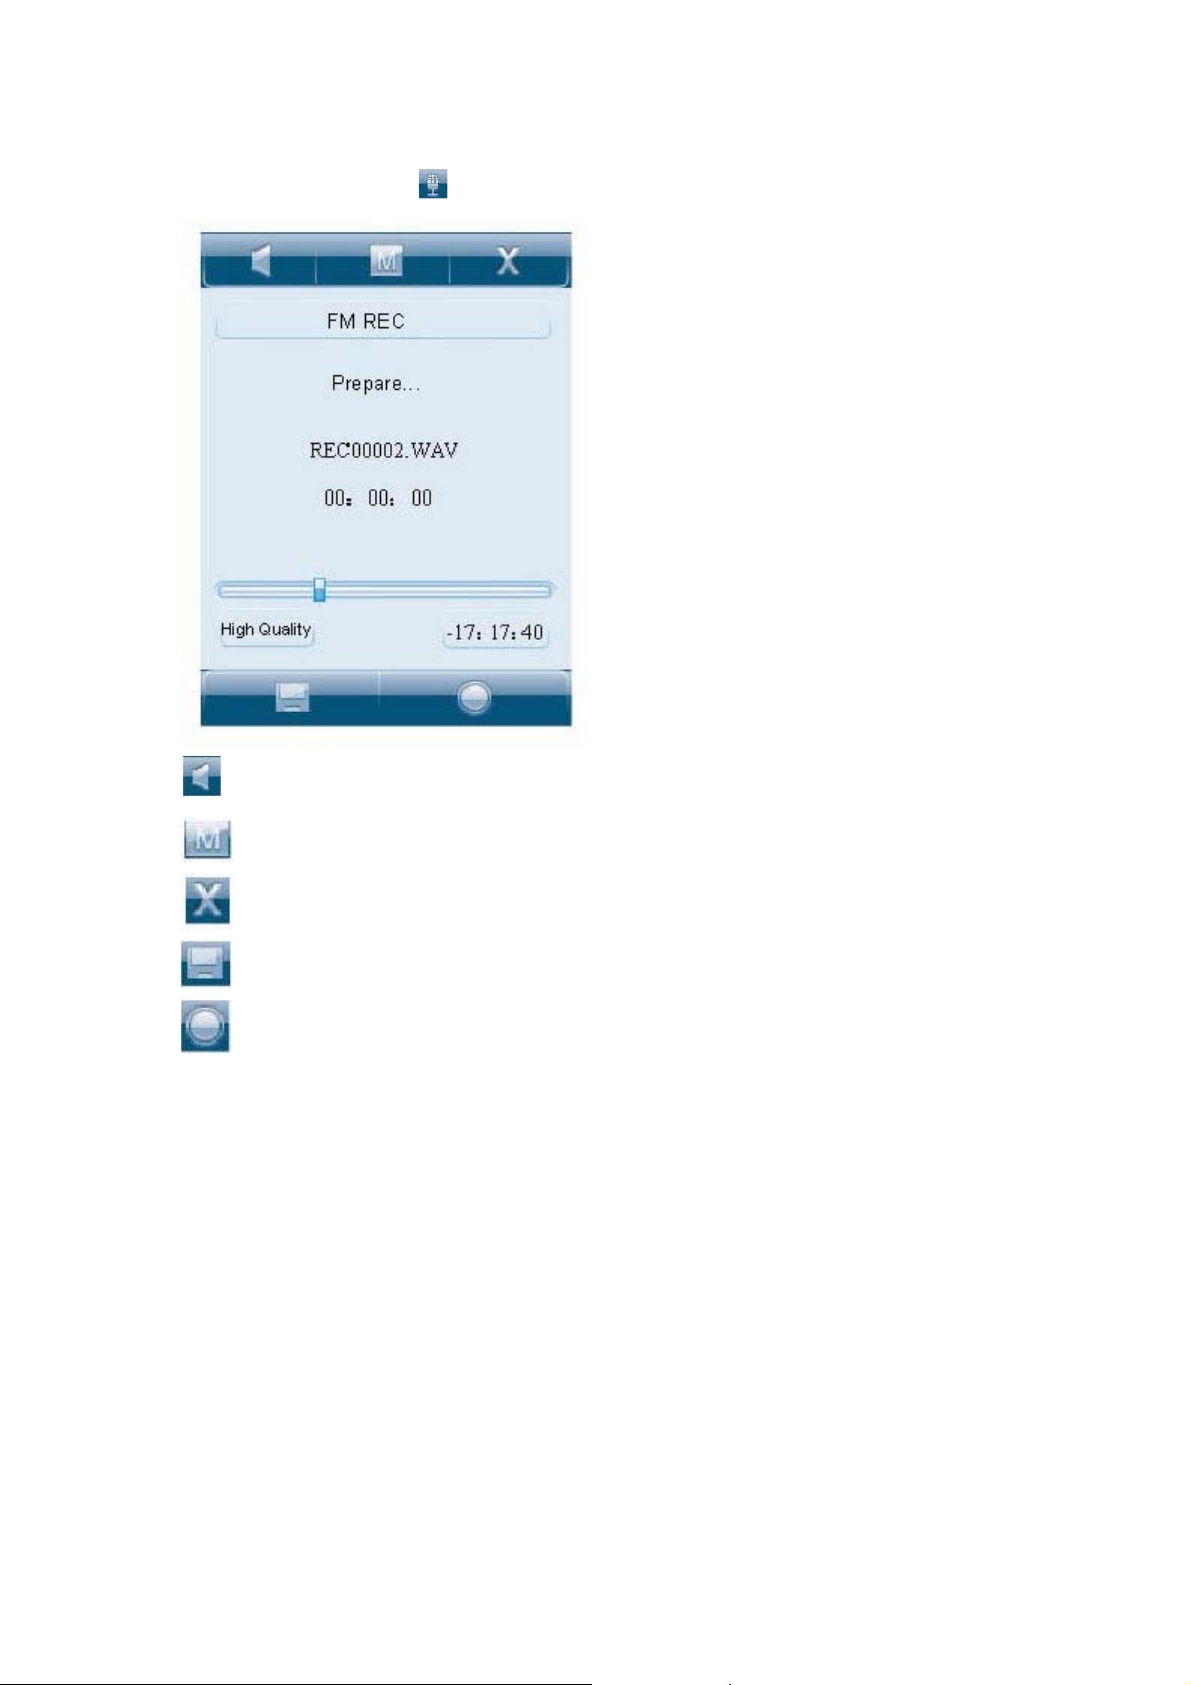
5. FM interior recording
In the radio state, press “ ” button to be able to acess the FM recording interface.
Built-in speaker on/off control button
Directly return to the main menu interface
Close the button menu display
Long press the button to save the recorded files and exit the recording state
Short press the button to start/pause recording
16
Page 17
Picture browse
In the main menu interface, click on “Picture” function icon to be able to access the
“Picture” function interface.
After accessing the “Picture” function mode, gently touch the contact screen to be
able to see the “menu window”.
Touch the “ ” at the upper part of the “screen menu”, and the “Menu Window” will
disappear.
Press “M” button at the upper part of the screen or “
” button at the bottom of the
contact screen to be able to directly return to the “Main Menu” interface.
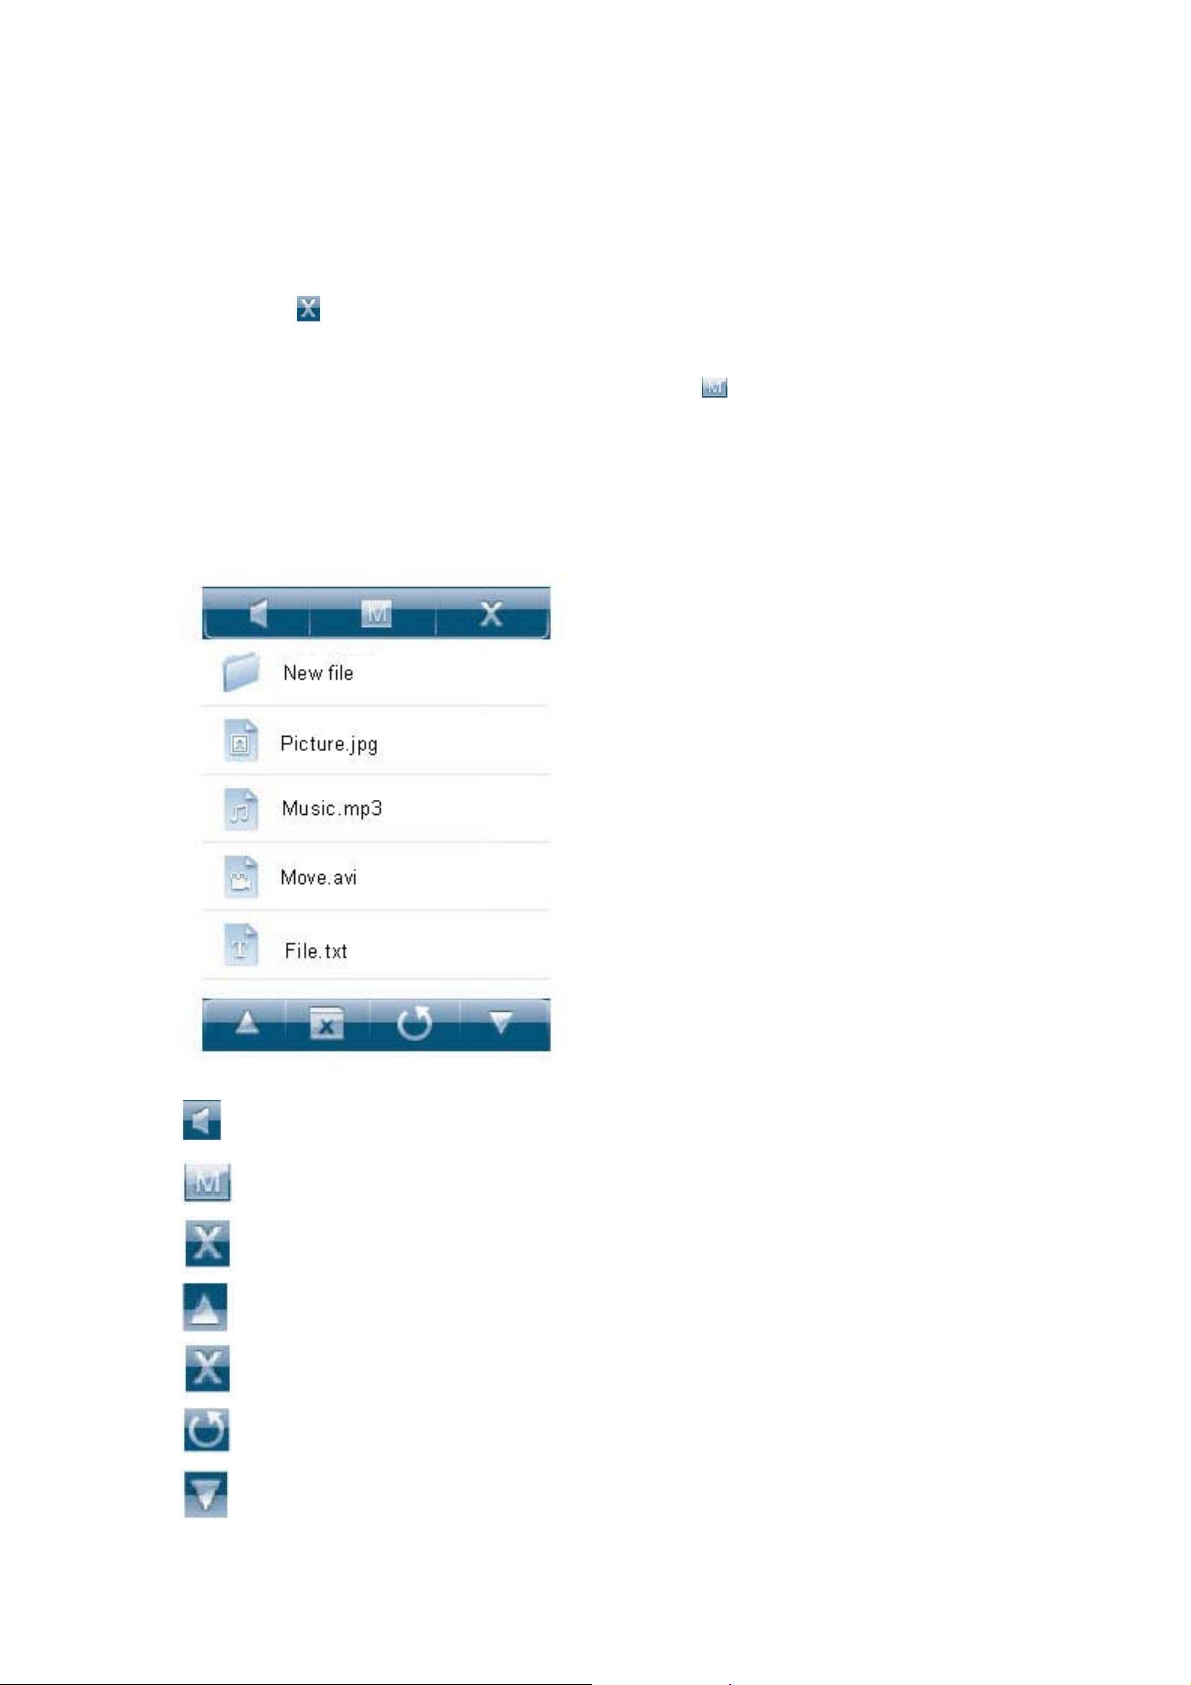
1. Description of the picture file list interface
Directly click on the “picture file name” on the screen to be able to display the
selected pictures.
Built-in speaker on/off control button
Directly return to the main menu interface
Close the button menu display
File browse up
Delete the selected pictures
Return to the folder at the upper level
File browse down
17
Page 18
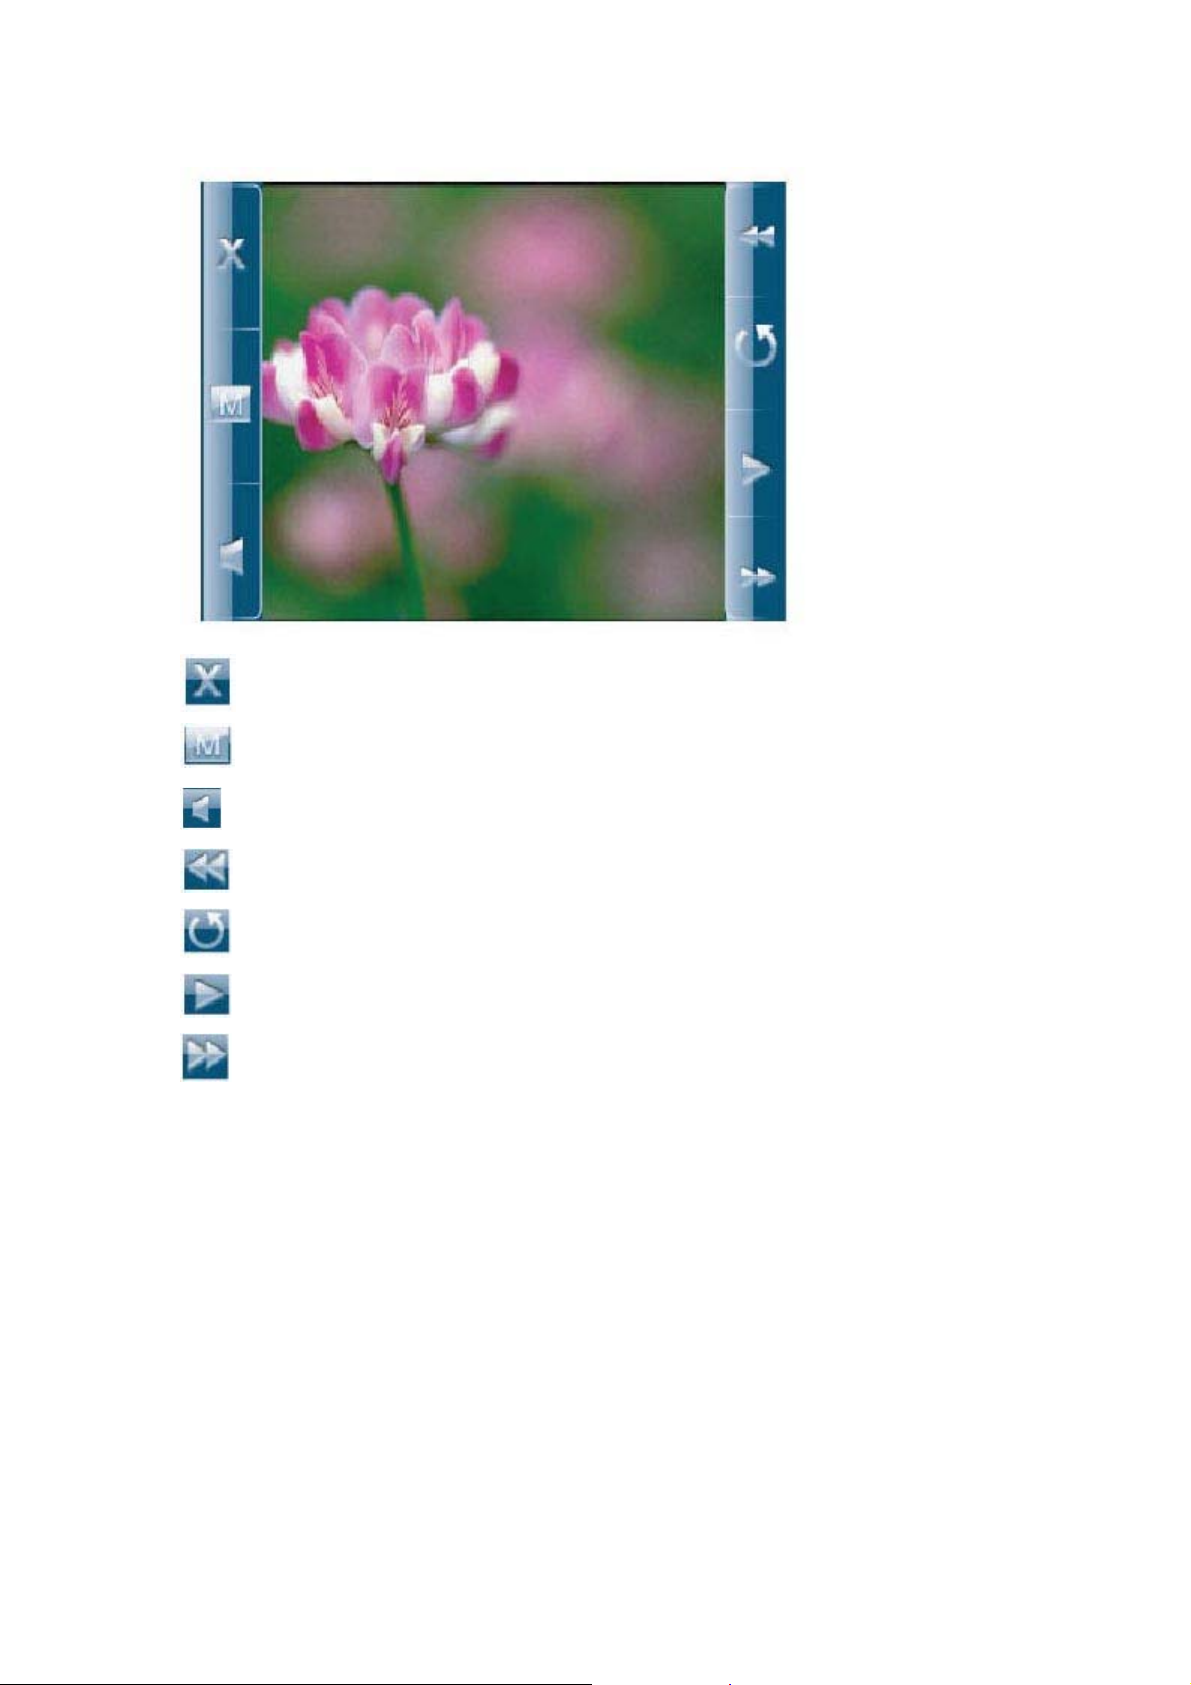
2. Picture browse
Close the button menu display;
Directly return to the main menu interface;
Built-in speaker on/off control button;
Access the previous picture;
Access the picture list to select from the picture files;
Automatic picture browse playing/pausing switch button;
Access the next picture.
18
Page 19
E-book
In the main menu interface, touch the “E-book” function icon to be able to access the
“E-book” function interface.
After accessing the “E-book” function mode, gently touch the screen to be able to see
the menu window.
Touch the “ ” at the upper part of the “screen menu”, and the “Menu Window” will
disappear.
Press “M” button at the upper part of the screen or “
” button at the bottom of the
contact screen to be able to directly return to the “Main Menu” interface.
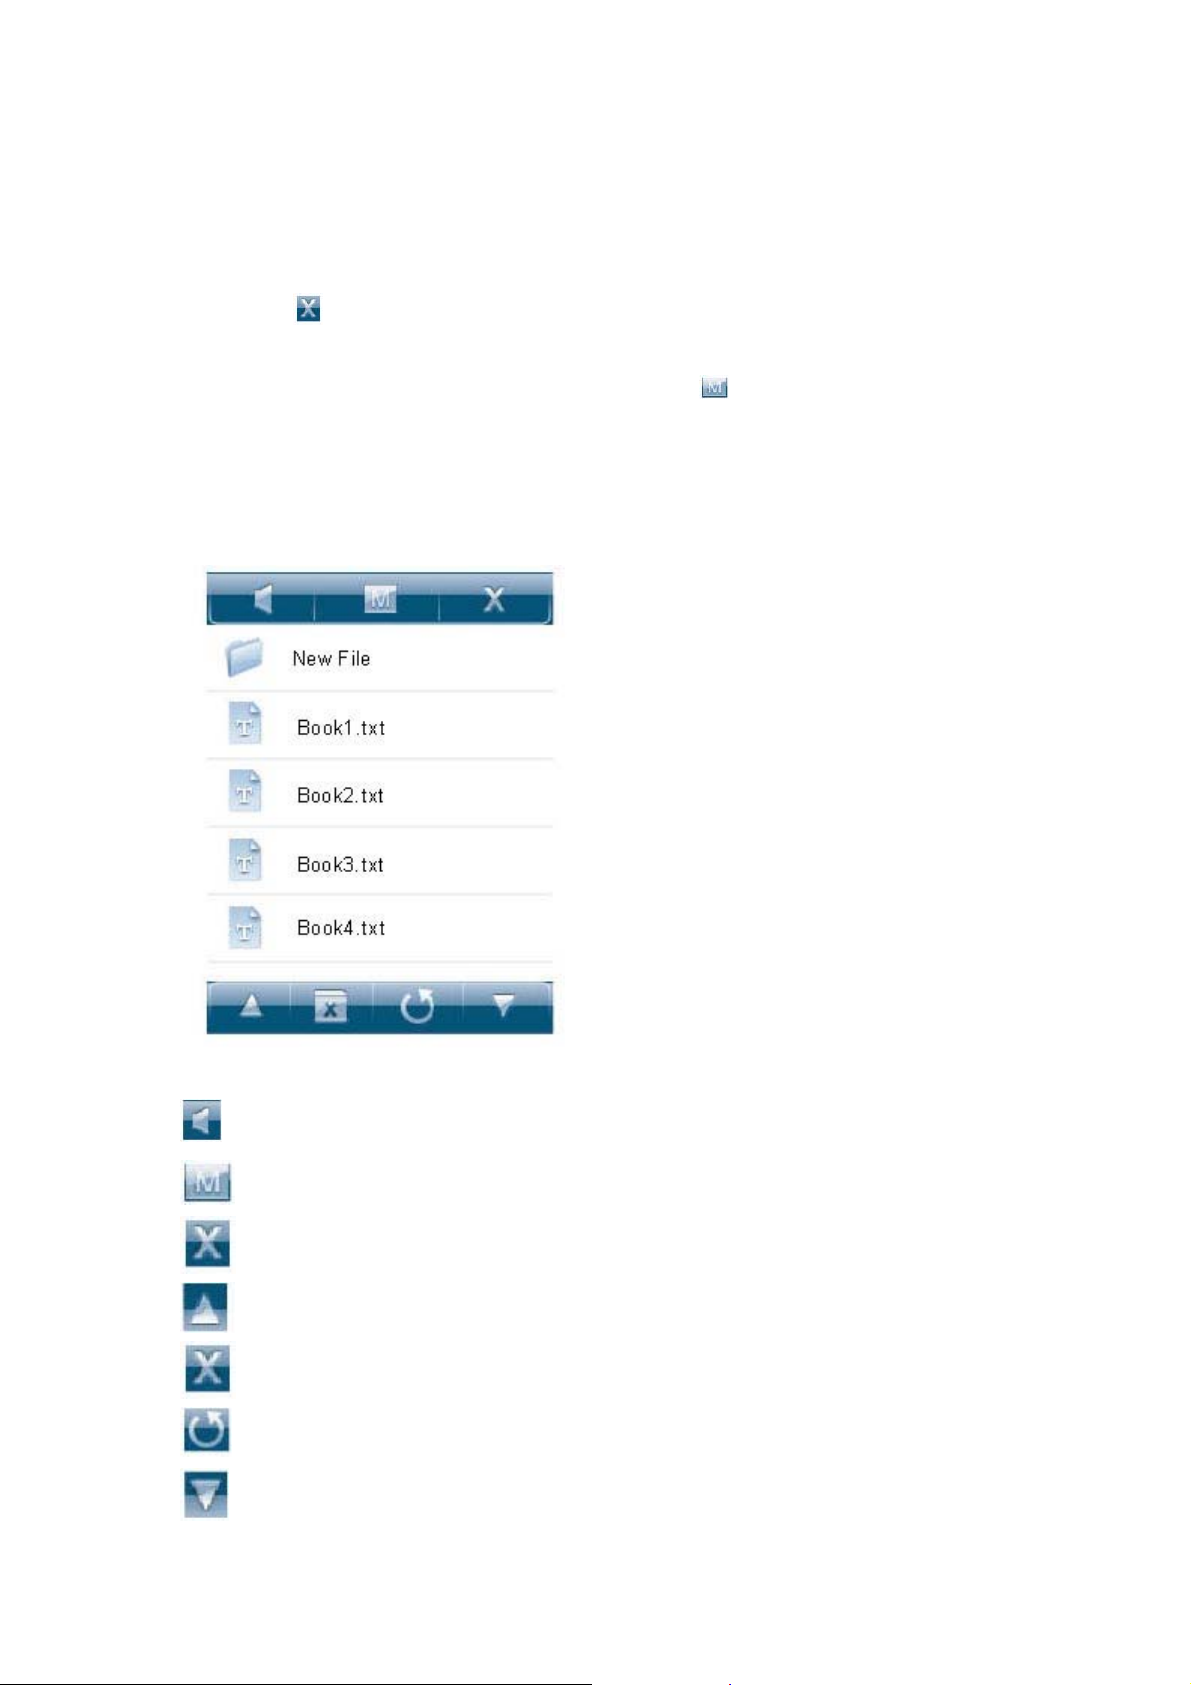
1. E-book file list
Directly touch the “E-book file name” on the screen to be able to start displaying the
selected e-book.
Built-in speaker on/off control button
Directly return to the main menu interface
Close the button menu display
File browse up
Delete the selected e-book
Return to the folder at the upper level
File browse down
19
Page 20
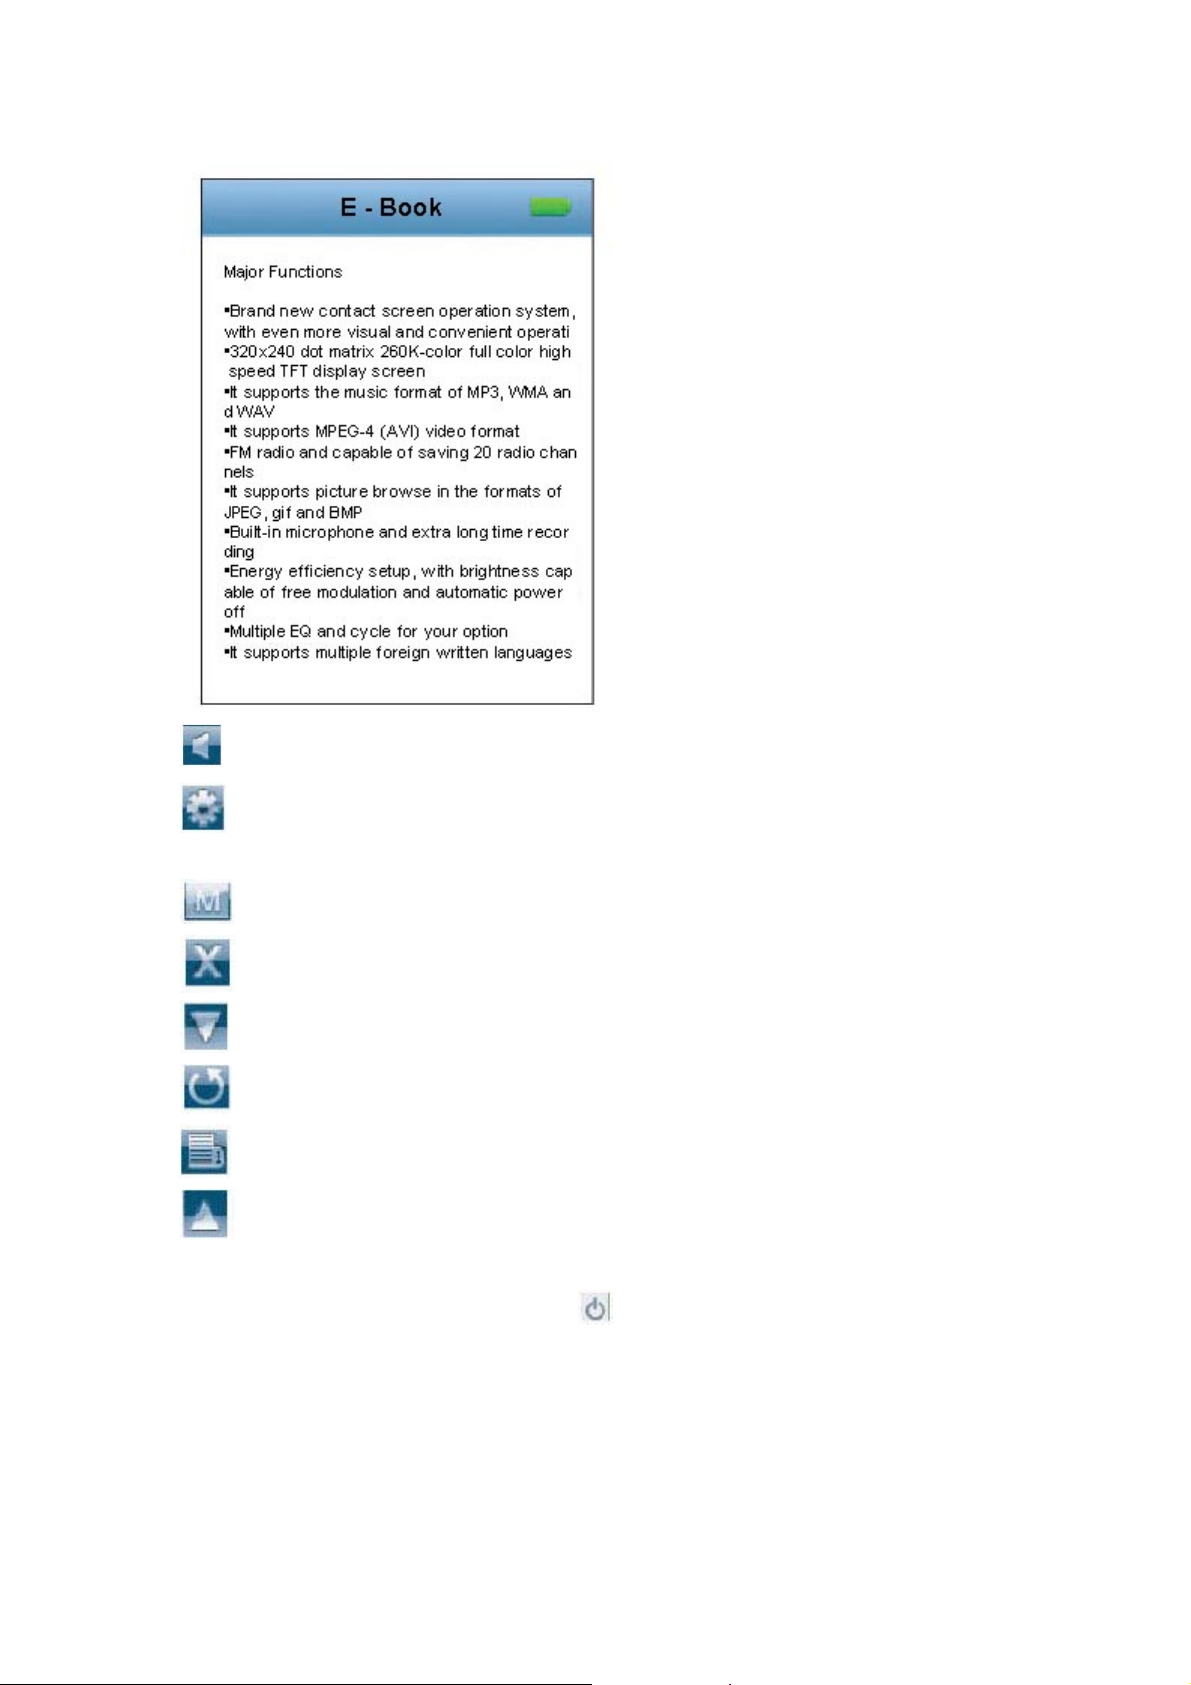
2. E-book browse
Built-in speaker on/off controller
Automatic e-book browse setup button to be able to set automatic browse
switching time
Press this button to be able to directly return to the main interface
Close the button zone display
E-book text page down
Return to the e-book text file interface
E-book bookmark function button
E-book text page up
Prompt: Push the power switch to the “ ” direction for one second to be able to
start/pause automatic browse function of the e-book.
20
Page 21
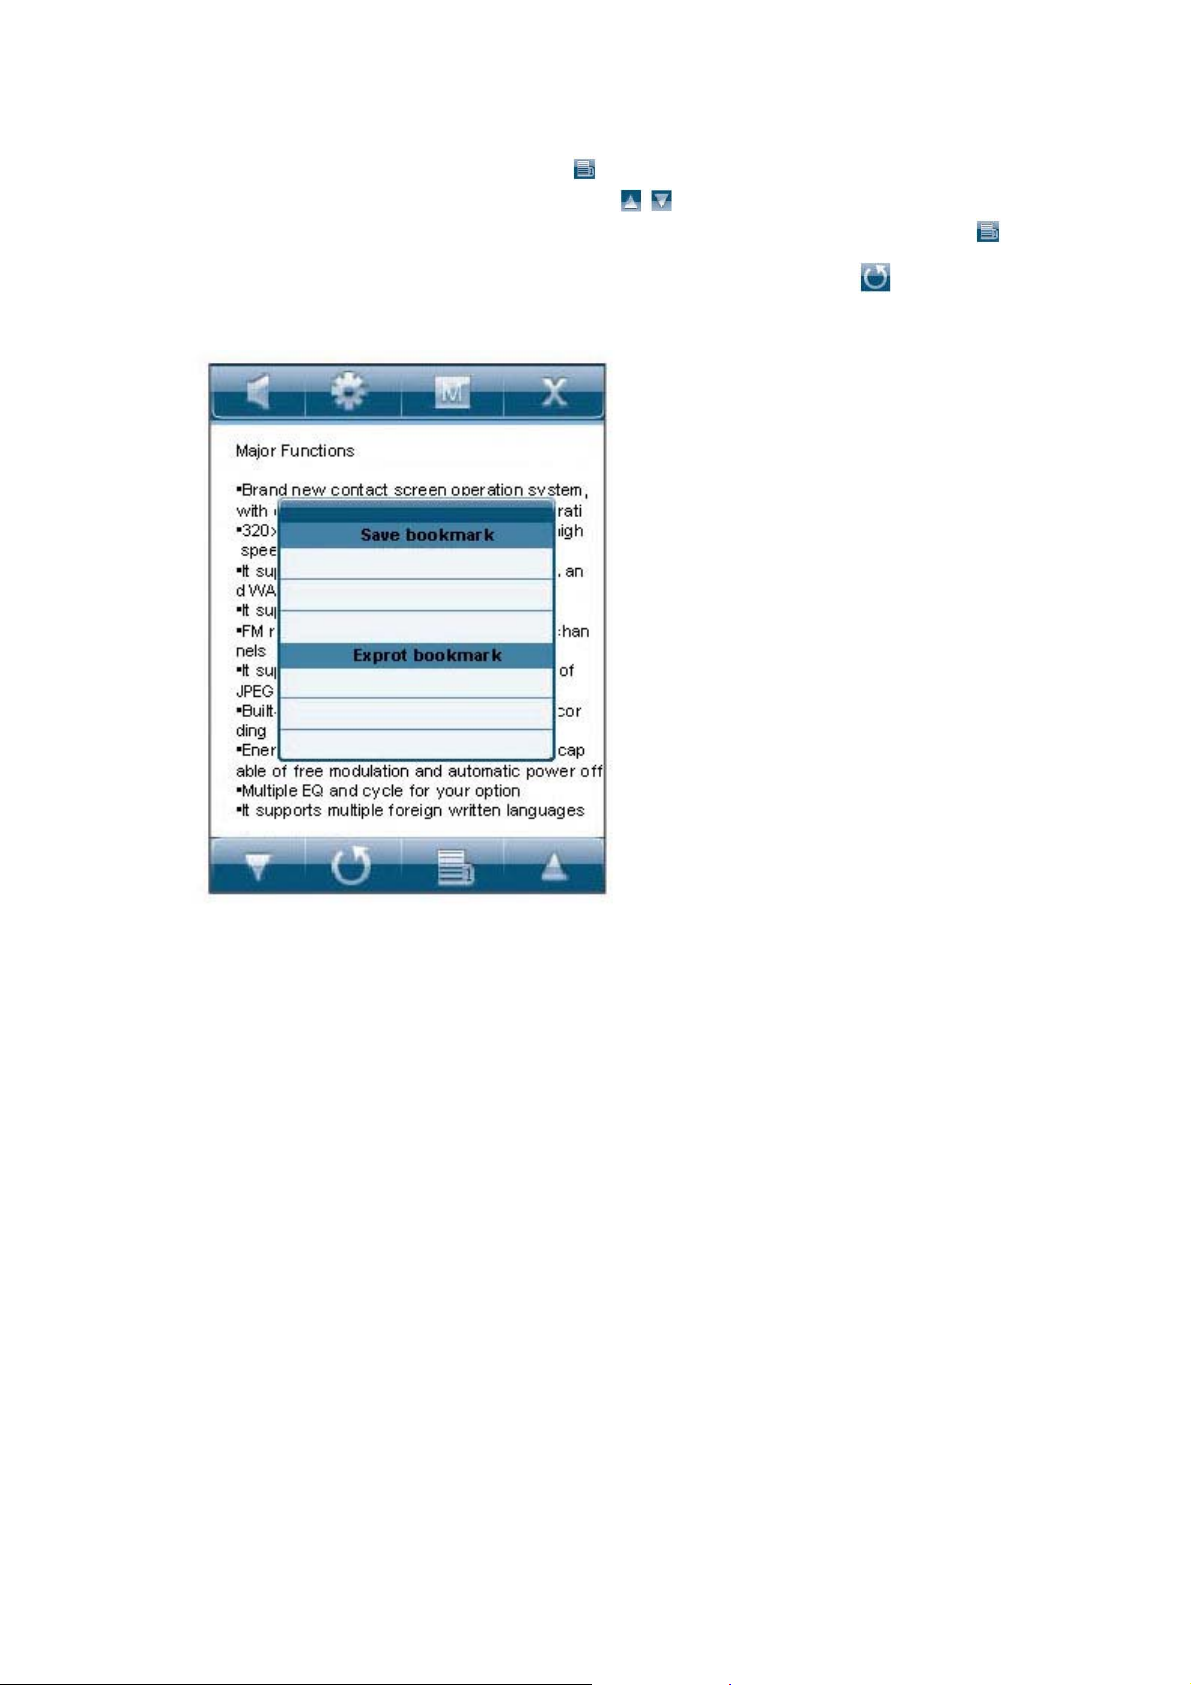
3. E-book bookmark setup
In the e-book browse state, short press “ ” button to pop up the e-book setup menu.
Press the e-book setup menu and then press “ / ” button to select the bookmarks to
be saved/exported. After selecting the “Save/Export Bookmark” zone, press “ ”
button to confirm saving/exporting bookmarks, and then press “ ” to cancel
saving/exporting the bookmark.
21
Page 22
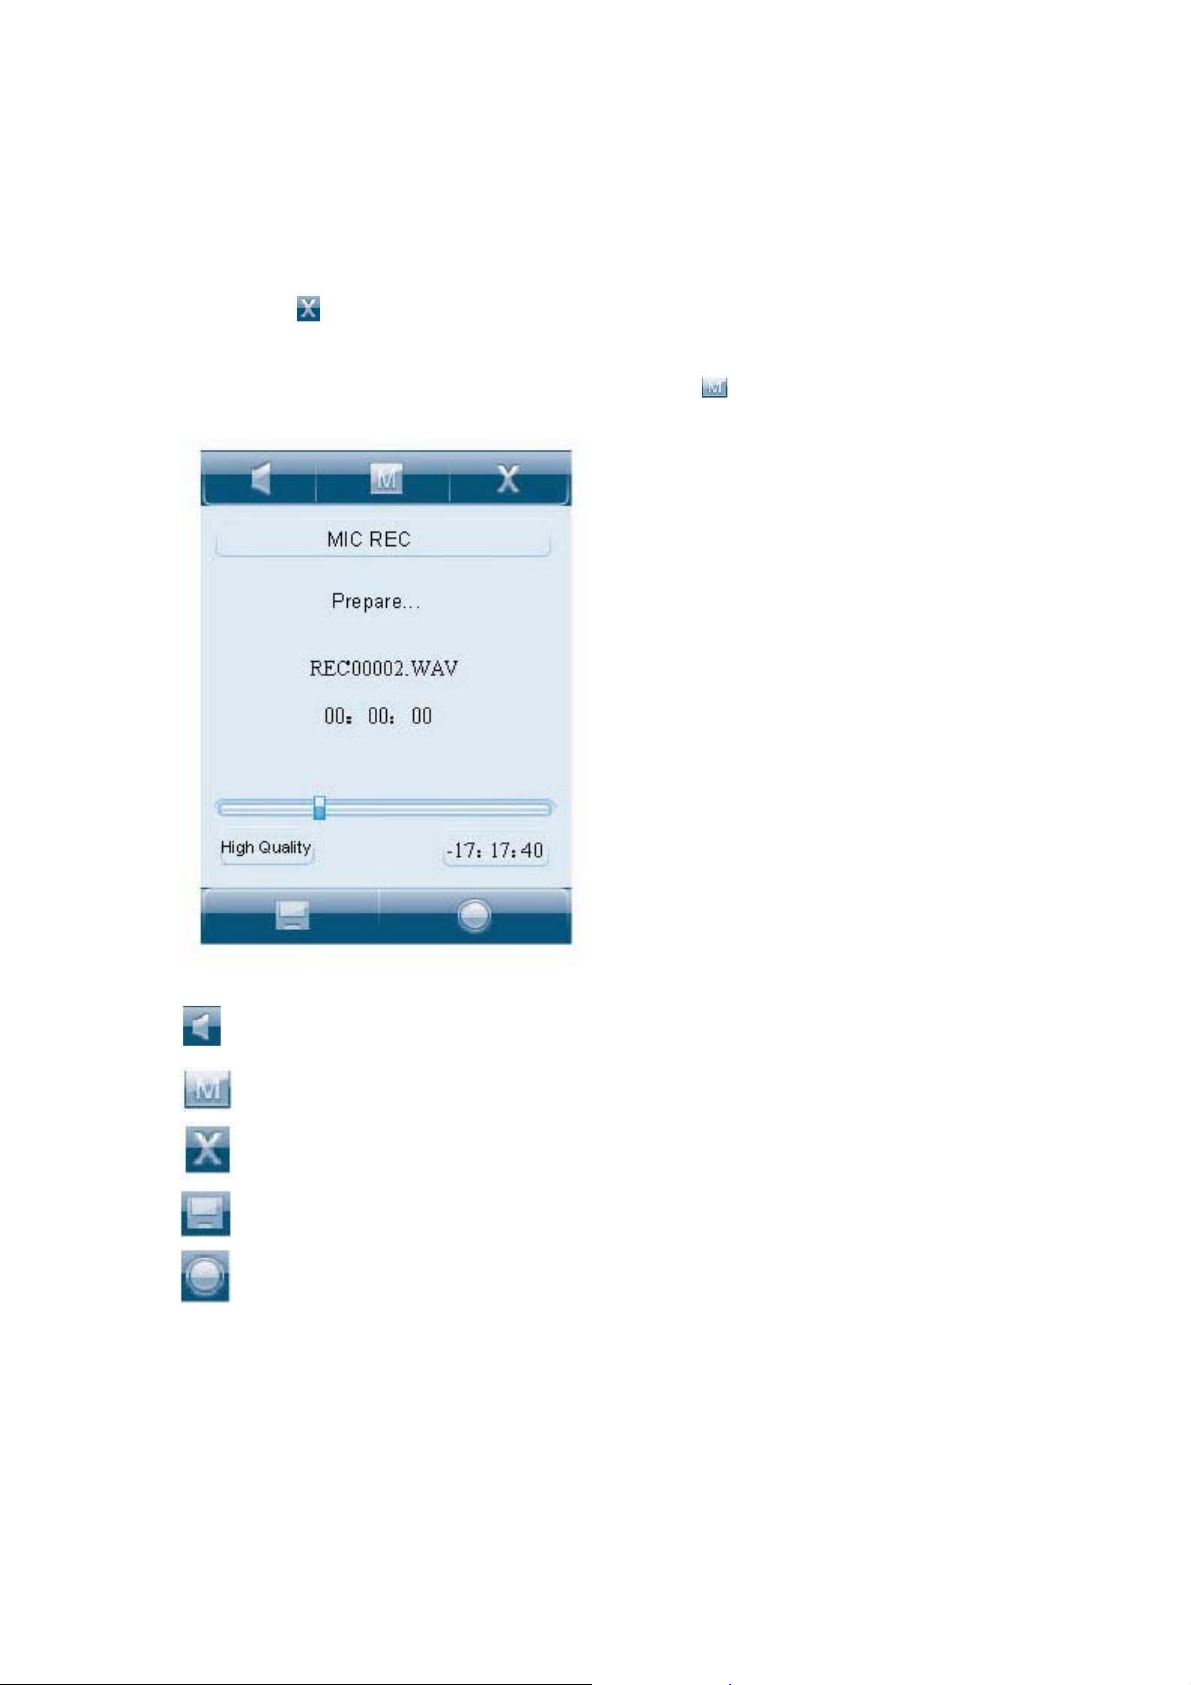
Recording
In the main menu interface, touch “Record” function icon on the screen to be able to
access “MIC voice recording” function interface.
After accessing the “Record” function mode, gently touch the screen to be able to
seethe menu window.
Touch the “ ” at the upper part of the “screen menu”, and the “Menu Window” will
disappear.
Press “M” button at the upper part of the screen or “
” button at the bottom of the
contact screen to be able to directly return to the “Main Menu” interface.
Built-in speaker on/off control button
Directly return to the main menu interface
Close the button menu display
Long press the button to save the recorded files and exit the recording state
Short press the button to start/pause recording
22
Page 23
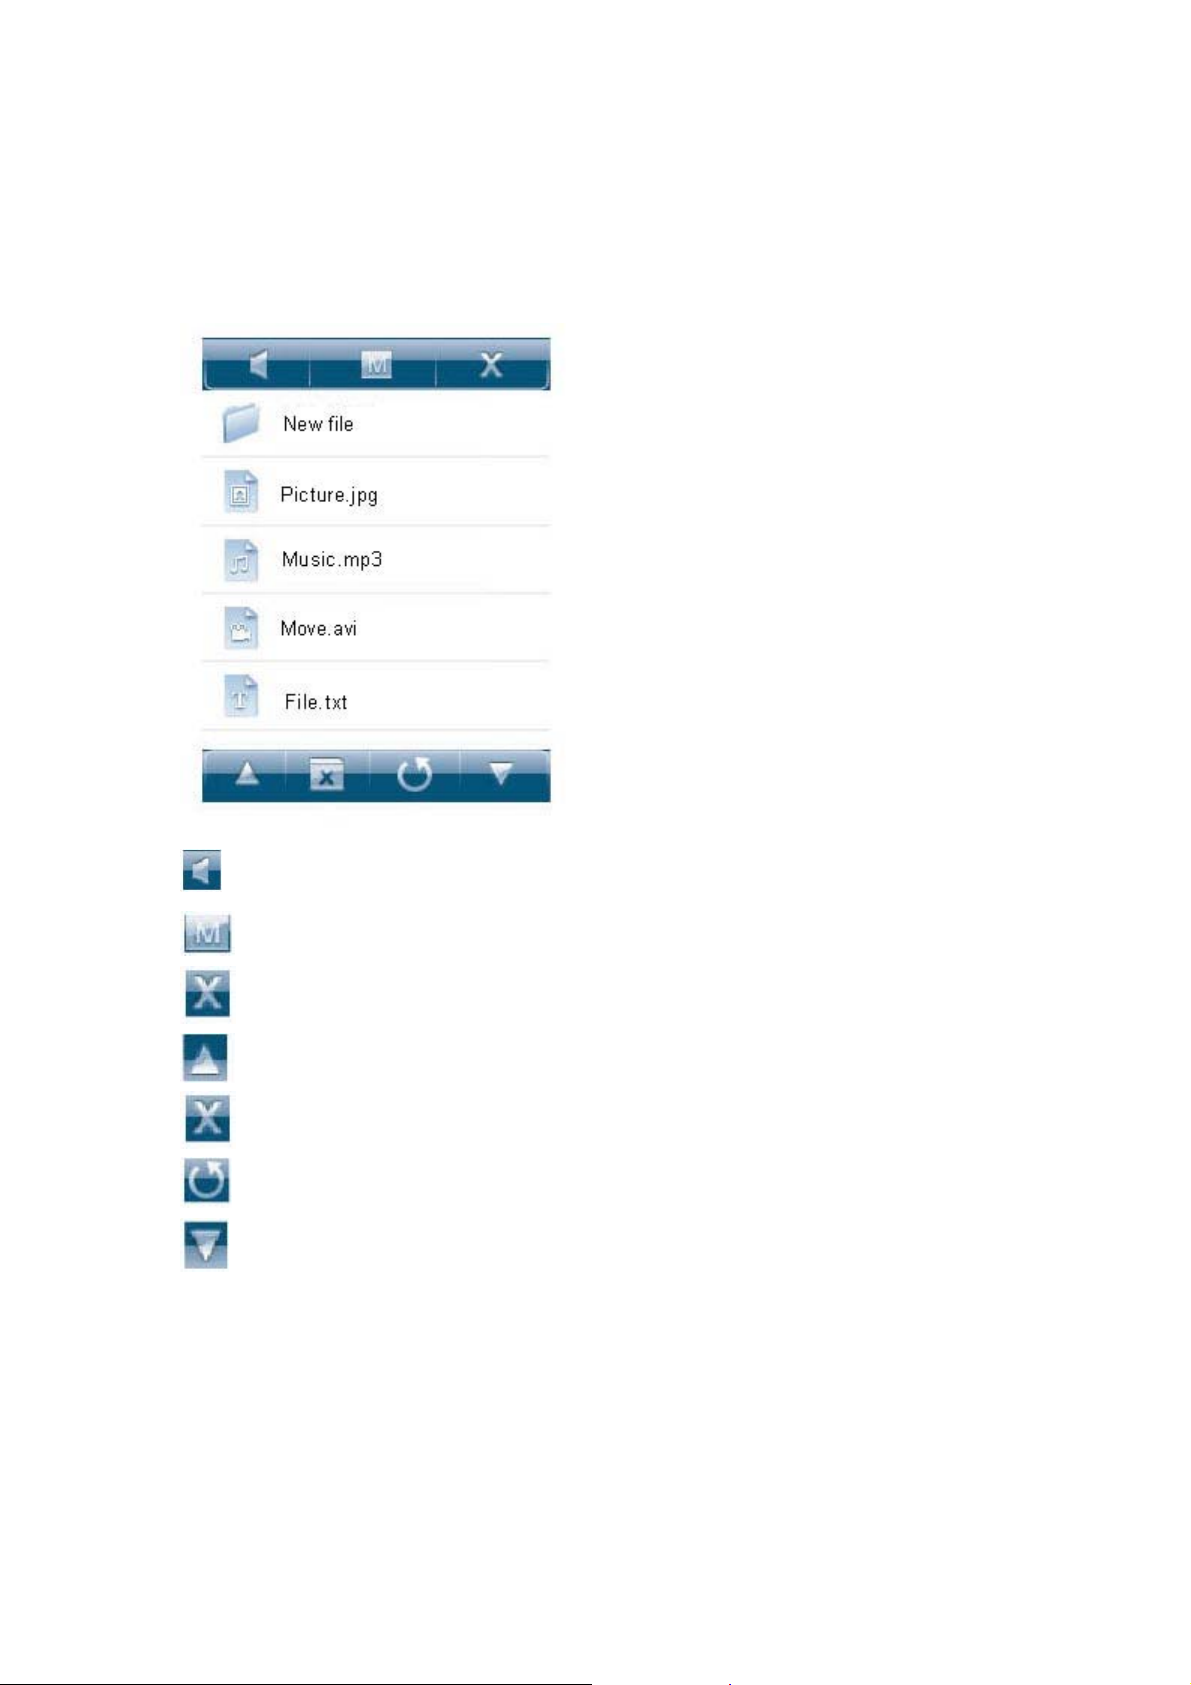
In the main menu interface, touch the “Resource manager” function icon on the screen
to be able to access the “Resource Manager” function interface.
In “Source Manager”, you can list all files and folders saved in the player. The user
can directly select the music, video, e-book and pictures and other files supported by
the player in this interface for playing and can also perform deletion operation for the
selected files.
Built-in speaker on/off control button
Directly return to the main menu interface
Close the button menu display
File browse up
Delete the selected files
Return to the folder at the upper level
File browse down
23
Page 24

Games
In the face of the main menu interface, touch “Game” function icon on the screen tobe
able to access the “Game” function interface.
Long press “M” button at the lower part of the screen to be able to directly return to
the main menu interface.
Game rules: When one line is filled with blocks, and the blocks at the top will move
downwards until the end when the blocks are placed down. If you clear one line at the
same time, there will be 100 credits, 300 credits for 2 lines, 700 credits for 3 lines,
1500 credits for 4 lines. When the credits exceed 10000, the speed will be faster.
Operation method
1. Start
Push the power switch to the “ ” direction for one second to start the games. Short
press “PLAY” button to perform start/pause function switching.
2. How to play games
Press “+/-“ button to move the blocks left or right and “M” to adjust the directions of
blocks.
3. Exit
Long press “M” button to quit the game and return to the game main interface.
24
Page 25
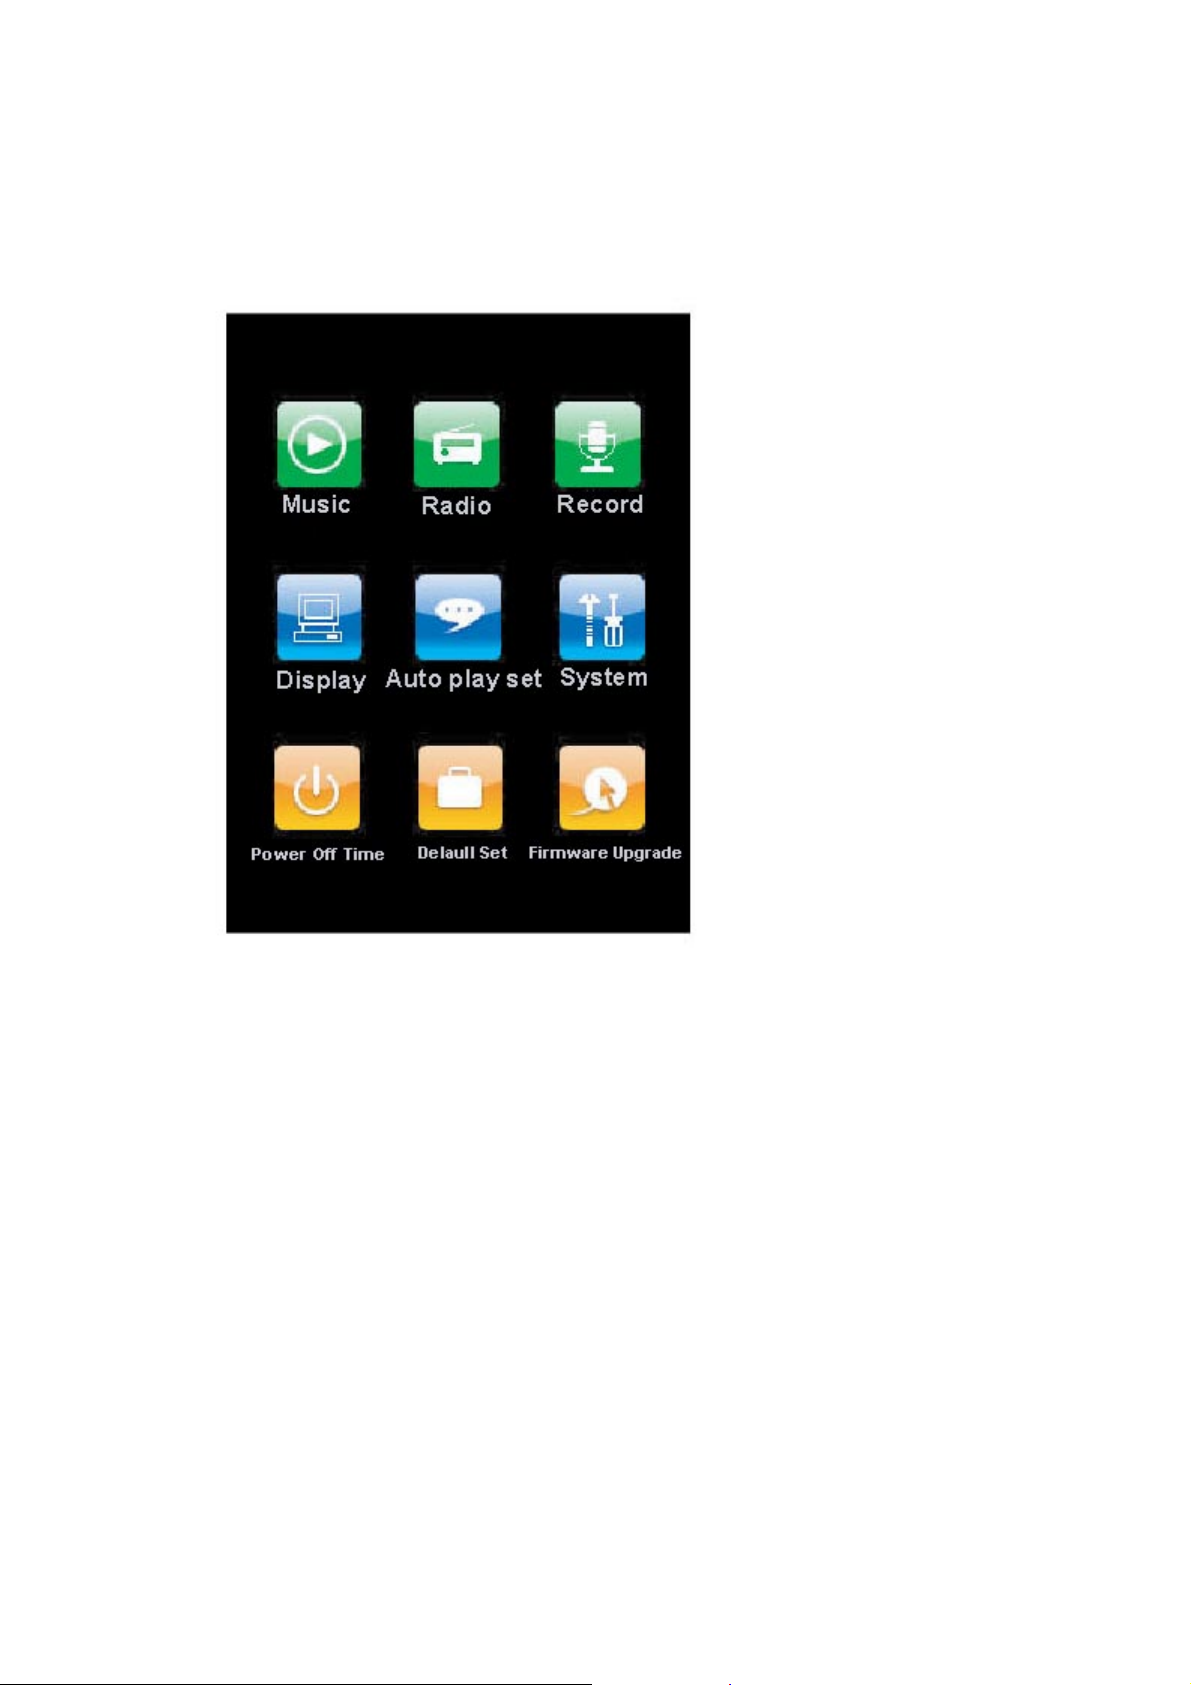
System setup
In the main menu interface, touch the “System” function on the screen to be able to
access the “System” setup function. This function can offer function settings such as
“Playing Setup”, “Radio Setup” “Display Setup” “Browse Setup”, “System Setup”,
“Power Off” Setup”, “Default Setup”, “Firmware Setup”, etc.
Touch the corresponding function setup icon on the screen to be able to access the
corresponding function setup options.
In the “Setup” interface, long press “M” menu button to return to the main menu
interface.
25
Page 26
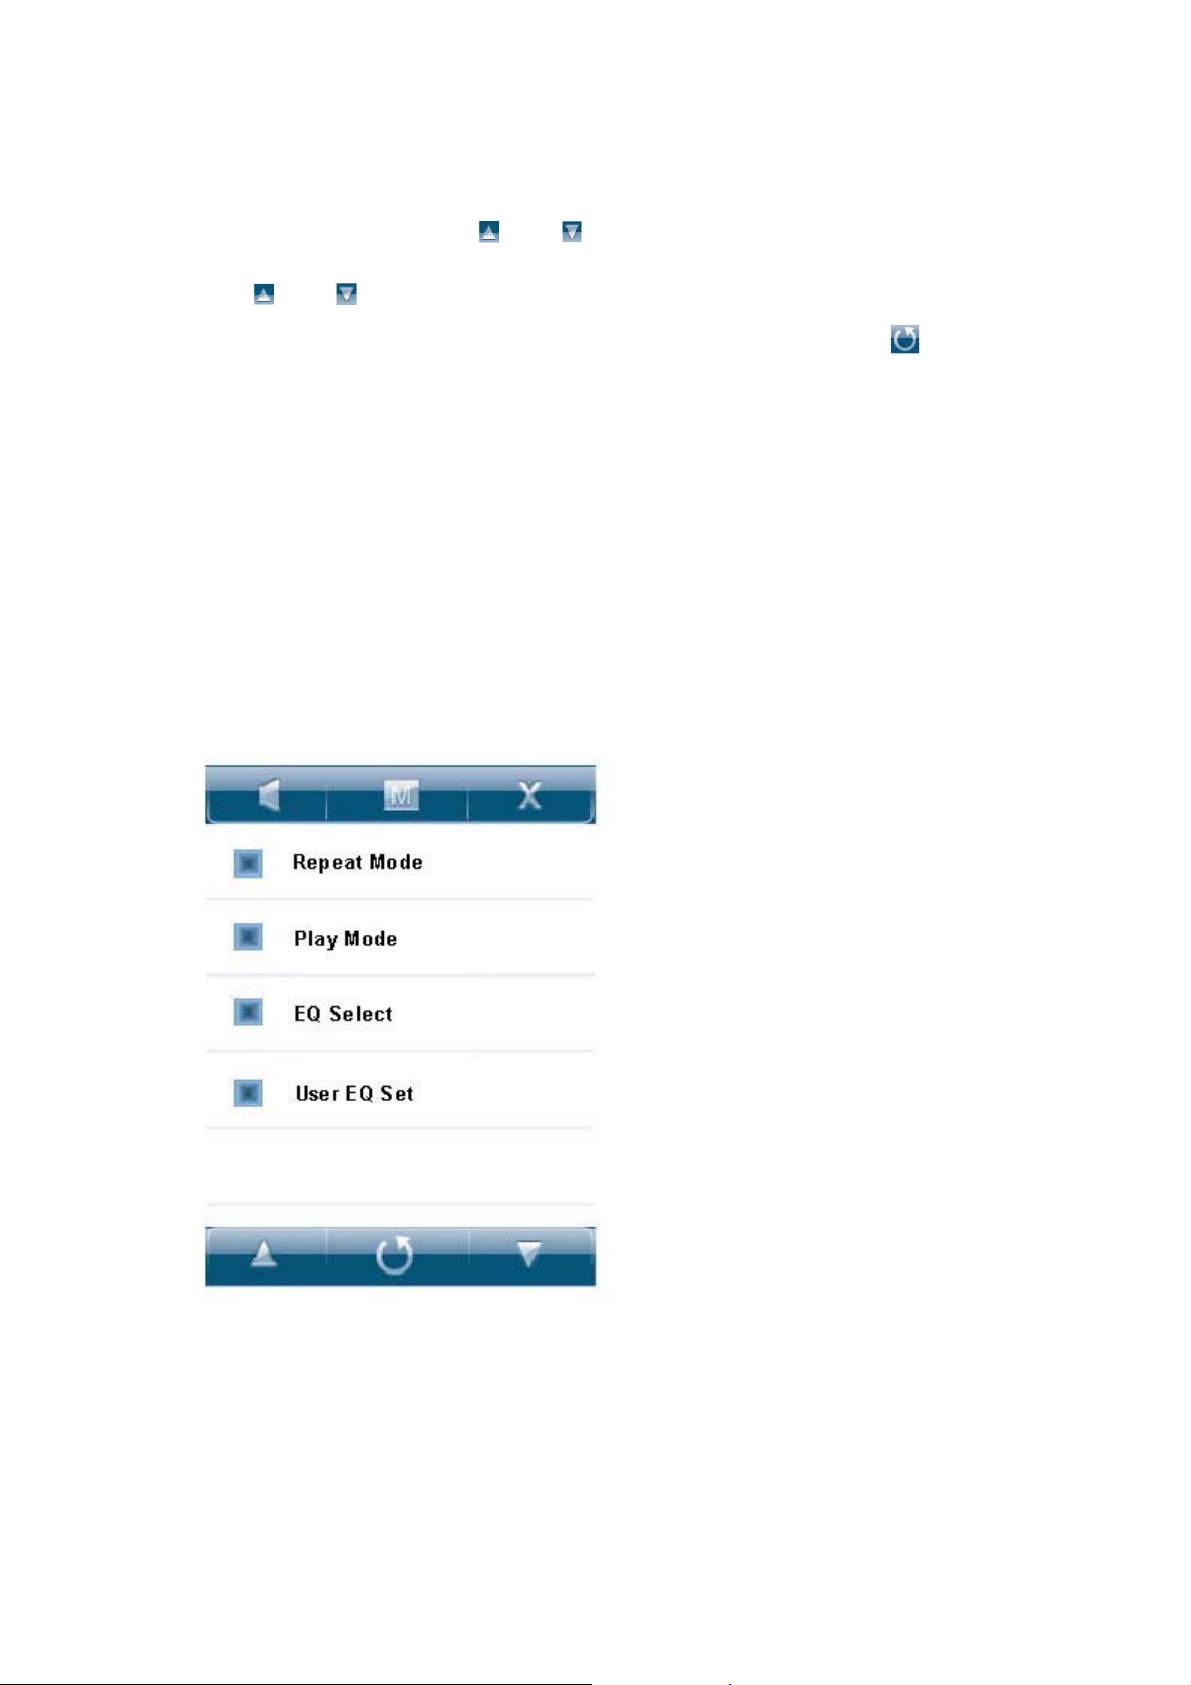
1. Playing setup
In this setup, there are 4 options: Repeat setup, Play setup, EQ selection and user EQ
adjustment.
At this time touch the screen “ and ” the icon button to select the setup options.
Short touch the selected zone on the screen to access Level 2 menu. In the 4 options,
touch “ and ” icon on the screen to select the corresponding setup, short touch
the selected zone on the screen to exit and save the settings. Touch “ ” icon to
return to the upper level of setup menu.
1) Repeating setup
In this menu, there is: single once, repeat single music, folder once, repeat folder,
repeat once, repeat all, trial listening for your option.
2) Playing setup
In this menu, there is: Sequence playing, random playing selection for your option.
3) EQ selection
In this menu, there is: normal, 3D, rock, popular, classical, bass, jazz, user define for
your option.
4) User define EQ setup:
In this menu there are five frequencies, for each of which there are 7 levels for the
user in adjustment.
26
Page 27
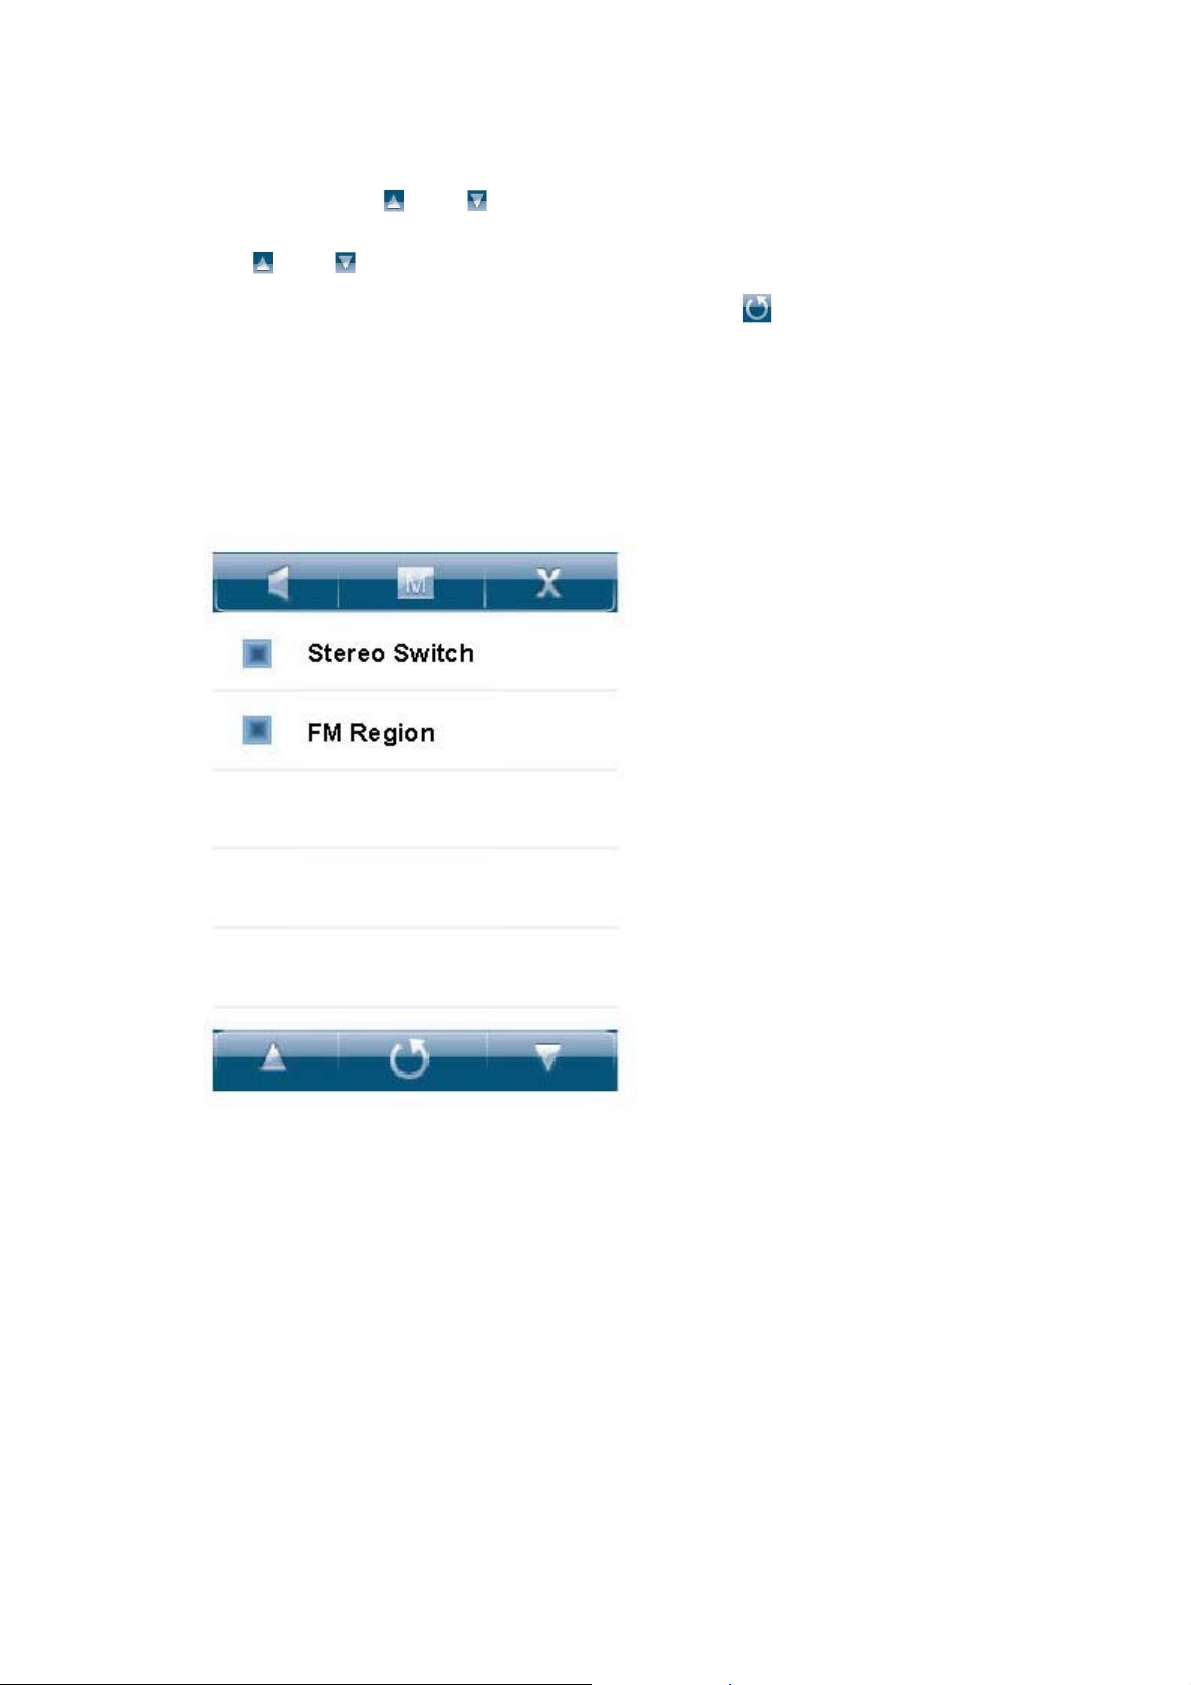
2. FM setup
In this setup, there are two options: stereo switch and FM area.
At this time touch “ and ” icons on the screen to select the set options. Then
short press the selected zone on the screen to access :Level 2 menu. In the two options,
touch “ and ” icons on the screen to select the corresponding setup. Short touch
the selected zone to exit and save the settings. Touch the “ ” icon button to return to
the upper level of setup menu.
1) Stereo on/off
Under this menu, there are options such as on and off for your option.
2) FM areas
Under this menu: there are options such as China, Europe, Japan and USA for your
option.
27
Page 28
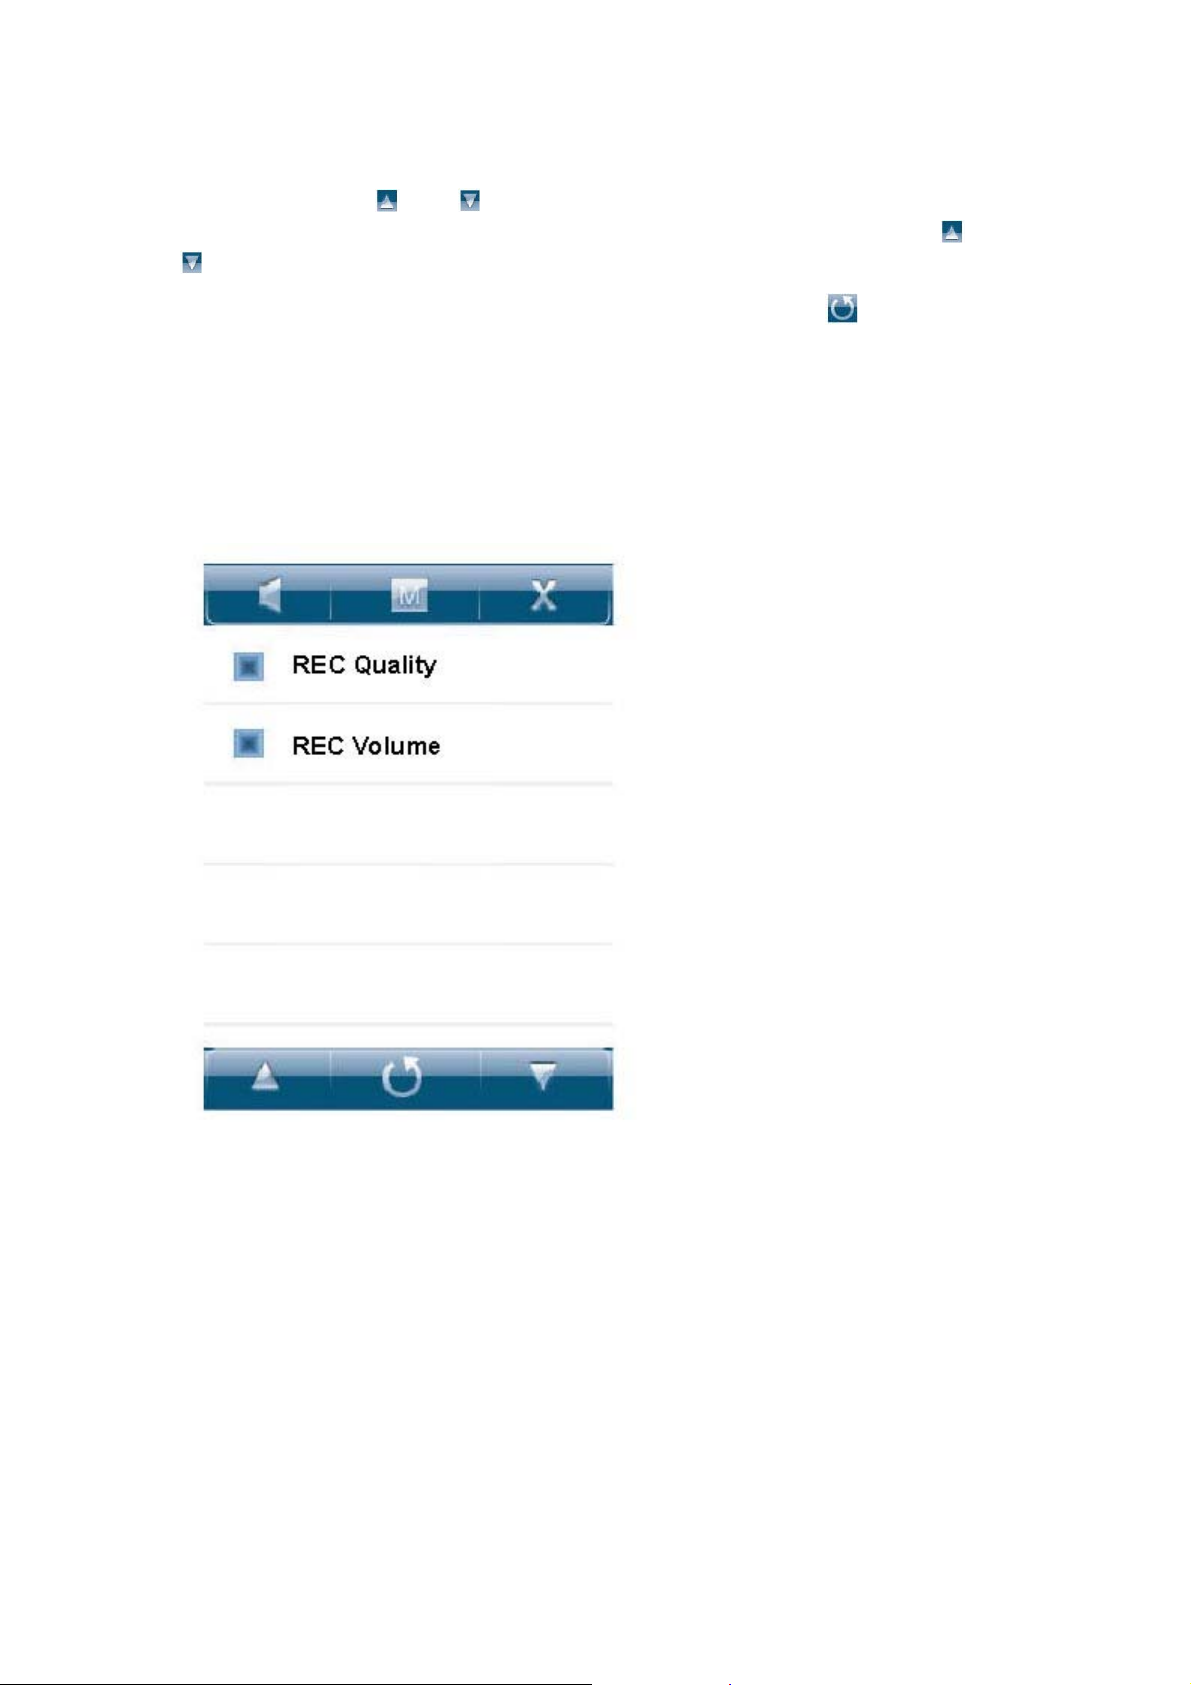
3. Recording setup
In this setting, there are two options: recording quality and recording volume.
At this time touch “ and ” buttons to select the setup options. Then short touch
the selected zone on the screen to access Level 2 menu. In 3 options, touch“ and
” icon button on the screen to select the corresponding setup and then short touch
the selected zone to confirm exiting and saving the setup. Touch “ ” icon button to
return to the upper level of setup menu.
1) Recording quality
In this menu there is: high quality and common quality for your option.
2) Recording volume
In this menu, there are 5 options: +1, +2, +3, +4, +5. The higher the level is, the
greater volume it records.
28
Page 29
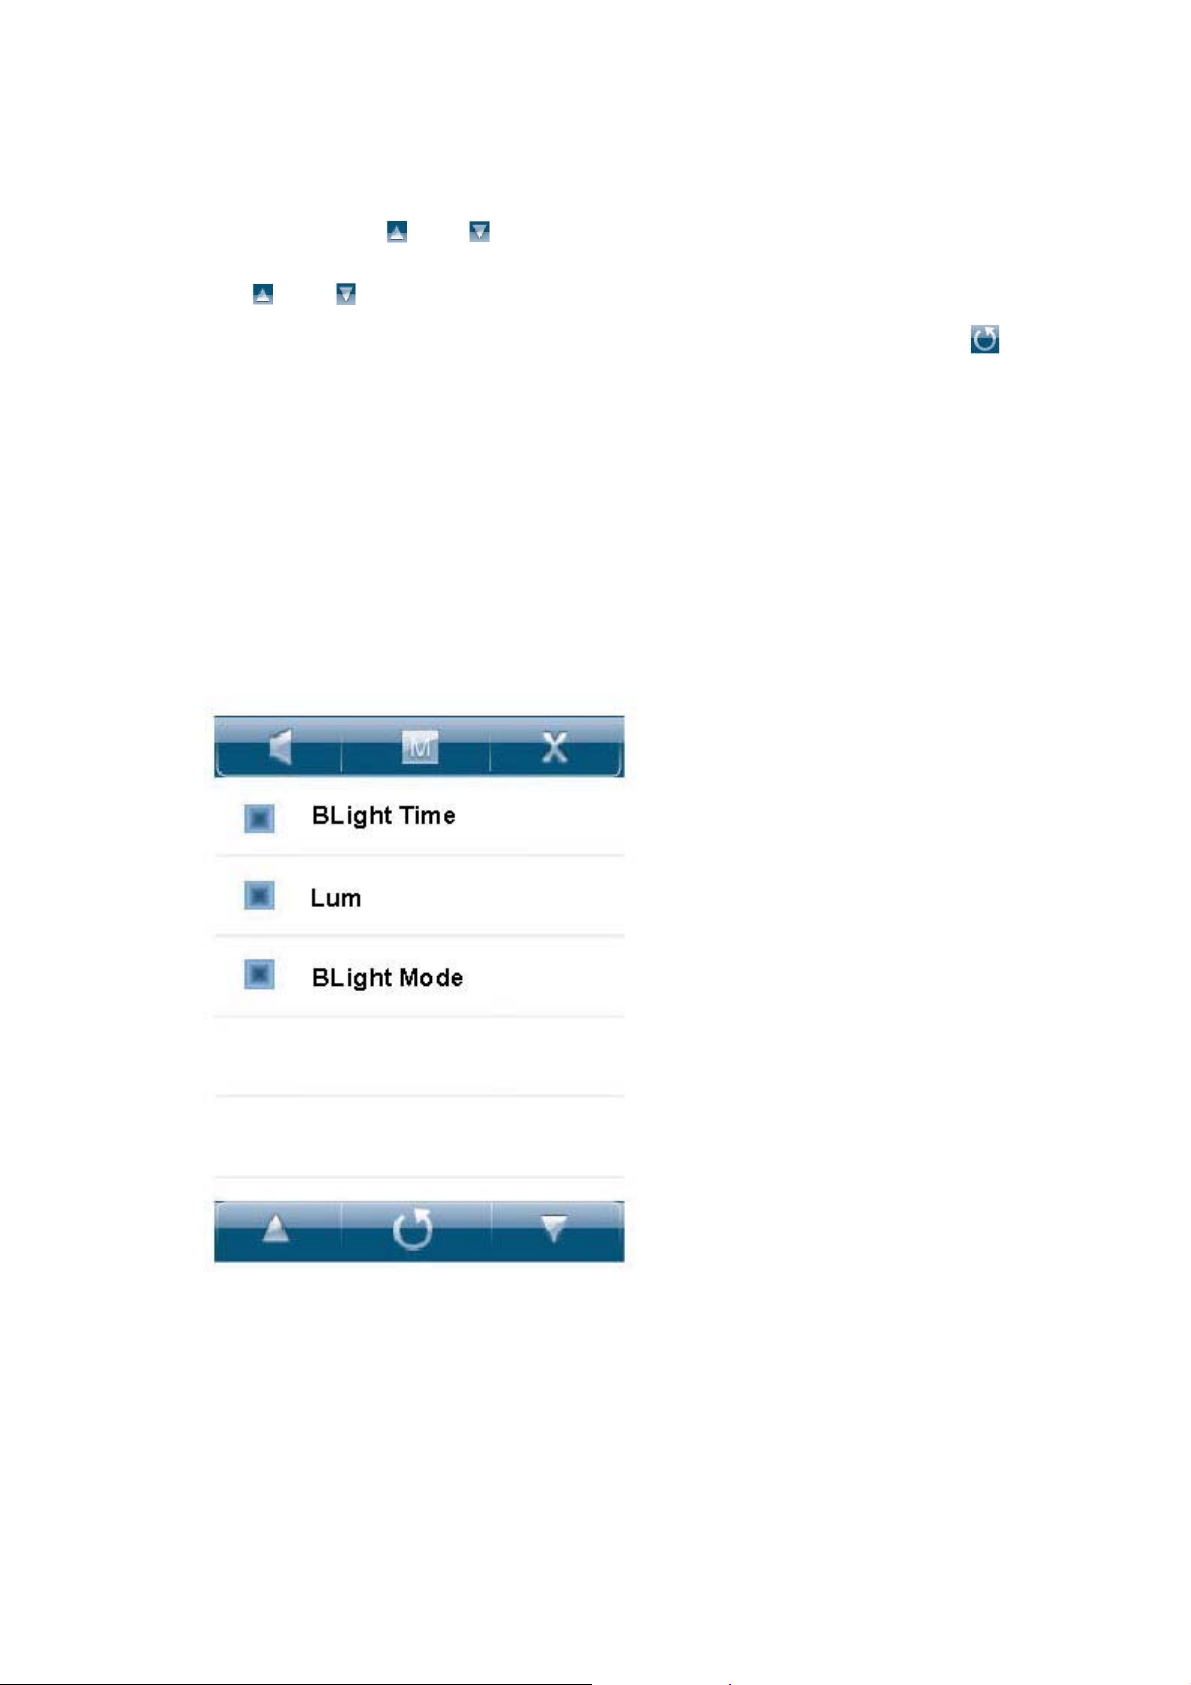
4. Display setup
In this setup there are 3 modes options: backlighting time, brightness control and
backlight display.
At this time touch “ and ” icon button to select the setup option. Then short
touch the selected the zone on the screen to access Level 2 menu. In two options,
touch “ and ” icon on the screen to select the corresponding setup. Short touch
the selected zone on the screen to confirm exiting and saving the setup. Touch “ ”
icon button to return to the upper level of the setup menu.
1) Backlighting time
In this menu there are 6 options such as: 5 seconds, 10 seconds, 15 seconds, 20
seconds, 30 seconds and long time lighting for your option.
2) Brightness control
In this menu, there are 5 options such as 1, 2, 3, 4 and 5. The higher the level is, the
brighter it will be.
3) Backlighting display mode
In this menu there are two options such as normal and power efficiency for your
option.
29
Page 30
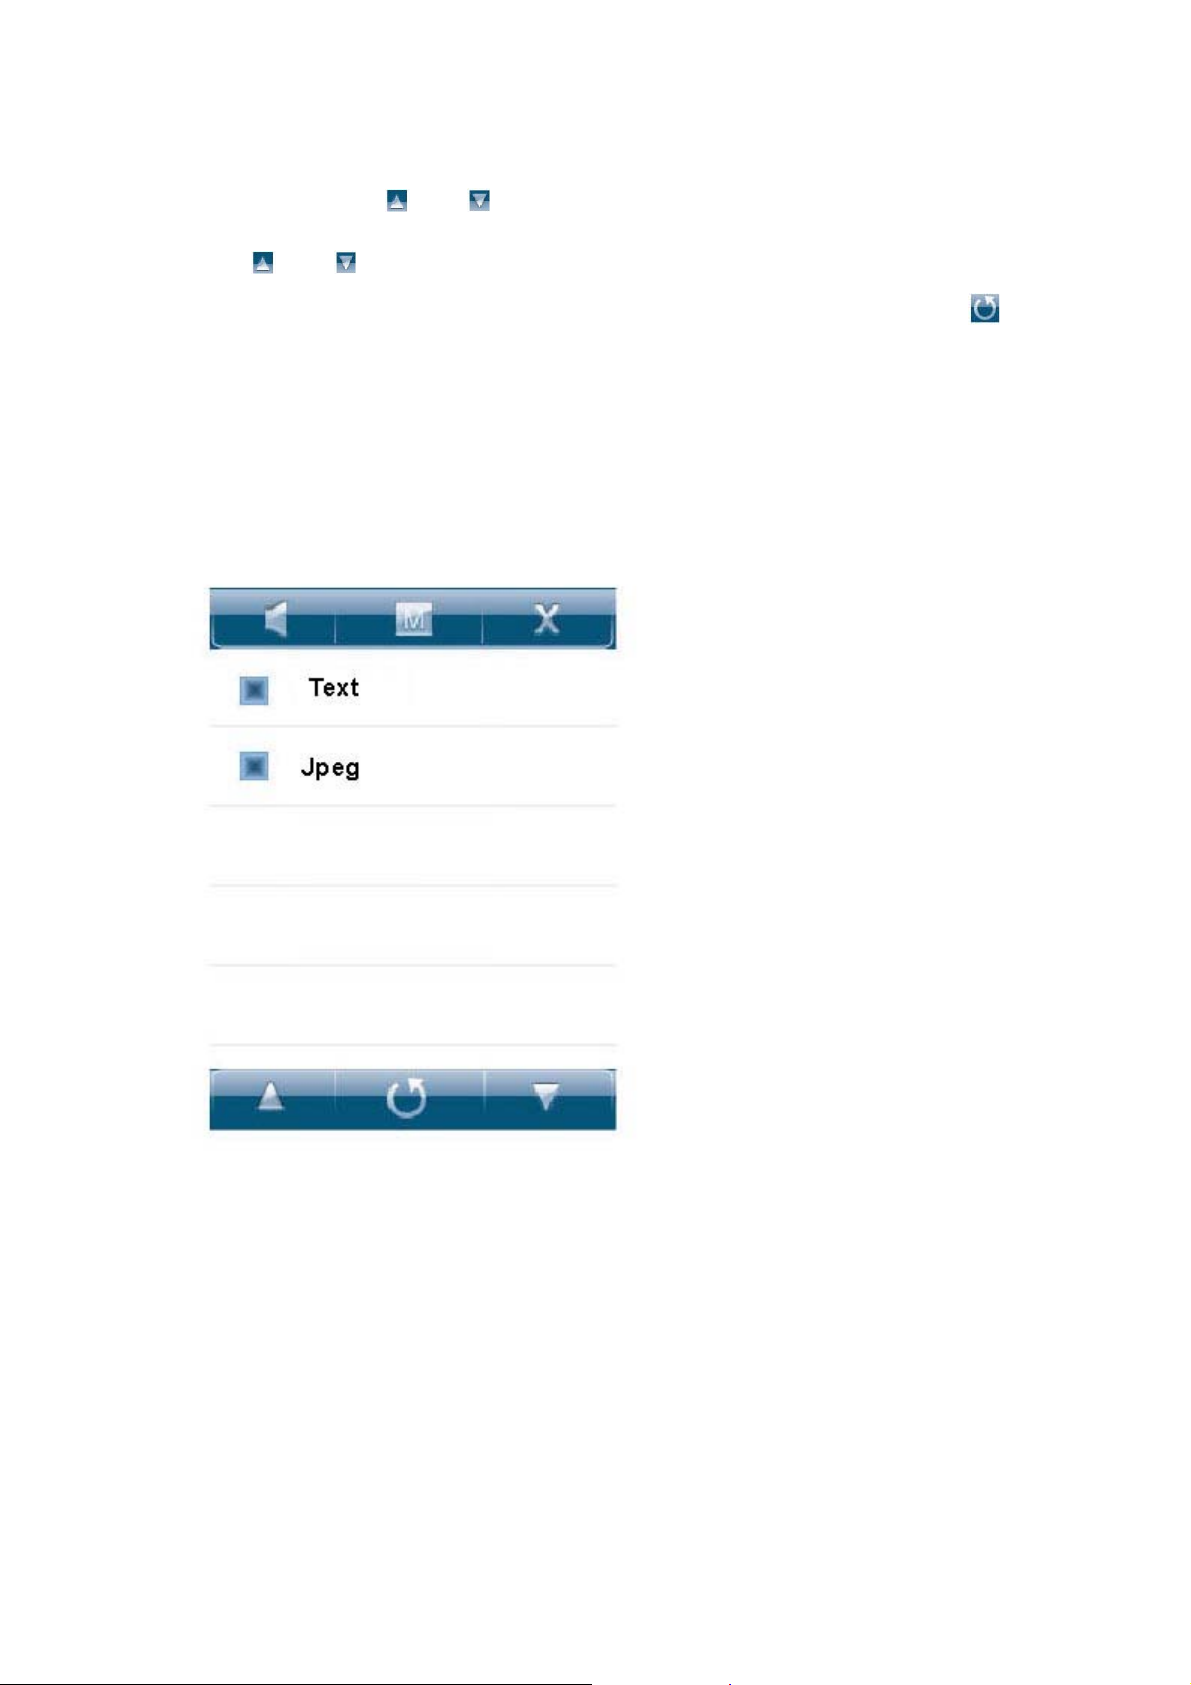
5. Browse setup
In this setup there are two options: text browse and picture browse.
At this time touch “ and ” icon button to select the setup option. Then short
touch the selected the zone on the screen to access Level 2 menu. In two options,
touch “ and ” icon on the screen to select the corresponding setup. Short touch
the selected zone on the screen to confirm exiting and saving the setup. Touch “ ”
icon button to return to the upper level of the setup menu.
1) T ext browse
In this menu, there are 5 options such as 10 seconds, 15 seconds, 20 seconds, 25
seconds and 30 seconds for your option.
2) Picture browse
In this menu, there are 5 options such as 1 seconds, 2 seconds, 3 seconds, 4 seconds
and 5 seconds for your option.
30
Page 31
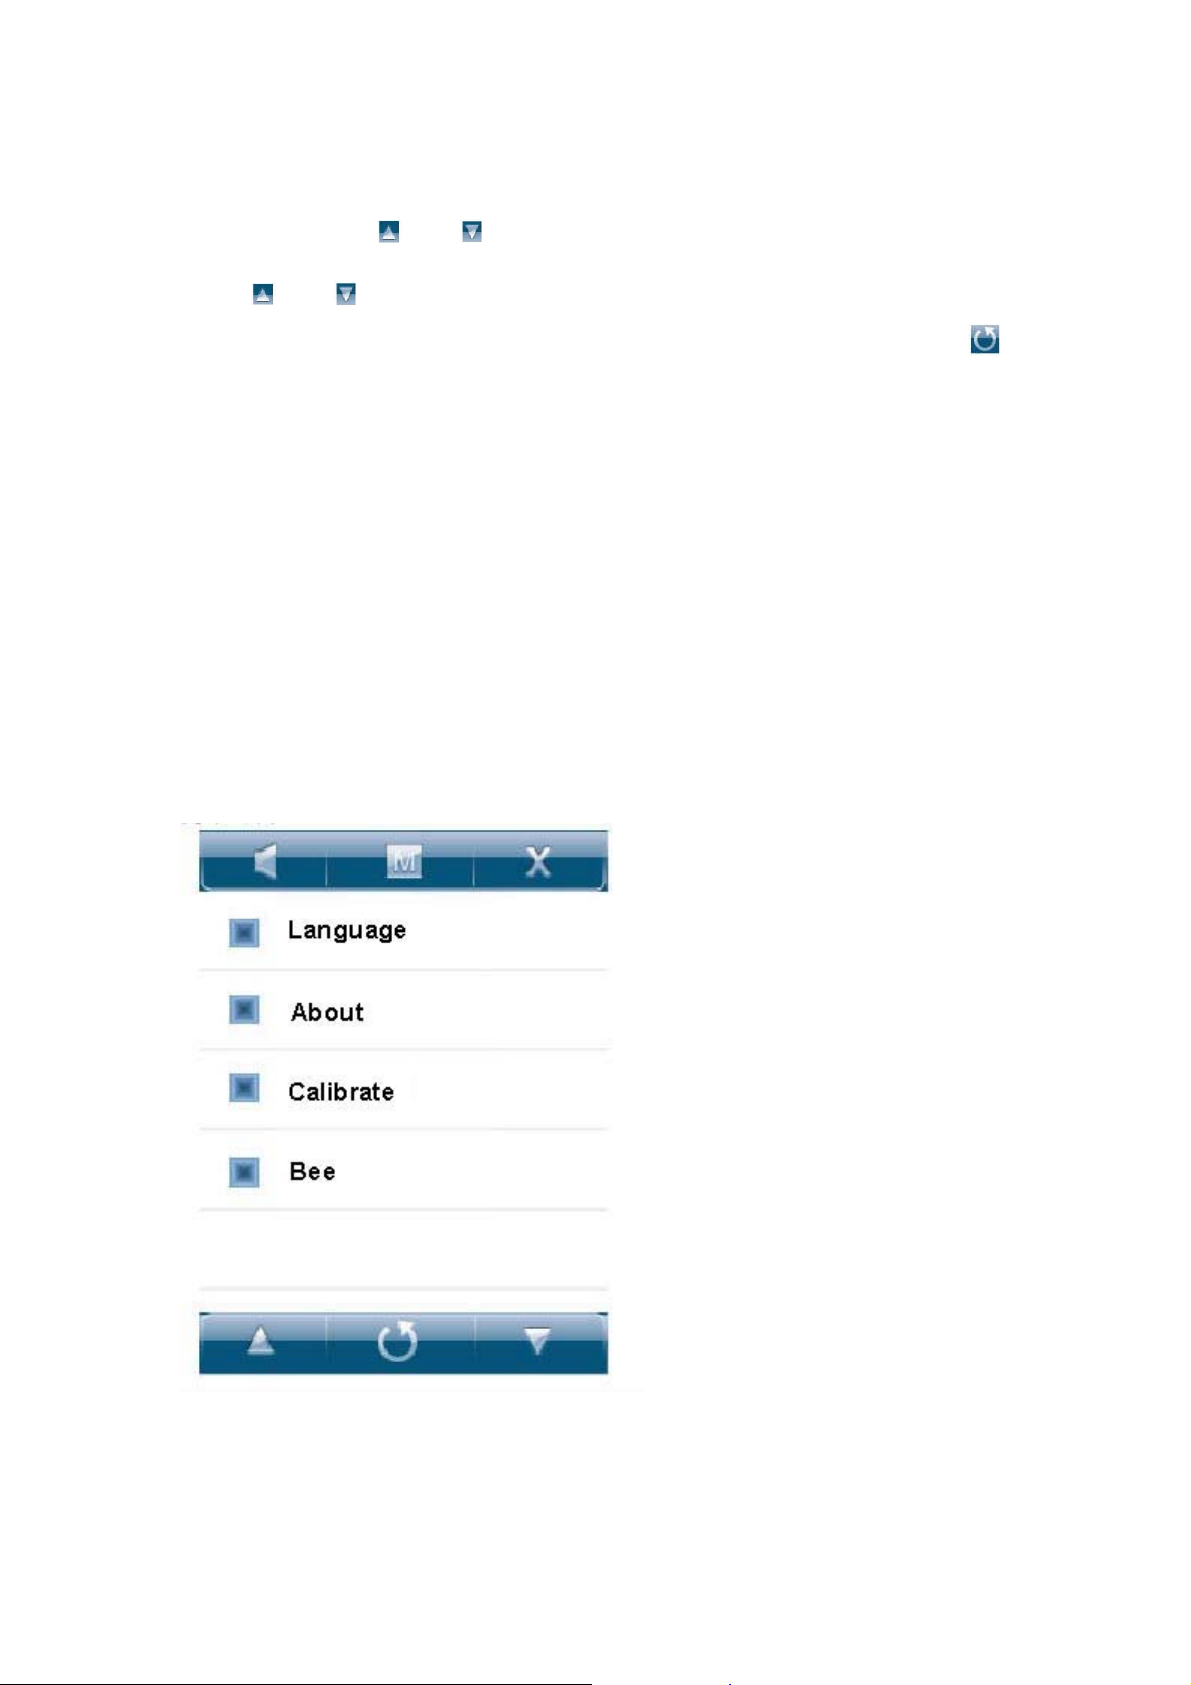
6. System setup
In this setup there are 4 options such as language selection, product information,
contact screen calibration and button noise.
At this time touch“ and ” icon button to select the setup option. Then short
touch the selected the zone on the screen to access Level 2 menu. In four options,
touch “ and ” icon on the screen to select the corresponding setup. Short touch
the selected zone on the screen to confirm exiting and saving the setup. Touch “ ”
icon button to return to the upper level of the setup menu.
1) Language selection
In this menu there are options of three languages: simplified Chinese, traditional
Chinese and English for your option.
2) Product information
In this menu, there is the remaining capacity and system software version number.
This information is only read information. Short touch the information display zone
on the screen and exit.
3) Contact screen calibration
When you find that the contact screen position is not right, you can calibrate the
contact buttons using this function.
4) Button noise
In this menu, there are two options such as On and Off for your option.
31
Page 32
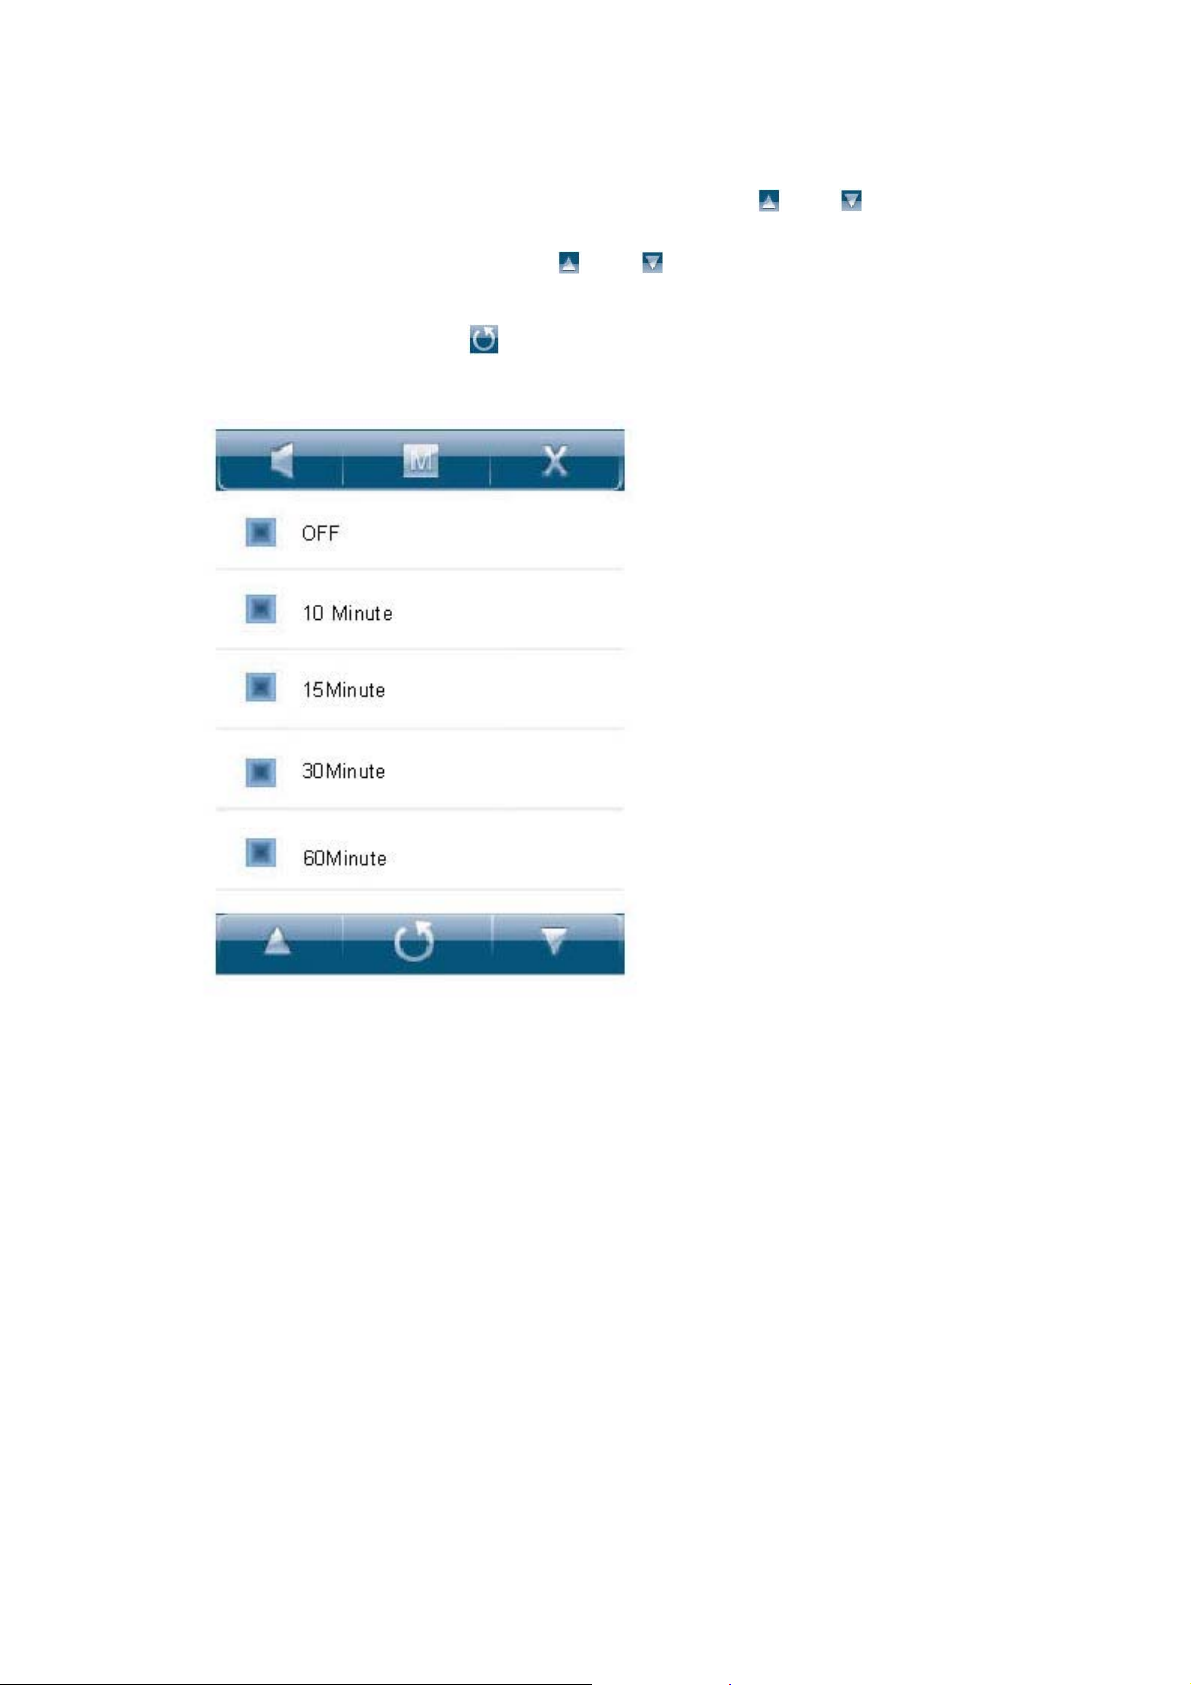
7. Power off settings
In this setup there are 6 options such as close, 10 minutes, 15 minutes, 30 minutes, 60
minutes, 120minutes for your option. At this time touch “ and ”icon button to
select the setup option. Then short touch the selected the zone on the screen to access
Level 2 menu. In 4 options, touch “ and ” icon on the screen to select the
corresponding setup. Short touch the selected zone on the screen to confirm exiting
and saving the setup. Touch “ ” icon button to return to the upper level of the setup
menu.
32
Page 33
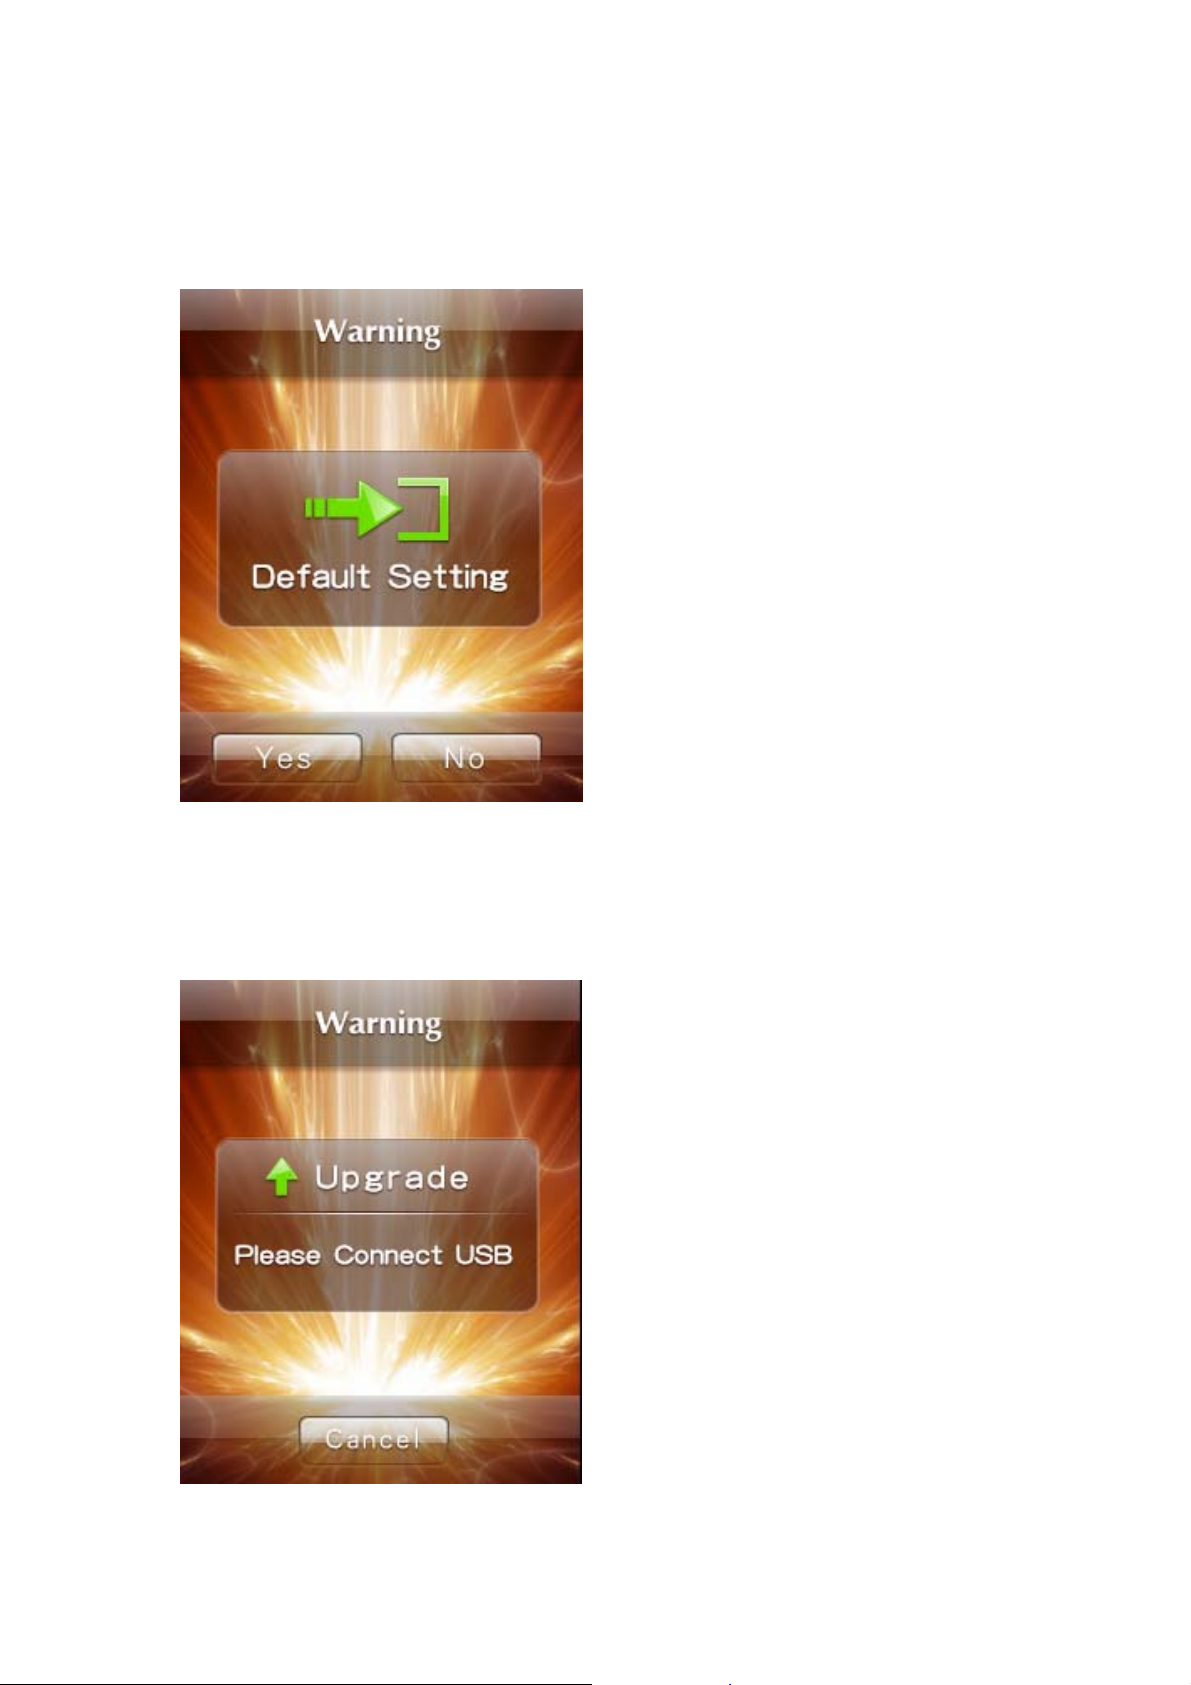
8. Default settings
Touch “Default Setup” icon on the screen to access the “System recovery default”
warning interface. Short touch “OK” button on the screen to restore to the factory
default setup. Short touch “Cancel” on the contact screen to give up this recovery
operation.
9. Firmware upgrade
Touch “Firmware Upgrade” icon on the screen to access the “Firmware Upgrade”
warning interface. Connect the player to the computer USB interface to update the
new firmware operation for the player. Short touch “Cancel” on the contact screen to
give up this recovery operation.
33
Page 34
Installing tool software
Put the drive disk attached to the unit in the computer compact disk driver. In the
Windows Operation System, it will automatically pop up the installation interface.
Click on “Video Convert Tool V3.X” to start installing all software for MP3 player.
Follow the installation prompt to complete the installation process very easily.
Producing video files
AVI is the most popular video format for the current portable media player as well as
one of the most popular formats on the network. The video culture coded in the
XVID/DIVX format has higher video quality, and moreover, the files are smaller. In
the viewing quality, the video file effect coded in the XVID/DIVX is not inferior to
the effect of coded in the WMV or RMVB format.
It supports the formats of AVI, MPG, MPEG, RMVB, VMV and DAT, etc to convert
into the AVI format in a quickest speed and highest quality.
System requirements
The basic configuration required by the video conversion software is:
CPU: INTEL or AMD core: INTEL requires at least INTEL PENTIUM3 or over,
including INTEL CELERON series WINDOWS operation that must be installed with
the player in the version of MS MEDIA PAAYER9 or over.
Operation steps
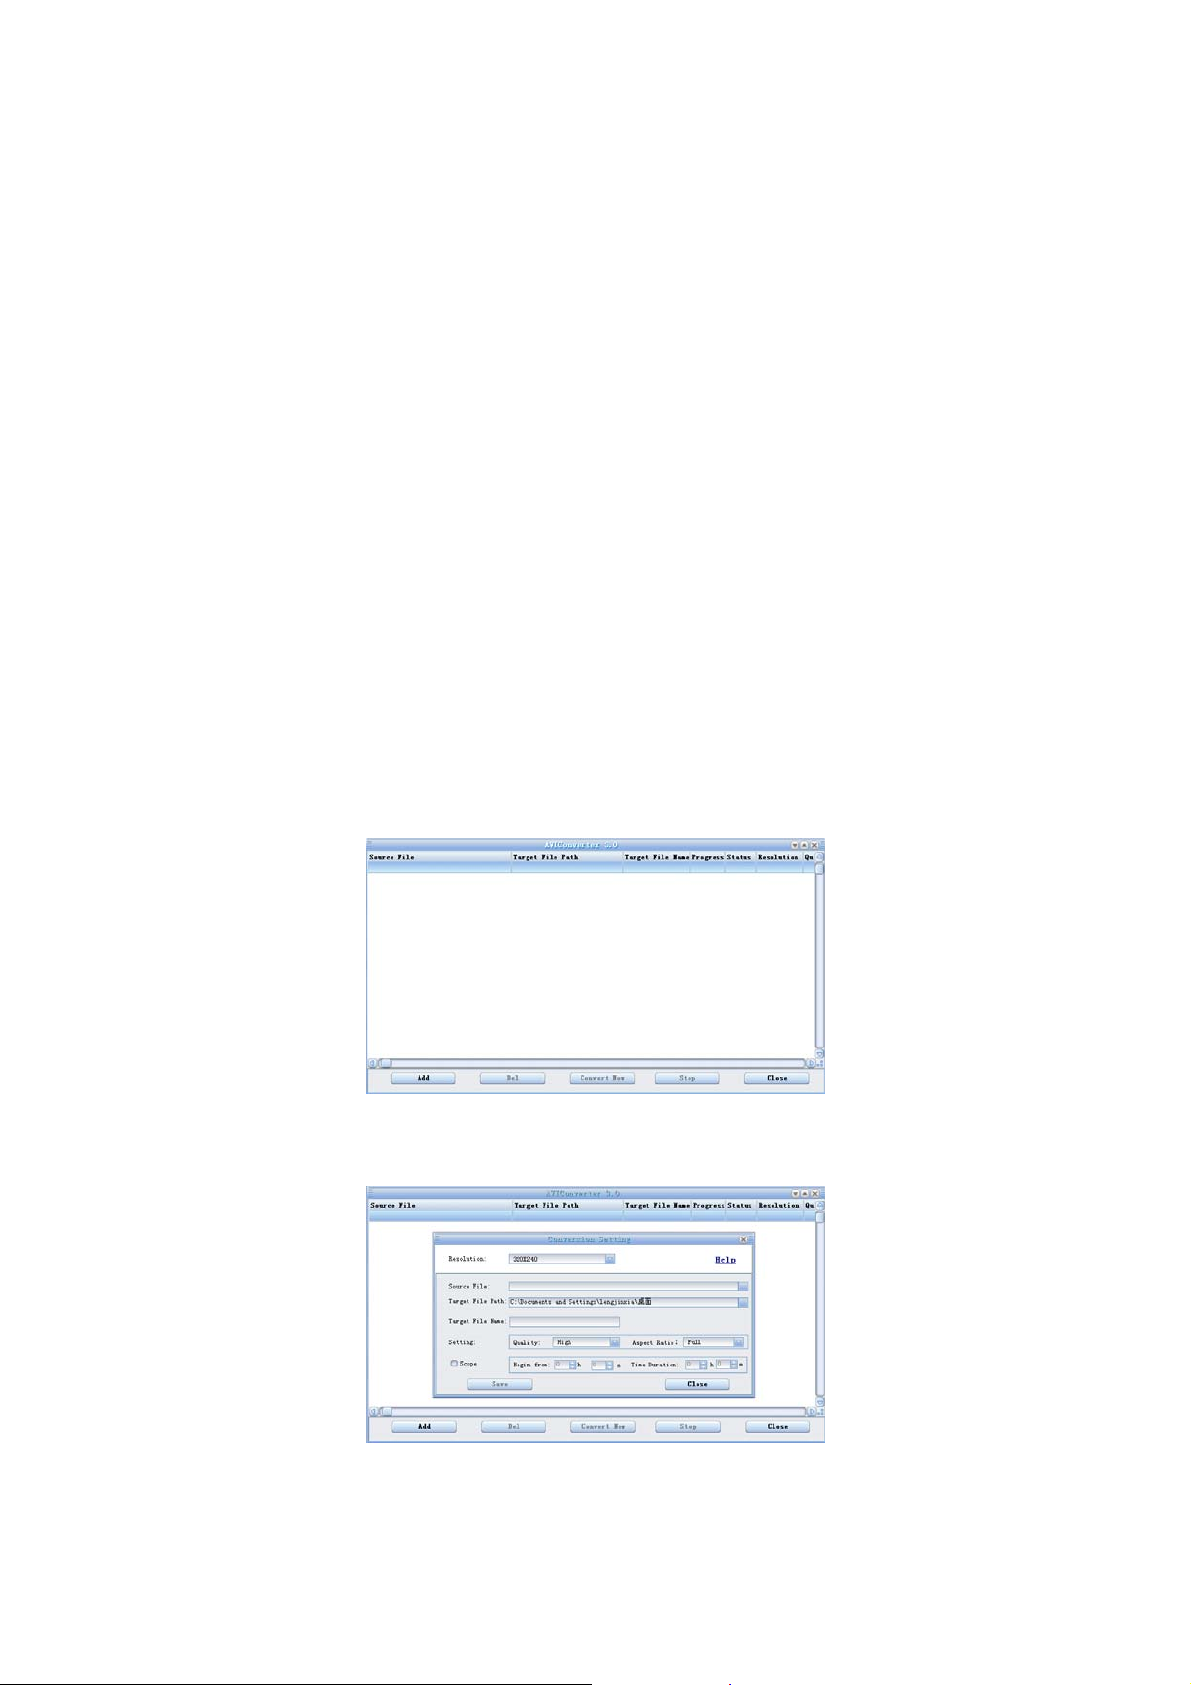
1. Click and run the program of “AV Converter.exe”, shown as follows:
2. click "add ", show dialog as follows:
34
Page 35
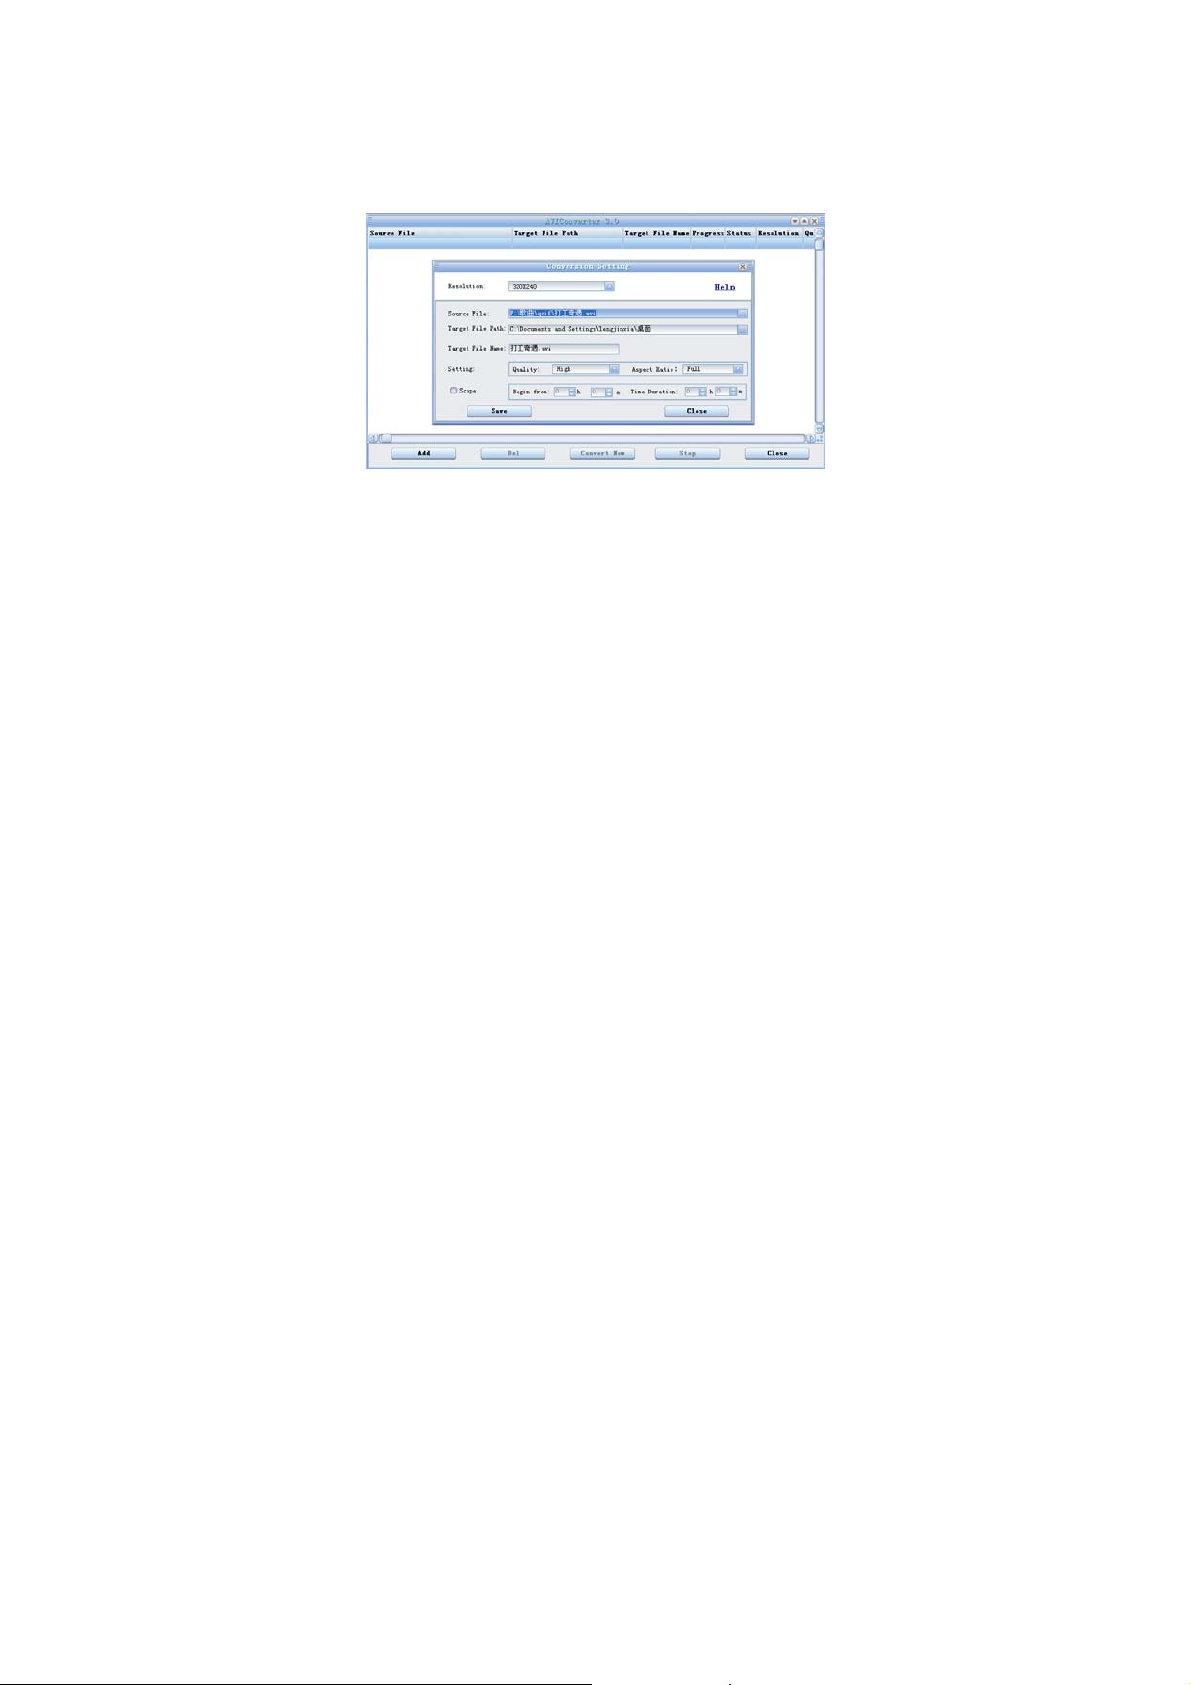
3.Select and set your desired parameters,select your desired video/audio file and AVI
video file routine to be generated, click [Start to Convert] button, then begin to
convert to AVI file.
4.The successfully converted AVI video file can be played in MP4 player. During he
operation, enter Video Play menu, select the corresponding file, short press [MODE]
key to play in video, long press to exit (the Video Play interface refers to the Screen
Description).
35
Page 36
Upgrade Player Driver
The player can upgrade or resume the damaged player driver via the tool software in
the attached disk.
1. For the first upgrading of computer, insert the drive disk into the CD-ROM of
computer, then connect the MP4 player with computer (it requires you to press and
hold the MENU key), till it appears the program Installation Interface.
2. Implement the next step according to the Dialog box prompt, and select the
“Upgrading Tool” folder in the attached disk in the “Browse” option of the fourth
Dialog box, then click Confirm.
3. Operate as per the prompt in dialog box till the accomplishment
4.When the installation of programs required by computer is OK, you can begin the
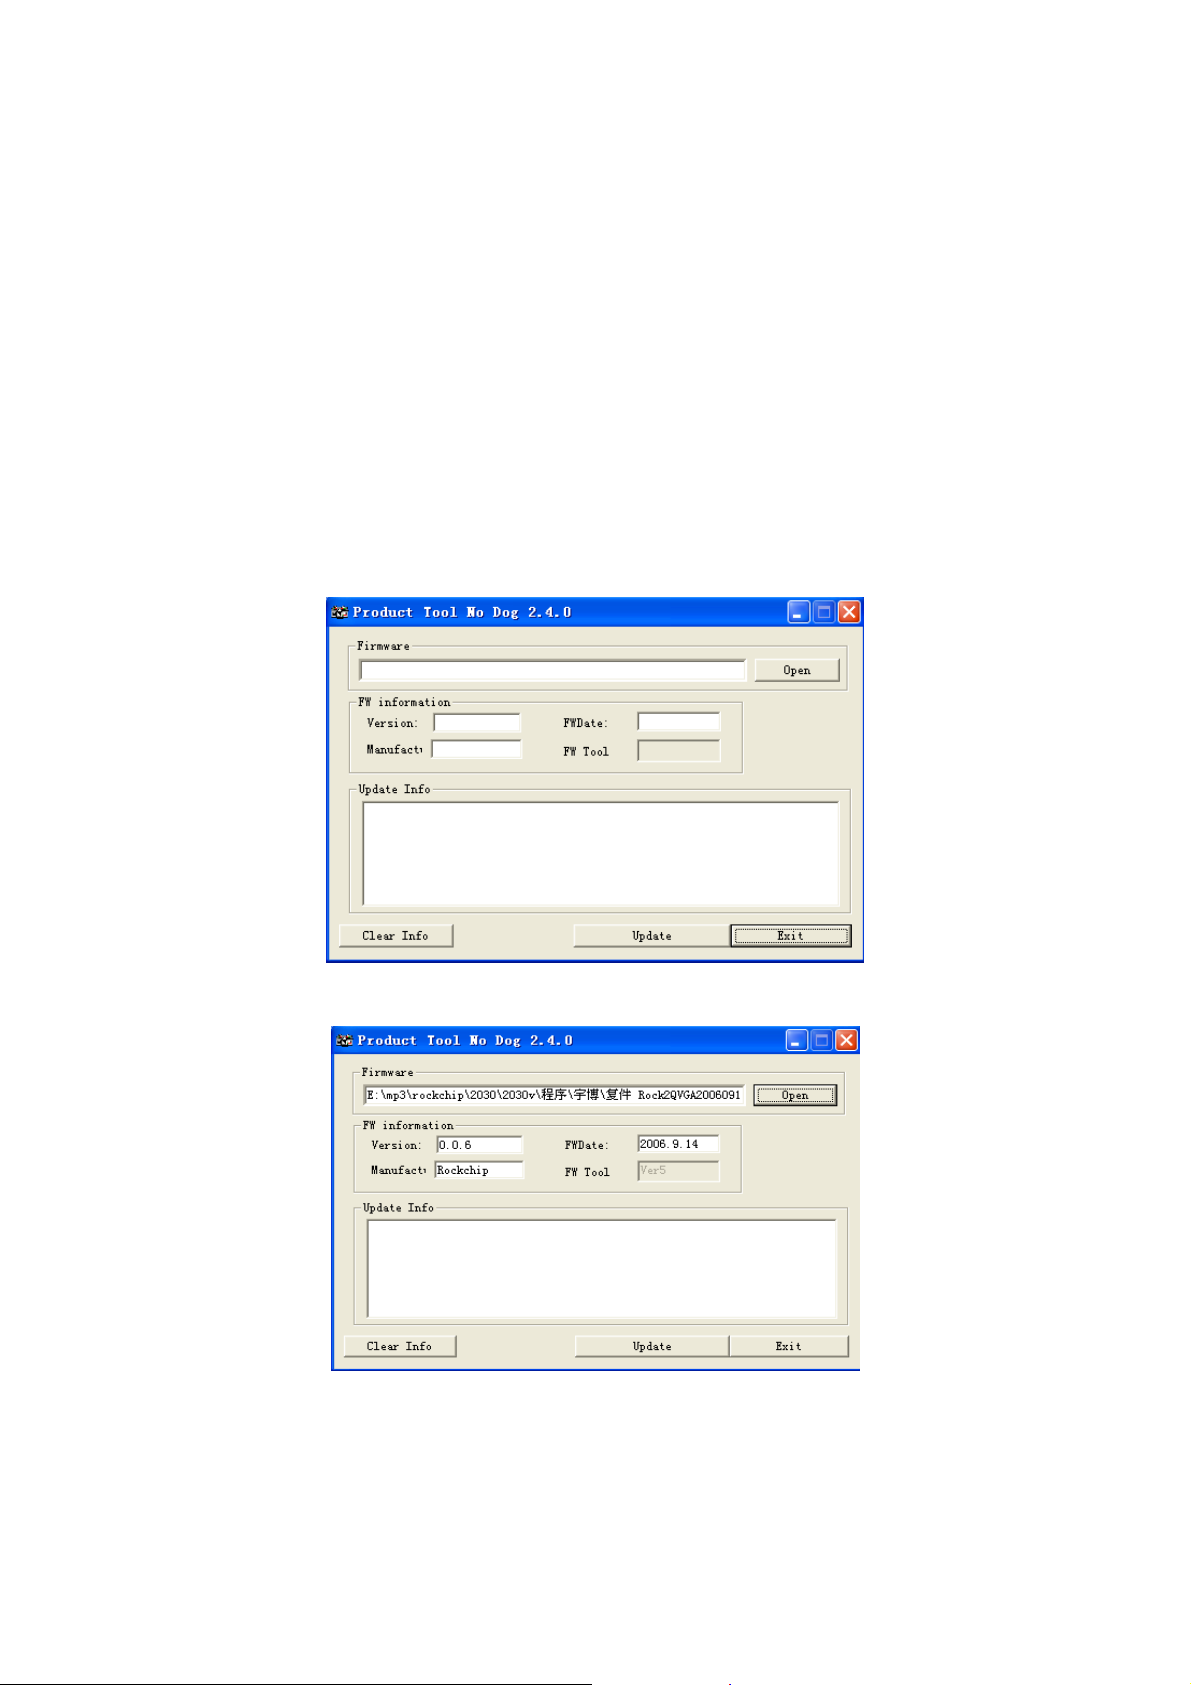
upgrading; select and run the firmware upgrading tool Consumer.exe (can be found in
attached disk), then open the option and select Rock2*.rfw file (the Interface is as
follows).
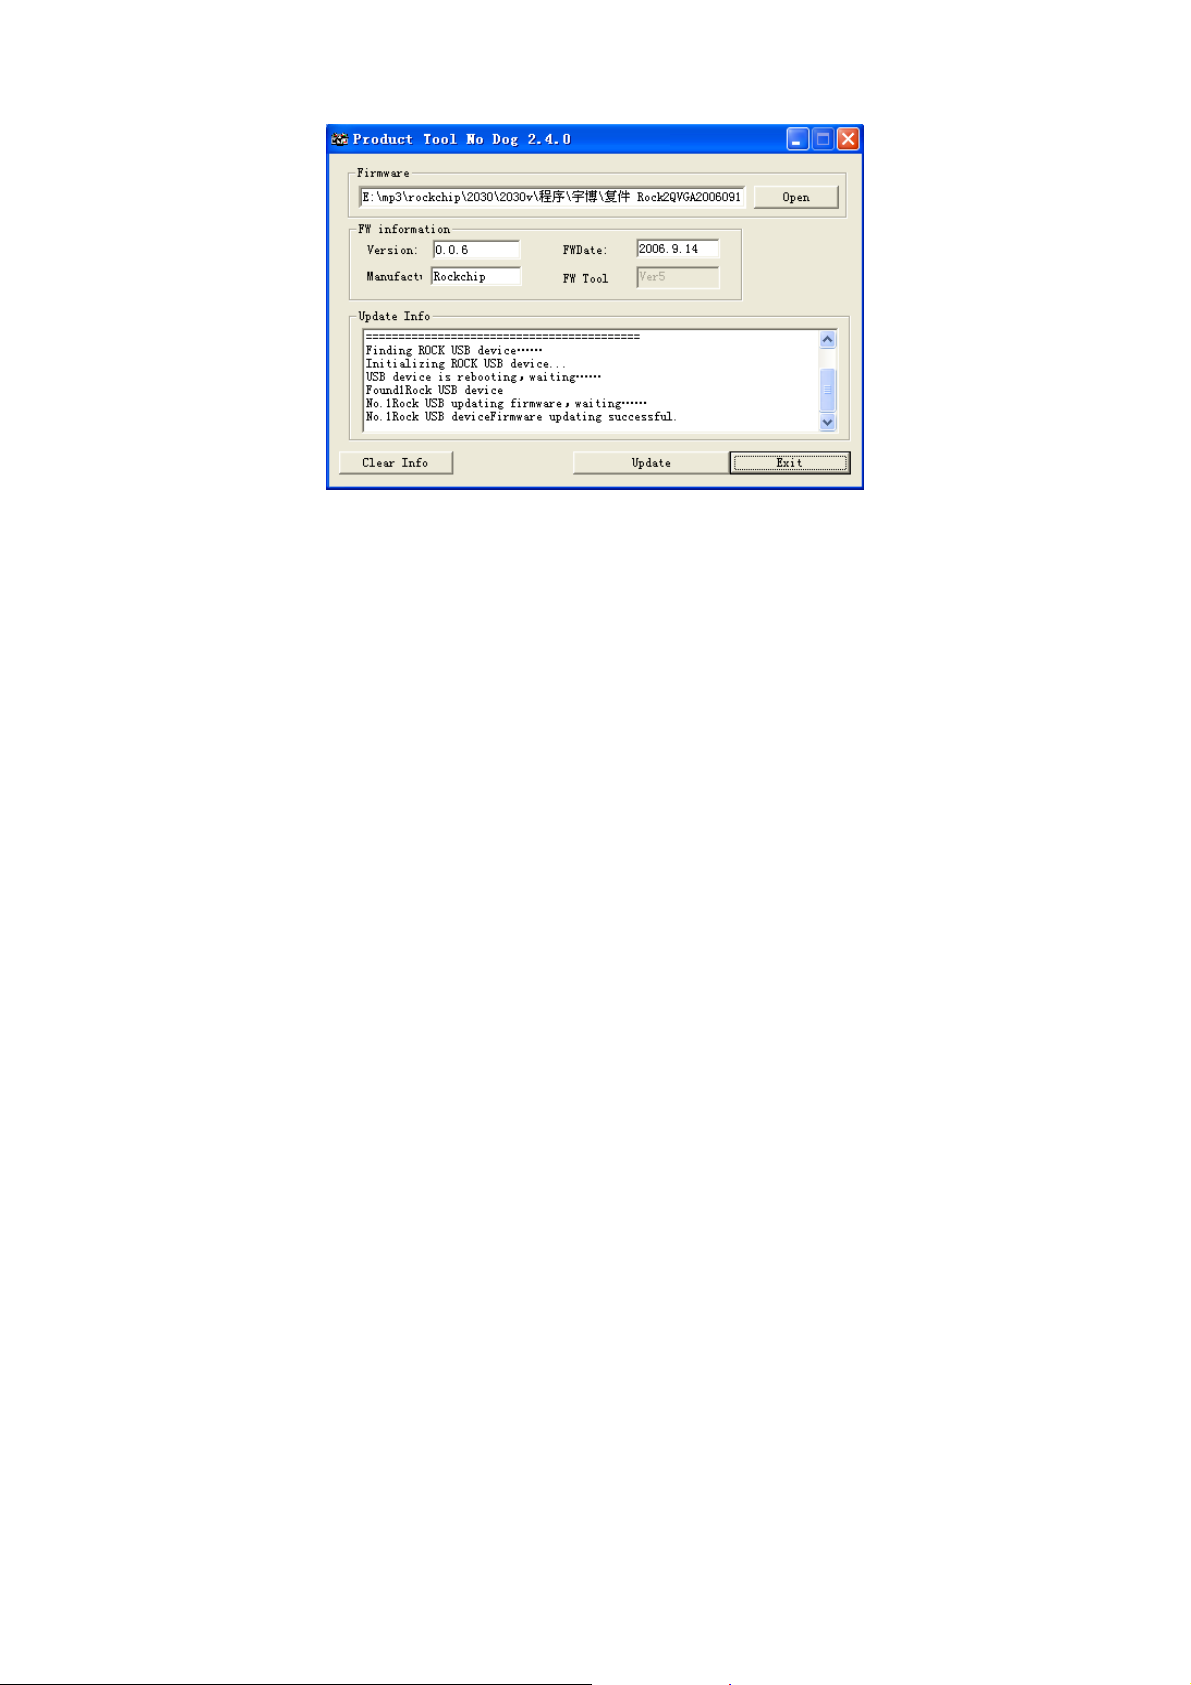
5.Connect the player to PC via USB cable (press and hold the MENU key before the
On-line operation), then click [Burnt Firmware] till the Auto Upgrading is achieved.
36
Page 37
Note: Firmware upgrade is to improve and optimize the performance of the player.
The normal work of the player would not be affected even if the firmware isn’t
upgraded. The wrong operation of upgrading firmware would cause the device not to
work normally! The firmware upgrade software of this player is not applied to other
series of players.Firmware upgrade
37
Page 38

Common troubleshooting
1. Products cannot be opened.
Check the battery. If the battery is discharged, please use the provided adaptor to
charge the battery and then retry. Based on the discharging state, the charging of full
battery needs some time. If there is no response of the product, please press “RESET”
button on the side of the unit. Note that RESET will be disconnected, but there is no
influence on the product.
2. Buttons do not work.
Check whether the power switch is in the HOLD position. If it is, please move it to
the opposite direction.
3. No sound.
Check whether the voice is set to “0”. If it is so, please control it to your favorite
position. Check whether there is any playing source on the product. If there is no
playing source on the product, there will be no output of sound.
4. Noise in playing.
The damaged music files may utter noise, or discontinued sound output. Check
whether the earphone is connected. There is impurity in the jack/terminal in the
earphone and there is noise.
5. The time for playing the files in the connected m emory is shortened.
Compared with the files in the built-in memory, it requires more sources while
playing the files on the external memory of MP4. Therefore, if the product playing is
respectively saved in the same file in the memory and the outside memory and the
built-in memory, the time for playing the former may be shortened.
38
Page 39

6. FM radio channels unable to work normally
Since there is no configuration of independent antenna, the MP4 uses the connected
earphone to receive FM radio signals. Therefore, please try to stretch your ears so that
the signal effect will be better. The reception sensitivity may differ as the positions are
different. If you cannot hear the FM radio in the zone being checked, it may be due to
the cause of the FM modules. In this case, please contact the nearest customer service
center.
7. Noise in the recorded files
The MP4 has been equipped with super fine microphone. This may lead to the noise
in the production process so that the quality will be badly distributed, which is the
cause of the nature of the digital equipment.
8. Clobbers displayed on the screen
Please check whether proper language options are set up. The language options will
be set up in the “Settings” – “System Settings” – “Language Settings”.
9. Unable to download files
Make sure that the computer and the player are properly connected.
Make sure that the memory space of the memory is full.
Make sure that the USB connection lines are damaged.
FCC WARNING
This device complies with Part 15 of the FCC Rules. Operation is
subject to the following two conditions:
(1) this device may not cause harmful interference, and (2) this device must accept any
interference received, including interference that may cause undesired operation.
NOTE: This equipment has been tested and found to comply with the limits for a Class B digital
device, pursuant to part 15 of the FCC Rules. These limits are designed to provide reasonable
protection against harmful interference in a residential installation. This equipment generates, uses
and can radiate radio frequency energy and, if not installed and used in accordance with the
instructions, may cause harmful interference to radio communications. However, there is no
guarantee that interference will not occur in a particular installation. If this equipment does cause
harmful interference to radio or television reception, which can be determined by turning the
equipment off and on, the user is encouraged to try to correct the interference by one or more of
the following measures:
- Reorient or relocate the receiving antenna.
- Increase the separation between the equipment and receive r .
-Connect the equipment into an outlet on a circuit different from that to which the receiver is
connected.
-Consult the dealer or an experienced radio/TV technician for help.
NOTE: The manufacturer is not responsible for and radio or TV interference caused by
unauthorized modifications to this equipment. Such modifications could void the user’s authority
to operate the equipment.
39
 Loading...