

Page 1
OPERATING MANUAL
(Original Instructions)
Label printing & lamination station
Version: 2017-04-01
Machine number: 2016705-01
toptack GmbH
Bachleiten 3 | D-93455 Traitsching
Page 2

Label printing & lamination station - Version: 2017-04-01
Page 2
Table of contents
Introduction ........................................................................................................................ 4
Basic notes ......................................................................................................................................................... 4
Copyright ........................................................................................................................................................... 4
Spare parts management................................................................................................................................... 4
Warranty ............................................................................................................................................................ 5
Manufacturer and service .................................................................................................................................. 5
EC declaration of conformity according to the EC machinery directive 2006/42/EC, Annex II A....................... 6
Rating plate ........................................................................................................................................................ 7
Equipment .......................................................................................................................... 8
Function description .......................................................................................................................................... 8
Intended use ...................................................................................................................................................... 8
Description of the machine ................................................................................................................................ 9
Operating elements with switching cabinet ................................................................................................................... 10
Pneumatic distributor block ........................................................................................................................................... 10
Cylinder unit with vacuum lance .................................................................................................................................... 10
Thermal transfer printer ................................................................................................................................................ 11
Laminate dispenser ........................................................................................................................................................ 11
Protective housing with safety door .............................................................................................................................. 12
Dimensions ...................................................................................................................................................... 13
Technical data .................................................................................................................................................. 14
Processable materials ...................................................................................................................................... 14
Introduction
Safety ............................................................................................................................... 15
General safety notes ........................................................................................................................................ 15
Operator's obligations ..................................................................................................................................... 15
Obligations of the operating and maintenance staff ....................................................................................... 16
Residual dangers .............................................................................................................................................. 17
Personal protection equipment ....................................................................................................................... 17
Safety devices .................................................................................................................................................. 18
Operating elements ........................................................................................................... 19
Operating elements at the control cabinet ...................................................................................................... 19
Brush at the laminate dispenser ...................................................................................................................... 21
Operating elements at the laminate dispenser ............................................................................................... 22
Operating processes .......................................................................................................... 23
Turning on the label printing & lamination station .......................................................................................... 23
Loading the printer label (layout) and specifying the piece number ............................................................... 25
Turning off the label printing & lamination station ......................................................................................... 29
Reset emergency off ........................................................................................................................................ 30
Maintenance ..................................................................................................................... 31
Maintenance plan ............................................................................................................................................ 32
Maintenance work ............................................................................................................ 34
Activate or deactivate manual mode ............................................................................................................... 34
Activating manual mode ................................................................................................................................................ 34
Deactivating manual mode ............................................................................................................................................ 34
Replacing the roll of protective laminate at the laminate dispenser ............................................................... 35
Page 3

Label printing & lamination station - Version: 2017-04-01
Page 3
Replacing the label roll at the thermal transfer printer ................................................................................... 36
Replacing the ink ribbon at the thermal transfer printer................................................................................. 39
Cleaning the printing head of the thermal transfer printer ............................................................................. 42
Disposal ............................................................................................................................ 44
Annex ............................................................................................................................... 45
Introduction
Page 4

Introduction
Label printing & lamination station - Version: 2017-04-01
Page 4
INTRODUCTION
Basic notes
The complete technical documentation is part of the machine according to the EC machinery
directive 2006/42/EC and must be kept near the described machine at all times.
Before commissioning of the machine, this operating manual must be read with care and
completely by the staff. No liability is assumed for any damage and operating faults that result
from non-observance of the instruction texts!
Copyright
Copyright © (2017) toptack GmbH
This operating manual is intended for the operator's staff.
The operating manual must only be reproduced or passed on to any third parties with written
permission. This applies even if only excerpts from the operating manual are copied or
forwarded.
Spare parts management
These operating instructions contain no information on spare parts of the machine.
All information that is needed to order spare parts can be taken from the separate spare parts
list.
If spare parts are used that have not been expressly released by toptack GmbH, this may impair
the safety of the machine!
Page 5

Label printing & lamination station - Version: 2017-04-01
Page 5
Warranty
toptack GmbH's liability period shall be 12 months.
Any liability on the side of toptack GmbH shall be excluded upon:
Use of spare parts that have not been expressly released by toptack GmbH.
Injury and property damage caused by unauthorised or untrained staff.
Injury and property damage caused by unauthorised conversions.
Injury and property damage caused by non-observance of the operating manual.
Injury and property damage caused by work that is not described in this manual and
therefore performed without authorisation.
Manufacturer and service
If you have any questions about the delivered machine, please contact us directly:
Introduction
toptack GmbH
Managing director: Rüdiger Horn
Bachleiten 3
D-93455 Traitsching
Phone: +49 (0) 9974 / 9048 - 477
Telefax: +49 (0) 9974 / 9048 - 479
Email: horn.r@toptack.de
Internet: http://www.toptack.de
Page 6

Introduction
Label printing & lamination station - Version: 2017-04-01
Page 6
EC declaration of conformity according to the EC machinery directive
2006/42/EC, Annex II A
We hereby declare that the following machine corresponds to the basic safety and health
requirements of the EC directive 2006/42/EC in its design and build and in the version marketed
by us. In case of changes to the machine that have not been coordinated with us, this
declaration shall lose its validity.
Manufacturer:
toptack GmbH
Bachleiten 3
D-93455 Traitsching
Description and identification of the machine:
Designation: Label printing & lamination station
Machine number: 2016705-01
Year of build: 04/2017
Person authorised for the technical documentation:
Mr Rüdiger Horn, toptack GmbH, Bachleiten 3, D-93455 Traitsching
Managing director:
Mr Rüdiger Horn, toptack GmbH, Bachleiten 3, D-93455 Traitsching
Traitsching, 01 April 2017
Signature (Rüdiger Horn)
Page 7
Label printing & lamination station - Version: 2017-04-01
Page 7
Rating plate
No.
Designation
1
Machine designation
2
Machine type
3
Machine number
4
Year of build of the machine
5
Technical information (electr. supply voltage & power, pneumatics) of the machine
6
Technical information (dimensions, L x W x H) of the machine
7
Technical information (weight) of the machine
Introduction
Page 8

Equipment
Label printing & lamination station - Version: 2017-04-01
Page 8
EQUIPMENT
Function description
The label printing & lamination station can be used to apply labels with different print images
(layout) and provide them with a protective lamination. The print images can be selected from
an internal storage medium. The printed images can be transferred from a network or an
external computer to the station (see Appendix 7 to this manual). The finished labels must be
removed by the operating staff by hand, or can be wound up for later processing.
Intended use
The label printing & lamination station serves only for printing and lamination of labels. The
station must only be operated with materials that can be processed according to the section
"Technical data". The user must also ensure that the required personal protection equipment is
worn so that no danger to himself and to others occurs.
Inadmissible working method:
Processing of any other materials than described in item "Processable materials".
Page 9

Label printing & lamination station - Version: 2017-04-01
Page 9
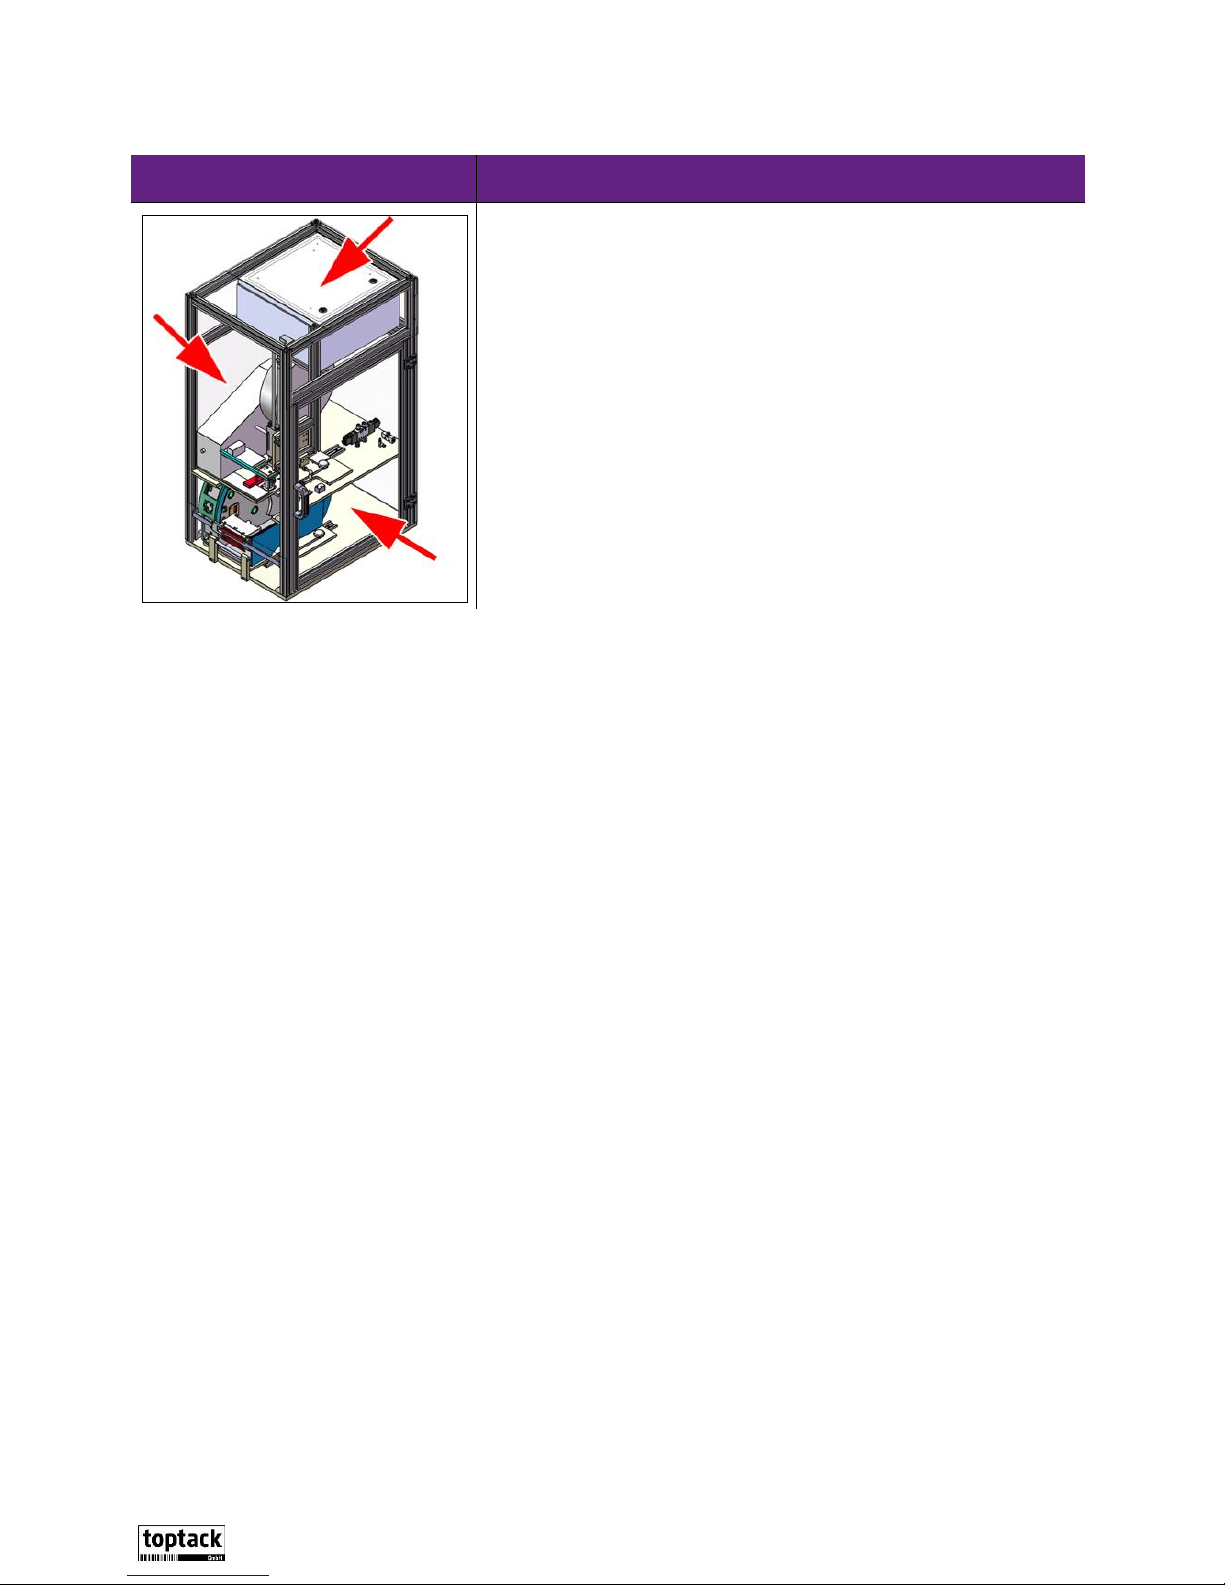
Description of the machine
No.
Designation
1
Operating elements with switching cabinet
2
Pneumatic distributor block
3
Cylinder unit with vacuum lance
4
Thermal transfer printer
5
Laminate dispenser
6
Protective housing with safety door
6
5
4 3 2
1
Equipment
Page 10
Label printing & lamination station - Version: 2017-04-01
Page 10
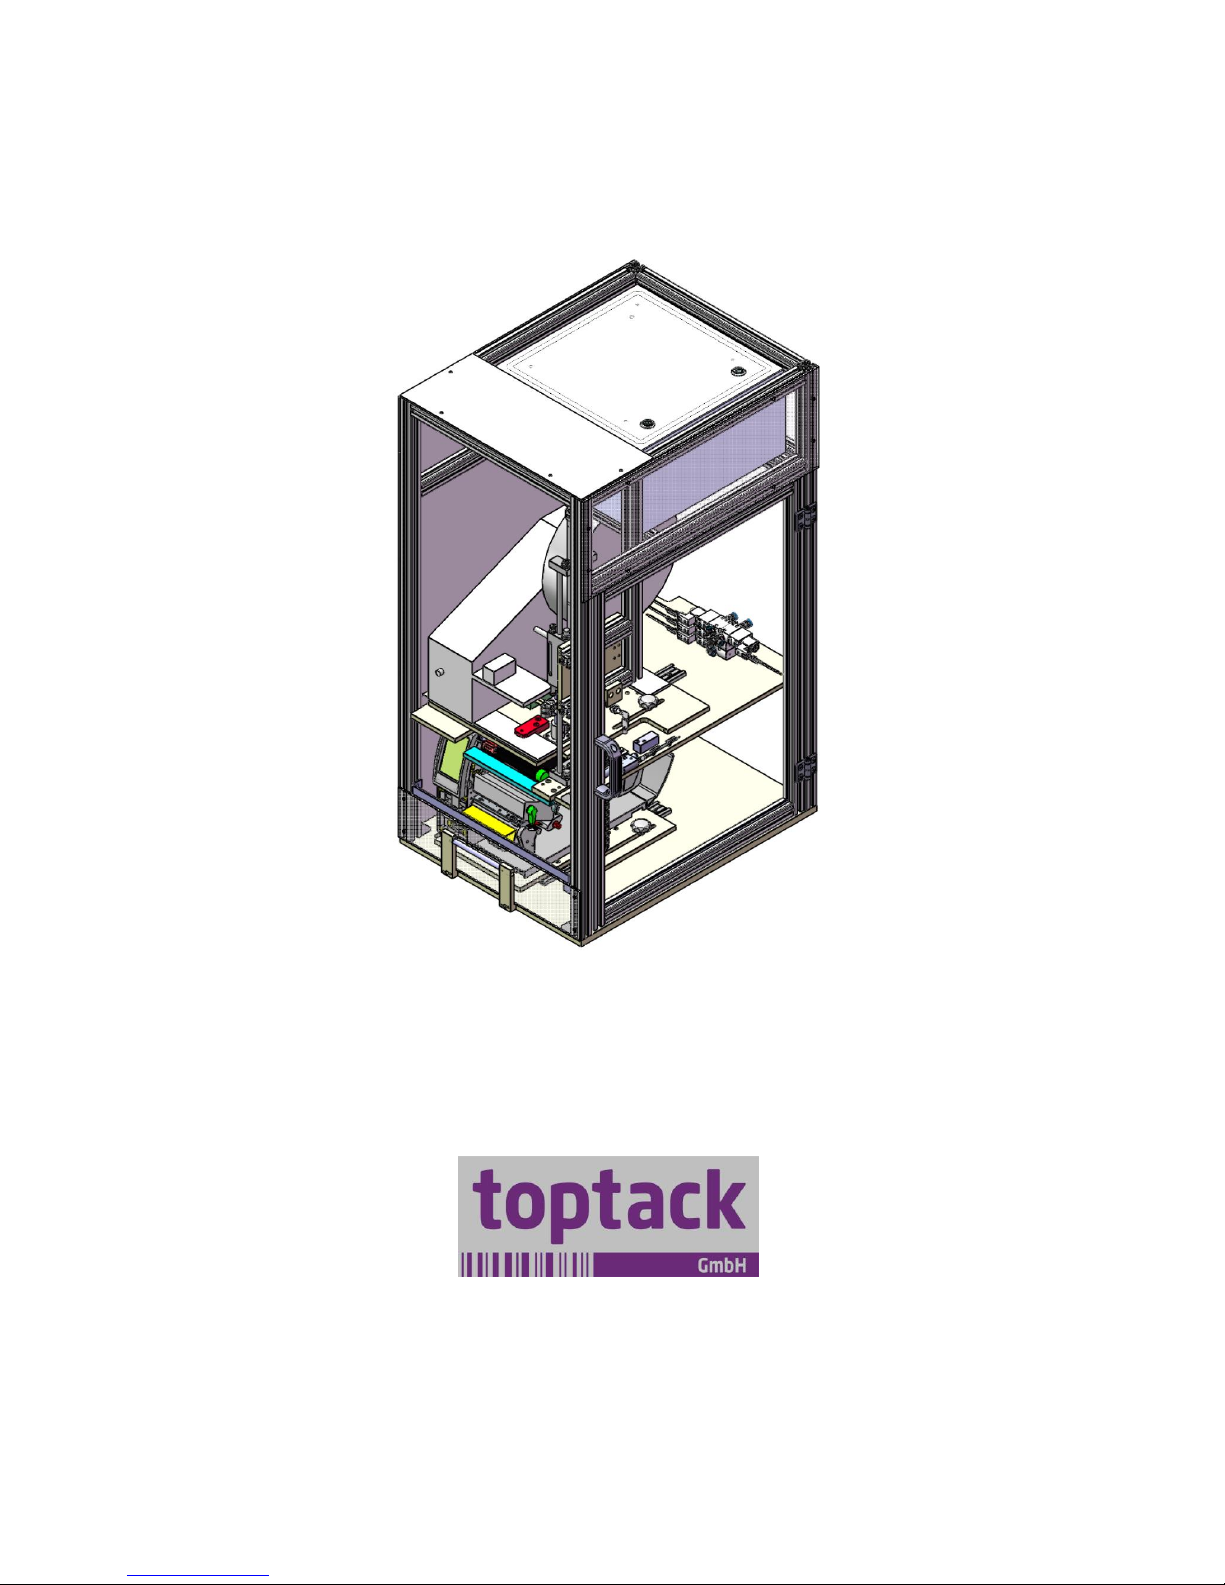
Operating elements with switching cabinet
Figure
Description
The operating elements applied to the machine can be used to
perform the different functions.
For a complete description of the operating elements,
see chapter "Operating elements".
All work on electrical facilities must only be performed
by trained, certified electricians licensed according to
the applicable provisions!
Figure
Description
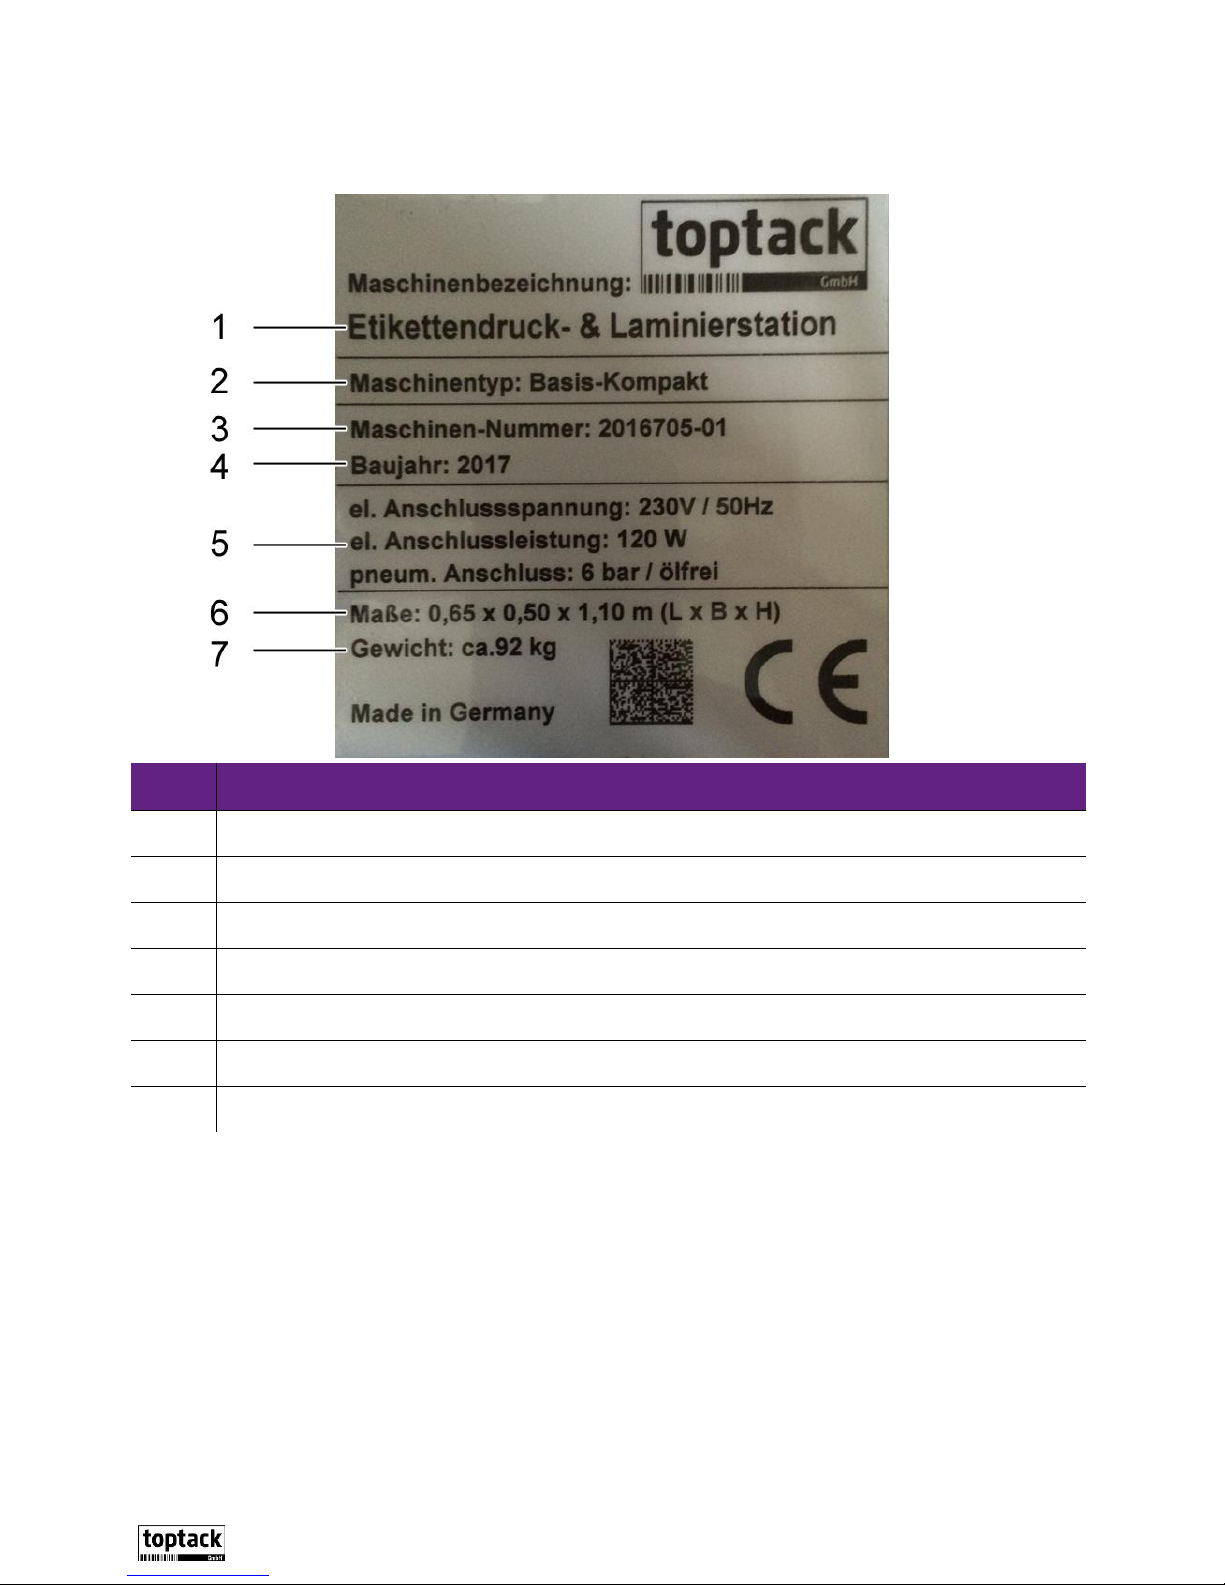
Three electro-pneumatic directional valves are used.
The 5/2 directional valve serves to control the cylinder unit (upand downwards movement of the cylinder).
A 3/2 directional valve is used to control the Venturi nozzle that
generates the vacuum for the vacuum lance (fastening of the
laminate upon movement at the vacuum lance).
A 3/2 directional valve switches the supporting air "on" when
dispensing the laminate, and "off" again after dispensing.
Figure
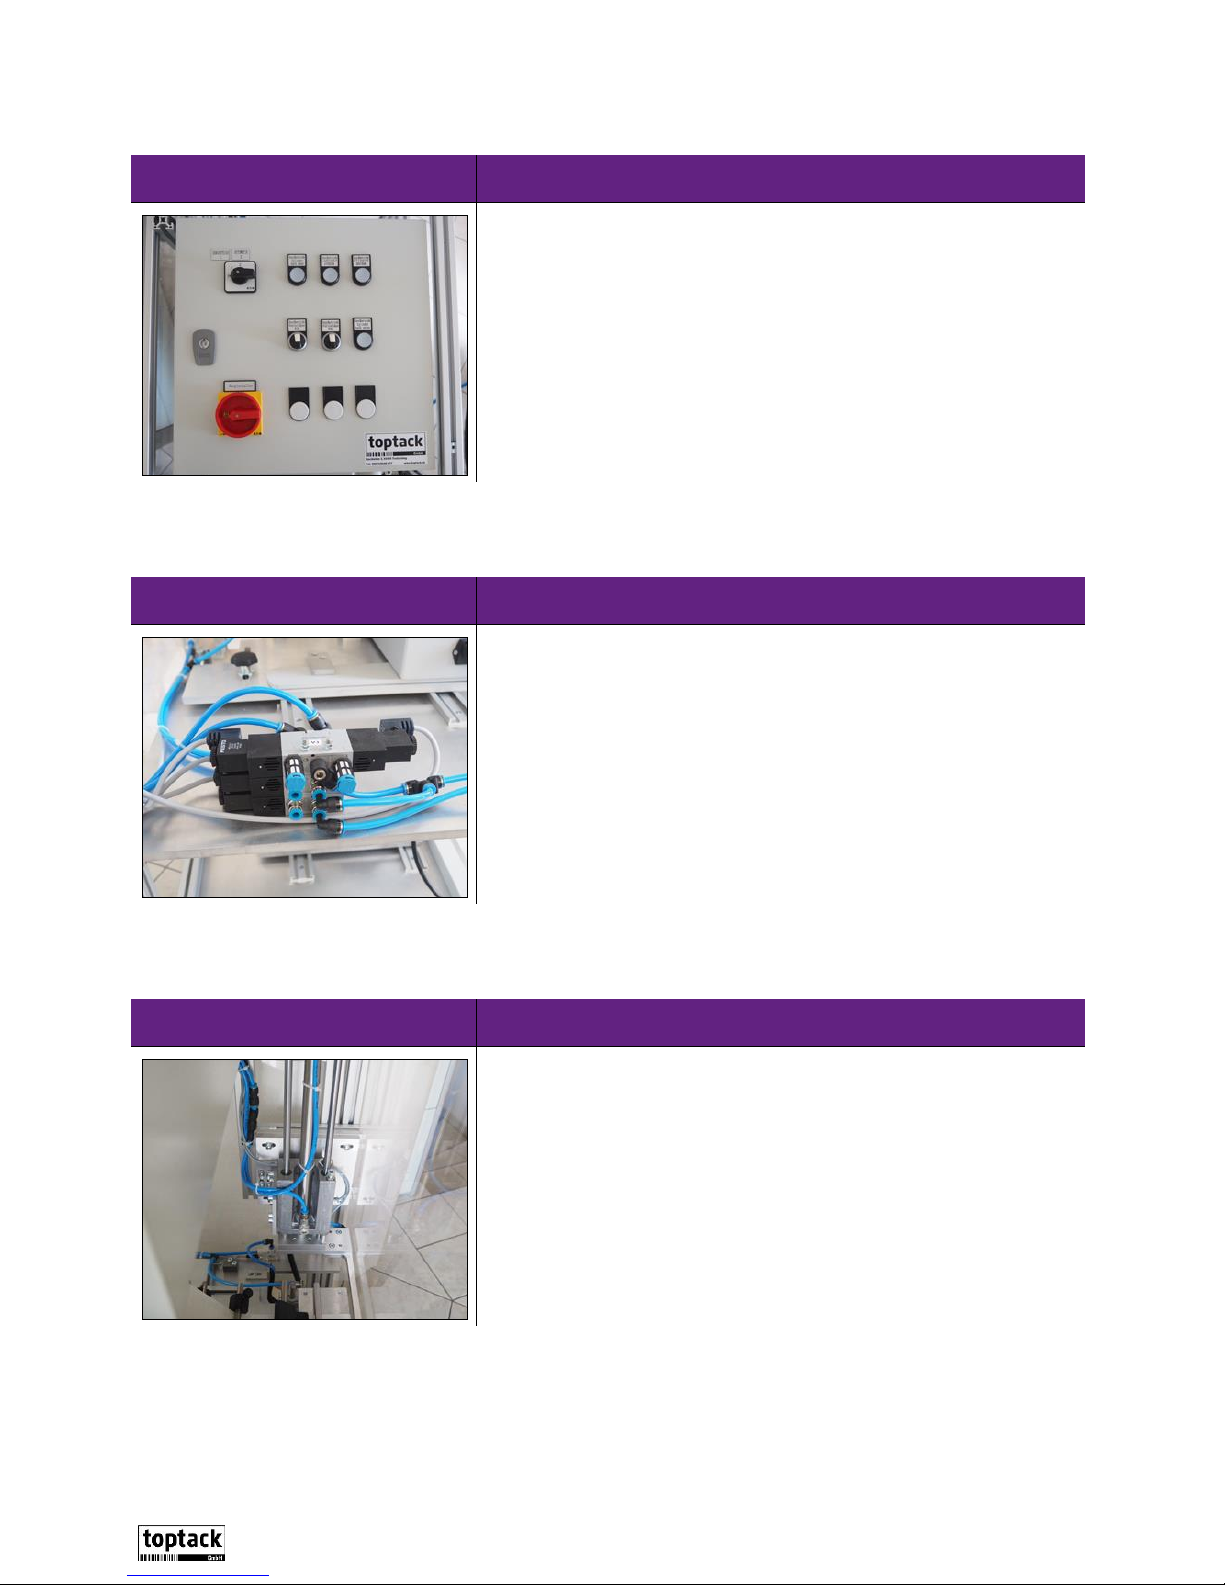
Description
The vacuum lance of the cylinder unit takes the laminate at the
dispenser and presses it onto the printed label. The laminate is
held during the downwards movement by the vacuum of the
lance. After bonding the laminate, the vacuum is turned off and
the lance will move up again.
Pneumatic distributor block
Equipment
Cylinder unit with vacuum lance
Page 11
Label printing & lamination station - Version: 2017-04-01
Page 11
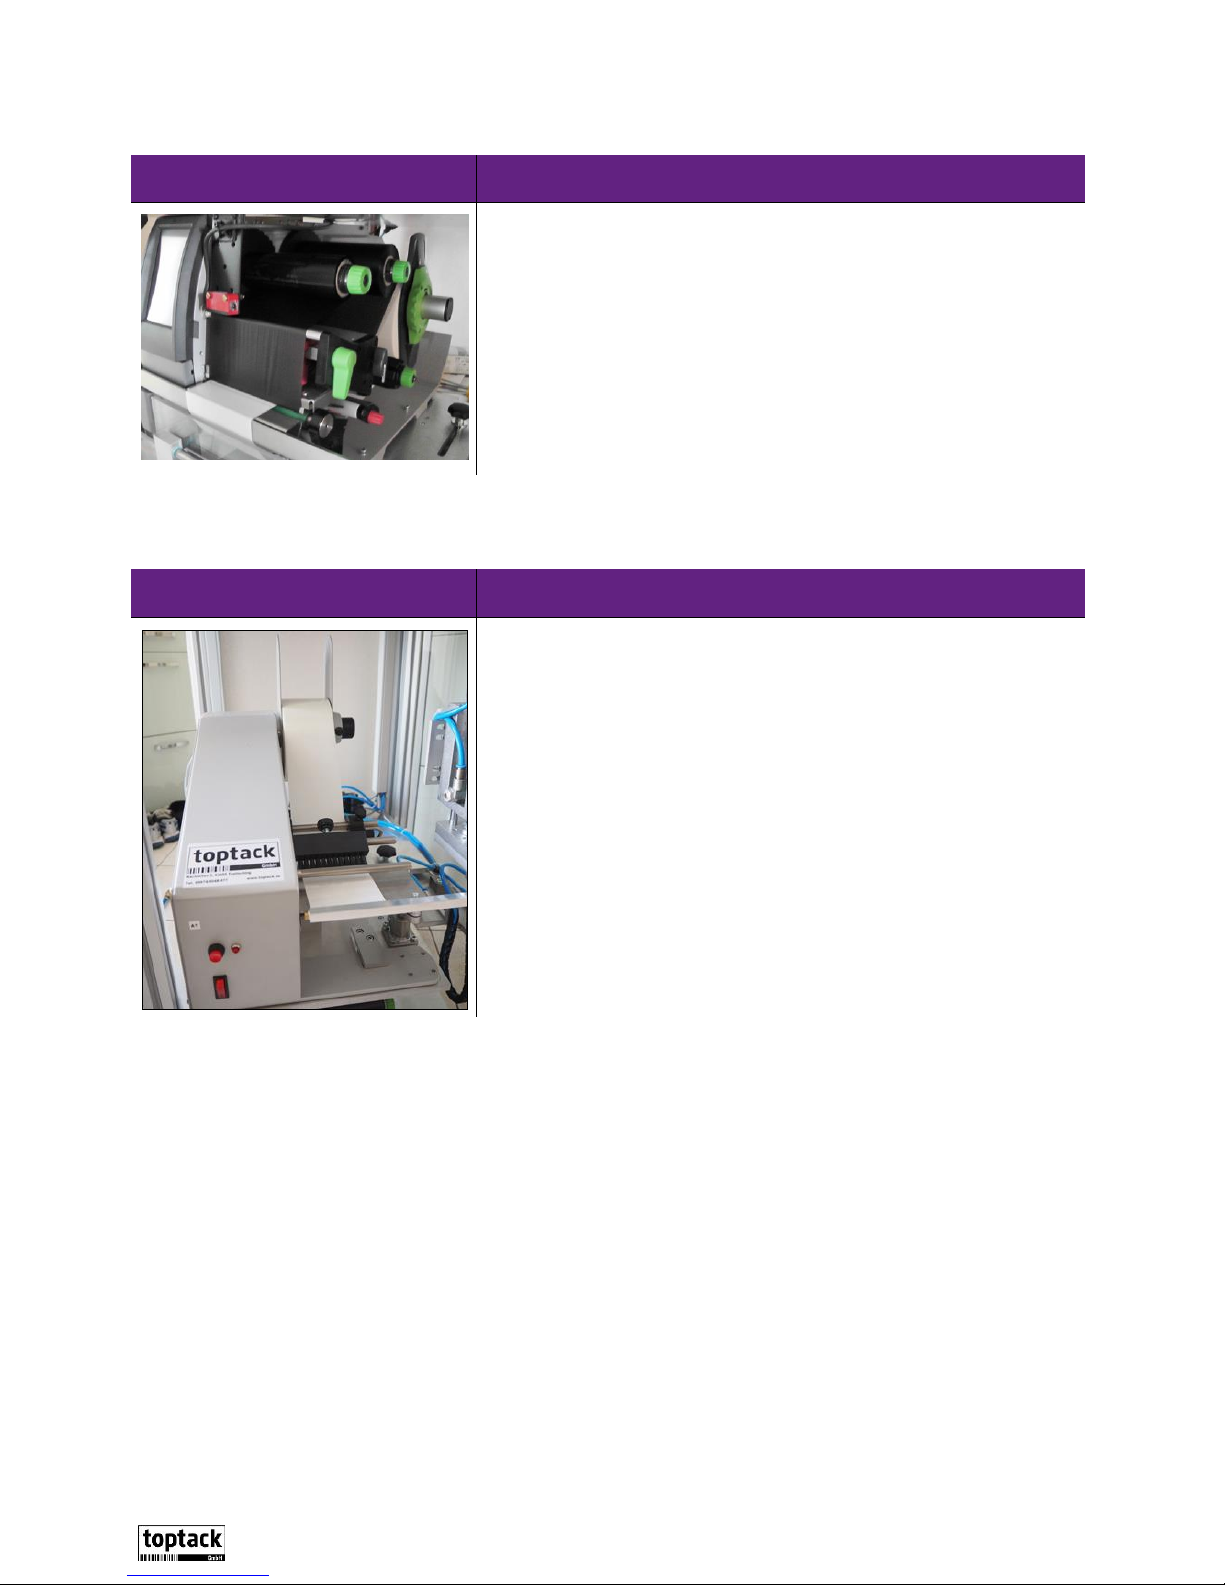
Thermal transfer printer
Figure
Description
Different label layouts can be chosen and printed with the
thermal transfer printer. For each production with internal
memory, the number of pieces to be printed must also be
entered. A memory card that can be plugged in on the rear of the
printer serves as data carrier for the different label layouts. (With
external data connection of the printer, see Appendix 7).
The printer has a coloured touch display. All input and settings at
the printer must be made directly at the display by touching with
a finger.
Figure
Description
The laminate dispenser provides the protective laminate for the
printer labels at the dispensing edge for collection by the vacuum
lance.
Laminate dispenser
Equipment
Page 12
Label printing & lamination station - Version: 2017-04-01
Page 12
Protective housing with safety door
Figure
Description
The protective housing of Plexiglas protects from crushing at the
label printing & lamination station during machine operation.
The safety door must be closed and locked during
production!
Equipment
Page 13

Label printing & lamination station - Version: 2017-04-01
Page 13
Dimensions
View
Top view
Designation
Value
Length (L):
500 mm
Width (B):
650 mm
Height (H):
1,100 mm
Equipment
Page 14

Label printing & lamination station - Version: 2017-04-01
Page 14
Technical data
Designation
Value
Total weight
approx. 92 kg
Recommended working pressure of the pneumatic
system
6 bar
Necessary minimum pressure of the pneumatic
system
4.5 bar
Electrical connection value
230 V AC, 50 - 60 Hz, 120 W
Admissible ambient temperature
min. 10 °C, max. 25 °C
Designation
Property
Laminate
Self-adhesive, as rolled goods
Format:
min. 10 x 10 mm to max. 12 x 100 mm*
Thickness:
Up to max. 0.5 mm
*expansible to 100 x 100 mm (constructional action of the
manufacturer required)
Label material
Self-adhesive with or without glue, as rolled
goods.
Format:
min. 20 x 12 mm up to max. 100 x 100 mm
Thickness:
Up to max. 0.5 mm
Processable materials
Equipment
Page 15

Label printing & lamination station - Version: 2017-04-01
Page 15
SAFETY
General safety notes
The delivered machine corresponds to the state of the art and is operationally safe. This
machine may pose dangers if it is used by untrained staff, improperly or in a non-intended
manner.
The machine must only be taken into operation by trained staff.
Intended use also includes compliance with the operating and maintenance instructions.
In order to avoid injury, conversions or changes at the machine are only permitted with
express written release from toptack GmbH.
Operator's obligations
The staff must be able to access the operating instructions at any time.
Safety
Every person who is charged with operation and maintenance of this machine in the
user's company must read and understand the entire documentation, and specifically
the safety notes.
No working method is permitted that would impair or endanger the safety of man and
material.
The operator must ensure cleanliness and a good overview of the workplace.
The operator must keep all safety and danger notes attached to the machine in a legible
condition and replace them if necessary.
The operator must ensure that the staff wear approved and tested personal protection
equipment.
The operator must ensure that only such staff work at the machine who meet the
requirements listed in the following sections and who have the required qualifications.
Page 16

Label printing & lamination station - Version: 2017-04-01
Page 16
Obligations of the operating and maintenance staff
Every person who is charged with operation and maintenance of this machine must read
and understand the entire operating manual.
The operating staff must report any unknown or unusual sounds and operating
conditions of the machine that occur to their supervisory at once.
The effectiveness of operating and adjustment parts must not be impaired or influenced.
Before starting any work on the machine, observe the following provisions:
o Do not wear loosely hanging clothing!
o Cover long hair with a hair net!
o Take off loose jewellery, rings and other personal objects that may be caught by
the machine!
Protective devices must only be removed for maintenance purposes:
o At machine standstill,
o with the main switch turned off and secured against unauthorised reactivation.
Before activation of the machine after maintenance work, check that all safety devices
have been properly attached or closed and are fully functional,
Safety
Regionally applicable safety and accident prevention provisions must be observed.
Page 17

Label printing & lamination station - Version: 2017-04-01
Page 17
Residual dangers
Electrical dangers
Danger to life from contact with parts that are subject to high electrical voltage!
Observe warning notes on control cabinet doors and operating panels!
Disconnect the power supply before conducting any maintenance work!
All work must only be performed by trained, certified electricians licensed
according to the applicable provisions!
Danger of crushing
Danger of crushing injury at the label printing & lamination station!
Before activating the station, ensure that the safety door is closed and the lock
locked! The key must be worn "on the person".
Danger of tripping and slipping
Observe all edges, attachment and lines in the machine area.
Remove contamination on the floor (e.g. waste) at once in order to avoid
tripping and slipping hazards!
Wear personal protection equipment
The staff must wear personal protection equipment when operating and working on
the label printing & lamination station:
Wear close-fitting work clothing and a safety hood.
Additionally observe the current operational provisions.
Safety
Personal protection equipment
Page 18

Label printing & lamination station - Version: 2017-04-01
Page 18
Safety devices
Figure
How
Main switch with emergency off function (type B)
Switches the entire power supply of the label printing &
lamination station on or off. The facility cannot be operated in
the deactivated condition.
Disassembly, damage or decommissioning of the main
switch are forbidden!
Perform a visual inspection for proper condition and
inspection of the function at least once per year and
after any maintenance work!
Control cabinet (type A)
Protects from electric shock at electrical facility.
Operation of the label printing & lamination station with
the control cabinet doors open is forbidden!
Access to the control cabinet is only permitted to
electrical specialists!
Disassembly, damage, decommissioning of the control
cabinet are forbidden!
Perform a visual inspection for proper condition at least
once per year and after any maintenance work!
Protective housing of Plexiglas (type A)
Protects from crushing injury at the label printing & lamination
station.
The station must not be operated with the protective
housing disassembled or defective!
Disassembly, damage or decommissioning of the
protective housing are forbidden!
Perform a visual inspection for proper condition at least
once per year and after any maintenance work!
Type of safety devices:
Type A: Separating safety device
Type B: Non-separating safety device
Type C: Deflecting safety device
Safety
Page 19

Label printing & lamination station - Version: 2017-04-01
Page 19
OPERATING ELEMENTS
No.
Function
1
Main switch with EMERGENCY OFF function.
Switches the entire power supply of the label printing & lamination station on or off. The
machines cannot be turned on in the OFF position.
The main switch must be turned off before any work (e.g. maintenance, repair,
troubleshooting, etc.) and secured against unauthorised reactivation with a padlock.
2
Setting the operating mode at the label printing & lamination station:
0 = No operating mode
1 = Operating mode manual mode (operating elements no. 3 - no. 8 active)
2 = Operating mode automatic (controlled production)
Operating elements at the control cabinet
Operating elements
Page 20

Operating elements
Label printing & lamination station - Version: 2017-04-01
Page 20
No.
Function
3
Pushbutton, manual mode: Printing label.
Note: Function of the pushbutton only in operating mode "Manual mode" (no. 2).
4
Pushbutton, manual mode: Infeed laminate dispensing.
Note: Function of the pushbutton only in operating mode "Manual mode" (no. 2).
5
Pushbutton, manual mode: Moves the cylinder up.
Note: Function of the pushbutton only in operating mode "Manual mode" (no. 2).
6
Pushbutton, manual mode: Moves the cylinder down.
Note: Function of the pushbutton only in operating mode "Manual mode" (no. 2).
7
Latching switch, manual mode: Supporting air "on" / "off".
Note: Function of the latching switch only in operating mode "Manual mode" (no. 2).
8
Latching switch, manual mode: Vacuum "on" / "off".
Note: Function of the latching switch only in operating mode "Manual mode" (no. 2).
Page 21
Label printing & lamination station - Version: 2017-04-01
Page 21
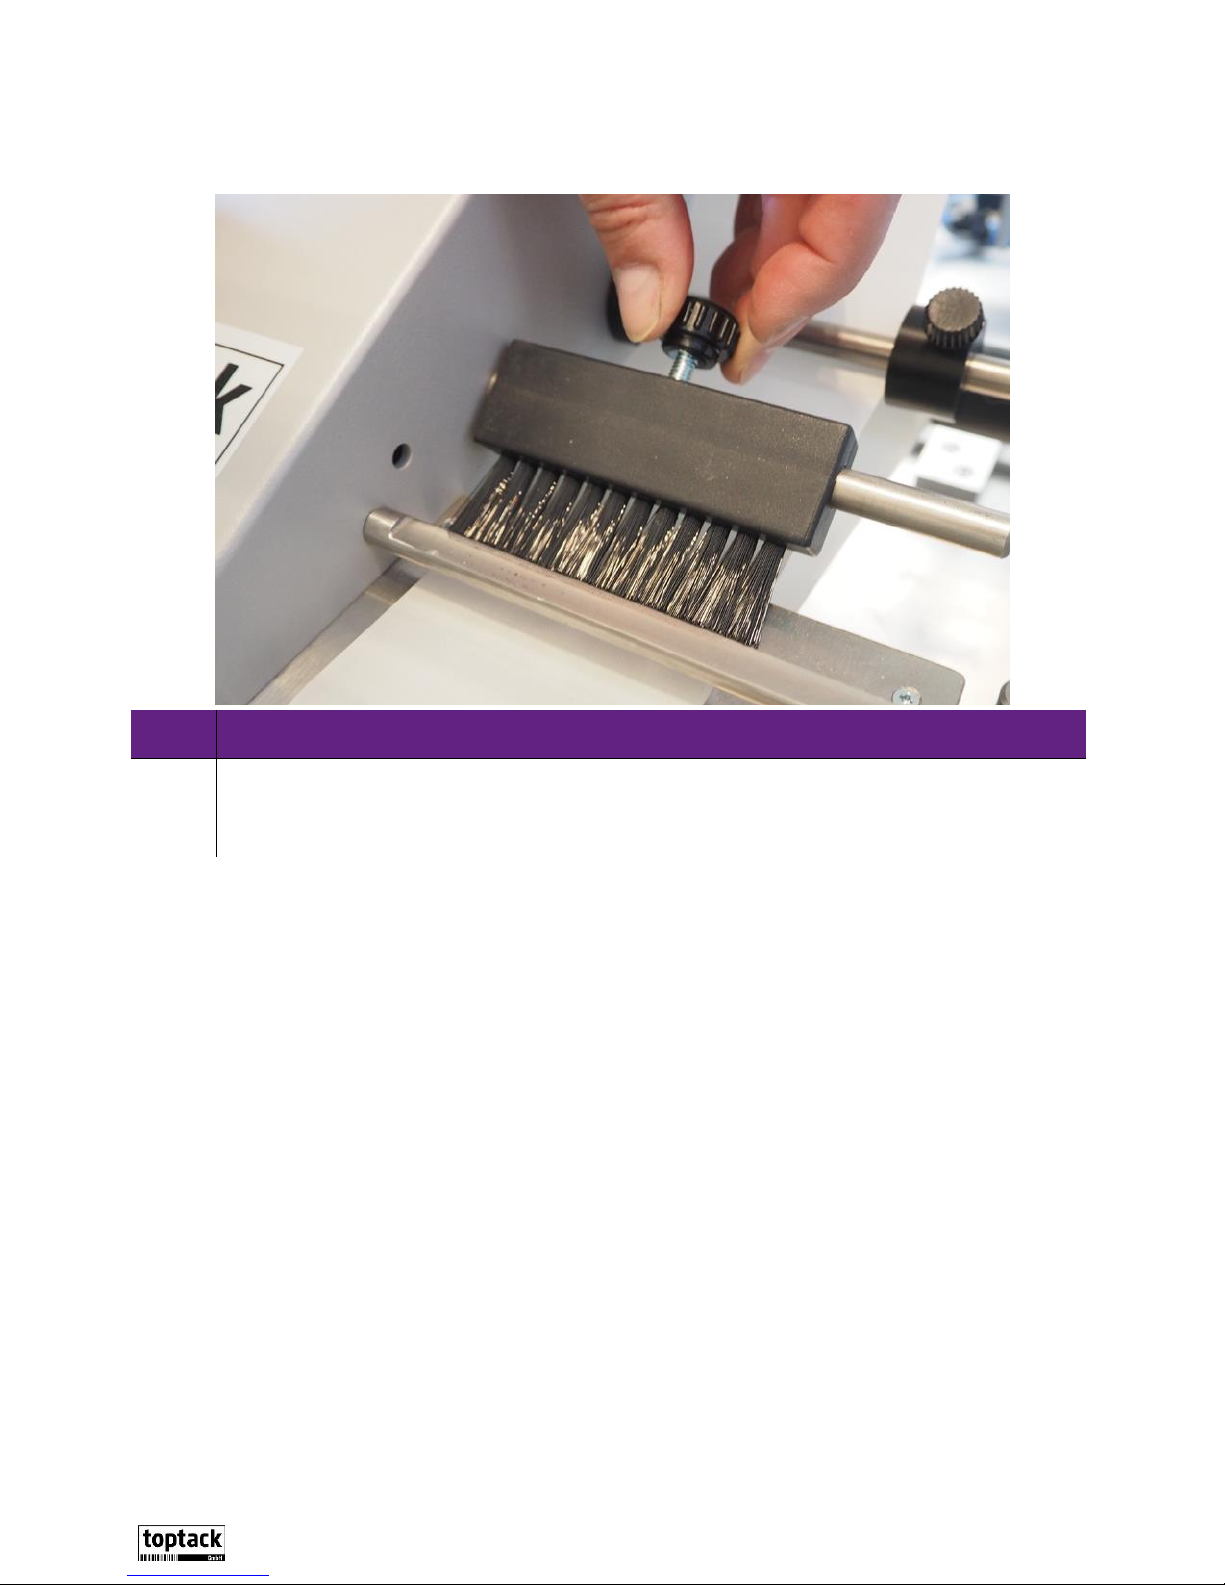
Brush at the laminate dispenser
No.
Function
1
The brush produces a lane tension and thus ensures a controlled production of the laminate
dispenser. The lane tension can be adjusted by releasing the knurled screw and increasing or
reducing the brush pressure on the material lane.
Operating elements
Page 22

Label printing & lamination station - Version: 2017-04-01
Page 22
Operating elements at the laminate dispenser
No.
Function
1
Turning the laminate dispenser on or off.
2
Activating permanent operation or confirming fault.
3
LED fault: Lights up in case of a fault at the laminate dispenser.
Operating elements
Page 23

Label printing & lamination station - Version: 2017-04-01
Page 23
OPERATING PROCESSES
Danger of injury from turning on of the label printing & lamination station!
Before activating the label printing & lamination station, ensure:
That no persons are working in the danger area!
That all safety devices are ready for operation or closed!
That no loose foreign bodies are present within the label printing & lamination
station!
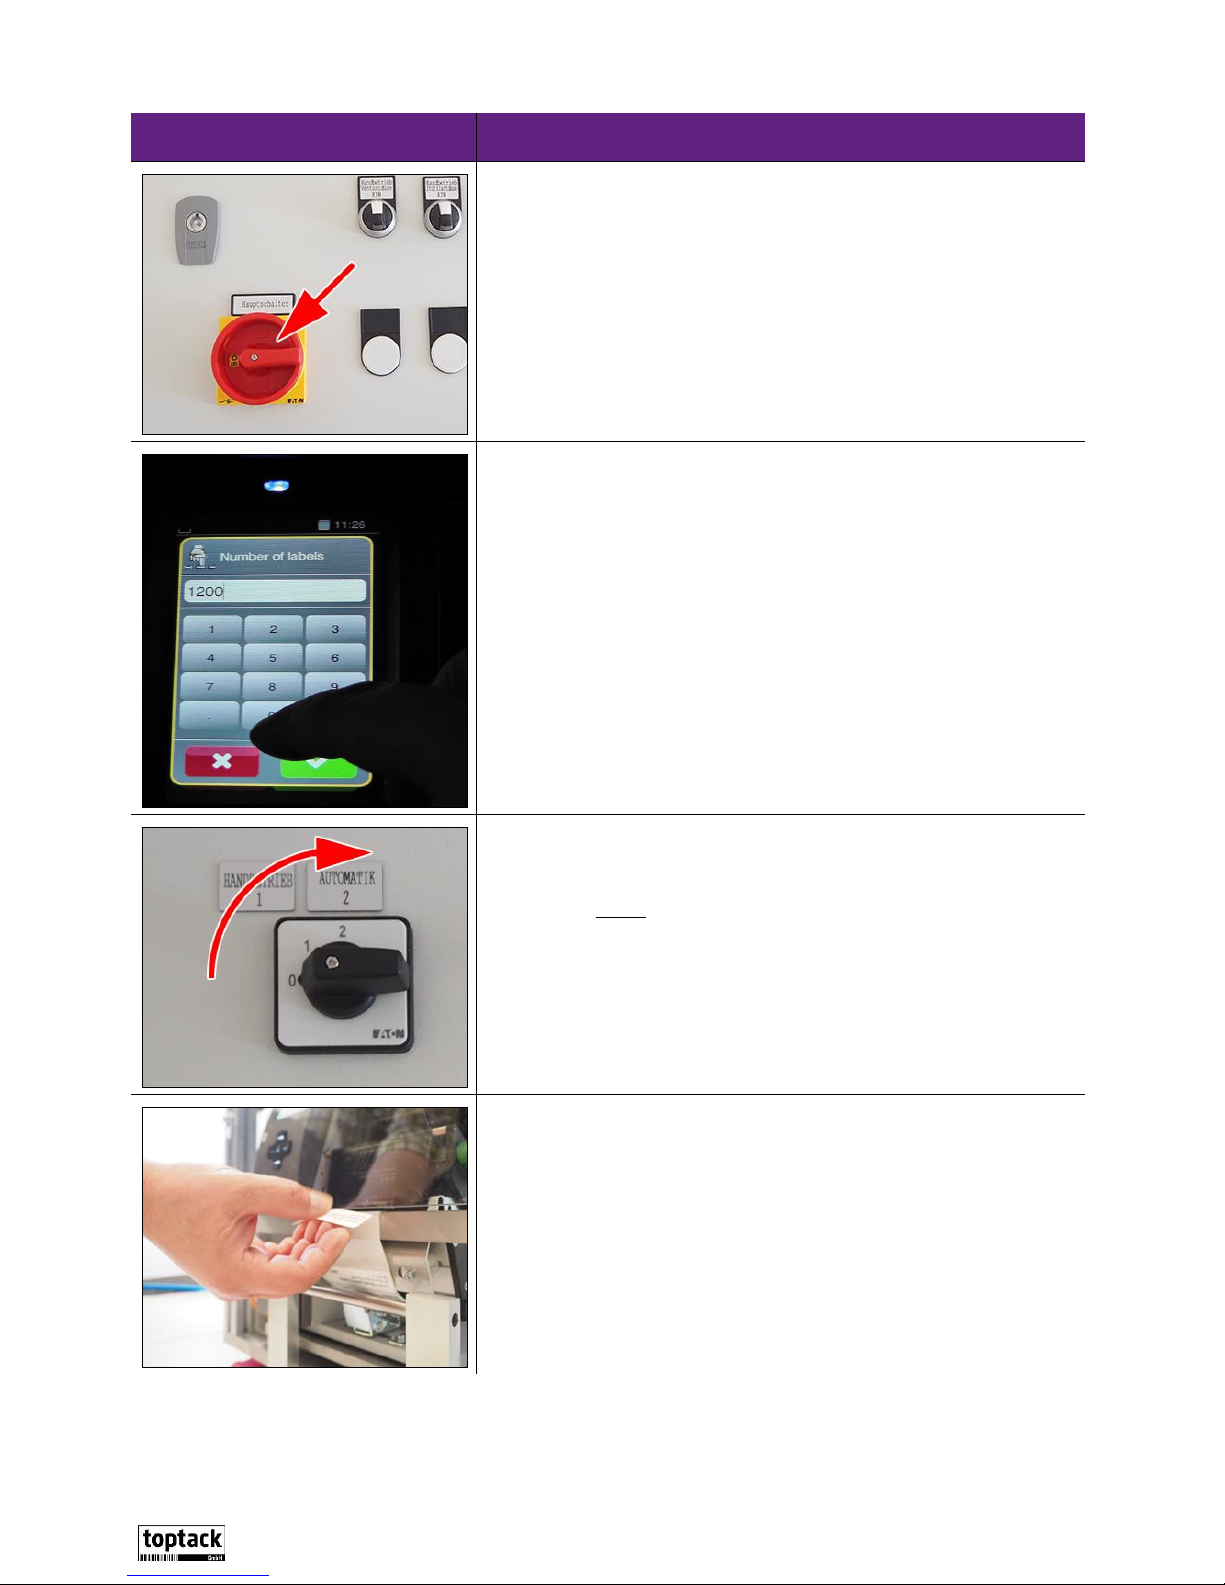
Figure
How
1. Before activation of the main switch at the label printing &
lamination station, ensure that the thermal transfer printer
and the laminate dispenser are on and ready for operation.
2. Before activating of the main switch at the label printing &
lamination station, ensure that the safety door is closed and
the lock locked! The key must be worn "on the person".
3. Before activation of the main switch at the label printing &
lamination station, turn on the compressed air and check it.
Turning on the label printing & lamination station
Operating processes
Page 24
Operating processes
Label printing & lamination station - Version: 2017-04-01
Page 24
Figure
How
4. Turn on the main switch of the label printing & lamination
station.
For external data connection of the printer, see Appendix 7
to the operating instructions:
> Controlling the printer via an external computer <
5. Select the required label layout at the printer and load it; see
work description "Loading the printer label (layout) and
specifying the piece number".
6. Specify the required label layout at the printer
see work description "Loading the printer label (layout) and
specifying the piece number".
7. Start automatic mode of the main switch of the label printing
& lamination station.
Note: For this, turn the swivel switch to position "2 -
Automatic".
The label printing & lamination station is now
running in automatic mode. The pre-set printer label
(layout) is produced in the required piece number
and provided with laminate.
8. The laminated labels must be manually removed at the
output slot.
Page 25

Operating processes
Label printing & lamination station - Version: 2017-04-01
Page 25
Figure
How
1. After activation of the label printing & lamination station, the
required printer label (layout) must be loaded and the piece
number to be produced must be specified*.
* When controlling the printer with data from a network or
an external computer, see Appendix 7 to the operating
instructions:
> External data connection of the printer <
2. Push the symbol with the "gear" 1x.
Loading the printer label (layout) and specifying the piece number
Different printer labels (layouts) can be printed with the thermal transfer printer. For every
production, a piece number must be set as well. A memory card that can be plugged in on the
rear of the printer serves as data carrier for the different printer labels (layouts). However, print
data and quantity can also be sent from an external computer to the printer (see appendix 7 to
the operating instructions > External data connection of the printer <).
Page 26

Operating processes
Label printing & lamination station - Version: 2017-04-01
Page 26
Figure
How
3. Push the symbol with the designation "storage" 1x in order
to select the inserted memory card at the rear of the printer.
4. Push the symbol line "Load label" 1x in order to get to the
table of the layout selection on the memory card.
5. Select the desired printer label manually (touch) in the
display line from the displayed overview of all stored printer
labels (layouts). The selected printer label is displayed with a
yellow background.
Only one printer label can be selected. The selection can be
changed after the first selection by touching another line or a
displayed printer label.
Page 27

Label printing & lamination station - Version: 2017-04-01
Page 27
Figure
How
6. Confirm the label selection. After selection of the desired
printer labels, confirm your selection by pushing the green
"OK" symbol 1x.
7. Set the label piece number.
Note: The input value has 5 digits; up to 99,999 labels
can be entered and printed in one production run.
The number of labels to be printed must be entered
via the display keyboard. Wrong inputs can be
deleted by pushing the red "X". The value can be
entered anew then.
8. Confirm the label piece number. After entering the number
of the labels to be printed, confirm your input by pushing the
green "OK" symbol 1x.
Operating processes
Page 28

Operating processes
Label printing & lamination station - Version: 2017-04-01
Page 28
Figure
How
9. Starting production; see work description "Turning on the
label printing & lamination station".
Page 29

Label printing & lamination station - Version: 2017-04-01
Page 29
Turning off the label printing & lamination station
Figure
How
1. Take the last printed and laminated labels from the output
manually.
2. End automatic mode of the main switch of the label printing
& lamination station.
Note: For this, turn the swivel switch to position "0 -
Off".
3. Turn off the main switch of the label printing & lamination
station and secure it against reactivation with the locked
padlock; remove the key.
4. Turn off the operating air pressure.
Operating processes
Page 30

Label printing & lamination station - Version: 2017-04-01
Page 30
Reset emergency off
Danger of severe injury from movement of the label printing & lamination station!
Before resetting the emergency off at the label printing & lamination station,
ensure:
That no persons are working in the danger area!
That all safety devices are ready for operation or closed!
That no loose foreign bodies are present within the label printing & lamination
station!
Figure
How
1. The label printing & lamination station is equipped with a
main switch with EMERGENCY OFF function.
Note: In case of danger, deactivate the main switch
with the EMERGENCY OFF function!
Confirmation of the EMERGENCY OFF function is not
necessary (see work description "Activation
sequence").
Operating processes
Page 31

Maintenance
Label printing & lamination station - Version: 2017-04-01
Page 31
Danger of severe injury from movement of the label printing & lamination station!
All maintenance work must be performed with the machine turned off!
During maintenance work that requires movements at the machine
components, the machine must be switched into manual mode!
MAINTENANCE
Maintenance work may be performed by operating and maintenance staff. The maintenance
plan specifies who is allowed to perform what work.
Operating staff are staff who:
are authorised by the operator,
may only perform operating work and simple maintenance measures,
must have been instructed by toptack GmbH or the operator.
Maintenance staff are staff who:
are authorised by the operator,
may perform further maintenance work,
Is trained by toptack GmbH for the respective work or, as far as required, or trained,
certified and licensed for this work according to the regionally applicable provisions.
All maintenance work must be performed in a timely and binding manner. In order to permit
evidence of this, the operator of the label printing & lamination station should maintain a
maintenance booklet in which the maintenance work performed is listed. Indications on the
type of work and the execution responsibility with the execution time complete the
maintenance booklet.
The maintenance booklet can supply toptack GmbH with important notes for continuous
improvement of the machine quality.
The maintenance evidence must be kept clearly visible and accessible to the staff close to the
machine and protected from dirt together with the maintenance plan.
Page 32

Label printing & lamination station - Version: 2017-04-01
Page 32
Maintenance plan
Figure
Interval / Who
How
Before production and on
demand.
To be performed by:
Operating staff
General control of the facility
and all components for
proper condition and poss.
cleaning (do not use any
compressed air).
Before production and on
demand.
To be performed by:
• Maintenance staff
The light beam of the laser
control button "B4" must hit
the label gap in focus when
the printer stands still. The
integrated LED display of the
laser button must be
permanently lit "green".
Before production and on
demand.
To be performed by:
• Maintenance staff
If the light beam of the laser
control button "B4" hits the
label surface, the LED display
of the laser button must be
lit "yellow".
When printing each label, the
LED display of the laser
button "B4" must switch
from "green" to "yellow" and
back to "green".
Calibrate the laser control
button "B4", see "annex 1" of
this manual
Laser control button
Maintenance
Page 33
Maintenance
Label printing & lamination station - Version: 2017-04-01
Page 33
Figure
Interval / Who
How
Continually during production.
To be performed by:
Operating staff
Check the printing result and
application of the protective
laminate.
Before production and at least 1x
week.
To be performed by:
Operating staff
Clean the brush of adhesive
residues and replace the
brush if necessary.
Before production and at least 1x
week.
To be performed by:
Maintenance staff
Clean the thermal transfer
printer, see work description:
"Clean thermal transfer
printer"
When the label, protective
laminate material or ink ribbon
have been used up.
To be performed by:
Operating staff
Replace the rolls of the label,
protective laminate material
or ink ribbon; see work
descriptions:
"Replacing the roll of
protective laminate at the
laminate dispenser"
"Replacing the label roll"
"Replacing the ink ribbon
roll"
Page 34
Maintenance work
Label printing & lamination station - Version: 2017-04-01
Page 34
Figure
How
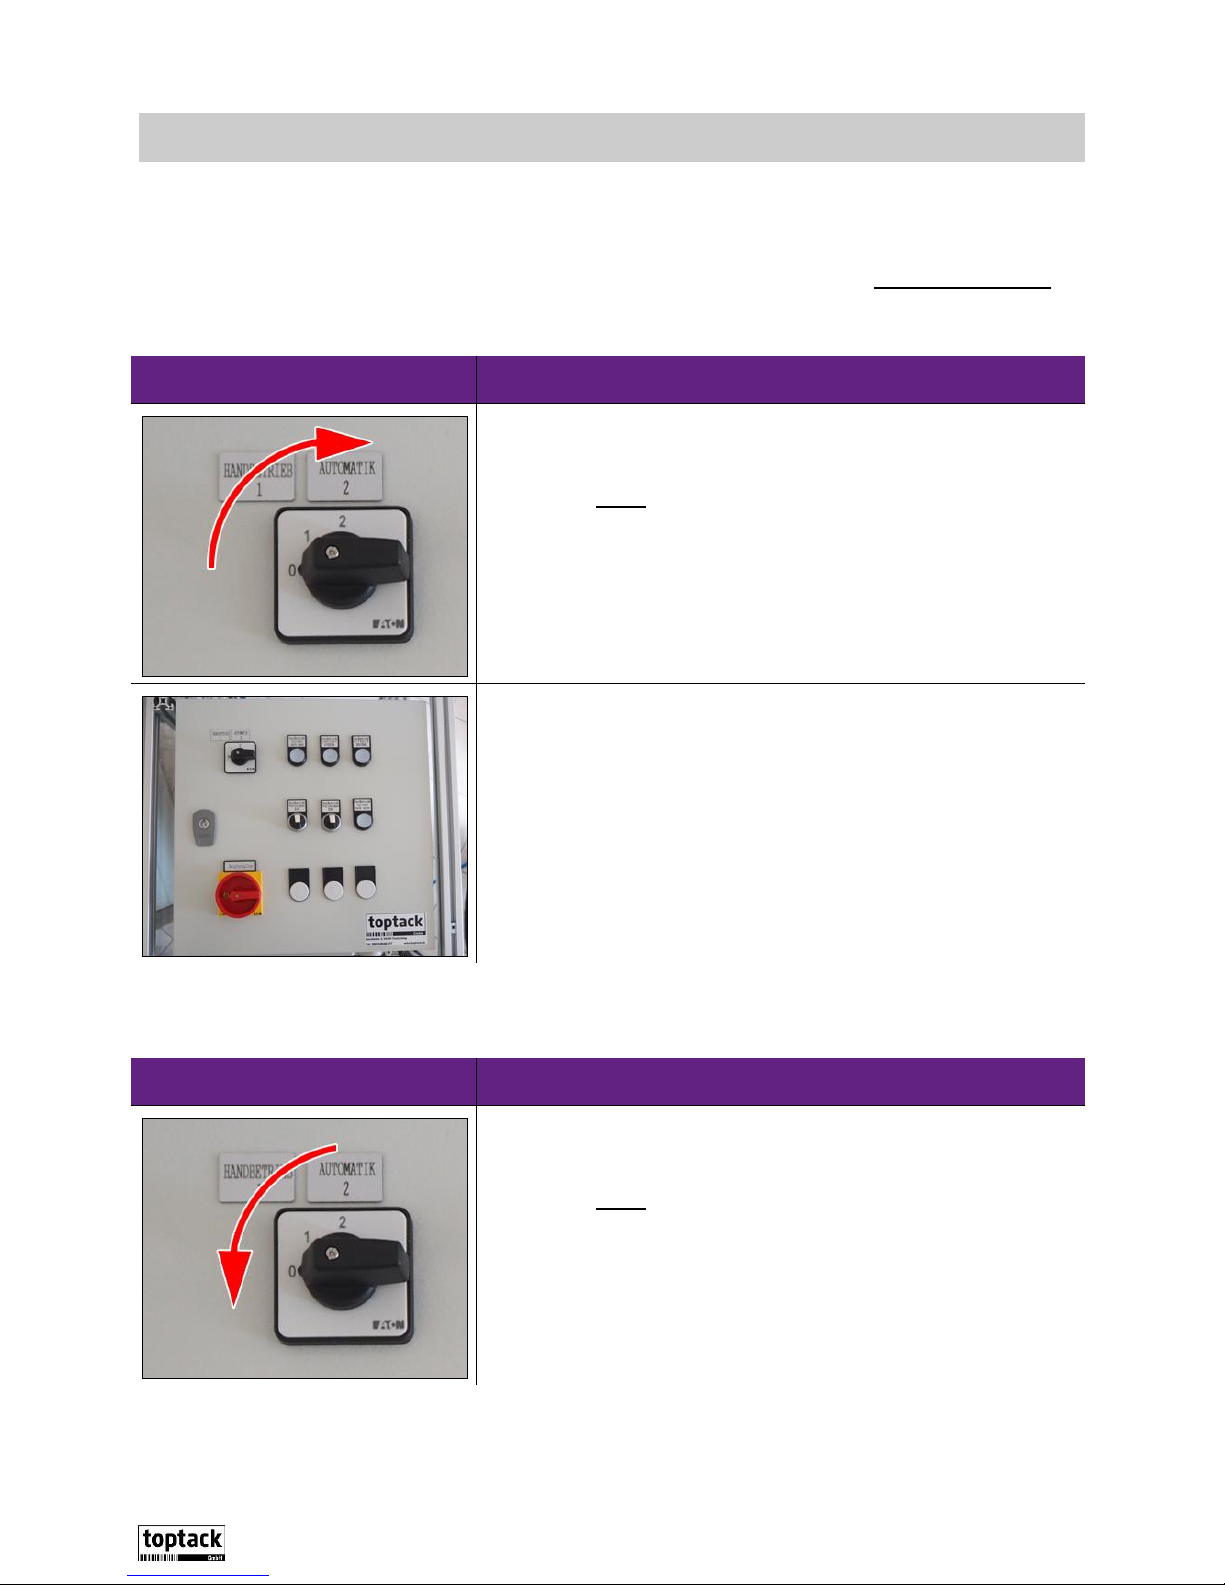
1. Activating manual mode of the main switch of the label
printing & lamination station.
Note: For this, turn the swivel switch to position "1 -
Manual mode".
2. The label printing & lamination station is now running in
manual mode. The individual machine components can be
operated with the operating elements.
Figure
How
1. Ending manual mode of the main switch of the label printing
& lamination station.
Note: For this, turn the swivel switch to position "0 -
Off".
MAINTENANCE WORK
Activate or deactivate manual mode
Maintenance work that requires manual mode must only be performed by maintenance staff.
Activating manual mode
Deactivating manual mode
Page 35

Maintenance work
Label printing & lamination station - Version: 2017-04-01
Page 35
Danger of crushing injury at the label printing & lamination station!
Before replacing the protective laminate roll, turn off the main switch of the
station and secure it against reactivation!
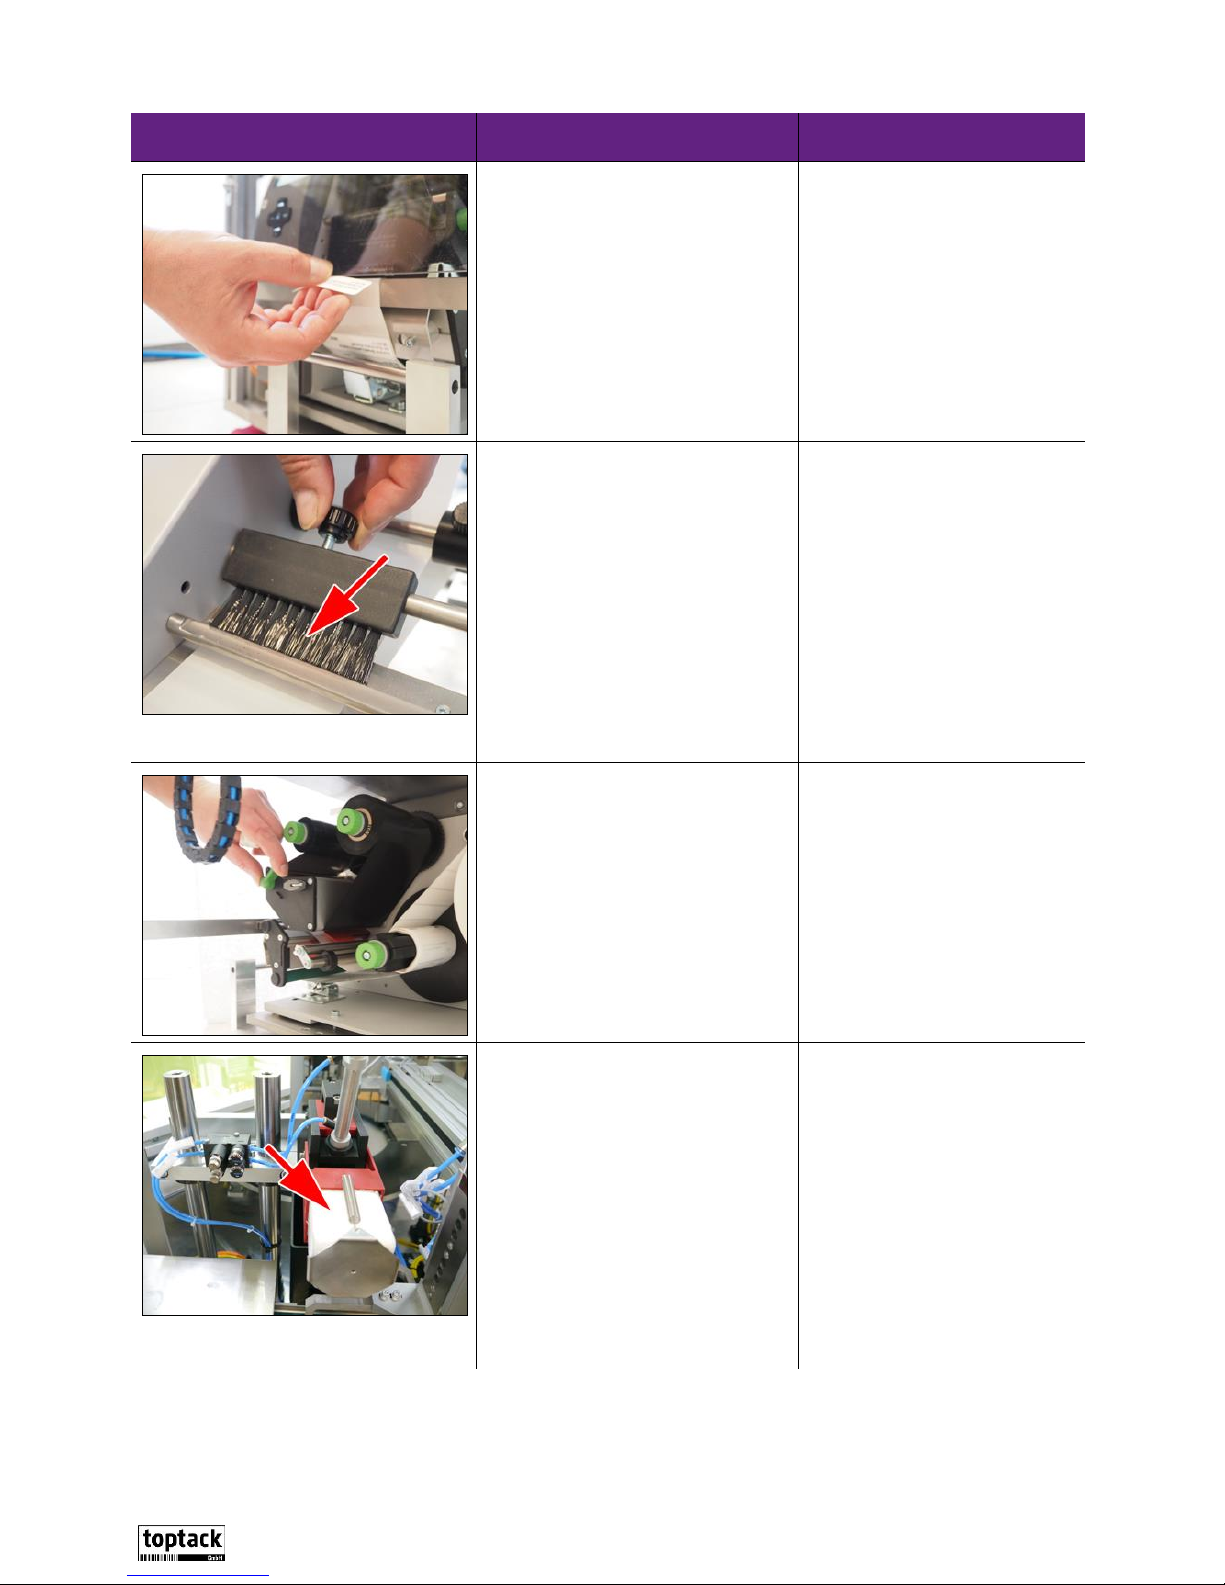
Figure
How
1. Remove the front safety wing, remove the laminate roll no
longer needed or the remaining material from the dispenser.
2. Insert a new laminate roll.
3. Push the wing onto the axis and fasten it.
4. Guide the laminate band through under the deflection and
set the lateral guides.
5. Guide the laminate band through under the brake brush.
Fasten the brake brush so that a light pressure onto the band
from above occurs.
6. Guide the laminate band around the dispensing edge.
7. If necessary, remove any release paper already present from
the shaft of the rolling shaft by pulling out the fastening pin.
8. Sling the release paper around the rolling shaft and clamp it
to the rolling shaft with a fastening pin.
Replacing the roll of protective laminate at the laminate dispenser
Page 36

Label printing & lamination station - Version: 2017-04-01
Page 36
Replacing the label roll at the thermal transfer printer
Danger of crushing injury at the label printing & lamination station!
Before replacing the label roll, turn off the main switch of the station and
secure it against reactivation!
Figure
How
1. Open the flap of the printing head. Pull the lever (green) up;
the printing head opens.
2. Remove the safety wing. For this, open the fastening (green
disc) by turning it to the left and then remove the safety wing
from the shaft.
3. Remove the roll that is no longer needed. Cut or separate the
carrier band if necessary and remove any present residual
material (carrier band) from the printer. Remove wound
carrier band from the winding shaft.
Maintenance work
Page 37

Maintenance work
Label printing & lamination station - Version: 2017-04-01
Page 37
Figure
How
4. Push the new label roll onto the shaft.
5. Push the safety wing onto the shaft and fasten it on the shaft
by turning the fastening (green disc) to the right.
6. Pull the label band off the roll, guide it through under the
deflection shaft and under the printing head.
7. Guide the label band over the front label dispensing edge.
Page 38

Maintenance work
Label printing & lamination station - Version: 2017-04-01
Page 38
Figure
How
8. Guide the label band back under the label dispensing edge
towards the winding shaft of the printer.
9. Guide the label band clockwise under the holding bracket to
the winding shaft.
10. After turning the winding shaft clockwise, wind up the label
band until it is slightly tensed.
11. Close the printing head by pushing the lever (green) down.
Page 39

Label printing & lamination station - Version: 2017-04-01
Page 39
Replacing the ink ribbon at the thermal transfer printer
Danger of crushing injury at the label printing & lamination station!
Before replacing the ink ribbon, turn off the main switch of the station and
secure it against reactivation!
Figure
How
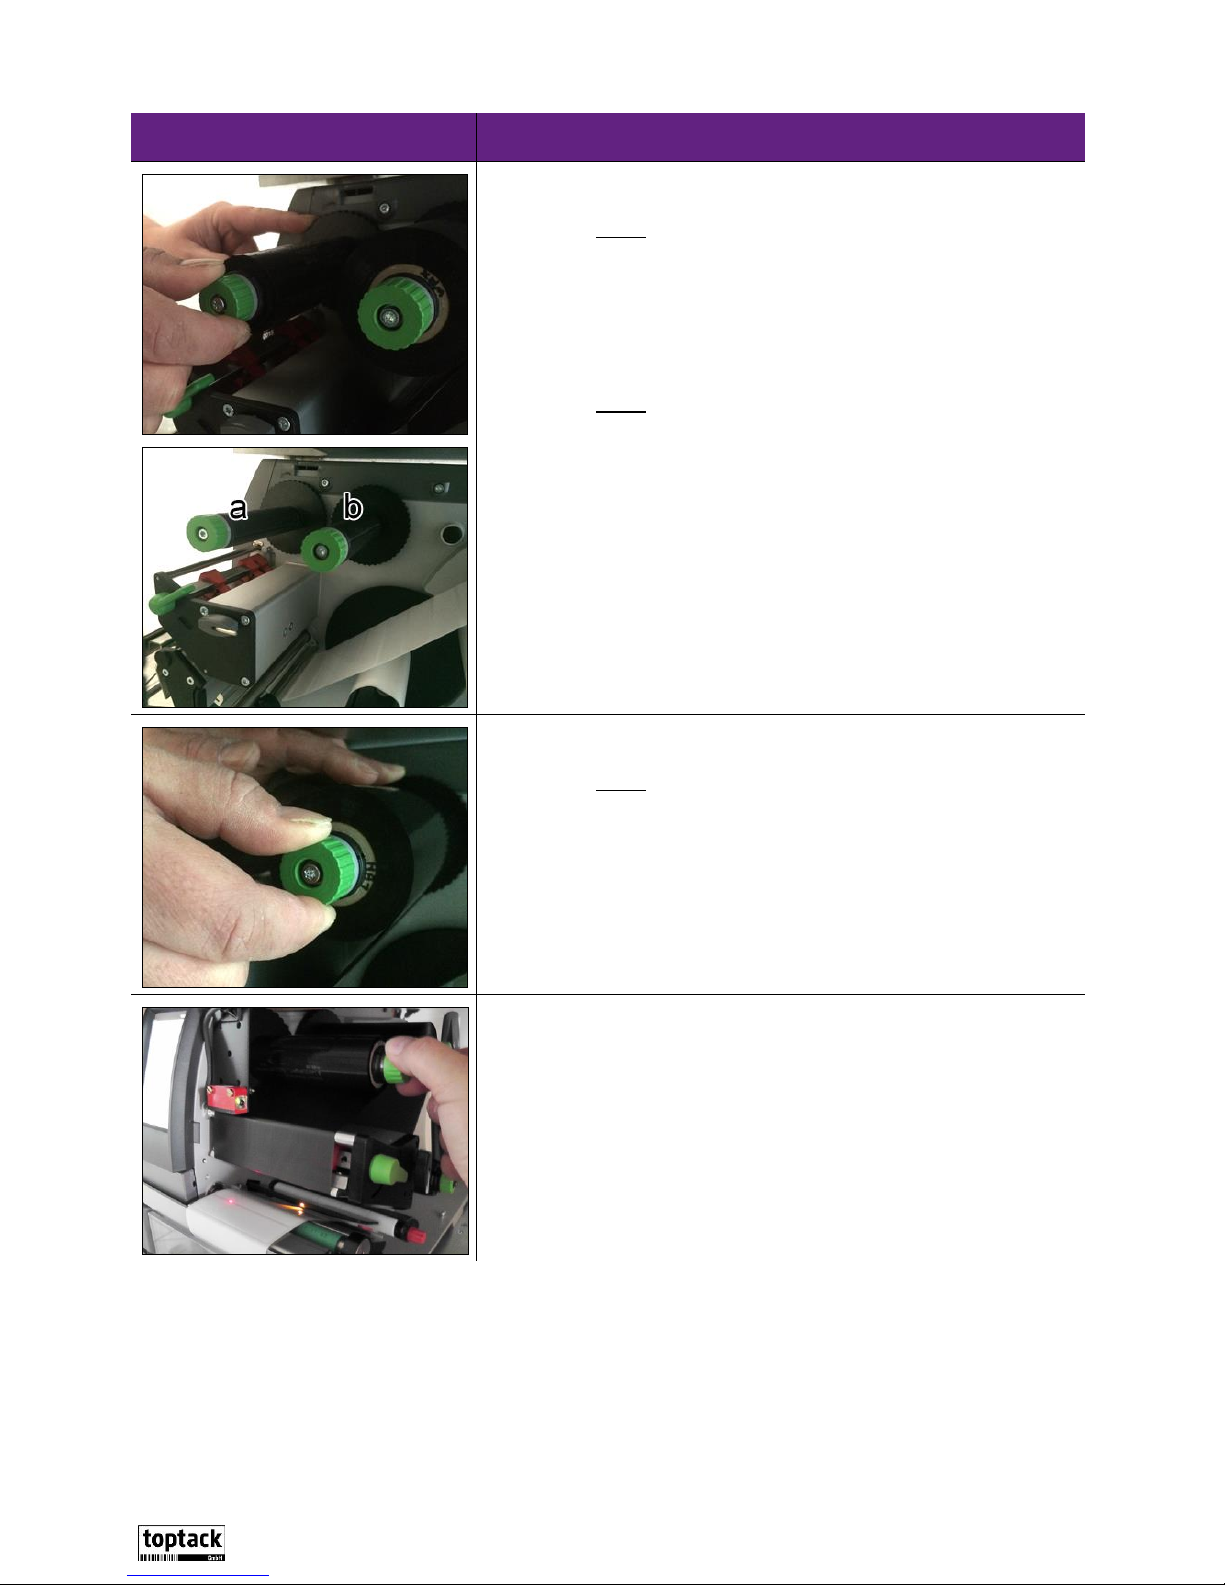
1. Open the flap of the printing head.
2. Release the fastening of the ink ribbon sleeves at the shafts.
Note: Turn the green knurled screws clockwise to
release the clamp of the roll at the shaft.
3. Pull the ink ribbon winding and unwinding sleeve from the
shaft.
Maintenance work
Page 40
Maintenance work
Label printing & lamination station - Version: 2017-04-01
Page 40
Figure
How
4. Push new ink ribbon roll onto the shafts.
Note: Push the roll with the ink ribbon onto the rear
unwinding shaft (b), attach the start of the ink ribbon
to an empty sleeve (ink side of the ink ribbon
towards the label material), guide it through under
the printing head and push it onto the front winding
shaft (a).
Note: The ink ribbon has one side with and one
without ink. The ink ribbon must be inserted so that
the ribbon side with ink is on the surface of the label.
5. Fasten the ink ribbon roll and winding sleeve to the shafts.
Note: Turn the green knurled screws counter-
clockwise to clamp the sleeves at the shafts.
6. Align the ink ribbon. Manually wind up ink ribbon at the
winding shaft (turn counter-clockwise!) until the ink ribbon
runs through under the printing head again smoothly and at
the full width.
Page 41

Maintenance work
Label printing & lamination station - Version: 2017-04-01
Page 41
Figure
How
7. Close the flap of the printing head.
Page 42

Label printing & lamination station - Version: 2017-04-01
Page 42
Cleaning the printing head of the thermal transfer printer
Danger of crushing injury at the label printing & lamination station!
Before cleaning the thermal transfer printer, turn off the main switch of the
station and secure it against reactivation!
Figure
How
1. Open the flap of the printing head.
2. Carefully push the thermal transfer printer to the side.
3. Carefully clean the printing head with a lint-free cleaning rag
(cotton cloth) soaked in isopropanol.
Note: A defective printing head must be replaced by
trained specialists!
This maintenance work must only be performed by maintenance staff.
Maintenance work
Page 43

Maintenance work
Label printing & lamination station - Version: 2017-04-01
Page 43
Figure
How
4. Push the thermal transfer band back again and turn the
winding shaft counter-clockwise to wind up ink ribbon until it
is perfectly smooth and placed across the entire printing
width.
5. Close the flap of the printing head by moving the lever down.
Page 44

Disposal
Label printing & lamination station - Version: 2017-04-01
Page 44
DISPOSAL
The label printing & lamination station is characterised by a long service life.
If the label printing & lamination station must be scrapped after the end of its service life, all
parts must be sorted by material classes. Only this way can subsequent reuse of differentiated
scrapping be permitted.
Observe the international provisions and the standards applicable in the destination country for
disposal. Observe all relevant environmental protection standards as well.
Page 45

Label printing & lamination station - Version: 2017-04-01
Page 45
ANNEX
No.
Designation
1
Circuit diagram for electrical system of the label printing &
lamination station
2
Overview plan of the pneumatic system of the label printing &
lamination station
3
"Annex 1" Description and operation of the laser control button
4
Operating manual of the thermal transfer printer
5
Operating manual of the laminate dispenser
6
Spare parts list of the label printing & lamination station
7
External data connection of the printer
Annex
 Loading...