

Page 1

TOPS DIGITAL VIDEO RECORDER
MP
Quick Manual
Page 2
MP SERIES (Digital Video Recorder)
-High Performance H/W MPEG4 DVR
- Max.240fps network transmission speed
- Remote upgrade
- PDNS for floating IP Address
- HDD Mirroring with TERA1500A(External HDD Storage with IEEE1394)
- MP7016: 480fps(Live), 480fps(Record), 480fps(Playback), 16CH(Audio)
- MP6016: 480fps(Live), 480fps(Record), 240fps(Playback), 8CH(Audio)
- MP5016: 480fps(Live), 120fps(Record), 120fps(Playback), 4CH(Audio)
- Resolution: 720*480(576), 720*240(256), 360*240(256)
- O/S: Windows 2000
- HDD / CD / DVD Backup
- Two-Way Audio Communication between DVR and Remote site
- Relay (Alarm Out) On/OFF
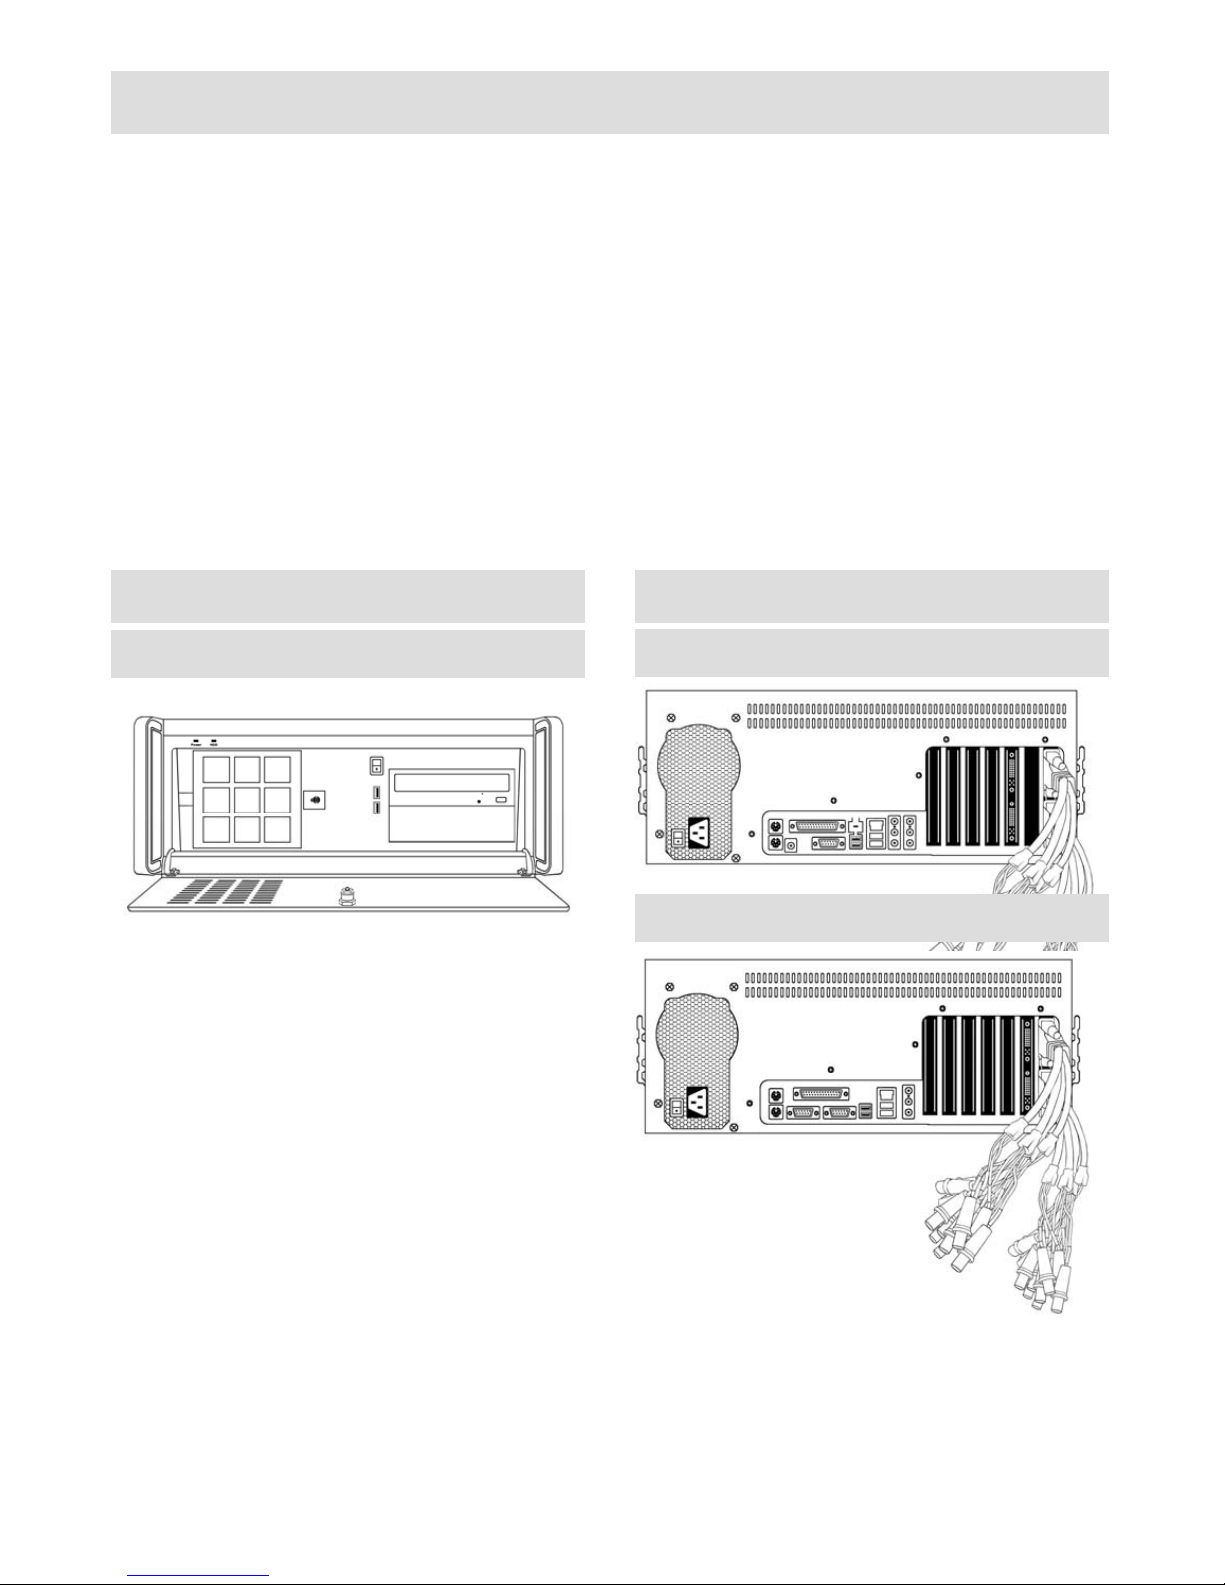
Front Layout Rear Layout
MP5016/6016/7016
①
⑤
②
④
⑥
① Power, HDD Led
② Power Switch
③ CD/DVD Expansion Rack
④USB Port
⑤Dust Filter
⑥Lock
③
MP6016/7016
①②③④
⑥
⑤
⑦
MP5016
①②③④
⑥
⑫
① Power Switch
②Mouse/Keyboard
③ Printer Port
④LAN Port
⑤ Audio Out (Green Port)
⑥VGA Port
⑦USB Port
⑧ Alarm Out
⑨ Sensor In
⑩ Camera In / Mux Out / Spot Out
⑪Audio In
⑫Pan/Tilt Port
⑤
⑦
⑧⑨⑩
⑪
⑧⑨⑩
⑪
Page 3
SURVEILLANCE
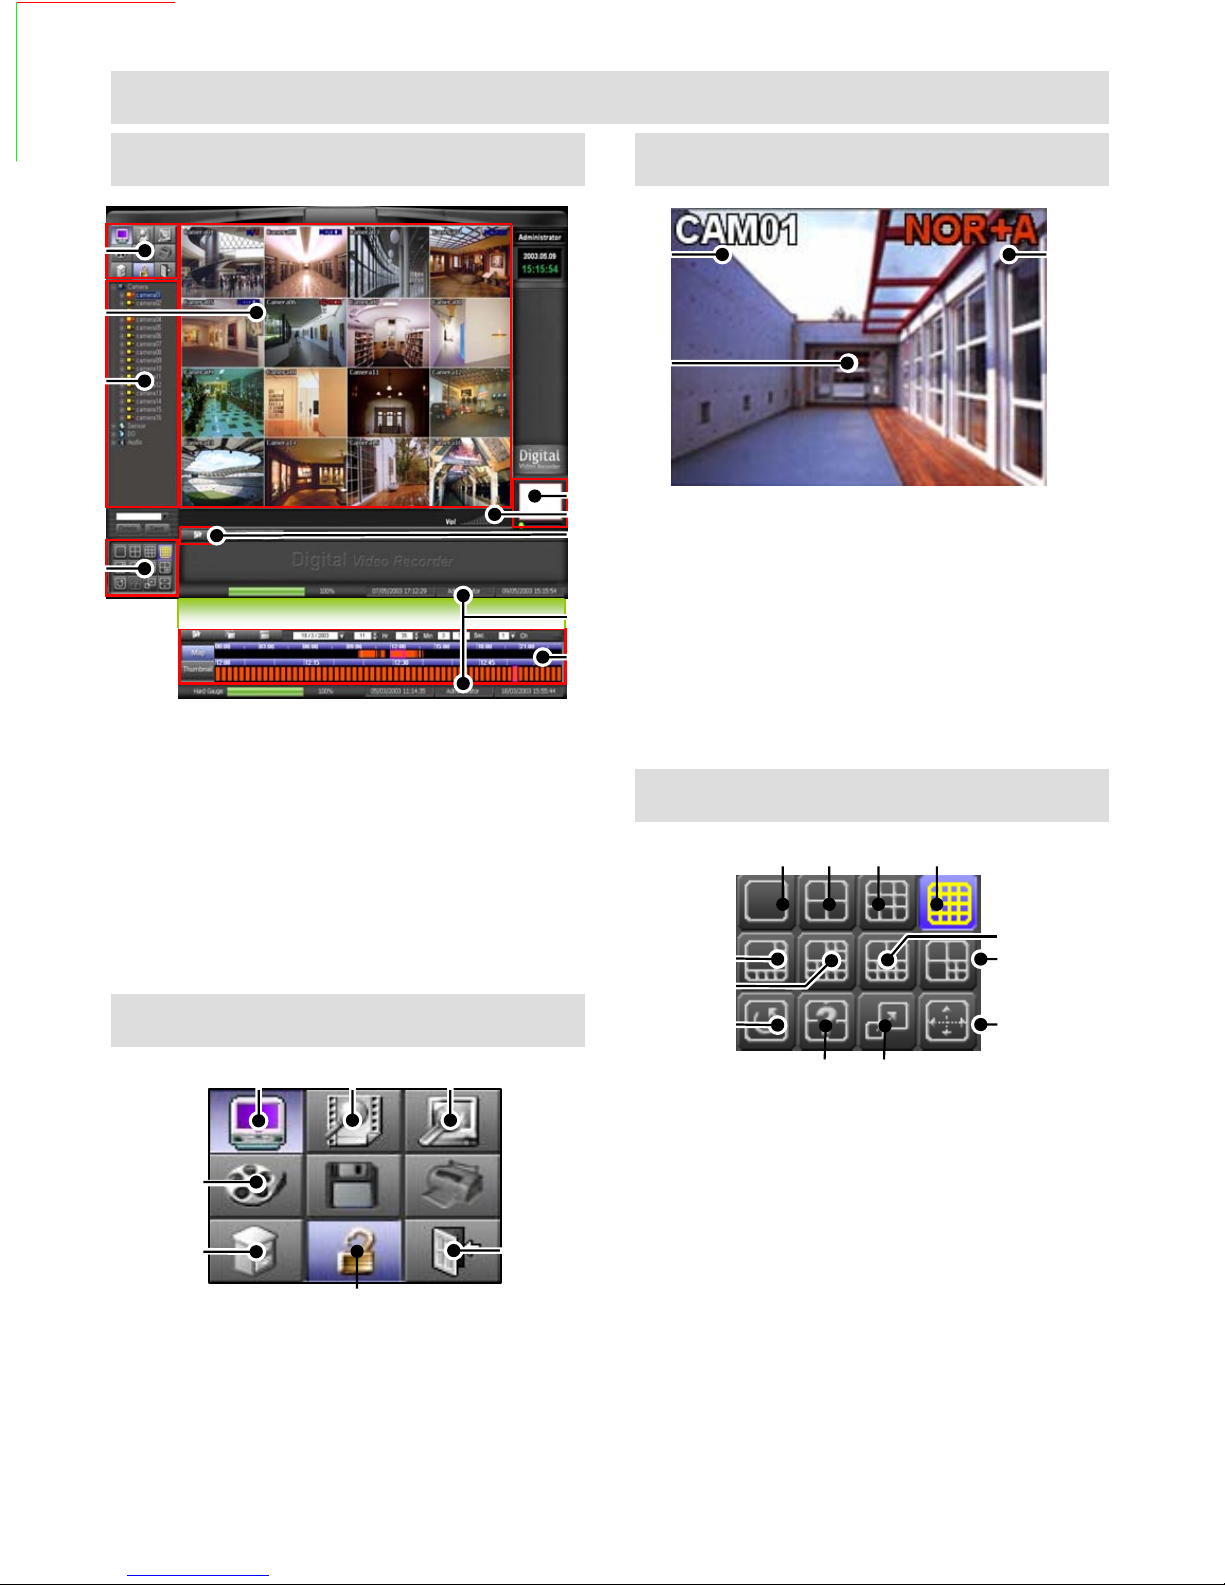
Main Mode
①
②
③
④
①Main Menu
② Live View
③ Camera Controller
④ Camera Layout
⑤Digital Zoom
⑥Volume Control
⑦ 1 CH Pop Up Search
⑧Log In User
⑨Map Search
⑤
⑥
⑦
⑧
⑨
Screen Information
①
③
① Camera Name
② Recording Status
NOR – Normal Recording
MOT – Motion Recording
SEN – Sensor Recording
MOT+SEN – Motion + Sensor
A – Audio Recording
③ Camera Image
Camera View Layout
②
①
⑤
⑥
③④
②
⑦
⑧
Main Menu
①
④
⑤
① Surveillance Mode
② Search Mode
③ Setup Mode
④ Backup Mode
⑤ Password / Rotation
Default P/W is “0”.
⑥ User Mode (Log In /Out)
⑦Shut Down
②③
⑥
⑦
⑨
⑩
①1 CH
②4 CH
③9 CH
④ 16 CH
⑤1 Main + 7 Sub CH
⑥ 1 Main + 12 Sub CH
⑦2 Main + 8 Sub CH
⑧3 Main + 4 Sub CH
⑨Rotation
⑩ User Selection
⑪Pop UP ON/OFF
⑫ Full Screen
⑪
⑫
Page 4
SURVEILLANCE
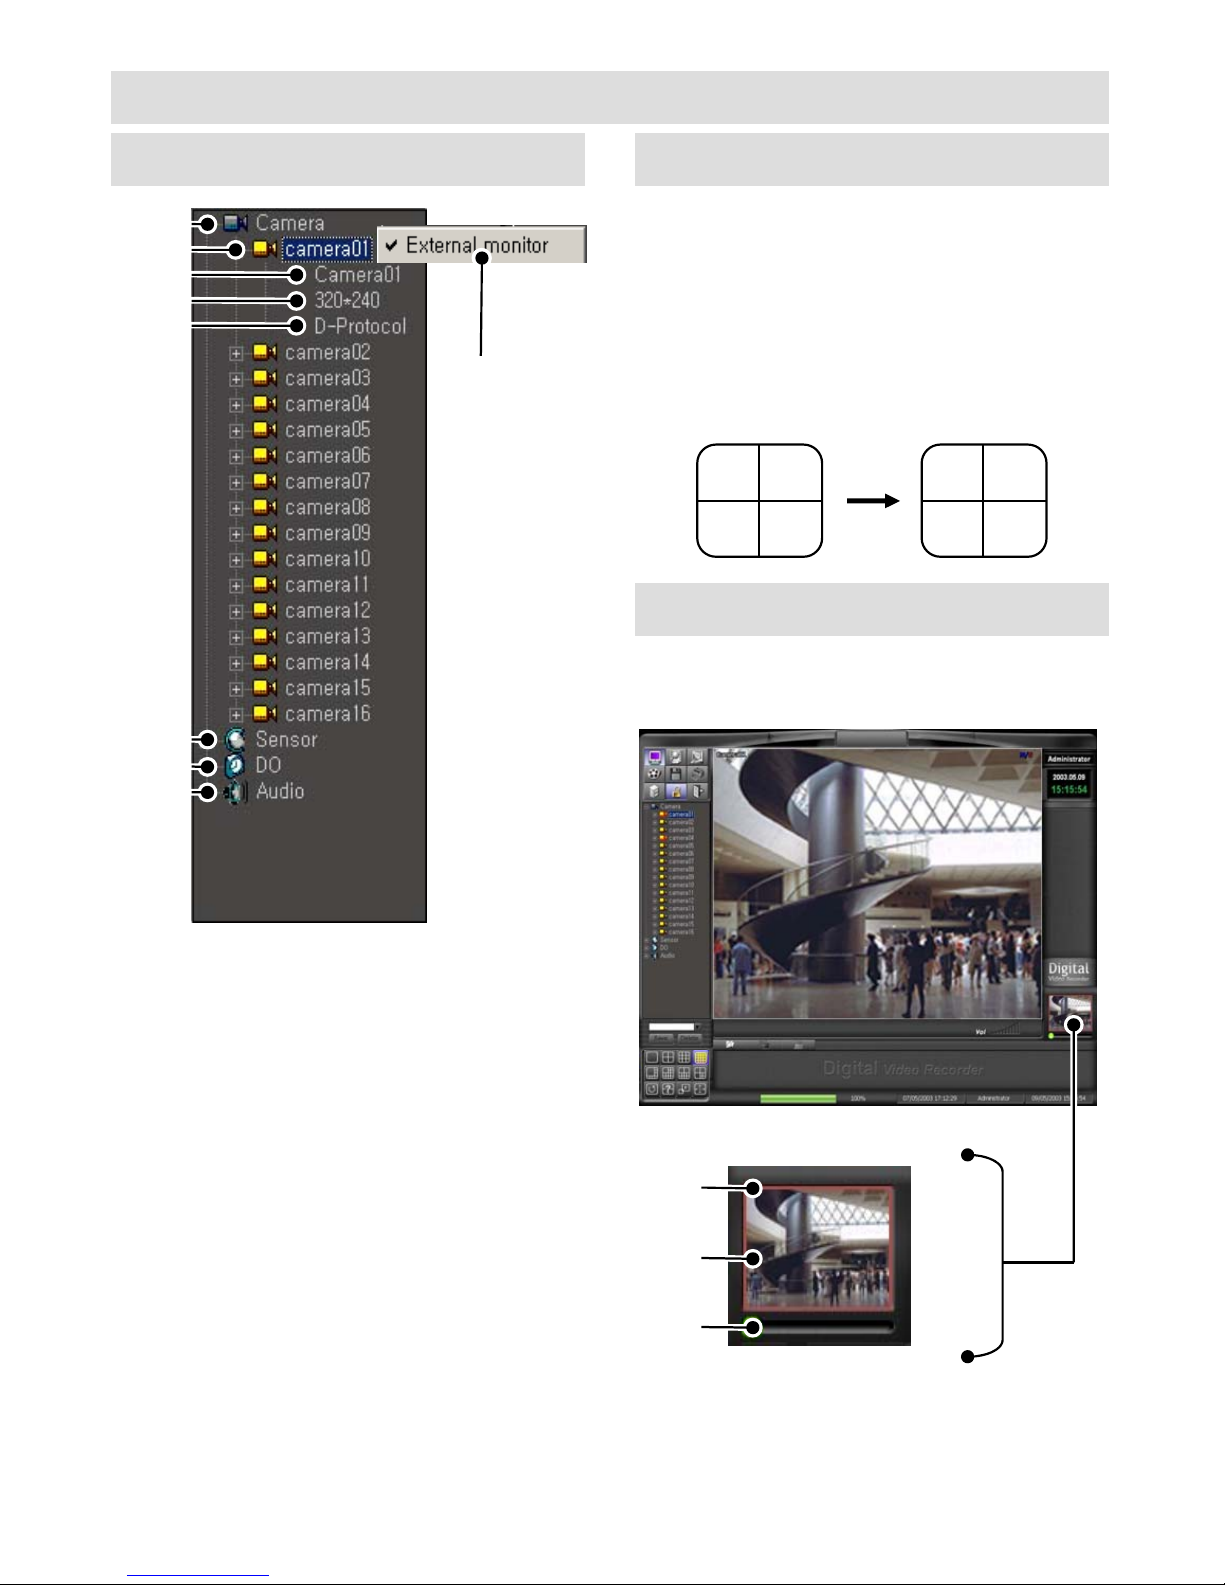
User SelectionChannel Information
①
②
③
④
⑤
⑥
⑦
⑧
⑨
① Click “USER SELECTION” button
② Drag a cam from “CAMERA
INFORMATION” and drop it on the
“LIVE VIEW”
Note:
The below is the example of “User
Selection”.
Cam1. Cam2.
Cam3. Cam4.
Cam2. Cam1.
Cam4. Cam3.
Digital Zoom
Digital Zoom is only available at 1 CH
layout.
MOT
MOT
① Camera Group
② Camera No.1
③ Camera Name
④ Camera Resolution
⑤ Camera Protocol
⑥ Sensor Group
⑦ D/O Group (Alarm Out)
⑧ Audio Group
⑨ External Monitor
NOTE:
Sub menu is available when right mouse
click each CH like “External Monitor” or
“ON/ OFF”
①
②
③
①Digital Zoom Box (RED)
② Panning View
③Digital Zoom Control Bar
Page 5
SURVEILLANCE
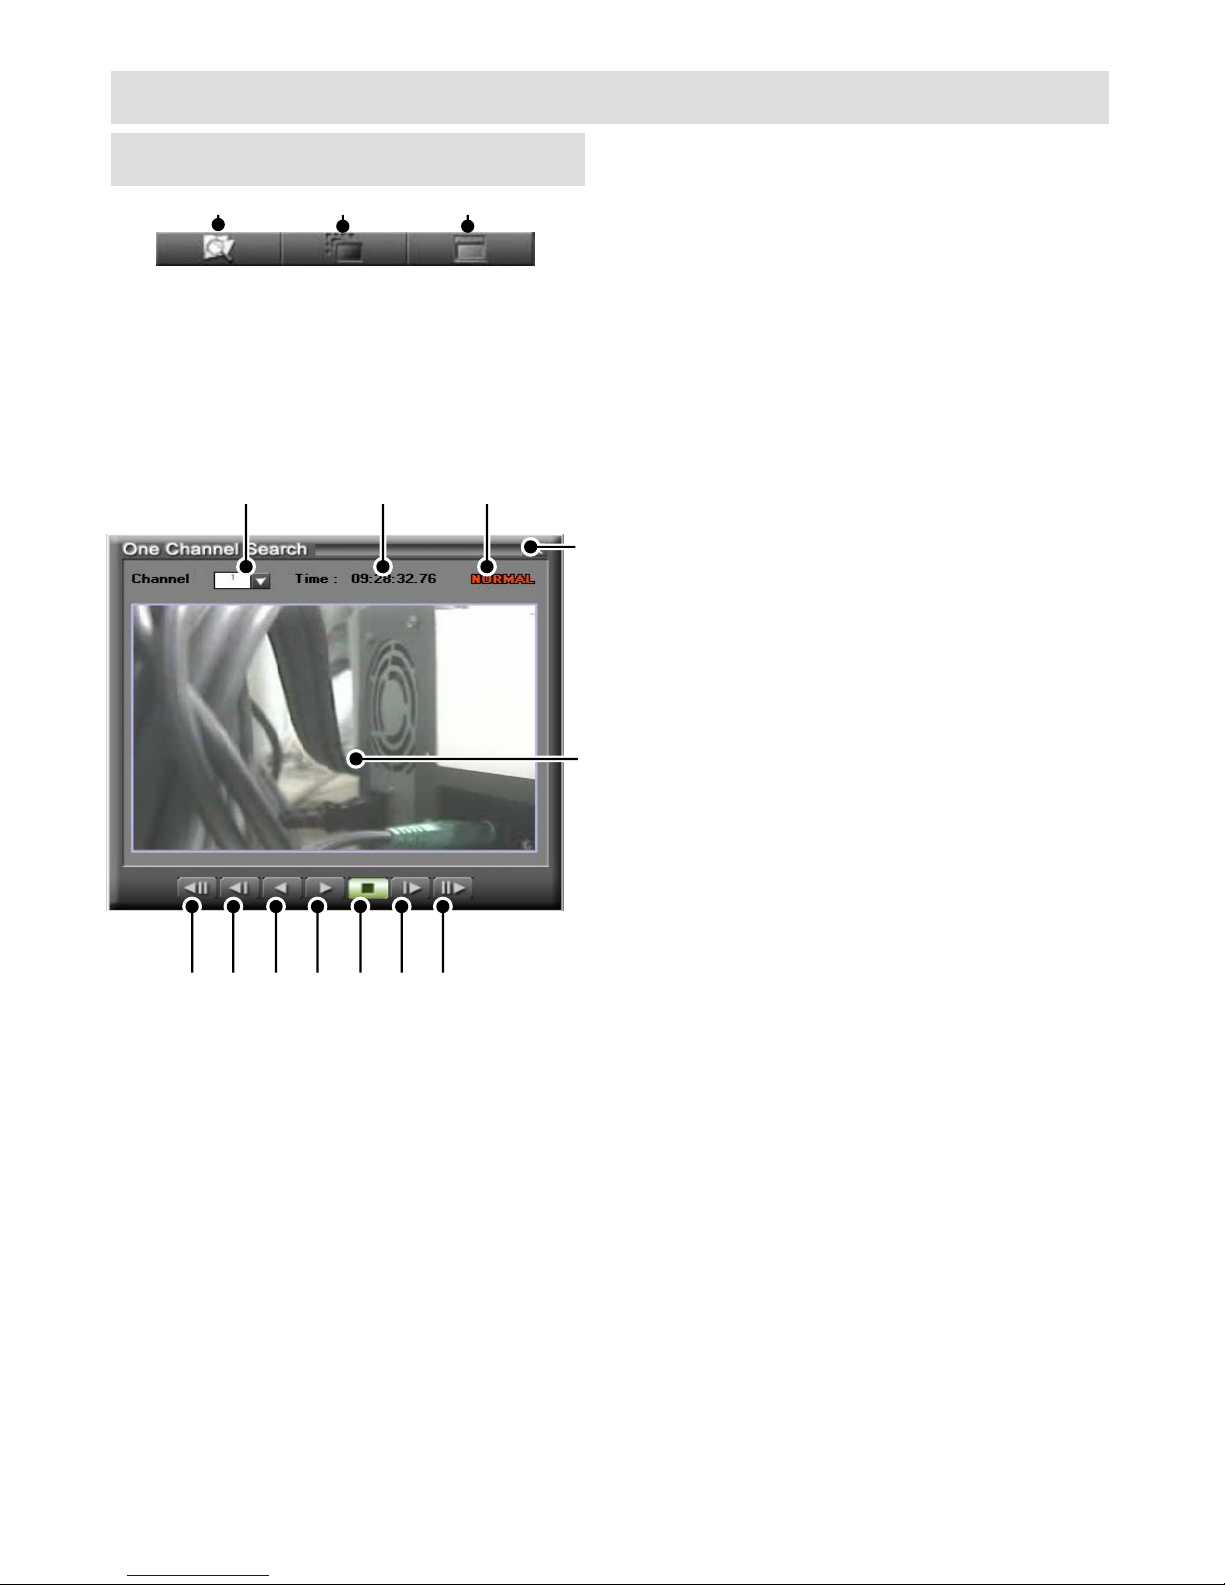
1CH Search
①
① 1CH Search
② Smart Search (Object Search)
③Map Search
Note:
1 CH Search is available at Surveillance
Mode
① ② ③
②③
④
⑤
⑥ ⑦ ⑧ ⑨ ⑩ ⑪ ⑫
①CH No.
②Rec. Time
③ Record Type
④Close 1 CH Search
⑤ Recorded Image
⑥First Image
⑦Previous Image
⑧Reverse
⑨Playback
⑩Stop
⑪Next Image
⑫Last Image
Page 6
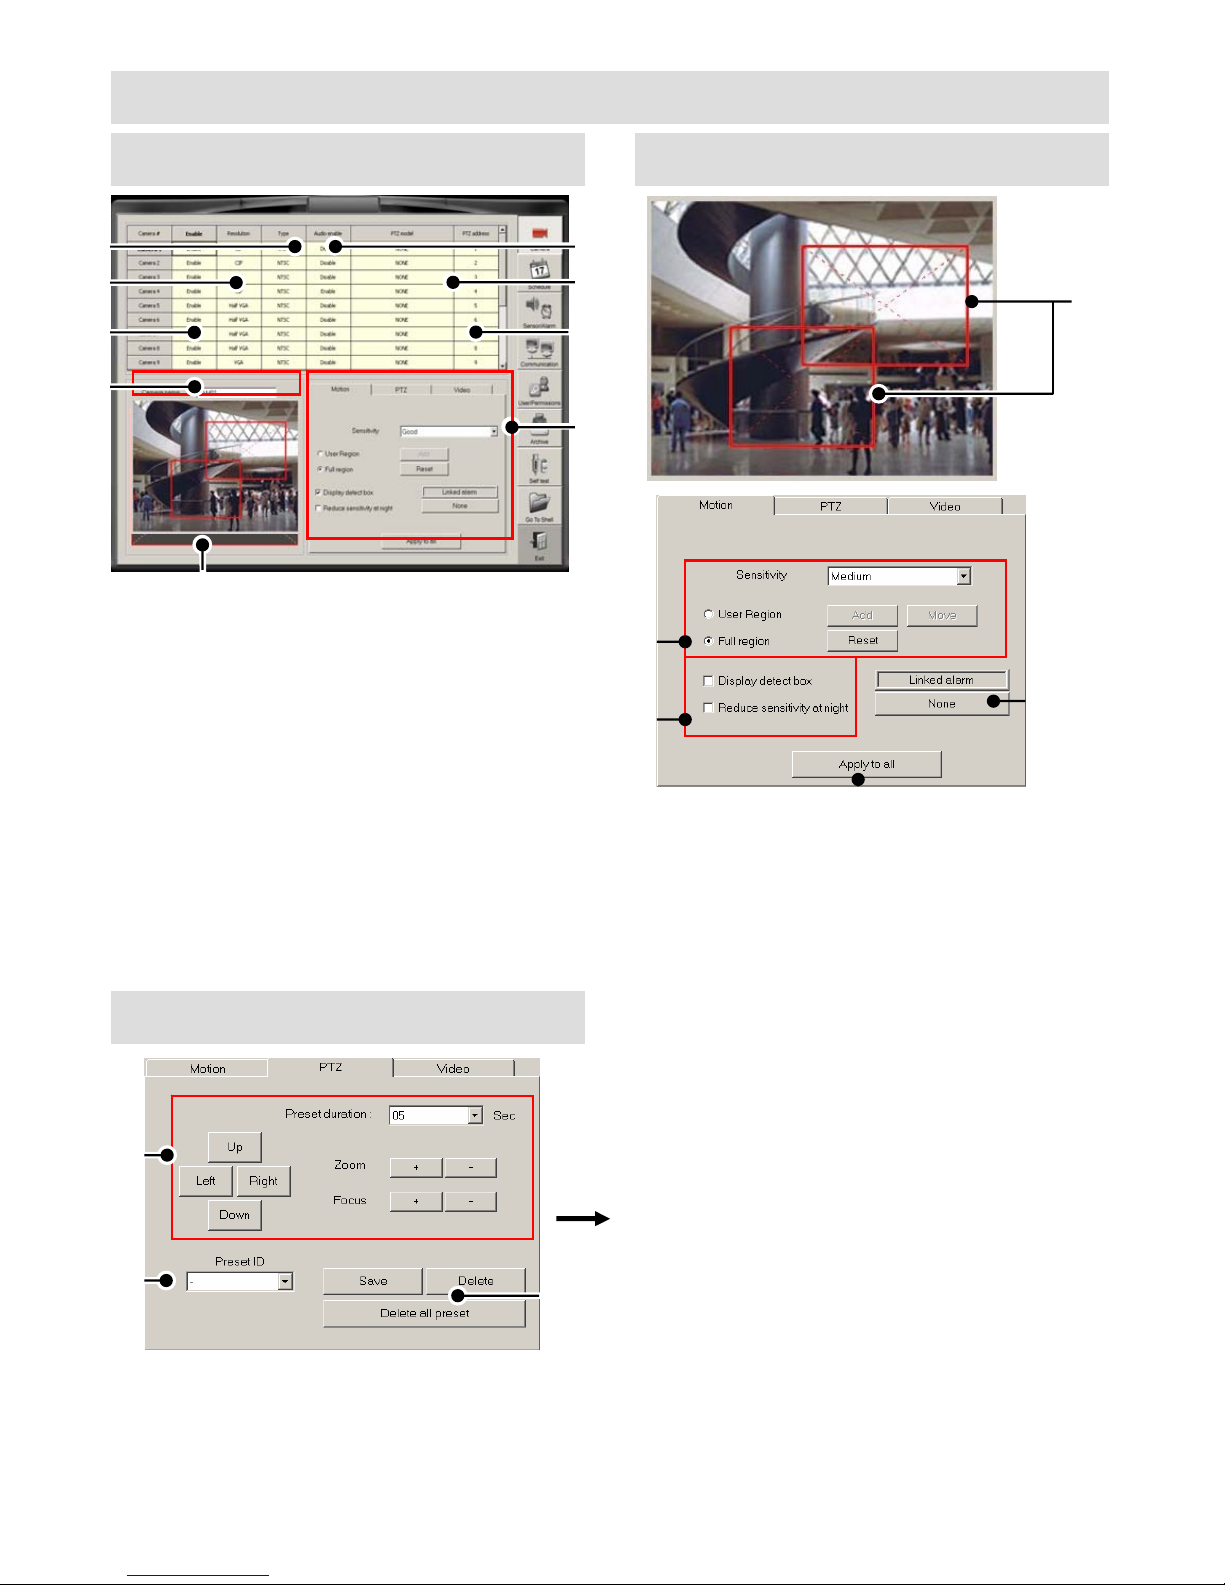
CONFIGURATION
Camera /Sensor Motion Area
①
②
③
⑦
⑧
①NTSC/PAL
②Resolution (CIF/HALF VGA/VGA)
③ Camera On/Off
④Audio On/Of
⑤ PTZ Protocol
⑥ PTZ Address
⑦ Camera Name
⑧ Motion Setting Area
⑨ Motion, PTZ, Video (Color)
PTZ
④
⑤
①
⑥
⑨
②
④
③
⑤
① User Setting Area
② User Defined – Small Area
Full Region –Full Area
③ Display Detection Box
Reduce Sensitivity at night
④ Motion-Alarm Setting
⑤ Apply to all cameras
①
②
③
①Direction, Zoom, Focus
Preset Duration
②Preset ID
③ Preset Save, Preset Delete.
Delete all Presets
Page 7
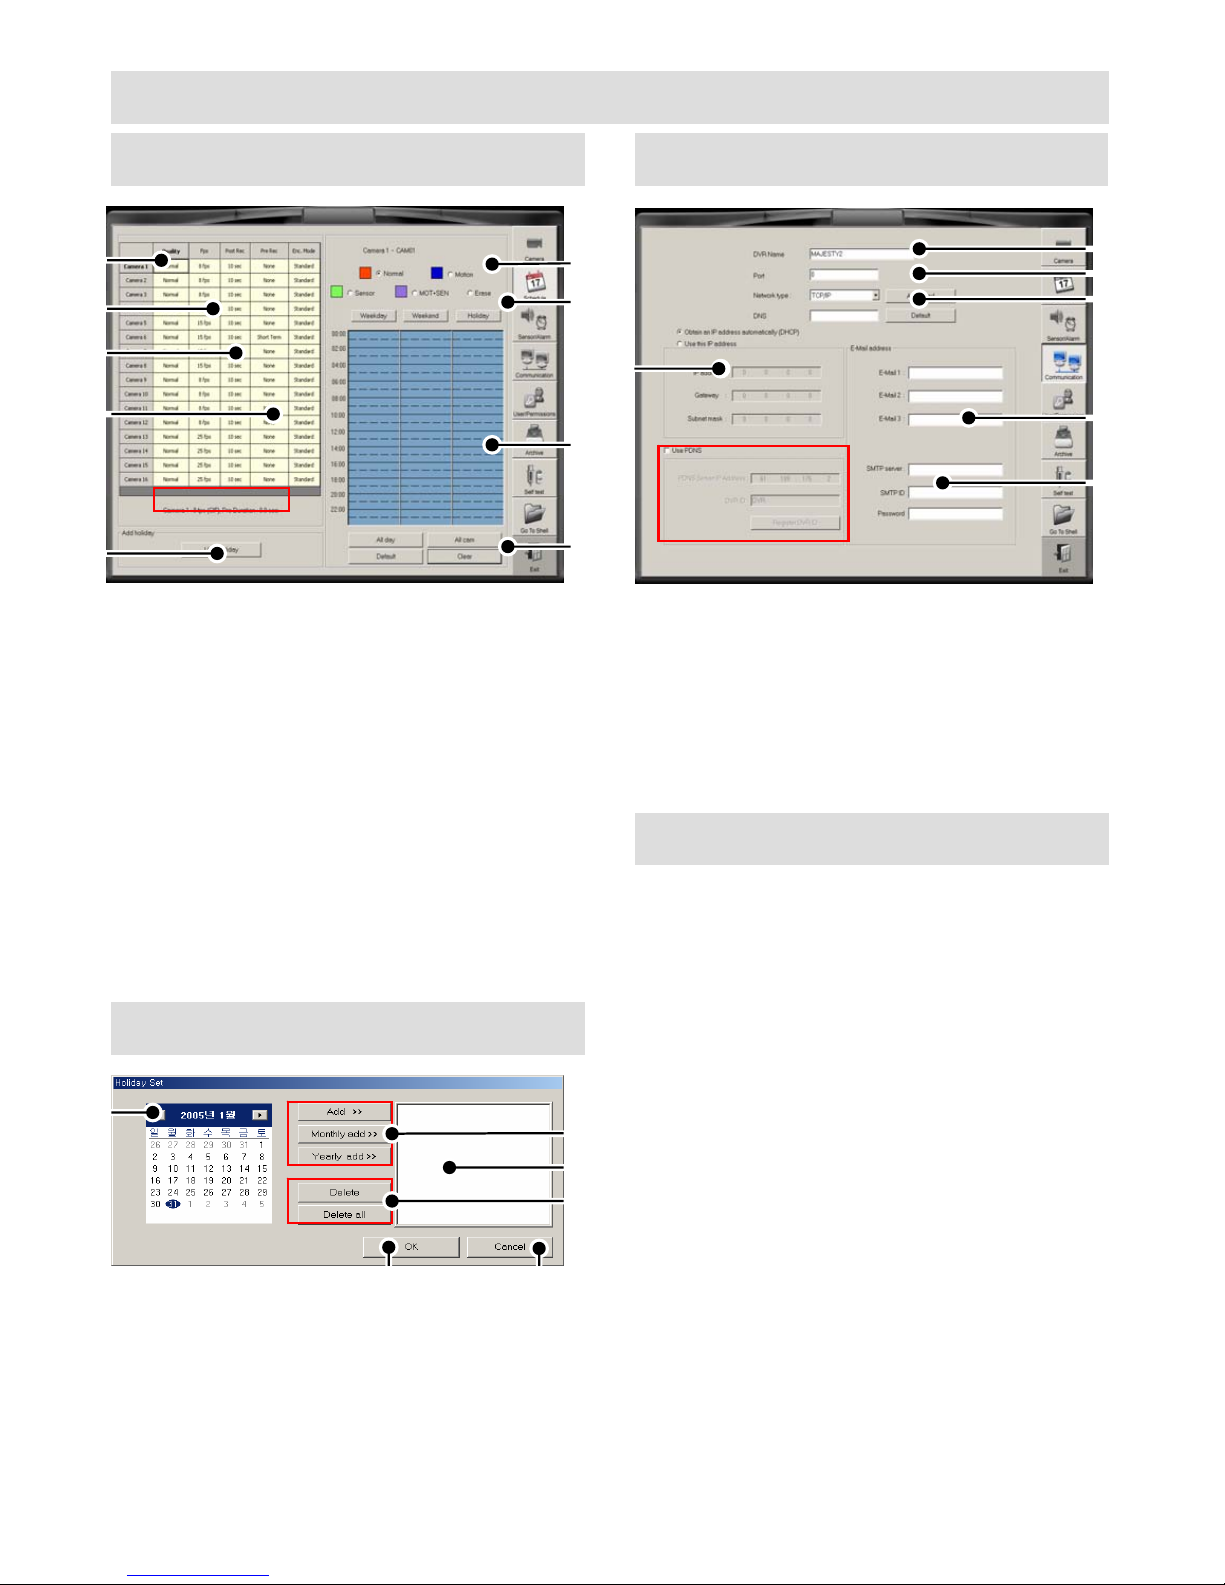
CONFIGURATION
Schedule Network
①
②
③
④
⑨
①Quality (5 Steps)
② Recording Speed
③ Post Recording (10Sec~5Min)
④ Pre Recording(4 Steps)
⑤ Recording Type Selection
⑥ Weekday, Weekend, Holiday
⑦ Schedule Setting Area
⑧Default
Clear –Delete a camera schedule
All Cam –Apply a schedule to all
Cameras
All Day –Apply a schedule to all days
⑨Add Holida
y
⑤
⑥
⑦
⑧
①
②
③
④
⑤
⑥
①DVR Name
② Network Port
③ Network Type (TCP/IP,MODEM)
④ DHCP/IP Setting
⑤ E-mail list for emergency transmission.
⑥ SMTP Server
How to set PDNS
①Tick “Use PDNS”
②Type “DVR ID”
③ Press “Register DVR ID”
Holiday
①
⑤
① Previous/Next Month
② Add, Monthly Add, Yearly Add
③ Added Holiday List Box
④ Delete(1 time), Delete all holidays
⑤Save & Exit
⑥Exit
Note:
If the DVR ID is already used on other
DVR, it will show warning message.
②
③
④
⑥
Page 8
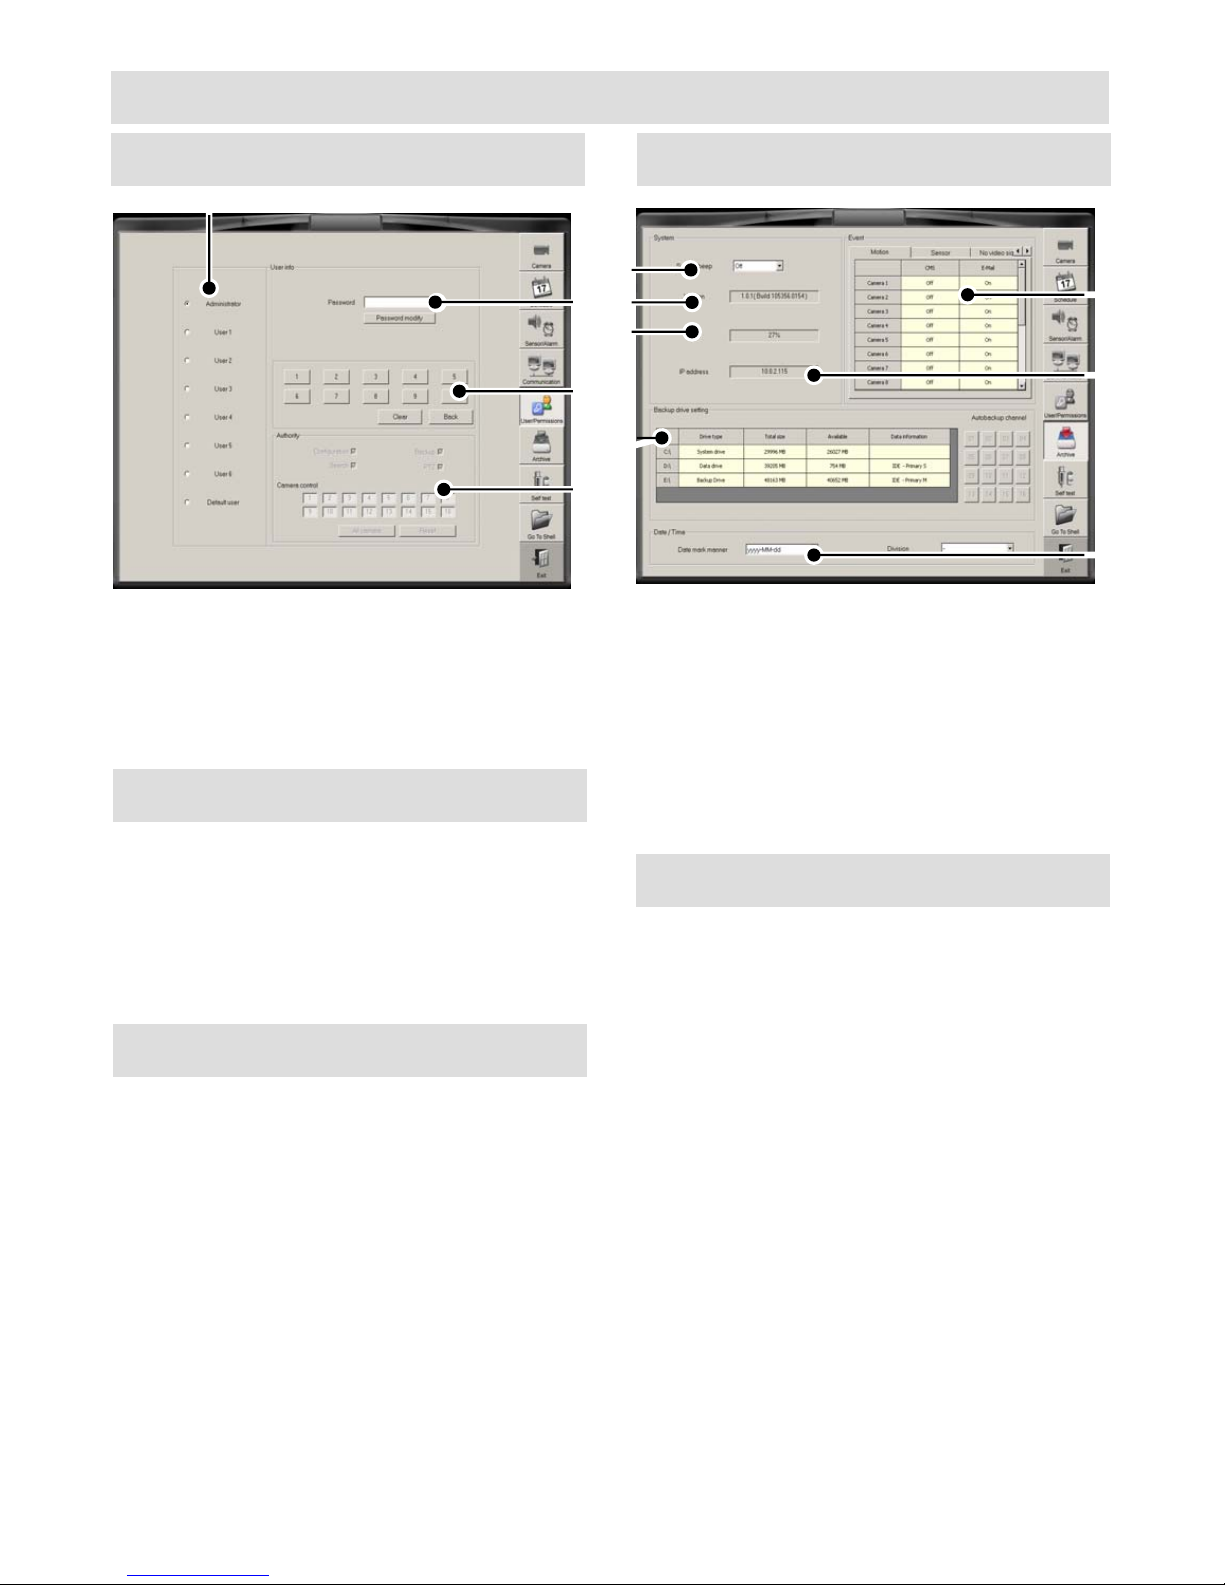
CONFIGURATION
User/Password Archive
①
①
②
②
③
⑤
① User Selection
② Password Configuration
③ Password No.
④ Configuration, Backup, Search, PTZ,
Camera Selection
Password Change
① Choose user
②Input P/W
③ Click “Password Modify” button
④ Input New P/W and confirm the P/W
⑤ E-mail list for emergency transmission.
⑥ SMTP Server
User Authority Change
③
④
④
① System Beep
②S/W Version
③ CPU Usage Status
④ Backup Drive Setting
⑤ Event Transmission Setting
(Motion, Sensor, No Video Signal)
⑥ IP Address
⑦DATE/TIME Forma
t
Backup Drive Setting
① Go to Backup Drive Setting
② Choose a drive
Ex) D:, E:, F:
③ Change the drive for Backup drive
④Save & Ex
it
⑥
⑦
① Choose user
② Change “Authority” like Configuration,
Backup, Search, PTZ, Camera
③Save & Exit
Page 9
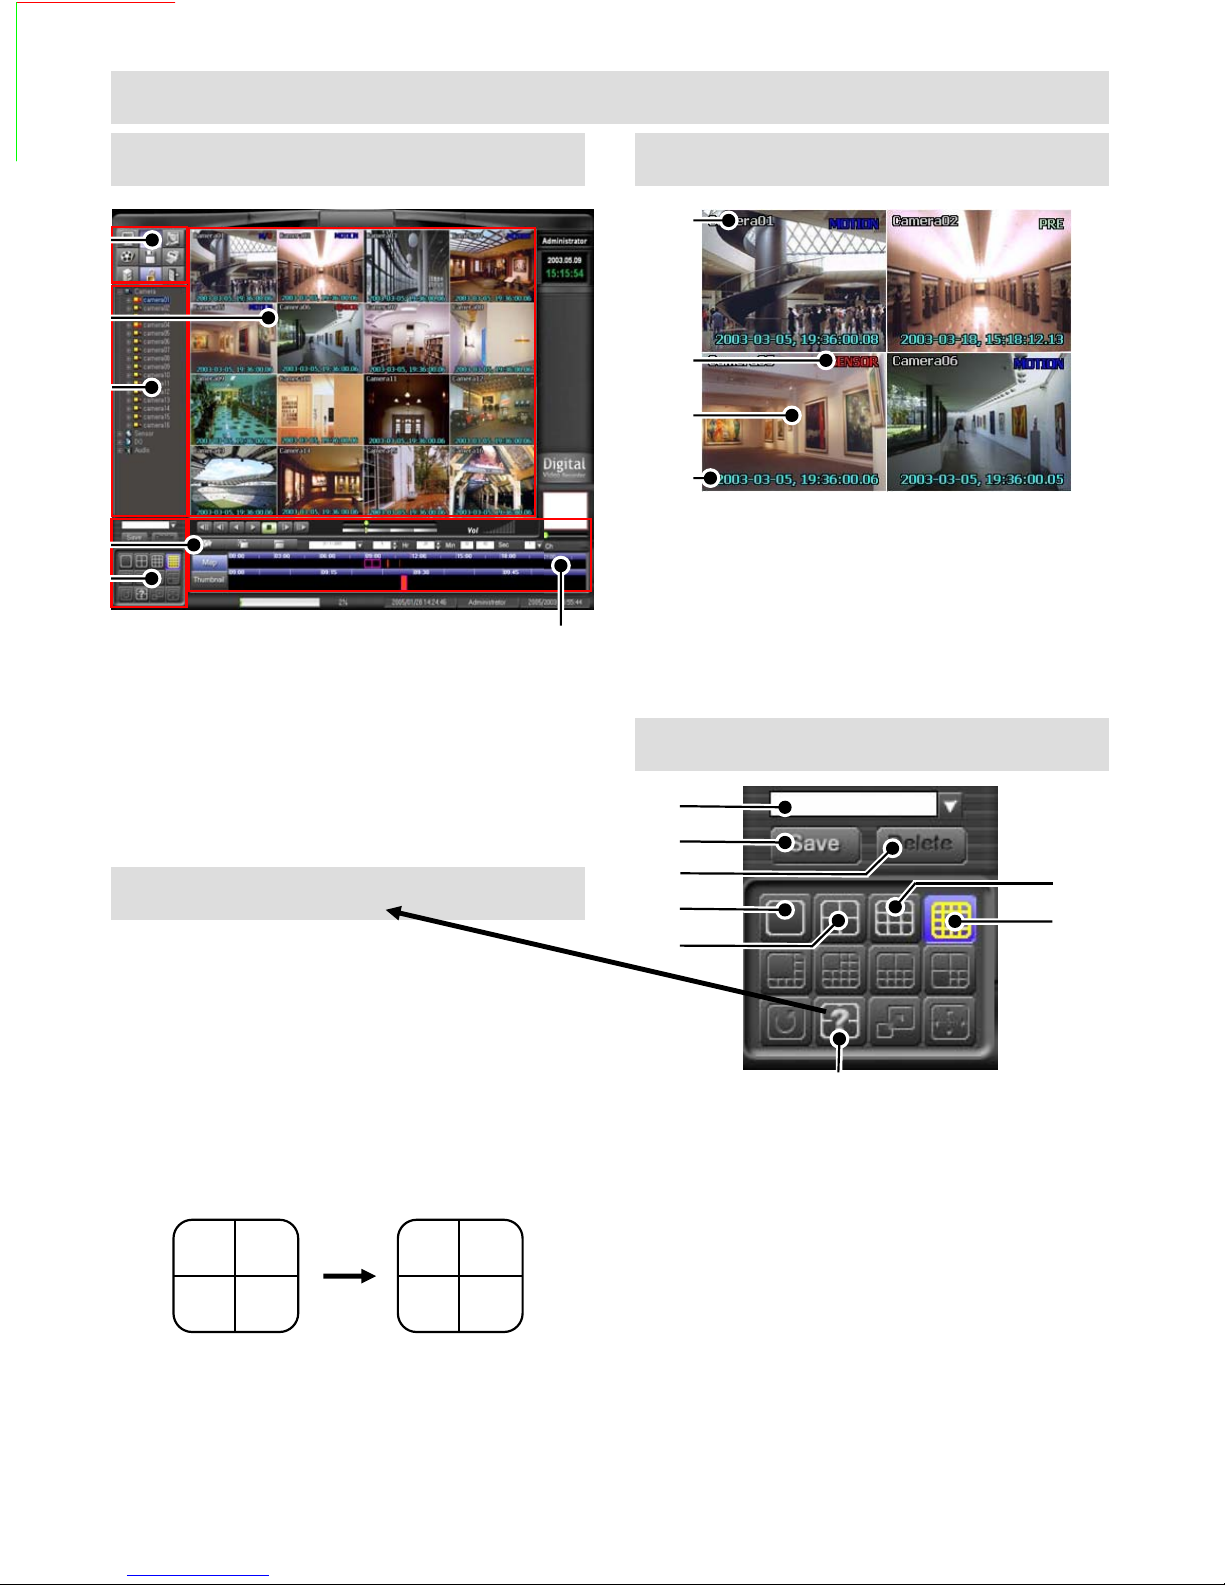
SEARCH
Main Mode Search Screen
①
②
②
③
④
⑤
① Search Mode
② Search Screen
③ Camera Information
④ Panorama Search Information
⑤ Camera Layout
⑥ Map & Thumbnail View
User Selection
① Click “USER SELECTION” button
② Drag a cam from “CAMERA
INFORMATION” and drop it on the
“SEARCH SCREEN”
⑥
①
②
③
④
① Camera Name
② Recorded Status
③ Playback Image
④ Recorded Time
Camera Layout
①
②
③
④
⑤
⑥
⑦
Note:
The search layout will be changeable.
The below is the example of “USER
SELECTION”.
Cam1. Cam2.
Cam3. Cam4.
Cam2. Cam1.
Cam4. Cam3.
⑧
① User Layout Name
② Save User Layout
③ Delete User Layout
④1CH
⑤4CH
⑥9CH
⑦16CH
⑧ User Selection
Page 10
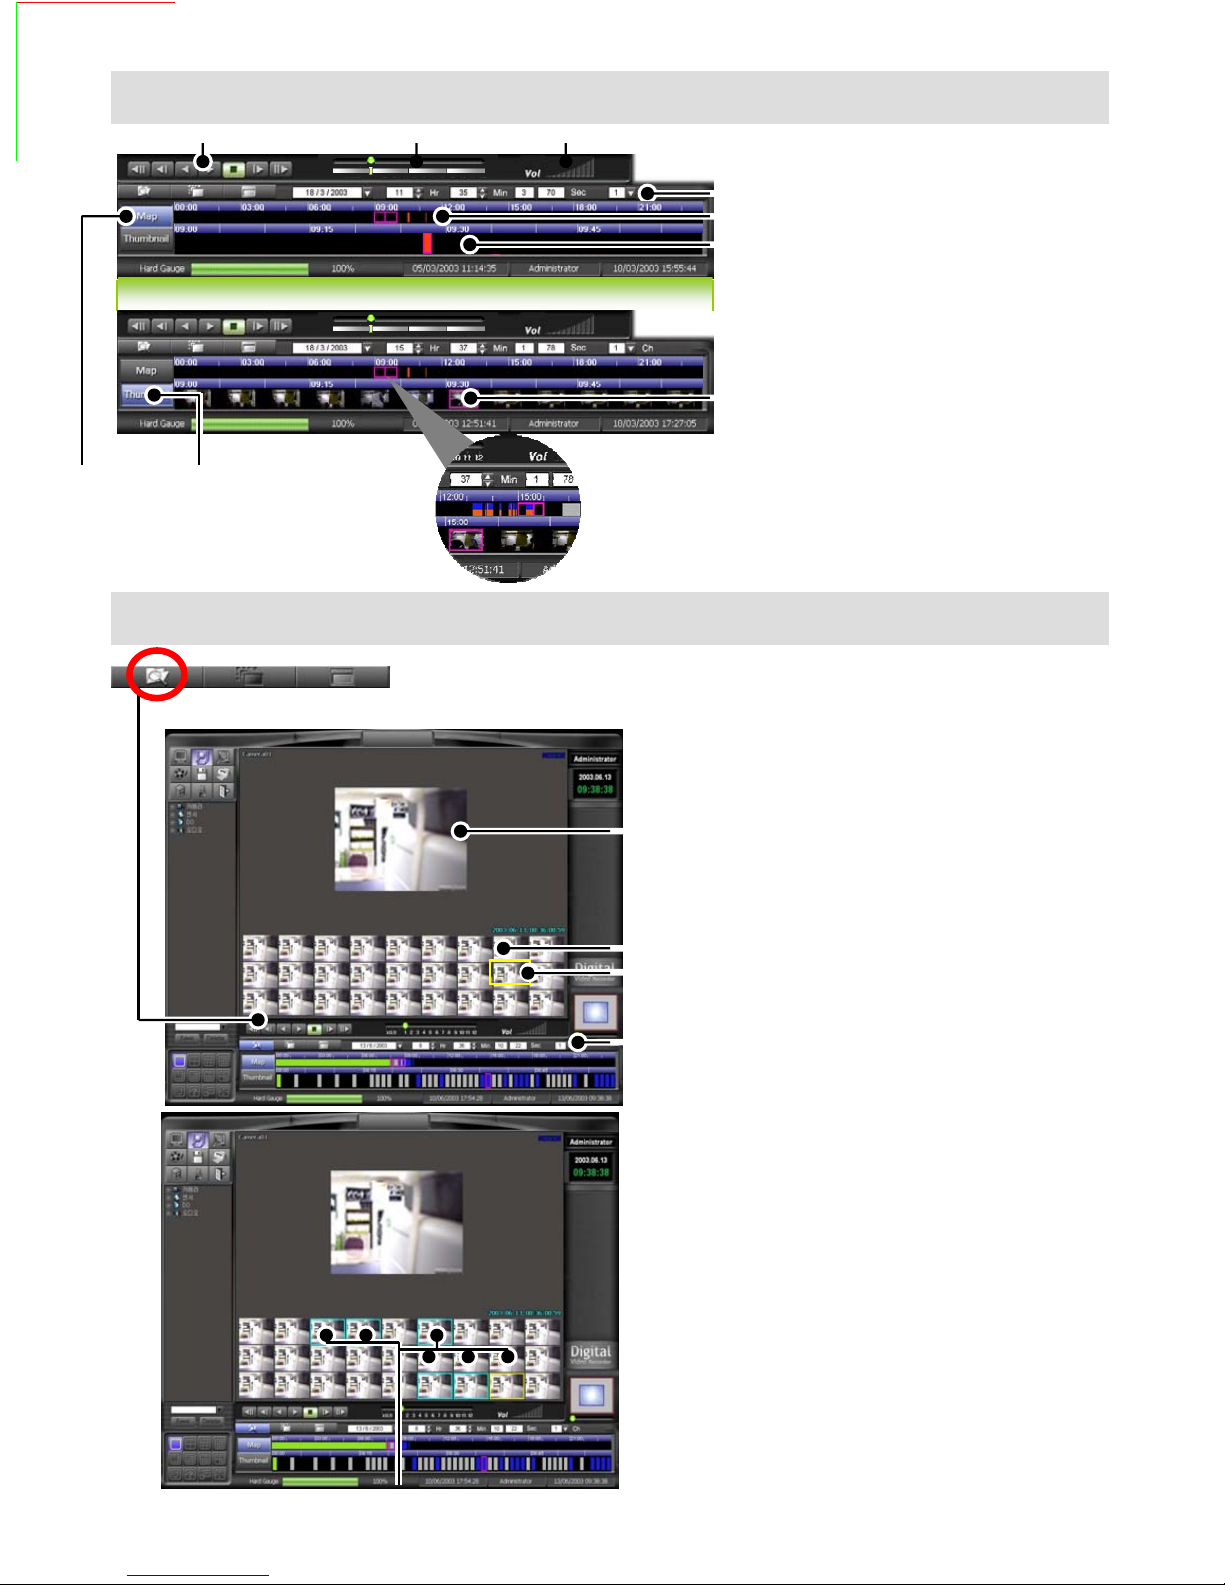
SEARCH
①②③
①Play Control
④
⑤
② Playback Speed
③ Audio Volume
⑥
④ Year/Month/Hour/Min/CH Search
⑤ 24 Hour Map
⑥ 1 Hour map
⑦Hide Thumbnail Map
⑧Show Thumbnail Map
⑨
⑨ Show image every 5 minutes
⑦
⑧
Panorama Search
①
① 1CH Search Screen
② Panorama Screen
③ Playing Screen
②
④ Time/Camera Selection
③
④
NOTE:
Before saving AVI, JPG, BMP, user
should select the images like the
below.
①
① Selected Screen
Page 11
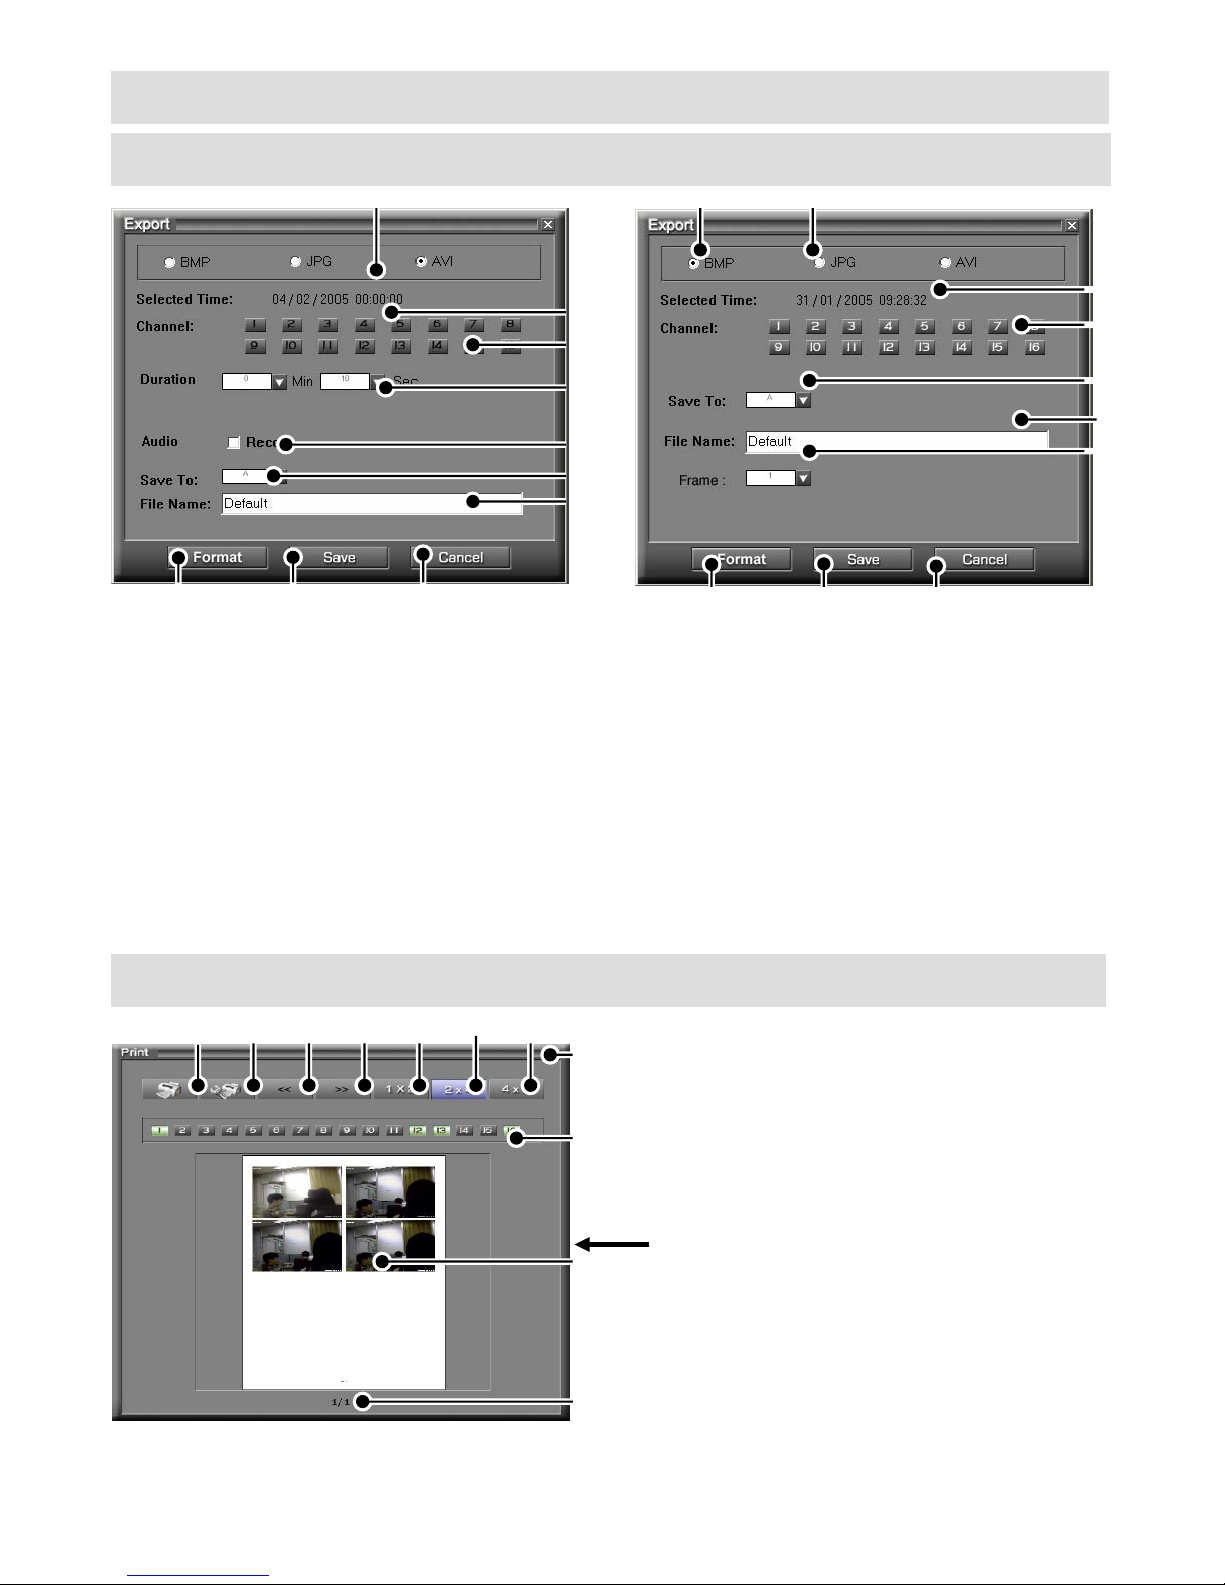
SEARCH
AVI, JPG, BMP Save
①
②
③
①
②
③
④
⑧
①AVI Save
② Selected Time
③ Camera No.
④AVI Duration
⑤ Audio Record
⑥ Drive Selection
⑦File Name
⑧Format Media
⑨Save
⑩Cancel
⑨
⑩
④
⑤
⑥
⑦
⑧
①BMP Save
②JPG Save
③ Selected Time
④ Camera No.
⑤ Drive Selection
⑥File Name
⑦ Count No.
⑧Format Media
⑨Save
⑩Cancel
⑨
⑤
⑥
⑦
⑩
Print
①⑪② ③ ④ ⑤ ⑥ ⑦
⑧
⑨
⑩
①Print
② Printer Setup
③Previous Print Image
④Next Print Image
⑤Layout 1X2
⑥ Layout 2X4
⑦Layout 4X8
⑧Close
⑨ Camera Selection
⑩Preview
⑪Page No
NOTE:
Printer Drive should be installed before
printing the image.
And make sure that printer is connected to
DVR and power is ON.
.
Page 12
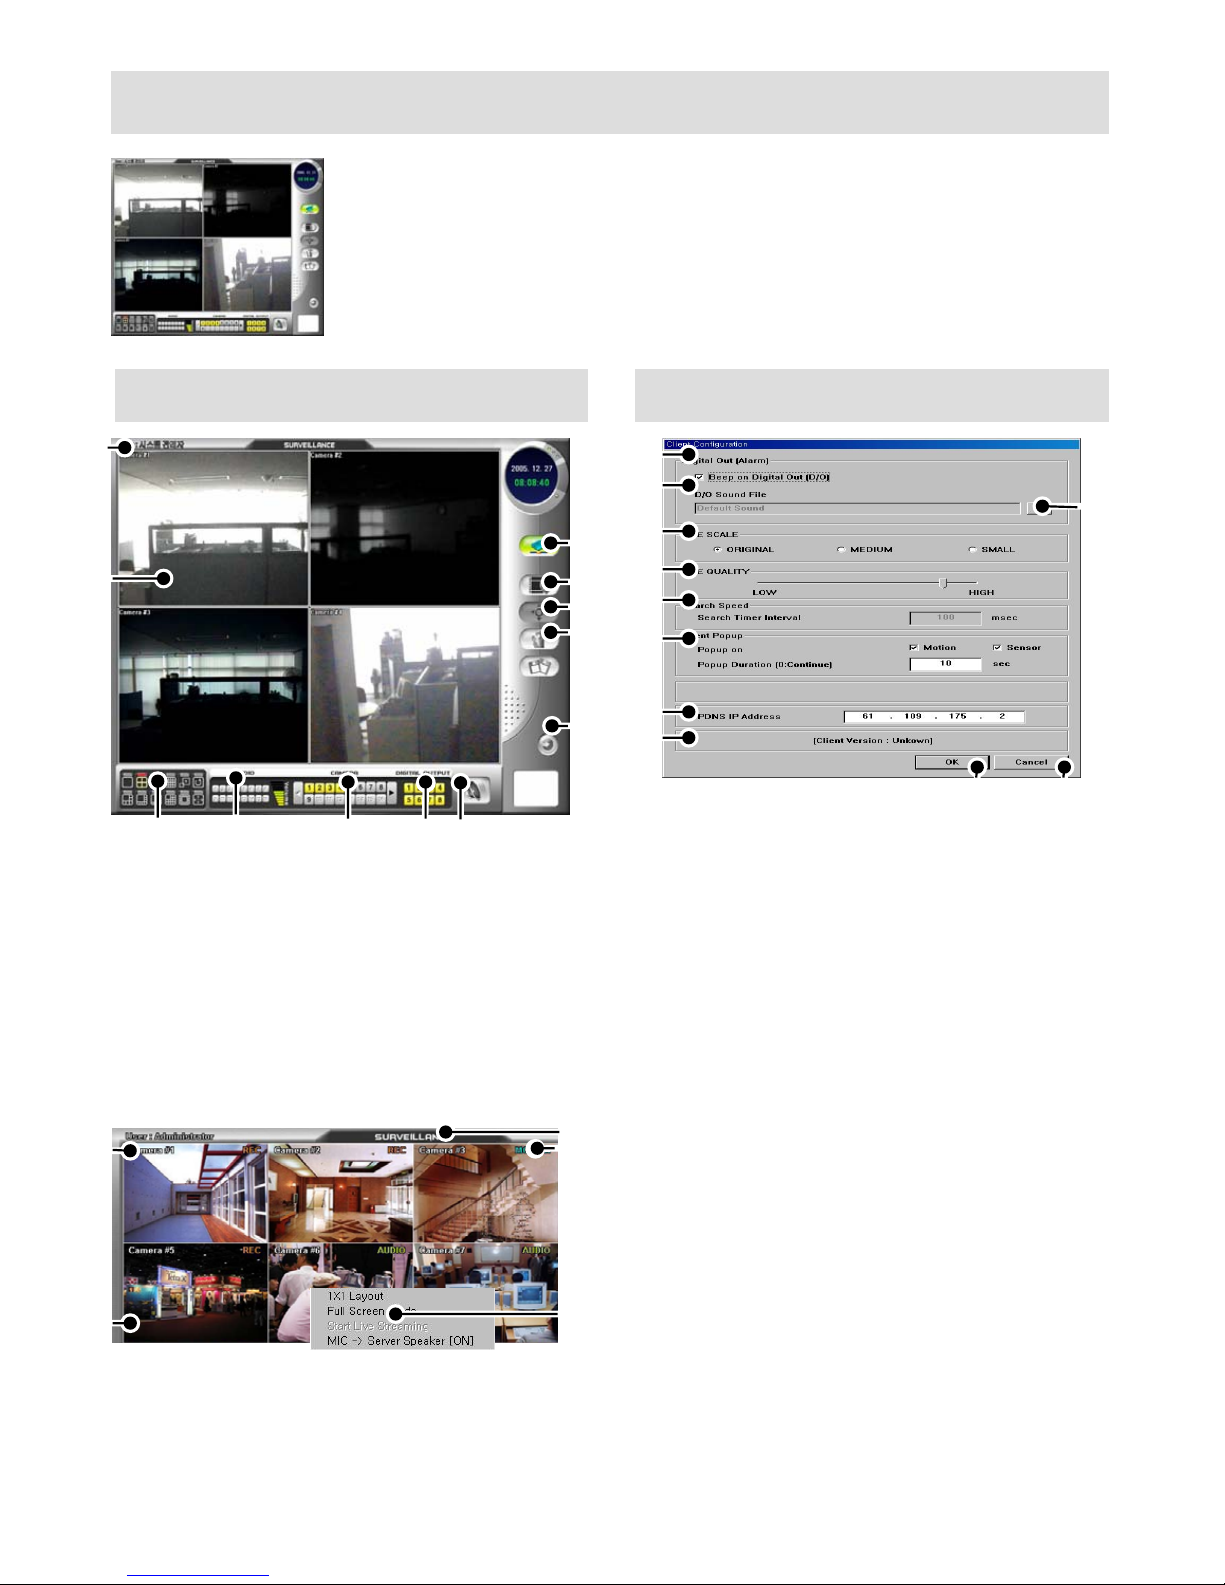
REMOTE MANAGEMENT SYSTEM(CLIENT)
- Remote DVR Server Upgrade
- Max.240fps network transmission speed with DVR Server
- AVI, JPG, BMP Save Available
- PTZ Control Available
- DVR Setup Available
- O/S: Windows 2000, XP
- Two-Way Audio Communication between DVR and Remote site
- Relay (Alarm Out) On/OFF
Client Surveillance
①
②
③④ ⑤⑥
① User level
② Network Live View
③ Screen Division
④ Audio Selection
⑤ Camera Selection
⑥ D/O (Alarm Out) Control
⑦ Network Speed Control
⑧ Connect / Disconnect
⑨ Search Mode (Client Configuration)
⑩ Pan/Tilt ⑪ Setup Mode ⑫ Exit
①
⑦
⑪
③
④
⑧
⑨
⑩
⑫
Client Configuration
①
②
③
④
⑤
⑥
⑦
⑧
⑨
⑩⑪
① Beep On/Off when Alarm
② Show the directory of sound file
③ Select the sound file
④ Select image size for transmission
⑤ Adjust image quality for transmission
⑥ Search Time interval to receive next
image from DVR
⑦ Event Pop up Selection
⑧PDNS IP Address
⑨ Save & Exit ⑩ Cancel
NOTE:
Live Scale: Original, Medium, Small
Original: Recorded Resolution on DVR
Medium: 320*240, Small:160*120
Audio
②
① Camera Name
②Audio Record
③ Show current mode
④ Show recording status
⑤Pop up Menu
- Choose one CH and right mouse click
⑤
Live Quality: Image Quality
If you want faster transmission from DVR
to Client. We recommend you to set live
scale “Small” and Image quality “Low”.
It will be faster than before but the image
quality is not good.
NOTE:
Live Scale is not available on ME,
MP,MPII DVR.
Page 13
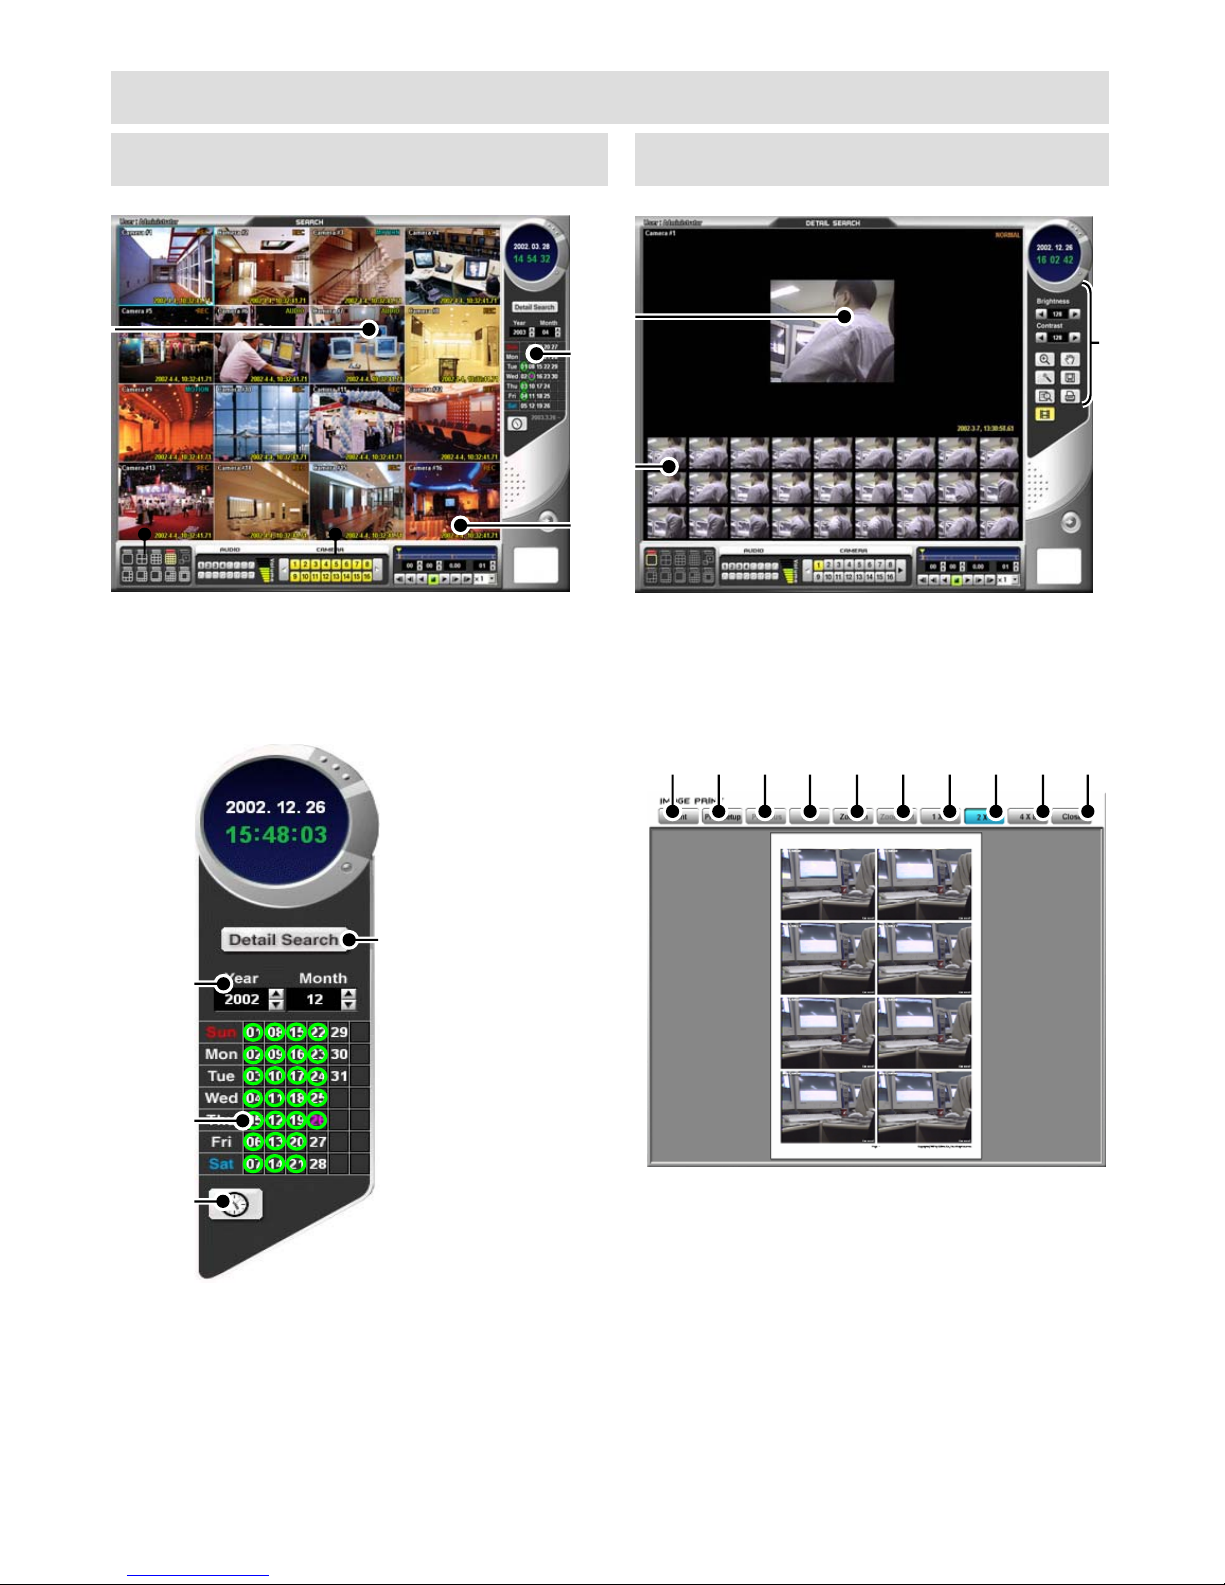
CLIENT SEARCH
Main Mode Detail Search
①
②③
① Playback Image
② Screen Division
③ Camera Selection
④Calendar
⑤ Playback Contro
l
④
⑤
①
③
②
① Playback Image
②Show continuous image
③Detail Search Menu
Zoom, Pan, AVI, JPG, BMP, Print
① ② ③ ④ ⑤ ⑥ ⑦ ⑧ ⑨ ⑩
④
①
②
③
① Select Year / Month
② Show date with recorded data in circle
③ Daylight Search
④ JPG.BMP, AVI Save, Print. Color
NOTE:
JPG.BMP, AVI save is not available on
some modelse.
①Print
② Print Setup
③ Show previous image
④Show next image
⑤Zoom In
⑥Zoom Out
⑦ Preview 1X2 layout
⑧ Preview 2X4 layout
⑨ Preview 4X8 layout
⑩Clos
Page 14
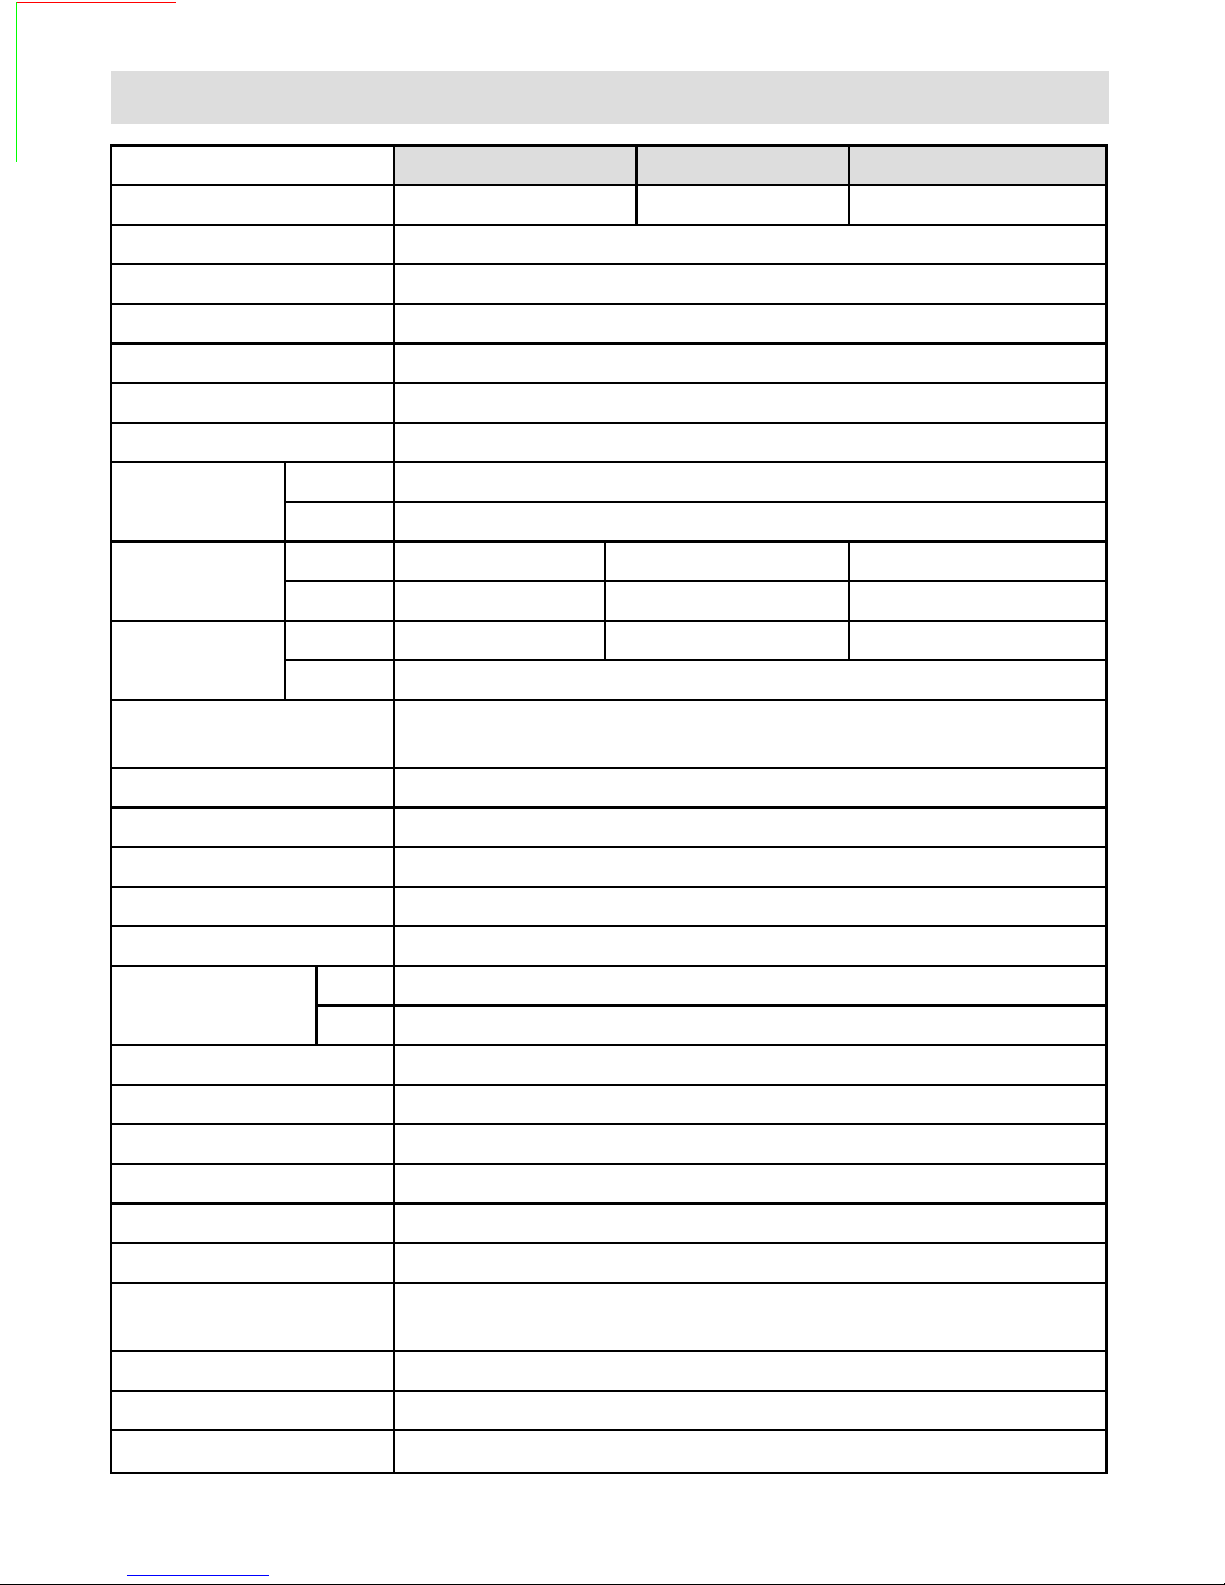
SPECIFICATION
CPU Celeron 2.53GHz Celeron 3.20GHz Pentium IV 3.0GHz
RAM DDR 512Mbytes
LAN 10/100mbyte
O/S Windows 2000
Camera Input 16 (NTSC/PAL)
Mux Out 1
Spot Out 1
MP 5016 MP 6016 MP 7016
Display
Record
Audio
Recording Resolution
Playback Speed Max.480fps for 16CH
Network Speed Max.240 fps for 16CH (Depends on Bandwidth and PC Spec)
File Size 1∼3 / 2∼6 / 4∼12 Kbytes (1 frame)
Compression H/W MPEG 4
Audio Compression ADPCM
Alarm (Option)
NTSC 480 fps
PAL
NTSC 240fps(1ch:30fps)
PAL
Input 8
output
In
Out
120fps(1ch:30fps)
100fps(1ch:25fps)
4
NTSC : 360x240/720x240/720x480(pixels)
PAL : 360x288/720x288/720x576(pixels)
200fps(1ch:25fps)
400 fps
1
16
16
480fps(1ch:30fps)
400fps(1ch:25fps)
16
Event Motion, Sensor
Backup CD/DVD/TERA1500,1500A
Mirroring Yes
Network LAN / Modem
Power 115-230V AC (47-63HZ)
Weight 20 kg
Dimension (mm) 431(w) x 177(h) x 457(d)
Operation Temp. +5 ∼ +40 ℃
Storage Temp. -5 ∼ +60 ℃
Humidity 30 ∼ 80 %RH (Non-condensing)
 Loading...