

Toprace TR - 411 User Manual
Installing controller batteries
Battery charging
Flight conditions
3D flip stunt
Troubleshooting
Flight Preparation
Operating Instructions for Flight and Trimming
Installing the blade guards and landing gear
Installing the drone battery
2.4 G 6-Axis Gyro Quad Copter
User Manual
TR - 411 Drone
Please read all instructions carefully before using.
Please keep the instructions available for future reference.
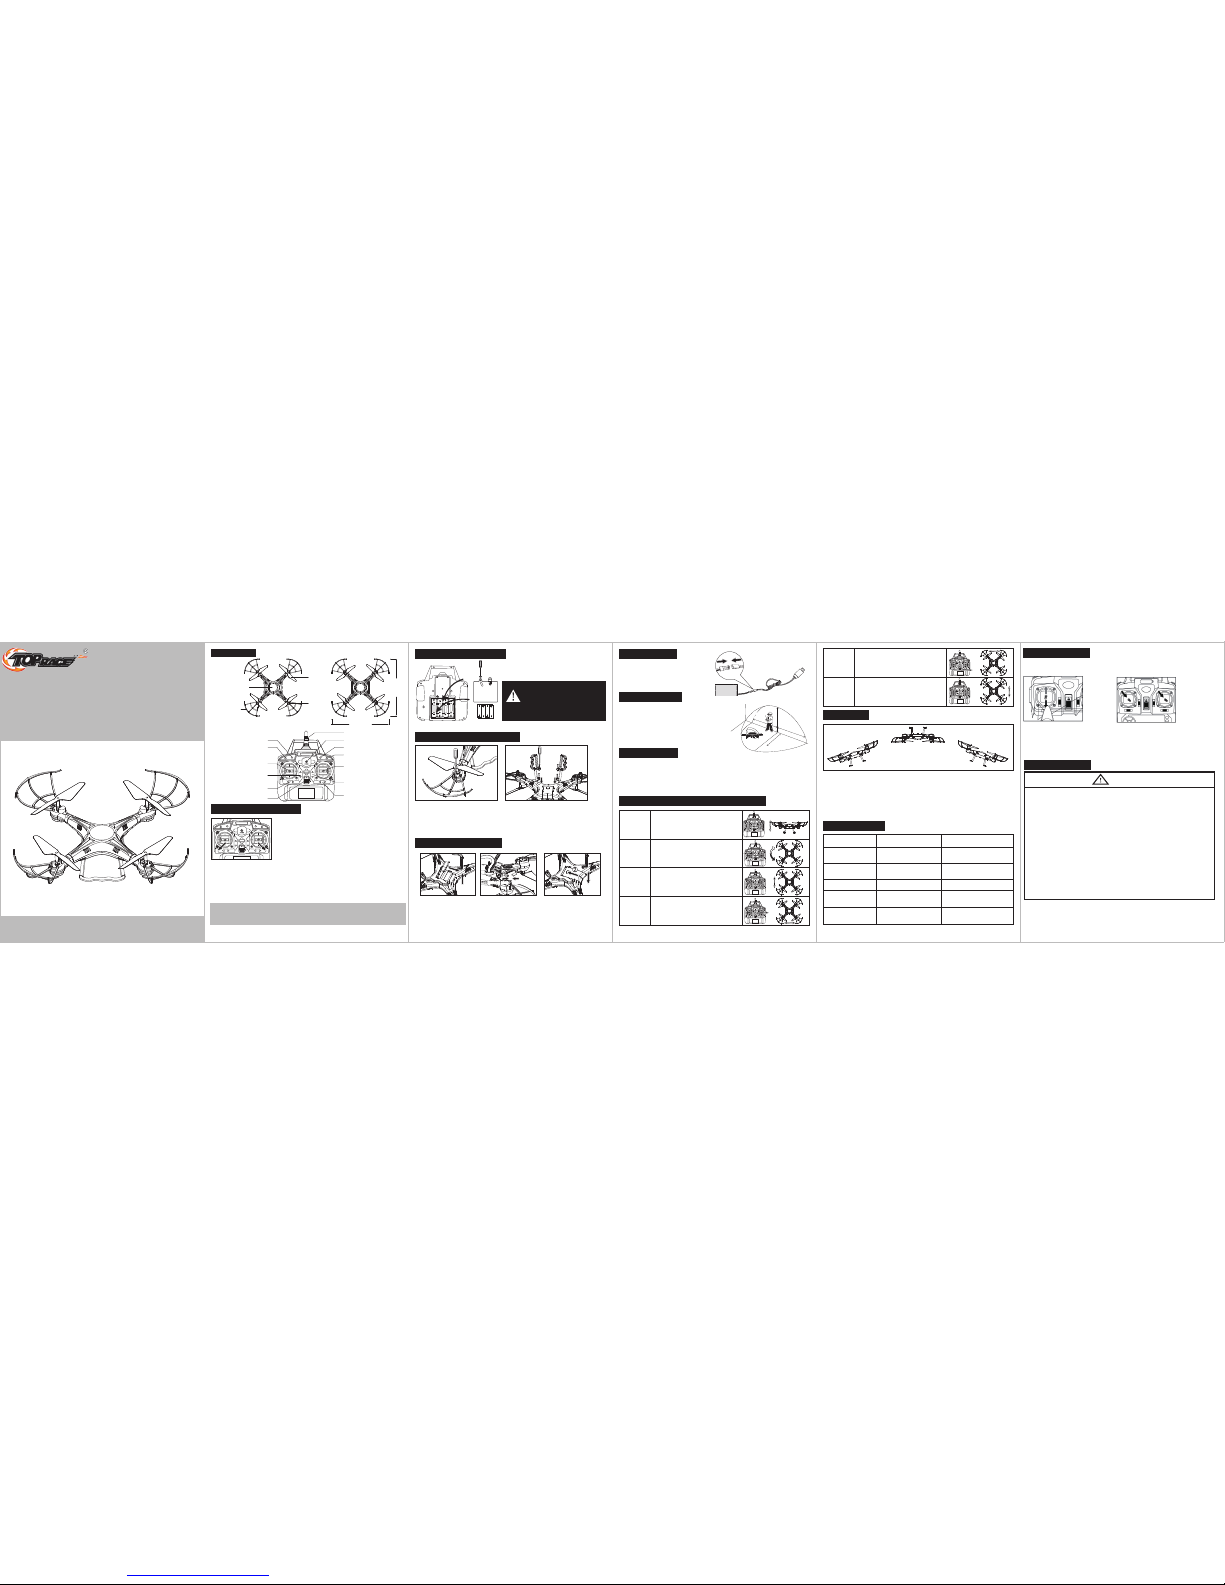
Diagram
shell
Blade guard
Remote control instruction:
blade
motor
Antenna
Power indicatorHeadless mode
Photo/video button
(This function requires a camera.
Camera is not included.)
Turn left/right
throttle handle
Up for acceleration
Down for deceleration
Turn left/right trimmer
Power switch
Return button
Flip button
Forward/backward
left/right side flight
Forward/backward
trimmer
Left/right side flight
trimmer
1. Open the battery cover, install 4 AA batteries
as shown in the diagram.
Side flight
trim
If the drone is drifting left or right during
flight, push the right or left trim
button until the drone stops drifting.
Forward/
backward
trim
If the drone is drifting forward or back
during flight, push the move backward
or forward trim button until the drone
stops drifting forward or backward.
Ascend/
descend
Push the left joystick up for taking off or
going up. Pull the left joystick down to
descend or to land the aircraft.
Problem
The drone is unresponsive.
The indicator is flashing
1. Unit not paired successfully
2. The drone battery is low
1. Perform pairing again(see pg 3)
2. Charge the battery
1. Charge the battery
2. Replace the blades
The drone’s rotors spin,
but it doesn’t take off
1. Battery power is low
2. Blades are damaged
Blades are damaged
1. Blades are damaged.
2. Motor is broken.
The flight sensors are out of
balance after crash
Turn the drone off for 10 seconds,
then pair the device again(see pg 3)
1. Replace the blades
2. Replace the motor
Replace the blades
The drone is shaking
when flying
The drone still moves after
adjusting the trim
After a crash, the drone is
out of control
Cause Solution
Right/left
turning
Push the left joystick to the right or left.
The craft will turn/spin in the direction
that the joystick is pushed.
Forward/
backward
Push the right joystick forward or back.
The craft will go in the direction that
the joystick is pushed.
Side flight
Push the right joystick to the right or left.
The quad will fly to the side in the
direction the stick is pushed.
4 AA batteries
(not included)
Figure 1
Figure 1 Figure 2 Figure 3
Figure 2
Battery cover
318.27mm
318.27mm
1
2
distance:
2.5 meters
distance:
3 meters
distance:
3 meters
distance:
2 meters
distance:
3 meters
3
4
Safety precautions
5
①
②
battery plug fuselage plug
①
Recycle the toys / batteries according to all local laws.
1. This product is intended for users over 14 years old
2. Please keep the quad a safe distance from people and animals to
prevent injury from the rotating blades.
3. Never use this product near an airport area to prevent electromagnetic
interference. Do not use this product in areas that prohibit the use of
remote control products.
4. Never look directly into or shine the light beam into the eyes.
5. Motors may become hot during use - avoid touching them.
6. Refer to instructions on pg 2 when taking out / installing batteries.
7. Never try to recharge non-rechargeable batteries.
8. Always charge batteries under adult supervision.
9. Install batteries with the correct polarity as shown on pg 2.
10. Always remove exhausted/used up batteries from the controller.
11. ONLY USE the TopRace provided USB charger to charge batteries.
12. Before cleaning the unit, disconnect everything from the charger.
13. Before flight, check wires, plugs, etc. Replace them if damaged.
Warning
1. Install the batteries as shown.
2. Never mix new batteries with
older ones.
3. Always use the same type of
batteries together.
Aircraft function introduction
Connect the USB charger
to the battery plug
14+
Ages
If you have questions about your TR-411, visit us at www.TopRace.com
or send us an email at Sales@TopRace.com.
12.5in
12.5in
- Turn the power on the quad copter and place it on a flat surface.
- Next, turn on the controller, pull the throttle stick back. LED Indicator
will flash from slow to fast. Now, push throttle stick forward then back
again.
- The RC controller will “beep” and LED will remain solid. This indicates
that the TR-411 is paired with your controller.
- A Low Battery warning will begin flashing when your battery is getting
too low. To avoid damage, bring the craft back immediately and recharge.
Use a Phillips screwdriver and install a blade
guard at each of the four blades as shown in
Figure 1 above. Tighten the screws provided.
Insert the ends of each landing gear(tripod arms)
into the holes in the body of the aircraft as
shown in Figure 2 above. Tighten the screws
using a Phillips screwdriver.
Open the battery cover as
shown in Step 1 and 2 above.
(Slide it out and then lift up)
Next, carefully connect the
battery plug to the fuselage
plug as shown above.
Replace the battery cover as
shown in Step 1 and 2 above.
(Push down and slide it back in)
To charge, connect the battery to USB charging
plug as shown. The Red LED in the USB plug
will turn on. Once the battery starts charging, the
LED light turns off. When the battery is fully charged
the LED light comes back on to indicate charging is
complete.
- Only fly outside when the weather is clear with no wind.
- To insure control and avoid damage to your TR-411, never
fly in wet and windy weather.
- Always make sure you have a clear area for flight. When
flying inside or outside, do not fly near obstacles, people
or pets.
Note: Minimum space for safe flight is have at least
9 feet to either side and in front of you and
8 feet above you.
-
The maximum distance for controlling the TR-411 drone is 300 feet. Never try
to fly beyond that distance.
- When the battery is installed, the indicator light will be flashing. Place the drone on a flat surface and
begin pairing it with the controller.
- To pair, pull the throttle stick to the bottom and turn on the controller. Next, push the throttle stick to the top
and then back to the bottom. The controller will “beep” once and the indicator stops flashing. This indicates
devices are successfully paired.
The TR-411 can perform a variety of flips/stunts. If you press the Flip Button, the controller will “beep” and
the drone will automatically flip forward. If you press the Flip Button and the Speed Button, the controller
will “beep” three times. Now, you can manually control the direction of your flip by pushing the right
joystick in the direction you want.
NOTE: When in manual flip mode, you must push the right joystick in more than a 15 degree angle, in
order for the drone to flip in that direction. If you move the stick at less than a 15 degree angle, the drone
will simply fly in that direction.
Visit us at: www.TopRace.com
Headless Mode: : refers to the copter flying according to the transmitter control on ly, regardless of which way
copter is fa cing. For example: if the front of the copter is facing to the side,if it is put in Headless Mode and th
e
control lever is pulled inward, the copter will fly toward you.
This is helpful in retrieving the copter if it is beyond
your sight.To activate Headless Mode,
press the Headless Mode button as shown until you hear two beeps.To
remove headless mode, press the button again.
One Key Return Mode: If copter is within range of the controller, once the One Key Return button is presse
d, the
copter will return to the transmitter. To remove One Key Return, press the button again.
NOTE: ONE KEY RETURN and HEADLESS MODE will not work properly if you have moved or changed
positions from the beginning of your flight. The Quad Copter will only remember your initial position and will
assume that as the correct spot to return to. In this event, manually return the copter and begin a new flight.
Resetting the Drone
If the Quad Copter is flying erratically, it can be corrected by resetting it to its defaults.
To reset, first turn on the transmitter and then power up the drone. Now, steps below:
Next, the TR-411 LED will begin
slowly flashing. Now, push the
throttle stick all the way forward
and then all the way back. As
shown above. The LED light will
stay lit and stop flashing.
Finally, place the drone on a level surface. Now,
push both levers to the bottom right corner, as
shown above. The LED lights will begin flashing
rapidly. After a few seconds, the lights will
return to solid idicating that the TR-411 has been
reset. If this does not work, repeat the process.
 Loading...