

TopLite Merlin-C10 Operation Manual, Maintenance & Troubleshooting
Merlin ®-
C10
Toplite International
Operation Manual,
Maintenance & Troubleshooting
Copyright 2009 TopLite International
Table of Contents
Introduction
Page 2
Section One
Page 3
Overview and Nomenclature: Exploring Your Merlin-
C10
®
Section Two
Page 8
Un-Packing - Setting up -
Fuses – Focusing & Testing Your Unit
Section Three
Page 9
L.E.D. Display (Reading and Functions)
DMX Addressing - Setting Up - Testing Operation
Choosing An Operating Mode
Section Four
Page 14
Care & Maintenance – Belts – Vents – Fans – Fuse
Cleaning - Operational Temperature Ranges
Section Five
Page 15
Troubleshooting Your Merlin-C10
Merlin ®-C10
Toplite International
Introduction
Thank You for Purchasing the TopLite Merlin-
C10
®!
In this manual, you will find everything you need to set up, operate, maintain and troubleshoot your
Merlin. If you have any further questions, stop by our website at: www.toplt.com for contact
information, frequently asked questions and larger-scale product support.
About Your Merlin-
C10
® ’s Shipping Box
After removing your Merlin-C10 from its shipping box, DO NOT discard the box or the packing
foams inside! Place the foam inserts and plastic bags back inside the box and store them in a cool,
dry place. They may well come in handy and save you some money later in the unlikely event that
you should have to ship or return your Merlin for service or should any warranty issues arise.
Shipping your Merlin-C10 in anything other than the original, intact factory shipping box and
packing materials or a professional, custom-built flight/road case will void all warranties! We will
NOT accept Merlin’s at our factory or at any authorized Dealers in any other type of container, crate
or box. The unit will be shipped back immediately, un-opened, at the sender’s expense. NO
EXCEPTIONS! In fewer words: Keep the box and the packing materials!
WARNING!
The Merlin-
C10
® is for INDOOR use only!
Any other use could void the warranty and/or damage your unit!
Recommended Operating Temperature Range: -20 to +45 Degrees Celsius
Before plugging in and using your Merlin-C10, it must first be prepped and lamped. Please make
yourself acquainted with the Merlin’s nomenclature and all of its parts and features on the following
pages (Section One) before you begin
.
Inventory of Your Merlin-
C10
® Box
Inside this box you will find:
1. A 84-270-volt, 2 amp Merlin-C10 Moving Light
2. A 1.5 meter UL/CE-listed a/c power cord
3. Include One LED 10-watt Lamp
4. 2X Clamp Mounts
2
Section One
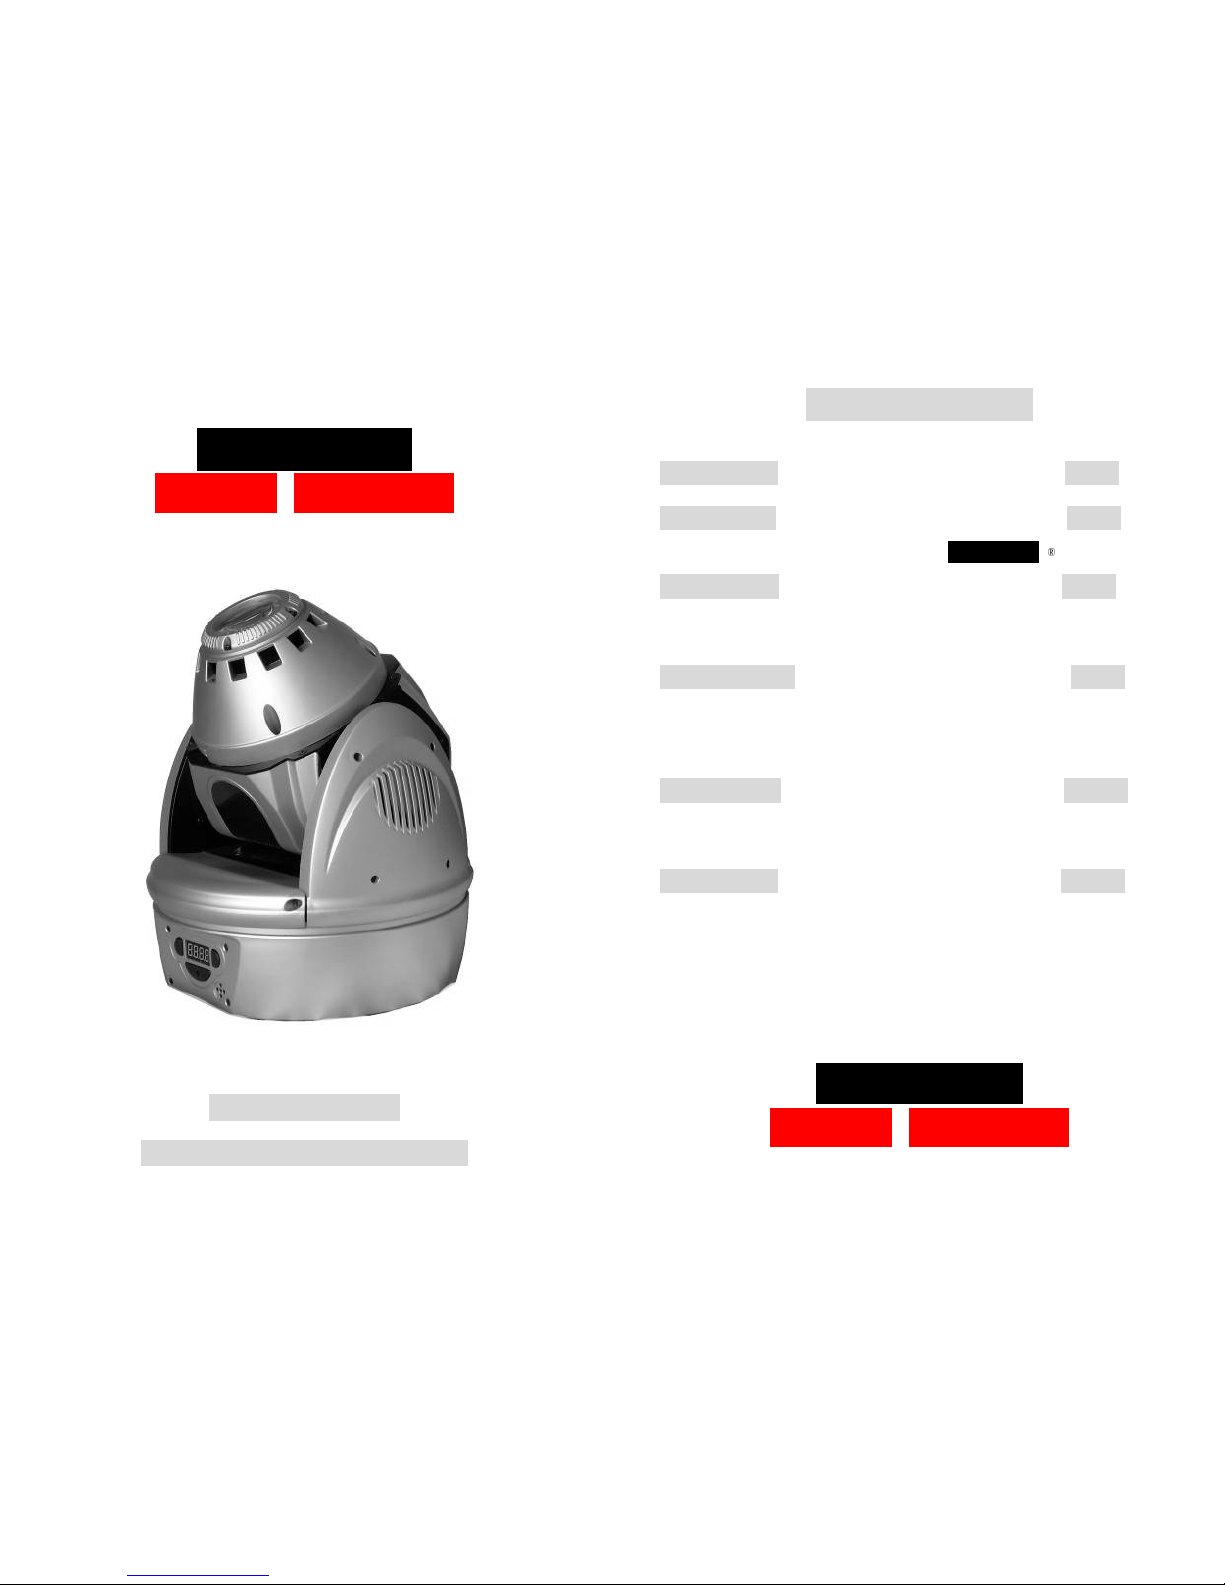
Overview And Nomenclature Of Your Merlin-
C10
®
* Gobo wheel: 7 gobos + open,
* Manual 10 or 18 degree zoom
* 8 colors + open, 8 split colors
* Strobe, Full Dimming and Blackout
* Sound-Active, Stand-Alone, Master / Slave, 9 DMX Channels, Pan / Tilt Invert
* Pan: 520° Tilt: 245°
* Lamp: LED 10W in White.
* Size (mm): 300 x 250 x 250
* Weight: 4.8 kg
3
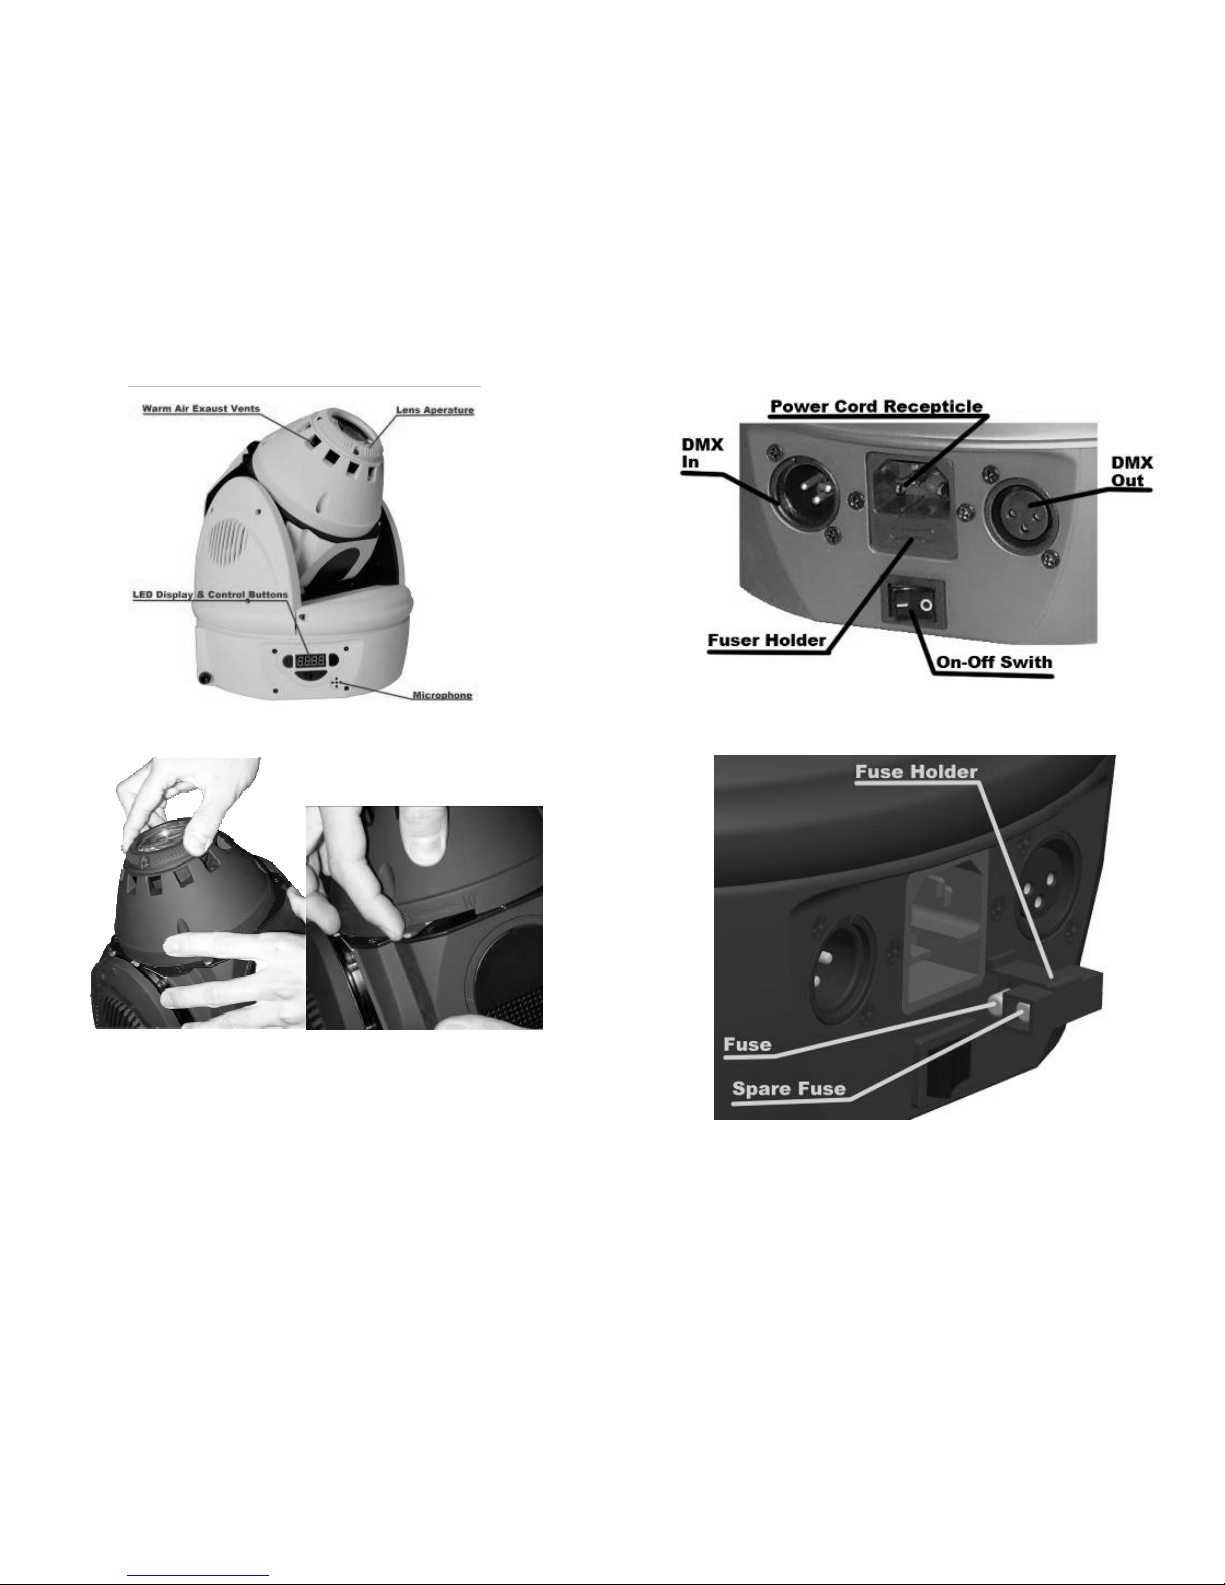
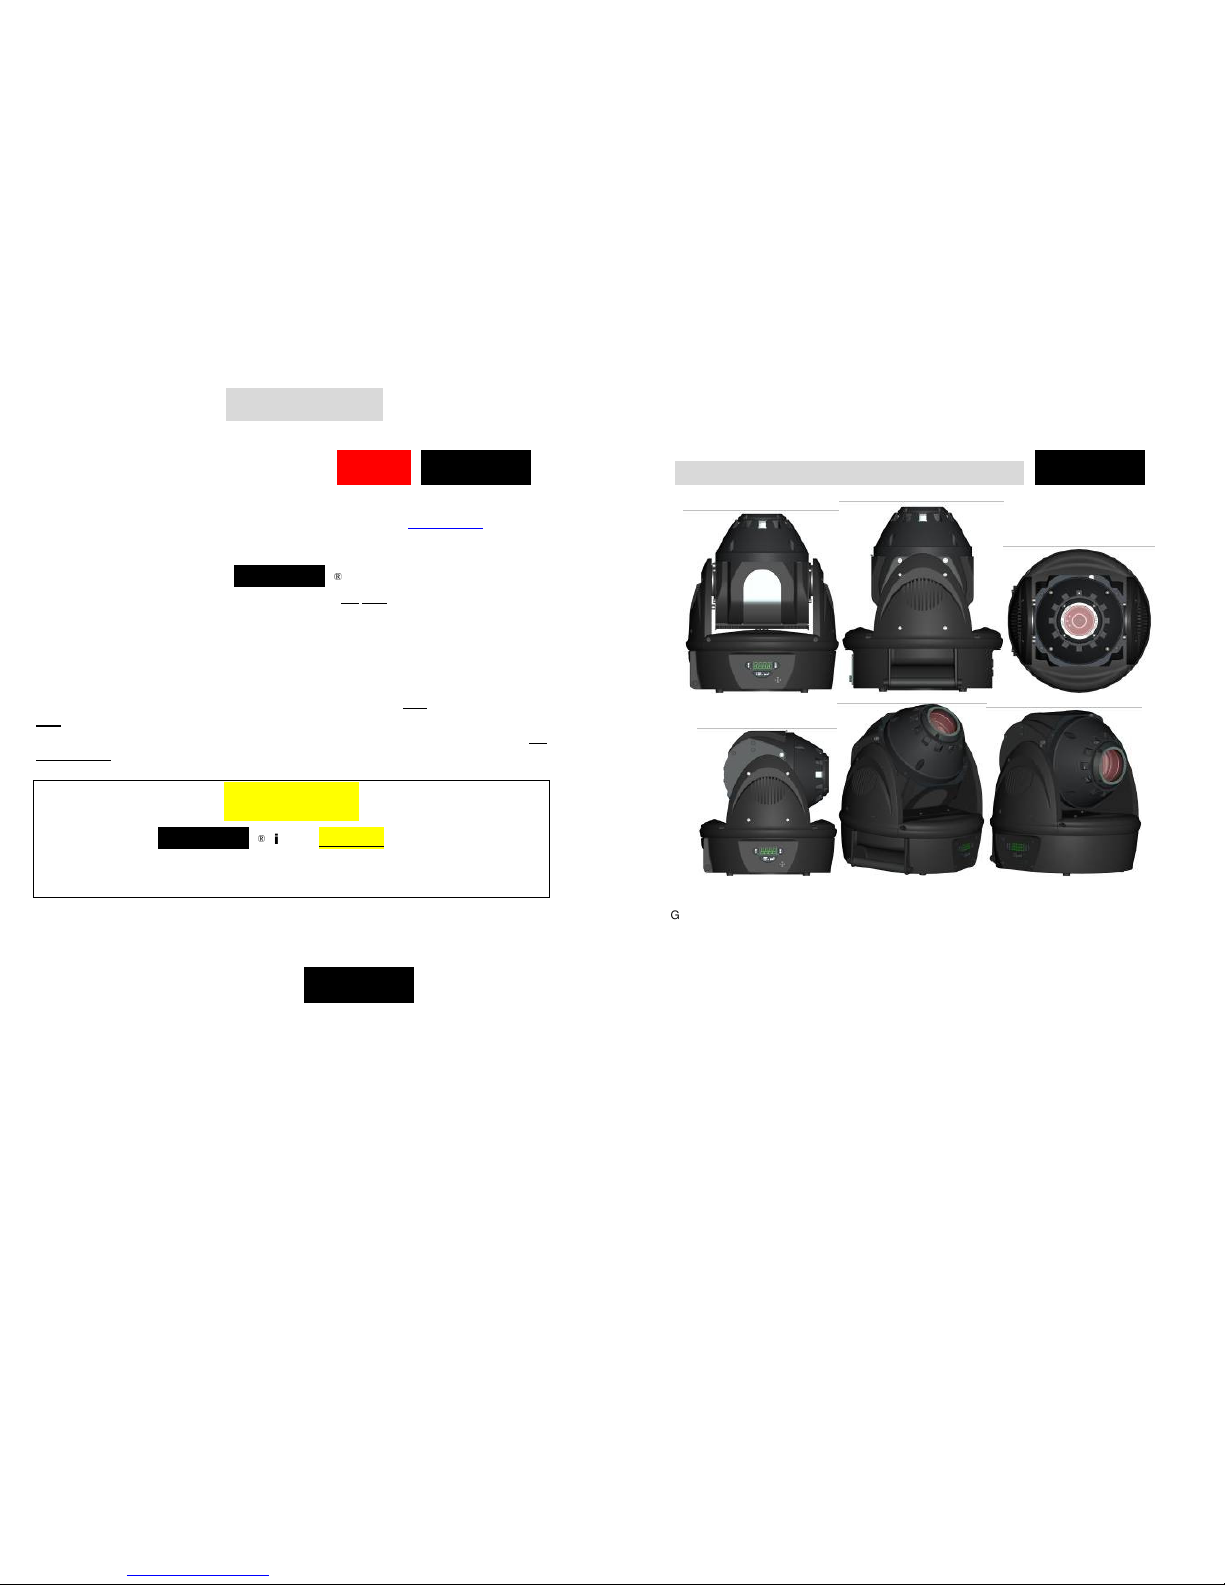
Figure 1. Display-Side View
Figure 2. The Lens Aperture and Focus Assembly
The Lens-Focus Ring can turn in either direction in order for you to focus the Merlin-C10 far or near.
The small arm at the base of the aperture cone is for manually selecting the zoom for either 10 or 18
degrees. Simply swing it left or right to the desired degree of divergence and it will stay in place.
4
Figure 3. Close-up of Power/Data Side
Figure 4. Fuse Holder Assembly
5
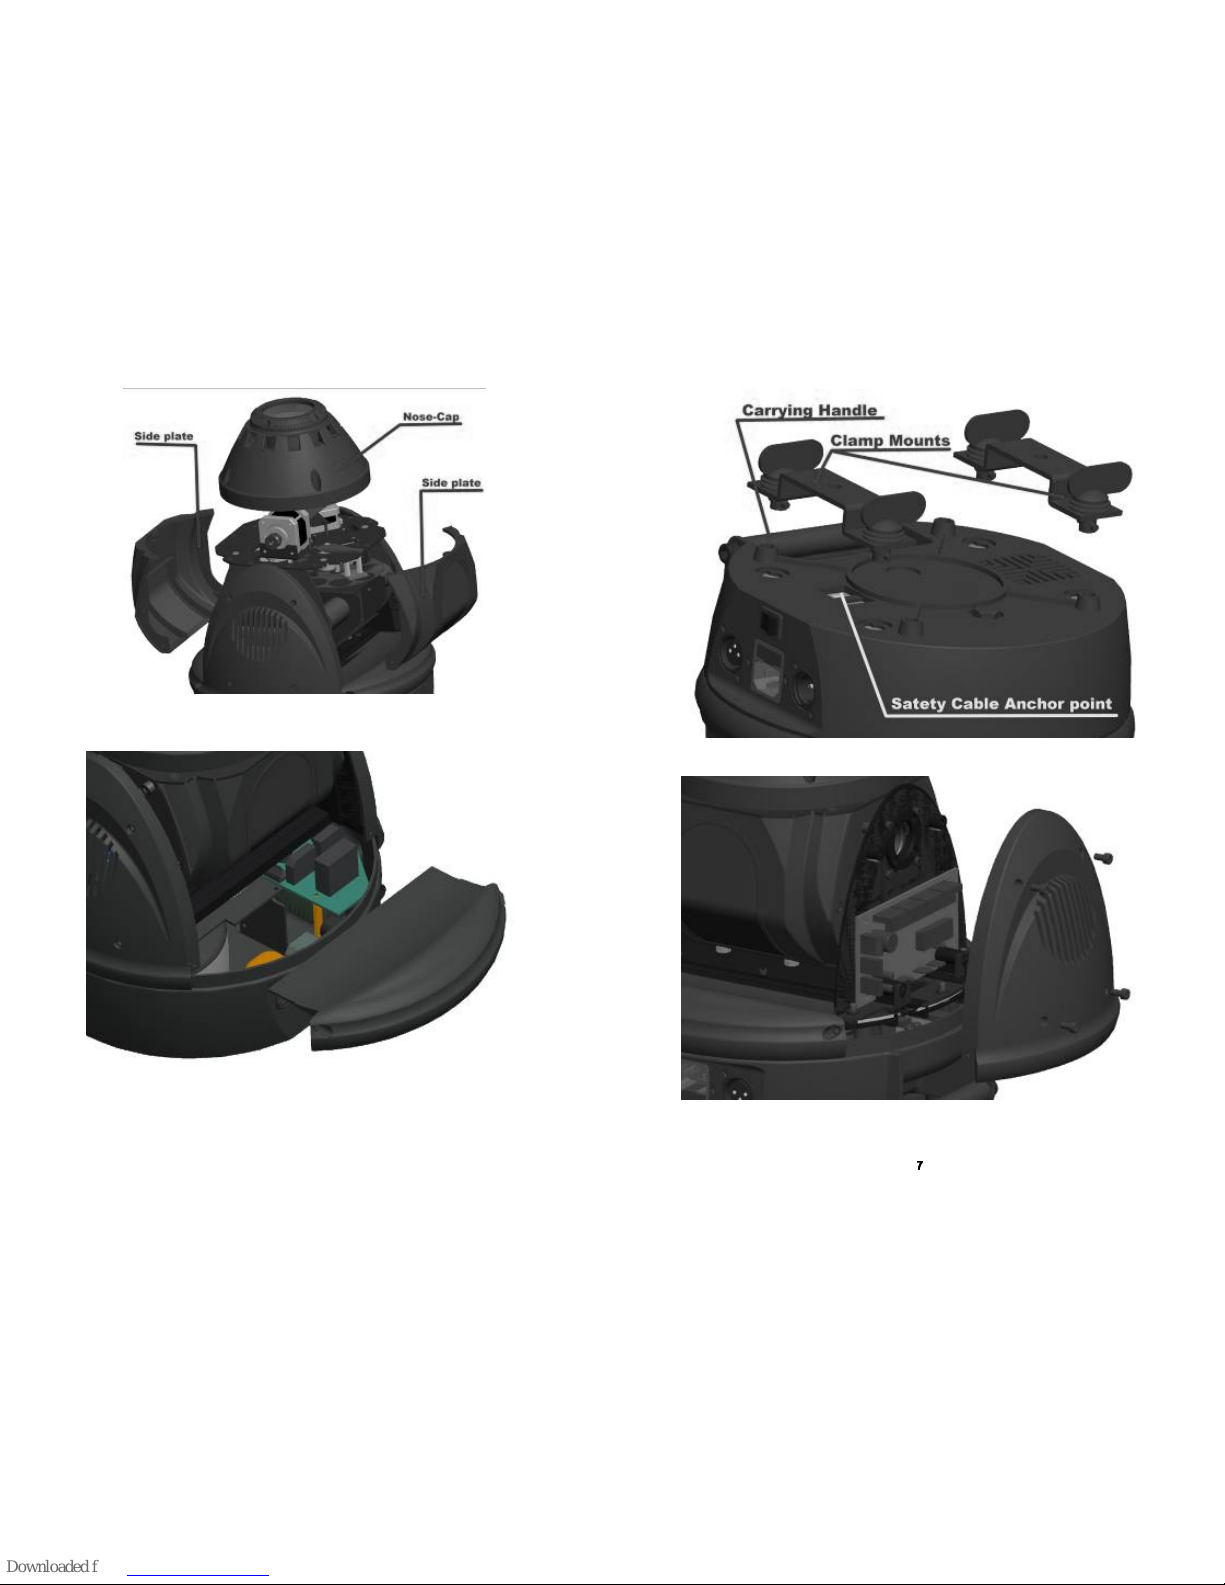
Figure 5. Side Plate & Nose-Cap Removal for Cleaning Vents, lenses and
checking the Y-axis Belt, the Dimmer/Shutter and the Color and Gobo Wheels
Figure 6. Removing the Base Access Cover s for Cleaning and Checking the X-Axis Belt.
6
Figure 7. Clamp Mounts, Carrying Handle and Safety Anchor
Figure 8. Removing the Y-Axis Covers for Cleaning
7777

Section Two
Setting Up Your Merlin
-C10
®
The Lens/Focus Assembly
and Focusing your
Merlin
-C10
® for the First Time.
Remove the clear, thin protective film from the lens piece and discard. Clean the lens with a
clean, dry optics cleaning cloth available at any eye-ware/sunglasses shop. After you have set up
your Merlin, place it in “TEST”-“GoBo” mode (See section 3 of this manual) and adjust the focus
of your Merlin against a far wall or surface (See figure 2). Then return it to a regular operating
mode.
The Fuse Holder and Replacing Fuses
Your Merlin is shipped with a 84- 270 volt, 2 amp, fast-blow fuse already installed in the holder.
We have also included a spare fuse, conveniently located right inside the holder! Should you
need to replace a fuse, we recommend you quickly replace the extra fuse for next time! Then you
will never be caught without one! To swap fuses, first make sure the power switch is in the “off”
position or that the Merlin is unplugged. Then, simply pull out the holder by pulling it free with a
fingernail, small knife or flat-head screwdriver; remove the old fuse, discard and then snap in the
fresh fuse. (See figures 3 & 4) Push the holder back into the Merlin and you are ready to power
the unit up! If the new fuse should blow upon powering up the Merlin, there is a bigger problem
and you should have the unit serviced by a qualified TopLite technician.
8
Section Three
Display Functions and Operation
Figure 9. The LED Display Section
THE LED DISPLAY
This Panel allows you to “talk” to your Merlin-C10; set it up, control it, operate it and even test it in
many diverse ways. For example: You can assign it a DMX address, set it to run in many different
“modes” or test its different functions (I.e. Color wheel, Gobo wheel, etc) Understanding how it
works and what it can do will make your experience with, and ability to utilize the Merlin-C10 to its
fullest potential, a snap!
Power Up & First Focus
The first time you power up your Merlin-C10, it will automatically home itself, strike the lamp and go into
a factory default “DMX Address” mode. While it powers up, the display will read the title cartoon:
“TOPLILTE”. After it is homed and the lamp is struck, the display will read: “ ”. Meaning it has been
addressed at channel one at the factory.
If receiving a good DMX signal, the purple/UV LED DMX signal indicator will be lit.
In order to focus your Merlin-C10 for the first time, press the “ ” key and scroll through the menu
using the “ ” or “ ” keys until the display reads “ ”. Press the “ ” key and then scroll
through the test modes using the “ ” or “ ” keys until the display reads: “ ”. Press “ ”.
The Merlin will move into a position and begin going through the gobos. Gently move the head manually
with your hands until it is aimed at a far wall or surface and then turn the focus ring (See Figure 2). This
will allow you to focus the image. Doing this before you hang your Merlin-C10 for the first time is a good
practice! Your Merlin is now ready to be hung or placed and set into any operating mode you wish, such
as “Stand Alone-Sound”, “DMX Address” or “Slave” etc. These functions, and how to set them, will be
covered in this section.
9
DMX Addressing/Address Mode
After focusing your Merlin-C10, you may wish to cable it up to a DMX controller and address it. To do
that, you must first understand that your Merlin-C10 uses 9 channels of DMX per “Address”. That is to
say that each Merlin has 9 channels of control and so the first Merlin-C10 in your system will have the
starting DMX address of “
”, the second will have the starting address of “ ”, and so on.
To set the DMX address of your Merlin-C10, press the “ ” key and scroll through the menu using the
“ ” or “ ” keys until the display reads: “ ”. Press the “ ” key and then raise or lower the
“address” value (or starting channel number) using the “ ” or “ ” keys until you have found the correct
number. Press the “ ”. key and your Merlin-C10 is now addressed.
Note that the 4 small “Value-Marker” LED’s on the display will begin to blink as soon as you
have changed the value from where you started. This is to signify that you have made such
a change and after you press the “ ” key, they will stop. This is useful if you happen to
forget which channel or other value you started from and want to return to that channel or
other value because you have decided not to change it. These LED’s will blink anytime you
make a change anywhere in any menu and stop blinking if you return to the original value or
if you press the “ ”key and select that new value.
Each DMX channel or “handle” coming from a controller has 255 “increments” of power within
that “handle”. That channels function and the things triggered by the ascending increments
within that channel for your Merlin-C10 are listed here:
Channel 1: Moves The Merlin-C10’s X-Axis
Channel 2: X-Axis 16 bit.
Channel 3: Moves The Merlin-C10’s Y-Axis
Channel 4: Y-Axis 16 bit.
Channel 5: Y and X-Axis Speed 0 is normal or “fast” and the Merlin-C10 will scan slower as you
increase the value towards 255, with 255 being the slowest scan rate possible.
Channel 6: Color Wheel 0-15 (open-no Color) 16-119 (individual Colors, one through eight)
120-240 (Half-Colors) 241-255 (Color scroll, slow to fast)
Channel 7: Gobo Wheel 0-23 (open-no-Gobo) 24-191 (individual Gobos, one through seven)
192-255 (Gobo scroll, fast to slow)
Channel 8: Dimmer Paddle 0-10 (closed) 11-135 (10 to 100 open dimming) 136-249 (Strobe,
Fast to Slow) 240-255 (open)
Channel 9: Reset/Home.
0-127 (nothing). 128-191 (wait 5 seconds and Merlin-C10 will home/reset all of its parameters:
Position, Color, Gobo and Shutter.) 191-255 (nothing).
This Channel is especially important as it allows you to “home” or reset your “Merlin-C10”,
should it begin to act strange due to corrupt DMX data, dirty position sensors, local power
failure or for any other reason
10
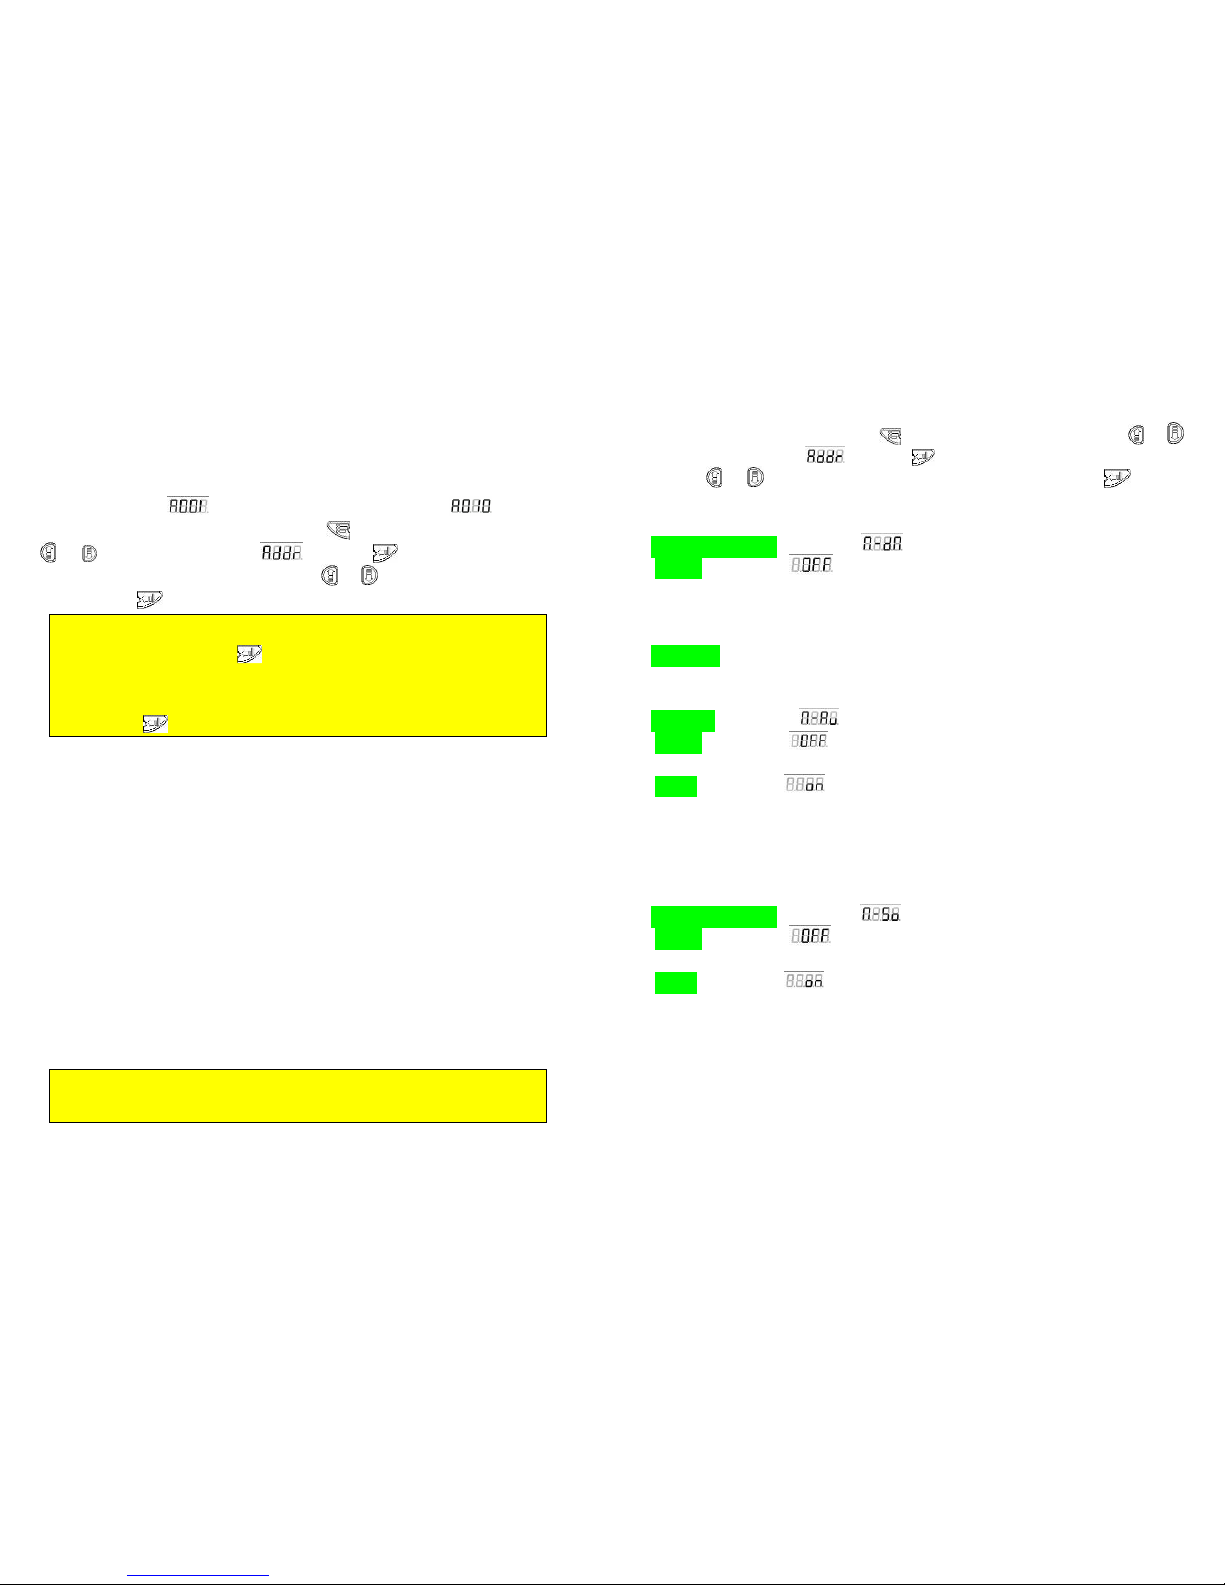
Operating Mode
This section of the menu allows you to operate your Merlin in many diverse ways. To enter the operating
mode section of your Merlin-C10, press the “ ” key and scroll through the menu using the “ ” or “ ”
keys until the display reads: “ ”. Press the “ ” key and then scroll through the different modes
using the “ ” or “ ” keys until you have found the mode you wish to use. Press the “ ” key when
you have found the mode you wish to use. The modes, what they do and the LED displays for each mode
are as follows:
“Master” or “DMX” Mode Display reads: “ ”
“Standard” Display reads: “ ”
This is the mode for using DMX control. After selecting this mode, you must also “address” your
Merlin-C10 accordingly (See Page 12). This is also the “Master Mode” in which this particular unit will be
the “Master” of a chain of “Slave” units all doing the same thing. (See Below)
“Slave Mode”
When any other unit which this particular unit will be the “Master” of a chain, your this Merlin will Slave
Mode and doing the same thing follow the “Master” of a chain. If all of this chain are same address.
“Auto Mode” Display reads: “ ”
“Standard” Display reads: “ ”
This is the factory default setting, no Auto program.
“Inverted” Display reads: “ ”
We have programmed a small, multi-stepped program into each Merlin-C10. Without any outside control,
your Merlin-C10 unit will go through all of its ranges of Motion, Color, Gobo and Shutter repeatedly. At this
time, and on this model, this function is not re-programmable and cannot be changed by the end user.
And This is also the “Master Mode” in which this particular unit will be the “Master” of a chain of “Slave”
units all doing the same thing.
“Sound-Activated Mode” Display reads: “ ”
“Standard” Display reads: “ ”
This is the factory default setting, no sound-activated.
“Inverted” Display reads: “ ”
This is the sound-activated, “Stand-alone” mode. Each Merlin-C10 is equipped with a highly-sensitive
microphone (See Figure 9.) It will react to deep bass or loud sounds by going through all its different
abilities. Each Merlin-C10 will act differently, so you won’t have a bunch of heads doing the exact same
thing. This mode is useful if you just want to have some fun with your Merlin-C10 and don’t want to set up
a controller and miles of cable.
And This is also the “Master Mode” in which this particular unit will be the “Master” of a chain of “Slave”
units all doing the same thing.
11
 Loading...