

Page 1
Portable Sewing Machine
Innovative Products to Make Your Life Easier
Model SP-403
Owners Manual
x Sews Durable LockStitch
x Handheld or Table-Top Operation
x Operates on 4AA batteries (not included)
Page 2

Dear Valued Customer:
Thank you for purchasing your Portable
Sewing Machine from our rapidly growing Sew Pro line. Our firm
takes pride in providing products with quality and value while
offering excellent service.
The Portable Sewing Machine will become a
valuable tool that will keep your family’s wardrobe in shape. Although not designed to make complicated clothing from scratch,
it provides a durable LockStitch to complete your basic mending
jobs quickly and with a quality stitch. This machine was
specifically designed to be lightweight for easy portability. We
are confident you will enjoy the time you spend using our
product.
Top Innovations, Inc. would like to invite you to take advantage of
our customer support web site at www.topinnovations.com
. Here
you will find additional information about the many other exciting
Sew Pro and Steam Fast products that are available. We take
pride in our quality line of garment care and steam cleaning
products and hope you will visit our web site to review our
product line.
Benny Lee
Chairman & CEO, Top Innovations, Inc.
1
Page 3

CONTENTS
SAFETY INSTRUCTIONS 2
PARTS LISTING 3-4
ACCESSORIES 4
WINDING A BOBBIN 5
THREADING THE BOBBIN 6
INSERTING THE THREADED BOBBIN CASE 6
REMOVING BOBBIN & BOBBIN CASE 7
THREADING THE MACHINE 8
RAISING THE BOBBIN THREAD 9
ADJUSTING THREAD TENSION 10
START TO SEW—HANDHELD OPERATION 11
START TO SEW—TAPLE-TOP OPERATION 12
SECURING A SEAM; DARNING 13
TURNING A SQUARE CORNER 14
CHANGING NEEDLES 14
HOW TO REPLACE THE SLIDE PLATE 14
PERFORMANCE CHECKLIST 15
IMPORTANT SAFETY INSTRUCTIONS
WHEN USING THIS MACHINE, THE FOLLOWING BASIC SAFETY
PRECAUTIONS SHOULD ALWAYS BE FOLLOWED:
x DO NOT USE WITH BENT NEEDLE.
x WHEN SEWING, KEEP FINGERS AWAY FROM ALL MOVING
PARTS. SPECIAL CARE IS REQUIRED AROUND THE NEEDLE.
x CLOSE ATTENTION IS NECESSARY WHEN THE MACHINE IS
USED BY OR NEAR CHILDREN.
x WHEN THREADING OR CHANGING A NEEDLE, ALWAYS
SWITCH OFF THE POWER SUPPLY.
x NEVER PRESS OR PULL THE NEEDLE ARM DIRECTLY, AL-
WAYS USE THE HAND WHEEL TO MOVE IT.
2
Page 4
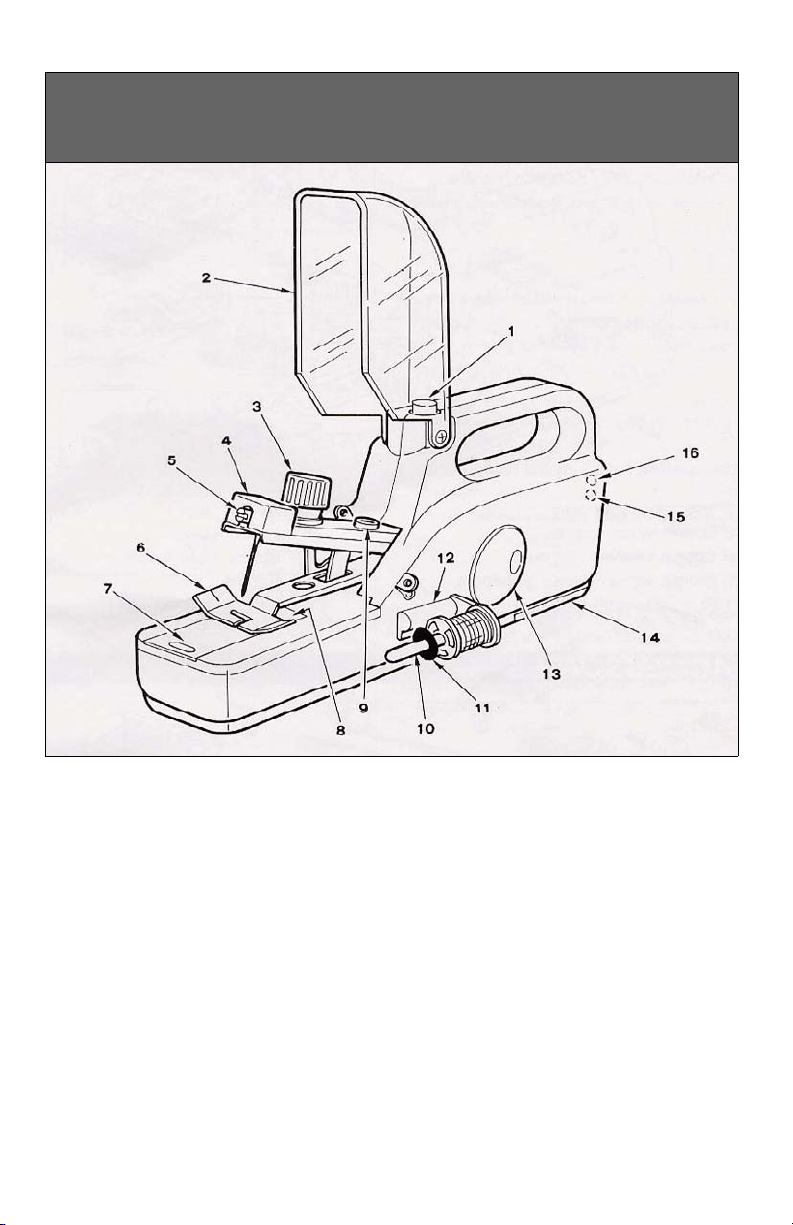
PARTS LISTING
1. On/Off Switch 11. Spool Holder Ring
2. Dust Cover 12. Spool Stand
3. Thread Tension Dial 13. Hand Wheel
4. Needle Arm 14. Battery Access
( 4 AA Batteries not included)
5. Needle Clamp Screw 15. AC Adaptor Socket
6. Presser Foot Rating: Input: 120V/ 60Hz
7. Slide Plate Output: 6 VDC, 600mA
8. Needle Plate 16. Foot Switch Socket
9. Pretension Stud
10. Spool Pin
3
Page 5
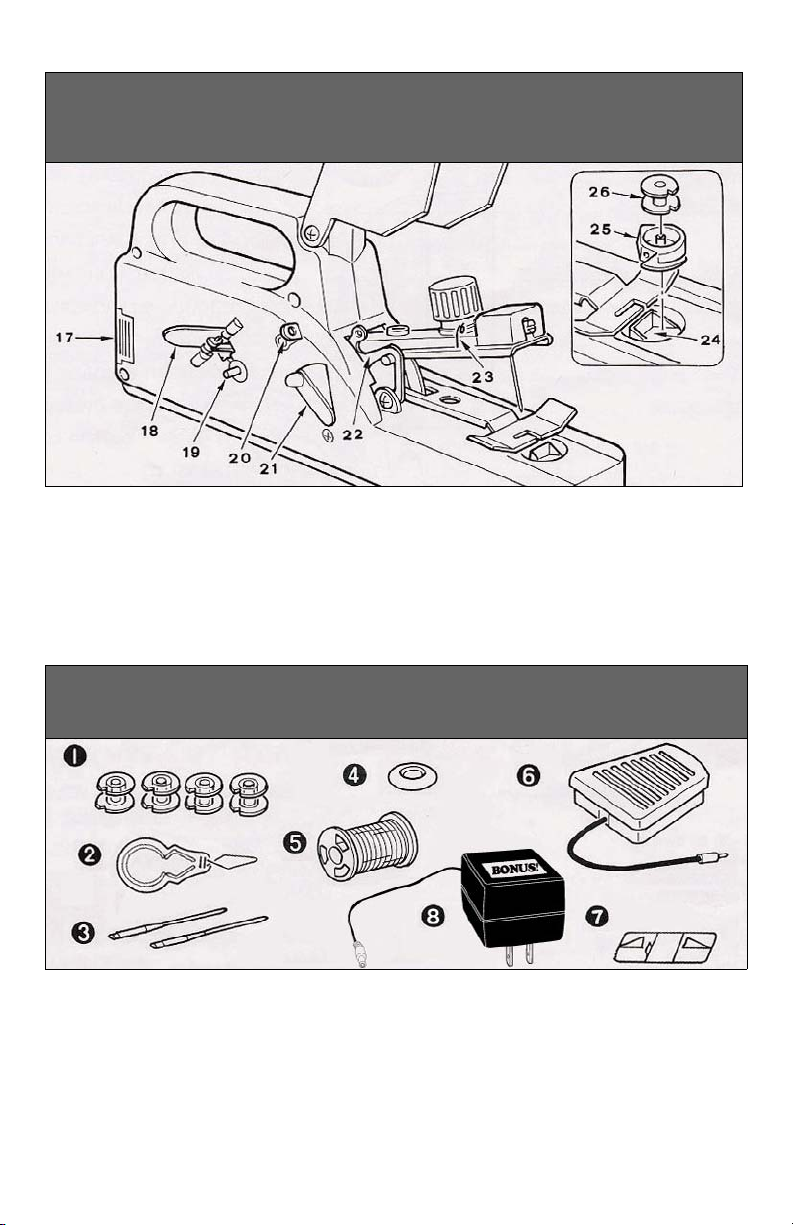
PARTS LISTING (cont’d)
17. Accessories Storage 22. Take-Up Lever
18. Bobbin Winder Cover 23. Thread Guide Wire Loop
19. Bobbin Winder 24. Bobbin Case Holder
20. Bobbin Winder Thread Guidepost
21. Presser Foot Lift Lever 26. Bobbin
25. Bobbin Case
ACCESSORIES
1. Bobbin x4 (1 in Machine) 5. Thread Spool (On Machine)
2. Needle Threader 6. Foot Switch
3. Needle x2 (1 in Machine)
(
Regular Needle No. 14 for General Sewing)
4. Spool Holder Ring (On Machine) 8. Bonus AC Adapter
7. Stabilizer (Table Top Operation)
4
Page 6
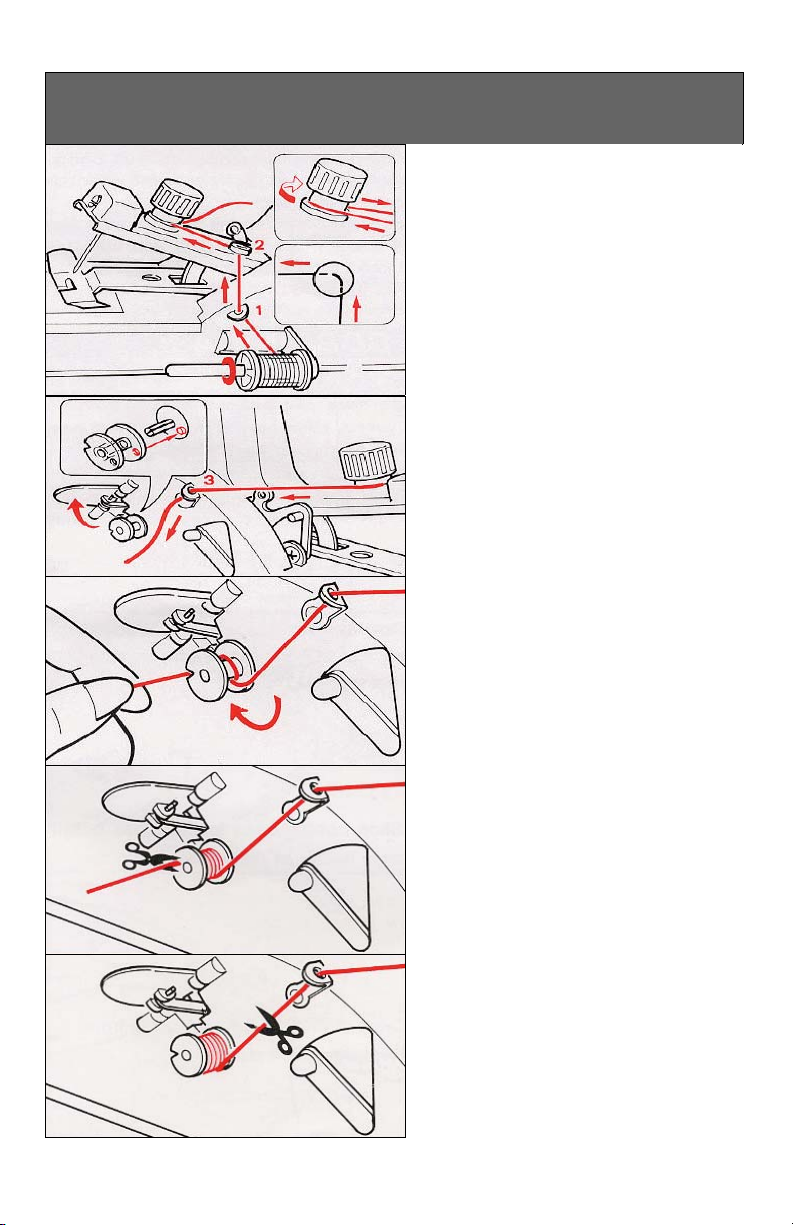
WINDING A BOBBIN
x Place spool of thread onto spool pin.
x Press spool holder ring against spool.
CAUTION: Spool of thread
should be rotated freely after
pressing the holder ring on.
x Lead thread to Guidepost (1) and draw
to the left under pretension stud (2).
x Draw thread between the two tension
discs of thread tension dial, then pull
thread to right as shown.
x Follow arrows. Guide thread through
guidepost (3).
x Open the bobbin winder cover and in-
sert a bobbin.
x Align the small bobbin hole on pin of
bobbin winder.
x Follow arrows. Manually wind thread
clockwise around the bobbin 3-5 turns,
then pass thread through the notch.
x Still holding end of thread, push on/off
switch and start to wind
x Trim the end of the thread after bobbin
is wound around a few times.
x Continue to wind bobbin until desired
amount is reached and cut thread.
CAUTION: Do not over-wind bobbin.
Over-winding causes thread jamming of
bobbin case.
5
(5-10 winds)
Page 7
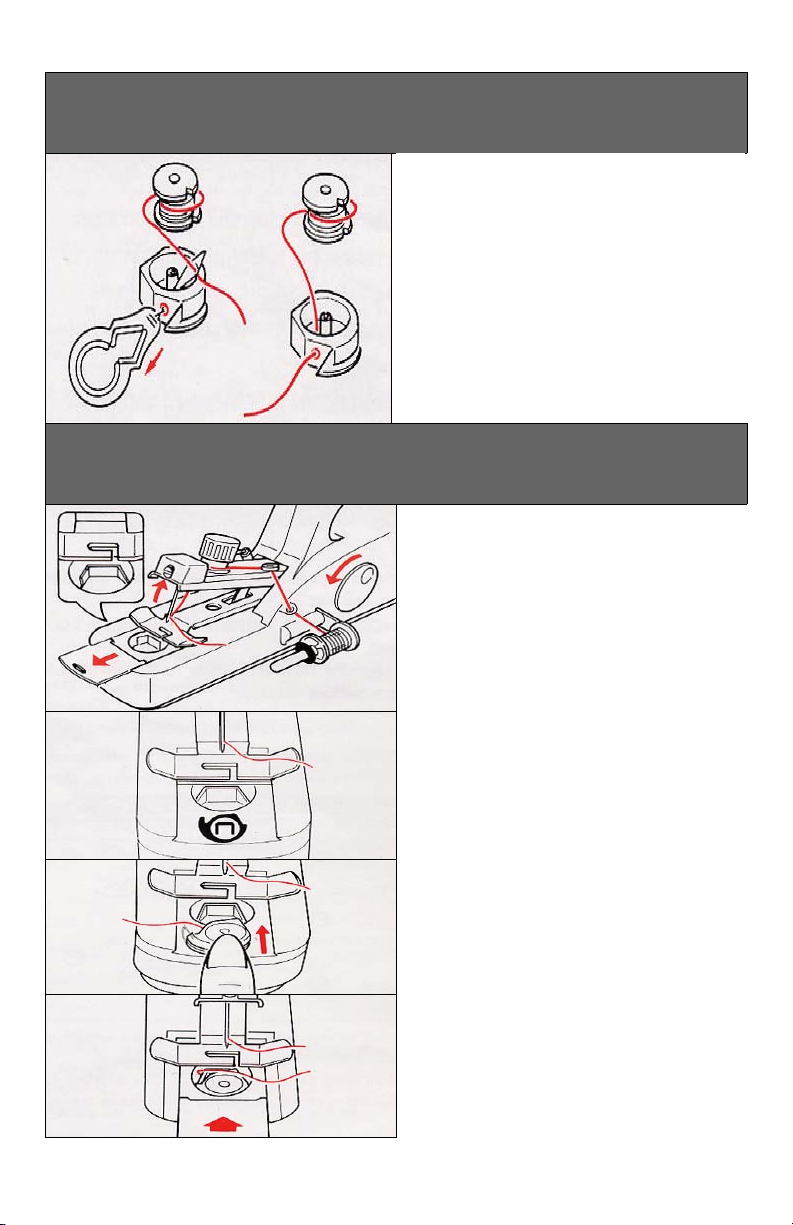
THREADING THE BOBBIN
x Use needle threader to pull bobbin
thread (bottom) from inside of bobbin
case hole
x Position bobbin in bobbin case and draw
2-3 inches of thread. You will feel thread
tension force while drawing.
CAUTION: Bobbin case tension was preset at factory and is not adjustable.
INSERTING THE THREADED BOBBIN CASE
x Be sure that the bobbin winder cover
is closed, raise needle to its highest po-
sition by turning hand wheel counter
clockwise.
x Fully open slide plate, and make sure
bobbin case holder is parallel to presser
foot edge by rotating hand wheel
slightly.
x Position and place threaded bobbin case
as per graphics shown on slide plate recess.
x Slide the bobbin case forward into the
bobbin case holder as arrow shown.
x Pull thread 2-3 inches to the front.
x Replace slide plate.
6
Page 8

REMOVING BOBBIN & BOBBIN CASE
x Be sure that bobbin winder
cover is closed, raise needle to
highest position by turning hand
wheel counter clockwise.
x Fully open slide plate, make sure
bobbin case holder is parallel to
presser foot edge by rotating
hand wheel slightly.
x Shake machine head to throw
the bobbin case out from its recess.
x Using a pin, insert into the hole
at the bottom of the bobbin case
and push bobbin out of bobbin
case.
7
Page 9

THREADING THE MACHINE
x Place spool of thread onto spool pin.
x Press spool holder ring against spool.
CAUTION: Spool of thread should be rotated freely after pressing the holder ring
on.
x Pull thread to Guidepost (1) and draw it
to left, under pretension stud (2).
x Draw thread between two tension discs
and then pull to right as shown.
x Follow arrows, guide thread into take-up
lever eyelet (3) and then backwards to
wire loop (4).
x Top view of threading.
x Slip thread through (5).
x Insert needle threader through needle
eye and pull thread through needle eye.
x Pull thread 2-3 inches to the front.
8
Page 10

RAISING THE BOBBIN THREAD
x Hold the needle thread (top) and
turn hand wheel counterclockwise
to lower needle, then raise to
highest position.
x Gently pull needle thread (top)
until bobbin thread (bottom)
comes up and forms a loop.
x Use a pin to pull up bobbin thread
loop (bottom).
x Place bobbin thread (bottom) un-
der presser foot.
9
Page 11

ADJUSTING THREAD TENSION
NOTE: Your machine’s tension has been
calibrated to ”5” in the factory to suit most
sewing applications.
x Always double check threading before
attempting to adjust thread tension.
x Make a test sample to find proper tension
before sewing on your fabrics.
A balanced stitch:
x A perfect, well balanced stitch will have
needle thread (top) and bobbin thread
(bottom) locked between two layers of
fabric with no loops on top or bottom and
no puckering.
Too much tension:
x Stitch locks appear on top side of fabric.
x To decrease tension, turn dial to a lower
number.
Too little tension:
x A loose stitch appears on bottom side of
fabric.
x To increase tension, turn dial to a higher
number.
10
Page 12

START TO SEW—HANDHELD OPERATION
x Insert four AA batteries or use bonus AC
adapter.
x Open dust cover.
x Raise needle to highest position by turn-
ing hand wheel counterclockwise.
x Move presser foot lift lever up to raise
presser foot.
x Place fabric under presser foot.
x Draw both the needle thread (top) and
the bobbin thread (bottom) 2-3 in. to the
left.
x Move presser foot lift lever down to
lower presser foot.
x Close dust cover.
11
x Press and hold the on/off switch.
x Guide fabric gently while sewing
x At the end of the seam, move presser
foot lift lever up to raise presser foot.
x Pull threads 2-3 in. forward, then cut.
Page 13

START TO SEW—TABLE-TOP OPERATION
x Insert four AA batteries or plug in bonus
AC adapter.
x Open dust cover.
x Raise needle to its highest position by
turning the hand wheel counterclockwise.
x Insert stabilizer when sewing heavier
fabrics.
x Move presser foot lift lever up to raise
presser foot.
x Place fabric under the presser foot.
x Draw both the needle thread (top) and
the bobbin thread (bottom) 2-3 in. to the
right.
x Move presser foot lift lever down to
lower presser foot.
x Plug foot pedal into back of unit.
x To begin sewing, slowly step on pedal.
x Hold onto both fabric ends while sewing
x At end of seam, move presser foot
lever up to raise the presser foot.
x Pull threads 2-3 in. forward, then cut.
12
Page 14

START TO SEW—HANDHELD OPERATION
x Insert four AA batteries or use bonus AC
adapter.
x Open dust cover.
x Raise needle to highest position by turn-
ing hand wheel counterclockwise.
x Move presser foot lift lever up to raise
presser foot.
x Place fabric under presser foot.
x Draw both the needle thread (top) and
the bobbin thread (bottom) 2-3 in. to the
left.
x Move presser foot lift lever down to
lower presser foot.
x Close dust cover.
11
x Press and hold the on/off switch.
x Guide fabric gently while sewing
x At the end of the seam, move presser
foot lift lever up to raise presser foot.
x Pull threads 2-3 in. forward, then cut.
Page 15

SECURING A SEAM
There are 2 methods for securing the threads:
Method #1: Back Stitching
x At start of seam, sew 1/2 in., then pull
fabric backwards to sew 4-5 back
stitches.
x Hold both fabric ends and continue sew-
ing forward to complete seam. Secure
end of seam by backstitching again.
Method #2: Tying Off
x When the seam is completed, use nee-
dle threader to pull needle thread (top)
to underside of fabric.
DARNING
13
x Tie a square knot with both threads un-
derside of the fabric.
x Place the area to be darned under
presser foot.
x Lower the presser foot and start stitch-
ing.
x Alternately guide fabric toward you and
gently pull it away from you.
x For additional strength, cover parallel
stitching area with crosswise stitching.
Page 16

TURNING A SQUARE CORNER
x Upon reaching the desired position, stop
stitching with the needle tip still in the
fabric.
x Move presser foot lift lever up.
x Turn fabric.
x Move presser foot lift lever down.
x Continue stitching the seam.
CHANGING NEEDLES
x Loosen needle clamp screw with a screw-
driver
x With flat shank face to the left side, insert
a new needle up into clamp as far as it
will go.
x Tighten needle clamp screw securely.
HOW TO REPLACE THE SLIDE PLATE
x Make sure dove tail side is facing up and
align slide plate to grooves.
14
Page 17

PERFORMANCE CHECKLIST
If stitch is not formed:
x Needle is not fully inserted into the needle clamp body.
x Needle is inserted into the wrong side.
x Needle is defective.
x Bobbin thread (bottom) is not threaded correctly into the bobbin case hole.
If machine skips stitches:
x Needle is not straight and sharp.
x Needle is inserted on wrong side.
x Machine is not properly threaded.
x Fabric is not firmly held down.
If needle thread (top) breaks:
x Machine is not properly threaded.
x Needle thread (top) tension is too tight.
x Thread is not freely unwinding from spool.
x Needle is inserted on wrong side.
If bobbin thread (bottom) breaks:
x Bobbin thread (bottom) is too tight.
x Thread is entangled in bobbin case.
x Bobbin thread (bottom) is threaded incorrectly into bobbin case.
If fabric does not feed:
x Presser foot is not lowered.
If needle breaks:
x Needle is defective.
x Needle is not inserted fully into needle clamp body.
x Fabric is pulled excessively while sewing.
x Needle thread (top) is caught somewhere.
x Needle thread (top) tension is too tight.
If needle does not move:
x Battery power is weak.
x Batteries are not inserted correctly.
x Foot switch plug is not inserted fully.
15
Page 18

TURNING A SQUARE CORNER
x Upon reaching the desired position, stop
stitching with the needle tip still in the
fabric.
x Move presser foot lift lever up.
x Turn fabric.
x Move presser foot lift lever down.
x Continue stitching the seam.
CHANGING NEEDLES
x Loosen needle clamp screw with a screw-
driver
x With flat shank face to the left side, insert
a new needle up into clamp as far as it
will go.
x Tighten needle clamp screw securely.
HOW TO REPLACE THE SLIDE PLATE
x Make sure dove tail side is facing up and
align slide plate to grooves.
14
Page 19

LIMITED WARRANTY
Top Innovations, Inc. will repair or replace, at its
option, without charge to the consumer any SEW PRO
product that fails, due to defect in material or workmanship
within 90 days following the initial consumer purchase.
This warranty does not cover damage caused by
commercial use, misuse, alteration, or modification.
Performance of any obligation under this warranty may
be obtained by returning warranted product with purchase
receipt, freight prepaid to:
®
TOP INNOVATIONS, INC.
Warranty Service Department
400 NW Platte Valley Drive
Riverside, MO 64150
If you have any questions about coverage under
this warranty, you may contact the Warranty Service
Department by telephone at (800) 711-6617 or e-mail
customerservice@topinnovations.com.
This warranty gives you specific legal rights, and
you may also have other rights which vary from state to
state.
16
Page 20

Notes19Notes
Page 21

20
Page 22

Top Innovations, Inc.
400 NW Platte Valley Drive Ɣ Riverside, MO 64150
(800) 711-6617 (816) 584-9700 Fax: (816) 584-9066
www.topinnovations.com
Printed in China
 Loading...