

Page 1
Built for years of
care-free use,
Read These Instructions
completely
before use.
MODEL
SP-350
Series
Please read this manual before
using
I
and keep for future reference.
Page 2

Dear Consumer
Professional Style Steamer
Thank you for purchasing the SteamFast
®
Professional Style steamer.
In order
to
prolong the life of your steamer we
recommend that the water tank be drained between
each use if tap water is being used. This will reduce
liming as a result of hard water.
®
Your SteamFast
thermostat control that will shut the steamer
the temperature reaches
steamer is equipped with a
off
248°F.
when
The steamer will automatically begin heating again
when the temperature drops below
248°F.
Should the water tank run dry while the unit is in
operation, we recommended that it be turned
immediately. If the steamer is not turned
the thermostat will cause the unit
owever, damage may occur to the unit.
H
to
shut
off
off
immediately,
off.
In the event that the steamer is left in operation
to
302°F
operate
causing
without water or the thermostat should fail
properly, the unit's fuse will burn out at
to
shut
the steamer
off.
Top Innovations, Inc.
400
Riverside,
web site:
-SteamFast
NW
Platte Valley Dr.,
MO
®
641
50
www.topinnovations.com
P.
1
Page 3

INTRODUCTION
Congratulations on your purchaseofthe Steam Fast
professional Steamer.
to
use
easy
Your new steamer provides professional results every time!
1. Holds over one half gallon of water
30
minutes of continuous operation.
2.
Water container is removable and easytofill.
3.
Automatic shut-off safety feature.
4.
Easytouse drain port.
5.
Eliminates ironing by removing wrinkles.
6.
Easy roll casters make unit highly portable.
7.
Convenient hanger for hose.
8.
Stores upright minimizing storage space requirements.
and extremely versatile.
You
will find that the Steam Fast®is
-
enough for approximately
®
P.
2
Page 4

IMPORTANT
SAFETY INSTRUCTIONS
When using electrical appliances, always follow basic safety
precautions, including the following:
1.
Read
2.
To
water or other liquid.
3.
Close supervisionisnecessary when any appliance is used by or
near children.
4.
Unplug from electrical outlet when not in use, before putting on or
taking off parts and before cleaning.
5.
Avoid contact with hot parts. Keep hands, hair, and clothing away from
these parts to prevent risk of injury to persons and
could occur.
6.
Use this product for its intended use only.
7.
Do
the appliance malfunctions or is dropped or damaged in any manner.
A
or injury.
8.
Do
9.
Please allow the unittocool before storage. The use of attachments
not recommended or sold for this appliance may cause fire, electric
shock or injury.
10.
Always turn the switch to"off"position before plugging
unplugging the
11.
Do
12.
Do
13.
Always keep the hose nozzle elevated above the water container.
Do
14.
Burns can occur by
all
instructions.
protect against riskofelectrical shock, do not put appliance
or
burns that
not operate any appliance with a damaged cord or plug or after
damaged cord, plug or unit may result in fire, electrical shock
not leave the steamer unattended.
unit.
not let cord touch hot surfaces.
not operate steamer without properly filling the water container.
not lay the hose on the floor.
touching
hot parts, hot water or steam.
in
in
or
SAVE THESE INSTRUCTIONS
P.
3
Page 5

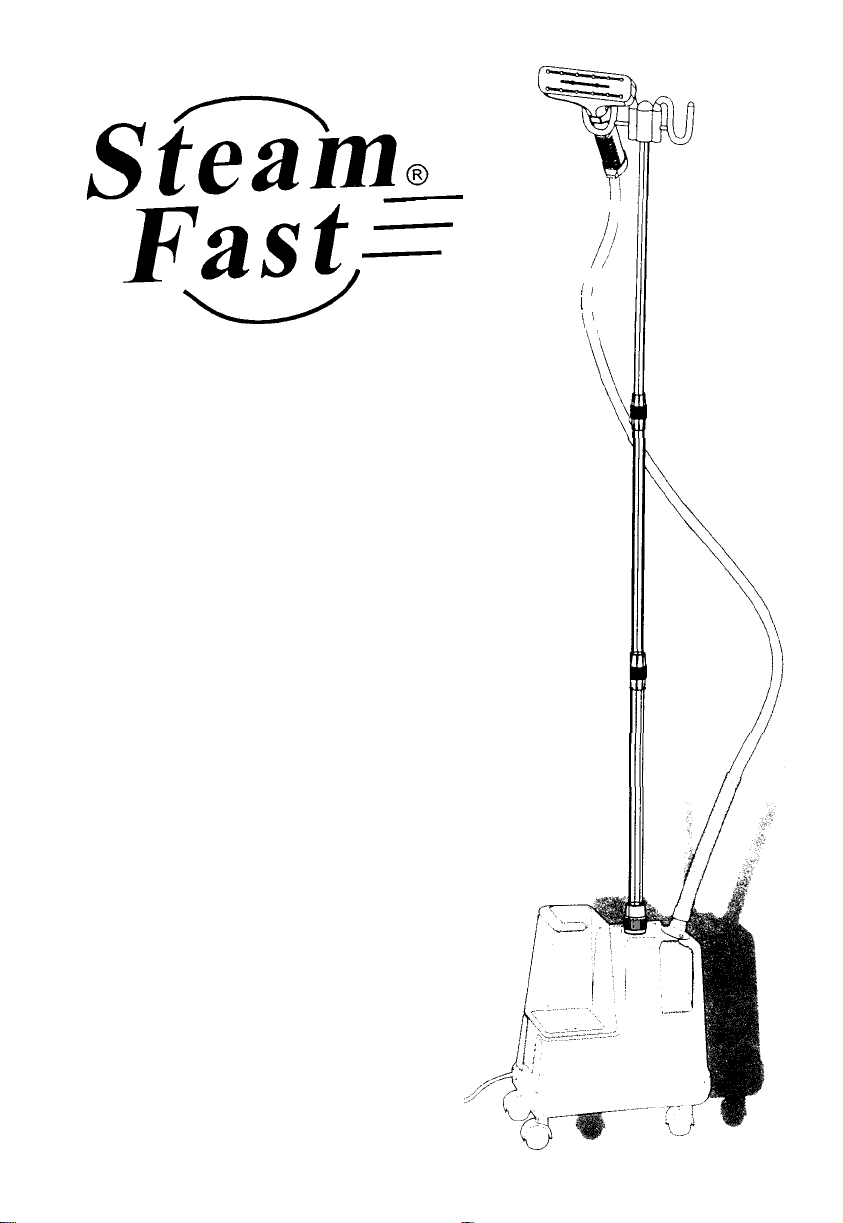
LEARNING ABOUT YOUR STEAMER
Please refer to the picture for each
(1) The control HANDLE on the end of the hose sits
before the nozzle. The HANDLE is designed to be
heat free and is safe to grasp. Use the HANDLE to
aim the direction of the steam released from the
nozzle.
(2) The NOZZLE on the end of the handle is located on
the end
of
the steamer hose. Always sit the NOZZLE
end of the hose on the hanger rod when not in use.
Keep the NOZZLE pointed upward and steam will
rise. If you point the NOZZLE downward, water
may condense and drip.
is
(3) The ROD
handle and
(4) The HOSE extends from the base of the unit. Do not
pull on the HOSE with extreme pressureoryou may
cause damage and leakage of steam.
(5) The
ON/OFF
(6) The WATER CONTAINER is filled through a hole in
the bottom and should be placed in the reservoir on the
base. Avoid spilling excess water into the reservoir
this could cause the steamer to expel water from the
nozzle. Do not try to substitute another water container
for the one designed for this
(7)
Th e WATER LEVEL can be seen visually in the water
container.
in
the WATER CONTAINER.
(8)
The steamer BASE houses the reservoir and water
container.
(9)
The CASTERS allow the unit to
(10) The ELECTRICAL CORD plugs into a standard three-
prong plug. Use only three prong UL approved extension
cords with
(11) The DRAIN PLUG is located on the side
convenient drainage of the water reservoir.
(
12)
The dual hook hanger allows
of
the nozzle and clothing.
P.
4
designed to conveniently hang the hose
also
can support garments for steaming.
switchislocated on the front of the base.
unit.
Do
not operate the steamer without water
It
also
supports the hanger rod and hose.
roll
a
minimum 20-ampere rating.
for
point
just
as
freely.
for
convenient simultaneous hanging
1
Page 6

STEAMER
STEP
1
A.
Set the appliance onasteady surface.
B. The Rod is shipped in a collapsed position and
must be extended for use. Take the Rod and
loosen the Top Knurled Knob slightly by
rotating it counter
the
inches). Tighten the
Similarly loosen the Bottom Knurled Knob and
C.
extend the middle section of the Rod and
retighten.
D.
Loosen the Rod Base by turning it counter
clockwise several turns. Insert the bottom
Rod and press down firmly. Hand-tighten the
Rod Base
Place the
E.
Mount and hand-tighten with clockwise turns.
ASSEMBLY
-
ATTACHING
Hook
Mount and extend fully (about
by
turning clockwise.
Dual
THE
-
clockwise. Grab the
Top
Knurled Knob.
Hook Hanger over the
ROD
Rod
18
Hook
by
of
the
STEP
2
-ATTACHING
A.
Screw the end of the steamer hose with the
knurled
top
excessive force in tightening the knob
B.
Tighten by hand until it no longer turns.
C.
Hang the nozzle from the large hook on the
Dual Hook Hanger.
knob
of
the steamer unit. (Caution:Donot use
THE
STEAMER
onto the threaded pipe on the
HOSE
)
P.
5
Page 7

STEAMER OPERATION
STEP 1 - PREPARATION FOR USE
Set the unit on the floor and remove the water
A.
container.
B.
Check the inside of the container the sediment. If
present rinse the container and following the
Removing Mineral Buildup procedure
this manual.
Turn the container upside down and push the plunger
C.
valve open and allow to close two or three times t o
insure it is functioning smoothly.
CAUTION: DO NOT PULL ON THE PLUNGER
VALVE OR YOU MAY ACCIDENTALLY REMOVE
IT AND THE WATER TANK WIL L NOT FUNCTION
PROPERLY.
If the plunger is removed or falls out of the from the
D.
valve ca p assembly please refer to t h eReassembling
The Water Tank ValveCap procedure later in this
manual.
found
later in
STEP2-
NOTE: USE OF DEMATERIALIZED OR DISTILLED
WATER IS HIGHLY RECOMMENDED.
A.
B.
C.
D.
NOTE: DO NOT FILL THE CONTAINER WITH HOT
WATER.
E.
STEP3-
A.
B.
C.
D.
E.
CAUTION: D O NOT ALLOW THE CONTAINER T O
BECOME DRY DURING OPERATION, AS THIS WILL
SHORTEN THE LIFE O F THE STEAMER.
FILLING
Insure the unit is unplugged.
Remove the water container with the handle
dow
upside
Turn the water facet in
While depressing the valve in the center of the base,
fill th e tank with cool water through the opening.
Release the valve and install water tankonthe base.
n.
THE
WATER
you
CONTAINER
sinkontoamild stream
and
turn
OPERATING THE STEAMER
Ensure the ON/OFF switch is in the OFF position.
Plug the steamer cord intoanormal
outlet or approved extension cord.
Turn the ON/OFF switch to theONposition.
The switch will light when electricity is
Steam will be produced from the nozzle in a few
seconds.
electrical
connected.
P.6
Page 8

PRESSING
1.
Grasp the control handle with the
nozzle facing upward. Beginning at
the bottom
steam to rise inside and outside
removing wrinkles. Slowly move the
nozzle from the bottom to the top of
the fabric.
2.
Remove the nozzle from the garment
and smooth the fabric with
hand.
WITH
of
STEAM
the fabric will allow the
your
NOTE:
free
a. Pressing
creases in the object to be steamed.
b. Shaking out the article prior
will avoid excess creasing.
c. For towels, handkerchiefs and napkins
peg drape them over a rod or steam
press them
d.
Heavier fabrics may require repeated
steaming. Repeat steps
necessary.
With practice you will gain speed and
efficiency.
fabrics will require multiple steam
applications.
IMPORTANCE
will
be easierifthere are fewer
to
steaming
in
place over towel racks.
1
AND
You will soon learn which
NOTICE
2
as
Remove and drain the water container bydepressing
the valve at the bottom
of
the container. (See drawing)
P.
7
Page 9

Drain the unit by removing the drain plug
.
-
(located at the side of the main unit
P.4
#1
1).
This will allow contents of the
see
reservoir (main unit) to drain. Tipping the
unit in the direction o f t h e drain plug to
remove any remaining water. Replace the
drain plug.
Using distilled water will eliminate a
residue build u p usually found in tap water.
valve
CLEANING
1.
Turn the
position and unplug from the power
source.
2.
Wait for the steamer to cool
for at least
3.
Remove and drain the water container.
Drain the unit
plug and allowing the contents
reservoir to drain. Tip the unit in the direction
of the drain
water. Replace
4.
Remove the steamer hose
5.
Remove the Water
6.
Remove excess water from the reservoir
by
lifting the unit and pouring. Flush the
reservoir area with fresh water to clean
any residue
AND
ON/OFF
30
minutes.
by
plug
the
from
the water source.
STORING
switch t o the
completely
removing the drain
of
to
remove remaining
plug.
and
hanger
Tank.
OFF
the
rod.
7.
Reattach the hose, hanger rod and water
container and store t he unit.
P.
8
Page 10

OTHER
IMPORTANT
NOTES
During
gurgle
If
operation the steamer hose
.
a.
This is a normal resultofcondensation
collecting inside the hose. Simply lift the
control handle upward until the hose is
extended to its
b.
The gurgling will disappear when the
excess moisture inside the hose has had a
chance to drain back into the base.
full
height.
may
the steamer stops producing steam
then starts again.
a.
You
may wish to examine the inside of
the reservoir. The
for this effect is the accumulation of
sediment from mineral laden water.
b. Clean the offending sediment from
inside the unit. first following the steps
for cooling and cleaning the unit as
presented previously.
most
common reason
P.
9
Page 11

TROUBLE
SHOOTING
THE
STEAMER
PROBLEM
Steamer fails to heat
No
steam
Water drips from nozzle
Nozzle gurgles
Steamisintermittent sediment in container
Water tank Valv
Valve leaks
CAUSE
Steamer not plugged
Auto shut
water
Condensation in hose
condensation in
is
level
e
plunger
removed
off
is
engaged
low
hose
in
SOLUTION
Plug
intoelectrical outlet
check water container. add water
if empty.
ON/OFF
Reset
Turn
ON/OFF
water container
Hold the hose vertical and
watertodrain backtotank
Hold the hose vertical and allow
to
water
Follow
buildup procedure
Follow
Water
switch.
switch
OFF
drain
back
to
tank
the removing mineral
the"Reassembling The
Tank Valve
Cap
"
Procedure
Note: Water chemicals and conditions will vary in different areas.
insure continued operation ofthe steamer, never store without
cleaning and removing excess water from the reservoir
and
water container.
and refill
allow
To
The brush attachment can be used to
gently brush the nap of fabric such as
corduroy.
Do
not
use
brush on delicate fabrics
such as silk or satin.
P.
1
0
Page 12

Removing Mineral Buildup
One common problem with steamersismineral buildup caused by the high
mineral content in many municipal water supplies. Mineral residue inside
internal pipes and heater can cause intermittent steaming or in severe cases no
steaming at
The best way to avoid this istouse demineralized or distilled water in the unit.
The procedure below can be used to clear mineral buildup. If you are unable to
use de
monthly
all.
-
mineralizedordistilled water we recommend you use this procedure
to
help avoid mineral buildup.
Turn the unit off and unplug the power cord.
1.
Unscrew and remove the hose from the hose connector on the top of the
2.
unit.
Remove the pole from the unit.
3.
Remove the water tank from the main unit and drain any water in the
4.
unit.
Make
a
5.
this
Slowly pour the water
6.
7.
8.
9.
10.
.
11
mixture of
mixture will be sufficient.
a. If the internal piping
buildup, the water
of the water intake hole. If this happens proceed to step
b. If t he internal piping is completely blocked, continue to pour
the mixture into the hose connector till full.
Pour the water
Let stand for
Drain the water using the drain plug.
Pour clean water though the hose base and water intake hole until the
vinegar smell dissipates.
Reassemble the unit and operate normally.
50%
vinegar and
-
vinegar mixture into the hose connector.
-
vinegar mixture will soon start flowing out
-
vinegar mixture into the water intake hole until full.
40
minutes.
50%
water. In most cases 1 cup of
is
only partially blocked by mineral
of
the
8.
If the procedure above does not return the unit
need servicing.
to
normal operation, the unit may
P.
11
Page 13

Reassembling
If the plunger becomes separated from the Valve Cap,
follow the following procedure.
A. Grab the Value Cap Assembly and rotate it counter
clockwise about 1/8th of a turn. Lift straight up t
remove the cap.
The disk will most likely be found inside the water
B.
container. Carefully drain the water from the container
and search for the disk.
C.
Insure the spring is around the plunger.
D.
Place the small end of the plunger through the center
hole
of
E.
Push the plunger through the central hole in the disk
until it pops into place.
Note: Be sure the disc is oriented as seen in the
bottom illustration.
Replace the Value Cap Assembly by aligning the
F.
notches and rotating the cap
Fill
G.
the tank with water and check the operation of
valve by holding the tank by the handle and checking
for leaks.
the cap.
The
Water Tank Valve Cap
1/8
turn clockwise.
o
Disk
\
valve
I
P.12
 Loading...