

Page 1
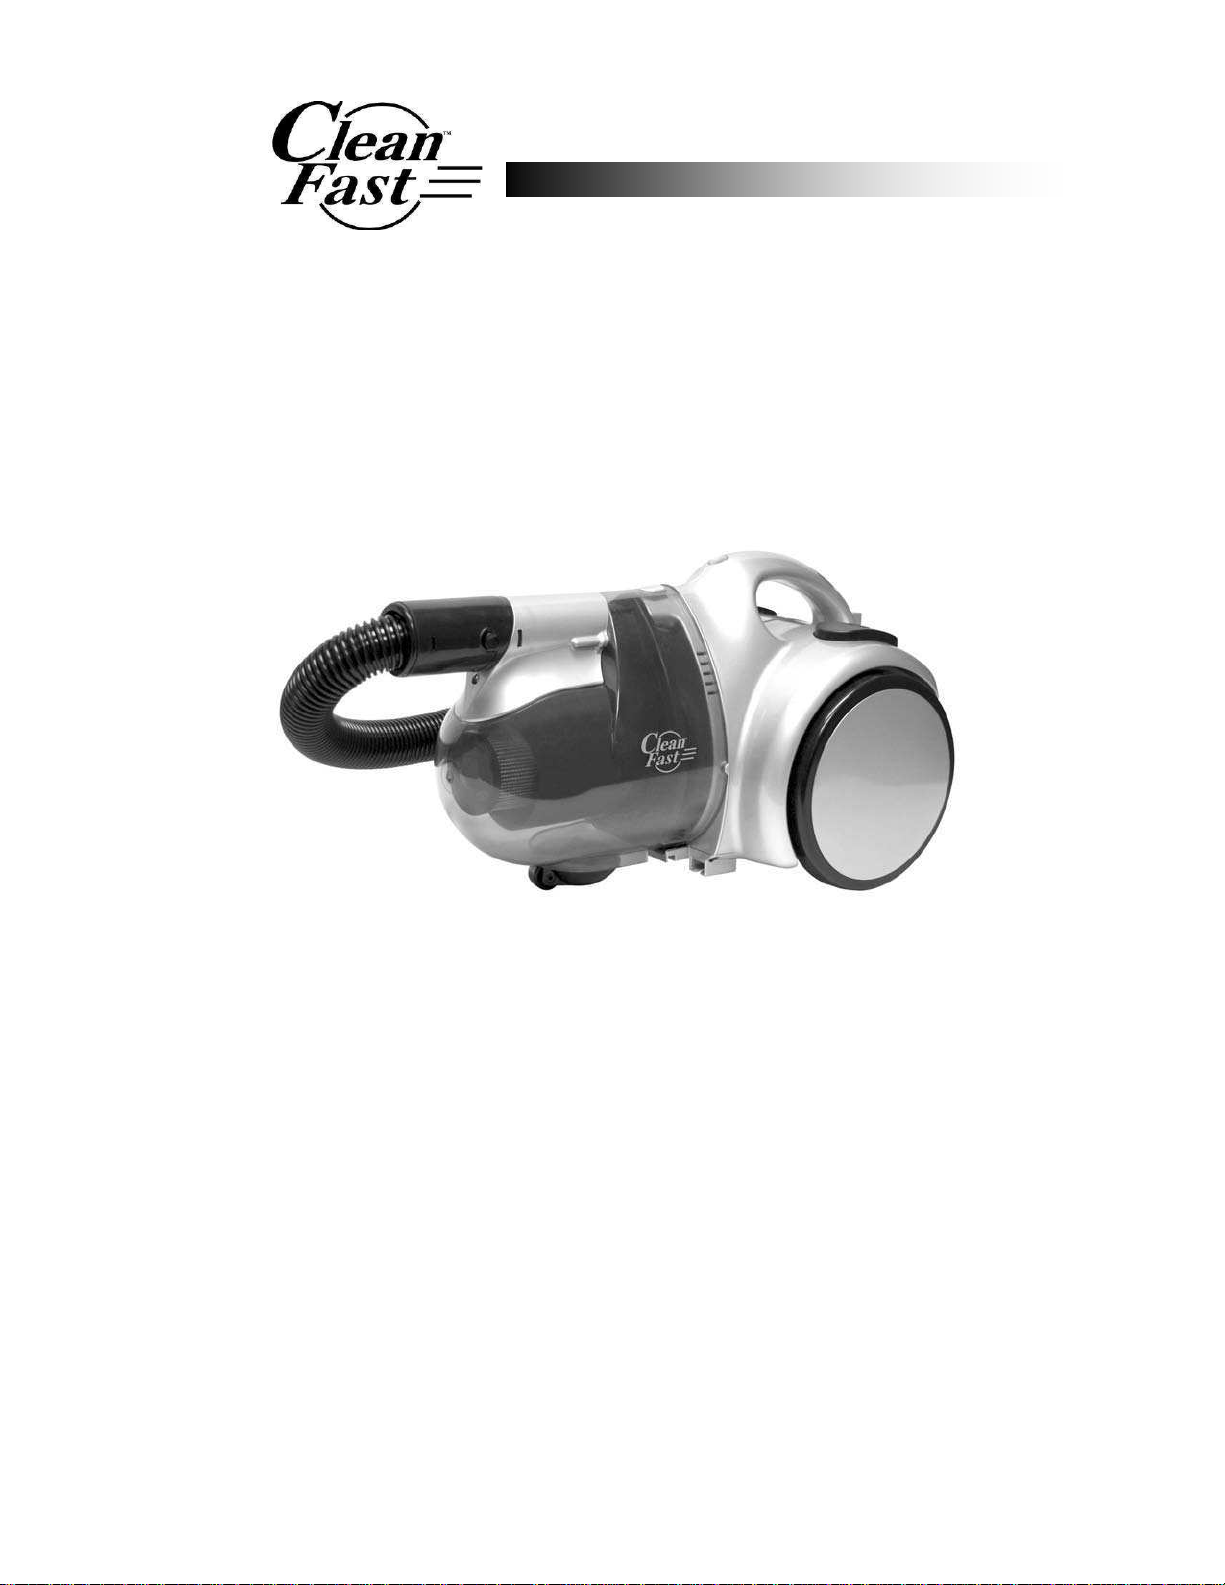
Bagless Cyclonic
Vacuum
Model CF-952
by Top Innovations, Inc.
PLEASE READ INSTRUCTIONS BEFORE USE.
M
AIL IN YOUR WARRANTY REGISTRATION CARD.
Page 2
LETTER FROM THE CEO
Dear Valued Customer,
Congratulations on purchasing your ThunderVac Bagless
Cyclonic Vacuum. We hope it can make your vacuuming
experience faster and more enjoyable.
Top Innovations, Inc. takes pride in providing excellent quality
products, affordable prices, and outstanding customer support.
We invite you to visit us at www.topinnovations.com
or call
1-800-711-6617 ext. 102/130. Our customer support team is
available to answer any questions you may have about this
exciting new product.
Enjoy your ThunderVac!
Benny Lee
Chairman and CEO
Top Innovations, Inc.
2
Top Innovations, Inc.
MODEL CF-952
THUNDERVAC BAGLESS
CYCLONIC VACUUM
1200 WATTS – 10 AMPS
120 V – 60 H
Z
1.2 L D
UST
T
ANK
C
APACITY
Page 3
IMPORTANT SAFEGUARDS
WARNING: To reduce the risk of fire, electrical shock, or
injury, the following basic safety precautions should always
be followed when using an electrical appliance.
READ ALL INSTRUCTIONS BEFORE USING YOUR VACCUM
1. DO NOT leave ThunderVac unattended when plugged in. Unplug unit from
wall outlet when not in use and/or before servicing.
2. DO NOT use outdoors or on wet surfaces.
3.
This unit is not a toy
. Close supervision is required when using unit
near children, pets, and plants. DO NOT allow to be used by children.
4. Use only as described in this manual. Use only manufacturer’s recommended
attachments and accessories.
5. DO NOT use with damaged power cord or plug. DO NOT use if unit has
been dropped, damaged, left outdoors, or dropped in water.
6. DO NOT pull or carry by power cord, use cord as handle, close cord in doors,
or pull cord around sharp edges or corners.
7. DO NOT allow unit to roll over power cord or allow cord to be pinched or
crimped in any way. Keep cord away from heated surfaces.
8.
DO NOT unplug by pulling or tugging on power cord. To unplug, grasp plug
and gently remove from wall outlet.
9. DO NOT handle unit or plug while hands are wet.
10. DO NOT put any object into suction intake opening that might block it.
DO NOT use with any opening or air intake area blocked. Keep free of dust,
lint, hair, and anything else that may reduce airflow.
11. Keep hair, loose clothing, fingers, and all body parts away from openings
and moving parts.
12. DO NOT vacuum anything that is burning or smoking, such as cigarettes,
matches, or hot ashes.
FOR HOUSEHOLD USE ONLY
SAVE THESE INSTRUCTIONS
3
Top Innovations, Inc.
Page 4
IMPORTANT SAFEGUARDS
WARNING: To reduce the risk of electric shock, this
appliance has a polarized plug (one blade is wider than the
other). This plug will fit in a polarized wall outlet only one
way. If the plug does not fit fully in the outlet, reverse the
plug. If it still does not fit, contact a qualified electrician to
install a proper outlet. DO NOT attempt to modify the plug
in any way.
13. Turn Power Switch to “Off” position before unplugging from wall outlet.
14. Use extra care when cleaning on stairs or other uneven surfaces.
15. DO NOT use to pick up flammable or combustible fluids such as gasoline, or
use in areas where they may be present.
16. Look on your ThunderVac and follow all instructions printed on unit.
17. This unit is designed for pick-up of dry matter. DO NOT attempt to vacuum
liquids or moist materials of any type as this could create a high-risk
situation for electrical shock.
18. Use only extension cords UL or cUL- rated at 15 amperes. Extension cords
rated less amperage may overheat. Care should be taken to avoid tripping
over cord or pulling cord out from wall outlet.
19. Keep end of hose, wands and other openings away from your face and body.
20. DO NOT operate ThunderVac without Dust Tank and all filters in place.
21. Always turn ThunderVac off before connecting or disconnecting vacuum
hose.
22. Store ThunderVac and its attachments indoors in a dry location.
23. Using improper voltage may result in damage to motor and possible injury to
user. Correct voltage is listed on rating label.
24. Use only on dry, indoor surfaces.
25. DO NOT use for any purpose other than described in this user’s guide.
26. If any part of unit or power cord is damaged, immediately discontinue use.
DO NOT attempt to repair unit yourself. Immediately contact qualified and
licensed service personnel.
FOR HOUSEHOLD USE ONLY
SAVE THESE INSTRUCTIONS
4
Top Innovations, Inc.
Page 5

PRODUCT INFORMATION
ACCESSORIES
INCLUDED
14. Hose
15. Floor Brush
16. Extension Wands
17. Upholstery Brush
18. Dust Brush
19. Crevice Tool
5
Top Innovations, Inc.
UNIT FEATURES
1. Intake Hole
2. Power Switch
3. Dust Full Indicator
4. Dust Tank
5. Dust Tank Release Button
6. Cord Retraction Button
7. Carrying Handle
8. Rubber Wheels
9. Exhaust Filter Access Door
10. Filter Assembly
11. Cyclone Cup
12. Filter Disc
13. Handle
Page 6

ASSEMBLY GUIDE
1. Insert Filter Assembly
Insert Filter Assembly into Dust Tank with Cyclone Cup pointing forward. Smaller
cylinder above Cyclone Cup fits into back of Intake Hole. Gently press Filter Assembly
forward until it fits snugly and securely inside Dust Tank (FIGURE 1).
NOTE: For more information on inserting individual filters, see Inserting Filters
section on page 8 of this manual.
2. Connect Dust Tank
Insert large tab on bottom-back of Dust Tank into groove on bottom-front of main unit
body. Swing Dust Tank back until it snaps over Dust Tank Release Button and stays
securely in place (FIGURE 2).
3. Connect Hose
Insert Hose into Intake Hole on top of Dust Tank. To accomplish this, press the two
buttons on sides of hose end inward (FIGURE 3). Then insert Hose into Intake Hole
until it clicks into correct position and stays securely in place (FIGURE 4). To remove
Hose, repeat process and reverse by pulling Hose out from Intake Hole.
4. Deploy Power Cord
Grasp plug of power cord firmly and pull out from compartment on back of unit to
desired length (15 ft. maximum) (FIGURE 5). To retract power cord back into storage
compartment, unplug it from wall outlet and press Cord Retraction Button on top of
unit. Hold button down until cord is completely retracted (FIGURE 6).
WARNING: Extend power cord ONLY to yellow mark on cord, as this indicates
maximum safe length. DO NOT extend cord to red warning mark.
6
FIGURE 1 FIGURE 2 FIGURE 3
FIGURE 4 FIGURE 5 FIGURE 6
Top Innovations, Inc.
Page 7

ACCESSORY GUIDE
Suction Control
Suction control switch on Hose permits you to reduce suction power,
allowing for accessory replacement and/or usage on delicate fabrics.
Extension Wands and Floor Brush
Insert small end of one wand into circular fitting of
Floor Brush (FIGURE 1), then insert small end of
second wand into larger end of first wand. Finally,
insert Hose handle into larger end of second wand
(FIGURE 2).
Press lever into position
(A)
for cleaning carpets.
Press lever into position
(B)
for cleaning hard surface
floors.
Connecting and Using Accessories
Slip circular end of desired accessory onto Hose handle and twist slightly
to ensure properly seated. If additional reach is required, attach one or
both Extension Wands onto Hose handle.
Upholstery Brush (A)
For curtains, draperies, cushions,
and other fabrics.
Crevice Tool (B)
For crevices, corners, baseboards,
and between cushions.
Dust Brush (C)
For furniture, lamps, ceiling fans,
and fixtures.
7
FIGURE 1 FIGURE 2
A
B
C
Top Innovation
s, Inc.
Page 8

INSERTING/REMOVING FILTERS
Your ThunderVac utilizes three filters that work together to prevent dust
and
other particles from escaping the vacuum and re-entering the air.
1. ULTRA Filter –
traps over 92.4% of air impurities. Located inside
Cyclone Cup
2. Charcoal Filter – reduces odors during cleaning process. Located
behind Filter Assembly.
3. Exhaust Filter – located in rear compartment of unit.
INSERTING FILTERS
1. Place ULTRA Filter inside Cyclone
Cup. Slide over the end of smaller
cylinder inside Cyclone Cup
(FIGURE 1).
2. Place Charcoal Filter inside Filter
Disc, with softer side facing out.
Filter Disc then fits into the back of
Filter Assembly, with exposed side of
filter placed against Filter Assembly
(FIGURE 2).
3. Open Exhaust Filter Access Door
on back of main unit by pressing down
on top tab and pulling outwards. Place
filter into rectangular hole inside
compartment (with grated side of filter
facing out). Reattach Access Door
(FIGURE 3).
REMOVING FILTERS
To remove filters, simply reverse steps
listed above. This is useful for
cleaning filters or replacing them with
new ones. See Cleaning Filters
section on page 9 for more
information. DO NOT place a
recently cleaned filter back into the
unit until it is completely dry.
8
FIGURE 1
FIGURE 2
FIGURE 3
Top Innovations, Inc.
Page 9

MAINTENANCE
EMPTYING DUST TANK
When Dust Full Indicator light activates, the Dust Tank needs to be
emptied. The following steps should be taken:
1. Turn ThunderVac off and unplug from wall outlet.
2. Disconnect Hose from Intake Hole.
3. Remove Dust Tank by pushing Dust Tank Release Button
(FIGURE 1).
4. Remove Filter Assembly by grasping and pulling Handle
(FIGURE 2).
5. Empty Dust Tank into trashcan or other receptacle (FIGURE 3).
6. Insert Filter Assembly back into Dust Tank.
7. Reattach Dust Tank to main unit body.
CLEANING AND REPLACING FILTERS
To prolong the effective life of the three filters and maintain maximum
performance of unit, it is recommended that you clean these filters
regularly. To do this, run them under cool or lukewarm water and
thoroughly rinse them out. DO NOT use hot water to rinse the filters.
IMPORTANT: Allow all filters to dry COMPLETELY before placing
them back in unit to avoid moisture damage.
-
RINSE ONLY; do not place filters in washing machine or dishwasher.
- AIR DRY ONLY; do not dry using hair dryer or other appliance.
9
Top Innovations, Inc.
FIGURE 1 FIGURE 2 FIGURE 3
REPLACING FILTERS
We recommend replacing filters every 4-6 months, depending on
usage. For more information on obtaining replacement filters and
other accessories, refer to the Accessory Order Form insert included
in this manual.
Page 10

TROUBLESHOOTING GUIDE
PROBLEM POSSIBLE REASONS POSSIBLE SOLUTIONS
ThunderVac will
not operate.
- Power cord may not be
firmly plugged into outlet.
- No power coming from
outlet.
- Unit may be in need of
service.
- Firmly replace power cord
into wall outlet.
- Check fuse or breaker.
Please note they may need
replacement.
- Contact qualified and
licensed service personnel.
Dust escapes
from
ThunderVac.
- Dust Tank improperly
installed.
- Dust Tank is full.
- Hose improperly installed.
- Replace Dust Tank so that it
firmly snaps into place.
- Empty Dust Tank.
- Review instructions for
proper Hose attachment.
ThunderVac has
no suction or very
weak suction.
- Dust Tank is improperly
installed.
- Dust Tank is full.
- One or more filters are
clogged.
- Hose or nozzle passage is
clogged.
- Replace Dust Tank so that it
firmly snaps into place.
- Empty Dust Tank.
- Clean and rinse filter/filters
with cool or lukewarm water,
or replace filters*.
- Turn unit off and unplug
from wall outlet. Check for
possible obstruction in Intake
Hole and/or accessories.
* See ordering insert included with this manual for information on obtaining replacement filters.
Flexible Hose and
accessories do not
lift dust.
- Dust Tank is full.
- One or more filters are
clogged.
- Hose or Intake Hole is
clogged.
- Empty Dust Tank.
- Clean and rinse filter/filters
with cool or lukewarm water,
or replace filters*.
- Turn unit off and unplug
from wall outlet. Check for
possible obstruction in Intake
Hole and/or accessories.
BEFORE RETURNING ANY PRODUCT THAT IS DEFECTIVE:
1. Read all instructions in this manual.
2. Read Troubleshooting Guide above.
3. Contact our Customer Service at (800) 711-6617 ext. 102/130
NOTE: To ensure prompt and accurate service, call for a Return Authorization Number before
returning any unit to Top Innovations, Inc. Failure to obtain a Return Authorization Number will
cause a delay in both warranty and out
-of-
warranty service requests.
10
Top Innovations, Inc.
Page 11

WARRANTY INFORMATION
11
Top Innovations, Inc.
ONE YEAR LIMITED WARRANTY
(If outside USA, additional shipping charges may apply)
Top Innovations, Inc. warrants this product to be free from defects in material and
workmanship for a period of one (1) year from the date of purchase. This warranty
does not cover damage caused by misuse, negligence, use by improper current or
voltage, use contrary to operating instructions or disassembly, repair or alteration by
any person other than Top Innovations, Inc. Warranty Service Department.
Top Innovations, Inc. will repair or replace, at its option. This warranty gives you
specific legal rights and may have other rights, which may vary from state to state.
Performance of any obligation under this warranty may be obtained by:
1. Calling (800) 711-6617 for Return Authorization Number before returning for
repair. Failure to obtain a Return Authorization Number will cause a delay in
warranty or out-of-warranty service requests.
2. Including copy of purchase receipt.
3. Including your name, address, telephone number, and Return Authorization
Number on returned package.
Please send product postage prepaid to:
TOP INNOVATIONS, INC.
WARRANTY SERVICE DEPARTMENT
400 NW PLATTE VALLEY DR.
RIVERSIDE, MO 64150
Should there be any missing or defective parts or accessories, please contact Customer
Support. In most cases, it is not necessary to return the entire unit. We can ship most
parts directly to your door.
Upon expiration of 1 year limited warranty, you will be advised of the repair cost
before any services are performed. However, you may enclose a note indicating that
you would like us to proceed with repairs without first notifying you.
If you have any questions about coverage under this warranty, you may contact
warranty service department by telephone at (800) 711-6617 ext. 102 or 130 or e-mail
customerservice@topinnovations.com
Page 12

Top Innovations, Inc.
400 NW Platte Valley Dr.
Riverside, MO 64150
Tel: (800) 711-6617
www.topinnovations.com
customerservice@topinnovations.com
Printed In China
 Loading...