

Page 1
TOPigeon Club Manager User Guide
The Next Generation Timer
Oct
2015
Page 2

2
Support Information
To be informed of
the latest
updates
and manuals please visi
t
www
.topigeon.com
This Manual
was updated
based
on fi r mwar e versi
on
V8.78
V 8.0 which was released in
May 2015
To check which versi
ons of software you are using
go to the
setup Tab
Page 3

3
Content
Content ..................................................................................................................................................... 3
Getting Start ............................................................................................................................................. 5
Connection cables ............................................................................................................................. 6
VCP Cable ................................................................................................................................ 7
USB-COM cables ..................................................................................................................... 7
COM Port Setting ............................................................................................................................. 8
Install Club manager software .......................................................................................................... 9
User Account Control ............................................................................................................... 9
System region and time setting ............................................................................................... 11
Coordinate data entry .............................................................................................................. 11
Data entry ............................................................................................................................... 12
TECS .ini file setting .............................................................................................................. 12
Basic Operation ...................................................................................................................................... 13
Home tab ................................................................................................................................ 14
Setup Tab ................................................................................................................................ 14
Adding new members ............................................................................................................. 16
Editing members ..................................................................................................................... 17
Download loft information into member’s clock .................................................................... 18
Adding Rings .......................................................................................................................... 21
Adding multiple rings ............................................................................................................. 22
Add/Delete Birds color
....................................................................................................... 23
Basic system operation
....................................................................................................................... 24
Clock Synchronization ................................................................................................................... 24
Marked Data Upload ...................................................................................................................... 26
Race operation ........................................................................................................................................ 28
Add new race .......................................................................................................................... 28
Multiple date racing ................................................................................................................ 28
Add/Edit/Delete Liberation Point ........................................................................................... 29
Add/Delete Club Information ................................................................................................. 30
Loft Distance .......................................................................................................................... 31
Race Status ............................................................................................................................. 32
Race Result Upload
..................................................................................................................... 33
Advance Features
................................................................................................................................ 33
Page 4

4
Manually input external clock ........................................................................................................ 33
Import/Export member birds list
..................................................................................... 34
Export Race Result
.................................................................................................................... 35
Import Club Race Distance
...................................................................................................... 36
Reports
.......................................................................................................................................... 37
iPigeon Clock Club Management ........................................................................................................... 37
Authentication Key ......................................................................................................................... 38
Set Time ......................................................................................................................................... 40
Summer Saving Time ............................................................................................................. 40
Manual Adjust the Club antenna master time. ........................................................................ 41
Manual synchronize to iPigeon clock. .................................................................................... 41
Connect to PC ................................................................................................................................. 42
Ring Assignment ............................................................................................................................ 42
Print Assignment Ring List .................................................................................................... 43
Race Marking ................................................................................................................................. 44
Unmark Birds ......................................................................................................................... 47
Race Manager ................................................................................................................................ . 48
Add Race ................................................................................................................................ 48
Arrival Operation .................................................................................................................... 49
Arrival Mode (Race in Progress) ............................................................................................ 49
Firmware upgrade ................................................................................................................... 51
System Test .................................................................................................................................... 51
Club Version System Operation ............................................................................................................. 53
Installation of Club Version System ............................................................................................... 53
Initialization of Club Version System ............................................................................................ 53
Club Version System Operation ..................................................................................................... 54
Member Data Operation ................................................................................................................. 54
Club Antenna Operation ......................................................................................................................... 55
Declaration of Conformity ..................................................................................................................... 61
iPigeon Timer ......................................................................................................................... 61
4 Channel Landing Board ....................................................................................................... 62
1 Channel Landing Board ....................................................................................................... 63
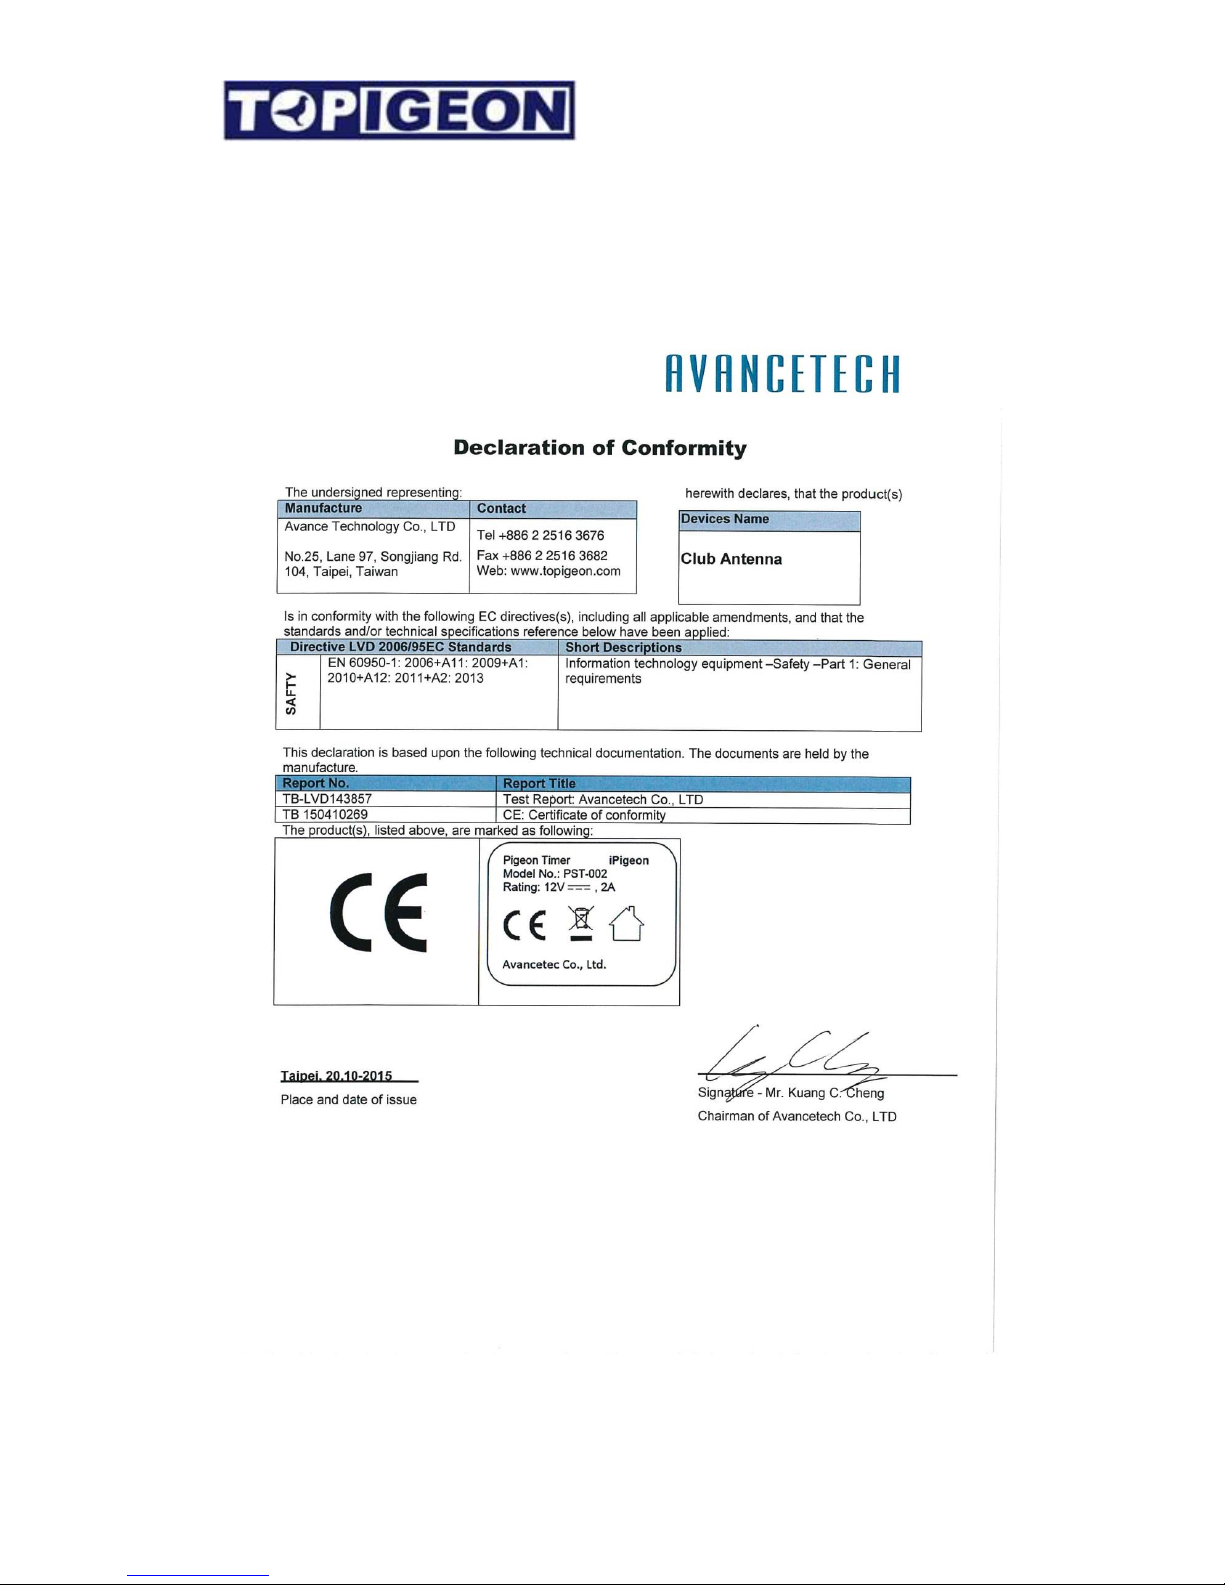
Club Antenna .......................................................................................................................... 64
iPigeon Technical Data ........................................................................................................................... 65
Page 5

5
Getting Start
Welcome to TOPigeon V8.0 iPigeon Club manager software user guide and iPigeon clock
club management user guide. The V8 iPigeon can operate without any computer, if your club
does not have any computer you can go directly to the Club management chapter in part 2.
You will find this is a very useful tool to help you manage the club system, as well as the
member’s timer. You will also find the most advance feature that the system can provides
accurate racing result.
You might already review the iPigeon timer user manual and knowing that iPigeon timer can
work independently without connecting computer. Please note that the information you
create the birds or races manually in iPigeon will not be synchronized to this club
manager software. If you are in the larger pigeon race club organization, the iPigeon club
manager will provides you a better way to manage your members, timers, birds and races.
These key features are,
1. To keep club members, timers, birds, and flight data secure and integrity.
2. To initialize iPigeon clock to the manufacture default setting.
3. To initialize vital the communication settings, such as host name and SMS center
number, which allow you to use the TOPigeon online cloud database and view your
result online.
4. To allow you create new member and loft information easily.
5. To create race activities swiftly.
6. Batch mode import and export to provide easy way to add new member information.
7. Easily print out and sorting for all information in the club system.
8. Automatic system backup to secure all information in the system.
9. Manually enter the other clock information for racing result
10. Export the result to Excel spreadsheet for the club further result process.
11. By using iPigeon coodinate information will automatic calculate distance in racing
result!
Before you begin please note that the TOPigeon timer is a sophisticated electronic device and
it needs some specific setting in your personal computer. Please read this manual and follow
the instructions.
Page 6
6
Connection cables
Before you use the club antenna firstly check your cable connections with your laptop or
personal computer.
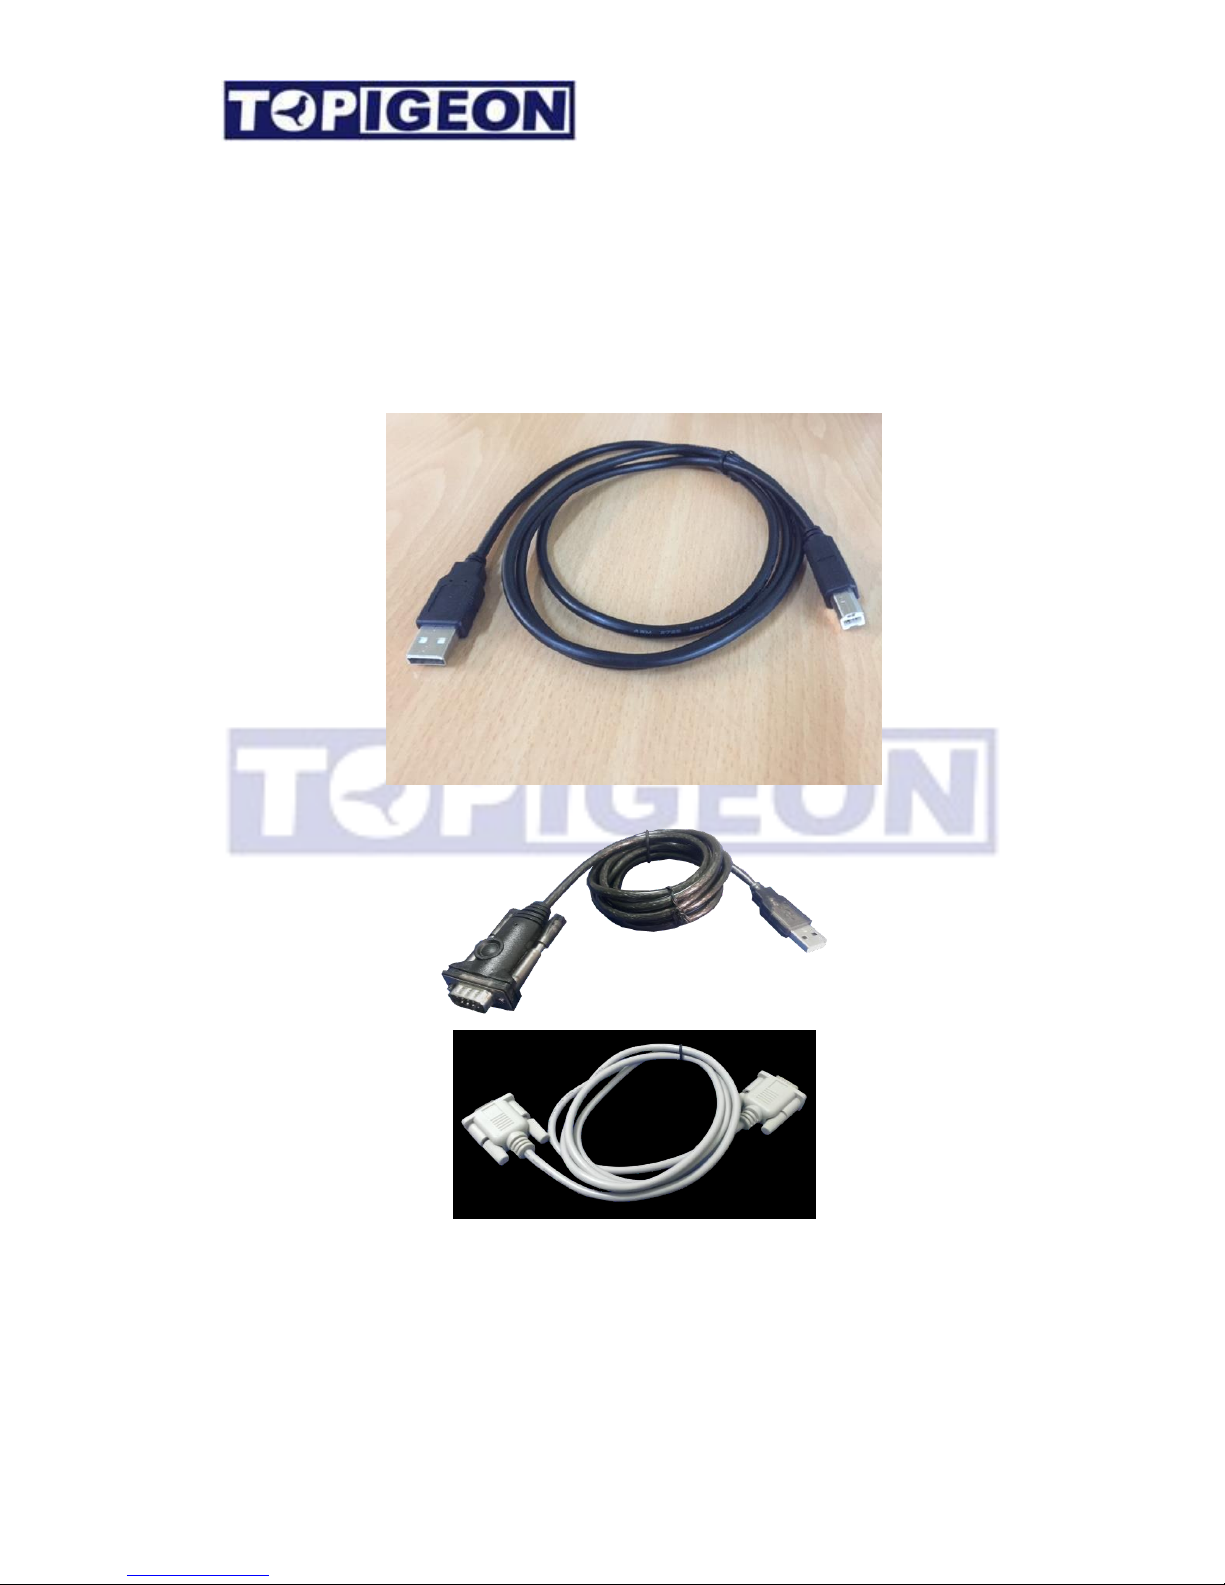
1. Virtual COM Port cable
2. RS-232 cable. (Option)
3. USB to RS-232 cable (Option)
VCP cable
RS-232 and USB cables
The RS-232 - USB cables and VCP cable, either way can connect club antenna to your
personal computer.
Page 7

7
VCP Cable
Virtual COM port (VCP) cable is for the USB device to appear as an additional COM port
available to the PC. Application software can access the USB device in the same way as it
would access a standard COM port. The VCP cable is also the standard cable come with
TOPigeon club system package.
The VCP capability is using the chip of FTDI FT-D232 in the club antenna. By using the
VCP cable, PC can automatic find the driver in the Window 8.1 or above with plug and play
(PNP). The specific drivers for different Microsoft Window operation systems, such as
x86-32/64 bit can be found in following web site:
http://www.ftdichip.com/Drivers/VCP.htm
This website provides the automatic installation program and after you install the driver the
plug and play (PNP) will help to finish the installation. If you are using VCP cable please
make sure the club antenna power is on. You can double check the readiness of COM port by
going to your Device Manager in the Control Panel. Go to the Ports (COM&LPT) and you
should see the USB Serial Port.
USB-COM cables
The USB and RS-232- COM cables have to connect together between club antenna and PC.
The USB to RS-232 cable has a chip inside to convert the protocol. This cable needs driver to
activate in your PC. If you have the driver installed properly you will find the COM Port in
your Device manager in control panel and does not need the club manager power on.
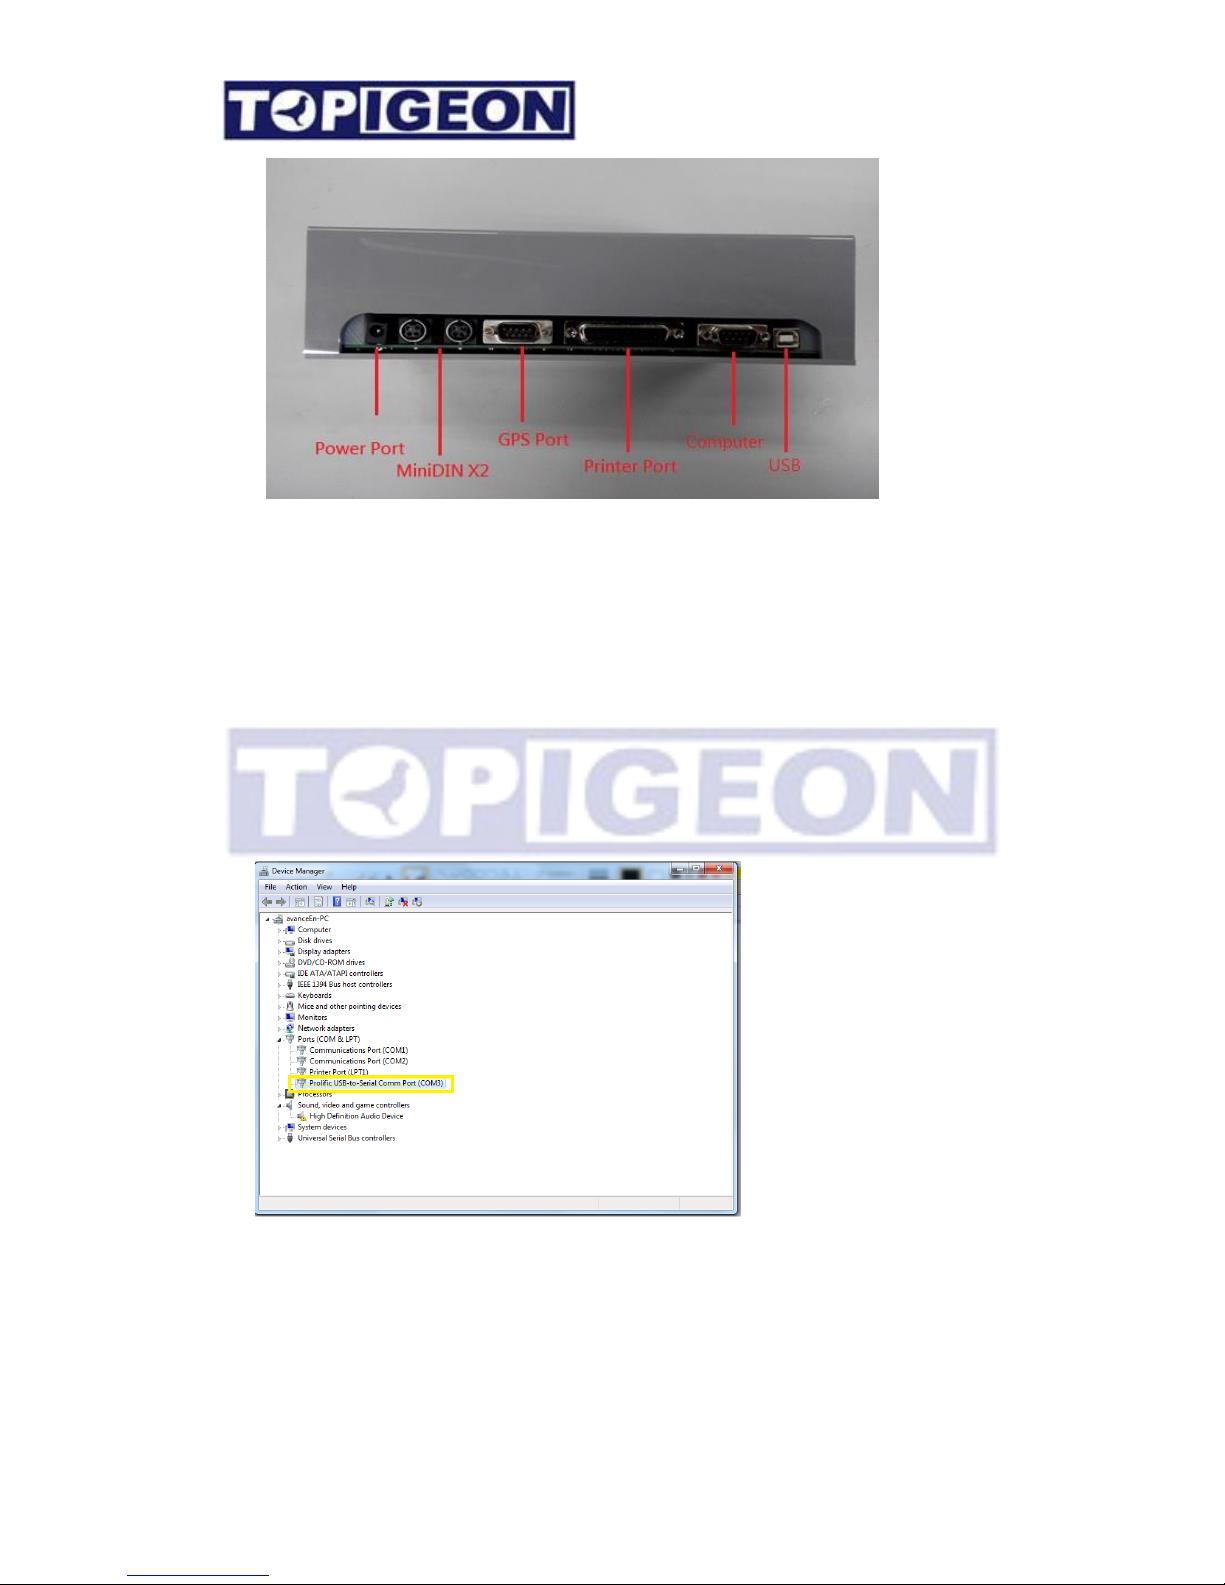
The iPigeon Club antenna IO port as below,
Page 8
8
COM Port Setting
Because the club manager software design in communicate in COM1, you have to set yoru
connection cable port to the COM1 Port.
For the Windows Win7 or above the setting process as below,
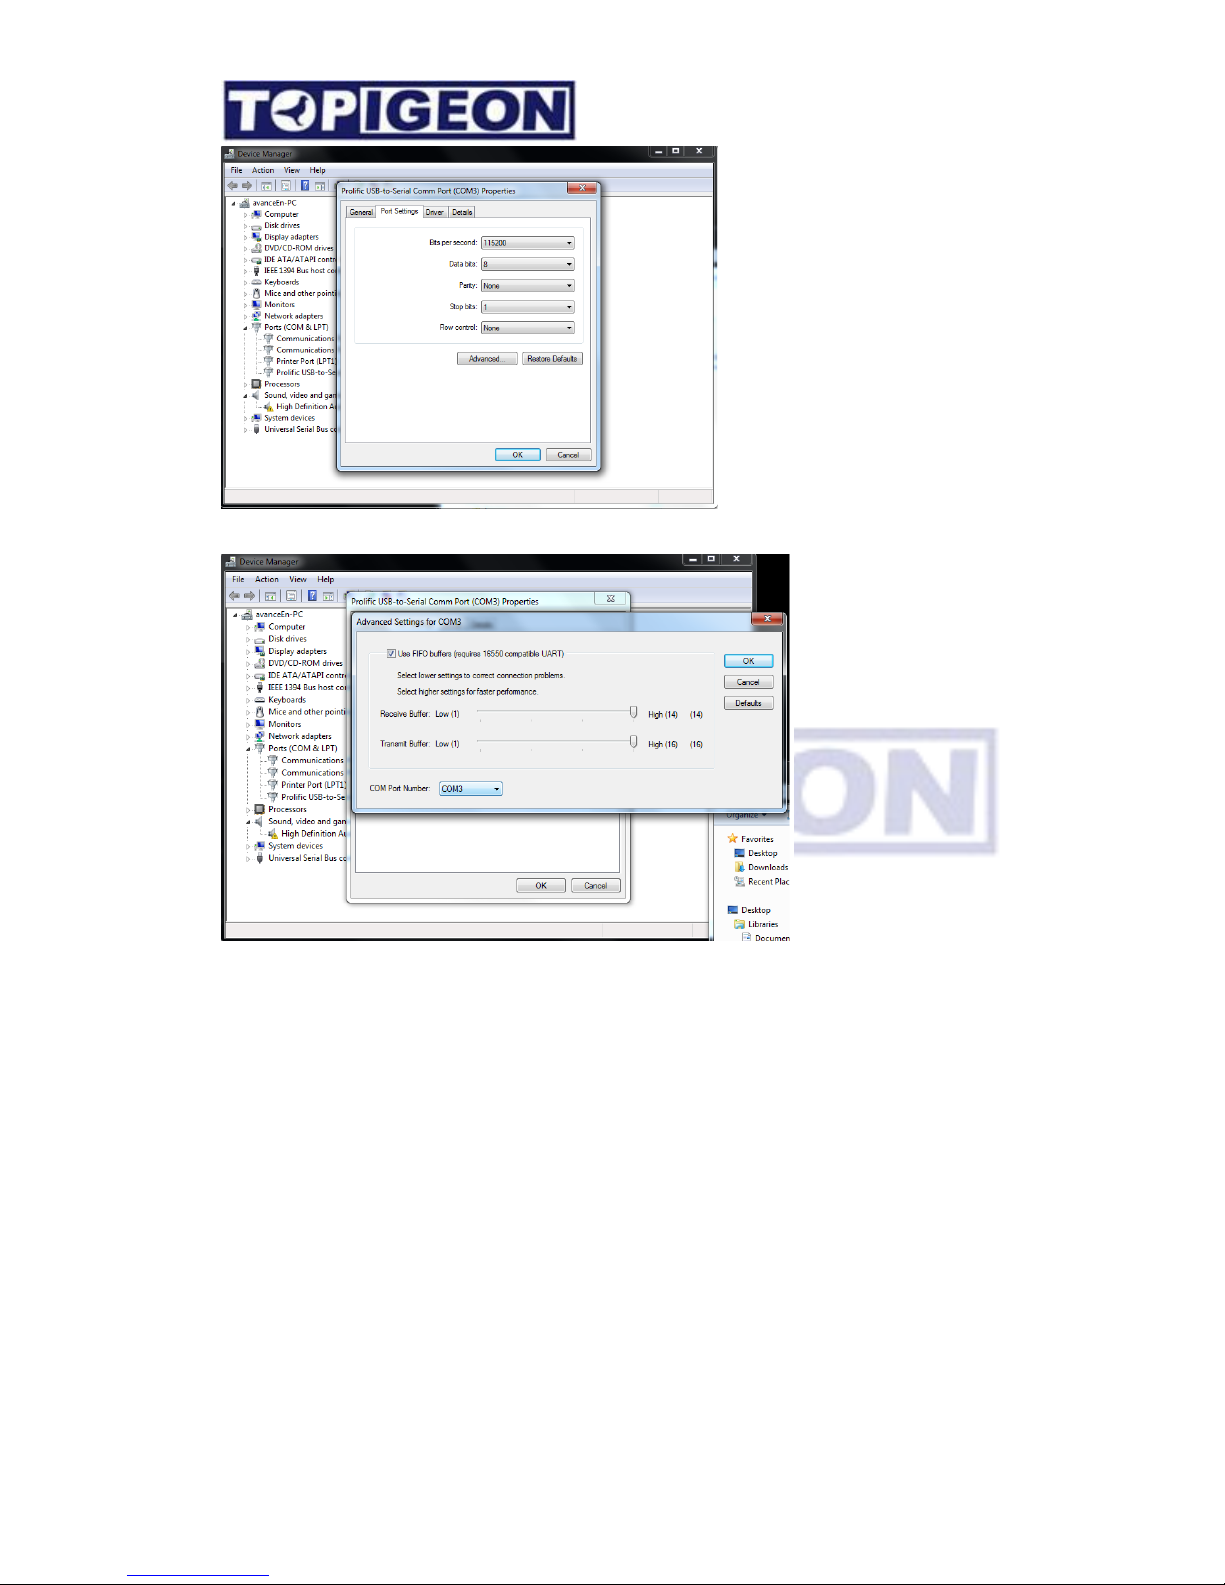
Go to Control Panel/Device Manger and find your device in the Port directory. The VCP
will display and USB COM port and USB-RS-232 will show USB to COM.
Go to the Property and click on the Advance Setting.
Page 9
9
You will find your port setting and change to COM1.
Note: If you have multiple USB ports on your personal computer, please remember which
port that you are using to connect to the club antenna. If you connect to the wrong USB port
and connection will fail.
Install Club manager software
User Account Control
Double click on the execution file and follow through the instruction until program properly
installed. If you are using Microsoft VISTA, WIN7, or WIN8, there is an UAC (user account
control) setting will impact the program execution. You can either right click on the short cut
of club manager program and run as administrator.
Page 10
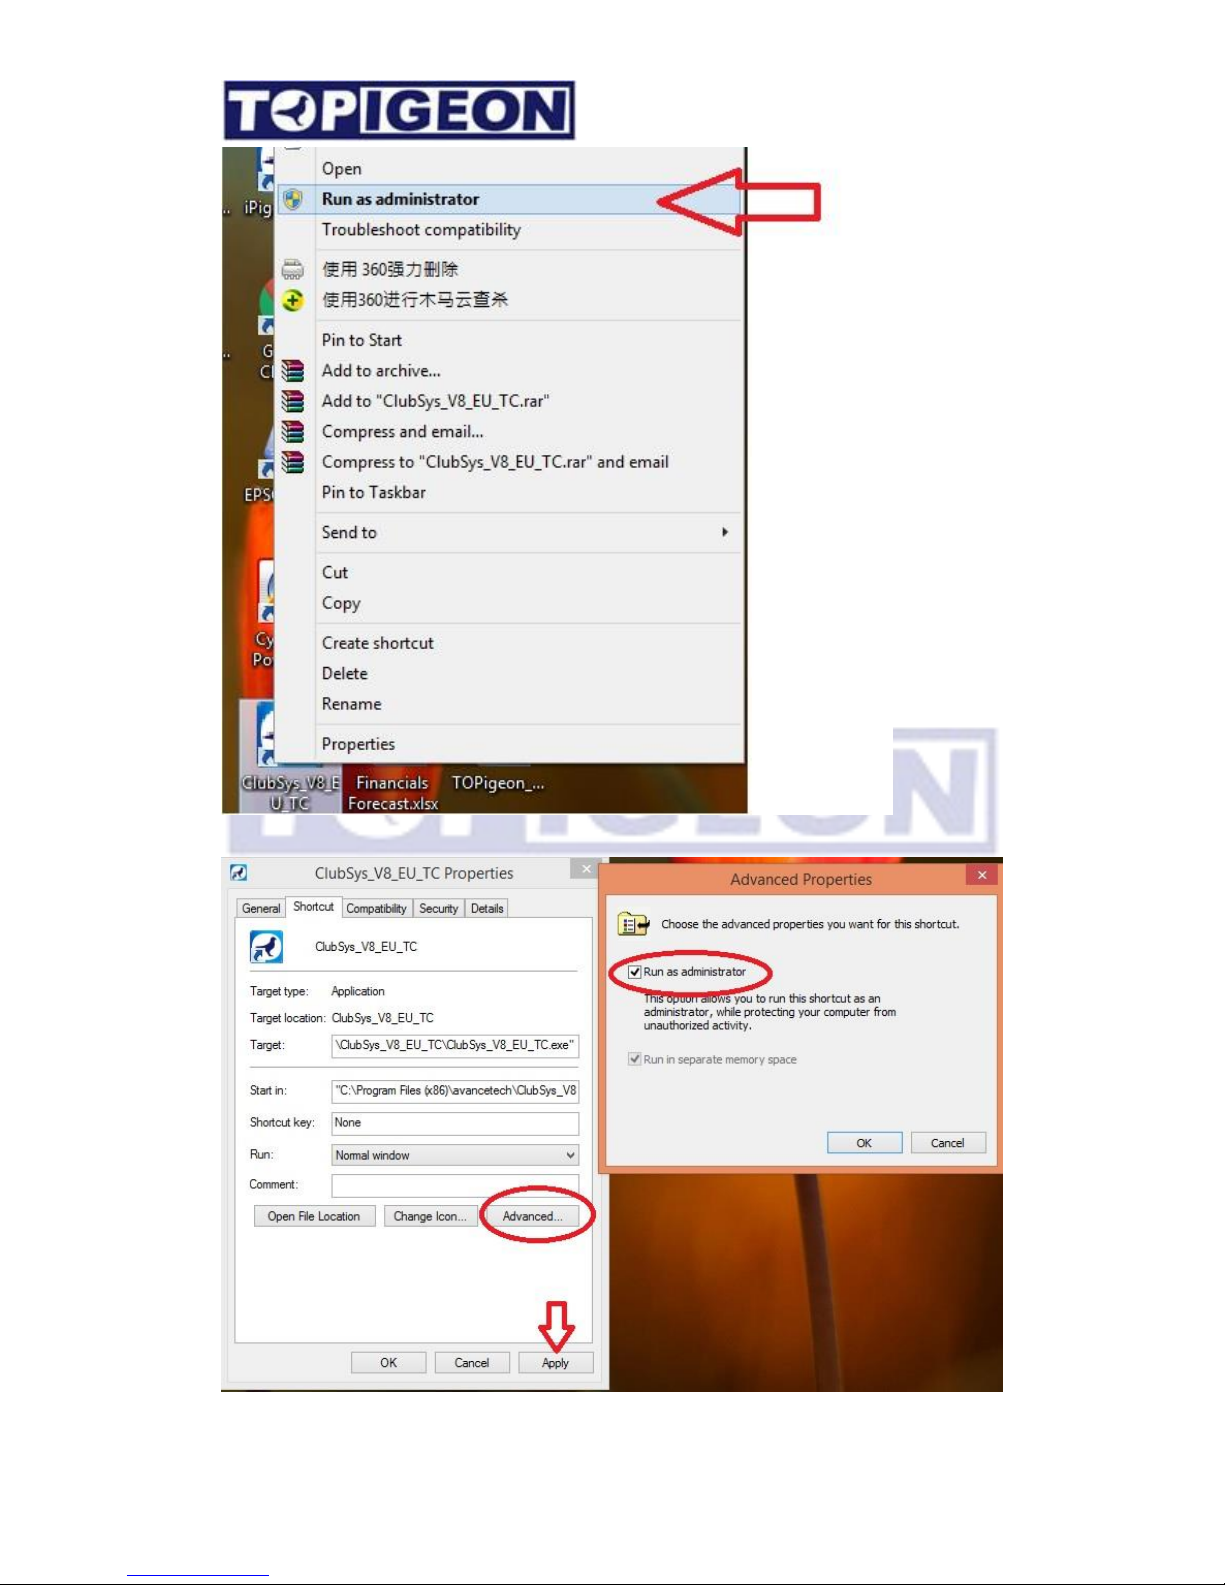
10
Or change the program property as always run as administrator.
Page 11
11
Please note if you miss the step above, the OS will create another Access Database in the
directory for you and all your data will be inside this directory of “WindoOS/User/(Your
computer)/Appdata/Local/Virtualstore/Program Files(X86)/Avancetech/ClubsysV8_EU_TC”.
This is to protect you if you do not have enough user right to execute the database.
System region and time setting
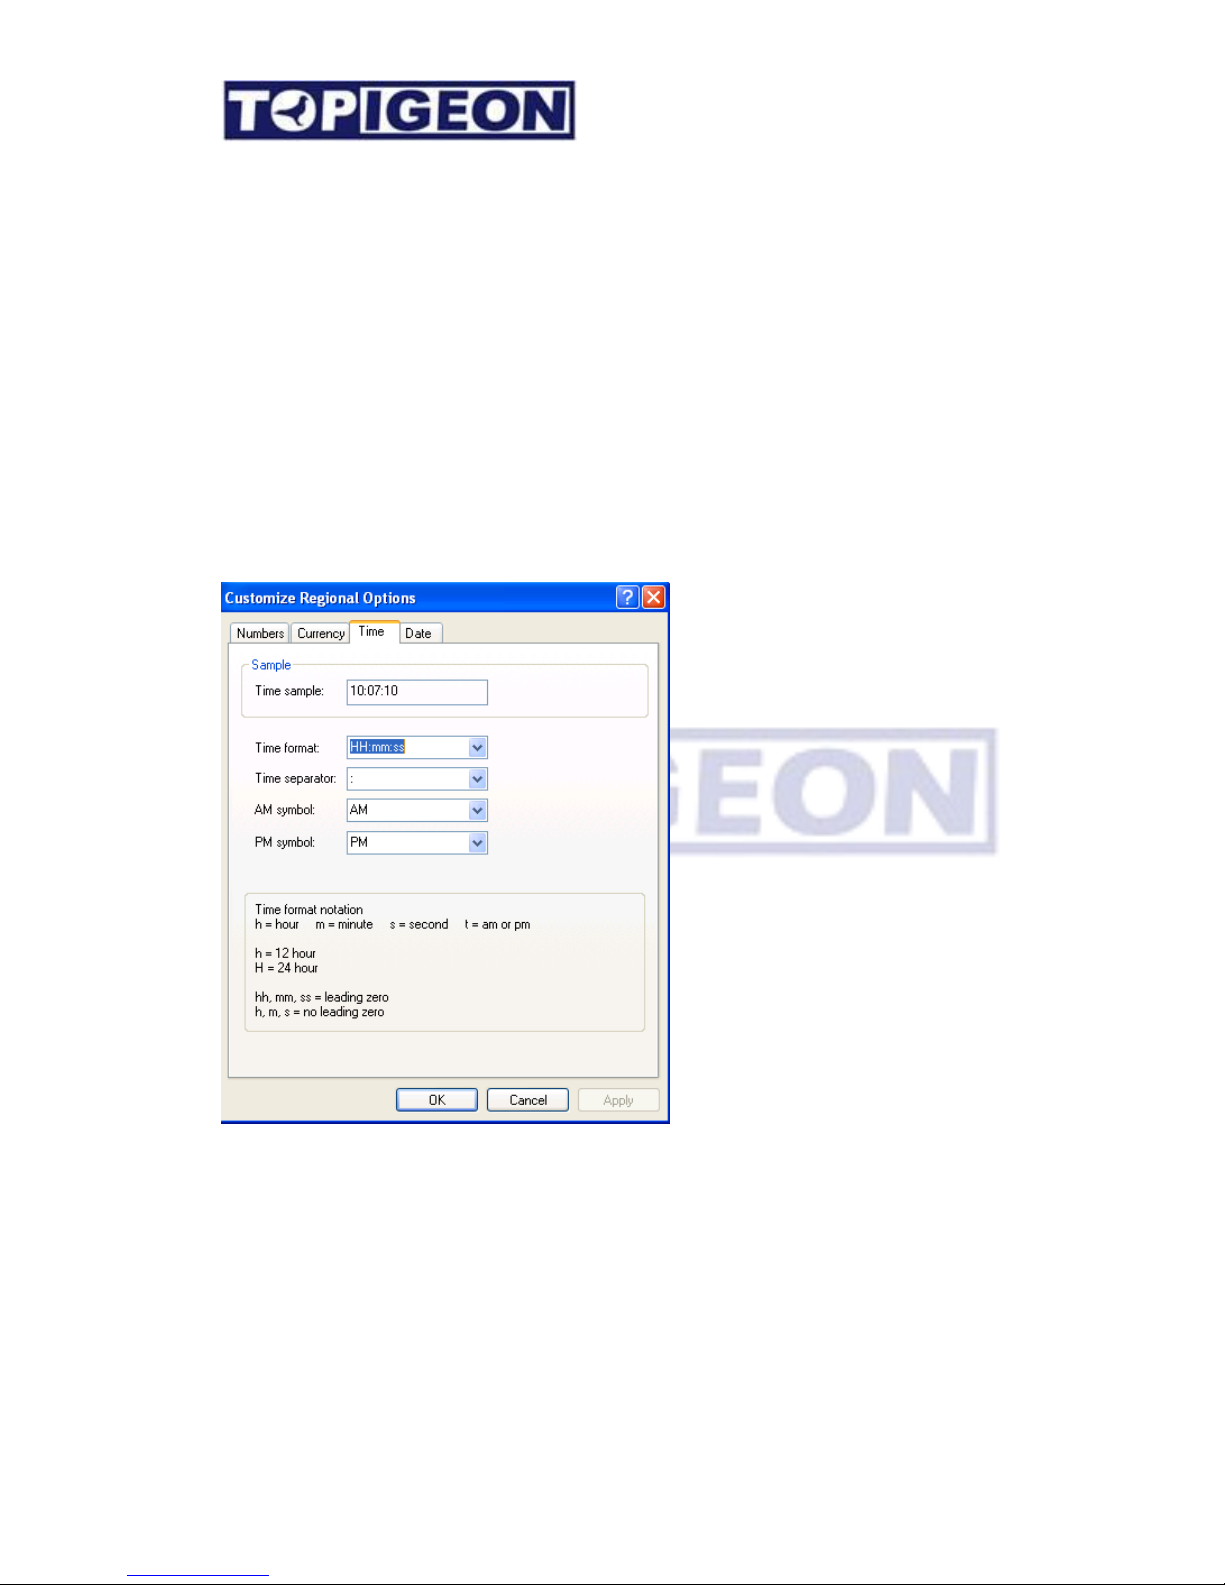
Since iPigeon timer is using ISO date/timing internally and this format needs to follow for the
result calculation. The standard long date/time format is YYYY-MM-DD and HH/MM (24
hours system). This format is the iPigeon internal formate. You need to customize your
personal computer accordingly in order for the club manager to calculate the result. Please go
to the region setting on your personal computer’s control panel and change the format
accordingly.
.
Coordinate data entry
The coordinate data entry is impotant in the system if you want to use this tool to help you
generate the race result. Please make the best use of the GPS module come with the
TOPigeon package. All member and race information, the coordination is mandatory and
cannot leave empty. If you do not have coordination information please enters the dummy
Page 12
12
data and does not use the race result feature. Please note that coordinate format in the tool
cannot be space. For example: N 24”22’3 and the entry should be N024”22:03.
Data entry
There are some small TIPs for you to enter the data easier, such as well use of your key board
“Tab” Key and “Arrow keys”. For example, there are many fields to fill in. If you finished
one field and press Tab key, the cursor will move to the next field. If you enter multiple
column data such as coordinate, date, and time. You can move the column by press -> to
move to next column.
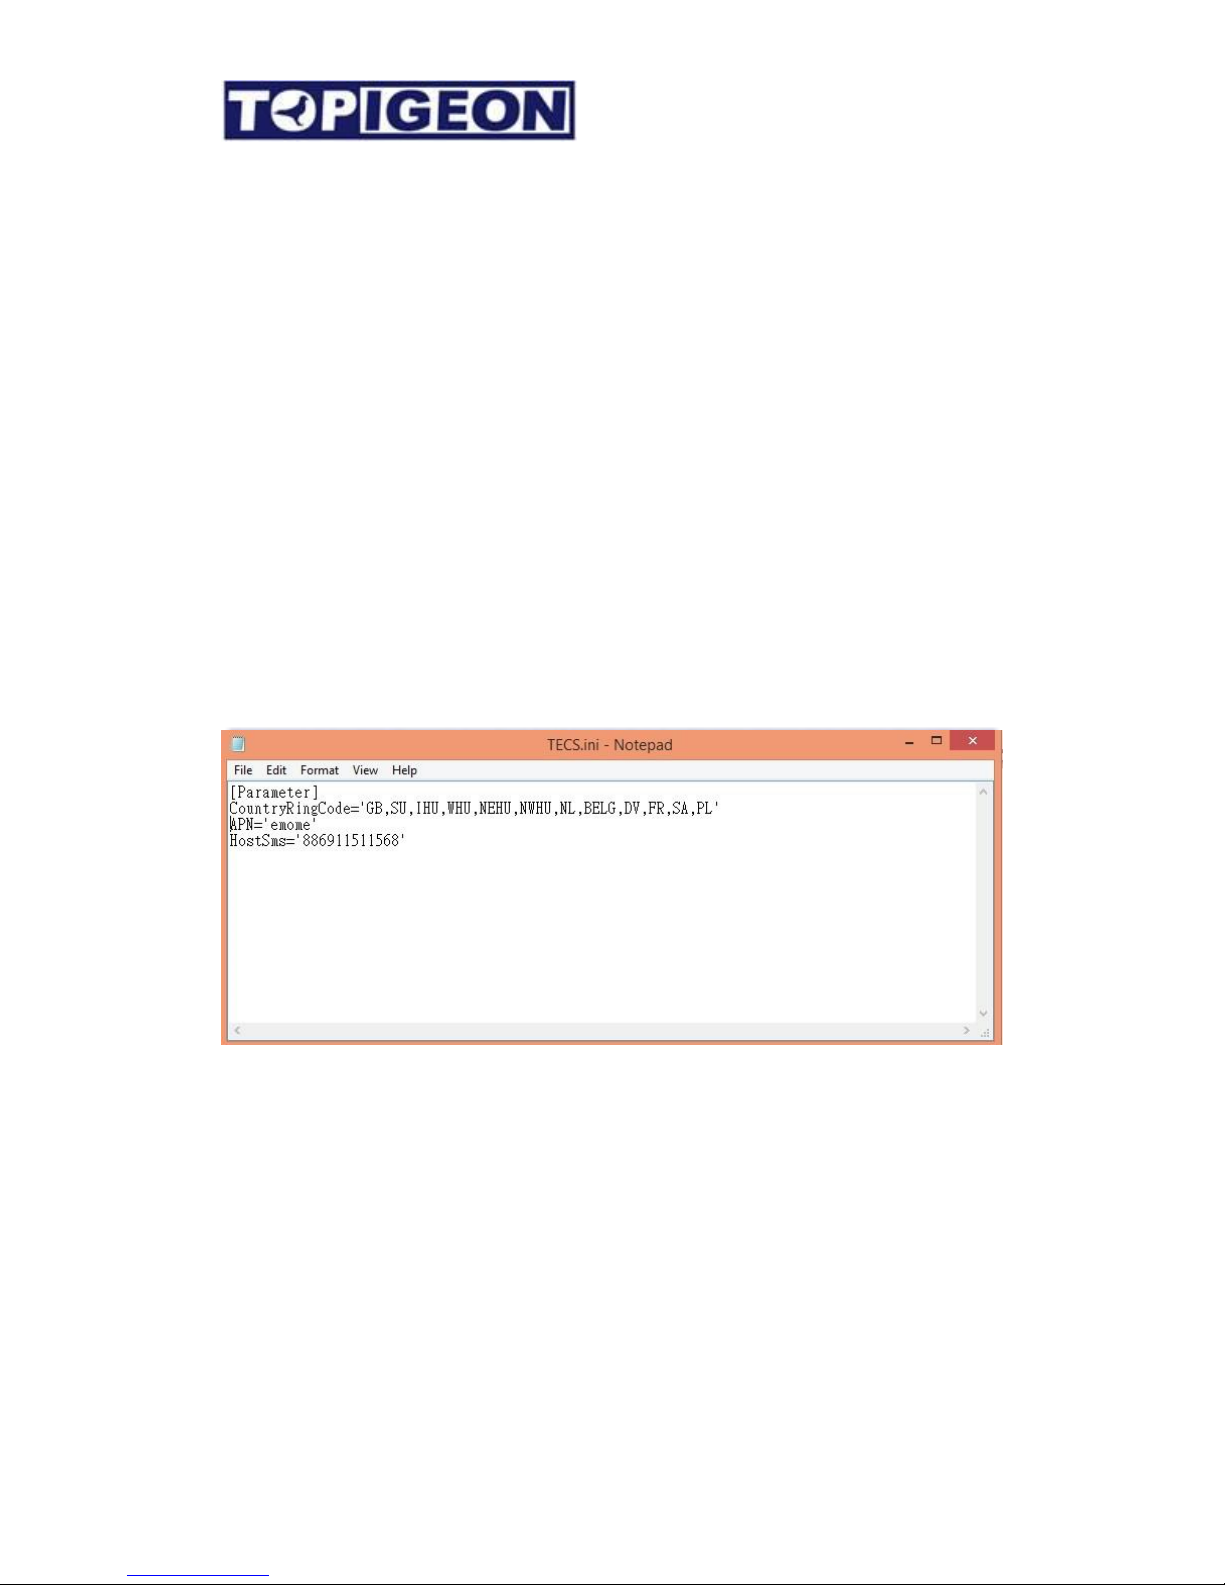
TECS .ini file setting
There are some vital parameters inside this initiate file before you run the club manager
system. You can find the TECS.ini file in your Program files (X86)/advancetech/ClubSys_V8
You can edit this file by Notepad.
CountryRing Code: The list inside is following the Europe Union/Association standard and
this will be your prefix of association number. You can edit it according to your Unions and
Associations.
APN: Access Point Name which is basic setting for the iPigeon timer 3G data. This will be
the default setting when you initiate a new iPigeon timer. In the iPigeon timer itself, the
fancier can also change the setting if they change a SIM card.
HostSMS: This is the SMS center phone numbers setting which fanciers are not allow to
change. The SMS center system can receive and send SMS of club race information to
fanciers mobile. This function can provide by either GSM module or HTC Mobile APP.
Please contact TOPigeon for more information.
Page 13
13
Basic Operation
This software designed in the way for the people not familiar with computer and soon feels
comfortable with it. You just follow the top tab buttons to go through all club operations. For
all data lists, if you click on the top row, the list will be sorted according to the row you click.
If you right click on your mouse over a data record, a popup window appears for your further
operation options, like delete, add, and edit.
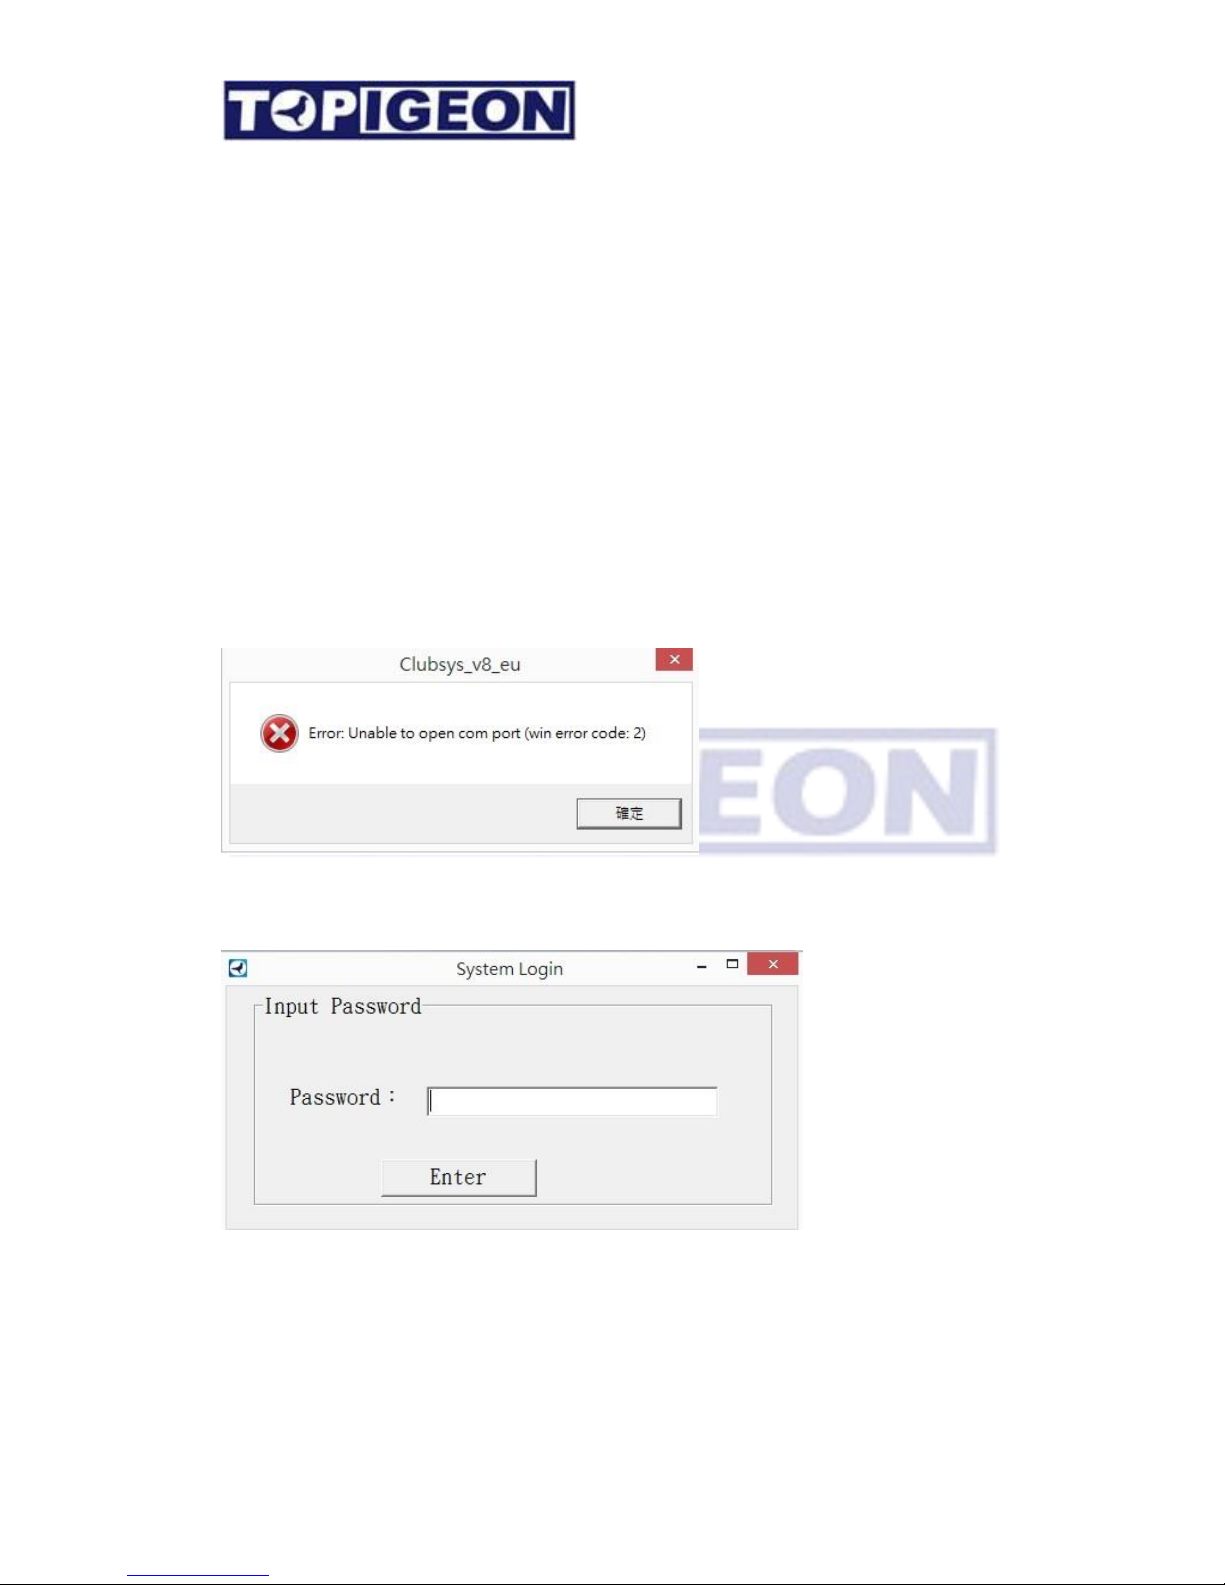
When you double click the iPigeon club manager icon on your computer desktop, the
applications will check the COM port connection firstly. If no COM port connection, the
system will prompt you an error message. This is to make sure that your COM port has
dedicated to this program. Again, please note that the COM port is default set to COM1 for
the timer communications.
Then will prompt you a login window. The password will be provided by each legal release
of the software.
The password for the club manager will be given by AdvanceTech or your local agent. This
password also data encryption key of club manager system and it will be different between
clubs.
Page 14
14
Home tab
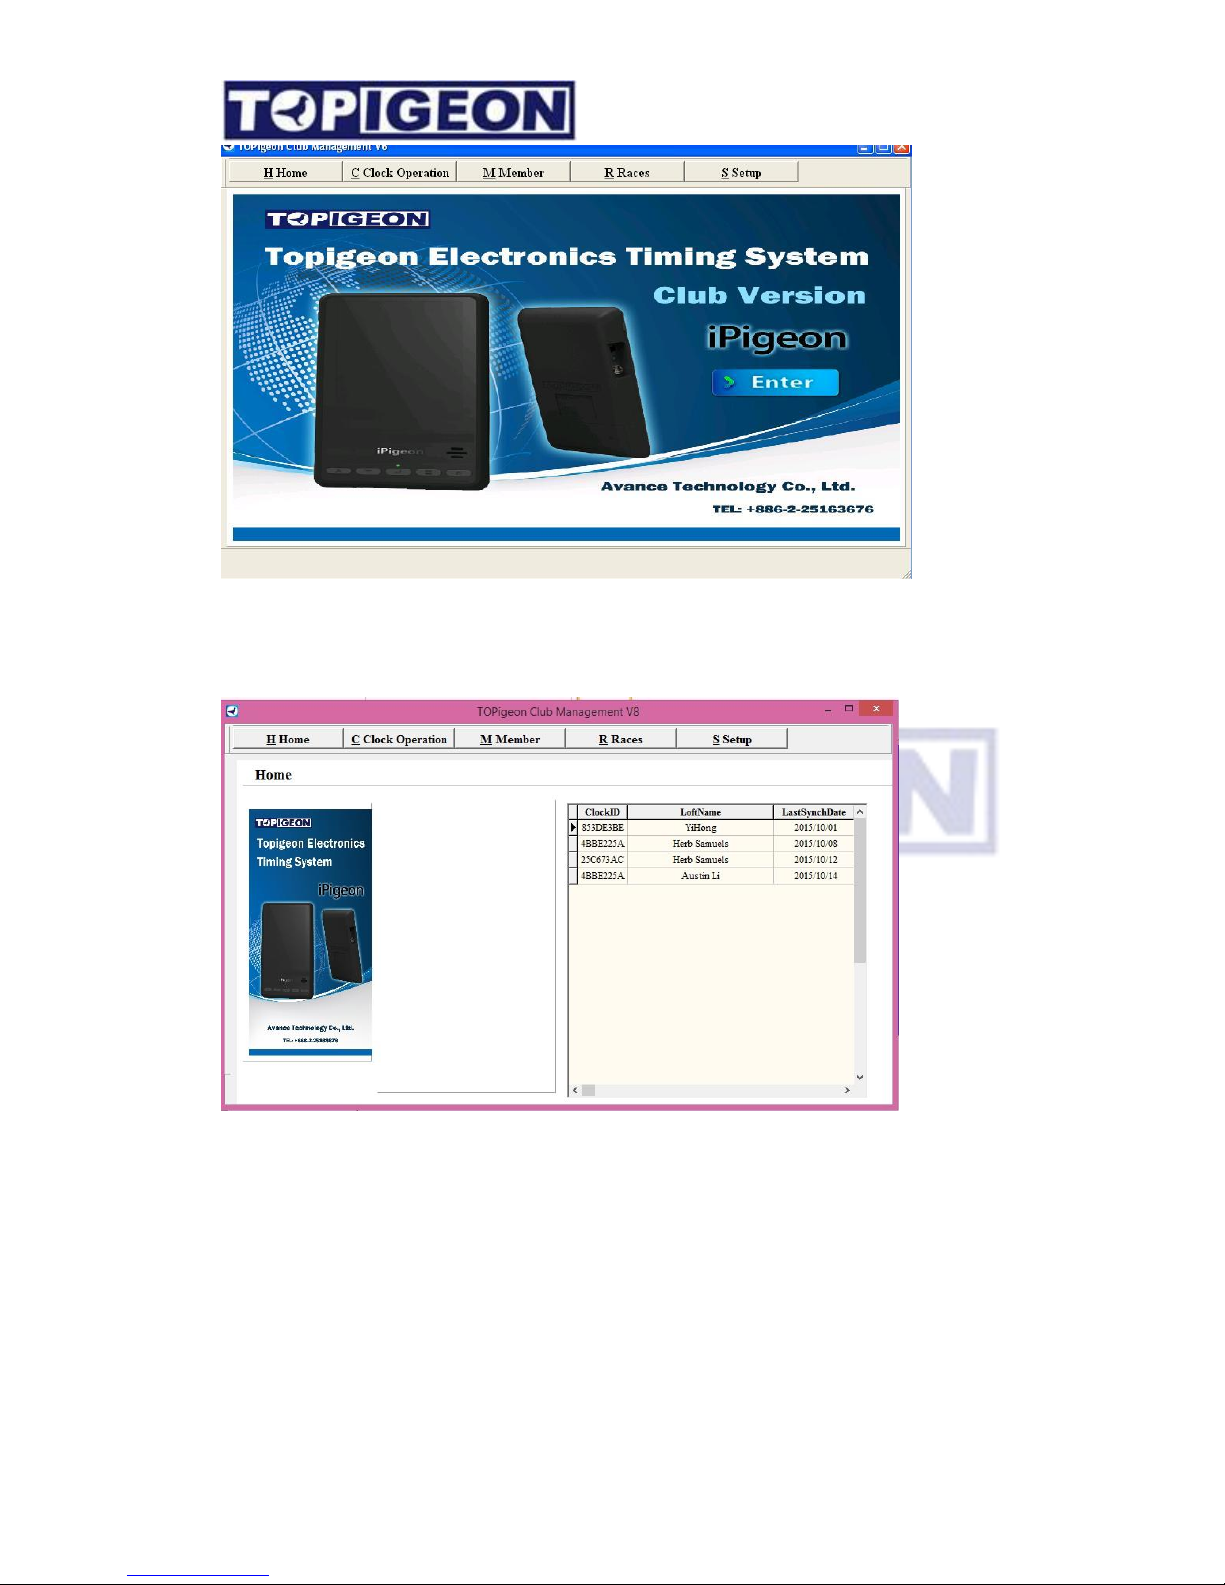
The Home Tab will show the system logs that this club manager has down load data or
synchronized with your club members. This provides a basic tracking record of the club
operations.
Setup Tab
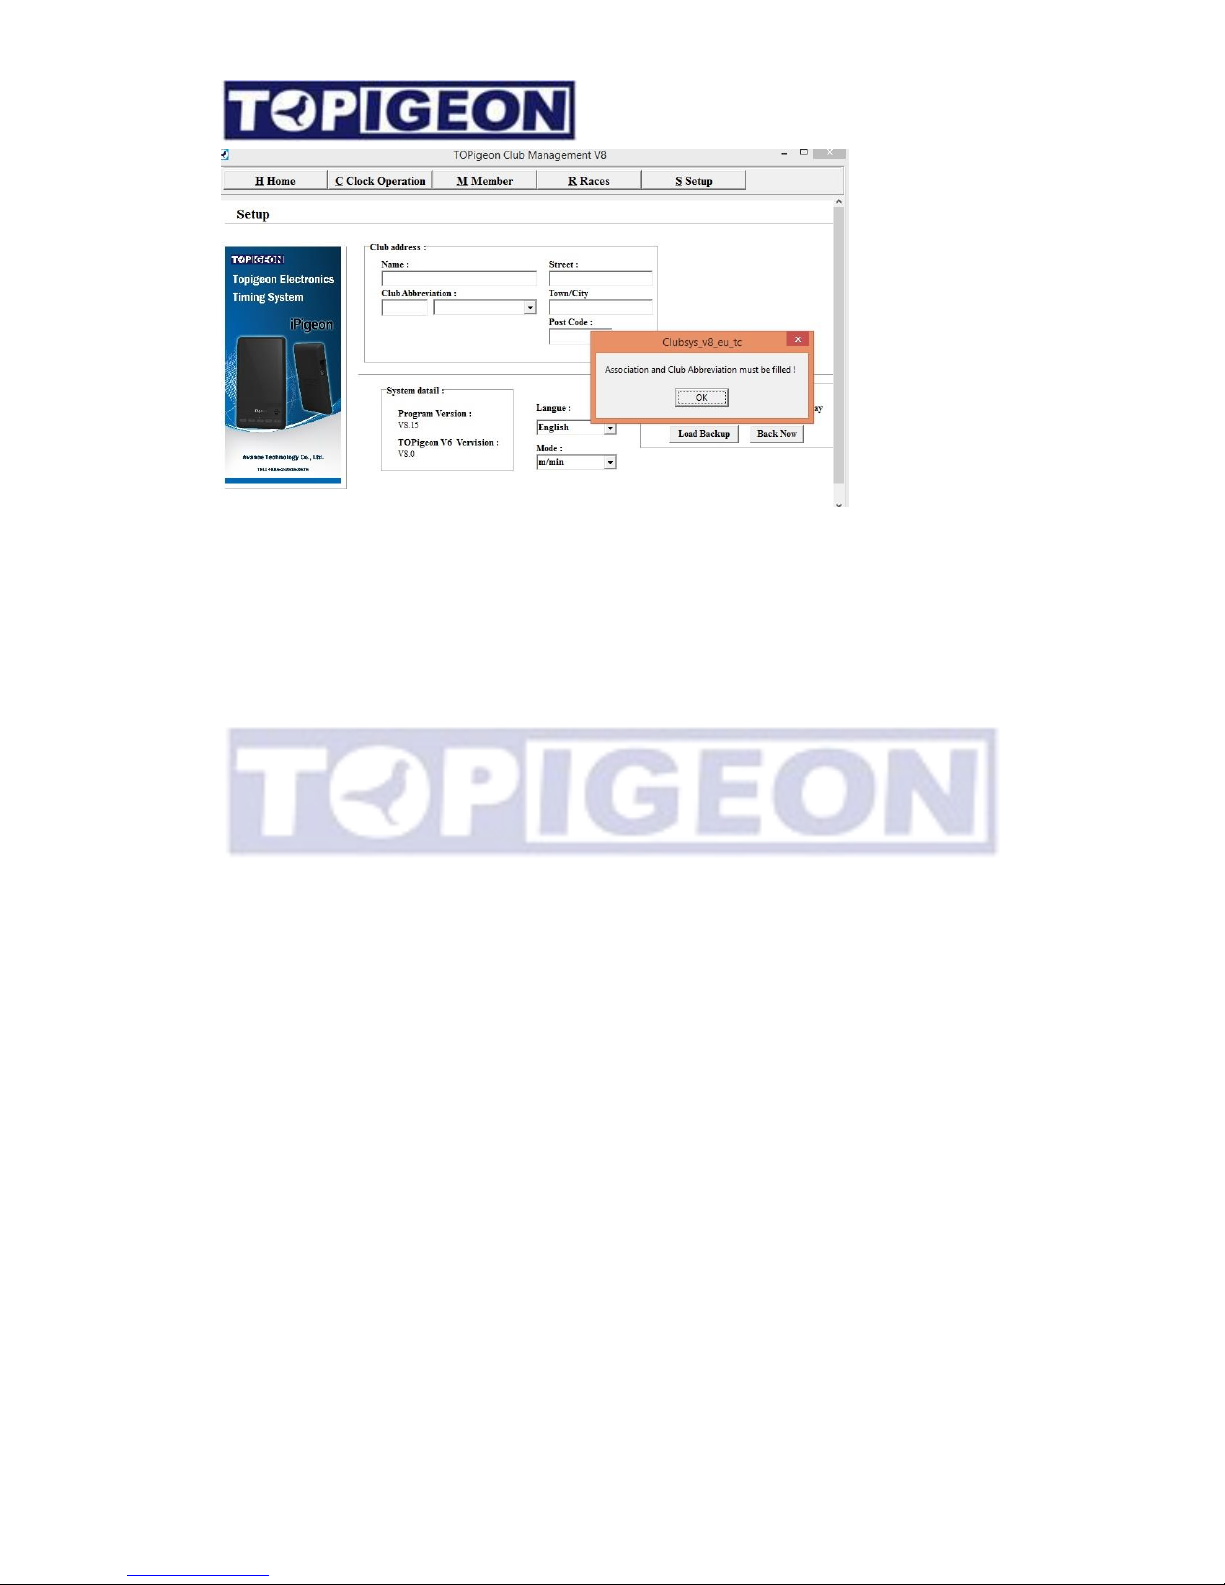
Note: If you are first time using this club manager software; the club system will direct go to
this Tab first and ask you to fill in the information.
Page 15
15
In this Setup Tab is all about the Club information and system setting and they are all basic
information but vital to the club operations. Some key fields explain as below
Club Abbreviation: If your club is not in the club abbreviation list please select “custom”.
Please note the Club Abbreviation will be the CLUB ID when you initiate the new timer for
your member. The CLUB ID is a very important identifier when your member wants to check
the online result. The maximum of Club abbreviation field is 8 characters.
Association: The Association code will be the default of the member loft ID. This is also an
identifier which will insert into all data transmission to cloud database. The fancier can view
their online result by using the Association code.
Please note: The Club Name and abbreviation are following by UK region. If you are in
different region, please edit yourself in the TEC_ClubMap table.
There are meters/minutes (m/min) and yards/minutes(y/min) option for the different
distance unit. Please setup the metrics system according to your club rule.
The club manager database automatic backup period and backup time can also be
configured in here as well.
Page 16
16
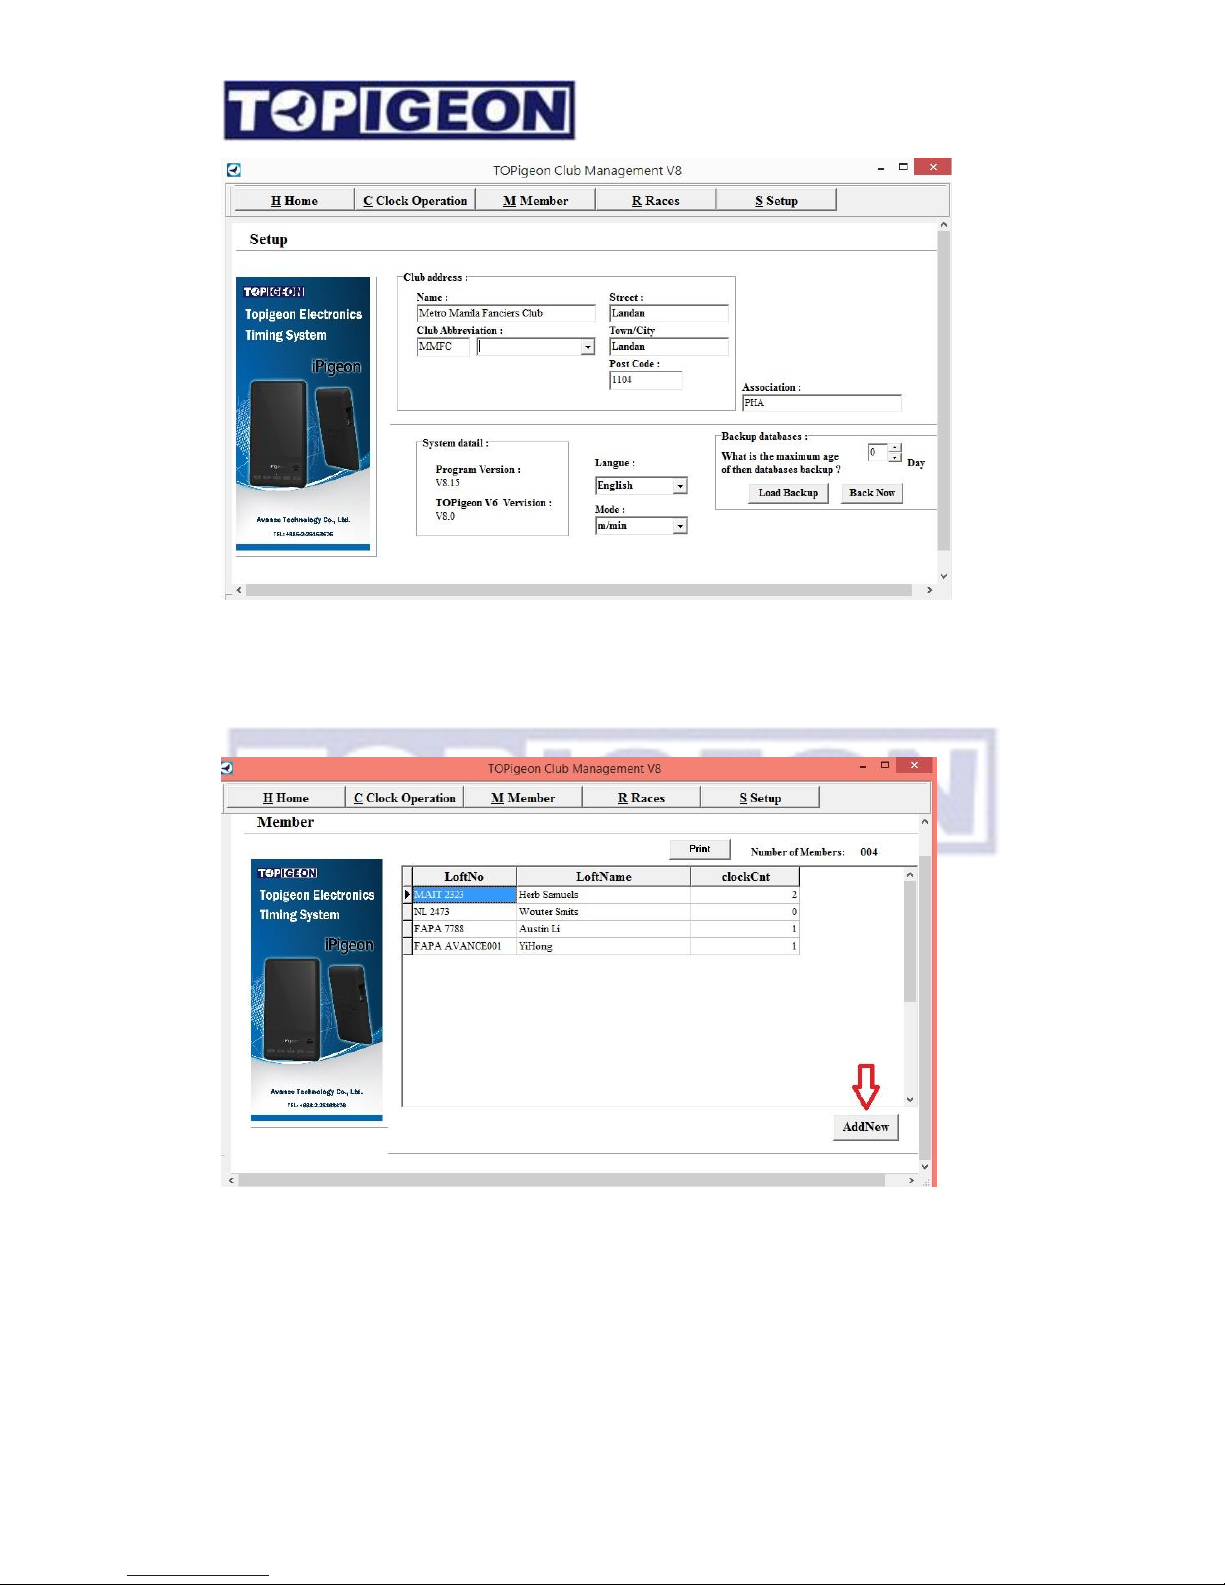
Adding new members
Selec
t the
Members
Tab at the top
of
the scree
n
Select
the “AddNew” button to add new members.
Page 17
17
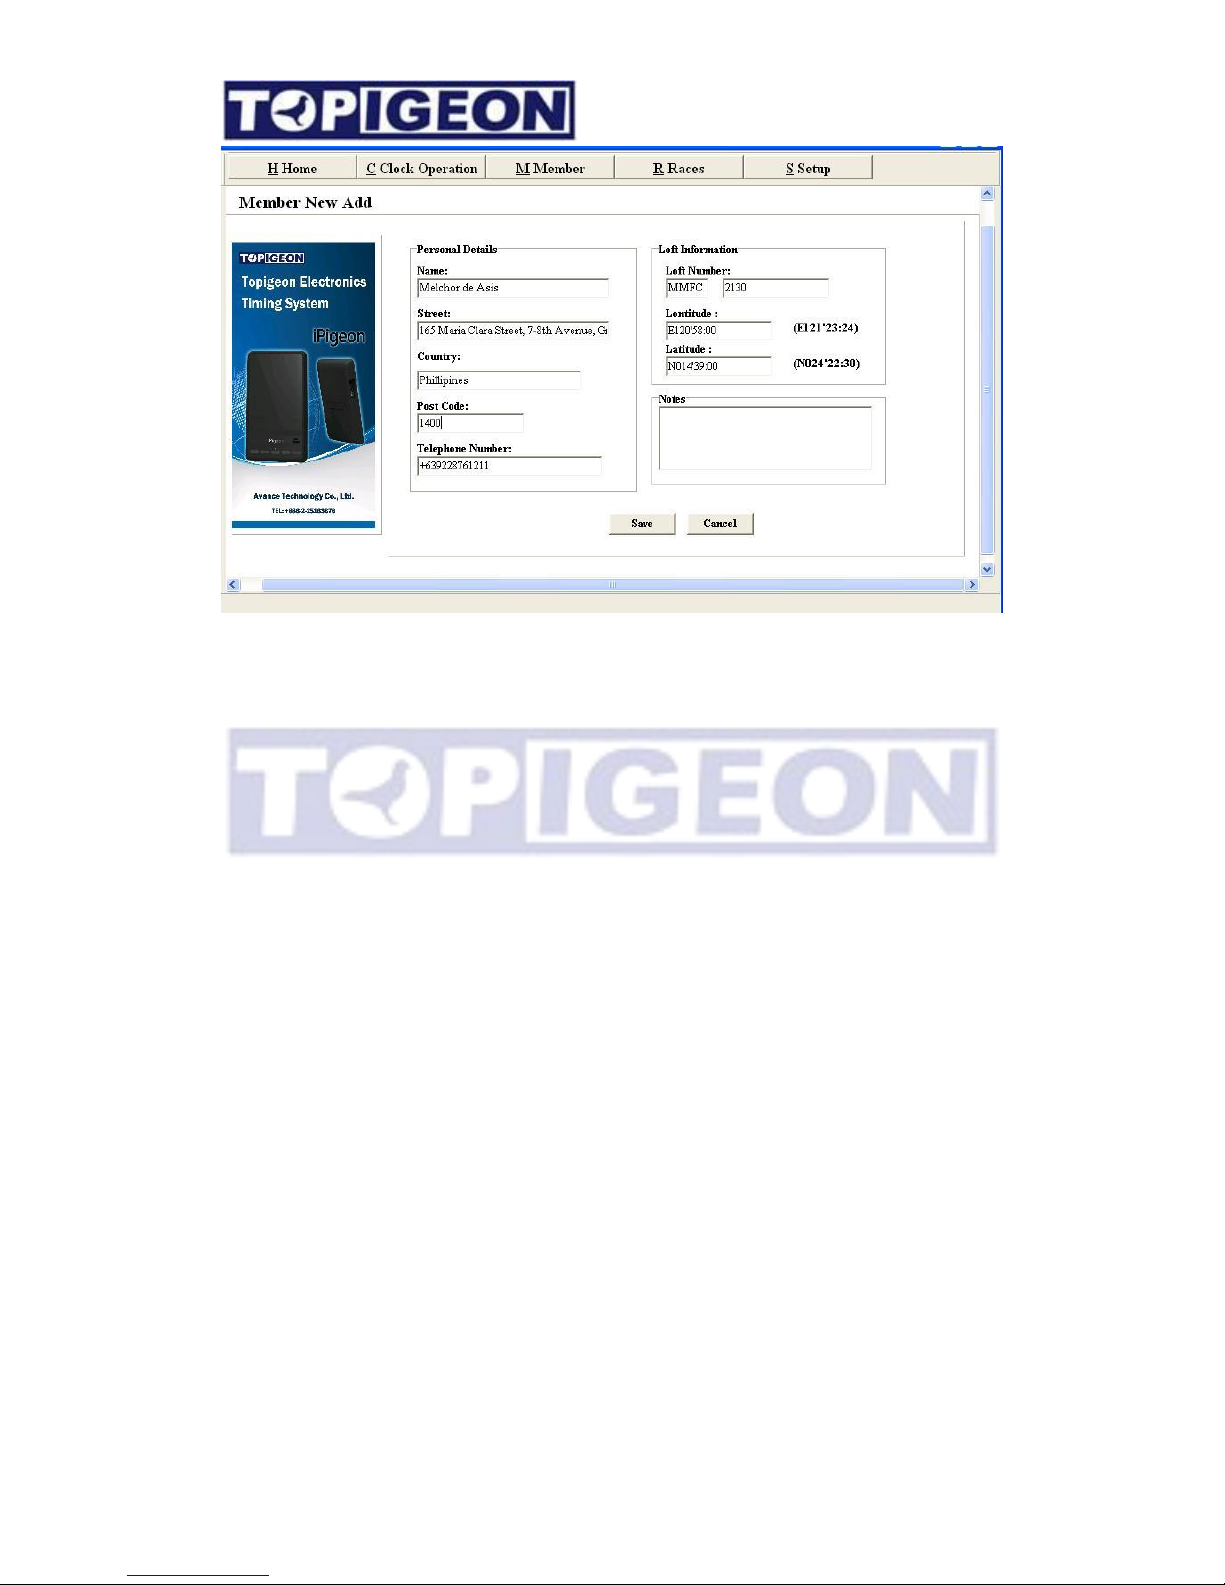
Enter your members details and loft information. Click Save when you have entered all the
information. Some important fields are,
Telephone Number: If you are using TOPigeon SMS Center system, the system will collect
this information as the member mobile number. The club can broadcast race information or
send the race result to the individual mobile phone via SMS.
Loft number: The first field will come with the Setup, Association. You can also edit this
field if this code is not correct. Please note this code will be update to the fancier timer
accordingly. The second field is the real Loft number, or called Loft ID which will update to
the fancier’s timer as well. This loft number will be the identifier for the loft in the backend
system.
Loft Coordinate: This Loft coordinate information is a fix value update to the Fancier
information in the timer which is different from the GPS coordinate from the Summary
Information in the timer. If you are using TOPigeon loft monitor system, the monitor system
will be alarm if these two coordinate are drifted over, say 300 meters (configurable), in order
to detect the fraud like changing loft location.
Editing members
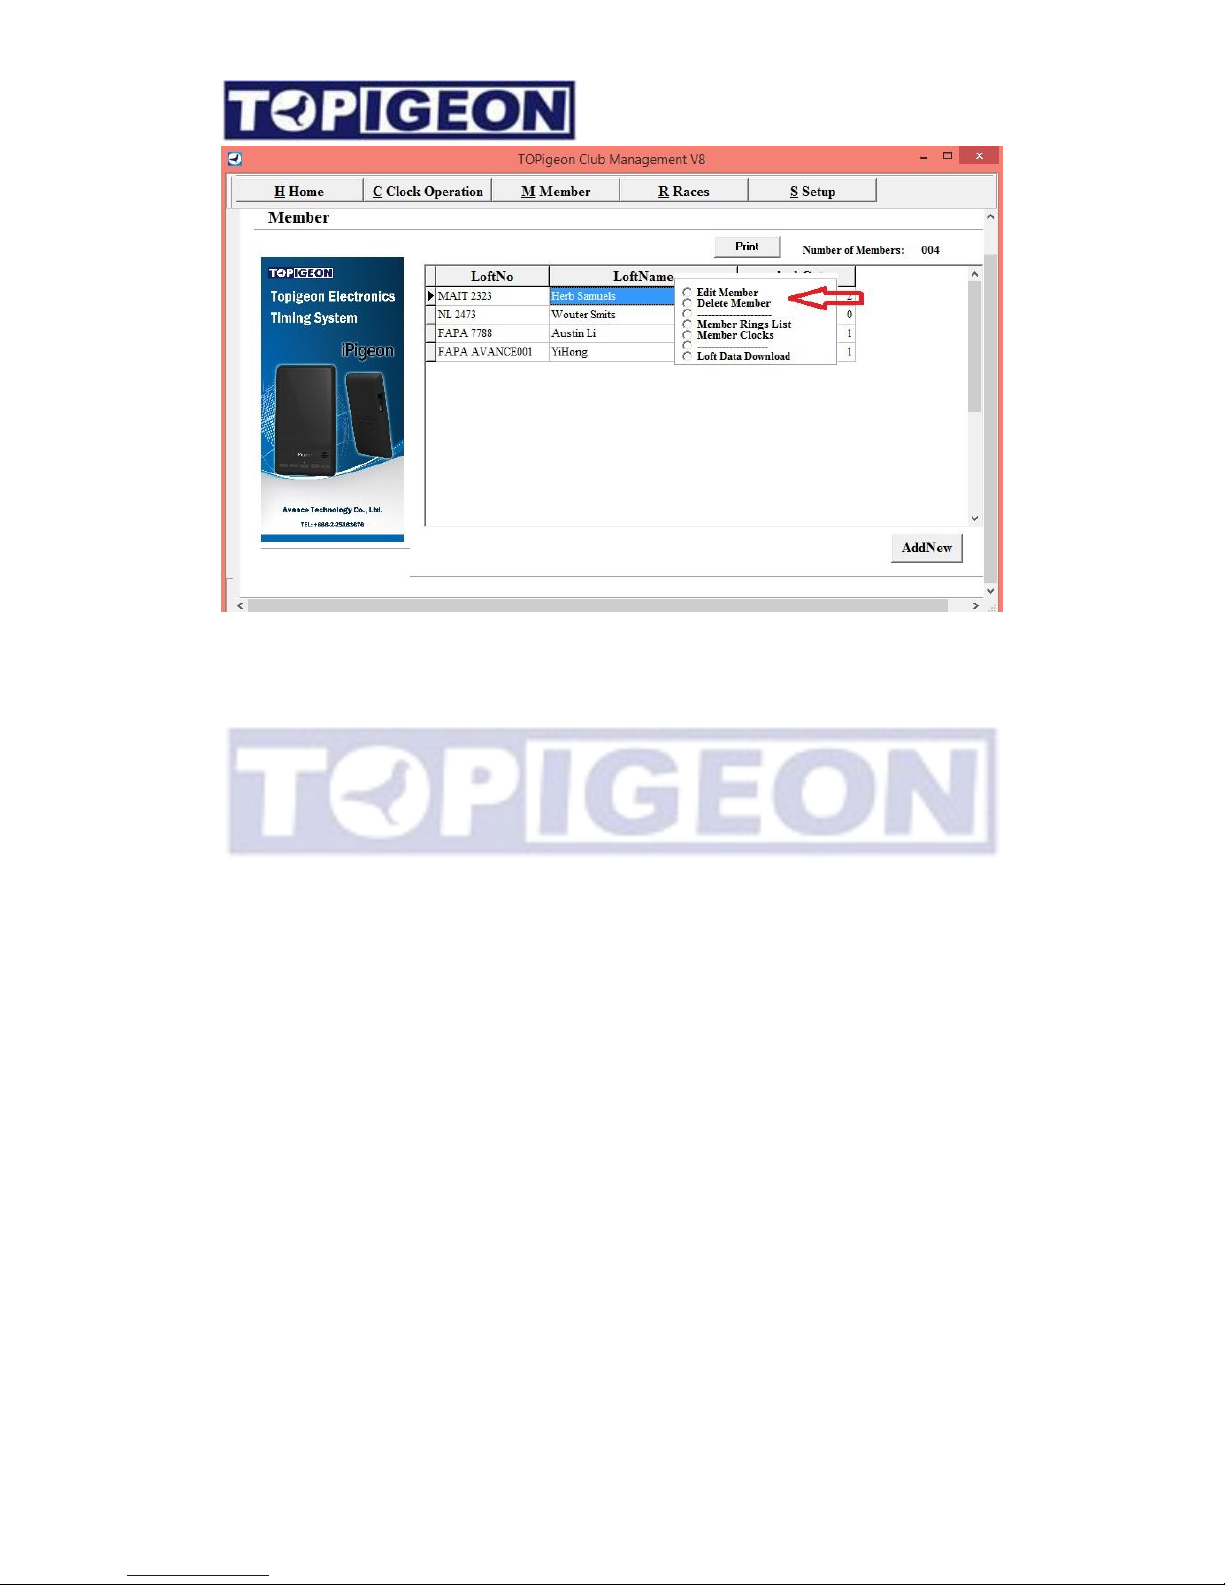
Selec
t the
Members tab a list
of all
your
members
will
be displaye
d. Hold mouse
over
member
you wish to edit, and then press the RIGHT MOUSE BUTTON
for further option
s
Page 18
18
Edit Membe
r” to
change members addresses
or details
. “Delete Member” to delete
the
member from Club Manager
“
Members Ring Lis
t” to vie
w their ring list, which will be the same as you double click on
the member’s row. The function will be introduce later.
“
Members Clock
s” to vie
w member Clock
s information, clock serial number and
time last synchronized.
Download loft information into member’s clock
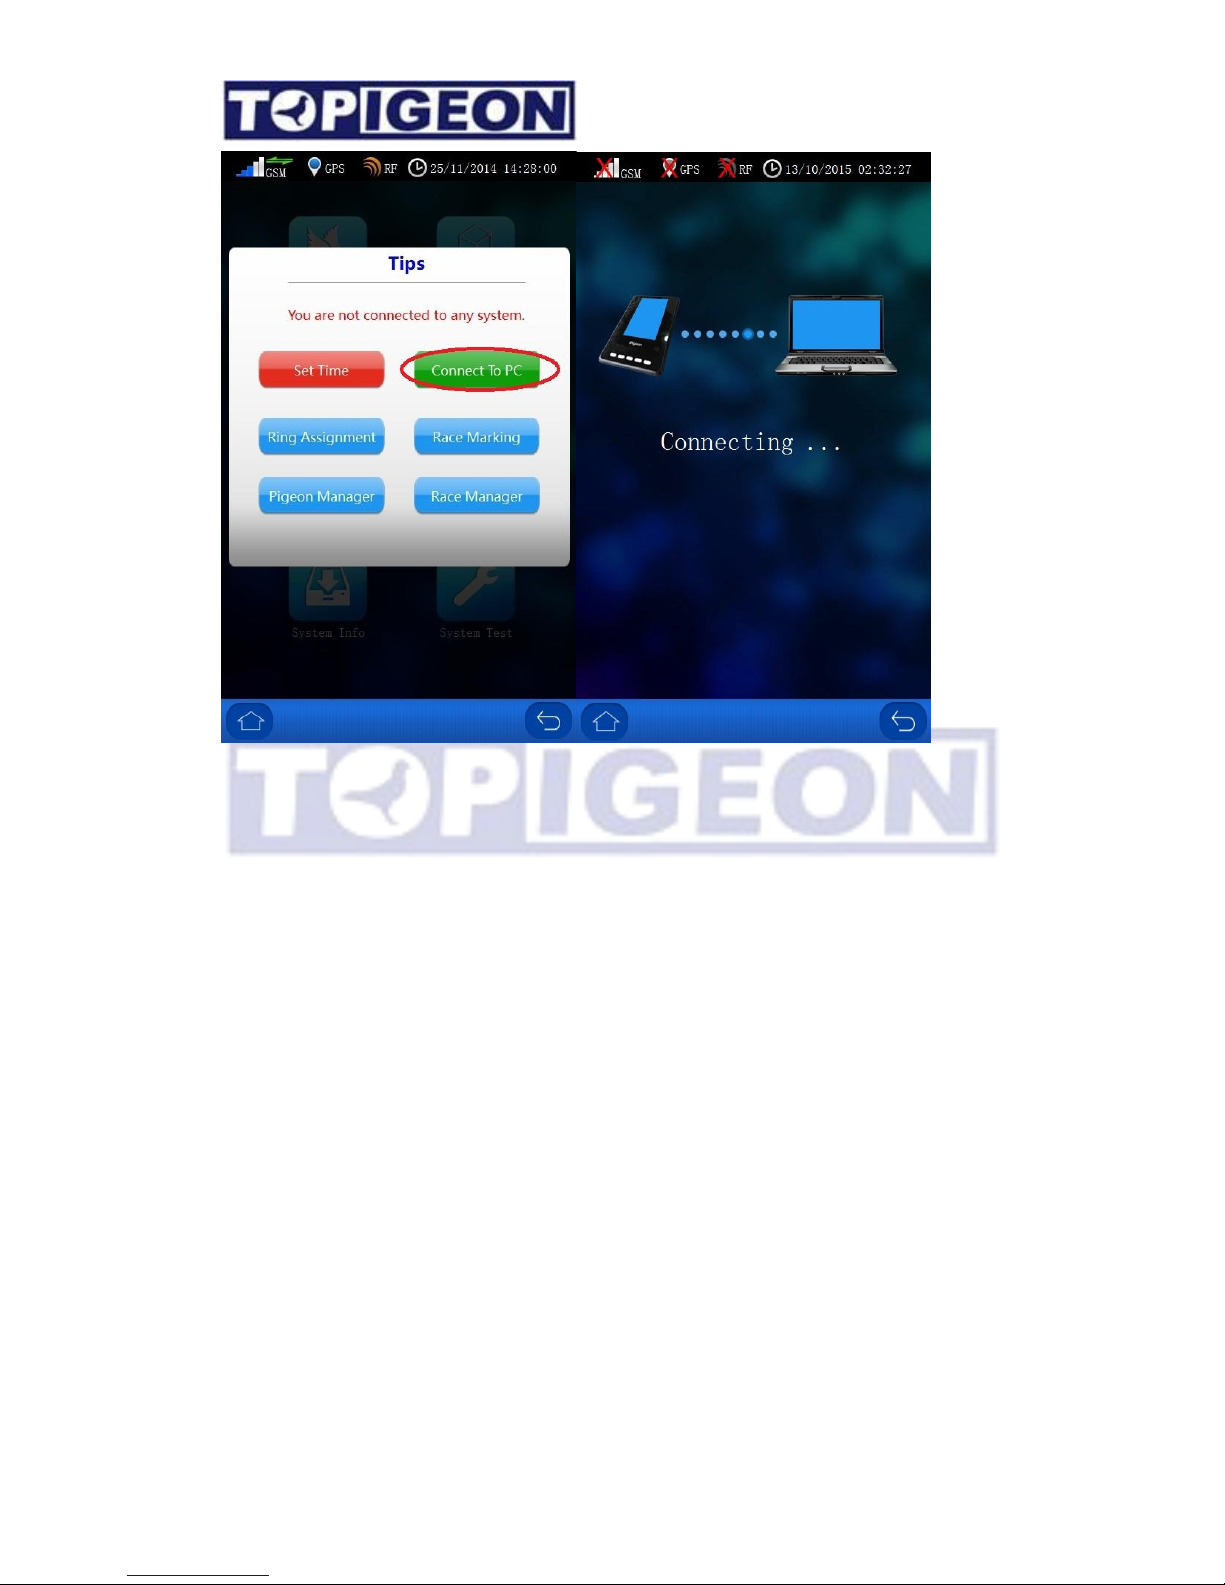
Before you operate this process make sure the member’s clock and PC already connect and
member’s clock is in “Connect to PC” Status.
Page 19
19
There are three situations that you need to use this features,
1. Fancier purchase new iPigeon timer.
2. Fancier’s iPigeon timer transfer to another fancier.
3. Fanciers change their member information, such as phone number, address or new loft
location.
The situation one and two need to initialize iPigeon timer and situation three do not need to
initialize the timer. A simple thumb of rules, only the timer change the loft number or new
assign the loft number need to initialize the timer.
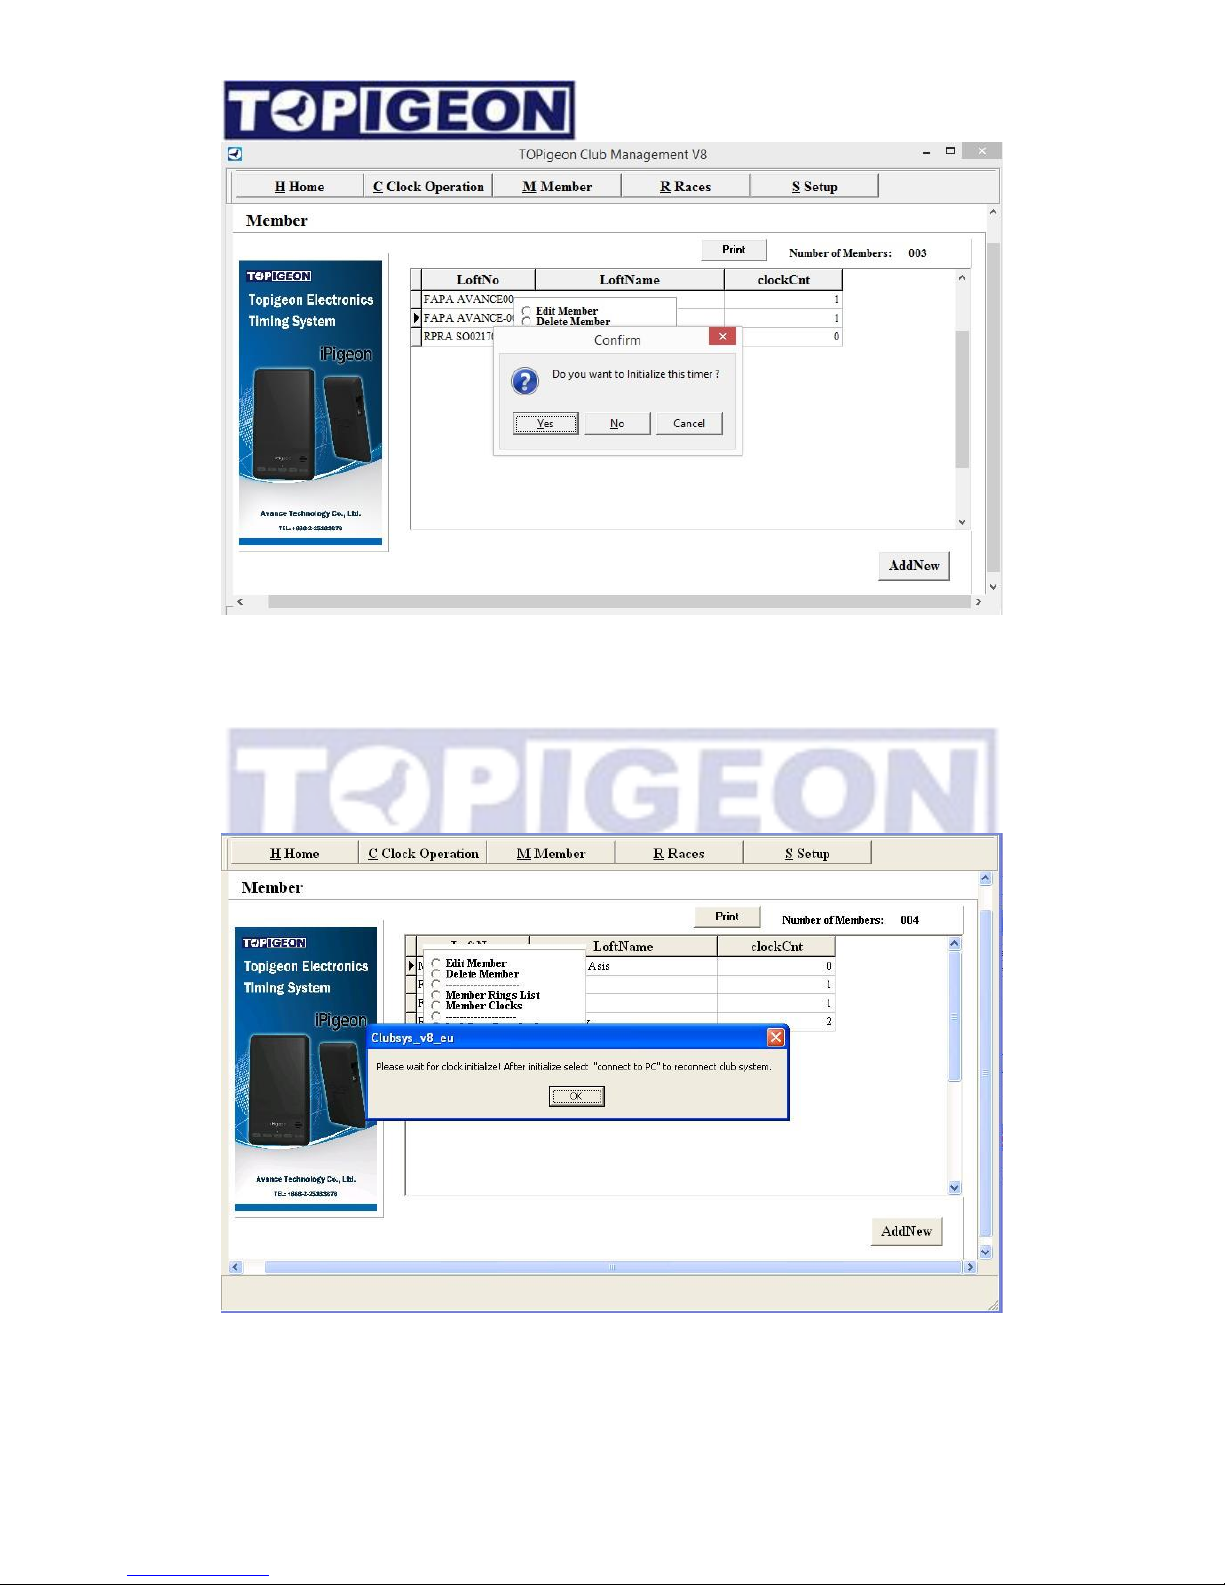
Right click over the member’s row and select the “Loft Data Download”
Page 20
20
A confirmation window will pop up “Do you want to initialize this timer?” The difference
of this confirmation window will be,
1. “YES”: This will initialize the member’s clock by clean up all loft data, including the
pigeon information, and load the new loft data to the clock as for situation one and two.
2. “NO”: This will keep all existing data and update the new loft information to the timer.
This feature is for the situation three.
Page 21
21
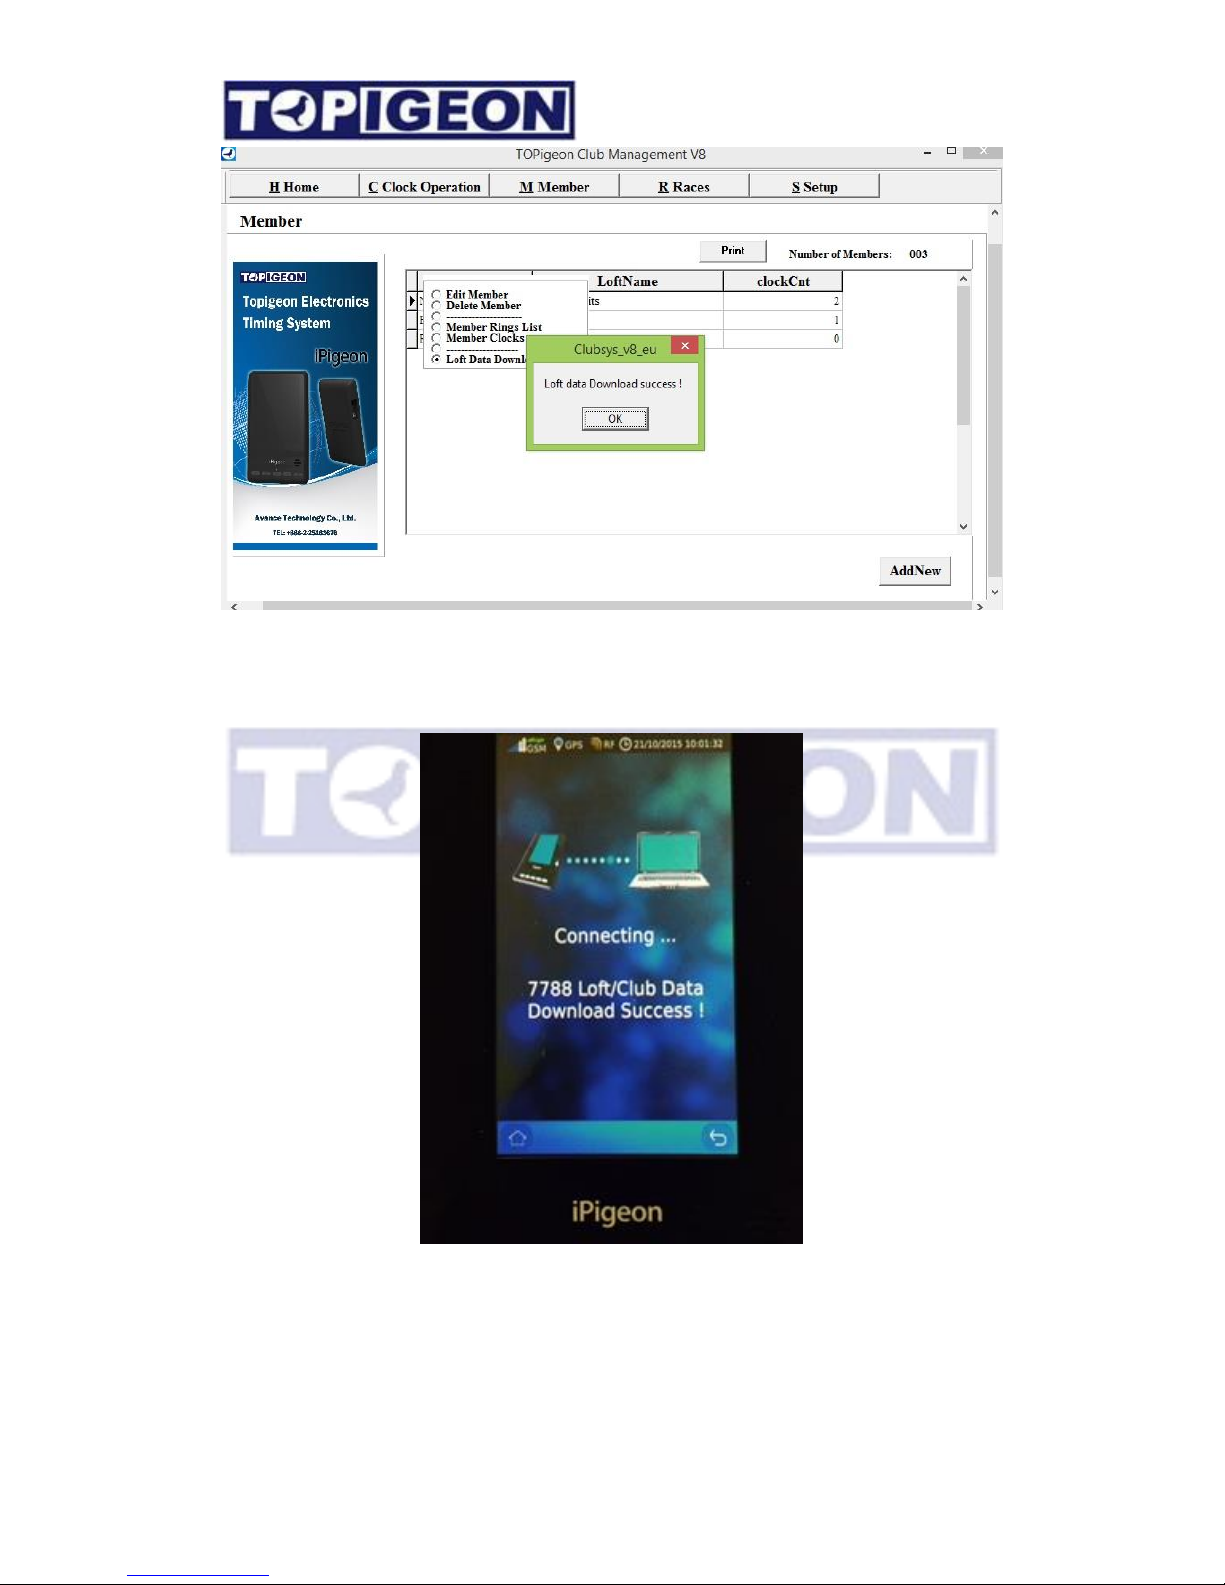
When download new loft data completed a message of “Loft data Download success!” will
pop up in the club manager. The iPigeon will also display Data Download success! Message
as below,
Adding Rings
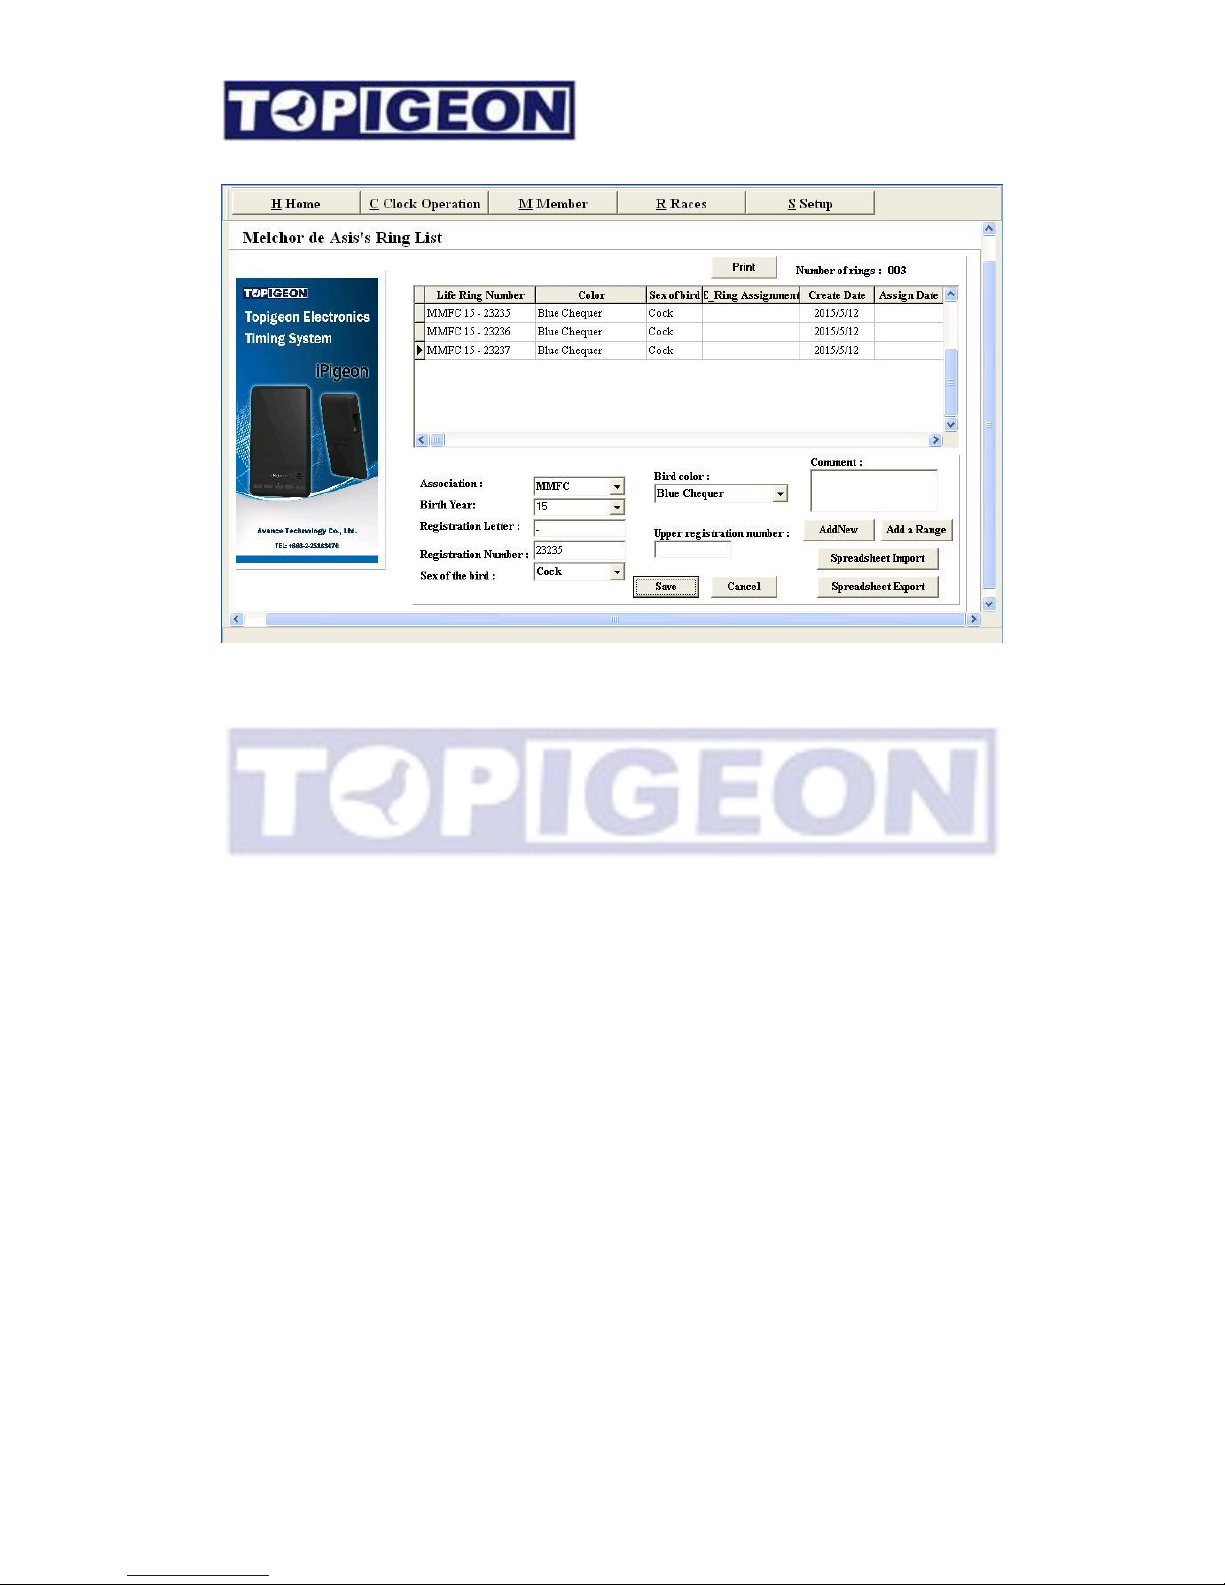
From the
Members screen, if you double click the member line or
right click on
m
ouse
and Select “Members ring lis
t” to Add member ring’s window as below,
Page 22
22
Use
the “AddNew” button to add birds.
In
the bottom part
of
the
screen select the Association
by either using
the drop down list
or pressing
the first letter
“G” for example
will bring
up “GB”
By using
the
“TAB”
key you can switch
between
the fields: Birth year, Registration
Number and etc. Enter the B i r d
color
and Sex o f b i r d
if
known. You can edit this
information later
.
When you have entered the entire
pigeon information click “Save
”
For ad ding
each ring Clic
k the “AddNew” button to add more rings
.
Adding multiple rings
One
of
the nice features of Club
Manager is
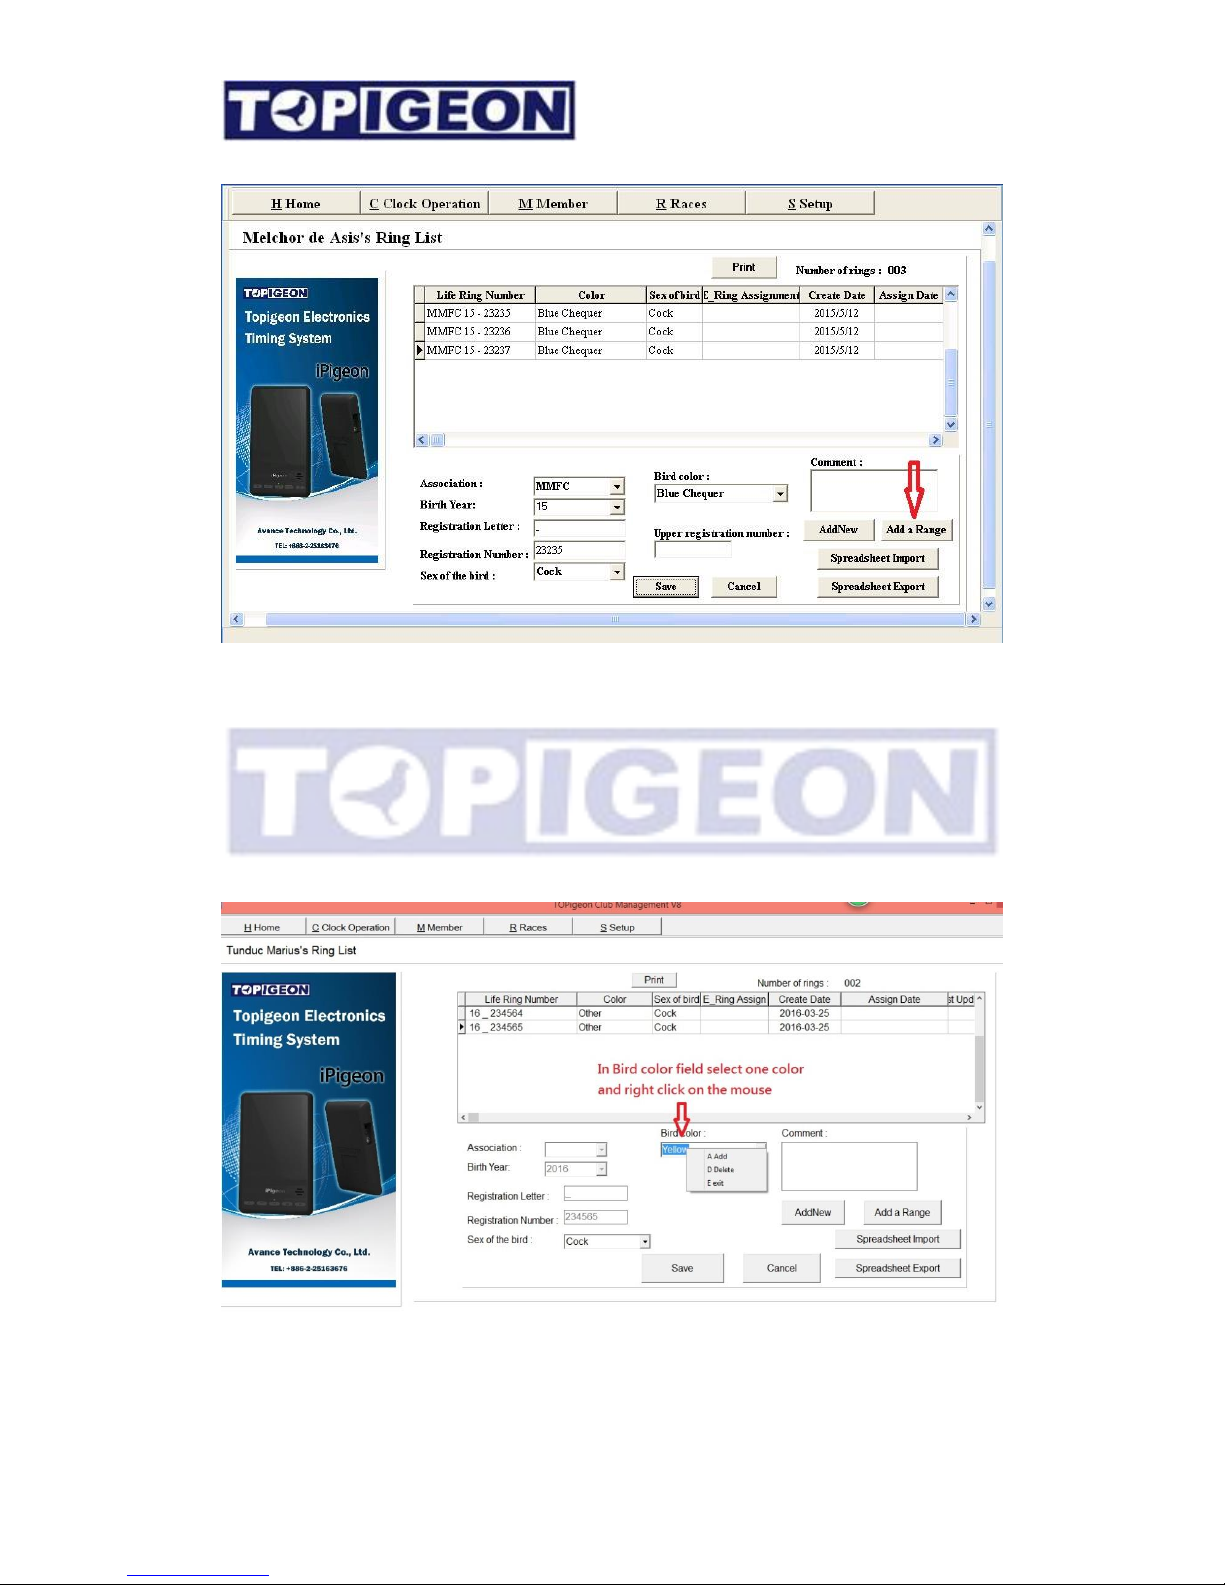
that you can add
a certain range of
the
rings for the
member
new birds batch process
. By select the “
Add a Range
” button.
Then the “Upper registration number” field will show. By fill in the range of registration
number from starting and ending (Upper registration number), the whole range of the rings will
Page 23
23
populate in the upper window.
The detail of the individual pigeon information can be edit later.
Add/Delete Birds color
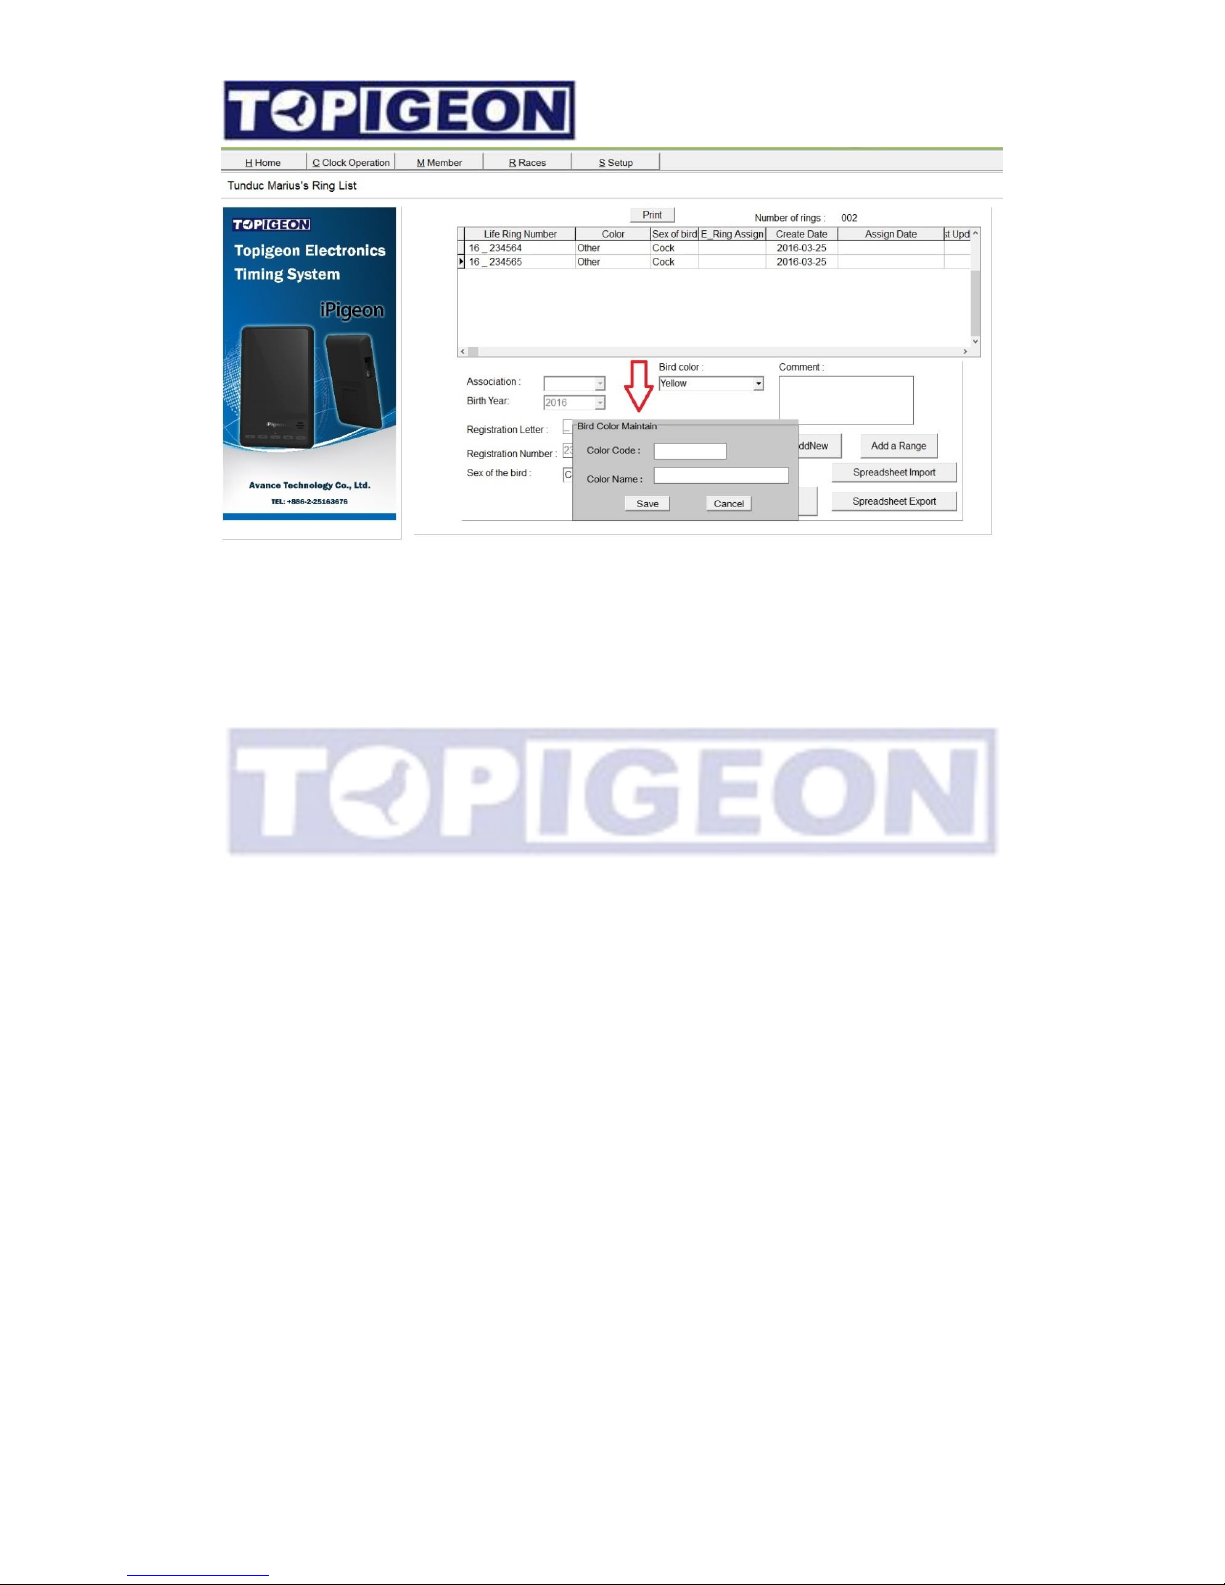
Select one bird color and the Bird color dropdown box and right clock on the mouse.
Add/Delete manual will show.
To delete the clock just check “delete”. To add color an adding window will show to
enter the color code and color name.
Page 24
24
Basic system operation
The basic club operation, including clock synchronization, Marking upload and Race
Result upload will be introduced in the follow sections,
Clock Synchronization
There are 3 major club operation needs to do this Clock Synchronize,
1. New Rings data download
2. Assignment data upload.
3. Race data Download
All of above operation needs to synchronize the data to keep data integrity. If you skip
synchronize procedure the system will prompt you an error message.
Again before you synchronize your timer this need to be “connect to PC”. Click the Club
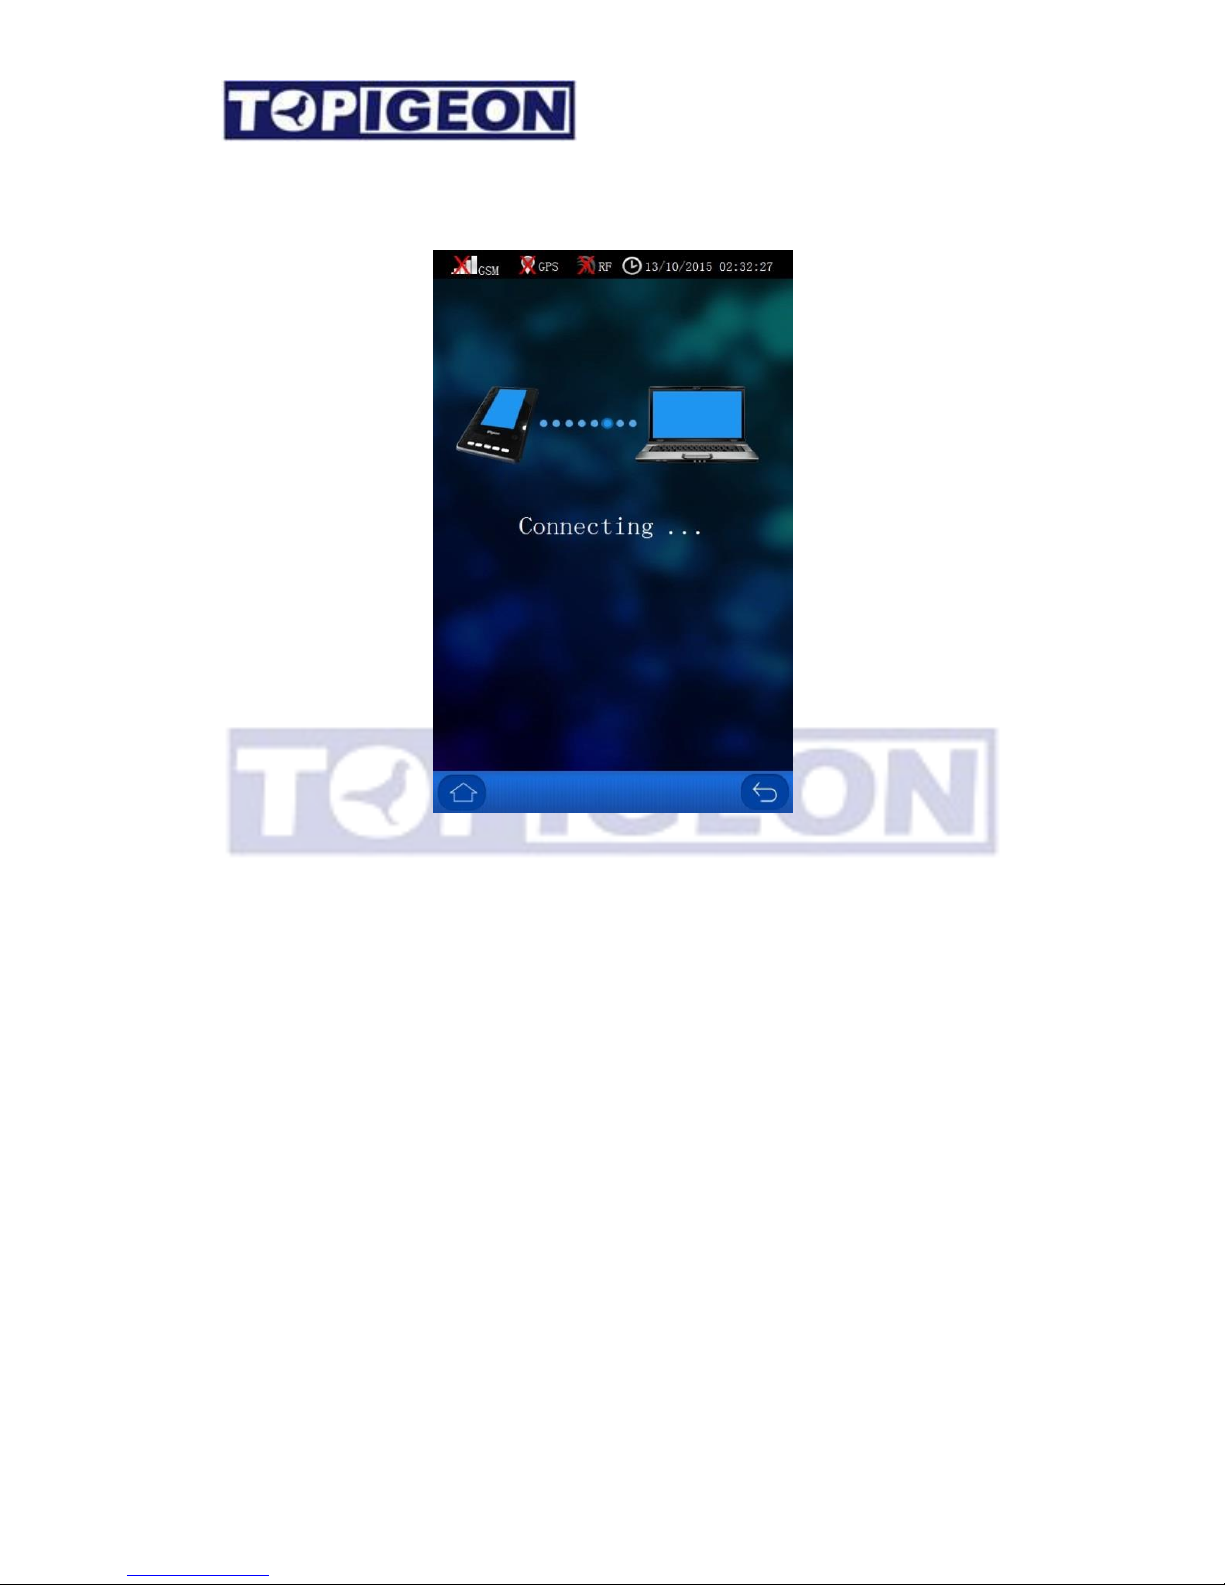
management in the iPigeon main menu. Then click “connect to PC” button, then you will get
“Connecting…..” screen.
As you can see that Ring Marking (Basketing) and Ring Assignment all in this menu, but you
do not need to connect to PC for these operations.
Page 25
25
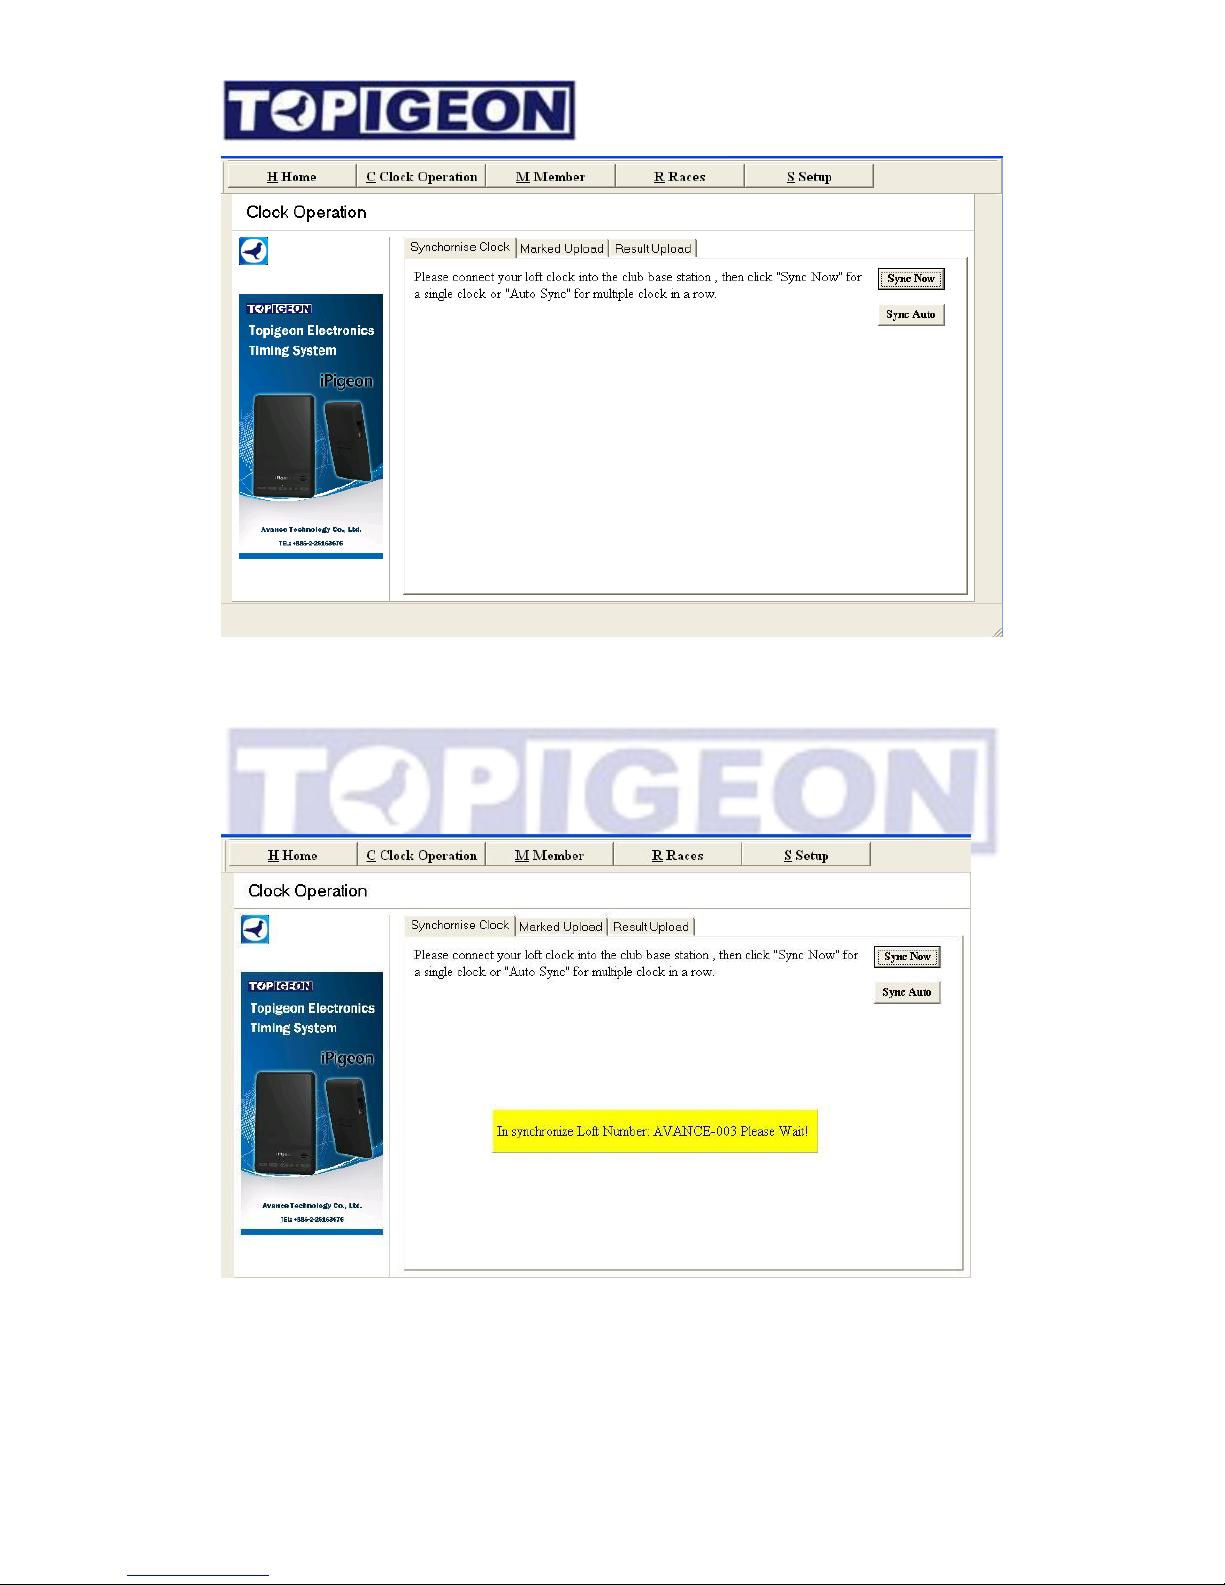
You will find there are two button in the Synchronize clock page” – Sync Now and Sync
Auto.
Sync Now: One time synchronization when you press the button.
Sync Auto: The synchronization action will start every 5 seconds. This is for the club batch
operation, such as during basketing/ marking process all member timers have gather together.
After synchronize complete, system will prompt the status, such as “In synchronize” and
“successful”. The iPigeon clock will also prompt the message “Synchronize Success!”
Page 26

26
Marked Data Upload
Most of other brand products do not have this feature because they are not providing the
result calculation. If you do not want the club manager to calculate the result for you and you
do not need to do this operation.
Please note:
1. Before you move to this function make sure you have synchronized the assignment data
to this system.
2. You cannot upload the manual created race marked data.
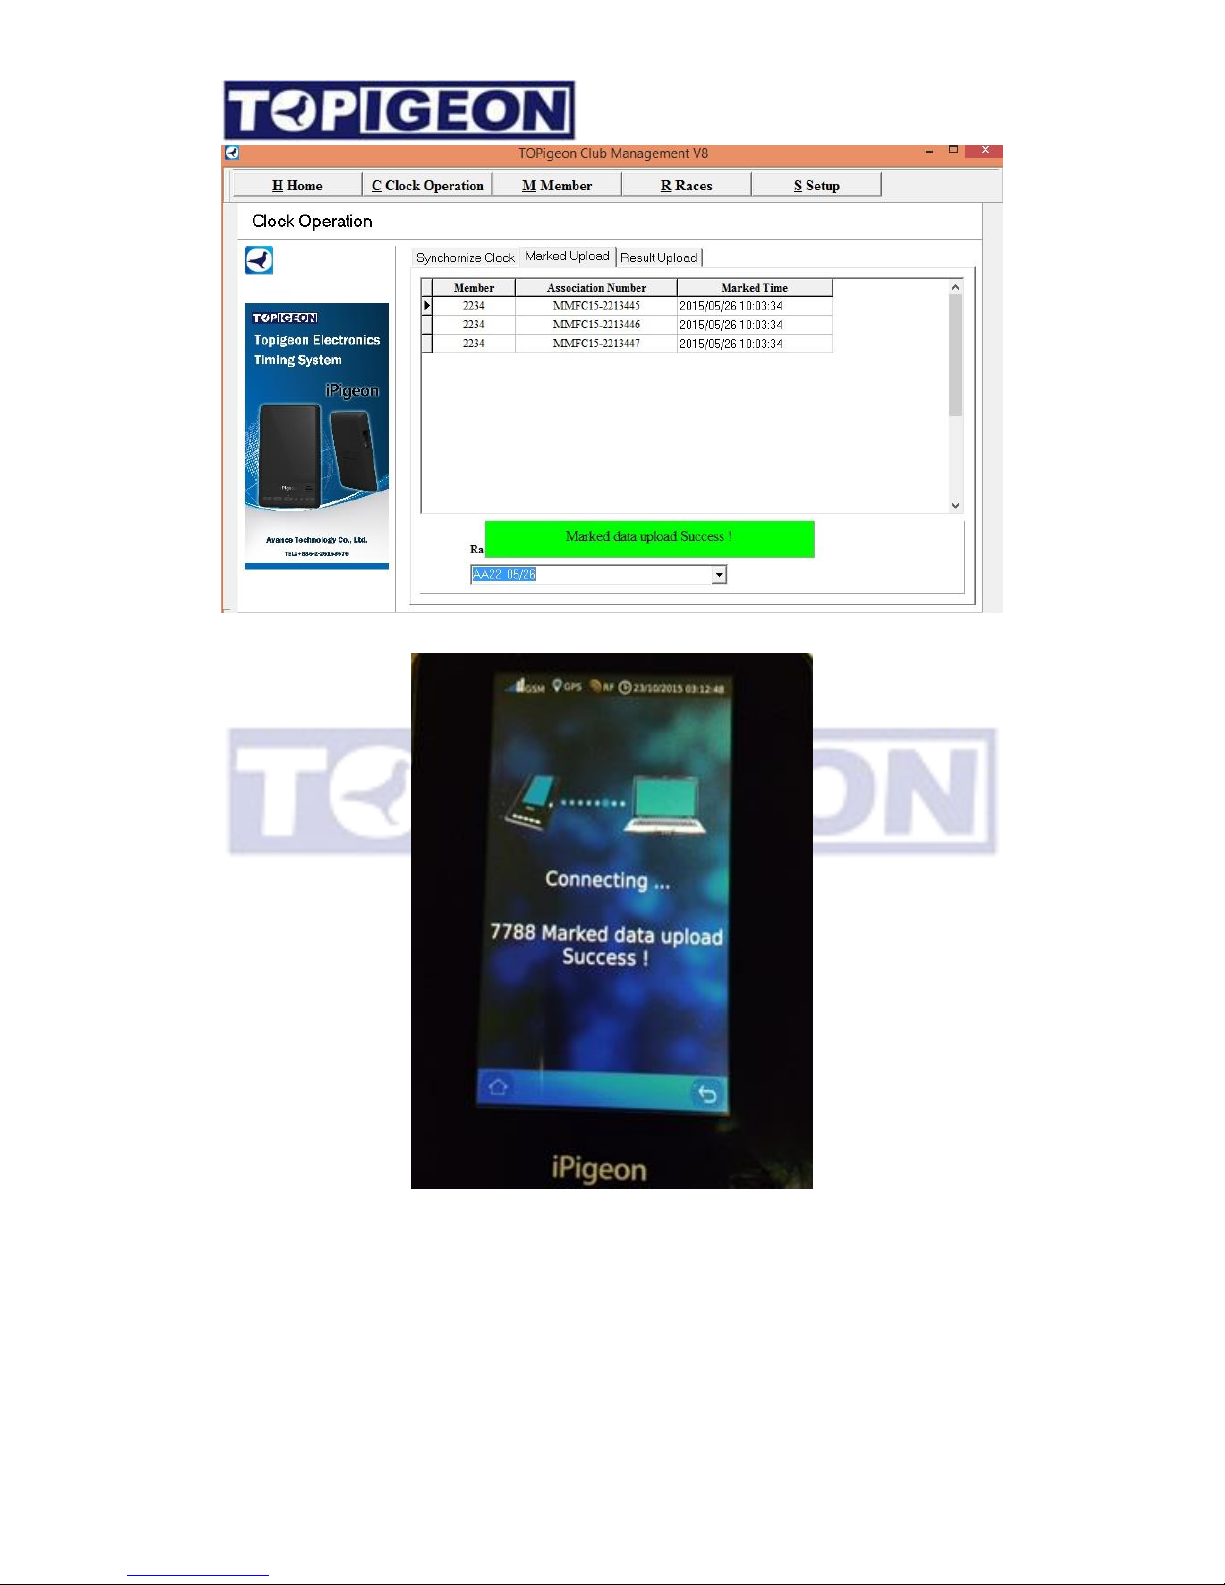
After marking you can upload the marked data to the club management system. You have to
do this process before member’s bird arrival. The process is very simple by going to the
Mark Upload page in the Club Operation tab. Select the Race Code that you marked and
wait for the system upload automatically. System will also prompt you the status as below,
Page 27
27
The Clock will also prompt “Marked data upload success!” message.
Page 28
28
Race operation
Add new race
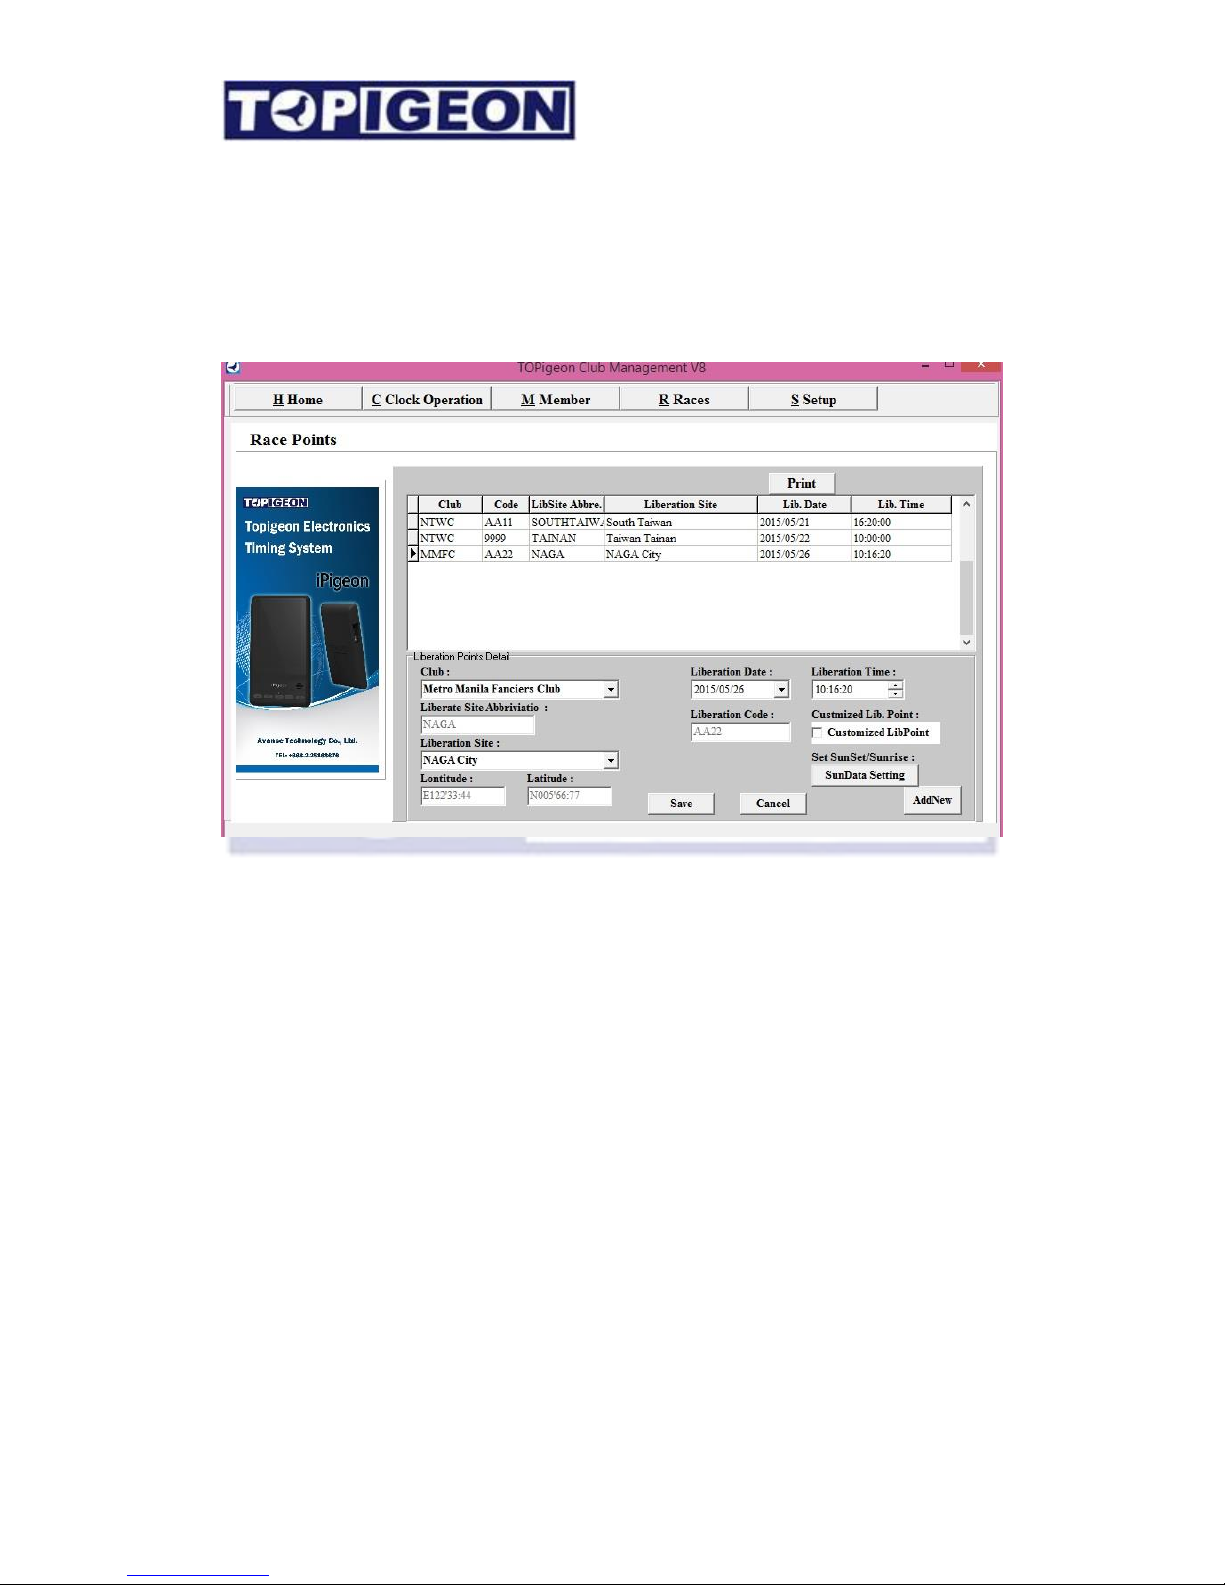
In the Race TAB, it shows all race point created. To create new race, you click on “Add New”,
then you enter race information in the Liberation Point Detail. You can also reuse the
existing liberation site by selecting the scroll bar of Liberation Site. If it is new liberation site,
you need to check on “Customized LibPoint”, to enter new liberation point. After you enter
all race information, click the “Save” button to save all racing information.
Note:
1. The Liberation code must not over 4 characters. The race code will generate
automatically in the system by combine the Lib code and Lib date, such as race code
1122 and Lib date is 0526, the race code will be 1122/0526.
2. The Coordination may leave empty. If you do want the club manager to calculate
the result of speed you MUST enter the coordinate.
Multiple date racing
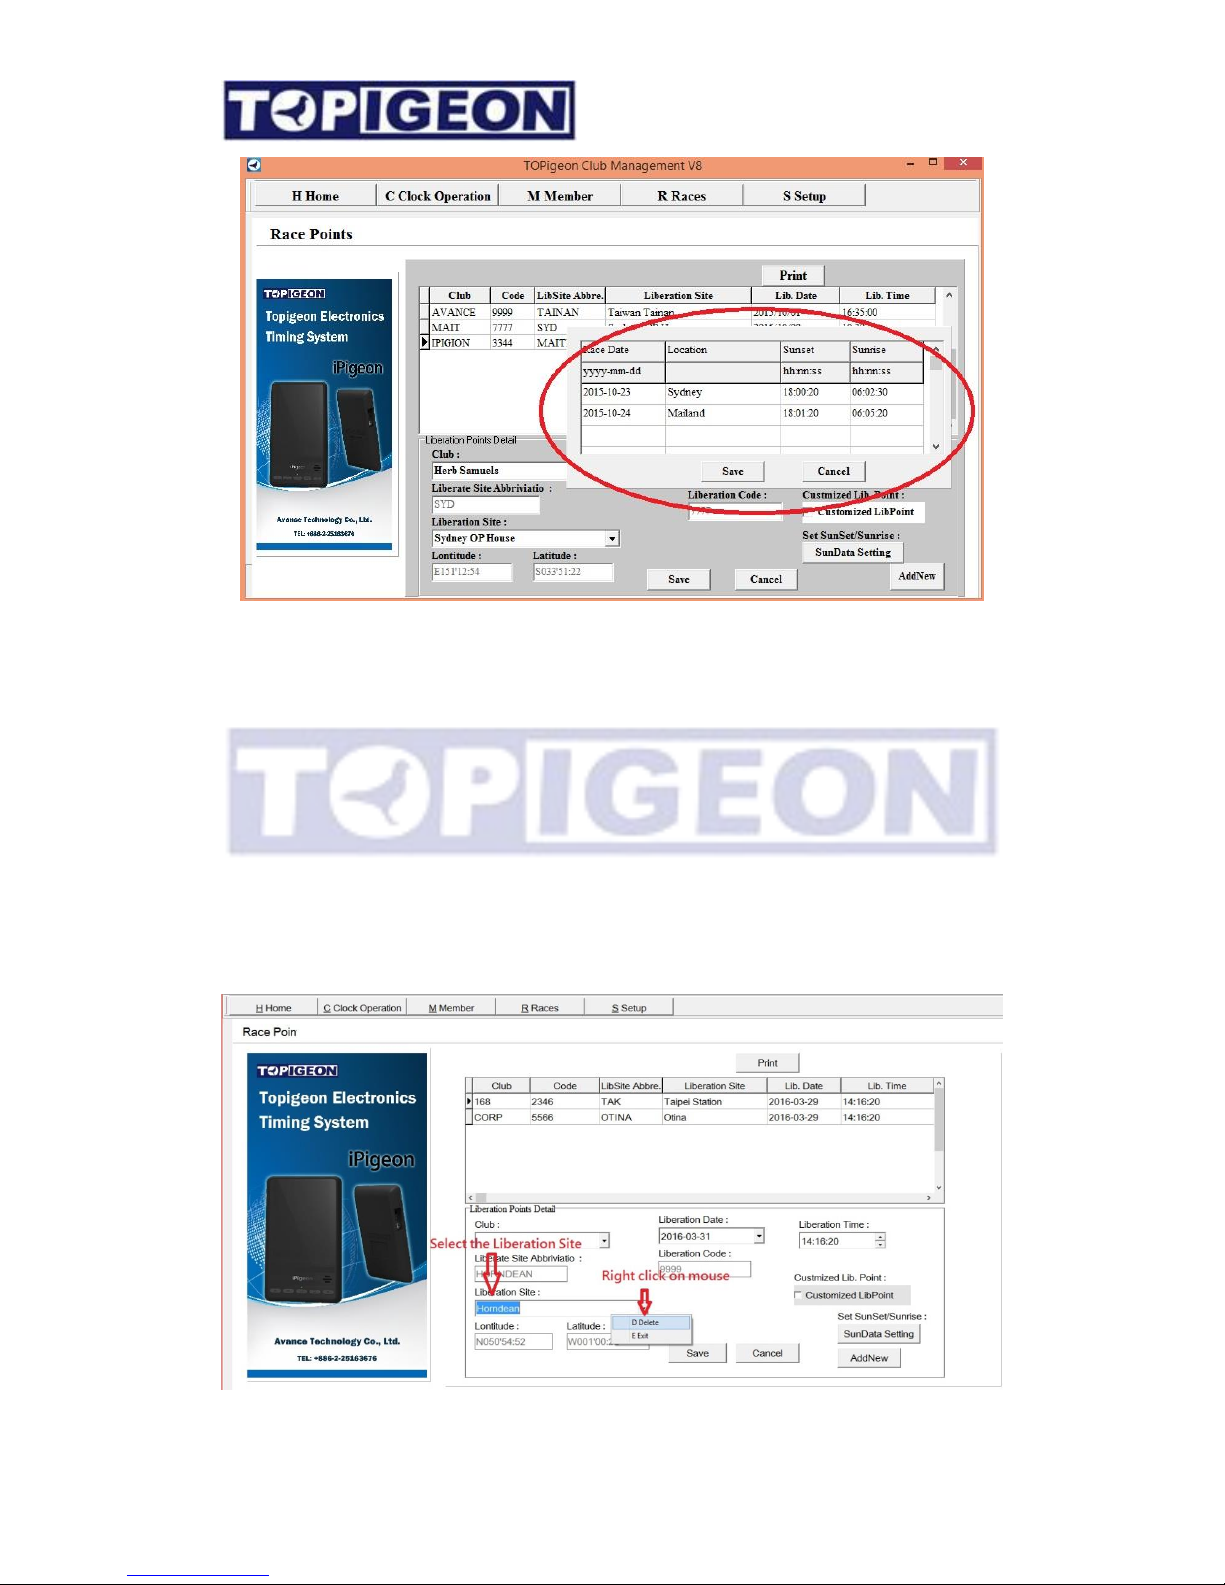
If your pigeon racing will across one day, you need to set the Sun Rise Time and Sun Set
Time in the SunDataSetting in order to get Hour of Darkness (HOD).
Page 29
29
Enter the data by following the date and time format on top of the row. The system then will
automatically calculate the flying time by deducting the HOD.
For example a cross one day race, liberate on 23rd of Oct. 15 and birds return on 24th of Oct,
you must set Sunset and Sunrise in two rows in 24 hours format. As such, 3 days there should
be 3 lines and the rest can be done in same manner.
Add/Edit/Delete Liberation Point
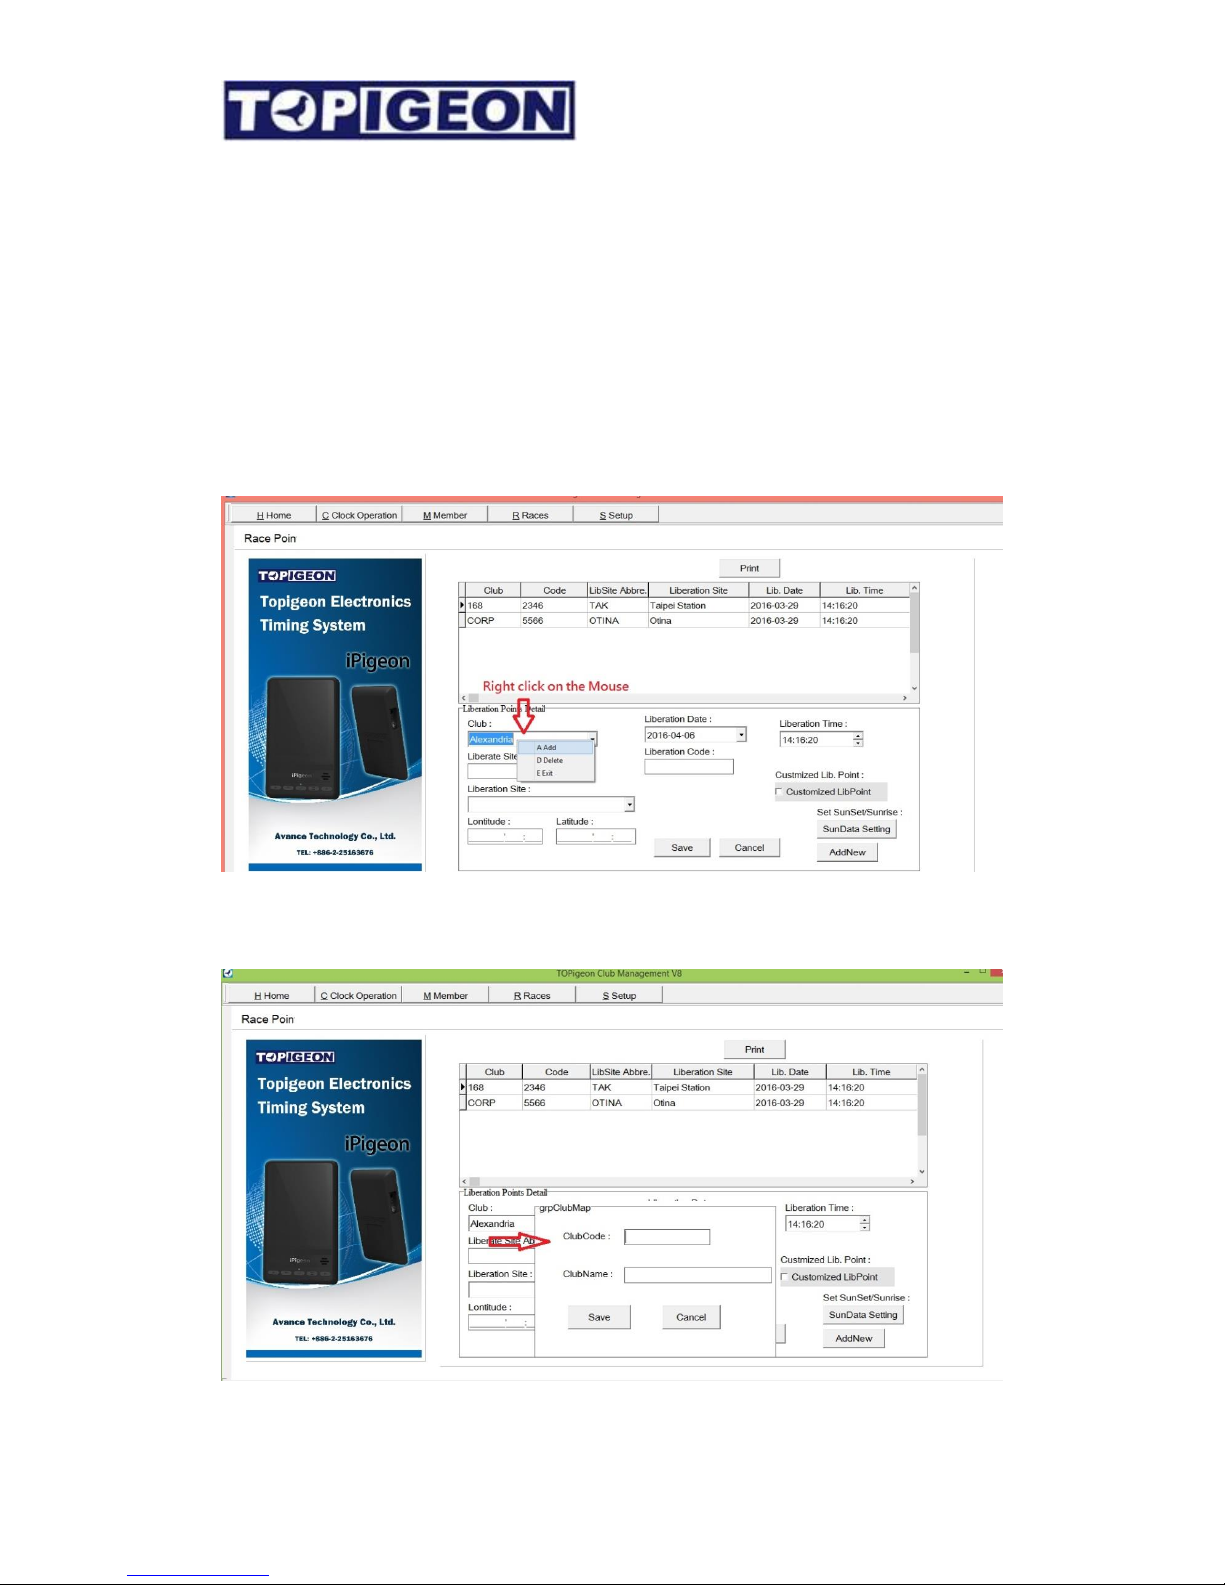
You can always Add/Edit the Liberation point by clicking on the Customized LibPoint
button. You can also delete the liberation point as follows procedure.
Page 30
30
1. Go to the Liberation Site Abbreviation dropdown box and select the Liberation point
you want to delete.
2. Right click on the mouse and check the delete button.
Add/Delete Club Information
The Club Manager is not only serving for single Club operation, but also serving Pigeon
racing Federation or Association. When the Club manager dealing with many club and you
will need the capability of adding and delete the Club information, such as Club name and
Club abbreviations (Club Code). This feature is inside the RACE Tab,
In the Club dropdown box, you can simply add or delete the Club information. After you
click on Add you can enter the Club Name and Club Code accordingly.
Page 31
31
Note: If you are using online transfer of the Race result the Club Code of the race will be
transferred in the result. Not your own clock Club code.
Loft Distance
Please note you must update the loft distance to getting the speed in a race.
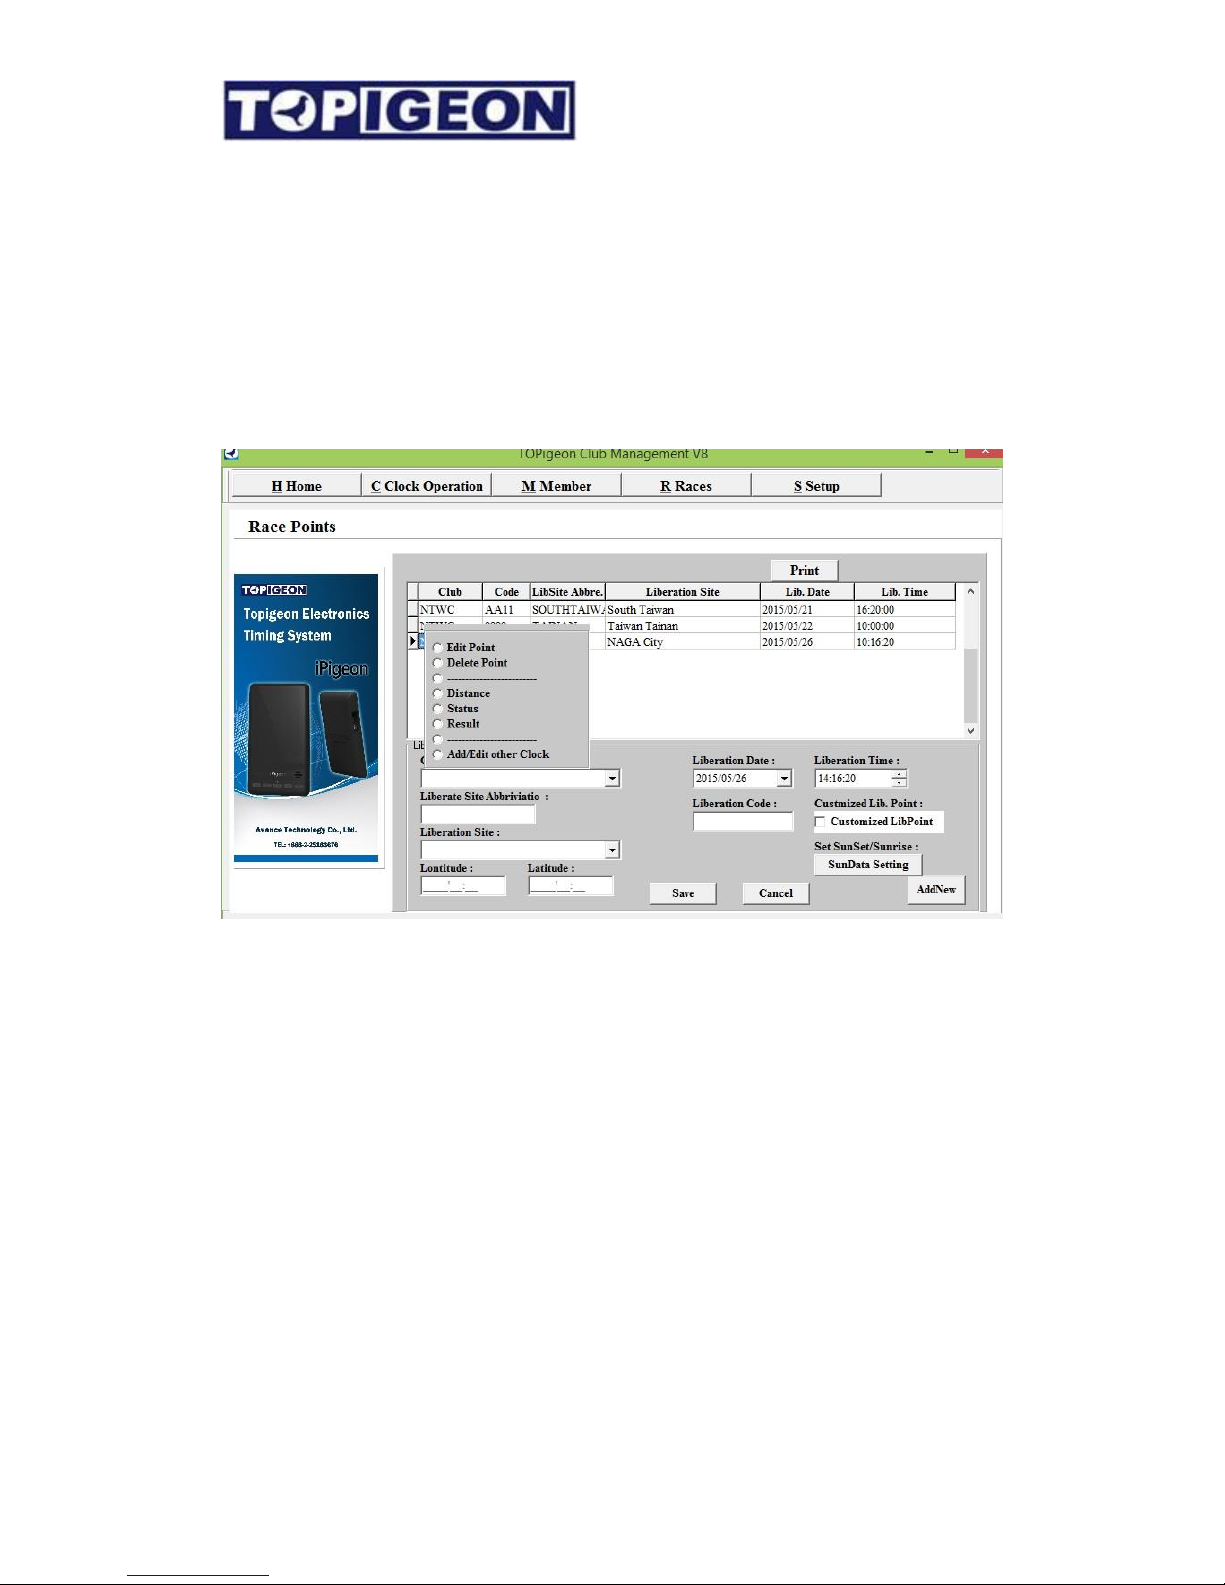
If you want this club manager to calculate the result automatically you have to operate this
function before member’s Result Upload.
Select the active race and left click on your mouse. You will see options that you can work
on. Click on the “Distance”, you will see all your member loft distances to the liberation
point. Of course, the distance is based on the loft and liberation point coordination. You need
to make sure that all these information has fill in correctly in order to calculate the right
distance.
Page 32
32
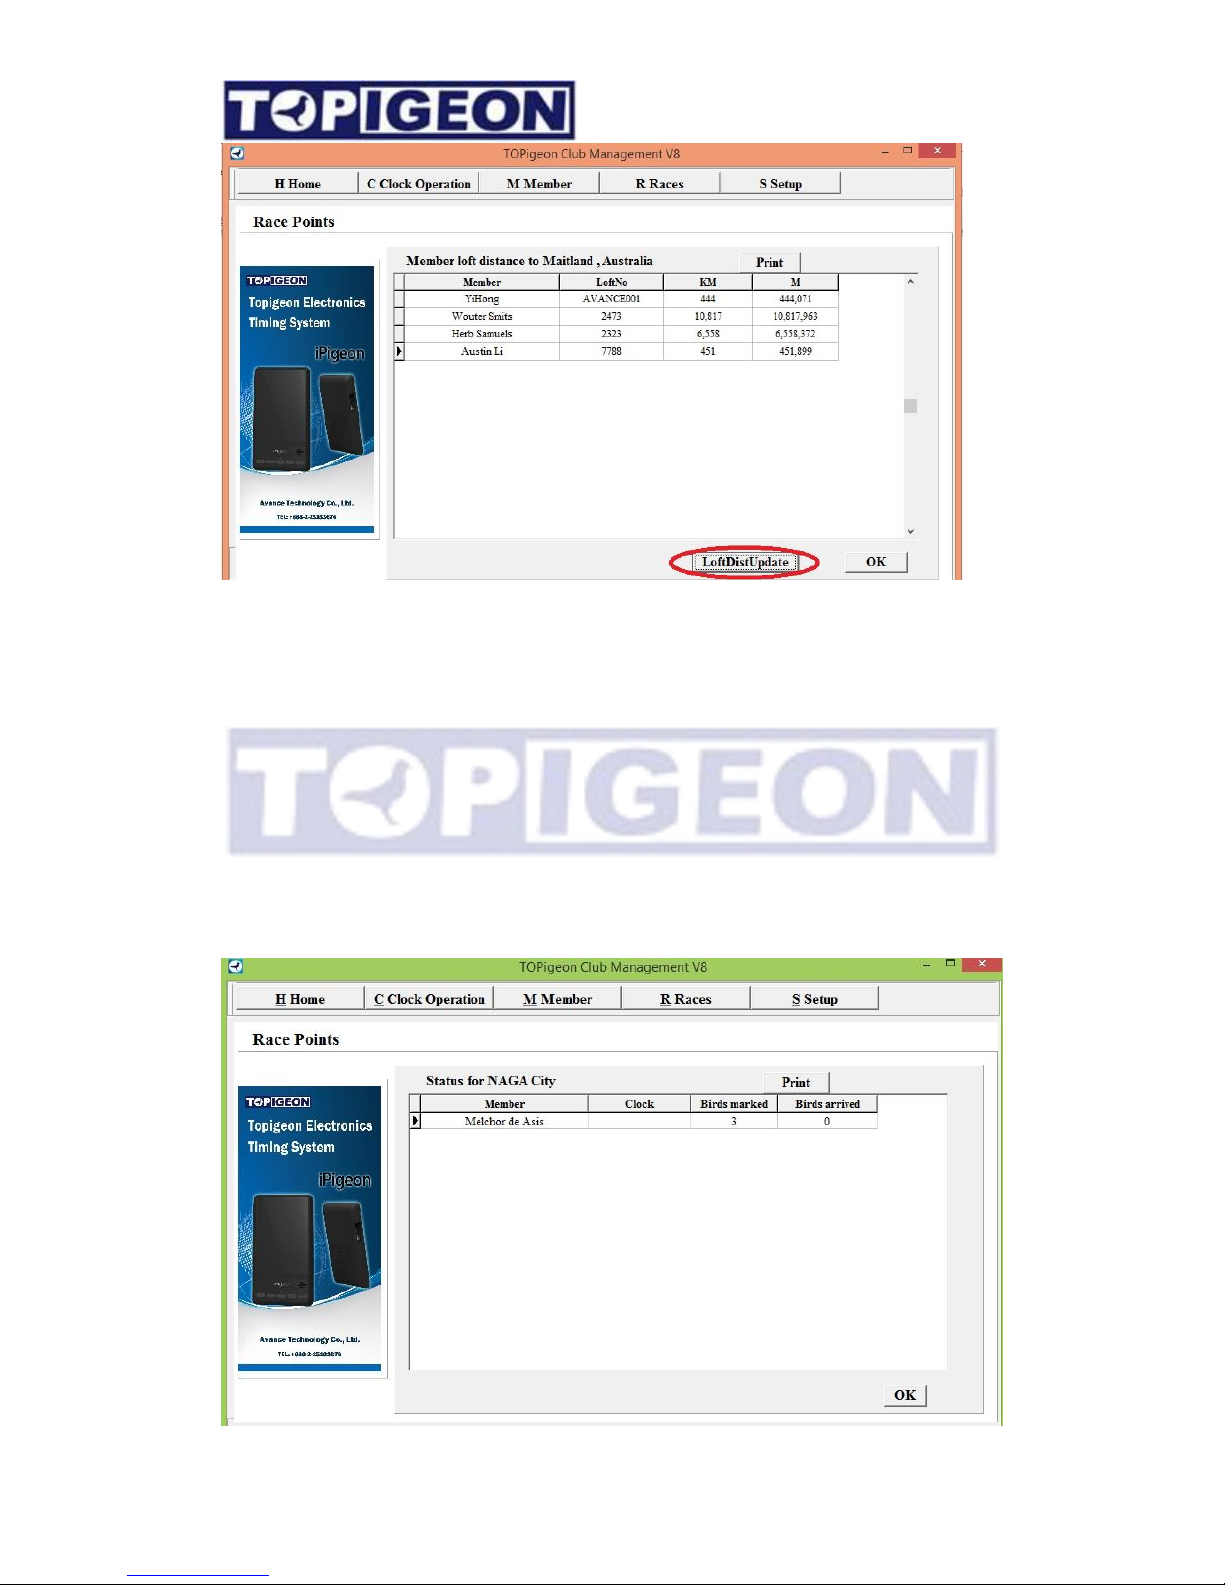
For new liberation point, click “LoftDistUpdate” to calculate the distance between
liberation point to your member’s loft in kilometers and meters.
You can also overwrite the distance manually, by moving your courser to the field and type
in new distance. Press OK and leave this page the new distance will be saved.
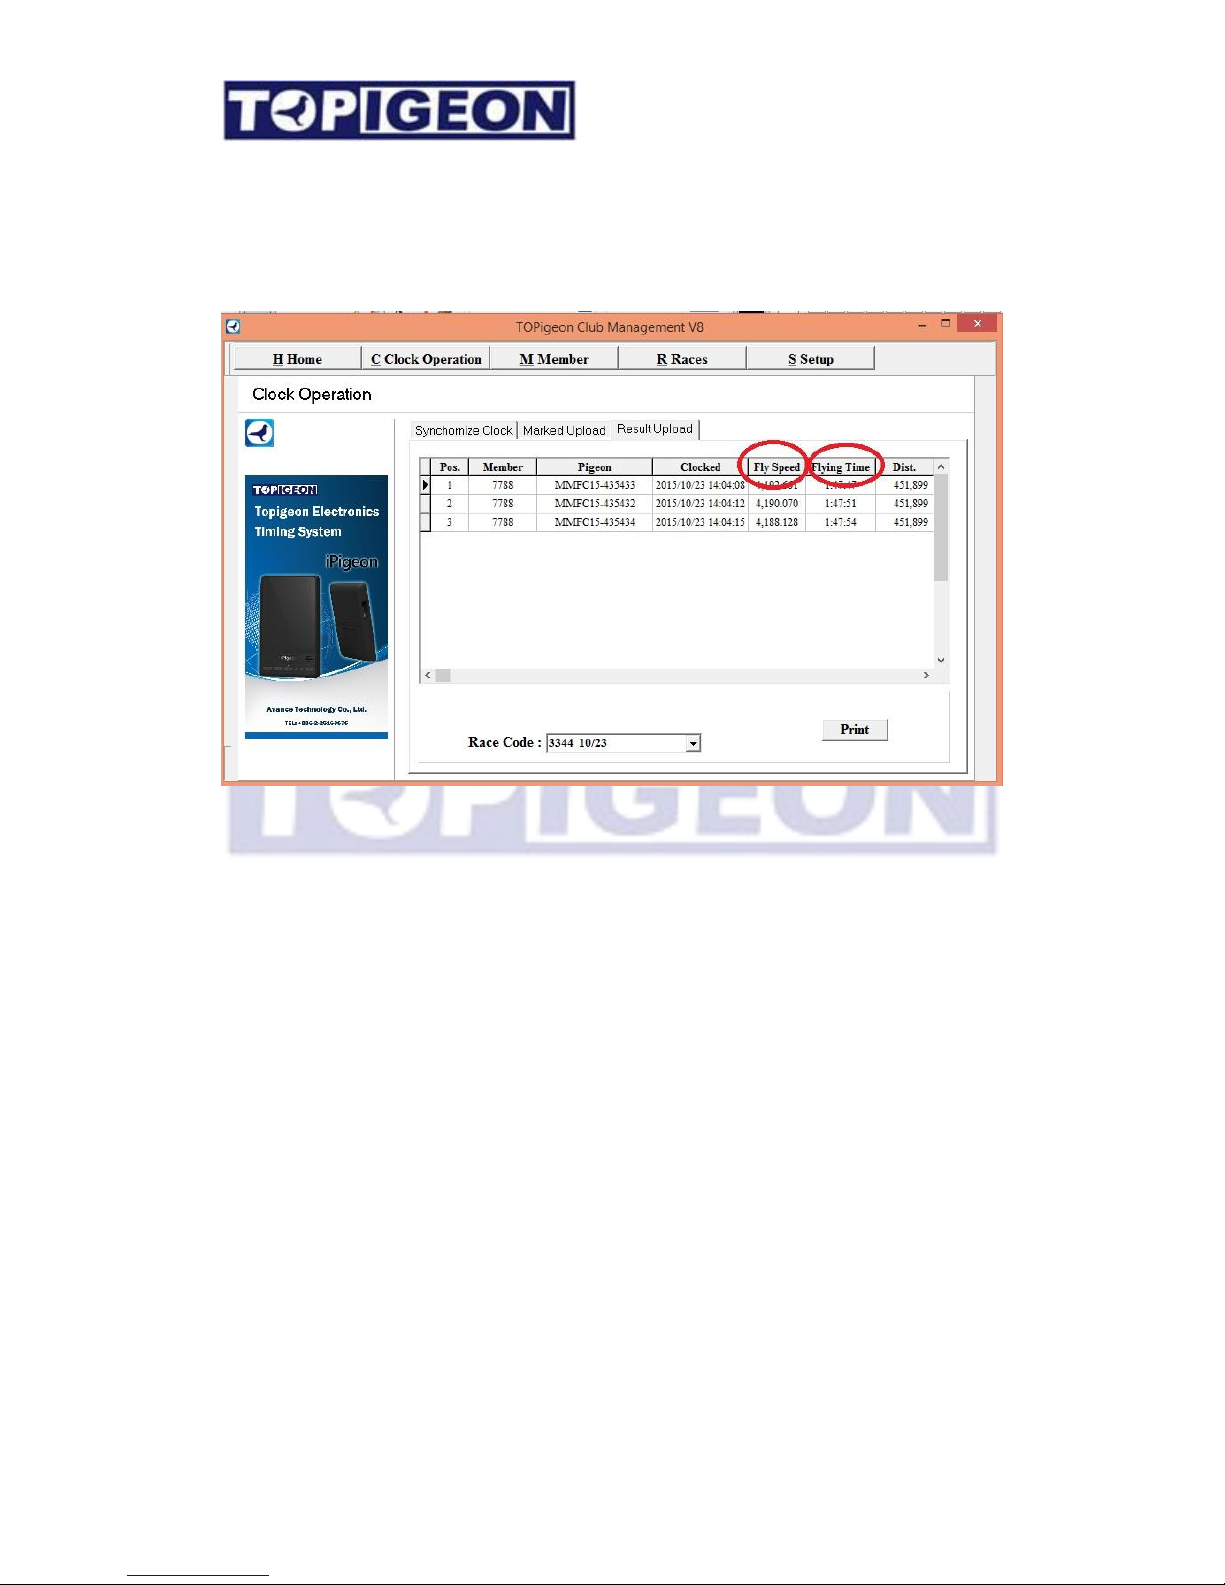
Race Status
You can also check the race status by select the status button. The race status will
show all you member’s marked and arrived of bird total number for this race and print
out the overall report.
Page 33
33
Race Result Upload
Note: You have to print from the timer of Race Finalization List at least once before you can
operate this function. Otherwise, you will get error message of print out first.
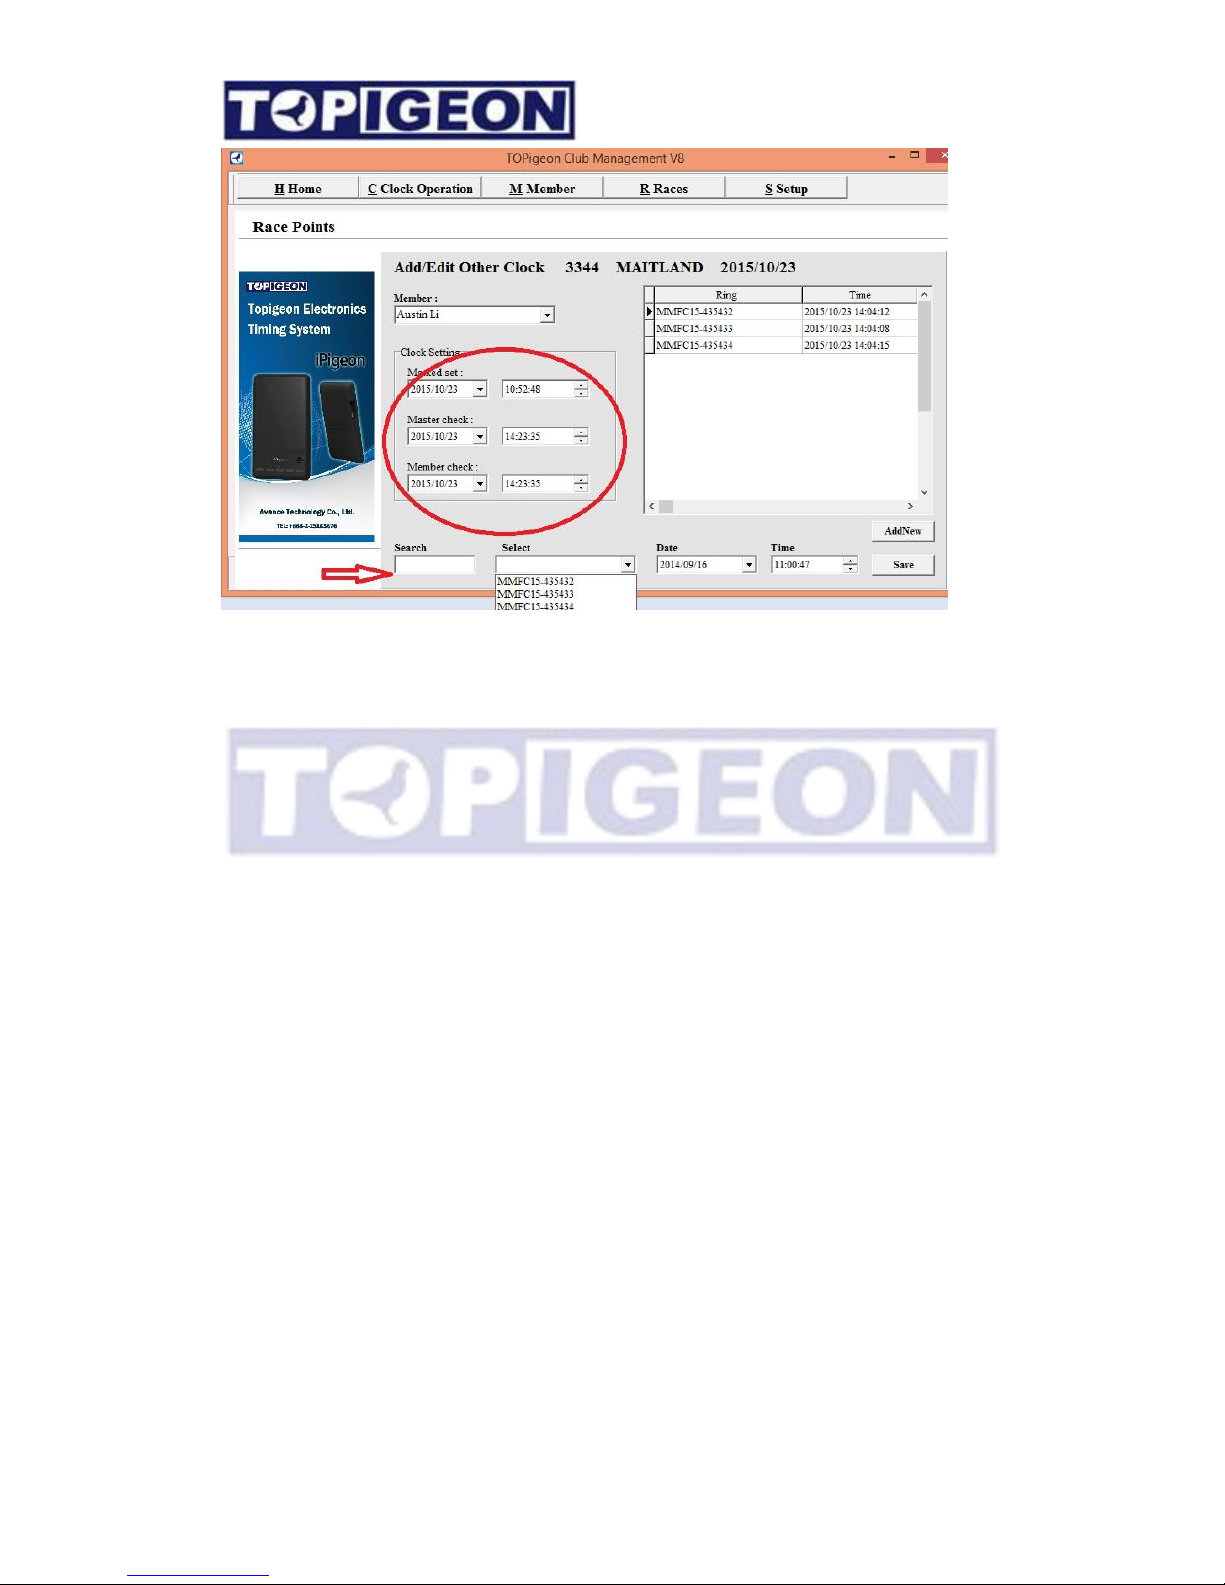
Again, the iPigeon timer needs to be “Connect to PC” status and go to Clock Operation Result Upload tab. Select the proper race code from the Race Code scroll bar and click on
the proper race. As you can see the picture above the Fly speed and Flying time all been given
after upload.
Advance Features
Manually input external clock
If your club has external clock which cannot upload to the club manager and you want
to use the race result tool to generate report you can manually input the data. Firstly,
you need to create the member and rings information in the system. In the Race TAB,
left click on the race entry and select the “
Add/Edit
other clock”.
Page 34
34
Make sure you have created member and member ring list. You can enter the clock
setting data. When you select the ring number, you can either use select drop down box
to select, or you can use the search field, by key in the last few digit of ring number, and
in the select drop down box will show the select condition ring number. Next enter the
date and time. You can simply enter the time by using arrow key. After complete the
bird data entry, click on
Save
button to save.
Import/Export member birds list
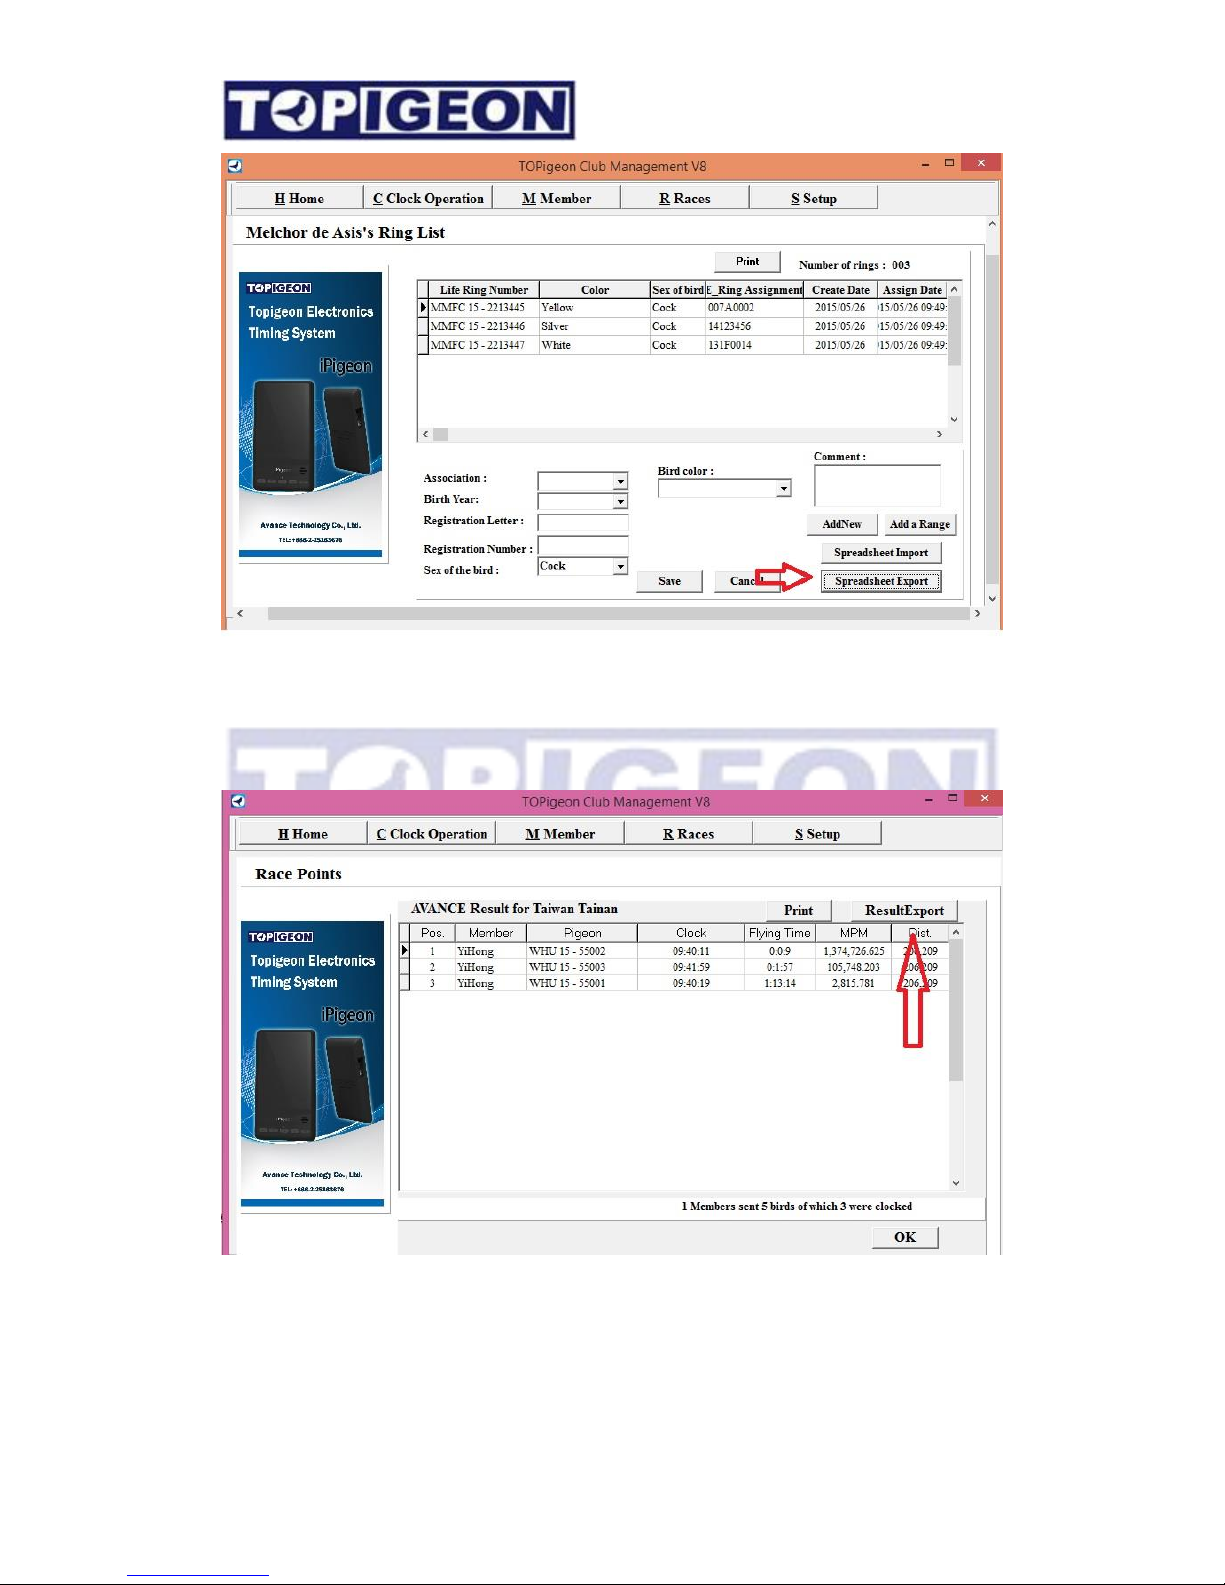
When other club member wants to join to your club you can use import/ export features
in the Member’s ring list window. Firstly, you have to create new import member
information. The member shown in the member list double click on the member will
bring you to the member’s ring list window. Edit the member’s birds list from
Microsoft Excel. Then click on the “import spreadsheet” select to the right file in the
file manager. The birds ring list will be direct import to this member. You can also
export to Excel spreadsheet if the member birds ring list like to migrate to other Club.
Page 35
35
Export Race Result
The club manager can export the race result to Excel spreadsheet file for club. The club can
use this export file to format their own result report or import to their existing system. The
export button is located in the RACE tab. Result option, “result export”.
Page 36
36
Import Club Race Distance
In many Associations and Clubs racing would provide their own distance to the loft/member
for their own distance calculation and to keep authorities. The Club Manager provides the tool
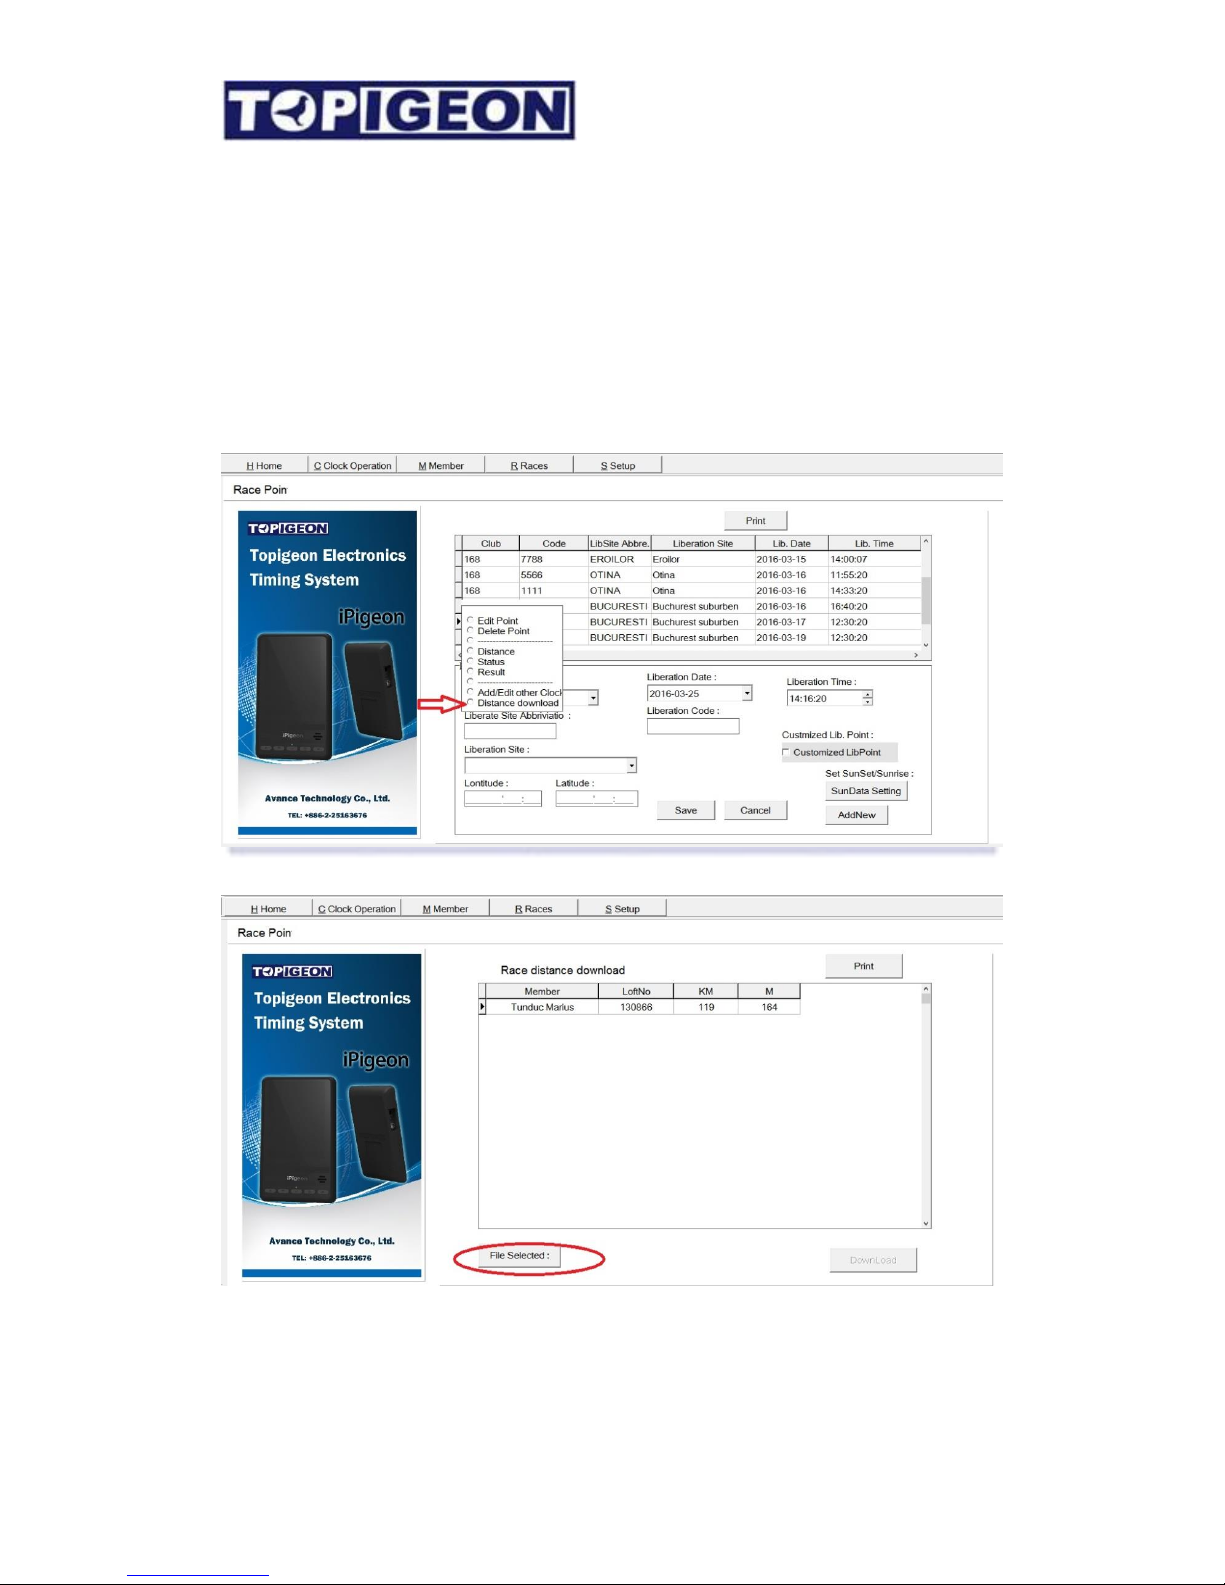
to import Club distance file for result calculation.
In the specific race information, right click on the mouse, then you will see distance download
selection button in below,
Check the box, then you will go to file selection windows as below,
After you click on the File Selected button, then you can select your distance file provided by
your authorities. The current file format is following the RPRA association in UK which is:
Race point code, Fancier number, Miles.yards or KM.meters. After selection the distance will
be load to the club manager for result calculation.
Page 37

37
Reports
There are totally 9 reports in this club management software. They are,
1. Race marking report: When you finished all your birds marking for a specific race
and you can print out marking report.
2. Loft to Liberate Site Distance List: The list of the distance from all your member
loft distance in the club to a specific liberation site
3. All Member List Report: List of all the member with loft number in the club
4. Member Ring List Report: The member all birds ring number and matching e-ring
number and marking information.
5. Race List Race: All active races in your club. If you have not deleted the race will
be regarding as active.
6. Race Result Report: A specific race of all member result. Please note that if no
distance and there won’t be ranked.
7. Race Status Report: A specific race of all member race status, including birds
marked, birds arrived.
8. Race upload report: This is the list of all member upload their race result which is
different from the race result report.
9. Timer up load Record Report: When fancier upload to the club system can print
out all up load data on site.
The 9 reports printout buttons are all in related function program. You can check
whilst you operated in the specific function.
iPigeon Clock Club Management
All club operations requirements are in this function. Before you tap this icon, first please
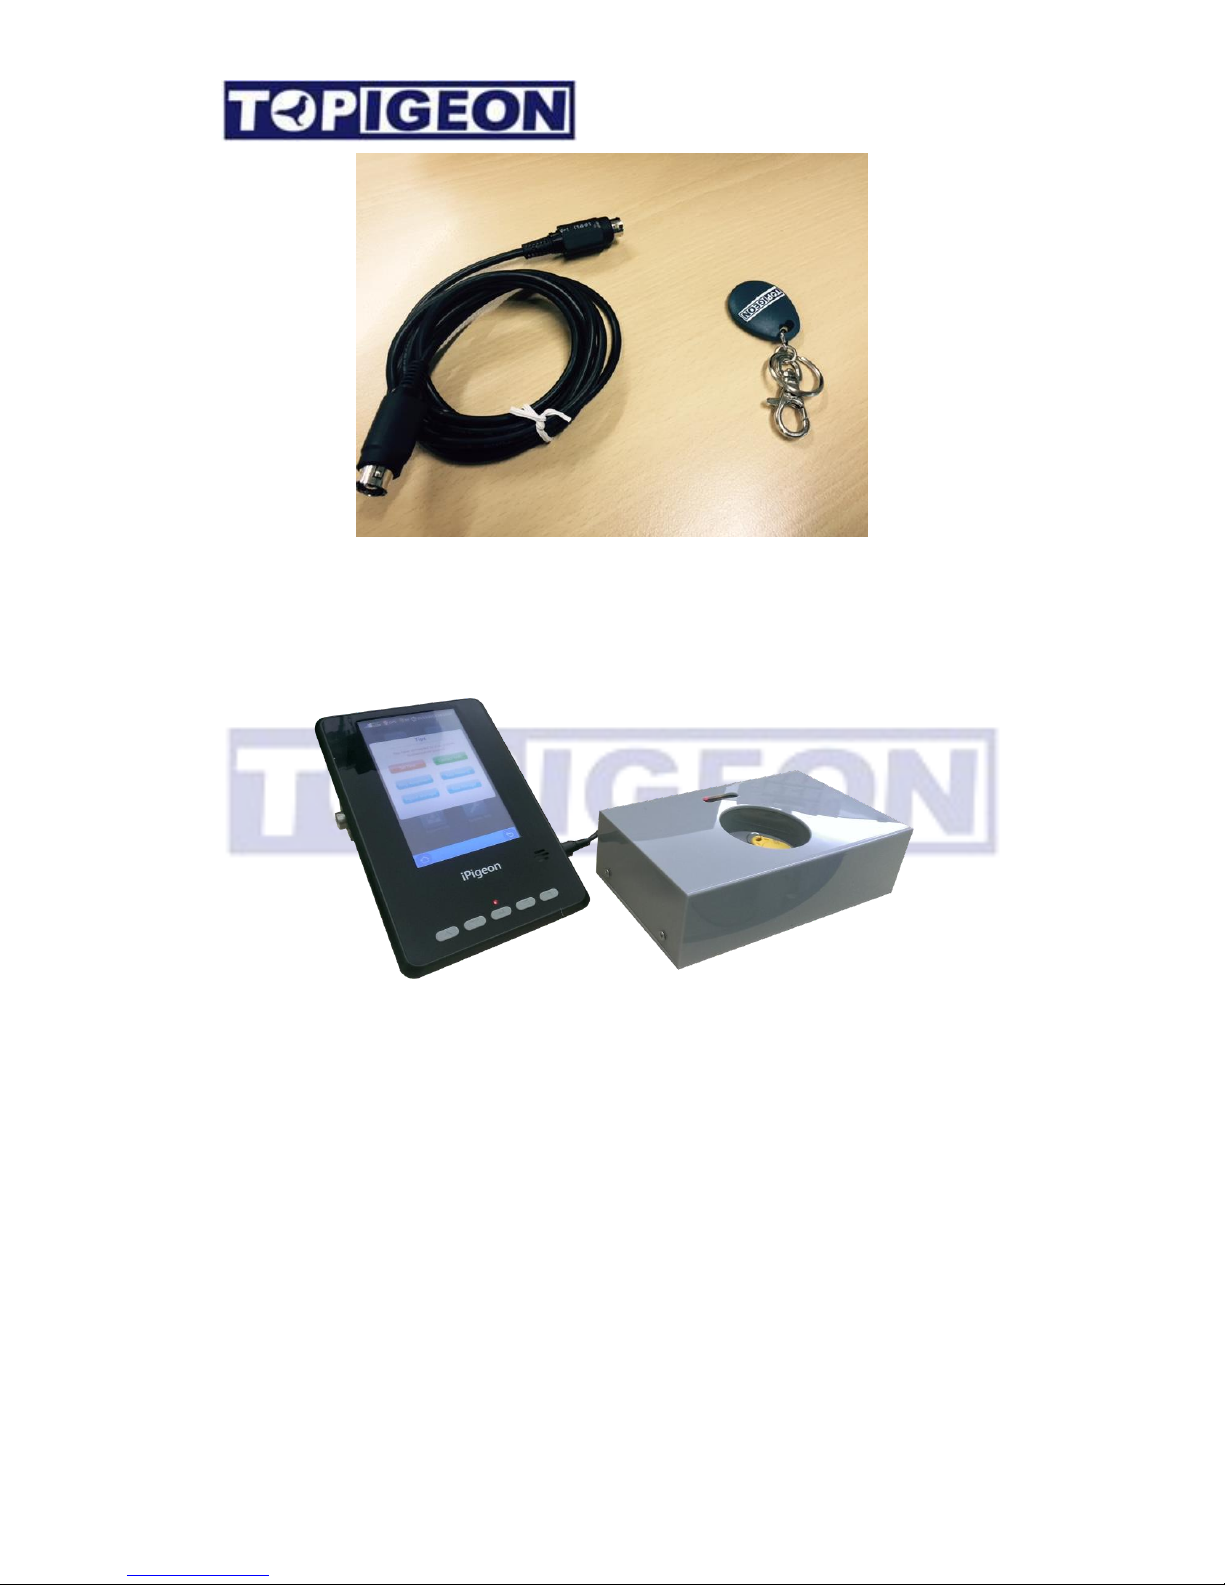
make sure that you have connected iPigeon clock to the club antenna by the Mini DIN cable.
Secondly, you need the Authentication key.
Page 38
38
There are 6 major functions when you connect to club antenna and use the authentication key
correctly: Set Time; Connect to PC; Ring Assignment; Race Marking; Pigeon Manager;
Race Manager.
iPigeon connecting to the club antenna
The Club Antenna operation will be introduced in the next session.
Authentication Key
The authentication key represents the club operation authority. Please keep the
authentication key safely at all time. The club manager will be activated when you present
the authentication key on the club antenna. Please also note that, once you leave the club
manager or completed an club operation you will need the authentication key again for follow
up actions.
Page 39

39
Page 40

40
Set Time
Normally you should not use this features in all time, unless your club manager cannot grasp
such as GPS time.
Note: If you are using a new clock, please go the System Info and double check if the time
zone setting is correct:
Summer Saving Time
You do not need special setting for the summer saving time. Both Club antenna master time
(including GPS) and iPigeon internal clock are using UTC time. You only need to change
your clock System Info – Time Zone UTC to the new summer saving time zone. For
example, you are in UTC +2 time zone and summer saving time change to UTC +3.
Note: You also need to change your club manager computer time to the new summer saving
time.
Page 41
41
Manual Adjust the Club antenna master time.
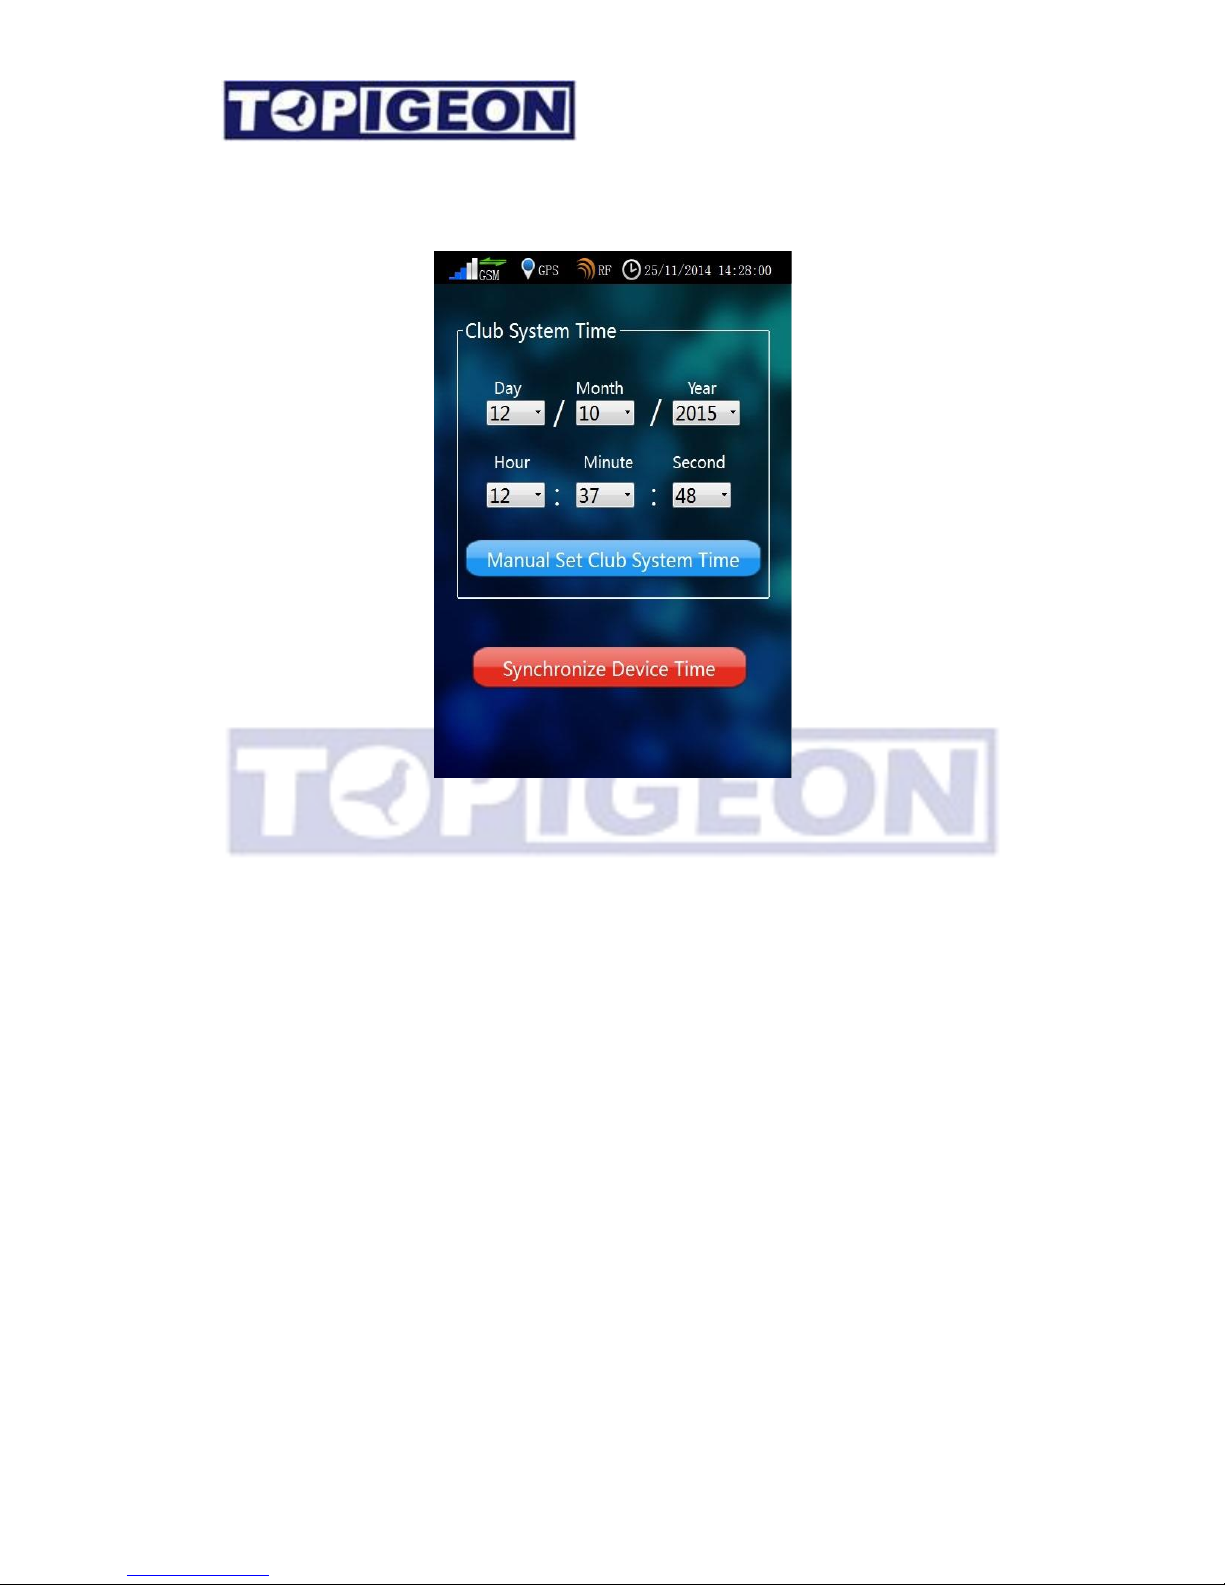
The upper site box indicates the current club antenna master time. The club master time can
be adjusted by the club authority. If the club antenna indication LED blue light is flickering,
then after manual time adjustment the LED blue light will stop flicking and turn on the blue
light.
Manual synchronize to iPigeon clock.
Once press the RED button below the box, the iPigeon internal RTC will be synchronized by
the club master time.
For the Set Time synchronization please note that,
1. During race basketing (Marking) process, the club antenna master time will automatic
synchronize to iPigeon clock.
2. Manual time synchronization will be disabled if the iPigeon timer has any active race.
Page 42
42
Connect to PC
This action is to set the iPigeon to designate the communication port to the club computer
instead of club antenna. The club computer should have TOPigeon V8 club management
software installed. The club manager software is for large pigeon club organizations to
manage their members pigeon race activates. The operation of club manager software is not
contained in this manual. Please refer to the iPigeon V8 Club Manager User Guide for
detailed information.
Ring Assignment
Page 43
43
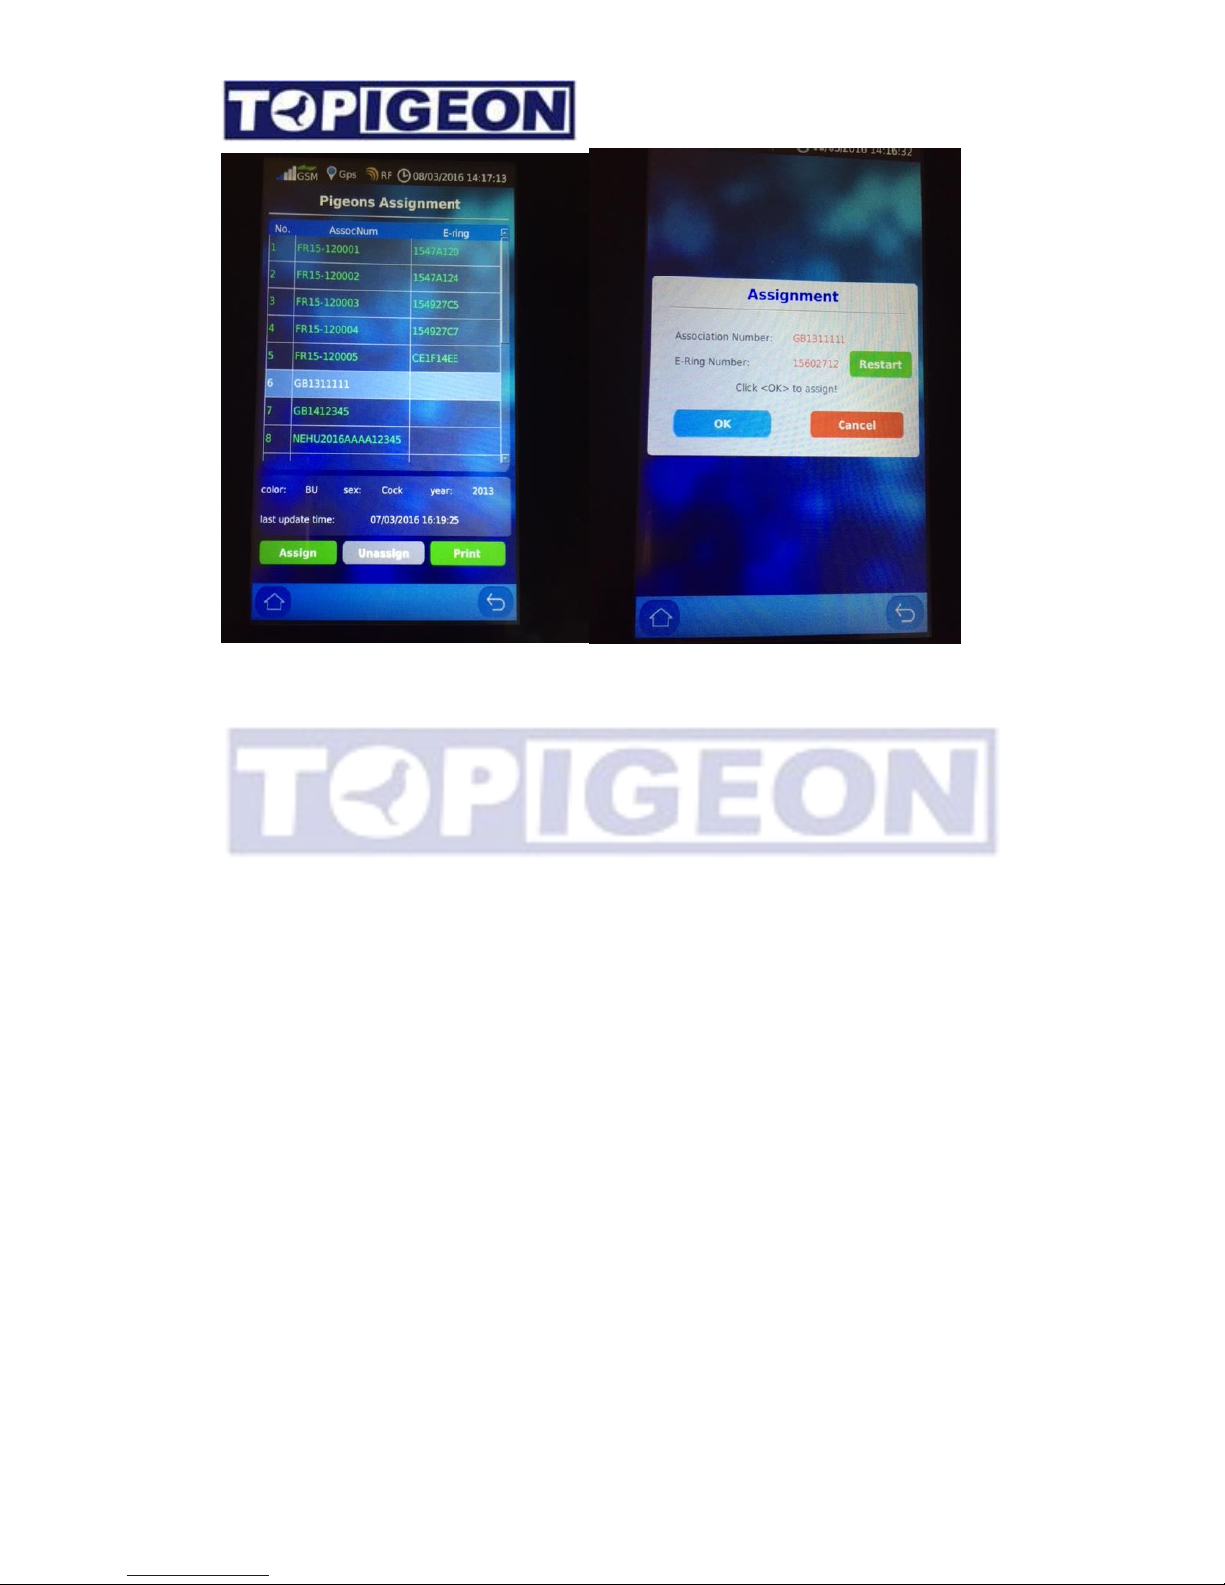
The Ring Assignment screen is similar to the Pigeon Manager where you can Add and
Search the specific bird that you want assigned. By selecting on the specific pigeon that
you want to assign the chip ring and the Assignment button will be activated. Press the
assignment button, a window will bring up “Scanning… “message. You can then swipe the
chip ring on the club antenna to assign the bird. If you assign to the wrong chip ring it can
Restart. Press OK to complete this ring assignment. You can also press Cancel to cancel
this assignment.
You can also Unassigned by pressing the “Unassign” button. After you Unassigned, you
can delete the unassigned bird.
Print Assignment Ring List
You can also print this assignment list for this operation for fancier or club to keep the record.
The assignment ring list will printed be in two rows. The color of the bird will be also printed
in the list for confirmation.
Page 44

44
Sample of assignment ring list
Race Marking
Before you operate this process, please make sure that you have created a specific RACE.
For race creation, please go to the “Race Manager” function, or you can create in the club
management software and synchronize to the clock.
It is strictly forbidden to connect to your computer during this operation. You may connect
to the computer after marking/basketing to upload the marking information to club
management system.
Page 45

45
When you select the Race Marking, you will get to the race list table to select the specific
race you want to mark. After select the race, you will go to the marking page. The upper
side is the Race Information of Race Code, Liberation site and Liberation Date and
Time.
In the lower side there is the Race Marking window which will guide you throughout the
race marking process. The process will be as follows:
1. Press RED Start button to start the marking process. The middle message will prompt
“Waiting…”
2. You can start basketing/marking your birds for the race continuously.
3. When you finish the basketing/marking process, press Stop to finish this fancier’s
basketing/Marking process.
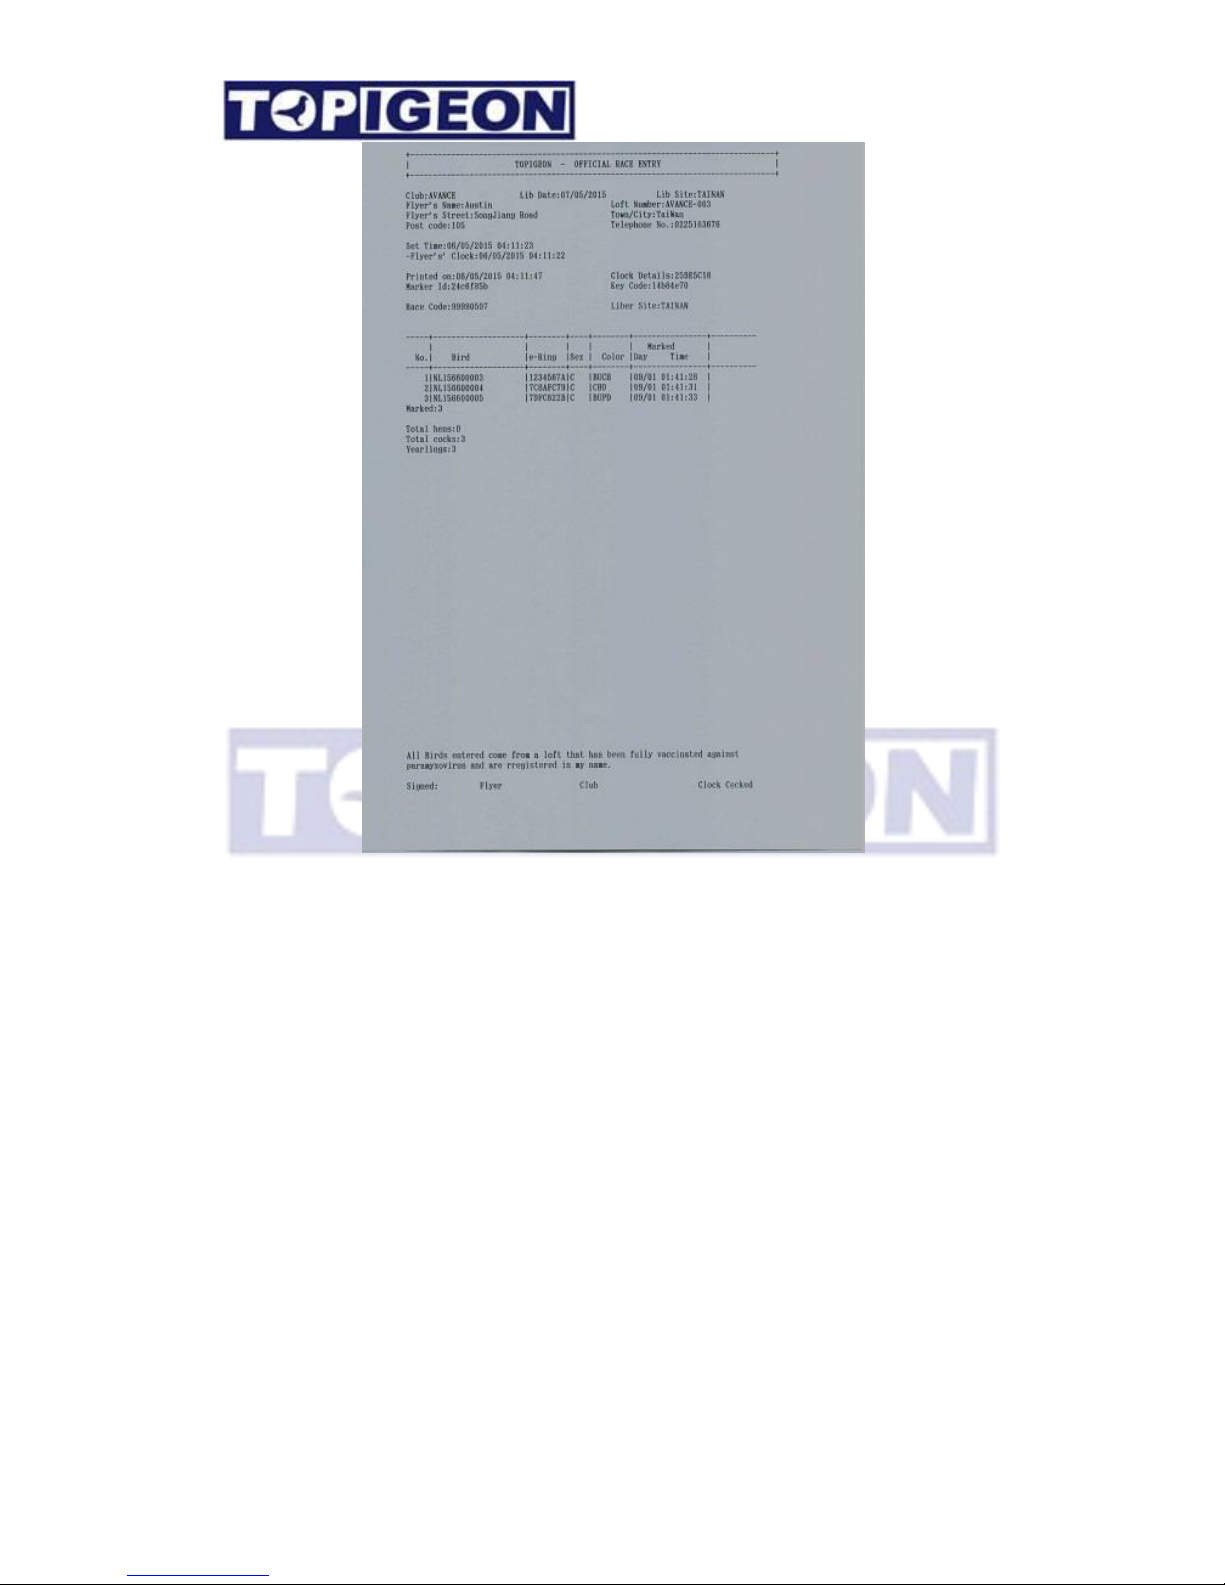
4. The Print button then will activate to green color. A reminder window also popup to
ask you to print the basketing/Marking report. You MUST print after finished the
basketing/Marking process.
5. In case you did not connect to a printer, the display will show you “Print Failed”.
Then you press OK and the process will proceed.
6. After printing the Basketing/Marking report, a Pigeon button will be activated to green
color where you can check your birds that have been marked. A search window can
help you to find the bird if you have too many birds in this marking.
Page 46
46
Sample of marking report
Page 47
47
Unmark Birds
During the club operation, there might be some incident which happened after the birds have
been swiped in club antenna in the basketing/marking process. Such as the club staff found
a disqualified bird or unhealthy bird, the club has to unmark such birds. You can simply
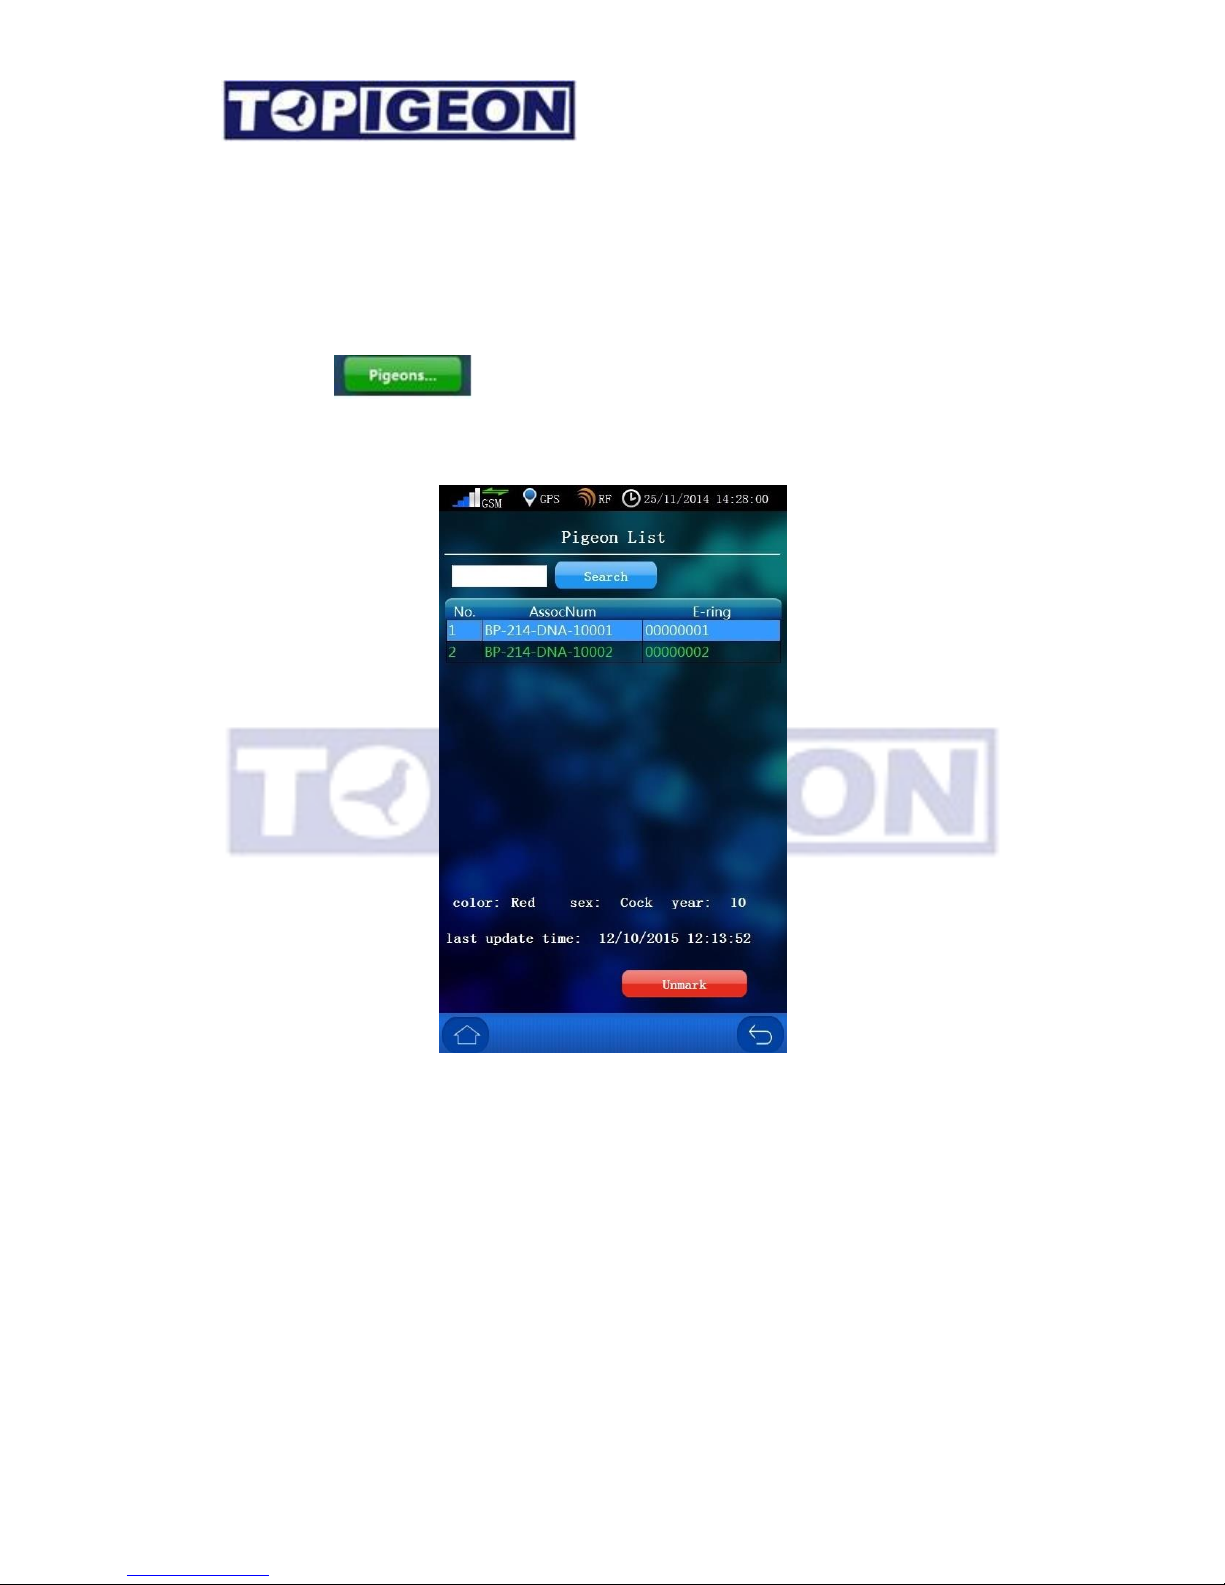
click on the button on the Racing Marking and marked pigeon list will
show, there is also an search window if you have more pigeons. Select the pigeon that you
wish to unmark and press Unmark button.
When you press the Unmark, it will show a confirmation window to double confirm the
un-marking process. If you press OK, it will unmarked the bird in this process.
Page 48
48
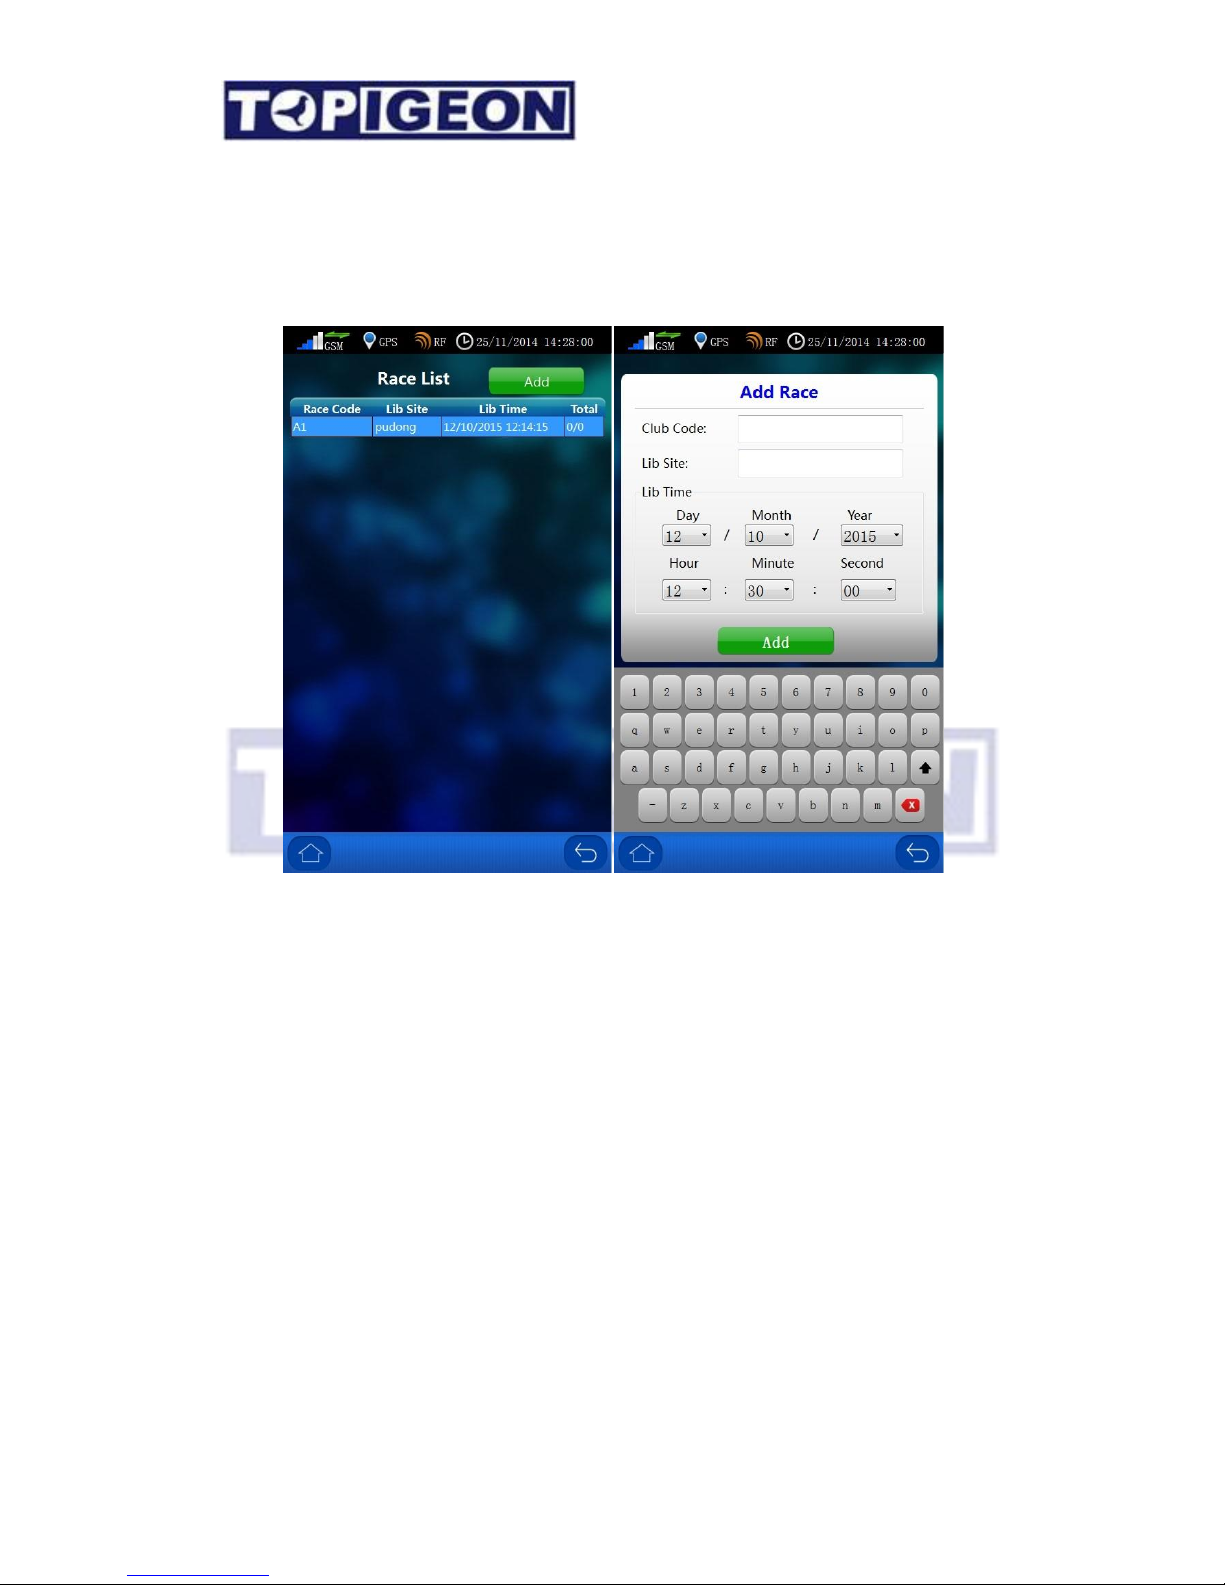
Race Manager
The race manger can handle all the race operation in the club. Firstly you will go to a Race
List where you can find all the active races. You can also Add Race manually in here.
Add Race
Note: This function is for manual operation only, if you are NOT using iPigeon Club
Manager System. This function is used when all your club members are not using iPigeon
club manager system (connect to PC) or when you join the club with FCI clocks and you have
to manually type in the race information.
Press Add button then you will go to Add race screen. You can simply type in the race
information in this window, including Club Code, Liberation Site and Liberation Date and
Time. If you want detail online information or result calculation, please using the iPigeon
club manager software to create the race information.
Page 49
49
Arrival Operation
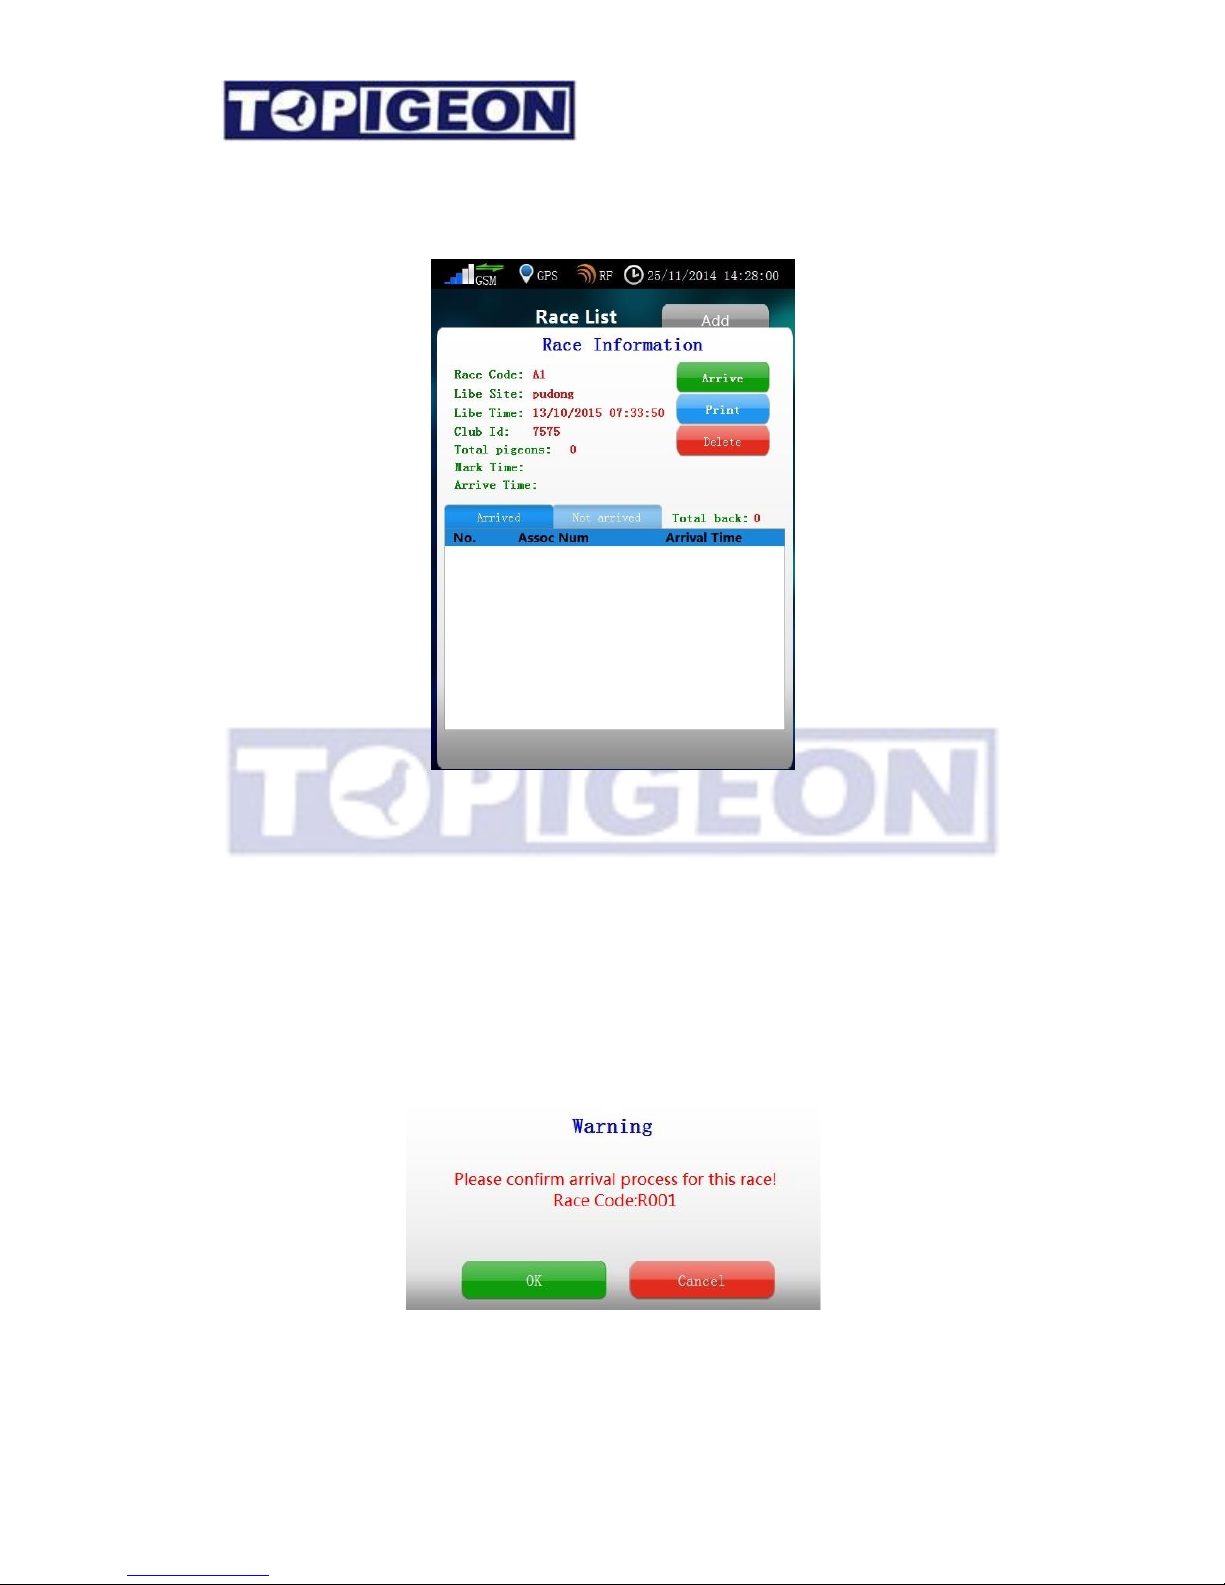
After your birds return to the loft, you can bring the iPigeon to the club anytime you want,
even if the birds have not all returned. When the iPigeon is connect to the club antenna with
authorization key, the race information will show the Arrive button. Click on this button
will to display arrival mode.
Arrival Mode (Race in Progress)
After you click the Arrive button, a confirmation window will pop up and ask you to confirm
if this is right race. In the arrival mode, you will see 2 buttons active in the race information,
Print, and Delete.
Page 50
50
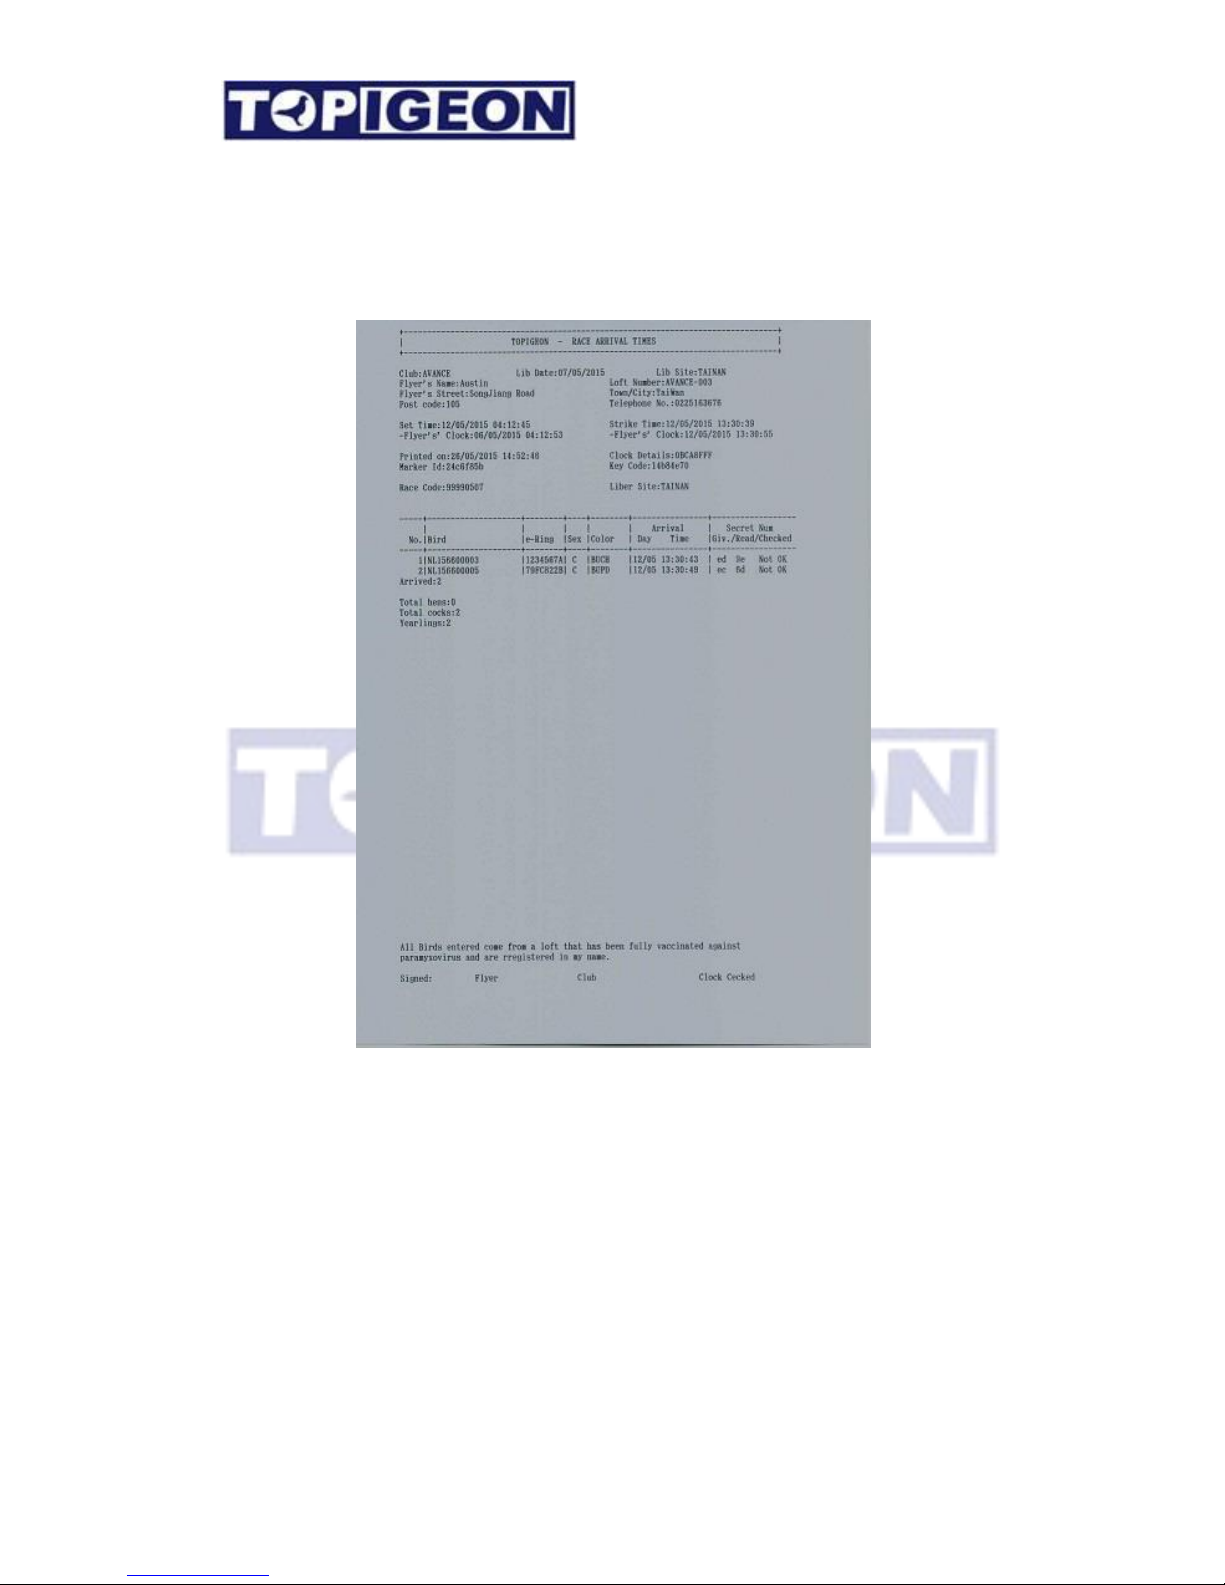
Print: This is to print the race result and can print as many copy as you want. However,
you have at least to print once before you can delete this race. Please also note that if
you are using club manager software and upload the race result this will also give you an error
message if you have not printed.
Sample race printing report
Delete: After you confirm the arrival result and close the race, then you can delete the race.
The screen will show a warning message to confirm this deletion process which releases all
birds from the race. This returns the clock back to the training mode and ready for the next
race.
Warning: Please do not delete the race if it is still in progress.
Page 51
51
Firmware upgrade
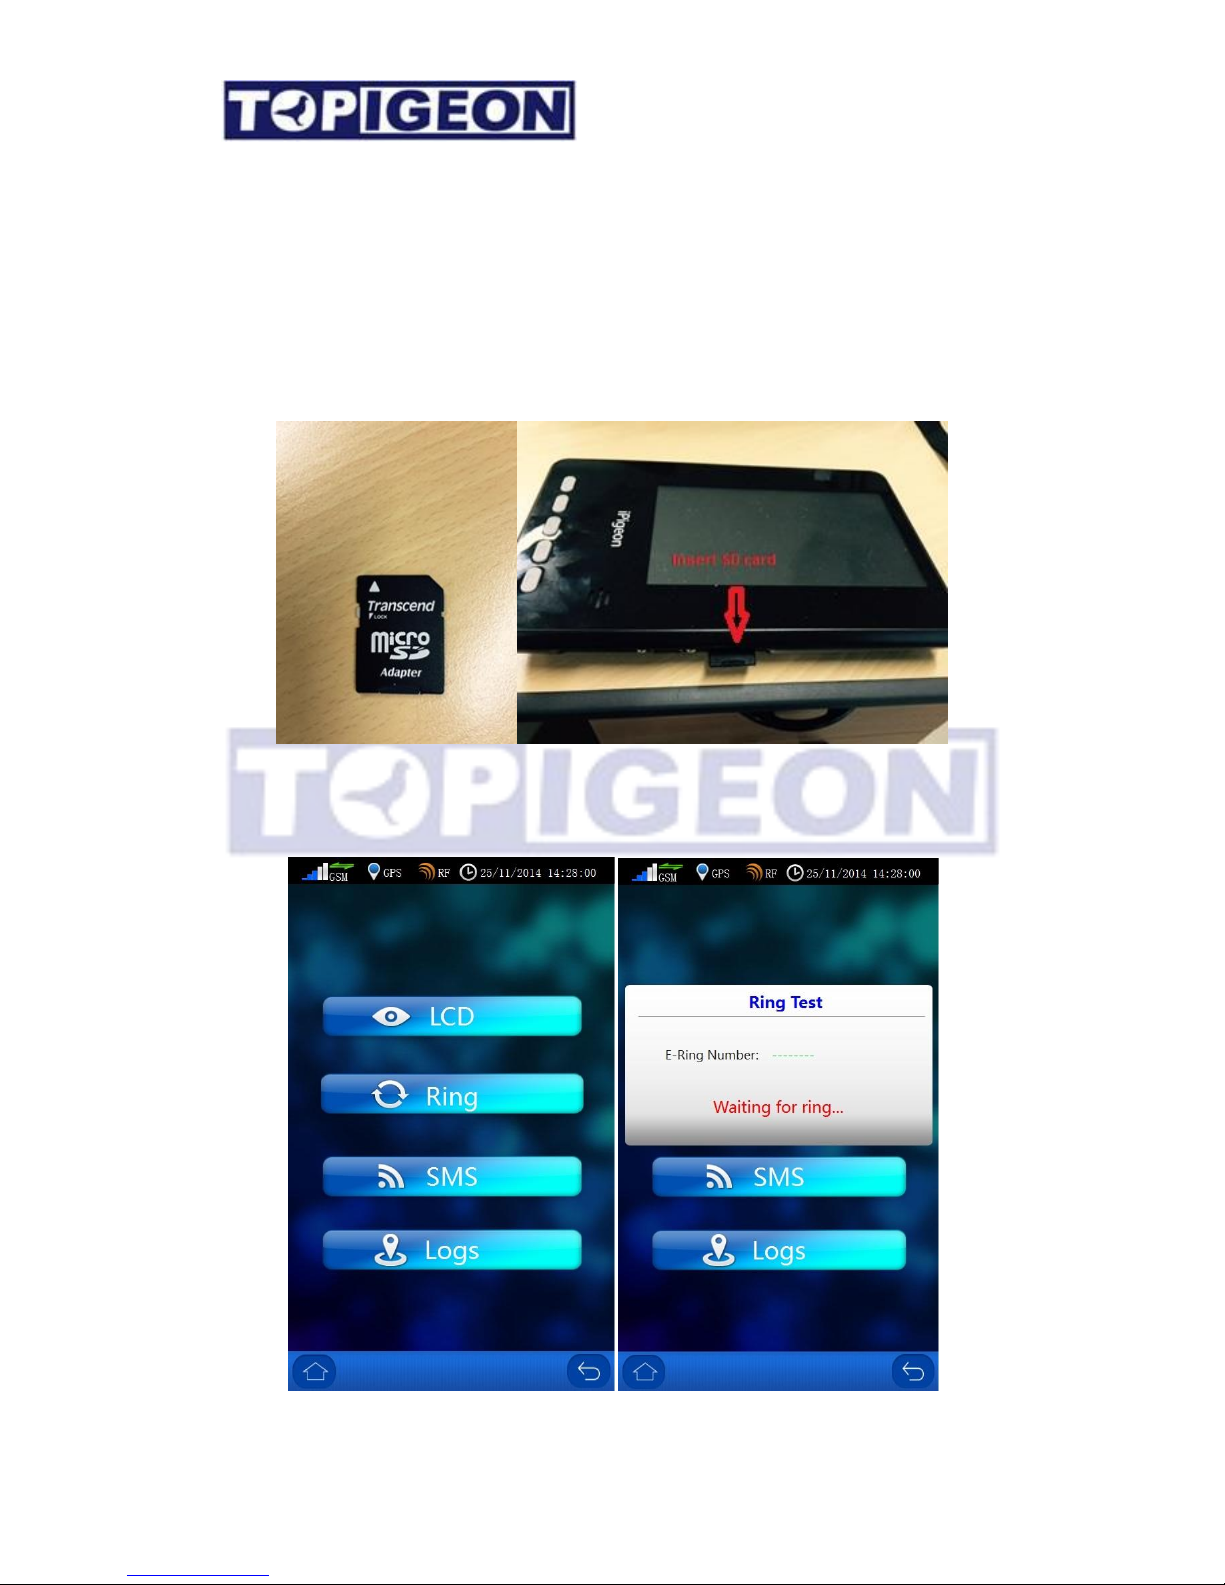
To update the iPigeon firmware is easy by using an SD memory card. Normally the
firmware of iPigeon is around 1M byte and compressed in a zip file. You just unzip the
firmware all file including a resource directory to a SD cards root directory. Plugin this SD
card to iPigeon, and reboot iPigeon, then the iPigeon new firmware will automatic upgrade.
Please note that the version can only be upgrade and cannot be downgraded.
System Test
Page 52
52
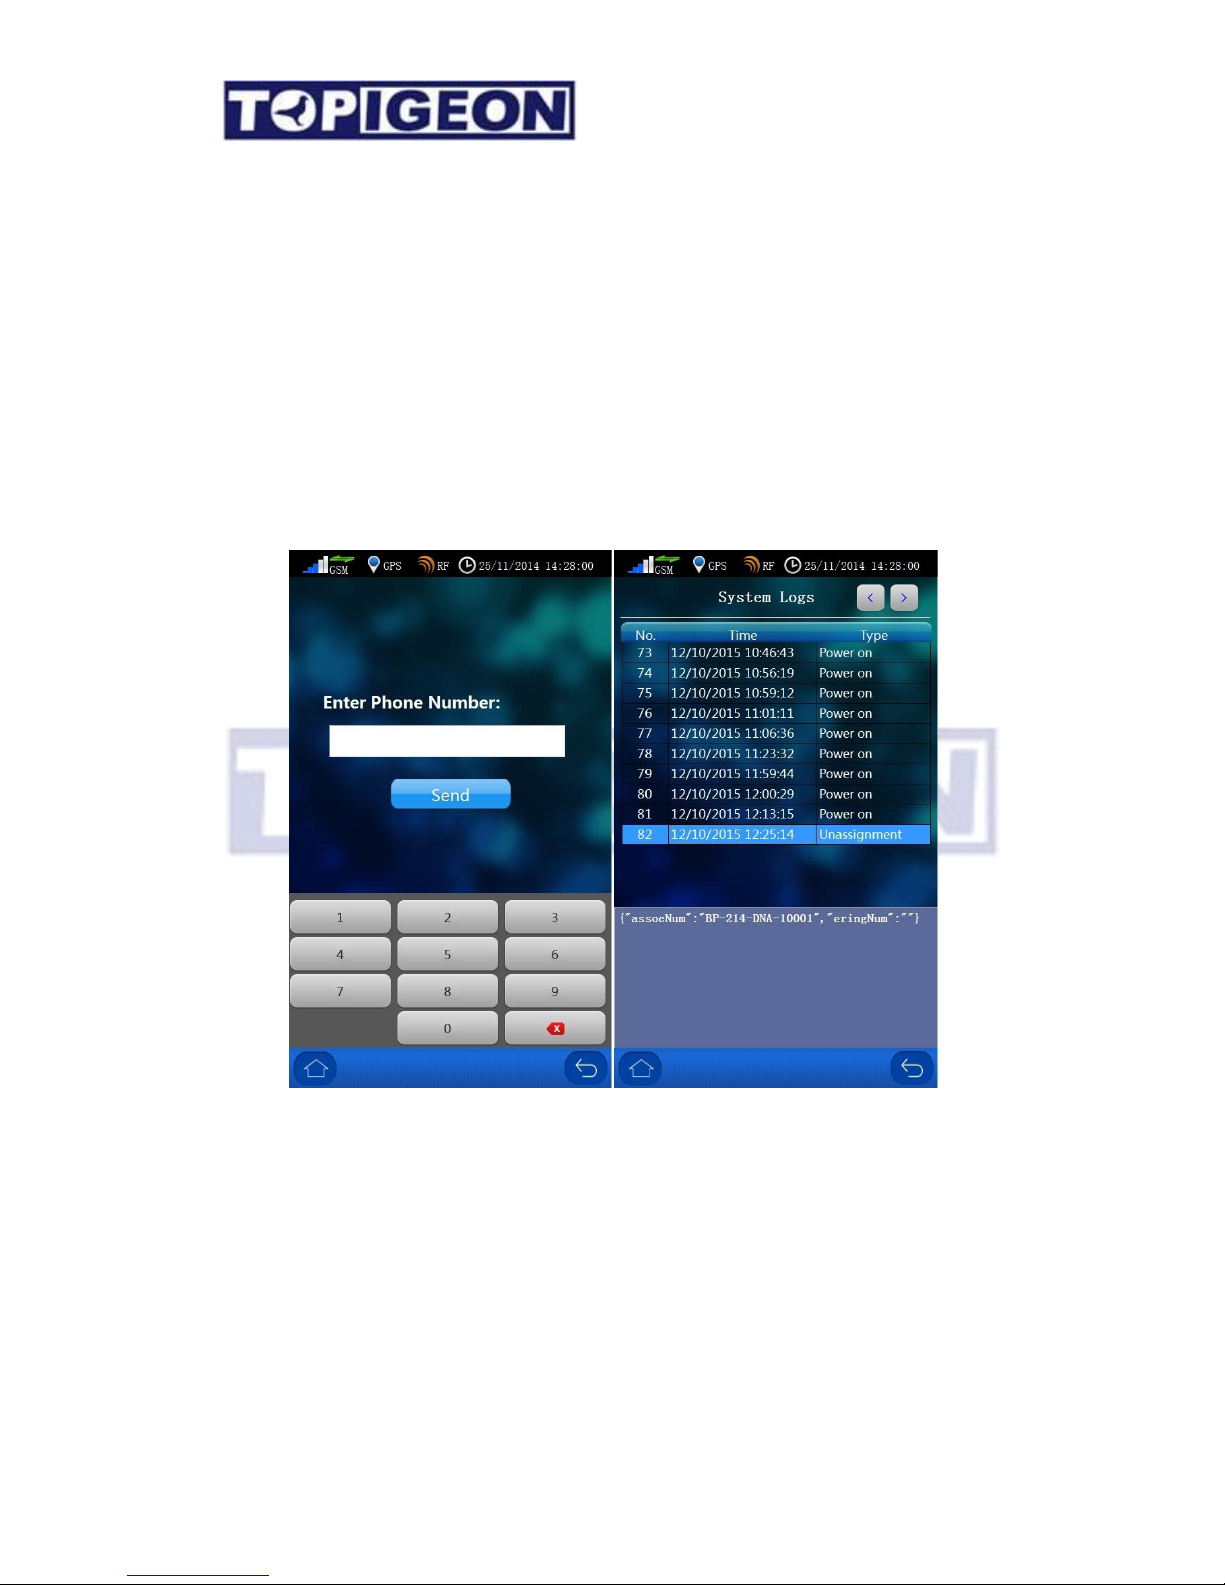
LCD test: The iPigeon screen is LCD and LCD will set the color calibration.
Ring test: In chip rings test will display the chip ring’s e-ring number. You can use the
iPigeon embedded RFID reader to do this test.
SMS test: Where you can type your mobile number to test the SMS feature. If your GSM
power bar is showing the signal the SMS function should work.
Logs: This is the same as the System Info’s System Log with more detail iPigeon technical
commands. This feature provides you more transparent information of how this clock
process. For example, when your pigeon is back to your loft and you will see the detail log
has displayed this pigeon’s ring number, back order, if GPS signal, SMS, internet, online
function and race information, including if secret code is read properly. This can provide
your tracking and analysis tool if you have dispute with the club. This is also the how
TOPigeon Loft Monitor System communication works.
Page 53
53
Club Version System Operation
There is special version for Club to read out the fancier exported race data without iPigeon
clock system. The Club Version is just a simplified iPigeon Fancier version and the operation
is simple.
Installation of Club Version System
To install the Club Version System, you need to get additional iPigeon clock and to upgrade
to the Club Version. The Club Version firmware will be located in the agent/distributor V8
Dropbox directory. You will need a SD card to copy the Club Version firmware to your SD
card and load to the clock which is exactly the same as clock firmware upgrade. Please refer
to the previous system firmware upgrade procedure for the detail operation.
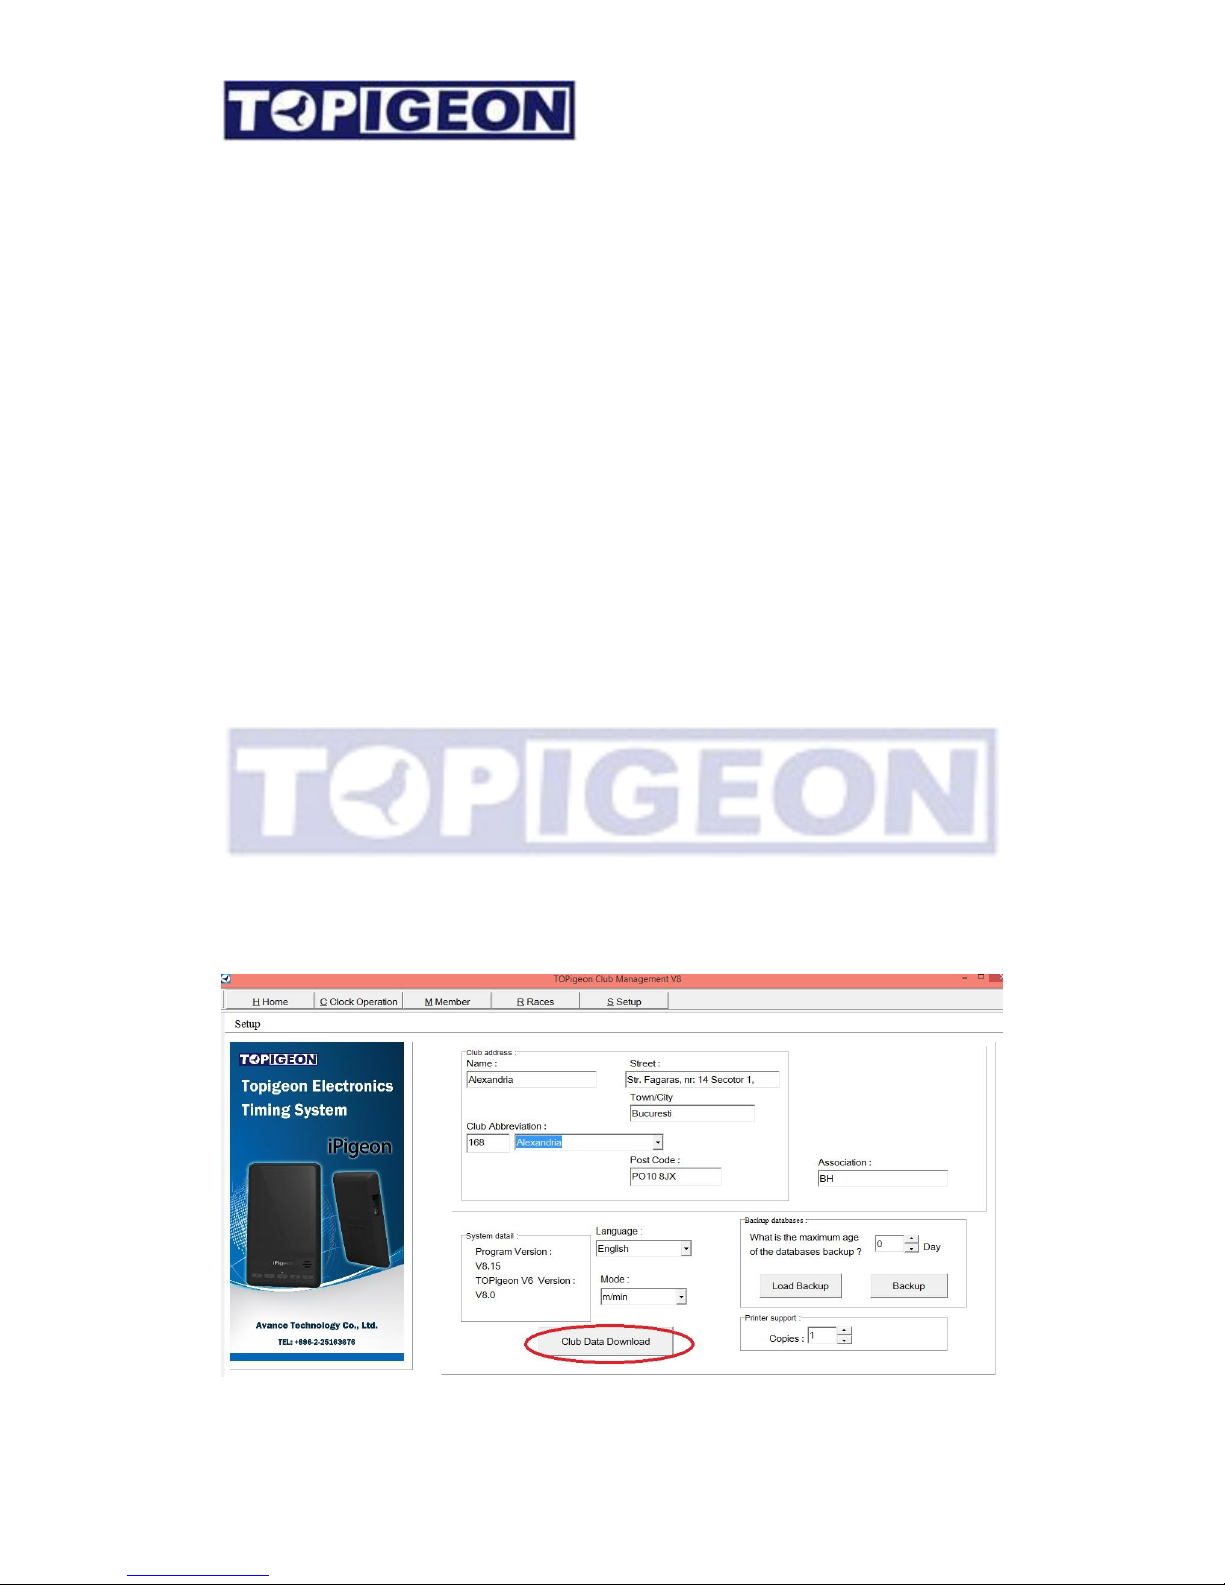
Initialization of Club Version System
After you have loaded the Club Version firmware to the clock, you need to initialize this
clock to import all the Club Manager club information. You will now need to connect this
clock to your Club Antenna making sure the computer Club Manager is loaded and the S
Setup screen is selected. Now place the Authorisation Key into the ‘Club Antenna Ring
Well’ and leave it there, then select the clock ‘Connect to PC’ icon and then select on the
computer ‘Club Manager’ screen ‘Club Data Download’ button which will then give a ‘Club
Data Download Success !’ OK button.
Page 54
54
Club Version System Operation
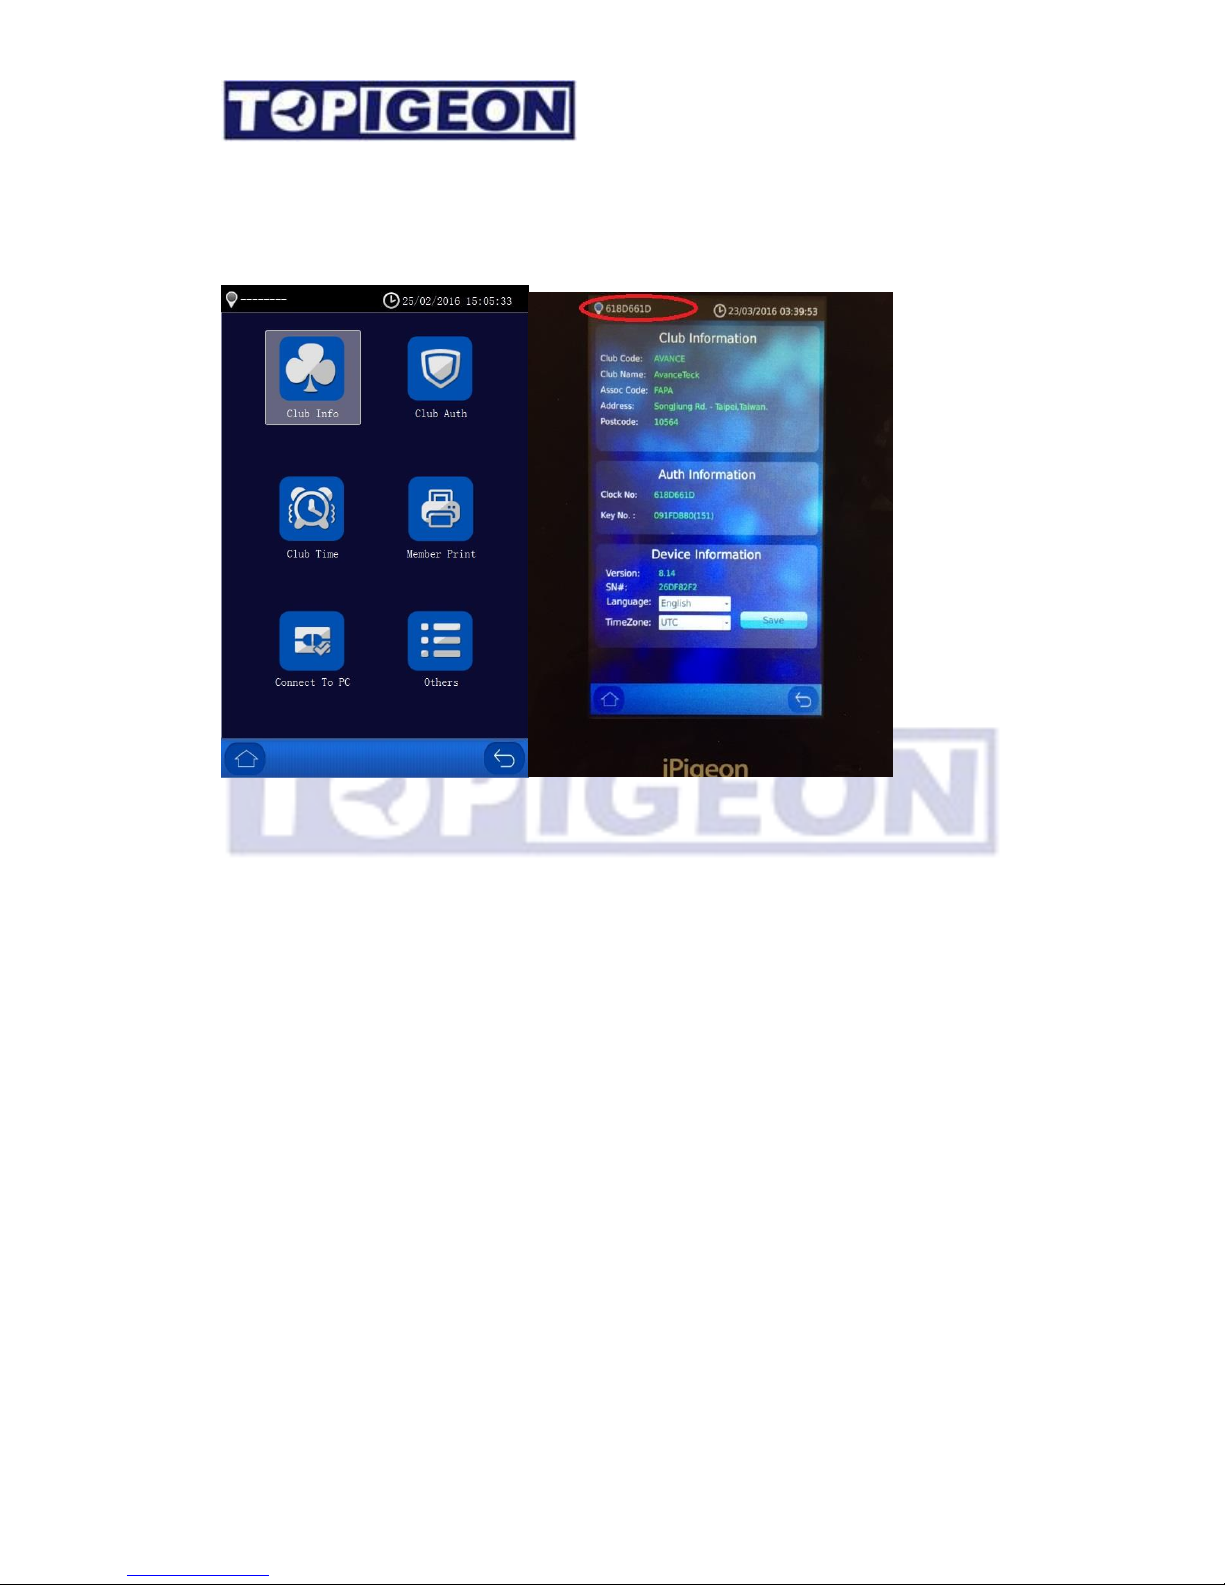
You will get the club system Version shown as below,
First Step you need to connect to the Club Antenna with the Authentication Key. Please go to
the first Icon of Club Info to check if all the information is correct, such as Marker ID,
Authentication Key and other device information is correct.
Secondly, make sure the Club time is synchronized with club antenna and the club master
time is correct.
Member Data Operation
Insert the member SD cards in the Club Version System and press the Member Print icon.
The Club Version will read the race result data from the fanciers export file. Note: The Club
Version System will base on Club Code + Association Code as the key to identify if this is the
correct fancier data. The Club Version will not recognize if the fancier data is not from your
own club.
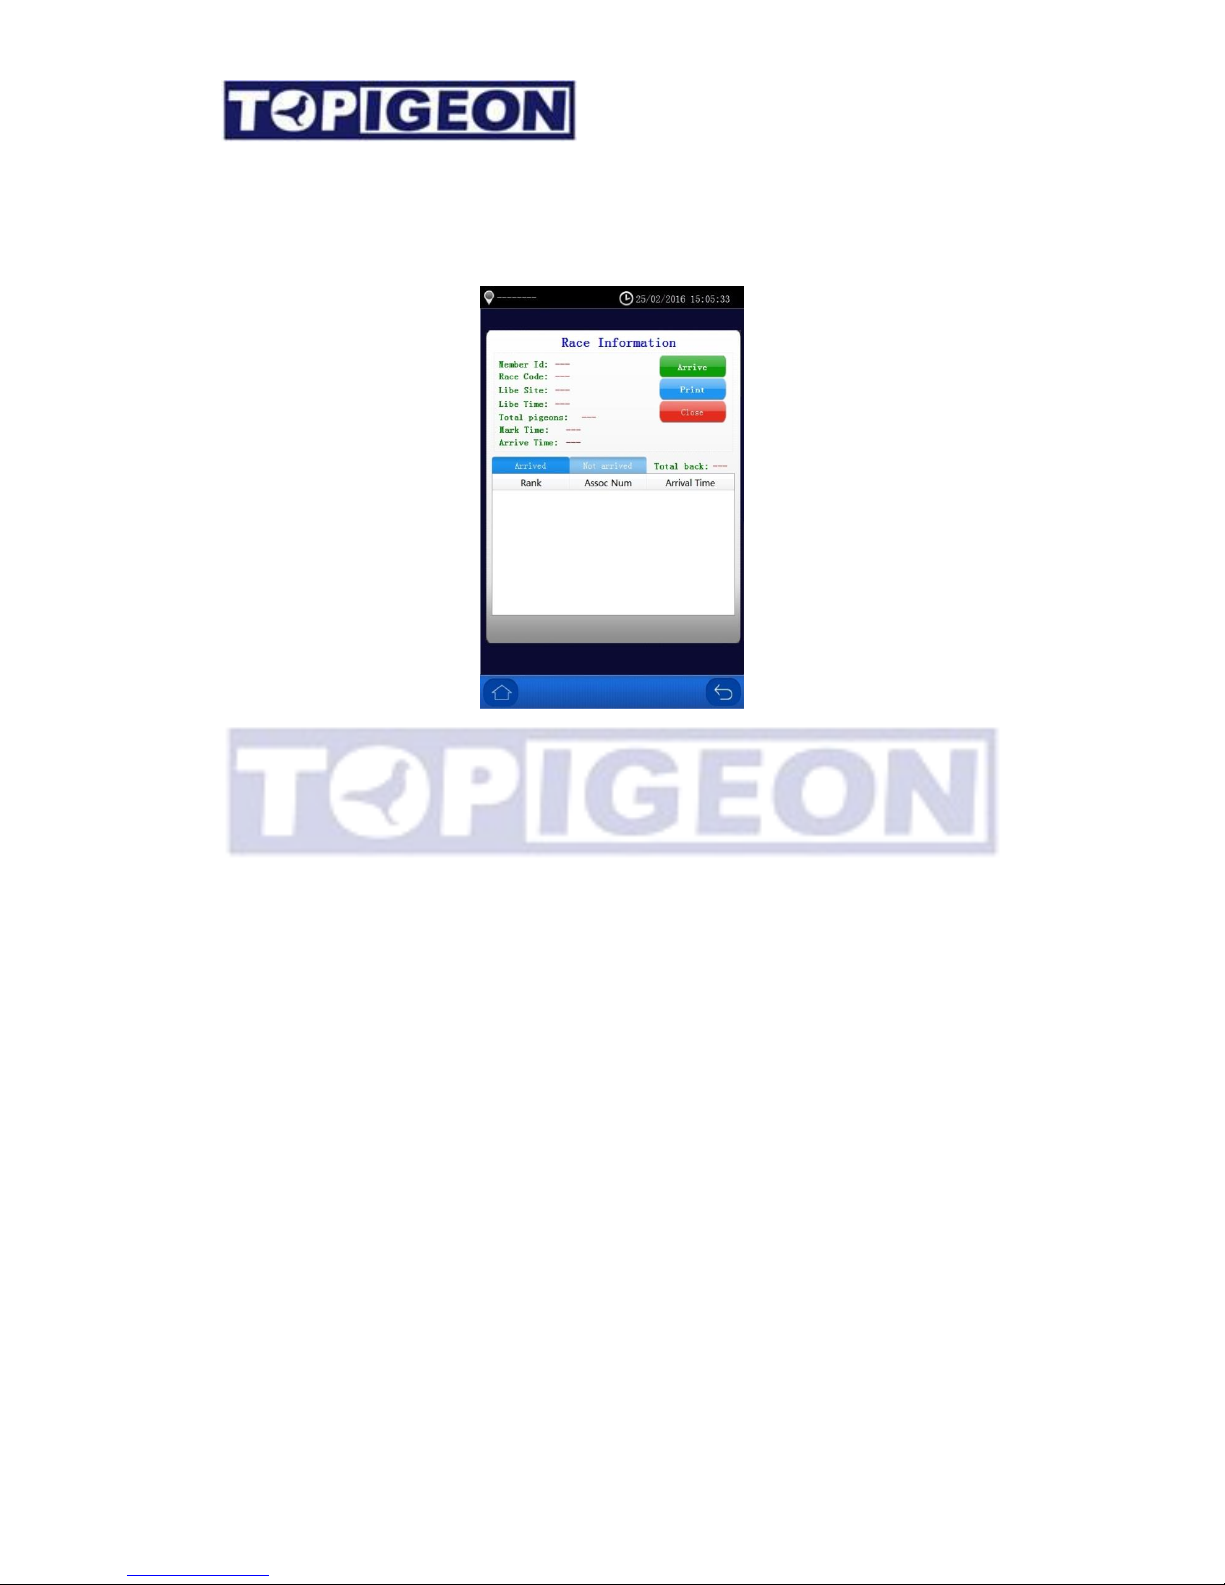
If the file can be read the same screen will come out same as in Club Manager – Race
Management. Note: Before you operate the Club Operation, make sure the race information
is correct on the screen. You can do all the operation from Arrive; print out Race in Progress;
Close; and Delete Race operation.
Page 55
55
After you have done all the Club Operation to the fancier race data, the system will automatic
generate a new Export file. You DO NOT need to save the operation and just extract the SD
card back to the fancier. Then, the fancier can synchronize all the Club Operation has done to
his/her own clock.
Club Antenna Operation
The club antenna is the center of club system operation, and it is very straight forward to use
by reading the LED light on top of the panel. Club antenna based on powerful logical
controller that provides all-in-one features and also intelligent workflow process in the club
operation. The I/O ports provide club antenna standalone operation capability without any
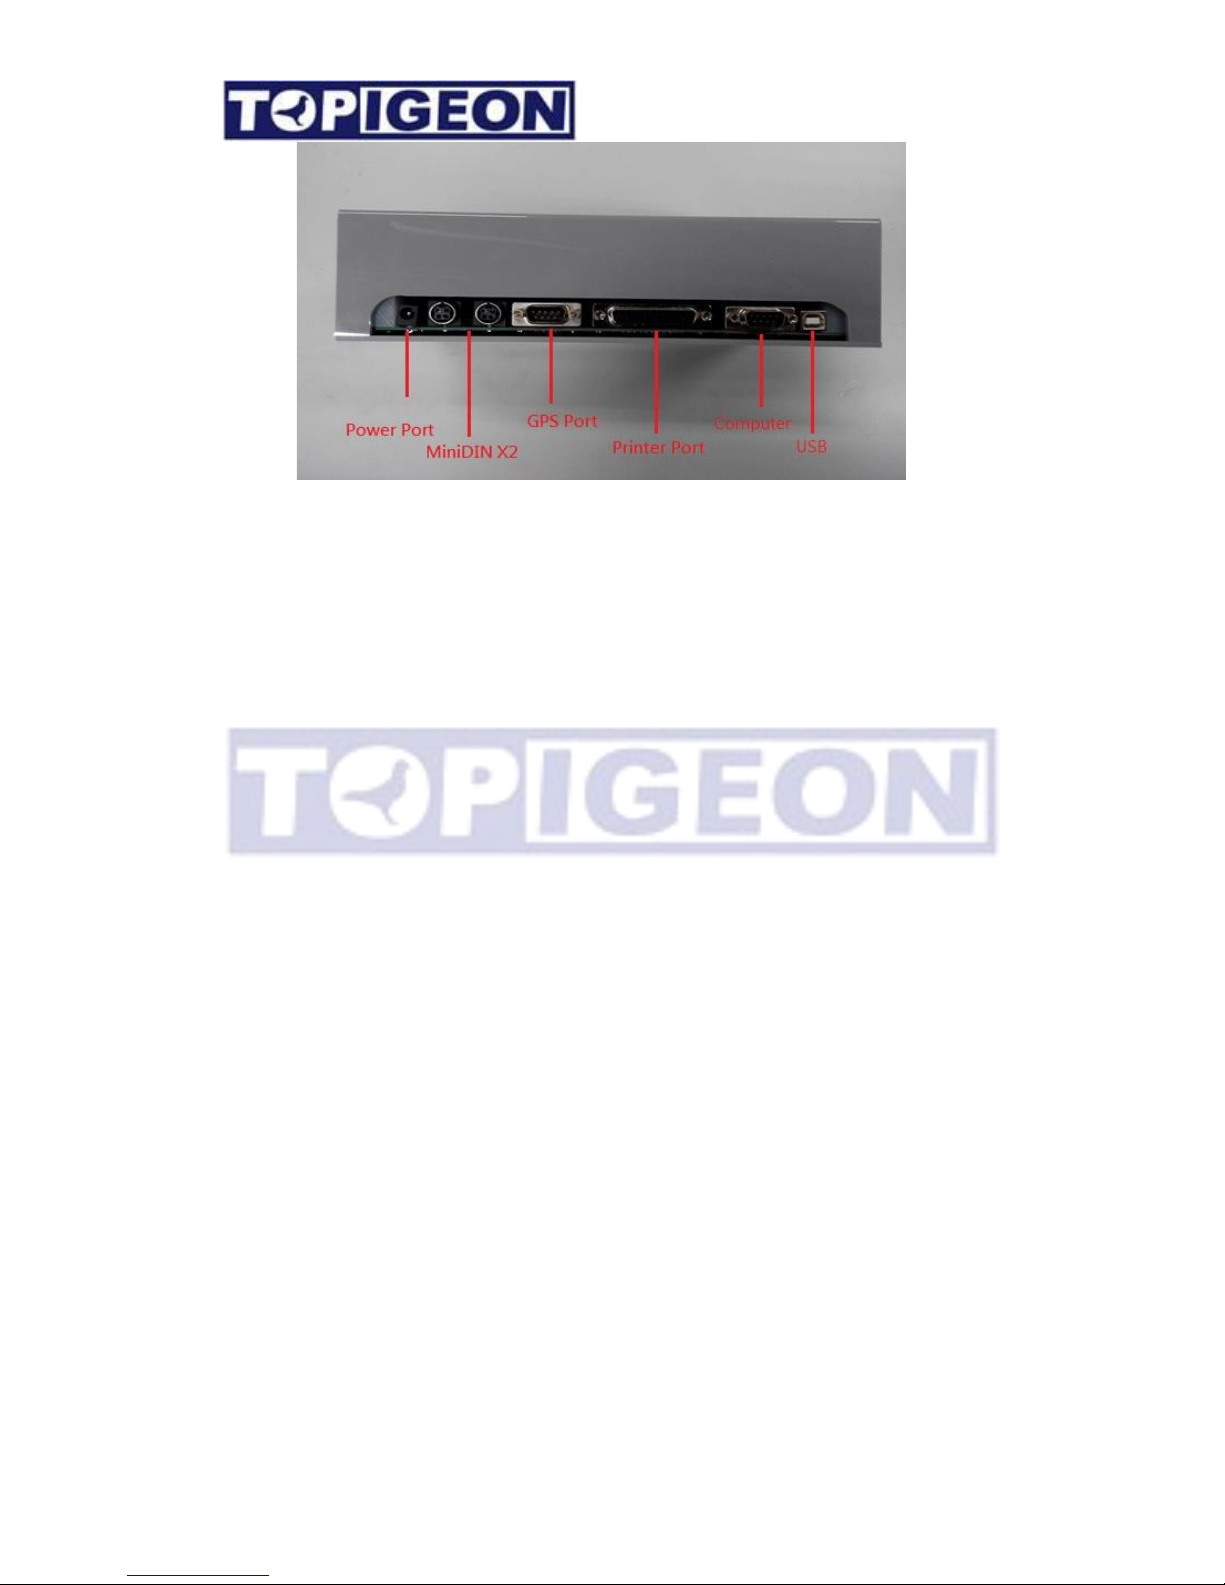
additional router. There are 2 mini-DIN, GPS, standard parallel port printer, and USB
Virtual COM port (VCP) to connect all devices necessary for club operations.
Page 56
56
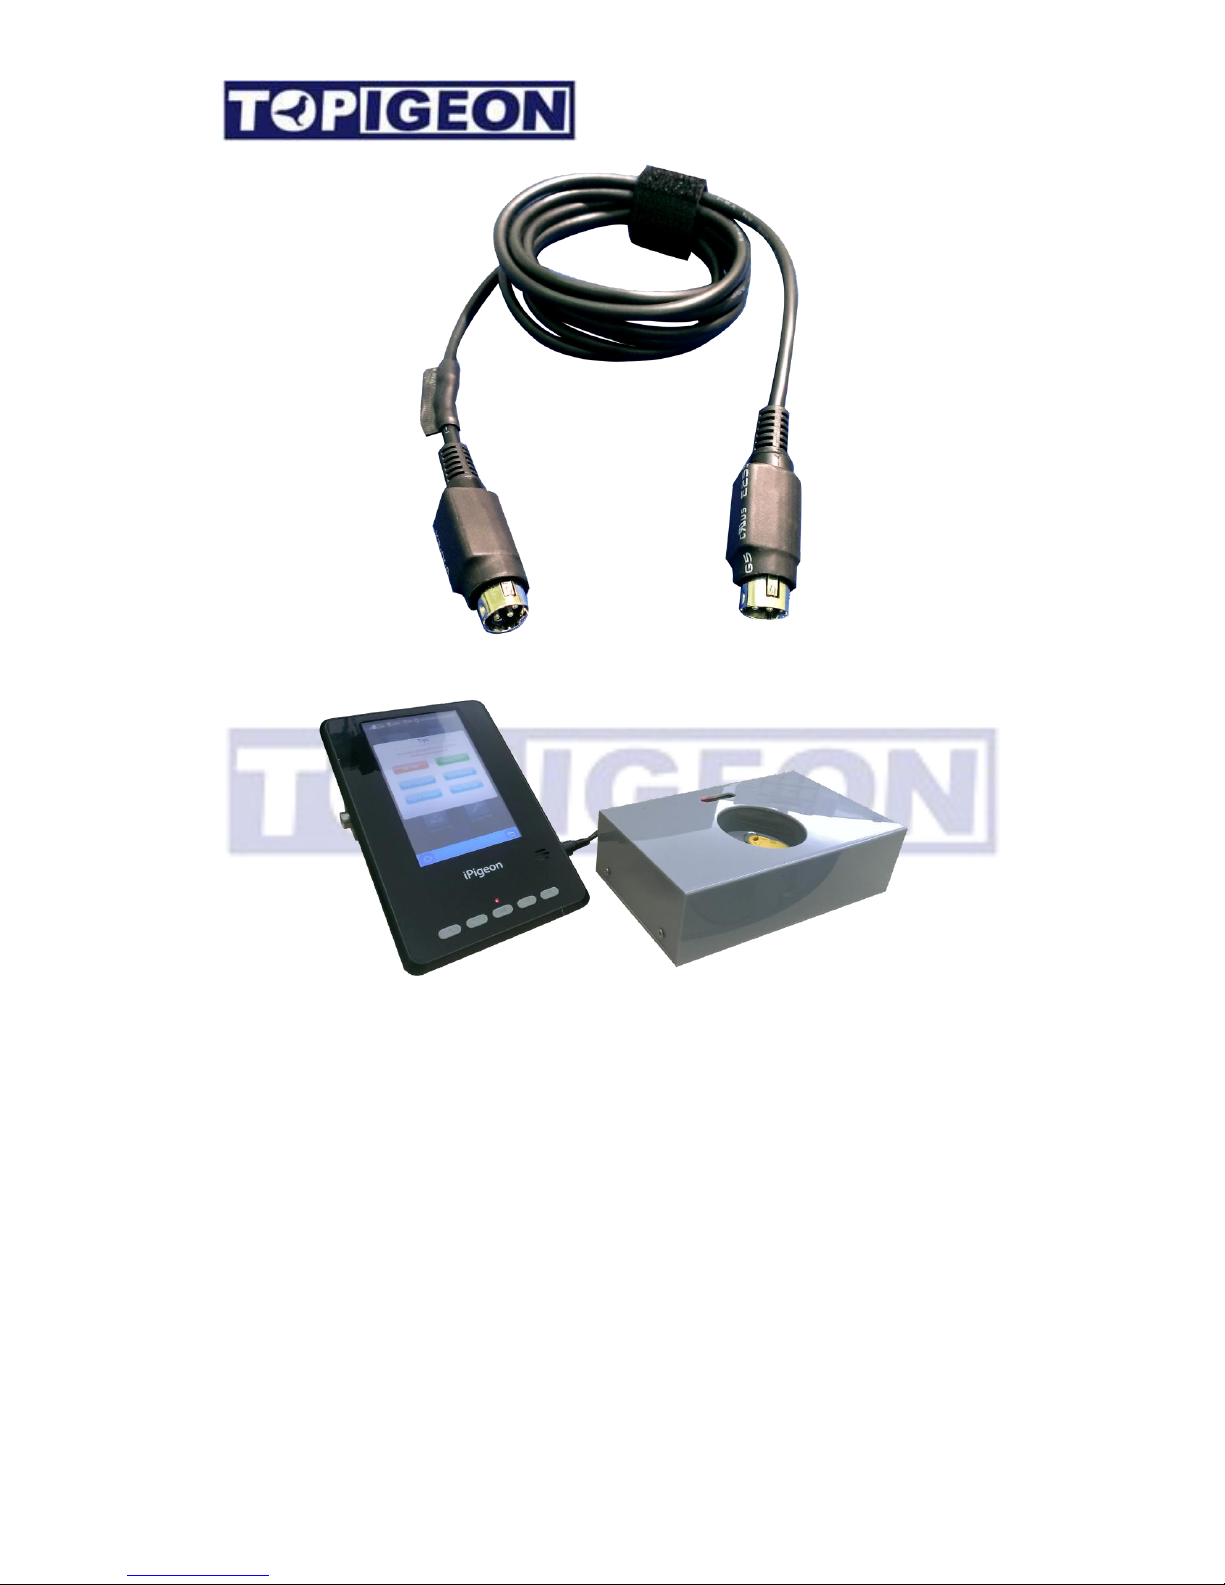
Mini DIN
This is Mini Din which provides power and signal between Club Antenna and Clock. If the
cable is not fully insert into the connector it will cause power unstable.
Please Note: There is an upside and downside on the plug and there is an arrow which is
upside. For Club antenna the upside is facing UP and to the Clock the upside is facing
DOWN.
Please also note, you have to FULLY insert into the plug, so you will see NO metal part come
out.
Page 57
57
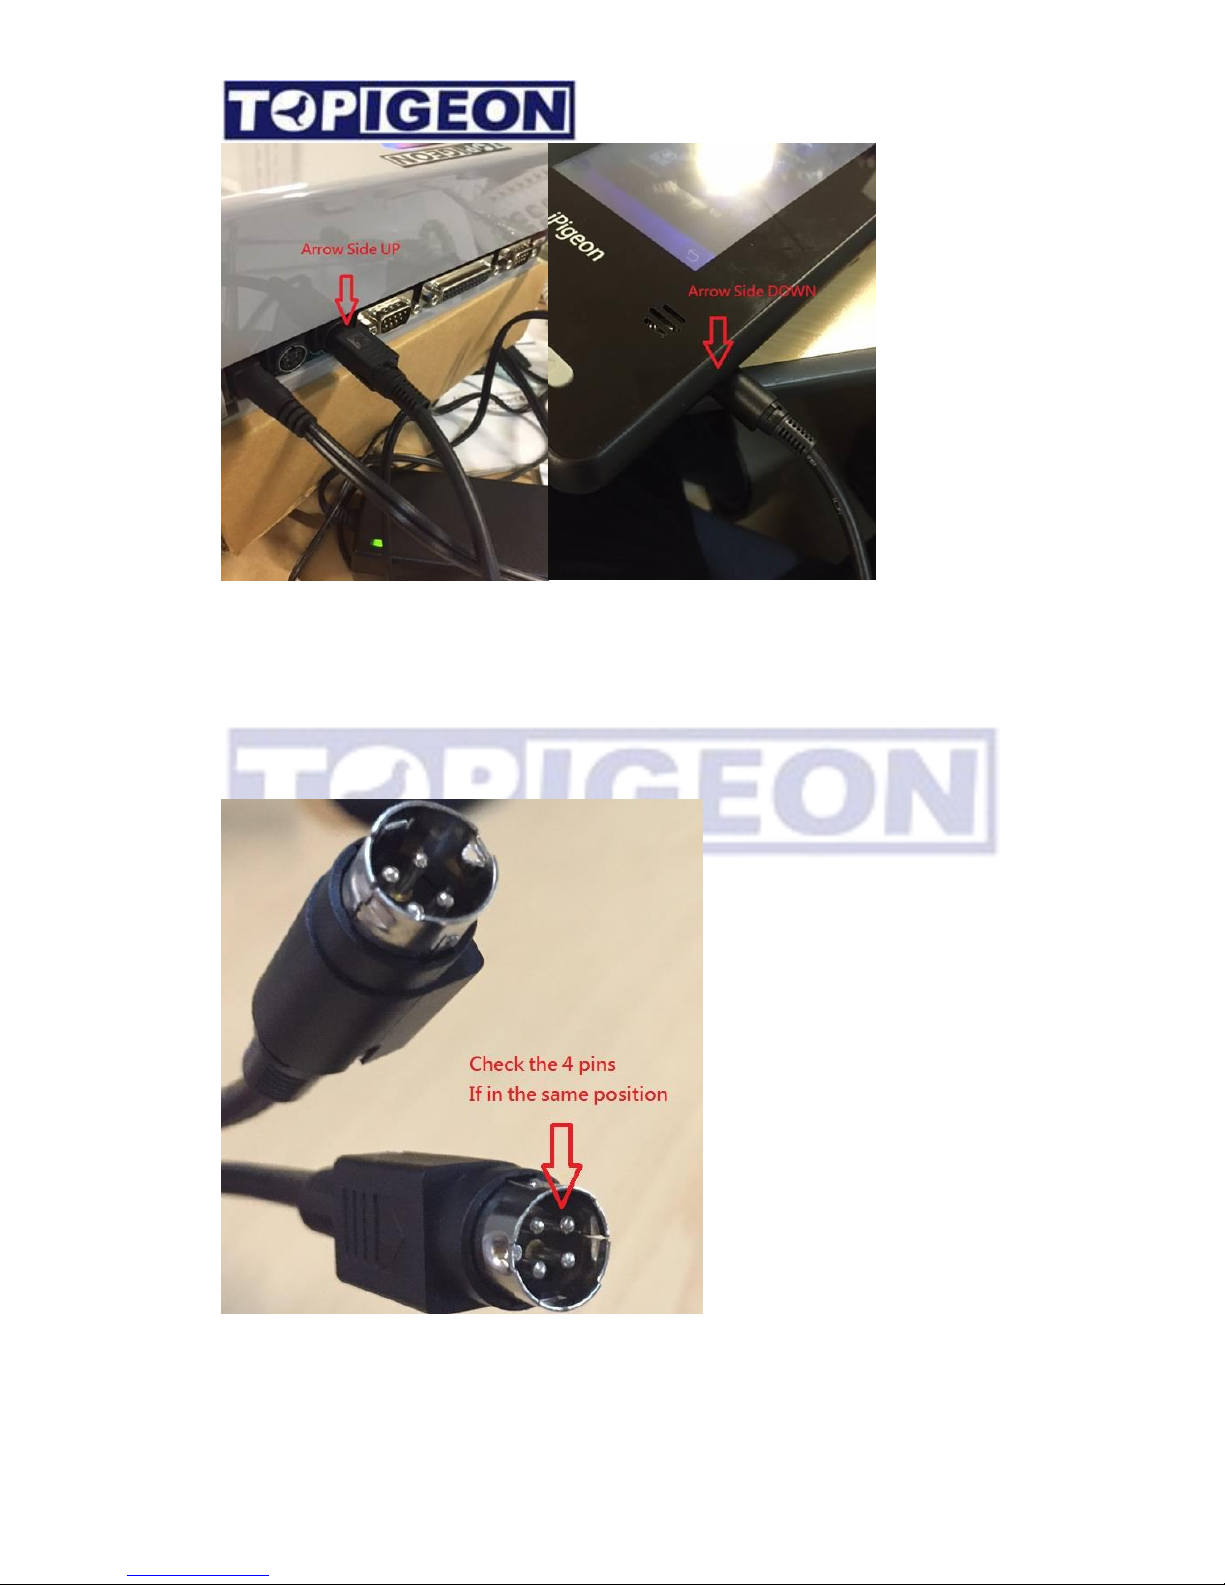
Trouble Shooting:
There is ONLY ONE possibility if the cable cause problem. You can ask to replace this cable.
Please check the 4 pins of the plug and see if all the pins in the same position.
CAUSE: If the one or two PINs shorter may cause connection problem.
When you connect to iPigeon clock with the MiniDIN cable, it will also provide the power to
iPigeon clock. The printer port is standard parallel port which support LPT IEEE1284
Page 58
58
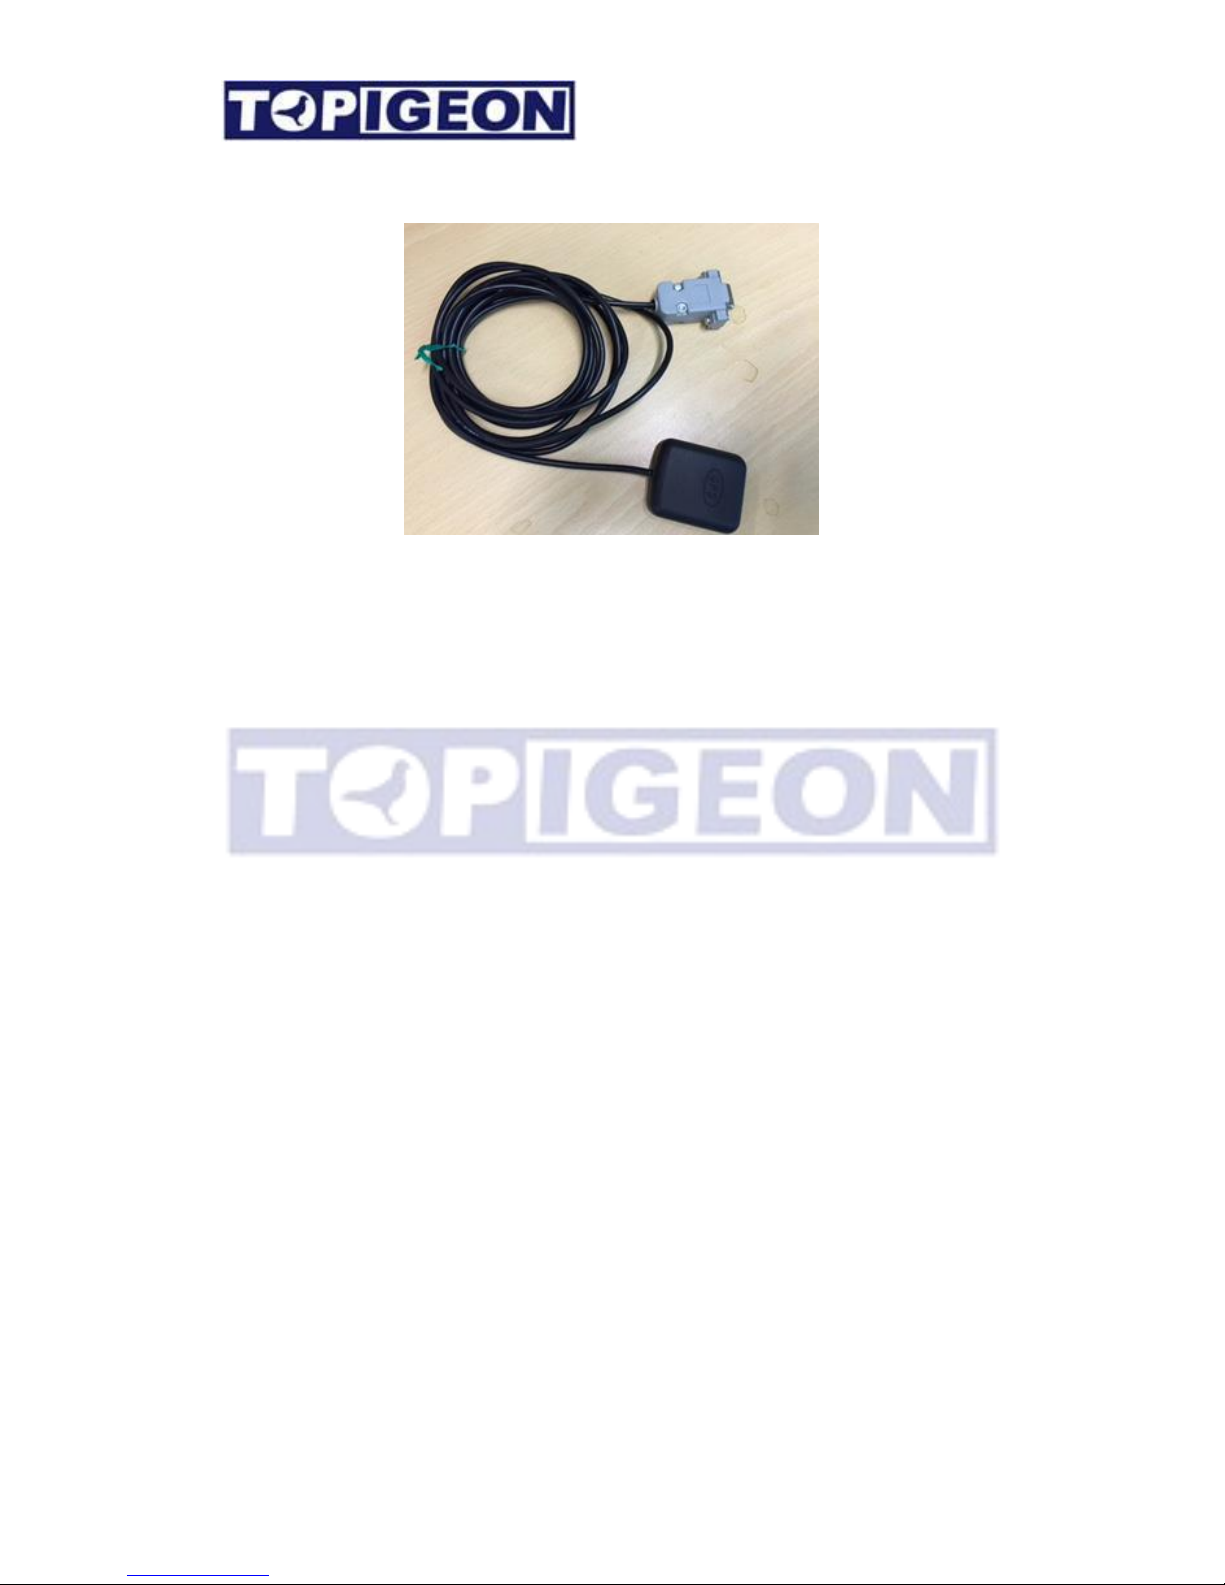
standard printer and the default printing size is A4. The external GPS module is an optional
device which you can purchase from your local agent or TOPigeon.
Page 59
59
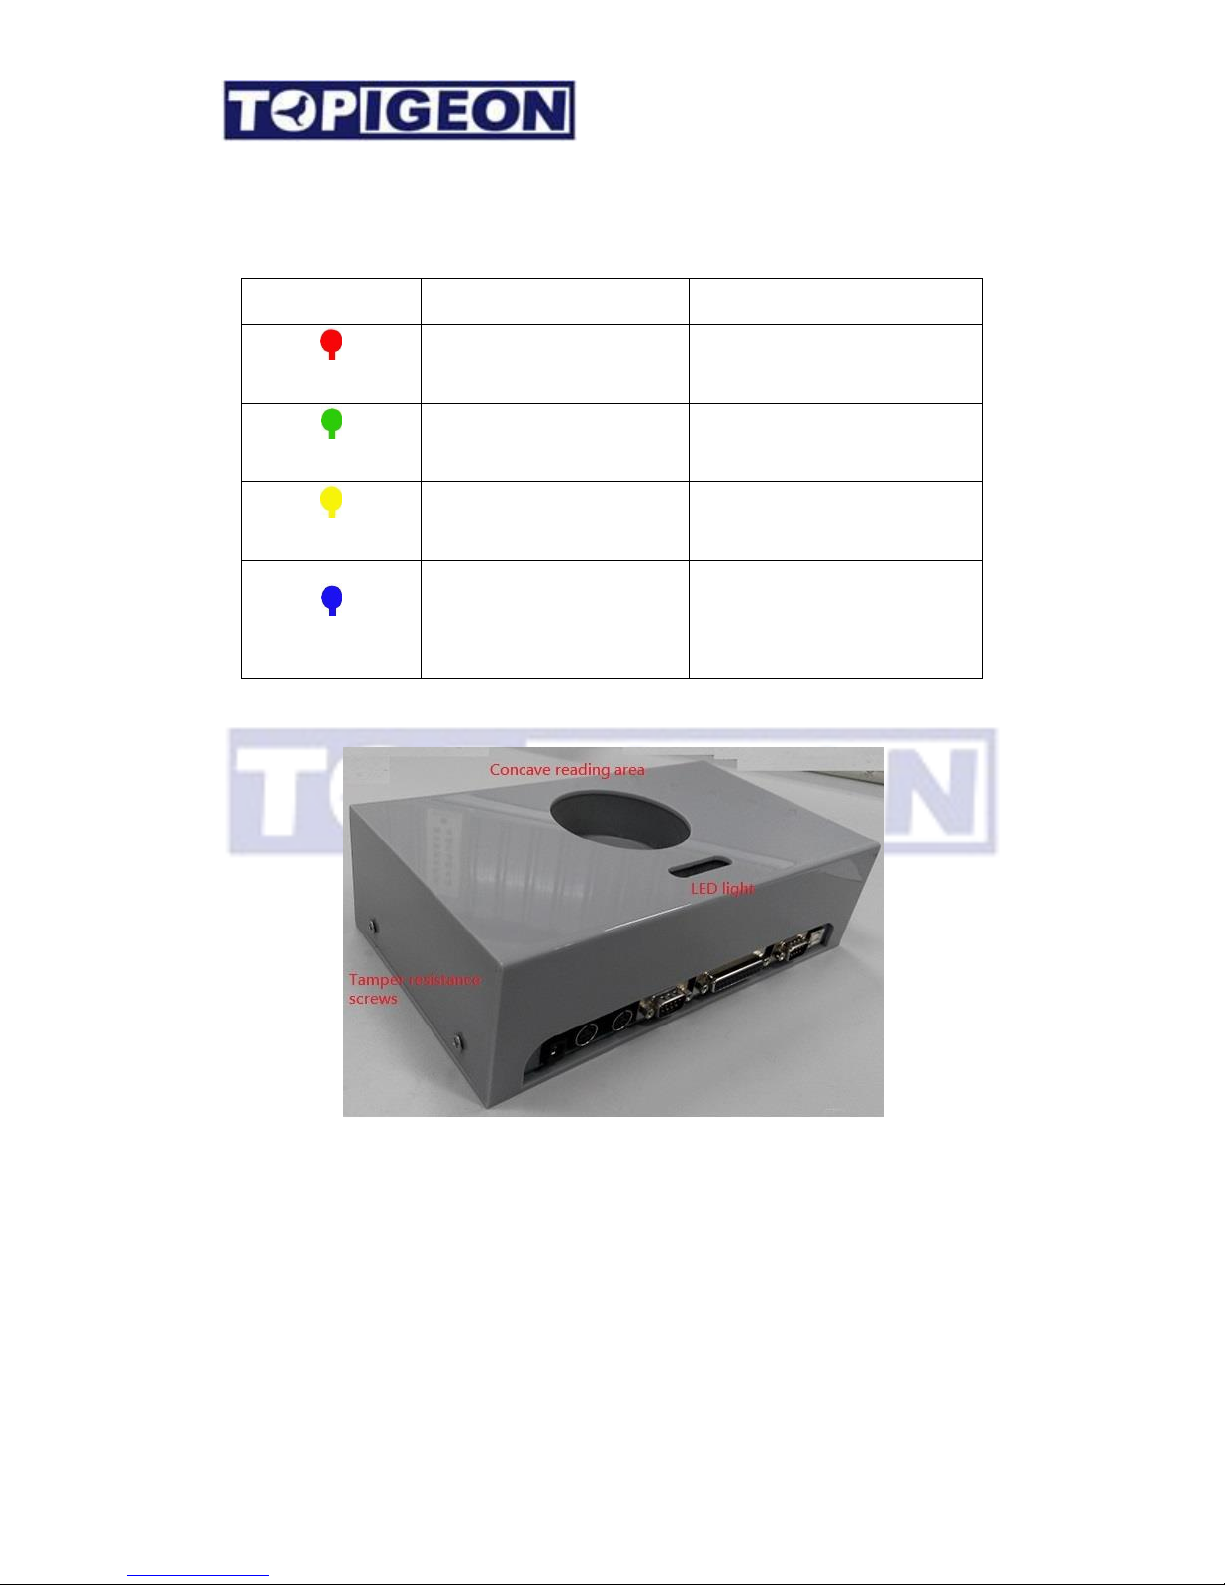
There are 4 LED on top of the club antenna with different colors and the meaning of these
LED light on or blink are as follows,
LED Light
ON
Flickering
Power
Power on and system normal
Operation error or system error
Transponder
Transponder read
Waiting to read a transponder (chip
ring) Authentication Key
Club master authenticated
Need to present the application key
Master Time
The club antenna RTC has
synchronized by radio-clock or
GPS signal
No radio-clock or GPS signal (NO
master time)
Page 60
60
If you are using the GPS module, make sure you plug to the right port, because it is similar
to the computer port. The GPS module antenna must out access to the outdoor.
Page 61
61
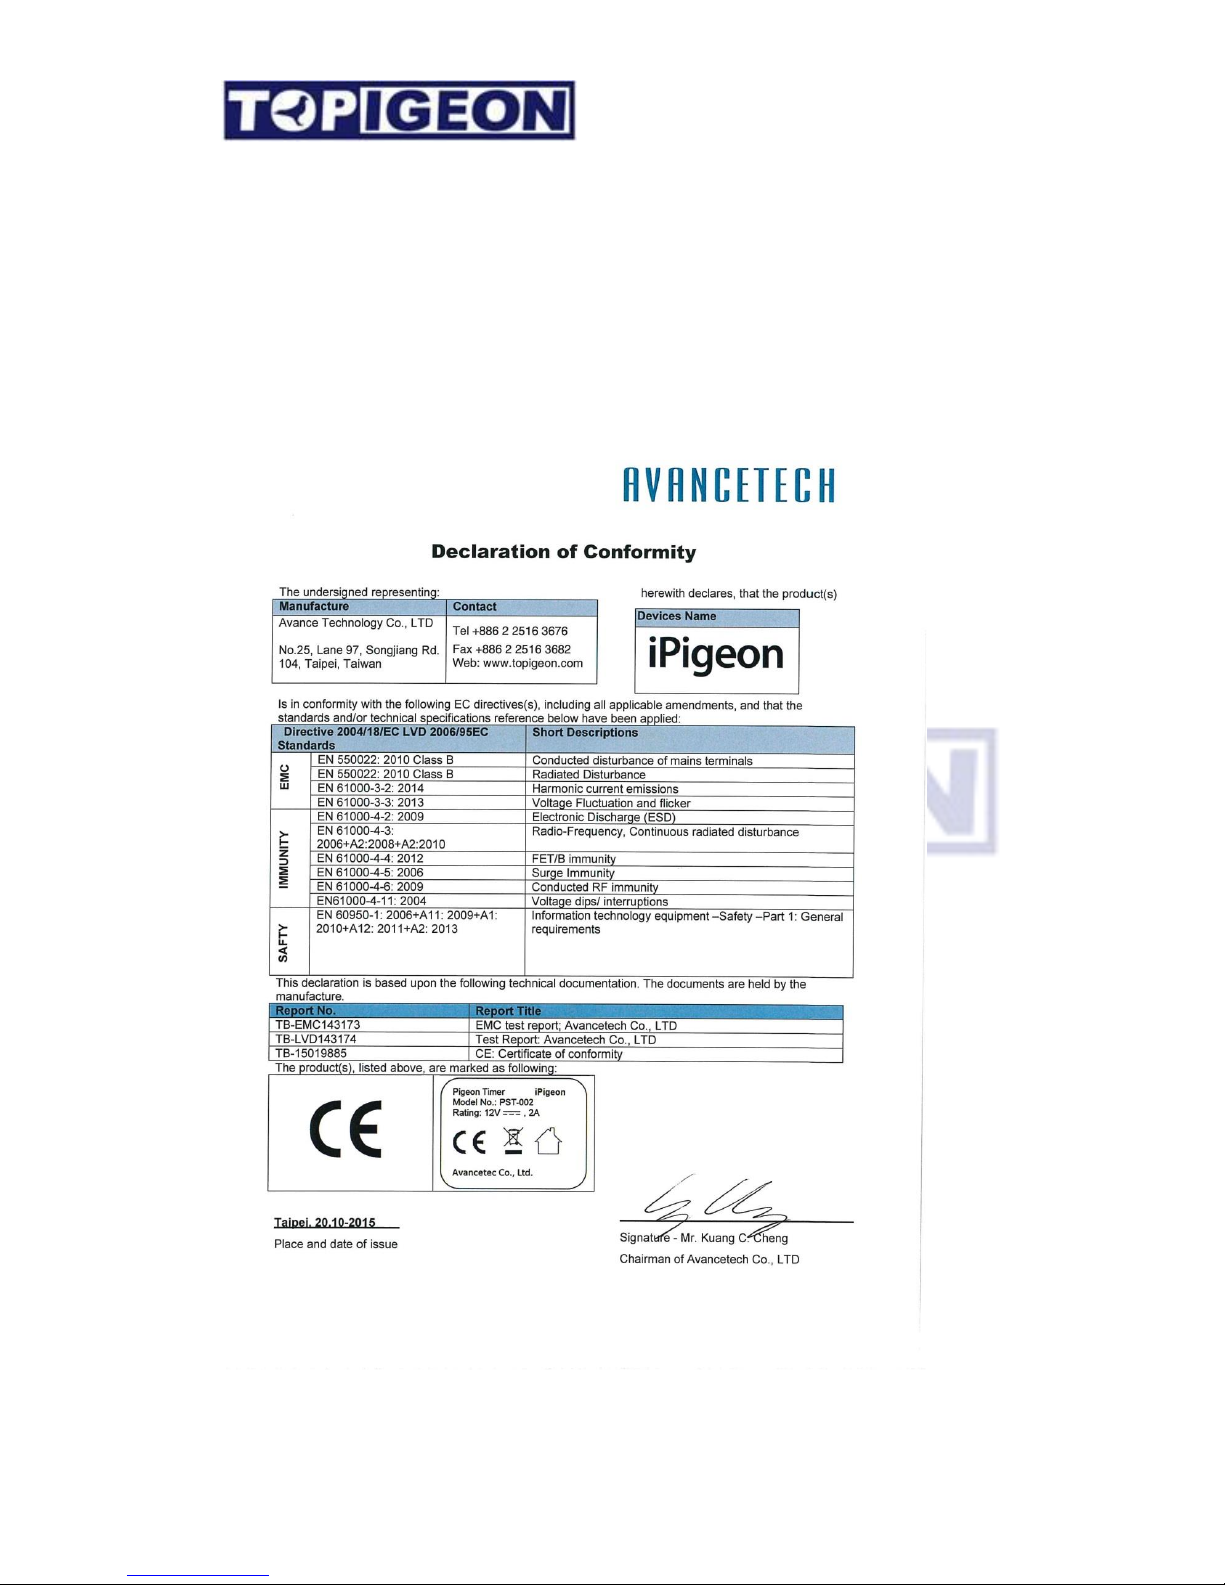
Declaration of Conformity
iPigeon Timer
Page 62
62
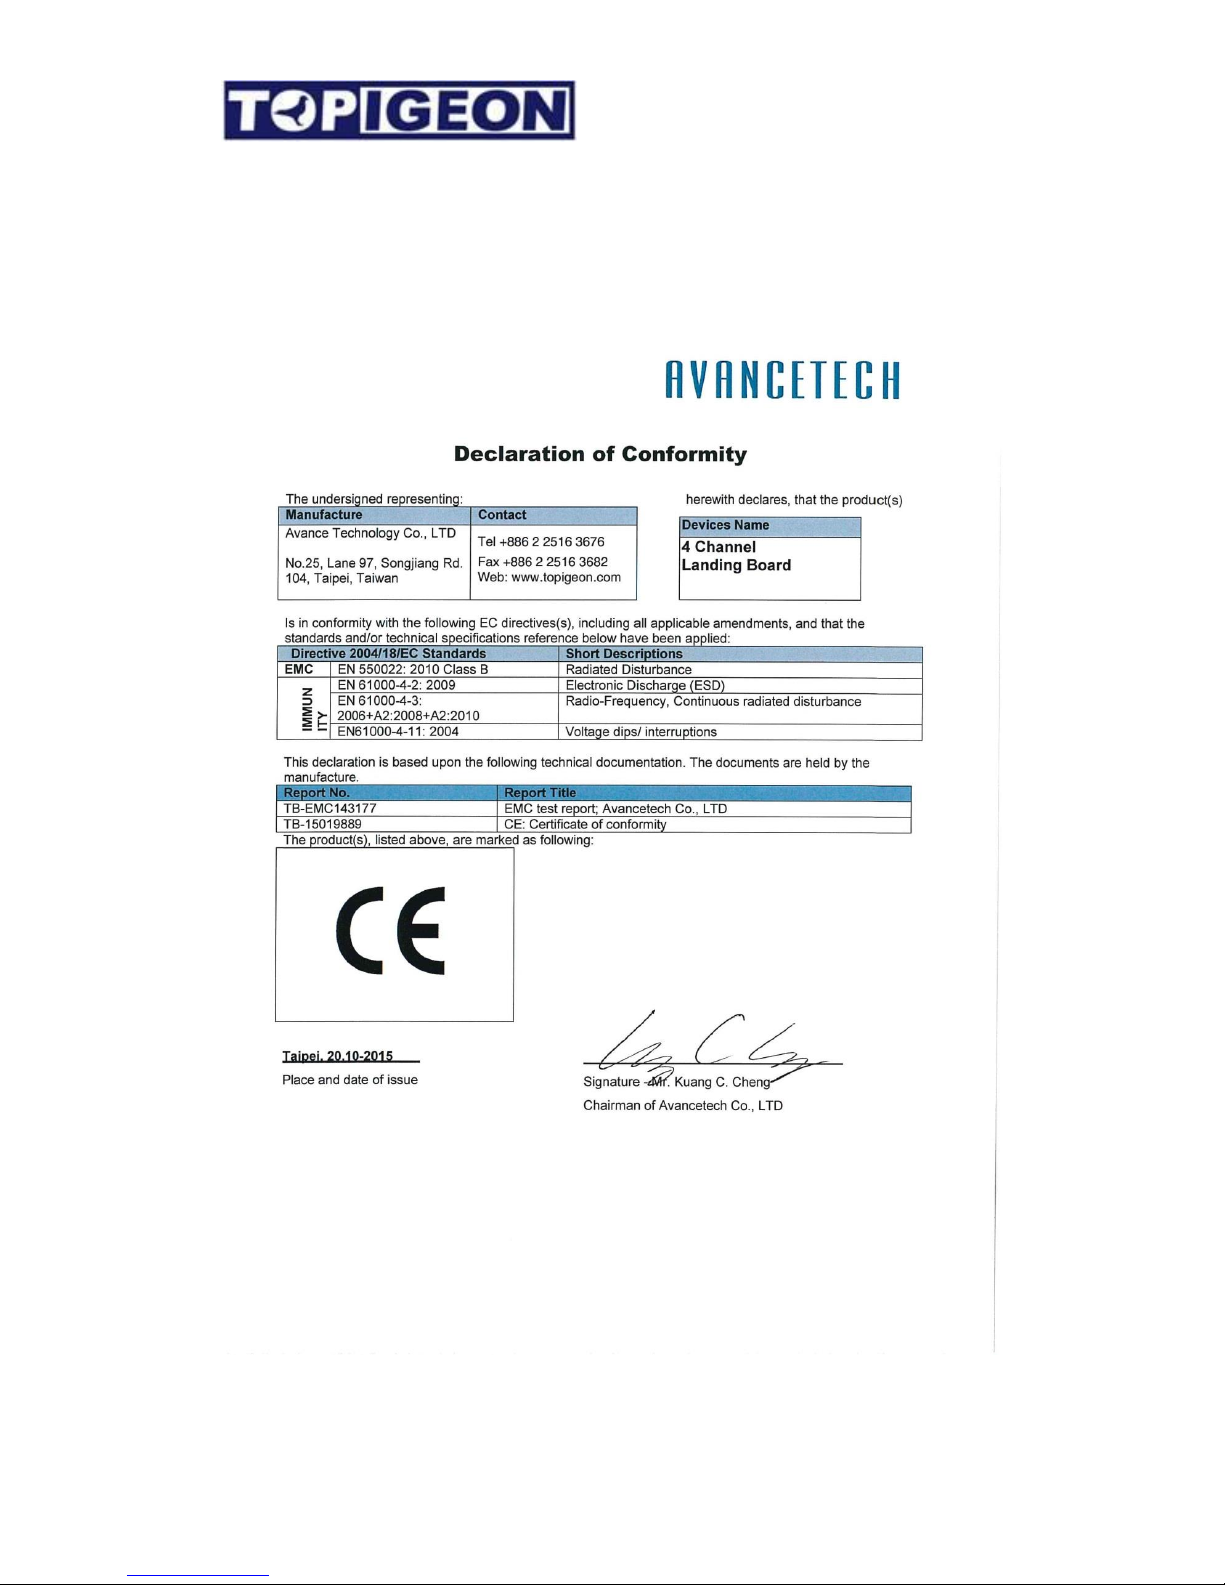
4 Channel Landing Board
Page 63
63
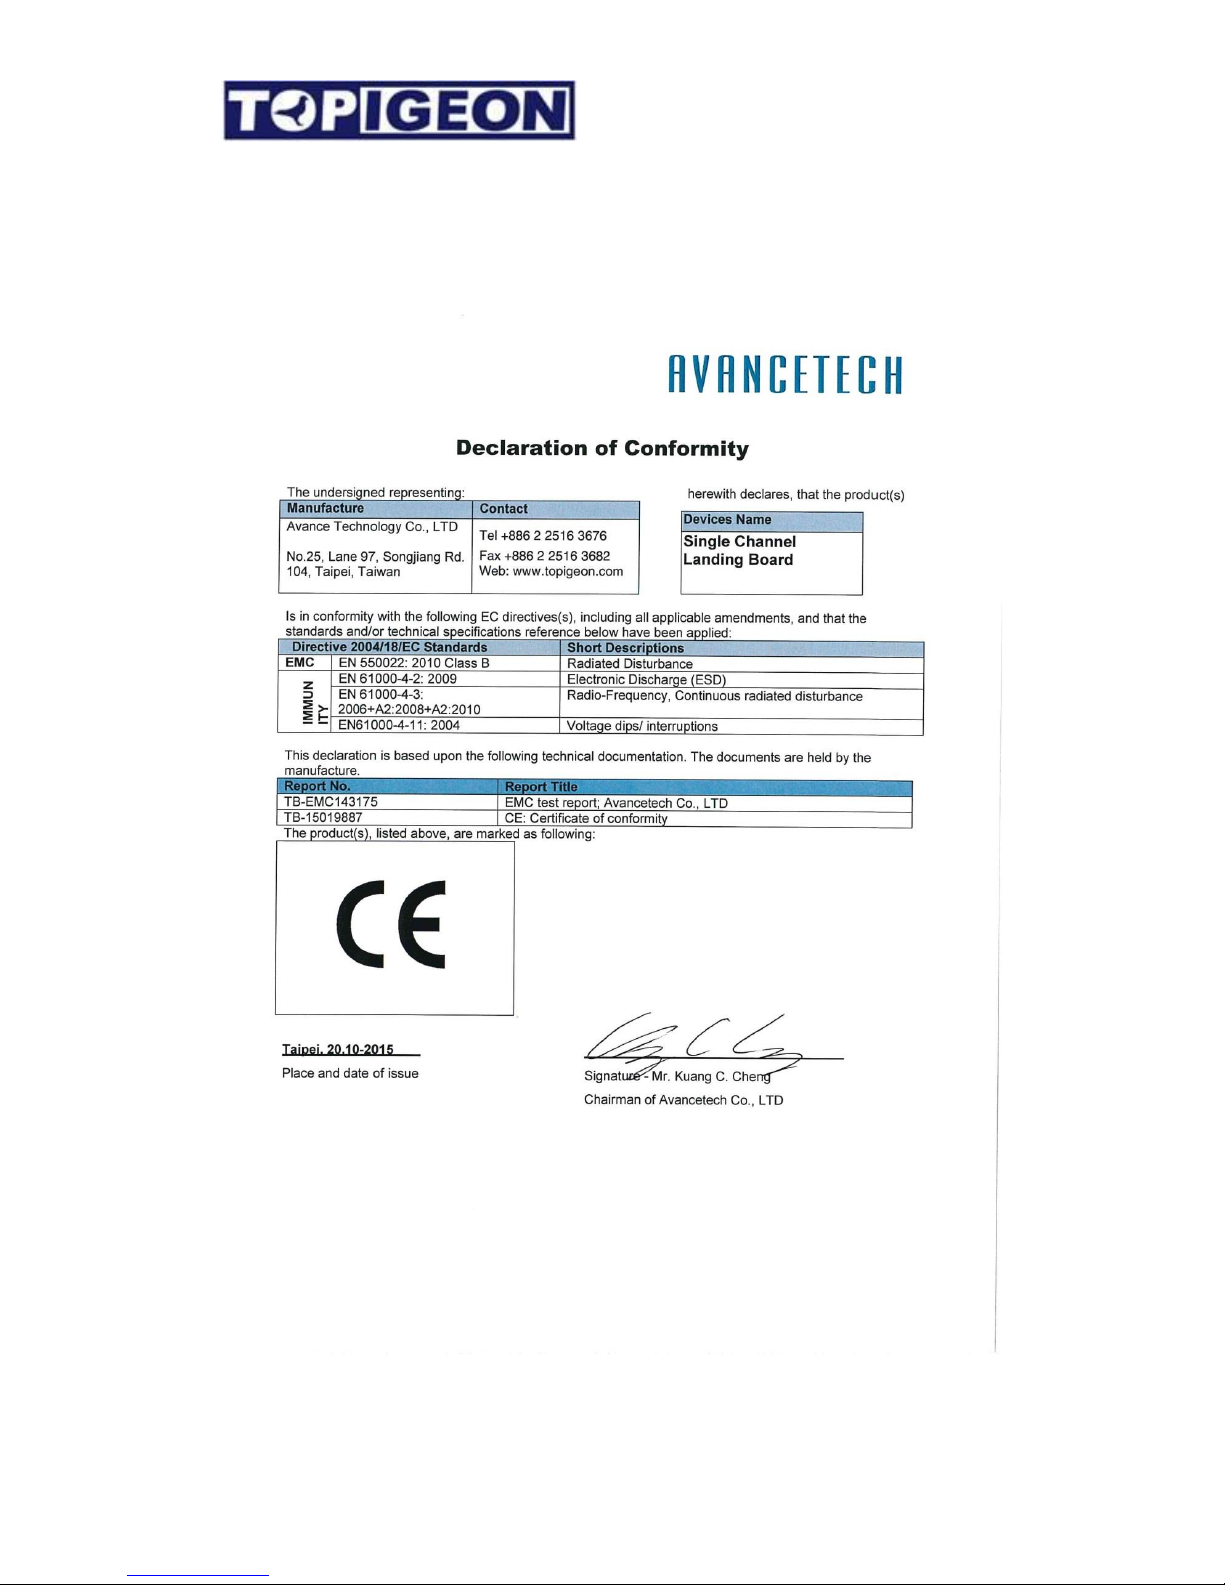
1 Channel Landing Board
Page 64
64
Club Antenna
Page 65

65
iPigeon Technical Data
• CPU: TI’s DM 3730 ARM Cortex A8 (Datasheet attached)
• RAM: 256MB
• ROM :512MB
• Pigeon Data: Over 10,000 pigeons
• Main processor speed: 1GHZ
• 2” inches speaker for audio out
• 800* 480, 32bit, 7” inches color touch LED display.
• Dimensions: 248mm*135mm*3.5mm
• Interface: RS-232 / RS-485 serial port, CAN bus system、USB
• SD Memory Card Socket for firmware update
• 3G module: UMTS/HSPA/HSPA+/GSM/GPRS
• Power supply: Input: AC 110~240V/1.2A; Output: DC 12V/2A
 Loading...