

Page 1
INSTALLATION INSTRUCTIONS
WIRING DIRECTIONS:
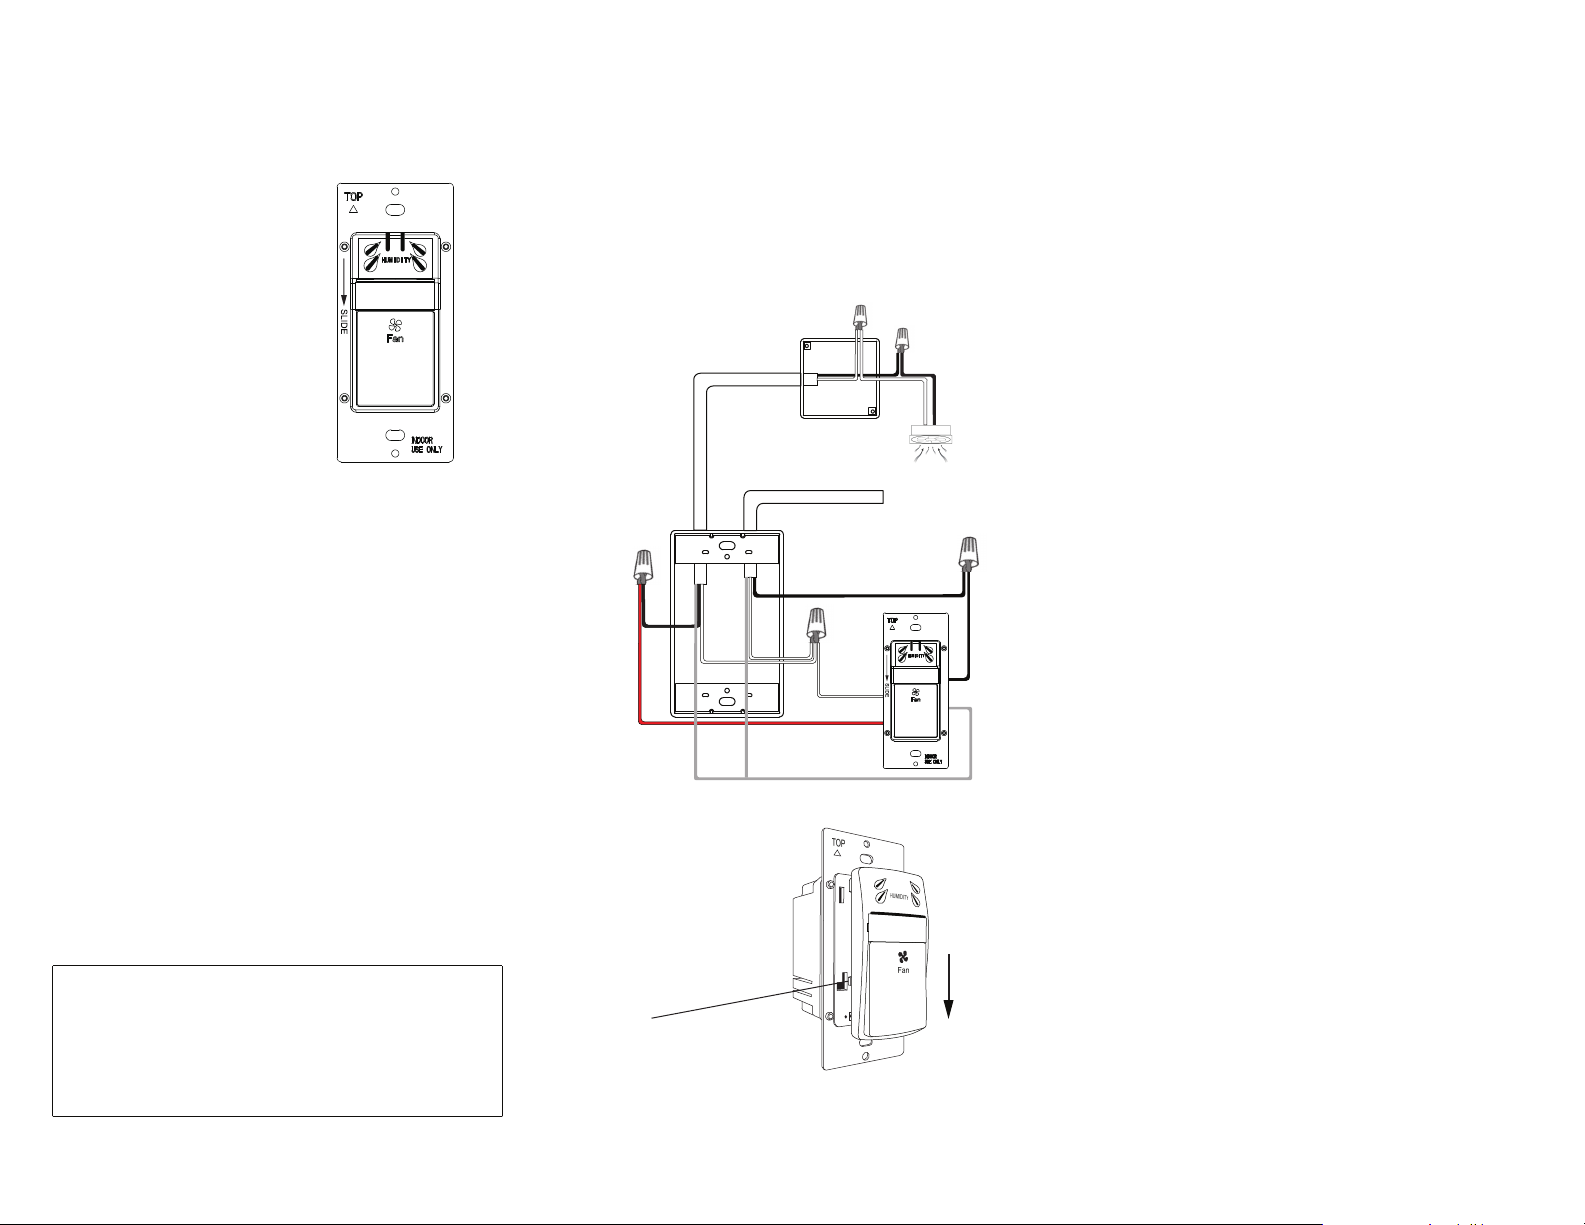
1. Remove the wall plate.
2. Remove existing switch from wall box and prior to disconnecting wires,
identify the wires and label as needed.
3. Remove wires from existing switch.
4. Follow the diagram below to reconnect the TDHOS5 humidity sensor.
WARNING: The white wire you see in the wall box is not always the
neutral wire. Verify whether the power enters the wall or
ceiling box first.
Model: TDHS5
Humidity Sensor/ Fan Control
with Interchangeable Face Cover
SPECIFICATIONS
Voltage...........................................................................................120VAC, 60Hz
Maximum Fan Load......................................................................................3Amp
Fan Time Delay.........................................................................................20 mins
Humidity range.................................................................................45%-80% RH
FEATURES
• Powerfull fan control
• Excellent humidity detection
• Selectable humidity levels
• LED indicator
• Manual override of fan control. Keeps fan off at night. Great for high
humidity locations
WARNING
Turn the power off at the circuit breaker before installing the Sensor.
Read and understand these instructions before installing. This device is intended for
installation in accordance with the National Electric Code and local regulations. It is
recommended that a qualified electrician performs this installation. Make sure to turn
off the circuit breaker or fuse(s) and make sure power is off before wiring the device.
Use copper wire only.
How to change the color cover.
Start by removing the wallplate if attached.
REMOVAL
Push down on the cover to release,
then pull away from main body.
REATTACH
Align the latch pins to the unit, push the
cover against the main body, then slide
up until it locks into place
Power
Neutral
(Red) Fan
PROGRAMMING
• The fan button will be used for programming
• Pay close attention to the LED lights as it will flash to indicate successful
programming steps and each time the button is pressed while making selections.
• After each step, there are only 20 seconds to make the next programming
selection. If a selection has not been made, time will expire and the LED light will
flash 3 times and exit programming mode.
There’s only one Programmable Function
Function 1: Humidity level (Humidity Range 45% - 80%)
• Setting 1: Low humidity +/- 45%. High sensitivity (requires little humidity
to trigger)
• Setting 2 (Default): Medium humidity +/- 65%. Medium sensitivity
• Setting 3: High humidity +/- 80%. Low sensitivity (requires high humidity
to trigger)
To progam the humidity sensor, you must first enter programming mode:
STEP 1: Enter Programming Mode
Press and hold the fan button for eight seconds until the LED indicator comes on.
STEP 2: Choose the Setting
• Press the fan button the same number of times as the Setting
Number (For example: Press the button 2 times to select Medium detection 65%).
Black Hot
Ground
E
V
O
M
R
E
E
R
V
O
O
T
C
N
E
D
W
I
L
O
S
D
After the last button is pressed the sensor will flash back the current setting
for that function 10 times at two-second intervals. If no selection has been
made, the device will exit programming mode.
STEP 3: Save the Settings
• Press and Hold the fan button for eight seconds. The LED light will flash 3 times
indicating that the settings are saved then the load will turn OFF.
Example: Change to Setting 3 (High humidity)
1. Press and hold the fan button for eight seconds until the LED indicator comes on
2. Press the fan button three times. The LED indicator should now blink three times
every two seconds
3. Press and Hold the fan button for eight seconds. The LED light will flash 3 times
indicating that the settings are saved then the load will turn OFF
Page 2

FAN MODES
The fan only has one mode: Auto On, Auto Off. The fan will turn ON
automatically when the humidity level reaches the selected (high, medium,
or low) level and will automatically turn OFF when the humidity level drops
low enough
• After running for 20 minutes, if the humidity level has not dropped low
enough, the fan will pause for 5 minutes, then resume for another
20 minutes.
• This is a feature that prevents the motor on the ventilation fan
from overheating
• When the manual button is used to turn ON, the fan will turn ON for
20 minutes and automatically turn OFF.
• Overriding the fan’s Auto On function: When the manual button is
used to turn OFF the fan, the fan will turn OFF immediately and the
humidity sensor will stop detecting humidity until it is reset by the user.
• This is a great feature if you live in areas with very high humidity
and you don’t want the fan to come on throughout the night
• To Reset the fan’s Auto On function: Use the fan button to turn ON the
fan and allow it to turn off on it’s own (20 minutes).
NOTES
What is Time Delay
• Time delay is how long the fan will run before turning off. This fan
controller has only one time setting and that is to run in 20 minute
intervals. Anytime the fan comes on whether by use of the button or
automatically, the fan will run for only 20 minutes. If humidity in the
room is still at a high level after running for 20 minutes, the TDHOS5
will pause for 5 minutes and resume for another 20 minutes.
High Relative Humidity (RH) locations
• If you live in high humidity areas, consider using the highest humidity
setting for the lowest sensitivity (Function 2, setting 3). If the fan runs
non-stop even with setting 3 selected, you should override the auto-on
until the relative humidity (RH) in your area drops below 80% RH.
LED indicators
• The Fan LED indicator will turn solid red when humidity is detected.
If the manual button is used and no humidity is detected, the LED
indicator will stay white.
TROUBLESHOOTING
• If the humidity sensor does not turn on the fan, but the fan button works.
Change the humidity level to a lower setting. Then reset the fan by using the
fan button to manually turn ON the fan. Wait 20 minutes for the fan to turn off.
The humidity sensor will reset after the 20 minutes.
WARRANTY
This device is warranted to be free of material and workmanship defects for 1 year from the date of purchase. Original receipt or proof of purchase from an authorized retailer must be presented upon warranty claim. ALL claims
must be verified and approved by Top Greener, Inc. Warranties from other TOPGREENER products may vary. This warranty is nontransferable and does not cover normal wear and tear or any malfunction, failure, or defect
resulting from misuse, abuse, neglect, alteration, modification, or improper installation. To the fullest extent permitted by the applicable state law, Top Greener, Inc. shall not be liable to the purchaser or end user customer of
TOPGREENER products for direct, indirect, incidental, or consequential damages even if Top Greener, Inc. has been advised of the possibility of such damages. Top Greener, Inc’s total liability under this or any other warranty,
express or implied, is limited to repair, replacement or refund. Repair, replacement or refund are the sole and exclusive remedies for breach of warranty or any other legal theory.
© 2018 Top Greener, Inc.
CA, U.S.A. WWW.TOPGREENER.COM 0205210103-07
 Loading...