

Page 1
INSTALLATION INSTRUCTIONS
REQUIREMENTS
• This timer requires that your switch box have a neutral wire in order for the timer to operate
correctly. If you open up your switch box and only see 2 wires, this indicates that your switch
box does NOT have a neutral wire and this timer cannot be installed.
• Compatible in single pole or 3-way installations only; NOT compatible in 4-way applications.
• This timer is rated for loads up to 15 amps combined outlets.
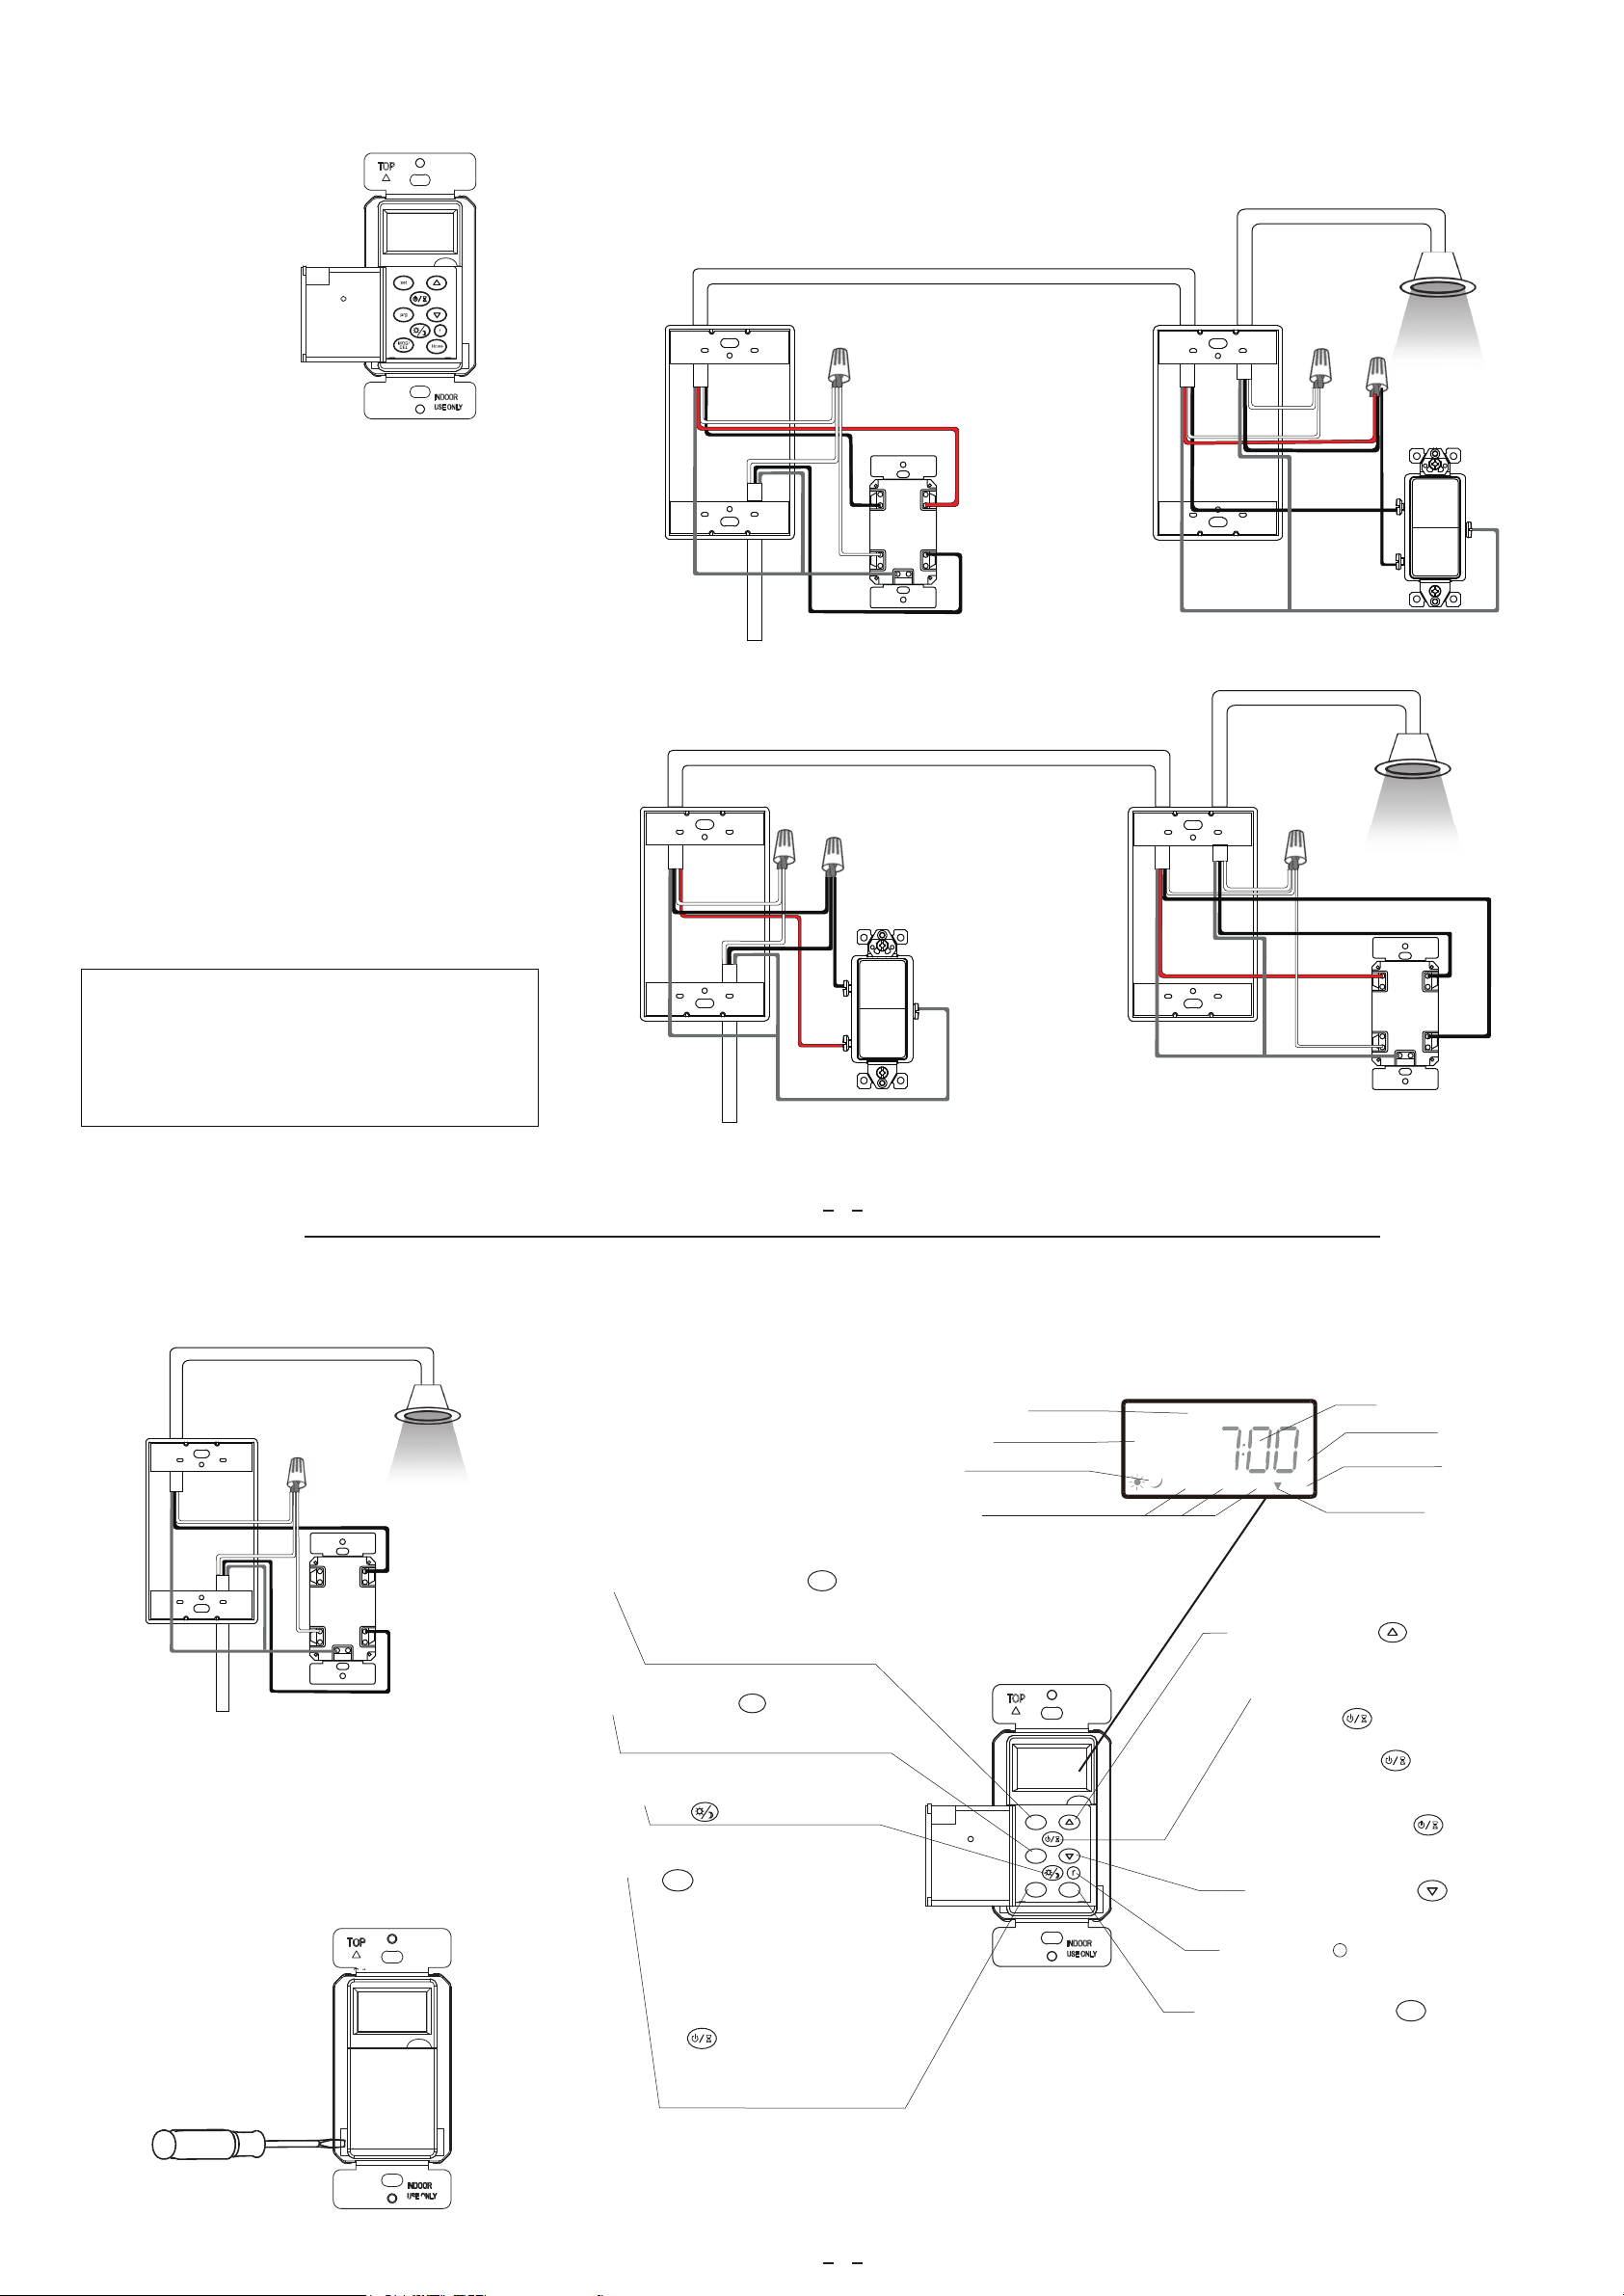
3-Way installation with Timer located on the “Line-In” side
Model: TGT01-H
Astronomic In-Wall Programmable Timer
with Interchangeable Face Cover
FEATURES
• Astronomic feature: Automatically adjusts dusk and dawn times
• Total of 7 ON/FF pairs of programmable settings
• Single-pole or 3-way installations
• Random ON/OFF operation mode for enhanced security
• Manual ON/OFF button for schedule override
• Daylight Savings: Automatically adjusts schedules for daylight savings time
• Replaces standard wall switch
• Back-lit LCD screen
• Works with CFL, LED and incandescent bulbs
• White interchangeable face cover (Light Almond and Black NOT INCLUDED)
3-Way installation with Timer located on the “Load” side
SPECIFICATIONS
Voltage................................................................................................................... 120VAC, 60Hz
Resistive………......................…...…….…………....................................................…15A, 1800W
Tungsten..............................................................................................................................1200W
Standard Ballast.................................................................................................................1200VA
LED........................................................................................................................................150W
Motor ……...........………................……....................................................……….………......1/2Hp
POWER
Neutral
Ground
TRAVELER
Traveler
LOAD
NEUTRAL
LINE
TGT01-H
Hot
Load
WIRING DIRECTIONS:
First, decide if you will be controlling the lights from one location or multiple
locations. Next, identify all wires. Once you’ve identified the wires, follow the
wiring diagram below.
Neutral
Traveler
Ground
Load
91150 (Single-pole) Switch
WARNING
Turn the POWER OFF at the circuit breaker before
installing the timer.
Read and understand these instructions before installing. This device is intended for
installation in accordance with the National Electric Code and local regulations. It is
recommended that a qualified electrician performs this installation.
Use copper wire only.
Single-Pole Installation
MAIN SCREEN BUTTONS AND INDICATORS
Hot
Traveler
POWER
91150 (Single-pole) Switch
1
Ground
DAY OF WEEK
ON/OFF STATUS OF
CONNECTED LOAD
DAWN/ DUSK INDICATORS
AUTOMATIC/ MANUAL/
RANDOM MODE INDICATOR
MAIN DISPLAY
WE
ON
AUTO MANU RND DST
Traveler
Neutral
Ground
CLOCK
P
COUNTDOWN
TIMER INDICATOR
TRAVELER
LOAD
NEUTRAL
LINE
TGT01-H
AM/PM INDICATOR
DAYLIGHT SAVINGS
TIME INDICATOR
Load
Hot
TRAVELER
LOAD
Load
NEUTRAL
Neutral
Ground
POWER
LINE
Hot
TGT01-H
REPLACING THE FACE COVER
1. Gently remove the face cover using a flathead blade screwdriver. Find the
slots at the bottom left or right of the face cover and pry the face cover loose.
2. Place the new face cover into position. Push the top of the face cover in first,
then push in the bottom until it snaps into place.
SETTINGS button. When you press the button 1, 2, 3, 4, 5, or 6 times the following
settings will appear for configuration:
1 time to set the clock
2 times to set the year
3 times to set the month
PROGRAM button. Press to scroll through
program On/ Off schedules. The schedule shows
you what you have programmed into this timer.
DAWN/DUSK button. From the main screen,
press to configure the dusk/ dawn times.
MODE/ DELETE button. From the main screen, press
MOD/DEL
the button to switch between
Manual, Automatic, and Random operation mode.
• Automatic Mode: The timer will run the programs
that you have scheduled. It will
automatically turn the lights ON or OFF based on
all your programs.
• Manual Mode: The timer WILL NOT run the
programs that you have scheduled.
You will only be able to operate the lights using
the button.
• Random Mode: Randomly turns the lights ON/OFF
within 30 minutes before or after the
programmed times.
PRG
SET
4 times to set the day
5 times to select the region
6 times to turn Daylight Savings (DST) On/Off
SET
PRG
MOD/DEL
HOME
UP SELECTION button. Use to
navigate while in settings and programming.
TIMER and MANUAL ON/OFF button.
a) Hold down for 3 seconds
to enter countdown timer mode.
b) Press and release to manually turn
the connected load(s) ON/ OFF. Using the
button to turn load on will override the
running program until the button
is used again to turn the load off.
DOWN SELECTION button. Use to
navigate while in settings and programming.
RESET button: Push and immediately
release to reset all settings to Factory Default.
HOME button. From any screen, press to
exit and return to home screen.
R
HOME
2
Page 2
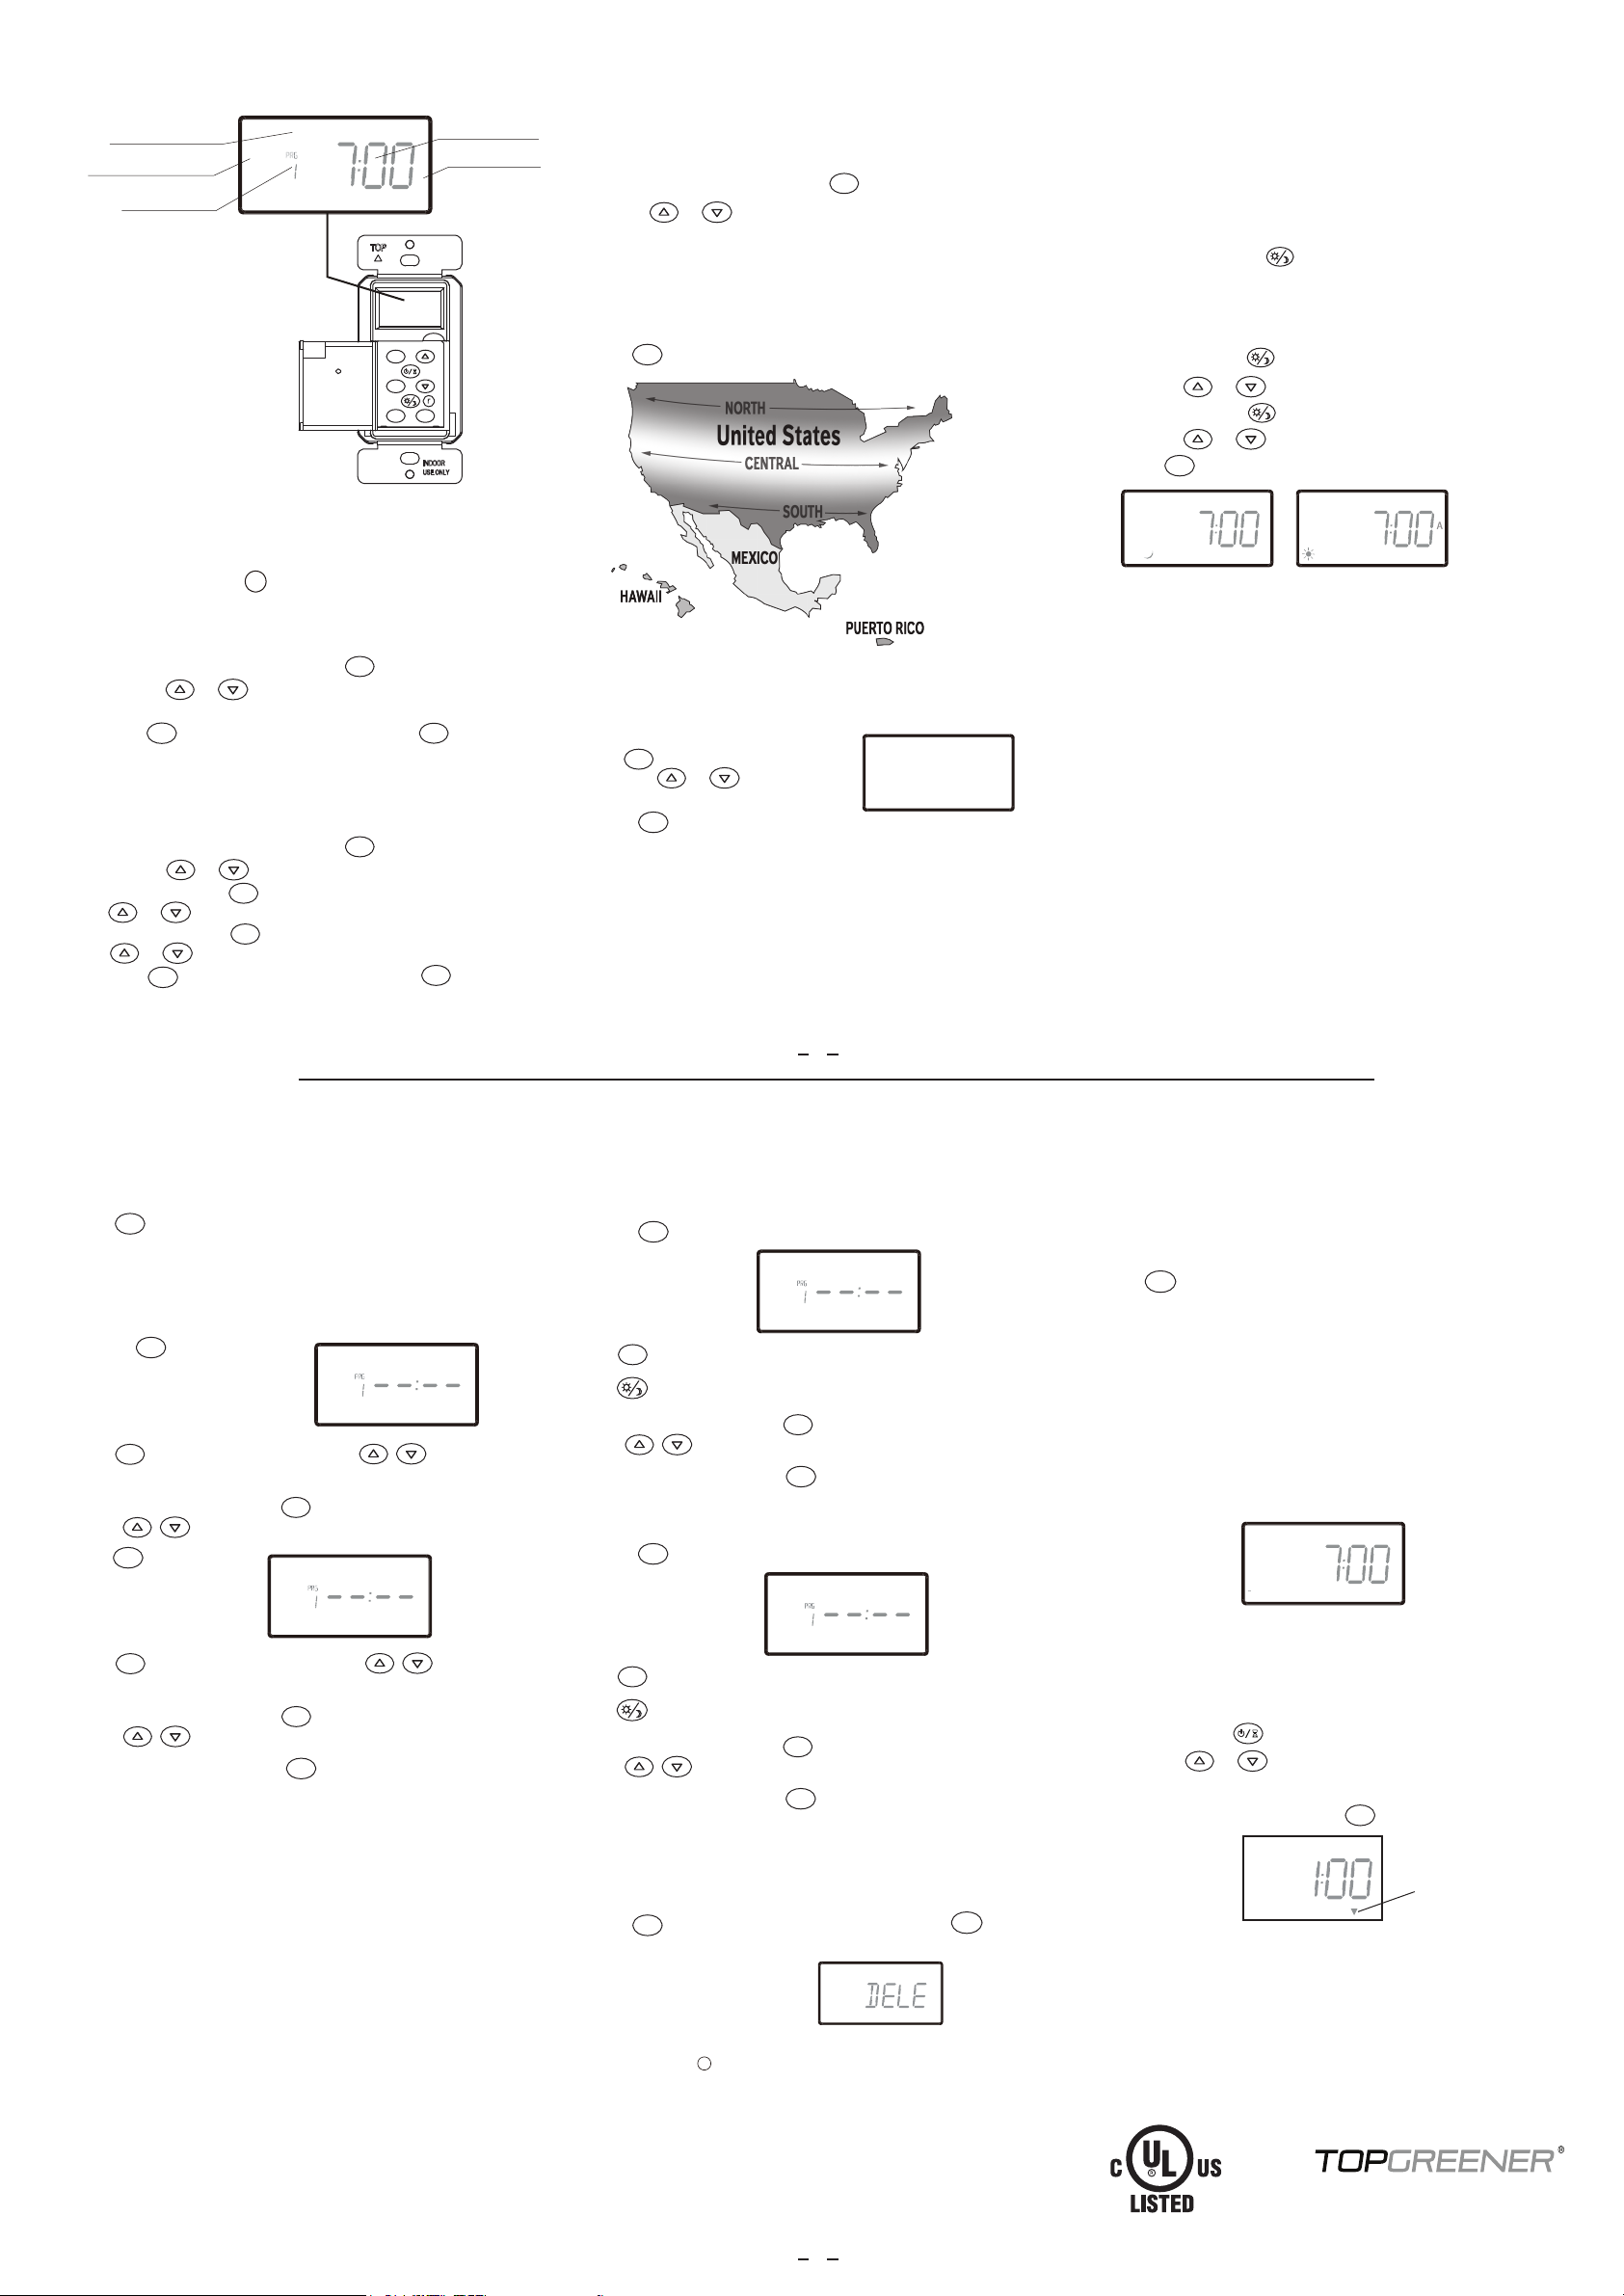
INDICATORS ON PROGRAMMING SCREEN
SET
PRG
MOD/DEL
P
HOME
ON/ OFF TIME IN
CURRENT PROGRAM
DAY OR DAYS OF WEEK
TO RUN THIS PROGRAM
INDICATES YOU ARE
IN “ON” OR “OFF” PROGRAM
CURRENT
PROGRAM NUMBER
MO TU WE TH FR SA SU
ON
AM/PM INDICATOR
SETTING THE REGION
It is important to set the correct region because the Dusk/Dawn feature operates based
on the region selected. Since the device does not transmit or receive signals, the
region must be manually selected and the Dusk/ Dawn times may need adjustment.
See ADJUSTING THE DUSK/DAWN TIME.
1. From the main screen, press and release the button 5 times.
2. Press the or butttons to change the region.
Choices are: NOR = North United States
CENT = Central United States
SOU = South United States
MEX = Mexico
PRI = Puerto Rico
HAW = Hawaii
3. Press to exit and return to home screen.
HOME
SET
UNDERSTANDING REGIONS AND DUSK/DAWN TIME
Selecting the region will tell the device how much daylight there is based on your
geographical location and the rotation of the earth. The Dusk/Dawn times will average
the dusk and dawn times based on each region. When you select the region “Central”
and you are in the Northernmost or Southernmost part of the central region, you may
need to adjust the dusk or dawn time so when you use the quick program settings, you
will have a more accurate dusk/dawn time when used during programming.
To use the Dusk/Dawn feature, you must first select the region, then adjust the
Dusk/Dawn time, then use the button while in programming mode.
ADJUSTING THE DUSK/DAWN TIME
1. Press and release the button once to adjust the Dusk time.
2. Press the or buttton to adjust the time.
3. Press and release the button again to adjust the Dawn time.
4. Press the or buttton to adjust the time.
5. Press to exit and return to home screen.
HOME
NOTE: Before you start, it’s best to factory reset the timer
to clear the timer of any programs that may have been
unintentionally left during random QA testing. To do so,
press and release the button.
R
SETTING THE CLOCK
1. From the main screen, press and release the button once.
2. Press the or buttton to change the time. Make sure the AM/PM
indicator displays the correct “morning/ afternoon” symbol.
3. Press to exit and return to home screen or press the button to
HOME
continue to set the date.
SET
SET
SETTING THE DATE
1. From the main screen, press and release the button twice.
2. Press the or butttons to select the year.
3. Press and release the button again to view the month and use the
SET
or buttons to change the month.
4. Press and release the button again to view the day and use the
or buttons to change the day.
3. Press to exit and return to home screen or press the button to
HOME
SET
continue to set the region.
SET
SET
SETTING THE DAYLIGHT SAVINGS TIME (DST)
1. From the main screen, press and release
SET
the button 6 times.
ON
2. Press the or buttton to toggle
the DST on/off.
3. Press to exit and return to home screen.
HOME
DST
NOTE: Daylight Savings does not automatically change. You must go into DST setting and
manually turn DST on or off.
3
P
NOTE: Depending on your geographical location, you may need to adjust the Dusk/
Dawn time. This device does not transmit or receive data, therefore it cannot find your
location automatically.
PROGRAMMING ON/OFF TIMES
REVIEWING PROGRAMS
PRG
Press the button to scroll through all On/Off programs.
NOTE: There are a total of 7 On and 7 Off programs available. During programming, the
USING THE DUSK/DAWN TIME DURING PROGRAMMING
EXAMPLE 1: USE DUSK FOR “ON” PROGRAM
1. Press the button ONCE to make changes to “Program 1 ON”. The display will
show "ON PRG 1" as illustrated.
system will return to home screen if there are more than 6 seconds of inactivity. For every
“ON” program, you should also add an “OFF” program.
ADD AN “ON” TIME AND “OFF” TIME TO THE TIMER’S SCHEDULE
1. Press the button once to make
changes to “Program 1 ON”. The display will
show "ON PRG 1" as illustrated.
PRG
MO TU WE TH FR SA SU
ON
2. Press to change the time of the selected program.
3. Press until the dusk time is displayed.
4. Once you have the desired time, press to change the day or days for this program.
2. Press to change the “ON PRG 1” time. Use the buttons to navigate
SET
to the desired “ON” time. Be sure the correct AM/PM indicator when selecting the time.
3. Once you have the desired time, press to change the day or days for “ON PRG 1”.
SET
Use the buttons to select the day or days of week to run “ON PRG 1”.
PRG
4. Press button until you get
to “OFF PRG 1” screen.
5. Press to change the “OFF PRG 1” time. Use the buttons to navigate
SET
MO TU WE TH FR SA SU
OFF
to the desired “OFF” time. Be sure the correct AM/PM indicator when selecting the time.
6. Once you have the desired time, press to change the day or days for “OFF PRG 1”.
SET
Use the buttons to select the day or days of week to run “OFF PRG 1”.
7. Once you have the desired days, press to save and exit to home screen.
HOME
Use the buttons to select the day or days of week to run this program.
5. Once you have the desired days, press to save and exit to home screen.
EXAMPLE 2: USE DAWN FOR “OFF” PROGRAM
1. Press the button TWICE to make changes to “Program 1 OFF”. The display will
show "OFF PRG 1" as illustrated.
2. Press to change the time of the selected program.
3. Press until the dusk time is displayed.
4. Once you have the desired time, press to change the day or days for this program.
Use the buttons to select the day or days of week to run this program.
5. Once you have the desired days, press to save and exit to home screen.
SET
SET
PRG
PRG
MO TU WE TH FR SA SU
ON
SET
HOME
MO TU WE TH FR SA SU
OFF
SET
HOME
OPERATING THE TIMER
To run the programs you have saved, set the mode to “AUTO”. Make sure “AUTO”
appears on the display.
SETTING THE TIMER TO AUTO, MANUAL OR RANDOM MODE
MOD/DEL
Press button to scroll through the available modes:
• AUTO – (Automatic) Timer is in Automatic mode and will operate by
the programmed times
• MANU – (Manual) This overrides the programmed times an the lights
can only be turned On and Off by pressing the ON/OFF button
• RND – (Random) The timer will randomly turn ON/OFF times within 30
minutes of all the programmed times
EXAMPLE: If you have 7pm “ON” programmed for WE,
the timer will turn the lights ON some time between 6:30 pm
and 7:30 pm every Wednesday. It will not be the same time
each occurance.
WE
ON
P
AUTO DST
In the example above, the current date and time is Wednesday, 7PM. The lights
connected to this timer is in the “ON” state. The timer is running in automatic mode.
Daylight Savings Time is turned on.
COUNTDOWN TIMER
1. Press and hold the button for 3 seconds to enter countdown timer mode.
2. Press the or buttton to adjust the run time.
3. Wait 8 seconds and the countdown will start.
4. To cancel and exit, press and release the button.
HOME
OTHER PROGRAMMING
DELETING PROGRAMS
• Press the button to scroll to the program to be deleted and press button
PRG
MOD/DEL
to delete. The screen will show the program has been deleted.
RESET DEVICE TO FACTORY DEFAULTS
• Press and release the button
R
WARRANTY
This device is warranted to be free of material and workmanship defects for 1 year from the date of purchase. Original receipt or proof of purchase from an authorized retailer must be presented upon warranty claim.
ALL claims must be verified and approved by Top Greener, Inc. Warranties from other Top Greener products may vary. This warranty is nontransferable and does not cover normal wear and tear or any malfunction,
failure, or defect resulting from misuse, abuse, neglect, alteration, modification, or improper installation. To the fullest extent permitted by the applicable state law, Top Greener shall not be liable to the purchaser or
end user customer of Top Greener products for direct, indirect, incidental, or consequential damages even if Top Greener has been advised of the possibility of such damages. Top Greener’ total liability under this
or any other warranty, express or implied, is limited to repair, replacement or refund. Repair, replacement or refund are the sole and exclusive remedies for breach of warranty or any other legal theory.
4
ON
COUNTDOWN
INDICATOR
©2018 Top Greener, Inc. • CA, USA • www.topgreener.com • 0205210084-12
 Loading...