

Page 1
INSTALLATION INSTRUCTIONS
WIRING DIRECTIONS:
1. Remove the wall plate.
2. Remove existing switch from wall box and prior to disconnecting wires,
identify the wires and label as needed.
3. Remove wires from existing switch.
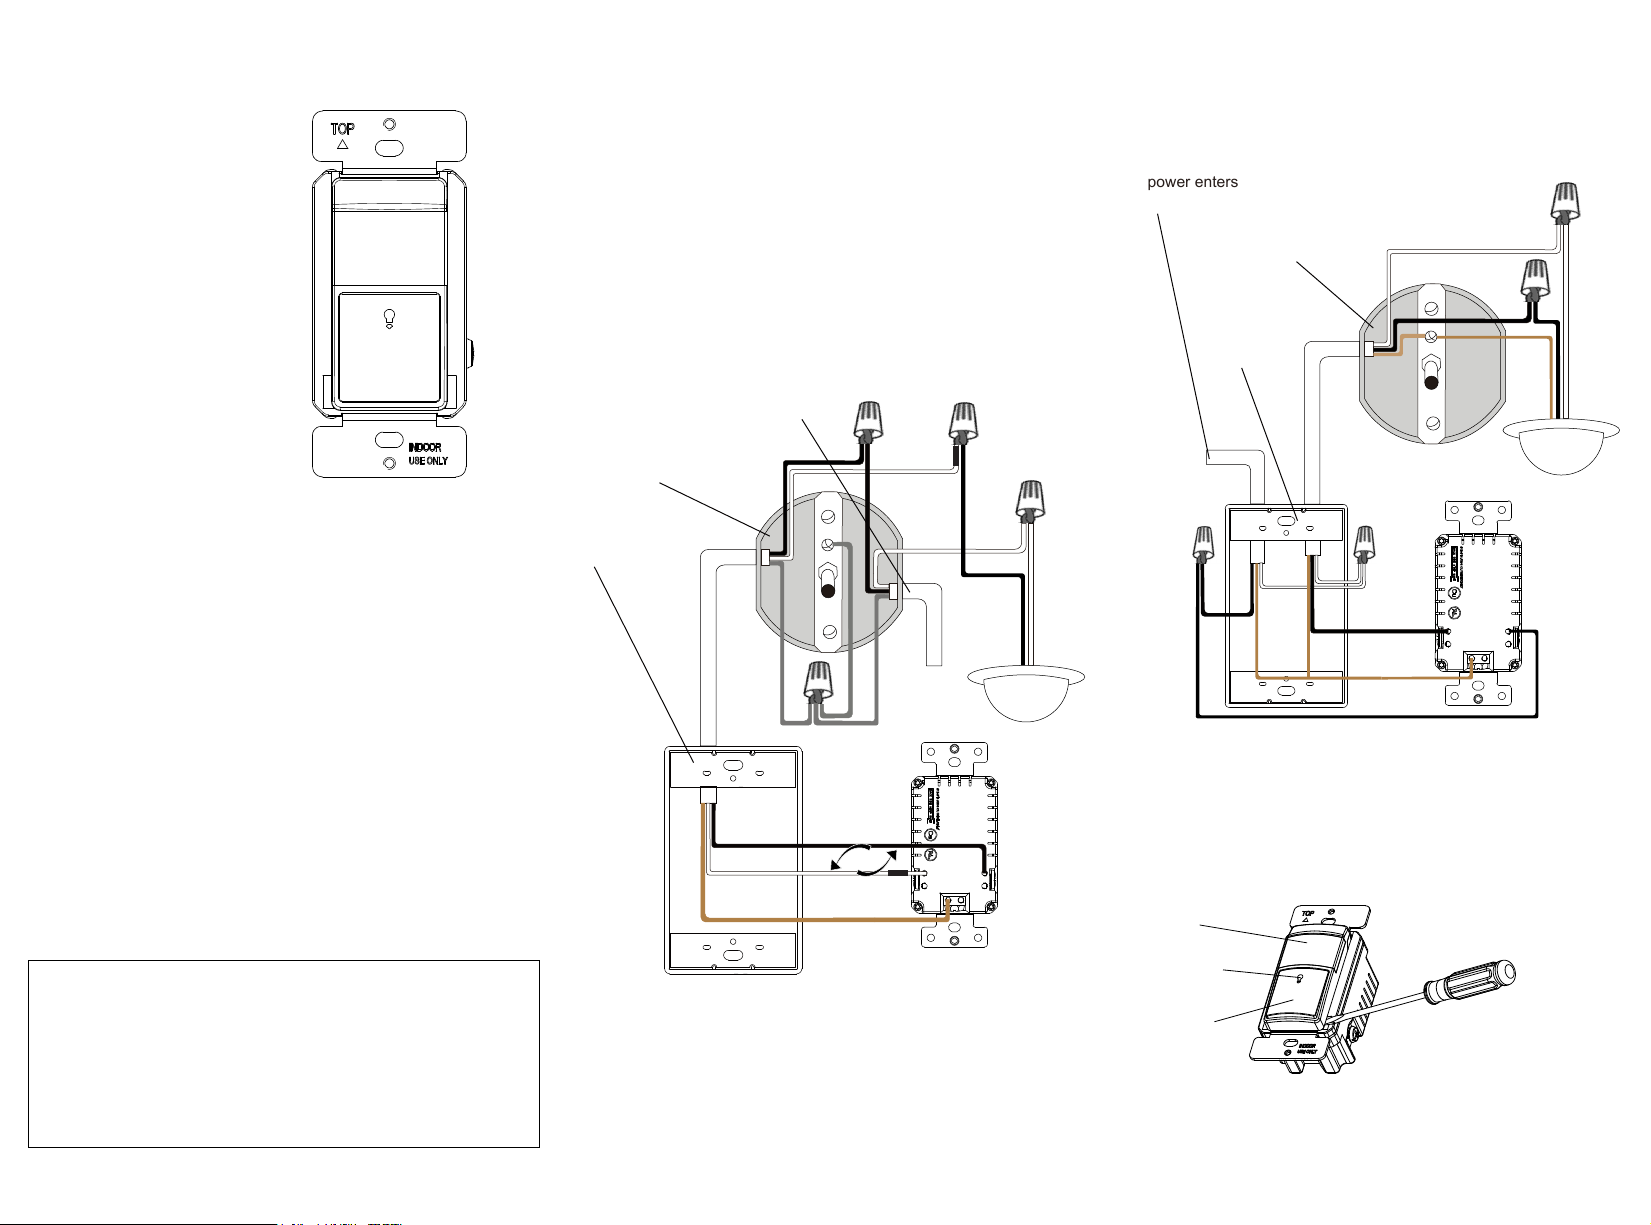
4. Follow the diagram below to reconnect the TDOS5-JM sensor switch.
WARNING: The white wire you see in the wall box is not
always the neutral wire. Verify whether the
power enters the wall or ceiling box first
If power enters the wall box first,
then wire the
TDOS5-JM this way
Ceiling box
Wall box
NeutralGround
Load
Model: TDOS5-JM
If power enters the ceiling box first,
then wire the TDOS5-JM this way
Occupancy/ Vacancy
CDS Sensor Switch
FEATURES
The sensor switch can automatically turn a load on (or manually be turned on) and stay
on as long as the sensor detects occupancy. After no motion is detected within the
selected time delay, the load turns off automatically. This device features a learning
capability; it will learn your on/off habits based on your usage during different ambient
light levels, then automatically operate the lights based on the usage patterns.
SPECIFICATIONS
Voltage ....................................................................…............120V, 60Hz
Tungsten.........................................................................................1800W
Resistive..............................................................................................10A
Electronic Ballast ..................................................................................5A
Motor .......................................................................................…… 1/6Hp
Time Delay......................................................................15Sec to 30Mins
Operation Temperature................................ 32° F--104° F(0 °C to 40 °C)
PIR Coverage.........................1200 sq.ft. (up to 40’ in front of the sensor)
Ceiling box
Wall box
WARNING
Turn the POWER OFF at the circuit breaker before
installing the Sensor Switch.
Read and understand these instructions before installing. This device is intended for
installation in accordance with the National Electric Code and local regulations. It is
recommended that a qualified electrician performs this installation.
Use copper wire only.
Use wires with a minimum temperature rating of 75ºC (167ºF)
Hot
Load
Ground
Hot
Reversible
Ground
Power
Load
Neutral
POWER
Hot
Neutral
Load
Hot
Ground
REMOVING COVER PANEL:
Remove the cover panel with a flathead screwdriver. Find the slots at the
bottom left or right of the panel cover and gently pry the panel cover off.
Fresnel Lens
LED Indicator
On/ Off and
Program Button
2 31
Page 2

ADJUSTMENT
PIR Sensor
CDS
LED Indicator
Note: There is a 60-second warm-up period after each power
reset (such as a power outtage).
After the one mintue warm-up, adjust the knobs to your desired sensitivity
range and time delay. The sensors are factory preset to allow for quick
installation in most applications.
Detection Range adjustment knob
Time Delay adjustment knob
Figure 4
OPERATING MODES
Switching between Occupancy and Vacancy Modes
Press and hold the program button 3 seconds to change the mode.
LED indicator flashes twice for Vacancy mode.
LED indicator flashes four times for Occupancy mode.
(Vacancy Mode) Lights must be turned on manually, auto off
The sensor will not turn the lights on when motion is detected, but the PIR
sensor will monitor motion and the LED indicator will flash once per second.
Press and release the On/Off button to turn the Lights ON or OFF.
When lights are on: If no motion is detected within the period of the
selected time delay, the light will turn off automatically. If motion is detected,
the time delay countdown restarts.
If the PIR detects motion within 15 seconds after the auto shut off, the
lights will turn ON automatically.
(Occupancy Mode) Auto On/Automatic Off Lights. ---Default Mode
The sensor will turn the lights on when motion is detected, and the LED
indicator will flash once per second. The On/Off button can also be used to
turn the Lights ON or OFF.
CDS Funtion
Only while in Occupancy Mode: Manually turn on or off the lights as you
would any standard light switch. As you use it, the CDS (Cadmium-Sulfide)
sensor will learn your habits based on the level of ambient light. If the lights
automatically turns on and you turn it off manually within 15 seconds, the
CDS sensor will learn that ambient light level and will not turn the lights on
again at that light level until you reprogram it.
The factory default light level for the CDS sensor is 30 lumens (lux). At this
level of brightness or brighter, the PIR sensor will not turn on the lights when
motion is detected, but the LED indicator will flash once every 2 seconds.
Time Delay Knob
When lights are on: If no motion is detected within the period of the
selected time delay, the light will turn off automatically. If motion is detected,
Default position: 15 Seconds (Test mode)
the time delay countdown restarts.
Adjustable: from 15 Seconds to 30 Minutes (clockwise)
Detection Range Knob (Sensor Sensitivity)
Default position: Center at 65%
If the PIR detects motion within 15 seconds after the auto shut off, the
lights will turn ON automatically.
Adjustable: 30% (Position 1) to 100% (Position 4)
Note: Turn toward right for greater room space.
Turn toward left to avoid false alert in smaller room and near
the door way or heat source.
WARRANTY
This device is warranted to be free of material and workmanship defects for 1 year from the date of purchase. Original receipt or proof of purchase from an authorized retailer must be presented upon warranty claim. ALL claims
must be verified and approved by Top Greener, Inc. Warranties from other TOPGREENER products may vary. This warranty is nontransferable and does not cover normal wear and tear or any malfunction, failure, or defect resulting
from misuse, abuse, neglect, alteration, modification, or improper installation. To the fullest extent permitted by the applicable state law, Top Greener, Inc. shall not be liable to the purchaser or end user customer of TOPGREENER
products for direct, indirect, incidental, or consequential damages even if Top Greener, Inc. has been advised of the possibility of such damages. Top Greener, Inc’s total liability under this or any other warranty, express or implied,
is limited to repair, replacement or refund. Repair, replacement or refund are the sole and exclusive remedies for breach of warranty or any other legal theory.
5 64
©2018 Top Greener, Inc. • CA, USA • www.topgreener.com • 0212190151-01
 Loading...