

Page 1

Top Global USA. ----MB6000 User Guide
MobileBridge Gateway Series
MB6000
Wireless Cellular Data Gateway
User Guide
Version 0.5
2005-9-14
Top Global USA, any modification of this product will not issue a separate notice.
All Rights Reserved.
- 1 -
Page 2

Top Global USA. ----MB6000 User Guide
Federal Communication Commission Interference Statement
This equipment has been tested and found to comply with the limits for a Class B digital
device, pursuant to Part 15 of the FCC Rules. These limits are designed to provide
reasonable protection against harmful interference in a residential installation. This
equipment generates, uses and can radiate radio frequency energy and, if not installed
and used in accordance with the instructions, may cause harmful interference to radio
communications. However, there is no guarantee that interference will not occur in a
particular installation. If this equipment does cause harmful interference to radio or
television reception, which can be determined by turning the equipment off and on, the
user is encouraged to try to correct the interference by one of the following measures:
- Reorient or relocate the receiving antenna.
- Increase the separation between the equipment and receiver.
- Connect the equipment into an outlet on a circuit different from that
to which the receiver is connected.
- Consult the dealer or an experienced radio/TV technician for help.
This device complies with Part 15 of the FCC Rules. Operation is subject to the following
two conditions: (1) This device may not cause harmful interference, and (2) this device
must accept any interference received, including interference that may cause undesired
operation.
FCC Caution: Any changes or modifications not expressly approved by the party
responsible for compliance could void the user's authority to operate this equipment.
IMPORTANT NOTE:
FCC Radiation Exposure Statement:
This equipment complies with FCC radiation exposure limits set forth for an
uncontrolled environment. This equipment should be installed and operated with
minimum distance 20cm between the radiator & your body.
This transmitter must not be co-located or operating in conjunction with any other antenna
or transmitter.
Top Global declares that MB6000 ( FCC ID: SUMMB6000 ) is limited in CH1~CH11 for
2.4GHz by specified firmware controlled in U.S.A.
- 2 -
Page 3

Top Global USA. ----MB6000 User Guide
CONTENT
FEDERAL COMMUNICATION COMMISSION INTERFERENCE STATEMENT................2
IMPORTANT NOTE:......................................................................................................................2
FCC RADIATION EXPOSURE STATEMENT: ..........................................................................2
CONTENT....................................................................................................................................3
1 INTRODUCTION...................................................................................................................5
2 INST ALLING THE MB6000 .................................................................................................6
2.1 VERIFY KIT CONTENTS......................................................................................................6
2.2 WRITE PRODUCT IDENTIFICATION.....................................................................................7
2.3 POWER UP TH E MB6000....................................................................................................7
2.4 LED INDICATORS...............................................................................................................8
2.5 INITIALIZE THE MB6000 UNIT ..........................................................................................9
3 MANAGEMENT ..................................................................................................................14
3.1 OVERVIEW.......................................................................................................................14
3.2 PAGE STRUCTURE............................................................................................................15
3.2.1 Shortcut...................................................................................................................16
3.3 PAGE OPERATION.............................................................................................................18
3.4 CONFIGURATION PAGES DESCRIPTION.............................................................................19
3.4.1 System......................................................................................................................19
3.4.2 Interfaces.................................................................................................................24
3.4.3 Firewall...................................................................................................................34
3.4.4 Security Services .....................................................................................................41
3.4.5 Status .......................................................................................................................44
3.4.6 Diagnostics..............................................................................................................46
4 TROUBLESHOOTING .......................................................................................................49
4.1 OVERVIEW.......................................................................................................................49
- 3 -
Page 4
Top Global USA. ----MB6000 User Guide
4.2 INTRODUCTION................................................................................................................49
5 DEFAULT MB6000 SETTINGS..........................................................................................60
FOREWORD
This section describes the objectives, audience and conventions of the Top Global
MB6000 User Guide.
Objectives
This document explains the steps for initial setup and basic configuration of the MB6000.
This document also provides troubleshooting information and detailed specifications.
Audience
This document is for the person installing and configuring the MB6000 for the first time.
The installer should be familiar with network structures, terms, and concepts.
Conventions
This document uses the following conventions to convey instructions and information:
■ Tools and keywords are in boldface type.
Means reader take note. Notes contain helpful suggestions or references to
Note
materials not contained in this manual.
The warning symbol means danger. You are in a situation that could
cause bodily injury. Before you work on any equipment, be aware of the
Warning
hazards involved with electrical circuitry and be familiar with standard
practices for preventing accidents.
Obtaining Documentation
The following sections explain how to obtain documentation from Top Global.
World Wide Web
You can access the latest Top Global documentation on the World Wide Web at the
following URL:
http://www.topglobalusa.com.com/support1.asp
Special comment
This device is general Wireless router, and can act as WWAN router only after inserting
WWAN pc card.
- 4 -
Page 5

Top Global USA. ----MB6000 User Guide
1 Introduction
MB6000 is the industrial first and the most integrated WLAN and 3rd generation cellular
(3G) solution for Home, Small Office and Home Office (SOHO).The products are simple to
use and easily scalable. MB6000 is a 3G router for consumer market based on our
MobileBridge™ platform technology.
MB6000 combines the best of Wi-Fi and 3G mobile communications technologies
including CDMA 1x, EV-DO, EDGE, and UMTS and can be easily upgraded to support
EV-DO Release A and HSDPA.
MB6000 bridges wireless networks of 802.11b/g standards and wired networks, allowing
them to communicate with each other. MB6000 allows authorized and welcome users to
share the Internet access.
Use the instructions in this guide to help you connect the MB6000, set it up, and configure
it to work.
- 5 -
Page 6
Top Global USA. ----MB6000 User Guide
2 Installing the MB6000
Installing the MB6000 is easy. Follow the quick steps below to power up your wireless
network:
Verify kit content;
Write down product ID;
Power up the MB6000;
LED Indicators;
Initialize the MB6000 unit
2.1 Verify Kit Contents
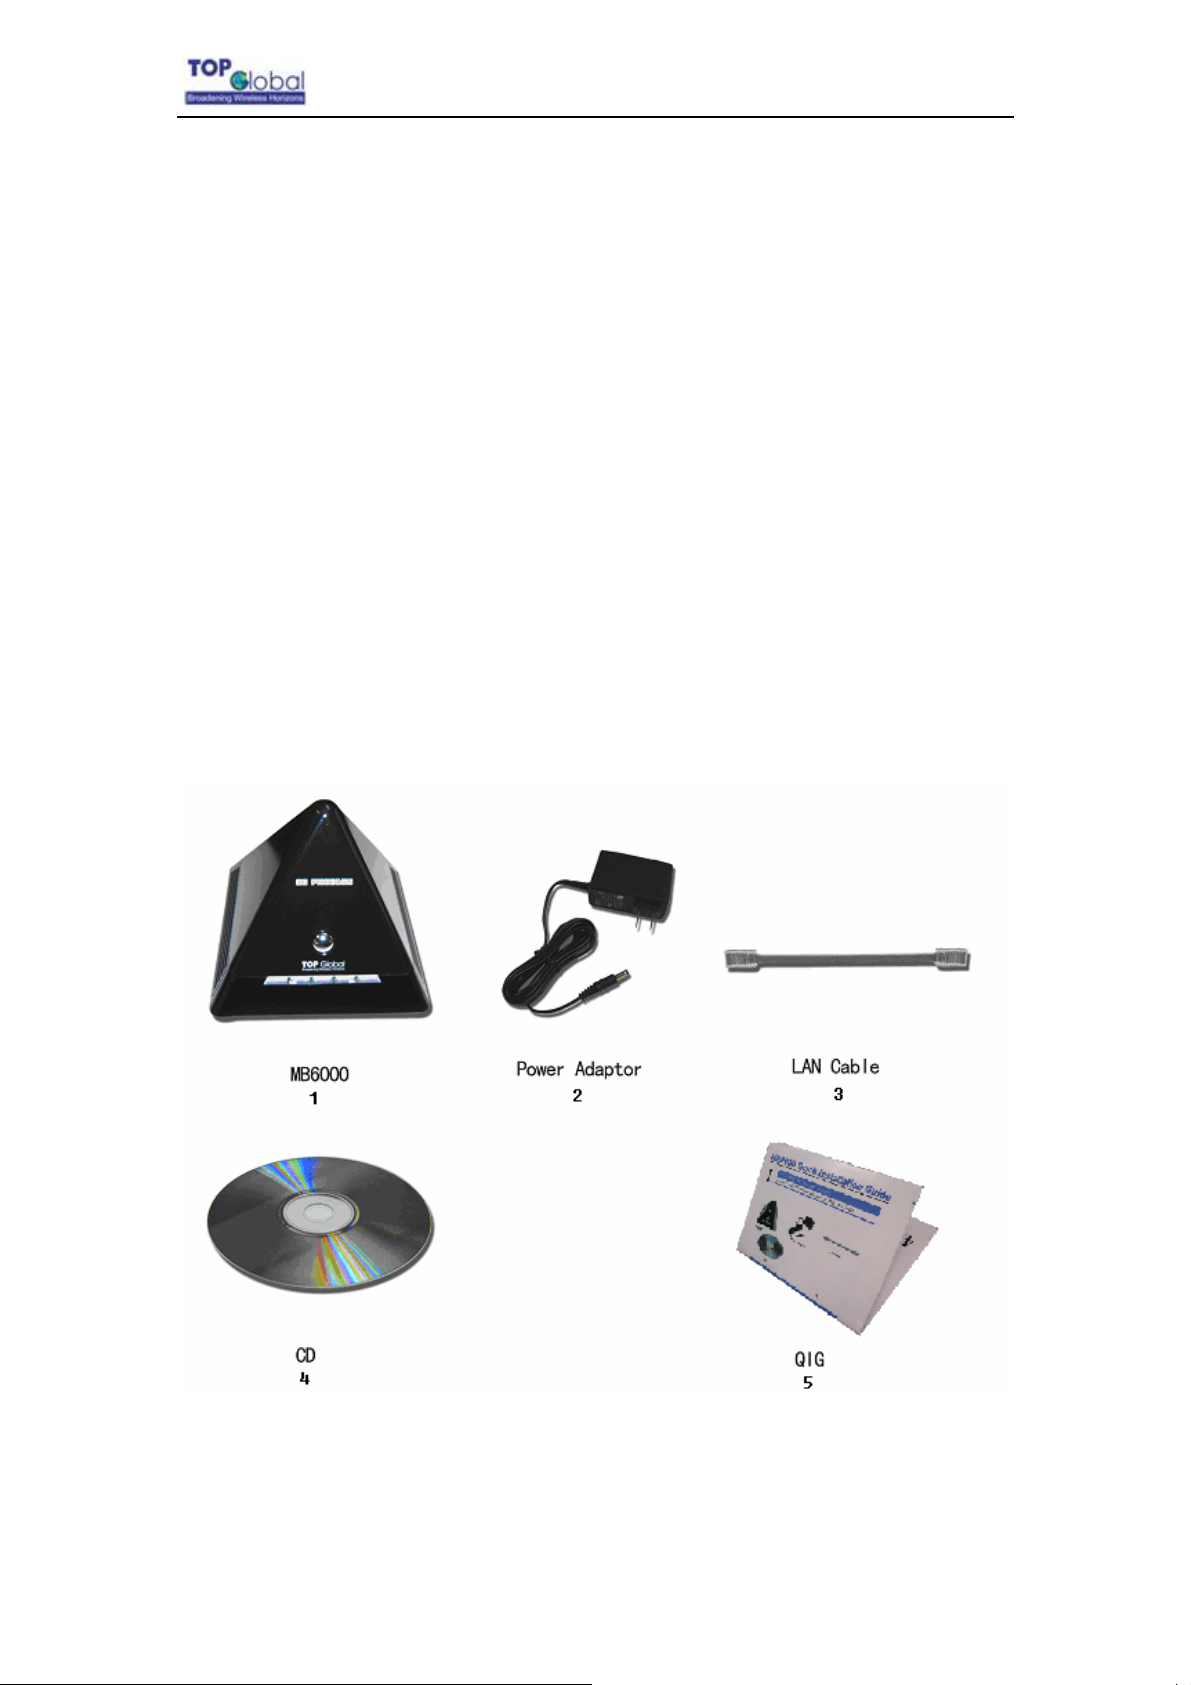
MB6000 kit includes the following components, similar to those depicted in Figure 2-1.
Figure2-1 MB6000 Kit Contents
1. MB6000 router (Top View)
2. Power supply
3. Ethernet cable
- 6 -
Page 7
Top Global USA. ----MB6000 User Guide
4. CD
5. QIG (Quick Installation Guide)
2.2 W rite Product Identification
Before you proceed with your MB6000 installation, please write down and keep the
following MB6000 information on the MB6000 label:
z Serial Number
z MAC address
2.3 Power up the MB6000
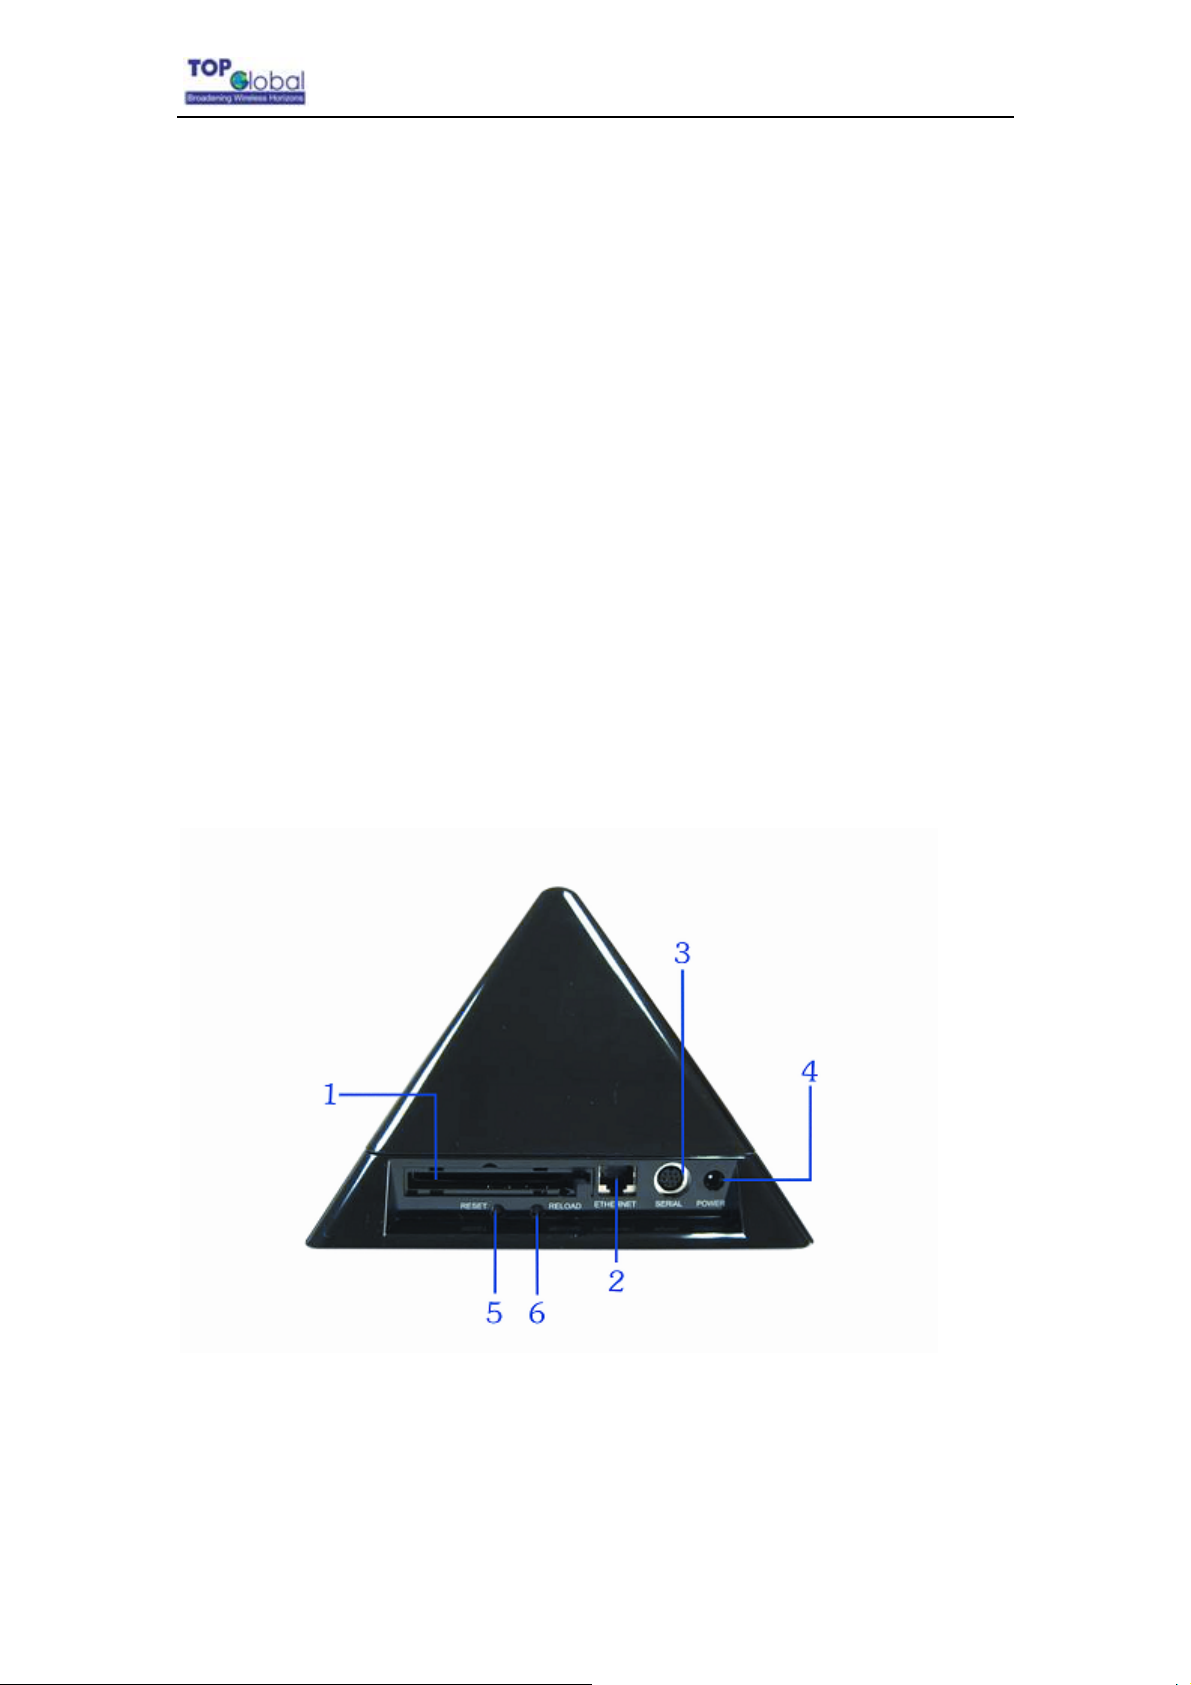
Connect the MB6000 power supply (refer to Figure 2-2) and press the power switch down.
Figure2-2 Ports description
1. PC Card Slot
2. Ethernet LAN Interface
3. Console Port (RS232)
4. Power jack
- 7 -
Page 8

Top Global USA. ----MB6000 User Guide
5. Reset Button
6. Reloader Button
The MB6000 power supply accepts any input AC voltage in the range of 100-240 VAC.
2.4 LED Indicators
MB6000 has four two-color LEDs to indicate the working status. The following table shows
the status when the MB6000 is configured successfully and running properly.
Table 2-1 Normal LED Indications
Power WLAN WWAN Ethernet
Off Power off Disabled Card inserted;
No Internet connection
Green Power on and
normal
Green Blink N/A Enabled and data
Red N/A N/A No card 10Mbps mode
Red Blink N/A N/A N/A 10Mbps mode,
Amber System boot
and error
Enabled Card inserted;
Internet connection
Card inserted;
transmission
N/A N/A N/A
Internet connecting
No cable
100Mbps mode
100Mbps
mode, and data
transmission
and data
transmission
Amber Blink Upgrading
firmware
Enabled and data
transmission error
- 8 -
N/A N/A
Page 9
Top Global USA. ----MB6000 User Guide
2.5 Initialize the MB6000 Unit
1. Connect MB6000 with your computer, there are two ways to connect MB6000 with
your computer:
I. Connect your computer to MB6000 using attached Ethernet cable or a hub
and your computer is set with “Automatic IP” configuration.
II. Alternatively, you can connect your computer to MB6000 with wireless LAN.
a) Install an 802.11b/g wireless LAN PC card in a laptop or other computer,
including the driver and the Client Manager Application software if
available. If you are using Centrino laptop, the wireless LAN module is
already embedded. There is no need to install extra Wireless LAN card.
b) Configure the Wireless LAN card to match the network name and
encryption key of Wireless LAN card installed in the MB6000. The
default network name is the SN of this device, and “Automatic IP”
configuration is also needed.
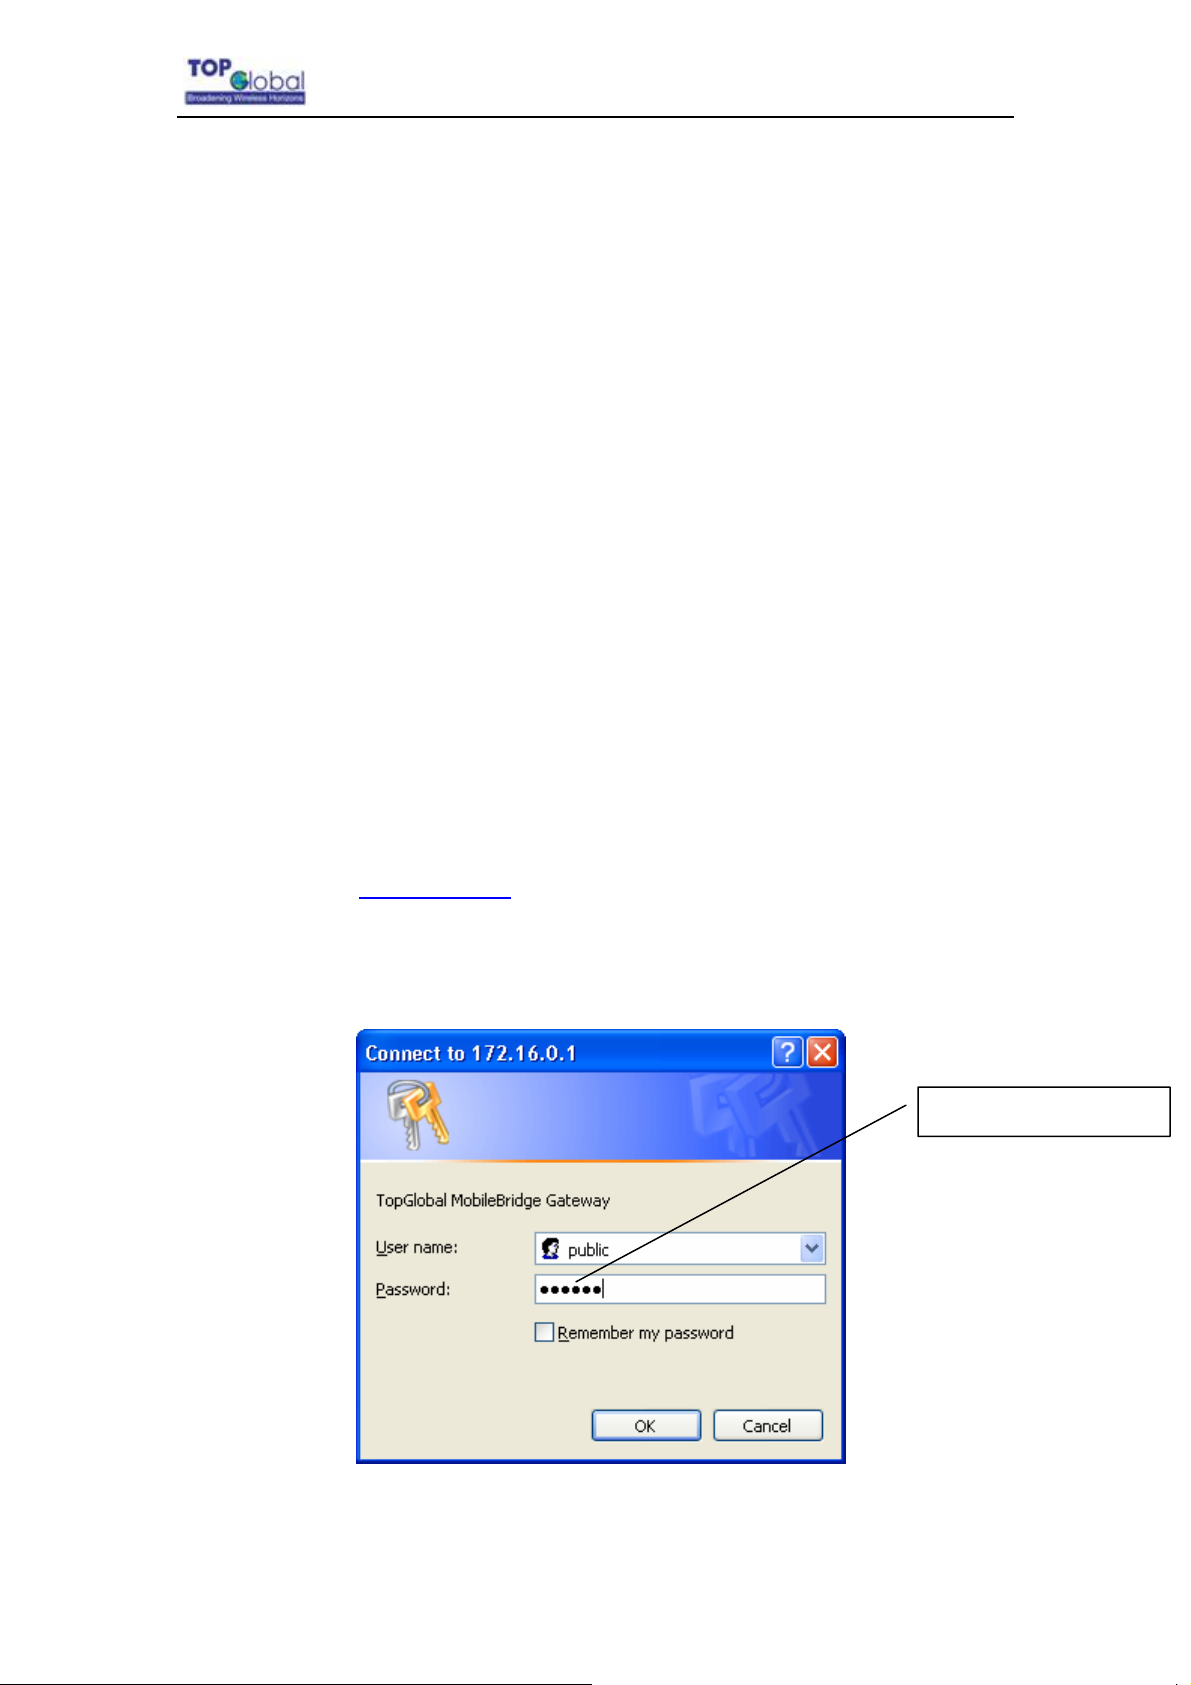
2. Validate that your computer has got IP address from the MB6000, then open the web
browser and enter
(Figure 2-1 login window). Enter the username/password (default is admin/admin), and
click OK, the home web page appears (Figure 2-4 home page).
Figure2-3 login window – English window
http://172.16.0.1. Press Enter then the MB6000 login screen appears
- 9 -
Default password: public
Page 10
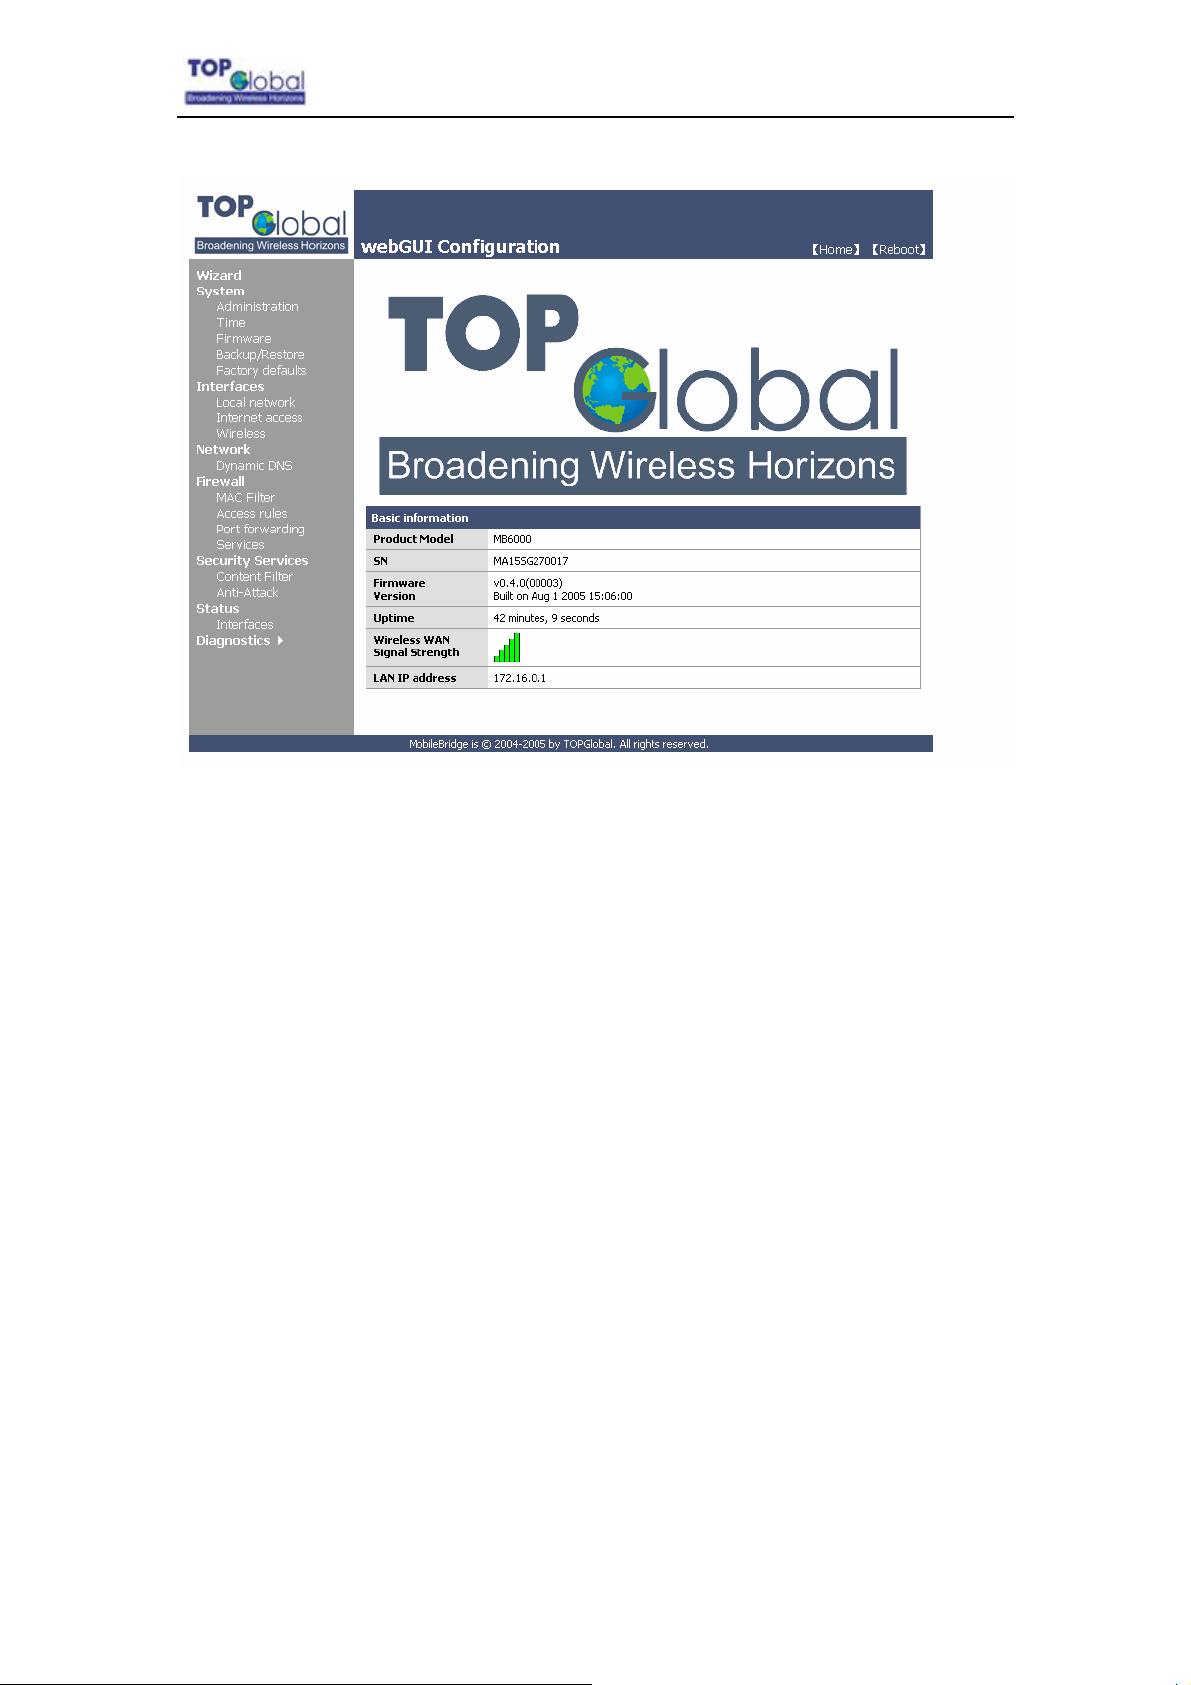
Figure2-4 home page
Top Global USA. ----MB6000 User Guide
If you want to do a quick installation, you can continue to read the content in this chapter.
Otherwise, you want to make a custom installation, please go to Chapter 3 directly.
3. Click “Wizard” on the home page. And click “Enter”. The “Step 1” page appears
(Figure 2-5 Wizard - Basic Information).
- 10 -
Page 11
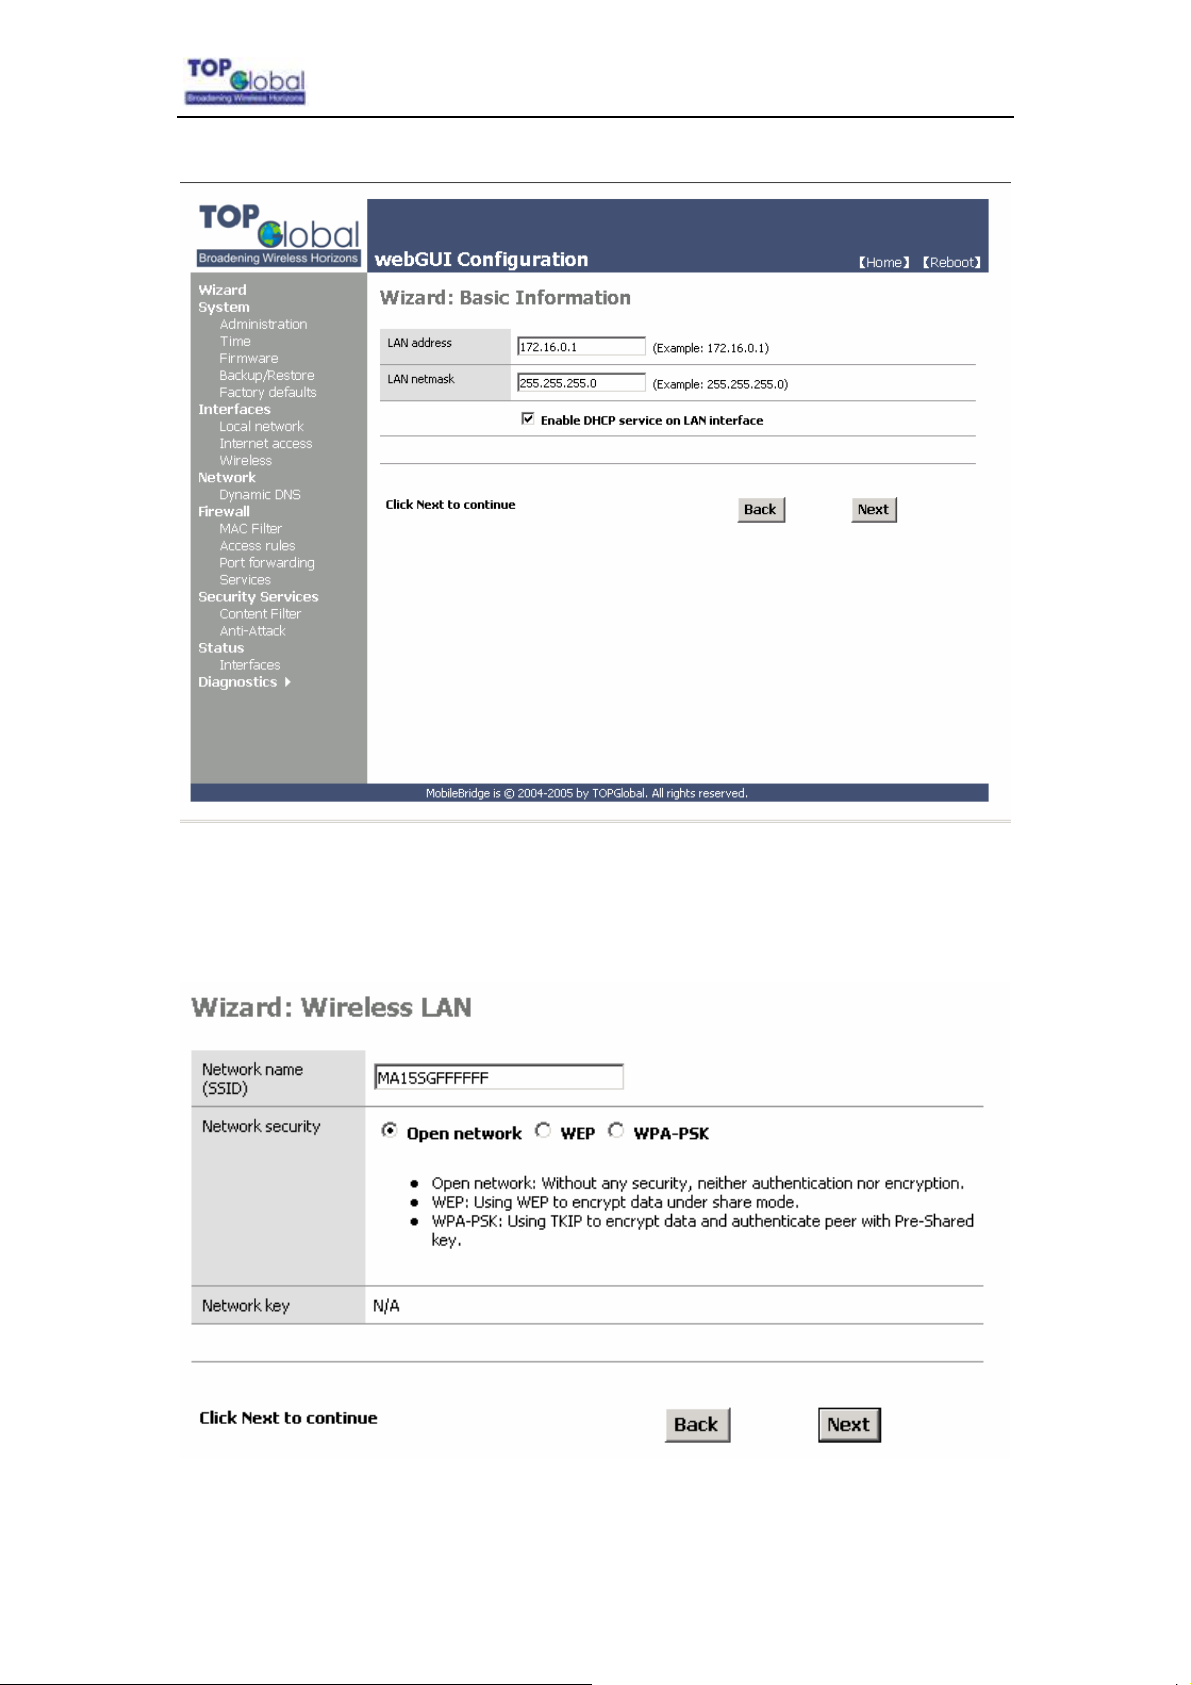
Figure2-5 Wizard - Basic Information
Top Global USA. ----MB6000 User Guide
You can change the IP of MB6000 or use the default values. Then click “Next”. Go to “Step
2” page (Figure 2-6 Wizard – Wireless LAN).
Figure2-6 Wizard—Wireless LAN
You can set the “Network name”, “Association Security” and related “Network Key” with
the values you prefer. Then click “Next”, go to “Step 3” page (Figure 2-7 Wizard - Internet
- 11 -
Page 12
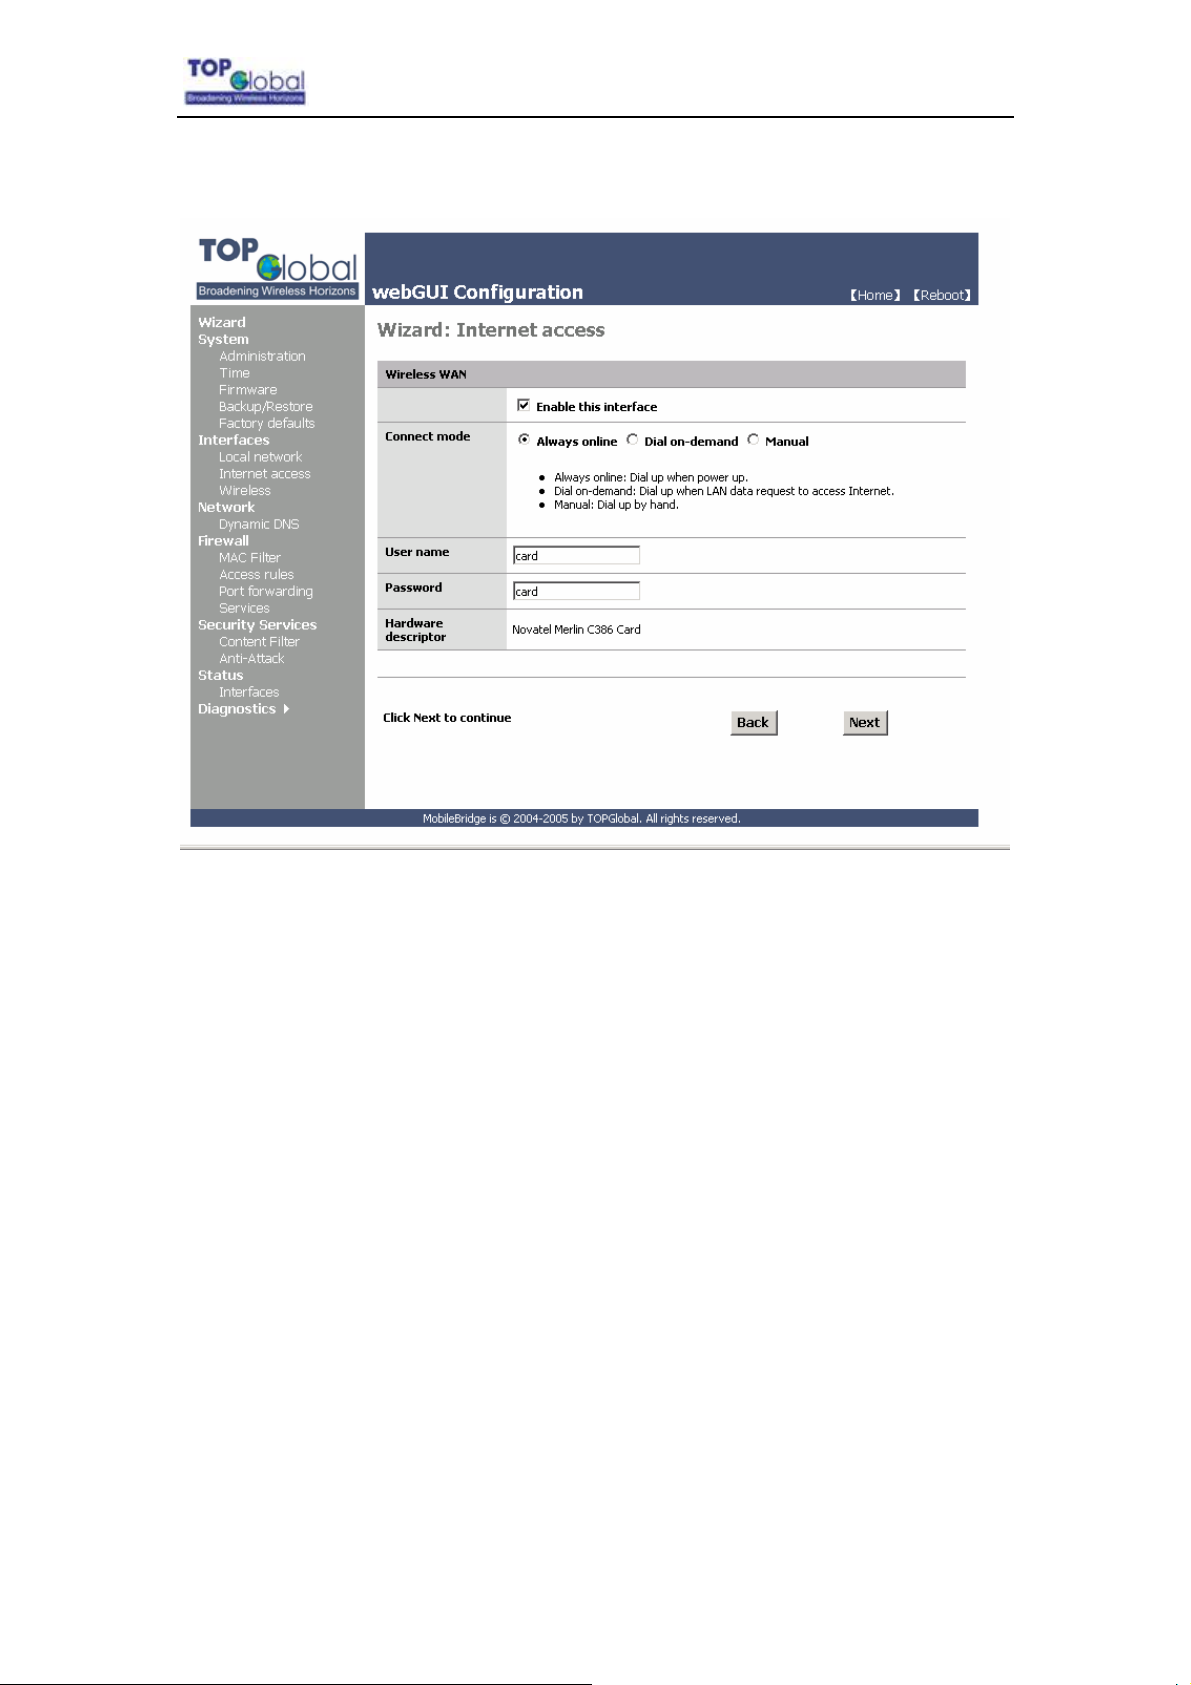
Access).
Figure2-7 Wizard - Internet access
Top Global USA. ----MB6000 User Guide
- 12 -
Page 13
Top Global USA. ----MB6000 User Guide
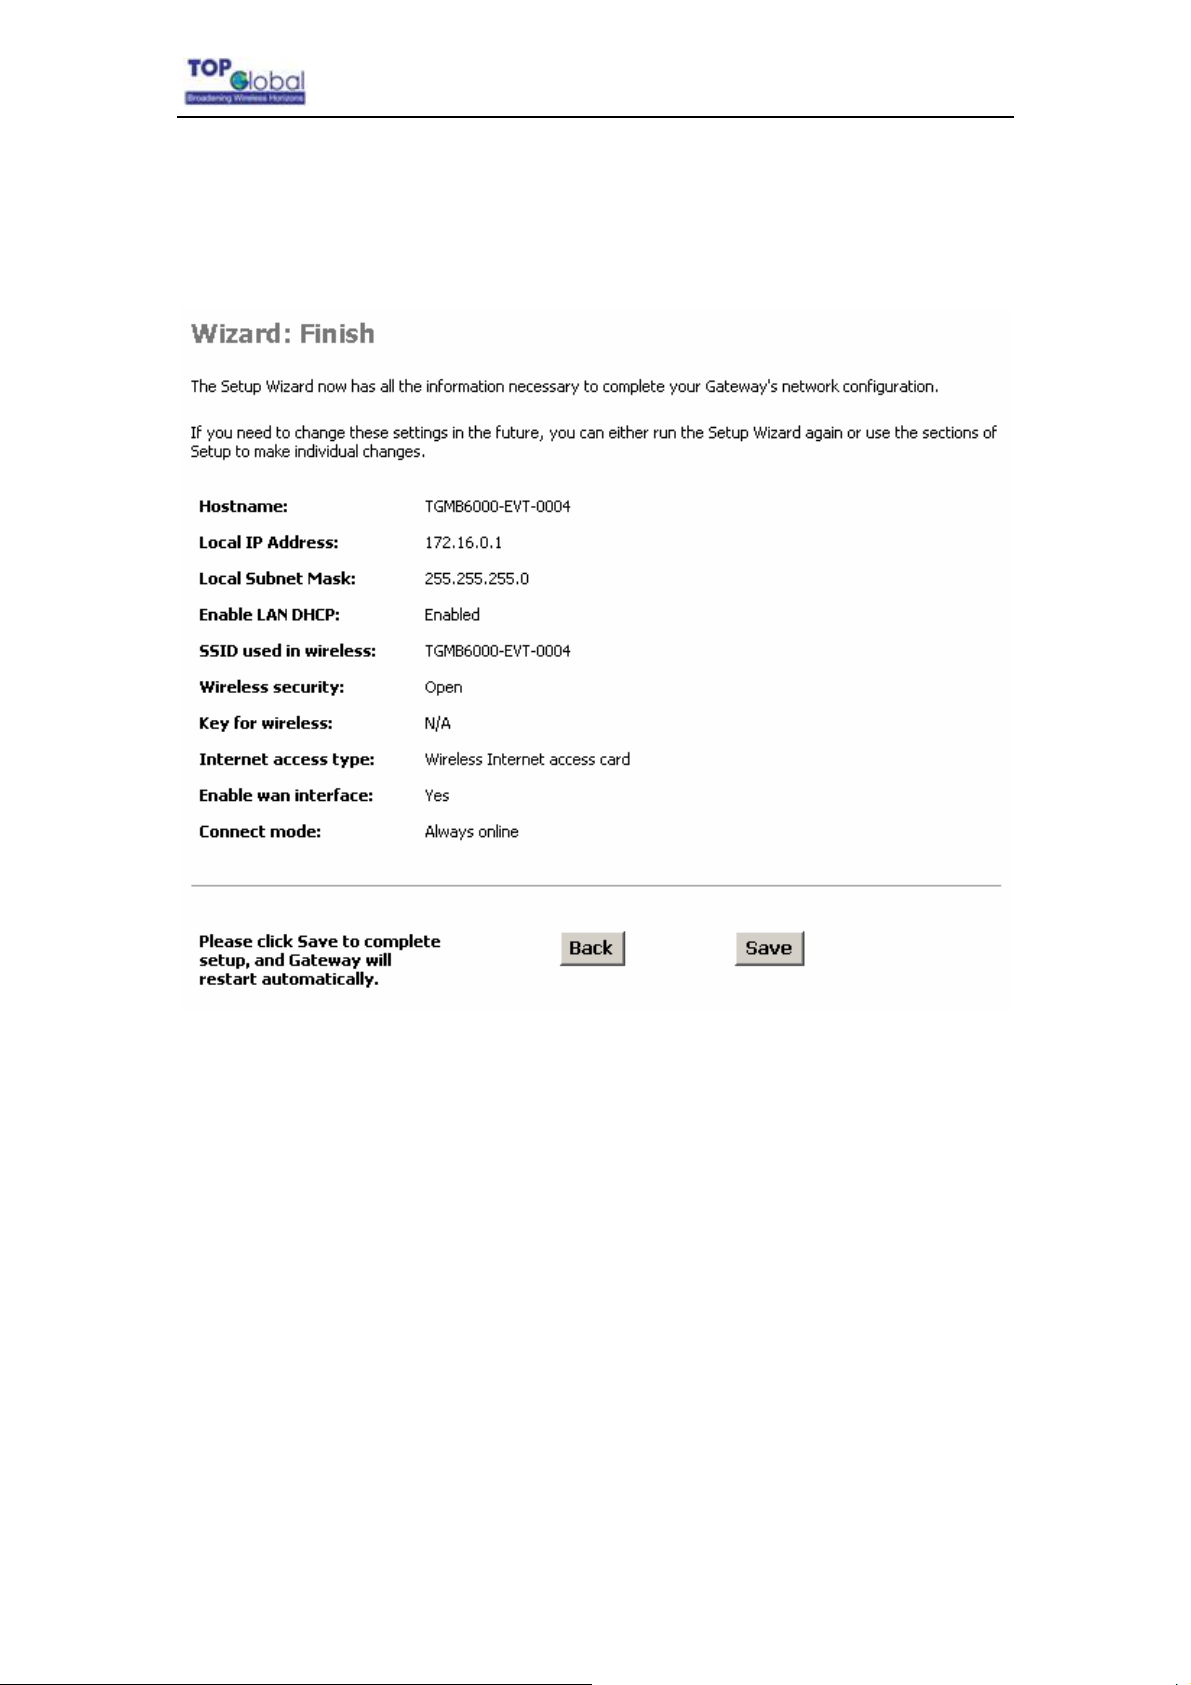
Change “Card Status” to “Enable”, type correct “Phone Number”, “User Name” and
“Password” (If you are using a GPRS/UMTS/EDGE network, you will need to input “CID”,
“APN”), then click button “Next”, the following configuration page appears (Figure 2-8
Wizard - Finish).
Figure2-8 Wizard - Finish
Check the settings and Click “Save”, MB6000 will reboot automatically.
- 13 -
Page 14
Top Global USA. ----MB6000 User Guide
3 Management
3.1 Overview
MB6000 embeds a web server for web-based management. This section will show you
how to visit MB6000’s web site.
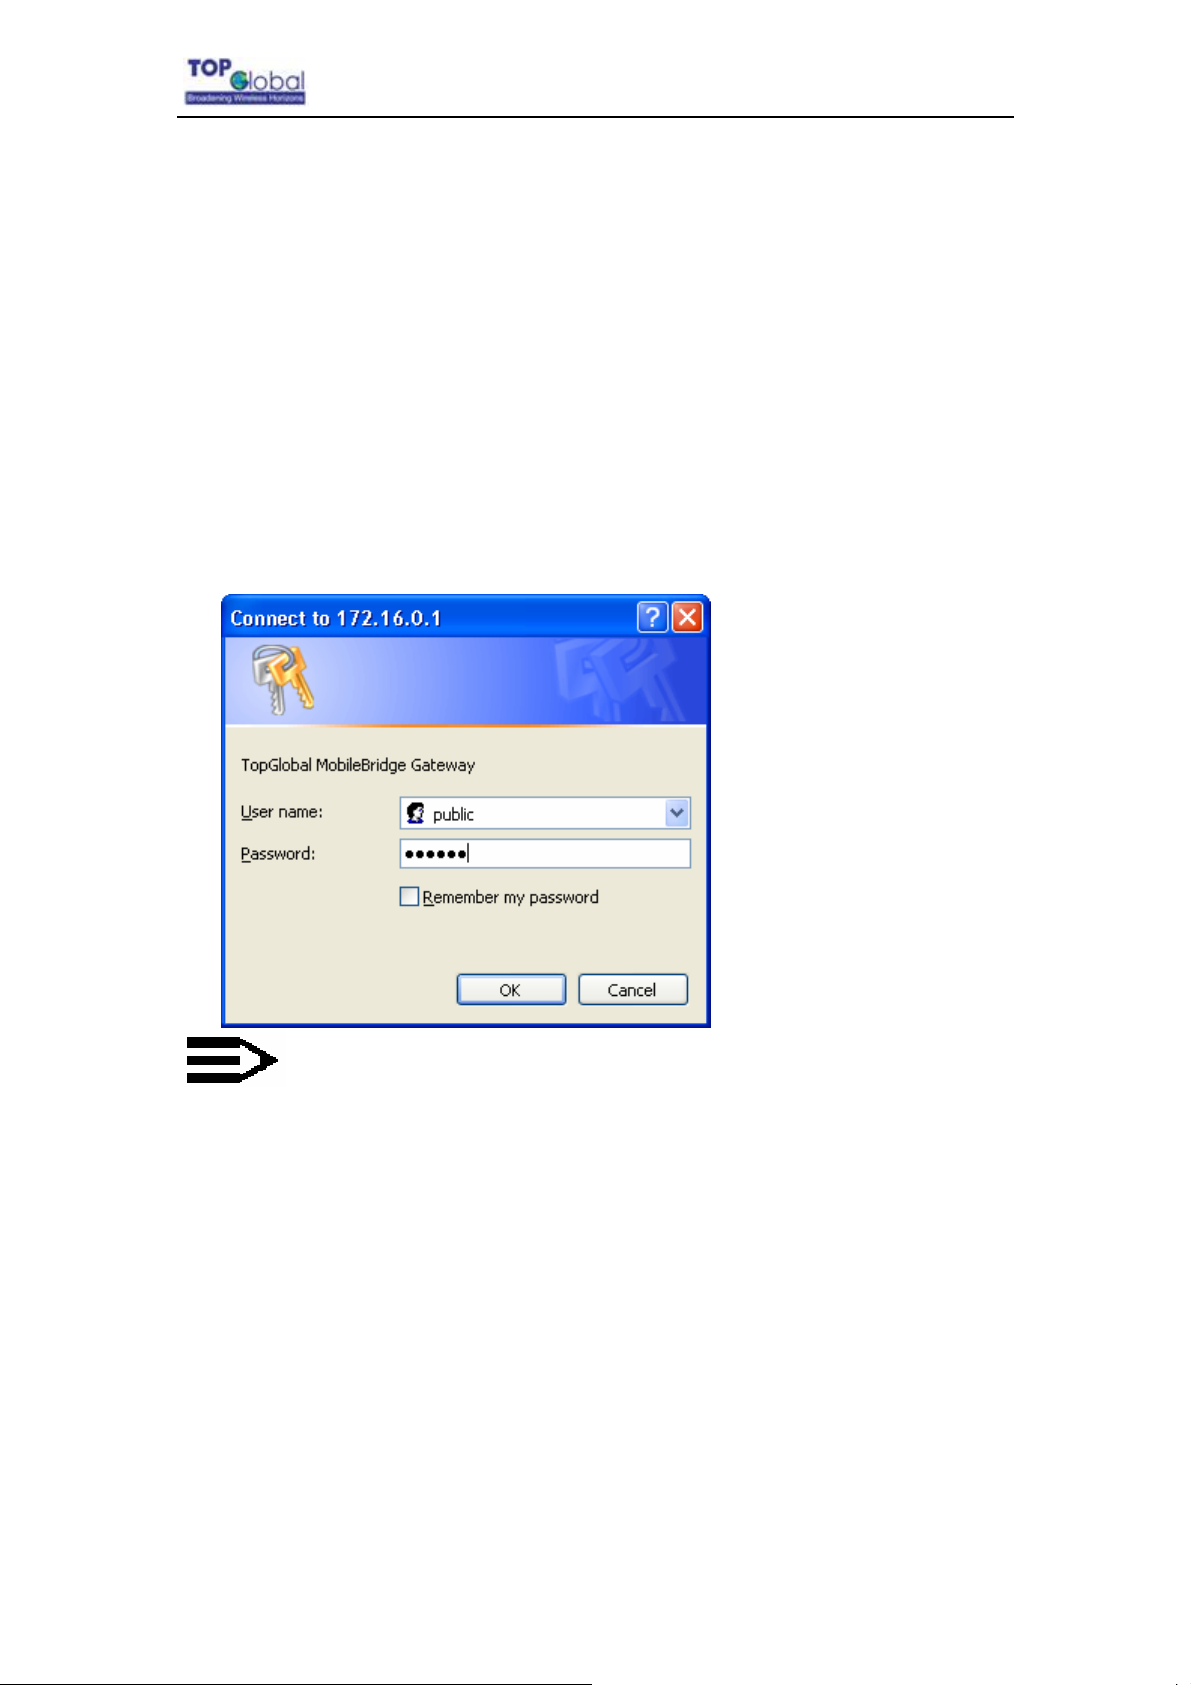
1. Open your browser and enter the MB6000’s IP address in the address bar.
2. Press the ENTER key. The MB6000 Login dialog box appears.
Figure 3-9 Login Dialog Box – English page
Note:
Default user name: public
Default password: public
3. After you input the right username and password, the home page of MB6000 web
site will appear (Figure 3-2).
- 14 -
Page 15
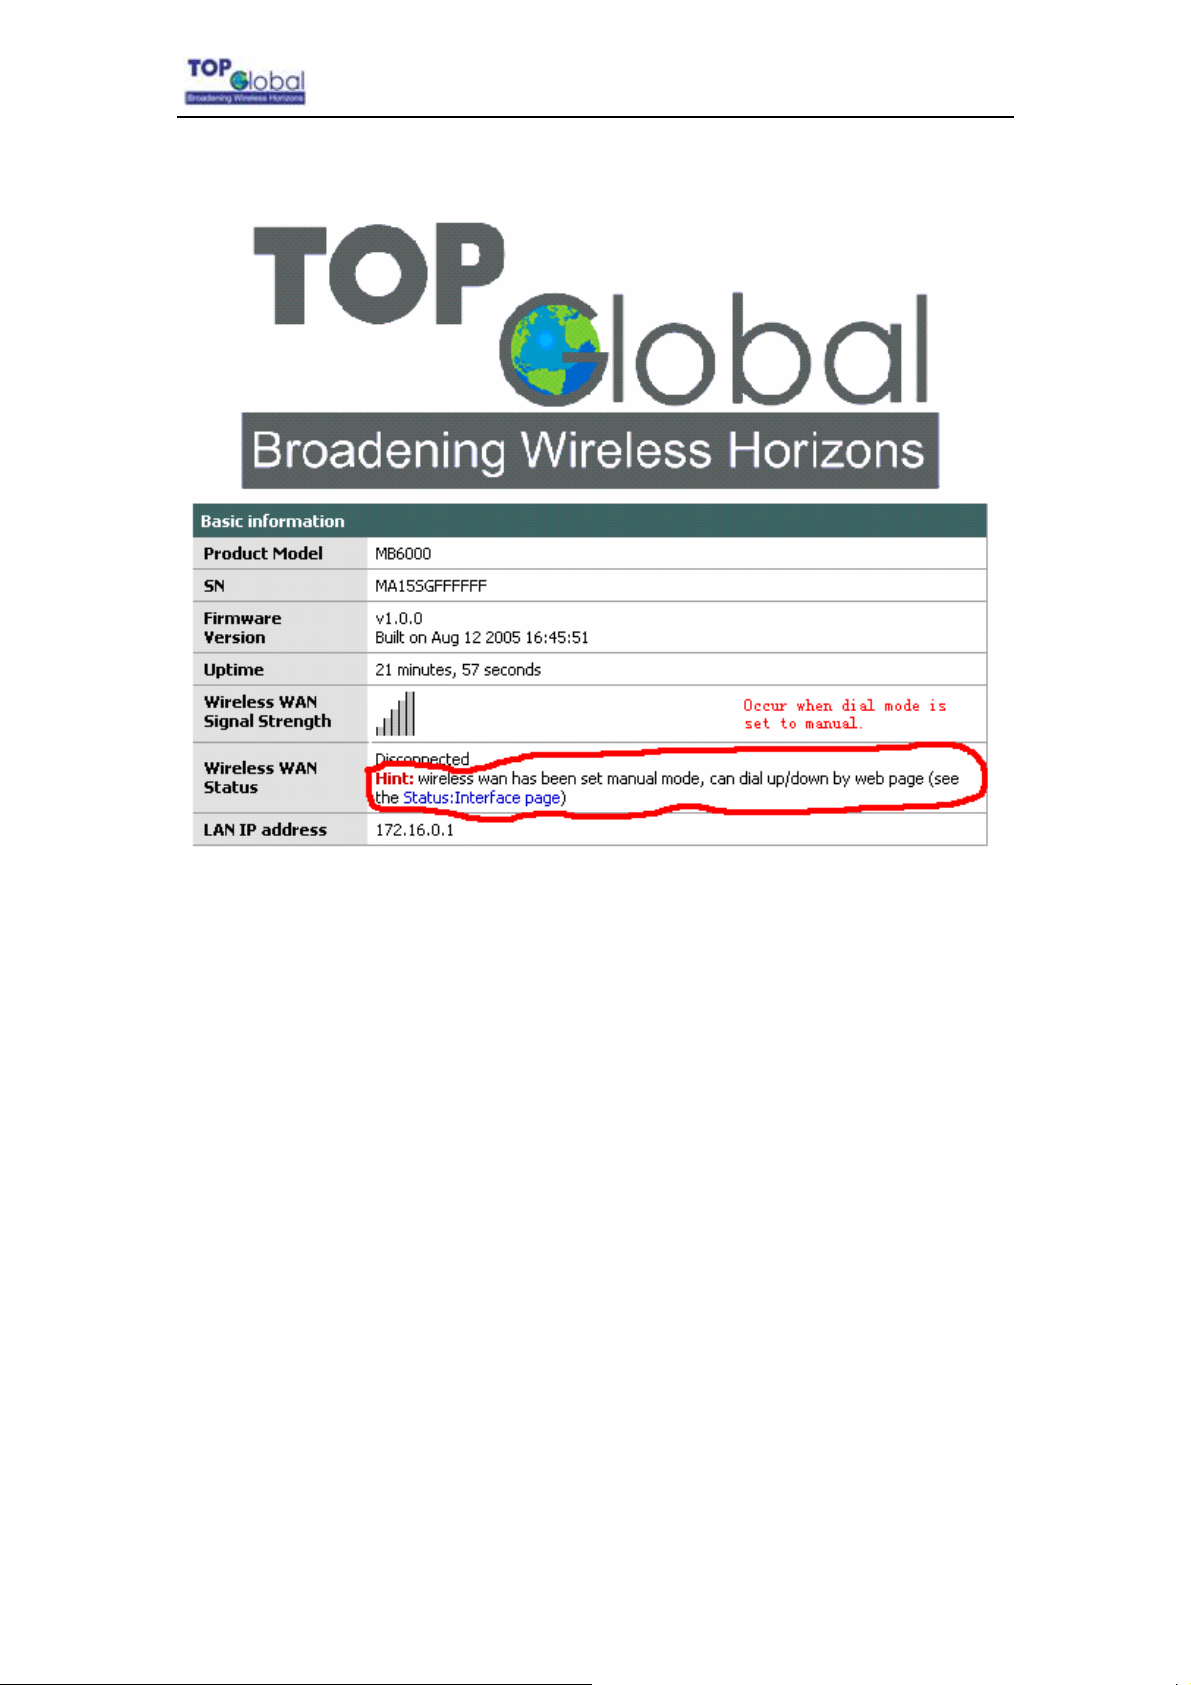
Figure 3-10 MB6000’s home page
Top Global USA. ----MB6000 User Guide
There are eight main categories of MB6000’s web site:
¾ Wizard;
¾ System;
¾ Interfaces;
¾ Network;
¾ Firewall;
¾ Security Services;
¾ Status;
¾ Diagnostics.
The following sections will explain each of them in detail.
3.2 Page Structure
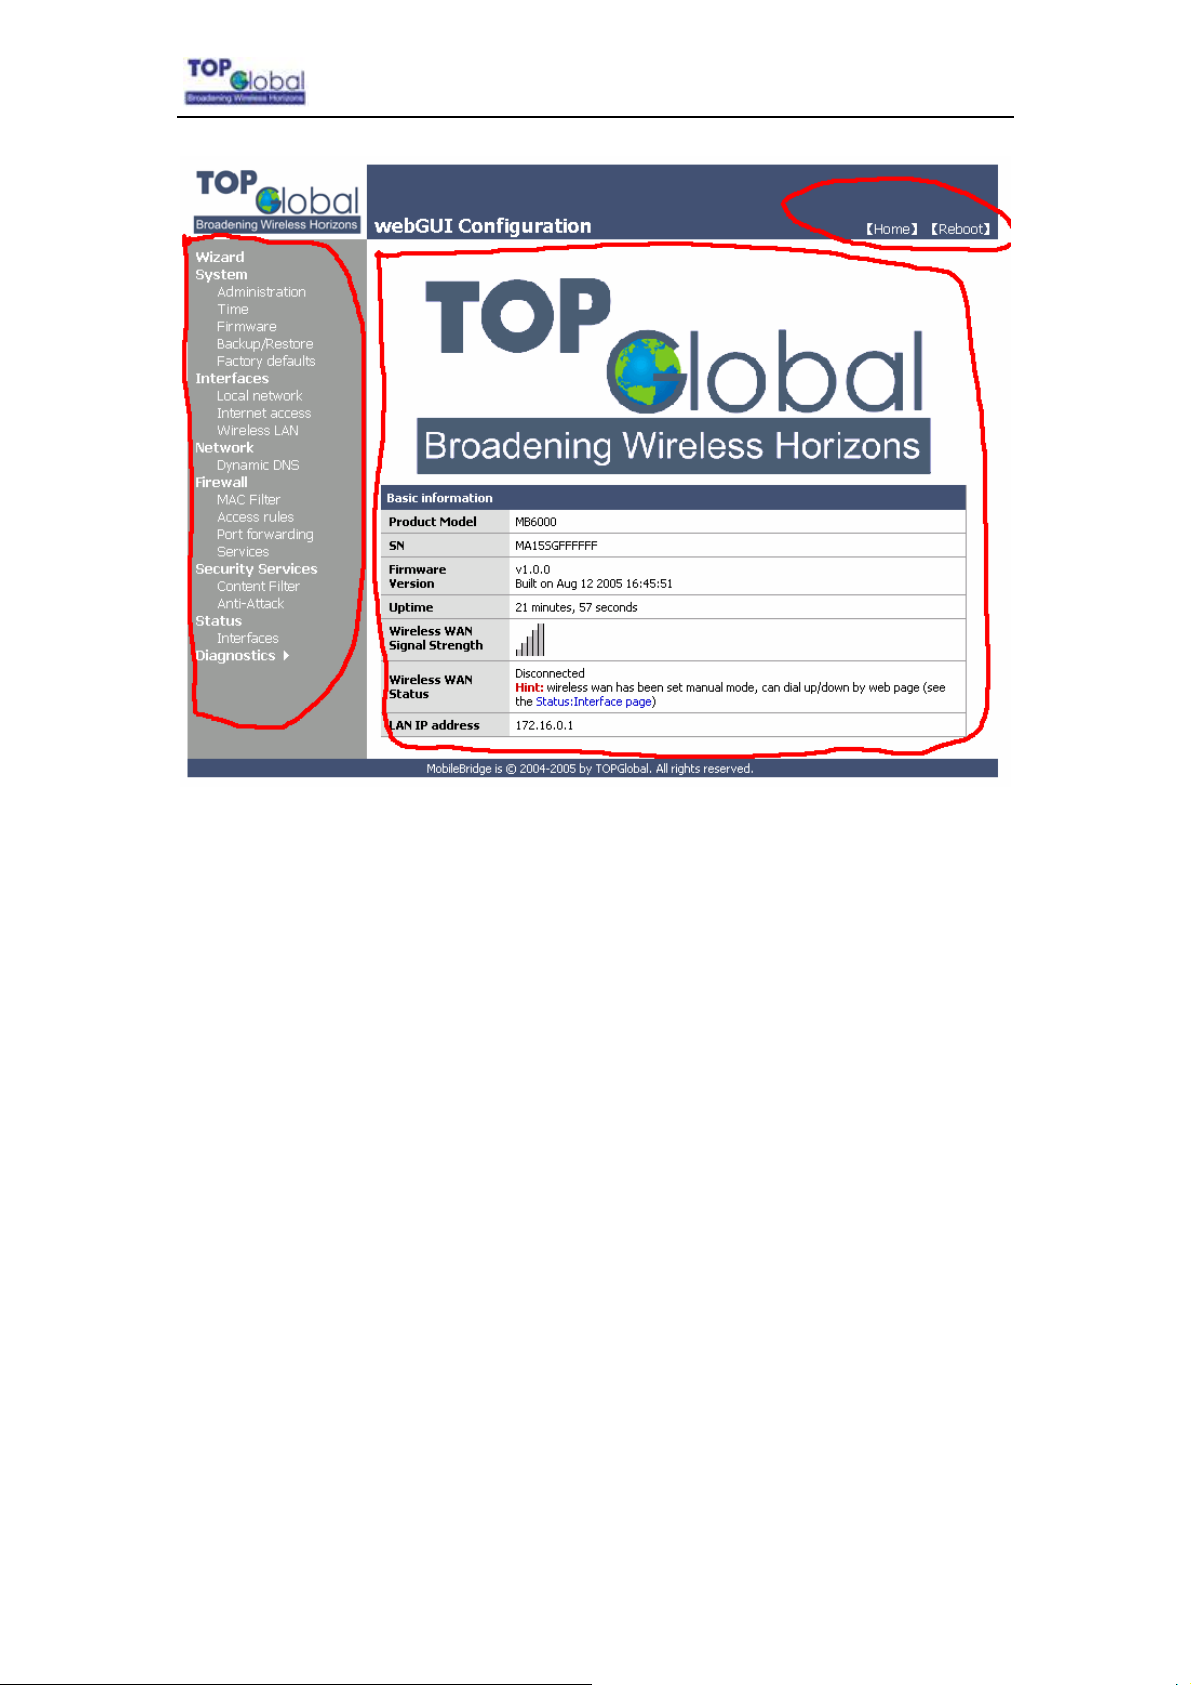
Figure 1-11 MB6000’s home page
- 15 -
Page 16
Top Global USA. ----MB6000 User Guide
The whole page consists of 3 main spaces:
¾ Upper title and shortcut space: display the most common used function page
shortcuts
¾ Left menu space: display MB6000 main 8 categories function menu;
¾ Right working space: display the detailed configuration pages for the function menu
3.2.1 Shortcut
There are two main categories in this setting:
Home
Reboot
- 16 -
Page 17
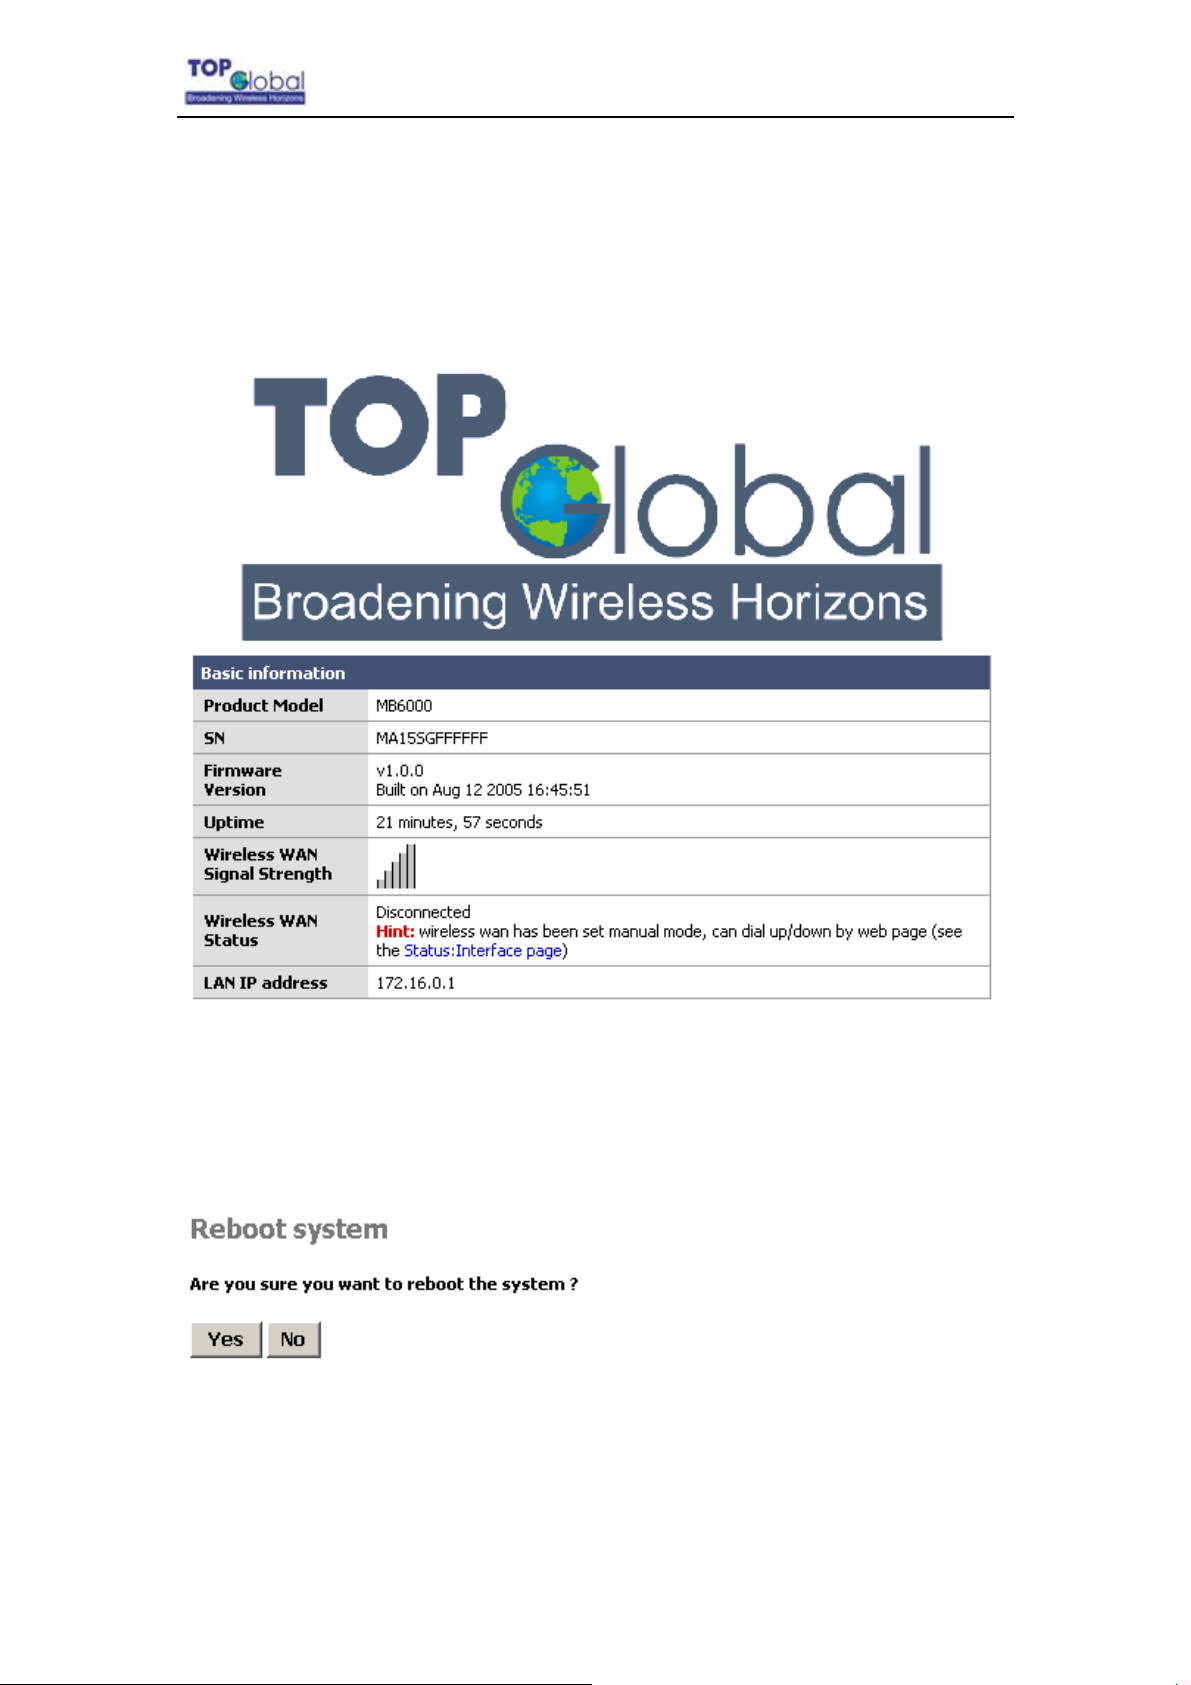
3.2.1.1 Home
Figure 3-12 MB6000’s home page
Top Global USA. ----MB6000 User Guide
3.2.1.2 Reboot
Figure 3-13 Reboot system
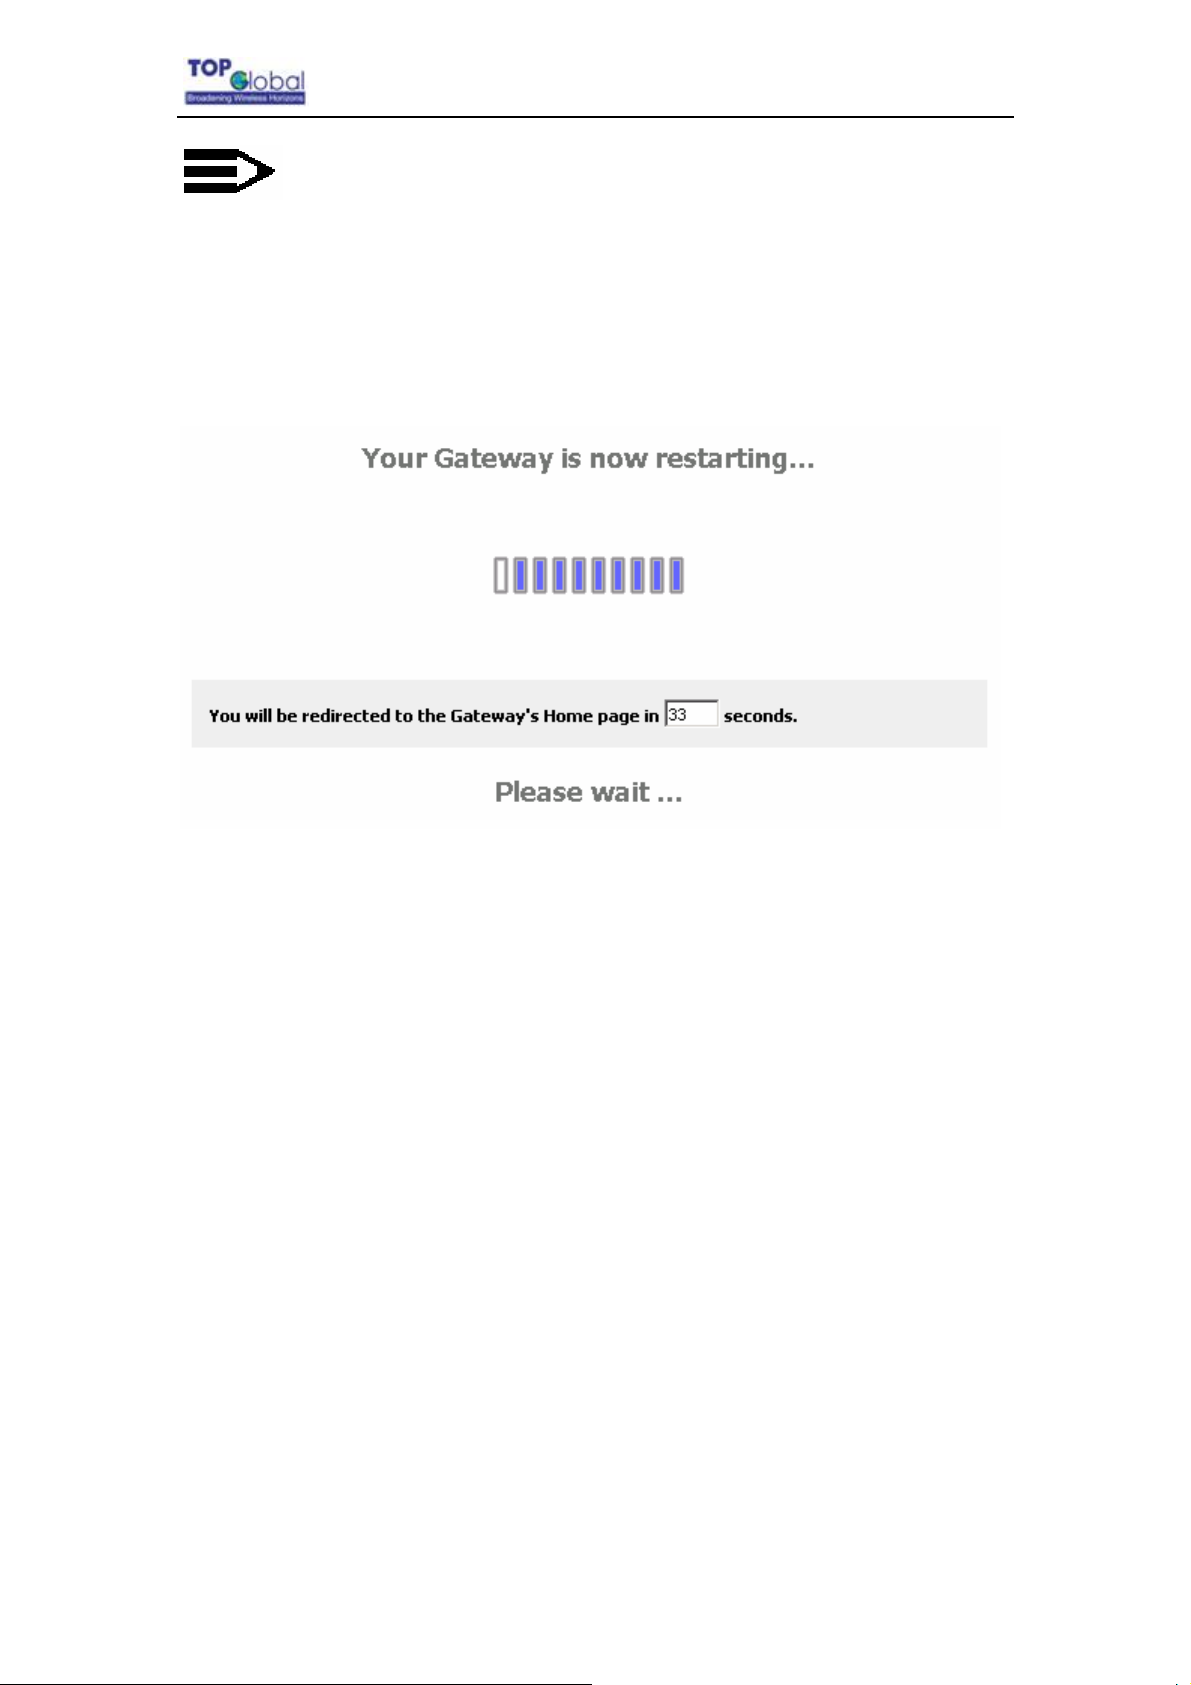
Reboot operation saves configuration changes (if any) before reboot the MB6000. Click
Yes, the device will be reboot. During the reboot process, the power LED will blink with
amber color.
- 17 -
Page 18
Top Global USA. ----MB6000 User Guide
Note:
After configured all the parameters you need, reboot the MB6000. Then the
new configurations will become effective.
Figure 3-14 MB6000’s restarting page
3.3 Page Operation
9 All of the MB6000 functions can be configured and become effective by going through
the following 3 steps: page content editing Æ submit Æ reboot;
9 Once every page is submitted, the system will confirm the page content, then notify
the user to reboot the MB6000 to make the configuration effective;
- 18 -
Page 19

Top Global USA. ----MB6000 User Guide
3.4 Configuration Pages Description
3.4.1 System
There are six main categories in this setting:
Administration
Time
Firmware
Backup/Restore
Factory defaults
3.4.1.1 Administration
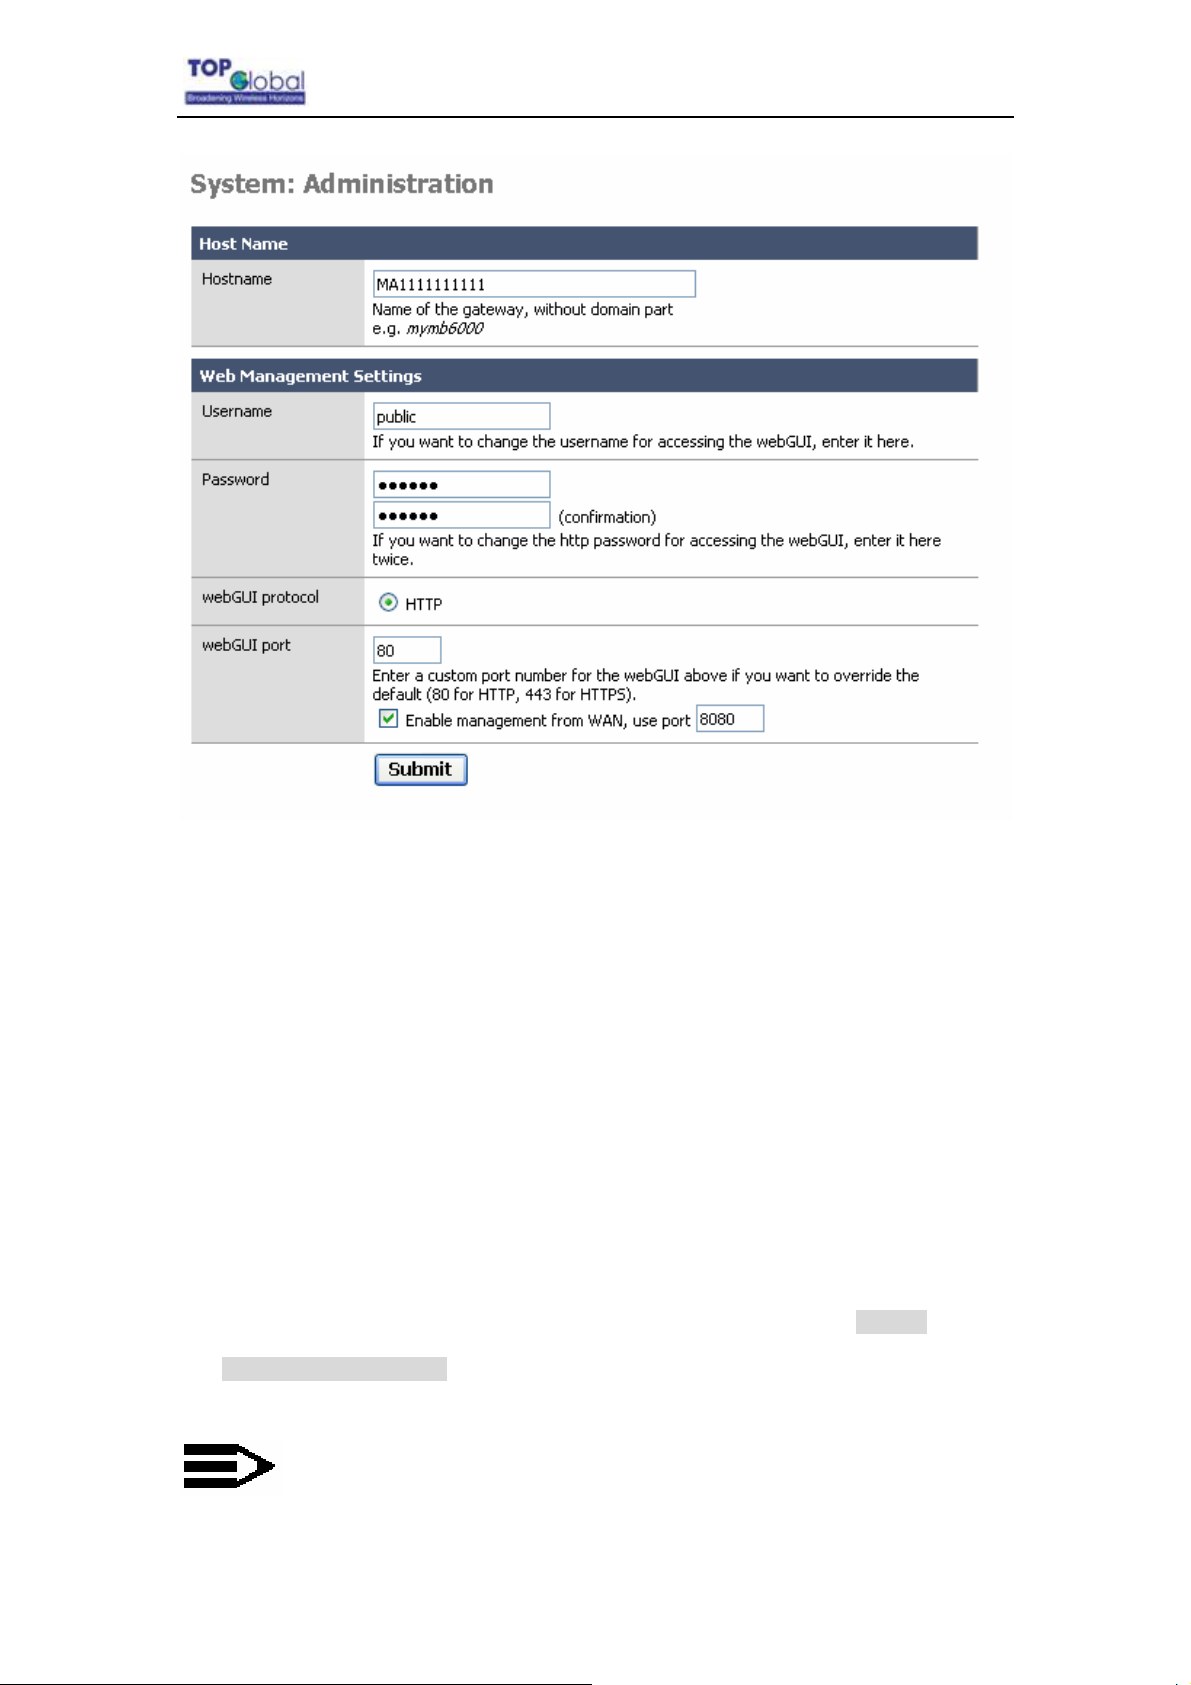
Figure 3-15 Administration
- 19 -
Page 20
Top Global USA. ----MB6000 User Guide
z Host Name: up to 64 characters name to represent MB6000. The device default
name is the product SN.
z Username: username for MB6000’s web administration. The default username is
public.
z Password: password for MB6000’s web administration. The default password is
public.
z WebGUI Protocol: the protocol web configuration used. HTTP is the only Current
choice.
z WebGUI port: the service port for HTTP. User normally need not modify this value. If
want allow someone mange the MB6000 from WAN, you can check Enable
management from WAN , and modify the port value by need .
z Save: after all of the input is ok, click SAVE to submit the configuration.
Note:
SAVE is not equal to keep the configuration information permanently in the
- 20 -
Page 21
Top Global USA. ----MB6000 User Guide
device. User must reboot the system, then the configuration will be saved. So if
user saves the configuration, and doesn’t reboot the device through web page,
the configuration information will be lost
Normally, MB6000 can’t be configured through WAN interface because of security
and other concerns. If user wishes to remotely configure the MB6000 through WAN
interface, there is one box to select to enable this feature.
Note:
Each time when the user modifies the username and password, the system
will request the user to re-authenticate using the new user name and
password.
3.4.1.2 Time
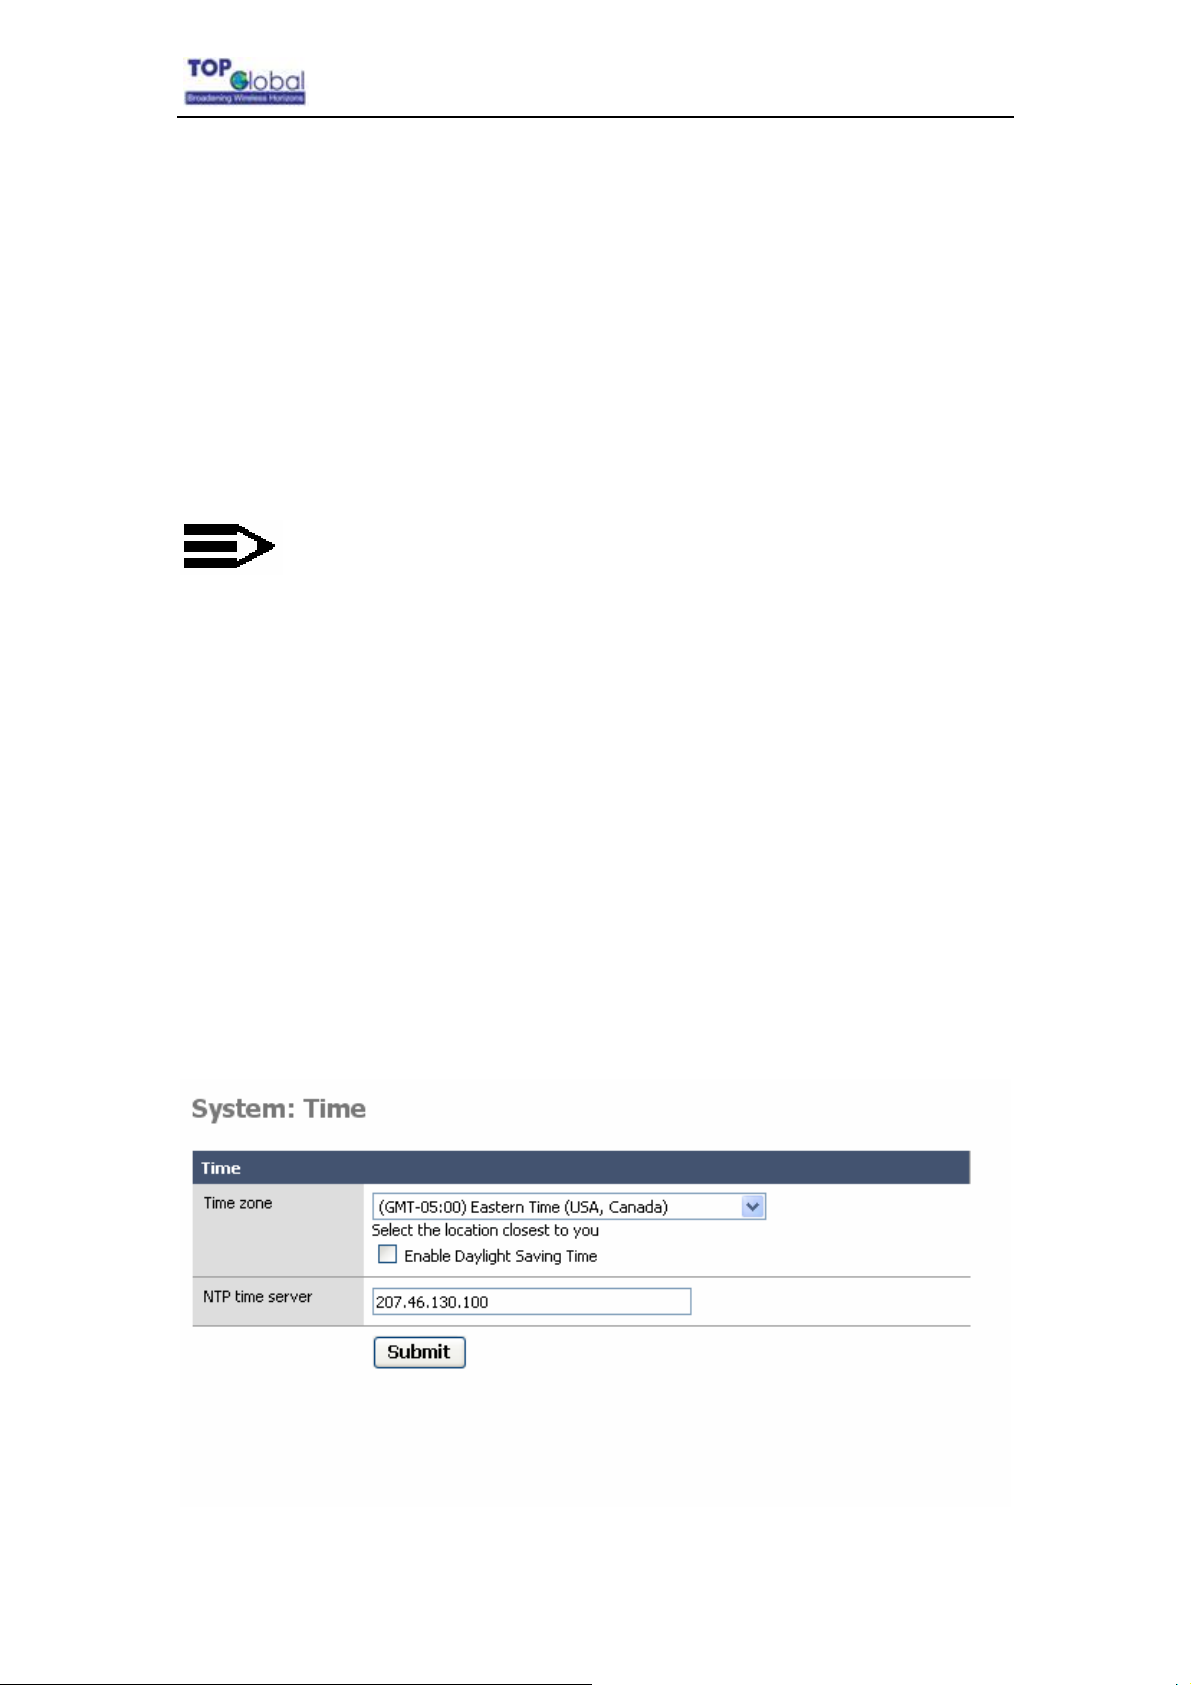
Figure 3-16 Time
- 21 -
Page 22
Top Global USA. ----MB6000 User Guide
z Time zone: Current country time zone.
z NTP time server: NTP server IP address, the default value is 207.46.130.100;
3.4.1.3 Firmware
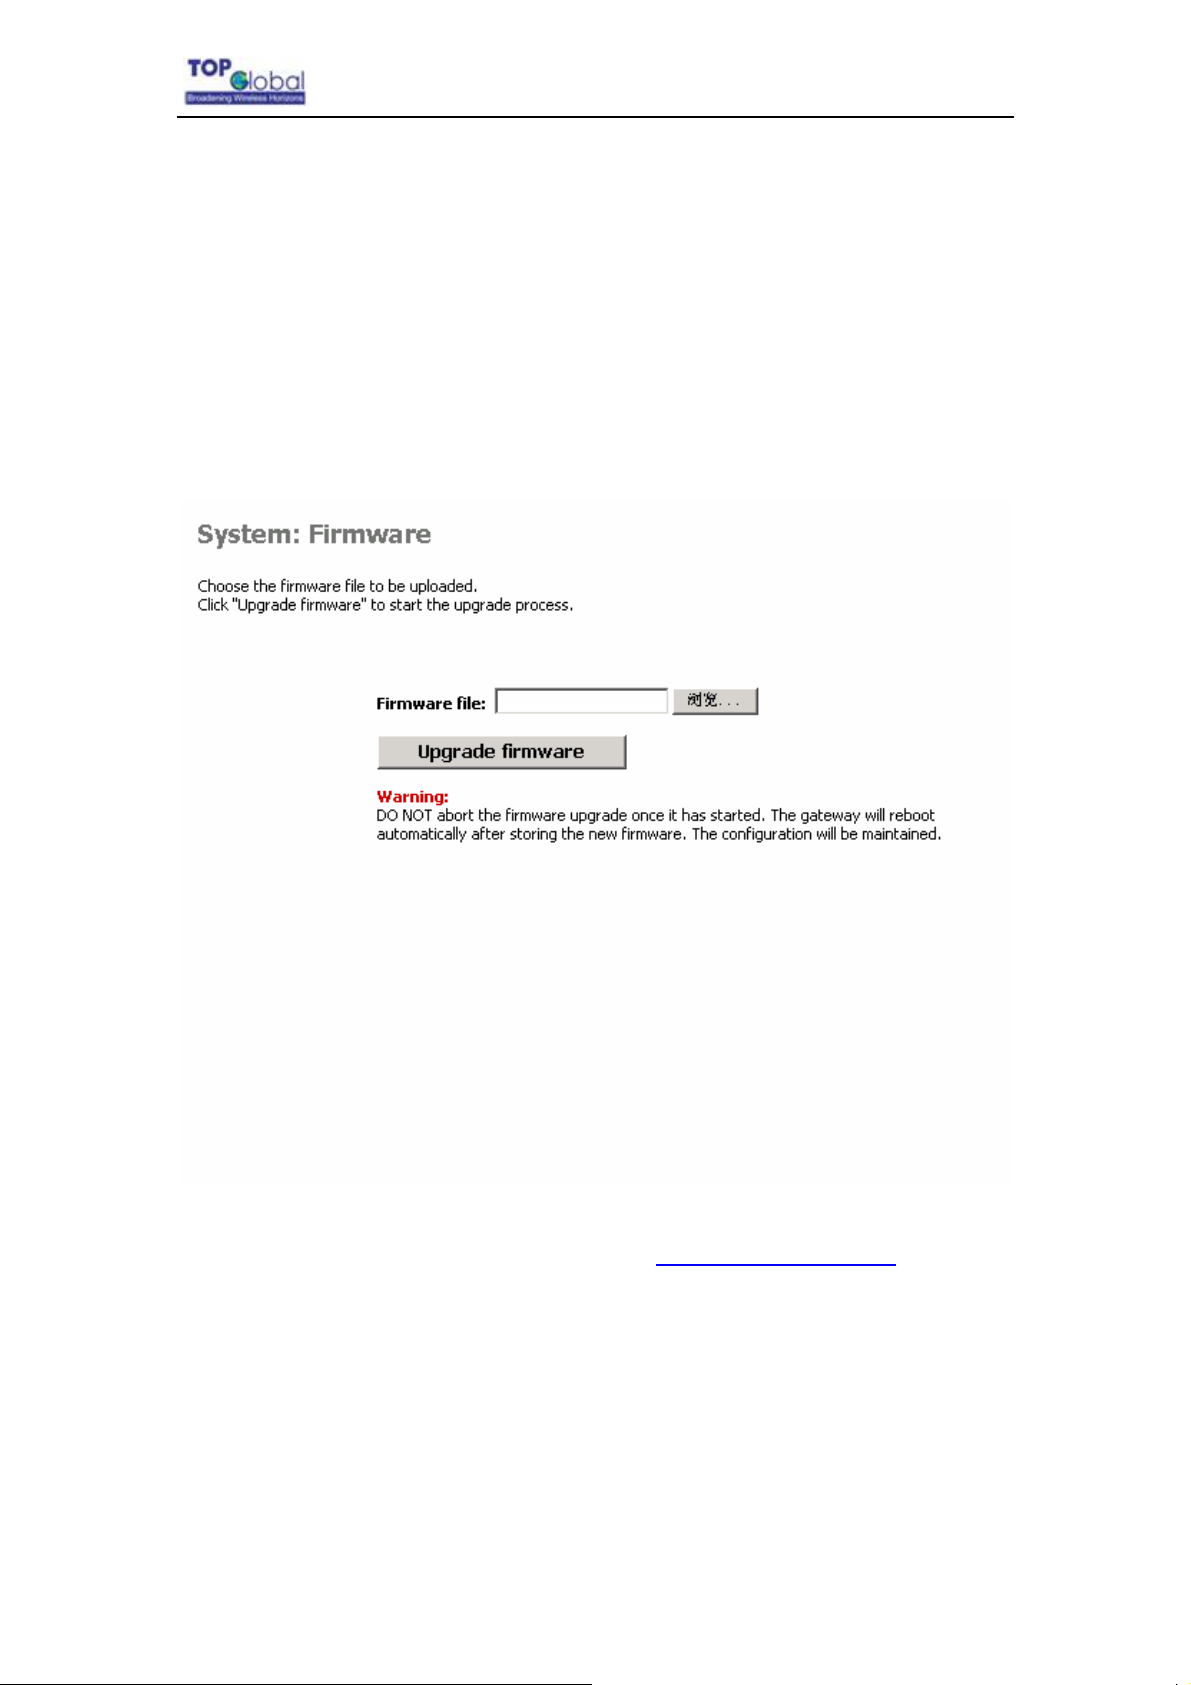
Figure 3-17 Firmware
MB6000's firmware is upgraded through this tab. Follow these instructions:
1. Download the firmware from Top Global website
PC. User can also get technical support from Top Global USA, Inc. by email or phone.
2. Enter the location of the firmware file or click the Browse button to find the file;
3. Click the Upgrade Firmware button to upgrade the firmware.
- 22 -
www. topglobalusa.com to your host
Page 23
Note:
During the upgrade process, the Power LED is blinking with amber color. The
device will reboot after the firmware upgrade is completed.
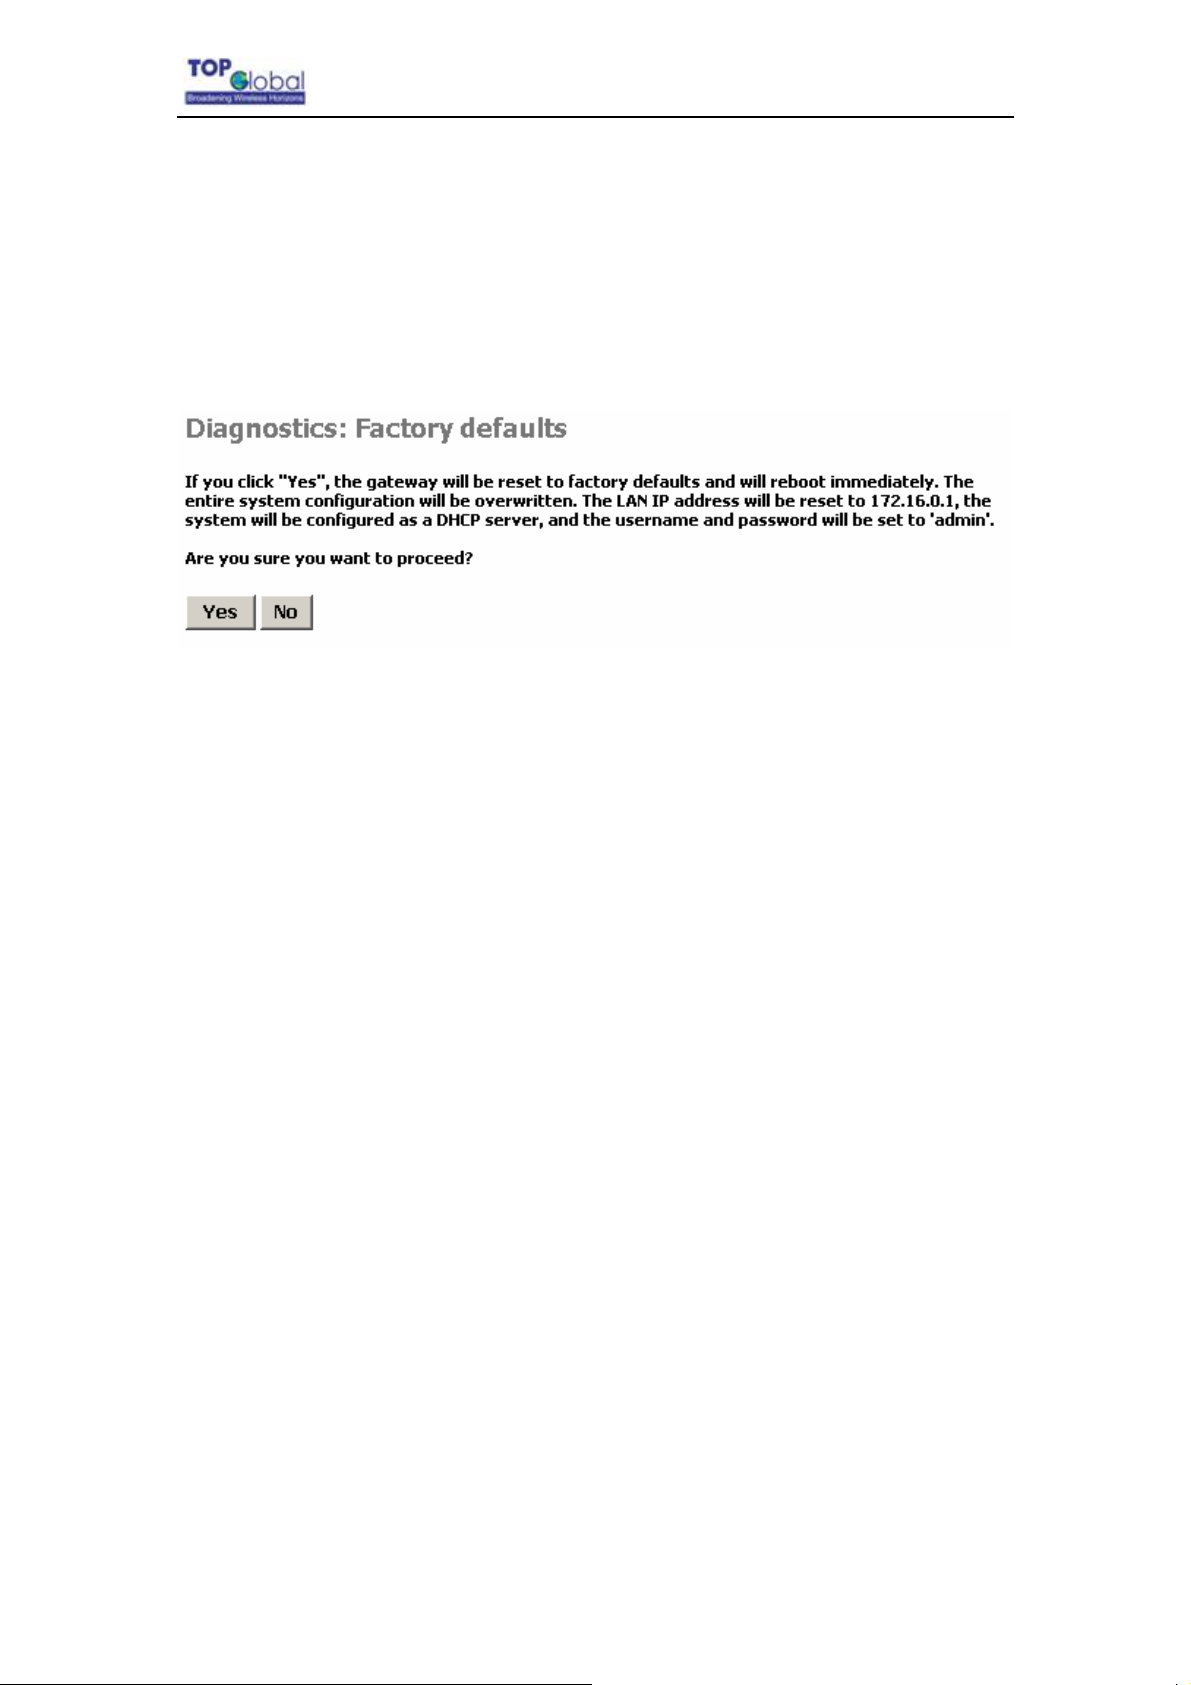
3.4.1.4 Backup/Restore
Figure 3-18 Backup/Restore
Top Global USA. ----MB6000 User Guide
Download Configurations: user can download current device configurations to save in
the local PC for later uploading and restoring.
Upload Configurations: user can use previous downloaded and saved device
configurations to restore the device configuration to some previous configuration status.
Note that this function erases the current configuration before restoring a previous back
up configuration; please do not attempt to restore unless you have a backup configuration
file stored on your local disk.
Note:
After upload configuration, the device will reboot.
- 23 -
Page 24
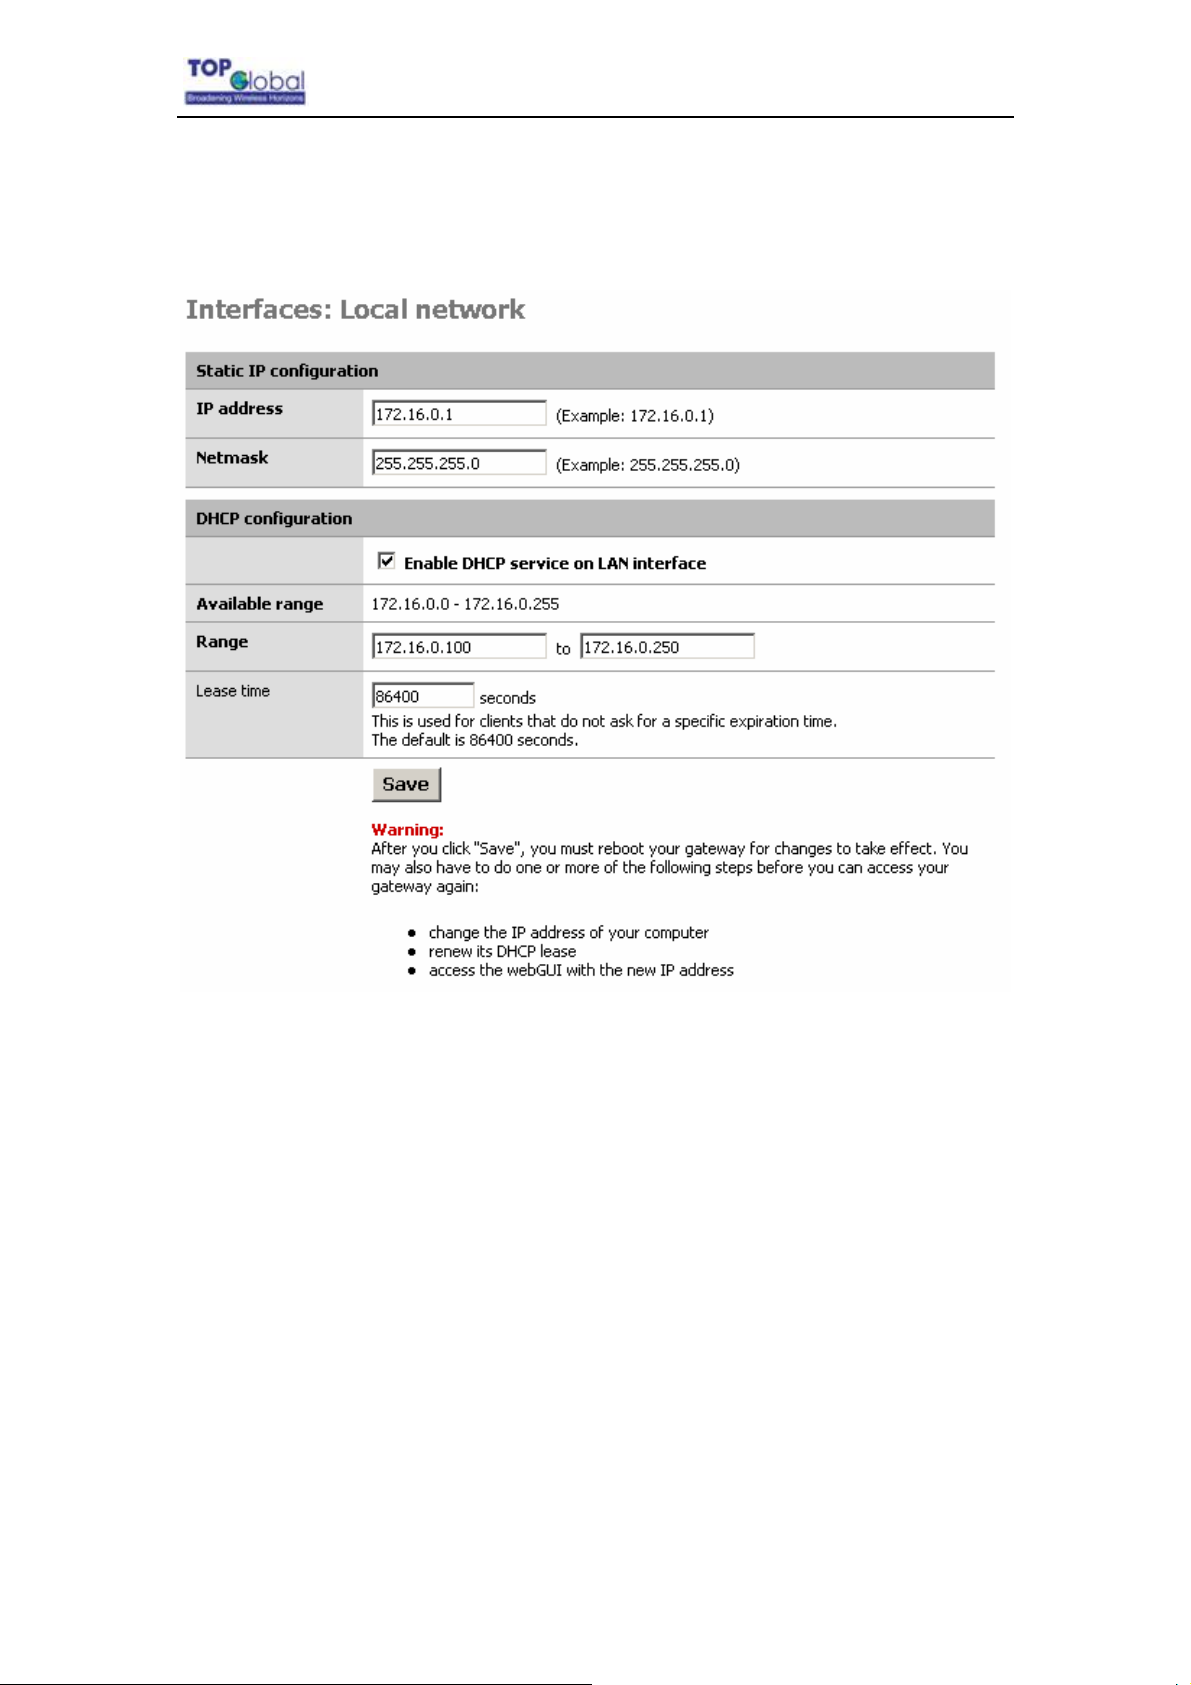
3.4.1.5 Factory Defaults
Figure 3-19Factory defaults
Top Global USA. ----MB6000 User Guide
Click the Yes button to reset all configurations to their factory default values.
3.4.2 Interfaces
There are three main categories in this setting:
Local Network
Internet Access
Wireless
- 24 -
Page 25
3.4.2.1 Local Network
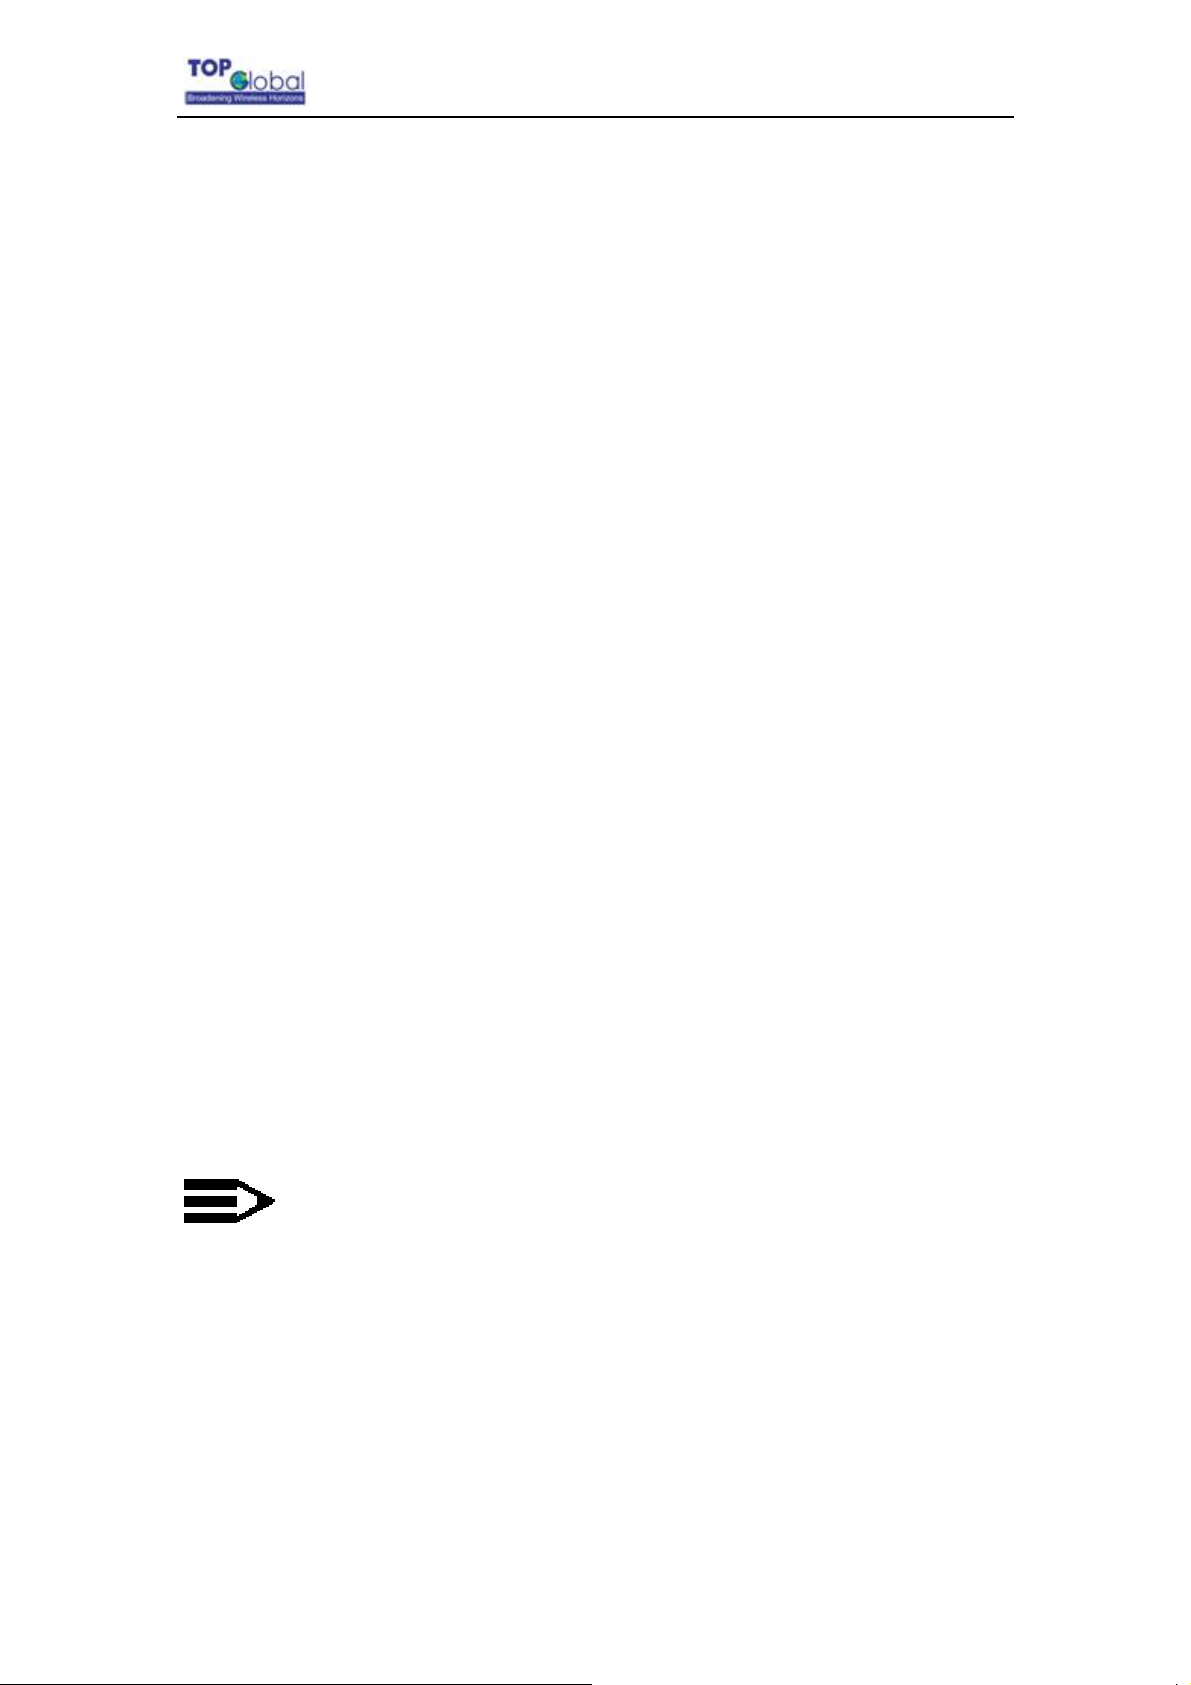
Figure 3-20 Local network
Top Global USA. ----MB6000 User Guide
Function Summary
The LAN interface is used to connect internal LAN and PCs in the LAN. The LAN
interface includes Wired LAN RJ45 interface and Wireless LAN interface. This
configuration page is used to set some basic parameters for LAN and the service provided
on the LAN interface: DHCP.
Detailed Configurations
9 IP Configuration
z IP Address: the IP Address of the LAN & WLAN. The default IP address is
172.16.0.1.
- 25 -
Page 26
Top Global USA. ----MB6000 User Guide
z Netmask: the subnet mask of the LAN & WLAN. The default subnet mask is
255.255.255.0.
9 DHCP Configuration
This setting is used to configure MB6000’s Dynamic Host Configuration Protocol
(DHCP) server function. MB6000 can be used as a DHCP server for the internal LAN
network. The DHCP server automatically assigns an IP address to each computer in
the LAN network. If you choose to enable MB6000’s DHCP server option, you must
configure all of PCs in the LAN network to connect to this DHCP server (MB6000),
and make sure there is no other DHCP server on your network.
DHCP is enabled by factory default. If there is already a DHCP server in the LAN
network, or a DHCP server is not necessary for the LAN network, the Enable DHCP
Server on LAN Interface can be un-checked. (Other DHCP features will be
disabled).
z Range: Enter the values for start IP address and end IP address, the default
start IP address is 172.16.0.2, the end IP address is 172.16.0.100.
z Lease Time: the amount of time in second a network user will be allowed to
connect to MB6000 with their current dynamic IP address got from the DHCP
server. After the time is up, the user will be automatically assigned a new
dynamic IP address. The default is 86400 second, which means one day.
Note:
When the DHCP server IP address range is set, it must be assured that there
is no other device in the network to use the IP address located in this address
range, such as printer server, file server, etc. otherwise there is risk for
address conflict.
- 26 -
Page 27
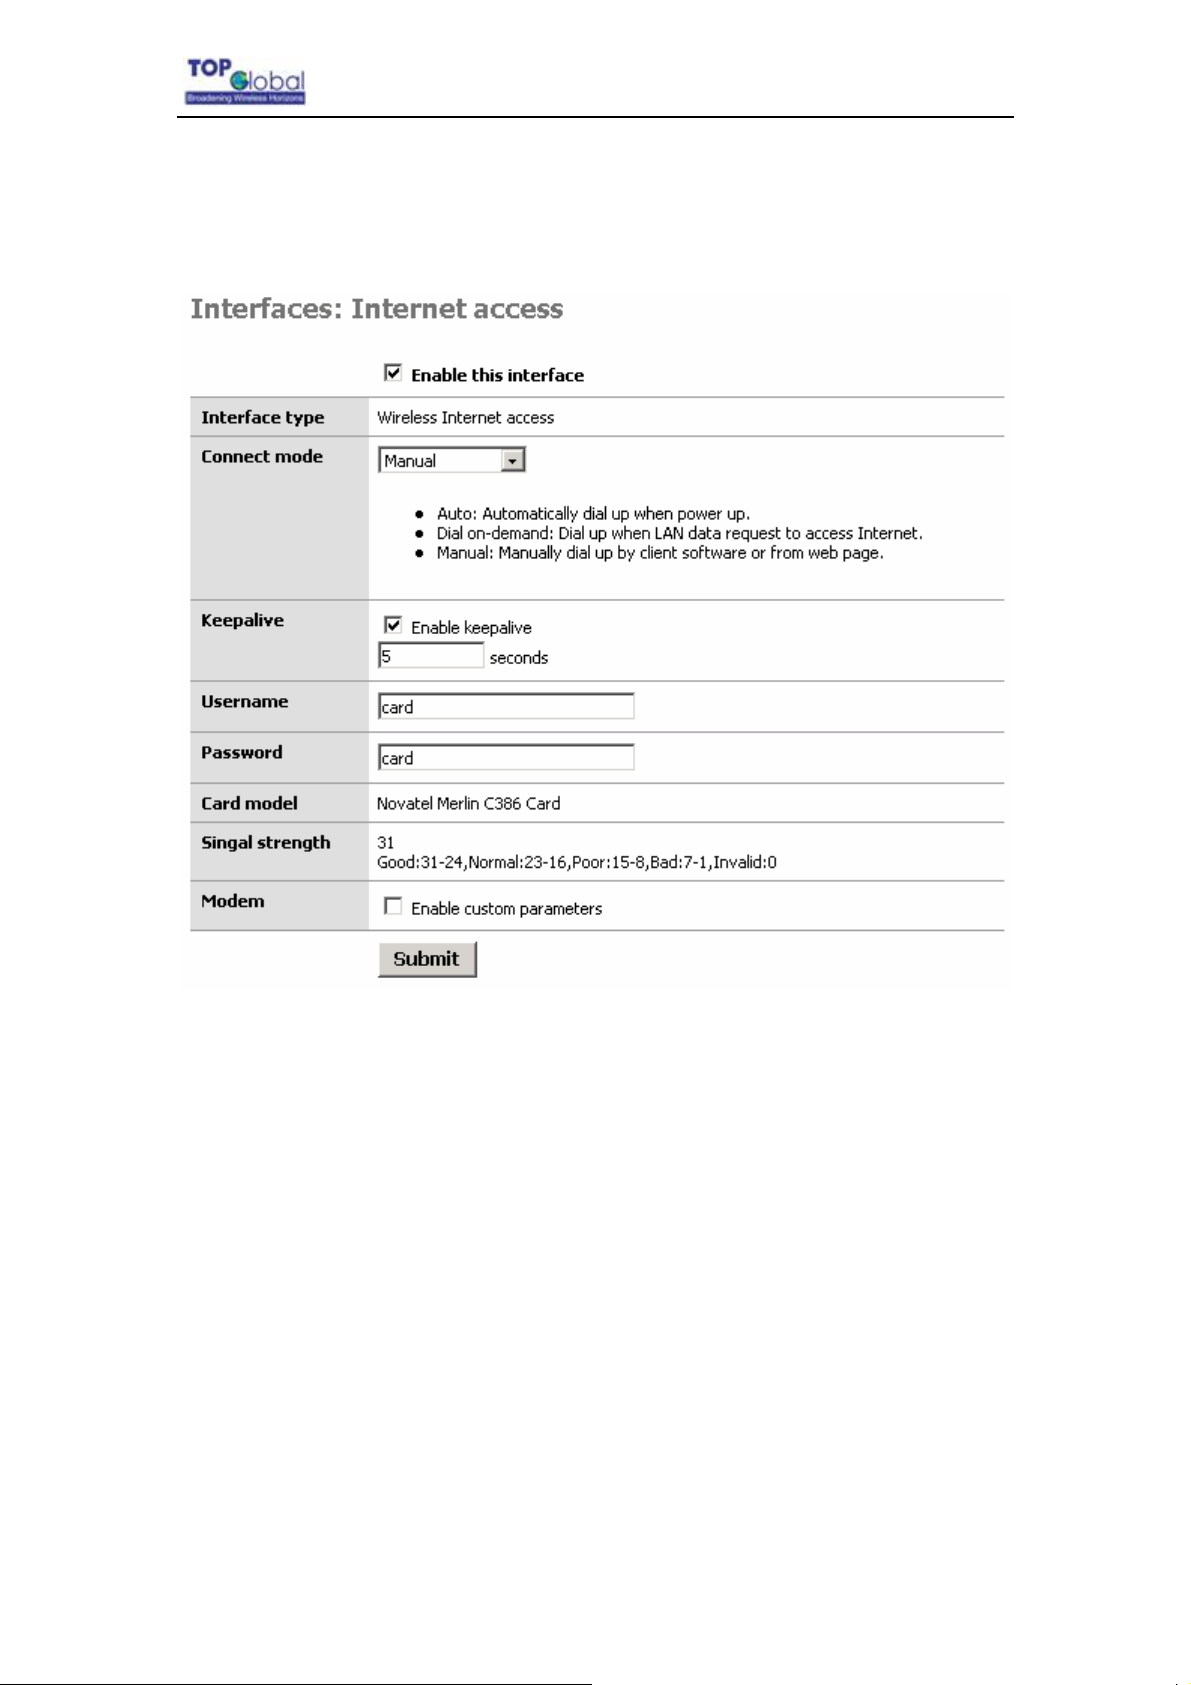
3.4.2.2 Internet Access
Figure 3-21 Internet access
Top Global USA. ----MB6000 User Guide
Function Summary
The WAN interface of MB6000 is used to connect Internet, wireless WAN. This
configuration page is used to set some wireless WAN card basic parameters.
Detailed Configurations
If Enable this Interface is not checked, no other parameters in this page are available.
z Connect mode: indicate which wireless WAN connection policy is used.
Auto: this option enable MB6000 to automatically make the internet connection
each time when it powers on. It keeps the MB6000 always connected to the
Internet, even when the connection is idle. To select this option, click the radio
button next to Keep Alive. The default Redial Period is 30 seconds (in other
- 27 -
Page 28

Top Global USA. ----MB6000 User Guide
words, the Device will check the Internet connection every 30 seconds).
Dial-On-Demand: MB6000 can be configured to disconnect from Internet
connection after a specified period of inactivity (Max Idle Time). If the Internet
connection has been terminated due to inactivity, Dial on Demand enables
MB6000 to automatically re-establish the Internet connection as soon as you
attempt to access the Internet again. If you want your Internet connection to
remain active at all times, enter 0 in the Max Idle Time field. Otherwise, enter
the number of seconds you want to have elapsed before your Internet
connection terminates.
Manual: If you choose the Manual mode , so the MB6000 will not make the
internet connection when you power up the MB6000.. You must manually make
the Cellular connection using the client software which can be found in the CD
and though web configuration page.
z User Name: provide a user name assign to the subscriber by the cellular mobile
operator. Please consult your mobile operator for your user names and password;
z Password: provide a password for your wireless modem. Again consult your mobile
operator for the correct password;
z Card model: When a cellular PC Card is inserted into the MB6000 correctly. It will
automatically detect the WAN card type. If the Cellular modem card is supported and
recognized by the MB6000, the name and model of the wireless WAN card will
appear. Contact Top Global for a list of all supported PC Cards.
z Signal strength: indicate current wireless WAN signal strength. Value 31 is the best
signal strength indication. The less value, the worse signal strength. If this value is 0,
you do not have a signal, please check the wireless WAN card carefully to make sure
it is inserted correctly and you may need to call your mobile operator to make sure
your area is covered within their network;
z Modem: if Enable custom parameters is not checked, the following parameters in
this page are unavailable:
Phone Number: provide a phone number for wireless WAN modem;
Init string: provide an initializing string for wireless WAN modem.
- 28 -
Page 29
3.4.2.3 Wireless LAN
There are three main tabs in this setting:
Basic
Advanced
Access Control
3.4.2.3.1 Basic
Top Global USA. ----MB6000 User Guide
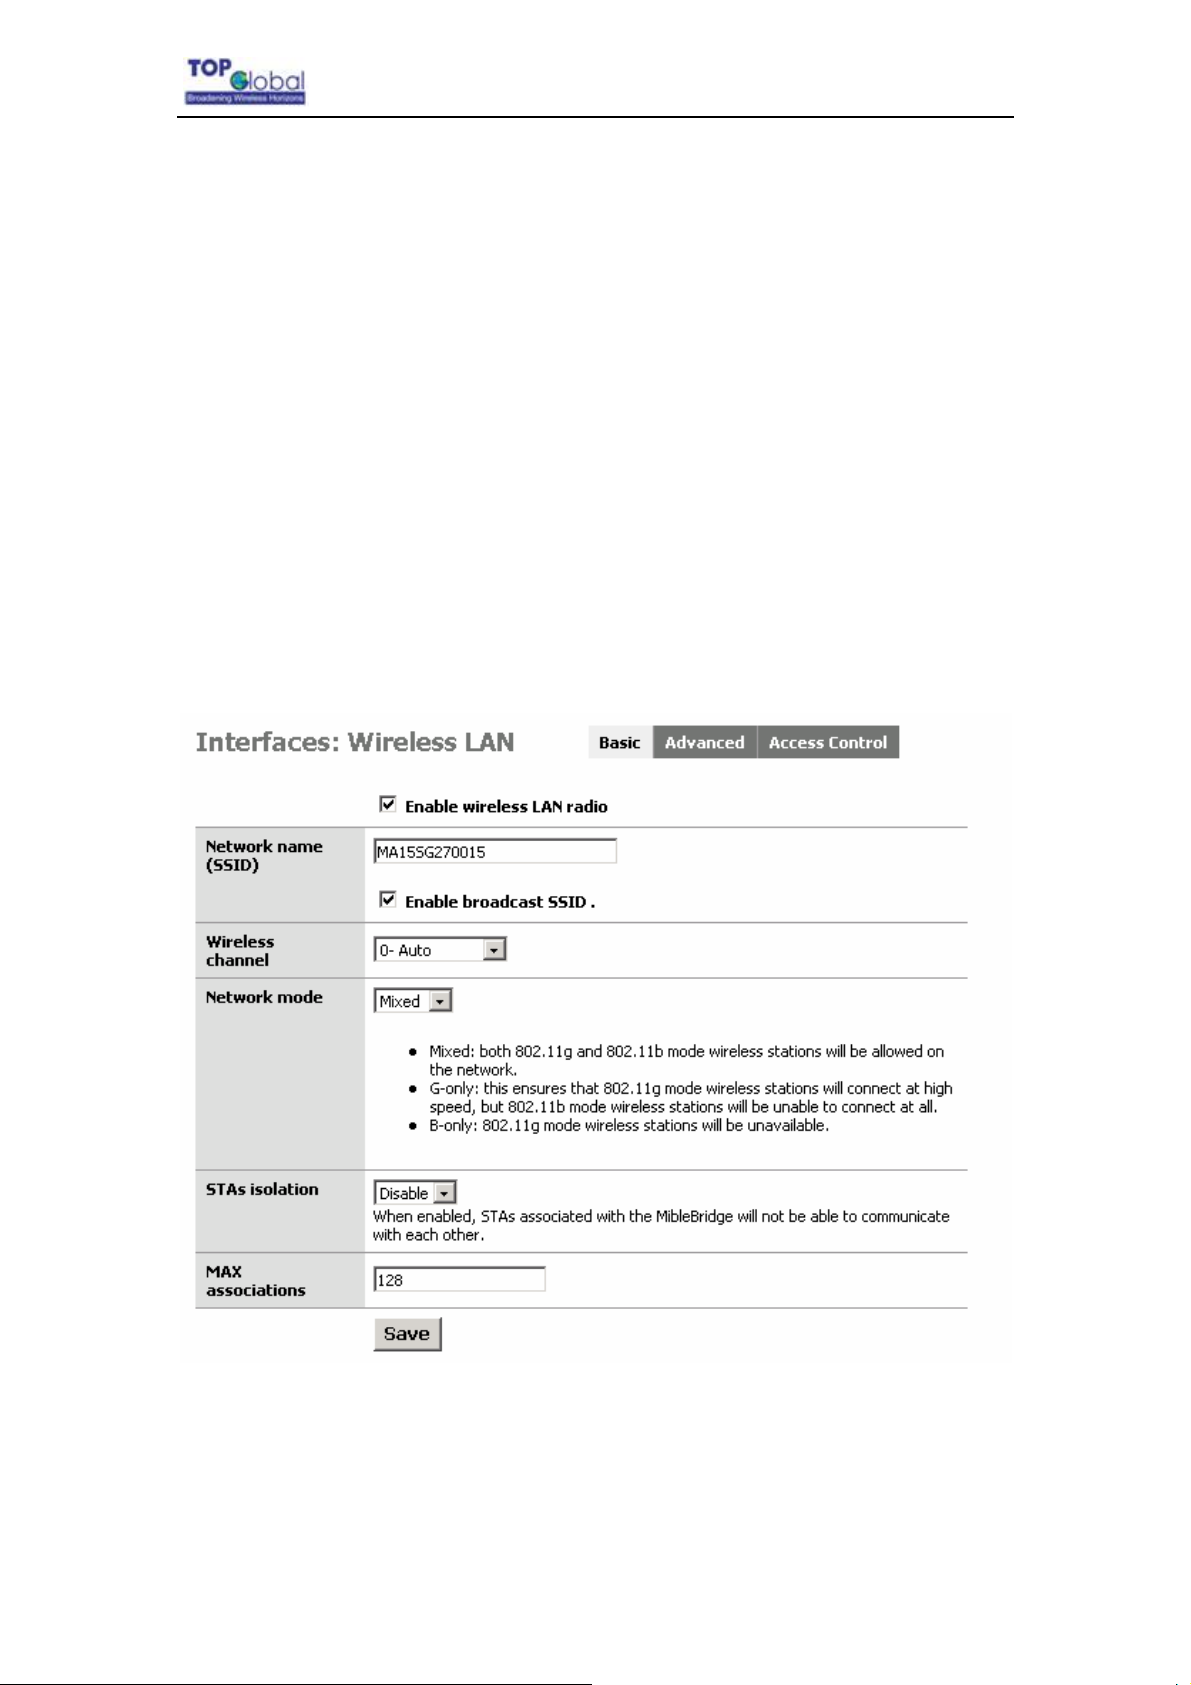
Figure 3-22 Wireless - basic
Function Summary
This configuration page is used to set the wireless LAN basic parameters.
- 29 -
Page 30

Top Global USA. ----MB6000 User Guide
Detailed configurations
Enable Wireless radio: if this box is not checked, no other parameters in this page are
available;
Wireless Network Name (SSID): the wireless LAN network name shared among all
access points in a wireless network. The SSID must be identical for all access points in
the wireless network. It is case-sensitive and must not exceed 32 characters (use any of
the characters on the keyboard). For added security, you should change the default SSID
to a unique name;
Enable SSID Broadcast: When wireless clients survey the local area for wireless
networks, they will detect the SSID broadcast by the Router. To broadcast MB6000's
SSID, keep the default setting checked. If you do not want to broadcast MB6000's SSID,
then select Disable;
Wireless Channel: select the appropriate channel from the list provided to correspond
with your network settings. All client devices in your wireless network must be broadcast
on the same channel in order to function correctly;
Network Mode: from this drop-down menu, you can select the wireless standards running
on your network. If you have both Wireless-g and Wireless-b devices in your network, you
can keep the default setting as Mix. If you have only Wireless-g devices, select g-Only. If
you have only Wireless-b devices, select b-Only;
STAs isolation: if you don’t want different client stations connected to the device
communicate with each other, Enable this option;
Max associations: the max client station number allowed to be connected to the
MB6000.
3.4.2.3.2 Advanced
- 30 -
Page 31
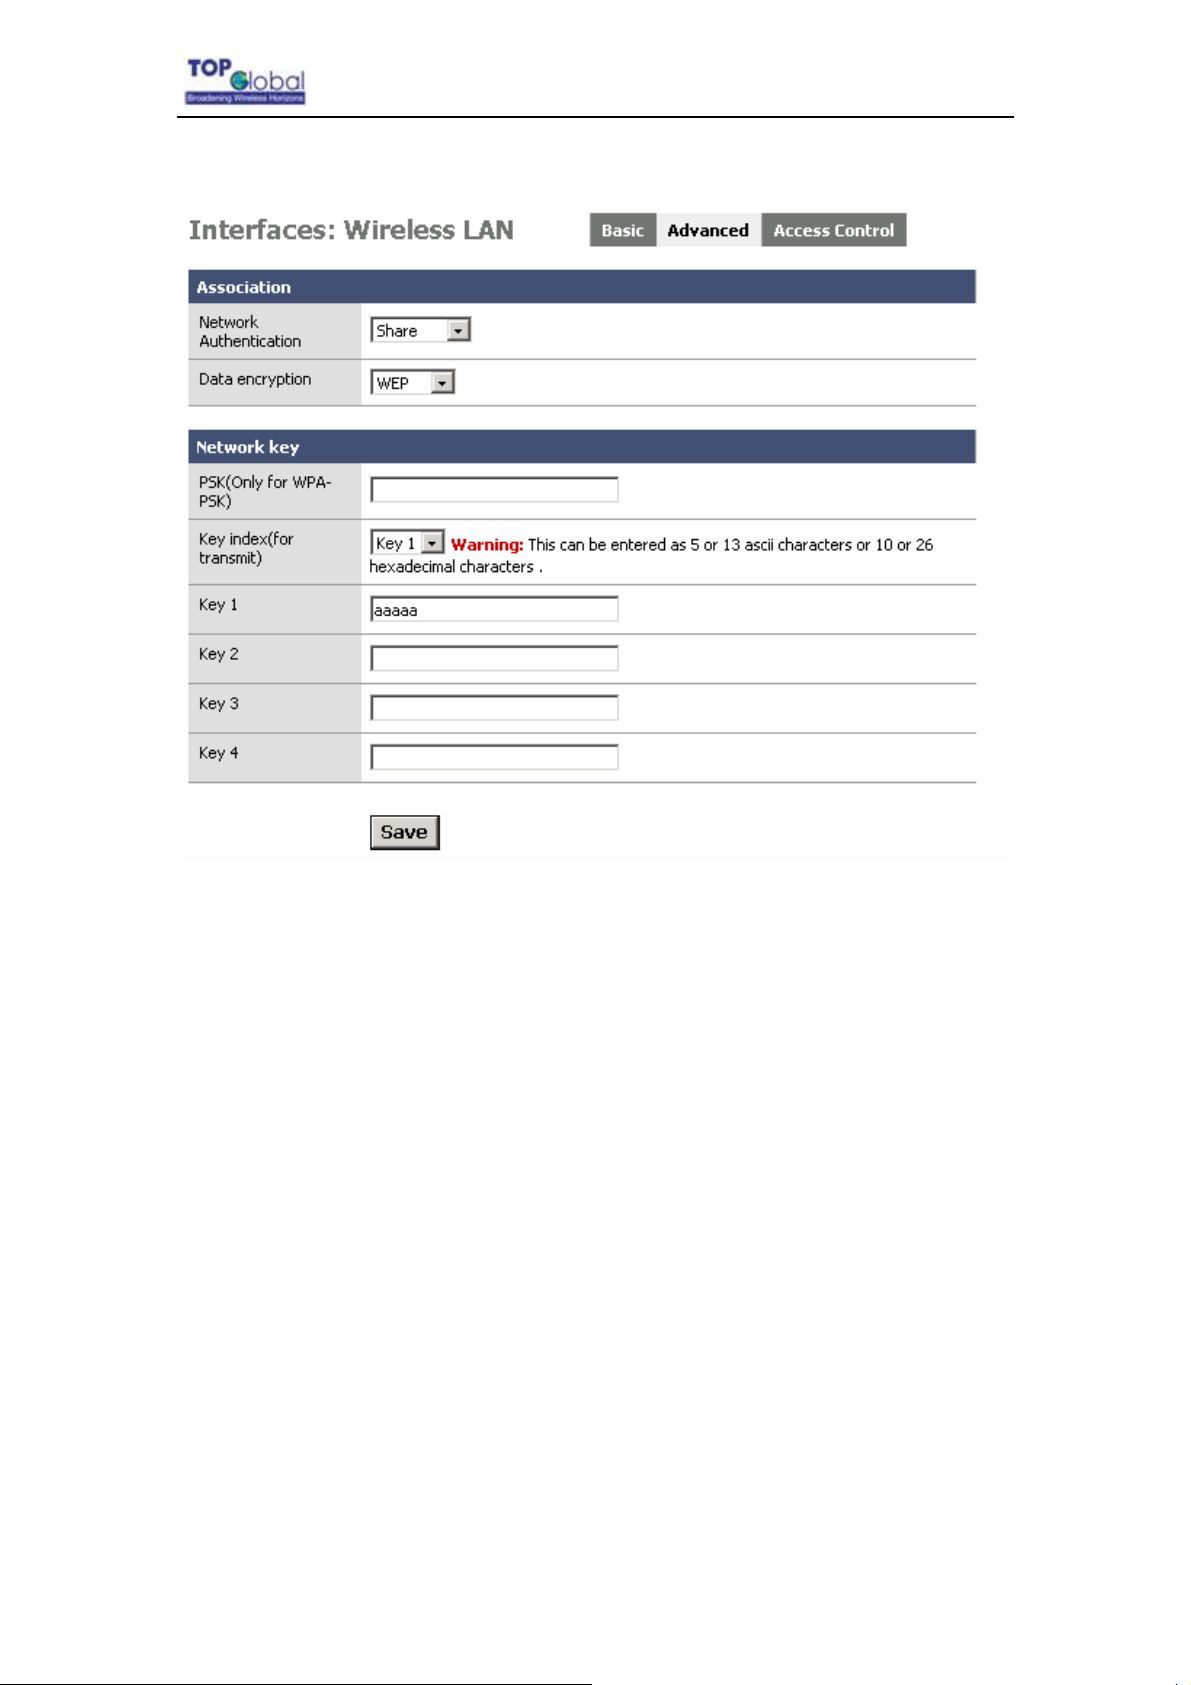
Figure 3-23 Wireless – advanced
Top Global USA. ----MB6000 User Guide
Function Summary
This configuration page is used to set wireless LAN security parameters. MB6000
supports two different types of security settings for your wireless LAN network: Wi-Fi
Protected Access (WPA) Pre-Shared key (PSK) and Wire Equivalence Protection (WEP).
Detailed configurations
Share: is selected from the dropdown menu of Network Authentication, which will
enable the WEP sections;
WEP: There are two levels of WEP encryption security, 64-bit and 128-bit. The bigger
encryption bit number, the more secure your wireless network. However, the transmission
speed is sacrificed at higher bit levels WEP security;
Key Index (for transmit): select WEP key (1-4) to decide which key will be used during
the data transmission;
- 31 -
Page 32

Top Global USA. ----MB6000 User Guide
Enter the WEP Key into the appropriate Key field. All access points in your wireless
network must use the same WEP key to utilize WEP encryption;
WPA Pre-Shared Key - There are two encryption options for WPA Pre-Shared Key, TKIP
and AES. TKIP stands for Temporal Key Integrity Protocol. TKIP utilizes a stronger
encryption method and incorporates Message Integrity Code (MIC) to provide protection
against hackers. AES stands for Advanced Encryption System, which utilizes a symmetric
128-Bit block data encryption. To use WPA Pre-Shared Key, enter a password in the
PSK(Only for WPA-PSK) field between 8 and 63 characters long;
You can also configure the MB6000 as other security mode to be compatible for other
station security settings. Such as:
Mode 1: no security, no authentication
Network Authentication: OPEN
Data Encryption: Disabled
Mode 2: enable security, no authentication
Network Authentication: OPEN
Data Encryption: WEP
Mode 3: no security, enable authentication
Network Authentication: Share
Data Encryption: Disabled
- 32 -
Page 33
3.4.2.3.3 Access Control
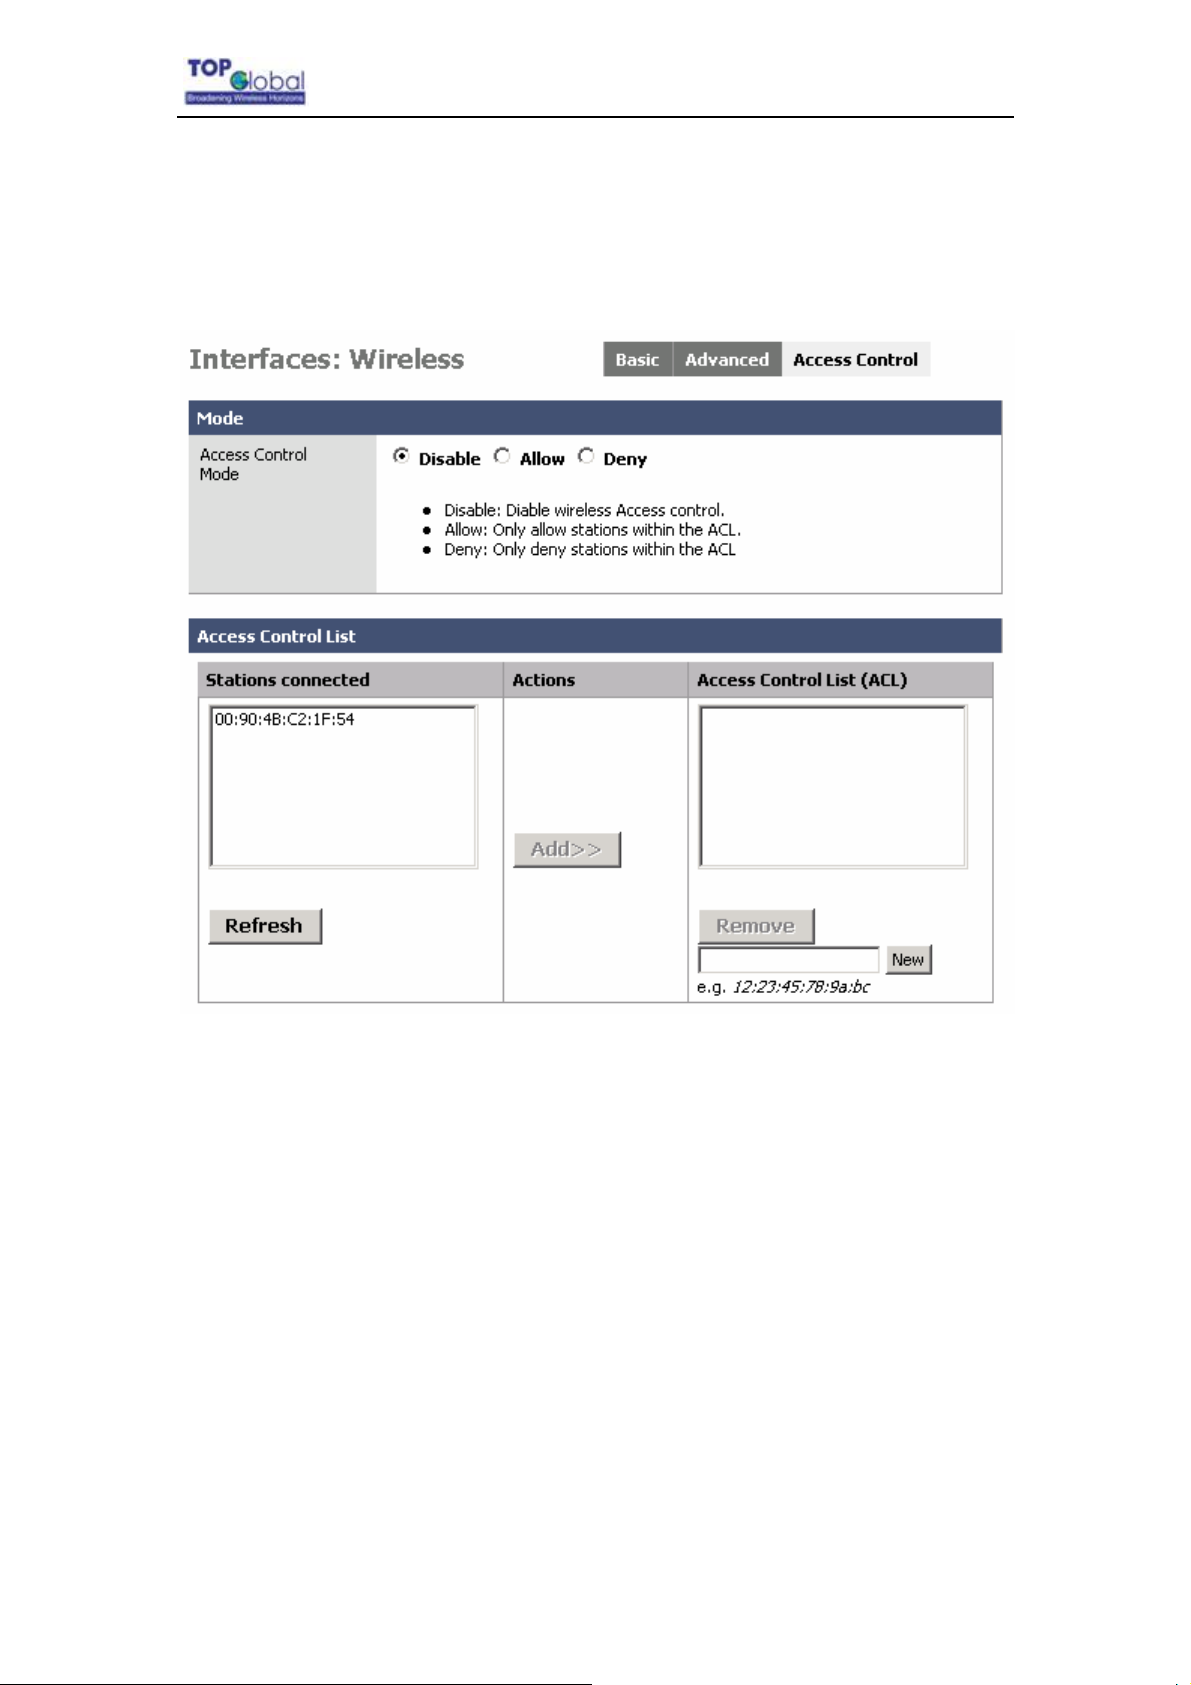
Figure 3-24 Wireless LAN – Access Control
Top Global USA. ----MB6000 User Guide
Function Summary
Besides assure the communication security in Wi-Fi network through encryption and
authentication, allowing or denying some special stations connection in the Wi-Fi network
is also an option to guarantee the wireless network security. This page configuration is
used to set the station connection control to assure the wireless network security.
Detailed configurations
Access Control Mode: MB6000 supports 3 type access control modes:
Disable: indicates no access control function, allow all of the stations connect to MB6000;
- 33 -
Page 34

Top Global USA. ----MB6000 User Guide
Allow: indicates only allow the stations which have the MAC address listed in the table to
access the MB6000;
Deny: indicate only deny the stations which have the MAC address listed in the table to
access the MB6000;
Stations connected:
stations which have already connected to MB6000 appear in this domain. Click the
Refresh button, this list will be updated.
Access Control List: the MAC addresses of stations which have been allowed or denied
to connect to MB6000 are saved in this list box.
There are 2 methods to input the MAC address: one is to select the station item in the
Station Connected list, then click Add; the other is to input the station MAC address
through MAC address edit box on the page (below the ACL), the input MAC address
format must be XX:XX:XX:XX:XX:XX.
Note:
Don’t forget to click Save button to save the settings.
in order to add the ACL conveniently, the MAC addresses of
3.4.3 Firewall
There are four main categories in this setting:
MAC Filter
Access rules
Port forwarding
Services
- 34 -
Page 35
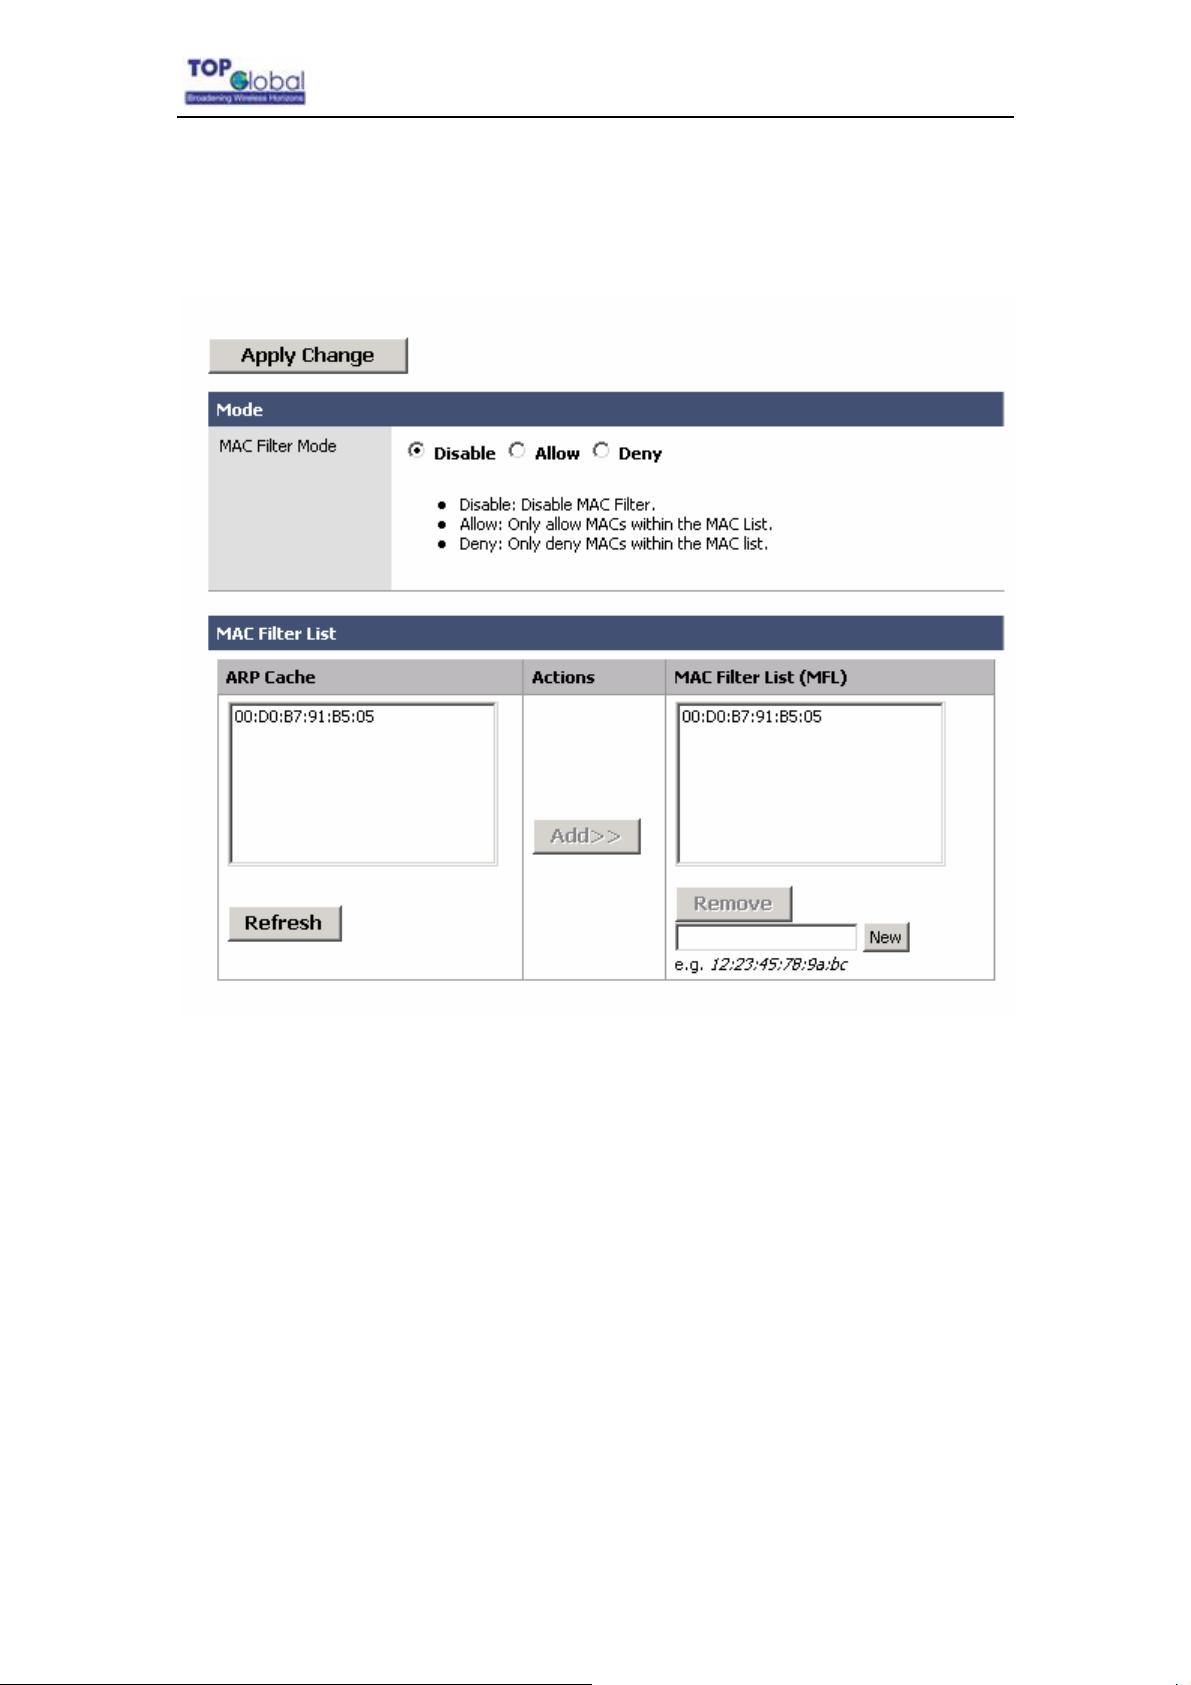
3.4.3.1 MAC Filter
Figure 3-25 MAC Filter
Top Global USA. ----MB6000 User Guide
Function Summary
The MAC address is a unique value associated with a network adapter. MAC addresses
are also known as hardware addresses or physical addresses. They uniquely identify an
adapter on a LAN. MAC addresses are 12-digit hexadecimal numbers (48 bits in length).
MAC Filter can control the hosts in LAN to allow or deny their Internet access based on
their MAC addresses.
Detailed Configurations
z MAC Filter Mode:
Disable means no MAC Filter is implemented
Allow means only the hosts with the MAC address in the list can access the
Internet.
- 35 -
Page 36
Top Global USA. ----MB6000 User Guide
Deny means only the hosts with the MAC address in the list can’t access the
Internet.
z ARP Cache: MB6000 collects the MAC addresses information of all the hosts
that communicated with MB6000 and display the information here. You can
easily add the MAC addresses you select to the MAC Filter List by click the Add
button. You can refresh the ARP cache by click the Refresh button.
z Access Control List: This is the MAC addresses list of all the selected hosts.
You can add items with two methods: Select from the ARP Cache or type the
MAC address manually in the MAC address edit box at the lower right hand side.
Note:
Both MAC Filter and Wireless LAN MAC Access Control List can realize the
access control based on MAC addresses, but they are different:MAC filter controls
the access to the Internet however Wireless LAN Access Control List controls the
access to the MB6000 via Wireless LAN.
3.4.3.2 Access rules
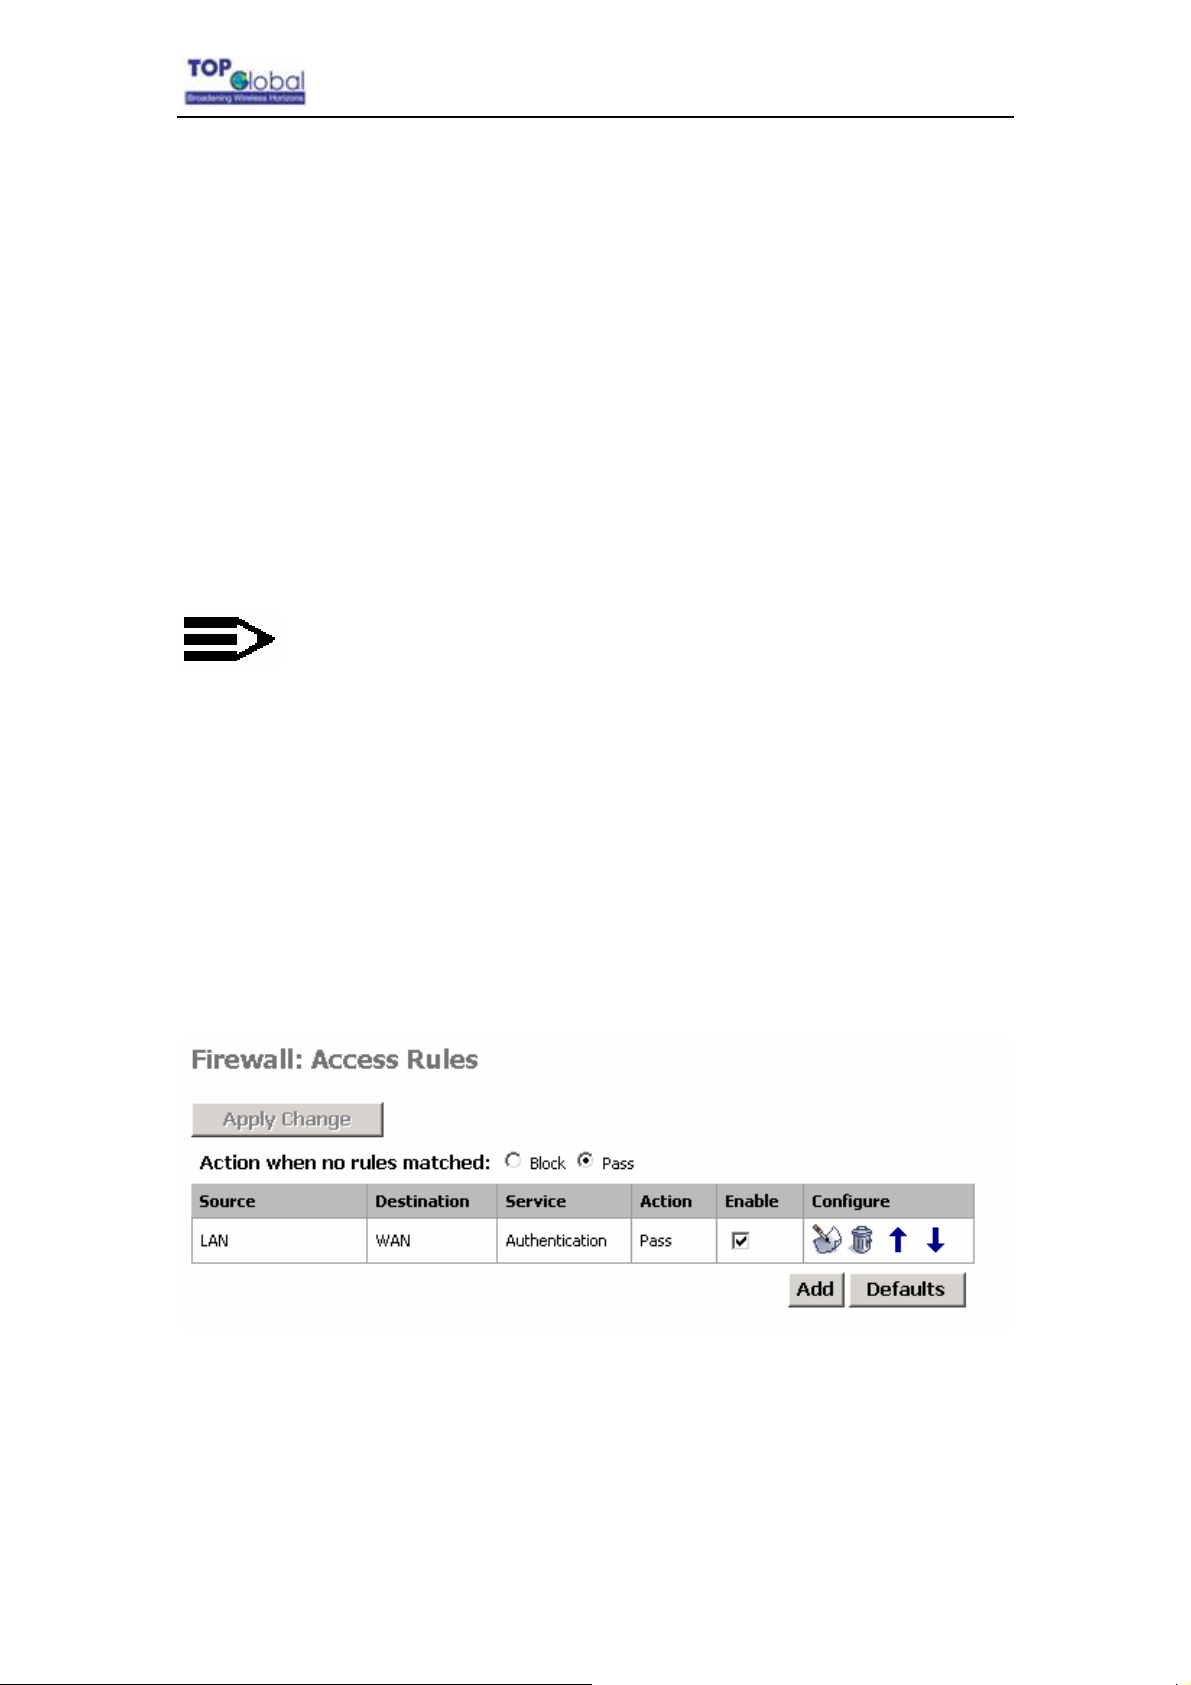
Figure 3-26 Access Rules
Function Summary
Access Rules is one of the most important functions of MB6000 firewall. Access Rules
utilize stateful package filter technology. All the access rules in firewall are set here.
- 36 -
Page 37
Top Global USA. ----MB6000 User Guide
Detailed Configurations
The access rules of the firewall in MB6000 have many access rule items. You can
maintain these rules with the operations of: Add, Delete, Move up, Move down, Apply.
z Default Policy: Factory default rules;
z Enable Checkbox: You can enable or disable a rule by check or uncheck this
checkbox;
z Move up, Move down: The sequence of the rules in the list is very important for
the firewall. When the firewall deals with a data packet, it will check the rules
from top to bottom in sequentially and execute the first rule which matches the
character of this packet. So please pay attention to the rules sequence when
you are using multiple rules;
z Apply Change: click the Apply Change button to validate the change
immediately. No reboot is required here;
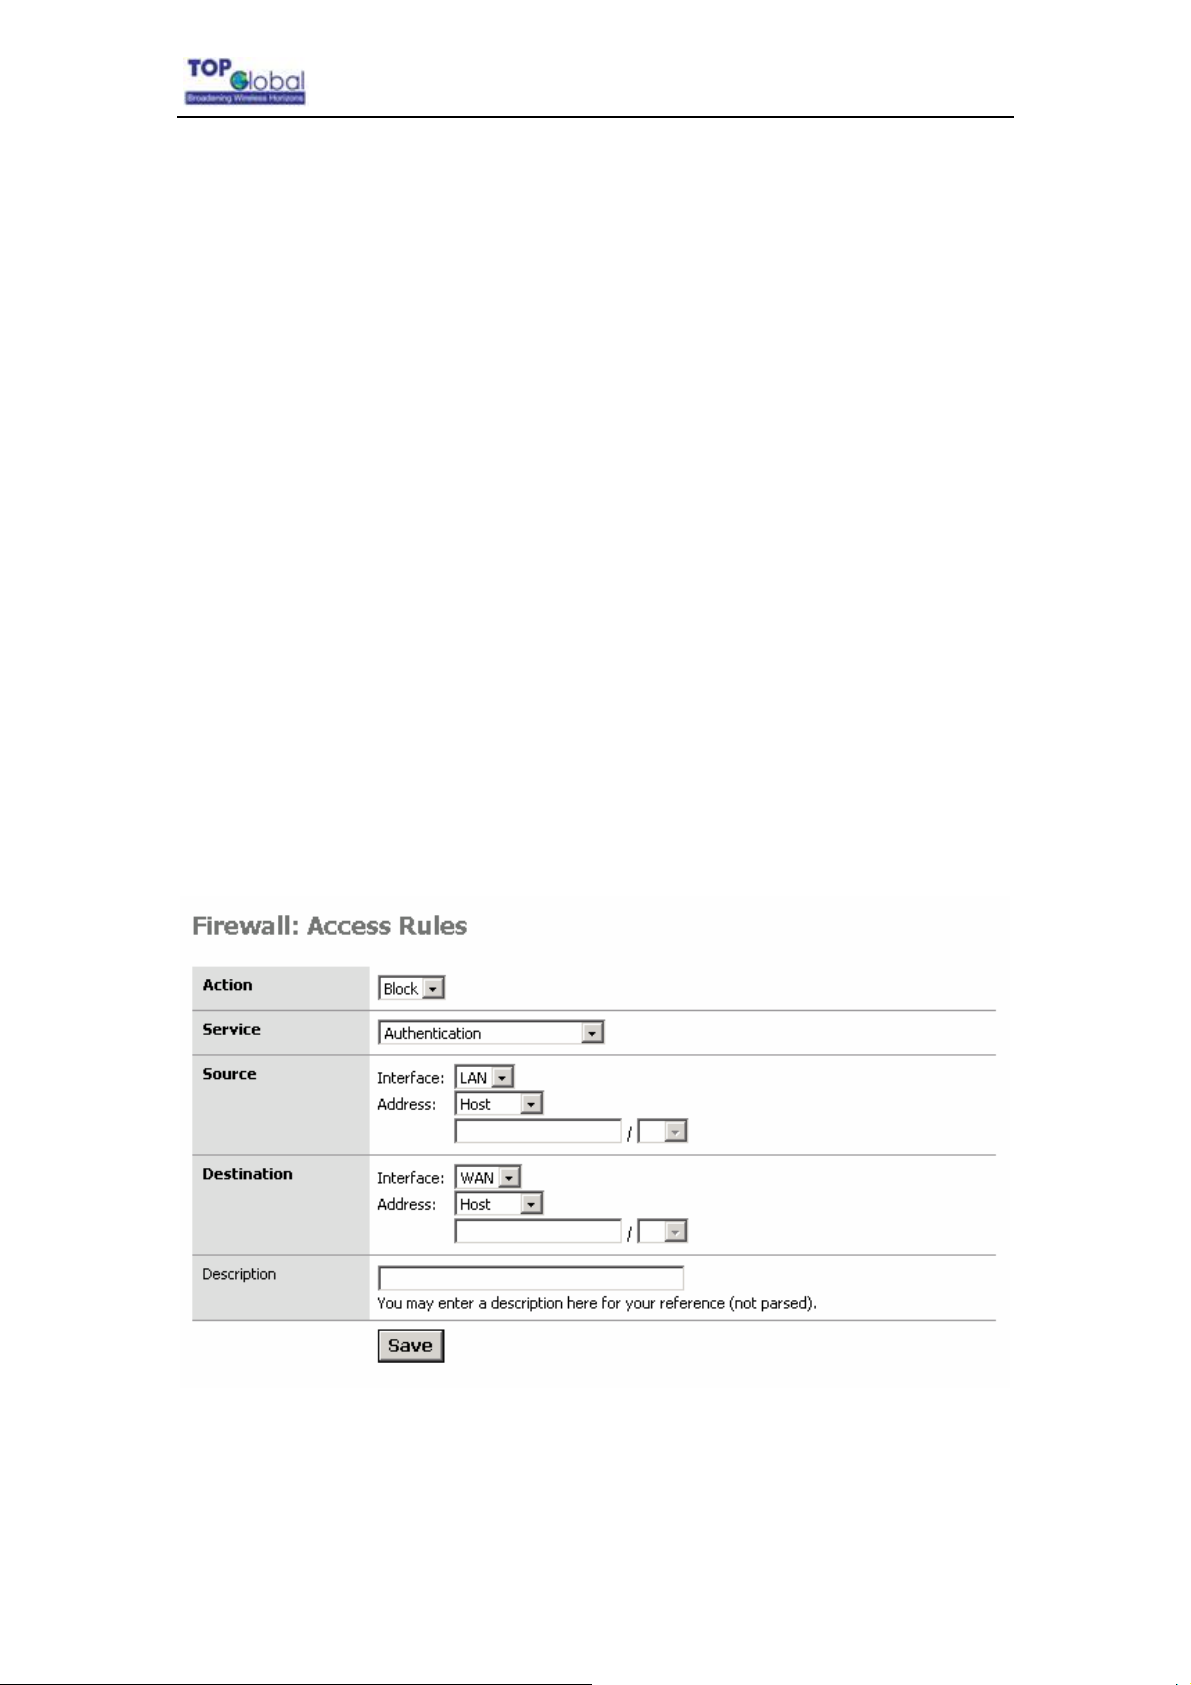
z Add: Click the Add button, a pop up window for inputting an access rule will
appear:
Each rule is consisted of the following parameters:
Action: You have two options here: Block or Pass. Block means the data packet which
matches this rule will be blocked by firewall; Pass means the data packet which matches
- 37 -
Page 38
Top Global USA. ----MB6000 User Guide
this rule will be passed by firewall;
Service: This parameter indicates the service type of this rule. The possible type includes
the system default services and also user defined services;
Source: This parameter indicates the IP addresses range of data source;
Destination: This parameter indicates the IP addresses range of destination;
Description (optional): Type your comments for this rule here.
Note:
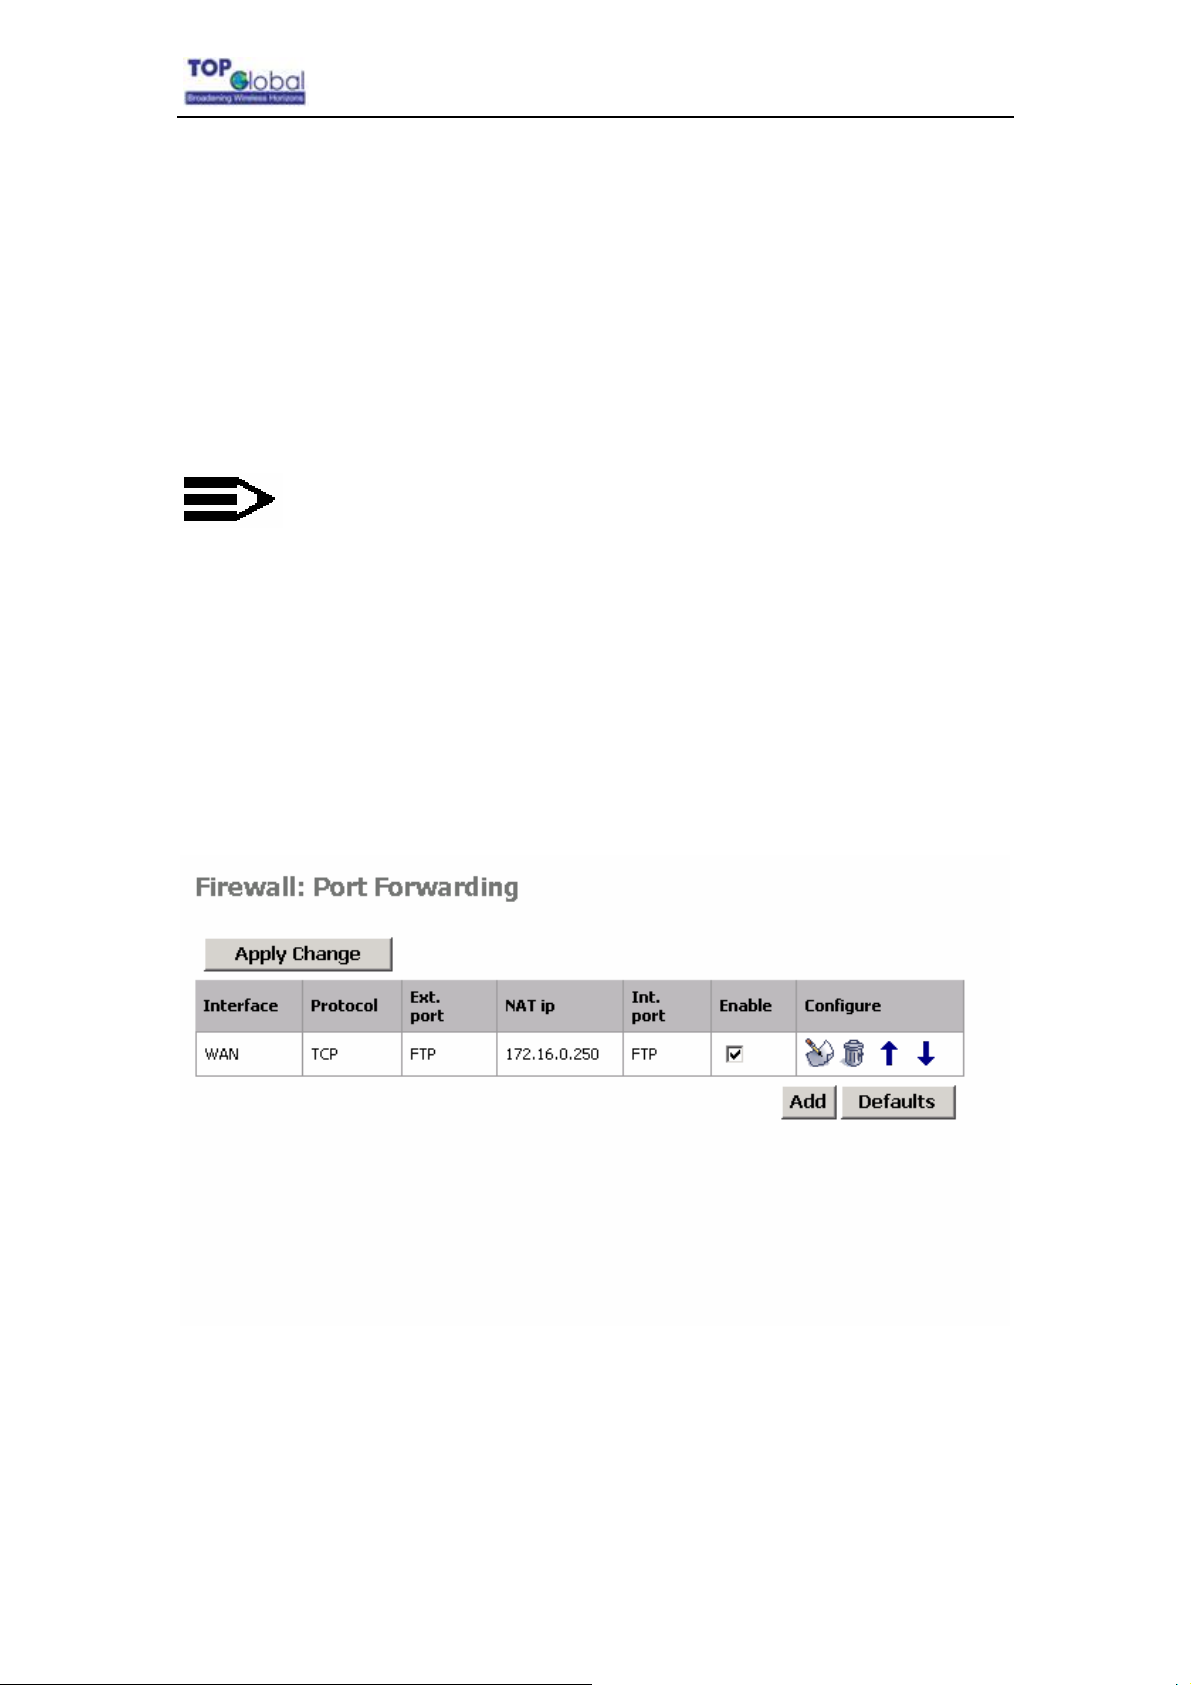
3.4.3.3 Port forwarding
Figure 3-27 Port forwarding
Function Summary
This feature allows you to forward incoming traffic on certain ports in order to access
servers behind the NAT. This feature can let you setup a web server, mail server, FTP
server, DNS, etc on your LAN so it can be accessed from the Internet.
- 38 -
Page 39
Top Global USA. ----MB6000 User Guide
Detailed Configurations
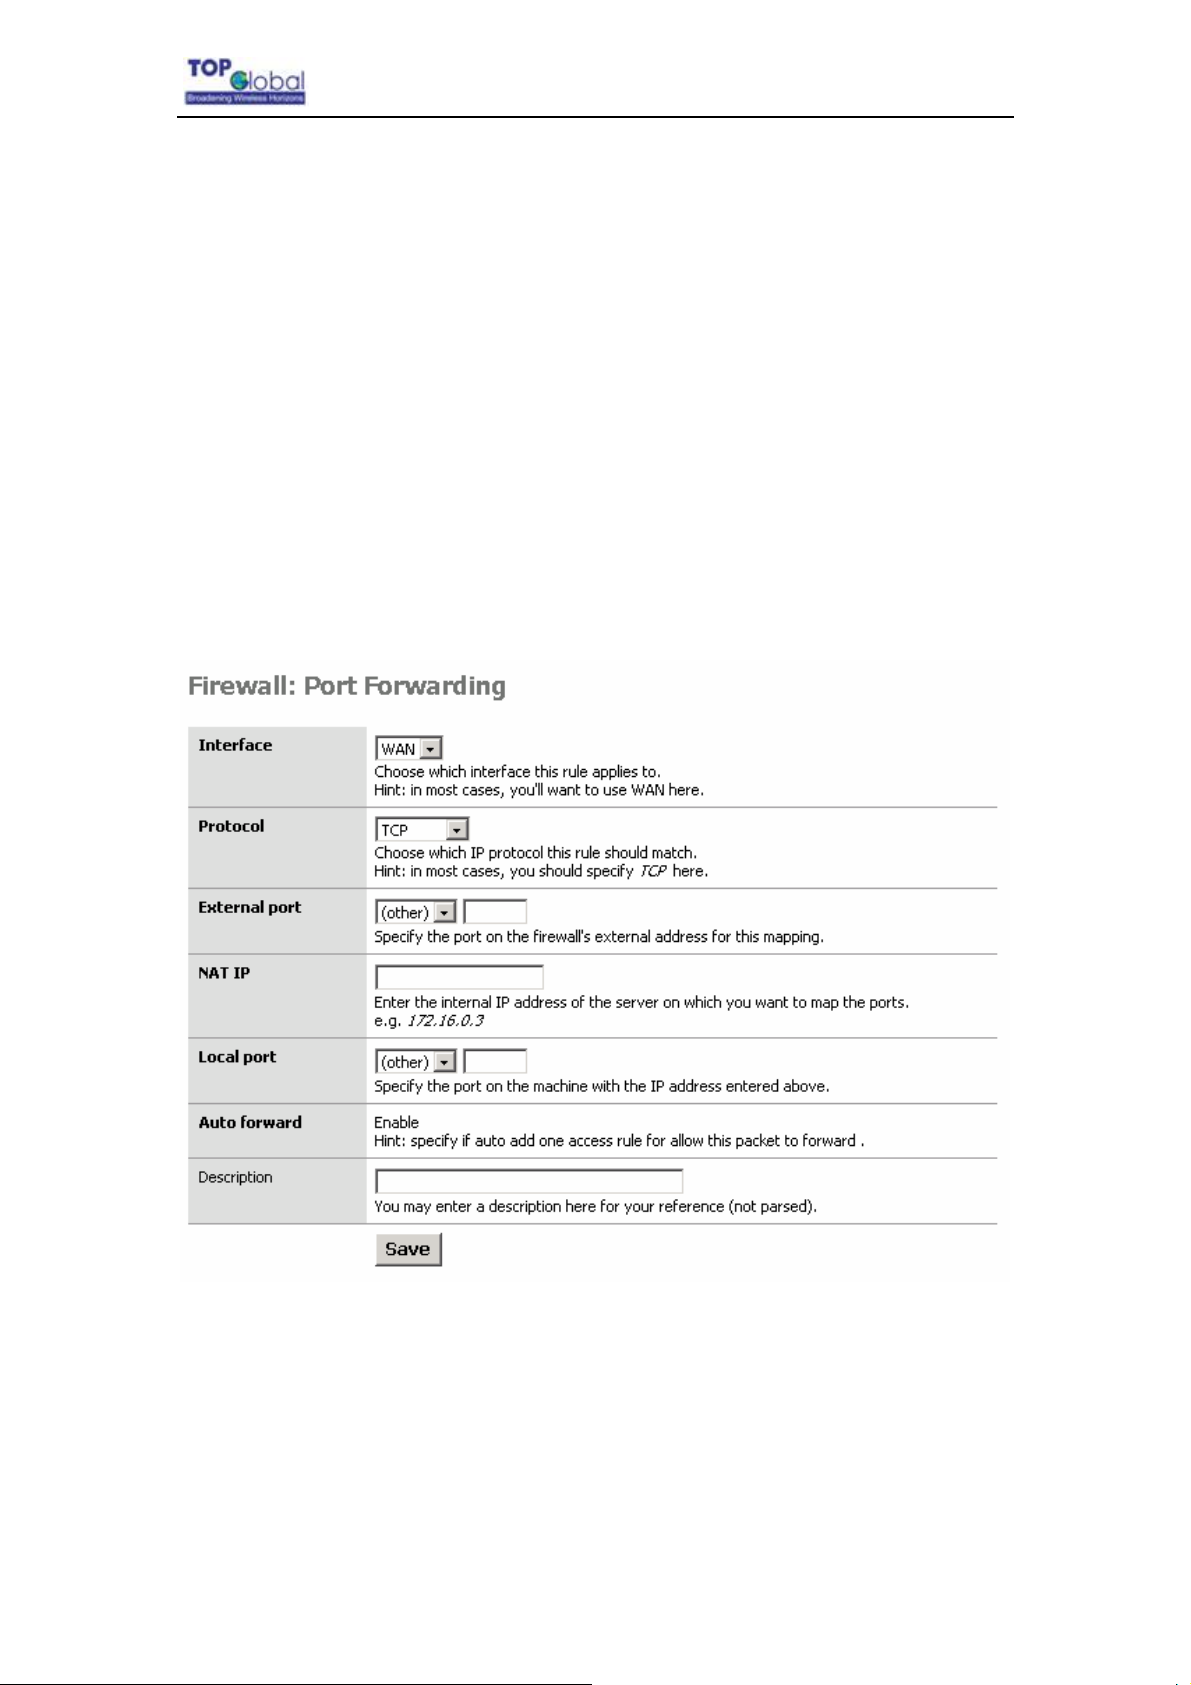
The port forwarding table in MB6000 is consisted of many port forwarding items.
Enable Checkbox:You can enable or disable a port forwarding item by check or
uncheck this checkbox;
Move up, Move down: Re-arrange the order of each item in the list;
Apply Change: click the Apply Change button to validate the change
immediately. No reboot is needed here;
Add: Click the Add button, a pop up window for inputting port forwarding item
will appear:
Each item is consisted of the following parameters:
Interface: This parameter indicates which interface of MB6000 will implement this port
forwarding rule. In most cases the interface should be WAN;
Protocol: This parameter indicates which protocol will implement this port forwarding rule.
Possible protocols are: TCP, UDP, TCP/UDP;
- 39 -
Page 40
Top Global USA. ----MB6000 User Guide
External port: This parameter indicates the port for public access;
NAP IP: This parameter indicates the IP address of the internal host which wants to
provide service for the outside.
Local port: This parameter indicates the port of internal service;
Auto forward: This parameter will be Enable always, which means MB6000 will enable
this forward automatically;
Description (optional): Type your comments for this rule here.
3.4.3.4 Services
Figure 3-28 Services
Function Summary
- 40 -
Page 41
Top Global USA. ----MB6000 User Guide
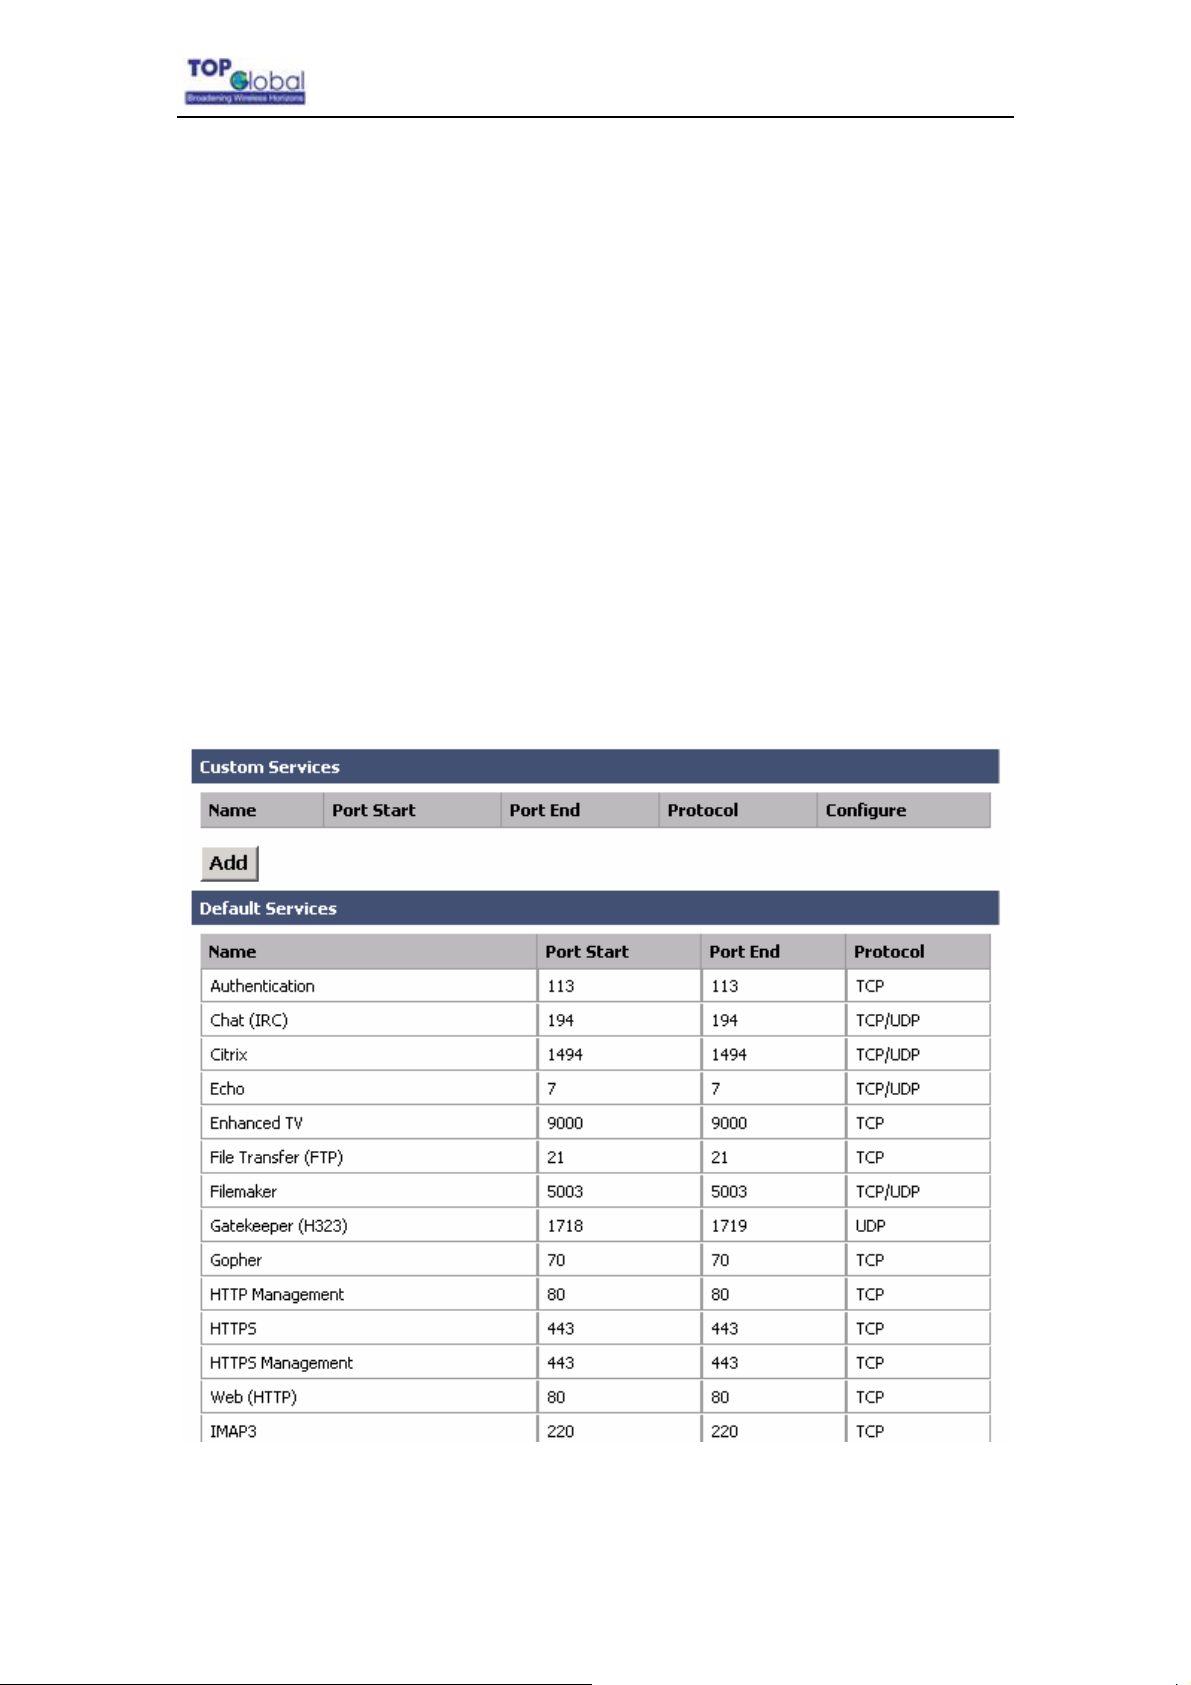
You can define fire wall services here and select the defined services in the Access
Rules to configure the fire wall.
Detailed Configurations
The service set is consisted of many service items. You can manage the service set
by create and delete service item. Service set can be divided into two parts, one is system
default part, and you can’t delete them; another one is user defined part, and you can
delete them as you wish.
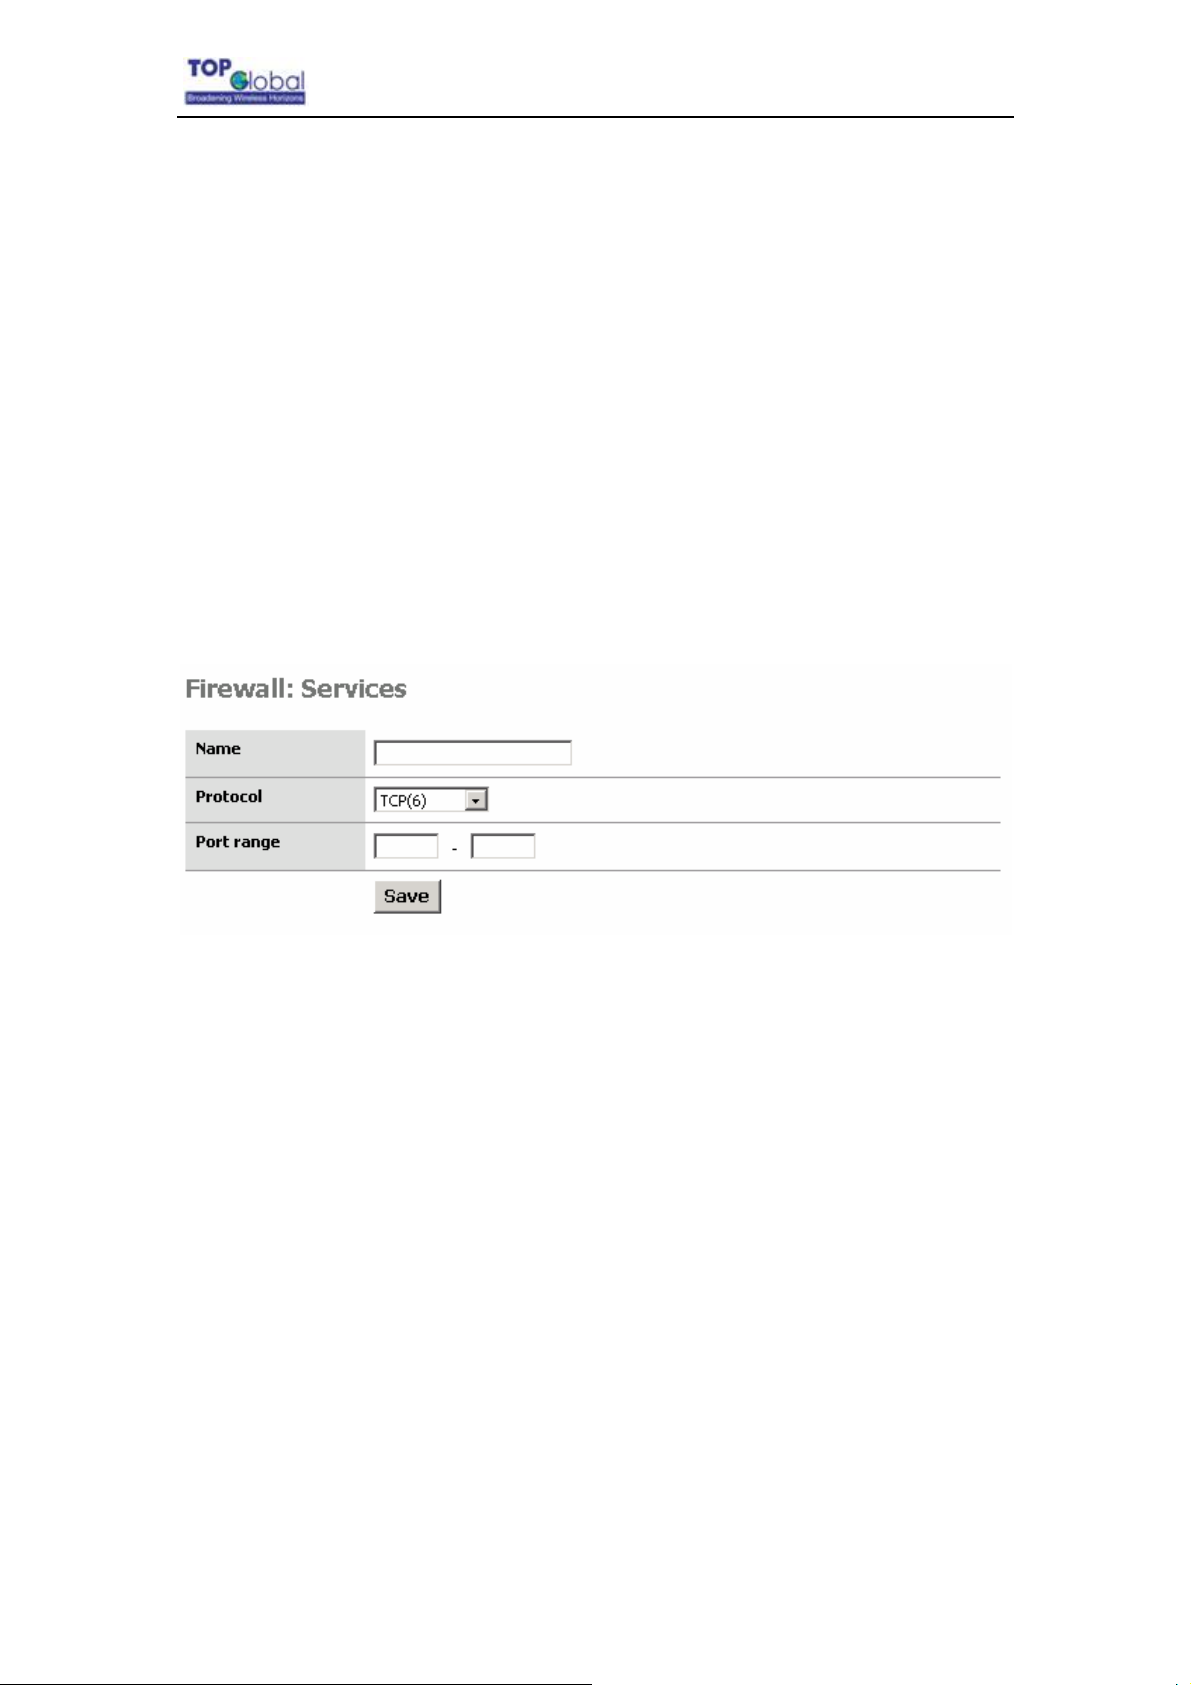
Add: Click the Add button, a pop up window for inputting a service item will
appear:
Name: the service name. Assign a meaningful name for a service so that you can
remember it by the name.
Protocol: This parameter indicates which protocol will implement this service. Possible
protocols are: TCP, UDP, TCP/UDP;
Port range: This parameter indicates which port or port range will implement this service.
If only one port will implement this service, type this port in both boxes. If a port range will
implement this service, type the start port in the left box and the end port in the right box.
3.4.4 Security Services
There are two main categories in this setting:
Content Filter
- 41 -
Page 42
Anti-Attack
3.4.4.1 Content Filter
Figure 3-29 Content Filter
Top Global USA. ----MB6000 User Guide
Function Summary
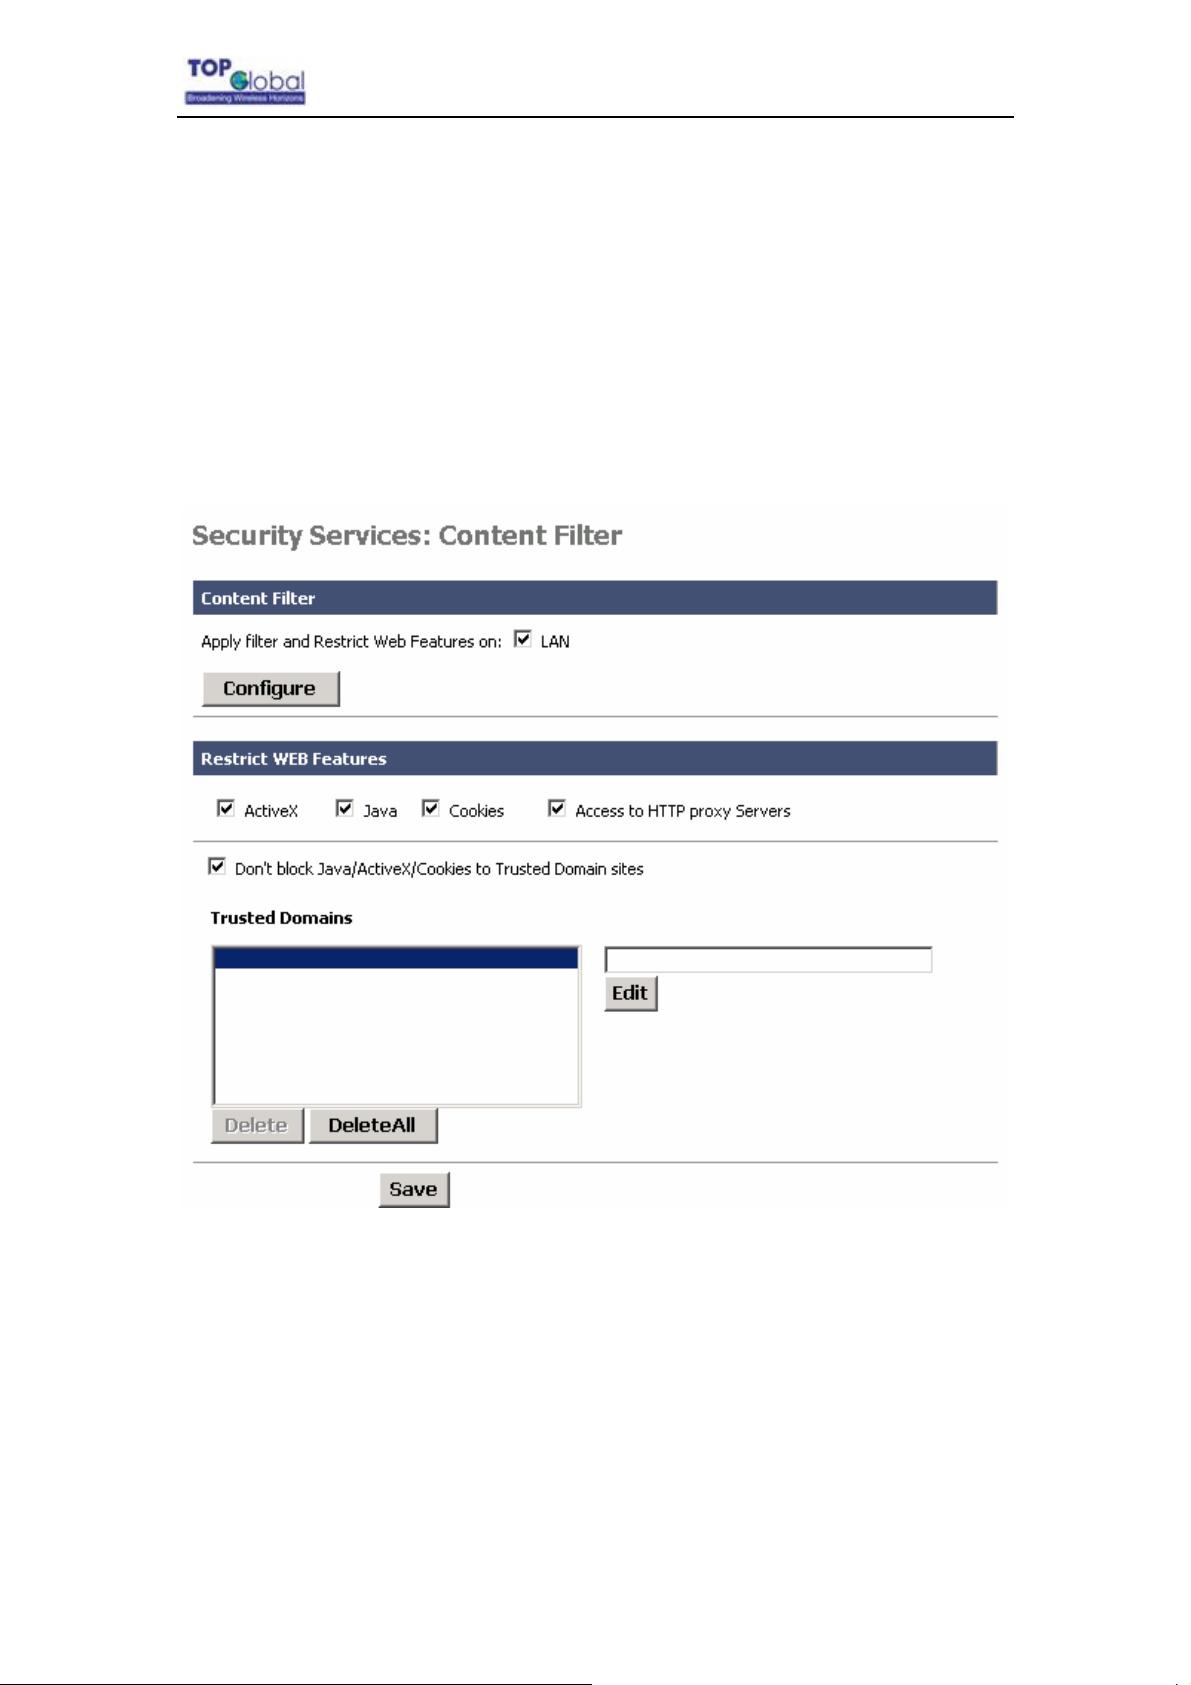
Content Filter is an advance security feature, it can filter the HTTP sessions
according to the contents.
Detailed Configurations
- 42 -
Page 43
Top Global USA. ----MB6000 User Guide
Content Filter includes URL filter list and WEB features restriction. The default
configuration of content filter is off. You can enable it by check the check box “Apply filter
□
and Restrict Web Features on:
LAN ”, then click the button Save.
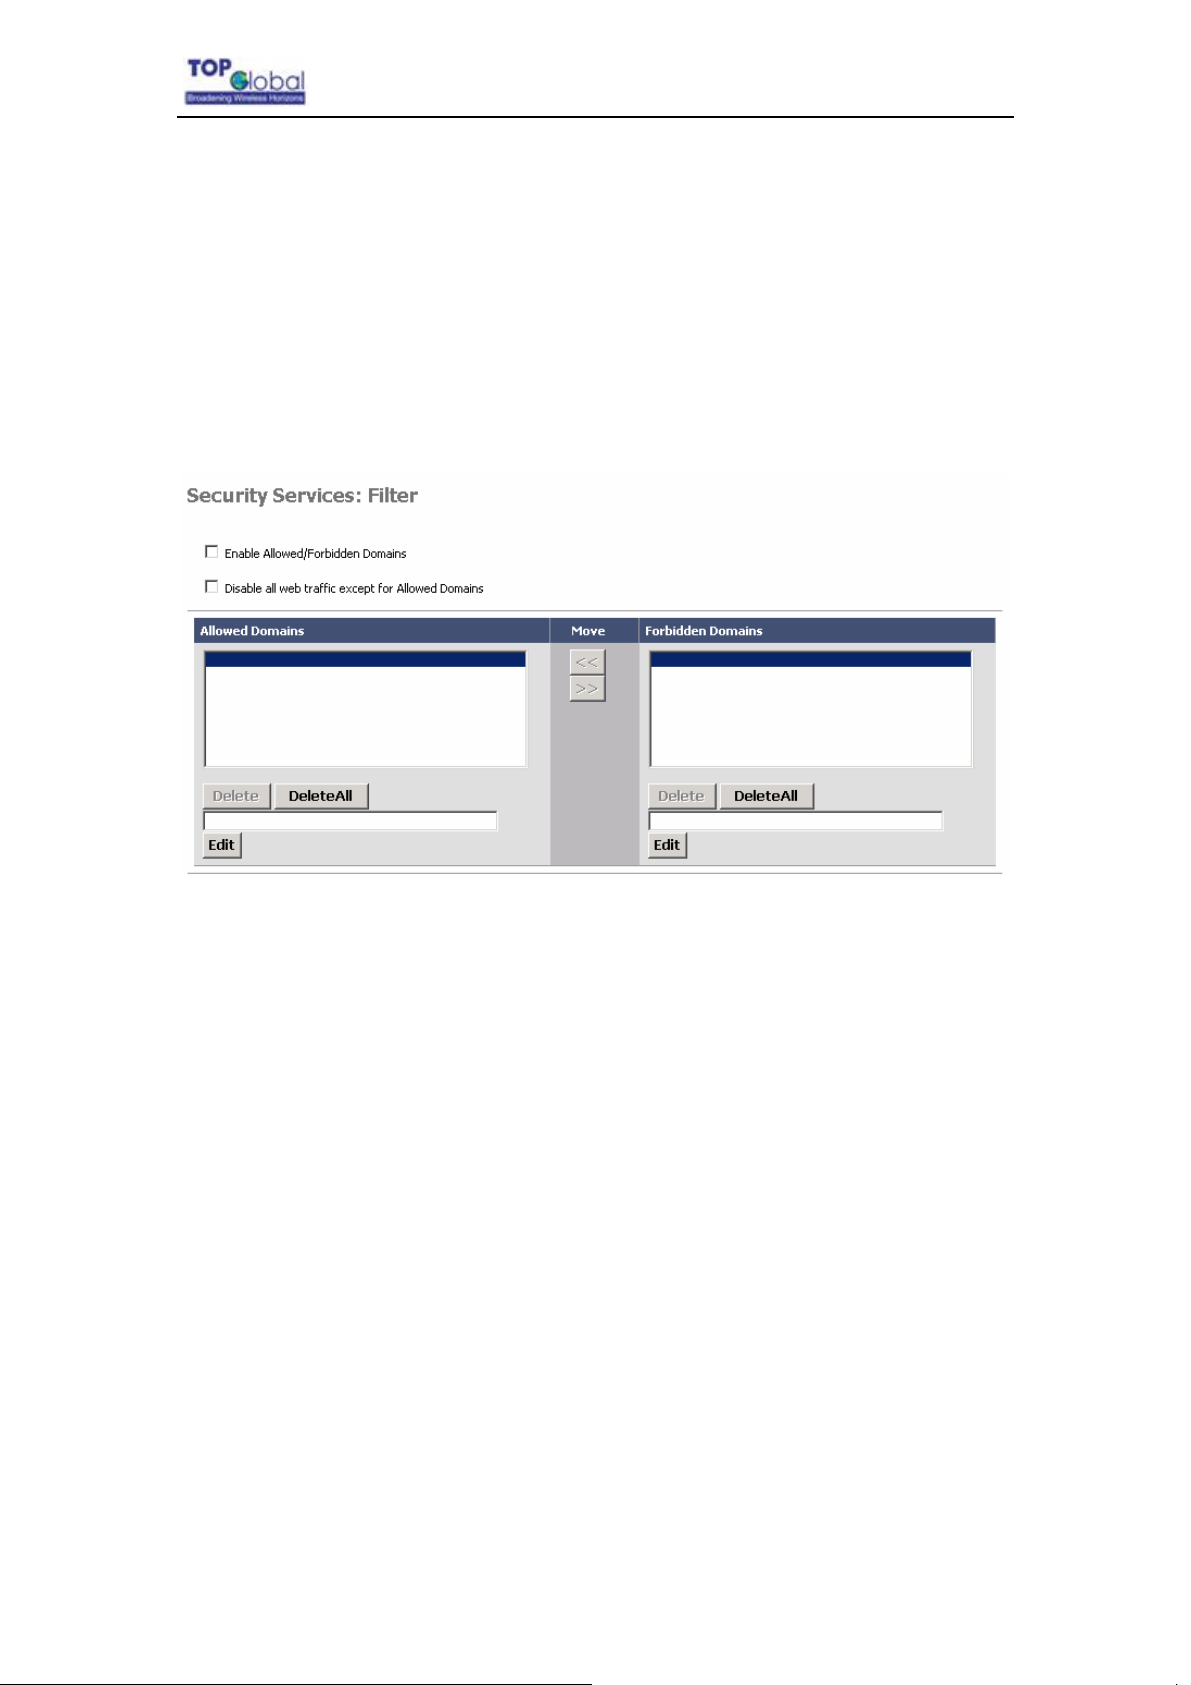
Configure: Click the button Configure to define the URL filter list:
Figure 3-30 URL Filter
Enable Allowed/Forbidden Domains indicates enable URL Filter or not;
Disable All web traffic expect Allowed Domains indicates URL Filter mode. URL Filter
has two modes: Allow means to allow the URL in the Allowed Domains only; Forbidden
means to forbid the URL in the Forbidden Domains only. Checking this checkbox means
the “allow” mode is adopt.
- 43 -
Page 44
3.4.4.2 Anti-Attack
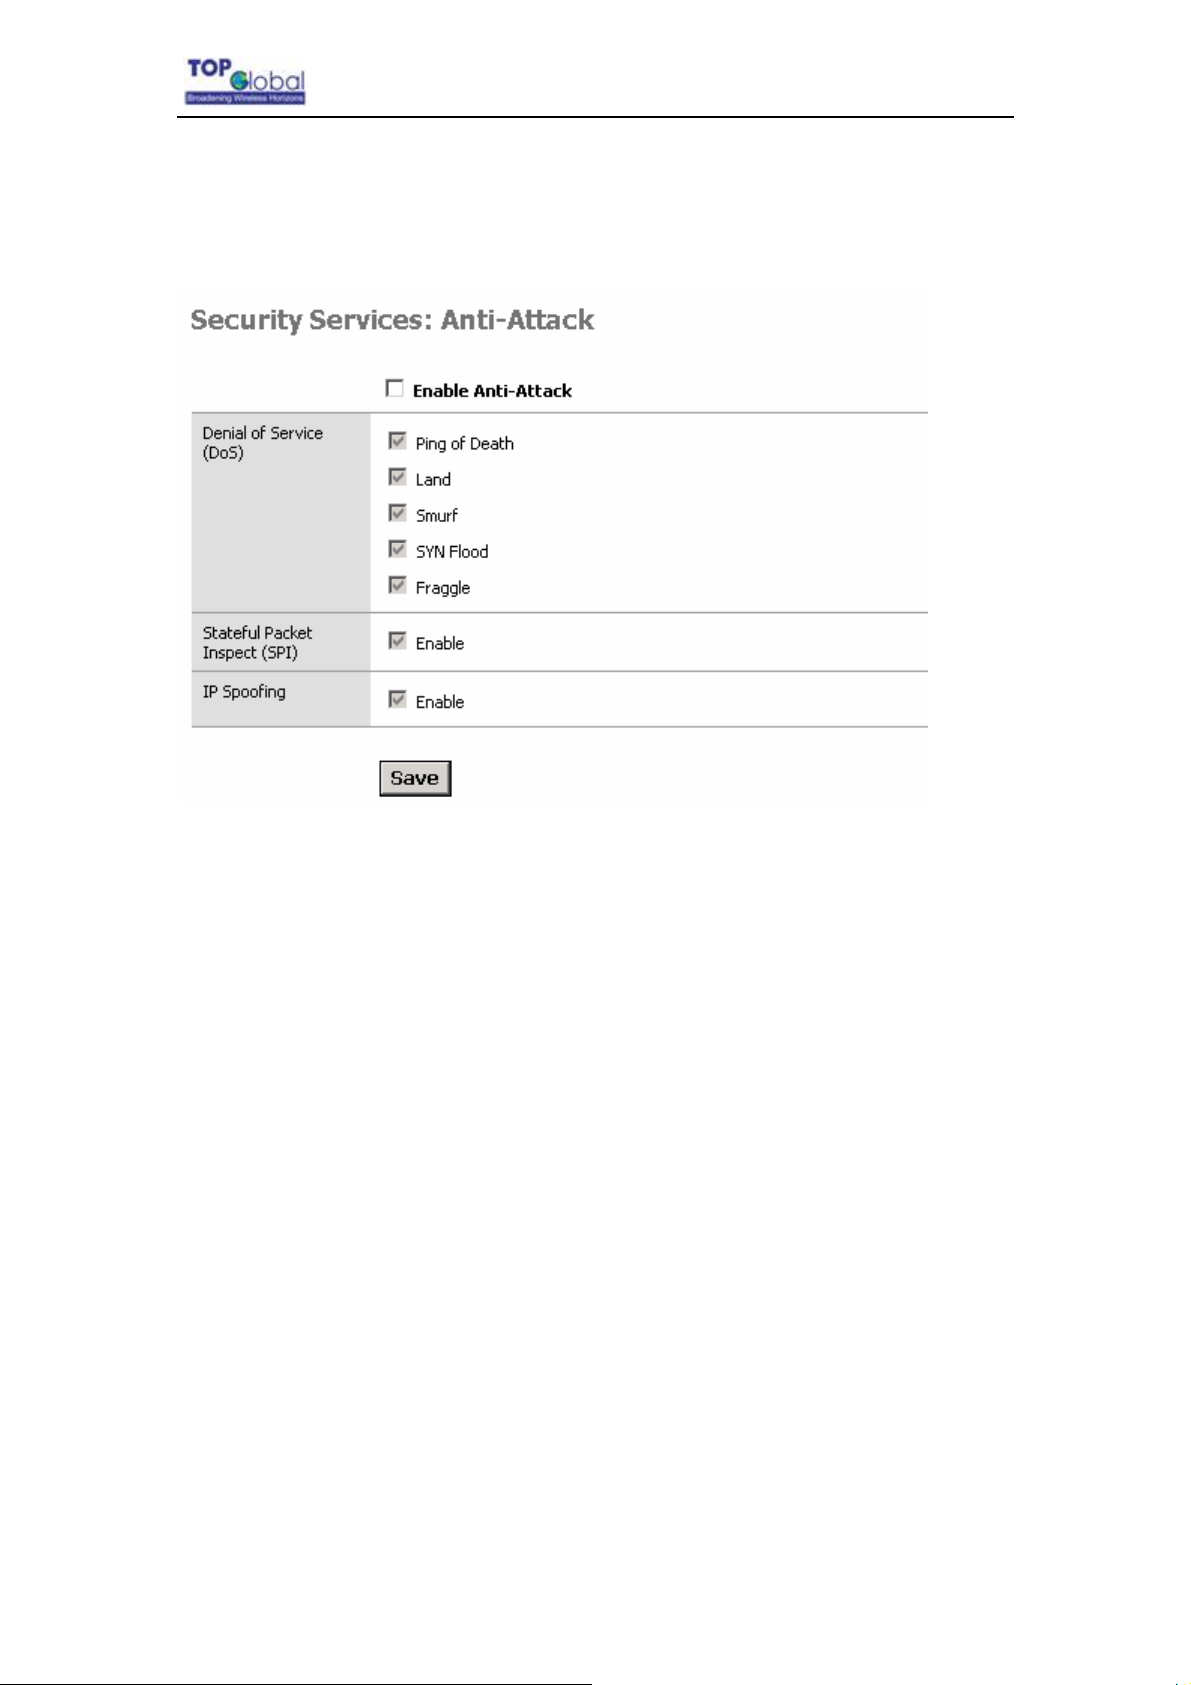
Figure 3-31 Anti-Attack
Top Global USA. ----MB6000 User Guide
Function Summary
Anti-Attack function can block the attack from LAN/WAN and the stateful packet
inspect (SPI). MB6000 can block the following attack:
Dos: Ping of Death, Land, Smurf, SYN Flood, Fraggle;
IP Spoofing.
Detailed Configurations
Enable Anti-Attack: Check this checkbox to enable the Anti-Attack function. Select
the attack you want to block after you enabled the Anti-Attack function.
3.4.5 Status
There is one category in this setting:
Interfaces
- 44 -
Page 45
Top Global USA. ----MB6000 User Guide
3.4.5.1 Interfaces
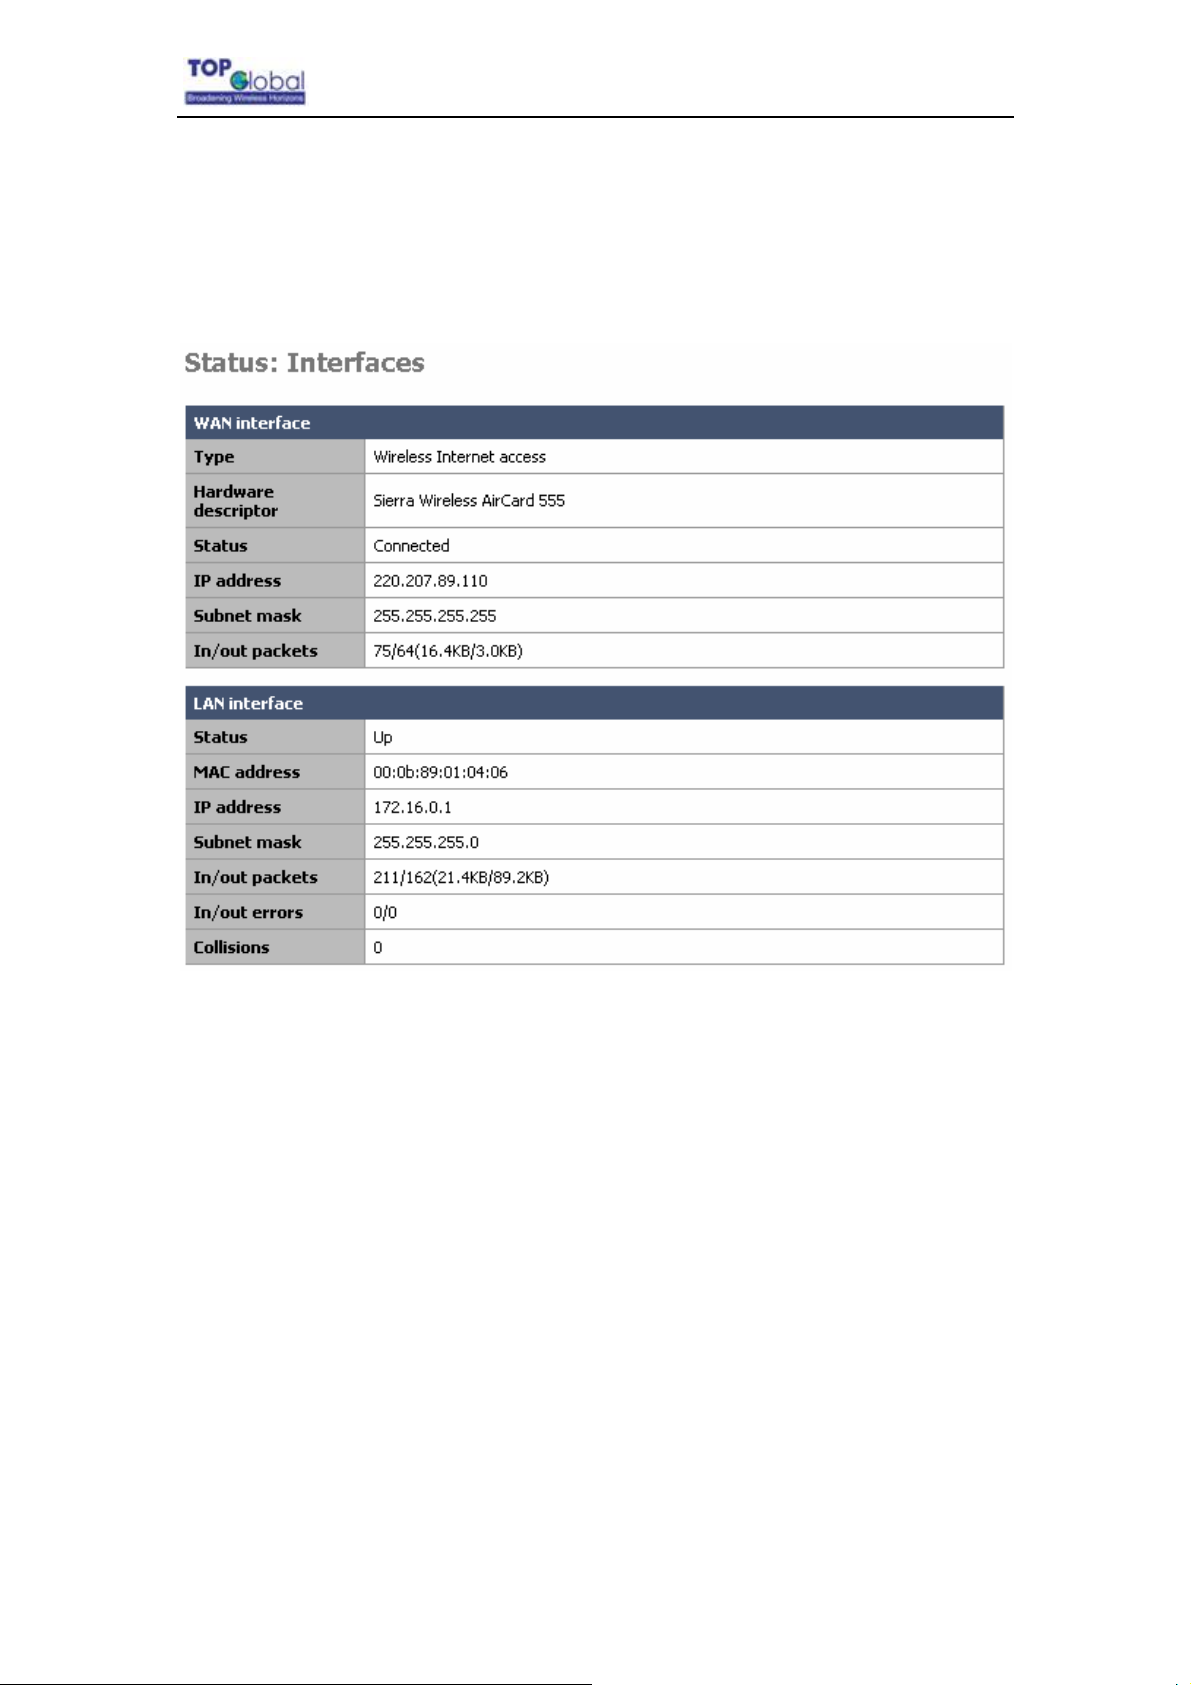
This tab displays the current information LAN interface, as well as the WAN interface.
Figure 3-32 Interfaces
Function Summary
The interfaces status display all the network interfaces information of MB6000. You
can also do the dial up and hang off WAN connection here.
Detailed Configurations
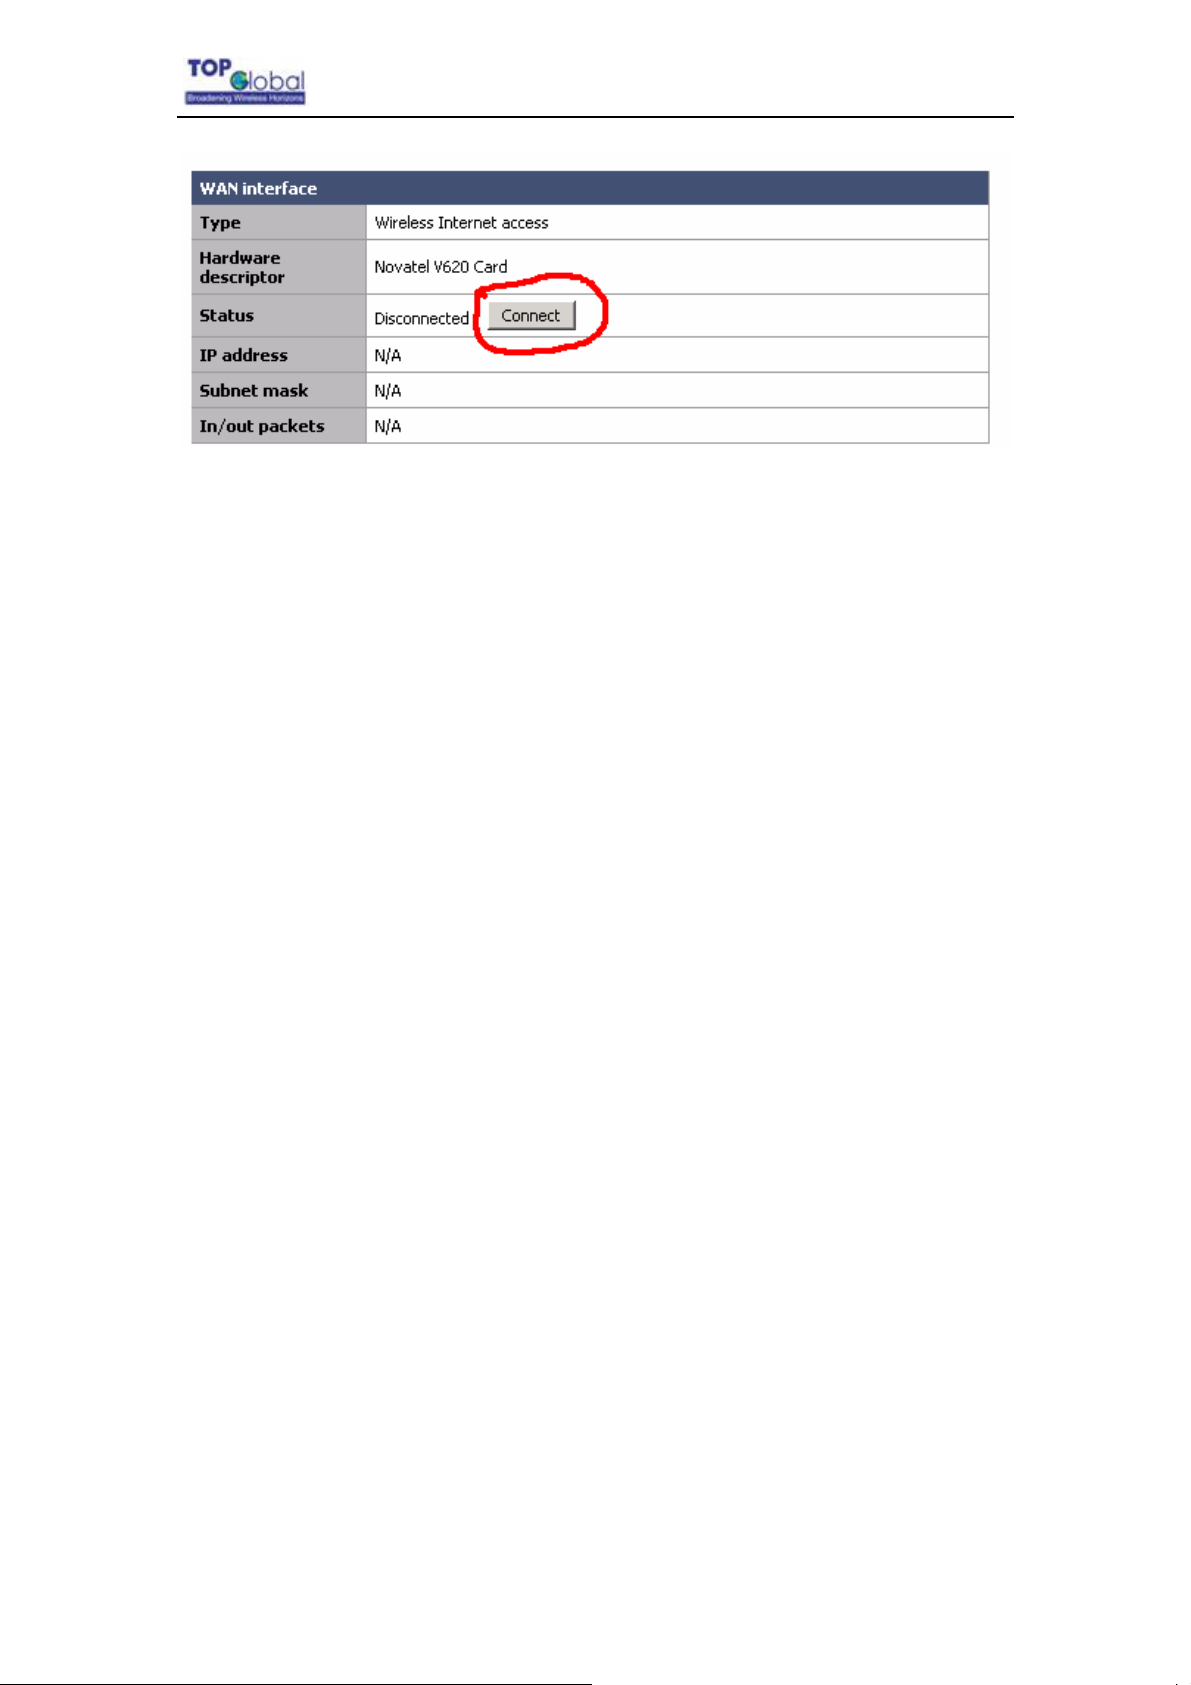
WAN displays the information of Wireless WAN data card inserted in MB6000. If no
data card exists, the information “No data card was found.” will be displayed. When a data
card is inserted and user selects “Manual” as the Wireless WAN dial mode, the WAN
displays as
below
- 45 -
Page 46
Top Global USA. ----MB6000 User Guide
User can click the button Connect/Disconnect to do dial up and hang off.
3.4.6 Diagnostics
There are two main categories in this setting:
System logs
DHCP leases
3.4.6.1 System Logs
There are two main tabs in this setting:
Logs of System
Settings
- 46 -
Page 47
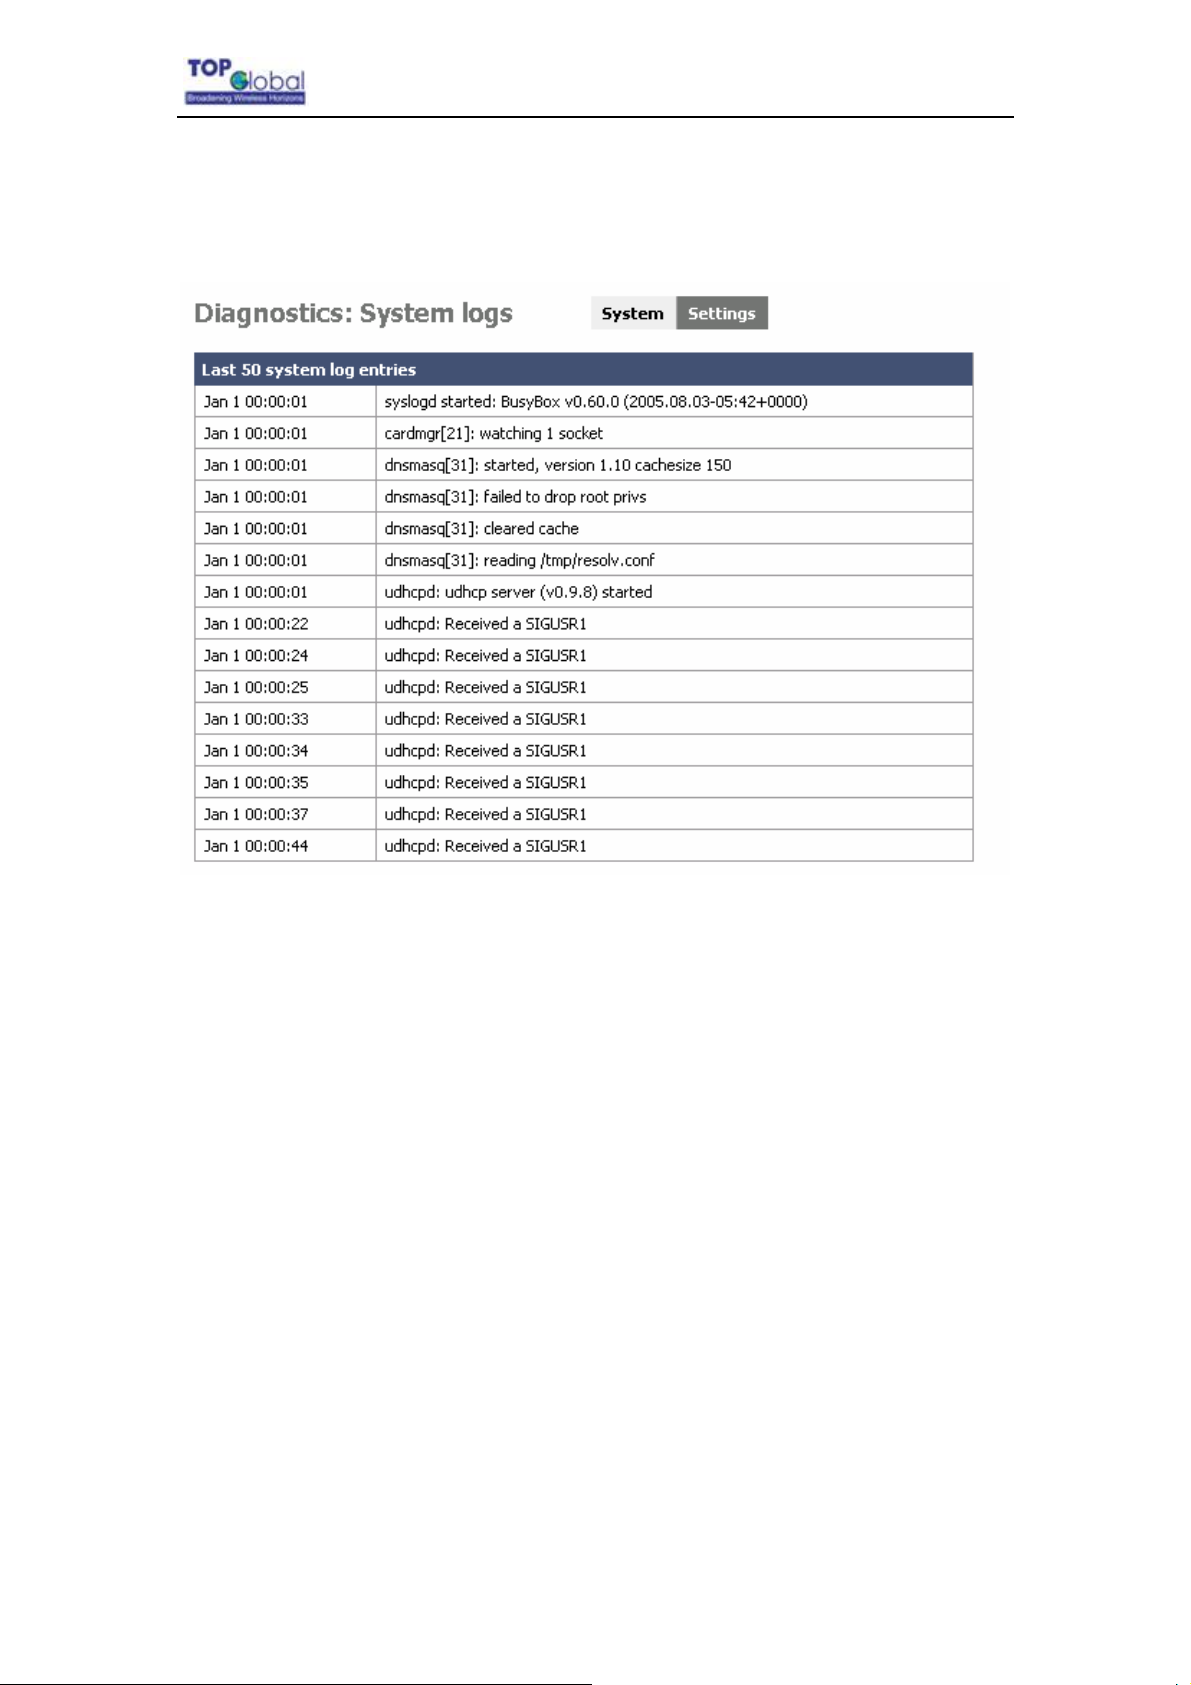
3.4.6.1.1 System Log
Figure 3-33 System logs
Top Global USA. ----MB6000 User Guide
Function Summary
The System Log displays a list of the most recent activity that has taken place on
MB6000.The System tab shows the last 50 system log entries.
- 47 -
Page 48
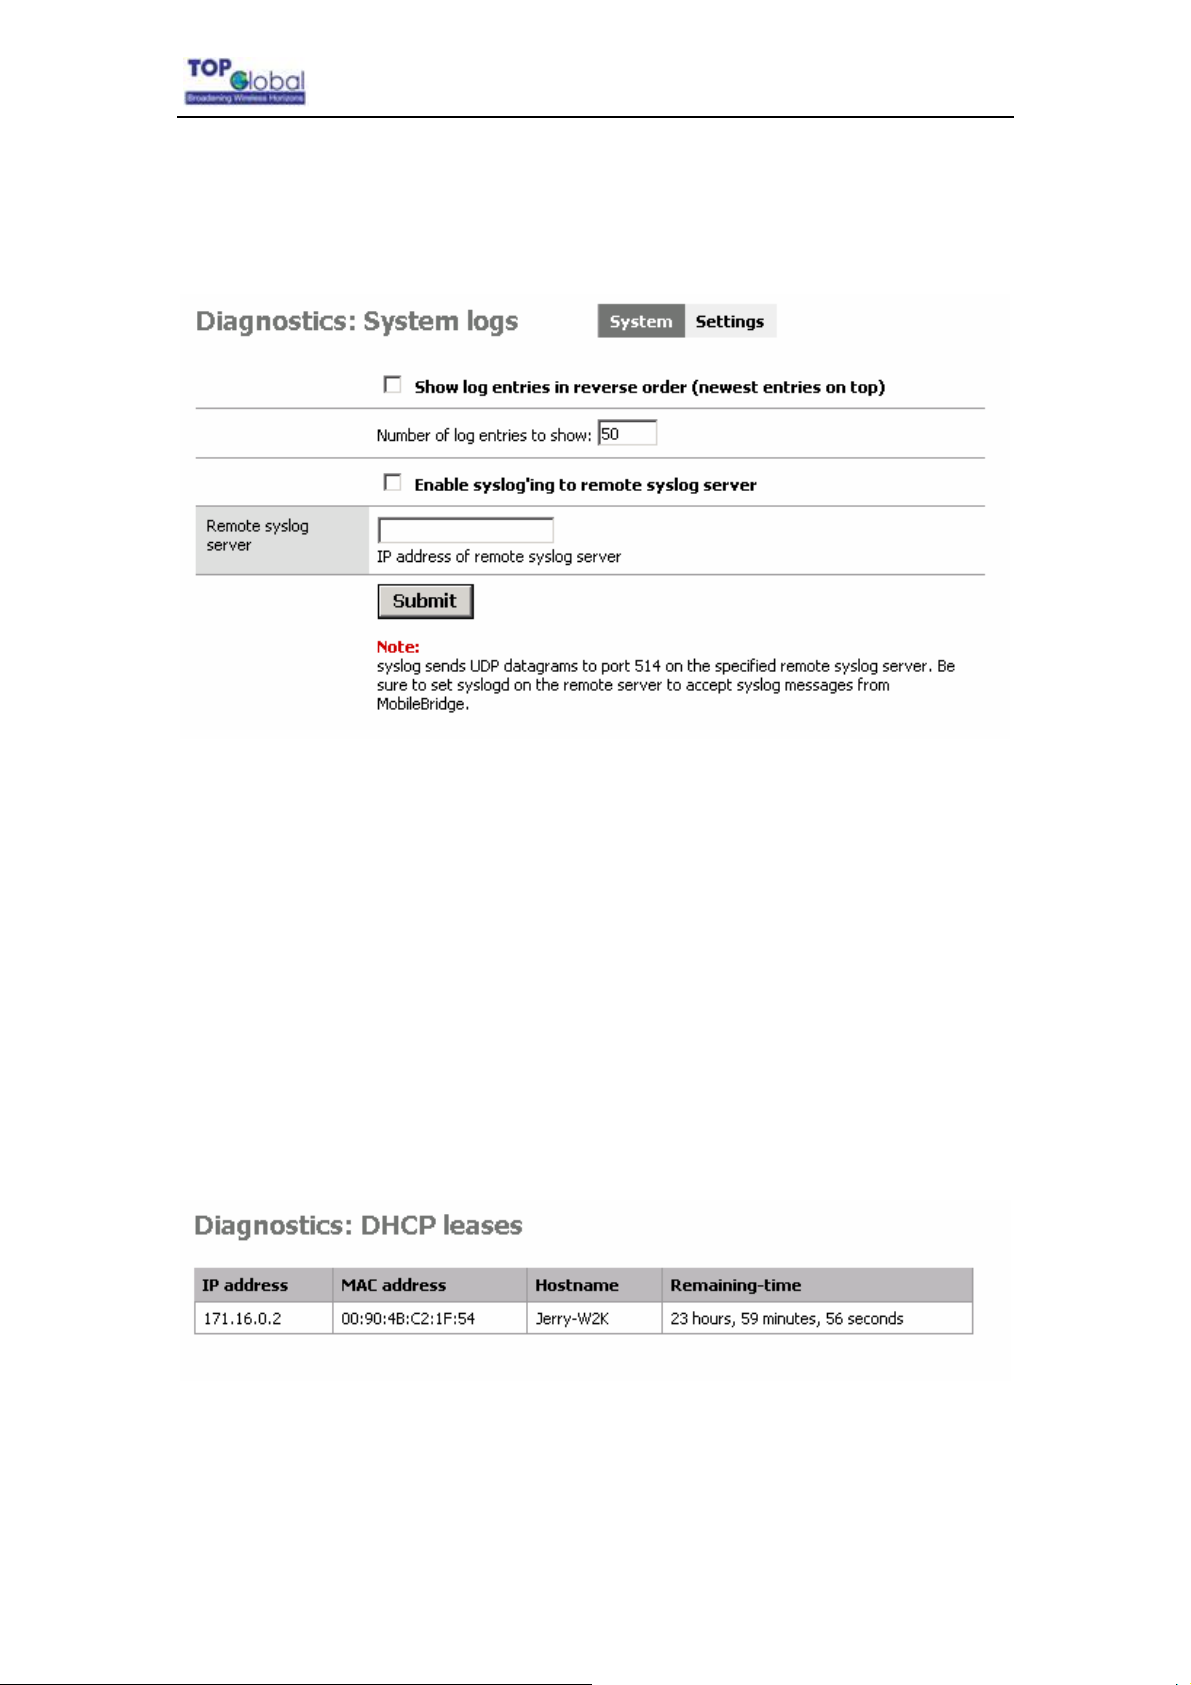
3.4.6.1.2 Settings
Figure 3-34 System log settings
Top Global USA. ----MB6000 User Guide
Function Summary
You can configure the Log method here. MB6000 can display the Syslog entries in
the Web GUI; it can also send the Syslog entries to a remote syslog server. To send
the Syslog to the syslog server, you need to check the “Enable sysloging to remote
syslog server” checkbox and assign the IP address of remote syslog server in the
bottom box.
3.4.6.2 DHCP leases
Figure 3-13 DHCP leases
Function Summary
This tab shows the information of MB6000’s DHCP server.
- 48 -
Page 49

4 Troubleshooting
4.1 Overview
Introduction
Reset to Factory Default procedure
Force Reload Procedure
Firmware Upgrade Procedure through Web
Common Problems and solutions
Frequently Asked Questions
Top Global USA. ----MB6000 User Guide
LED Indication status
4.2 Introduction
This section helps you to locate problems related to MB6000 setup. The most common
installation problems are related to the IP address. For example, without the TFTP server
IP address, you will not be able to download the firmware to the MB6000.
IP address management is critical and we suggest you to create a chart to document
and validate the IP addresses of your system.
If the password is lost or forgotten, you will need to reset the MB6000 to default values.
The Reset to Factory Default procedure resets the MB6000 configuration settings, but
does not change the current firmware. The Forced Reload procedure will erase the
current firmware and configurations, please use it with caution when you need to
download new software.
Reset to Factory Default Procedure
Use this procedure to reset the network configuration values, including the MB6000 IP
Address, Subnet Mask, and so on. The current MB6000 Software will not be erased. This
- 49 -
Page 50
Top Global USA. ----MB6000 User Guide
procedure may be required if the password is forgotten or the configurations are forgotten.
When MB6000 is working in normal status, press and holds the RELOAD button for about
20 seconds, until all the indicator lights change to amber. Then release RELOAD button,
and press reset button to reboot MB6000,he factory default network values are restored.
Please refer Table 6-1 for the factory default value.
Warning:
If you press and hold the RELOAD button for more than 10 seconds
immediately after the MB6000 is power on or reset, the MB6000 will enter into
Force Reload Procedure. The software in the MB6000 will be erased. You will
have to download software into MB6000 to make it work again.
Forced Reload Procedure
Use this procedure to force the MB6000 back to default network configuration values and
download new MB6000 software. This procedure may be required when the current
MB6000 software is missing, corrupted or needs to be upgraded.
Download procedure
1. Prepare you TFTP server. TFTP server is a computer with TFTP server software
running. TFTP server can be freely downloaded from
www.solarwinds.net. You
can also search other TFTP servers from the Internet if you like.
2. To download the MB6000 Software, you will need an Ethernet connection to the
computer on which the TFTP server resides. This can be any computer on the
LAN, or connected to the MB6000’s “LAN” port with a “crossover” Ethernet cable.
3. After force reload, MB6000's IP will be set to 172.16.0.1 by default, and MB6000
will login the TFTP server with IP address “172.16.0.2” to download software
named “firmware.bin” by default. So please change the IP address of TFTP
server to 172.16.0.2, and change the MB6000 software name to firmware.bin,
put it in the directory of TFTP server root.
4. After finishing this preparation, power on the MB6000.
- 50 -
Page 51
Top Global USA. ----MB6000 User Guide
5. Press the RESET button.
6. Press and hold the RELOAD button for about 10 seconds immediately after you
press and release the RESET button until the POWER LED turns amber and the
WWAN LED turns off. Result: The MB6000 deletes the current MB6000 software
and Configuration files. Then MB6000 will download the software you have
prepared in the step 3. Observe the TFTP display and you should see
downloading activity begin after a few seconds.
7. After finished this procedure, MB6000 will boot automatically. and you can see
the POWER LED turns amber and blinks
8. MB6000 will be configured to the factory default value. Please refer Table 6-1 for
the factory default value.
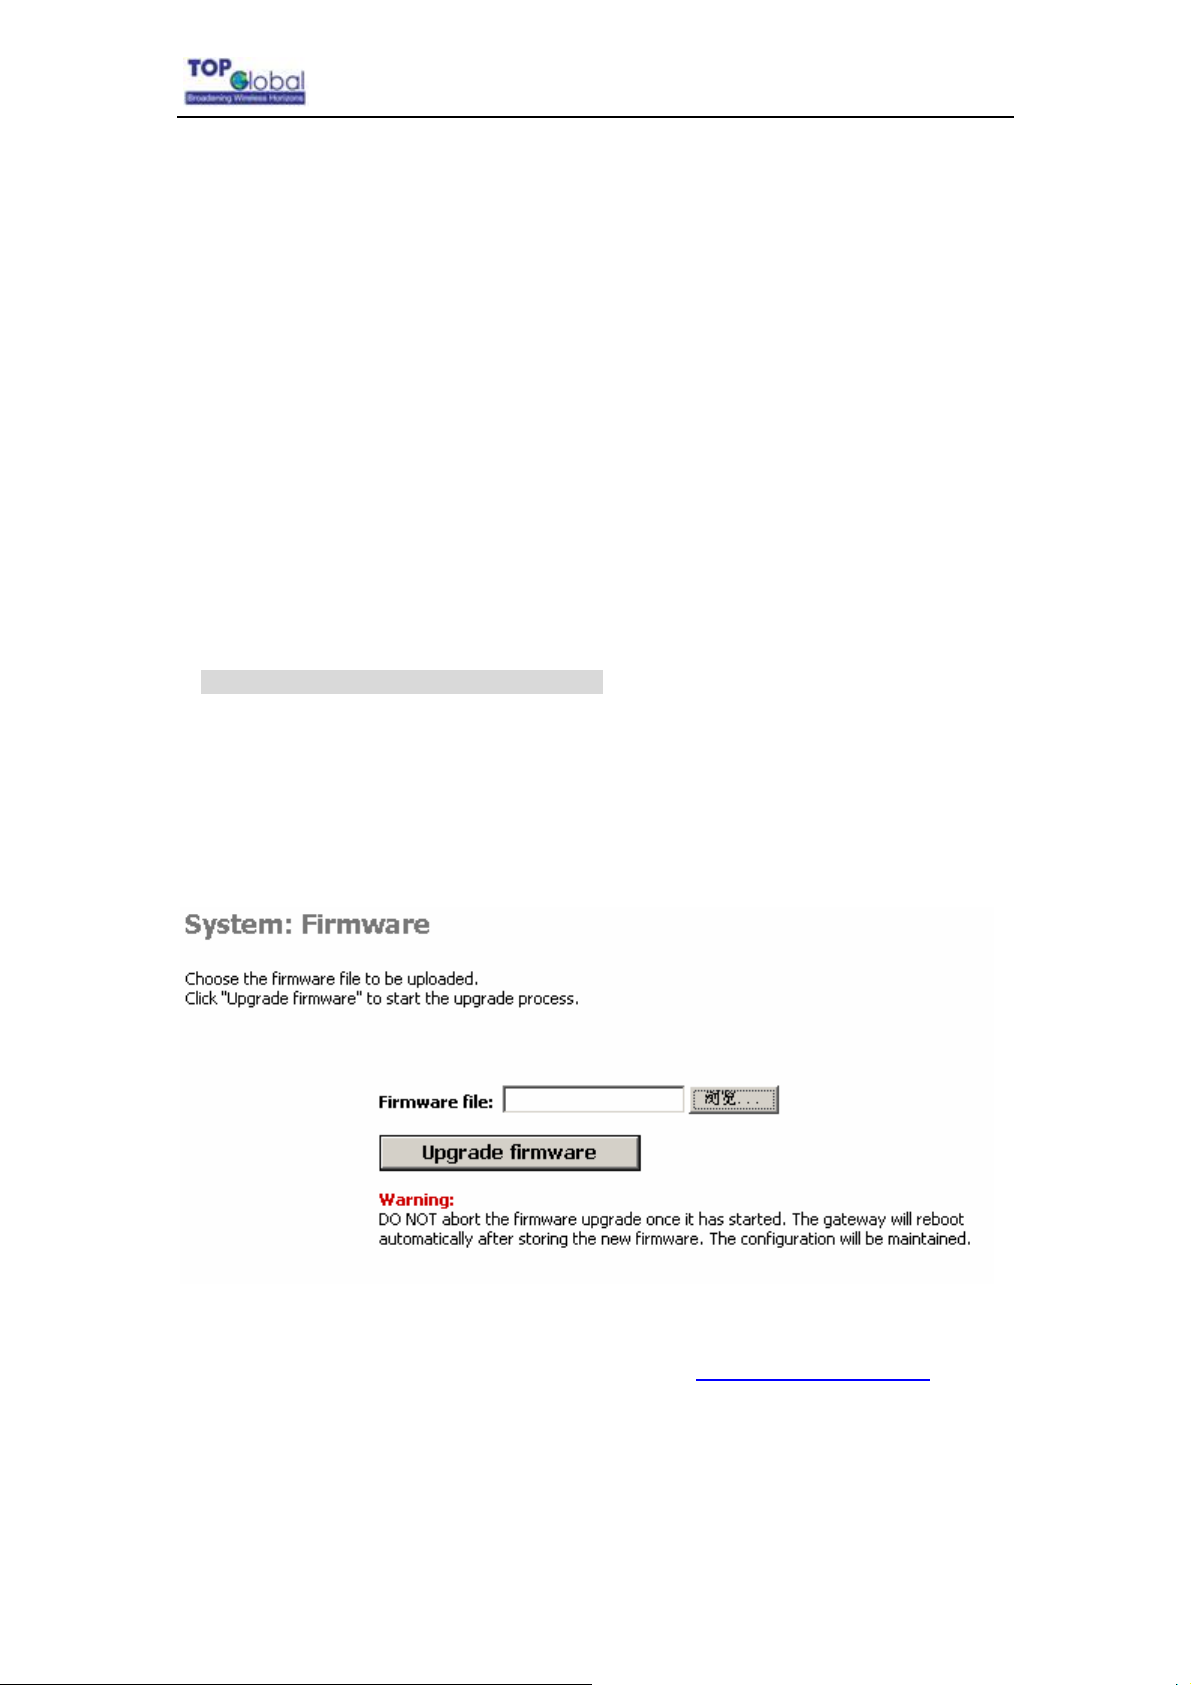
Firmware Upgrade Procedure through Web
Use this procedure to upgrade the newest version firmware for MB6000 through Web
interface on user client. This procedure may be necessary when a new version firmware is
released(Figure 4-1).
Figure 4-1 Firmware upgrade
MB6000's firmware is upgraded through Firmware tab. Follow these instructions:
1. Download the firmware from Top Global’s website at
www.topglobalusa.com to your
host PC.
2. Enter the location of the firmware file or click the Browse button to find the file.
3. Then, click the Upgrade Firmware button to upgrade the firmware.
- 51 -
Page 52

Top Global USA. ----MB6000 User Guide
Common Problems and Solutions
1. How to set a static IP address on a PC ?
You can assign a static IP address to a PC by performing the following steps:
• For Windows 98 and Me:
a. Click Start, Settings, and Control Panel. Double-click Network.
b. In “The following network components are installed” box, select the TCP/IP->
associated with your Ethernet adapter. If you only have one Ethernet adapter
installed, you will only see one TCP/IP line with no association to an Ethernet
adapter. Highlight it then click the Properties button.
c.
d. In the TCP/IP properties window, select the IP address tab, and select Specify an
IP address. Enter a unique IP address that is not used by any other computer on
the network connected to MB6000. Make sure that each IP address is unique for
each PC or network device.
e. Click the Gateway tab, and in the New Gateway prompt, enter 172.16.0.1, which
is the default IP address MB6000. Click the Add button to accept the entry.
f. Click the DNS tab, and make sure the DNS Enabled option is selected. Enter the
DNS entry provided by your ISP. If your ISP has not provided the DNS IP address,
contact your ISP to get that information or go to its website for the information.
g. Click the OK button in the TCP/IP properties window, and click Close or the OK
button for the Network window.
h. Restart the computer when asked.
• For Windows 2000:
a. Click Start, Settings, and Control Panel. Double-click Network and Dial-Up
connections.
b. Right-click the Local Area Connection that is associated with the Ethernet adapter
you are using, and select the Properties option.
c. In the Components checked are used by this connection box, highlight Internet
Protocol (TCP/IP), and click the Properties button. Select Use the following IP
address option.
- 52 -
Page 53

Top Global USA. ----MB6000 User Guide
d. Enter a unique IP address that is not used by any other computer on the network
connected to MB6000.
e. Enter the Subnet Mask, 255.255.0.0.
f. Enter the Default Gateway, 172.16.0.1 (MB6000’s default IP address).
g. Toward the bottom of the window, select Use the following DNS server addresses,
and enter the Preferred DNS server and Alternative DNS server (provided by your
ISP). Contact your ISP or go on its website to find the information.
h. Click the OK button in the Internet Protocol (TCP/IP) Properties window, and click
the OK button in the Local Area Connection Properties window.
i. Restart the computer if asked.
• For Windows XP:
The following instructions assume you are running Windows XP with the default interface.
If you are using the Classic interface (where the icons and menus look like previous
Windows versions), please follow the instructions for Windows 2000.
a. Click Start and Control Panel.
b. Click the Network and Internet Connections icon and then the Network
Connections icon.
c. Right-click the Local Area Connection that is associated with the Ethernet adapter
you are using, and select the Properties option.
d. In the This connection uses the following items box, highlight Internet Protocol
(TCP/IP). Click the Properties button.
e. Enter a unique IP address that is not used by any other computer on the network
connected to MB6000.
f. Enter the Subnet Mask, 255.255.0.0.
g. Enter the Default Gateway, 172.16.0.1 (Router’s default IP address).
h. Toward the bottom of the window, select Use the following DNS server addresses,
and enter the Preferred DNS server and Alternative DNS server (provided by your
ISP). Contact your ISP or go on its website to find the information.
i. Click the OK button in the Internet Protocol (TCP/IP) Properties window. Click the
OK button in the Local Area Connection Properties window.
- 53 -
Page 54

Top Global USA. ----MB6000 User Guide
2. How to test my Internet connection ?
a. Check your TCP/IP settings.
For Windows 98, Me, 2000, and XP:
• Make sure Obtain IP address automatically is selected in the settings.
b. Open a command prompt.
For Windows 98 and Me:
• Click Start and Run. In the Open field, type “command”. Press the Enter key or click the
OK button.
For Windows 2000 and XP:
• Click Start and Run. In the Open field, type “cmd”. Press the Enter key or click the OK
button. In the command prompt, type “ping 172.16.0.1” and press the Enter key.
• If you get a reply, the computer is communicating with MB6000.
• If you do NOT get a reply, please check the cable, and make sure Obtain an IP address
automatically is selected in the TCP/IP settings for your Ethernet adapter.
c. In the command prompt, type ping followed by your WWAN IP address and press
the Enter key. The WAN IP Address can be found on the Status screen of MB6000’s
web-based utility. For example, if WWAN IP address is 1.2.3.4, you would enter ping
1.2.3.4 and press the Enter key.
• If you get a reply, the computer is connected to MB6000.
• If you do NOT get a reply, try the ping command from a different computer to verify that
your original computer is not the cause of the problem.
d. In the command prompt, type ping www.yahoo.com and press the Enter key.
• If you get a reply, the computer is connected to the Internet. If you cannot open a
webpage, try the ping command from a different computer to verify that your original
computer is not the cause of the problem.
• If you do NOT get a reply, there may be a problem with the connection. Try the ping
command from a different computer to verify that your original computer is not the cause
of the problem.
3.When I enter a URL or IP address, I get a time-out error or am prompted
to retry.
- 54 -
Page 55

Top Global USA. ----MB6000 User Guide
• Check if other PCs work. If they do, ensure that your workstation’s IP settings are correct
(IP Address, Subnet Mask, Default Gateway, and DNS). Restart the computer that is
having a problem.
• If the PCs are configured correctly, but still not working, check MB6000. Ensure that it is
connected and powered on. Connect to it and check its settings. (If you cannot connect to
it, check the LAN and power connections.)
• If MB6000 is configured correctly, check your Internet connection (WWAN card) to see if
it is working correctly.
• Manually configure the TCP/IP settings with a DNS address provided by your ISP.
• Make sure that your browser is set to connect directly and that any dial-up is disabled.
For Internet Explorer, click Tools, Internet Options, and then the Connection tab. Make
sure that Internet Explorer is set to Never dial a connection. For Netscape Navigator, click
Edit, Preferences, Advanced, and Proxy. Make sure that Netscape Navigator is set to
Direct connection to the Internet.
Frequently Asked Questions
What is the maximum number of IP addresses that MB6000 will support?
MB6000 will support up to 253 IP addresses.
Is IPSec Pass-Through supported by MB6000?
Yes, it is a built-in feature that MB6000 automatically enables.
Does MB6000 support IPX or AppleTalk?
No. TCP/IP is the only protocol supported.
What is Network Address Translation and what is it used for?
Network Address Translation (NAT) translates multiple IP addresses on the private LAN
to one public address that is sent out to the Internet. This adds a level of security since the
address of a PC connected to the private LAN is never transmitted on the Internet.
- 55 -
Page 56

Top Global USA. ----MB6000 User Guide
Furthermore, NAT allows MB6000 to be used with low cost Internet accounts. The user
may have many private addresses behind this single address provided by the ISP.
Does MB6000 support any operating system other than Windows 98, Windows
Millennium, Windows 2000, or Windows XP?
Yes.
Does MB6000 support ICQ send file?
Yes, with the following fix: click ICQ menu -> preference -> connections tab->, and check I
am behind a firewall or proxy. Then set the firewall time-out to 80 seconds in the firewall
setting. The Internet user can then send a file to a user behind MB6000.
Can multiple gamers on the LAN get on one game server and play simultaneously
with just one public IP address?
It depends on which network game or what kind of game server you are using. It will work
if the game server supports multi-user with one public IP address.
Will MB6000 function in a Macintosh environment?
Yes, but MB6000’s setup pages are accessible only through Internet Explorer 4.0 or
Netscape Navigator 4.0 or higher for Macintosh.
I am not able to get the web configuration screen for MB6000. What can I do?
You may have to remove the proxy settings on your Internet browser, e.g., Netscape
Navigator or Internet Explorer. Or remove the dial-up settings on your browser. Check
with your browser documentation, and make sure that your browser is set to connect
directly and that any dial-up is disabled. For Internet Explorer, click Tools, Internet Options,
then the Connection tab. Make sure that Internet Explorer is set to Never dial a connection.
For Netscape Navigator, click Edit, Preferences, Advanced, and Proxy. Make sure that
Netscape Navigator is set to Direct connection to the Internet.
Does MB6000 pass PPTP packets or actively route PPTP sessions?
- 56 -
Page 57

Top Global USA. ----MB6000 User Guide
MB6000 allows PPTP packets to pass through.
Is MB6000 cross-platform compatible?
Any platform that supports Ethernet and TCP/IP is compatible with MB6000.
Can MB6000 act as my DHCP server?
Yes. MB6000 has DHCP server software built-in.
What is the IEEE 802.11g standard?
It is one of the IEEE standards for wireless networks. The 802.11g standards allow
wireless networking hardware from different manufacturers to communicate, provided that
the hardware complies with the 802.11g standards. The 802.11g standards state a
maximum data transfer rate of 54Mbps and an operating frequency of 2.4GHz. The
802.11g is downward compatible with 802.11b.
What IEEE 802.11b features are supported?
The product supports the following IEEE 802.11b functions:
• CSMA/CA plus Acknowledge protocol
• Multi-Channel Roaming
• Automatic Rate Selection
• RTS/CTS feature
• Fragmentation
• Power Management
Will the information be intercepted while it is being transmitted through the air?
WLAN features two-fold protection in security. On the hardware side, as with Direct
Sequence Spread Spectrum technology, it has the inherent security feature of scrambling.
On the software side, WLAN offers the encryption function (WEP or WPA) to enhance
security and access control.
- 57 -
Page 58

Top Global USA. ----MB6000 User Guide
What is WEP?
WEP is Wired Equivalent Privacy, a data privacy mechanism based on a 64-bit or 128-bit
shared key algorithm, as described in the IEEE 802.11 standard.
What is WPA-PSK?
WPA-PSK means Wi-Fi Protected Access - Pre-Shared Key. It is an enhanced wireless
encryption standards defined by the WiFi Alliances.
What is a MAC Address?
The Media Access Control (MAC) address is a unique number assigned by the
manufacturer to any Ethernet networking device, such as a network adapter, that allows
the network to identify it at the hardware level. For all practical purposes, this number is
usually permanent. Unlike IP addresses, which can change every time a computer logs
onto the network, the MAC address of a device stays the same, making it a valuable
identifier for the network.
How do I reset MB6000 to factory default?
When MB6000 is working in normal status, press and holds the RELOAD button for about
5~7 seconds, until all the indicator lights turn off. Then release RELOAD button, press the
RESET button to set up the device again.. This will reset MB6000 to its default settings.
How do I resolve issues with signal loss?
There is no way to know the exact range of your wireless network without testing. Every
obstacle placed between MB6000 and a wireless PC will create signal loss. Lead glass,
metal, concrete floors, water and walls will inhibit the signal and reduce range. Start with
MB6000 and your wireless PC in the same room and move it away in small increments to
determine the maximum range in your environment. You may also try using different
channels, as this may eliminate interference affecting only one channel.
I have excellent signal strength, but I cannot see my network.
- 58 -
Page 59

Top Global USA. ----MB6000 User Guide
WEP or WPA-PSK is probably enabled on MB6000, but not on your wireless client. Verify
that the same keys are being used on all nodes of your wireless network.
How many channels/frequencies are available with MB6000?
There are eleven available channels, ranging from 1 to 11 (in North America).
- 59 -
Page 60
Top Global USA. ----MB6000 User Guide
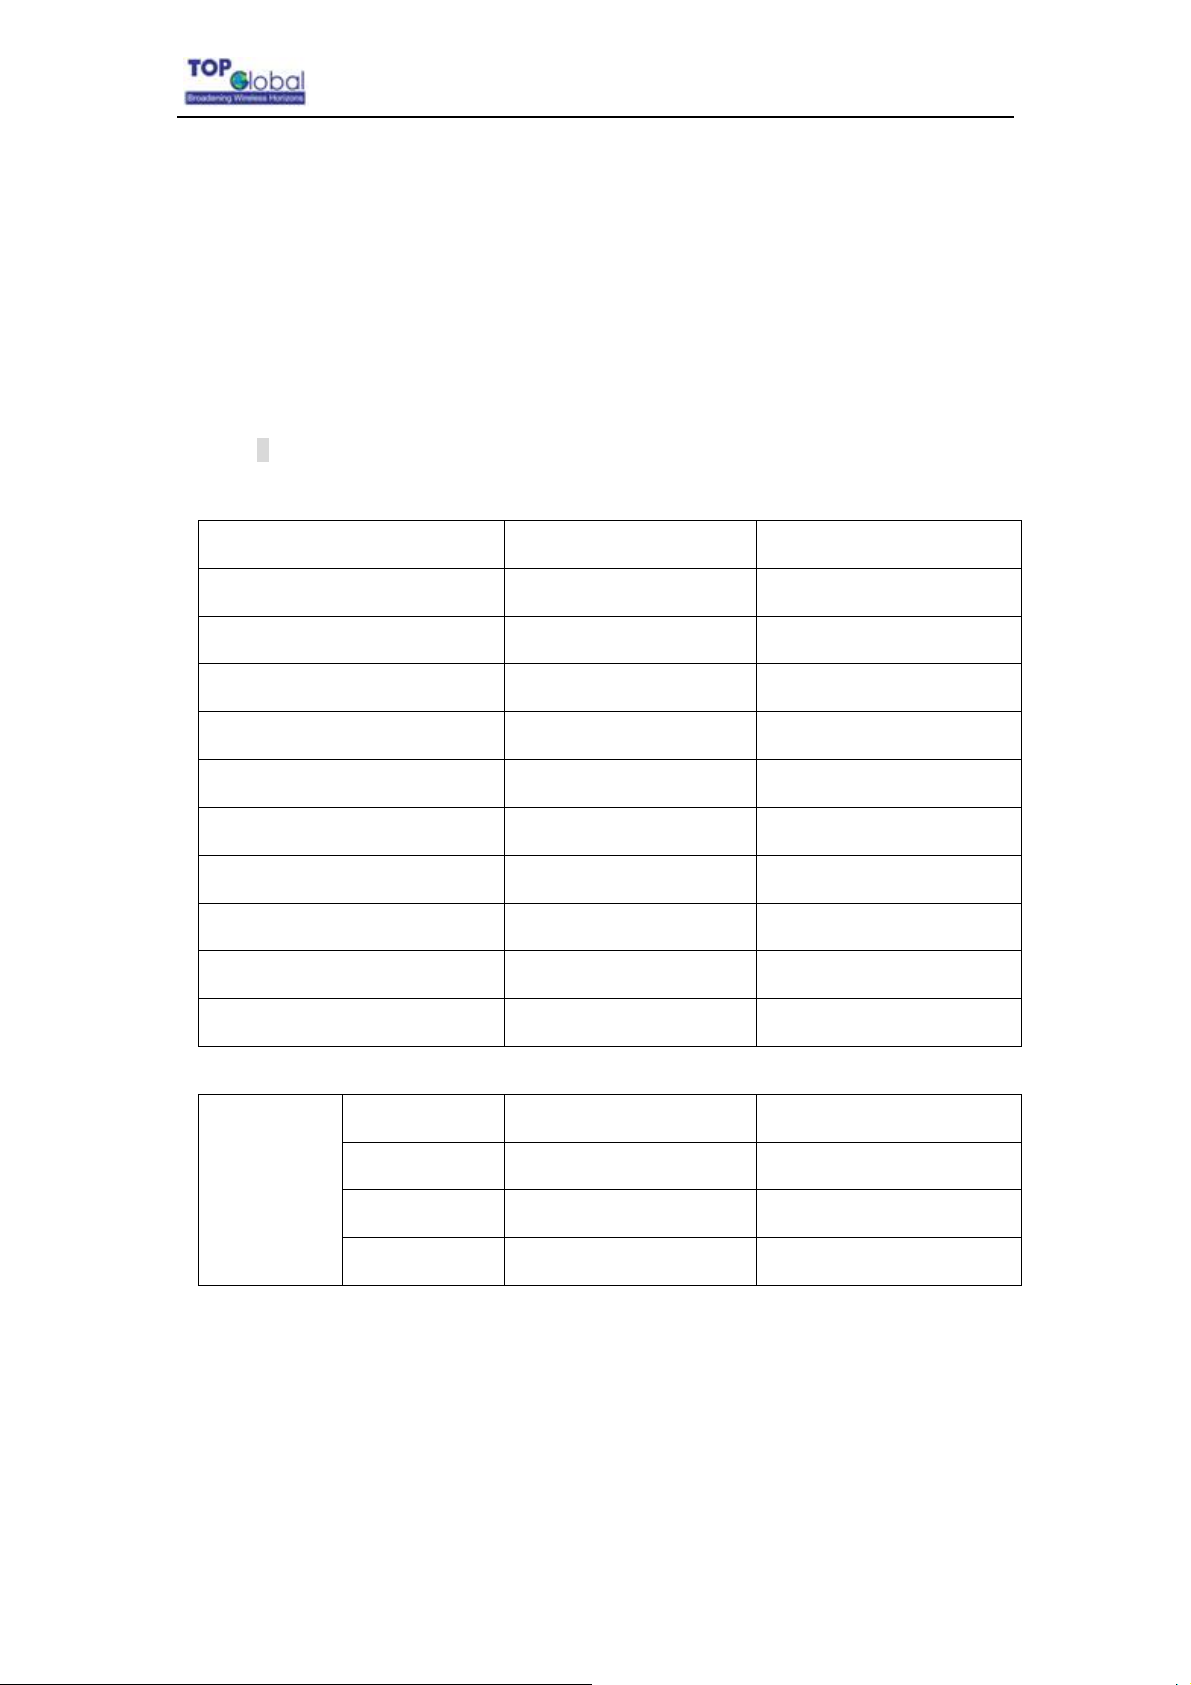
5 Default MB6000 Settings
The following table lists the settings defined at the factory for all MB6000 units, and
provides a place to enter the values for your system if you have changed them.
Table 6-1 Default Setting
Item Default Value My System Value
Local IP Address 172.16.0.1
Local IP Mask 255.255.255.0
Network Name(SSID) (Same with SN)
Frequency Channel 6
DHCP Server Status Enabled
DHCP Lease Range 172.16.0.2-172.16.0.100
TFTP Server IP Address 172.16.0.2
TFTP File Name firmware.bin
Http Username public
Http Password public
Wireless
WAN default
setting:
phone number "#777"
username "card"
password "card"
Init string "AT&F"
- 60 -
 Loading...