

Page 1
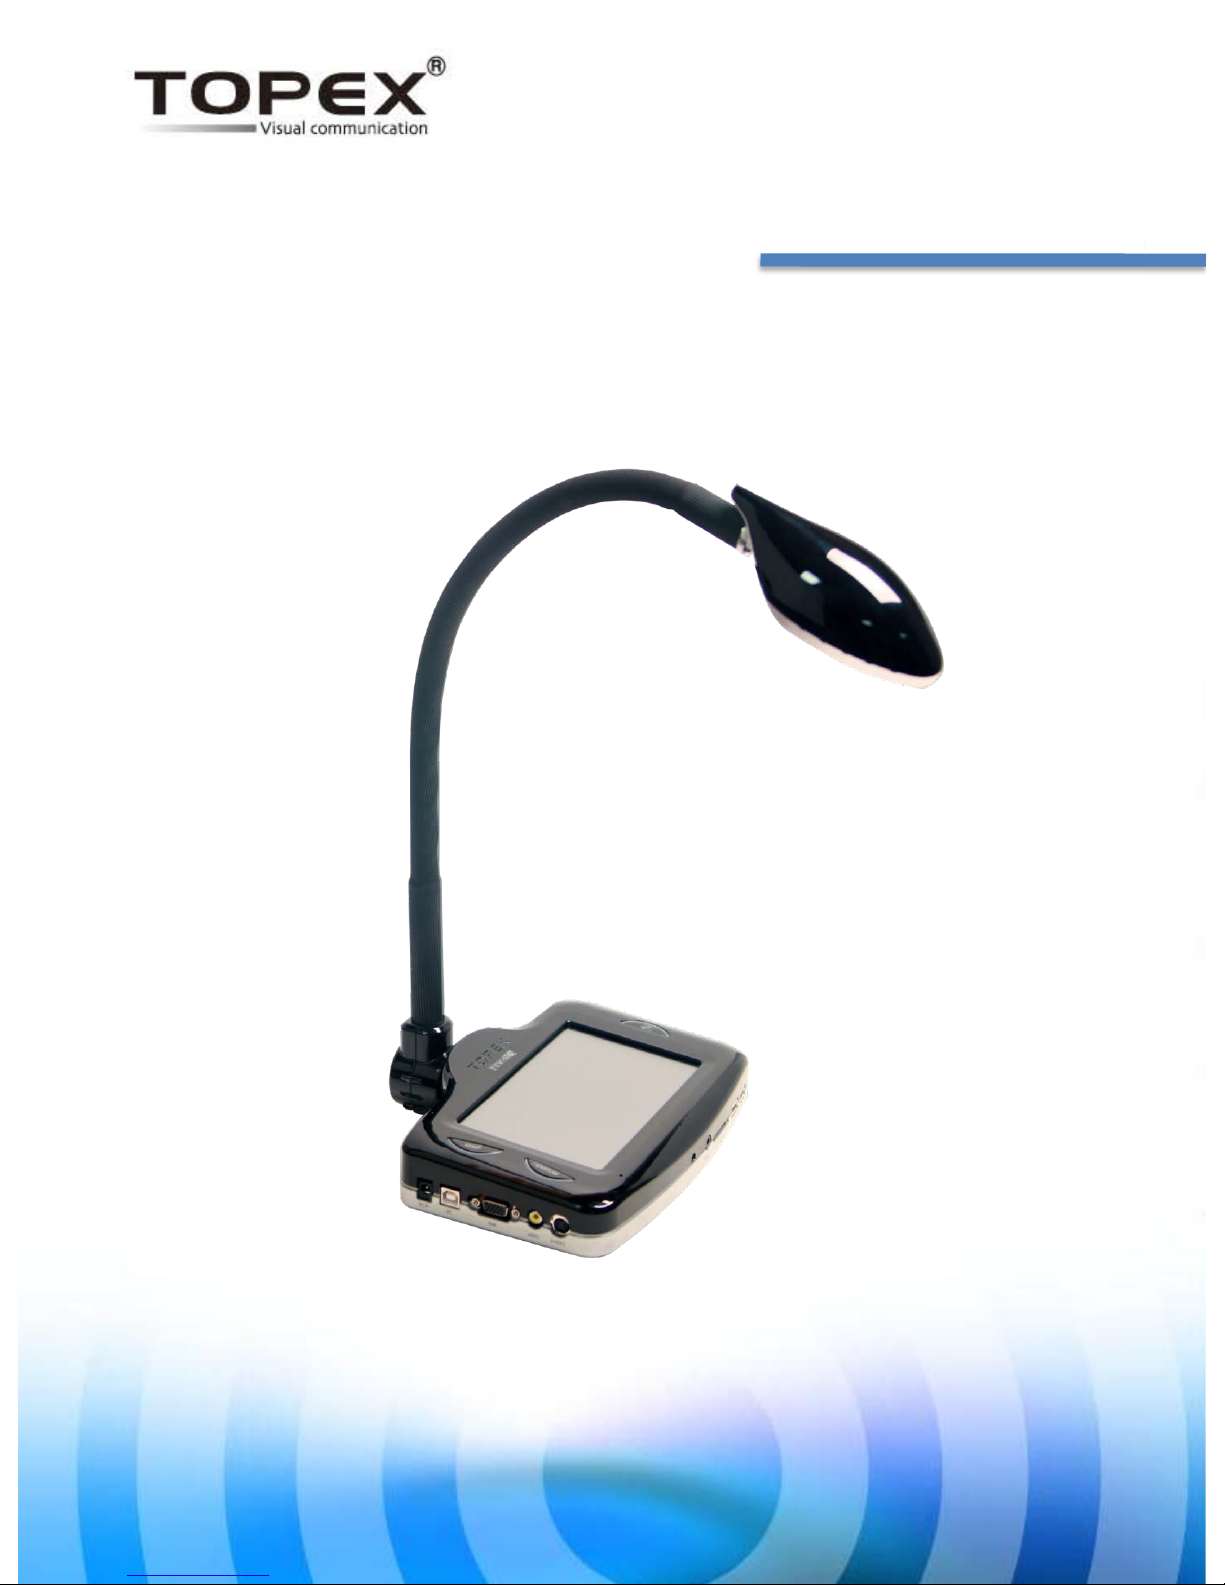
TTV-5.0
Operation Manual
Page 2

5.0 Mega pixels high resolution CMOS Camera, Max. 30 fps
7” Full Touch Screen Electronic Board function (Support Moving picutres)
Convenient outer button (A/F, CAPTURE, LIGHT) and 8 pcs of high-
brightness LED
1GB inner memory (Saving images / videos on the body)
Standalone System can operating without a computer
Letter/Voice conversion program (OCR/TTS)
My dictionary function can reading as the user’s wished pronunciation
Highlight function indicating the reading area
Cover function for learning purpose and BGM(Back Ground Music)
function
Voice book function can reading the edited and saved contents
A rich variety of output
(USB/HDMI/DVI/RGB/S-Video/RCA/Speaker/Mic.)
2
Features
Page 3

I. Confirmation prior to use and connection
1. Accessories
2. Names of each part
3. Description of remote controller
4. Setting up
5. Connection
II. Usage
1. Installing the program
2. Using on the PC
1) Preview
2) Drawing
3) Learning
4) Movies
3. Using on the Digital Video Presenter
III. Miscellaneous
1. Handling after use
2. Storage
3. Precautions
4. Troubleshooting
5. Product specifications
3
C o n t e n t s
Page 4
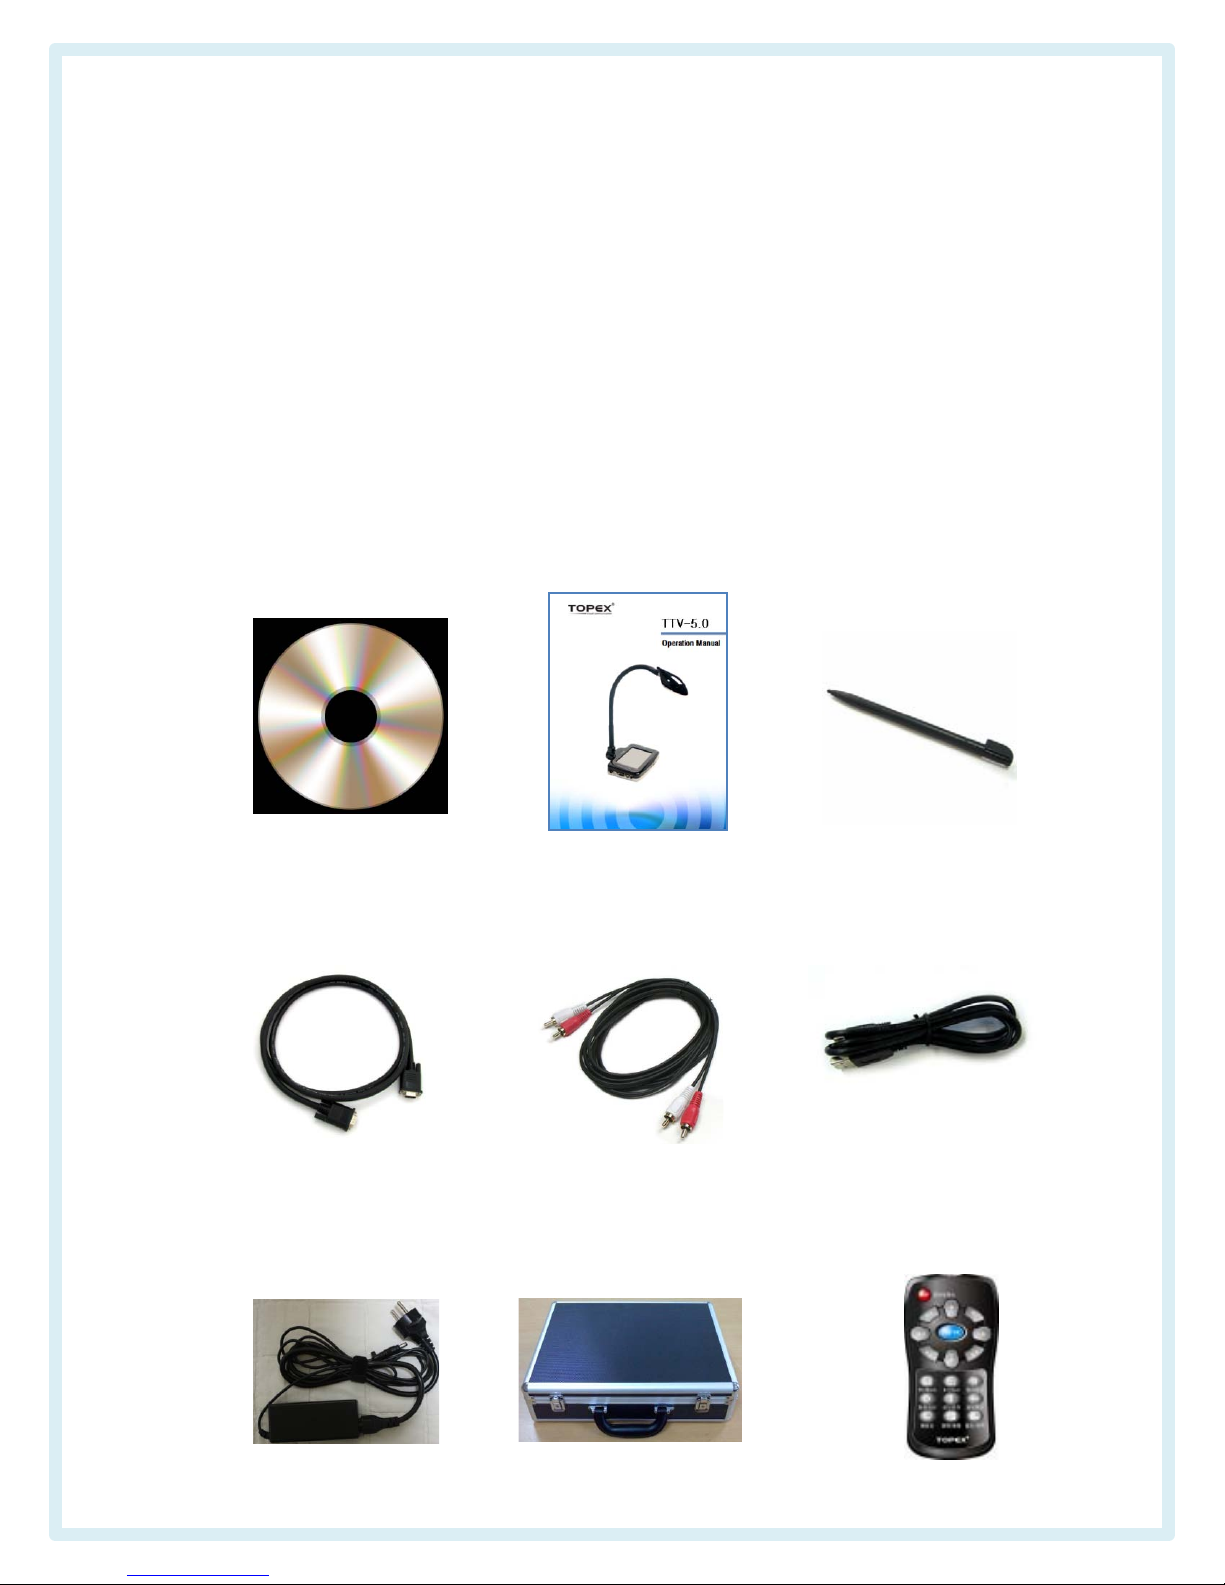
1. Accessories
· Check all accessories that you have before using.
· Contact the head office or sales agency to purchase
accessories or optional items.
4
Progrm CD
RGB Cable
Operation manual
Aluminum
case
USB Cable
Adapter
Touch Pen
AV Cable
Remote controller
Page 5
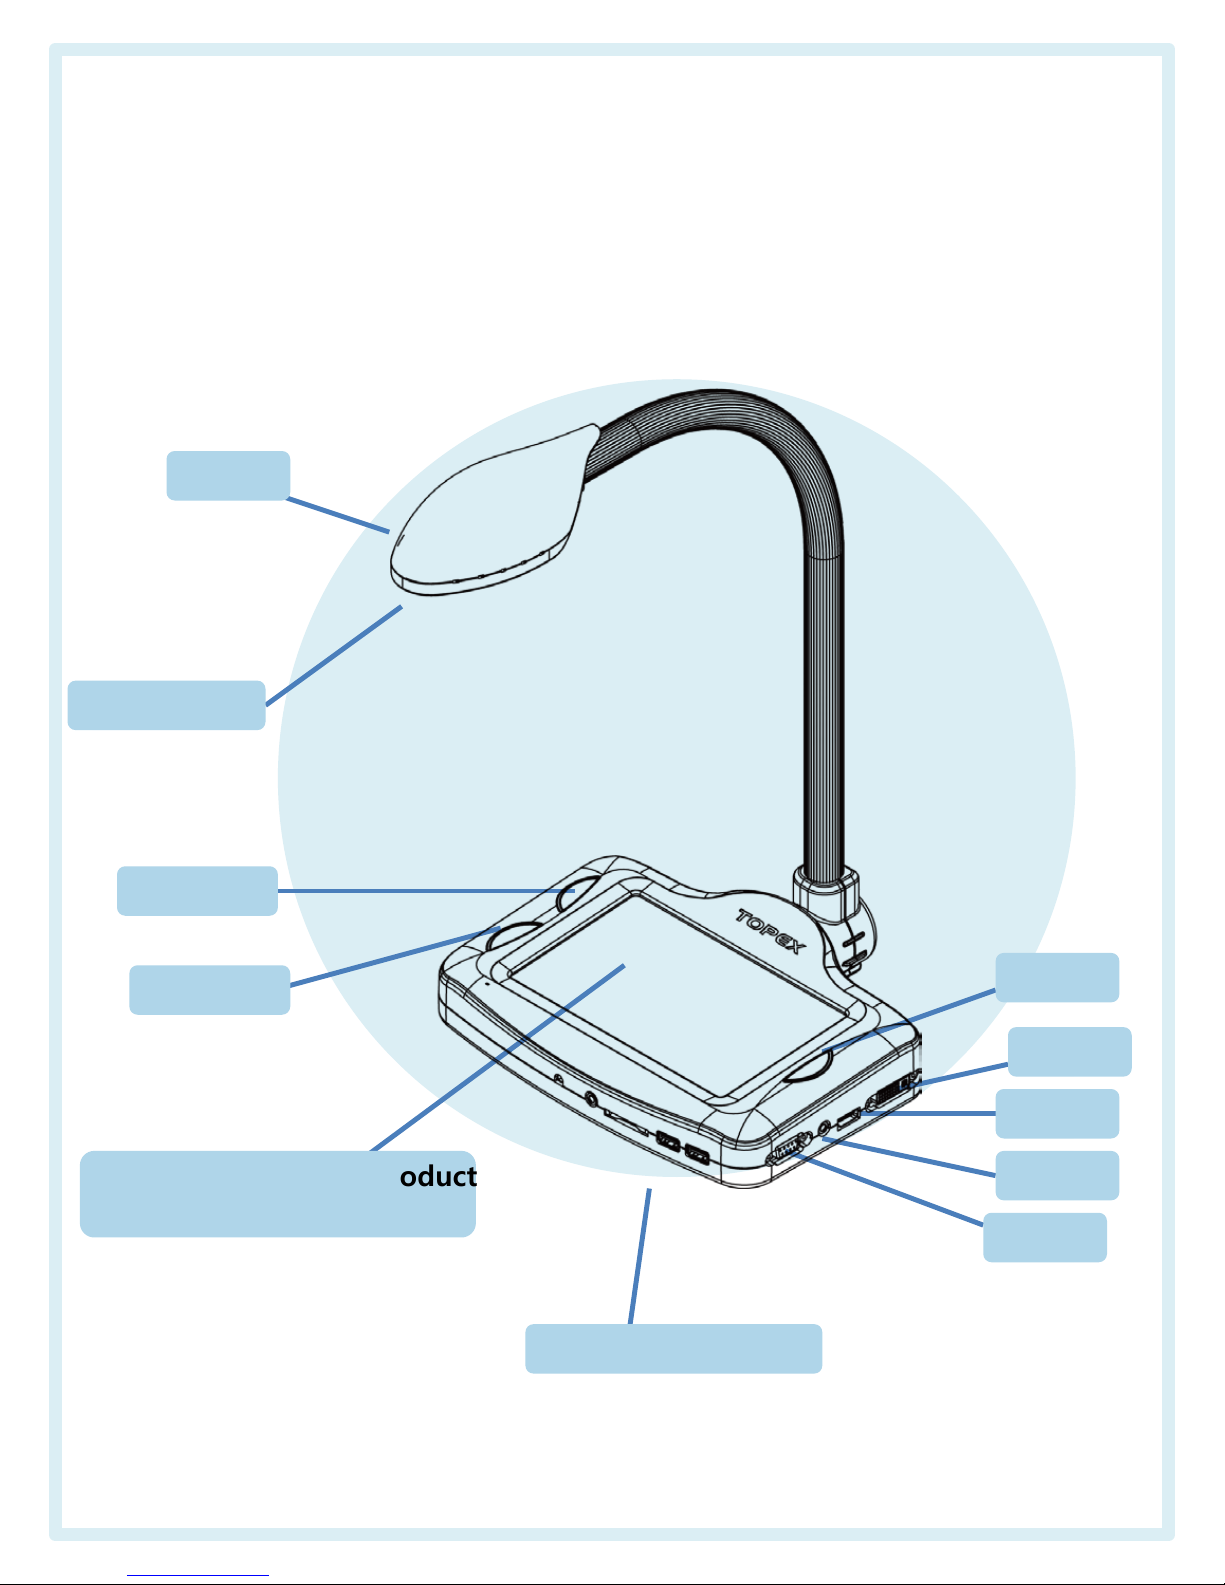
2. Names of each part
Camera
head
Lens/LED light
Capture
Light
Mic./SD Card/USB/USB
7” LCD Touch Screen Product
control and Image Display
A/F
DVI
HDMI
Audio
RS-232C
5
Page 6
Ⅰ 사용전 확인 및 연결
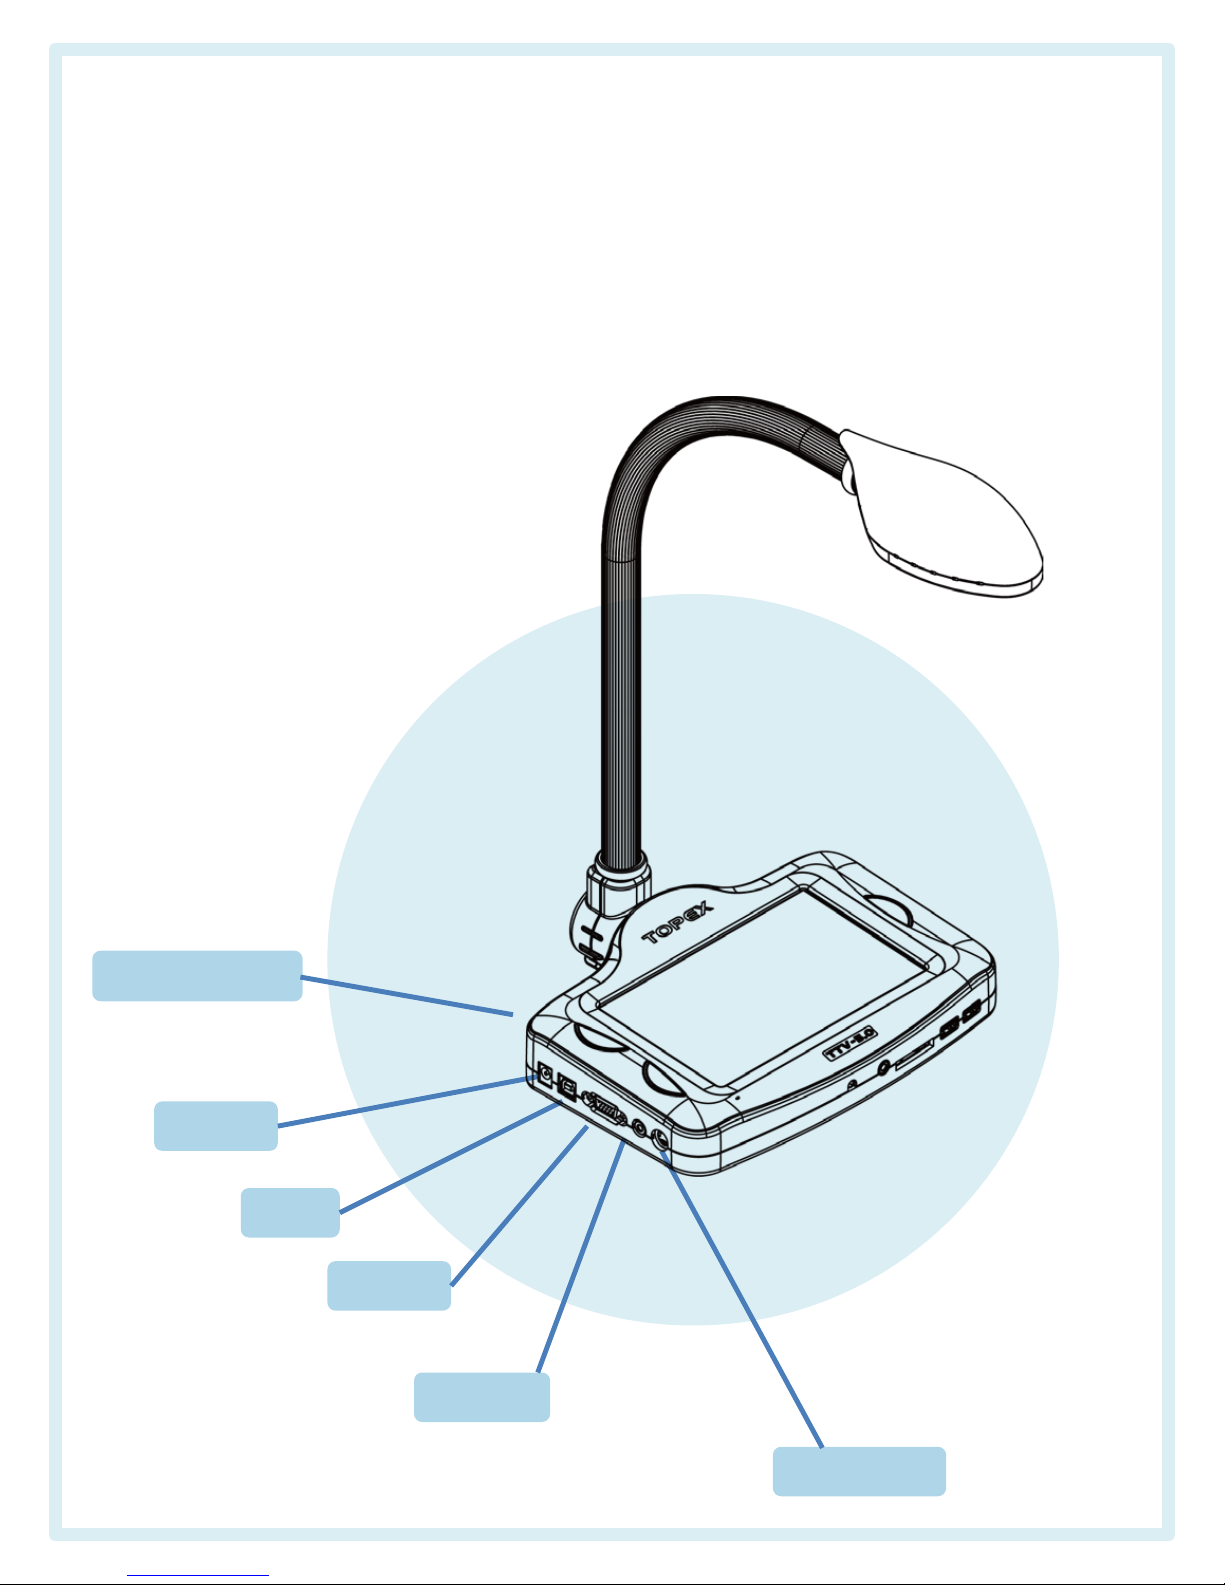
2. Names of each part(Continued)
RGB
Power S/W
DC 5V
PC
Video
S-Video
6
Page 7
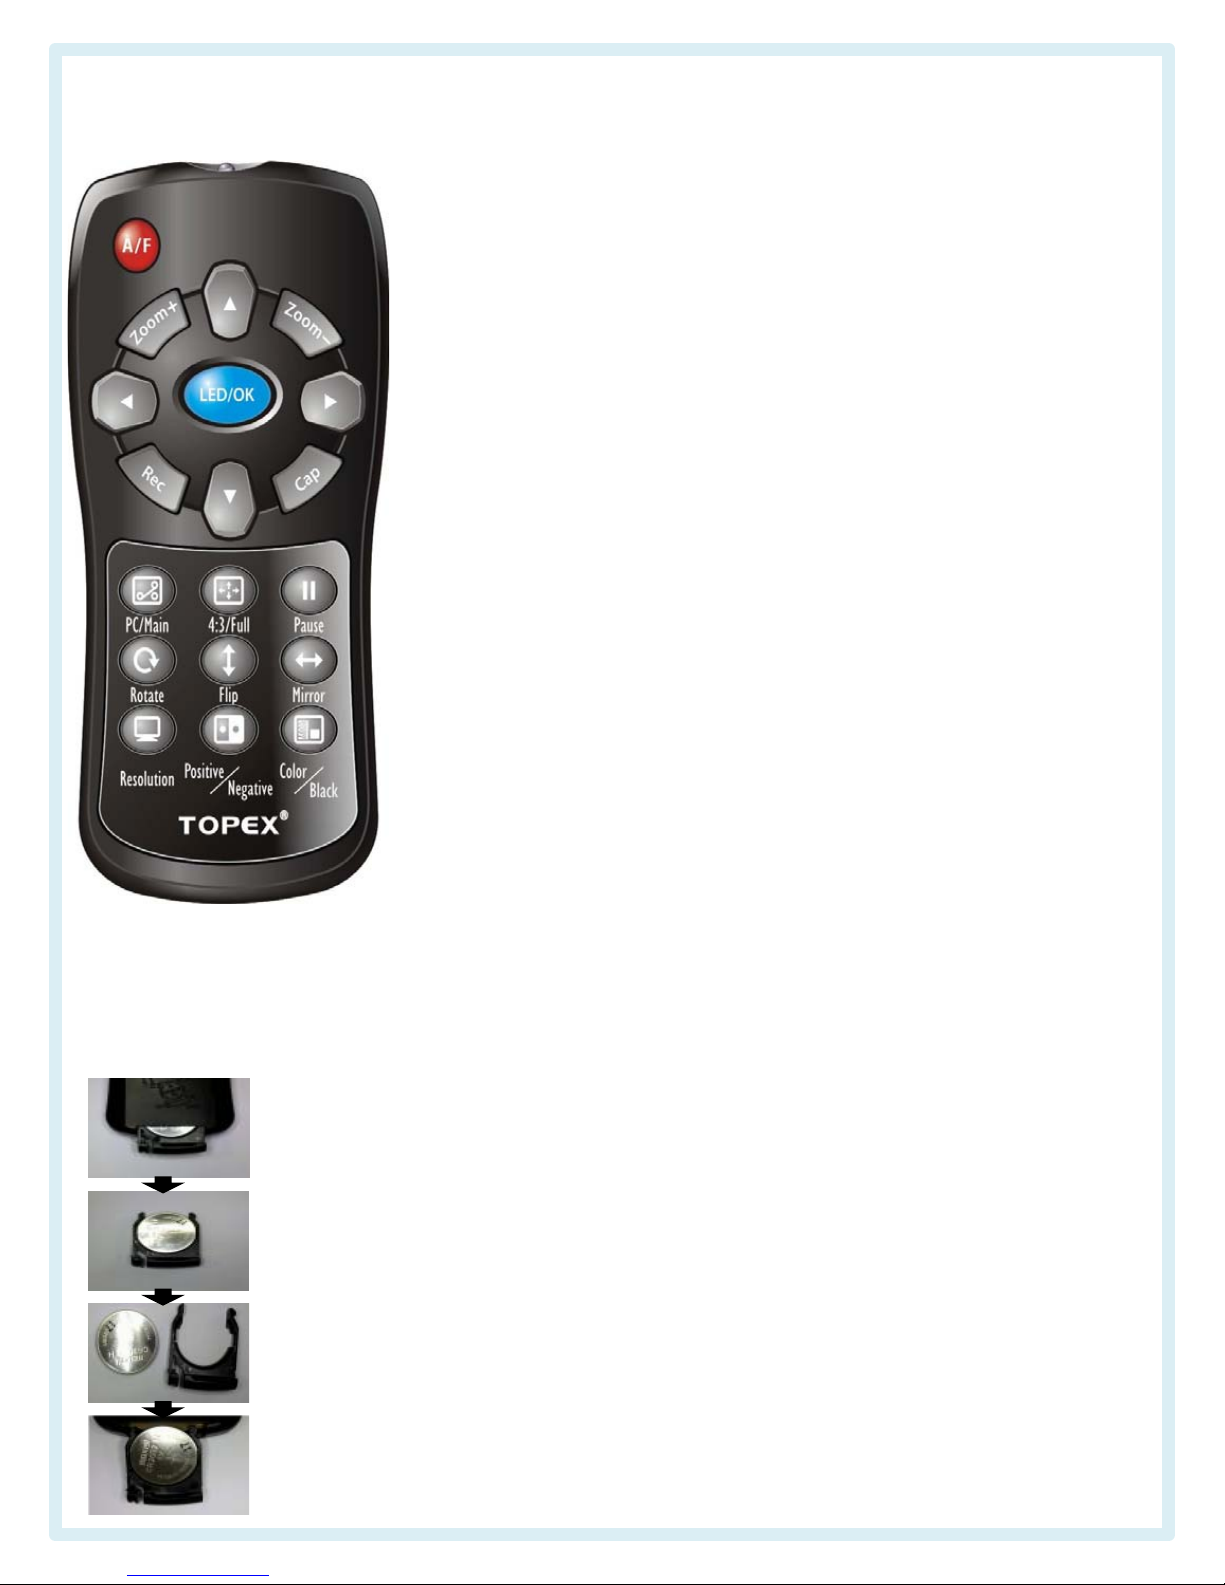
3. Description of remote controller
7
• A/F(Auto Focus) : Perform the auto focus function whenever clicking
• Zoom+, Zoom- : Manifying or minimizing the size of displaying
data or object
• ▲,▼,◀,▶ : Moving the magnified or minimized image to
Up, Down, Left & Right(Can be used as the page up &
page down function on the document view mode)
• Rec : Recording the preview images (saving file name will be flicking
when record and using internal/external microphone for record).
Once clicked, it'll start to record and when click again, it'll finish
to record.
• Cap : Saving the Preview image automatically.
• LED/OK : Controlling the ON/OFF of RGB LED (When click Record
or Capture, it can be used as OK or EXIT function)
• PC/Main : Select to use PC or Main unit.
• 4:3/Full : Converting the screen size at Normal screen/Full
screen
• Pause : Pause the Preview/Movies image temporary.
• Rotate : Rotate the Preview image by 90˚ in a clockwise direction
• Flip : Flip the Preview image vertically/return
• Mirror : Flip the Preview image horizontally/return
• Resolution : Change the resolution to 2540X1920, 1600X1200,
1200X960 and 640X480
•
Positive/Negative : Change the Preview image to Positive/Negative
• Color/Black : Change the Preview image to Color/Black
Insertion of battery
Hold the slot of rear side of remote controller and pushing
the clip on the right, then pull out it to the direction of arrow.
Push battery from lower to upper part by hand slightly.
Take out the finished battery and insert the new one show
the + polarity upside.
Push the battery inward until the click sound occurs.
Page 8
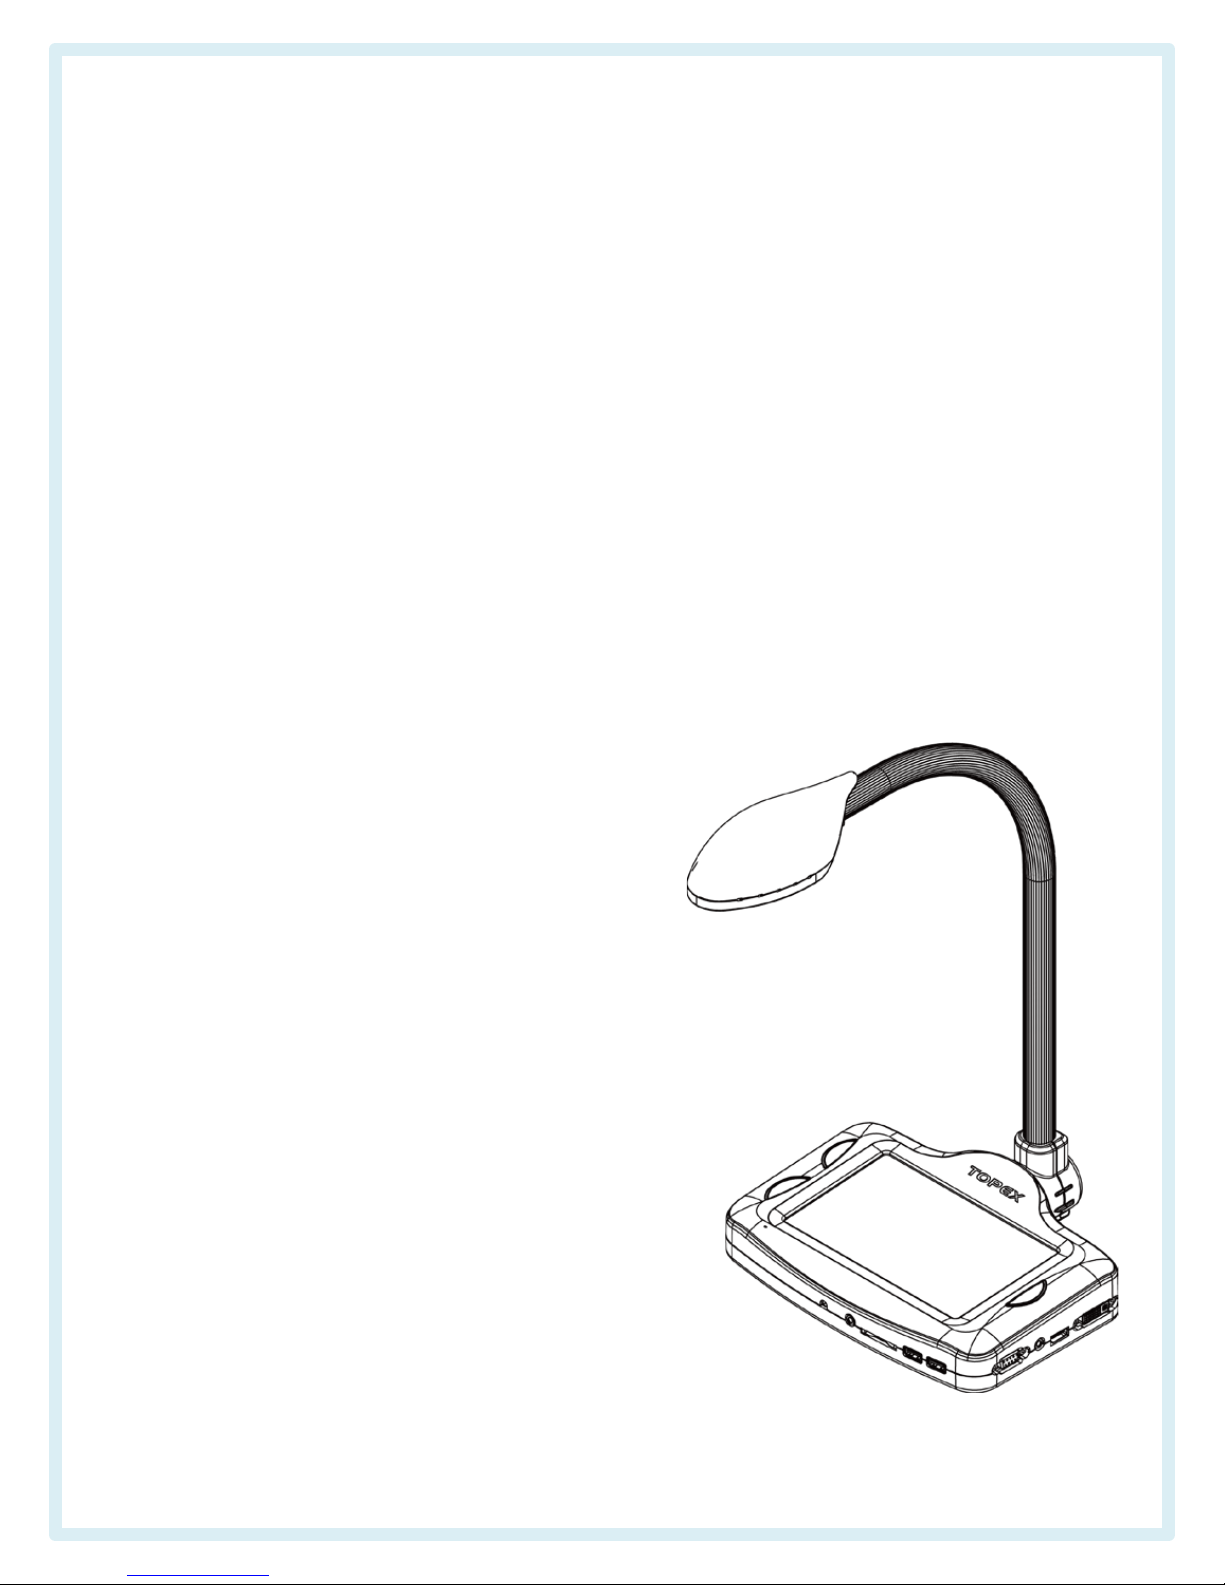
4. Setting up
1. Raise the flexible post slowly.
2. Rotate the post at 180° and fit the camera head
horizontally(when turning the post, grasp the lower
end and rotate post).
3. Connect adapter to DC 5V terminal.
4. Power S/W on.
8
Page 9
0
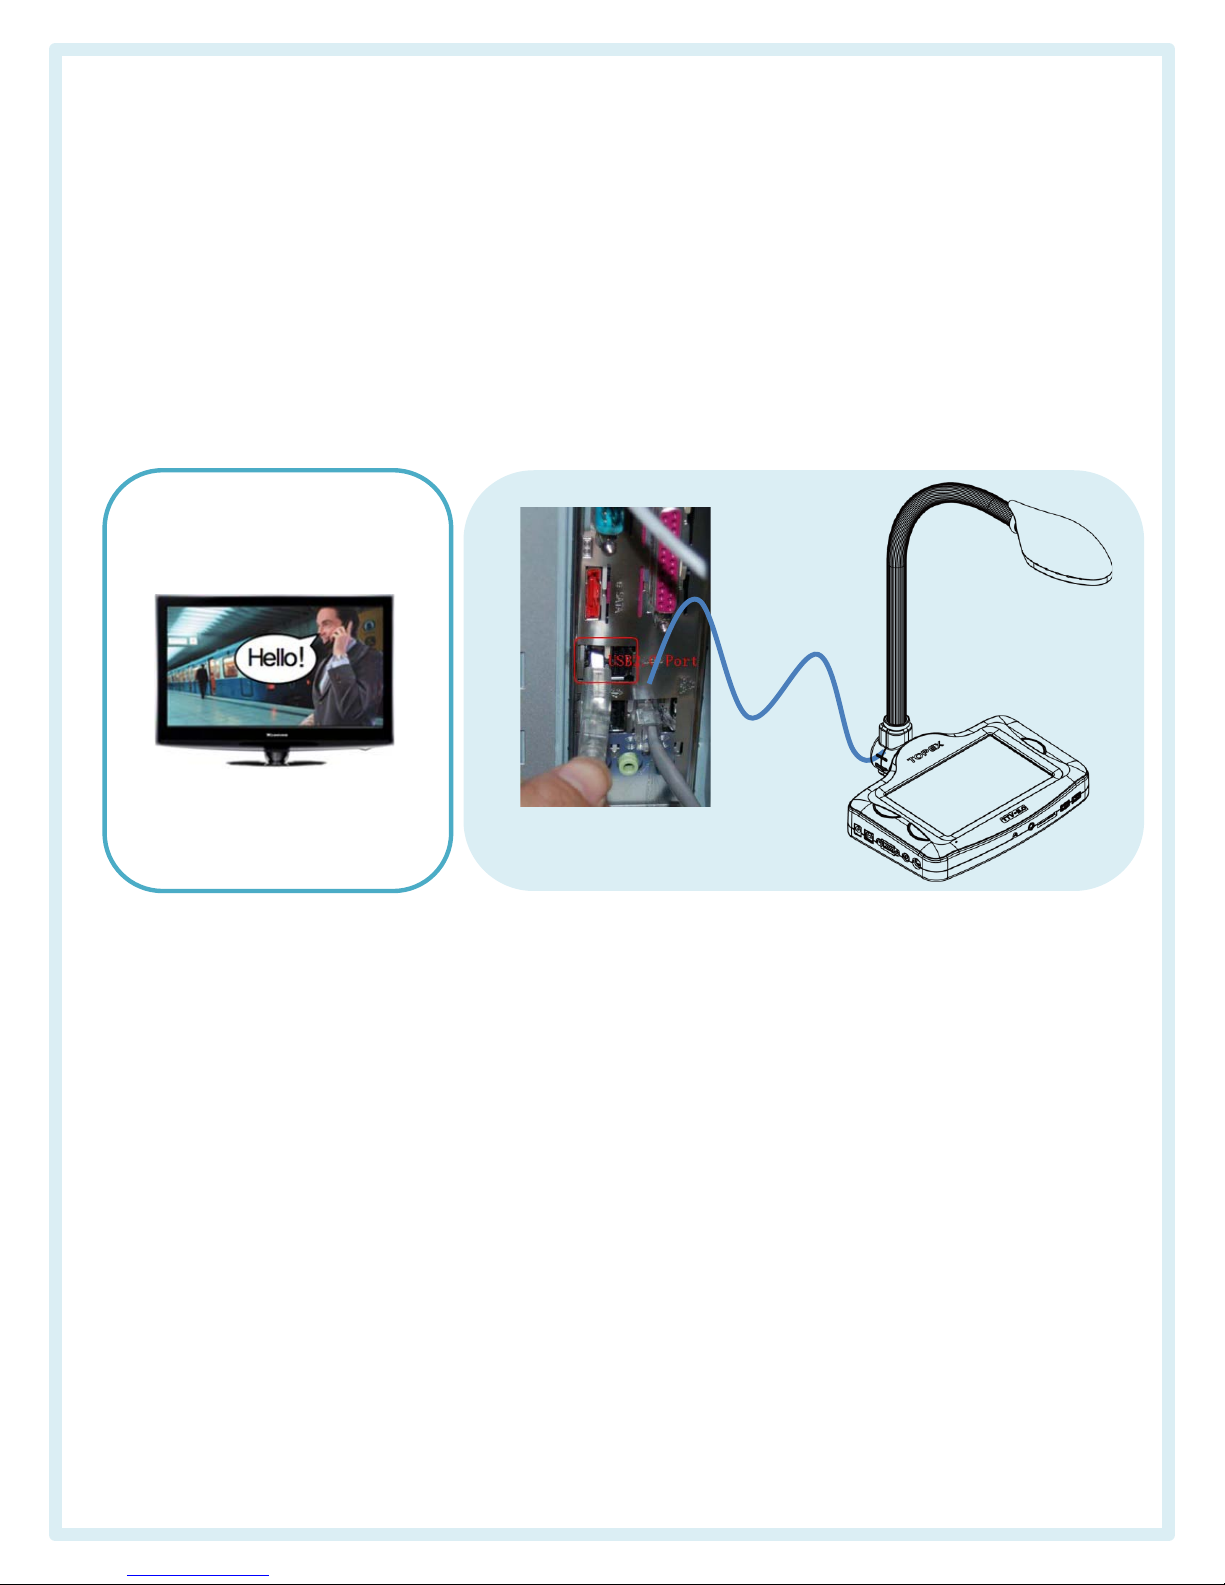
5. Connection
1) Connecting with PC
- Using the USB cable, connect PC with TTV-5.0.
- Using the Goose neck of Digital Video Presenter, can shoot the wished
video easily.
2) Start the program file of TTV-5.0 on the PC.
- Double click the icon of TTV-5.0 on the desktop.
- Select camera and click enter.
3) Execution of Digital Video Presenter (Shooting, Video recording
and image saving)
- Using various functions of the provided program, apply the necessary
faculties like video shooting, image capturing, electronic board.
English learning and others fit to the purpose.
9
Page 10
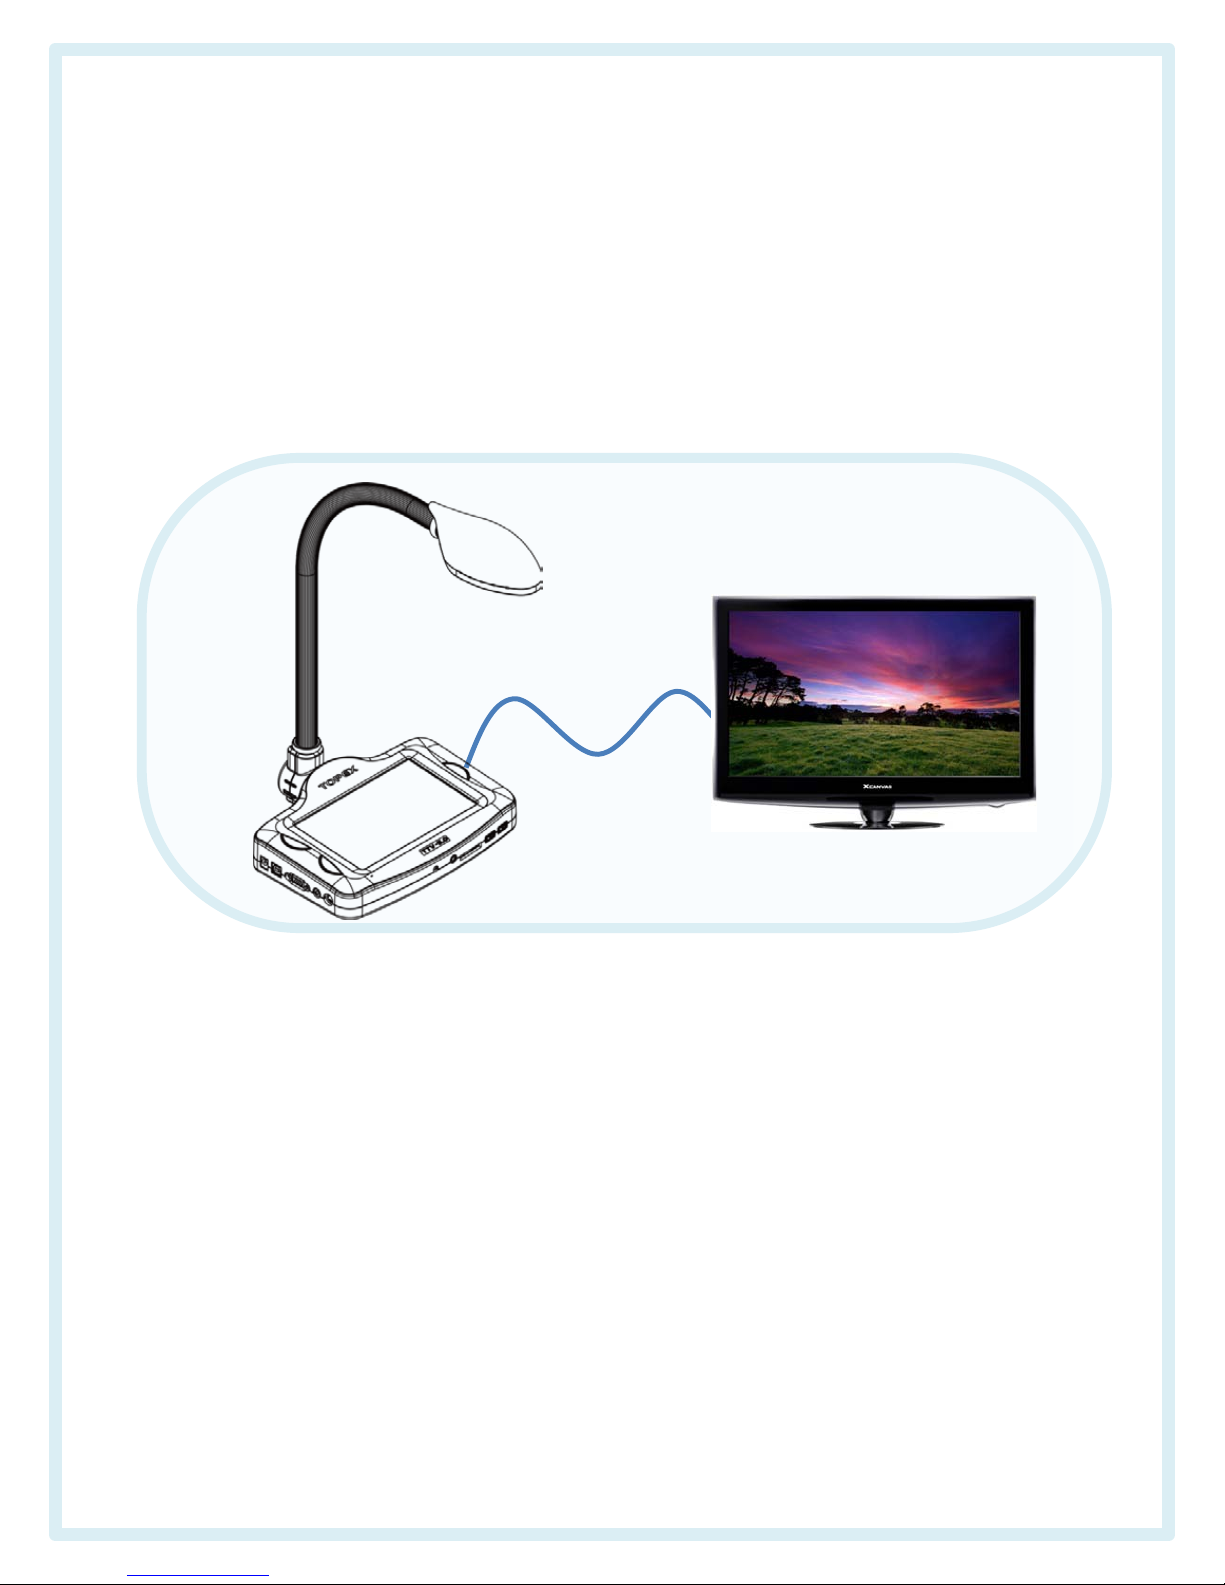
5. Connection
1) Connecting with monitor/TV
- Using HDMI/DVI/RGB/S-Video/RCA cable, connect monitor
with TTV-5.0.
- Using the Goose neck of Digital Video Presenter, can shoot
the wished video easily.
2) A/F adjustment and how to use LED lighting lamp
- When using product, press the A/F button on the right of unit at
the wished shooting distance, then the focus is readjusted.
- Lighting can be adjusted using the LIGHT button on the left of unit.
3) Execution of Digital Video Presenter (Shooting, Video recording
and image saving)
- Using various functions on the providing program, apply the necessary
faculties like video shooting, image capturing, electronic board.
English learning and others fit to the purpose.
10
Page 11
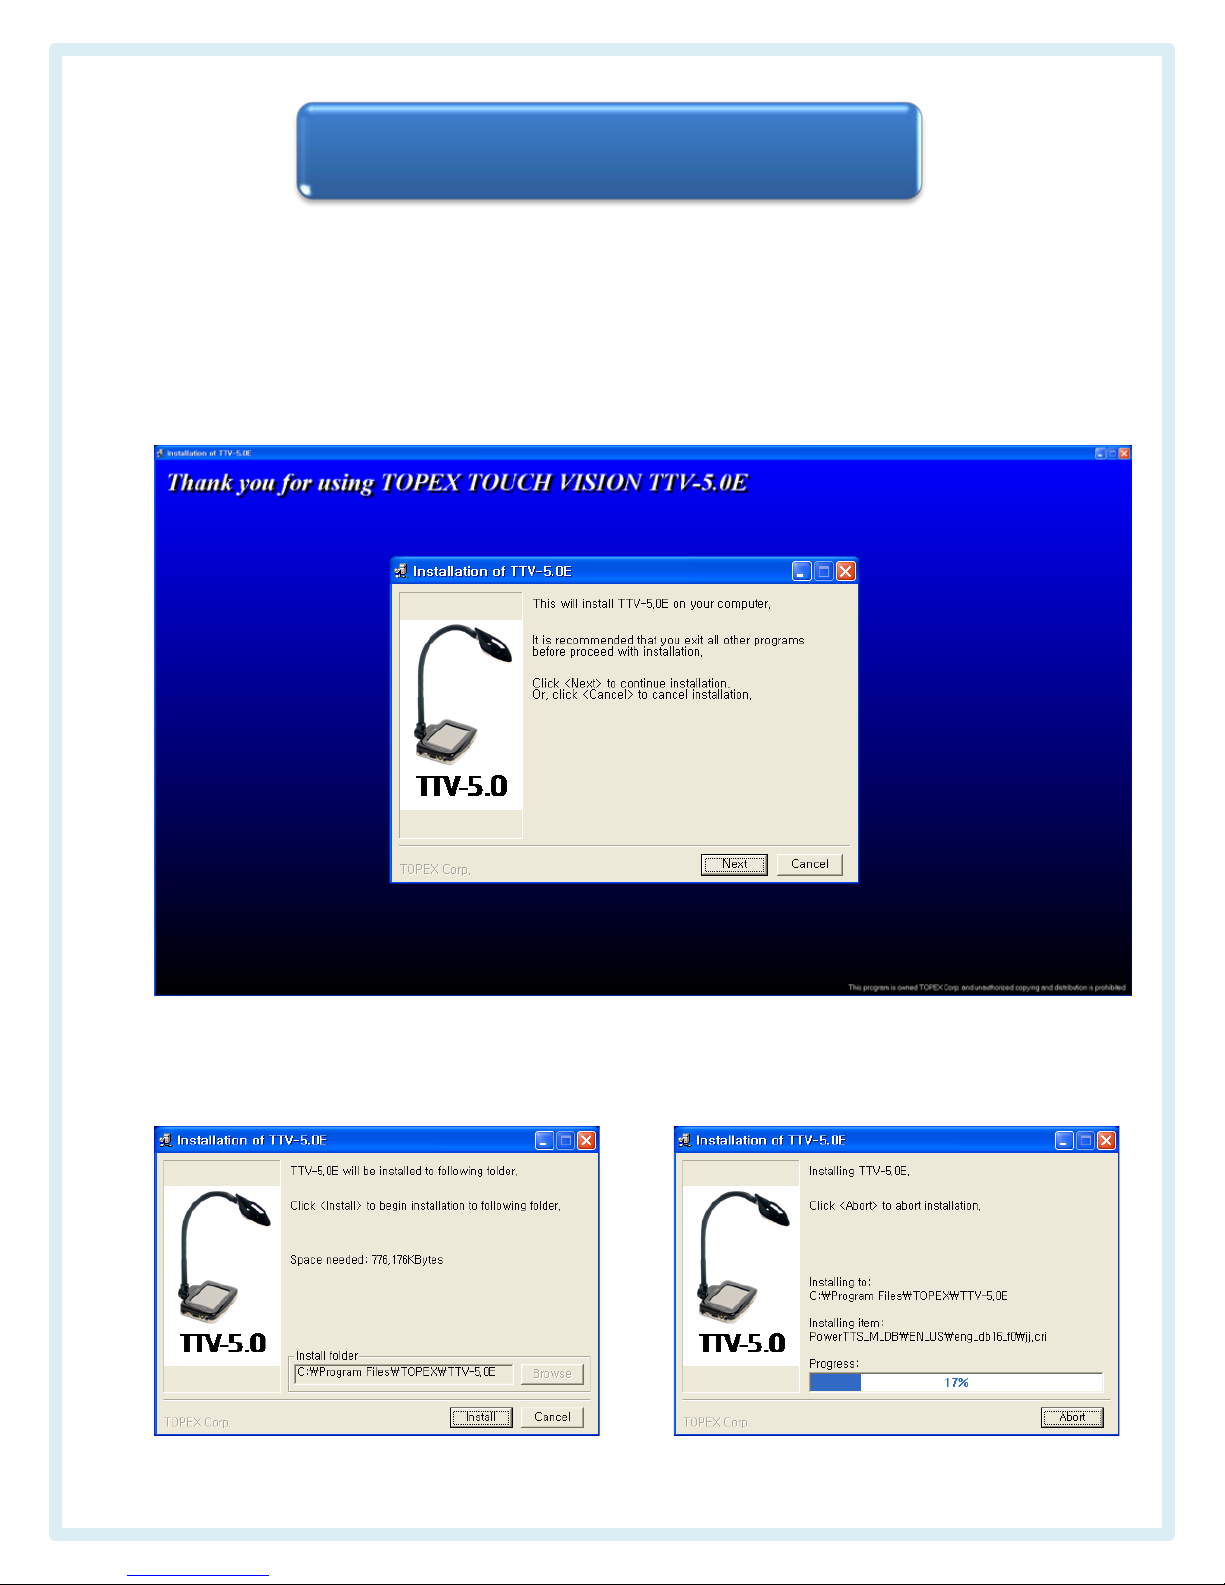
1. Installing the program
1) When insert CD in the CD driver, the following display will be shown.
It takes about 20~30 sec. (Execute CD\setup.exe, if doesn’t become
automatically.)
Then, click 『Next』. (Total installation time will be take about 3~5 min.)
2) After click 『Installation』, continue he installation.
11
II. Usage
Page 12
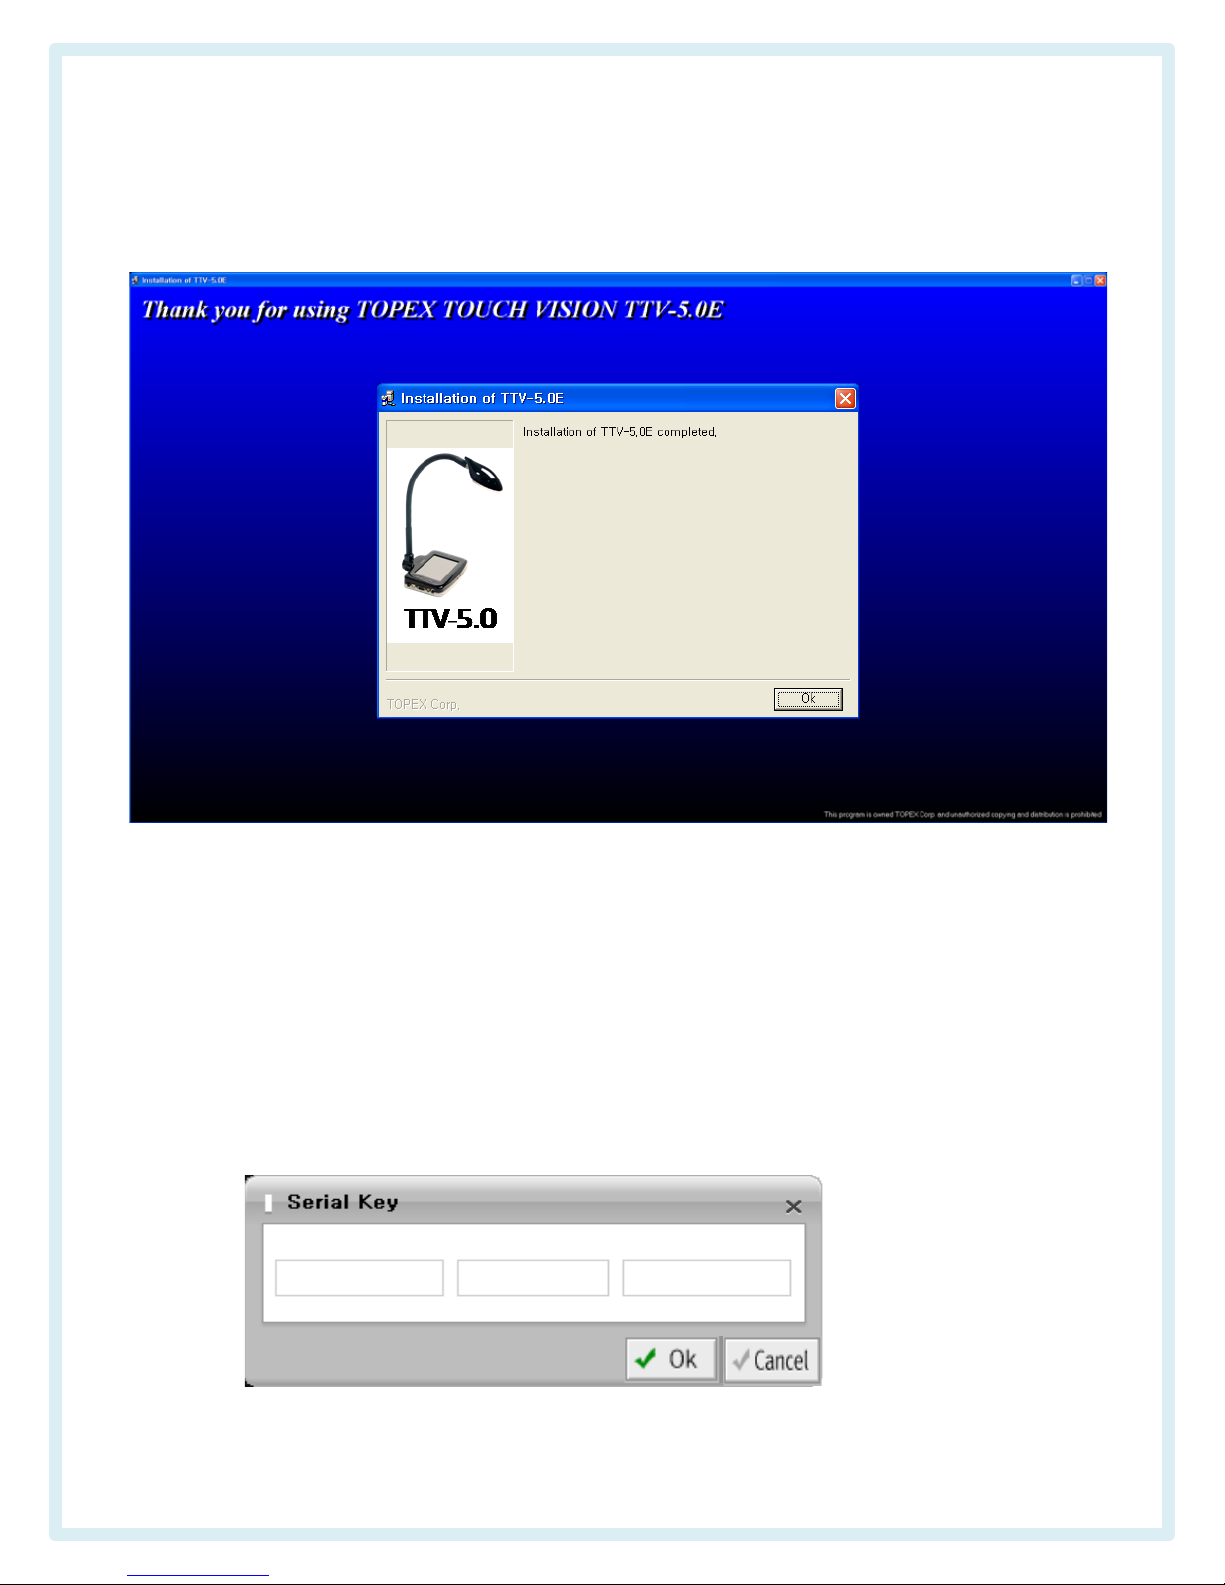
3) When completed the installation, click 『OK』 and
end up.
4) Registration of S/N
* Start ⇒ Program ⇒ TouchVision ⇒ TTV-5.0 or carry out TTV-5.0
on the desktop.
- Put the S/N on the enclosed product, then click 『OK』.
12
Page 13
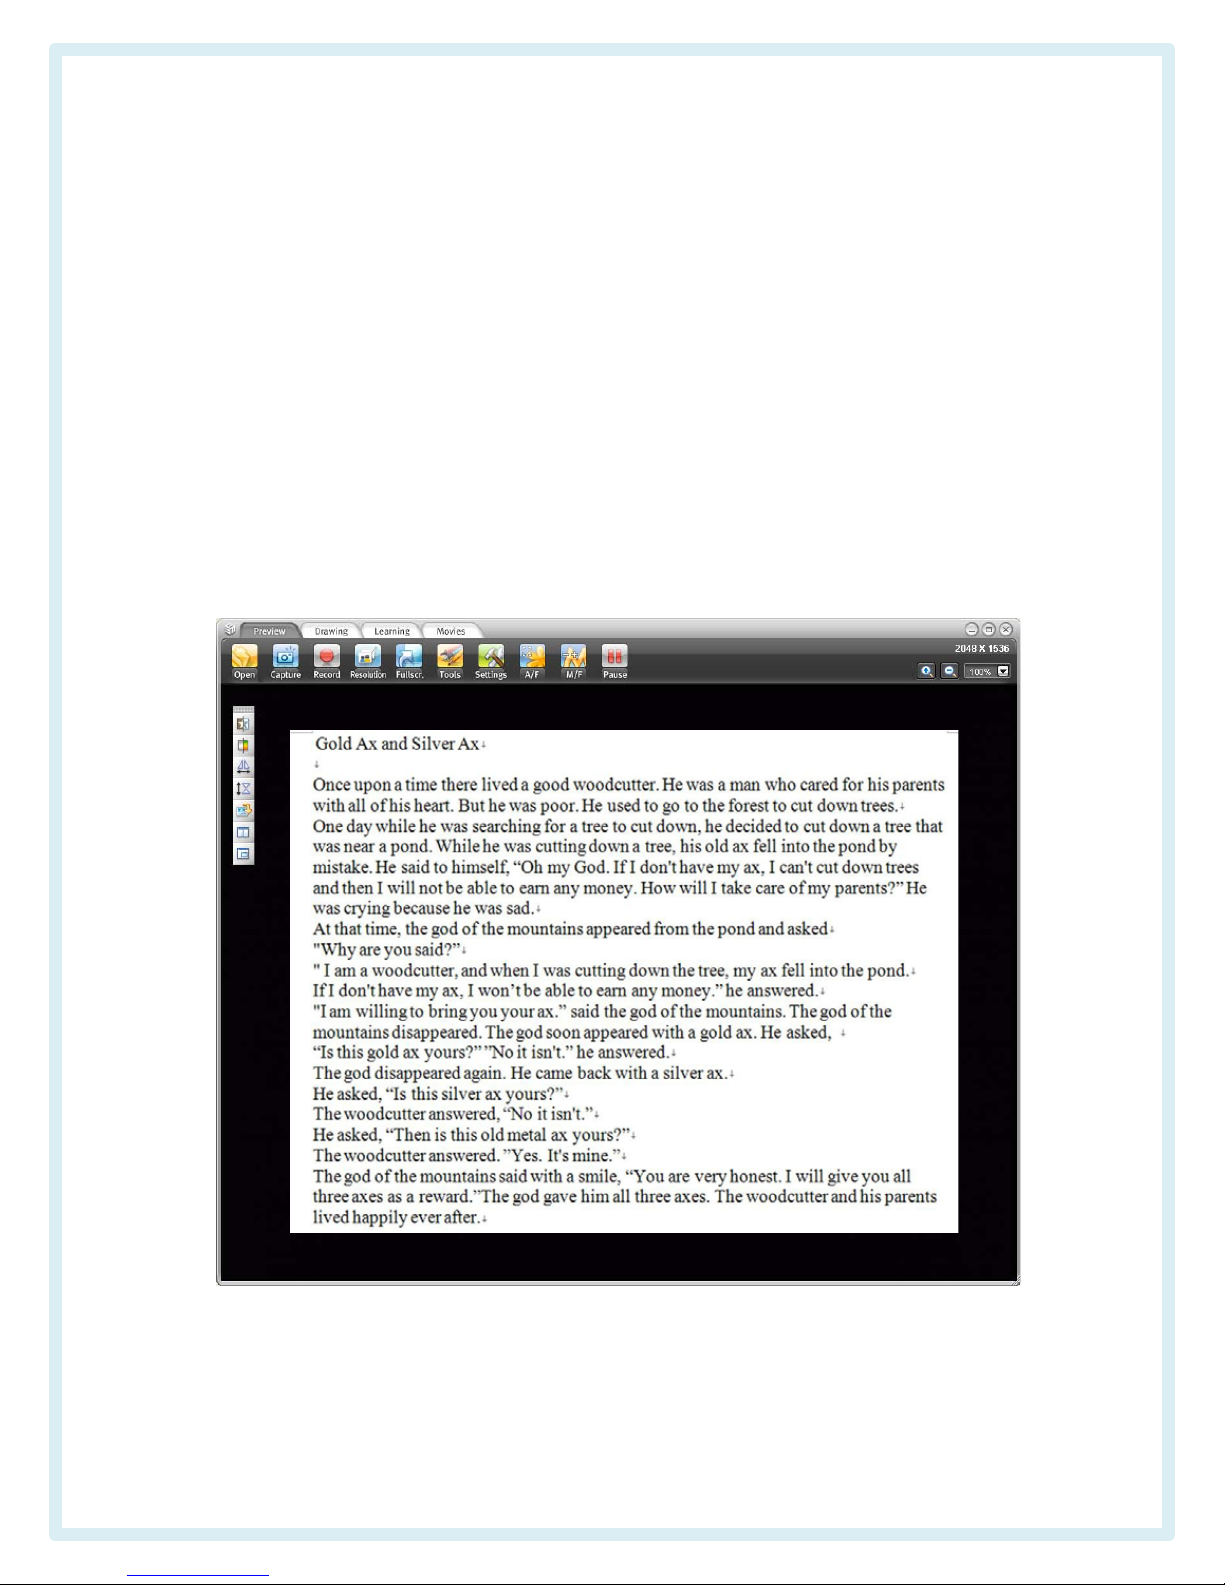
2. Using on the PC
1) Preview (Showing the shooting image by camera)
• Program is divided into 4 sections as Preview (Showing the
shooting image by camera), Drawing (Capture in preview or
drawing on the captured image in movies), Learning (Reading
ENG/KOR and saving the edited contents), Movies (Playing the
saved movies). When click each functional icon, can move to that
section immediately.
* After preparing the setting as I-3 and when executed TTV-5.0 on the
desktop, the following window will be floating and the images shooting by
camera will be shown on the display.
• Preview can show the real-time video at sharper quality, possible
to change as various resolutions, can zoom to 1000% at maximum
and can be easily moved to the navigator. Auto focus and manual
focus features increased the ease of use more.
13
Page 14

Zoom in : Magnify at 25% whenever clicking (Max. 1000%)
Support AOW (Active Output Window) when Zoom in.
Zoom out : Reduce at 25% whenever clicking (Min. 25%)
Display window : Display the enlarged state and change to the assigned
magnification
Minimize : Minimizing the display and move to the taskbar
Maximize : Change/Return to the full screen on the monitor
Close : End up the program
Open : Open the images or movies saved in the PC.
Capture : Save the Preview image automatically (saved as the set resolution).
Record : Record the Preview images (•Rec will be flicking when record.
Separate Mic. is needed for recording)
When the display is slow during record, please erase the general
Codec which is installed previously.)
Resolution option : 640X480, 1280x720, 1280x1024, 1600x1200, 2048x1536 and
2592x1944
Full scr./Return : Convert the display at 4:3 or Full
Tools : Can select Nega/Posi, BW/Color, Mirror, Flip, Rotate, Split Screen and
Picture in Picture, Tools hide/show
Settings : Setting the image saving folder of outer button and movie saving
folder, Camera setting (Video Processor amplifier/Camera control)
A/F : Perform the Auto Focus function whenever clicking
M/F : Adjust focus manually by moving bar with mouse or, minutely control by
pushing +/-.
Pause : Pause the displaying image temporary
Nega/Posi : Change the image to Negative/Positive
BW/Color : Change the image to Black/White
Mirror : Flip the Preview image horizontally/return
Flip : Flip the Preview image vertically/return
Rotate : Rotate the Preview image by 90˚ in a clockwise direction
Rotate the Preview image by 90˚ in a clockwise direction
Split Screen : Divide the display at half, then showing the paused image on left
and the preview image on right. Can adjust the size by dragging the center line.
Picture in Picture : PIP function. When double-click the paused image, it’ll be
preview image and the preview image is convert to the paused movie.
14
Page 15
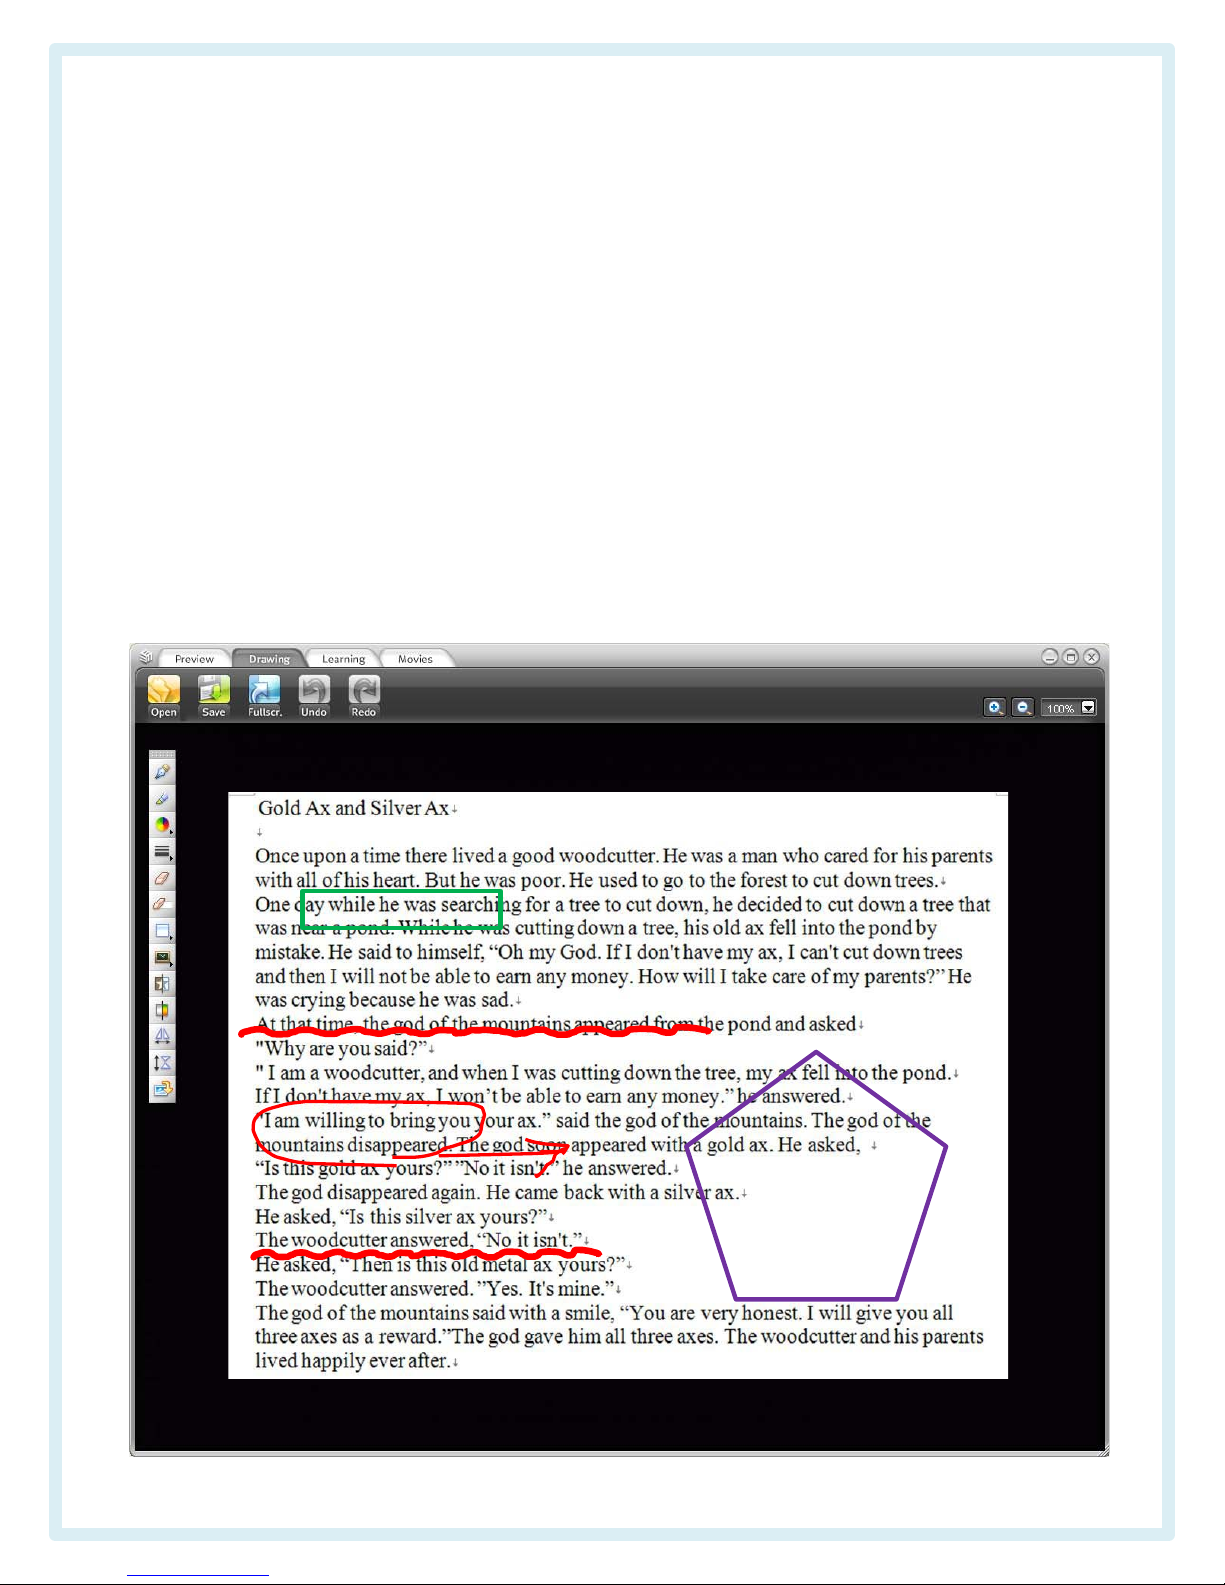
2) Drawing (Doing various works on the image and saving)
When click the drawing on the Preview or image capture on the
movies, showing the seeing captured image and can demonstrate
the saved image by opening.
Can make various tasks on the captured image like pen, highlighter,
shape and etc., and erase the contents of writing sequentially by
clicking Undo & Redo and return.
Possible to effective teaching with the functions of Board, Flip, Rotate,
Nega/Posi, B/W, Zoom in/Zoom out and others.
15
Page 16

Open : Open the saved image
Save : Save the written contents altogether
Fullscr./Return : Convert the display at 4:3 or Full
Undo : Cancel the drawing or figure by stage
Redo : Return the drawing or shape by stage
Pen : Select a normal pen
Highlighter : Select a highlighted pen
Color : Select the color at 10 stages
Pen Type : Choose the width at 10 stages
Eraser : Erase with eraser
Erase All : Erase all
Shapes : Select Quadrangle/Ellipse/Polygon/Line/Wave
Board : Select capture image/Board/White board/Note
Nega/Posi : Change the image to Negative/Positive
BW/Color : Change the image to black/white
Mirror : Flip the Preview image horizontally/return
Flip : Flip the Preview image vertically/return
Rotate : Rotate the image by 90˚ in a clockwise direction
16
Page 17
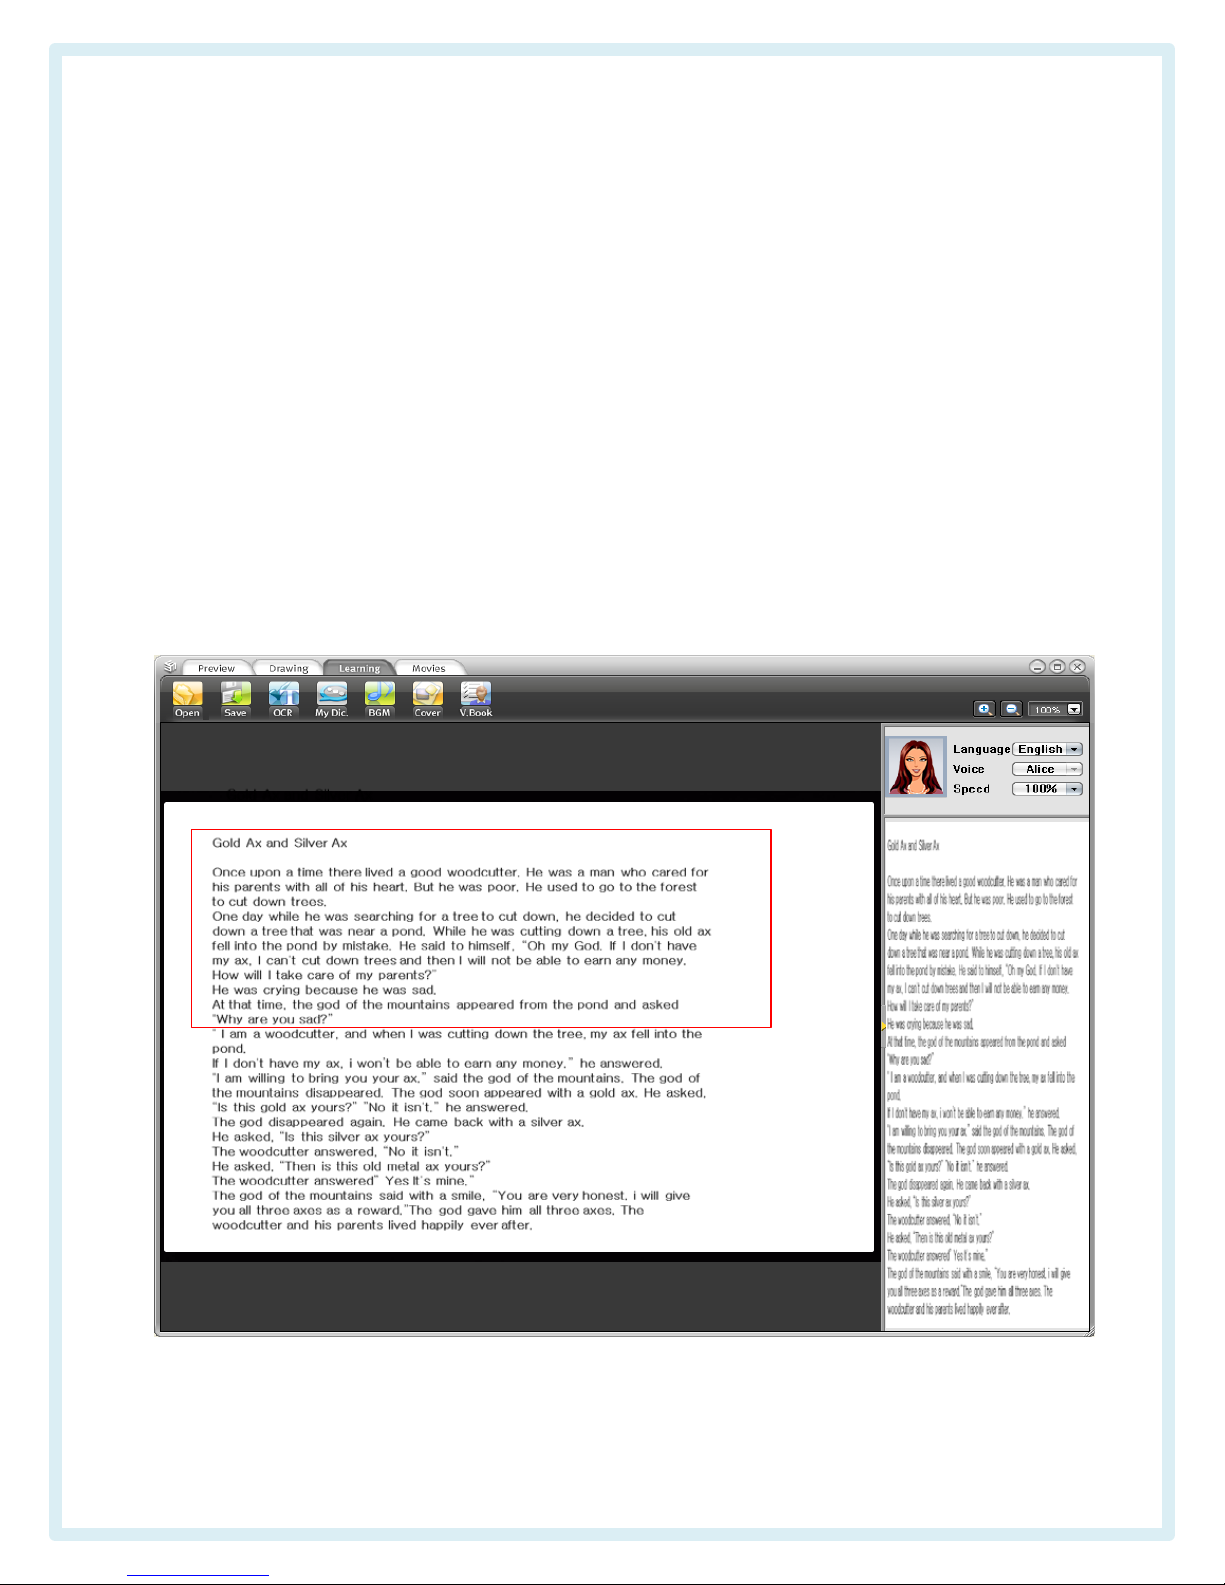
Read, Pause, Stop, Infinite repeat and Volume adjustment control window is
located in the center of the bottom. Control window is showing when move
it to the Learning and disappear when recognize the mouse cursor.
Control window will be appeared again when take the mouse cursor to the
control window and if move the mouse cursor, it'll be disappeared after 1
second.
3) Learning (Reading ENG/KOR and saving the edited contents)
When press the Learning in Preview and Drawing, it capturing image
and obtaining it.
By clicking the Learning while playing in Movies, capturing the seeing
image and get it.
To convert the letter of captured image to text, press the OCR at
above function bar.
By scanning the entire image and drag it move to the text window.
If want to recognize only a portion of character, select the area with
mouse and click OCR, then can scan only the selected area and move
to the text window.
If the recognized characters in the text window is English, select
English in language and if Korean, select Korean in language.
It can be edited in the text window.
<Possible to add text, modify, copy (ctrl+c) and paste (ctrl+v) with
mouse>
When editing is done, click Save to save the file.
(It'll be saved at *.tec )
17
Page 18
When select BGM(background music) while reading text, it'll come out
even if while reading. (only the music is come out after completing all the
ongoing sentence.)
As the volume of BGM is not adjustable, please use the quiet and modest
one so that the original sound is undisturbed.
18
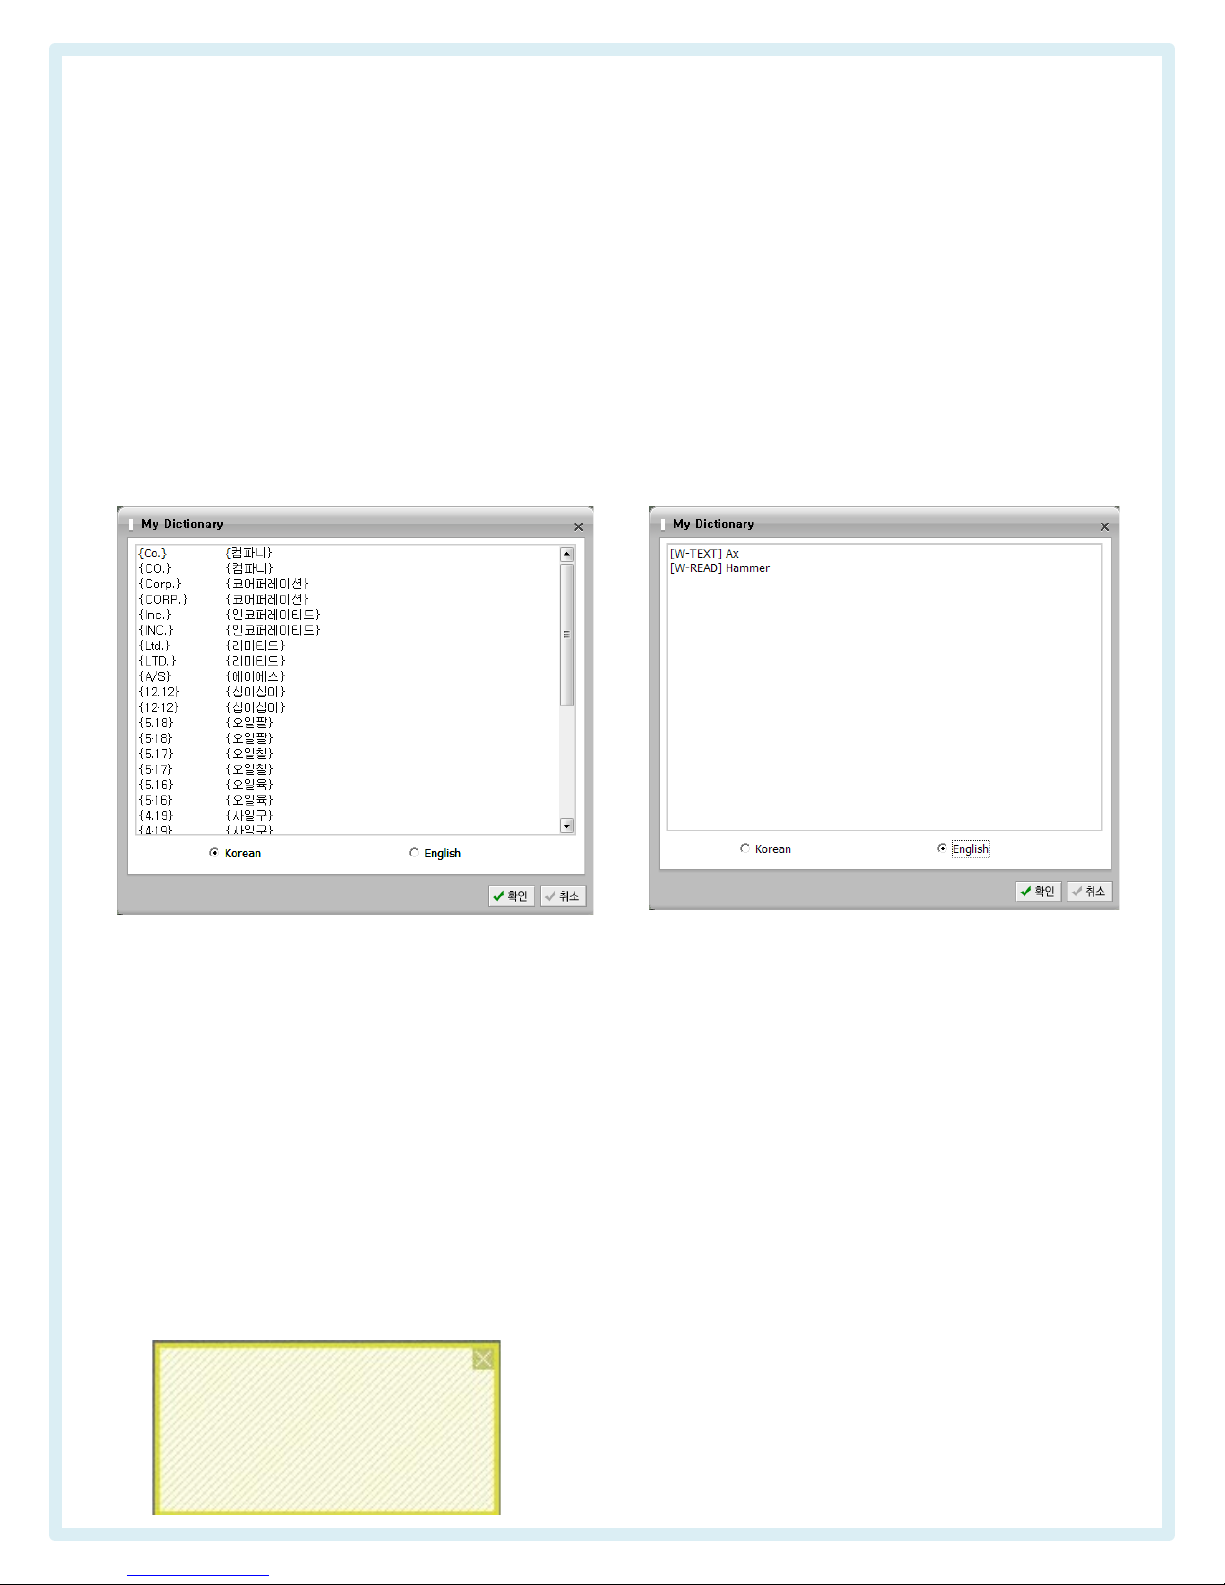
When click the My Dic., My Dictionary (pronunciation dictionary) window
will pops up.
Change Korean and English to pronounce as I wished words.
For Korean, the left is before changing and the right is the words after
changing.
[Example) Co. => Read as a Keompani]
For English, [W-TEXT] is before changing and [W-READ] is the words after
changing.
[Example) [W-TEXT] Ax => Read as a [W-READ] Hammer]
- For the words before changing in English, distinguish the capital letter
and small letter.
Cover function is used to show the contents of text as the state of
temporarily hiding.
Can move it with the mouse and can adjust the size at the outline.
When you click the X in the upper right corner, it'll be disappeared.
Page 19
Resolution : 5M pixels, keep the camera leveling and the precise focus
operating.
Font: Korean (Courier or Gothic), English (Arial or Time New Roman)
Color: Black letters on white background (white letters are not recognized)
Size: 12 fonts (10~14 font). Adjust the camera height at 15cm from the
printed object.
Brightness: Constantly adjust without shade and reflection of light
Document : Prepare at the state of no tilt and no height
■ Recommendations for character recognition
* Depending on the surrounding conditions, the recognition rate may be
lower. (Please modify it on the text window.)
19
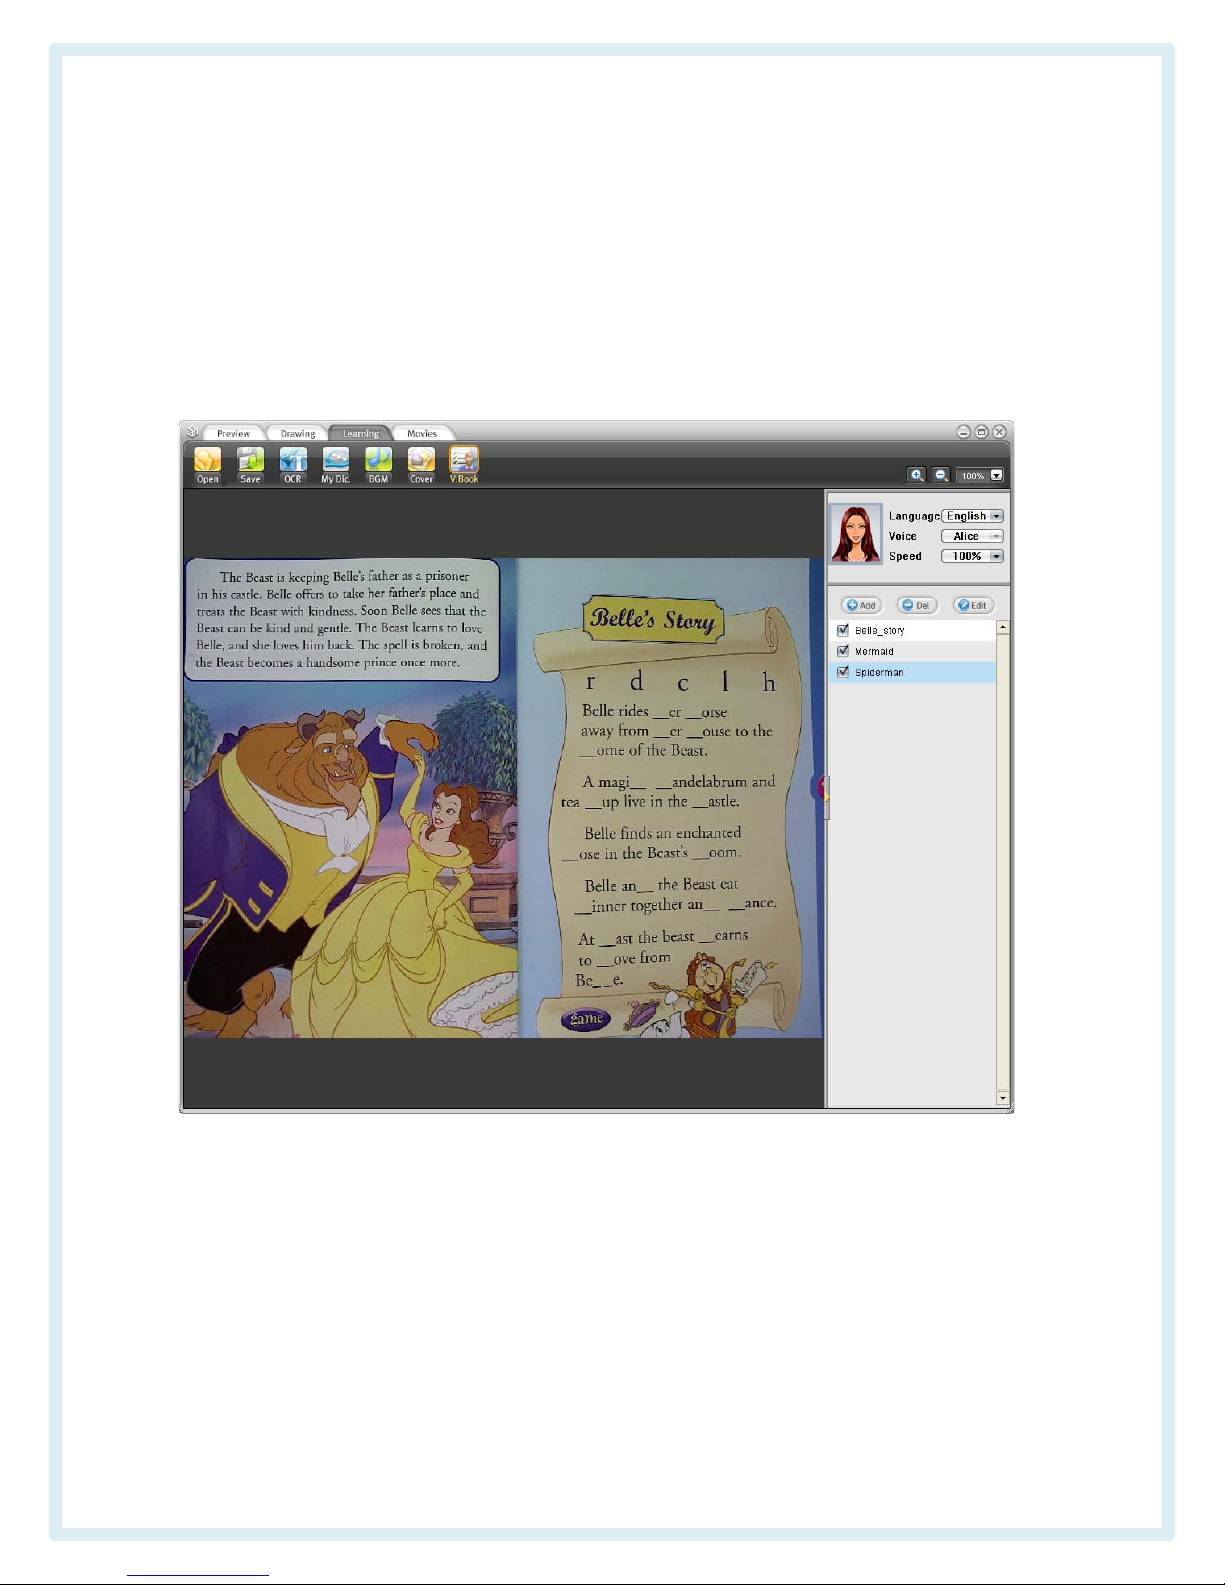
The saved file in Learning is saved as a *. tec and available as a V.Book
When click the V.Book, the text window change to the V.Book list window.
Click Call or Add to add it to the list window.
After checking v and if click the point where you want to read, the color
will be reversed. When click reading, it'll start to reading from the
reversed file.
When click the V.Book one more time, the list window is changed to the
text window and shows the current reading text.
Editing a page in the text window is available.
Page 20

Open : Open the saved image
Save : Saving the converted text and image in the text window.
OCR : Convert the whole or mouse-selected image to text(OCR) and
saving it in the text window.
My Dic. : Setting the specific words as user’s preferred pronunciation
BGM : Play the set sound as a background music
Cover : Make the quadrangle cover on the display. Can change the size
and location
V. Book : Read the saved data at image and text forms simultaneously
Add : Add the saved contents for voice book.
Del : Delete the selected contents for voice book
Edit : Edit the name of selected voice book data
Language : Select English/Korean
Voice : Alice
Speed : 50~200% (speed control at 11 stages)
Reading : Read all or the mouse-selected text
Pause : Pause reading. Start to read from the paused point when click
the reading
Stop : Stop reading. Start to read from the first when click the reading
Repeat : Read all or the mouse-selected text continuously
Highlight : Perform the highlight for the present reading points on the
display window
Boundary icon : Text window will be disappeared when press it
Boundary : Adjust the size by dragging with mouse
Volume bar : Control the volume of sound
20
Page 21
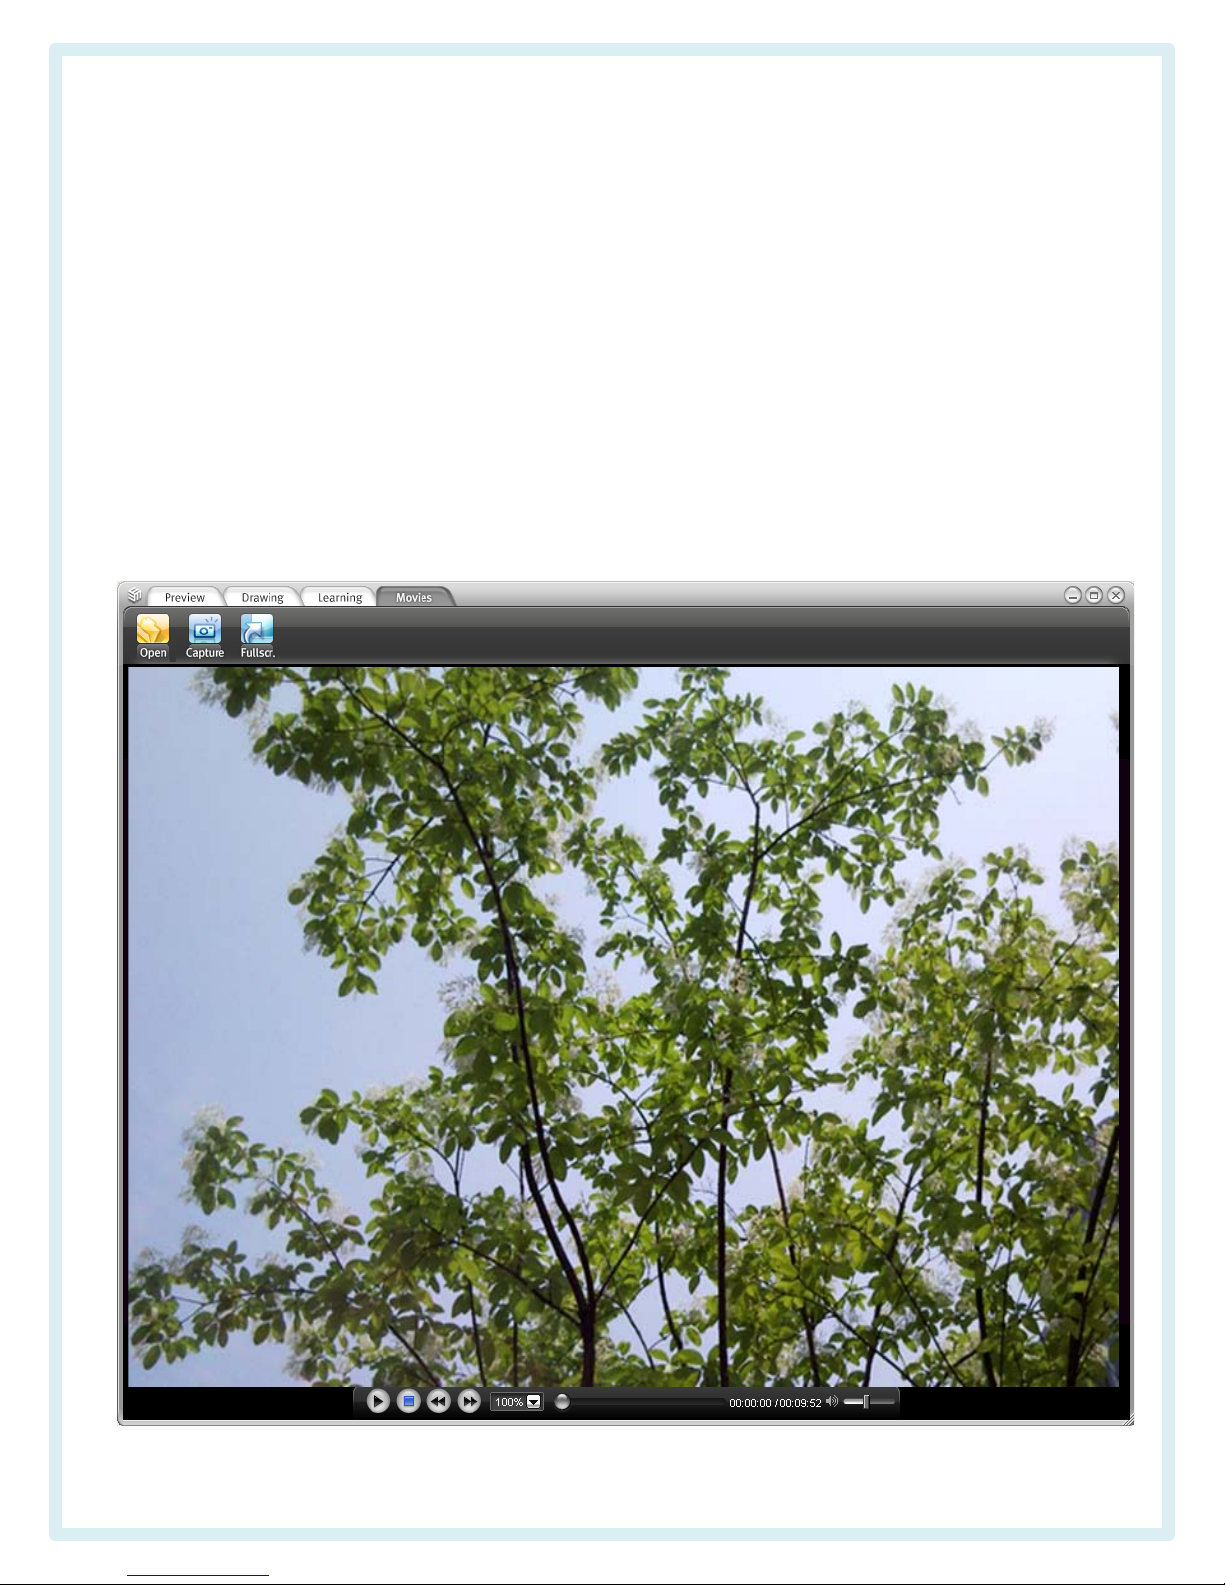
4) Movies (Playing the saved movies)
Play and show the recorded movie in Preview mode or other movie.
Play the movie by calling and the movie can be played at various
speeds.
When doing the image capture during play, move to the writing
and do a variety of tasks.
21
Page 22

Open : Open the saved movies.
Capture : Save the image of playing movies automatically (save as the
set resolution)
Full screen : Choose 4:3 or full
Play : Play the opend movies.
Pause : Pause playing the movies.
When click the play, replay it from the stopped point.
Stop : Stop paying the movies. When click the play, play from the first.
Fast-forward : When click fast-forward, moving forward at 10 seconds and
playing the movies.
Rewind : When click rewind, moving backward at 10 seconds and playing
the movies.
Speed bar : Showing the current progress of the full-length.
When click the speed bar, moving to the clicked point
Time : Show the running time/total running time
Speed control : Show playing speed (control speed at 11 stages)
The Control bar will be shown when play the movie and disappear when
recognized the mouse.
When take the mouse to the control window, control window will be shown
again and disappear after about 1 sec. when move the mouse.
22
Page 23
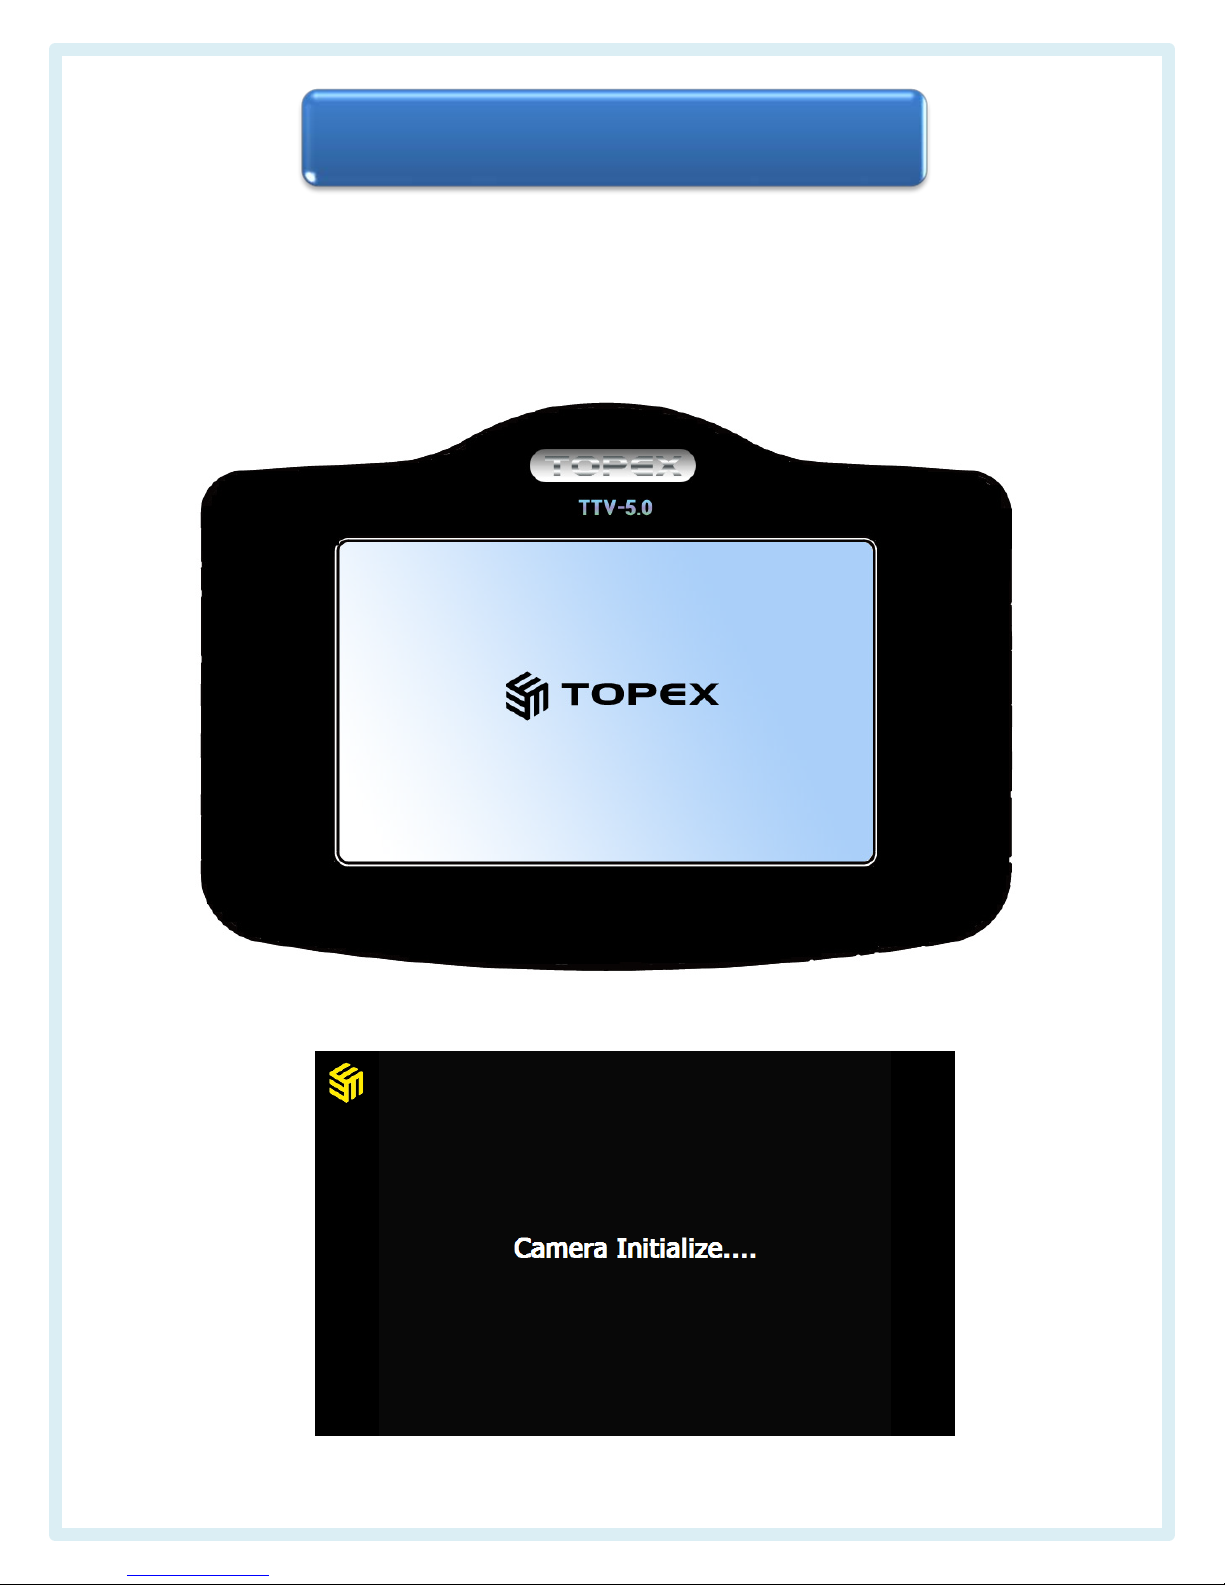
3. Using on the Digital Video Presenter
▪ When power TTV-5.0 on, the image will be displayed on
the LCD.
23
II. Usage
Page 24
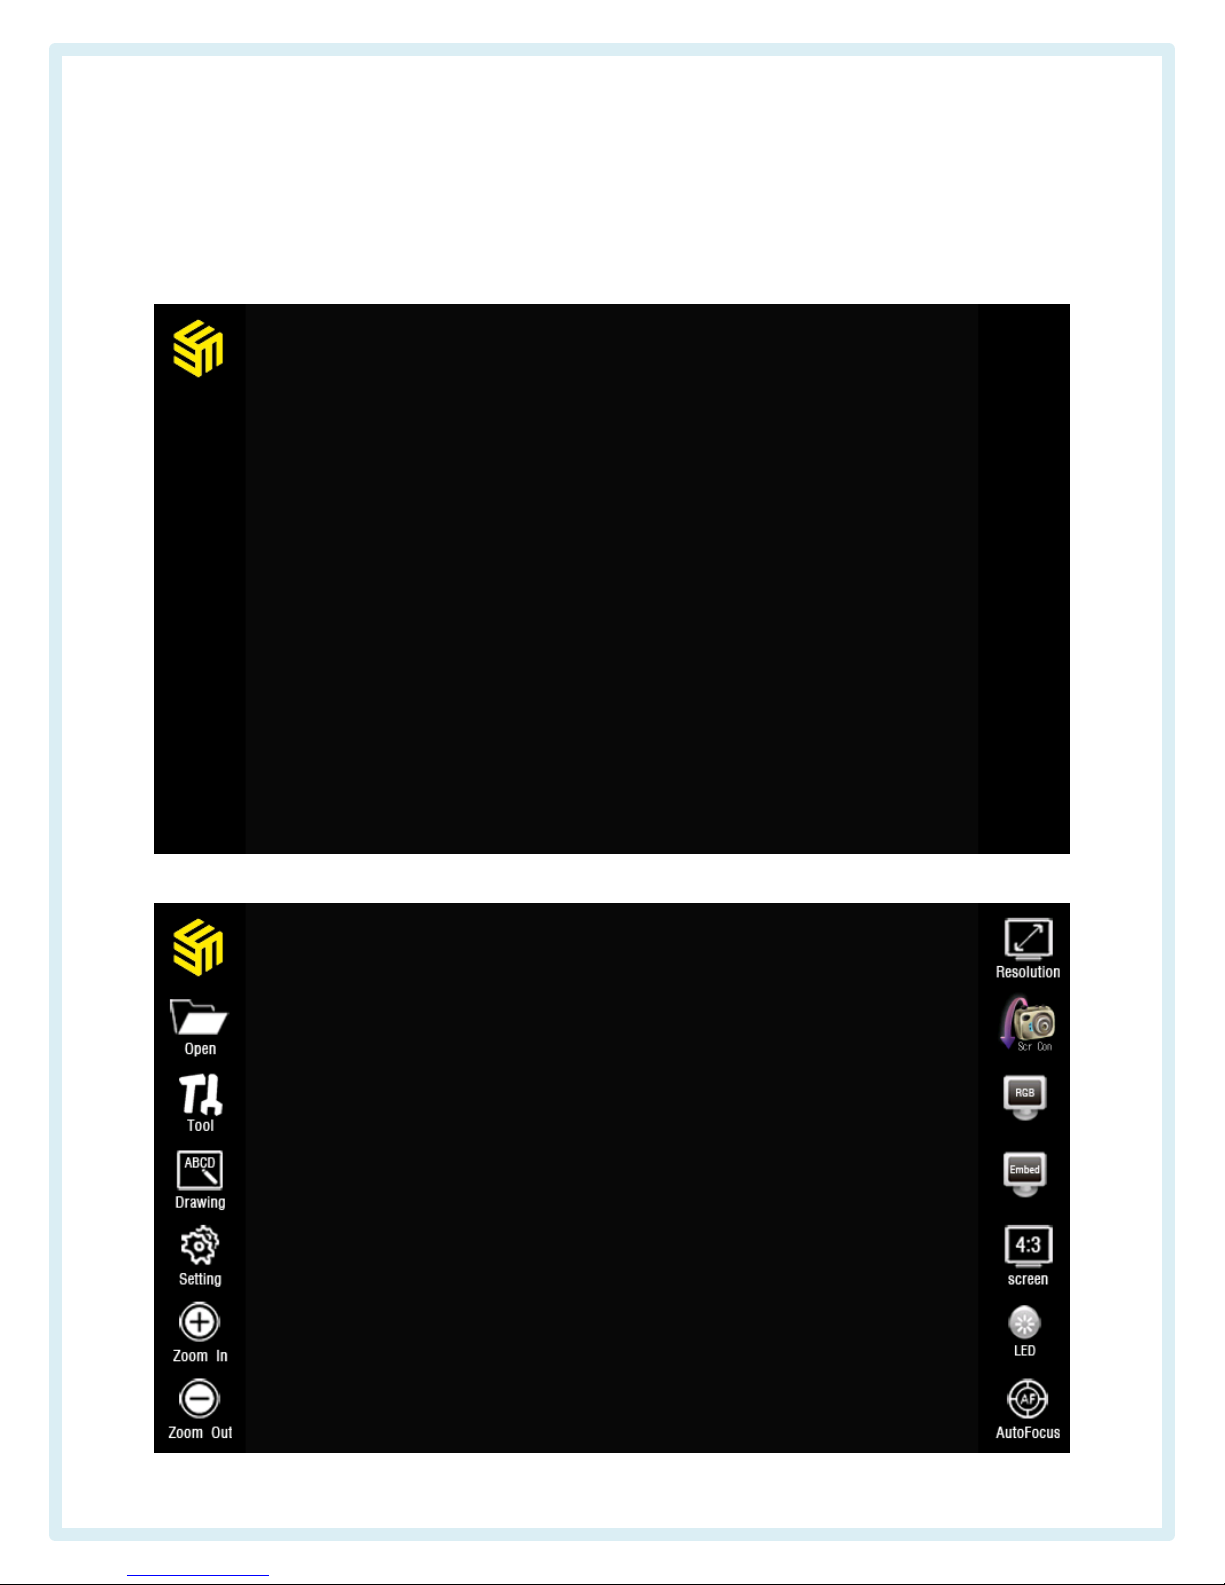
▪ TOPEX logo will be appeared on the LCD panel of TTV-5.0.
When click the logo, the menu will be appeared.
24
Page 25
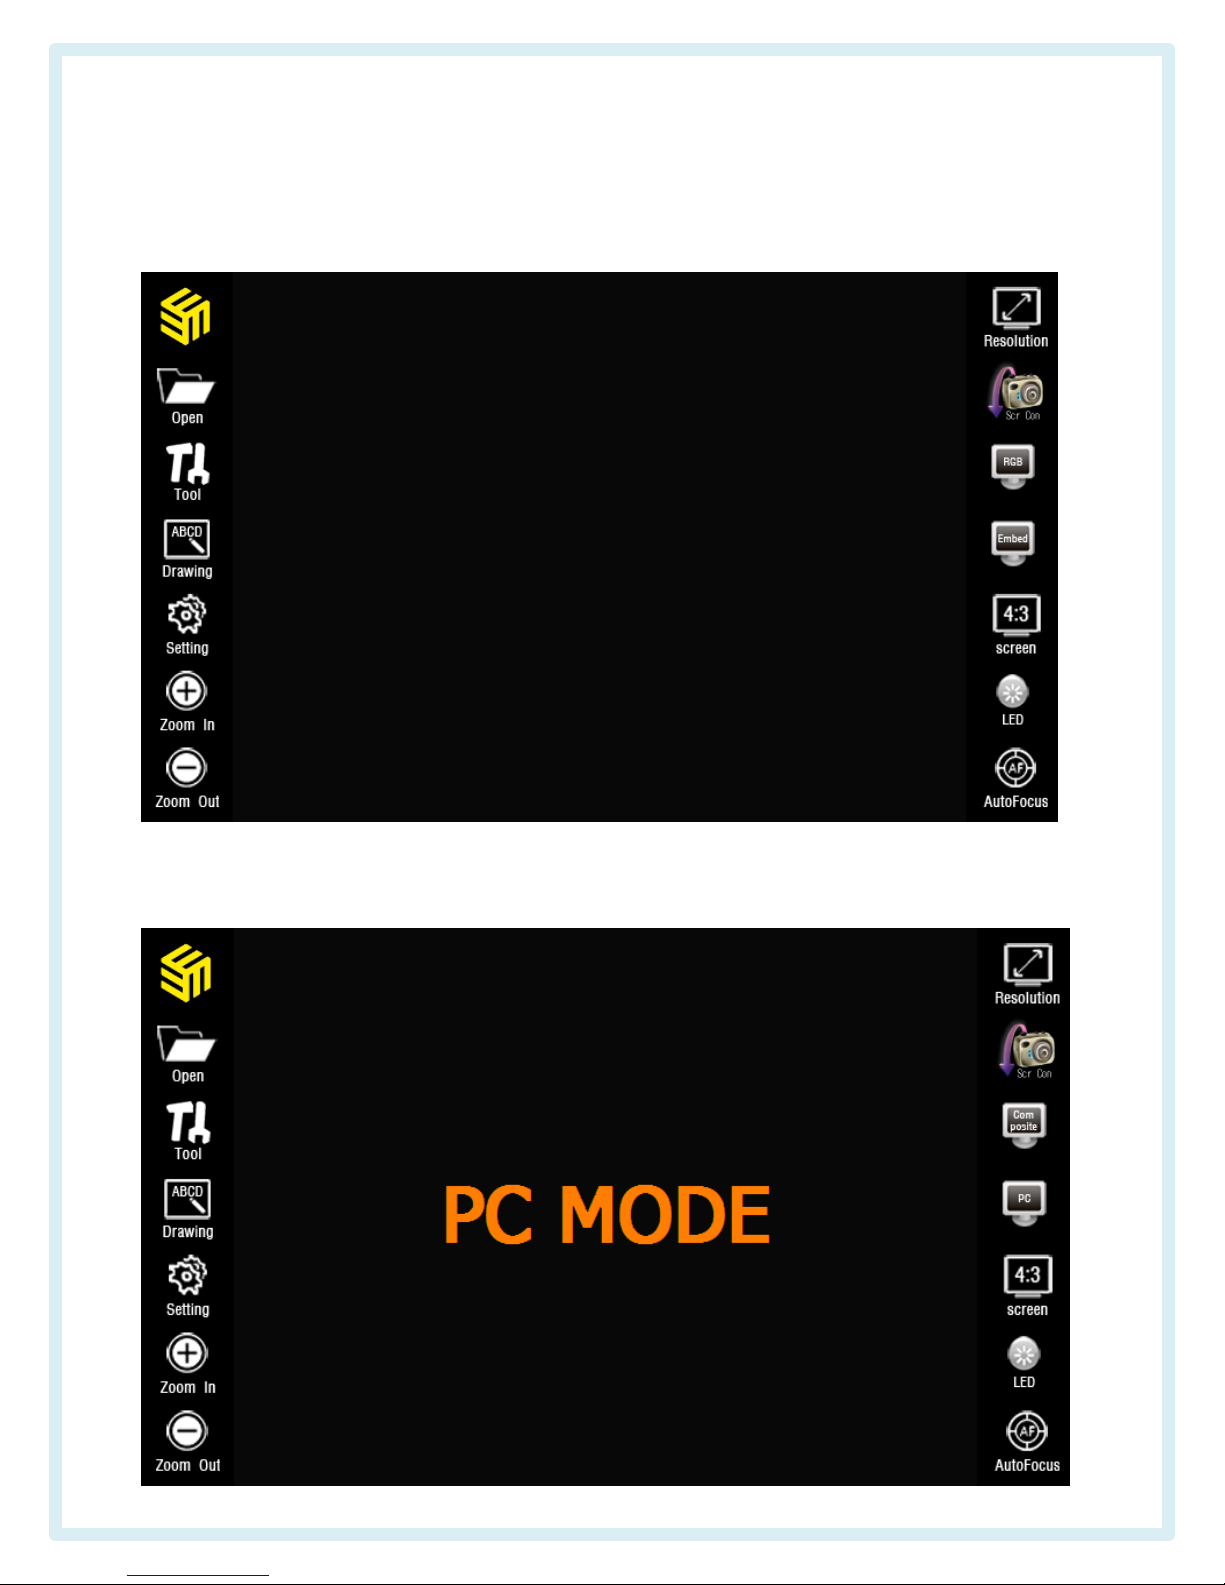
▪ When click Composite/RGB(VGA )icon, the image will be
transferred to the connected terminal.
▪ When click Embed/PC icon, the image will be transferred
to the connected terminal.
25
Page 26
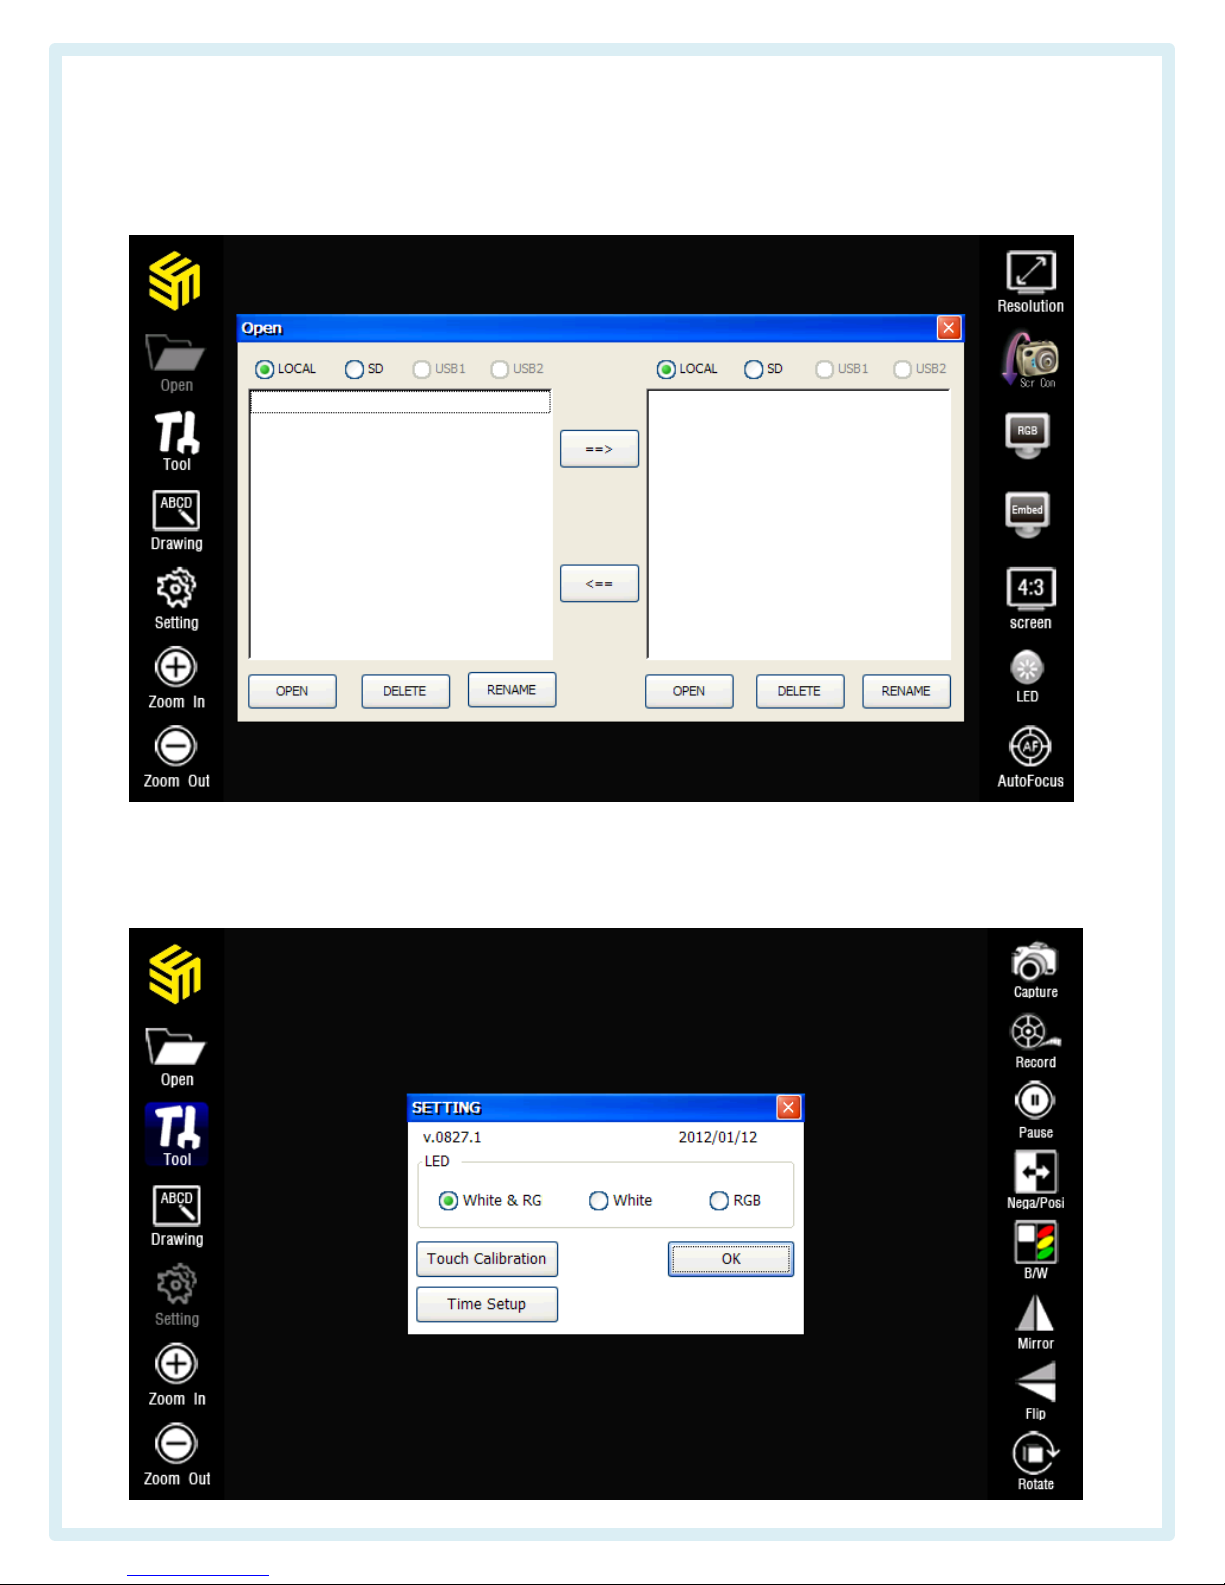
▪ When click 'Open', can open the wished file.
▪ When click 'Setting', can choose the LED specification/Time
Setup/Touch Calibration.
26
Page 27
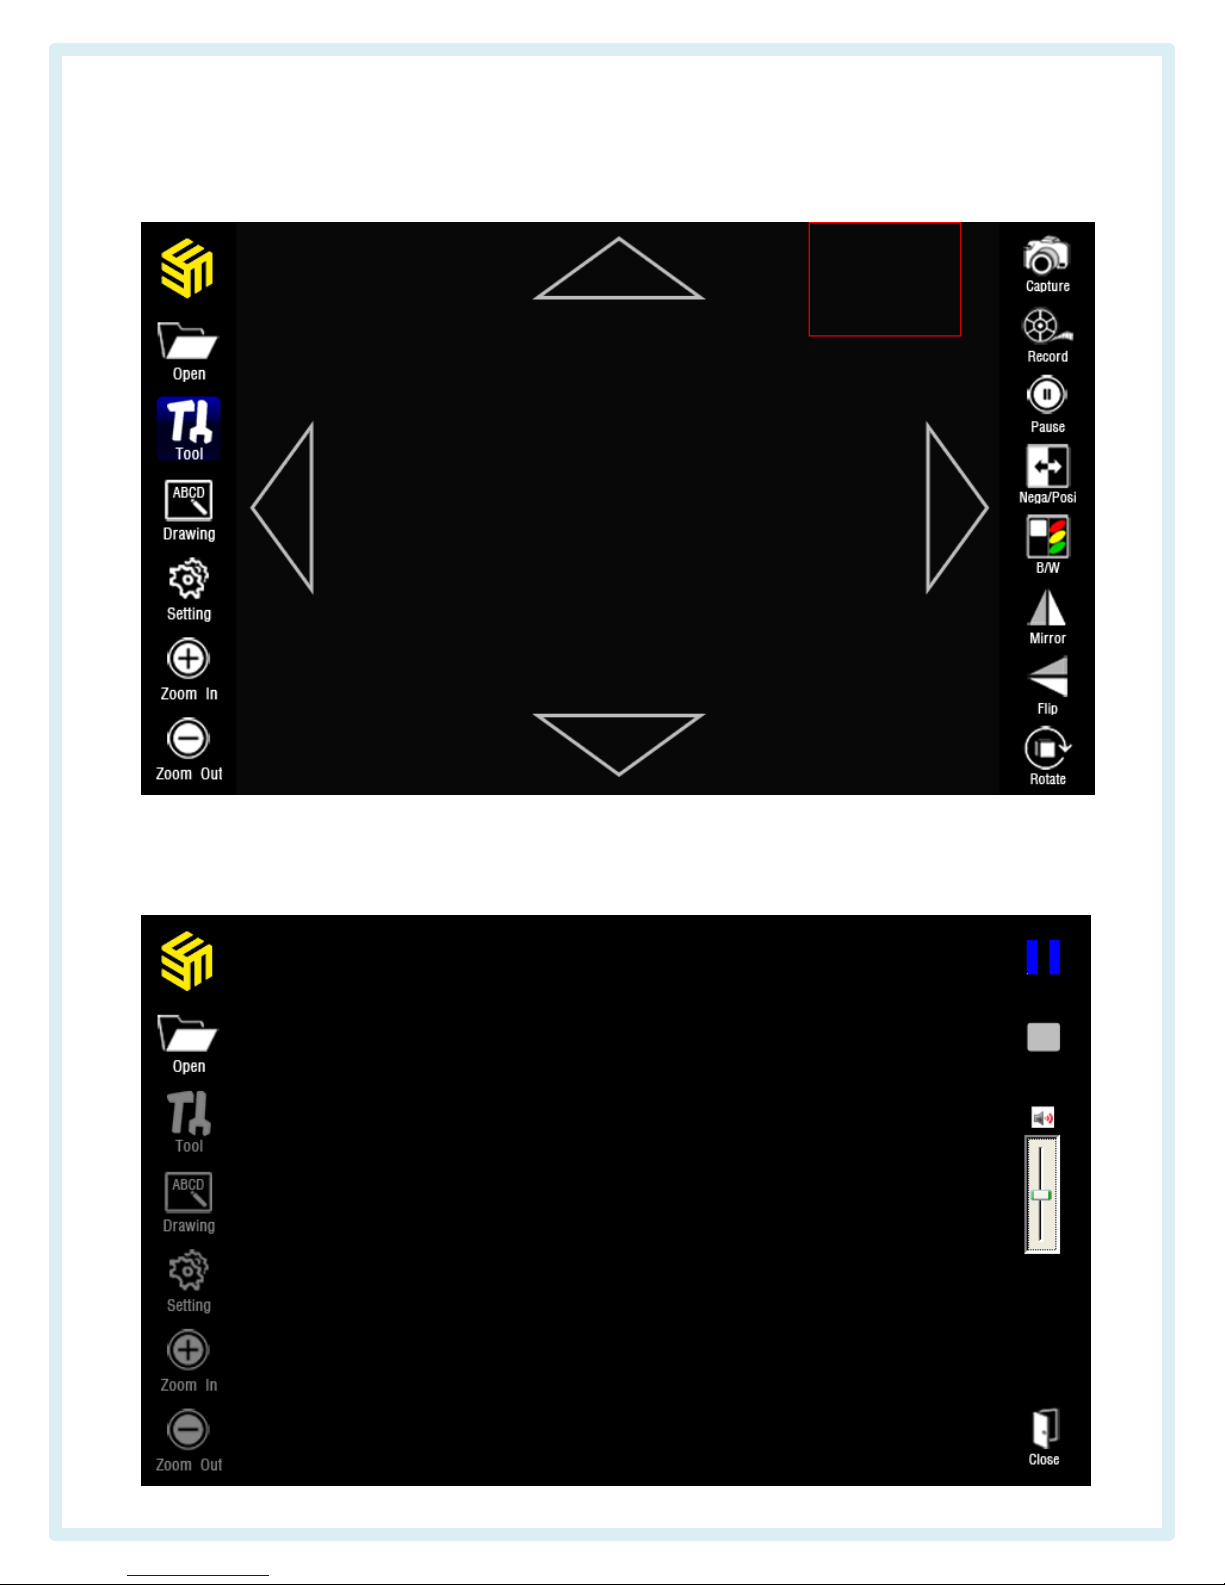
▪ After Zoom in and touch the screen, the scroll bar will be shown
to move screen.
▪ When open the movie, the control icon as right side will be
activated.
27
Page 28
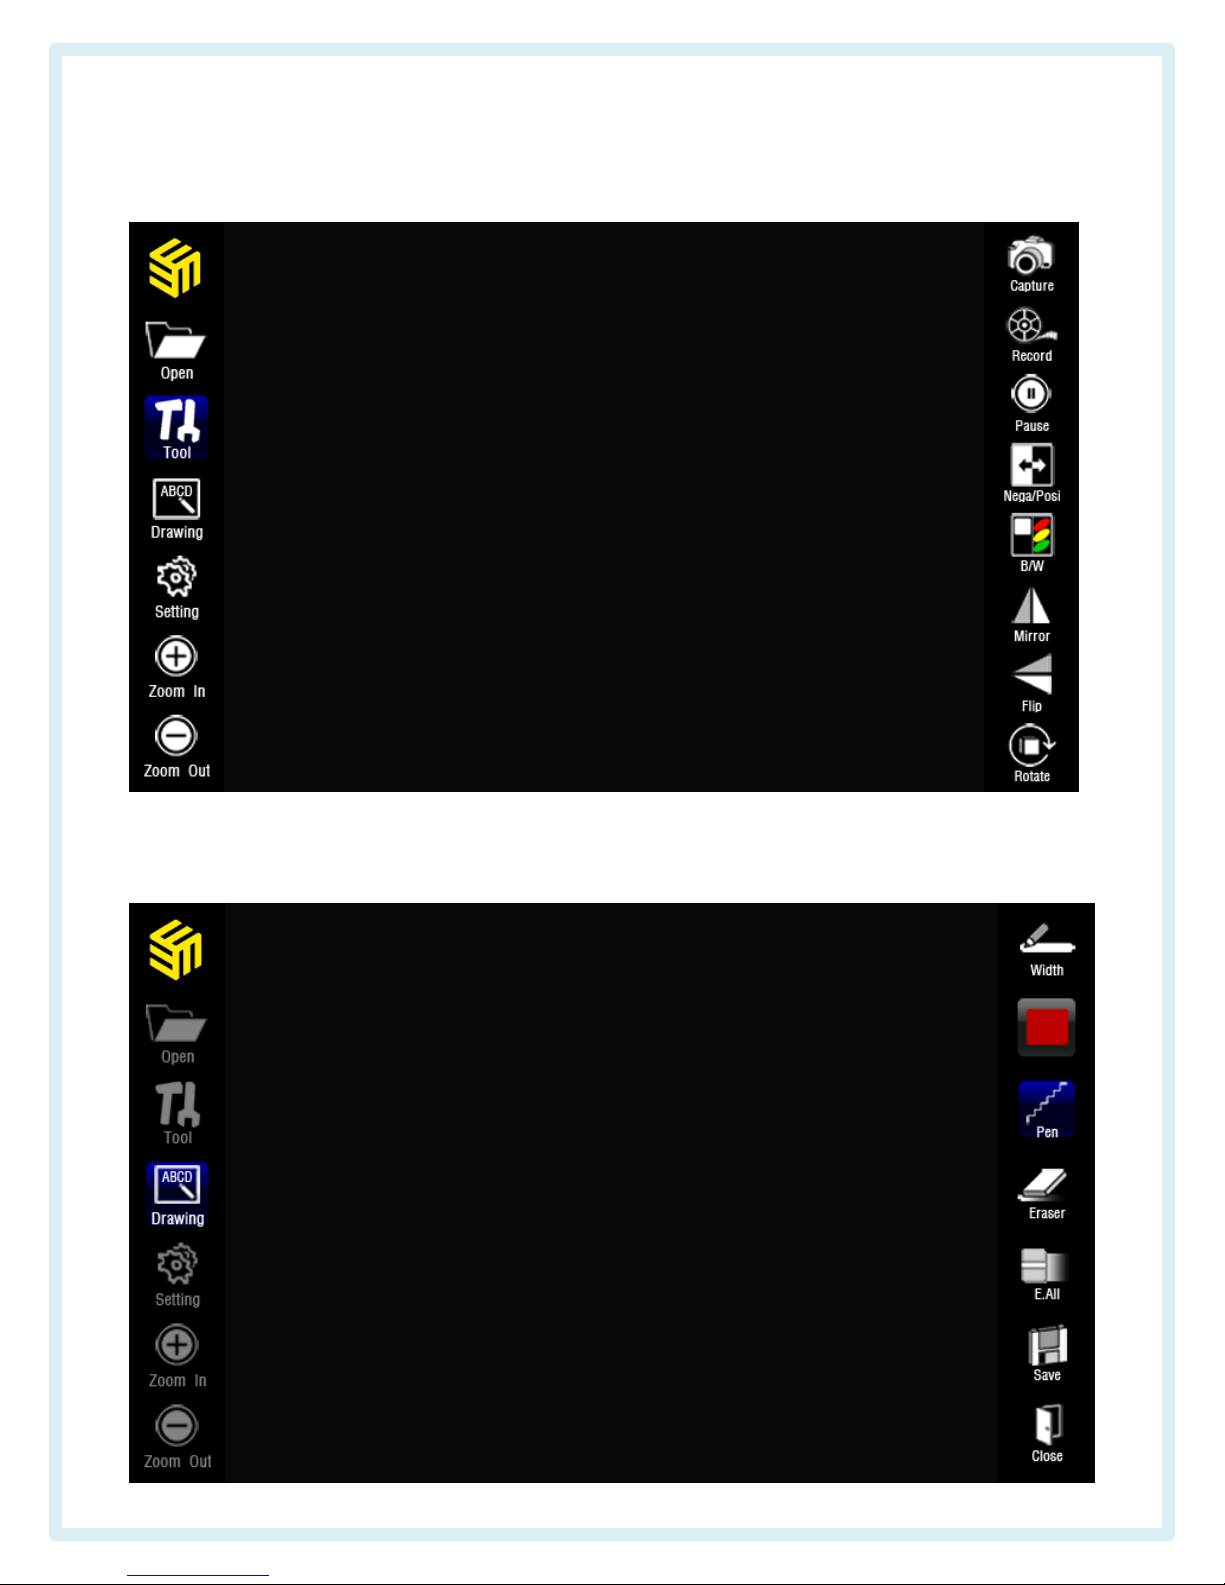
▪ When click the Tool, can execute the various functions of Video
Presenter.
▪ When click the Drawing, can execute the writing function with
outer monitor at the same time.
28
Page 29
1. Handling after use
2. Storage
Disconnect the connected USB cable.
Bend the head to the front getting into the bag.
Put it in the storage bag well.
Put the USB cable into the bag well.
3. Precautions
Please keep followings to protect the damage of product and for the
safe usage.
Precautions, handling, storage after use & etc.
When cleaning the exterior, wipe it with a soft and dry cloth.
Wipe the dust or fingerprint on the LCD with a soft cloth.
Be careful do not water flew into the product.
Wipe around the camera with a soft and dry cloth.
Do not clean using with the cloth added in methyl alcohol
or ammonia.
Be careful do not water sink into the part of camera head.
Keep and install the camera away from the heavy moisture areas
or dusty places.
Keep away the camera from the heating devices like heater and
avoid the exposure to direct sunlight.
Do not leave the camera lens toward the sun.
29
III. Miscellaneous
Page 30
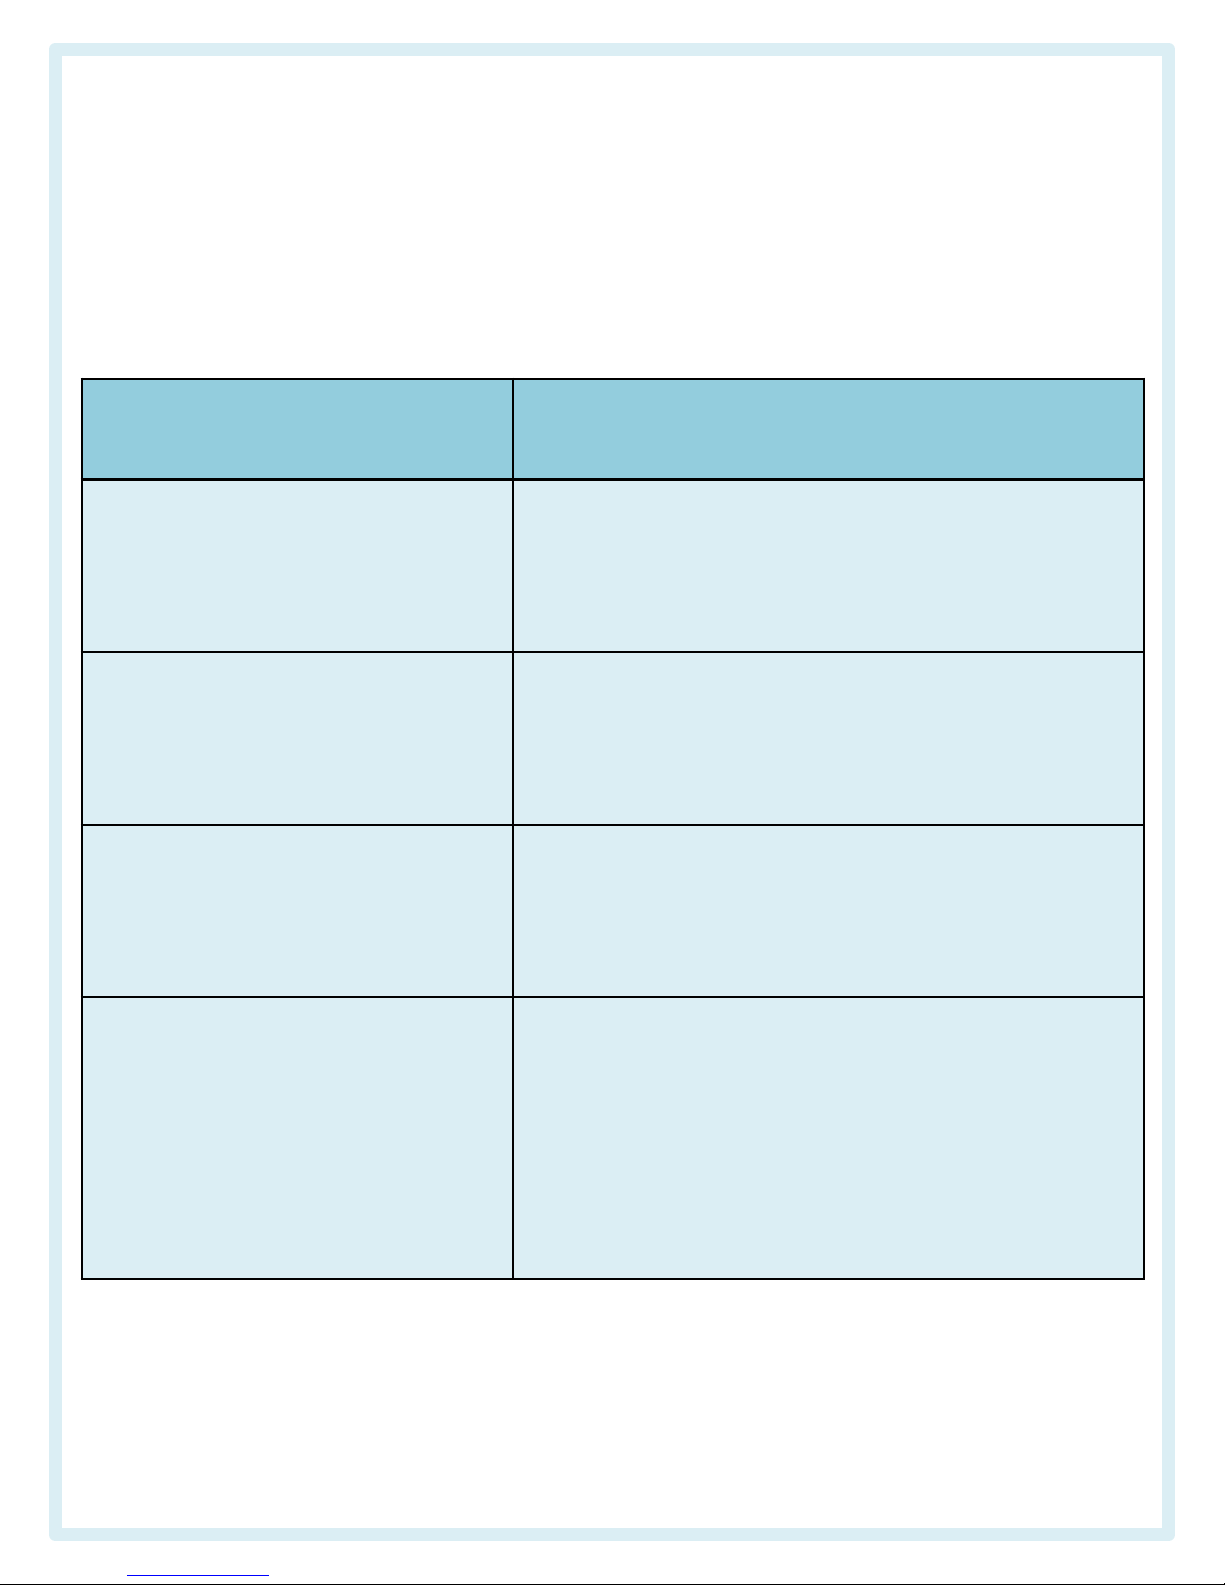
4. Troubleshooting
Check
• Click the auto focus button(A/F) on the
unit
• Click auto/manual button on the program
•
Check the USB cable is connected
correctly
• Check the PC program is installed
properly.
• Check the cable is connected properly
• Check the selection of VGA and Composite
Picture is not displayed on
the monitor
Picture is not focused
properly
PC does not communicate
using USB
Symptoms
Image is not displayed
• Check the USB connection is correct
• Check the Power connection is correct
30
Page 31
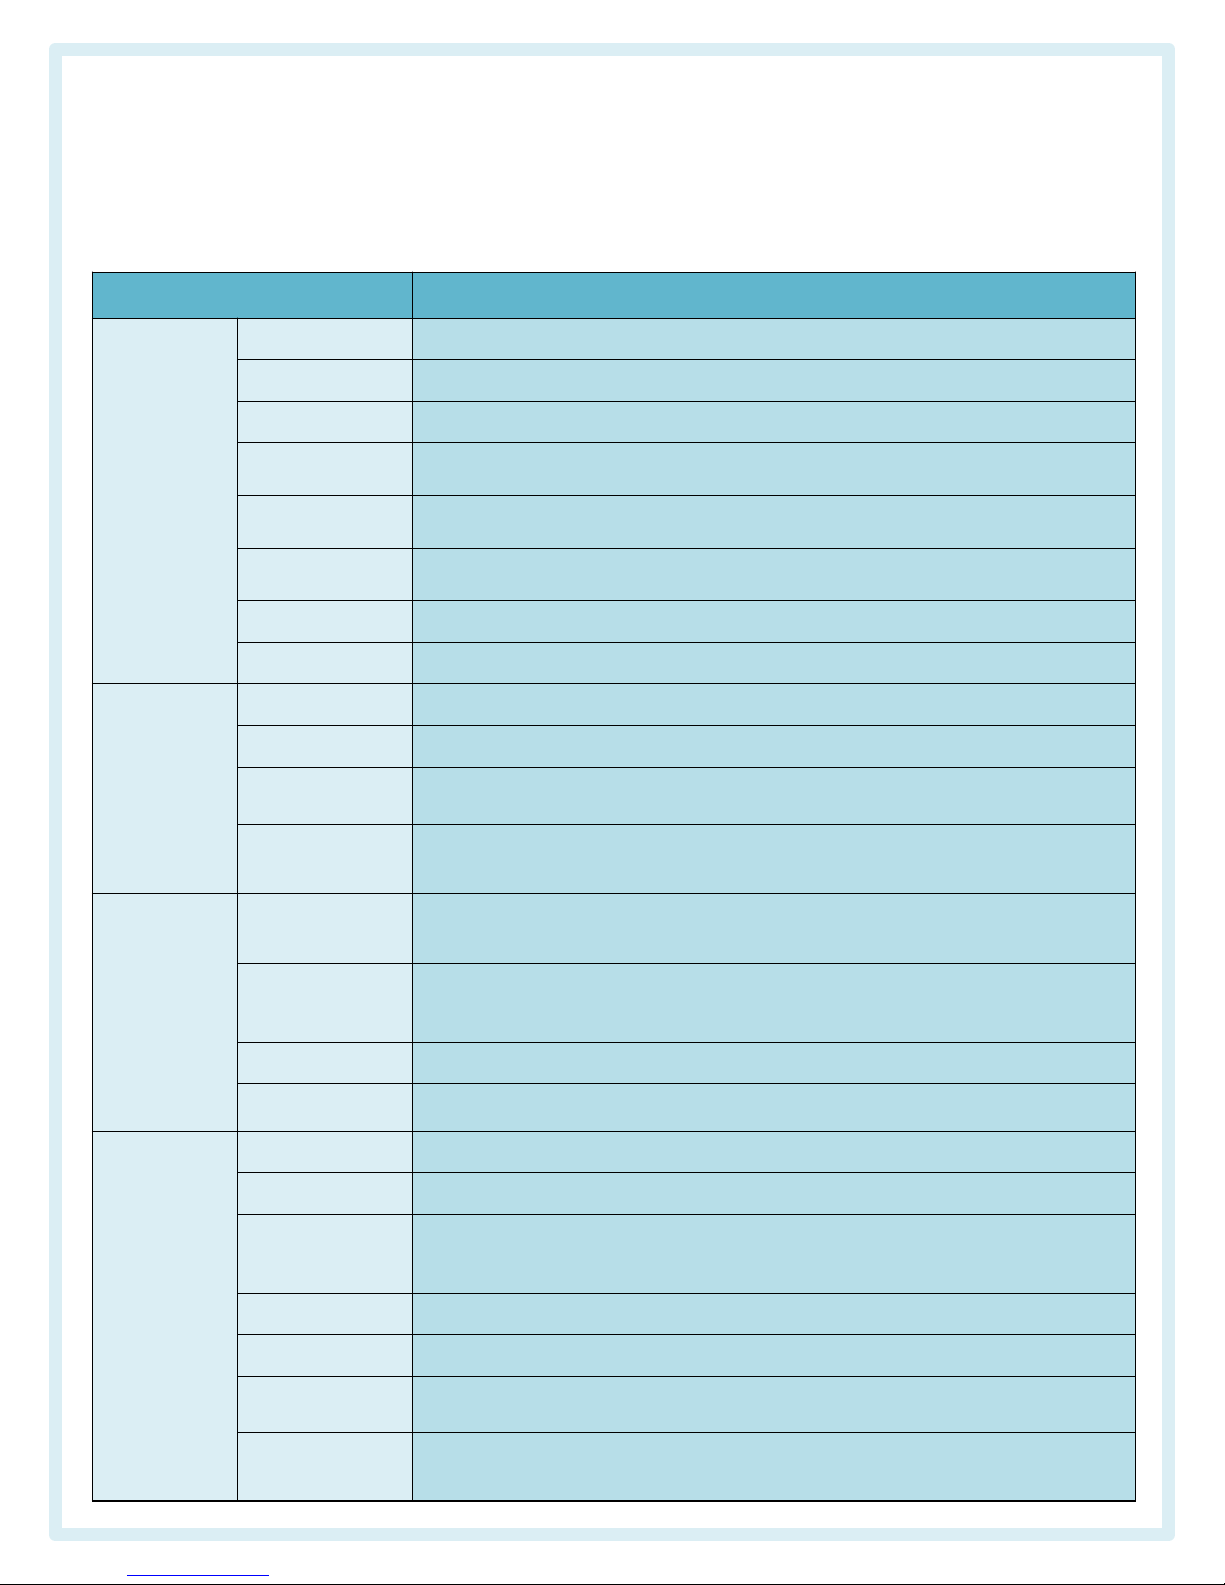
5. Product specifications
Items Specifications
Camera Sensor 5 Mega Pixel CMOS Sensor
Focus Auto focus
Frame rate Max. 30 fps
Exposure
adjustment
Auto exposure
Color
adjustment
Auto white balance
Frequency
adjustment
Auto anti-flicker
Resolution Max. 2592 X 1944
Display Support A4 size
Unit Memory 1GB
GPIO Capture, LED, A/F, Touch screen
Interface USB, HDMI, DVI, RGB, S-Video, composite, Audio, Mic, SD-Card
7” touch
panel
Electronic board function – Double viewer function
Program control function(Imbodiment of each function button)
Program Preview
Auto focus, Capture, REC, Zoom-in/Zoom-out, Resolution, Settings,
Nega/Posi, B/W, Rotate, Flip/Mirror, Split, PIP
Learning
Reading, Pause, Infinite repeat, Speed control,
Language(KOR/ENG), OCR, My dictionary, BGM, Cover, Highlight,
Voice book
Drawing Pen, Highlight, Color, Width, Shapes, Board selection
Movies Play, Speed control, Running time, Switch to learning
Specification O/S Windows XP, Windows7
LED 8 Point high-brightness LED
Operating
temperature
/Humidity
0ºC ~ 40ºC / 30% ~ 90%
Size 228mm(W) x 195mm(D) x 615mm(H)
Weight 1.8kg[net]
Power
Input AC 100~240V, 50~60Hz,
Output DC 5V
Accessories
Unit, Adapter, Installation CD, Aluminium case, USB Cable,
HDMI cable, A/C cable, Operation manual
31
Page 32
Page 33

TOPEX Corp.
522-5, Yonghyun-dong, Uijeongbu-si, Gyeonggi-do, Korea
TEL : 031-852-1991(代) http://www.topex.com
FAX : 031-852-2992 E-Mail : [email protected]
• ©2011.8 TOPEX Corp. has the copyright of this operational manual and prohibited to using all or any parts of this manual
without an advance consent.
• Product or operational manual are subject to change without prior notice for the improvement of its functions.
• TOPEX Corp. shall not be liable for damages by misuse and precaution recorded in this manual.
 Loading...