

Page 1
PREPSTAND™ SERIES
User's Guide
GB
Art no. TW001-1
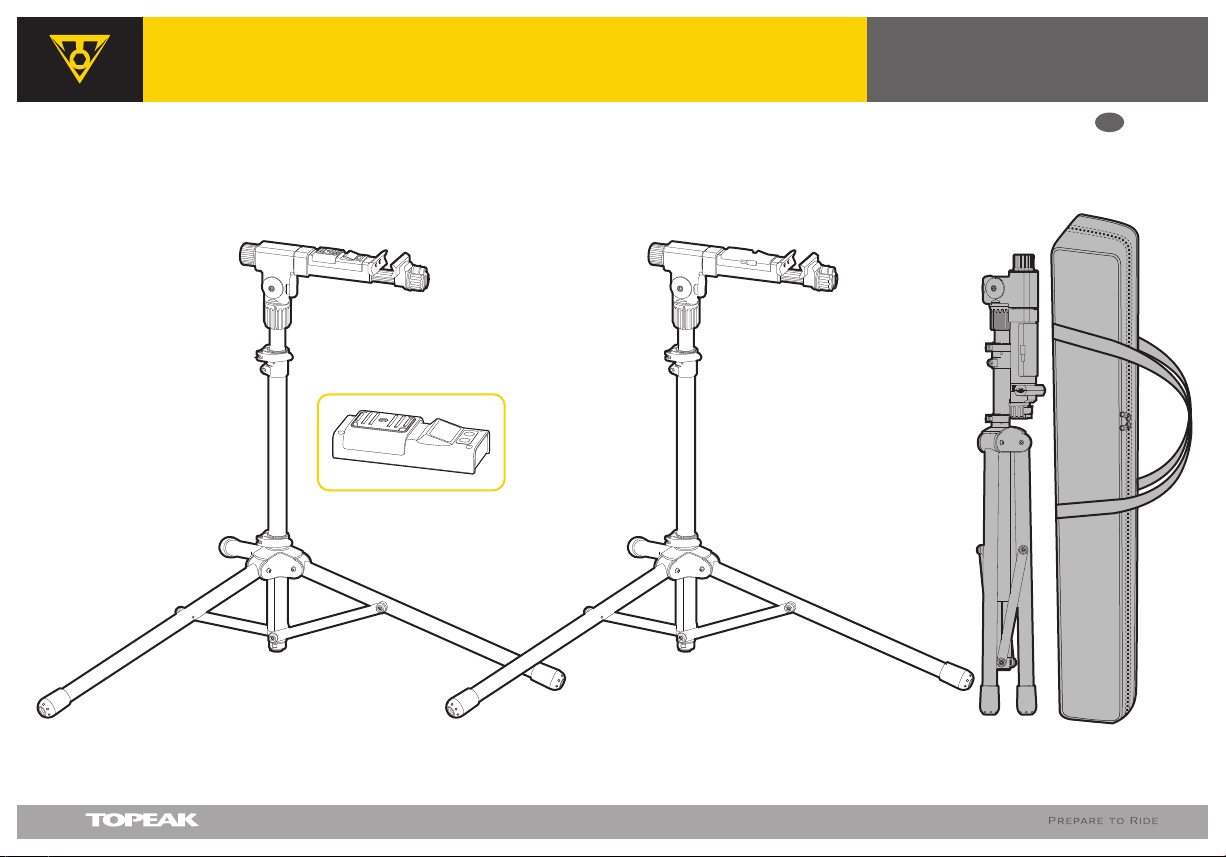
PREPSTAND™ PRO
WEIGHT SCALE
Art no. TWSC01
PREPSTAND™ ELITE
Art no. TW002-1
Page 2
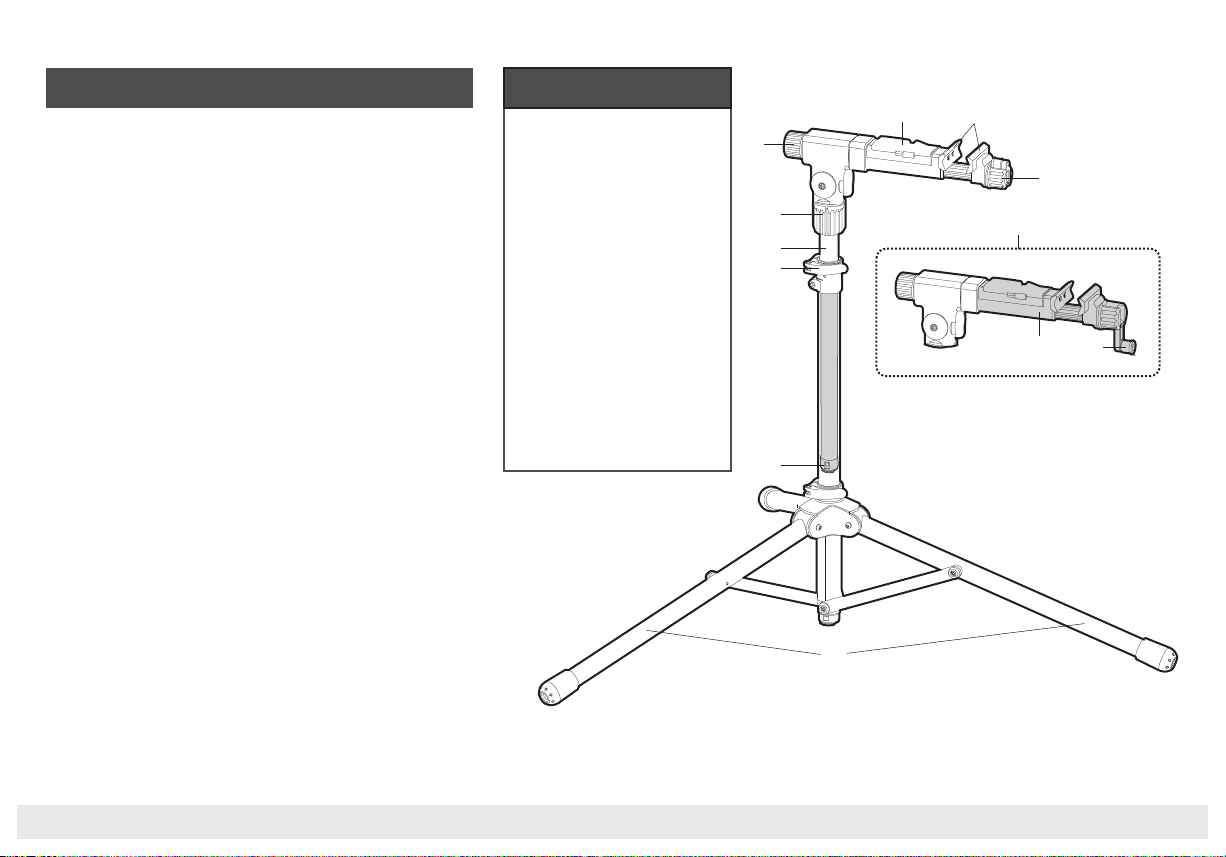
TABLE OF CONTENTS
PREPSTAND ELITE
03-04 : ASSEMBLY
03 : SUPPORT LEGS ASSEMBLY
04 : MAIN UNIT ASSEMBLY
05 : ADJUSTMENT
05 : CLAMP STRENGTH ON EXTENSION TUBE
AND CLAMP JAWS ADJUSTMENT
05 : ROTATING ANGLE ADJUSTMENT
06 : SMALL PARTS BOX
06 : SMALL PARTS BOX OPERATION
08-10 : DISASSEMBLY
08 : ROTATE CLAMP ARM TO HORIZONTAL
POSITION
08 : CLOSE CLAMP JAWS
09 : FOLD MAIN UNIT
10 : FOLD SUPPORT LEGS
06 : PREPSTAND PRO (WITH WEIGHT SCALE)
06 : WEIGHT MEASUREMENT
05-07 : WEIGHT SCALE
05 : CONVERT SMALL PARTS BOX TO WEIGHT SCALE
07 : QUICK START MANUAL
07 : CHANGE BATTERY
DETAILED PARTS DESCRIPTION
1. 360˚ Rotation Knob
2. Small Parts Box
3. Clamp Jaws
4. Clamp Knob
5. Main Unit
5a. Clamp Arm
5b. Clamp Lever
6. Folding Knob
7. Extension Tube
8. QR Clamp Lever
9. Air Cushion Valve
10. Support Legs
2
3
1
4
6
5
7
8
5a 5b
9
10
REPAIR & STORAGE SOLUTIONS01
PREPSTAND SERIES
Page 3
PREPSTAND ELITE
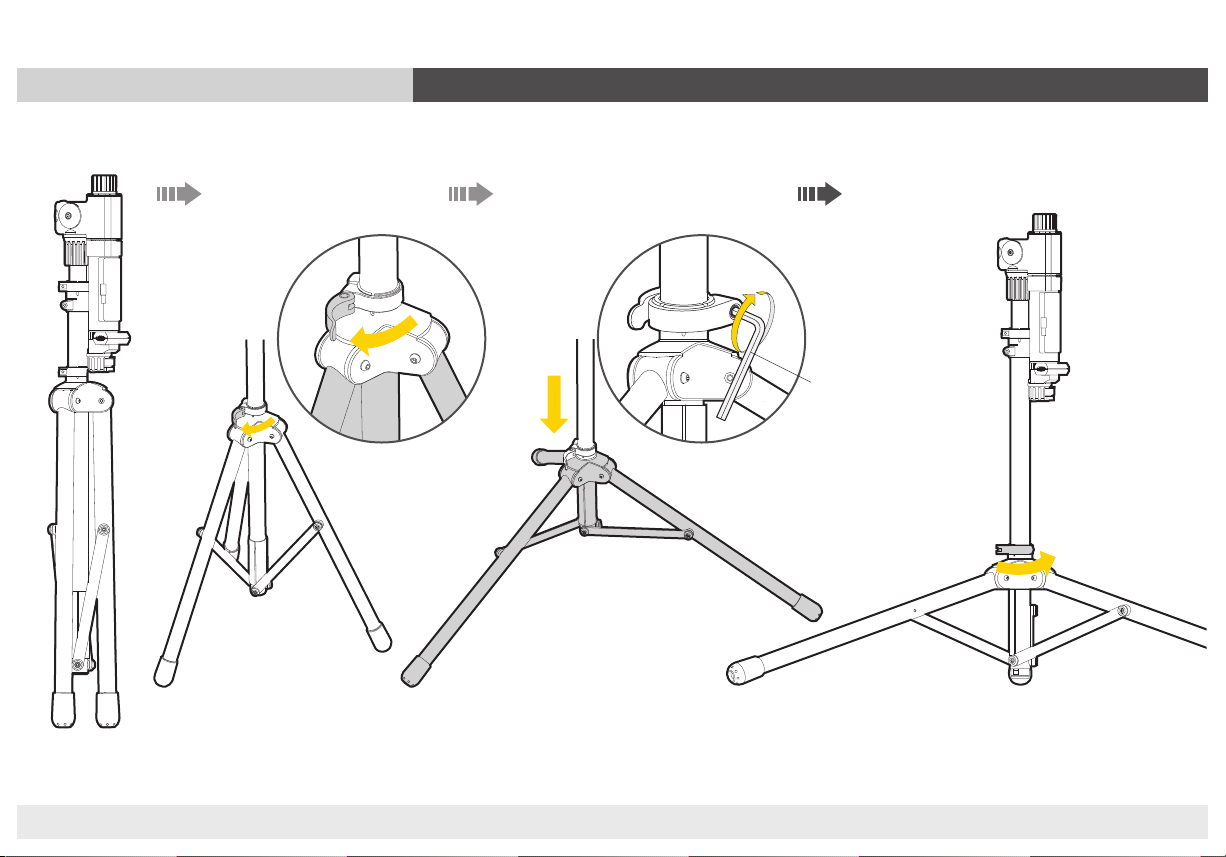
ASSEMBLY
SUPPORT LEGS ASSEMBLY
5mm
Allen Key
Clamp strength
adjustment
PREPSTAND SERIES
NOTE:
Always fully expand support
legs for a steady foundation.
REPAIR & STORAGE SOLUTIONS
02
Page 4
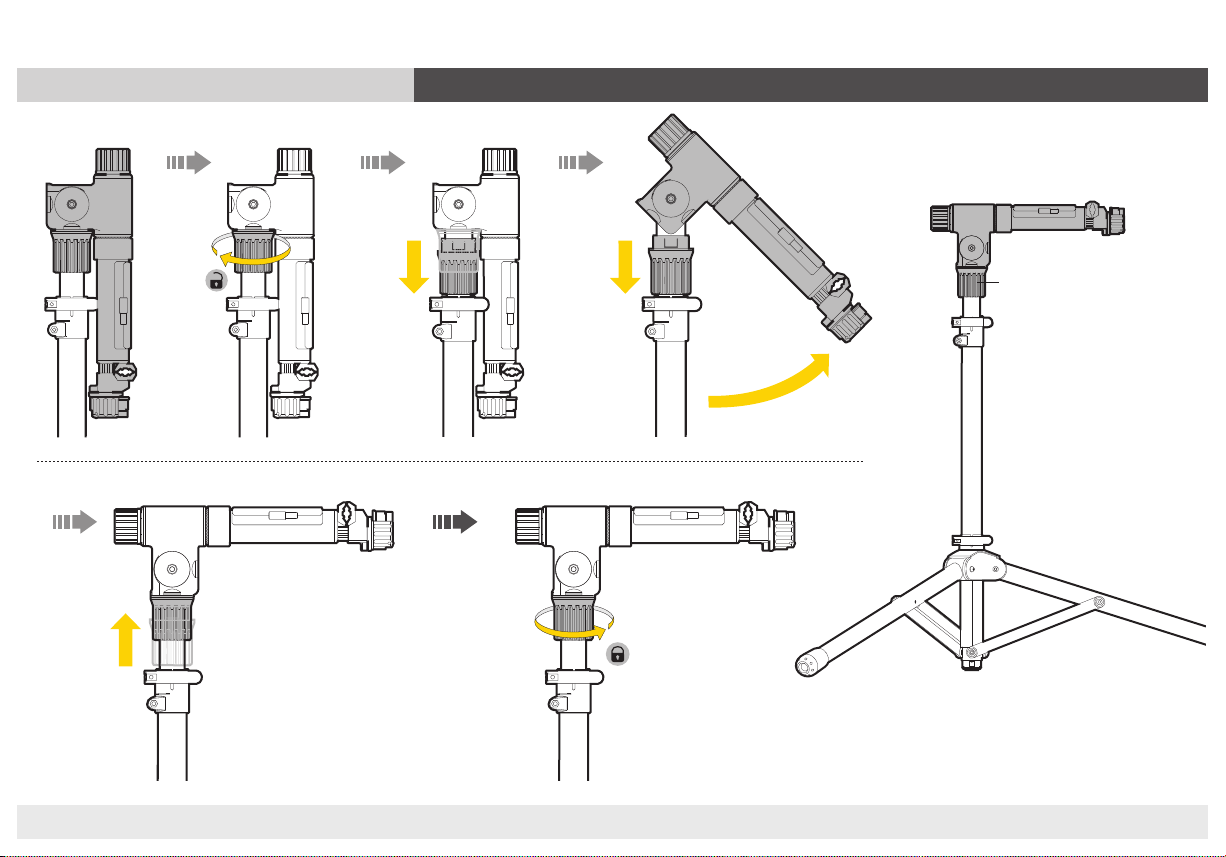
ASSEMBLY
MAIN UNIT ASSEMBLY
Folding Knob
REPAIR & STORAGE SOLUTIONS
03
NOTE:
Always make sure folding knob
is securely tightened.
PREPSTAND SERIES
Page 5

ADJUSTMENT
CLAMP STRENGTH ON EXTENSION TUBE AND CLAMP JAWS ADJUSTMENT
Clamp
Lever
ADJUSTMENT
PREPSTAND SERIES
CLICK
NOTE:
Always make sure small
parts box is locked before
rotating main unit.
5mm
Allen
Key
Clamp strength
on extension tube
adjustment
ROTATING ANGLE ADJUSTMENT
CAUTION
Tighten the clamp lever
carefully. Over-tightening may
cause damage to your bike.
NOTE:
Always make sure clamp
arm is securely tightened
after rotating.
REPAIR & STORAGE SOLUTIONS
04
Page 6

SMALL PARTS BOX
SMALL PARTS BOX OPERATION
NOTE:
Always make sure small
parts box is locked before
rotating main unit.
WEIGHT SCALE
REPAIR & STORAGE SOLUTIONS
05
CONVERT SMALL PARTS BOX TO WEIGHT SCALE
PREPSTAND SERIES
Page 7

PREPSTAND PRO (WITH WEIGHT SCALE)
PREPSTAND WITH WEIGHT SCALE
WEIGHT MEASUREMENT
PREPSTAND SERIES
NOTE:
In order to weigh accurately, support
legs should be on flat ground and
weight scale facing up in vertical
position. Make sure item being weighed
is not touching Prepstand.
REPAIR & STORAGE SOLUTIONS
06
Page 8

WEIGHT SCALE
QUICK START MANUAL
Size: (L x W x H)
5.4" x 2.5" x 1"
Weight: 240 g
Screw Holes
(Screws -
M4 x 0.7mm x L20
Supplied)
Scale
Display screen
Unit selection
On/Off/Reset
Screw Holes
(Screws -
M4 x 0.7mm x L20
Supplied)
Ready to weigh/
weight completed
Negative indicator
Low battery indicator
indicator
Kg
lb
Weight units
Digital display screen
BE AWARE
Measured data from the
Topeak weight scale is for
personal reference only
and cannot be used for
OPERATION:
On Press
Off Press and hold for 3 seconds.
Unit Selection Press kg lb
Reset Press when unit is on.
Auto-off Display screen will shut off automatically after 3 minutes of inactivity.
Kg
lb
NOTE:
Maximum weight capacity is 25 kg (55 lb), accuracy tolerance: 20 g
commercial purposes.
CHANGING BATTERIES (CR2032 x 2 pcs)
1. Open battery cover.
2. Replace batteries. Be sure positive and
negative side of batteries are inserted correctly
when replacing.
REPAIR & STORAGE SOLUTIONS
07
PREPSTAND SERIES
Page 9

PREPSTAND ELITE
DISASSEMBLY
ROTATE CLAMP ARM TO HORIZONTAL POSITION
DISASSEMBLY
PREPSTAND SERIES
CLOSE CLAMP JAWS
REPAIR & STORAGE SOLUTIONS
CLICK
08
Page 10

DISASSEMBLY
FOLD MAIN UNIT
CAUTION
Always use both hands to
fold down main unit,
otherwise main unit might hit
your fingers and cause injury.
REPAIR & STORAGE SOLUTIONS
09
PREPSTAND SERIES
Page 11

DISASSEMBLY
FOLD SUPPORT LEGS
PREPSTAND SERIES
REPAIR & STORAGE SOLUTIONS
10
Page 12

IMPORTANT
1. Always fully expand support legs for a steady foundation.
2. Always make sure folding knob is securely tightened.
3. Always make sure clamp arm is securely tightened after rotating.
4. Always make sure small parts box is locked before rotating main unit.
5.
Tighten the clamp lever carefully. Over-tightening may cause damage to
your bike.
6. In order to weigh accurately, support legs should be on flat ground and
weight scale is facing up in vertical position. Make sure item being
weighed is not touching the Prepstand.
7. The Weight Scale is water resistant, however, care should be taken when
used in wet environments. The Weight Scale should never be submerged
in water.
8. When cleaning the Weight Scale, use only a damp cloth to remove excess
dirt. Never use compressed air to clean the Weight Scale.
9. Always use both hands to fold down main unit, otherwise main unit might
hit your fingers and cause injury.
10. Always make sure the 360˚ rotation knob and folding knob are
securely tightened when mounting bike.
11. When releasing clamp jaws to remove bike, hold bike to prevent
it from falling.
12. When setting up bike, make sure QR clamp levers are tightened.
13. Keep main unit parallel with one of the support legs for stability.
Support Legs
Main Unit
14. Both PrepStand Elite and PreStand Pro are equipped with air
cushion valve. (see detailed parts description) It allows extension
tube to slide down smoothly when adjusting height or disassembling.
WARRANTY
2-year Warranty: All mechanical components against manufacturer defects only.
1-year Warranty: All electronic components (weight scale) against manufacturer defects only. Batteries are not covered under any implied warranty.
Warranty Claim Requirements
To obtain warranty service, you must have your original sales receipt. Items returned without a sales receipt will assume that the warranty begins
on the date of manufacture. All warranties will be void if the product is damaged due to user crash, abuse, system alteration, modification, or used in
any way not intended as described in this manual.
* The specifications and design are subject to change without notice.
Please contact your Topeak dealer with any questions.
For USA customer service call : 1-800-250-3068
www.topeak.com
M-TW001-1-GB 09/15
 Loading...