

Page 1
User’s Guide
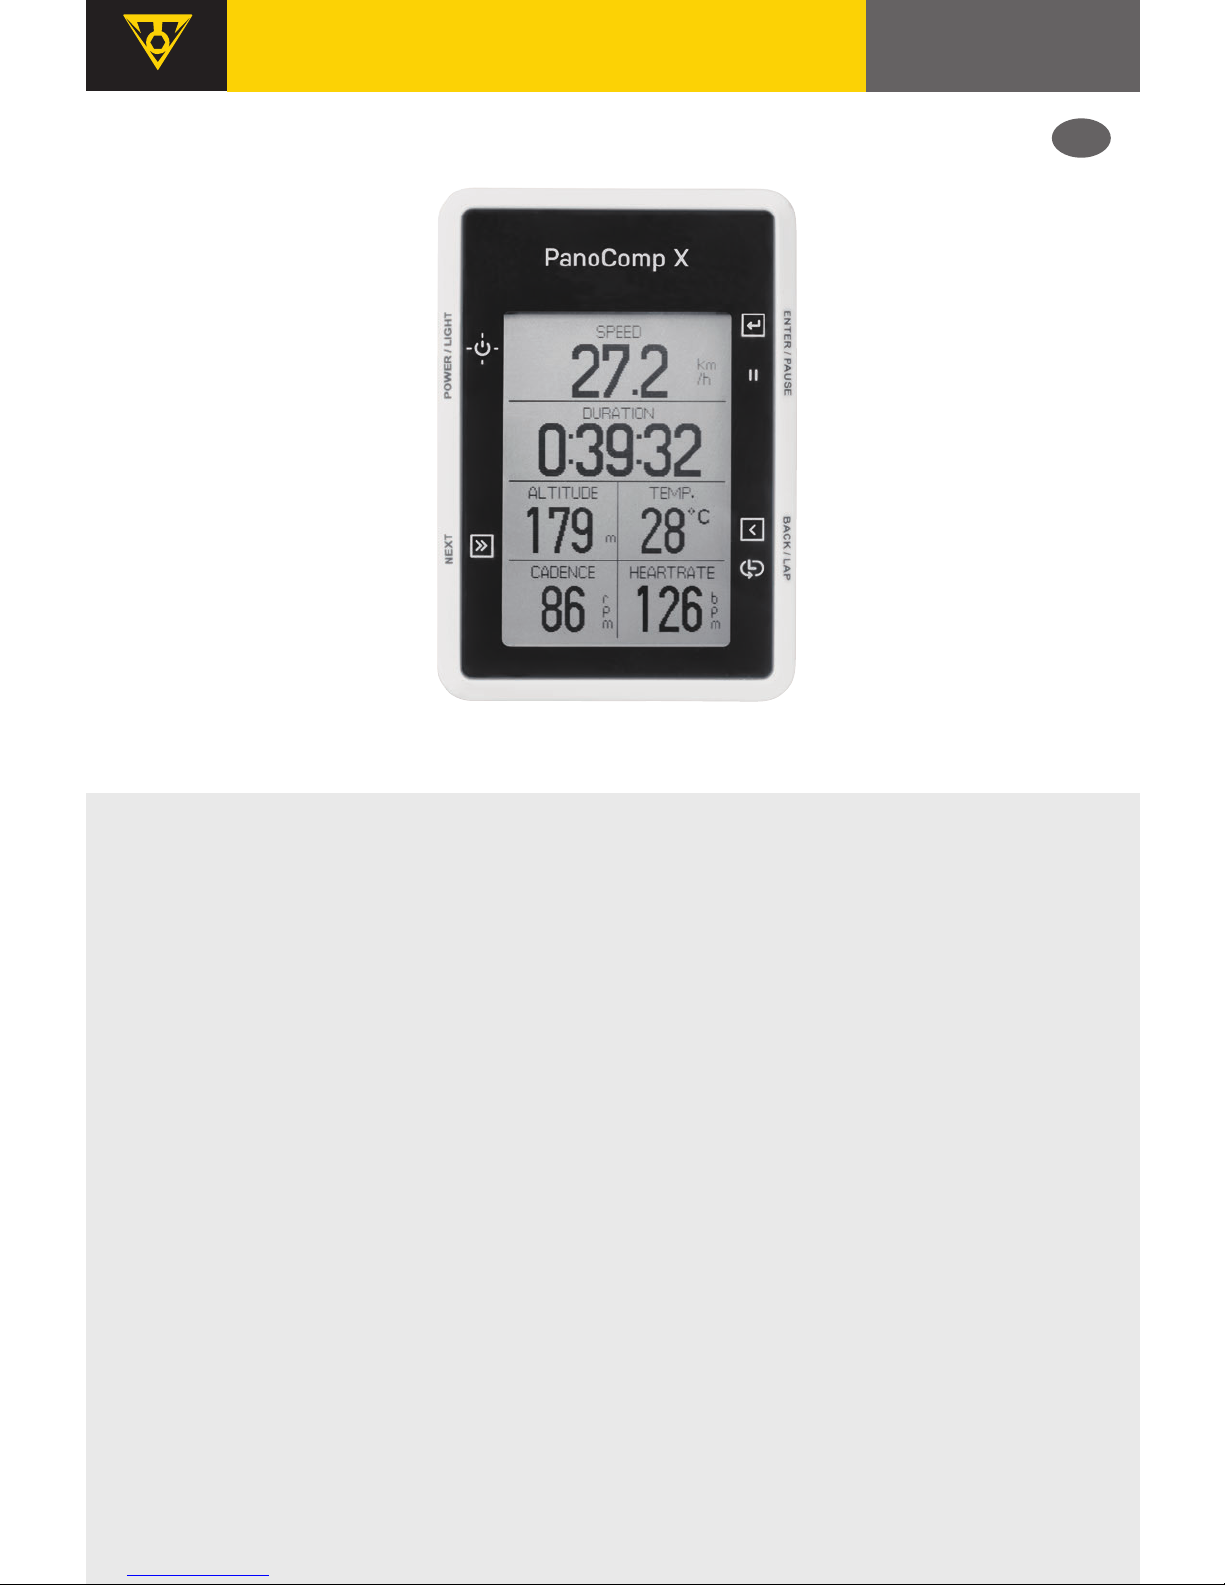
PANOCOMP X WIRELESS
Speed
Current Speed
Average Speed
Max Speed
Distance
Trip Distance
Odometer
Time
Ride Time
Total Time
12/24 hr Clock
Timer
Cadence
Current Cadence
Average Cadence
Max Cadence
Heart Rate
Current Heart Rate
Average Heart Rate
Max Heart Rate
Heart Rate Max Limit Alarm
Other
Customize Display
Temperature
Grade
Altitude (Barometer)
Calories
Training
Remote Display
Backlight
Incoming Call Alert
Export ride data to Strava
Auto Pause
Battery Indicator
EN
Page 2
1
2
3
4
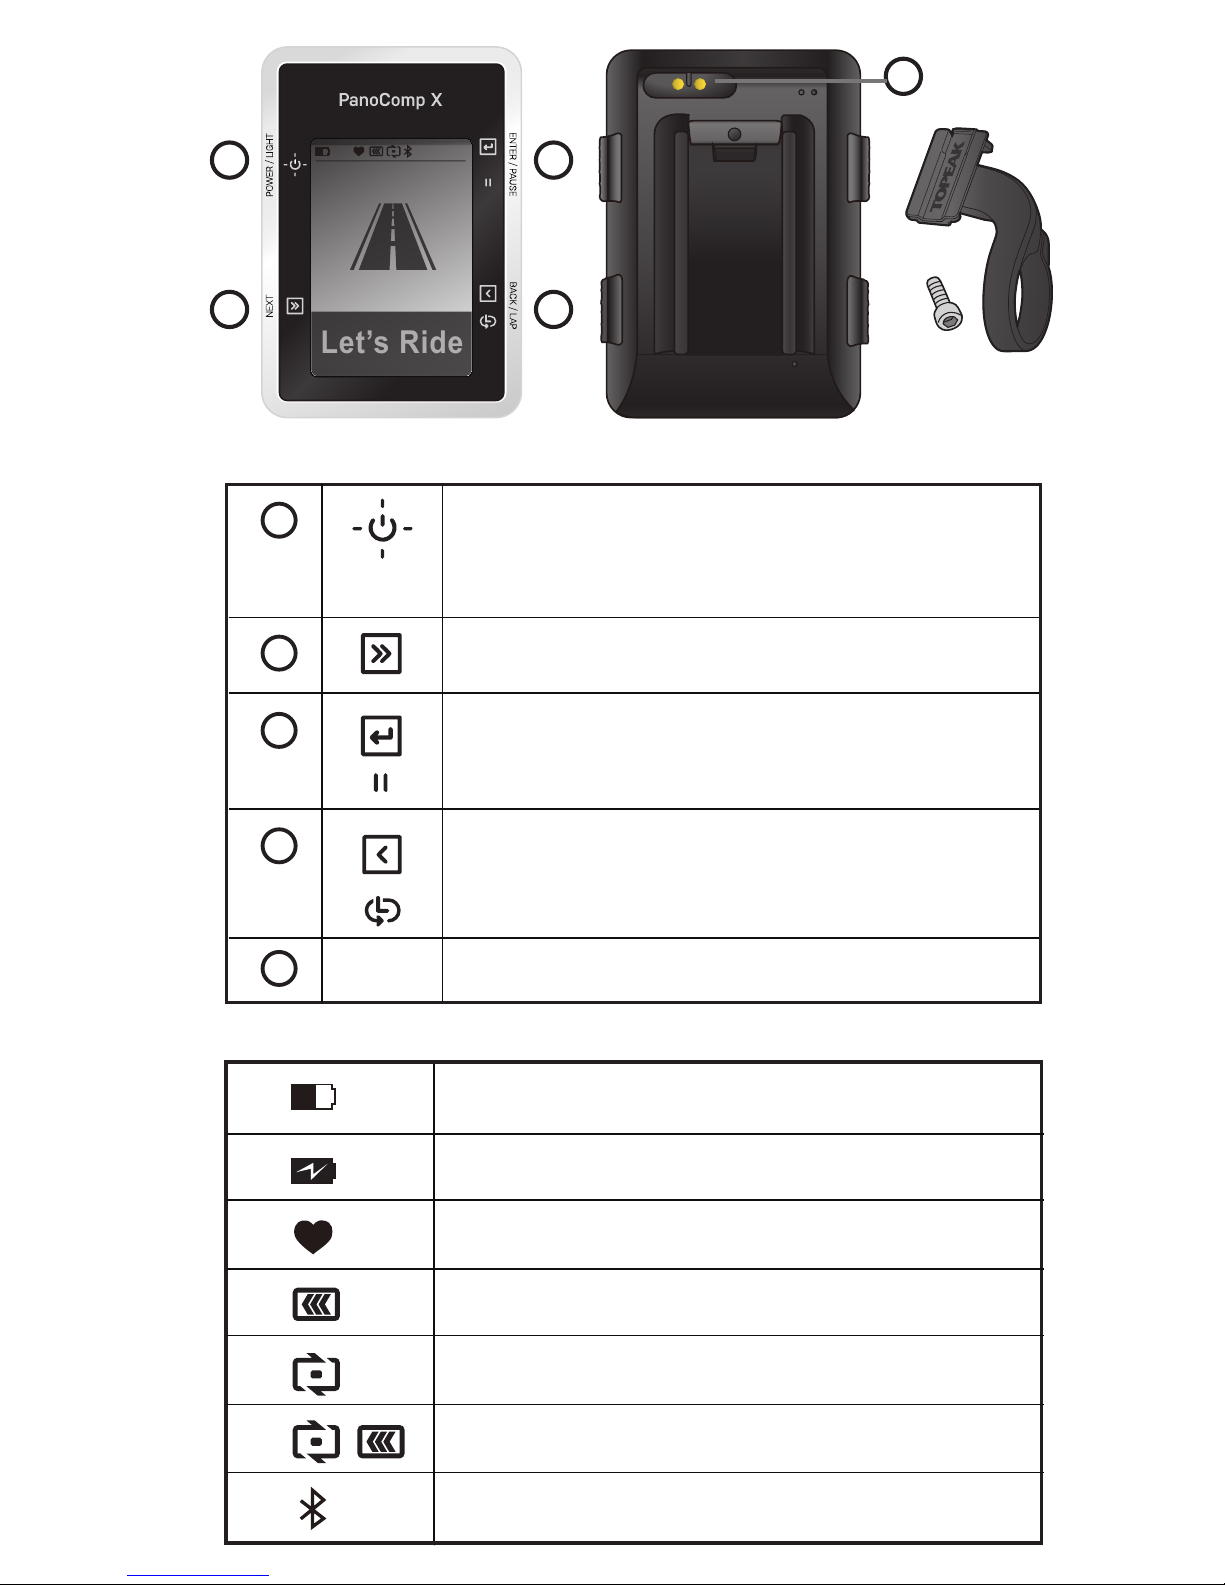
KEYS
1
2
3
4
5
Press to turn the computer on.
Press and hold for 2 sec to turn off.
Press to switch on/off the backlight.
Return to the previous page.
Select to mark a new lap.
MagUSB Charge Port.
Select to view the setup menu.
Select to enter and confirm.
Press to pause riding.
Let’s Ride
67% 33°c 21:30
Home Screen Overview Icons show battery level and connectivity.
Power indicator.
Charging
Heart Rate sensor connected.
Speed sensor connected.
Cadence sensor connected.
Speed/cadence sensor connected.
Smartphone connected.
67%
5
PanoComp X Mount
(Fits ø 31.8 mm
handlebars only).
Page 3

1. Start PanoComp X
Setting in PanoBike+ app or in PanoComp X,
see section 3.3 on how to pair PanoBike+ app to PanoComp X.
1.1 Settings from PanoBike+ app :
• Debut screen > Select language >
transfer profile from PanoBike+ app. >
Select system : iOS or Android
• Turn on Bluetooth mode on your smartphone.
• Turn on PanoBike+ app, tap the "Sensors" ( ) icon,
tap the "+" symbol to start the pairing process.
Page 4
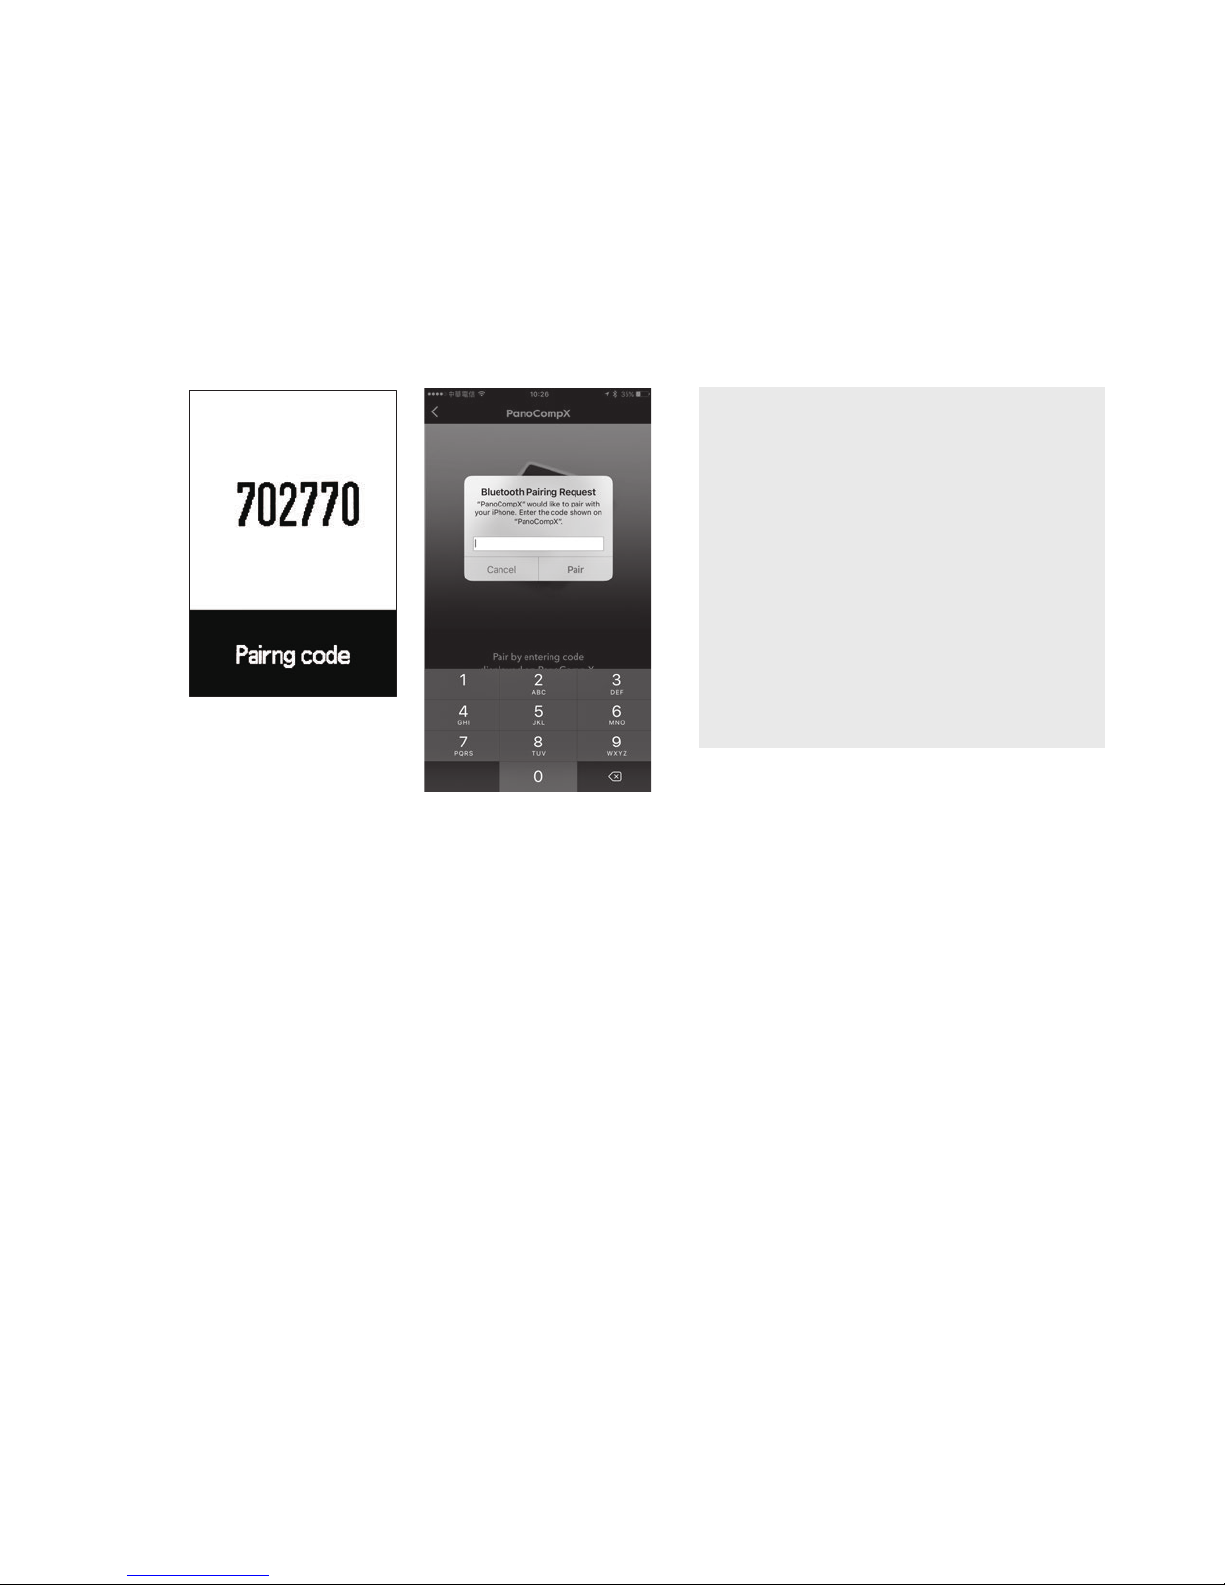
• Smartphone:
(iOS device) Enter pairing code displayed on PanoComp X
into smartphone.
(Android device) Enable location function before pairing
PanoComp X with PanoBike+ app.
• After pairing is complete, PanoComp X will return to the
Let's Ride screen.
NOTE
If PanoBike+ app pairing
is skipped at PanoComp X
start screen, after profile
setup, proceed to:
Settings > Bluetooth >
Select system : iOS or
Android
1.2 Settings in PanoComp X :
For additional information, see section 3.6 "System Settings”
for more information.
• Debut screen > Select language > profile setup.
• Click Profile Setup:
Key sequence for operations below
NEXT to cycle selection. ENTER to confirm selection.
1. Set Year:
Repeat sequence to set and confirm remaining year information.
2. Set Month/Day:
Repeat sequence to set and confirm correct date.
3. Set Clock Mode:
Cycle between 12hr and 24hr mode, then confirm clock mode.
4. Set Time:
Repeat sequence to set and confirm correct time.
5. Set Gender
(iOS device)
Page 5
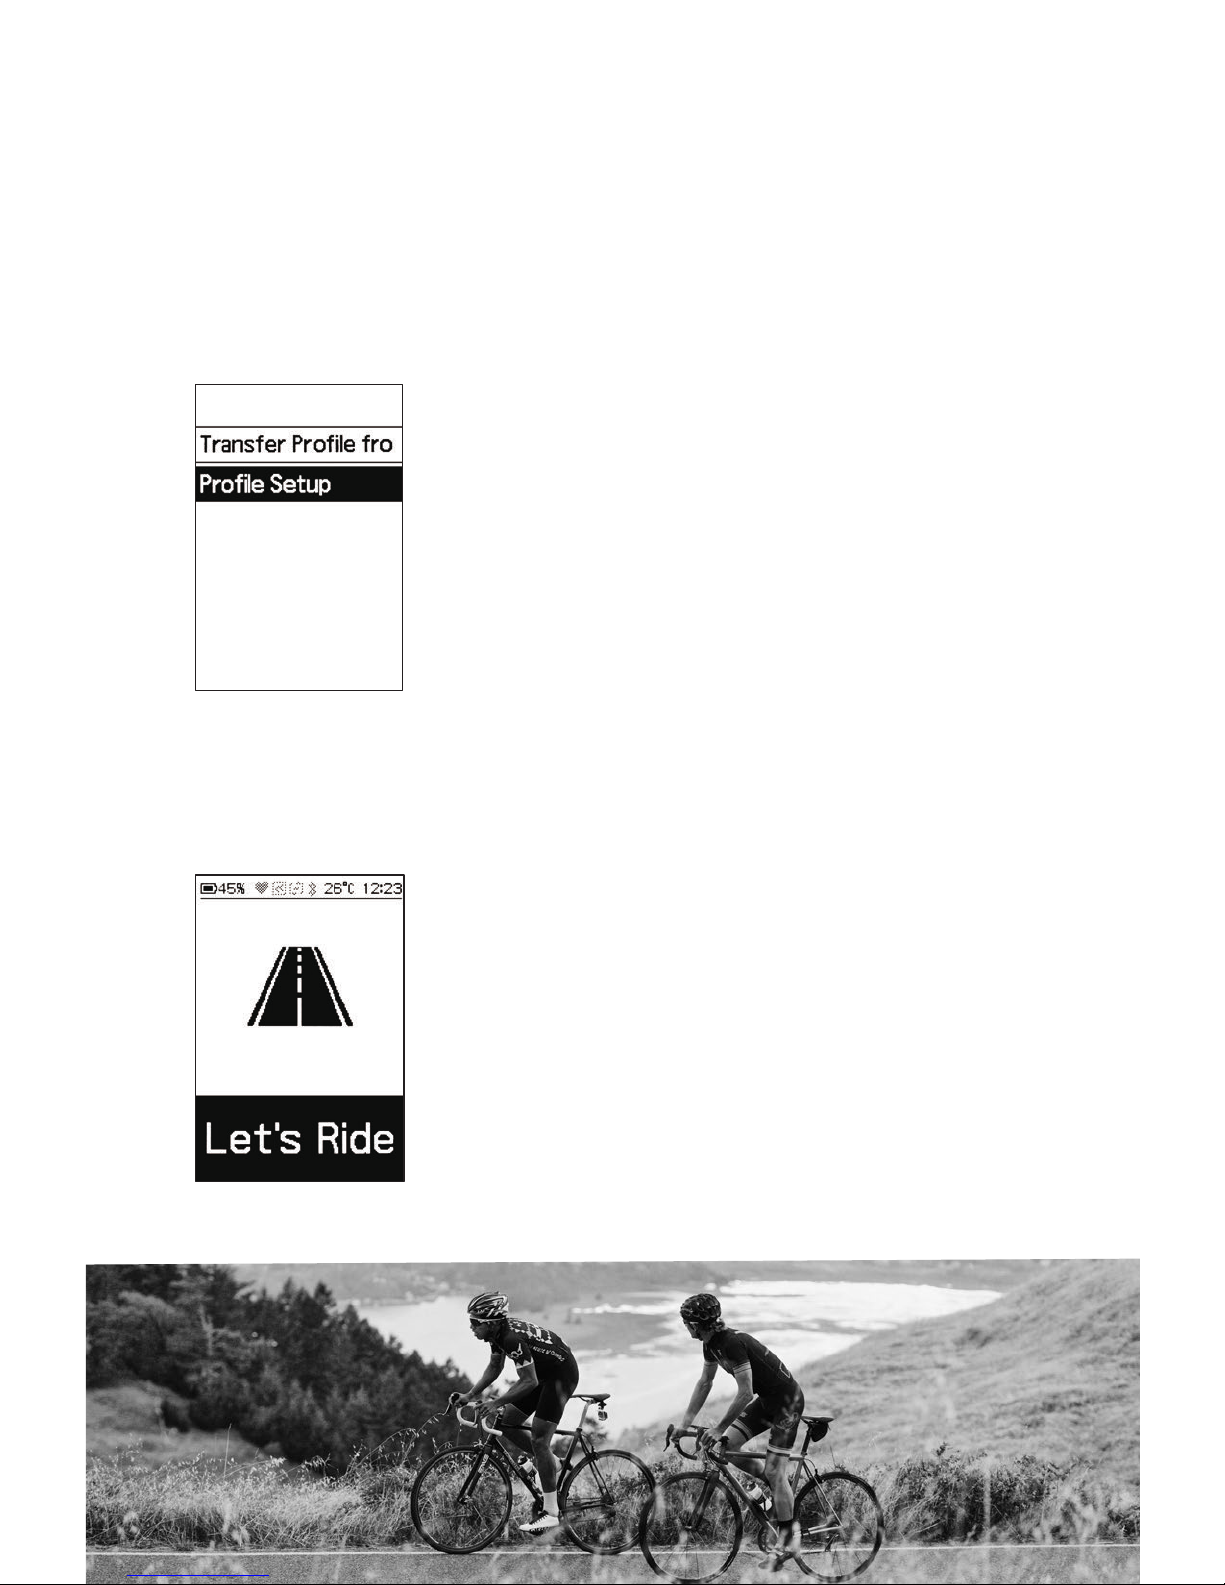
2. Start Ride
• Press POWER to turn on PanoComp X.
• Select the riding mode.
6. Set Birth Year:
Repeat sequence to set and confirm remaining year information.
7. Set Measurement Units:
Cycle between Metric and Imperial, confirm selection.
8. Set Height:
Repeat sequence to complete height setting.
9. Weight :
Repeat sequence to complete weight information.
Page 6
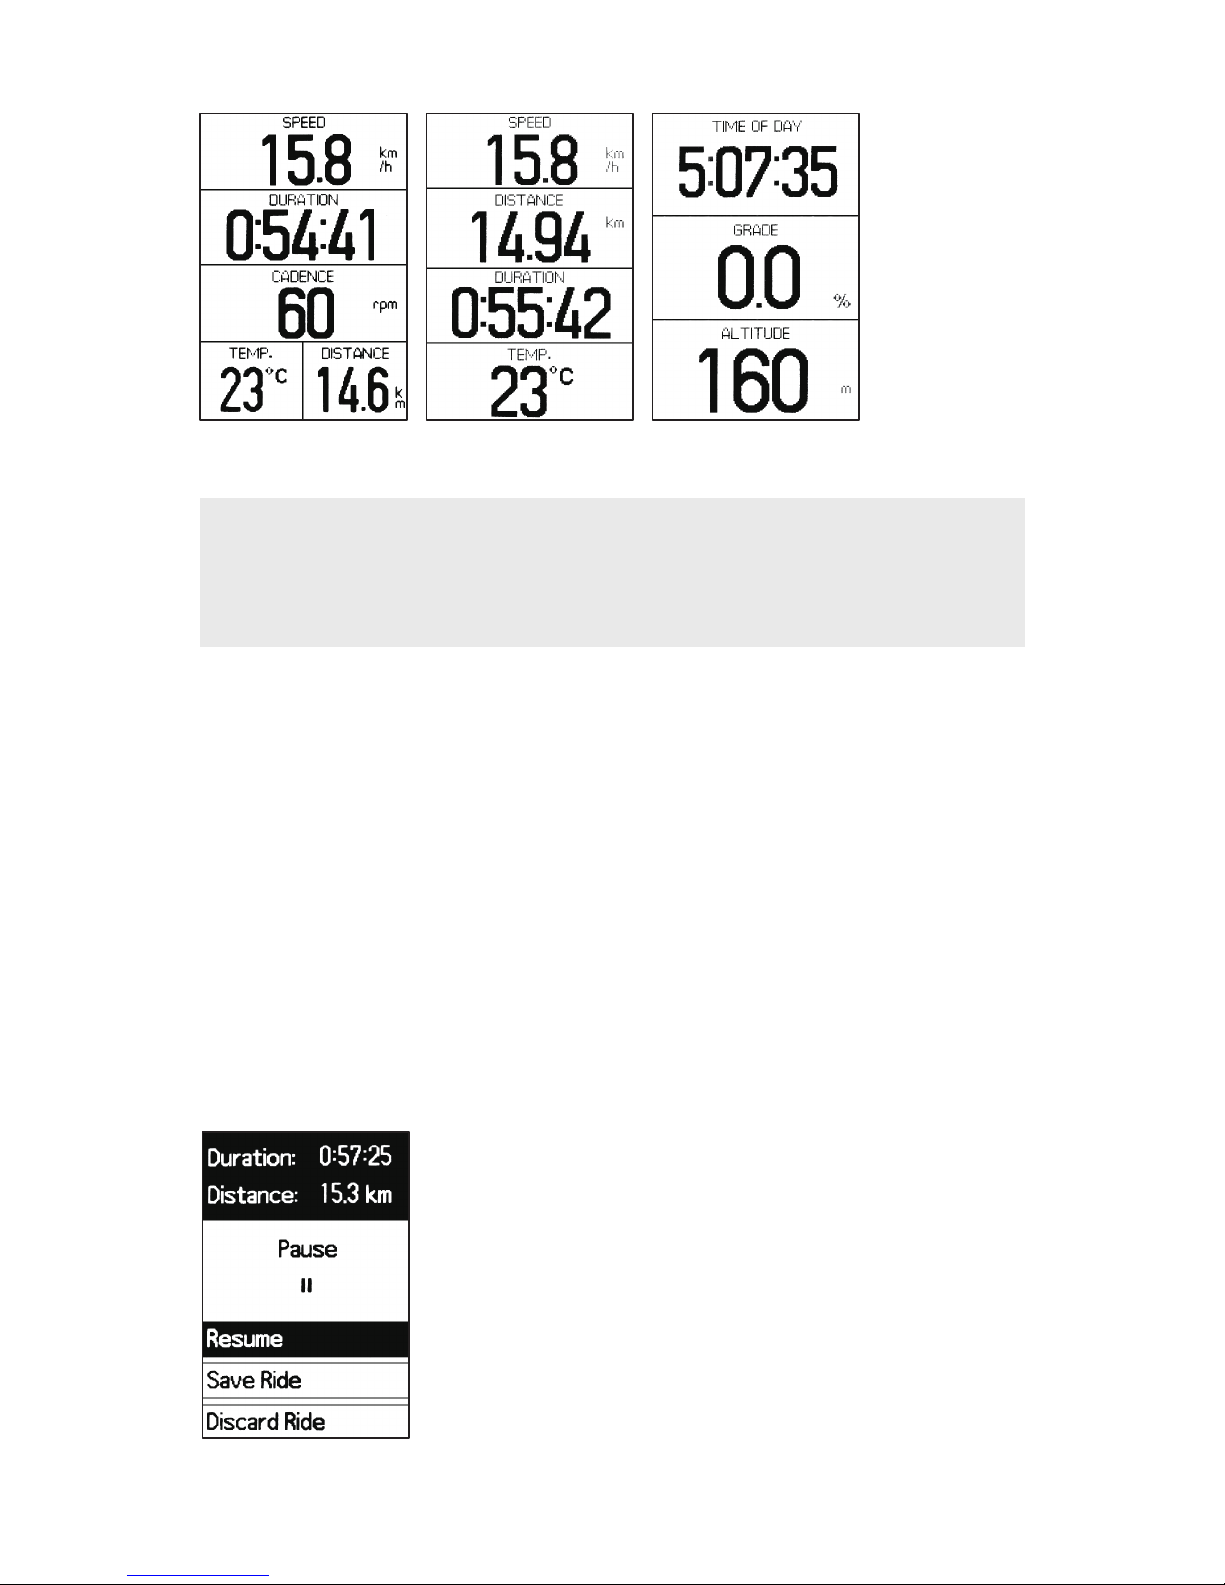
2.2 Pause
• If Auto Pause is set to off, press PAUSE when you want to
suspend recording your ride. This is helpful at stoplights, rest
stops or when you
need to maintain your bike during a ride.
• Ride recording is automatically paused if motion is not detected
when Auto Pause is set to on.
Press ENTER to resume recording your ride or press NEXT to cycle
between selections and press ENTER to confirm your selection.
Screen 1 Screen 2 Screen 3
2.1 Three user customizable screens.
NOTE
To modify your customizable screens, see Section 3.1.1
"Customizing the Data Pages" for more information.
Page 7
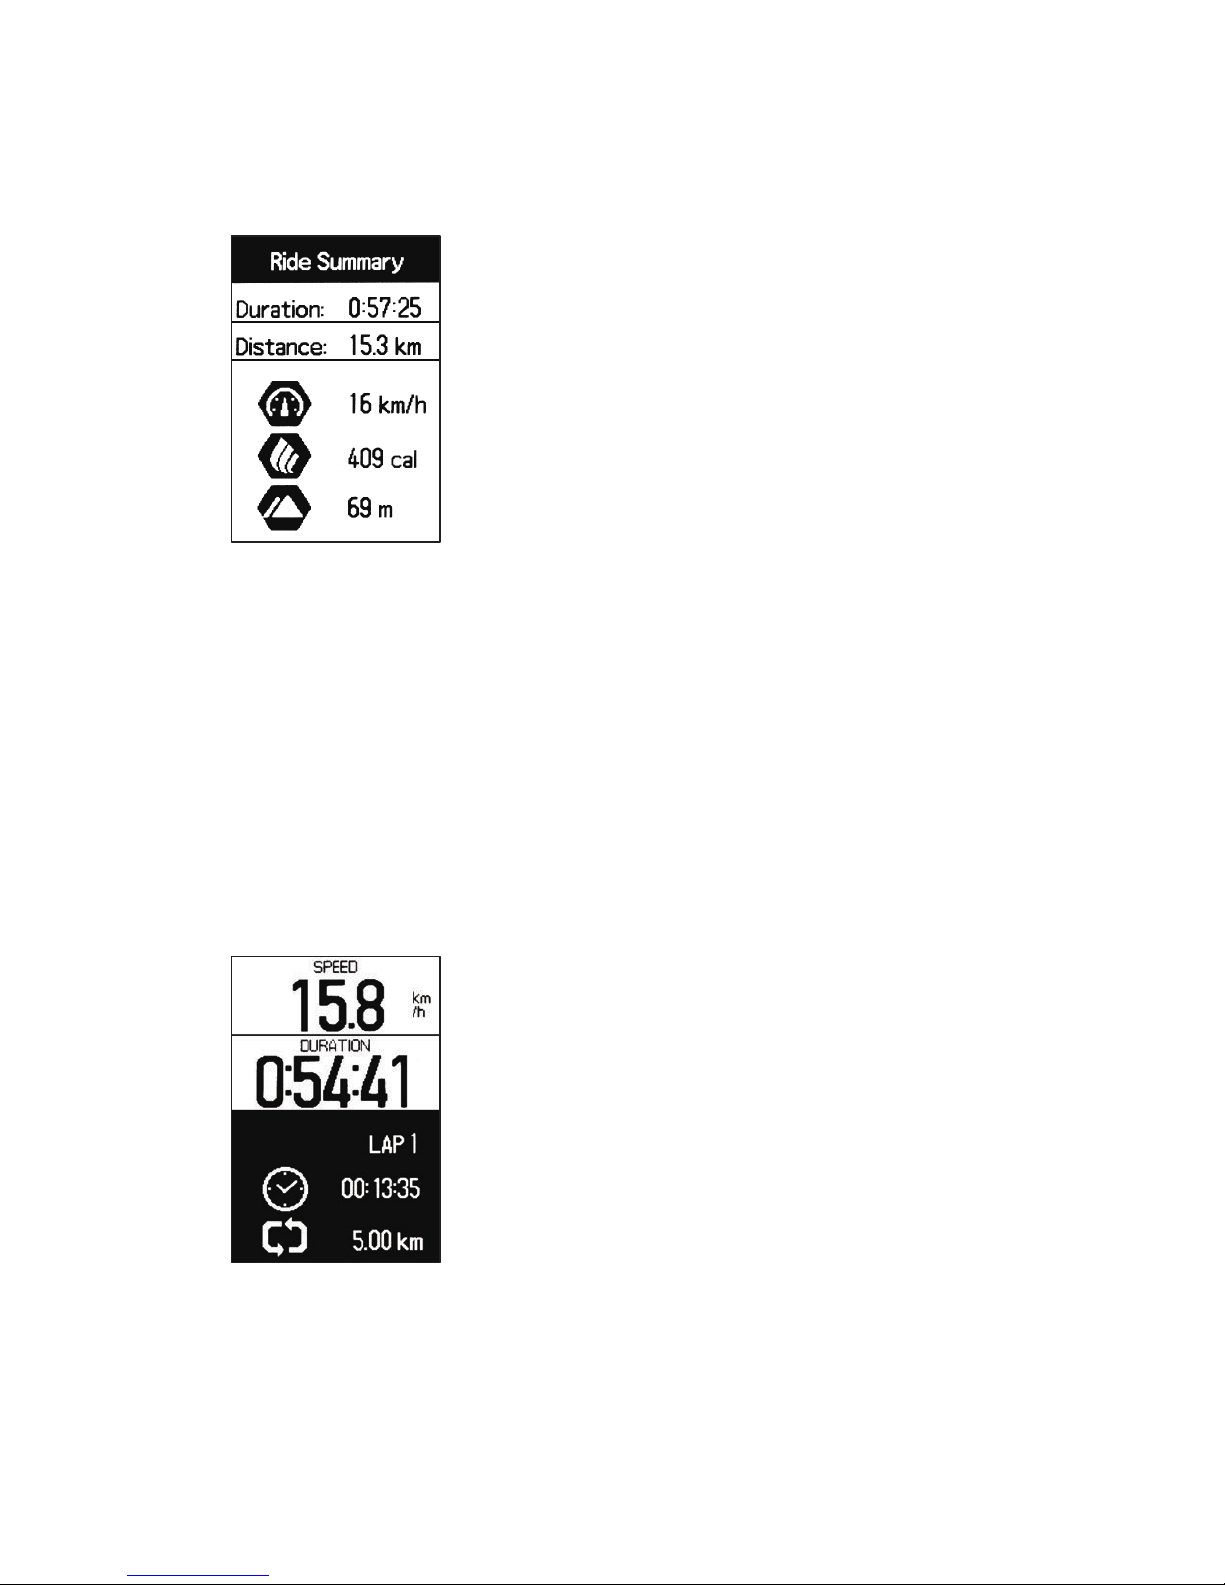
2.2-2 “Discard Ride”
If you select Discard Ride, your ride data will be deleted
and cannot be retrieved. Ensure you want to confirm this
action as it is immediate.
2.3 Lap
Click LAP to record lap times.
2.2-1 “Save Ride”
If you select Save Ride, a summary of your ride will be
displayed and the ride data will be saved. Press any button
to return to the Let's Ride screen.
Page 8
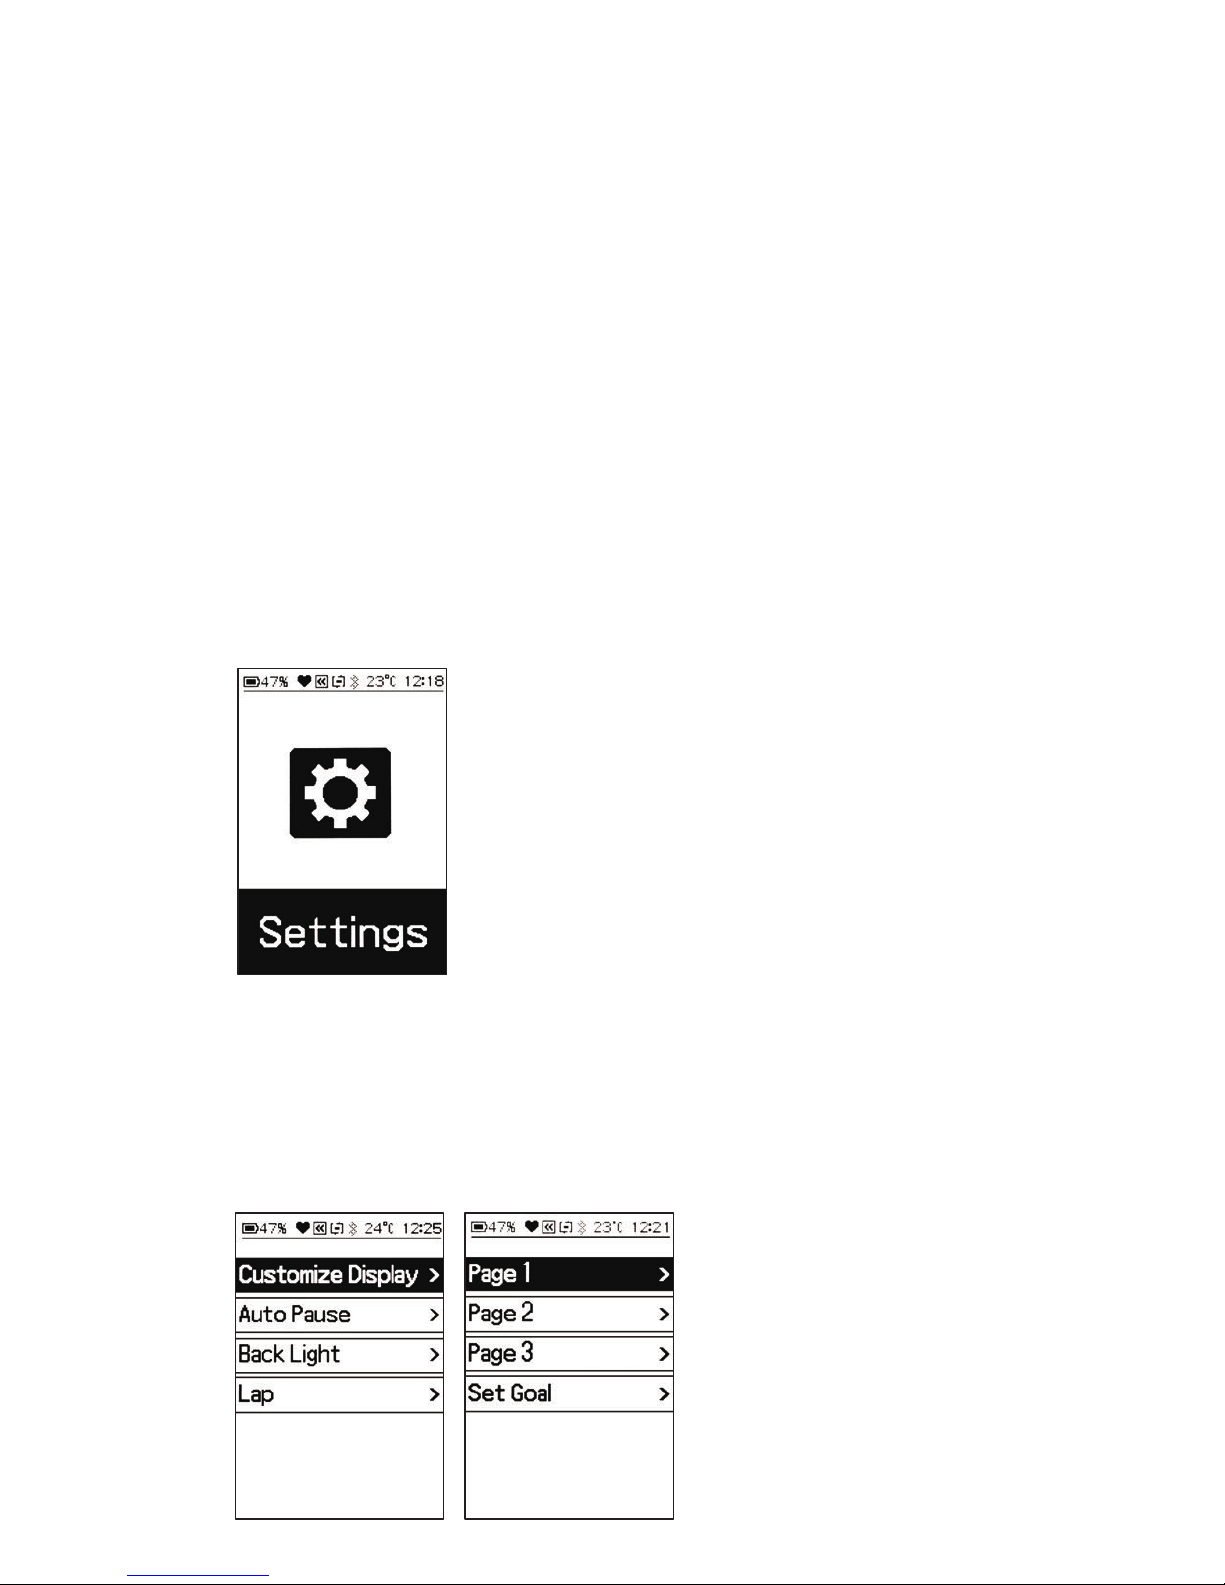
3.1 Ride Settings
3.1.1 Customizing the Data Pages
• Settings > Ride Settings > Customize Display
• Press ENTER to select page to customize.
3. Setting Your PanoComp X
3.1 Ride Settings
1. Customize Display
2. Auto Pause
3. Back Light
4. Lap
3.2 Connect Sensor
1. Find Additional Sensors
3.3 Bluetooth
1. Connect PanoBike+ app
2. Notification
3. Forget Device
3.4 Tones
1. Key Tones
2. Warning Tones
3.5 Profile
1. Gender
2. Height
3. Weight
4. Birth Year
5. Max.Heart Rate
3.6 System
1. Language
2. Time
3. Unit
4. Barometer
5. Factory Reset
6. Version
Page 9
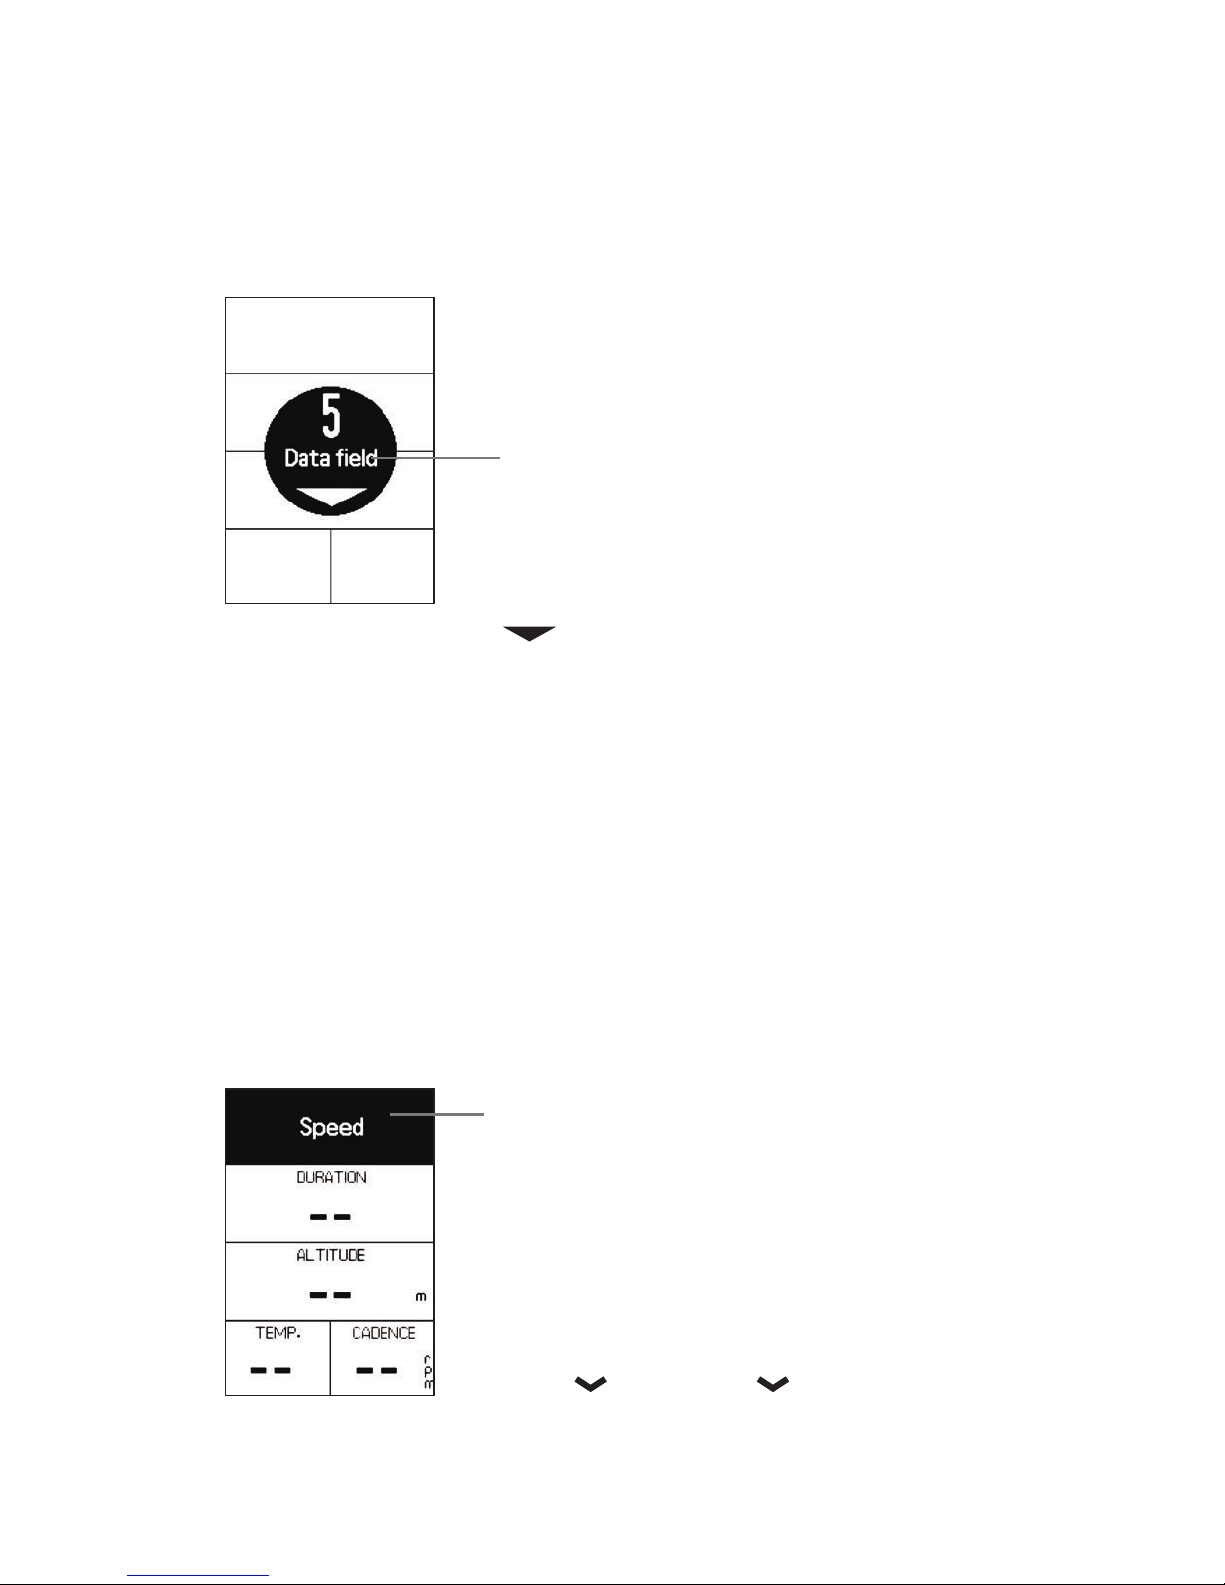
3.1.1.2 Data field
• Press NEXT to choose number of fields to display
on customized page.
• 3 to 8 fields can be selected.
• Press ENTER to confirm number of fields to display.
8
7
6
5
4
3
3.1.1.3 Select and customize each data field
19 different data metrics.
• Press NEXT to cycle through fields to customize.
• Press ENTER to select field.
• Press NEXT to cycle through data metric to display.
• Press ENTER to confirm data metric to display.
• Repeat sequence above until chosen fields are customized.
• Press BACK to return to previous screen.
Speed
Avg Speed
Max Speed
Cadence
Avg Cadence
Max Cadence
Grade
Altitude
Total Descent
Total Ascent
Temperature
Battery
Calories
HeartRate
Avg HeartRate
Max HeartRate
Distance
Duration
Time of day
Page 10
3.1.2 Auto Pause
When Auto Pause is engaged, PanoComp X
will automatically pause timer when bike stops.
Timer will restart once movement is detected.
• Settings > Ride Settings > Auto Pause > On / Off.
• Press NEXT to cycle between options.
• Press ENTER to select option.
• Press BACK to return to previous screen.
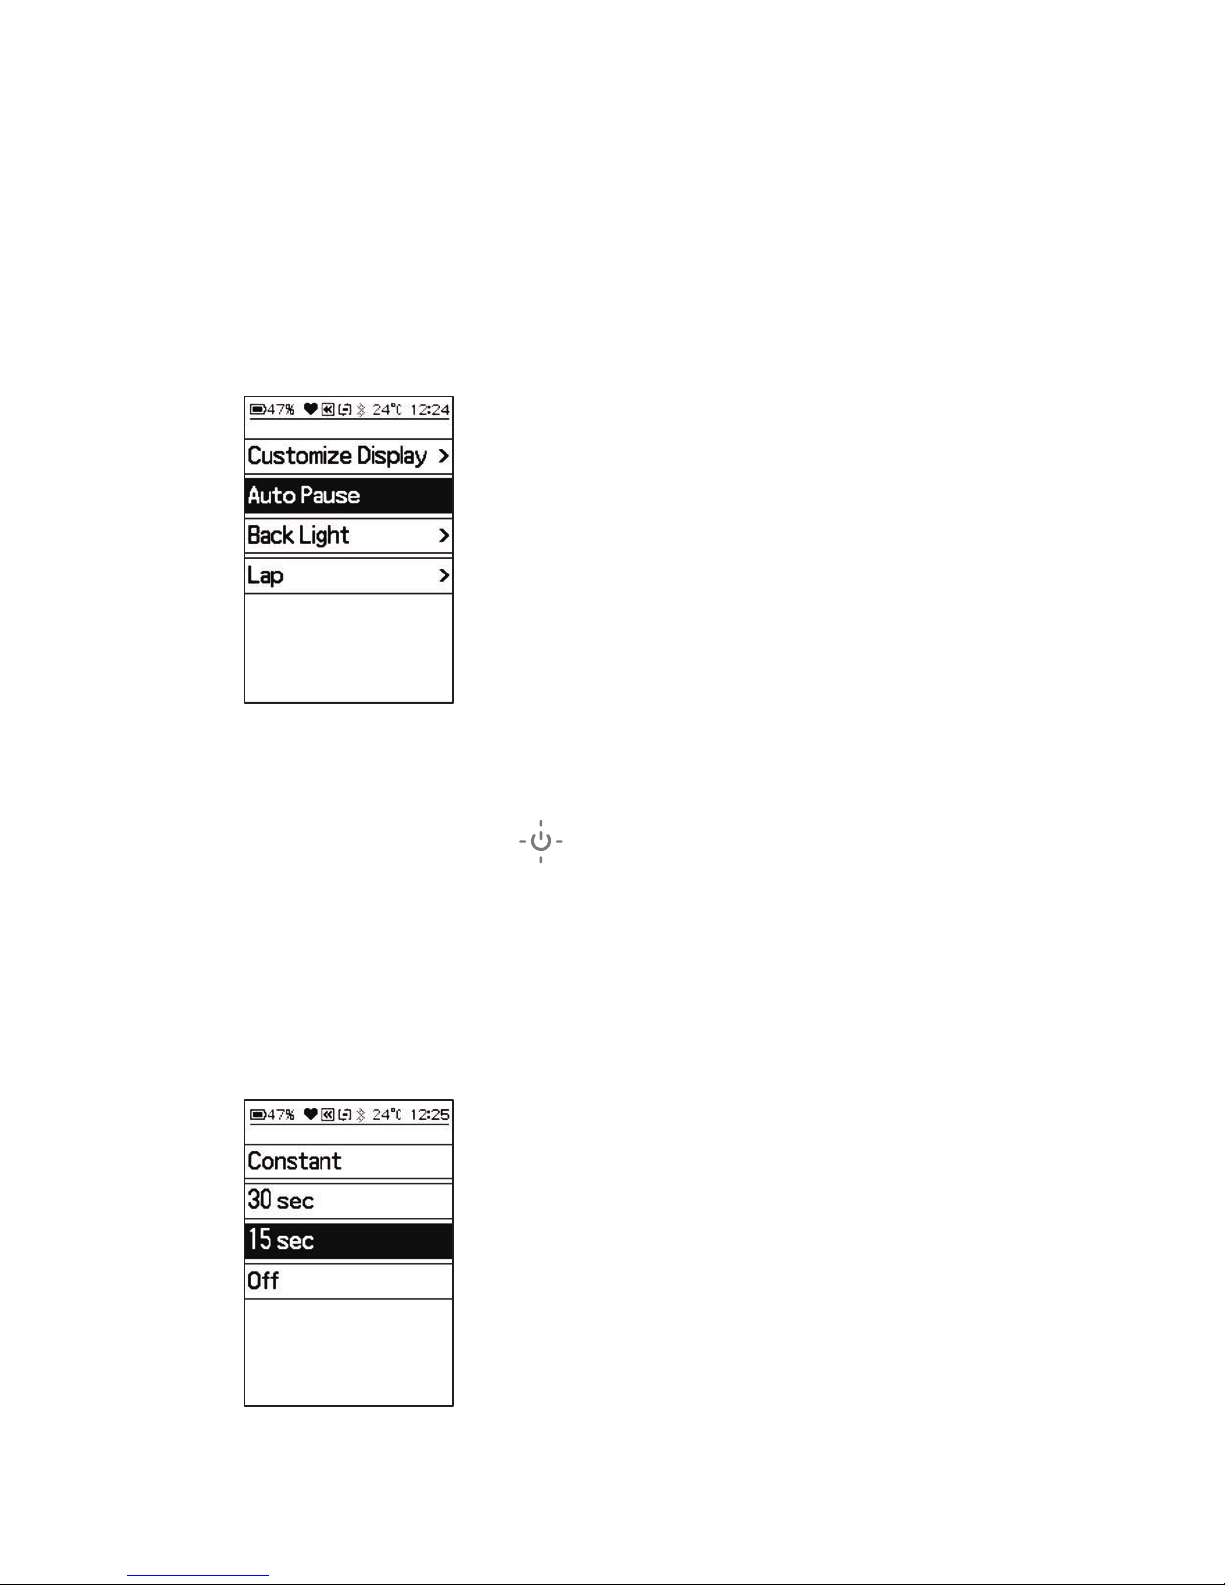
3.1.3 Back Light
• At any time, press to turn on the back light.
• Settings > Ride Settings > Back Light >
Constant / 30 sec / 15 sec / Off.
• Press NEXT to cycle through options.
• Press ENTER to select option.
• Press BACK to return to previous screen.
Page 11

3.1.4 Lap
Switch on auto lap function, PanoComp X will put a lap mark
by setting distance automatically, which helps riders to
compare and analyze performance.
• Settings > Ride Settings > Lap > Manual / Auto 10 km / Auto 5 km.
• Press NEXT to cycle through options.
• Press ENTER to select option.
• Press BACK to return to previous screen.
3.2 How to Connect Sensors
3.2.1 Connect with speed & cadence sensor
Turn on sensors to prepare for pairing. If PanoComp X receives a
signal from the sensor, the sensor will be displayed on the scan list.
• Turn on Bluetooth device. Distance between sensor and
PanoComp X should be less than 1m(3ft) when pairing.
• Settings > Connect sensor > additional sensor > select the sensor.
• Press ENTER to scan for sensors. After sensors are detected,
press NEXT to cycle to sensor to add.
• Press ENTER to confirm.
Page 12

3.2.1.2
Set wheel size
Access wheel size
settings screen:
Settings >
Connect Sensor >
(Sensor Name) >
Set Wheel Size.
• Press NEXT to
cycle digits.
• Press ENTER to
confirm selection.
Repeat sequence
until wheel size
is confirmed.
DETERMINE WHEEL CIRCUMFERENCE
METHOD A) measure wheel circumference.
mm x 3.14
Wheel
Circumference
= mm x 3.14
METHOD B) Choose from wheel circumference data below.
16x1.50
16x1.75
16x2.00
18x1.50
18x1.75
20x1.50
20x1.75
24x1.75
24x2.00
26x1.50
26x1.75
26x1.95
26x2.10
26x2.20
700x38C
29x2.00
40-305
47-305
34-305
40-355
47-355
40-406
47-406
47-507
50-507
40-559
47-559
50-559
54-559
56-559
38-622
56-622
1185
1195
1245
1340
1350
1490
1515
1890
1925
2010
2023
2050
2068
2083
2180
2272
Tire Size Designation
Wheel Circumference
650C Tubular
650x20C
650x23C
650x25C
27.5x2.25
(650B)
27.5x2.35
(650B)
700C Tubular
700x20C
700x23C
700x25C
700x28C
700x30C
700x32C
700x35C
29x2.10
29x2.25
1920
1938
1944
1952
2217
2230
2130
2086
2096
2105
2136
2146
2155
2168
2288
2320
Tire Size Designation
Wheel Circumference
20-571
23-571
25-571
57-584
60-584
20-622
23-622
25-622
28-622
30-622
32-622
35-622
54-622
57-622
Page 13

3.2.2 Connect with heart rate sensor
• Moisten the belt contacts and wear to connect heart rate
sensor. Distance between sensor and PanoComp X should be
less than 1m(3ft) when pairing.
• Connect sensor > additional sensor > select the device.
NOTE
• Distance between
sensors and PanoComp X
should not exceed 1m(3ft)
when pairing.
• Keep at least 10m(33ft)
away from other
sensors while pairing.
3.2.3 Select the sensor
If you have more than one sensor, please select the one
you want to be default.
• Connect Sensor > Select the sensors.
• ”” icon shows the sensors in use.
• Supports maximum 5 sensors.
• If 5 sensors are already
paired and "Find
Additional Sensors" is
selected, a "Pairing
Sensor Full" warning
screen will display.
Page 14

3.3 How to pair your PanoBike+ app
PanoComp X supports PanoBike+ app, provides personal
settings info, incoming call alerts, data uploads, firmware uploads.
3.3.1 Settings > Bluetooth > Select system : iOS or Android
• Turn on Bluetooth mode on your smartphone.
• Turn on PanoBike+ app, tap the "Sensors" ( ) icon, tap the "+"
symbol to start the pairing process.
(iOS device)
• Smartphone:
(iOS device) Enter pairing code displayed on PanoComp X
into smartphone.
(Android device) Enable location function before pairing
PanoComp X with PanoBike+ app.
Page 15

3.3.2 Connection to PanoBike+ app ( PHONE NOTIFICATION )
• PanoComp X must be paired with PanoBike+ app
(See Section 3.3 for more information).
• If smartphone is within PanoComp X Bluetooth range
10m(33ft) while PanoComp X is recording a ride or paused,
a "Receiving Phone Call" alert will display and the computer
will beep.
Turn on/off incoming call on PanoComp X
• Settings > Bluetooth > Notification > On or Off.
3.3.3 Repair PanoBike+ app
• If PanoComp X is connected to Phone A, delete its connection with
PanoBike+ app, then repair with new connection to Phone B.
Delete the connection between PanoComp X & smartphone
• The connection between smartphone, PanoComp X,
and PanoBike+ app needs to be deleted.
• PanoComp X: Settings > Bluetooth > Forget Device > Yes or No.
• Smartphone:
(Android device):
From system settings, delete PanoComp X connection
with Bluetooth.
(iOS device):
Settings > Bluetooth > PanoComp X > Forget Device.
• PanoBike+: SENSORS > PanoComp X > DELETE SENSOR.
Page 16

PanoBike+:
SENSORS > PanoComp X > DELETE SENSOR.
PanoComp X:
Settings > Bluetooth > Forget Device.
• Smartphone:
(Android device) From system settings, delete
PanoComp X connection with Bluetooth.
(iOS device) Settings > Bluetooth > PanoComp X > Forget Device.
Page 17

3.4 Tones
• Settings > Tones > Key Tones / Warning Tones.
• Sub menu selections On / Off.
1. Key Tones : On / Off.
2. Warning Tones :
• Max. Heart Rate
• Max. Cadence
• Min. Cadence
• Timer
NOTE: When limits set for these metrics are reached,
an alert screen will display and a beep will be heard.
3.5 Profile
Setting up your user profile.
• Settings > Profile.
Set your gender, height, weight, age (by birth year), and
max heart rate settings. The device uses this information to
calculate accurate ride data.
Page 18

3.6 System settings
Key sequence for operations below
NEXT to cycle selection.
ENTER to confirm selection.
• Settings > System.
1. Language : Select language.
2. Time : Set Year: Repeat sequence to set and confirm year.
Set Month/Day: Repeat sequence to set and confirm date.
Set Clock Mode: To cycle between 12hr and 24hr mode,
then confirm clock mode.
Set Time: Set correct time.
3. Unit : Select between Metric and Imperial.
4. Barometer : Calibrate: Key in altitude manually.
Auto Calibrate : The system will calibrate
automatically.
5. Factory Reset : Select to delete all records and reset settings
in PanoComp X to factory defaults.
6. Version : Check the current version.
Page 19

In History mode, you can review the
following information recorded to date.
4.1 Total
• RIDES
• DISTANCE/(UNITS)
• DURATION
• CALORIES BURNED
Press NEXT to access
second screen
• PERSONAL BEST
• DISTANCE/(UNITS)
• DURATION
• CALORIES BURNED
4. History
Ride record management
Ride records include sensors
and settings information in
PanoComp X and should be
uploaded to PanoBike+ app
regularly.
4.1 Totals
4.2 Rides
4.3 Ride Archive
4.4 Delete Data
1. Trip
2. All Data
IMPORTANT NOTE
PanoComp X can store up to 100hrs of ride
data. When memory is nearly full, an alert
screen "Memory is Full" will display. When
data exceeds memory capacity, ALL ride
data will be automatically erased. To
prevent inadvertent loss of desired data,
upload rides to PanoBike+ app or delete
unwanted rides to free up space.
Page 20

4.2 Rides
• Individual Rides
Press NEXT to scroll through individual rides.
Press ENTER to select ride.
• Summary - Check all data for single record
Press ENTER to display detail information.
Press NEXT to scroll through screens.
• LAP: Detailed Lap Information
• Heart Rate Zone : Check Heart Rate zone
(with DuoBand heart rate sensor).
Detailed Heart Rate Information.
Summy Lap Heart Rate Zone
Page 21

Zone5 - 95~100%
You should only train in this zone if you are very fit,
and only for very short periods of time. Lactic acid
develops quickly as you are operating in oxygen debt
to the muscles. The value of training in this zone is
to train your fast twitch muscle fibers which develop
top-end speed.
Zone4 - 88~95%
Anaerobic workouts involve faster, more explosive
movements that require immediate energy reserves.
Hence anaerobic workouts tend to burn more calories
from carbohydrates then fat.
Zone3 - 77~88%
Aerobic endurance is the ability of the body to perform
repetitive movements for a long period of time. This is
the preferred zone if you are training for an endurance
event. In this phase, more calories are burned from fat
and carbohydrate.
Zone2 - 65~77%
This zone provides the same benefits as the Aerobic
zone, but is more intense and in which you use fat
and carbohydrates as fuel. 85% of calories burned in
this zone are fats!
Zone1 - 50~65%
Training in this zone improves the ability of your heart
to pump blood and improve the muscles’ ability to utilize
oxygen, which is the key to having a healthy heart or
recovering after intense workouts in a low risk of injury.
Heart Rate zone using manual
PanoBike+ app > Settings > Zones > Heart Rate Zones.
Page 22

4.3 Ride Archive
Number of rides archived
(1000 maximum).
NOTE: If maximum number
of rides has been reached,
the oldest record will be
overwritten. You can also
delete unwanted ride
information to free up
archive space.
4.4 Delete Data
4.4.1 Trip
Press NEXT to scroll
through individual rides.
Press ENTER to select.
Confirm you want to
delete trip.
4.4.2 All Data
Press ENTER to select.
Confirm you want to
delete all data history.
IMPORTANT !
Make sure you want to
delete all ride data as
it cannot be retrieved
once deleted.
Page 23

5. Set Goal
Setting a ride goal will show a percentage of goal
in a bar graph on PanoComp X screen during ride.
5.1 Set Duration
5.2 Set Distance
5.3 Set Calories
Press NEXT to access other
information screens.
"Set Goal"
screen.
"Main Goal"
screen.
Page 24

PanoComp X provides three training modes; Duration,
Distance and Calorie Burn. Choose the type of training,
and let PanoComp X will be your personal coach
on the ride.
Training mode:
5.1 Set Duration Goal : Select this setting to input the
number of minutes (1 - 999) you want to ride as a goal.
When the time is reached, an alert screen with ride
summary will display on the PanoComp X screen for 4
seconds and continue to record your activity until you
press ENTER to pause the ride recording.
5.2 Set Distance Goal : Select this setting to input the
number of miles or kilometers (1 - 999) you want to ride as
a goal. When the distance is reached, an alert screen with
ride summary will display on the PanoComp X screen for 4
seconds and continue to record your activity until you
press ENTER to pause the ride recording.
5.3 Set Calories Goal : Select this setting to input the
number of calories (1 - 8999) to burn you want as a goal.
When the calories set is reached, an alert screen with ride
summary will display on the PanoComp X screen for 4
seconds and continue to record your activity until you
press ENTER to pause the ride recording.
• To Resume Recording Ride
Press ENTER to resume recording your ride.
• To Save Ride Data
Press NEXT to select "Save Ride", then press ENTER
to confirm. A ride summary page will display until either
ENTER, BACK or NEXT is pressed.
• To Discard Ride Data
Press NEXT twice to select "Discard Ride", then press
ENTER to confirm. Once ENTER is pressed, the ride data
is immediately deleted.
IMPORTANT!
Make sure you want to delete ride data as
it cannot be retrieved once deleted.
Page 25

6. Setting in PanoComp X
Bluetooth® Connection
PanoComp X connects and transfers data with smartphone
via Bluetooth Smart (BLE4.0). Bluetooth connected
PanoComp X device displays Bluetooth connected features
for your compatible smartphone
or fitness device.
NOTE:
• Distance between sensors and PanoComp X should
not exceed 1m(3ft) when pairing.
• Before pairing PanoBike+ app to PanoComp X, turn on
“Bluetooth” in “Settings” on smartphone.
• Select Settings >
Select system : iOS or Android
.
• Connect PanoComp X to PanoBike+ app:
Please download and install Topeak PanoBike+ app from
Apple App Store or GooglePlay to your smart device first.
• Notification : Switch on/off for incoming call notification.
• Forget Device : yes or no.
Page 26

The ultimate cycling performance app just got better. The
PanoBike+ has additional functionality that transforms your
smartphone’s powerful Bluetooth® Smart capabilities into a bike
computer, personal trainer, health management, and social media
upload device. The new PanoBike+ app can upload your ride
details to Strava and share it on Facebook, and the Dual Mode
Technology allows you to use either your smartphone during your
ride, or use a compatible PanoComp X bike computer during your
ride and sync your phone afterwards to upload and analyze your
ride data. By combining the functions of an enhanced cycle
computer and heart rate monitor (requires optional DuoBand
Speed & Cadence Sensor and DuoBand Heart Rate Monitor) in a
single app, you get the most out of your bike ride.
(Download for Free)
iOS 8 or above Android OS 4.4 or above
(Download for Free)
Works with iPhone 4s
or above & devices
with iSO 8 & above, or
Android OS 4.4 & above
with Bluetooth® Smart
(BLE 4.0)
Page 27

7. How to update PanoComp X firmware
PanoComp X will indicate if a firmware update is available.
Follow the on-screen instructions to update the firmware to
ensure PanoComp X functions properly.
7.1 Connection to PanoBike+ app (FIRMWARE UPDATE)
1. PanoComp X must be paired with PanoBike+ app
(See Section 3.3 for more information).
2. If new firmware is available, installation will be requested.
8. How to upload data to PanoBike+
Switch to PanoBike+ app home screen, then press the
History icon ( ) and drag screen down to refresh page.
PanoComp X will automatically upload ride data to PanoBike+
app that has not been previously uploaded.
8.1 PanoBike+ app connect to PanoComp X (UPLOAD)
8.1.1 PanoBike+ app should be paired with PanoComp X
(See Section 3.3 for more information).
8.1.2 After saving ride on PanoComp X, a summary screen
will display. Press any button to return to main screen, this
will allow ride data to be uploaded to the PanoBike+ app.
8.1.3 When PanoBike+ app and PanoComp X are paired, new
ride data will automatically be uploaded when PanoBike+ app
history page is refreshed.
8.1.4 When uploading ride data, PanoComp X will display
percentage left to upload. PanoBike+ will display "Loading".
8.1.5 Each time PanoBike+ app and PanoComp X are paired,
altitude data (based on barometric pressure) is loaded as
standard value in PanoComp X.
NOTE:
Previously uploaded data will not be transferred again,
only new records will be uploaded.
Page 28

PanoComp X must display one of the four main screens to upload ride
data to the PanoBike+ app.
9. Remote monitor mode
When PanoComp X is paired with the PanoBike+ app and you
start recording your ride with the app, the PanoComp X
screen will change to remote monitor mode automatically
allowing you to save your smartphone battery. You can put
your phone in a backpack or jersey pocket and view your ride
information on PanoComp X.
NOTE : When using remote monitor mode, the PAUSE and LAP
functions are inoperable on PanoComp X.
Page 29

9.1 PanoBike+ app ride information to PanoComp X display
(Remote monitor)
9.1.1 PanoBike+ app should be paired with PanoComp X
(See Section 3.3 for more information).
9.1.2 When you use PanoBike+ app to start recording your ride,
the remote monitor mode automatically starts and ride information
is displayed on the PanoComp X screen.
9.1.3 When you stop recording your ride with the PanoBike+ app,
the PanoComp X returns to the main screen automatically.
9.1.4 If the PanoBike+ app is disconnected from PanoComp X
during a ride, a "Disconnected" alert screen is displayed on
PanoComp X. Press any button to return to the main screen.
Page 30

BATTERY CHARGING
Operation Time
up to
48 hr.
USB
Recharger via computer
USB port, USB charger, or
USB power bank.
Standard charging time
1 hr (approx)
INSTALL PANOCOMP X ON HANDLEBAR MOUNT
ATTENTION
1. PanoComp X can be charged while riding by using a portable USB
power bank.
2. Automatic Shutdown:
PanoComp X will automatically shutdown after 10mins if no ride activity
is detected in these modes: Let's Ride, Set Goal and Remote Monitor.
Press the lever.
Release the
computer.
Install the bracket
on the handlebar.
1
Install the computer.
2
1
2
3 mm Allen Key
0.8 N.m
Page 31

FCC INFORMATION
This device complies with Part 15 of the FCC Rules. Operation is subject to
the following two conditions:
1. This device may not cause harmful interference.
2. This device must accept any interference received, including
interference that may cause undesired operation.
Note: This equipment has been tested and found to comply with the limits
for a Class B digital device, pursuant to part 15 of the FCC Rules. These
limits are designed to provide reasonable protection against harmful
interference in a residential installation. This equipment generates, uses
and can radiate radio frequency energy and, if not installed and used in
accordance with the instructions, may cause harmful interference to radio
communications. However, there is no guarantee that interference will not
occur in a particular installation. If this equipment does cause harmful
interference to radio or television reception, which can be determined by
turning the equipment off and on, the user is encouraged to try to correct
the interference by one or more of the following measures:
• Reorient or relocate the receiving antenna.
• Increase the separation between the equipment and receiver.
• Connect the equipment into an outlet on a circuit different from that to
which the receiver is connected.
• Consult the dealer or an experienced radio/ TV technician for help.
FCC Radiation Exposure Statement
* This equipment complies with FCC radiation exposure limits set forth for
an uncontrolled environment. This transmitter must not be collocated or
operating in conjunction with any other antenna or transmitter.
* This equipment must be installed and operated in accordance with
provided instructions and the antenna(s) used for this transmitter must be
installed to provide a separation distance of at least 20 cm from all
persons and must be co-located or operating in conjunction with any other
antenna or transmitter.
Caution: Any changes or modifications not expressly approved by the
party responsible for compliance could void the user's authority to
operate this equipment
Page 32

NCC INFORMATION
Administrative Regulations on Low Power Radio Waves Radiated Devices
warning:
• Without permission granted by the NCC, any company, enterprise, or user
is not allowed to change frequency, enhance transmitting power or alter
original characteristic as well as performance to an approved low power
radio-frequency devices.
• The low power radio-frequency devices shall not influence aircraft security
and interfere legal communications; If found, the user shall cease operating
immediately until no interference is achieved.
• The said legal communications means radio communications is operated in
compliance with the Telecommunications Act.
• The low power radio-frequency devices must be susceptible with the
interference from legal communications or ISM radio wave radiated devices.
WARRANTY
* Bluetooth® is a registered trademark of Bluetooth SIG, Inc.
* iPhone is a registered trademark of Apple Inc.
* App Store is a service mark of Apple Inc.
FCC ID:R3S-C02
MODEL:TPB-C02
2-year Warranty: All mechanical components against manufacturer
defects only. Batteries are not covered under any implied warranty.
Warranty Claim Requirements
To obtain warranty service, you must have your original sales receipt.
Items returned without a sales receipt will assume that the warranty
begins on the date of manufacture. All warranties will be void if the
product is damaged due to user crash, abuse, system alteration,
modification, or used in any way not intended as described in this
manual.
* The specifications and design are subject to change without notice.
Please contact your Topeak dealer with any questions.
For USA customer service call : 1-800-250-3068
www.topeak.com
 Loading...