

Topeak BabySeat II User Manual [es]
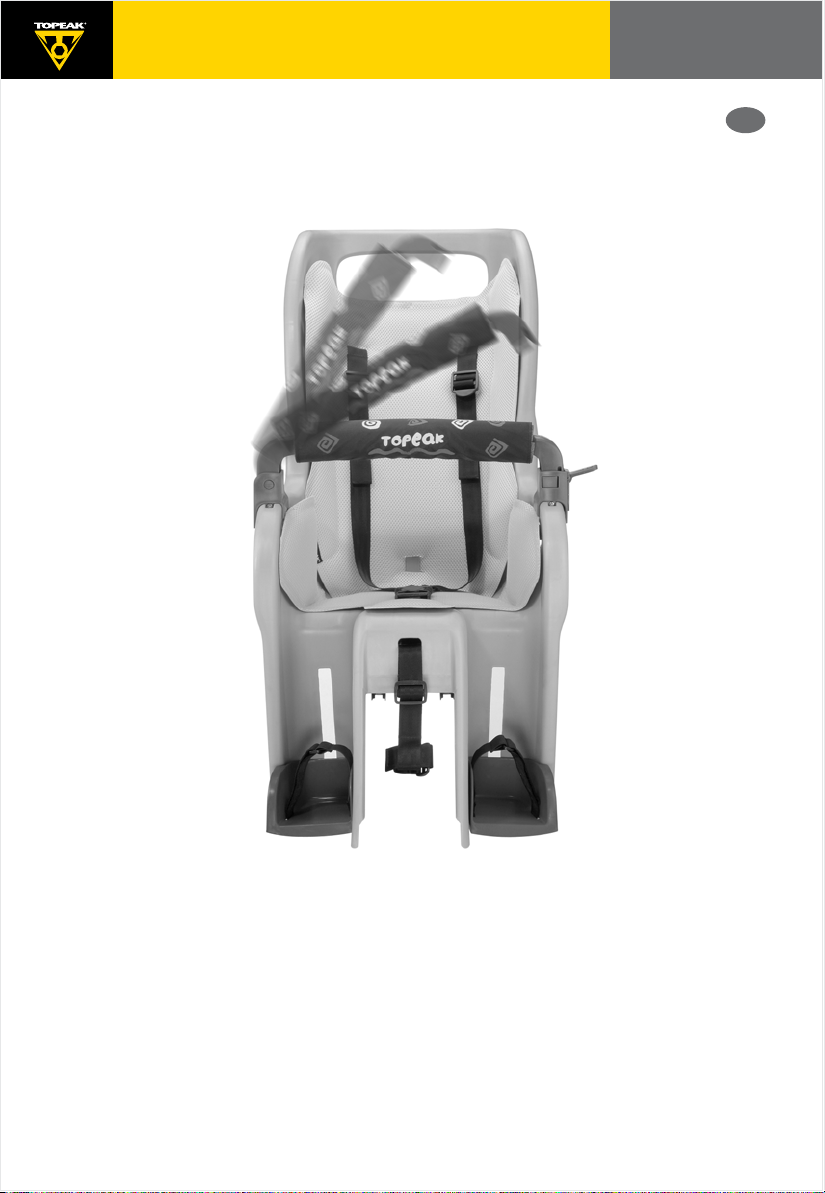
BabySeat II
Suspension Child Carrier
User's Guide
GB
It is recommended a professional bicycle shop assemble and
install the BabySeat II to your bike.
It is imperative that you read this owner's manual prior to installation.
Load Class: A22 (22kgs/48.5lbs)
TOOLS REQUIRED FOR ASSEMBLY:
Topeak Babyseat II Art No. TCS-2201 /TCS-2202 EN 14344
5mm Allen Key

Table of Contents
Getting To Know Your Topeak BabySeat
Mounting Rack To Bicycle
Mounting BabySeat To Rack Surface
Securing BabySeat To Seat Post
Opening Grab Bar
Adjusting Height Of Footrests
Fitting Your Child In BabySeat
Release Seat Pad
Caution Notes
4
6
8
9
10
11
12
13
14
G
B
2
Mounts
to rack
Mounts to
rack
Mounts to bicycle
Mounts to bicycle
G
B
3

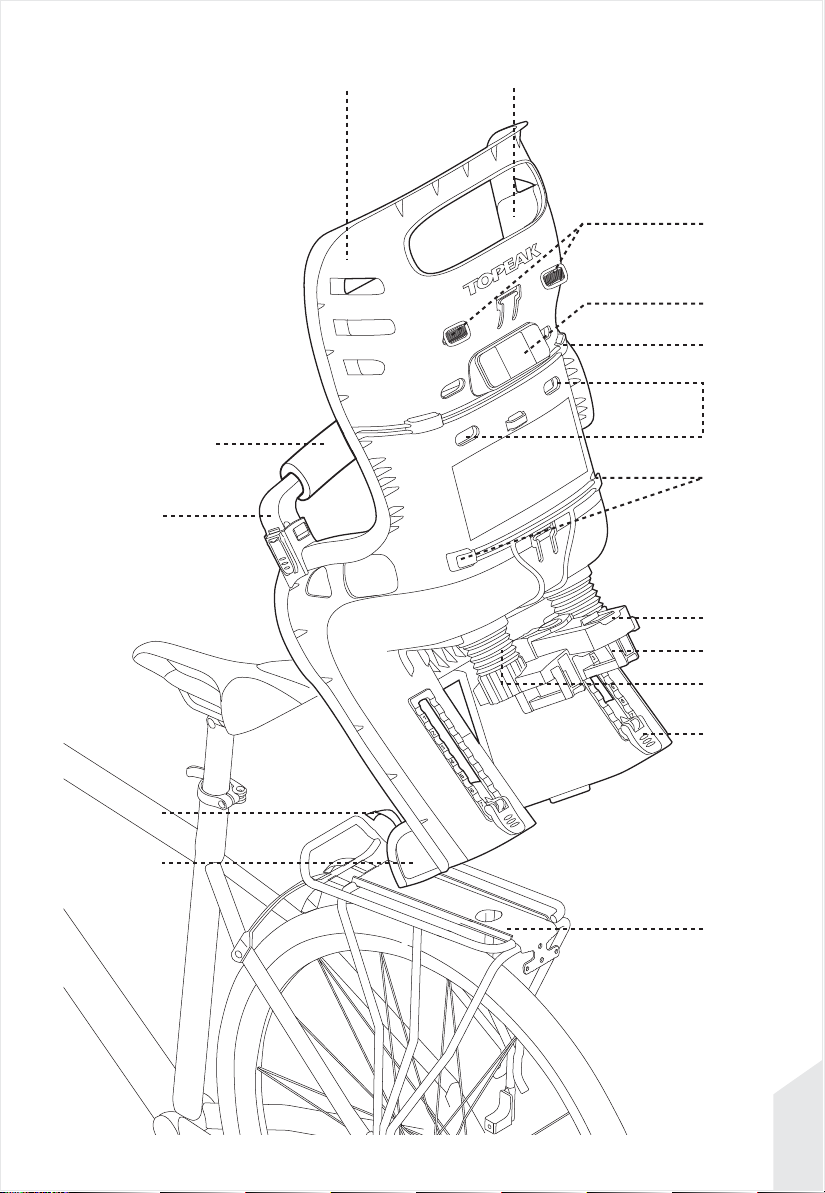
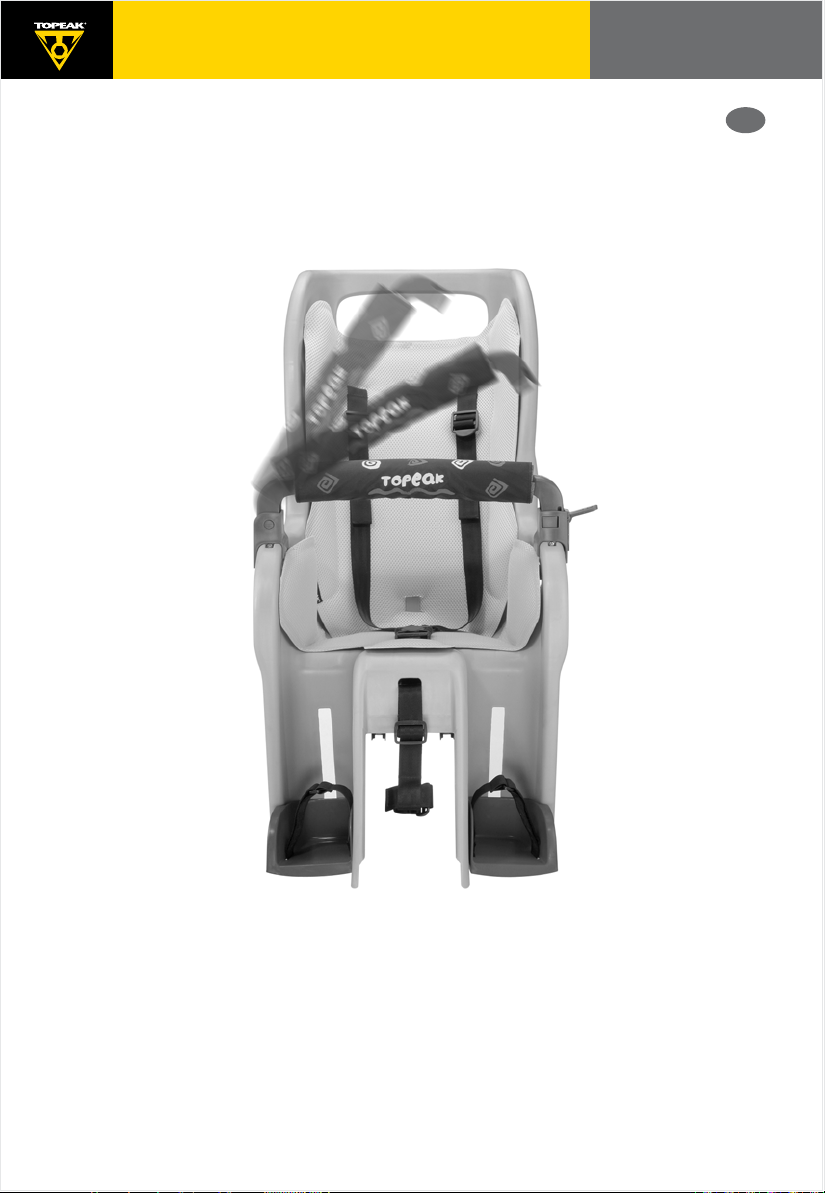
Getting To Know Your Topeak BabySeat
These pages will help you to identify the different parts of your Topeak BabySeat.
ILLUSTRATED PARTS LIST:
1. SEAT
2. RACK
3. GRAB BAR
4. GRAB BAR PAD
5. SEAT PAD
6. FOOTRESTS x 2
7. FOOT STRAPS x 2
8. QUICK ADJUST LEVER FOR FOOTRESTS x 2
9. SLIDE LOCK WITH BUTTON
(in storage position)
10. REFLECTOR
11. SHOCK ABSORBING BASE
12. SPRING BARREL x 2
13. SECURING BUCKLE
14. BACK LOOP
15. LOWER HOLE
16. BACK HOOK
MAINTENANCE:
Please use mild soap and water to clean BabySeat. Seat pad, safety harness
and grab bar pad should be hand washed only. Occasionally lubricate rack
and BabySeat hardware with Teflon® based lubricant.
G
* Teflon® is a registered trademark of DuPont.
B
4
1
4
3
5
13
10
14
15
16
9
11
12
8
7
6
2
G
B
5
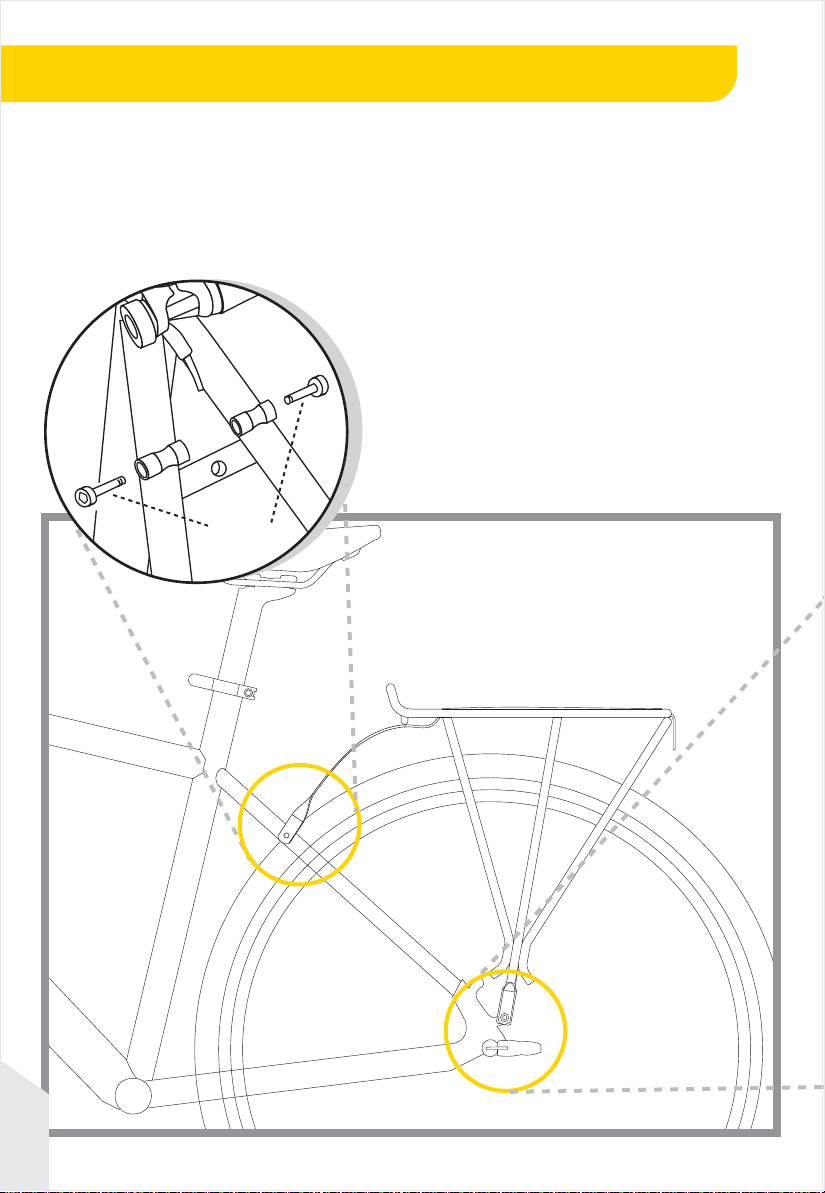
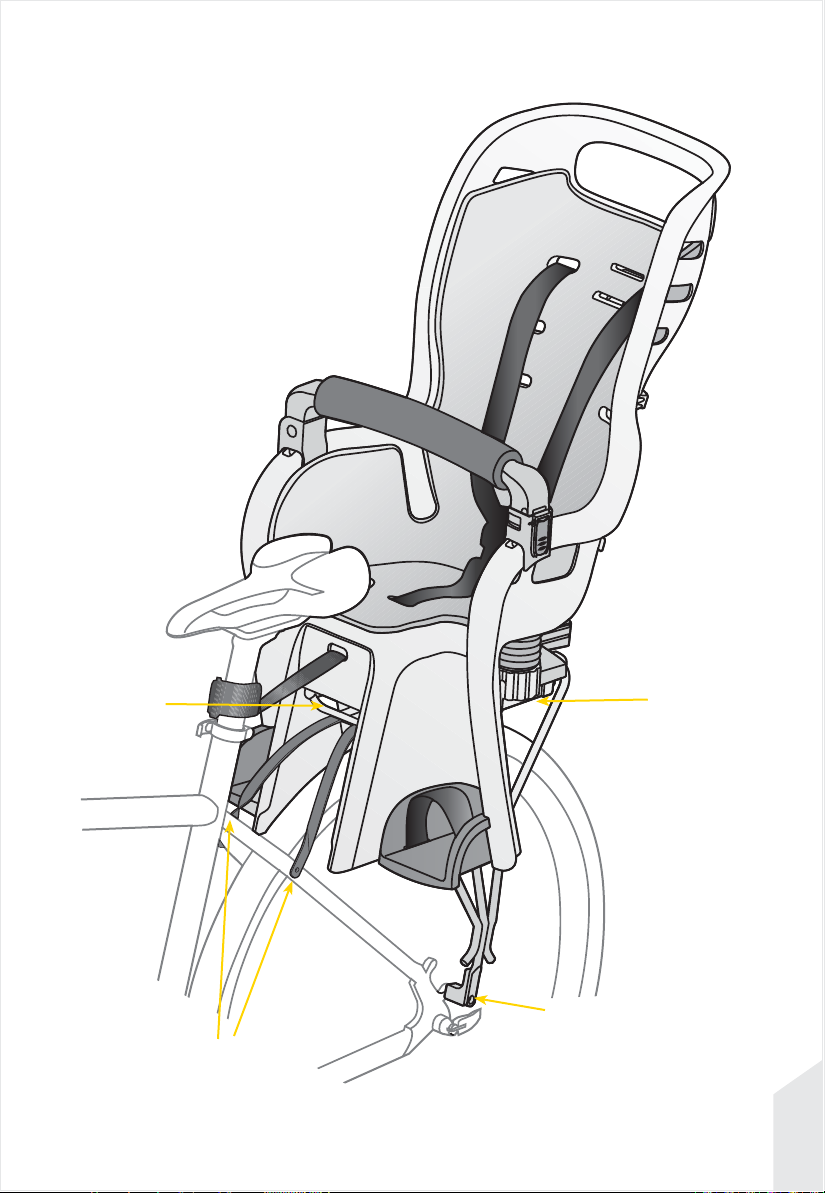
Mounting Rack To Bicycle
Follow these illustrations for mounting rack to bicycle. Make sure rack is
level with ground before tightening hardware. Several adjustments are
available to help level rack.
Slide rack hardware forward or back to
determine correct positions before
tightening Philips screws on rack surface.
M5 x 13mm
G
B
6
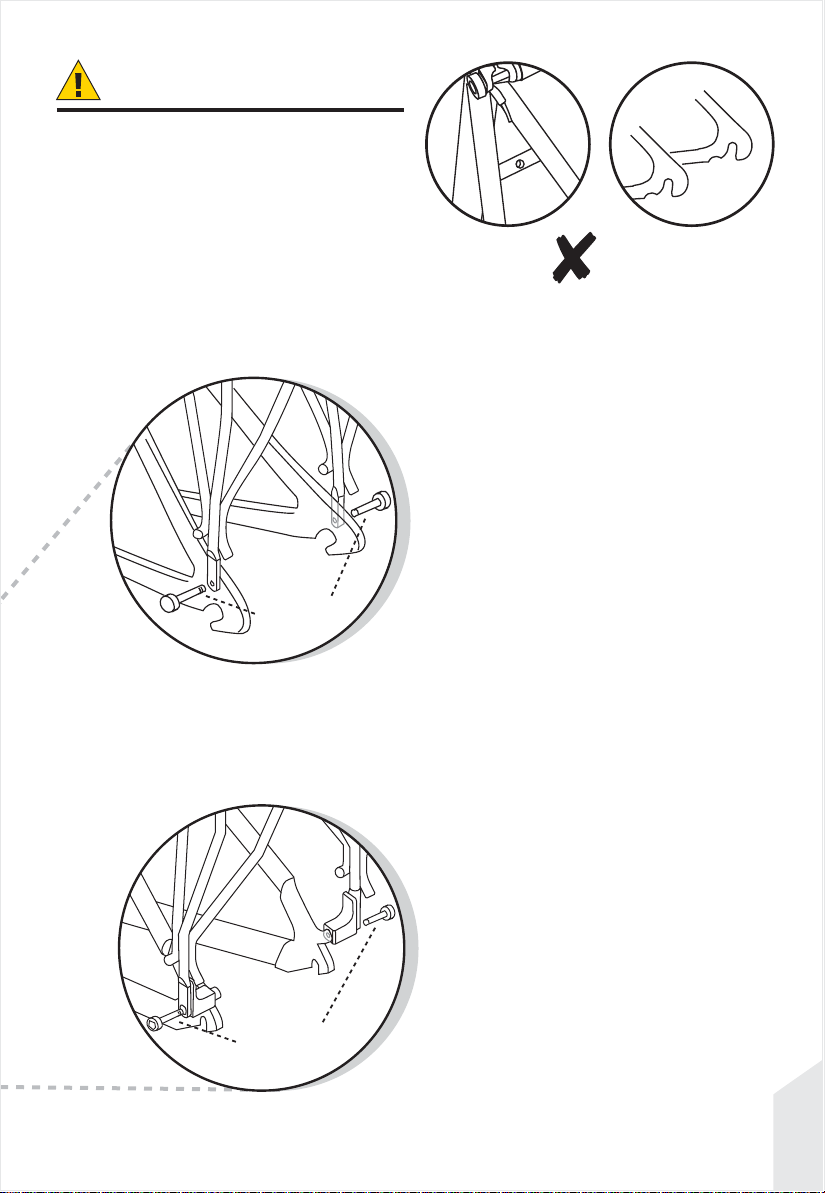
CAUTION
The Topeak BabySeat is designed to work
on frames with seatstay rack mounts AND
threaded dropout eyelets only. Do not use
the Topeak BabySeat on frames without
these fittings for safety reasons.
M5 x 15mm
NO
BabySeat Rack
w/o disc Mounts
M5 x 15mm
BabySeat Rack
w/disc Mounts
Attach base of rack strut to
frame rear dropout. Most
frame dropouts provide more
than one mounting point.
G
B
7
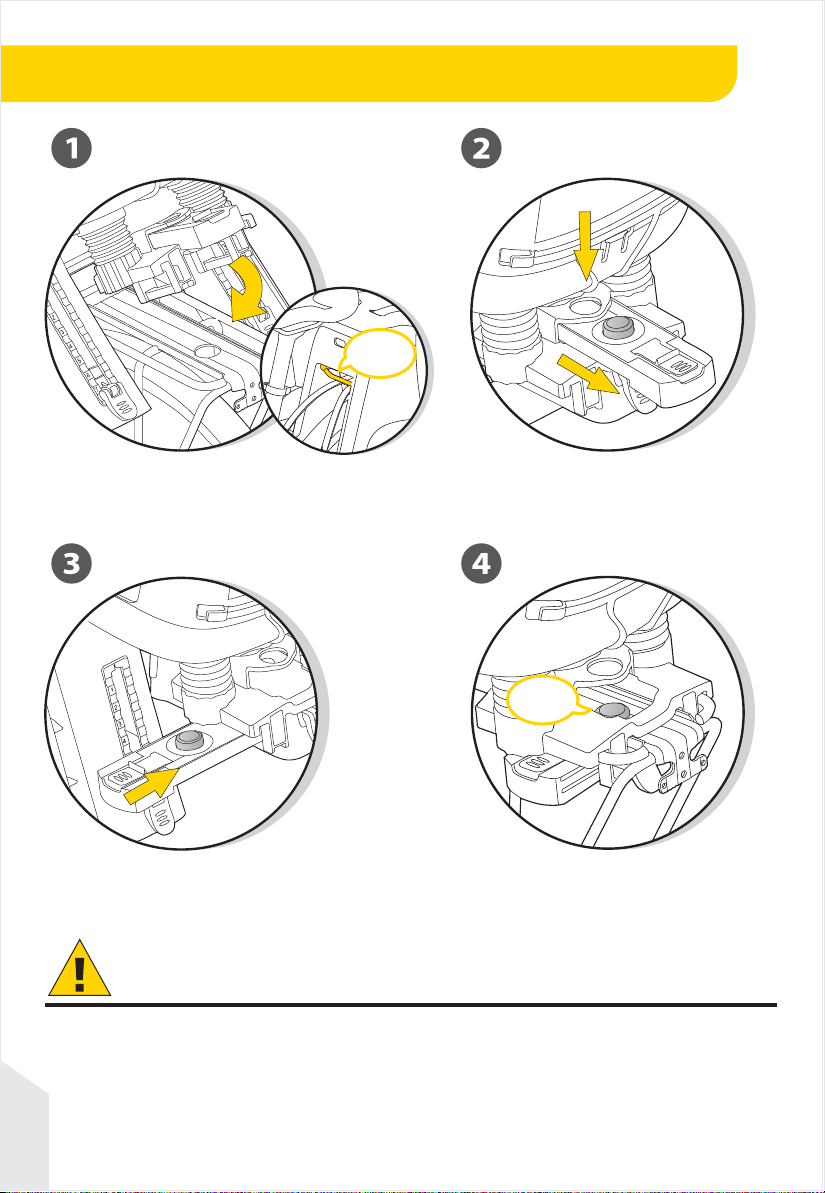
Mounting BabySeat To Rack Surface
Mount BabySeat on rack
Click
Hook seat onto front rail of rack. Rotate seat down on
rack surface until snapped into positive engagement.
Install slide lock on rack
Remove slide lock from storage
position
Press the red button and pull the slide
lock back away from seat.
Click
Press red button and push
slide lock back into rack.
Make sure positive engagement "click"
is heard and red button is protruding
through hole in rack surface.
CAUTION
• If sliding lock fails to slide into rack or if red button does not protrude through the rack surface the
installation is incorrect.
• If your saddle has exposed springs, please cover springs adequately to prevent pinching child passenger.
• Never modify BabySeat or rack from their original specifications.
• Do not attach additional luggage to the child carrier. Recommend to carry such loads at the opposite end
G
of the cycle, e.g. in the case of a rear seat, to use a front luggage carrier.
B
• Ensure that your bike is stable before installing or removing BabySeat.
8
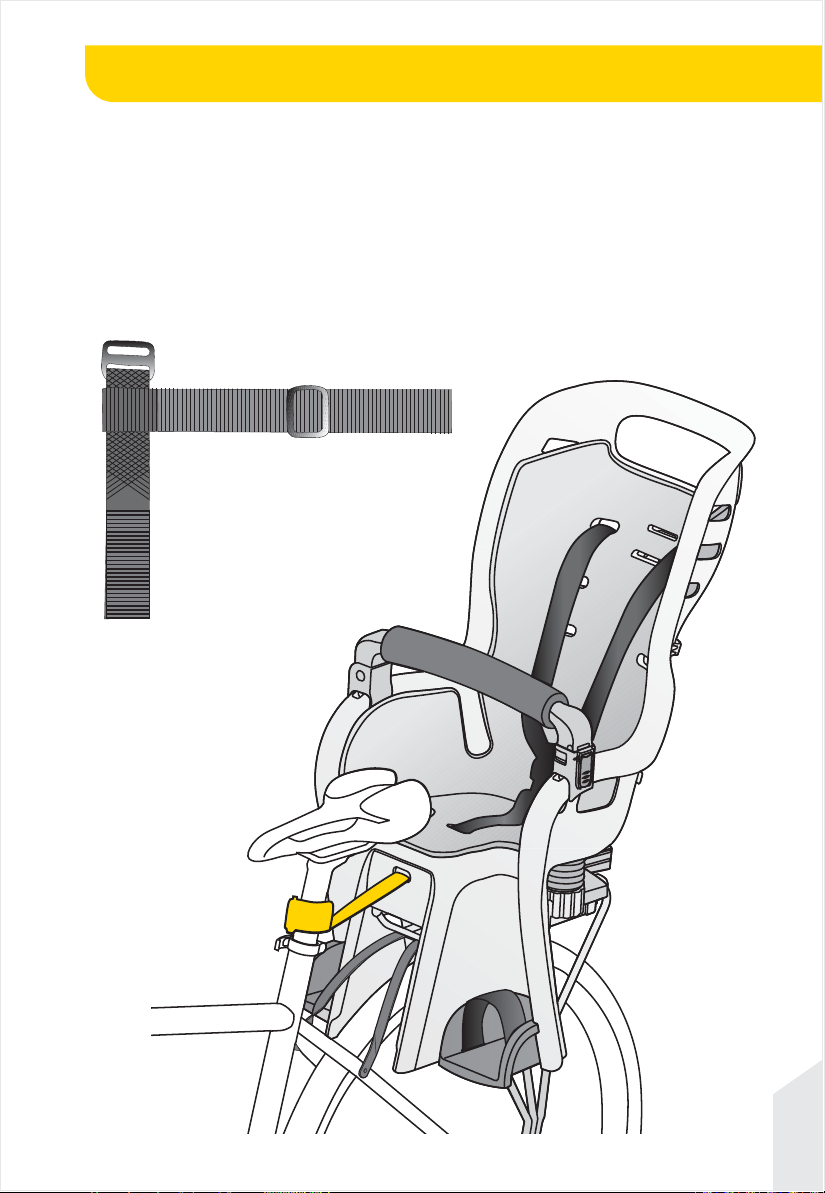
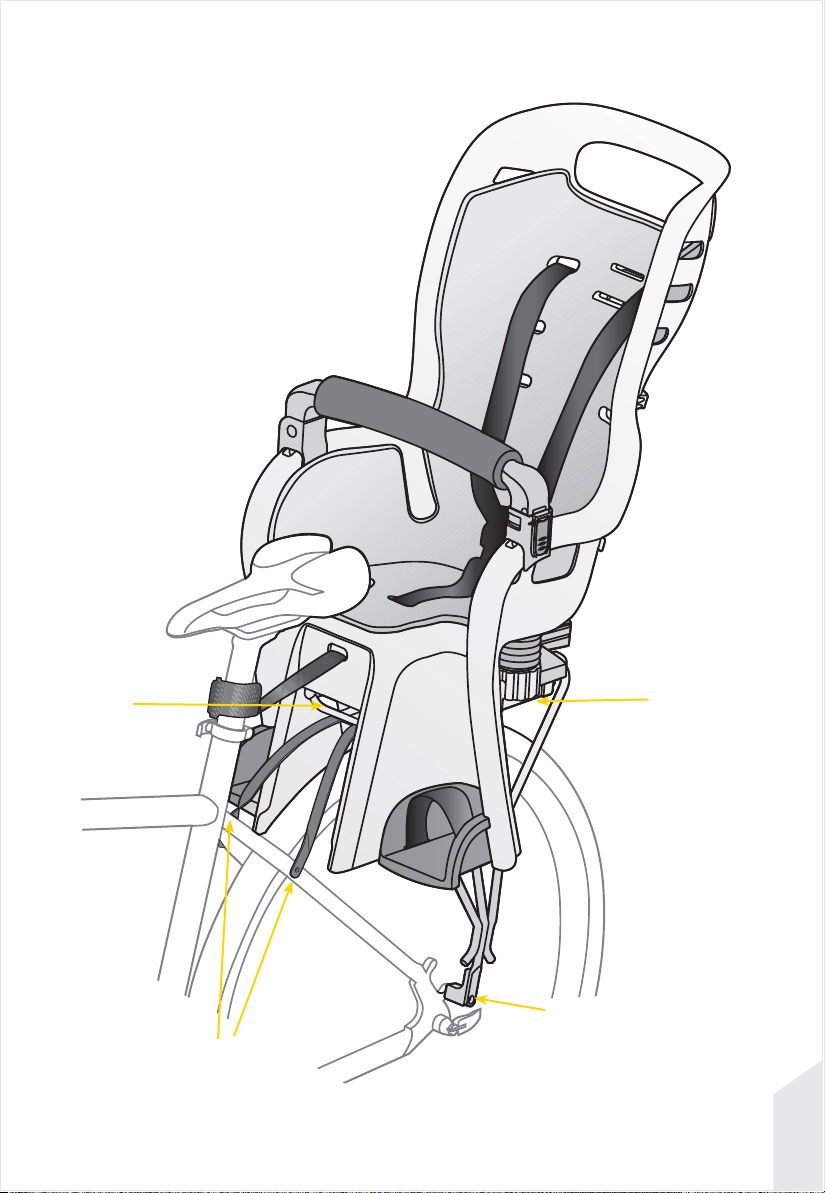
Securing BabySeat To Seat Post
"T" type loop and hook strap is a safety device designed
to connect BabySeat and seat post.
Please be sure to fasten it to seat post immediately after
mounting BabySeat on rack. The "T" strap should only
be disconnected from seat post if removing BabySeat
from rack.
Adjust length of "T" type strap.
Fasten "T" type strap
to seat post.
G
B
9
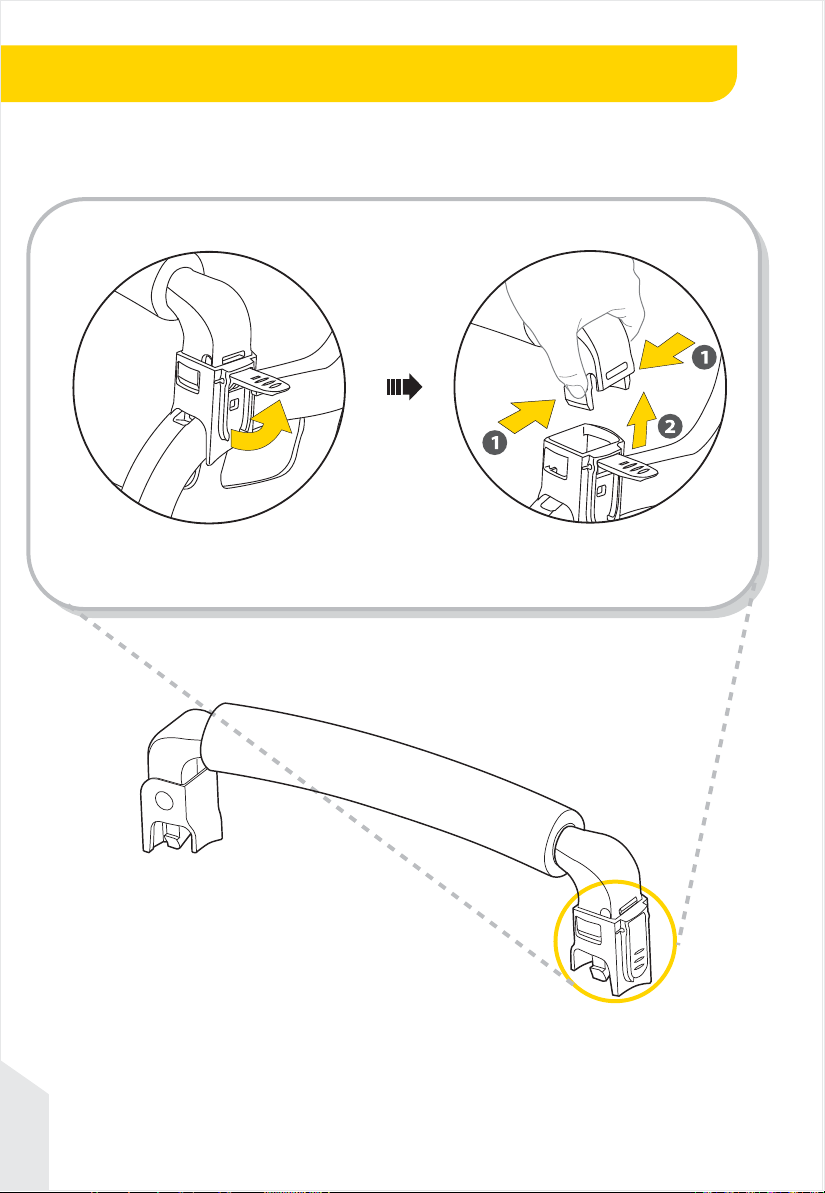
Opening Grab Bar
G
B
10
Lift up the lever
Press tabs and lift to open
grab bar as shown.
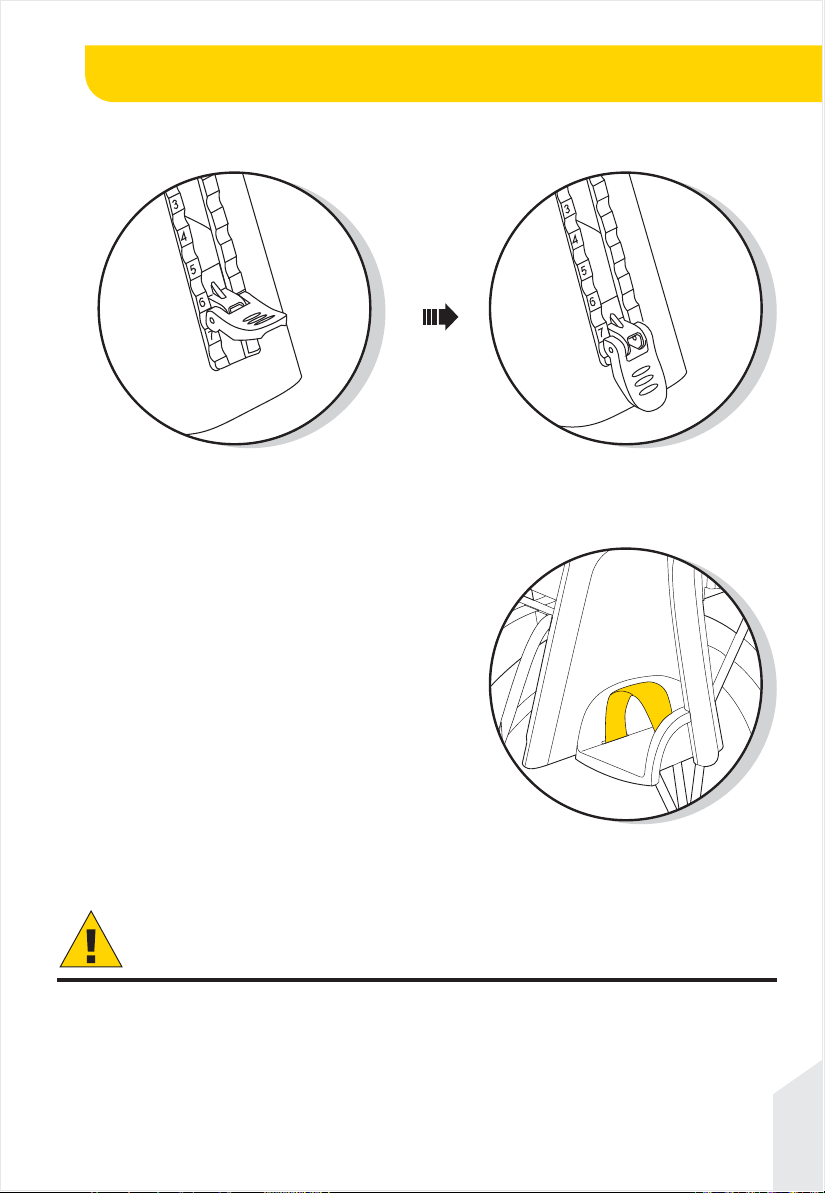
Adjusting Height of Footrests
Lift lever to adjust height
of footrests.
Push lever down to lock.
Adjust the foot strap
as necessary.
CAUTION
NEVER LEAVE CHILD IN BABYSEAT WITH ONLY THE KICKSTAND SUPPORTING THE BICYCLE.
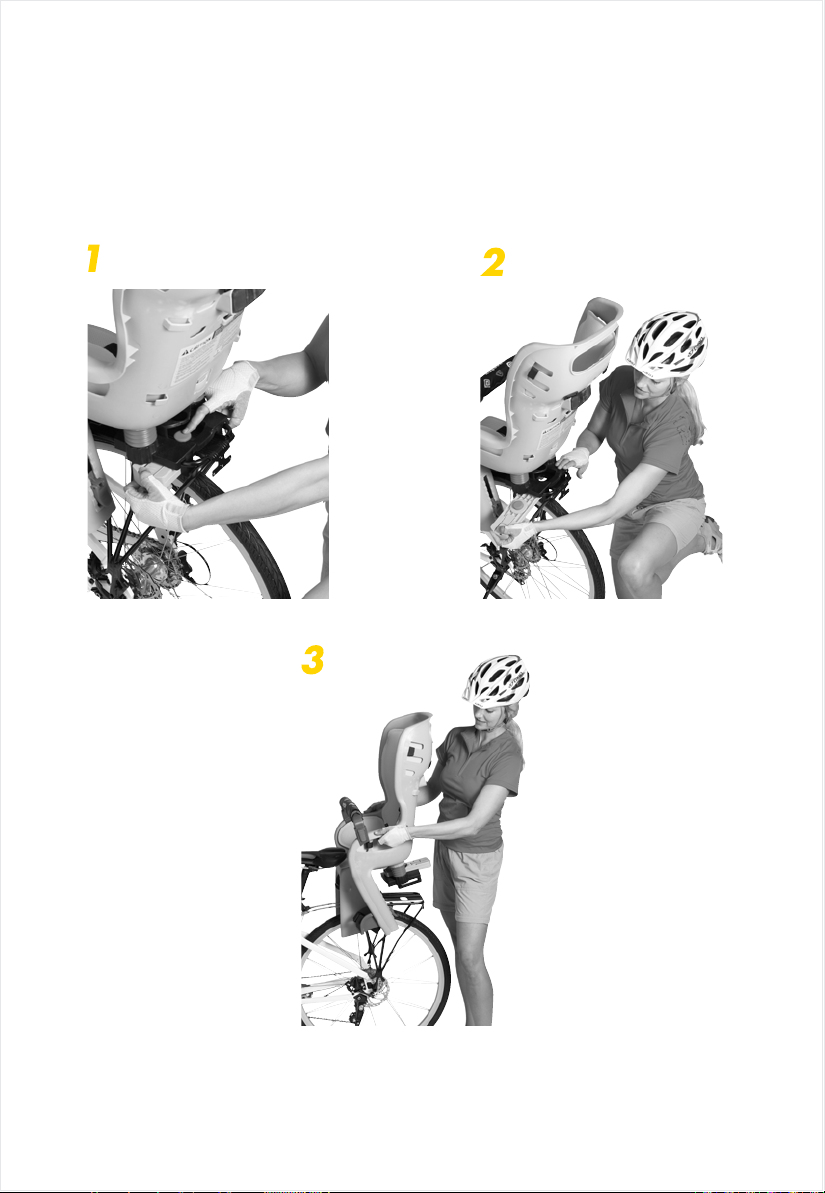
1. Have someone help support bicycle while placing child in BabySeat.
2. Place child in comfortable position in BabySeat II. Adjust and fasten safety harness over child.
3. Note position of child's feet and legs and tighten the foot straps after placing child in
comfortable position. Remove child from BabySeat and adjust footrests as necessary.
4. Don't use the BabySeat if any part is broken.
G
B
11
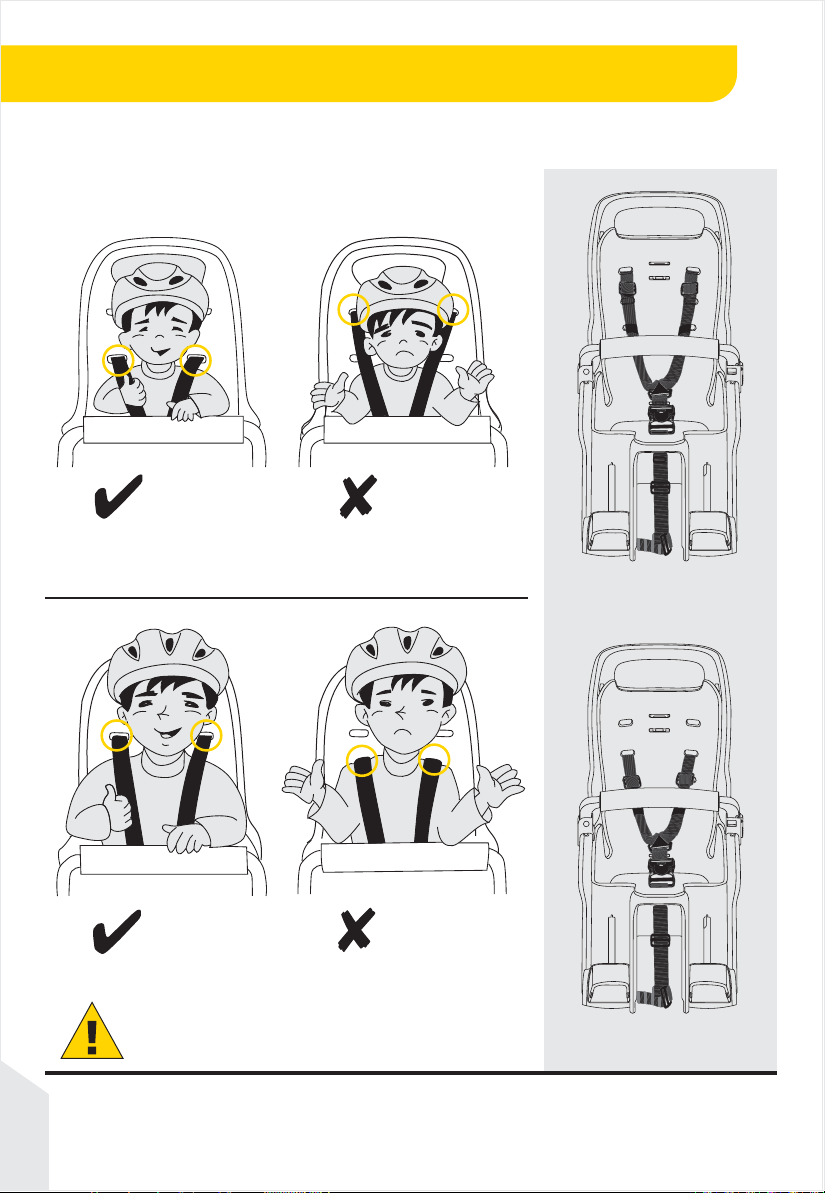
Fitting Your Child In BabySeat
BabySeat shoulder buckle straps adjust in a high or low position.
Make sure they are in the correct position for your child's size.
OK
OK
CAUTION
NO
Shoulder Strap Is Too High.
High Position
NO
Shoulder Strap Is Too Low.
Low Position
Make sure the buckle straps are assembled correctly on the back side of
G
BabySeat as shown above.
B
12
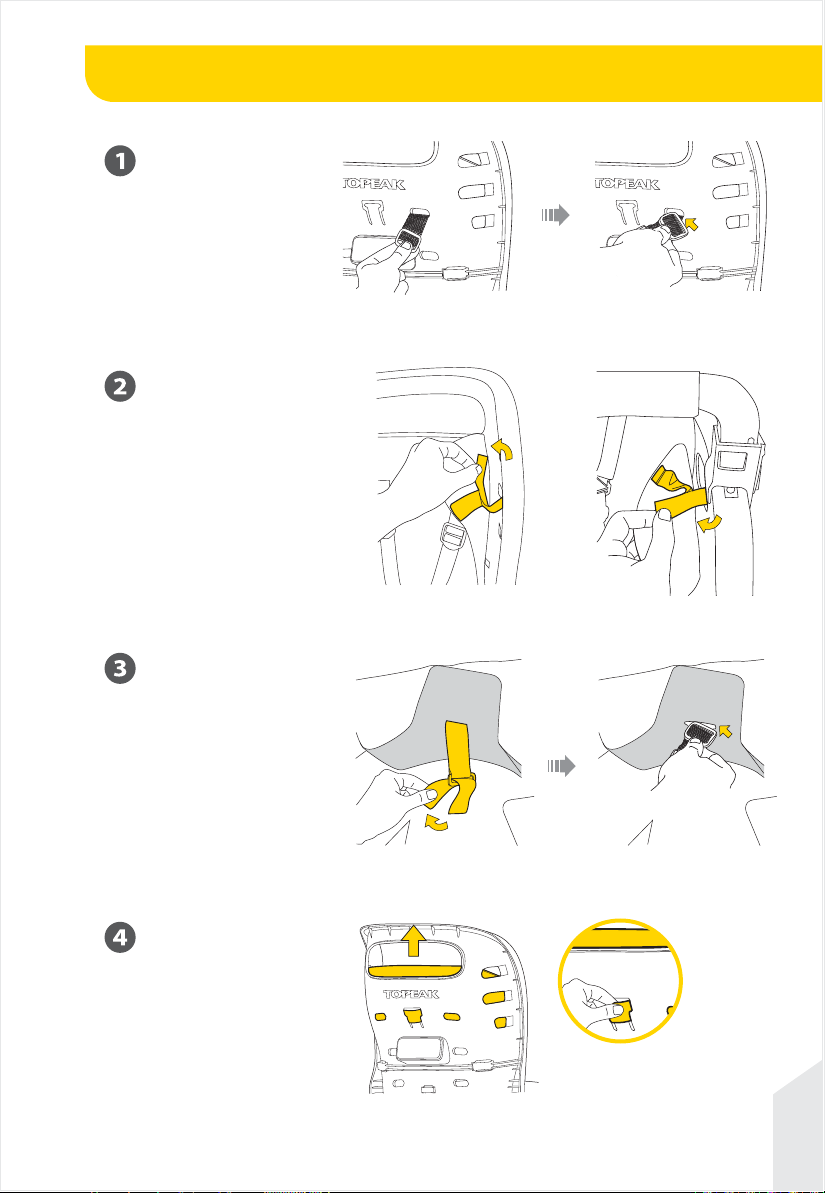
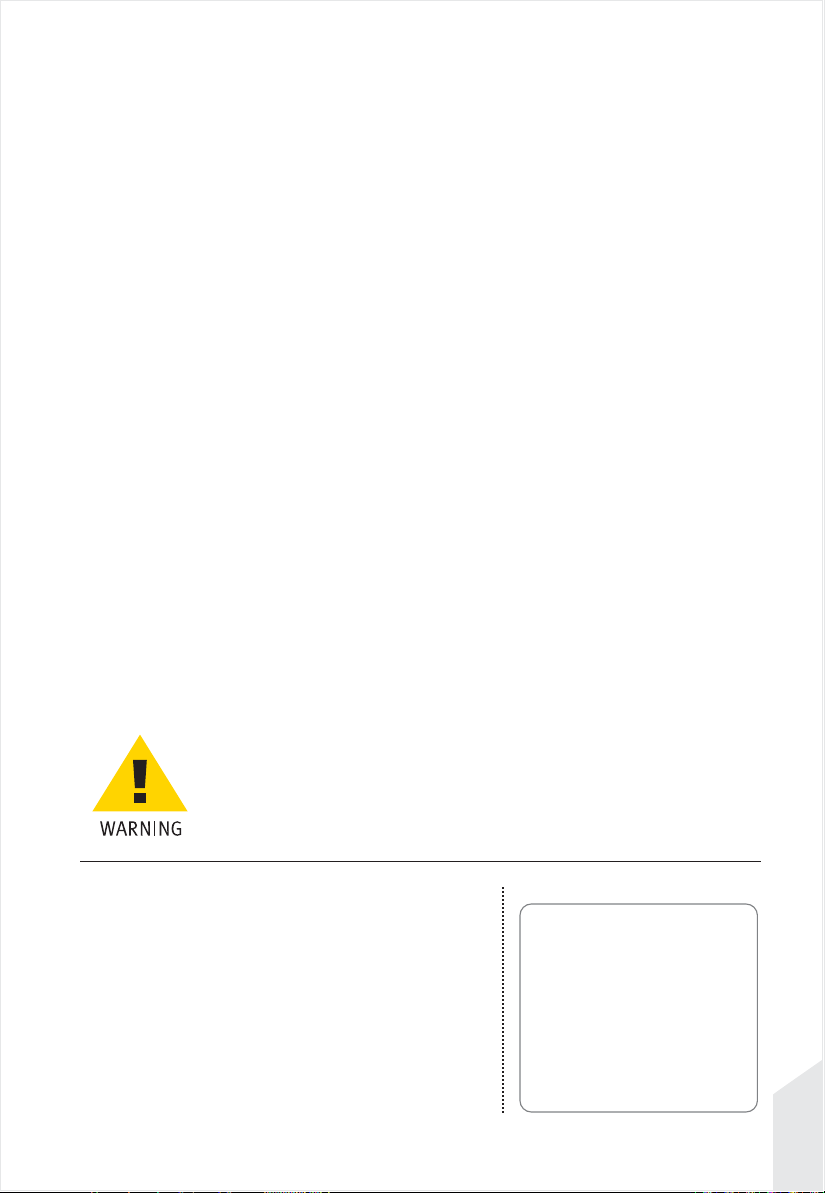
Release the buckle strap
from back side.
Remove the fastener on the
both sides of BabySeat.
Release Seat Pad
Release strap on the
bottom of seat pad and
release the buckle strap.
Release the buckle strap
from back side of seat
pad and remove the
seat pad from the back
hook behind BabySeat.
G
B
13

CAUTION
Carry only a child who is able to hold his/her head up while wearing a correctly sized bicycle helmet.
1.
The age and weight limits for the BabySeat rack are 1~4 years old , and 20lbs~48.5lbs (9kgs ~ 22kgs)
respectively. Never exceed these limits.
Bicycle operator's age must be at least 18 years old.
2.
The load of a baby carrier may lessen the stability and alter the riding characteristics of the bicycle,
3.
particularly regarding steering and braking.
Make sure bicycle is stable and under control when loading and unloading child.
4.
This baby seat system is not compatible with rear suspension bikes.
5.
The bicycle to which the BabySeat and rack is mounted must be in good working order, of a type
6.
appropriate for the additional load, and of proper size and adjustment for the operator. See bicycle
owner's manual for additional bicycle loading information. Make sure not to overload your bicycle
when using the BabySeat and rack, and make sure not to attach additional luggage or accessories to
the rack.
BabySeat rack is designed for use on 26" wheel and 700C wheel bicycles only.
7.
Bicycle operator and child should always wear helmets which have been approved by nationally
8.
recognized standards.
The bicycle operator should avoid busy streets, bad weather and ride with extra care and reduced
9.
speed.
Make sure BabySeat safety harness is fastened correctly and firmly over child.
10.
G
B
14
Never leave child alone unattended in BabySeat.
11.
Rear seats that are fixed to the luggage carrier shall have an additional fastening, not removable from
12.
the seat, which shall be attached to another part of the cycle and limits rearward movement of the
seat.
When walking bicycle with child in BabySeat, hold rack with one hand and hold handlebar with the
13.
other.
Tighten fasteners securely before each use and check them frequently.
14.
Before each ride, ensure the mounted BabySeat does not interfere with braking, pedaling, or steering
15.
of the bicycle.
Do not allow any of the child's body, clothing, shoe laces, or toys to come in contact with moving parts
16.
of the bicycle(e.g. wheels and brakes) and recheck as the child grows.
Do not carry a child that is too young to sit safely in the seat. Carry only children that are able to sit
17.
unaided for a longer period of time.
Make no modifications to the BabySeat and rack.
18.
Never ride the bicycle at night without adequate lighting.
19.
Always remove BabySeat from the rack when the bicycle is being transported on a motor vehicle.
20.
This is necessary because the force of the high wind on BabySeat may degrade or damage BabySeat
or the rack to the point that they will not perform reliably.
Presence of a child carrier on a bicycle may require alteration of the method used by the rider to mount
21.
or dismount the bicycle. Care must be taken whenever the rider gets on or off the bicycle.
Ensure that there are no sharp objects which the child can touch, e.g. frayed cables.
22.
When no child is being carried, fasten the retention system buckles so the straps do not hang loosely.
23.
Advice that child in babyseat need to be more warmly clothed than riders and child should be protected
24.
from rain.
Check any excessive temperature (e.g. due to direct exposure to sun) of the seat before placing the
25.
child in it.
Cover any exposed rear saddle springs to avoid any possible injury.
26.
Ensure that the restraint system is not loose or able to become trapped in any moving parts particularly
27.
the wheels, including when the cycle is ridden without a child in the seat.
Please connect your nearest Topeak authorized bicycle dealer if you found any broken or damage parts
28.
of the babyseat.
Ensure initially and to re-check from time that the child's weight and size do not exceed the maximum
29.
capacity fo the seat.
The cycle may behave differently with a child in the seat. Particularly with regard to balance, steering
30.
and braking.
The stated distance between the center of gravity mark and front of the rear wheel axis should be less
31.
than 100 mm.
• Failure to comply with these operating instructions can lead to
serious injury or death of the bicycle operator and/or child.
• Additional security devices shall always be fastened.
• For safety reasons this seat shall only be fitted to luggage carriers
conforming to ISO 11243.
WAR RANT Y
2-year Warranty: All mechanical components against manufacturer
defects only.
Warranty Claim Requirements
To obtain warranty service, you must have your original sales receipt.
Items returned without a sales receipt will assume that the warranty
begins on the date of manufacture. All warranties will be void if the
product is damaged due to user crash, abuse, system alteration,
modification, or used in any way not intended as described in this
operating manual.
* The specifications and design are subject to change without notice.
Please contact your Topeak dealer with any questions.
For USA customer service call: 1-800-250-3068
www.topeak.com
Copyright © Topeak, I nc. 2012
Stamp and signature of Topeak dealer
M-TCS2201-02-GB 05/12
G
B
15
BabySeat II
Remove BabySeat II From Rack
Press the yellow and red
buttons at the same time
Remove the slide lock then
push into storage position
Lift off BabySeat
Please contact your Topeak dealer with any questions.
For USA customer service call: 1-800-250-3068
www.topeak.com
Kindersitz II
Gefederter Kindersitz
Bedienungsanleitung
D
Der Aufbau und die Montage des Kindersitzes an Ihrem Fahrrad sollte
von einem professionellen Fahrradfachhändler vorgenommen werden.
Lesen Sie sich diese Anleitung vor der Montage genau durch.
Lastklasse: A22 (22 kg / 48,5 lbs)
FÜR DIE MONTAGE WERDEN FOLGENDE WERKZEUGE BENÖTIGT:
Topeak Kindersitz II Art.Nr. : TCS-2201 / TCS-2202 EN 14344
5mm Innensechskant-Schlüssel
Inhaltsverzeichnis
Lieferumfang
Montage des Gepäckträgers
Befestigung des Kindersitzes am Gepäckträger
Sichern des Kindersitzes an der Sattelstütze
Öffnen des Sicherungsbügels
Höheneinstellung der Fußstützen
So setzen Sie Ihr Kind richtig in den Kindersitz
Lösen des Sitzpolsters
Sicherheitshinweise
4
6
8
9
10
11
12
13
14
D
E
2
Befestigung am
KindersitzGepäckträger
Befestigung am Fahrradrahmen
Befestigung am
KindersitzGepäckträger
Befestigung am Fahrradrahmen
D
E
3

Lieferumfang
Die nächsten Seiten werden Ihnen helfen, die Bestandteile des
Topeak Kindersitzes zu bestimmen.
Bebilderte Teileliste:
1. Sitzschale
2. Gepäckträger
3. Sicherheitsbügel
4. Polster für Sicherheitsbügel
5. Sitzpolster
6. Fußstützen (2x)
7. Sicherheitsschlaufen für Fußstützen (2x)
8. Schnellverschluss für Fußstützen (2x)
9. Sicherungsverschluss
10. Reflektor
11. Stoßdämpfende Platte
12. Sprungfeder (2x)
13. Sicherheitsgurt
14. Rückseitige Öse
15. Unteres Loch
16. Rückseitiger Haken
Pflegehinweise:
Bitte verwenden Sie milde Seife und Wasser zum Reinigen des Kindersitzes.
Das Sitzpolster, der Sicherheitsgurt und das Polster für den Sicherheitsbügel
bitte nur mit der Hand waschen. Fetten Sie den Gepäckträger und die Metallteile
des Kindersitzes gelegentlich mit einem Teflon® basierten Schmiermittel.
D
* Teflon® ist ein eingetragenes Warenzeichen von DuPon.
E
4
 Loading...