

Page 1
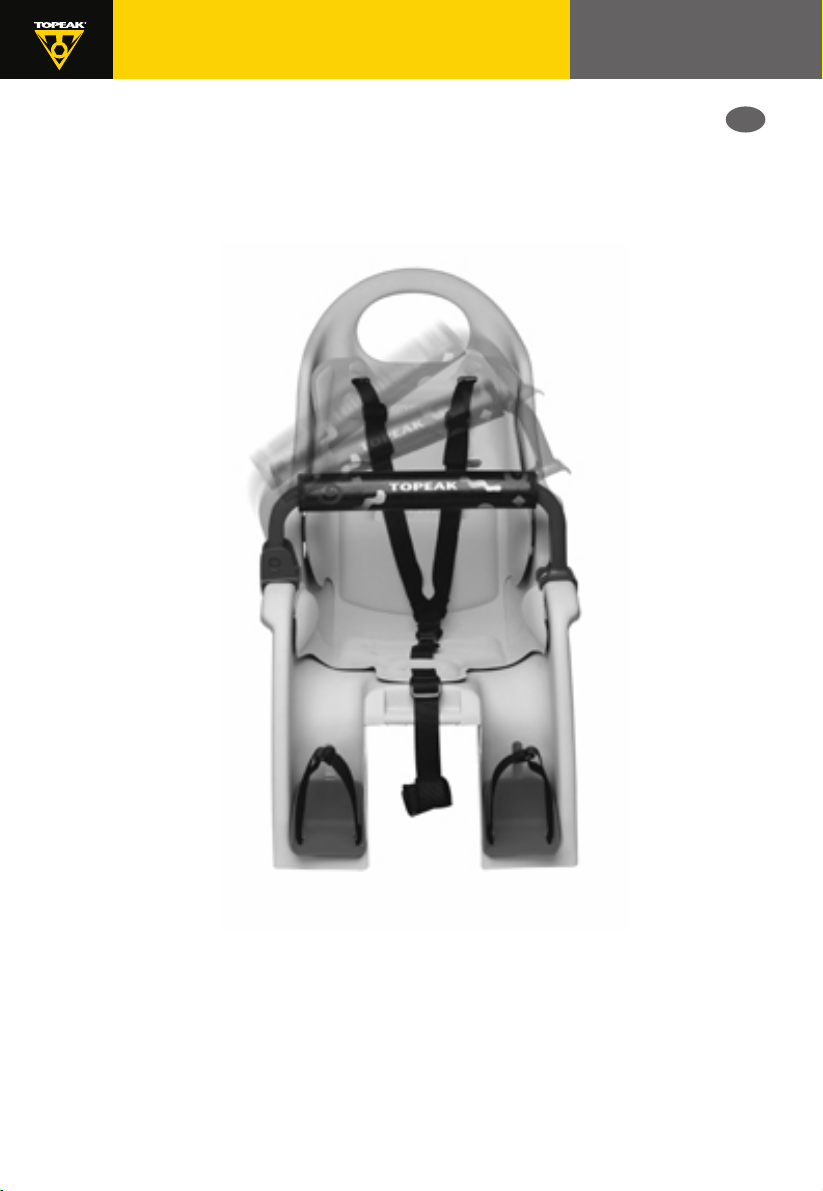
BabyS
ea
t
User's Guid
G
e
B
Suspension Child Carrie
r
It is recommended a professional bicycle shop assemble and
install the BabySeat to your bike.
It is imperative that you read this owner's manual
prior to installation.
5mm Allen Key, 8mm Box Wrench and Philips Screwdriver
TOOLS REQUIRED FOR ASSEMBLY:
Page 2
Table of Contents
Getting To Know Your Topeak BabySeat
Mounting Rack To Bicycle
Mounting BabySeat To Rack Surfac
Securing BabySeat To Seat Pos
Insta
lling Grab Bar
Adjusting Height Of Footrest
Fitting Your Child In BabySea
Caution Note
s
s
t
e
t
4
6
8
9
10
11
12
14
G
B
2
Page 3
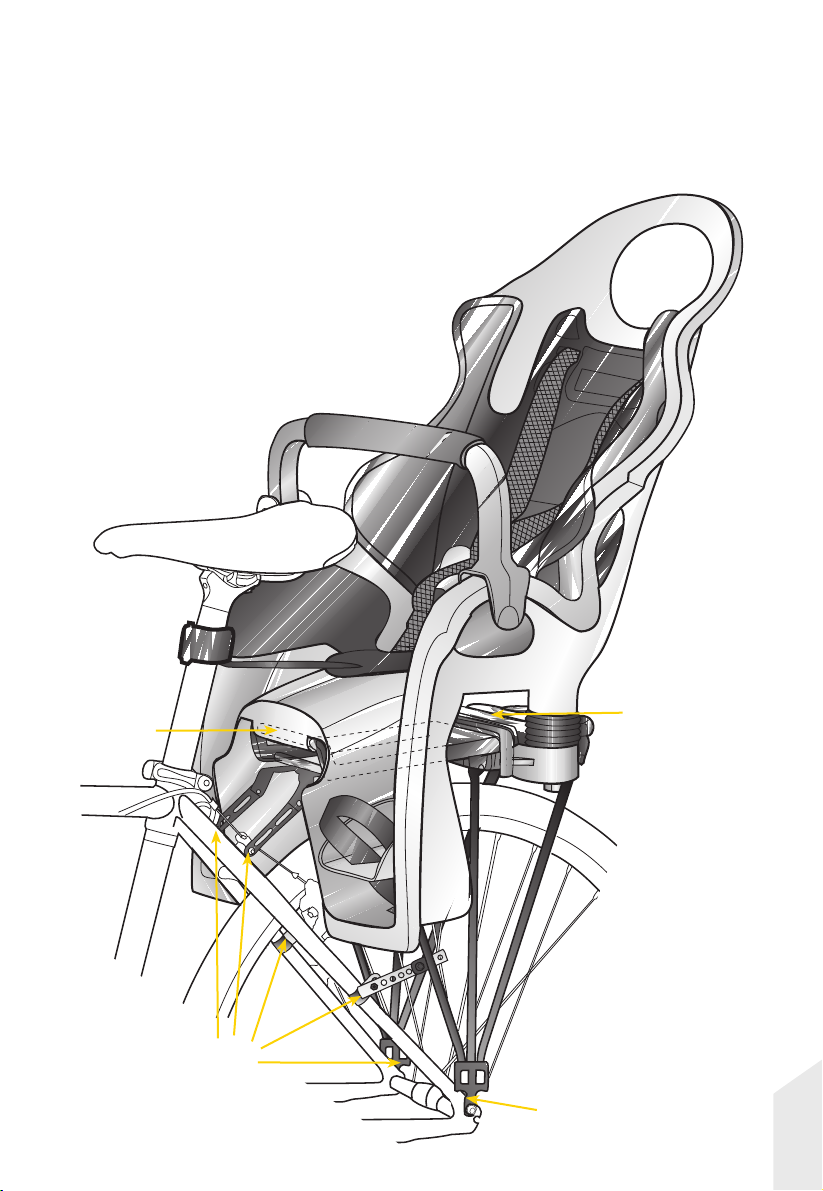
Mounts to
rack
Mounts to bicycle
Mounts to
rack
Mounts to bicycle
G
B
3
Page 4
Getting To Know Your Top
eak BabySea
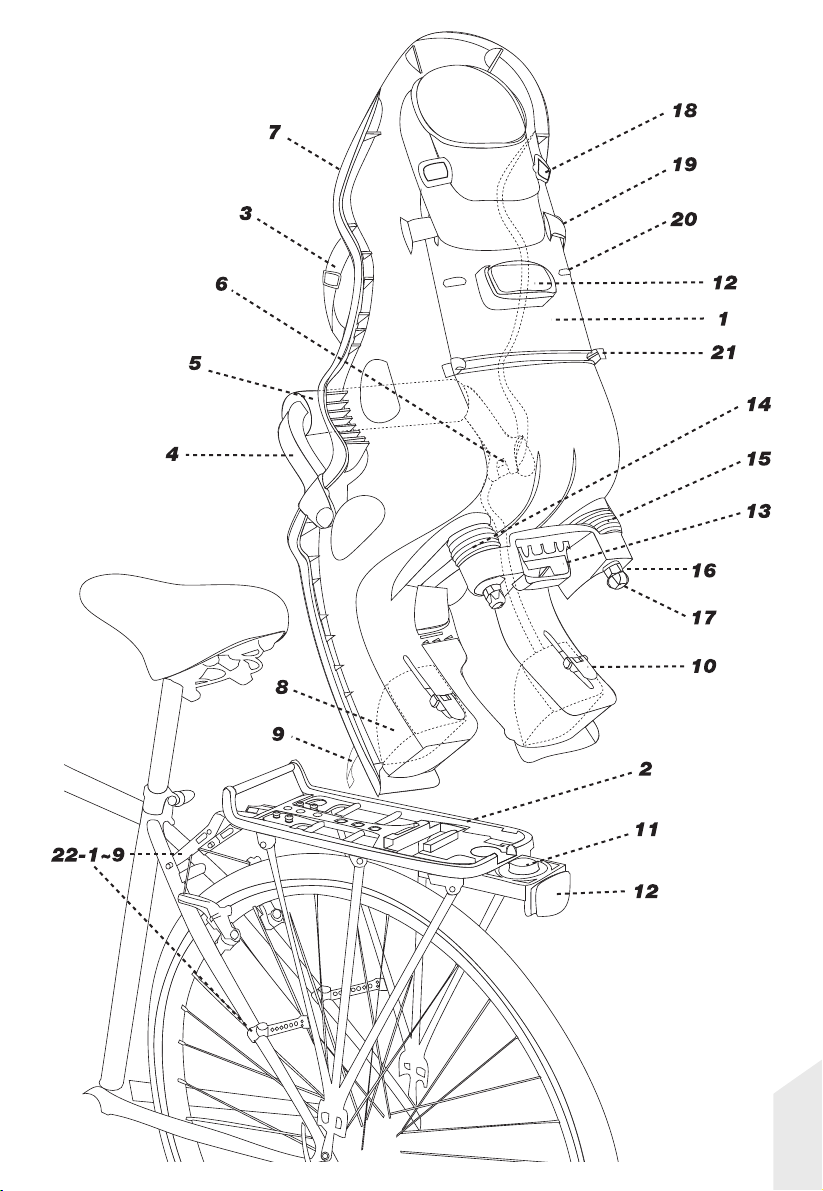
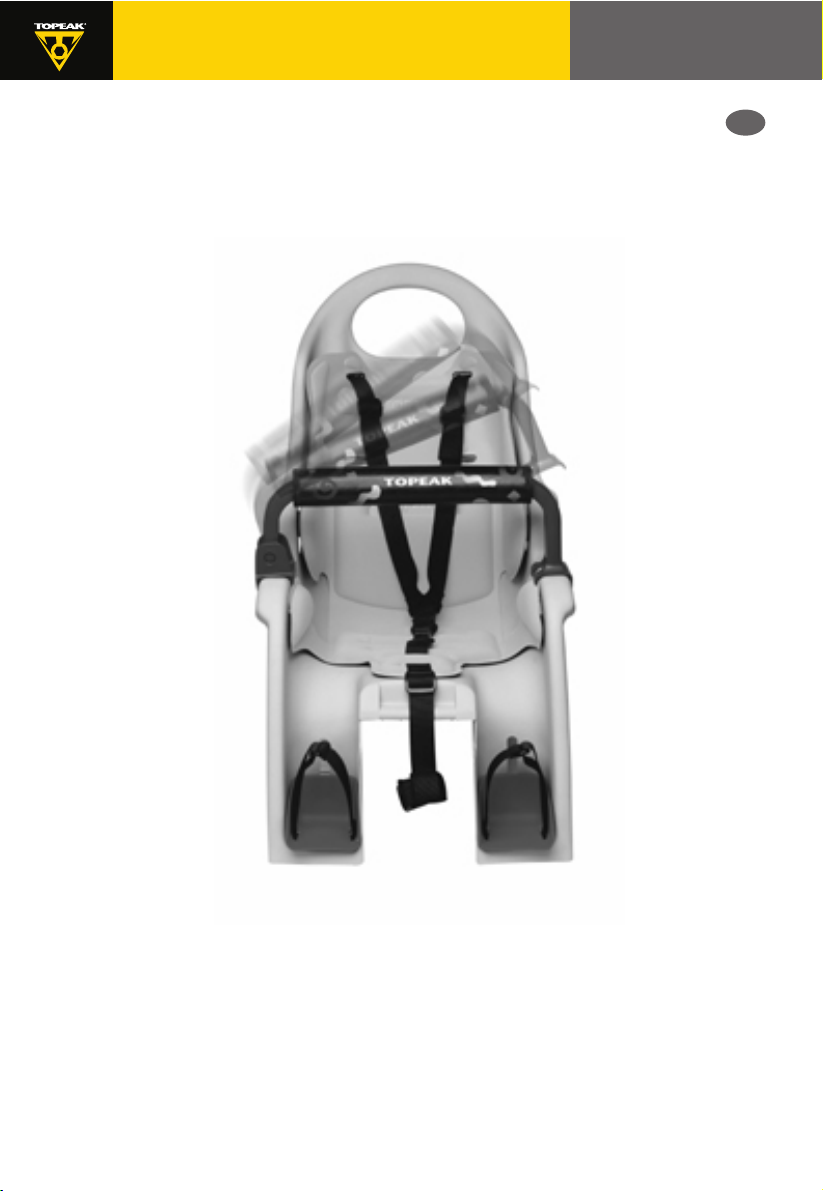
These pages will help you to identify the different parts
of your Topeak BabySeat.
t
ILLUSTRATED PARTS LIST
1. SEAT (1)
2. RACK (1)
3. HARNESS SYSTEM (1)
4. GRAB BAR (1)
5. GRAB BAR PAD (1)
6. GRAB BAR FIXER (1)
7. SEAT PAD (1)
8. FOOTRESTS (2)
9. FOOT STRAPS (2)
10. QUICK ADJUST LEVER
FOR FOOTRESTS (2)
11. SLIDE LOCK WITH BUTTON (1)
12. REFLECTOR (2)
13. SHOCK ABSORBING BASE (1)
14. STAINLESS STEEL SPRING (2)
15. SPRING BARREL (2)
16. SPRING ADJUSTING NUT (2)
:
17. LOCK NUT (2)
18. SECURING BUCKLE
19. BACK LOOP
20. LOWER HOLE
21. BACK HOOK
22. HARDWARE FOR RACK
22-1. L type bracket (2)
22-2. 22mm length bracket (2)
22-3. 70mm length bracket (2)
22-4. 150mm length bracket (2)
22-5. M5 x 13mm bolt (14)
M5 x 25mm bolt (2)
22-6. Nylon nut (12)
22-7. Seatstay bracket (2)
22-8. Clamp for seatstay bracket (2)
22-9. washer (12)
23. "T" TYPE STRAP
MAINTENANCE
Please use mild soap and water to clean BabySeat. Seat pad, safety harness
and grab bar pad should be hand washed only. Occasionally lubricate rack and
BabySeat hardware with Teflon based lubricant.
:
G
B
4
Page 5
G
B
5
Page 6
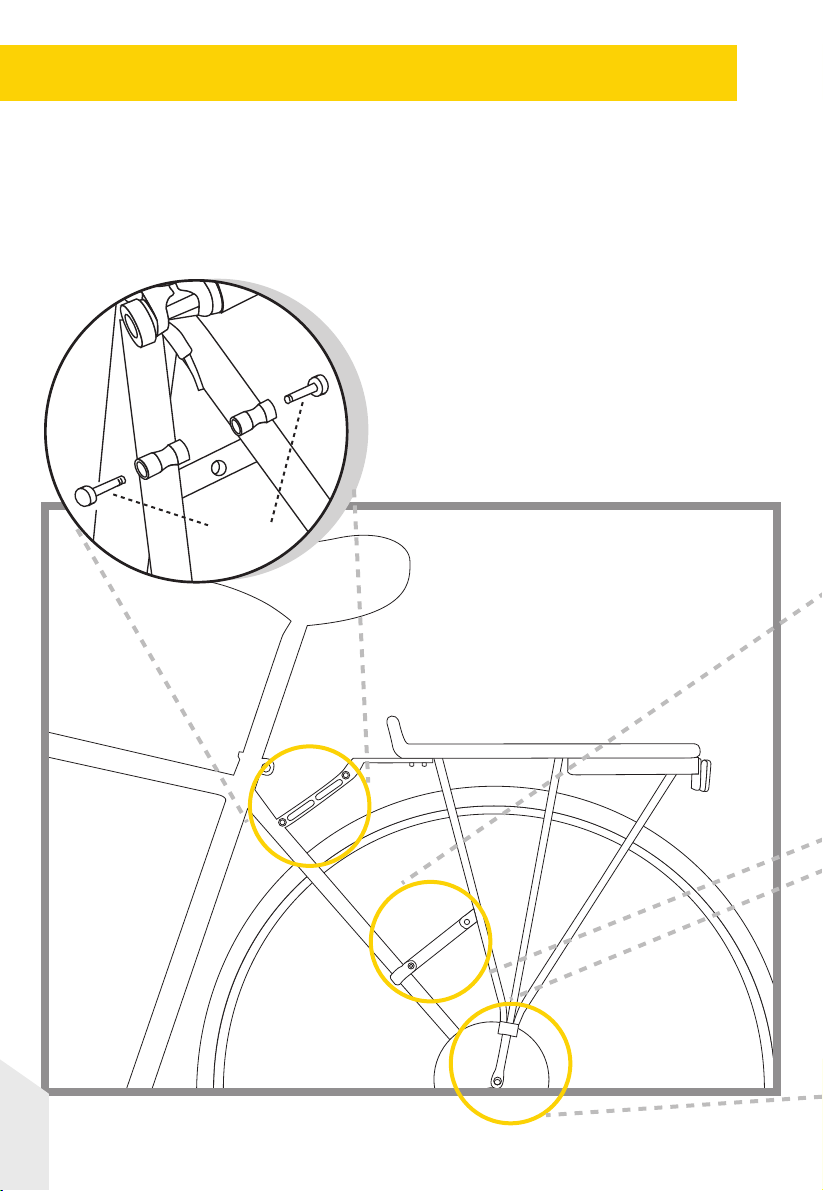
Mounting Rack To Bicycle
Follow these illustrations for mounting rack to bicycle. Make
sure rack is level with ground before tightening hardware.
Several adjustments are available to help level rack.
Slide rack hardware forward or
back to determine correct
positions before tightening
Philips screws on rack surface.
22-5
(M5 x 13mm)
G
B
6
Page 7
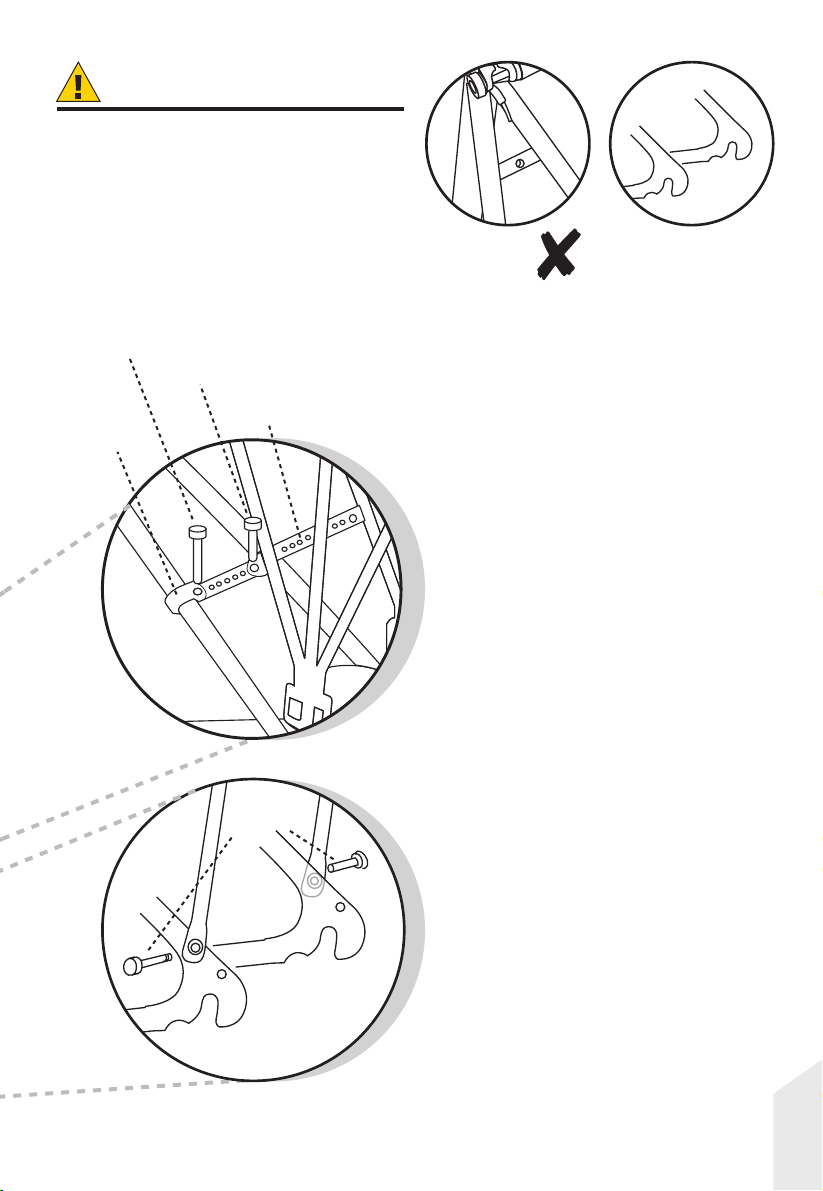
CAUTION
The Topeak BabySeat is designed
to work on frames with seatstay rack
mounts AND threaded dropout
eyelets only. Do not use the Topeak
BabySeat on frames without these
fittings for safety reasons.
22-5
(M5 x 13mm/
M5 x 25mm)
22-8
22-5
(M5 x 13mm)
22-7
N
O
Securing Center Bracket
To Rear Sta
Use adjustable bracket to
attach rack to bicycle.
Several adjustments are
available to ensure that
rack surface is level.
y
22-5
(M5 x 13mm)
Attach base of rack strut
to frame rear dropout.
Most frame dropouts
provide more than one
mounting point.
G
B
7
Page 8
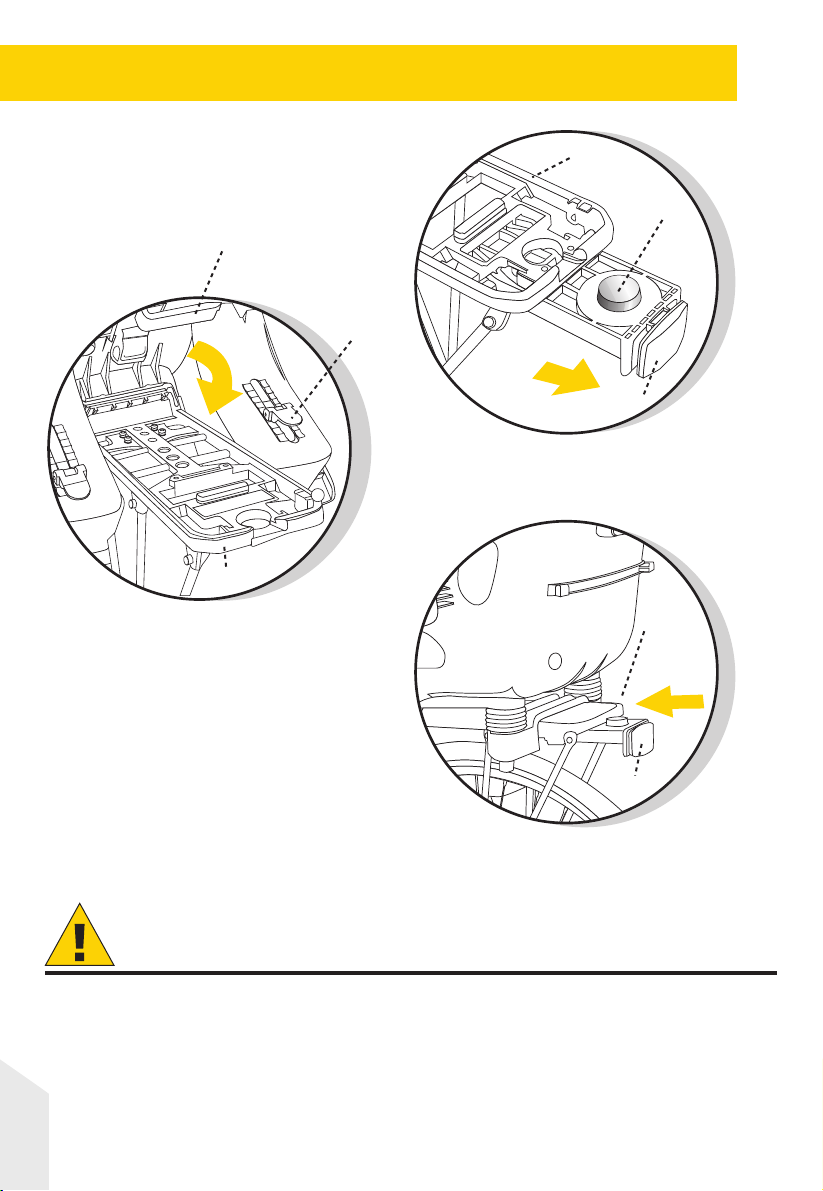
Mounting BabyS
13
2
eat To Rack Surfac
2
11
10
12
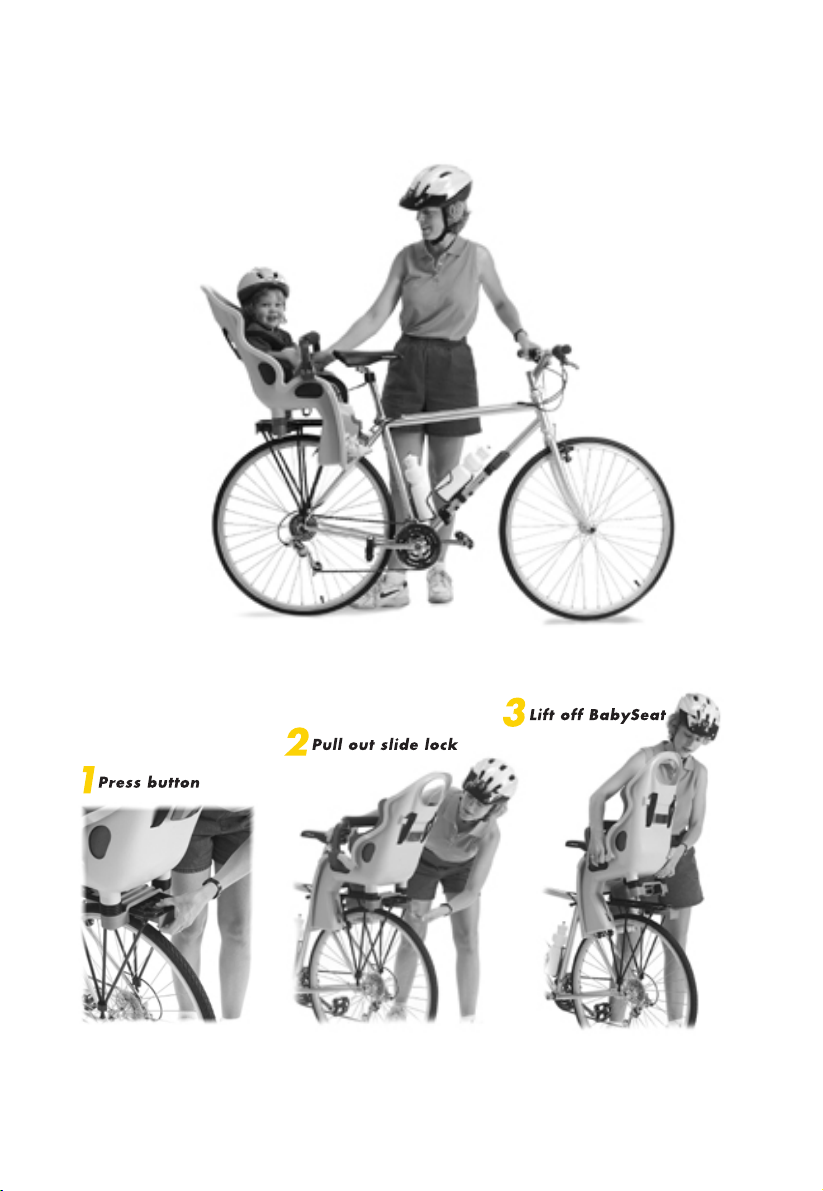
Disengage slide lock by pressing
red button and pulling back away
from rack.
1
e
Hook seat onto front rail of
rack. Rotate seat down on
rack surface until snapped
into positive engagement.
Push slide lock back into rack until
positive engagement is heard and
red button is protruding through
hole in rack surface.
11
12
CAUTION
• If sliding lock fails to slide into rack or if red button does not protrude
through the rack surface the installation is incorrect.
• If your saddle has exposed springs, please cover springs adequately to
prevent pinching child passenger.
G
• Never modify BabySeat or rack from their original specifications.
B
8
Page 9
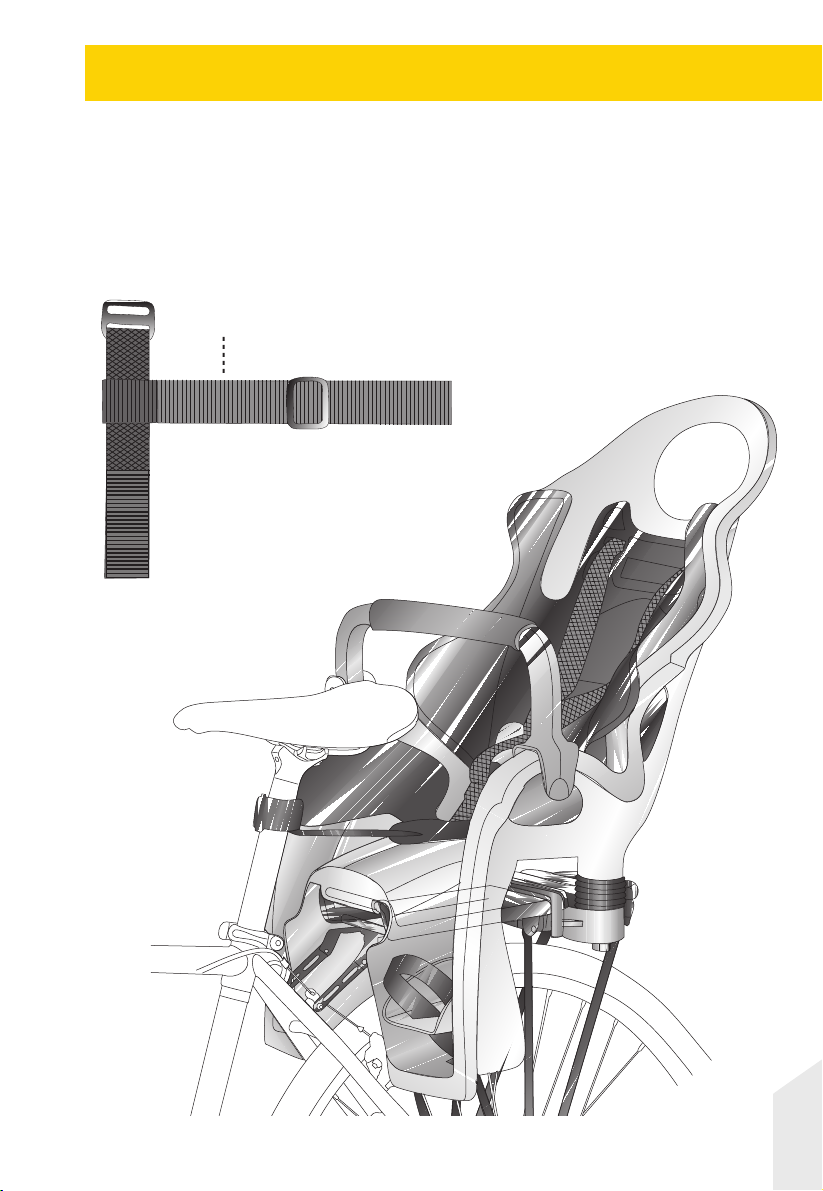
Securing BabySeat To S
"T" type loop and hook strap is a safety device
designed to connect BabySeat and seat post.
Please be sure to fasten it to seat post immediately
after mounting BabySeat on rack. The "T" strap
should only be disconnected from seat post if
removing BabySeat from rack.
23
Adjust length of "T" type strap.
eat Post
Fasten "T" type strap
to seat post.
G
B
9
Page 10
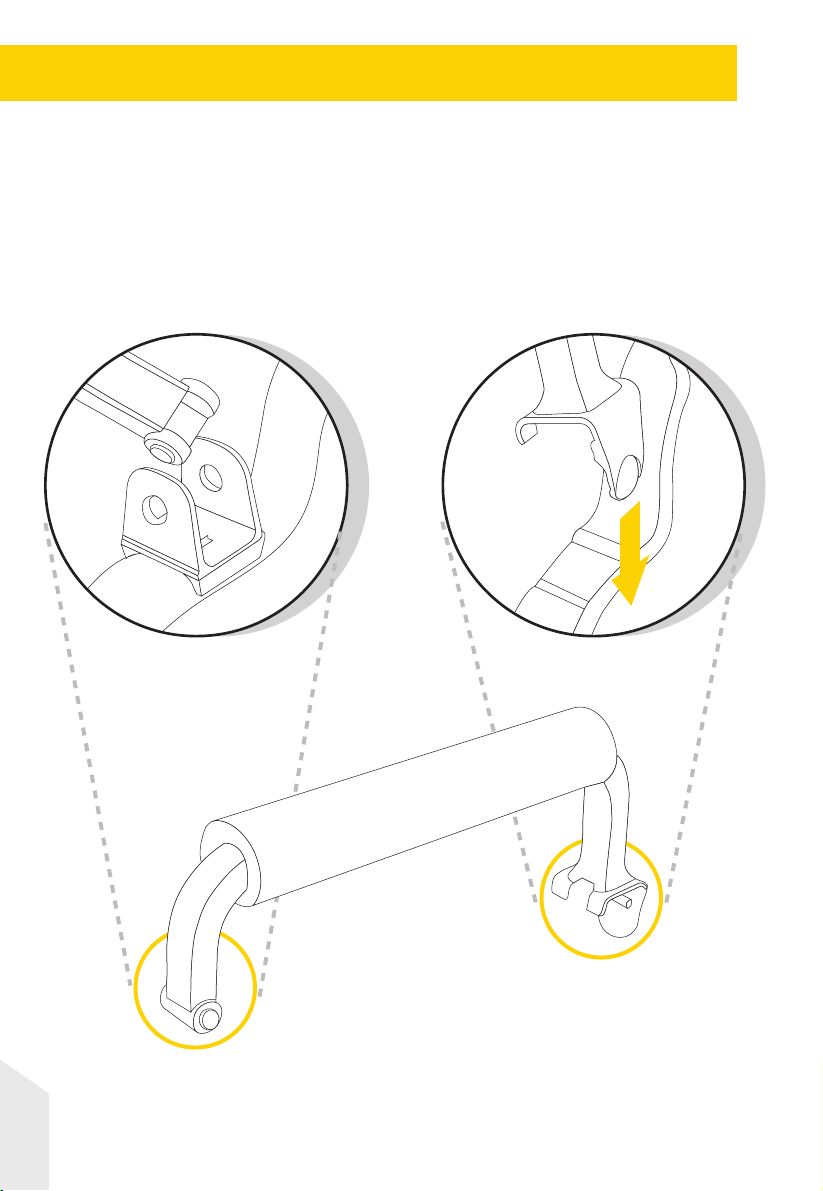
Insta
lling Grab Ba
r
Twist pivoting end of grab
bar into mounting bracket
as shown.
4
6
Pivot grab bar down and
snap open end over edge
of seat as shown.
4
1
5
G
B
1
0
Page 11
Adjusting Height of F
10
Lift lever to adjust
height of footrests.
10
ootrests
Push lever
down to lock.
CAUTION
NEVER LEAVE CHILD IN BABYSEAT WITH ONLY TH
KICKSTAND SUPPORTING THE BICYCLE
Have someone help support bicycle while placing child in BabySeat.
Place child in comfortable position in BabySeat. Adjust and fasten safety
harness over child.
Note position of child's feet and legs. Remove child from BabySeat and adjust
footrests as necessary.
.
E
G
B
11
Page 12
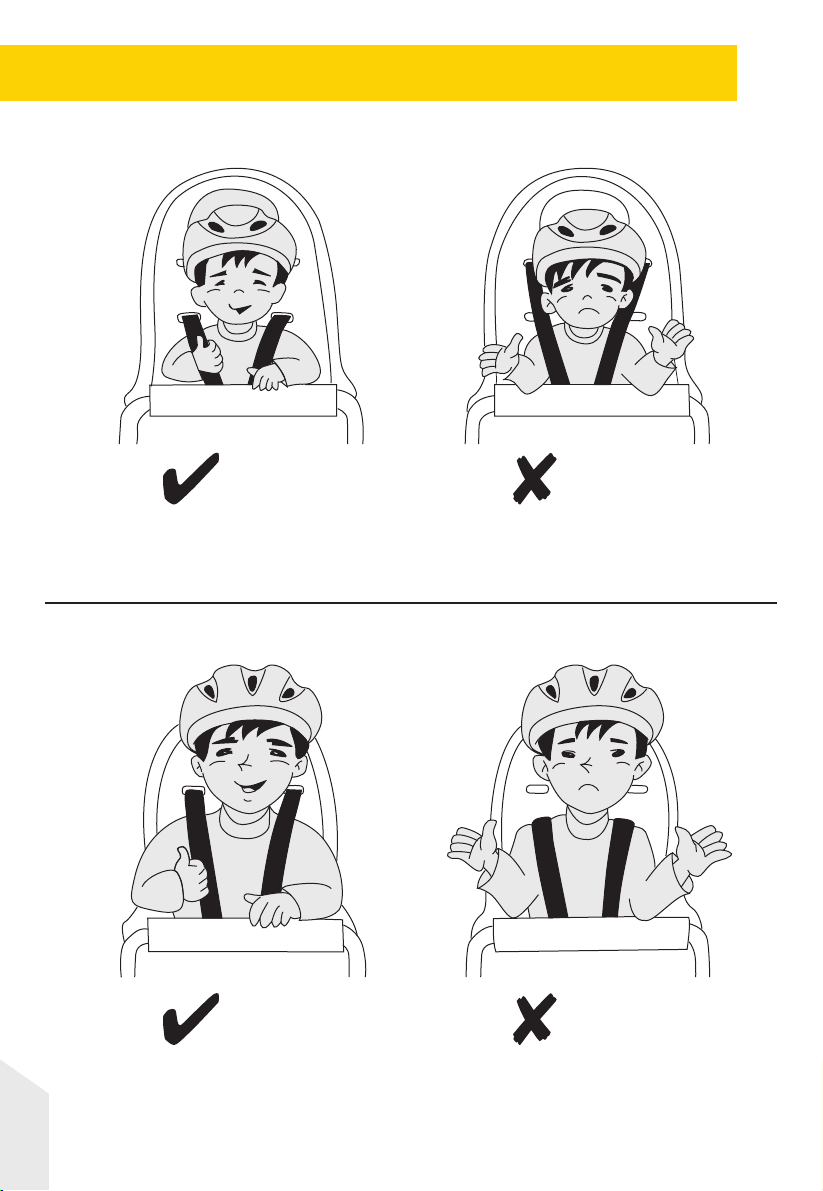
Fitting Your Child In BabySea
Adjust shoulder harness properly to fit your child.
O
K
Shoulder Straps Too High.
t
N
O
O
K
Shoulder Straps Too Low.
G
B
1
2
N
O
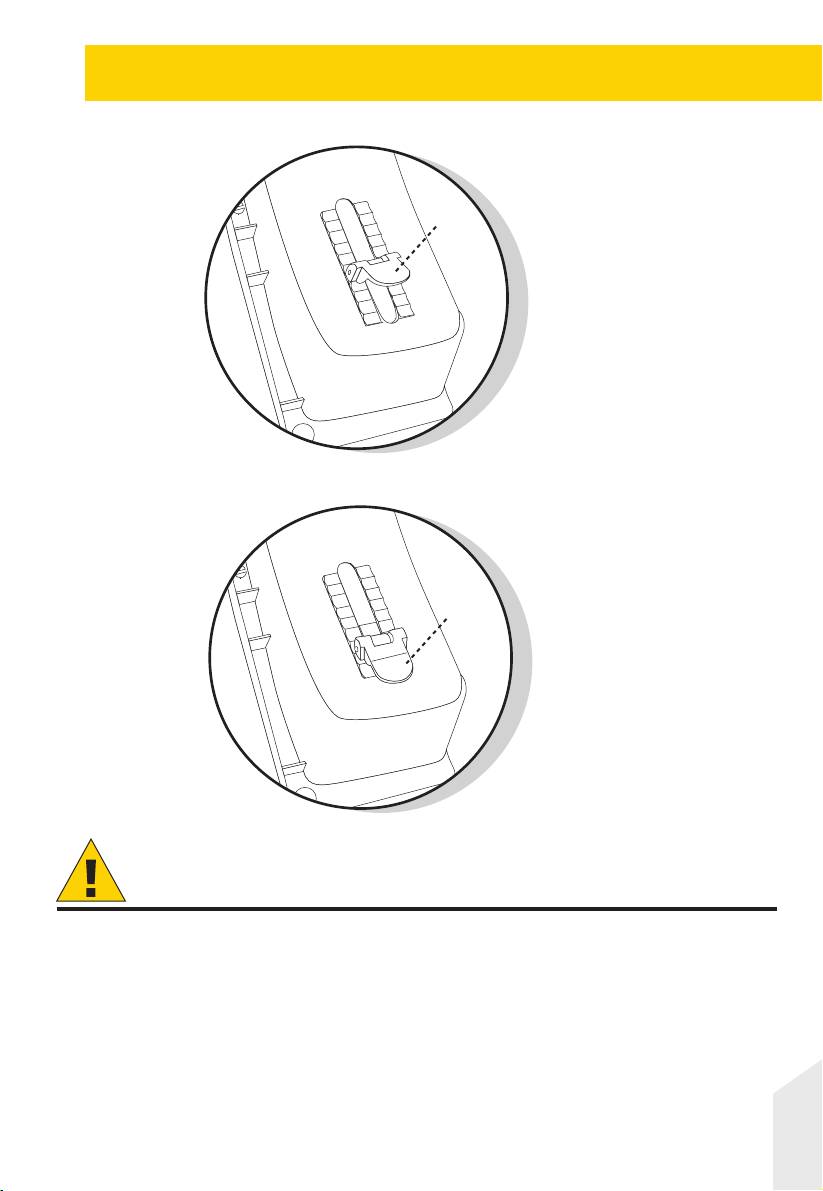
Page 13
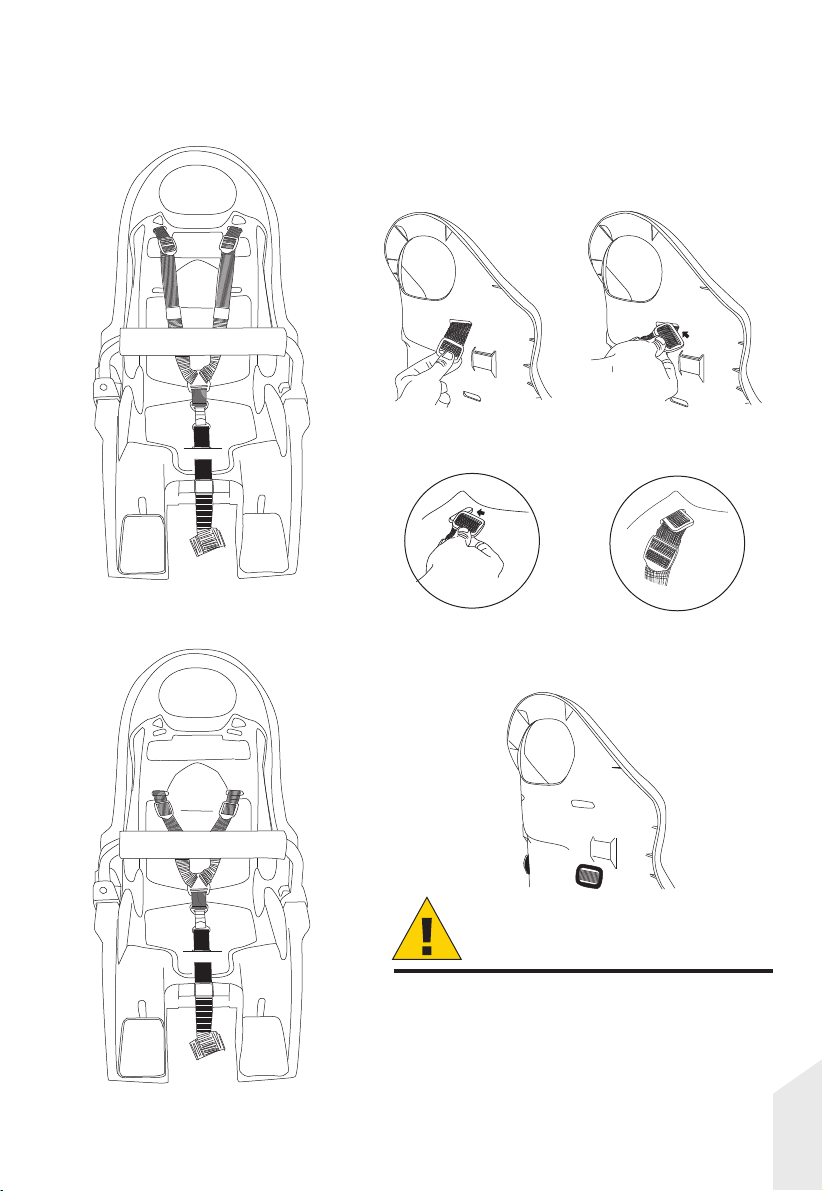
BabySeat shoulder buckle straps adjust in a high or low
position. Make sure they are in the correct position for
your child's size.
Release the buckle strap from back side.
High Position
Assemble the buckle strap from front side.
Low Position
CAUTION
Make sure the buckle straps are
assembled correctly on the back
side of BabySeat as shown above.
1
G
B
3
Page 14

C
A
U
TIO
1. Carry only a child who is able to hold his/her head up while
wearing a correctly sized bicycle helmet. The age and weight
limits for the BabySeat rack are
40lbs (9kgs ~ 18kgs) respectively. Never exceed these limits.
2. Bicycle operator's age must be at least
3. The load of a baby carrier may lessen the stability and alter
the riding characteristics of the bicycle, particularly regarding
steering and braking.
4. Make sure bicycle is stable and under control when loading
and unloading child.
5. This baby seat system is not compatible with rear suspension
bikes or bikes equipped with disc brakes.
6. The bicycle to which the BabySeat and rack is mounted
must be in good working order, of a type appropriate for the
additional load, and of proper size and adjustment for the
operator. See bicycle owner's manual for additional bicycle
loading information. Make sure not to overload your bicycle
when using the BabySeat and rack, and make sure not to
attach additional luggage or accessories to the rack.
7. BabySeat rack is designed for use on 26" wheel and 700C
wheel bicycles only. It's compatible with Topeak BabySeat
only.
8. Bicycle operator and child should always wear helmets which
have been approved by nationally recognized standards.
9. The bicycle operator should avoid busy streets, bad weather
and ride with extra care and reduced speed.
10. Make sure BabySeat safety harness is fastened correctly and
firmly over child.
11. Never leave child alone unattended in BabySeat.
1~4
N
years old , and
18
years old.
20
lbs ~
12. Never leave child in BabySeat with only the kickstand
supporting the bicycle.
13. When walking bicycle with child in BabySeat, hold rack with
one hand and hold handlebar with the other.
G
B
1
4
Page 15
4. Tighten fasteners securely before each use and check
them frequently.
15. Before each ride, ensure the mounted BabySeat does not
interfere with braking, pedaling, or steering of the bicycle.
16. Do not allow any of the child's body, clothing, shoe laces,
or toys to come in contact with moving parts of the bicycle.
17. Make no modifications to the BabySeat and rack.
18. Never ride the bicycle at night without adequate lighting.
19. Always remove BabySeat from the rack when the bicycle is
being transported on a motor vehicle. This is necessary
because the force of the high wind on BabySeat may
degrade or damage BabySeat or the rack to the point that
they will not perform reliably.
20. Presence of a child carrier on a bicycle may require
alteration of the method used by the rider to mount or
dismount the bicycle. Care must be taken whenever the
rider gets on or off the bicycle.
21. Don't use the BabySeat if any part is broken.
22. Ensure that there are no sharp objects which the child can
touch, e.g. frayed cables.
23. When no child is being carried, fasten the retention system
buckles so the straps do not hang loosely.
24.
Failure to comply with these operating
instructions can lead to serious injury or
WARNING
LIMITED WARRANTY
2-y
ea
r
W
arra
W
arra
nty
C
T
o ob
tai
n
w
arra
w
it
hou
t
a
s
ale
A
ll
w
arra
n
ti
sys
t
e
m
altera
thi
s
op
era
ti
n
g
T
h
e
s
p
ec
*
ificati
death of the bicycle operator and/or child.
nty
:
A
ll
m
echa
n
ical
c
lai
m
R
e
qu
i
r
eme
n
t
s
nty
s
e
r
v
i
ce
, you
m
s
r
ece
ipt
w
ill
a
ss
u
m
e
e
s
w
ill
b
e
void
i
f
t
h
e
ti
on,
m
od
ificati
on, o
r
m
anua
l
.
on
s
a
nd d
e
s
i
g
n
are
s
ub
Topeak pr
Please contact
oducts are available only from professional bicycle shops.
your nearest Topeak authorized bicycle dealer for any questions
For customers in the USA, ca
Copyright © Topeak, Inc. Printed in Taiwan / 2005
omponen
u
t
s
aga
i
n
s
t
m
a
nu
f
ac
t
u
rer
s
t
hav
e
you
r
o
r
igi
n
a
l
s
ale
s
r
ece
t
h
a
t t
h
e
w
arra
nty b
e
g
i
n
s
on
B
a
by
Seat i
s
d
amage
d du
e
t
o u
u
s
e
d
i
n
a
ny
w
a
y no
t int
ende
d
ject t
o
cha
n
g
e
w
it
hou
t
no
ti
ce
.
ll: 1-800-250-3068 Website: www.topeak.com
t
h
s
a
d
efec
t
s
only.
ipt
.
I
t
e
m
s
r
e
t
urned
e
d
ate
o
f
m
a
nu
f
ac
e
r
cra
s
h,
a
bu
s
e
,
s
d
esc
r
i
bed
i
n
M-TCS01-GB 7/
t
u
r
e
.
.
1
G
B
5
05
Page 16
Bab
y
S
ea
t
Topeak products are available only from professional bicycle shops.
Please contact your nearest Topeak authorized bicycle dealer for any questions.
Website : www.topeak.com
Page 17
BabyS
ea
t
Bedienungsanleitun
D
g
Gefederter Ki
ndersitz
Es wird unbedingt empfohlen, dass Sie sich diese Anleitung
vor der Montage genaustens durchlesen.
FÜR DIE MONTAGE BENÖTIGEN SIE FOLGENDE WERKZEUGE:
5mm Innensechskant-Schlüssel, 8mm Ringschlüssel und
Kreuzschlitzschraubenzieher
Page 18

I
nhaltsverzeichnis
Der BabySeat in der Übersicht
Montage des Gepäckträger
Befestigung des Kindersitzes am Gepäckträger
Sichern des Kindersitzes a
Montage des Sicherheitsbügels
Höheneinstellung der Fußstütze
So setzen Sie Ihr Ki
Sicherheitshinweise
nd richtig in den Kindersit
s
n der Sattelstütze
n
z
4
6
8
9
10
11
12
14
D
2
Page 19

Befestigung am
KindersitzGepäckträger
Befestigung am
Fahrradrahmen
Befestigung am
KindersitzGepäckträger
Befestigung am
Fahrradrahmen
D
3
Page 20
Lieferu
mfang
Die folgenden Seiten werden Ihnen helfen die einzelnen
Teile Ihres TOPEAK Kindersitzes zu bestimmen.
BEBILDERTE TEILELISTE
1. KINDERSITZ (1)
2. GEPÄCKTRÄGER (1)
3. SICHERHEITSGURT-SYSTEM (1)
4. SICHERHEITSBÜGEL (1)
5. POLSTER FÜR SICHERHEITSBÜGEL (1)
6. BEFESTIGUNG FÜR SICHERHEITSBÜGEL (1)
7. SITZPOLSTER (1)
8. FUßSTÜTZEN (2)
9. SICHERHEITS-SCHLAUFEN
FÜR FUßSTÜTZEN (2)
10. VERSTELLHEBEL FÜR FUßSTÜTZEN (2)
11. SCHIEBE-VERSCHLUSS MIT ROTEM
SICHERHEITSKNOPF (1)
12. REFLEKTOR (2)
13. AUFNAHME FÜR FEDERUNGS-SYSTEM (1)
14. ROSTFREIE EDELSTAHL-FEDERN (2)
15. SCHUTZÜBERZUG FÜR FEDERN (2)
16. EINSTELLSCHRAUBE FÜR FEDERHÄRTEN-
REGULIERUNG (2)
:
17. FESTSTELLSCHRAUBE FÜR FEDERHÄRTEN-
REGULIERUNG (2)
18. SICHERUNGSSCHNALLE
19. RÜCKSEITIGE ÖSE
20. UNTERES LOCH
21. RÜCKENHAKEN
22. BEFESTIGUNGSSET FÜR GEPÄCKTRÄGER
22-1. L-FÖRMIGES VERBINDUNGSELEMENT (2)
22-2. VERBINDUNGSELEMENT 22mm LÄNGE (2)
22-3. VERBINDUNGSELEMENT 70mm LÄNGE (2)
22-4. VERBINDUNGSELEMENT 150mm LÄNGE (2)
22-5. M5 X 13mm SCHRAUBE (14)
M5 X 25mm SCHRAUBE (2)
22-6. MUTTERN (12)
22-7. GELOCHTES VERBINDUNGSELEMENT ZUR
BEFESTIGUNG DES TRÄGERS AN DEN
SITZSTREBEN DES RAHMENS (2)
22-8. SCHELLE FÜR GELOCHTES
VERBINDUNGSELEMENT (2)
22-9. UNTERLEGSCHEIBEN (12)
23. SICHERHEITSLEINE
PFLEGEHINWEISE:
Reinigen Sie die Kindersitz-Schale nur mit Wasser.
Sitzpolster, Sicherheitsgurt und Haltegriff nur mit der Hand waschen, nicht in
der Waschmaschine.
Zur Vorbeugung von Korrosion von Zeit zu Zeit die Verbindungselemente des
Gepäckträgers ölen.
D
4
Page 21

D
5
Page 22

Montage des Gepäckträgers
Folgen Sie der Illustration, um den Gepäckträger zu montieren.
Achten Sie bei der Montage darauf, dass der Gepäckträger
parallel zum Boden (ohne Neigung) steht. Sie genaue Ausrichtung
kann mittels verschiedenen Verbindungspunkten vorgenommen
werden.
Verschieben Sie die
Verbindungsteile vor dem
Festziehen der
Kreuzschlitzschrauben, um die
korrekte Position zu bestimmen.
22-5
(M5 x 13mm)
D
6
Page 23

ACHTUNG!
Der Kindersitz kann nur auf Rahmen
mit Ausfallenden mit doppelten
Gewindeaugen zur unabhängigen
Befestigung von Gepäckträgern und
Schutzblechen verwendet werden.
Benutzen Sie den Topeak Kindersitz aus
Sicherheitsgründen niemals auf Rahmen,
die dieses Kriterium nicht erfüllen.
22-5
(M5 x 13mm/
M5 x 25mm)
22-8
22-5
(M5 x 13mm)
22-7
N
O
22-5
(M5 x 13mm)
Befestige
am Fahrrad-Hinterbau
Benutzen Sie die Verbindungselemente,
um den Gepäckträger am Rad zu
befestigen. Diverse Einstellungen sind
vorhanden, um den Träger parallel zum
Boden auszurichten.
Befestigen Sie die Enden des
Gepäckträgers im Bereich der
Achse (hintere Ausfallenden des
Rahmens). Die meisten Rahmen
verfügen über mehrere
Gewindeösen oder –bohrungen.
n des Gepäckträgers
D
7
Page 24

Befestigung des Ki
13
2
ndersitzes am Gepäckträger
2
11
10
12
Ziehen Sie den Schiebeverschluss
nach hinten bis zur Sperre.
1
Haken Sie den Kindersitz
am vorderen Teil des
Gepäckträgers ein und
kippen Sie den Sitz nach
hinten bis er auf dem
Gepäckträger aufliegt.
Schließen Sie den Schiebeverschluss, indem Sie den
roten Knopf nach unten drücken und den Verschluss
nach innen in Richtung des Gepäckträgers schieben.
Wenn Sie ein Einrastgeräusch hören, ist der Verschluss
verriegelt. Der rote Sicherheitsknopf ist damit vollständig
in die runde Öffnung des Gepäckträgers eingerastet.
11
12
ACHTUNG!
• Wenn der Schiebeverschluss weder vollständig nach innen gedrückt werden kann noch der
rote Sicherheitsknopf vollständig in die runde Öffnung des Gepäckträgers passt und sich nach
oben bewegt hat, ist die Montage nicht ordnungsgemäß und der Kindersitz nicht gesichert.
• Falls Ihr Fahrrad mit einem Federsattel ausgestattet ist, decken Sie die Federn bitte so ab,
dass sich Ihr Kind an jenen nicht die Finger klemmen kann.
• Nehmen Sie keine Modifizierungen an der Werkausführung des Kindersitzes vor.
D
8
Page 25

Sichern des Kindersitzes an der Sattelstütz
Der BabySeat ist mit einer zusätzlichen „Sicherheitsleine“
ausgerüstet, mit welcher der BabySeat an der Sattelstütze
befestigt werden kann. Diese Befestigung sollte unmittelbar
nach der Montage des Kindersitzes auf den Gepäckträger
vorgenommen und nur dann gelöst werden, wenn der
Kindersitz vom Gepäckträger genommen wird.
23
Länge der „Sicherheitsleine“ einstellen.
e
Befestigung an
der Sattelstütze.
D
9
Page 26

Montage des Sicherheits
bügels
Führen Sie den Haltegriff
so in die Aufnahme ein,
dass die beiden Nocken in
den Löchern einrasten.
4
6
Rasten Sie den Sicherheitsbügel
auf der anderen Seite des Sitzes
ein, indem Sie die Klammer nach
unten drücken und über die Kante
heben.
4
1
5
D
1
0
Page 27

Höheneinstellung der Fußstütze
10
Heben Sie den
Verstellhebel an, um die
Höhe der Fußstützen
einzustellen.
10
n
Drücken Sie den
Verstellhebel runter, um
die Einstellung zu
sichern.
ACHTUNG!
Setzen Sie Ihr Kind niemals in den Kindersitz, wenn der
Seitenständer ausgeklappt ist
Eine zweite Person sollte das Fahrrad festhalten, solange Sie Ihr Kind in den
Kindersitz setzen. Sobald das Kind in eine bequeme Position gebracht wurde,
stellen Sie den Sicherheitsgurt fest.
Prüfen Sie die Position der Beine und der Füße des Kindes. Heben Sie anschließend
das Kind aus dem Sitz und korrigieren Sie ggf. die Fußstützen.
.
D
11
Page 28

So setzen Sie Ihr Kind richtig in den Ki
Stellen Sie die Schultergurte auf die Größe Ihres Kindes ein.
O
K
ndersitz
N
O
Schultergurte zu hoc
O
K
Schultergurte zu niedrig
D
1
2
N
O
h.
.
Page 29

Die Schultergurte des Kindersitzes können in hoher und
niedriger Position angebracht werden. Passen Sie die Position
der Größe Ihres Kindes entsprechend an.
Lösen Sie die Gurtschnalle auf der Rückseite.
Hohe Position
Stecken Sie die Gurtschnalle an der
Vorderseite zusammen.
Niedrige Position
ACHTUNG!
Achten Sie darauf, dass die
Gurtschnallen auf der Rückseite
korrekt zusammengesteckt sind
(siehe Abb.)
1
D
3
Page 30

SIC
1. Transportieren Sie nur Kinder, welche beim Tragen eines korrekt sitzenden
Fahrradhelmes in der Lage sind ihren Kopf aufrecht zu halten. Das Alter
des Kindes sollte zwischen 1-4 Jahren liegen, das Körpergewicht zwischen
9 und 18 kg. Achten Sie darauf, dass diese Werte niemals überschritten
werden.
2. Der Fahrer sollte mind. 18 Jahre alt sein.
3. Das Gewicht, das auf dem Kindersitz lastet, kann u.U. die Stabilität Ihres
Fahrrades verringern bzw. die Fahreigenschaften, insbesondere in Bezug
auf Lenkung und Bremsleistung, verändern.
4. Achten Sie auf einen festen Stand des Fahrrades, wenn Sie das Kind
auf den Kindersitz setzen bzw. es aus jenem herausheben.
5. Das Kindersitz-System ist nicht kompatibel mit Fahrrädern mit
Hinterradfederung und/oder Scheibenbremsen.
6. Das Fahrrad, auf welches das Kindersitz-System montiert wird, muss
sich in einem fehlerfreien Zustand befinden. Es muss ausgerichtet sein
für das zusätzliche Gewicht des Kindersitzes und sollte in seinen
Abmessungen und Einstellungen auf den Fahrer abgestimmt sein.
Informieren Sie sich bezüglich des Ladegewichts in der Betriebsanleitung
Ihres Fahrrades. Achten Sie stets darauf, dass Sie Ihr Fahrrad nicht
überladen, wenn Sie das Kindersitz-System verwenden. Vermeiden Sie
zudem weiteres Gepäck und Zubehör am Gepäckträger.
7. Der Kindersitzgepäckträger funktioniert ausschließlich an Laufrädern
in den Größen 26“ und 700C und mit dem Topeak Kindersitz.
8. Sowohl der Fahrer als auch das Kind sollten stets Fahrradhelme tragen,
die den nationalen Sicherheitsrichtlinien entsprechen.
9. Vermeiden Sie Fahrten auf stark befahrenen Straßen und Fahrten bei
schlechtem Wetter. Fahren Sie stets vorsichtig und mit reduzierter
Geschwindigkeit.
10. Achten Sie auf den korrekten Sitz und die korrekte Befestigung des
Sicherheitsgurtes.
11. Lassen Sie das Kind niemals unbeaufsichtigt im Kindersitz sitzen.
12. Lassen Sie das Kind niemals im Kindersitz sitzen, wenn das Fahrrad
alleine durch den seitlichen Fahrradständer gehalten wird.
13. Wenn Sie Ihr Fahrrad schieben, während das Kind im Kindersitz sitzt,
halten Sie mit einer Hand den Fahrradlenker und mit der anderen den
Kindersitzgepäckträger.
D
1
4
H
E
R
H
EIT
S
HIN
W
EIS
E
Page 31

14. Ziehen Sie alle Befestigungen vor jedem Gebrauch des Kindersitzes
fest und überprüfen Sie jene regelmäßig.
15. Achten Sie vor jeder Fahrt darauf, dass der montierte Kindersitz nicht
mit vorhandenen Bremsanlagen, Pedalen und Lenkvorrichtungen in
Berührung kommt.
16. Achten Sie stets darauf, dass das Kind selbst, dessen Kleidung,
Schnürsenkel und Spielzeug niemals in Kontakt mit den sich
bewegenden Fahrradteilen kommt.
17. Nehmen Sie unter keinen Umständen Modifikationen am Kindersitz
und dem Kindersitz-Gepäckträger vor.
18. Fahren Sie bei Dunkelheit ausschließlich unter Verwendung
entsprechender Beleuchtungssysteme.
19. Lösen Sie den Kindersitz stets vom Gepäckträger, wenn Sie Ihr Fahrrad
z.B. per Auto transportieren. Andernfalls würde der Kindersitz und
der Gepäckträger beschädigt werden und nicht mehr ordnungsgemäß
und sicher funktionieren.
20. D
as Vorhandensein des Kindersitzes kann u.U. dazu führen, dass der
Fahrer seine bisherige Art das Fahrrad zu besteigen und von jenem
abzusteigen ändern muss. Seien Sie bei diesen Vorgängen stets vorsichtig.
21. Verwenden Sie den Kindersitz unter keinen Umständen, wenn ein
Defekt an jenem, dem Gepäckträger oder am Fahrrad vorliegt.
22. Achten Sie darauf, dass sich keine scharfkantigen Objekte in der
Reichweite des Kindes befinden, z.B. ausgefranste Kabelstränge.
23. Wenn kein Kind transportiert wird, sollten alle losen Befestigungsriemen
befestigt werden.
24.
Befolgen Sie stets die Anweisungen dieses
Handbuches. Bei Nichteinhaltung kann dies zu
ernsthaften Verletzungen oder gar zum Tod des
ACHTUNG!
Fahrers oder des Kindes führen!
GARANTIE-ANSPRUCH
U
m
G
ara
n
ti
e
-
S
e
r
v
i
ce z
u
e
r
h
alte
n, ben
ö
ti
g
e
n
Si
e
Ihr
e
n
O
r
igi
n
a
l
-
K
a
ufb
ele
g
.
B
e
i
A
r
ti
k
e
l
n,
d
i
e
ohn
e
K
a
ufb
ele
g
e
i
n
g
esc
h
i
c
k
t
w
e
r
den,
w
i
r
d davon
a
u
s
geg
a
n
g
e
n, d
a
ss
d
i
e
G
ara
n
ti
e
fr
ist
m
it
d
e
m
H
e
r
s
tell
un
g
s
d
a
t
u
m
b
e
g
innt
.
A
ll
e
G
ara
n
ti
e
fr
ist
e
n
w
e
r
den un
g
ü
lti
g
,
w
e
nn d
e
r
A
r
ti
k
e
l
a
u
f
G
r
und
e
i
n
e
s
U
n
f
a
ll
s
b
esc
häd
igt
od
e
r
zwecke
n
t
fr
e
m
d
e
t
w
urde,
S
y
s
t
e
m
ä
nd
e
r
un
g
e
n od
e
r
andere
V
e
r
ä
nd
e
r
un
g
e
n
vo
r
g
e
no
mm
e
n
w
urden od
e
r
d
e
r
A
r
ti
k
e
l
ande
r
s
v
e
r
w
ende
t
w
urd
e a
l
s
i
n d
i
ese
m
H
a
ndbuch
b
esc
h
r
i
ebe
n.
Ä
nd
e
r
un
g
e
n
i
n
D
e
s
i
g
n und
E
i
g
e
n
s
cha
f
t
bed
ü
rf
e
n k
e
i
n
e
r
vo
r
i
g
e
n
A
nkünd
i
gung
*
Topeak Pr
B
itte nehmen Sie Kontakt mit Ihrem näheren Topeak Händler auf, um offene Fragen zu klären.
odukte sind ausschließlich in gut sortierten Fahrradläden erhä
Homepage: www.topea
Copyright © Topeak, Inc. Gedruckt in Taiwan /
k.d
e
2005
.
ltlich.
M-TCS01-D 7/05
1
D
5
Page 32

Bab
y
S
ea
t
Topeak Pr
odukte sind ausschließlich in gut sortierten Fahrradläden erhä
B
itte nehmen Sie Kontakt mit Ihrem nächsten
Topeak Händler auf, um offene Fragen zu kläre
Website: www.topea
k.d
e
n
ltlich
Page 33

BabyS
ea
t
Guía del Usuari
E
o
con suspensión incorporad
a
Se recomienda acudir a una tienda especializada para el montaje
e instalación de la Silla Porta Bebé en su bicicleta.
Es conveniente, leer el manual de instrucciones antes de
proceder a la instalación.
Herramientas necesarias para el montaje:
Llave Allen 5mm, llave fija de 8mm y destornillador Philips.
Page 34

Tabla de Contenidos
Como conocer mejor su silla Porta Bebé Topea
Como montar el portabultos en su bicicleta
Como montar la silla Porta Bebé en el portabulto
Fijar la silla Porta Bebé a la barra o tija del sillí
Instalación de la barra de seguridad
Ajuste de la altura del reposapié
Como colocar al niño en la sill
Observaciones importantes
s
a
k
n
4
6
s
8
9
10
11
12
14
E
2
Page 35

Fijaciones al
Porta
equipajes
Fijaciones a la bicicleta
Fijaciones al
Porta equipajes
Fijaciones a la bicicleta
E
3
Page 36

Como conocer
mejor la silla Topeak Porta Bebé
Estas páginas le ayudarán a identificar todas las partes
de su silla Porta Bebé Topeak.
LISTA DE PARTES MOSTRADAS
1. ASIENTO (1)
2. PORTABULTOS (1)
3. SISTEMA DE ARNÉS (1)
4. AGARRE A LA BARRA DE SEGURIDAD (1)
5. ALMOHADILLA DE LA BARRA
DE SEGURIDAD (1)
6. SUJECIÓN DE LA BARRA DE SEGURIDAD (1)
7. ALMOHADILLA DEL ASIENTO (1)
8. REPOSAPIÉS (2)
9. CORREAS DE SUJECIÓN DE LOS PIÉS (2)
10. AJUSTE RÁPIDO DE LA INCLINACIÓN
DEL REPOSAPIÉS (2)
11. PINZA DE CIERRE CON BOTÓN (1)
12. REFLECTANTE ( 2 )
13. BASE AMORTIGUADORA (1)
14. MUELLE DE ACERO INOXIDABLE (2)
:
17. TUERCA DE CIERRE (2)
18. ANCLAJE DE CIERRE
19. AJUSTABLE TRASERO
20. ORIFICIO INFERIOR
21. ENGANCHE TRASERO
22. CONJUNTO DE ELEMENTOS DE ANCLAJE
PARA EL PORTABULTOS
22.1. TIRANTES DE ANCLAJE TIPO L (2)
22.2. ANCLAJE 22mm DE LONGITUD (2)
22.3. ANCLAJE 70mm DE LONGITUD (2)
22.4. ANCLAJE 150mm DE LONGITUD (2)
22.5. M5 x 13mm TORNILLO CON TUERCA (14)
M5 x 25mm TORNILLO CON TUERCA (2)
22.6. TUERCA DE NYLON (12)
22.7. SOPORTE TIRANTE ASIENTO (2)
22.8. AGARRE PARA SOPORTE TIRANTE (2)
15. BARRA DE SUSPENSIÓN (2)
16. TUERCA DE AJUSTE DE LA SUSPENSIÓN (2)
MANTENIMIENTO
:
22.9. ARANDELA (12)
23. CORREA TIPO T
Por favor, utilizar un jabón suave y agua para limpiar la silla Porta Bebé. Almohadilla
del asiento, cinturón de seguridad y agarre de la barra de seguridad deben lavarse
a mano. De vez en cuando conviene lubricar todos los dispositivos del Porta
Bebé y del portabultos.
E
4
Page 37

18
7
19
3
6
5
4
8
9
20
12
1
21
14
15
13
16
17
10
2
22-1~9
11
12
E
5
Page 38

Como
montar el Porta
bultos
Siga las siguientes ilustraciones para el montaje del portabultos
a la bicicleta. Asegúrese de que el portabultos esté totalmente
nivelado antes de apretar las tuercas.
Existen varios componentes para ayudar a nivelar el portabultos.
Deslice dispositivos de anclaje hacia
delante o hacia atrás para determinar
una correcta posición antes de
apretar los tornillos del portabultos
con un destornillador Philips.
22-5
(M5 x 13mm)
E
6
Page 39

ADVERTENCIA
La silla para niños Topeak está
diseñada solamente para cuadros con
anclaje posterior para soporte porta
equipajes y guías laterales con rosca.
No utilice la silla para niños Topeak en
cuadros que carezcan de este tipo de
anclajes por razones de seguridad.
22-5
(M5 x 13mm/
M5 x 25mm)
22-8
22-5
(M5 x 13mm)
22-7
:
N
O
22-5
(M5 x 13mm)
Anclajes de Segurida
para el soporte trasero
Utilice el tirante ajustable para
sujetar el portabultos a la bicicleta.
Serán necesarios varios ajustes
para asegurarse que el portabultos
esté nivelado.
Ajustar la base del puntal del
portabultos a la puntera trasera.
La mayoría de las punteras del
cuadro disponen de más de un
punto de montaje.
d
E
7
Page 40

Como
montar la S
13
2
illa Porta Bebé en el Porta
2
10
12
Desenganchar pinza de cierre
presionando el botón rojo y tirando hacia
fuera de la parte de atrás del portabultos.
1
bultos
11
Enganchar la silla en la ranura
del portabultos. Girar hacia
abajo la silla sobre el portabultos
hasta que suene un chasquido
de enganche.
Empujar pinza de cierre desde atrás, en
la ranura del portabultos hasta que se
oiga un chasquido de enganche y el
botón rojo sobresalga de la superficie
del portabultos.
ADVERTENCIA
• Si la pinza de cierre no se desliza bien por el portabultos o el botón rojo no
sobresale del portabultos, la instalación es incorrecta.
• Si los muelles del sillín están al alcance de los niños, por favor trate de cubrirlos
para evitar que se puedan pinchar.
E
• No modifique nunca las especificaciones de serie del Porta Bebé.
:
11
12
8
Page 41

Como asegurar la Silla Porta Bebé a la barra del s
Correaje de seguridad tipo T ajustable, diseñado
para fijar el Porta Bebé a la barra del sillín. Por favor
asegúrese de fijarlo a la barra o tija del sillín después
de montar el Porta Bebé al portabultos. El correaje
de ajuste tipo T sólo se debe soltar de la barra del
sillín, si se quita el Porta Bebé del portabultos.
23
Correa ajustable en
longitud tipo T.
illí
n
Agarre de la correa
tipo T a la barra o
tija del sillín.
E
9
Page 42

Instalación de la barra de seguridad
Introducir el pivote del final
de la barra de seguridad en
el anclaje (n.6) como muestra
la figura.
4
6
A continuación empujar la
barra de seguridad hasta que
encaje con un chasquido en
el extremo del asiento como
muestra la figura.
4
1
5
E
1
0
Page 43

Ajuste de la altura del Reposapié
10
Levantar la palanca
para ajustar la altura
del reposapiés.
10
Empujar la palanca
hacia abajo para fijar
la posición deseada.
s
ADVERTENCIA
NUNCA DEJE AL NIÑO EN
SOLO PIE DE APOYO, SUJETANDO LA BICICLETA
Tenga a alguien que le ayude a sujetar la bicicleta mientras coloca al niño
en el asiento.
Ponga al niño en una posición cómoda en el asiento. Ajuste y abroche el
cinturón de seguridad.
Compruebe la posición de los pies y las piernas. Si es preciso quite al niño
y ajuste el reposapiés del asiento.
:
UNA BICICLETA QUE TENGA
.
UN
E
11
Page 44

Como colocar al niño en el Porta Bebé
Ajuste apropiadamente las correas de los hombros para
colocar al niño.
O
K
N
O
Tirantes demasiado altos
O
K
Tirantes demasiado bajos.
E
1
2
N
O
.
Page 45

Las hebillas de las correas de los hombros se ajustan a
diferente altura. Asegúrese de que están en una posición
correcta en función de la altura del niño.
Desabroche la correa de la parte de atrás.
Vuelva a sujeta r el ga ncho y el
cierre en la posición superior
del agujero del cinturón.
gancho adhesivo
y cierre
Quitar el gancho adhesivo y el cierre de la almohadilla
Posición alta
de la silla de la posición inferior y moverlo a la
posición superior para cubrir el agujero del cinturón.
Posición baja
Abroche la correa desde un lado de la parte delantera.
ADVERTENCIA
Asegúrese de que la hebilla para las
correas está perfectamente montada
en la parte de atrás del asiento como
muestra la figura superior.
:
E
1
3
Page 46

O
B
S
E
RVA
I
M
P
O
RTA
1. Lleve sólo niños que sean capaces de mantener la cabeza derecha
utilizando un casco apropiado para su tamaño. El peso y la edad
indicada para poder ir en la Silla Porta Bebé es de entre 9 y 18 Kgs.
y de 1 a 4 años respectivamente. No se deben sobrepasar esos límites.
2. El conductor de la bicicleta debe de tener al menos 18 años.
3. La carga del porta bebés puede reducir la estabilidad y alterar la
manera de montar en la bicicleta, particularmente en lo referente a
la conducción y frenado.
4. Asegúrese de que la bicicleta se encuentra en una posición estable
mientras se carga y descarga al niño.
5. Este sistema de silla de bebé no es compatible con bicicletas de doble
amortiguación ni las equipadas con freno de disco.
6. La bicicleta en la que se monte la BabySeat debe estar en buenas
condiciones de funcionamiento, ser apropiada para transportar carga
adicional y ser de la medida adecuada al ciclista. Revise el manual
del usuario de la bicicleta para conseguir información sobre carga
adicional. Asegúrese de no sobrecargar la bicicleta cuando lleve la
Silla Porta Bebé ni llevar carga adicional ni accesorios en el porta equipajes.
CIO
N
NTE
E
S
S
7. El Porta Silla de Bebé está diseñado sólo para bicicleta de montaña
de 26” ó 700c y es compatible con la BabySeat Topeak exclusivamente.
8. El conductor de la bicicleta y el niño deben llevar casco autorizado
por la normativa y autoridades competentes en cada país.
9. Deben evitarse calles concurridas, mal tiempo y han de extremarse
las precauciones y reducir la velocidad.
10. Asegúrese de que el cinturón de seguridad esté perfectamente
abrochado y sujetando al niño firmemente.
11. Nunca deje al niño sólo o desatendido en la BabySeat.
12. No deje nunca al niño en la BabySeat sólo con la pata de cabra
sujetando la bicicleta.
13. Cuando vaya empujando la bicicleta con el niño en la BabySeat, sujete
E
el porta equipaje con una mano y el manillar con la otra.
1
4
Page 47

14. Asegure los tirantes de cierre firmemente antes de cada uso
y revíselos con frecuencia.
15. Antes de montar, asegúrese siempre de que la silla no interfiere
en el pedaleo, frenada ni conducción de la bicicleta.
16. No permita que ninguna arte del cuerpo, ropa, cordón de
zapato o juguete del niño entre en contacto con las partes
en movimiento de labicicleta.
17. No haga ninguna modificación a la BabySeat ni al porta equipaje.
18. No monte nunca en bicicleta por la noche sin iluminación
adecuada.
19. Retire la BabySeat siempre que transporte la bicicleta en un
vehículo a motor. Esto es necesario porque la fuerza del viento
puede dañar o degradar la BabySeat o el porta equipaje.
20. La presencia del niño en la silla puede requerir modificaciones
en el método de montar o desmontar de la bicicleta del
conductor. Debe extremar el cuidado al hacerlo.
21. No utilice la BabySeat si se ha roto cualquier elemento.
22. Asegúrese de que no hay objetos punzantes que el niño pueda
tocar, como cables deshilachados, etc.
23. Cuando no transporte al niño, ate los tirantes de retención
para que no vayan colgando.
24.
El incumplimiento de estas instrucciones
de manejo puede producir lesiones graves
ATENCIÓ
LÍMITE DE LA GARANTÍA:
G
ara
n
t
í
a
d
e
2
R
e
qu
isit
o
s
p
P
ara
ven
t
a
l
a
g
ara
r
eclamac
alterac
d
e
i
n
*
L
a
s
ara
r
eclama
r
un
o
r
igi
n
a
l
.
n
t
í
a c
o
i
ó
n
s
i
ó
n d
e
s
l
t
r
u
cc
i
on
e
e
s
p
ec
ifi
cac
Los productos TOPEAK están dis
o muerte del conductor y / o del niño.
N
a
ñ
o
: P
ara cua
lqui
e
r
d
efec
t
o d
e
f
a
b
r
i
cac
i
ó
n
s
o
l
ame
n
t
e
.
s
o
licit
a
r
un
a
g
ara
n
t
í
s
e
r
v
ici
o d
e
g
E
n
ca
s
o d
m
i
enza e
i l
a
B
a
by
sis
t
ema
s
.
i
on
e
s
y
Para cualquier consulta, contacte con su distribuidor autorizado más próxim
ara
e a
r
t
í
c
n
l
a
f
echa
Seat
e
s
t
,
e
l
á
m
od
ifi
cac
d
i
s
e
ñ
o pueden
Copyright © Topeak, Inc. Impreso en Taiwan / 2005
a
n
t
í
a e
s
n
ecesa
r
i
o p
r
ese
n
t
a
r
l
a
f
ac
t
u
r
a
o
e
l
r
ulo
s
devu
e
lt
o
s s
i
n
e
l
r
ec
i
bo o
r
igi
n
a
l
,
d
e
f
a
b
r
i
cac
i
ó
n d
e
l
a
p
i
d
añada
i
ó
debido
n o u
tili
zac
i
ó
s
e
r
m
od
ifi
cada
ponibles únicamente en tiendas de ciclismo especializadas
Página Web: www.topeak.com
a
n d
s s
acc
istint
i
n p
i
eza
den
r
e
a a
vio
.
N
o
s
e atende
t
e
d
e
l
usu
l
a
indi
a
v
i
s
o.
s
e
r
á
a
r
i
o,
cada e
ec
a
s
u
r
á
a
buso, o
n
e
i
bo d
m
i
do qu
ningun
s
t
e
e
a
m
anua
o.
M-TCS01-E 7/05
e
l
.
E
1
5
Page 48

Bab
y
S
ea
t
Los productos Topeak está
Por favor contacta con tu distribuidor Topeak más cercano para cualquier cuestión.
n disponibles en las tiendas especializadas.
Página Web: www.topeak.com
Page 49

BabyS
ea
t
Guide d'utilisateur
Siège enfant à suspension
F
Il est recommandé de faire installer votre siège enfant par
un mécanicien vélo professionel.
Il est impératif que vous lisiez la notice d'utilisation
avant de commencer l'instalation.
clé Allen de 5mm, clé plate de 8mm et tournevis cruciforme
OUTILS INDISPENSABLES AU MONTAGE :
Page 50

Table des Matière
s
Connaître votre Topeak BabySea
Monter le porte-bagages sur le vél
Monter le siège sur le porte-bagages
Sécuriser le siège au p
Installer la barre d'appu
Ajuster la hauteur des repose-pieds
Installer votre enfant dans le sièg
Attentio
n
ilier de sell
i
t
o
e
e
4
6
8
9
10
11
12
14
F
2
Page 51

Montage sur
le portebagage
Montage sur le vélo
Montage sur
le portebagage
Montage sur le vélo
F
3
Page 52

Connaître votre Topeak BabySea
t
Ces pages vous aiderons à identifier les différentes parties
de votre Topeak BabySeat.
ECORCHE ILLUSTRE :
1. SIEGE (1)
2. PORTE-BAGAGES (1)
3. SANGLES (1)
4. BARRE D'APPUI (1)
5. MOUSSE DE PROTECTION (1)
6. FIXATION DE BARRE D'APPUI (1)
7. COUSSIN DE SIEGE (1)
8. REPOSE PIEDS (2)
9. SANGLES DE REPOSE PIEDS (2)
10. LEVIER D'AJUSTEMENT
POUR REPOSE PIEDS (2)
11. BLOCAGE A GLISSIERE + BOUTON (1)
12. REFLECTEUR (2)
13. SUPPORT DE SUSPENSION (1)
14. RESSORT EN ACIER (2)
15. CYLINDRE DE SUSPENSION (2)
16. REGLAGE DU RESSORT (2)
17. ECROU DE BLOCAGE (2)
18. BOUCLE DE SECURITE
19. BOUCLE ARRIERE
20. TROU POSITION BASSE
21. CROCHET ARRIERE
22. VISSERIE DU PORTE BAGAGE
22-1. SUPPORT EN L (2)
22-2. SUPPORT 22mm (2)
22-3. SUPPORT 70mm (2)
22-4. SUPPORT 150mm (2)
22-5. BOULON M5 x 13mm (14)
BOULON M5 x 25mm (2)
22-6. ECROU EN PLASTIQUE (12)
22-7. SUPPORT DE SIEGE (2)
22-8. FIXATION POUR SUPPORT SIEGE(2)
22-9. RONDELLES (12)
23. LA SANGLE EN "T"
MAINTENANCE
:
Veuillez utiliser du savon léger et de l'eau pour nettoyer le siège. Les coussins,
sangles sécurité et mousses de protection doivent être lavés à la main. Lubrifiez
occasionellement le porte-bagages et la visserie avec une huile teflonée.
F
4
Page 53

F
5
Page 54

Monter le porte-bagages sur le vélo
Suivez ces instructions afin de monter le porte-bagages.
Vérifiez si le porte-bagages est de niveau par rapport au
sol avant de serrer la visserie. Plusieurs ajustements sont
possibles.
Faites glisser les supports d'avant
en arrière afin de déterminer la
bonne position avant de resserer
les vis sur la surface du portebagages.
22-5
(M5 x 13mm)
F
6
Page 55

AVERTISSEMENT:
Le BabySeat de Topeak est conçu
afin d’être monté sur des cadres
pourvus d’œillets de montage pour
porte-bagages filetés. N’utilisez pas
le BabySeat Topeak sur des cadres
dépourvus de ces œillets pour des
raisons de sécurité.
22-5
(M5 x 13mm/
M5 x 25mm)
22-8
22-5
(M5 x 13mm)
22-7
N
O
22-5
(M5 x 13mm)
Sécurisez le suppor
central sur le cadre.
Utilisez le support ajustable afin
d'attacher le porte-bagage
au vélo. Plusieurs ajustements
sont possible afin de mettre le
porte-bagage à niveau.
Fixez la base du porte-bagages
aux fixations arrières du cadre.
La plupart des cadres sont
pourvus de plusieurs points
d'attache.
t
F
7
Page 56

Monter le siège sur le porte-bagage
2
11
13
10
12
Débloquez le blocage en pressant
le bouton rouge et en le retirant
vers l'arrière du porte-bagages.
1
2
s
Accrochez le siége sur le rail du
porte-bagages. Faites pivoter le
siège vers l'arrière jusqu'à ce qu'il
s'engage dans le porte-bagages.
Repoussez le blocage dans le porte-bagages
jusqu'a ce que l'engagement se fasse entendre
et veillez à ce que le bouton rouge soit bloqué
dans le trou du porte-bagages.
11
12
AVERTISSEMENT:
• Si le blocage ne coulisse pas parfaitement dans le porte-bagages ou si le bouton
rouge ne ressort pas suffissament, l'instalation est erronée.
• Si votre selle dispose de ressorts apparents, veuillez les recouvrir afin d'éviter
d'éventuelles blessures à l'enfant que vous transportez.
• Ne jamais modifier les spécifications du siège ou du porte-bagages.
F
8
Page 57

Sécuriser le siège au p
La sangle en "T" est un dispositif de sécurité destiné
à rattacher le siège à votre pilier de selle.
Veuillez le fixer au pilier de selle dès que le siège
est monté sur le porte-bagages. La sangle en "T" ne
doit être détachée du pilier de selle qu'après avoir
retiré le siège du porte-bagages.
23
Ajustez la longueur de la sangle en "T"
ilier de selle
Fixez la sangle en "T"
au pilier de selle.
F
9
Page 58

Installer la barre d'appu
i
Faites pivoter l'extrémité de
la barre d'appui à l'intérieur
du support de montage
comme illustré.
4
6
Pivotez la barre d'appui sur
son axe et bloquez la sur
le bord extérieur du siége.
4
1
5
F
1
0
Page 59

Ajuster la hauteur des repose-pieds
10
Soulevez le levier pour
ajuster la hauteur.
10
Repoussez le levier afin de
bloquer le repose-pieds.
AVERTISSEMENT:
NE JAMAIS LAISSER
LA BEQUILLE POUR SEUL SUPPORT DU VELO
Faites vous aider par quelqu'un lorsque vous placez l'enfant dans le siège.
Installez votre enfant de manière confortable. Ajustez et resserrez les sangles
sur l'enfant.
Notez la position des jambes et des pieds de l'enfant. Sortez l'enfant du siège
et ajustez les reposes-pieds suivant la nécéssité.
UN ENFANT SEUL DANS LE SIEGE AVE
.
C
F
11
Page 60

Installer votre enfant dans le siège
Ajustez les sangles d'épaule à la taille de votre enfant.
O
K
N
O
Sangles d'épaule tro
O
K
Sangles d'épaule tro
F
1
2
N
p hautes.
O
p basses
.
Page 61

Les sangles d'épaule de votre siège peuvent s'ajuster en
position haute ou basse. Vérifiez que leur position soit adaptée
à la taille de votre enfant.
Détachez la boucle du dos du siège.
Position haute
Faites passer la boucle dans le trou par devant.
Position basse
AVERTISSEMEN
Vérifiez que la boucle et les sangles
soient assemblées correctement
sur la partie arrière du siège comme
illustré.
T
:
F
1
3
Page 62

A
TT
1. Ne transportez pas d'enfant qui ne soit pas capable de maintenir
sa tête lorsqu'il porte un casque adapté. Les limites d'âge et
de poids sont respectivement de
Ne dépassez jamais ces limites.
2. Le cycliste doit être âgé d'au moins
3. La charge d'un siège enfant peut altérer la stabilité et les
caractéristiques de roulage du vélo, spécialement au niveau
de la direction et du freinage.
4. Vérifiez que le vélo est en position stable lorsque vous chargez
ou déchargez votre enfant.
5. Ce siège enfant n'est pas compatible avec les vélos équipés
de suspension arrière ou de freins à disques.
6. Le vélo sur lequel est fixé le siège enfant doit être dans un bon
état de marche, il doit être adapté au transport de poids et doit
être adapté à la taille du cycliste. Vérifier le manuel d'utilisation
du vélo pour connaître ses caractéristiques de charge. Vérifier
de ne pas surcharger le vélo lors de l'utilisation du BabySeat
et de son porte-bagages. Ne pas transporter de bagages ou
accessoires additionnels sur les porte-bagages.
7. Le porte-bagages n'a été conçu que pour des vélos munis de
roues de 26" ou de 700c. Il n'est compatible qu'avec le Topeak
BabySeat.
8. le cycliste et l'enfant devraient toujours porter un casques
répondants aux standards de sécurités en vigueur.
9. Le cycliste se doit d'éviter les rues encombrées, le mauvais
temps et doit rouler avec prudence et à allure modérée.
10. Vérifiez que les sangles soient correctement et fermement
attachées.
11. Ne laissez jamais un enfant seul et sans surveillance.
12. Ne jamais laisser un enfant seul dans le siège avec la béquille
pour seul support du vélo.
13. Lorsque vous marchez à côté de votre vélo avec un enfant dans
le siége, tenez le siège avec une main et votre guidon de l'autre.
F
1
4
E
N
TIO
1
à 5 ans et de
18
N
ans.
10
à 20 kg.
Page 63

14. Resserrer les vis avant chaque utilisation et vérifiez les
régulièrement.
15. Avant chaque utilisation, vérifier que le porte-bagages n'interfère
pas avec le freinage, le pédalage ou la direction du vélo.
16. Vérifier qu'aucune partie du corps de l'enfant, vêtements, lacets
ou jouet n'entre en contact avec une partie mobile du vélo.
17. Ne pas faire de modifications sur le BabySeat ou son porte bagages.
18. Ne pas rouler de nuit sans l'équipement adéquat.
19. Toujours retirer le BabySeat du porte-bagage lorsque le vélo
est transporté sur un véhicule motorisé. Cela est nécessaire
car la force exercée par le vent sur le BabySeat pourrait
dégrader ou endommager le BabySeat ou le porte-bagage oa
point tel que leur utilisation pourrait s'en trouver compromise.
20. La présence d'un siège enfant sur le vélo modifie la façon de
monter ou de descendre du vélo. La plus grande attention doit
être apportée par le cycliste lorsqu'il monte ou descend du
vélo.
21. Ne pas utiliser le BabySeat si une de ses parties est cassée.
22. Vérifier qu'aucun objet dangereux se ne trouve à la portée de
l'enfant ex : câbles effilés.
23. Lorsque l'enfant n'est pas sur le siège, resserer les sangles
afin qu'elles ne pendent pas dangereusement.
24.
Ne pas respecter ces instrucions peut entraîner
de sérieuses blessures ou la mort du cycliste
AVERTISSEMEN
et/ou de l'enfant.
T
GARANTIE LIMITEE
Garantie de 2 ans : sur toutes parties mécaniques. Défauts de fabrication seulement.
Réclamation de la garantie
Pour bénéficier de notre service de garantie, vous devez être en possession de la
facture d'achat originale. Si le produit nous est retourné sans cette facture d'achat,
nous considérons la date de fabrication comme début de la garantie. Toute garantie
sera considérée comme nulle si le BabySeat à été endommagé suite à une chute, à
un abus, à un quelconque changement ou modification ou à une utilisation autre que
celle décrite dans ce manuel.
* Les spécifications et l'apparence peuvent être sujettes à certaines modifications.
Les produits Topeak sont disponibles dans les magasins spécialisés.
Contactez votre revendeur Topeak si vous avez la moindre question.
Website: www.topeak.com
Copyright © Topeak, Inc. Imprimé à Taiwan /
2005
M-TCS01-F 7/05
F
1
5
Page 64

Bab
y
S
ea
t
Les produits TOPEAK ne sont disponibles
Veuillez contacter votre distributeur Topeak le plus proche si vous avez la moindre question.
Website : www.topeak.com
que dans les magasins de cycles spécialisés
.
 Loading...